


Geist2

Geist22
Operation Manual
1 Introduction to Geist2
................................................................................................................................... 5Geist2 Architecture and Interface1.1
................................................................................................................................... 10Loading sounds for the first time1.2
................................................................................................................................... 13Playing pads and recording a pattern1.3
................................................................................................................................... 17Slicing loops1.4
................................................................................................................................... 18More about loading sounds and saving work1.5
................................................................................................................................... 22Editing and modulating sounds1.6
................................................................................................................................... 24Mixer pages and Effects1.7
................................................................................................................................... 28Sequencing and arrangement1.8
................................................................................................................................... 29Patterns in more detail1.9
................................................................................................................................... 32Introduction to Graphs1.10
................................................................................................................................... 36Performing with patterns1.11
................................................................................................................................... 38Performing with scenes1.12
................................................................................................................................... 40Arranging patterns into a song1.13
................................................................................................................................... 42Using MIDI and host automation1.14
................................................................................................................................... 44MIDI / audio export and MIDI output1.15
2 Browser
4
46
................................................................................................................................... 47Browser Modes2.1
................................................................................................................................... 48Browser Navigation and Options2.2
................................................................................................................................... 50Sidebar and Files2.3
................................................................................................................................... 53Searches, Favourites and Shortlists2.4
3 Slicing
................................................................................................................................... 57Slicer panel3.1
................................................................................................................................... 59Slicing tools and modes3.2
4 Sampler
................................................................................................................................... 65Sampler controls4.1
5 Pads and Layers
................................................................................................................................... 69Pads and managing pads5.1
................................................................................................................................... 72Layer controls5.2
.......................................................................................................................................................... 75Setup, Mix, Tuning and Filter controls
.......................................................................................................................................................... 78Play, Looping and Timestretch controls
.......................................................................................................................................................... 80Envelope controls
................................................................................................................................... 83Pad Mixer5.3
................................................................................................................................... 86Layer Mixer5.4
56
64
68
6 Engines and Global Mixer
87
© 2016 FXpansion Audio

3
................................................................................................................................... 88Engine Selector6.1
................................................................................................................................... 90Global Mixer6.2
7 Geist2 Effects
................................................................................................................................... 93Effects slot controls7.1
................................................................................................................................... 95Distortion7.2
................................................................................................................................... 98Dynamics7.3
................................................................................................................................... 100EQ7.4
................................................................................................................................... 101Filters7.5
................................................................................................................................... 103FX7.6
................................................................................................................................... 107Reverb7.7
8 TransMod modulation
................................................................................................................................... 110Using TransMod modulation8.1
................................................................................................................................... 113Assignable TransMod modulators8.2
9 Patterns and Graphs
................................................................................................................................... 116Pattern memory keys9.1
................................................................................................................................... 118Pattern editor9.2
................................................................................................................................... 123Pattern editing functions9.3
................................................................................................................................... 125Graphs9.4
92
109
115
10 Scenes and Song pages
................................................................................................................................... 131Scenes page10.1
................................................................................................................................... 133Song page10.2
................................................................................................................................... 137Song page editing functions10.3
11 Other controls, menus, controls and indicators
................................................................................................................................... 140Transport and Status display11.1
................................................................................................................................... 143File, Tools and Help menus11.2
................................................................................................................................... 145Exporting Audio11.3
................................................................................................................................... 146Mapping panel11.4
................................................................................................................................... 148Preferences11.5
12 Using the Geist2 standalone application
130
139
151
© 2016 FXpansion Audio
3
Geist24
1 Introduction to Geist2
Geist2 is an advanced step-sequencer and sample-based drum machine realised in software.
It is intended to be an ergonomic way to effortlessly build grooves and beats although it can be
used for all kinds of musical material.
© 2016 FXpansion Audio
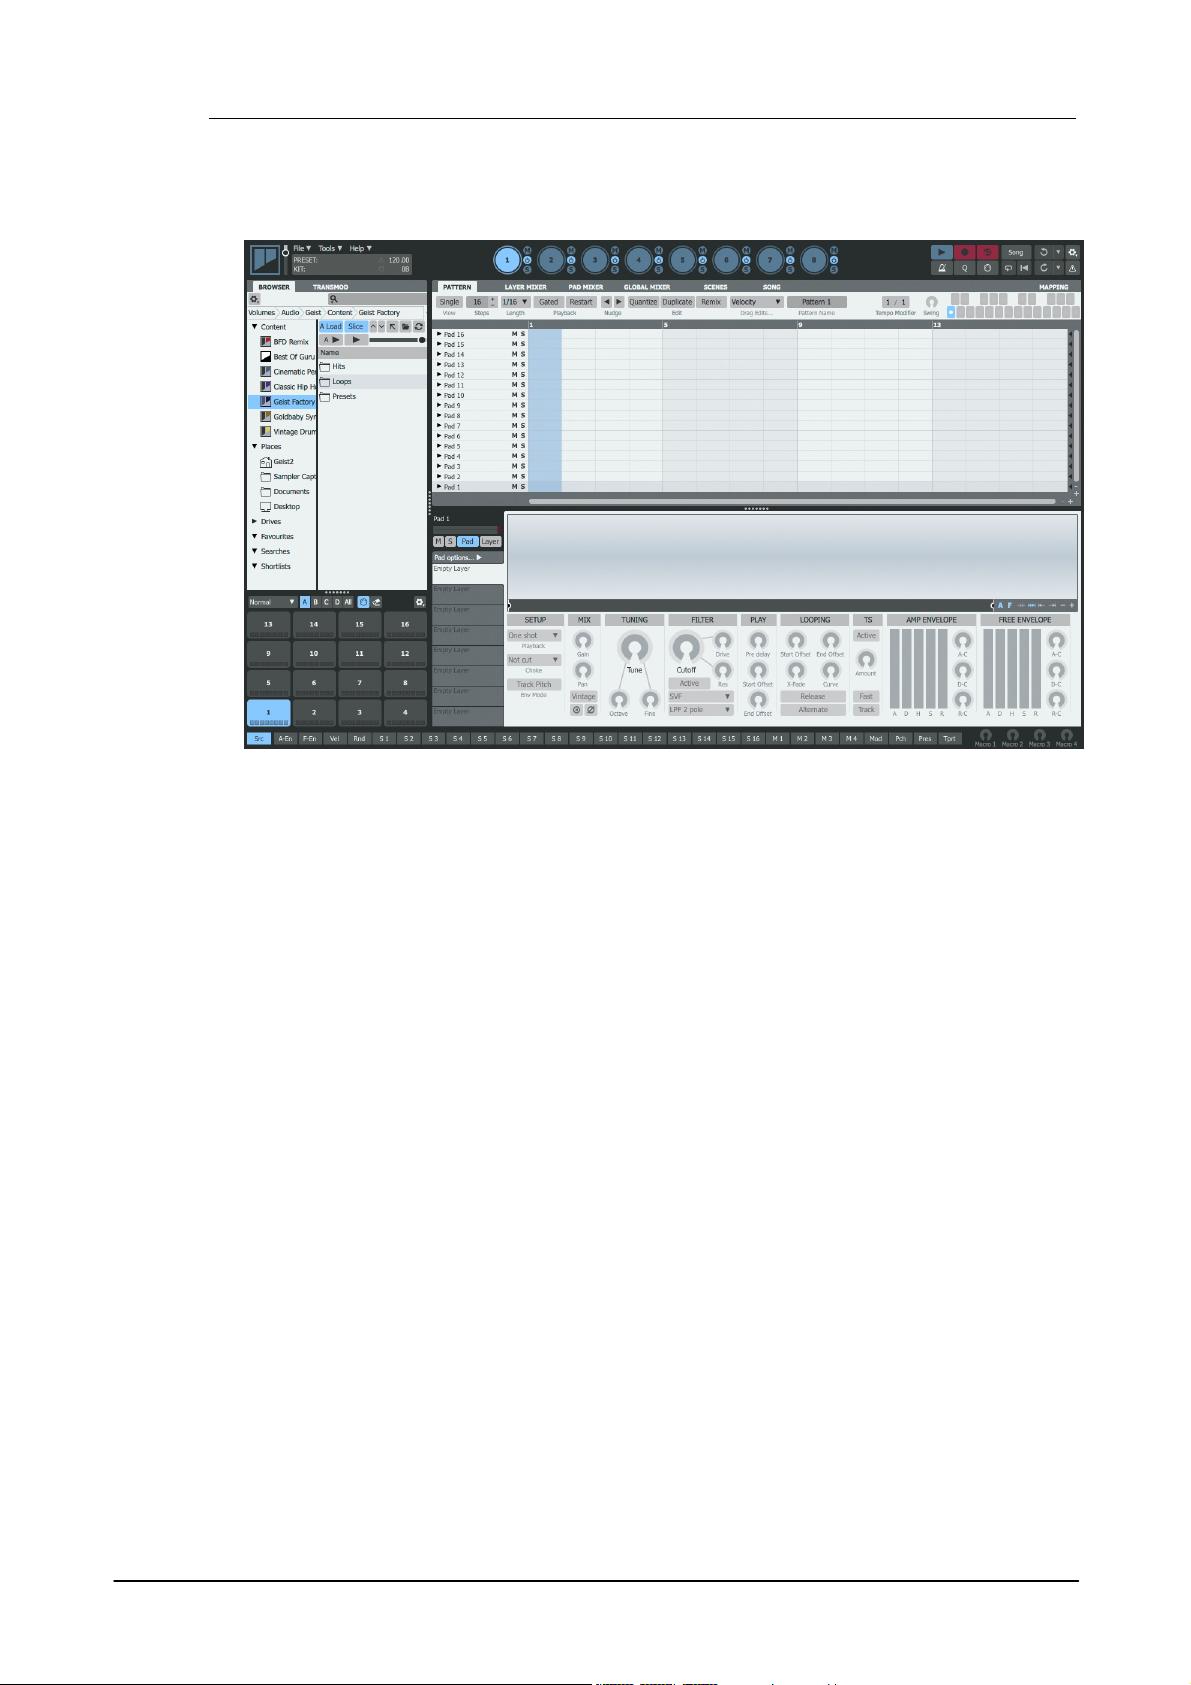
1.1 Geist2 Architecture and Interface
Layers
The basic 'slots' for loading samples in Geist2. There are 8 layers on each pad.
Pads
There are 64 pads in each engine: 4 banks with 16 pads visible at any one time.
Each pad contains 8 layers.
Patterns
Each pattern features 64 tracks – one for each pad in the engine.
There are 24 patterns in each engine.
Engines
There are 8 engines in total: each engine features 64 pads, and 24 patterns.
Scenes
Performance snapshots of the currently playing patterns in all engines
Song
A timeline-based arrangement of pattern references with a track for each engine
Samples
Individual WAV/AIFF files to load onto pad layers
Loops
Loops can be loaded into Geist2's Slicer for non-destructive 'chopping'
Pad presets
Presets for all 8 layers of a pad including samples and additional pad/layer
settings
Kit presets
Presets for all pads within an engine
Engine presets
Presets for the entire engine, including engine effects
Full Geist2 presets
These are also known simply as 'presets' and store the entire state of
Geist2.
Geist2 architecture
• The basic elements in Geist2 are as follows:
• As well as the above elements, Geist2 also has the following features for arranging patterns:
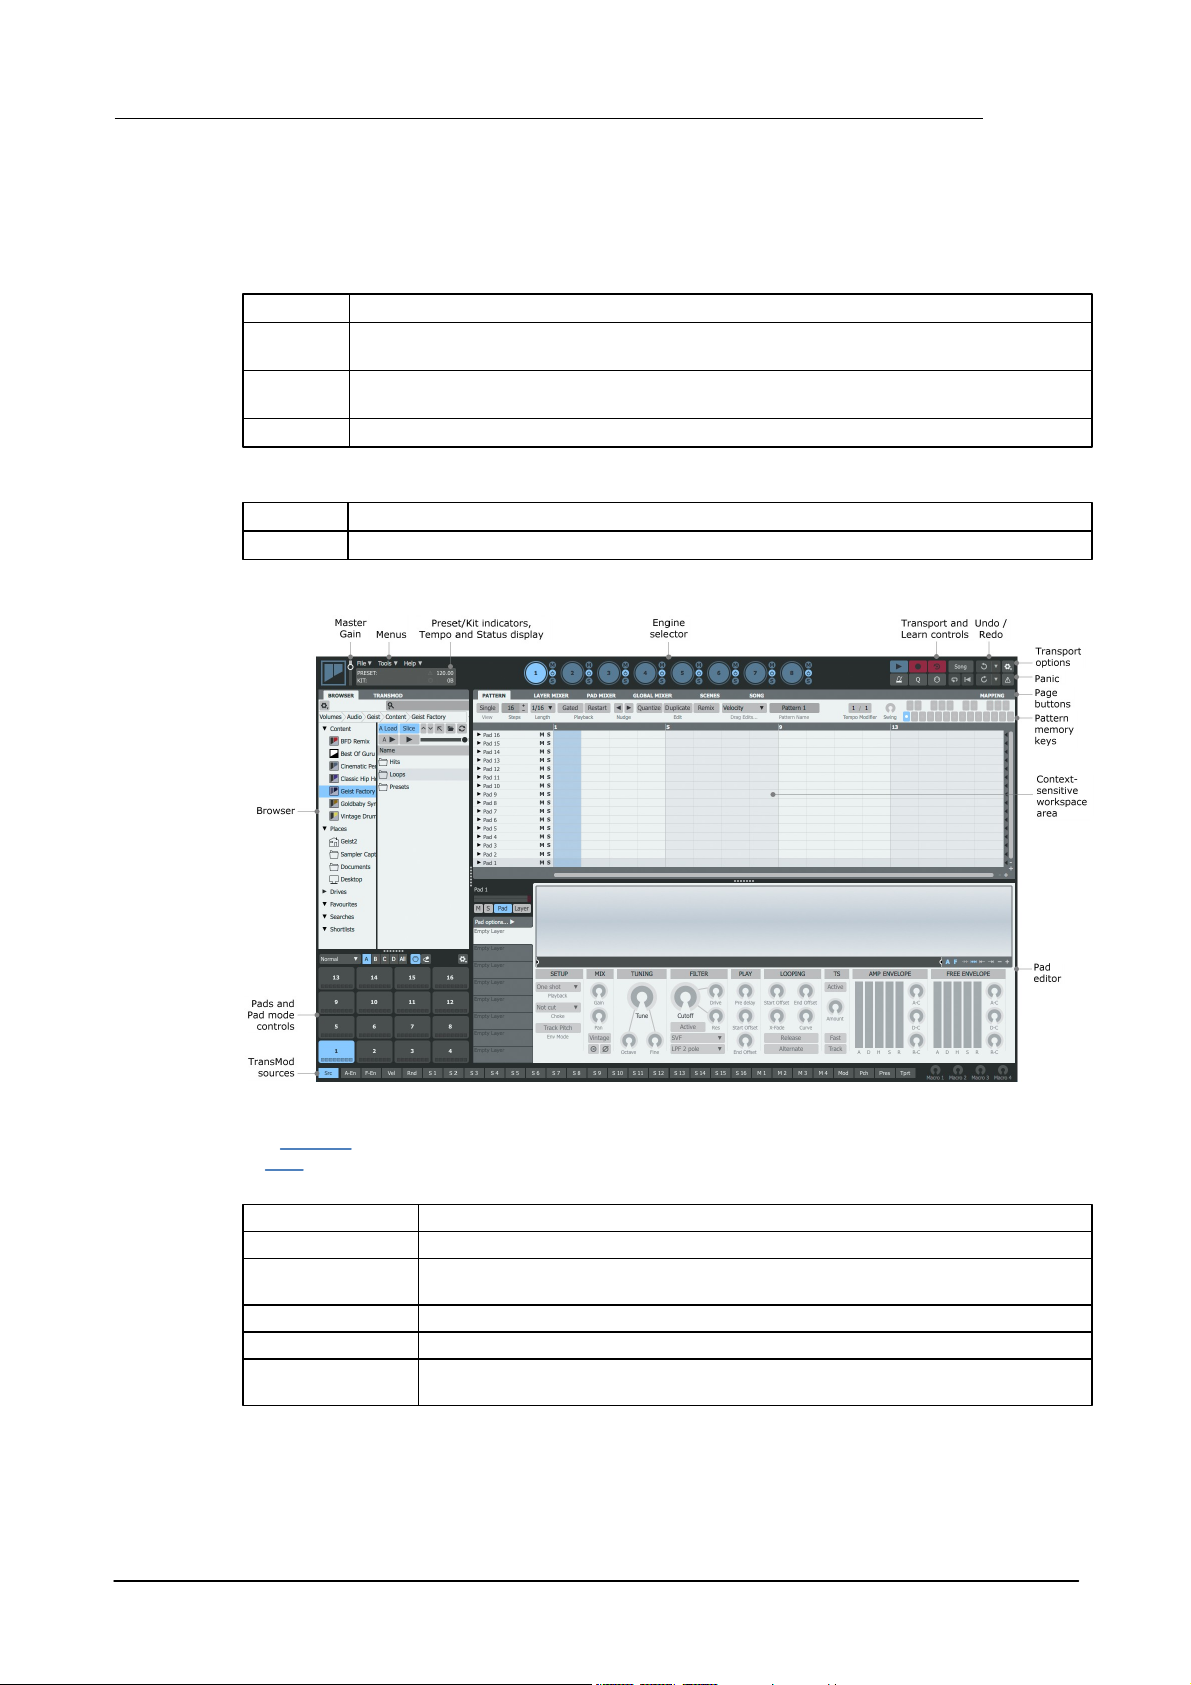
Geist2 interface
Introduction to Geist2 5
Browser
The Browser is the main method of loading sounds into Geist2. It is also used for selecting sounds
to slice into smaller sections before loading these sections to the pads.
Geist2 allows the following types of files to be loaded from the Browser:
© 2016 FXpansion Audio

Geist26
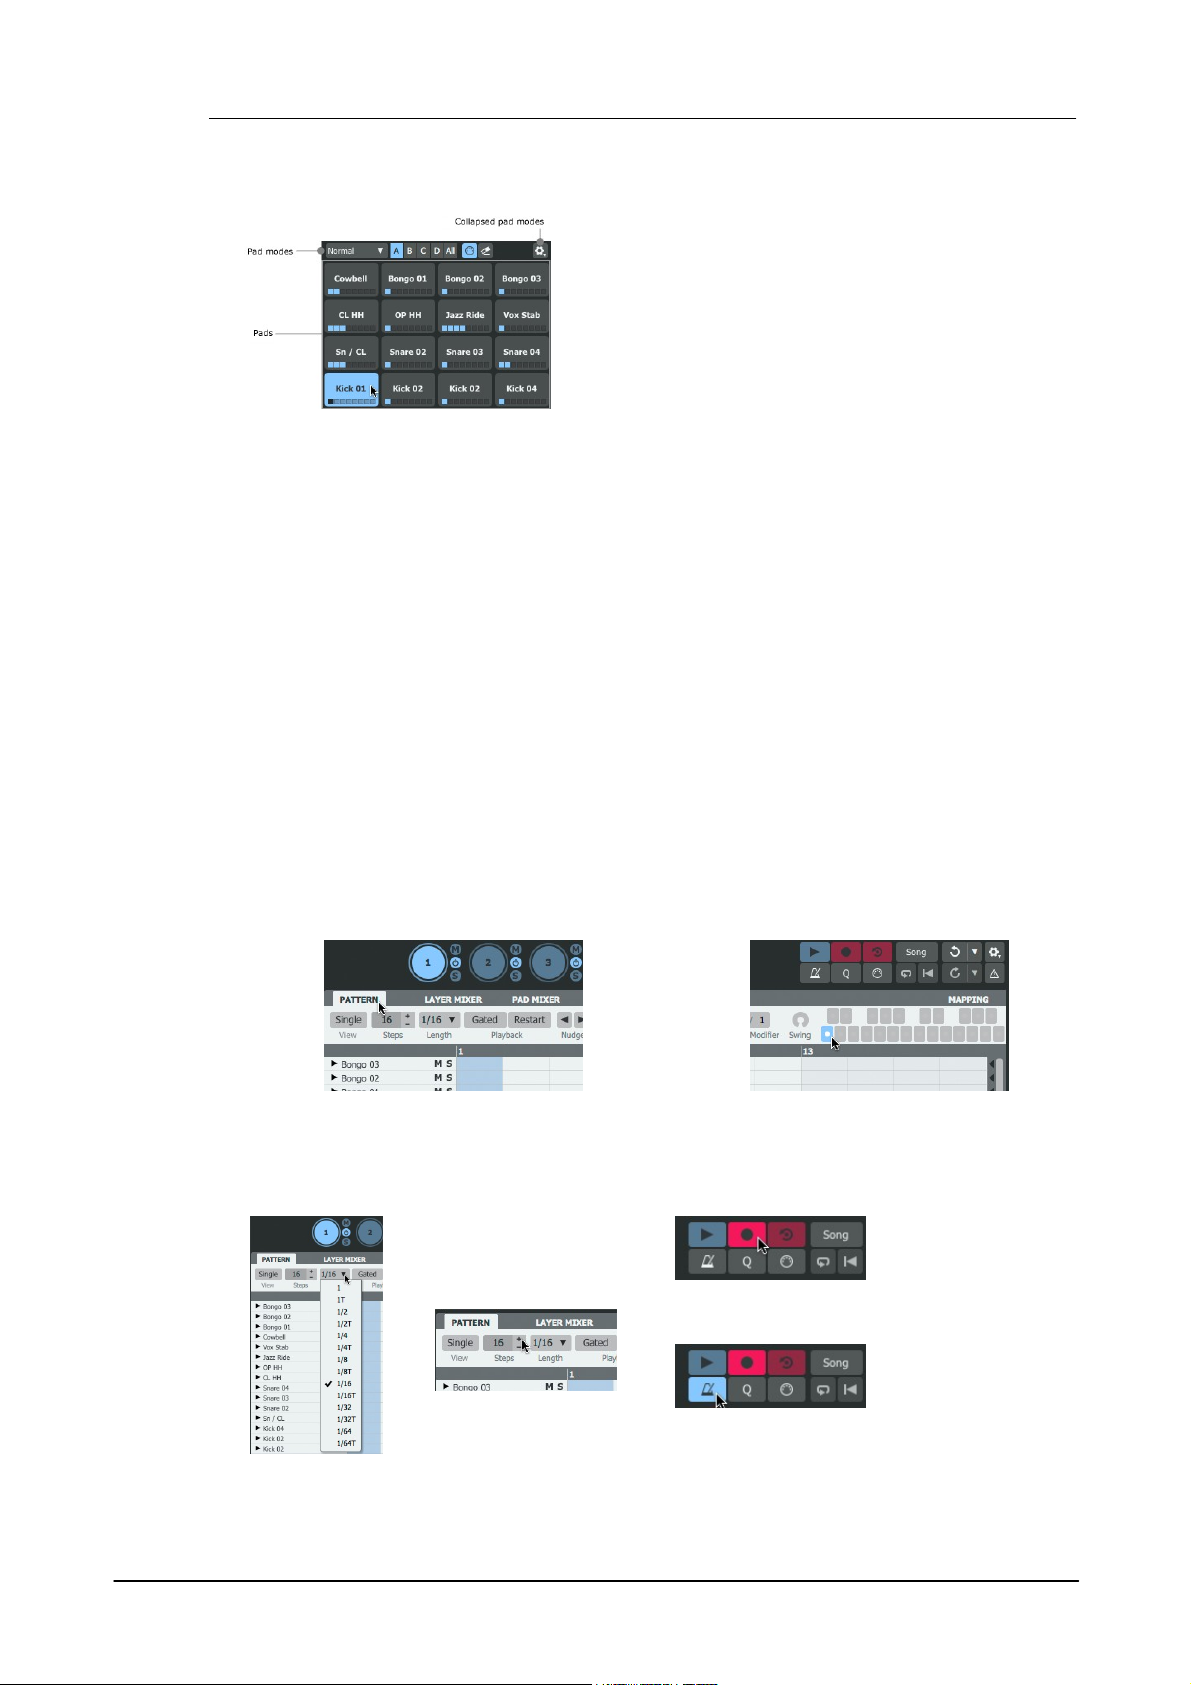
Pads and Pad mode controls
The on-screen pads represent the pads in the current engine. Each pad has a corresponding MIDI
note.
Pattern memory keys
The pattern memory keys, or pattern keys, represent and select the 24 patterns in the current
engine. Each pattern memory key also has a corresponding MIDI note.
Engine selector
The Engine selector buttons select one of the 8 engines for editing.
Pad Editor
The Pad Editor section provides editing controls for the current pad and its 8 layers.
Context-sensitive workspace area
The contents of the workspace are dictated by the Page buttons. The default page shown in this
area is the Pattern page, representing the currently selected pattern in the current engine.
Page buttons
The Pattern, Global Mixer, Pad Mixer, Layer Mixer, Scenes, Song and Mapping buttons
control which page is shown in the workspace area.
Transport
The Transport controls are vital to sequencing within Geist2 – the transport must be running to
play and perform with patterns.
Learn
The Learn button is used for mapping Geist2 controls to MIDI or host automation.
Undo/Redo
Geist2 features a powerful multiple-level Undo/Redo system which even applies to almost all
Browser load actions. Since it is possible to load sounds and kits with a single click, the Undo
function can be very useful if existing sounds are replaced accidentally.
Tempo
Geist2's tempo is locked to the host while it runs as a plugin. In the standalone application, click
and drag the Tempo control up/down or double-click it to type a new tempo. Alternatively, it can
be set via the Tap Tempo function: ALT-click the Tempo control 4 or more times.
Menus
The File menu is used for saving/loading files, the Tools menu provides several additional utility
functions including the Preferences panel and the Help menu provides access to documentation /
support resources.
Preset/Kit indicator
This indicator displays the name of the last loaded Geist2 preset and/or kit.
Status display
The Status display section contains indicators for the amount of memory (RAM) used by samples
in Geist2, for MIDI/Audio engine status and whenever voice stealing occurs.
Master Gain
The Master gain control adjusts the gain of the Master channel - this is an identical control to the
Master channel's Gain fader in the Global Mixer page. Since all Geist2 elements are routed to the
Master channel by default, the control effectively adjusts the level of the default audio destination
for all elements in Geist2.
If any elements are routed to one of the 32 sub-outputs, they will not exist within the Master
channel signal and therefore are not affected by this control.
© 2016 FXpansion Audio
Introduction to Geist2 7
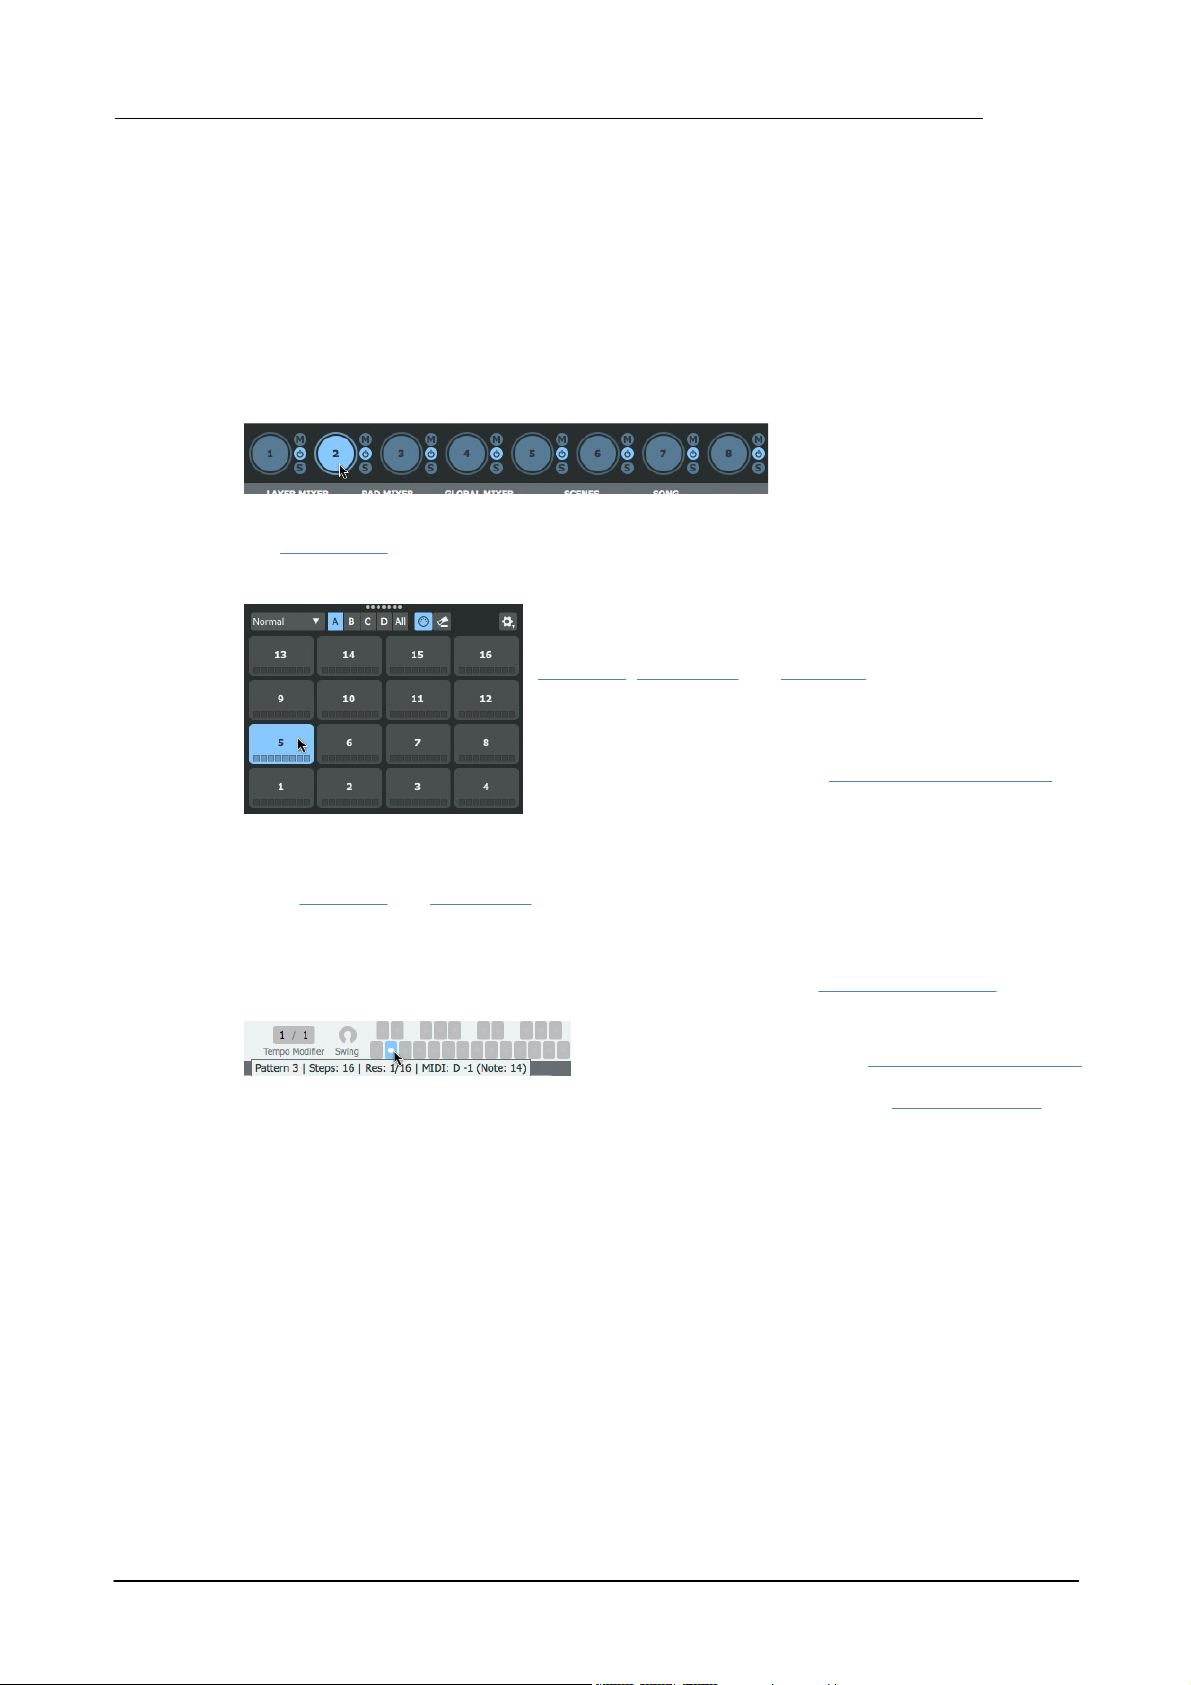
Select the engine to edit by clicking
one of the 8 buttons in the Engine
selector at the top of the Geist2
interface (engine 1 is selected when
Geist2 is initialized).
The concept of the 'selected pad' is used in many situations in
Geist2, such as when using single/double-click processes in the
Browser to load samples from the Browser and when using the
Pad Editor, Layer Mixer and Pad Mixer.
• Click a pad to select it and play its layers
• ALT-click a pad to select it without playing its layers
If the Pad selection follows MIDI button is activated, pads
are also selected by playing their corresponding MIDI notes.
One of 4 Banks of 16 pads are usually visible. To view all pads,
click the All button.
• Click the pattern memory key
• Play the pattern memory key's corresponding MIDI note
Geist2 interface concepts
Many of Geist2's editing functions are selection-dependent and shown on its main workspace or
Pad Editor areas.
Selecting elements for editing
One of the main concepts used in Geist2 is selecting an element for editing.
Selecting an engine
Only one of the 8 engines can be visible for editing at any one time. The other engines are still
active and can play patterns or be triggered via MIDI.
The Global Mixer page can also be used to select engines by clicking an engine channel.
Selecting a pad
Selecting a layer
In the Pad Editor and Layer Mixer, a layer must be selected for editing its sound design and effects
parameters.
Selecting a pattern
Each of the 8 engines contains 24 patterns, each represented by a pattern memory key. Select a
pattern using either of the following methods:
What actually happens when a pattern is selected depends on the pattern's Playback mode
settings – for example, Gated mode requires the pattern's memory key or its MIDI note to be
held down to be heard for the required duration.
© 2016 FXpansion Audio
Geist28
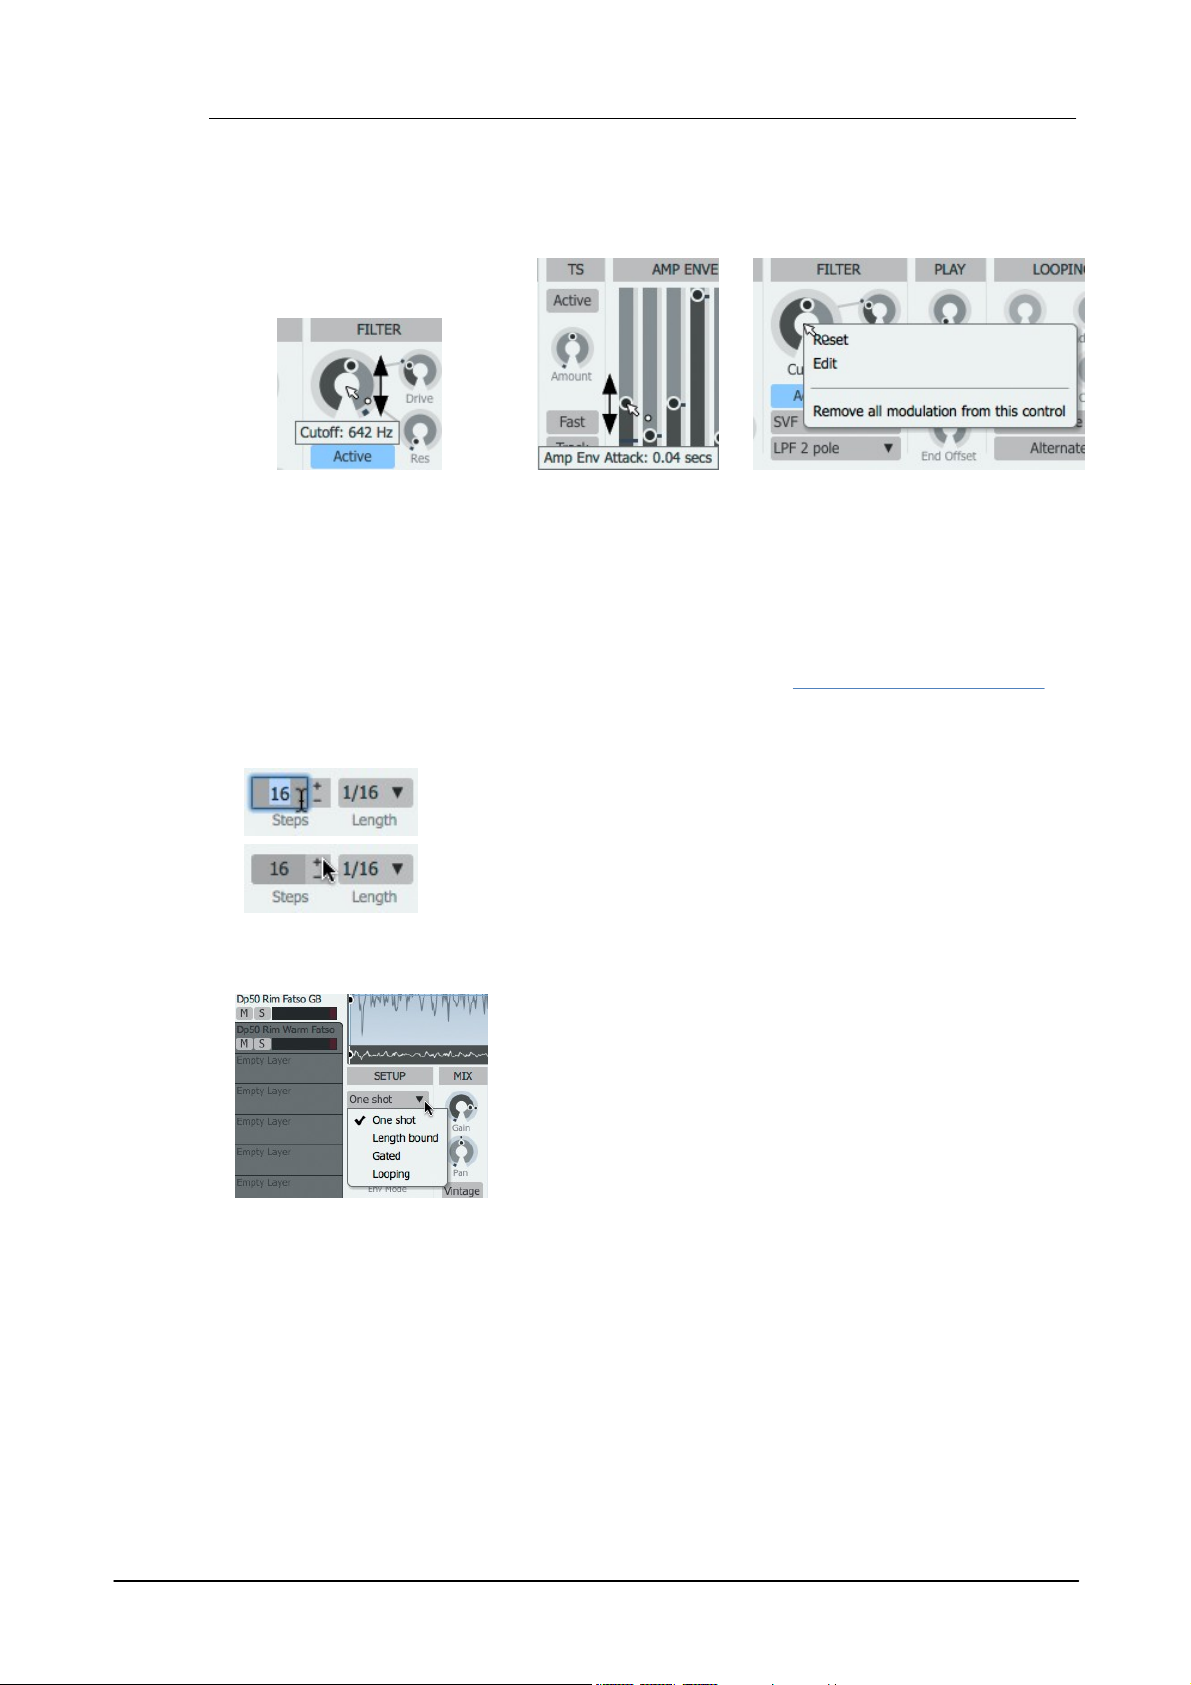
• Rotary and slider controls are adjusted by clicking as
indicated above and dragging up/down.
• Alternatively, use the mousewheel/trackpad scrolling
function.
• In order to achieve fine control over a parameter, hold
down the SHIFT key while making the adjustment.
Right-click a control to display the
control context menu, allowing access
to these functions:
• Reset the control to its default value
(alternatively, double-click the control)
• Directly Edit the value with the
computer keyboard
Numeric values can be manipulated in the following ways:
• Click the numerical display to type a value manually
• Click the + and - buttons to increase and decrease the value by 1
• Click while holding down the SHIFT key to adjust the value by +/- 8
• Click while holding down the ALT key to double or halve the value
Drop-down menus are used extensively throughout Geist2 for
selecting between a number of settings for a function. They are
often referred to within this manual simply as 'menus'.
Context menus
As shown for the control context menu above, Geist2 includes
many additional functions on context menus, displayed by right-
clicking on the relevant area of the interface. The various context
menus are documented in full throughout this manual.
Control conventions
Adjusting rotary/slider controls
Many rotary/slider controls in Geist2 can be modulated with the TransMod modulation system.
Numeric values
Drop-down menus
When using a single-button mouse, CTRL-click in order to display context menus.
Tooltips
As shown in the screenshots above, tooltips are used for showing parameter values and other
useful information in Geist2. Hover over a control to display a tooltip containing information about
the control's current value. Tooltips are shown while adjusting a control, with values updated in
real time.
© 2016 FXpansion Audio
Introduction to Geist2 9
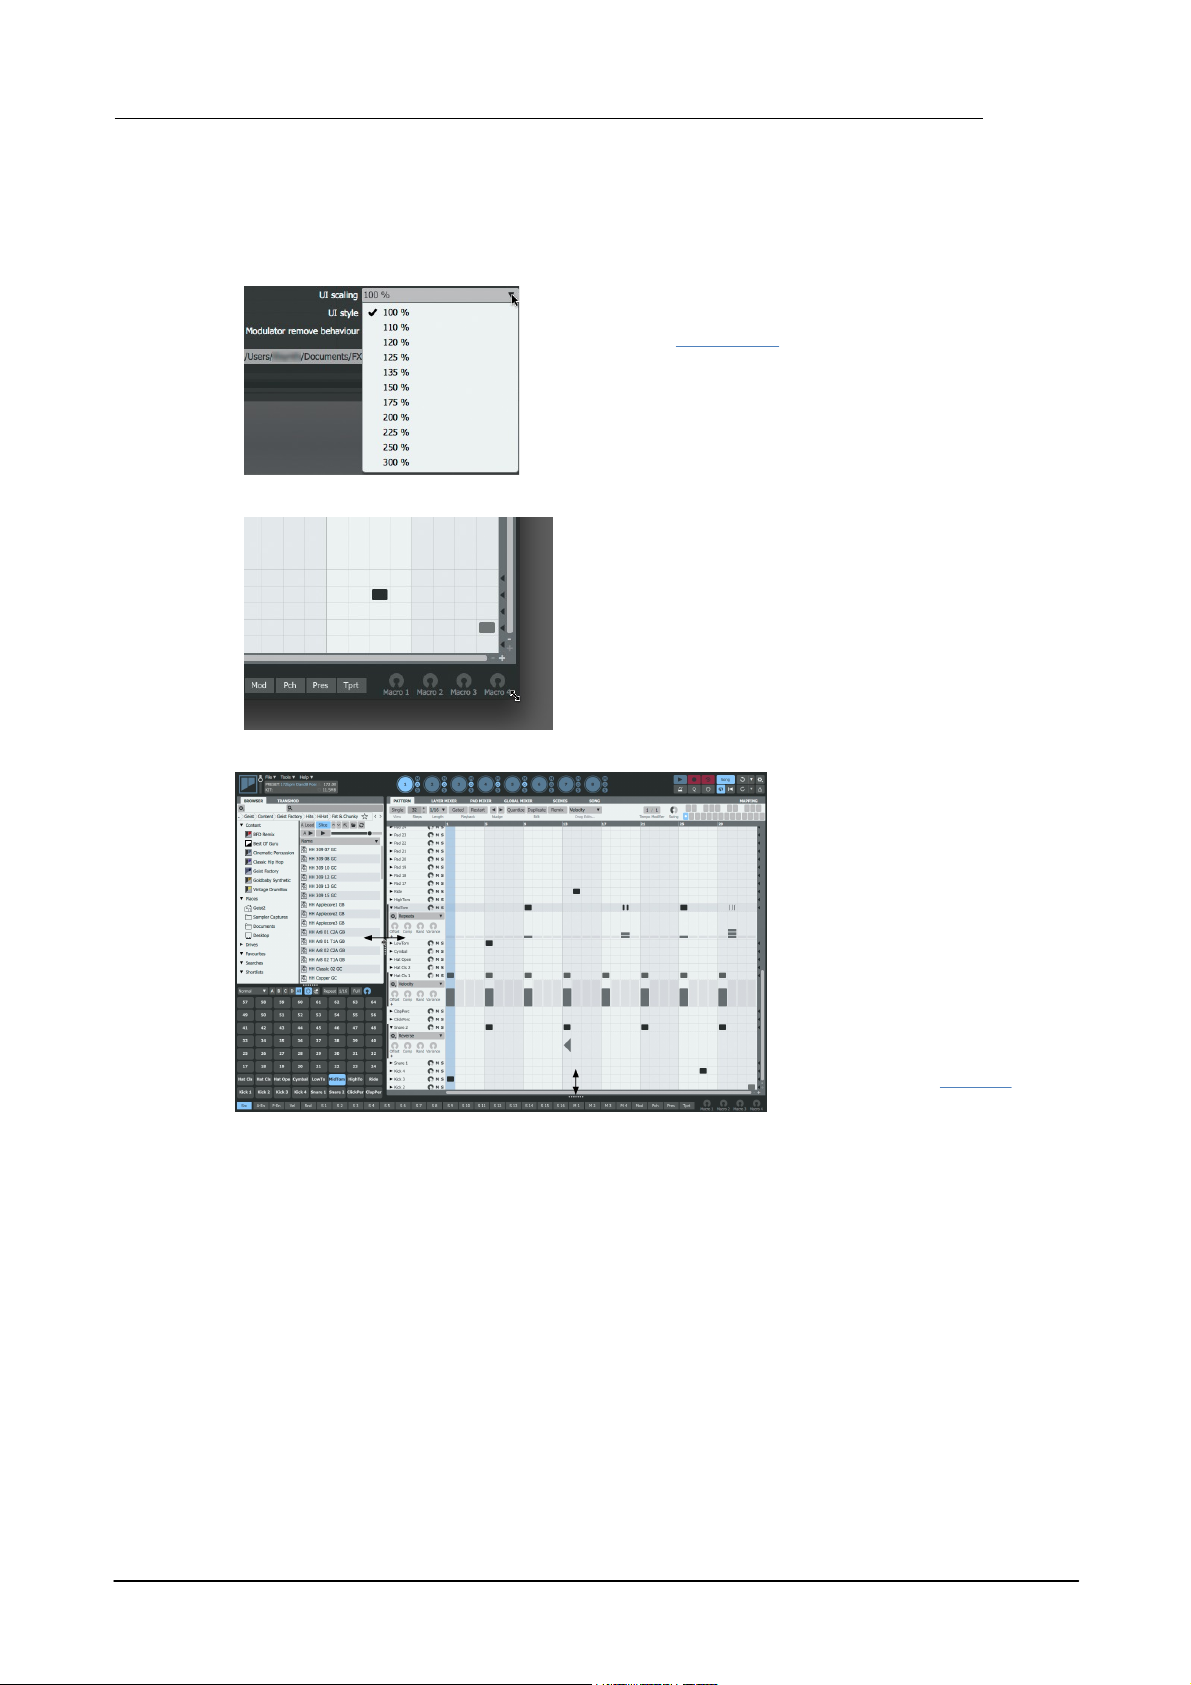
UI scaling
This menu in the Preferences (use the Preferences function in
the Tools menu) adjusts the scaling of the user interface. The
default setting is 100%.
The setting can be changed between 100% and 300% - higher
settings are recommended for Retina/4k or higher resolution
screens.
UI window resize
Click/drag the edges of the Geist2 window to resize it as
required.
Panel reconfiguration
The dividers between panel areas
can be adjusted by clicking and
dragging or double-clicking to
toggle visibility.
In this example, the divider
between the Browser and the rest
of the interface is being resized.
The divider between the contextsensitive editing area and the Pad
Editor has been dragged to the
bottom of the interface for a much
larger pattern editing area.
Panels within the Browser area can
also be reconfigured in this way.
User Interface scaling, size and panel reconfiguration
Geist2's interface is vector-based and can be scaled and resized. Additionally, the various panels
within it can be reconfigured using the dividers between them.
© 2016 FXpansion Audio
Geist210
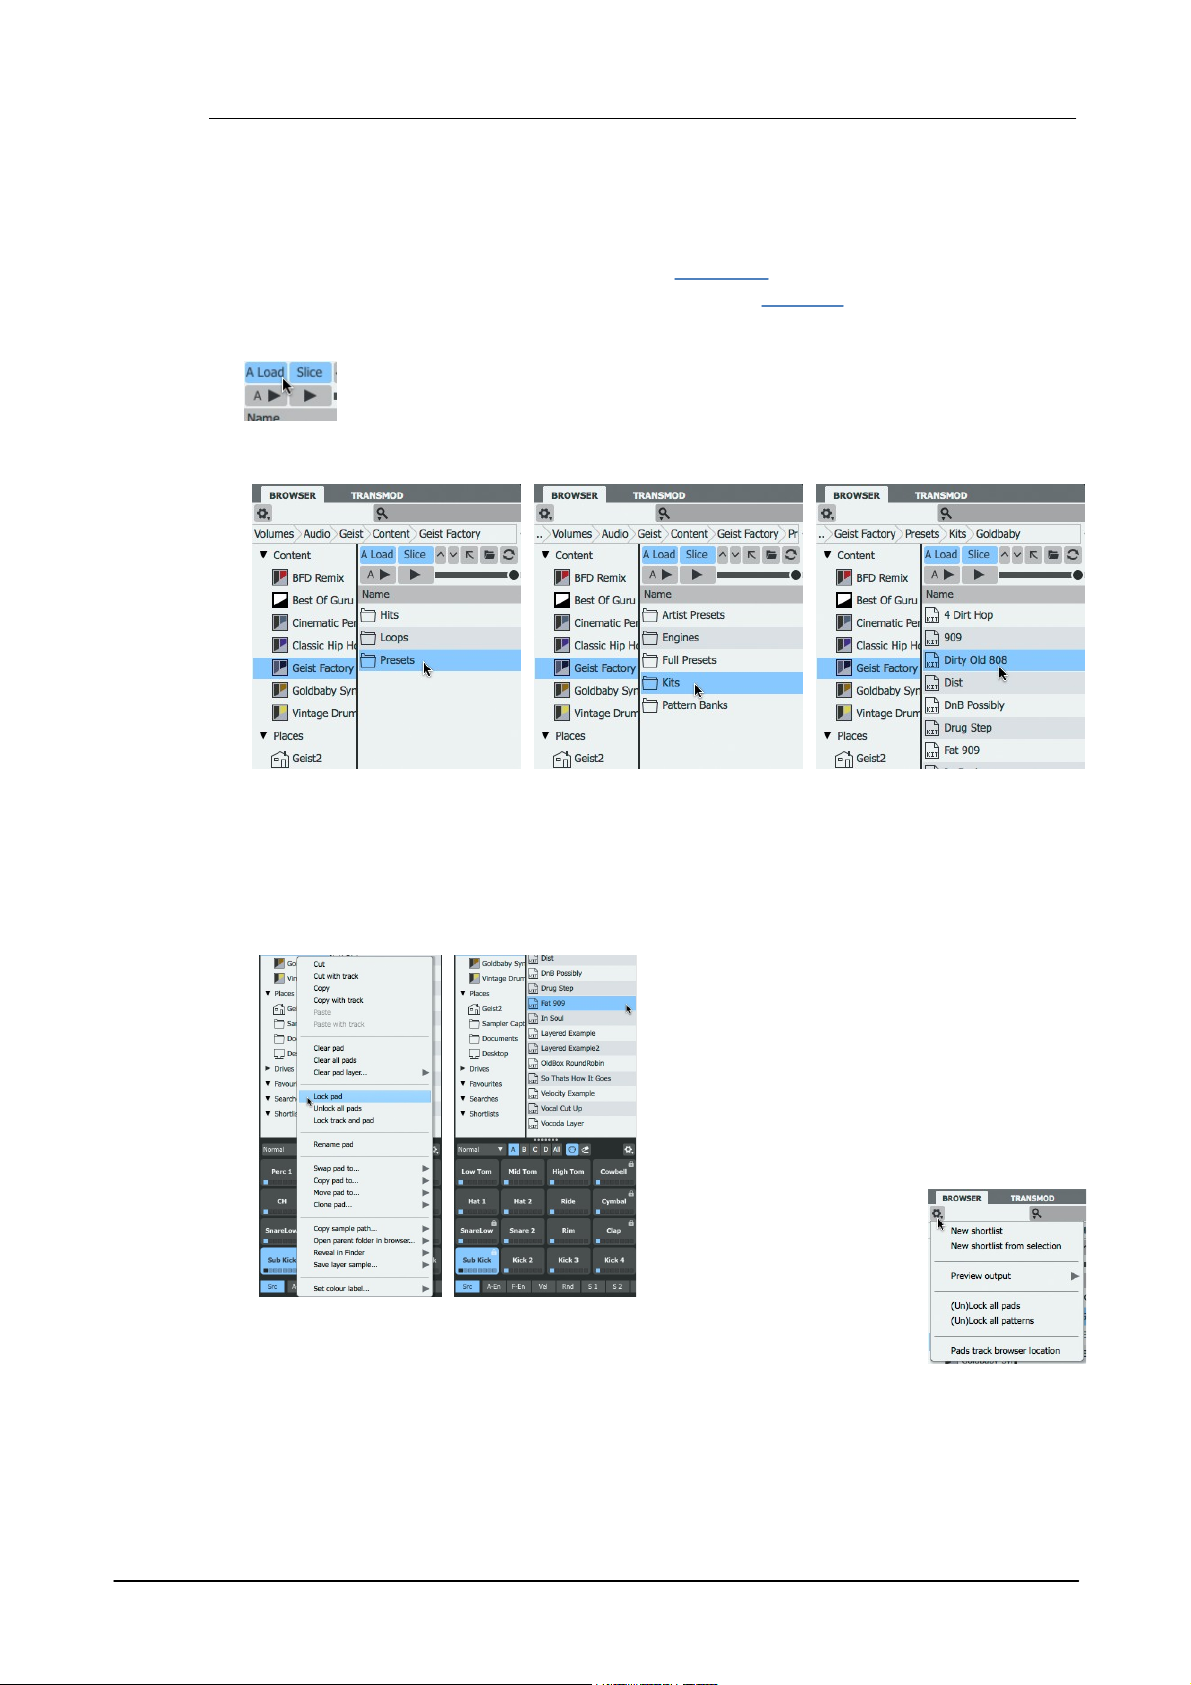
This section shows how to use the Browser in Auto load mode – with the Auto Load
button (labelled A Load on the interface) activated. In this mode, click a file in the
Browser to load it to the selected pad or engine.
1. Click a Factory item in the
Browser sidebar, then doubleclick the Presets folder.
2. Double-click the Kits folder.
3. Double-click any sub-folder
within Kits and then click a kit
file to load it.
1. Right-click a pad
and use the Lock
pad function in the
context menu. Lock
a few more pads.
2. Click another kit
in the Browser.
• When the new kit is loaded, the locked pads are
not affected – only unlocked pads can be replaced
with sounds from the new kit.
Each pad, pattern and layer features its own Lock
function, available via right-click context menus.
• The Browser options menu
contains functions to Lock/
Unlock all pads or all patterns
in the current engine.
1.2 Loading sounds for the first time
The Browser is the most immediate method of loading sounds into Geist2. It is used for loading
kits, samples and other files. This section includes an introduction to loading sounds in the
Browser. More advanced functions are covered in section 1.5.
For a full reference guide to the Browser's functionality, see chapter 2.
Working in Auto load mode
Loading a kit
• The kit is loaded to the current engine. Click the pads to hear the sounds!
Locking pads and loading another kit
© 2016 FXpansion Audio
Returning to a previous state with the Undo function
If the Auto load functionality causes an undesired change, the
multi-stage Undo and Redo functions can be used to revert to
previous states.
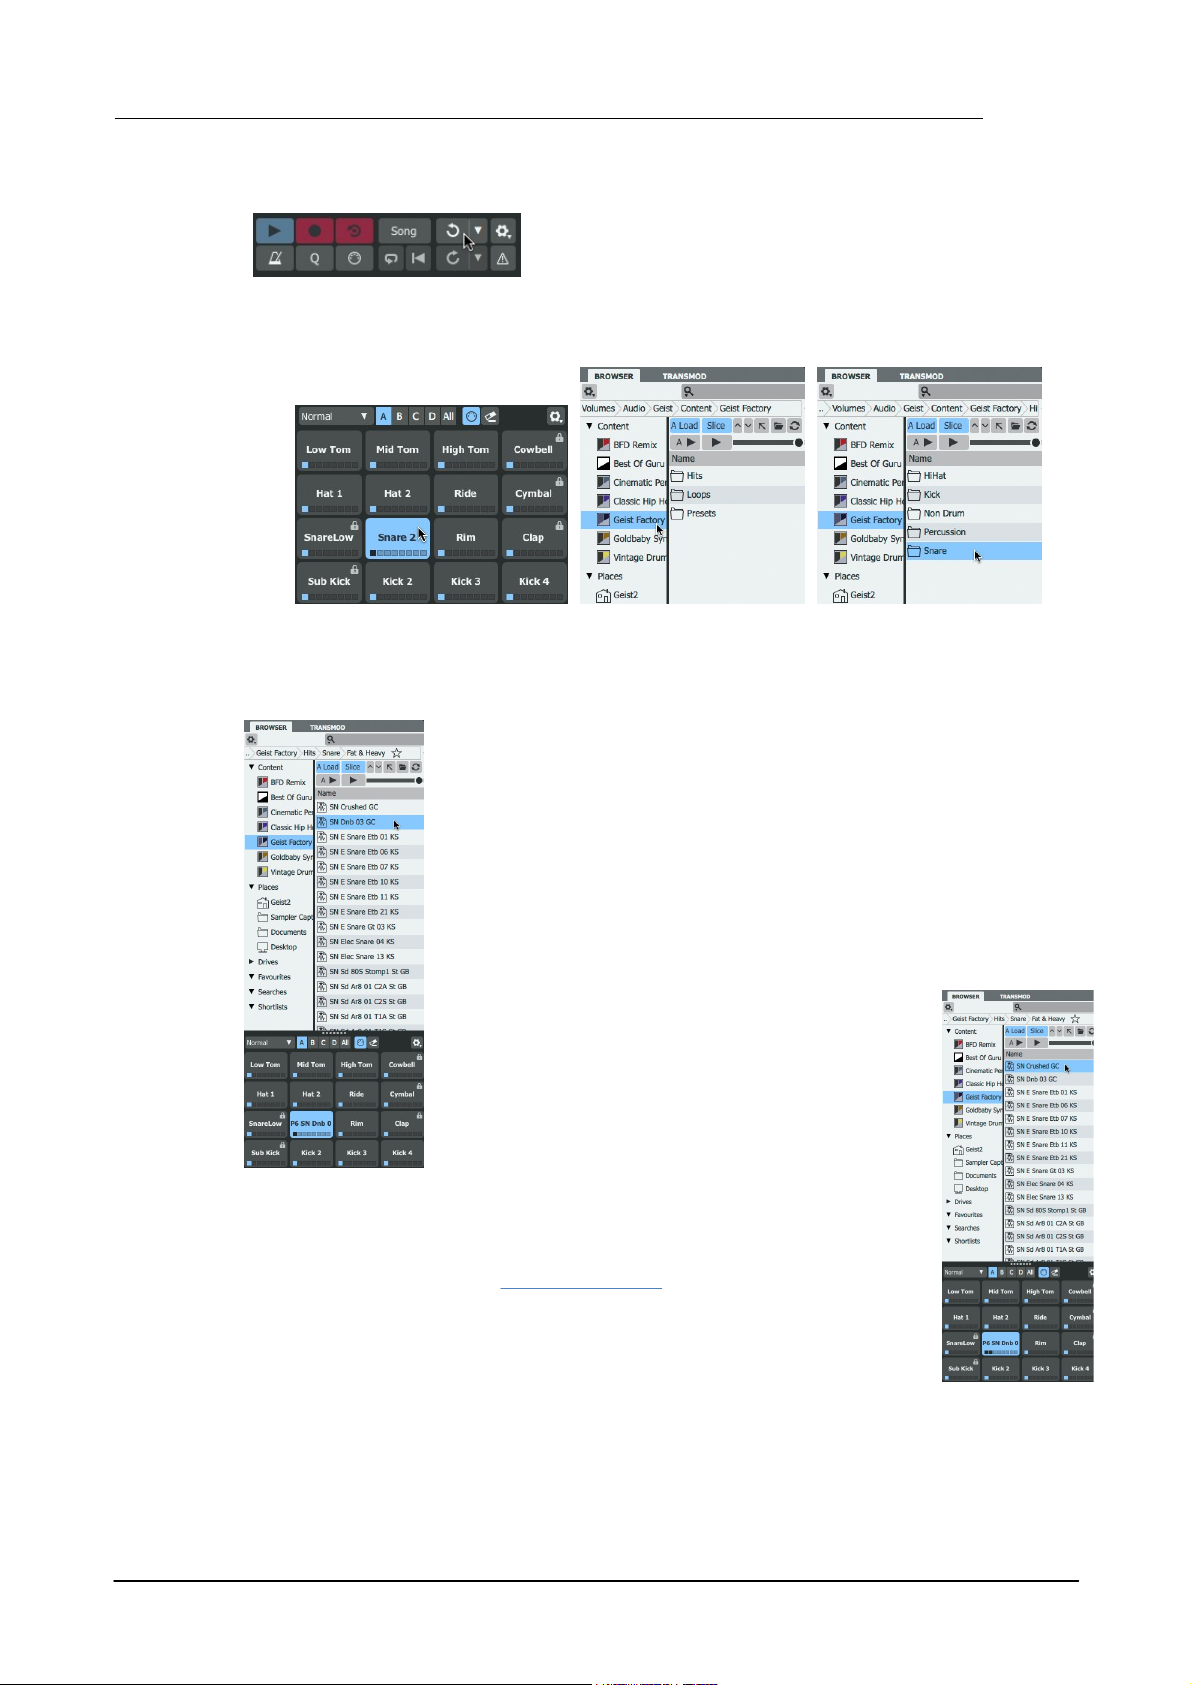
1. Select any pad which is not
currently locked by clicking it.
2. Click on a Factory
item and double-click the
Hits folder.
3. Double-click the
Snares folder.
4. Double-click any sub-folder to enter it and then click
on a sample to load it. The sample is loaded to the
selected pad (see left).
Layering multiple sounds on a single pad
1. Click another sample in the folder while holding
down the ALT key - the sample is loaded to the next
free layer on the pad. Note the extra LED on the pad
that is lit when the 2nd layer is loaded (see right).
2. Click the pad to hear both samples played together.
By default, layered sounds on a pad are played
together when the pad is triggered. By changing a
pad's Layer play Mode from the default setting of All
Layers its layers can be set to play depending on input
velocity (Velocity split), or to be cycled in a 'round-
robin' or random order.
Replacing a pad with a new sound
Introduction to Geist2 11
© 2016 FXpansion Audio
Geist212
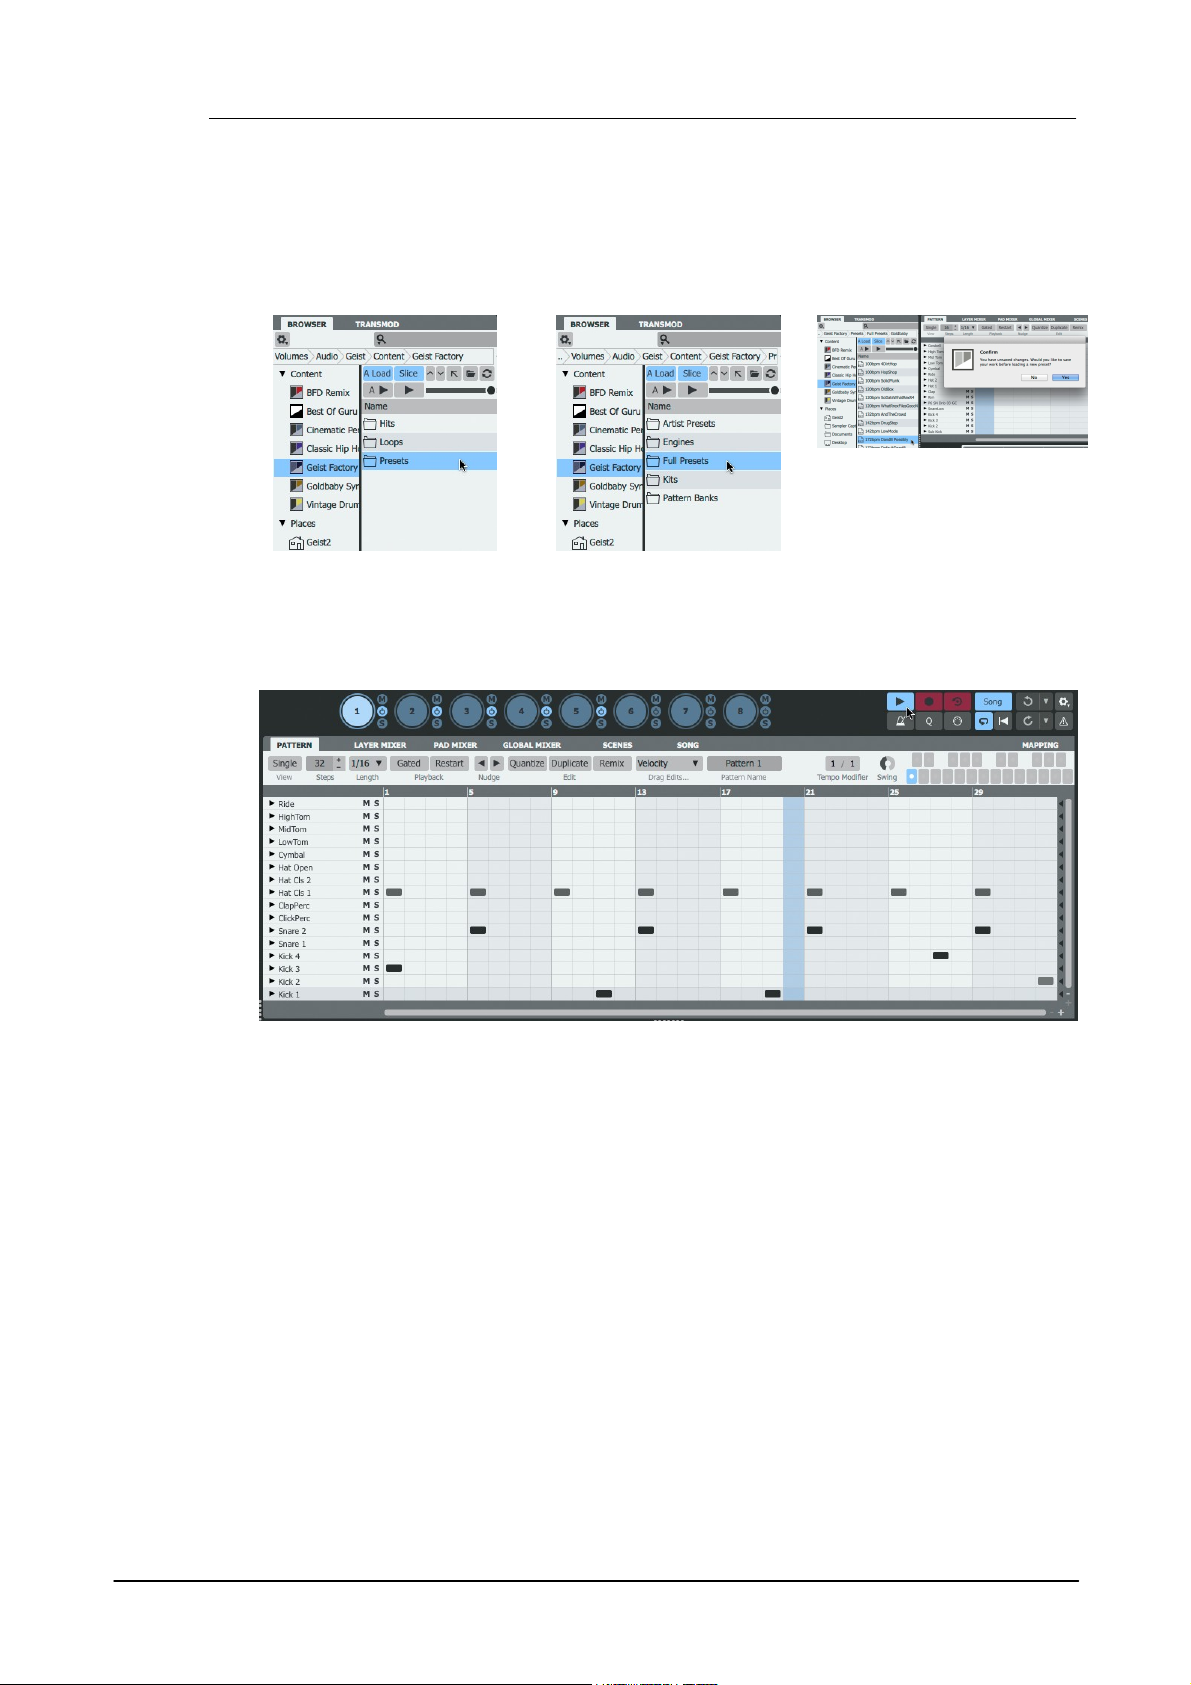
1. Return to a Factory folder
and double-click the Presets
folder.
2. Double-click the Full
Presets folder.
3. Double-click any sub-folder
and then click a Preset file to
load it. Geist2 asks to save
the current session.
4. Click the Play/Stop button on the transport after the preset has loaded, or start the host/DAW
transport if running Geist2 as a plugin.
Loading a preset
A Geist2 preset (also known as a 'full preset') stores the entire contents of a Geist2 session.
Presets are loaded by double-clicking, unlike other file types used in Geist2, as this action cannot
be undone. If any work is unsaved, Geist2 asks to save the current session.
© 2016 FXpansion Audio
1.3 Playing pads and recording a pattern
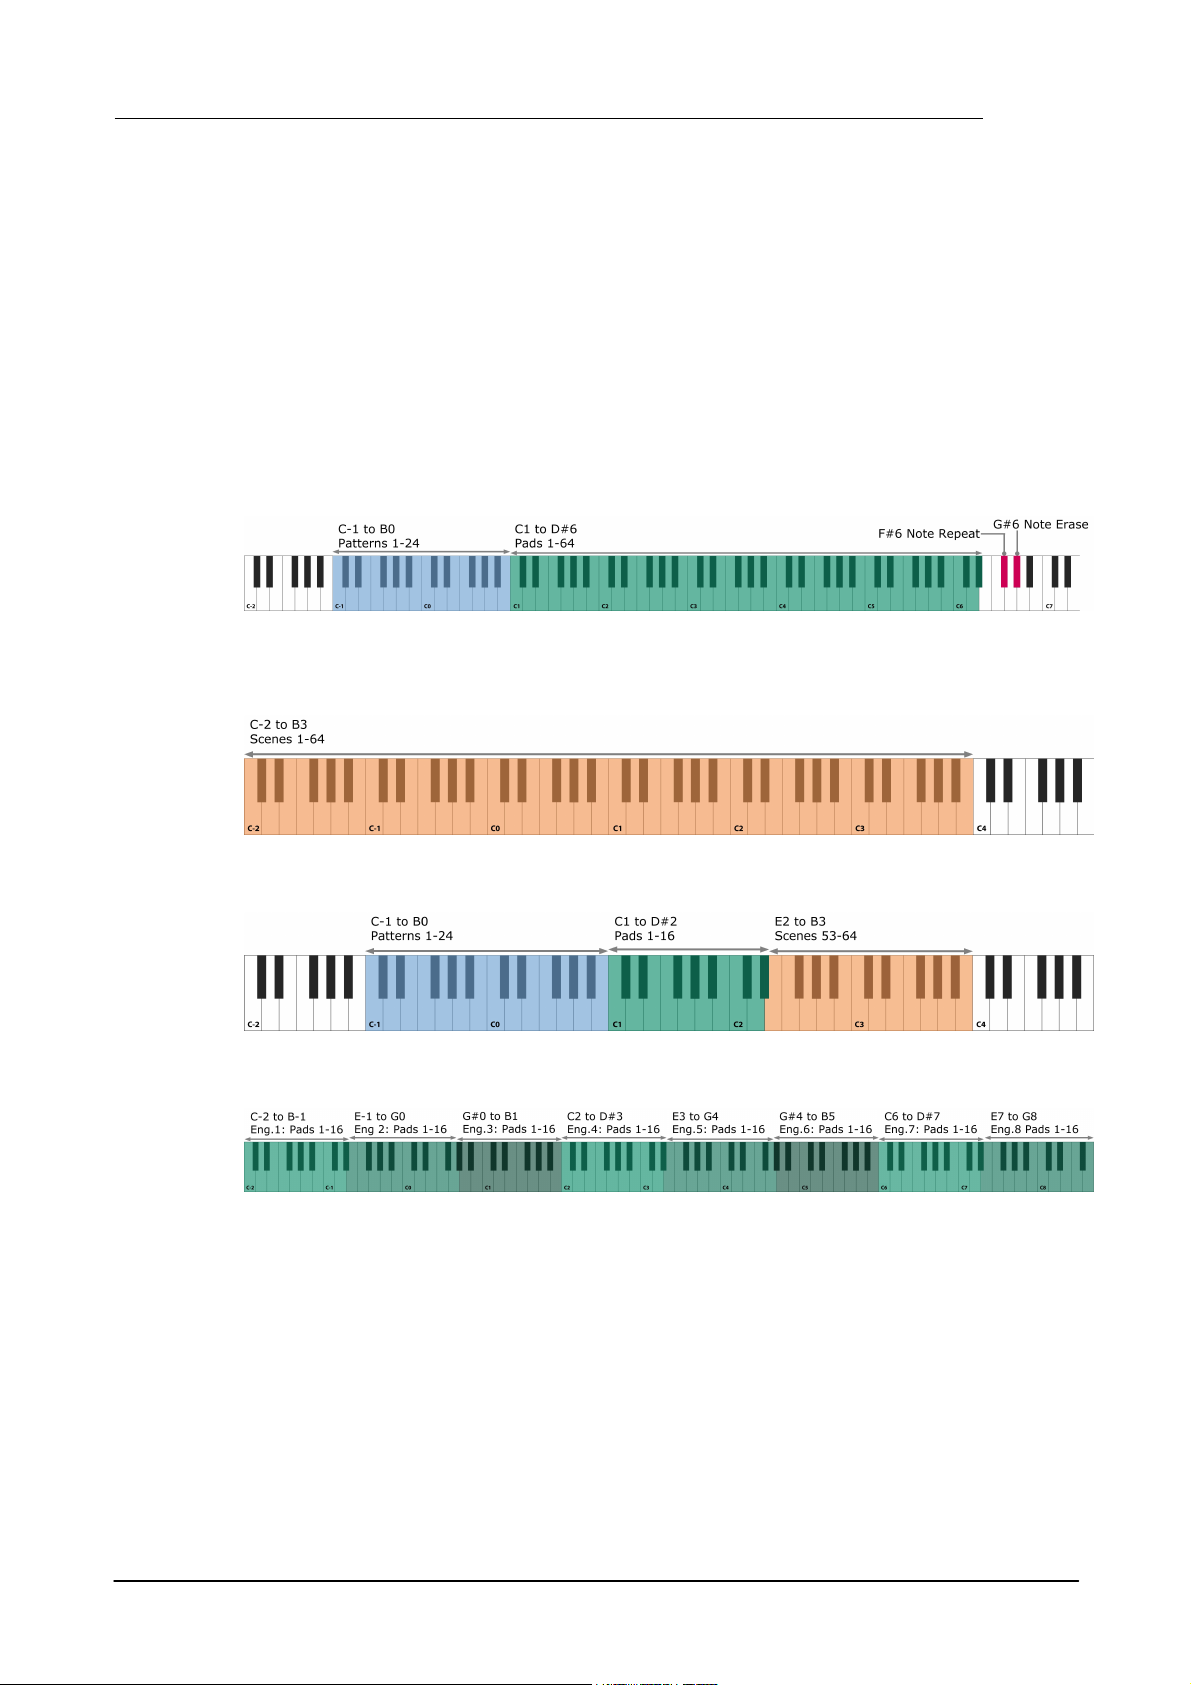
Geist2 MIDI notes and channels
Geist2 is a multitimbral instrument. This means that it responds on more than one MIDI channel.
Please do not confuse this concept with 'multiple outputs', which means that audio can be output
from more than a single stereo audio channel (although Geist2 is also capable of this).
Geist2 contains 8 'engines', each containing 64 pads and 24 patterns, which are all assigned to an
individual MIDI note. Because there simply are not enough MIDI notes in a single MIDI channel,
each of the 8 engines is assigned to a MIDI channel from 1-8. Channel 9 is used for the currently
selected engine.
Channels 1-9: Engine pads and patterns
Channels 1-8: Engines 1-8
Channel 9: Currently selected engine
There are also several other MIDI channels to which Geist2 responds:
Introduction to Geist2 13
Channel 11: Scenes
Channel 16: Current engine and scenes 53-64
Channel 10: Pads 1-16 on all 8 engines
© 2016 FXpansion Audio
Geist214
The pads visible underneath the Browser represent the pads
in the currently selected engine.
Pads can be played in either of the following ways:
• play their corresponding MIDI notes
• click the on-screen pads on the Geist2 interface
It is highly recommended to use a MIDI controller to play the
pads. Playing the Geist2 interface pads with the mouse is
intended for quick previewing during editing - this cannot
provide accurate timing response for playback.
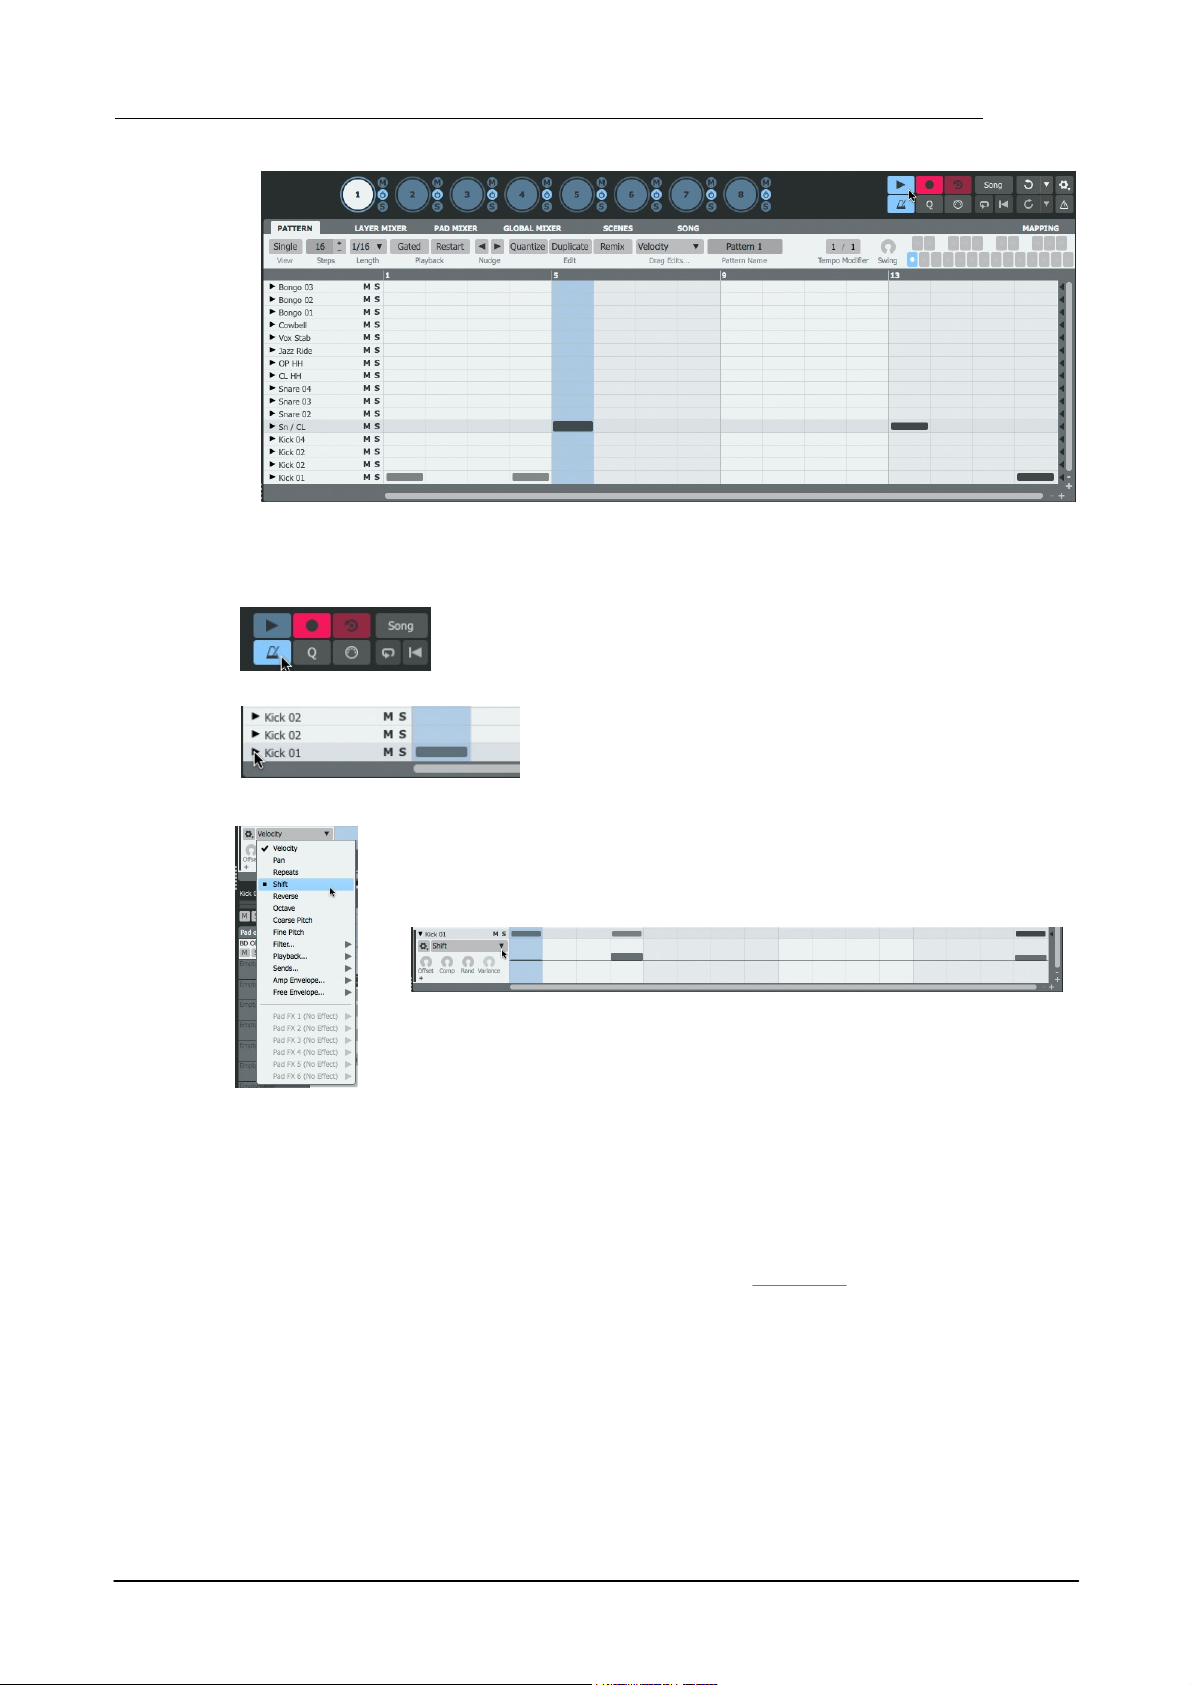
1. Click on the Pattern page button to
display the Pattern page.
2. Select the desired pattern into which to
record by clicking the desired pattern memory
key.
3. Set the required values
for the Steps and Length
parameters.
4. Click the Record
button to 'arm' the
recording function.
5. Click the
Metronome button to
hear a click on every
beat.
Real-time pad triggering
Sequencing pad triggers into a Pattern
Geist2 can record step-based sequences of the pads being played – these sequences are called
patterns and 24 can be created in each engine. Patterns can also be programmed and edited using
the mouse on the Geist2 interface.
An introduction to Geist2's step-sequencing paradigm
It is important to remember that Geist2 is a step-sequencer. Its sequencing system is inherently
based around a set grid, defined by the Steps and Step Length parameters.
However, Geist2 can also accomodate deviations before or after straight grid divisions using Shift
graph values for each step. Graphs are introduced in detail later but, briefly, they provide stepbased automation of various parameters for each step in each pattern. When using the Shift
graph, positive values (above the centre line) result in the step's event being played late and
negative values (below the centre line) mean it is played early. Shift Graph values can be
programmed or edited visually and are also generated during realtime MIDI input recording of
pattern events.
By default, each pattern is set to 16 Steps, with a Step Length of 1/16 (a 16th note). These two
parameters establish the 'grid' of the step-sequencer pattern. Adjusting these values using the
controls on the Pattern page changes the length of the current pattern and its 'step resolution'.
Recording events to a pattern via MIDI
After loading some sounds onto the layers on the engine's pads, proceed as follows in order to
record pattern events in real time:
© 2016 FXpansion Audio
Introduction to Geist2 15
6. Click the Play/Stop button (or start the host transport if using Geist2 as a plugin) to start the
transport and begin recording. Play the pads – events are recorded into the pattern as pad input is
received.
7. Click the Record button to disarm the recording function and return to
playback mode.
8. When recording events, the timing of each event within each
step is captured within each track's Shift graph. To show it, first
click the small triangular button at the left of the track. Ensure
the Single view button is disabled.
9. By default, Velocity values are shown. Click the graph menu that appears and
select Shift.
10. When events feature positive Shift values (above the centre line), events
play later than the start of the step. Negative values (below the centre line)
cause an event to play earlier than the start of the step.
Programming and editing patterns
Patterns in Geist2 can also be programmed/edited with the mouse. Basic pattern event editing is
very simple:
• To add an event, click a step cell with the mouse.
• To erase an event, right-click a step cell containing an event.
Pattern sequencing and editing is covered in more detail in section 1.9.
© 2016 FXpansion Audio
Geist216
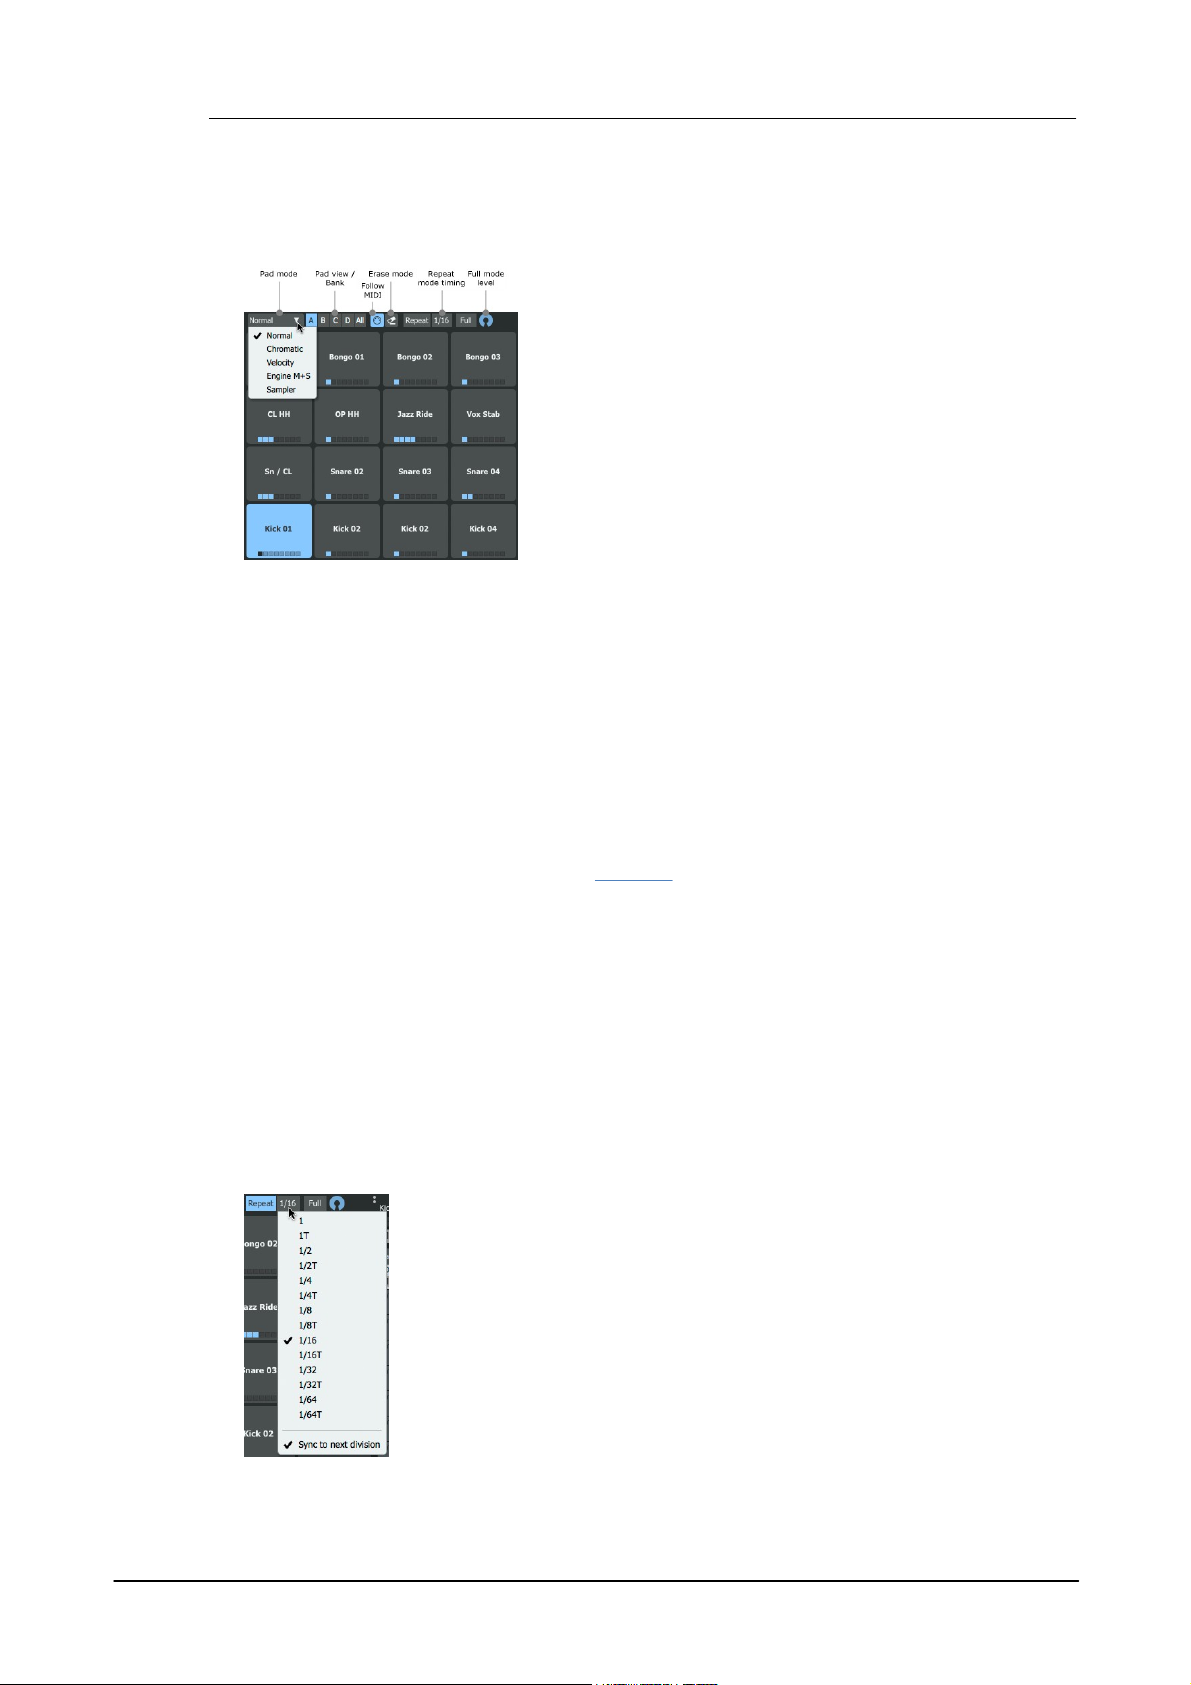
Pad mode
This menu provides a number of modes for the engine pads (and
their corresponding MIDI notes).
• Normal
In the default mode (Normal) each pad plays that pad's layers
(each containing a sample) normally.
• Chromatic
In Chromatic mode the currently selected pad is placed over all
64 pads with different pitches. The pad itself plays at the root
pitch defined by its layer Tune settings. Pads above it ascend by
a semitone, while pads below it descend by a semitone, up to a
maximum of +/- 48 semitones.
Rpt (Note Repeat)
Holding down the Rpt (Note Repeat) function while playing a pad results in
multiple steps being recorded in succession. The drop-down menu under this
button dictates how often events are repeated - various BPM-based settings are
available, from 1 to 1/ 64 (including Triplet versions). The Sync to next
division setting, when activated, ensures that the initial event upon holding
down the pad is quantized to the next BPM division.
This function features a MIDI key mapping on channels 1-9 (F#6).
Full (Full level mode)
When this button is enabled, the velocity of all received notes is forced to the
value set by the control to the right of the button.
Pad modes
Geist2 features a number of additional modes for the pads, intended for performance and pattern
recording via MIDI while the transport is running.
When events are recorded for pad performances in this mode, the different pitches of the pads are
converted to Pitch graph events on a single pad track in the pattern.
• Velocity
With Velocity mode activated, the currently selected pad is placed on all pads at different
velocities. Velocity graph information is captured when recording a performance in this mode.
Unlike Chromatic playback mode, this mode only uses the 16 pads, with velocity proportionally
ascending from the lowest velocity on pad 1.
• Engine M+S
The Engine M+S (Engine Mute+Solo) mode is slightly different to the other modes, as
performances in this mode cannot be recorded. With this mode enabled, the first 8 pads mute
engines 1-8, while pads 9-16 solo engines 1-8. This mode is intended for live performance only.
• Sampler
The Sampler mode is a special mode for sampling directly onto pads in Geist2.
Pad view / Bank
This control dictates whether the A, B, C or D pad bank, each containing 16 of the 64 pads in each
engine are shown in the pads area and in the Pattern page. To view all pads/tracks, click the All
button.
Follow MIDI
With the Follow MIDI button enabled, received MIDI input (on the relevant notes) results in
changing the currently selected pad. Deactivate the button to stop this behaviour.
Erase mode
Hold down the Erase Mode button along with any pad while a pattern is playing back: if the
playback position passes any events for the pad while the Erase mode button is active, they are
erased. This function features a MIDI key mapping on channels 1-9 (G#6).
© 2016 FXpansion Audio
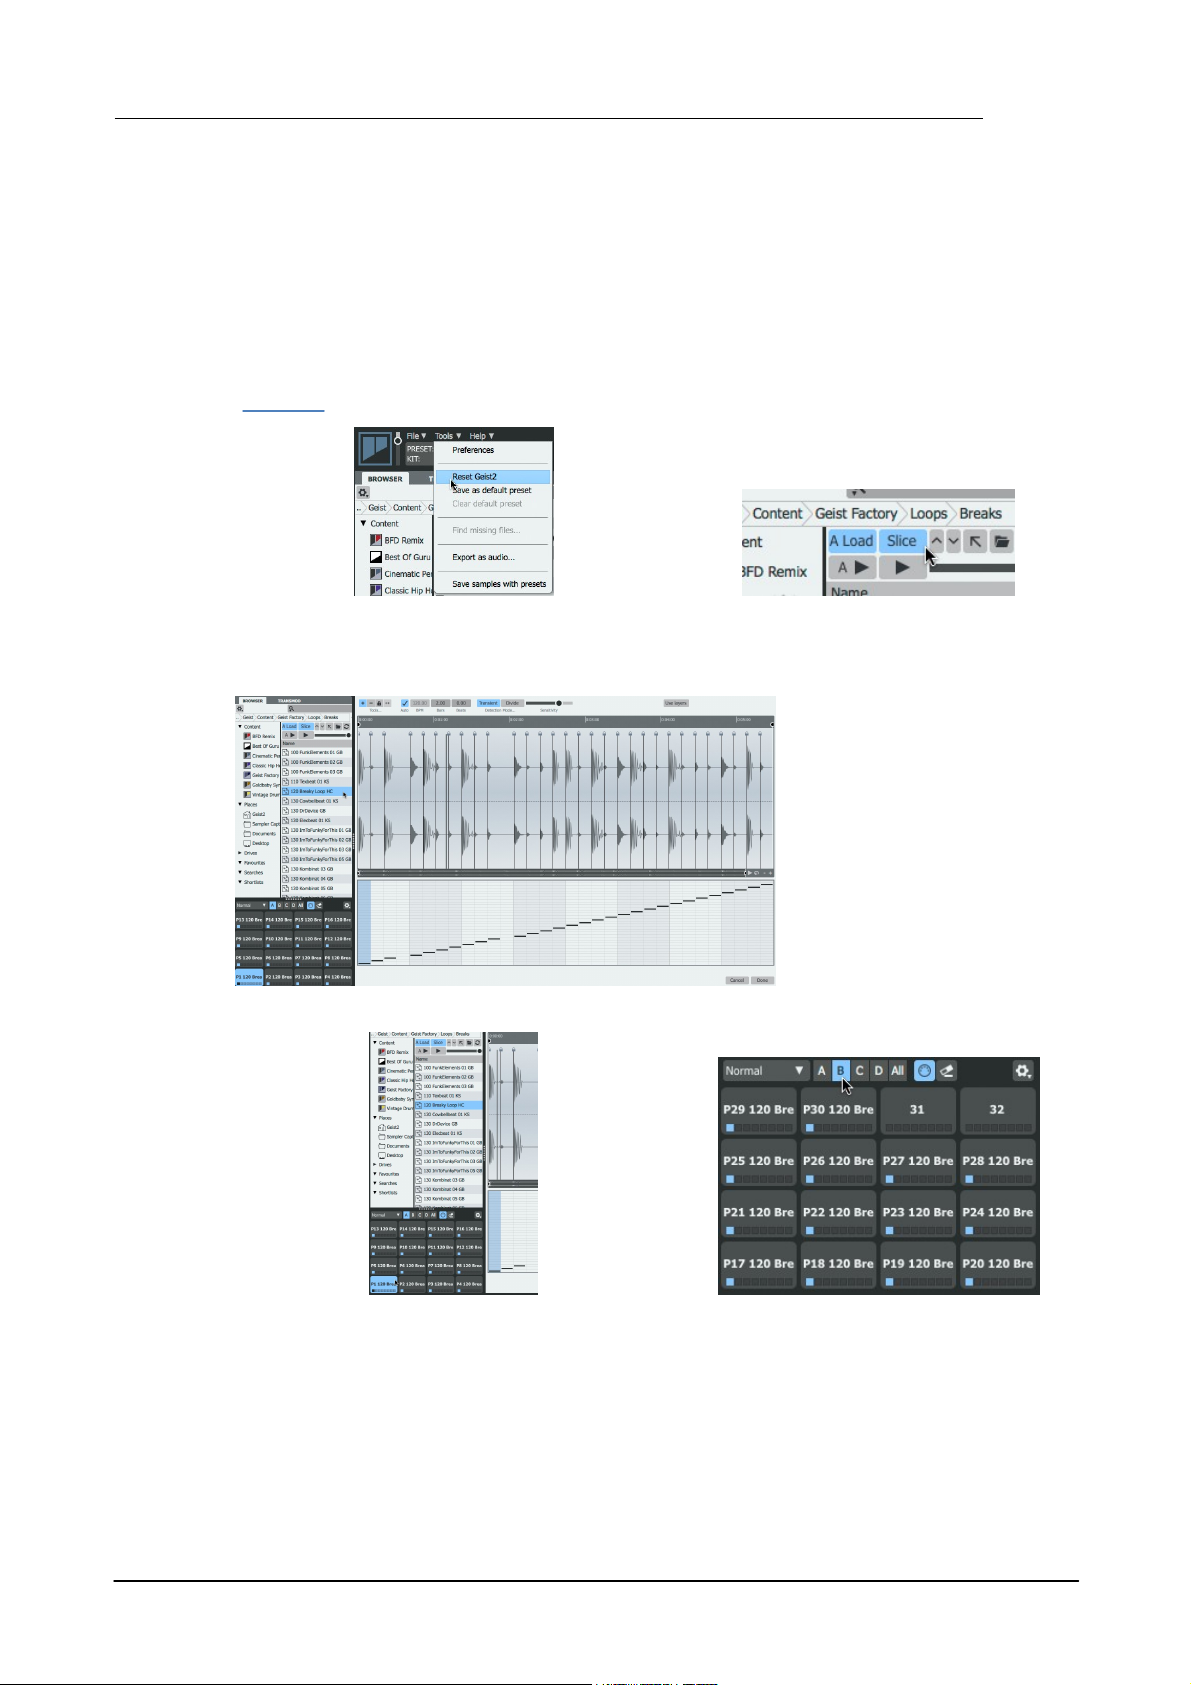
1.4 Slicing loops
1. Initialize Geist2 by using the Reset Geist2
function on the Tools menu.
2. Activate the Slice and Auto Load buttons in
the Browser.
3. Navigate to a subfolder within
the Loops folder in the factory
library and click a loop in the files
listing.
4. Click/play the pads or start the transport –
the slices are already assigned to the pads.
Note the playback indicator on slices when
they are played.
5. When loops possess more than 16 slices, the
additional slices are assigned to pads in the B,
C and D pad banks, up to a maximum of 64
pads.
Geist2 features a Slicer panel which can be considered as an extension of the Browser. It is
displayed when clicking on a file while the Slice button is enabled in the Browser and allows nondestructive 'chop' techniques for loops and breakbeats in order to extract audio slices and
patterns.
This section describes using Geist2's factory loop library which is supplied pre-sliced in RX2 format
- with these loops it is usually unnecessary to adjust slice points upon loading.
However, the Slicer can be used with any WAV or AIFF format samples. When doing so it is usually
necessary to perform some degree of fine-tuning to optimize all slice points for a loop. See
chapter 3 for more details of the Slicer panel's different tools and modes.
Introduction to Geist2 17
© 2016 FXpansion Audio
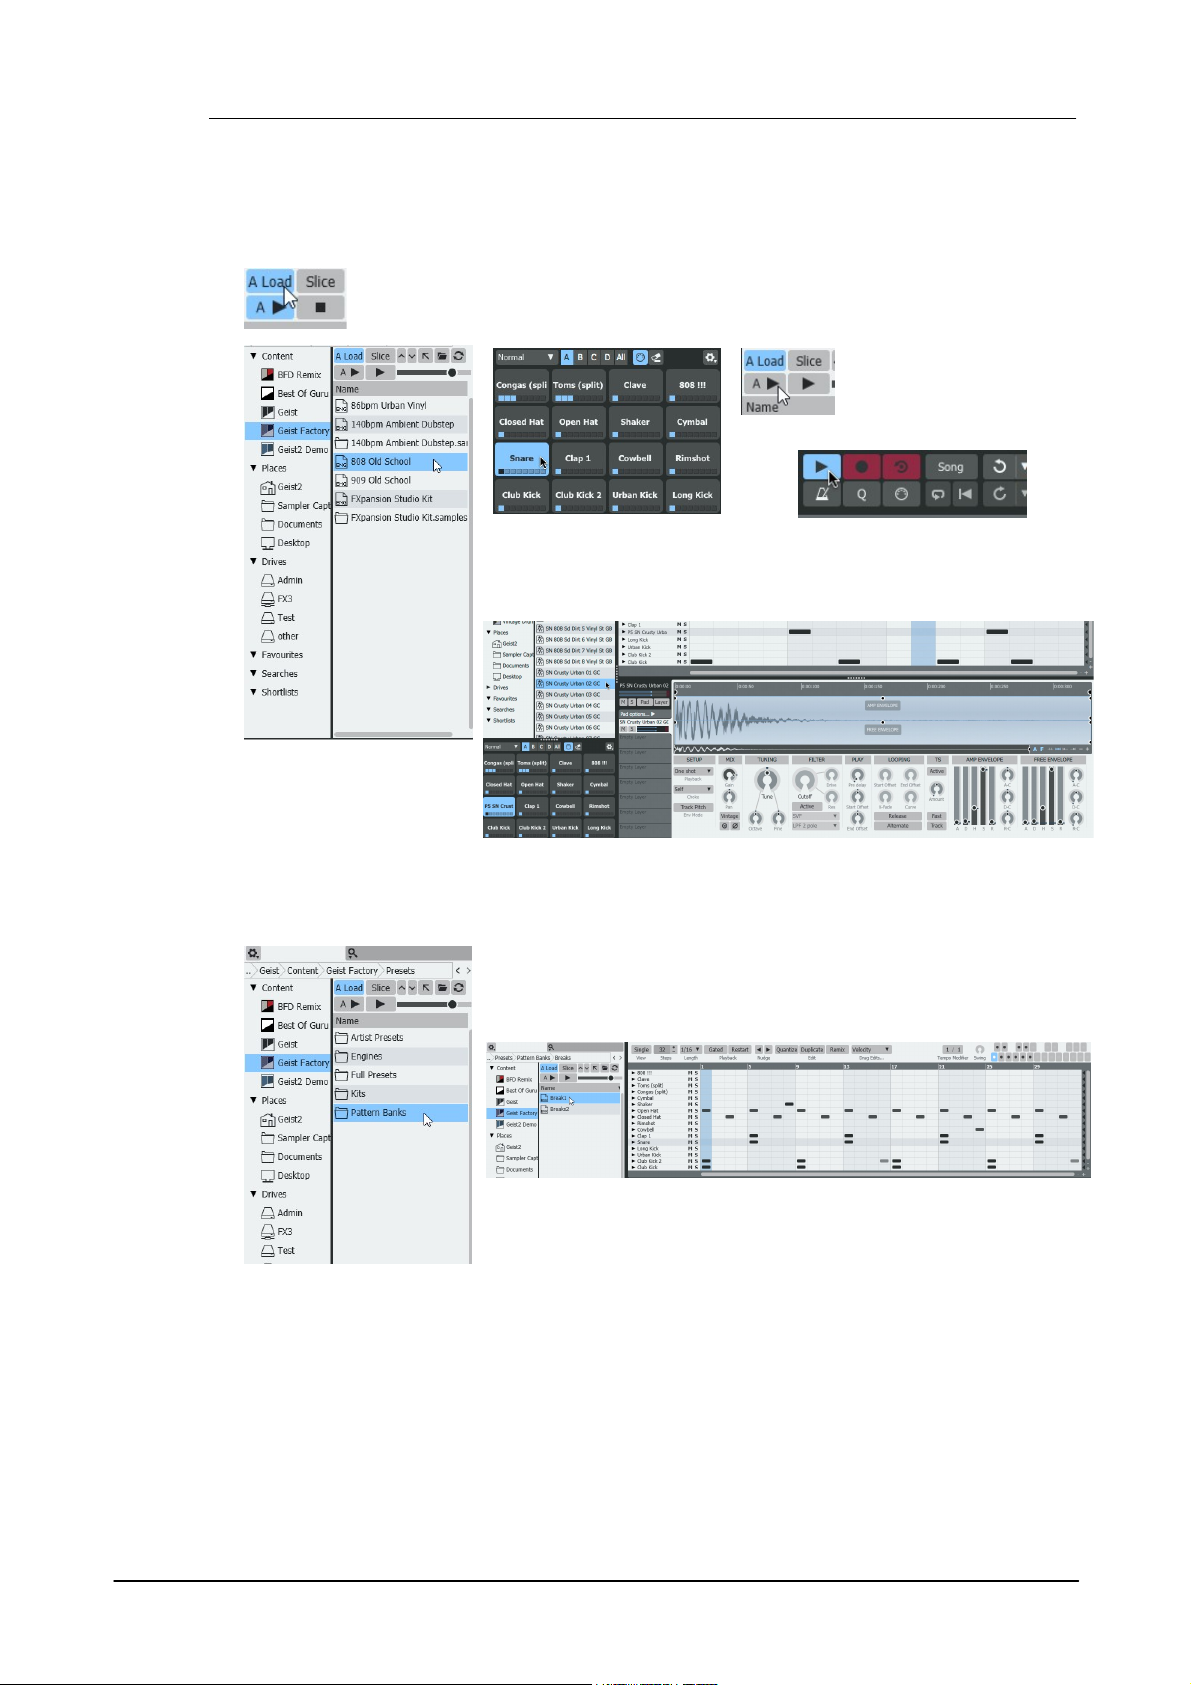
6. To finish loading the loop, click the Done button at the lower-right of the panel. To exit the
slicer panel without loading anything, click Cancel.
Geist218
1. Initialize Geist2 and activate the Auto load button if it is not already activated.
Also ensure Slice mode is disabled.
2. Click an engine file to
load it into the first
engine. This loads sounds
and patterns.
4. Deactivate the Auto
play button in the Browser
if it is activated.
3. Click the first snare pad
to select it. Ensure that it
features pattern events in
the current pattern.
5. Start the Geist2 transport by clicking
the Play/Stop button.
6. Navigate to an individual sample in the Browser and click it.
8. Click a pattern bank file - the patterns within it replace the existing
24 patterns in the engine.
7. Now navigate to a
pattern bank.
1.5 More about loading sounds and saving work
Using Auto load mode to load-in-context
The sample is not previewed, but it is loaded to the pad and heard when triggered by pattern
events.
© 2016 FXpansion Audio
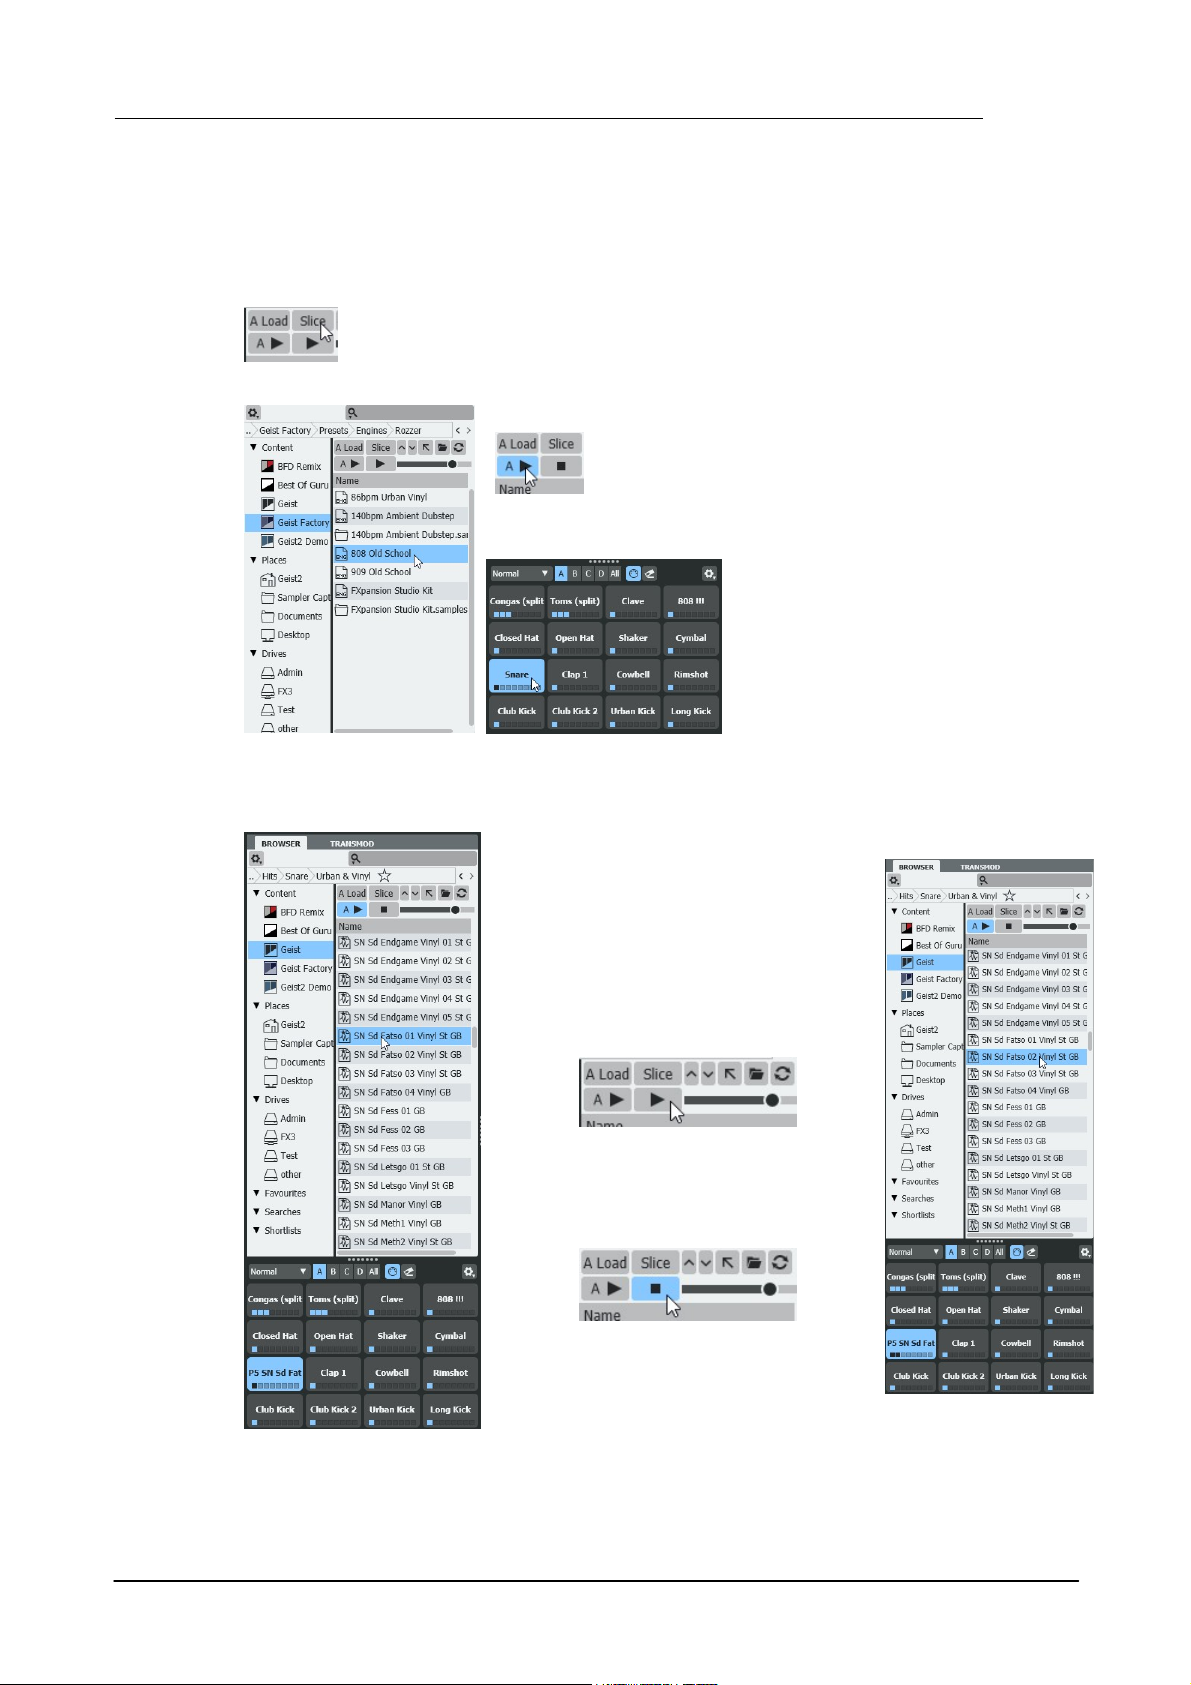
Introduction to Geist2 19
1. Initialize Geist2 and deactivate the Auto load and Slice buttons.
3. Activate the Auto play button in order to preview
samples when they are selected in the Browser.
4. Click the first snare pad to select it.
Ensure that it features pattern events in
the current pattern.
2. Navigate to a folder
with engine files and
double-click it to load it.
5. Navigate to a folder with samples and
double-click one to load it (see left).
6. Double-click another sample in the
folder while holding down the ALT key - the
sample is loaded to the next free layer on
the pad (see right).
• If automatic previewing is not desired,
deactivate the Auto play button and
manually use the Preview play button to
its right to preview the selected sample.
• Any preview (whether it is automatic or
manual) can be stopped while it is active by
deactivating the Preview play button.
Working with Auto load deactivated
If the Auto load button is deactivated, clicking a loadable element does not result in it being
loaded automatically – instead, elements are loaded by double-clicking or by using drag and drop.
Loading by double-clicking with Auto load deactivated
© 2016 FXpansion Audio
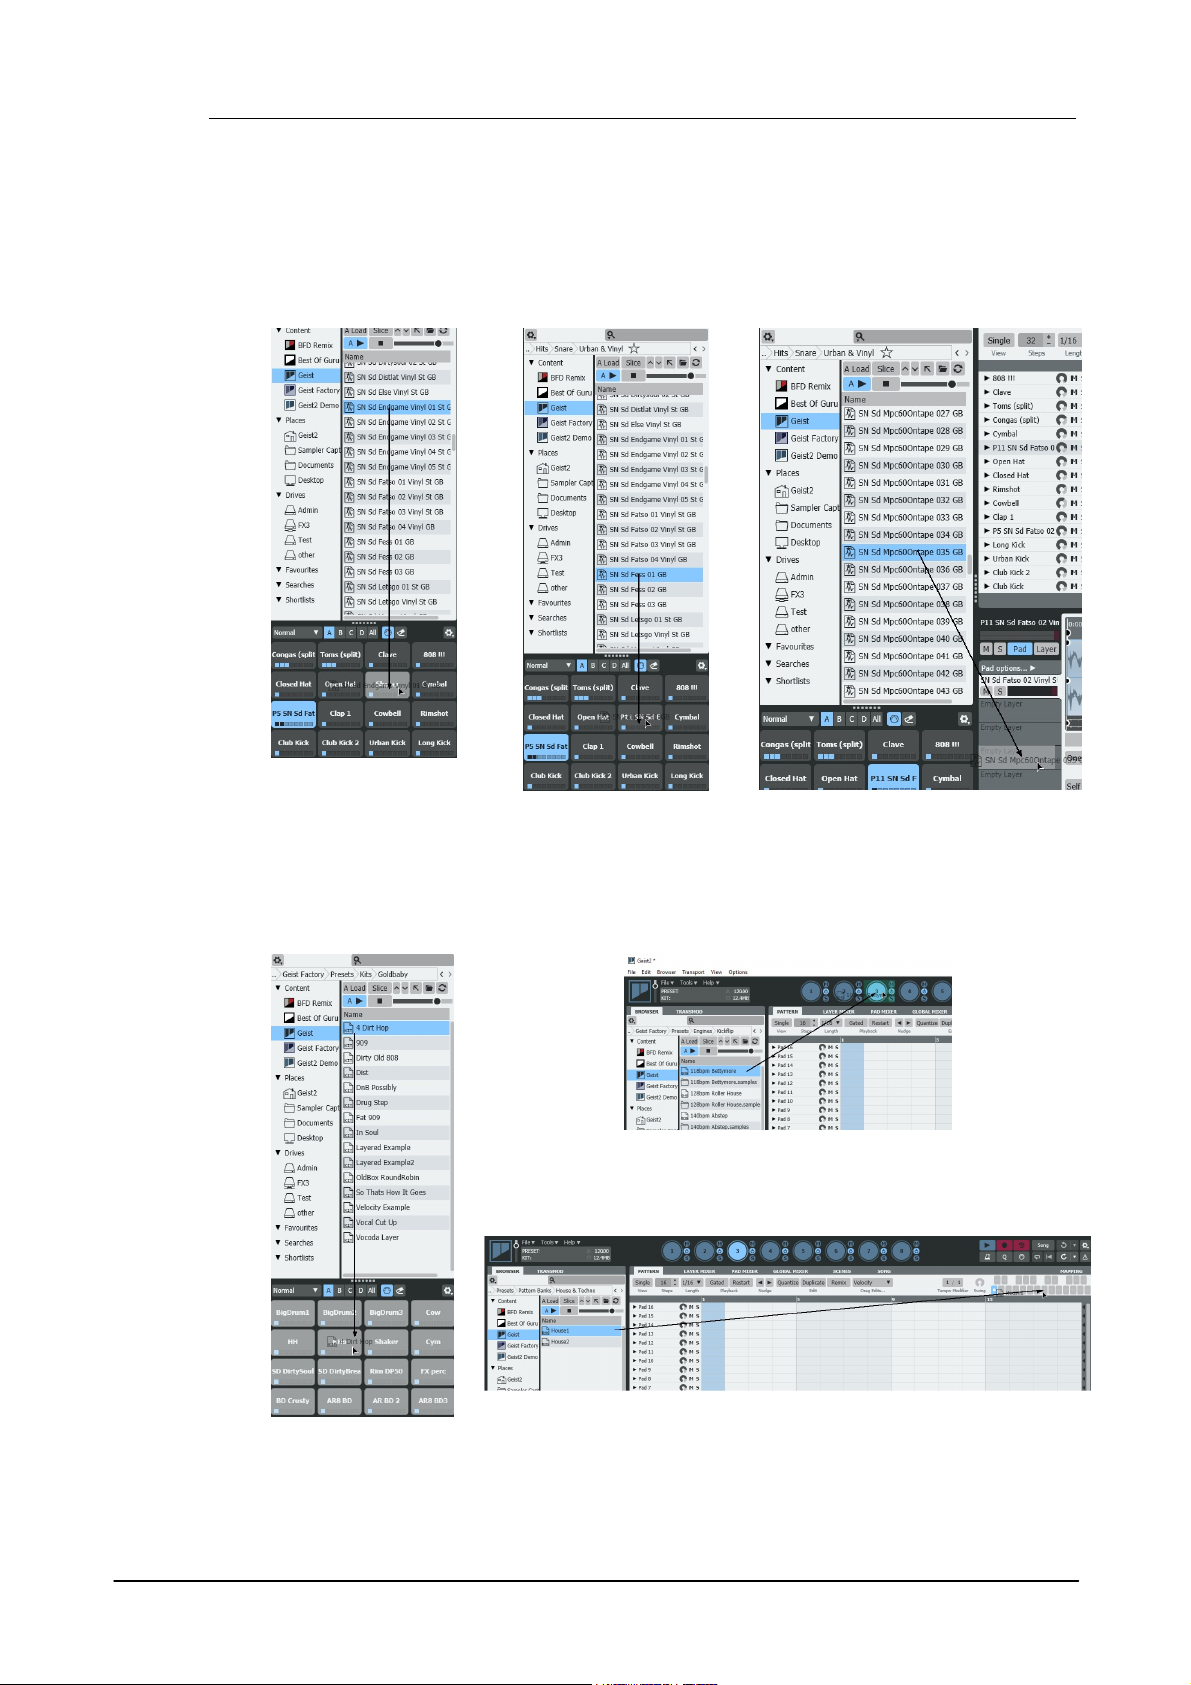
Geist220
• Drag and drop a sample
onto a pad to load it. Any
existing samples on the
pad are removed first.
• Drag and drop a sample
to a pad while holding
down the ALT key to load
it to the next free layer.
• Drag and drop a sample to any layer
in the Pad Editor's Layer selector to load
it to a specific layer.
• Drag and drop a kit file
onto the pads to load it.
• Drag and drop engine files onto an engine selector.
• Drag and drop patterns onto the pattern memory keys. Drag single
patterns to single keys, or banks to any key.
Loading using drag & drop with Auto load deactivated
While dragging and dropping samples, pads, kits and patterns/pattern banks, hover over any
other engine selector button in order to switch the currently selected engine. This means it is not
necessary to abandon the drag and drop operation if the engine was not switched before starting
it.
• Samples
• Kits, patterns and engines
© 2016 FXpansion Audio

Introduction to Geist2 21
The File menu is used to save any current element in Geist2.
Saving a preset
To save the entire state of Geist2, use the Save preset function. Enter a
filename in the system Save As dialog that appears and press ENTER.
The default save location is the FXpansion/Geist2 folder within the user
documents folder, accessible using the Places/Geist2 item in the Browser
sidebar.
Saving other elements
The File menu also provides functions to save the kit, current engine, pads,
pattern, or the whole bank of 24 patterns in the current engine.
Exporting as MIDI or audio
Geist2 offers several ways to export MIDI and audio material for external
use.
Other Browser functions
The Browser contains a number of features like searches, Favourites and Shortlists to make it as
easy and quick as possible to locate sounds.
See chapter 2 for a full guide to their operation.
Saving work
© 2016 FXpansion Audio
Geist222
1.6 Editing and modulating sounds
The Pad Editor provides numerous controls to edit parameters for altering the sound and playback
characteristics of the currently selected pad and each of its 8 layers. This section introduces the
most important parameters - see chapter 5 for a full guide.
It is always visible on the Geist2 interface, meaning that it is possible to view pages like the
Pattern page, Layer Mixer and Pad Mixer at the same time as viewing selected pad/layer
parameters.
Layer Editor parameters can be modulated over time using graphs and TransMod modulation.
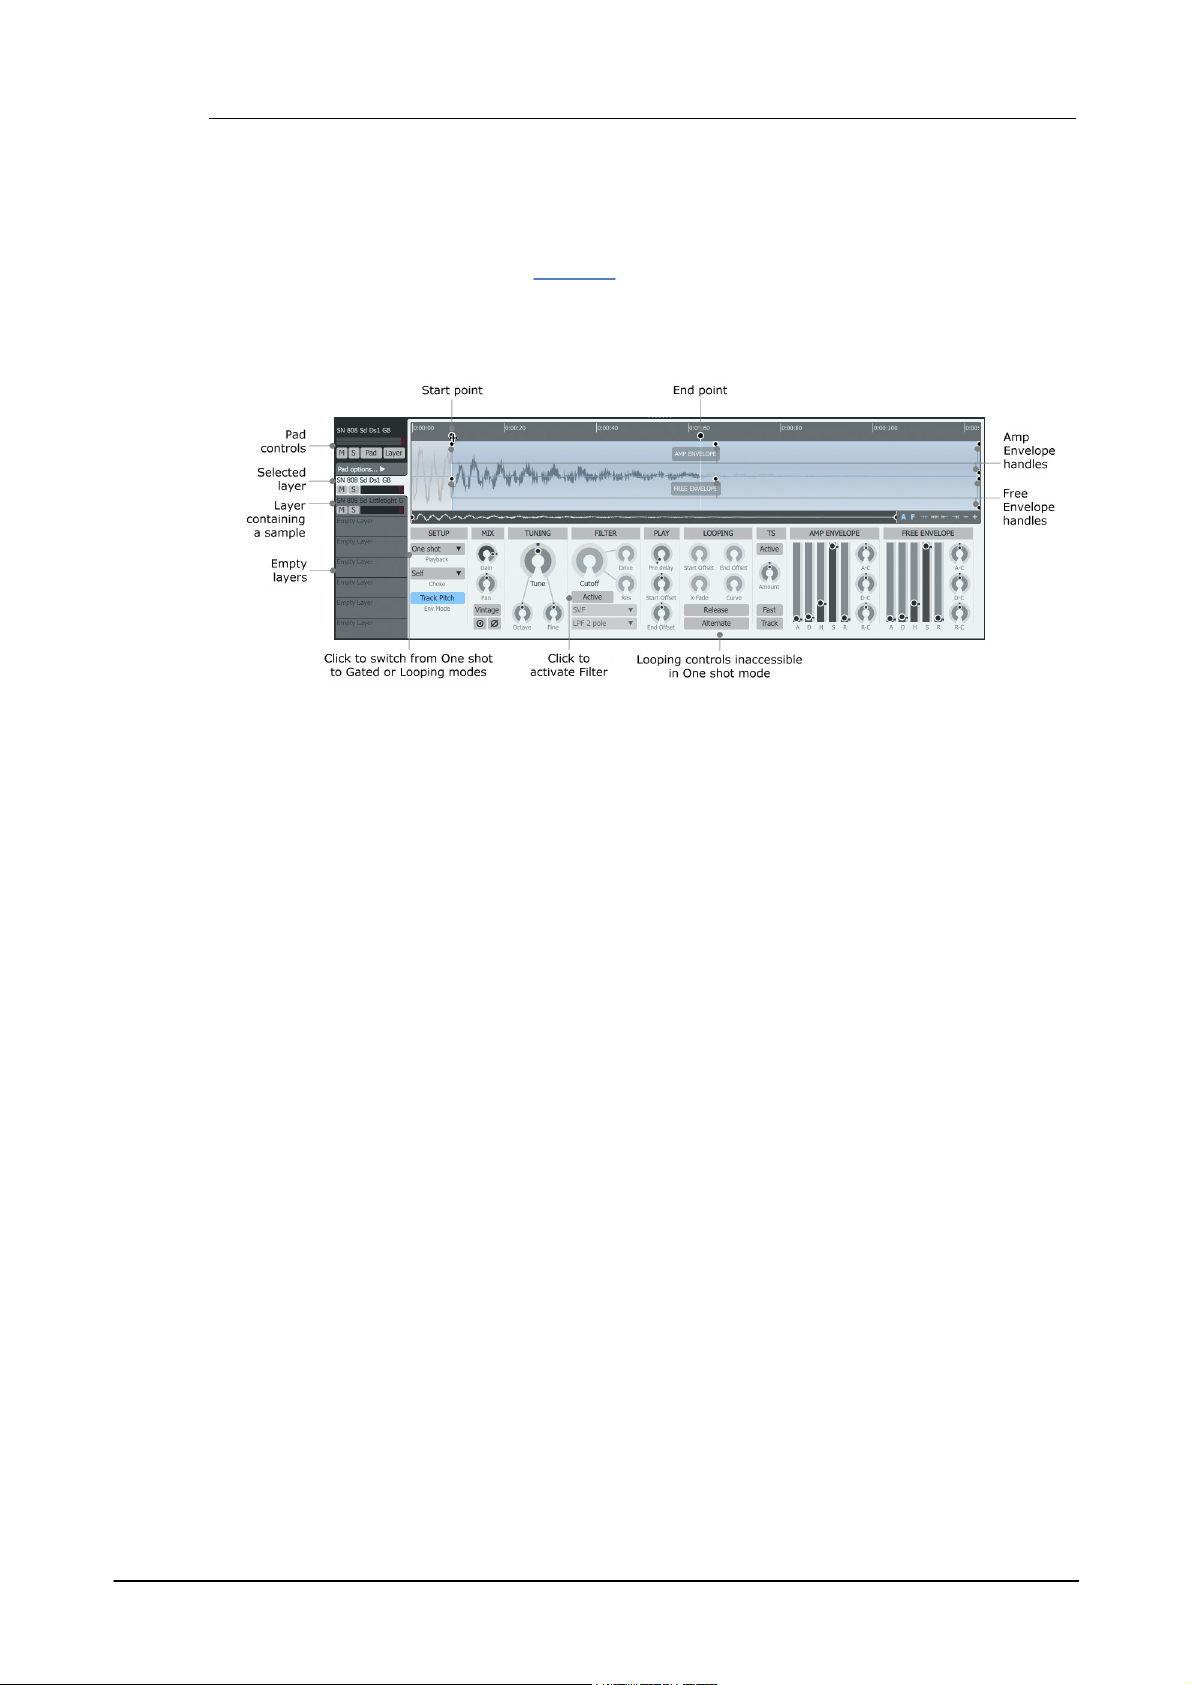
Pad controls
The pad controls provide various controls and settings for the entire pad and how its 8 layers are
played. It also includes the Multiple Edit shortcuts which are described later in this section.
Click the Pad options... to access additional controls for the pad, including the Layer play mode
for dictating how layers are played back. By default, all 8 layers on the pad are played
simultaneously whenever it is triggered, using the All layers setting. Setting this to Velocity split
mode activates controls for defining velocity split points and fades for the pad's layers.
Layer selector
The 8 slots underneath the pad controls represent each of the 8 layers on the pad. Click a layer to
select it for editing in the main Layer controls section of the Pad Editor, containing the waveform
display and editing controls. It is also possible to drag and drop samples onto these layer slots
from the Browser.
Start point and End point
The Start point and End point handles can be dragged left/right in order to set the start and end
of the section of the sample that is played when the layer is triggered.
Playback mode
This menu selects between One shot, Gated and Looping modes. Gated and Looping modes mean
that the layer responds to event duration. When Looping mode is activated, the Looping controls
section becomes accessible and Loop start and Loop end handles become available in the
waveform display - these are adjusted in the same way as the Start point and End point
handles.
Amp Envelope and Free Envelope handles
These handles can be dragged in order to adjust the shape of each envelope, as an alternative to
using the sliders at the lower-right of the Pad Editor panel.
The Free Envelope can be assigned to modulate a variety of destination parameters via the
TransMod system (see below). It is not assigned to any destinations by default.
Activating the Filter
By default, the layer's Filter is deactivated - to activate it, click the Active button in the Filter
controls section.
Selecting and editing multiple layers
To select multiple layers in the Layer selector for simultaneous paramter editing:
© 2016 FXpansion Audio
Introduction to Geist2 23
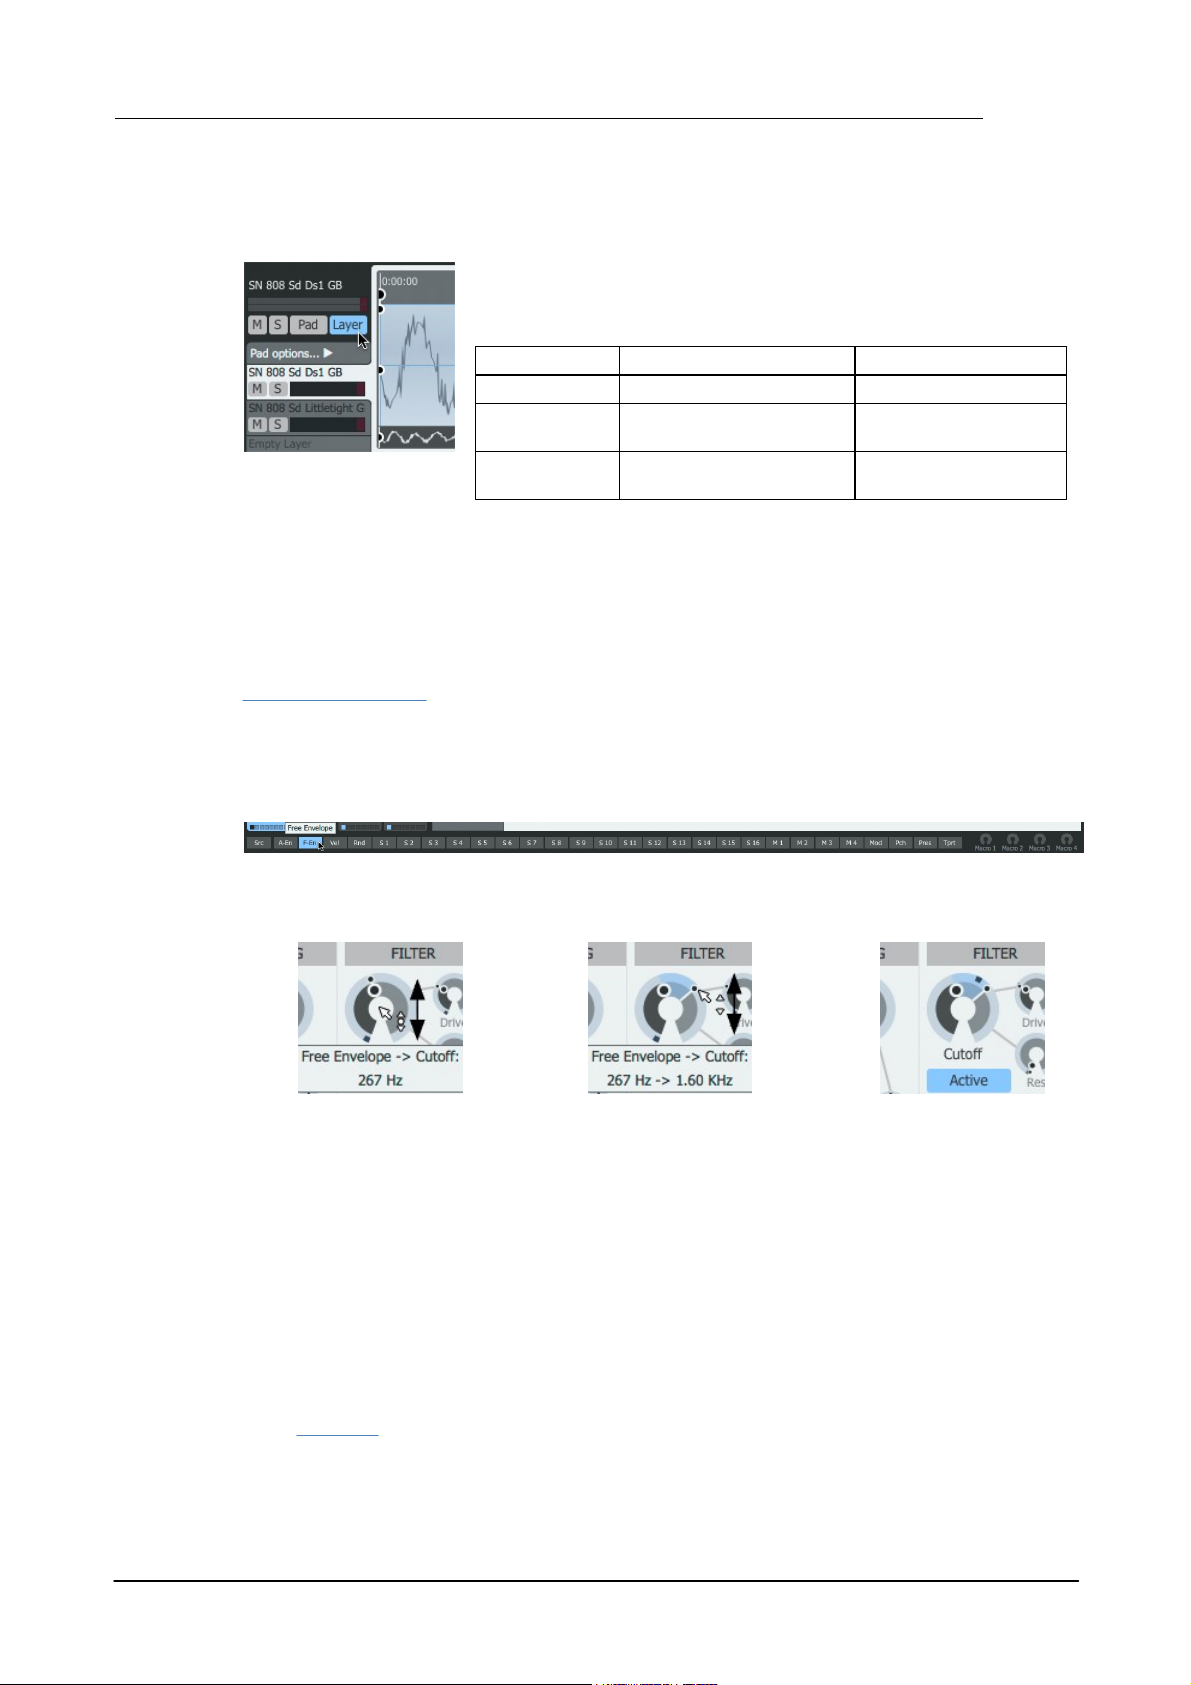
The Layer and Pad edit shortcuts are provided in order to allow
multiple layers/pads to be edited simultaneously (if they are not
locked). Simply hold down the following keyboard modifiers when
adjusting controls:
Keyboard modifiers
Function
Layer shortcut
CMD (Mac) / CTRL (Win)
Edit all pad layers
Pad shortcut
ALT
Edit same layer on all
engine pads
Layer + Pad
shortcuts
CMD+ALT (Mac)
CTRL+ALT (Win)
Edit all pad layers on
all engine pads
1. First, select the layer for editing and then click the F Env TransMod source near the lower-left
of the Geist2 interface.
2. Click/drag vertically the
central part of the Cutoff
control to set the initial value.
3. Click/drag vertically the outer
ring of the control to set the
maximum modulation depth.
• Whenever the layer is
triggered, the envelope
modulation is indicated in realtime.
• SHIFT-click to create a contiguous selection between 2 layers
• CMD-click (Mac) or CTRL-click (Windows) to add a layer to the selection
Multiple edit shortcuts
As an alternative to using keyboard modifiers, toggle the Layer and Pad buttons in the Pad
controls section.
The Pads shortcut can also be used in conjunction with multiple layer selections (see above) -
parameter adjustments are duplicated in all selected layer numbers across all pads in the engine.
Note that effects devices cannot be added or edited using these edit shortcuts.
Modulating sounds with the TransMod system
TransMod modulation involves selecting a current modulation source (from a variety of available
sources) and drawing modulation amounts directly onto any Geist2 controls capable of being
modulated.
Therefore, modulation can be viewed and edited visually rather than through an abstract
modulation matrix list.
To assign a layer's Free Envelope to its Filter Cutoff parameter, proceed as follows.
• This modulation acts only on the layer on which the modulation depth is set up as shown above.
To operate multiple layers and pads, use the multiple selection/edit methods described above.
• Envelopes are polyphonic and act per layer - an individual Amp Envelope and Free Envelope
exists for each layer on each pad in each engine. There are other polyphonic TransMod modulation
sources such as the Vel (Velocity) and Rnd (Random) sources which provide values for each MIDI
and pattern event triggering the layer.
• There are also a number of 'global' modulation sources such as Macro controls and LFOs (the
latter must first be assigned to one of the 16 assignable modulator slots). These do not operate
polyphonically but can still be used to modulate parameters on individual layers.
• See chapter 8 for a full guide to the TransMod system.
© 2016 FXpansion Audio
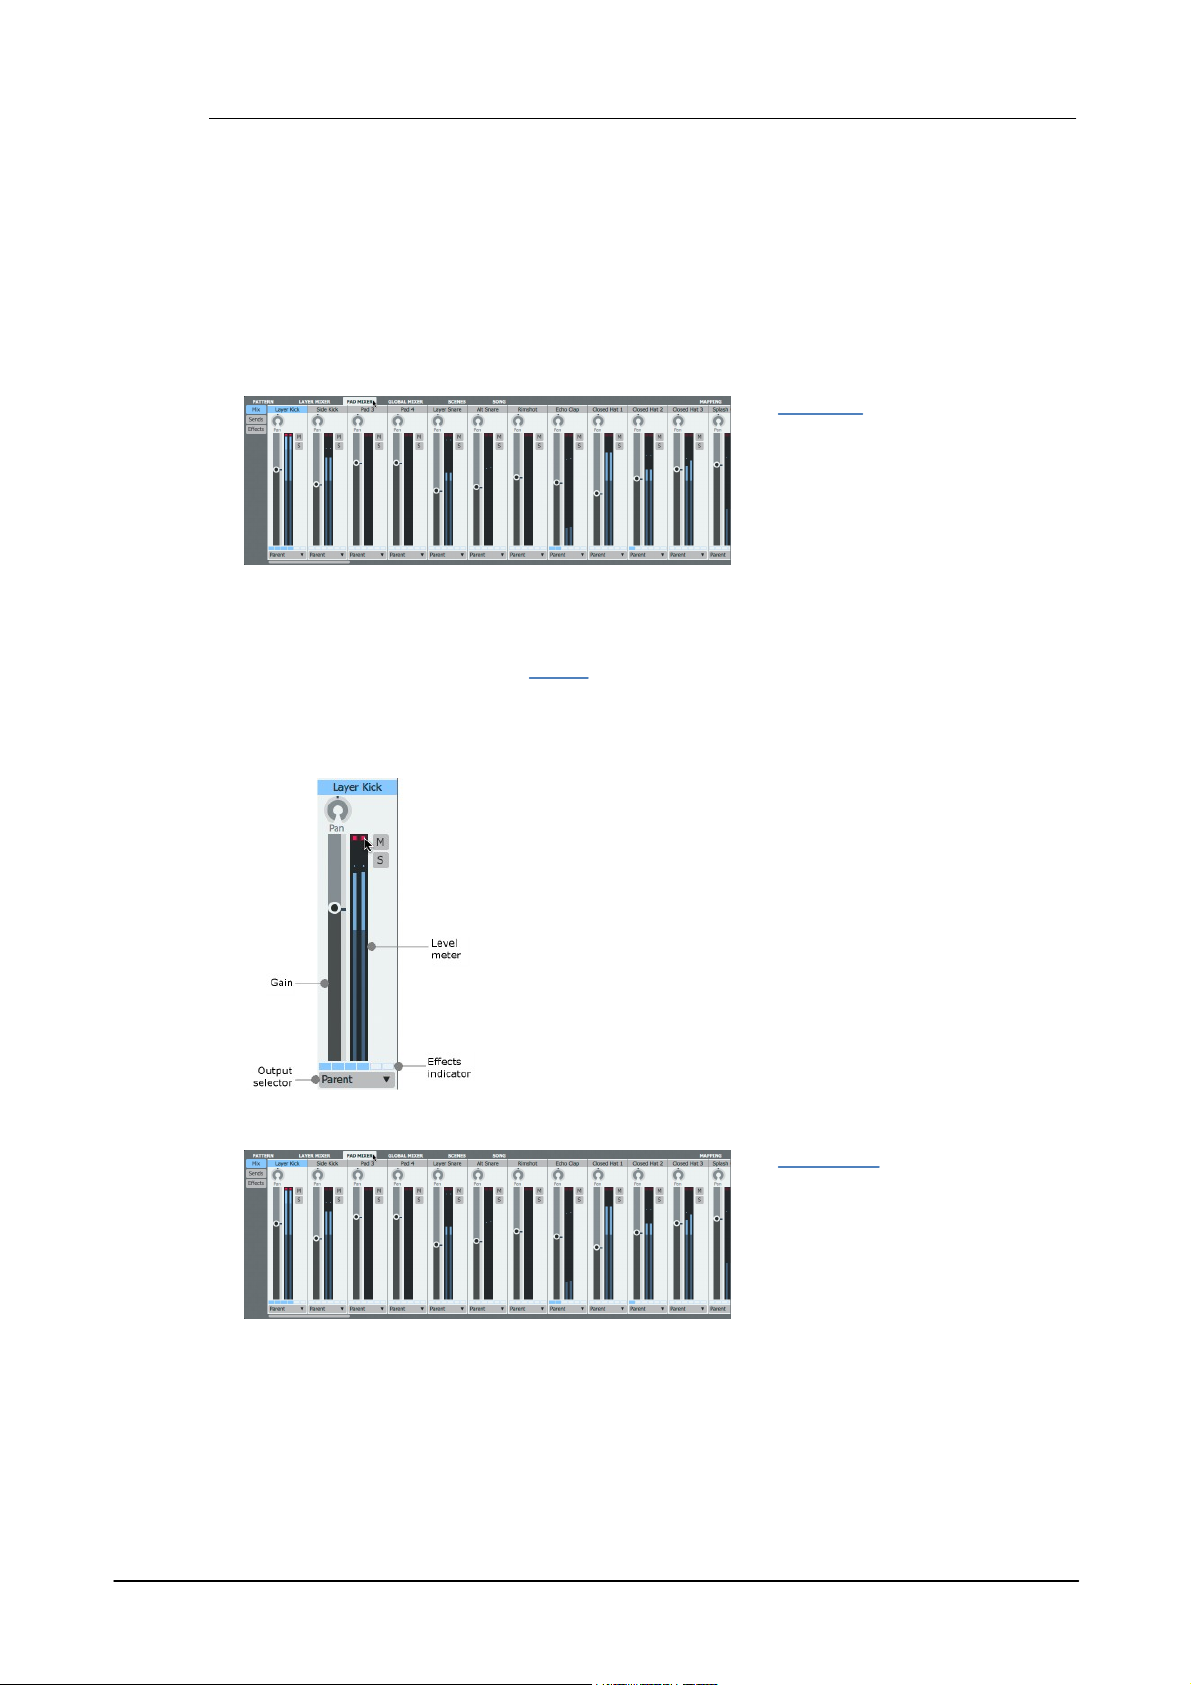
Geist224
The Pad Mixer page displays as many
channels as the number of pads
currently specified for the engine.
For applying effects to individual sounds
in most situations, it is recommended to
use the Pad Mixer. This means that
usually, all layers on the pad are
processed through the pad's effects
devices.
Pan, Gain, Mute, Solo, Level Meter
Use these controls in order to perform basic mixing functions.
Output selector
If a pad's Output selector is set to Parent, it is mixed with any other
pads in the engine with the same setting. It can then be processed
further in the Global Mixer if required.
If a discrete sub-output is specified, the pad bypasses the Global
Mixer.
Effects indicator
This indicator shows whether each of the channel's 6 Effects slots is
Active or not.
The Layer Mixer page displays 8
channels - each representing one of the
8 layers on the currently selected pad.
It allows mixing and effects processing
of individual layers within a pad.
If a layer's Output selector control is
set to Parent, it is mixed with other
layers with the same setting and sent to
its parent pad channel.
1.7 Mixer pages and Effects
Geist2 features 3 separate mixer pages which provide channel-based layouts alongside effects
processing for the following:
• Engines, Aux busses and the Master channel (Global Mixer page),
• Pads in the current engine (Pad Mixer page)
• Layers on the current pad (Layer Mixer page)
Pad Mixer page
The only exception to this is when individual layers are routed to alternative outputs using the
Output selector control (see below for more details on this control).
One of the main advantages of adding effects to the entire pad is that the effects devices'
parameters become available as graphs so they can be automated per-step in patterns.
It is also more efficient to use effects on the entire pad rather than using the same effects devices
on multiple individual layers.
Important Pad Mixer controls
Layer Mixer page
It can then be further processed in the Pad Mixer page if required.
Layers can also be set to discrete sub-outputs, bypassing the Pad Mixer.
© 2016 FXpansion Audio
Introduction to Geist2 25
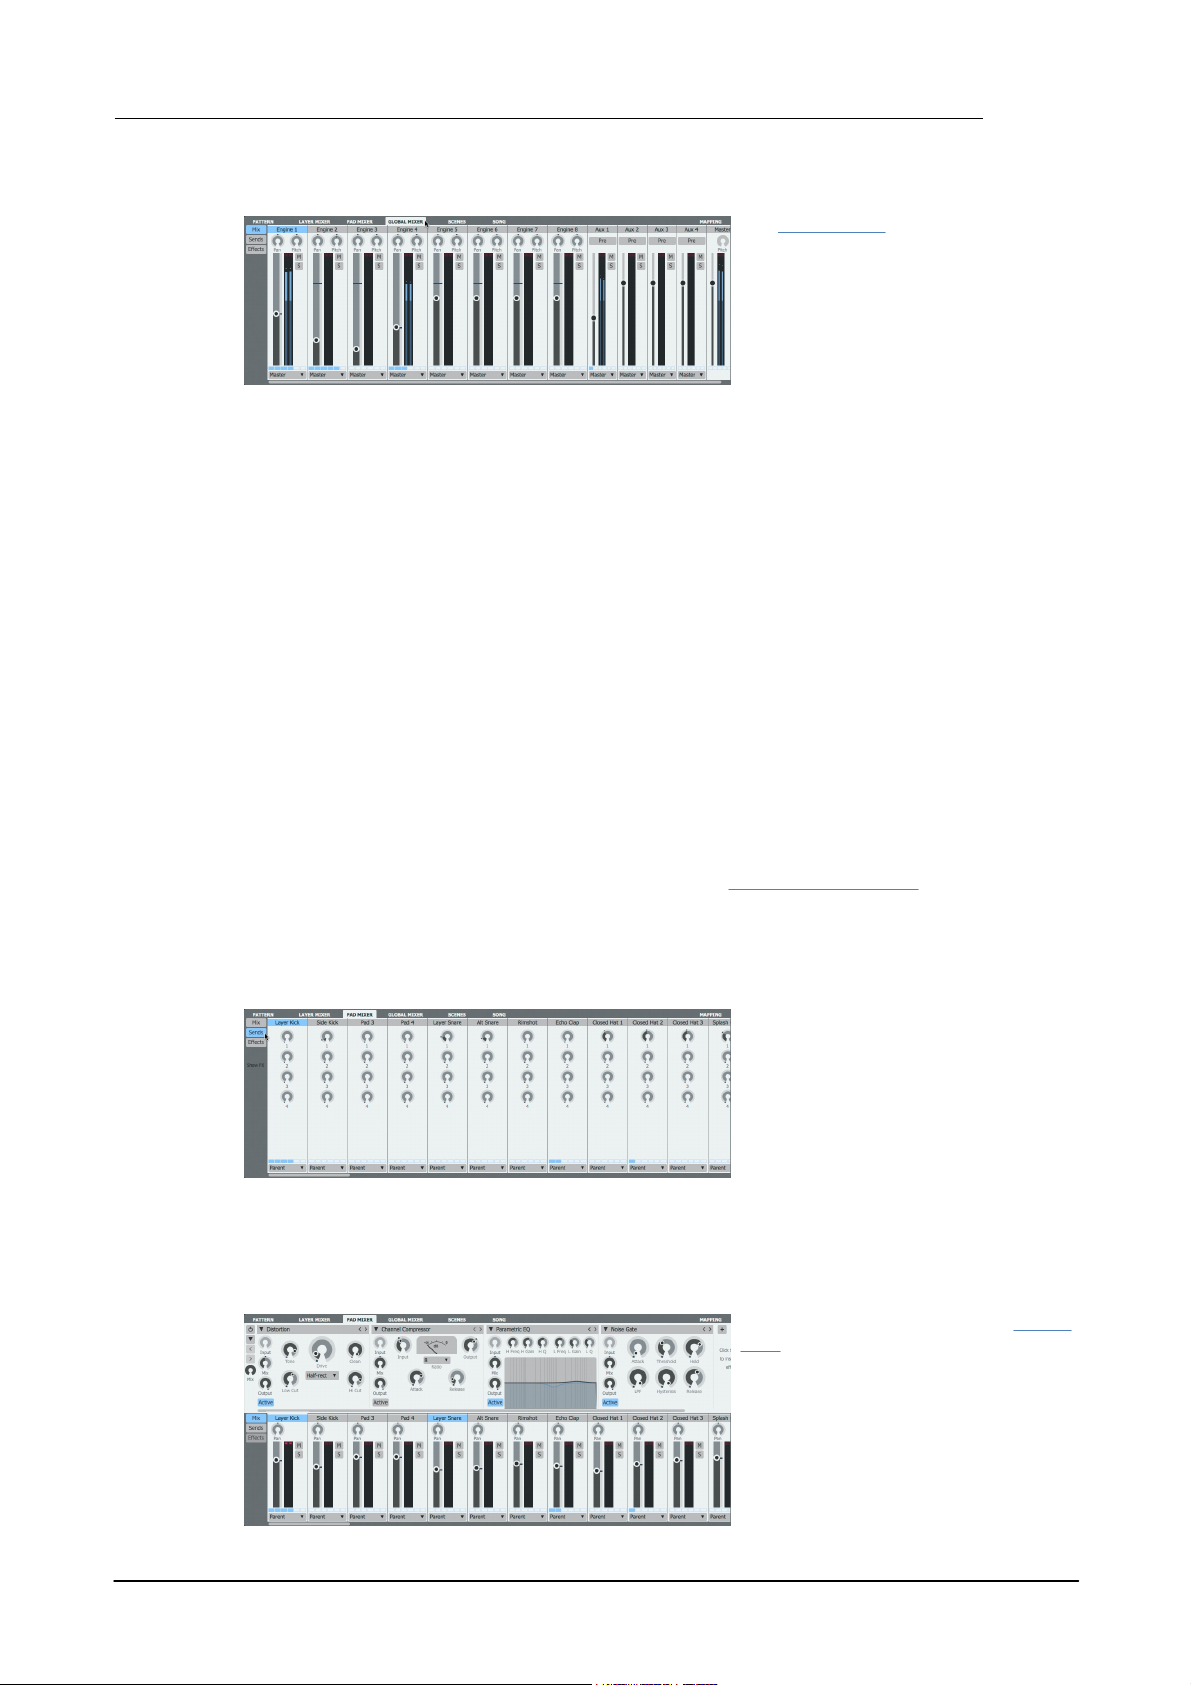
The Global Mixer page displays all 8
engines, the 4 Aux channels and the
Master channel as individual mixer
channels.
If any pads or layers have been routed
to a discrete sub-output using their
Output selector controls, they are not
represented in its parent engine channel
in the Mixer page.
Sends are 'parallel' routings from the
pad to the Aux busses - each pad
channel features 4 Send controls, one
for each of the 4 Aux busses, labelled 1
to 4.
To display the Send controls, click the
Sends button to the left of the mixer.
Each pad features 6 assignable Effects
slots for loading effects devices. The
visibility of the Effects slots is dependent
on the current size/scaling of the Geist2
interface.
• When an adequate vertical area is
available, the Effects slots for the
selected channel are shown above the
mixer.
Global Mixer page
Each engine channel's Pitch control adjusts the pitch of the entire engine's sounds relative to
individual layer Tuning settings.
Engine Effects
Engine Effects are for overall processes for all pads in the engine.
Aux busses
Aux busses are useful for parallel processing and other classic Send-based effects such as
reverbs and parallel compression for multiple channels.
Layer, pad and engine channels can be sent to Aux channels in variable amounts using their S1 to
S4 controls.
Entire pad, layer or engine channels can be routed to Aux channels using their Output selector
controls.
Each Aux channel also features a Pre button for specifying its position in the signal path.
Master channel
The Master channel is the default output routing for all channels in Geist, unless any channel is
specifically assigned to a sub-output with its Output selector.
Editing multiple channels
Multiple channels can be selected or the Layers / Pads multiple edit shortcuts can be used in
order to adjust mix parameters for multiple elements simultaneously.
Note that it is not possible to insert effects devices or adjust their parameters on multiple channels
simultaneously.
Sends
The routing point for all sends to an Aux buss can be set to either pre- or post-fader, using the
Pre button on the Aux buss itself, located in the Global Mixer.
Note that the Aux channels themselves in the Global Mixer do not feature Sends.
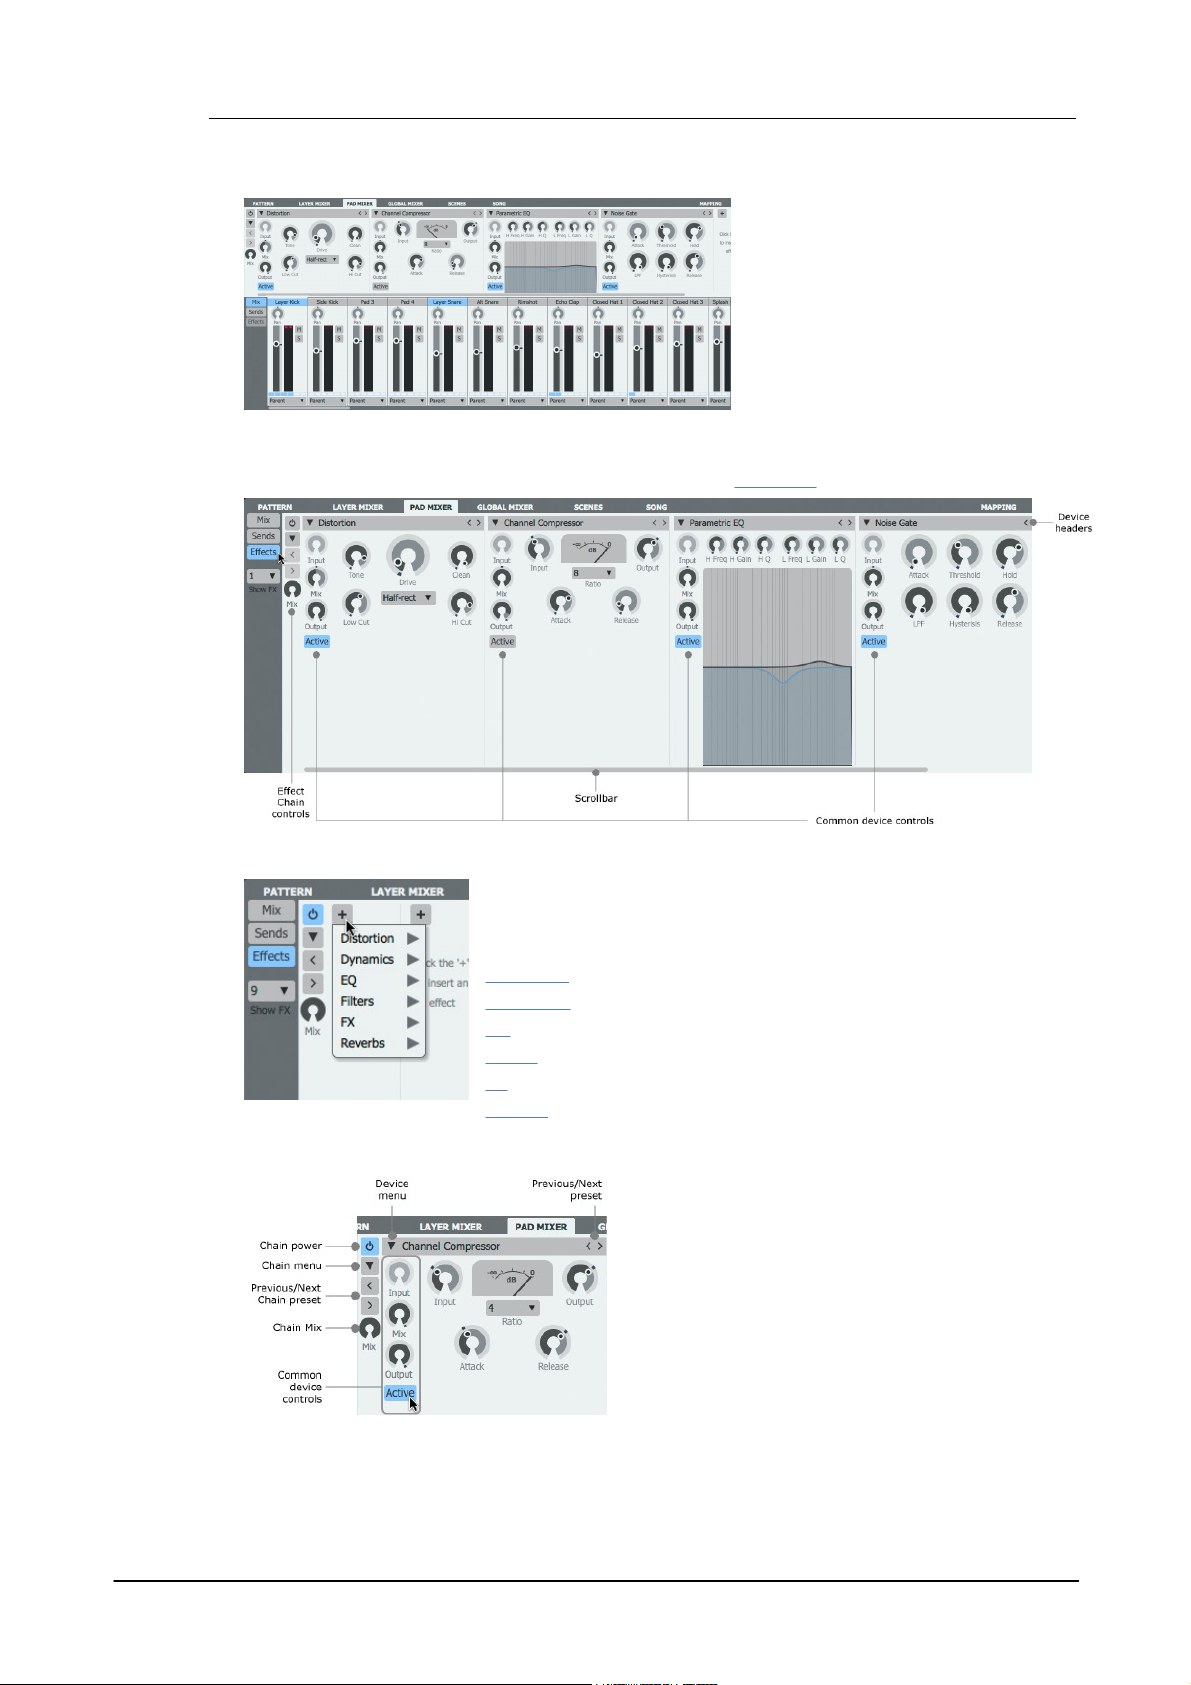
Effects Slots
© 2016 FXpansion Audio
Geist226
• When the required vertical area is
unavailable, click the Effects button to
display the current channel's Effects
slots in place of the mixer channels.
When an effects slot is empty, click the + button to display a menu of
available devices. Click the desired device within the relevant submenu to load it into the slot. See the following sections for details of
each available effects device:
Distortion
Dynamics
EQ
Filters
FX
Reverb
The Active button must be engaged for the device to
process audio. When it is deactivated, the device is
bypassed and audio passes through it unaffected.
The Device menu allows a different Effect device to
be loaded in place of the current device and also
provides access to preset loading and saving
functions. The Previous/Next preset buttons cycle
through the available presets for the device.
The Mix control exists on all effects slots and allows a
wet/dry mix for any device.
In addition to the Mix control, each slot features an
output Level control which is useful for attenuating or
boosting a signal after certain effects settings.
Using the Effects controls
For a full guide to the effects system and its controls see chapter 7.
Loading an effect device into an empty slot
Device headers and common device controls
The Input control is provided for certain devices such as delays and reverbs and sets the input
level to the device.
© 2016 FXpansion Audio

Introduction to Geist2 27
Effect chain controls
The Chain menu and Previous/Next Chain preset buttons provide the ability to save and load
presets for the entire chain of 6 effect slots. The Chain Mix control sets the wet/dry mix of the
entire chain vs. the original signal.
The Chain Power button toggles the entire chain on or off.
Automating Effects
Effects parameters can be automated with the following methods:
• Graphs (for Pad Mixer effects only)
• TransMod modulation
• Host automation or MIDI CC control, either live using hardware controls or from tracks in the
DAW/host when running Geist2 as a plugin
© 2016 FXpansion Audio

Geist228
In such situations the internal sequencing functions can be ignored entirely - if
patterns are not required, the Pattern Power buttons for all 8 engines can be
deactivated.
1.8 Sequencing and arrangement
Geist2's architecture is deep enough to accomodate many different ways of working. No single
way is better than another – it's purely down to the personal preference of the user.
Geist2 as a sample playback module or 'drum sampler'
Geist2 can be used as a sample-playback engine using the MIDI sequencing features in the host/
DAW to trigger the Geist2 plugin's pads.
Using Geist2's internal pattern sequencing
Another method of working is to sequence within Geist2 itself using its patterns and Graphs - this
offers the following advantages:
• The slick step-sequencing environment can be faster and more fun for creating drum patterns
than the sometimes cumbersome and fiddly MIDI editors in many host/DAW applications.
• Its advanced features like retro recording may not exist in the host.
• The step-based parameter automation graphs can efficiently add variation, movement and
experimental effects.
Arranging pattern changes within Geist2's Song page
The Song page allows patterns to be arranged as 'blocks' on a linear timeline.
• Patterns can be recorded into the Song timeline in real-time (using Pattern memory keys or
Scenes when working with multiple engines)
• The Retro Record function can also be used to 'capture' a pattern/scene performance after the
fact
Working in this way can have the following advantages:
• Diverse full Geist2 presets can be loaded within the same host/DAW project for trying different
rhythmic arrangements.
• The Geist2 standalone version can be used for composition work (without having to deal with a
complex, resource-hungry host application) – perhaps on a laptop. The Geist2 session can then be
loaded into a host/plugin environment for detailed work.
• If the kinds of features found in fully-fledged sequencer hosts are not required, it is perfectly
possible to create entire sample-based musical pieces with the standalone version of Geist2 and
nothing else – the built-in audio export functions allow entire songs or individual patterns to be
exported as finished stereo mixdowns.
Hybrid approaches
Exporting patterns from Geist
Patterns can be composed in Geist2 and then exported to MIDI tracks in the DAW/host - working
in this way takes advantage of the fast pattern composition tools in Geist2 along with the host's
detailed arrangement and editing features. Patterns are exported by dragging pattern memory
keys to suitable MIDI tracks in the host.
To stop patterns playing within Geist2 while it is triggered by MIDI notes from the host, deactivate
the Pattern power button for the relevant engine(s).
Triggering patterns and scenes from the host
An alternative to the previous method is to effectively use the DAW/host as the 'song sequencer' patterns can be composed in Geist2 but then played using MIDI notes - either live or from
recorded/programmed notes on MIDI tracks. Patterns can be played either as 'triggers' for
switching continuously looping patterns or as 'gates' to play patterns for the duration of the note.
Scenes provide a convenient way to play patterns on all 8 engines simultaneously using a single
MIDI channel.
© 2016 FXpansion Audio

1.9 Patterns in more detail
The transport is vital to using patterns in Geist.
The Play/Stop button must be active to hear
patterns.
The Song button must be deactivated in order
to Record or Retro record pattern events.
With the Song button activated, these buttons
are used for Song page events.
Activate the Metronome button to hear a
click.
The Swing and Tempo Modifier functions, shown on the Pattern page,
allow control over various aspects of the entire engine's pattern timing
behaviour.
The Swing control in the Pattern page is set per-engine:
• all patterns in the same engine share the same Swing settings
• each of the 8 engines can be set to different Swing settings
Right-click the Swing control in order to display the Swing menu - this
includes a swing template menu, with each template providing a
different type of syncopation. Try the Triplet feel setting for a classic
drum-machine style swing.
The Swing functions are explored in more detail in the Pattern editor
section.
Patterns and pattern recording were introduced earlier. This section introduces features including
pattern editing, Retro recording, Swing and other pattern-related functions.
Transport controls for working with patterns
If the Quantize input button is activated, incoming events are automatically quantized to the
pattern grid.
Use the Panic button to stop any currently playing patterns and pad layers that may be playing.
The Transport options menu includes additional Metronome and count-in settings as well as the
Follow playback cursor function which causes the Pattern and Song pages to scroll with the
current playback position.
Introduction to Geist2 29
Swing and other timing related functions
Applying Swing to the engine's patterns
Each engine features individual swing/shuffle controls to apply a syncopated timing adjustment to
the patterns within the engine. Control the amount for the current engine with the Swing control
on the Pattern page.
Setting the engine's Tempo Modifier
The Tempo Modifier control multiplies the playback speed of the engine's patterns by a ratio,
which can be a fraction (to slow down the tempo of the patterns) or a value greater than 1 (to
increase the tempo). Try a setting of 1/2 to halve the speed of the pattern or 2/1 to double it.
The Tempo Modifier function is explored in more detail in the Pattern editor section.
Convert timing
This function, available by right-clicking on a pattern memory key, allows the 'resolution' of a
pattern to be changed without altering the position of events in the pattern. It can be useful if
triplet steps are required rather than 16ths, for example.
© 2016 FXpansion Audio

Geist230
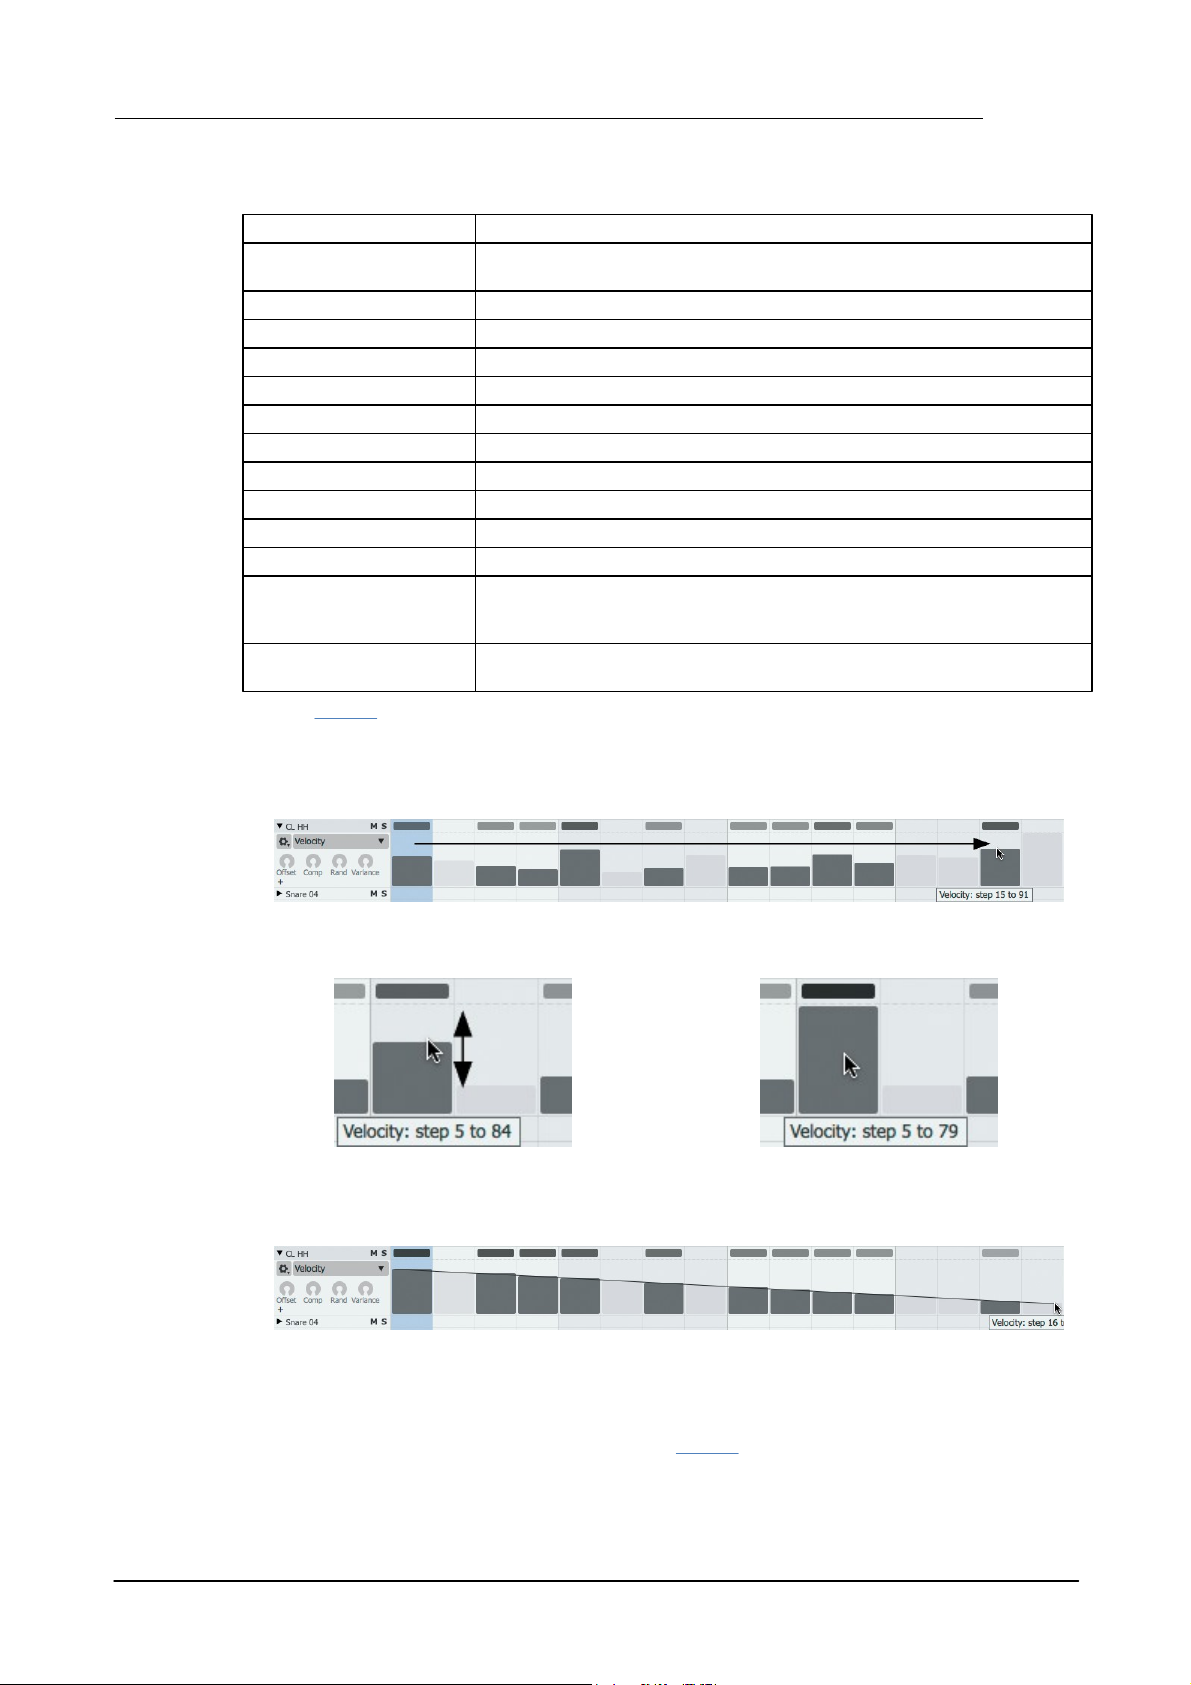
Adding an event
Adjusting velocity
Event context
menu
• Right-click in the
editing area while
holding down ALT to
display the event
context menu.
• Click to add an event
• Click and drag an
event/selection up or
down to adjust its
velocity*
Deleting an event
These actions can be
swapped using the
Preferences panel.
• Right-click to delete an event (or selection)
Selecting and deselecting events
• SHIFT-click an event to select it. Any
previously selected events are de-selected.
• Click an event while holding SHIFT and CMD
(Mac) or CTRL (Windows) to add it to the
selection. Clicking the event again with these
keyboard modifiers held down de-selects it.
• SHIFT-click and drag to draw a selection
box, from an empty area or from an event
(the event is included in the selection). Also
hold down CMD (Mac) or CTRL (Windows) to
add to an existing selection.
• SHIFT-click an empty area to de-select any
selected events.
Programming and editing pattern events
The guide below shows the main editing functions available for patterns. For a full guide see
chapter 9.
* It is possible to adjust any graph type in this way instead of Velocity, using the Drag edits
function in the Pattern editor.
© 2016 FXpansion Audio

Introduction to Geist2 31
Moving and copying selections
• Create a selection
• Click and drag the selection to
move it. Any Graph data that
exists on selected steps is moved
with the events.
• Click and drag the selection
while holding down ALT to copy
it. Any Graph data that exists on
selected steps is copied with the
events.
2. Click Play/Stop to
start the transport.
Alternatively, start the
host transport if using
the plugin.
3. Click the
Metronome button if
a click is required.
5. Click the Retro button to capture the events from the last non-empty pattern cycle.
Other pattern editing functions
See the Pattern editor section later in this manual for a guide to other editing functions in the
Pattern page.
Retro record
Sometimes the pressure of 'being in record mode' can impact the quality or spontaneity of a
performance. Geist2's Retro record function retrospectively captures events triggered by MIDI
input during playback. This means that it is possible to jam parts while in playback and then
capture a good take when it occurs.
1. Select a pattern and set the required Steps and Step Length values in the Pattern page, either
in a new or existing pattern, as shown previously.
It is not necessary to select a pattern at this time, but be aware that the position of any captured
events is always based on the pattern playing back while the events were played.
4. Play the pads on the interface or via their corresponding MIDI notes.
© 2016 FXpansion Audio
Geist232
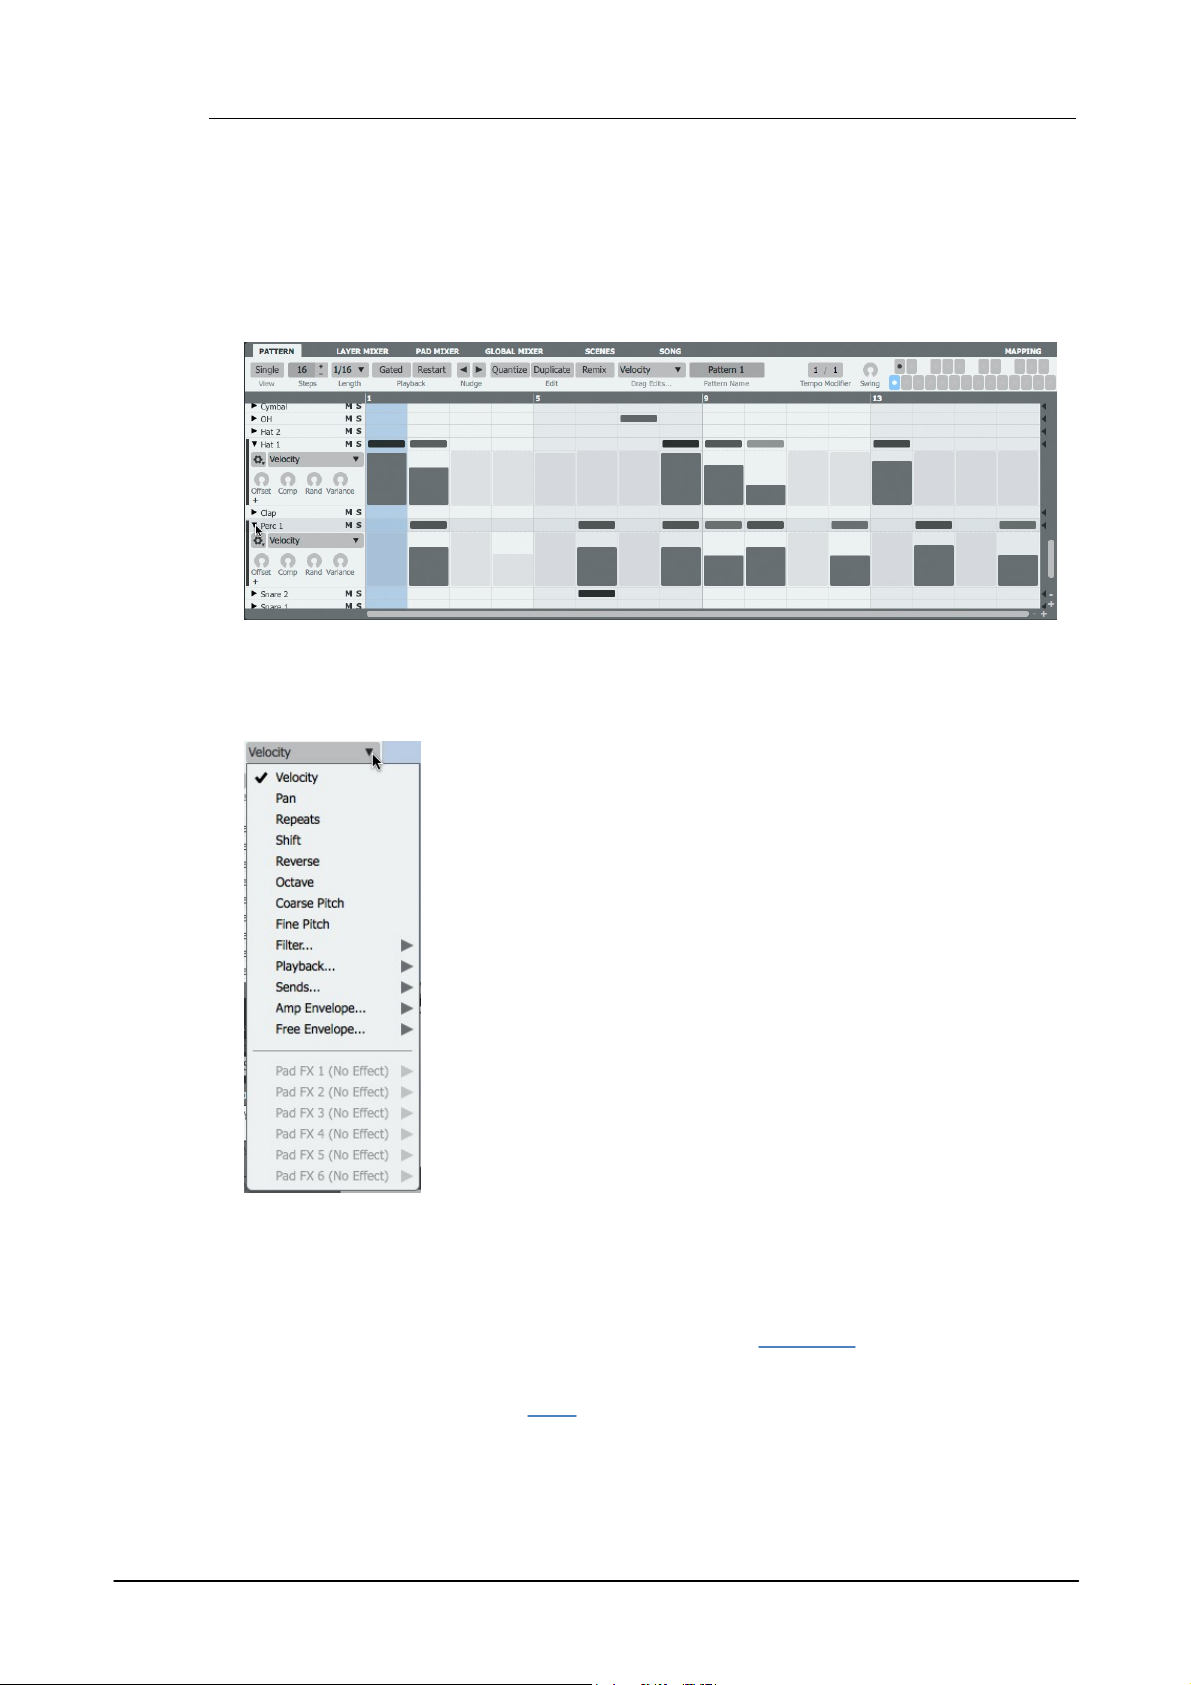
Selecting the graph type
Use the Graph type drop-down menu to select the graph type to view/edit.
Any graph containing any events is highlighted in the menu listing.
Important graph types in Geist2
Although graphs offer a lot of potential for sound design and movement for
patterns, they are also crucial in several fundamental aspects of sequencing
in Geist2.
Shift graph
This graph represents timing deviations away from straight step timing by
placing pad events on pattern tracks at variable distances before or after
actual step onsets.
Positive values (above the centre line) result in the step's event being
played late and negative values (below the centre line) mean it is played
early.
Shift graph values can be programmed or edited visually, and they are also
generated during realtime MIDI input recording of pattern events.
1.10 Introduction to Graphs
Graphs are step-automation sequences which send a value to a parameter at the onset of each
step.
Please note that graphs are not 'continuous' automation curves.
Viewing Graphs
By default, a graph lane can be shown for all tracks in the pattern - their visibility is toggled by
clicking the small triangular arrow Show graph buttons at the left of each track. If the Single
View button is activated, only a single graph lane is shown for the selected track only. When the
Single View button is deselected, multiple graphs can be displayed.
Octave, Coarse Pitch, Fine Pitch graphs
These graphs represent changes in the overall pitch of pads over the course of the pattern.
Pitch graph values can be programmed or edited visually and are also generated during realtime
MIDI recording of pattern events when using the Chromatic Pad mode.
Force Layers graph (Playback sub-menu)
This graph is produced when the Slicer panel's Use layers function is activated for extracting
more than 64 slices from an audio loop with an accompanying pattern.
It has 8 steps, with each value forcing the corresponding pad layer (1-8) to be played on that step.
When using multi-layer velocity-split kits, adjusting this graph can offer a quick way of
programming variation for each step.
© 2016 FXpansion Audio
Summary of graph types
Velocity, Pan
Pad Velocity and Pan
Repeats
Number of event repeats within a single step – useful for glitchy
effects
Shift
Deviation from quantized beat divisions
Coarse/Fine Pitch
Coarse and Fine pitch for all pad layers
Start Point
Changes the Start point of samples on pad layers
Filter Cutoff, Res
Filter Cutoff and Resonance for the step
Filter Type
Filter Type for the step
Force Layer
Forces only a certain layer (1-8) to play for the step
Probability
Dictates the probability of a pad triggering event occurring on a step
Loop Start
Changes the Loop Start point if a loop is defined for the sample
Loop End
Changes the Loop End point if a loop is defined for the sample
Send 1-4
Send levels for Aux sends 1-4
Envelope parameters
The Attack, Decay, Sustain, Hold, Release, Attack Curve,
Decay Curve and Release Curve parameters for both the Amp and
Free Envelopes are available as Graphs.
Pad FX 1-6...
All parameters for all 6 pad effects (not layer effects or any other
type of effects!) are available.
• Click and drag across the graph lane to 'paint' values or simply click values in single steps.
• Click and drag up/down to adjust a value.
Hold down the SHIFT key for fine control.
• Right-click in the graph lane to revert a step's
value to the default.
• Click and drag while holding down the ALT key to draw a series of graph events with the same
value.
Introduction to Geist2 33
See the Graphs section later in this manual for a reference guide to each graph type.
Creating Graph events
Drawing graph values
Recording graph values in real time
Graph data can be recorded in real time - see the Graphs section later in this manual for a guide
to this process.
© 2016 FXpansion Audio
Geist234
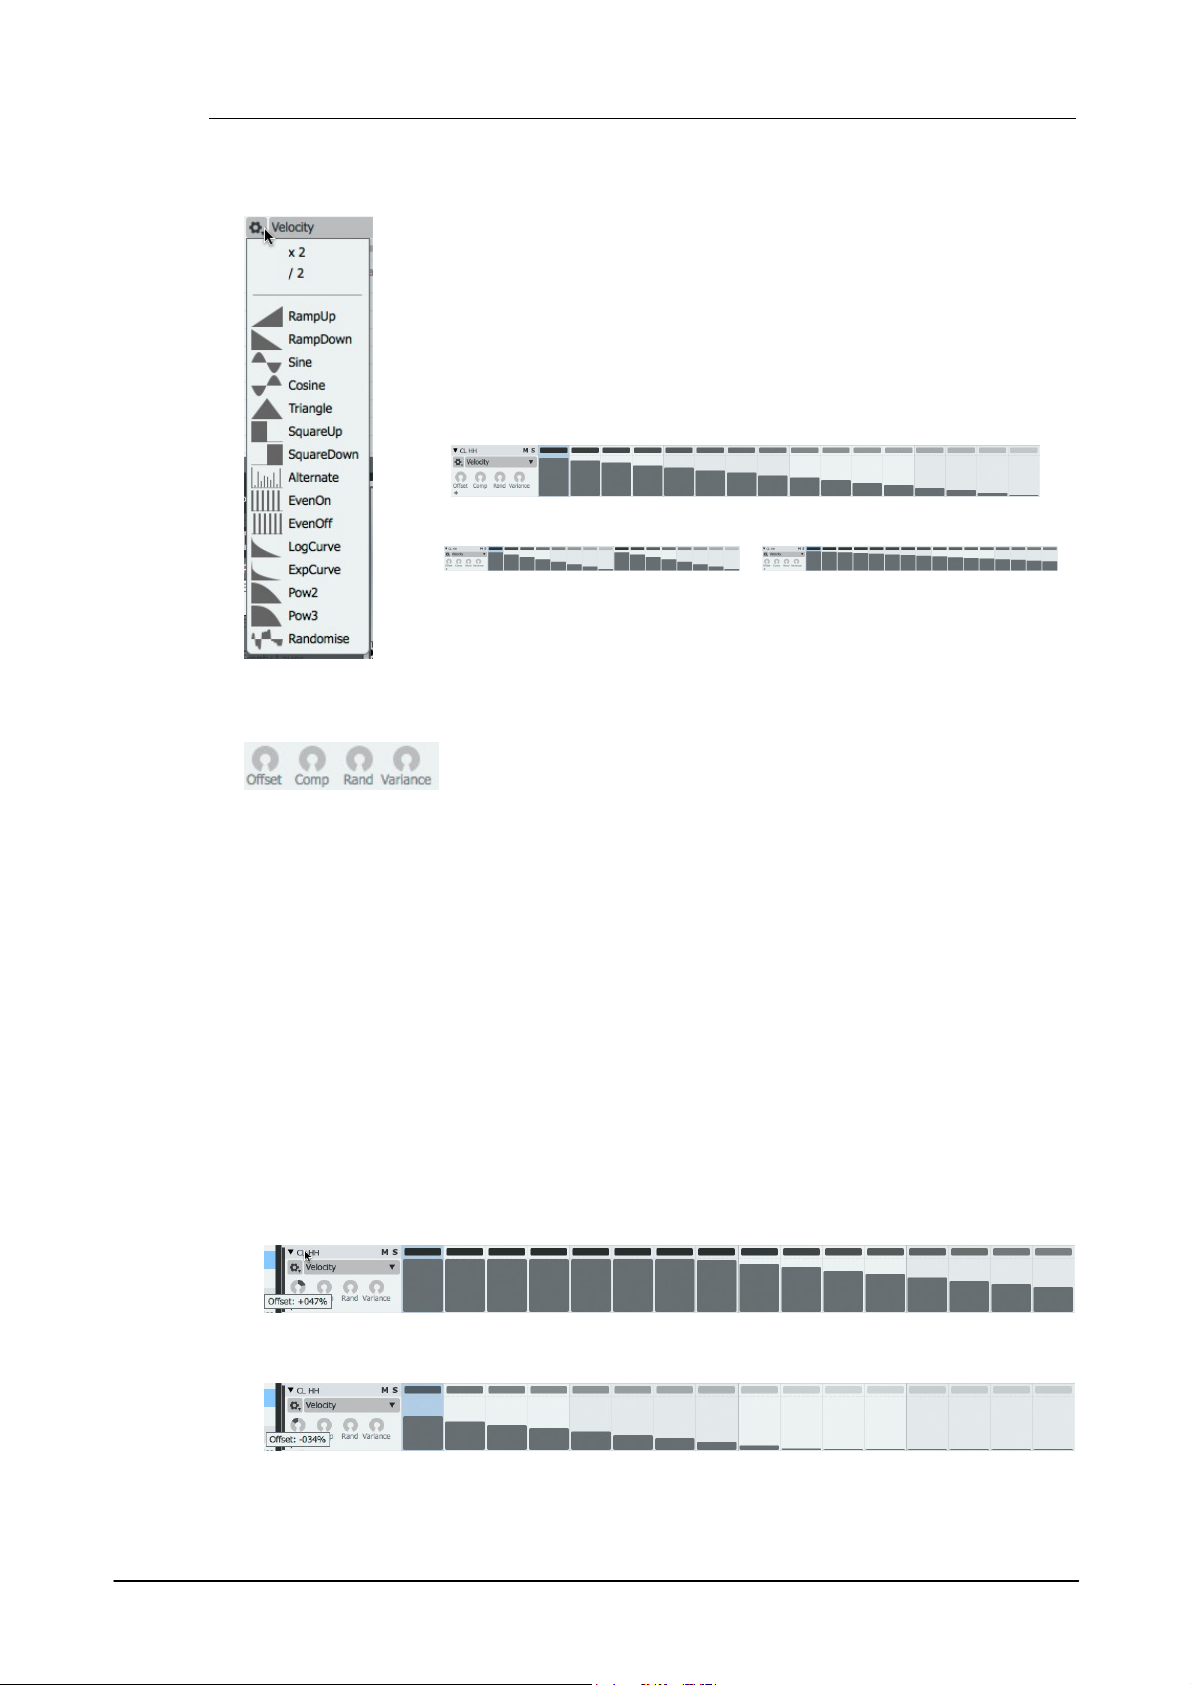
Insert menu
The Insert drop-down menu provides a number of useful graph automation
shapes to insert onto the lane.
Note that using a shape from this menu results in overwriting all existing values
in the graph lane.
X2 and /2 functions
The X2 and /2 functions, available on the Insert menu, operate on the entire
graph lane and stretch or expand the duration of the sequence of values.
• Original series of graph values
• The X2 button compresses the
graph value sequence to half the
length, and repeats it to fill the
entire length of the pattern.
• The /2 button expands the first
half of the sequence to double the
length so that its duration is the
entire pattern length.
These controls, with the exception of Variance, all act destructively to
edit graph values. The Variance control acts non-destructively in real
time.
• Increasing the Offset control from 0 on the Ramp-down graph sequence from earlier
• Decreasing the Offset control from 0 on the Ramp-down graph sequence
Additional graph editing functions
Variance, Offset, Comp and Rand controls
Variance
The Variance control applies non-destructive randomization for each graph lane in real time
during playback. It adds a positive or negative offset at random for each step, up to the amount
specified.
Using this control is a very fast way of adding movement and variation to sequences. Try using it
with the Velocity and Fine Pitch graphs for subtle amplitude and pitch variation over time. Try also
using it with Pad FX graphs.
Offset, Comp, Rand
The Offset, Comp and Rand controls are used to adjust multiple graph values simultaneously.
Adjusting any of these controls results in destructive edits to the graph values, visually
represented on the graph display. When the control is released, the current graph values are
applied and the control springs back to the default position (with value 0).
If a selection of steps exists on the track, the controls are applied only to the selected steps.
Note that it is not possible to assign or control the Offset, Comp and Rand controls to MIDI or host
automation.
Offset
The Offset control adds the same value to all current values for the relevant graph.
Comp
© 2016 FXpansion Audio

Introduction to Geist2 35
• Increasing the Comp control from 0 on the Ramp-down graph sequence
• Decreasing the Comp control from 0 on the Ramp-down graph sequence
• Increasing the Rand control from 0 on the Ramp-down graph sequence
• Decreasing the Rand control from 0 on the Ramp down graph sequence
As the Comp control is turned to the right, it gradually increases all graph values towards the
maximum value, effectively 'compressing' the range between the maximum and minimum value.
If the control is turned to the left, graph values are reduced towards the minimum value.
Rand
The Rand control adds a random value to all graph values that is between 0 and the current value
of the Rand control. The value can be positive or negative, depending on whether the Rand control
is turned to the right or to the left.
© 2016 FXpansion Audio
Geist236
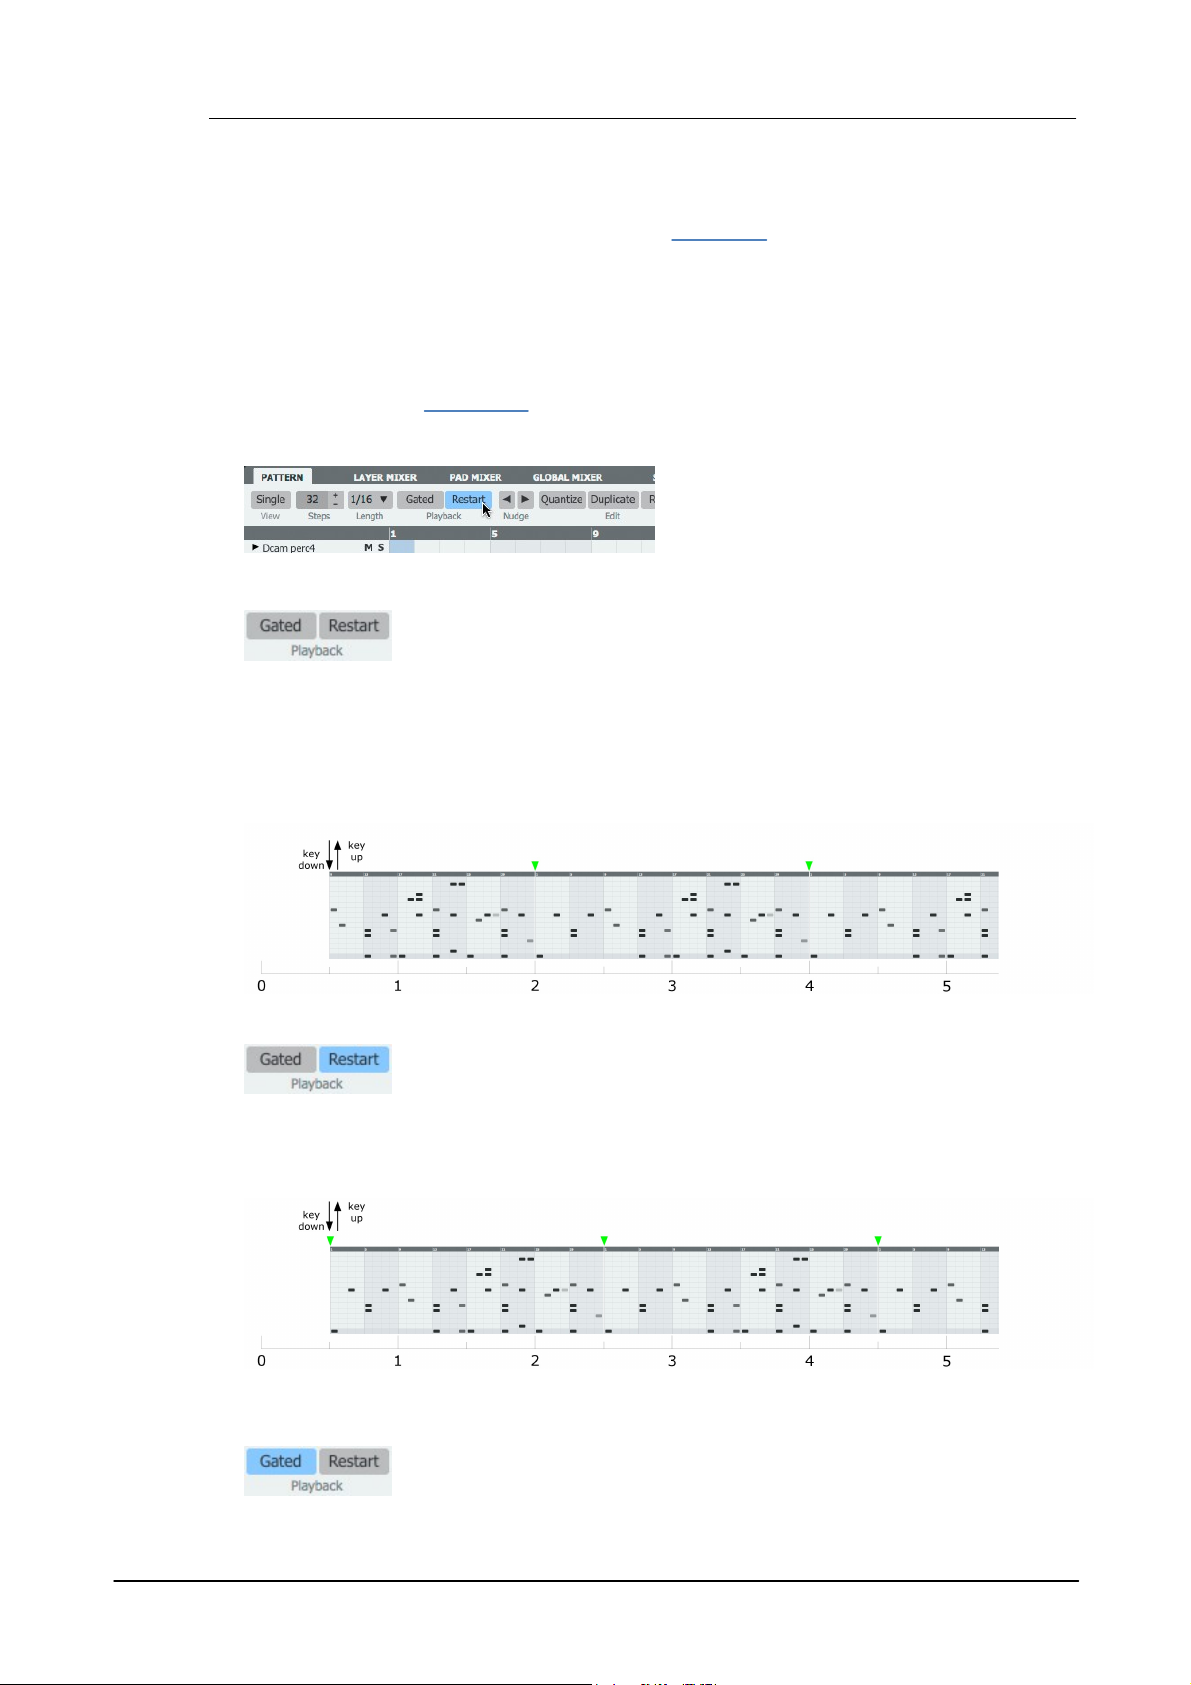
Each pattern features the Restart and Gated
Playback modes which dictate certain aspects
of how it is played back. Both modes can be
active or inactive at the same time.
These are the default Playback settings for new patterns in Geist2, as they
represent most immediate form of pattern playback.
These settings are similar to the default settings mentioned above, except that
in situations when the transport is already started, the pattern is always played
from its beginning when its MIDI key is used to switch to it.
Gated mode is provided in order to allow patterns to be played by holding
down a pattern's MIDI key.
1.11 Performing with patterns
Geist2 allows pattern performance by playing the MIDI notes associated with pattern memory
keys (they can also be clicked on-screen but MIDI keys offer a far more accurate and playable
method). This section refers to a pattern's MIDI keys, as the most common MIDI note input
method for playing patterns are keys on a MIDI keyboard.
Each engine can play one pattern at any one time. Triggering or playing patterns in this way can
be useful for live performances, playing specific patterns during a project from MIDI tracks in a
sequencing host/DAW, or when recording into the Song page.
An alternative to triggering individual engine patterns is to use Scenes which are used in a very
similar way. See the next section for a guide to using Scenes.
Playback mode
Gated off, Restart off
• With the Gated mode deactivated, if the pattern is selected as the current pattern, it plays
automatically when the Geist2 transport is started.
• If the transport is already started with a different pattern already playing, the pattern's MIDI key
is used to switch to it - simply play the key and release it.
• The deactivated Restart mode means that it starts in phase with the playing position.
• It then loops indefinitely until another pattern is selected/played.
Gated off, Restart on
• The pattern is started by playing its MIDI key and releasing it.
• The pattern always plays from its start, and can play out of phase with the playing position.
• It loops indefinitely until another pattern is selected/played.
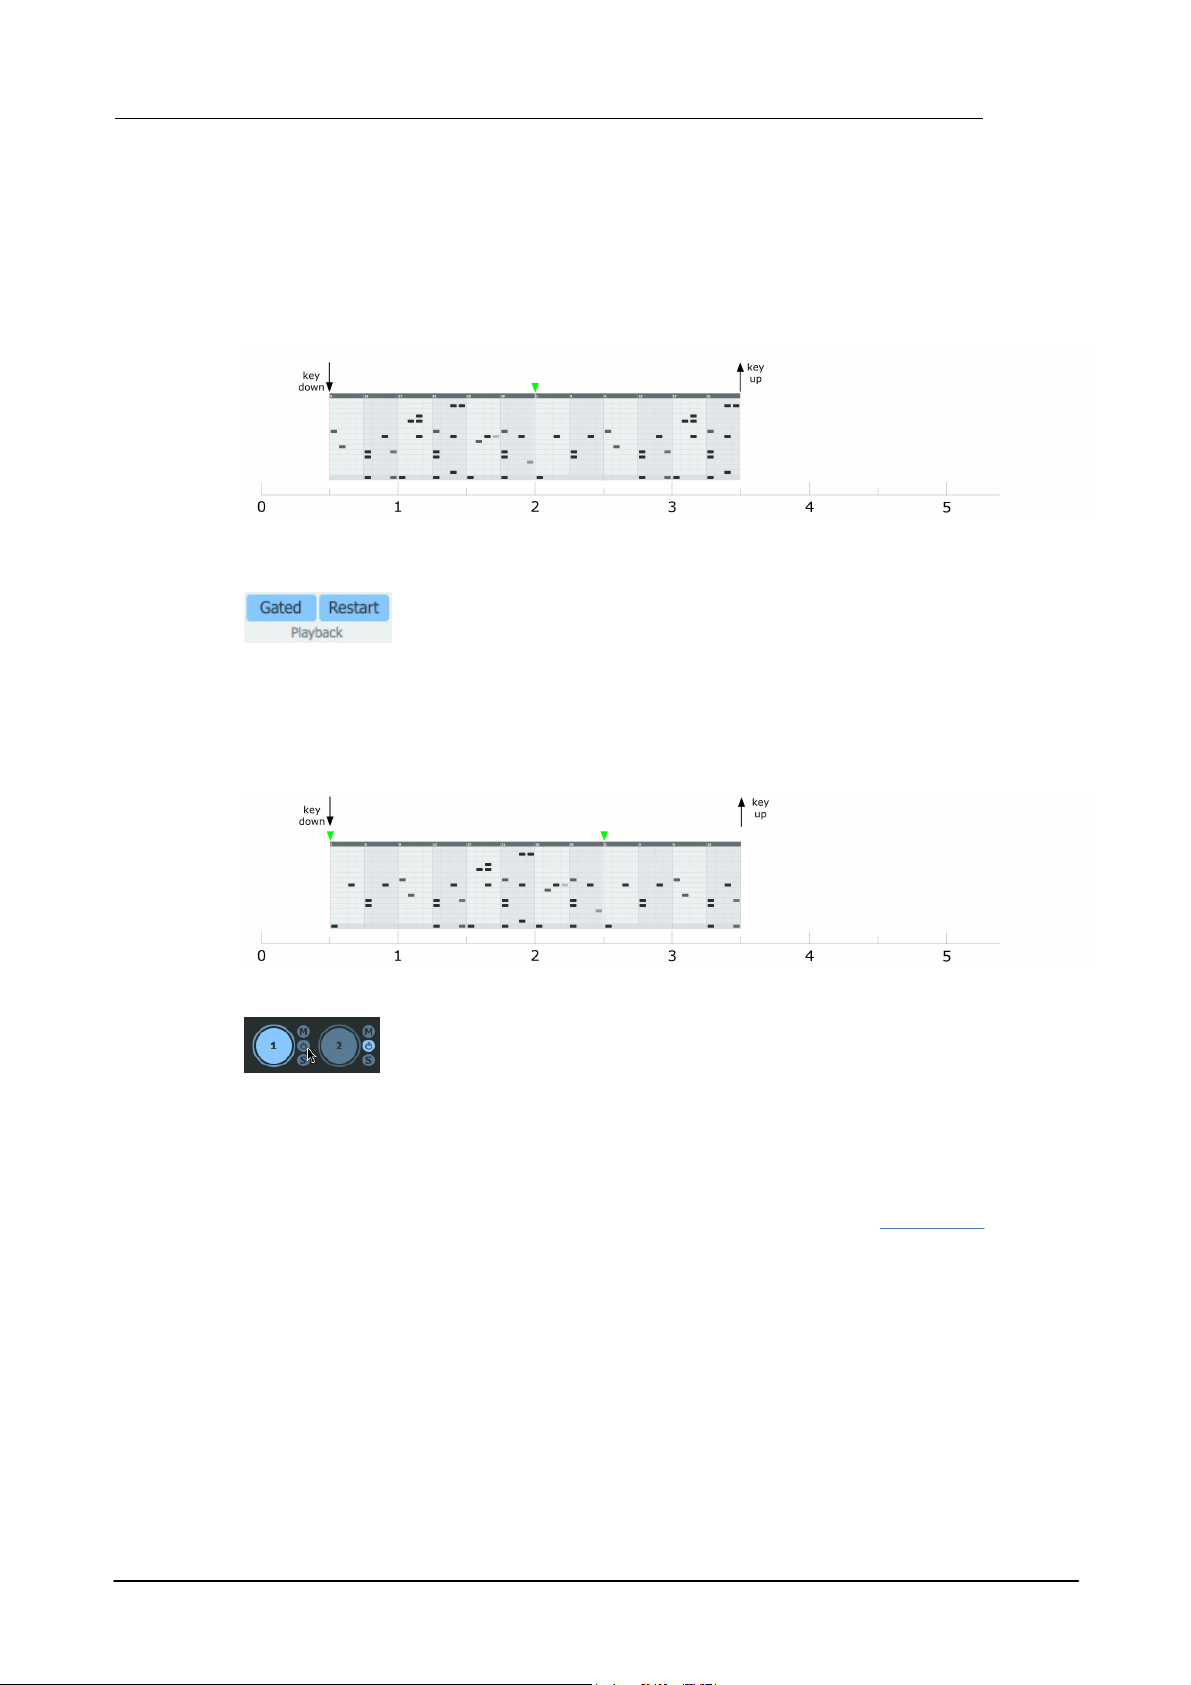
Gated on, Restart off
© 2016 FXpansion Audio
Introduction to Geist2 37
These settings behave in a very similar way to the Gated on, Restart off
settings described above, except that in situations when the transport is
already started, the pattern is always played from its beginning when its MIDI
key is held down to play it.
If an engine's patterns are not required, the sequencing functions on the
engine can be disabled by deactivating its Pattern power button.
There are several situations when this may be required:
• With this setting activated for the current pattern, it does not play automatically when the Geist2
transport is started.
• If the transport is already started, whether a different pattern is already playing or not, the
pattern's MIDI key must be held down to switch to it and play it.
• The deactivated Restart mode means that it starts in phase with the playing position.
• It continues to play until the key is released.
Gated on, Restart on
• The pattern is started by holding its key down.
• The pattern always plays from its start, and can play out of phase with the playing position.
• It continues to play until the key is released.
Turning off pattern sequencing on an engine
• When sequencing the engine's sounds from MIDI tracks in the host/DAW when using Geist2 as a
plugin
• After exporting pattern(s) from the engine to a host MIDI track (to prevent double-triggering
from pattern events at the same time as the incoming MIDI)
• Pattern power is very important in the context of using Scenes in Geist2 – after switching scenes,
the Pattern power of one or more engines may be deactivated. See the next section for more
details.
© 2016 FXpansion Audio

Geist238
1. Initialize Geist2 and load
an engine file into the first
engine.
2. Select
engine 2.
3. Load an engine file into
engine 2.
4. If the loaded engine files do not contain at least 2 patterns in each, then
create some patterns or load pattern banks. Make sure that the Playback
mode for all the patterns is set to Gated off, Restart off.
5. In engine 2, select pattern 2 by
clicking its pattern memory key or
playing its MIDI note on the
relevant MIDI channel.
6. Select
engine 1.
7. Make sure that pattern 1 is
selected in engine 1 - if not, click
its pattern memory key or play its
MIDI note.
8. Switch to the
Scenes page.
9. Click the Snapshot
scene button on the first
scene slot (C-2), or any
other scene slot.
10. Now select pattern 2 in engine
1 by playing its MIDI note or by
switching to the Pattern page and
clicking its pattern memory key.
11. Select
engine 2.
12. Select pattern 1, again either
using its MIDI or pattern memory
key.
13. On the Scenes page,
click the Snapshot scene
button on the next slot (C#-
2) or any other unused slot.
1.12 Performing with scenes
Scenes are playable 'snapshots' that represent the pattern state of all 8 engines. Playing scenes
with MIDI notes can be much more convenient than playing patterns individually on multiple
engines for performance or for recording into the Song page.
A reference guide to the controls on the Scenes page is provided in chapter 10.
Creating scenes
© 2016 FXpansion Audio

Introduction to Geist2 39
14. Click Play/Stop to start the transport.
Alternatively, start the host transport if using
the plugin.
15. Now each of the used scene slots can be
clicked in order to trigger them. Alternatively,
use the scene's MIDI note on MIDI channel 11.
1. Click engine 1's Pattern
Power button to deactivate it.
2. Click the Snapshot scene
button on an unused scene slot.
3. The Scene info display
shows only engine 2 is active.
Scenes and Pattern Power
If the selected pattern in any engines is blank when a scene is created, Geist2 deactivates the
Pattern power button for these engines within the scene data. When such a scene is recalled, the
Pattern power button for the engines is deactivated. This is to ensure that the scene sounds the
same if events are subsequently added to patterns in a previously unused engine. Therefore,
when changing scenes, one or more engines' Pattern power button may be turned off – simply
reactivate it if required.
To disable an engine's patterns within a scene manually, deactivate its Pattern power button
manually before creating the scene.
For example, to create a variation on the last example with engine 1 deactivated:
Scene playback behaviour
Note that scenes simply reference the numbered patterns in each engine. If a scene references
pattern 2 in engine 1, deleting or editing the referenced pattern will result in the scene sounding
different when it is triggered.
What is actually heard when recalling a scene depends on the the Playback mode settings for the
patterns within it. If any patterns are set to Gated mode, the scene trigger/MIDI note must be
held down for as long as required. Patterns within scenes also follow the behaviour set by the
Restart mode.
By default, scenes start as soon as they are triggered - this is specified using the Immediate Start
Mode setting. By adjusting this setting, scenes can be set to start on the Next Beat or at the start
of the Next Bar.
Scenes can be selected without being played by clicking the lower-left part of the scene slot which
also displays the scene's MIDI note. This can be useful for inspecting the Scene info for a scene
without playing it.
© 2016 FXpansion Audio
Geist240
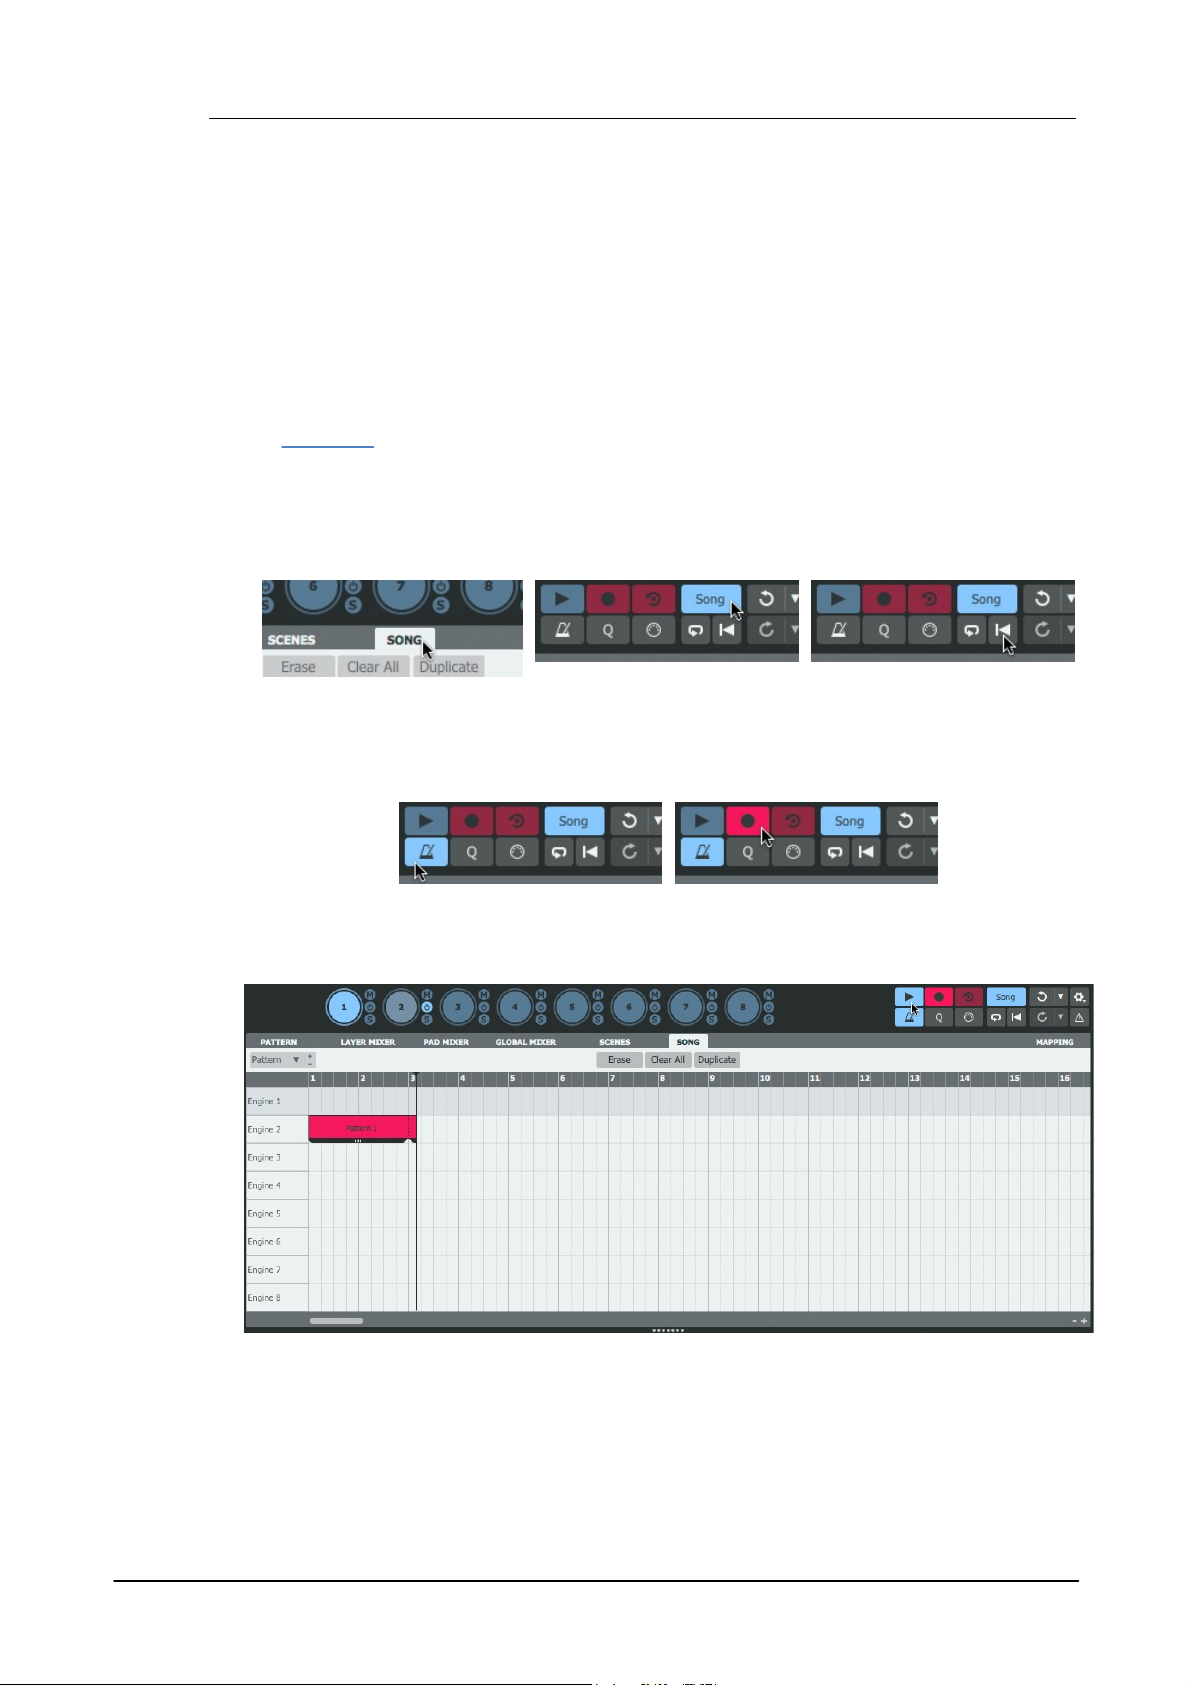
2. Click the Song button to
display the Song page.
3. Activate the Song Mode
button.
4. Click the Return to start
button to go to the start of
the timeline.
5. Activate the Metronome
button if required.
6. Activate the Record
button to 'arm' Record mode.
7. Start the transport with the Play/Stop button. Any engines with their Pattern Power button
deactivated for the scene do not produce any events.
1.13 Arranging patterns into a song
The Song page provides a sequencer for arranging patterns along a linear timeline to form a
'song' structure.
It features a track for each of the 8 engines. Song events can be captured in real time or
programmed/edited with the mouse.
This section introduces using the Record and Retro Record functions to capture song events in
real time.
The Song page is only capable of sequencing patterns – there are no parameter automation
features. To automate parameters over time within Geist2, use MIDI or automation to send the
required data to Geist2.
See chapter 10 for a full guide to editing and other functions in the Song page.
Recording in Song mode
1. Follow the Scenes tutorial in the previous section to create several scenes with distinct pattern
combinations.
© 2016 FXpansion Audio

Introduction to Geist2 41
8. When the transport is stopped, the record process is complete. Zoom out if necessary to see
the result in full.
1. Start the transport and
perform with Scene or
Pattern key triggers.
2. Stop the transport and
click the Retro record
button. All active pattern
events during the previous
playback pass are captured.
• Pattern memory keys or their corresponding MIDI notes can also be used instead of Scenes.
Scenes can be more convenient for creating Song events for all engines.
Recording retrospectively into the song
The process for Retro recording is very similar. Instead of entering Record mode:
• Pattern key or scene performances which occurred while the Song mode button is deactivated
can also be captured. After the performance, click the Song mode button and then click the
Retro button on the transport. The captured parts are inserted from the beginning of the song.
© 2016 FXpansion Audio

Geist242
1. Click the Learn button to enter Learn mode. Controls in Geist2 which can be mapped to MIDI
CCs are highlighted in yellow.
2. Click the desired
control on the Geist2
interface.
3. Move the physical
knob, slider or other
controller to map to
the Geist2 control.
4. The control is now
mapped to the MIDI
CC - the MIDI channel
and CC number is
overlaid on the control.
5. Click the Learn button
again to exit Learn mode
and return to normal
operation.
1.14 Using MIDI and host automation
The Learn system allows one or more Geist2 controls to be mapped to single MIDI CCs
(continuous controllers) or host automation parameters.
Mappings are stored with presets – to recall a set of mappings whenever Geist2 is launched, save
them in a default preset.
Mapping Geist2 controls to MIDI CCs
Hardware controllers which send MIDI CCs tend to be affordable and accessible. They offer a
range of 127 values.
Alternatively, instead of steps 2 and 3, right-click the desired control while in Learn mode and use
the Bind to MIDI sub-menu to assign a MIDI CC number manually.
© 2016 FXpansion Audio

Introduction to Geist2 43
Host automation parameters generally offer higher resolution than
MIDI CCs. They can be drawn as curves in most sequencing hosts, or
recorded with a dedicated controller. Such controllers are not simple,
generic MIDI controllers, but usually dedicated devices that integrate
specially with the host.
To create host automation assignments, first enter Learn mode as
described above. Then right-click the desired control and use the
Bind to Host sub-menu to specify the host parameter number to
which to map the Geist2 control. The assignment is created with the
host parameter number overlaid on the control. Click the Learn
button again to exit Learn mode.
Removing MIDI or host automation assignments
To remove any existing assignments, right-click on any mapped
control and use the Clear current binding function.
Managing assignments with the Mapping panel
The Mapping panel displays a table showing all current MIDI CC and
host automation mappings.
The panel allows each mapping's current properties and behaviour
settings are shown and can be adjusted.
Mapping Geist2 controls to host automation parameters
© 2016 FXpansion Audio

Geist244
Exporting to a disk folder
• Click and drag the
required pattern key to the
desktop or any other
location with write
permissions in Finder (Mac)
or Explorer (Windows). The
pattern is exported as a
MIDI file to the relevant
location.
Exporting to a MIDI track
in a host/DAW
• First, make sure the
required MIDI or audio
instrument track in the host's
'arrange' page is visible.
Click and drag the required
pattern key to the required
point on the track. The
pattern is exported as a
MIDI 'clip' to the track where
the mouse is released.
• If using the exported MIDI track to drive the same engine in Geist2, it is
advisable to turn off the Pattern power button for the engine or to select an
empty pattern.
1.15 MIDI / audio export and MIDI output
Geist2 offers various ways of exporting material allowing arrangement within other environments
such as the host/DAW or other hardware/software samplers.
Exporting patterns as MIDI
Patterns can be exported as MIDI sequences from Geist2 using drag and drop.
Exporting graph data
If any graphs used in a pattern are assigned to MIDI CCs, the graph data is written as MIDI CC
values when the pattern is exported.
When attempting to export a pattern which contains any graph data not currently assigned to a
MIDI CC, Geist2 automatically assigns MIDI CCs to any graphs that contain events, and event
values are exported as MIDI CC data with the pattern.
If this automatic assignment behaviour is not required it can be disabled in the Preferences.
Exporting patterns as audio
Patterns can also be exported as audio clips using the pattern context menu, either to a file
location or to an audio track in a host/DAW when using Geist2 as a plugin:
1. Firstly, select the desired pattern.
© 2016 FXpansion Audio

Introduction to Geist2 45
2. Right-click its pattern
memory key to display the
pattern key context menu.
3. Click the Export as Audio
(stops playback) function.
4. The pattern is internally mixed
(offline and faster than real time).
When the audio has been mixed
down and prepared for export, a
popup appears with a draggable
area. Drag and drop from here to
an audio track or to a valid file
location such as the desktop.
When using Geist2 as a standalone application or as a plugin in a suitable
host, its pattern and graph events are transmitted from its MIDI output in
order to trigger other MIDI instruments by activating the Send Note and
Send CC buttons in the Mapping panel.
Audio export panel
The above process uses settings found within the Audio export panel, displayed using the Export
as audio function in the File menu. This panel also provides several other audio export options.
MIDI output (standalone and VST plugin in suitable hosts only)
If using the Geist2 plugin, the host must support MIDI output from a plugin.
With the Send Note button activated, the output from engines 1-8 is transmitted on MIDI channels
1-8 of the MIDI output, using the pads' assigned MIDI notes.
With the Send CC button activated, any graphs currently assigned to MIDI CCs are output as MIDI
CC data alongside note events in the pattern.
© 2016 FXpansion Audio

Geist246
The Browser shares space on the interface with the TransMod panel,
used for TransMod modulation in Geist2. If the TransMod panel is
currently visible, click the Browser button to display the Browser
instead.
The border between the Browser sidebar and the files area/shortlist
can be adjusted to resize the areas: simply click and drag the border
left/right.
The border can also be double-clicked to hide the sidebar completely
– double-click it again to restore it.
• The pads area can be
made larger or smaller by
vertically dragging the
divider above it.
• The pads can be hidden
entirely if desired. Toggle
visibility by double-clicking
the divider.
• The Browser area can be resized
or hidden by dragging left/right the
divider between the Browser and
the rest of the interface.
Alternatively, double-click the
divider.
2 Browser
Browser overview
The Browser is the primary method of loading sounds into Geist2, and is introduced in the
following sections:
• Loading sounds for the first time
• More about loading sounds and saving work
This chapter provides a reference guide to using the following aspects of the Browser:
• Browser modes: Auto load, Auto play, Preview play and Slice buttons
• Navigation and Options: Tools for folder/file navigation and additional Browser functions
• Sidebar and Files: Sidebar shortcut locations, Geist2 file types and additional functions
• Searches, Favourites and Shortlists: Additional tools to make it easier and faster to find the right
sound
Note that files can also be loaded using the File menu.
Browser visibility and dividers
© 2016 FXpansion Audio

2.1 Browser Modes
When the Auto load button (labelled A Load on the interface) is activated,
selecting a file in the Browser results in it being loaded to the currently selected
pad or layer. Continuing to click on other files will result in them replacing the
current contents.
Holding down ALT while clicking on a sample results in it being loaded to the next
available layer on the current pad.
When the Auto play button is activated, selecting a sample in the Browser
results in it being previewed automatically.
Any playing preview can be stopped by clicking the Preview Play/Stop button
to the right of the Auto play button.
With the Slice button activated, selecting a sample results in it being opened in
the Slicer panel. The Slicer allows non-destructive 'chopping' for loops and
breakbeats and is designed for fast operation and automatic pad assignment.
Auto load
This continues to occur until the pad is locked, another pad is selected or the Auto load button is
deactivated.
Deactivating Auto load
If Auto load is deactivated, samples must be loaded to pad layers via one of the following
methods:
• Drag & drop to a specific pad or layer
Dragging a sample onto a pad loads it to the pad's first layer, replacing all other samples on the
pad's layers.
Holding down ALT while dragging a sample onto a pad loads it to the pad's next available layer.
In this mode, 8 samples can be selected and subsequently loaded to a pad using drag and drop.
Hover over a different engine's Engine selector button during the drag operation in order to switch
to that engine before dropping the sample onto one of its pads.
• Double-click to load the sample to the current pad layer
Double-click to load a sample to the currently selected pad layer.
Hold down the ALT key during this process to loads the sample to the pad's next available layer.
Browser 47
Auto play
Previewing sounds manually
To preview a sample again, or if the Auto play button is deactivated entirely, click the Preview
play/stop button.
Slice
Note that it is possible to set the contents of any folder not to invoke the Slicer panel, even when
the Slice button is activated: right-click any file in the folder and use the Allow/Disallow slicing
of files in this folder function on the files context menu that appears.
© 2016 FXpansion Audio

Geist248
The Browser provides various controls
for navigating around folders and files
on the system.
Navigation
Previous / Next file
The Previous file / Next file buttons
select the previous or next file in the
Files list.
The current folder's parent hierarchy is shown with this control.
The name of each folder level is abbreviated for space reasons
but is shown in full as a tooltip.
Click on any level of the Path to jump to the relevant location.
Refresh
The Refresh button refreshes the current Files listing.
This menu provides a number of additional Browser functions.
New Shortlist
New Shortlist from selection
These functions are used with the shortlists system.
Preview output
This function allows Browser previews to be routed to a discrete suboutput.
2.2 Browser Navigation and Options
It can be useful to assign these buttons to MIDI CCs for browsing samples with a hardware
controller.
Navigate to parent
The Navigate to parent button either returns to the location which contains the current folder or,
when performing a search, cancels the search and returns to the previous location.
Enter selected folder
When a sub-folder is selected, the Enter folder button opens the sub-folder (the sub-folder can
also be double-clicked to enter it - this button is primarily provided for use with MIDI remote
control).
Path
Previous / Next location
The Previous location / Next location folder buttons are web-browser-style navigation buttons
to return to the previous or next location within a sequence of browsed locations.
Preview volume
This control adjusts the level of Browser previews.
Drag and drop from OS file window
Drag and drop a folder from Finder (Mac) or Explorer (Windows) to show the folder's contents in
the Geist2 Browser.
Browser Options
Setting a discrete sub-output allows a 'cueing' system to be used, whereby sounds can be
auditioned without them being heard in the main mix, useful for live performance.
© 2016 FXpansion Audio

Browser 49
Lock/Unlock all pads
Lock/Unlock all patterns
These functions lock or unlock all pads and patterns in the current engine with a single action.
This can be especially useful for Slicer operations while Auto load mode is enabled if only the
audio or only the pattern are required to be extracted from a loop.
© 2016 FXpansion Audio

Geist250
Main items
Content
This area of the sidebar displays links to content locations of
various types, including the Geist2 factory library and any
installed Geist Expanders.
The context menu for these items (right-click on any item)
provides the ability to reveal their location in a system file
window (Explorer on Windows / Finder on Mac).
Drives
This section displays all available drives detected on the
system – click any drive to browse its contents.
The context menu for these items (right-click on any item)
provides the ability to reveal their location in a system file
window.
Other items
The context menu for these items allows the selected item to
be renamed or removed. A colour label can also be defined.
Some items feature additional functions on the context menu
(see below).
2.3 Sidebar and Files
Browser sidebar
The Browser sidebar provides clickable shortcuts to various locations and Browser utility functions.
Each type of item in the sidebar can be right-clicked to display a context menu offering further
context-specific functions.
Favourites
Saved favourites are shown in this area.
Searches
Saved searches are shown in this area.
The context menu for these items provides the ability to refresh the selected search.
Shortlists
Saved shortlists are shown in this area.
Files area
This area of the Browser shows the files contained within the currently selected location. Nested
sub-folders are also shown for navigating further down in the folder structure.
Main controls
Files
The main part of this area shows the files contained within the current location or the search
results when a search is performed.
Selection
Click a file to select it. The behaviour that follows selection depends upon the state of the Auto
load, Auto play and Slice buttons (see section 2.1 for details of these functions).
Right-clicking on a selection displays the files context menu.
© 2016 FXpansion Audio
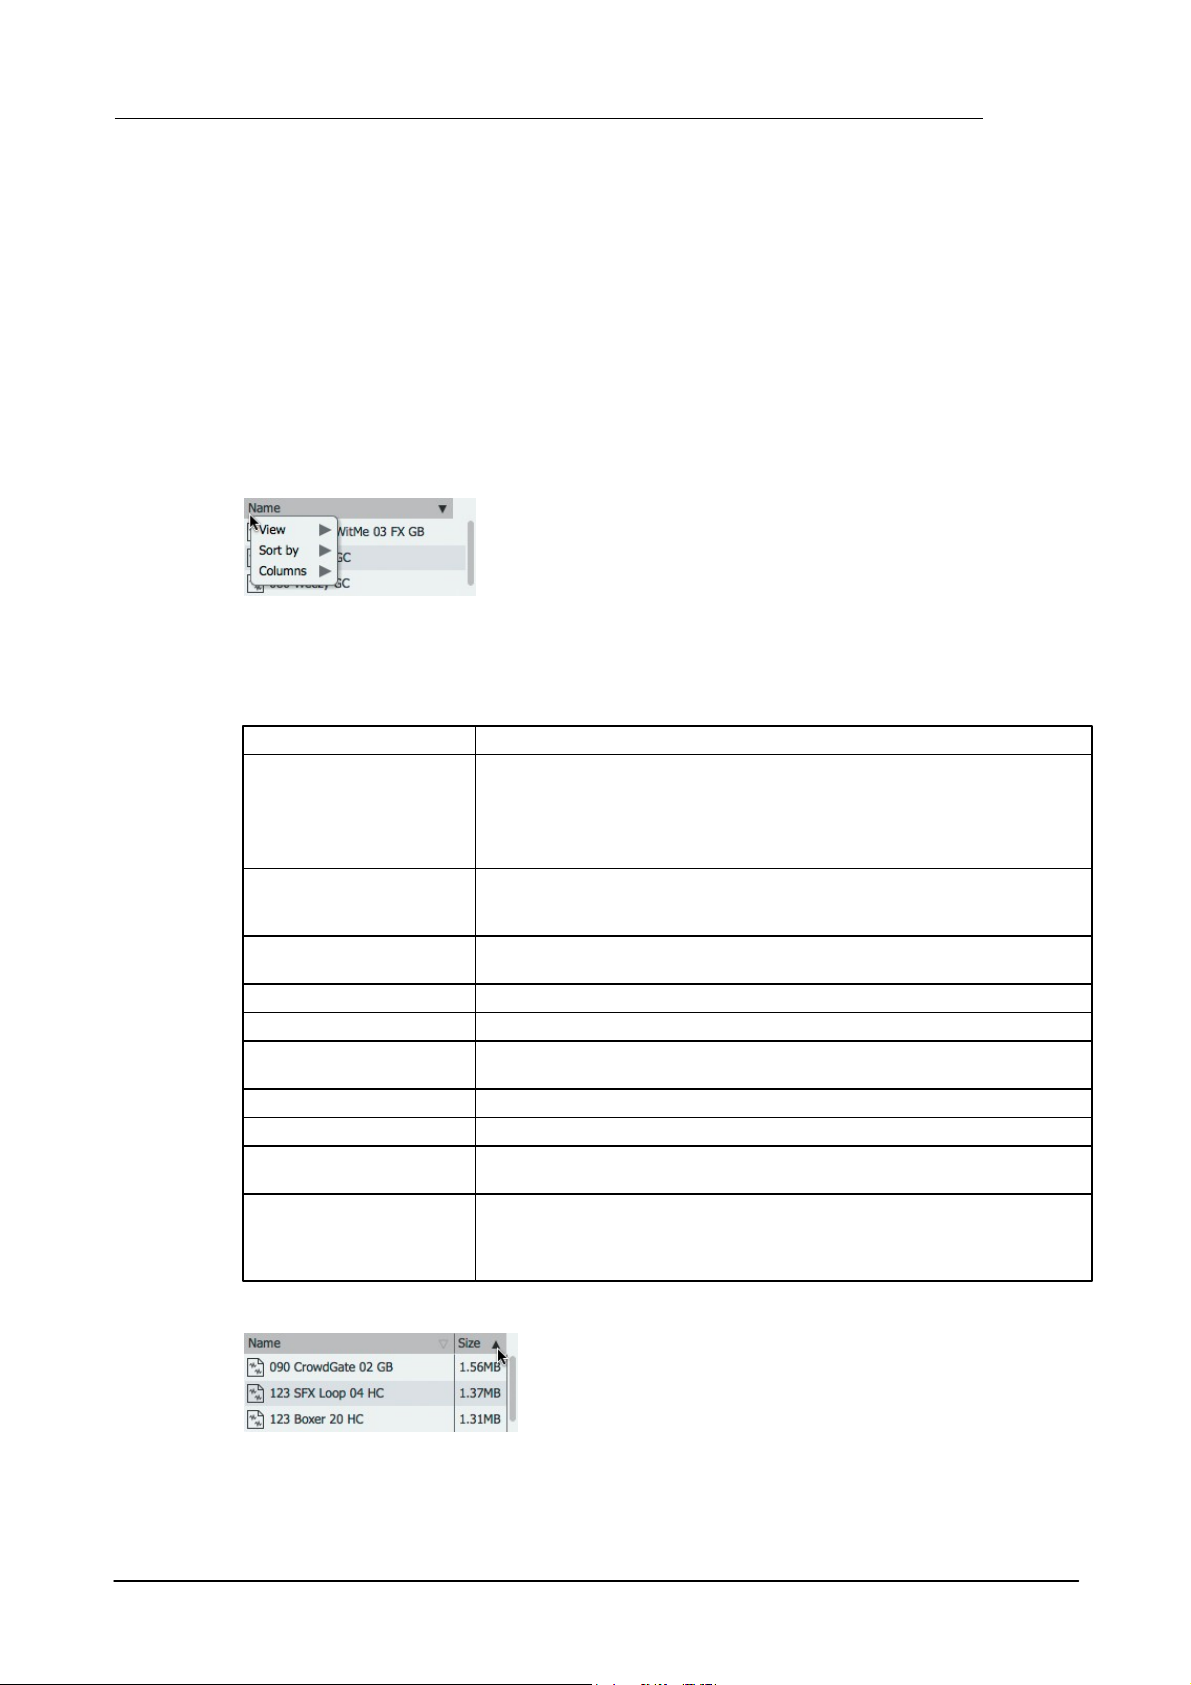
Browser 51
Right-click on the column headings bar above the Files list to display
the View options menu. This menu provides various options for the
content of the Files list under the View, Columns and Sort by submenus.
Audio
Samples in WAV, AIFF, REX and RX2 formats
Presets
Geist2 presets store the entire state of Geist2, and must be doubleclicked to load them from the Browser (regardless of the Auto load
button state), discarding the contents of the current session.
Note that a preset loading operation cannot be reversed using the
Undo function.
Engines
Engine files store the entire state of an engine: the sounds on the pad
(plus Pad Editor settings), 24 patterns, and any layer/pad/engine
effects.
Kits
A kit file contains the contents of the pads on an engine, including
layer and pad effects.
Patterns
Individual pattern files
Pattern Banks
An entire set of up to 24 patterns (all patterns in an engine)
MIDI
Geist2 can import MIDI files as patterns - any MIDI notes that are not
on pad notes are ignored.
Guru Kit
The GURU kit file must be saved with GURU 1.5 or later
Guru Pattern
Individual GURU pattern (saved with GURU 1.5 or later)
Guru Pattern Bank
An entire set of up to 24 GURU patterns (saved with GURU 1.5 or
later)
Folders
If this item is deactivated, folders are not visible in the files list in the
Browser. This is intended for situations when a folder containing
samples also contains a lot of sub-folders, and their presence makes
excessive scrolling necessary.
By default, only the Name (filename) is shown for each item in
the Files list. Using this menu, Type and Size columns can also
be shown for each item (or deactivated if they are currently
activated).
Multiple selection
Multiple files can be selected using the following methods:
• SHIFT-click to create a contiguous selection between 2 files
• CMD-click (Mac) or CTRL-click (Windows) to add a file to the selection
This is useful for several functions, such as:
• adding files to shortlists
• loading up to 8 samples to a single pad when Auto load mode is deactivated
• various operations on the files context menu (see below)
Columns, View options and File types
View
By default, the Browser is set to show all possible types of files relevant to Geist2. The View menu
provides the ability to toggle the visibility of each of these file types:
Columns
Clicking on the column headings sorts the currently displayed files by the column's criteria.
Repeatedly clicking the column headings toggles between ascending and descending sorting.
© 2016 FXpansion Audio
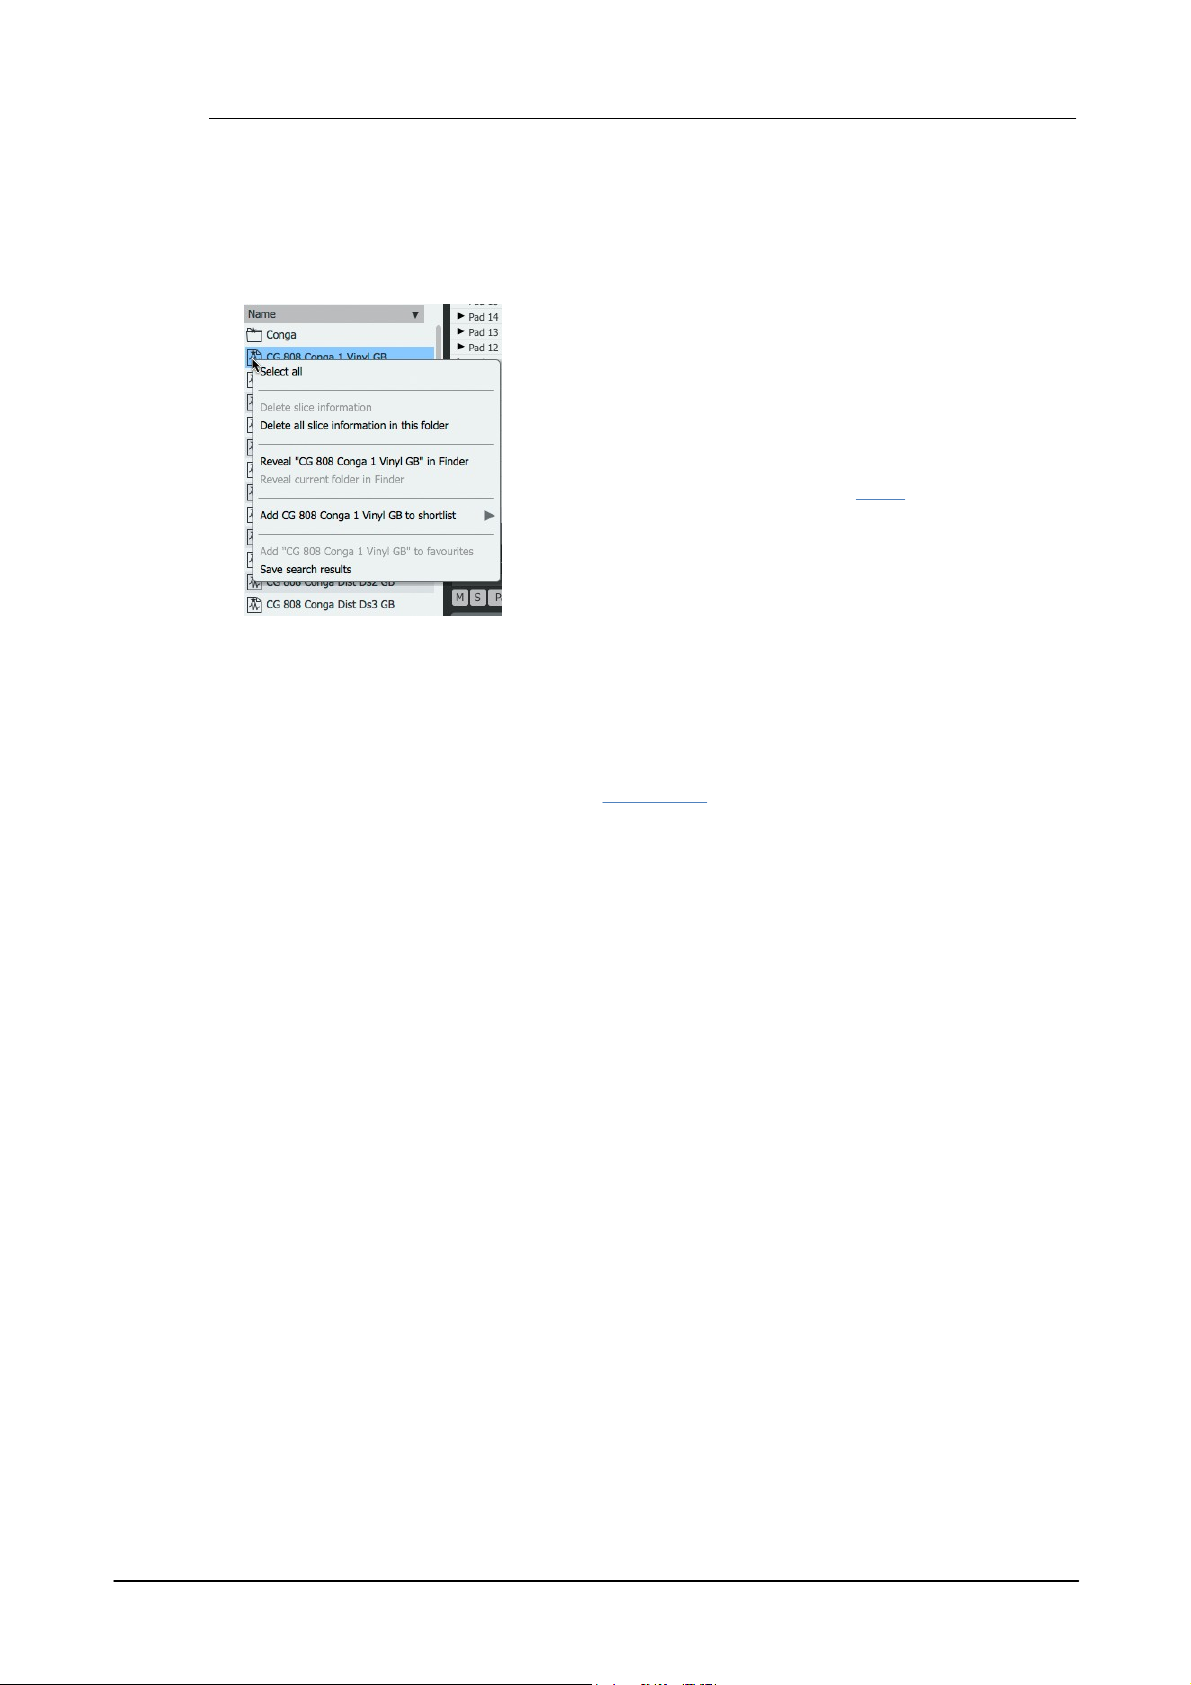
Geist252
Right-click in the files area to display the files context menu, which
provides the following functions:
Select All
This function selects all files visible within the current location.
Delete slice information
Allow/Disallow slicing of files in this folder
These functions are related to Geist2's Slicer.
Reveal selected items in Explorer/Finder
This function launches a system file browser window (Explorer on
Windows or Finder on Mac) at the selected file or folder location.
Sort by
This menu provides an alternative to clicking column headings to sort by Name, Type or Size
column headings to change the current sorting method used for the Files list.
Files context menu
Reveal current folder in Explorer/Finder
This function launches a system file browser window at the current folder location.
Add selected to shortlist
Add selected to favourites
Add current folder to favourites
These functions are discussed in the next next section.
Importing GURU files saved in GURU 1.5 or later
Geist2 can import GURU v1.5 format kits, patterns and pattern banks from the Browser. GURU
v1.5 format presets can also be imported via the File menu (see section 12:4). Files saved with
GURU versions prior to v1.0 cannot be imported – they must be loaded into v1.5 or later and resaved.
Note that while the important aspects of the files are imported, there are some parameters which
cannot be translated due to fundamental differences between the architecture of Geist2 and GURU.
• Effects are not imported
• The filter settings may differ considerably, due to the improved filter in Geist, and the fact that it
features discrete filter types rather than GURU's blendable LP/BP/HP filter.
• Envelope settings are an approximation of GURU envelopes.
• Velocity split ranges are approximated from GURU's velocity split settings.
• Choke groups are also an approximation of GURU's settings.
• Gain/volume levels may differ slightly, due to the different gain structure within Geist.
• Not all graphs are translated properly – in particular, the Force Layers and Filter Type graphs
differ considerably.
© 2016 FXpansion Audio

2.4 Searches, Favourites and Shortlists
The Search box provides a simple filename-based
search. Simply click the Search box, type a search
term and press ENTER.
Click the Search menu button at the left of the Search
box to display the Search menu.
Search within sub-folders
With this setting deactivated, the Seach function
effectively applies a filter to the files within the current
folder.
Right-click within the search results to display the files context menu.
Use the Save search results function to save the search in the
Searches section of the Browser sidebar.
The context menu for these sidebar items provides the ability to
remove, rename, set a colour label for the item or reveal the
selected item's location in the system file browser.
Geist2's Browser provides a number of functions to make it faster and easier to find the right
sound.
Simple searches
Search results appear in place of the current Browser location in the files area. To return to the
previous Browser location, click either the Previous or Navigate to Parent buttons.
Search menu
With this setting activated, all sub-folders within the current Browser location are included in the
search.
Browser 53
Search within favourites
With this setting activated, all current Favourites locations are also included in the search.
Advanced search...
This function toggles the visibility of the Advanced search controls (see below).
Recent searches
Any recently used search terms are listed in this sub-menu for convenience.
Saving searches
© 2016 FXpansion Audio
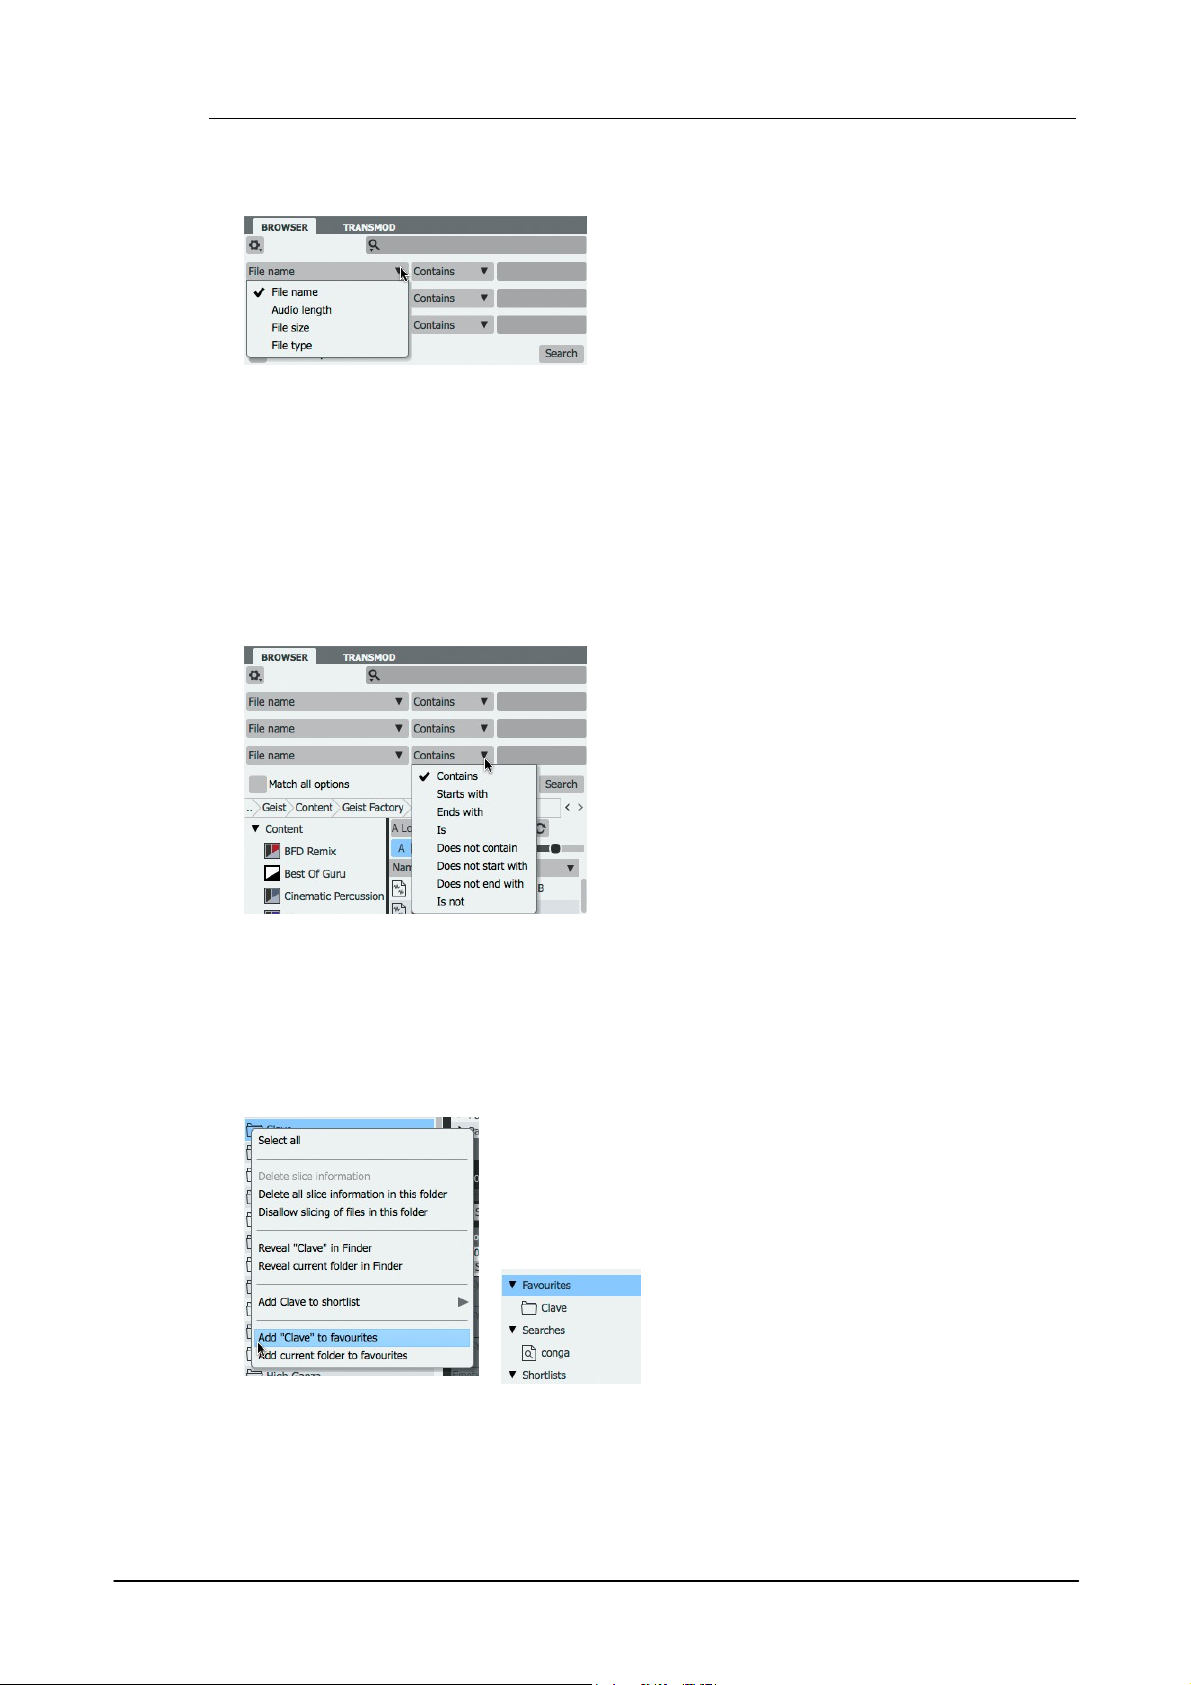
Geist254
The Advanced search... function on the Search menu
(see above) toggles the visibility of the Advanced
search controls, providing additional options for
searching.
Note that the Search within sub-folders and Search
within favourites settings in the Search menu also
apply to the Advanced search function.
Condition
This drop-down menu defines the condition for the
search term to return a result. The possible settings
are:
• Positive searches: Contains; Starts with; Ends with; Is
• Negative searches: Does not contain; Does not start
with; Does not end with; Is not
Advanced Search term
Enter the desired search term in the text box at the
right of each of the 3 search conditions.
Click and drag any folder from the files area to this section to save it
as a favourite, or right-click in the files section and use the Add to
favourites functions.
The items are then accessible in the Favourites section of the sidebar
for quick access in future. The context menu for these sidebar items
provides the ability to reveal the selected item's location in the
system file browser.
Advanced Search functions
Like the simple Search function described above, the results returned by the Advanced Search
are displayed in place of the current Browser location in the files area. To return to the previous
Browser location, click the Previous or Navigate to Parent buttons.
Search conditions
It is possible to define up to 3 search conditions with the Advanced search controls. Each of the 3
search conditions feature the ability to define a File attribute, Condition and Advanced
Search term.
File attribute
This menu specifies which file attribute is searched. This can be any of the following: File name,
Audio length, File size and File type.
Match all options
With this button activated, all 3 search conditions must be met for a result to be returned.
With the button deactivated, any of the 3 search conditions must be met for a result to be
returned.
Favourites
Shortlists
Shortlists allow multiple samples to be added from different locations on disk to be viewed and
auditioned together for convenience.
© 2016 FXpansion Audio

Creating shortlists
To add files to a shortlist, right-click on a sample in the
Files area of the Browser and use the Add to shortlist
function. Name the shortlist and press ENTER. A new
shortlist can also be created by using the Browser
options menu.
Recalling a shortlist
To recall a shortlist, click the relevant Shortlist in the
Browser sidebar - any files previously added to the
shortlist are now displayed in the Files area.
Shortlist context menu
Right-click on a shortlist in the Browser sidebar to
display the shortlist context menu which provides
several functions with which to manage shortlists.
Remove
This function removes the selected shortlist from the
sidebar. Note that any audio files contained within it
remain unaffected in their original disk locations.
Set name...
This function allows the shortlist to be renamed.
Set colour label...
This function specifies a colour label for the shortlist in
the Browser sidebar.
Export to folder
Use this function to create a copy of all audio files within
the shortlist in a new folder.
Browser 55
Export to folder and add as favourite
This function creates a copy of all audio files within the shortlist in a new folder and then adds the
folder to the Favourites section in the Browser sidebar.
© 2016 FXpansion Audio
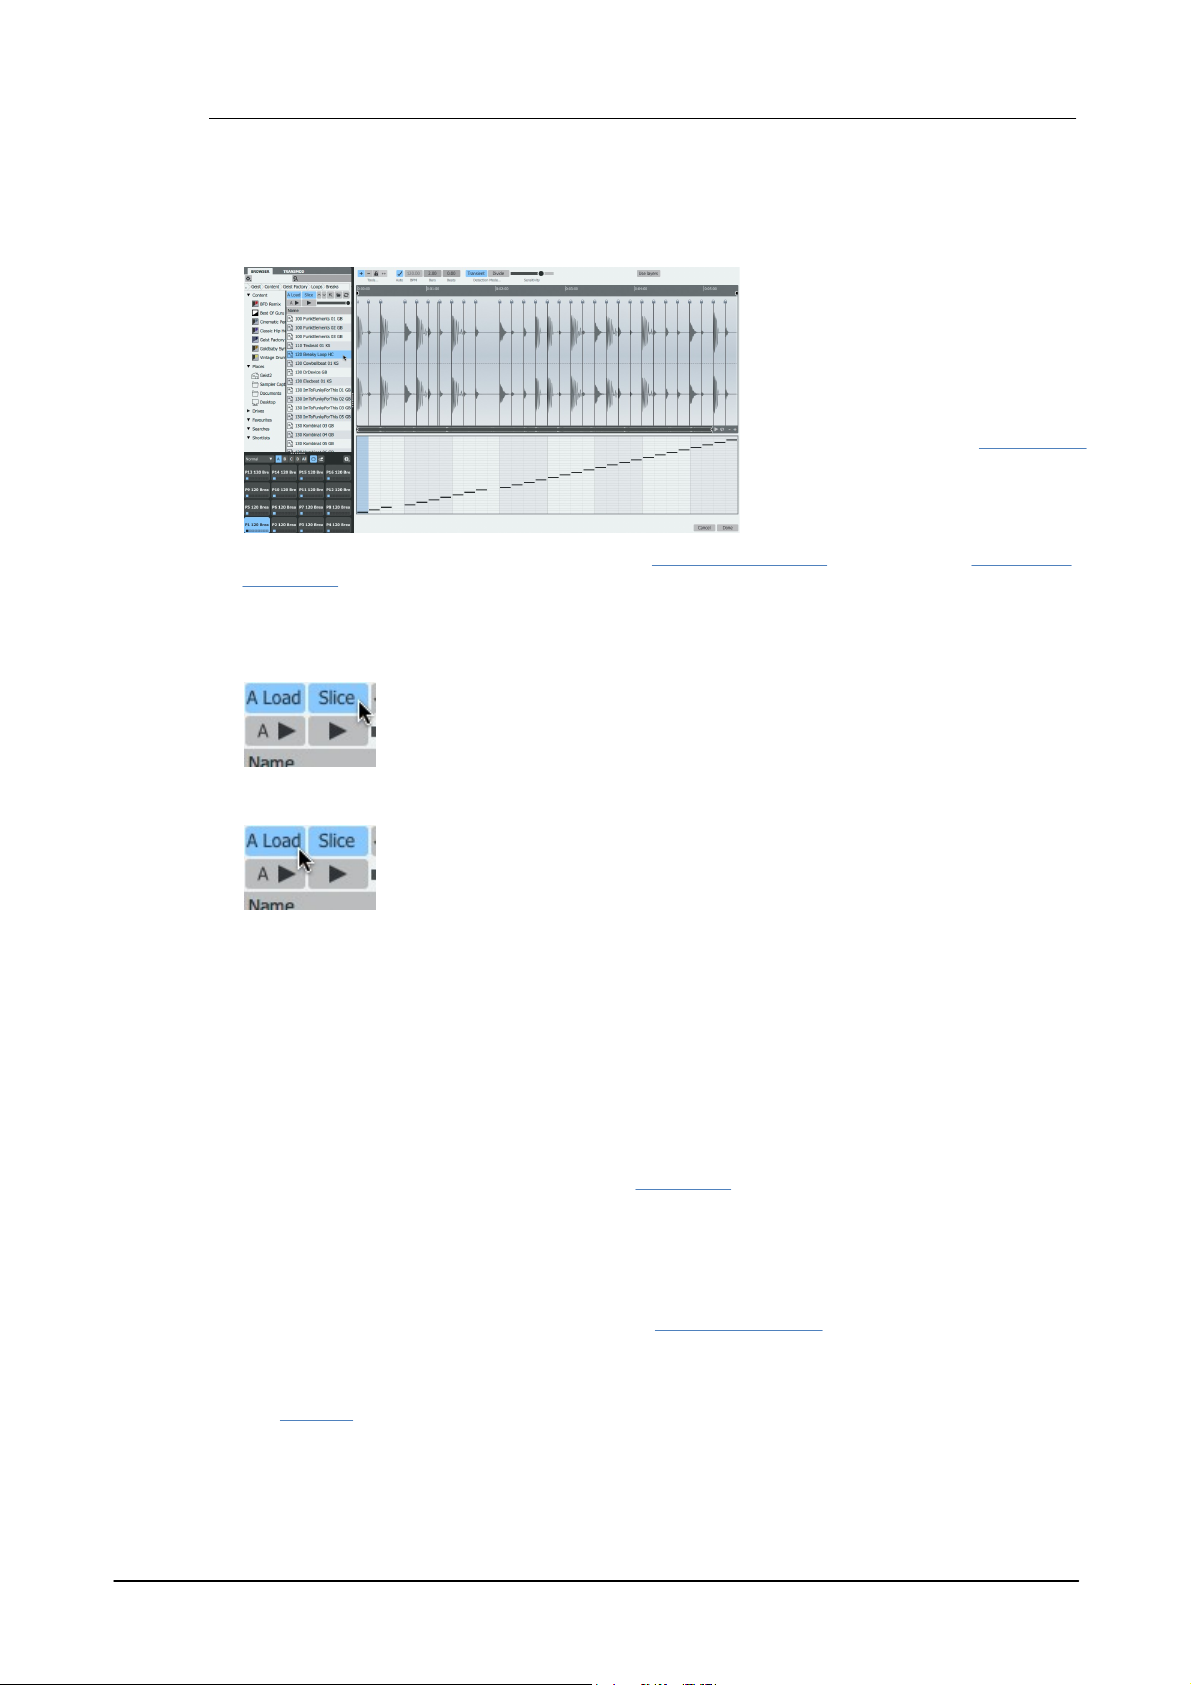
Geist256
When the Browser's Slice button is
activated, clicking a sample (WAV/AIFF/
RX2) in the Browser displays the Slicer
panel. This panel allows loops and
breakbeats to be 'chopped' nondestructively and assigned to pad
layers. The pattern of the loop can also
be extracted.
Slicing is introduced in the Slicing loops
section earlier in this manual.
This section describes how to open
loops in the Slicer panel.
The Slice button must be activated for Geist2 to open the Slicer panel when a
sample is clicked in the Browser.
Note that there are other ways of sending a sample to the Slicer panel - see
below.
If the Auto load button is activated when the Slicer is used, the extracted slices
and corresponding pattern are always automatically assigned to the pads and
current pattern in the current engine in order to preview it in context.
3 Slicing
The rest of this chapter provides a guide to the Slicer panel controls and the various slicing tools
and modes.
Important Browser controls for slicing
Slice
Auto load
In the case of pads, previous layer sample content is removed but other settings remain.
The above does not apply to locked pads or patterns.
Note that this automatic loading can be cancelled by clicking the Cancel button to exit the Slicer
and discard the current slicing session. Click the Done button to confirm the changes.
When Auto load mode is active, the extracted pad and pattern contents are refreshed in real time
when moving/adding/removing slice points and using the Sensitivity slider in Transient slice
mode.
Deactivating Auto load mode
If the Auto load button is deactivated, pads and audio slices are loaded to pads using the
Extract buttons while individual slices can also be loaded to pads using drag and drop (using the
Drag tool). These functions are described in section 3:2.
Other ways of opening samples in the Slicer
Slicing samples already loaded into layers
The Send to slicer function is available on the layer context menu - it allows any sample on a
pad layer to be opened in the Slicer panel.
Assigning newly-recorded samples to the Slicer
The Sampler provides an Assign mode for sending new samples directly to the Slicer panel.
© 2016 FXpansion Audio
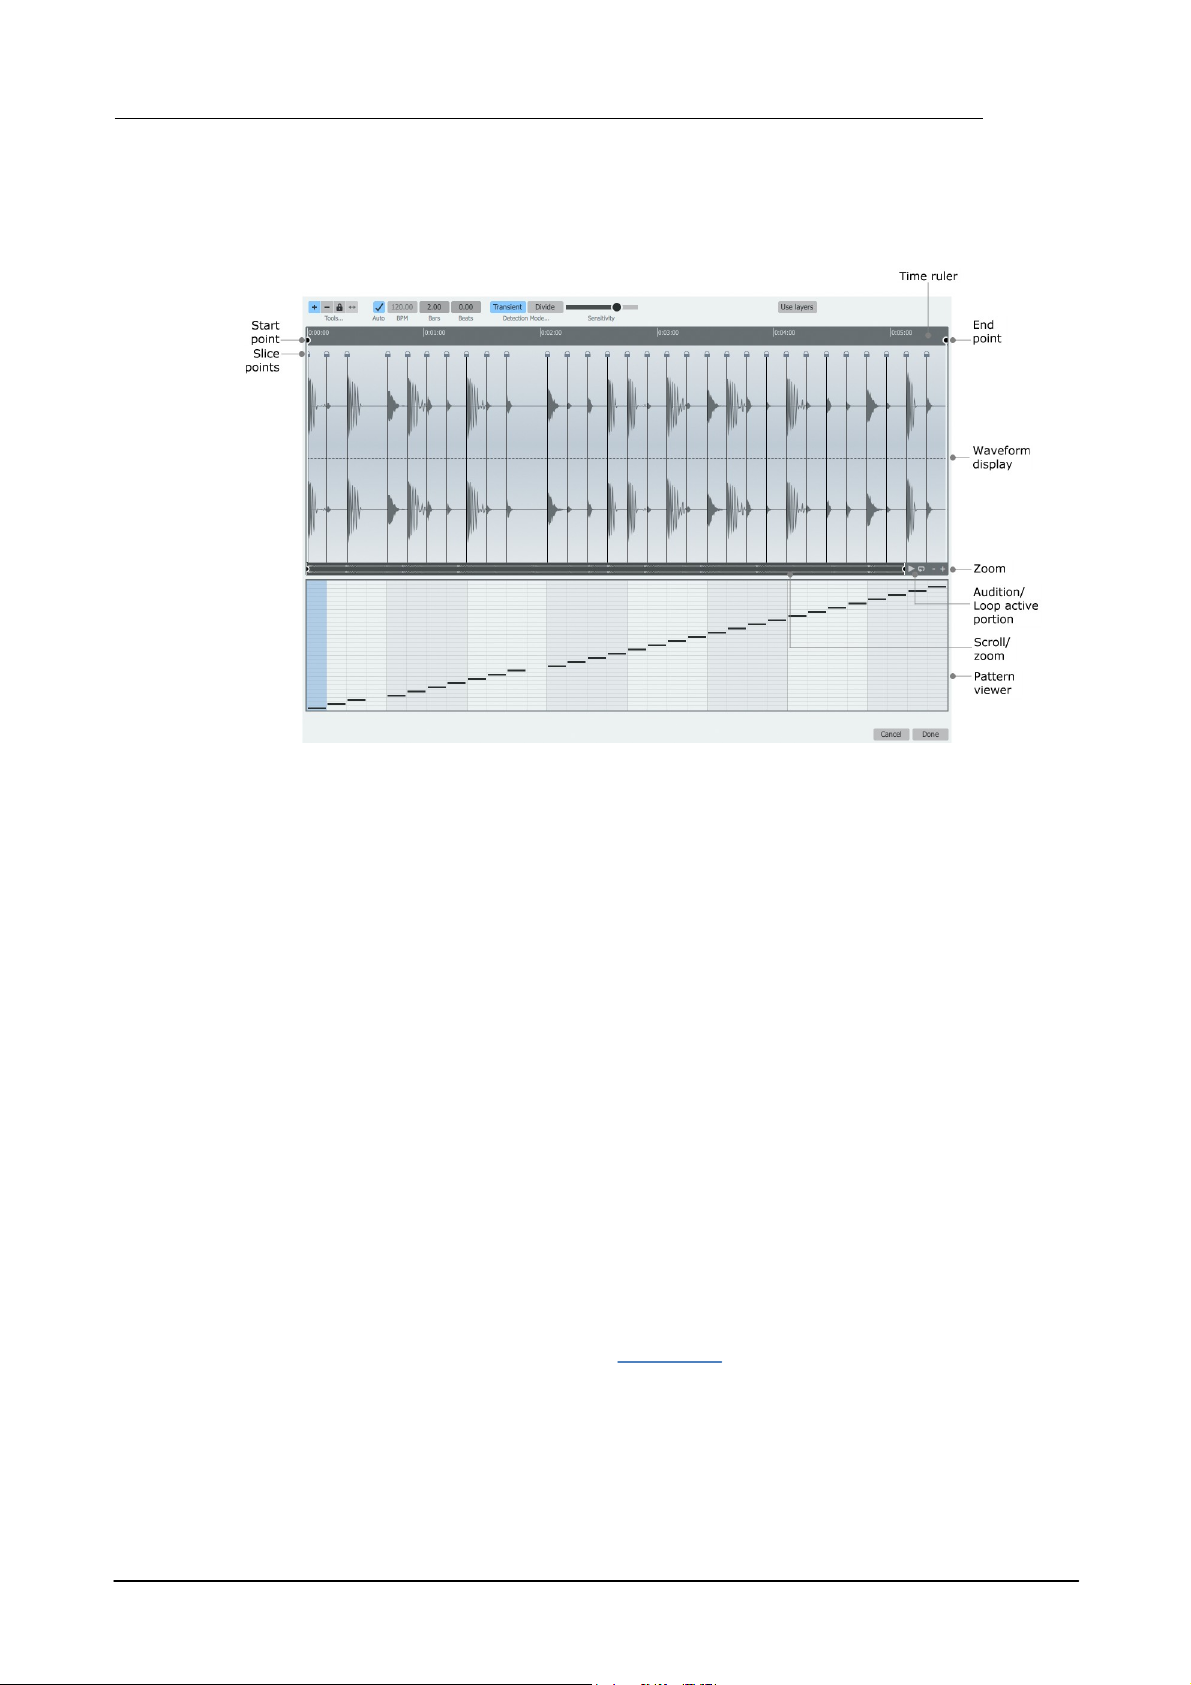
3.1 Slicer panel
Slicer displays and controls
Slicing 57
Waveform display
The selected sample in the Browser is shown in the waveform display.
BPM/Bars/Beats
This information in these fields is calculated from the sample. REX2 files feature embedded
information for these fields, while WAV/AIFF samples are analysed and calculated according to
their length.
It is possible to manually override the automatically detected information if required - simply click
the relevant field and type a new numerical value.
Time ruler
Time units are shown on the rule above the waveform and slice point markers. By default,
seconds are used as units. Right-click in the ruler to display a context menu which allows tempobased units (Beats) to be used instead.
Start and End points
The Start point and End point markers enclose the section of the sample that is used for the
slicing session. It can be very useful to adjust these markers when only a certain part of a sample
is required - for example, it is possible to load an entire song into the slicer and focus on the drum
solo/break section with these markers.
Slice points
Each division is indicated by a slice point, which represents the end of the previous slice and the
start of the next.
Locked slices such as those shown above are displayed with a 'padlock' symbol. Unlocked slices
are shown as triangular indicators. See the next section for more details on slice points and the
Lock functions.
Audition/Loop active portion
The Audition active portion button on the scrollbar plays the active portion of the loop enclosed
by the Start point and End point. Activating the Loop active portion button to its right results
in the portion repeating when the Audition button is used - click the Audition button again to stop
the looping audition.
© 2016 FXpansion Audio

Geist258
When extracting patterns from loops, this function can be very useful for ensuring that a musically
useful looping portion is sliced, which is crucial for obtaining an optimal pattern.
Pattern viewer
This part of the Slicer page displays the current pattern (this display cannot be edited).
If Auto load mode is currently activated, the loop's pattern is automatically extracted and
replaces the previous contents of the current pattern.
When Auto load mode is not active, this display shows the contents of the pattern before the
Slicer was invoked. The sliced loop's pattern can still be manually extracted by clicking the
Extract Pattern button.
Detection Mode: Transient/Divide
This control sets the Slicer to either Transient (transient-based algorithm) or Divide (equal
division-based algorithm) mode.
In Transient mode, a Sensitivity control is shown on the interface.
In Divide mode, this is replaced by a numerical text box which specifies the number of equal-
length slices into which to divide the audio file.
These modes are described in more detail in the next section.
Use layers
Clicking the Use layers button results in all slices in the loop (if over 64) being used and assigned
to additional layers on the pads.
If the pattern is extracted, information about the layers required is also extracted with it and
stored in Force layer graph values for the pattern's tracks.
Other useful controls for slicing sessions
Undo
The Undo function can be used to revert to previous states before the slicing session was initiated,
whether or not Auto load mode is active.
Lock pad/pattern functions
Pad and pattern locks are very useful for Slicer operations while Auto load mode is activated.
These lock functions can be accessed via pad and pattern key context menus.
Delete slice information
Delete all slice information in this folder
See the next section for details of these functions.
Allow/Disallow slicing of files in this folder
This function, on the files context menu, allows any folder to be set to override the Slicer panel
functionality if the Browser's Slice button is activated. It may be convenient to use this setting for
any folders containing 'single hits' rather than loops/breakbeats (all sub-folders in the Geist2
Factory/Hits folder have been set to disallow slicing).
If this function has been applied to a folder, a 'star' indicator appears on the folder icon, the folder
name in the Path display and on the icon for each sample within the folder.
All sub-folders in the Geist2 Factory/Hits folder have been set to disallow slicing.
© 2016 FXpansion Audio

3.2 Slicing tools and modes
1. With the Auto Load and Slice buttons activated in the Browser, Click a WAV or AIFF audio file
containing the desired loop from which to extract slices and/or a pattern.
At first, the pattern can typically look quite chaotic, especially if the desired loop is a sub-section of
the audio file.
2. Use the Start point and End point
markers to specify the desired portion
of the file on which to operate.
When extracting a pattern from the
audio, the Audition / Loop active
portion buttons can be very useful
during this process. By looping the
portion between the Start point and
End point markers, the markers can
be set to ensure that the resulting
pattern loops in a musically useful way.
Any factory loops supplied with Geist2 or Geist Expander add-ons are already sliced optimally for
convenience.
However, when working with user samples, it is usually necessary to perform some adjustment
using the various tools and modes in the Slicer panel.
Using Transient Detection mode
In Transient slice mode, Geist2 features a variable Sensitivity control for detecting transients in
the audio file. As the slider is increased, the slicing algorithm becomes more sensitive to transients
so that more slice points are created.
Slicing 59
© 2016 FXpansion Audio

Geist260
3. Geist2 attempts to make a best
guess of the BPM and length of the
active portion which is being sliced. To
override the detected values, simply
click the relevant field and type a new
numerical value.
In this case, the loop in question is 1
bar long.
After these processes, the extracted
pattern more closely resembles the
transients in the audio.
4. The Sensitivity control can be used
to adjust the transient-detection.
Decreasing the control as shown in the
image to the left results in less slices
being detected.
Increase the control to detect more
slices.
• Any slice can be
auditioned by rightclicking the waveform.
Insert tool
• Simply click at the
desired point in the
waveform in order to
add a slice point.
• Click and drag the
slice point left/right to
move it.
• Right-click the slice point
to display the slice context
menu (see below).
Additional tools for adjusting slices
There may be situations, especially with material containing widely varying dynamics, where the
Sensitivity control cannot provide the granularity to detect all required slices. In such cases the
Insert tool can be used to manually add slice points wherever required.
When a slice is manually added in this way, it is automatically Locked – this means that it is not
affected by any further adjustment of the Sensitivity control until it is unlocked.
• Additionally, slice points can be deleted by ALT-clicking in the waveform - the slice point to the
left is deleted.
• Audition slices by right-clicking the waveform.
© 2016 FXpansion Audio

Slicing 61
Delete tool
Activate the Delete tool for easy deletion of
slice points by clicking the waveform.
• Additionally, slice points can be inserted by
ALT-clicking in the waveform wherever
required.
• Audition slices by right-clicking the
waveform.
• Right-click a slice point to display the slice
context menu (see below).
• Click the required
slice.
• The slice point is
removed.
Lock tool
It can be very useful to lock slice points to
prevent them from being affected by further
changes to the Sensitivity control. For
example, it can be useful to dial in a high
Sensitivity setting to detect and then lock
quieter transients, after which the control can
be decreased again without affecting the
locked slices.
• Audition slices by right-clicking the
waveform.
• Right-click a slice point to display the slice
context menu (see below).
• Click the waveform
within the required slice.
• The slice point is
locked.
The slice context menu provides access to certain functions which may
be more convenient than switching the active slicing tool.
Lock/Unlock Slice
Delete Slice
These functions provide an alternative to switching to the Lock tool or
Delete tool.
Lock all slices / Unlock all slices
These functions allow all slice points to be locked/unlocked in a single
action.
Slice context menu
Delete all slices
This function allows all unlocked slice points to be deleted in a single action.
Delete all slices including locked ones
This function allows all slice points (even those which are locked) to be deleted in a single action.
© 2016 FXpansion Audio

Geist262
In the Divide Detection mode, the
Sensitivity slider is replaced by a
Divisions control – a numerical text
box which specifies the number of
equal-length divisions produced by the
slicing process.
The image to the left shows Divide
mode in operation with Auto Load
activated.
The loop has been chopped into 16
equal slices, with the slices and pattern
automatically extracted. To change the
number of divisions, click the Divisions
value and enter a new number.
It is still possible to add additional slice
points manually or move/lock/delete
slice points as required with the slicing
tools.
Geist2 contains additional functions for manual slice and pattern
extraction with the Auto Load button deactivated. This may be
more convenient when extracting material from multiple
sources, instead of using Auto Load mode along with Lock
functions.
They can be used with both Transient and Divide Detection
modes.
These 3 buttons are only visible when
the Auto load button is deactivated in
the Browser.
Audio
The Audio button sends the audio
slices to current engine's pads.
Pattern
Click the Pattern button to send the
extracted pattern to the current pattern
slot (as shown in the image on the left).
Audio+Ptn
Click this button to perform both of the
above actions.
Using Divide Detection mode
Manual slice and pattern extraction
When working in this way, simply clicking the Done button before performing any Extract or drag
& drop actions does not result in anything being loaded. The Cancel button, however, still discards
any actions performed in the Slicer session.
Manual Extraction buttons: Audio, Pattern, Audio+Ptn
© 2016 FXpansion Audio

Drag tool
The Drag tool is a special tool designed to
drag and drop slices manually to pads or
layers. This tool is only available when the
Auto load button is deactivated in the
Browser.
With the tool selected, simply click and drag
any slice to a pad – all previous sample
contents are removed and the slice is added as
the first layer.
If this operation is performed while holding
down the ALT key, the slice is added as the
next unused layer on the pad.
Additionally, the following functions are also available with the Drag tool active:
• Audition slices by right-clicking the waveform.
• Right-click a slice point to display the slice context menu (see above).
Confirming or discarding a slicing session
Slicing 63
Done
After any adjustments and pad assignment as a result of the Auto load function or any manual
slice extraction, click the Done button to confirm all actions since the Slicer panel was opened.
Cancel
To cancel and discard all operations performed during the slicing session, click the Cancel button
to exit the Slicer panel. Any slicing and extraction operations, whether automatic or manual, are
discarded.
Slice information files
When clicking the Done button to confirm a slicing session, Geist2 saves a 'slice information
file' (using the original filename with a .gsa file extension) alongside any sample that is processed
in the Slicer.
The .gsa file contains information about the slicing settings and slice points and means that it is
only necessary to slice any particular file once. Loading the same file into the Slicer in future also
recalls the slice points and settings.
To remove the .gsa file for any sample (and therefore remove any slicing settings and slice
points), simply right-click the sample in the Browser and use the Remove slice information
function. The file can now be re-sliced from scratch if desired.
If a slicing operation is aborted with the Cancel button, no changes are made to the .gsa file
alongside the sample (if a .gsa file does not yet exist, none is created).
© 2016 FXpansion Audio

Geist264
Sampling in Geist2 occurs directly to the selected pad, making
it as fast as possible to start composing music with freshly
sampled sounds.
The Sampler mode is accessed via the Pad modes menu
above the pads.
When the Sampler mode is selected in this menu, the Sampler controls appear and are active for the currently selected pad in the current engine.
The next section provides a full guide to Geist2's Sampler
controls.
4 Sampler
Geist2's Sampler functions provide the ability to record audio directly onto a pad so that new
samples are ready to play and sequence as quickly as possible.
It is possible to sample an external signal or to 'resample' Geist2's Master output (or any of its
sub-outputs). The latter is especially useful for quickly creating new samples by sampling existing
material processed through Geist2's layer processing and effects.
A number of sampling modes are provided, such as starting/stopping recording based on an audio
threshold level - perfect for recording single drum hits - or exact bar/beat lengths for creating
loops.
© 2016 FXpansion Audio
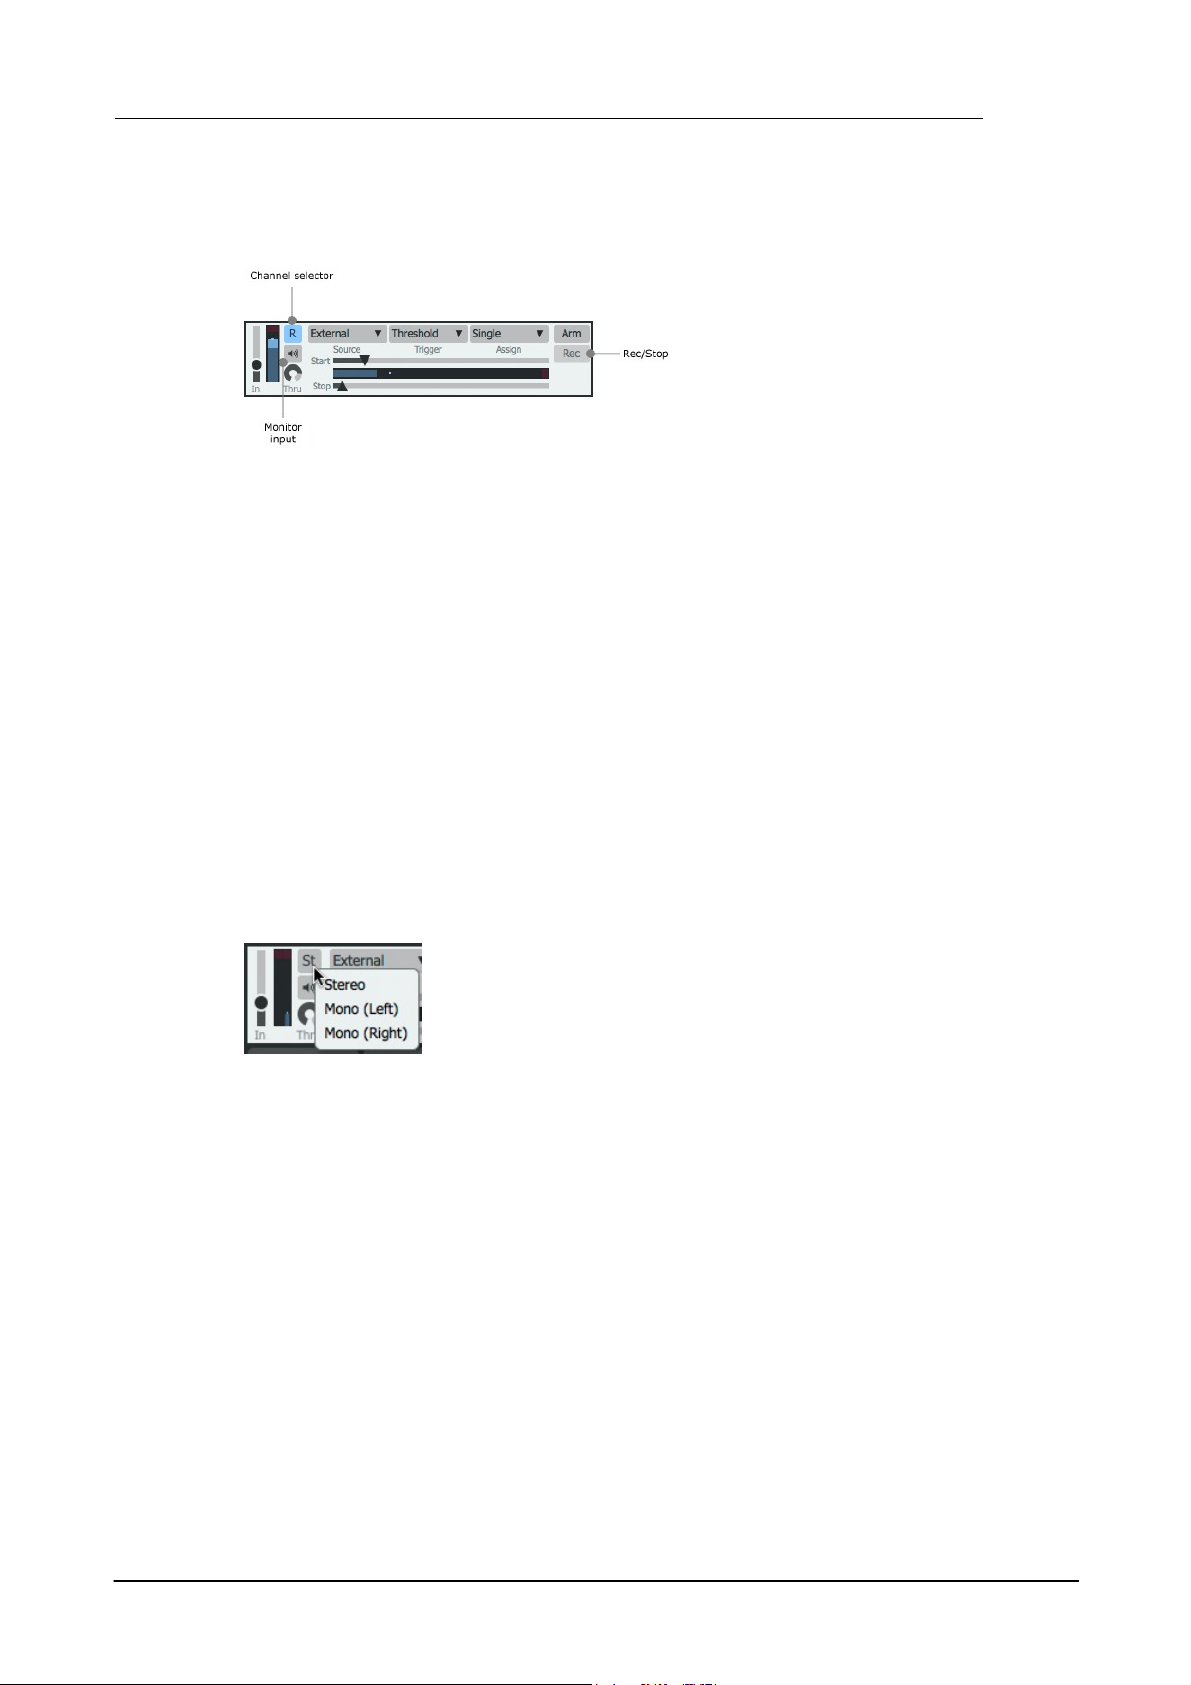
4.1 Sampler controls
Source
The source for the sampling session is
specified using the Source selector, located
near the Arm and Rec/Stop buttons in the
Sampler page.
• External
The external input allows sampling from
external sources.
Click this button to set which input channels are recorded - Stereo, Mono
(Left) and Mono (Right) are available.
Monitor input
With this button activated, the sampler input signal is routed to the Master
channel output.
Sampler controls
This mode can be used in the standalone version and in hosts that support the routing of audio to
instrument plugin inputs.
• Resample Master
With this setting, the content of the Master output is used for the sampler input source. No audio
streams routed to Sub-outputs are recorded.
Resampling is used for quickly creating new samples using Geist2's processing and effects effectively a real-time alternative to using the audio export functions.
• Resample sub-output 1-32
With these settings, the content of the relevant sub-output is used as the sampler input source.
• Spitter2
Spitter2 is used to route audio from a host DAW into Geist2's sampler. By loading an instance of
Spitter2 to the track you wish to record, you can then sample the incoming audio by changing the
input of Geist2's sampler to 'Spitter2' (or whatever you may have renamed the instance of
Spitter2 running in your DAW).
Sampler 65
In Gain/Meter
The Input gain control sets the input level for the sampler recording. The Input meter
represents the current level of the input signal.
Channels
Thru
The Thru control adjusts the level of the sampler input signal that is routed through to the Master
output when the Monitor input button is activated. Please note that this control is exactly the
same as the Browser's Preview Volume control - using either of these controls affects the other.
Note that when the Source is set to resample the Master, the sampler input signal is never routed
to the Master output to prevent feedback.
Arm
The Arm button arms the Sampler for recording.
If the Trigger mode is set to Immediate, clicking the Arm button starts recording immediately.
In other Trigger modes, further actions or conditions are required before recording starts.
© 2016 FXpansion Audio

Geist266
The Trigger mode setting dictates how the sampler starts
recording. Note that in the MIDI, Host and Threshold modes,
the Rec/Stop button can always be used to start and stop
recording manually while the Arm button is active.
With this setting, the sampler begins recording as soon as the
Arm button is activated, for the period defined by the Beats
or Seconds time controls which appear when this mode is
activated.
Trigger Mode
• Threshold
When this setting is enabled, two extra controls appear, labelled Start and Stop, with a Level
meter between them which represents the source signal.
With the Arm button active, recording starts when the signal level rises above the threshold
defined by the Start parameter.
Recording stops when the source level falls below the threshold defined by the Stop parameter for
a short period.
Additionally, sampling can be manually started or stopped using the Rec/Stop button.
• Immediate
• MIDI
With this setting, recording begins on the first MIDI note received (when the Arm button is active),
for the duration defined by the Beats or Seconds time controls which appear when this mode is
activated.
If the Follow MIDI button is activated, it is possible to play any pad's MIDI note to select the pad
and immediately commence recording.
To record to the current pad, either play its specific MIDI note, or deactivate the Follow MIDI
button and play any note.
• Host
With this setting, recording starts when the transport is started, either internally or from the host
(when the Arm button is active). The sampler records multiple takes of a defined length.
The length of each take can be defined in Beats (specified using the Bars and Beats) or
Seconds using the controls that appear when this mode is active.
© 2016 FXpansion Audio

Sampler 67
The Assign mode dictates what happens to sampler takes
after they have been recorded - this menu allows a number of
automatic assignment options.
• Slice
In Slice mode the sample is automatically opened in the Slicer
panel after recording is complete.
When samples are created, they are assigned as dictated by the
Assign menu and saved automatically to the Sampler Captures
folder within the Geist2 documents folder.
To keep projects organized, it is highly recommended to save a
Geist2 preset, kit or pad while the Save samples with presets
setting (in the Tools menu) is activated.
Assign mode
• Single
In Single mode, the sample is always recorded to the currently selected pad layer.
• Next Layer
In Next Layer mode, the sample is assigned to the next layer on the currently selected pad. When
all pads on the current pad are filled, no further automatic assignment takes place (any further
recorded samples can be accessed from the Sampler Captures folder).
• Next Pad
In Next Pad mode, the sample is assigned to the first layer on the next pad. When all pads are
filled, no further automatic assignment takes place (any further recorded samples can be accessed
from the Sampler Captures folder).
• Next Layer and Pad
In this mode, samples are assigned to the next layer on the current pad. When all layers have
been filled, the process repeats on the next pad.
• No Auto Allocation
In this mode, no automatic assignment takes place (recorded samples can be accessed from the
Sampler Captures folder).
Rec/Stop
The various modes activate and deactivate this button automatically based on various conditions.
Whenever recording is in progress, click this button to stop recording when required.
In the Threshold Trigger mode, while the Arm button is activated, the Rec/Stop button can be
manually clicked to start recording.
Managing recorded samples
© 2016 FXpansion Audio
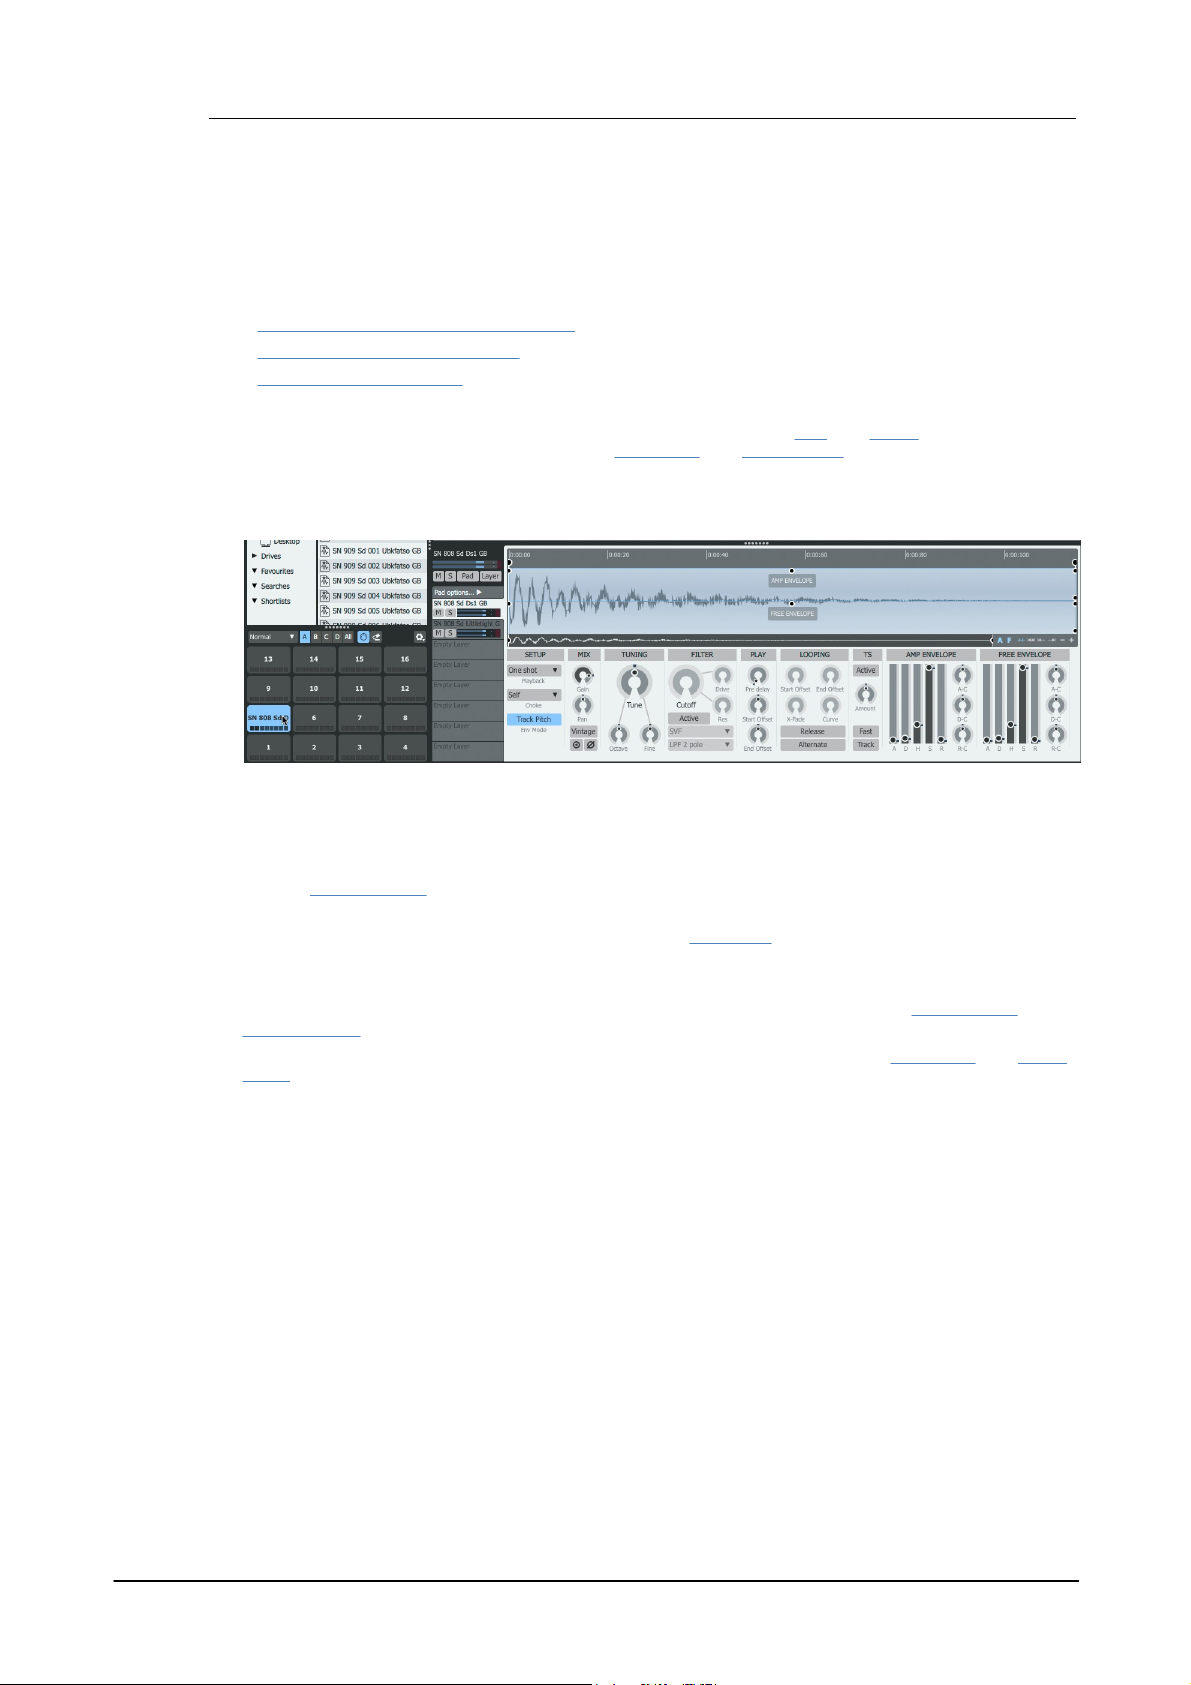
Geist268
5 Pads and Layers
Each Geist2 engine contains up to 64 pads. Each pad is assigned to a MIDI note on the engine's
MIDI channel and contains 8 layers, each of which can contain a sample.
Pads and layers are introduced in chapter 1 in the following sections:
• Playing pads and recording a pattern
• Editing and modulating sounds
• Mixer pages and Effects
This chapter provides a full reference guide to pads and layers: Pad and Layer controls in the Pad
Editor and mixing/effects processing in the Pad Mixer and Layer Mixer pages.
Selecting a pad or layer for editing
The concept of the 'selected pad' is used for editing a pad or any of its layers.
• Click a pad to select it and plays its layers
• ALT-click a pad to select it without playing any audio
• If the Follow MIDI button is activated, the pad can be selected via its corresponding note on the
relevant MIDI channel
• If any of the real-time pad modes are active (see chapter 1) a pad must be ALT-clicked to select
it.
• When a pad is selected, it becomes the active pad for editing - a number of pad controls and
layer controls are available.
• Pad and layer selections are preserved between the Layer Editor and the Pad Mixer and Layer
Mixer pages.
© 2016 FXpansion Audio

5.1 Pads and managing pads
Pad name
The default name for a pad is that of the first sample loaded to one of its
layers. To rename a pad, double-click on the current name, type a new
name, then press ENTER.
This setting dictates how the pad's 8 layers are played back when
the pad is triggered.
• All layers
All layers are played back simultaneously (this is the default
setting).
• Velocity split
Any layers on the pad can be split along the velocity range, with
different layers triggered at different velocities.
Pad controls
Mute (M) / Solo (S)
These buttons mute/solo the pad. Note that these buttons are distinct from the Track Mute/Solo
buttons on each track of every pattern.
Level Meter
The Level meter displays a real-time representation of the pad's output amplitude whenever it is
played.
Pad Options
Pads and Layers 69
Click the Pad Options button to show additional controls relating to the pad, which replace the
Layer controls section.
V-to-A (Velocity to Amplitude)
This parameter sets the degree to which the pad's amplitude is affected by MIDI/pattern event
velocity.
Layer play mode
When this setting is active, the Velocity split editor becomes visible, allowing the velocity range and
fade for each layer to be edited (see below).
• Round robin
A single layer is played each time the pad is triggered. The playback engine 'cycles through' the
available layers each time the pad is triggered.
© 2016 FXpansion Audio
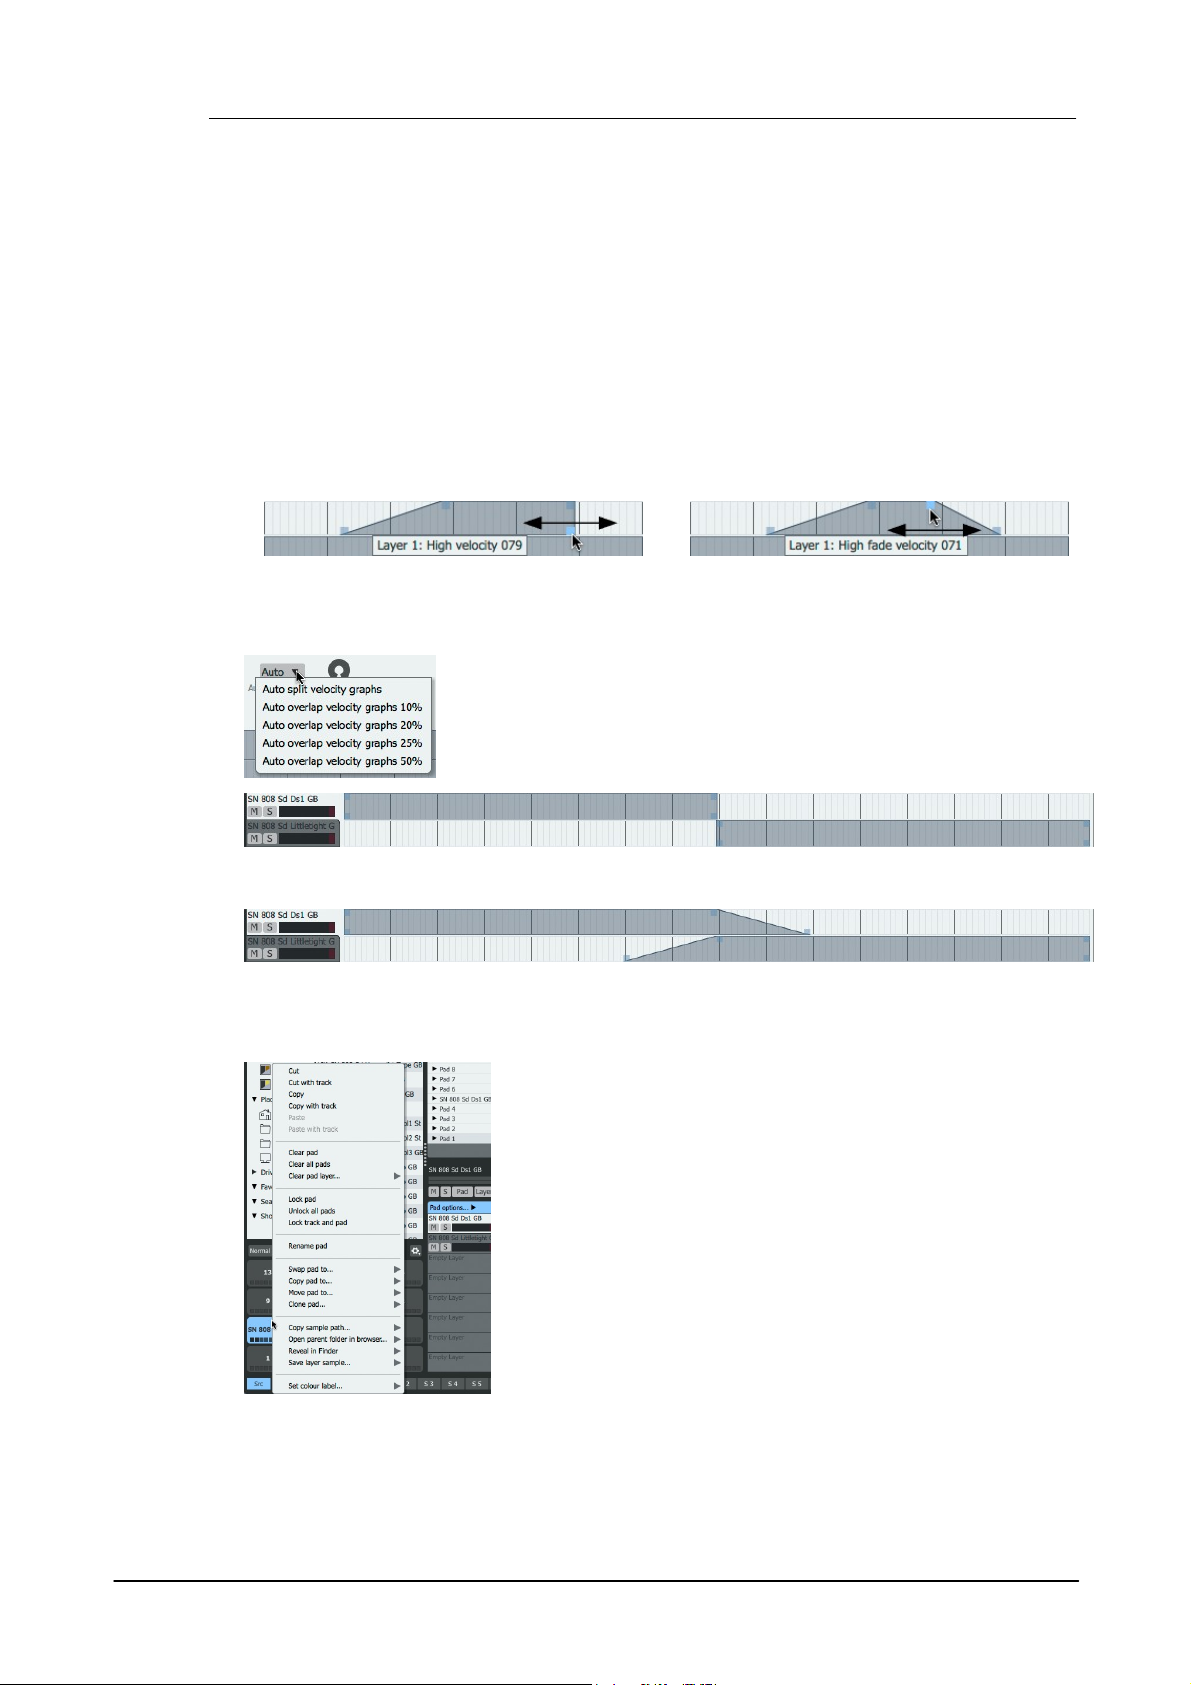
Geist270
Selecting and deselecting events
• Click and drag the lower handles to adjust
the layer's Low / High velocity split points.
• Click and drag the upper handles to adjust
the Layer's Low / High velocity fade.
Auto V SplitMode
This menu can be used to arrange all layers proportionally across the
velocity range, with a selection of optional fade (overlap) amounts.
Right-click a pad to display the Pad context menu, which provides a
number of pad management operations.
Cut, Copy, Paste
These functions allow pads to be Cut, Copied and Pasted within the
engine or any other engine.
Cut with pattern
Copy with pattern
Paste with Pattern
These functions allow pads to be Cut, Copied and Pasted along with
their corresponding pattern tracks.
Clear pad
This function clears the contents of the selected pad - all its layer
samples and settings are removed.
• Round robin reset
Similar to Round robin, except that each time the pattern is looped, the pad is played from the first
layer. This means that the round-robin behaviour is repeatable: it sounds the same on every pass
when the pattern is repeated.
• Random
A single layer is played at random each time the pad is triggered.
Velocity split editor
The Velocity split editor can only be used when the Layer play mode is set to Velocity split.
The Low / High velocity split and velocity fade points for each layer are adjusted by clicking and
dragging their handles left/right as shown below.
• Using the Auto split velocity graphs setting.
• Using the Auto overlap velocity graphs 25% setting.
Pad context menu
Clear all pads
This function clears the contents of all pads in the current engine.
© 2016 FXpansion Audio

Pads and Layers 71
Clear pad layer...
This sub-menu allows any of the pad's 8 layers (displayed on a sub-menu) to be cleared.
Lock/Unlock pad
This function locks the pad – none of its pad/layer settings can be adjusted, and its samples
cannot be changed.
Unlock all pads
This function unlocks any pads in the engine which are currently locked.
Lock/Unlock track and pad
This function locks both the pad and the corresponding track in the current pattern.
Rename pad
This function allows the pad to be renamed (the default name is that of the first sample loaded to
the pad).
Swap, Copy, Move pad to...
These functions allow pads to be Swapped/Copied/Moved to other pads within the engine. Select
the destination pad from the sub-menus.
Clone pad...
This function clones all layers of the current pad to all pads in the engine at varying pitch,
overwriting the previous contents of the pads. It is distinct from the Chromatic Pad mode, which
non-destructively allows the currently selected pad to be played at different pitches over all pads
in the engine, after which the Pad mode can be set back to Normal.
If any layers' Timestretch function is activated, the pitching process does not affect the length of
its sample. If the Timestretch function is not active, the duration of its sample varies with pitch.
The pad can be cloned in the following ways:
Upwards: Ascending in semitones from pad 1 at original pitch.
Downwards: Descending in semitones from pad 16 at original pitch.
Centred: Ascending and descending in semitones from pad 9 at original pitch.
Copy sample path...
This function copies, as text to the clipboard, the path to the sample file on any of the pad's layers.
Select the required layer from the sub-menu.
Open parent folder in browser...
This function reveals the sample on any of the pad's layers in the Geist2 Browser. Select the
required layer from the sub-menu.
Reveal in Explorer/Finder...
This function reveals the sample on any of the pad's layers in a system file window (Explorer on
Windows, Finder on Mac). Select the required layer from the sub-menu.
Save layer sample...
This function opens a file save dialog for saving any pad layer's sample to disk. Select the
required layer from the sub-menu.
Set colour label...
This sub-menu allows a colour to be set for the pad.
© 2016 FXpansion Audio

Geist272
Click the relevant layer in the Layer selector to select one of the
pad's 8 layers for editing.
The Layer selector section also provides the following controls for
each layer when it contains a sample:
Layer name
The default name for each layer is the filename of the sample
loaded into it. To rename the layer, double-click the current
name, type the new name and press ENTER.
Mute (M) / Solo (S)
These buttons mute/solo the layer.
5.2 Layer controls
The Layer controls are always visible in Geist2 except when the Pad Options controls are active or
when the context-sensitive editing area (for the Pattern, Song, Scene, Mapping and Mixer pages)
is extended to full-height using the divider as shown in chapter 1.
Layer selector
This control dictates which layer on the currently selected pad is represented by the Layer
controls.
Level Meter
The level meter displays a real-time representation of the Layer's sample amplitude whenever it is
played.
Layer editing parameters
The controls underneath the waveform display are discussed in detail in the next few sections:
• Setup, Mix, Tuning and Filter controls
• Play, Looping and Timestretch controls
• Envelope controls
Waveform display
The waveform display represents the layer's sample at its original pitch.
Start/End points
The Start and End markers shown above the layer's sample in the waveform display set the
beginning and end of the layer's sample that is played back. To adjust their positions, click and
drag the markers left/right.
© 2016 FXpansion Audio

Pads and Layers 73
Loop start/end
When a layer's Playback mode is set to Looping, the waveform display also shows Loop Start
and Loop End markers. To adjust their positions, click and drag the markers left/right. See
section 5.2.1 for more details of the Loop markers and additional Looping controls.
Ruler
Time units are shown on the ruler above the waveform and Start/End/Loop markers. By default,
seconds are used as units. Right-click in the ruler to display a context menu allowing tempo-based
units to be used instead.
Amp Envelope and Free Envelope handles
These controls allow graphic envelope editing as an alternative to using the Envelope sliders, if
activated using the Envelope visibility buttons (see below).
Scroll/zoom controls
Scroll/zoom
The Scroll/zoom bar adjusts the visible area when zoomed in (drag left/right to scroll) and can
also be used to set the zoom level - drag left/right the handles on either end of the control.
Zoom buttons
The Auto-zoom modes can be faster for many operations than manual zooming with the Zoom
In/Out buttons. Only one of the modes can be active at any one time.
No Auto-zoom
With this button active, no auto-zooming occurs.
Auto-zoom start & end
With this button enabled, the waveform view auto-zooms so that the start and end points are at
the extreme left and right border of the display. Effectively, the 'active' part of the sample is
'maximized' within the waveform display.
Auto-zoom start
Auto-zoom end
The Auto-zoom start mode forces the waveform display to 'jump' to the start point of the layer
when it is selected. The start point is centred in the display.
The Auto-zoom end mode forces the waveform display to 'jump' to the end point of the layer
when it is selected. The end point is centred in the display.
These modes are extremely useful for fine adjustments to prevent clicks.
A (Amp Envelope visibility)
F (Free Envelope visibility)
These buttons toggle the visibility of the Amp and Free Envelopes in the waveform display.
© 2016 FXpansion Audio

Geist274
The Layer and Pad edit shortcuts are provided in order to allow all
layers on the pad or all pads in the engine to be edited simultaneously
(if they are not locked).
These functions are described in chapter 1.
Right-click any of the 8 layers in the Layer selector to display the
Layer context menu, which provides a number of management
functions for layers.
Cut, Copy, Paste
These functions allow layers to be Cut, Copied and Pasted between
the 8 layer slots on the pad and other pads in any engine.
Note that multiple selections are disregarded when using these
functions.
Clear
This function clears the sample and all settings from the layer.
Reset
This function resets the layer to its initialized state, but does not
remove its sample.
Multiple edit shortcuts
Layer context menu
Reset envelopes
This function resets the layer's envelopes to their initialized state.
Lock/Unlock
This function locks the layer so that its sample and settings cannot be altered by Load operations.
If the layer has been previously locked, this function unlocks it.
Send to slicer
This function opens the layer's sample in the Slicer panel.
© 2016 FXpansion Audio

5.2.1 Setup, Mix, Tuning and Filter controls
The Playback mode menu dictates how the layer reacts to being played.
This setting dictates how the layer's sample is played back and also affects
the behaviour of the layer's envelopes.
• One shot
In this mode, the layer is triggered and plays in its entirety unless choked.
Unless another layer on the pad is set to Gated or Looping operation, pattern
events for the pad are always set as 'single step' events - no duration can be
specified. If any other layer on the pad is set to Gated or Looping mode, the
duration of the pattern event is ignored for any layer set to One shot mode.
Similarly, the duration of any incoming MIDI event is also ignored for the
layer.
Choking is the process of stopping the playback of one layer by another.
Geist2 offers a number of different sources for choking a layer, specified by
the Choke menu.
• Not cut
The layer cannot be choked by any other layers. Use this setting for
polyphonic playback (over MIDI only - pattern sequencing within Geist2 is
monophonic for each pad).
• Self
The layer is choked by itself.
• Pad
The layer is choked by any layer on the same pad.
Setup controls
Playback mode
Pads and Layers 75
• Length Bound
Length Bound mode is similar to One shot mode except that both envelopes for the layer are
switched to a special AHR mode, in which envelopes are forced to the length of the sample.
• Gated
In Gated mode, the layer responds to event duration.
In the Pattern page, events for the pad can be set with variable duration, over multiple steps if
required.
For incoming MIDI events, the layer responds to MIDI note-on and MIDI note-off messages.
• Looping
Looping mode is similar to Gated mode, but continuously repeats the region enclosed by the Loop
Start and Loop End points and then, when the event ends, the remainder of the sample after the
Loop End point is played during the Amp Envelope's Release stage (unless the Release button in
the Looping controls is activated, in which case the looping section is played during the Release
stage).
Choke mode
© 2016 FXpansion Audio
• By other pads
The layer is choked by any other pad in the engine.
• Self + Other

Geist276
Gain, Pan
These controls adjust the layer's gain and pan - they can also be found within
the Layer Mixer.
Vintage mode
Activating the Vintage button applies an alternative lo-fi resampling algorithm
derived from those found on vintage sampler hardware. The effect of this
setting is most prominent when altering the pitch of the Layer's sample.
Reverse
This button reverses the sample on the layer.
Phase
This button inverts the phase of the layer's sample.
Tune
The Tune control adjusts the pitch of the layer's sample by up to +/- 12
semitones.
Fine
The Fine control adjusts the pitch of the layer's sample by up to +/- 1
semitones.
Octave
The Octave control increases or decreases the pitch of the layer's sample by
up to 4 octaves.
The layer is choked by any layer on the pad (including itself), or any other pad in the engine.
• Pad type
The layer is choked by any layer on any pad in the same row within the engine.
• Engine group 1, 2
The layer is choked by any layer assigned to the same engine group – each engine features 2
assignable cut groups.
• Global group 1, 2
The layer is choked by any layer assigned to the same global cut group, of which 2 are available
in total.
Track Pitch
See the Envelope controls section later in this chapter for details of this setting.
Mix controls
Tuning controls
© 2016 FXpansion Audio

Filter controls
Active
Engaging this button activates the layer's filter.
Geist2's per-layer filter is an extremely high quality circuit-
modelled algorithm – by default, the filter is deactivated in
order to save CPU power.
Algorithm
Japan
The Japan filter offers a classic Japanese monosynth filter
based on cascaded OTA filters and a huge variety of filter
Type menu settings are available.
• Algorithm menu
• Type menu for
SVF Algorithm
As well as conventional 2-pole and 4-pole low-pass, band-pass, high-pass
and notch filters, it also offers a 2-pole peak filter response and a number of
additional combinations of low-pass, high-pass, notch and peak filter outputs
which provide a huge range of possible sonic effects.
SVF
This filter is a typical state-variable filter (SVF) design, offering 2-pole and 4-
pole low-pass, band-pass, high-pass, notch and peak filter responses using
the Type menu.
MS20
The MS20 filter is an OTA-based Sallen-Key filter design, offering low-pass,
band-pass, high-pass and notch Type settings.
Comb
The Comb filter is great for all sorts of uses, especially lush detune and
chorus textures, resonant special FX and sounds reminiscent of flanging and
phasing. When this filter is selected, 2 Type menu settings are available:
negative and positive.
Type
The Type drop-down menu allows one of a variety of filter responses to be
selected, depending on the current Algorithm.
Cutoff, Res (Resonance)
These parameters adjust the cutoff frequency of the filter and the amount of
resonance at the cutoff frequency.
Drive
The Drive control increases the level of the signal entering the filter,
effectively overloading and overdriving the filter circuit. Higher amounts of
drive lead to a gritty, aggressive sound with less resonance.
Pads and Layers 77
© 2016 FXpansion Audio

Geist278
Predelay
This parameter applies a delay of up to 1 second before the layer is played.
This can be very useful for creative stacking of sounds on multiple layers.
Start offset
This control adds a positive or negative offset to the sample Start point
defined on the waveform display.
End offset
This control adds a positive or negative offset to the sample End point
defined on the waveform display.
Loop Start Offset
The Loop Start Offset control adds a positive or negative offset to the
Loop Start point defined on the waveform display.
Loop End Offset
The Loop End Offset adds a positive or negative offset to the Loop End
point defined on the waveform display.
X-Fade
The X-Fade control adjusts the size of a crossfaded transition between the
end and start of the looping section. Using a crossfade is a way of avoiding
clicks when looping a sample.
5.2.2 Play, Looping and Timestretch controls
Play controls
Looping controls
These controls are available only when the Playback mode is set to Looping.
It is important to be aware that the Loop Start Offset and Loop End Offset rotary controls
represent additional offsets to the loop points defined in the waveform display.
Curve
This control adjusts the crossfade curve shape when the X-Fade control is active.
Release
With the Release button activated, the looping section is played during the Release phase of the
Amp Envelope. With the button deactivated, playback continues from the current point to the End
point of the sample when the voice is released, ignoring the Loop End point.
Alternate
With the Alternate button activated, playback occurs in alternating forward/backward directions
between the loop points.
© 2016 FXpansion Audio

Pads and Layers 79
Timestretch power
This button activates or deactivates the timestretch function.
When the timestretch function is active, any changes to the pitch of the
sample – using the Tune and Fine controls, pitch graphs and engine/Master
pitch controls elsewhere in Geist2 – result in the length of the sample staying
the same.
Amount
This control adjusts the timestretch amount between a range of 10% to
400% of the original length. At the centre position (0%), the sample is played
back at its original speed.
Timestretch controls
The process of time-stretching allows the pitch of a sample to be changed without affecting its
length and vice-versa..
This is useful for working with full loops on a single pad, and also for general-purpose creative
sound design.
It is important to remember that timestretching almost always results in some artifacts, as it is a
very complex digital process which 'bends physics' to some extent. Toggling the Fast mode button
can minimize the artifacts, although these types of artifacts can often be desirable when used in a
creative context.
Fast
By default, the Geist2 timestretch algorithm is optimized for drum sounds and other sounds with
hard, fast transients. Activating the Fast mode button enables a less CPU-heavy algorithm instead
which is designed for melodic material like synths or vocals. It's always worth experimenting with
both the default and Fast modes, as one may work better than the other for any particular
material.
Track
When the Track button is activated, the amount of timestretch is scaled accordingly when the
Geist2 tempo is changed.
© 2016 FXpansion Audio
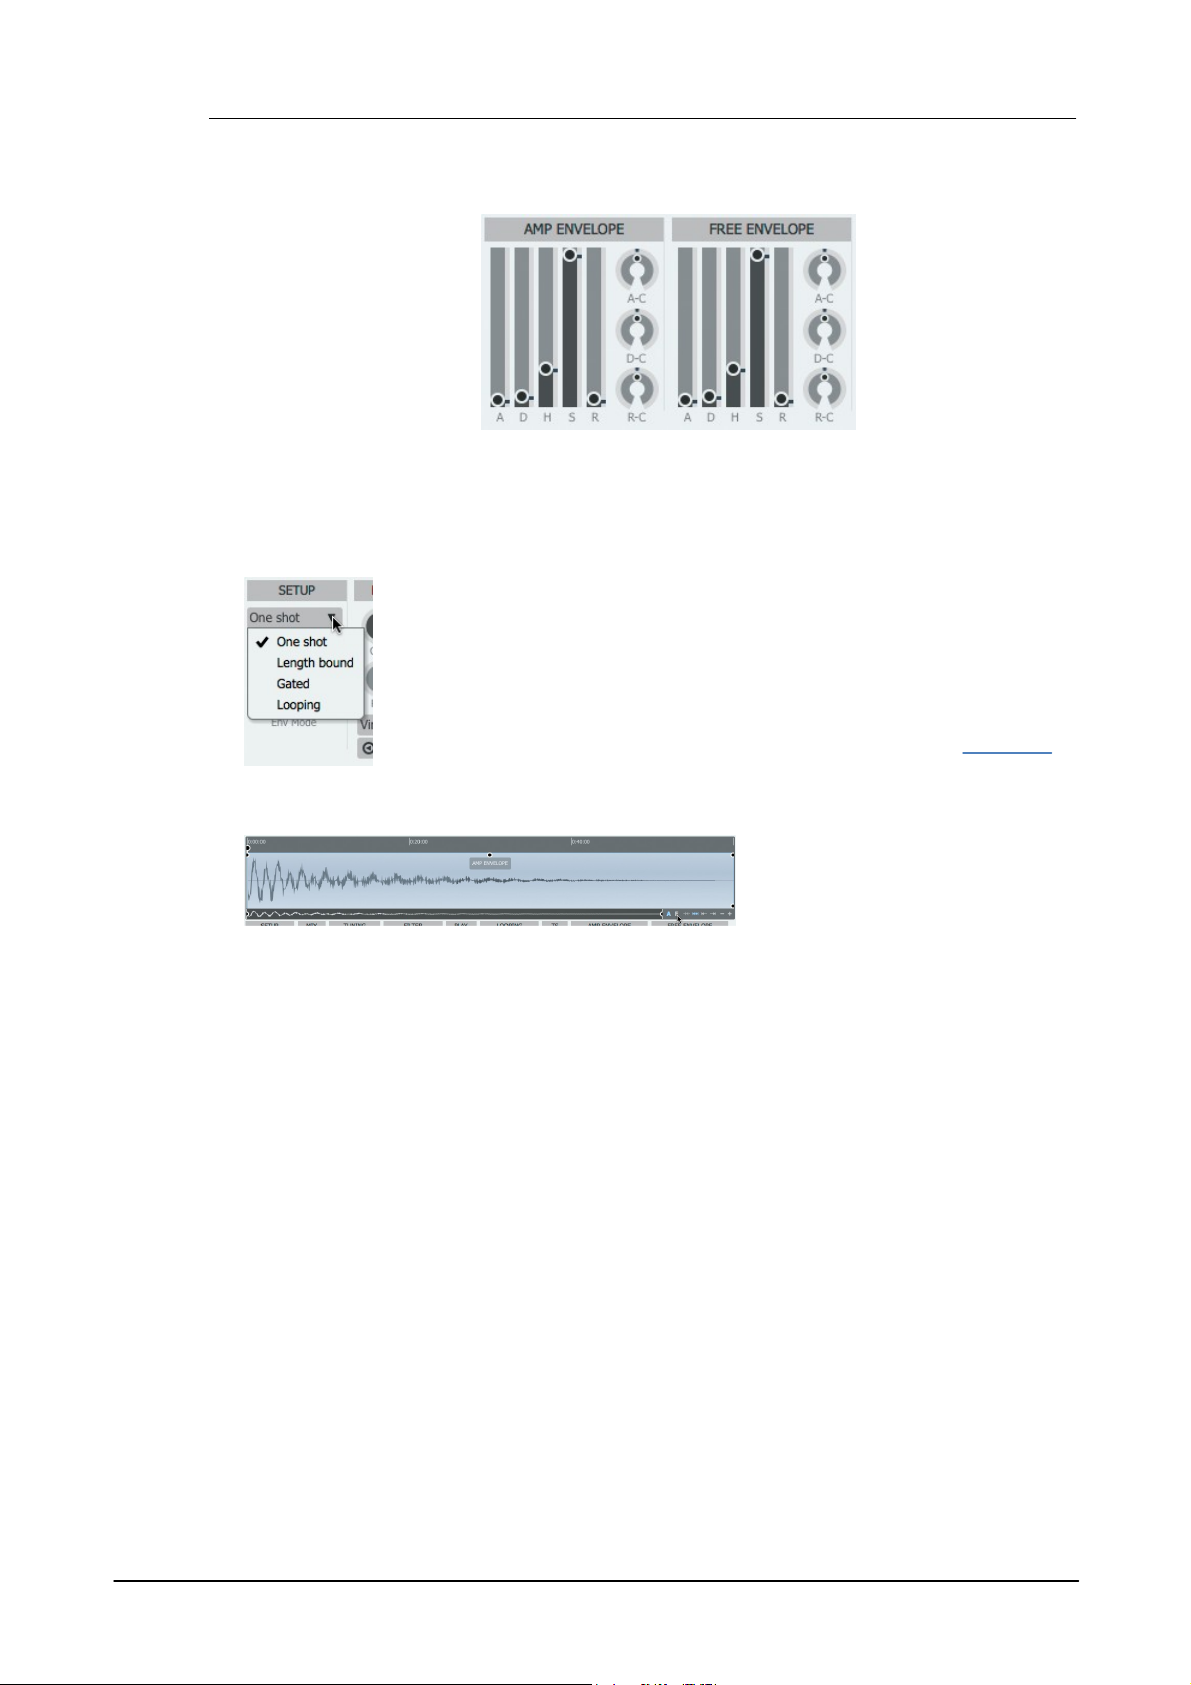
Geist280
The Amp Envelope is hard-wired to the amplitude of the layer's sample but can
also be used to modulate other parameters within the layer using the TransMod
modulation system.
The Free Envelope is not routed to any parameters by default - it is intended to
be used only via the TransMod modulation system.
Both envelopes are displayed and edited over the waveform display but can also
be adjusted via conventional controls.
The behaviour of the envelopes is affected by the Layer's current Playback
(see left) and Track Pitch settings.
The A and F visibility buttons for each
envelope (located next to the Auto-
zoom controls) toggle their visibility on
the waveform display.
5.2.3 Envelope controls
Each Layer in Geist2 features 2 ADHSR envelopes with A (Attack), D (Decay), H (Hold), S
(Sustain) and R (Release) stages.
The curve of the Attack, Decay and Release stages can be set using the A-C (Attack-Curve), D-
C (Decay-Curve) and R-C (Release-Curve) controls, which vary the curve shape between
exponential (0%), linear (50%) and inverse-exponential (100%).
Envelope visibility
With both envelopes visible, the Amp env is shown over the top half of the waveform, while the
Free env is displayed over the lower half.
Using One-shot Playback mode
When the layer's Playback mode is set to One shot, the envelopes for Track Pitch and Non
Tracked Env Mode settings effectively operate as ADHR envelopes.
It is important to remember that One shot envelopes cannot possess a true 'release' stage as no
release event exists - they only respond to an initial trigger. Similarly, there is no true sustain
event since the event has no duration.
However, the Sustain and Release parameters are not ignored. In such situations:
• the Sustain setting dictates the level of the envelope during the Hold time
• the Release stage effectively acts as a second Decay stage after the Hold stage
The default envelope shape features 0-length Attack, Decay and Release stages, with the Hold
time set to the duration between the stard/end indicators.
© 2016 FXpansion Audio

Pads and Layers 81
• click and drag the left side of the handle to
adjust the Attack
• click and drag the right side of the handle to
adjust the Decay
Click and drag the Attack handle left/
right to set the Attack time. Note that
the Hold time now extends beyond the
layer's sample end point, as it has not
been changed.
Click and drag the Decay handle left/
right to set the Decay time, and up/
down to set the Sustain level during the
Hold stage.
Right-click the Decay handle to access
the vertical lock function meaning that
the Sustain level cannot be altered by
dragging up/down.
Click and drag the Hold handle left/
right to set the Hold time, and up/down
to set the Sustain level during the Hold
stage.
Right-click the Hold handle to access
the vertical lock function meaning that
the Sustain level cannot be altered by
dragging up/down.
Click and drag the Sustain handle up/
down to set the Sustain level during the
Hold stage - this is especially useful if
the Decay/Hold handles are locked.
Click and drag the Release handle left/
right to adjust the Release time. Note
that in One-shot mode, the Release is
simply a second Decay stage – it is not
related to input note duration.
Click and drag the handles within the
Attack, Decay and Release stages to
adjust the curve of each stage.
The handles for the 0-length Attack and Decay can overlap. When this is the case:
This technique applies with any overlapping envelope handles.
© 2016 FXpansion Audio
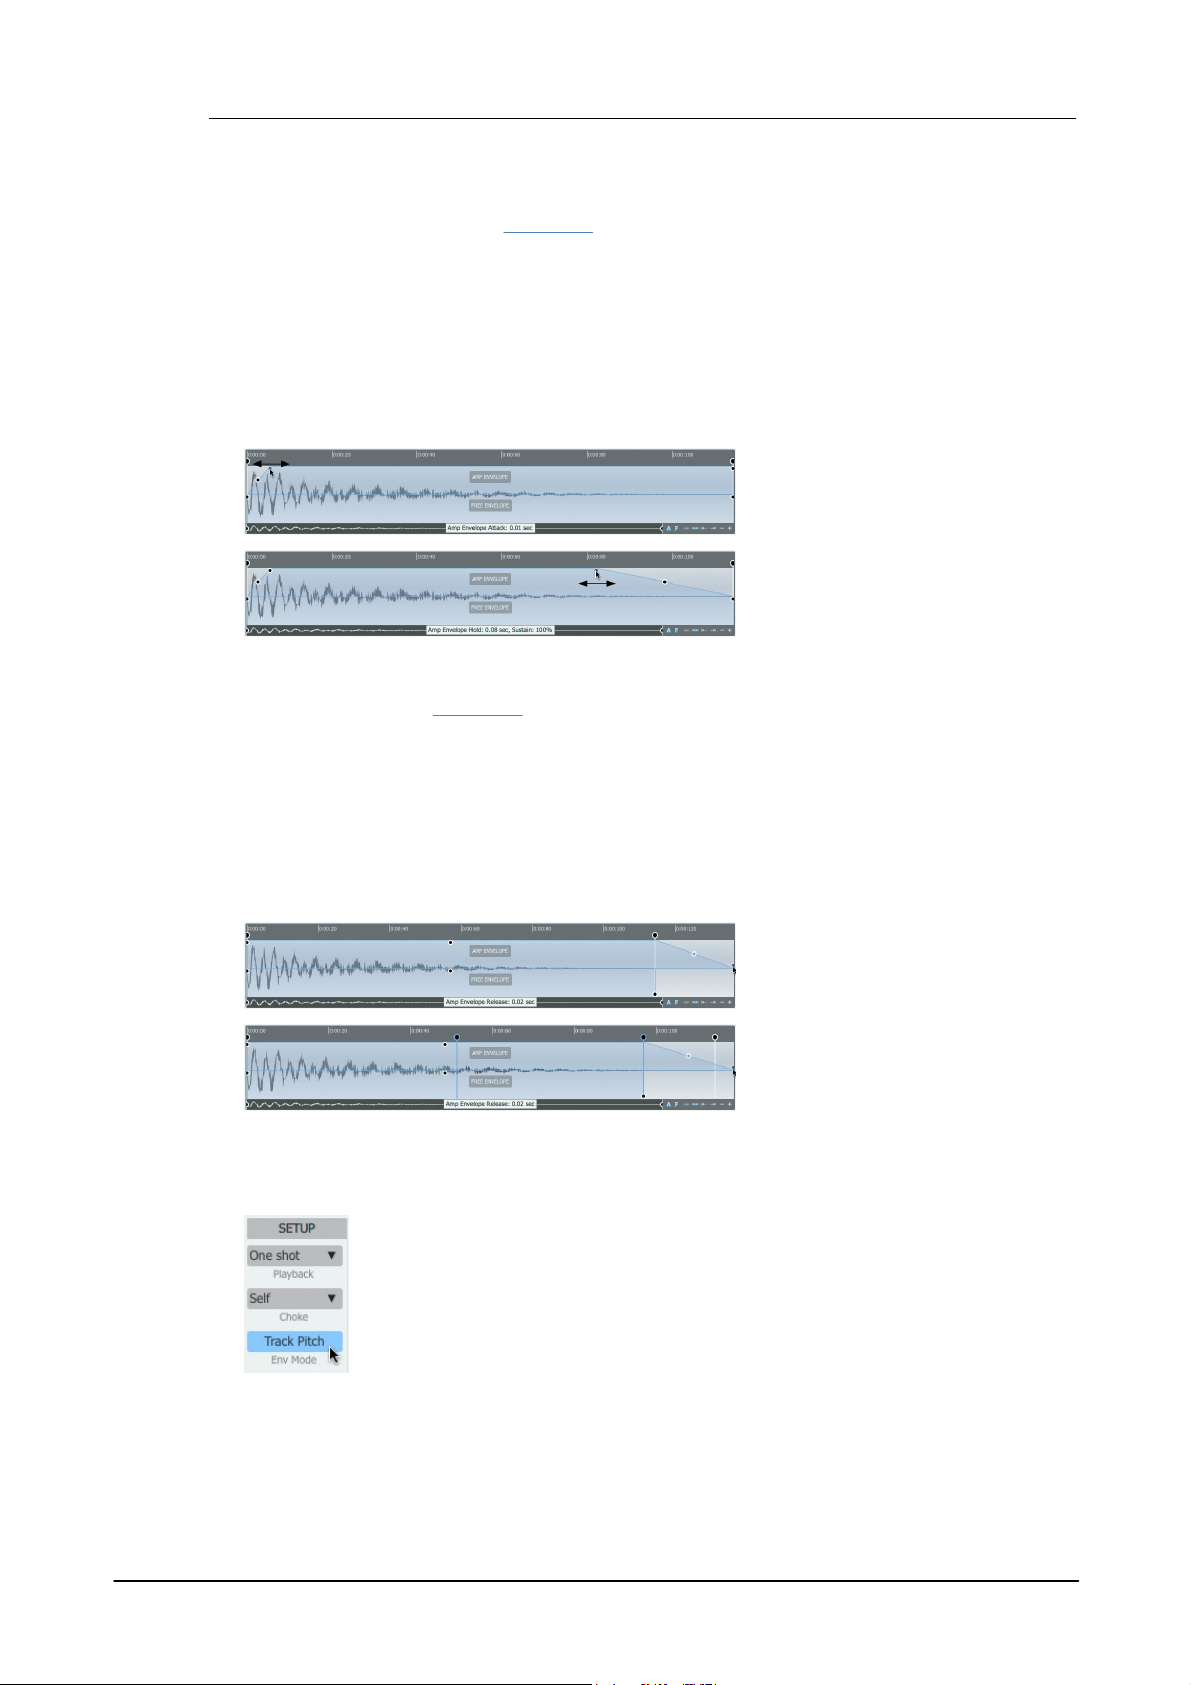
Geist282
Click and drag the Attack handle left/
right to set the Attack and Hold times.
Click and drag the Hold handle left/
right to set the Hold and Release times.
In Gated mode, the Release stage is
shown as starting from the sample End
point, although it begins as soon as
the pad input event is released.
In Looping mode, the Release stage
begins from the end of the Loop end
point.
With the Track Pitch setting activated, envelope times are scaled proportionally
when changing the pitch of a sample - since the sample is played back faster or
more slowly, the envelope times are also scaled accordingly.
With the setting deactivated, envelopes are not scaled with pitch or the length of the
sample - they are always applied in absolute time, regardless of the pitch of the
layer's sample.
Using Length Bound Playback mode
When One Shot Length Bound Playback mode is used, the layer's envelopes are switched to a
special AHR mode and always scaled to the length of the sample. In this mode, envelopes follow
the behaviour of the envelopes in Geist2's predecessor, GURU.
• The Attack and Release times can be set up to 50% of the length of the sample.
• The Hold time is 0-100% of the difference between the length of the sample and the Attack +
Release times.
Therefore, if the Attack and Release stages are set to 25% of the length of the layer's sample, the
Hold stage can be set up to 50% of the sample duration.
• The Release stage is effectively a Decay stage. Length Bound envelopes can only act as one-
shot events - they only respond to a trigger event and ignore any event duration.
Using Gated or Looping Playback modes
In Gated and Looping Playback modes, the envelopes act as ADHSR envelopes when the Env
Mode is set to Track Pitch or Non Tracked.
If the incoming event stops, the Release stage becomes active immediately, regardless of the
current stage within the ADH sequence.
If the incoming event is still active when the Hold time has elapsed, the Sustain stage becomes
active for the remaining duration of the incoming event, after which the Release stage becomes
active.
The Attack and Decay handles are adjusted in the same way as for One-shot envelopes. The Hold
handle does not exist – the Sustain level is set using the Decay handle (with unlocked vertical
movement) or the Sustain handle.
The Attack, Decay and Release curves are adjusted in exactly the same way as in the One-shot
envelope.
Track Pitch
© 2016 FXpansion Audio
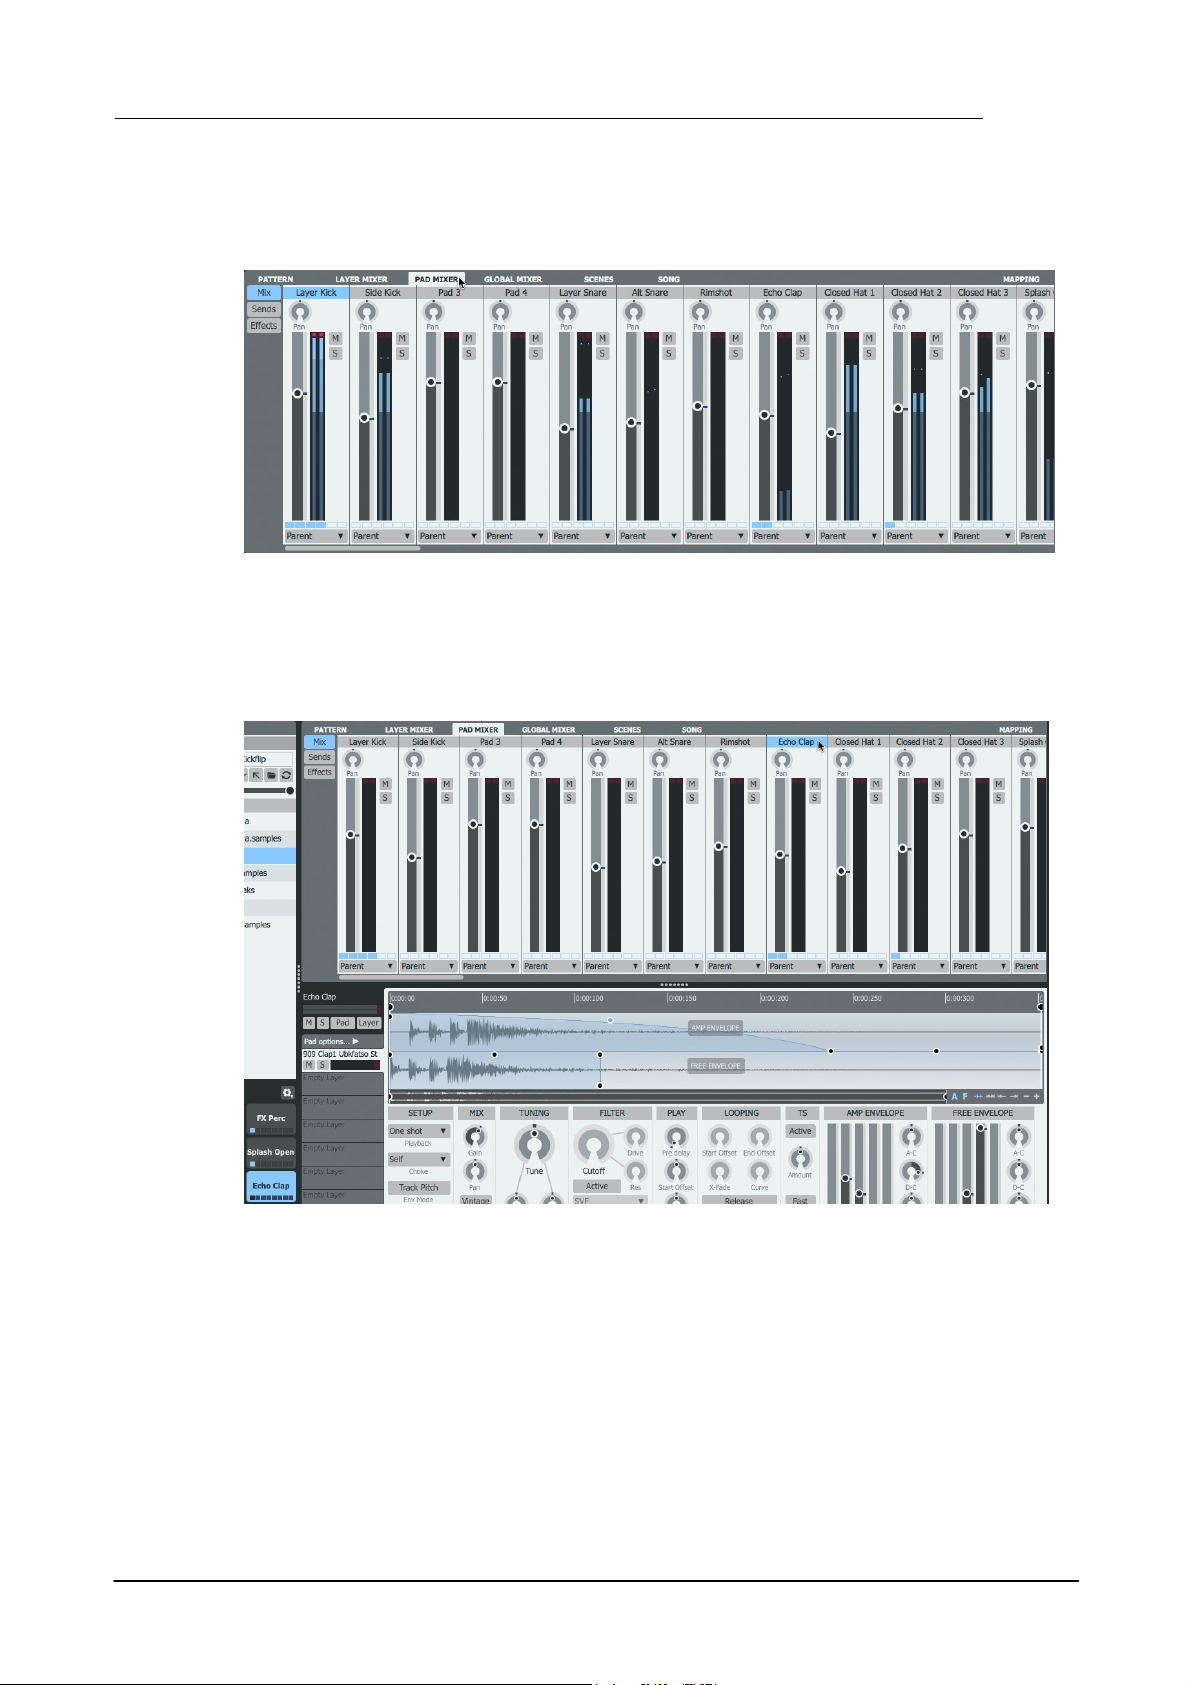
5.3 Pad Mixer
The Pad mixer allows the pads in the currently selected engine to be mixed and processed with
effects. It is displayed by clicking the Pad Mixer page button.
Pad 'channels'
The 'channels' in the mixer, arranged from left to right, represent the 64 available pads in the
current engine - use the scrollbar to access all pad channels.
Pads and Layers 83
Selecting a pad channel
• Click one of the 64 displayed channels, each of which corresponds to a pad in the current
engine.
The selection is also reflected in the Pads area and the Pad Editor.
Likewise, the relevant pad channel becomes selected with the following actions:
• Clicking a pad to select it and play its layers
• ALT-clicking a pad to select it without playing any audio
• If the Pad selection follows MIDI button is activated, the pad is selected by playing its
corresponding note on the relevant MIDI channel
© 2016 FXpansion Audio

Geist284
Each pad 'channel' features Mute, Solo, Pan and Gain controls
along with the following controls:
Level meter
The meter features a clip indicator at the top of the channel click the indicator to reset it.
Output selector
If a pad's Output selector is set to Parent, it is mixed with any
other pads in the parent engine that are also set to Parent and
then sent to the Mixer, allowing effects to be added to the engine
mix. If a sub-output is specified, the layer bypasses any other
stages and effects further down the signal path (engine channel
and Master channel blocks).
Effects indicator
This indicator shows whether each of the channel's 6 effects slots
is Active (see below).
Multiple selection of Pad mixer channels
Multiple pads can be selected in the Pad mixer, using the following methods:
• SHIFT-click to create a contiguous selection between 2 pads
• CMD-click (Mac) or CTRL-click (Windows) to add a pad to the selection
Multiple edit shortcuts
The Pad multiple edit shortcut applies in the Pad Mixer in the same way as in the Pad Editor.
Note that the Pad edit shortcut is not capable of adding effects devices or altering their
parameters across multiple pads.
Pad channel controls
Sends
Sends are 'parallel' routings from the pad to the Aux busses - each pad channel features 4 Send
controls, one for each of the 4 Aux busses, labelled S1 to S4.
To display the Send controls, click the Sends button to the left of the mixer.
The routing point for all sends to an Aux buss can be set to either pre- or post-fader, using the
Pre button on the Aux buss itself, located in the Global Mixer.
© 2016 FXpansion Audio
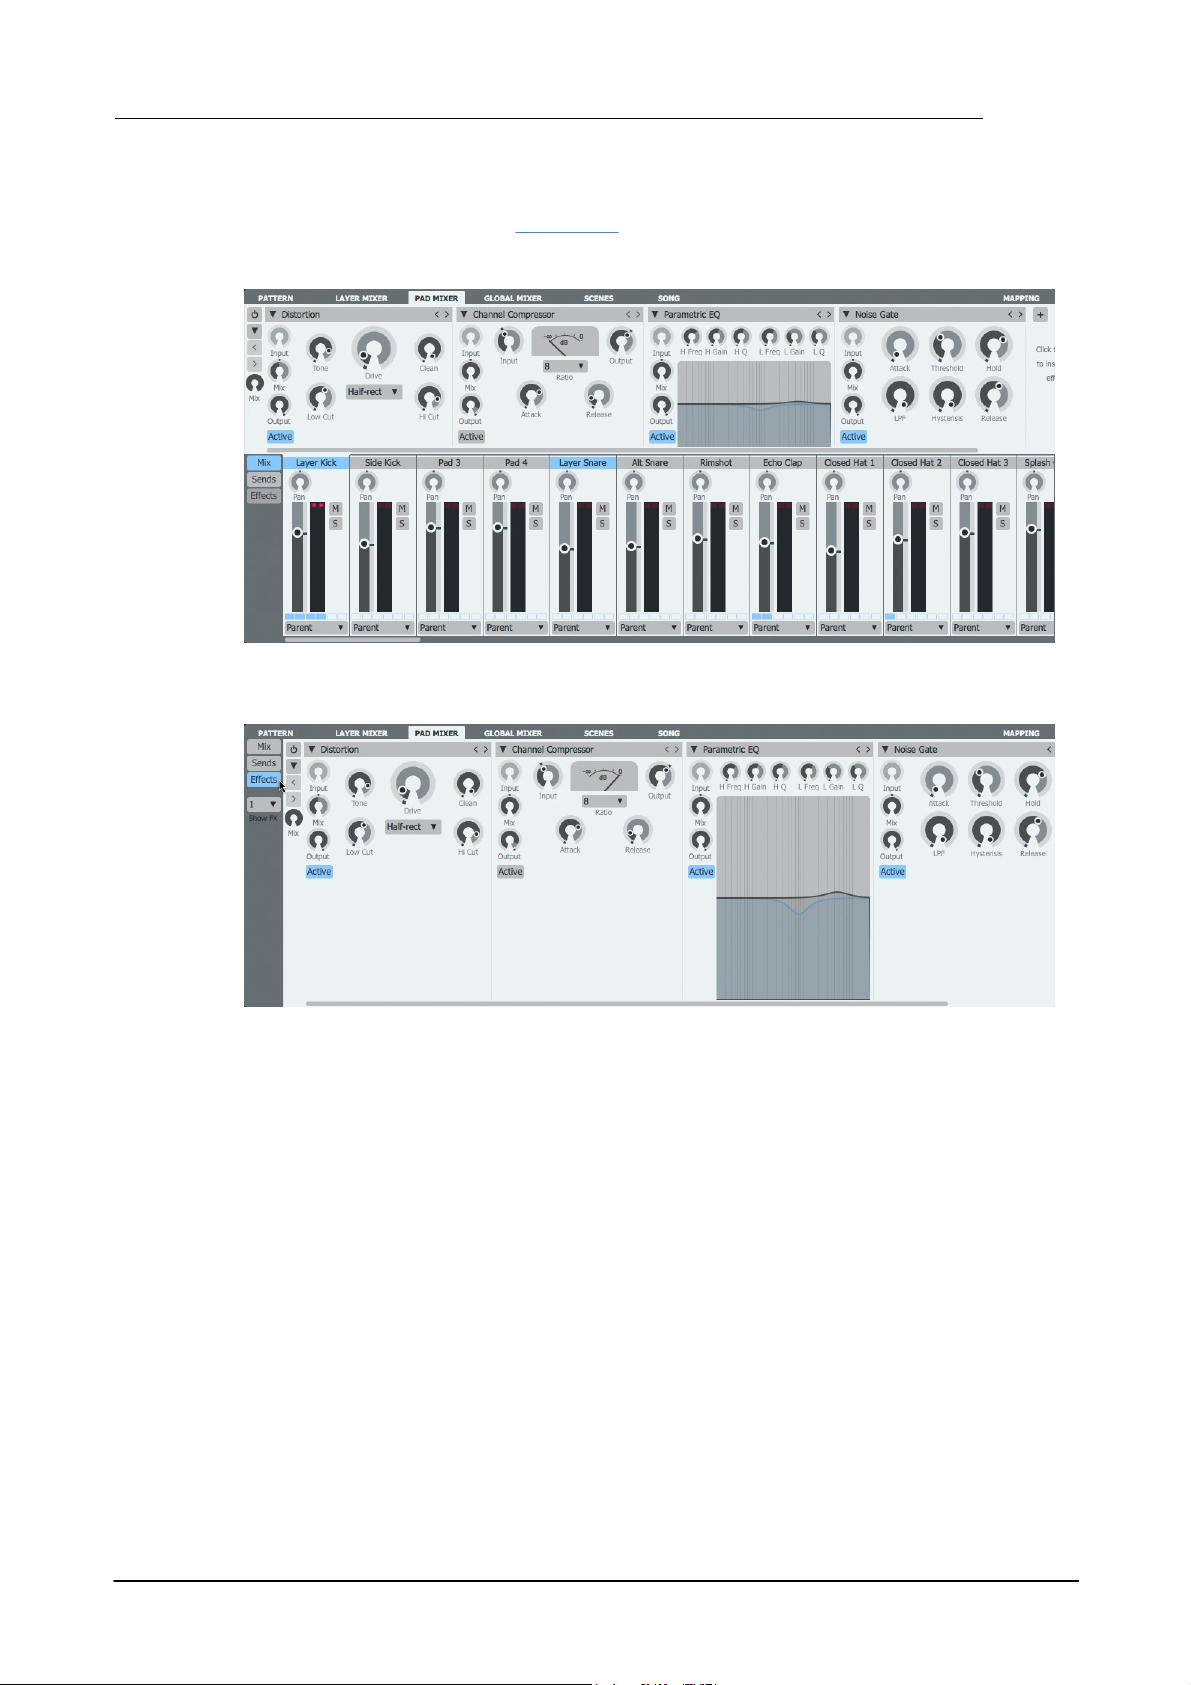
Pads and Layers 85
Effects Slots
Each pad features 6 assignable Effects slots for loading effects devices. The visibility of the Effects
controls is dependent on the current size/scaling of the Geist2 interface.
• When an adequate vertical area is available, the Effects slots for the selected channel are shown
above the mixer.
• When the required vertical area is unavailable, click the Effects button to display the current
channel's Effects slots in place of the mixer channels.
© 2016 FXpansion Audio
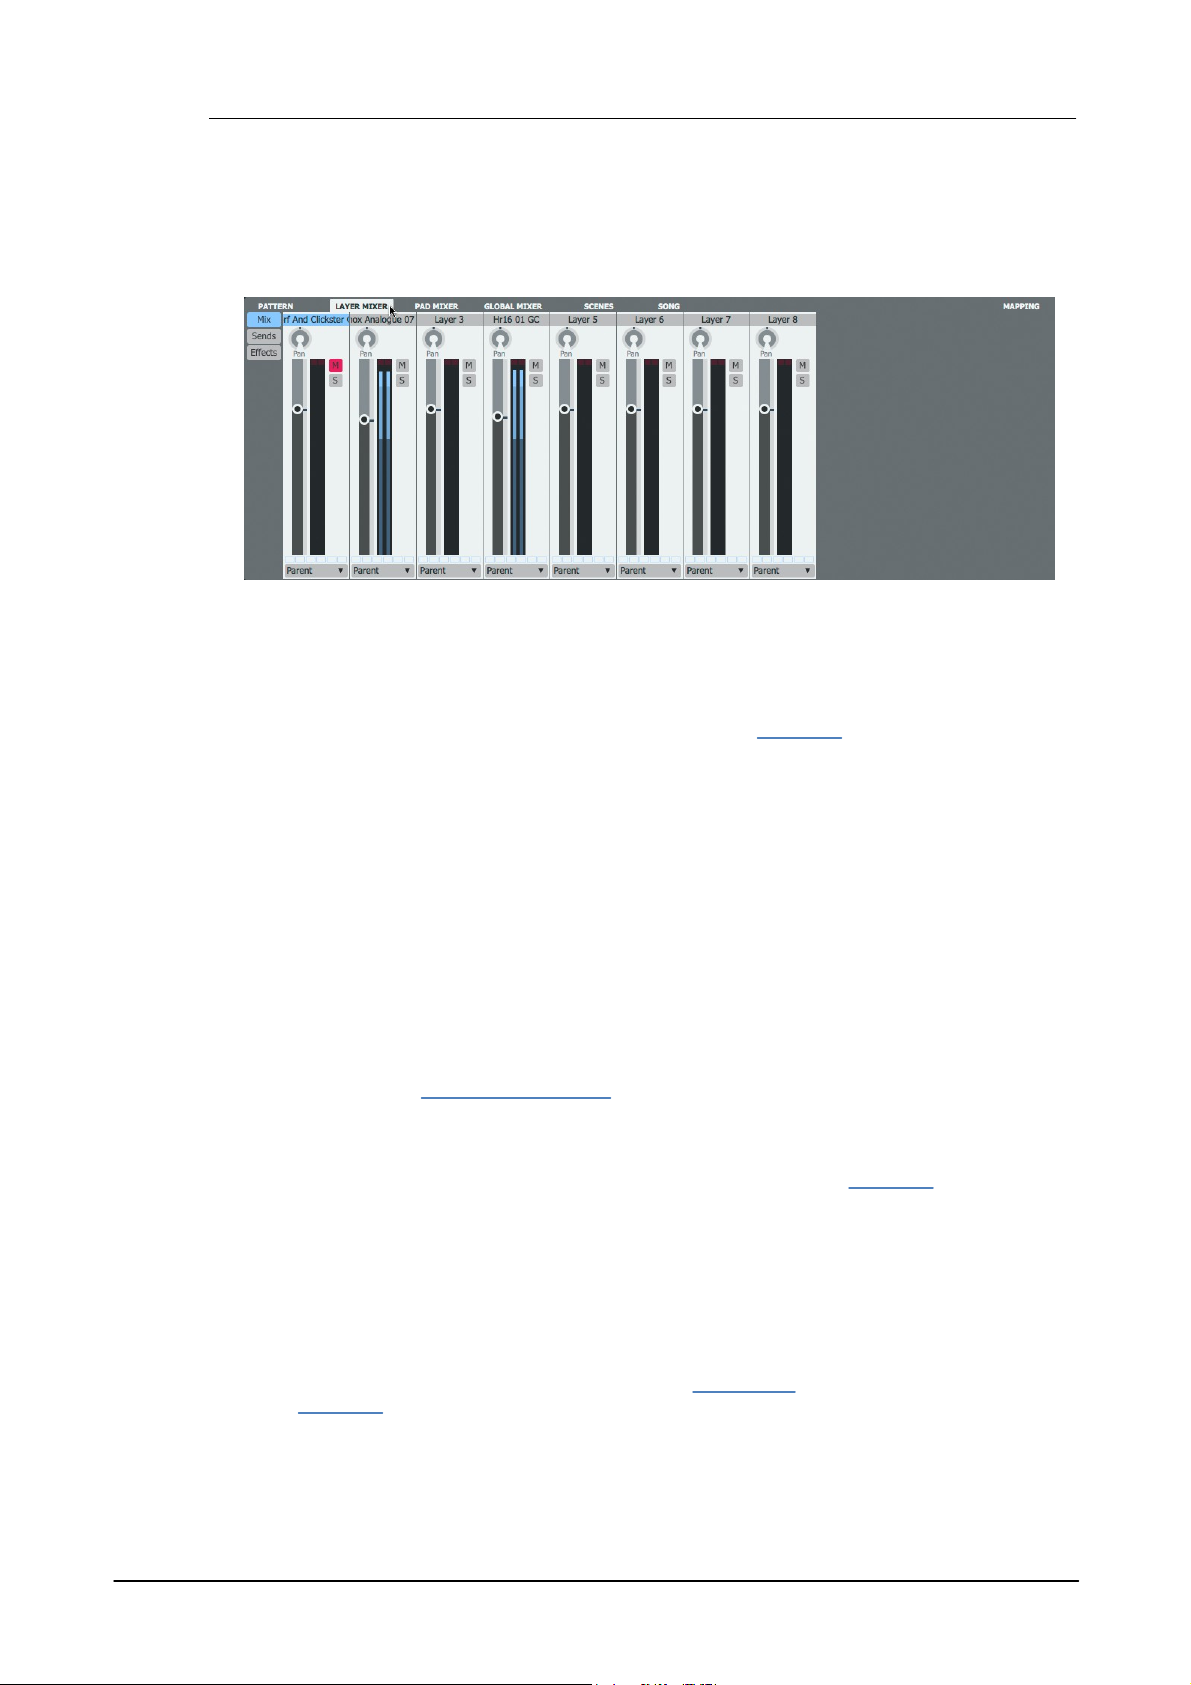
Geist286
5.4 Layer Mixer
The Layer mixer allows the 8 layers in the currently selected pad to be mixed and processed with
effects. It is displayed by clicking the Layer Mixer page button.
Layer 'channels'
The 'channels' in the mixer, arranged from left to right, represent the 8 available layers on the
selected pad.
Selecting a layer
First, the relevant pad must be selected as described in the Pad Mixer section.
Then, select a layer on the pad in either of the following ways:
• Select a layer by clicking one of the 8 displayed 'channels' in the Layer mixer, each of which
represents a layer on the current pad.
• Click a layer in the Layer selector at the left of the Pad Editor – selections are always preserved
between the Layer selector and the Layer Mixer.
Multiple selection of layers
Multiple layers can be selected in the Layer mixer, using the following methods:
• SHIFT-click to create a contiguous selection between 2 layers
• CMD-click (Mac) or CTRL-click (Windows) to add a layer to the selection
Multiple selections can also be made in the Layer selector in the Pad Editor – as mentioned above,
selections are always preserved between these sections.
Multiple edit shortcuts
The Layer and Pad multiple edit shortcuts apply in the Layer Mixer in the same way as in the Pad
Editor.
Layer Channel controls
Each channel's controls in the mixer behave identically to those of the Pad Mixer.
Output selector
If a layer's Output selector is set to Parent, it is mixed with any other layers on the parent pad
that are also set to Parent and sent to the Pad Mixer.
If the layer is routed to a sub-output, it bypasses any other stages and effects further down the
signal path (the pad, engine and Master channel blocks).
Sends and Effects slots
Each channel in the layer mixer features Sends and Effects slots which behave identically to those
of the Pad Mixer.
© 2016 FXpansion Audio
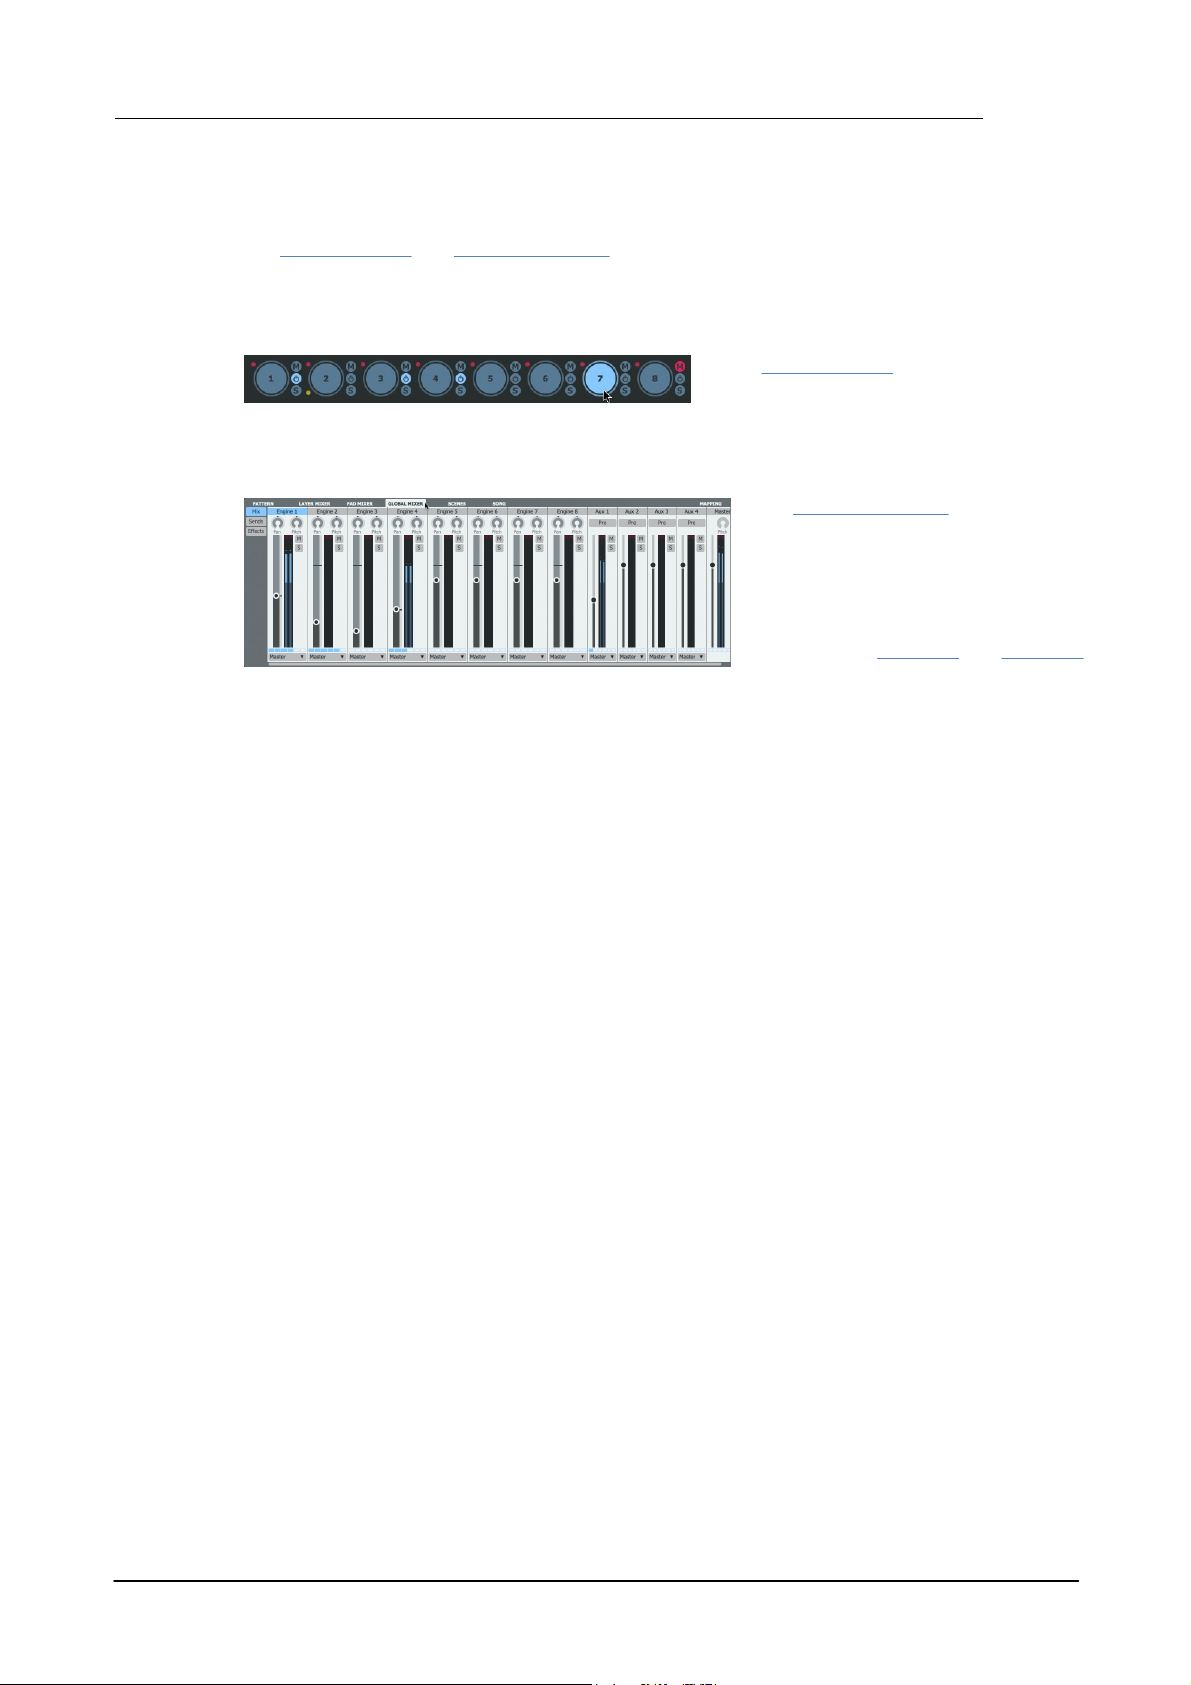
6 Engines and Global Mixer
• The Engine selector provides access to
Geist2's 8 engines, along with a number of
additional supporting functions.
• The Global Mixer page page displays
channels for each of the 8 engines
alongside 4 Aux channels, used as Send
destinations from other channels, and
the Master channel, the primary stereo
output from Geist2.
Much of the Global Mixer's functionality
is introduced in chapter 1 and chapter 5.
The Engine selector and Global Mixer page page provide control over Geist2's 8 engines as well as
the 4 Aux channels and the Master channel.
Engine Selector
Global Mixer page
Engines and Global Mixer 87
© 2016 FXpansion Audio

Geist288
6.1 Engine Selector
The Engine Selector provides a number of functions relating to Geist2's 8 engines:
• it specifies and indicates the engine currently selected for editing
• it allows engines to be muted or solo'd
• it provides indicators to represent muted or solo'd elements within engines
• it allows the pattern sequencing of each engine to be enabled or disabled
• it also provides various engine management functions via the engine context menu
Engine Select
Each engine features a large circular button for selecting it as the current engine. The currently
selected engine is highlighted.
Note that engines can be named (see below), with the name shown within the Engine Select
button, replacing the default numbering.
The current engine can also be selected using engine channels in the Global Mixer.
Engine Select buttons also act as level meters - louder signals produced by the engine result in
brighter highlighting.
Engine Mute, Solo
Each engine features Mute and Solo buttons, to the right of its Engine Select button. These
functions affect the entire audio output from the engine.
Mute/Solo indicators
Each engine selector button contains 2 LED indicators, to the left of its Engine Select button.
These are highlighted if any element of the engine is muted or soloed (layers, pads or the engine
itself).
A red LED indicates that mutes are present within the engine, while a green LED indicates solos.
If an element within an engine is muted, its red mute indicator is highlighted.
If an element within an engine is solo'd, its green solo indicator is highlighted and the red mute
indicators for unsoloed engines are also highlighted.
Level meter
The Level meter indicates the amplitude of any pads/layers being played within the engine.
© 2016 FXpansion Audio
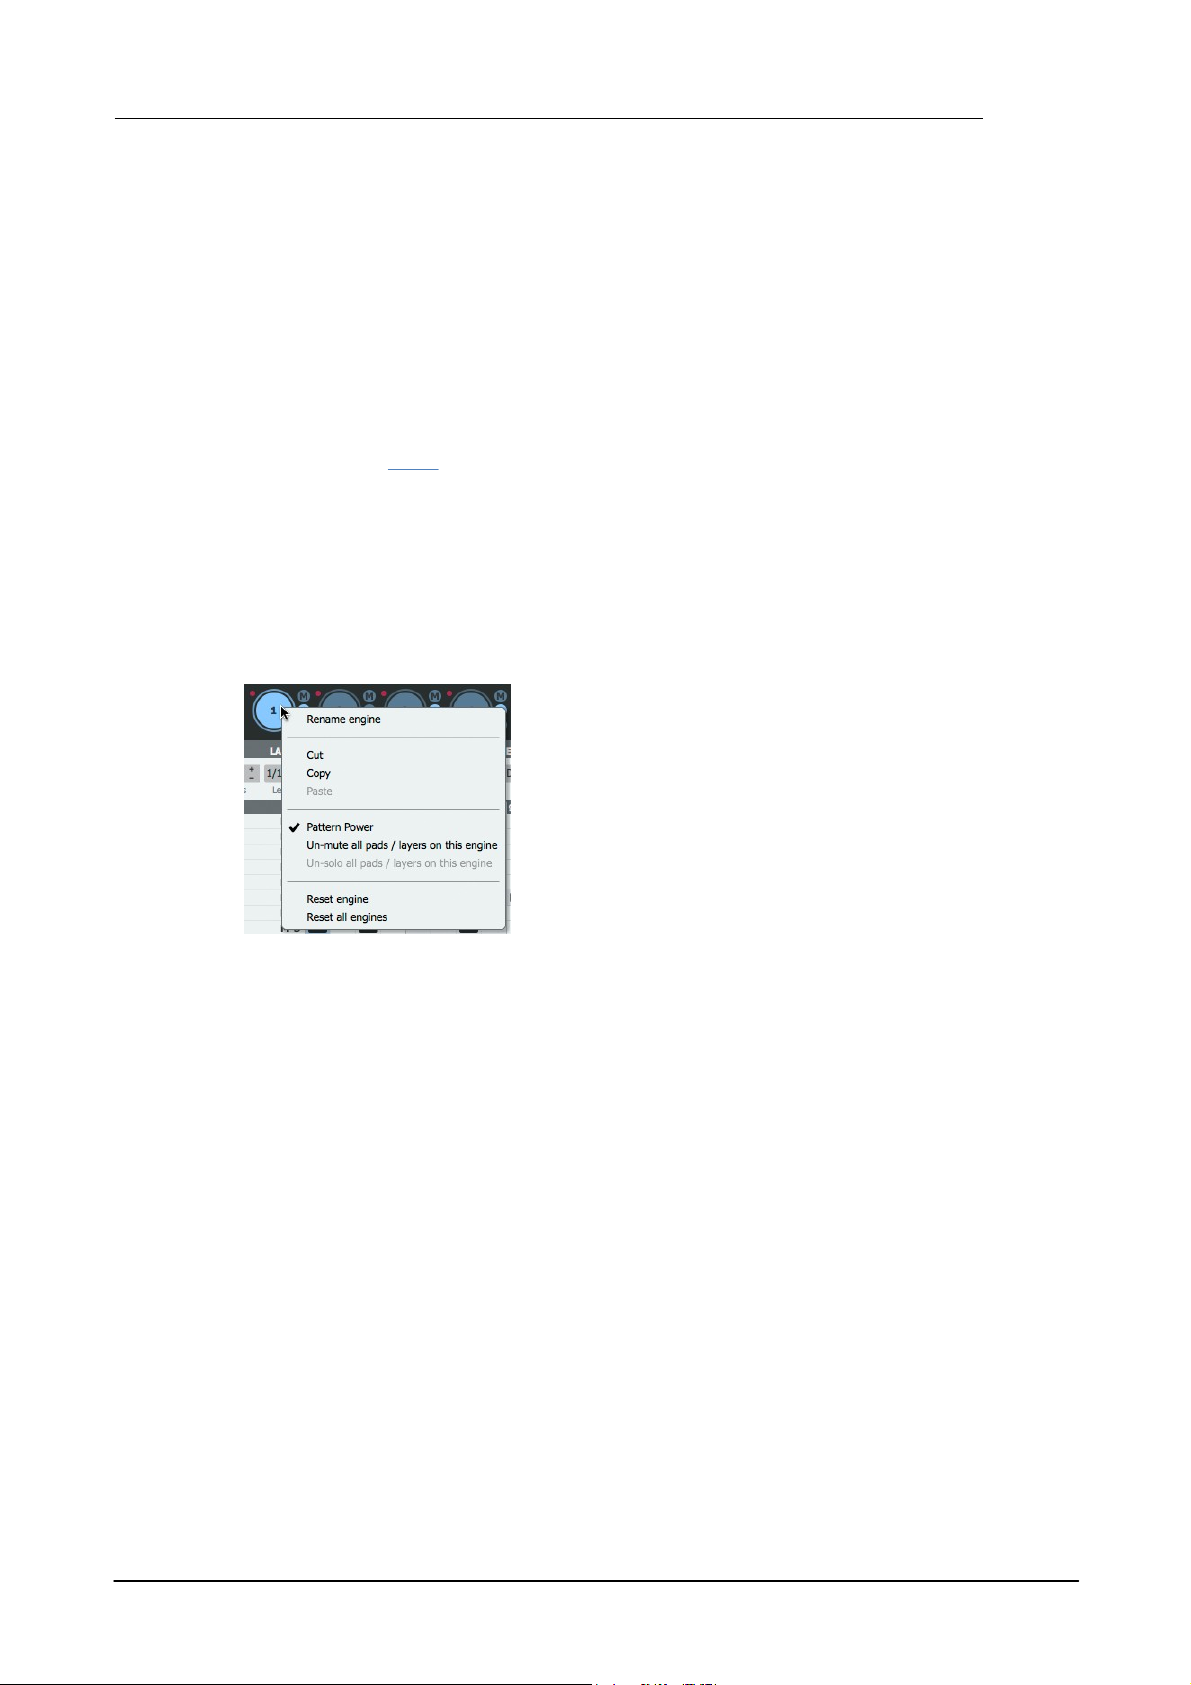
Engines and Global Mixer 89
Rename engine
This function allows the engine name to be changed from its
numerical default of 1-8. It is recommended to keep the engine
name as short as possible.
Cut, Copy, Paste
These functions allow the entirety of the currently selected engine
to be cut, copied and pasted between the 8 engines. When pasting
the contents of a clipboard, the destination engine is overwritten.
Pattern Power
The Pattern power button for each engine is very important in the context of Geist2's sequencing
functions.
Deactivating an engine's Pattern power button disables pattern playback on the engine. This is
useful in the following situations:
When exporting patterns to a DAW/host
After exporting patterns to MIDI tracks in the DAW/host for further editing/arrangement, it is
usually necessary to deactivate the Pattern power button so that only the incoming MIDI notes
trigger Geist2 pads.
When using scenes
When creating a scene, Geist2 stores an engine's state with its Pattern power button deactivated
if it is currently playing back an empty pattern. This is to ensure that the original scene content is
preserved if the empty pattern is subsequently edited.
To enable the engine's pattern sequencer again, simply reactivate the Pattern power button on
the affected engines.
Engine context menu
Right-click an Engine selector button to display the Engine context menu. This menu provides a
number of functions for managing engines.
Un-mute all pads/layers on this engine
This function turns off any mutes that exist within the engine, on any of its pads and layers.
Un-solo all pads/layers on this engine
This function turns off any solos that exist within the engine, on any of its pads and layers.
Reset engine
This function resets the current engine to its default empty state - all layers, pads and patterns
within the engine are reset.
Reset all engines
This function resets all 8 engines to their default empty state - all layers, pads and patterns within
all 8 engines are reset.
© 2016 FXpansion Audio

Geist290
6.2 Global Mixer
Geist2's Global Mixer page, displayed by clicking the Global Mixer page button, shows all 8
engines as channels, along with 4 Aux buss channels and the Master channel.
It provides very similar controls to the Pad Mixer and Layer Mixer pages although there are a few
differences.
Selecting a channel
Engine channels can be selected by either of the following methods:
• click the engine channels in the Global Mixer page.
• click the Engine selector buttons which are always visible on the Geist2 interface
Selecting an engine makes it the currently active engine for editing – its pads and patterns are
accessible via the on-screen pad and pattern buttons.
Other channels are selected by clicking the relevant channel in the Global Mixer.
Multiple selection of channels
Multiple channels can be selected in the Mixer page, using the following methods:
• SHIFT-click to create a contiguous selection between 2 channels
• CMD-click (Mac) or CTRL-click (Windows) to add a channel to the selection
Engines
Like channels in the Pad Mixer and Layer Mixer, each engine 'channel' features Mute, Solo, Pan
and Gain controls, along with a Level meter and Output selector.
Engine channels also each contain a Pitch control.
Pitch
This control adjusts the pitch of the entire engine. Relative pitch differences between layers in the
engine are preserved.
Output selector
If an engine's Output routing is set to Master, it is mixed with all other signals routed to the Master
channel.
© 2016 FXpansion Audio
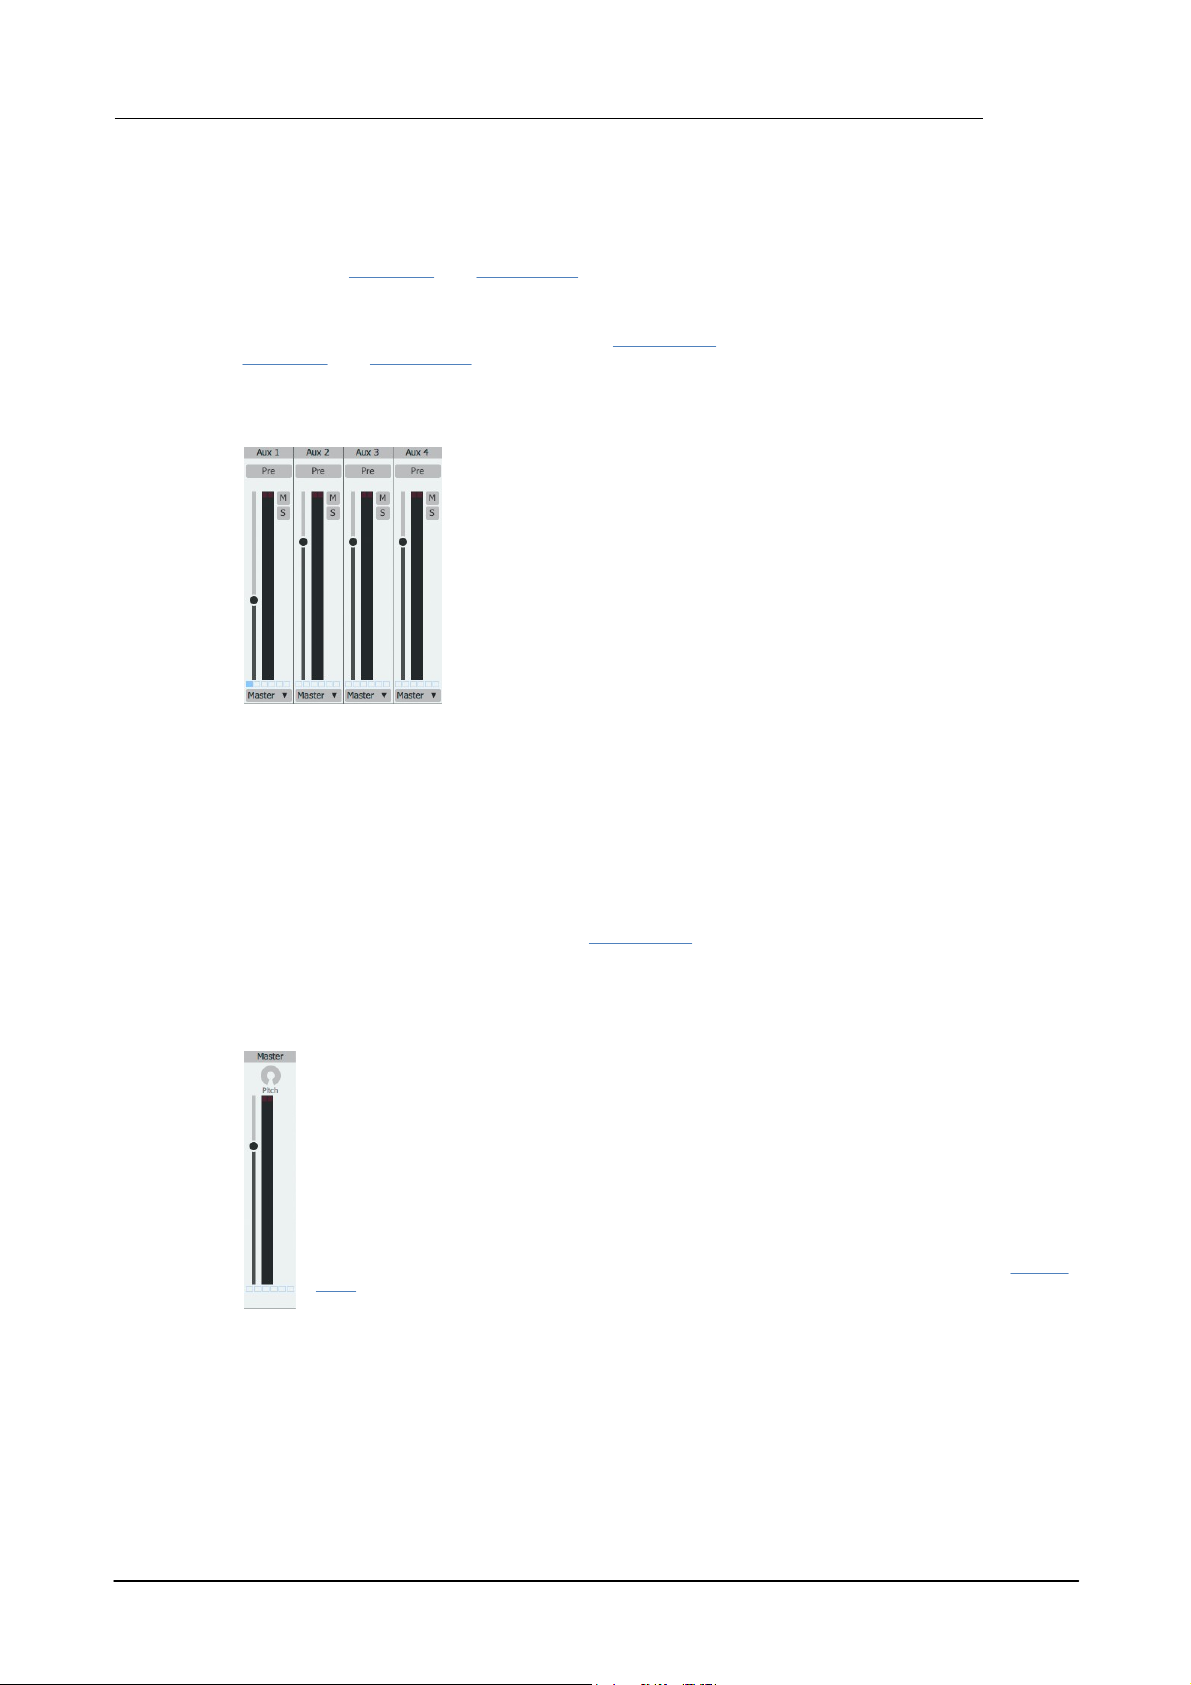
Engines and Global Mixer 91
Like all channels discussed previously, each Aux channel features Mute,
Solo and Gain controls, along with a Level meter and Output
selector.
Aux channels also each contain a Pre button.
Pre
In Geist2, the pre- or post-fader routing of the sends to an Aux channel is
set for all sends at once, using the channel's Pre button.
By default, with the button deactivated for an Aux, the routing occurs
post-fader - all sends to the Aux are routed after the source channel's
Gain control is applied.
Activating the button for an Aux changes the routing to pre-fader - all
sends to the Aux are routed before the source channel's Gain control is
applied.
The Master channel represents the primary stereo output of Geist2 and is the default
routing destination for all 8 engines.
It features a Gain control, Level meter and Pitch control.
Pitch
This control adjusts the pitch of the entire output of Geist2, relative to individual layer,
pad and engine tuning settings.
Effects Slots
Like other channels in Geist2's mixers, the Master channel features 6 assignable Effects
slots for loading effects devices.
If the engine is routed to a sub-output, it bypasses the Master channel.
Sends
In the Global Mixer page, Sends are only available for Engine channels and behave identically to
those in the Pad Mixer and Layer Mixer pages.
Effects Slots
Each engine channel features 6 assignable Effects slots which behave identically to those in the
Pad Mixer and Layer Mixer pages.
Aux channels
Output selector
If an Aux channel's Output selector is set to Master, it is mixed with all other signals routed to
the Master channel.
If the Aux buss is routed to a sub-output, it bypasses the Master channel.
Effects Slots
Each Aux channel features 6 assignable Effects slots for loading effects devices.
Master channel
© 2016 FXpansion Audio

Geist292
When an Effects slot is empty, click the + button to display a menu of
available devices. Click the desired device within the relevant submenu to load it into the slot. See the following sections for details of
each available device:
Distortion
Dynamics
EQ
Filters
FX
Reverb
7 Geist2 Effects
Geist2 features Effects slots within the Global Mixer, Pad Mixer and Layer Mixer pages.
Each channel in each Mixer page contains 6 Effects slots which are used in the same way within all
these pages.
See the next section for a guide to common Effects slot controls.
Loading an effects device into an empty slot
© 2016 FXpansion Audio

7.1 Effects slot controls
Device headers and common device
controls
Active
With this button activated, the effects device
processes audio. When it is deactivated, the device is
bypassed and audio passes through it unaffected.
Device menu
Preset functions
The upper part of this menu contains preset-based
functions.
The Save preset function saves the current device settings as a
preset.
Use the Save as default function to save the current settings as
the default settings whenever the device is loaded in future. The
Revert to default function switches back to the currently defined
default settings.
The next section of the menu displays factory and previously saved
user presets for the device.
Device menu
The lower part of the menu displays the effects device menu for
replacing the device currently loaded into the slot - this part of the
menu is used in the same way as the + button menu for an empty
slot. It also provides the Remove effect function for emptying the
slot.
Previous / Next preset
These buttons cycle through the available presets for the device.
Input
The Input control is provided for certain effects devices such as
delays and reverbs and sets the input level to the device.
Effect controls
Geist2 Effects 93
It is useful for automation purposes, effectively functioning as a wet/dry control which preserves
decaying tails when it is turned down.
Mix
This control acts as a 'wet/dry' control, blending between the input signal and the output of the
device. It is very useful for parallel processing through inserted devices such as compressors,
© 2016 FXpansion Audio
reverbs and so on.
Output
This control sets the output level from the device.
Effect Chain controls
The Effects chain controls, located above the Effects slots, provide a preset system for the entire
chain of 6 Effects slots.
Chain power
The Chain power button activates or deactivates the entire chain of 6 slots.

Geist294
Chain menu
The Presets... menu contains the Save preset function to
save the current settings as a preset and the Clear chain
function to re-initialize the entire set of 6 slots on the channel.
This menu also allows factory and previously saved presets to
be loaded.
Previous / Next Chain preset
The Previous and Next buttons cycle through the available
Chain presets sequentially.
Cut
The Cut function stores the current Effects slot's state in the
clipboard and removes the device, resetting the slot to an
empty state.
Copy
The Copy function stores the current Effects slot's state in the
clipboard, leaving the slot unchanged.
Chain Mix
The Chain Mix control acts as a 'wet/dry' control for the entire chain, blending between the input
signal and the output of the 6 Effects slots.
Re-ordering Effects slots
Click and drag any Device header left/right in order to change its position in the FX chain.
Effects context menu
Right-clicking within an effects device displays the effects context menu.
Paste
If the clipboard contains suitable data, this function pastes the clipboard contents into the slot,
replacing its previous state.
© 2016 FXpansion Audio

7.2 Distortion
• Distortion
• Shaped Distortion
• Driver
Shaped Distortion
The Model menu selects from a wide range of available distortion algorithms.
The Drive control adjusts the amount of distortion while the Gain control sets the
final output level, useful for attenuating the volume produced by large amounts of
Drive.
The Post Freq control applies a low-pass filter after the distortion stage, useful
for removing unwanted high frequencies produced by this process. The Restore
control provides a dynamics function for the distorted signal. At the centre point,
no dynamics adjustment occurs. At settings below this, attack transients are
emphasized while sustain portions of the transient are de-emphasized. At settings
above the centre, the opposite occurs: attacks in transients are de-emphasized
while the sustain portion is emphasized.
The Saturation button activates a saturation circuit which is dependent on the
signal level and is applied to the entire output signal. Note that this is not a peak
clipper - the output signal can still exceed 0dB.
Driver
The Driver device is an overdrive/distortion effect. The Model menu selects from
a wide range of different distortion algorithms each with its own character. The
Drive control adjusts the amount of overdrive. The In Gain adjusts the level of
the signal entering the effect while the Out Gain adjusts the final output level,
useful for attenuating the volume added by larger amounts of Drive.
The Saturation button activates a saturation circuit which is dependent on the
signal level and is applied to the entire output signal. Note that this is not a peak
clipper - the output signal can still exceed 0dB. The Limit button engages a soft
limiter on the output signal - again, please note that the output can still exceed
0dB if it contains very fast transients.
Distortion
This is a versatile, DCAM-modelled overdrive/distortion effect. The Type control switches between
4 different distortion models – Diode, OTA, OpAmp and HalfRect – each of which provides a
different flavour of distortion. The Low Cut and Hi Cut controls filter the signal before the
distortion stage.
The Drive control sets the amount of drive or distortion applied to the signal. The Tone control
adjusts a 1-pole low-pass filter for removing unwanted high frequencies from the driven signal.
The Clean control reintroduces the signal previously filtered out by the Low Cut and High Cut
controls.
Geist2 Effects 95
© 2016 FXpansion Audio

Geist296
• Maul
• Bitcrusher
• RingMod
Adjust the bit-depth with Bits control and the samplerate with
the Frequency control.
The Drive control sets the amount of drive or distortion applied
to the signal. The Tone control adjusts a 1-pole low-pass filter
for removing unwanted high-frequencies from the processed
signal.
RingMod
This effect is used for radical shifts in timbre and experimental
effects. It multiplies the input signal with its internal oscillator, the
shape and pitch of which are set with the Mode menu and Pitch
control respectively. The Drive control sets the amount of
distortion on the input signal.
This effect emulates the behaviour of an old Digital-to-Analogue
Converter with low-fidelity characteristics. It offers an alternative
processing algorithm to the Bitcrusher device and imparts a
similar type of effect, although the character is very different.
The Frequency control sets the sample-rate frequency of the
DAC model. It can be adjusted between 1kHz (fully anticlockwise) and 10kHz. Lower settings lead to more pronounced
aliasing effects.
The AntiAlias control adjusts the amount of anti-aliasing filtering
for the output signal. Turning up the control reduces the cutoff
frequency of a low-pass filter, reducing audible sidebands and
aliasing effects caused by the sample-rate reduction process.
Maul
This device splits the incoming signal into 2 bands with resonant low-pass/high-pass filters and
applies a distortion algorithm to each bands with different amounts.
The Model menu selects from the available distortion algorithms. The Freq Low and Rez Low
controls set the cutoff frequency and resonance of the low band. The Drive Low control sets the
amount of distortion for the low band and the Gain Low control adjusts the final output level of the
band.
The Freq High, Rez High, Drive High and Gain High controls perform the same functions for a
high-pass filter which acts to define the high band.
Any part of the signal with frequencies between the Freq Low and Freq High settings is passed
through unaffected.
BitCrusher
This effect emulates the digital distortion that occurs when lowering the bit-depth or sample-rate of
an audio signal. The Low Cut and Hi Cut controls filter the signal before the distortion/bit-
reduction/samplerate-reduction stages.
Dirty DAC
© 2016 FXpansion Audio

Analog Ring Mod
This device provides an alternative ring modulator circuit. Again,
the input signal is multiplied with an internal oscillator to create
complex sidebands and dissonant effects.
The Pitch control tunes the internal oscillator by +/- 6 octaves.
The Tone control introduces and adjusts a low-pass filter function
to the ring modulated output signal. Increase the control to
increase the amount of filtering.
The Mode control adjusts the waveform of the internal oscillator
between Sine, Triangle, Saw and Square shapes.
Geist2 Effects 97
© 2016 FXpansion Audio
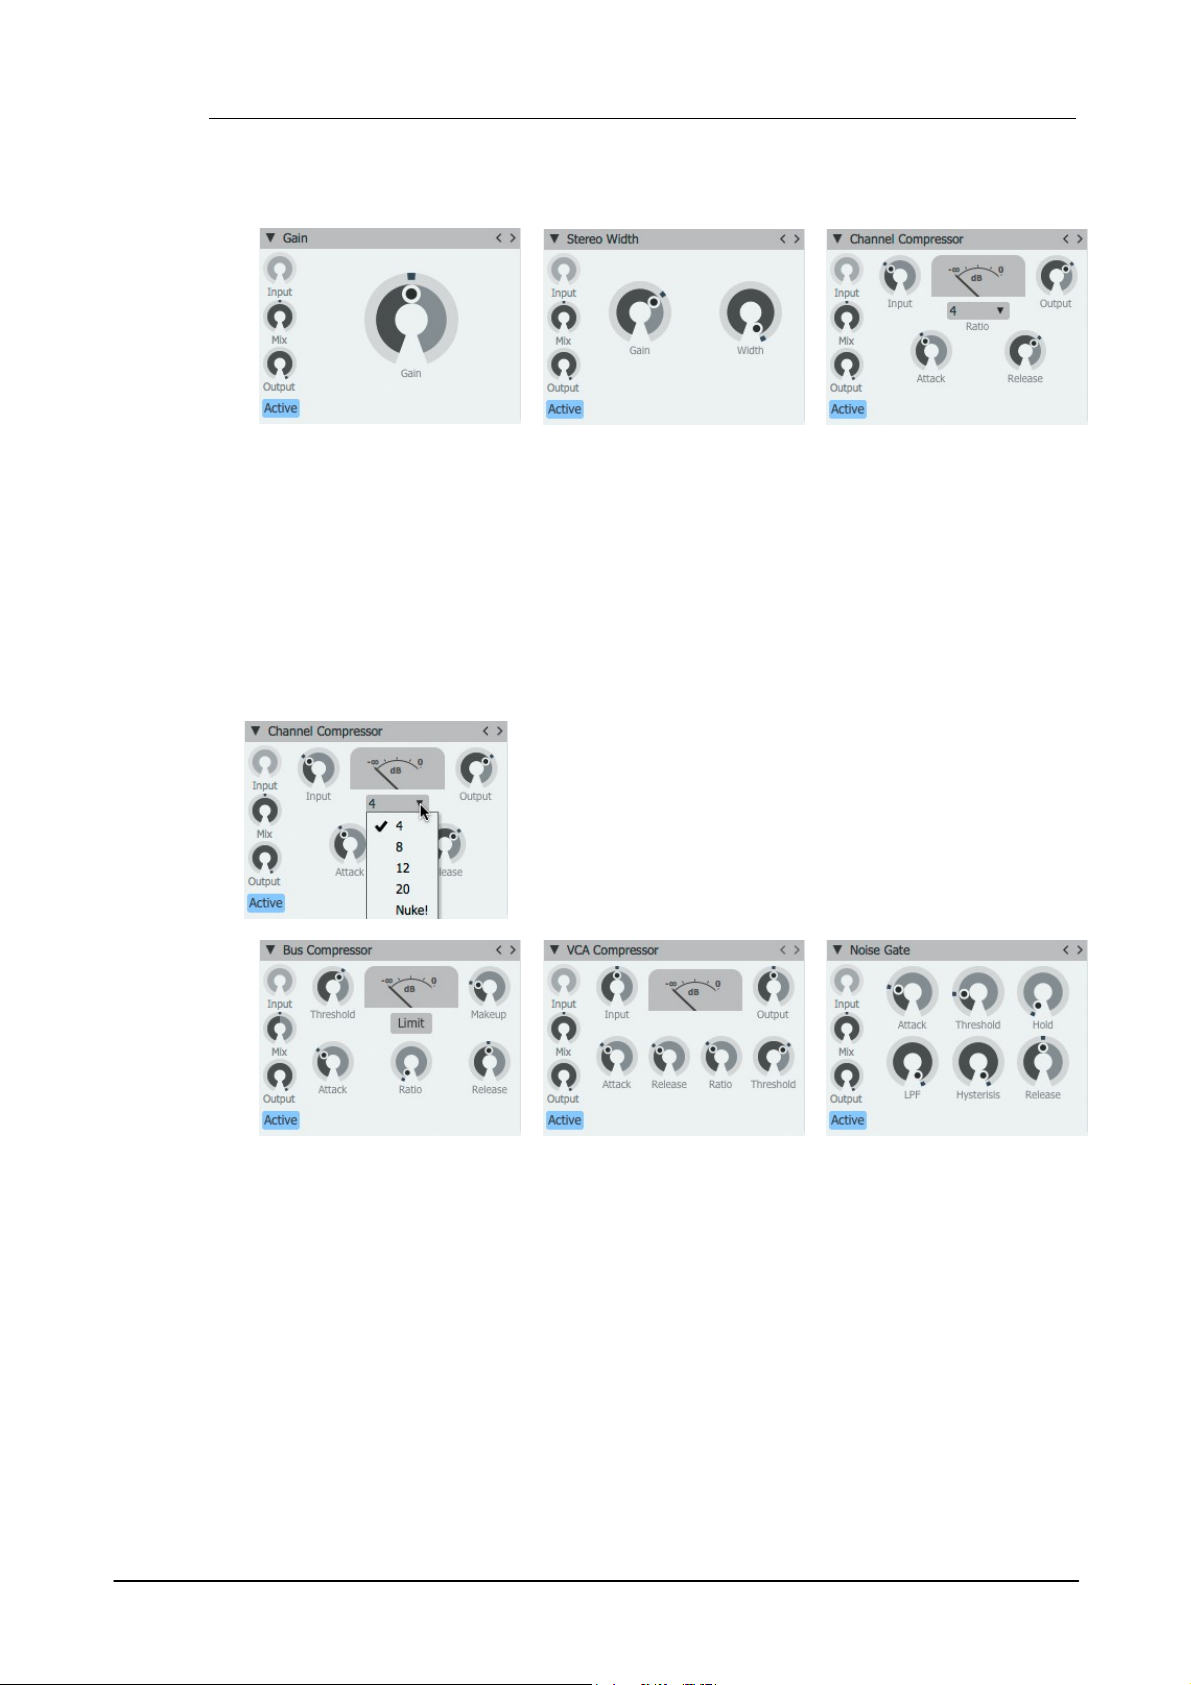
Geist298
• Gain
• Stereo Width
• Channel Compressor
This is a DCAM circuit-modelled channel compressor, based on a
classic 'limiting amplifier' design. Increase the Input control to
make the sound more compressed (higher signals engage the
compression circuit more), and adjust the Output level to reduce
the final level as required.
The Ratio, Attack and Release controls affect the compression
characteristics.
The amount of gain reduction is indicated on the VU meter in real
time.
• Bus Compressor
• VCA Compressor
• Noise Gate
7.3 Dynamics
Gain
This effect is a simple tool for increasing or decreasing a channel's gain. The Gain control sets the
channel's gain between -inf dB and +36 dB.
Stereo Width
This device provides a Width control that adjusts the stereo width of the signal between stereo
(maximum position) and mono (minimum position). It also features a Gain control that sets the
signal's gain between -inf dB and +18 dB.
Channel Compressor
Bus Compressor
This is a DCAM circuit model of a classic British console bus compressor design. The Threshold
control dictates the level over which signals are compressed. The Ratio, Attack and Release
parameters control the compression characteristics, while the Makeup control allows the audio
level to be increased after the compression circuit's gain-reduction. The Limit button applies non-
linearities to the compressor’s amplitude detection circuit (while not affecting the input signal itself)
. This results in a different character to the processing – the compression effect is more
transparent on attacks.
The amount of gain reduction is indicated on the VU meter in real time.
© 2016 FXpansion Audio

Geist2 Effects 99
• Envelope Shaper
• Drum Dynamics
• Limiter
VCA Compressor
This device is a modelled emulation of a VCA-based compressor circuit with a fast and clean
compression characteristic. The Input control adjusts the signal level entering the compressor
circuit. Higher levels result in the compressor circuit reacting more heavily. The Attack time can
be set between 100μs (microseconds) and 100ms (milliseconds) while the Release time can be
set between 10ms and 2s. The compressor's Ratio can be set between 1:1 and 50:1. The
Threshold represents the signal level at which the compressor begins to react and the Output
control increase the output level after the compressor circuit has applied gain reduction.
Noise Gate
The Noise Gate attenuates the signal until its amplitude reaches the Threshold level. The Attack
and Release controls set the speed at which the gate opens and closes after the signal goes
above or below the threshold, while the Hold control forces the gate to remain open for an
adjustable length of time after it is opened, even if the input signal drops below the threshold
level. The LPF control applies a low-pass filter to the signal used for the amplitude-detection
circuit. Increasing the Hysteresis control smooths the gate's response, although this can result in
a side effect of lower sensitivity to small changes in amplitude around the threshold level.
Envelope Shaper
The Envelope Shaper adjusts transients and changes the dynamic shape of a signal in a different
way to using a compressor. The Sensitivity control adjusts the sensitivity of the Envelope
Shaper's peak-detection circuit. The Attack control adjusts the intensity of the attack phase of
detected peaks in the audio signal. Increase the control to intensify attack transients, and
decrease it to soften transients. The Sustain control adjusts the intensity of release portions of
detected peaks in the audio signal, which increases or decreases the apparent sustain of sounds in
the signal. Increase the control for more sustain, and decrease it for less sustain. This control is
useful for adjusting the perceived level of ambience in a channel. Very low settings can produce
damping effects for drum sounds.
The processed signal level can be adjusted using the Gain control.With the Linked button
activated, the device's peak-detection circuit operates on a mix of left/right input channels. With
the button deactivated, it operates on left/right channels independently.
Drum Dynamics
The Drum Dynamics device is an alternative envelope-shaping transient processor.
The Attack control increases or decreases the intensity of the attack phase of incoming
transients. The Sustain control increases or decreases the intensity of the decay phase (and the
apparent sustain) of incoming transients. Reducing this control is useful for 'damping' effects on
drum sounds. Activating the Fast button makes the algorithm more sensitive to short transients.
With this button deactivated, the algorithm is more sensitive to longer transients.
Limiter
A limiter is effectively a compressor with a very fast attack time and a high ratio for signals that
exceed the maximum level. The Input control adjusts the level of the signal going into the Limiter
algorithm. Higher input levels lead to more pronounced and 'brutal' limiting. The Hardness control
adjusts the strength of the Limiter's 'knee'. At high settings, peaks are clipped with a 'brick-wall'
limiting effect. At lower settings, gain reduction occurs more slowly (with slower attack and release
settings), leading to a more natural effect with less 'pumping'. The Output control attenuates the
processed output signal from the Limiter circuit.
© 2016 FXpansion Audio

Geist2100
• Parametric EQ
• DJ EQ
• Hi Lo Balance
The Vari EQ is a single-band EQ processor which provides a wide
variety of filter response types, selected using the drop-down menu.
The current frequency response curve is indicated on the graphical
display.
Bell, Low shelf, High shelf types: these parametric EQ-style curves
provide Frequency, Gain and Q controls.
LPF, BPF, BPF (0 dB), HPF, Notch, Allpass types: these filter-style
curves provide Frequency and Q controls.
The Enhancer device is intended to add high-frequency harmonics to
emphasize these frequencies in the signal. It is useful for adding 'sizzle'
to sounds to help them cut through dense mixes. Harmonics are added
at and above the Frequency setting. The Mode control adjusts how
the Enhancer circuit reacts to transients in the incoming signal. I is the
slowest setting while IV is the fastest. The Amount control adjusts the
level of the harmonics which are added to the signal before the output.
7.4 EQ
Parametric EQ
This is a 2-band parametric EQ. The current frequency response curve is indicated on the
graphical display.
The High Freq, High Q and High Gain controls set the centre frequency, Q and gain of the high
band.
The Low Freq, Low Q and Low Gain controls set the centre frequency, Q and gain of the low
band.
DJ EQ
The DJ EQ offers a simple 3-band parametric EQ, with fixed Q. The L Gain and H Gain set the
amount of gain for the low and high bands. The M Gain and M Freq settings adjust the gain and
centre frequency for the mid band.
The frequency response curve is represented on the graphical display.
Hi-Lo Balance
The HiLo Balance device is a 'tilt'-style EQ which cuts high frequencies when boosting low
frequencies, and vice versa. The Crossover control sets the point between the low and high
frequency bands. The Balance control sets the degree of 'tilt' between low and high frequencies.
At the centre position no effect is applied to the incoming audio.
At values higher than the centre position, high frequencies are boosted while low frequencies are
attenuated by the same amount.
At values lower than the centre position, low frequencies are boosted while high frequencies are
attenuated by the same amount.
Vari EQ
Enhancer
© 2016 FXpansion Audio
 Loading...