FXpansion DCAM Synth Squad Operation Manual
2
Contents
5 Credits
5 About this manual
6 1: Introduction
6 1:1 Welcome to DCAM: Synth Squad
6 DCAM: Synth Squad at a glance
6 A note on effects
7 1:2 Shared aspects of all instruments
8 1:3 Interface basics
8 Loading presets: preset pickers
8 Other Preset picker controls
9 Preset browser
10 Controlling parameters: initial values (Main view)
10 Fine control over parameters
10 Controlling parameters: TransMod modulation depths
11 TransMod slots
11 Rotary selectors and drop-down menus
11 Numerical text-boxes
11 Buttons
11 Indicator LEDs
12 Parameter context menu
12 Snapping/unit options for tuning and filter cutoff controls
12 On-screen keyboard and performance controllers
13 2: Strobe
13 2:1 Overview
13 Strobe highlights
14 2:2 Oscillator section
14 Oscillator controls
14 Waveform mixing controls
14 Pulse Width controls
14 Direct modulation
15 2:3 Filter section
15 Filter controls
15 Direct modulation
16 2:4 Amp section
16 2:5 Other functions
17 2:6 Modulation
17 Gateable modulators
17 Glide
17 Keytracking (modulation from keyboard pitch)
18 2:7 Strobe signal flow
19 3: Cypher
19 3:1 Overview
19 Background
19 Programming with Cypher
20 3:2 Oscillator section
21 3:3 Shaper section
22 3:4 Filter section: shared controls
22 3:5 Filter section: individual controls for filters 1 & 2
23 3:6 Amp section
23 3:7 Other functions
24 3:8 Modulation in Cypher
24 Gateable modulators
24 Glide
24 Keytracking (modulation from keyboard pitch)
24 Oscillators as LFOs
24 Beating rates as LFOs
25 3:9 Cypher signal flow
25 Osc section
26 Shaper-Filter & Amp sections
27 4: Cypher’s oscillators in detail
27 4:1 Introduction to audio-rate modulation
27 Basics of audio-rate modulation
27 Audio-rate modulation implementations
27 4:2 Frequency modulation
28 Oscillator FM in Cypher
29 Filter FM
29 Envelopes and LFOs
29 Programming hints
30 4:3 Wave modulation
30 Continuous waveshape of Cypher’s oscs
30 Audio-rate waveform modulation
31 4:4 Audio-rate sample and hold
31 Using audio-rate sample & hold
32 4:5 Variable-depth oscillator sync
32 Main uses of osc sync
32 Variable-depth osc sync in Cypher
34 4:6 Beat detune
34 Using the Beat control
34 Beat rates as TransMod modulators
34 Usage with other oscillator functions
35 5: Amber
35 5:1 Overview
35 Divide-down synthesis explained
35 Implementations of divide-down synths
35 String synths in popular use
36 Amber: the next step in divide-down synthesis
37 5:2 Master tuning controls
37 5:3 Synth section
37 Paraphonic oscillator control
37 Filter stage (polyphonic multimode resonant filter)
38 5:4 Ensemble section
38 Paraphonic oscillator control
38 Formant filter stage
38 5:5 Ensemble section chorus stage
39 5:6 Mixer / Amplifier stage
39 5:7 Perform controls
40 5:8 Other functions
40 5:9 Modulation
40 Paraphonic architecture and polyphonic modulation
40 Gateable modulators
41 Synth and Ensemble Envelopes
41 Glide
41 Keytracking (modulation from keyboard pitch)
42 5:10 Amber signal flow
43 6: Common synth functions
43 6:1 Arpeggiator (Strobe and Cypher only)
43 Arpeggiator and LFO
43 Arpeggiator and Keying controls
43 Arpeggiator controls
44 6:2 Keying controls
45 6:3 Glide controls
45 6:4 Settings
46 6:5 Preferences panel
46 Oversampling
46 Perf. Controls (Performance controllers)
46 Managing settings
47 6:6 Visualizer scope
47 Locking and unlocking the Scope
47 Parameter value display
47 6:7 FX versions of synth plugins
48 6:8 MIDI Learn and host automation
48 MIDI Learn
49 Host automation
50 6:9 Program change panel
50 Using the PC panel
3

51 7: Modulation
51 7:1 Introduction to modulation in DCAM: Synth Squad
51 The TransMod system explained
52 7:2 TransMod system overview
52 Main view
52 TransMod Slot views
53 Basic TransMod system operations
53 Scaling
54 7:3 Using the TransMod system
54 Setting initial value of controls (Main view)
54 Fine control over parameters
54 Setting TransMod modulation depths
55 Managing modulation with the parameter context-menu
55 Managing TransMod slots with the slot context menu
55 Mouseover indicators and slot highlighting
56 Load to Mod Slot
57 7:4 Velocity and Performance controllers
57 Velocity
57 Performance controllers
58 7:5 Gateable modulators
58 Types of gating behaviour (Gate parameter settings)
59 Envelope
60 LFO
61 Ramp
62 7:6 Glide, voices and unison
62 Glide
62 Voices and Unison
63 7:7 Tracking the keyboard
63 Pitch keytracking
63 Keyboard zones
64 7:8 Summary of TransMod sources
64 Monophonic sources
64 Mono source sub-menu
65 Perf source sub-menu
65 Polyphonic sources
65 Poly source sub-menu
66 Random source sub-menu
67 Synth source sub-menu
68 8: Fusor
68 8:1 What is Fusor?
68 FuseMod
68 8:2 Interface Overview
68 Fusor LCD
69 Macro controls
69 Edit page buttons
69 Edit workspace
69 Keyboard and performance controls
69 Status display
70 8:3 Global page
70 Device and preset pickers
70 Edit and Power buttons
70 MIDI channels
71 Synth channels
71 Aux FX, Mixer & Master insert FX
72 8:4 Input device pages
72 Key Map page
73 MonoMod page
73 Animator page
74 8:5 Synth channel pages
74 Synth1, Synth2 and Synth3 pages
75 FX1, FX2 and FX3 pages
75 8:6 Aux FX and Master FX pages
75 Aux FX page
75 Master FX page
76 8:7 Fusor FX suite
76 Overview
76 Effect types
78 X4 Quad FX
80 8:8 Modulation in Fusor
80 FuseMod
80 Devices that can be modulated
80 Using the FuseMod system
80 FuseMod modulation sources
81 Using FuseMod modulation within synths’ TransMod slots
82 8:9 Animator: global controls
82 Architecture overview
82 Preset pickers
82 Engine selector
83 Engine type
83 Clocking
83 Important note about clocking and triggering
83 Driving devices with Animator
84 Animator Graph editor
84 Graph lanes
85 Advanced engine type Graph modulation
86 8:10 Animator: Arpeggiator engine type
86 Destination
86 Arp/Seq section
86 Graphs section
86 Triggering section
87 Using the Advanced engine type as an arpeggiator
87 8:11 Animator: Note Sequencer engine type
87 Destination
87 Arp/Seq section
87 Graphs section
88 8:12 Animator: Modulation Sequencer engine type
88 Destination
88 Graphs section
89 8:13 Animator: Advanced engine type
89 Introduction
89 Using the Advanced engine type alongside other types
89 Destination
90 Pattern memories
90 Graph offset controls and modulation
90 Triggering section
92 Arp/Seq section
92 Key Input section
92 Oct Advance section
94 8:14 Fusor signal flow
95 Appendix 1: Standalone application & plugin usage
95 Using the synth standalone applications
95 I/O Settings
96 Using Synth Squad as RTAS plugins in Pro Tools 7.x
96 Using Synth Squad as AU plugins in Logic 7.2 or later
96 Using Synth Squad as AU plugins in Logic 8
97 Using Synth Squad as VST / AU plugins in Ableton Live
97 Using Synth Squad as AU plugins in Digital Performer
97 Using Synth Squad as VST plugins in Cubase 4
98 Using Synth Squad as VST plugins in Sonar
98 Using Synth Squad as VST plugins in FL Studio
98 Using Synth Squad as VST plugins in Reaper
99 Potential problems
100 Appendix 2: Strobe filter modes
101 Appendix 3: Cypher waveshaper modes
102 Appendix 4: Fusor – Overloud Breverb algorithms
102 Breverb Hall
102 Breverb Inverse
103 Breverb Room
103 Breverb Plate
104 Appendix 5: Host automation parameters
104 Strobe
105 Cypher
107 Amber
108 Fusor
4
Credits
DSP Programming Andrew Simper
Additional Programming Angus Hewlett
Steve Baker
Paul Chana
SKoT McDonald
Caleb Reach
Project Co-ordination Steve Baker
Rhiannon Bankston-Thomas
Interface Design Alex Akers
Steve Baker
Angus Hewlett
Artwork/Packaging Design Rus Brockman
Web Programming Andreas Schnetzler
Manual/Copywriting Mayur Maha
Video Production Rory Dow
QA Rob Bantin
Andrew Vernon
Preset design and QA Peter ‘Mod’ Slotwinski
Support Ryan Sellers
Rory Dow
Alex Volmer
Andrew Vernon
Artist Relations Clare O’Brien
FXpansion USA Terry Hardin
Daniel Wilkinson
Preset design
Patchen Preston
Kickflip
DJ Subject
Dave Blakely
Bobule
Michal Garstecki
Janis Chaffin
Francesco Silvestri
Daniel Stawczyk
Rory Dow
Angus Hewlett
Peter ‘Mod’ Slotwinski
Tasmodia tasmodia.com
Raphael S. electric-himalaya.com
Brian Lee xenossoundworks.com
Derik White dustedwilliamsounds.com
SoundsDivine soundsdivine.com
Beta testing
Mark Williams, Sean Ahern, Andrew Capon,
Robert Sfeir, Ashley Smith, Mikael Adle,
Murray McDowall, Jordan Chillcot, Christopher
Reis, Andy Reaburn, Anthony Webster, Paul
Sureno, Andrew Shantz, Joost Gransjean, Scott
McGrath, Kris Giampa, Roy Queenan, Andreas
Beisler, Alice Bernier
Special thanks to Zimon Drake at
French Kiss Films: frenchkissfilms.com
www.fxpansion.com
About this manual
It is beyond the scope of this manual to fully explain every concept of synthesis in detail.
A lot of background information is given in order for you to fully understand DCAM: Synth Squad’s features, but some prior
knowledge of synthesis and audio processing/mixing functions is assumed.
Suggested further reading
The Sound On Sound magazine articles database includes an excellent resource of synthesis information, particularly
the comprehensive ‘Synth Secrets’ series. There are also articles on mixing, effects processing and other relevant topics
when using DCAM: Synth Squad:
http://www.soundonsound.com/articles/Technique.php
There is also an excellent book about synthesis available for free viewing on the web (or as a downloadable PDF file),
called ‘Advanced Programming Techniques for Modular Synthesizers’ by James J. Clark. It is written for the Nord Modular
DSP synthesis environment, but its information is relevant for all kinds of synthesis, no matter what equipment you’re
using:
http://www.cim.mcgill.ca/~clark/nordmodularbook/nm_book_toc.html
Printing this manual
Full permission is granted to print this manual for personal, non-commercial use.
Manual revision 1.01
5
1: Introduction
1:1 Welcome to DCAM: Synth Squad
DCAM: Synth Squad at a glance
DCAM: Synth Squad contains 4 individual devices:
Strobe
• souped-up performance synth
• designed for easy programming of classic subtractive analogue synth sounds
• centred around a simple 1-oscillator architecture
• includes a built-in arpeggiator
Strobe is installed as an instrument and as an effect for processing audio through its circuit.
Cypher
• 3-oscillator, complex synth
• FM and other audio-rate modulation
• several other specialized oscillator functions
• a dual-filter/waveshaper architecture
• a built-in arpeggiator
Cypher is a more challenging environment for programming – if you require a traditional analogue-style sound, you’ll
achieve quicker results using Strobe.
Cypher is installed as an instrument and as an effect for processing audio through its circuit.
Amber
• classic string synthesizer model with divide-down oscillator structure
• constantly generates the notes for a 96-note keyboard range within a single voice
• 3 vintage chorus models and a formant filter
Amber is installed as an instrument and as an effect for processing audio through its circuit.
Fusor
Fusor is an environment for:
• layering synths
• applying FX processing
• step-sequencing
• performing modulation between the various loaded elements
Fusor is installed only as an instrument plugin – it cannot be used as an effect for processing external audio.
A note on effects
None of the individual synths feature built-in audio effects, with the exception of Amber’s chorus, which is essential for a
string synthesizer. You may wonder why we took this decision. There are a couple of main reasons:
1. Classic analogue synthesizers have no problem sounding great without any effects
2. We wanted the synths in DCAM: Synth Squad to sound equally great without relying on any effects
However, we realise that effected super-patches are valid in their own right. This is where Fusor comes in – it includes an
extremely versatile suite of built-in effects, as well as a comprehensive way of modulating them. If effects are vital to you,
we encourage you to use the synths within Fusor to see (and hear) what’s possible.
6
1:2 Shared aspects of all instruments
DCAM: Discrete Component Analogue Modelling
DCAM: Synth Squad has been built by accurately analysing and modelling real-world components and circuits found in
vintage analogue synths.
As a result, don’t expect a standard ‘clean VA’ sound from these synths – you would never get perfect waveshapes on a
real VCO-based analogue synthesizer.
What you can expect is a set of meticulously crafted synthesizer instruments that sound truly alive in a way that is very
rare in the digital world.
Voices, Unison voices and polyphony
Each of the synths within DCAM: Synth Squad features an identical approach to synth voices and unison.
Strobe and Cypher feature a classic polyphonic architecture – to achieve 2 note
polyphony, for example, 2 whole monosynths are effectively played together at the
relevant pitches.
You can consider each of these ‘monosynths’ as a ‘voice’.
Additionally, you can set up ‘unison voices’ in order to stack more than 1 voice for
each note of polyphony. This is a classic technique used in analogue synthesis to
achieve huge, fat sounds.
Unison voices are taken from the total available voices. The total polyphony is:
voices ÷ unison voices
Amber’s architecture, like any classic string machine, is different to a classic polysynth. It provides 96 simultaneous notes
within a single voice. However, multiple voices can be used for programming more unconventional sounds.
TransMod modulation
Common between all the DCAM: Synth Squad instruments is the modulation architecture, called the TransMod system.
While there are some hard-wired modulation routings in the synths, you will need to use the TransMod modulation system
to perform more sophisticated synth programming functions.
By default, no TransMod slot is selected, and ‘Main’ is highlighted. In this state, only the initial values of parameters can be
adjusted.
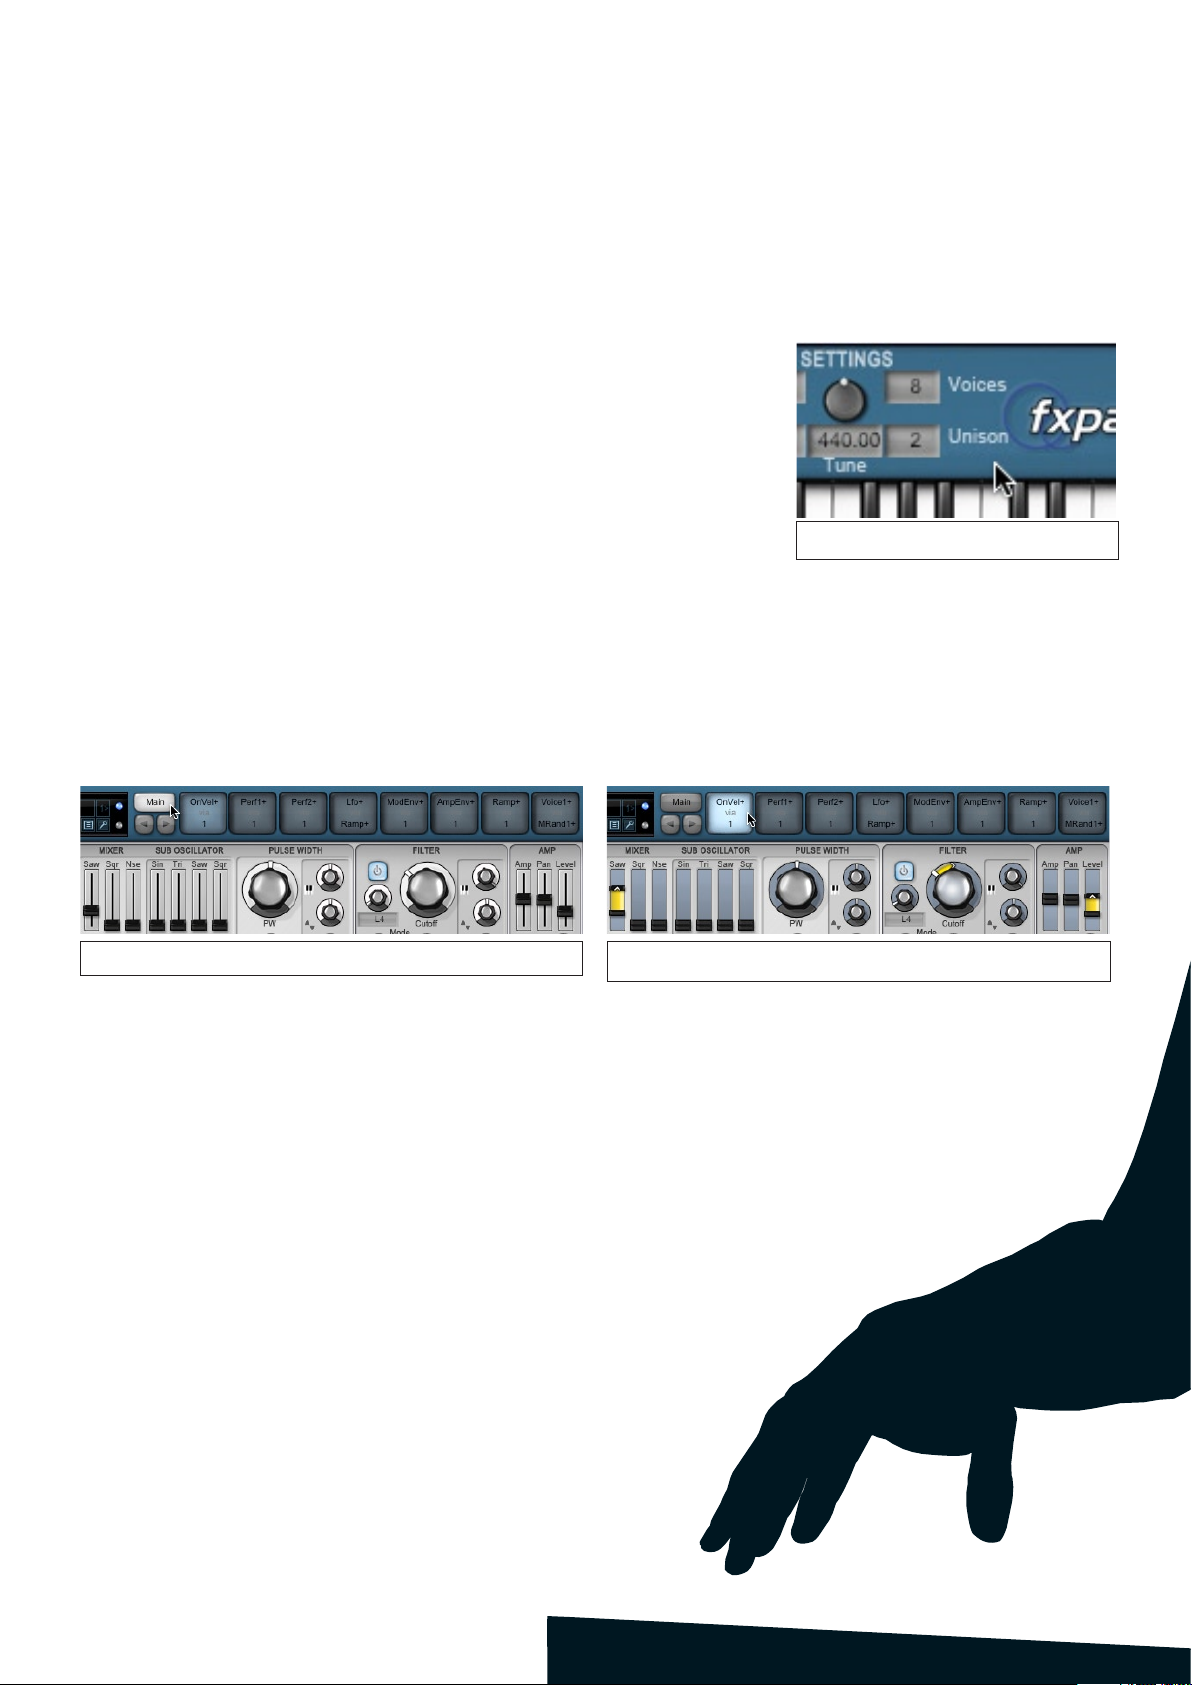
These settings result in 4-note polyphony,
with each note being 2 stacked voices.
Main view selected – only the initial value of all parameters is shown.
First TransMod slot selected – controls can now set and display
modulation depths away from initial values.
Clicking on one of the 8 TransMod slots changes the controls so that you can set a modulation depth on each of them.
Fusor includes a slight variant on the system called FuseMod, which allows various devices within Fusor, including synths,
to modulate each other. It operates in a very similar way to the TransMod system, and is described in section 8:8.
Performance controllers and MIDI Learn
DCAM: Synth Squad features a standardized system for manipulating parameters with MIDI controllers.
Performance controllers are designed to allow you to have access to your most immediate MIDI controllers across all
presets. Typical performance controls include Modulation Wheel, Aftertouch, Breath, Expression controllers and so on.
DCAM: Synth Squad also provides a MIDI Learn system, which allows you to map any MIDI CC# to any parameter.
7
1:3 Interface basics
Loading presets: preset pickers
Load to
Mod Slot
Audio stream indicator
MIDI indicator
PreferencesTools
menu
Prev/Next
preset
Preset name
Preset
browser
Save
preset
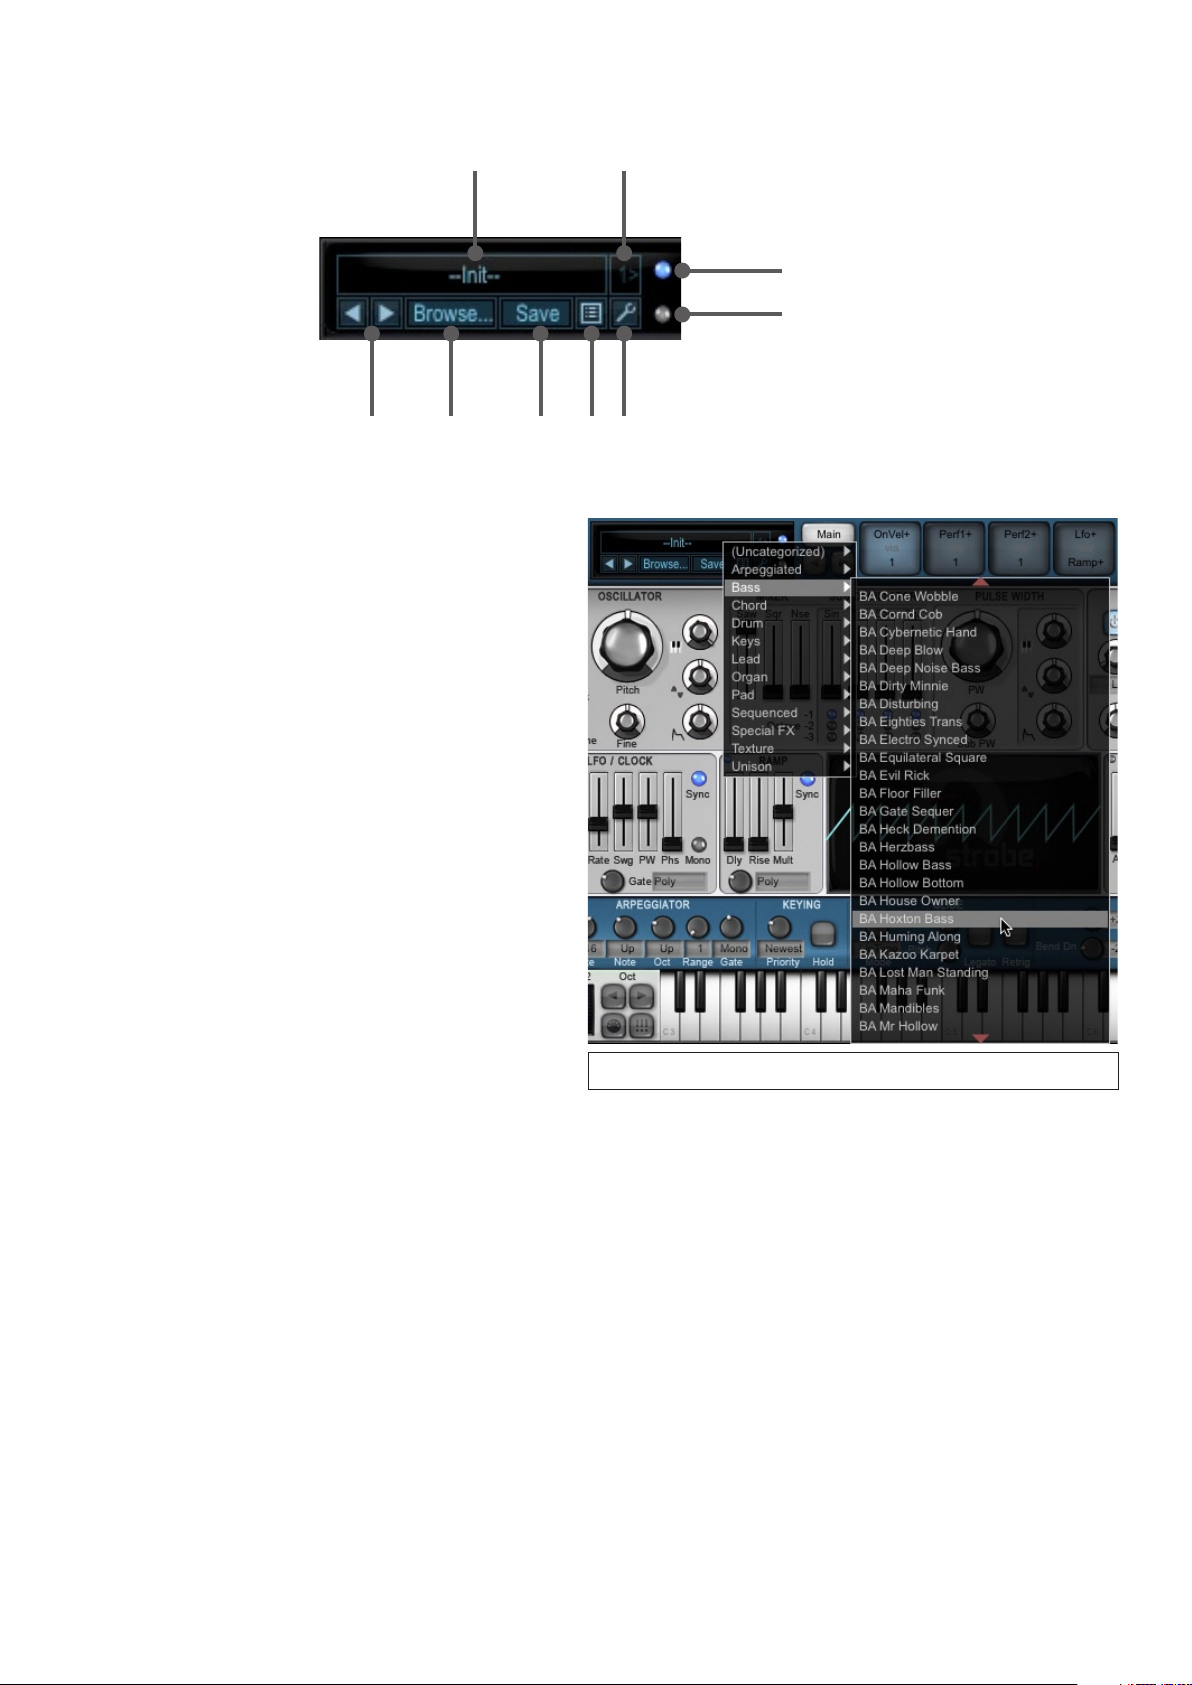
The instruments in DCAM: Synth Squad have a standardized preset selection system. There are 3 ways of browsing
through presets:
• Drop-down preset menu
Click on the preset name to display a simple drop-down
list of available presets, arranged by styles.
In order to access all available presets, hover the mouse
over the red up/down arrows at the top and bottom of
each sub-menu. The contents of the sub-menu scroll
up/down to reveal more presets if they are present.
• Prev/Next preset buttons
These buttons provide a quick way of flicking through
presets sequentially.
• Preset browser
Click on the Browse... button in the preset picker to
launch the preset browser, which lets you browse
through presets ‘in-context’ – see below for more details.
Other Preset picker controls
Save preset
This button launches a system Save As... dialog, directed
at the user preset location, It is recommended to save
your presets into this folder so that they are easily
accessible within the preset-loading functions!
Saving a preset with the relevant 2-letter prefix (for
example, BA for basses) results in it appearing in the
Clicking on the preset name displays a drop-down menu of all available
presets. Click on any preset in the menu to load it.
respective category sub-menu.
The user preset location is:
<user location>/FXpansion/<synth name>/Presets
Tools menu
The Tools menu contains items for launching the preset browser and Save As... dialog. It also features Cut, Copy and
Paste functions, which can be useful for transferring the current preset to other instances of the synth that are currently
open in your host.
Preferences
Click this button to open the Preferences panel, which is discussed in section 6:5.
Load to Mod Slot
The synth preset pickers contain the Load to Mod Slot button, which offers an advanced function for use with the
TransMod system. See section 7:3 for more details.
Audio stream indicator
This indicator lights up if the synth receives an audio stream. The indicator should be lit if the synth is operating properly in
your host’s audio engine, or within the standalone application if a valid audio interface is selected.
MIDI indicator
This indicator lights up when any MIDI event input is received.
8
Preset browser
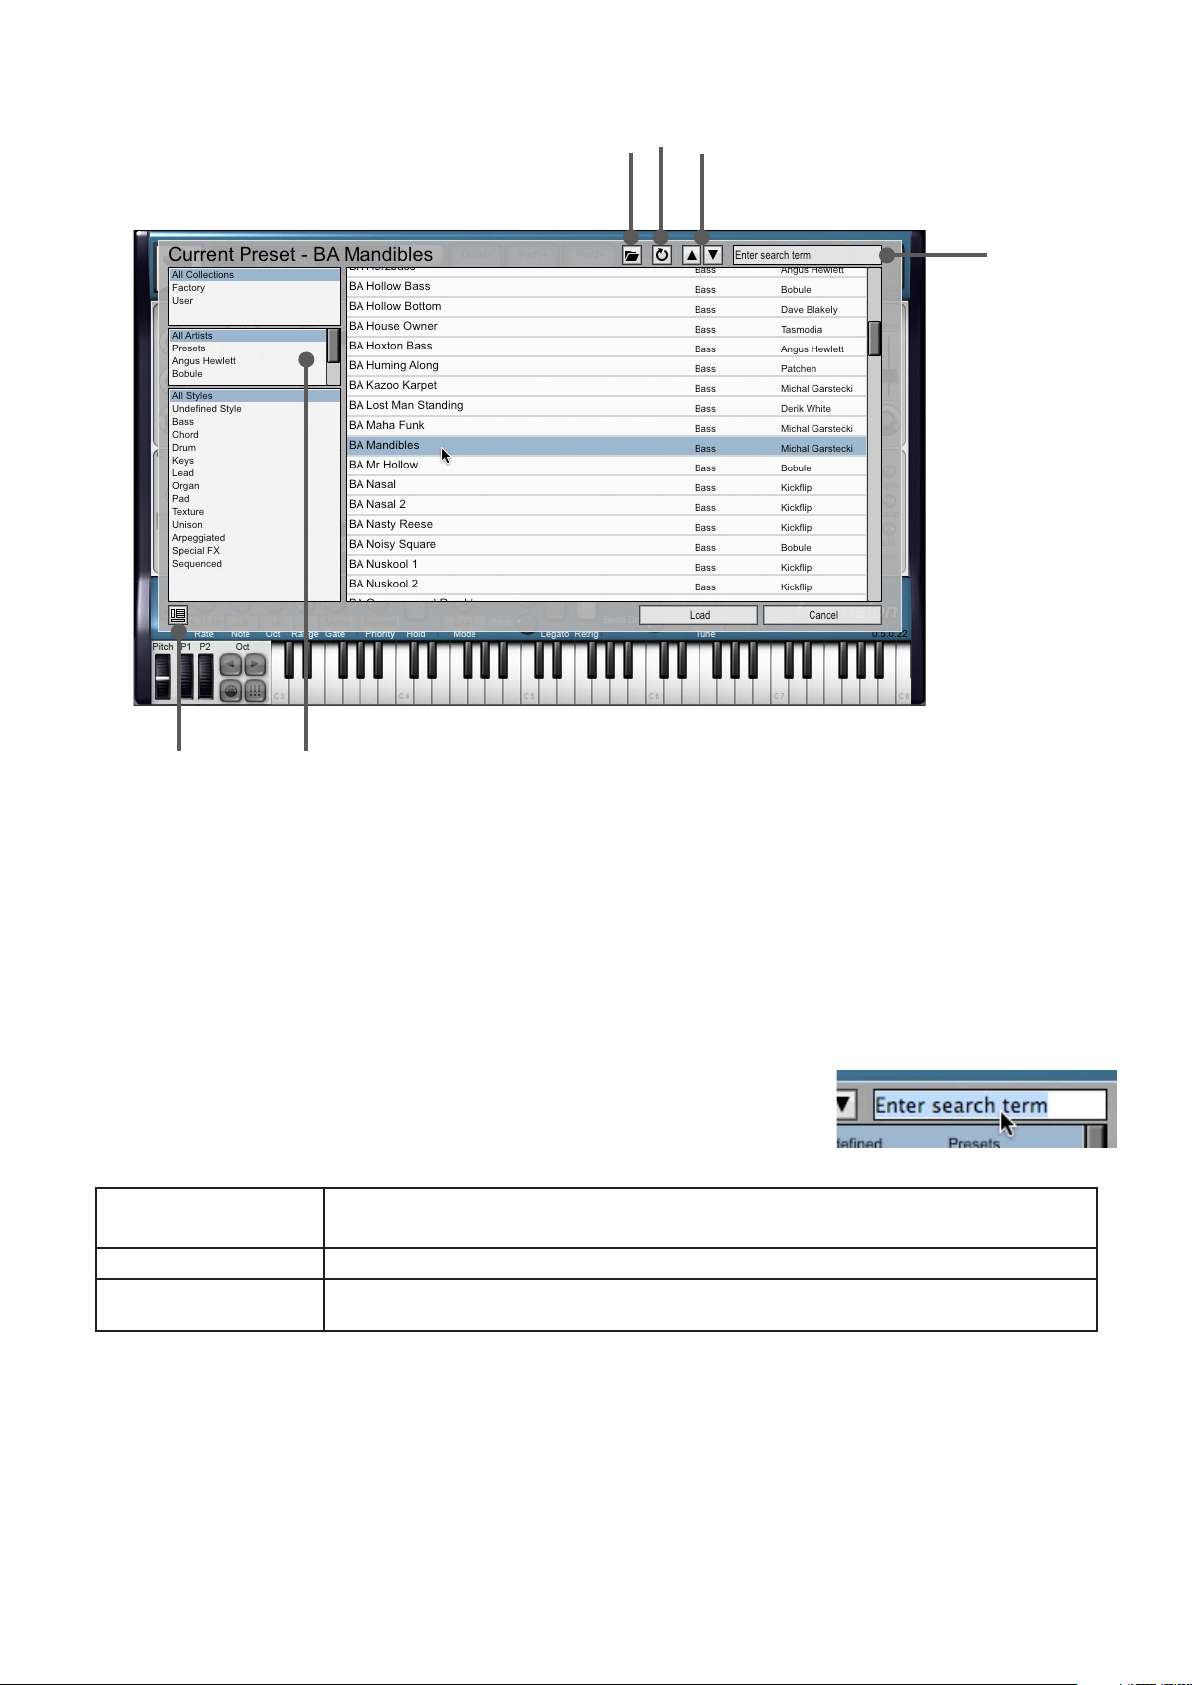
The preset browser allows you to browse through presets ‘in-context’.
Load
preset
Refresh
Prev/Next
preset
Search
field
Show PC panel Category
filters
1. Click on the Browse... button in the preset picker in order to display the preset browser.
2. Click on a preset in the list.
3. Play some MIDI notes into the synth – you’ll hear the selected preset.
4. If you click the Load button, the preset will be loaded into the synth.
5. If you click the Cancel button, the synth reverts back to its state before you opened the preset browser.
Presets can be selected either by clicking them in the listing, or by using the Prev/Next buttons.
The Load Preset button allows you to load a preset from any location on your system (rather than merely within the synth
plugins’ own preset folders), while the Refresh button re-reads the contents of the preset folder.
Searching and filtering
The preset browser contains additional functions to filter and search the available presets.
Click in the Search field at the top-right of the preset browser, type a search term
and press ENTER in order to search the name, author and style fields and display
matching results.
The 3 category filters allow you to narrow down the displayed presets by the following criteria:
Collections Filters by preset collection. By default, Factory and User collections exist.
You can also compile new collections using the PC panel (see below).
Preset author Filters by the name of the preset designer.
Preset style Filters by preset style (Bass, Chord, Drum, Keys, Lead, Organ, Pad, Texture, Unison,
Arpeggiated, Special FX or Sequenced).
All 3 filters and the search facility can be used at the same time.
The preset browser contains the program change (PC) panel, which is shown by clicking the Show PC Panel button. This
function is described in section 6:9.
9
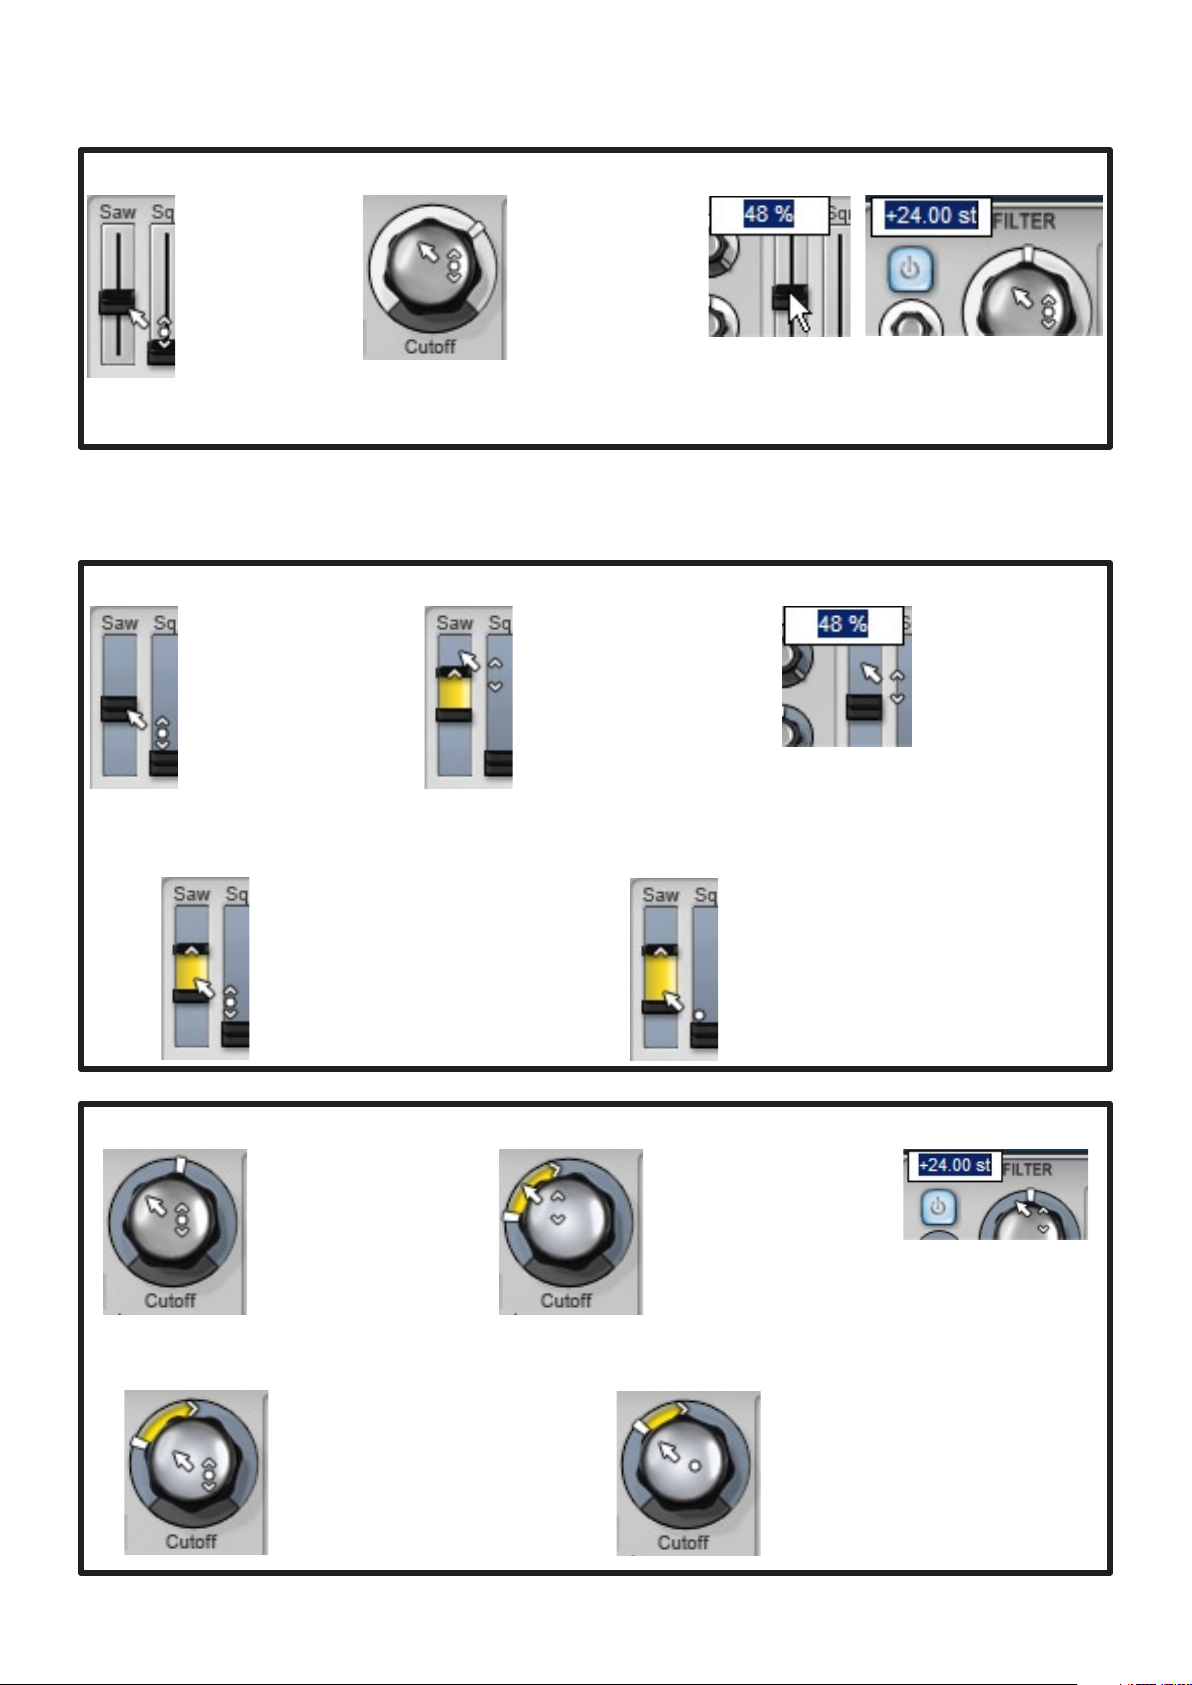
Controlling parameters: initial values (Main view)
When the ‘Main’ view is selected, only the initial value of a control can be adjusted.
Main view
Main view:
Sliders
The initial value of a
control is adjusted by
clicking it and dragging
up/down.
Main view:
Rotary pots
The initial value of a
control is adjusted by
clicking it and dragging
up/down.
You can also double-click the control, type a value and
press ENTER or RETURN.
Fine control over parameters
Hold down the SHIFT key while adjusting a control for finer resolution.
Controlling parameters: TransMod modulation depths
Each synth features 8 TransMod slots, which allow modulation depths to be set on almost all synth parameters.
When a TransMod slot is selected (see below), the synth’s controls can be adjusted in the following ways:
Sliders
TransMod slot selected:
Setting initial value
Click the slider cap and drag
up/down, or double-click to type
a value and press ENTER or
RETURN.
TransMod slot selected:
Setting modulation depth
Click outside the slider cap and
drag up/down.
The slider cap divides and the
modulation depth from the initial
value is set.
You can also move the part of the
slider cap with the arrow to adjust
modulation depth.
• When modulation already exists, 2 additional ways of manipulation are possible:
You can also double-click
outside the slider cap,
type a value and press
ENTER or RETURN.
TransMod slot selected:
Setting initial value + depth
Drag the initial part of the slider cap
(without the arrow):
The initial value and the modulation depth
are adjusted together.
You can also double-click to type a value.
TransMod slot selected:
Setting initial value only
Hold down ALT and click/drag the initial
slider cap (without the arrow):
Only the initial value is set – the
modulation depth is unaffected.
Rotary pots
TransMod slot selected:
Setting initial value
Click the centre of the
rotary pot and drag up/down.
TransMod slot selected:
Setting modulation depth
Click and drag the outer ring
around the rotary pot to set the
modulation depth from the initial
value.
• When modulation already exists, 2 additional ways of manipulation are possible:
TransMod slot selected:
Setting initial value + depth
Click and drag the centre of the rotary pot
to adjust the initial value and modulation
depth together.
You can also double-click to type a value.
You can also double-click
in the outer ring, type a
value and press ENTER
or RETURN.
TransMod slot selected:
Setting initial value only
Hold down ALT and click/drag the centre
of the pot:
Only the initial value is set – the modula
tion depth is unaffected.
-
10
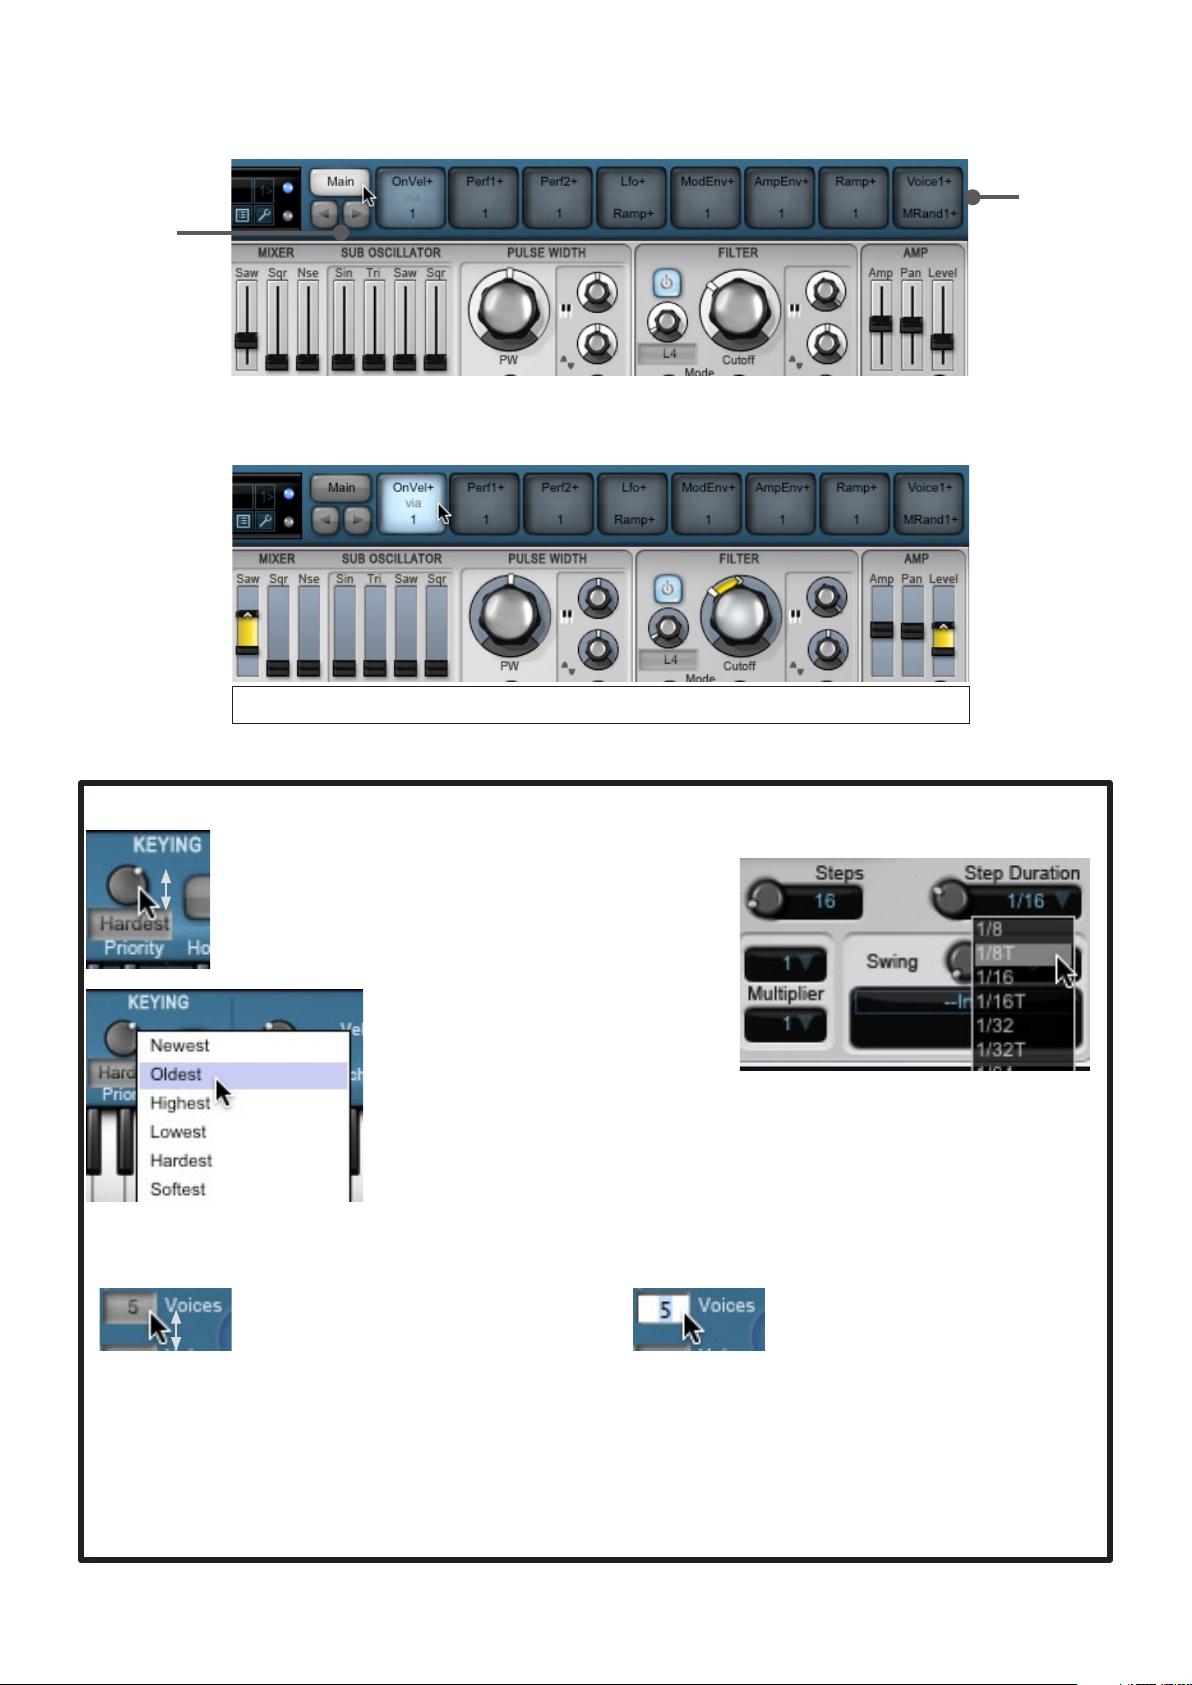
TransMod slots
When you first launch a DCAM synth, it displays its Main view.
The Main view only edits the ‘basic state’ of the synth – the initial values of all controls before any TransMod modulation.
TransMod
Prev/Next
slot buttons
slots 1-8
If you click on any of the 8 TransMod slots’ selection area (where it says ‘via’), or use the Prev/Next slot buttons, the
synth’s interface changes so that most of its controls are able to set and display modulation depths away from the initial
value.
In this example, Strobe’s first TransMod slot (assigned to key-on velocity) contains modulation for the
osc Saw waveform level, filter Cutoff and amp Level parameters.
See chapter 7 for full details of the TransMod system.
Rotary selectors and drop-down menus
• Rotary selector click & drag (left):
Click the rotary selector and drag up/down.
• Rotary selector drop-down menu (below):
Click on the display that shows the setting and select the relevant
setting from the drop-down menu that appears.
• Fusor contains some rotary selectors that
are essentially pots (such as
screenshot to the right), some which have
associated drop-down menus (such as
menus (such as the
Drop-down menus can also be found in the synths – for example, TransMod slot source/scaler
menus, performance controller selectors in the preferences panel and the preset menu (click on
the preset name).
Numerical text-boxes
There are two ways to adjust these controls:
• Click & drag:
Click the value and drag it up/down.
Steps in the
Step Duration) and some which are simply drop-down
Multiplier controls).
• Double-click & type:
Double-click the value, type a new one and
press ENTER/RETURN.
Buttons
Buttons are generally ‘toggle’ type buttons – click to activate, click again to deactivate. Buttons light up when
activated. Some ‘radio’ button-style controls exist, such as the sub-oscillator
Octave buttons in Strobe.
Indicator LEDs
DCAM: Synth Squad instruments contain indicator LEDs which light up to represent LFO rates, audio-rate modulation
and so on. Do not confuse these with buttons, which are larger.
11
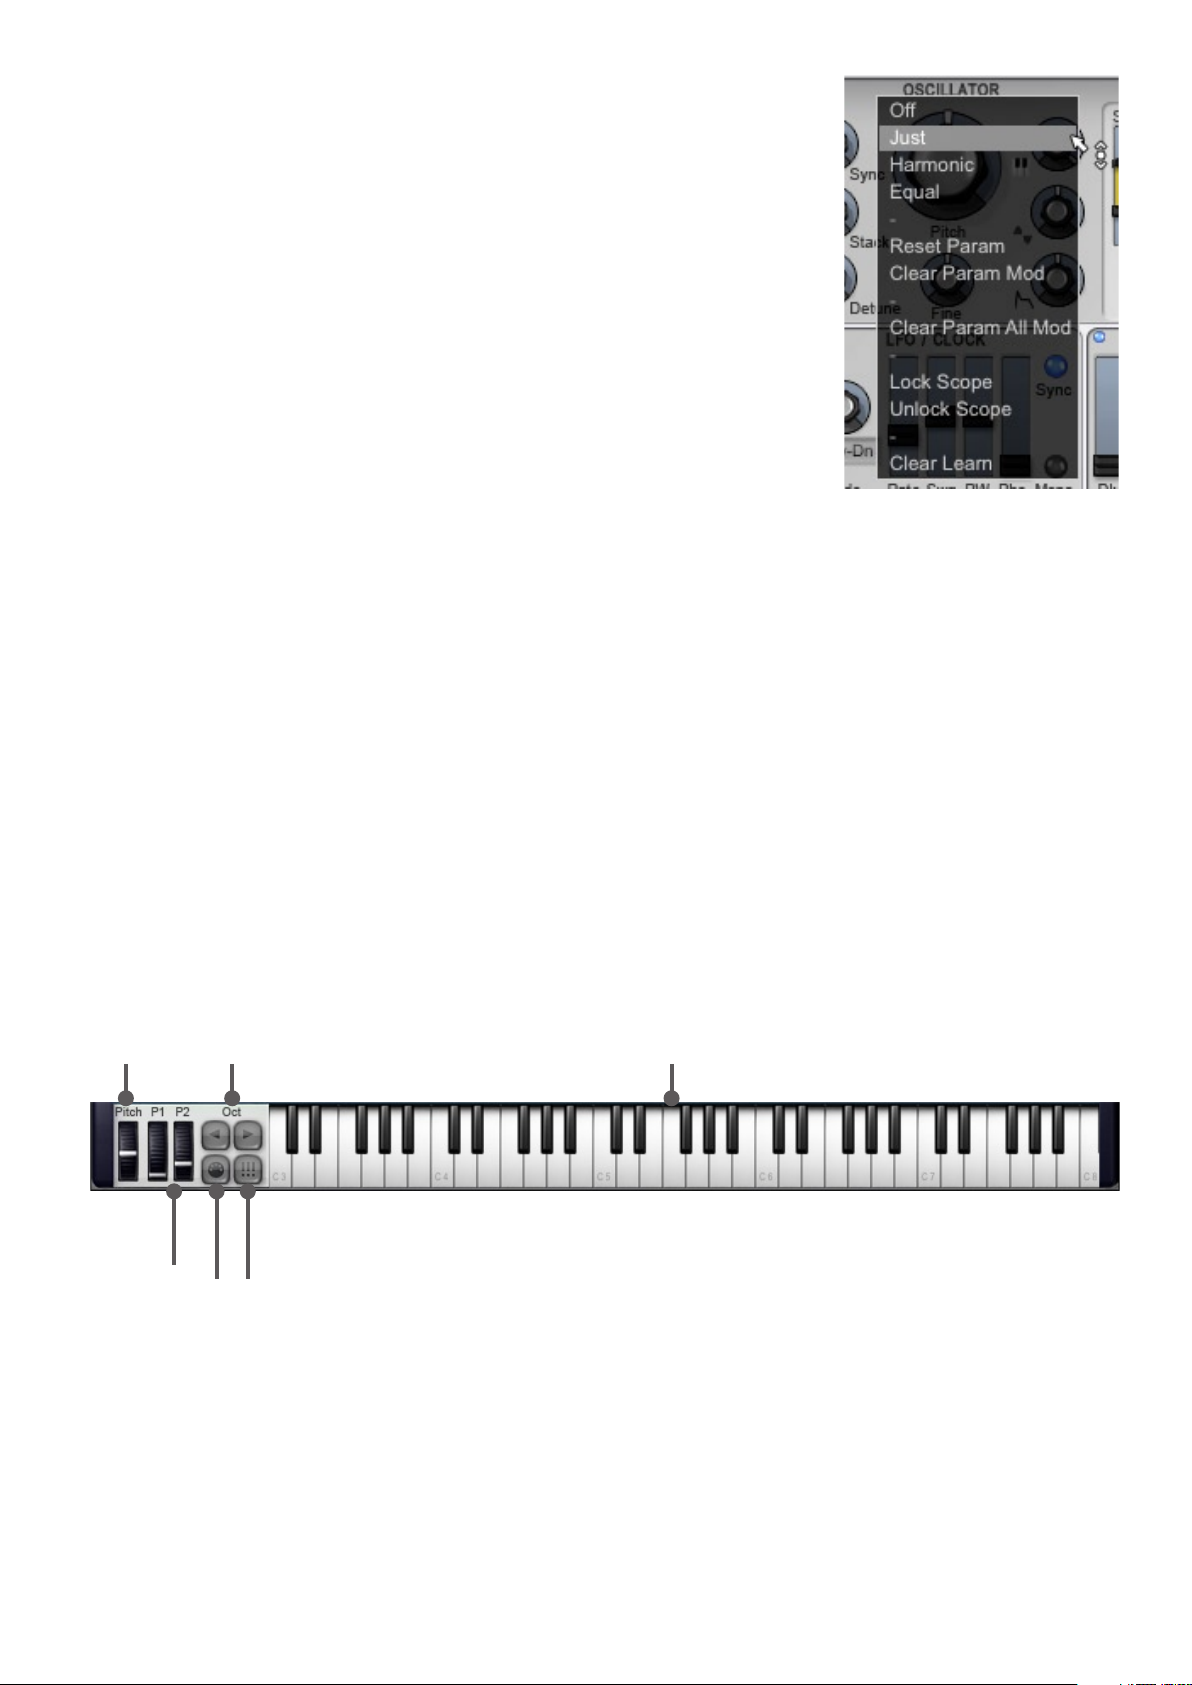
Parameter context menu
Right-click (or CTRL-click) on any control to show its parameter context menu, which
offers a number of functions and options relating to the control.
Reset Param
Resets the control’s initial value to its default setting.
Clear Param Mod
Clears any modulation depths that exist for the control in the current TransMod slot.
Clear Param All Mod
Clears any modulation depths that exist for the control in all TransMod slots.
Lock Scope Unlock Scope
You can lock the visualizer scope to the section of the synth that contains the current
parameter (see section 6:6).
Clear Learn
Clears any MIDI Learn assignment that exists for the parameter (see section 6:8).
Snapping/unit options for tuning and filter cutoff controls
Any controls related to audio pitch or frequency (usually oscillator pitch and filter cutoff controls) offer 3 distinct modes of
operation, which are accessed via the parameter context menu.
The Just and Harmonic modes are based on perfect pitch ratios, rather than absolute frequency settings. This is
particularly useful for programming musically harmonic frequencies when using Cypher’s audio-rate modulation functions.
Using these modes means you you don’t have to calculate such frequencies manually.
These modes persist independently – all tuning controls within each synth possess their own mode, and all filter controls
possess their own mode.
Just
Uses perfect pitch ratios rather than imperfect, equal-tempered pitch.
In this mode, pitch or filter cutoff controls are set in harmonics (Hm).
There is no snapping to whole harmonics.
Harmonic
Similar to Just, except that the control snaps to whole harmonics.
Equal
Represents equal-tempered tuning in semitones, snapping to whole semitones.
Off
Turns off all snapping/unit options: the control is set in semitones but does not snap to whole semitones.
On-screen keyboard and performance controllers
Pitch bend
wheel Octave down/up
Keyboard
Performance
controllers
1 & 2
MIDI Learn Panic button
(all notes off)
This area of the interface mainly contains controls that are representations of hardware input – the keyboard, pitchbend wheel and performance controllers 1 and 2. While these are intended to be used with MIDI hardware, the interface
elements can nevertheless be controlled with the mouse. Use the Octave down/up buttons to access the full range of
MIDI notes on the keyboard.
There are a couple of other MIDI-related functions in this area:
MIDI Learn button
Engaging this button enters MIDI Learn mode. This function is discussed in section 6:8.
Panic button
Clicking this button results in a MIDI reset – all notes are turned off. Use this to stop any notes that are hung or have a
very long amp envelope release time.
12
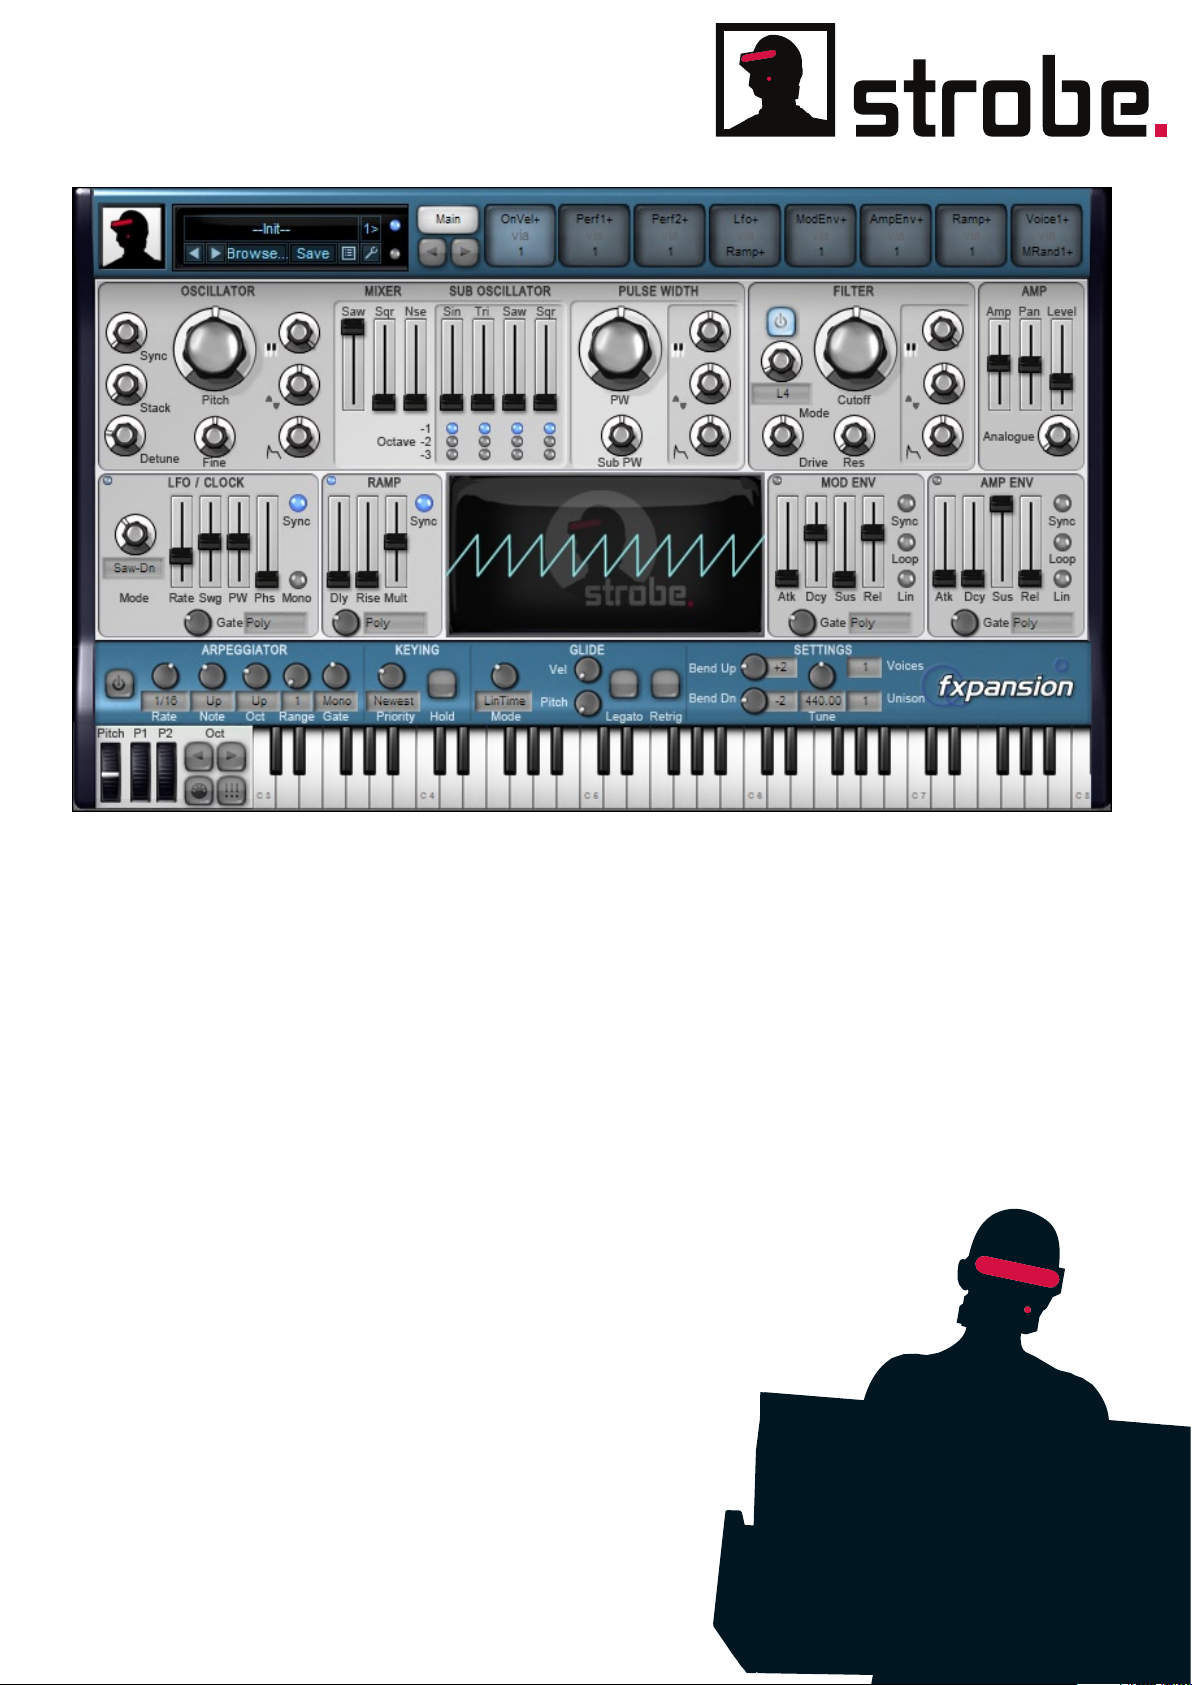
2: Strobe
2:1 Overview
Strobe is a performance synthesizer, designed to be easy to program so that you can get on with playing great-sounding
music! A single-oscillator synth with osc-stacking, sub-oscs and osc sync, it also features a versatile multimode filter, LFO,
ramp generator, two envelopes and an arpeggiator.
While being inspired by relatively simple monosynths such as the Roland SH series (especially the SH-09 and SH-101),
Oberheim OB-1 and SCI Pro-One, Strobe is not an exact model of any particular synth. It has been designed to take the
performance synthesizer into a new dimension.
Strobe highlights
Unlike the monosynths which inspired its design, Strobe is capable of polyphony - you can set up as many voices as your
CPU can handle, and define a number of unison voices. For example, with 8 voices and 2 unison voices, the result is 4note polyphony with each note comprising 2 unison voices.
Strobe is designed for powerful analogue-style bass, lead and pad sounds. The filter section features a large variety
of modes, leading to wide range of potential timbres. The detailed filter model includes realistic overdrive of the circuit,
further increasing the tonal range. The osc-stacking allows many possibilities that are normally only possible when using
multiple oscillators or unison voices.
While the synth’s architecture is quite simple, with certain ‘obvious’ hard-wired modulation routings
already available via dedicated depth controls, the TransMod modulation system provides a huge
selection of monophonic and polyphonic modulation sources, which can be routed to virtually any
synthesis parameter. Strobe’s power truly comes alive when using imaginitive modulation,
which greatly expands its sound and performance potential.
Try also stacking 2 or 3 instances of Strobe in Fusor, which allows you to interconnect modulation sources between instances.
13
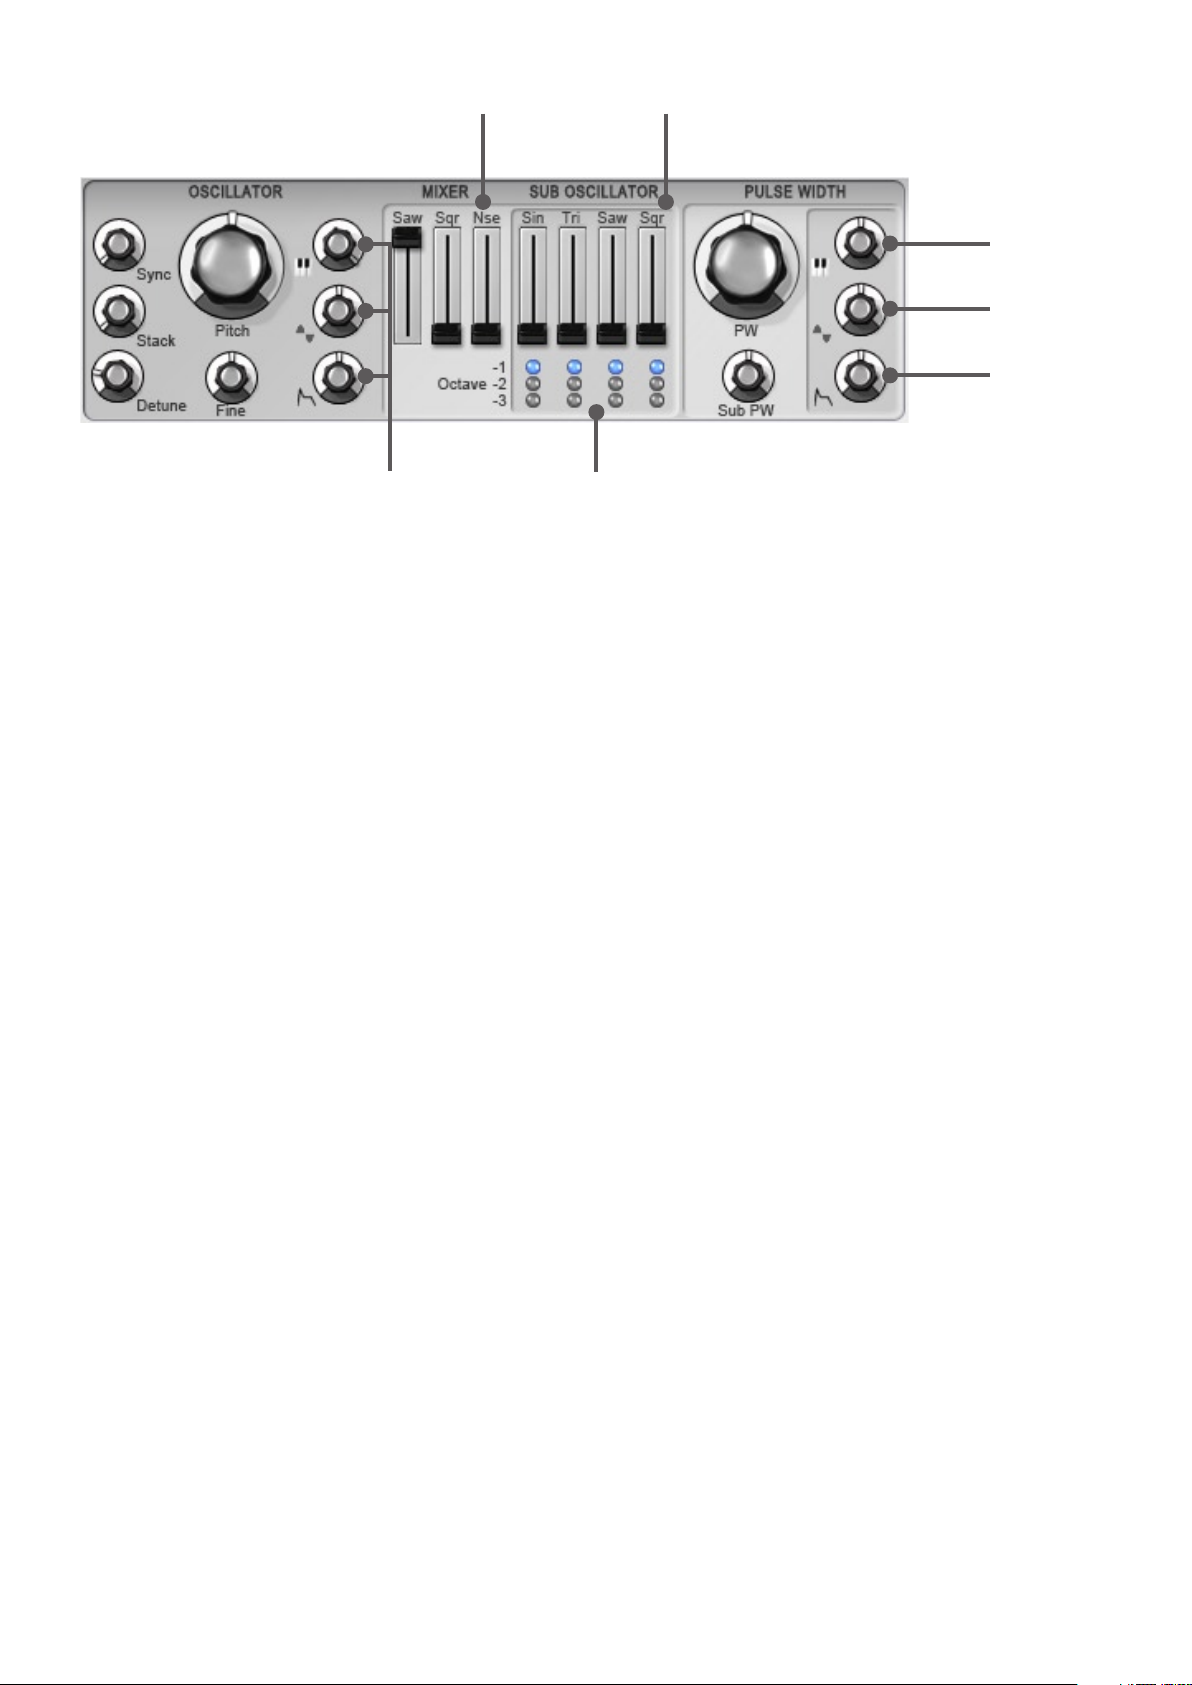
2:2 Oscillator section
Main osc
waveform mixer
Sub-osc
waveform mixer
Pulse Width
direct mod: Key
Pulse Width
direct mod: LFO
Pulse Width
direct mod: Env
Pitch direct
modulation:
- Key
- LFO
- Env
Octave
buttons for sub-oscs
Oscillator controls
Tuning: Pitch & Fine
These are the main tuning controls for the oscillator. The Pitch can be modulated from the keyboard, LFO and Mod
Envelope using the dedicated controls.
Sync
The oscillator features a ‘hard sync’ function: you can increase the frequency of the oscillator with the Sync control, but it
is re-synced on each cycle of the lowest sub-oscillator.
The resulting waveform has the same overall pitch as the original osc but with added harmonics that create more complex
timbres.
Stack & Detune
These controls comprise the oscillator-stack function, which provides classic multi-osc sounds using a single oscillator,
without needing to use additional unison voices.
The Stack control sets the number of stacked oscillators, while the Detune control detunes them up to an octave apart
from the main oscillator pitch. For a ‘detuned supersaw’ sound, set the Detune control to around 5%, and then increase
the Stack control to 2 or 3 (or any number up to 5!).
Waveform mixing controls
Main osc and sub-osc mixer
The main osc mixer contains level sliders for Saw, Square (Sqr) and Noise (Nse) (gaussian white) waveforms.
The sub-osc mixer features level siders for Sine (Sin), Triangle (Tri), Saw and Square (Sqr) sub-oscillator waveforms.
Each of these can be set 1, 2 or 3 octaves below the main osc pitch using the Octave buttons.
The level sliders allow you to freely mix the levels of all these parallel waveforms.
The Square waveforms, for both the main osc and sub-osc, are in fact pulse waveforms. Their pulse width can be
manipulated with the controls in the Pulse Width section of the oscillator.
When using the StrobeFX plugin (MIDI-controlled audio effect plugin version), the external audio input appears in place of
the Nse source.
Pulse Width controls
PW & Sub PW
The Square waveforms in Strobe are actually variable-width Pulse waveforms.
The Pulse Width section allows you to control the pulse width of the Square main oscillator and sub-oscillator shapes
using the PW and Sub PW controls respectively.
The main osc pulse width (PW) can be modulated from the keyboard, LFO and Mod Envelope using the dedicated
controls.
Direct modulation
The oscillator section contains dedicated controls for setting the modulation depth of the osc’s Pitch and the Pulse Width
of the main Square waveform (the sub-osc pulse width must be modulated via the TransMod system) from 3 modulation
sources:
• Keytracking
• LFO
• Mod Envelope
14
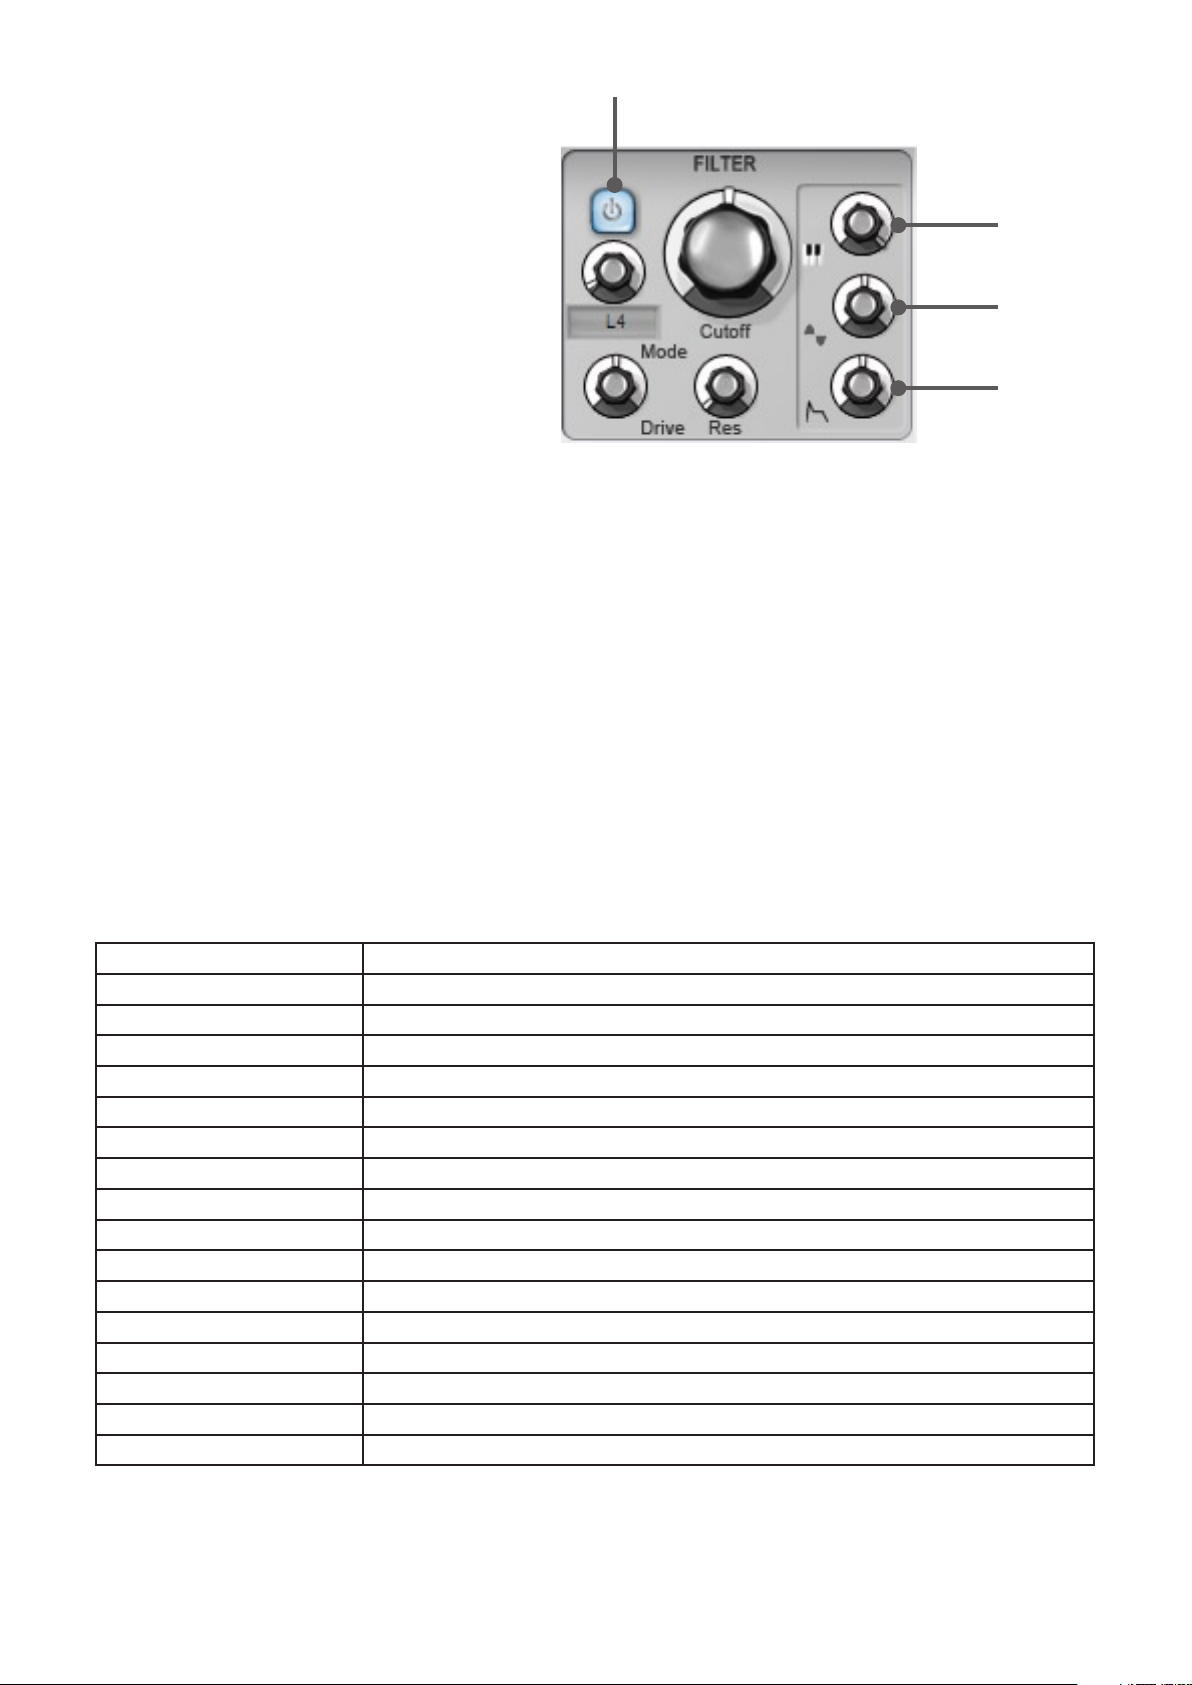
2:3 Filter section
Filter Power
Strobe’s filter is its main source of tonal variation,
especially when modulated. While there are direct
modulation routings to the cutoff from the keyboard
pitch, LFO and Mod Envelope, the filter’s controls
can be modulated with the TransMod system for
really creative and varied effects.
Filter cutoff
direct mod: Key
Strobe’s filter is based on an OTA (operation
transconductance amplifier) cascaded core, with a
diode clipper in the feedback section. The diodes
are slightly mismatched, leading to the characteristic
Filter cutoff
direct mod: LFO
growl of a real analog filter.
Filter controls
Power
Filter cutoff
direct mod: Env
The Power button switches the filter on or off. When
the button is disabled, the audio from the oscillator passes through the filter unaffected.
Cutoff & Res (Resonance)
The Cutoff control determines the cutoff frequency of Strobe’s filter.
The Res control adds emphasis around the cutoff frequency, giving a warm, resonant sound to the osc tone. At extreme
Res settings, the filter self-oscillates.
The cutoff can be modulated from the keyboard, LFO and Mod Envelope using the dedicated controls.
The control is adjusted in semitones, allowing you to tune the self-oscillating filter just like an oscillator. Setting the
keytracking depth control to maximum allows you to ‘play’ the filter musically from the keyboard.
Drive
The Drive control increases the gain of the signal going into the filter. This overloads the filter’s components, drastically
changing its sound and character.
Note that the effective resonance is reduced as you turn up the Drive control.
Mode
A large variety of filter modes are available by adjusting the Mode control.
Note that filters denoted as ‘T’ feature 2 or more filters with an octave between the frequency of each. The first filter in the
name is at the cutoff frequency, with subsequent filters each an octave higher than the last. The only exceptions are the
last 2 filter modes - see the table below. Graphical plots of the filter responses can be found in Appendix 2.
In other combination filters, all filters act at the cutoff frequency.
L2, L4, B2, B4, H2, H4 2-pole (12 dB/oct.) & 4-pole (24 dB/oct.) Low-pass, Band-pass & High-pass filters
P2 2-pole Peak filter
NP2 1-pole Notch and 2-pole Peak filters
N2P2 T 2-pole Notch and 2-pole Peak filters, an octave apart
N2L2 T 2-pole Notch and 2-pole Low-pass filters, an octave apart
N2H1L1 T 2-pole Notch, 1-pole High-pass and 1-pole Low-pass filters, each an octave apart
P2N2 T 2-pole Peak and 2-pole Notch filters, an octave apart
H2N2 T 2-pole High-pass and 2-pole Notch filters, an octave apart
H1L1N2 T 1-pole High-pass, 1-pole Low-pass and 2-pole Notch filters, each an octave apart
N2P2N2 T 2-pole Notch, 2-pole Peak and 2-pole Notch filters, each an octave apart
N2 2-pole notch filter
N4 4-pole notch filter
N2L2 2-pole Notch and 2-pole Low-pass filters
H2N2 2-pole High-pass and 2-pole Notch filters
H1N2L1 1-pole High-pass, 2-pole Notch and 1-pole Low-pass, each an octave apart
N2N2A T 2-pole Notch with 2-pole Notch an octave higher than the cutoff frequency
N2N2B T 2-pole Notch with 2-pole Notch an octave lower than the cutoff frequency
Direct modulation
The filter section contains dedicated controls for setting modulation depth of the filter Cutoff by 3 modulation sources:
• Keytracking
• LFO
• Mod Envelope
15
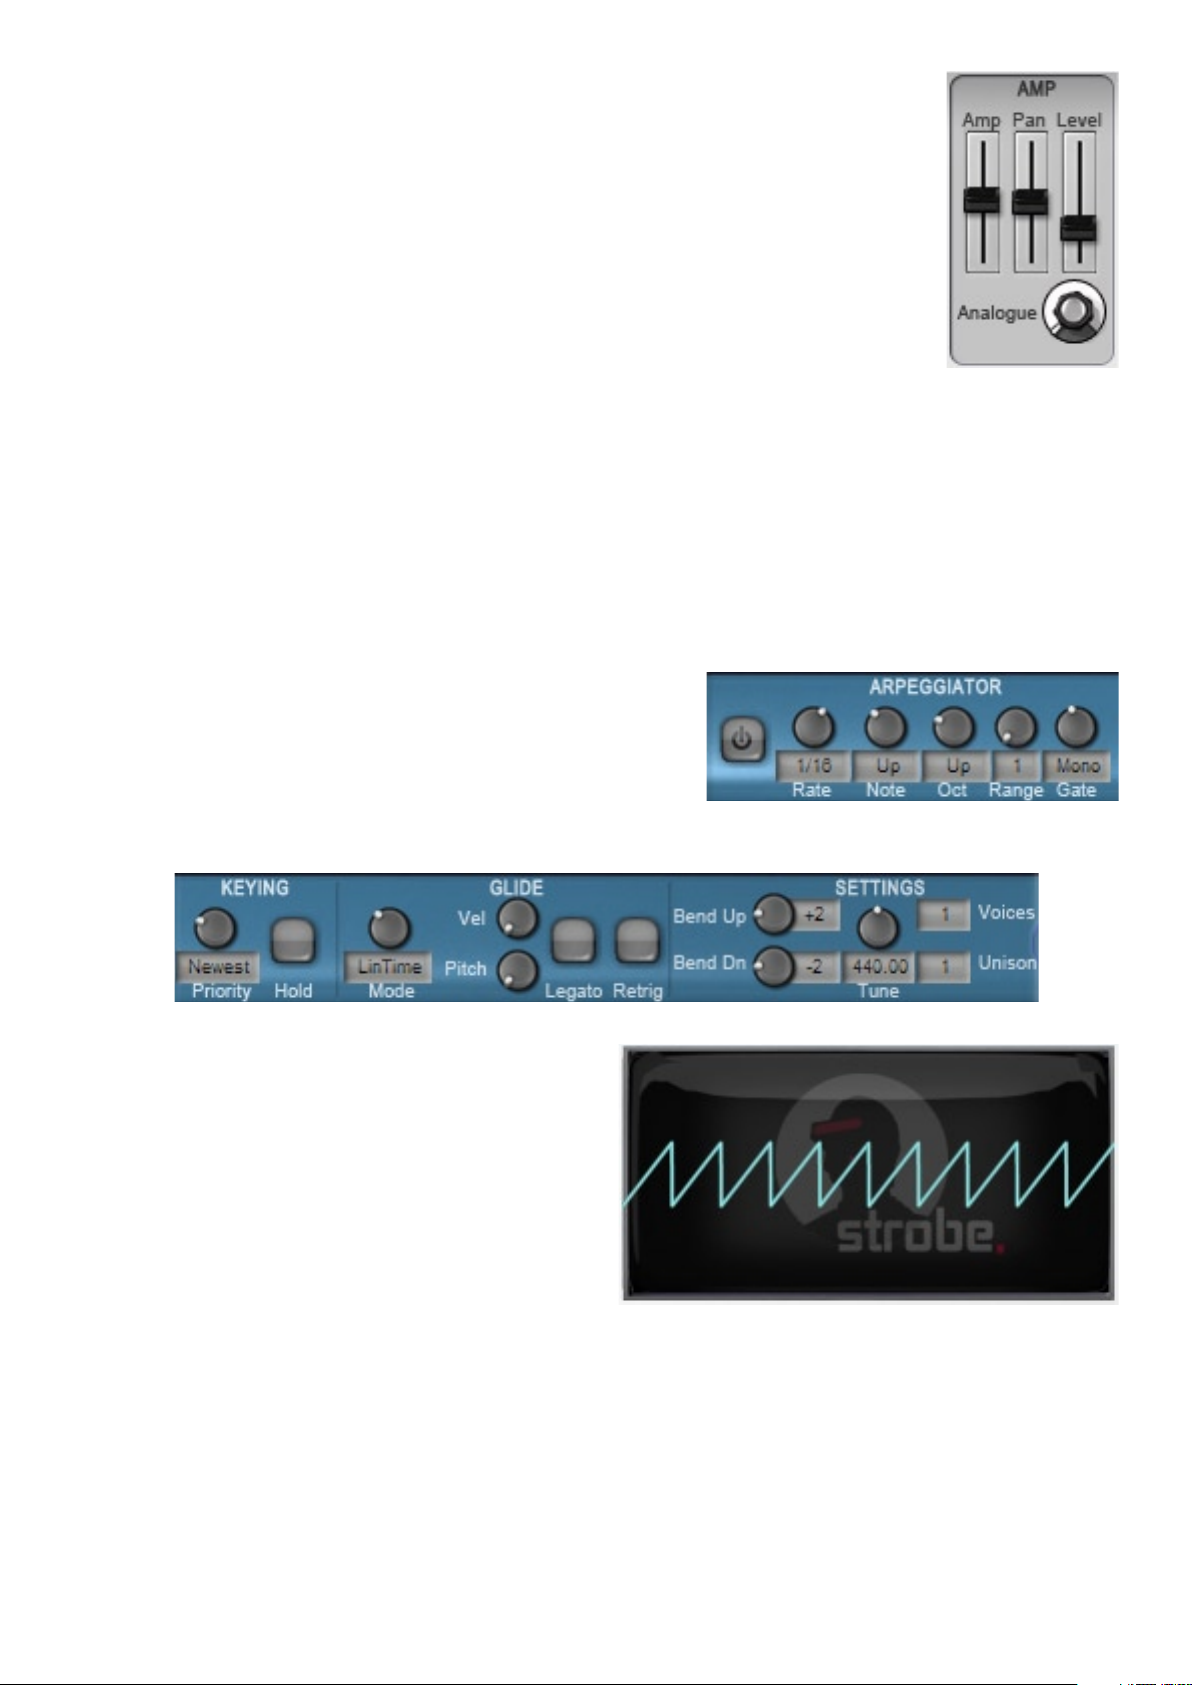
2:4 Amp section
Strobe’s amp section can be overloaded like that of a real analogue synth VCA (voltage-controlled
amplifier). There is a waveshaping stage between the Amp and final Level controls, which is capable
of distortion when its components are driven hard.
If you want a cleaner sound, keep the Amp control at low settings and increase the Level.
If you want to overload the amp by increasing the Amp parameter, remember to turn down the Level
control. Otherwise, the output of Strobe may clip.
Amp
The Amp parameter is directly modulated by the Amp Envelope. Its value represents the amplitude at
the maximum value of the AmpEnv (at the end of its attack stage).
In order to achieve velocity-sensitivity for amplitude, modulate the Amp parameter with the OnVel+
source (found in TransMod slot 1 in all DCAM: Synth Squad presets).
Pan
The Pan parameter sets the position of the voice in the stereo field.
Try modulating this control with the TransMod system, using a Voice modulation source – this leads to a rich stereo spread
of the voices when playing chords.
Level
This parameter sets the final Level of the voice before it is summed with all other active voices.
Analogue
The Analogue parameter simulates the effect of noise and mains hum in certain parts of the audio and control signal
paths, something that always occurs in real analogue synth circuits. At lower settings, it leads to a subtly gritty and slurring
character, while higher settings create a more unstable and noisy sound.
2:5 Other functions
Built-in Arpeggiator
The arpeggiator is common to both Strobe and Cypher. See section 6:1
for details on using the arpeggiator.
Settings, Glide and Keying controls
These parameters are common to all synths, and are covered in sections 6:2, 6:3 and 6:4.
Visualizer Scope
The visualizer scope provides context-sensitive graphical
feedback for each section of Strobe. See section 6:6 for
more details on this feature.
16
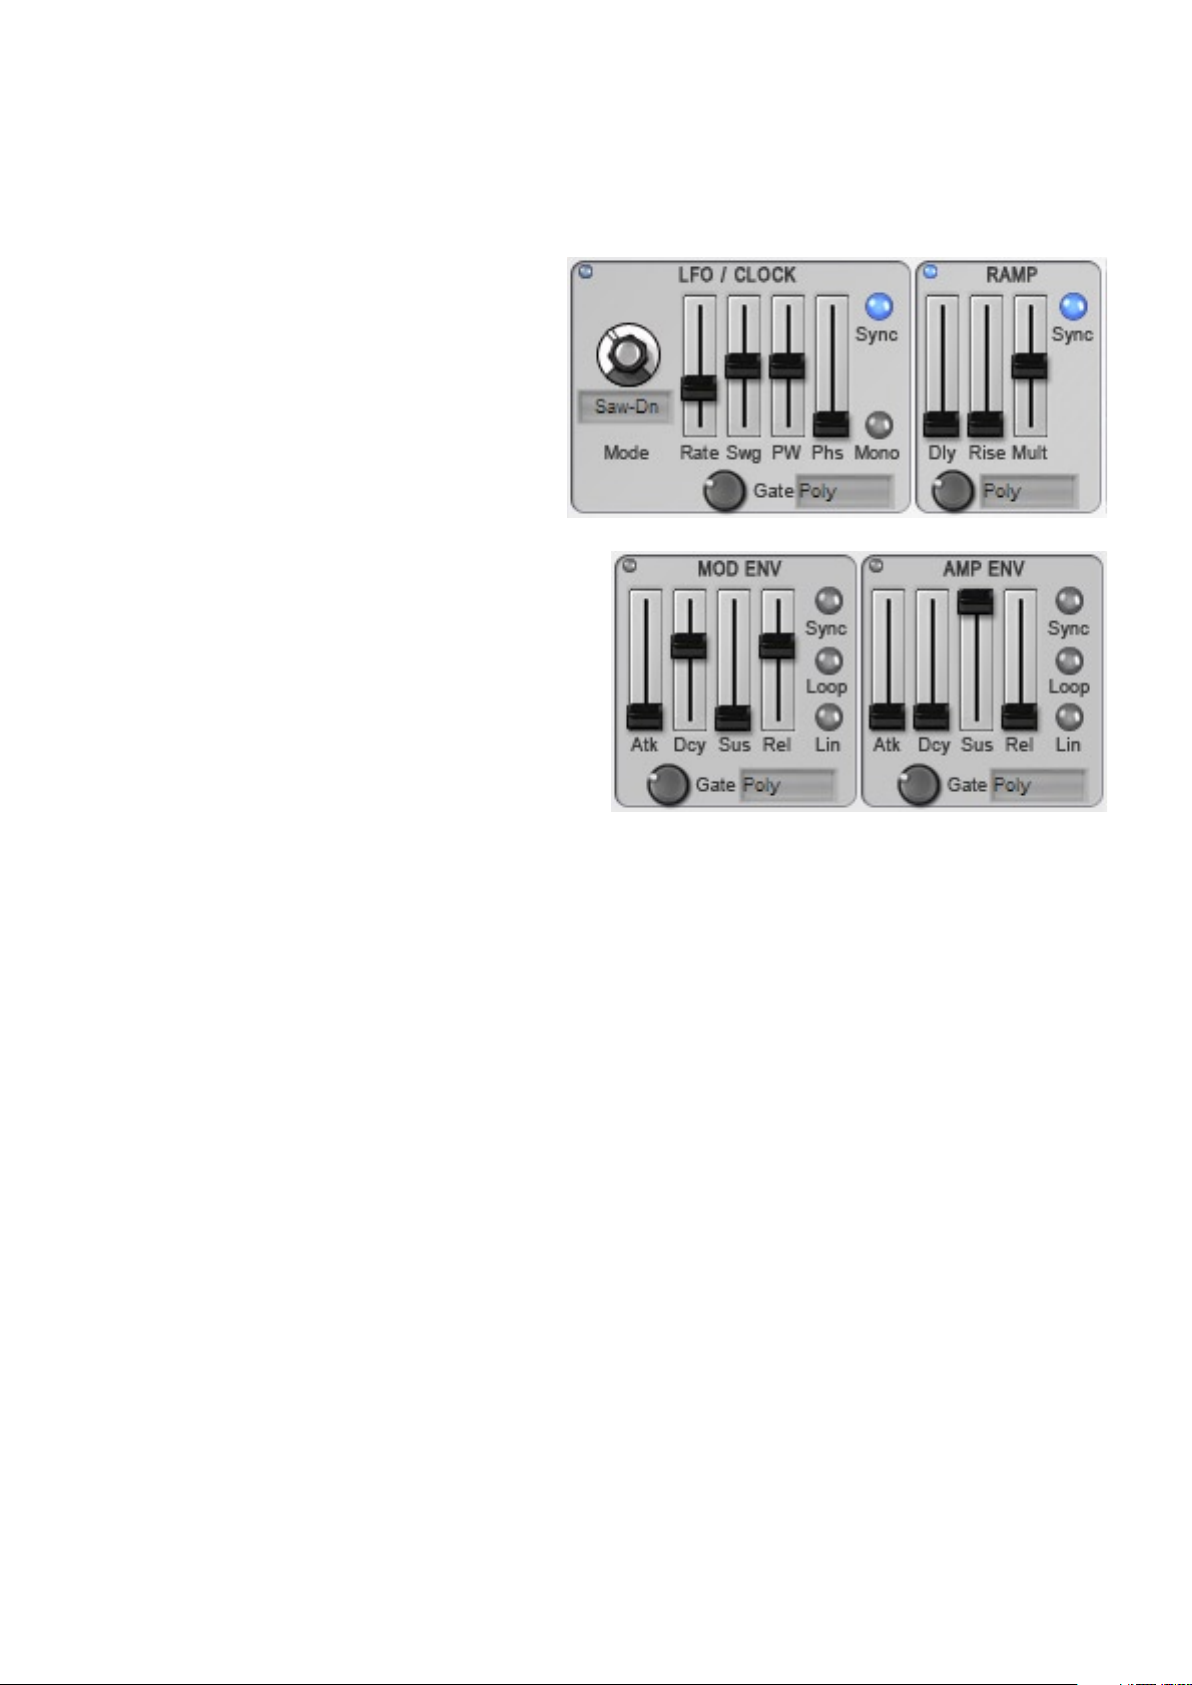
2:6 Modulation
Strobe contains several modulators that feature direct routings and depth controls for certain destinations. These sources
can also be used in the TransMod system (see chapter 7) to modulate other parameters and perform more complex
modulation. There are many other TransMod sources available beyond the modulators shown on the interface.
Gateable modulators
Gateable modulators (which can be gated with note-on/-off or triggered with note-on) feature a number of different gating/
triggering modes, including the ability to gate or trigger each other. For more details, see section 7:5.
LFO
Direct routings: Osc Pitch, Pulse Width, Filter Cutoff
Gateable by: Poly, PolyOn, Mono, Ramp, ModEnv,
Song
Ramp
Direct routings: none
Gateable by: Poly, PolyOn, Mono, ModEnv, LFO, Song
Mod Envelope
Direct routings: Osc Pitch, Pulse Width, Filter Cutoff
Gateable by: Poly, PolyOn, Mono, Ramp, LFO, Song
Amp Envelope
Direct routings: VCA Amp
Gateable by: Poly, PolyOn, ModEnv, Ramp, LFO, Song
Glide
Strobe is capable of smoothing both velocity and pitch
control signals.
For further details on the Pitch Glide and Vel Glide
functions, see sections 6:3 and 7:6.
Keytracking (modulation from keyboard pitch)
Direct routings: Osc Pitch, Pulse Width, Filter Cutoff
Keytracking is modulation from the pitch of the keyboard. The pitch modulation source value increases by 1 over each
octave. As well as the direct routings and depth controls specified above, keytracking can also be achieved for any other
parameter by using the Pitch source in the TransMod system.
See section 7:7 for more details about keytracking.
17
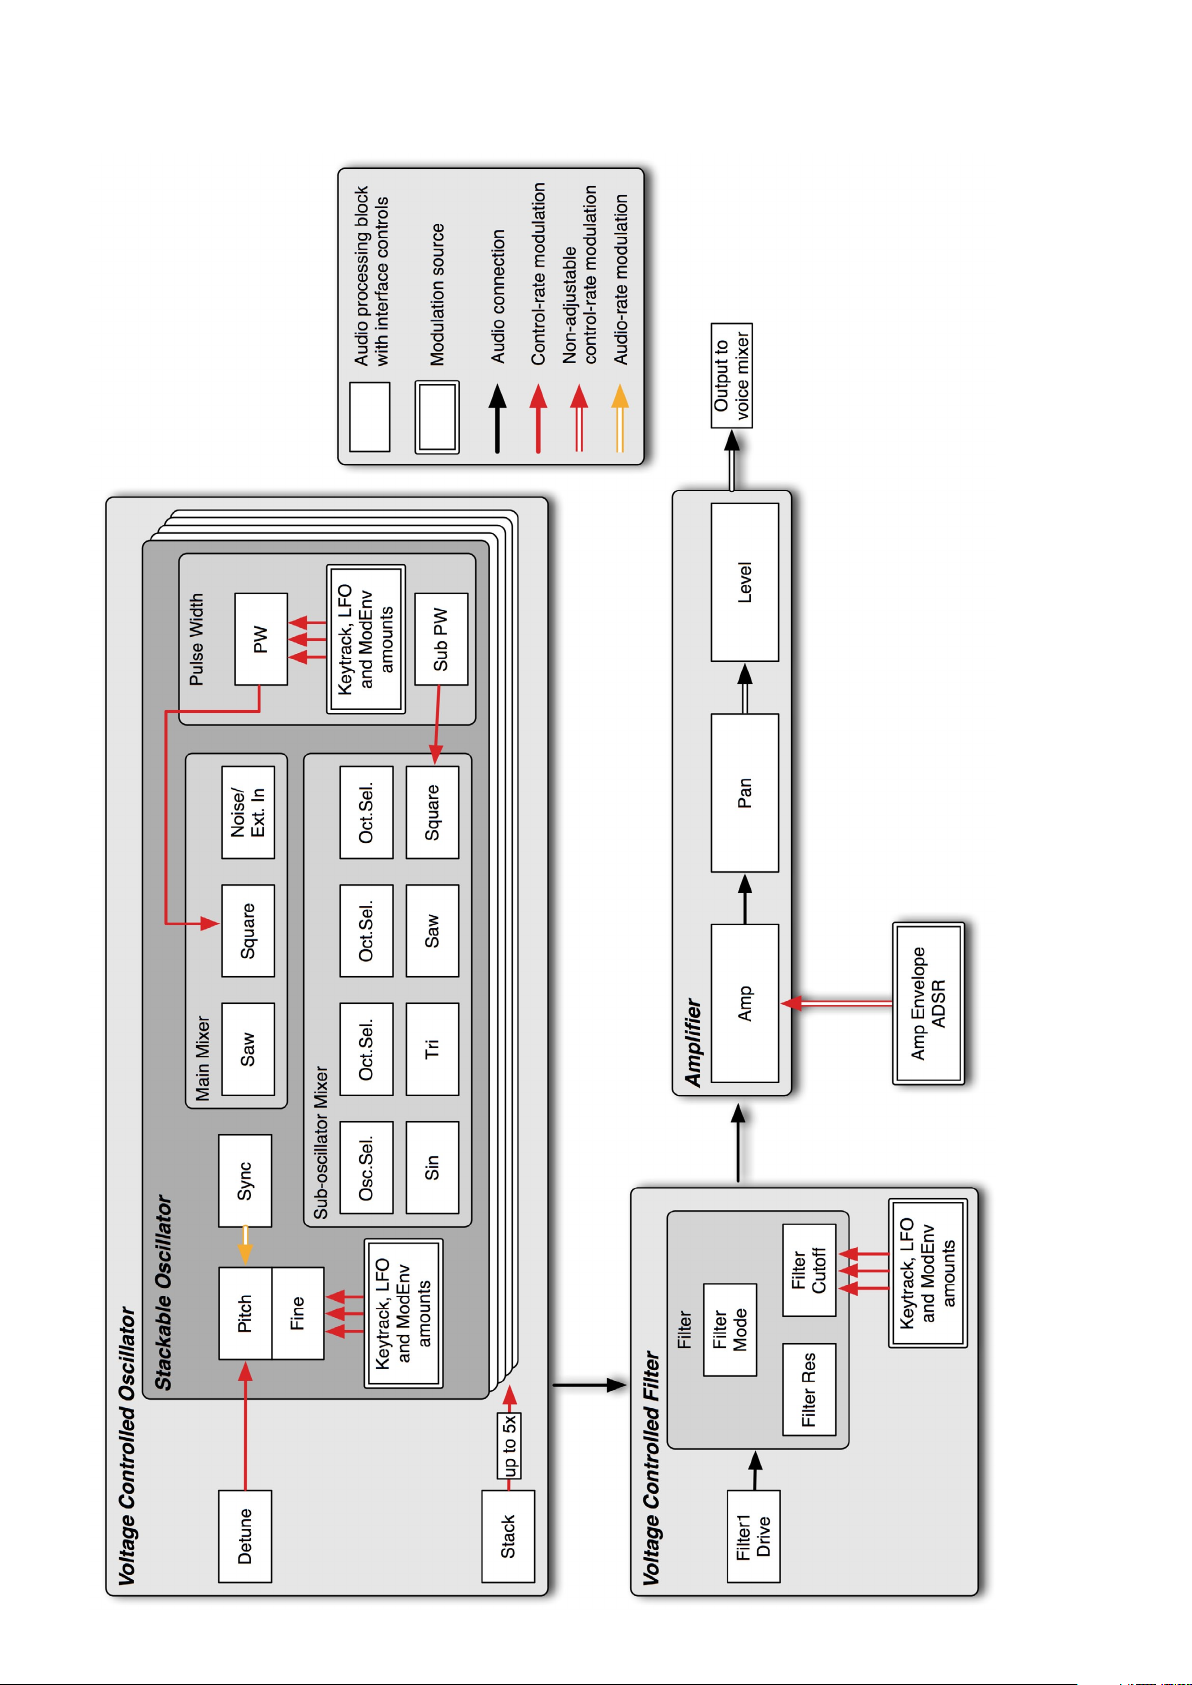
2:7 Strobe signal flow
The following signal flow diagram represents a single voice of Strobe. Only direct modulation is shown – there are many
further possibilities when using the TransMod system.
18
3: Cypher
3:1 Overview
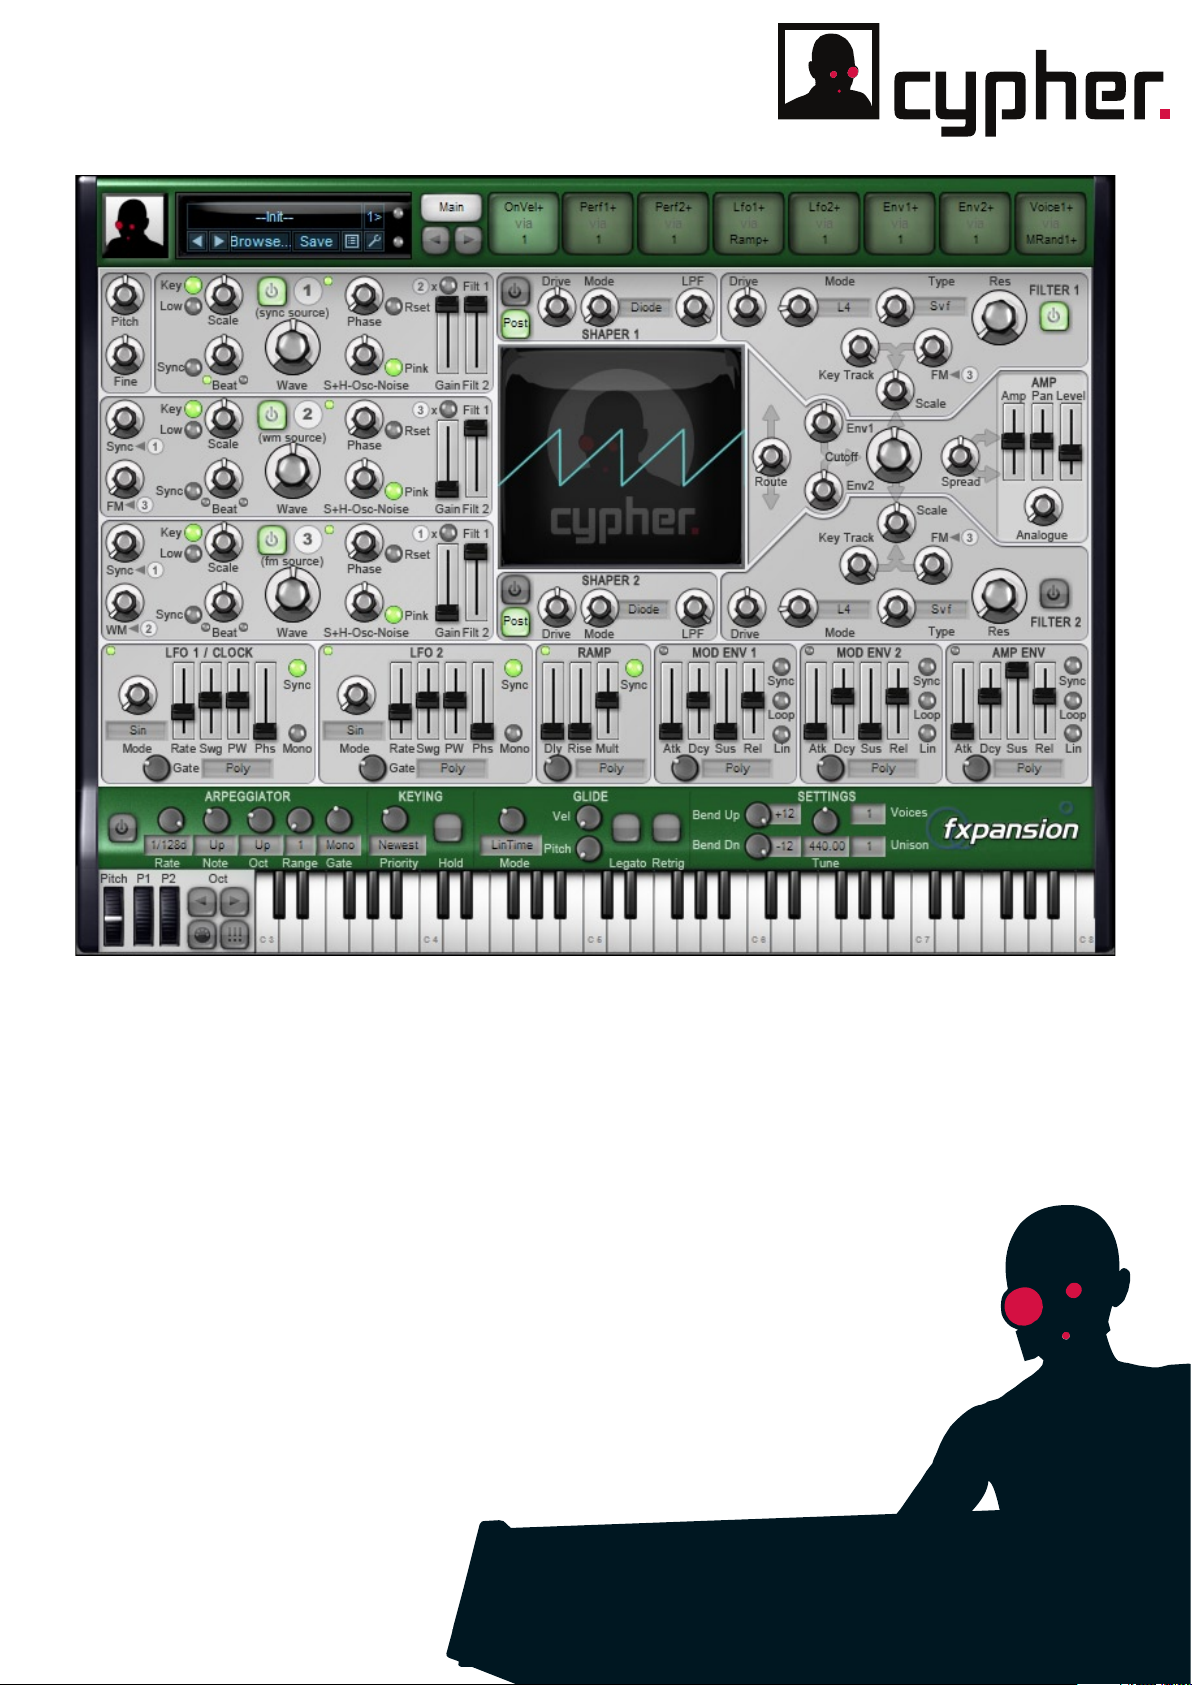
Cypher features a dual-filter/waveshaper architecture and a highly complex, versatile set of 3 modelled oscillators. While
it can be used as a 3-osc analogue-style subtractive synth, it has been designed to be used primarily for FM, audio-rate
modulation and other advanced oscillator functions. Using Strobe is recommended for most ‘conventional’ subtractive
sounds, as it is optimized for quick and easy programming.
Also included in Cypher is an arpeggiator identical to that found in Strobe, and other common DCAM: Synth Squad
functions such as the TransMod system for advanced modulation.
Background
The ethos behind Cypher is to provide a truly accurate model of an analogue synth capable of analogue-style FM and
other audio-rate modulation (as opposed to multi-operator FM such as that found in Yamaha DX-series digital synths). It
features thru-zero FM which allows musical digital FM-style sounds with an analogue-style circuit.
Some examples of analogue synths that feature FM are the SCI Prophet 5 and Roland Jupiter series,
which allowed one osc to modulate another. Most modular synths also allow you to patch any audio-rate
signal to vary the osc frequency.
Programming with Cypher
Cypher requires a slightly different approach to a more conventional analogue-style synth. Chapter 4
features a detailed discussion of the specialized functions of Cypher’s oscillators, which are the main
focus of timbral variety in the synth.
Each osc is tuned using a Scale control in relation to a variable master pitch. Since any pitch-related
control in DCAM: Synth Squad features several snapping modes including ‘harmonic’, you can tune
each osc with harmonic ratio multipliers instead of absolute frequencies. This means you don’t
have to calculate harmonic frequencies yourself, making musically useful FM sounds much
easier to achieve than with traditional
analogue oscillators. See section 1:3 for
more details of the snapping functions.
19
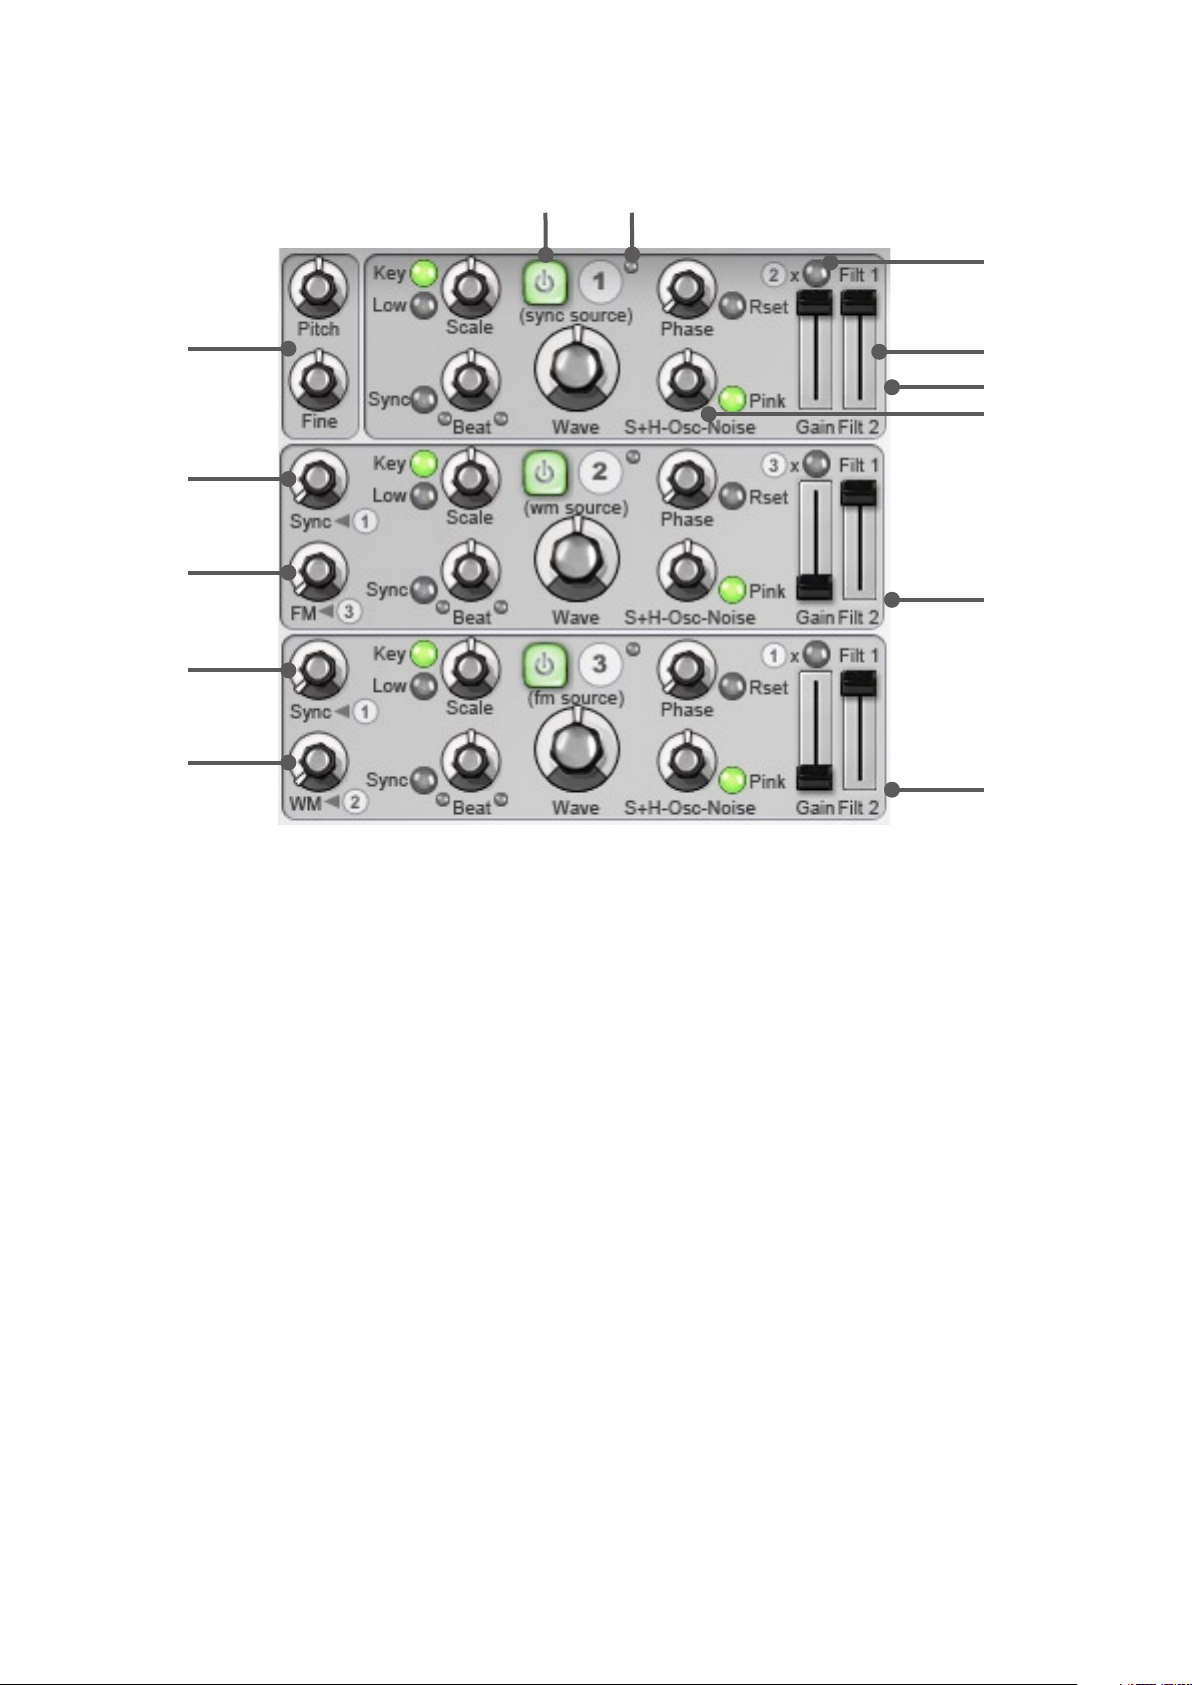
3:2 Oscillator section
This section is a brief overview of Cypher’s oscillator functions. Please read chapter 4 to gain a full understanding of the
oscs’ special capabilities.
Osc
Power
Frequency
indicator
LED
Ring Mod
Master
tuning
Osc 2
Sync to 1
Osc 2
FM from 3
Osc 3
Sync to 1
Osc 3
WM from 2
Filter Mix
Oscillator 1
Blend control
Oscillator 2
Oscillator 3
Pitch, Fine & Scale
The pitch of each of the 3 oscillators is scaled against the master tuning (set using the Pitch and Fine controls), using
their respective Scale parameters.
By setting the Harmonic mode on a pitch control’s parameter context menu, each osc’s Scale control can operate in
harmonic pitch ratios instead of semitones, useful when dealing with FM and other audio-rate modulation processes.
Power
Each osc features a Power button to enable it. With the button disabled, the osc is deactivated.
Wave
The shape of each oscillator can be varied continuously between Triangle, Saw, Square and Pulse waveforms, using the
Wave control.
Due to their continuously variable nature, Cypher’s oscs do not feature a dedicated pulse width control – in order to vary
pulse width, you must modulate the Wave parameter in the square/pulse region of its travel.
The waveform of Osc3 can be varied at audio rate by Osc2 using the WM from 2 control.
FM from 3 & WM from 2
Audio-rate modulation refers to modulating a parameter at the very fast speeds of audio waveforms, as opposed to the
slower speeds of LFOs and envelopes (known as control-rate modulation). The audio-rate modulation in Cypher is the
result of extremely detailed modelling, and strives to reproduce the complex behaviour that results when modulating
analogue components at audio-rate. Here’s a summary of what Cypher can do in this respect:
• Audio-rate Frequency modulation of Osc2 by Osc3 using the FM from 3 control on Osc2 (see sections 4:1 and 4:2)
• Audio-rate wave modulation of Osc3 by Osc2 using the WM from 2 control on Osc3 (see section 4:3)
Sync to 1
The Sync to 1 controls in the Osc2 and Osc3 sections allow you to sync these oscs to Osc1’s frequency. Rather than
a simple on/off button for this function, Cypher features a continuous control that provides full ‘hard’ sync at 100% and
variable degrees of sync between 0 and 100%. This feature is covered in detail in section 4:5.
Beat
The Beat control allows you to detune one oscillator against another while keeping the rate of the resulting ‘beating’
constant across the keyboard. This opens up new rhythmic ways of playing sounds with classic detuned-beating
characteristics. See section 4:6 for a detailed discussion of how the Beat control works.
This control also sets the osc’s frequency (or rate) while the Osc is in LFO mode (when the Low button is enabled).
20
Phase
Each osc’s phase can be set with the Phase parameter.
With the Rset (Reset) button enabled, the phase is reset to the value defined by the Phase parameter on each envelope
retrigger event (which is dependent on the Retrig button).
Disabling the Reset button means that the phase is effectively free-running.
The Phase control can be continuously modulated in real time for phase modulation effects (at control-rate rather than
audio-rate).
Low
The Low button on each osc switches it to act as an LFO, with the Beat parameter controlling its rate in Hz. Each osc is
available as a control-rate TransMod source for use with this function (see section 7:8).
Key
The Key button turns keytracking (modulation of pitch by the keyboard) on or off for each osc.
Blend (S+H - Osc - Noise) & Pink
The Blend control crossfades the final audio output from each oscillator between the oscillator itself (centre position),
white/pink noise (fully right), and another osc sampled and held at audio-rate by the osc’s frequency (fully left).
Section 4:4 offers a detailed analysis of the audio-rate sample and hold feature.
When the Pink button is engaged, the noise source outputs pink noise. When the button is deactivated, the source is set
to white noise.
Note that when using the CypherFX plugin (MIDI-controlled audio effect plugin version), external audio appears in place
of the white noise source in each osc – the Pink noise source is still available for each osc. Therefore, to hear the external
audio source, you must disable the Pink button.
Ring mod
Each oscillator features a ring modulation function, allowing it to be multiplied by one of the other oscillators. Enabling the
Ring Mod button for an osc results in the sum and difference of the oscs’ frequencies being used as the output of the osc.
If the oscs’ frequencies are harmonically related, the result is a musical sound; if not, the output may be dissonant. The
ring modulation process occurs after the Blend control in the signal path.
Osc1: Osc2 x Osc1
Osc2: Osc3 x Osc2
Osc3: Osc1 x Osc3
Gain
The Gain control sets the final output level of each oscillator. At a setting of zero, the osc is not heard in the final output.
However, its effect is still heard if it is modulating one of the other oscs.
Filter Mix
Each Osc’s Filter Mix control determines the amount of signal from the osc that is routed to each of the two filter/shaper
paths. When at the centre position, the osc’s signal is sent equally to both filter/shaper paths.
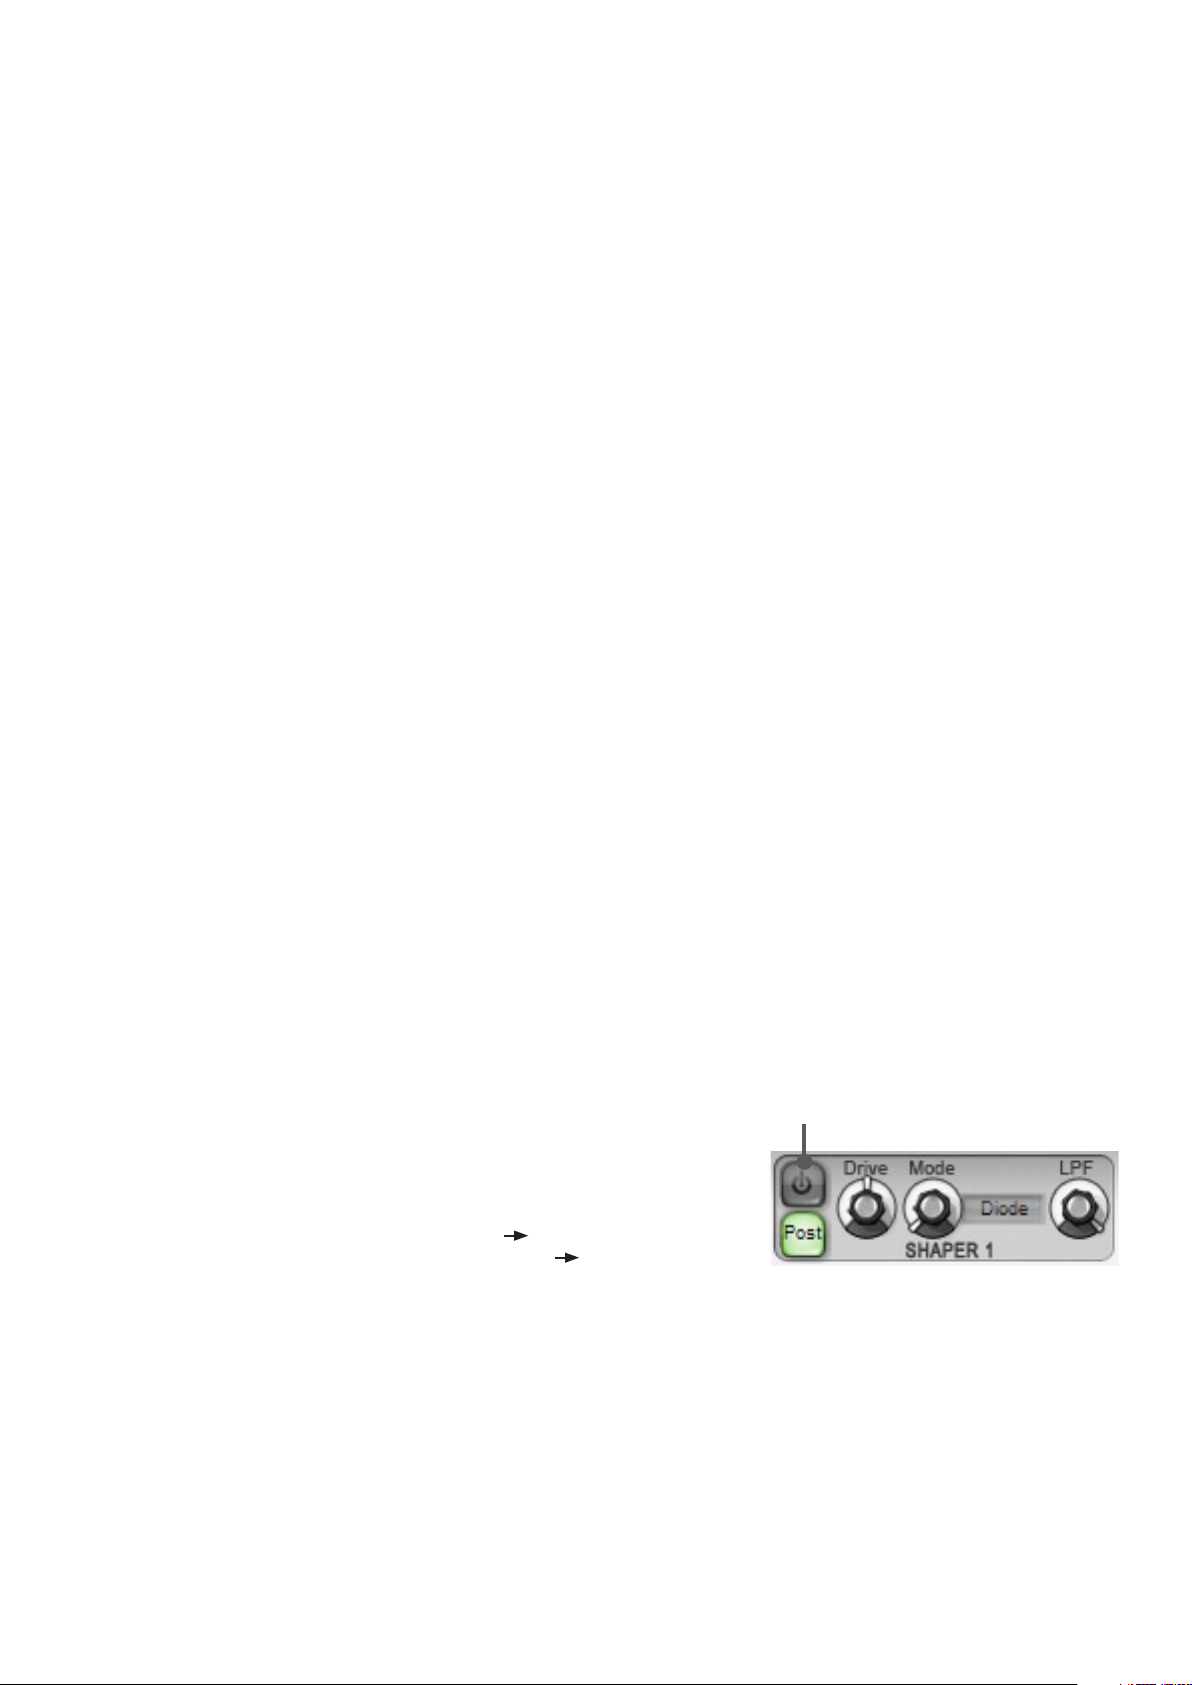
3:3 Shaper section
Each of Cypher’s two filter paths features a polyphonic waveshaping block that can be placed before or after the filter.
A waveshaper applies a mathematical function to the incoming waveform in order to alter its harmonic content and
introduce distortion. It is useful for overdriving the signal to add abrasive grit and character.
Shaper Power
Power
To enable each of the waveshaper blocks, engage its Power button.
Post
With its Post button turned off, the waveshaper block is placed before the
corresponding filter block (for example, shaper 1 filter 1). By engaging the
Post button, the shaper is moved after the filter (filter 1 shaper 1).
Mode
This control selects from 4 distinct waveshaper models, each providing its own distortion flavour. ‘Diode’, ‘OTA’ (operational
transconductance amplifier), ‘OpAmp’ (operational amplifier) and ‘HalfRect’ (half-rectifier) shapers are available. Graphical
plots of these shaper modes are provided in Appendix 3.
Drive
The Drive control increases the gain of the signal going into the waveshaper – higher values drive the waveshaper harder,
leading to more grit and distortion.
LPF
The LPF control applies a 1-pole Low-pass filter after the waveshaper for dialling out high frequencies and harmonics as
required.
21
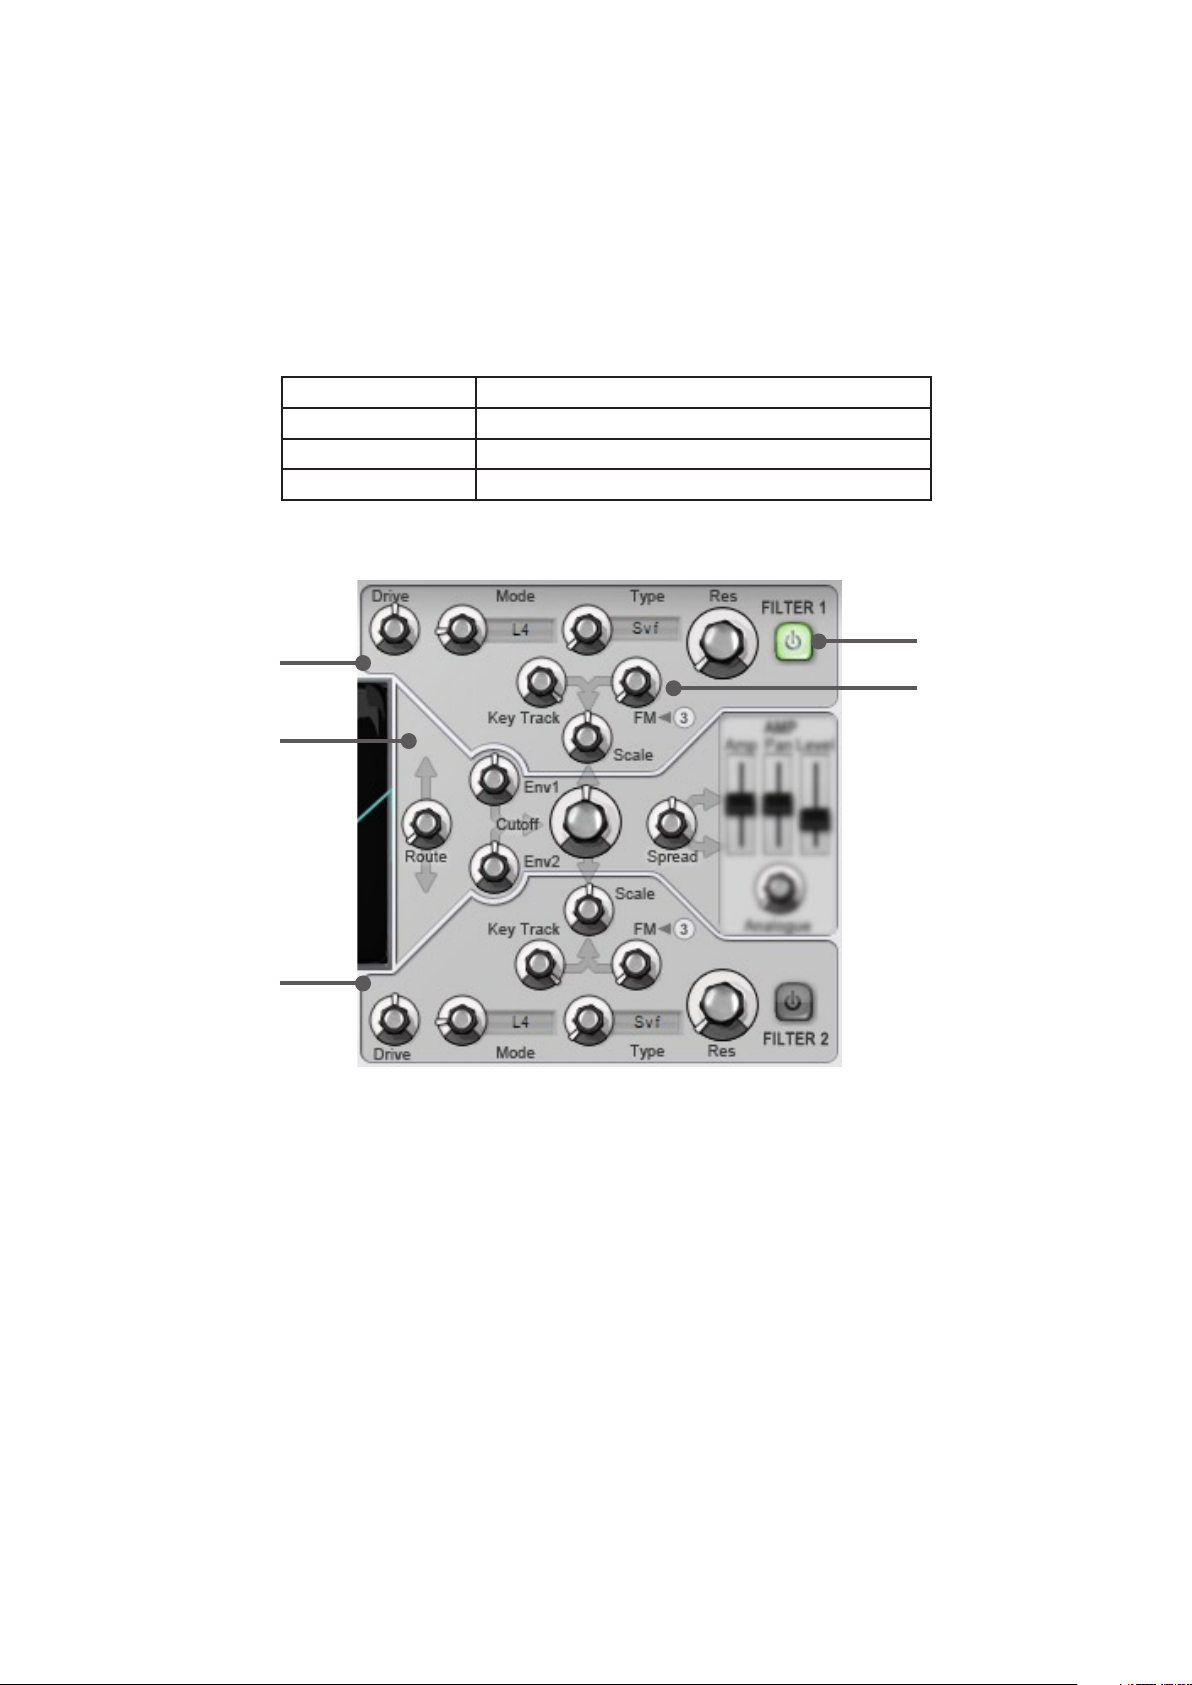
3:4 Filter section: shared controls
Cypher’s dual-filter section features a number of controls for each filter, while others are shared between them.
The following controls are shared between both filters:
Cutoff
The Cutoff control adjusts the cutoff frequency of both filters relative to each filter’s Scale control setting.
You can consider this control as the ‘master’ cutoff frequency that adjusts the cutoff of both filters simultaneously.
Env1 & Env2
Mod Envelopes 1 and 2 are directly routed to modulate the Cutoff (the cutoff frequencies of both filters simultaneously).
The Env1 and Env2 controls adjust the depth of modulation from ModEnv 1 and ModEnv 2 respectively.
Route
The routing of the filters can be changed between 2 serial and 2 parallel configurations using the Route parameter.
1 > 2 Serial, filter 1 before filter 2
2 > 1 Serial, filter 2 before filter 1
1 + 2 Parallel, filter 1 + filter 2
1 - 2 Parallel, inverted filter 1 + filter 2
Spread
The Spread control sets the amount of stereo spread between the filters when using parallel routings.
Filter Power
Filter 1
FM from 3
Shared filter
controls
Filter 2
3:5 Filter section: individual controls for filters 1 & 2
In addition to the shared controls that affect the filters in both of Cypher’s filter paths, each filter features the following
individual controls:
Power
The Power button enables or disables the filter. When disabled, incoming audio passes through the filter stage unaffected.
Type
Select from two classic filter designs for either of the two filter paths using the Type parameter: state-variable (Svf) and
transistor-ladder (Mgf) types are available.
These are both distinct circuit models with very different sonic characteristics.
Mode
The Mode control allows you to select from the following filter modes:
• Low-Pass 2-pole or 4-pole
• High-Pass 2-pole or 4-pole
• Band-Pass 2-pole or 4-pole
• Peak 4-pole
• Notch 4-pole
Drive
The Drive control increases the gain of the signal entering the filter. This leads to the filter circuit being overloaded,
drastically altering its tone and character.
22
Scale
Each filter’s Scale control offsets its cutoff frequency relative to the master cutoff by positive or negative amounts. At the
centre position, the filter’s cutoff is the same as that of the master.
Res (Resonance)
The Res control adjusts the resonance of each filter. Higher settings result in self-oscillation.
Keytrack
The KeyTrack parameter controls the amount of direct modulation from keyboard pitch, which is applied relative to the
filter’s Scale setting.
FM from 3
The cutoff frequency of each filter can be modulated at audio-rate by the frequency of oscillator 3. The FM from 3 controls
adjust the amount of frequency modulation for each filter.
See section 4:2 for more details of filter FM, and FM in general.
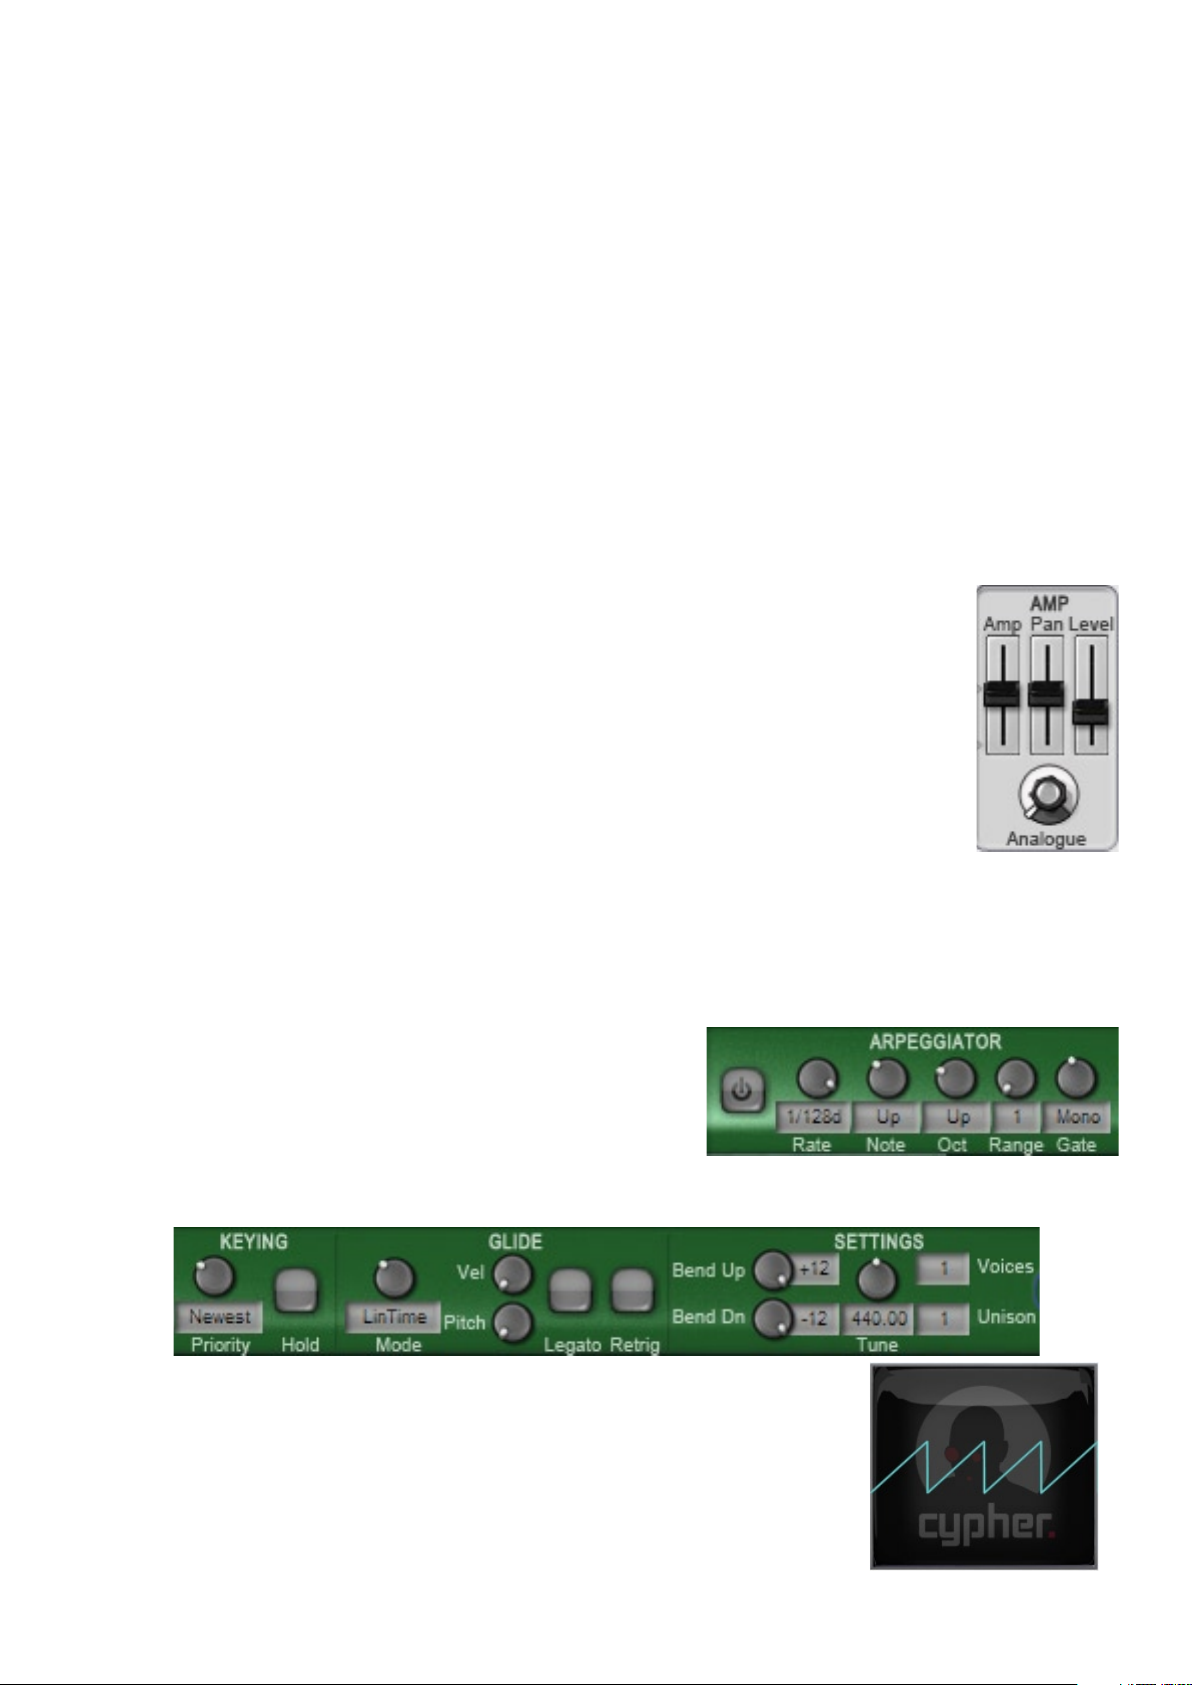
3:6 Amp section
Cypher’s amp section can be overloaded like that of a real analogue synth VCA (voltage-controlled amplifier). There is a
waveshaping stage between the Amp and final Level controls, which is capable of distortion when its components are
driven hard.
If you want a cleaner sound, keep the Amp control at low settings and increase the Level.
If you want to overload the amp by turning up the Amp paramater, remember to turn down the Level control. Otherwise,
the output of Cypher may clip.
Amp
The Amp parameter is directly modulated by the Amp Envelope. Its value represents the amplitude at the
maximum value of the AmpEnv (at the end of its attack stage).
In order to achieve velocity-sensitivity for amplitude, modulate this parameter with the OnVel+ source
(found in TransMod slot 1 in all DCAM: Synth Squad presets).
Pan
The Pan parameter sets the position of the voice in the stereo field.
Try modulating this control with the TransMod system, using a Voice modulation source – this leads to a
rich stereo spread of the voices when playing chords.
Level
This parameter sets the final Level of each voice before it is summed with all other active voices at the final output of the
synth.
Analogue
The Analogue parameter simulates the effect of noise and mains hum in certain parts of the audio and control signal
paths, something that always occurs in real analogue synth circuits. At lower settings, it leads to a subtly gritty and slurring
character, while higher settings create a more unstable and noisy sound.
3:7 Other functions
Built-in Arpeggiator
The arpeggiator is common to both Cypher and Strobe. See section 6:1
for details on using the arpeggiator.
Settings, Glide and Keying controls
These parameters are common to all synths, and are covered in sections 6:2, 6:3 and 6:4.
Visualizer scope
The visualizer scope provides context-sensitive graphical feedback for each section of
Cypher. See section 6:6 for more details on this feature.
23
3:8 Modulation in Cypher
This section covers parameter modulation in Cypher (control-rate modulation). For a detailed guide to Cypher’s audio-rate
modulation capabilities, see chapter 4.
Some of Cypher’s modulators feature dedicated routings and depth controls for certain parameters, while others must be
utilized within the TransMod system (see chapter 7)
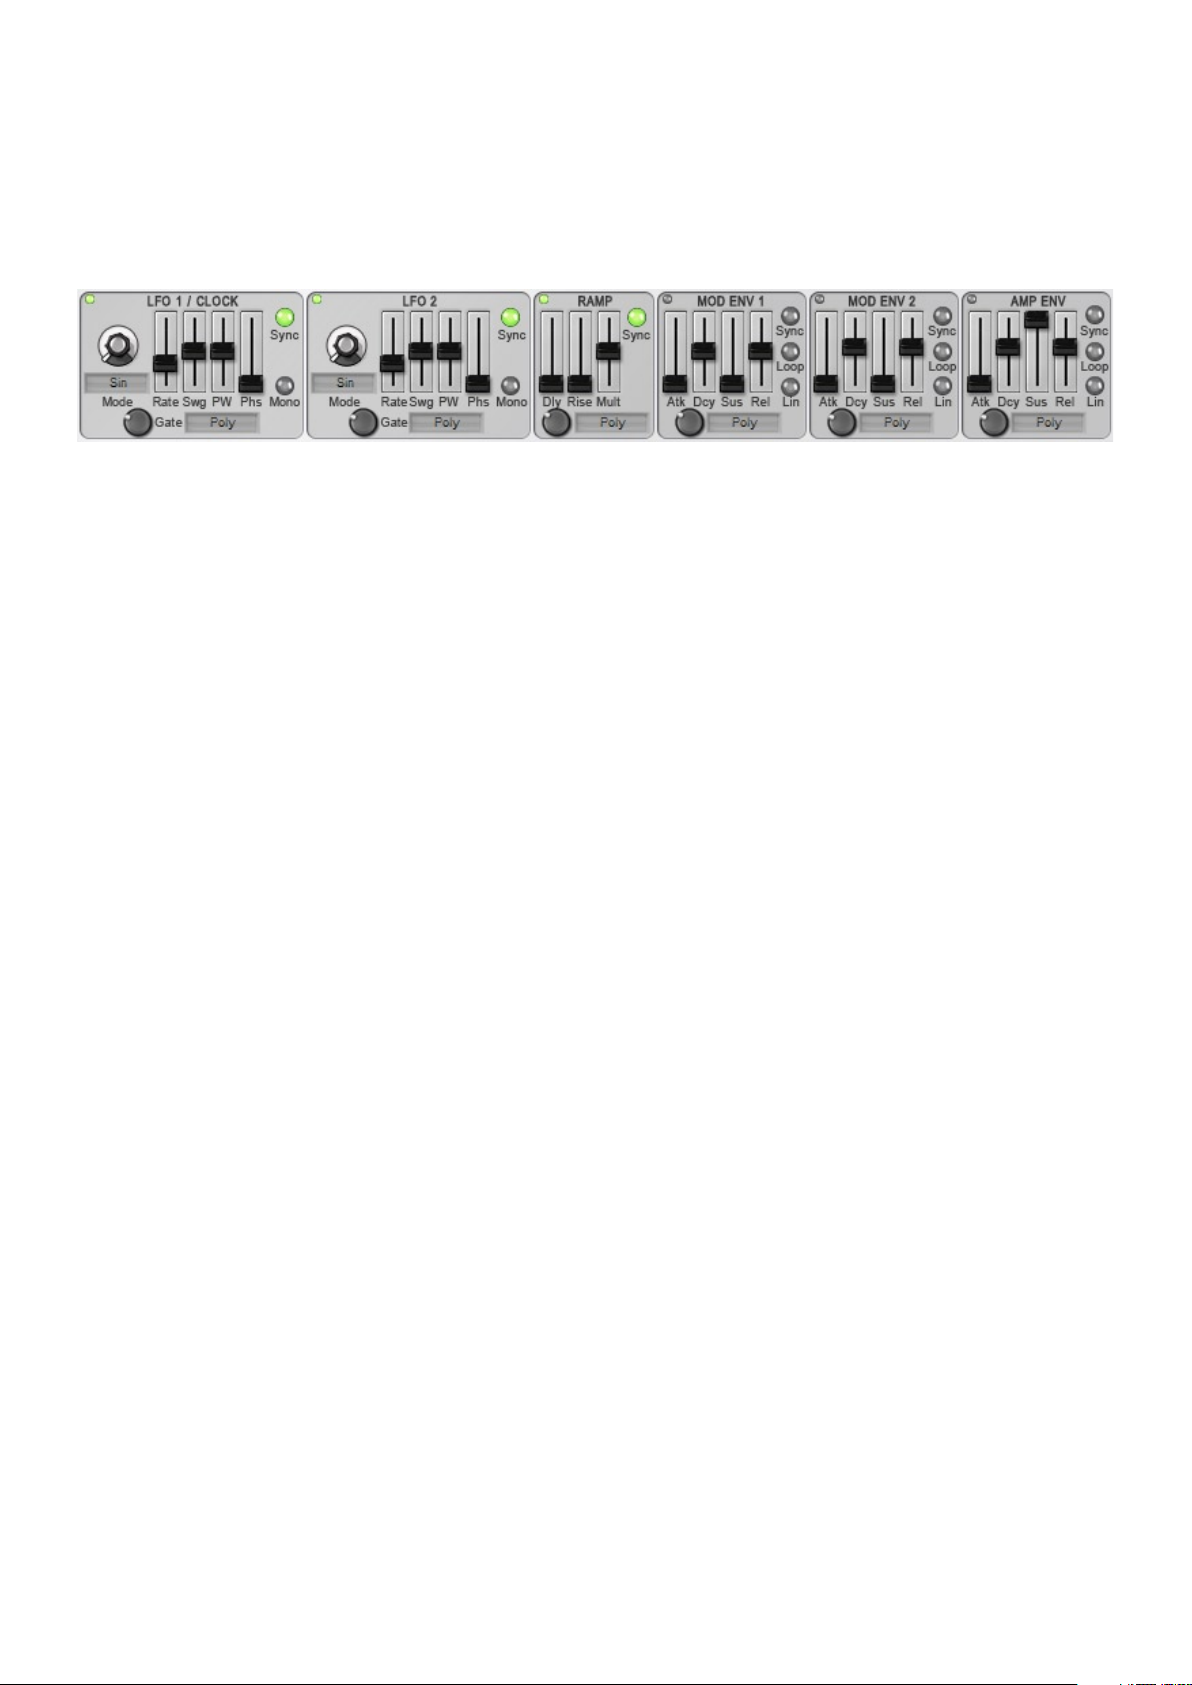
Gateable modulators
Gateable modulators (which can be gated with note-on/-off or triggered with note-on) feature a number of different gating/
triggering modes, including the ability to gate or trigger each other. For more details, see section 7:5.
LFO1 & LFO2
Direct routings: none
LFO1 gateable by: Poly, PolyOn, Mono, Ramp, ModEnv1, Song
LFO2 gateable by: Poly, PolyOn, Mono, Ramp, ModEnv2, Song
Ramp
Direct routings: none
Gateable by: Poly, PolyOn, Mono, Ramp, LFO1, Song
ModEnv1 & ModEnv2
Direct routings: Filter Cutoff
LFO1 gateable by: Poly, PolyOn, Mono, Ramp, LFO1, Song
LFO2 gateable by: Poly, PolyOn, Mono, Ramp, LFO2, Song
Amp Envelope
Direct routings: VCA Amp
Gateable by: Poly, PolyOn, Mono, Ramp, LFO1, Song
Glide
Cypher is capable of smoothing both velocity and pitch control signals.
For further details on the Pitch Glide and Vel Glide functions, see sections 6:3 and 7:6.
Keytracking (modulation from keyboard pitch)
Direct routings: Osc Pitch (on/off), Filter 1 & Filter 2 (variable)
Keytracking is modulation from the pitch of the keyboard. The pitch modulation source value increases by 1 over each
octave. As well as the direct routings and depth controls specified above, keytracking can also be achieved by using the
Pitch source in the TransMod system.
See section 7:7 for more details about keytracking.
Oscillators as LFOs
Each osc functions as an LFO if its Low switch is enabled. Each osc is available as a TransMod source (Osc1
and Osc3
+
) for modulating any parameter. See section 7:8 for more details.
-
Beating rates as LFOs
The beating rates between oscillators are available as TransMod sources, which can be used as additional LFOs. These
sources operate regardless of the Beat control. All beating rates can be utilized in the TransMod system, whether constant
beating via the Beat control, or conventional irregular beating when manually detuning oscs against each other.
Section 7:8 contains a summary of the beating rate TransMod sources.
+
, Osc2
-
+
-
24
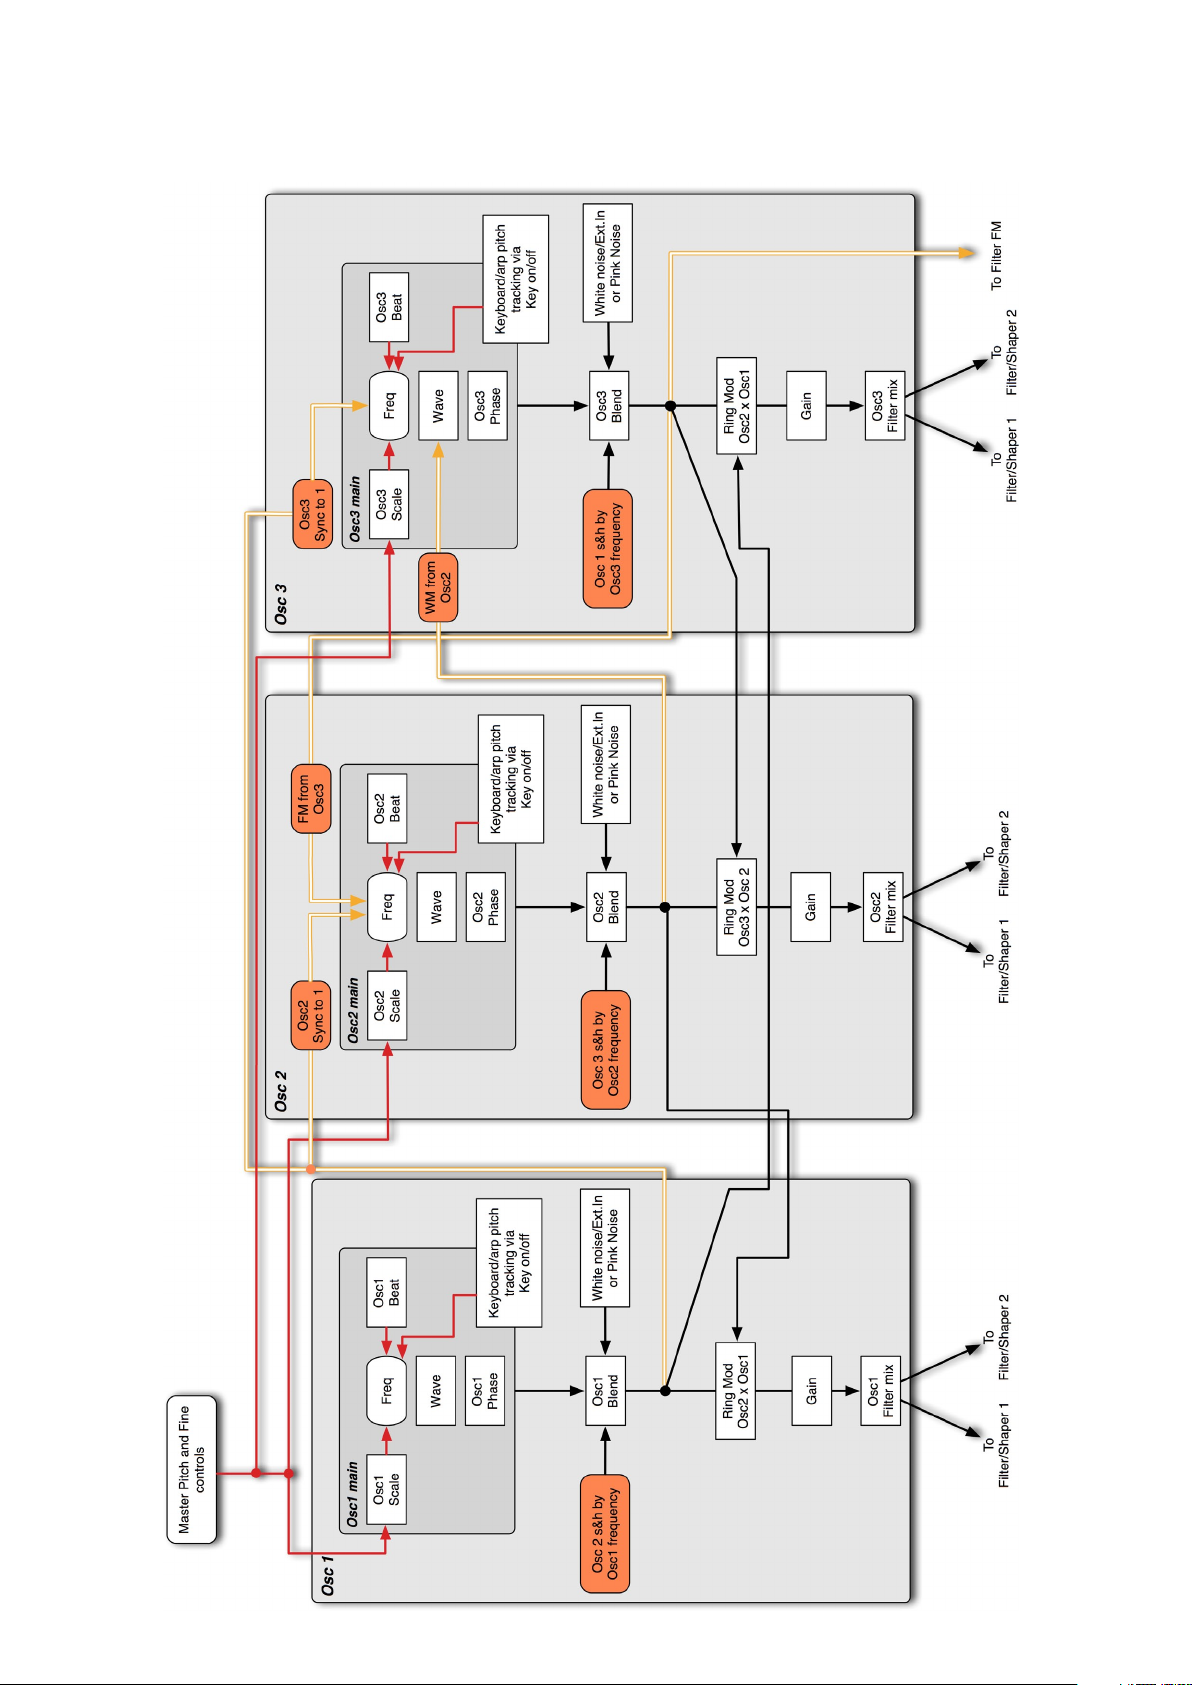
3:9 Cypher signal flow
The following signal flow diagrams represent the Osc section and the Shaper-Filter/Amp sections of a single Cypher voice.
Only direct modulation is shown – there are many further possibilities when using the TransMod system.
Osc section
25
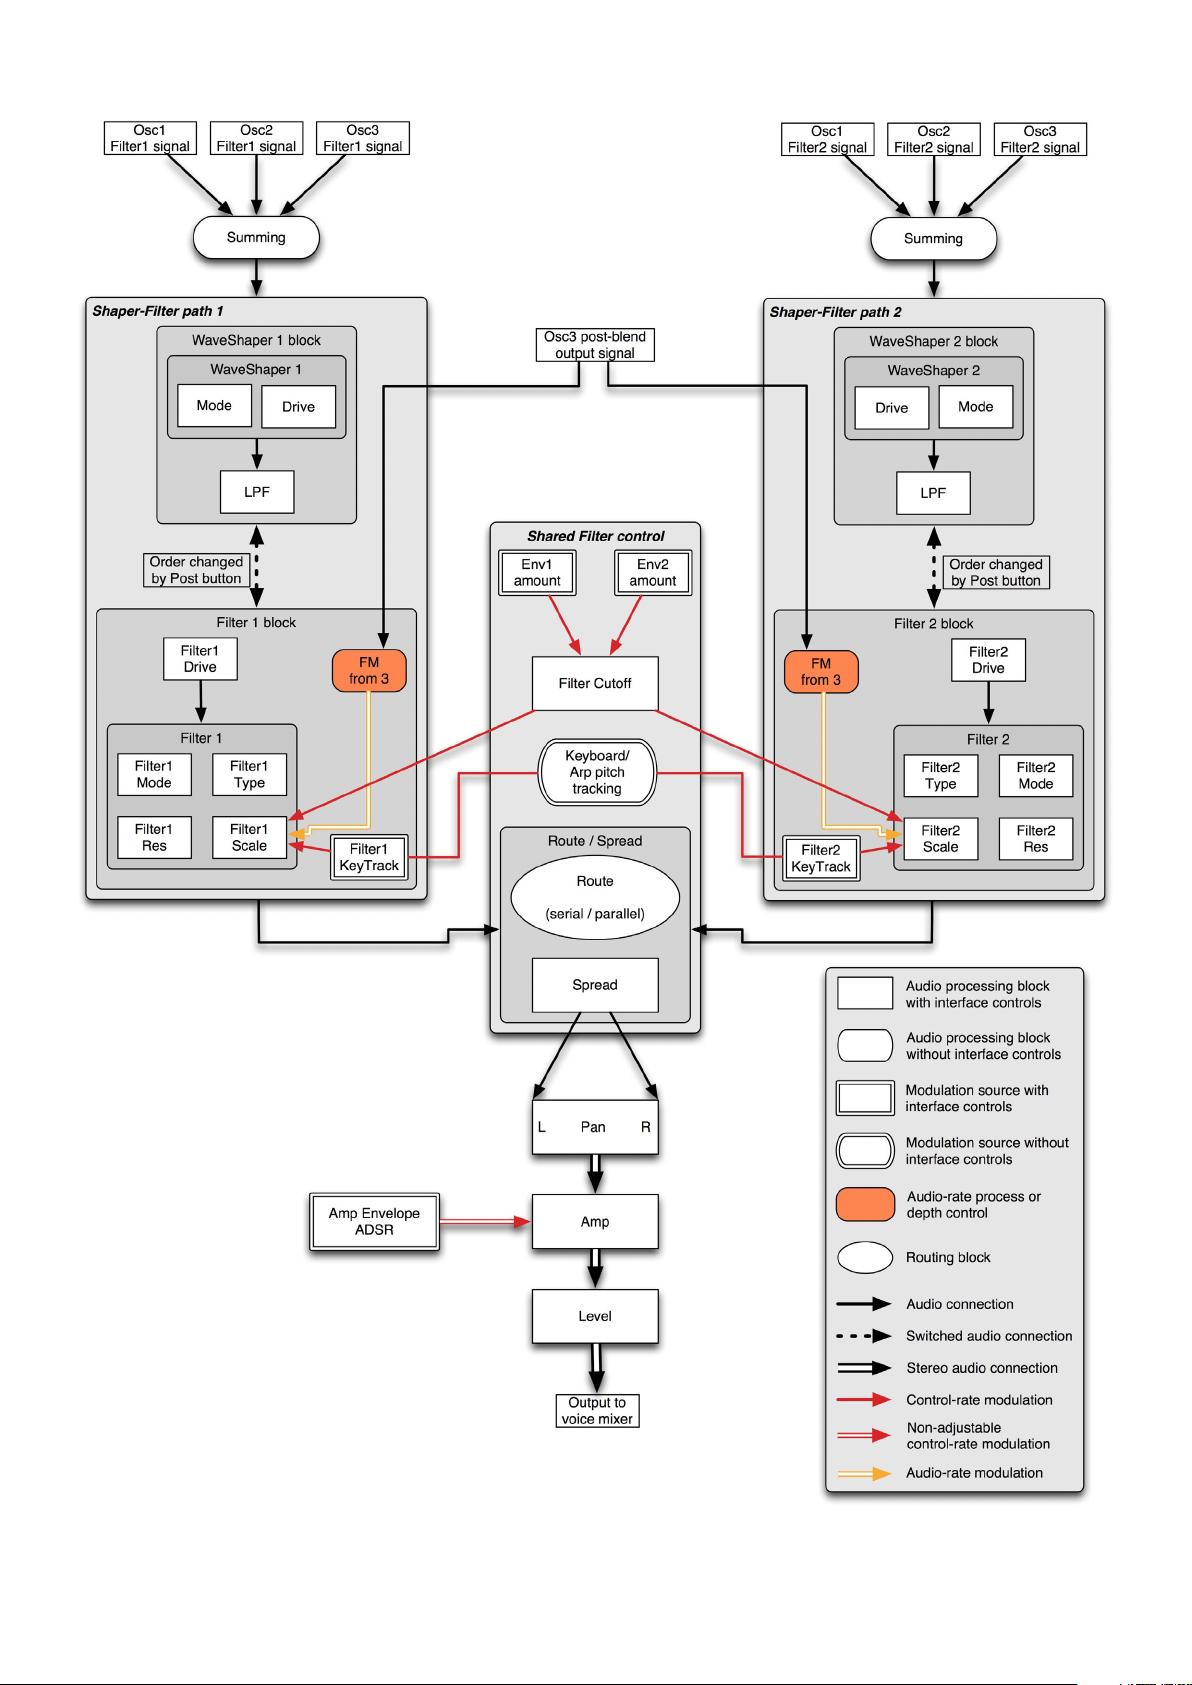
Shaper-Filter & Amp sections
26
4: Cypher’s oscillators in detail
4:1 Introduction to audio-rate modulation
Basics of audio-rate modulation
While subtractive synthesis – using a filter to subtract portions of an oscillator’s frequency range – is relatively easy to
understand, FM and other audio-rate modulation tends to perplex most musicians.
Conventional subtractive synthesis is great for many types of mostly abstract sounds but it isn’t usually sophisticated
enough to produce more complex, ‘realistic’ timbres such as those produced by acoustic instruments. This is because
most real-world timbres involve very complex harmonic variation – harmonics change at very high speeds and in more
complex ways than those made possible by subtractive filtering.
Most modulation in subtractive synthesizers takes the form of control-rate functions such as LFOs and envelopes, which
do not produce fast enough modulation for these complex timbres.
Audio-rate modulation – modulation at frequencies of audible sounds – is capable of producing more complex tones. FM
is one of the most common types of audio-rate modulation, and can be very effective at emulating many types of acoustic
sounds, particularly when using envelopes and other control-rate modulation to dictate the amount of FM applied. For
example, sounds reminiscent of acoustic plucked and hammered instruments are much more convincing when using FM
rather than conventional subtractive synthesis techniques.
Of course, it is not necessary to restrict the uses of audio-rate modulation to producing real-world timbres. It can also be
used for producing new types of abstract sounds that are not possible with conventional subtractive synthesis.
Audio-rate modulation implementations
FM (frequency modulation) is possibly the most well-known type of audio-rate modulation. While it is common to associate
FM with digital synths such as the Yamaha DX and TX series, FM capabilities can actually be found on many analogue
synthesizers. Many classic poly- and monosynths feature FM capabilities, with one osc typically modulating another osc or
the filter. Some examples include the Roland Jupiter series, SCI Prophet 5, Minimoog and ARP Odyssey. Most patchable
modular and semi-modular synthesizers also allow this kind of functionality.
Digital synthesizers have a huge advantage over analogue synths when it comes to FM: it is easy to input exact values
and frequency ratios, and the tuning is stable and reliable. Despite these drawbacks, the sound of analogue FM is rich
and complex. With its meticulously modelled oscillators, Cypher attempts to combine the sound of analogue with the
convenience and stability of a digital polyphonic software instrument.
4:2 Frequency modulation
When you modulate the frequency of one oscillator with that of another, the modulator oscillator is essentially acting as a
very fast vibrato on the modulated osc’s pitch.
An LFO is an oscillator running at low speeds, which produces a vibrato effect when it modulates pitch.
Modulating pitch with an oscillator that runs at audio-rates results in additional harmonics, called ‘sidebands’, being
produced. This leads to a change in tone rather than in pitch.
The nature of these tonal changes depends on the frequency of the modulator oscillator – more accurately, how the
frequency of the modulator oscillator relates to the frequency of the modulated oscillator (known as the ‘carrier’).
Simple, integer-based ratios between the frequencies of the carrier and modulator, such as 2:1, 1:2, 1:3, 1:4, 1:5 and so
on, produce ‘musical-sounding’, or ‘harmonic’ results. The additional harmonics are musically related to the base oscillator
frequency. On the other hand, arbitrary ratios such as 1:2.57, produce more dissonant results.
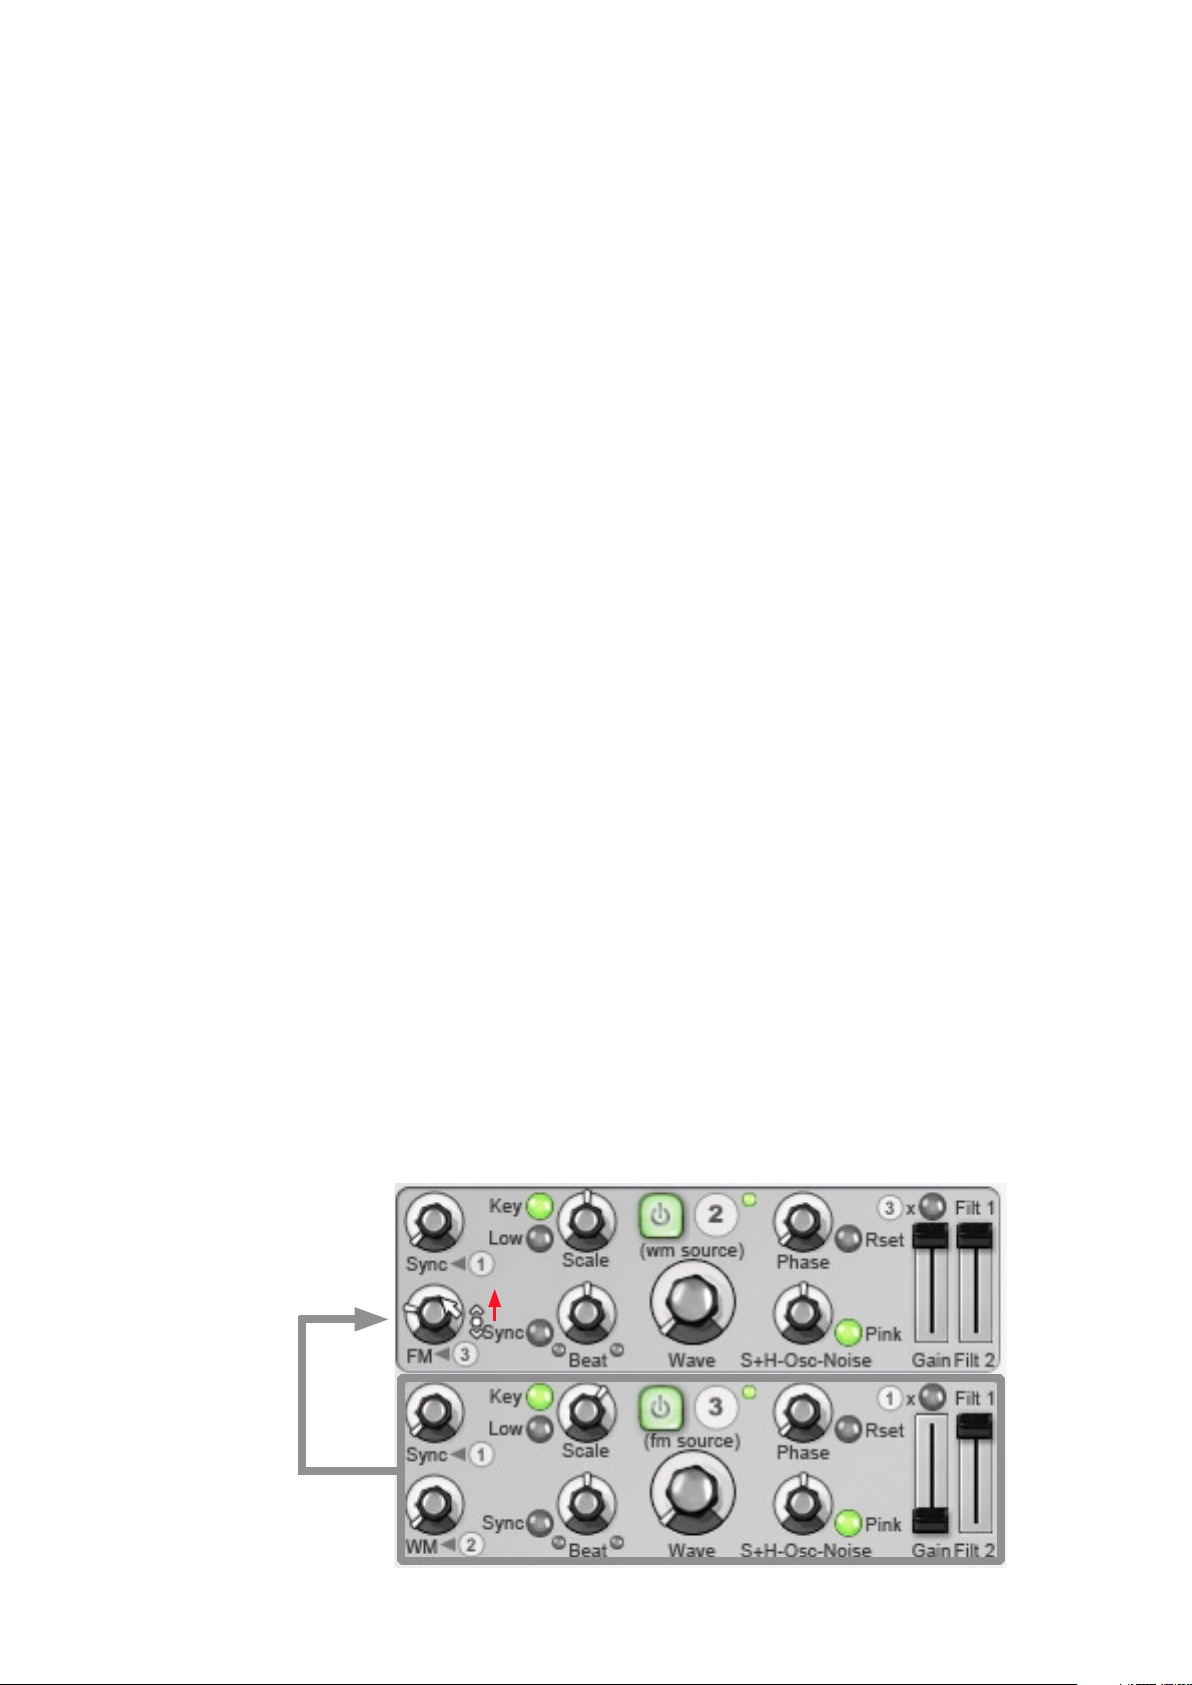
Cypher allows you to modulate the frequency of Osc2 with the output of Osc3. The overall shape of the Osc3 waveform is
used as the modulator – therefore there are a lot of parameters that contribute to its output. However, the most important
factor is Osc3’s frequency, or pitch.
Osc3 used as FM source
for Osc2.
The FM from 3 control
sets the depth of FM.
27
Oscillator FM in Cypher
Harmonic tuning
Cypher’s pitch control unit/snapping options (see section 1:3) allow you to specify each osc’s frequency as either of the
following:
• an absolute frequency multiplier of the master pitch, expressed in semitones.
• a perfect pitch-ratio of the master pitch, expressed in harmonics (using the Just and Harmonic modes).
Using the Harmonic mode, you can easily set up harmonic pitch relationships between oscs.
FM depth
Before Osc3 has any effect on Osc2, it is necessary to set the depth of modulation with Osc2’s FM from 3 control. As the
control is increased, more sidebands are introduced – additional tonal partials appear in the frequency spectrum.
Demonstrating osc FM in Cypher
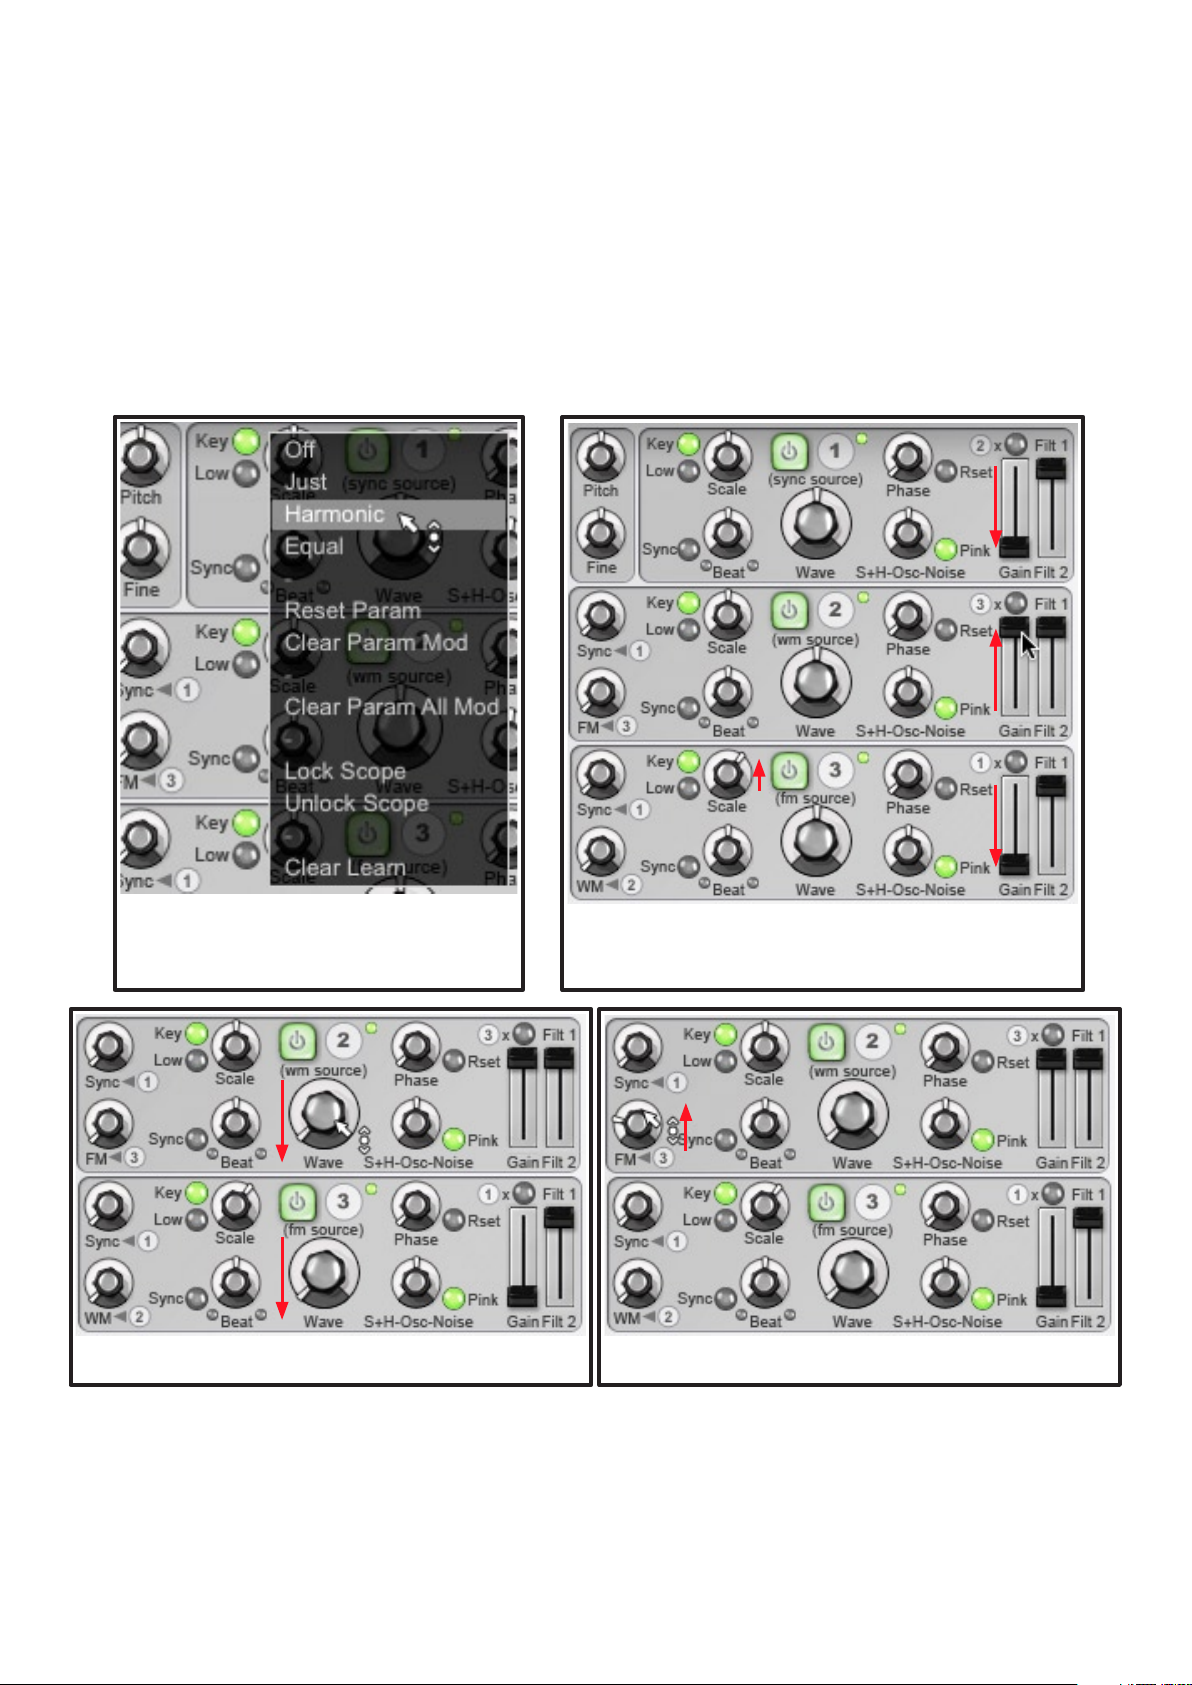
Here’s a practical example to demonstrate FM, starting with an initialized Cypher state:
1. Set the Osc tuning controls to Harmonic mode by
right-clicking on an Osc Scale control and selecting
Harmonic from the context menu.
4. Set the Wave parameter of both Osc2 and Osc3 to a Triangle shape
(move the control fully to the left).
2. With the master Pitch set to 0 semitones, set the Osc3 Scale con-
trol to 3. Leave the Osc2 Scale control unchanged (1).
3. Set the
Gain controls of Osc1 and Osc3 to 0, and fully turn up
Osc2’s Gain.
5. Gradually increase the FM from 3 control on Osc2 from 0 to 1 while
playing a key.
The pitch ratio of 1:3 (carrier:modulator) is a harmonic ratio – the resulting sounds are musical rather than dissonant.
Inharmonic ratios can be useful, however, just like detuned pitching of multiple analogue oscillators. Try setting the Osc3
Scale to 3.09. The result still has an overall harmonic tone, but with an interesting dissonance. More extreme inharmonic
scaling of the modulator can create bell-type sounds, one of the staples of FM-based synthesizers.
You may have noticed that as you sweep the FM from 3 control, the change in timbre is reminiscent of a filter sweep.
When using FM, it is possible to achieve a very broad range of tonal characteristics using the oscillators alone. More
conventional subtractive synthesizers are heavily reliant on the filter stage for most of their tonal variety.
28
Thru-zero oscillator FM
The term ‘thru-zero FM’ refers to the ability to modulate the frequency of an oscillator beyond zero into negative frequency
values. Negative frequencies are vitally important for a stable pitch response with any possible amount of modulation,
and is a prominent characteristic of the Yamaha DX-series’ implementation of FM. Cypher’s implementation gives you
digital FM-style sounds rendered by a realistic analogue circuit model, with the convenience and polyphony of a software
instrument.
Thru-zero FM is not usually possible with analogue oscillators – instead of the frequency travelling beyond zero when
modulated, it simply stops at zero until the modulation causes it to rise into positive values again. The result is that, at
harmonic ratios, the overall pitch that is heard is irregular at lower frequencies. Thru-zero FM allows for the timbre to
remain harmonic at all frequencies even with very large modulation.
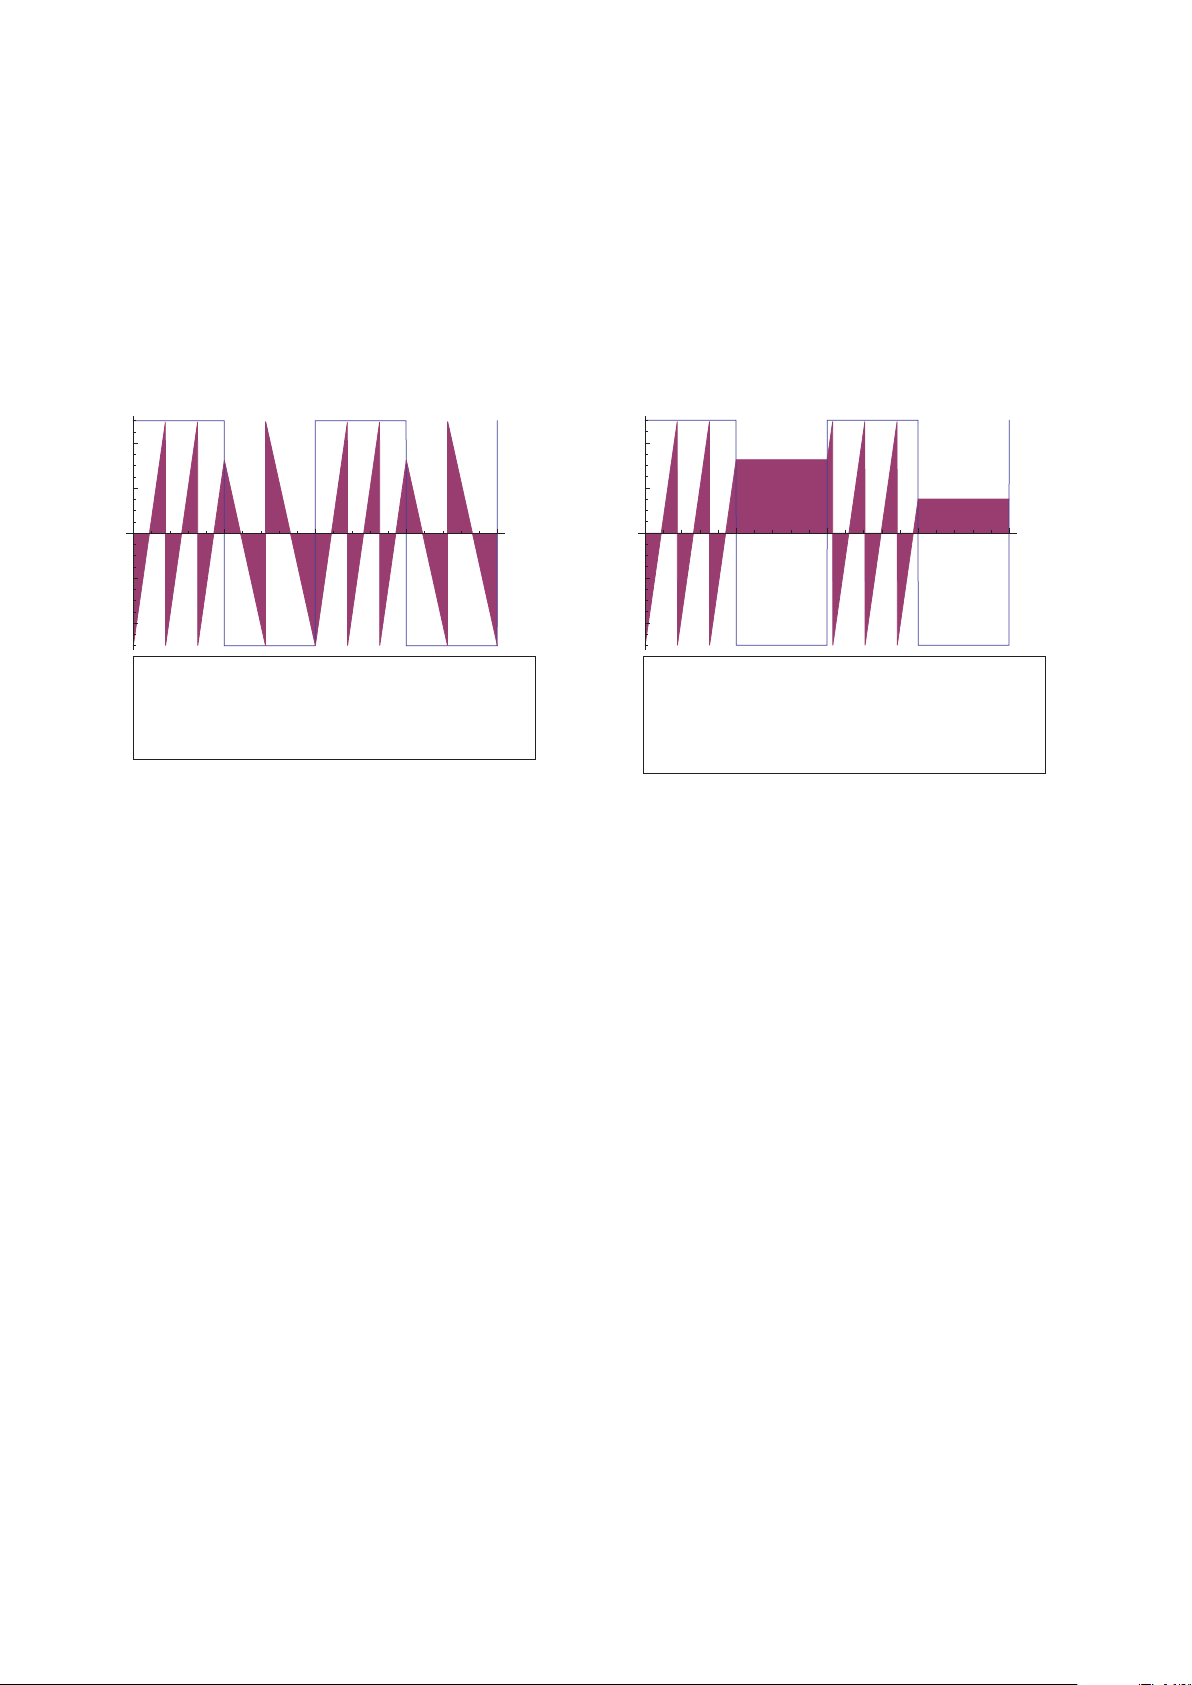
The following waveform plots show thru-zero and normal analog FM using a square wave as the modulator, and a
sawtooth wave as the signal being modulated. While the square wave is high, the pitch of the saw is increased, and when
the square wave is low the pitch is decreased.
Voltage V
Voltage V
0.4
0.2
0.5 1.0 1.5 2.0
0.2
0.4
Thru-zero FM:
The decrease in pitch results in a negative
frequency, and the saw-up waveform becomes a sawdown waveform. A triangle waveform corner is created
at the point of transition.
Time mS
0.4
0.2
0.5 1.0 1.5 2.0
0.2
0.4
Normal analogue FM:
The osc is unable to produce a negative frequency when
the pitch decreases. It becomes clamped at zero and
stays constant until the modulator increases the pitch.
The result is that the resulting pitch is not the same as
the original saw wave.
Time mS
There are currently some thru-zero analogue oscillators available for modular systems, such as the Cyndustries
Zeroscillator. However, these tend to be rather expensive (especially if you need a polyphonic system) and there are still
inherent problems such as the inability to achieve exact tuning ratios.
Thru-zero FM is very easy to implement on digital synths that use wavetable-lookup techniques, such as the Yamaha DX
series. Cypher’s oscillator FM is capable of thru-zero FM using true virtual oscillators generated in real time, without using
wavetable-lookup techniques (which cannot offer the same sound quality as a modelled analogue-style oscillator).
Filter FM
Another classic use of analogue FM is to modulate the cutoff frequency of a filter at audio-rates such as that of an
oscillator. Cypher allows you to modulate both of its two filters at audio-rate, using Osc3 as the modulator.
Again, this technique is used in order to obtain a change in timbre by modulating the filter cutoff at very fast speeds.
Turning up the FM3 control on the filter reduces the action of the filter while introducing additional harmonics, resulting in
a buzzy and aggressive sound.
The effect tends to be more pronounced at higher resonance settings, especially as the filter begins to self-oscillate – in
such situations, filter FM is effectively like performing FM on a sine wave.
As with oscillator FM, the frequency (pitch) of the modulating oscillator is an important factor in determining the character
of the resulting signal.
Thru-zero FM on a filter is inherently impossible in both analogue and digital domains. Therefore, if the amount of
frequency modulation away from the initial filter cutoff frequency would take the frequency value beyond zero into negative
values, the frequency stays at 0 Hz until the modulation again raises it higher again. This means that in such situations,
the resulting timbre changes with the pitch of the signal going through the filter, meaning that Cypher’s filter FM behaves
exactly like that of a real analogue filter.
Envelopes and LFOs
FM depths become much more interesting when modulated by envelopes or LFOs. You must use the TransMod system in
order to achieve this – select an Env or LFO as the source of a TransMod slot and set a modulation depth on the FM from
3 control on Osc2 or the filter section.
Programming hints
Extreme amounts of audio-rate modulation can be great when you want wild and experimental sounds, but for most
useful, ‘musical’ sounds, try to use smaller amounts. The same is true of modulating FM depth controls with the TransMod
system – for useful rather than crazy sounds, try to find sweet spots within small depth ranges.
Try also looking at the factory Cypher presets for ideas and inspiration. Figuring out how sounds have been created using
synthesis parameters is more immediate and practical than studying text-books about mathematical FM theory.
Make sure to look at all used TransMod slots to see exactly what is going on in the preset!
29
4:3 Wave modulation
Wave Modulation uses audio-rate modulation of an oscillator in order to vary its timbre. However, unlike oscillator FM, it
modulates the waveform of an oscillator in order to produce these timbral changes, rather than its frequency.
Continuous waveshape of Cypher’s oscs
The waveshape of Cypher’s oscillators can be continuously varied between the following:
• Triangle
• Saw
• Square
• Pulse
If you move the Wave control while watching Cypher’s visualizer scope, you can see exactly how the waveform morphs
between the available shapes. The control can be modulated by any TransMod source at control-rate.
Audio-rate waveform modulation
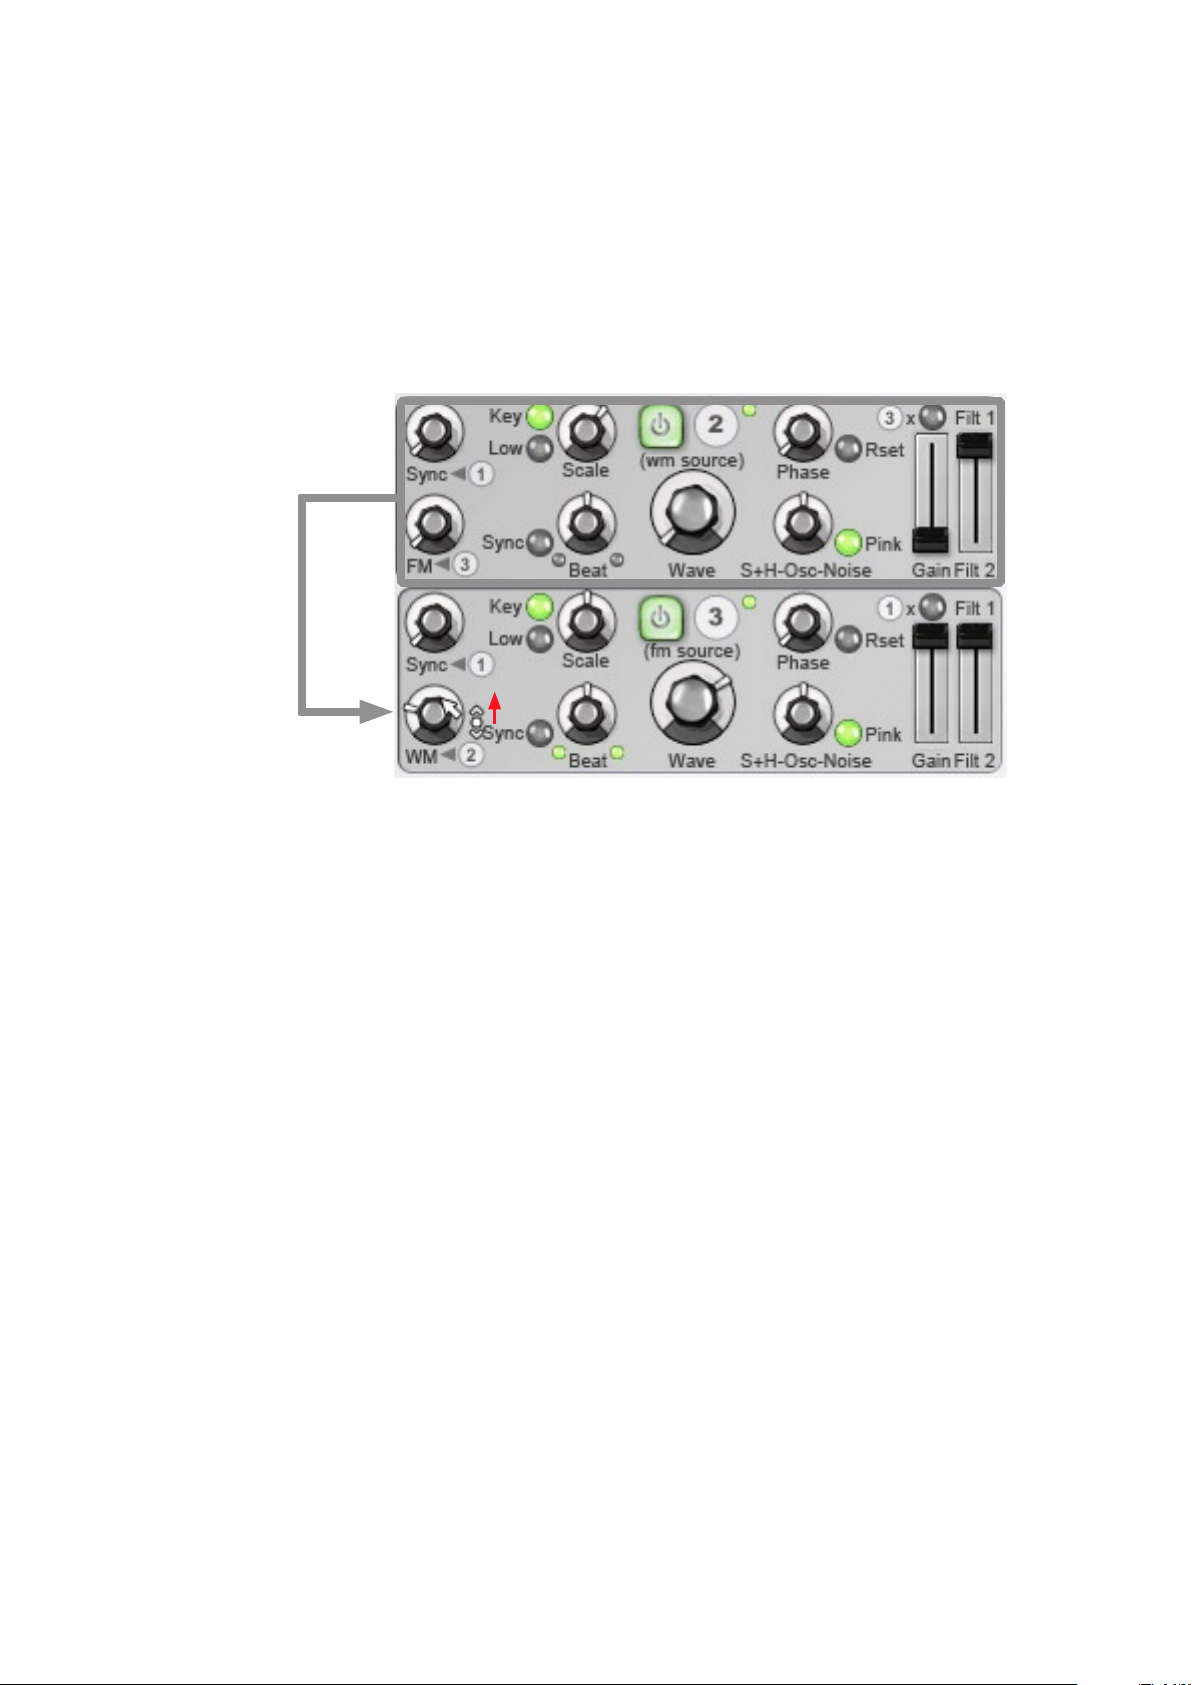
Osc3 used as WM
source for Osc2.
The WM from 2 control
sets the depth of WM.
A specialized function of Osc3 allows you to modulate its waveform at audio-rate using the output of Osc2 as the
modulator. Increase the WM from 2 control in order to set the amount of waveform modulation. The movement of the
oscillator through the waveshapes at these fast rates causes timbral changes due to the varying harmonics of the
waveshapes.
Similarly to FM, the frequency of Osc2 (adjusted using the Osc2 Scale control) has a major influence on the sound of
Osc3 when using audio-rate wave modulation.
The initial position of the Osc3 Wave control also has a large influence on the character of the timbral changes, due to the
harmonic differences between the waveforms. For example, a square wave contains only odd harmonics, but as the pulse
width is changed (as the waveform changes towards a pulse), more even harmonics are introduced.
Changes in harmonics occur throughout the range of the Wave parameter. These changes offer a huge variety of osc
sounds, whether modulated at control-rate via the TransMod system, or at audio-rate using the Osc3’s WM from 2 control.
Wave Mod and FM
Follow the oscillator FM example in the previous section and then turn up the WM from 2 control on Osc3. You will notice
the signal getting more complex and aggressive, with more buzzy harmonics. Try routing an LFO to this parameter so that
it changes over time while you adjust the FM from 3 control on Osc2.
Please note that, due to the implementation of the oscillator algorithm, there is a very short delay on the output of each
oscillator (4 samples, for high-quality band-limiting of signals between oscs).
If you use large amounts of the FM from 3 and WM from 2 controls, the oscs display very chaotic sonic behaviour.
Effects of wave shape
While an osc’s frequency (pitch) is the most important factor when performing FM on another osc, its wave shape also
has a large influence on the nature and character of the sidebands generated. This is also the case on the modulated osc.
When using the Square/Pulse range of the Wave control, the resulting sidebands sound very aggressive and extreme.
Wave shape, like other elements of the oscillator, is relevant to other processes, not just FM. It also affects the ring mod
and sync functions, for example.
30
 Loading...