

Page 1
Page 2

1
CONTENTS
INTRODUCTION 3
Credits 3
WHAT IS BFD? 4
The BFD concept 4
Multiple microphone positions 4
Hyper-realistic kits 5
Easy compilation of new kits 6
Flexible play modes: introducing the Groove Librarian 6
Endless variety of sound and feel 6
Potential uses for BFD 6
A note about the manual 7
Technical Support and Updates 7
INSTALLATION AND GETTING STARTED 9
System Requirements 9
Installation 9
Using BFD in Your Sequencer or Host 11
Using BFD in Steinberg Cubase SX and Cubase VST 11
Using BFD in Emagic Logic Audio 11
Using BFD in Digidesign Pro Tools 12
Using BFD in MOTU Digital Performer 4 12
Using BFD in Image-Line FL Studio 13
Using BFD in Sonic Foundry Acid 4.0 14
Using BFD in Cakewalk Project 5 14
Using BFD in Cakewalk Sonar 14
Using BFD with ReWire 15
USING BFD 16
Part One: FIRST STEPS… 16
Part Two: IN THE MIX… 20
Part Three: INTRODUCING THE GROOVE LIBRARIAN… 23
Part Four : USING YOUR HOST’S MIXING CAPABILITIES 30
Page 3

2
REFERENCE 32
Introduction To BFD’s Interface 32
Loading Kits and Kit-Pieces 32
Kit Display 36
Mixer Section 37
Groove Librarian 41
Humanization Functions 45
Quantization Panel 45
Humanization Panels 46
Play Options Panel 48
Auto Groove Repeat Buttons 51
Options Panel 53
Hit Options Panel 56
Tempo Display 58
Loading and Saving Presets 59
Other File Types Used in BFD 60
Miscellaneous Functions 61
Drum Recording Notes 63
BFD’s Library of Grooves 65
APPENDIX 66
Host-specific issues 66
Troubleshooting 66
Page 4

3
INTRODUCTION
Thank you for choosing FXpansion’s BFD! We hope you will agree that the painstaking effort of putting it together has resulted in the most realistic acoustic drum
machine ever.
CREDITS
Lead Programming: SKoT McDonald (www.vellocet.com)
Audio Engineering: Steve Duda, Elan Trujillo
Drum Technician: Josh Baldwin
Additional Programming: Angus Hewlett
Design and Graphics: Adam Ferns (www.raresense.co.uk)
Project Management: Rhiannon Bankston-Thomas
Manual and Groove Engineering: Mayur Maha
Session Drumming: Chris Dagley
With thanks to:
Andy Simper, Matt Hooper, Swedish Moose, Tom Santamera, Bat, Simon Allen,
Monkey, Shane Chambers, Nicolas Lacoumette, Gareth Green, Charlie Norton,
Lighthouse Guy for watching over us, WonderBorg, The Cove Pasty Shop, and of
course our Long Suffering Significant Others.
Recorded at Eldorado Recording, Burbank CA
www.eldoradorecording.com
ReWire is a trademark of Propellerhead Software. VST is a trademark of Steinberg Media
Technology AG. ACID is a trademark of Sonic Foundry Inc. Windows XP and RTAS are
trademarks of Microsoft Corporation. Other trademarks mentioned are held by their respec-
tive owners. © 2003-2004 FXpansion Audio. All rights reserved.
Manual revision 1.0.8.11
Page 5

4
WHAT IS BFD?
BFD is a high-quality acoustic drum module. It concentrates on impeccablyrecorded multi-velocity acoustic drumkits, with some crucial differences to using a
general-purpose sampler with sample-CDs, or using pre-recorded acoustic drum
loops.
The BFD concept:
• Flexible mixing of multiple microphone placements
• Hyper-detailed kits: up to 46 velocity layers and a wide selection of hit
types, all recorded simultaneously through eleven microphones
• Easy compilation of new kits without wrestling with time-consuming
editing and combination of sampler programs, or having to load multiple
whole kits
• A versatile automated drummer in the Groove Librarian
• Endlessly variable sound and feel
All this and more is provided in an intuitive, highly integrated interface, plugged
into the heart of your favourite sequencing environment, via the VSTi, DXi, RTAS,
AudioUnit and ReWire interfaces. A standalone version is also supplied, which
uses the ASIO and CoreAudio protocols. BFD supports Windows and MacOS-X
operating systems. While BFD should work in Windows 98SE and ME environments, we only recommend and officially support its use in Windows 2000 and
XP.
When designing BFD, we tried to make it easy to use for people who prefer
to write music rather than mess with the inner workings of a plugin, while still
allowing a great deal of control and flexibility for the habitual tweaker.
Multiple microphone positions
Each drum component in BFD is sampled with a number of microphone placements simultaneously:
Direct: a clean, close-mic’d signal. A variety of microphone types were used for
this, including Sennheiser MD421, Neumann KM81 and M49, ElectroVoice Re20,
Page 6

5
AKG 451 and Shure SM57. They were recorded through custom modified API
preamps.
Overhead: a lush set of overhead mics - namely AKG C-12’s (which, incidentally,
cost around $15,000 each), recorded through Summit MPC-100A tube preamps.
Room: a room ambience signal, recorded with Neumann U87’s and Avalon
preamps.
PZM: Crown PZM microphones placed at floor level, tracked with API preamps
and an additional compression stage (Empirical Labs Distressor set at 3:1 ratio)
for added body and sustain.
These signals can be mixed together as desired, so you can ‘dial in’ exactly the
amount and type of natural ambience you need, without having to use CPU-heavy
reverb plugins. The ambience in BFD is totally natural and the result of pain-staking recording in high-quality spaces. Any reverb processor can only try to emulate
such a space, while BFD gives you the real thing. There is additional control over
the distance placement of each mic-set, and the width of its stereo field.
The ambient send levels of each kit element (such as kick, snare, toms, hats and
cymbals) can be adjusted in the detailed mixer section, resulting in exceptionallyversatile control over the final drum sound. The mixer section even has controls
to handle the blend between mics inside and outside the kick drum, and above
and below the snare. In addition, each individual microphone bus, and even each
individual dry drum component, can easily be routed to an individual output into
the host sequencer’s mixer for further sound processing. The mixer section has
an integrated, intuitive preset system, facilitating the ability to save your favourite
mixer configurations and flick through them with ease.
Hyper-realistic kits
As well as the flexibility offered by the multiple microphone positions, BFD’s high
quality drum sample library has an unparalleled degree of realism. For each
type of drum type in each kit, there are a number of different styles of ‘hits’: for
example, the snares offer flams, drags, rims and side-sticks, while the hihats
include closed and half-open tip & shank, open tip and pedal. Each of these ‘hits’
Page 7

6
is sampled at up to 46 velocity layers, resulting in drum parts of unparalleled
detail and expressiveness.
Easy compilation of new kits
Ever tried to edit and combine elements of large disk-streamed sample libraries?
You’ll know that it isn’t exactly the most productive use of creative time in the studio. To save you this tedious, time-consuming process, BFD allows you to easily
mix and match the kicks, snares, toms, hats and cymbals of the various supplied
kits to create custom kits. All this within seconds, and with just a few mouseclicks! You can preview any potential kit changes in real-time and in context,
leaving you free to concentrate on the sound rather than losing your creative flow
through excessive file and sample management operations.
Custom kit creations can be easily saved into a small preset file, so it’s easy to
create a library of drumkits tailored to your requirements, and the small size of
these files makes it simple to share your kits with other users online.
Flexible play modes: introducing the Groove Librarian
In addition to functioning as a single-hit module which can be triggered via the
host sequencer’s MIDI engine, BFD also incorporates an extensive library of
‘Grooves’, in a number of different styles, feels and time signatures. There is also
a comprehensive fill library. What makes BFD so powerful is that these ‘Grooves’
are implemented using standard MIDI files, so it is incredibly easy to create and
import your own, or use commercial MIDI-file libraries, such as the Kenton and
Twiddly Bits products. BFD conforms to the General MIDI (GM) standard, making
it very easy to import standard MIDI drum parts as Grooves.
Endless variety of sound and feel
BFD’s intelligent humanization techniques inject that elusive ‘soul’ into your
drum parts. The provided MIDI Grooves are dripping with a variety of feels, and
the integrated swing controls make it easy to tighten or relax the vibe as much
as required. On top of this, the sound of the Groove can be further humanized
through the controlled variation of velocity and timing.
Potential uses for BFD
BFD has the ability to be many things to many people. As well as catering for
Page 8

7
composers who require ‘ready-rolled’ but flexible drum accompaniments in order
to facilitate song-writing without interruption to the creative flow, it also provides
convenient access to the very highest quality sampled drum sounds for producers
without access to a real drumkit or good recording facilities.
BFD’s sounds and Grooves are perfectly suited to rock, jazz, funk, hip-hop, blues,
drum & bass… in fact, anything that may require a real drumkit. It can be used
for anything from auto-accompaniment, traditional song-writing and production,
to modern techniques such as creating new drum breaks to use in hip-hop and
drum & bass production.
A note about the manual
We have designed BFD to be as intuitive as possible, to the point where it is possible to fire it up and be up and running within seconds for instant gratification. However, it is recommended that you go through the tutorial chapter (“Using BFD”)
which introduces the plugin’s variety of features in a logical and straightforward
way, so that you can make sure you understand all the concepts crucial to the
way it works.
It is also highly useful to be aware of the Appendix, which contains notes on a
number of technical issues regarding performance and troubleshooting.
We also hope that you don’t find the size of this manual intimidating, as there are
several sections (for example, the host-specific Quickstart guides) which you may
not need to concern yourself with, depending upon your level of experience.
Technical Support and Updates
Before contacting our support department, please make sure you have fully read
the manual, and in particular, the technical appendix. If, after following the manual’s advice, you still cannot resolve your problem, our support department will be
only too happy to help.
Our primary technical support channel is our support forum at kvr-vst.com:
http://www.kvr-vst.com/forum/viewforum.php?f=13
Page 9

8
This forum is monitored by FXpansion technical support staff, as well as the
developers themselves; it is also home to many highly knowledgeable users and
answers to your questions can be found quickly at all hours of the day. If, for whatever reason, you are unable to access the forum, or cannot get a satisfactory
answer there, feel free to contact us at:
support@fxpansion.com
Before you contact us, please make sure to read our BFD User FAQ, which
includes solutions to many common installation and performance problems:
http://www.fxpansion.com/product-bfd-userFAQ.php
Please be aware that we are continuously working on updates to BFD and its content, so please be sure to keep checking our website (http://www.fxpansion.com)
in order to download updates, new Groove bundles and more!
Many thanks,
The FXpansion team.
Page 10

9
INSTALLATION AND GETTING STARTED
System Requirements
BFD requires a substantial amount of computing power. Here is the minimum recommended specification:
• 1 GHz Pentium III or Athlon (for Windows platform)
• Apple PowerMac G4 733 MHz (for MacOSX platform)
• 512 MB of RAM (preferably 768 MB or more)
• DVD drive (for installation)
• Windows 2000 or XP, or MacOSX
• 9 GB of free hard disk space
• 800x600 resolution with 16-bit colour graphics (1024x768 or higher recommended)
On the Mac, it will not work on OS9 or earlier versions.
BFD works by streaming all its samples from the hard disk, so in order to prevent
glitches during playback, please follow these guidelines.
• Try to install the BFD audio data on a clean, defragmented hard disk.
• If possible, install BFD on a dedicated drive, separate from those used
for the computer’s operating system and any audio data used with the
sequencer.
• If you use a notebook or laptop, try and use an external FireWire drive for
the audio data. Laptop drives (often as slow as 4200 RPM) can be quite
slow for BFD’s disk-streaming technology.
Installation
BFD comes on two DVD’s. The first DVD contains the stand alone program,
plugins, and several drum kits. The second DVD contains only drum kits. Before
installing, always check to see if there is a newer version available on our
website. Please see the following webpage for full details on obtaining updates, or
if you are encountering problems during installation:
http://www.fxpansion.com/product-bfd-userFAQ.php
Page 11

10
Please note that the BFD data directory needs to be on a fast disk with around 9
GB of free space which, ideally, you will not be using to stream other audio data.
If you are using Digidesign ProTools, Sonic Foundry Acid, or MOTU Digital
Performer 4, and want multiple outputs from BFD you will need to install the
ReWire version. See “ReWire installation” below for help on setting your ReWire
options.
Windows installation
Insert the first DVD and run the BFD Windows Setup program.
Follow the prompts to choose your main BFD data directory, VST plugin directory
and directories for the other plugin formats. Follow the on-screen instructions for
the rest of the installation.
MacOS installation
Insert the first DVD and run the BFD MacOSX SETUP.mpkg program. This will
install the plugin files, and must be installed to your OS drive.
Then, run the BFD MacOSX Setup Data.mpkg in order to install the data from
DVD1. The data can be installed to any hard drive in your system.
After this, insert DVD2 and run the BFD MacOSX Setup DVD2.mkpg program in
order to install the data from DVD2. Follow the on-screen instructions for the rest
of the installation.
ReWire installation
If you choose to install the BFD ReWire version during the installation process
you will be prompted to set your ReWire options. The main reason to use ReWire
is to support BFD’s multiple outputs so you will probably want to choose ‘All outputs’ or ‘Group outputs’. ReWire functionality is disabled by default, so enable this
with the checkbox.
Page 12

11
USING BFD IN YOUR SEQUENCER OR HOST
If you are familiar with using plugin instruments with your chosen sequencer or
host, you can skip the following tutorials, and go straight to the next chapter,
“Using BFD”. Below are guides to using BFD in the most popular sequencing
hosts. BFD will also work perfectly well in other hosts which support the VST, DXi
and AudioUnit plugin formats, and those which support ReWire.
Using BFD in Steinberg Cubase SX and Cubase VST
As long as the installation went smoothly, you should now have three new plugins
available to you: BFD Stereo, BFD Groups, and BFD All. To use BFD, please do
the following after launching Cubase:
• Bring up the VST Instruments panel.
• Click on an instrument slot and choose one of the BFD plugins.
• Depending on which plugin you choose, you will have a number of channels
added to the mixer.
• Assign a track on the Project Window to BFD.
Using BFD in Emagic Logic Audio
As long as the installation went smoothly, you should now have three new plugins
(on Windows, they are VST plugins, and on OSX, they are AudioUnits) available
to you: BFD Stereo, BFD Groups, and BFD All. During the first launch of Logic
after installing BFD, it should detect the plugins, after which they will be available
in the plugins list. To use BFD, please do the following after launching Logic:
• Bring up the Audio Environment (the mixer).
• Find an unused Audio Instrument channel (or create one if there are none
available - see your Logic documentation if you are unsure of how to do this)
and click-hold on the instrument plugin slot (just above the output slot).
• The Master output version of BFD (BFD Stereo) can be found in Stereo/VST
(on OSX, the location is Stereo/AudioUnits/FXpansion), while the multichannel versions (BFD Groups and BFD All) can be found in Multi Channel/
VST (on OSX, MultiChannel/AudioUnits/FXpansion).
• Create a track in Logic’s Arrange window, corresponding to the Audio Instru-
ment object on which you inserted BFD. You can now operate BFD from this
track.
Page 13

12
• If you want to access the various multiple outputs if you load a multi-channel
version of the plugin, create some Aux objects if you have not done so already,
and assign BFD to them by click-holding on their input slots and choosing
Instrument n, where n is the number of the Instrument object on which you
inserted BFD, and selecting the required output. The output configuration in
BFD All is different in Logic, because it has a limitation of 16 VST/AudioUnit
outputs. To get around this limitation (BFD All has 17 outputs), BFD outputs
Cymbals 2 and 3 on the same direct output channel. The BFD All plugin
automatically detects if Logic is the host, and adjusts the output configuration
accordingly.
• If an Aux channel has not been opened and assigned for a particular output,
that output is routed automatically to the master instrument output. Therefore,
if you have not opened an Aux channel and assigned it to the PZM bus output,
for example, it will still be played through the instrument channel for BFD,
assuming the PZM fader is not turned all the way down.
Using BFD in Digidesign Pro Tools
As long as the installation went smoothly, you should now have a new RTAS plugin available to you: BFD Stereo. At this time, Pro Tools does not support multiple
outputs from instrument plugins. The term ‘multi-channel plugins’ in Pro Tools
refers to stereo-output plugins. If you need to use multiple output versions of BFD,
please see the section below entitled “Using BFD with ReWire”.
To use BFD, please do the following after launching Pro Tools:
• Add a new Audio Track or Aux channel using the File/New Track menu item.
• Create a new MIDI track.
• On the mixer view, click an insert button on the Audio channel you just inserted,
and select BFD (Stereo) from the multi-channel RTAS plug-in/Other menu
item.
• The MIDI track you created will also appear on the mixer: select BFD as the
output port for this track.
Using BFD in MOTU Digital Performer 4
As long as the installation went smoothly, you should now have three new AudioUnit plugins available to you: BFD Stereo, BFD Groups, and BFD All (in fact, in
DP4, there will be six plugins - since there is a stereo and mono version for each).
Page 14

13
At this time, Digital Performer does not support multiple outputs from instrument
plugins. Therefore, the only one you can use as a plugin is BFD Stereo (the
stereo version in DP4 - the mono one won’t be very useful). If you would like
to use the multiple output capabilities of BFD, you will need to use the ReWire
version - please see the section below entitled “Using BFD with ReWire”.
To use the stereo version as a plugin in Digital Performer, do the following after
lauching DP:
• In a new project, add BFD as an instrument track, using the Project/Add Track/
Instrument Track menu option. You will see the various BFD plugin versions
there. Select BFD (stereo out) (stereo).
• The plugin will appear, along with a new track in the Tracks Overview.
Using BFD in Image-Line FL Studio
As long as the installation went smoothly, you should now have three new plugins
available in your Vstplugins folder: BFD Stereo, BFD Groups, and BFD All. To
use BFD, please do the following after launching FL Studio:
• Add BFD to the project by adding it as a channel. Select the Channels menu
then choose Add one…’
• BFD will not be in the list displayed by default. To make it part of the list select
‘More…’ to popup a list of all available plugins. From the bottom-right of this
window click Refresh then Fast Scan (recommended).
• Now enable the checkboxes next to the three BFD plugin names which are
shown in red to show they are newly found plugins.
• Now you can add BFD to the Step Sequencer by selecting Channels/Add
one… then select the version of BFD you want.
• Assign BFD to an FX track, using the Channel Settings window.
• If you are using a multiple-output version of BFD, enable the multiple outputs
(using the down-arrow menu, just underneath the red plugin icon in the topleft corner of the plugin window). The additional outputs will occupy the FX
tracks after the FX track you specified. For example, when using BFD Groups,
assigning the main FX track to track 4 will lead to the other three stereo outputs
to tracks 5-7.
Page 15

14
Using BFD in Sonic Foundry Acid 4.0
As long as the installation went smoothly, you should now have three new plugins
available in your Vstplugins folder: BFD Stereo, BFD Groups, and BFD All. As
long as you have pointed Acid to your Vstplugins folder, it should detect the BFD
files. To use BFD, please do the following after launching Acid:
• Load BFD using the Soft Synth entry on the Insert menu.
• Choose BFD Stereo. At this time, Acid does not support multiple outputs on
VST instruments. If you need to use multiple output versions of BFD, please
see the section below entitled “Using BFD with ReWire”.
• Create a MIDI track using the MIDI Track entry on the Insert menu.
• Assign this MIDI track to BFD by using the Device Selection button- BFD
should be on the list as Soft Synth N (BFD Stereo), where N is the number of
the Soft Synth.
• If you intend to play BFD from a MIDI input device such as a keyboard, click the
Enable Real-Time MIDI button at the top of the BFD plugin window in its Soft
Synth Properties dialog.
Using BFD in Cakewalk Project 5
As long as the installation went smoothly, you should now have three DXi entries
available to you: BFD Stereo, BFD Groups, and BFD All. Because BFD installs
a set of DXi plugins, you do not need to run the Cakewalk VST Adapter in order to
wrap the VST versions into DXi format.
To use BFD in Project 5, simply click the Insert Track button and select one of the
BFD plugins which should be visible on the menu.
Using BFD in Cakewalk Sonar
As long as the installation went smoothly, you should now have three DXi entries
available to you: BFD Stereo, BFD Groups, and BFD All. Because BFD installs a
set of DXi plugins, you do not need to run any extra utility such as Cakewalk VST
Adapter in order to wrap the VST versions into DXi format. To use BFD, please do
the following after launching Sonar:
Page 16

15
• Insert BFD as a DXi plugin. To do this, use one of the following methods:
• Open the Synth Rack (using the Synth Rack entry on the View menu)
and choose one of the BFD plugins from the Insert button’s drop-down
menu.
or:
• Use the Insert/DX Instruments menu command to display a list of
installed DXi's, and choose one of the BFD entries.
or:
• You can also right-click on the Fx field of an unused audio track, aux bus
or virtual main bus, in either the Track or Console view. Under DXi Synth,
choose one of the BFD plugin entries. This method is limited to using
only the first stereo output pair of the DXi, so is not recommended when
using BFD Groups or BFD All.
• If you used one of the first two methods, bring up the Insert DXi Synth Pref-
erences dialog (using the Insert DXi Synth Options button in the Synth Rack
view) and use the Create These Tracks… options according to which BFD
version you are using. If you used the Fx field method, click the Out field of a
MIDI track and select BFD.
• If you intend to play BFD using a MIDI controller such as a keyboard, ensure
that the Audio Engine button on the Transport toolbar is enabled, and the
required track is in focus (its titlebar will be gold).
Using BFD with ReWire
You should have already setup ReWire during the installation process. You can
change your settings at any time by running the BFD ReWire Configuration Applet
(BfdRewireApplet) at any time.
You have three options for output configuration: ‘Stereo outputs’, ‘Group outputs’,
and ‘All outputs’. You will probably want to select ‘All outputs’ to allow for individual
processing of every drum sound through your host.
Once you have the BFD ReWire device enabled you can start your ReWire host
and select BFD as a source in it. Please see your ReWire host’s documentation
on how to initiate a ReWire device within it. After you have selected BFD as a
source, you then need to run the Launch BFD ReWire application. This brings up
the actual BFD interface enabling you to use it.
Page 17
USING BFD
If you’re not familiar with using plugin instruments in your host, please make sure
to read the Host Quickstart guides in the previous chapter. During the tutorial,
there are references to opening various panels, which should be fairly intuitive.
If you are in any doubt at any stage during the tutorial, please consult the
Reference section later in the manual.
Part One: FIRST STEPS…
When you try to launch BFD as a plugin instrument in your sequencer, you will
notice that there are three different versions of the plugin: BFD Stereo, BFD
Groups and BFD All. Each of these is essentially identical in functionality, with
the crucial difference between them being the output bus configuration. To start
with, load BFD Stereo, which mixes all buses to one stereo output pair.
When the BFD plugin is first initiated, it won’t make any sound! Loading a kit
takes a while so it’s only done when you want it done.
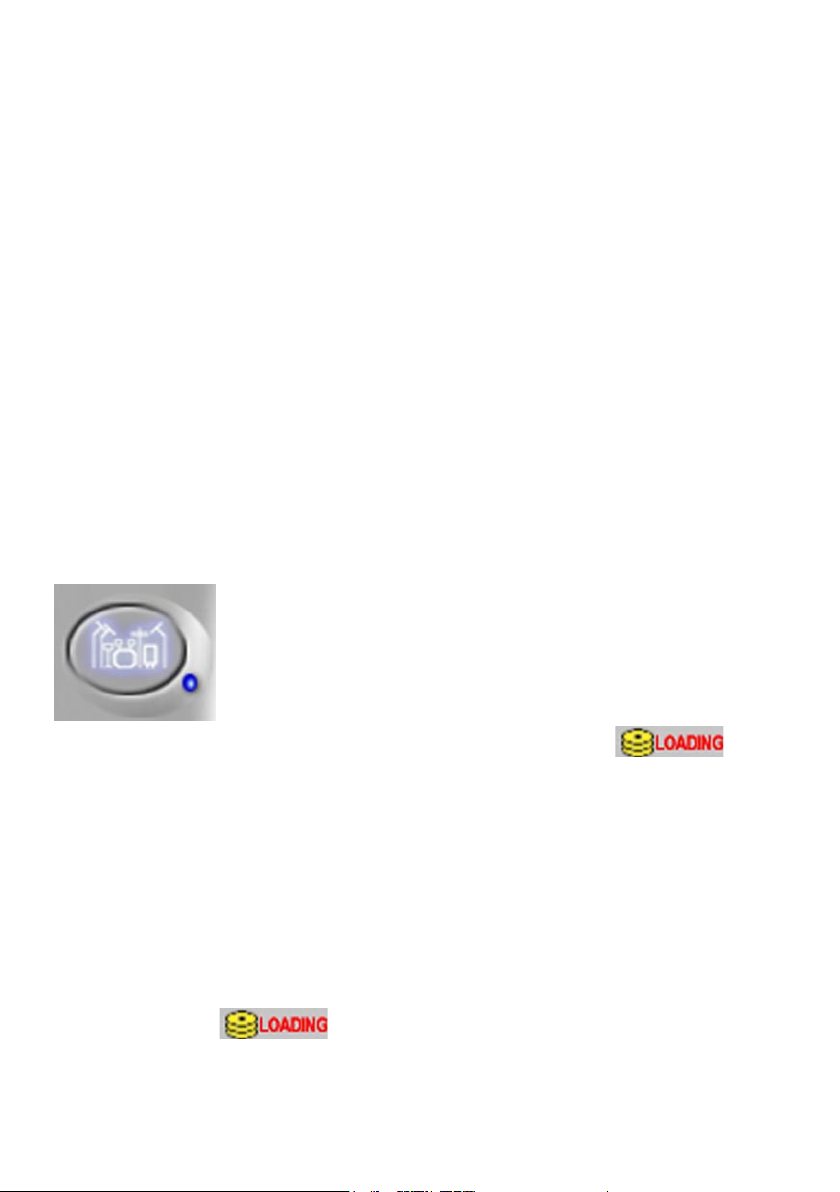
To load a drumkit click the Kit Selector button. This brings up a
projected panel showing the various supplied drumkits, along
with useful information about each one, which is displayed
when you move the mouse over any kit.
After you click on a kit in order to load it, you will notice that the
indicator is displayed to the left of the status window. You may also notice that,
gradually, the little red lights, underneath the red (Solo) buttons in the Kit-Piece
area of the mixer section, begin to each turn orange, yellow, then a stable green.
These lights indicate the loading status of each Kit-Piece (i.e. the kick, snare,
hihat, floor, medium and high toms, and cymbals 1-3). If there is nothing loaded
into a Kit-Piece ‘slot’, the indicator light is red. When a light turns orange, BFD is
queueing up the samples to be loaded, while a yellow light shows that the KitPiece is in the process of being loaded. After a Kit-Piece has finished loading, its
light will turn green. When the entire kit (i.e. all the Kit-Pieces contained within it)
is fully loaded, the indicator disappears, and all of the kit indicator
lights will have turned green.
16
Page 18
17
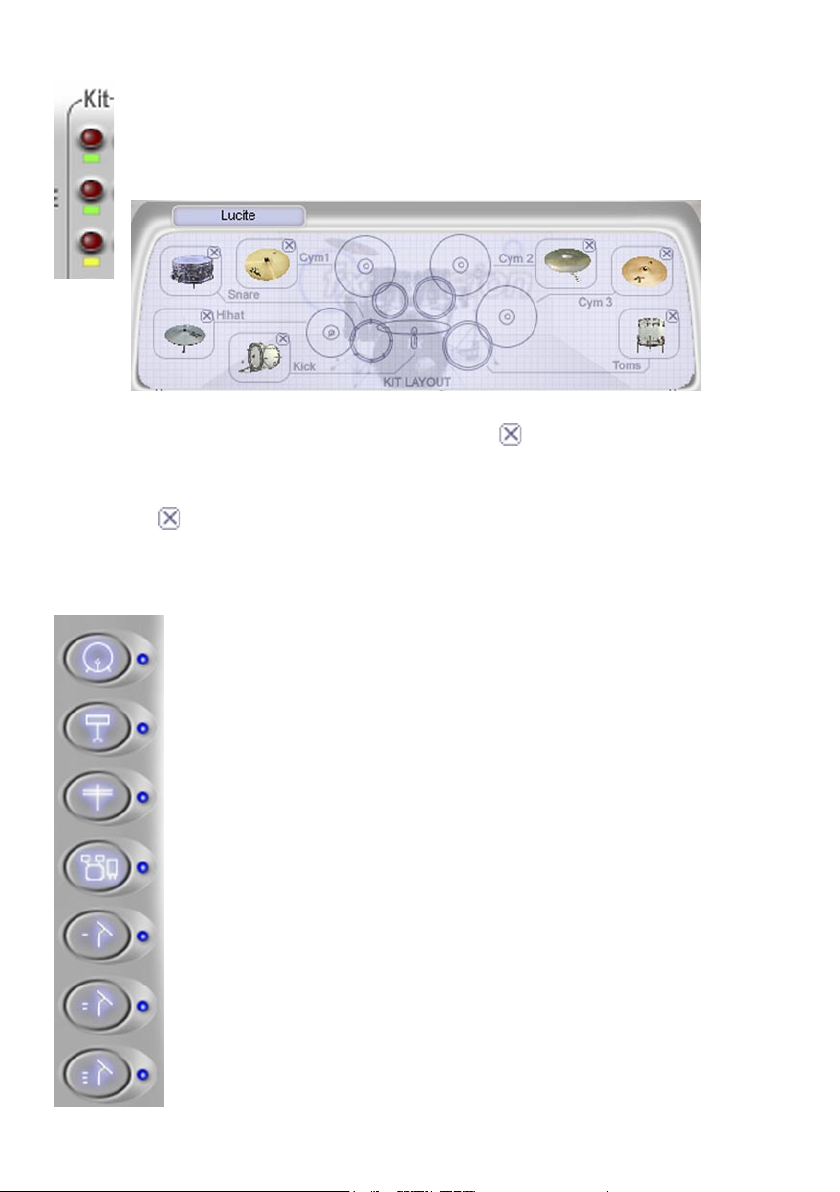
In order to make sure all Kit-Pieces are loaded, the currently-loaded kit
layout can be viewed by clicking on the main drumkit graphic, upon which
the Kit Display appears: an overhead view of the kit, with a box for each
individually-loadable Kit-Piece.
Each Kit-Piece box contains a graphical representation of whatever is loaded into
it (it will be blank if nothing is loaded into it), and a button. You can now quickly
audition each part of the kit by clicking on its graphic, the click position maps from
bottom to top for increasing velocity. You can clear individual Kit-Piece slots by
clicking the in the corner of each box. Clicking on the Kit-Piece name labels in
the mixer area also previews sounds – this time left to right for increasing velocity.
When you have finished with this view, click the graphic again in order to exit the
Kit Display.
Customizing your drumkit…
You can customize the loaded drumkit by replacing individual Kit-
Pieces. To do this, click the Kit-Piece Selector buttons. Each of these
brings up an individual panel with which to select from the numerous
included kicks, snares, hihats, toms and cymbals.
For example, to replace the snare, firstly click the snare icon :
you will be presented with a panel similar in appearance to the
Kit Selector panel, except that it contains different types of snares
instead of whole drumkits. When you move the mouse over each
snare type, the information display is updated with useful data
regarding each one. One of the most important pieces of information
to be aware of in the Kit-Piece selectors is the display of each KitPiece’s ‘hits’. This shows which types of hits are present in the data
for each drum. For example, most snares have a standard hit, drag,
flam, rim and side-stick. Similarly, most kick drums have the kick
Page 19

18
recorded with and
without the snare present, while there is a range of different hihat hits. Some kits
do not have recordings of certain hits - for example, side-stick is missing on some
snares, while some kicks do not have an individual hit for ‘kick with snare’. On
these occasions, an intelligent substitution method is used, where a suitable hit
is used for the missing one. Please see the Reference section for a summary of
substitutions.
There is a handy preview function for each Kit-Piece in the library: hold
down the [SHIFT] key and click on any Kit-Piece in order to hear a
simple preview (a typical ‘hit’ is used, at the highest velocity).
Ready to play!
When you are done with loading and modifying the drumkit, you are
ready to start playing! You can play the plugin live via MIDI input (for
example via a MIDI keyboard, or an electronic drum input device such as
Roland’s V-Drums), or program a drum sequence using your sequencer’s editing
tools, for example the piano-roll (also known as the key editor in Cubase, and the
matrix editor in Logic). Some sequencers have editors which are more geared
towards drum parts (Cubase’s drum edit and Logic’s hyper edit). As mentioned
above, each Kit-Piece contains a number of ‘hits’. You can view which hits are
assigned to which keys by initiating the Hit Options panel, brought up by clicking
the icon.
It is recommended that you spend a little time at this point in getting acquainted
with how BFD sounds and how it reacts to velocity. If you really don’t feel like programming or recording a drum sequence at this stage, then you can also drag/
import one of the supplied MIDI files (located in the BFD/Grooves folder) into the
arrange page of your sequencer, or briefly skip forward to the Groove Librarian tutorial, which shows how BFD can function as a drummer, as well as a drum sound
module.
Before we continue the tour of BFD by looking at the mixer section, it may
be a good idea to know how to save the drumkit combination you built earlier. To
do this, click the save kit combo icon (located underneath the kit display window),
point it to a location on your hard drive and provide a filename.
Page 20

19
• note: If you save your kit file (.bfk) in the BFD/Kits folder, it will be selectable via
the main Kit Selector panel.
BFD’s .bfk files are small files which only reference the bulky audio data which
contains the actual sounds.
A .bfk can be loaded as the default kit via the Options panel which is covered later
in the manual.
Page 21
20
Part Two: IN THE MIX…
Once a sequence or internal Groove is playing through BFD, it is possible to
explore the plugin’s extensive mixer section.
The most prominent controls are the main level faders for the Direct Master and
ambient (Overhead, Room and PZM) microphone buses. By using these faders, you
adjust the level of each mic bus to create an overall drum mix. For convenience
when mixing, Solo and Mute buttons are also present. The Master fader adjusts
the overall level of BFD’s output.
We recommend dragging all the ambient bus faders down, leaving only the Direct
Master signal. Then, begin to move each ambient fader up one by one: you will
see how easy it is to dial in varying levels of room ambience.
The Distance control allows to ‘virtually shift’ the microphone placements further
back. The Width parameter, meanwhile, varies the stereo field of each bus from
the default natural stereo towards mono (turn the control to the left) or extended
stereo (turn it to the right).
Try turning the Distance control up a little on the Room mic bus. You will notice that
the signal is delayed slightly, giving the appearance of a bigger recording space.
Its effect is essentially similar to the ‘Pre-delay’ parameter on a reverb processor.
While you’re doing this, experiment a little with the Width parameter to experience
how it may be usable in a mixing situation. BFD has a graphical indicator for these
parameters: while you are moving the controls, a 3D representation of the microphones relative to the drumkit is shown in the main display.
Page 22

21
The finer points of mixing…
BFD also allows much more in-depth mixing possibilities than those detailed
above. The Kit-Piece and Direct mixer areas allow detailed control over levels of
individual Kit-Pieces.
Let’s say, for instance, that you wanted to reduce the amount of ambience on the
kick drum, to get a tighter, more focused bottom-end. Firstly, you can tighten the
kick with the Kick In/Out control. By default, the Direct kick signal is an equal mix
of two mics, one placed inside, and one outside, the kick drum. If you turn the Kick
In/ Out control to the left (towards the inside mic position), you will begin to hear
the kick get less boomy and more focused in the Direct bus.
You may also want to reduce the level of the kick signal in the ambient mic buses,
in order to tighten it up further. To do this, turn down the Kit-Piece Trim parameter
for the kick (located immediately to the right of the Solo and Mute buttons). With
the control to the extreme left, you will only hear a kick signal in the Direct section.
To verify this, turn down the Direct Master fader: all the ambient buses will be free
from the kick. Now turn up the Direct Master fader again (the kick should return).
To do the inverse of this, turn up the Kit-Piece Trim control again, and decrease the
Direct Trim. Now, you should hear a more roomy kick, rather than the fatter direct
version earlier. This is an extreme way of using the mixing controls: by carefully
tweaking the mixer section, you can get an infinite variety of killer drum sounds
between the extremes. Many of BFD’s mixing functions are not necessarily
‘realistic’: for example, the ability to turn down the amount of a certain Kit-Piece
in the ambient mics. However, we decided to include this type of functionality for
maximum flexibility.
It might be a good idea to cover some of the special mixing functions. The Kick In/
Out control was explained earlier. Meanwhile, the Snare Bot/Top parameter works
Page 23

22
in a similar principle: it blends between a mic placed on the top of the snare drum,
and another on the bottom. Like the Kick In/Out, it applies only to the Direct bus.
Each Kit-Piece has a Tune parameter. This changes the pitch for each component
globally, through the Direct and ambient buses. The Solo (yellow) and Mute (red) lit
buttons also affect each Kit-Piece globally. The Pan controls vary the stereo placement of each Direct signal within the stereo Direct Master bus - therefore, it has
no effect (in fact, it is greyed out) when using the multi-channel BFD All version
of the plugin, where each Direct Kit-Piece has a dedicated mono output into the
sequencer (more on multi-channel capabilities later). You cannot manipulate the
stereo position of Kit-Pieces in the ambient buses, other than by using the Width
parameter.
There is another type of control in the mixer section: the Dyn (Dynamics) controls.
These increase or decrease the velocity of each incoming MIDI note for each particular Kit-Piece. Velocity is quite distinct from volume. Each drum-hit in BFD is
recorded at a variety of velocities - i.e. the drums were hit with different degrees
of force. Manipulating the Dyn parameter effectively increases or decreases how
hard the drum is hit, by altering the incoming velocities of the notes used to trigger
them. If you turn down the Dyn parameter on the snare Kit-Piece, for example, you
will hear the snare hits get ‘softer’, an effect quite different from turning down the
volume on a high-velocity hit. Try it! There is also a Master Dyn control, situated just
above the Master level fader (it is unlabelled on the user interface). This alters the
velocity of all incoming notes in a relative manner. The small indicator light underneath the Kit-Piece Mute buttons is a visual indicator of the velocity of incoming
MIDI notes for each Kit-Piece.
The mixer section includes a handy preset system, the controls for which are
located above the main level faders. You can load and save mixer settings (.bfm
files), as well as reset the whole mixer to default settings. If you save your mixer
setups in the BFD/Mixers folder, you can flick through them easily with the
buttons.
Page 24

23
Part Three: INTRODUCING THE GROOVE LIBRARIAN…
To initiate the Groove Librarian, start by clicking the pull-down bar at the top of
BFD’s interface.
You will see three ‘Banks’ of Grooves, flanked by a tree-view ‘browser’ on either
side. The Groove Browser on the left is for what we call ‘Grooves’: essentially MIDI
drumloops. Meanwhile, the right-hand side browser is the Fill Browser. Fills are
exactly the same format as Grooves: they are just regarded as ‘Fills’ for convenience. The Banks are where you drag in Groove ‘Bundles’ from the browsers:
there are two Banks for Grooves (Bank A and Bank B) and another for Fills.
A Bundle is a group of up to twelve MIDI Grooves, a large range of which are
supplied with BFD. There are two distinct types of Bundles: ‘Groove Bundles’ and
‘Fill Bundles’. There are two general-purpose Groove Bundles and a Fill Bundle
loaded by default into the Banks.
Instant gratification…
Now click on any of the Grooves listed in Bank A. You will notice that the
Groove plays through for its duration, and then stops. Now click the Auto
Groove Repeat A button on the right of the BFD interface. The Groove will now loop
until another is clicked.
Please note that this method is usually for auditioning the Grooves. The Grooves
are mainly intended to be played from the MIDI keyboard (or alternative MIDI
input device). All the three loaded Bundles are mapped to the keyboard: in fact,
the keys used are reflected in the black and white slots in each Bank, which
represent the actual keys on the keyboard. Therefore, the first beat in a Bundle
is shown at the bottom, reflecting how it would appear in your sequencer’s piano
roll, for example.
The actual keys which correspond to each Bank of Grooves depend on your host
- numbering conventions vary between sequencers. Cubase and Logic start their
octave numbering from C-2, rather than C0 on Sonar and FL Studio, for example.
You will have noticed that there are key numbers displayed on each Bank slot.
BFD attempts to detect the sequencer used and changes its naming convention
Page 25

24
automatically. This can be over-ridden with the -2 Octave Numbering toggle in the
Options panel.
Now that you are aware of all this, try triggering some Grooves and Fills with your
MIDI keyboard! If the Auto Groove Repeat option is still checked for any of the two
Banks, any Groove in that Bank will loop as long as you hold the key down, or
until you press another key.
It is also possible to use BFD as an auto-accompaniment module by activating
certain options. For more details on this, please refer to the section below, entitled
“Different ways of playing Grooves…”
Using Bundles…
Drag one of the Bundles from the Groove Browser onto Bank A. When you do this,
you will see that the new Bundle fills all slots in the Bank, overwriting any previous
ones.
You will notice that, in the Browsers, each Bundle can be ‘expanded’ by clicking
on the icon next to its name. The new names which appear are the individual
Grooves or Fills inside the Bundle. You can drag individual Grooves or Fills onto
each of the twelve ‘slots’ in each Bank in order to compile your own Bundles. You
can also double-click on any slot in a Bank in order to bring up a standard file
browser to manually locate and load a MIDI Groove, or a multiple selection (when
you import multiple Grooves via the file browser, they will be placed sequentially
on the slots, starting from the one on which you double-clicked).
There is a simple system for re-ordering Bundles in BFD. Hold down the [SHIFT]
key and click and drag a Groove or Fill from one slot to another. If you drag the
Groove/Fill onto a slot which is already filled, it swaps the contents of the two
slots. If the destination slot is empty, the Groove is copied there.
When you have finished compiling your Bundle, you can save it. Simply click on
the button underneath the Bank you wish to save as a Bundle, and specify a
location and filename. If you save it into the BFD/Grooves or BFD/Fills folder,
it will instantly appear in the respective browser. You can also clear any Bank by
clicking the icon underneath it.
Page 26

25
Different ways of playing Grooves…
You may remember that when we first introduced the Groove Librarian above, we
made the playing Groove repeat by clicking the Auto Groove Repeat A button. This
button is just one of a number of options which let you change different aspects
of the Groove Librarian’s behaviour. On the right of the BFD interface, there are
two columns of three buttons. Each column relates to one of the Groove Librarian’s
Banks. As well as the Auto Groove Repeat button already discussed above, there
are another two buttons in each column: Auto Bundle Shuffle and Auto Fill. When
Auto Groove Repeat is enabled for any of the two Banks, turning on Auto Bundle Shuf-
fle randomly shuffles between Grooves in the Bank instead of repeating the same
Groove, while Auto Fill inserts a random Fill from the Fill Bank at an interval specified by the Auto Fill Period option in the Play Options panel. In this way it is possible
to create convincing, varied drum-accompaniment with minimum effort.
The Play Options panel contains several other options which control how
BFD’s Grooves behave. Click the play options button in order to bring up
the panel. Perhaps the most important parameters to understand here are the
Sync modes and Transition Mode options.
Sync to Song
This function makes Grooves play in phase with the song clock. You will have
noticed that, so far, when you initiate any loaded Grooves, they start playing
immediately, and are not synchronized with the song. With the Sync to Song option
on, start the sequencer playing, and trigger one of BFD’s Grooves via MIDI. You
will notice that, depending on when you hit the note within a bar, the Groove
starts playing from that point within it. For example, if you trigger the Groove on
the 2nd beat of a bar, it will play from the 2nd beat - so that if there is a kick on the
1st beat, and a snare on the 2nd, it will start playing with the snare.
Sync Groove Phase
This method of synchronization makes subsequent Grooves play in phase with
the first Groove played. Press play on your sequencer, and trigger a Groove
via MIDI on, say, the 4th beat. Now, when you trigger another Groove, it will
synchronize to the original Groove you played.
Page 27

26
Transition Mode
This parameter sets how transitions between Grooves are handled. So far,
we have been using the ‘Immediate’ mode, which stops a Groove which is
playing already and starts the second Groove straight away when it is triggered,
according to the currently-selected Sync mode. If you change the Transition
Mode to ‘Next Beat’, the transition takes place on the next beat of the Sync Mode
source. To try it, trigger a new Groove on an offbeat - for example, between the
2nd and 3rd beats of a bar. You will notice that the Groove starts playing on the
3rd beat, which is the next one after the trigger is made.
There are a further two types of Transition Mode, ‘Next Bar’ and ‘End of Phrase’.
As its name implies, the former works in a similar way to ‘Next Beat’ except that,
after the next Groove is triggered, it starts playing from the start of the next bar.
Meanwhile, the ‘End of Phrase’ mode works by triggering the next Groove after
the current one has played until the end. This mode is useful when working with
Grooves longer than 1 bar in duration. When using 1-bar Grooves, it will work
exactly like the ‘Next Bar’ mode.
While you are in the Play Options panel, it’s a good idea to acquaint yourself with
the rest of the option toggles. When Latching Mode is enabled, Grooves are not
turned off by a note-off message, but by another note-on message of the same
note number. Therefore, you hit a key once to start the Groove, and hit it again to
stop it. Polyphonic Mode allows you to overlay multiple Grooves over each other,
by not stopping a Groove which might already be playing. Checking the Respond
to Song Start option results in a definable Groove (specified with the Default Groove
parameter) being played when the sequencer is started, something which is
extremely useful when using BFD as an auto-accompaniment module. If this
option is enabled along with Auto Groove Repeat, you will not have to enter any
MIDI notes in order to make BFD start playing continuously! Respond to Song Stop
option stops all Grooves which may be playing when the sequencer is stopped.
We have already examined the Auto Groove Repeat option earlier: this option loops
the Groove until it is stopped by a note-off (or by another note-on if in Latching
Mode).
It’s useful to have a play around with these parameters to see which ones might
be useful for the way in which you work: we tried to make it accessible to people
Page 28

27
with a wide array of working methods. For example, some people will not want to
bother with programming in or playing the MIDI notes so the Respond to Song Start,
Auto Groove Repeat, Auto Bundle Shuffle and Auto Fill options are present, making
BFD function as a no-nonsense auto-accompaniment unit which happily plays
along at the host tempo while you compose without requiring any MIDI input.
Humanization…
BFD’s intelligent humanization system offers a great deal of control over the ‘feel’
of Grooves. First of all, the supplied Grooves have been recorded using professional session drummers playing an electronic drumkit. With the natural swing
and shuffle of the drummer to offer a great deal of natural swing and shuffle,
resulting in drumloops which sound as much like a real drummer as possible. The
Quantization panel allows you to manipulate the feel of the Grooves to your requirements.
Firstly, you can ‘roll off’ the amount of natural feel in the Grooves by varying the
Hard Quantize slider. One of the ways in which BFD’s Grooves achieve their realis-
tic feel is by playing certain notes slightly before or after ‘where they should be’,
in terms of a hard-quantized, robotic drumbeat. The Hard Quantize slider gradually
moves early or late notes back to strict beat divisions: in other words, making the
feel tighter.
BFD also has a Swing function which works alongside the Hard Quantize. You
can regard the concept of Swing in BFD as a similar one to ‘groove templates’
in sequencers such as Cubase or Logic, which apply a quantization template to
MIDI sequences. BFD ‘s Swing Templates operate by applying a timing template
(chosen via the Template drop-down) over the Groove, which is varied by the
Swing slider. It is applied after the Hard Quantize function, so that the central point
of the Swing slider - i.e. when none of the Swing Template is applied - is the end
result of the Hard Quantize function.
To better understand this, use one of the funkier Grooves, for example those
contained within one of the funk bundles. Move the Hard Quantize slider to the
maximum. You should hear that the timing becomes more rigid and ‘robotic’. Now
move the Swing slider (there is always a Swing Template loaded by default). You
will notice that the timing becomes more syncopated again, but in a more uniform
Page 29

28
way compared to the original timing of the Groove, somewhat reminiscent of a
‘shuffle’ parameter on a drum machine. Now vary the Hard Quantize to allow more
of the original feel, and move the Swing slider… now, the Swing Template is being
applied in addition to the original timing, resulting in a different type of feel again.
There are a number of different Swing Templates, which you access using the
Template pull-down menu. Each has a different set of ‘rules’ to modify the feel of
the Groove, which result in a different character to the timing. Try them! The funky
opposing ‘Groove Dudes’ are a graphical representation of the two quantization
parameters.
Controlled randomization…
In addition to the versatile Quantization panel, BFD offers a further two
functions to vary the expressive character of its output. The Humanize
Timing panel allows you to introduce a controlled amount of variation to
the timing of the Grooves. When you click on the icon, a popup graph panel
is displayed, which represents the probability distribution of random timing
variations: the x-axis represents the deviation from the original timing, while the yaxis indicates the probability that a certain time deviation will occur.
Move the mouse over the graph to see how it reacts.
You will find that the curve changes shape according
to mouse movements, while clicking the mouse
button ‘sets’ the shape. With a graphical shape
similar to that shown here, the randomization is
quite extreme. Effectively, the graph is showing you
that there is the highest probability of large timing
displacements.
With the graph shape shown here, there will be a
reasonable amount of randomization: most notes
will have a slight timing deviation, but there will be
the odd note which is displaced to a more extreme
degree.
Page 30

29
When the graph looks like the one shown here,
there will be no randomization of timing: the graph is
showing that there is an equal probability of no timing
deviations occurring.
The Humanize Velocity panel, works in the same way except that, this
time, the x-axis represents velocity. The randomization causes changes
in
velocity which emulate the non-linear way in which a drummer would play.
• note: The Humanize Velocity panel is unique among BFD’s humanization
functions in that it not only applies to the Groove Librarian, but also when
using the plugin as a sound module: in other words, using the host’s
sequencing functions to trigger BFD’s sounds as single hits.
Page 31

30
Part Four : USING YOUR HOST’S MIXING CAPABILITIES
As mentioned at the beginning of the tutorial, there are three different versions of
the BFD plugin:
• BFD Stereo: Stereo Master output only. This version mixes all microphone
buses together with the Direct signals inside the plugin, outputting a stereo pair.
The Master output fader controls the overall output volume of the plugin.
• BFD Groups: Stereo Groups version. This version outputs each stereo micro-
phone group as an independent stereo output. Therefore, output pair 1-2 is the
Direct Master bus, 3-4 is the Overhead bus, 5-6 is the Room bus and 7-8 is the
PZM bus. The Master output fader affects the volume of all buses in a relative
manner.
• BFD All: All output version. This is the same as BFD Groups but, instead of a
stereo mix of the Direct signals, each individual Kit-Piece has its own output.
Therefore, kick in, kick out, snare bottom, snare top, hihat, low, medium and
high toms, and cymbals 1-3 each have an independent output, starting at
output 7. The Master output fader affects the volume of all buses in a relative
manner. If you are using Logic Audio, please see the Logic Quickstart guide, as
the BFD All plugin works slightly differently when it detects Logic as the host.
So far, you have been working with the Master output version, which mixes all signals together. This version is obviously very limited if you want to fully utilize your
sequencer’s multi-output mixing capabilities, if it has them, which are vital for processing each part of the drumkit with unique EQ, dynamics and effects settings in
real time.
Save your kit changes if you have made any modifications you would like to use
again, and load the BFD All plugin in place of the BFD Stereo you have been
using, and reload a kit. This version of the BFD plugin offers the most versatility
over the final mix. Please refer to the Host-specific Quickstarts if you don’t know
how to use your host’s multi-output facilities, or if you are not sure if it supports
them. You will see that you now have three stereo pairs (the ambient buses) and
eleven mono outputs available to you. When using a multiple output configuration,
BFD is operated in exactly the same way, except that each Direct Kit-Piece is
Page 32

31
routed individually into the host’s mixer, according to the rules shown above.
Therefore, if you are not getting any sound, or if you are only hearing certain parts
of the kit, it may be necessary to ‘enable’ the additional outputs in your host: for
example, in Logic Audio you need to create Aux channels and point them to one
of BFD’s multiple outputs.
Page 33

32
REFERENCE
INTRODUCTION TO BFD’s INTERFACE
All of BFD’s knobs, faders and dynamics controls are adjusted by clicking the
control and dragging vertically. They can also be adjusted by moving the mouse
pointer over the control and scrolling your mouse-wheel, if your mouse has one.
LOADING KITS AND KIT-PIECES
Click the drumkit panel icons (the column of icons on the left side of the plugin
window) in order to bring up their respective panels. These are used for loading
either a full kit, or for compiling one from the components, or ‘Kit-Pieces’ of the
various included kits, or a number of extra drums and cymbals which are not part
of any one particular kit.
Exit each panel without making any changes by clicking its icon again, or by clicking the icon in the top-right corner, or bring up a new panel instead by clicking
another panel icon.
Page 34

33
Kit Selector panel
Clicking on this icon brings up the Kit Selector panel. Here, you
can load one of the supplied full drumkits. Moving the mouse
over each kit brings up information about the kit on the right
of the panel. You can also navigate around the kits with the
arrow/PageUp/PageDn keys on your computer keyboard. Click
on any kit in order to load it. This will load all elements of the chosen drumkit, and
overwrite any previous edits made with the individual Kit-Piece Selector panels.
Kit-Piece Selector panels
The rest of the icons in the left-hand column allow the loading of
individual Kit-Pieces in a similar way to that in which you would load
a whole kit. You can preview each available hit in each Kit-Piece at
different velocities by holding down the [SHIFT] key and clicking on
them. Different hits are previewed by varying the clicking position
vertically, while varying it horizontally changes the velocity (extremeleft = velocity 0, extreme-right = 127).
• note: Please be aware that in all the following descriptions, the -2
Octave Numbering system is used (this option can be set in
the Options panel).
• Kick
Each Kick Kit-Piece contains two hits:
Hit: C1 (the kick recorded with the snare present)
No Snare: B0 (the kick recorded without the snare present)
There are a couple of exceptions: the DW, Leedy, Ludwig, Extras Kick2 and
Extras Kick 4 Kit-Pieces do not have a No Snare hit. In these cases, any notes
destined for the No Snare hit are redirected to the standard Hit.
Page 35

34
• Snare
Each Snare Kit-Piece contains five hits:
Hit: D1 (a standard snare drum hit)
Drag: D#1
Flam: F1
Rim: E1
Side-stick: C#1
There are some exceptions: the DW Snare 1, DW Snare 2, Extras Snare 3, Extras
Snare 7, Lucite and Radio King Kit-Pieces do not have a Side-stick hit. These
are all redirected to a Rim hit. Additionally, the Ayotte Snare has a Sizzle-stick hit
instead of a Side-stick.
• Hihats
Each Hihat Kit-Piece contains six hits:
Closed Tip: F#1
Closed Shank: C2
Half Tip: D2
Half Shank: E2
Open Tip: A#1
Pedal: G#1
• Toms
Each Tom Kit-Piece contains three hits:
Floor Tom: G1
Mid Tom: A1
High Tom: B1
There are a few exceptions: the Leedy and Ludwig Tom Kit-Pieces do not have a
High Tom. Instead, they duplicate the Mid Tom into the High Tom slot. Also, the
DW Tom Kit-Piece does not have a Mid Tom, so the High Tom is substituted for
it. BFD does not tune this substitution automatically: it is recommended that you
retune the substituted Tom as desired with the Tune parameter in the mixer section.
Page 36

35
• Cymbals
Each Cymbal Kit-Piece has two hits: a standard hit and a control to choke the
cymbal (i.e. damping it).
Cymbal 1: C#2
Cymbal 1 choke: F#2
Cymbal 2: G2
Cymbal 2 choke: G#2
Cymbal 3: D#2
Cymbal 3 choke: A#2
By default, each Kit and Kit-Piece is mapped to the keys shown above,
which correspond to the GM standard. However, the key assignments
can be changed using the Hit Options panel.
Page 37

36
KIT DISPLAY
Clicking on the main drumkit graphic in the upper centre of the BFD window
shows the Kit Display. At the top of the display is an indicator showing which kit is
loaded. The rest of the display shows a graphical layout of the drumkit, showing
which parts are loaded for each component. Clicking on the box for each KitPiece auditions the sound, the position of the click from bottom to top maps to
increasing velocity. The icon in the corner of the box clears the Kit-Piece - you
may want to clear some unused Kit-Pieces to reduce kit loading times on some
occasions.
Click the Kit Display again in order to return to the main panel.
Underneath the kit display are three icons:
• Reset kit:
Clears the whole kit layout.
• Save kit:
Saves a customized kit layout. If you save it into the BFD/Kits folder, then
it appears in the main Kit Selector panel.
It is important to note that only the kit layout is saved: any mixer settings and key
assignments are not saved with this function! For that, please use the relevant buttons in the mixer section and Hit Options panel, or save a global program preset.
Please see the section below entitled ‘Loading and Saving Presets’ for more information on BFD’s preset systems.
• Load kit:
Allows you to load a kit file from any location.
Page 38

37
MIXER SECTION
A note on the controls:
Controls are manipulated by clicking on them and dragging up and down. Doubleclicking any control returns it to its default value. Holding down the [SHIFT] key
while moving a control allows fine control over it. You can also move a control by
hovering the mouse pointer over it, and moving your mouse-wheel, if your mouse
has one.
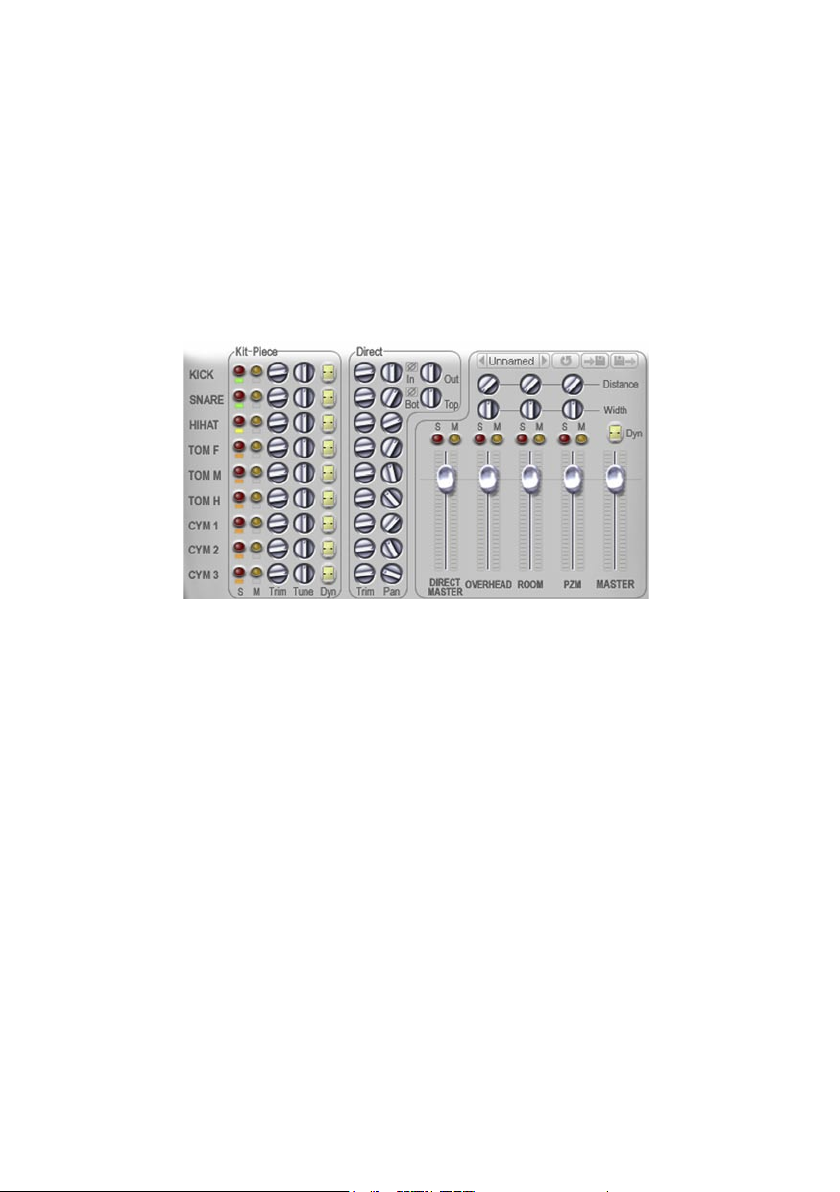
BFD’s mixer section is divided into three areas.
1. The Kit-Piece area
• Kit-Piece labels:
The name labels for each Kit-Piece have a handy
preview functionality. Clicking on the name previews
the sound with the left to right position mapping to
increased velocity.
• Solo and Mute buttons:
These lit buttons allow you to solo or mute any KitPiece(s). When one or more parts are soloed, the
Mute buttons light up for all non-soloed parts, giving
an easily-visible indication of the mute/solo status. If
a muted part is soloed, when the Solo button is deactivated, the muted status will return.
• Small indicator lights:
The indicator lights beneath the Solo buttons show the load status of each KitPiece ‘slot’. A red light indicates that there is no Kit-Piece loaded, an orange light
shows that the samples for that Kit-Piece are being queued up for loading. A
yellow light indicates that it is in the process of loading, and the light turns green
when a Kit-Piece has successfully been loaded.
Additionally, there is also a blue status for the high, medium and floor tom
indicator lights. This is to show that a substitution has occurred. Some of BFD’s
kits have only two toms, because the original kit did not have either a mid or high
tom. In these cases, one of the other toms in the kit is substituted for the missing
Page 39

38
one. You can still independently mix the substituted tom: in other words, you can
alter the tuning, panning and levels without affecting the original. To preserve a
realistic three-tom set, it is advisable to retune the substituted tom.
The indicator lights under the Mute buttons light up when any hits in each KitPiece are triggered via MIDI (or via the Groove Librarian).
• Trim:
This control allows you to trim the ambient level of each drumkit component,
between +6 and -inf dB. Effectively, it functions as a ‘reverb send’ for the natural
ambience in BFD’s mic buses.
• Tune:
Using this control, the pitch of each drumkit component can be tuned up or down
an octave (+/- 1200 cents). This control acts globally for all mic buses.
• Dyn (Dynamics):
This control scales the velocity sensitivity of each drumkit component. The control’s value (-127 to 127) is added onto the velocity of each incoming MIDI note for
that particular component.
2. The Direct area
This area of the mixer section controls only the sound of the
Direct Master stereo bus or the Direct mono outputs (in BFD
All), and does not affect the Overhead, Room or PZM mic buses.
Here, each Kit-Piece has two controls (apart from the kick and
the snare: more on those in a moment):
• Trim:
Controls the level of each Kit-Piece between -inf and +6 dB, in
the Direct bus.
• Pan:
Here, you can control the position in the stereo field of each
Kit-Piece, in the Direct Master stereo bus. They are only functional when using
Page 40

39
BFD Stereo or BFD Groups, and are greyed out when using the BFD All version
of the plugin, as the individual mono Direct outputs do not need to be panned.
The kick and snare Kit-Pieces each have some special controls for the Direct bus.
• Kick In/Out:
This control adjusts the blend between the mic placed inside the kick drum, and
that outside. If you click the button, the phase of the internal mic is inverted.
• Snare Bot/Top:
Using this control, the blend between the mics below and above the snare drum
can be adjusted. If you click the phase button, the phase of the bottom mic is
inverted.
3. Bus mixer area
This area allows easy control over the overall
mix. The Direct and each individual ambient
bus each have their own volume fader here,
as well as Solo and Mute buttons. In addition,
the ambient mics have two extra controls:
• Distance:
This parameter allows you to virtually
manipulate the distance of each ambient mic
set from the drumkit.
• Width:
This control adjusts the stereo width of each ambient mic bus. It ranges from
mono (hard-left) through stereo (centre position) to enhanced stereo (hard-right).
Extreme settings of enhanced stereo should be used carefully as they can add an
out of phase component to your mix.
The Distance and Width parameters for each ambient mic bus are illustrated by a
moving set of mics which can be seen in the main Kit Display.
Page 41

40
The last two controls in this area are as follows:
• Master:
This is an overall master level control for all of the buses together. In the master
output plugin (BFD Stereo) this will control the overall level of the stereo channel.
In the multi-channel versions of the plugin (BFD Groups and BFD All), it controls
the relative volume of all separate outputs.
• Master Dynamics:
This is a global control over velocity sensitivity. Its value (ranging from -127 to
127) is added to the velocity of all incoming notes (from either normal MIDI input
or from the Groove Librarian), after the individual Kit-Piece dynamic values have
been added.
note: this is unlabelled on the interface - it is located just above the Master fader.
The mixer section contains a preset system, which allows very quick access to different mixer settings.
• Save Mixer Preset
Brings up a standard file browser in order to save your mixer setups. By
default, the BFD/Mixers folder is used.
• Load Mixer Preset
Brings up a standard file browser, allowing you to load a mixer setup file
from any location.
• Quick-access Preset Browser
If you save your mixer setups into the BFD/Mixers folder, you can
use these quick access buttons in order to quickly flick between the various
setups stored in the folder.
• Reset Mixer Section
Resets the mixer section to default settings.
Page 42

41
GROOVE LIBRARIAN
To open the Groove Librarian, click the top bar of BFD’s plugin window. To close it
again, click on the bottom or top bars of the Groove Librarian drop-down panel.
When using the Groove Librarian, it is important to remember some of the terms
used in BFD in order to properly understand its functionality.
• Groove:
A MIDI drum sequence used in BFD ‘s Groove Librarian. BFD can import any General MIDI (GM) MIDI file (type 0 and type 1). It is advisable to import MIDI files
with only one track. If BFD encounters a file with multiple tracks, it will access only
the track with the largest amount of notes (most likely to be the drum track).
• Fill:
Similar to a Groove, but distinctly categorized as a fill.
• Bundle:
A group of up to twelve Grooves. Bundles are small files which point to any
Grooves or Fills. BFD comes supplied with a comprehensive library of Grooves
and Fills sorted into Bundles.
Page 43

42
When you access the Groove Librarian, you will be presented by a couple of
distinct areas.
• Browsers:
There are two tree-view browsers in BFD’s Groove Librarian, which are used to
select Groove and Fill bundles, located within the BFD/Grooves and BFD/Fills
folders, and the individual Grooves within them. The top ‘tree-level’ is the Bundle
itself. If you expand the tree structure (click on the icon next to the Bundle
name), you will see the individual Grooves which comprise it.
• Banks:
There are three banks, each with twelve ‘slots’, in BFD’s Groove Librarian. These
areas are where you drag Bundles or individual Grooves from the Browsers. It
can also be used in order to compile and save Bundles: There are two banks for
Groove Bundles and one for Fill Bundles.
Each slot in each Bank corresponds to a MIDI key, an indicator for which is displayed on the right-hand side of the slot, alongside the name of any Groove which
is loaded into the slot. When a MIDI key within the range of the Groove Librarian’s
key mappings is pressed, the MIDI note value and the Groove name are highlighted in red. If you are in Auto Bundle Shuffle mode, the MIDI key highlight will
remain the same, while the actual Groove which is playing will be highlighted
instead.
Grooves can be copied or re-ordered within the Banks by holding down the
[SHIFT] key while dragging a Groove from one slot to another. If the destination
slot is empty, the Groove is copied, whereas if the destination slot contains
another Groove, they are swapped between the slots.
After a Bundle has been compiled in one of the Banks, it can be saved for future
use by clicking the button under each Bank. It is best to save it in the BFD/
Grooves folder, or in BFD/Fills if it is a Fill Bundle, so that it appears in the
Browsers. You can clear the contents of any Bank by clicking the icon beneath
each one..
Page 44

43
Auditioning Grooves
Grooves or Fills within any Bank can be auditioned just by clicking on them. The
name of the Groove and the MIDI note label will turn red. If you want to audition
the Groove while it repeats, turn on the Auto Groove Repeat option for the relevant
Bank. Clicking a playing Groove again will stop auditioning it.
Playing Bundles from the Keyboard
The Grooves and Fills in all three Banks are mapped to the keyboard. The actual
names of the keys used are displayed in the Bank slots, next to the name of each
Groove. These values change dynamically depending upon the status of the -2
Octave Numbering option in the Options panel.
It is highly recommended to turn on the Polyphonic Mode option (in the Play Options
panel) when using the Groove Librarian. This mode allows two or more Grooves
to play at the same time. Not only is this important for overlaying ‘drumloop’-type
Grooves in one Bank with ride and crash patterns from another, but it is also
useful for working with the Kit-Piece Note Filters (see below).
Please consult the sections below about the Play Options panel and the Auto
Groove Repeat buttons, in order to see how the Groove Librarian’s behaviour can be
tailored to suit your particular methods of working.
Kit-Piece Note Filters / Half-Time button
At the top of the Groove Librarian you will notice a row of pink-coloured buttons
above the Groove/Fill Banks. These (with one exception, the Half-Time button at
the extreme-right of each row - see below) are used to filter out individual KitPieces’ notes from the Grooves playing from the Banks. This function can be used
when you only want to play certain parts of each Groove while you jam other
parts live. For example you could filter the kick and snare so that only the hihats,
toms and cymbals are playing, while you jam in a new kick and snare pattern.
This mode is also useful for combining two Groove sets - for instance, you can
use the kicks, snares and toms from one Bank and the hihats and cymbals from
another. If you are working in this way, please ensure you enable Polyphonic Mode
in the Play Options panel.
Page 45

44
If you click on one of the Note Filter buttons while holding down the [SHIFT] key,
the state of all the Bank’s Note Filters is inverted relative to the one on which you
click. If you [CTRL]-click a note filter, the filter settings for that filter are inverted
between Bank A and Bank B.
The button on the extreme-right of each row is the Half-Time button, which
makes that Bank’s Grooves play in half-time.
Creating your own Grooves and Fills
BFD’s Grooves and Fills use the standard MIDI file format. This makes it
incredibly easy to create and import your own Grooves. Please follow these
guidelines if you would like to create your own Grooves.
• You can use any MIDI sequencer which allows the export of MIDI files.
• Load BFD into the sequencer and program or record the sequences you want to
convert into Grooves.
• You can also import any commercial or freeware MIDI files you have, using
the import function in your sequencer (some sequencers also allow dragging
MIDI files from the operating system file browsers right into the arrange page).
Make sure that the notes in the MIDI files correspond properly with BFD’s key
assignments: you may need to do some editing of the MIDI data in order to
achieve this.
• Grooves can be of any length, although it is recommended to keep them to
bar-length multiples. Please also remember that, in general, each Groove must
be written for any particular time signature. If presented with a Groove which is
intended for a different time signature than the current one, it will do one of two
things. If the Groove's time signature has more beats in the bar than the current
time signature, then the notes within the extra beats are cut off. If the Groove's
time signature contains less beats in the bar than the current time signature,
then the Groove will be repeated until the end of the bar.
• When you have finished creating your Grooves, export them to standard MIDI
format. BFD supports both Type 0 and Type 1 MIDI files.
• It is recommended to organize your Grooves into subfolders within the BFD/
Grooves or BFD/Fills folders for convenience.
Page 46

45
HUMANIZATION FUNCTIONS
• QUANTIZATION PANEL
BFD’s humanization system is comprised of the Quantization panel, and the
Humanize Velocity and Humanize Timing panels. All of these functions take effect
when BFD is playing Grooves, with the exception of the Humanize Velocity panel,
which also affects BFD’s output when using standard MIDI input (in other words,
when triggering BFD’s sounds using the MIDI functions of your sequencer, rather
than the built-in Groove Librarian).
To access the Quantization panel, click the quantization button. The two
sliders in the panel allow a great deal of control over the timing “feel” of
the playing Grooves. Here, you can control the variation from the original timing of
the Groove and a hard-quantized, robotic feel, and also apply a timing distortion
map loaded from a ‘Swing Template’.
Exit the panel without making any changes by clicking its icon again, or by clicking
the icon in the top-right corner, or bring up a new panel instead by clicking
another panel icon.
Hard Quantize slider
This slider gradually varies the timing of the playing Groove from its original
timing, to a hard-quantized, rigid, ‘robotic’ feel, where any slight timing deviations
of notes away from a metrical grid (used in order to achieve a more realistic feel)
are ‘snapped’ back to strict timing divisions.
You can select what metrical grid you would like to use, ranging from 4th to 64th
notes, by using the drop-down menu selector.
Swing Templates
BFD’s Swing Templates can be considered as a cross between ‘groove templates’
in sequencers such as Cubase or Logic, and the ‘shuffle’ or ‘swing’ function on
classic drum machines. They define an X-Y map which translates original time
into swung time to achieve different feels. Currently, BFD comes with the common
8th and 16th note swings.
Page 47

46
Template selector
This drop-down menu allows the selection of one of a number of Swing Templates
supplied with BFD.
Swing slider
This control gradually varies the timing of the playing Groove between the setting
specified with the Hard Quantize slider, and the currently selected Template.
The funky opposing ‘Groove Dudes’ are a graphical representation of the two
swing parameters.
• HUMANIZATION PANELS
In addition to the versatile Quantization panel, BFD offers a further two
functions to vary the expressive character of its output: the Humanize
Timing and Humanize Velocity panels. These work in a slightly different
way
to the other panels. To bring up either panel, click the timing or velocity
buttons. You will see that a popup graph is displayed, the curve of
which can be shaped by moving the mouse, after which a click will both finalize
the curve shape and exit the panel. Please see below for an explanation
regarding how to interpret the curve shapes.
Humanize Timing panel
Use this panel to introduce random timing variations to make a Groove sound
more ‘human’ - in other words, less mechanically perfect. The panel graph has an
x-axis showing time deviations away from a note’s original time position (marked
by a white line in the centre), and the y-axis represents the probability of a certain
deviation occurring, the top of the graph being “highly probable”. If you are playing
a Groove with Auto Groove Repeat enabled, the timing variations will be different
for every repetition. Timing randomizations are not applied to notes from your
sequencer or MIDI controller – only to Grooves.
Humanize Velocity panel
This panel graph works in exactly the same way as the Humanize Timing panel,
except that the x-axis represents changes in velocity from the original. Therefore,
it is possible to emulate the slight variations in force used by a real drummer
Page 48

47
when hitting the drums. This panel is unique among BFD’s humanization functions
in that it not only applies to the Groove Librarian, but also when using the plugin as
a sound module - i.e. using the host’s sequencing functions to trigger its sounds
as single hits.
Here are a few examples showing how to interpret the graph curves. If, for
instance, you are using the Humanize Timing panel:
With a graphical shape similar to that shown in the
picture to the left, the randomization can be quite
extreme. Effectively, the graph is showing you that
there is an equal probability of all timing displacements, large or small.
With the graph shape shown in this picture, there will
be a reasonable amount of randomization: most notes
will have a slight timing deviation, but there will be
the odd note which is displaced to a more extreme
degree.
When the graph looks like the one shown in this
picture, there will be no randomization of timing: the
graph is showing that there is an equal probability of
no timing deviations occurring.
The principle is exactly the same for the Humanize Velocity panel.
Page 49

48
PLAY OPTIONS PANEL
This panel lets you change a number of different aspects of the Groove
Librarian’s behaviour.
Exit the panel without making any changes by clicking its icon again, or by clicking
the icon in the top-right corner, or bring up a new panel instead by clicking
another panel icon.
Sync to Song
This setting sets the host sequencer’s song clock as the synchronization source
for BFD’s Grooves, so that they play in phase with the song clock. Effectively, it
means that if a Groove is triggered, it starts playing from the point in the bar at
which it is triggered. For example, if you trigger a Groove on the 2nd beat of a bar
in your song, it will play the Groove from its 2nd beat - so that if there is a kick on
the 1st beat, and a snare on the 2nd, it will start playing with the snare.
Sync Groove Phase
This setting makes subsequent Grooves play in phase with the first Groove
played. So, if you trigger a new Groove whilst the original is playing its third beat,
the new Groove will start playing from its third beat as well. Note that Polyphonic
Mode (see below) must be enabled for this to have any effect.
Transition Mode
This drop-down sets how transitions between Grooves are handled.
• Immediate:
When in this mode, a newly triggered Groove will start playing immediately.
Any Groove synchronization options will still be in effect, however, which may lead
to an apparent delay in the Groove’s playback if, for instance, the Groove has no
notes at the synchronized play start point.
• Next Beat:
Using this mode, when a new Groove is triggered, the transition takes place
on the next beat of the Sync Mode source. For example, if the new Groove is
triggered between the 2nd and 3rd beats of a bar, it will actually start playing on
the 3rd beat, which is the next beat after the trigger is made.
Page 50

49
• Next Bar:
This mode works in a similar way to Next Beat except that, when the next Groove
is triggered, it starts playing from the start of the next bar.
Default Groove
This parameter specifies the default Groove trigger note to play when the Respond
to Song Start option is enabled. Whatever Groove you have loaded into this note’s
corresponding Groove Bank slot will be triggered when you start playing your
song.
Auto Fill period (Bars)
Here, you set the period, in bars, between every Fill played when in Auto Fill
mode. For example, setting it to 16 will result in a Fill being played every 16 bars.
Latching Mode
When this mode is enabled, Grooves are tuned off not by a note-off message,
but by another note-on message of the same note number. Therefore, you hit a
key once to start the Groove, and hit it again to stop it. Please be aware that this
applies to all notes – those that you trigger from your keyboard, and those from
your sequencer.
Polyphonic Mode
When in Polyphonic Mode, multiple Grooves may be played simultaneously. A
newly triggered Groove doesn’t stop any other Grooves currently playing. This
is useful, for example, to layer grooves that are partial beat components, and for
overlaying ride and crash patterns over kick/snare/hat drumloop Grooves.
Respond to Song Start
Checking this option results in the default Groove (specified with the Default
Groove option described above) being played when the sequencer is started.
Respond to Song Stop
This option stops all Grooves which may be playing when the sequencer is
stopped.
Page 51

50
Respond to Groove Notes
If you need to use a drum mapping that includes midi notes in the range that triggers Grooves you can use this option to disable triggering of Grooves.
Respond to MIDI CCs
This option enables MIDI controller support. It is essential when using the variable
Hihat Controller method of playing hihats (see the Hit Options section for further
details on this). There are also a number of hardwired MIDI controllers used for
the knobs and faders in BFD’s bus mixer section. These can be changed if you
require it. Please see the BFD user FAQ for full information on how to do this:
http://www.fxpansion.com/product-bfd-userFAQ.php
Here is a list of the default controller numbers and the controls to which they are
linked:
Control MIDI CC
Direct Master Level fader 16
Overhead Level fader 17
Overhead Distance 21
Overhead Width 20
PZM Level fader 19
PZM Distance 25
PZM Width 24
Room Level fader 18
Room Distance 23
Room Width 22
Master Level fader 7
Master Dynamics 11
Page 52

51
AUTO GROOVE REPEAT BUTTONS
The two columns of three buttons on the right of the BFD interface are
used for auto-accompaniment purposes. Each column represents one of
the Groove Banks: the column on the left represents Bank A, while the one
on the right represents Bank B.
Auto Groove Repeat
When this option is checked, any triggered Groove will repeat until it is stopped by
a note-off (or by another note-on if in Latching Mode).
You can toggle this option via MIDI:
Auto Groove Repeat A ON/OFF: F4 or F6*, note no. 101
Auto Groove Repeat B ON/OFF: F#4 or F#6*, note no. 102
Auto Bundle Shuffle
When in Auto Groove Repeat mode, this option causes random Grooves within the
same Bank to play, instead of the triggered Groove being repeated. This option
has no effect when Auto Groove Repeat is disabled.
You can toggle this option via MIDI:
Auto Bundle Shuffle A ON/OFF: G4 or G6*, note no. 103
Auto Bundle Shuffle B ON/OFF: G#4 or G#6*, note no. 104
Auto Fill
When in Auto Groove Repeat mode, enabling this option causes a random Fill from
the Fill Bank to be played every n bars, where n is defined by the Auto Fill Period
option in the Play Options panel.
You can toggle this option via MIDI:
Auto Fill A ON/OFF: A4 or A6*, note no. 105
Auto Fill B ON/OFF: A#4 or A#6*, note no. 106
* depends on the state of the -2 Octave Numbering option in the Options panel.
A-B Link
Also located in the Auto Groove Repeat area is the A-B Link function.
When this is activated, any Groove note which is routed to Bank A
Page 53

52
will
be also routed to Bank B, and vice versa. It is useful when using the Note Filters
in the Groove Librarian - you can use mutually exclusive Kit-Pieces in each Bank,
then use one note to trigger a Groove from each Bank, making new Groove styles
quickly and easily.
Page 54

53
OPTIONS PANEL
This icon activates the Options panel. Here, you can toggle various
options within BFD, which affect how it performs.
Exit the panel without making any changes by clicking its icon again, or by clicking
the icon in the top-right corner, or bring up a new panel instead by clicking
another panel icon.
Animation options
It is strongly recommended to turn off animations if you are using a relatively slow
computer, or a laptop, as the additional CPU load generated by the animations
might lead to an impairment of performance. You can turn off any or all of the animated panels, hit-indicator lights, tempo beat indicator light and level VU LED’s.
Enable Context Info
This enables the context-sensitive Status window at the bottom of the plugin window. When you move the mouse over a control, it shows a summary of the control
and its value. You can turn off this functionality here if you find it a distraction.
Load Default Kit
With this option and the Default Kit selector box, you can specify and load a kit by
default when BFD is initiated. Click on the Default Kit box in order to bring up a file
browser so that a kit can be selected.
-2 Octave Numbering
Some sequencers, such as Cubase and Logic, use an octave numbering system
which begins at C-2, rather than C0 in sequencers such as Sonar and FL Studio.
When it launches, BFD attempts to detect the sequencer used and adjusts the
naming convention used in the Hit Options panel and Groove Librarian Banks. You
can override this by manually setting this option in order to use whatever convention you prefer.
16 Bit Mode
In this mode, sample data is loaded into RAM and streamed from disk at 16 bit
instead of 24 bit. This effectively halves the memory footprint required by BFD’s
data.
Page 55

54
Host Starts Time At 1
This option is provided for sequencers such as Digital Performer, which start their
time numbering at 1 instead of 0, which would lead to Grooves playing at the
wrong time.
Bleed To Primary Direct (BFD All only)
BFD’s multiple-microphone technology enables control over the level of bleed
present in the final mix. All bleed appears in the kick (in and out) and snare (top
and bottom) channels. This is in order to capture the resonation of the snare and
kick as each Kit-Piece is struck, as well as the sound of the Kit-Piece recorded
through the kick and snare mics. When using the BFD All version (all outputs),
this bleed is, by default, preserved in the original channel on which it was
recorded.
If you check this option, the bleed will be routed to the Kit-Piece’s own direct mic
channel (in other words, the bleed from the snare and kick channels is summed
and added to the drum’s primary direct mic channel).
There are a couple of special cases:
• For kicks, the bleed from the snare’s top mic is routed to the kick in channel,
and the bleed from the snare bottom mic is routed to the kick out channel.
• For snares, the bleed from the kick in mic is routed to the snare top channel,
and the bleed from the kick out mic is routed to the snare bottom channel.
A decision was made not to include bleed from the other mics, because the
levels were just too low to be useful, and would have demanded too much extra
bandwidth during the disk streaming process.
Preview RAM Audio Only
This option makes BFD play only the initial part of the sounds which are held in
RAM before the disk streaming process begins (corresponds to RAM Cache Size).
In this mode no data is accessed from the disk. It can be useful as a preview
mode while composing, and turned off during mixdown.
Maximum Stream Buffers
BFD keeps recently played audio data in RAM, so that there is less strain on the
Page 56

55
hard disk. Specifying a lower number of buffers within the cache leads to less
RAM overhead, but also to a higher strain on the hard disk. If you are using a
wide range of velocities, RAM caching will be less effective, as each velocity split
maps to a different sample.
To adjust the amount of cache buffers, double-click the value box, enter a new
value, and press enter. Only do this when BFD is idle!
Maximum Voices
Here, you can set a limit on BFD’s polyphony. If the voice limit is exceeded, BFD
implements an intelligent voice-stealing system, based on the oldest note which is
still playing.
To adjust the number of voices, double-click the value box, enter a new value, and
press enter.
RAM Cache Size
The size of the portion of each sound held in RAM to enable low latency operation
within BFD. This portion plays while BFD cues up the rest of the data from the
hard disk. A bigger value gives the hard drive longer to deliver the data, but is
more demanding on RAM.
This is the amount of each sound played when Preview RAM Audio Only mode is
enabled.
Stream Buffer Size
The size of the buffers of data being streamed off the hard disk for each voice. Bigger cache sizes are more efficient but are more demanding on RAM.
Maximum Layers
You can limit the amount of velocity layers used by BFD, thereby reducing the
strain on the hard disk and RAM. This can be useful as a preview mode to use
while composing, and increased during mixdown.
Data Path
Clicking on this box allows you to specify a new BFD data path.
Page 57

56
HIT OPTIONS PANEL
The Hit Options panel allows you to preview, and to adjust the key
assignments and trim levels, for the different hits in each Kit-Piece of the
currently loaded drumkit. It also allows the facility to unload any hit from the
current kit. In addition, it lets you assign a continuous MIDI controller for hihat
control, so that a variable controller pedal such as those used in Clavia D-Drums,
Roland V-Drums and DrumKats, can be used.
Exit the panel without making any changes by clicking its icon again, or by clicking
the icon in the top-right corner, or bring up a new panel instead by clicking
another panel icon.
Previewing Hits
You can preview each hit at varying velocity by clicking on the name of the hit.
Veloicity is varied from the left (velocity 0) to the right (127) of the name label.
Note Assignments
The MIDI note assignment of each note can either be set manually, or by using
the MIDI Learn button.
To change the values manually, either:
• click and drag vertically the note-value box
• hover the mouse pointer above the note-value box and scroll your mousewheel
• double-click the note-value box and enter the new value with the computer key-
board
MIDI Learn
To use MIDI Learn, click the MIDI learn button for the hit whose key mapping you
wish to change. The button will indicate it is waiting for a MIDI signal. Trigger the
MIDI note you wish to use - BFD will now have learned the assignment.
Any duplicate note assignments are highlighted in blue.
Hihat Controller
This option lets you define a MIDI controller number for use with the hihat, so that
a variable hihat controller can be used with BFD. Most electronic drumkit systems
Page 58

57
use a variable hihat controller to indicate the position within open/closed states of
the hihat pedal. When used with BFD, this method will use the definable/learnable
Variable Trigger note for triggering the hihat, with the controller position telling
BFD which sound to play from the available hits - closed, 1/2-open, and fully-open
hats.
To define a controller number, click the MIDI Learn button and move the controller
pedal, or enter it manually. You will also need to do the same for the Variable Trig-
ger note. In this mode, BFD uses the Tip hihats.
Unloading Hits
The checkbox next to each hit indicates that it is loaded in the current kit. If you
choose to, you can unload any hit by unchecking its respective checkbox. It is
useful for unloading flams and drags if you prefer to play/program these yourself,
for example, or if you do not need half-open hihats. Since every hit has a small
portion of its initial attack (defined by the RAM Cache Size option in the Options
panel) stored in RAM, it can be useful to unload any hits from RAM which are not
required.
If you play a note for a hit which has been unloaded (or if a playing Groove contains it) then the closest available hit from the Kit-Piece will be used.
• note: None of the played Grooves use any snare flam or drag hits, so these can
safely be unloaded when working with them. However, please be aware that some
of the programmed Grooves (for example the RetroBreaks sets) do use them.
Hit Trim
Using the trim knob, you can adjust the volume of each hit within the Kit-Pieces.
This is extremely useful when you want to adjust the relative levels of open and
closed hihats, or main and rim snare, for example.
You can save and load Hit Options setups by using the buttons at the top of this
panel. Press the button in order to reset to default settings.
Page 59

58
TEMPO DISPLAY
There is a handy tempo display in the bottom-right of the BFD interface. This area
also houses the ‘Panic’ button.
Panic Button
Clicking this button stops any sound which may be coming out of BFD. It
is useful if you get any stuck notes, or if you are auditioning Grooves
using the Auto Groove Repeat options.
Beat LED
This light flashes on every beat when the song is playing.
Tempo display
Shows the current tempo in your sequencer. You can also use it in
the standalone version for setting a tempo for the Grooves
functionality. Double-click the display and enter a new value.
Time Signature display
Shows the current time signature in your sequencer.You can also
use it in the standalone version for setting a time signature for the
Grooves functionality. Double-click the display and enter a new value.
Page 60

LOADING AND SAVING PRESETS
BFD has 4 different types of presets:
Kit Combo Preset: .bfk
Location: BFD/Kits
This preset type contains information about the loaded kit components. You load
and save these presets via the buttons just under the Kit Display.
Mixer Setup preset: .bfm
Location: BFD/Mixers
These files contain information about the mixer section. These can be saved and
loaded, as well as browsed quickly with the buttons, by using the
mixer section preset bar, located just above the Distance and Width controls on
the mixer.
Hit Options preset: .bft (BFD triggers)
Location: BFD/KeyMaps
You can save preferred layouts of key assignments as defined in the Hit Options
panel.
Global Preset: .bfp (BFD programs)
Location: BFD/Programs
This type of preset file is a global setting: it contains both kit and mixer and key
assignment setups and, as such, can be regarded as a combination of .bfk, .bfm
and .bfp files. To load and save a global preset, use the buttons on the top-right of
the BFD interface.
Your host should save the state of the plugin when you save a song. Effectively
this is like saving a .bfp file.
59
Page 61

60
OTHER FILE TYPES USED IN BFD
As well as the preset file formats listed above, BFD uses a number of other filetypes:
Grooves and Fills: .mid
Location: BFD/Grooves and BFD/Fills
These are standard MIDI files.
Groove and Fill Bundles: .bfb
Location: BFD/Grooves and BFD/Fills
These are text files which reference up to twelve Grooves and Fills.
Swing Templates: .txt
Location: BFD/SwingTemplates
These are text files which contain information on time-distortion mapping used in
the Quantization panel’s Swing Template functionality.
Page 62

61
MISCELLANEOUS FUNCTIONS
Bounce Switch
This switch is intended for use with hosts that provide an offline bounce
facility. When it is switched on, BFD waits for all data to be properly delivered from
the hard disk before continuing, ensuring that sounds are not cut off before their
natural decay is complete. Please note that the Bounce mode is non-realtime,
and should only be used during offline rendering in your sequencer (if it offers this
feature).
BFD and multiple outputs
There are three versions of the BFD plugin, which give different permutations of
outputs into the host. We made this decision because of some hosts’ inability to
properly change the output configuration.
• BFD Stereo:
Stereo Master output only. This version mixes all microphone buses together with
the Direct Master stereo mix inside the plugin, outputting a single stereo pair. The
Master output fader controls the overall output volume of the plugin.
• BFD Groups:
Stereo Groups version. This version outputs each stereo microphone bus as an
independent stereo output. The Master output fader affects the volume of all buses
in a relative manner.
Output Name
1+2 Direct Master
3+4 Overhead bus
5+6 Room bus
7+8 PZM bus
Page 63

62
• BFD All:
All Outputs version. This is the same as BFD Groups but, instead of a stereo mix
of the Direct signals, each individual kit-component has its own output. The Master
output fader affects the volume of all buses in a relative manner. Note that Logic
only supports a maximum of 16 outputs from a plugin so the direct signal from
cymbal 2 and 3 are mixed together.
Output Name (non Logic) Name (Logic)
1+2 Overhead bus Overhead bus
3+4 Room bus Room bus
5+6 PZM bus PZM bus
7 Direct Kick In Direct Kick In
8 Direct Kick Out Direct Kick Out
9 Direct Snare Bottom Direct Snare Bottom
10 Direct Snare Top Direct Snare Top
11 Direct Hihat Direct Hihat
12 Direct Floor Tom Direct Floor Tom
13 Direct Mid Tom Direct Mid Tom
14 Direct High Tom Direct High Tom
15 Direct Cymbal 1 Direct Cymbal 1
16 Direct Cymbal 2 Direct Cymbal 2+3
17 Direct Cymbal 3 -
Page 64

63
DRUM RECORDING NOTES
BFD’s high-quality drum content was produced and edited by Steve Duda…
http://www.good-science.com/SteveDuda/
… and was recorded by Elan Trujillo and Steve Duda at Eldorado Studios, Burbank, CA, USA.
http://www.eldoradorecording.com/
Drums were provided courtesy of Josh Baldwin and Christopher S. Heuer at Vintage Drum Rental, Los Angeles.
http://www.vintagedrumrental.com/
Here is a comprehensive breakdown of how each drum was recorded…
• Direct signals:
Snare top and bottom: Shure SM57
Kick In: ElectroVoice Re20
Kick Out: Neumann M49
Hihats: Neumann KM81
Toms: Sennheiser MD421
Cymbals: AKG 451
All the above microphones were recorded through custom modified API preamps.
Please note that the Sennheiser MD421 used to record the toms is actually two
mics, one placed on the top and one on the bottom of the drum. Each part was
fed into custom API preamps, and then summed on an SSL desk.
• Overhead set:
AKG C-12’s recorded through Summit MPC-100A tube preamps.
These were placed 5 ft. directly above the kit, with the capsules facing each other,
3 ft. apart.
Page 65

64
• Room set:
Neumann U87’s recorded through Avalon preamps.
They were placed 15 ft. back from the bass drum, each at a 45 degree angle from
the kit.
A room set like this is often mixed in mono and set back 10 to 24 dB. It provides a
nice ‘filler’ for the drum tone, and adds a live room flavour.
• PZM set:
Crown PZM microphones at floor level recorded through API preamps and Empirical Labs Distressors set at 3:1 compression ratio with a gentle threshold (removing 0 to 6dB depending on drum-hit velocity). This compression stage was added
in order to bring more body and sustain to the PZM recordings.
Their placement was 10 ft. back from the bass drum, each at a 45 degree angle
from the kit, forming a right-angle intersecting bass drum trajectory.
PZM’s are also good ‘filler’ as they capture a good room tone and drum trajectory/
stereo image not captured by the other mics.
Page 66

65
BFD’s LIBRARY OF GROOVES
Most of the Grooves supplied with BFD are performed on Roland V-Drums by
Chris Dagley, a renowned UK session drummer. As well as playing with the
National Youth Jazz Orchestra for several years, Chris has played with such
diverse luminaries of the international music scene as Lalo Schifrin, Des’ree, Gary
Barlow, All Saints, Rosie Gaines, Jamiroquai, Tom Scott, Gloria Gaynor, Chaka
Khan, Ray Charles, Eric Clapton, Ella Fitzgerald, George Michael and countless
others. He has also played on numerous film soundtracks, theatre productions
and adverts, and somehow also finds time to play in various jazz fusion and big
band groups. Additionally, Chris was an early pioneer of internet-based session
recording, via WorldNetStudios.
http://www.worldnetstudios.com
Additional Grooves were played by Tom Santamera on V-Drums. There are also
many programmed Grooves in the package, put together in-house by Mayur
Maha.
Please see the GroovesReadme.txt file for further information on the Grooves.
Page 67

66
APPENDIX
Host-specific issues
Some hosts do not support multiple outputs from plugin instruments. At this time,
we are aware that Sonic Foundry Acid 4.0, MOTU Digital Performer 4 and Digide-
sign ProTools fall into this category.
To get around this limitation, we suggest you use the ReWire application in these
hosts.
Emagic’s Logic Audio has a limitation of 16 outputs from plugin instruments. If the
BFD All plugin is loaded in Logic, it automatically detects that Logic is the host
and uses the 16th output for both Cymbal 2 and Cymbal 3.
To get any of the multiple output version of BFD to work in specific hosts please
refer to the “Installation and Getting Started” section.
Digital Performer also starts its host time numbering system at 1 instead of 0,
which causes BFD’s Grooves to trigger at the wrong beat. You can resolve this by
checking the Host Starts Time At 1 option in the Options panel.
Troubleshooting
• BFD User FAQ
Many common installation and performance issues can be resolved by reading
our BFD User FAQ:
http://www.fxpansion.com/product-bfd-userFAQ.php
• I’m not hearing any sound!
Chances are that you have not yet loaded a kit. Also, many sequencers (such as
Logic) require you to record-enable a MIDI track, or enable live MIDI input in order
to get MIDI input to it.
Page 68

67
• There is a noticeable delay between pressing a key on my MIDI keyboard
and hearing the sound.
This is a symptom of latency, something which all CPU-based processing suffers
from. Latency can be reduced by using a better soundcard with well-written drivers. Latency also depends upon the speed of your computer processor: even if
your soundcard supports very low latencies (for example RME cards are capable
of going down to 1.5ms, lower than the latency of many hardware synths) it takes
a heavy amount of processing power in order to actually achieve this.
• I’m getting clicks and pops!
First of all, please verify if you are only getting this behaviour with BFD. Clicks and
pops are usually a result of interruptions to the computer, caused by conflicting
IRQs and substandard motherboards (such as those with a VIA chipset). These
symptoms are also very common when using very low latencies on a computer
which cannot handle them. Often, you may not get clicks and pops when working
on small projects; however, the symptoms can manifest themselves when using
many tracks and plugins, or some resource-hungry plugins. BFD makes big
demands on the disk subsystem (that is, the hard drive and the controller and
routing on the motherboard used to deliver the data to the operating system). Try
increasing the latency (i.e. the size of the buffers) on your soundcard, and increasing buffer-size settings within your host. Also, try looking at the various cache and
buffer settings in the Options panel.
If this does not fix the problem, please contact our support channels for further
assistance.
• I’m getting dropped notes, loss of sync, or drop-outs.
If you are getting such symptoms, it is likely that your hard disk cannot deliver
data fast enough for BFD! Because of BFD’s disk-streamed multiple microphone
technology, playing back just one drum sound is the equivalent of 11 mono audio
tracks!
Page 69

68
You should always make sure that the drive or partition on which the BFD audio
data resides is defragmented. As long as you defragment the drive before installing the plugin, you should be okay. Also, on Windows platforms, make sure that
the drive is running in DMA mode (check your primary and secondary hard disk
controller settings in Control Panel/Device Manager). Also, try looking at the vari-
ous cache and buffer settings in the Options panel.
You can try the following workarounds to get around hard disk subsystem bottlenecks:
Install BFD on a separate drive to the operating system and any audio tracks you
may be using. If this is impractical, try using a dedicated partition.
Use an external firewire or USB 2.0 drive. This is especially useful for laptop/
notebook users, as the internal hard drives on these types of machines are
usually very slow compared to their desktop equivalents (4200 rpm versus 7200
rpm). An external drive should be capable enough to deliver the required amount
of data in time. To give you an idea of the transfer rate required, a particularly
heavy scenario when using BFD would need around 15 MB/sec. This means that
a firewire or USB 2.0 drive which typically delivers 30 MB/sec would be perfectly
adequate.
• Triggering of grooves isn’t working as expected.
Check the settings in Play Options panel and see that the latch mode and sync
modes are what you need to trigger the grooves how you would like. Refer to the
Play Options reference section to find out more about the different triggering and
sync options available. Please also make sure that the Respond to Groove Notes
option is enabled in the Play Options panel.
Page 70

w w w . f x p a n s i o n . c o m
 Loading...