

Page 1

CREATIVE
CMO 4507 TC
LMO 4507 TC
LMO 4507 TC
Page 2

Page 3
I
GB
FR
DE
ES
PT
Italiano
English
Français
Deutsch
Español
Português
I
3
Page 4
Caro Cliente,
I
sentitamente La ringraziamo e ci congratuliamo per la scelta da Lei fatta.
Questo nuovo prodotto, accuratamente progettato e costruito con materiali di primissima
qualità, é stato accuratamente collaudato per poter soddisfare tutte le Sue esigenze di una
perfetta cottura.
La preghiamo pertanto di leggere e rispettare le facili istruzioni che Le permetteranno
di raggiungere eccellenti risultati sin dalla prima utilizzazione. Con questo moderno
apparecchio Le formuliamo i nostri più vivi auguri.
IMPORTANTI ISTRUZIONI E AVVERTENZE
DI SICUREZZA
LEGGERE ATTENTAMENTE E CONSERVARE
PER UN USO FUTURO
4 5
Page 5

QUESTO PRODOTTO È STATO CONCEPITO PER UN IMPIEGO DI TIPO DOMESTICO.
IL COSTRUTTORE DECLINA OGNI RESPONSABILITÀ NEL CASO DI EVENTUALI DANNI A COSE O PERSONE DERIVANTI
DA UNA NON CORRETTA INSTALLAZIONE O DA USO IMPROPRIO, ERRONEO OD ASSURDO.
L’APPARECCHIO NON DEVE ESSERE USATO DA PERSONE (COMPRESI BAMBINI) CON RIDOTTE CAPACITÀ FISICHE,
SENSORIALI O MENTALI, O DA PERSONE CHE MANCANO DELL’ESPERIENZA E DELLE CONOSCENZE NECESSARIE
SE NON SOTTO LA SUPERVISIONE O DIETRO ISTRUZIONI SULL’USO DELL’APPARECCHIO DA PARTE DI UNA PERSONA
RESPONSABILE PER LA LORO SICUREZZA.
I BAMBINI DEVONO ESSERE CONTROLLATI PER ASSICURARSI CHE NON GIOCHINO CON L’APPARECCHIO. VIETATO
APPORRE CARTA STAGNOLA, PENTOLE O SIMILI A CONTATTO CON LA BASE INTERNA DEL FORNO PER CUCINARE.
DURANTE L’USO L’APPARECCHIO DIVENTA MOLTO CALDO. ATTENZIONE A NON TOCCARE GLI ELEMENTI RISCALDANTI
ALL’INTERNO DEL FORNO.
I
ATTENZIONE:
ATTENZIONE:
ATTENZIONE:
ATTENZIONE:
Se la porta o le guarnizioni della porta sono danneggiate, il forno non deve
essere fatto funzionare nché non è stato riparato dal personale addetto;
E’ pericoloso per tutti, ad eccezione del personale addetto, eseguire qualsiasi
operazione di manutenzione o di riparazione che implichi la rimozione
di qualunque coperchio che protegge dall’esposizione all’energia delle
microonde;
I liquidi o altri cibi non devono essere scaldati in contenitori sigillati poiché
potrebbero esplodere;
I bambini possono utilizzare il forno senza sorveglianza solo quando sono stati
istruiti in modo adeguato così che siano in grado di utilizzare il forno in modo
sicuro e che capiscano i pericoli derivanti da un uso scorretto;
utilizzare solo gli utensili appropriati per i forni a microonde;
quando si riscaldano gli alimenti in contenitori di plastica o carta, controllare il
forno frequentemente a causa dei rischi di incendio;
se si nota emissione di fumo, spegnere o togliere la spina dell’apparecchio e
mantenere la porta chiusa per estinguere eventuali amme;
il riscaldamento di bevande nel forno a microonde può avere come risultato
un’ebollizione eruttiva ritardata, perciò occorre prestare attenzione quando si
maneggia il contenitore;
il contenuto di biberon e gli omogeneizzati in vasetti devono essere mescolati
o agitati e la temperatura deve essere controllata prima della consumazione
per evitare scottature;
le uova nel guscio e le uova sode intere non devono essere scaldate nei
forni a microonde poiché potrebbero esplodere anche una volta terminata
l’operazione di riscaldamento nel microonde;
la spiegazione in dettaglio per pulire le guarnizioni delle porte della cavità e
delle parti adiacenti;
il forno dovrebbe essere pulito periodicamente e si dovrebbe rimuovere ogni
residuo di cibo;
il non mantenere il forno pulito potrebbe portare al deterioramento delle
superci che potrebbe inuire negativamente sulla vita dell’apparecchio e
dare origine ad una situazione di pericolo;
Non usare per la pulizia materiali ruvidi abrasivi o raschietti metallici aflati
per pulire la porta di vetro del forno, perché possono grafare la supercie e
causare la frantumazione del vetro.
Per la pulizia dell’apparecchio non devono essere utilizzati pulitori a vapore.
Page 6

AVVERTENZE PER IL
I
FORNO A MICROONDE
Preparazione degli alimenti
Stoviglie
Potenza microonde e durata
Confezioni
Bevande
Pericolo di incendio!
Utilizzare la funzione microonde esclusivamente per la preparazione di alimenti
destinati al consumo. Altri tipi di applicazioni possono essere pericolosi o
causare danni.
Ad esempio, le pantofole e i cuscini di grano o di cereali riscaldati possono
incendiarsi anche dopo alcune ore.
Pericolo di lesioni!
Le stoviglie in porcellana e ceramica possono presentare piccoli fori sui manici
e sul coperchio.
Dietro questi fori possono nascondersi cavità. Se si veriva un’inltrazione di
liquido in queste cavità, la stoviglia si può spaccare.
Non utilizzare stoviglie non adatte alla funzione microonde.
Pericolo di scottature!
Il calore dei cibi può riscaldare la stoviglia. Servirsi sempre delle presine per
estrarre le stoviglie e gli accessori dal vano cottura.
Pericolo di incendio!
Non impostare mai valori troppo elevati per la potenza microonde o per
la durata di cottura. Gli alimenti possono prendere fuoco e danneggare
l’apparecchio. Attenersi alle indicazioni riportate in queste istruzioni d’uso.
Pericolo di incendio!
Non far mai riscaldare gli alimenti all’interno di confezioni termiche.
Gli alimenti all’interno di contenitori in plastica, carta o altri materiali
inammabili devono essere tenuti sempre sotto sorveglianza.
Pericolo di scottature!
Le confezioni ermetiche a tenuta d’aria possono esplodere. Attenersi alle
indicazioni riportate sulla confezione. Servirsi sempre delle presine per
estrarre le pietanze.
Pericolo di bruciature!
Durante il riscaldamento di liquidi si può vericare un ritardo nel processo di
ebollizione.
In altri termini, la temperatura di ebollizione viene raggiunta senza che si
formino le tipiche bollicine di vapore. Anche un urto leggero può causare
l’improvviso traboccare del liquido o la formazione di spruzzi.
Quando si riscaldano liquidi, aggiungere sempre un cucchiaio nel contenitore
in modo da evitare un ritardo del processo di ebollizione.
6 7
Page 7

Alimenti per neonati
Alimenti con pelle o buccia
Essicazione degli alimenti
Alimenti a basso contenuto
d’acqua
Olio
CAUSE DEI DANNI
Fuoriuscita del succo della
frutta
Guasto tecnico
Raffreddamento con porta
dell’apparecchio aperta
Guarnizione molto sporca
Porta dell’apparecchio come
superficie di appoggio
Uso della funzione microonde
senza alimenti all’interno del
forno
Alimenti umidi
Pericolo di esplosione!
Non far mai riscaldare le bevande o altri tipi di alimenti in contenitori con
coperchio.
Non far mai riscaldare eccessivamente le bevande alcoliche.
Pericolo di scottature!
Non far mai scaldare gli alimenti per neonati all’interno di contenitori con
coperchio. Rimuovere sempre il coperchio o la tettarella.
Una volta terminata la fase di riscaldamento, scuotere o mescolare sempre
con cura in modo che il calore si distribuisca omogeneamente.
Controllare la temperatura prima di dare gli alimenti al bambino.
Pericolo di scottature!
Non far mai cuocere le uova con guscio. Non far mai scaldare le uova sode,
in quanto possone esplodere anche dopo la disattivazione del microonde.
Questo vale ache per molluschi e crostacei.
In caso di uova al tegamino forare prima il tuorlo.
In caso di alimenti con pelle o buccia dura quali mele, pomodori, patate o
salsicce, la buccia può scoppirare.
Prima di procedere alla cottura forare la buccia o la pelle.
Pericolo di incendio!
Non essiccare mai gli alimenti con la funzione microonde.
Pericolo di incendio!
Non scongelare o riscaldare troppo a lungo o a una potenza eccessiva gli
alimenti a basso contenuto d’acqua, come per esempio il pane.
Pericolo di incendio!
Non utilizzare mai la funzione microonde per far scaldare soltanto l’olio.
Durante la preparazioni di dolci alla frutta molto succosi, non riempire
eccessivamente la teglia. Il succo della frutta che trabocca dalla teglia causa
la formazione di macchie difcilmente pulibili.
Non utilizzare mai teglie smaltate con il microonde in quanto ne deriverebbe
un guasto tecnico.
Il raffreddamento del vano di cottura deve avvenire esclusivamente con la
porta chiusa. Controllare che nulla resti incastrato nella porta dell’apparecchio.
Anche se la porta è socchiusa, con il passare del tempo i mobili adiacenti
possono danneggiarsi.
Se la guarnizione è molto sporca, durante il funzionamento dell’apparecchio
la porta non si chiude più correttamente. Le superci dei mobili adiacenti
possono danneggiarsi. Mantenere sempre pulita la guarnizione.
Non appoggiarsi ne stendersi sulla porta dell’apparecchio aperta e non
posatevi stoviglie o accessori.
Attivare l’apparecchio a microonde solo dopo aver inserito gli alimenti nel
vano cottura. Senza alimenti, si può causare il sovraccarico dell’apparecchio
stesso. L’unica eccezione consentita è quella di un breve test per le stoviglie
(si vedano a questo proposito le avvertenze relative alle pentole).
Non conservare alimenti umidi all’interno del vano di cottura chiuso per
periodi di tempo prolungati. Lo samlto viene danneggiato.
I
Page 8
IMPORTANTE
I
La targhetta delle caratteristiche del forno è accessibile anche ad apparecchio installato. In questa terghetta, visibile
aprendo la porta, sono riportati tutti i dati di identicazione dell’apparecchio a cui si dovrà fare riferimento per richiesta
di ricambi.
PRIMO UTILIZZO
Il forno va pulito a fondo con acqua e sapone e risciacquato accuratamente.
Riscaldare il forno per circa 30 minuti alla massima temperatura; verranno così eliminati tutti i residui grassi di
lavorazione che potrebbero causare sgradevoli odori in fase di cottura. Usare la funzione grill con il forno privo degli
accessori. Prima di utilizzare gli accessori per la prima volta, pulirli accuratamente con una soluzione alcalina di
lavaggio molto calda e un panno morbido.
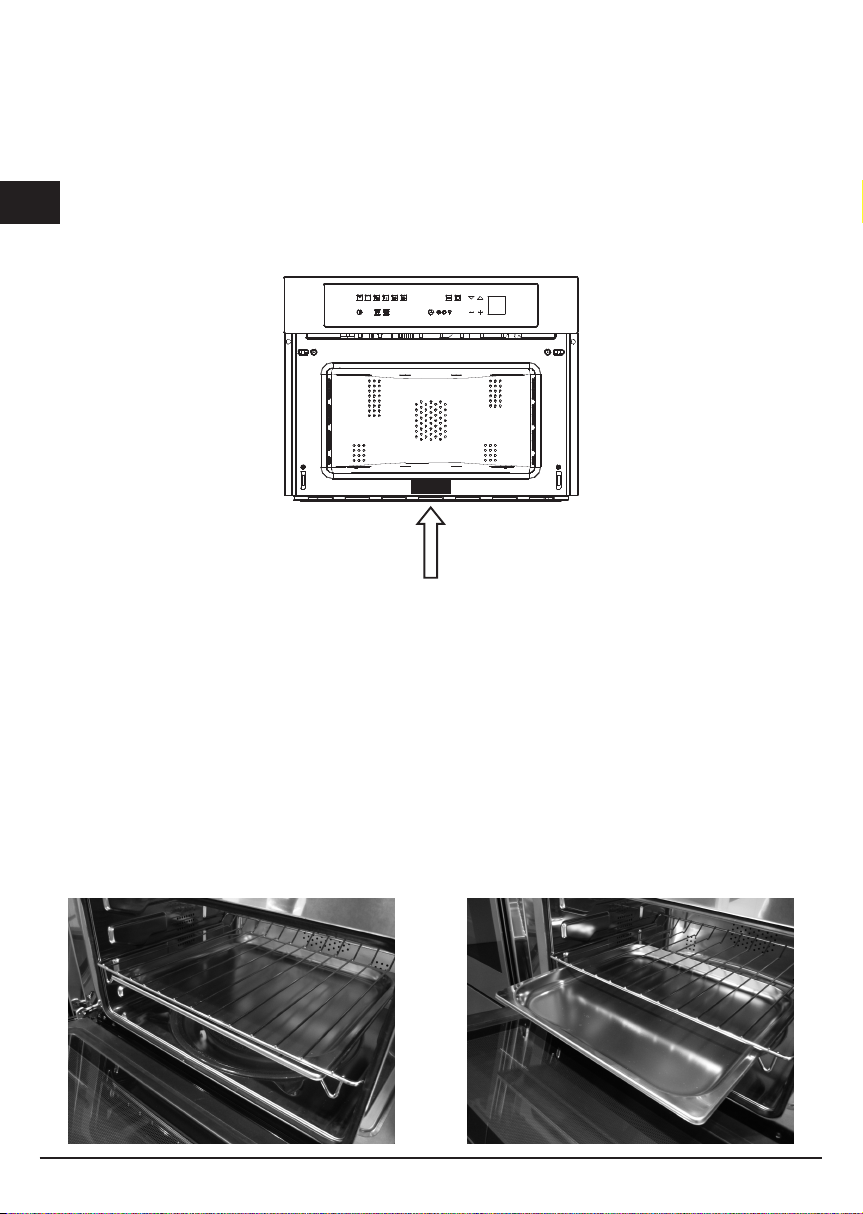
MONTAGGIO E SMONTAGGIO GRIGLIA PIANA
Per smontare la griglia piana, trascinare verso di se la griglia no al blocco, poi sollevare tirando verso l’alto no a
completa estrazione.
Per montare la griglia piana procedere inserendo la griglia inclinata a 45° no al blocco, quindi posizionarla orizzontale
e spingere no a ne corsa la griglia.
Se la griglia piana e’ dotata di leccarda (vassoio) per estrarla dalla sua sede, sollevarla leggermente e farla scorrere
verso di se. Reinserirla no a che rientra nella sede predisposta.
8 9
Page 9

Importante:
come precauzione di sicurezza prima di procedere a qualsiasi operazione di pulizia del forno staccare sempre la spina
dalla presa di corrente o togliere la linea di alimentazione dell’apparecchio. Inoltre evitare di usare sostanze acide
o alcaline (succhi di limone, aceto, sale, pomodori, ecc.). Evitare di usare prodotti a base di cloro, acidi o abrasivi
specialmente per la pulizia delle parti verniciate.
RISPETTO PER L’AMBIENTE
La documentazione del presente apparecchio utilizza carta sbiancata, senza cloro, oppure carta ricilata
allo scopo di contribuire alla protezione dell’ambiente.
Gli imballaggi sono concepiti per non danneggiare l’ambiente; possono essere recuperati o riciclati
essendo prodotti ecologici.
Riciclando l’imballaggio, si contribuirà ad un risparmio di materie prime e ad una riduzione del volume
degli scarti industriali e domestici.
IL MATERIALE DI IMBALLAGGIO è riciclabile al 100% ed è contrassegnato dal simbolo del riciclaggio. Per lo
smaltimento seguire le normative locali. Il materiale di imballaggio (sacchetti di plastica, parti in polistirolo, ecc.)
deve essere tenuto fuori dalla portata dei bambini in quanto potenziale fonte di pericolo. QUESTO APPARECCHIO è
contrassegnato in conformità alla Direttiva Europea 2002/96/CE, Waste Electrical and Electronic Equipment (WEEE).
Assicurandosi che questo prodotto sia smaltito in modo corretto, l’utente contribuisce a prevenire le potenziali
conseguenze negative per l’ambiente e la salute.
IL SIMBOLO sul prodotto o sulla documentazione di accompagnamento indica che questo prodotto non
deve essere trattato come riuto domestico, ma deve essere consegnato presso l’idoneo punto di raccolta
per il riciclaggio di apparecchiature elettriche ed elettroniche.
LO SMALTIMENTO DEVE ESSERE EFFETTUATO seguendo le normative locali per lo smaltimento dei riuti.
PER ULTERIORI INFORMAZIONI sul trattamento, recupero e riciclaggio di questo prodotto, contattare l’ufcio locale
competente, il servizio di raccolta dei riuti domestici o il negozio presso il quale il prodotto è stato acquistato.
PRIMA DELLA ROTTAMAZIONE, renderlo inservibile tagliando il cavo elettrico di alimentazione.
I
Page 10
FORNO A MICROONDE 45
I
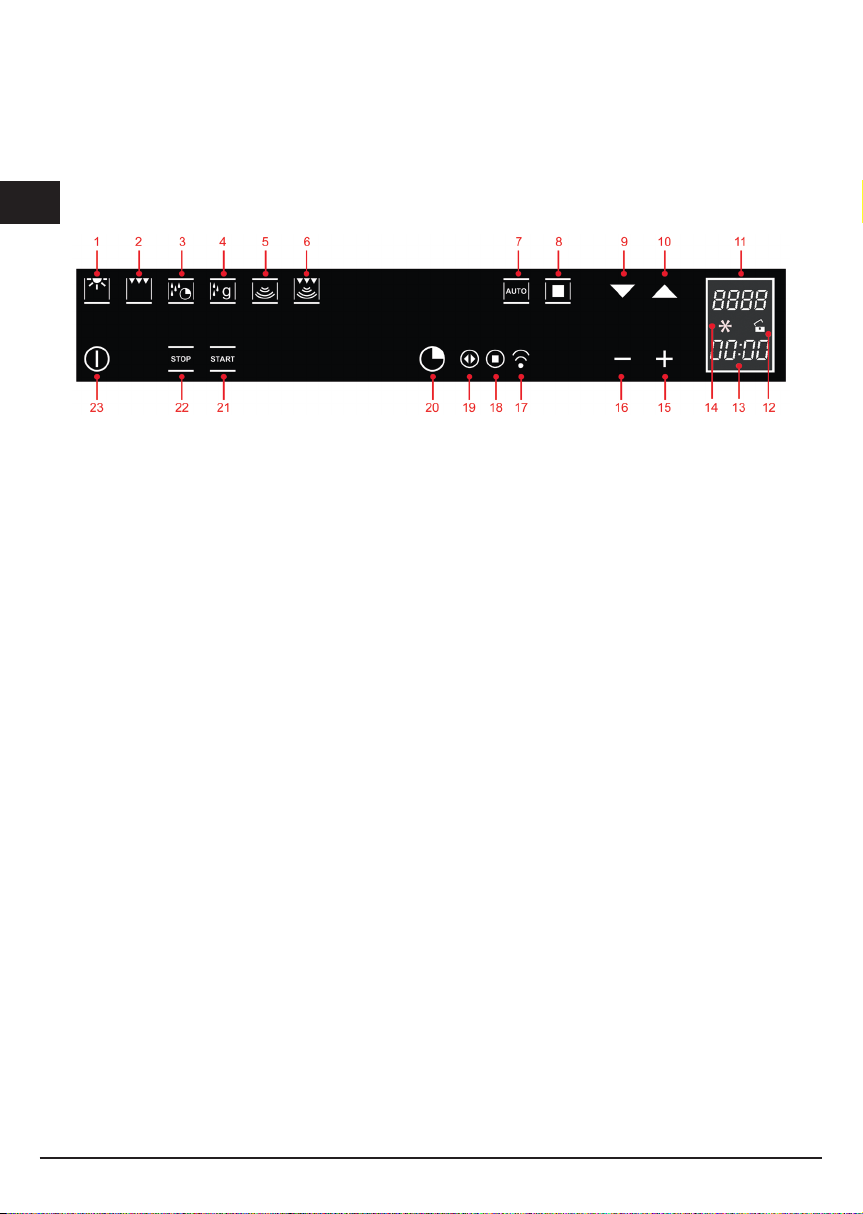
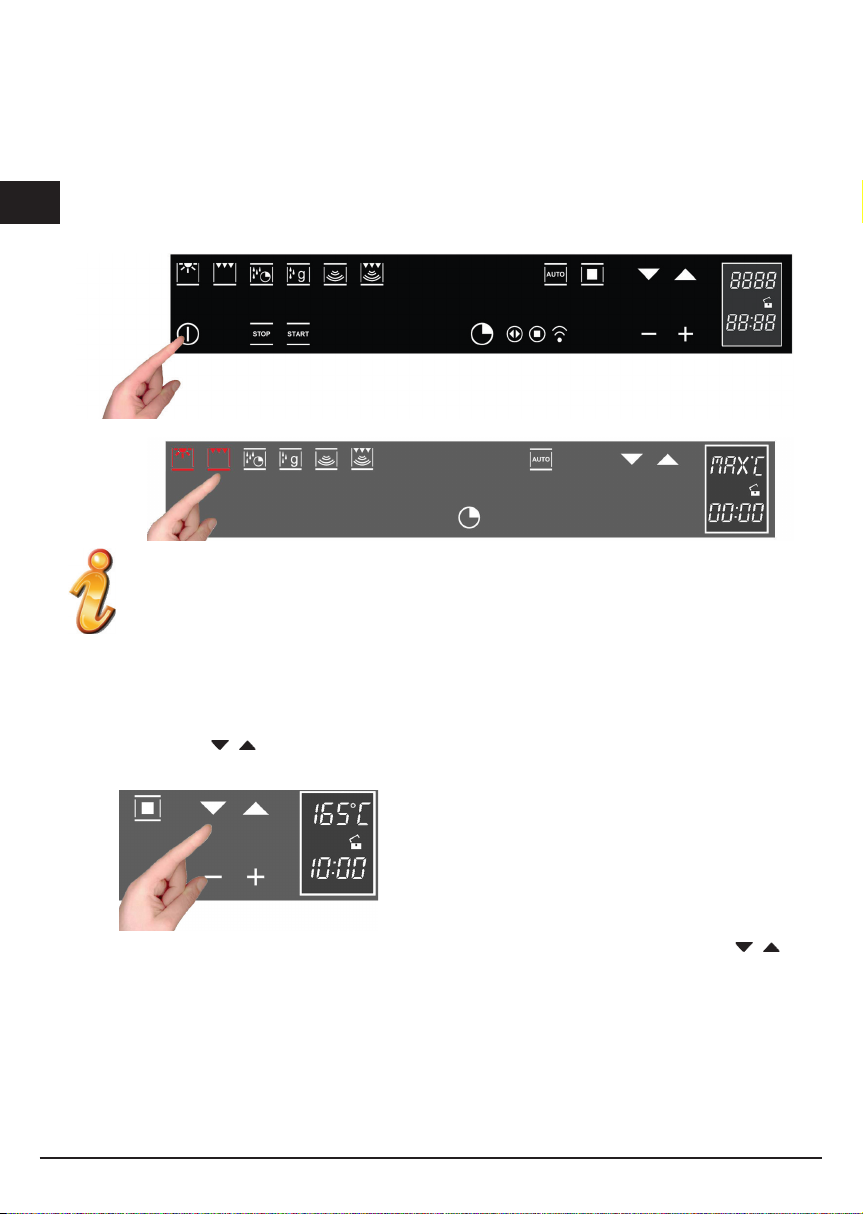
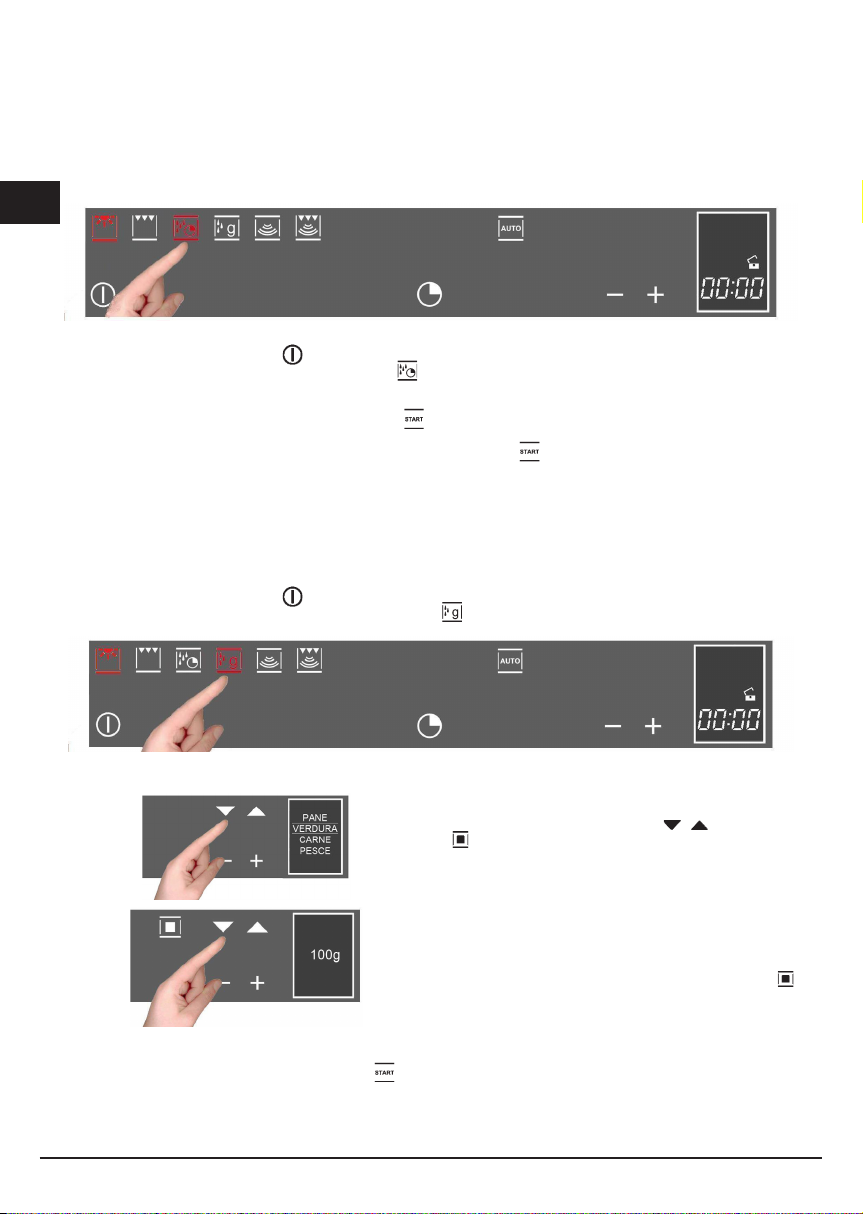
Panoramica comandi
FUNZIONI COTTURA STANDARD: dal 1 al 2;
IMPOSTAZIONE TEMPERATURA, DURATA COTTURA: 19 e 20;
ON/OFF + CHIAVE (CHILD LOCK): 23;
FUNZIONI CON MICROONDE: da 3 a 6;
FUNZIONI per RICETTE: 7 e 8;
FUNZIONI SCROLL POTENZA e MENU’: 9 e 10;
FUNZIONI TIMER: 20;
IMPOSTAZIONE DEL TIMER: 15 e 16;
1 luce forno;
2 funzione cottura standard - grill;
3 scongelamento a tempo;
4 scongelamento a seconda del peso;
5 funzione cottura microonde - microonde tradizionale;
6 funzione cottura microonde - microonde + grill;
7 funzione impostazione automatiche (ricette);
8 funzione conferma impostazioni;
9 funzione scroll menù verso il basso, decremento potenza;
10 funzione scroll menù verso l’alto, incremento potenza;
11 funzione indicazioni temperature;
12 funzione chiave abilitata/disabilitata;
13 funzione indicazioni timer;
14 funzione countdown;
15 funzione aumento impostazioni;
16 funzione decremento impostazioni;
17 funzione timer “contaminuti”;
18 funzione timer “ne cottura”;
19 funzione timer “durata cottura”;
20 funzione timer;
21 funzione “START” - avvio funzionalità;
22 funzione “STOP” - spegnimento funzionalità;
23 funzione “ON/OFF” e funzione “chiave (child lock)”;
NB: tutte le impostazioni/variazioni delle funzioni sono confermate da un segnale acustico.
10 11
Page 11
PRESENTAZIONE DEL FORNO
Caro Cliente, il suo nuovo forno è gestito da una scheda elettronica che si occupa di monitorarne in ogni istante il
funzionamento per migliorarne le prestazioni, tutte.
Il controllo touch control è di ultima generazione, preciso, afdabile.
L’interfaccia è elegante, ordinata e discreta, più intuitiva che mai!
Pochi tasti, molte funzioni, nessuna combinazione o sequenza difcile di tasti, concentratevi a seguire la ricetta, il
forno è pronto con due gesti!
Installazione e allacciamento
Caro Cliente, questo forno è un apparecchio elettronico sosticato, classicato come bene duraturo. Necessita di
essere installato da personale qualicato che operi secondo la regola dell’arte sia per gli allacciamenti alla linea di
alimentazione sia per l’installazione nel mobile della cucina.
(VEDI ISTRUZIONI DI MONTAGGIO A PAG. 27)
Primo allacciamento
Quando il forno viene collegato alla rete elettrica per la prima volta potrà apparire sul display l’indicazione di quale
lingua scegliere;
con i tasti
con il tasto confermare la scelta.
d’ora in avanti la lingua prescelta rimmarrà ssa anche per le successive mancanze di alimentazione.
NB: se alla prima accensione sul display appare una lingua diversa dalla vostra, per cambiarla vedere le istruzioni a
pag.12.
Ora entra in funzione La modalità dimostrazione.
La modalità dimostrazione - DEMO MODE
Si chiama così la modalità nella quale il forno si presenta ogni volta che l’alimentazione viene a mancare, e di
conseguenza al primo allacciamento:
lo scopo è di visualizzare tutte le potenzialità del controllo con una sequenza registrata di comandi.
selazionare la lingua desiderata;
I
In questa modalità il forno non vieni MAI azionato realmente, cioè non vengono accese le resistenze
termiche!!
Il pannello di controllo è INATTIVO e quindi il forno non risponderà ai comandi!
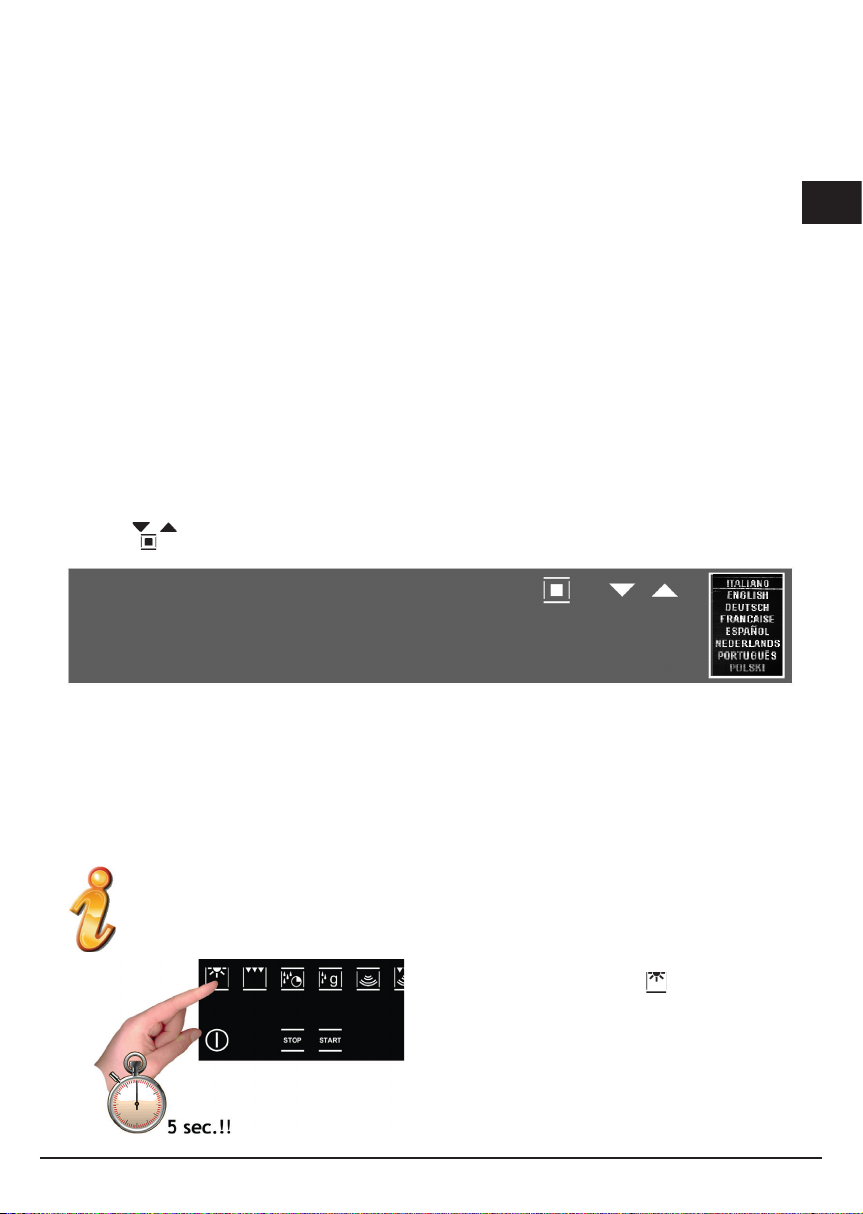
Per disabilitare la modalità dimostrazione toccare per
cinque secondi il simbolo luce:
funzionamento normale e pronto per l’accensione.
Ora la regolazione dell’ora è possibile, ma non necessaria,
per procedere all’accensione del forno.
il forno entrerà in
Page 12

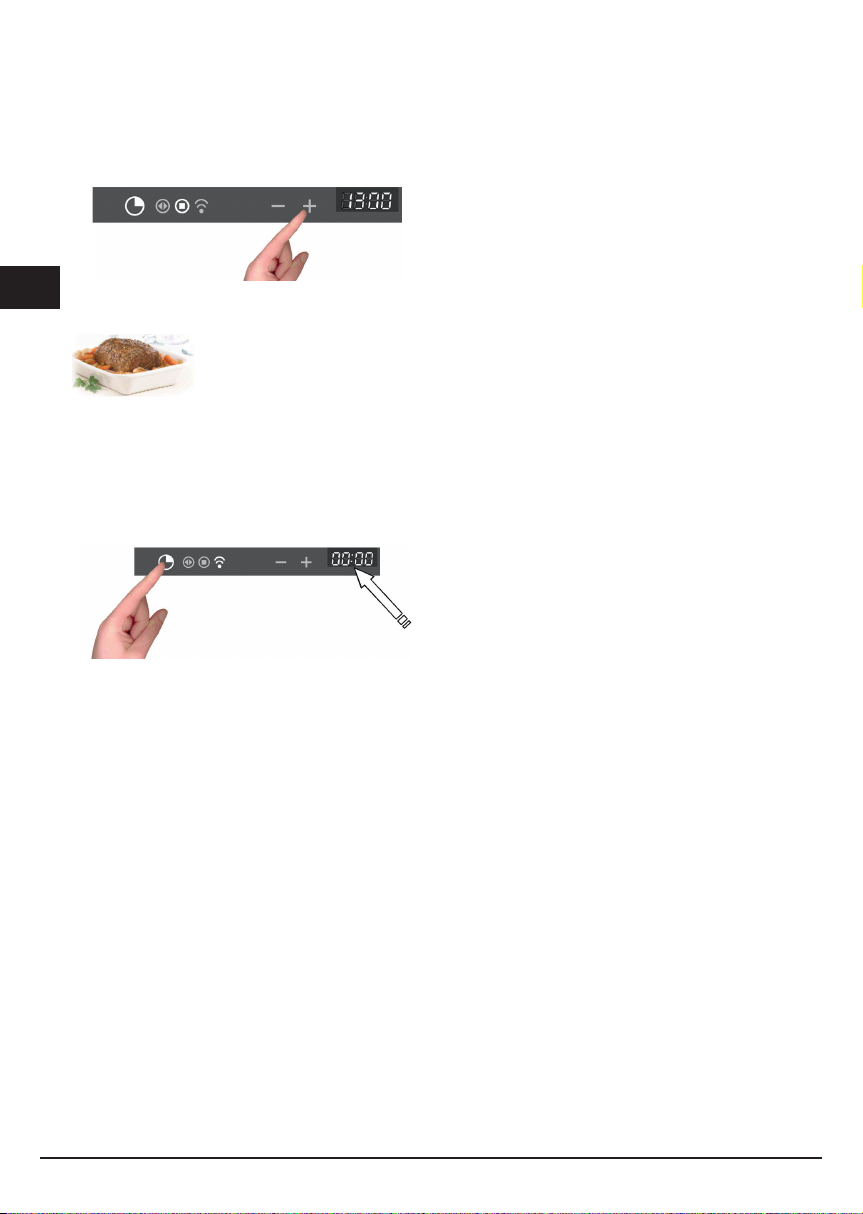
Regolazione dell’orologio
I
Il forno segnalerà l’avvenuto collegamento alla rete elettrica con un doppio segnale acustico.
Per regolare l’ora di sistema tenere attivo il tasto “FUNZIONI TIMER”
Ogni comando attivato viene confermato da un segnale acustico.
Regolare l’orologio con i tasti + e - : durante l’impostazione
lampeggiano i puntini separatori, l’ora viene acquisita
quando i puntini divengono ssi.
per almeno 3 sec.
AZIONI POSSIBILI A FORNO SPENTO
- Accensione luce del forno
La luce forno viene attivata/disattivata digitando il simbolo
come in gura.
- Cambio della Lingua
A forno spento è possibile cambiare la Lingua nel display selezionando
contemporaneamente
Poi con
scegliere la lingua e confermare la scelta con .
e il tasto + in basso a destra.
12 13
Page 13
- Impostazione funzione timer “contaminuti”
Si consulti la sezione apposita a pag 20.
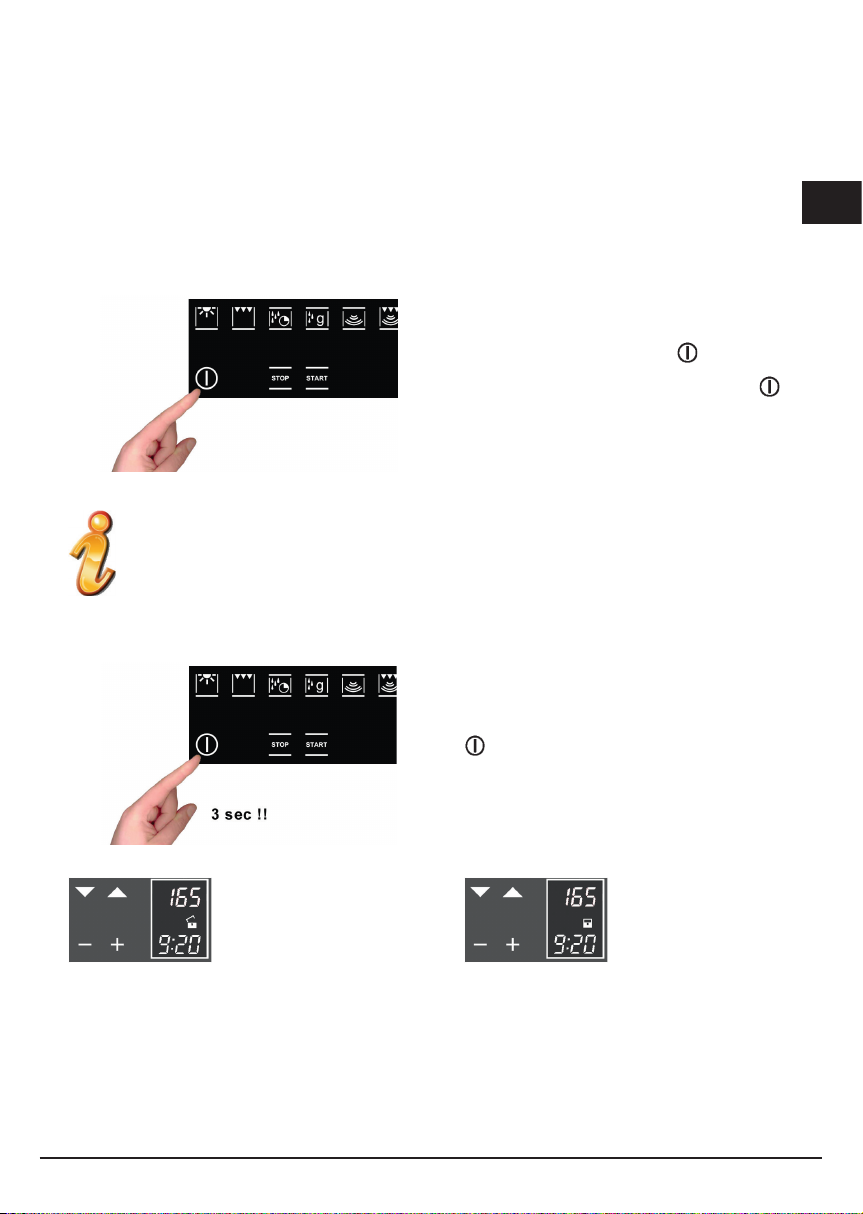
ACCENSIONE DEL FORNO
Il forno si accende agendo sul simbolo schematizzato
in gura.
per attivare le funzionalità del forno digitare sempre
parte le funzioni luce forno e timer che sono indipendenti
Il controllo attiva tutte le icone illuminandone lo sfondo.
NOTA: ricordarsi che l’accensione avviene solamente se la funzione chiave è disattivata
Per un minuto dall’accensione (appare la scritta ON sul display), il controllo aspetta che una funzione di
cottura venga scelta. In caso contrario interpreta l’accensione come accidentale e, per motivi di sicurezza,
spegne automaticamente il forno (appare la scritta OFF sul display per qualche secondo).
Funzione chiave (o sicurezza bambini)
La funzione chiave viene attivata/disattivata digitando il
tasto
per almeno 3 secondi.
Si può attivare e disattivare in qualsiasi momento e modo
di funzionamento del forno.
I
a
Il simbolo lucchetto
APERTO specica che
la funzione chiave non è
attiva.
Il simbolo lucchetto
CHIUSO specica che la
funzione chiave è attiva.
Page 14
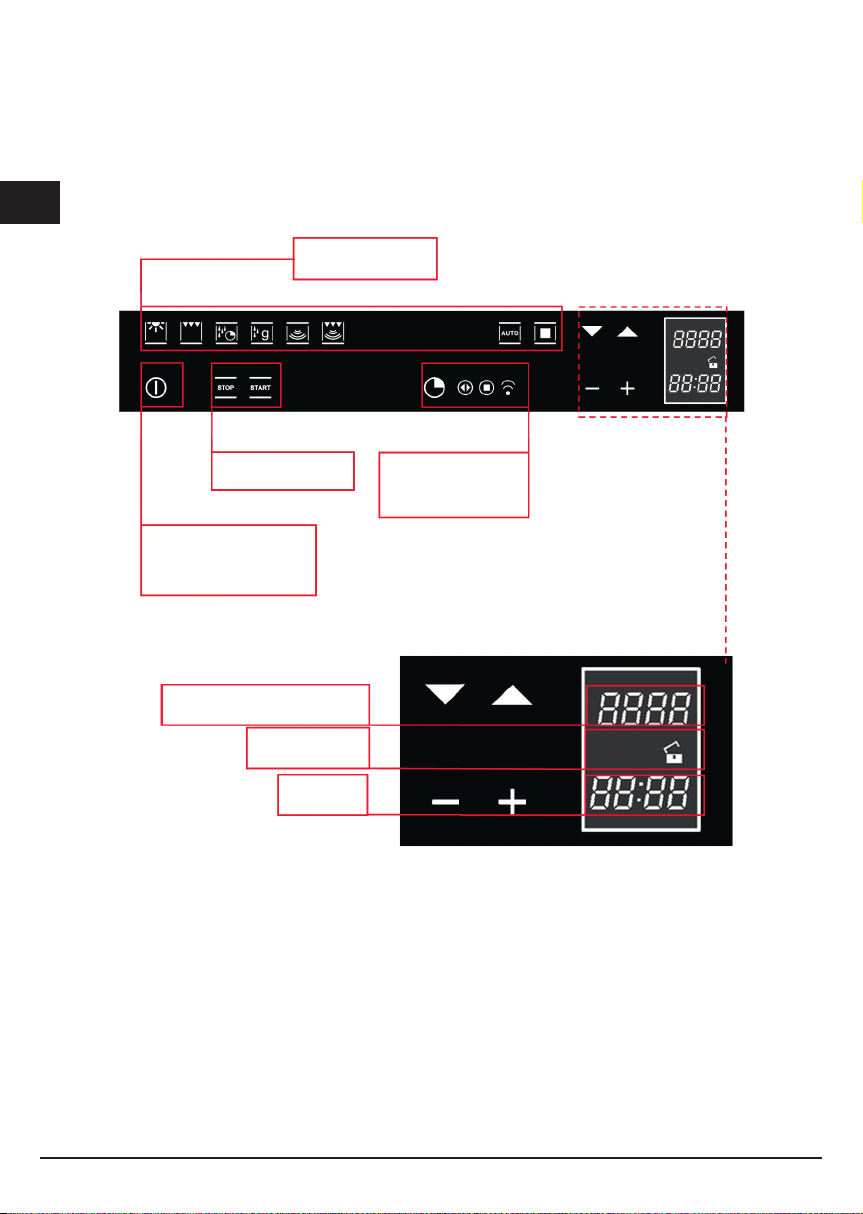
FUNZIONI PRINCIPALI
I
Panoramica del frontalino comandi
Funzioni cottura
Funzioni speciali
On/Off forno
On/Off blocco forno
Temperatura / Potenza
Blocco
Orologio
Le funzioni di cottura
Il controllo mette a disposizione ben sette funzioni speciche di cottura!
Per attivare una funzione è sufciente toccare il simbolo corrispondente. Ogni funzione ha una temperatura impostata
scelta in base a prove di cottura su ricette che tipicamente la utilizzano e possono essere facilmente variate a seconda
della propria esperienza.
Programmazione
del forno
14 15
Page 15
Funzionalità del forno
Lampada forno, rimane sempre accesa durante il funzionamento nelle modalità con microonde
e per risparmio energetico, viene gestita dal sistema, nelle altre modalità .
Tipo di cottura per la grigliatura o doratura dei cibi. La griglia con il cibo da cuocere va inserito
nel 2ª o 3ª posizione da sotto. Preriscaldare per almeno 2 minuti prima di inserire la pietanza.
Scongelamento a tempo
Scongelamento a peso
Microonde
Microonde combinato con la cottura con Grill
Accesso alle ricette pre-impostate
Nella seguente tabella indichiamo i risultati delle prove di cottura eseguite presso i nostri laboratori da un cuoco
professionista, in ogni caso si tratta di indicazioni e i valori che proponiamo servono per partire a sperimentare le
proprie ricette ed ottenere sempre i migliori risultati!
I
Page 16
Semplici gesti per cucinare
I
Bastano due semplici gesti per impostare una cottura grazie alla logica di controllo di ultima generazione: accendere il
forno e scegliere la funzione più idonea alla pietanza che state per cucinare…la scegliete e semplicemente la toccate!
Il controllo propone una temperatura per ogni funzione, è possibile in qualsiasi momento modicarla, ma se
la ritenete idonea non occorre fare altro, il forno si attiverà da solo in pochi secondi!
Regolazione della temperatura
Il controllo si avvale di una sonda temperatura con precisione di ± 5°C per la massima afdabilità delle temperature
di cottura richieste.
La modica della temperatura può essere eseguita in qualsiasi momento, dopo aver selezionato la funzione di cottura
basta agire sui simboli
Non occorre confermare la modica, il controllo si attiva dopo pochi secondi in maniera autonoma.
e il campo di regolazione varia da +50 °C a MAX.
Durante il riscaldamento il simbolo di grado centigrado
(°C) lampeggia ad indicare la termoregolazione per
raggiungere la temperatura scelta.
Al raggiungimento lo segnalerà con un segnale acustico.
NB: alcuni modelli possono avere la visualizzazione
della temperatura all’interno del forno istantanea no al
raggiungimento della temperatura impostata. Se durante
la fase di innalzamento voglio vericare la temperatura
impostata, digito indifferentemente uno dei tasti e
se voglio, con gli stessi, posso cambiare la temperatura
impostata.
Calore residuo
Durante la cottura dei cibi la struttura del forno immagazzina calore, questo calore è mantenuto isolato dal resto della
cucina grazie ad un isolamento termico generoso e ad alcuni accorgimenti di costruzione.
Questo calore viene disperso gradualmente nel tempo e può rappresentare ancora una risorsa in cucina se viene
gestito: il controllo indica la temperatura interna, dopo lo spegnimento del forno, no al raggiungimento dei 50°C.
16 17
Page 17
Sfruttate questa caratteristica per mantenere i cibi caldi, oppure per terminarne la cottura in maniera dolce!
Controllo della luce forno
Il controllo della luce è attivo su tutte le funzioni di cottura ed è indipendente da esse cioè può essere accesa o spenta,
a seconda delle Vostre necessità, quando lo volete!
Normalmente la luce del forno è tenuta accesa durante il riscaldamento e poi per tre minuti dopo il raggiungimento
della temperatura impostata. A partire da quel momento la luce forno viene spenta per motivi di risparmio energetico.
Per vericare la cottura può rendersi necessario accendere la luce interna, per questo basta toccare il simbolo della
luce:
resterà accesa per tre minuti per poi spegnersi da sola, naturalmente potete spegnerla subito dopo toccando
nuovamente il simbolo luce.
All’ apertura della porta si accende sempre la luce interna del forno.
PROGRAMMAZIONE DEL FORNO
(solo per la funzione )
La programmazione del forno mette a disposizione tre modalità per il controllo della durata di cottura. Sono disponibili
in abbinamento alle normali funzioni di cottura.
Le funzioni sono selezionabili in sequenza, da sinistra a destra, toccando il
simbolo orologio ad ogni tocco si illuminerà un simbolo, in sequenza.
I
Page 18
Programmazione timer: tempo di cottura
I
Una volta denito il tempo di cottura, il display visualizzerà ancora l’ora corrente, il simbolo
“durata cottura” sarà acceso.
A partire da ora inizia il conteggio. Trascorso il tempo indicato il forno lo segnalerà acusticamente, le resistenze
termiche vengono spente terminando quindi la cottura. Nel display apparirà la scritta “Programma terminato estrarre
la pietanza”: premere un tasto qualsiasi per interrompere la segnalazione acustica o aprire la porta.
Il forno, dopo 1 minuto, si spegnerà autonomamente se altre funzioni di cottura non vengono impostate.
Toccare una volta il simbolo timer, si accenderà
il simbolo relativo. Inoltre il display dell’orologio
sostituirà l’indicazione dell’ora corrente.
I puntini separatori lampeggiano ad indicare che è
possibile programmare il tempo di cottura
Programmazione timer: ora di fine cottura
Toccare due volte il simbolo timer, si accenderà il
simbolo relativo.
I puntini separatori lampeggiano ad indicare che è
possibile programmare l’ora di ne cottura.
18 19
Page 19

Impostare l’ora di ne cottura toccando i simboli “+”
e “-“.
Una volta denita l’ora di ne cottura, il display visualizzerà ancora l’ora corrente, il simbolo
“ne cottura” sarà acceso.
A partire da ora inizia il conteggio. Raggiunta l’ora impostata, il forno lo segnalerà acusticamente, le resistenze
termiche verranno spente, terminando quindi la cottura. Nel display apparirà la scritta “Programma terminato estrarre
la pietanza”: premere un tasto qualsiasi per interrompere la segnalazione acustica o aprire la porta.
Il forno, dopo otto secondi, si spegnerà autonomamente se altre funzioni di cottura non vengono impostate.
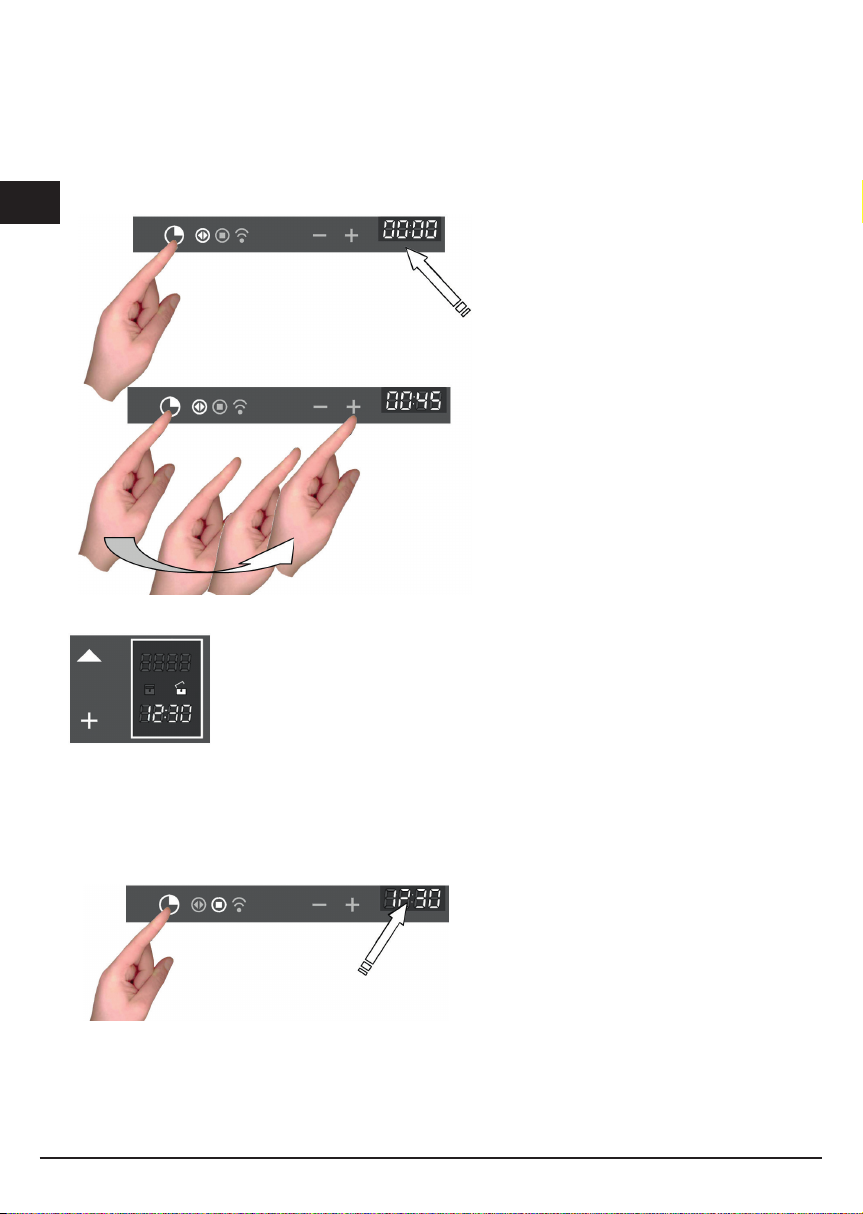
Programmazione timer: cottura posticipata
Tramite la combinazione delle due modalità “tempo di cottura” e “ora di ne cottura” si può impostare il forno in modo
che cominci la cottura ad un’ora posticipata rispetto all’attuale.
Per esempio, sono le ore 8:30 e state per uscire di casa ma volete che al vostro rientro alle ore 13:00 sia pronto un
arrosto, ecco come fare:
Preparate il cibo per la cottura,
infornatelo
I
Accendete il forno, scegliete la funzione di cottura e impostate la temperatura.
A questo punto impostate la durata di cottura,
supponiamo due ore.
Denite adesso l’ora di ne cottura : il controllo
normalmente somma all’ora attuale il tempo
di cottura e la propone come ora di ne
cottura, nel nostro caso proporrà le ore 10:30
(8:30+2:00).
Page 20
I
Modicate l’ora di ne cottura per farla coincidere con
quella da Voi desiderata, nel nostro esempio le 13:00.
Il forno si pone ora in attesa (stand-by) spegnendo la luce forno.
Il controllo attiverà autonomamente il forno alle ore 11:00 (13:00-2:00) e lo spegnerà alle 13:00,
al vostro rientro troverete l’arrosto pronto!
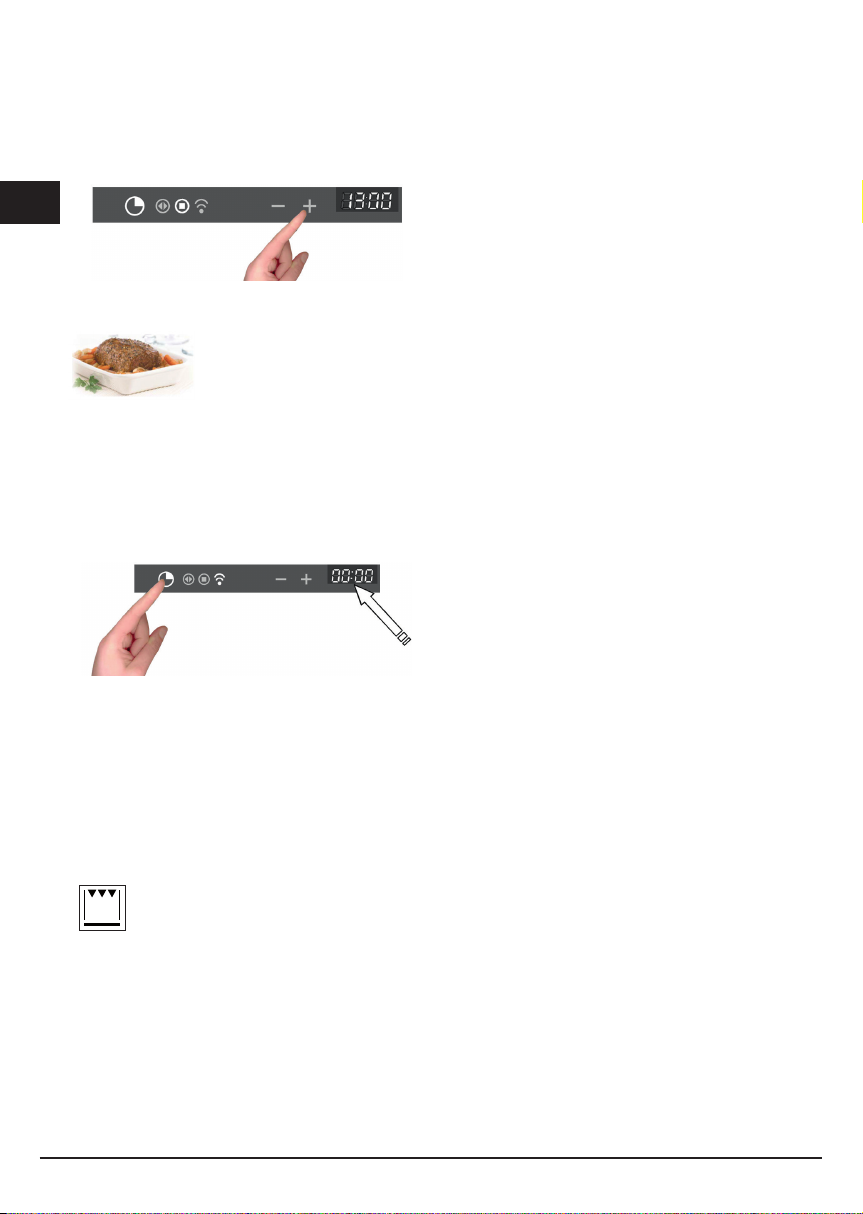
Programmazione del timer: contaminuti
Il contaminuti è una funzione del timer che è indipendente dal funzionamento del forno, cioè non blocca la cottura e
non spegne il forno, funziona come avvisatore acustico.
Lo potete impostare in qualsiasi momento, per esempio come promemoria di controllo della cottura ai fornelli, oltre
che del forno o di altre attività di cucina.
E’ disponibile anche a forno spento, in questo caso basta toccare una volta il simbolo delle funzioni timer.
Se invece lo utilizzate a forno acceso, dovete toccare in sequenza il simbolo funzioni timer tre volte:
I puntini separatori lampeggiano ad indicare che è possibile
impostare il valore.
Impostare i minuti agendo sui simboli “+” e “-“ a partire da ora inizia il conteggio. Trascorso il tempo indicato il
forno lo segnalerà acusticamente, lampeggerà il simbolo dedicato : premere un tasto qualsiasi per interrompere la
segnalazione acustica
Programmazione del timer: cancellazione del programma
Per cancellare una programmazione è necessario portare a zero il valore assegnato precedentemente, oppure
spegnere il forno.
LE FUNZIONI DI COTTURA TRADIZIONALI
Grill grande supercie. Regolazione del termostato da 50° a MAX.
20 21
Page 21

FUNZIONAMENTO CON MICROONDE
Le microonde vengono trasformate in calore negli alimenti. Il forno a microonde può essere utilizzato da solo oppure
in abbinamento a un altro tipo di riscaldamento. Questa sezione contiene informazioni relative alle stoviglie e istruzioni
su come impostare il forno a microonde.
AVVERTENZE PER LE
STOVIGLIE
Stoviglie adatte
Stoviglie non adatte
Test delle stoviglie
Sono appropriate le stoviglie termoresistenti in vetro, vetroceramica,
porcellana, ceramica o in materiale plastico refrattario. questi materiali sono
permeabili alle microonde.
E’ anche possibile utillizzare piatti di servizio. In questo modo non sarà più
necessario travasare gli alimenti.
Le stoviglie con decorazioni dorate o argentate possono essere utilizzate
soltanto nel caso in cui il costruttore garantisca che esse siano adatte all’uso
con il forno a microonde.
Si ricorda che quando si usa il forno in funzione microonde la stoviglia và
posizionata sul piatto rotante.
Le stoviglie in metallo non sono appropriate.
Il metallo non è permeabile alle microonde. Gli alimenti posti entro contenitori
in metallo restano freddi.
Attenzione! I componenti in metallo, per esempio o cucchiai contenuti nei
bicchieri devono restare ad una distanza non inferiore a 2 cm dalle pareti del
forno e dal lato interno della porta. Le scintille potrebbero infatti danneggiare
gravemente il vetro interno della porta.
Attenzione! la griglia piana deve essere rimossa per l’utilizzo in modalità
microonde e combinata. Utilizzarla unicamente per le funzionalità come forno
tradizionale.
Non attivare mai il forno a microonde senza aver prima inserito gli alimenti.
L’unica eccezione consentita è rappresentata dal test per le stoviglie.
In caso di dubbio circa l’adeguatezza delle stoviglie all’uso del forno a
microonde, si consiglia di effettuare il seguente test:
introdurre la pentola vuota nell’apparecchio per ½ - 1 minuto alla massima
potenza. Controllare regolarmente la temperatura. La pentola deve essere
fredda o tiepida. nel caso in cui sia calda o qualora si formino scintille, la
pentola non è adatta.
I
Page 22
Scongelamento a tempo
I
Accendo il forno agendo sul tasto ;
Seleziono la funzione SCONGELAMENTO a TEMPO
Con i tasti - + , posso modicare il tempo di scongelamento con step di 5 s.
Se tengo premuto - + per un tempo maggiore di 3 secondi la regolazione del tempo si velocizza;
Al termine delle impostazioni seleziono la funzione
countdown del tempo sul display.
Il tempo di scongelamento deve essere per forza impostato altrimenti lo
L’alimentazione del microonde sarà regolata automaticamente in modo da ottenere il migliore risultato possibile.
Il forno vi indicherà a un certo punto di RIVOLTARE LA PIETANZA oppure se non si può fare aprite e chiudete la porta
del forno per farlo proseguire nello scongelamento.
L‘avvisatore acustico e la scritta PROGRAMMA TERMINATO ESTRARRE LA PIETANZA che appare sul display
segnalano l’avvenuta conclusione del programma.
Scongelamento in base al peso
Accendo il forno agendo sul tasto
Seleziono la funzione SCONGELAMENTO in base al PESO
;
;
che sta lampeggiando, e inizia lo scongelamento con il
non funziona.
;
Compare la schermata:
Dopo aver selezionato la pietanza con e confermato
con il display visualizza il peso da impostare.
Partendo da un peso iniziale minimo di 100g con + posso aumentare o diminuire il valore del peso, poi con
confermo la scelta;
Al termine delle impostazioni seleziono la funzione
e il countdown del tempo.
L‘avvisatore acustico e la scritta PROGRAMMA TERMINATO ESTRARRE LA PIETANZA che appare sul display
segnala l’avvenuta conclusione del programma.
L’alimentazione del microonde sarà regolata automaticamente in modo da ottenere il migliore risultato possibile. Il
che sta lampeggiando, così inizia il programma di scongelamento
22 23
Page 23

forno vi indicherà a un certo punto di RIVOLTARE LA PIETANZA oppure, se non si può fare, aprite e chiudete la porta
del forno per farlo proseguire nello scongelamento.
Nella tabella sottostante sono illustrati i principali programmi di scongelamento a seconda della categorie principali
di alimenti:
Programma
Pane 100 – 800 2 – 19 10 - 20
Verdure 100 – 500 2 – 13 10 - 20
Carne 100 – 2000 2 – 43 20 - 30
Pesce 100 – 2000 2 – 40 20 - 30
Peso (g)
Tempo di
lavoro (min)
Tempo di
sosta (min)
FUNZIONE MANUALE: MICROONDE
Accendo il forno agendo sul tasto ;
Seleziono la funzione MICROONDE
Con i tasti posso regolare la potenza preimpostata con step di 150 W, a partire dal valore massimo di 900
W. Con i tasti - + imposto invece la durata cottura con step di 5s. Se tengo premuto - + per un tempo maggiore di 3
secondi la regolazione si velocizza;
Il tempo di cottura deve essere per forza impostato altrimenti lo
Al termine delle impostazioni seleziono la funzione
tempo sul display.
L‘avvisatore acustico e la scritta PROGRAMMA TERMINATO ESTRARRE LA PIETANZA che appare sul display
segnala l’avvenuta conclusione del programma.
ATTENZIONE : il forno memorizza sempre l’ultima potenza utilizzata !!!
;
non funziona.
che sta lampeggiando e inizia la cottura con il countdown del
FUNZIONE MANUALE: MICROONDE + GRILL
I
Accendo il forno agendo sul tasto ;
Seleziono la funzione MICROONDE + GRILL
Con i tasti posso regolare la potenza preimpostata con step di 150 W, a partire dal valore massimo di 450 W.
Con i tasti - + imposto invece la durata cottura con step di 5s.
Se tengo premuto - + per un tempo maggiore di 3 secondi la regolazione si velocizza;
Il tempo di cottura deve essere per forza impostato altrimenti lo
e sul display comparirà il tempo lampeggiante.
Al termine delle impostazioni seleziono la funzione
tempo sul display.
L‘avvisatore acustico e la scritta PROGRAMMA TERMINATO ESTRARRE LA PIETANZA che appare sul display
segnala l’avvenuta conclusione del programma.
;
non funziona, non si può dare avvio alla cottura
che sta lampeggiando e inizia la cottura con il countdown del
Page 24

FUNZIONE AUTOMATICO MICROONDE: RICETTE
I
NOTA: la sequenza delle indicazioni del display di seguito elencata è solo a titolo di esempio. Potrebbe non esserci
una completa corrispondenza.
Per accedere alla funzione ricette eseguire la seguente procedura:
Accendo il forno col tasto
Seleziono la funzione AUTOMATICO
;
Il display visualizza le 2 opzioni:
- ricette personali;
- ricette impostate
Scegliere l’impostazione desiderata con
con il tasto
compare il seguente menù;
agire sui tasti
tasto
confermo la scelta;
per scegliere la tipologia della pietanza e con il
confermo la scelta.
;
agire sui tasti per scegliere la tipologia e con il tasto
confermo la scelta.
agire sui tasti per scegliere la tipologia e con il tasto
confermo la scelta.
24 25
Page 25
Compare la schermata del peso e agendo sui tasti scelgo
uno dei valori pre-impostati e con il tasto confermo la scelta.
Al termine delle impostazioni il display riassume la ricetta impostata.
I due punti del tempo durata cottura (00:40) saranno lampeggianti ad
indicare la possibilità di poterlo modicare.
Per modicarlo agire sui tasti - + .
I
Oppure seleziono direttamente la funzione
e così inizia il programma cottura con il countdown del tempo
prestabilito sul display.
ATTENZIONE: certe ricette usano il preriscaldamento, quindi introdurre la pietanza
una volta che il forno sarà arrivato in temperatura e nel display comparirà la scritta
“PRERISCALDAMENTO TERMINATO INSERIRE LA PIETANZA”
Una volta terminata la cottura sul display appare la scritta intermittente “PROGRAMMA
vedi come salvare le ricette nel paragrafo successivo
TERMINATO, ESTRARRE LA PIETANZA”, simultaneamente si accende l’avviso acustico
che rimane tale no a che non agisco premendo un qualsiasi tasto o aprendo la porta.
N.B.: Se vengono eseguite cotture con i parametri del tempo modicati delle ricette
preimpostate, durante il bip sonoro a termine cottura comparirà:
che sta lampeggiando
Page 26
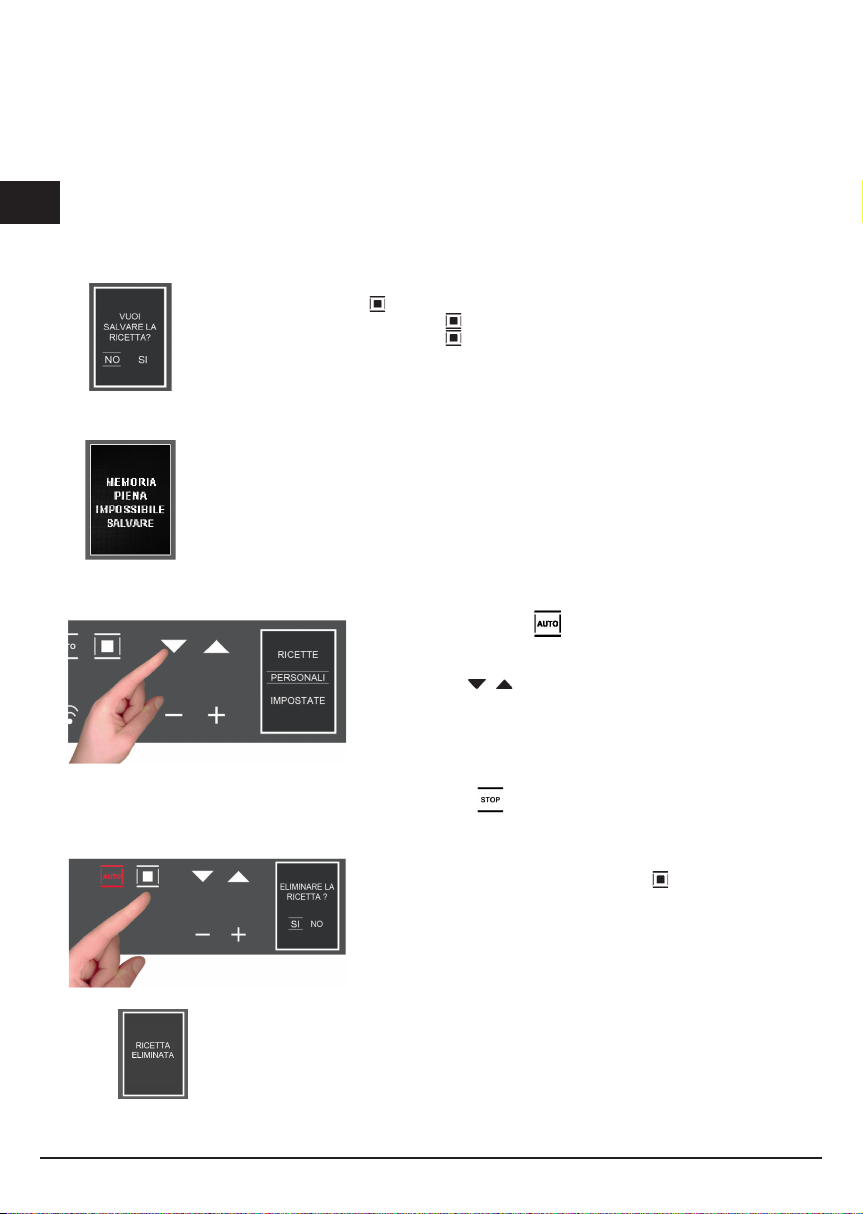
PERSONALIZZAZIONE DELLE RICETTE
I
Una volta modicato il tempo di cottura di una ricetta pre-impostata ed eseguita, possiamo andare a salvarla per la
prossima volta, memorizzando i nuovi parametri usati (peso e tempo di cottura).
A ne ciclo di cottura della ricetta modicata apparirà l’icona sotto e per poterla salvare dovrò agire in questo modo:
Ogni volta che accedo al menù “ RICETTE PERSONALI “ trovo salvate in elenco le mie ricette.
- con il tasto + scegliere “SI”
- dare conferma con il tasto
- modicare con + e - e confermare con , appare il peso utilizzato,
- modicare con + e - e confermare con
“RICETTA SALVATA POS. 001”, e così via in numero crescente
si visualizza il tempo utilizzato,
, comparirà il messaggio
Se la memoria dedicata al salvataggio delle ricette personali dovesse essere
insufciente il display visualizza il messaggio: “MEMORIA PIENA IMPOSSIBILE
SALVARE”.
Prima di salvare la mia ricetta devo cancellarne altre dal menù in questo modo:
- seleziono la funzione ;
- digitando entro nella sezione “RICETTE PERSONALI” dove trovo
tutte le ricette salvate;
- con i tasti scorro il menù per andare a selezionare la
ricetta che voglio eliminare.
NB: i nomi vengono dati per default dal menù;
Una volta visualizzata la ricetta da eliminare seleziono il tasto
schermata successiva:
Di default la selezione sarà impostata su NO, ma premendo i tasti
di scroll + e - seleziono SI e confermo con ;
- Il display comunica l’avvenuta eliminazione della ricetta;
26 27
tenendolo premuto no alla comparsa della
Page 27
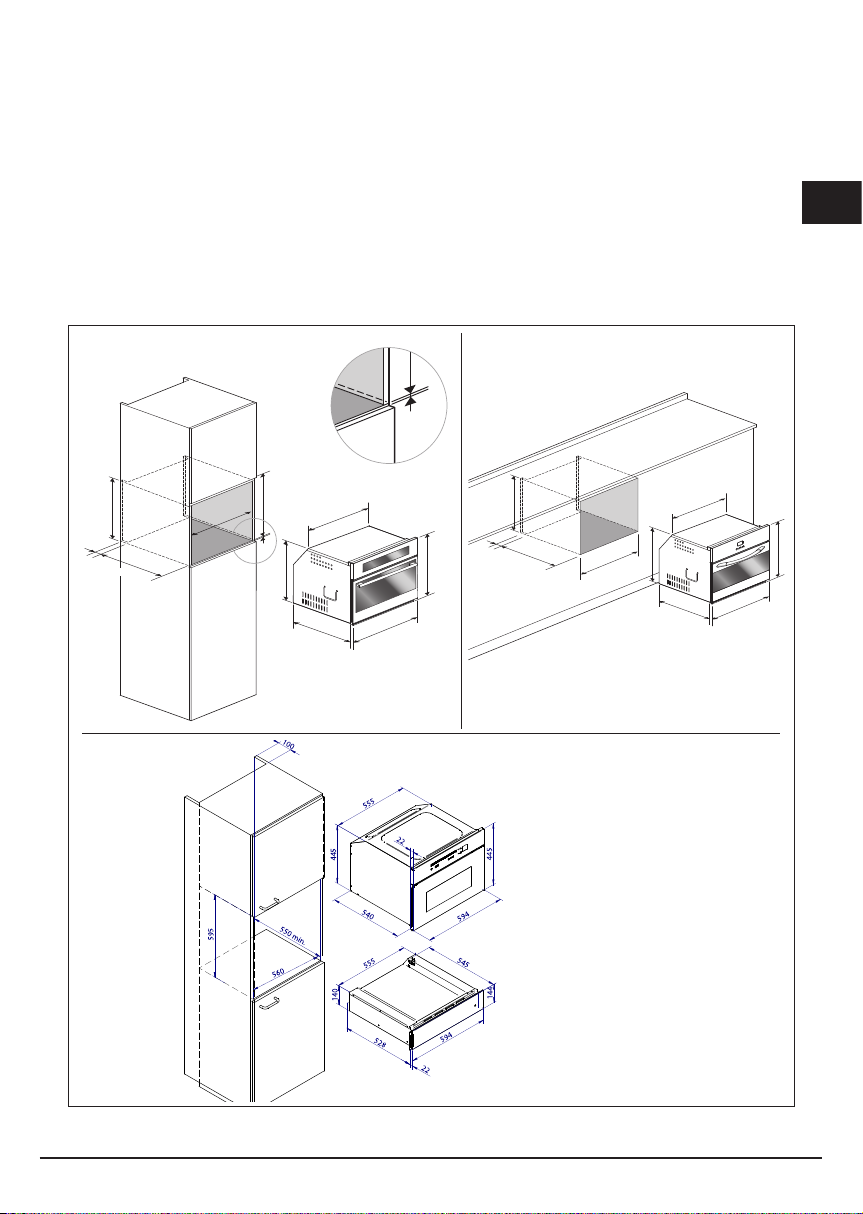
PER L’INSTALLATORE
min 3
533
455
594
540
560
min
460
432
50
510
Incasso del forno
Il forno può essere installato sotto un piano di cottura, in colonna,oppure abbinato al relativo cassetto scaldavivande.
Le dimensioni dell’incasso devono essere come riportato in gura.
Il materiale del mobile deve essere in grado di resistere al calore. Il forno deve essere centrato rispetto alle pareti
del mobile e ssato con le viti e bussole che sono fornite in dotazione.
I
min
450
50
510
min 458
560
min 3
540
432
533
455
594
Page 28
DATI TECNICI
I
Alimentazione di corrente 220-240 V~, 50Hz
Potenza massima assorbita 3200 W
Potenza microonde 900 W
Grill 1500 W
Frequenza microonde 2450 MHz
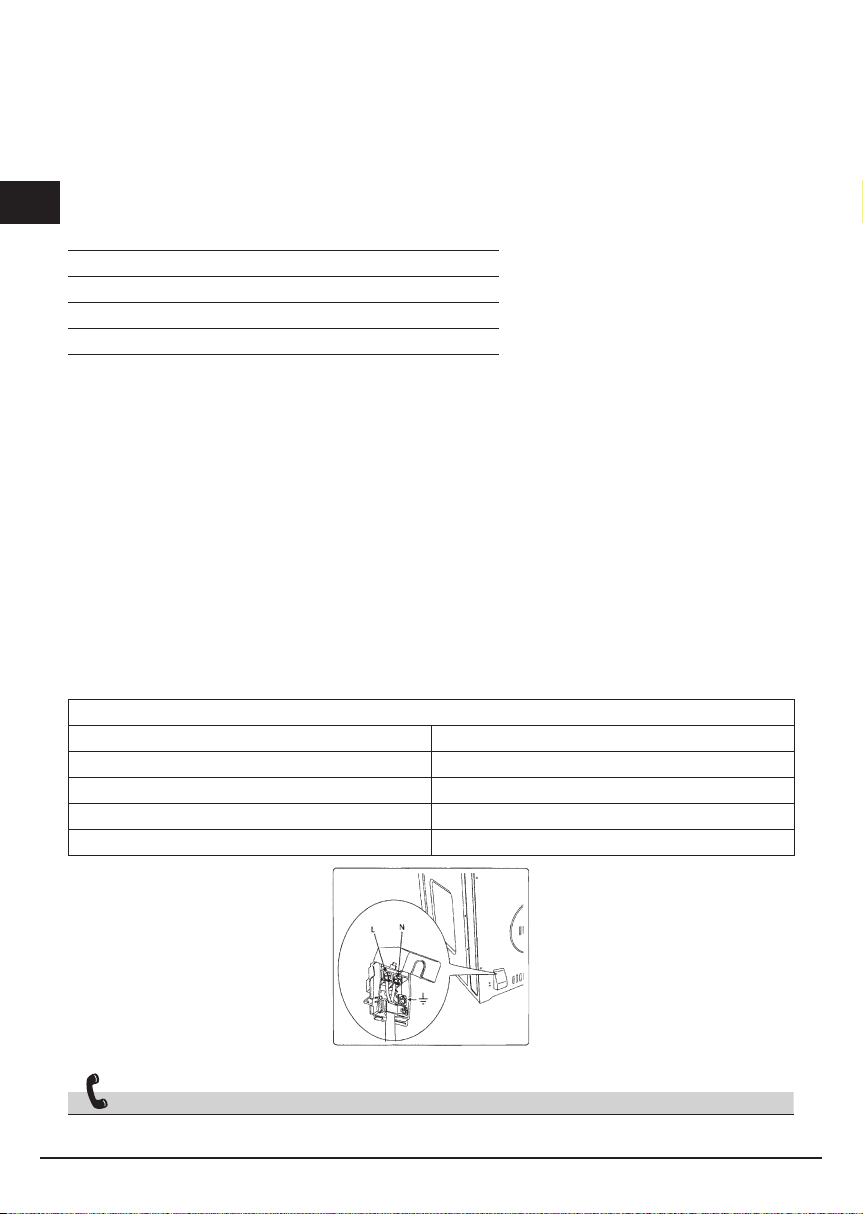
ALLACCIAMENTO ELETTRICO
Prima di effettuare l’allacciamento elettrico accertarsi che:
- le caratteristiche dell’impianto siano tali da soddisfare quanto indicato sulla targa matricola applicata sul fronte del
forno;
- l’impianto sia munito di un efcace collegamento di terra secondo le norme e le disposizioni di legge in vigore.
La messa a terra è obbligatoria a termini di legge. Il cavo in nessun punto dovrà raggiungere una temperatura
superiore di 50° C quella ambiente.
Questo forno deve essere connesso all’alimentazione per mezzo di un cavo di alimentazione con un’apposita spina
che sia compatibile con la presa montata nell’impianto elettrico che alimenta questo forno.
Se un apparecchio sso non è provvisto di cavo di alimentazione e di spina, o di altro dispositivo che assicuri la
disconnessione dalla rete, con una distanza di apertura dei contatti che consenta la disconnessione completa nelle
condizioni della categoria di sovratensione III, tali dispositivi di disconnessione devono essere previsti nella rete di
alimentazione conformemente alle regole di installazione.
La presa o l’interruttore onnipolare devono essere facilmente raggiungibili con l’apparecchiatura installata.
N.B. Il costruttore declina ogni responsabilità nel caso che quanto sopra e le usuali norme antinfortunistiche non
vengano rispettate.
TIPI E DIAMETRO MINIMO DEI CAVI
SASO
H05RR-F 3x1,5 mm² H05RR-F 3x2,5 mm²
H05VV-F 3x1,5 mm² H05VV-F 3x2,5 mm²
H05RN-F 3x1,5 mm² H05RN-F 3x2,5 mm²
H05V2V2-F 3x1,5 mm² H05V2V2-F 3x2,5 mm²
SERVIZIO ASSISTENZA TECNICA: 199.151.195
Page 29
I
Italiano
GB
FR
DE
ES
PT
English
Français
Deutsch
Español
Português
GB
29
Page 30

Dear Customer
We would like to thank you and congratulate you on your choice.
This new product has been carefully designed and built using top quality materials, and
meticulously tested to ensure that it meets all your culinary requirements.
Please read and observe these simple instructions, which will enable you to achieve
GB
excellent results from the very rst time you use it.
,
IMPORTANT INSTRUCTIONS AND SAFETY
WARNINGS
READ CAREFULLY AND KEEP
FOR FUTURE USE
30 31
Page 31

THIS PRODUCT IS DESIGNED FOR DOMESTIC USE. THE MANUFACTURER DECLINES ALL RESPONSIBILITY FOR
PERSONAL INJURY OR PROPERTY DAMAGE DERIVING FROM INCORRECT INSTALLATION OR IMPROPER, ERRONEOUS
OR UNSUITABLE USE.
THE APPLIANCE MUST NOT BE USED BY PEOPLE (INCLUDING CHILDREN) WITH PHYSICAL, SENSORIAL OR MENTAL
IMPAIRMENTS, OR BY PEOPLE WITHOUT THE NECESSARY EXPERIENCE OR KNOWLEDGE, UNLESS THEY ARE
SUPERVISED OR INSTRUCTED IN THE USE OF THE APPLIANCE BY A PERSON RESPONSIBLE FOR THEIR SAFETY.
CHILDREN MUST BE SUPERVISED TO ENSURE THAT THEY DO NOT PLAY WITH THE APPLIANCE. DO NOT PLACE
ALUMINIUM FOIL, POTS OR SIMILAR OBJECTS IN CONTACT WITH THE BASE INSIDE THE OVEN FOR COOKING. THE
HEATING ACTION OF THE LOWER HEATING ELEMENT CAUSES OVERHEATING OF THE LOWER PART OF THE OVEN
CAUSING DAMAGE AND SERIOUS CONSEQUENCES (RISK OF FIRE) EVEN TO THE COUNTER UNDER THE OVEN.
THE APPLIANCE GETS VERY HOT DURING USE. WARNING: DON’T TOUCH THE HEATING ELEMENTS INSIDE THE OVEN.
ATTENTION:
ATTENTION:
ATTENTION:
ATTENTION:
If the door or the gasket seals of the door are damaged, the oven may not be
used until it repaired by a qualied service technician;
It dangerous for anyone other than a service technician to perform any
maintenance or repairs that involve the removal of any cover that protects
against exposure to microwaves;
Liquids or other foods must not be heated in air-tight contains because they
could explode;
Children may not use the oven without supervision until they have been
adequately instructed in its safe use and understand the dangers of using it
incorrectly;
only use untensils that are appropriate for microwave ovens;
when heating food in plastic or paper containers, check the oven frequently
because of the risks of re;
if you see smoke coming out, turn off the appliance or remove its plug and
keep the door closed to extinguish any ames;
heating beverages in the microwave oven can cause a delayed boil-over, so
be careful when handling the container;
the contents of baby bottles and baby food in jars must be mixed or shaken
and their temperature must be checked before feeding to avoid scalding;
eggs in the shell and whole hardboiled eggs must not be heated in microwave
ovens because they could explode even after the end of heating in the
microwave;
a detailed explanation for cleaning the gasket seals of the doors of the cavity
and adjacent parts;
the oven must be cleaned periodically and all food residues must be removed;
failure to keep the oven clean could cause deterioration of the surfaces that
could reduce the life of the appliance and cause dangerous conditions;
Do not use rough abrasives or sharp metal scrapers to clean the glass door
of the oven because they could scratch the surface and cause the glass to
shatter.
Do not use steam cleaners to clean the appliance.
GB
WARNINGS FOR
MICROWAVE OVENS
Food preparation
Danger of re!
Only use the microwave function for the preparation of food to be eaten. Any
other uses can be dangerous or cause damage.
For example, heated slippers or pillows lled with grain or cereals can catch
re even after several hours.
Page 32

Pots and pans
GB
Microwave power and duration
Packaging
Beverages
Danger of injury!
Porcelain and ceramic crockery can have small holes in the handles and cover.
There can be cavities hidden behind these holes. If water gets into these
cavities, the crockery could break.
Do not use crockery that is unsuitable for microwave ovens.
Danger of burns!
The heat of the food can heat the dish. Always use a pot holder to remove
dishes and accessories from the cooking chamber.
Danger of re!
Never set values that are too high for the microwave power or the cooking
time. The food could catch re and damage the appliance. Follow the rules in
these instructions.
Danger of re!
Never heat food in thermal packaging.
Food in containers made of plastic, paper or other inammable materials must
be watched constantly.
Danger of burns!
Air-tight packaging can explode. Follow the instructions shown on the
package. Always use a pot holder to remove dishes.
Danger of burns!
When heating liquids, boiling can be delayed.
This means that the boiling temperature has been reached without forming
the typical little steam bubbles. Even a slight knock can cause the sudden
overow of liquid or sprays.
When heating liquids, always put a spoon in the container to avoid delayed
boiling.
Foods for newborns
Danger of explosion!
Never heat beverages or other types of food in covered containers.
Never heat alcoholic beverages excessively.
Danger of burns!
Never heat baby foods in a covered container. Always remove the cover or
nipple.
When nished heating, always carefully shake or mix so that the heat is evenly
distributed.
Test the temperature before giving the food to the baby.
32 33
Page 33

Foods with skin or peel
Drying foods
Foods with low water content
Oil
CAUSES OF DAMAGE
Juice leaking from fruit
Technical breakdown
Cooling with the door of the
appliance open
Very dirty gasket seal
Using the door of the appliance
as a support surface
Using the microwave without
food in the chamber
Moist foods
Danger of burns!
Never cook eggs in the shell. Never heat hard-boiled eggs because they could
explode even after the microwave is turned off. This also goes for molluscs
and crustaceans.
In the case of fried eggs, rst pierce the yolk.
In the case of foods with a hard peel or skin like apples, tomatoes, potatoes or
sausage, the peel or skin could explode.
Pierce the peel or skin before cooking.
Danger of re!
Never dry food in the microwave.
Danger of re!
Never defrost or heat foods with low water content, like bread, for too long or
at an excessive power.
Danger of re!
Never use the microwave to heat just oil.
When preparing sweets containing very juicy fruit, do not overll the baking
dish. Fruit juices that overow the baking dish can leave indelible stains.
Never use enamelled baking dishes in the microwave because it could cause
a technical breakdown.
The cooking chamber must only be cooled with the door closed. Check that
nothing is stuck on the door of the appliance.
Even if the door is only ajar, nearby cabinets can be damaged over time.
If the gasket seal is very dirty, the door of the appliance does not close correctly during operation. The surfaces of nearby cabinets can be damaged.
Always keep the gasket seal clean.
Do not rest or lean on the open door of the appliance and do not put dishware or accessories on it.
Only turn on the microwave after you have put the food in the cooking chamber. Without food inside, the appliance can become overloaded. The only
exception allowed are brief tests of dishware (in this regard, see the warnings
about pots and pans).
Do not leave moist foods in the cooking chamber for extended periods of
time. They can damage the enamel.
GB
Page 34

IMPORTANT
The oven’s identication plate is even accessible when the appliance is installed. This identication plate, which is
visible when you open the door, shows all the information you will need when requesting replacement parts for the
appliance.
GB
FIRST USE
The oven should be thoroughly cleaned with soap and water and carefully rinsed.
Heat the oven for about 30 minutes at the maximum temperature; this eliminates all the residual manufacturing oils
that could cause unpleasant odours during cooking. Use the grill function without accessories in the oven. Before
using the accessories for the rst time, clean them carefully with a very hot alkaline washing solution and a soft cloth.
ASSEMBLING AND DISASSEMBLING THE FLAT GRILL
To remove the at grill, pull the grill towards you until it stops and then lift, by pulling upwards, until it comes completely
out.
To put the at grill back in, insert it at a 45-degree angle and then position it horizontally and push it all the way in to
the end of the grill track.
If the at grill has a drip-pan (tray), to remove it, lift slightly and slide it towards you. To reinsert it, slide it back until it
is correctly seated.
34 35
Page 35

Important:
As a safety precaution, before cleaning the oven, always disconnect the plug from the outlet or remove
the appliance’s power cord. In addition, avoid using acid or alkaline substances such as lemon,
vinegar, salt, tomatoes, etc.). Avoid using products containing chlorine, acids or abrasives, especially
for cleaning the painted walls.
RESPECT FOR THE ENVIRONMENT
The documentation for this appliance is printed on paper bleached without chlorine or recycled paper to contribute to
protecting the environment. The packaging was designed to prevent damage to the environment; they are ecological
products that can be recovered or recycled.
Recycling the packing saves raw materials and reduces the volume of industrial and domestic waste.
THE PACKING MATERIAL is 100% recyclable and marked with the recycling symbol. Dispose of in conformity with
local law. The packing material (plastic bags, polystyrene parts, etc.) must be kept out of the reach of children because
it is potentially dangerous. THIS APPLIANCE is marked in conformity with European Directive 2002/96/EC, Waste
Electrical and Electronic Equipment (WEEE). By making sure that this product is disposed of correctly, the user
contributes to preventing potential negative consequences for the environment and health.
THE SYMBOL on the product or accompanying documentation indicates that this product must not be treated
as domestic waste but must be delivered to a suitable collection point for the recycling of electrical and
electronic equipment.
DISPOSAL MUST BE MADE in conformity with local laws on waste disposal.
FOR ADDITIONAL INFORMATION about the treatment, recovery and recycling of this product, contact the local office
of competence, the domestic waste collection service or the store where the product was purchased.
BEFORE SCRAPPING, make it unusable by cutting the electrical cord.
GB
Page 36

MICROWAVE OVEN M45
Command Overview
GB
STANDARD COOKING FUNCTION: from 1 to 2;
TEMPERATURE SETTING, COOKING TIME: 19 and 20;
ON/OFF + KEY (CHILD LOCK): 23;
FUNCTIONS WITH MICROWAVES: from 3 to 6;
FUNCTIONS for RECIPES: 7 and 8;
POWER AND MENU SCROLL FUNCTIONS: 9 and 10;
TIMER FUNCTIONS: 20;
SETTING THE TIMER: 15 and 16;
1 oven light;
2 standard cooking function - grill;
3 defrosting by time;
4 defrosting by weight;
5 microwave cooking function - traditional microwaves;
6 microwave cooking function - microwaves + grill;
7 automatic settings function (recipes);
8 conrm settings function;
9 scroll menu downwards function, decrease power;
10 scroll menu upwards function, increase power;
11 temperature display function;
12 key enabled/disabled function;
13 timer display function;
14 countdown function;
15 increase settings function;
16 decrease settings function;
17 timer function “minute-counter”;
18 timer function “end cooking”;
19 timer function “cooking time”;
20 timer function;
21 “START” function - start operation;
22 “STOP” - turn-off operation;
23 “ON/ OFF” and “key (child lock)” function;
Note: all settings/function changes are conrmed by a beep.
INTRODUCTION TO THE OVEN
Dear Customer, your new oven is controlled by an electronic board that constantly monitors its operation to improve
its performance.
The touch controls are state-of-the-art, precise and reliable.
36 37
Page 37

The interface is elegant, orderly and discrete, more intuitive than ever!
A few buttons, many functions and no combination or sequence is difcult to enter, so you can concentrate on
following the recipe and the oven is ready in two clicks!
Installation and hook-up
Dear Customer, this oven is a sophisticated electronic appliance, classied as a durable good. Its installation requires
qualied professionals for both the hook-up of the power line and itsplacement in the kitchen counter.
(SEE ASSEMBLY INSTRUCTIONS ON PAGE 53)
Before hook-up
When the oven is connected to the electric mains for the rst time, the display will ask you to select your language;
use the buttons
use the button
from now on, the language choice will remain xed even when their are power outages.
NOTE: if a language other than yours appears on the display at rst power-on, see the instructions on page 38 to
change it.
Now, it goes into demonstration mode
Demonstration mode
This is the mode that the oven is normally in every time that there is a power failure and, consequently, when it is rst
hooked-up:
the purpose is to show how you can control it with a recorded sequence of commands.
In this mode, the oven is never REALLY turned on, i.e., the heating elements are never powered!
The control panel is INACTIVE and, so, the oven will not respond to commands!
to select the language you want;
to conrm the choice;
GB
To disable the demonstration mode, touch the light symbol
for ve seconds:
and ready for turning on.
Now you can set the time but it is not necessary for turning
on the oven.
the control will go to normal operation
Page 38

Setting the clock
GB
The oven will signal that it is connected to the power mains with a double beep.
To set the system time, press the “TIMER FUNCTIONS” button
Each command activated is conrmed by a beep.
Set the clock with the + and - buttons: during setting the
separator dots ash, the time has been set when the dots
remain steady on.
for at least 3 seconds
ACTIONS THAT ARE POSSIBLE WITH THE OVEN OFF
- Turn on oven light
The oven light is turned on/off by touching the symbol as
shown in the gure.
- Change the Language
With oven off it is possible to change Language of the display by simultaneously selecting
the lower right.
Then use
to select the language and conrm the choice with .
38 39
and the + button in
Page 39

- Setting the “minute-counter” timer function
See the appropriate section on page 46.
TURNING ON THE OVEN
Turn the oven on by pressing the symbol shown in
gure.
to activate the oven functions, always press
the light and timer functions, which are independent
The command activates all the icons by lighting up their
backgrounds.
NOTE: Remember that the oven only turns on if the key function is deactivated
The word ON appears on the display for a minute. The control is waiting for you to select a cooking function.
Otherwise, the oven assumes that it was turned on by accident and, for safety reasons, it automatically turns
off (displaying the word OFF for several seconds).
Key (or child safety) function
The key function is activated/deactivated by pressing the
button for at least 3 seconds.
You can activate and deactivate the operating mode of the
oven at any time.
GB
except for
The padlock OPEN symbol
means that the key function
is not active.
The padlock CLOSED
symbol means that the key
function is active.
Page 40

MAIN FUNCTIONS
Overview of the command panel
GB
Cooking functions
Special functions
Oven ON/OFF
Lock oven ON/OFF
Temperature/Power
Lock
Clock
The cooking functions
The provides seven specic cooking functions!
To activate a function, just touch the corresponding symbol
Each function has a temperature setting selected on the basis of cooking tests of the recipes that are typically used,
which can be easily changed based on your own experience.
Programming the
oven
40 41
Page 41

Oven functions
The oven light is always on during operation in microwave mode and, to save energy, is
managed by the system in the other modes.
Type of cooking for grilling or browning foods. The grill with the food to be cooked is placed
in the 2nd or 3rd position from the bottom. Pre-heat for at least 2 minutes before putting in
the dish.
Time defrosting
Weight defrosting
Microwaves
Microwaves combined with grill cooking
Access to preset recipes
The table below shows the results of the cooking tests conducted in our laboratories by a professional cook. In any
case, these are only indicative and the values that we have selected are only a starting point for your to experiment
with your own recipes to obtain better results!
GB
Page 42

Simple cooking commands
Thanks to state-of-the-art controls, only two touches are required to set a cooking mode: turn on the oven and select
the most suitable function for the dish you are about to cook… you choose it and you touch it!
GB
The control suggests a temperature for each function, which you can change at any time, but if you consider
it suitable, you don’t need to do anything else, the oven will start by itself in just a few seconds!
Setting the temperature
The uses a temperature probe that is accurate to ±5 °C for the maximum reliability of the cooking temperatures
requested.
You can change the temperature at any time. After selecting the cooking function, just touch the symbols
the setting range varies from +50 °C to MAX.
You don’t need to conrm the change, the control turns on by itself after a few seconds.
and
During heating, the centigrade symbol (°C) ashes
to indicate that it is heating up to reach the selected
temperature. When the temperature is reached, it beeps.
NOTE: some models may display the current temperature
in the oven until the temperature set is reached. If you want
to check the temperature set, press any one of the keys
and, if you wish, you can use them to change the
temperature set.
Residual heat
While cooking food, the structure of the oven stores heat. This heat is kept isolated from the rest of the kitchen thanks
to generous heat insulation and certain construction techniques.
This heat is gradually dissipated over time and can still be a resource in the kitchen, if it is managed: the control shows
the internal temperature after the oven is turned off until it falls to 50 °C.
42 43
Page 43

Use this characteristic to keep foods warm or to complete their cooking gently!
COven light control
The oven light control is active in all cooking functions and is independent of them, i.e., it can be turned on or off
depending on the need, whenever you want!
The oven light is normally kept on during heating and, then, for three after the temperature setting is reached. After
that time, the light is turned off to save energy.
To check how the food is cooking, you must turn on the inside light. To do this, just touch the light symbol:
stay on for three minutes and then turn off by itself. Of course, you can turn it right away by touching the light symbol
again.
When you open the door, the light inside the oven always turns on.
it will
PROGRAMMING THE OVEN
(only for the function
The programming of the oven provides three modes for controlling the cooking time. They can be used in combination
with normal cooking functions.
)
The functions can be selected in sequence, from left to right, by touching
the clock symbol.
At each touch, a symbol lights up in sequence.
GB
Page 44

Timer programming: cooking time
Touch the timer symbol once and the relative
symbol will light up. Plus, the clock display will
replace the current time:
GB
The separator dots ash to indicate that you can
program the cooking time.
Once the cooking time is entered, the display will ash the current time again and the
“cooking time” symbol will be lit.
The countdown begins now. After the indicated time has elapsed, the oven will beep and the heating elements, and
cooking, will be turned off. The following words will appear on the display: “Program nished remove the dish”: press
any button to stop the beeping or open the door.
After one minute, the oven will automatically turn off, if other cooking functions have not been set.
Timer programming: end-of-cooking time
Touch the timer symbol two times and the relative
symbol will light up.
The separator does will ash to indicate that you can
set the end-of-cooking time.
44 45
Page 45

Set the end-of-cooking time by touching the “+” and
“-” symbols.
Once the end-of-cooking time is entered, the display will ash the current time again and the
“end-of-cooking time” symbol will be lit.
The countdown starts now. When the set time has been reached, the oven will beep and the heating elements will
turn off, ending cooking. The following words will appear on the display: “Program nished remove the dish”: press
any button to stop the beeping or open the door.
After eight seconds, the oven will automatically turn off, if other cooking functions have not been set.
Timer programming: delayed cooking
By combining the two modes, “cooking time” and “end-of-cooking time”, you can program the oven so that cooking
starts later than the current time.
For example, if you want to go out at 8:30 and you want a roast to be ready when you return at 13:00, do this:
Prepare the food for cooking and
put it in the oven
GB
Turn on the oven, select the cooking function and set the temperature.
Then set the cooking time, which we assume to be
two hours.
Now, set the end-of-cooking time: the control
normally adds the cooking time to the current
time, so it proposes an end-of-cooking time,
which in our case would be 10:30 (8:30+2:00).
Page 46
Change the end-of-cooking time to what you want, in our
example 13:00
GB
The oven goes to standby mode, turning off the oven light.
The control automatically turns the oven on at 11:00 (13:00-2:00) and turns it off at 13:00. The
roast will be ready when you return!
Programming the timer: minute-counter
The minute-counter is a function of the timer that is independent from the operation of the oven, i.e., it does not stop
cooking or turn off the oven but functions as an alarm. You can set it at any time, such as to remind you when to check
cooking on the burners, in addition to the oven, or for other kitchen tasks.
It is even available when the oven is off and, in this case, just touch the timer function symbol one time.
But, if you are using it with the oven on, you must touch the time function symbol three times:
The separator dots ash to indicate you can set the time.
Touch the “+” and “-” symbols to set the minutes.
The countdown starts now. After the indicated time passes, the over will and the dedicated symbol will ash: press
any button to stop the beep.
Programming the timer: cancelling the program
To cancel a program, you must set the previously assigned value to zero or turn on the oven.
46 47
Page 47

TRADITIONAL COOKING FUNCTIONS
Circular heating element with fan. Thermostat setting from 50°C to MAX.
OPERATION WITH MICROWAVES
The microwaves are transformed into heat inside foods. The microwave oven can be used by itself or in combination with other types of heating. This section contains information about the dishware and instructions for setting the
microwave oven.
WARNINGS FOR DISHWARE
Suitable dishware
Unsuitable dishware
Testing dishware
You can use heat-resistant dishware made of glass, glass ceramic, porcelain,
ceramic or refractory plastics. These materials are permeable to microwaves.
It is also possible to use normal plates. In this way, it won’t be necessary to
transfer the food.
Dishware with gold or silver decorations can only be used if the manufacture
guarantees that they can be used in microwave ovens.
Remember that, when using the oven in microwave mode, the dish must be
placed on the rotating plate.
Metal dishware cannot be used.
Metal is not permeable to microwaves. Food in metal containers will remain
cold.
Warning! Metal components, such as spoons in glasses, must stay at least 2
cm from the walls of the oven and the inside of the door. In fact, sparks could
seriously damage the inside of the glass door.
Warning! The at grill must be removed when using the microwave and
combined modes. Use it only with traditional oven functions.
Never turn on the microwave oven before you have put in the food.
The only exception allowed is testing dishware.
If you unsure if your dishware can be used in the microwave oven, we
recommend performing the following test:
place the empty pot in the appliance for ½ - 1 minute at the maximum power.
Check the temperature. The pat must be cold or slightly warm. If it is hot or
there are sparks, the pot is not suitable.
GB
Page 48

Time defrosting
GB
Turn the oven on using the button;
Select the TIME DEFROSTING function
Using the - + buttons, you can change the defrosting time in 5-second intervals.
If you press - + for longer than 3 seconds, the time setting speeds up;
When nished entering settings, select the
the time on the display.
The defrosting time must be
The power of the microwave will be regulated automatically to obtain the best possible result.
At a certain point, the oven will ask you to TURN OVER THE FOOD or, if you can’t, open and close the door of the
oven to make it continue defrosting.
The beep and the words PROGRAM FINISHED REMOVE THE DISH on the display signal that the program has
nished.
Defrosting by weight
set or it won’t work.
;
function that is ashing, and defrosting begins with a countdown of
Turn on the oven with the
Select the DEFROST BY WEIGHT function
The following screen appears:
When nished entering settings, select the A function
countdown of the time.
The beep and the words PROGRAM FINISHED REMOVE THE DISH on the display signal that the program has
button;
;
After you have selected the dish with and conrmed
with the display shows the weight to set
Starting from an initial minimum of 100 g; using , you
can increase or decrease the weight and then conrm the
choice with .
that is ashing; this starts the defrost program and the
48 49
Page 49

nished.
The power of the microwave will be automatically adjusted for the best possible results. At a certain point, the oven
will ask you to TURN OVER THE FOOD or, if you can’t, open and close the door of the oven to make it continue
defrosting.
The table below lists the main defrost programs for the main food categories:
Program Weight (g)
Bread 100 – 800 2 – 19 10 - 20
Vegetables 100 – 500 2 – 13 10 - 20
Meat 100 – 2000 2 – 43 20 - 30
Fish 100 – 2000 2 – 40 20 - 30
Working
time (min)
Rest time
(min)
MANUAL FUNCTION: MICROONDE
Turn on the oven with the button;
Select the MICROWAVE
Using the keys, you can adjust the pre-set power in 150-W steps, starting from the maximum value of 900 W.
On the other hand, use the - + buttons to set the cooking time in 5-second intervals.
If you press - + for longer than 3 seconds, the setting speeds up;
The cooking time must be set or
When nished entering settings, select the function
time on the display.
The beep and the words PROGRAM FINISHED REMOVE THE DISH on the display signal that the program has
nished.
ATTENTION: the oven always remembers the last power used!!!
function;
won’t work.
that is ashing, and cooking begins with a countdown of the
MANUAL FUNCTION: MICROWAVE + GRILL
GB
Turn on the oven with the key;
Select the MICROWAVE + GRILL
Using the keys, you can adjust the pre-set power in 150-W steps, starting from the maximum value of 450 W.
On the other hand, use the - + buttons to set the cooking time in 5-second intervals.
If you press - + for longer than 3 seconds, the setting speeds up;
When nished entering settings, select the function
time on the display.
The beep and the words PROGRAM FINISHED REMOVE THE DISH on the display signal that the program has
nished. Press any key or open the door to stop the beeping.
function;
that is ashing, and cooking begins with a countdown of the
Page 50

AUTOMATIC MICROWAVE FUNCTION: RECIPES:
NOTE: the sequence of instructions on the display shown below is only an example. It may not match what you see
exactly.
To access the recipe function, proceed as follows:
Turn on the oven with the
Select the AUTOMATIC function
GB
key;
The display shows the 2 options:
- personal recipes;
- preset recipes
Choose the desired setting with the buttons;
using the button, conrm the choice;
the following menu appears;
press the
to conrm the choice.
buttons to select the type of dish and the button
Press the buttons to select the type and the to conrm
the choice.
Press the buttons to select the type and the to conrm
the choice.
The weight screen appears. Use the buttons to select the
preset values and conrm the choice with the
button.
50 51
Page 51

ATTENTION: certain recipes use pre-heating, so put the dish in when the oven has reached
the set temperature and the display shows “PRE-HEATING FINISHED PUT IN THE DISH”
When cooking is nished the display will ash “PROGRAM FINISHED REMOVE THE
see how to save recipes in the next paragraph.
DISH” and, at the same time, the oven will beep until you press a key or open the door.
Note: If you are cooking with the modied parameters of a preset recipe, while the oven
beeps at the end of cooking, you will see:
When nished with the settings, the display summarizes the recipe
set. The colon in the cooking time (00:30) will be ashing to indicate
that it can be changed.
To change it, use the - + buttons.
Or select the
program starts with a countdown of the preset time on the display.
function directly and, in this way, the cooking
GB
Page 52

PERSONALISING RECIPES
Once you have changed the cooking time of a preset recipe and executed it, you can save it for the next by storing
the new parameters you used (weight and cooking time).
At the end of the cooking cycle of the modied recipe, the icon below will appear and, to save it, proceed as follows:
GB
Each time you access the “PERSONAL RECIPES” menu, you will nd it saved in your recipes.
Before saving your recipe, you must delete others from the menu in this way:
- with the + key select “YES”
- conrm with the key, the time used is displayed,
- change with the + and - keys and conrm with , the weight used appears,
- change it with + and - and conrm with , you will see the message
“RECIPE SAVED POS. 001”, and so on, in ascending order
If there is insufcient memory for saving your personal recipes, you will see this message
displayed: “MEMORY FULL, UNABLE TO SAVE”.
- select the function ;
- select the “PERSONAL RECIPES” section where you will nd all
the saved recipes;
- use the
want to delete.
Note: the menu provides the names by default;
keys to scroll the menu and select the recipe you
When the recipe to be deleted is displayed, select
- The display tells you that the recipe has been deleted;
holding it down until the next screen appears:
By default, the selection will be set to NO, but, by pressing the +
and - scroll keys, select YES and conrm with ;
52 53
Page 53

FOR THE INSTALLER
min 3
533
455
594
540
560
min
460
432
50
510
Install the oven in the counter
The oven must be installed under a cook top, in a column, or combined with the relative food-warmer drawer.
The dimensions of the space must be those shown in gure.
The cabinet material must be able to withstand the heat.
The oven must be centred within the walls of the cabinet and xed with the screws and bushings that are provided.
GB
min
450
50
510
min 458
560
min 3
540
432
533
455
594
Page 54

TECHNICAL DATA
Power supply 220-240 V~, 50Hz
Maximum absorbed power 3200 W
GB
Microwave power 900 W
Grill 1500 W
Microwave frequency 2450 MHz
ELECTRICAL HOOK-UP
Before making the electrical hook-up, make sure that:
- the characteristics of the electrical system satisfy what is shown on the serial number plate applied to the front of
the oven;
- the electrical system has an effect earth connection conforming to standards and current law.
The earth connection is required by law.
The cable must not, at any point, reach a temperature greater than 50 °C above the ambient temperature.
This oven must be connected to the supply by a supply cord tted with an appropriately rated plug that is compatible
with the socket-outlet tted to the nal sub-circuit in the xed wiring that is intended to supply this oven.
If a xed appliance does not have a power cord and plug, or another device that ensures disconnection from
the mains, with an opening distance of the contacts that allows complete disconnection under the conditions of
excessive voltage category III, such disconnection devices must be provided in the power supply mains conforming
to the installation rules.
The omnipolar socket or switch must be easy to reach when the appliance is installed.
NOTE: The manufacturer declines all liability if the usual accident prevention standards and the above instructions
are not followed.
TYPE AND MINIMUM DIAMETER OF THE CABLES
SASO
H05RR-F 3x1,5 mm² H05RR-F 3x2,5 mm²
H05VV-F 3x1,5 mm² H05VV-F 3x2,5 mm²
H05RN-F 3x1,5 mm² H05RN-F 3x2,5 mm²
H05V2V2-F 3x1,5 mm² H05V2V2-F 3x2,5 mm²
Page 55

GB
I
Italiano
English
FR
DE
ES
PT
Français
Deutsch
Español
Português
FR
55
Page 56

Cher Client
Vous avez choisi l’un de nos produits et nous vous en félicitons.
Ce nouveau produit, minutieusement conçu et construit avec des matériaux de tout premier
choix, a été soigneusement testé an de satisfaire chacune de vos exigences en matière
de cuisson.
Nous vous prions de lire et de respecter ces instructions simples qui vous permettront
d’obtenir d’excellents résultats dès la première utilisation.
FR
,
CONSIGNES IMPORTANTES ET MISES EN
GARDE DE SECURITE
A LIRE ATTENTIVEMENT ET A CONSERVER
POUR UN USAGE FUTUR
56 57
Page 57

CE PRODUIT A ETE CONÇU POUR UN USAGE DOMESTIQUE. LE FABRICANT DÉCLINE TOUTE RESPONSABILITÉ EN
CAS DE DOMMAGES SUBIS PAR LES PERSONNES ET LES CHOSES, DÉCOULANT DU NON RESPECT DES SUSDITES
PRESCRIPTIONS OU DÉRIVANT DE L’ALTÉRATION D’UNE SEULE PIÈCE DE L’APPAREIL.
CET APPAREIL N’EST PAS INDIQUÉ POUR L’UTILISATION DE LA PART DE PERSONNES (Y COMPRIS LES ENFANTS) AUX
CAPACITÉS PHYSIQUES, SENSORIELLES OU MENTALES RÉDUITES OU SANS L’EXPÉRIENCE NI LES CONNAISSANCES
NÉCESSAIRES, À MOINS QU’ELLES NE SOIENT SURVEILLÉES OU INSTRUITES QUANT À L’UTILISATION DE L’APPAREIL
PAR UNE PERSONNE RESPONSABLE DE LEUR SÉCURITÉ. SURVEILLER LES ENFANTS POUR ÉVITER QU’ILS NE JOUENT
AVEC L’APPAREIL. IL EST INTERDIT DE PLACER DU PAPIER ALUMINIUM, DES CASSEROLES OU AUTRE AU CONTACT
DE LA BASE INTERNE DU FOUR POUR CUISINER. LE RECHAUFFAGE DE LA RESISTANCE INFERIEURE PROVOQUE
LA SURCHAUFFE DE LA PARTIE BASSE DU FOUR, RISQUANT DE DETERIORER CES OBJETS OU D’ENTRAINER DES
CONSEQUENCES SERIEUSES (RISQUE D’INCENDIE) POUR LE MEUBLE DE SUPPORT DU FOUR. DURANT L’EMPLOI,
L’APPAREIL CHAUFFE TRÈS FORT. VEILLER À NE PAS TOUCHER LES PARTIES CHAUFFANTES À L’INTÉRIEUR DU FOUR.
ATTENTION :
ATTENTION :
ATTENTION :
ATTENTION :
Si la porte ou ses joints sont abîmés, le four ne doit pas être mis en marche tant
qu’il n’a pas été réparé par du personnel spécialisé ;
Il est dangereux pour tout le monde, à l’exception du personnel préposé,
d’effectuer des travaux d’entretien ou de réparation qui impliquent le retrait d’un
couvercle protégeant de l’exposition à l’énergie des microondes ;
Les liquides ou autres aliments en doivent pas être chauffés dans des récipients
scellés puisqu’ils pourraient exploser ;
Les enfants ne peuvent utiliser le four sans surveillance qu’après qu’on leur ait
expliqué comment faire de façon à pouvoir s’en servir en toute sécurité et en
connaissant les dangers liés à un usage incorrect.
Utiliser uniquement les ustensiles appropriés aux fours à microondes.
Quand on réchauffe des aliments dans des récipients en plastique ou en papier,
contrôler souvent le four en raison des risques d’incendie.
Si on remarque la présence de fumée, couper l’appareil ou enlever sa prise tout en
laissant la porte fermée pour éteindre les ammes éventuelles.
Le chauffage de boisson dans le four à microondes peut avoir pour résultat une
ébullition éruptive retardée. Prendre bien garde quand on manipule le récipient.
Le contenu des biberons et des petits pots doit être mélangé ou agité et la
température contrôlée avant la consommation pour éviter les brûlures.
Les œufs dans leur coquille et les œufs durs entiers ne doivent pas être chauffé
dans les fours à microondes puisqu’ils pourraient exploser même après le temps
de chauffage dans le microondes.
L’explication détaillée du nettoyage des joints des portes du four et des pièces
adjacentes.
Le four devrait être nettoyé régulièrement en éliminant toute trace de nourriture.
Un manque de propreté du four pourrait entraîner la détérioration des surfaces,
ce qui risquerait d’inuencer négativement la vie de l’appareil et de représenter
un danger.
Pour le nettoyage, ne pas utiliser de matériel rugueux, abrasif ou des racloirs
métalliques aiguisés pour nettoyer la porte en verre du four parce qu’ils
peuvent griffer la surface et provoquer l’éclatement du verre.
Pour nettoyer l’appareil, ne pas employer de nettoyeurs à vapeur.
FR
Page 58

MISES EN GARDE POUR
LE FOUR A MICROONDES
Préparation des aliments
Vaisselle
FR
Puissance du micro-ondes et
durée
Emballages
Boissons
Risque d’incendie!
Utiliser la fonction micro-ondes exclusivement pour préparer des aliments
destinés à la consommation Certains types d’applications peuvent être dangereux
ou provoquer des dégâts.
Par exemple, les pantoues et les coussins grains de blé ou de céréales
réchauffées peuvent prendre feu même après quelques heures.
Risque de blessures!
La vaisselle en porcelaine et en céramique peut présenter de petits trous sur les
manches et sur le couvercle.
Des cavités peuvent se cacher derrière ces trous. Si une inltration de liquide se
produit dans ces cavités, la vaisselle peut se casser.
Ne pas utiliser de la vaisselle qui n’est pas appropriée à la fonction micro-ondes.
Risque de brûlures!
La chaleur des aliments peut chauffer la vaisselle. Se servir toujours des maniques
pour extraire le plat et les accessoires du compartiment de cuisson.
Risque d’incendie!
Ne jamais programmer des valeurs trop élevées pour la puissance du micro-ondes
ou pour la durée de la cuisson. Les aliments peuvent prendre feu et endommager
l’appareil. S’en tenir aux indications contenues dans ces consignes d’utilisation.
Risque d’incendie!
Ne jamais faire chauffer les aliments à l’intérieur des emballages thermiques.
Les aliments à l’intérieur de conteneurs en plastique, en papier ou en d’autres
matériaux inammables doivent toujours être contrôlés.
Risque de brûlures!
Les emballages hermétiques étanches à l’air peuvent exploser. S’en tenir aux
indications gurant sur l’emballage. Se servir toujours des maniques pour extraire
les plats.
Risque de brûlures!
Durant le réchauffement des liquides, il pourrait y avoir un retard dans le procédé
d’ébullition.
En d’autre mots, la température d’ébullition peut être atteinte sans la formation des
typiques bulles de vapeur. Même un léger choc peut faire déborder à l’improviste
le liquide ou le faire gicler.
Quand on réchauffe des liquides, ajouter toujours une cuiller dans le conteneur
pour éviter le retard du processus d’ébullition.
Risque d’explosion!
Ne jamais réchauffer les boissons ou d’autres types d’aliments dans des
conteneurs dotés de couvercle.
Ne jamais faire chauffer excessivement les boissons alcooliques.
58 59
Page 59

Aliments pour nourrissons
Aliments avec peau ou écorce
Séchage des aliments
Aliments à bas contenu d’eau
Huile
CAUSES DES
DOMMAGES
Sortie du jus de fruit
Avarie technique
Refroidissement avec la porte de
l’appareil ouverte
Joint très sale
Porte de l’appareil comme
surface d’appui
Utilisation de la fonction microondes sans aliments à l’intérieur
du four
Aliments humides
Risque de brûlures!
Ne jamais chauffeur les aliments pour les nourrissons dans des conteneurs dotés
de couvercle. Enlever toujours le couvercle ou la tétine.
Une fois que la phase de réchauffement est terminée, agiter ou mélanger toujours
soigneusement, pour que la chaleur se distribue de façon homogène.
Contrôler la température avant de donner les aliments à l’enfant.
Risque de brûlures!
Ne jamais faire cuire les œufs avec la coquille. Ne jamais réchauffer les œufs
durs, car ils pourraient exploser même après l’extinction du micro-ondes. Ce vaut
également pour les mollusques et les crustacés.
Dans le cas des œufs au plat trouer d’abord le jaune.
Dans le cas des aliments avec une peau ou une écorce dure, comme les pommes,
les tomates, les pommes de terre ou les saucisses, l’écorce peut exploser.
Avant de procéder à la cuisson, trouer l’écorce ou la peau.
Risque d’incendie!
Ne jamais sécher les aliments avec la fonction micro-ondes.
Risque d’incendie!
Ne pas décongeler ou réchauffer trop longtemps, ou à une puissance excessive
les aliments à bas contenu d’eau, comme par exemple le pain.
Risque d’incendie!
Ne jamais utiliser la fonction micro-ondes pour réchauffer simplement l’huile.
Durant la préparation des gâteaux aux fruits très juteux, ne pas trop remplir le plat
à four. Le jus de fruit qui déborde du plat à four provoque la formation de taches
difciles à éliminer.
Ne jamais utiliser de plats à four en émail dans le micro-ondes, car ceci pourrait
provoquer une avarie technique.
Le refroidissement du compartiment de cuisson doit avoir lieu uniquement avec
la porte fermée. Contrôler que rien ne soit encastré dans la porte de l’appareil.
Même si la porte est entrebâillée, les meubles situés à proximité pourraient
s’abîmer.
Si le joint est très sale, durant le fonctionnement de l’appareil, la porte ne se ferme
pas correctement. Les surfaces des meubles situés à proximité peuvent s’abîmer.
Le joint doit toujours être nettoyé.
Ne pas s’appuyer et ne pas s’allonger sur la porte ouverte de l’appareil et ne pas
y poser de vaisselle ni d’accessoires.
Activer l’appareil à micro-ondes uniquement après avoir introduit les aliments
dans le compartiment de cuisson. Sans aliments, ceci pourrait provoquer la
surcharge de l’appareil. L’unique exception consentie consiste à faire un test bref
pour la vaisselle (voir à ce propos les mises en garde relatives aux casseroles).
Ne pas conserver d’aliments humides à l’intérieur du compartiment de cuisson
fermé pendant de longues périodes. L’émail est endommagé.
FR
Page 60

IMPORTANT
La plaquette des caractéristiques du four est accessible après l’installation de l’appareil. On l’aperçoit en ouvrant la
porte du four et indique toutes les données d’identication de l’appareil auxquelles on devra se référer pour toute
demande de pièces de rechange.
FR
PREMIÈRE UTILISATION
Nettoyer minutieusement avec de l’eau et du savon et rincer soigneusement.
Chauffer le four pendant 30 minutes environ à la température maximale pour éliminer tous les résidus gras de
fabrication pouvant déterminer des odeurs désagréables pendant la cuisson. Utiliser la fonction gril avec le four
sans accessoires. Avant d’utiliser les accessoires pour la première fois, les nettoyer avec soin à l’aide d’une solution
alcaline de lavage très chaude et d’un chiffon humide.
MONTAGE ET DÉMONTAGE DE LA GRILLE PLATE
Pour démonter la grille plate, tirer vers soi la grille jusqu’au blocage, puis la soulever en la tirant vers le haut jusqu’à
son extraction complète.
Pour monter la grille plate, introduire la grille inclinée à 45° jusqu’au blocage, puis la mettre à l’horizontale et la
pousser jusqu’en n de course.
Si la grille plate est munie de plateau pour le four, pour l’extraire de son logement, la soulever légèrement et la faire
coulisser vers soi. La réintroduire jusqu’à ce qu’elle reprenne sa position originale dans son logement.
60 61
Page 61

Important:
Comme mesure de sécurité, toujours retirer la che de la prise de courant ou mettre l’appareil hors
tension avant toute opération de nettoyage du four. Éviter également d’utiliser des substances acides
ou alcalines (jus de citron, vinaigre, sel, tomates, etc.). Éviter d’utiliser des produits à base de chlore,
d’acides ou des agents abrasifs surtout pour le nettoyage des parties peintes.
RESPECT DE L’ENVIRONNEMENT
La documentation relative à cet appareil est réalisée avec du papier blanchi, sans chlore, ou du papier recyclé, dans
le but de contribuer à la protection de l’environnement. Les emballages sont conçus de manière à ne pas polluer la
nature ; il s’agit de produits écologiques qui peuvent être récupérés ou recyclés.
En recyclant l’emballage, on contribue à économiser les matières premières et à réduire le volume des déchets
industriels et ménagers.
LE MATERIEL D’EMBALLAGE est recyclable à 100% et est marqué par le symbole du recyclage.
Pour l’élimination, suivre les règlementations locales. Le matériel d’emballage (sachets en plastique, parties en
polystyrène, etc.) doit être tenu hors de la portée des enfants, car il représente une source potentielle de danger.
CET APPAREIL est marqué conformément à la Directive Européenne 2002/96/CE, Déchets d’équipements
électriques et électroniques provenant des Equipements Electriques et Electroniques [Waste Electrical and Electronic
Equipment] (WEEE). L’utilisateur doit s’assurer que ce produit est éliminé correctement, et contribue ainsi à éviter les
conséquences négatives potentielles pour l’environnement et la santé.
LE SYMBOLE sur le produit ou sur la documentation d’accompagnement indique que ce produit ne doit pas
traité comme un déchet domestique, mais doit être remis auprès du centre de collecte approprié pour le
recyclage des appareils électriques et électroniques.
L’ELIMINATION DOIT AVOIR LIEU selon les règlementations locales pour l’élimination des déchets.
POUR D’AUTRES INFORMATIONS sur le traitement, la récupération et le recyclage de ce produit, contacter le bureau
local compétent, le service de collecte des déchets domestiques ou le magasin où le produit a été acheté.
AVANT LA MISE A LA CASSE, il est nécessaire de le rendre inutilisable en coupant le câble électrique d’alimentation.
FR
Page 62

FOUR À MICRO-ONDES 45
Vue d’ensemble des commandes
FR
FONCTIONS DE CUISSON STANDARD: de 1 à 2;
RÉGLAGE DE LA TEMPÉRATURE, DURÉE DE CUISSON: 19 et 20;
ON/OFF + CLÉS (CHILD LOCK): 23;
FONCTIONS AVEC MICRO-ONDES: de 3 à 6;
FONCTIONS POUR RECETTES: 7 et 8;
FONCTIONS DÉFILEMENT PUISSANCE et MENU : 9 et 10;
FONCTIONS TEMPORISATEUR: 20;
SÉLECTION DU TEMPORISATEUR: 15 et 16;
1 lampe du four;
2 fonction cuisson standard - gril;
3 fdécongélation programmée;
4 décongélation en fonction du poids;
5 fonction cuisson micro-ondes - micro-ondes traditionnel;
6 fonction cuisson micro-ondes - micro-ondes + gril;
7 fonction sélection automatique (recettes);
8 fonction conrmation sélections;
9 fonction délement menu vers le bas, diminution puissance;
10 fonction délement menu vers le haut, augmentation puissance;
11 fonction indications températures;
12 fonction clé activée/désactivée;
13 fonction indications temporisateur;
14 fonction compte à rebours;
15 fonction augmentation sélections;
16 fonction diminution sélections;
17 fonction temporisateur «minuterie»;
18 fonction temporisateur «n de cuisson»;
19 fonction temporisateur «durée de cuisson»;
20 fonction temporisateur;
21 fonction «START» - démarrage fonction;
22 fonction «STOP» - arrêt fonction;
23 fonction «ON/OFF» et fonction «clé (child lock)»;
NB : toutes les programmations/variations des fonctions sont conrmées par un signal acoustique.
62 63
Page 63

PRÉSENTATION DU FOUR
Cher Client, votre nouveau four est géré par une carte électronique qui en surveille le fonctionnement à tout instant,
an d’améliorer toutes les performances.
Le contrôle touch control est de dernière génération, précis et able.
L’interface est élégante, ordonnée et discrète, plus intuitive que jamais !
Peu de touches, de nombreuses fonctions, aucune combinaison ni séquence difcile de touches; concentrez-vous
sur la recette : le four est prêt en deux gestes !!
Installation et raccordement
Cher Client, ce four est un appareil électrique sophistiqué, classé comme un bien durable. Il doit être installé par du
personnel qualié qui réalisera les raccordements au secteur l’installera dans le meuble de la cuisine dans les règles
de l’art.
(VOIR INSTRUCTIONS DE MONTAGE A LA PAGE 79)
Premier branchement
Quand on branche le four sur le réseau électrique pour la première fois, l’afcheur peut indiquer la langue à sélectionner;
avec les touches , sélectionner la langue souhaitée; avec la touche , conrmer le choix
la langue choisie ne change pas, même en cas de coupure de courant.
N.B. : si au premier allumage l’afcheur indique une langue différente de la vôtre, suivre les instructions de la p. 64
pour procéder aux modications.
On accède à présent à la modalité «démonstration».
La modalité « DÉMONTRATION »
C’est ainsi que l’on appelle la modalité dans laquelle le four se présente normalement en cas de coupure de courant,
et donc au moment du premier branchement. L’objectif est d’afcher tous les potentiels du contrôle en une séquence
enregistrée de commandes.
FR
Dans cette modalité, le four n’est JAMAIS réellement mis en marche, c’est-à-dire que les résistances
thermiques ne sont mises sous tension!!
Le bandeau de commande est INACTIF et le four ne répond pas aux commandes!
Pour désactiver la modalité «démonstration», appuyer
pendant cinq secondes sur le symbole de l’éclairage:
le contrôle fonctionne dans le mode normal: il est prêt pour
la mise sous tension.
À présent, il est possible (mais non nécessaire) de régler
l’heure pour allumer le four.
Page 64

Réglage de l’horloge
FR
Le four signale le raccordement au secteur par un double signal sonore. Pour régler l’heure du système, appuyer sur
la touche «FONCTIONS TEMPORISATEUR»
Chaque commande activée est conrmée par un signal sonore.
pendant au moins 3 secondes.
Régler l’horloge avec les touches + et -: les points de
séparation clignotent pendant la sélection; l’heure est
saisie quand les points deviennent xes.
ACTIONS POSSIBLES LORSQUE LE FOUR EST ÉTEINT
- Tourner la lampe du four
On allume/éteint l’éclairage du four en efeurant le
symbole d’après la gure.
- Changement de langue
Lorsque le four est éteint, on peut modier la langue sur l’afcheur en sélectionnant simultanément
+ en bas à droite.
Ensuite, choisir la langue avec la touche
- Sélection de la fonction temporisateur «minuterie»
et conrmer le choix avec la touche .
64 65
et la touche
Page 65

Voir la section spécique page 72.
ALLUMAGE DU FOUR
On allume le four en efeurant sur le symbole
schématisé dans la gure.
Pour activer les fonctions du four, toujours
ON/OFF, à l’exception des fonctions éclairage four et
temporisateur qui sont indépendantes.
Le commande active toutes les icônes en en illuminant le
fond.
REMARQUE: on rappelle que l’allumage du four n’est possible que lorsque la fonction clé est désactivée.
Pendant une minute après l’allumage (le message ON s’afche), le dispositif de contrôle attend qu’on ait
choisi une fonction de cuisson. Dans le cas contraire, il interprète l’allumage comme une erreur et, pour des
raisons de sécurité, il éteint automatiquement le four (OFF s’afche pendant quelques secondes).
Fonction clé (ou sécurité enfants)
On active/désactive la fonction clé en appuyant sur la
touche
Le mode de fonctionnement du four peut être activé/
désactivé à tout moment.
pendant au moins 3 secondes.
frapper
FR
Le symbole du cadenas
OUVERT indique que la
fonction clé n’est pas
active.
Le symbole du cadenas
FERMÉ indique que la
fonction clé est active.
Page 66

FONCTIONS PRINCIPALES:
Vue d’ensemble du bandeau de commande
FR
Fonctions cuisson
Procédures spéciales
On/Off four
On/Off blocage four
Température / Puissance
Verrouillage
Horloge
Les fonctions de cuisson
Le contrôle met à disposition sept fonctions de cuisson spéciques!
Pour activer une fonction, il suft d’efeurer le symbole correspondant. Chaque fonction prévoit une température
programmée choisie en vertu d’essais de cuisson sur des recettes qui l’utilisent typiquement; toute modication est
aisée en fonction de l’expérience de chacun.
Programmation du
four
66 67
Page 67

Fonctionnement du four
La lampe du four reste toujours allumée durant le fonctionnement dans les modalités microondes et pour une épargne énergétique, elle est gérée par le système, dans les autres
modalités .
Type de cuisson pour griller ou dorer des aliments. La grille avec les aliments à cuire doit être
introduite sur le 2e ou 3e niveau du dessous. Préchauffer pendant au moins 2 minutes avant
d’introduire le plat.
Décongélation au temps
Décongélation au poids
Micro-ondes
Micro-ondes combiné avec la cuisson au Grill
Accès aux recettes pré-établies
Le tableau suivant indique les résultats des essais de cuisson effectués en nos laboratoires par un cuisinier
professionnel; quoi qu’il en soit, il s’agit d’indications et les valeurs proposées servent de point de départ pour
expérimenter les recettes et obtenir constamment les meilleurs résultats!
FR
Page 68

Des gestes simples pour cuisiner
Deux simples gestes sufsent pour congurer une cuisson grâce à la logique de contrôle de dernière génération:
allumer le four et choisir la fonction qui convient le mieux au mets que vous êtes sur le point de cuisiner…choisissez
et efeurez, tout simplement!
FR
Le contrôle propose une température pour chaque fonction; celle-ci est modiable à tout moment; mais si
vous estimez que le réglage est correct, le four s’allume automatiquement au bout de quelques secondes!
Réglage de la température
Le contrôle utilise une sonde de température d’une précision de ± 5° C pour la abilité maximale des températures
de cuisson souhaitées.
La température peut être modiée à tout moment: après avoir sélectionné la fonction de cuisson, il suft d’agir sur les
symboles
car le contrôle s’active automatiquement au bout de quelques secondes
et le champ de réglage varie de +50° C à MAX. Il n’est pas nécessaire de conrmer la modication
Pendant le réchauffage, le symbole du degré centigrade
(°C) clignote, indiquant le thermorégulation pour atteindre
la température choisie.
Lorsque celle-ci est atteinte, on entend un signal sonore.
NB: certains modèles peuvent être munis de l’afchage
instantané de la température à l’intérieur du four, jusqu’à
ce que la température sélectionnée soit atteinte. Si, au
cours de la phase d’augmentation de la température, on
souhaite vérier la température sélectionnée, on appuie
sur une des touches et si on le souhaite, avec ces
dernières, on peut modier la température sélectionnée.
Chaleur résiduelle
Pendant la cuisson des aliments, la structure du four emmagasine de la chaleur qui est maintenue isolée du reste de
la cuisine grâce à un isolement thermique généreux et certains détails de construction.
Cette chaleur est graduellement dispersée dans le temps et peut représenter une ressource en cuisine si l’on parvient
à la gérer : le contrôle indique la température interne, après l’extinction du four, jusqu’à 50° C.
68 69
Page 69

Exploitez cette caractéristique pour maintenir les aliments au chaud ou pour en terminer la cuisson en
douceur!
Contrôle de l’éclairage du four
La commande de l’éclairage est actif pour toutes les fonctions de cuisson et elle est indépendante de ces dernières,
c’est-à-dire qu’elle peut être activée ou désactivée, en fonction des besoins!
Normalement la lumière du four reste allumée pendant le réchauffage et pendant trois minutes lorsque la température
sélectionnée est atteinte. Ensuite, elle s’éteint pour économiser l’énergie.
Pour vérier la cuisson, il peut être nécessaire de rallumer la lumière interne; pour cela, il suft d’efeurer le symbole
de l’éclairage:
est possible de l’éteindre immédiatement après le contrôle, en efeurant de nouveau le symbole de l’éclairage.
La lumière interne du four s’allume dès que l’on ouvre la porte.
la lumière reste allumée pendant trois minutes, puis s’éteindra automatiquement. Bien entendu, il
PROGRAMMATION DU FOUR
(uniquement pour la fonction )
La programmation du four offre trois modes de contrôle de la durée de cuisson. Elles sont disponibles alliés aux
fonctions de cuisson normales.
Les fonctions sont électionnables tour à tour, de gauche à droite, en
efeurant le symbole de l’horloge; chaque efeurement illumine un symbole.
FR
Page 70

Programmation temporisateur: temps de cuisson
Efeurer une fois le symbole du temporisateur:
le symbole correspondant s’allume. En outre,
l’afcheur de l’horloge remplace l’indication de
l’heure actuelle:
FR
Iles points de séparation clignotent, indiquant qu’il
est possible de programmer le temps de cuisson.
Une fois que le temps de cuisson a été déni, l’afcheur indique encore l’heure actuelle et le
symbole «durée cuisson» s’allume.
Dès maintenant, le décompte commence. Une fois le temps écoulé, le four émet un signal acoustique et les
résistances thermiques sont éteintes pour mettre n à la cuisson. L’afcheur indiquera “Programme terminé, enlever
le plat”. Pousser sur une touche quelconque pour couper le signal acoustique ou ouvrir la porte.
Au bout d’1 minute, le four s’éteint automatiquement si aucune autre fonction de cuisson n’a été sélectionnée.
Programmation temporisateur: heure de fin de cuisson
Efeurer deux fois le symbole du temporisateur: le
symbole correspondant s’allume.
Les points de séparation clignotent, indiquant qu’il
est possible de programmer l’heure de n de la
cuisson.
70 71
Page 71

Programmer l’heure de n de cuisson en efeurant
les symboles « + » et « - ».
Une fois que l’heure de n de cuisson a été dénie, l’afcheur indique encore l’heure actuelle
et le symbole «n cuisson» s’allume.
À présent, le compte à rebours commence. Lorsque le temps sélectionné s’est écoulé, le four émet un signal sonore,
les résistances thermiques sont désactivées, terminant ainsi la cuisson. L’afcheur indiquera “Programme terminé,
enlever le plat”. Pousser sur une touche quelconque pour couper le signal acoustique ou ouvrir la porte.
Au bout de huit secondes, le four s’éteint automatiquement si aucune autre fonction de cuisson n’a été sélectionnée.
Programmation temporisateur: cuisson différée
La combinaison des deux modalités «temps de cuisson» et «heure de n de cuisson» permet de congurer le four an
qu’il commence la cuisson à une heure différée par rapport à l’heure actuelle.
Par exemple, il est 8h30 et vous vous apprêtez à quitter la maison; vous souhaitez toutefois trouver un rôti cuit à votre
retour; voici comment procéder:
Préparez les alimentes pour la
cuisson et enfournez-le.
FR
Allumez le four, choisissez la fonction de cuisson et réglez la température.
Maintenant, sélectionnez la durée de cuisson,
supposons deux heures.
Dénissez l’heure de n de cuisson : le contrôle
additionne normalement le temps de cuisson
et l’heure actuelle et la propose comme l’heure
de n de cuisson; dans notre cas, il proposera
les heures suivantes: 10h30 (8h30+2h00).
Page 72

Le four se met en attente (stand-by) et la lumière s’éteint.
Modiez l’heure de n de cuisson pour la faire coïncider
avec l’heure souhaitée: 13h00; dans notre exemple 13:00.
FR
Programmation du temporisateur: minuterie
La minuterie est une fonction du temporisateur indépendante du fonctionnement du four, c’est-à-dire qu’elle ne
bloque pas la cuisson et qu’elle n’éteint pas le four ; elle fonctionne comme un avertisseur sonore.
Vous pouvez la régler à tout moment, par exemple pour vous souvenir de contrôler la cuisson sur la cuisinière et dans
le four ou pour d’autres activités dans la cuisine.
Elle fonctionne également si le four est éteint; dans ce cas, il suft d’efeurer une fois le symbole des fonctions
temporisateur. Si, en revanche, vous l’utilisez alors que le four est allumé, efeurez trois fois, tour à tour, le symbole
des fonctions temporisateur:
Programmer les minutes en appuyant sur les symboles « + » et « - ».
À présent, le compte à rebours commence. Lorsque le temps sélectionné s’est écoulé, le four émet un signal sonore
et le symbole en question clignote: efeurer une touche quelconque pour interrompre le signal sonore.
Programmation du temporisateur : effacement du programme
Pour effacer une programmation, mettre à zéro la valeur attribuée précédemment, ou éteindre le four.
Le contrôle active automatiquement le four à 11h00 (13h00-2h00) et l’éteint à 13h00; à votre
retour, vous trouverez un rôti prêt pour être consommé!
les points de séparation clignotent, indiquant qu’il est
possible de programmer cette valeur.
LES FONCTIONS DE CUISSON TRADITIONNELLE
Grill à grande sur-face. Réglage du thermostat de 50° à MAX.
72 73
Page 73

FONCTIONNEMENT AVEC MICRO-ONDES
Les micro-ondes sont transformées en chaleur dans les aliments. Le four à micro-ondes peut être utilisé seul ou avec
un autre type de réchauffement. Cette section contient des informations relatives à la vaisselle et les consignes sur la
façon de programmer le four à micro-ondes.
MISES EN GARDE POUR LA
VAISSELLE
Vaisselle appropriée
Vaisselle inappropriée
Test de la vaisselle
La vaisselle thermorésistante en verre, vitrocéramique, porcelaine ou en
matière plastique réfractaire est appropriée. Ces matériaux sont perméables
aux micro-ondes.
Il est également possible d’utiliser des plats de service. De cette façon il ne
faudra plus transvaser les aliments.
La vaisselle comportant des décorations dorées ou argentées peut être
uniquement utilisée dans le cas où le fabricant garantit sa conformité à
l’utilisation dans le four à micro-ondes.
Lorsqu’on emploie le four en fonctionnement microondes, ne pas oublier que
la vaisselle doit être placée sur le plateau rotatif.
La vaisselle en métal n’est pas appropriée.
Le métal n’est pas perméable aux micro-ondes. Les aliments placés dans des
conteneurs en métal restent froids.
Attention! Les éléments en métal, par exemple les cuillers contenues dans les
verres doivent se trouver à une distance d’au moins 2 cm des parois du four et
de la partie interne de la porte. Les étincelles pourraient en effet endommager
gravement le verre interne de la porte.
Attention! la grille plate doit être enlevée pour l’emploi en mode microondes
et combiné. L’utiliser uniquement comme four traditionnel.
Ne jamais activer le four à micro-ondes sans avoir d’abord introduit les
aliments.
L’unique exception qui est consentie concerne le test pour la vaisselle.
En cas de doute au sujet de la conformité de la vaisselle à l’utilisation dans le
four à micro-ondes, il est conseillé de faire le test suivant:
introduire la casserole vide dans l’appareil pendant ½ - 1 minute à la puissance
maximale. Contrôler régulièrement la température. La casserole doit être
froide ou tiède. Si elle est chaude ou si des étincelles se forment, ceci signie
que la casserole n’est pas appropriée.
FR
Page 74

Decongélation programmée
Allumer le four en efeurant la touche ;
FR
Sélectionner la fonction «DÉCONGÉLATION PROGRAMMÉE»
Avec les touches - +, on peut modier le temps de décongélation en intervalles de 5 s.;
Si l’on maintient la touche - + enfoncée pendant plus de 3 secondes, le réglage du temps s’accélère;
Au terme des sélections, on choisit la fonction
temps sur l’afcheur.
Il faut obligatoirement sélectionner le temps de décongélation; dans le cas contraire, le
L’alimentation du micro-ondes sera automatiquement réglée de manière à obtenir le meilleur résultat possible.
Le four indiquera à moment donné de RETOURNER LE METS, ou bien si cela est impossible, ouvrez et fermez la porte
du four pour poursuivre la décongélation.
L‘avertisseur sonore et le message PROGRAMME TERMINE EXTRAIRE LE METS sur l’afcheur signale la n du
programme.
Décongélation en fonction du poids
Allumer le four en efeurant la touche
Sélectionner la fonction «DÉCONGÉLATION EN FONCTION DU POIDS»
cqui clignote ; la décongélation commence avec le décompte du
;
;
ne fonctionne pas.
;
L’écran apparaît:
Après avoir sélectionné le plat par un et valider
de la même manière, l’afcheur indique le poids à
programmer.
En partant d’un poids initial minimum de 100g avec
je peux augmenter ou diminuer cette valeur, puis valider le
choix par un autre .
Au terme des sélections, on choisit la fonction
commencent.
L‘avertisseur sonore et le message PROGRAMME TERMINE EXTRAIRE LE METS sur l’afcheur signale la n du
programme.
qui clignote ; la décongélation et le décompte du temps
74 75
Page 75

L’alimentation du four à micro-ondes sera automatiquement réglée de manière à obtenir le meilleur résultat possible.
Le four indiquera à moment donné de RETOURNER LE METS, ou bien si cela est impossible, ouvrez et fermez la porte
du four pour poursuivre la décongélation.
Le tableau ci-après illustre les principaux programmes de décongélation en fonction des principales catégories
d’aliments:
Programme
Pain 100 – 800 2 – 19 10 - 20
Légumes 100 – 500 2 – 13 10 - 20
Viande 100 – 2000 2 – 43 20 - 30
Poisson 100 – 2000 2 – 40 20 - 30
poids (g)
Temps de
fonctionnement
(min.)
Temps
de pause
(min.)
FONCTION MANUELLE: MICRO-ONDES
Allumer le four en efeurant la touche ;
Sélectionner la fonction MICRO-ONDES
Les touches permettent de régler la puissance précongurée par crans de 150 W à partir de la valeur maximale
de 900 W. Les touches - + permettent en revanche de sélectionner la durée de cuisson en intervalles de 5s.
Si l’on maintient la touche - + enfoncée pendant plus de 3 secondes, le réglage s’accélère;
Il faut obligatoirement sélectionner le temps de cuisson; dans le cas contraire, le
Au terme des sélections, on choisit la fonction
sur l’afcheur.
L‘avertisseur sonore et le message PROGRAMME TERMINE EXTRAIRE LE METS sur l’afcheur signale la n du
programme.
ATTENTION : Le four garde toujours en mémoire la dernière puissance utilisée !
;
ne fonctionne pas.
qui clignote ; la cuisson commence avec le décompte du temps
FR
FONCTION MANUELLE: MICRO-ONDES + GRIL
Allumer le four en efeurant la touche ;
Sélectionner la fonction MICRO-ONDES + GRIL
Les touches permettent de régler la puissance précongurée par crans de 150 W à partir de la valeur maximale
de 450 W. Les touches - + permettent en revanche de sélectionner la durée de cuisson en intervalles de 5s. Si l’on
maintient la touche - + enfoncée pendant plus de 3 secondes, le réglage s’accélère;
Il faut obligatoirement sélectionner le temps de cuisson; dans le cas contraire, le
peut pas démarrer et l’afcheur indique le temps clignotant.
Au terme des sélections, on choisit la fonction
sur l’afcheur. L‘avertisseur sonore et le message PROGRAMME TERMINE EXTRAIRE LE METS sur l’afcheur signale
la n du programme.
;
ne fonctionne pas; la cuisson ne
qui clignote ; la cuisson commence avec le décompte du temps
Page 76

FONCTIONS AUTOMATIQUES: RECETTES
REMARQUE : l’ordre des indications de l’écran gurant ci-dessous est un simple exemple. Dans certains cas, il
pourrait différer légèrement selon le modèle.
Pour accéder à la fonction recettes exécutez la procédure suivante:
J’allume le four avec la touche
Je sélectionne la fonction AUTOMATIQUE
FR
L’afcheur visualise les 2 options:
;
L’afcheur indique les 2 options:
- recettes personnelles;
- recettes programmées
Choisir la sélection souhaitée avec les touches ;
Avec la touche conrmer le choix;
Le menu suivant s’afche;
Efeurer les touches pour choisir le type de mets et conrmer
la sélection avec la touche
.
Efeurer les touches pour choisir le type et conrmer la
sélection avec la touche
Efeurer les touches pour choisir le type et conrmer la
sélection avec la touche
.
.
76 77
Page 77

La page-écran du poids s’afche; en efeurant les touches ,
choisir une des valeurs sélectionnées et conrmer avec la touche
.
Au terme de la programmation, l’afcheur récapitule la recette
sélectionnée.
Les deux points de durée de la cuisson (00 :30) clignoteront.
Modier en efeurant les touches - + .
Ou bien sélectionner directement la fonction
le compte à rebours du temps sélectionné sur l’afcheur démarrent.
Ou bien je sélectionne directement la fonction
compte à rebours du temps préétabli sur l’afcheur.
ATTENTION : certaines recettes utilisent le préchauffage ; il faut donc introduire le mets une
fois que le four a atteint la température sélectionnée et l’afcheur indique “PRECHAUFFAGE
TERMINE INTRODUIRE LE METS”.
La cuisson terminée, l’afcheur indiquera « programme terminé, enlever le plat » par intermittence.
En même temps, le signal acoustique retentit jusqu’à ce qu’on ait poussé sur une touche
quelconque ou qu’on ait ouvert la porte.
N.B.: Si l’on effectue des cuissons de recettes préétablies dont les paramètres de temps sont
modiés, durant le bip sonore, au terme de la cuisson la page-écran suivante s’afchera:
Voir la façon d’enregistrer les recettes au paragraphe suivant
et c’est ainsi que le programme de cuisson commence avec le
FR
; le programme et
Page 78

PERSONNALISATION DES RECETTES
Une fois que le temps de cuisson d’une recette préétablie et exécutée est modié, nous pouvons l’enregistrer pour
la prochaine fois, en mémorisant les nouveaux paramètres utilisés (poids et temps de cuisson).
A la n du cycle de cuisson de la recette modiée l’icône ci-dessous s’afchera et pour pouvoir l’enregistrer il faut
agir de la façon suivante:
FR
Chaque fois que j’accède au menu “ RECETTES PERSONNELLES “ je trouve mes recettes enregistrées dans une
liste.
Avant d’enregistrer ma recette je dois en effacer d’autres du menu de la façon suivante:
- avec la touche + choisissez OUI
- conrmez avec la touche le temps utilisé s’afche,
- modiez avec + et – et conrmer avec , le poids utilisé s’afche,
- modiez avec + et – et conrmer avec , le message s’afchera
« RECETTE ENREGISTRÉE 001 » et ainsi de suite en nombre croissant
Si la mémoire dédiée à l’enregistrement des recettes personnelles ne suft pas, l’afcheur
visualise le message: «MÉMOIRE PLEINE IMPOSSIBLE SAUVER».
- je sélectionne la fonction ;
- en tapant je rentre dans la section “ RECETTES
PERSONNELLES ” où je trouve toutes les recettes enregistrées;
- à l’aide des touches je fais déler le menu pour
sélectionner la recette que je désire éliminer.
NB: les noms sont donnés par défaut par le menu;
Une fois que la recette à éliminer s’afche, je sélectionne la touche
écran successive s’afche:
Par défaut la sélection sera programmée sur NON, mais en
pressant les touches + et – je sélectionne OUI et je conrme avec
;
- L’afcheur communique que la recette a été éliminée;
78 79
en la tenant pressée jusqu’à ce que la page-
Page 79

INSTRUCTIONS POUR L’INSTALLATEUR
min 3
533
455
594
540
560
min
460
432
50
510
Encastrement du four
Le four peut être installé sous un plan de cuisson, dans une colonne ou associé à son tiroir chauffe-plats.
Les dimensions de l’encastrement doivent correspondre à celles de la gure.
Le matériau du meuble doit résister à la chaleur. Le four doit être centré par rapport aux parois du meuble et xé avec
les vis et les douilles fournies.
FR
min
450
50
510
min 458
560
min 3
540
432
533
455
594
Page 80

DONNÉES TECHNIQUES
Alimentation électrique 220-240 V~, 50Hz
Puissance maximale absorbée 3200 W
Puissance micro-ondes 900 W
Grill 1500 W
Fréquence micro-ondes 2450 MHz
FR
RACCORDEMENT ÉLECTRIQUE
Avant de brancher l’appareil, s’assurer que:
- les caractéristiques de l’installation correspondent au contenu de la plaque d’immatriculation appliquée à l’avant
du four;
- l’installation est munie d’une mise à la terre efcace conforme aux normes et aux lois en vigueur. la mise à la terre
est obligatoire en vertu de la Loi.
Le câble ne devra atteindre en aucun point une température supérieure de 50° C par rapport à la température
ambiante.
Ce four doit être connecté à l’alimentation par un câble muni d’une che compatible avec la prise de l’installation
électrique qui l’alimente.
Si un appareil xe est dépourvu du cordon d’alimentation ou de la che, ou d’un autre dispositif assurant le
débranchement du secteur, dont la distance d’ouverture des contacts permet la déconnexion complète dans les
conditions de la catégorie de surintensité III, ces dispositifs de déconnexion doivent être prévus sur le réseau
d’alimentation, conformément aux consignes d’installation.
La prise ou l’interrupteur omnipolaire doivent être facilement accessibles après l’installation de l’appareil.
N.B. : le constructeur décline toute responsabilité dans les susdits cas et si les normes habituelles de prévention des
accidents ne sont pas respectées.
TYPE ET DIAMETRE MINIMUM DES CABLES
SASO
H05RR-F 3x1,5 mm² H05RR-F 3x2,5 mm²
H05VV-F 3x1,5 mm² H05VV-F 3x2,5 mm²
H05RN-F 3x1,5 mm² H05RN-F 3x2,5 mm²
H05V2V2-F 3x1,5 mm² H05V2V2-F 3x2,5 mm²
Page 81

I
GB
FR
Italiano
English
Français
DE
ES
PT
Deutsch
Español
Português
DE
81
Page 82

Geehrter
wir danken und gratulieren Ihnen zu Ihrer Wahl.
Dieses neue, sorgfältig entworfene Gerät aus hochqualitativen Materialien wurde einer
strengen Prüfung unterzogen, um eine perfekte Zubereitung garantieren zu können.
Um bereits ab der ersten Benutzung ausgezeichnete Ergebnisse erzielen zu können, bitten
wir Sie, diese einfachen Anweisungen durchzulesen und zu befolgen.
DE
Kunde
,
WICHTIGE ANLEITUNGEN UND SI-
CHERHEITSHINWEISE
SORGFÄLTIG LESEN UND FÜR ZUKÜNFTIGES
NACHSCHLAGEN AUFBEWAHREN
82 83
Page 83

DIESES PRODUKT WURDE FÜR DEN HAUSHALT ENTWICKELT. DER HERSTELLER LEHNT JEDER VERANTWORTUNG
FÜR SCHÄDEN AN DINGEN ODER VERLETZUNGEN VON PERSONEN AB, DIE AUF EINE NICHT KORREKTE INSTALLATION
ODER AUF UNSACHGEMÄSSEN, FALSCHEN ODER UNVORHERSEHBAREN GEBRAUCH ZURÜCKFÜHRBAR SIND.
DAS GERÄT DARF NICHT VON PERSONEN (EINSCHLIESSLICH KINDERN) MIT BESCHRÄNKTEN KÖRPERLICHEN,
SENSORISCHEN ODER GEISTIGEN FÄHIGKEITEN ODER VON PERSONEN OHNE DIE NÖTIGE ERFAHRUNG UND
KENNTNISSE VERWENDET WERDEN, SOFERN DIESE NICHT VON EINER FÜR IHRE SICHERHEIT VERANTWORTLICHE
PERSON ÜBERWACHT ODER UNTERWIESEN WERDEN. KINDER MÜSSEN ÜBERWACHT WERDEN, DAMIT DIESE NICHT
MIT DEM GERÄT SPIELEN. STANNIOL, TÖPFE ODER ÄHNLICHES DARF NICHT DEM INNENBODEN DES OFENS IN
BERÜHRUNG KOMMEN. BEIM ERHITZEN DER UNTEREN HEIZWIDERSTÄNDE WIRD DER UNTERE TEIL DES OFENS
ÜBERHITZT, WAS ZU SCHÄDEN ODER SOGAR SCHWERWIEGENDEN FOLGEN (BRANDGEFAHR) AM ELEMENT FÜR DEN
EINBAU DES OFENS FÜHREN KANN.
WÄHREND DES GEBRAUCHS WIRD DAS GERÄT SEHR HEISS. VORSICHT, UM NICHT DIE HEIZELEMENTE IM
OFENINNEREN ZU BERÜHREN.
ACHTUNG:
ACHTUNG:
ACHTUNG:
ACHTUNG:
Wenn die Tür oder die Dichtungen der Tür beschädigt sind, darf der Ofen
nicht in Betrieb genommen werden, bis er von zuständigem Personal repariert
wurde;
Es ist für alle – mit Ausnahme des zuständigen Personals – gefährlich,
Wartungsarbeiten oder Reparaturen auszuführen, welche das Entfernen von
Abdeckungen zum Schutz vor der Mikrowellenenergie implizieren;
Flüssigkeiten oder andere Lebensmittel dürfen nicht in verschlossenen
Behältern erhitzt werden, da sie explodieren könnten;
Kinder dürfen den Mikrowellenofen nur benutzen, wenn sie angemessen
unterwiesen wurden und in der Lage sind, das Gerät sicher zu verwenden und
die Gefahren durch unsachgemäßen Gebrauch verstehen;
nur die für Mikrowellenherde geeigneten Gerätschaften verwenden;
wenn Lebensmittel in Kunststoff- oder Papierbehältnissen erhitzt werden,
muss der Herd häug kontrolliert werden, da Brandgefahr besteht;
falls Rauch auftritt, das Gerät abschalten oder den Stecker herausziehen und
die Tür geschlossen halten, um ggf. vorhandene Flammen zu ersticken;
das Erhitzen von Getränken im Mikrowellenofen kann zu einem eruptionsartigen
verzögerten Aufkochen führen, deshalb das Behältnis sehr vorsichtig
handhaben;
der Inhalt von Trinkäschchen oder Babynahrung in Gläschen muss vor dem
Verzehr gemischt oder verrührt werden und auch die Temperatur kontrollieren,
um ein Verbrennen zu vermeiden;
Eier in der Schale und ganze harte Eier dürfen nicht in der Mikrowelle erwärmt
werden, denn sie können auch nach dem Erhitzen in der Mikrowelle explodieren;
detaillierte Erklärung zum Reinigen der Türdichtungen, der Aussparungen und
der anliegenden Teile;
der Ofen muss regelmäßig gereinigt und alle Lebensmittelreste beseitigt
werden;
wenn der Ofen nicht sauber gehalten wird, kann dies die Oberächen
beeinträchtigen und sich negativ auf die Standzeit des Geräts auswirken oder
zu Gefahren führen;
Für die Reinigung der Glastür des Ofens keine rauen, scheuernden
Materialien oder scharfe Metallschaber verwenden, da diese die Oberäche
verkratzen und zu Glasbruch führen können.
Für die Reinigung des Geräts dürfen keine Dampfreiniger benutzt werden.
DE
Page 84

HINWEISE FÜR DEN
MIKROWELLENOFEN
Zubereitung der Lebensmittel
Geschirr
DE
Mikrowellenleistung und Dauer
Verpackungen
Getränke
Brandgefahr!
Die Mikrowellenfunktion nur zum Zubereiten von zum Verzehr bestimmten
Lebensmitteln benutzen. Andere Arten der Anwendung können gefährlich sein
oder Schäden verursachen.
Beispielsweise können sich erhitzte Pantoffeln und Kornkissen auch nach
einigen Stunden entzünden.
Verletzungsgefahr!
Geschirr aus Porzellan oder Keramik kann kleine Löcher auf den Griffen oder
dem Deckel haben.
Hinter diesen Löchern können sich Hohlräume verbergen. Wenn Flüssigkeit in
diese Hohlräume eindringt, dann kann das Geschirr springen.
Kein Geschirr verwenden, das nicht mikrowellengeeignet ist.
Verbrennungsgefahr!
Die Wärme der Lebensmittel kann das Geschirr erhitzen. Immer Topappen
benutzen, um das Geschirr oder Zubehör aus dem Ofen zu nehmen.
Brandgefahr!
Niemals zu hohe Werte für die Mikrowellenleistung oder die Kochdauer
einstellen. Die Lebensmittel können Feuer fangen und das Gerät beschädigen.
Halten Sie sich an die Anweisungen in dieser Betriebsanleitung.
Brandgefahr!
Lebensmittel niemals in Thermobehältnissen erwärmen.
Lebensmittel in Behältnissen aus Plastik, Papier oder anderen brennbaren
Materialien müssen immer kontrolliert werden.
Verbrennungsgefahr!
Luftdichte Behältnisse können explodieren. Die Anleitungen auf der
Verpackung beachten. Immer Topappen benutzen, um die Gerichte aus dem
Ofen zu nehmen.
Verbrennungsgefahr!
Beim Erwärmen von Flüssigkeiten kann es zu einer Verzögerung des
Kochvorgangs kommen.
Anders ausgedrückt wird die Kochtemperatur erreicht, ohne dass sich die
typischen Dampfblasen bilden. Auch ein leichter Stoß kann zum plötzlichen
Überkochen der Flüssigkeit oder Spritzern führen.
Wenn Flüssigkeiten erwärmt werden, immer einen Löffel in das Behältnis
stecken, um eine Verzögerung des Kochens zu vermeiden.
84 85
Page 85

Säuglingsnahrung
Lebensmittel mit Haut oder
Schale
Trocknen von Lebensmitteln
Lebensmittel mit geringem
Wassergehalt
Öl
SCHADENSURSACHEN
Austreten von Fruchtsaft
Technischer Defekt
Kühlen mit offener Gerätetür
Stark verschmutzte Dichtung
Gerätetür als Ablagefläche
Gebrauch der
Mikrowellenfunktion ohne
Lebensmittel im Ofeninneren
Feuchte Lebensmittel
Explosionsgefahr!
Niemals Getränke oder andere Lebensmittel in Behältnissen mit Deckel
erhitzen.
Alkoholische Getränke nie zu sehr erwärmen.
Verbrennungsgefahr!
Niemals Säuglingsnahrung in Behältnissen mit Deckel erwärmen. Immer den
Deckel oder den Schnuller entfernen.
Nach dem Erwärmen immer sorgfältig schütteln oder umrühren, damit die
Wärme gleichmäßig verteilt wird.
Vor dem Füttern des Kindes immer erst die Temperatur kontrollieren.
Verbrennungsgefahr!
Niemals Eier mit der Schale kochen. Keine hartgekochten Eier erwärmen, da
diese auch nach dem Ausschalten der Mikrowelle explodieren können. Dies gilt
auch für Schalen- und Krustentiere.
Bei Spiegelei zuerst das Eigelb löchern.
Bei Lebensmitteln mit Haut oder Schale wie Äpfel, Tomaten, Kartoffeln oder
Würstchen kann die Schale/Haut platzen.
Vor dem Garen die Schale oder Haut löchern.
Brandgefahr!
Niemals Lebensmittel mit der Mikrowellenfunktion trocknen.
Brandgefahr!
Lebensmittel mit geringem Wassergehalt wie z.B. Brot nicht auftauen oder zu
lange oder mit einer zu hohen Leistung erwärmen .
Brandgefahr!
Niemals die Mikrowellenfunktion zum Erwärmen nur von Öl benutzen.
Bei der Zubereitung von Süßspeisen mit der saftigem Obst darf die Ofenform
nicht zu sehr gefüllt werden. Der Fruchtsaft, der aus der Ofenform läuft, kann
Flecken verursachen, die sich nur schwer entfernen lassen.
Niemals emaillierte Ofenformen mit der Mikrowelle verwenden, da dies einen
technischen Schaden verursacht.
Das Kühlen des Ofeninnern darf nur bei geschlossener Tür erfolgen.
Kontrollieren, dass nichts in der Gerätetür klemmt.
Auch wenn die Tür halb geschlossen ist, können sich die anliegenden Möbel
mit der Zeit beschädigen.
Wenn die Dichtung stark verschmutzt ist, dann schließt die Gerätetür bei
Betrieb nicht mehr richtig. Die Oberächen der anliegenden Möbel können
beschädigt werden. Die Dichtung immer sauber halten.
Sich nicht auf der offenen Tür des Geräts abstützen oder sich darauf legen
und auch keine Bestecke odr sonstiges Zubehör ablegen.
Die Mikrowelle erst dann einschalten, wenn Lebensmittel in den Ofenraum
gestellt wurden. Ohne Lebensmittel kann es zu einer Überlastung des Geräts
selbst kommen. Einzige Ausnahme ist ein kurzer Geschirrtest (siehe die
entsprechenden Hinweise für die Töpfe).
Feuchte Lebensmittel nicht über längere Zeit im geschlossenen Ofeninneren
aufbewahren. Das beschädigt den Lack.
DE
Page 86

WICHTIG
Das Typenschild des Ofens kann durch Öffnen der Tür auch bei montiertem Gerät abgelesen werden. Auf dem Schild
sind alle Kenndaten des Geräts angeführt, die bei der Ersatzteilbestellung anzugeben sind.
DE
ERSTE ANWENDUNG
Den Ofen gründlich mit Wasser und Seife reinigen und sorgfältig nachspülen.
Danach den Ofen zirka 30 Minuten bei Höchsttemperatur erhitzen. Auf diese Weise werden alle Fettrückstände aus
der Beareitung beseitigt, die zu schlechten Gerüchen beim Kochen führen könnten. Die Funktion grill mit dem Ofen
ohne Zubehör verwenden. Vor dem ersten Gebrauch des Zubehörs dieses sorgfältig mit einer sehr heißen alkalinen
Waschlösung und einem weichen Tuch reinigen.
EIN- UND AUSBAU DES PLANEN GITTERROSTS
Um das plane Gitter auszubauen, das Gitter bis zum Anschlag herausziehen, dann anheben und nach oben abziehen,
bis es ganz herauskommt.
Um das ache Gitter wieder einzusetzen, muss es schräg gehalten werden (45°) und bis zum Anschlag eingeschoben
werden. Dann horizontal ausrichten und bis zum Gitteranschlag schieben.
Wenn das plane Gitter mit einem Tablett (Tropfpfanne) versehen ist, dann muss es zum Herausnehmen leicht
angehoben und zu sich gezogen werden. Wieder einsetzen, bis in der entsprechenden Aufnahme einrastet.
86 87
Page 87

Wichtig:
Zur Sicherheit sollte vor der Reinigung des Ofens immer der Stecker aus der Steckdose gezogen oder
die Stromversorgung zum Gerät unterbrochen werden. Ferner dürfen keine saure- oder laugenhältigen
Substanzen (Zitronensaft, Essig, Salz, Tomaten, usw.) verwendet werden. Keine Scheuer-, chlor- oder
säurehaltigen Mittel für die Reinigung der lackierten Teile verwenden.
UMWELTSCHUTZ
Zum Schutz der Umwelt wurde für die Unterlagen zu diesem Geräts chlorfrei gebleichtes Papier oder Recyclingpapier
verwendet. Die Verpackung wurde aus umweltfreundlichen Produkten hergestellt und kann daher wieder verwendet
oder recycelt werden.
Das Recyceln der Verpackung trägt zur Einsparung von Rohstoffen und zu einer Reduzierung der Industrie- und
Haushaltsmüllmengen bei.
DAS VERPACKUNGSMATERIAL ist 100% recycelbar und mit dem Recyclingsymbol versehen. Für die Entsorgung
die örtlichen Auagen befolgen. Das Verpackungsmaterial (Plastiktüten, Polystyrolteile usw.) muss außerhalb der
Reichweite von Kindern aufbewahrt werden, da es sich um potentielle Gefahrenquellen handelt. DIESES GERÄT ist in
Konformität mit der EU-Richtlinie 2002/96/EG, Waste Electrical and Electronic Equipment (WEEE, über Elektro- und
Elektronik-Altgeräte) markiert. Wenn der Anwender sicherstellt, dass das Produkt sachgerecht entsorgt wird, trägt er
dazu bei, den negativen Umwirkungen auf Umwelt und Gesundheit vorzubeugen.
DAS ZEICHEN auf dem Produkt oder den begleitenden Unterlagen weist darauf hin, dass dieses Produkt
nicht als Hausmüll behandelt werden darf, sondern zur Sammelstelle für das Recycling von elektrischen
und elektronischen Geräten gebracht werden muss.
DIE ENTSORGUNG muss unter Einhaltung der örtlichen Auagen zur Abfallentsorgung erfolgen.
FÜR WEITERE INFORMATIONEN zur Behandlung, der Rückgewinnung und das Wiederverwerten dieses Produkts
die zuständige lokale Behörde, die Müllabfuhr oder das Geschäft kontaktieren, bei dem Sie das Gerät gekauft haben.
VOR DEM ABRÜSTEN unbrauchbar machen und dazu das Netzkabel abschneiden.
DE
Page 88

OFEM mit MIKROWELLE M45
Übersicht der Steuerungen
STANDARDGARFUNKTIONEN: von 1 bis 2
DE
EINSTELLUNG DER TEMPERATUR UND GARZEIT: 19 und 20
EIN/AUS + SPERRE (KINDERSICHERUNG): 23
FUNKTIONEN MIT MIKROWELLE: von 3 bis 6
FUNKTIONEN für REZEPTE: 7 und 8
ROLLENFUNKTIONEN LEISTUNG UND MENÜ: 9 und 10
TIMERFUNKTIONEN: 20;
EINSTELLUNG DES TIMERS: 15 und 16
1 Ofenlicht
2 Funktion Standardgaren - Grill
3 Auftauen nach Zeit
4 Auftauen nach Gewicht
5 Funktion Mikrowellengaren – traditionelle Mikrowelle
6 Funktion Mikrowellengaren – Mikrowelle + Grill
7 Funktion automatische Einstellungen (Rezepte)
8 Funktion Einstellungen bestätigen
9 Funktion Rollenmenü nach unten, Leistungsreduzierung
10 Funktion Rollenmenü nach oben, Leistungssteigerung
11 Funktion Temperaturanzeigen
12 Funktion Sperre freigegeben/deaktiviert
13 Funktion Timeranzeigen
14 Funktion Countdown
15 Funktion Einstellungen erhöhen
16 Funktion Einstellungen reduzieren
17 Timerfunktion „Minutenzähler“
18 Timerfunktion „Garende“
19 Timerfunktion „Gardauer“
20 Timerfunktion
21 Funktion „START“ - Einschaltung
22 Funktion „STOP“ - Abschaltung
23 Funktion “EIN/AUS” und Funktion “Sperre (Kindersicherung” HINWEIS: Alle Einstellungen/Änderungen
Bitte beachten: Alle Einstellungen/Änderungen der Funktionen werden von einem Signalton bestätigt.
88 89
Page 89

VORSTELLUNG DES OFENS
Geehrter Kunde, Ihr neuer Ofen wird von einer Leiterplatine gesteuert, die für eine ständige Verbesserung der
Leistungen den Betrieb überwacht.
Das Berührungsbedienfeld der letzten Generation ist präzise und zuverlässig.
Die Schnittstelle ist elegant, unauffällig, geordnet und übersichtlicher angeordnet als je zuvor!
Wenigen Tasten, vielen Funktionen und keine schwierigen Tastenkombinationen oder –Sequenzen: Konzentrieren Sie
sich auf Ihr Rezept, denn der Ofen ist mit zwei Gesten betriebsbereit!
Installation und Anschluss
Geehrter Kunde, dieser Ofen ist ein hochtechnologisches Elektrogerät mit langer Lebensdauer. Es muss von
qualizierten Technikern fachgemäß an das Versorgungsnetz angeschlossen und im Küchenelement installiert werden.
(DIE MONTAGEANLEITUNGEN AUF SEITE 105 )
Erster Anschluss
Wenn der Ofen zum ersten Mal an das Stromnetz angeschlossen wird, dann kann auf dem Display die Sprachauswahl
erscheinen;
Mit den ( )Tasten wird die gewünschte Sprache gewählt und mit der Taste ( ) die Wahl bestätigt.
Ab diesem Zeitpunkt bleibt die vorgewählte Sprache auch bei Stromausfall gespeichert.
Bitte beachten: Wenn bei dem ersten Einschalten auf dem Display eine andere als Ihre Sprache erscheint, dann lesen
Sie zum Wechsel bitte die Anleitungen auf Seite 90.
Danach beginnt die Vorführungsfunktion.
Die Vorführungsfunktion
Bei jedem Stromausfall und folglich bei dem ersten Anschluss begibt sich der Ofen in diesen Modus, in dem die
Funktionstüchtigkeit aller Steuerungen und die gespeicherte Tastenabfolge angezeigt werden.
In diesem Modus wird der Ofen NIEMALS wirklich betätigt, d.h. die Heizwiderstände werden nicht
eingeschaltet!!
Das Bedienfeld ist AUSGESCHALTET, daher antwortet der Ofen auf keine Befehle!
Zum Deaktivieren des Vorführungsmodus muss das
Lichtsymbol fünf Sekunden betätigt werden, wonach
die Steuerung in den Normalbetrieb übergeht und
einschaltbereit ist.
Nun kann auf Wunsch die Uhrzeit für die Einschaltung des
Ofens eingestellt werden.
DE
Page 90

Einstellung der Uhrzeit
Der Ofen meldet den Anschluss an das Stromnetz mit einem zweifachen akustischen Signalton.
DE
Zum Einstellen der Systemuhrzeit muss die Taste „TIMERFUNKTIONEN”
werden.
Jeder betätigte Befehl wird durch ein akustisches Signal bestätigt.
Die Uhrzeit wird mit den Tasten + und - eingestellt:
Während der Einstellung blinken die Trennungspunkte.
Die Uhrzeit wird übernommen, wenn diese Punkte x
aueuchten.
mindestens 3 Sekunden gedrückt
MÖGLICHE TÄTIGKEITEN BEI ABGESCHALTETEM OFEN
- Einschalten des Ofenlichtes
Bei Betätigung des Symbols (siehe Abb.) wird das
Ofenlicht ein- bzw. abgeschaltet.
- Sprachenänderung
Bei abgeschaltetem Ofen kann durch gleichzeitiges Betätigen der Funktionstaste
die Sprache am Display geändert werden. Danach wird mit den Pfeiltasten die Sprache gewählt und diese
Wahl mit
bestätigt.
und der Taste + unten rechts
90 91
Page 91

- Einstellen der Timerfunktion „Minutenzähler“
Siehe diesbezüglich den Abschnitt auf S. 98.
EINSCHALTEN DES OFENS
Zum Einschalten des Ofens das Symbol in der
Abbildung betätigen.
Alle Ofenfunktionen werden immer mit der
eingeschaltet. Nur die Funktionen Ofenlicht und Timer sind
unabhängig.
Die Steuerung schaltet die Hintergrundbeleuchtung aller
Ikons ein.
HINWEIS: Der Ofen wird erst eingeschaltet, wenn die Sperrfunktion deaktiviert ist.
Eine Minute lang nach dem Einschalten erscheint die Schrift ON auf dem Display, die Steuerung wartet, das
die Garfunktion gewählt wird. Andernfalls wird das Einschalten als ungewollt interpretiert und die Steuerung
schaltet aus Sicherheitsgründen automatisch den Ofen aus (es erscheint einige Sekunden lang die Schrift
OFF auf dem Display).
Sperrfunktion (oder Kindersicherung)
Die Sperrfunktion wird freigegeben/deaktiviert, wenn die
Taste
Funktion kann jederzeit und in jeder Betriebweise des
Ofens aktiviert und deaktiviert werden.
mindestens 3 Sekunden betätigt wird. Diese
Taste
DE
Das Symbol OFFENES
Vorhängeschloss zeigt an,
dass die Sperrfunktion
nicht aktiv ist.
Das Symbol
GESCHLOSSENES
Vorhängeschloss zeigt an,
dass die Sperrfunktion
aktiv ist.
Page 92
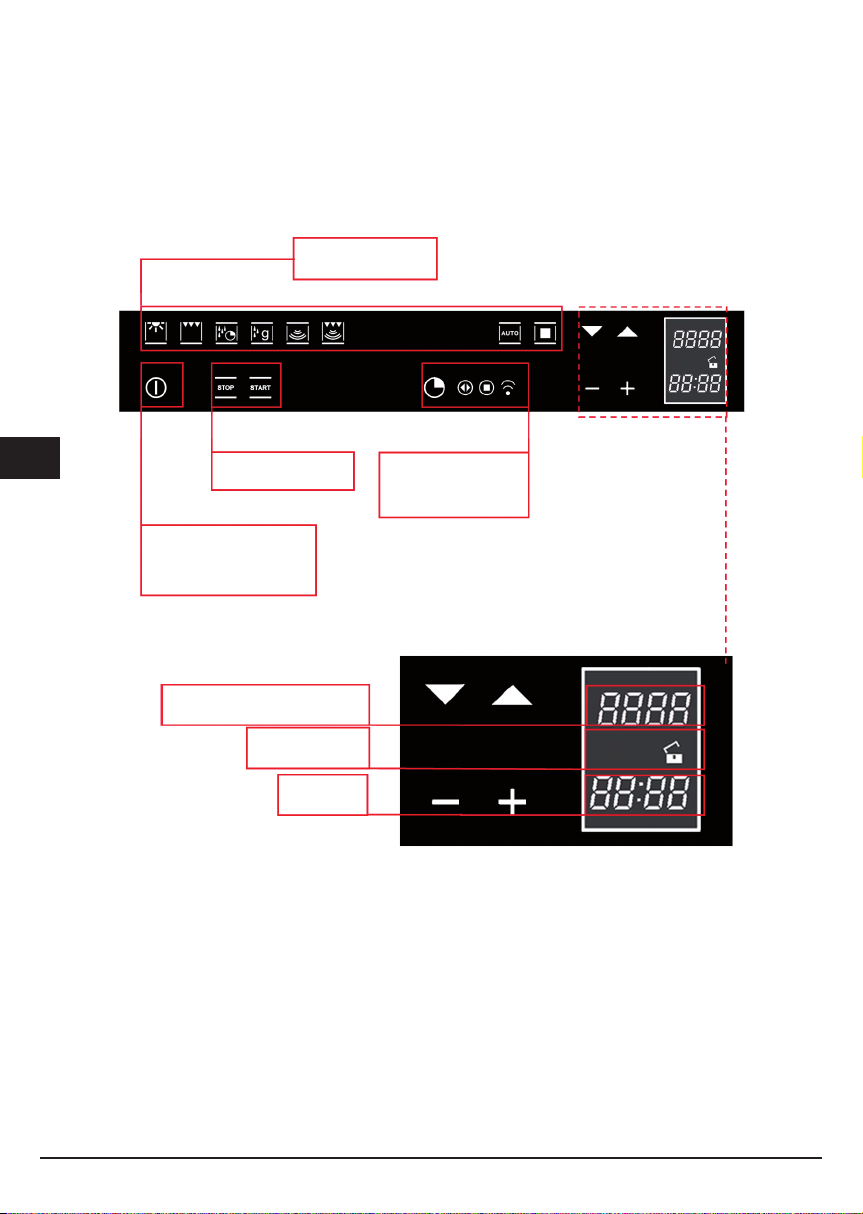
HAUPTFUNKTIONEN
Übersicht über das Bedienfeld
Garfunktionen
DE
Die Garfunktionen
Die Steuerung hat sieben verschiedene Garfunktionen!
Zum Schalten einer Funktion genügt es, wenn man das betreffende Symbol berührt.
Jede Funktion hat eine eingestellte Temperatur, die auf der Basis von Garproben für typische Rezepte gewählt wurde.
Diese Temperatur kann auf einfache Weise nach der eigenen Erfahrung verändert werden.
Sonderfunktionen
Ofen EIN/AUS
Ofensperre EIN/AUS
Temperatur / Leistung
Sperre
Programmieren
des Ofens
Uhrzeit
92 93
Page 93

Ofenfunktionen
Ofenlampe. Bleibt während des Betriebs in den Modalitäten Mikrowelle und Energiesparen
immer an. Sie wird in den anderen Modalitäten vom System verwaltet.
Gartyp für Grillen oder Bräunen der Gerichte. Das Gitter mit dem zu garenden Gericht muss
in die 2. oder 3. Position von unten eingeschoben werden. Mindestens 2 Minuten vor dem
Einschieben des Gerichts vorheizen.
Auftauen nach Zeit
Auftauen nach Gewicht
Mikrowelle
Mikrowelle kombiniert mit dem Grill
Zugriff auf die voreingestellten Rezepte
In der folgenden Tabelle sind die Ergebnisse der Garproben angeführt, die in unseren Labors von einer Proköchin
ausgeführt wurden. Es handelt sich dabei jedoch um Richtwerte, die als Ansatzpunkte für Versuche eigener Rezepte
mit immer besseren Ergebnissen dienen sollen!
DE
Page 94

Einfache Gesten fürs Garen
Dank der Steuerlogik der letzten Generation genügen zwei einfache Gesten, um eine Garzeit einzustellen: Den
Mikrowellenherd einschalten und die geeignete Funktion für das Gericht wählen… die Wahl erfolgt einfach durch
Berührung!
DE
Die Steuerung schlägt eine Temperatur für jede Funktion vor. Diese Temperatur kann jederzeit verändert
werden. Wenn keine Änderung der Temperatur erfolgt, schaltet sich der Mikrowellenherd nach wenigen
Sekunden von selbst ein!
Restwärme
Beim Garen von Gerichten speichert die Ofenstruktur Wärme. Diese Wärme wird dank einer großzügigen
Wärmeisolierung und einigen baulichen Maßnahmen vom Rest der Küche isoliert.
Die Wärme wird dann langsam abgegeben und kann noch in der Küche als Wärmequelle benutzt werden. Die
Steuerung zeigt nach dem Abschalten die Innentemperatur des Ofens an bis 50°C erreicht wurden.
Während der Erhitzung blinkt das Symbol Celsiusgrad
(°C), um anzuzeigen, dass die gewählte Temperatur
erreicht wird.
Die endgültige Erreichung der Temperatur wird durch ein
akustisches Signal gemeldet.
Bitte beachten: Bei einigen Modellen kann es die
momentane Temperaturanzeige im Ofen geben, bis
die eingestellte Temperatur erreicht wird. Wenn Sie die
eingestellte Temperatur prüfen möchten, dann drücken
Sie eine beliebige der Tasten und Sie können bei
Bedarf mit diesen die eingestellte Temperatur ändern.
Restwärme
Beim Garen von Gerichten speichert die Ofenstruktur Wärme. Diese Wärme wird dank einer großzügigen
Wärmeisolierung und einigen baulichen Maßnahmen vom Rest der Küche isoliert.
Die Wärme wird dann langsam abgegeben und kann noch in der Küche als Wärmequelle benutzt werden. Die
Steuerung zeigt nach dem Abschalten die Innentemperatur des Ofens an bis 50°C erreicht wurden.
94 95
Page 95

Diese Wärme kann zum Warmhalten von Gerichten oder zum langsamen Fertiggaren benutzt werden!
Steuerung des Ofenlichtes
Die Steuerung des Lichtes erfolgt unabhängig und ist in allen Garfunktionen aktiv. Das Licht kann daher jederzeit
ein- und ausgeschaltet werden!
Normalerweise bleibt das Licht im Ofen beim Erhitzen und drei Minuten nach der Erreichung der eingestellten
Temperatur eingeschaltet. Danach wird das Licht zu Energiesparzwecken ausgeschaltet.
Wenn das Ofeninnere während der Garzeit beleuchtet werden soll, muss nur das Symbol Licht berührt werden. Das
Licht bleibt drei Minuten eingeschaltet und schaltet sich danach automatisch ab. Natürlich kann es durch Betätigen
des Symbols Licht
Beim Öffnen der Ofentür schaltet sich das Innenlicht immer ein.
auch sofort abgeschaltet werden.
PROGRAMMIEREN DES OFENS
(nur für die Funktion )
Die Ofenprogrammierung bietet drei Arten der Kontrolle beim Garen. Sie sind zusätzlich zu den normalen
Kochfunktionen verfügbar.
Die Funktionen können der Reihe nach - von links nach rechts – angewählt
werden: Bei jeder Berührung des Symbols Uhr leuchtet der Reihe nach ein
Symbol auf.
DE
Page 96

Timerprogrammierung: Garzeit
Bei einmaligem Berühren des Symbols Timer
leuchtet das betreffende Symbol auf. Außerdem
löscht das Uhrzeitdisplay die Angabe der aktuellen
Uhrzeit:
Die Trennungspunkte blinken um anzuzeigen,
dass die Garzeit programmiert werden kann.
DE
Nach Festlegung der Garzeit zeigt das Display wieder die aktuelle Uhrzeit an und das Symbol
„Garzeit“ leuchtet auf.
Das Zählen der Zeit beginnt ab diesem Moment. Nach Ablauf der angezeigten Zeit gibt der Ofen einen Signalton aus,
die Heizwiderstände werden ausgeschaltet und der Garvorgang wird beendet. Auf dem Display erscheint die Schrift
“Programm beendet, Gericht herausnehmen”: Eine beliebige Taste drücken oder die Tür öffnen, um den Signalton
abzustellen.
Wenn keine anderen Garfunktionen eingestellt werden schaltet sich der Ofen nach einer Minute aus.
Timerprogrammierung: Garzeitende
Bei zweimaligem Berühren des Symbols Timer
leuchtet das betreffende Symbol auf.
Die Trennungspunkte blinken um anzuzeigen, dass
das Garzeitende programmiert werden kann.
96 97
Page 97

Danach kann durch Berühren der Symbole “+” und
“-” die Uhrzeit für das Garende eingestellt werden.
Sobald das Garzeitende festgelegt wurde, zeigt das Display wieder die aktuelle Uhrzeit an
und das Symbol „Garende“ leuchtet auf.
Ab diesem Zeitpunkt beginnt die Zeitzählung. Nach Ablauf der angegebenen Zeit gibt der Ofen ein akustisches
Signal ab und die Heizwiderstände schalten sich aus, wodurch der Garvorgang abgeschlossen wird. Auf dem Display
erscheint die Schrift “Programm beendet, Gericht herausnehmen”: Eine beliebige Taste drücken oder die Tür öffnen,
um den Signalton abzustellen.
Wenn keine anderen Garfunktionen eingestellt werden schaltet sich der Ofen nach acht Sekunden aus.
Timerprogrammierung: Verzögerung des Garbeginns
Durch die Kombination der beiden Betriebsweisen „Garzeit” und „Garzeitende“ kann der Ofen so eingestellt werden,
dass der Garvorgang zeitlich verzögert wird.
Es ist zum Beispiel 8.30. Sie verlassen das Haus, möchten aber, dass bei Ihrer Rückkehr um 13.00 der Braten fertig
ist. Sie müssen also folgend vorgehen:
Bereiten Sie den Lebensmittel
zum Garen vor und schieben
Sie diesen in den Ofen
DE
Den Ofen einschalten, die Garfunktion wählen und die Temperatur einstellen.
Danach wird die Garzeit eingestellt: nehmen wir 2
Stunden an.
Darauf wird das Garzeitende bestimmt: Die
Steuerung summiert normalerweise die
aktuelle Uhrzeit mit der Garzeit und schlägt
das Ergebnis als Garzeitende vor. In diesem
Fall also 10.30 (8.30 + 2 h).
Page 98

Nun muss das Garzeitende auf die gewünschte Uhrzeit
abgeändert werden. In unserem Beispiel auf 13.00.
Der Ofen stellt eine Stunde Wartezeit (Stand-by) ein und schaltet das Ofenlicht aus.
Die Steuerung schaltet den Ofen automatisch um 11.00 (13.00 – 2 h) ein und um 13.00 aus. Bei
Ihrer Rückkehr ist der Braten im Ofen fertig!
Timerprogrammierung: Minutenzähler
DE
Der Minutenzähler ist eine Funktion des Timers, die unabhängig vom Ofenbetrieb ist, d.h. sie unterbricht den Garvorgang nicht
und schaltet den Ofen nicht aus. Der Minutenzähler hat die Funktion eines akustischen Meldegeräts.
Der Minutenzähler jederzeit eingestellt und z.B. sowohl für die Steuerung von Kochplatten und Ofen als auch für andere
Küchentätigkeiten verwendet werden.
Diese Funktion ist auch bei abgeschaltetem Ofen durch Berühren des Symbols der Timerfunktionen anwählbar.
Bei eingeschaltetem Ofen muss das Symbol Timerfunktion hingegen drei Mal berührt werden:
Die Trennungspunkte blinken um anzuzeigen, dass der Wert
eingestellt werden kann.
Jetzt können die Minuten durch Berühren der Symbole “+” und “-“ eingestellt werden.
Ab diesem Zeitpunkt beginnt die Zeitzählung. Nach Ablauf dieser Zeit gibt der Ofen ein akustisches Signal ab und das
betreffende Symbol blinkt. Das akustische Signal wird durch Betätigen einer beliebigen Taste unterbrochen.
Timerprogrammierung: Löschen des Programms
Zum Löschen eines Programms muss der zuvor zugeteilte Wert nullgestellt bzw. der Ofen abgeschaltet werden.
DIE HERKÖMMLICHEN KOCHFUNKTIONEN
Großächiger Grill. Einstellung des Thermostats von 50° auf MAX.
98 99
Page 99

FUNKTION MIT MIKROWELLE
Die Mikrowellen werden in den Lebensmitteln in Wärme umgewandelt. Der Mikrowellenofen kann alleine oder
kombiniert mit einem anderen Heiztyp verwendet werden. Dieses Kapitel enthält Informationen zum Geschirr und wie
der Mikrowellenofen einzustellen ist.
HINWEISE FÜR DAS GESCHIRR
Passendes Geschirr
Nicht geeignetes Geschirr
Geschirrtest
Geeignet ist hitzebeständiges Geschirr aus Glas, Glaskeramik, Porzellan,
Keramik oder feuerfestem Kunststoff. Diese Materialien lassen die
Mikrowellen durch.
Es können auch die Teller des Services benutzt werden, so dass man die
Lebensmittel nicht mehr umladen muss.
Geschirr mit Gold- oder Silberdekoration darf nur dann benutzt werden, wenn
der Hersteller diese für die Verwendung in der Mikrowelle garantiert.
Es wird darauf hingewiesen, dass bei Verwendung des Ofens als Mikrowelle
der Teller auf dem Drehteller positioniert werden muss.
Geschirr aus Metall ist nicht geeignet.
Metall lässt keine Mikrowellen durch. Die Lebensmittel in Metallbehältern
bleiben kalt.
Achtung! Die Metallkomponenten, wie beispielsweise Löffel in Gläsern
müssen mindestens 2 cm von den Ofenwänden und von der Türinnenseite
entfernt sein. Funken können das Glas auf der Innenseite der Tür schwer
beschädigen.
Achtung! Das Gitter muss für die Verwendung in der Betriebsart Mikrowelle
oder Kombi-Funktion entfernt werden. Es darf nur bei Funktion als
herkömmlicher Ofen benutzt werden.
Den Ofen nicht einschalten, ohne zuvor die Lebensmittel hineingestellt zu
haben.
Einzige Ausnahme ist der Geschirrtest.
Falls Zweifel bezüglich der Eignung des Geschirrs für die Mikrowelle
bestehen, wird der folgende Test empfohlen:
½ - 1 Minute auf der höchsten Leistungsstufe einen Topf in den Ofen stellen.
Die Temperatur regelmäßig kontrollieren. Der Topf muss kalt oder lauwarm
sein. Sollte sich der Topf erwärmen oder es zur Funkenbildung kommen, dann
ist der Topf nicht geeignet.
DE
Page 100

Abtauen nach zeit
Die Taste betätigen, um den Ofen einzuschalten.
Die Funktion ABTAUEN nach ZEIT
Mit den Tasten - + kann die Abtauzeit in 5-Sekunden-Schritten verändert werden.
Werden die Tasten - + länger als 3 Sekunden gedrückt, wird die Zeiteinstellung beschleunigt.
Am Ende der Einstellungen wählen Sie die blinkende Funktion
Display läuft rückwärts.
DE
Die Abtauzeit muss immer eingestellt werden, da sonst die Taste
Für die Erzielung des bestmöglichen Ergebnisses wird die Versorgung der Mikrowelle automatisch geregelt.
Der Ofen zeigt Ihnen dann an, wann Sie das GERICHT UMDREHEN müssen oder wenn dies nicht möglich ist, dann
öffnen und schließen Sie die Ofentür, damit das Auftauen fortgesetzt wird.
Der Signalton und die Schrift PROGRAMM BEENDET, GERICHT HERAUSNEHMEN auf dem Display zeigen an, dass
das Programm beendet wurde.
Abtauen nach gewicht
wählen.
und es beginnt das Auftauen mit die Zeit auf dem
nicht funktioniert.
Die Taste
Die Funktion ABTAUEN nach GEWICHT
Es erscheint der folgende Bildschirm:
Am Ende der Einstellungen wählen Sie die blinkende Funktion
Display läuft rückwärts.
Der Signalton und die Schrift PROGRAMM BEENDET, GERICHT HERAUSNEHMEN auf dem Display zeigen an, dass
betätigen, um den Ofen einzuschalten.
wählen.
Nach der Auswahl des Gerichts mit und dessen
Bestätigung mit zeigt das Display das einzustellende
Gericht an.
Ausgehend von einem Mindestanfangsgewicht von 50g mit
kann der Gewichtswert gesteigert oder verringert
und dann mit bestätigt werden;
und es beginnt das Auftauen und die Zeit auf dem
100 101
 Loading...