

Page 1

KEEP THIS MANUAL
FOR FUTURE REFERENCE
FUJITSU GENERAL LIMITED
P/N9374708017
OPERATING MANUAL
AIR CONDITIONER
OPERATING MANUAL
BEDIENUNGSANLEITUNG
MODE D’EMPLOI
MANUAL DE FUNCIONAMIENTO
MANUALE DI ISTRUZIONI
ΕΓΧΕΙΡΙ∆ΙΟ ΛΕΙΤΟΥΡΓΙΑΣ
РУКОВОДСТВО ПО ЭКСПЛУАТАЦИИ
MANUAL DE INSTRUÇÕES
Remote Controller
UTB- D
GROUP REMOTE
CONTROLLER
(WIRED TYPE)
TM
English
Deutsch
Français
Español
Italiano
EλληvIkά
Русский
Português
Page 2

En-1
SAFETY PRECAUTIONS
● Before using the appliance, read these “SAFETY PRECAUTIONS” thoroughly and operate in the correct way.
● The instructions in this section all relate to safety; be sure to maintain safe operating conditions.
SAFETY PRECAUTIONS................................................ 1
NAME OF PARTS ........................................................... 2
PREPARATORY OPERATION......................................... 3
OPERATION ................................................................... 3
WEEKLY TIMER ............................................................. 4
MONITOR MODE ........................................................... 6
SELF-DIAGNOSIS .......................................................... 6
OPERATING TIPS........................................................... 6
TROUBLESHOOTING .................................................... 6
SPECIFICATIONS ........................................................... 6
DANGER!
This mark indicates procedures which, if improperly performed, are most likely to result in the death of
or serious injury to the user or service personnel.
● Do not attempt to install this controller by yourself.
● This controller contains no user-serviceable parts. Always consult authorized service personnel for re-
pairs.
● When moving, consult authorized service personnel for disconnection and installation of the controller.
● If a problem (burning smell, etc.) occurs, turn off the electrical breaker immediately to stop operation, and
then consult authorized service personnel.
● If the wiring cord is damaged, contact your service representative for instruction.
CAUTION!
This mark indicates procedures which, if improperly performed, might possibly result in personal harm
to the user, or damage to property.
● Do not expose the controller directly to water.
● Do not operate the controller with wet hands.
● Do not touch the switches with sharp objects.
● Always turn off the electrical breaker whenever cleaning the controller, the air conditioner or the air filter.
● Check the condition of the installation stand for damage.
● Ensure that any electronic equipment is at least one metre away from the controller.
● Avoid installing the controller near a fireplace or other heating apparatus.
● When installing the controller, take precautions to prevent access by infants.
● Do not use inflammable gases near the controller.
CONTENTS
Page 3
En-2
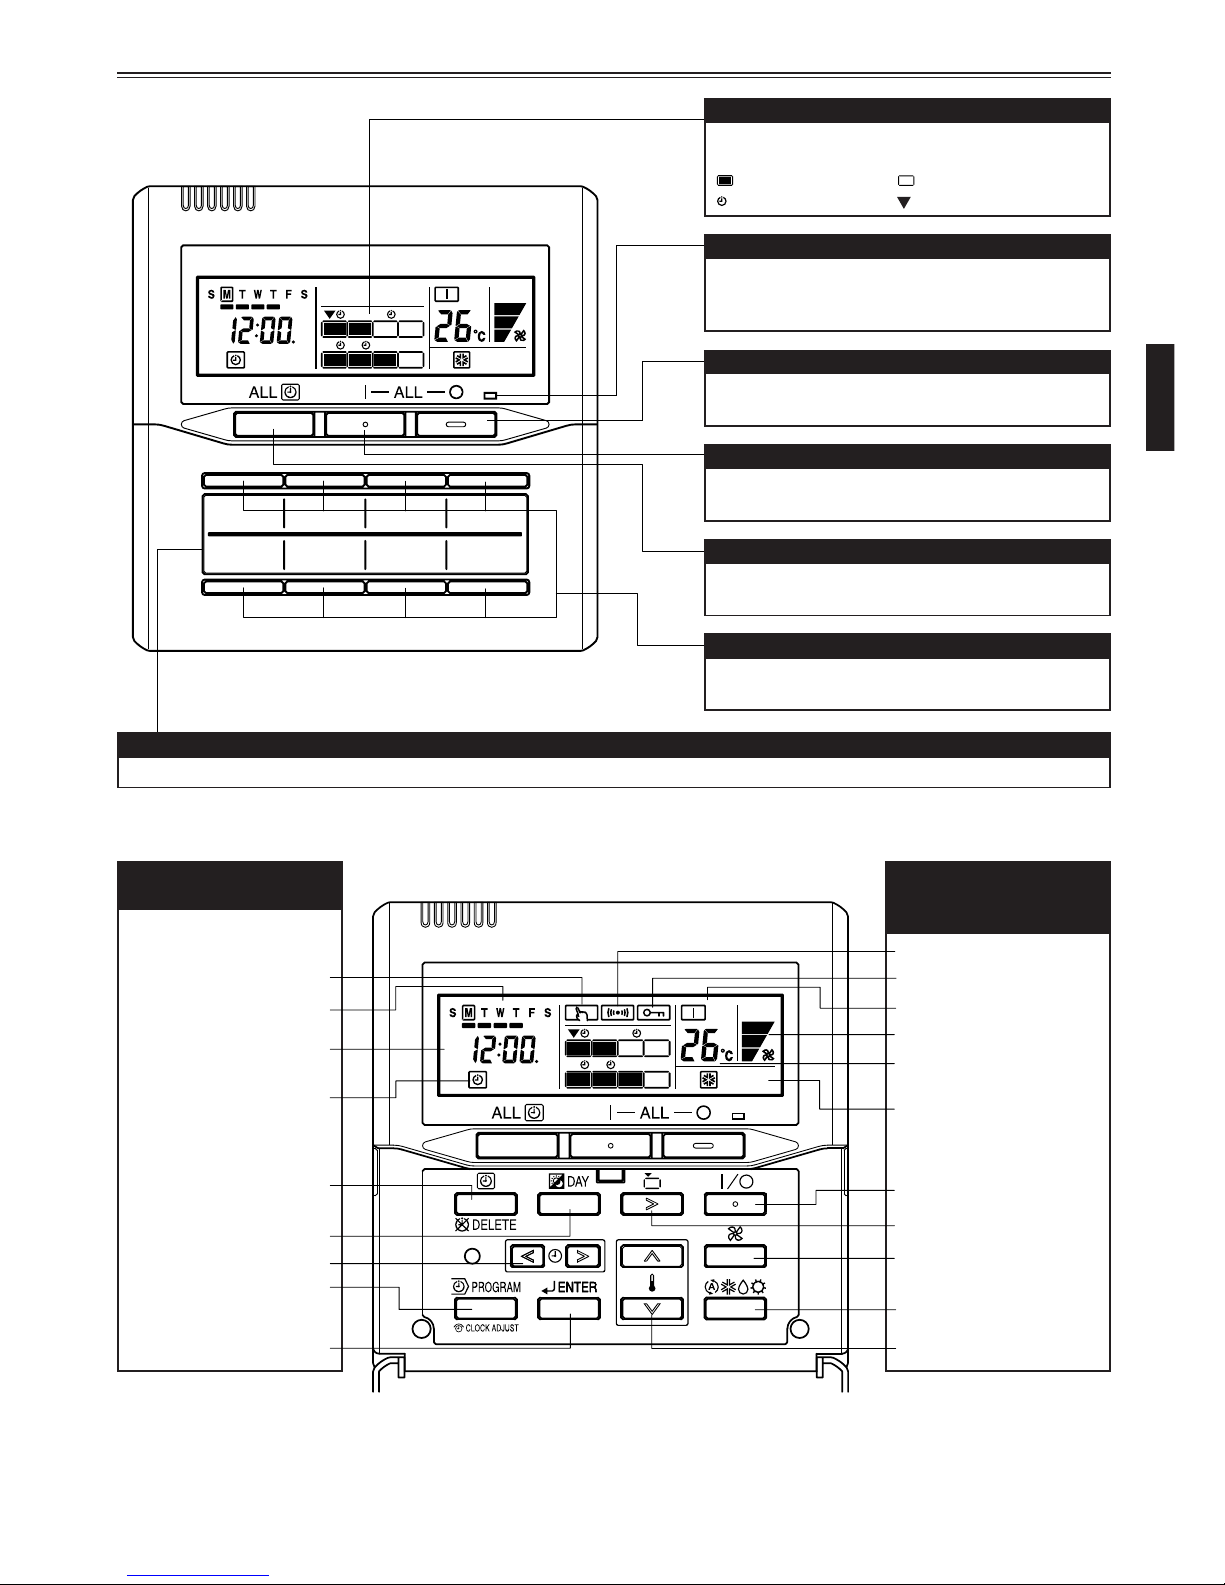
NAME OF PARTS
● With cover closed
Indoor Unit Name Labels
Write the names of the indoor units on the included labels and attach them.
● With cover open
Setting Display
Day Display
Timer and Clock Display
Timer Mode Display
Timer Mode
(DELETE) Button
DAY Button
Set Time Button
PROGRAM (CLOCK
ADJUST) Button
ENTER Button
* The LCD display is the same with the cover open or closed.
Transmission Display
Operation Lock Display
ON/OFF Display
Fan Speed Display
Temperature Display
Operation Mode Display
Start/Stop Button
Select Button
Fan Control Button
Master Control Button
Set Temperature Button
Timer and Clock
Display and setting
Displaying the Status
and Controlling
indoor units
Indoor Unit Operation Indicators
This shows the operating status and timer operation status for each of the indoor units.
: On : Off
: Timer operation : Selection
Operation Lamp
This is on if any of the indoor units is operating.
This flashes if any of the indoor units has
malfunction(s).
ALL OFF Button
Press the ALL OFF button to turn off all of the
indoor units.
ALL ON Button
Press the ALL ON button to turn on all of the indoor units.
ALL TIMER Button
Press the ALL TIMER button to turn the timer operation on or off for all indoor units.
ON/OFF Button
Press the ON/OFF button to turn the corresponding indoor unit on or off.
Page 4

En-3
PREPARATORY OPERATION
To set the operation mode
OPERATION
● It is possible to make the operation settings for all indoor units or individual units.
To start/stop operation
Hold down the PROGRAM (CLOCK ADJUST) button for 2
seconds or more.
2
Press the DAY button and select the
current day.
A
appears around the selected
day.
Press the Set Time buttons to set the current time.
Press repeatedly to adjust the current time in 1-minute increments. Press and
hold to adjust the current time in 10-minute increments.
ex. Monday 10:00 (24-hour display)
Press again the PROGRAM (CLOCK
ADJUST) button to end.
CLOCK ADJUST
1
3
4
Press the ALL ON button or the ALL OFF button to turn on or off all registered indoor units.
Press the Master Control button to set the operation mode.
To set the current day and time
● Operation mode setting
AUTO
COOL
DRY FAN HEAT
CLOCK ADJUST
DAY
S M T W T F S
SUN MON TUE WED THU FRI SAT
Reverse Advance
ALL
ON
ALL
OFF
* With cover closed
Press the ON/OFF button for the corresponding indoor unit.
* With cover open
Press the Start/Stop button for selected indoor unit(s).
ON
OFF
Temperature setting range
AUTO ............................................................ 18 to 30 °C
COOL/DRY .................................................... 18 to 30 °C
HEAT ............................................................. 10 to 30 °C
Raise
Press the Set Temperature buttons to set the room temperature.
● Room temperature setting
* AUTO and FAN cannot be selected for “HEAT PUMP MODELS.”
* HEAT cannot be selected for “COOLING ONLY MODELS.”
Lower
Press the Fan Control button to set the fan speed.
* According to the initial setting, the heating temperature range from 10 to 15 °C
cannot be set. In addition, the temperature range from 10 to 15 °C is invalid depending on the model even if it can be set.
● Fan speed setting
AUTO
HIGH
MED LOW
* If DRY is selected, the fan speed can be set to AUTO only.
Page 5

En-4
OPERATION
To select the indoor unit
Press the Select button to select the indoor unit.
1st indoor unit 2nd indoor unit 8th indoor unit All indoor units
WEEKLY TIMER
The timer function is not available depending on the initial setting.
● Different schedules can be set for each day of the week.
● Four timers can be set for each day.
● Operation on/off time, operation mode, and temperature can be specified for each timer.
To start/cancel the WEEKLY timer operation
The for the selected indoor unit lights, and the operating status is displayed.
* If all indoor units are selected, all of the registered indoor units are controlled at the same time.
* If all indoor units are selected,
appears on the Timer and Clock Display.
Press the ALL TIMER button to start or cancel the WEEKLY timers for all indoor units.
• If any of the indoor units are in the timer mode, pressing this
button cancels the timers for all indoor units.
• If none of the indoor units are in the timer mode, pressing
this button starts the timers for all indoor units.
Press the Timer Mode (DELETE) button to start or cancel the WEEKLY timers for the indoor units selected by the Select button.
Press the PROGRAM (CLOCK ADJUST) button.
* Do not press this button for two sec-
onds or more, otherwise you will enter the time setting mode.
2
Press the Select button to select the indoor unit.
* If all indoor units are selected, the times for all of the registered indoor unit
timers are set at once.
1
3
CLOCK ADJUST
● Day of the week setting
DAY
Press the DAY button to select the day of the week.
* For ALL, all of the days can be set together when a
appears around
each day.
S M T W T F S
To set the WEEKLY timer
ALL
All indoor units
SUN MON TUE WED THU FRI SAT
Page 6

En-5
4
Press the Set Time buttons to set the time in 10-minute increments.
5
Reverse Advance
ex. 24-hour display
● Operating setting
Raise
Lower
*
**
**
No display
ON OFF
No setting
No display
No setting AUTO COOL DRY FAN HEAT
* If all of the selected indoor units are COOLING ONLY MODELS, there is a possibility
that HEAT cannot be selected.
** If all of the selected indoor units are HEAT PUMP MODELS or if HEAT PUMP MOD-
ELS are selected with COOLING ONLY MODELS, there is a possibility that AUTO or
FAN cannot be selected.
No display
No setting
Depend on
initial setting
HEAT only
* The temperature setting ranges vary according to the operation mode and initial
setting. In addition, the temperature range from 10 to 15 °C is invalid depending on
the model even if it can be set.
Press the Start/Stop button or the Master Control button or the Set Temperature button to set the operation.
6
● Setting the next timer for the same day:
TIMER-1 TIMER-2 TIMER-3 TIMER-4
Then press the ENTER button to proceed to the time setting, and repeat steps from 4 to 5.
● Repeat steps
3
to 5 to set the timer for another day of the week.
● To delete the operating time
WEEKLY TIMER
● Timer setting
8
When the operating time is set, the mark appears.
ex. TIMER-1 will start operation at 8:00 on COOL with a set-
ting of 20 °C.
1. Press the ENTER button to confirm the set timer.
2. Press again the PROGRAM (CLOCK ADJUST)
button to complete the weekly timer setting.
*
flashes for two seconds.
CLOCK ADJUST
7
● Setting the timer for the other indoor units:
Before setting the timer for other indoor units, press the ENTER button to confirm the
settings.
* The display switches to the next timer.
● Repeat steps
2
to 6 to set the timer for other indoor units.
1. If the Timer Mode (DELETE) button is pressed during steps
3
to 7, the operat-
ing time for the selected day will be deleted.
* If all the days are selected, the operating times for all of the days of the se-
lected timer will be deleted.
2. Press the ENTER button to confirm the deletion.
Page 7

En-6
SELF-DIAGNOSIS
The air conditioning system must be inspected if “E✽:✽✽” (error code) appears on the Timer and Clock Display, or the operation lamp is flashing.
Stop air conditioner operation and please consult authorized service personnel.
OPERATING TIPS
Cooling/heating priority (AIRSTAGE
TM
(VRF system Heat Pump model only))
• If another indoor unit in the same system is already operating in the cooling mode or dry mode, heating mode settings cannot be performed.
• If another indoor unit in the same system is already operating in the heating mode, cooling mode or dry mode settings cannot be performed.
TROUBLESHOOTING
Before requesting service, perform the following checks:
Symptom
Does not operate at all.
Items to check
●
Has there been a power failure?
●
Has a fuse of convertor blown out, or a circuit breaker been tripped?
●
Is the main power switch set to the OFF position?
●
Is the timer operating?
CHECK ONCE
MORE
If the problem persists after performing these checks, or if you notice burning smells, stop operation immediately, turn off the
electrical breaker and consult authorized service personnel.
SPECIFICATIONS
GROUP REMOTE CONTROLLER (WIRED TYPE)
MODEL POWER
DIMENSIONS & WEIGHT
HEIGHT [mm] WIDTH [mm] DEPTH [mm] WEIGHT [g]
UTB-
D DC 12 V 120 120 17 160
MONITOR MODE
● The operation status of each indoor unit can be checked in the Monitor mode.
To enter the Monitor mode
The display automatically switches to the Monitor mode after
60 seconds if no button is pressed.
*
is not shown in the Monitor mode.
Press the Select button to select an indoor unit to display the
current status.
not shown
Setting display
• When a key operation is in progress, is displayed.
After the operation is complete,
flashes for a minute,
and then goes off.
• When
is flashing, it means that the signal is being
transmitted. During this time, key operations are disabled.
• When
is displayed there are functions for which set-
tings cannot be made.
NOTES
(1) The WEEKLY timer does not operate when the HEAT timer is set if a HEAT PUMP MODEL in the air conditioning system
is operating in the cooling mode. In addition, the WEEKLY timer does not operate when the COOL or DRY timer is set if
a HEAT PUMP MODEL in the air conditioning system is operating in the heating mode.
(2) Even if the timer operation is set, the timer lamp of the indoor unit does not light up. (The timer lamp is used for
wireless remote controller only.)
WEEKLY TIMER
 Loading...