

Page 1

Rhein Tech Laboratories
360 Herndon Parkway
Suite 1400
Herndon, VA 20170
http://www.rheintech.com
APPENDIX J: MANUAL
Please refer to the following pages.
Fujitsu Transaction Solutions
Model: iPAD100-XX
FCC ID: QL9-IPAD100INT
FCC/IC: Part 15.247/RSS-210
RTL WO#: 2002188
Page 47 of 76
Page 2
Operations Guide
Revision 1.0
90000610
Page 3

Draft
Using the IPAD
This manual contains important information required for using the iPAD safely. Before
attempting to use the iPAD, read this manual carefully to ensure that you understand its
contents. For safe operation of the product, pay particular attention to the section "Notes on
Safety." Also keep this manual in a safe but convenient location for quick reference. Since
Fujitsu takes every precaution to ensure that its products can be used safely without physical
harm to users or damage to a product or peripheral equipment, use the iPAD only as
instructed in this manual.
Preface
Thank you for purchasing the iPAD. Before using the iPAD, read this manual thoroughly so
that you will be able to take full advantage of its functions.
July 2002 First Edition
VCCI Compatibility Standard
This product is a Class A information
technology device that complies with the
standard of the Voluntary Control Council for
Interference by Information Technology
Equipment (VCCI). Since use of the IPAD in a
home environment can cause interference,
appropriate protective measures may be
required.
Microsoft, Windows CE, and eMbedded Visual Tools are registered trademarks of Microsoft
Corporation in the U.S.A. and/or other countries. Other company and product names
appearing in this manual are the trademarks of their respective owners.
2
Page 4

Draft
Using the iPAD in Mission-Critical Situations
The iPAD is designed and manufactured for use in standard applications such as those for
general office, personal, and household use. It is not intended for specialized uses, such as
atomic energy control systems, aeronautical or space systems, mass transportation control
systems, medical devices for life support, or weapons firing control systems where particularly
high reliability requirements exist, the pertinent levels of safety are not guaranteed, or a failure
or operational error could be life threatening or result in physical injury (referred to hereafter as
"mission-critical" use). Customers considering the use the iPAD for mission-critical
applications must have safety-assurance measures in place beforehand, and should consult a
Fujitsu sales representative before proceeding.
3
Page 5

Draft
Regulatory Information- iPAD
Radio Frequency Interference Requirements – U.S.A.
This device has been tested and found to comply with the limits for a Class B digital device
pursuant to Part 15 of the Federal Communications Commission Rules and Regulations. These
limits are designed to provide reasonable protection against harmful interference when the
equipment is operated in a commercial or residential environment. This equipment generates,
uses, and radiates radio frequency energy and, if not installed and used in accordance with the
instruction manual, may cause harmful interference to radio communications. There is no
guarantee that interference will not occur in a particular installation. If the equipment does cause
harmful interference to radio or television reception, which can be determined by turning the
equipment off and on, the user is encouraged to try to correct the interference by one or more of
the following measures:
• Re-orient or relocate the receiving antenna
• Increase the separation between the equipment and receiver
• Connect the equipment into an outlet on a circuit different from that which the receiver is
connected
• Contact a Fujitsu Service Technician for assistance
This device complies with Part 15 of the FCC Rules. Operation is subject to the following two
conditions: (1) this device may not cause harmful interference and (2) this device must accept
any interference received, including interference that may cause undesired operation.
Radio Frequency Interference Requirements – Canada
This device complies with RSS 210 of Industry & Science Canada. Operation is subject to the
following two conditions: (1) this device may not cause harmful interference and (2) this device
must accept any interference received, including interference that may cause undesired
operation.
This Class B digital apparatus complies with Industry Canada Standard ICES-003.
Cet appareil numérique de la classe B est conform à la norme NMB-003 d’Industrie Canada.
Option – RF Devices
Fujitsu’s RF products are designed to be compliant with the rules and regulations in the locations
into which they are sold and are labeled as required. The majority of Fujitsu’s RF devices are
type approved and do not require the user to obtain license or authorization before using the
equipment. Any changes or modification to Fujitsu equipment, not expressly approved by Fujitsu,
could void the user’s authority to operate the equipment.
4
Page 6
Draft
FCC RF Exposure Guidelines
The radio module in this device has been evaluated under FCC Bulletin OET 65C and found
compliant to the requirements as set forth in CFR Sections 2.1091, 2.1093, and 15.247(b)(4)
addressing RF Exposure from radio frequency devices. The iPad contains an internal low-power
radio whose radiated output power is far below the FCC radio frequency exposure limits.
Nevertheless, the iPad shall be used in such a manner that the potential for human contact with
the radio antenna during normal operation is minimized. The iPad should be utilized/worn in
accordance with the instructions for the device.
This device must not be collocated with any other antenna or transmitters.
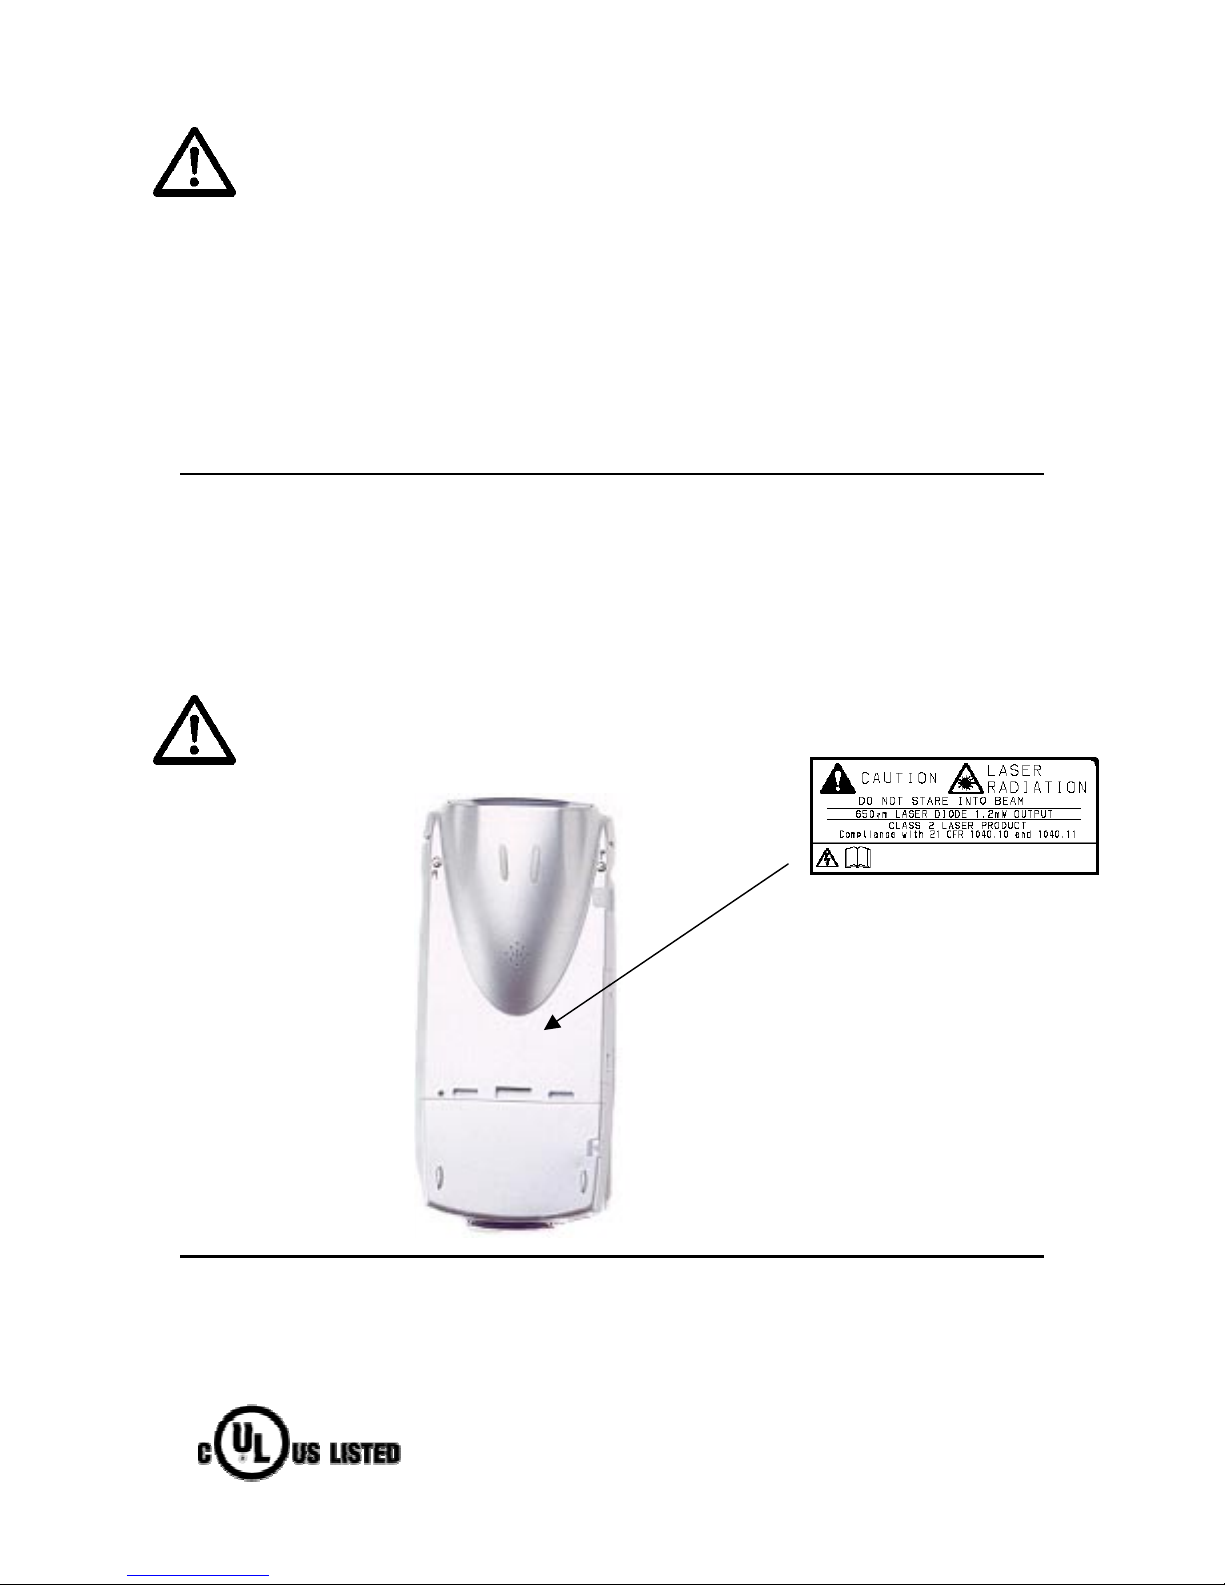
Option - Laser Devices
This product contains a Class 2 laser and complies with US 21CFR1040.10. These type of lasers
use a low power visible light diode. Care should be taken to avoid staring directly into the light.
Laser power up to 1.2 mW at 650nm could be accessible in the interior.
“CAUTION – use of controls or adjustments or performance of procedures other than those
specified herein may result in hazardous laser light exposure.”
Scanner Safety Labeling
Safety
This product has been certified with Underwriters Laboratories for use in the United
States and Canada.
5
Page 7

Draft
Table of Contents
Preface ................................................................................................................................2
Using the iPAD in Mission Critical Situations .................................................................3
Regulatory Information .....................................................................................................4
Contents .............................................................................................................................6
Chapter 1 Before Using the iPAD......................................................................................8
1.1 Names of Parts ...........................................................................................................8
1.2 Using batteries............................................................................................................13
1.2.1 Batteries ...................................................................................................................13
1.2.2 Charging the Main Battery......................................................................................14
1.2.3 Installing and Removing the Main Battery............................................................20
1.2.4 Charging the Auxiliary Battery...............................................................................21
Chapter 2 Setup ..................................................................................................................23
Chapter 3 Using the iPAD ..................................................................................................24
3.1 Power on/off (suspend/resume)................................................................................24
3.1.1 Turning on the iPAD (resume mode) ...................................................................24
3.1.2 Turning off the iPAD (suspend mode) .................................................................24
3.2 Checking the Battery Status......................................................................................25
3.3 Adjusting the Volume.................................................................................................27
3.4 Adjusting the Brightness of the Front Light ............................................................28
3.5 Calibrating the Touch Screen....................................................................................28
3.6 Virtual Keyboard .........................................................................................................30
3.6.1 Displaying the keyboard .......................................................................................30
3.6.2 Inputting a character .............................................................................................30
3.6.3 Changing the keyboard type ................................................................................30
3.7 Resetting the iPAD......................................................................................................31
3.7.1 Using the reset switch ..........................................................................................31
3.7.2 Completely resetting the iPAD .............................................................................32
Chapter 4 LED Indications .................................................................................................34
4.1 IPAD LED .....................................................................................................................34
4.2 LED on the Single-pack Charger during Charging .................................................35
Chapter 5 Wireless LAN .....................................................................................................35
5.1 Installing the RF Card ................................................................................................36
5.1.1 Parts for RF LAN Card Installation ......................................................................36
5.2 Installation Procedure ................................................................................................36
Chapter 6 Bar Code Scanner .............................................................................................38
6.1 Using the Bar Code Scanner .....................................................................................38
6.2 Bar Code Specifications ............................................................................................39
6.3 Cleaning the Reading Aperture.................................................................................39
6.4 Bar Code Sample Chart .............................................................................................40
Chapter 7 Magnetic Card Reader ......................................................................................40
Chapter 8 IC Card Reader/Writer.......................................................................................42
Chapter 9 User Action Response to Messages...............................................................44
Chapter 10 Troubleshooting..............................................................................................45
Chapter 11 Correctly Using the iPAD................................................................................46
11.1 Using the Main Battery..............................................................................................46
11.2 Using the Auxiliary Battery......................................................................................46
11.3 Long-term Storage....................................................................................................47
11.4 Cleaning.....................................................................................................................47
11.5 Other Precautions.....................................................................................................47
A Specifications..................................................................................................................48
B Consumables...................................................................................................................50
6
Page 8

Draft
C Accessories .....................................................................................................................51
D Options.............................................................................................................................51
E Supplies ...........................................................................................................................52
F Warning Indications and Symbols.................................................................................52
G Notes on Safety .............................................................................................................54
H Conventions Used in the Manual ..................................................................................58
7
Page 9
Draft
1 Before Using the IPAD
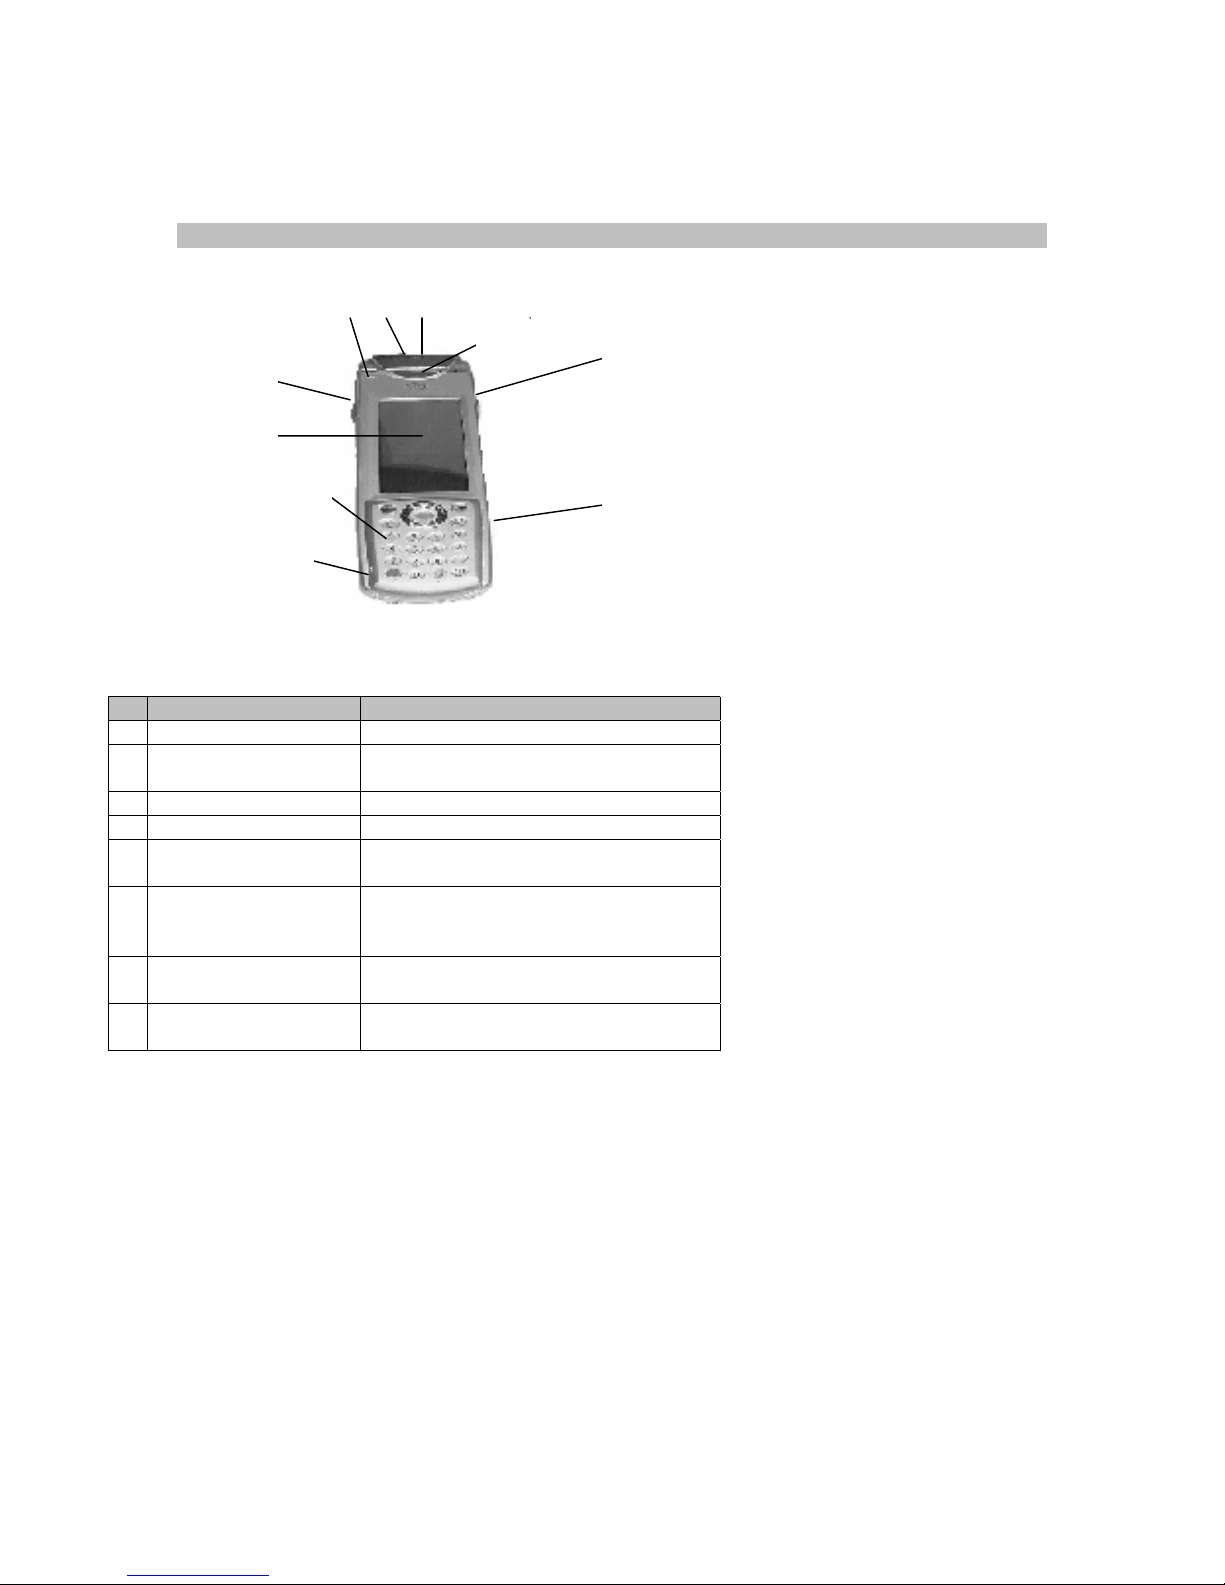
1.1 Names of Parts
<Front>
8
6
7
2
5
4
9
Part name Remarks
1 Magnetic card reader Reads magnetic cards.
2 Trigger key Used when the barcode scanner is
used.
3 Microphone (built-in) Used for speech input.
4 Operations section See the <Operations section>.
5 Resistive-film touch
panel LCD
6 LED Lit during charging on the cradle or
7 Wireless antenna
(built-in)
8 Bar code
scanner
Referred to as "touch panel" or
"screen" in this manual.
during reading by the scanner.
Can also be lit by an application.
Used during 11 Mbps wireless
communication.
Outputs the laser beam used to read
a bar code.
1
2
3
8
Page 10

Draft
<Rear>
3
5
6
5
2
4
1
NO. Part name Remarks
1 Main battery
compartment
2 Speaker (built-in) Outputs sound.
3 Bar code scanner Outputs the laser beam
4 Compact flash slot A built-in 11 Mbps antennae
5 Strap hole Means by which to attach a
6 Reset switch Used to forcibly terminate
7 Headset jack Accepts a 2.5 mm diameter
Holds a lithium ion battery
(main battery).
used to read a bar code.
for RF card
strap.
or restart the unit.
* Do not use this switch
during normal operation.
plug.
7
9
Page 11
Draft
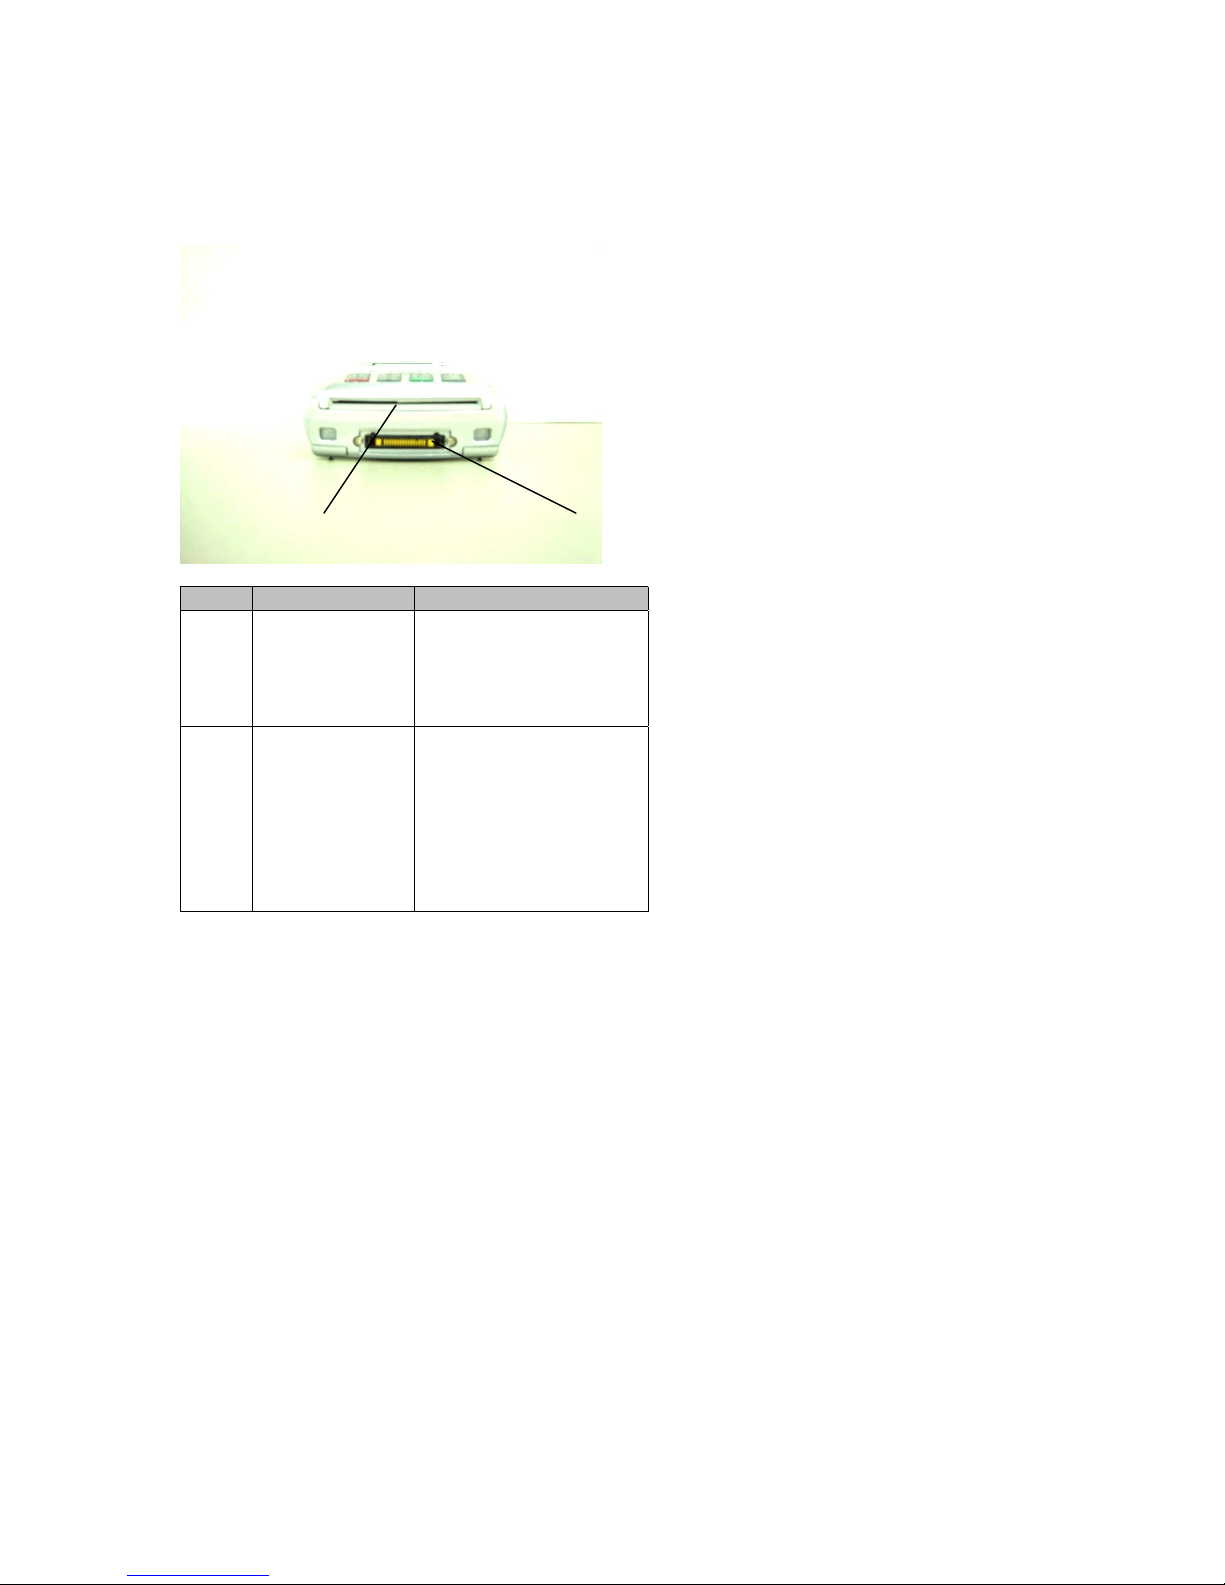
<Bottom>
2
NO. Part name Remarks
1
2
Cradle interface
IC card
reader/writer
Provides the contacts
used to charge the
iPAD or transfer data
when it is mounted on
the cradle (IPAD142-01)
Available only on the
IPAD100-20.
Used to make a
payment using an IC
card.
Insert an IC card with
the IC terminal side
facing up.
1
For information about the cradle, see the "IPAD Cradle (IPAD142-01) Manual”
10
Page 12
Draft
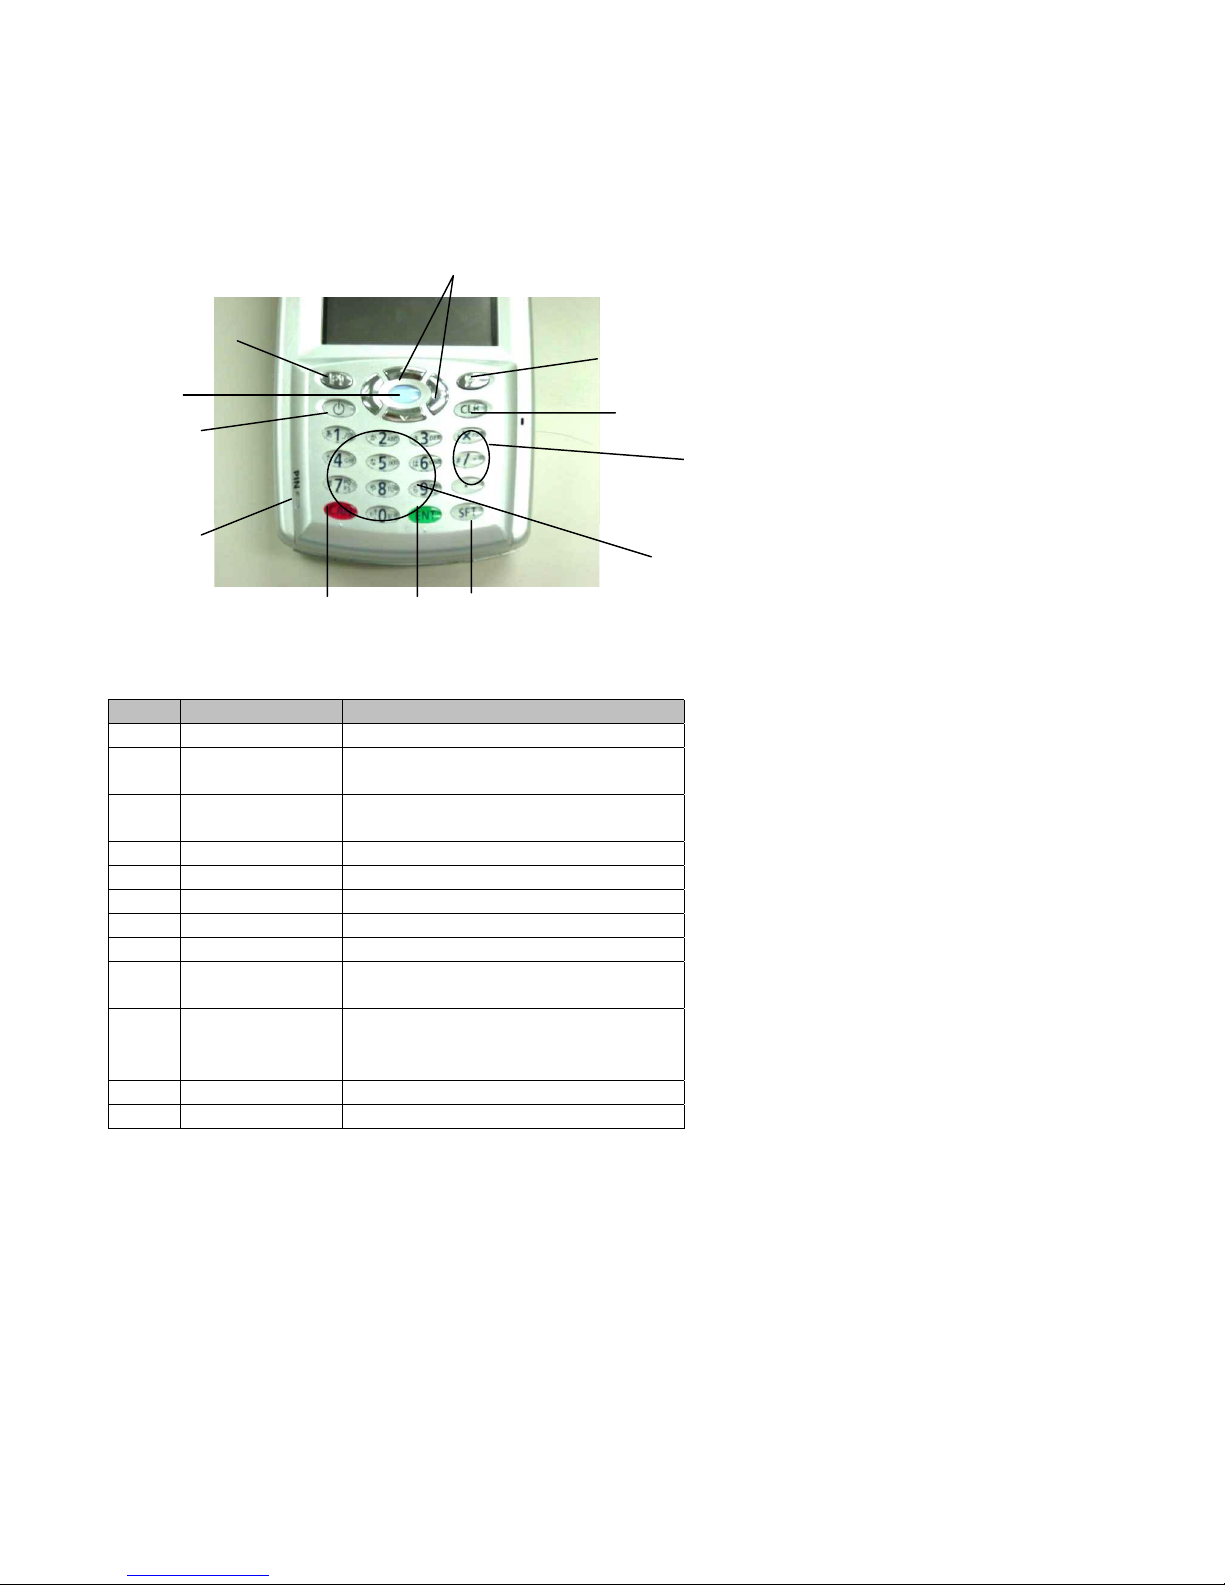
<Operations section>
1
11
8
12
2
7
6
5
3
4
9
NO. Part name Remarks
1 Cursor key Moves the cursor.
2 Function key 1 Invokes a function defined by an
application.
3 Function key 2 Invokes a function defined by an
application.
4 Clear key [CLR] key in this manual.
5 Shift key [SFT] key in this manual.
6 Enter key [ENT] key in this manual.
7 Cancel key [CAN] key in this manual.
8 Power key
9 Numeric/charac
ter keys
10
11 Set key
12 PIN LED Lights when a payment PIN is input.
× / and .
(decimal point)
keys
-
-
-
-
10
11
Page 13
Draft
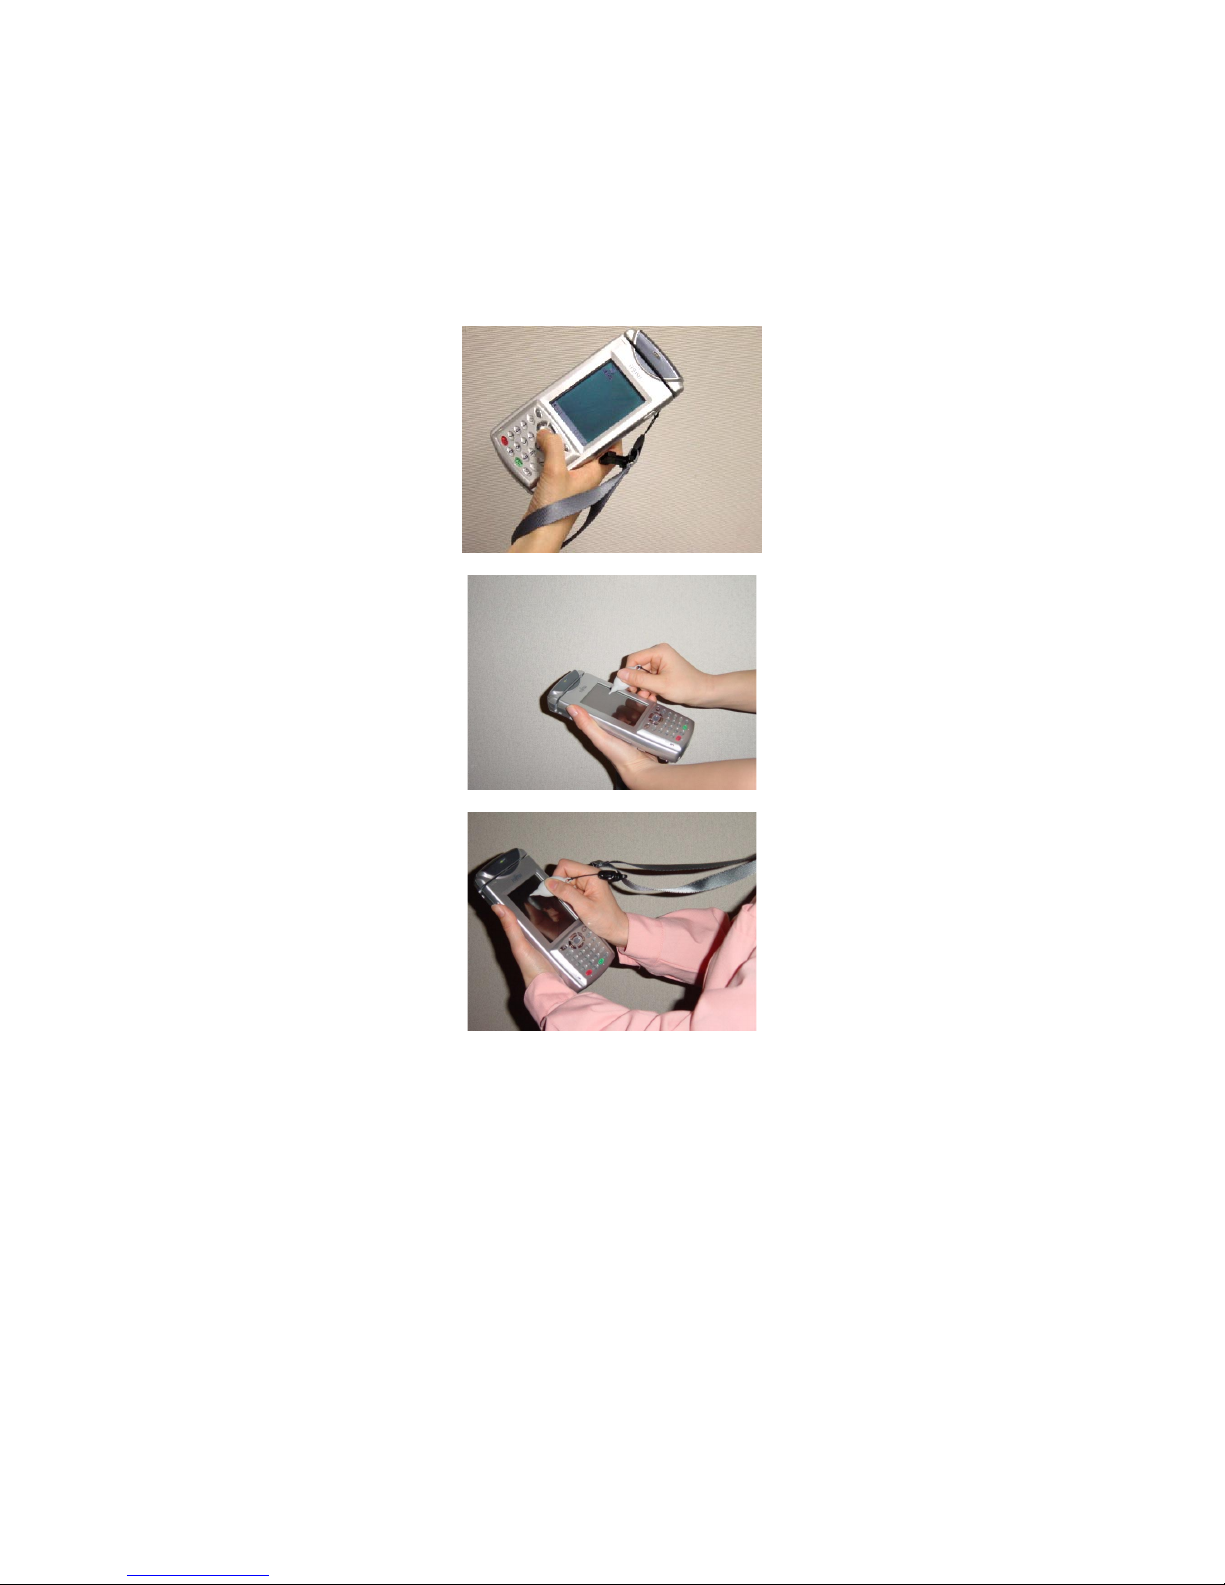
<Operating style>
The iPAD is designed so that you can either hold it in one hand and operate it with your thumb
or hold it in one hand and operate it with the other hand. The two styles shown in Figures 1
and 2. Operate the iPAD as shown in the figures.
[Figure 1]
[Figure 2]
<Using the neck strap>
12
Page 14

Draft
1.2 Using Batteries
1.2.1 Batteries
Battery types
The iPAD has a main battery and an auxiliary battery.
Main battery: The main battery is used to back up the contents of memory during
normal operation and in suspend mode.
Auxiliary battery: The auxiliary battery is used to back up the contents of memory if the
main battery loses its charge or the main battery is being replaced.
Guidelines on battery life
1. Main battery
As a guideline, the life of the main battery is either about 500 chargings and dischargings
or two years.
The more a battery is used, the shorter the time it will last. The life of the main battery has
expired if it loses its charge in a very short time after being fully charged. When this
happens, replace the main battery with a new one.
Main battery life may be less than 500 chargings and dischargings or two years depending
on ambient temperature and how the iPAD is used.
2. Auxiliary battery
The auxiliary battery is used temporarily to retain data while the main battery is being
replaced.
The auxiliary battery backs up data in the iPAD's memory during replacement of the main
battery.
To replace the main battery, have ready a fully charged main battery and complete the
procedure within ten minutes.
The auxiliary battery is embedded in the main unit and cannot be replaced.
Message screen when recharging message displayed
When the battery charge falls below a certain level, a message prompting you to recharge
the battery appears.
Checking the battery status
You can check the status of the battery and the remaining battery charge.
>>Reference>> Section 3.2, "Checking the Battery Status"
13
Page 15
Draft
1.2.2 Charging the main battery
Charge the main battery the first time that you use it or when the battery charge
is low.
You can charge the main battery with any of the following methods:
Mounting the iPAD on the cradle with the main battery mounted in the iPAD
Using a single-pack charger
Connecting two cradles for simultaneous charging of two batteries
Connecting the single-pack charger and the cradle for simultaneous charging
CAUTION
Do not unplug the AC adapter before
charging has been completed.
Use only the cradle, AC adapter, and
single-pack charger designed for the
iPAD to prevent damage to the iPAD
resulting from product differences such
as voltage or current requirements.
Note
It is best to charge a battery at room
temperature (from 50
The cradle, AC adapter, or single-pack
charger may become slightly hot. This
is not a malfunction.
For information about the single-pack charger, see the "iPAD Single-pack Charger (CA05951-
7080) User's Guide."
o
F to 86oF).
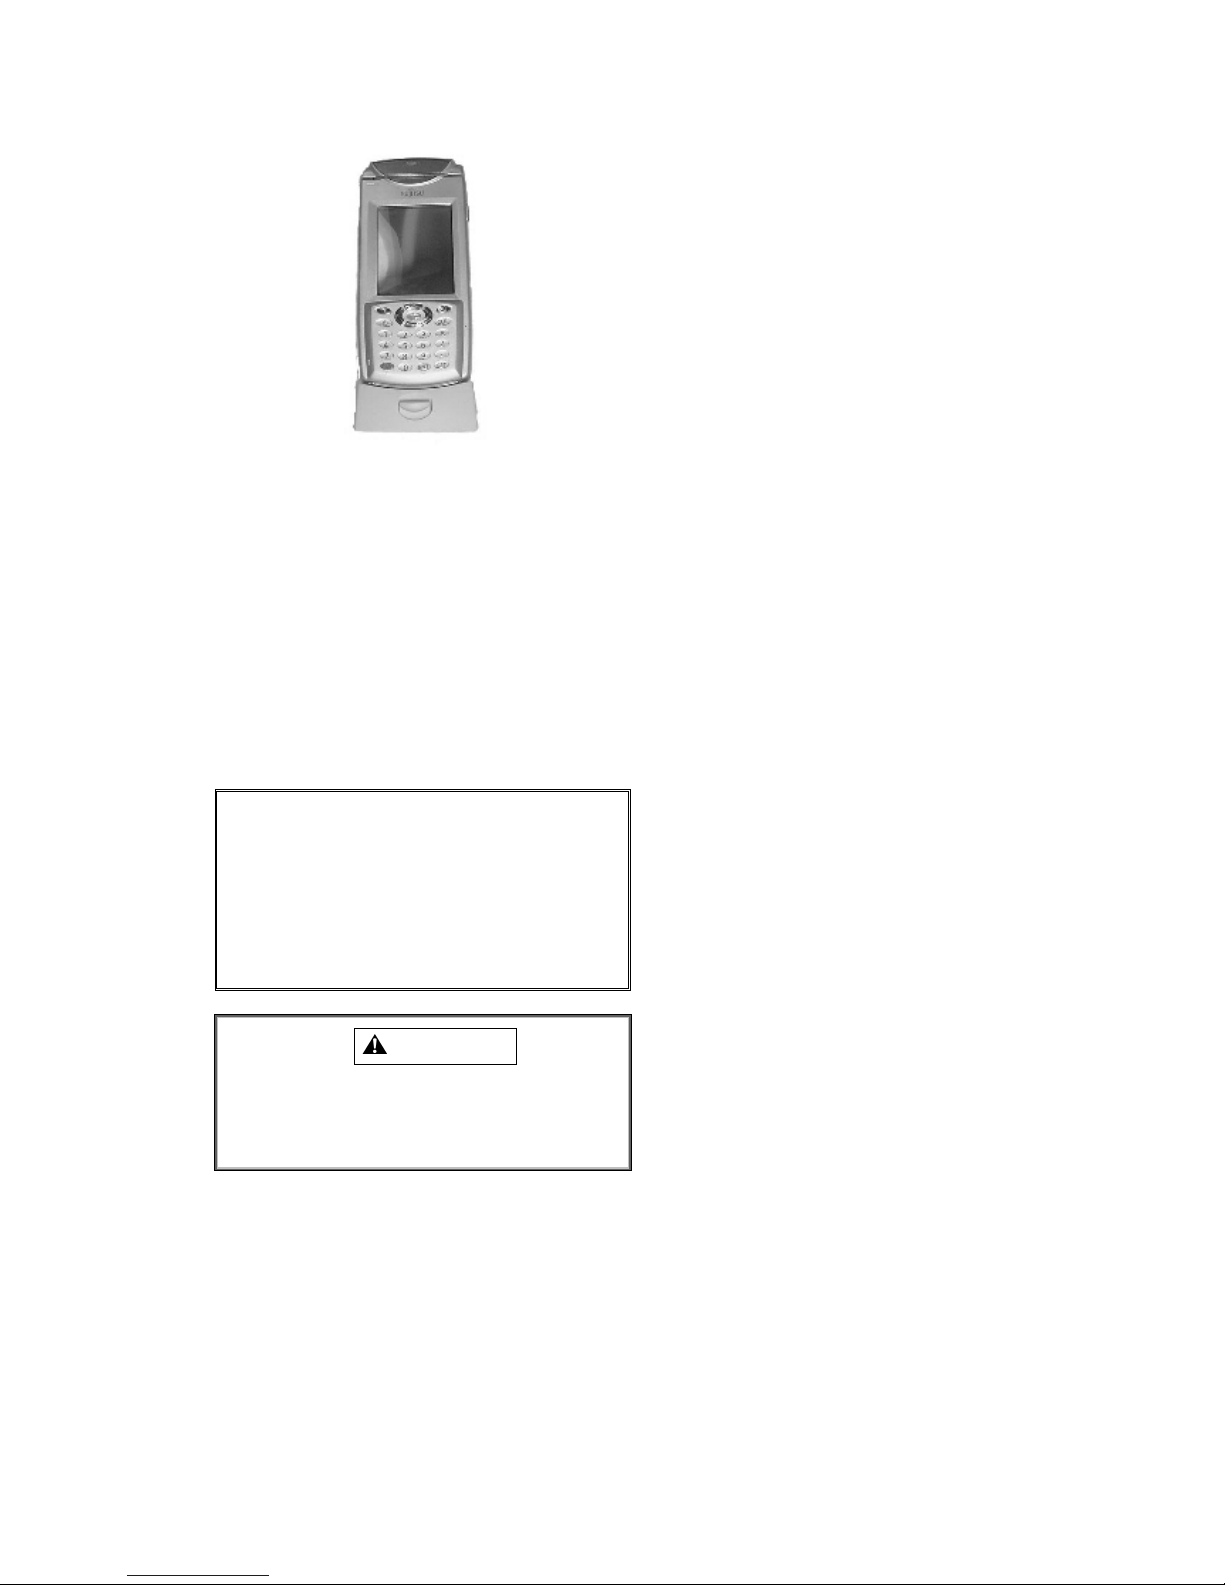
Charging the main battery using the cradle (IPAD142-01)
You can use one of three methods to charge the main battery when you mount the iPAD on
the cradle. The first method uses one cradle to charge one iPAD. The second method uses
two cradles connected with a daisychain cable to charge two iPAD units simultaneously. The
third method uses one cradle and one single-pack charger connected with a daisychain cable
to simultaneously charge a battery and the iPAD.
<Using one cradle>
Using the cradle, you can charge one battery installed in the IPAD.
A cradle (IPAD142-01) and an AC adapter (CA05306-D500) are required for this operation.
14
Page 16
Draft
(1) Connect the AC adapter to either of the cradle connection ports.
(2) Plug the AC adapter into a wall outlet.
(3) Turn off the iPAD.
(4) Insert the iPAD with the main battery installed into the cradle until you hear a click.
Charging starts.
During charging, the LED is on and is orange. When charging is completed, the LED
changes to green.
The charging time is about 2.5 hours.
Note
Gently mount the iPAD on the cradle
to prevent malfunctioning of the iPAD
and cradle.
If the LED does not light, make sure
that the IPAD is correctly mounted on
the cradle.
CAUTION
If you mount the iPAD on the cradle
while iPAD power is on, the LED
lights but the battery is not fully
charged.
⌦ This completes the operation.
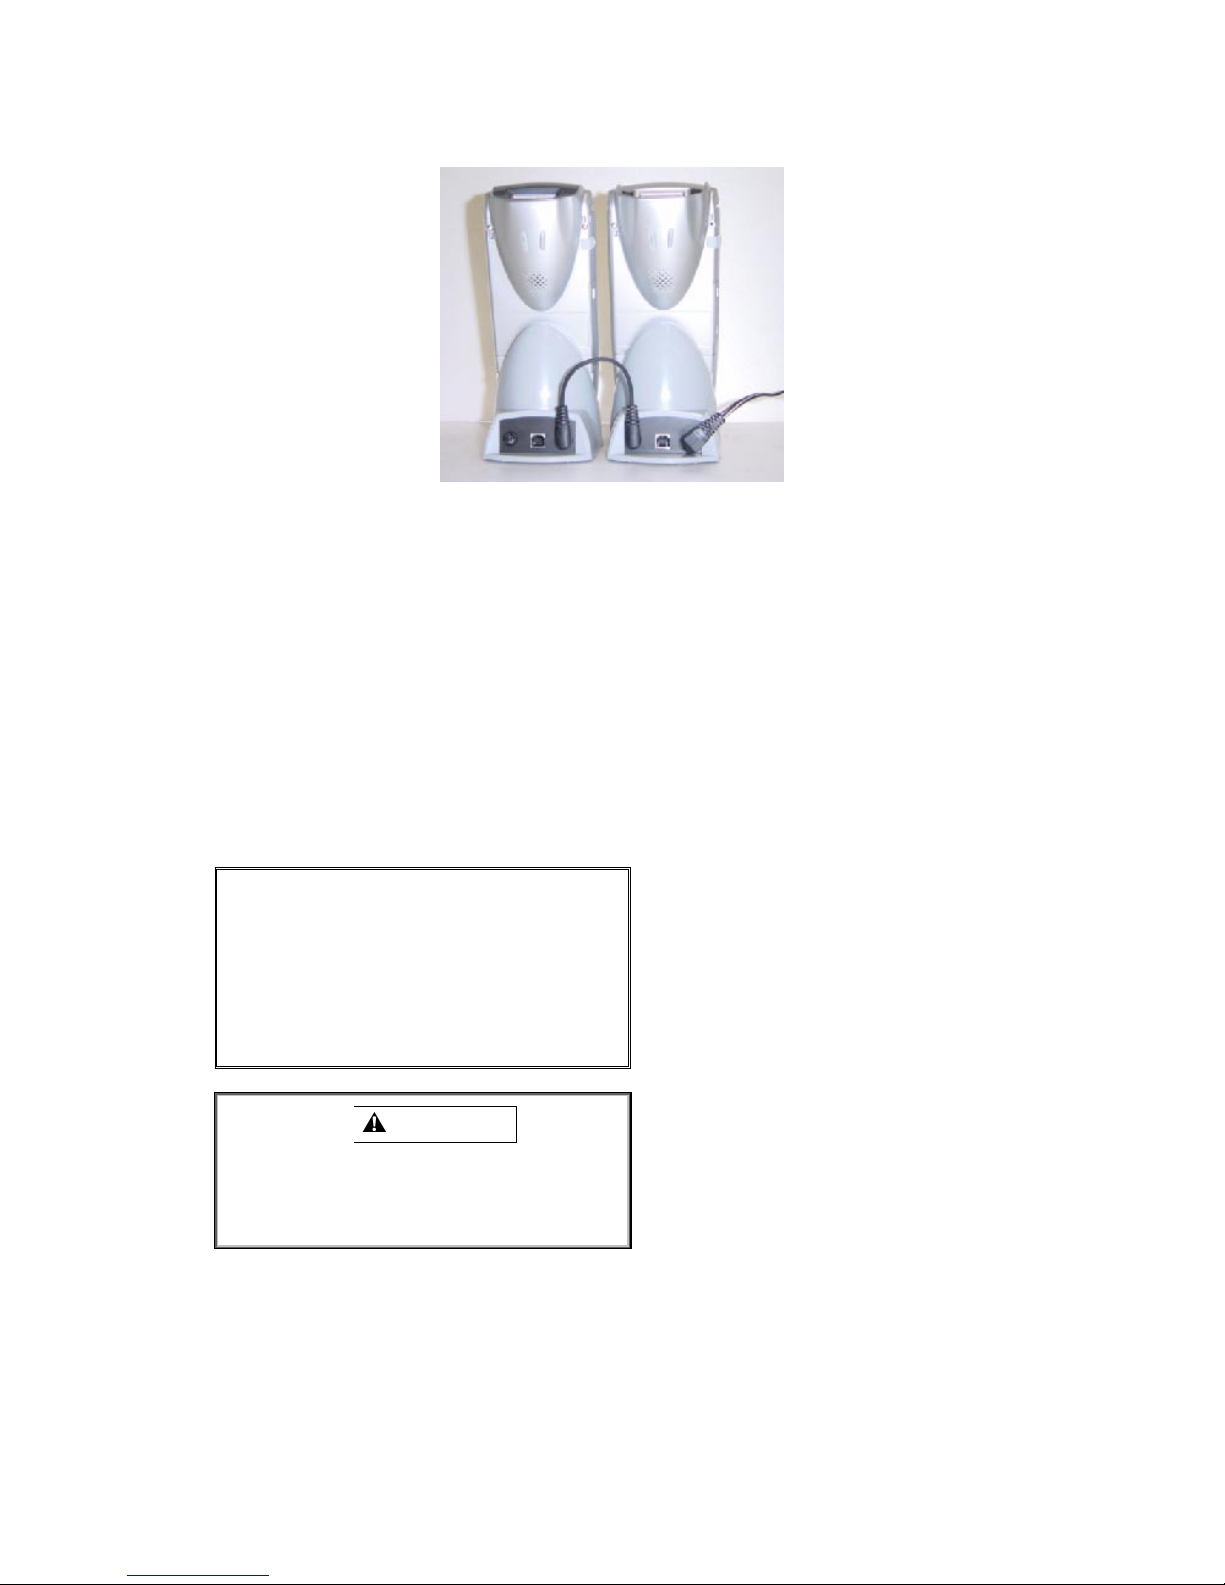
<Using two cradles (IPAD142-01)>
Using two cradles, you can simultaneously charge two batteries, one in each of two iPAD
units.
Two cradles (IPAD142-01), one AC adapter (CA05306-D500), and one daisychain cable
(CA72001-1895) are required for this operation.
15
Page 17
Draft
(1) Using a daisychain cable, connect the AC adapter connection interface on the right of one
cradle to the connection interface on the left of the second cradle.
The cable can be connected to either of the two AC adapter connection interfaces
provided on a cradle.
(2) Connect an AC adapter to the unoccupied AC adapter connection interface on either of
the cradles.
(3) Plug the AC cable of the AC adapter into a wall outlet.
(4) Turn off the iPAD.
(5) Insert the iPAD units with the their main batteries installed into the cradles until you hear a
click.
Charging starts.
During charging, the LED is on and is orange. When charging is completed, the LED
changes to green.
The charging time is about 2.5 hours.
Note
Gently mount the iPAD on the cradle
to prevent malfunctioning of the iPAD
and cradle.
If the LED does not light, make sure
that the iPAD is correctly mounted on
the cradle.
CAUTION
If you mount the iPAD on the cradle
while iPAD power is on, the LED
lights but the battery is not fully
charged.
⌦ This completes the operation.
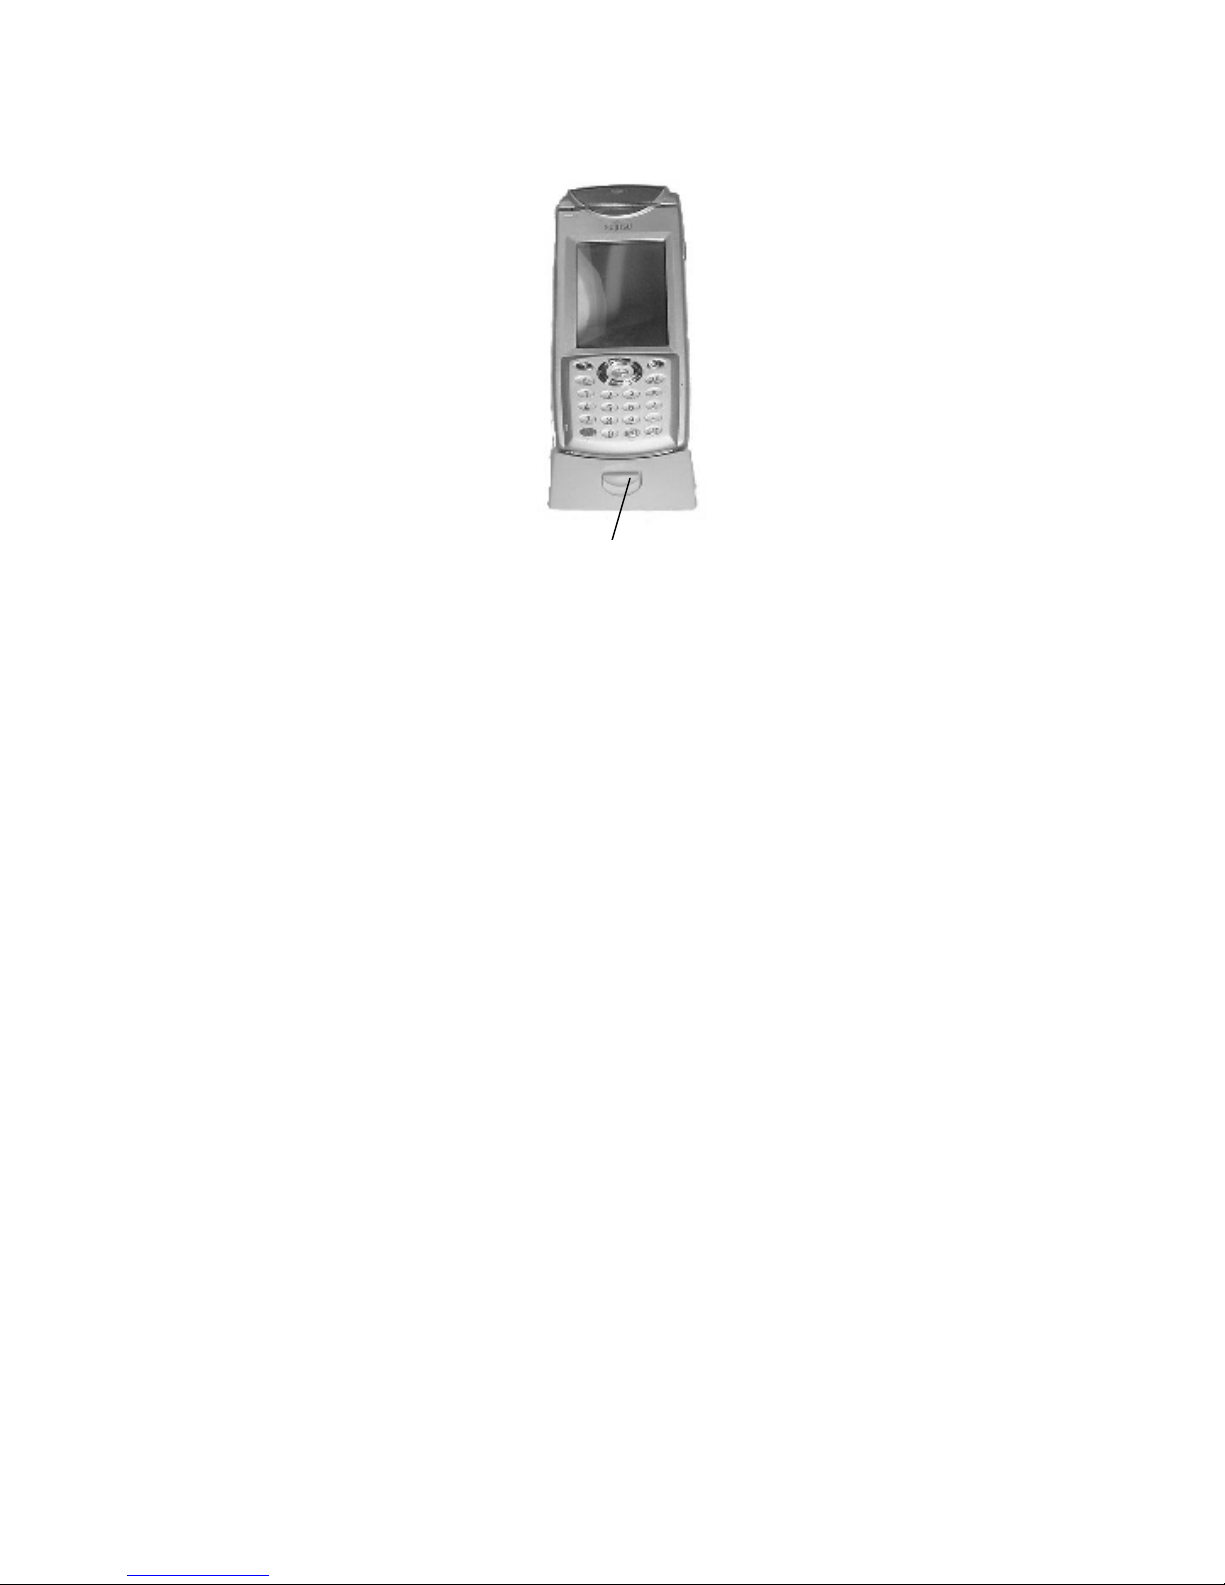
<Removing the iPAD from a cradle>
Remove the iPAD from the cradle as follows: Lightly hold the iPAD with one hand. Using the
other hand, press the Eject button in the center of the cradle. When the iPAD is released from
the cradle, hold it lightly and lift it.
16
Page 18
Draft
Eject button
17
Page 19

Draft
Charging the main battery using a single-pack charger (CA05951-7080)
You can charge the main battery using a single-pack charger (CA05951-7080).
Charging using this method requires a single-pack charger (CA05951-7080) and an AC
adapter
(CAS05306-D500).
(1) Connect the AC adapter to the single-pack charger.
(2) Plug the AC cable of the AC adapter into a wall outlet.
(3) Mount the main battery on the single-pack charger.
Charging starts.
During charging, the pack charger LED is on and is orange. When charging is completed,
the LED changes to green. The charging time is about 2.5 hours.
Note
If the pack charger LED lights in red, the
battery is faulty and cannot be charged.
Replace the battery.
CAUTION
The LED will not light if the main
battery is not correctly installed.
⌦ This completes the operation.
18
Page 20

Draft
<Using a single-pack charger (CA05951-7080) and a cradle (IPAD142-01) that are
connected>
You can simultaneously charge main batteries mounted on a single-pack charger and in the
IPAD mounted on a cradle.
A single-pack charger (CA05951-7080), cradle (IPAD142-01), AC adapter (FHTAC601A), and
a daisychain cable (CA72001-1895) are required for this operation.
(1) Using the daisychain cable, connect the AC adapter connection interface of the single-
pack charger to either the left or right AC adapter connection interface on the cradle.
The cable can be connected to either of the two AC adapter connection interfaces
provided on the cradle.
(2) Connect the AC adapter to the unused AC adapter connection interface on the cradle.
(3) Plug the AC cable of the AC adapter into a wall outlet.
(4) Turn off the iPAD.
(5) Insert the iPAD with the main battery installed into the cradle until you hear a click.
Charging starts.
During charging, the LED is on and is orange. When charging is completed, the LED changes
to green.
The charging time for the two is about 2.5 hours.
Note
Gently mount the iPAD on the cradle to
prevent malfunctioning of the iPAD and
cradle.
If the LED does not light, make sure
that the iPAD is correctly mounted on
the cradle.
19
Page 21

Draft
CAUTION
If you mount the iPAD on the cradle
while IPAD power is on, the LED lights
but the battery is not fully charged.
The LED will not light if the main
battery is not correctly mounted on a
single-pack charger.
⌦ This completes the operation.
1.2.3 Installing and removing the main battery
Installing the main battery
(1) On the rear of the iPAD, slide the battery lock switches on both sides of the lower part to
the outside.
(2) Slide down the battery cover to remove it.
(3) Insert the main battery in the battery compartment.
In this step, make sure the black ribbon is outside.
(4) Install the battery cover and slide it upward to lock it.
In this step, make sure that the black ribbon does not protrude from the cover.
(5) Slide the battery lock switches inward to lock them.
CAUTION
The iPAD can be turned on only when the
battery lock switches have locked.
⌦ This completes the operation.
20
Page 22

Draft
Removing the main battery
(1) Turn off the iPAD.
(2) On the rear of the iPAD, slide the battery lock switches on both sides of the lower part to
the outside.
(3) Slide down the cover to remove it.
(4) Pull the black ribbon to remove the battery.
CAUTION
Be sure to turn off the iPAD before
replacing the main battery.
Make sure that the auxiliary battery has
sufficient charge before replacing the
main battery. The data in memory may
be lost if you replace the main battery
while the auxiliary battery alarm message
is displayed.
While the main battery is being replaced,
the auxiliary battery backs up data in the
iPAD memory.
When replacing the main battery, have
ready a fully charged main battery and
complete the procedure within ten
minutes.
→ The life of the auxiliary battery is
significantly reduced if the iPAD is
left with the main battery removed.
⌦ This completes the operation.
1.2.4 Charging the auxiliary battery
1. Charging the auxiliary battery
Charge the auxiliary battery by installing a sufficiently charged main battery in
the iPAD.
For initial installation, charge the auxiliary battery at least 24 hours, since its
voltage is low.
Initially, the auxiliary battery will start to charge once the iPAD has been turned
on. (During normal operation, the auxiliary battery is permanently charged as
long as the main battery is installed.)
Even though the auxiliary battery is charged, notify your maintenance
representative if an alarm is frequently displayed.
21
Page 23

Draft
CAUTION
The auxiliary battery is temporarily used
to retain data while the main battery is
being replaced. The life of the auxiliary
battery may be shortened if the iPAD is
left with only the auxiliary battery
installed.
Do not leave the iPAD in a state with the
main battery removed.
For Reference
The following are the guidelines for the retention
of data in memory while the iPAD is off (suspend
mode):
If both the main and auxiliary batteries
are fully charged: About 1 month
If the main battery is in the alarm state
and the auxiliary battery is fully charged:
About 3 days
The usage environment may affect these
estimates.
22
Page 24

23
2 Setup
After the iPAD has been removed from its packaging, set it up.
(1) When you turn on the iPAD for the first time, the initial installation screen shown below appears.
To start the setup process, press the [CAN] key while holding down the [SFT] key.
(2) The touch panel correction screen appears.
Follow the instructions on the screen.
>>Reference>> Section 3.5, "Correcting the Coordinates on the Touch Screen"
(3) Date/Time Properties is activated.
For information about Date/Time Properties, see the
"iPAD (IPAD100-xx) Systems Users
Guide."
(4) After Date/Time Properties have been set, the setup tool program is activated. When
" Bringing up the Setup Tool Menu" is displayed, install the applications.
For information about installing an application, see the "i
PAD (IPAD100-xx) Systems Users
Guide
."
CAUTION
The iPAD is not shipped with the main
battery installed and charged.
Perform setup either with the iPAD
connected to the cradle or after you have
charged the main battery and installed it in
the iPAD.
>>Reference>> Section 1.2, "Using the
Battery"
Th
e au
xiliary
battery is
in
stalled
in the iPAD,
Is this the initial installation?
Page 25

24
but it has not been charged.
To charge the auxiliary battery, install a
charged main battery in the iPAD.
>>Reference>> Section 1.2.4, "Charging the
auxiliary battery"
3 Using the iPAD
3.1 Power on/off (suspend/resume)
3.1.1 Turning on the iPAD (resume mode)
With the power off, press the Power key until the
LED lights in green.
The iPAD is turned on, the screen light, and the LED goes off.
Turning on the iPAD for the first time:
The initial installation screen appears when you turn on the iPAD for the first time or you initialize
the system.
See the "i
PAD (IPAD100-xx) Systems Users Guide
" for information about performing setup.
Turning on the iPAD after the first time:
The screen that was displayed when you stopped the last time is displayed.
CAUTION
During resume processing (the green LED is
on), do not remove the main battery or press
the Reset button. Either of these actions may
cause the data in memory to be lost.
3.1.2 Turning off the iPAD (suspend mode)
With the power on, press the Power key.
The screen turns black and the iPAD is turned off.
Page 26

25
CAUTION
Do not unlock and remove the main battery
from the iPAD until power has been turned
off.
Doing so may cause the data in memory to
be lost.
Do not turn off the iPAD in the following state:
• Data is being backed up or restored.
(The hourglass icon is displayed.)
For Reference
You can also turn off the iPAD as follows:
Tap the [Start] button, then the [Suspend]
button.
When power is on, the iPAD has a function
that automatically turns itself off if no action is
performed for a certain length of time
(automatic power-off function). For more
information, see the "i
PAD (IPAD100-xx)
Systems Users Guide
."
An application may prevent power from being
turned off while the iPAD is operating. If you
are using such an application, turn off the
iPAD with an instruction from the application.
3.2 Checking the Battery Status
You can check the battery status.
While the iPAD is on, press the [ENT] key while holding down the [SFT] key. The [System
Information] window opens.
Page 27

26
System Information
×
Main battery
Status: External power source
Remaining charge
Auxiliary battery
Status : Normal
1. Volume and brightness settings
2. Touch screen calibration
Battery voltage:
3.87 V
Battery information
Check the battery status in [Battery Information].
The items in [Battery Information] have the following meanings:
Main battery
Status
−−−−
External power source
Indicates that the iPAD is mounted on the cradle.
−−−−
Normal
Indicates that the battery can be used.
−−−−
Insufficient charge
Indicates that the main battery charge is too low. Either charge or replace the main battery.
Remaining battery charge
The current main battery charge is shown as one of five levels.
Page 28

27
Note
If [Insufficient charge] is displayed, the
remaining battery charge is too low. Either
charge the battery or replace it with a spare
battery.
If the charge is too low, a message is displayed
on the screen and the iPAD is automatically
turned off after a while.
Either charge or replace the battery.
After checking the battery status, tap the [×] button
on the window to close it.
⌦
This completes the operation.
Auxiliary battery
Status
Indicates the auxiliary battery status. The displayed status is one of the following:
−−−−
Normal
Indicates that memory backup is allowed.
−−−−
Insufficient charge
Indicates that the charge is not sufficient for memory backup. Charge the battery.
Note
If [Insufficient charge] is displayed, the
auxiliary battery charge is too low. Charge
the auxiliary battery.
After checking the battery status, tap the [×] button on the window to close it.
⌦ This completes the operation.
CAUTION
The data in memory may be lost if you
r
emove the ma
in
battery
while the auxiliary
Page 29

28
battery has an insufficient charge.
>>Reference>> For information about charging the auxiliary battery, see Section 1.2.4, "Charging
the auxiliary battery."
3.3 Adjusting the Volume
While the iPAD is on, press the [ENT] key while holding down the [SFT] key to bring up the [System
Information] window. Next, tap [1. Volume and brightness settings].
Volume and Brightness
Volume
Low
High
Front light
Dark
Bright
OFF
The [Volume and Brightness] window opens.
(1) In the [Volume] area, adjust the speaker volume.
(2) Tap the and buttons to adjust the volume. The order of choices from the left is low,
somewhat low, somewhat high, and high.
(3) Tap the [×] button on the window to close it.
⌦ This completes the operation.
< >
Page 30

29
3.4 Adjusting the Brightness of the Front Light
While the iPAD is on, press the [ENT] key while holding down the [SFT] key to bring up the [System
Information] window. Next, tap [1. Volume and brightness settings].
Volume and Brightness
Volume
Low
High
Front light
Dark
Bright
OFF
(1) In the [Front light] area, specify the
brightness. Tap the and
buttons to select the brightness level. The order of choices from the left is off, somewhat dark,
somewhat bright, and bright.
(2) Tap the [×] button on the window to close it.
⌦
This completes the operation.
For Reference
The front light automatically goes off if the
remaining battery charge is too low.
3.5 Calibrating the Touch Screen
The coordinates on the touch panel are misaligned if the touch panel does not respond when you tap
the screen and a location different from where you tapped is entered.
If this situation occurs, correct the misaligned coordinates on the touch panel. This operation is
called "touch screen calibration."
< >
Page 31

30
Perform touch screen calibration as follows: While the IPAD is on, press the [ENT] key while holding
down the [SFT] key to bring up the [System Information] window. Next, tap [2. Touch screen
calibration] key on the screen or press the [2] key to bring up the following touch screen calibration
screen.
(1) As directed on the screen, tap the center of the crosshairs (+) using a stylus.
You will need to tap the center and the four corners of the screen.
(2) After you have tapped all the correct locations, the crosshairs disappear and the message
"Calibration settings have been measured" is displayed. Press the [ENT] key to register the
correction settings. To cancel the operation, press the [CLR] key while holding down the [SFT]
key.
Note
If you tap a location away from the
crosshairs, you will be required to start the
operation again from the beginning.
Do not press the Power key while the touch
panel correction tool is running. Doing so will
nullify the touch panel correction settings,
and the touch panel correction will have to be
done again.
If the battery loses its charge during touch
panel correction, charge or replace the
batter
y,
then perform touch panel correction
Use the stylus to press the center of the crosshairs for about one second.
Lift the stylus and the crosshairs will move. Repeat the same procedure.
To cancel this operation, press the [SFT] and [CLR] keys.
Page 32

31
again.
Use a stylus.
Do not tap the screen with a pencil, ballpoint
pen, or any other pointed object. Doing so
may scratch or crack the screen.
Do not touch the screen with your palm while
you are tapping the screen.
⌦ This completes the operation.
3.6 Virtual Keyboard
The screen keyboard is the keyboard that is displayed on the screen.
3.6.1 Displaying the keyboard
Open and close the screen keyboard as follows:
(1) To open the screen keyboard, press the [0] key while holding down the [SFT] key.
The screen keyboard appears on the lower part of the screen.
(2) To close the screen keyboard, press the [0] key while holding down the [SFT] key, as you did to
open it.
The screen keyboard disappears from the lower part of the screen.
⌦ This completes the operation.
3.6.2 Inputting a character
To input a character, tap the input field to make it ready for input (the cursor is displayed). When the
field is ready for input, tap a character on the screen keyboard. The character is entered in the input
field.
⌦
This completes the operation.
3.6.3 Changing the keyboard type
There are three types of screen keyboard: keyboard (Figure 1), extended keyboard (Figure 2), and
Page 33

32
handwriting (Figure 3).
(Figure 1)
(Figure 2)
(Figure 3)
You can change the keyboard type as follows:
(1) Double-tap the [Input Panel] icon in [Control Panel].
(2) When [Input Panel Properties] is displayed, select a keyboard type in [Current Input Method].
(3) Tap the [OK] button.
CAUTION
The setting will not change if you close the
screen by tapping the [× ] button instead of
using the [OK] button.
Handwriting
Em-size
Recog-
nize
Space
Number
Convert
Em/en
Kata
kana
Sym-
bol
Hira
gana
Back
space
Enter
Space
Page 34

33
⌦ This completes the operation.
3.7 Resetting the iPAD
3.7.1 Using the reset switch
Use the reset switch mainly to install an application or driver or change a setting.
(1) If possible, save the data that you are working on.
(2) Using a stylus, press the reset switch located on the left side of the rear of the iPAD.
(3) The screen turns black, then the power is turned on again.
CAUTION
If you reset the iPAD, any unsaved data or
settings are lost.
Do not use the reset switch while the iPAD is in
operation (saving data or resuming operation).
Doing so may cause data in memory to be lost.
⌦ This completes the operation.
3.7.2 Completely resetting the iPAD
Completely reset the iPAD if it is not operating correctly after a reset or if you want to prevent
deterioration of the main battery when storing the iPAD for a long period.
(1) Turn off the iPAD
Page 35

34
(2) On the rear of the iPAD, slide the battery lock switches on both sides of the lower part to the
outside.
(3) Slide down the cover to remove it.
(4) Pull the black ribbon to remove the battery.
(5) Using the stylus, press the switch exposed when the battery is removed.
All the data in memory is cleared, and memory is initialized.
CAUTION
When you completely reset the iPAD, all of
the data and information (Control Panel
settings and installed applications) in its
memory is lost
(except for the data in the flash disk area).
See the
"iPAD (IPAD100-xx) Systems
Users Guide"
to restore the applications.
⌦
This completes the operation.
Page 36

4 LED Indications
This chapter explains the indications of the LED on the IPAD and on the single-pack charger.
4.1 iPAD LED
LED indication
Equipment
status
iPAD is
being
turned on
Bar code is
being read
by the
scanner
Magnetic
card being
read by the
reader
Battery on
the cradle is
being
charged
Battery on
the cradle is
being
charged
(*1) The LED can be made to go on by an application when a magnetic card is read by the reader.
C
o
l
o
r
G
r
e
e
n
G
r
e
e
n
G
r
e
e
n
O
r
a
n
g
e
G
r
e
e
n
Y
e
l
l
o
w
Indication
Lights and then
goes off.
Lights if the bar
code is read
correctly.
Lights if the
magnetic card is
read correctly.
(*1)
Lights.
Lights. Charging is complete.
Lights. A charging error has
Explanation
The iPAD is starting up
(resuming operation).
Do not operate the iPAD until
the LED goes off.
The iPAD is in scanner
reading processing mode.
Do not operate the iPAD until
the LED goes off.
The LED can be made to light
if the iPAD reads the
magnetic card correctly.
The battery is being charged.
The LED turns green when
charging is complete.
occurred.
Either replace or charge the
main battery again.
34
Page 37

4.2 LED on the Single-Pack Charger during Charging
LED indication
C
o
l
o
r
Lights. The battery is being
O
r
a
n
g
e
Lights. Charging is complete.
G
r
e
e
n
R
Lights. The main battery cannot be
e
d
Indication
Meaning
charged.
charged because it either is
not correctly connected to
the single-pack charger or is
faulty.
Either correctly connect the
main battery to the
single-pack charger or
replace the main battery.
5 Wireless LAN (local area network)
The iPAD is designed to use an internal LAN radio as its primary means of communicating data when used as
an end-node device within a wireless LAN.
The iPAD is purpose built to use an 802.11b WiFi spread-spectrum radio that operates in the 2.4 GHz band.
This does not require a license for operation. The iPAD requires a compact flash radio card. The integration
of an 802.11b WiFi spread spectrum radio allows the iPAD to interactively communicate in real-time with its
host/server environment via a wireless local area network.
In a store environment, the iPAD can communicate within a radius of 16 to 66 ft. from a wireless LAN access
point. (The range of communication may vary significantly depending on the environment of the facility. In a
semi-open space, communication can occur from 98 to 164 ft.)
CAUTION
The iPAD may not be able to communicate if it is
used near a microwave oven, security gate, or
other device that generates noise.
Use the iPAD away from a TV set, radio, or
another wireless device.
35
Page 38

5.1 Installing the RF Card
5.1.1 Parts for RF LAN card installation
The following parts are included with main unit:
(A) Side cover
(A)
(B) Card stopper
Stopper for Intel / Symbol RF LAN Card
(C) Card Tab
Pull-tab for RF Card
(C)
5.2. Installation procedure for Intel or Symbol RF card
Remove battery cover and remove battery pack
Remove the protective sheet from the adhesive tape
on the slit side of the pull-tab. Attach the pull-tab to
the RF LAN card to match forked portion of the
pull-tab with RF card edge as shown here at right.
Antenna cable A
Antenna cable B
Insert RF LAN card about 2/3 of the way in. Remove the protective sheet
from the RF antenna cable and connect the RF cable and card as shown here.
Connect antenna cable A with inside connecter on RF card.
Antenna cable A has a black mark on the RF connector; make sure the black
mark is showing when the cable is connected.
Antenna cable B
Antenna cable A
(B)
Forked portion
RF LAN card
Slit
Pull tab
36
Page 39

r
Remove the protective sheet from the adhesive tape of the pull tab and
attach it to the RF card so the RF connecters are covered with the pull
tab as shown. Make sure the RF connecters are firmly connected.
Insert card completely and tuck the pull-tab and antenna cables into the slot.
Take off ABS resin block and rubber from side cover.
Remove protective sheet of adhesive tape from card stopper and attach card
stopper with side cover to the spot where the ABS resin block and rubber
were attached.
Attach side cover to main unit
Side cove
37
Page 40

6 Bar Code Scanner
6.1 Using the Bar Code Scanner
Reading aperture of bar code scanner
(1) Aim the bar code scanner of the iPAD at a bar code.
(2) Press either of the trigger switches on the two sides of the iPAD. A scanning beam passes
through the reading aperture of the bar code scanner.
(3) Run the scanning beam across the bar code.
(4) The LED lights in green if the data has been read correctly.
(5) The scanning beam automatically stops when reading is completed.
(6) Release the trigger switch.
38
Page 41

WARNING
Do not look into the reading aperture while a
scanning beam is being emitted.
Doing so can injure the eyes.
For Reference
A scanning beam stops in about one second if you
continue to press the trigger key but no bar code
is detected from the reading aperture.
If a bar code cannot be read, try changing the
direction of the scanning beam in relation to the
bar code or the distance of the IPAD from the
barcode.
Note that if the scanning beam passes over more
than one bar code, it cannot be determined which
of the bar codes will be read.
6.2 Bar Code Specifications
Item Specifications
PCS value
0.25 or more (Value for a 650 nm laser
beam)
Resolution
Reading angle
Reading depth
0.13 mm
Vertical direction: ± 65
Horizontal direction: ± 60
Rotation: ± 30
o
or less
Narrow bar
o
Distance
or less
o
or less
width
0.13 mm 5.6 to 12.7 cm
0.19 mm 4.6 to 19.0 cm
0.25 mm 5.08 to 24.6 cm
0.33 mm 5.08 to 30.4 cm
0.51 mm * to 38.1 cm
1.02 mm * to 55.8 cm
1.40 mm * to 73.6 cm
Reading
LED indication (green)
confirmed by:
* The minimum reading distance is determined by the bar code label width and the reading depth.
6.3 Cleaning the Reading Aperture of the Bar Code Scanner
The reading aperture of the bar code reader must always be clean when it is used.
Clean the reading aperture using a dry cloth or a cloth moistened with water or a diluted neutral detergent
solution. Do not use alcohol, thinner, or other volatile solvent.
39
Page 42

6.4 Bar Code Sample Chart
Use the sample chart to check whether the scanner is faulty.
NW7
Code 39
JAN standard
JAN abbreviated
UPC/E
UPC/A
Code 128
InterLeaved2of5
40
Page 43

pp
EAN-8
EAN-13
CAUTION
This chart may become illegible due to age or
improper handling of the User's Manual.
7 Magnetic Card Reader
(1) After making sure of the orientation (direction of the arrow, for example), insert a magnetic card.
(2) Slowly move the magnetic card from left to right.
Note
A magnetic card will not be read correctly if
movement stops part way, the speed of
movement changes, or the card is not
moved parallel with the slot.
The LED can be made to light by an
a
lication when a magnetic card is read
41
Page 44

<Cleaning the magnetic card reader>
The magnetic card reader becomes contaminated with dirt and dust from use. Clean the reader using the
cleaning card supplied as an accessory.
correctly.
− Cleaning cycle: Clean the reader every month or whenever errors are frequent.
Cleaning method: Insert the cleaning card (supplied) in the reader with the rough side (cleaning side)
−
facing up. (Insertion is the same as for a magnetic card.)
− Replacement cycle: Replace the cleaning card (supplied at a cost) when it becomes contaminated.
If errors still occur after the reader has been cleaned, notify your Fujitsu maintenance representative.
CAUTION
Before cleaning the reader, turn off the IPAD
to guard against a possible malfunction.
8 IC Card Reader/Writer
(Installed in the IPAD100-20)
Figure 1
IC card slot
The IPAD100-20 is equipped with an IC card reader.
(1) When instructed to by message, insert an IC card in the IC card slot with the IC terminal side
facing up.
42
Page 45

Figure 2
<Cleaning the IC card reader/writer>
The contacts of the IC card reader/writer become contaminated with dirt and dust from use. Clean the reader
using the cleaning card supplied as an accessory.
− Cleaning cycle: Clean the reader every month
or whenever errors are
frequent.
Cleaning method: Insert the cleaning card in the reader with the rough side (cleaning side) facing up.
−
(Insertion is the same as for an IC card.)
− Replacement cycle: Replace the cleaning card (supplied at a cost) when it becomes contaminated.
If errors still occur after the reader has been cleaned, notify your Fujitsu maintenance representative.
CAUTION
Before cleaning the reader, turn off the iPAD
to guard against a possible malfunction.
43
Page 46

9 User Action in Response to Messages
If any of the following messages are displayed, take the action described in the following table.
Message Cause User response
Main battery alarm
The front light is off.
Auxiliary battery
alarm
Is this the initial
installation?
A power failure may
have occurred.
An error was
detected on the flash
disk.
The main
battery
charge is
too low.
The
auxiliary
battery
charge is
too low.
No
application
programs
have been
installed.
The
memory
data was
deleted
because, for
example,
the battery
charge was
too low.
An error
occurred in
the system
information
storage area
of the flash
ROM.
Either replace the main battery or
charge the main battery using the
battery charger or cradle.
>>Reference>>
Section 1.2.2, "Charging the
main battery"
Section 1.2.3, "Installing and
removing the main battery"
Charge the auxiliary battery.
>>Reference>>
Section 1.2.4, "Charging the
auxiliary battery"
Press the [SFT] and [CAN] keys
simultaneously to install application
programs.
>>Reference>>
"IPAD Systems Users Guide"
Press the [SFT] and [CAN] keys
simultaneously to automatically
recover the application programs.
>>Reference>>
"iPAD Systems Users Guide"
Tap the [OK] button to initialize the
flash ROM and then reinstall the
application programs.
>>Reference>>
"iPAD Systems Users Guide"
44
Page 47

10 Troubleshooting
If you encounter any of the problems described in the following table while using the IPAD, take the indicated
action before notifying your maintenance representative.
Problem User response
The IPAD cannot be turned on.
The main battery has no charge. Replace it with a charged main
battery.
>>Reference>>
Section 1.2, "Using the Battery"
Alternatively, charge the main battery.
>>Reference>>
Section 1.2.2, "Charging the main battery"
If the main battery is completely dead, all the data and information
in memory in the IPAD may be lost. If data has
been lost, reinstall the applications again.
The service life of the main battery has expired or the battery is
faulty. Install a new main battery.
>>Reference>>
Section 1.2, "Using the Battery"
The iPAD cannot be turned on.
(continued)
The screen appears for a moment, then turns
black when you press the
Power key to turn on the power.
The speaker is silent. The speaker may be set to "Low." Check the volume setting of the
The touch panel does not respond. The coordinates on the touch panel may be misaligned. Perform
The front light is dark or turns black. The main battery may have no charge. Replace it with a charged
The main battery may not be correctly installed. Install the main
battery correctly.
>>Reference>>
Section 1.2.3," Installing and removing the main battery"
The battery lock switch may be unlocked.
>>Reference>>
Section 3.7.2, "Completely resetting the iPAD”
The main battery may have no charge. Replace it with a charged
main battery.
>>Reference>>
Section 1.2, "Using the Battery"
speaker.
>>Reference>>
Section 3.3," Adjusting the Volume"
>>Reference>>
Section 3.5, "Correcting the Coordinates on the Touch
>>Reference>>
Section 1.2, "Using the Battery"
touch panel correction.
Panel"
main battery.
45
Page 48

11 Correctly Using the iPAD
11.1 Using the main battery
To prevent deterioration, do not store the main battery for a long time when it is fully charged. For
long-term storage, remove the battery from the IPAD when it is about 50% charged and store it at room
temperature.
If the battery has not been used for a long time, recharge it.
Be careful not to short-circuit the battery terminals with a necklace or other metallic object.
Do not heat the battery or throw it into a fire.
Do not leave the battery in a car exposed to sunlight or in direct sunlight.
Do not allow the battery to become wet.
Do not apply a strong shock to the battery. Do not drop the battery.
o
Using the iPAD at low temperatures (below 50
− At low temperatures (below 50
In an environment of 50
environment of 32
o
F, it is about 50% (new battery used).
o
F), the iPAD does not operate as long as it does at room temperature.
o
F, operating time is about 70% of that at room temperature, and in an
If operation in a low-temperature environment is possible, review charging procedures and operation.
− In operation at low temperatures (below 50
charged will result in a very short operating time. Be sure to replace the battery with a fully charged
one.
F)
o
F), replacing the battery with one that is only partially
− Keep a spare battery warm until you use it by, for example, putting it in your pocket. If you warm a
battery with a body warmer, be careful that the battery does not come into direct contact with the body
warmer.
If a message indicating that charging is required (battery status message) is displayed, promptly charge
the battery or replace the battery with a spare battery.
Be careful that no dust, sand, or other foreign matter enters the terminal section while you are using the
iPAD. If any foreign matter gets in, completely remove it using a soft-tipped cotton swab or gauze, then
repeat several times inserting the iPAD into the charger or device and then removing it.
The iPAD may not charge if the terminals are dirty.
Despite complete charging, the battery naturally discharges little by little as time passes. If possible,
charge the battery again just before using it (within one or two days).
Store the battery in as cool a place as possible and charge it at an ambient temperature of 50
o
F to 86oF.
Doing so will increase the life of the battery.
11.2 Using the auxiliary battery
Auxiliary battery alarm message
A warning message appears in the center of the screen if the voltage of the auxiliary battery drops or the
auxiliary battery is not connected. The programs and data in memory will be lost if you replace the main
battery while this message is displayed.
Immediately charge the auxiliary battery.
46
Page 49

>>Reference>> For information about charging the auxiliary battery, see Section 1.2.4,
"Charging the auxiliary battery."
11.3 Long-term storage
Store the iPAD where it will not be exposed to vibration, dust, high and low temperatures, high humidity, and
direct sunlight.
Storing the iPAD with the programs saved
To avoid discharging of the main and auxiliary batteries, charge the main battery once every week.
Without charging, the programs and data in memory will be lost.
Storing the iPAD without the programs saved
To store the iPAD without the programs saved, remove the main battery and completely reset the iPAD.
>>Reference>> For information about removing the battery, see Section 1.2.3," Installing and
removing the main battery," and Section 1.2.4, "Charging the auxiliary battery."
For information about completely resetting the iPAD, see Section 3.7.2, "Completely
resetting the iPAD."
11.4 Cleaning
Clean the cover of the iPAD using a cloth moistened with a solution of water and neutral detergent and
wrung out or a dry cloth. If you use a damp cloth, be sure to wring it out thoroughly to prevent water from
getting into the iPAD, causing a malfunction.
Do not wipe the iPAD using thinner, benzine, or other volatile solvent. Such materials can discolor the
iPAD or erase printed characters.
Wipe the display area of the iPAD using a cloth moistened with water and wrung out thoroughly or a glass
wipe with a very fine texture.
Occasionally clean the cradle interface using a dry cotton swab or gauze. If the terminals become dirty,
contact may be poor, causing the IPAD to turn off or disabling normal charging and communication.
11.5 Other precautions
Do not disassemble or modify the iPAD.
To prevent the iPAD from malfunctioning, do not leave the iPAD, even for a short time, where it is
exposed to any of the following conditions:
− Extreme heat (for example, car in sunlight with the windows closed)
− Direct sunlight
− Extreme heat or cold
− Dust
− Strong vibration
− Humidity
Do not apply a strong shock to the iPAD. Do not drop the iPAD.
Be careful not to hold the iPAD for a long time in a high-temperature environment (95
Doing so may result in a low-temperature burn.
o
F or higher).
47
Page 50

A Specifications
Item Specification
Controller
Display section
Operator section Touch panel (resistive-film type), trigger switches (bar code
Strage card
External interfaces Cradle I/F: USB client
Power supply
CPU Intel XScale-400MHz
Memory ROM: 32M bytes RAM: 64M bytes(SDRAM)
FFS 32MB
OS Windows CE .NET
Type 3.5-inch TFT reflective color LCD
Screen size
240 (H) × 320 (V) dots
Display lighting High-intensity front light
scanner input), power key, function keys,
set key, cursor keys, clear key, numeric keypad, × key, / key,
decimal-point (.) key, cancel key, enter key, shift key, and
cellular phone input mode (alphabetic/hiragana input)
Compact flash × 1 slot (RF-LAN card)
(for PC connection)
Charge terminals
Main-Battery Lithium ion battery pack, 3.7 V 1700 mAh
Operating time About 3 hours
Main-Battery
charging time
Sub-Battery
charging time
Item Specification
Environmental
Temperature
conditions
Relative
humidity
Scanner
Audio
Magnetic card reader
(new battery, room temperature, wireless communication in
progress for 10% of the time, scanner reading once every ten
seconds, and front light on at the "dark" setting)
About 7 hours
(new battery, room temperature, wireless communication in
progress for 10% of the time, and front light off)
About 2.5 hours (unit power off, operating from the cradle)
About 2.5 hours (With the battery pack charger)
About 24 hours (from the Main-Battery)
Operating: 0 to 40°C (non-condensing)
Idle: -20 to 60°C (non-condensing)
Operating: 20 to 85% (non-condensing)
Idle: 20 to 85% (non-condensing)
JAN/EAN-13/8,UPC-A/E,NW-7,CODE39/128,Interleaved2of5
(ITF)
Speaker×1 built-in,
Microphone×1 built-in
Headset connector(input/output)
JIS Ⅰ(ISO1/2), JISⅡ
48
Page 51

External dimensions PDA size
(84 (W) ×187 (D) ×23 (H) mm)
Weight About 340 g (battery included)
49
Page 52

B Consumables
The following table lists the consumables that the user must replace.
Product name Product
number
Lithium ion
battery for
FWT3xxx
(Main battery)
The main battery service life may be less than about 500 chargings and dischargings or two years depending
on the ambient temperature and how the iPAD is used.
If the main battery requires two cycles of charging and discharge per day, service life is less than one year.
If you use the iPAD in a manner that is not standard use as specified by Fujitsu, components other than the
consumables listed above may have to be replaced at the user's expense.
For more information about standard use and components that may have to be replaced, consult your
maintenance representative.
0644040 About 500 chargings
Service life
and dischargings, or
about two years
50
Page 53

C Accessories
Item Quantity
* Lithium ion battery for
FWT3xxx
1
* Strap with a stylus pen 1
* Cleaning card 1
Drip-proof cover (for
1
magnetic card reader)
Operation's manual 1 (this manual)
* Supplies that can be purchased are the lithium ion battery for the FWT3XXX, strap with a stylus pen, and
cleaning card (product name: Magnetic Card Reader Cleaning Card).
D Options
Product
name
Cradle
Model Specification
overview
IPAD142-01 Special cradle for the
FWT31Bx.
Unit that
accommodates the
IPAD to recharge its
battery.
The charging time is
about 3 hours.
An AC adapter
(FHTAC601A) is
required for each
cradle.
An AC adapter
(FHTAC601A) and a
cable (CA72001-1895)
are required for two
cradles.
Single-pack
charger
CA05951-7080
Unit that itself charges
a square-type lithium
ion battery.
An AC adapter
(FHTAC601A) is
required for the
charger.
The charging time is
about 2.5 hours.
AC adapter FHTAC601B AC adapter required to
use a cradle
Cable CA72001-1895 Cable that connects
two cradles or connects
a cradle and a
single-pack charger
USB cable FHTCB271 Cable that connects the
IPAD to a PC while the
IPAD is in the cradle
51
Page 54

E Supplies
For supplies, use authentic Fujitsu CoWorCo brand name products appropriate for the iPAD.
The use of other supplies will shorten the life of IPAD parts or cause the IPAD to malfunction.
Item Product
code
Lithium ion
battery for
FWT3xxx
Cleaning cloth
for touch panel
Magnetic card
reader cleaning
card *
Magnetic card
reader cleaning
card (2) *
Double-sided
cleaning card
for magnetic
card reader *
* Head cleaning cards that can be used for both the magnetic card reader and the IC card reader/writer. If
either of these cards is used, the life of the head and cards can be extended.
0644040 1
0632320 5 For the
0631310 1 set Single-side
0631312 1 set Single-side
0631313 1 set Double-side
Shipping
unit
Remarks
touch panel
and the bar
code reader
d type with
a case;
10 cards per
set
d type;
10 cards per
set
d type;
2 cards per
set
F Warning Indications and Symbols
This user's manual uses warning indications and symbols to help users use the iPAD safely and to prevent
personal injury and property damage.
This manual uses warning indications and symbols in the text to indicate safety conditions. The meaning of
each indication and symbol is explained below.
Warning Indications
Indicates a hazardous situation
WARNING
CAUTION
that could result in personal
injury if the user does not
perform the procedure correctly.
Indicates a hazardous situation
that could result in minor or
52
Page 55

Warning Symbols
Indicates the possibility of injury from
an electric shock.
ELECTRIC SHOCK
GENERAL
INHIBITION
GENERAL
CAUTION
Indicates a condition that requires
caution and a specific action that must
not be performed.
Indicates a condition that requires
general caution.
moderate personal injury if the
user does not perform the
procedure correctly. Also
indicates that damage to the
product or other property could
occur if the user does not
perform the procedure
correctly.
Indicates the possibility of an electric
shock or fire.
FIRE
Indicates an action that is prohibited
(prohibited action).
DISASSEMBLY
PROHIBITED
UNPLUG
THE CABLE
Indicates a required action.
53
Page 56

G Notes on Safety
WARNING
ELECTRIC SHO CK
GENERAL
INHIBITION
CAUTION: LASER
Do not damage the power cord
Use only the specially designed
If the battery is not handled
when you use the AC adapter,
single-pack charger, or cradle.
Doing so may result in an electric
shock or fire.
cradle, AC adapter, and
single-pack charger.
If another item is used, differences in
voltage or current can damage the
iPAD.
correctly, the iPAD may overheat,
explode, or catch fire.
Be sure to observe the following
precautions:
− Neither throw the battery into a fire
nor heat it.
− Connect the terminals correctly.
− Do not connect the terminals using a
wire or other metallic material.
Do not carry or store the battery
while wearing a metal necklace or
hair pin.
− Do not puncture the battery with a
needle, hit it with a hammer, stomp
on it, or otherwise apply a strong
shock to it.
− Do not disassemble or modify the
battery.
When using the laser scanner, do
not direct the laser beam toward
anyone's eyes.
Doing so may injure the eyes.
Do not look into the aperture of
the laser scanner.
Because a laser beam is emitted from
the aperture, you may injure your
eyes.
54
Page 57

GENERAL
INHIBITION
FIRE
DISASSEMBLY
PROHIBITED
WARNING
− Do not use or leave the battery near a
flame, fire, stove, or other source of
heat, in direct sunlight, or in a car
exposed to sunlight.
− Do not put the battery in a microwave
oven or other hot container.
− Charge the battery only on the special
cradle or single-pack charger.
Do not charge the battery by directly
−
connecting it to a wall outlet or
cigarette lighter in a car.
− Do not charge the battery near a flame,
fire or under a hot sun.
If the iPAD generates heat, smoke, or
an unusual smell or noise, turn off the
power immediately and contact
maintenance personnel.
Failure to do so may result in an electric
shock or fire.
Do not modify the iPAD without
permission.
Doing so may result in an electric shock
or fire.
55
Page 58

GENERAL
INHIBITION
GENERAL
CAUTION
CAUTION
Turn off the iPAD before cleaning it.
Do not clean the iPAD using a damp
Do not remove the battery without
Do not unplug the AC adapter or
Do not apply a strong shock to the
Although the iPAD is resistant to
Do not carry the iPAD in your hip
Because the fluorescent tubes in the
Dispose of the main battery in
or chemically treated cloth, and do
not use thinner or other volatile
chemical. Doing so may cause the
iPAD to malfunction.
turning off the iPAD.
single-pack charger until charging
has been completed.
Doing so may cause the battery to be
improperly charged.
iPAD. Do not drop the iPAD.
breakage for ordinary operations (for
example, putting it on a desk), Fujitsu
recommends that users use a neck
strap so that the iPAD cannot be
accidentally dropped.
pocket.
Sitting down with the iPAD in your hip
pocket may break the display unit.
liquid crystal display (LCD) used in
the iPAD contain mercury, dispose of
the LCD in accordance with any local
laws and regulations.
accordance with any local laws and
regulations after insulating the
battery terminals with tape or other
means to prevent a short circuit.
56
Page 59

DISASSEMBLY
PROHIBITED
Always keep the magnetic card
reader and magnetic cards clean. If
GENERAL
CAUTION
dust, oil, or water gets on them, an
error occurs or the magnetic head
malfunctions or deteriorates.
Do not lubricate the magnetic card
reader.
If you drop an object into the
magnetic card reader slot, use
tweezers or a similar means to
extract it.
Keep magnetic cards and the
magnetic card reader away from
magnets or magnetic objects.
Magnetism will destroy data on a
magnetic card.
Always keep the IC card
reader/writer and IC cards clean. If
dust, oil, or water gets on them, an
error occurs or the card reader/writer
malfunctions or deteriorates.
Do not lubricate the IC card
reader/writer.
(* Only the FWT31B2 accepts IC
cards.)
Do not remove any component that is
screwed on.
Doing so may result in an electric shock,
burns, or injury.
CAUTION
UNPLUG
THE CABLE
For safety reasons, unplug the AC
adapter and single-pack charger if
they will not be used for a long time.
Failure to do so may result in an electric
shock or fire.
57
Page 60

H Conventions Used in the Manual
Symbols
Symbol Meaning
Note
For
reference
>>Reference>>
Circled numbers
(such as (1) and
(2))
⌦
Indicates a precaution or
information you need to note.
Be sure to read these items.
Indicates useful information.
Indicates a section to be
referred to for more
information.
Indicates the steps, starting
with (1), in a procedure.
Indicates the result for an
operation.
Indicates the end of a series of
operations.
Terminology
Te rm Meaning
Ta p
Double-tap
To press once somewhere on
the screen of the IPAD
To press twice in succession
somewhere on the screen of
the IPAD
58
 Loading...