


LP7500 / 7600 / 7700 / 7900
4Starting Guide
This manual explains precautions and other information you need to know before
operating this product.
1. For your safety
2. Getting Started
3. Turning power on/off
4. Accessing each display
5. Printing
6. How to use the display module
7. Troubleshooting with the power off
8. How to access the HELP display
English Ver. 3


Preface
We greatly appreciate your purchase of this product.
Before using this product, read the manual carefully, and make sure that you understand the procedure described. Be sure to
store the paper manual near the product so it can be referred to immediately should you have questions about operation or
should any problems arise.
If you should lose or heavily damage the manual, contact your place of purchase.
[Issued in December, 2008]
! It is prohibited to copy or reproduce this manual.
! The manual is subject to change without notice.
! Illustrations in the manual may vary depending on the model or manufacturing lot.
! If should you find any unclear points or errors, or should you have any comments for the manual, please contact your place
of purchase.
! If there is a missing page or incorrect pagination in this manual, please contact your place of purchase to receive a
replacement.

Microsoft, MS-DOS and Windows are registered trademarks of Microsoft Corporation in the United States and/or other
countries.
"UNLHA(32).DLL" is free softtware published by Micco.
This software is based in part on the work of the Independent JPEG Group.
Copyright(c) 1988-1997 Sam Leffler
Copyright(c) 1991-1997 Silicon Graphics, Inc.
Permission to use, copy, modify, distribute, and sell this software and its documentation for any purpose is hereby granted
without fee, provided that (i) the above copyright notices and this permission notice appear in all copies of the software and
related documentation, and (ii) the names of Sam Leffler and Silicon Graphics may not be used in any advertising or publicity
relating to the software without the specific, prior written permission of Sam Leffler and Silicon Graphics.
THE SOFTWARE IS PROVIDED "AS-IS" AND WITHOUT WARRANTY OF ANY KIND, EXPRESS, IMPLIED OR
OTHERWISE, INCLUDING WITHOUT LIMITATION, ANY WARRANTY OF MERCHANTABILITY OR FITNESS FOR A
PARTICULAR PURPOSE.
IN NO EVENT SHALL SAM LEFFLER OR SILICON GRAPHICS BE LIABLE FOR ANY SPECIAL, INCIDENTAL, INDIRECT
OR CONSEQUENTIAL DAMAGES OF ANY KIND, OR ANY DAMAGES WHATSOEVER RESULTING FROM LOSS OF USE,
DATA OR PROFITS, WHETHER OR NOT ADVISED OF THE POSSIBILITY OF DAMAGE, AND ON ANY THEORY OF
LIABILITY, ARISING OUT OF OR IN CONNECTION WITH THE USE OR PERFORMANCE OF THIS SOFTWARE.
Other product and company names mentioned herein may be the trademarks of their respective owners. Trademark symbols,
™
and ®, are not shown in the manual itself.
Export Control
This Product shall be exported pursuant to the Japan Foreign Exchange and Foreign Trade Control Law, and Export Control of
Administration on Regulations of the U. S. Bureau of Industry and Security, and relevant laws and regulations. If Buyer reexports, directly or indirectly, the product to any country, the rules or regulations immediately preceding and relevant laws and
regulations of the countries concerned shall be applied.
<FCC Declaration of Conformity (for US only)>
WARNING: Changes or modifications not expressly approved by the party responsible for compliance could void the user's
authority to operate the equipment.
This device complies with Part 15 of the FCC rules. Operation is subject to the following two conditions:
(1) This device may not cause harmful interference.
(2) This device must accept any interference received including interference that may cause undesired operation.
This equipment has been tested and found to comply with the limits for a Class A digital device, pursuant to Part 15 of the FCC
Rules. These limits are designed to provide reasonable protection against harmful interference when the equipment is
operated in a commercial environment. This equipment generates, uses, and can radiate radio frequency energy and, if not
installed and used in accordance with the instruction manual, may cause harmful interference to radio communications.
Operation of this equipment in a residential area is likely to cause harmful interference in which case the user will be required
to correct the interference at his own expense.
iii
Explanation of manual
Manual types/contents
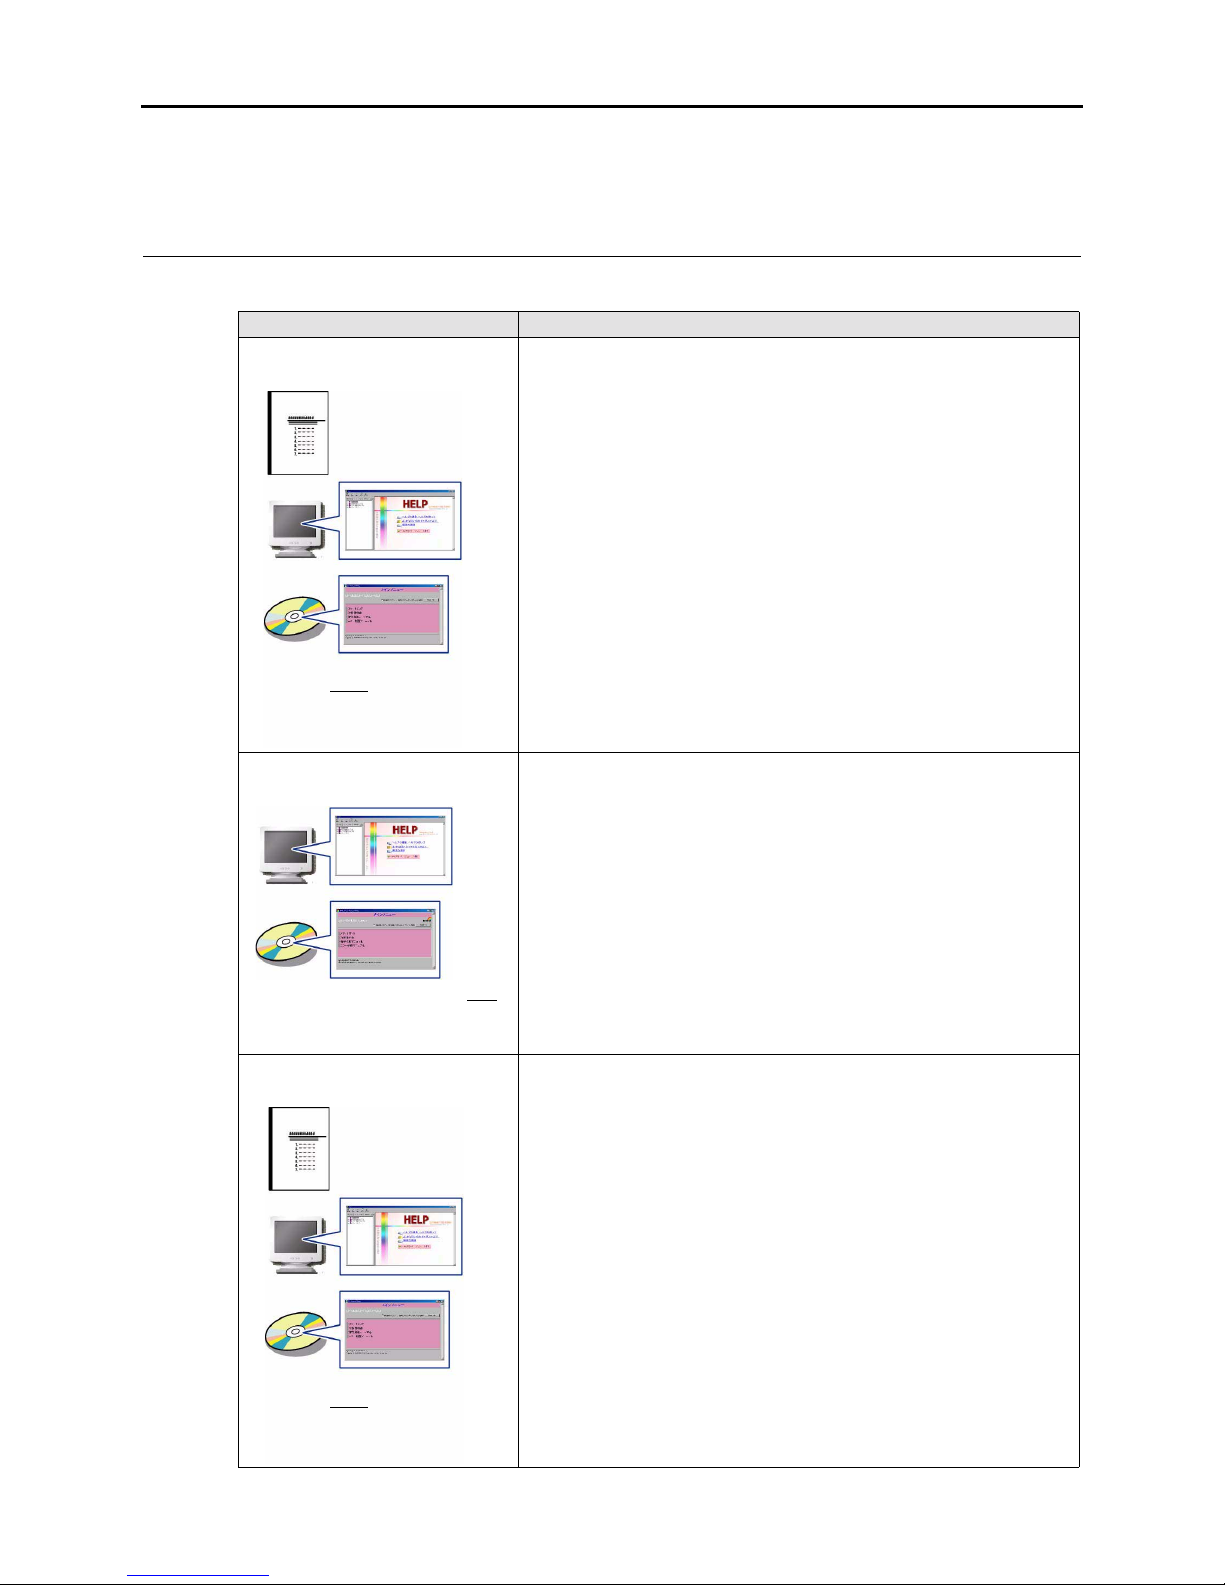
The following manuals are supplied with this product.
Manual type Main contents
Starting Guide
This manual explains precautions and other information you need to know before
operating this product.
• For your safety
• Getting Started
• Turning power on/off
• Accessing each display
• Printing
• How to use the display module
• Troubleshooting with the power off
• How to access the HELP display
Operator's Manual
Explains basic operations and how to configure the advanced functions settings.
• Preparations for operation
• Paper settings
• Color and density correction settings
• Function Settings
• Checking and adjusting the system condition
• Saving and loading the system data
• Glossary
Maintenance Manual
Explains how to check and perform maintenance for the system such as the Start
Up Checks and the Close Down Checks.
• Before performing maintenance
• Start Up/Close Down Checks
• Checks to perform as needed
• Weekly Checks
• Biweekly Checks
• Monthly Checks
• Three-month checks
• Six-month Checks
• Yearly Checks
• Biennial Checks
• Consumable parts and how to replace
This manual is provided in a hard copy,
on built-in HELP
, and on a CD.
This manual is supplied on built-in Help
and on a CD.
This manual is provided in a hard copy,
on built-in HELP
, and on a CD.

iv
Symbols used in this manual
This section explains the definitions of the symbols used in this manual.
Troubleshooting Manual
Explains corrective actions for Error/Attention messages, and solutions to other
problems, including the procedure to restart the system.
• Error and Attention messages
• Corrective actions for Attention messages
• Corrective actions for Error messages
• Detailed explanation
• Quick Reference
Manual type Main contents
This manual is supplied on built-in Help
and on a CD.
v
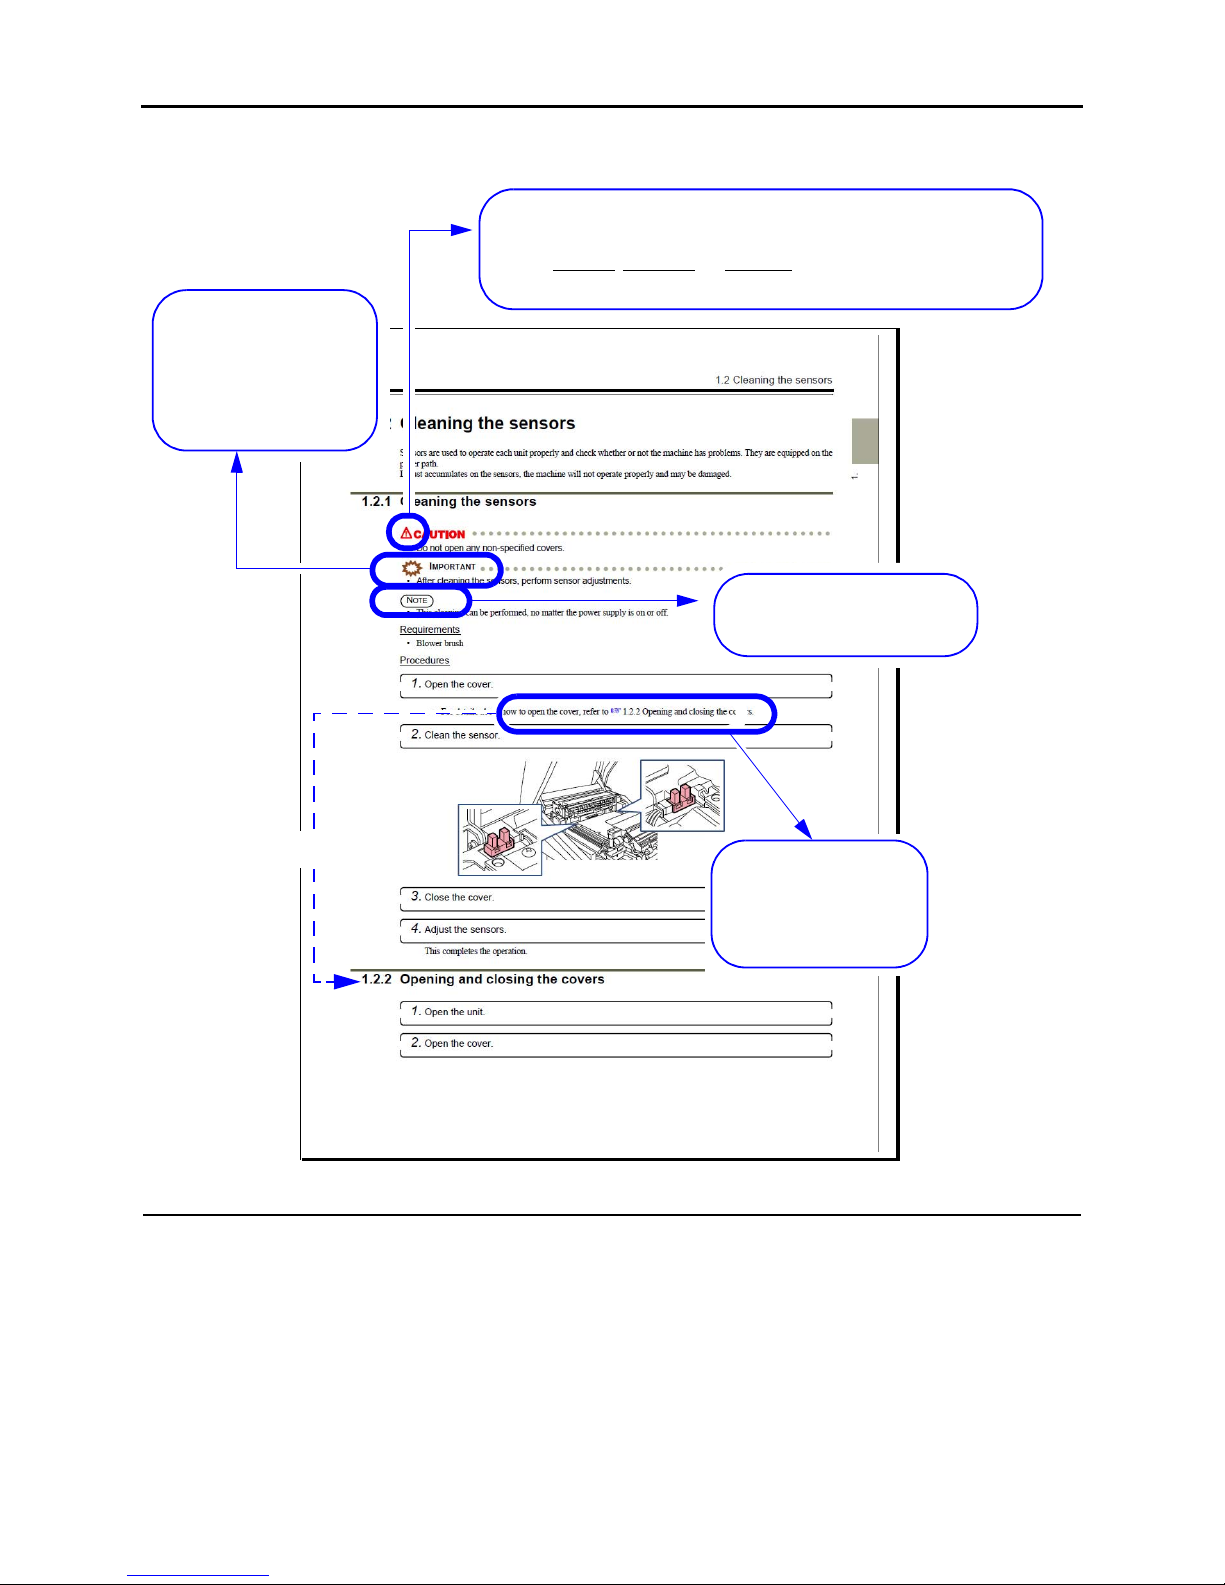
The symbols shown below are used in this manual. Confirm the meaning of each of them before reading the manual.
Operation method in the manuals
Operations on the display are to be carried out using the mouse or the keyboard.
As for the explanation in the manual, when operation can be carried out using both mouse and keyboard, the procedure using
either mouse or keyboard is described.
The pointing finger
indicates the manual or
section where you can find
additional information.
The Important symbol indicate s
supplementary explanations,
operations or procedures that
require caution, and
instructions that must be
followed.
This is called the alert symbol.
Text following this symbol contains particularly important information concerning
safety. Be sure to heed this information. This symbol is used in conjunction with the
words DANGER
, WARNING and CAUTION, according to the possible degree of
injury to people or damage to physical property.
The Note symbol indicates useful
information on functions and
instructions.
Reference
G068176
vi
Abbreviations for processing solutions used in this manual
Names of processing solutions in this manual are abbreviated as shown below. The name of specific processing solutions
may differ from those shown here, depending on the exact type used.
Abbreviations used in this manual
Abbreviation below is used in this manual.
Processing
solutions
Abbreviations
Color Developer P1
Bleach Fixer P2
Stabilizer PS
Name Abbreviation Overview
Correction Value Printing Unit CVP Used to output data on the back of prints.

vii
TABLE OF CONTENTS
Preface
Explanation of manual ........................................................................................................................... iii
Manual types/contents ................................................................................................................... iii
Symbols used in this manual .........................................................................................................iv
Operation method in the manuals ...................................................................................................v
Abbreviations for processing solutions used in this manual ...........................................................vi
Abbreviations used in this manual .................................................................................................vi
1. For your safety
1.1 Description of warnings (signal words) ........................................................................... 1 - 2
1.2 Location of warning labels .............................................................................................. 1 - 3
1.3 Safety precautions for operation ..................................................................................... 1 - 6
1.3.1 General precautions....................................................................................................................... 1 - 6
1.3.2 Precautions for processing solutions............................................................................................. 1 - 6
1.3.3 Precautions for operating heating section...................................................................................... 1 - 7
1.3.4 Precautions for operating rotary section........................................................................................ 1 - 7
1.3.5 Precautions against electric shock................................................................................................. 1 - 7
1.3.6 Precautions for movable units ....................................................................................................... 1 - 8
1.3.7 Precautions around cutting parts ................................................................................................... 1 - 8
1.3.8 Laser Precautions........................................................................................................................... 1 - 8
1.4 Additional precautions................................................................................................... 1 - 11
1.4.1 Precautions in moving the system............................................................................................... 1 - 11
1.4.2 Precautions in operating this product .......................................................................................... 1 - 11
1.4.3 Precautions during print operation .............................................................................................. 1 - 11
2. Getting Started
2.1 Component names and functions ................................................................................... 2 - 2
2.1.1 External components ..................................................................................................................... 2 - 2
2.1.2 Names and functions of printer section......................................................................................... 2 - 2
2.1.3 Names and functions of paper processor section .......................................................................... 2 -5
2.1.3.1 Types of processing racks and processing solutions..................................................................... 2-7
2.2 Paper path diagram ........................................................................................................ 2 -8
3. Turning power on/off
3.1 Starting up the system .................................................................................................... 3 -2
3.1.1 Starting up the system automatically using the program timer ..................................................... 3 - 2
3.1.2 Starting up the system during the temperature adjustment of processing solutions...................... 3 - 3
3.1.3 Starting up the system while the program timer is being activated............................................... 3 - 3
3.1.4 Starting up the system when the breaker is off.............................................................................. 3 - 5

viii
3.2 Closing down the system ................................................................................................ 3 - 7
3.2.1 Closing down the system with the program timer......................................................................... 3 - 7
3.2.2 Closing down the system without using the program timer.......................................................... 3 - 9
3.2.3 Closing down the system when you do not use it over the next five days.................................. 3 - 12
4. Accessing each display
4.1 Maintenance Application display..................................................................................... 4 - 2
4.1.1 Starting up the Maintenance Application...................................................................................... 4 - 2
4.1.2 Quitting the Maintenance Application .......................................................................................... 4 - 3
4.2 Maintenance display ....................................................................................................... 4 -4
4.2.1 Accessing the Maintenance display............................................................................................... 4 - 4
4.2.2 Maintenance display...................................................................................................................... 4 - 5
4.2.3 Selecting the output device [Output Device Selection]................................................................. 4 - 6
4.3 Confirming system status [Status Display]...................................................................... 4 - 7
4.3.1 Status Display................................................................................................................................ 4 - 7
4.3.2 Printer Information........................................................................................................................ 4 - 8
4.3.3 Processor Status........................................................................................................................... 4 - 10
4.4 Output Device Registration display............................................................................... 4 - 12
4.4.1 Registering output devices .......................................................................................................... 4 - 12
4.4.2 Deleting output devices from the Output Device List................................................................. 4 - 14
5. Printing
5.1 Printing............................................................................................................................ 5 - 2
5.1.1 Printing flow.................................................................................................................................. 5 - 2
5.1.2 Priority order ................................................................................................................................. 5 - 3
5.2 Installing and removing paper magazines ...................................................................... 5 - 7
5.2.1 Installing a paper magazine........................................................................................................... 5 - 7
5.2.2 Removing a paper magazine ....................................................................................................... 5 - 11
5.2.3 Installing a paper magazine in the system in which the quad magazine unit is installed............ 5 - 15
5.2.4 Removing a paper magazine from the system in which the quad magazine unit is installed ..... 5 - 17
5.3 Replacing paper ............................................................................................................ 5-21
5.3.1 Replacing paper........................................................................................................................... 5 - 21

ix
6. How to use the display module
6.1 Display module ............................................................................................................... 6 - 2
6.1.1 Each display................................................................................................................................... 6 - 3
6.1.1.1 Status Display................................................................................................................................ 6 - 3
6.1.1.2 [MENU]......................................................................................................................................... 6 - 4
6.1.1.3 The Attention/Error display........................................................................................................... 6 - 4
6.1.1.4 Magazine Information display....................................................................................................... 6 - 5
6.1.2 Mode list........................................................................................................................................ 6 - 5
6.1.3 Performing the Start Up Checks.................................................................................................... 6 - 6
6.1.4 Performing Close Down Checks ................................................................................................... 6 - 8
6.1.5 Performing the setup.................................................................................................................... 6 - 10
6.1.5.1 Performing the Daily Setup ......................................................................................................... 6 - 11
6.1.5.2 Changing the Emulsion Number ................................................................................................. 6 - 12
6.1.6 Confirming the status .................................................................................................................. 6 - 12
6.1.6.1 Confirming the present time........................................................................................................ 6 - 12
6.1.6.2 Confirming the processor temperature........................................................................................ 6 - 13
6.1.6.3 Confirming the version................................................................................................................ 6 - 14
6.1.6.4 Confirming the serial number (Administrator mode).................................................................. 6 - 15
6.1.6.5 Confirming the installation date (Administrator mode) .............................................................. 6 - 16
6.1.6.6 Confirming the communication speed (Administrator mode)..................................................... 6 - 17
6.1.7 Configuring each setting.............................................................................................................. 6 - 18
6.1.7.1 Configuring the density of display .............................................................................................. 6 - 18
6.1.7.2 Setting the buzzer volume ........................................................................................................... 6 - 19
6.1.7.3 Configuring the language (Administrator mode) ........................................................................ 6 - 19
6.1.7.4 Configuring the order of date display (Administrator mode)...................................................... 6 - 21
6.1.7.5 Configuring the IP address (Administrator mode)...................................................................... 6 - 22
6.1.7.6 Configuring the subnet mask (Administrator mode)................................................................... 6 - 23
6.1.7.7 Configuring the default gateway (Administrator mode) ............................................................. 6 - 24
6.1.7.8 Configuring the communication speed (Administrator mode).................................................... 6 - 25
6.1.8 Performing Input Check .............................................................................................................. 6 - 26
6.1.9 Performing Output Check............................................................................................................ 6 - 27
6.1.10 Accessing the administrator mode............................................................................................... 6 - 29
7. Troubleshooting with the power off
7.1 Closing down/restarting the system due to troubleshooting or in an emergency............ 7 - 2
7.1.1 Turning off the power supply for troubleshooting ........................................................................ 7 -2
7.1.2 Turning on the power supply after troubleshooting ...................................................................... 7 - 3
7.1.3 Restarting this product when an error occurs ................................................................................ 7 - 5
7.1.4 Turning off the power supply in an emergency............................................................................. 7-6
7.1.5 Stopping the system drive due to an abnormal sound given from the paper processor section .... 7 - 8
7.2 Paper jam in the paper processor section ...................................................................... 7 - 9
7.2.1 Paper jam in the paper processor section (LP7500/7600)............................................................. 7 - 9
7.2.2 Paper jam in the paper processor section (LP7700/7900)........................................................... 7 - 19
7.2.3 Paper jam around upper guide (No. 1) ........................................................................................ 7 - 31
7.2.4 Paper jam around upper guides ................................................................................................... 7 - 35
7.2.5 Paper jam between the colorimeter unit and dryer rack.............................................................. 7 - 38

x
8. How to access the HELP display
8.1 Accessing the HELP display ........................................................................................... 8 - 2
8.1.1 Accessing the HELP display from the Maintenance display ........................................................ 8 - 2
8.1.2 Closing the HELP display............................................................................................................. 8 - 3
8.1.3 Hiding the HELP display............................................................................................................... 8 - 3

1
1–1
1. For your safety
This chapter explains the general safety precautions.
Read these precautions thoroughly and carefully.
1.1 Description of warnings (signal words)
1–2
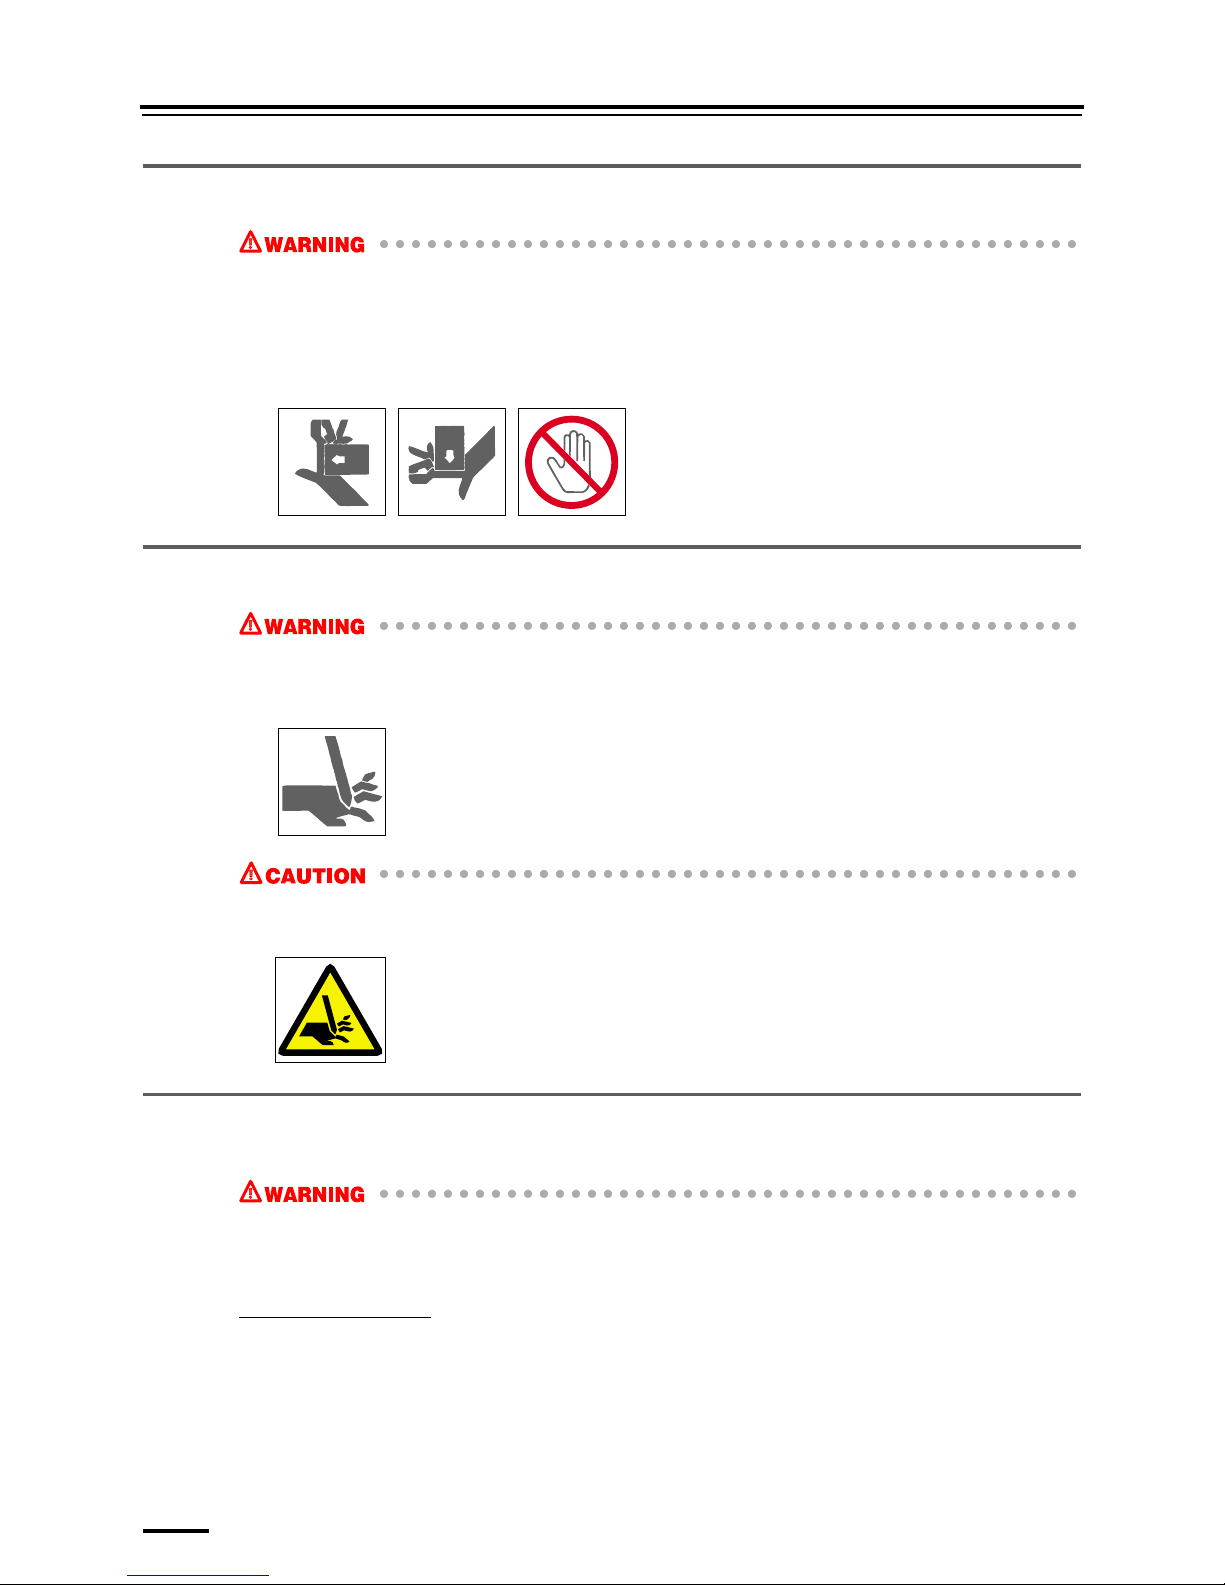
1.1 Description of warnings (signal words)
• Signal words identify the level of injuries that can potentially occur.
• The signal words used in this manual and found on labels, DANGER, WARNING and CAUTION, are assigned
according to the level of potential risk.
• Warning labels are located at or near the part of the system that poses the indicated danger. Ignoring a warning may
cause death or serious injury, or system malfunction. Be sure to follow the indications in the manuals and on the warning
labels.
• The warnings include a signal word, the type and extent of the danger, and information on avoiding the danger.
• Carefully read and understand the warnings included in this manual and on the warning labels before operating the
system.
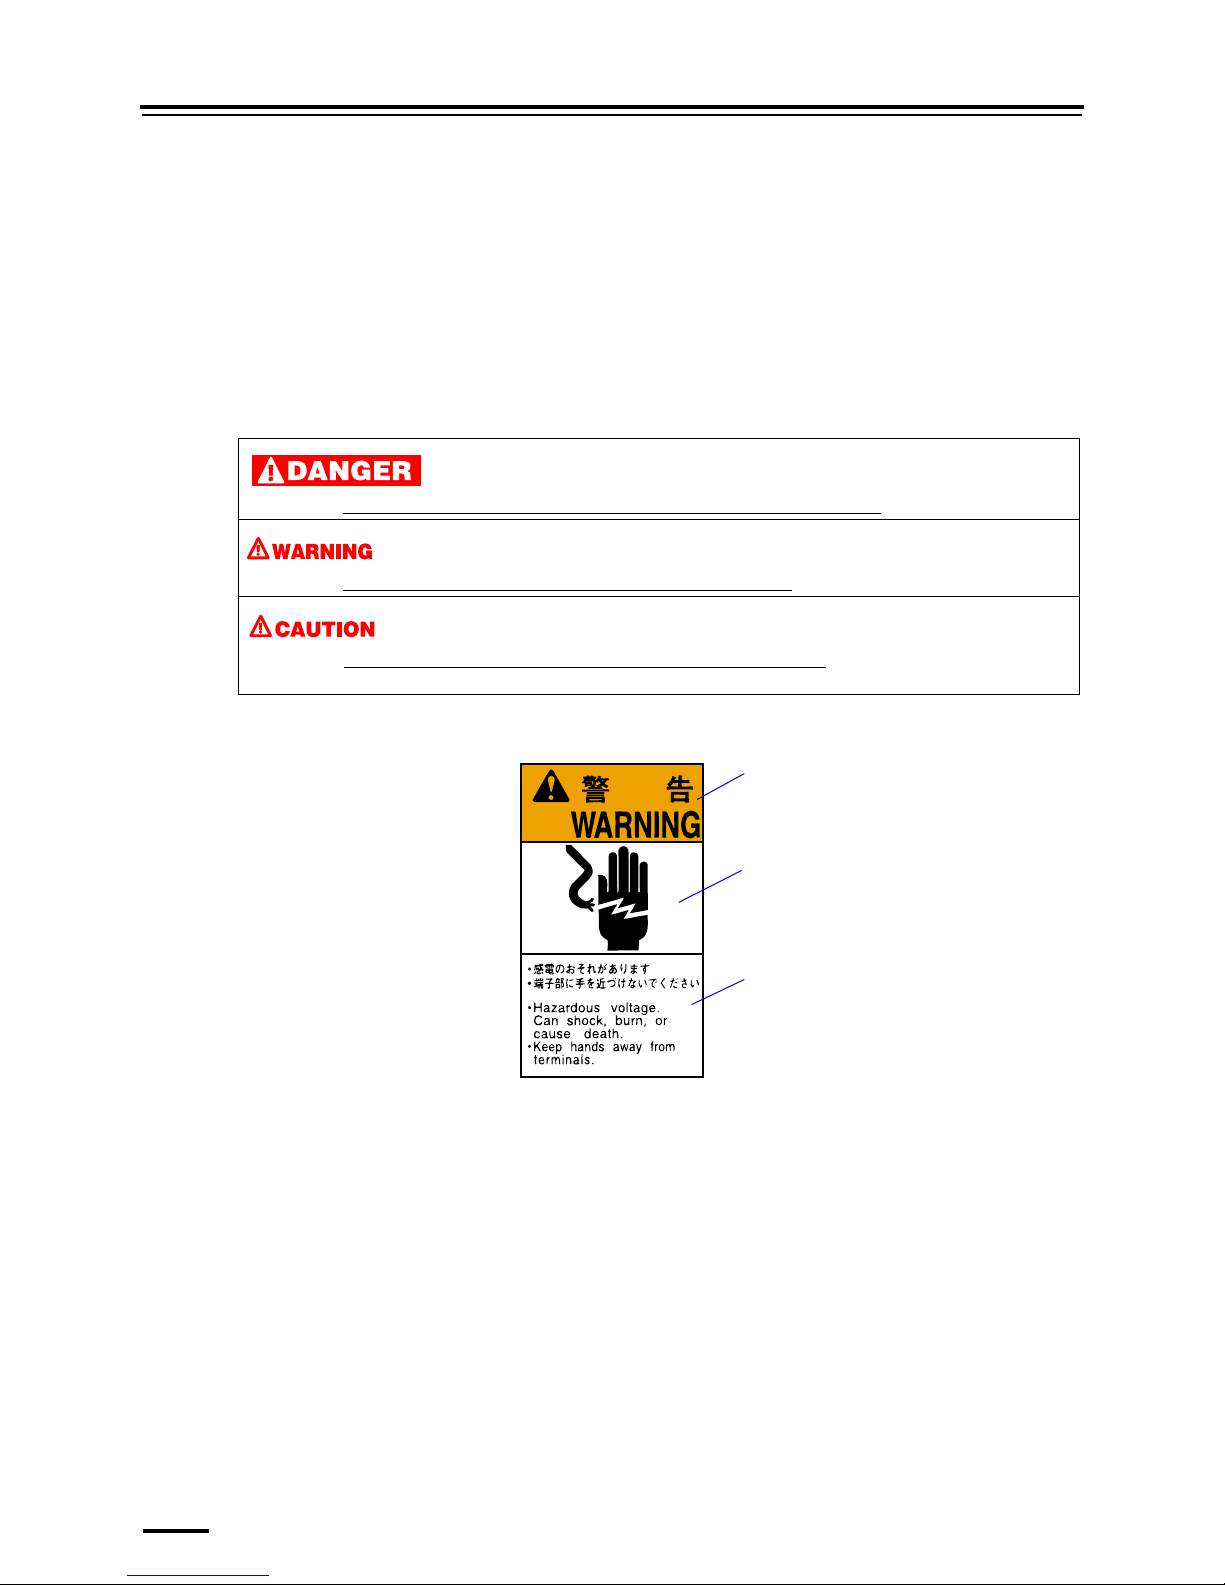
Example of warning label
This indicates situations that if not immediately avoided could result in serious injury or death.
This indicates situations that if not avoided could result in serious injury or death
.
This indicates situations that if not avoided could result in non-life threatening injury
. It is also used to indicate situations
which may cause damage to physical property.
Warning (signal word)
Symbol (warning indication)
Warning text (warning
indication)
SIGNALWORD
1.2 Location of warning labels
1–3
1. For your safety
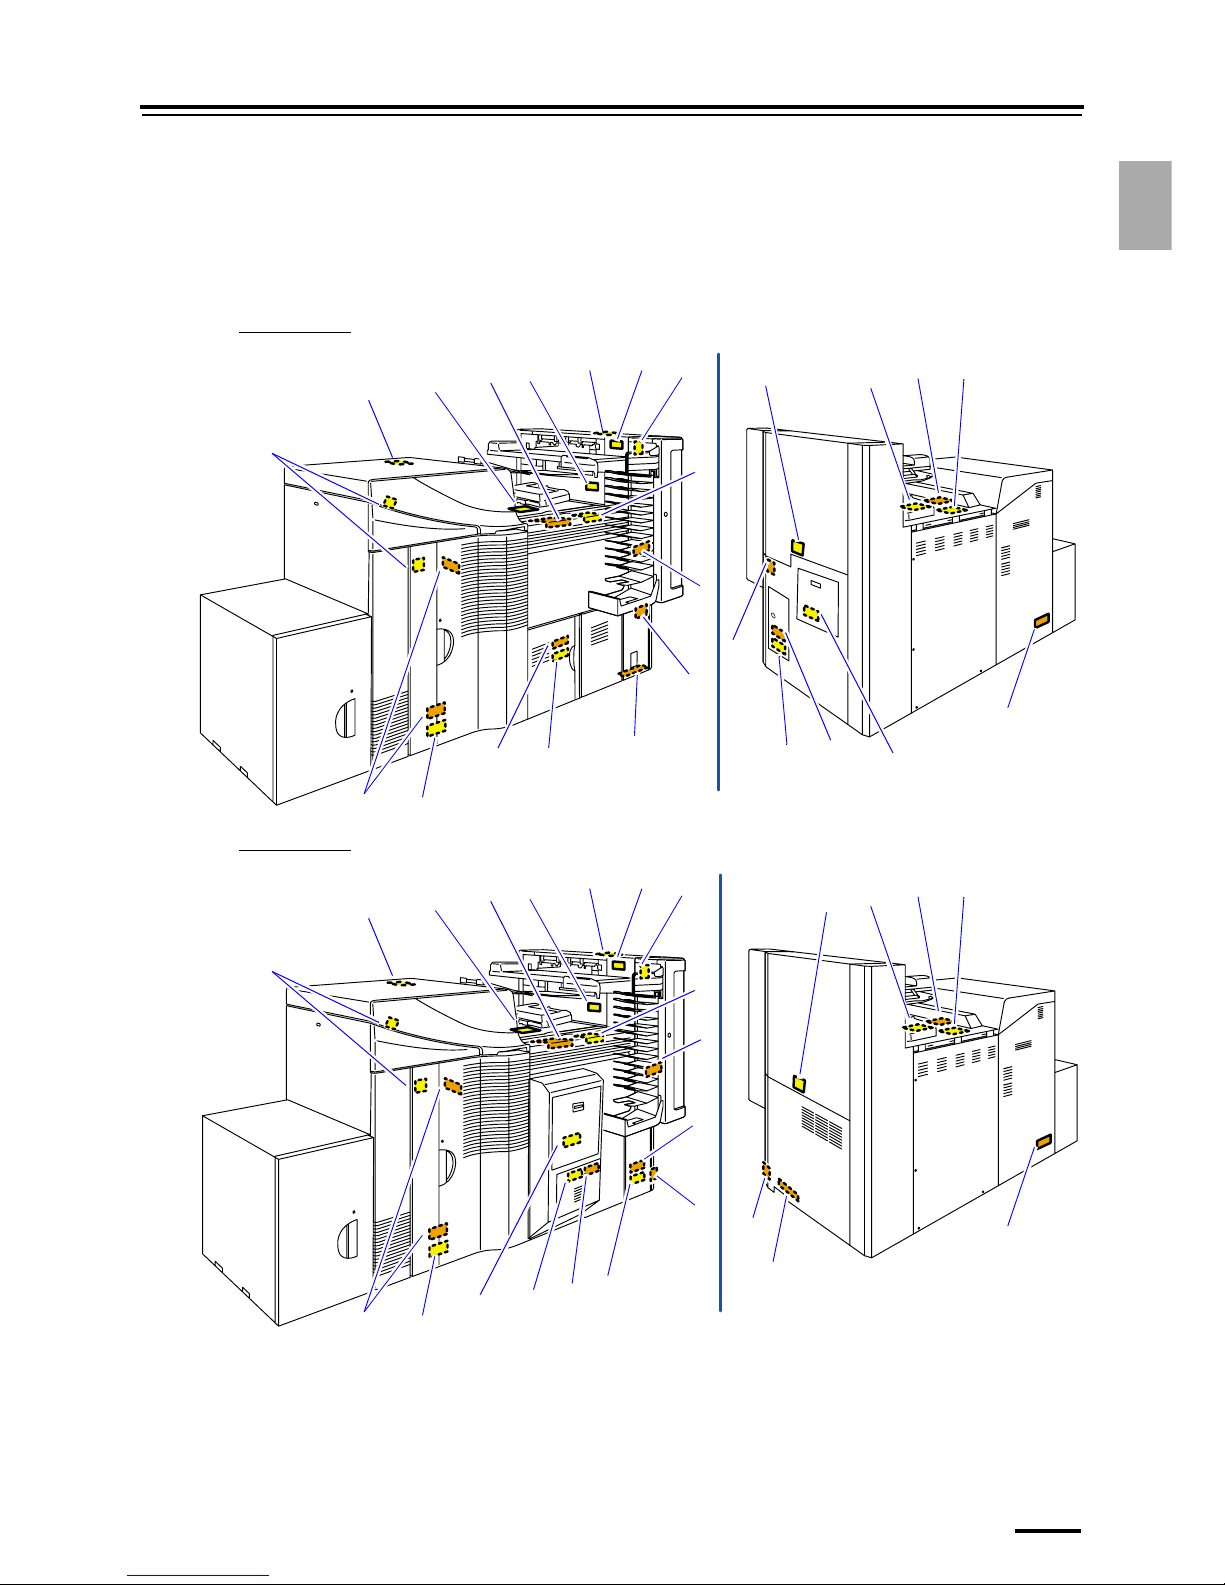
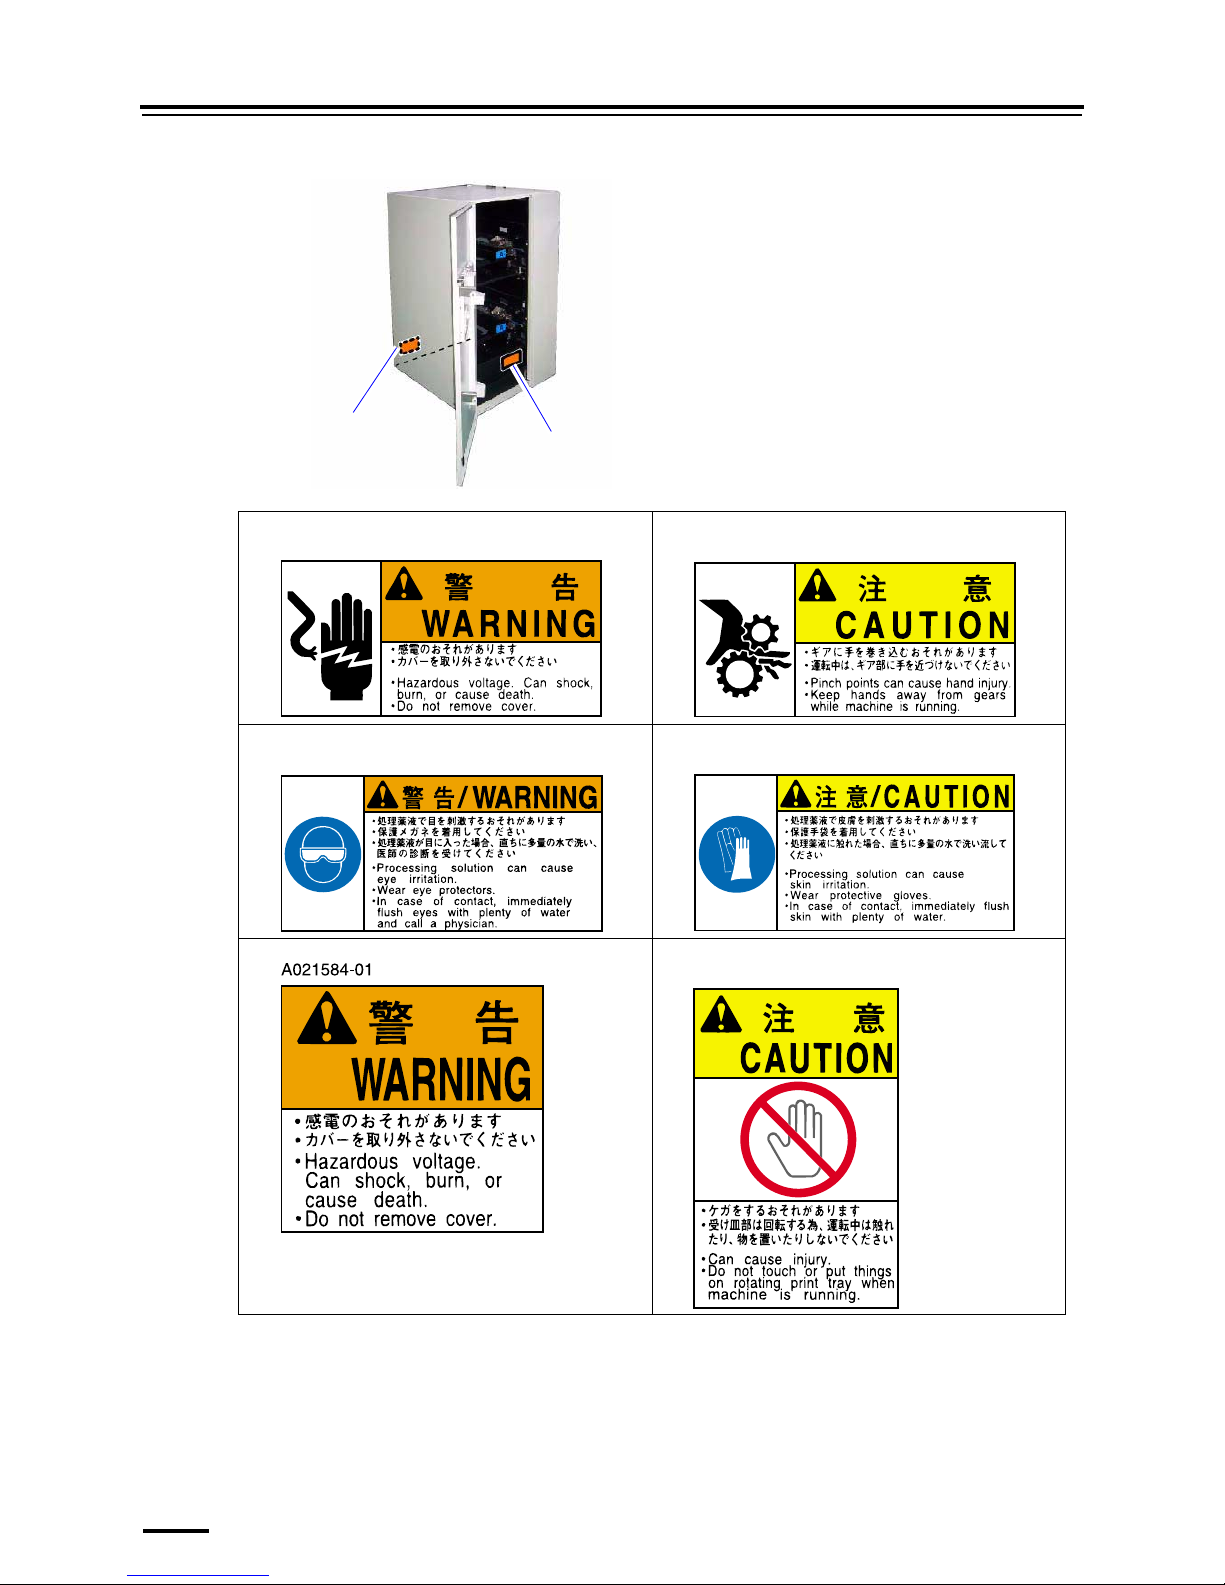
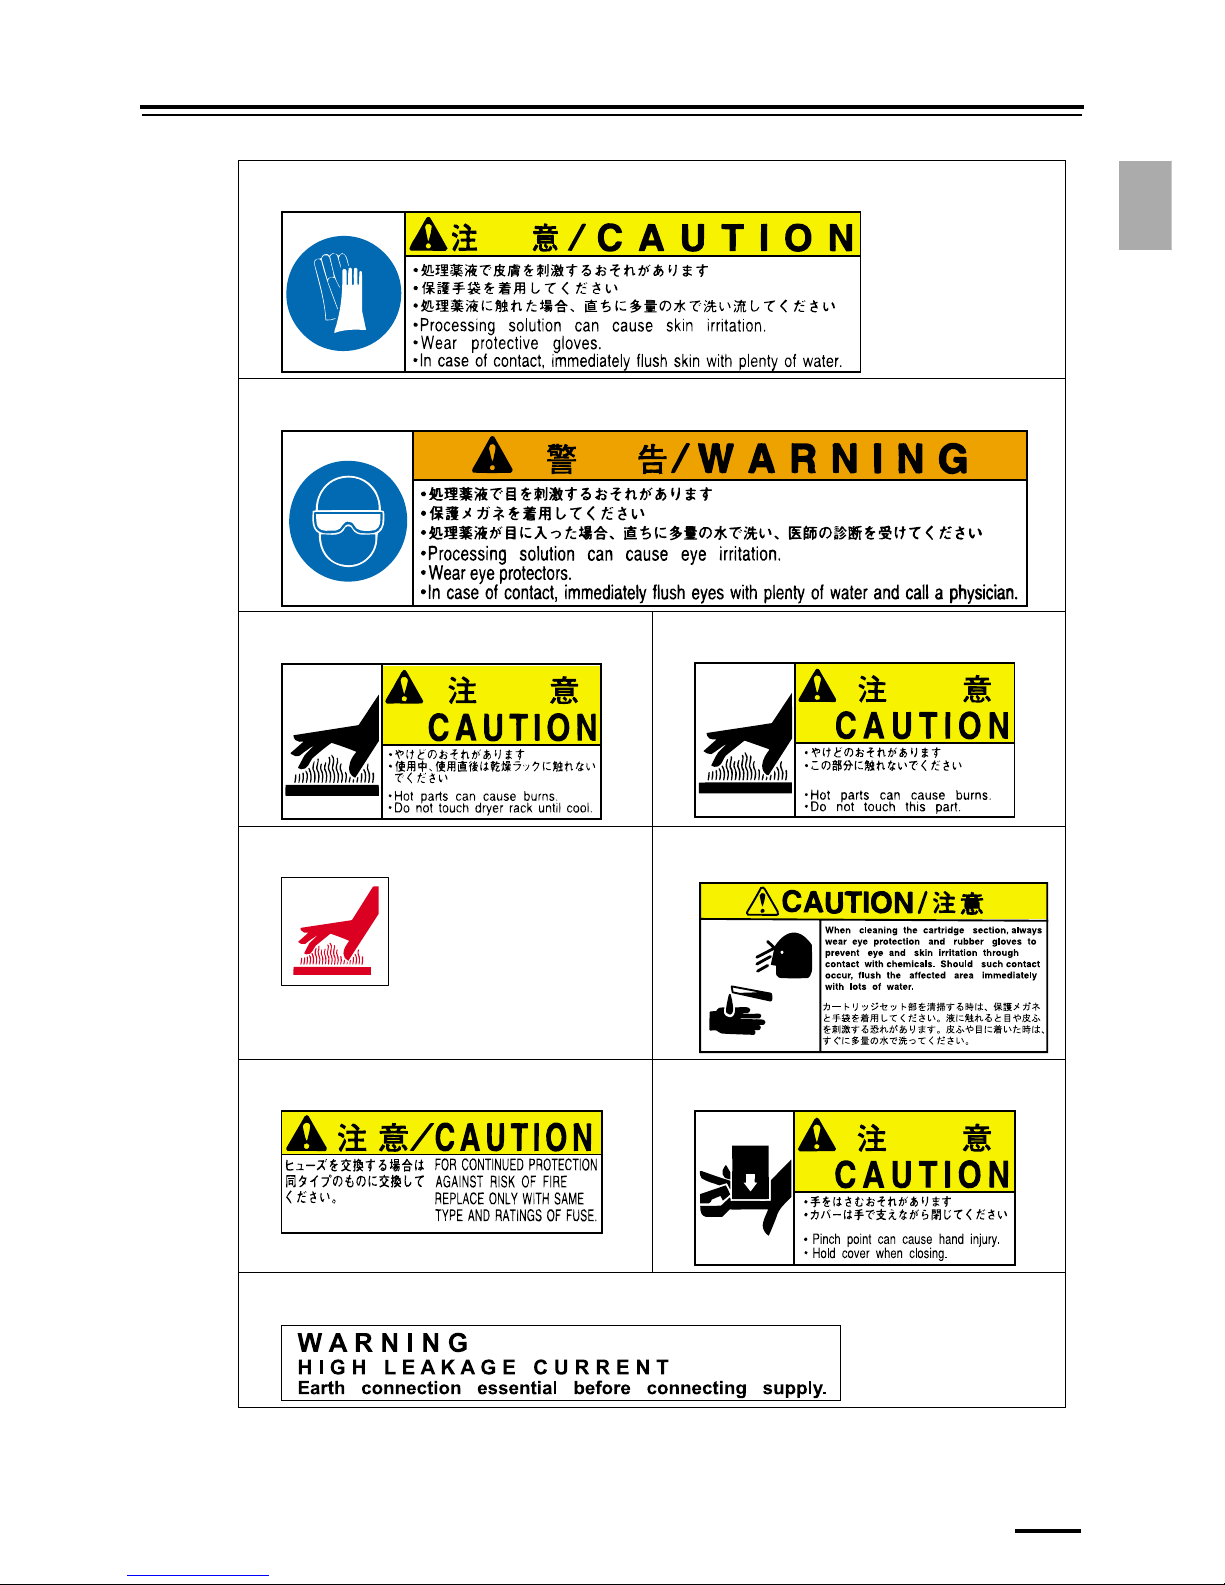
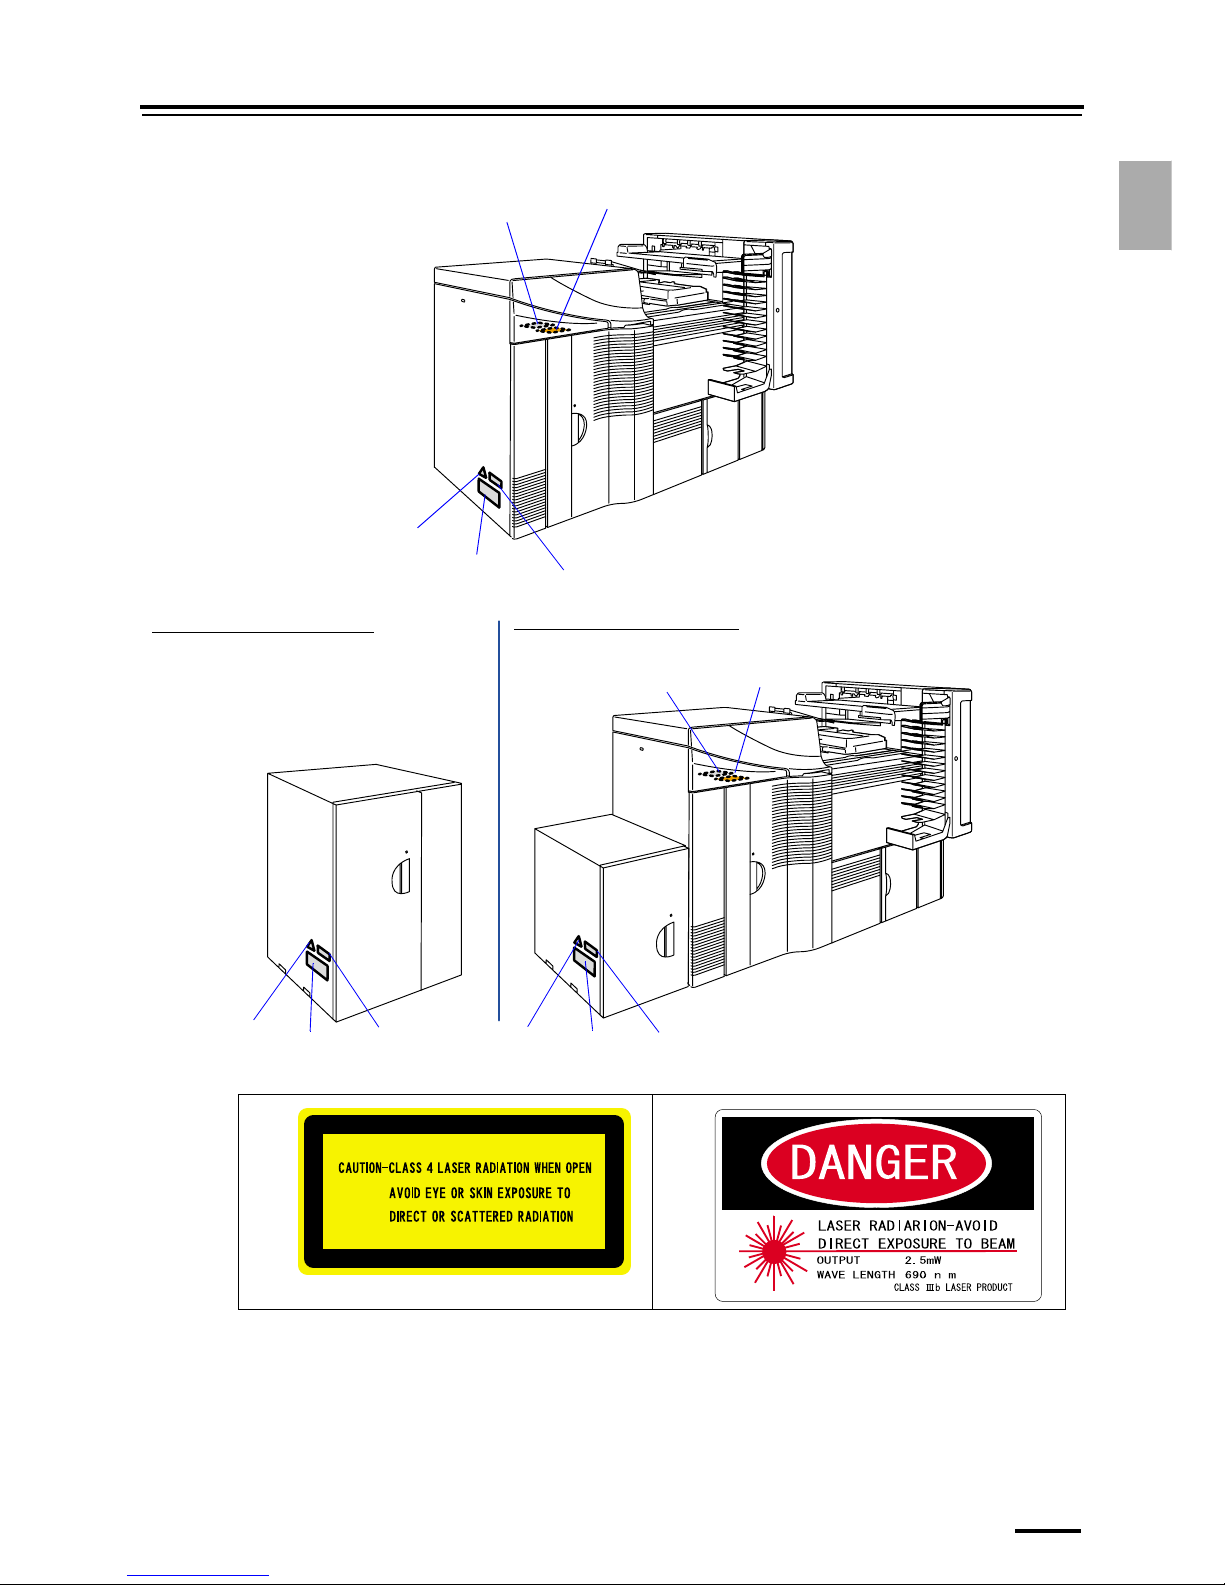
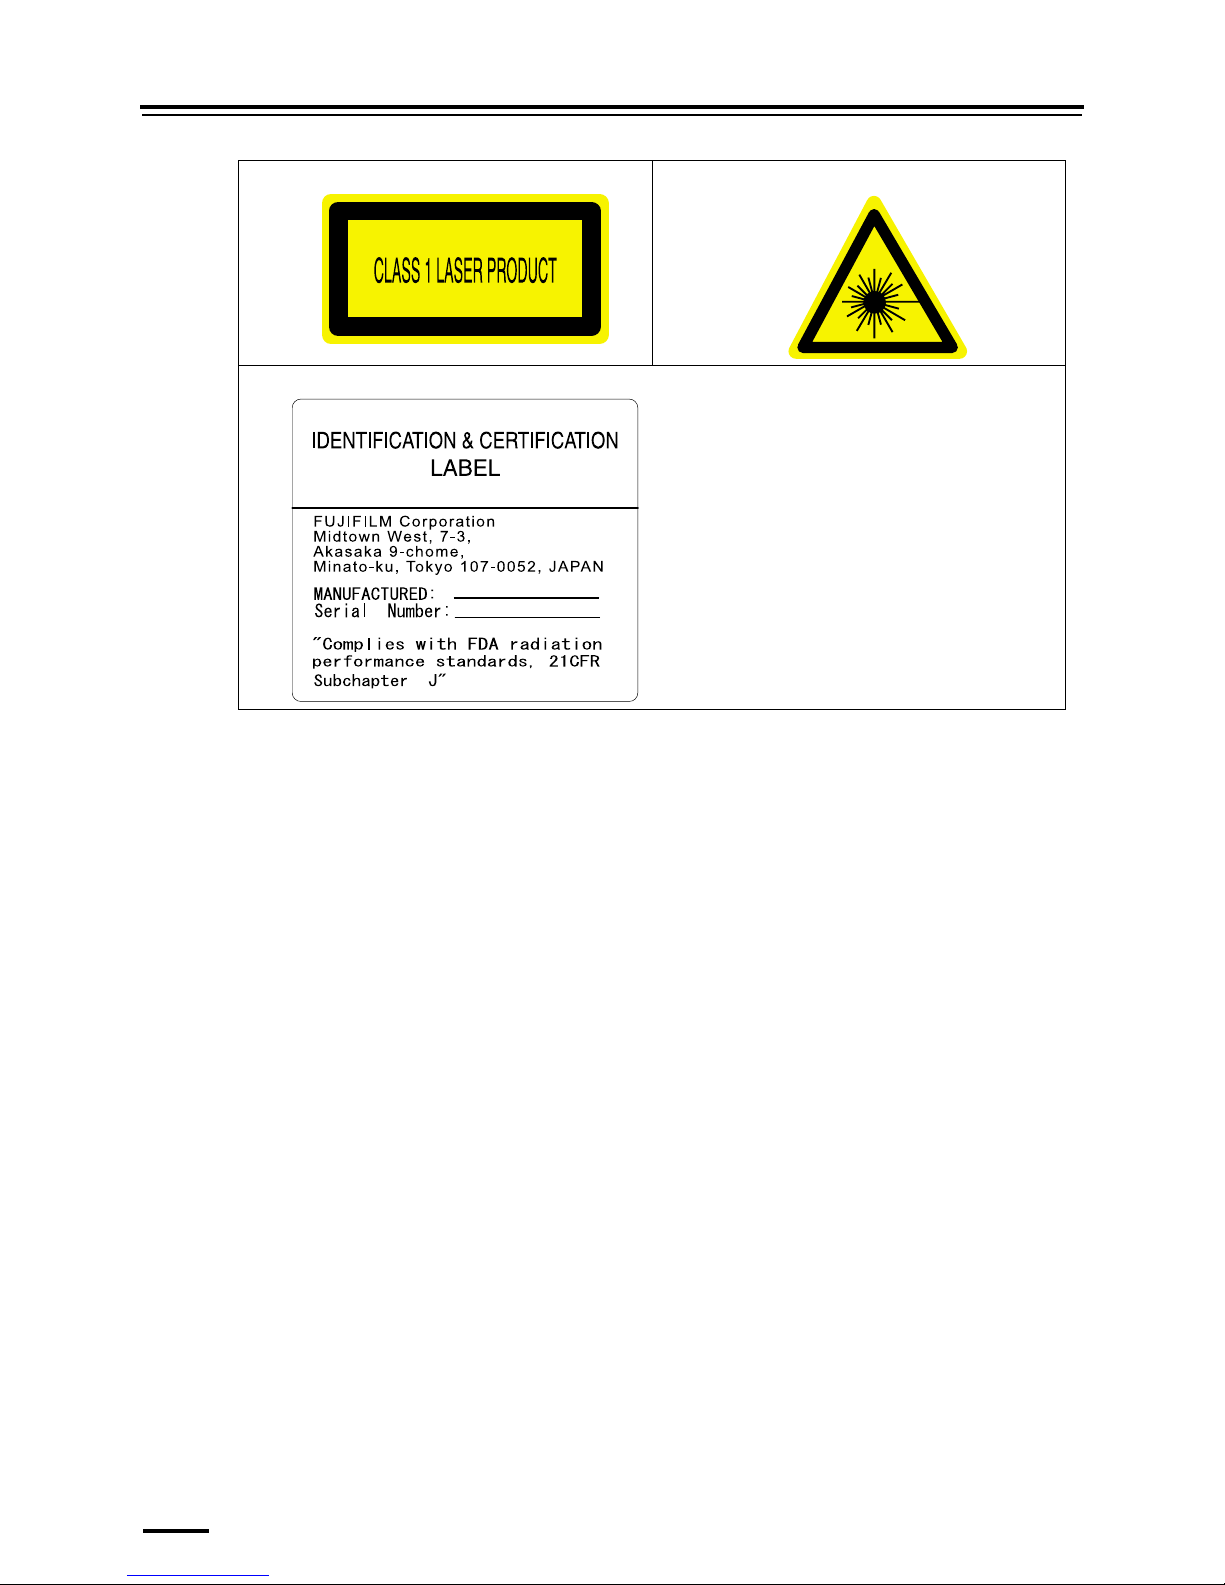
1.2 Location of warning labels
The following shows the locations, types of warning labels and the part numbers on this product. Follow the instructions on
the labels carefully in order to operate the product safely and avoid accidents. Do not peel the labels off. If a label becomes
illegible or comes off completely, contact your place of purchase for replacement label using the part number shown.
The external view of some models differs from the figures below, though the location of warning labels is the same.
LP7500/7600
LP7700/7900
3
4
12
1
6
9
1
5
4
3
8
7
10
2
4
3
10
1
11
11
13
5
14
15
10
G088957
1
6
9
1
5
4
3
8
7
10
2
4
3
10
1
11
11
13
3
14
15
12
5
4
10
G090071
1.2 Location of warning labels
1–4
Quad magazine unit (option)
12
34
56
1
1
G088962
A023349-01
A023200-01
A022523-01
A022531-01
A022509-01
1.2 Location of warning labels
1–5
1. For your safety
7
8
910
11 12
13 14
15
A234392-01
A234350-01
A022536-01
A023202-01
A515330-01
A087463-01
A023358-01
A022516-01
A063381-01

1.3 Safety precautions for operation
1–6
1.3 Safety precautions for operation
1.3.1 General precautions
• Do not modify, remove or install any non-specified parts without our permission as non-specified parts may
cause or contribute to severe personal injury, damage to this machine and/or void any quality guarantee.
• Do not bypass, defeat or remove safety devices. Do not use the machine for a purpose or in a manner for
which it was not designed. Doing either may put the users at risk or cause a malfunction.
• Immediately turn the machine off at its circuit breaker if it smokes, makes abnormal sounds or is overheating
during operation. Contact your place of purchase.
1.3.2 Precautions for processing solutions
• This system uses non-pharmaceutical poison and toxic processing solutions which are dangerous to drink in.
Direct contact with processing solutions may irritate eyes.
When handling processing solutions, wear safety goggles.
If a processing solution has been ingested accidentally, immediately rinse the mouth out with water, and drink
one or two cups of water. Contact a physician as soon as possible, and then vomit the solution according to
the physician's instructions.
If processing solution gets into eyes, immediately rinse them under running water for at least 15 minutes, and
then contact a physician.
• Direct contact with processing solutions may irritate the skin and may cause an allergic reaction.
When handling processing solutions, be sure to wear rubber gloves and clothing for workwear, to avoid direct
contact.
If there is a possibility of direct or indirect exposure to a processing solution, wash with soap and rinse with
lots of water, after completion of work.
• Processing solution stains on your clothing may result in discoloration or fading. When handling processing
solutions, wear clothing for workwear.
1.3 Safety precautions for operation
1–7
1. For your safety
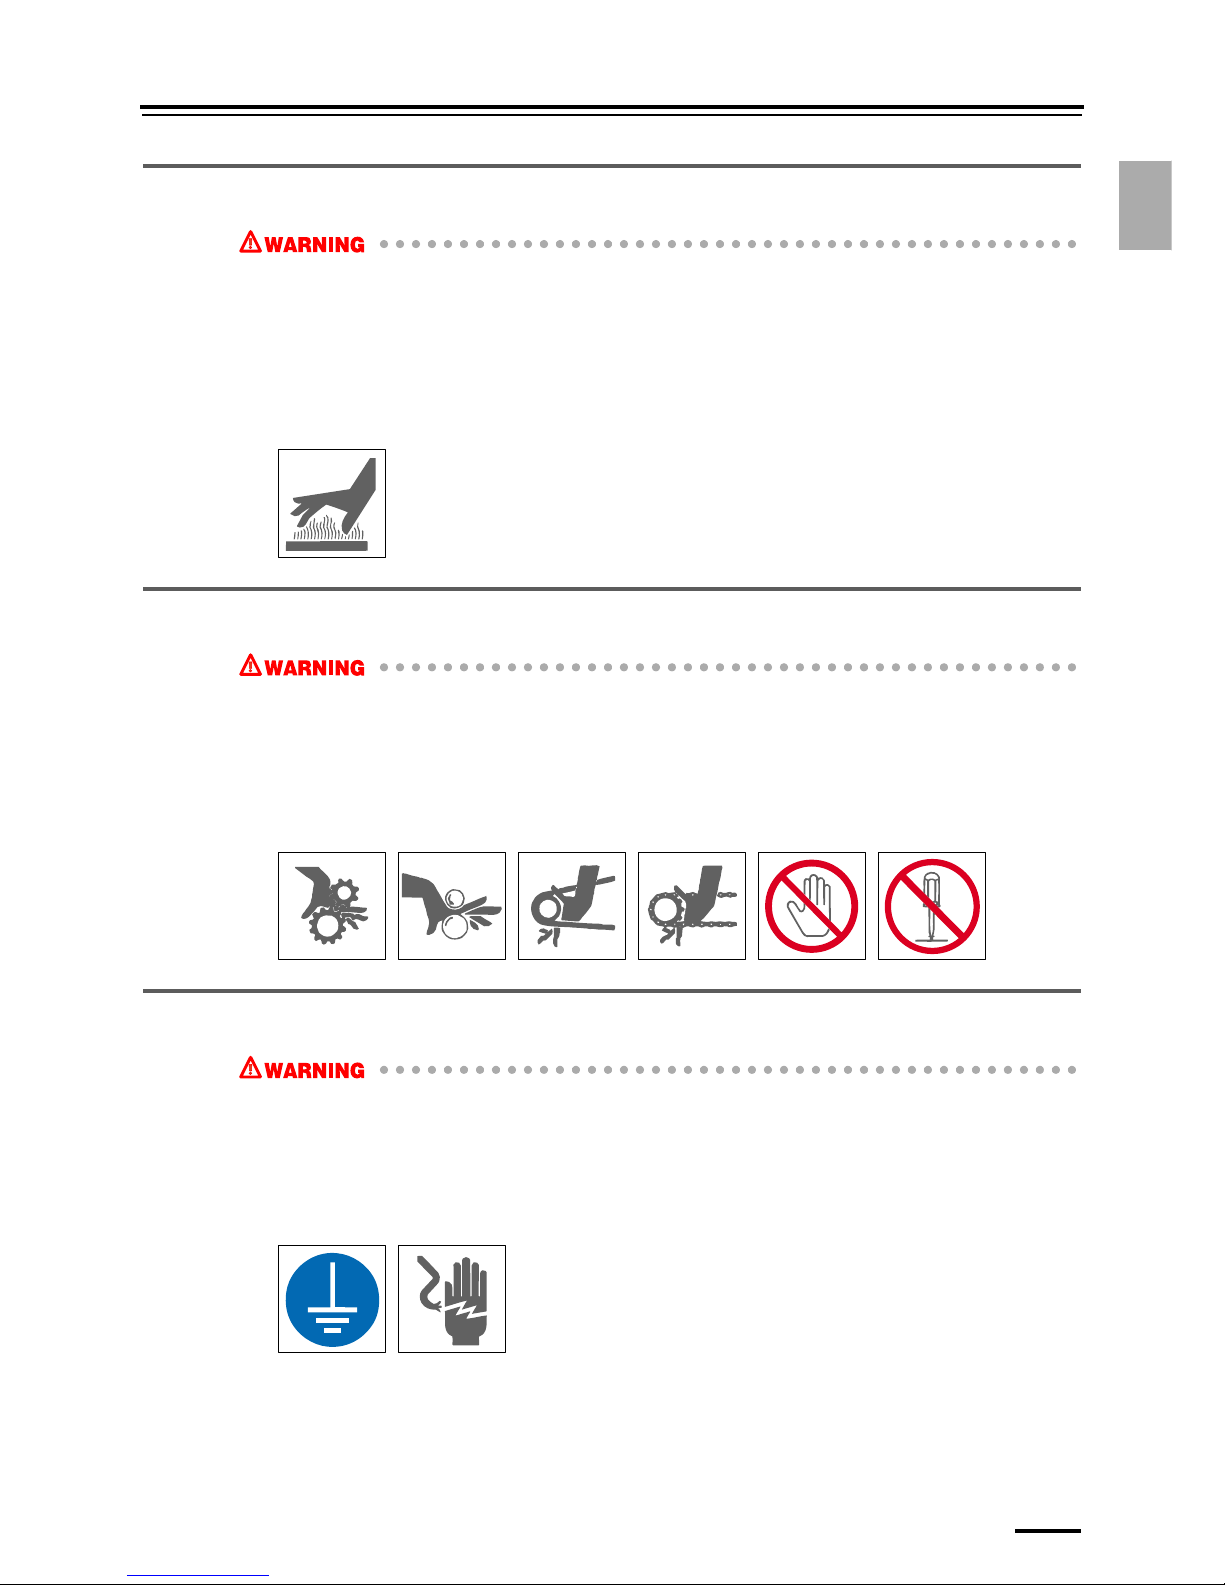
1.3.3 Precautions for operating heating section
• The processing solution heater, dryer heater and motor, etc. become very hot.
If you directly touch them during operation or right after operation, you may get burnt.
When replacement of parts or maintenance is performed, make sure that the temperature is fully lowered.
After temperature fully falls, carry out the operation by turning off the circuit breaker and the main power
supply.
Cooling time, such as the heater section and the motor, changes with work states. Turn off the circuit breaker
and main power supply. Then, perform the work after the temperature has become low enough.
If you have got burnt, cool the burn with running water and contact a physician as soon as possible.
1.3.4 Precautions for operating rotary section
• Be careful for your hands, hair, clothes, etc., not to be caught under the gear, chain, belt, roller, fan and other
rotating parts.
Do not remove covers other than those specified.
Be sure to turn off the circuit breaker and main power supply of this machine before performing any
operation.
Keep away your hands from the system during operation.
If your hands are caught and you cannot move, ask someone to turn off the circuit breaker at once.
1.3.5 Precautions against electric shock
• Do not remove covers unless directed by us or specified in the manual.
• Do not remove covers while the main power supply and circuit breakers are on. Doing so presents a risk of
electrical shock.
The control box contains high voltage and high current sections. An electrical shock from the control box may
cause severe personal injury or death, and/or damage to this system.
• Consult an electrician for electrical grounding.
1.3 Safety precautions for operation
1–8
1.3.6 Precautions for movable units
• Hands can be caught by the opening and closing of covers and doors or by movable units.
Hold covers and doors firmly when opening or closing them.
When manually moving a unit, only hold the specified parts.
Turn off the circuit breaker and main power supply when working with or around a unit that moves
automatically.
Immediately call for help to turn off the circuit breaker if your hand is caught and you cannot move.
1.3.7 Precautions around cutting parts
• There is a danger of cutting your hands on cutting parts (paper cutters and the like).
Do not remove the covers from cutting parts. Keep your hands away from cutting parts.
When working near cutting parts, turn off the circuit breaker and main power supply.
• There is a danger of cutting your hands on cutting parts.
When replacing a cutting part, do not touch the edge.
1.3.8 Laser Precautions
The laser is built into the printer.
• Follow the instructions to avoid exposing your eyes to laser beam.
• Do not remove any parts except specified ones.
• Do not perform printing operations while the safety device is released.
Location of laser labels
The labels for the laser precautions are placed on this system.
1.3 Safety precautions for operation
1–9
1. For your safety
Do not remove those labels.
12
2
3
4
1
5
G089038
If the triple magazine unit is installed
If the quad magazine unit is installed
4
3
4
3
1
2
5
5
G089039
1.3 Safety precautions for operation
1–10
34
5 LP7500 / 7600 / 7700 / 7900

1.4 Additional precautions
1–11
1. For your safety
1.4 Additional precautions
1.4.1 Precautions in moving the system
Consult your technical representative when moving the system.
1.4.2 Precautions in operating this product
• Do not suddenly change the temperature of the room in which this product is installed.
Rapid changes in room temperature may cause condensation in the system and adversely affect its performance.
• Provide sufficient ventilation. Do not use this product in a closed location.
• Do not place any vase or cup containing liquid on this product. Liquid in the keyboard or control box may damage the
system. Do not place heavy objects on the product.
• This product has some vents. These vents are used for air intake/outlet. Do not place anything in front of the vents or
block them in any way.
• Applying strong vibration to the system may adversely affect printing. Do not apply strong vibration to the product.
• Connecting devices other than those optional devices specified by us or using software which is not recommended by us
may result in system malfunctions.
• Dilute processing solutions and replenishment solutions with water of which temperature is specified by the chemical
solution manufacturer.
If the solution tanks are filled with a solution of which temperature is too high, the system may be damaged.
• If you handle the processing solution such as the replenishment solution or the effluent, the filter cartridges containing
the solution, and their packages, follow the chemical manufacturer's instructions and comply with the local ordinance
and regulation.
• Specific grease is applied to the rack gears of the processing racks. Basically, you need not apply any additional grease
to them. However, if you apply grease, be sure to use the specified grease.
Using other grease may damage resin parts (e.g. tanks).
• Do not use the supplied parts such as power cable for other devices than this product.
1.4.3 Precautions during print operation
Doing any of the actions below will terminate system operations. (except an emergency)
!!!! Turning off the circuit breaker
The processor drive is turned off. Paper currently being processed stops, possibly causing a paper jam. If the circuit breaker
is turned off by mistake, turn it on immediately.
!!!! Turning off the processor drive
If the drive stops, paper which is currently being processed may have color problems and may cause a paper jam.
If turning off the processor drive by mistake, turn it on immediately as follows:
1. Access the Status Display display.
Bringing up the display
On the Maintenance Application display, click Maintenance. → Status Display
2. Click the Processor Status tab, and click Processor Drive ON/OFF.
Turn on the processor drive.
!!!! Opening or removing covers or doors
The paper will be fogged and then good quality printing cannot be ensured.
Never open any cover or door except when taking necessary countermeasure for errors.

1.4 Additional precautions
1–12
!!!! Vibrating the system
Do not bump or otherwise cause the system to vibrate. Vibrations may adversely affect printing.

2
2–1
2. Getting Started
This chapter explains each part name and paper advance path.
2.1 Component names and functions
2–2
2.1 Component names and functions
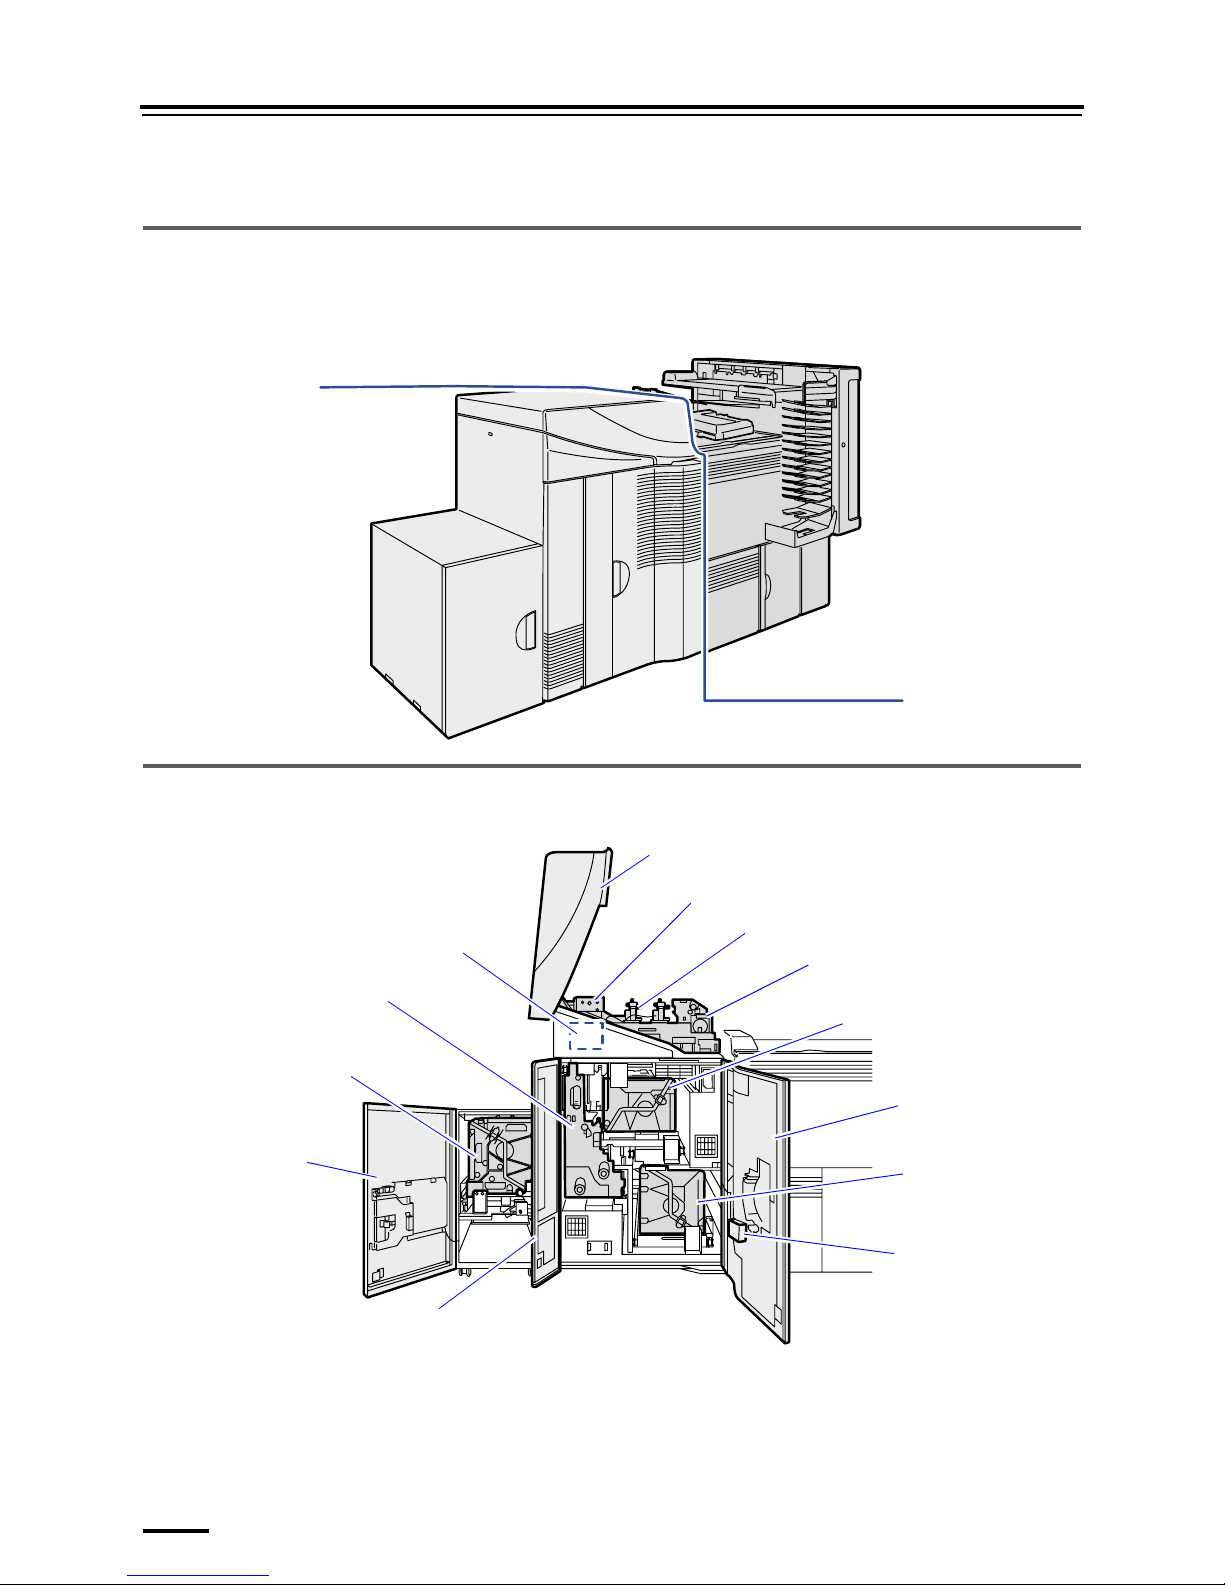
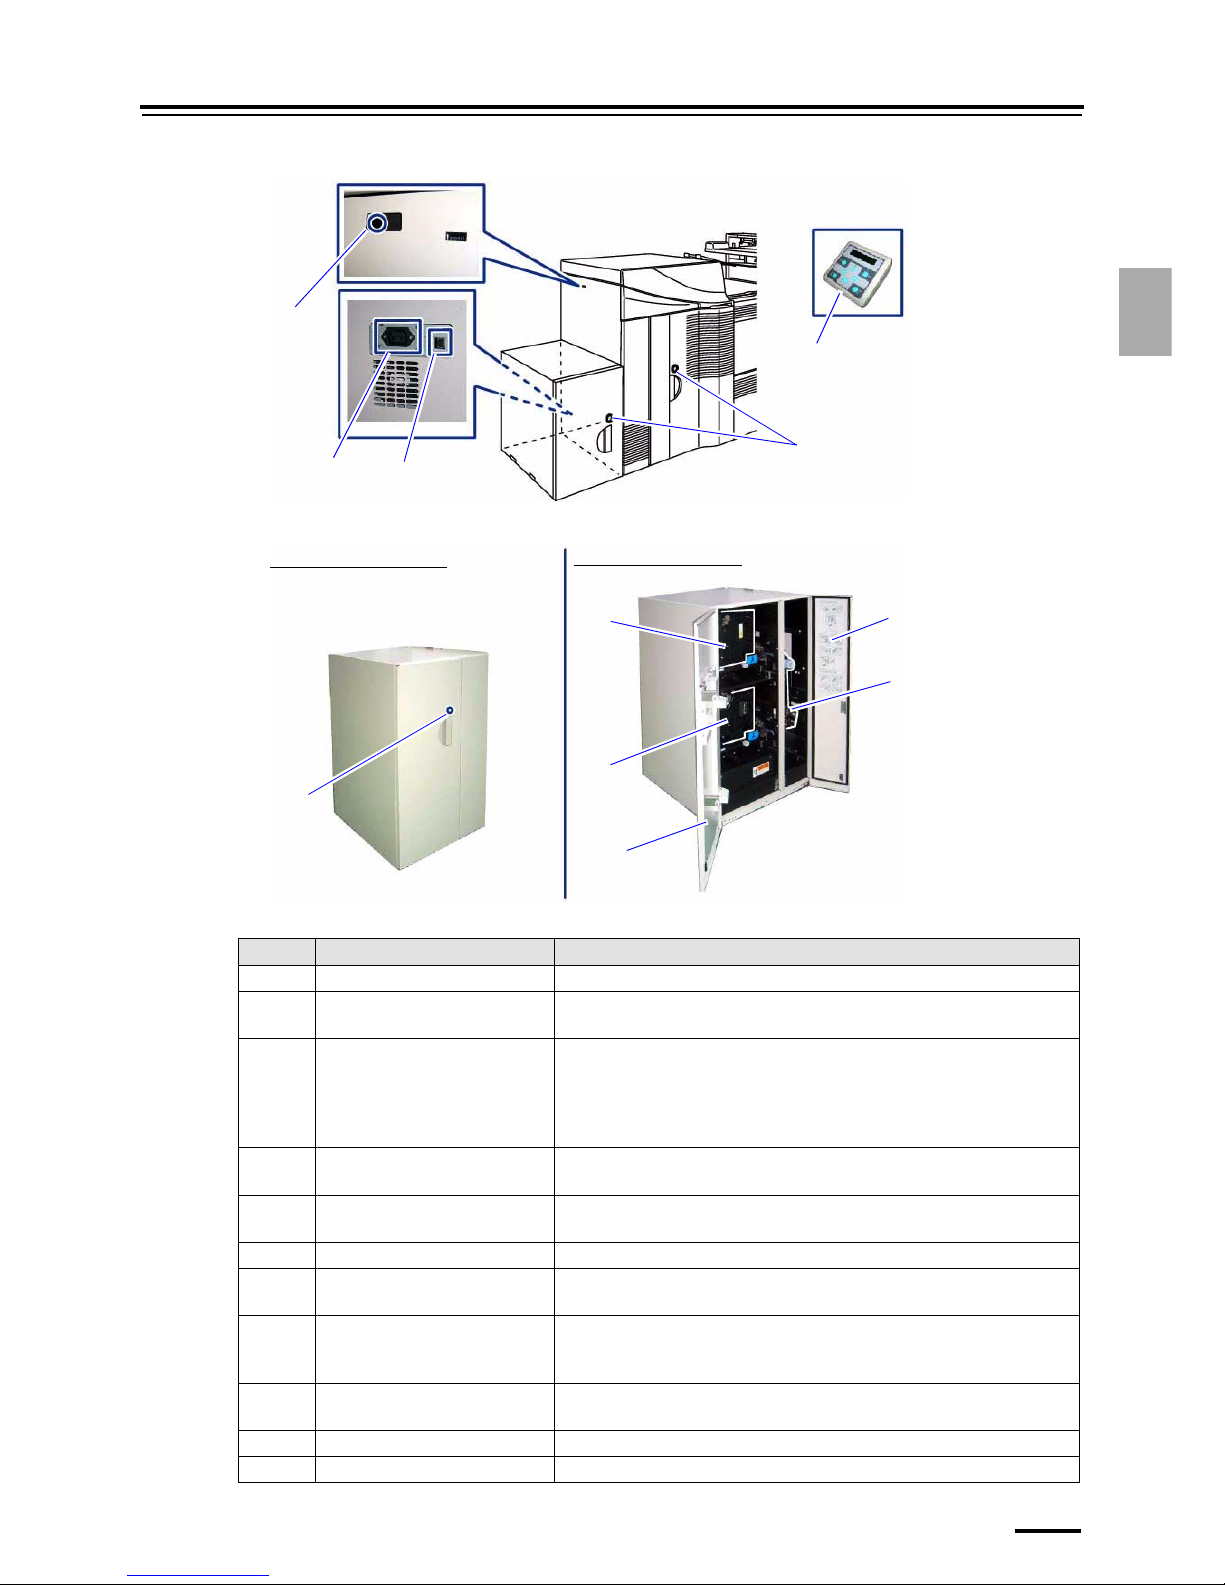
2.1.1 External components
The external view of some models differs from the image below.
The illustration below is for the system with the triple magazine.
Printer processor section
2.1.2 Names and functions of printer section
Printer section with the printer doors open (The triple magazine unit is installed.)
Processor section
Printer section
G088953
6
2
10
3
*1
3
*3
3
*2
1
7
9
8
5
4
18
G088950
2.1 Component names and functions
2–3
2. Getting Started
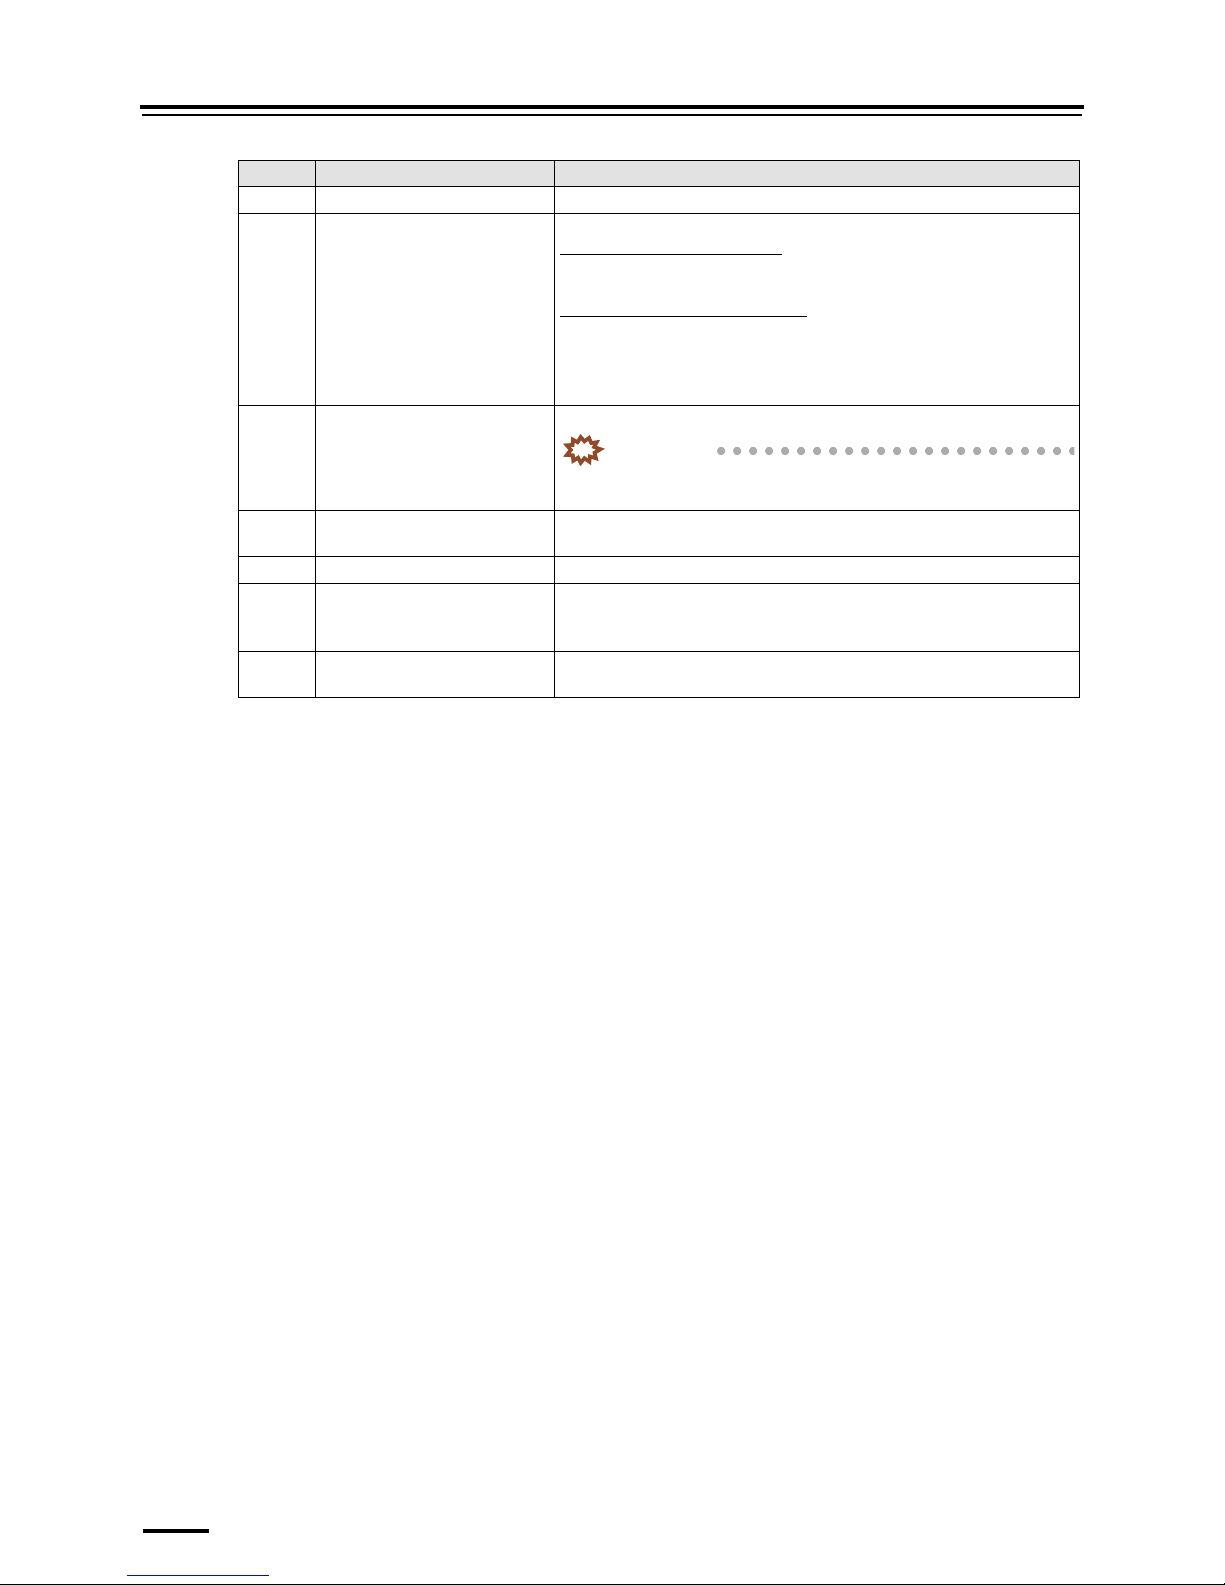
Printer section with the printer doors closed (The triple magazine unit is installed.)
If the quad magazine unit is installed
The numbers in the table below correspond to those in the illustration.
No. Name Functions
1 Printer door 1 Open this door to remove and to maintain the paper magazine.
2 Printer door 3 Open this to remove or maintain the paper magazine when optional triple or
quad magazine unit is installed.
3 Paper magazine Contains paper for processing.
*1: Paper magazine B
*2: Paper magazine C
*3: Paper magazine A (option)
*4: Paper magazine A2 (option)
4 Paper supply unit Feeds paper from Paper Magazine to Exposure Advance Unit.
Pull this out to solve paper jam or perform maintenance checks.
5 Exposure advance unit Feeds paper to Exposure advance unit 1 with exposure.
Clean this unit not to cause a paper jam.
6 Printer top cover Open this to solve paper jam or perform maintenance checks.
7 Paper advance unit 1 Feeds paper to Paper Advance Unit 2.
Open this to solve paper jam or perform maintenance checks.
8 Paper advance unit 2 Divides the paper path into right and left lanes to feed paper to the
processor loading unit.
Open this to solve paper jam or perform maintenance checks.
9 Processor loading unit Feeds paper to Paper Processor.
Open this to solve paper jam or perform maintenance checks.
10 Printer door 2 Open this door to remove and to maintain the paper magazine.
11 Paper magazine lamp Lights in red while paper is being fed from the paper magazine.
11
12
14
15
13
G088949
If the printer doors are closed
If the printer doors are open
11
3
*3
2
16
17
3
*4
G088963
2.1 Component names and functions
2–4
12 LAN cable connector LAN cable connector to connect with the operation PC
13 Power outlet for scanner
AC200 V to AC240 V
Connects the power cable of scanner to this product.
If the system is in program timer
The power supply of the scanner interfaces with that of this product.
If the system is not in program timer
The power supply of the scanner is turned on by turning on the power
supply of this system.
Power capacity is 1.5 A.
14 Display module connector Used to connect the display module.
IMPORTANT
• Turn off the system before disconnecting or connecting the cable
of the display module.
15 Display module Used to perform maintenance or other operations of this system without
using an operation PC.
16 Printer door 4 Open this door to maintain or pull out paper supply unit A2.
17 Paper supply unit A2 Paper supplied from the paper magazine in the quad magazine unit is
advanced to the paper supply unit in the main body.
Pull this out to solve paper jam or perform maintenance checks.
18 Storage position of the cleaning
cloth
Store a cleaning cloth in this position.
No. Name Functions
2.1 Component names and functions
2–5
2. Getting Started
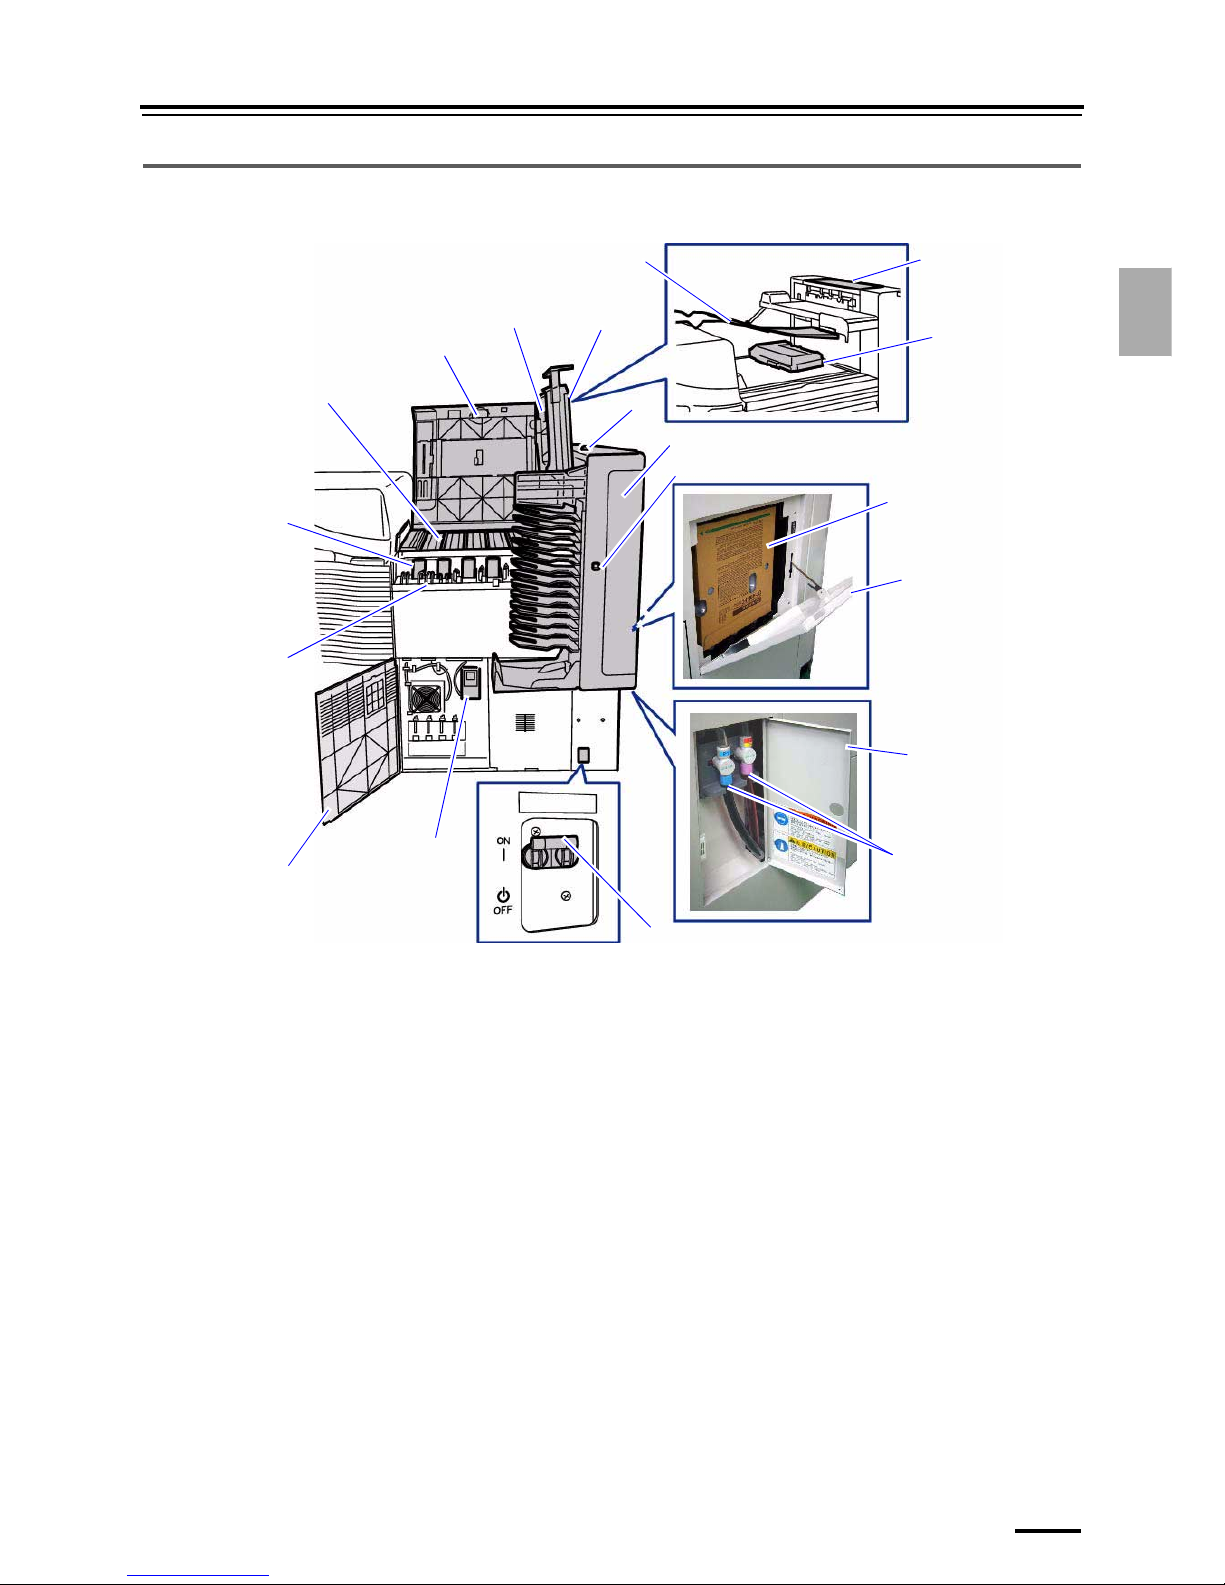
2.1.3 Names and functions of paper processor section
LP7500/7600
5
1
16
3
9
6
11
19
2
4
10
7
14
8
15
12
17
18
13
G089581
2.1 Component names and functions
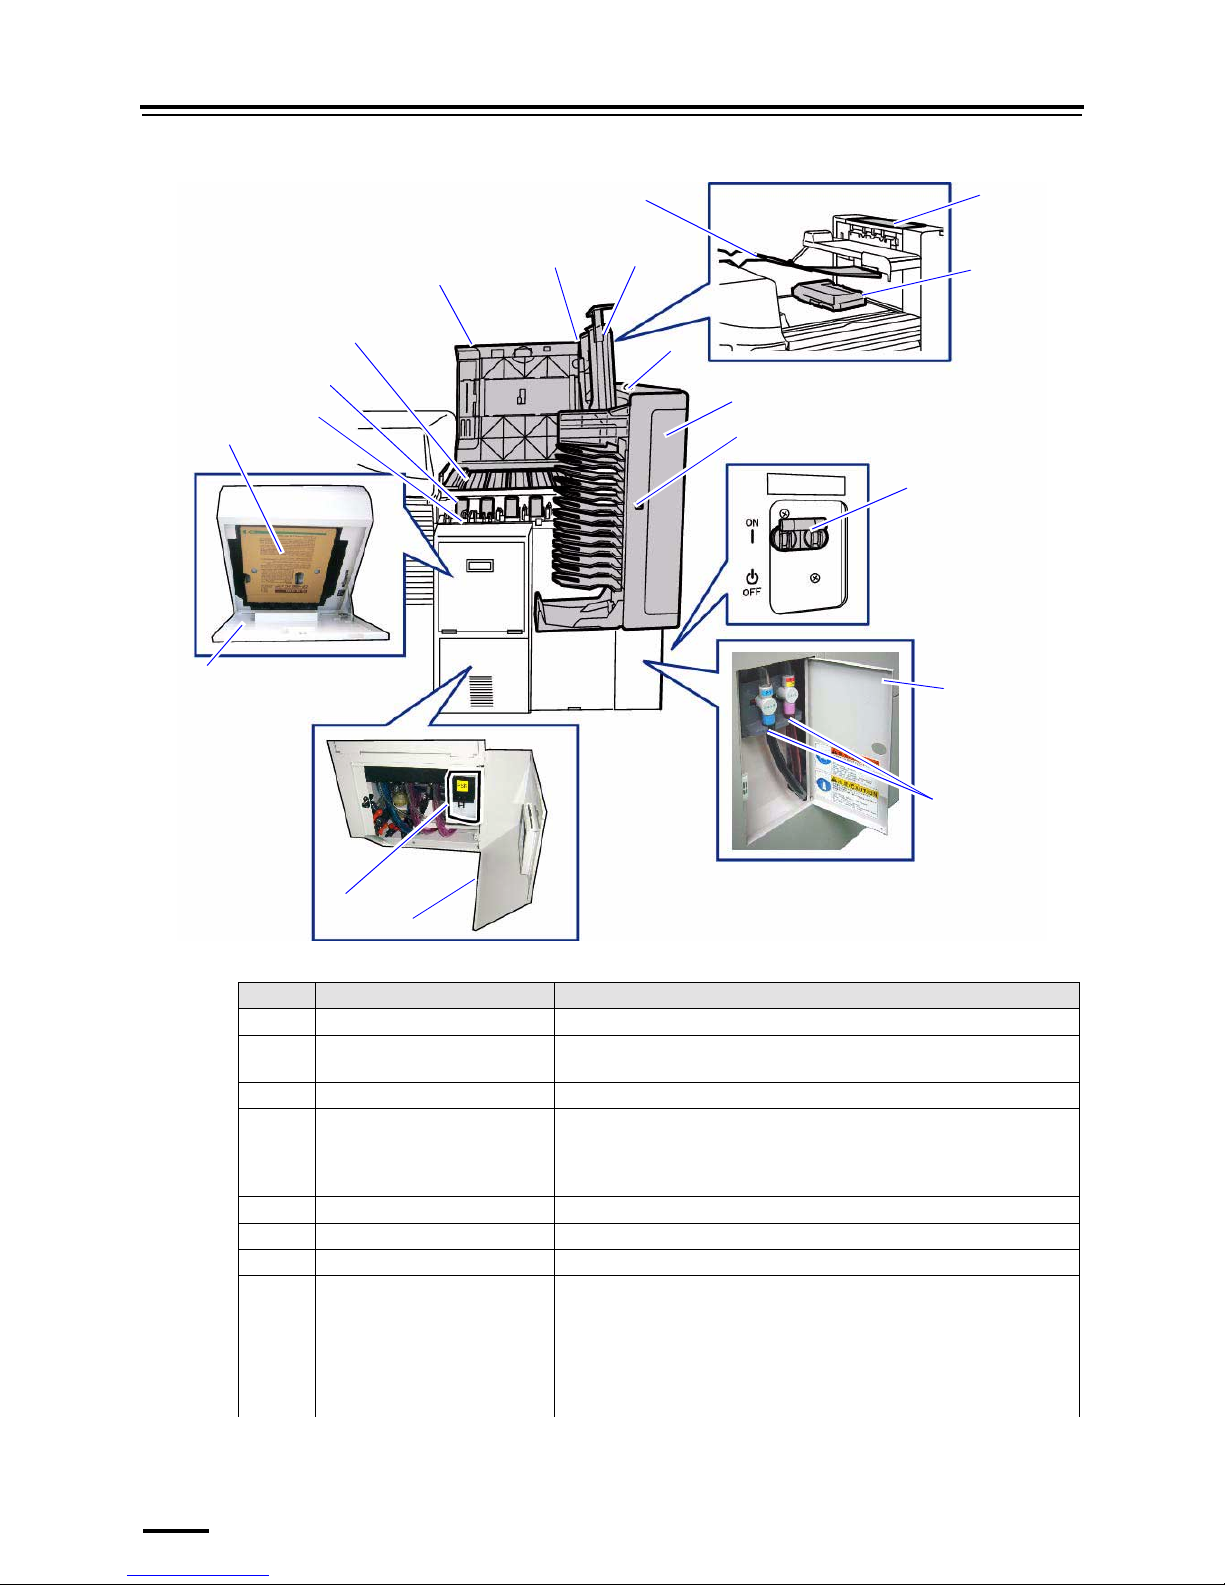
2–6
LP7700/7900
The numbers in the table below correspond to those in the illustration.
No. Name Functions
1 Processor door 1 Open this door for processor maintenance.
2 Sub-tank Controls processing solution in the replenisher tanks with the filters,
solution level sensors and heaters.
3 Filter cartridge Filters processing solution to make it clean.
4 Processing tank, processing rack
(upper guides, squeegee unit)
Processing tank contains processing solution.
Processing rack feeds paper in processing solution.
Upper guides feed paper between the processing racks.
Squeegee unit feeds paper from processing rack to the dryer rack.
5 Processor top cover Open this door to perform maintenance, or solve paper jam.
6 Print receiving tray (large) Receives large prints.
7 Print conveyor unit Feeds paper from the dryer section to the print sorter unit.
8 Processor condition lamp Shows whether or not the paper processor section is ready to process.
• Lights in green.
It is ready. It has completed adjusting temperature of processing
solution.
• Blinks in green.
It is not ready. It is adjusting processing solution temperature.
5
1
16
3
9
6
11
19
2
4
10
7
14
8
15
12
17
18
13
G089582