

Page 1

LUMINESCENT IMAGE ANALYZER
LAS-3000
OPERATION GUIDE
2nd Edition 2004. Jun.
Page 2

Introduction
Thank you for purchasing the FUJIFILM Luminescent Image Ana-
lyzer LAS-3000.
This guide is used for explanation of the equipment. Therefore,
this guide simply describes each function and usage. Please see
the Operation Manual for more detailed informations.
Index
1 Features of the Luminescent Image Analyzer 3
2 System Configuration and Parts Identification 3
3 Preparation for Exposure 6
1 Activation 6
2 Setting of Samples 6
4 Exposure of Samples (Lite mode) 7
1 Setting of Mode 7
2 Method and Tray position Setting 7
3 Adjustment of Focus 8
4 Exposure Type and Exposure Time Setting 8
5 Setting of Sensitivity 8
6 Exposure 9
7 Saving the Exposed Image 9
8 Printing the Exposed Image 10
9 Termination 10
5 Exposure of Samples (Pro mode) 11
6 Cautions on Use 12
1 Sample Tray 12
Appendix 12
■ Exposure Type 12
■ Operation required to be carried out for exposure with
green and red LED incident light sources (Optional) 13
■ Detection Sensitivity and Number of Pixels 14
■ Detection Reagents and Settings of LAS-3000 14
2
∗ In LAS-3000, the excitation light (incident/transmitted light), filter, lens, and the components of the
analytic part vary depending on the system you are using. Please confirm each system. The basic
system of “LAS-3000” is described in this Operation Guide.
Page 3
Features of the Luminescent Image Analyzer
1
In LAS-3000, chemiluminescent and fluorescent samples can be detected in high sensitivity, Dark frame
correction and Flat frame correction are equipped for the quantitative analysis of the images. A digitized
image of stained gel, membrane or film can be obtained by white light illumination.
● A super CCD camera of 3,200,000 pixels is employed. A high-resolution image of 6,300,000 pixels is
obtained by the special image processing procedure.
● A newly designed lens of F0.85 with remote focus and remote iris is mounted.
Chemiluminescence can be detected in high sensitivity through use of a four-step pixel binning function.
● Fluorescence can be detected in high sensitivity using a UV transmitted illuminator and incident blue LED.
● Wider range of fluorescent reagents can be detected by the use of green and red incident LEDs in addition
to the blue one (Optional).
● The operability is remarkably improved by the newly designed Image Reader software.
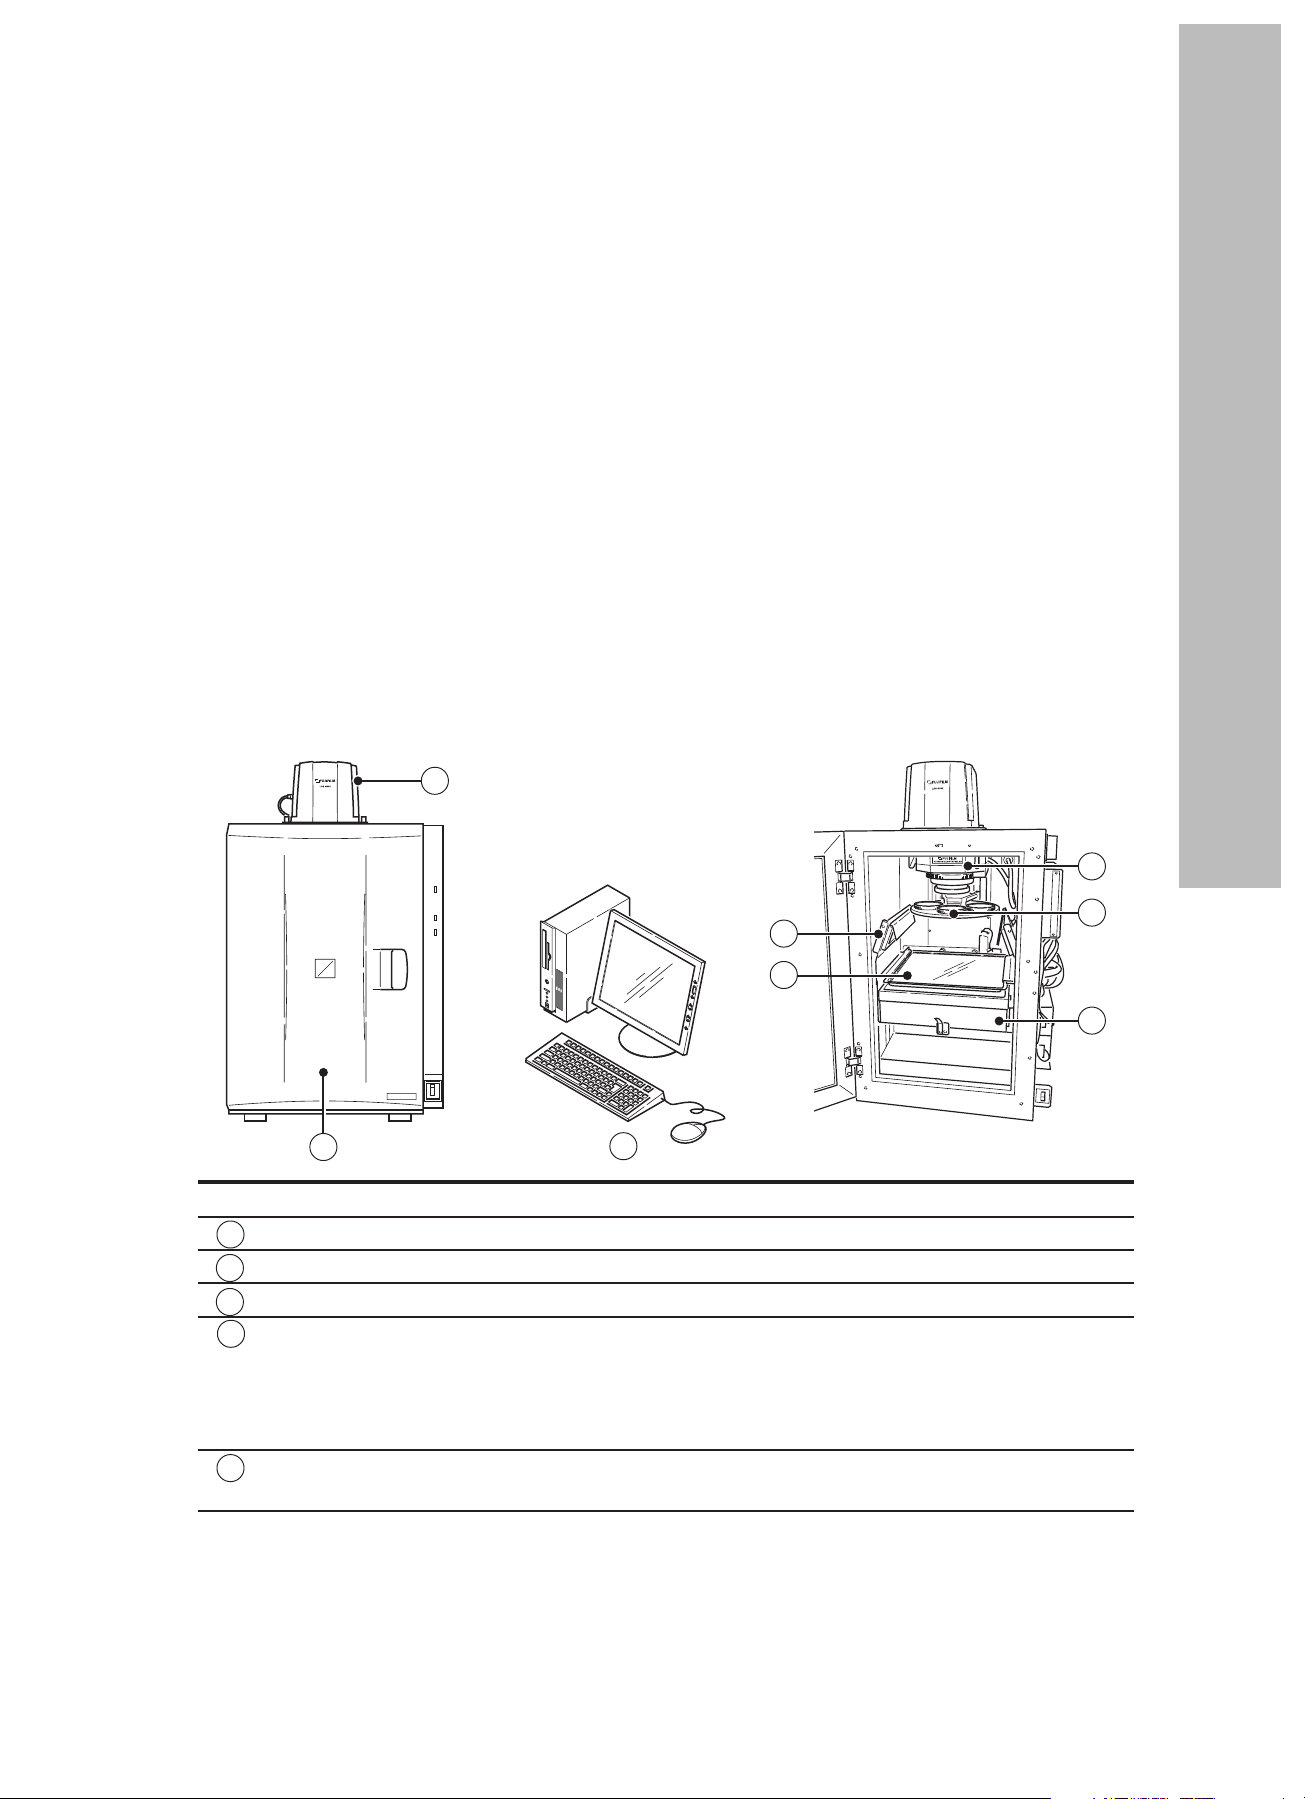
System Configuration and Parts Identification
2
< System configuration of LAS-3000: An Example > < Internal view of intelligent dark box (IDX) >
LAS-3000 OPERATION GUIDE
1
4
7
2
Name Description
Camera head CCD cooling function and image data output USB port
1
Intelligent dark box (IDX) Dark box
2
Lens unit F0.85/43mm
3
Incident light source
4
Transmitted light source 312nm UV light source or
5
8
Blue LED (460nm) incident light sources
White LED incident light sources
Green LED (520nm) incident light sources (Optional)
Red LED (630nm) incident light sources (Optional)
White transmitted light source
3
6
5
3
Page 4

Filter Y515Di (filter for blue LED)
6
605DF40 (EtBr detecting filter)
510DF10 (GFP detecting filter)
575DF20 (filter for green LED) (Optional)
R670 (filter for red LED) (Optional)
Sample tray
7
EPI tray
(for chemiluminescence and incident light source)
DIA tray (for transmitted light source)
NP tray (for titer plate)
DIA-UV tray (for UV transmitted light source)
Computer Exposure operation and analysis work
8
● Pictrography High quality digital color printer
4
Page 5
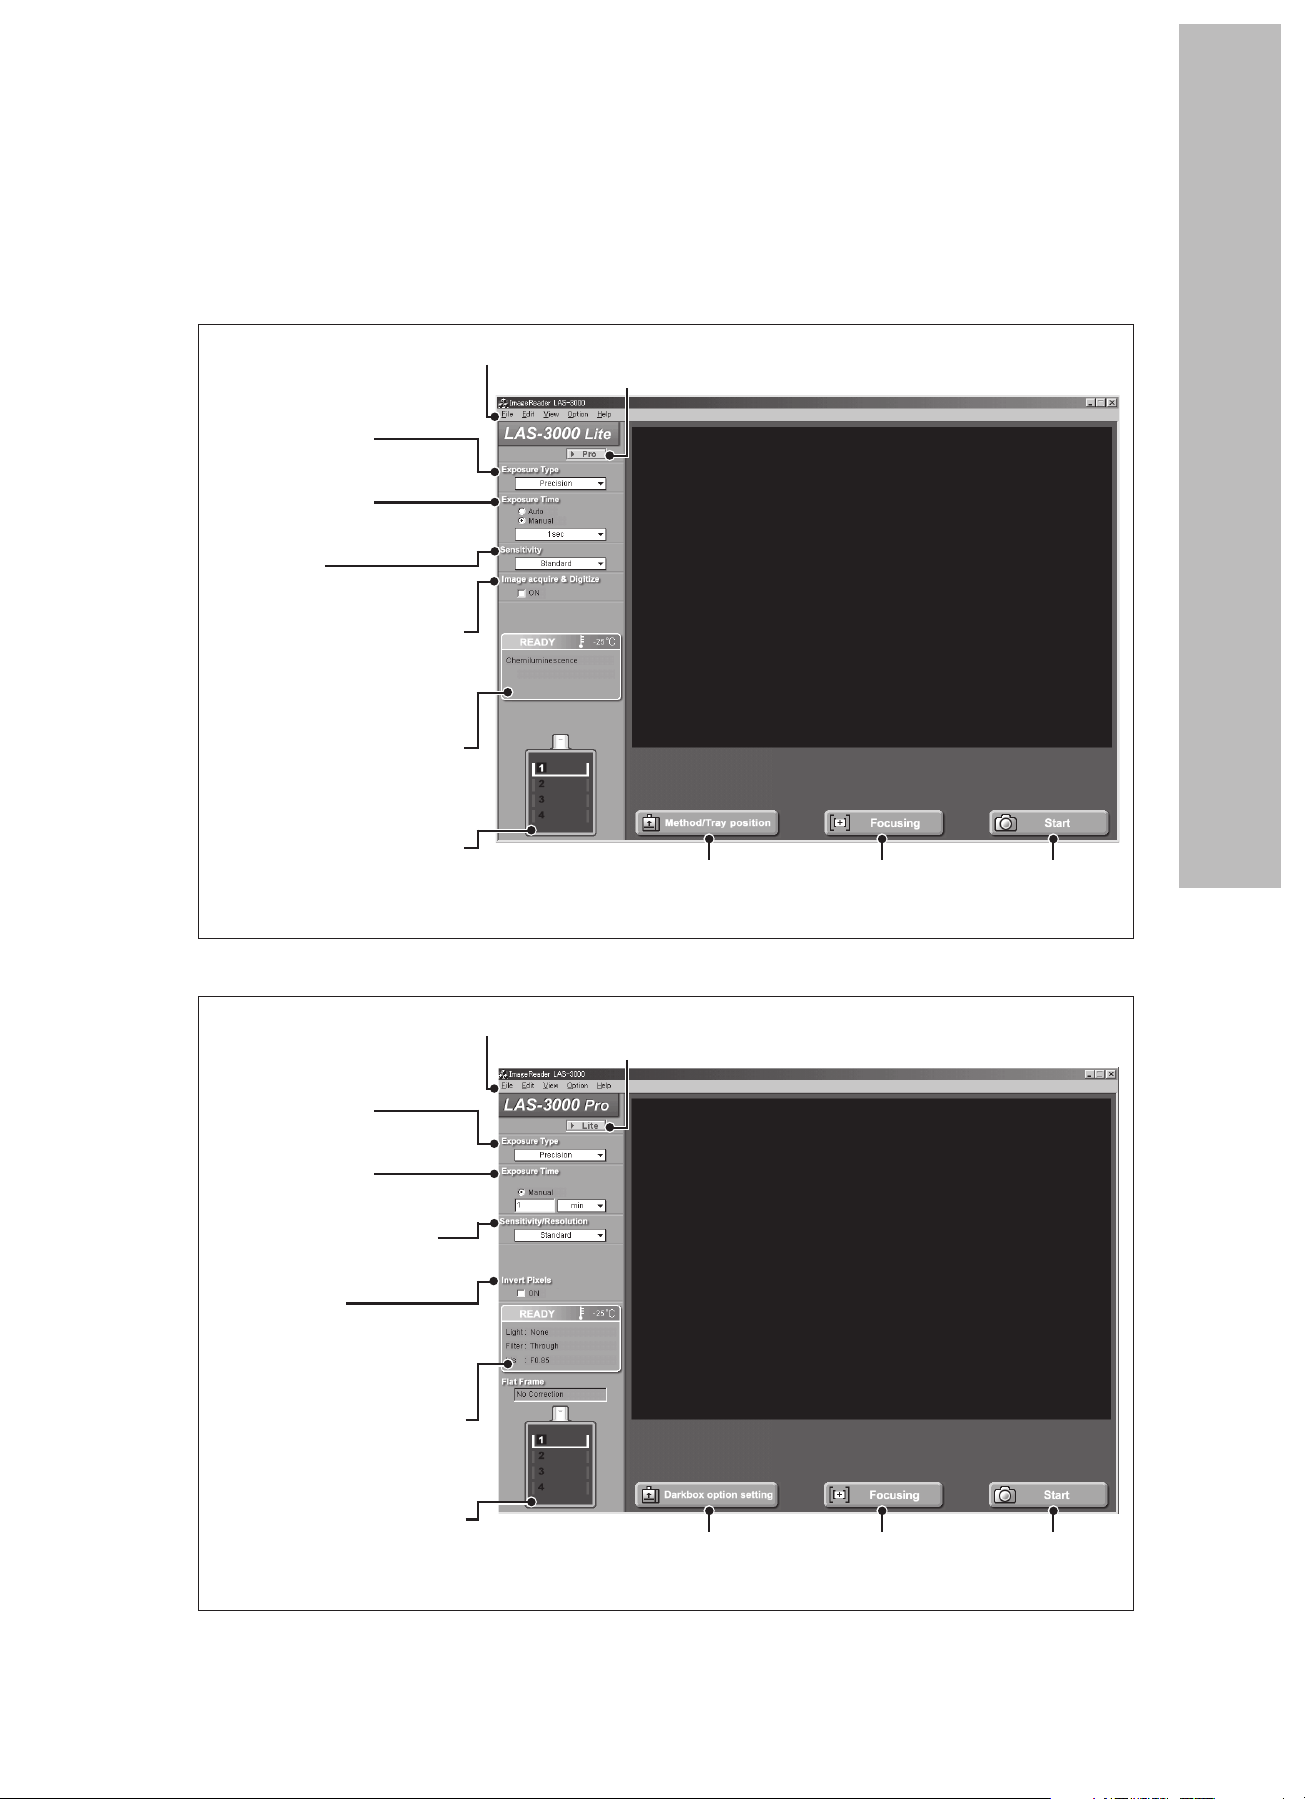
Image Reader Software
The Image reader software consists of Lite and Pro modes. In the Lite mode, luminescence can be easily
detected because a detection method has been set. In the Pro mode, advanced combination can be set.
< Screen in Lite mode >
LAS-3000 OPERATION GUIDE
Exposure Type
Sets the exposure method.
Exposure Time
Sets the exposure time.
Sensitivity
Sets the sensitivity.
Image acquire & Digitize
A digitized image is also exposed
consecutively with a Chemiluminescence image (only when the
method is Chemiluminescence).
The setting state such as
the temperature condition
of CCD is displayed.
The tray positon and light
conditions in the intelligent
dark box (IDX) is displayed.
Menu
Pro mode selector button
Press this button to switch to the Pro mode.
Method/Tray position
Sets the detection method
and tray position.
Focusing
Adjusts the focusing.
Start
Starts the
exposure.
< Screen in Pro mode >
Exposure Type
Sets the exposure method.
Exposure Time
Sets the exposure time.
Sensitivity/Resolution
Sets the sensitivity and resolution.
Invert Pixels
Exposes the image whose concentration value is inverted.
The setting state such as
the temperature condition
of CCD is displayed.
The tray positon and light
conditions in the intelligent
dark box (IDX) is displayed.
Menu
Lite mode selector button
Press this button to switch to the Lite mode.
Darkbox option setting
Sets the light source, filter, and
tray position.
Focusing
Adjusts the focusing.
Start
Starts the
exposure.
∗Please use the Pro mode, in case of using green LED or red LED incident light source. Please use the Lite
mode for imaging of chemiluminescence, digitizing, EtBr detection by UV light source, fluorescence detection by blue LED, using the preset conditions.
5
Page 6

Preparation for Exposure
3
1 Activation
Step
Turn ON the power switches of IDX, computer
1
and peripheral equipments.
Start up reading software LAS-3000 ImageReader.
➟ A message is displayed until the
2
LAS-3000 is prepared.
Confirm that the temperature setting state of the
CCD is ready.
< Not Ready state >
3
< Ready state >
● After a few minutes, the LAS-3000 will be
able to be in readable state. In the readable state, only the power LED light is lit in
green.
In the normal state, the cooling temperature of a CCD camera is set to –30°C.
● Method/Tray position and Dark box option
setting can be executed even if the temperature setting state of CCD is Not Ready.
A sample can be set during the time required for the temperature change.
Operation
2 Setting of Samples
Step Operation
Select a tray corresponding to the sample to be
detected.
Detection Samples Trays
Chemiluminescence
1
Fluorescence Gel (LED detection) EPI tray
Digitize
Place a sample on the sample tray.
The reading size varies depending on the tray
position. Therefore, place the tray in the position
corresponding to the sample size.
< Reading size and tray position >
(For EPI tray and DIA tray)
Membrane EPI tray
Titer plate NP tray
Gel (UV detection) DIA-UV tray
Membrane EPI tray
Membrane EPI tray
Gel (CBB, silver stain) DIA tray
2
Position 1
Position 2
Position 3
Position 4
Open the IDX door and set the tray.
Set the EPI tray and the DIA tray with the holed
side placed toward you.
3
hole
210mm ✕ 140mm
180mm ✕ 120mm
144mm ✕ 96mm
105mm ✕ 70mm
6
● The power switches of the IDX and personal computer can be turned ON in any
order. Turn ON the power of the pictrography
first when a pictrography printer is connected by SCSI.
● The ready state is entered when the cooling temperature is stabilized at –30.0°C.
Close the IDX door.
4
On the EPI tray, there are round dents for size
adjustment for each tray position. Put a sample
using the dent as reference.
Page 7

Exposure of Samples (Lite mode)
4
The light source and filter are set by the
pre-determined combination.
∗Please use the Lite mode for imaging of chemiluminescence, digitizing, EtBr detection by UV light
source, fluorescence detection by blue LED, using the preset conditions. Please use the Pro mode,
in case of using green LED or red LED incident light source. (See Page 11 of this Operation Guide)
1
4
5
6
LAS-3000 OPERATION GUIDE
1 Setting of Mode
Step Operation
Confirm that the state is in the Lite mode.
1
2 Method and Tray position Setting
Click the Method/Tray position button.
(1)
(2)
(1)
Select the Method.
2
2
(3)
3 7
(2)
Select Tray Position according to the sample
used.
2
(3)
Click the OK button.
∗ See Page 14 of this Operation Guide.
Detection Method
Chemiluminescence and
bioluminescence
Fluorescence using the UV light
source (of 312 nm)
Fluorescence using blue LED
l incident light source (of 460 nm)
Digitization using white
incident light source
Digitization using white
transmitted light source
Chemiluminescence
Fluorescence:EtBr
Fluorescence:SYBRGreen,GFP
Digitize:EPI
Digitize:DIA
7
Page 8

3 Adjustment of Focus
5 Setting of Sensitivity
Click the Focusing button.
Click on the screen for Zooming.
3
The brightness of viewing becomes dark.
The brightness of viewing becomes light.
Confirm the sample position and focus.
Click the Return button.
Adjusts the focus. Click
these buttons to perform
coarse adjustment.
Performs precise focus
adjustment.
The adjustment of brightness does not influence the actual exposure.
4
Exposure Type and Exposure Time Setting
Select Precision for Exposure
Type.
4
Check Auto or Manual for Exposure Time.
Select Sensitivity.
Click here and select the sensitivity for the list.
6
The sensitivity is improved by binning multiple pixels into one big pixel. Smoothing by
the interpolation of pixels causes the numbers of pixels to increase.
The sensitivity becomes higher in the order of
Standard, High, Super and Ultra.
Sensitivity
Standard 1536✕1024 1536✕1024
High 768✕512 1536✕1024
Super 384✕256 1536✕ 1024
Ultra 192✕128 1536✕1024
∗ See Page 14 of this Operation Guide.
Only in the Chemiluminescence mode, Image
acquire & Digitize function can be used. This
function can expose chemiluminescence and
digitize images consecutively at one click.
Original pixels
(W✕H) Number of pixels(W✕H)
8
5
< For setting of Auto >
Automatic exposure is
done after pre-exposure.
∗ See Page 12 of this Operation Guide.
Upper limit of the Manual Setting
sec. (-1999) min. (-1800) hr.(-30)
< For setting of Manual >
Select an exposure
time from the list or
enter the exposure
time using a numeric
value.
Page 9

LAS-3000 OPERATION GUIDE
6 Exposure
Click the Start button.
Exposure is started.
➟The orange Busy LED lights during exposure.
7
7 Saving the Exposed Image
Step Operation
Click the Save button or select the Save function
in the File menu.
< Screen state after exposure >
1
< Save function is also in the File menu >
Set the folder for saving a file, the file name, and
the file type then click the Save button.
< For Windows® >
< For MacintoshTM >
Save button
The file name is
automatically set,
but it can also be
changed.
(Example)
20021010_1300
↑↑
Date Time
Select the file format.
2
<
File format
● Fuji Img/Inf format
This is a file format developed exclusively by FUJIFILM.
This format is suitable for the analysis in which the
quantitative performance was maintained.
● 16 bit Linear Tiff
This is 16-bit Tiff format.
This format enables the analysis in other software.
● 8bit Color Tiff
This is a Tiff format having eight-bit color gradation.
The changed gradation can be saved as it is.
For FUJI Img/Inf
format, you can
enter a comment.
>
9
Page 10

8 Printing the Exposed Image
9 Termination
Step Operation
Click the Print button or select the Print function in
the File menu.
< Screen state after exposure >
1
< Print function is also in the File menu >
< For Windows® >
Select the output setting of a printer and the type
(full-scale print or screen print) of a print to be
output. Click the OK button.
For the screen print, display the screen you wish
to output.
➟ The image is printed.
2
< For MacintoshTM >
Select the type (full-scale print or screen print) of
a print to be output. Click the OK button.
For the screen print, display the screen you wish
to output.
Print button
Step Operation
Select Quit from the File menu.
1
Select whether to keep or stop the CCD cooling.
Click the OK button.
2
Select “keep the CCD cooling after quit”. The
cooling temperature of CCD then remains
kept. As a result, the LAS-3000 can be immediately used without waiting for the temperature to be cooled.
Terminate the personal computer.
3
Turn OFF the IDX power switch.
4
10
Click the Print button.
➟ The image is printed.
Click the Complete button.
3
➟ The current display returns to the initial screen.
Page 11

Exposure of Samples (Pro mode)
5
The desired light source and filters can
be selected for exposure.
∗Please use the Pro mode, in case of using green LED or red LED incident light source. Please use
the Lite mode for imaging of chemiluminescence, digitizing, EtBr detection by UV light source,
fluorescence detection by blue LED, using the preset conditions.
1
4
5
6
LAS-3000 OPERATION GUIDE
Step Operation
Click the Lite/Pro selector button to enter the Pro
1
mode.
Click the Dark box option setting button.
(2)
(1)
(4)
2
(1)
Select the light source.
Light: None (No light source provided)
UV (312 nm transmitted light)
Blue (460 nm incident light)
Green (520 nm incident light) (Optional)
Red (630 nm incident light) (Optional)
EPI-White (White incident light)
(2)
Select the filter.
(3)
Select the iris.
DIA-White (White transmitted light)
Filter: 1 Through (No filter provided)
2 605DF40 (EtBr detection)
3 Y515Di (for blue LED) or 510DF10 (for GFP)
4 575DF20 (for green LED) (Optional)
5 R670 (for red LED) (Optional)
∗ The setting can be changed.
Iris: F0.85 (For blue, green, red, white-EPI)
F2.8 (For UV, white-DIA)
2
(3)
(5)
3 7
(4)
Select Tray Position according to the size of a
sample.
(5)
Click the Next button.
(6)
2
(6)
Select the FlatFrame file made for the selected
conditions.
(7)
Click the OK button.
FlatFrame is a correction file required to correct the characteristics of a lens. It can be
created by FlatFrame Calibration in the Option menu.
∗ *See Pages 133 and 134 of the Operation Manual.
See Page 8.
3
3. Adjustment of Focus 3.
See Page 8.
4
4. Exposure Type and Exposure Time Setting.
See Page 8.
5
4. Exposure Type and Exposure Time 5.
(7)
11
Page 12

Caution on Use
6
Select Sensitivity/Resolution.
Click here and select the Sensitivity/Resolution in a list.
6
In the Pro mode, the detection of a binning
image (High binning, Super binning, and Ultra binning) and High resolution image can
also be selected in addition to Standard, High,
Super, and Ultra. See Page 13 of this Operation Guide for the relationship between the
sensitivity and the number of pixels.
See Page 9.
7
6. Exposure 7.
1 Sample Tray
1. We recommend the use of a hybridization bag
to prevent the membrane from being dried. In
such a case, fix the portion, not covered with
the membrane, to the tray using a seal so as
to keep the membrane flat.
A sharp image can be obtained.
2. Wash the sample tray with water and dry it sufficiently before use when it is unclean.
Appendix
■ Exposure Type
Precision ......... Exposes for the entire time set in Exposure Time.
Increment ........ Exposes for each time set in Interval Time and accumulates the images.
Repetition ........ Exposes for each interval time set in Interval Time and displays images for each section.
Program ...........Exposure time and interval time can be set. Each image file and integrated image files
can be generated and saved.
12
Page 13

■ Operation required to be carried out for exposure with green and red LED incident
light sources (Optional)
1. Changing the LED incident light sources
This operation should be carried out with Tray placed in position 4.
The same procedure should be carried out respectively for the right and left sides.
(1) Removing the incident light source ∗ See Page 7 of this Operation Guide 2 (2).
LAS-3000 OPERATION GUIDE
Flip up the lock.
1 2 3
(2) Installing the incident light source
1 2 3
Lock in the
lifted position
Hook the
LED Unit
Blue LED unit can be handled by the same way.
Supporting the lock with one
hand, gently draw it toward
you.
➟➟
➟
➟➟
Slide until it clicks. Lower the lock.
➟➟
➟
➟➟
Lift up the incident light
source until it comes off.
➟➟
➟➟
➟
2. Installing the optional filter.
Select Filter Customization from Option menu with the IDX door closed.
1
Click "Filter down" button.
2
Open the IDX door after the filter changer has come down.
3
Turn the filter turret to the selected posi-
4 5
tion by turning it and fix the filter there.
Enter the name of the option filter in the
box and press the OK button.
13
Page 14

■ Detection Sensitivity and Number of Pixels
Sensitivity
High Resolution 3072 ✕ 2048 12.6 MB
Standard 1536 ✕ 1024 3.15 MB
High 1536 ✕ 1024 3.15 MB
Super 1536 ✕ 1024 3.15 MB
Ultra 1536 ✕ 1024 3.15 MB
High Binning 768 ✕ 512 786 KB
Super Binning 384 ✕ 256 197 KB
Ultra Binning 192 ✕ 128 49.2 KB
Number of pixels (W ✕ H)
Image file size
■ Detection Reagents and Settings of LAS-3000
Setting of LAS-3000
Classification Reagent name Lite mode Pro mode
Method Light Filter Iris
ECL Chemiluminescence none Through 0.85
ECL Plus Chemiluminescence none Through 0.85
Lumi-Light Plus Chemiluminescence none Through 0.85
Chemiluminescence
Renaissance Chemiluminescence none Through 0.85
Super Signal
Bright-Star Chemiluminescence none Through 0.85
CDP-Star Chemiluminescence none Through 0.85
CSPD Chemiluminescence none Through 0.85
®
Chemiluminescence none Through 0.85
14
Page 15

Setting of LAS-3000
Classification Reagent name Lite mode Pro mode
Method Light Filter Iris
SYBR® Green I Fluorescence:SYBR Green Blue(460nmEPI) Y515-Di 0.85
SYBR® Green II Fluorescence:SYBR Green Blue(460nmEPI) Y515-Di 0.85
Intercalate
SYBR® Gold Fluorescence:SYBR Green Blue(460nmEPI) Y515-Di 0.85
EtBr Fluorescence:EtBr UV(312nmDIA) 605DF40 2.8
TOTO-3 - Red(630nmEPI) R670 0.85
SYPRO® Ruby Fluorescence:SYBR Green Blue(460nmEPI) Y515-Di 0.85
SYPRO® Orange Fluorescence:SYBR Green Blue(460nmEPI) Y515-Di 0.85
Protein
SYPRO®
stain Deep Purple -
SYPRO® Red Pro-Q Diamond -
tangerine
Fluorescence:SYBR Green Blue(460nmEPI) Y515-Di 0.85
Green(520nmEPI)
Green(520nmEPI)
Green(520nmEPI)
FITC Fluorescence:SYBR Green Blue(460nmEPI) Y515-Di 0.85
TM
FAM
Fluorescence:SYBR Green Blue(460nmEPI) Y515-Di 0.85
Alexa® 488 Fluorescence:SYBR Green Blue(460nmEPI) Y515-Di 0.85
TM
Fluorescence
dye
Cy2
TM
Cy3
TM
HEX
NED Tetramethylrhodamine
R-phycoerythrin -
Labeling TAMRA
BODIPY 576/589 Rhodamine Red 5-ROX
Alexa®
Alexa® 568 594
TM
TM
514 532 546 555
Fluorescence:SYBR Green Blue(460nmEPI) Y515-Di 0.85
-
-
Green(520nmEPI)
Green(520nmEPI)
Green(520nmEPI)
-
Green(520nmEPI)
Green(520nmEPI)
-
Green(520nmEPI)
Green(520nmEPI)
Green(520nmEPI)
-
-
-
Green(520nmEPI)
Green(520nmEPI)
Green(520nmEPI)
DiD - Red(630nmEPI) R670 0.85
BODIPY - Red(630nmEPI) R670 0.85
TM
Fluorescent
protein
Chemifluo-
rescence
Cy5
Alexa®
633 635 647
Alexa® 660 680
EGFP
Fluorescence:GFP
ECFP Fluorescence:GFP Blue(460nmEPI) 510DF10 0.85
RFP Attophos
∗1
Fluorescence:SYBR Green Blue(460nmEPI) Y515-Di 0.85
ECL Plus Fluorescence:SYBR Green Blue(460nmEPI) Y515-Di 0.85
HNPP DDAO
phosphate
®
- Red(630nmEPI) R670 0.85
- Red(630nmEPI) R670 0.85
Blue(460nmEPI) 510DF10 0.85
Green(520nmEPI)
Green(520nmEPI)
- Blue(460nmEPI) R670 0.85
Silver stain Digitize:DIA White(DIA) Through 2.8
Digitize
CBB stain Digitize:DIA White(DIA) Through 2.8
X-ray film Digitize:DIA White(DIA) Through 2.8
NBT/BCIP Digitize:DIA White(DIA) Through 2.8
∗1: Attophos cannot be used for detecting the nucleic acid on Nylon membrane.
Note) The pre-label method detection by UV illumination is not licensed.
LAS-3000 OPERATION GUIDE
605DF40 0.85
605DF40 0.85
575DF20 0.85
575DF20 0.85
575DF20 0.85
605DF40 0.85
575DF20 0.85
575DF20 0.85
575DF20 0.85
605DF40 0.85
605DF40 0.85
605DF40 0.85
575DF20 0.85
605DF40 0.85
605DF40 0.85
575DF20 0.85
15
Page 16

Support services of LAS-3000 is provided by your
local supplier.
LIFE SCIENCE, INFORMATION PRODUCTS
MARKETING DIV.
FUJI PHOTO FILM CO.,LTD.
PHONE:+81-3-3406-2201
FAX:+81-3-3406-2158
e-mail:sginfo@tokyo.fujifilm.co.jp
URL:http://home.fujifilm.com/products/science/index.html
 Loading...