

Page 1

DIGITAL CAMERA
FINEPIX
FINEPIX
HS25EXR
HS28EXR
BL01704-200
Before You Begin
First Steps
EN
Owner’s Manual
Thank you for your purchase of this
product. This manual describes how
to use your FUJIFILM digital camera and
the supplied software. Be sure that you
have read and understood its contents
and the warnings in “For Your Safety”
(P ii) before using the camera.
For information on related products, visit our website at
http://www.fujifilm.com/products/digital_cameras/index.html
Basic Photography and Playback
More on Photography
More on Playback
Movies
Connections
Menus
Technical Notes
Tro ubl esh oot ing
Appendix
Page 2

Instal lation
Antenn as
For Your Safety
• Read Instructions: All the safety and
operating instructions should be
read before the appliance is operated.
• Retain Instructions: The safety and
operating instructions should be
retained for future reference.
• Heed Warnings: All warnings on the
appliance and in the operating instructions should be adhered to.
• Follow Instructions: All operating
and use instructions should be followed.
Installation
Power Sources: This video product
should be operated only from the
type of power source indicated on
the marking label. If you are not sure
of the type of power supply to your
home, consult your appliance dealer
or local power company. For video
products intended to operate from
batter y power, or other sources, ref er
to the operating instructions.
Grounding or Polarization: This video
product is equipped with a polarized alternating-current line plug (a
plug having one blade wider than
the other). This p lug will fit into the
power outlet only one way. This is a
safety feature. If you are unable to insert the plug fully into the outlet, try
reversing the p lug. If the plug should
still fail to f it, contact your ele ctrician
to replace your obsolete outlet. Do
ii
IMPORTANT SAFETY INSTRUCTIONS
not defeat the safety purpose of the
polarized plug.
Alternate Warnings: This video
product is equipped with a 3-wire
grounding-type plug, a plug having
a third (grounding) p in. This plug will
only fit into a gro unding-typ e power
outlet. This is a safety feature. If you
are unable to insert the plug into
the outlet, contact your electrician
to replace your obsolete outlet. Do
not defeat the safety purpose of the
grounding-type plug.
Overloading: Do not overload wall
outlets and extension cords as this
can result in a risk of fire or electric
shock.
Ventil ation: Sl ots and openings in the
cabinet are provided for ventilation
and to ensure reliable operation of
the video product and to protect it
from overheating, and these openings must not be blocked or covered.
The openings should never be
blocked by p lacing the v ideo product on a be d, sofa, rug, or other si milar surface.
This video product should not be
placed in a built-in installation such
as a bookcase or rack unless proper
ventilation is provided or the manufacturer’s instructions have been
adhered to.
This video product should never be
placed near or over a radiator or heat
register.
Attachme nts: Do not use attachments not recommended by the
video product manufacturer as they
may cause hazards .
Water and Moisture: Do not use this
video product near water – for example, near a bath tub, wash bowl,
kitchen sink, or laundry tub, in a wet
basement, o r near a swimming pool,
and the like.
Power-Cord Protection: Power-Supply
cords should be routed so that
they are not likely to be walked on
or pinched by items placed upon
or against them, paying particular
attention to cords at plugs, convenience receptacles, and the point
where they exit from the appliance.
Accessories: Do not place this video
product on an unstable cart, stand,
tripod, bracket, or table. The video
product may fall, causing serious injury to a child or adult, and serious
damage to the appliance. Use only
with a cart, stand, tripod, bracket, or
table recommended by th e manufactu rer, or sold w ith the video product. Any mounting of the appliance
should follow the manufacturer’s instructions, and should use a mounting accessor y recommended by the
manufacturer.
An appliance
and cart combination should
be moved with
care. Quick sto ps,
excessive force,
and uneven surfaces may cause the appliance and
cart combination to over turn.
Antennas
Outdoor Antenna Grou nding:
outside antenna or cable s ystem is
connected to the vide o produc t, be
sure the antenna or cable system is
grounded so as to provide some protection against voltage surges and
built-up static charges. Section 810
of the National Electrical Code, ANSI/
NFPA No. 70, provides information
with respect to proper grounding
of the mast and supporting structure, grounding of the lead-in wire
to an antenna-discharge unit, size of
grounding conductors, location of
antenna-discharge unit, connection
to grounding electrodes, and requirements for the grounding electrode.
If an
Page 3

For Your Safety
Use
Servic e
Power Lines: An outside antenna system should not b e located in the
vicinity of overhead power lines or
other elec tric light o r power circuits,
or where it can f all into such power
lines or circuits. When installing an
outside antenna system, extreme
care should be taken to keep from
touching such power lines or circuits
as contact with them might be fatal.
EXAMPLE OF AN TENNA GROUNDING
AS PER NATIONAL ELECTRICAL CODE
PART H )
Antenna
Lead in Wire
Antenna
Discharge Unit
(NEC SECTION
810-2 0)
Grounding
Conduc tors
(NEC SECTION
810-21)
Ground Clamp
Electric
Service
Equipment
Ground
Clamps
Power Service
Grounding Elec trode
System (NEC ART 250.
Use
Cleaning: Unplug this video product
from the wall outlet before cleaning. Do not use liquid cleaners or
aerosol cleaners. Use a damp cloth
for cleaning.
Object and Liquid Entry: Never push
object s of any kind into this video
product through openings as they
may touch dangerous voltage
points or short out p arts that could
res ult in a f ire o r el ect ric sho ck. N eve r
spill liquid of any kind on the video
product.
Lightning: For added protection for
this video product receiver during
a lightning storm, or when it is left
unattended and unused for long pe riods of time, unplug it from the wall
outlet and disconnect the antenna
or cable system. This will prevent
damage to the video product due
to lightning and p ower-line surges.
Service
Servicing: Do not attempt to service
this video product yourself as opening or removing covers may exp ose
you to dangerous vo ltage or other
hazards. Refer all servicing to qualified ser vice personnel.
Damage Requiring Service: Unplug this
video product from the wall outlet
and refer ser vicing to qualified service personnel under the following
conditions:
When the power-supply cord or
plug is damaged.
If liquid has been spilled, or objects
have fallen into the video product.
If the video product has been exposed to rain or water.
If the video product has been
dropped or the cabinet has been
damaged.
If the video product does not operate normally be following the
operating instructions. Adjust only
those controls that are covered by
the operating instructions as an improper adjus tment of other controls
may result in damage and will often
require ex tensive work by a qualifie d
technician to res tore the video product to its normal oper ation.
When the video product exhibits a
distinct change in performance - this
indicates a ne ed for service.
Replacement Parts: When replacement part s are required, be sure
the service technician has used
replacement parts specified by the
manufacturer or have the same
characteristics as the original part.
Unauthorized substitutions may
result in fire, electric shock or other
hazards.
Safety Check: Upon completion of any
service or repairs to this video product, ask th e service technician to
perform safety checks to determine
that the video product is in proper
operating condition.
iii
Page 4
For Your Safety
WARNING
WARNING
Be sure to read this notes before using
Safety Notes
• Make sure that y ou use your camera corre ctly. Read these Safe ty Notes and
your Owner’s Manual carefully before use.
• After reading these Safet y Notes, store them in a safe place.
About th e Icons
The icons sho wn below are used in this do cument to indicate the sev erity of
the injury o r damage that can result if the info rmation indicated by the icon
is ignored and the product is used incorrectly as a result.
This icon indi cates that death or serious injury can re sult if the information is ignored.
WARNING
This icon indicates that personal injury or material damage can result
if the infor mation is ignored.
CAUTION
The icons show n below are use d to indicate the nature of the information
which is to be observed.
Triangular icons tell you that this infor mation requires attenti on (“important”).
Circular icons w ith a diagonal bar tell you that the action indicated is
prohibited (“Prohibited”).
Fill ed circl es with a n excla mation m ark tell you an ac tion th at must b e
performed (“Required”).
WARNING
If a prob lem arises, tu rn the camer a off, remove th e battery, dis connect and
unplu g the AC power ad apter.
Continued use of the camera when it is emitting smoke, is emitting
Unplug
any unusual odor, or is in any other ab normal st ate can cause a fire
from power
or electric shock.
socket.
• Contact yo ur FUJIFILM dealer.
WARNING
Do not all ow water or f oreign ob jects to e nter the ca mera.
If water or fore ign objec ts get insi de the came ra, turn th e camera
off, remove the batte ry and dis connec t and unplug the AC power
Avoid
adapter.
exposure to
Continued us e of the camera can caus e a fire or electric sh ock.
water
• Contact yo ur FUJIFILM dealer.
Do not us e the camer a in the bath room or sho wer.
Do not use in
This can caus e a fire or electric s hock.
the bathroom
or shower.
Never at tempt to di sassemb le or modi fy (never op en the case).
Failure to obser ve this precaution ca n cause fire or elec tric shock.
Do not disas-
semble
Shoul d the case b reak op en as the re sult of a f all or oth er accid ent, do no t touch
the exp osed par ts.
Failure to obser ve this precaution coul d result in ele ctric sh ock or in
Do not touch
injury from touching the damaged parts. Remove the battery im-
internal
mediately, taking care to avoid injury or electric shock, and take the
parts
produc t to the point of purchase fo r consultation.
Do not ch ange, he at or und uly tw ist or pu ll the co nnec tion co rd and do n ot
place he avy obje cts on the c onnect ion cord.
These ac tions coul d damage the cord and cause a fire or electric
shock.
• If the cord is dama ged, contact your FUJIFIL M dealer.
Do not pl ace the cam era on an uns table sur face.
This can caus e the camera to fall or ti p over and cause injury.
Never at tempt to ta ke pictu res while i n motion.
Do not use the c amera while you are w alking or drivin g a vehicle. This
can result in yo u falling down or bein g involved in a traff ic accident.
Do not tou ch any meta l parts o f the camer a during a th unders torm.
This can caus e an elec tric shock due to induced c urrent from t he
lightning discharge.
Do not us e the batte ry except a s specif ied.
Load the bat tery as aligned w ith the indicator.
iv
Page 5
For Your Safety
WARNING
CAUTION
CAUTION
WARNING
Do not he at, change o r take apar t the batter y. Do not drop o r subjec t the battery to i mpacts. Do n ot store the ba ttery with m etallic pr oducts. Do n ot use
charg ers othe r than the sp ecifie d model to ch arge the ba ttery.
Any of these a ctions c an cause the b attery to burst or l eak and cause
fire or injur y as a result.
Use only t he batter y or AC power adap ters speci fied for use w ith this cam era.
Do not us e voltages o ther than t he power su pply volt age shown.
The use of ot her power sources can ca use a fire.
If the bat tery leak s and fluid g ets in contac t with your eye s, skin or clot hing.
Flush th e affect ed area wit h clean wate r and seek me dical at tention or c all an
emerg ency num ber right a way.
Do not us e the charg er to charg e batter ies other t han those s pecifi ed here.
The Ni-M H batter y charger is d esigned fo r FUJIFILM HR-A A Ni-MH
batteri es. Using the charger to ch arge conventional bat teries or other
types o f rechargea ble batteries can cause the bat tery to leak fluid,
overheat or burst.
Danger o f explosion i f battery is i ncorrectl y replaced. Re place only wi th the
same or equivalent type.
Do not us e in the pres ence of fl ammable o bjects , explosi ve gases, o r dust.
When ca rrying th e battery, in stall it in a dig ital came ra or keep it in th e hard
case. Wh en stor ing the b atte ry, keep it in the hard case . When discard ing,
cover th e batter y termina ls with ins ulation t ape.
Contact wi th other metallic obje cts or battery could cause th e battery to ignite o r burst.
Keep Mem ory Card s out of the r each of sma ll childr en.
Because M emory Cards are small , they can be swallowe d by children.
Be sure to store Memory C ards out of th e reach of small children. If
a child swall ows a Memor y Card, se ek medical attention or call an
emergency number.
Do not us e this cam era in loc ation s affec ted by oil f umes, st eam, hum idity o r dust.
This can caus e a fire or electric s hock.
Do not le ave this cam era in plac es subjec t to extr emely hig h tempera tures.
Do not leave the camera in lo cations such as a sealed ve hicle or in
direct sun light. This can cause a fir e.
CAUTION
CAUTION
Keep out o f the reach o f small ch ildren.
This produ ct could cause injur y in the hands of a child.
Do not pl ace heavy o bjects o n the camer a.
This can caus e the heavy objec t to tip over or fall and cause in jury.
Do not mov e the camera w hile the AC po wer adapter i s still con nected. D o not
pull on t he connec tion cor d to disconn ect the AC po wer adapte r.
This can dama ge the power cord or cab les and cause a fire or ele ctric
shock.
Do not us e the AC power ada pter when th e plug is dam aged or the pl ug socket
connection is loose.
This could ca use a fire or electri c shock.
Do not cov er or wrap th e camera or t he AC power ada pter in a clo th or blan ket.
This can caus e heat to build up and distor t the casing or cause a f ire.
When you a re cle aning the came ra or you d o not pla n to use the camer a for
an exte nded pe riod, r emove th e batte ry and d iscon nect a nd unpl ug the AC
power adapter.
Failure to do so can ca use a fire or electr ic shock.
When ch arging en ds, unplu g the charg er from th e power soc ket.
Leaving the charger plugged into the power socket can cause a fire.
Using a f lash too cl ose to a per son’s eyes may te mporar ily affe ct the eyes ight.
Take particula r care when photogra phing infants and you ng children.
When a me mory ca rd is remo ved, the ca rd could c ome out of th e slot too q uickly. Use you r finger to h old it and ge ntly rel ease the ca rd.
Reques t regula r interna l testing a nd cleani ng for your c amera.
Build-u p of dust in your camera c an cause a fire or elec tric shock.
• Contact your FUJIFILM deal er to reques t internal cleaning every 2
years.
• Please note this is n ot a free of charge serv ice.
Remove yo ur finge rs from th e flash wi ndow befo re the fla sh fires .
Failure to obser ve this precaution cou ld result in burns.
Keep the f lash w indow c lean an d do not us e the fl ash if th e window is obstructed.
Failure to obser ve these precautio ns could caus e smoke or discoloration.
v
Page 6

For Your Safety
Power S upply and Bat tery
* Confi rm your bat tery ty pe before r ead-
ing the follo wing descriptions .
The following explains proper use of
batteries and how to prolong their
life. Incorrect use of batteries can
cause shor ter batter y life, as well as
leakage, e xcessive heat, fire or expl osion.
Camera uses the Rechargeable
1
Lithium-ion Battery
* When shipped, the bat tery is not
fully charged. Always charge the
battery before using it .
* When c arrying the bat tery, install it
in a digital camera or keep it in the
soft case.
■ Battery Features
• The bat tery gr adually loses its
charge even when not used. Use
a batter y that has been charged
recently (in the last day or two) to
take pictures.
• To maximize the life of the bat tery,
turn the camera off as quickly as
possible when it is not being used.
• The number of available frames
will be lower in cold locations or
at low temperatures. Take along
a spare fully charged bat tery. You
can also increase the amount of
power produced by put ting the
battery in your pocket or another
warm place to heat it and then
loading it into the camera just before you take a pic ture.
vi
If you are using a heating pad, take
care not to place th e batter y directly against the pad. The camera
may not operate if you use a depleted bat tery in cold conditions.
■ Ch arging th e Batter y
• You can charge the battery using
the battery charger (included ).
- The battery can be charged
at ambient temperatures between 0°C and +40°C (+32°F
and +104°F). Refer to the Owner’s
Manual for the time of charging
battery.
- You should charge the battery
at an ambient temperature between +10°C and +35°C (+50°F
and +95°F). If you charge the
batter y at a temperature outside
this range, charging takes longer
because the performance of the
battery is impaired.
- You cannot charge the b attery
at temperatures of 0°C (+32°F) or
below.
• The Rechargeable Lithium-ion Battery does not need to be fully discharged or exhausted flat before
being charged.
• The battery may feel warm af ter it
has been charged or immediately
after being used. This is perfectly
normal.
• Do not recharge a fully charged
battery.
■ Battery Life
At normal temperatures, the battery can be used at least 30 0 times.
If the time for which the bat tery
provides power shortens markedly,
this indicates that the battery has
reached the end of its ef fective life
and should be replaced.
■ Notes on storage
• If a battery is stored for long
periods while charged, the performance of the batter y can be
impaired. If the battery will not be
used for som e time, run the batter y
out before storing it.
• If you do not intend to use the
camera for a long period of time,
remove the bat tery from the camera.
• Store the batter y in a cool place.
- The batter y should be stored in
a dry location with an ambient
temperature b etween +15°C and
+25°C (+59°F and +77°F).
- Do not leave the batter y in hot or
extrem ely cold places.
■ Ha ndling th e Battery
Cauti ons for Your Sa fety:
• Do not carr y or store bat tery with
metal objects such as necklaces or
hairpins.
• Do not heat the batter y or throw it
into a fire.
• Do not attempt to take apart or
change the battery.
• Do not recharge the bat tery with
chargers other those specified.
• Dispose of used battery promptly.
• Do not drop the bat tery or otherwise subjec t it to strong impacts.
• Do not expose the battery to water.
• Always keep the batter y terminals
clean.
• Do not store bat teries in hot places. Also, if you use the battery for
a long period, the camera body
and the bat tery it self will b ecome
warm. This is n ormal. Use the AC
power adapter if you are taking
pictures or viewing images for a
long period of time.
Camera uses AA-size alkaline or Ni-MH
2
(nickel-metal hydride) rechargeable
batteries
* For details on the b atteries that
you can use, refer to the Owner’s
Manual of your camer a.
■ C autions fo r Using Batt ery
• Do not heat the batteries or throw
them into a fire.
• Do not carr y or store batteries with
metal objects such as necklaces or
hairpins.
• Do not expose the batteries to
water, and keep batteries from getting wet or stored in moist locations.
• Do not attempt to take apart or
change the batteries, including
battery casings.
• Do not subject the batteries to
strong impacts.
Page 7

For Your Safety
CAUTION
• D o not use batteries that are leaking, deformed, discolored.
• Do not store batteries in warm or
humid places.
• Keep the batteries out of reach of
babies and small children.
• Make sure that the battery polarit y
(C and D) is correct.
• Do not use new with used batteries. Do not use charged and discharged bat teries together.
• Do not use different types or
brands of bat teries at the s ame
time.
• If you do not intend to use the
camera for a long period of time,
remove the bat teries from the
camera. Note if the camera is left
with the batteries removed, the
time and date set tings are cleared.
• The batteries feel warm right af ter
being used. B efore removing the
batteries, turn the camera of f and
wait for the b atteries to cool dow n.
• Since bat teries do not work well in
cold weather or locations, warm
the batteries by placing them inside your garments before use.
Batteries do not work well when
cold. They will work again when
the temperature returns to normal.
• Soil (such as fingerprints) on the
batter y terminals makes the batteries charge less reducing the
number of images. Carefully wipe
the battery terminals with a sof t
dry cloth b efore loading.
If any liquid at all leaks from
the batteries, wip e the battery
compartment thoroughly and
then load new batteries.
If any batter y fluid comes into
contact with your hands or
clothing, f lush the area thoroughly with water. Note that
battery fluid can cause loss
of eyesight if it gets into your
eyes. If this occurs, do not rub
your eyes. Flush the fluid out
with clean water and contact
your physician for treatment.
■ Us ing the AA-s ize Ni-MH bat teries
correctly
• Ni-MH batteries left unused in
storage for long periods can be come “deactivated”. Also, repeatedly charging Ni-MH bat teries
that are only par tially discharged
can cause them to suffer from the
“memory effec t”. Ni-MH batteries
that are “deactivate d” or affected
by “memory” suffer from the problem of only providing power for a
short time after being charged. To
prevent this problem, discharge
and recharge them several times
using the camera’s “Discharging
rechargeable batteries” function.
Deactivation and memory are spe-
cific to Ni- MH batteries and are not
in fact battery faults.
See Owner’s Manual for the proce-
dure for “Discharging rechargea ble
batteries”.
CAUTION
Do not use the “Discharging rechargeable batteries” function when
alkaline bat teries being used.
• To charge Ni-MH batteries, use the
quick battery charger (sold separately). Refer to th e instruc tions
supplied with the charger to make
sure that the charger is used correctly.
• Do not use the bat tery charger to
charge other batteries.
• Note that the batteries feel warm
after being charged.
• Due to the way the camera is construc ted, a small amount of current
is used even when the camera is
turned off. Note in particular that
leaving Ni-MH batteries in the
camera for a long period will overdischarge the batteries and may
render them unusable even after
recharging.
• Ni-MH batteries will self-discharge
even when not use d, and the time
for which they can be used may b e
shortened as a result.
• Ni-MH batteries will deteriorate
rapidly if over-discharge d (e.g.
by discharging th e batteries in a
flashlig ht). Use the “D ischarging rechargeable batteries” function provided in the camera to discharge
the batteries.
• Ni-MH batteries have a limited
service life. If a battery can only
be used for a short time even after
repeated discharge-charge cycles,
it may have reached the end of its
service life.
■ Disposing of Batteries
• When disposing of batteries, do
so in accordance with your local
waste disposal regulations.
Notes on both models (1, 2)
3
■ AC Pow er Adapter
Always use the AC Power Adapter
with the camera. The use of an AC
Power adapter other than FUJIFIL M
AC Power Adapter can be damaged
to your digital camera.
For details on the AC power adapter,
refer to the Owner’s Manual of your
camera.
• Use the AC power adapter for indoor use only.
• Plug the connection cord plug securely into the DC input terminal.
• Turn of f the FUJIFILM Digital camera before dis connecting the cord
from the DC inp ut terminal. To disconnect, pull out the plug gently.
Do not pull on the cord.
• Do not use the AC power adapter
with any device other than your
camera.
• During use, the AC power adapter
will become hot to the touch. This
is normal.
vii
Page 8

For Your Safety
• Do not take apar t the AC power
adapter. Doing so could be dangerous.
• Do not use the AC power adapter
in a hot and humid place.
• Do not subject the AC power
adapter to strong shock s.
• The AC power adapter may emit a
humming. This is normal.
• If used near a radio, the AC power
adapter may cause s tatic. If this
happens, move the camera away
from the radio.
Befor e Using the Came ra
Do not aim the camera at ex tremely
bright light sources, such as the sun
in a cloudless sky. Failure to obser ve
this precaution could damage the
camera image sensor.
■ Tes t Shots Prio r to Photogr aphy
For important photographs (such as
weddings an d overseas trips), always
take a test shot and view the im age to make sure that the camera is
working normally.
• FUJIFILM Corporation cannot accept liabilit y for any incidental
losses (such a s the costs of photog raphy or the loss of income from
photography) incurred as a result
of faults with this product.
■ No tes on Copyr ight
Images recorded using your digital
camera system cannot be used in
ways that infringe copyright laws
without the consent of the owner,
viii
unless intended only for personal
use. Note that some restrictions apply to the photographing of stage
performances, entertainments and
exhibits, even when intended purely
for perso nal use. Users are also asked
to note that the transfer of Memory
Card containing images or data protected under copyright laws is only
permissible within the restrictions
imposed by those copyright laws.
■ Ha ndling Your D igital Ca mera
To ensure that images are recorded
correctly, do not subjec t the camera
to impact or shock while an image is
being recorde d.
■ Liquid Crystal
If the LCD monitor is damaged, take
particular care with the liquid crystal
in the monitor. If any of the following situations arise, take the urgent
action indicated.
• If liquid crystal comes in contact
with your skin:
Wipe the area with a cloth and
then wash thoroughly with soap
and running water.
• If liquid crystal gets into your eye:
Flush the affected eye with clean
water for at least 15 minutes and
then seek medical assis tance.
• If liquid crystal is swallowed:
Flush your mouth thoroughly with
water. Drink large quantities of wa ter and induce vo miting. Then seek
medical assistance.
Although t he LCD panel is produced
with highly sophisticated technologies, there may be black spots or
permanently lit spots. This is not a
malfunction, and does not affect recorded images.
■ Trademark Information
xD-Picture Card and E are trade-
marks of FUJIFILM Corporation. The
typef aces included herein are solely
develope d by DynaComware Taiwan Inc. Macintosh, QuickTime, and
Mac OS are trademarks of Apple Inc.
in the U.S.A. and other countries .
Windows 7, Windows V ista, and the
Windows logo are trad emarks of
the Microso ft group of companies.
Adobe and Adobe Reader are either
trademarks or registered trademarks
of Adobe Systems Incorporated in
the U.S.A. and/or other countries.
The SDHC an d SDXC logos are t rademarks of SD -3C, LLC. The HDMI logo
is a trademark. YouTube is a trademark of Goo gle Inc. All other trade
names mentio ned in this manual are
the trademarks or registered trademarks of their respec tive owners.
■ Notes on Electrical Interference
If the camera is to be used in hospitals or aircrafts, please note that
this camera may cause interference
to other equipment in the hospital
or aircraft. For details, please check
with the applicable regulations.
■ E xplanati on of Color Tele vision
System
NTSC: National Television System
Committee, color telev ision
telecasting specifications
adopted mainly in the U.S. A.,
Canada and Japan.
PAL: Phase Alternation by Line, a
color television system adopted mainly by European
countries and China.
■ E xif Print (Ex if ver. 2.3)
Exif Print Format is a newly revised
digital camera file format that contains a variety of shooting information for optimal printing.
IMPORTANT NOTIC E: Read Before
Using th e Softwar e
Direct or indirect export, in whole or
in part, of licensed software without
the permission of the applicable
governing bodies is prohibited.
Page 9

For Your Safety
NOTICES
For Customers in the U. S. A.
For Customers in Canada
Disposal of Electrical and Electronic Equipment in Private
Households
NOTICES
To prevent fire or shock hazard, do not expose the unit
to rain or moisture.
Please read the “Safety Notes” and make sure you understand them before using the camera.
Perchlorate Material—special handling may apply. See
http://www.dtsc.ca.gov/hazardouswaste/perchlorate.
For Customers in the U. S. A.
Tested To Comply With FCC Standards
FOR HOME OR OFFICE USE
FCC Statement: This device complies with Part 15 of the
FCC Rules. Operation is subject to the following two
conditions: (1) This device may not cause harmful interference, and (2) this device must accept any interference received, including interference that may cause
undesired operation.
CAUTION: This equipment has been tested and found
to comply with the limits for a Class B digital device,
pursuant to Part 15 of the FCC Rules. These limits are
designed to provide reasonable protection against
harmful interference in a residential installation. This
equipment generates, uses, and can radiate radio
frequency energy and, if not installed and used in accordance with the instructions, may cause harmful
interference to radio communications. However, there
is no guarantee that interference will not occur in a
particular installation. If this equipment does cause
harmful interference to radio or television reception,
which can be determined by turning the equipment
off and on, the user is encouraged to try to correct the
interference by one or more of the following measures:
• Reorient or relocate the receiving antenna.
• Increase the separation between the equipment and
receiver.
• Connect the equipment into an outlet on a circuit different from that to which the receiver is connected.
• Consult the dealer or an experienced radio/TV technician for help.
• You are cautioned that any changes or modifications
not expressly approved in this manual could void the
user’s authority to operate the equipment.
Notes on the Grant: To comply with Part 15 of the FCC
Rules, this product must be used with a Fujifilm-specified ferrite-core A/V cable, USB cable, and DC supply
cord.
For Customers in Canada
CAUTION: This Class B digital apparatus complies with
Canadian ICES-003.
Disposal of Electrical and Electronic Equipment in Private
Households
In the European Union, Norway, Iceland and Liechtenstein: This symbol on the product, or in
the manual and in the warranty, and/or on
its packaging indicates that this product
shall not be treated as household waste.
Instead it should be taken to an applicable
collection point for the recycling of electrical and electronic equipment.
By ensuring this product is disposed of correctly, you
will help prevent potential negative consequences to
the environment and human health, which could otherwise be caused by inappropriate waste handling of
this product.
This symbol on the batteries or accumulators indicates that those batteries shall not
be treated as household waste.
If your equipment contains easy removable batteries or
accumulators please dispose these separately according to your local requirements.
The recycling of materials will help to conserve natural
resources. For more detailed information about recycling this product, please contact your local city office,
your household waste disposal service or the shop
where you purchased the product.
In Countries Outside the European Union, Norway, Iceland and
Liechtenstein: If you wish to discard this product, includ-
ing the batteries or accumulators, please contact your
local authorities and ask for the correct way of disposal.
ix
Page 10

About This Manual
✔✔ Warning Messages and Displays
.....................
116
✔✔ Troubleshooting
............................................
110
✔✔ Table of Contents
..............................................
xi
Before using the camera, read this manual and the warnings on pages ii–ix. For information on specific
topics, consult the sources below.
Table of Contents
The “Table of Contents” gives an overview of the
entire manual. The principal camera operations
are listed here.
Warning Messages and Displays
Find out what’s behind that flashing icon or error
message in the display.
Memory Cards
Pictures can be stored in the camera’s internal memory or on optional SD, SDHC, and SDXC memory c ards (P 14),
referred to in this manual as “memory cards”.
x
..............................................PP
.....................PP
116
Trou blesh ooting
xi
Having a specific problem with the camera?
Find the answer here.
............................................PP
110
Page 11

Before You Begin
First Steps
Basic Photography and Playback
More on Photography
Table of Contents
For Your Safety ................................................................................. ii
IMPORTANT SAFETY INSTRUCTIONS ......................................ii
Safety Notes ....................................................................................iv
About This Manual .......................................................................... x
Before You Begin
Introduction ....................................................................................... 1
Symbols and Conventions .......................................................... 1
Supplied Accessories .................................................................... 1
Parts of the Camera ....................................................................... 2
Camera Displays ..........................................................................5
First Steps
Attaching Accessories ................................................................... 8
The Strap......................................................................................... 8
The Lens Cap .................................................................................8
Inserting the Batteries .................................................................. 9
Inserting a Memory Card ........................................................... 12
Turning the Camera on and Off .............................................. 15
Basic Setup ....................................................................................... 16
Basic Photography and Playback
Taking Pictures in R (E AUTO) Mode ...................... 17
Viewing Pictures ............................................................................21
More on Photography
Shooting Mode ...............................................................................22
O (E AUTO/E Priority) ..................................23
B AUTO ..........................................................................................24
Adv. ADVANCED ...........................................................................24
SP1/SP2: SCENE POSITION .......................................................28
r MOTION PANORAMA 360 .................................................30
P: PROGRAM AE ............................................................................32
S: SHUTTER PRIORITY AE ...........................................................33
A: APERTURE PRIORITY AE ........................................................33
M: MANUAL ....................................................................................34
C: CUSTOM MODE ........................................................................35
Focus Lock.........................................................................................36
The AE/AF LOCK Button.....................................................................37
Locking Exposure ...................................................................... 37
Locking Focus .............................................................................37
F Macro and Super Macro Modes (Close-ups) ................38
N Using the Flash (Super-Intelligent Flash) .......................39
J Using the Self-Timer ...............................................................41
I Continuous Shooting (Burst Mode) ................................ 42
d Exposure Compensation .....................................................46
Metering ............................................................................................47
Focus Mode ...................................................................................... 48
Autofocus Mode .............................................................................50
Sensitivity ......................................................................................... 51
White Balance..................................................................................52
The Fn Button .................................................................................. 53
b Intelligent Face Detection ..................................................5 4
xi
Page 12

Table of Contents
More on Playback
Movies
Connections
n Face Recognition .................................................................... 55
Adding New Faces .......................................................................55
Viewing, Editing, and Deleting Existing Data ...................56
Adding Faces Automatically ....................................................56
More on Playback
Playback Options ........................................................................... 58
Continuous Shooting .................................................................58
I Favorites: Rating Pictures ....................................................58
Playback Zoom .............................................................................. 59
Multi-Frame Playback .................................................................60
A Deleting Pictures ....................................................................61
Viewing Photo Information ...................................................... 62
Image Search ...................................................................................63
X PhotoBook Assist ...................................................................64
Creating a PhotoBook ................................................................64
Viewing PhotoBooks ..................................................................65
Editing and Deleting PhotoBooks .........................................65
Viewing Panoramas ......................................................................66
Movies
Recording Movies ..........................................................................67
Movie Frame Size .........................................................................68
a Viewing Movies ........................................................................69
Connections
Viewing Pictures on TV ............................................................... 70
Printing Pictures via USB ............................................................72
Connecting the Camera ............................................................72
Printing Selected Pictures ........................................................72
Printing the DPOF Print Order .................................................73
Creating a DPOF Print Order .................................................... 75
Viewing Pictures on a Computer ............................................78
Windows: Installing MyFinePix Studio .................................78
Macintosh: Installing FinePixViewer .....................................80
Connecting the Camera ............................................................82
xii
Page 13

Table of Contents
Menus
Menus
Using the Menus: Shooting Mode .........................................84
Using the Shooting Menu .........................................................84
Shooting Menu Options ............................................................84
A E MODE ..........................................................................84
A Adv. MODE ..............................................................................84
A
SCENE POSITION
N ISO ...............................................................................................84
O IMAGE SIZE ...............................................................................85
T IMAGE QUALITY .....................................................................85
U DYNAMIC RANGE ..................................................................86
P FILM SIMULATION .................................................................86
d WB SHIFT ..................................................................................87
f COLOR ........................................................................................ 87
e TONE ..........................................................................................87
q SHARPNESS ..............................................................................87
h NOISE REDUCTION................................................................87
y INTELLIGENT SHARPNESS ..................................................87
R INTELLIGENT DIGITAL ZOOM ............................................87
Z ADVANCED ANTI BLUR ........................................................88
b FACE DETECTION ...................................................................88
n FACE RECOGNITION ..............................................................88
W MOVIE MODE ..........................................................................88
a STILL SHOOTING IN MOVIE ................................................88
J AE BKT EV STEPS ....................................................................89
I FLASH .........................................................................................89
g EXTERNAL FLASH ..................................................................89
K CUSTOM SET ............................................................................90
.....................................................................84
Using the Menus: Playback Mode .......................................... 91
Using the Playback Menu..........................................................91
Playback Menu Options .............................................................91
X PHOTOBOOK ASSIST ............................................................91
x ERASE .........................................................................................91
j MARK FOR UPLOAD TO .......................................................92
I SLIDE SHOW ............................................................................93
B RED EYE REMOVAL ................................................................93
D PROTECT ...................................................................................94
G CROP ..........................................................................................94
O RESIZE ........................................................................................95
C IMAGE ROTATE ........................................................................95
E COPY ...........................................................................................96
F VOICE MEMO ...........................................................................96
n ERASE FACE RECOG. ............................................................97
K PRINT ORDER (DPOF) ...........................................................97
J DISP. ASPECT ...........................................................................97
The Setup Menu .............................................................................98
Using the Setup Menu................................................................98
Setup Menu Options ...................................................................99
F DATE/TIME ...............................................................................99
N TIME DIFFERENCE ..................................................................99
L a .................................................................................99
o SILENT MODE ..........................................................................99
R RESET ...................................................................................... 100
K FORMAT .................................................................................100
A IMAGE DISP. ......................................................................... 100
B FRAME NO. ............................................................................101
G OPERATION VOL. ................................................................101
xiii
Page 14

Table of Contents
Technical Notes
Troubleshooting
Appendix
H SHUTTER VOLUME ..............................................................101
e SHUTTER SOUND.................................................................101
I PLAYBACK VOLUME ............................................................102
J LCD BRIGHTNESS .................................................................102
T MONITOR SUNLIGHT MODE............................................102
E EVF/LCD MODE.....................................................................102
M AUTO POWER OFF ...............................................................102
1 QUICK START MODE ...........................................................102
F Fn BUTTON .............................................................................102
L DUAL IS MODE ..................................................................... 103
B RED EYE REMOVAL ............................................................. 103
C AF ILLUMINATOR ................................................................ 103
k AE/AF-LOCK MODE ............................................................104
v AE/AF-LOCK BUTTON ....................................................... 104
j FOCUS CHECK ...................................................................... 104
t SAVE ORG IMAGE ................................................................ 104
m AUTOROTATE PB ................................................................. 105
O BACKGROUND COLOR ...................................................... 105
c GUIDANCE DISPLAY ........................................................... 105
Q VIDEO SYSTEM ..................................................................... 105
S CUSTOM RESET ................................................................... 105
T BATTERY TYPE ...................................................................... 105
P DISCHARGE (Ni-MH Batteries Only) ............................ 106
U DATE STAMP .........................................................................106
Technical Notes
Optional Accessories ..................................................................107
Accessories from FUJIFILM ....................................................108
Caring for the Camera .............................................................. 109
Tro ub les ho oti ng
Problems and Solutions ...........................................................110
Warning Messages and Displays .......................................... 116
Appendix
Internal Memory/Memory Card Capacity ........................120
Specifications ................................................................................121
xiv
Page 15
Introduction
Symbols and Conventions
Supplied Accessories
Symbols and Conventions
The following symbols are used in this manual:
c : This information should be read before use to ensure correct operation.
a : Points to note when using the camera.
b : Additional information that may be helpful when using the camera.
P: Other pages in this manual on which related information may be found.
Menus and other text in the camera monitor are shown in bold. In the illustrations in this manual, the
monitor display may be simplified for explanatory purposes.
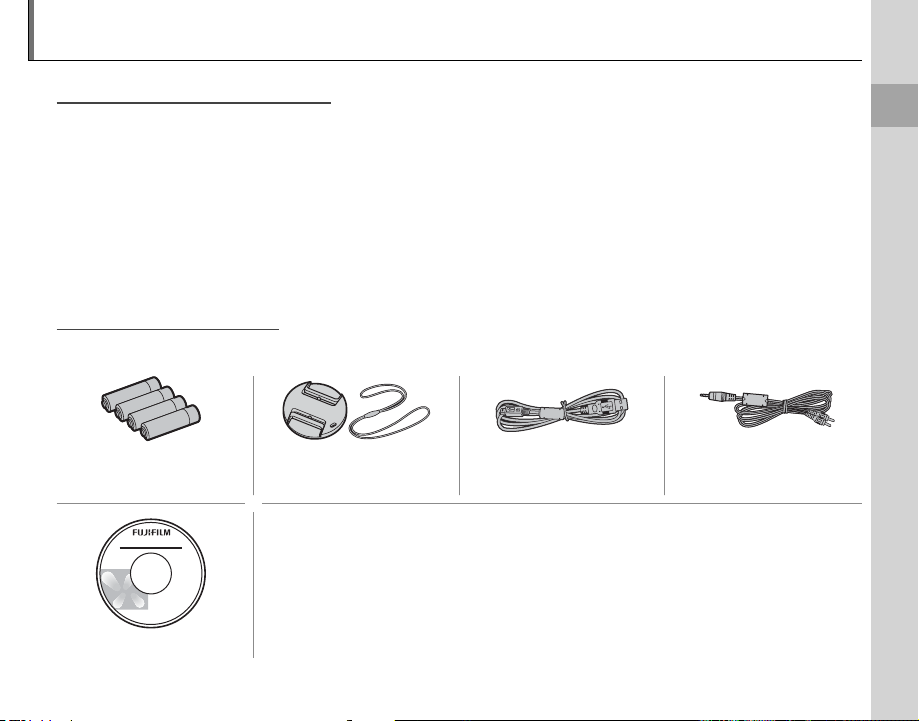
Supplied Accessories
The following items are included with the camera:
Before You Begin
AA alkaline (LR6) batteries
(×4)
CD-ROM
Lens cap USB cable
• Shoulder strap
• Owner’s Manual (this manual)
• Basic Manual
A/V cable
1
Page 16
Parts of the Camera
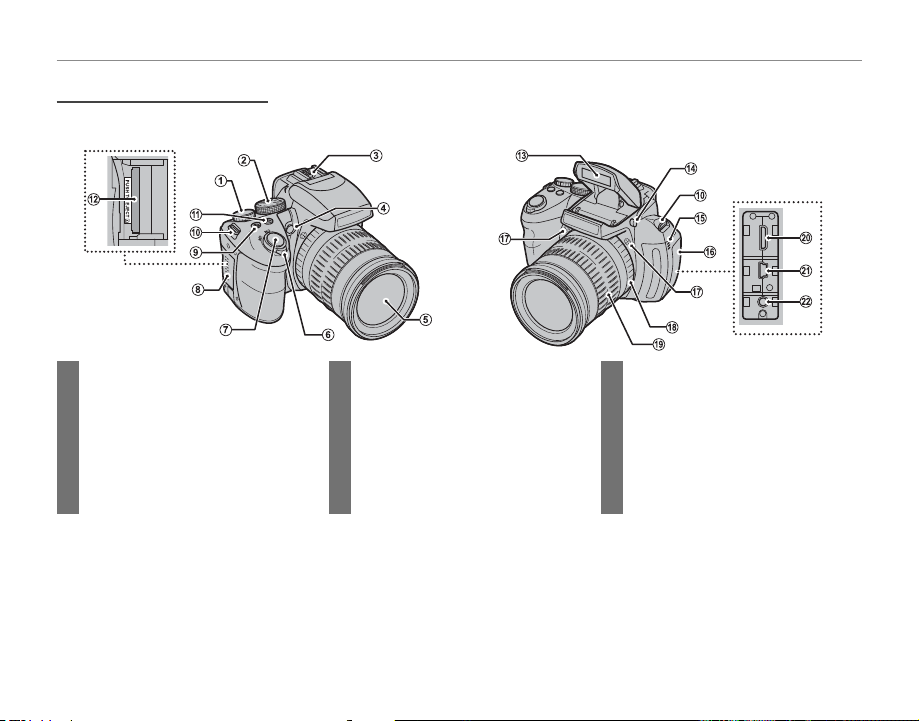
Parts of the Camera
For more information, refer to the page listed to the right of each item.
Introduction
1 Command dial ...........................32, 33, 34
2 Mode dial ......................................................22
3 Hot shoe ........................................................89
4 AF-assist illuminator ............................103
Self-timer lamp ..........................................41
5 Lens ................................................................ 121
6 ON/OFF switch ..............................................15
7 Shutter button ........................................... 19
2
8 Memory card slot cover ....................... 12
9 I (continuous shooting) button ...............42
10 Strap eyelet .................................................... 8
11 d (exposure compensation) button .........46
12 Memory card slot .....................................12
13 Flash ..................................................................39
14 N (flash pop-up) button ..............................39
15 Speaker ................................................... 69, 96
16 Terminal cover ............................ 70, 72, 82
17 Microphone (L/R) .....................................67
18 Focus ring .....................................................48
19 Zoom ring .....................................................18
20 Connector for HDMI cable .................70
21 USB cable connector .....................72, 82
22 A/V cable connector..............................70
Page 17
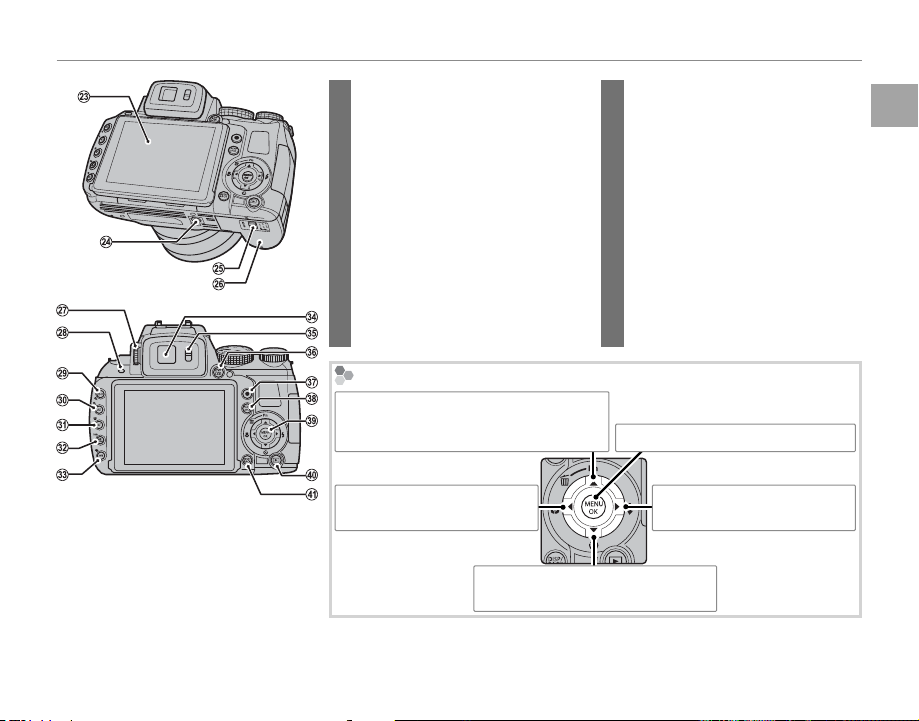
Introduction
23 Monitor ............................................................. 5
24 Tri pod mou nt
25 Battery-chamber latch ............................ 9
26 Battery-chamber cover .......................... 9
27 Diopter adjustment control ................4
28 Indicator lamp ............................................20
29 IS O (sensitivity) button ................................51
k (playback zoom in) button .....................59
30 AE (autoexposure) button ............................47
n (playback zo om out) button ..................59
31 AF (autofocus) button ...................................50
g
(Intelligent Face Detection) button
32 AF C-S-M (focus mode) button ...................48
info button ....................................................62
...54,88
The Selector Button
Move curs or up (e)
Fn (Function) button (P 53)/
b (delete) button (P 21)
Move curs or left (g)
F (macro) button (P 38)
Move curs or down (f)
h (self-timer) button (P 41)
33 WB (white balance) button ..........................52
H (image search) button...........................63
34 Electronic viewfinder .............................. 4
35 Eye sensor ....................................................... 4
36 EVF/LCD (display selection) button .............. 4
37 z (movie record) button .............................67
38 AE /AF LOCK (autofocus lock/autoexposure)
button ......................................................37, 49
39 Selector button (see below)
40 a (playback) button .......................... 15, 21
41 DISP (display)/BACK button ................. 7, 20
MENU/OK button (P 16, 84, 91, 98)
Move curs or right (h)
N (flash) button (P 39)
Before You Begin
3
Page 18
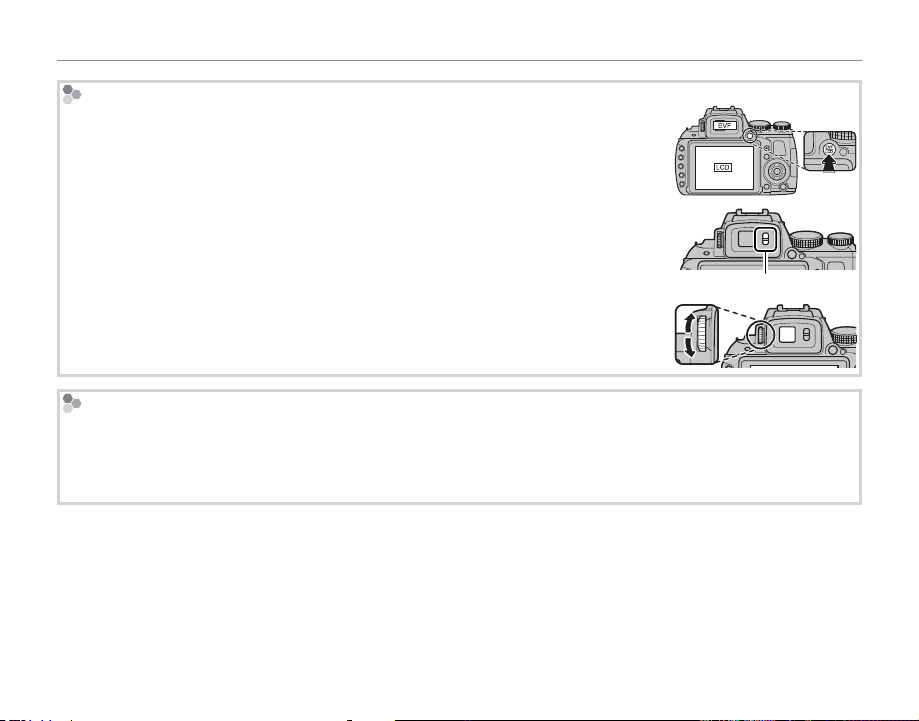
Introduction
The Electro nic Viewfinder (EVF)
The electronic viewfinder provides the same information as the monitor, and can be
used when bright lighting conditions make the display in the monitor difficult to see.
Press EVF/LCD button to select from the auto switch, monitor, or electric view finder
mode. When the auto switch mode is set, the electric view finder turns on automatically when you put your eye to the view finder, and the monitor turns on when you
take your eye away (note that the eye sensor may not respond if you are wearing
glasses or your head is an angle to the camera).
Eye sensor
The camera is equipped with diopter adjustment to accommodate individual differences in vision. Slide the diopter adjustment control up and down until the viewfinder display is in sharp focus.
Bright Ambient Lighting
Reflections and glare caused by bright ambient lighting may make it hard to see the display in the monitor,
particularly when the camera is used outdoors. This can be addressed by holding the EVF/LCD button to trigger
outdoor mode. Outdoor mode can also be enabled using the T MONITOR SUNLIGHT MODE option in the
setup menu (P 102).
4
Page 19
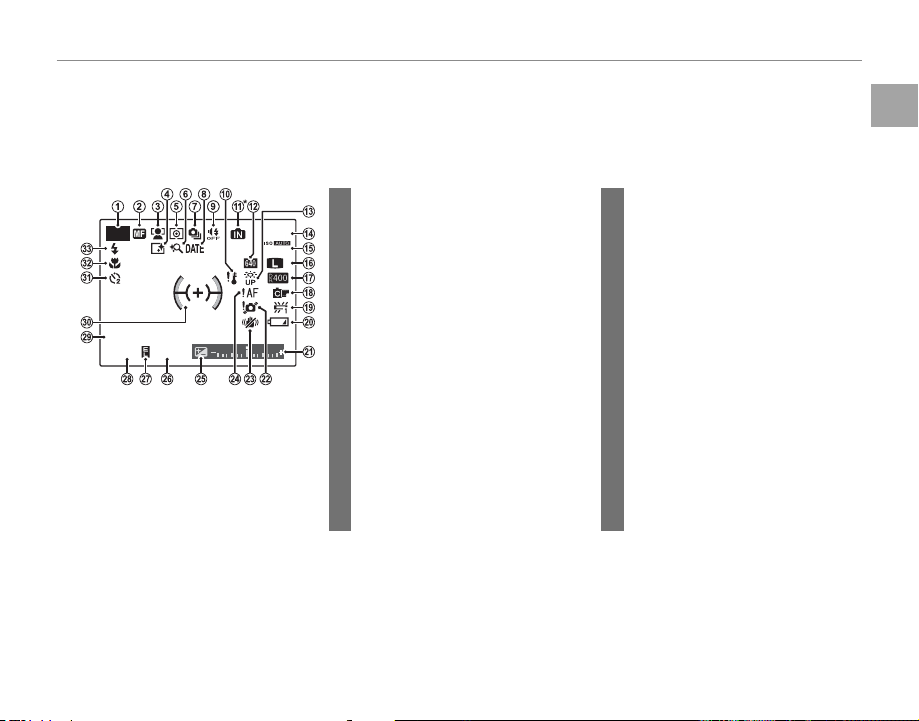
Introduction
Camera Displays
■■ Shooting
10:00
AM
12 / 31/ 2050
250
F
4.5
Camera Displays
The following indicators may appear during shooting and playback. The indicators displayed vary with
camera settings.
Shooting
18 Film simulation ..........................................86
19 White balance ............................................52
20 Battery level ................................................. 15
21 Exposure indicator ..................................46
22 Blur warning ......................................40, 116
23 Dual IS mode ...........................................103
24 Focus warning .................................19, 116
25 Exposure compensation .....................46
26 Aperture .................................................33, 34
27 AE lock indicator .......................................37
28 Shutter speed .....................................33, 34
29 Date and time .............................................16
30 Focus frame .................................................36
31 Self-timer indicator .................................41
32 Macro (close-up) mode ........................38
33 Flash mode...................................................39
P
12 / 31/ 2050
250
10:00
4.5
AM
F
800
9
N
* a: indicates that no memor y card
is inserted and that pictures will
be stored in the camera’s internal
memory (P 12).
1 Shooting mode .........................................22
2 Manual focus indicator .........................48
3 Intelligent Face Detection
indicator .........................................................54
4 Intelligent sharpness ..............................87
5 Metering ........................................................47
6 Intelligent digital zoom ........................87
7 Continuous shooting mode .............42
8 Date stamp ................................................ 106
9 Silent mode indicator ....................20, 99
10 Temperature warning ........................ 120
11 Internal memory indicator *
12 Movie mode ................................................68
13 Monitor sunlight mode ..................... 102
14 Number of available frames ........... 120
15 Sensitivit y .............................................. 51, 84
16 Image size/quality ...................................85
17 Dynamic range ..........................................86
Before You Begin
5
Page 20
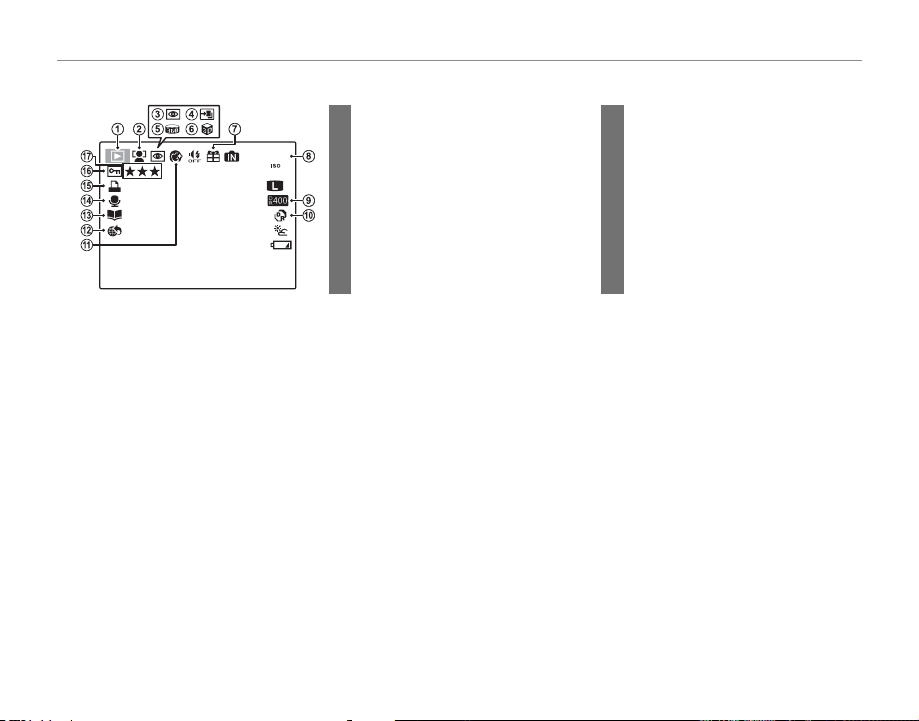
■■ Playback
Playback
100-0001
400
12 / 31/ 2050
10:00
AM
1 / 250
F
4.5
12/31/2050
1/250
YouTube
F
10:00
4.5
AM
100-0001
400
1 Playback mode indicator ............21, 58
2 Intelligent Face Detection
indicator .................................................54, 88
3 Red-eye removal indicator.................93
N
4 Pro focus mode,
pro low-light mode ................................25
5 Motion panorama z .................. 30, 66
6 3D image .......................................................26
7 Gift image .....................................................58
8 Frame number ........................................ 101
Introduction
9 Dynamic range ..........................................86
10 E mode ..............................................23
11 Portrait enhancer .....................................28
12 Mark for upload to ...................................92
13 Photobook assist ..................................... 64
14 Voice memo indicator ...........................96
15 DPOF print indicator ..............................73
16 Protected image .......................................94
17 Favorites .........................................................58
6
Page 21
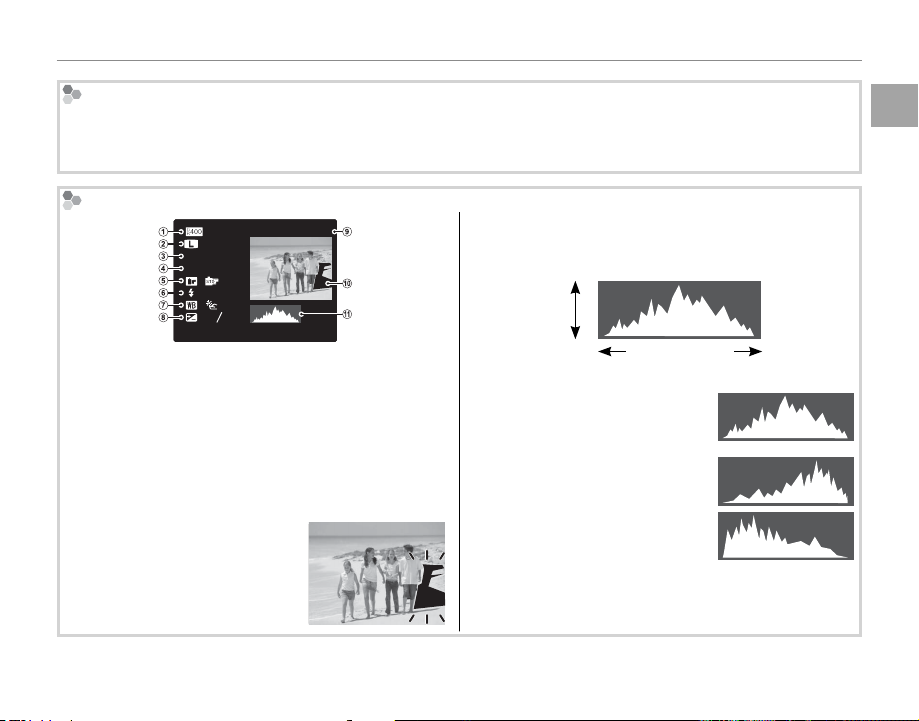
Hiding and Viewing Indic ators
Press DISP/BACK to cycle through shooting and playback indicators as follows:
• Shooting: Indicators displayed/indicators hidden/best framing/HD framing/histogram
• Playback: Indicators displayed/indicators hidden/I favorites (P 58)/photo info
Histograms
4:3
N
ISO
400
F
4.5
1/250
:
:OFF
:
2
:
-
1
3
12/ 31/2050 10: 00
Dynamic rangew Image size and quality
q
Sensitivity
e
Film simulationy Flash mode
t
White balance
u
Frame number
o
Picture (overexposed areas blink on and off )
!0
Histogram
!1
Shutter speed/aperture
r
Exposure compensation
i
100-0001
AM
Overexposed areas blink on and
off.
Histograms show the distribution of tones in the image. Brightness is shown by the horizontal axis, the
number of pixels by the vertical axis.
No. of
pixels
Pixel brightness
Shadows Highlights
Optimal exposure: Pixels are
distributed in an even curve
throughout the tone range.
Overexposed: Pixels are clustered
at the right side of the graph.
Underexposed: Pixels are clustered
at the left side of the graph.
Introduction
Before You Begin
7
Page 22
Attaching Accessories
The Strap
The Lens Cap
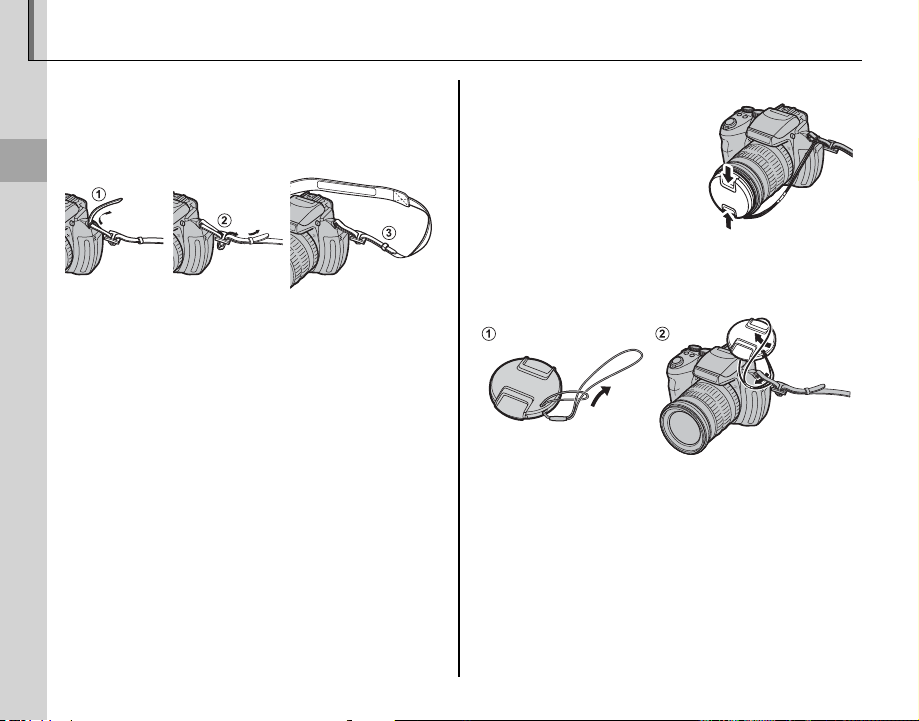
The Strap
Attach the strap to the two strap eyelets as shown
below.
First Steps
c
To avoid dropping the camera, be sure the strap is correctly secured.
The Lens Cap
Attach the lens cap as shown.
To avoid losing the lens cap, pass the supplied string
through the eyelet (q) and secure the lens cap to the
strap (w).
8
Page 23
Inserting the Batteries
The camera takes four AA alkaline, lithium, or rechargeable Ni-MH batteries. A set of four alkaline
batteries is supplied with the camera. Insert the
batteries in the camera as described below.
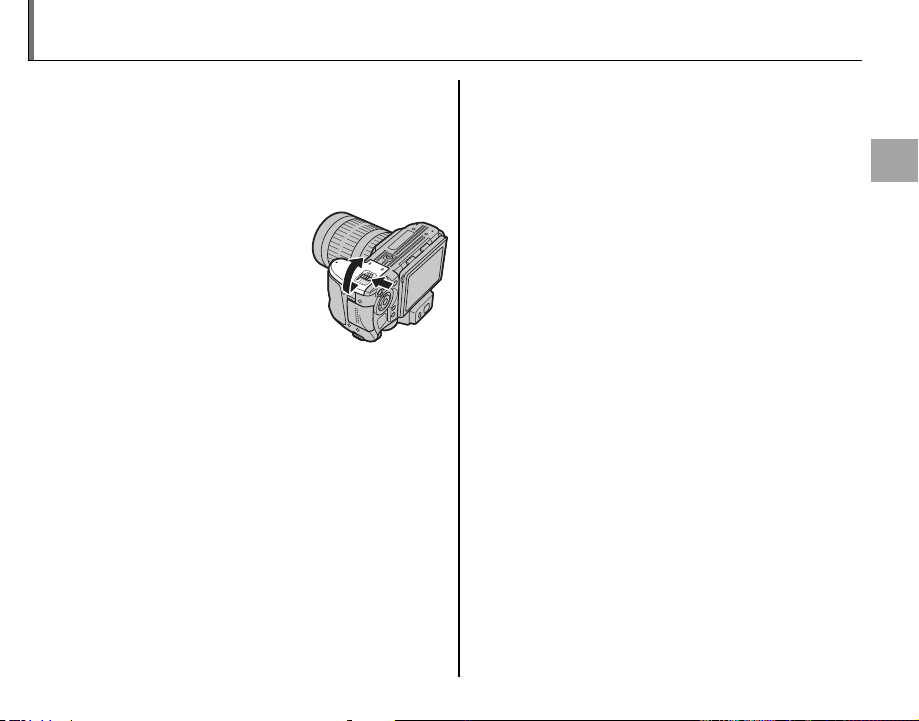
Open the battery-chamber cover.
1
Slide the battery-chamber latch in the direction
shown and open the battery-chamber cover.
a
Be sure the camera is off before opening the battery-chamber cover.
c
• Do not open the battery-chamber cover when
the camera is on. Failure to observe this precaution could result in damage to image files or
memory cards.
• Do not use excessive force when handling the
battery-chamber cover.
First Steps
9
Page 24

Inserting the Battery
Battery casing
Insert the batteries.
2
Insert the batteries in the
orientation shown by the
“+“ and “–“ marks inside
the battery chamber.
3
• Insert the batteries in the correct orientation.
• Never use batteries with peel-
ing or damaged casing or mix
old and new batteries, batteries with dif ferent charge levels,
or batteries of different types.
Failure to observe these
precautions could result
in the batteries leaking or
overheating.
• Ne ver use manganese or N i-Cd batteries.
• The capacity of alkaline batteries varies with the
manufacturer and drops at temperatures below
10 °C/50 °F; Ni-MH batteries are recommended.
• Fingerprints and other soil on the battery terminals can shorten battery life.
Battery casing
10
Page 25
Inserting the Battery
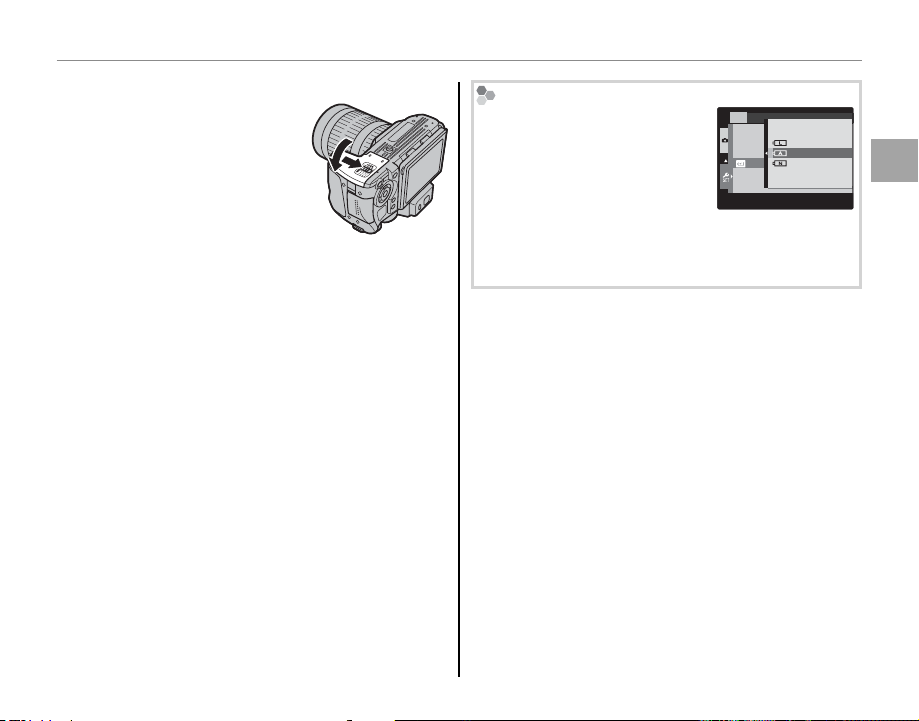
Close the battery-chamber cover.
3
Close the battery-chamber cover and slide it in
until the latch clicks into
place.
3
Do not use force. If the battery-chamber cover
does not close, check that the batteries are in the
correct orientation and try again.
2 Using an AC Power Adapter
The camera can be powered by an optional AC
power adapter and DC coupler (sold separately).
Choosing the Battery Type
After replacing the batteries
with batteries of a different
type, select the battery type
SET-UP
LITHIUM
ALKALINE
BATTERY TYPE
NI-MH
using the T BATTERY TYPE
option in the setup menu (P 105)
to ensure that the battery level
is displayed correctly and the camera does not turn
off unexpectedly.
First Steps
11
Page 26
Inserting a Memory Card
Write-protect
switch
Although the camera can store pictures in internal memory, optional SD, SDHC and SDXC mem-
ory cards (sold separately) can be used to store
additional pictures.
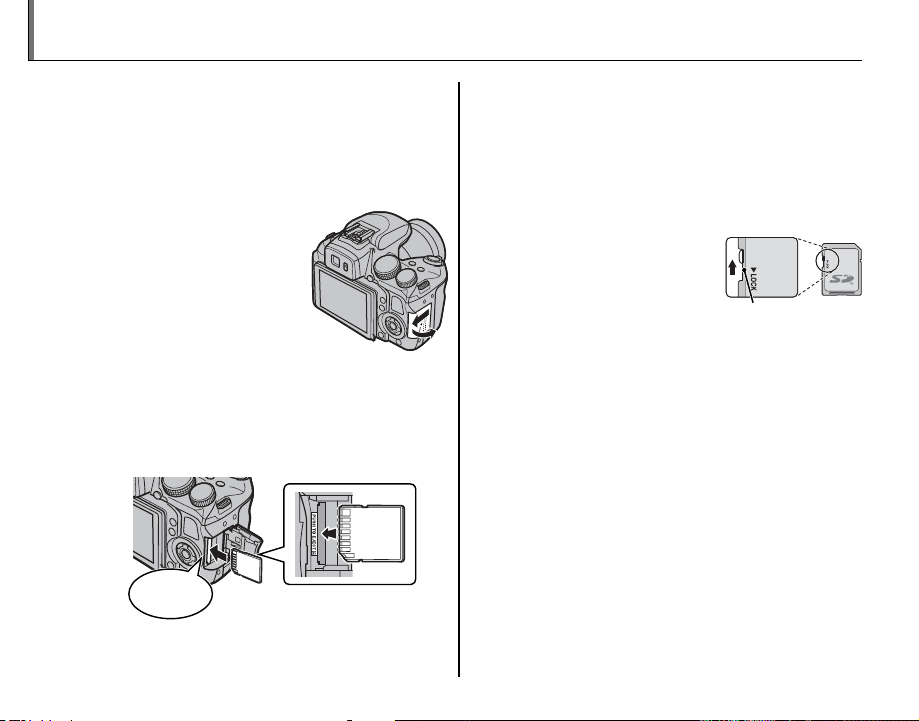
Open the memory card slot cover.
1
a
Be sure the camera is off before opening the memory
card slot cover.
Insert the memory card.
2
Holding the memory card in the orientation
shown below, slide it in until it clicks into
place at the back of the slot.
Click
c
• Be sure card is in the correct orientation; do not
insert at an angle or use force. If the memory
card is not correctly inserted or no memory
card is inserted, a will appear in the LCD monitor and internal memory will be used for recording and playback.
• SD/SDHC/SDXC memor y
cards can be locked, making it impossible to format
the card or to record or
delete images. Before inserting an SD/SDHC/SDXC
memory card, slide the
write-protect switch to the
unlocked position.
Write -protect
switch
12
Page 27
Inserting a Memory Card
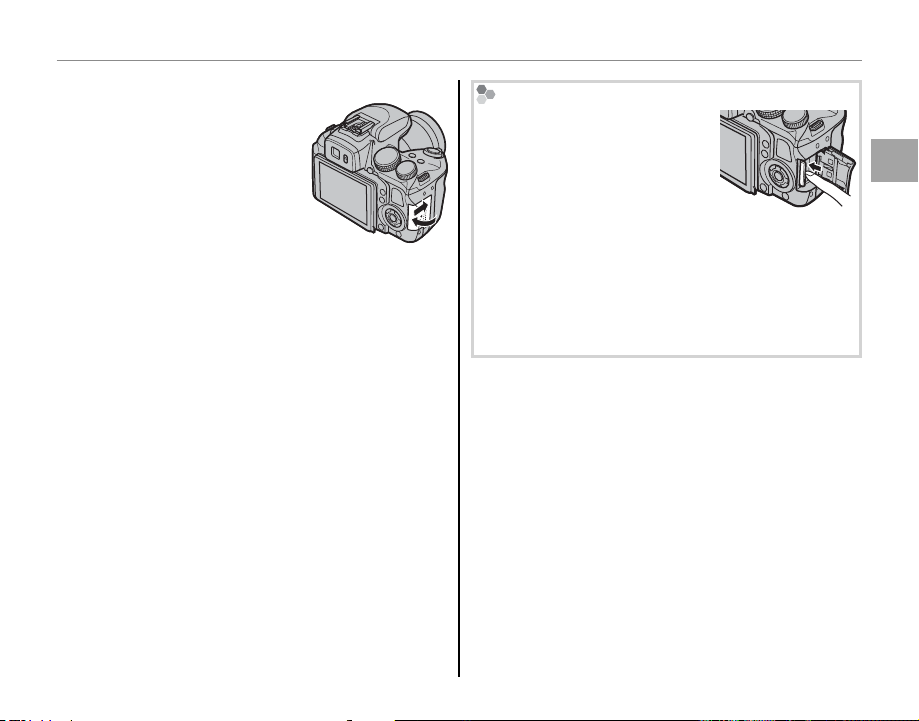
Close the memory card slot cover.
3
Removing Memory Cards
After confirming that the camera is off, press the card in and
then release it slowly. The card
can now be removed by hand.
c
• The memory card may spring out if you remove
your finger immediately after pushing the card in.
• Memory cards may be warm to the touch after being removed from the camera. This is normal and
does not indicate a malfunction.
First Steps
13
Page 28

Inserting a Memory Card
■ ■ Compatible Memory Cards
Compatible Memory Cards
FUJIFILM and SanDisk SD, SDHC, and SDXC memory cards have been approved for use in the camera. A complete list of approved memory cards
is available at http://www.fujifilm.com/support/
digital_cameras/compatibility/. Operation is not
guaranteed with other cards. The camera can not
be used with xD-Picture Cards or MultiMediaCard
(MMC) devices.
c Memory Cards
• Do not turn the camera off or remove the memory
card while the memory card is being formatted or
data are being recorded to or deleted from the card.
Failure to observe this precaution could damage the
card.
• Format SD/SDHC/SDXC memory cards before first
use, and be sure to reformat all memory cards after using them in a computer or other device. For
more information on formatting memory cards, see
“K FORMAT” (P 100 ).
• Memory cards are small and can be swallowed; keep
out of reach of children. If a child swallows a memory
card, seek medical assistance immediately.
• miniSD or microSD adapters that are larger or smaller
than the standard dimensions of an SD/SDHC/SDXC
card may not eject normally; if the card does not
eject, take the camera to an authorized service representative. Do not forcibly remove the card.
• Do not affix labels to memory cards. Peeling labels
can cause camera malfunction.
• Movie recording may be interrupted with some types
of SD/SDHC/SDXC memory card. Use a G card
or better when shooting HD or high-speed movies.
• The data in internal memory may be erased or corrupted when the camera is repaired. Please note that
the repairer will be able to view pictures in internal
memory.
• Formatting a memory card or internal memory in the
camera creates a folder in which pictures are stored.
Do not rename or delete this folder or use a computer or other device to edit, delete, or rename image
files. Always use the camera to delete pictures from
memory cards and internal memory; before editing
or renaming files, copy them to a computer and edit
or rename the copies, not the originals.
14
Page 29
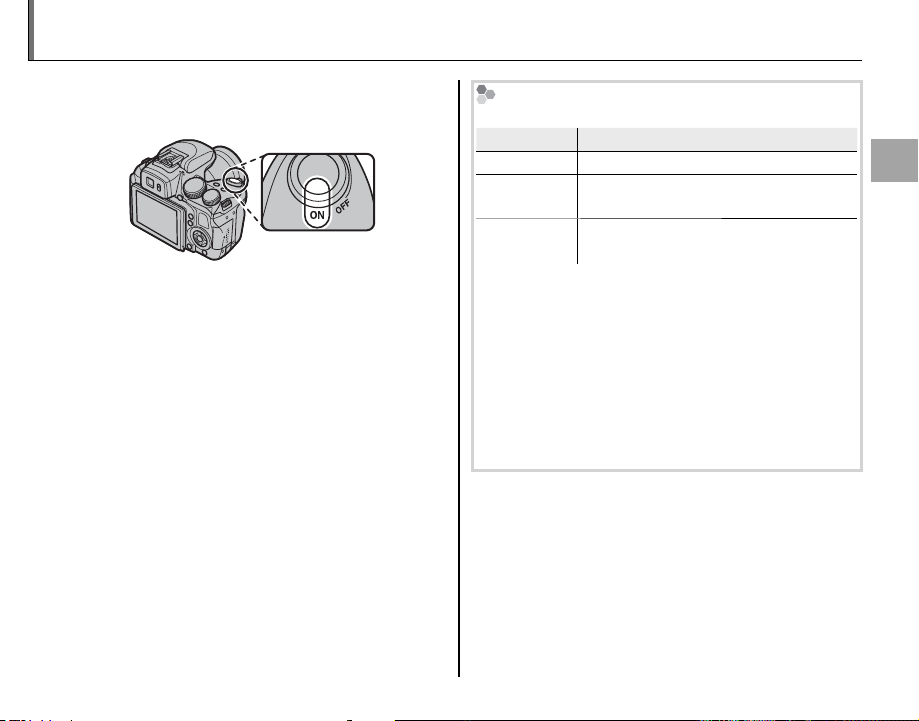
Turning the Camera on and Off
Indicato r
Description
Rotate the ON/OFF switch to ON to turn the camera
on.
Select OFF to turn the camera off.
b Switching to Play back Mode
Press the a button to start playback. Press a button
again or press the shutter button halfway to return to
shooting mode.
b Auto Power O ff
The camera will turn off automatically if no operations
are performed for the length of time selected in the
M AUTO POWER OFF menu (P 102). To reactivate the
camera after it has turned off automatically, turn the
ON/OFF switch to OFF and then back to ON.
Battery Level
Battery level is shown as follows:
Indicator
NO ICON Batteries are partially discharged.
B (red )
A (blinks red)
1
A battery warning may not be displayed before the
camera turns off, particularly if batteries are reused
after having once been exhausted. Power consumption varies greatly from mode to mode; the low battery warning (B) may not be displayed or may be
displayed only briefly before the camera turns off in
some modes or when switching from shooting to
playback mode.
Batteries are low. Replace as soon as
possible.
Batteries are exhausted. Turn camera
off and replace batteries.
Description
First Steps
15
Page 30

Basic Setup
A language-selection dialog is displayed the first time the camera is turned on. Set up the camera as
described below (for information on resetting the clock or changing languages, see page 99).
START MENU
ENGLISH
FRANCAIS
DEUTSCH
ESPAÑOL
PORTUGUÊS
SET NO
Highlight a language and press MENU/OK.
1
a
Press DISP/BACK to skip the current step. Any steps you skip will be displayed
the next time the camera is turned on.
DATE / TIME NOT SET
2014
2013
YY. MM. DD
1. 1 12 : 00
2012
2011
2010
SET NO
AM
The date and time will be displayed. Press the selector left or right to
2
highlight the year, month, day, hour, or minute and press up or down
to change. To change the order in which the year, month, and day
are displayed, highlight the date format and press the selector up or
down. Press MENU/OK when settings are complete.
A battery type message will be displayed; if the type differs from the
3
type inserted in the camera, use the setup menu T BATTERY TYPE
option (P 11) to specify the correct type.
b The Ca mera Clock
If the batteries are removed for an extended period, the camera clock and battery type will be reset and the
language-selection dialog will be displayed when the camera is turned on.
16
Page 31

Taking Pictures in R (E AUTO) Mode
This section describes how to take pictures in R (E AUTO) mode.
Select a mode.
1
When you rotate the mode dial to O, the R display will appear in the LCD monitor.
The o Icon
In R mode, the camera continuously adjusts focus and searches for faces, increasing the drain on the
battery. o is displayed in the LCD monitor.
Scene Icon (P 23)
The camera automatically selects the appropriate scene.
a
• The camera analyses the scene and selects the preferred E mode when the shutter button is pressed
halfway (P 24).
• To raise the flash when lighting is poor, press the flash pop-up button (P 39).
Basic Photography and Playback
17
Page 32

Taking Pictures in R (E AUTO) Mode
Frame the picture.
2
Use the zoom ring to
frame the picture in the
display. The zoom indicator appears.
Zoom indicator
b Focus Lock
Use focus lock (P 36) to focus on subjects that are not
in the focus frame.
Zoom ring
Hold ing the Camera
Hold the camera steady with
both hands and brace your
elbows against your sides.
Shaking or unsteady hands
can blur your shots.
To prevent pictures that are
out of focus or too dark (underexposed), keep your fingers and other objects away
from the lens and flash.
18
Page 33

Taking Pictures in R (E AUTO) Mode
Focus.
3
Press the shutter button halfway
to focus.
If the camera is able to focus, it will beep twice
and the indicator lamp will glow green.
If the camera is unable to focus, the focus frame
will turn red, s will be displayed, and the
indicator lamp will blink green. Change the
composition or use focus lock (P 36).
Shoot.
4
Smoothly press the shutter button
the rest of the way down to take
the picture.
b The Shutter Button
The shutter button has two positions. Pressing the
shutter button halfway (q) sets focus and exposure;
to shoot, press the shutter button the rest of the way
down (w).
Double
beep
qw
Press halfway
a
If the subject is poorly lit, the AF-assist illuminator may
light to assist focus (P 103). For information on using the
flash when lighting is poor, see page 39.
Press the rest of
the way down
Click
Basic Photography and Playback
19
Page 34

Taking Pictures in R (E AUTO) Mode
Indicator lamp
Camera status
Silent Mode
In situations in which camera sounds or lights may be
unwelcome, hold the DISP/BACK button down until o
is displayed.
The camera speaker, flash, and AF-assist illuminator/
self-timer lamp turn off and flash and volume settings
can not be adjusted (note that the flash will still fire
when C is selected in scene mode). To restore normal operation, press the DISP/BACK button until the o
icon is no longer displayed.
The Indicator L amp
Indicator lamp
The indicator lamp shows camera status as follows:
Indicator lamp
Glows green Focus locked.
Blinks green
Blinks green
and orange
Glows
orange
Blinks orange
Blinks red
b Warnings
Detailed warnings appear in the display. See pages
116–119 for more information.
Blur, focus, or exposure warning. Picture can be taken.
Recording pictures. Additional pictures can be taken.
Recording pictures. No additional pictures can be taken at this time.
Flash charging; flash will not fire when
picture is taken.
Lens or memory error (memory card
full or not formatted, format error, or
other memory error).
Camera status
20
Page 35

Viewing Pictures
100-0001
1/ 1000
4. 5
2
-
1
3
Pictures can be viewed in the monitor. When taking important photographs, take a test shot and
check the results.
Press the a button.
1
The most recent picture will be displayed in
the monitor.
100-0001
2
-
F4. 5
1
3
1/1000F4.
View additional pictures.
2
Press the selector right to view
pictures in the order recorded, left
to view pictures in reverse order.
Press the shutter button to exit to shooting
mode.
Deleting Pictures
To delete pictures, press the b button. A menu of
deletion options will be displayed (P 61).
Basic Photography and Playback
b The Playback Menu
Pictures can also be deleted from the playback menu
(P 91).
21
Page 36

Shooting Mode
Choose a shooting mode according to the scene or type of subject. To
choose a shooting mode, rotate the mode dial to the desired setting. The
following modes are available:
P, S, A, M: Select for full control over camera settings, including
aperture (M and A) and/or shutter speed (M and S) (P 32).
O: Improve clarity, reduce noise, increase dynamic range, or let the camera
More on Photography
automatically adjust settings to suit the
scene (P 23).
B (AUTO): A simple “point-and-shoot”
mode recommended for first-time users
of digital cameras (P 24).
Adv. (ADVANCED): Sophisticated tech-
niques made easy (P 24).
22
C (C USTOM): Recall stored settings for
modes P, S, A, M and all E modes
except R (P 35).
N (MOTION PANORAMA 360): Select for
taking a panorama (P 30).
SP1, SP2 (SCENE POSITION): Choose a scene suited to the subject
or shooting conditions and let the camera do the rest (P 28).
Page 37

Shooting Mode
O
E
AUTO/
E
Priority)
■■ RR ( (E
AUTO)
Scene
Main sub ject
AUTO
LANDSCAPE
NIGHT
NIGHT
(TRIPOD)
MACRO
BEACH
SUNSET
SNOW
SKY
GREEN-
ERY
SKY &
GREENERY
Non-por trait
Portra it
Normal
Backli t
Moving ob ject
Portra it and
motion
Normal
Backli t
O ( (
E
AUTO/
E
Priority)
Optimize settings for your current subject or improve clarity, reduce noise, or enhance
dynamic range. Rotate the mode dial to O and choose one of the following E
modes in the shooting menu.
E
AUTO)
The camera automatically selects the scene and E mode according to shooting conditions.
a
If S is selected for O IMAGE SIZE in R mode, the camera will automatically select the optimal image size.
The Scene Icon
The camera selects from the following scenes:
LAND-
AUTO
acd
ddc dd
ggc
ccc cd ch ce cu cv cw cx cy cz
aac ad ah
bbc
SCAPE
NIGHT
Main subject
Non-portrait
Portra it
Moving object
Portra it and
motion
Scene
Normal
Backlit
Normal
Backlit
* If n is displayed, the camera will take a series of shots (advanced anti-blur; P 24 ).
c
The mode selected may vary with shooting conditions. If the mode and subject do not match, select B mode
(P 24) or choose SP (P 28) and select a scene manually.
NIGHT
MACRO
h
dh
*
euvwxyz
*
—
—
(TRIPOD)
*
*
———
———
GREEN-
BEACH
SUNSET
du dv dw dx dy dz
gu gv gw gx gy gz
au av aw ax ay az
bu bv bw bx by bz
SNOW
SKY
ERY
SKY &
GREENERY
More on Photography
23
Page 38

Advanced Anti Blur
■■ E
Priority
B B AUTO
Adv.
ADVANCED
When n is displayed, the camera will take a series of
exposures and combine them to form a single image,
reducing “noise” (mottling) and blur.
a
n is available when ON is selected in the shooting
menu (P 88) and the flash (P 39) is off or set to auto.
c
• Some time may be required to combine the exposures into a single image. A single combined image
may not be created if the subject or camera moves
during shooting. Keep the camera steady during
shooting and do not move the camera until shooting is complete.
• Frame coverage is reduced.
The E XR Icon
When the shutter button is pressed halfway, the
camera chooses the preferred E mode:
• S (RESOLUTION PRIORITY): Produces crisp, clear
shots.
• T (HIGH ISO & LOW NOISE): Reduces noise in pictures taken at high sensitivities.
• U (D-RANGE PRIORITY): Increases the amount of
detail visible in highlights.
Shooting Mode
E
Priorit y
Select this mode to manually choose from the following E modes:
• S (RESOLUTION PRIORITY): Choose for crisp, clear
shots.
• T (HIGH ISO & LOW NOISE): Reduce noise in pic-
tures taken at high sensitivities.
• U (D-RANGE PRIORITY): Increase the amount of
detail visible in highlights.
U DYNAMIC RANGE (P 86) can be set to M
(1600%) and D (800%).
AUTO
Choose for crisp, clear snapshots. This
mode is recommended in most situations.
Adv.
ADVANCED
This mode combines “point-and-shoot”
simplicity with sophisticated photographic techniques. The A Adv. MODE option in the shooting menu can be used
to choose from the following advanced
modes:
24
Page 39

Shooting Mode
■ ■ ii PRO FOCUS
■ ■ jj PRO LOW-LIGHT
PRO FOCUS
The camera takes up to three
shots each time the shutter
button is pressed, softening
the background to emphasize
the main subject. The amount
of softening can be adjusted before shooting by
rotating the command dial. Use for portraits or
photos of flowers similar to those produced by
SLR cameras.
a
Softening can not be applied to background objects
that are too close to the main subject. If a message
stating that the camera can not create the effect is
displayed when the camera focuses, try backing away
from your subject and zooming in. The camera may
also be unable to soften the background if the subject
is moving; if prompted, check the results and try again.
PRO LOW-LIGHT
Each time the shutter button
is pressed, the camera makes
four exposures and combines
them into a single photograph.
Use to reduce noise and blur
when photographing poorly lit subjects or static
subjects at high zoom ratios.
a
A single combined photograph may not be created
with some scenes or if the subject or camera moves
during shooting. Do not move the camera until shooting is complete.
Pro Focus/Pro Low-Light
To save unprocessed copies of pictures taken in these
modes, select ON for the t SAVE ORG IMAGE op-
tion in the setup menu (P 104 ).
c
• Keep the camera steady during shooting.
• Frame coverage is reduced.
More on Photography
25
Page 40

Shooting Mode
■■ nn MULTIPLE EXPOSURE
■ ■ ii I INDIVID. SHUTTER 3D
MULTIPLE EXPOSURE
Create a photograph that combines two exposures.
Take the first shot.
1
Press MENU/OK. The first shot will be shown su-
2
perimposed on the view through the lens as a
guide to taking the second shot.
a
To return to Step 1 and retake the first shot, press
the selector left. To save the first shot and exit
without creating a multiple exposure, press DISP/
BACK.
Take the second shot.
3
Press MENU/OK to create the multiple exposure,
4
or press the selector left to return to Step 3 and
retake the second shot.
NDIVID. SHUTTER 3D
Take two shots from different angles to create a
3D image.
To choose the order in
1
which the pictures are taken, press the selector right
to display the current order
and then press the selector
left or right to choose from the options below.
G: Take the left shot first.
H: Take the right shot first.
Press the shutter button to take the first shot.
2
a
To exit without recording a picture, press DISP/
BACK.
TURN
26
Page 41

Shooting Mode
The first shot will be shown superimposed on
3
the view through the lens. Using it as a guide,
frame the second shot and press the shutter
release button.
a
• The 3D effect
may not be visible with some
subjects or under
some shooting conditions. For best results, the
distance the camera is moved between shots
should be about 1/30th to 1/50th of the distance to the subject.
• The camera will turn off automatically if no operations performed for the time selected for
N AUTO POWER OFF ( P 102). The first shot will
not be saved if the second shot is not taken before the camera turns off.
Viewing and Pri nting 3D Images
• The camera displays images in 2D. Press the selector
down to toggle between the first and second shots.
• Devices equipped for 3D display, such as the FINEPIX
REAL 3D V3 digital photo frame or FINEPIX REAL 3D
W3 digital camera, will display the images in 3D.
• 3D prints can be ordered from http://www.fujifilm.
com/3d/pr int/
• The supplied software displays 3D anaglyph images.
3D photos can also be viewed using other applications that support the MP format.
• 3D TVs that support the MP format can display images in 3D. See the manual for your TV for details.
c
• Images are not output in 3D when printed directly
from the camera.
• 3D images are displayed in 2D in slide shows and
when output on a conventional TV.
• 3D images can not be edited or retouched.
Note: The MP (Multi-Picture) format is a CIPA standard for
files containing multiple still images. Files in MP format are
referred to as “MP files” and have the extension “*.MPO”. The
camera uses this format for 3D images.
More on Photography
27
Page 42

Shooting Mode
SP1/SP2
: SCENE POSITION
Scene
Description
NATURAL &
SP1/SP2
: SCENE POSITION
The camera offers a choice of “scenes,” each adapted to particular shooting conditions or
a specific type of subject. Use the A SCENE POSITION option in the shooting menu to
choose the scene assigned to the SP1/SP2 position on the mode dial.
Scene
CC
NATURAL & NN
D NATURAL LIGHT
L PORTRAIT
Z PORTRAIT ENHANCER
l DOG
m CAT
M LANDSCAPE
N SPORT
O NIGHT
H NIGHT (TRIPOD)
U FIREWORKS
Q SUNSET
R SNOW
V BEACH
U PART Y
V FLOWER
W TEXT
The camera takes two shots: one without the flash and one with.
Capture natural lighting under low-light conditions.
Choose for portraits.
Choose for a smooth skin effect when shooting portraits.
Choose when photographing dogs.
Choose when photographing cats.
Choose for daylight shots of buildings and landscapes.
Choose when photographing moving subjects.
Choose this mode for poorly lit twilight or night scenes.
Choose this mode for slow shutter speeds when shooting at night.
Slow shutter speeds are used to capture the expanding burst of light from a firework.
Choose this mode to record the vivid colors in sunrises and sunsets.
Choose for crisp, clear shots that capture the brightness of scenes dominated by shining white snow.
Choose for crisp, clear shots that capture the brightness of sunlit beaches.
Capture indoor background lighting under low-light conditions.
Choose for vivid close-ups of flowers.
Take clear pictures of text or drawings in print.
Description
28
Page 43

Shooting Mode
l DOG/m CAT
The camera focuses on the faces of dogs or cats that are facing the camera, and the self-timer menu offers a
n AUTO RELEASE option that releases the shutter automatically when a pet is detected (P 41). During play-
back, image search (P 63) can be used to search for pictures taken in either mode.
1
Although camera can detect many different breeds of dogs and cats, results may vary with the breed and shooting conditions. The camera may fail to detect pets with dark-colored faces or long hair covering their entire face.
If a dog or cat is not detected, the camera focuses on the subject at the center of the frame.
More on Photography
29
Page 44

Shooting Mode
rr MOTION PANORAMA 360
MOTION PANORAMA 360
Follow an on-screen guide
to take photos that will
automatically be joined to
form a panorama.
Rotate the zoom ring until the zoom indicator
1
turns white (P 18).
To select the angle through which you will pan
2
the camera while shooting, press the selector
down. Press the selector left or right to highlight an angle and press MENU/OK.
Press the selector right to view a choice of pan
3
directions. Press the selector left or right to
highlight a pan direction and press MENU/OK.
Press the shutter button all the way down to
4
start recording. There is no need to keep the
shutter button pressed during recording.
Pan the camera in the direction shown by
5
the arrow. Shooting ends
automatically when the
progress bar is full and the
panorama is complete.
a
Shooting ends if the shutter button is pressed all the way down during shooting. No
panorama will be recorded if the shutter button is
pressed before the camera has been panned through
120 °.
120
Progress bar
30
Page 45

Shooting Mode
c
• Panoramas are created from multiple frames. The
camera may in some cases record a greater or lesser
angle than selected or be unable to stitch the frames
together perfectly. The last part of the panorama
may not be recorded if shooting ends before the
panorama is complete.
• Shooting may be interrupted if the camera is panned
too quickly or too slowly. Panning the camera in a
direction other than that shown cancels shooting.
• The desired results may not be achieved with moving subjects, subjects close to the camera, unvarying
subjects such as the sky or a field of grass, subjects
that are in constant motion, such as waves and waterfalls, or subjects that undergo marked changes in
brightness. Panoramas may be blurred if the subject
is poorly lit.
z
Choose z for seamless 360° panoramas that can be
played back in a loop (P 66).
a
The t SAVE ORG IMAGE option in the setup menu
can be used to record a v panorama in addition to
a seamless z panorama (P 104).
c
Depending on the subject and shooting conditions,
the camera may produce distorted results or a v
panorama. The top and bottom of the area visible in
the shooting display are cropped out and white strips
may appear at the top and bottom of the display.
For Bes t Results
For best results, move the camera in a small circle at
a steady speed, keeping the camera horizontal and
being careful only to pan in the direction shown by
the guides. If the desired results are not achieved, try
panning at a different speed.
More on Photography
31
Page 46

P P: PROGRAM AE
: PROGRAM AE
In this mode, the camera sets exposure
automatically. If desired, you can choose
different combinations of shutter speed
and aperture that will produce the same
exposure (program shift).
c
If the subject is outside the metering range of the camera, the shutter speed and aperture displays will show
“---”. Press the shutter button halfway to measure exposure again.
Shooting Mode
Program Shift
Rotate the command dial to choose the desired combination of shutter speed and aperture. The default
values can be restored by raising the flash or turning
the camera off. Program shift is only available if the
flash is off and an option other than AUTO is selected
for U DYNAMIC RANGE and N ISO.
Shutter speed
250F4.5
Aperture
32
Page 47

Shooting Mode
S S: SHUTTER PRIORITY AE
AA: APERTURE PRIORITY AE
: SHUTTER PRIORITY AE
Choose the shutter speed using the
command dial, while the camera adjusts aperture for optimal exposure.
Shutter speed
1000
c
• If the correct exposure can not be achieved at the
selected shutter speed, aperture will be displayed in
red. Adjust shutter speed until the correct exposure
is achieved. If the subject is outside the metering
range of the camera, the aperture display will show
“F---”. Press the shutter button halfway to measure
exposure again.
• The shutter speed is restricted depending on the ISO
setting.
: APERTURE PRIORITY AE
Choose the aperture using the command dial, while the camera adjusts
shutter speed for optimal exposure.
Aperture
F3.5
c
If the correct exposure can not be achieved at the selected aperture, shutter speed will be displayed in red.
Adjust aperture until the correct exposure is achieved.
If the subject is outside the metering range of the camera, the shutter speed display will show “---”. Press the
shutter button halfway to measure exposure again.
More on Photography
33
Page 48

M M: MANUAL
: MANUAL
In this mode, you choose both shutter
speed and aperture. If desired, exposure can be altered from the value suggested by the camera.
Press the d button to choose between shutter
speed and aperture and rotate the command dial
to adjust the selected setting.
M
Shutter speed
250F4.5
Aperture
c
• Noise in the form of randomly-spaced bright pixels
may occur in long exposures.
• The shutter speed is restricted depending on the ISO
setting.
Shooting Mode
The Exposure Indicator
The amount the picture will be under- or over-exposed at current settings is shown by the exposure
indicator.
250F4.5
34
Page 49

Shooting Mode
C C: CUSTOM MODE
Menu/se tting
Setti ngs saved
Shootin g
menu
Setup me nu
Other
: CUSTOM MODE
In P, S, A, M and all E modes ex-
cept R, the K CUSTOM SET option
in the shooting menu (P 90) can be
used to save current camera and menu
settings. These settings are recalled
whenever the mode dial is rotated to
C (custom mode).
Menu/setting
Shooting
menu
Setup menu
Other
N ISO, O IMAGE SIZE, T IMAGE QUALITY, U DYNAMIC RANGE, P FILM SIMULATION, d WB SHIFT, f COLOR, e TONE,
q SHARPNESS, h NOISE REDUCTION,
y INTELLIGENT SHARPNESS, R INTELLIGENT DIGITAL ZOOM, b FACE DETECT ION,
n FACE RECOGNI TI ON, W MOVIE MODE,
a STILL SHOOTING IN MOVIE, J AE BKT
EV STEPS, I FLASH, g EXTERNAL FLASH
C AF ILLUMINATOR
ISO, metering, autofocus mode, focus mode,
white balance, burst mode, macro mode, flash
mode, exposure compensation, monitor display options (DISP/BACK button)
Settings saved
c
Once the camera is turned off, R INTELLIGENT DIGI-
TAL ZOO M is deactivated.
More on Photography
35
Page 50

Focus Lock
To compose photographs with off-center subjects:
Position the subject in the focus frame.
1
Focus.
2
Press the shutter button
halfway to set focus and
exposure. Focus and exposure will remain locked
while the shutter button
is pressed halfway (AF/AE
lock).
Recompose the picture.
3
Keeping the shutter button pressed halfway, recompose the picture.
Shoot.
4
36
Autofocus
Although the camera boasts a high-precision autofocus system, it may be unable to focus on the subjects
listed below. If the camera is unable to focus using
autofocus, use focus lock to focus on another subject
at the same distance and then recompose the photograph.
• Very shiny subjects such as mirrors or car bodies.
• Fast-moving subjects.
• Subjects photographed through a window or other
reflective object.
• Dark subjects and subjects that absorb rather than
reflect light, such as hair or fur.
• Insubstantial subjects, such as smoke or flame.
• Subjects that show little contrast with the background (for example, subjects in clothing that is the
same color as the background).
• Subjects positioned in front of or behind a highcontrast object that is also in the focus frame (for
example, a subject photographed against a backdrop of highly contrasting elements).
Page 51

The AE/AF LOCK Button
Locking Exposure
Locking Focus
The AE/AF LOCK button can be used to lock exposure or focus.
Locking Exposure
Meter exposure.
1
Position the subject in the focus frame and
press the AE/AF LOCK button to meter exposure.
Focus.
2
Keeping the AE/AF LOCK
button pressed, press the
shutter button halfway
to focus. Focus and exposure will remain locked while the shutter
button is pressed halfway, even if you later
release the AE/AF LOCK button.
Repeat steps 1 and 2 as desired to refocus
before taking the picture.
+
Recompose the picture.
3
Keeping the shutter button pressed halfway,
recompose the picture.
c
Adjusting zoom ends AE lock. AE lock is not available with Intelligent Face Detection.
Shoot.
4
Locking Focus
If AF LOCK ONLY is selected for v AE/AF-LOCK
BUTTON in the setup menu (P 104), pressing the
AE/AF LOCK button locks focus. If AE/AF LOCK is
selected, both focus and exposure will be locked.
a
If AE&AF ON/OFF SWITCH is selected for k AE/AF-
LOCK MO DE in the setup menu (P 10 4), ex po su re a nd /
or focus will lock when the AE/AF LOCK button is pressed
and remain locked until the button is pressed again.
More on Photography
37
Page 52

F Macro and Super Macro Modes (Close-ups)
For close-ups, press the selector left (F) to choose from the macro options shown below.
OFF
OFF
Choose from F (macro mode),
G (super macro mode), or
OFF (macro mode off)
When macro mode is in effect, the camera focuses on subjects near the center of the frame. Use the
zoom ring to compose pictures. The following restrictions apply in super macro mode: the lens must
be zoomed all the way out (at other zoom positions, o is displayed) and the flash can not be used.
a
• Use of a tripod is recommended to prevent blur caused by camera shake.
• Flash compensation may be required when using the flash (P 89).
• Using the flash at close range may cast a lens shadow. Zoom a little or have more distance from the subject.
38
Page 53

N Using the Flash (Super-Intelligent Flash)
Mode
Description
When the flash is used, the camera’s Super-Intelligent Flash system instantly analyzes the scene based
on such factors as the brightness of the subject, its position in the frame, and its distance from the
camera. Flash output and sensitivity are adjusted to ensure that the main subject is correctly exposed
while preserving the effects of ambient background lighting, even in dimly-lit indoor scenes. Use the
flash when lighting is poor, for example when shooting at night or indoors under low light.
Raise the flash.
1
Press the flash pop-up button to raise the flash.
Choose a flash mode.
2
Press the selector right (N). The flash mode changes each time the selector is pressed.
More on Photography
Mode
A/K
(AUTO FLASH)
N/L
(FORCED FLASH)
O/M
(SLOW SYNCHRO)
Description
The flash fires when required. Recommended in most situations.
The flash fires whenever a picture is taken. Use for backlit subjects or for natural
coloration when shooting in bright light.
Capture both the main subject and the background under low light (note that
brightly lit scenes may be overexposed).
39
Page 54

N Using the Flash (Super-Intelligent Flash)
c
The flash may fire several times with each shot. Do not move the camera until shooting is complete.
a
• The peripheral part of an image may be dark when using the flash.
• Remove lens hoods to prevent shadows in photos taken with the flash.
Red-Eye Removal
When Intelligent Face Detection is active (P 54), and ON is se l ec t ed fo r B RED EYE R EMOVAL in the
setup menu (P 103), red-eye removal is available in K, L, and M.
Red-eye removal minimizes “red-eye” caused when light from the flash is reflected from the subject’s
retinas as shown in the illustration at right.
Turning the Flash Of f
Lower the flash where flash photography is prohibited or to capture natural lighting under dim light. At slow shutter speeds, k will be displayed to warn that pictures may be
blurred; use of a tripod is recommended.
Optional Flash Units
The camera can be used with optional EF-42 and EF-20 clip flash units (P 10 8).
40
Page 55

J Using the Self-Timer
Option
Description
To use the self-timer, press the selector down (h) and choose from the following options:
OFF
OFF
Option
T (OFF)
n (AUTO RELEASE)
o (AUTO RELEASE)
Self-timer off.
The shutter is released automatically when the camera detects the face of a cat or dog
(P 29).
The shutter is released automatically when the camera detects a human portrait subject
facing the camera. Use for portraits of babies.
Description
The shutter is released ten seconds after the shutter button is pressed. Use for self-portraits.
S (10 SEC)
The self-timer lamp on the front of the camera lights when the timer starts and begins to
blink shortly before the photo is taken.
The shutter is released two seconds after the shutter button is pressed. Use to reduce blur
R (2 SEC)
caused by the camera moving when the shutter button is pressed. The self-timer lamp will
blink as the timer counts down.
Burst Mode
If I is selected for burst mode (P 42), the camera will record burst of five photographs when the timer expires,
improving your chances of getting the desired results in portraits taken with the self-timer.
More on Photography
41
Page 56

I Continuous Shooting (Burst Mode)
Capture motion or automatically vary selected settings over a series of pictures.
Press the I button and choose
from the following options:
CONTINUOUS
OFF
OFF
OFF: OFF
I: TOP
P: BEST FRAME CAPTURE
O: AE BKT
X: FILM SIMULATION BKT
Y: DYNAMIC RANGE BKT
42
a
• Focus and exposure are determined by the first frame
in each series. The flash turns off automatically; the
previously-selected flash mode is restored when continuous shooting is turned off.
• Frame rate varies with shutter speed, shooting conditions, and the number of pictures in each burst.
• The number of pictures that can be taken in a single
burst varies with the scene and camera settings. The
number of pictures that can be recorded depends on
the memory available.
Page 57

I Continuous Shooting (Burst Mode)
■■ II TOP n
■■ PP BEST FRAME CAPTURE
TOP n
The camera takes photographs while the shutter
button is pressed. To choose the frame rate:
Press the selector right
1
when the camera is in
shooting mode.
Press the selector up or down to choose a
2
frame rate and press MENU/OK to select and re-
CONTINUOUS SHOOTING SETUP
11
frames/s
8
frames/s
5
frames/s
3
frames/s
turn to shooting mode.
BEST FRAME CAPTURE
The camera takes a series of pictures, starting
before and ending after the shutter button is
pressed. To choose the frame rate and number
of shots:
Press the selector right when the camera is in
1
shooting mode.
Highlight the current frame rate and press the
2
selector right, then press selector up or down
to choose a new value and press MENU/OK to
select.
c
Some frame rates may reduce the number of shots
available in Step 3.
More on Photography
43
Page 58

I Continuous Shooting (Burst Mode)
Highlight the number of
3
shots and press the selector right. Press the selector
Shots per burst
CONTINUOUS SHOOTING SETUP
–1S SHUTTER 1S
up or down to choose the
number of shots in each
burst and left or right to
choose their distribution
SET CANCEL
Distribution
(the number on the left is taken before and the
number on the right after the shutter button
is pressed). Press MENU/OK when settings are
complete.
Press DISP/BACK to return to shooting mode.
4
Take photographs. The camera begins record-
5
ing while the shutter button is pressed half-
16
FRAMES8
way, and completes the burst when the shutter button is pressed all the way down. The
illustration shows a burst of eight shots, three
before the shutter button is pressed and four
after.
Shutter button
Shutter button
pressed halfway
c
• If the shutter button is pressed all the way down before the number of frames selected for the “before”
portion is recorded, the remaining frames will be
taken after the shutter button is pressed all the way
down.
• If the shutter button is pressed halfway for an extended period, the camera may record the burst before
the shutter button is pressed all the way down.
pressed all the
way down
“Before”
shots
“Af te r”
shots
44
Page 59

I Continuous Shooting (Burst Mode)
■ ■ OO AE BKT
■■ XX FILM SIMULATION BKT
■■ YY DYNAMIC RANGE BKT
AE BKT
Each time the shutter button is pressed, the
camera takes three shots: one using the metered
value for exposure, the second overexposed by
the amount selected for J AE BKT EV STEPS in
the shooting menu (P 89), and the third underexposed by the same amount (the camera may not
be able to use the selected bracketing increment
if the amount of over- or under- exposure exceeds
the limits of the exposure metering system).
FILM SIMULATION BKT
Each time the shutter button is pressed, the camera takes one shot and processes it to create three
copies with different P FILM SIMULATION set-
tings (P 86): c PROVIA/STANDARD for the first,
d Velvia/ VIVID for the second, and e ASTIA/
SOFT for the third.
DYNAMIC RANGE BKT
Each time the shutter button is pressed, the camera takes three shots at different U DYNAMIC
RANGE settings (P 86): A 100% for the first,
B 200% for the second, and C 400% for
the third (N ISO can not exceed 3200; values less
than 400 are not available when O is selected for
O IMAGE SIZE).
More on Photography
45
Page 60

d Exposure Compensation
F
4.5
250
Use exposure compensation when photographing very bright, very dark, or high-contrast subjects.
Press the d button to display
the exposure indicator and
rotate the command dial to
choose a value.
46
P
Exposure indicator
F
4.5
250
The effect is visible in the display. Press the d
button again to select.
Choose negative values
to reduce exposure
1
• A d icon and exposure indicator are displayed at
settings other than ±0. Exposure compensation is
not reset when the camera is turned off; to restore
normal exposure control, choose a value of ±0.
• Turn the flash off when using exposure compensation.
Choose positive values to
increase exposure
Page 61

Metering
Option
Description
To choose how the camera meters exposure, press the AE button and then choose from the following
options.
PHOTOMETRY
MULTI
Option
o
(MULTI)
p
(SPOT)
q
(AVERAGE)
Description
Automatic scene recognition is used to adjust exposure for a wide range of shooting conditions.
The camera meters lighting conditions at the center of the frame. Recommended when the background is much brighter or darker than the main subject.
Exposure is set to the average for the entire frame. Provides consistent exposure across multiple
shots with the same lighting, and is particularly effective for landscapes and portraits of subjects
dressed in black or white.
More on Photography
47
Page 62

Focus Mode
Mode
Description
To choose how the camera focuses, during still photography and movie recording press the AF C-S-M
button and then choose from the following options.
FOCUSING
CONTINUOUS AF
Mode
(SINGLE AF)
(CONTINUOUS AF)
(MANUAL FOCUS)
48
K
J
j
Description
Focus locks while the shutter button is pressed halfway. Choose for stationary subjects.
The camera continually adjusts focus to reflect changes in the distance to the subject even
when the shutter button is not pressed halfway (note that this increases the drain on the
batteries). r (CENTER) is automatically selected for autofocus mo de (P 50); if Intelligent Face
Detection is on, the camera will continually adjust focus for the selected face. Choose for
moving subjects.
Focus manually using the focus ring. Rotate the ring left to reduce the focus distance, right
to increase. The manual focus indicator indicates how closely the focus distance matches the
distance to the subject in the focus brackets. Choose for manual control of focus or in situations in which the camera is unable to focus using autofocus (P 36). Intelligent Face D etectio n
turns off automatically.
Reduce focus
distance
P
Increase focus
distance
Manual focus
mode icon
Manual focus
indicator
Page 63

Focus Mode
1
• Use of a tripod is recommended. Focus may be affected if the camera moves.
• If ON is selected for j FOCUS CHECK in the setup menu (P 104), the whole image will be magnified to assist
focus when the focus ring is rotated.
• The camera will not focus when the focus ring is rotated all the way to the right. To focus at infinity, focus on a
distant object.
• To focus using autofocus, press the AE/AF LOCK button. This can be used to
quickly focus on a chosen subject in manual focus mode.
More on Photography
49
Page 64

Autofocus Mode
To choose how the camera selects the focus area
when K is selected for focus mode (P 48), press
the AF button and rotate the command dial. Note
that regardless of the option selected, the camera will focus on the subject in the center of the
monitor when macro mode is on (P 38).
AF MODE
CENTER
The following options are available:
• r (CENTER): The camera fo-
M
cuses on the subject in the
center of the frame. This option can be used with focus
lock.
250F4.5
• s (MULTI): When the shutter
button is pressed halfway,
the camera detects highcontrast subjects near the
center of the frame and se-
Focus frame
lects the focus area automatically.
• t (AREA):
The focus position
SELECT AF AREA
can be chosen manually by
pressing the selector up,
down, left, or right and press-
Focus target
CANCELSET
ing MENU/OK when the focus
brackets are in the desired position. Choose for
precise focus when the camera is mounted on a
tripod.
• x (TRACKING): Position the
M
subject in the focus target
and press the selector left.
The camera will track the
START TRACKING
250F4.5
subject and adjust focus as it
moves through the frame.
50
Page 65

Sensitivity
Option
Description
To adjust the camera’s sensitivity to light, press the ISO button and choose from the options below.
ISO
100 200 400 800 1600 3200
100
ISO
Higher values can reduce blur; note, however, that mottling may appear in pictures taken at high sensitivities.
100
Bright
Less noticeable
ISO
Scene
Noise (mottling)
128 00
Dark
More noticeable
More on Photography
Option
Description
AUTO Sensitivity is adjusted automatically in response to shooting conditions.
AUTO (3200) / AUTO (1600) / AUTO (800) /
AUTO (400)
12800 / 6400 / 3200 / 1600 / 800 / 4 00 /
200 / 100
As above, except that sensitivity will not be raised above the value in parentheses.
Sensitivity is set to the specified value, which is shown in the display.
a
Sensitivity can also be adjusted in the shooting menu (P 84).
51
Page 66

Option
Descr iption
White Balance
For natural colors, press the WB button and choose
a setting that matches the light source.
Option
AUTO White balance adjusted automatically.
h
i
j
k
l
m
n
Measure a value for white balance.
For subjects in direct sunlight.
For subjects in the shade.
Use under “daylight” fluorescent lights.
Use under “warm white” fluorescent lights.
Use under “cool white” fluorescent lights.
Use under incandescent lighting.
Description
h: Custom White Balance
Choose h to adjust white balance for unusual lighting conditions. White balance measurement options
will be displayed; frame a white object so that it fills
the LCD monitor and press the shutter button all the
way down to measure white balance.
• If “COMPLETED!” is displayed, press MENU/OK to set
white balance to the measured value.
• If “UNDER” is displayed, raise exposure compensation (P 46) and try again.
• If “OVER” is di splayed, lower exposure compensation
and try again.
a
For greater precision, adjust P FILM SIMULATION,
N ISO, and U DYNAMIC RANGE before measur-
ing white balance.
a
• At settings other than h, auto white balance is used
with the flash.
• Results vary with shooting conditions. Play pictures
back after shooting to check colors in the LCD monitor.
52
Page 67

The Fn Button
The role played by the Fn button can be selected using the F Fn BUTTON
option in the setup menu (P 102).
The following options are available:
IMAGE SIZE ( P 85)/IMAGE QUALITY ( P 85)/DYNA MIC R A NGE ( P 86)/FILM SIMUL ATIO N
(P 86)/FACE D E T E CTI O N ( P 88)/FACE RE C O G N I T I O N ( P 88)/INTELLIGENT DIGITAL ZOOM
(P 87)/MOVIE MODE (P 88)
a
The F Fn BUTTON menu can also be displayed by pressing and holding the Fn button.
Fn button
More on Photography
53
Page 68

77
b Intelligent Face Detection
Intelligent Face Detection allows the camera to automatically detect human faces and set focus and
exposure for a face anywhere in the frame for shots that emphasize portrait subjects. Choose for group
portraits (in horizontal or vertical orientations) to prevent the camera from focusing on the background.
To use Intelligent Face Detection, press MENU/OK to display
the shooting menu and select ON for b FACE DETEC-
TION. Faces can be detected
with the camera in vertical
Green border
or horizontal orientation; if a
face is detected, it will be indicated by a green border. If there is more than one face in the frame, the
camera will select the face closest to the center;
other faces are indicated by white borders.
c
• In some modes, the camera may set exposure for the
frame as a whole rather than the portrait subject.
• If the subject moves as the shutter button is pressed,
their face may not be in the area indicated by the
green border when the picture is taken.
54
Intelligent Face Detection
Intelligent Face Detection is
recommended when using the
self-timer for group- or self-portraits (P 41).
When a picture taken with Intelligent Face Detection is displayed, the camera can automatically select
faces for red-eye removal (P 93), playba ck zo om (P 59) ,
slide shows (P 93), image search (P 63), image disp.
(P 100), printing (P 76), and cropping (P 94).
7
Page 69

n Face Recognition
Adding New Faces
The camera can store information on the face
and personal details (name, relationship, and
birth date) of portrait subjects and assign these
subjects priority for Intelligent Face Detection or
display their names and other information during
playback.
Adding New Faces
Follow the steps below to add faces to the face
recognition database.
Select REGISTER.
1
Select REGISTER for n FACE RECOG NI-
TION in the shooting menu.
a
To disable face recognition, select OFF.
Take a photograph.
2
After checking that the
REGISTER FACE
subject is facing the camera, frame the subject using the guides and take
the photograph.
a
If an er ror is disp layed , take the ph otogr aph ag ain.
CAPTURE THE FACE
ALONG WITH THE GUIDLINE
CANCEL
Enter face recognition data.
3
Press MENU/OK to display face recognition
data and enter the following information:
• NAME: Enter a name of up to 14 characters
and press MENU/OK.
• BIRTHDAY: Enter the subject’s date of birth
and press MENU/OK.
• CATEGORY: Choose the option that describes
your relationship to the subject and press
MENU/OK.
a
If you attempt to zoom in on the face of a person indicated by a green border in the face recognition database on their birthday, the camera will display their
name and the message “Happy Birthday!”.
c
Face recognition may not be available depending on
the shooting mode.
More on Photography
55
Page 70

n Face Recognition
Viewing, Editing, and Deleting Existing Data
Adding Faces Automatically
Viewing, Editing, and Deleting Existing Data
Follow the steps below to view, edit, or delete
face recognition data.
Select VIEW & EDIT for n FACE RECOG-
1
NITION.
Select a face.
2
View or edit face recognition data.
3
The name, category, or birth date can be edited as described in Step 3 of “Adding New
Faces ” (P 55). To retake the photo, select RE-
PLACING IMAGE and shoot a new portrait
as described above.
a
To delete face recognition data for the selected subject, select ERASE.
Adding Faces Automatically
To automatically add frequently-photographed
subjects to the face recognition database, select
ON for AUTO REGISTRATION in the face recognition menu. If the camera detects a face that has
been photographed many times without being
added to the database, it will display a message
prompting you to create a new face recognition
entry. Press MENU/OK and enter face recognition
data.
1
The camera may sometimes fail to recognize new faces
automatically. If necessary, faces can be added manually using the REGISTER option.
56
Page 71

n Face Recognition
Face Recognition
The camera can store up to eight faces. If you attempt to add a ninth face, a confirmation dialog will be displayed; use VIEW & EDIT to make room for new faces by deleting existing data.
When Intelligent Face Detection (P 54) is on and the frame contains multiple subjects from the face recognition
database, the camera displays the name of the subject that will be used to set focus and exposure (the subject
shown by the green frame). If no name is entered, the camera will show “---”. Subjects identified using face recognition but not used to set focus and exposure are shown by orange frames, other subjects by white frames.
c
The camera may fail to identify subjects in the face recognition database if they are not facing the camera or
are only partly in the frame, or if details of the subjects’ faces or expressions differ markedly from those in the
database.
More on Photography
57
Page 72

Playback Options
100-0001
1/ 1000
4. 5
2
-
1
3
Continuous Shooting
I I Favorites: Rating Pictures
To view the most recent picture in the monitor,
press the a button.
-
F4. 5
1
1/1000F4.
Press the selector right to view pictures
in the order recorded, left to view pictures in reverse order. Keep the selector
pressed to scroll rapidly to the desired
frame.
More on Playback
a
Pictures taken using other cameras are indicated by a
m (“gift image”) icon during playback.
100-0001
2
3
Continuous Shooting
In the case of pictures taken in continuous shooting mode, only the first frame of each series will
be displayed. Press the selector down to view the
other pictures in the series.
Favorites: Rating Pictures
To rate the picture currently displayed in full-frame
playback, press DISP/BACK and press the selector
up and down to select from zero to five stars.
58
Page 73

Playback Zoom
Playback Zoom
Press k to zoom in on pictures displayed in single-frame playback; n to zoom out. When the
picture is zoomed in, the selector can be used to
view areas of the image not currently visible in the
display.
Zoom indicator
Navigation window
shows portion of image
currently displayed in
monitor
Press DISP/BACK or MENU/OK to exit zoom.
a
• Rotate the command dial to view other pictures without changing the zoom ratio.
• The maximum zoom ratio varies with image size.
Playback zoom is not available with cropped or resized copies saved at a size of a or smaller.
Playback Options
Intelligent Face Detection
Pictures taken with Intelligent Face Detection (P 54)
are indicated by a g icon. Press the g button to
zoom in on the subject selected with Intelligent Face
Detection. You can then use the k and n buttons
to zoom in and out.
More on Playback
59
Page 74

Multi-Frame Playback
Multi-Frame Playback
100-0001
To change the number of images displayed, press
n in single-frame view.
100-0001
Press k to view
fewer images.
Press n to view
more images.
Playback Options
Use the selector to highlight images and press
MENU/OK to view the highlighted image full frame.
In the nine- and hundred-frame displays, press
the selector up or down to view more pictures.
b Two-Frame Display
Two-frame display can be used
to compare pictures taken in
C mode.
60
Page 75

A Deleting Pictures
Option
Descr iption
To delete individual pictures, multiple selected pictures, or all pictures,
press MENU/OK, select A ERASE ( P 91), and choose from the options be-
low. Note that deleted pictures can not be recovered. Copy important
pictures to a computer or other storage device before proceeding.
FRAME
Option
Press the selector left or right to scroll through pictures and press MENU/OK to delete the current picture
(a confirmation dialog is not displayed).
Description
SET
PLAYBACK MENU
ERASE
BACK
FRAME
SELECTED FRAMES
ALL FRAMES
Highlight pictures and press MENU/OK to select or deselect (pictures included in the photobook or print
SELECT FRAMES
order are shown by S). When the operation is complete, press DISP/BACK to display a confirmation dialog, then highlight OK and press MENU/OK to delete the selected pictures.
A confirmation dialog will be displayed; highlight OK and press MENU/OK to delete all unprotected pic-
ALL FRAMES
tures (if a memory card is inserted, only the pictures on the memory card will be affected; the pictures
in internal memory are only deleted if no memory card is inserted). Pressing DISP/BACK cancels deletion;
note that any pictures deleted before the button was pressed can not be recovered.
a
• Protected pictures can not be deleted. Remove protection from any pictures you wish to delete (P 94).
• If a message appears stating that the selected images are part of a DPOF print order, press MENU/OK to delete the
pictures.
More on Playback
61
Page 76

Viewing Photo Information
100-0001
12/31/2050
10: 00 AM
3:2
F
Photo information can be viewed by pressing the
info button.
100-0001
3:2
12/31/2050
10: 00 AM
2
-
1
1/ 1000 F4. 5
200
3
PLAYBACK INFORMATION 1
AF INFORMATION 2
F
D-RANGE
COLOR
TONE
SHARPNESS
FILM SIM.
WHITE BALANCE
METERING
EXPOSURE MODE
LENS
FOCAL LENGTH
FLASH MODE
: 200
: STD
: STD
: STD
: PROVIA
: AUTO
: PATTERN
: AUTO
: 4
mm
: F
3.0
: 4
mm
: OFF
a
• Use the command dial to view other images.
• The active focus point is shown by a “+” icon.
Zooming in on the Focus Point
Press the f button to zoom in
on the focus point. Press DISP/
BACK or MENU/OK to return to fullframe playback.
62
Page 77

Image Search
Option
Descr iption
Option
See page
I
Search for images by various criteria.
Press the H button during playback.
1
Highlight one of the following options and
2
press MENU/OK:
Option
BY DATE
BY FACE
BY I FAVORIT ES
BY SCENE
BY TYPE OF DATA Find all still pictures or all movies.
BY UPLOAD MARK
Find all pictures taken on a selected
date.
Find all pictures based on specified face
information.
Find all pictures with a specified rating
(P 58).
Find all pictures that match a selected
scene.
Find all pictures selected for upload to a
specified destination (P 92).
Description
Select a search condition. Only pictures that
3
match the search condition will be displayed.
To delete or protect selected pictures or to
view the selected pictures in a slide show,
press MENU/OK and choose from the following
options:
Option
A ERASE 61
D PROTEC T 94
SLIDE SHOW 93
See page
More on Playback
63
Page 78

Creating a PhotoBook
X PhotoBook Assist
Create books from your favorite photos.
Creating a PhotoBook
Select X PHOTOBOOK ASSIST in the play-
1
back menu.
Highlight NEW BOOK.
2
Press MENU/OK to display the new
3
book dialog.
Choose pictures for the new book.
4
• SE LECT FROM ALL: Choose from all the
pictures available.
• SELECT BY IMAGE SEARCH:
matching selected search conditions (P 63).
a
Neither photographs a or smaller nor movies can
be selected for photobooks.
Choose from pictures
Scroll through the images and press the selec-
5
tor up to select or deselect the current image
for inclusion in the book. To display the current
image on the cover, press the selector down.
a
The first picture selected automatically becomes
the cover image. Press the selector down to select
a different picture for the cover.
Press MENU/OK to exit when the book
6
is complete.
Highlight COMPLETE PHOTOBOOK.
7
a
Choose SELECT ALL to select all photos, or all photos matching the specified search conditions, for
the book.
SELECT IMAGES FOR PHOTOBOOK
SELECT ALL
COMPLETE PHOTOBOOK
EXIT
64
Page 79

k PhotoBook Assist
Viewing PhotoBooks
Editing and Deleting PhotoBooks
Press MENU/OK. The new book will be
8
added to the list in the photobook
assist menu.
c
• Photobooks can contain up to 300 pictures.
• Books that contain no photos are automatically
deleted.
PhotoBooks
Photobooks can be copied to a computer using the
supplied MyFinePix Studio software.
Viewing PhotoBooks
Highlight a book in the photobook assist menu
and press MENU/OK to display the book, then press
the selector left and right to scroll through the
pictures. Press DISP/BACK to return to the photobook assist menu.
Editing and Deleting PhotoBooks
Display the photobook and press
1
MENU/OK to view book edit options.
Choose from the following options:
2
• EDIT: Edit the book as described in “Creating a
PhotoBook” on page 64.
• ERASE: Delete the current photobook.
Follow the on-screen instructions.
3
More on Playback
65
Page 80

Operation
Button
Description
Viewing Panoramas
If you press the selector down when a panorama is displayed full frame, the camera will play back the
picture from left to right or from bottom to top.
PLAY
PAUSE
STOP
The following operations can be performed during playback:
Operation
Start/pause
playback
Button
Description
Press the selector down to start playback. Press again to pause.
End playback
Press the selector up to end playback.
a
• Once displayed in full-frame playback, panoramas can be zoomed in or out using the zoom buttons.
• z panoramas play back in an endless loop (
P 31); the playback direction can be controlled by pressing the
selector left or right. The camera will not turn off automatically while playback is in progress (P 102) .
66
Page 81

Recording Movies
1
999m59s
F
Press z to shoot a movie. During recording, the following indicators will be displayed and sound will
be recorded via the built-in microphone (be careful not to cover the microphone during recording).
y REC icon
Number of photos that
1
REC
999m59s
F
can be taken during
recording
Time remaining
To end recording, press the z button again. Recording ends automatically when the movie reaches
maximum length or memory is full.
a
• Zoom can be adjusted while recording is in progress.
• If the subject is poorly lit, the AF-assist lamp may light to assist the focus operation.
To turn the AF-assist lamp off, select OFF for C AF ILLUMINATOR in the setup menu (P 103).
• Exposure and white balance are adjusted automatically throughout recording. The color and brightness of the
image may vary from that displayed before recording begins.
• Sounds made by the camera may be recorded.
Movies
67
Page 82

Taking Photographs dur ing Recording
Movie Frame Size
Option
Description
Press the shutter button to take a photograph during
recording.
a
• See page 8 8 for information on choosing how photographs are recorded.
• The photo is saved separately from the movie and
does not appear as part of the movie.
c
• Photos can not be taken while a high-speed movie
is being recorded.
• The number of photos that can be taken is limited.
c
• The indicator lamp lights while movies are being recorded. Do not open the battery chamber during
shooting or while the indicator lamp is lit. Failure
to observe this precaution could prevent the movie
from being played back.
• Vertical or horizontal streaks may appear in movies
containing very bright subjects. This is normal and
does not indicate a malfunction.
• The temperature of the camera may rise if it is used to
record movies for an extended period or if the ambient temperature is high. This is normal and does not
indicate a malfunction.
Recording Movies
Movie Frame Size
Before recording, select a frame size using the
W MOVIE MODE option in the shooting menu
(P 88).
Option
i 1920 (1920 × 1080)
h 128 0 (1280 × 720)
f (640 × 480)
Y 640 × 480 (8 0fps)
Y 320 × 240 (160 fps)
Y 320 × 112 (320fp s)
Full HD (High Definition).
High Definition.
Standard definition.
High speed movie. Sound is not
recorded, and focus, exposure,
and white balance are not adjusted automatically. Black bands
appear at the top and bottom of
movies recorded at Y 320 × 112.
Description
68
Page 83

a Viewing Movies
100-006
Operation
Description
5m42s
During playback (P 58), movi es
are displayed in the monitor as
shown at right. The following
operations can be performed
while a movie is displayed:
Operation
Start/
pause
playback
End
playback
Adjust
speed
Adjust
volume
Press the selector down to start playback.
Press again to pause. While playback is
paused, you can press the selector left or
right to rewind or advance one frame at
a time.
Press the selector up to end playback.
Press the s elector left or right to adjust play-
back speed during playback.
Press MENU/OK to pause playback and display volume controls. Press the selector
up or down to adjust the volume and
press MENU/OK to exit. Volume can also be
adjusted from the setup menu.
Description
PLAY
100-006
Playback Speed
Press the selector left or right to
adjust playback speed. Speed is
shown by the number of arrows
(M or N).
b Viewing Movies on a Computer
Copy movies to the computer before viewing.
c
Do not cover the speaker during playback.
Arrow
5m42s
STOP PAUSE
Movies
69
Page 84

Viewing Pictures on TV
Connect the camera to a TV to show pictures to a group.
Turn the camera off.
1
Connect the camera using the supplied A/V cable or an HDMI cable available from third party sup-
2
pliers.
Connect white plug
Insert into A/V
cable connector
Insert into HDMI
connector
Connections
HDMI Mini connector
HDMI
An HDMI cable (available from third-part y suppliers; P 107) can be used to connect the camera to High Defini-
tion (HD) devices (playback only). The USB cable or optional A/V cable cannot be used while an HDMI cable
is connected.
to audio-in jack
Connect yellow plug
to video-in jack
Insert into HDMI
connector
70
Page 85

Viewing Pictures on TV
Tune the television to the video or HDMI input channel. See the documentation supplied with the
3
television for details.
Turn the camera on and press the a button. The camera monitor turns off and pictures and mov-
4
ies are played back on the TV. Note that the camera volume controls have no effect on sounds
played on the TV; use the television volume controls to adjust the volume.
a
Image quality drops during movie playback.
c
When connecting the cable, be sure the connectors are fully inserted.
Connections
71
Page 86

Printing Pictures via USB
Connecting the Camera
Printing Selected Pictures
If the printer supports PictBridge, the camera can be connected directly to the printer and
pictures can be printed without first being copied to a computer. Note that depending on
the printer, not all the functions described below may be supported.
Connecting the Camera
Connect the supplied USB cable as shown and
1
turn the printer on.
Turn the camera on. t USB will be displayed
2
in the monitor, followed by the PictBridge display shown below at right.
USB
PICTBRIDGE
TOTAL:
00000
00
FRAME
OK
SHEETS
72
SET
Printing Selected Pictures
Press the selector left or right to display a pic-
1
ture you wish to print.
Press the selector up or down to choose the
2
number of copies (up to 99).
Repeat steps 1–2 to select additional pictures.
3
Press MENU/OK to display a confirmation dialog
when settings are complete.
PRINT THESE FRAMES
TOTAL:
9
SHEETS
YES CANCEL
Press MENU/OK to start printing.
4
Page 87

Printing Pictures via USB
Printing the DPOF Print Order
b Printing the Date of Recording
To print the date of recording on pictures, press DISP/
BACK in steps 1–2 to display the PictBridge menu (see
“Printing the DPOF Print Order,” below). Press the selector up or down to highlight PRINT WITH DATE s
and press MENU/OK to return to the PictBridge display
(to print pictures without the date of recording, select
PRINT WITHOUT DATE).
a
If no pictures are selected when the MENU/OK button is
pressed, the camera will print one copy of the current
picture.
Printing the DPOF Print Order
To print the print order created with K PRINT
ORDER (DPOF) in the playback menu (P 97):
In the PictBridge display, press DISP/BACK to
1
open the PictBridge menu.
PICTBRIDGE
PRINT WITH DATE
PRINT WITHOUT DATE
PRINT DPOF
Press the selector up or down to highlight
2
u PRINT DPOF.
Press MENU/OK to display a confirmation dialog.
3
PRINT DPOF OK?
TOTAL: 9 SHEETS
YES CANCEL
Connections
73
Page 88

Printing Pictures via USB
Press MENU/OK to start printing.
4
During Printing
The message shown at right
is displayed during printing.
Press DISP/BACK to cancel before all pictures are printed
(depending on the printer,
printing may end before the
current picture has printed).
If printing is interrupted, turn the camera off and then
on again.
Disconnec ting the Camera
Confirm that “PRINTING” is not displayed in the monitor and turn the camera off. Disconnect the USB
cable.
PRINTING
CANCEL
a
• Pictures can be printed from internal memory or a
memory card that has been formatted in the camera.
• If the printer does not support date printing, the
PRINT WITH DATE s option will not be available in
the PictBridge menu and the date will not be printed
on the pictures in the DPOF print order.
• When pictures are printed via direct USB connection,
page size, print quality, and border selections are
made using the printer.
74
Page 89

■■ WITH DATE
/ WITHOUT DATE
Creating a DPOF Print Order
Creating a DPOF Print Order
The K PRINT ORDER (DPOF) option in the
playback menu can be used to create a digital
“print order” for PictBridge-compatible printers
(P 107) or devices that support DPOF.
DPOF
DPOF (Digital Print Order Format) is a standard that allows pictures to be printed from
“print orders” stored in internal memory or
on a memory card. The information in the
order includes the pictures to be printed, date imprint, and the number of copies of each picture.
Printing Pictures via USB
WITH DATE s
Select playback mode and press MENU/OK to
1
display the playback menu.
Highlight K PRINT ORDER (DPOF) and press
2
MENU/OK.
Highlight one of the following options and
3
press MENU/OK:
• WITH DATE s: Print the date of recording on
pictures.
• WITHOUT DATE: Do not print the date of recording on pictures.
Press the selector left or right to display a pic-
4
ture you wish to include in or remove from the
print order.
/ WITHOUT DATE
Connections
75
Page 90

Printing Pictures via USB
Press the selector up or down to choose the
5
number of copies (up to 99). To remove a picture from the order, press the selector down
until the number of copies is 0.
00001
SHEETS
FRAME
SET
)
Total number of prints
Number of copies
PRINT ORDER (DPOF
DPOF:
01
b Intelligent Face Detection
If the current picture was created with Intelligent
Face Detection, pressing g sets the number of
copies to the number of faces detected.
a
When pictures are printed via direct USB connection, page size, print quality, and border selections
are made using the printer.
Repeat steps 4–5 to complete the print order.
6
Press MENU/OK to save the print order when settings are complete, or DISP/BACK to exit without
changing the print order.
The total number of prints is displayed in the
7
monitor. Press MENU/OK to exit.
The pictures in the current
print order are indicated by a
u icon during playback.
76
Page 91

Printing Pictures via USB
■■ RESET ALL
a
• Remove the memory card to create or modify a print
order for the pictures in internal memory.
• Print orders can contain a maximum of 999 pictures.
• If a memory card is inserted
RESET DPOF OK?
containing a print order created by another camera, the
message shown at right will
be displayed. Pressing MENU/
YES NO
OK cancels the print order; a
new print order must be created as described above.
RESET ALL
To cancel the current print
RESET DPOF OK?
order, select RESET ALL
in the K PRINT ORDER
(DPOF) menu. The confir-
YES CANCEL
mation shown at right will
be displayed; press MENU/OK to remove all pictures
from the order.
Connections
77
Page 92

Viewing Pictures on a Computer
Windows: Installing MyFinePix Studio
Windows 7 (SP 1)/ Windows Vista (SP 2)
1
Windows X P (SP 3)
1
CPU
RAM
Free disk s pace
GPU
Video
Other
The supplied software can be used to copy pictures to a computer, where they can be stored, viewed,
organized, and printed. Before proceeding, install the software as described below. Do NOT connect the
camera to the computer until installation is complete.
Windows: Installing MyFinePix Studio
Confirm that the computer meets the following system requirements:
1
Windows 7 (SP 1)/ Windows Vista (SP 2)
CPU
RAM 1 GB or more
Free disk s pace 2 GB or more
GPU
Video 1,024 × 768 pixels or more with 24-bit color or better
• Built-in USB port recommended. Operation is not guaranteed with other USB ports.
Other
1 Other versions of Windows are not suppor ted. Only pre-installed operating systems are supported; operation is not
guaranteed on home-built computers or computers that have been upgraded from earlier versions of Windows.
2 Recommended when displaying HD movies.
• .NET Framework 3.5 Service Pack 1 required when uploading images or using Map Viewer.
• Internet connection (broadband recommended) required to install .NET Framework (if necessary), to use
auto update feature, and when performing such tasks as sharing pictures on-line or via e-mail.
3 GHz Pentium 4 or better
(2.4 GHz Core 2 Duo or better)
Supports DirectX 9 or later
(recommended)
1
2
(required; per formance not guaran teed with other GPUs)
Windows X P (SP 3)
2 GHz Pentium 4 or better
(2.4 GHz Core 2 Duo or better)
512 MB or more
(1 GB or more)
Supports DirectX 7 or later
1
2
2
78
Page 93

Viewing Pictures on a Computer
Start the computer. Log in to an account with administrator privileges before proceeding.
2
Exit any applications that may be running and insert the installer CD in a CD-ROM drive.
3
Windows 7/Windows Vista
If an AutoPlay dialog is displayed, click SETUP.EXE. A “User Account Control” dialog will then be displayed;
click Yes (Windows 7) or Allow (Windows Vista).
The installer will start automatically; click Install MyFinePix Studio and follow the on-screen instructions to install MyFinePix Studio.
If the Installer Does Not St art Automatically
If the installer does not start automatically, select Computer or My Computer from the Start menu, then
double-click the FINEPIX CD icon to open the FINEPIX CD window and double-click setup or SETUP.EXE.
If prompted to install Windows Media Player or DirectX, follow the on-screen instructions to com-
4
plete installation.
Remove the installer CD from the CD-ROM drive when installation is complete. Store the installer
5
CD in a dry location out of direct sunlight in case you need to re-install the software.
Installation is now complete. Proceed to “Connecting the Camera” on page 82.
Connections
79
Page 94

Viewing Pictures on a Computer
Macintosh: Installing FinePixViewer
CPU
OS
RAM
Free disk s pace
Video
Other
Macintosh: Installing FinePixViewer
Confirm that the computer meets the following system requirements:
1
CPU PowerPC or Intel (Core 2 Duo or better) *
Pre-installed versions of Mac OS X version 10.3.9–10.6
OS
(visit http: //ww w.fujifil m.com/supp ort/digita l_cameras /compa tibility/ for more information)
Mac OS X version 10.7 and later not supported.
RAM 256 MB or more (1 GB or more) *
Free disk s pace A minimum of 200 MB required for installation with 400 MB available when FinePixViewer is running
Video 800 × 600 pixels or more with thousands of colors or better
Other Built-in USB port recommended. Operation is not guaranteed with other USB ports.
* Recommended when displaying HD movies.
After starting the computer and quitting any applications that may be running, insert the installer
2
CD in a CD-ROM drive and double-click Installer for Mac OS X.
An installer dialog will be displayed; click Installing FinePixViewer to start installation. Enter an
3
administrator name and password when prompted and click OK, then follow the on-screen instructions to install FinePixViewer. Click Exit to quit the installer when installation is complete.
80
Page 95

Viewing Pictures on a Computer
Remove the installer CD from the CD-ROM drive. Note that you may be unable to remove the CD
4
if Safari is running; if necessary, quit Safari before removing the CD. Store the installer CD in a dry
location out of direct sunlight in case you need to re-install the software.
Mac OS X 10.5 or earlier: Open the “Applications” folder, start Image Capture, and select Preferences…
5
from the Image Capture application menu. The Image Capture preferences dialog will be displayed;
choose Other… in the When a camera is connected, open menu, then select FPVBridge in the
“Applications/FinePixViewer” folder and click Open. Quit Image Capture.
Mac OS X 10.6: Connect the camera and turn it on. Open the “Applications” folder and start Image
Capture. The camera will be listed under DEVICES; select the camera and choose FPVBridge from
the Connecting this camera opens menu and click Choose. Quit Image Capture.
Installation is now complete. Proceed to “Connecting the Camera” on page 82.
Connections
81
Page 96

Connecting the Camera
Connecting the Camera
If the pictures you wish to copy are stored on a
1
memory card, insert the card into the camera
(P 12) .
a
Windows users may require the Windows CD when
starting the software for the first time.
c
Loss of power during transfer could result in loss of
data or damage to internal memory or the memory
card. Insert fresh or fully-charged batteries before
connecting the camera.
Turn the camera off and connect the supplied
2
USB cable as shown, making sure the connectors are fully inserted. Connect the camera directly to the computer; do not use a USB hub
or keyboard.
Viewing Pictures on a Computer
Turn the camera on and follow the on-screen
3
instructions to copy pictures to the computer.
To exit without copying pictures, click Cancel.
For more information on using the supplied software, start the application and select the appropriate option from the Help menu.
82
Page 97

Viewing Pictures on a Computer
c
• If a memor y card containing a large number of images
is inserted, there may be a delay before the software
starts and you may be unable to import or save images. Use a memory card reader to transfer pictures.
• Make sure that the computer does not display a message stating that copying is in progress and that the
indicator lamp is out before turning the camera off or
disconnecting the USB cable (if the number of images copied is very large, the indicator lamp may remain
lit after the message has cleared from the computer
display). Failure to observe this precaution could result in loss of data or damage to internal memory or
the memory card.
• Disconnect the camera before inserting or removing
memory cards.
• I n s om e ca s e s, i t ma y no t be p o ss i b le t o a c ce s s p i c tu r es
saved to a network server using the supplied software
in the same way as on a standalone computer.
• The user bears all applicable fees charged by the
phone company or Internet service provider when
using services that require an Internet connection.
Disconnec ting the Camera
After confirming that the indicator lamp is out, follow
the on-screen instructions to turn the camera off and
disconnect the USB cable.
Uninstalling the Supplied Software
On ly u nin sta ll t he s upp lie d sof tw are when it i s no lon ger required or before beginning reinstallation. After
quitting the software and disconnecting the camera,
drag the “FinePixViewer” folder from “Applications”
into the Trash and select Empty Trash in the Finder
menu (Macintosh), or open the control panel and use
“Programs and Features” (Windows 7/Windows Vista)
or “Add or Remove Programs” (Windows XP) to uninstall MyFinePix Studio. Under Windows, one or more
confirmation dialogs may be displayed; read the contents carefully before clicking OK.
Connections
83
Page 98

Using the Menus: Shooting Mode
Using the Shooting Menu
Shooting Menu Options
AA E
MODE [
AA Adv.
MODE [
AA SCENE POSITION
[
SP1:
] [
SP2:
N N ISO [AUTO (800)]
Use the shooting menus to adjust shooting settings. The options available vary with the shooting mode selected.
Using the Shooting Menu
Press MENU/OK to display the shoot-
1
ing menu.
Press the selector up or down to
2
highlight the desired menu item.
Press the selector right to display op-
3
tions for the highlighted item.
Press the selector up or down to
4
highlight the desired option.
Press MENU/OK to select the high-
5
lighted option.
Menus
Press DISP/BACK to exit from the
6
menu.
Shooting Menu Options
Default values are shown in square brackets [ ].
E
Choose an option for E mode (P 23).
Choose an advanced shooting mode (P 24).
Choose a scene for SP1/SP2 mode (P 28).
Control the camera’s sensitivity to light (P 51).
MODE [RR]]
Adv.
MODE [ii]]
SCENE POSITION
ISO [AUTO (800)]
[
SP1:LL
] [
SP2:MM]]
84
Page 99

Using the Menus: Shooting Mode
O O IMAGE SIZE [
4 : 3
Size
Option
Prints at sizes up to
Aspec t ratio
T T IMAGE QUALITY [FINE]
Option
Description
FINE
NORMAL
IMAGE SIZE [OO
Choose the image size and
aspect ratio at which pictures
are recorded. Large pictures
O 4 : 3
Size
4 : 3]]
Aspect ratio
can be printed at large sizes with no drop in quality, while small pictures require less memory, allowing more pictures to be recorded.
Size Ver sus Aspect Ratio
Size
Option
O
P
Q
4 : 3: Pictures have
the same proportions as the camera display.
3
4
Prints at sizes up to
34 × 25 cm (13.5 × 10 in.)
24 × 18 cm (9.5 × 7 in.)
17 × 13 cm (7 × 5 in.)
Aspect ratio
3 : 2: Pictures have
the same proportions as a frame of
35 mm film.
2
3
16 : 9: Suited for
display on High
Definition (HD) devices.
9
16
IMAGE QUALITY [FINE]
Choose how much image files are compressed.
Option
FINE
NORMAL
Low compression. Select for higher image
quality.
High compression. Select this option to
store more pictures.
Description
Menus
85
Page 100

Using the Menus: Shooting Mode
U U DYNAMIC RANGE [AUTO]
Option
Description
AUTO
AA 100%
BB 200%
CC 400%
DD 800%
MM 1600%
P P FILM SIMULATION [
Option
Description
cc PROVIA/
STANDARD
dd Velvia/
VIVID
ee ASTIA/
SOFT
bb B&W
ff SEPIA
DYNAMIC RANGE [AUTO]
Control contrast. Higher values are recommended for scenes that include both sunlight and deep
shade or for increased contrast with such subjects
as sunlight on water, brightly-lit autumn leaves,
portraits taken against a blue sky, and white objects or people wearing white; note, however, that
mottling may appear in pictures taken at higher
values. If AUTO is selected, the camera will automatically select values between 100% and 400%
in response to shooting conditions.
Option
Increase contrast when shooting
100%
AUTO
800%
1600%
a
M 160 0% and D 800% are available only when
D-RANGE PRIORITY is selected in E mode.
indoors or under overcast skies.
200%
400%
Reduce loss of detail in highlights
and shadows when photographing high-contrast scenes.
Description
FILM SIMULATION [cc]]
Simulate the effects of different types of film, including sepia and black-and-white.
Option
PROVIA/
STANDARD
Velv ia/
VIVID
ASTIA/
SOFT
B&W
SEPIA
Standard color reproduction. Suited to a
wide range of subjects, from portraits to
landscapes.
A high-contrast palette of saturated colors, suited to nature photographs.
A soft-toned palette of less saturated colors.
Take pictures in black and white.
Take pictures in sepia.
Description
86
 Loading...