

Page 1
Owner’s Manual
Thank you for your purchase
of this product. This manual
describes how to use your
FUJIFILM FinePix F70EXR digital
camera and the supplied
software. Be sure that you
have read and understood
its contents before using the
camera.
BL00884-200
Before You Begin
Basic Photography and Playback
More on Photography
More on Playback
EN
First Steps
Movies
Connections
Menus
For information on related products, visit our website at
http://www.fujifilm.com/products/index.html
Technical Notes
Tro ubl esh oot ing
Appendix
Page 2

About This Manual
✔✔ Troubleshooting
..............................................
pg. 97
✔✔ Glossary
........................................................
pg. 108
✔✔ Table of Contents
..............................................
pg. vi
✔✔ Warning Messages and Displays
.....................
pg. 104
✔✔ Camera Q & A
...................................................
pg. iii
✔✔ Restrictions on Camera Settings
............................
Before using the camera, read this manual and the warnings on the Basic Manual. For information on
specific topics, consult the sources below.
Camera Q & A
Know what you want to do but don’t know the
name for it? Find the answer in “Camera Q & A.”
Troubleshooting
Having a specific problem with the camera?
Find the answer here.
Glossary
The meanings of some technical terms may be
found here.
Memory Cards
Pictures can be stored in the camera’s internal memory or on optional SD and SDHC memory cards. In this
manual, SD memory cards are referred to as “memory cards.” For more information, see page 8.
ii
...................................................
..............................................
........................................................
pg. iii
pg. 97
pg. 108
Table of Contents
The “Table of Contents” gives an overview of the
entire manual. The principal camera operations
are listed here.
Warning Messages and Displays
Find out what’s behind that flashing icon or
error message in the monitor or electronic
viewfinder.
Restrictions on Camera Set tings
See the Basic Manual for restrictions on the
options available in each shooting mode.
..............................................
.....................
............................BMBM
pg. vi
pg. 104
Page 3

Camera Q & A
Camera Setup
Question
Key phrase
See page
Sharing Pictures
Question
Key phrase
See page
Find items by task.
Camera Setup
Question
How do I set the camera clock? Date and time 12
Can I set the clock to local time when I travel? Time difference 88
How do I keep the display from turning off automatically? Auto power off 91
How do I make the display brighter or darker? LCD brightness 91
How do I stop the camera beeping and clicking?
Can I change the sound the shutter makes? Shutter sound 86
What are the parts of the camera called? Parts of the camera 2
What do the icons in the display mean? Displays 3
How do I use the menus? Menus 62
What’s behind that flashing icon or error message? Messages and displays 104
How much charge is left in the battery? Battery level 14
Sharing Pictures
Question
Can I print pictures on my home printer? Printing pictures 51
Can I copy my pictures to my computer? Viewing pictures on a computer 56
Operation and shutter volume 86
Key phrase
Silent mode 17
Key phrase
See page
See page
iii
Page 4

Camera Q & A
Tak ing Pictures
Question
Key phrase
See page
Tak ing Pictures
Question
How many pictures can I take? Memory capacity 109
Is there a quick and easy way to take snapshots?
How can I avoid blurred pictures? Dual IS mode 16
How can I make good portraits? Intelligent Face Detection 20
Can I choose my own settings for different scenes? Scene position 35
Can the camera automatically adjust settings for different scenes?
Can I choose between clarity, reduced noise, and dynamic range?
How do I shoot close-ups? Close-ups (macro mode) 27
How do I keep the flash from firing?
How do I “fill-in” shadows on back-lit subjects?
How do I take a series of pictures in a single burst? Continuous shooting mode 71
How do I turn off the lamp on the front of the camera? AF-assist illuminator 24
How do I take a group portrait that includes the photographer? Self-timer mode 30
How do I frame pictures with the subject off to one side? Focus lock 22
Can I choose shutter speed and aperture? P and M modes 38, 39
How do I adjust exposure? Exposure compensation 25
How do I simulate the effects of different types of film? Film simulation 65
How do I shoot movies? Recording movies 47
Key phrase
k mode
r mode
s, t, and u modes
Flash mode 28How do I stop my subjects’ eyes glowing red when I use the flash?
See page
14
33
33
iv
Page 5

Camera Q & A
Viewing Pictures
Question
Key phrase
See page
Viewing Pictures
Question
How do I view my pictures? Single-frame playback 41
How do I delete the current picture? The I button 19
Can I select other pictures for deletion? Deleting pictures 45
Can I zoom in on pictures during playback? Playback zoom 42
How do I view a lot of pictures at once? Multi-frame playback 43
How do I view all pictures taken on the same day? Sort by date 44
Can I protect my pictures from accidental deletion? Protect 79
Can I hide the icons in the display when viewing my pictures? Choosing a display format 41
Can I view my pictures in a slide show? Slide show 75
Can I add a short voice memo to my pictures? Voice memo 83
Can I crop unwanted elements out of my pictures? Crop 80
Can I make small copies of pictures? Resize 81
Can I copy pictures from internal memory to a memory card? Copy 81
How do I view my pictures on TV? Viewing pictures on TV 50
Key phrase
See page
v
Page 6

Before You Begi
First Step
Basic Photography and Playbac
More on Photograph
Table of Contents
About This Manual .......................................................................... ii
Camera Q & A .................................................................................... iii
Before You Beginn
Introduction .......................................................................................1
Symbols and Conventions ..........................................................1
Supplied Accessories .................................................................... 1
Parts of the Camera ....................................................................... 2
Camera Displays ..........................................................................3
The Mode Dial ..............................................................................4
First Stepss
Charging the Batter y ..................................................................... 5
Inserting the Battery...................................................................... 6
Inserting a Memory Card ............................................................. 8
Turning the Camera on and Off .............................................. 11
Shooting Mode .............................................................................11
Playback Mode ..............................................................................11
Basic Setup ....................................................................................... 12
Basic Photography and Playbackk
Taking Pictures in k (Auto) Mode ........................................ 14
Viewing Pictures ............................................................................19
More on Photographyy
B Intelligent Face Detection ..................................................20
Focus Lock ........................................................................................22
5 Exposure Compensation .....................................................25
L Macro Mode (Close-ups) ......................................................27
K Using the Flash (Super Intelligent Flash) .......................28
J Using the Self-Timer ...............................................................30
Shooting Mode ...............................................................................32
k AUTO ..........................................................................................32
O EXR ......................................................................................32
A NATURAL & K .......................................................................34
B NATURAL LIGHT ...................................................................35
SP SCENE POSITION ....................................................................35
M MANUAL .....................................................................................38
P PROGRAM AE/A APERTURE PRIORITY AE ........................39
vi
Page 7

Table of Contents
More on Playbac
Movie
Connection
Menu
More on Playbackk
Playback Options ........................................................................... 41
Playback Zoom ..............................................................................42
Multi-Frame Playback .................................................................43
Sort by Date ....................................................................................44
M Deleting Pictures ....................................................................45
Moviess
A Recording Movies ...................................................................47
D Viewing Movies .......................................................................49
Connectionss
Viewing Pictures on T V ...............................................................50
Printing Pictures via USB ........................................................... 51
Connecting the Camera ............................................................51
Printing Selected Pictures ........................................................51
Printing the DPOF Print Order ................................................53
Creating a DPOF Print Order ....................................................54
Viewing Pictures on a Computer ............................................ 56
Installing FinePixViewer ............................................................56
Connecting the Camera ............................................................60
Menuss
Using the Menus: Shooting Mode .........................................62
Using the v-Mode Menu .........................................................62
v-Mode Menu Options ............................................................63
n ISO ............................................................................................64
o IMAGE SIZE ...........................................................................64
W FILM SIMULATION ..............................................................65
Using the Shooting Menu .........................................................66
Shooting Menu Options ............................................................67
T IMAGE QUALITY ..................................................................69
U DYNAMIC RANGE ...............................................................69
C WHITE BALANCE .................................................................69
E CONTINUOUS ......................................................................71
B PHOTOMETRY ......................................................................72
F AF MODE ...............................................................................72
Using the Menus: Playback Mode .......................................... 74
Using the v-Mode Menu .........................................................74
v-Mode Menu Options ............................................................74
q SLIDE SHOW .........................................................................75
Using the Playback Menu .........................................................76
Playback Menu Options .............................................................77
a RED EYE REMOVAL .............................................................77
N IMAGE ROTATE ....................................................................78
O PROTECT ................................................................................79
R CROP .......................................................................................80
j RESIZE .....................................................................................81
P COPY .......................................................................................81
Q VOICE MEMO ........................................................................83
vii
Page 8

Table of Contents
Tec hni cal N ote
Tro ub les hoo ti n
Appendi
The Setup Menu .............................................................................85
Using the Setup Menu ...............................................................85
Setup Menu Options ...................................................................86
p TIME DIFFERENCE ...............................................................88
m FORMAT .................................................................................89
a IMAGE DISP. ..........................................................................89
b FRAME NO. ............................................................................90
g PLAYBACK VOLUME ...........................................................90
g LCD BRIGHTNESS................................................................91
o AUTO POWER OFF ..............................................................91
c DIGITAL ZOOM ....................................................................92
m POWER MANAGEMENT ....................................................93
Tec hni cal N otess
Optional Accessories ...................................................................94
Accessories from FUJIFILM .......................................................95
Caring for the Camera ................................................................. 96
Tro ub les hoo ti ngg
Tro ub les ho oti ng ............................................................................ 97
Warning Messages and Displays ......................................... 104
Appendixx
Glossary .......................................................................................... 108
Internal Memory/Memory Card Capacity ....................... 109
Specifications ................................................................................ 111
viii
Page 9
Introduction
Symbols and Conventions
Supplied Accessories
Symbols and Conventions
The following symbols are used in this manual:
C Caution: This information should be read before use to ensure correct operation.
A Note: Points to note when using the camera.
B Tip: Additional information that may be helpful when using the camera.
Menus and other text in the camera monitor are shown in bold. In the illustrations in this manual, the
monitor display may be simplified for explanatory purposes.
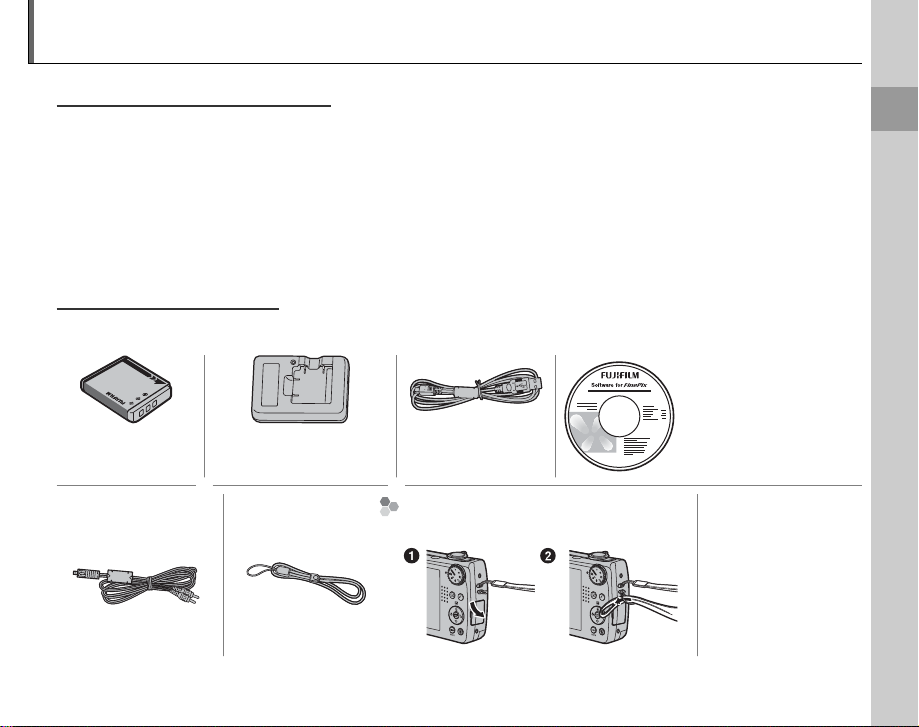
Supplied Accessories
The following items are included with the camera:
FinePix software CD
NP-50 rechargeable
battery
A/V cable Strap
BC-45W battery charger USB cable
Att aching the Strap
Attach the strap as shown.
• Owner’s Manual
CD (contains this
manual)
• Basic Manual
Before You Begin
1
Page 10
Parts of the Camera
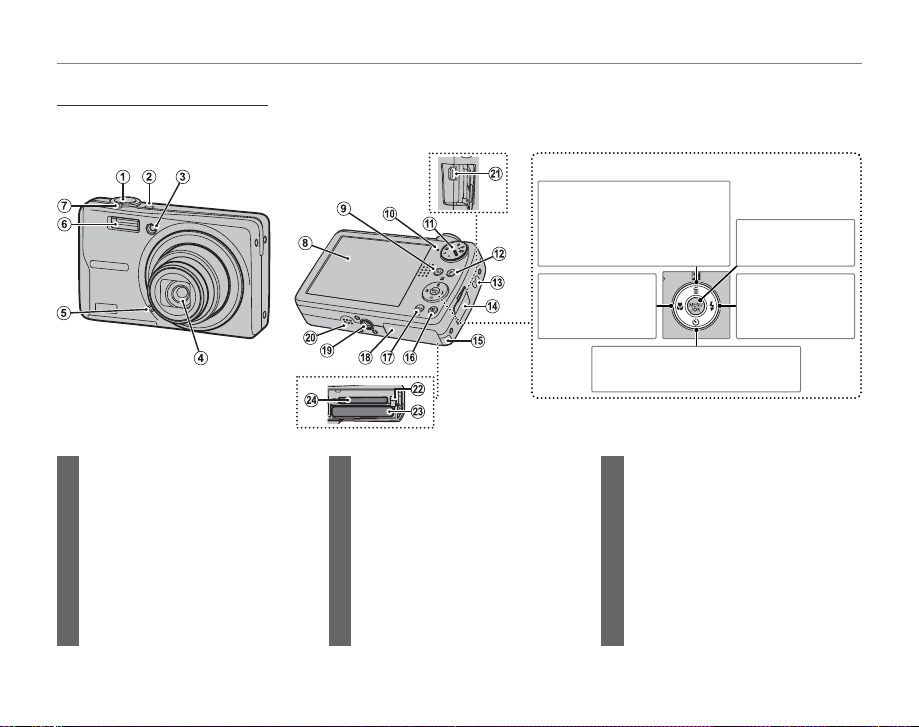
Parts of the Camera
For more information, refer to the page listed to the right of each item.
Selector button
Move cursor up
(exposure comp ensation)
5
button (pg. 25)
I (delete) button (pg. 19)
Introduction
MENU/OK button
(pg. 12)
1 Shutter button ...........................................18
2 n button .........................................11
3 AF-assist illuminator ...............................24
Self-timer lamp ..........................................31
4 Lens and lens cover
5 Microphone .................................................83
6 Flash ..................................................................28
7 Zoom control ...................................... 15, 42
8 Monitor ............................................................. 3
2
Move cursor left
L (macro)
button (pg. 27)
9 D (playback) button ............................ 41
10 Indicator lamp ............................................18
11 Mode dial ........................................................ 4
12 v (photo mode) button ............62, 74
13 Strap eyelet .................................................... 1
14 Terminal cover ............................50, 51, 60
15 DC coupler cable cover ........................95
16 B (Intelligent Face Detection)
button .............................................................20
Move curs or right
K (flash) button
(pg. 28)
Move cursor down
J (self-timer) button (pg. 30)
17 DISP (display)/BACK button .......... 16, 41
18 Battery-chamber cover .......................... 6
19 Tripod mount
20 Speaker .......................................................... 84
21 Connector for USB cable ............. 51, 60
Connector for A/V cable .....................50
22 Battery latch ............................................. 6, 7
23 Battery chamber ......................................... 6
24 Memory card slot ....................................... 9
Page 11
Introduction
Camera Displays
■■ Shooting
12 / 31/ 2050
■■ Playback
2
3
-
1
12 / 31/ 2050
Camera Displays
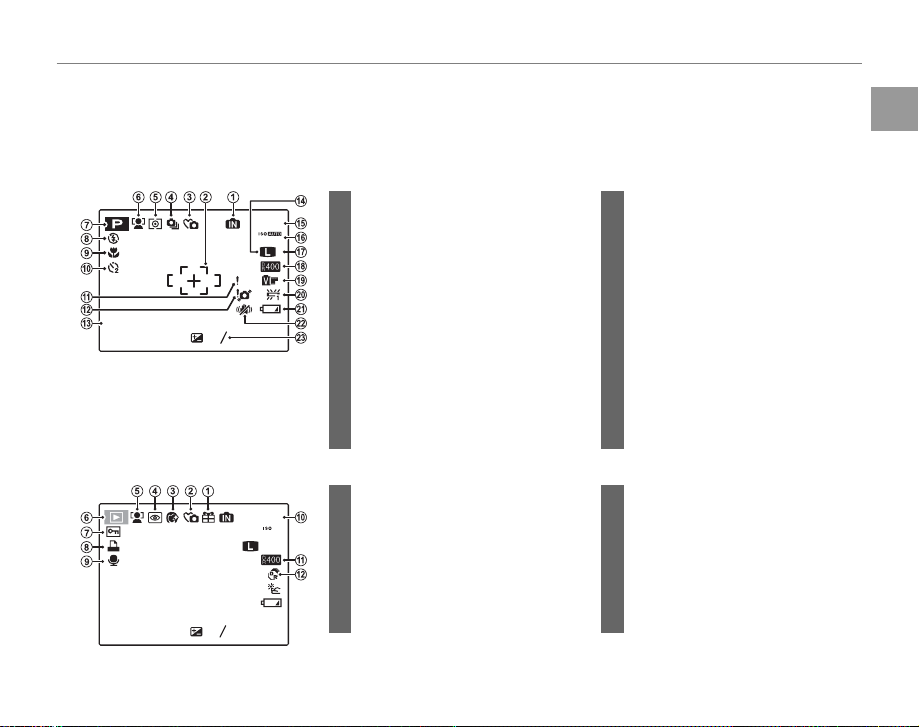
The following indicators may appear during shooting and playback: The indicators displayed vary
with camera settings.
Shooting
12/31/2050
250F3.3
* d: indicates that no memory card
is inserted and that pictures will
be stored in the camera’s internal
memory (pg. 8).
Playback
12/31/2050
1/250F3.3
10:00
10:00
-
AM
-
AM
1
1
2
3
2
3
*
19
800
AF
100-0001
400
4:3
1 Internal memory indicator*
2 Focus frame .................................................15
3 Silent mode indicator ............................ 17
F
4 Continuous shooting mode .............71
5 Metering ........................................................72
6 Intelligent Face Detection indicator
.............................................................................20
7 Shooting mode .........................................32
8 Flash mode...................................................28
9 Macro (close-up) mode........................27
10 Self-timer indicator .................................30
11 Focus warning ........................................... 17
1 Gift image ..................................................... 41
2 Silent mode indicator ............................ 17
3 Portrait enhancer .....................................37
F
4 Red-eye removal indicator ................77
5 Intelligent Face Detection indicator
.....................................................................20, 42
6 Playback mode indicator .............19, 41
12 Blur warning ................................................29
13 Date and time.............................................12
14 Image size .................................................... 64
15 Number of available frames ...........109
16 Sensitivit y ..................................................... 64
17 Image quality ............................................. 64
18 Dynamic range ..........................................69
19 Film simulation ..........................................65
20 White balance ............................................69
21 Battery level .................................................14
22 Dual IS mode ..............................................16
23 Exposure compensation .....................25
7 Protected image .......................................79
8 DPOF print indicator ..............................53
9 Voice memo indicator...........................83
10 Frame number ...........................................90
11 Dynamic range ..........................................69
12 O mode ..............................................32
Before You Begin
3
Page 12
The Mode Dial
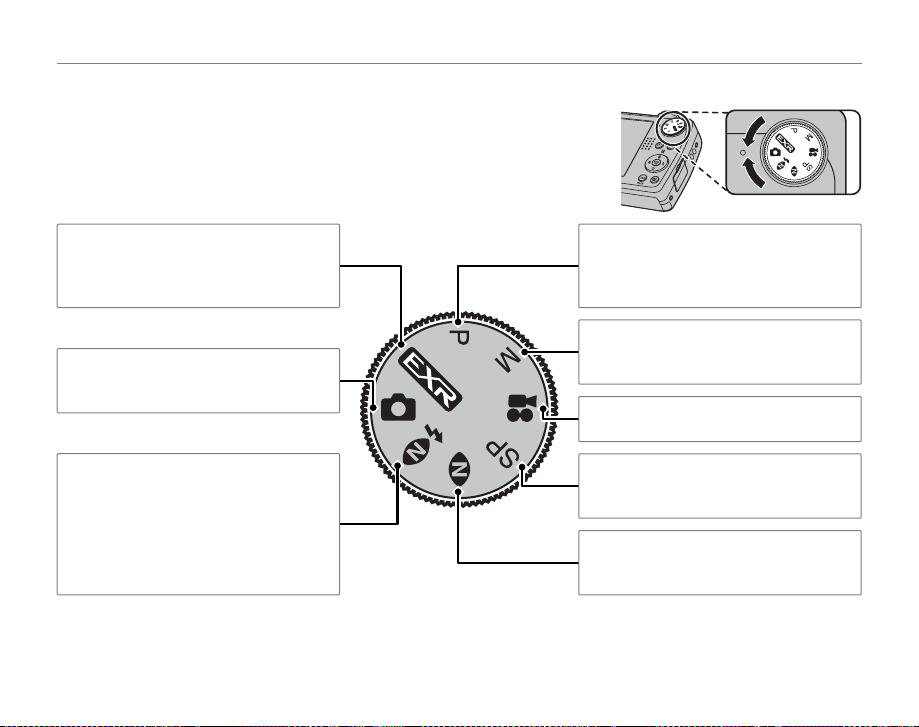
The Mode Dial
To select a shooting mode, align the mode icon with the mark next
to the mode dial.
Introduction
O: Improve clarity, reduce noise,
increase dynamic range, or let the camera
automatically adjust settings to suit the
scene (pg. 32).
k (AUTO): A simple “point-and-shoot”
mode recommended for first-time users
of digital cameras (pg. 14).
A (NATURAL & K): Helps ensure good
results in situations with difficult lighting.
Each time the shutter button is pressed,
the camera takes two shots: one shot
without the flash to preserve natural
lighting, followed immediately by a
second shot with the flash (pg. 34).
4
P (PROGRAM AE): Select for full control over
all camera settings except shutter speed
(pg. 39). Choose between program and
aperture-priority AE.
M (MANUAL): Select for full control over
camera settings, including shutter speed
and aperture (pg. 38).
A (MOVIE) : Record movies with sound
(pg. 47).
SP (SCENE POSITION): Choose a scene suited
to the subject or shooting conditions and
let the camera do the rest (pg. 35).
B (NATURAL LIGHT): Capture natural light
indoors, under low light, or where the
flash can not be used (pg. 35).
Page 13
Charging the Battery
Charging indicator
Battery status
Action
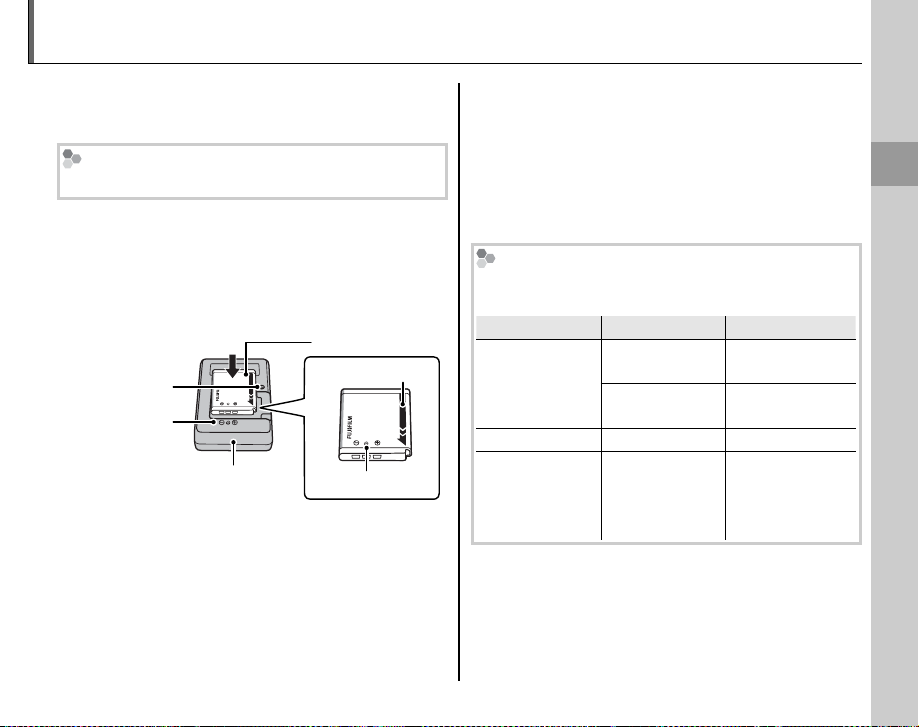
The battery is not charged at shipment. Charge
the battery before use.
Batteries
The camera uses an NP-50 rechargeable battery.
Place the battery in the charger.
1
Insert the battery into the supplied battery
charger as shown, making sure that the
battery is in the orientation indicated by the
F B E labels.
Battery
Charging
indicator
FBE
label
Battery charger
Plug the charger in.
2
Plug the charger into a power outlet. The
F
Arrow
B
Elabel
charging indicator will light.
C Cautions
• Unplug the charger when it is not in use.
• Remove dirt from the battery terminals with
a clean, dry cloth. Failure to observe this
precaution could prevent the battery from
charging.
• Charging times increase at low temperatures.
The Charging Indicator
The charging indicator shows battery charge status
as follows:
Charging indicator
Off
On
Blinks Battery fault.
Charge the battery.
3
Remove the battery when charging is
Battery status
Battery not
inserted.
Battery fully
charged.
Battery charging.
Action
Insert
the battery.
Remove
the battery.
—
Unplug the
charger and
remove the
battery.
complete.
First Steps
5
Page 14
Inserting the Battery
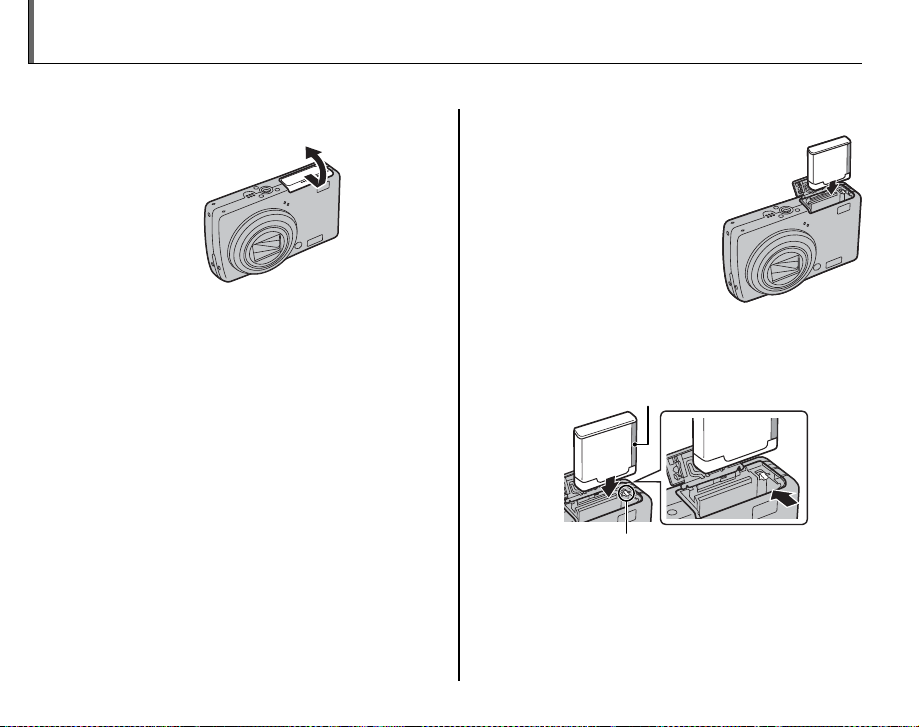
After charging the battery, insert it in the camera as described below.
Open the battery-chamber cover.
1
A Note
Be sure the camera is off before opening the
battery-chamber cover.
C Cautions
• Do not open the battery-chamber cover
when the camera is on. Failure to observe this
precaution could result in damage to image
files or memory cards.
• Do not use excessive force when handling the
battery-chamber cover.
6
Insert the battery.
2
Insert the battery
with the terminals first
and the orange stripe
aligned with the orange
battery latch. Slide the
battery into the camera,
keeping the battery
latch pressed to one
side as shown below. Confirm that the
battery is securely latched.
Orange stripe
Battery latch
C Caution
Insert the battery in the correct orientation. Do
NOT use force or attempt to insert the battery
upside down or backwards. The battery will
slide in easily in the correct orientation.
Page 15
Inserting the Battery
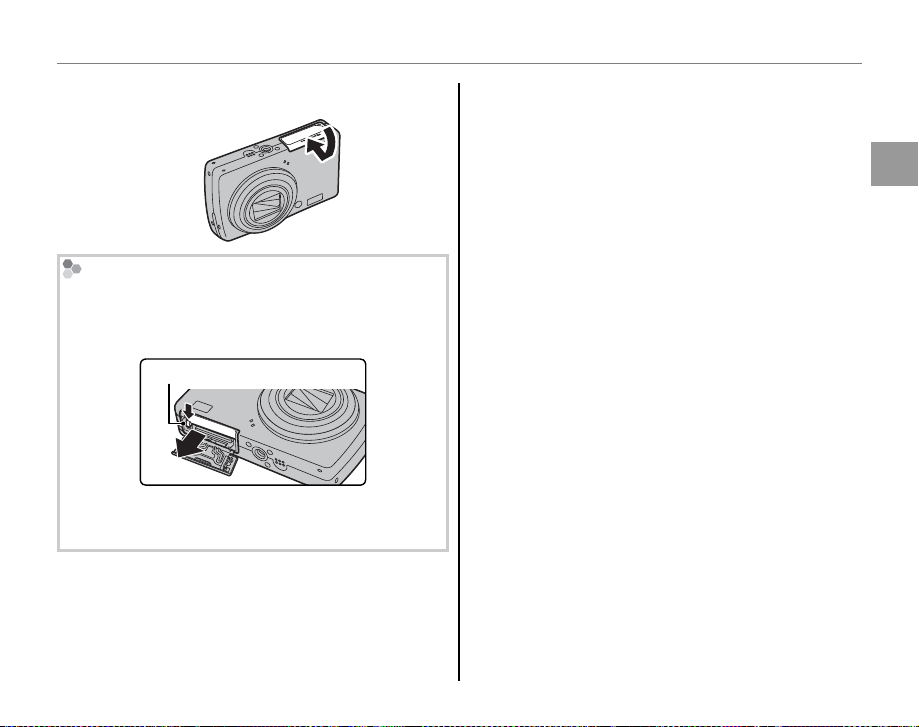
Close the battery-chamber cover.
3
Removing the Battery
After turning the camera off, open the batterychamber cover, press the battery latch to the side,
and slide the battery out of the camera as shown.
Battery latch
C Caution
Turn the camera off before removing the battery.
B Tips: Using an AC Adapter
• The camera can be powered by an optional AC
adapter and DC coupler (sold separately). See
manuals provided with the AC adapter and DC
coupler for details.
• If the camera is powered by an AC adapter, demo
mode instructions will be displayed when the
camera is turned on. Selecting this option starts a
slide show. To cancel, press the shutter button.
C Cautions
• Do not affix stickers or other objects to the battery.
Failure to observe this precaution could make it
impossible to remove the battery from the camera.
• Do not short the battery terminals. The battery
could overheat.
• Use only battery chargers designated for use with
the battery. Failure to observe this precaution could
result in product malfunction.
• Do not remove the labels from the battery or
attempt to split or peel the outer casing.
• The battery gradually loses its charge when not in
use. Charge the battery one or two days before use.
First Steps
7
Page 16

Inserting a Memory Card
■
Compatible Memory Cards
Write -prote ct
switch
Although the camera can store pictures in internal memory, SD memory cards (sold separately) can
be used to store additional pictures.
When no memory card is inserted, d appears in the monitor and internal memory is used for recording
and playback. Note that because camera malfunction could cause internal memory to become
corrupted, the pictures in internal memory should periodically be transferred to a computer and
saved on the computer hard disk or on removable media such as CDs or DVDs. The pictures in
internal memory can also be copied to a memory card (see page 81). To prevent internal memory
from becoming full, be sure to delete pictures when they are no longer needed.
When a memory card is inserted as described below, the card will be used for recording and playback.
■
Compatible Memory Cards
SanDisk SD and SDHC memory cards have been tested and approved for use in the camera. A
complete list of approved memory cards is available at http://www.fujifilm.com/products/digital_
cameras/index.html. Operation is not guaranteed with other cards. The camera can not be used with
MultiMediaCard (MMC) or xD-Picture Cards.
C Caution
SD memory cards can be locked, making it impossible to format the card or to record or
delete images. Before inserting an SD memory card, slide the write-protect switch to the
unlocked position.
Write -prote ct
switch
8
Page 17
■■ Inserting a Me mory Card
Inserting a Me mory Card
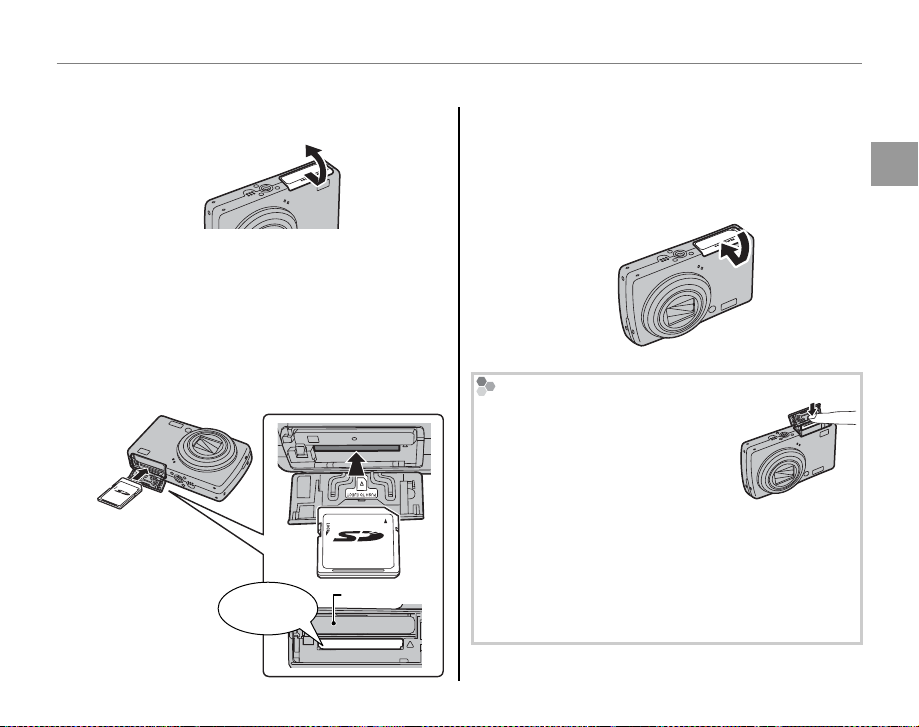
Open the battery-chamber cover.
1
A Note
Be sure the camera is off before opening the
battery-chamber cover.
Insert the memory card.
2
Holding the memory card in the orientation
shown below, slide it all the way in. Press
firmly until it clicks into place.
Battery
Click
Inserting a Memory Card
C Caution
Be sure card is in correct orientation; do not
insert at an angle or use force.
Close the battery-chamber cover.
3
Removing Memory Cards
After confirming that the camera
is off, press the card in and then
release it slowly. The card can
now be removed by hand.
C Cautions
• The memory card may spring out if you remove
your finger immediately after pushing the card in.
• Memory cards may be warm to the touch after
being removed from the camera. This is normal
and does not indicate a malfunction.
First Steps
9
Page 18

Inserting a Memory Card
C Cautions
• Do no t turn the camera off or remo ve the memory card
while the memo ry card is being format ted or data are being
recorded to or del eted from the card. Failure to observe
this precaution could damage the card.
• Format SD memory cards before first use, and be
sure to reformat all memory cards after using them
in a computer or other device. For more information
on formatting memory cards, see page 89.
• Memory cards are small and can be swallowed; keep
out of reach of children. If a child swallows a
memory card, seek medical assistance immediately.
• Do not use miniSD or microSD adapters
that expose the back of the card. Failure
to observe this precaution may cause
damage or malfunction. Adapters that
are larger or smaller than the standard
dimensions of an SD card may not eject normally;
if the card does not eject, take the camera to an
authorized service representative. Do not forcibly
remove the card.
• Do not affix labels to memory cards. Peeling labels
can cause camera malfunction.
• Movie recording may be interrupted with some
types of SD memory card.
• The data in internal memory may be erased or
corrupted when the camera is repaired. Please note
that the repairer will be able to view pictures in
internal memory.
• Formatting a memory card or internal memory
in the camera creates a folder in which pictures
are stored. Do not rename or delete this folder or
use a computer or other device to edit, delete, or
rename image files. Always use the camera to delete
pictures from memory cards and internal memory;
before editing or renaming files, copy them to a
computer and edit or rename the copies, not the
originals.
10
Page 19
Turning the Camera on and Off
Shooting Mode
Playback Mode
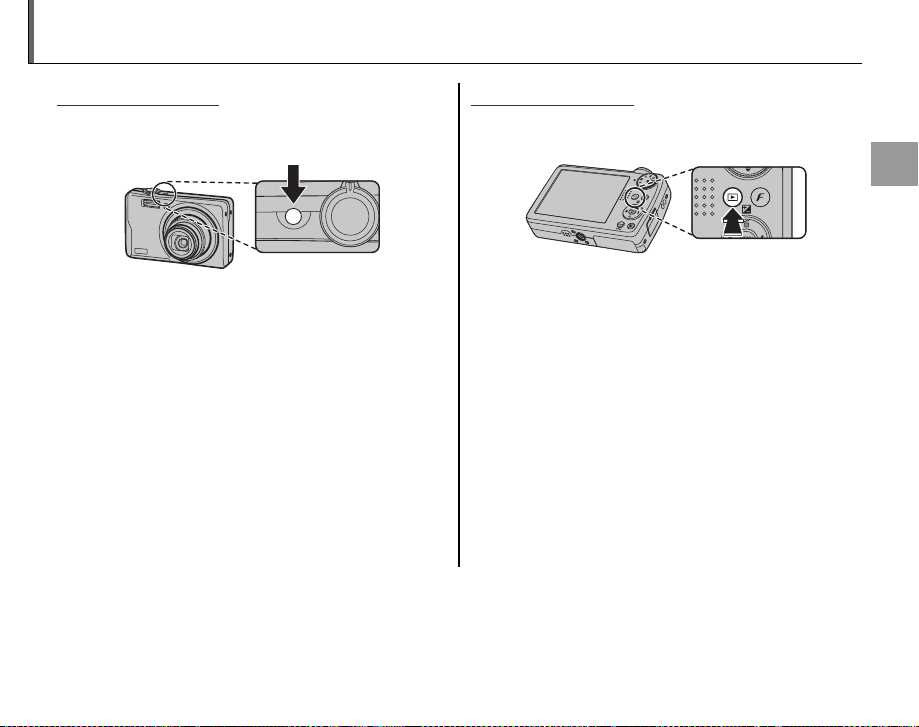
Shooting Mode
Press the n button to turn the camera on.
The lens will extend and the lens cover will open.
Press n again to turn the camera off.
B Tip: Switching to Playback Mode
Press the D button for about a second to start
playback. Press the shutter button halfway to return
to shooting mode.
C Cautions
• Forcibly preventing the lens from extending could
cause damage or product malfunction.
• Pictures can be affected by fingerprints and other
marks on the lens. Keep the lens clean.
• The n button does not completely disconnect
the camera from its power supply.
B Tip: Auto Power Of f
The camera will turn off automatically if no operations are performed for the length of time selected in the
o AUTO POWER OFF menu (pg. 91). To turn the camera on, use the n button or press the D button
for about a second.
Playback Mode
To turn the camera on and begin playback, press
the D button for about a second.
Press the n button to turn the camera off.
B Tip: Switching to Shooting Mode
To exit to shooting mode, press the shutter button
halfway. Press the D button to return to playback.
First Steps
11
Page 20
Basic Setup
A language-selection dialog is displayed the first time the camera is turned on. Set up the camera as
described below (for information on resetting the clock or changing languages, see page 85).
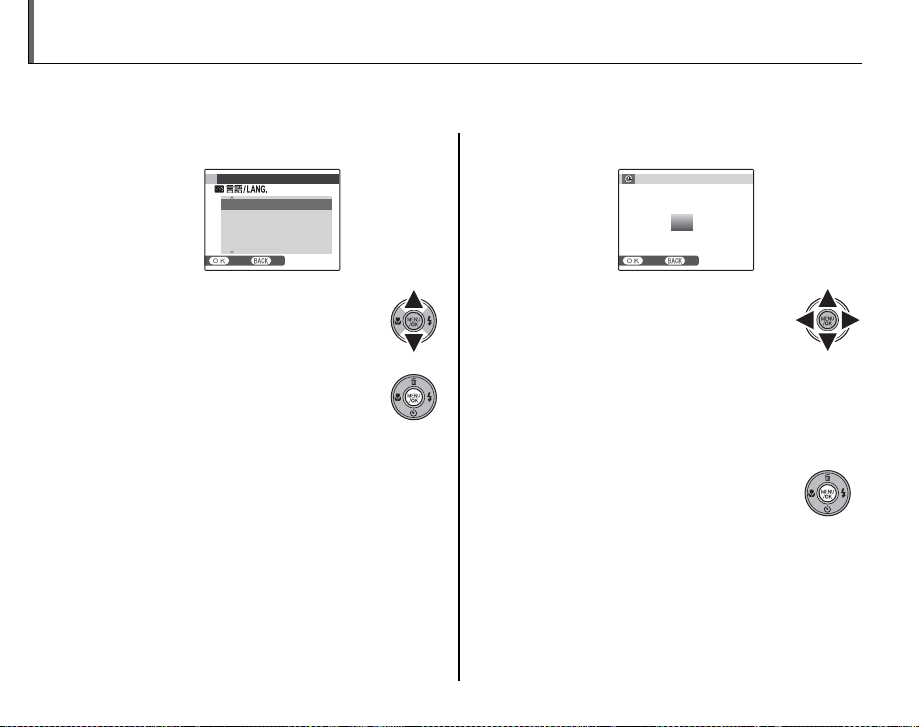
Choose a language.
1
1.1 Press the selector up, down,
left, or right to highlight a
language.
1.2 Press MENU/OK.
12
START MENU
ENGLISH
FRANCAIS
DEUTSCH
ESPAÑOL
PORTUGUÊS
SET NO
Set the date and time.
2
DATE / TIME NOT SET
2011
2010
2009
YY. MM. DD
2008
2007
SET NO
2.1 Press the selector left or right
to highlight the year, month,
day, hour, or minute and press
up or down to change. To change the
order in which the year, month, and day
are displayed, highlight the date format
and press the selector up or down.
2.2 Press MENU/OK.
1. 1 12
:
00
AM
Page 21

Basic Setup
Choose power management options.
3
POWER MANAGEMENT
POWER SAVE
QUICK AF
CLEAR DISPLAY
Power saving for longer
battery life
SET NO
3.1 Press the selector up or
down to highlight one of the
following options:
• v POWER SAVE: Save battery power.
• w QUICK AF:
Reduce focusing time,
ensuring a quick shutter response
• x CLEAR DISPLAY: Choose this option for
a brighter, higher quality display.
3.2 Press MENU/OK.
B Tip: The Camera Clock
If the battery is removed for an extended period,
the camera clock will be reset and the languageselection dialog will be displayed when the camera
is turned on. If the battery is left in the camera or an
optional AC adapter connected for about four days,
First Steps
the battery can be removed for about seven days
without resetting clock, language selection, or power
management options.
.
13
Page 22

Taking Pictures in k (Auto) Mode
Indicator
Description
This section describes how to take pictures in k (auto) mode.
Turn the camera on.
1
Press the n button to turn the
camera on.
Basic Photography and Playback
Select k mode.
2
Rotate the mode dial to k.
14
Check the battery level.
3
Check the battery level in the display.
qwe
Indicator
Q
(whit e)
P
(whit e)
O
(red )
N
(blinks red)
Battery partially discharged.
Battery more than half discharged.
Low battery. Charge as soon as
possible.
Battery exhausted. Turn camera off
and charge battery.
Description
r
Page 23
Taking Pictures in k (Auto) Mode
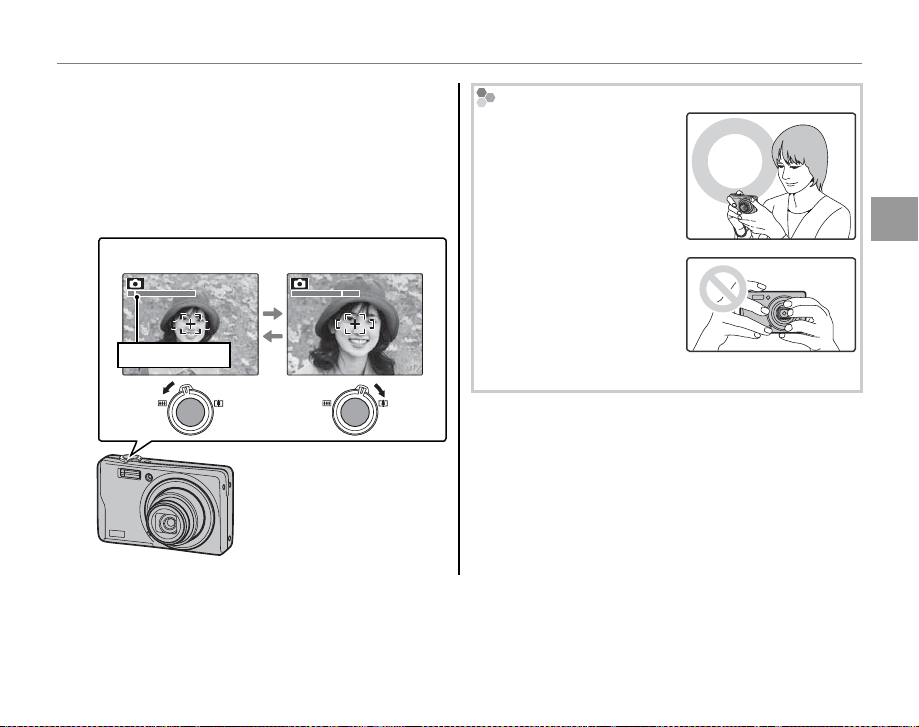
Frame the picture.
4
Position the main subject in the focus frame
and use the zoom control to frame the
picture in the display.
The zoom speed can be changed by
adjusting the position of the zoom control.
Select B to zoom out Select A to zoom in
Zoom indicator
Holding the Camera
Hold the camera steady
with both hands and brace
your elbows against your
sides. Shaking or unsteady
hands can blur your shots.
To prevent pictures that
are out of focus or too dark
(underexposed), keep your
fingers and other objects
away from the lens and
flash.
By default, the camera
uses optical zoom only. If
desired, digital zoom (pg.
92) can be used to zoom
in closer.
B Tip: Focus Lock
Use focus lock (pg. 22) to focus on subjects that are not in the focus frame.
Basic Photography and Playback
15
Page 24
Taking Pictures in k (Auto) Mode
Framing Guideline and Pos t-Shot Assist Window
In shooting mode, press DISP/BACK to select a
shooting display format. The selection changes
each time DISP/BACK is pressed.
INFORMATION
ON
INFORMATION
OFF
BEST FRAMING
• Best Framing: To use the best framing, position the
main subject at the intersection of two lines or
align one of the horizontal lines with the horizon.
Use focus lock (pg. 22) to focus on subjects that
will not be in the center of the frame in the final
photograph.
Avoiding Blurred Pictures
If the subject is poorly lit,
blurring caused by camera
shake can be reduced by
activating the Z DUAL IS
SET-UP
LCD BRIGHTNESS
AUTO POWER OFF
DUAL IS MODE
RED EYE REMOVAL
OFF
DIGITAL ZOOM
AF ILLUMINATOR
CONTINUOUS
SHOOTING ONLY
OFF
3
2
ON
ON
MODE. k CONTINUOUS,
l SHOOTING ONLY or OFF
can be set in the setup menu
(pg. 87).
B Tip
When using the camera with a tripod, Z DUAL IS
MODE is recommended to be OFF.
A Note
Sensitivity is raised when dual IS is in effect. Note
that blurring may still occur depending on the scene
or shooting conditions.
/4
16
Page 25
Taking Pictures in k (Auto) Mode
250
F
3.3
( Silent Mode
In situations in which camera sounds or lights may
be unwelcome, hold the DISP/BACK button down
until ( is displayed (note that silent mode is not
available during movie or voice memo playback).
The camera speaker, flash, and AF-assist illuminator/
self-timer lamp turn off and flash and volume
settings can not be adjusted (note that the flash will
still fire in A mode). To restore normal operation,
press the DISP/BACK button until the ( icon is no
longer displayed. Silent mode can also be set from
the setup menu (pg. 87).
Focus.
5
Press the shutter button halfway to focus on
the main subject in the focus frame.
Press
halfway
250
F
3.3
Focus frame Camera selects small
focus frame and
focuses on subject
A Note
The lens may make a noise when the camera
focuses. This is normal.
If the camera is able to focus, it will beep twice
and the indicator lamp will glow green.
If the camera is unable to focus, the focus frame
will turn red, R will be displayed, and the
indicator lamp will blink green. Change the
composition or use focus lock (pg. 22).
Basic Photography and Playback
17
Page 26
Taking Pictures in k (Auto) Mode
Indicator lamp
Camera status
Shoot.
6
Smoothly press the shutter
button the rest of the way down
to take the picture.
B Tip: The Shutter Button
The shutter button has two positions. Pressing the
shutter button halfway (q) sets focus and exposure;
to shoot, press the shutter button the rest of the way
down (w).
Double
beep
qw
Press halfway
A Note
If the subject is poorly lit, the flash may fire when the
picture is taken. For information on using the flash
when lighting is poor, see page 28.
Press the rest of
the way down
Click
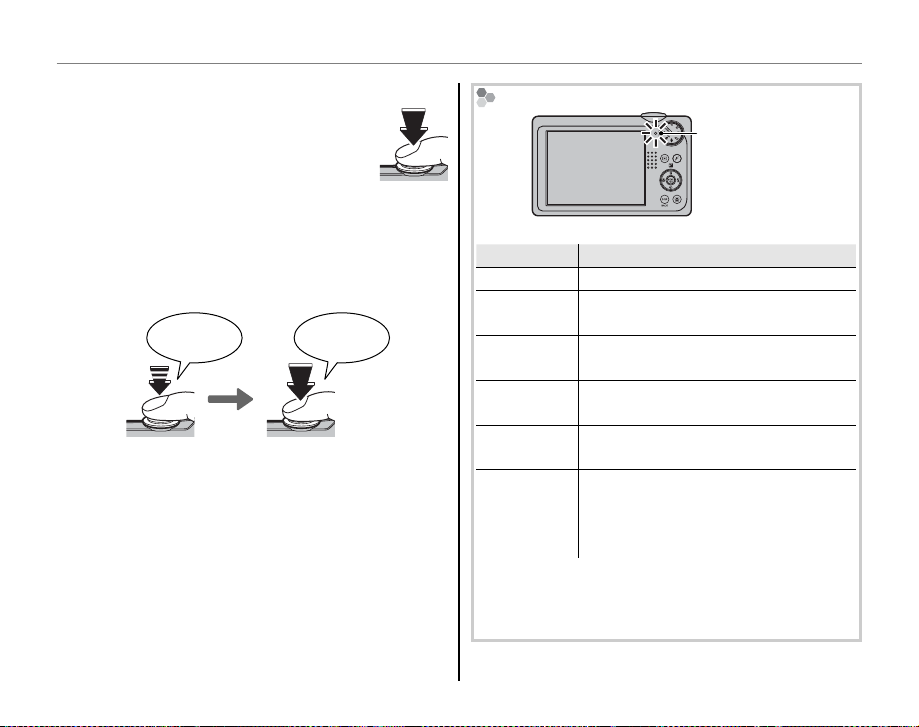
The Indicator L amp
Indicator lamp
The indicator lamp shows camera status as follows:
Indicator lamp
Glows green Focus locked.
Blinks green
Blinks green
and orange
Glows
orange
Blinks orange
Blinks red
B Tip: Warnings
Detailed warnings appear in the display. See pages
104–107 for more information.
Blur, focus, or exposure warning.
Picture can be taken.
Recording pictures. Additional
pictures can be taken.
Recording pictures. No additional
pictures can be taken at this time.
Flash charging; flash will not fire
when picture is taken.
Lens or memory error (internal
memory or memory card full or not
formatted, format error, or other
memory error).
Camera status
18
Page 27
Viewing Pictures
12/ 31 /2050
10: 00
AM
1/250
F
3.3
100-0001
400
4:3
N
Pictures can be viewed in the monitor. When taking important photographs, take a test shot and
check the results.
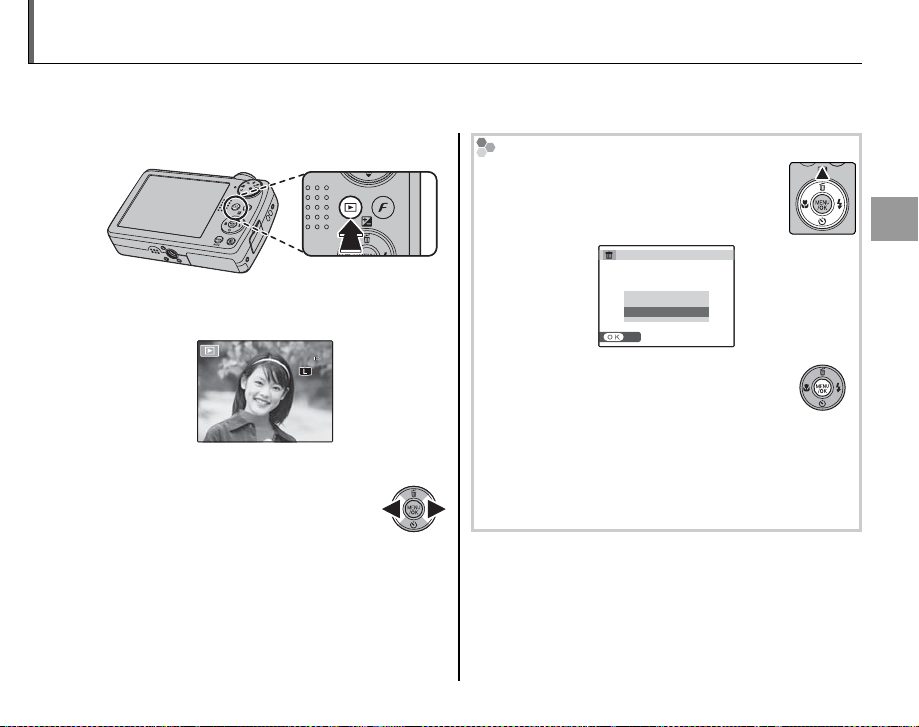
Press the D button for about a second.
1
The most recent picture will be displayed in
the monitor.
100-0001
400
4:3
N
12/ 31 /2050
10: 00
AM
1/250
View additional pictures.
2
Press the selector right to view
F
3.3
pictures in the order recorded, left
to view pictures in reverse order.
Press the shutter button to exit to shooting
mode.
Deleting Pictures
To delete the picture currently displayed
in the monitor, press the selector up (
I).
The following dialog will be displayed.
ERASE OK?
OK
CANCEL
SET
To delete the picture, press the selector
left to highlight OK and press MENU/OK.
To exit without deleting the picture,
highlight CANCEL and press MENU/OK.
B Tip: The Playback Menu
Pictures can also be deleted from the playback
menu (pg. 45).
Basic Photography and Playback
19
Page 28
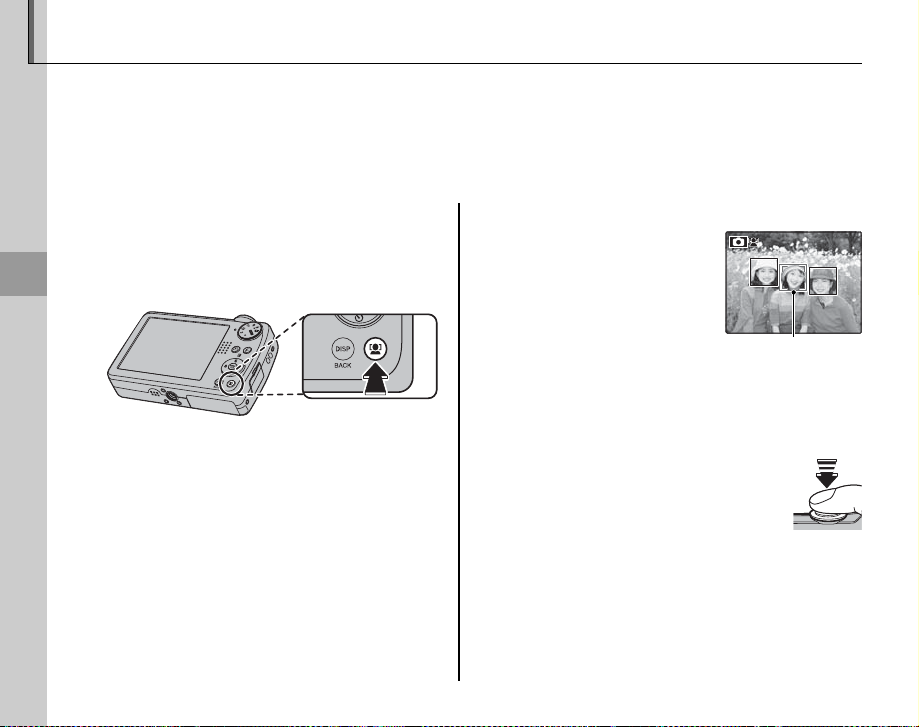
B Intelligent Face Detection
Intelligent Face Detection allows the camera to automatically detect human faces and set focus and
exposure for a face anywhere in the frame for shots that emphasize portrait subjects. Choose for
group portraits (in vertical or horizontal orientations) to prevent the camera from focusing on the
background. Intelligent Face Detection also offers a red-eye removal option for removing “red-eye”
effects caused by the flash.
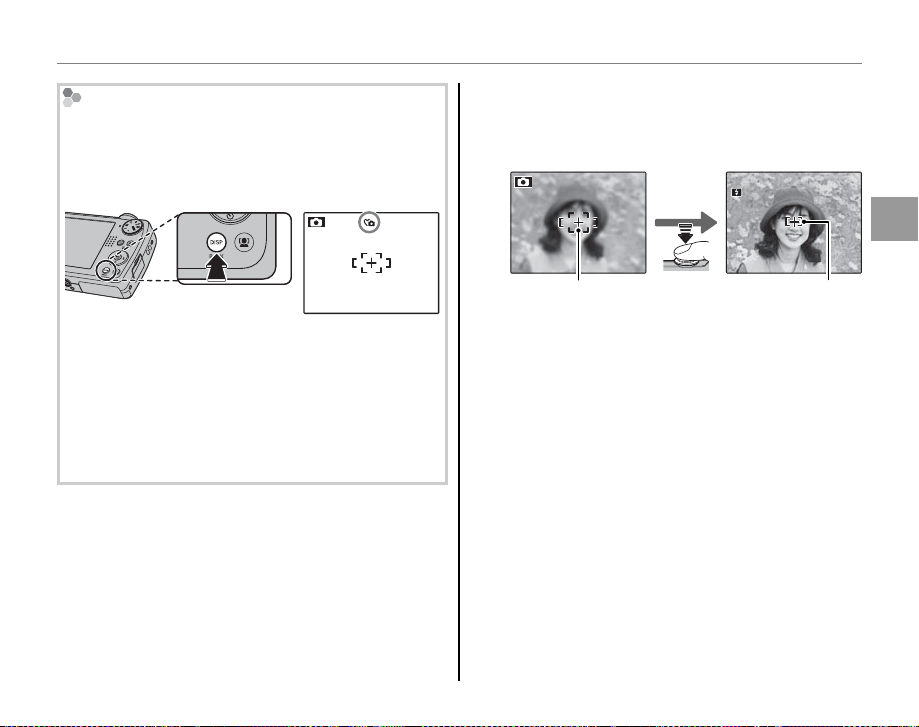
Turn Intelligent Face Detection on.
1
Press the B button to turn Intelligent Face
Detection on. The selection changes each
More on Photography
20
time the B button is pressed.
A Note
When removing red-eye effect, select ON for
a RED EYE REMOVAL in the setup menu (pg.
87).
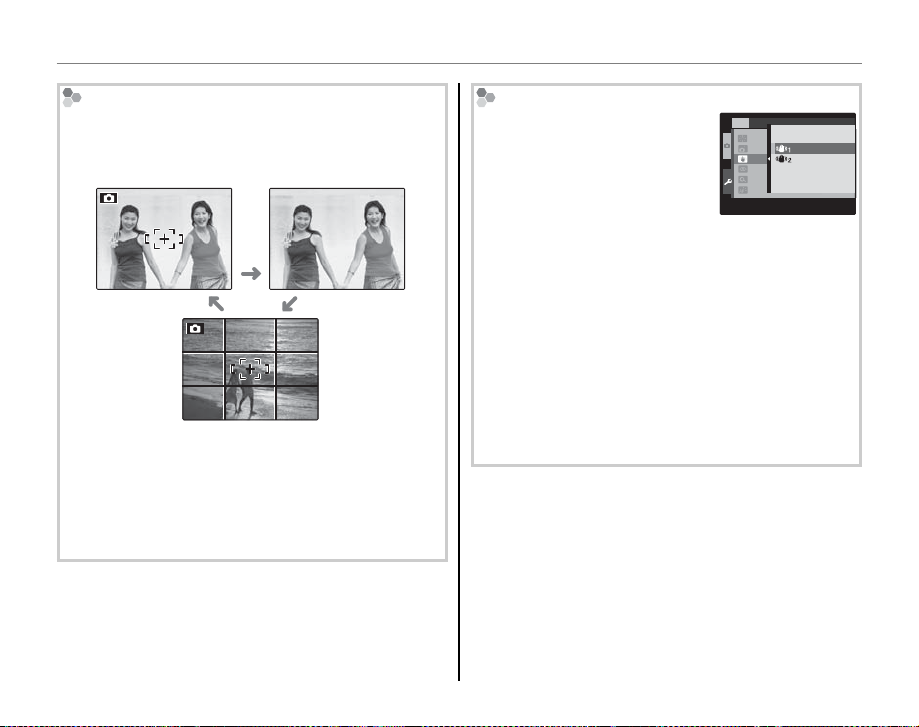
Frame the picture.
2
If a face is detected, it will
be indicated by a green
border. If there is more
than one face in the
frame, the camera will
select the face closest
to the center; other faces are indicated by
white borders.
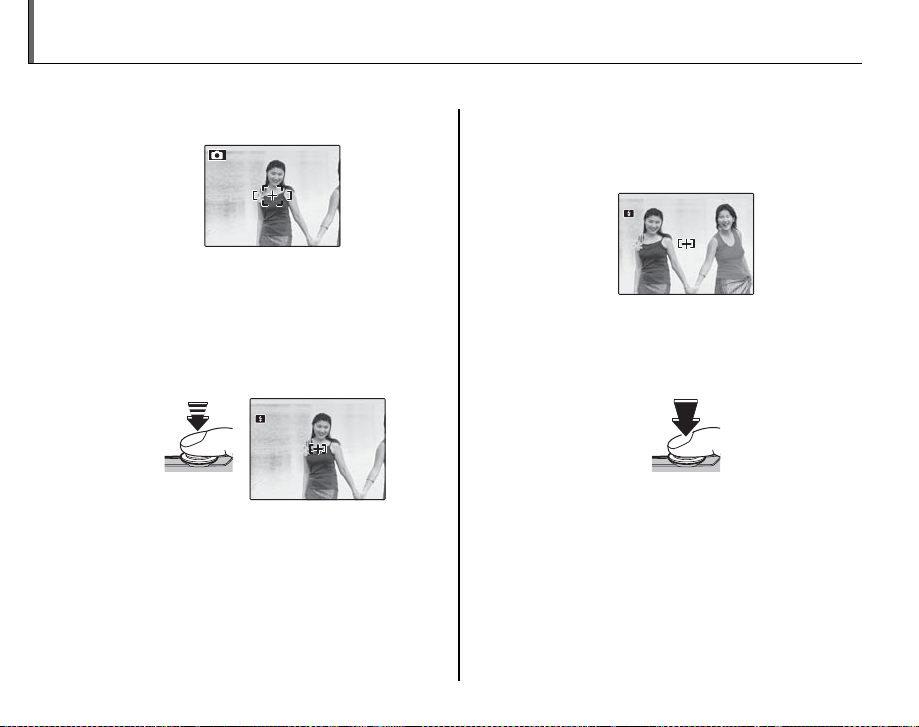
Focus.
3
Press the shutter button halfway
to focus on the subject in the
green border. Note that, in some
shooting modes, exposure is
adjusted for the current shooting mode
and may not be optimized for the selected
subject.
Green borderGreen border
Page 29
77
B Intelligent Face Detection
C Caution
If no face is detected when the shutter button is
pressed halfway (pg. 99), the camera will focus
on the subject at the center of the display and
red-eye will not be removed.
Shoot.
4
Press the shutter button all the
way down to shoot.
C Caution
If the subject moves as the shutter button
is pressed, their face may not be in the area
indicated by the green border when the picture
is taken.
B Tip: Red-Eye Removal
Select ON for the R SAVE ORG IMAGE option
in the setup menu (pg. 86) to save unprocessed
copies of pictures created with red-eye removal.
Intelligent Face Detection
Intelligent Face Detection is
recommended when using the
self-timer for group- or selfportraits (pg. 30).
When a picture taken with Intelligent Face Detection
is displayed, the camera can automatically select
faces for red-eye removal (pg. 77), playback zoom
(pg. 42), slide shows (pg. 75), printing (pg. 51), and
crop (pg. 80).
7
More on Photography
21
Page 30
Focus Lock
250
F
3.3
250
F
3.3
To compose photographs with off-center subjects:
Position the subject in the focus frame.
1
Recompose the picture.
3
Keeping the shutter button pressed
halfway, recompose the picture.
Focus.
2
Press the shutter button halfway to set
focus and exposure. Focus and exposure
will remain locked while the shutter button
is pressed halfway (AF/AE lock).
250
F
3.3
Press
halfway
Shoot.
4
Press the shutter-release button the rest of
the way down to take the picture.
250
F
3.3
Press the rest of
the way down
Repeat steps 1 and 2 as desired to refocus
before taking the picture.
22
Page 31

Focus Lock
Autofocus
Although the camera boasts a high-precision autofocus system, it may be unable to focus on the subjects
listed below. If the camera is unable to focus using autofocus, use focus lock (pg. 22) to focus on another
subject at the same distance and then recompose the photograph.
• Very shiny subjects such as mirrors or car bodies.
• Fast-moving subjects.
• Subjects photographed through a window or other reflective object.
• Dark subjects and subjects that absorb rather than reflect light, such as hair or fur.
• Insubstantial subjects, such as smoke or flame.
• Subjects that show little contrast with the background (for example, subjects in clothing that is the same
color as the background).
• Subjects positioned in front of or behind a high-contrast object that is also in the focus frame (for example, a
subject photographed against a backdrop of highly contrasting elements).
More on Photography
23
Page 32

Focus Lock
The AF-Assist Ill uminator
If the subject is poorly lit, the AF-assist illuminator will light to assist the focus operation when the shutter
button is pressed halfway.
AF-assist
illuminator
A Notes
• Avoid shining the AF-assist illuminator directly into your subject’s eyes. See page 87 for information on
disabling the AF-assist illuminator.
• The camera may be unable to focus using the AF-assist illuminator in some cases. If the camera is unable to
focus in macro mode (pg. 27), try increasing the distance to the subject.
• The AF-assist illuminator is not available in silent mode.
24
Page 33

5 Exposure Compensation
Use exposure compensation when photographing very bright, very dark, or high-contrast subjects.
Press the selector up (5).
1
The exposure indicator will be displayed.
A
Choose a value.
2
Press the selector button. The effect is
visible in the display.
Choose positive (+) values
to increase exposure
Choose negative (–) values
to reduce exposure
SET
Return to shooting mode.
3
Press MENU/OK to return to
shooting mode.
Tak e pictures.
4
0
F
3. 3
A Note
A 5 icon and exposure indicator are displayed at
settings other than ±0. Exposure compensation is not
reset when the camera is turned off; to restore normal
exposure control, choose a value of ±0.
More on Photography
25
Page 34

5 Exposure Compensation
Choosing an Exposure Compensation Value
• Backlit subjects: choose values from +
2
/
3 EV to +1
2
/
3 EV (for an explanation of the term “EV”,
see the Glossary on page 108)
• Highly reflective subjects or very bright scenes (e.g., snowfields): +1 EV
• Scenes that are mostly sky: +1 EV
• Spotlit subjects (particularly if photographed against dark backgrounds): –
2
• Subjects with low reflectivity (pine trees or dark-colored foliage): –
/
3 EV
2
/
3 EV
26
Page 35

L Macro Mode (Close-ups)
For close-ups, press the selector left (L). The selection changes each time the selector is pressed.
OFF
MACRO
When macro mode is in effect, the camera focuses on subjects near the center of the frame. Use the
zoom control to compose pictures.
To exit macro mode, press the selector left (L) and select OFF. Macro mode can also be cancelled by
turning the camera off or selecting another shooting mode.
A Notes
• Use of a tripod is recommended to prevent blur caused by camera shake.
• The flash may fail to light the entire subject at very short ranges. Increase the distance to the subject and try
again.
More on Photography
27
Page 36

K Using the Flash (Super Intelligent Flash)
Mode
Description
When the flash is used, the camera’s Super Intelligent Flash system instantly analyzes the scene based
on such factors as the brightness of the subject, its position in the frame, and its distance from the
camera. Flash output and sensitivity are adjusted to ensure that the main subject is correctly exposed
while preserving the effects of ambient background lighting, even in dimly-lit indoor scenes. Use the
flash when lighting is poor, for example when shooting at night or indoors under low light.
Choose a flash mode.
1
Press the selector right (K). The flash mode changes each time the
selector is pressed; in modes other than 4, the current mode
is indicated by an icon in the display. Choose from the following
options:
28
Mode
4 (AUTO FLASH)
K (FORCED FLASH)
W (SUPPRESSED
FLASH)
T (SLOW SYNCHRO)
Description
The flash fires when required. Recommended in most situations.
The flash fires whenever a picture is taken. Use for backlit subjects or for natural
coloration when shooting in bright light.
The flash does not fire even when the subject is poorly lit. 0 will appear in the
monitor at slow shutter speeds to warn that pictures may be blurred. Use of a
tripod is recommended.
Capture both the main subject and the background under low light (note that
brightly lit scenes may be overexposed).
Page 37

K Using the Flash (Super Intelligent Flash)
Focus.
2
Press the shutter button halfway to focus. If the flash will fire, X will be displayed
when the shutter button is pressed halfway. At slow shutter speeds, 0 will appear in
the display to warn that pictures may be blurred; use of a tripod is recommended.
Shoot.
3
Press the shutter button the rest of the way down to shoot.
C Caution
The flash may fire several times with each shot. Do not move the camera until shooting is
complete.
Red-Eye Removal
When Intelligent Face Detection is active (pg. 20), and ON is selected for a RED EYE REMOVAL
in the setup menu (pg. 87), red-eye removal is available in V, U, and Z. Red-eye removal
minimizes “red-eye” caused when light from the flash is reflected from the subject’s retinas as
shown in the illustration at right.
More on Photography
29
Page 38

J Using the Self-Timer
9
The camera offers a ten-second timer that allows photographers to appear in their own photographs,
and a two-second timer that can be used to avoid blur caused by the camera moving when the
shutter button is pressed. The self-timer is available in all shooting modes.
Set the timer.
1
Press the selector down (J). The selection changes each time the selector is pressed. The
current self-timer mode is displayed in the monitor.
Choose from y (self-timer off),
OFF
OFF
Focus.
2
Press the shutter button halfway to focus.
C Caution
Stand behind the camera when using the shutter button. Standing in front of the lens can
interfere with focus and exposure.
Start the timer.
3
Press the shutter button the rest of the way down to start the timer.
The display in the monitor shows the number of seconds remaining
until the shutter is released. To stop the timer before the picture is
taken, press DISP/BACK.
c (10 s delay), or b (2 s delay)
30
Page 39

J Using the Self-Timer
The self-timer lamp on the front of the camera will blink
immediately before the picture is taken. If the twosecond timer is selected, the self-timer lamp will blink
as the timer counts down.
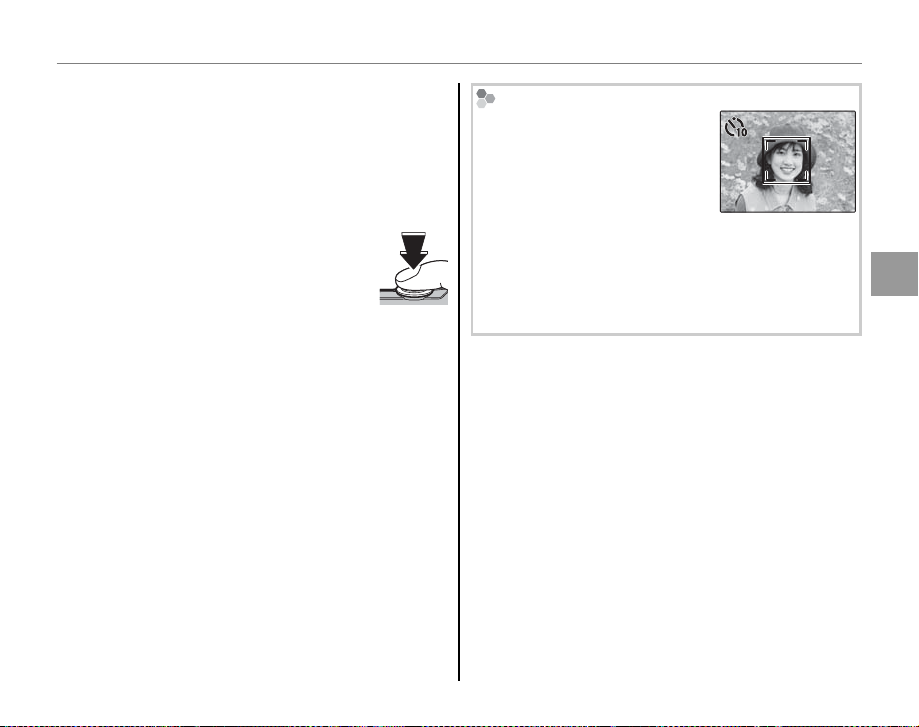
Intelligent Face Detection
Because it ensures that the faces of portrait subjects will be in focus, Intelligent Face Detection (pg. 20) is
recommended when using the self-timer for group portraits or self-portraits. To use the self-timer with
Intelligent Face Detection, turn Intelligent Face Detection on, set the timer as described in Step 1, and then
press the shutter button all the way down to start the timer. The camera will detect faces while the timer is
counting down and adjust focus and exposure immediately before the shutter is released. Be careful not to
move until the picture has been recorded.
A Note
The self-timer turns off automatically when the picture is taken, a different shooting mode is selected, playback
mode is selected, or the camera is turned off.
More on Photography
31
Page 40

kk AUTO
O
EXR
Shooting Mode
Choose a shooting mode according to the scene or type of subject. To choose a shooting mode,
rotate the mode dial to the desired setting (pg. 4). The following modes are available:
AUTO
Choose for crisp, clear snapshots (pg. 14). This
mode is recommended in most situations.
O
EXR
To let the camera automatically
optimize settings for your current
subject, or to improve clarity, reduce
noise, or enhance dynamic range, rotate the
mode dial to O and follow the steps below:
Press MENU/OK to display the
1
shooting menu.
SHOOTING MENU
MODE
ISO
IMAGE SIZE
IMAGE QUALITY
DYNAMIC RANGE
FILM SIMULATION
EXIT
AUTO
4:3
AUTO
1
/2
N
32
Highlight A P MODE.
2
Press the selector right to display
3
the following menu.
AUTO
RESOLUTION PRIORITY
HIGH ISO & LOW NOISE
D-RANGE PRIORITY
Selects EXR mode
and camera settings
for each scene.
CANCELSET
Page 41

Shooting Mode
Option
Description
rr P
AUTO
Mode
Type of subjec t or scene detected
Press the selector up or down to
4
highlight one of the following
options.
Option
The camera automatically
r P AUTO
s RESOLUTION
PRIORITY
t HIGH ISO &
LOW NOISE
u D-RANGE
PRIORITY
Press MENU/OK to select the
5
highlighted option.
Press DISP/BACK to exit from the
6
menu.
selects the scene and O
mode according to shooting
conditions.
Choose for crisp, clear shots.
Reduce noise in pictures taken
at high sensitivities.
Increase the amount of
detail visible in highlights.
U DYNAMIC RANGE is set to
D (800%).
Description
P
AUTO
In this mode, the camera automatically analyzes
the composition and selects the appropriate
scene mode according to the subject and
shooting conditions. The selected mode is
displayed as shown below. When the shutter
button is pressed halfway, the camera selects the
optimal P mode, which is displayed next to
the scene mode icon.
Display when
portrait subject is
detected.
Mode
PORTRAIT: Human portrait subject.
H
LANDSCAPE: Man-made or natural landscape.
I
NIGHT: Poorly lit landscape.
J
MACRO: Subject close to camera.
K
BACKLIT PORTRAIT: Back-lit portrait subject.
T
NIGHT PORTRAIT: Poorly lit portrait subject.
Z
Type of subjec t or scene detected
More on Photography
33
Page 42

o IMAGE SIZE
A
NATURAL &
If S is selected for o IMAGE
SIZE in r mode, the camera
will automatically select the
optimal image size (pg. 66).
SHOOTING MENU
AUTO
IMAGE SIZE
N
AUTO
AUTO (L/M
4:3
3:2
16: 9
4:3
3:2
16:
9
)
19
A Notes
• L (AUT O) will be selected if the subject does not
match the scenes listed above.
• I appears on the display while in r. The
camera continuously analyzes the scene, always
trying to detect faces.
• The camera focuses continuously, increasing the
drain on the battery. The sound of the camera
focusing may be audible.
1
AUTO
L
4:3
AUTO
FRAMES
Shooting Mode
A
NATURAL & KK
/2
This mode helps ensure good results with backlit
subjects and in other situations with difficult
N
lighting. Each time the shutter button is pressed,
the camera takes two shots: one shot without
the flash to preserve natural lighting, followed
immediately by a second shot with the flash. Do
not move the camera until shooting is complete.
A Notes
• Do not use where flash photography is prohibited.
The flash will fire even in silent mode.
• Only available if memory remains for two pictures.
34
Page 43

Shooting Mode
BB NATURAL LIGHT
SPSP SCENE POSITION
NATURAL LIGHT
Capture natural light indoors,
under low light, or where the
flash can not be used. The
flash turns off and sensitivity is
raised to reduce blur.
SCENE POSITION
The camera offers a choice of “scenes,” each
adapted to particular shooting conditions or a
specific type of subject, which can be assigned
to the SP position on the mode dial:
Rotate the mode dial to SP.
1
Press MENU/OK to display the
2
following menu.
SHOOTING MENU
SCENE POSITION
ISO
IMAGE SIZE
IMAGE QUALITY
DYNAMIC RANGE
FILM SIMULATION
EXIT
AUTO
4:3
AUTO
1
/2
N
Highlight A SCENE POSITION.
3
Press the selector right to display
4
shooting mode options.
Press the selector up or down to
5
highlight a scene (pg. 37).
PRO FOCUS
PRO LOW-LIGHT
PORTRAIT
PORTRAIT ENHANCER
Portrait with soft
overall tone and
beautiful skin tones
CANCELSET
Press MENU/OK to select the
6
highlighted option.
Press DISP/BACK to exit from the
7
menu.
Until the setting is changed as described above,
the chosen scene will be selected whenever the
mode dial is rotated to SP.
More on Photography
35
Page 44

Shooting Mode
GG PRO FOCUS MODE
FF PRO LOW-LIGHT MODE
PRO FOCUS MODE
Choose for blurring the background of a
subject such as a portrait or a flower to make it
impressive. When the shutter button is pressed,
the camera automatically takes up to 3 pictures
and merges the pictures together to create a
clear focused subject with a blurred background.
The camera can allow you to get a blurry effect
as a single lens reflex camera does.
Press the selector left or right to select
SOFTNESS in 3 steps before shooting.
A Notes
• When a subject is too close to the background, the
camera may not create effect to a picture. When
the message 5 CANNOT CREATE EFFECT appears
during focus lock, take a little distance from your
subject and use the zoom control to adjust.
• When shooting a moving subject, the function may
not work.
• When the camera fails to create effect, the message
5 PLAYBACK TO CHECK IMAGE appears. Take a
picture again.
C Caution
Hold the camera firmly while you shoot.
PRO LOW-LIGHT MODE
Choose for shooting a subject under low light
or a still subject by using the telephoto zoom.
When the shutter button is pressed, the camera
automatically takes up to 4 pictures and merges
the pictures together. Blurring caused by camera
shake can be reduced and pictures with low
noise can be taken even with high sensitivity.
A Notes
• When shooting a moving subject, the function may
not work.
• Pictures may be saved without merged, depending
on the shooting condition, or when moving the
camera a lot during shooting.
C Caution
Hold the camera firmly while you shoot.
36
Page 45

Shooting Mode
Scene
Description
Scene
G PRO FOC US
F PRO LOW-LIG HT
C PORTRAIT
V PORTRAIT ENHANCER
K LANDSCAPE
L SPORT
D NIGHT
U NIGHT (TRIPOD)
W FIREWORKS
E SUNSET
F SNOW
G BEACH
I PART Y
O FLOWER
P TEXT
Description
Choose for blurring the background of a subject such as a portrait or a flower to make it impressive.
Choose for shooting a subject under low light or a still subject by using the telephoto zoom.
Choose for soft-toned portraits with natural skin tones.
Choose for a smooth skin effect in soft-focus portraits.
Choose for crisp, clear daylight shots of buildings and landscapes.
Choose when photographing moving subjects. w QUICK AF is automatically selected for
m POWER MANAGEMENT and priority is given to faster shutter speeds.
Choose this mode for poorly lit twilight or night scenes. Sensitivity is automatically raised to reduce
blur caused by camera shake.
Choose this mode for slow shutter speeds when shooting at night. Use a tripod to prevent blur.
Slow shutter speeds are used to capture the expanding burst of light from a firework. Use a tripod
to prevent blur.
Record the vivid colors in sunrises and sunsets.
Choose for crisp, clear shots that capture the brightness of scenes dominated by shining white snow.
Choose for crisp, clear shots that capture the brightness of sunlit beaches.
Capture indoor background lighting under low-light conditions.
Choose for vivid close-ups of flowers. The camera focuses in the macro range.
Take clear pictures of text or drawings in print. The camera focuses in the macro range.
More on Photography
37
Page 46

Shooting Mode
MM MANUAL
MANUAL
In this mode, you choose both shutter speed and aperture. If desired, exposure can be altered from
the value suggested by the camera.
Rotate the mode dial to M.
1
Press the 5 button. Shutter speed
2
and aperture will be displayed.
Shutter speed
SET
F
3. 3200
Aperture
Press the selector up or down to
3
choose the aperture.
38
Press the selector left or right to
4
choose the shutter speed.
C Caution
Noise in the form of randomly-spaced bright pixels
may occur in long exposures.
Press MENU/OK to return to shooting
5
mode.
Take pictures.
6
The Exposure Indicator
The amount the picture will
be under- or over-exposed at
current settings is shown by the
exposure indicator.
SET
F
3. 3200
Page 47

Shooting Mode
PP PROGRAM AE/
APERTURE PRIORITY AE
PROGRAM AE/AA
APERTURE PRIORITY AE
Mode P offers a choice of program AE (autoexposure), in which the camera sets exposure
automatically, and aperture priority AE, in which you adjust aperture to soften background details or
bring both background and foreground into focus while letting the camera control shutter speed for
optimal exposure. To take pictures in program and aperture priority AE:
Rotate the mode dial to P.
1
Press MENU/OK to display the
2
shooting menu.
Press the selector up or down to
3
highlight
Press the selector right to display
4
shooting mode options.
A SHOOTING MODE.
Press the selector up or down to
5
highlight an option.
SHOOTING MENU
SHOOTING MODE
1600
4:3
N
AUTO
Press MENU/OK to select the
6
highlighted option.
Press DISP/BACK to exit from the
7
menu.
AUTO
PROGRAM AE
L
APERTURE PRIORITY AE
AUTO
1
/2
4:3
N
More on Photography
39
Page 48

Shooting Mode
Press the selector up (5) to display
8
exposure compensation (program
AE) or aperture (aperture priority
AE).
P
SET
0
Exposure compensation
(program AE)
Press the selector button to choose exposure
9
compensation (program AE) or aperture
A
SET
0
F
3. 3
Aperture
(aperture priority AE)
(aperture priority AE). If the correct exposure
can not be achieved at the aperture selected
for aperture priority AE, the shutter speed will
be displayed in red.
Press MENU/OK to return to shooting
10
mode.
Take pictures.
11
C Caution
If the subject is outside the metering range of the
camera, the shutter speed and aperture displays
will show “---”. Press the shutter button halfway to
measure exposure again.
40
Page 49

Playback Options
12/ 31 /2050
10: 00
AM
1/250
F
3.3
100-0001
400
4:3
N
12/ 31 /2050
10: 00
AM
1/250
F
3.3
100-0001
400
4:3
N
2/13
To view the most recent picture in the monitor,
press the D button.
100-0001
400
4:3
N
12/ 31 /2050
10: 00
AM
1/250
F
3.3
Press the selector right to view pictures
in the order recorded, left to view
pictures in reverse order. Keep the
Choosing a Display Form at
In playback mode, press DISP/BACK to select a
playback display format.
The selection changes each time DISP/BACK is
pressed.
INFORMATION ON INFORMATION OFF
selector pressed to scroll rapidly to the desired
frame.
12/ 31 /2050
10: 00
AM
1/250
A Note
Pictures taken using other cameras are indicated by a e (“gift image”) icon during playback.
F
3.3
SORT BY DATE (pg. 42)
2050
12/31
100-0001
4:3
400
N
2/13
More on Playback
41
Page 50

Playback Zoom
Playback Zoom
Select A to zoom in on pictures displayed in
single-frame playback; select B to zoom out.
When the picture is zoomed in, the selector can
be used to view areas of the image not currently
visible in the display.
Zoom indicator
Navigation window shows
portion of image currently
displayed in monitor
Press DISP/BACK to exit zoom.
A Note
Playback zoom is not available with cropped copies
saved at a size of t or copies created with
j RESIZE (pg. 81).
Playback Options
Intelligent Face Detection
Pictures taken with Intelligent
Face Detection (pg. 20) are
indicated by a B icon. Press
the B button to zoom in
on the subject selected with
Intelligent Face Detection. You
can then use the zoom control to zoom in and out.
BACKZOOM
42
Page 51

Playback Options
Multi-Frame Playback
10: 00
AM
12/ 31/ 2050
Multi-Frame Playback
To change the number of images displayed,
select B when a picture is shown full-frame in
the monitor.
10: 00
AM
12/ 31/ 2050
Select B to
increase the
number of
pictures displayed
to one frame with
previous and next,
two, nine, and a
hundred.
Select A to
reduce the
number of images
displayed.
Use the selector to highlight images and press
MENU/OK to view the highlighted image full frame.
In the nine- and hundred-frame displays, press
the selector up or down to view more pictures.
B Tip: Two-Frame Display
Two-frame display can be used
to compare pictures taken in A
mode.
More on Playback
43
Page 52

Sort by Date
Sort by Date
2/13
Choose sort-by-date mode to view pictures
taken on a selected date.
Press DISP/BACK repeatedly until
1
SORT BY DATE is displayed.
2050
Playback Options
12/31
Use the selector up or down to
2
highlight a date. Keep the selector
pressed to scroll rapidly to the
desired date.
Press the selector left or right to
3
scroll through the pictures taken
on the highlighted date. Keep the
selector pressed to scroll rapidly to
the desired frame.
44
2/13
Page 53

M Deleting Pictures
The ERASE option in the playback menu can be used to delete still pictures and movies, increasing
the amount of space available on the memory card or in internal memory (for information on
deleting pictures in single-frame playback, see page 19). Note that deleted pictures can not be
recovered. Copy important pictures to a computer or other storage device before proceeding.
Press MENU/OK to display the
1
playback menu.
PLAYBACK MENU
ERASE
SLIDE SHOW
RED EYE REMOVAL
IMAGE ROTATE
PROTECT
CROP
EXIT
Press the selector up or down to
2
highlight M ERASE.
Press the selector right to display
3
delete options.
PLAYBACK MENU
ERASE
BACK
SLIDE SHOW
FRAME
RED EYE REMOVAL
ALL FRAMES
IMAGE ROTATE
PROTECT
CROP
Press the selector up or down to
4
highlight FRAME or ALL FRAMES.
1
/2
Press MENU/OK to display options for
5
the selected item (see following
page).
B Tips: Deleting Pictures
• When a memory card is inserted, pictures will be
deleted from the memory card; otherwise, pictures
will be deleted from internal memory.
• Protected pictures can not be deleted. Remove
protection from any pictures you wish to delete (pg.
79).
1
/2
• If a message appears stating that the selected
images are part of a DPOF print order, press MENU/OK
to delete the pictures.
More on Playback
45
Page 54

■■ FRAME
: Deleting Selec ted Images
■■
ALL FRAMES
: Deleting All Images
M Deleting Pictures
FRAME
Selecting FRAME displays the
: Deleting Selected Images
ERASE OK?
dialog shown at right.
YES CANCEL
Press the selector left or right
to scroll through pictures and
press MENU/OK to delete the
current picture (the picture
is deleted immediately; be
careful not to delete the
wrong picture).
Press DISP/BACK to exit when all the desired
pictures have been deleted.
ALL FRAMES
Selecting ALL FRAMES
: Deleting All Images
ERASE ALL OK?
IT MAY TAKE A WHILE
displays the confirmation
SET
OK
CANCEL
shown at right.
Highlight OK and press MENU/
OK to delete all unprotected
pictures.
The dialog shown at right is
displayed during deletion.
Press DISP/BACK to cancel
before all pictures have been
CANCELCANCEL
deleted (any pictures deleted
before the button was pressed can not be
recovered).
46
Page 55

STANDBY
12
s
STANDBY
12
s
12
s
A Recording Movies
Shoot short movies at 30 frames per second. Sound is recorded via the built-in microphone; do not
cover the microphone during recording.
Rotate the mode dial to A (movie
1
mode).
Display shows time
12
s
STANDBY
available
Frame the scene using the zoom
2
control.
12
s
STANDBY
Zoom indicator
Press the shutter button all the way
3
down to start recording.
z REC and time
12
s
REC
remaining are
displayed
B Tip
There is no need to keep the shutter button pressed
during recording.
A Notes
• Focus, exposure and white balance are adjusted
automatically throughout recording. The color
and brightness of the image may vary from that
displayed before recording begins.
• If the subject is poorly lit, the AF-assist lamp
may light to assist the focus operation. To turn
the AF-assist lamp off, select OFF for the b AF
ILLUMINATOR option in the setup menu (pg. 87).
Movies
47
Page 56

A Recording Movies
Press the shutter button halfway
4
to end recording. Recording ends
automatically when the movie
reaches maximum length or
memory is full.
C Caution
The indicator lamp lights while movies are being
recorded. Do not open the battery chamber card
during shooting or while the indicator lamp is lit.
Failure to observe this precaution could prevent the
movie from being played back.
A Note
Movies are recorded as monaural motion JPEG files.
Choosing the Frame Size
To choose the frame size,
press MENU/OK and select
o QUALITY. Choose
t (640 × 480 pixels) for
better quality, s (320 × 240
pixels) for smaller data size. Press DISP/BACK to return
to movie recording mode.
SHOOTING MENU
QUALITY
AF MODE
10m59s
15m00s
Selecting focus mo de
Select F AF MODE in the shooting menu.
• w CENTER: When zooming in or out, the camera
refocus on the subject in the center of the frame.
• T CONTINUOUS: The camera continuously
adjusts focus to reflect changes in the distance to
the main subject.
1
/2
48
Page 57

D Viewing Movies
100-006
12/ 31 /2050
10: 00
AM
Operation
Description
15
s
During playback, movies are
displayed in the monitor as
shown at right. The following
operations can be performed
while a movie is displayed:
Operation
Start/pause
playback
End
playback/
delete
Advance/
rewind
Adjust
volume
Press the selector down to start playback.
Press again to pause.
Press the selector up to end playback. If
playback is not in progress, pressing the
selector up will delete the current movie.
Press the selector right to advance, left to
rewind. If playback is paused, the movie
will advance or rewind one frame each
time the selector is pressed.
Press MENU/OK to pause playback and
display volume controls. Press the
selector up or down to adjust the
volume; press MENU/OK again to resume
playback.
Description
12/ 31 /2050
PLAY
10: 00
AM
Progress is shown in the monitor during
100-006
playback.
15
s
Progress bar
STOP PAUSE
B Tip: Viewing Movies on a Computer
Copy movies to the computer before viewing.
C Cautions
• Do not cover the speaker during playback.
• Vertical or horizontal streaks may appear in movies
containing very bright subjects. This is normal and
does not indicate a malfunction.
Movies
49
Page 58

Viewing Pictures on TV
Connect the camera to a TV and tune the television to the video channel to show pictures to a group.
Connect the A/V cable, as shown below. Be sure that the camera is off before connecting the cable.
Insert into A/V cable
connec tor
Connect yellow plug
to video-in jack
Connect white plug
to audio-in jack
Press D for about a second to turn the camera on. The camera monitor turns off and pictures and
voice memos are played back on the TV. Note that the camera volume controls have no effect on
sounds played on the TV; use the television volume controls to adjust the volume.
A Note
Image quality drops during movie playback.
Connections
C Caution
When connecting the cable, be sure the connectors are fully inserted.
50
Page 59

Printing Pictures via USB
Connecting the Camera
Printing Selected Pictures
If the printer supports PictBridge, the camera can be connected directly to the printer and
pictures can be printed without first being copied to a computer. Note that depending on
the printer, not all the functions described below may be supported.
Connecting the Camera
Connect the supplied USB cable as shown
1
and turn the printer on.
Press the D button for about a second
2
to turn the camera on. w USB will be
displayed in the monitor, followed by the
PictBridge display shown below at right.
USB
PICTBRIDGE
TOTAL:
00000
00
FRAME
OK SET
SHEETS
Printing Selected Pictures
Press the selector left or right to
1
display a picture you wish to print.
A Note
To print one copy of the current picture, proceed
directly to Step 3.
Press the selector up or down to
2
choose the number of copies (up
to 99). Repeat steps 1–2 to select
additional pictures.
Press MENU/OK to display a
3
confirmation dialog.
PRINT THESE FRAMES
TOTAL:
9
SHEETS
YES CANCEL
Press MENU/OK to start printing.
4
Connections
51
Page 60

Printing Pictures via USB
B Tip: Printing the Date of Recording
To print the date of recording on pictures, press
DISP/BACK in steps 1–2 to display the PictBridge menu
(see “Printing the DPOF Print Order,” on pg. 53).
Press the selector up or down to highlight PRINT
WITH DATE y and press MENU/OK to return to the
PictBridge display (to print pictures without the date
of recording, select PRINT WITHOUT DATE). To
ensure that the date is correct, set the camera clock
before taking pictures. Note that the PRINT WITH
DATE y option is only available with printers that
support date printing.
A Notes
• Use an optional AC adapter and DC coupler to
power the camera for extended periods.
• Print pictures from internal memory or a memory
card that has been formatted in the camera.
• Default printer page size and print quality settings
are used when printing via direct USB connection.
During Printing
The message shown at right is
PRINTING
displayed during printing. Press
DISP/BACK to cancel before all
pictures are printed (depending
on the printer, printing may end
CANCEL
before the current picture has
printed).
If printing is interrupted, press D to turn the camera
off and then on again.
Disconnec ting the Camera
Confirm that the above message is not displayed
and turn the camera off. Disconnect the USB cable.
52
Page 61

Printing the DPOF Print Order
Printing the DPOF Print Order
To print the print order created with r PRINT
ORDER (DPOF) in the playback menu (pg. 54):
In the PictBridge display, press DISP/
1
BACK to open the PictBridge menu.
PICTBRIDGE
PRINT WITH DATE
PRINT WITHOUT DATE
PRINT DPOF
Press the selector up or down to
2
highlight x PRINT DPOF.
Printing Pictures via USB
Press MENU/OK to display a
3
confirmation dialog.
PRINT DPOF OK?
TOTAL: 9 SHEETS
YES CANCEL
Press MENU/OK to start printing.
4
Connections
53
Page 62

■■ WITH DATE
/ WITHOUT DATE
Creating a DPOF Print Order
Creating a DPOF Print Order
The r PRINT ORDER (DPOF) option in the
playback menu can be used to create a digital
“print order” for PictBridge-compatible printers
(pg. 53) or devices that support DPOF.
DPOF
DPOF (Digital Print Order Format) is
standard that allows pictures to be printed
from “print orders” stored in internal
memory or on a memory card. The information in
the order includes the pictures to be printed and the
number of copies of each picture.
WITH DATE y
/ WITHOUT DATE
To modify the DPOF print order, select r PRINT
ORDER (DPOF) in the playback menu and press
the selector up or down to highlight WITH
DATE y or WITHOUT DATE.
PLAYBACK MENU
RESIZE
WITH DATE
COPY
WITHOUT DATE
VOICE MEMO
RESET ALL
PRINT ORDER
2
/2
WITH DATE y: Print date of
recording on pictures.
WITHOUT DATE: Print pictures without
date.
Printing Pictures via USB
Press MENU/OK and follow the steps below.
Press the selector left or right to
1
display a picture you wish to
include in or remove from the print
order.
Press the selector up or down to
2
choose the number of copies (up
to 99). To remove a picture from
the order, press the selector down until the
number of copies is 0.
SHEETS
FRAME
00001
SET
)
Total number of prints
Number of copies
PRINT ORDER (DPOF
DPOF:
01
B Tip: Intelligent Face Detection
If the current picture was created with Intelligent
Face Detection, pressing B sets the number of
copies to the number of faces detected.
54
Page 63

Printing Pictures via USB
■■ RESET ALL
Repeat steps 1–2 to complete the
3
print order. Press MENU/OK to save
the print order when settings
are complete, or DISP/BACK to exit without
changing the print order.
The total number of prints is
4
displayed in the monitor. Press
MENU/OK to exit.
The pictures in the current
print order are indicated by a
x icon during playback.
RESET ALL
RESET DPOF OK?
To cancel the current print
RESET DPOF OK?
order, select RESET ALL in the
r PRINT ORDER (DPOF)
menu. The confirmation
YES CANCEL
YES CANCEL
shown at right will be
displayed; press MENU/OK to remove all pictures
from the order.
A Notes
• Remove the memory card to create or modify a print
order for the pictures in internal memory.
• Print orders can contain a maximum of 999 pictures.
RESET DPOF OK?
• If a memory card is inserted
containing a print order
created by another camera, the
message shown at right will be
displayed. Pressing MENU/OK
cancels the print order; a new
print order must be created as described above.
RESET DPOF OK?
YES CANCEL
YES CANCEL
Connections
55
Page 64

Viewing Pictures on a Computer
Installing FinePixViewer
Installing FinePixViewer: Windows
OS
CPU
RAM
Free di sk
space
Video
Other
The supplied FinePixViewer software can be used to copy pictures to a computer, where they can be
stored, viewed, organized, and printed. Before proceeding, install FinePixViewer as described below.
Do NOT connect the camera to the computer until installation is complete.
Installing FinePixViewer
FinePixViewer is available in Windows and Macintosh versions. Installation instructions for Windows
are on pages 56–57, those for the Macintosh on pages 58–59.
Installing FinePixViewer: Windows
Confirm that the computer meets the following system requirements:
1
Free dis k
* To check if FinePixViewer is Windows® 7-compliant, please visit http://www.fujifilm.com/support/download/camera/
C Caution
Other versions of Windows are not supported. Operation is not guaranteed on home-built computers or
computers that have been upgraded from earlier versions of Windows.
56
Preinstalled versions of Windows Vista, Windows XP Home Edition, Windows XP Professional (Ser vice Pack 2),
OS
or Windows 2000 Professional (Service Pack 4)*
• Win dows Vista: 800 MHz Pentium 4 or better (3 GHz Pentium 4 or better recommended)
CPU
• Windows XP: 800 MHz Pentium 4 or better (2 GHz Pentium 4 or better recommended)
• Windows 2000: 200 MHz Pentium or better
• Win dows Vista: 512 MB or more (1 GB or more recommended)
RAM
• Windows XP: 512 MB or more
• Windows 2000: 128 MB or more
A minimum of 450 MB required for installation with 600 MB available when FinePixViewer is running (15 GB or
space
more recommended under Windows Vista, 2 GB or more recommended under Windows XP)
Video 800 × 600 pixels or more with 16-bit color or better (1,024 × 768 pixels or more with 32-bit color recommended)
• Built-in USB port recommended. Operation is not guaranteed other USB ports.
Other
• Internet connection (56 kbps or faster recommended) required to use FinePix Internet Service; Internet
software/.
connection and e-mail software required to use e-mail option.
Page 65

Viewing Pictures on a Computer
Start the computer. Log in to an account with administrator privileges before proceeding.
2
Exit any applications that may be running and insert the installer CD in a CD-ROM drive.
3
Windows Vista
If an AutoPlay dialog is displayed, click SETUP.exe. A “User Account Control” dialog will then be displayed;
click Allow.
The installer will start automatically; click Installing FinePixViewer and follow the on-screen
instructions to install FinePixViewer. Note that the Windows CD may be required during
installation.
If the Installer Does Not St art Automatically
If the installer does not start automatically, select Computer or My Computer from the Start menu
(Windows Vista/XP) or double-click the My Computer icon on the desktop (Windows 2000), then doubleclick the FINEPIX CD icon to open the FINEPIX CD window and double-click SETUP or SETUP.exe.
If prompted to install Windows Media Player or DirectX, follow the on-screen instructions to
4
complete installation.
When prompted, remove the installer CD from the CD-ROM drive and click Restart to restart the
5
computer. Store the installer CD in a dry location out of direct sunlight in case you need to reinstall the software. The version number is printed at the top of the CD label for reference when
updating the software or contacting customer support.
Installation is now complete. Proceed to “Connecting the Camera” on page 60.
Connections
57
Page 66

Viewing Pictures on a Computer
Installing FinePixViewer: Macintosh
CPU
OS
RAM
Free dis k space
Video
Other
Installing FinePixViewer: Macintosh
Confirm that the computer meets the following system requirements:
1
2
CPU PowerPC or Intel
Pre-installed versions of Mac OS X version 10.3.9–10.5 (for the latest information, visit http://www.fujifilm.
OS
com/ )
RAM 256 MB or more
Free dis k space A minimum of 200 MB required for installation with 400 MB available when FinePixViewer is running
Video 800 × 600 pixels or more with thousands of colors or better
Other
• Built-in USB port recommended. Operation is not guaranteed other USB por ts.
• Internet connection (56 kbps or faster recommended) required to use FinePix Internet Service; Internet
connection and e-mail software required to use e-mail option.
After starting the computer and quitting any applications that may be running, insert the installer
CD in a CD-ROM drive. Double-click the FinePix CD icon on the desktop and double-click
Installer for Mac OS X.
An installer dialog will be displayed; click Installing FinePixViewer to start installation. Enter
3
an administrator name and password when prompted and click OK, then follow the on-screen
instructions to install FinePixViewer. Click Exit to quit the installer when installation is complete.
58
Page 67

Viewing Pictures on a Computer
Remove the installer CD from the CD-ROM drive. Note that you may be unable to remove the CD
4
if Safari is running; if necessary, quit Safari before removing the CD. Store the installer CD in a dry
location out of direct sunlight in case you need to re-install the software. The version number
is printed at the top of the CD label for reference when updating the software or contacting
customer support.
Select Applications in the Finder Go menu to open the applications folder.
5
Double-click the Image Capture icon and select Preferences… from the
Image Capture application menu.
The Image Capture preferences dialog will be displayed. Choose Other… in
the When a camera is connected, open menu, then select FPVBridge in
the “Applications/FinePixViewer” folder and click Open.
Select Quit Image Capture from the Image Capture application menu.
Installation is now complete. Proceed to “Connecting the Camera” on page 60.
Connections
59
Page 68

Connecting the Camera
Connecting the Camera
If the pictures you wish to copy are stored
1
on a memory card, insert the card into the
camera (pg. 8). If no card is inserted, pictures
will be copied from internal memory.
C Caution
Loss of power during transfer could result in loss of
data or damage to internal memory or the memory
card. Charge the battery before connecting the
camera.
Turn the camera off and connect the supplied
2
USB cable as shown, making sure the
connectors are fully inserted. Connect the
camera directly to the computer; do not use a
USB hub or keyboard.
Viewing Pictures on a Computer
Press the D button for about a second to
3
turn the camera on. FinePixViewer will start
automatically and the “Save Image Wizard”
will be displayed. Follow the on-screen
instructions to copy pictures to the computer.
To exit without copying pictures, click Cancel.
C Caution
If FinePixViewer does not start automatically,
the software may not be correctly installed.
Disconnect the camera and reinstall the software.
For more information on using FinePixViewer,
select How to Use FinePixViewer in the
FinePixViewer Help menu.
A Note
The camera will not turn off automatically while connected to a computer.
60
Page 69

Viewing Pictures on a Computer
C Cautions
• Use only memory cards that have been formatted
in the camera and contain pictures taken with
the camera. If a memory card containing a large
number of images is inserted, there may be a delay
before FinePixViewer starts and FinePixViewer may
be unable to import or save images. Use a memory
card reader to transfer pictures.
• Make sure the indicator lamp is out before turning
the camera off, disconnecting the USB cable. Failure
to observe this precaution could result in loss of data
or damage to internal memory or the memory card.
• Disconnect the camera before inserting or removing
memory cards.
• Use FinePixViewer to copy voice memos.
• In some cases, it may not be possible to access
pictures saved to a network server using
FinePixViewer in the same way as on a standalone
computer.
• The user bears all applicable fees charged by the
phone company or Internet service provider when
using services that require an Internet connection.
Disconnec ting the Camera
After confirming that the indicator lamp is out,
follow the on-screen instructions to turn the camera
off and disconnect the USB cable.
Updating FinePixViewer
The latest version of FinePixViewer can be
downloaded from http://www.fujifilm.com/.
Uninstalling FinePixViewer
Only uninstall FinePixViewer before reinstalling
the software or when it is no longer required.
After quitting FinePixViewer and disconnecting
the camera, drag the “FinePixViewer” folder
from “Applications” into the Trash and select
Empty Trash in the Finder menu (Macintosh), or
open the control panel and use “Programs and
Features” (Windows Vista) or “Add or Remove
Programs” (other versions of Windows) to uninstall
FinePixViewer, FinePix Resource, and FinePix Studio.
Under Windows, one or more confirmation dialogs
may be displayed; read the contents carefully before
clicking OK.
Connections
61
Page 70

Using the Menus: Shooting Mode
Using the
-Mode Menu
The v-mode and shooting menus contain settings for a wide range of shooting conditions.
Using the vv
Press the v button to display the
1
v-MODE menu.
Press the selector up or down to
2
highlight the desired menu item.
-Mode Menu
MODE MENU
ISO
IMAGE SIZE
FILM SIMULATION
EXIT
Menus
62
Press the selector right to display
3
options for the highlighted item.
MODE MENU
12800
6400
800
4:3
Press the selector up or down to
4
highlight the desired option.
Press MENU/OK to select the
5
highlighted option.
Press DISP/BACK to exit from the
6
menu.
ISO
4:3
3200
1600
800
4:3
800
400
Page 71

vv-Mode Menu Options
-Mode Menu Options
Menu item
Description
Options
Default
Menu item
n ISO
o IMAGE SIZE
W FILM SIMULATIO N
Adjust ISO sensitivity (pg. 64). Choose higher
values when the subject is poorly lit.
Choose image size and aspect ratio (pg. 64).
Simulate the effects of different types of film
(pg. 65).
Description
A Note
Some options are not available in all shooting modes.
Using the Menus: Shooting Mode
Options
AUTO / AUTO (1600) /
AUTO (800) / AUTO (400) /
128 00 / 6400 / 3200 / 160 0 /
800 / 400 / 200 / 100
o 4 : 3 / o 3 : 2 / o 16 : 9 /
p 4 : 3 / p 3 : 2 / p 16 : 9 /
q 4 : 3 / q 3 : 2 / q 16 : 9
c PROVIA/STANDARD /
d Velvia/VIVI D / e ASTIA/SOFT /
N B&W / f SEPIA
Default
AUTO
o 4 : 3
c PROVIA/
STANDARD
Menus
63
Page 72

Using the Menus: Shooting Mode
nn ISO
o
IMAGE SIZE
Option
Prints at sizes up to
ISO
Control the camera’s sensitivity to light. Higher
values can be used to reduce blur when lighting
is poor; note, however, that mottling may appear
in pictures taken at high sensitivities, particularly
at settings above 160 0. If AUTO or an option
such as AUTO (1600) is selected, the camera will
adjust sensitivity automatically in response to
shooting conditions. In the case of AUTO
(160 0), AUTO (800), and AUTO (400), the value
in parentheses is the maximum sensitivity that
will be selected when the subject is poorly lit.
Settings other than AUTO
ISO
ISO
100
100
are shown by an icon in the
display.
o
IMAGE SIZE
Choose the size and aspect ratio at which still
pictures are recorded. Large pictures can be
printed at large sizes with no drop in quality;
small pictures require less memory, allowing
more pictures to be recorded.
Option
o 4 : 3
o 3 : 2
o 16 : 9
p 4 : 3
p 3 : 2
p 16 : 9
q 4 : 3
q 3 : 2
q 16 : 9
Prints at sizes up to
34 × 25 cm (13.5 × 10 in.)
34 × 23 cm (13.5 × 9 in.)
34 × 19 cm (13.5 × 7.5 in.)
24 × 18 cm (9.5 × 7 in.)
24 × 16 cm (9.5 × 6 in.)
24 × 13 cm (9.5 × 5.5 in.)
17 × 13 cm (7 × 5 in.)
17 × 12 cm (7 × 4.5 in.)
17 × 9 cm (7 × 3.5 in.)
The number of pictures that can be taken at
current settings (pg. 109) is shown to the right of
the image quality icon in the display.
64
Page 73

Aspect Ratio
4:3
3:2
16:9
W
FILM SIMULATION
Option
Description
Pictures with an aspect ratio of 4 : 3 have the same
proportions as the camera display. Pictures with an
aspect ratio of 3 : 2 have the same proportions as a
frame of 35-mm film, while an aspect ratio of 16 : 9 is
suited to display on High Definition (HD) devices.
4:3
4 : 3
3:2
16:9
3 : 2 16 : 9
Using the Menus: Shooting Mode
W
FILM SIMULATION
Simulate the effects of different types of film,
including sepia and black-and-white.
Option
c PROVIA/
STANDARD
d Velvia/
VIVID
e ASTIA/
SOFT
N B&W
f SEPIA
Standard color reproduction. Suited
to a wide range of subjects, from
portraits to landscapes.
A high-contrast palette of saturated
colors, suited to nature photographs.
A soft-toned palette of less saturated
colors.
Take pictures in black and white.
Take pictures in sepia.
Description
A Note
Image quality is not reset when the camera is turned
off or another shooting mode is selected.
Menus
65
Page 74

Using the Shooting Menu
Using the Shooting Menu
Using the Menus: Shooting Mode
Press MENU/OK to display the
1
shooting menu.
SHOOTING MENU
ISO
IMAGE SIZE
IMAGE QUALITY
DYNAMIC RANGE
FILM SIMULATION
EXIT
Press the selector up or down to
2
highlight the desired menu item.
Press the selector right to display
3
options for the highlighted item.
SHOOTING MENU
AUTO
IMAGE SIZE
N
AUTO
)
AUTO (L/M
66
MODE
16: 9
16:
Press the selector up or down to
4
highlight the desired option.
1
/2
AUTO
4:3
N
AUTO
1
/2
4:3
3:2
AUTO
L
4:3
4:3
N
3:2
AUTO
9
19
FRAMES
Press MENU/OK to select the
5
highlighted option.
Press DISP/BACK to exit from the
6
menu.
Page 75

Shooting Menu Options
Shooting Menu Options
Menu item
Description
Options
Default
1/2
Menu item
A SCENE POSITION
A SHOOTING MODE
(P/A)
A P MODE
n ISO
1/2
o IMAGE SIZE
T IMAGE QUALITY
U DYNAMIC RANG E
W FILM SIMULATIO N
Choose a scene for SP mode (pg. 35).
Choose program or aperture priority AE for P
mode (pg. 39).
Choose options for O mode (pg. 32). r/s/t/ur
Adjust ISO sensitivity (pg. 64). Choose higher
values when the subject is poorly lit.
Choose image size and aspect ratio (pg. 64).
Choose image quality (pg. 69). FINE / NORMAL NORMAL
Enhance details in highlights for natural
contrast (pg. 69).
Simulate the effects of different types of film
(pg. 65).
Description
Using the Menus: Shooting Mode
Options
G/F/C/V/K/L/D/U/
W/E/F/G/I/O/P
P / AP
AUTO / AUTO (1600) /
AUTO (800) / AUTO (400) /
128 00 / 6400 / 3200 / 160 0 /
800 / 400 / 200 / 100
o 4 : 3 / o 3 : 2 / o 16 : 9 /
p 4 : 3 / p 3 : 2 / p 16 : 9 /
q 4 : 3 / q 3 : 2 / q 16 : 9
AUTO / A 100% /
b 200% / C 400% /
D 800%
c PROVIA/STANDARD /
d Velvia/VIVI D /
e ASTIA/SOFT /
N B&W / f SEPIA
Default
G
AUTO
o 4 : 3
AUTO
c PROVIA/
STANDARD
Menus
67
Page 76

Using the Menus: Shooting Mode
Menu item
Description
Options
Default
2/2
Menu item
C WHITE BALANCE
E CONTINUOUS
2/2
B PHOTOMETR Y
F AF MODE
Adjust color for different light sources (pg. 69).
Shoot a series of pictures (pg. 71).
Choose how the camera meters exposure (pg.
72).
Choose how the camera selects a focus area
(pg. 72).
Description
A Note
Some options are not available in all shooting modes.
Options
AUTO/Q/p/q/s/t/u/r
R/S/o/m/ OFF
N/O/PN
w/x/T
Default
AUTO
OFF
w
68
Page 77

TT IMAGE QUALITY
IMAGE QUALITY
UU DYNAMIC RANGE
CC WHITE BALANCE
Option
Description
Choose how much image files are compressed.
Select FINE (low compression) for higher image
quality, NORMAL (high compression) to increase
the number of pictures that can be stored.
DYNAMIC RANGE
Control contrast. Higher values are
recommended for scenes that include both
sunlight and deep shade or for increased
contrast when photographing such subjects as
sunlight on water, brightly-lit autumn leaves, and
portraits taken against a blue sky; note, however,
that mottling may appear in pictures taken at
higher values. If AUTO is selected, the camera
will automatically select values between 100%
and 400% in response to shooting conditions.
A Note
D 800% is available only when U DYNA MIC
RANGE is selected in O mode and an option
other than d Velvia/VIVID or e ASTIA/SOFT is
selected for W FILM SIMULATION.
Using the Menus: Shooting Mode
WHITE BALANCE
For natural colors, choose a setting that matches
the light source (for an explanation of “white
balance,” see the Glossary on page 108).
Option
AUTO
White balance adjusted automatically.
Measure a value for white balance.
Q
For subjects in direct sunlight.
p
For subjects in the shade.
q
Use under “daylight” fluorescent lights.
s
Use under “warm white” fluorescent lights.
t
Use under “cool white” fluorescent lights.
u
Use under incandescent lighting.
r
Description
If AUTO does not produce the desired results (for
example, when taking close-ups), select Q and
measure a value for white balance or choose the
option that matches the light source.
Menus
69
Page 78

Using the Menus: Shooting Mode
■■ QQ: Custom White Balance
A Notes
• At settings other than Q, auto white balance is used
with the flash. Turn the flash off (pg. 28) to take
pictures at other settings.
• Results vary with shooting conditions. Play pictures
back after shooting to check colors in the monitor.
: Custom White Balance
CUSTOM WB
Choose Q to adjust white
CUSTOM WB
balance for unusual lighting
conditions. The options at
NEW WB
NEW WB
SHUTTER
right will be displayed; frame a
SHUTTER
NOT CHANGE CANCEL
NOT CHANGE CANCEL
white object so that it fills the
monitor and press the shutter button all the way
down to measure white balance.
If “COMPLETED!” is displayed, press MENU/OK to
set white balance to the measured value. This
value is stored even when the battery is removed
and can be reselected by pressing MENU/OK when
custom white balance options are displayed.
If “UNDER” is displayed, raise exposure
compensation (pg. 25) and try again.
If “OVER” is displayed, lower exposure
compensation and try again.
B Tip
To give a deliberate color cast to your photographs,
measure a value for custom white balance using a
colored instead of a white object.
70
Page 79

■■
S
TOP 12 /
m
TOP 3
S
EE CONTINUOUS
CONTINUOUS
■■
R
FINAL 12 /
o
FINAL 3
R
Capture motion in a series of pictures.
A Notes
• The flash turns off automatically. The previouslyselected flash mode is restored when OFF is
selected for E CONTINUOUS.
• Frame rate varies with shutter speed.
R
FINAL 12 /
o
FINAL 3
While the shutter button is pressed, the camera
takes up to 40 pictures, but only the last 12 shots
(
R) or 3 shots (oo) are recorded.
Up to 40 shots
Shutter button
pressed
Shutter button
released
Using the Menus: Shooting Mode
S
TOP 12 /
m
The camera takes up to 12 (
TOP 3
S) or 3 (mm) pictures
while the shutter button is pressed.
A Notes: S TOP 12 / R FINAL 12 / m TOP 3 / o FINAL 3
• Focus and exposure are determined by the first
frame in each series.
• The number of pictures that can
be recorded depends on the
memory available. Additional
time may be required to record
pictures when shooting ends.
The pictures are displayed in the
monitor while recording is in progress.
A Note: The Self-Timer
If the self-timer is used, only one picture will be taken
when R FINAL 12 or o FINAL 3 is selected.
STORINGSTORING
Last 12 (R) or 3 (o) shots recorded
Menus
71
Page 80

Using the Menus: Shooting Mode
BB PHOTOMETRY
F
AF MODE
250
F
3.3
PHOTOMETRY
Choose how the camera meters exposure when
Intelligent Face Detection is off.
• N MULTI: Automatic scene recognition is used
to adjust exposure for a wide range of shooting
conditions.
• O SPOT: The camera meters lighting conditions
at the center of the frame. Recommended
when the background is much brighter or
darker than the main subject. Can be used
with focus lock (pg. 22) to meter off-center
subjects.
• P AVERAGE: Exposure is set to the average for
the entire frame. Provides consistent exposure
across multiple shots with the same lighting,
and is particularly effective for landscapes and
portraits of subjects dressed in black or white.
F
AF MODE
This option controls how the camera selects the
focus area. Regardless of the option selected,
the camera will focus on the subject in the
center of the monitor when macro mode is on
(pg. 27).
• w CENTER: The camera
focuses on the subject in
the center of the frame. This
option can be used with
focus lock.
• x MULTI: When the shutter button is pressed
halfway, the camera detects high-contrast
subjects near the center of the frame and
selects the focus area automatically (if the focus
frame is not displayed, select w CENTER and
use focus lock; pg. 22).
Press
halfway
250
F
3.3
Focus frame
72
Page 81

• T CONTINUOUS: While the
shutter button is pressed
halfway, the camera
continuously adjusts focus to
reflect changes in the
distance to the main subject in the focus frame
(see page 17; note that this increases the drain
on the battery and that the sound of the
camera focusing will be audible). Choose this
option when photographing moving subjects.
Using the Menus: Shooting Mode
Menus
73
Page 82

Using the Menus: Playback Mode
vv-Mode Menu Options
Option
Description
q
r
Using the
-Mode Menu
The v-MODE and playback menus are used to manage the pictures in internal memory or on the
memory card.
Using the vv
Press the D button to enter
1
playback mode (pg. 11).
Press the v button to display the
2
v-MODE menu.
Press the selector up or down to
3
highlight the desired menu item.
Press the selector right to display
4
options for the highlighted item.
Press the selector up or down to
5
highlight the desired option.
74
-Mode Menu
MODE MENU
SLIDE SHOW
PRINT ORDER (DPOF)
EXIT
Press MENU/OK to select the
6
highlighted option.
-Mode Menu Options
Option
SLIDE SHOW
PRINT ORDER
(DPOF)
View pictures in a slide show (pg. 75).
Select pictures for printing on DPOF- and
PictBridge-compatible devices (pg. 54).
Description
Page 83

qq SLIDE SHOW
SLIDE SHOW
Option
Displayed in
View pictures in an automated slide show.
Choose the type of show and press MENU/OK
to start. Press DISP/BACK at any time during
the show to view on-screen help. When a
movie is displayed, movie playback will begin
automatically, and the slide show will continue
when the movie ends. The show can be ended
at any time by pressing MENU/OK.
Option
NORMAL
FADE- IN
NORMAL
FADE- IN
MULTIPLE Display several pictures at once.
A Note
The camera will not turn off automatically while a
slide show is in progress.
Press selector left or right to go back or
skip ahead one frame. Select FADE- IN
for fade transitions between frames.
As above, except that camera
B
automatically zooms in on faces
selected with Intelligent Face
B
detection.
Displayed in
Using the Menus: Playback Mode
Menus
75
Page 84

Using the Playback Menu
Using the Playback Menu
Using the Menus: Playback Mode
Press D to enter playback mode
1
(pg. 11).
Press MENU/OK to display the
2
playback menu.
PLAYBACK MENU
ERASE
SLIDE SHOW
RED EYE REMOVAL
IMAGE ROTATE
PROTECT
CROP
EXIT
Press the selector up or down to
3
highlight the desired menu item.
76
Press the selector right to display
4
options for the highlighted item.
PLAYBACK MENU
ERASE
SLIDE SHOW
FRAME
RED EYE REMOVAL
ALL FRAMES
IMAGE ROTATE
PROTECT
1
/2
Press the selector up or down to
5
highlight the desired option.
Press MENU/OK to select the
6
highlighted option.
CROP
BACK
1
/2
Page 85

Playback Menu Options
Playback Menu Options
Option
Description
1/2
q
2/2
aa RED EYE REMOVAL
The following options are available:
Option
M ERASE
SLIDE SHOW
a RED-EY E REMOVAL
1/2
N IMAGE ROTATE
O PROTECT
R CROP
j RESIZE
P COPY
2/2
Q VOICE MEMO
r PRINT ORDER
(DPOF)
Delete all or selected pictures (pg.
45).
View pictures in a slide show (pg.
75).
Create copies with reduced red
eye (pg. 77).
Rotate pictures (pg. 78).
Protect pictures from accidental
deletion (pg. 79).
Create cropped copies of pictures
(pg. 80).
Create small copies of pictures
(pg. 81).
Copy pictures between internal
memory and a memory card (pg.
81).
Add voice memos to pictures (pg.
83).
Select pictures for printing on
DPOF- and PictBridge-compatible
devices (pg. 54).
Description
Using the Menus: Playback Mode
RED EYE REMOVAL
If the current picture is marked with a B icon
to indicate that it was taken with Intelligent Face
Detection, this option can be used to remove
red-eye. The camera will analyze the image; if
red-eye is detected, the image will be processed
to create a copy with reduced red-eye.
PLAYBACK MENU
ERASE
SLIDE SHOW
RED EYE REMOVAL
IMAGE ROTATE
PROTECT
CROP
EXIT
1
/2
A Notes
• Red eye may not be removed if the camera is unable
to detect a face or the face is in profile. Results may
differ depending on the scene. Red eye can not
be removed from pictures that have already been
processed using red-eye removal or pictures created
with other devices.
• The amount of time needed to process the image
varies with the number of faces detected.
• Copies created with a RED EYE REMOVAL are
indicated by a l icon during playback.
REMOVING
Menus
77
Page 86

NN IMAGE ROTATE
IMAGE ROTATE
IMAGE ROTATE
By default, pictures taken in
IMAGE ROTATE
tall orientation are displayed
in wide orientation. Use this
option to display pictures in
CANCELSET
CANCELSET
the correct orientation in the
monitor. It has no effect on pictures displayed
on a computer or other device.
A Notes
• Protected pictures can not be rotated. Remove
protection before rotating pictures (pg. 79).
• The camera may not be able to rotate pictures
created with other devices.
Using the Menus: Playback Mode
Press the selector down to
1
rotate the picture 90 ° clockwise,
up to rotate the picture 90 °
counterclockwise.
To rotate a picture, play the picture back and
select N IMAGE ROTATE in the playback menu.
78
Press MENU/OK to confirm the
2
operation (to exit without rotating
the picture, press DISP/BACK).
The next time the picture is played back, it will
automatically be rotated.
Page 87

OO PROTECT
PROTECT
■■ FRAME
■■
SET ALL
■■ RESET ALL
Protect pictures from accidental deletion. The
following options are available.
FRAME
Protect selected pictures.
Press the selector left or right to
1
display the desired picture.
PROTECT OK?
YES CANCEL
Picture not protected Protected picture
Press MENU/OK to protect the
2
picture. If the picture is already
UNPROTECT OK?
YES CANCEL
protected, pressing MENU/OK will
remove protection from the image.
Repeat steps 1–2 to protect
3
additional images. Press DISP/BACK
to exit when the operation is
complete.
Using the Menus: Playback Mode
SET ALL
Press MENU/OK to protect all
SET ALL OK?
IT MAY TAKE A WHILE
pictures, or press DISP/BACK to
exit without changing picture
status.
RESET ALL
Press MENU/OK to remove
YES CANCEL
RESET ALL OK?
IT MAY TAKE A WHILE
protection from all pictures, or
press DISP/BACK to exit without
changing picture status.
YES CANCEL
If the number of pictures
affected is very large, the
display at right will appear
in the monitor while the
CANCELCANCEL
operation is in progress.
Press DISP/BACK to exit before the operation is
complete.
C Caution
Protected pictures will be deleted when the memory
card or internal memory is formatted (pg. 89).
Menus
79
Page 88

Using the Menus: Playback Mode
RR CROP
CROP
To create a cropped copy of a picture, play
the picture back and select R CROP in the
playback menu.
Use the zoom control to zoom in and out and
1
use the selector to scroll the picture until the
desired portion is displayed (to exit to singleframe playback without creating a cropped
copy, press DISP/BACK).
CROP
CANCELYES
Zoom indicator
Navigation window
shows portion of
image currently
displayed in monitor
If the size of the final copy will be t, OK
will be displayed in yellow.
B Tip: Intelligent Face Detection
CROP
If the picture was shot with
CROP
Intelligent Face Detection (pg.
20), B will be displayed in the
monitor. Press the B button
to zoom in on the selected
CROP
CROP
YES
YES
face.
Press MENU/OK. A confirmation
2
dialog will be displayed.
REC OK?
CANCELREC
Copy size (p, q, or t) is shown at the
top. Larger crops produce larger copies; all
copies have an aspect ratio of 4 : 3.
Press MENU/OK to save the cropped
3
copy to a separate file.
CANCEL
CANCEL
80
Page 89

jj RESIZE
RESIZE
COPY
To create a small copy of a picture, play the
picture back and select j RESIZE in the
playback menu.
Press the selector up or down
1
to highlight t STANDARD or
s SMALL.
Press MENU/OK to select the
2
highlighted option.
Press MENU/OK to copy the picture at
3
the selected size.
Using the Menus: Playback Mode
P
COPY
Copy pictures between internal memory and a
memory card.
Press the selector up or down to
1
highlight d INTERNAL MEMORY
g x CARD (copy pictures from
internal memory to the memory card) or
x CARD g d INTERNAL MEMORY (copy
pictures from a memory card to internal
memory).
Press the selector right to display
2
options for the highlighted item.
COPY
FRAME
INTERNAL MEMORY
CARD
ALL FRAMES
CARD
INTERNAL MEMORY
Press the selector up or down to
3
highlight FRAME or ALL FRAMES.
Press MENU/OK.
4
Menus
81
Page 90

Using the Menus: Playback Mode
■■ FRAME
100-0001
■■ ALL FRAMES
100-0001
B Tip: Copying Pictures Between Memor y Cards
To copy pictures between two memory cards, insert
the source card and copy the pictures to internal
memory, then remove the source card, insert the
destination card, and copy the pictures from internal
memory.
FRAME
Copy selected frames.
Press the selector left or right to
1
display the desired picture.
Press MENU/OK to copy the picture.
2
Repeat steps 1–2 to copy additional
3
images. Press DISP/BACK to exit
COPY OK?
YES CANCEL
100-0001
when the operation is complete.
ALL FRAMES
Press MENU/OK to copy all
pictures, or press DISP/BACK to
COPY ALL OK?
IT MAY TAKE
A WHILE
exit without copying pictures.
YES CANCEL
C Cautions
• Copying ends when the destination is full.
• DPOF print information is not copied (pg. 54).
100-0001
82
Page 91

Using the Menus: Playback Mode
QQ VOICE MEMO
VOICE MEMO
30
s
30
To add a voice memo to a
REC STANDBY
REC STANDBY
s
still picture, select Q VOICE
MEMO after displaying the
picture in playback mode.
A Note
Voice memos can not be added to movies or
protected pictures. Remove protection from pictures
before recording voice memos (pg. 79).
Hold the camera at a distance of about 20 cm
1
(8 in.) and face the microphone.
Press MENU/OK to start recording.
2
28
RECORDING
REC RE-REC
s
Time remaining
Blinks red
START CANCEL
START CANCEL
Microphone
Press MENU/OK again to end
3
recording. Recording ends
automatically after 30 seconds.
FINISH
REC RE-REC
A Notes
PLAYBACK MENU
• If a voice memo already
exists for the current picture,
the options at right will be
displayed. Select RE-REC to
replace the existing memo.
• Voice memos are recorded as PCM-format WAV files
(pg. 108).
PLAYBACK MENU
RESIZE
RESIZE
COPY
COPY
BACK
BACK
VOICE MEMO
VOICE MEMO
RE-REC
RE-REC
PRINT ORDER
PRINT ORDER
2
2
/2
/2
Menus
83
Page 92

Playing Voice Memos
15
s
Pictures with voice memos are indicated by a h
icon during playback. To play the voice memo, press
the selector down. To pause, press the selector
down again; to end playback, press the selector up.
Press the selector left to rewind, right to fast forward.
Volume controls can be displayed by pressing the
MENU/OK button; press the selector up or down
to adjust the volume, and press MENU/OK again to
resume playback.
15
s
Progress is shown
in the monitor.
Using the Menus: Playback Mode
STOP PAUSE
Progress bar
A Note
The camera may not play voice memos recorded
with other devices.
C Caution
Do not cover the speaker during playback.
84
Speaker
Page 93

The Setup Menu
Using the Setup Menu
Using the Setup Menu
Display the setup menu.
1
1.1 Press MENU/OK to display the
menu for the current mode.
Adjust settings.
2
2.1 Press the selector right to
activate the setup menu.
1.2 Press the selector left to
highlight a left tab.
1.3 Press the selector up or down
to select P.
The setup menu appears.
SET-UP
DATE/TIME
TIME DIFFERENCE
SILENT MODE
RESET
FORMAT
EXIT
1
ENGLISH
OFF
/4
2.2 Press the selector up or down
to highlight a menu item.
SET-UP
IMAGE DISP.
FRAME NO.
OPERATION VOL.
SHUTTER VOLUME
SHUTTER SOUND
PLAYBACK VOLUME
EXIT
1.5 SEC
CONT.
2
/4
2.3 Press the selector right
to display options for the
highlighted item.
2.4 Press the selector up or down
to highlight an option.
2.5 Press MENU/OK to select the
highlighted option.
2.6 Press DISP/BACK to exit from the
menu.
Menus
85
Page 94

Setup Menu Options
Setup Menu Options
Menu item
Description
Options
Default
1/4
2/4
Menu item
e DATE/ TIME
p TIME DIFFERENCE
n w
V SILENT MODE
1/4
s RESET
m FORMAT
a IMAGE D ISP.
b FRAME N O.
d OPERATION VOL.
2/4
e SHUTTER VOLUME
f SHUTTER SOUND
g PLAYBACK VOLUME
Set the camera clock. — —
Set the clock to local time (pg. 88). k/j
Choose a language. See page 113 ENGLISH
Turn off the speaker, flash, and AF-assist illuminator/self-
timer lamp.
Reset all settings except DATE/T IME, TIME DIFFERENCE,
BACKGROUND COLOR, and VIDEO SYSTEM to default values. A
confirmation dialog will be displayed, press the selector
left or right to highlight OK and press MENU/OK .
Format internal memory or memory cards (pg. 89). — —
Choose how long pictures are displayed af ter shooting
(pg. 89).
Choose how files are named (pg. 90). CONTINUOUS / RENEW CONTINUOUS
Adjust the volume of camera controls.
Adjust the volume of the shutter sound.
Choose the sound made by the shutter. 2 / 3
Adjust the volume for movie and voice memo playback
(pg. 90).
Description
The Setup Menu
Options
ON / OFF OFF
——
3 SEC / 1.5 SEC /
ZOOM (CONTINUOUS) / OFF
q (high) / m (mid) /
n (low) / EOFF (mute)
— 7
Default
k
1.5 SEC
m
2
86
Page 95

The Setup Menu
Menu item
Description
Options
Default
3/4
4/4
Menu item
g LCD BRIGHTNESS
o AUTO POWER OFF
Z DUAL IS MODE
3/4
a RED EY E REMOVAL
c DIGITAL ZOOM
b AF ILLUMINATOR
R SAVE ORG IMAGE
q BACKGROUND COLOR
4/4
u GUIDANCE DISPLAY
r VIDEO SYSTEM
m POWER MANAGEMENT
Description
Control the brightness of the display (pg. 91). — 0
Choose the auto power of f delay (pg. 91). 5 MIN / 2 MIN / OFF 2 MIN
Reduce blur. Choose whether the function is performed
at all times when the camera is in the shooting mode
(k CONTINUOUS), only when the shutter button is
pressed halfway (l SHOOTING ONLY) or OFF.
Remove “red-eye” effects caused by the f lash. ON / OFF ON
Enable or disable digital zoom (pg. 92). ON / OFF OFF
Turn the AF-assist illuminator on or off (pg. 24). ON / OFF ON
Choose whether to save unprocessed copies of pictures
taken using red-eye removal.
Choose a color scheme for menus and cursors. — BLUE
Choose whether to display tool tips. ON / OFF ON
Choose a video mode for connection to a TV (pg. 50). NTSC / PAL —
Optimize camera per formance for increased battery life,
quick focus, or display quality (pg. 93).
Options
k CONTINUOUS /
l SHOOTING ONLY /
OFF
ON / OFF OFF
v/w/xv
Default
k
Menus
87
Page 96

The Setup Menu
pp TIME DIFFERENCE
12/ 31 /2050
10: 00
AM
TIME DIFFERENCE
When traveling, use this option to switch the camera clock instantly from your home time zone to the
local time at your destination.
88
Specify the difference between local time
1
and your home time zone.
1.1 Press the selector up or down
to highlight j LOCAL.
1.2 Press the selector right to
display the time difference.
TIME DIFFERENCE
12/ 31 /2050
10: 00 AM
12/ 31 /2050
10: 00 AM
01
00
00
23
SET CANCEL
1.3 Press the selector left or right
to highlight +, –, hours, or
minutes; press up or down to
edit. The minimum increment
is 15 minutes.
1.4 Press MENU/OK when settings
are complete.
Switch between local time and your
2
home time zone.
To set the camera clock to local time,
highlight j LOCAL and press MENU/OK.
To set the clock to the time in your home
time zone, select k HOME. If j LOCAL
is selected, j will be displayed in the
monitor for three seconds after the camera
enters shooting mode, and the date will be
displayed in yellow.
12/ 31 /2050
10: 00
AM
After changing time zones, check that the
date and time are correct.
Page 97

m
FORMAT
aa IMAGE DISP.
FORMAT
FORMAT
Format internal memory or a
memory card. If a memory
card is inserted in the camera,
x will be displayed in the
FORMAT
FORMAT OK?
FORMAT OK?
ERASE ALL DATA
ERASE ALL DATA
OK
OK
CANCEL
CANCEL
SET
SET
dialog shown at right and
this option will format the memory card. If no
memory card is inserted, d will be displayed
and this option will format internal memory.
Press the selector left to highlight OK and press
MENU/OK to begin formatting.
C Cautions
• All data—including protected pictures—will be
deleted. Be sure important files have been copied to
a computer or other storage device.
• Do not open the battery cover during formatting.
The Setup Menu
IMAGE DISP.
Choose how long pictures are displayed in the
monitor after shooting.
• 3 SEC: Pictures are displayed for about 3 s before
being recorded to the memory card.
• 1. 5 SEC: Pictures are displayed for about 1.5 s
before being recorded to the memory card.
• ZOOM (CONTINUOUS): Pictures are displayed until
the MENU/OK button is pressed. Pictures can be
zoomed in to check fine details.
ZOOM (CONTINUOUS) is disabled in the following
case:
- A, G or F is selected in the shooting
mode.
- An option other than OFF is selected for
E CONTINUOUS.
A Notes
• Pictures taken in continuous shooting modes are
always displayed after shooting.
• The colors displayed at settings of 1.5 SEC and
3 SEC may differ from those in the final picture.
Menus
89
Page 98

The Setup Menu
bb FRAME NO.
gg PLAYBACK VOLUME
100-0001
100-0001
FRAME NO.
New pictures are stored in
image files named using
a four-digit file number
assigned by adding one to
the last file number used.
Frame number
Frame number
Directory
Directory
number
number
number
number
100-0001
100-0001
The file number is displayed during playback as
shown at right. FRAME NO. controls whether
file numbering is reset to 0001 when a new
memory card is inserted or the current memory
card or internal memory is formatted.
• CONTINUOUS: Numbering continues from the
last file number used or the first available file
number, whichever is higher. Choose this
option to reduce the number of pictures with
duplicate file names.
• RENEW: Numbering is reset to 0001 after
formatting or when a new memory card is
inserted.
A Notes
• If the frame number reaches 999-9999, the shutter
release will be disabled (pg. 106).
• Selecting s RESET (pg. 86) resets b FRAME
File
File
NO. to CONTINUOUS but does not reset frame
numbering.
• Frame numbers for pictures taken with other
cameras may differ.
PLAYBACK VOLUME
Press the selector up or down
to choose volume for movie
and voice memo playback and
press MENU/OK to select.
VOLUME
7
SET CANCEL
90
Page 99

The Setup Menu
gg LCD BRIGHTNESS
oo AUTO POWER OFF
LCD BRIGHTNESS
Press the selector up or down
LCD BRIGHTNESS
to choose display brightness
SET
0
CANCEL
and press MENU/OK to select.
AUTO POWER OFF
Choose the length of time before the camera
turns off automatically when no operations
are performed. Shorter times increase battery
life; if OFF is selected, the camera must be
turned off manually. Note that regardless of the
option selected, the camera will not turn off
automatically when connected to a printer (pg.
51) or computer (pg. 56) or when a slide show is
in progress (pg. 75).
B Tip: Reactivating the Camera
To reactivate the camera after it has turned off
automatically, use the n button or press the D
button for about a second (pg. 11).
A Note
Although OFF is selected for o AUTO POWER OFF,
the camera will turn off automatically if no operations
are performed for five minutes in the following case:
• w QUICK AF or x CLEAR DISPLAY is selected for
m POWER MANAGEMENT.
• r is selected in P MODE.
• STANDBY is displayed in A.
• B is displayed in the shooting mode.
• G, V is selected in the shooting mode.
Menus
91
Page 100

The Setup Menu
cc DIGITAL ZOOM
N
9
DIGITAL ZOOM
If ON is selected, selecting A at the maximum
optical zoom position will trigger digital zoom,
further magnifying the image. To cancel digital
zoom, zoom out to the minimum digital zoom
position and select B.
N
9
4:3
Zoom
indicator
Zoom indicator,
DIGITAL ZOOM off
BBAA
Zoom indicator,
DIGITAL ZOOM on
Optical zoomOptical zoom
Digital
zoom
C Caution
Digital zoom produces lower quality images than
optical zoom.
92
 Loading...