


FUJI COMPUTED RADIOGRAPHY
FCR ID TERMINAL
ID-T741
OPERATION MANUAL
5th Edition
ID Terminal Operation Manual
.A>HK=HO
009-021-40 Fuji Photo Film Co., Ltd.
2001. 02
MADE IN JAPAN
FUJI PHOTO FILM CO., LTD.
TOKYO 106-8620

ID Terminal Operation Manual
1. No part or all of this manual may be reproduced in any form without prior permission.
2. The information contained in this manual may be subject to change without prior notice.
3. Fuji Photo Film shall not be liable for malfunctions and damages resulting from installation,
relocation, remodeling, maintenance, and repair performed by other than dealers specified by
Fuji Photo Film.
4. Fuji Photo Film shall not be liable for malfunctions and damages of Fuji Photo Film products
due to products of other manufacturers not supplied by Fuji Photo Film.
5. Fuji Photo Film shall not be liable for malfunctions and damages resulting from remodeling,
maintenance, and repair using repair parts other than those specified by Fuji Photo Film.
6. Fuji Photo Film shall not be liable for malfunctions and damages resulting from negligence of
precautions and operating methods contained in this manual.
7. Fuji Photo Film shall not be liable for malfunctions and damages resulting from use under
environment conditions outside the range of using conditions for this product such as power
supply, installation environment, etc. contained in this manual.
8. Fuji Photo Film shall not be liable for malfunctions and damages resulting from natural
disasters such as fires, earthquakes, floods, lightning, etc.
009-021-40 Fuji Photo Film Co., Ltd.
2001. 02

FOREWORD
Thank you for purchasing the ID Terminal.
For users to understand the functions of the ID Terminal and use them to the fullest, this
manual ID TERMINAL OPERATION MANUAL describes in detail how to operate the
unit, precautions in operations, etc.
Users using the unit for the first time should read this manual carefully before beginning use.
After using the manual, keep it nearby carefully for future reference.
ID Terminal Operation Manual
Copyright
©
2001 by Fuji Photo Film Co., Ltd.
009-021-40 Fuji Photo Film Co., Ltd.
2001. 02

ID Terminal Operation Manual
CONTENTS
INTRODUCTION _____________________________________________ "
1. PRECAUTIONS BEFORE USE _______________________________ #
2. INTRODUCING ID TERMINAL ________________________________ %
3. OPERATIONS (BASIC) _____________________________________
1. Outline of the Unit ...................................................................................................... %
2. Name and Function of Each Part ................................................................................ &
3. Precaution for Installation ..........................................................................................
1. Starting Up/Ending the Unit .......................................................................................
Step1. Starting Up the Unit .......................................................................................
Step2. Ending the Unit .............................................................................................. "
2. Selection Operation .................................................................................................... #
3. Input Operation ........................................................................................................... $
Step1. Software Keyboard ......................................................................................... $
Step2. Text Box and Cursor ...................................................................................... &
Step3. Inputting/Deleting Characters ........................................................................ '
4. Operation Screen ........................................................................................................
5. Operation Flow Chart ................................................................................................. "
4. OPERATIONS (PROCESSING) _______________________________ $
1. Basic Operation .......................................................................................................... $
Step1. Inputting the Patient Information ................................................................... $
Step2. Inputting the Exposure Information ............................................................... !
Step3. Registering the IP Number ............................................................................. !
2. Applied Operations ..................................................................................................... !$
Step1.
Step2.
Step3.
Step4.
Step5. Retrieving/Deleting the ID information ......................................................... "
3. Setting Various Parameters ........................................................................................ ""
Step1. Image Inversion .............................................................................................. ""
Step2. Film Output Format ........................................................................................ "$
Step3. EDR mode ...................................................................................................... "&
Step4. IP Reading Size .............................................................................................. #
Step5. C-Shift/S-Shift ................................................................................................ #
Step6. Filing Mode .................................................................................................... #
Step7. Number of Films Output ................................................................................ #!
Step8. Function ......................................................................................................... #"
Step9. Film Mark ....................................................................................................... ##
Step10.Distribution Code ........................................................................................... #$
Step11.Pixel Density .................................................................................................. #%
Inputting the Exposure Information with the Routine Menu Selection Method ............
Exposing Several Patients with the Same Exposure Information (Changing the Patient Information) ..
Taking Several Exposures with the Same Patient Information and Exposure Information ...
Exposing with the Same Patient Information but with Different Exposure Information .....
!$
!&
"
"
009-021-40 Fuji Photo Film Co., Ltd.
2001. 02

ID Terminal Operation Manual
5. TROUBLE SHOOTING ______________________________________ #&
1. Method to Deal with Errors ........................................................................................ #&
2. When These Happen................................................................................................... #'
6. MAINTENANCE ___________________________________________ $
1. Maintenance by Users ................................................................................................ $
2. Periodic Inspection ..................................................................................................... $
009-021-40 Fuji Photo Film Co., Ltd.
2001. 02
!

ID Terminal Operation Manual
INTRODUCTION
This operation manual provides detailed information required for using this unit. To make full
use of available functions, read the following sections carefully.
The manual contains the following sections:
1. PRECAUTIONS BEFORE USE
Contains basic precautions to be read before using the unit.
2. INTRODUCING THE ID TERMINAL
Gives basic information useful before operating the unit.
3. OPERATIONS (BASIC)
Describes the basic operations of starting/ending the unit, selecting/inputting, etc.
4. OPERATIONS (PROCESSING)
Describes the operations in the routine processing mode.
5. TROUBLE SHOOTING
Describes the measures to be taken when errors occur.
6. MAINTENANCE
Describes daily maintenance of the unit.
SEPARATE VOLUME. THE SERVICE MODE OPERATIONS
Describes operations in the service mode.
"
009-021-40 Fuji Photo Film Co., Ltd.
2001. 02

ID Terminal Operation Manual
PRECAUTIONS BEFORE USE
This chapter lists the precautions required to use the ID Terminal safely. Before starting use,
read this chapter very carefully and understand its operations thoroughly first.
Safety precautions consist of WARNING, CAUTION, and NOTE which is a
supplementary explanation. Differing in nature, each have the following meanings.
WARNING
Indicates hazardous situations which may lead to serious injuries or even death if the
precaution is not or could not be followed.
CAUTION
Indicates hazardous situations which may lead to mild or medium injuries if the precaution is
not or could not be followed. Precautions against accidents causing only physical damages.
NOTE
Gives procedures requiring special attention, instructions which must be followed,
supplementary explanations, etc.
WARNING
This model supplies high voltage to the inside of unit, etc. The following instructions must be
carefully followed to prevent an electrical shock.
No one other than service engineers should open the unit cover. Do not touch the high
voltage portion of the above-mentioned parts with your hand, or you may get an electric
shock.
WARNING
The supply voltage of the units comprising this system is AC100V to 120V or AC200V to
240V.
The instructions below must be followed to prevent an electrical shock.
Install the unit where no water may subject the units.
Check that the ground of each unit has been perfectly connected.
Check that all the cables have been properly and perfectly connected.
009-021-40 Fuji Photo Film Co., Ltd.
2001. 02
#

ID Terminal Operation Manual
$
009-021-40 Fuji Photo Film Co., Ltd.
2001. 02

INTRODUCING THE ID TERMINAL
Outline of the Unit
1
The ID terminal is a unit that registers the ID information and various parameters of images in
the FCR Image Reader when using IPs (imaging plates) to take radiographs.
When radiographs are taken using IPs, the images will be read by the FCR Image Reader. At
the same time, the FCR Image Reader will perform processings for obtaining the best images
for reading according to the exposure technique used. To make this possible, the information
shown below must be registered with this unit.
Patient Information
¨
Information concerning the patient (ID number, name, etc.).
ID Terminal Operation Manual
Exposure Information
¨
Exposure menu of the image.
IP Number
¨
IP number used for exposure.
Various Parameter
¨
Parameters concerning image processings (image inversion, film output format, etc.).
This unit is capable of registering the above information collectively at the time of exposure, so
that smooth processings with FCR Image Reader are possible. As a result, the operation/
performance efficiency will be improved.
009-021-40 Fuji Photo Film Co., Ltd.
2001. 02
%
ID Terminal Operation Manual
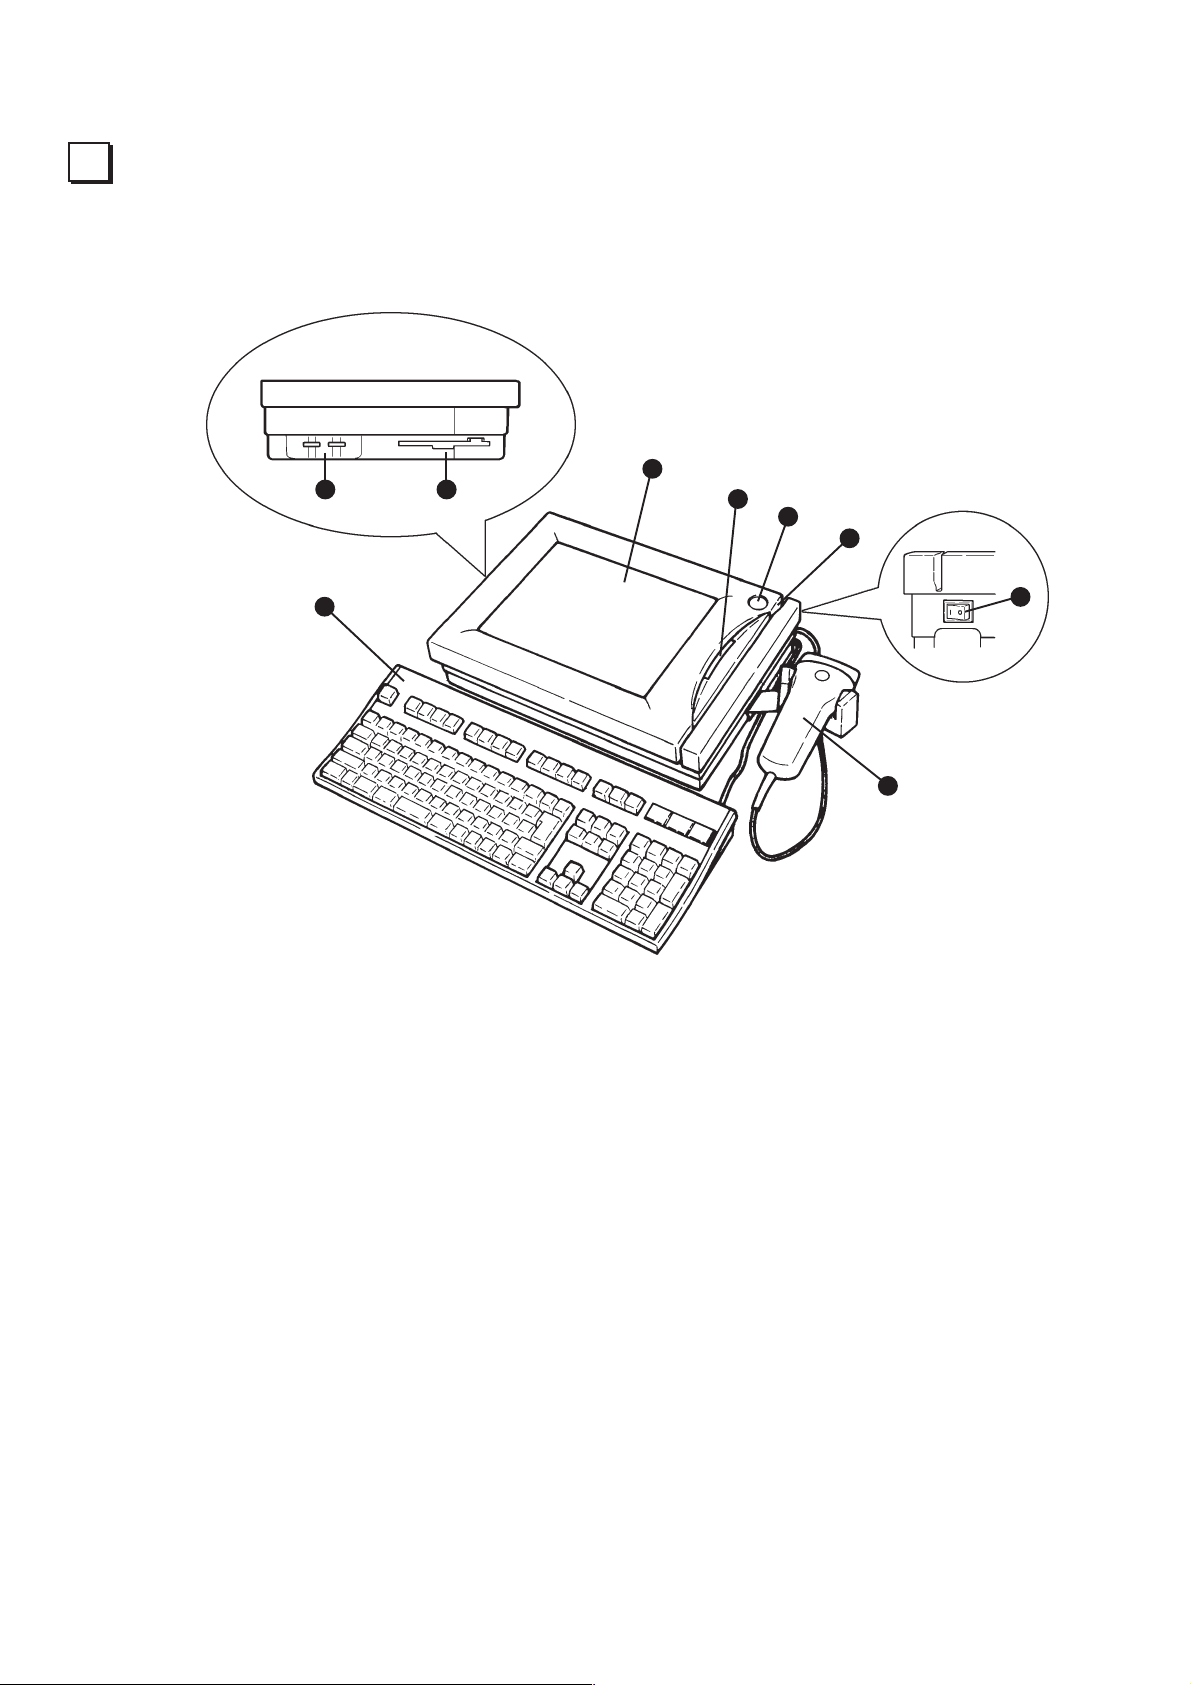
Name and Function of Each Part
2
8 9
2
7
1
3
5
4
6
&
009-021-40 Fuji Photo Film Co., Ltd.
2001. 02

ID Terminal Operation Manual
Starting/ending button
1
Button to start/end the unit.
2
Display
Touch-panel type color LCD display to display operation screen.
If the unit is not operated for a certain period of time, the screen saver will function, and the
screen will be undisplayed. In this case, check the indicator to ensure the unit is started, and
lightly touch the display. The screen display will be restored.
Card reader
3
Reads the patient information when the ID card is inserted.
Bar-code reader
4
Reads the IP number from the bar-code label of the IP.
5
Keyboard (Option)
Inputs characters and numerical values.
6
Power switch
Power switch of the unit. Always leave it at ON (press I side).
7
Indicators
Indicators to show the state of the unit.
There are two indicators: upper indicator and lower indicator. The lower indicator will light
when the power of the unit is turned on. The upper indicator will light when the unit is
started.
Adjustment knobs
8
Knobs for adjusting the display luminance and beep sound. Refer to page $.
9
Floppy disk drive
Drive of 3.5-inch floppy disk. Used in the service mode operation.
NOTE
Although the color LCD adopted for the display is manufactured using considerably high
degree of technology, there may be a malfunctioning dot in a part of a display. Despite the
effort made to minimize the number of those malfunctioning dots, it is extremely difficult to
completely eliminate the malfunctioning dots even if the most advanced technology is used.
And also, although temperature change may cause a little unevenness of display, it is due to
the characteristics of color LCD and not a failure by any means.
To prevent the bar code reader from being damaged due to dropping, etc., place the bar-code
reader on the holder when not used. In addition, placing the bar-code reader on the display
may result in the scratch on the display.
The floppy disk drive is not used in the routine processing mode. Do not mount anything in
the floppy disk drive except when required in the service mode.
009-021-40 Fuji Photo Film Co., Ltd.
2001. 02
'

ID Terminal Operation Manual
Precautions for Installation
3
This unit is designed for the general office use. The use in an extreme environment may lead to
malfunction.
Avoid installing the unit in the following places, where considered to be unsuitable for
operating the unit.
Places where strong magnetic fields are present.
Places where the unit may be exposed to direct sunlight, the heat from heating equipment, or
drastic temperature change.
Places where corrosive gases may be generated.
Places where strong vibrations are present.
Dusty places such as the surface of a floor.
Places where the unit may be exposed to water leakage, water droplet, or extremely high
humidity.
009-021-40 Fuji Photo Film Co., Ltd.
2001. 02

ID Terminal Operation Manual
009-021-40 Fuji Photo Film Co., Ltd.
2001. 02

ID Terminal Operation Manual
OPERATIONS (BASIC)
The following explains the various basic operations required for using this unit. Understand
each section thoroughly to efficiently perform actual operations.
Starting Up/Ending the Unit
1
Step1.
Ensure the followings before starting up the unit.
Cables, etc. of each device are firmly connected.
The power switch at the back of the unit is ON.
The floppy disk drive is not mounted with anything.
Press starting-up/ending button. Starting-up processing will be started.
Starting Up the Unit
12
009-021-40 Fuji Photo Film Co., Ltd.
2001. 02

ID Terminal Operation Manual
After a while, the following screen will be displayed. The starting up is completed. (Normally,
starting up takes a few minutes from the start to completion.)
If there is an IP which is not read by FCR Image Reader even though its ID information was
registered in the last operation, the number and information of unprocessed IP will be listed as
shown below.
Press
to delete all the information, and press to continue the operation.
NOTE
While the unit is starting and after it is started, do not operate the starting/ending button nor
the power switch. If the power is turned off while the unit is running, it may cause trouble to
the unit.
009-021-40 Fuji Photo Film Co., Ltd.
2001. 02
13

ID Terminal Operation Manual
Step2.
Ensure that the unit is not running, and press starting/ending button. The unit will end.
Be sure to shut-down the unit with the procedure shown above. Shutting down the unit with
It takes a while for ending processing of the unit. Do not restart (pressing starting/ending
Ending the Unit
NOTE
the power switch at the back of the unit may result in malfunction. (Always leave the power
switch at the back of the unit turned on.)
button) until the unit is completely ended (indicator is turned off).
14
009-021-40 Fuji Photo Film Co., Ltd.
2001. 02

Selection Operation
2
Select the button on the screen (touch panel).
Press the button to select. The button is selected and the corresponding processing will be
executed. When selecting a button, lightly touch a button with the tip of a finger. Pressing the
button with a finger flat down or pressing the button too hard may result in the malfunction.
ID Terminal Operation Manual
NOTE
Buttons whose characters and icons are grayed out (displayed in a light color) cannot be
selected.
Do not place any objects on the touch panel screen. If an object is placed on the screen, it
may cause malfunction and the screen may not respond for a while (10 seconds or so) even
after the object is removed.
009-021-40 Fuji Photo Film Co., Ltd.
2001. 02
15

ID Terminal Operation Manual
Input Operation
3
Characters (letters/number/symbols) and numerical values are input using the software
keyboard displayed on the screen (touch panel).
If the unit is provided with an optional keyboard (hardware keyboard, hereafter) as an option.
The hardware keyboard can be used in the same manner as the software keyboard. Refer to the
following explanation. In the explanation (including other chapters), keys shown in the
parentheses along with the name of the button on the software keyboard indicate the alternative
keys on the hardware keyboard.
Step1.
Normally, the software keyboard is automatically displayed when inputting characters is
required.
The following shows function of each button on the software keyboard.
1
Software Keyboard
1
3
4
Input mode changing button
Changes input mode (
letter mode) each time this button is pressed.
: number mode, : upper-case letter mode, : lower-case
2
5
6
7
8
9
16
2
Cursor moving button
Moves cursor (described later) in the text box to left/right.
3
Letter/number/symbol button
Inputs characters/numbers/symbols according to the input mode.
Number mode : 0 to 9
Upper-case letter mode : A to Z, * / [ ]
Lower-case letter mode : a to z, * / [ ]
When inputting successively the character assigned to the same button in the upper-case
letter/lower-case letter mode, use the cursor moving button along with the letter/number/
symbol button as shown in the example below.
Example> High ®
009-021-40 Fuji Photo Film Co., Ltd.
2001. 02

Symbol button
4
Inputs symbols according to the input mode.
Number mode : .
Upper-case letter mode : . , :
Lower-case letter mode : . , :
5
AC button
Clears all the characters in the text box.
- button
6
Inputs - (hyphen).
7
BS button
Deletes the character on the left of the cursor.
8
SP button
Inputs a space.
ID Terminal Operation Manual
9
ENTER button
Enters the input.
NOTE
When simultaneously using the software keyboard and the hardware keyboard, release Caps
Lock of the hardware keyboard, otherwise, the input mode of the software keyboard and the
input characters are reversed as shown below.
Upper-case letter mode : Lower-case letters are input.
Lower-case letter mode : Upper-case letters are input.
009-021-40 Fuji Photo Film Co., Ltd.
2001. 02
17

ID Terminal Operation Manual
Step2.
The text box refers to the box to which characters are input. The cursor | blinking in the box
indicates the point of starting input or inserting characters.
Text Box and Cursor
Text box
When inputting/deleting characters, move the cursor to the desired point as shown below.
Moving the cursor between the text boxes:
Press the desired text box or press ( Tab / Enter key). The cursor will move
between the text boxes.
Moving the cursor in the character string:
Press / ( ¬ / ® key). The cursor will move in the character string.
18
009-021-40 Fuji Photo Film Co., Ltd.
2001. 02

ID Terminal Operation Manual
Step3.
Inputting
n
Inputting/Deleting Characters
Move the cursor to the desired point, and input the appropriate character. The character will be
input (insert) on the left of the cursor. Exercise care that inputting inappropriate characters are
regarded as invalid (e.g., inputting letters in the numerical value input box).
Deleting
n
NOTE
* and @ are invalid characters. Do not input these characters when using the hardware
keyboard.
Move the cursor to the desired point, and press ( Back Space key) or . When is
pressed, the character on the left of the cursor will be deleted. When
characters will be deleted.
When using the hardware keyboard, the character on the right of the cursor will be deleted
when Delete is pressed.
is pressed, all the
009-021-40 Fuji Photo Film Co., Ltd.
2001. 02
19
 Loading...