

Page 1
Getting Ready
Using the Camera
OWNER’S MANUAL
This manual will show you how to use
your FUJIFILM DIGITAL CAMERA
FinePix F650 correctly.
Please follow the instructions carefully.
Advanced Features
Camera Connection
Troubleshooting
BL00541-201(1)
• Photography
• Playback
•Movie
Settings
Software
Installation
Appendices
Page 2

Warning
To prevent fire or shock hazard, do not expose the unit to rain
or moisture.
For customers in the U.S.A.
FCC Statement
This device complies with Part 15 of the FCC Rules. Operation is
subject to the following two conditions: (1) This device may not
cause harmful interference, and (2) this device must accept any
interference received, including interference that may cause
undesired operation.
CAUTION
This equipment has been tested and found to comply with the limits
for a Class B digital device, pursuant to Part 15 of the FCC Rules.
These limits are designed to provide reasonable protection against
harmful interference in a residential installation. This equipment
generates, uses, and can radiate radio frequency energy and, if not
installed and used in accordance with the instructions, may cause
harmful interference to radio communications. However, there is no
guarantee that interference will not occur in a particular installation.
If this equipment does cause harmful interference to radio or
television reception, which can be determined by turning the
equipment off and on, the user is encouraged to try to correct the
interference by one or more of the following measures:
— Reorient or relocate the receiving antenna.
— Increase the separation between the equipment and receiver.
— Connect the equipment into an outlet on a circuit different from
that to which the receiver is connected.
— Consult the dealer or an experienced radio/TV technician for
help.
You are cautioned that any changes or modifications not expressly
approved in this manual could void the user’s authority to operate
the equipment.
Notes on the Grant:
To comply with Part 15 of the FCC Rules, this product must be used
with a Fujifilm-specified ferrite-core A/V cable, USB cable, and DC
supply cord.
Tested To Comply
With FCC Standards
FOR HOME OR OFFICE USE
For customers in Canada
CAUTION
This Class B digital apparatus complies with Canadian ICES-003.
Please read the Safety Notes (➝p.144) and make
sure you understand them before using the camera.
2
Page 3

IMPORTANT
BEFORE OPENING THE CD-ROM PROVIDED BY FUJI PHOTO FILM
CO., LTD., PLEASE READ THIS END USER LICENSE AGREEMENT
CAREFULLY. ONLY IF YOU AGREE WITH THIS AGREEMENT,
SHOULD YOU USE THE SOFTWARE RECORDED ON THE CD-ROM.
BY OPENING THE PACKAGE, YO U ACCEPT AND A GREE TO BE
BOUND BY THIS AGREEMEN T.
This End User License Agreement (“Agreement”) is an agreement between
Fuji Photo Film Co., Ltd. (“FUJIFILM”) and you, which sets forth the terms
and conditions of the license granted for you to use the software provided
by FUJIFILM.
The CD-ROM contains third party software. In case a separate agreement
is provided by a third party supplier for its software, the provisions of such
separate agreement shall apply to the use of such third party software,
prevailing over those of this Agreement.
1. Definitions.
(a) “Media” means the CD-ROM titled “Software for FinePix CX”- which
is provided to you together with this Agreement.
(b) “Software” means the software which is recorded on M edia.
(c) “ Documentation” means the operation manuals of Software and
other related written materials which are provided to you together
with Media.
(d) “Product” means Media (including Software) and Documentation
collectively.
2. Use of Software.
FUJIFILM grants to you a nontransferable, nonexclusive license:
(a) to install one copy of Software onto one computer in binary machine
executable form;
(b) to use Software on the computer onto which Software is installed; and
(c) to make one backup copy of Software.
3. Restrictions.
3.1 You shall not distribute, rent, lease or otherwise transfer all or any
part of Software, Media or Documentation to any third party without
FUJIFILM’s prior written consent. You also shall not sublicense,
assign or otherwise transfer all or any part of the rights granted to
you by FUJIFILM under this Agreement without FUJIFILM’s prior
written consent.
3.2 Except as expressly granted by FUJIFILM hereunder, you shall not
copy or reproduce all or any part of Software or Documentation.
3.3 You shall not modify, adapt or translate Software or Documentation.
You also shall not alter or remove copyright and other proprietary
notices that appear on or in Software or Documentation.
3.4 You shall not, or shall not have any third party, reverse-engineer,
decompile, or disassemble Software.
NOTICE
End User License Agreement
Be sure to read this page before using the software.
4. Ownership.
All copyrights and other proprietary rights to Software and Documentation are
owned and retained by FUJIFILM or the third party suppliers as indi cated on
or in Software or Documentation. Nothing contained her ein shall be
construed, expressly or implicitly, as transf erring or granting any right, license,
or title to you other than t hose explicitly granted under thi s Agreement.
5. Lim ited Warranty.
FUJIFILM warrants to you that Media is free from any defect in material
and workmanship under normal use for ninety (90) days from the date
of your receipt of Media. Should Media not meet the foregoing warranty,
FUJIFILM shall replace such defective Media with other Media bearing
no defect. FUJIFILM’s entire liability and your sole and exclusive
remedy with regard to any defect in Media shall be expressly limited to
such FUJIFILM’s replacement of Media as provided herein
6. DIS CLAIMER OF WARRANTY .
EXCEPT AS PROVIDED IN SECTION 5 HEREIN, FUJIFILM PROVIDES
PRODUCT “AS IS” AND WITHOUT WARRANTIES OF ANY KIND,
EXPRESS OR IMPLIED. FUJIFILM SHALL MAKE NO WARRANTY,
EXPRESS, IMPLIED OR STATUTORY, AS TO ANY OTHER MATTERS,
INCLUDING, BUT NOT LIMITED TO NON-INFRINGEMENT OF ANY
COPYRIGHT, PATENT, TRADE SECRET, OR ANY OTHER
PROPRIETARY RIGHTS OF ANY THIRD PARTY, MERCHANTABILITY,
OR FITNESS FOR ANY PARTICULAR PURPOSE.
7. LIMI TATION OF LIABILITY.
IN NO EVENT SHALL FUJIFILM HAVE ANY LIABILITY FOR ANY
GENERAL, SPECIAL, DIRECT, INDIRECT, CONSEQUENTIAL,
INCIDENTAL, OR OTHER DAMAGES (I NCLUDING DAMAG ES FOR
LOSS OF PROFITS OR LOST SAVINGS) INCURRED FROM THE
USE OF OR INABILITY TO USE PRODUCT EVEN IF FUJIFILM HAS
BEEN ADVISED OF THE POSSIBILITY OF SUCH DAMAGES.
8. No export.
You acknowledge that neither Software nor any part thereof, will be
transferred, or exported to any country or used in any manner in violation
of any export control laws and regulations to which Software is subject.
9. Termination.
In case you breach any of the terms and conditions hereof, FUJIFILM
may immediately terminate this Agreement without any notice.
10. Term.
This Agreement is effective until the date when you cease to use
Software, unless earlier terminated in ac cordance with Se ction 9 hereof.
11. Obligation upon termination.
Upon termination or expiration of this Agreement, you shall, at your own
responsibility and expense, delete or destroy immediately all Software
(including its copies), Media and Documentation.
12. Governing Law.
This Agreement shall be governed by and construed in accordance with
laws of Japan.
3
Page 4
EC Declaration of Conformity
We
Name: Fuji Photo Film (Europe) GmbH
Address: Heesenstrasse 31
declare that the product
Product Name: FUJIFILM DIGITAL CAMERA FinePix F650
Manufacturer’s Name: Fuji Photo Film Co., Ltd.
Manufacturer’s Address: 26-30, Nishiazabu 2-chome, Minato-ku,
conforms to the following Standards:
following the provision of the EMC Directive (89/336/EEC, 92/31/EEC and
93/68/EEC) and Low Voltage Directive (73/23/EEC).
40549 Dusseldorf, Germany
Tokyo 106-8620, Japan
Safety: EN60065
EMC: EN55022: 1998 Classe B
EN55024: 1998
EN61000-3-2: 1995 + A1: 1998 + A2: 1998
Dusseldorf, Germany
Place
This product comes with batteries. When these are empty, you shouldn’t throw them
away but deliver them as domestic chemical refuse.
June 1, 2006
Signature/Managing DirectorDate
4
Page 5

Disposal of Electric and Electronic Equipment in Private Households
Disposal of used Electrical & Electronic Equipment (Applicable in the European Union and other European countries with
separate collection systems)
This symbol on the product, or in the manual and in the warranty, and/or on its packaging indicates that this
product shall not be treated as household waste.
Instead it should be taken to an applicable collection point for the recycling of electrical and electronic
equipment.
By ensuring this product is disposed of correctly, you will help prevent potential negative consequences to
the environment and human health, which could otherwise be caused by inappropriate waste handling of this
If your equipment contains easy removable batteries or accumulators please dispose these separately according to your local
requirements.
The recycling of materials will help to conserve natural resources. For more detailed information about recycling of this product,
please contact your local city office, your household waste disposal service or the shop where you have purchased the product.
In Countries outside the EU:
If you wish to discard this product, please contact your local authorities and ask for the correct way of disposal.
product.
5
Page 6

Contents
Warning................................................................. 2
IMPORTANT ......................................................... 3
EC Declaration of Conformity................................ 4
Disposal of Electric and Electronic Equipment
in Private Households...................................... 5
Contents ................................................................ 6
Preface .................................................................. 9
About this Manual ............................................... 11
Accessories Included .......................................... 12
Camera Parts and Features ................................ 13
Example of LCD Monitor Text Display ................ 14
Getting Ready
Charging the Battery ........................................... 15
Loading the Battery ............................................. 17
Loading the xD-Picture Card ......................... 19
Turning On and Off ............................................. 21
Setting the date and time ............................ 22
Correcting the Date and Time ............................. 24
Selecting the Language ...................................... 25
Using the Camera
Taking Pictures (q AUTO Mode)....................... 26
Taking pictures with the focus and
exposure locked ....................................... 30
Adjusting the shot composition ................... 32
Viewing the Images............................................. 33
Using the Erase Button ................................... 37
6
Advanced Features — Photography
Using the Photography Functions —
Procedure of Setting ..................................... 38
Setting the Shooting Mode ................................. 40
q AUTO .................................................... 40
? SCENE POSITION .............................. 40
s MANUAL .............................................. 45
< APERTURE PRIORITY AE ................... 45
M SHUTTER PRIORITY AE ...................... 47
e Macro/> Super macro (Close-up) ................ 50
d Setting the Flash............................................. 51
j Increasing Monitor Brightness ...................... 53
Using p-MODE MENU (Photography)/
SHOOTING MENU ....................................... 54
Setting the p-MODE MENU...................... 54
Setting the SHOOTING MENU .................. 54
p-MODE MENU (Photography) ........................ 56
Changing the sensitivity setting
(S ISO)................................................... 56
Changing the quality setting
( QUALITY).......................................... 57
Changing the FinePix COLOR setting
( FinePix COLOR) ............................... 58
SHOOTING MENU ............................................. 59
Taking pictures using self-timer
( SELF-TIMER) .................................... 59
Adjusting exposure compensation
(S EXP. COMPENSATION) ................. 60
Adjusting color balance
(T WHITE BALANCE) .......................... 61
Page 7

Taking pictures continuously
( CONTINUOUS).................................. 62
Advanced Features — Playback
Using p-MODE MENU (Playback)/
PLAYBACK MENU ........................................ 63
Setting the p-MODE MENU (Playback) .... 63
Setting the PLAYBACK MENU ................... 63
p-MODE MENU (Playback) ............................... 64
Setting automatic playback
( PLAYBACK) ....................................... 64
DPOF set frame
( PRINT ORDER (DPOF)).................... 64
PLAYBACK MENU.............................................. 68
Erasing the images
( ERASE).............................................. 68
Rotating the images
( IMAGE ROTATE)............................... 69
Protecting the images
( PROTECT)......................................... 70
Copying the images
(V COPY) ............................................... 72
Adding voice memos to the images
( VOICE MEMO) .................................. 73
Trimming the images
( TRIMMING)........................................ 76
Advanced Features — Movie
r Recording Movies ......................................... 78
Changing movie size................................. 80
w Playing Back Movies ..................................... 81
Settings
U SET-UP ........................................................ 83
Using the SET-UP menu ............................ 83
SET-UP menu option ................................. 84
Camera Connection
Connecting to a TV............................................. 93
Connecting Camera Directly to Printer —
PictBridge Function....................................... 94
Software Installation
Installation on a Windows PC............................. 99
Installation on a Mac OS X............................... 102
Connecting to a PC .......................................... 105
Using FinePixViewer ................................ 109
Appendices
System Expansion Option ................................ 111
Accessories Guide ........................................... 112
Using Your Camera Correctly .......................... 114
Power Supply and Battery ................................ 115
Notes on the xD-Picture Card™ and
the Internal Memory .................................... 119
Warning Displays ............................................. 121
Continued Q
7
Page 8

Contents
Troubleshooting
Troubleshooting ................................................ 125
Specifications ................................................. 132
Explanation of Terms ..................................... 136
FUJIFILM Digital Camera Worldwide
Network .................................................... 137
Safety Notes .................................................. 144
8
Page 9

Preface
Z Test Shots Prior to Photography
For important photographs (such as weddings and
overseas trips), always take a test shot and view the
image to make sure that the camera is working normally.
• Fuji Photo Film Co., Ltd. cannot accept liability for any
incidental losses (such as the costs of photography or
the loss of income from photography) incurred as a
result of faults with this product.
Z Notes on Copyright
Images recorded using your dig ital camera system cannot
be used in ways that infringe copyright laws without the
consent of the owner, unless intended only for personal
use. Note that some restrictions apply to the
photographing of stage performances, entertainments
and exhibits, even when intended purely for personal use.
Users are also asked to note that the transfer of
xD-Picture Card containing images or data protected
under copyright laws is only permissible within the
restrictions imposed by those copyright laws.
Z Handling Your Digital Camera
This camera contains precision electronic components.
To ensure that images are recorded correctly, do not
subject the camera to impact or shock while an image is
being recorded.
Z Liquid Crystal
If the LCD monitor is damaged, take particular care with
the liquid crystal in the monitor. If any of the following
situations arise, take the urgent action indicated.
• If liquid crystal comes in contact with your skin
Wipe the area with a cloth and then wash thoroughly
with soap and running water.
• If liquid crystal gets into your eye
Flush the affected eye with clean water for at least 15
minutes and then seek medical assistance.
• If liquid crystal is swallowed
Flush your mouth thoroughly with water. Drink large
quantities of water and induce vomiting. Then seek
medical assistance.
Z Trademark Information
• and xD-Picture Card™ are trademarks of Fuji
Photo Film Co., Ltd.
• IBM PC/AT is a registered trademark of International
Business Machines Corp. of the U.S.A.
• Macintosh, Power Macintosh, iMac, PowerBook, iBook
and Mac OS are trademarks of Apple Computer, Inc.,
registered in the U.S. and other countries.
• Microsoft, Windows, and the Windows logo are
trademarks, or registered trademarks of Microsoft
Corporation in the United States and/or other countries.
Windows is an abbreviated term referring to the
®
Microsoft
The “Designed for Microsoft® Windows® XP” logo refers
*
to the camera and the driver only.
• Other company or product names are trademarks or
registered trademarks of the respective companies.
Windows® Operating System.
Continued Q
9
Page 10

Preface
Z Notes on Electrical Interference
If the camera is to be used in hospitals or aircrafts, please
note that this camera may cause interference to other
equipment in the hospital or aircraft. For details, please
check with the applicable regulations.
Z Explanation of Color Television System
NTSC: National Television System Committee, color
television telecasting specifications adopted
mainly in the U.S.A., Canada and Japan.
PAL: Phase Alternation by Line, a color television
system adopted mainly by European countries
and China.
Z Exif Print (Exif ver. 2.2)
Exif Print Format is a newly revised digital camera file
format that contains a variety of shooting information for
optimal printing.
See “Using Your Camera Correctly” (➝p.114) for more
*
information.
10
Page 11
About this Manual
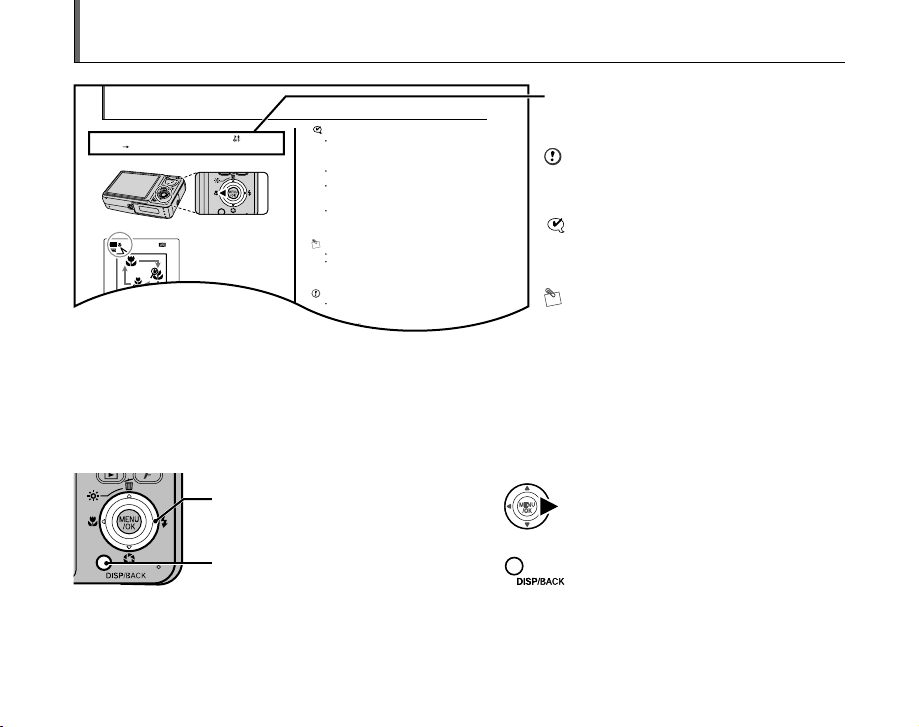
e Macro/> Super macro (Close-up)
Use this mode to take close-up shots.
Available Photography modes: q, ? ( only), s,
<, M ( p.40)
The macro setting changes each time you press e (p).
CHECK
Focal range (e: Macro)
Approx. 12 cm to 80 cm (4.7 in. to 2.6 ft.)
Focal length (35mm camera equivalent) : approx.
35mm to 78 mm, max. zoom scale : approx. 2.2×
Effective flash range (e: Macro)
Approx. 30 cm to 80 cm (1.0 ft. to 2.6 ft.)
Focal range (>: Super macro)
Approx. 3 cm to 20 cm (1.2 in. to 7.9 in.) (Wide-angle
only)
MEMO
Use a tripod to prevent camera shake in Macro mode.
Any of the following cancels Macro mode:
- Changing the Shooting mode setting
- Turning the camera off
CAUTION
If the focal length is more th an 78 mm (35 mm camera
equivalent) before setting e Macro mode, the focal
length moves to 78 mm automatically.
When setting > Super macro mode, the focal length
NN 252525
25
AUTO
AUTO
The last displayed setting is
the selected mode.
e: Macro
>: Super macro
M
E
N
U
W
D
I
S
P
/
B
A
C
K
T
/
O
K
Icons indicate the modes that are available.
CAUTION
This mark denotes issues that may affect the
When setting > Super macro mode, the camera sets to
C Suppressed flash mode automatically and the flash
cannot be used.
Z 4-direction (nopq) button
Up, down, left, and right are indicated by black triangles in the Owner’s Manual. Up or down is shown as n or o, and left or
right is shown as p or q.
camera’s operation.
CHECK
This mark denotes points to notice in the
camera’s operation.
MEMO
This mark denotes additional topics that
complement the basic operating procedures.
When pressing q:
When pressing DISP/BACK:
11
Page 12

Accessories Included
• Rechargeable Battery NP-40N (1)
Soft case included
•Strap (1)
• Battery Charger BC-40 (1)
• A/V cable for FinePix F650 (1)
Including plug to pin-plug ×2
• USB cable for FinePix F650 (1)
• CD-ROM (1)
Software for FinePix CX
NP-40N
• Owner’s Manual (this manual) (1)
Attaching the strap
Attach the strap as shown in 1 and 2.
1 2
W
T
D
I
S
P
/
B
A
C
K
W
T
D
I
S
P
/
B
A
C
K
12
Page 13

Camera Parts and Features
• Refer to the pages in parentheses for information on using the camera parts or features.
A Shutter button
B Mode dial
C Self-timer lamp (p.59)
D Flash (p.51)
E Lens (lens cover)
F POWER button
G Speaker
H Microphone
I Indicator lamp (p.29)
J MENU/OK button
K 4-direction (nopq) button
L LCD monitor
M Tripod mount
N Battery cover (p.17)
O W (Wide zoom) button (p.27, 34)
P T (Tele zoom) button (p.27, 34)
W
T
M
E
N
U
/O
K
D
IS
P
/B
A
C
K
Q w (Playback) button
R Photo mode (p) button (p.54, 63)
S DISP (Display)/BACK button (p.32, 33)
T Terminal cover
U DC IN 5V socket
V A/V OUT (Audio/Visual output) socket (p.93)
W USB socket
X Strap mount
Y Battery release catch (p.17)
Z Battery compartment (p.17)
! xD-Picture Card slot (p.19)
13
Page 14

Example of LCD Monitor Text Display
I S O 10 0
2 5
UP
1 0 00
F 2 .8
1 0 00
F 2 .8
1
2 0 06 12
0 0 A M
AF
I S O 10 0
1 0 0- 00 0 1
1 0 00
F 2 .8
1
2 0 06 12
0 0 A M
Z Photography mode
A 9 White balance (p.61)
B ( Self-timer (p.59)
C C Flash (p.51)
D s Photography mode (p.40)
E Battery level indicator
(p.18)
F e Macro (close-up) (p.50)
G AF frame (p.27)
H Date/Time (p.22)
I Shutter speed (p.47)
J Aperture (p.45)
K f Continuous shooting
(p.62)
1/ 1
/
2006 12
1000
1000
F2.8
F2.8
:
00 AM
1
1
ISO 100
232
3
NN
252525
AF
UPUPUP
Z Playback mode
A w P layback mode (p.33)
100-0001
N
ISO 100
1/ 1
/
2006 12
:
00 AM
232
11
F2.8
1000
FinePix F650 has internal memory that can store images without xD-Picture Card. Y appears on the LCD monitor when the
internal memory is active.
14
3
B u DPOF (p.64)
C F Protection (p.70)
D Frame number (p.87)
E # Voice memo (p.73)
L 5N Quality mode (p.57)
M Number of available frames
(p.135)
N FinePix COLOR (p.58)
O { AF warning (p.27)
P | Camera shake warning
(p.28)
Q Increasing monitor
brightness (p.53)
R Y Internal memory (p.20)
S ISO 100 Sensitivity (p.56)
T S Exposure compensation
(p.60)
Page 15

Charging the Battery
The battery is not fully charged at shipment and must be
fully charged before being used.
Z Compatible battery
Rechargeable Battery NP-40N (1)
P-40N
N
Indicator
Terminals
CAUTION
• Always use the Rechargeable Battery NP-40N
(included). The use of other brands of rechargeable
battery could cause faults or damage to the camera.
• NP-40N (included) that is supplied with the camera is a
battery only for FinePix F650/F470/F460. Do not load
the battery into another FUJIFILM digital camera.
Please specify the FUJIFILM NP-40 Rechargeable
Battery (sold separately) when you purchase a spare
battery (➝p.112).
• The battery (included) is not fully charged at shipment
and must be fully charged before being used.
• The battery cannot be charged even when connecting
the camera directly to the AC power adapter.
• If the terminals of battery are soiled, it may not be
possible to charge it. Clean the battery terminals and
battery charger terminals with a clean, dry cloth.
• Charging times increase at low temperatures.
• The NP-40N gradually loses its charge even when not
used. Charge a NP-40N just before taking pictures (in
the last day or two).
• Do not stick labels onto the battery as this could cause
the battery to become jammed inside the camera.
• When removed from the camera, the battery should be
stored and transported in the case provided. Any
contact between the battery terminals could cause the
battery to short-circuit and overheat.
• See p.115-116 for information on the battery.
Continued Q
Getting Ready
15
15
Page 16
Charging the Battery
NP-40N
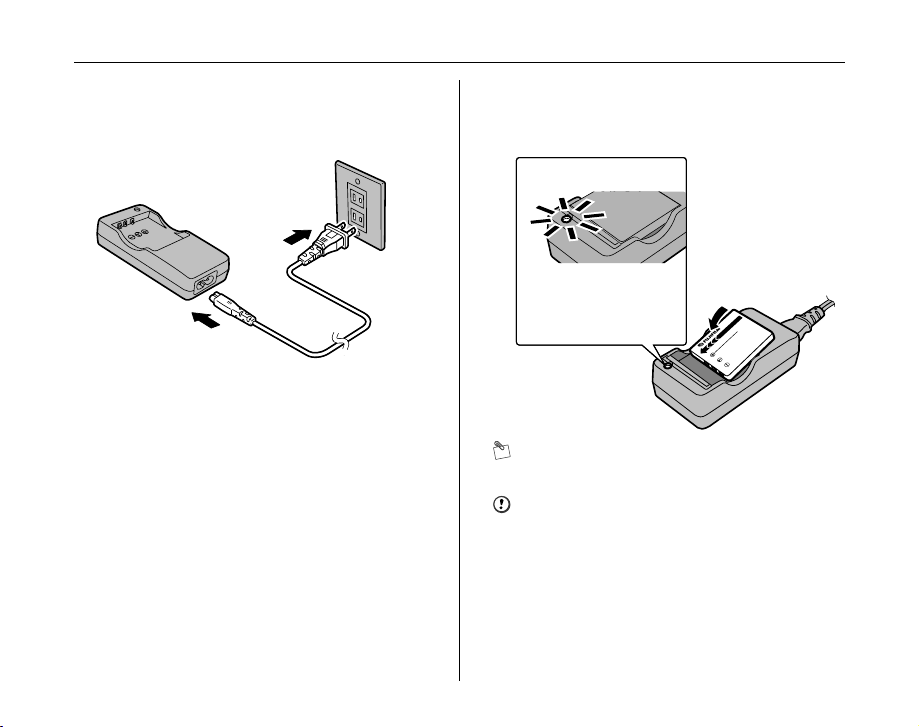
1 Plug the Battery Charger BC-40 (included)
into the power outlet using the connection
cord.
2 Load the battery into the Battery Charger
BC-40 correctly as indicated by the polarity
icon to start charging.
Charging lamp
[During charging]
Lit red
[Charging completed]
Off
MEMO
Charging ends after about 90 minutes.
CAUTION
Unplug the battery charger from the power outlet when it
is not in use.
16
Page 17
Loading the Battery
D
I
S
P
/
B
A
C
K
Battery is required to operate the digital camera. At first,
load the battery in the camera.
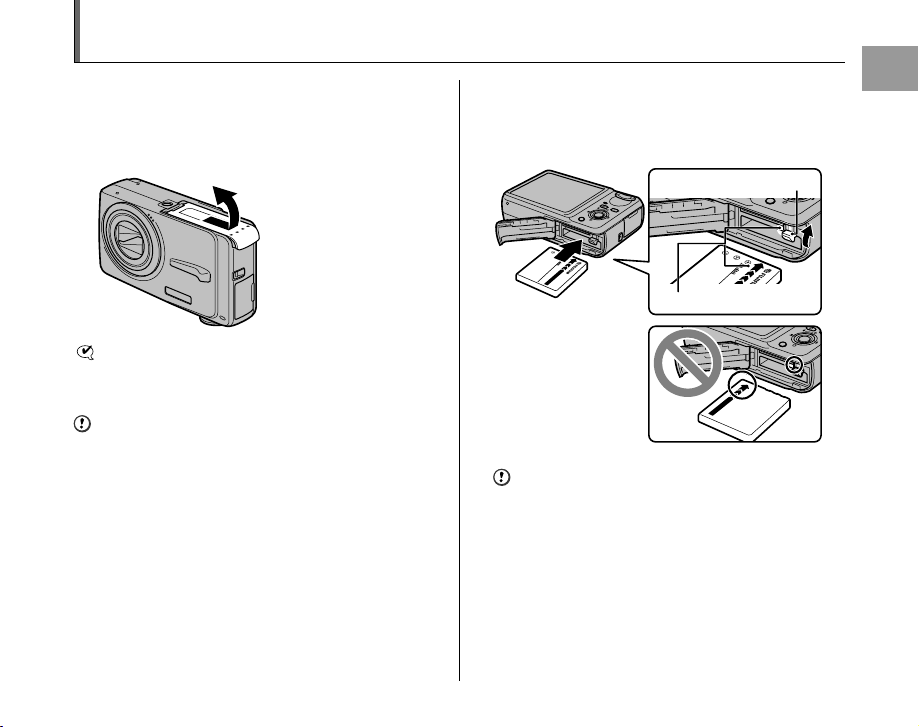
1 Open the battery cover.
OPEN
CHECK
Check that the camera is turned off before opening the
battery cover.
CAUTION
• Do not open the battery cover while the camera is on.
This could damage the xD-Picture Card or ruin the
image files on the xD-Picture Card.
• Do not apply force to the battery cover.
2 Load the battery.
Hold the battery so that the indicators are aligned. Push
the battery release catch aside while loading the battery.
Check that the battery is firmly held in place.
W
D
I
S
P
/
B
A
C
K
CAUTION
Load the battery in the correct direction.
Battery release catch
T
Indicators
D
IS
P
/
B
A
C
K
Continued Q
Getting Ready
17
Page 18
Loading the Battery
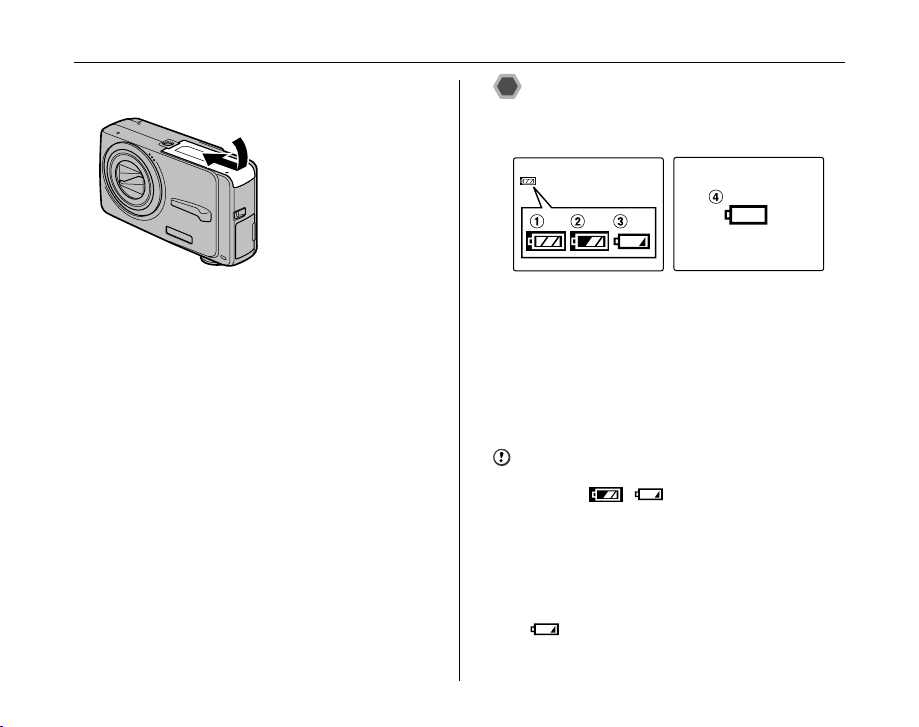
3 Close the battery cover.
OPEN
Checking the battery charge
Turn the camera on and check the battery level indicator
on the LCD monitor.
AThere is ample battery charge. (Lit white)
BThe battery is almost half charged. (Lit white)
CThere is insufficient charge left in the battery. The
battery will soon run out. Have a charged battery
ready. (Lit red)
DThe battery is depleted. The display will shortly go
blank and the camera will stop working. Replace or
recharge the battery. (Blinking red)
CAUTION
• Due to the nature of the battery, the battery level
indicator ( , , or V) may appear early
when the camera is used in cold locations. Try warming
the battery in your pocket or a similar location before
use.
• Battery with no remaining charge (V blinking red)
may cause camera faults such as the camera turning
itself off without retracting the lens. Always load a fully
charged battery.
• Depending on the camera mode, the transition from
to V may occur more quickly.
18
Page 19
Loading the xD-Picture Card
Although you can store pictures in the camera’s internal
memory, you can store many more images on the xD-
Picture Card (sold separately). There is a slot for the xDPicture Card inside the battery compartment.
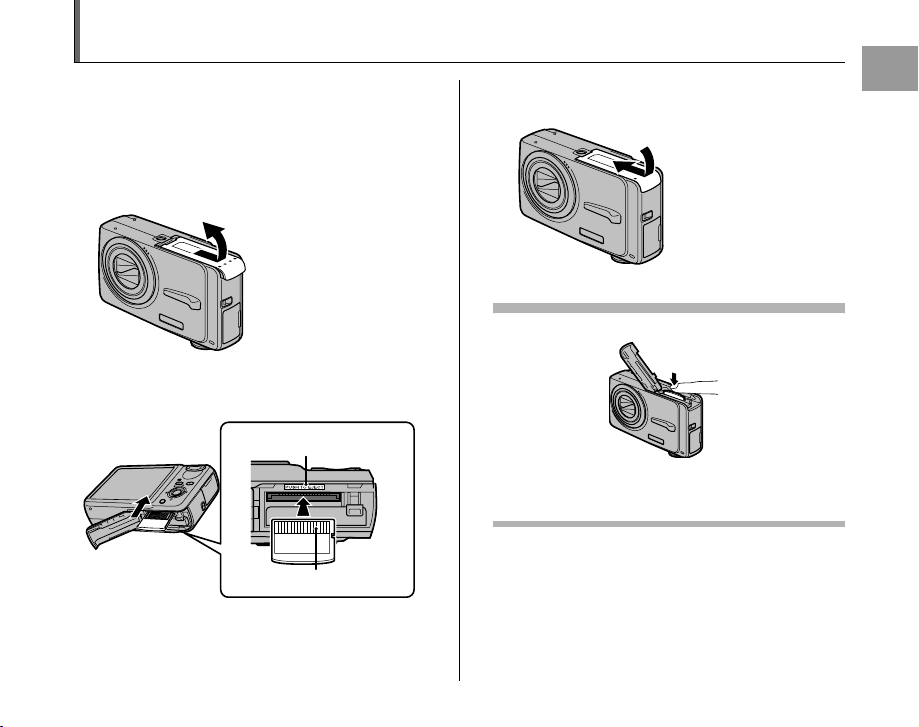
1 Open the battery cover.
O
P
E
N
2 Insert an xD-Picture Card.
T
W
D
IS
P
/BA
C
K
Gold marking
Gold contact area
Align the gold marking with
the gold contact area.
3 Close the battery cover.
O
P
E
N
How to replace the xD-Picture Card
Push the xD-Picture Card into the slot and then slowly
remove your finger. The lock is released and the xD-Picture
Card is pushed out.
Continued Q
Getting Ready
19
Page 20
Loading the xD-Picture Card
AUTO
25
CAUTION
• When storing xD-Picture Cards, make sure that they
are kept out of the reach of children. An xD-Picture
Card could be swallowed and cause suffocation. If a
child swallows an xD-Picture Card, seek medical
attention or call emergency number right away.
• If the xD-Picture Card is oriented incorrectly, it will not
go all the way into the slot. Do not apply force when
inserting an xD-Picture Card.
• Note that the xD-Picture Card may spring out if you
release your finger quickly from the card immediately
after the lock is released.
• Operation of this camera is only guaranteed when it is
used with FUJIFILM xD-Picture Card.
• See p.119 for information on the xD-Picture Card.
MEMO
• The size of an image file varies depending on the
subject. For this reason, the number recorded may not
represent the actual number of frames.
• See p.135 for information on the standard number of
available frames.
Z About internal memory
AUTO
FinePix F650 has internal
NN 252525
memory that can store
images without xD-Picture
Card. Y appears on the
LCD monitor when internal
memory is active.
When an xD-Picture Card (sold separately) is
inserted
[Record images]: Record images to an xD-Picture
Card.
[Playback images]: Playback images in an xD-Picture
Card.
When an xD-Picture Card (sold separately) is not
inserted
[Record images]: Record images to internal memory.
[Playback images]: Playback images in internal memory.
Z About images in the internal memory
Images held in the camera’s internal memory may be
corrupted or erased due to problems such as camera
faults. Save your important data to another media (i.e.,
MO disk, CD-R, CD-RW, hard disk, etc.).
It is possible to transfer saved images on the internal
memory to an xD-Picture Card (➝p.72).
20
Page 21

Turning On and Off
Turning the camera on in
Photography mode
Press POWER down fully to turn the camera on.
Press POWER again to turn the camera off.
MEMO
Changes between Photography mode and
Playback mode
Press w during shooting to change to Playback mode.
Press the shutter button down halfway to return to
Photography mode.
CAUTION
• The lens moves and the lens cover opens when turning
the camera on in Photography mode. Take care not to
obstruct the lens.
• Take care not to get fingerprints on the camera lens as
this will result in impaired image quality in your shots.
Turning the camera on in
Playback mode
Press w for about 1 second to turn the camera on in
Playback mode.
Press POWER to turn the camera off.
W
T
M
E
N
U
/O
K
D
I
S
P
/
B
A
C
K
MEMO
To change to Photography mode, press the shutter button
down halfway.
Continued Q
Getting Ready
21
Page 22
Turning On and Off
DATE/TIM E NOT SET
SETNONO
2008
2007
2005
2004
YY .MM .DD
2006
DATE/TIM E
1 . 1
12 :00
AM
SET
CANCEL
Setting the date and time
When using the camera for the first time after purchasing,
the date and time are cleared. Set the date and time.
1 “DATE/TIME NOT SET” message appears
when turning the camera on.
DATE/TIME NOT SET
SET
Press MENU/OK to set the date and time.
22
2 Set the date and time.
DATE/TIME
2008
2007
YY .MM .DD
2006
1 . 1
12:00
2005
2004
SET
APress p or q to select Year, Month,
Day, Hour, or Minute.
BPress n or o to correct the setting.
MEMO
• Holding down n or o changes the numbers
continuously.
• When the time displayed passes “12”, the AM/PM
setting changes.
AM
CANCEL
Page 23
3 Change the date format.
DATE/TIM E
YY. MM. DD
YY
SET
CANCEL
DD. MM. YY
5 /2 4/ 20 06
1 0: 00
AM
APress p or q to select the date format.
BPress n or o to set the format.
CAlways press MENU/OK after the settings
are completed.
Date format
ex. May 24, 2006
YY.MM.DD: 2006.5.24
MM/DD/YY: 5/24/2006
DD.MM.YY: 24.5.2006
DATE/TIME
DD. MM . YY
MMMM/
DDDD/
YY. MM. D D
SET
YY
5/24/2006
CANCEL
10:00
AM
MEMO
“DATE/TIME NOT SET” message also appears when the
battery has been removed and the camera has been left
for a long period. Once the AC power adapter has been
connected or the battery has been installed for 10 hours
or more, the camera settings will be retained for roughly
24 hours even if both sources of power are removed.
Getting Ready
Auto power off function
When the Auto power off function is active, if the camera
is left unused for 2 or 5 minutes, this function turns the
camera off (➝p.91). To turn the camera back on, press
POWER. To play back images, hold down w for about 1
second.
23
Page 24

Correcting the Date and Time
SHO OTING M ENU
OFF
CON TINUOU S
SET
UP
OFF
SEL F
TIM ER
SET
UP
DATE
TIM E
FOR MAT
PLAYBAC K VOLU ME
LCD BRIGHT NESS
BEE P VOLU ME
SHU TTER VOL UME
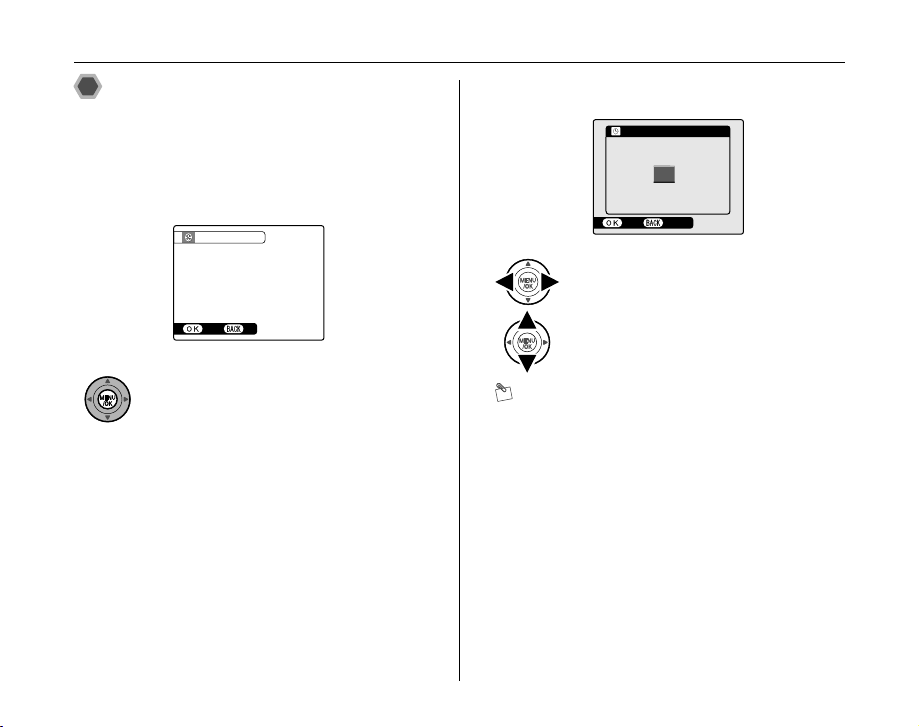
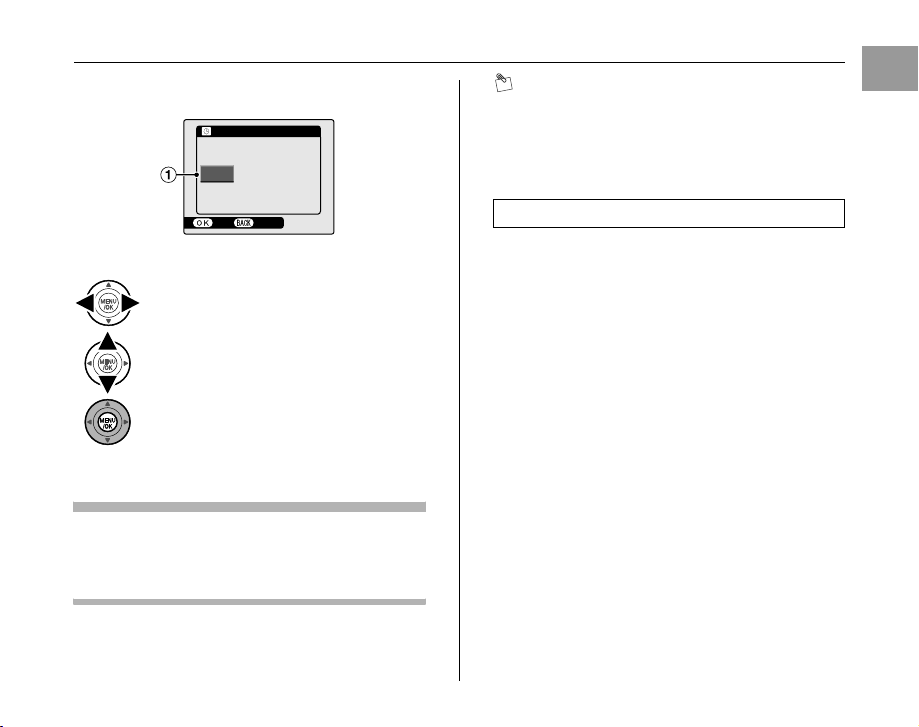
1 Open the SET-UP menu. 2 Display the DATE/TIME screen.
SET
-
SHOOTING MENU
SELF
-
TIMER
CONTINUOUS
SET
-
UP
OFF
OFF
UP
DATE
/
TIME
BEEP VOLUME
SHUTTER VOLUME
PLAYBACK VOLUME
LCD BRIGHTNESS
FORMAT
24
APress MENU/OK to open the menu.
BPress n or o to select U SET-UP.
CPress q.
APress p or q to select .
BPress o to move to menu item.
CPress n or o to select DATE/TIME.
DPress q.
See “2 Set the date and time. ” (➝p.22).
Page 25
Selecting the Language
SHO OTING MENU
OFF
CON TINUOUS
SET
UP
OFF
SEL F
TIM ER
SET
UP
RES ET
USB MODE
AUTO POWER O FF
TIM E DIFFE RENC E
VID EO SYST EM
2 M IN
NTS C
ENGLISH
ENGLISH
FRANCAIS
DEUTSCH
ESPA
OL
ITALIANO
SET
CANCEL
1 Open the SET-UP menu.
SHOOTING MENU
SELF
CONTINUOUS
SET
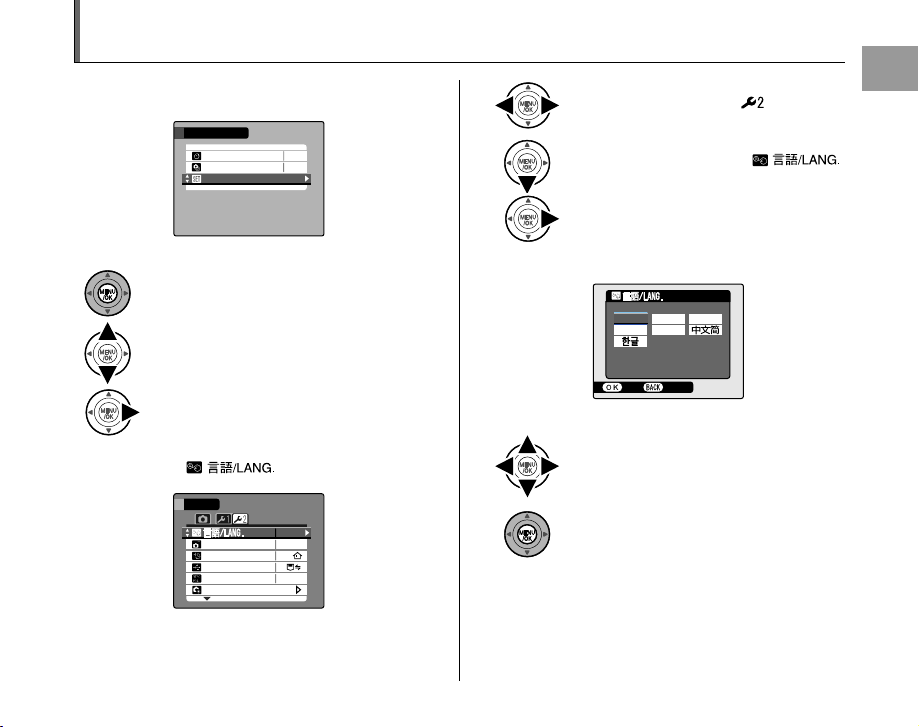
APress MENU/OK to open the menu.
BPress n or o to select U SET-UP.
CPress q.
2 Display the screen.
SET
-
UP
AUTO POWER OFF
TIME DIFFERENCE
USB MODE
VIDEO SYSTEM
RESET
-
TIMER
-
UP
OFF
OFF
ENGLISH
2 MIN
NTSC
APress p or q to select .
BPress o to move to select .
CPress q.
3 Select the language.
ENGLISH
FRANCAIS
ESPA
ÑOL
ITALIANO
SET
APress n, o, p, or q to select the
language.
BPress MENU/OK to confirm the setting.
Getting Ready
DEUTSCH
CANCEL
25
Page 26
Taking Pictures (q AUTO Mode)
This section describes the basic operations.
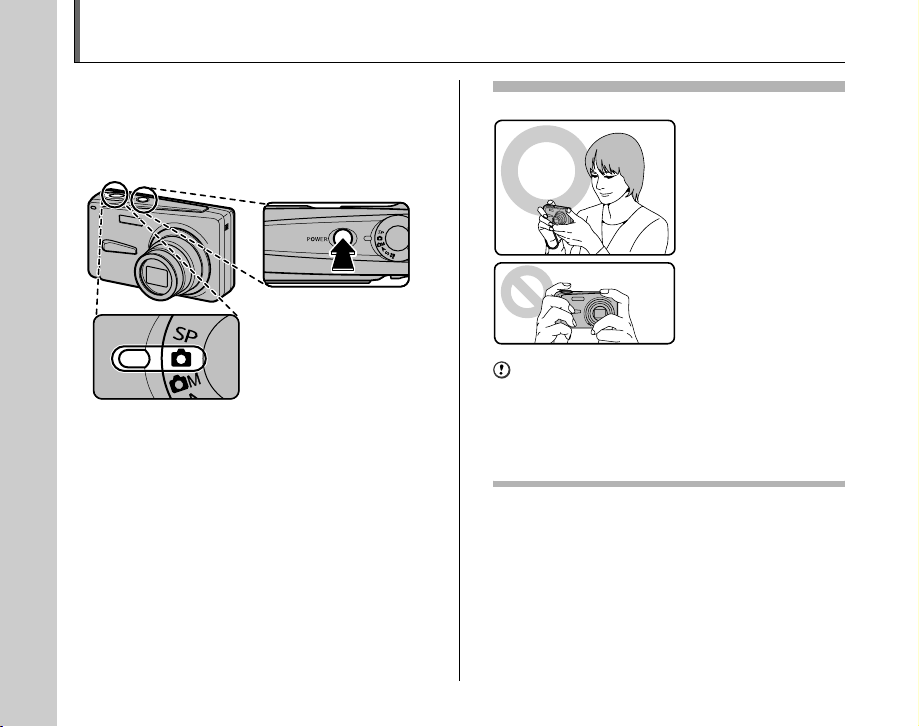
1 Turn the camera on.
APress POWER to turn the camera on.
BSet the Mode dial to q.
Holding the camera correctly
Brace your elbows
against your sides and
hold the camera with both
hands.
Do not cover the lens
or flash with your fingers.
CAUTION
• Moving the camera while shooting gives a blurred
picture (camera shake). Hold the camera steadily with
both hands.
• If the lens or flash is obscured by your fingers or the
strap, subjects may be out of focus or the brightness
(exposure) of your shot may be incorrect.
26
26
Page 27
2 Check the composition on the LCD monitor.
2 5252 5
AUTO
AUTO
2 5252 5
2 5
2 5
AUTO
2 50 F5 .6
2 50 F5 .6
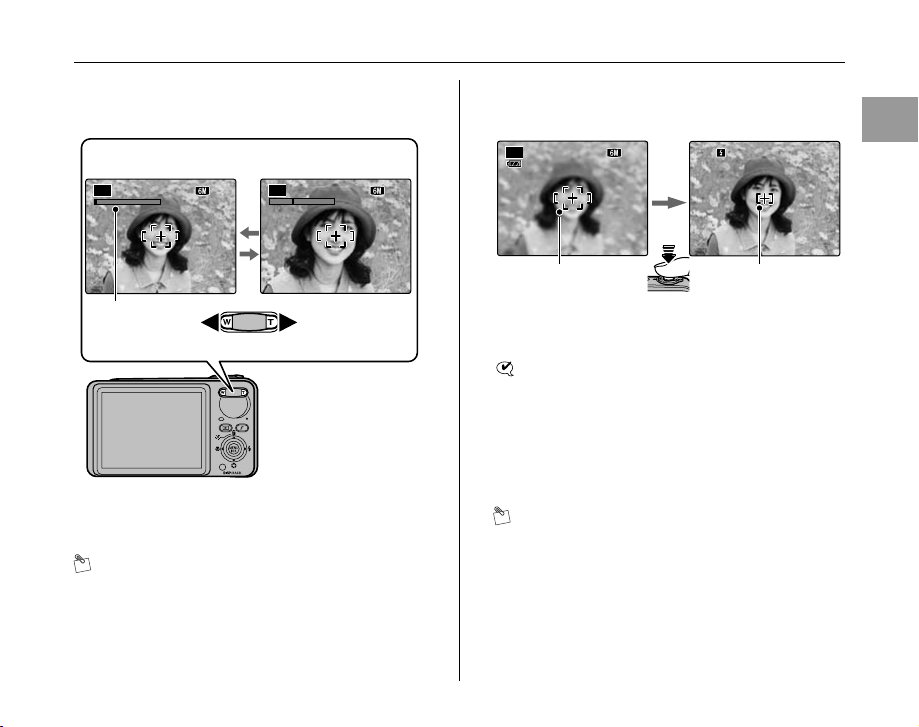
To adjust zoom scale using the Zoom button:
3 Focus on the main subject in the AF frame
and press the shutter button down halfway.
W button
(Zoom out)
AUTO
NN 25
AUTO
T button
(Zoom in)
NN 25
Zoom bar
• Focal range
Approx. 60 cm (2.0 ft.)
to infinity
• Optical zoom focal
length (35 mm
camera equivalent)
Approx. 35 mm to
175 mm
• Max. zoom scale
5×
MEMO
•Select e Macro mode to take close-up shots (➝p.50).
• Use digital zoom when you want to shoot the subject
closer (➝p.88).
AUTO
AF frame AF frame
N 25
N 25
Halfway
pressed
250 F5.6
250 F5.6
becomes smaller
and camera
focuses on the
subject.
CHECK
• Focus on the subject
Double beep is heard
Indicator lamp lit green
• Not focus on the subject
No sound
{ indicated
Indicator lamp blinking green
MEMO
• The shutter button has a halfway point at which focus
and exposure are automatically optimized before taking
the picture by pressing fully down.
Continued Q
Using the Camera
27
Page 28
Taking Pictures (q AU TO Mode)
2 50
F 5. 6
2 50
F 5. 6
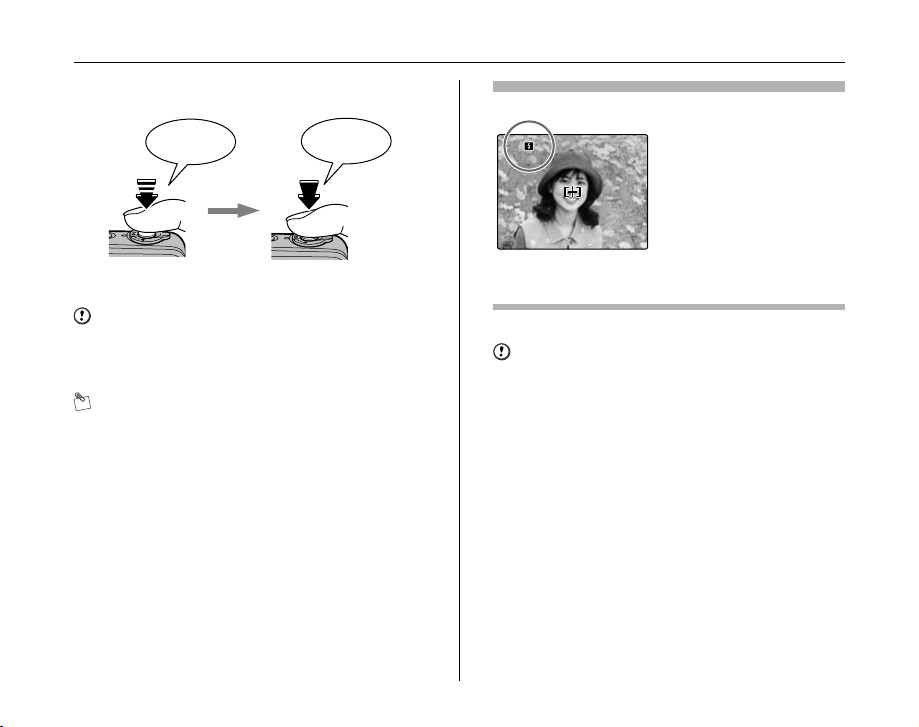
4 Press the shutter button fully.
Double
beep
Halfway pressed Fully pressed
CAUTION
When taking a picture using the flash, the image may
disappear and go dark briefly due to flash charging. The
indicator lamp blinks orange during charging.
MEMO
• When the subject is not in the AF frame, use AF/AE lock
to take the picture (➝p.30).
• When pressing the shutter button down fully in one
motion, the camera takes the picture without the AF
frame changing.
Click
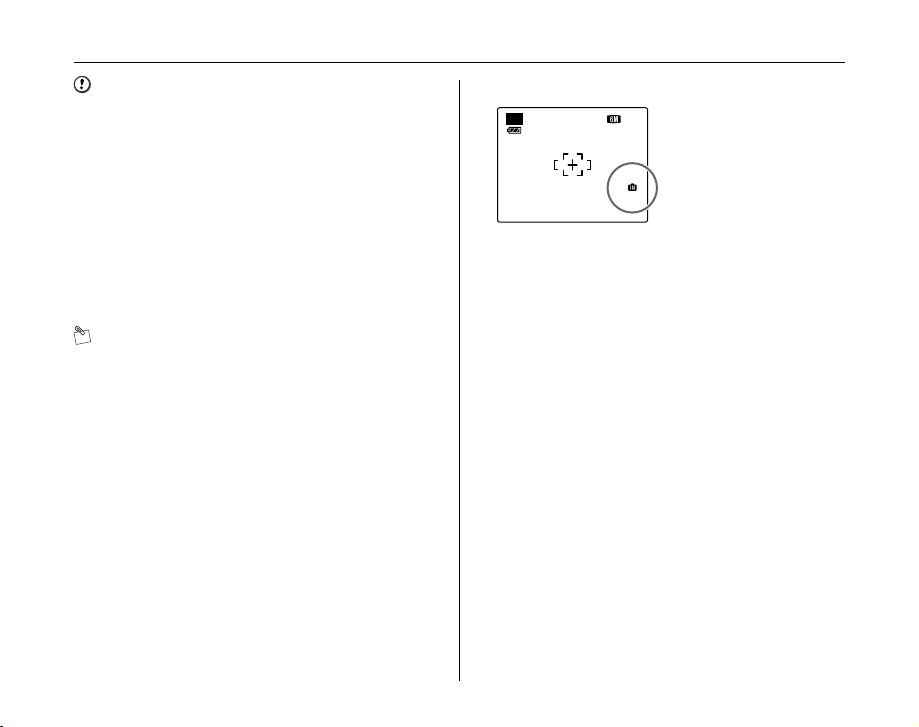
Flash
When pressing the shutter
button down halfway, b
appears on the LCD monitor
before the flash fires.
250
F5.6
250
F5.6
Change the flash mode when you want to take pictures without
flash. See p.51 for information on flash.
CAUTION
• The image shown on the LCD monitor before the
picture is taken may differ in brightness, color, etc. from
the image actually recorded. Play back the recorded
image to check it (➝p.33).
• When selecting a slow shutter speed that will cause
camera shake, | appears on the LCD monitor. Use
flash or a tripod.
• See p.121-124 for information on warning displays. See
“Troubleshooting” (➝p.125-131) for more information.
28
Page 29
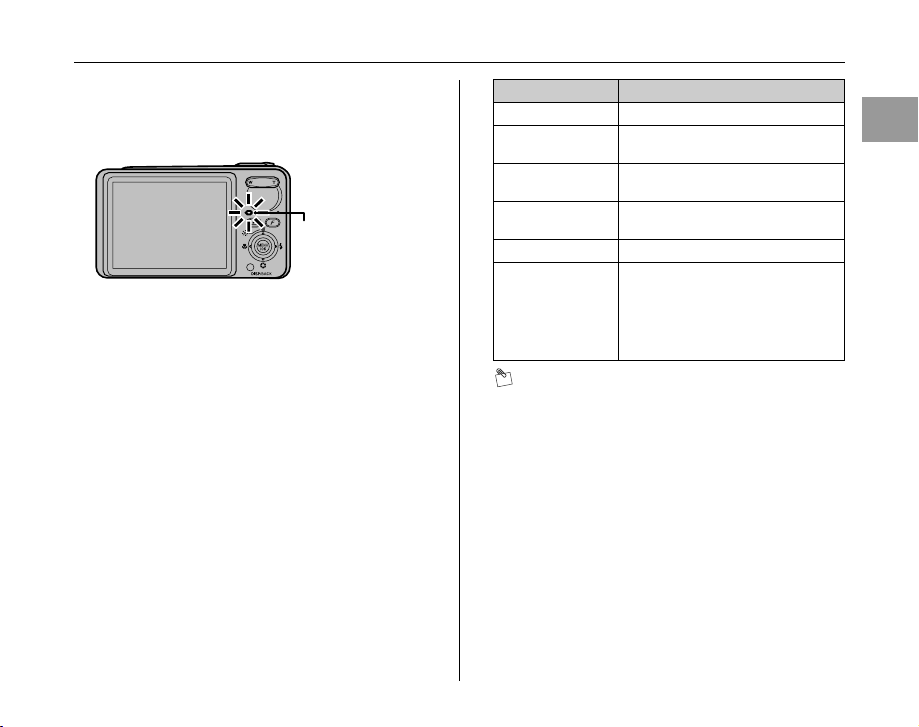
Z Indicator lamp display
The indicator lamp lights or blinks when pressing the
shutter button, etc. The indicator lamp shows the camera
status.
Indicator lamp
Display Status
Lit green Locking the focus
Blinking green Camera shake warning, AF warning,
Blinking green and
orange alternately
Lit orange Recording to xD-Picture Card or
Blinking orange Charging flash (flash will not fire)
Blinking red • Warnings for xD-Picture Card and
or AE warning (ready to shoot)
Recording to xD-Picture Card or
internal memory (ready to shoot)
internal memory (not ready)
internal memory
Card not formatted, incorrect format,
memory full, xD-Picture Card or
internal memory error
• Lens operation error
MEMO
Detailed warning messages appear on the LCD monitor
(➝p.121-124).
Using the Camera
29
Page 30
Taking Pictures (q AU TO Mode)
AUTO
2 5252 5
AUTO
2 5252 5
2 50
F 5. 6
2 50
F 5. 6
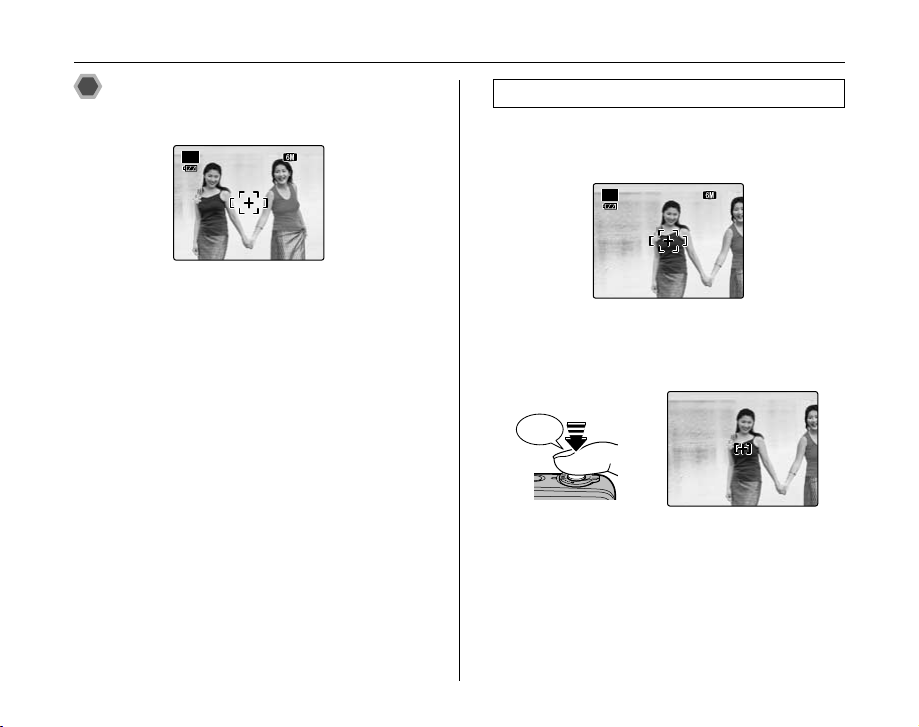
Taking pictures with the focus
and exposure locked
AUTO
In the above composition, the subjects (two people in this
case) are not in the AF frame. Pressing the shutter button
halfway at this point will result in the subjects being out of
focus.
AF/AE lock is useful:
Use AF/AE lock to guarantee best result when shooting a
subject that is not suited to autofocusing (➝p.31).
25
NN
Using AF/AE lock
1 Move the camera slightly so that one of the
subjects is in the AF frame.
AUTO
NN 25
2 Press the shutter button down halfway to
focus on the subject.
Double
beep
250
F5.6
250
Halfway
pressed
F5.6
30
Page 31

3 Continue to hold the shutter button down
2 50
F 5. 6
2 50
F 5. 6
halfway. Move the camera back to the
original image and press the shutter button
fully.
Click
250
F5.6
250
F5.6
Fully pressed
MEMO
• AF/AE lock can be applied repeatedly before the shutter
is released.
• Use AF/AE lock in all Photography modes to guarantee
excellent results.
• On FinePix F650, pressing the shutter button down
halfway locks the focus and exposure settings (AF and
AE lock).
Subjects not suitable for autofocus
FinePix F650 uses a high-precision autofocusing mechanism.
However, it may have difficulty focusing on the following:
Very shiny subjects such
Fast moving subjects
as a mirror or car body
• Subjects photographed through glass
• Subjects that do not reflect well, such as hair or fur
• Subjects with no substance, such as smoke or flames
• Dark subjects
• Subjects with little or no contrast between the subject and
the background (such as subjects dressed in the same color
as the background)
• Shots where another high-contrast object (not the subject) is
close to the AF frame and is either closer or further away
than your subject (such as a shot of someone against a
background with strongly contrasting elements)
For such subjects use AF/AE lock (➝p.30).
Using the Camera
31
Page 32

Taking Pictures (q AU TO Mode)
2 5252 5
AUTO
2 5252 5
AUTO
2 5252 5
AUTO
Adjusting the shot composition
Select the LCD monitor display.
Press DISP/BACK to change the LCD monitor display.
W
T
M
E
N
U
/
O
K
D
I
S
P
/
B
A
C
K
AUTO
Text displayed No text displayed
NN 25
AUTO
Framing guideline
displayed
NN 25
Best framing
Position the main subject at
the intersection of two lines
in this frame or align one of
the horizontal lines with the
horizon. Use this frame as a
guide to the subject’s size
and the balance of the shot
while composing a shot.
AUTO
NN 25
32
Page 33

Viewing the Images
2006
14
22
23
24
1 00 -0 00 1
1 00 -0 00 1
I SO 1 00
1 00 0
F 2. 8
1 00 0
F 2. 8
5
2 4
2 00 6 12
0 0 AM
I SO 1 00
5
2 4
2 00 6 12
0 0 AM
Playback your images to check them. For important
photographs, always take a test shot and view the image
to make sure that the camera is working normally.
Setting the camera to Playback
mode
Press w during shooting to change to Playback mode.
W
T
M
E
N
U
/O
K
D
I
S
P
/
B
A
C
K
When the camera is off, press w for about 1 second to
turn the camera on in Playback mode.
MEMO
When pressing w, the last image shot appears on the
LCD monitor.
CAUTION Still images viewable on FinePix F650
This camera will display still images recorded on FinePix
F650 or still images (excluding some uncompressed
images) recorded on any FUJIFILM digital camera that
supports xD-Picture Cards. Clear playback or playback
zooming may not be possible for still images shot on
cameras other than FinePix F650.
Select the LCD monitor display.
Press DISP/BACK during Playback mode to change the
LCD monitor display.
W
T
M
E
N
U
/O
K
D
I
S
P
/
B
A
C
K
100-0001
100-0001
NN
ISO 100
ISO 100
5
/
24
/
2006 12
:
5
2006
00 AM
/
24
/
2006 12
:
00 AM
1000
F2.8
1000
F2.8
Text displayed No text displayed
5 5/
22
5/23
5 5/
24
1/14
Multi-frame playbackSorting by date
Using the Camera
33
Page 34

Viewing the Images
1 00 0
F 2. 8
1 00 0
F 2. 8
5
2 4
2 00 6 10
0 0 AM
5
2 4
2 00 6 10
0 0 AM
1 00 -0 00 1
1 00 -0 00 1
I SO 1 00
I SO 1 00
Selecting images
34
Single-frame playback
100-0001
100-0001
ISO 100
ISO 100
5
/
24
/
2006 10
:
5
To select the required image:
Press p: last image
Press q: next image
00 AM
/
24
/
2006 10
:
00 AM
1000
F2.8
1000
F2.8
To select images on the
thumbnail lists screen, hold
down p or q for 1 second
during playback.
When releasing p or q,
camera returns to singleframe playback.
Playback zoom
NN
1 Zoom in / Zoom out.
To zoom in an image during single-frame playback:
W button (Zoom out) T button (Zoom in)
Zoom bar
Press W or T to zoom in or out on an
image.
Press DISP/BACK to cancel playback zoom.
2 Display another part of the image.
Navigation screen
(Current displayed
image)
Press n, o, p, or q to display another
part of the image.
Page 35

Z Zoom scales
Quality mode Max. zoom scale
5 (2816 × 2112 pixels)
% (2816 × 1880 pixels)
3 (2048 × 1536 pixels)
2 (1600 × 1200 pixels)
Approx. 4.4×
Approx. 4.4×
Approx. 3.2×
Approx. 2.5×
Multi-frame playback
Multi-frame playback screen (30 frames) appears on the
LCD monitor. Select required frame from the 30 frames.
APress n, o, p, or q to move the cursor
(colored frame) to the selecting frame.
Press n or o repeatedly to jump to the
next page.
BPress MENU/OK to enlarge the image.
Using the Camera
35
Page 36

Viewing the Images
2006
14
22
23
24
2006
14
22
23
24
Sorting by date
In sorting by date mode, you can view all images taken on
the same day.
2006
5 5/
22
5/23
5 5/
24
1/14
Selecting the date
2006
5/22
5/23
5/24
14
APress n, o, p, or q to move the cursor
(colored frame) to on the upper left
APress n, o, p, or q to move the cursor
frame.
(colored frame) to the selecting frame.
BPress p to display the selecting date.
BPress MENU/OK to enlarge the image.
CPress n or o to move the cursor (colored
frame) to select the date.
Press n or o repeatedly to jump to the
next page.
DPress q.
36
Page 37

Using the Erase Button
1 00 0
F 2. 8
1 00 0
F 2. 8
5
2 4
2 00 6 10
0 0 AM
5
2 4
2 00 6 10
0 0 AM
1 00 -0 00 1
1 00 -0 00 1
I SO 1 00
I SO 1 00
SET
ERA SE OK?
OK
CAN CEL
Use this mode to erase unnecessary images to have
ample free space on the xD-Picture Card or internal
memory.
1 Set the camera to Playback mode.
Press w to turn the camera on in Playback mode.
W
T
M
E
N
U
/O
K
D
I
S
P
/
B
A
C
K
2 Select the image.
5
/
24
/
2006 10
:
/
24
1000
1000
/
00 AM
2006 10
:
00 AM
F2.8
F2.8
5
Press p or q to select the erasing frame
(file).
100-0001
100-0001
NN
ISO 100
ISO 100
3 Erase the image.
ERASE OK?
OK
SET
APress n ().
BPress p or q to select OK.
CPress MENU/OK to erase the displayed
image.
CAUTION
Erased images cannot be recovered.
Using the Camera
CANCEL
37
Page 38

Using the Photography Functions — Procedure of Setting
Specify the camera settings for taking pictures to get the
best result. A general guide is given below.
1 Select the Photography mode.
Turn the Mode dial to select the Photography mode.
The camera settings are tailored to the scene being
shot.
q Auto
? Scene
position
s Manual
< Aperture
priority AE
M Shutter
priority AE
This is the easiest mode for taking
pictures (➝p.40).
Select the best Shooting mode for the
scene being shot (➝p.40).
This mode provides more detailed
settings that are impossible to set in q
Auto mode (➝ p.45).
Used for changing the aperture setting so
that the background is out of focus, or the
area in front of and behind the subject is
also in focus in the shot (➝p.45).
Used for changing the shutter speed
setting so that the action is frozen or the
flow of the motion is conveyed (➝p.47).
2 Specify the photography settings.
Pressing buttons or selecting menu allows you to
specify photography functions. You can obtain the
best result for shooting.
W
T
M
E
N
U
/O
K
D
I
S
P
/
B
A
C
K
e (p) Macro button
d (q) Flash button
(o) Shutter speed/Aperture
button
Z Specifying functions using buttons
e Macro Used for close-up shots (➝p.50).
d Flash
Shutter
speed/
Aperture
Used for shots in dark locations or for
backlit subjects, etc. (➝p.51).
Used for changing the aperture or shutter
speed (➝p.46, 48).
38
38
Page 39

Z Specifying functions using p-MODE MENU (p
MOD E MENU
ISO
COL OR
QUAL ITY
AUTO
STD
SHO OTING MENU
WHI TE BALA NCE
CON TINUOUS
EXP
COM PENSATION
SEL F
TIM ER
OFF
AUTO
SET
UP
OFF
button)
S ISO
QUALITY
FinePix COLOR
Use to specify required sensitivity
setting (➝p.56).
Use to specify required image size
(➝p.57).
Use to specify required color tone
(➝p.58).
W
T
M
E
N
U
/O
K
D
I
S
P
/
B
A
C
K
MODE MENU
ISO
QUALITY
COLOR
AUTO
STD
Z Specifying functions using SHOOTING MENU
(MENU/OK button)
SELF-TIMER
SEXP.
COMPENSATION
Used in situations such as group
shots where the photographer is
included in the shot (➝p.59).
Used for changing the image
brightness (➝p.60).
Advanced Features — Photography
T WHITE BALANCE Use to adjust the color tone (➝p.61).
CONTINUOUS
N
Use to take pictures continuously
(➝p.62).
W
T
M
E
N
U
/O
K
D
I
S
P
/
B
A
C
K
SHOOTING MENU
SELF
-
TIMER
EXP
.
COMPENSATION
WHITE BALANCE
CONTINUOUS
SET
-
UP
AUTO
OFF
OFF
39
Page 40

Setting the Shooting Mode
You can select the most suitable setting according to the
subject by selecting one of the Shooting modes.
q AUTO
This is the easiest mode for providing crisp and clear
shots.
Use this mode for ordinary photography.
Camera specifies all settings other than p-MODE
(Quality and FinePix COLOR) automatically.
Set the Mode dial to q.
CHECK
Available flash modes:
AUTO, b, d, C
? SCENE POSITION
This mode provides th e best Scene position setting for the
scene being shot. Choose from 12 types of scene.
Select the Scene position setting in the SCENE
POSITION menu.
Set the Mode dial to ?.
MEMO
• See p.52 for information on the available flash modes.
• p-CHROME (p.58) cannot be set.
40
Page 41

Z Selecting Scene position setting
SCE NE POS
SEL F
TIM ER
CON TINUOUS
SHO OTING MENU
SET
UP
POR TRAIT
LAN DSCAPE
SPO RT
NIG HT
SUN SET
FIR EWORK S
SHOOTING MENU
SCENE POS
SELF
CONTINUOUS
SET
-
TIMER
-
UP
PORTRAIT
LANDSCAPE
SPORT
NIGHT
FIREWORKS
SUNSET
H PORTRAIT
Use this mode for
photography to get
beautiful skin tones and
soft overall tone.
Advanced Features — Photography
APress MENU/OK to open the menu.
BPress n or o to select SCENE
POSITION.
CPress q.
DPress n or o to select the setting.
EPress MENU/OK button to confirm the
setting.
, LANDSCAPE
Use this mode for shooting
scenery in daylight and
provides crisp, clear shots of
scenery such as buildings
and mountains.
CHECK
Flash cannot be used in
the Landscape mode.
Continued Q
41
Page 42

Setting the Shooting Mode
. SPORT
Use this mode to take
pictures of a moving subject.
It gives priority to faster
shutter speeds.
8 NIGHT
Use this mode for shooting
evening and night scenes.
A picture is taken with a slow
shutter of up to 2 seconds.
CHECK
Use a tripod to prevent camera shake, because a picture
is taken with a slow shutter.
CAUTION
For slow shutter speeds of 1/2 sec. or longer, recording
takes longer because noise reduction processing is
performed after you take the shot.
[PROCESSING...] appears on the LCD monitor during
noise reduction.
42
FIREWORKS
Use this mode to shoot
fireworks.
It is effective for taking
more vivid shots of
fireworks with a slow
shutter of 2 seconds.
CHECK
• Flash cannot be used in the Fireworks mode.
• Use a tripod to prevent camera shake in the Fireworks
mode.
CAUTION
For slow shutter speeds of 1/2 sec. or longer, recording
takes longer because noise reduction processing is
performed after you take the shot.
[PROCESSING...] appears on the LCD monitor during
noise reduction.
SUNSET
Use this mode to shoot
sunset, making the colors
more vivid.
Page 43

SNOW
Use this mode to prevent
darkening images and
provide crisp, clear shots,
when shooting at snowy
scene where the whole
screen appears white.
BEACH
Use this mode to prevent
darkening images and
provide crisp, clear shots,
when shooting at beach
under strong sunlight.
MUSEUM
Use this mode for taking
pictures in places such as
museum where the use of
flash and making an
operation sound and a
shutter sound are
restricted.
Flash mode is forcibly set
to Suppressed flash and
operation sound and shutter sound are not emitted.
MEMO
Check whether photography is permitted before using this
mode.
PARTY
Use this mode for shooting
at indoor wedding and
party.
This mode produces
beautiful images that retain
the natural ambien ce when
shots are taken in low-light
conditions.
Continued Q
Advanced Features — Photography
43
Page 44

Setting the Shooting Mode
FLOWER TEXT
Use this mode to take
clear close-up shots when
zooming up a flower.
It is effective for taking
more vivid shots of flower
petal.
Use this mode to shoot
documents and white
board.
It is effective for taking
clearer shots of letters.
CHECK
• Flash cannot be used in the Flower mode.
• Focal range
Approx. 12 cm (4.7 in.) to infinity
• Focal length and maximum zoom scale are limited to
approx. 35 mm to 78 mm (35 mm camera equivalent)
and approx. 2.2× respectively.
CAUTION
If the focal length is more than 78 mm (35 mm camera
equivalent) before setting this mode, the focal length
moves to 78 mm automatically.
CHECK
• Focal range
Approx. 12 cm (4.7 in.) to infinity
• Focal length and maximum zoom scale are limited to
approx. 35 mm to 78 mm (35 mm camera equivalent)
and approx. 2.2× respectively.
CAUTION
If the focal length is more than 78 mm (35 mm camera
equivalent) before setting this mode, the focal length
moves to 78 mm automatically.
44
Page 45

s MANUAL
This is an automatic mode to specify the settings except
for the shutter speed and aperture setting.
Set the Photography functions to manual to easily control
yourself.
Set the Mode dial to s. Set the Mode dial to < .
< APERTURE PRIORITY AE
This is an automatic mode to set the aperture.
Use this mode to have the area in front of and behind the
subject out of focus (large aperture) or have both near
and far subjects in focus (small aperture).
Advanced Features — Photography
Photography functions:
• S EXP. COMPENSATION (➝p.60)
• T WHITE BALANCE (➝p.61)
CHECK
Available flash modes:
AUTO, b, d, C, c, n
Photography functions:
• S EXP. COMPENSATION (➝p.60)
• T WHITE BALANCE (➝p.61)
CHECK
Available flash modes:
b, d, C, c, n
Continued Q
45
Page 46

Setting the Shooting Mode
SET TING A PERTUR E
2 5252 5
I SO 1 00
I SO 1 00
2 50
F 5. 6
4
F8
2 5252 5
I SO 1 00
I SO 1 00
SEL ECT
SET
F 5. 6
----
----
2 5252 5
I SO 1 00
I SO 1 00
SEL ECT
SET
NN 25
ISO 100
ISO 100
SETTING APERTURE
250
F5.6
APress o to select SETTING APERTURE.
BPress p or q to select the aperture.
CPress the shutter button to take pictures.
CHECK
Aperture settings
Wide-angle: F2.8 to F8 in 1/3 EV increments
Telephoto: F4.7 to F7.6 in 1/3 EV increments
MEMO
To change the macro or flash setting, press o to cancel
the aperture setting.
CAUTION
SELECT
F8
4
SELECT
----
----
F5.6
4
SET
Lit red
SET
When the correct exposure
NNNN25
cannot be obtained with
ISO 100
ISO 100
selected aperture setting, the
shutter speed appears in red.
When this occurs, adjust the
aperture setting again.
When the brightness of the
NN 25
subject is outside t he camera’s
ISO 100
ISO 100
brightness metering range,
“---” appears as the shutter
speed. When this occurs,
press the shutter button down
halfway to measure the light
level again.
46
Page 47

Aperture
By adjusting the aperture, you can change the depth of focus
(depth of field). Selecting a larger number of aperture (closed)
obtains a larger depth of focus. Selecting a smaller number of
aperture (open) has the area in front of and behind the subject
out of focus.
Closed
Main subject
Open
The area in front of and
behind the subject is also in
focus in the shot.
The area in front of and
behind the subject is out of
focus.
M SHUTTER PRIORITY AE
This is an automatic mode to set the shutter speed. Use
this mode to freeze a moving subject (fast shutter speed)
or convey the impression of movement (slow shutter
speed).
Set the Mode dial to M.
Photography functions:
• S EXP. COMPENSATION (➝p.60)
• T WHITE BALANCE (➝p.61)
CHECK
Available flash modes:
b, d, C
Continued Q
Advanced Features — Photography
47
Page 48

Setting the Shooting Mode
SET TING SH UTTE R SPE ED
2 50
F 5. 6
I SO 1 00
2 5
1 00 0
2 5252 5
I SO 1 00
I SO 1 00
F 2. 8
SEL ECT
SET
F2.8
SEL ECT
SET
2 5
I SO 1 00
50
---
48
N 25
ISO 100
SETTING SHUTTER SPEED
250
F5.6
APress o to select SETTING SHUTTER
SPEED.
BPress p or q to select the shutter speed.
CPress the shutter button to take pictures.
CHECK
Shutter speed setting
2 sec. to 1/1000 sec. in 1/3 EV increments
MEMO
To change the macro or flash setting, press o to cancel
the shutter speed setting.
CAUTION
When the correct
NNNN25
exposure cannot be
ISO 100
ISO 100
obtained with selected
shutter speed, the
aperture setting appears
in red. When this occurs,
adjust the shutter speed
again.
When the brightness of
N 25
the subject is outside the
ISO 100
camera’s brightness
1000
SELECT
F2.8
F2.8
SET
Lit red
metering range, “F---”
appears as the aperture
SELECT
50
SET
---
F
setting. When this
occurs, press the shutter
button down halfway to
measure the light level
again.
• For slow shutter speeds of 1/2 sec. or longer, recording
takes longer because noise reduction processing is
performed after you take the shot.
[PROCESSING...] appears on the LCD monitor during
noise reduction.
Page 49

Shutter speed
When shooting a moving subject, you can either “freeze the
motion” or “capture the sense of movement” by adjusting the
shutter speed.
Fast
Freezes the motion of the
subject.
Advanced Features — Photography
Slow
Photographs the traces left
by the subject’s movement.
49
Page 50

e Macro/> Super macro (Close-up)
2 5252 5
AUTO
Use this mode to take close-up shots.
Available Photography modes: q, ? ( only), s,
<, M (➝p.40)
The macro setting changes each time you press e (p).
W
T
M
E
N
U
/O
K
D
I
S
P
/
B
A
C
K
AUTO
The last displayed setting is
NN 25
the selected mode.
e: Macro
>: Super macro
CHECK
• Focal range (e: Macro)
Approx. 12 cm to 80 cm (4.7 in. to 2.6 ft.)
Focal length (35mm camera equivalent) : approx.
35mm to 78 mm, max. zoom scale : approx. 2.2×
• Effective flash range (e: Macro)
Approx. 30 cm to 80 cm (1.0 ft. to 2.6 ft.)
• Focal range (>: Super macro)
Approx. 3 cm to 20 cm (1.2 in. to 7.9 in.) (Wide-angle
only)
• When setting > Super macro mode, the camera sets to
C Suppressed flash mode automatically and the flash
cannot be used.
MEMO
• Use a tripod to prevent camera shake in Macro mode.
• Any of the following cancels Macro mode:
- Changing the Shooting mode setting
- Turning the camera off
CAUTION
• If the focal length is more than 78 mm (35 mm camera
equivalent) before setting e Macro mode, the focal
length moves to 78 mm automatically.
• When setting > Super macro mode, the focal length
changes to wide-angle (W) automatically.
50
Page 51

d Setting the Flash
Flash photography is useful for taking pictures at night or
indoor dark locations. Choose from 6 flash modes
according to the type of shot. See p.52 for information on
the available Photography modes.
W
T
M
E
N
U
/O
K
D
I
S
P
/
B
A
C
K
The flash setting changes
each time you press d
(q).
MEMO
When pressing the shutter button down halfway, b
appears on the LCD monitor before the flash fires.
AUTO Auto flash (not displayed)
Use this mode for ordinary photography.
The flash fires as required by the shooting conditions.
b RED EYE REDUCTION
This mode is suitable for shooting portraits
in low-light conditions.
Use this mode to minimize red-eye (eyes
appear in red in the finished photo).
MEMO Red-eye effect
When using the flash to take a picture of people in lowlight conditions, their eyes sometimes appear red in the
picture. This is caused by the light of the flash reflecting
off the inside of the eye.
d FORCED FLASH
Use this mode in backlit scenes, or to get the correct
colors when taking a picture under bright lighting.
In this mode, the flash fires in bright as well as dark
conditions.
C SUPPRESSED FLASH
This mode is suitab le for situations where the flash ca nnot
be used.
Use a tripod to prevent camera shake when shooting in
Suppressed flash mode in the dark condition.
Any time, flash does not fire.
c SLOW SYNCHRO,
n RED EYE & SLOW
This mode allows you to take pictures of people at night
that clearly show both your subjects and the night time
backdrop. To prevent camera shake, always use a tripod.
Using n synchronizes Red-eye reduction mode.
Using 8 selects slow shutter speeds of up to 2 seconds.
CAUTION
In bright scenes, overexposure may occur.
Continued Q
Advanced Features — Photography
51
Page 52

d Setting the Flash
CHECK
List of available flash modes in each Photography mode
AUTO b d C c n
q ✓ ✓ ✓ ✓
H ✓ ✓ ✓ ✓ ✓ ✓
, ✓
. ✓ ✓ ✓
8 ✓ ✓ ✓
✓
✓ ✓
✓ ✓ ✓ ✓
✓ ✓ ✓ ✓
✓
✓
✓
✓ ✓
s ✓ ✓ ✓ ✓ ✓ ✓
< ✓ ✓ ✓ ✓ ✓
M ✓ ✓ ✓
CHECK
Effective flash range (S : AUTO)
Wide-angle:
Approx. 60 cm to 4.6 m (2.0 ft. to 15.1 ft.)
Telephoto:
Approx. 60 cm to 2.7 m (2.0 ft. to 8.9 ft.)
If you take pictures outside of the effective flash range,
the image may appear dark even if the flash is used.
CAUTION Notes on using flash
• If pressing the shutter button while the flash is charging
(indicator lamp blinking orange), the picture will be
taken without the flash (when using AUTO and b).
• The flash charging time may increase when the battery
is low on charge.
• When taking a picture using the flash, the image may
disappear and go dark briefly due to flash charging. The
indicator lamp blinks orange during charging.
• The flash fires several times (pre-flashes and the main
flash). Do not move the camera until the picture is
taken.
• When setting > Super macro mode, the camera sets to
C Suppressed flash mode automatically and the flash
cannot be used.
52
Page 53

j Increasing Monitor Brightness
UP
2 5252 5
AUTO
This is useful when checking the shot composition for
outdoor scenes.
Increasing the LCD monitor
brightness
Press j (n) to display the LCD monitor brightly.
Press j (n) again to return to normal LCD monitor
brightness.
W
T
M
E
N
U
/O
K
D
I
S
P
/
B
A
C
K
AUTO
NN 25
appears on the LCD
monitor when the function is
working.
UPUPUP
MEMO
• This function is automatically canceled after each shot.
• This function is purely for checking the composition of
your shot. It does not increase the brightness of the
image.
• Even if you increase the brightness in low-light
conditions, you cannot check the subject.
Advanced Features — Photography
53
Page 54

Using p-MODE MENU (Photography)/SHOOTING MENU
ISO
QUAL ITY
COL OR
MOD E MENU
21
35
45
219
1 9
FRAMES
OFF
10 SEC
2 S EC
CON TINUOUS
SHO OTING MENU
WHI TE BALA NCE
SET
UP
EXP
COM PENSATION
SEL F
TIM ER
Use these menus to adjust image quality. You can take
pictures in a wide range of conditions.
Setting the p-MODE MENU
MODE MENU
54
ISO
QUALITY
APress p to open the p-MODE MENU.
BPress n or o to select the menu.
CPress q.
DPress n or o to change the setting.
EPress MENU/OK to confirm the setting.
F
N
COLOR
219
19
21
35
45
9
FRAMES
Setting the SHOOTING MENU
SHOOTING MENU
SELF
-
TIMER
EXP
.
COMPENSATION
WHITE BALANCE
CONTINUOUS
SET
-
UP
APress MENU/OK to open the SHOOTING
MENU.
BPress n or o to select the menu.
CPress q.
DPress n or o to change the setting.
EPress MENU/OK to confirm the setting.
OFF
10 SEC
2 SEC
Page 55

Z List of p -MODE MENU options
Menu Functions Settings
S ISO
(➝p.56)
QUALITY
(➝p.57)
FinePix COLOR
(➝p.58)
Specifies required sensitivity setting of the ambient light around the subject.
The larger value of the sensitivity, the higher sensitivity is obtained. The
higher sensitivity settings will allow you to take pictures in darker locations.
Specifies the image size.
The larger image size, the better image quality is obtained. The smaller
image size, the larger number of images are recorded.
Specifies required color tone.
This mode is effective for taking more vivid shots or black and white shots.
Z List of SHOOTING MENU options
Menu Functions Settings
SCENE POSITION
(➝p.40)
SELF-TIMER
(➝p.59)
S EXP.
COMPENSATION
(➝p.60)
T WHITE BALANCE
(➝p.61)
CONTINUOUS
(➝p.62)
This setting can be used when the Mode dial is set to ?.
Use this setting to provide the best photography menu setting for the scene
being shot.
This setting can be used with any of the modes.
Used in situations such as group shots where the photographer is included
in the shot.
This setting can be used when the Mode dial is set to s, <, or M.
Use this setting to obtain the correct exposure.
This setting can be used when the Mode dial is set to s, <, or M.
Use this setting to adjust the color balance to suit the color of the ambient
light around the subject.
This setting can be used with any of the modes.
Use this setting to select the required Continuous shooting mode.
Setting the menu (➝p.54)
Factory
default
AUTO/400/200/100/64 –
5F/5N/%/
3/2/`
STD/ / STD
H/,/./8///
/ / ///
(10 seconds) /
( (2 seconds)/OFF
–2 EV to +2 EV
(1/3 EV increments)
AUTO/6/7/9/0/
-/8
ON/OFF OFF
5N
Factory
default
H
OFF
±0
AUTO
Advanced Features — Photography
55
Page 56

p-MODE MENU (Photography)
2 5252 5
I SO 4 00
I SO 1 00
Changing the sensitivity setting
(S ISO)
Use this menu to specify required sensitivity setting of the
ambient light around the subject.
The larger value of the sensitivity, the higher sensitivity is
obtained. The higher sensitivity settings will allow you to
take pictures in darker locations.
CHECK
Settings
AUTO/400/200/100/64
Selecting AUTO as the sensitivity setting, the camera
selects the best sensitivity setting for the subject’s
brightness.
M
ISO 400
ISO 100
The selected sensitivity
NN 25
setting appears on the
LCD monitor when the
sensitivity setting is set
to another setting
excluding AUTO.
Setting the menu (➝p.54)
MEMO
• Sensitivity is retained even when the camera is turned
off or the mode setting is changed.
• When anything other than s, <, or M in the
Photography mode is selected, only AUTO can be
selected for the ISO (sensitivity) setting.
• When < or M in the Photography mode is selected,
AUTO cannot be selected for the ISO (sensitivity)
setting.
CAUTION
Although higher sensitivity settings will allow you to take
pictures in darker locations, they will also increase the
amount of speckling in your images. Choose the
sensitivity setting that best suits the conditions.
56
Page 57

2 5252 5
AUTO
2 5252 5
AUTO
Setting the menu (➝p.54)
Changing the quality setting
( QUALITY)
Use this menu to specify the image size (number of
recorded pixels).
Select the quality setting for the scene being shot.
Z Quality settings in Photography mode
Quality mode Sample uses
5 F (2816 × 2112)
5 N (2816 × 2112)
% (2816 × 1880)
3 (2048 × 1536) Printing at up to 6R (15.2 × 20.3 cm/
2 (1600 × 1200) Printing at up to 4R (10.2 × 15.2 cm/
` (640 × 480) To use for e-mail or web site
Printing at up to 10R (25.4 × 30.5 cm/
10 × 12 in.) / A4 size
For better quality, select 5 F
6 × 8 in.) / A5 size
4 × 6 in.) / A6 size
Area shot and quality setting
Area shot excluding %
AUTO
Normal shooting provides an aspect ratio of 4:3 and %
shooting provides an aspect ratio of 3:2 (same aspect ratio as
35 mm film and post card).
Area shot with %
NN 25
AUTO
25
MEMO
• The bigger the number of recorded pixels, the better the
image quality becomes. As the number of recorded
pixels becomes smaller, you will be able to record more
frames to an xD-Picture Card.
• The quality setting is retained even when the camera is
turned off or the mode setting is changed.
• When changing the quality setting, the number of
available frames also changes (➝p.135). The numbers
to the right of setting show the number of available
frames.
Continued Q
Advanced Features — Photography
57
Page 58

p-MODE MENU (Photography)
Setting the menu (➝p.54)
Changing the FinePix COLOR
setting ( FinePix COLOR)
Use this menu to specify required color tone.
It is effective for taking vivid shots or black and white
shots.
CHECK
FinePix COLOR settings
STD
p-STANDARD
p-CHROME
p-B&W
When setting p-CHROME or p-B&W, the icon
appears on the LCD monitor.
CAUTION
When the Mode dial sets to ?, does not appear on
the LCD monitor.
The contrast and color saturation
are set to standard.
Use this mode for normal
photography.
The contrast and color saturation
are set to high.
This mode is effective for taking
more vivid shots of subjects such as
scenery (blue sky and greenery)
and flowers.
This mode converts the colors in the
photographed image to black and
white.
MEMO
p-CHROME may have little visible effect with some
subjects or the scene being shot. You may not be able to
see any difference on the LCD monitor.
58
Page 59

SHOOTING MENU
OFF
10 SEC
2 S EC
CON TINUOUS
SHO OTING MENU
WHI TE BALA NCE
SET
UP
EXP
COM PENSATION
SEL F
TIM ER
Setting the menu (➝p.54)
Taking pictures using self-timer
( SELF-TIMER)
Available Photography modes: All
Use this menu in situations where the photographer is
included in the shot.
When selecting the self-timer setting, the self-timer icon
appears on the LCD monitor.
: The picture is taken after 10 seconds.
(: The picture is taken after 2 seconds.
SHOOTING MENU
SELF
-
TIMER
EXP
.
COMPENSATION
WHITE BALANCE
CONTINUOUS
SET
-
OFF
UP
1 Press the shutter button down halfway to
focus on the subject and press the shutter
button fully.
Double
beep
Halfway pressed Fully pressed
Pressing the shutter button down halfway that focuses
on the subject.
Without releasing the shutter button, press the button
all the way down (fully pressed) to start the self-timer.
10 SEC
2 SEC
Beep
2 Take pictures in selected time.
A picture is taken after the self-timer lamp changes
from lit to blinking (only blinks with the 2-second selftimer).
A countdown appears on the
LCD monitor indicating the
time remaining until the
picture is taken.
Continued Q
Advanced Features — Photography
59
Page 60

SHOOTING MENU
EXP
COM PENSATION
+2
+1
-1
-2
Setting the menu (➝p.54)
Using the 2-second self-timer
This is useful when you worry about camera shake even if
attaching the camera on a tripod.
MEMO
• To stop the self-timer, once it has started running, press
DISP/BACK.
• Any of the following cancels the self-timer setting:
- Completing the shooting
- Changing the Photography mode setting
- Setting the camera to Playback mode
- Turning the camera off
• Take care not to stand in front of the lens when pressing
the shutter button as this can prevent the correct focus
or brightness (exposure) from being achieved.
60
Adjusting exposure
compensation
(S EXP. COMPENSATION)
Available Photography mode: s, <, M
Use this menu for shots to get the correct brightness
(exposure), such as shots with extremely high contrast
between the subject and the background.
EXP
.
COMPENSATION
positive (+) compensation
negative (–) compensation
CHECK
• Compensation range: –2 EV to +2 EV
(13 steps in 1/3 EV increments)
• Explanation of Terms “EV” (➝p.136)
+2
+1
-1
-2
Page 61

WHI TE BALA NCE
AUTO
Setting the menu (➝p.54)
Guide to compensation
• Backlit portraits:
+2/3 EV to +1 2/3 EV
• Very bright scenes (such as
snowfields) and highly
reflective subjects: +1 EV
• Shots made up predominantly of sky: +1 EV
• Spotlit subjects, particularly against dark backgrounds:
–2/3 EV
• Scenes with low reflectivity, such as shots of pine trees or
dark foliage: –2/3 EV
MEMO
Any of the following disables exposure
compensation:
• Using the flash in AUTO or b mode
• Shooting dark scenes in d mode
Adjusting color balance
(T WHITE BALANCE)
Available Photography modes: s, <, M
Adjust the color balance based on white to suit the color
of the ambient light around the subject.
WHITE BALANCE
AUTO: Automatic adjustment
6 : Shooting outdoors in good weather
7 : Shooting in shade
9 : Shooting under Daylight fluorescent lamps
0 : Shooting under Warm White fluorescent lamps
- : Shooting under Cool White fluorescent lamps
8 : Shooting in incandescent light
MEMO
• In AUTO mode, the correct white balance may not be
achieved for subjects such as close-ups of people’s
faces and pictures taken under a special light source.
Select the correct white balance for the light source.
• When the flash fires, the white balance setting for the
flash is used. Consequently, to achieve a particular
effect, the flash mode should be set to C Suppressed
flash (➝p.51).
• The color tones may vary depending on the shooting
conditions (light source, etc.).
• Explanation of Terms “White balance” (➝p.136)
AUTO
Continued Q
Advanced Features — Photography
61
Page 62

SHOOTING MENU
SHO OTING MENU
WHI TE BALA NCE
AUTO
CON TINUOUS
SET
UP
EXP
COM PENSATION
OFF
SEL F
TIM ER
ON
OFF
Setting the menu (➝p.54)
Taking pictures continuously
( CONTINUOUS)
Available Photography mode: q, ?,
s, <, M
Use this mode to take pictures of a moving subject.
SHOOTING MENU
SELF
-
TIMER
EXP
.
COMPENSATION
WHITE BALANCE
CONTINUOUS
SET
-
UP
Shooting continues as long as holding the shutter button
down. This mode shoots up to 1.7 frames per second.
When taking the pictures, the last photographed image
appears and all of the images are recorded.
Z Number of available frames in Continuous
shooting mode
Number of available frames varies depending on the
quality setting in Continuous shooting mode. See p.57 for
information on changing quality setting.
62
Number of recorded
pixels
Maximum recorded
frames
5F 5N % 3 2 `
6 12 13 22 29 140
ON
OFF
OFF
AUTO
CAUTION
• Number of available frames is limited depending on the
available space on the xD-Picture Card or internal
memory.
• The focus is determined in the first frame and cannot be
changed in mid-sequence.
• The exposure is determined in the first frame.
• The speed of continuous shooting varies depending on
the shutter speed.
• The flash cannot be used as the flash mode is set to C
Suppressed flash.
Page 63

Using p-MODE MENU (Playback)/PLAYBACK MENU
PLAYBAC K
PRI NT ORDE
MOD E MENU
FADE
IN
MULTI PLE
CLO CK
FADE
IN
NOR MAL
NOR MAL
PLAYBAC K MEN U
PROT ECT
ERA SE
IMA GE ROTATE
VOICE MEMO
COP Y
TRI MMING
FRA ME
ALL FRAMES
Use these menus to play back photographed images.
Setting the p-MODE MENU
(Playback)
ASet the camera to Playback mode (➝p.33).
MODE MENU
PLAYBACK
NORMAL
PRINT ORDE
NORMAL
FAD E
-
IN
FAD E
-
IN
MULTIPLE
CLOCK
BPress p to open the p-MODE MENU.
CPress n or o to select the menu.
DPress q.
EPress n or o to change the setting.
FPress MENU/OK to confirm the setting.
Setting the PLAYBACK MENU
ASet the camera to Playback mode (➝p.33).
PLAYBACK MENU
ERASE
IMAGE ROTATE
PROTECT
COPY
VOICE MEMO
TRIMMING
BPress MENU/OK to open the PLAYBACK
MENU.
CPress n or o to select the menu.
DPress q.
EPress n or o to change the setting.
FPress MENU/OK to confirm the setting.
FRAME
ALL FRAMES
Advanced Features — Playback
Advanced Features — Playback
63
63
Page 64

p-MODE MENU (Playback)
PLAYBAC K
PRI NT ORDE
MOD E MENU
FADE
IN
MULTI PLE
CLO CK
FADE
IN
NOR MAL
NOR MAL
PRI NT ORD
MOD E MENU
PLAYBAC K
WIT HOUT DATE
RES ET ALL
WIT H DATE
Setting the menu (➝p.63)
Setting automatic playback
( PLAYBACK)
Use this mode to play back photographed images
continuously. You can se lect playback interval and type of
image transition.
MODE MENU
PLAYBACK
NORMAL
PRINT ORDE
NORMAL
FAD E
-
IN
FAD E
-
IN
MULTIPLE
CLOCK
MEMO
• To interrupt automatic playback, press MENU/OK.
•Press p or q to advance or go back through the
images when selecting NORMAL and FADE-IN.
• The Auto power off function (➝p.91) does not operate
during playback.
• Movie starts automatically. When the movie ends, the
playback function moves it on.
• Press DISP/BACK once during playback to display onscreen help.
64
DPOF set frame
( PRINT ORDER (DPOF))
You can specify the image, number of prints, with or
without date of printing with a DPOF-compatible printer.
MODE MENU
PLAYBACK
PRINT ORD
WITH DATE
WITHOUT DATE
RESET ALL
WITH DATE E : The date will be imprinted on your
WITHOUT DATE : The date will not be imprinted on your
RESET ALL : All DPOF settings will be canceled.
prints.
prints.
Page 65

Setting the menu (➝p.63)
Z u PRINT ORDER (DPOF)
“DPOF SPECIFIED. ERASE OK ?”
“DPOF SPECIFIED. ERASE ALL OK ?” (➝p.68)
When erasing the image, the DPOF setting for that image is deleted at the same time.
“RESET DPOF OK ?” (➝p.67)
When inserting an xD-Picture Card that contains images specified for printing by another camera, those print specifications are all
reset and replaced by the new print specifications.
[DPOF FILE ERROR] (➝p.123)
Up to 999 images can be specified on the same xD-Picture Card.
DPOF stands for Digital Print Order Format and refers to a format that is used for recording printing specifications
for images shot using a digital camera on media such as an xD-Picture Card. The recorded specifications include
information on which frames are to be printed.
This section gives a detailed description of how to order your prints with FinePix F650.
Some printers do not support date and time imprinting or specification of the number of prints.
*
The warnings shown below may appear while specifying the prints.
*
Continued Q
Advanced Features — Playback
65
Page 66

p-MODE MENU (Playback)
SHE ETS
DPO F
0 00 09
PRI NT ORDE R
DPO F
0 1
FRA ME
SET
Setting the menu (➝p.63)
WITH DATE / WITHOUT DATE
Selecting WITH DATEE, E appears on the LCD
monitor and the date will be imprinted on your prints.
(
PRINT ORDER
DPOF
01
FRAME
To specify more DPOF settings, repeat steps A and B.
)
DPOF
:
00009
SHEETS
SET
Total number of prints
Setting for that frame
APress p or q to display the frame (file)
for specifying DPOF setting.
BPress n or o to set a value.
Up to 99 sheets are printed.
For frames (files) that you do not want
printed, set the number of prints to 0
(zero).
CAlways press MENU/OK after the settings
are completed.
Pressing DISP/BACK cancels those
settings.
MEMO Canceling DPOF setting
A Press p to open the p-MODE MENU and select
PRINT ORDER (DPOF).
B Press q.
C Press n or o to select WITH DATE E or WITHOUT
DATE.
D Press p or q to select the frame (file) with the DPOF
setting you want to cancel.
E Set the number of prints to 0 (zero).
To cancel the DPOF setting for another frame (file),
repeat steps D and E.
Always press MENU/OK to complete the settings.
• RESET ALL (➝p.67)
66
Page 67

RES ET DPOF OK?
YESNONO
RES ET DPOF OK?
YES
CANCEL
5
2 4
2 00 6 10
0 0 AM
1 00 0
F 2. 8
1 00 -0 00 1
I SO 1 00
Setting the menu (➝p.63)
MEMO
• When DPOF settings were specified on another
camera.
RESET DPOF OK?
YES
When the data includes a frame (file) with DPOF
settings that were specified on another camera,
“RESET DPOF OK?” appears.
Pressing MENU/OK erases all of the DPOF settings
already specified for each frame (file). Specify the
DPOF setting for each frame (file) again.
• Prints of up to 999 frames (files) can be ordered on the
same xD-Picture Card.
• DPOF settings cannot be specified for movies.
CAUTION
• Pressing DISP/BACK while choosing settings will
cancel all current settings. If the re were previous DPOF
settings, only the modifications are canceled.
• When selecting the WITH DATE setting, the date is
imprinted on your shots using the Print Service or a
DPOF-compatible printer (depending on the printer
specifications, the date may not be printed in some
cases).
• Images photographed with a camera other than FinePix
F650 may not be specified DPOF settings.
RESET ALL
To cancel all DPOF settings:
RESET DPOF OK?
YES
CANCEL
Select RESET ALL in the p-MODE MENU (➝p.63).
Press MENU/OK.
MEMO
100-0001
N
ISO 100
5
/
24
/
2006 10
:
00 AM
1000
F2.8
u appears on the LCD monitor during playback when the
image has specified DPOF settings.
Advanced Features — Playback
67
Page 68

PLAYBACK MENU
ERA SE OK?
YES
CANCEL
Setting the menu (➝p.63)
Erasing the images
( ERASE)
Use this mode to erase unnecessary images to have
ample free space on the xD-Picture Card or internal
memory. Your camera calls images “frames”.
MEMO
• When using an xD-Picture Card, the images in the xDPicture Card are erased. When not using an xDPicture Card, the images in the internal memory are
erased.
• Protected frames (files) cannot be erased. Unprotect
the frames (files) before erasing them (➝p.70).
• If “DPOF SPECIFIED. ERASE OK?” or “DPOF
SPECIFIED. ERASE ALL OK?” appears, press MENU/
OK again to erase the frames (files).
CAUTION
Erased frames (files) cannot be recovered. Back up
important frames (files) onto your PC or another media.
Erasing one frame at a time (FRAME)
ERASE OK?
YES
CANCEL
APress p or q to select the erasing frame
(file).
BPress MENU/OK to erase the currently
displayed frame (file).
MEMO
To erase another frame (file), repeat above steps.
When erasing frames (files) is completed, press DISP/
BACK.
CAUTION
Pressing MENU/OK repeatedly erases consecutive
frames (files). Take care not to erase a frame (file) by
mistake.
68
Page 69

ERA SE ALL OK?
IT MAY TAKE A WHI LE
YES
CAN CEL
CAN CEL
Setting the menu (➝p.63)
Erasing all frames (ALL FRAMES)
ERASE ALL OK?
IT MAY TAKE A WHILE
YES
CANCEL
Press MENU/OK to erase all the frames
(files).
MEMO
Press DISP/BACK to cancel
erasing of all the frames
(files). Some unprotected
frames (files) will be left
unerased.
CANCEL
Rotating the images
( IMAGE ROTATE)
When shooting in the vertical position, the image appears
horizontal on the LCD monitor.
Use this mode to rotate an image and to display correct
direction. Your camera calls images “frames”.
MEMO
An image can be rotated only when playing back using
FinePix F650.
You may not be able to rotate images that were shot with
a camera other than FinePix F650.
APress p or q to select the rotating frame
(file).
BPress MENU/OK to open the PLAYBACK
MENU.
CPress n or o to select IMAGE
ROTATE.
DPress MENU/OK.
Continued Q
Advanced Features — Playback
69
Page 70

PLAYBACK MENU
IMA GE ROTATE
SET
CAN CEL
PROT ECT OK?
YES
CAN CEL
UNP ROTECT O K?
YES
CANCEL
Setting the menu (➝p.63)
IMAGE ROTATE
SET
CANCEL
EPress n or o to rotate the image.
o: Rotates the image clockwise at a 90
degree angle.
n: Rotates the image counterclockwise at
a 90 degree angle.
FPress MENU/OK to confirm the setting.
Next time the image is played back, it will
be automatically rotated.
Protecting the images
( PROTECT)
Use this mode to prevent frames (files) from being
accidentally erased. Your camera calls images “frames”.
FRAME SET / RESET
PROTECT OK?
YES
CANCEL
Unprotected
APress p or q to select the protecting/
unprotecting frame (file).
BPress MENU/OK to protect/unprotect the
currently displayed frame (file).
Unprotected: protecting frame (file)
Protected: reset frame (file)
To protect another frame (file), repeat steps A and B.
When protecting frames (files) is completed, press DISP/
BACK.
UNPROTECT OK?
YES
CANCEL
Protected (F appears)
70
Page 71

SET ALL OK ?
IT MAY TAKE A WHI LE
YES
CANCEL
RES ET ALL OK?
IT MAY TAKE A WHI LE
YES
CANCEL
CAN CEL
Setting the menu (➝p.63)
SET ALL
Press MENU/OK to protect all the frames
(files).
RESET ALL
Press MENU/OK to unprotect all the frames
(files).
SET ALL OK?
IT MAY TAKE A WHILE
YES
CANCEL
RESET ALL OK?
IT MAY TAKE A WHILE
YES
CANCEL
MEMO To stop the procedure midway
CANCEL
If the images are very large, protecting or unprotecting all
the frames (files) may take some time.
If you want to take a picture or record a movie during the
procedure, press DISP/BACK.
CAUTION
The Format function erases all the frames (files),
including protected frames (files) (➝p.90).
Continued Q
Advanced Features — Playback
71
Page 72

PLAYBACK MENU
COP Y
NEX T
CAN CEL
INT ERNAL M EMORY.
CAR D
INT ERNAL M EMORY.
CAR D
INT ERNAL M EMORY.
CAR D
INT ERNAL M EMORY.
CAR D
COPY
FRAME
ALL FRAMES
YES
CANCEL
Setting the menu (➝p.63)
Copying the images
(V COPY)
It is possible to transfer saved images between the
internal memory and an xD-Picture Card. Your camera
calls images “frames”.
Z Selecting COPY
COPY
72
INTERNAL MEMORY.
CARD
NEXT
APress n or o to select Y INTERNAL
MEMORY ➡ \ CARD or \ CARD ➡ Y
INTERNAL MEMORY.
BPress q.
INTERNAL MEMORY.
CANCEL
CARD
Copying one frame at a time (FRAME)
COPY
INTERNAL MEMORY.
CARD
FRAME
INTERNAL MEMORY.
CARD
ALL FRAMES
YES
CANCEL
APress n or o to select FRAME.
BPress MENU/OK.
CPress p or q to select the copying fram e
(file).
DPress MENU/OK to copy the currently
displayed frame (file).
MEMO
To copy another frame (file), repeat steps C and D.
When copying frames (files) is completed, press DISP/
BACK.
Page 73

INT ERNAL M EMORY.
CAR D
INT ERNAL M EMORY.
CAR D
COPY
FRAME
ALL FRAMES
YES
CANCEL
Setting the menu (➝p.63)
Copying all frames (ALL FRAMES)
COPY
INTERNAL MEMORY.
INTERNAL MEMORY.
CARD
YES
CANCEL
APress n or o to select ALL FRAMES.
BPress MENU/OK.
CPress MENU/OK to copy all the frames
(files).
CAUTION
• When [\ CARD FULL] or [Y CARD FULL] appears
on the LCD monitor, copying the data stops on the way.
• When copying the image that has specified DPOF
setting, the DPOF setting is not copied.
CARD
FRAME
ALL FRAMES
Adding voice memos to the
images ( VOICE MEMO)
Voice memos of up to 30 seconds can be added to still
images.
Recording voice memos
APress p or q to select the image to add
a voice memo.
BPress MENU/OK to open the PLAYBACK
MENU.
CPress n or o to select VOICE MEMO.
DPress q.
Continued Q
Advanced Features — Playback
73
Page 74

PLAYBACK MENU
REC STANDBY
3 0s
START
CANCEL
REC ORDING
2 8s
RECRERE
REC
FIN ISH
RECRERE
REC
BAC K
PLAYBAC K MEN U
PROT ECT
ERA SE
IMA GE ROTATE
VOICE MEMO
COP Y
TRI MMING
REC
Setting the menu (➝p.63)
REC STANDBY
START
CANCEL
EPress MENU/OK to start recording.
Face the microphone on the front of the camera to record
your comment. Hold the camera about 20 cm (7.9 in.)
away for the best results.
The remaining recording time appears during recording
and the self-timer lamp blinks.
When the time remaining reaches 5 seconds, the selftimer lamp starts blinking quickly
RECORDING
74
REC
-
REC
30s
Microphone
28s
Remaining
time
Blinking red
FINISH
REC
-
REC
FThe voice memo ends when pressing
MENU/OK midway or 30 seconds pass.
To record your comment: press MENU/OK.
To rerecord the comment: press DISP/BACK.
MEMO
• When the image already has a voice memo
PLAYBACK MENU
ERASE
IMAGE ROTATE
PROTECT
COPY
VOICE MEMO
TRIMMING
• When [PROTECTED FRAME] appears, unprotect the
frame (➝p.70).
• Voice memos cannot be added to movies.
If you select an image that
already has a voice memo, a
screen appears in which you
can select whether to rerecord
the memo.
BACK
RERE-
REC
Page 75

1 5s
1 5s
STOP
PAUSE
Setting the menu (➝p.63)
Playing back voice memo
APress p or q to select an image file with
a voice memo. # appears on the LCD
monitor.
BPress o to start playing back the voice
memo.
STOP
PAU SE
Progress bar
CAUTION
Uncover the speaker.
The sound may be difficult to hear.
The playback time a ppears on
15s
15s
the LCD monitor along with a
progress bar.
Speaker
Z Playing back voice memos
Control Description
Playback Playback begins.
Pause /
Resume
Stop Stops playback.
Fast forward /
Rewind
The voice memo stops when
playback ends.
Pauses the voice memo during
playback.
Press o again to resume
playback.
Press p or q while voice
memo playback is stopped to go
back to the previous file or
advance to the next file
respectively.
Press p or q during playback
to skip forwards or backwards
through the voice memo.
These buttons do not function
while playback is paused.
CHECK
• Audio recording format:
WAVE (➝p.136), PCM recording format
• Audio file size:
Approx. 240 KB (for a 30-second voice memo)
MEMO Playing voice memo files
You may not be able to play back some voice memo files
recorded on other cameras.
Continued Q
Advanced Features — Playback
75
Page 76

PLAYBACK MENU
7
VOLUME
SET
CAN CEL
TRI MMING
TRI MMING
YES
CANCEL
YES
CANCEL
Setting the menu (➝p.63)
Adjusting volume of voice memos
Volume can be adjusted while playing back voice memos.
VOLUME
7
SET
CANCEL
APress MENU/OK while playing back voice
memo.
The voice memo is paused during
playback.
BPress n or o to adjust the volume.
CPress MENU/OK to confirm your selection.
Camera starts to play back the voice
memo.
76
Trimming the images
( TRIMMING)
Use this mode to trim the required part of the
photographed image.
W button
(Zoom out)
TRIMMING
YES
CANCEL
Zoom bar
APress W or T to zoom in or out on an
image.
CHECK
Before selecting TRIMMING, select the trimming
frame (file).
T button
(Zoom in)
TRIMMING
YES
CANCEL
Page 77

TRI MMING
YES
CANCEL
REC OK?
REC
CANCEL
Setting the menu (➝p.63)
TRIMMING
Navigation screen
(Current displayed image)
YES
CANCEL
BPress n, o, p, or q to display another
part of the image.
Press DISP/BACK to return to single-frame playback.
CPress MENU/OK.
REC OK?
REC
CANCEL
DCheck the saved image size and press
MENU/OK.
The trimmed image is added as a separate
file in the final frame.
MEMO
• A saved image size varies depending on the zoom
scale of step A. For 0.3 M, k YES option appears
in yellow.
• Image sizes
Printing at up to 6R (15.2 × 20.3 cm/6 × 8 in.) /
3
A5 size
Printing at up to 4R (10.2 × 15.2 cm/4 × 6 in.) /
2
A6 size
To use for e-mail or web site
`
• When % quality setting is selected, the image is
trimmed to normal size (4:3 aspect ratio).
CAUTION
You may not be able to trim images that were shot with a
camera other than FinePix F650.
Advanced Features — Playback
77
Page 78

r Recording Movies
STAND BY
1 3s
1 3s
STAND BY
1 3s
1 3s
Use this mode to record movies with sound.
1 Set the camera to r Movie mode.
Set the Mode dial to r.
13s
13s
STANDBY
The available recording time
appears on the LCD
monitor.
Z Zooming the image
You must zoom beforehand as you cannot zoom during
recording.
STANDBY
13s
13s
Zoom bar
Press W or T to zoom in or out on an
image.
CHECK
• Optical zoom focal length
Approx. 35 mm to 175 mm (35 mm camera equivalent)
Max. zoom scale: 5×
• Focal range
Approx. 60 cm (2.0 ft.) to infinity
78
78
Page 79

2 Record movies.
REC
REC
1 2s
1 2s
12s
12s
REC
REC
Fully pressed
Press the shutter button down fully to start recording.
During recording, lREC and a counter that shows the
remaining time appear on the LCD monitor.
Recording ends when pressi ng
the shutter button down
halfway during recording or the
remaining time runs out.
Halfway pressed
MEMO
There is no need to hold down the shutter button during
recording.
CHECK Recording movies
• Specifications: Motion JPEG (➝p.136), Monaural
sound
• Quality selection method:% (640 × 480 pixels)
• Frame rate (➝p.136): 30 frames per second (fixed)
$ (320 × 240 pixels)
MEMO
• The brightness and color of the LCD monitor shown
during movie recording may differ from those shown
before recording begins.
• Pressing the shutter button down fully fixes the focus,
however the exposure and white balance are adjusted
to the scene being shot.
• If recording is stopped immediately after it begins,
1 second of the movie is recorded onto the xD-Picture
Card or internal memory.
CAUTION
• Because a movie is recorded onto the xD-Picture Card
or internal memory as it is saved, it cannot be recorded
correctly if the camera suddenly loses power (if the
battery runs out or the AC power adapter is
disconnected).
• A movie file taken by FinePix F650 m ay not be playable
on other cameras.
• Because sound is recorded concurrently with the
images, make sure that you do not cover the
microphone with a finger, etc. (➝p.13).
• Camera operation noises may be recorded during
movie shooting.
Advanced Features — Movie
79
Page 80

r Recording Movies
MOD E MENU
QUAL ITY
3 0s
4 8s
Changing movie size
Press p to open the p-MODE MENU.
MODE MENU
QUALITY
APress q.
BPress n or o to change the setting.
CPress MENU/OK to confirm the setting.
Z Quality settings in Movie mode
% (640 × 480 pixels): For better quality
$ (320 × 240 pixels): To record longer movies
80
30s
48s
MEMO
• The quality setting is retained even when the camera is
turned off or the mode setting is changed.
•In r Movie mode, you cannot set the S (sensitivity)
setting and FinePix COLOR setting.
• See p.135 for information on recording times per xD-
Picture Card or internal memory.
CAUTION
If you shoot using the xD-Picture Cards with model
numbers containing “M” such as DPC- M1GB, movie
recording time may be reduced if you repeatedly record
and erase (frame erase) image files.
In such a case, erase all frames or format the xD-Picture
Card before use. Back up important frames (files) onto
your PC or another media.
Page 81

w Playing Back Movies
PLAY
3 0s
3 0s
STOP
PAUSE
Z Playing back movies
Control Description
Playback begins.
Playback
Playback stops when the end of
the movie is reached.
Setting the camera to w
Playback mode (➝p.33)
PLAY
APress p or q to select the movie file. r
appears on the LCD monitor.
BPress o to begin playing back movie.
The playback time a ppears on
30s
30s
the LCD monitor along with a
progress bar.
STOP
PAU S E
Progress bar
Pause /
Resume
Stop
Fast
forward /
Rewind
Skip
playback
Pauses the movie during
playback.
Press o again to resume
playback.
Stops playback.
Press p or q while playback is
stopped to go back to the previous
file or advance to the next file
respectively.
Press p or q during playback to
skip forwards or backwards
through the movie.
Press p or q when the movie is
paused, the movie advances or
goes back one frame.
Hold down p or q to move
through the frames quickly.
Continued Q
Advanced Features — Movie
81
Page 82

w Playing Back Movies
7
VOLUME
SET
CANCEL
Setting the camera to w Playback mode (➝p.33)
82
MEMO
If the subject of the shot is very bright, white vertical
streaks or black horizontal streaks may appear in the
image during playback. This is normal.
CAUTION
• You may not be able to play back some movie files
recorded on other cameras.
• To play back movie files on a PC, save the movie file on
the xD-Picture Card or internal memory to the PC’s
hard disk and then play back the saved file.
• Uncover the speaker. The sound is difficult to hear.
Adjusting volume of movies
Volume can be adjusted while playing back movies.
VOLUME
7
SET
CANCEL
APress MENU/OK while playing back
movie.
The movie is paused during playback.
BPress n or o to adjust the volume.
CPress MENU/OK to confirm the setting.
Camera starts to play back the movie.
Page 83

U SET-UP
SET
UP
DATE
TIM E
BEE P VOLU ME
FOR MAT
PLAYBAC K VOLU ME
LCD BRIGHT NESS
SHU TTER VOL UME
SET
UP
FOR MAT
DATE
TIM E
PLAYBAC K VOLU ME
LCD BRIGHT NESS
BEE P VOLU ME
SHU TTER VOL UME
OFF
Using the SET-UP menu
1 Open the SET-UP menu.
APress MENU/OK to open the menu.
BPress n or o to select U SET-UP.
CPress q.
2 Change the page.
APress p or q to select the page.
BPress o to move to menu item.
SET
-
UP
DATE
/
TIME
BEEP VOLUME
SHUTTER VOLUME
PLAYBACK VOLUME
LCD BRIGHTNESS
FORMAT
3 Change the setting.
SET
-
UP
DATE
/
TIME
BEEP VOLUME
SHUTTER VOLUME
PLAYBACK VOLUME
LCD BRIGHTNESS
FORMAT
APress n or o to select the menu.
BPress q.
Different type of screen appears
depending on selected item.
CPress n or o to change the setting.
DPress MENU/OK to confirm the setting.
OFF
Continued Q
Settings
Settings
83
83
Page 84

U SET-UP
How to use the SET-UP menu (➝p.83)
SET-UP menu option
Setting Display Factory default Explanation Page
IMAGE DISP.
q
FRAME NO. CONT./RENEW CONT.
DIGITAL ZOOM ON/OFF OFF Specifies whether digital zoom is used together. 88
LCD POWER
SAVE
DATE/TIME – – Corrects the date or time. 24
BEEP VOLUME / / /
SHUTTER
VOLUME
PLAYBACK
VOLUME
LCD BRIGHTNESS – – Sets the LCD monitor brightness. 90
FORMAT – –
1.5 SEC/3 SEC/
ZOOM
(CONTINUOUS)
ON/OFF ON Darkens the LCD monitor when camera is not used. 89
// /
––
1.5 SEC
Sets the time for displaying the check image screen
(photograph result) after taking a picture. The color
tones in images recorded may differ from actual
color. Play back the recorded images to check
them.
Specifies whether frame numbers are assigned
consecutively from previous numbers or begin
again.
Sets the volume of the tone emitted when the
camera controls are used.
Sets the volume of the sound emitted when the
shutter operates.
Sets the volume of playing back movie and voice
memo.
Initializes an xD-Picture Card or internal memory.
Select this menu to erase all the frames (files).
86
87
–
–
89
90
84
Page 85

How to use the SET-UP menu (➝p.83)
Setting Display Factory default Explanation Page
ENGLISH
Specifies the language used for LCD monitor
display. 25
AUTO POWER
OFF
TIME
DIFFERENCE
USB MODE @/<@
VIDEO SYSTEM NTSC/PAL –
RESET – –
OFF/2 MIN/ 5MIN 2 MIN
N/INSpecifies the time difference settings. 91
Sets the time of turning camera off when camera is
not used.
@DSC
Provides a simple way to read images from an xD-
Picture Card or internal memory and store images
onto an xD-Picture Card.
<PICTBRIDGE
When a printer that supports PictBridge is available,
images can be printed by connecting the camera
directly to the PictBridge-compatible printer without
a PC.
Specifies whether video output is set to NTSC or
PAL.
Resets all the camera settings (other than the
DATE/TIME, , TIME DIFFERENCE,
and VIDEO SYSTEM) to the factory default values
set at shipment. A confirmation message appears
when you press q. To reset the camera settings,
press MENU/OK.
91
105
95
–
–
Continued Q
Settings
85
Page 86

U SET-UP
NEX T SHOOT ING
ZOO M
CON TINUOUS
How to use the SET-UP menu (➝p.83)
IMAGE DISP.
Use this setting to set the way for displaying the check
image screen (photograph result) after taking a picture.
3 SEC/1.5 SEC:
The image appears for about 3 or 1.5 seconds and is
then recorded.
ZOOM (CONTINUOUS):
The image appears enlarged. Use this mode to check
details of image.
MEMO
In continuous shooting, the images do not appear.
CAUTION
The color tones in images displayed when 3 SEC or 1.5
SEC is selected may differ slightly from those in the
images actually recorded.
Z Enlarging images
(
ZOOM
NEXT SHOOTING
)
CONTINUOUS
Navigation screen
(Current displayed image)
APress W or T to zoom in or out the
image.
BPress n, o, p, or q to display
another part of the image.
CPress MENU/OK to take another
picture.
MEMO
• When ` quality setting is selected, the image cannot
be enlarged.
• Pressing DISP/BACK cancels the zoom setting.
• This function is disabled when setting the continuous
shooting.
86
Page 87

1 00 -0 00 1
1 00 -0 00 1
How to use the SET-UP menu (➝p.83)
FRAME NO.
Use this function to specify whether frame numbers are
assigned consecutively from previous numbers or begin
again.
<CONT.> <RENEW>
AA
BB
Formatted xD-Picture Card or internal memory used
*
for both A and B.
CONT. : Pictures are stored beginning from the highest
RENEW : Pictures are stored on each xD-Picture Card
file number stored on the last xD-Picture Card
or internal memory used.
beginning with a file number 0001.
CHECK
Frame number
100-0001
100-0001
File number
Directory number
The last 4 digits of the 7-digit number in the top right
corner of the LC D monitor are the file numbers , while
the first 3 digits show the directory number.
MEMO
• Setting this function to CONT. makes file management
easier as it makes sure that file names are not
duplicated when images are downloaded to a PC.
• When the camera settings are RESET (➝p.85), the
frame number setting (CONT. or RENEW) is changed
to CONT. and the frame number itself does not return to
0001.
• In CONT. setting, images are stored beginning from the
highest file number on the current xD-Picture Card
when the xD-Picture Card already contains image files
with file numbers higher than the highest file number on
the last xD-Picture Card.
• File number runs from 0001 to 9999. Once 9999 is
exceeded, the directory number changes from 100 to
101. The maximum number is 999-9999.
• The displayed frame number may differ for images
photographed on other cameras.
Continued Q
Settings
87
Page 88

U SET-UP
AUTO
How to use the SET-UP menu (➝p.83)
DIGITAL ZOOM
Use this function to shoot enlarged images than
maximum optical zoom scale.
AUTO
Zoom bar
Z Zoom bar display
OFF
Optical zoom: 5×
ON
Optical zoom: 5× Digital zoom:
CHECK
• Optical zoom focal length
Approx. 35 mm to 175 mm
• Digital zoom focal length
Approx. 175 mm to 770 mm
Max. zoom scale: approx. 4.4×
approx. 4.4×
*
*
35 mm camera equivalents
*
MEMO
When zooming changes between optical and digital, the
position of the “ ” indicator stops. Press the same Zoom
button again to start the “ ” indicator moving again.
CAUTION
Using the digital zoom allows you to enlarge your subject
and shoot it. However, it will lower your image quality. Set
the digital zoom when requiring it.
88
Page 89

LCD POWER SAVE PLAYBACK VOLUME
7
VOLUME
SET
CANCEL
The LCD monitor darkens when camera is not used for 10
seconds.
When this function is active, you can save power and get
the maximum possible running time from your battery.
MEMO
Pressing any button wakes the camera up.
CAUTION
The LCD power save function is disabled during Playback
mode and Movie mode.
Use this function to adjust volume while playing back
movie and voice memo.
How to use the SET-UP menu (➝p.83)
VOLUME
7
SET
CANCEL
APress n or o to adjust the volume.
The larger the number, the larger the
volume is emitted. 0 (zero) indicates a
sound deadening.
BPress MENU/OK to confirm the setting.
Continued Q
Settings
89
Page 90

U SET-UP
0
BRI GHTNESS
SET
CANCEL
FOR MAT
FOR MAT OK?
ERA SE ALL DATA
OK
CAN CEL
SET
How to use the SET-UP menu (➝p.83)
LCD BRIGHTNESS
Use this function to adjust the LCD monitor brightness. Initialize (format) the xD-Picture Card or internal memory
BRIGHTNESS
0
SET
CANCEL
FORMAT
for use with the camera.
FORMAT
FORMAT OK?
ERASE ALL DATA
OK
SET
CANCEL
Place of initialize
Y FORMAT:
Internal memory
\ FORMAT:
xD-Picture Card
APress n or o to adjust the LCD monitor
brightness.
The indicator moves to the + to display the
APress p or q to select OK.
LCD monitor brightly or to the – to darken
the LCD monitor.
BPress MENU/OK to confirm the setting.
BPressing MENU/OK initializes the xD-
Picture Card or internal memory.
CAUTION
The Format function erases all the frames (files),
including protected frames (files).
Back up important frames (files) onto your PC or another
media.
90
Page 91

AUTO POWER OFF TIME DIFFERENCE
TIM E DIFFE RENC
SET
UP
USB MODE
AUTO POWER O FF
VID EO SYST EM
RES ET
2 M IN
LOC AL
HOM E
ENGLISH
When this function is active and the camera remains
unused for 2 or 5 minutes, it turns camera off.
Use this function when you want to get the maximum
possible running time from your battery.
CAUTION
The Auto power off function is disabled during automatic
playback (➝p.64), and when a USB connection (➝p.95,
106) is being used.
MEMO To restore power to the camera
Refer to “Turning On and Off” (➝p.21).
How to use the SET-UP menu (➝p.83)
Use this function when traveling to destinations in
different time zones. This function sets a time difference
relative to the date and time currently set. When this
setting is enabled, the specified time difference is applied
when pictures are taken.
1 Use Time difference function.
SET
-
UP
AUTO POWER OFF
TIME DIFFERENC
USB MODE
VIDEO SYSTEM
RESET
Press n or o to change between N HOME
and I LOCAL.
To set the time difference, select I LOCAL.
N HOME: Your home time zone
I LOCAL: Your destination time zone
ENGLISH
2 MIN
HOME
LOCAL
Continued Q
Settings
91
Page 92

U SET-UP
TIM E DIFFE RENC
SET
UP
USB MODE
AUTO POWER O FF
VID EO SYST EM
RES ET
2 M IN
LOC AL
HOM E
ENGLISH
TIM E DIFFE RENC E
5
2 4
2 00 6 10
0 0 AM
5
2 4
2 00 6 10
0 0 AM
SET
CANCEL
M
2 5252 5
5
2 4
2 00 6 10
0 0 AM
5
2 4
2 00 6 11
0 0 AM
2 Move to TIME DIFFERENCE screen.
SET
-
UP
AUTO POWER OFF
TIME DIFFERENC
USB MODE
VIDEO SYSTEM
RESET
Press q.
3 Set time difference.
TIME DIFFERENCE
5
/
24
/
2006 10
5
/
24
/
2006 10
SET
APress p or q to select +/–, hour, and
minute.
BPress n or o to change the setting.
92
CAlways press MENU/OK after the settings
are completed.
:
00 AM
:
00 AM
CANCEL
ENGLISH
2 MIN
HOME
LOCAL
CHECK
Available time setting
–23:45 to +23:45 (in 15-minute increments)
MEMO
M
In the time difference
NNNN25
setting, when you change to
the Photography mode, I
and the date is displayed for
3 seconds, the date display
5
/
24
5
/
24
/
2006 10
/
2006 11
:
00 AM
:
00 AM
turns yellow.
CHECK
Upon returning from a trip, always change the time
difference setting back to N HOME.
Page 93

Connecting to a TV
W
T
When connecting to a TV, images can be displayed on wider screen. Using Automatic playback function (➝p.64) together, you
can have fun with folks.
AC-5VX
(sold separately)
Plug the A/V cable (included) into
the A/V OUT (Audio/Visual
output) socket of the camera.
Video (yellow)
To terminals
W
T
Audio (white)
Plug the other end of the cable into the
DISP/BA
CK
CAUTION
• Plug the A/V cable (included) and the AC power adapter
correctly and push them in each terminal.
• See p.118 for the information of the AC power adapter.
MEMO
• When connecting the A/V cable (included) to TV, the
• The image quality for movie playback is lower than for
• Refer to the instructions provided with your TV for more
• Use the AC-5VX (sold separately) when FinePix F650
audio/video input socket on the TV.
LCD monitor is turned off. However, during movie
recording, movie images appear on the LCD monitor.
The movie images cannot be shown on a TV.
still images.
information on audio/video input for your TV.
is connected to a TV for long periods.
Camera Connection
Camera Connection
93
93
Page 94

Connecting Camera Directly to Printer — PictBridge Function
SHO OTING MENU
OFF
CON TINUOUS
SET
UP
OFF
SEL F
TIM ER
SET
UP
RES ET
USB MODE
AUTO POWER O FF
TIM E DIFFE RENC E
VID EO SYST EM
2 M IN
NTS C
ENGLISH
94
When a printer that supports PictBridge is
available, images can be printed by
connecting the camera directly to the
PictBridge-compatible printer without a PC.
Before connecting to a printer
SHOOTING MENU
SELF
-
TIMER
CONTINUOUS
SET
-
UP
APress MENU/OK to open the menu.
BPress n or o to select U SET-UP.
CPress q to open the SET-UP menu.
OFF
OFF
SET
-
UP
AUTO POWER OFF
TIME DIFFERENCE
USB MODE
VIDEO SYSTEM
RESET
ENGLISH
2 MIN
NTSC
DPress p or q to move to .
EPress n or o to select USB MODE.
FPress q.
Page 95

VID EO S
SET
SET
UP
USB MOD
AUTO POWER O FF
TIM E DIFFE RENC E
RES ET
2 M IN
DSC
PIC TBRIDGE
ENGLISH
-
UP
AUTO POWER OFF
TIME DIFFERENCE
USB MOD
VIDEO S
RESET
ENGLISH
2 MIN
DSC
PICTBRIDGE
GPress n or o to select
<PICTBRIDGE.
HPress MENU/OK to confirm the setting.
Connecting to a printer
AConnect the camera to your printer using the USB
cable (included).
AC-5VX
(sold separately)
;
USB socket
IPress POWER to turn the camera off.
W
T
D
IS
P
/B
A
C
K
MEMO
Use the AC-5VX (sold separately) when FinePix F650 is
connected to a printer for long periods.
Continued Q
Camera Connection
95
Page 96

Connecting Camera Directly to Printer — PictBridge Function
USB
CHE CKING U SB
...
PIC TBRIDGE
PIC TBRIDGE
FRA ME
SHE ETS
TOTAL
0 00 00
00
SET
PIC TBRIDGE
SHE ETS
02
FRA ME
TOTAL
0 00 02
SET
BConnect the camera to a printer and turn the printer on.
Press POWER to turn the camera on.
USB
PICTBRIDGE
CHECKING USB
...
“CHECKING USB”
appears on the LCD
monitor.
CThe following screen appears on the LCD monitor after
a moment.
PICTBRIDGE
:
TOTAL
00000
“Specifying images for
printing”
➝p.96
“Printing with DPOF setting”
SHEETS
00
FRAME
OKOKSET
➝p.97
MEMO
• If the screen of step C does not appear, check whether
the USB MODE setting is < PICTBRIDGE.
• Depending on the printer, some functions are disabled.
Specifying images for printing
(PRINT WITH DATE / PRINT
WITHOUT DATE)
PICTBRIDGE
:
TOTAL
00002
02
SHEETS
FRAME
OKOKSET
APress p or q to display the frame (file)
for specifying PRINT setting.
B
Press n or o to set a value.
Up to 99 sheets are printed.
To specify more PRINT settings, repeat steps A and B.
CPress MENU/OK to display the confirm
setting.
96
Page 97

CAN CEL
SHE ETS
SHE ETS
PRINTING
PRI NTING
PIC TBRIDGE
PRI NT WI TH DATE
PRI NT WI THOUT DATE
PRI NT DPOF
PICTBRIDGE
PRINT WITH DATE
PRINT WITHOUT DATE
PRINT DPOF
PRI NT DPOF OK?
YES
CANCEL
TOTAL
:
9
SHE ETS
CANCEL
1/9 SHEETS
1/9 SHEETS
DPress MENU/OK again to download the
data to the printer and start printing the
specified number of prints.
MEMO
Even if MENU/OK is pressed with total number of images set
at 0 (zero), the image that is displayed is printed on ce.
MEMO Printing with date
PICTBRIDGE
PRINT WITH DATE
PRINT WITHOUT DATE
PRINT DPOF
APress DISP/BACK to
display the setting
display.
BPress n or o to select
PRINT WITH DATE E.
CPress MENU/OK.
Printing with DPOF setting
(u PRINT DPOF)
PICTBRIDGE
PRINT WITH DATE
PRINT WITHOUT DATE
PRINT DPOF
APress DISP/BACK to open the menu.
BPress n or o to select u PRINT DPOF.
CPress MENU/OK to display the confirm
setting.
PRINT DPOF OK?
:
TOTAL
9
SHEETS
Camera Connection
CAUTION
PRINT WITH DATE E is not available when the camera
is connected to a printer that does not support date
printing.
YES
CANCEL
DPress MENU/OK again to download the
data to the printer and start printing the
specified frames (files) continuously.
Continued Q
97
Page 98

Connecting Camera Directly to Printer — PictBridge Function
CAN CEL
SHE ETS
PRI NTING
CHECK
To select uPRINT DPOF, the DPOF settings must be
specified on FinePix F650 beforehand (➝p.64).
CAUTION
Even when WITH DATE E is specified in the DPOF
settings (➝p.64), the date is not inserted on printers that
do not support date printing.
MEMO
PRINTING
CANCEL
Press DISP/BACK to cancel the printing.
Depending on the printer, the printing may not be
canceled immediately or printing may stop midway
through.
When printing stops midway, briefly turn the camera off
and then on again.
1/9 SHEETS
Disconnecting the printer
ACheck that “PRINTING” is not displayed on the
camera’s LCD monitor.
BTurn the camera off. Unplug the USB cable (included).
MEMO
DPOF setting can be specified for images on internal
memory.
CAUTION
• In PictBridge function, images photographed on other
than a camera may not be printed.
• Do not connect to a PC when the US B MODE setting
is set to <PICTBRIDGE. See p.130 if you connect
to a PC by mistake.
• The camera cannot be used to specify printer settings
such as the paper size and print quality.
• Use internal memory or an xD-Picture Card that was
formatted on FinePix F650.
• Movies cannot be printed.
• Images photographed with a camera other than FinePix
F650 may not be printed.
98
Page 99

Installation on a Windows PC
Pre-installation checklist
Z Hardware and software requirements
To run this software, you must have the hardware and software described below. Check your system before you begin the
installation.
Windows 98 (including the Second Edition)
Operating System
CPU 200 MHz Pentium minimum
RAM 64 MB minimum
Hard disk space
Display
Internet connection
1
*
Models with one of the above operating systems pre-installed.
2
*
When you install the software, login using a system administrator account (e.g. “Administrator”).
3
Required to use the FinePix Internet Service. The software can still be installed even if you do not have an Internet
*
1
*
3
*
connection.
Windows Millennium Edition (Windows Me)
Windows 2000 Professional
Windows XP Home Edition
Windows XP Professional
Amount required for installation: 450 MB minimum
Amount required for operation: 600 MB minimum
(When using ImageMixer VCD2 LE for FinePix: 2 GB or better)
800 × 600 pixels or better, 16-bit color or better
(When using ImageMixer VCD2 LE for FinePix: 1024 × 768 or better)
• To use the FinePix Internet Service or mail attachment function:
An Internet connection or e-mail transmission software is needed
• Connection speed: 56 k or better recommended
2
*
2
*
2
*
Continued Q
Software Installation
Software Installation
99
99
Page 100

Installation on a Windows PC
Z Recommended system
Operating System Windows XP
CPU 2 GHz Pentium 4 or better recommended
RAM 512 MB or better recommended
Hard disk space 2 GB or better
Display 1024 × 768 pixels or better, Highest (32 bit)
Internet connection Broadband (ADSL, FTTH, CATV, etc.)
MEMO
• Connect the camera directly to the PC using the USB cable (included). The software may not operate correctly when you use an
extension cable or connect the camera via a USB hub.
• When your PC has more than one USB port, the camera can be connected to either port.
• Push the USB connector fully into the socket to ensure that it is securely connected. The software may not operate correctly if the
connection is faulty.
• Additional USB interface board is not guaranteed.
• Windows 95 and Windows NT cannot be used.
• Operation is not guaranteed on home-built PCs or on PCs running updated operating system software.
• When you reinstall or remove FinePixViewer, the Internet menu and your user ID and password for the FinePix Internet Service
are deleted from your PC. Click the [Register now] button, enter your registered user ID and password and download the menu
again.
100
 Loading...