

Page 1

Thank you for purchasing this FUJIFILM product.
BL00155-200(1
)
E
Software Quick Start Guide
EX3.1
EX Version 3.1 for Windows®and Macintosh™
• Refer to the web site given below for other information on this product.
http://home.fujifilm.com/products/digital/index.html
Learning More About
FinePixViewer
Launching FinePixViewer/Using Batch Format Conversion/Creating
FinePix CD Albums/Attaching Images to E-mails/Videoconferencing
Installing FinePixViewer
1
Connecting the Camera to Your Computer
2
Using FinePixViewer
Saving your camera shots on your computer and then printing them.
3
Page 2

32
IMPORTANT
Be sure to read this page before using the Software.
Please note that this Guide is written on the assumption that you already have a basic
understanding of how to use your PC (personal computer), Windows and Macintosh.
For basic information on using your PC, Windows and Macintosh, refer to the respective manuals
supplied with your PC.
• Microsoft and Windows are trademarks of the Microsoft Corporation of the U.S. registered in the
U.S. and other countries.
Windows is an abbreviated term referring to the Microsoft Windows Operating System.
• Macintosh, iMac and Mac OS are registered trademarks of Apple Computer, Inc.
• QuickTime and the QuickTime logo are trademarks used under license. The QuickTime logo is
registered in the U.S. and other countries.
• Adobe Acrobat
®
Reader™, ActiveShare™ and PhotoDeluxe are trademarks of Adobe Systems
Incorporated of the U.S.
• SmartMedia™ is a trademark of Toshiba Corporation.
• VideoImpression™ is a trademark of ArcSoft, Inc.
• All other company or product names are trademarks or registered trademarks of the respective
companies.
a
Do not attempt to play the CD-ROM enclosed with this product on
an audio CD player. Doing so could damage your hearing or could
damage your speakers or headphones.
This End User License Agreement (“Agreement”) is an agreement between Fuji Photo Film Co., Ltd.
(“FUJIFILM”) and you, which sets forth the terms and conditions of the license granted for you to use
the software provided by FUJIFILM.
The CD-ROM contains third party software. In case a separate agreement is provided by a third
party supplier for its software, the provisions of such separate agreement shall apply to the use of
such third party software, prevailing over those of this Agreement.
1. Definitions.
(a) “Media” means the CD-ROM titled “Software for FinePix EX” which is provided to you together with this
Agreement.
(b) “Software” means the software which is recorded on Media.
(c) “Documentation” means the operation manuals of Software and other related written materials which are
provided to you together with Media.
(d) “Product” means Media (including Software) and Documentation collectively.
2. Use of Software.
FUJIFILM grants to you a nontransferable, nonexclusive license:
(a) to install one copy of Software onto one computer in binary machine executable form;
(b) to use Software on the computer onto which Software is installed; and
(c) to make one backup copy of Software.
3. Restrictions.
3.1 You shall not distribute, rent, lease or otherwise transfer all or any part of Software, Media or Documentation
to any third party without FUJIFILM’s prior written consent. You also shall not sublicense, assign or otherwise
transfer all or any part of the rights granted to you by FUJIFILM under this Agreement without FUJIFILM’s
prior written consent.
3.2 Except as expressly granted by FUJIFILM hereunder, you shall not copy or reproduce all or any part of
Software or Documentation.
3.3 You shall not modify, adapt or translate Software or Documentation. You also shall not alter or remove
copyright and other proprietary notices that appear on or in Software or Documentation.
3.4 You shall not, or shall not have any third party, reverse-engineer, decompile, or disassemble Software.
4. Ownership.
All copyrights and other proprietary rights to Software and Documentation are owned and retained by FUJIFILM
or the third party suppliers as indicated on or in Software or Documentation. Nothing contained herein shall be
construed, expressly or implicitly, as transferring or granting any right, license, or title to you other than those
explicitly granted under this Agreement.
5. Limited Warranty.
FUJIFILM warrants to you that Media is free from any defect in material and workmanship under normal use for
ninety (90) days from the date of your receipt of Media. Should Media not meet the foregoing warranty, FUJIFILM
shall replace such defective Media with other Media bearing no defect. FUJIFILM’s entire liability and your sole
and exclusive remedy with regard to any defect in Media shall be expressly limited to such FUJIFILM’s
replacement of Media as provided herein.
6. DISCLAIMER OF WARRANTY.
EXCEPT AS PROVIDED IN SECTION 5 HEREIN, FUJIFILM PROVIDES PRODUCT “AS IS” AND WITHOUT
WARRANTIES OF ANY KIND, EXPRESS OR IMPLIED. FUJIFILM SHALL MAKE NO WARRANTY, EXPRESS,
IMPLIED OR STATUTORY, AS TO ANY OTHER MATTERS, INCLUDING, BUT NOT LIMITED TO NONINFRINGEMENT OF ANY COPYRIGHT, PATENT, TRADE SECRET, OR ANY OTHER PROPRIETARY
RIGHTS OF ANY THIRD PARTY, MARCHANTABILITY, OR FITNESS FOR ANY PARTICULAR PURPOSE.
NOTICE
BEFORE OPENING THE PACKAGE OF CD-ROM PROVIDED BY FUJI PHOTO FILM CO., LTD.,
PLEASE READ THIS END USER LICENSE AGREEMENT CAREFULLY. ONLY IF YOU DO
AGREE TO THIS AGREEMENT, YOU WILL BE ABLE TO USE THE SOFTWARE RECORDED
ON THE CD-ROM. BY OPENING THE PACKAGE, YOU ACCEPT AND AGREE TO BE BOUND
BY THIS AGREEMENT.
End User License Agreement
7. LIMITATION OF LIABILITY.
IN NO EVENT SHALL FUJIFILM HAVE ANY LIABILITY FOR ANY GENERAL, SPECIAL, DIRECT, INDIRECT,
CONSEQUENTIAL, INCIDENTAL, OR OTHER DAMAGES (INCLUDING DAMAGES FOR LOSS OF PROFITS
OR LOST SAVINGS) INCURRED FROM THE USE OF OR INABILITY TO USE PRODUCT EVEN IF FUJIFILM
HAS BEEN ADVISED OF THE POSSIBILITY OF SUCH DAMAGES.
8. No export.
You acknowledge that neither Software nor any part thereof, will be transferred, or exported to any country or
used in any manner in violation of any export control laws and regulations to which Software is subject.
9. Termination.
In case you breach any of the terms and conditions hereof, FUJIFILM may immediately terminate this Agreement
without any notice.
10. Term.
This Agreement is effective until the date when you cease to use Software, unless earlier terminated in
accordance with Section 9 hereof.
11. Obligation upon termination.
Upon termination or expiration of this Agreement, you shall, at your own responsibility and expense, delete or
destroy immediately all Software (including its copies), Media and Documentation.
12. Governing Law.
This Agreement shall be governed by and construed in accordance with laws of Japan.
Page 3
54
IMPORTANT .........................................................................................2
How to Read This Manual ...................................................................4
Contents ...............................................................................................5
About the Online Help................................................................................6
Introduction..........................................................................................7
Glossary of Terms............................................................................7
Important Information and Helpful Hints for Internet Users .......................9
The Software Components ...............................................................10
Installation on a Windows PC...........................................................11
1 Pre-installation Checklist .........................................................................12
2 Load the CD-ROM into your PC ..............................................................13
3 From FinePixViewer installation to restart ...............................................15
4 Use this procedure the first time you connect the camera
to your PC (DSC connection) ..................................................................17
5 Disconnecting the Camera (DSC Connection) ........................................20
6 Use this procedure the first time you connect the camera
to your PC (PC Camera connection) .......................................................22
7 Disconnecting the Camera (PC Camera Connection) .............................24
8 Acrobat Reader, PhotoDeluxe and ActiveShare installation....................25
Installing the Software on Mac OS 8.6 to 9.2 ..................................27
1 Pre-installation Checklist .........................................................................28
2 Check the system software settings ........................................................29
3 From FinePixViewer installation to restart ...............................................29
4 Connecting the Camera as a Card Reader .............................................32
5 Disconnecting the Camera ......................................................................33
6 Acrobat Reader installation......................................................................34
Installing the Software on Mac OS X ...............................................35
1 Pre-installation Checklist .........................................................................36
2 From FinePixViewer installation to restart ...............................................37
3 Connecting the Camera as a Card Reader .............................................39
4 Disconnecting the Camera ......................................................................40
Using FinePixViewer .........................................................................41
Saving Images on Your Computer...........................................................41
Printing.....................................................................................................44
Deleting Images.......................................................................................45
Using the FinePixViewer Advanced Features.................................47
Launching FinePixViewer ........................................................................48
FinePixViewer Components ....................................................................50
Switching between Windows ...................................................................51
Selecting Folders .....................................................................................52
Copying Images.......................................................................................54
Select a Thumbnail ..................................................................................54
Batch Format Conversion .............................................................56
Making a FinePix CD Album..........................................................58
ContentsHow to Read This Manual
Setting up a
videoconferencing
session...
Getting creative
with your images...
Learning more
about using
FinePixViewer...
Click “How to Use
FinePixViewer”
in the FinePixViewer
Help menu
Using the FinePix
Internet Service...
To create an
album CD...
Page 58 Page 83
Troubleshooting
Click!
How to Use
FinePixViewer
Windows
Page 75Page 93
Windows / Mac OS 8.6–9.2
Page 66
Mac OS X
Page 72
1
2
3
Finishing the Installation
• Windows ..........................................................page 11
• Mac OS 8.6 to 9.2 ............................................page 27
• Mac OS X ........................................................page 35
Using FinePixViewer
Connecting the Camera to Your Computer
• Windows ..........................................................page 17
• Mac OS 8.6 to 9.2 ............................................page 32
• Mac OS X ........................................................page 39
See also the “Connection” section of your camera’s Owner’s Manual.
Page 4

7
Introduction
Glossary of Terms
6
For more information on FinePixViewer functions not fully explained in this
manual, refer to “How to Use FinePixViewer” in the Help menu.
■ To read “How to Use FinePixViewer”...
You must install Adobe Systems’ Acrobat Reader. See P.25 (Windows) or
P.34 (Macintosh) for information on installing Acrobat Reader.
About the Online Help
This section provides explanations of the minimum basic operations you must
be familiar with in order to use your personal computer, along with an
introduction to some other operations that will help you to use your computer
more efficiently. For more detailed information on using your computer, refer
to the user manuals supplied with the computer.
■ Administrator
This refers to the account owned by the computer’s administrator. Setting your user
privileges to “Administrator” allows you to use all the functions available in Windows
2000 Professional, Windows XP.
■ Application software
Software used for a specific purpose, such as word processing, spreadsheets or image
editing.
■ Browser
Software used for viewing web pages on the Internet. Examples include Internet
Explorer and Netscape Navigator.
■ Click, Double-click
Click: Pressing the left mouse button (Windows) or the mouse button (Macintosh) once
and then releasing it.
☞ Used to select files, folders, windows, buttons, etc.
Double-click: Clicking the left mouse button (Windows) or the mouse button (Macintosh)
twice.
☞ Used to open files, folders, etc.
■ DPOF
A format used for recording information on SmartMedia that specifies which images are
to be printed.
Left
Double-
click
Click
Windows Macintosh
Specifications for the
images to be printed
(trimming data, etc.)
SmartMedia
Images
Symbols Used in This Guide
The symbols listed below are used throughout this guide.
q Indicates a camera operation must be performed. Refer to the Owner’s
Manual for your camera.
Indicates important precautions to follow when using the software.
✽
Indicates important information.
☞ Indicates notes or additional information.
Indicates useful tips.
TIP
NOTE
Attaching Images to E-mail Messages in FinePixViewer ...........62
Using the FinePix Internet Service ...............................................66
User Registration .....................................................................................67
Using the Services...................................................................................69
Obtaining the Latest Version of FinePixViewer .......................................70
Using the FinePix Internet Service (Mac OS X) ...........................72
User Registration .....................................................................................72
Using the Services...................................................................................74
Videoconferencing with PictureHello...........................................75
Using the Address Book ..........................................................................81
Mastering FinePixViewer
– Using Online Help – ....................................................................82
Lights, Camera, Action! Using VideoImpression ...........................83
Main Functions ........................................................................................83
Making Your Own Movies........................................................................84
Capturing Live Images (Windows)...........................................................86
Capturing Live Images (Mac OS 8.6 to 9.2) ............................................88
Uninstalling the Software..................................................................91
Uninstalling Mass Storage Driver and PC Camera Driver .......................92
Uninstalling Exif Launcher, FinePixViewer and DP Editor.......................92
Uninstalling FinePixViewer ......................................................................92
When you have a problem ................................................................93
Troubleshooting (Windows)..........................................................94
Troubleshooting Connection Problems....................................................95
Troubleshooting Videoconferencing Problems ........................................98
Troubleshooting Other Problems...........................................................101
Troubleshooting (Macintosh)......................................................103
Troubleshooting Connection and Image Viewing Problems ..................103
Troubleshooting Internet Problems........................................................105
Troubleshooting Other Problems...........................................................106
Page 5

98
Drag
1. Position the mouse pointer over the
file or folder icon you want to drag.
2. With the mouse button held down,
move the mouse to another location.
Drop
When you reach the desired location,
release the mouse button.
■ Drag & drop
An operation used to move, copy or store files and folders.
■ Drive
A peripheral device used by a personal computer to store and access files.
A disk drive into which removable media can be loaded is referred to as a removable
disk drive.
Typical examples include CD-ROM drives and floppy disk drives. Digital cameras are
also handled as disk drives.
Drive icons in Windows Drive icons for Macintosh
■ Driver
Software used by a personal computer to operate a peripheral device.
■ File
Data stored on a SmartMedia or on the hard disk of a personal computer. Files are the
units used by personal computers and cameras to manage data. For instance, one
image is handled as one file, as is one music track.
■ Folder
A location in which related files are stored. Other folders can also be stored inside a folder.
■ Install
The process of setting up software on a personal computer.
■ Menu
A list of functions displayed at the edge of the screen. Typical examples include the
“File” and “Edit” menus.
When you click on a menu name, a list of the available functions appears and you can
then execute a function by moving the mouse to the desired function name.
<Windows> <Macintosh>
■ Password
This is a secret code designed to prevent improper use of your user ID. Type your
password when you log in to the server.
The first time you log in during the FinePix Internet Service user registration, type in
your choice of password using letters or numbers. Ensure that you are not observed as
you type in your password.
■ Server
A computer used on a computer network, such as the Internet, that provides services
and data to connected network users.
■ SSL (Secure Sockets Layer)
A communications format with enhanced security functions. Using SSL allows you to
exchange data over the Internet with greater safety.
■ Thumbnail
A reduced image created when images are displayed as a list. In FinePixViewer,
double-clicking on a thumbnail image displays the original image.
■ Uninstall
The process of removing software from your PC and restoring your PC’s settings to
their original status before the software was installed.
■ User ID
A name by which users are identified. Type your user ID when you log in to the server.
The first time you log in during the FinePix Internet Service user registration, type in
your choice of user ID using letters or numbers.
■ Charges
The charges for using the Internet include the following:
✽
If the charges vary depending on the call or connection time, you should use your
PC’s automatic disconnect function to avoid wasted connection time.
✽
The FUJIFILM FinePix Internet Service includes both free and fee-based services.
✽
If you use online shopping or other services, you will be invoiced for the product or
service in addition to the call and connection charges.
■ Viruses
A virus infecting your PC can result in the loss of important data or the sending of
unwanted e-mail messages to the people stored in your address book. Do not open
downloaded files or files received as e-mail attachments unless you are certain of their
content.
Important Information and Helpful Hints for Internet Users
Call charges
Connection
charges
The fees paid for using the phone line; paid to your telephone company.
The fees paid for server connection and data storage (e-mail and
web pages); paid to your Internet service provider (ISP).
Page 6
11
1
2
3
4
5
6
7
8
5
6
7
8
Installation on a Windows PC
10
This chapter describes how to install and set up the software on a Windows
PC.
Disconnect the camera in DSC mode.
Connect the camera in PC CAMERA mode.
• Check that the USB PC Camera Driver is operating normally.
• The first time you connect, specify the required settings.
Disconnect the camera in PC CAMERA mode.
Install Acrobat Reader, PhotoDeluxe and ActiveShare.
You must install this software as you need it to read the electronic manual.
1
2
3
4
Check this before you start the installation.
Ensure that your PC hardware and software meet the system requirements
for the software to be installed.
Install FinePixViewer and restart your PC.
Click “Install FinePixViewer” and install the software as directed by the on-screen
instructions. Then restart your PC.
Connect the camera in DSC mode.
• Check that the USB Mass Storage Driver is operating normally.
• The first time you connect, specify the required settings.
Load the “Software for FinePix” CD-ROM into your PC.
The Software Components
Exif Launcher
Launches the FinePixViewer
software when a camera is
connected.
QuickTime
Software needed for playing back movies, etc.
Software used to read PDF-format documents on a
personal computer. This software is needed to read
the User’s Guides for FinePixViewer and
VideoImpression, etc.
Acrobat Reader
R
Used to download and edit
movies you have shot.
VideoImpression
TM
FinePixViewer PictureHello
Used for videoconferencing
(Windows only)
Allows you to display thumbnail
lists of the images stored on your
PC or in the camera, print the
images individually or as an
index, display the images at full
size and perform some basic
image processing.
✽ Note that the software configuration differs slightly depending on your operating system.
Connect the camera
with “DSC” selected
as the USB setting.
(/“Connection” in the
Owner’s Manual)
Connect the camera
with “PC CAM” selected
as the USB setting.
(/“Connection” in the
Owner’s Manual)
USB PC Camera Driver
USB Mass Storage Driver
Allows a digital camera to be used as
USB Mass Storage (removable disk
drive, card reader).
Allows a digital camera to be used
as a PC Camera.
When you have installed all the software...
Once you have finished installing all the software components, remove the CD-ROM.
You will need this CD-ROM if you ever have to re-install any of the software, so keep it
in a safe place away from dampness and out of direct sunlight.
Page 7

12 13
1
2
1. Switch on your PC and start up Windows.
✽
If you have already switched on your PC, restart your PC at this point.
Users of Windows 2000 or Windows XP should log in using a system administrator
account (e.g. “Administrator”).
2. Quit all other active applications until no applications are
shown in the taskbar.
1 Click the right mouse button on the application icon in the taskbar.
2 Click “Close” in the menu that appears to quit the application.
✽
For more information, refer to the instructions provided with your PC and
applications (antivirus software, etc.).
If a “----.dll file not found.” message appears during installation, there is another
application running in the background. Forcibly shut down the application. Refer to your
Windows manuals for information on how to forcibly shut down an application.
3. Load the enclosed CD-ROM into the CD-ROM drive. The
installer starts up automatically.
NOTE
NOTE
Load the CD-ROM into your PC
<Taskbar>
Applications to be shut down
(the icons shown vary depending on
the applications that are running)
Do not connect the camera to your PC until the software
installation is completed.
Launching the Installer Manually
1. Double-click the “My Computer” icon.
✽
Windows XP users should click “My Computer” in the “Start” menu.
2. Right-click “PHOTODELUXE” (CD-ROM drive) in the “My
Computer” window and select “Open”.
3. Double-click “SETUP” or “SETUP.exe” in the CD-ROM
window.
✽
The way file names are displayed differs as described below depending on your
computer settings.
• File extensions (3-letter suffixes indicating the file type) may be shown or
hidden. (e.g. Setup.exe or Setup)
• Text may be shown normally or all in uppercase (e.g. Setup or SETUP).
■ Hardware and software requirements
To run this software, you must have the hardware and software described
below. Check your system before you begin the installation.
Compatible PCs IBM PC/AT or compatible
✽1
Operating System Windows 98 (including the Second Edition)
Windows Millennium Edition (Windows Me)
Windows 2000 Professional
✽2
Windows XP Home Edition
✽2
Windows XP Professional
✽2
CPU 200 MHz Pentium or better recommended (800 MHz
Pentium 3 or better recommended for Windows XP
RAM 64MB minimum (128 MB minimum for Windows XP)
Hard disk space Amount required for installation: 140 MB minimum
Amount required for operation: 300 MB minimum
(When FinePix CD Album Maker is used: 2 GB or better)
Display 800 × 600 pixels or better, 16-bit color or better
Internet connection
✽3
• To use the FinePix Internet Service or mail attachment
function
An Internet connection and e-mail transmission software
• To use videoconferencing
An analog modem or ISDN connection
• Connection speed: 56k or better recommended
Sound functions
✽4
Speakers, microphone and sound card
✽1
Models with a USB interface as a standard feature and one of the above operating
systems preinstalled.
✽2
When you install the software, log in using a system administrator account (e.g.
“Administrator”).
✽3
Required to use the FinePix Internet Service and videoconferencing. The software can still
be installed even if you do not have an Internet connection.
✽4
Sound functions are required for videoconferencing and audio input/output in
VideoImpression.
• Connect the camera directly to the computer using the special USB cable. The
software may not operate correctly if you use an extension cable or connect the
camera via a USB hub.
• If your computer has more than one USB port, the camera can be connected to either
port.
• Push the USB connector fully into the socket to ensure that it is securely connected.
The software may not operate correctly if the connection is faulty.
• Additional USB interface board is not guaranteed.
• Windows 95 cannot be used.
• Operation is not guaranteed on home-built computers or on computers running
updated operating system software.
• If your Internet connection is via a router or via a LAN (connecting machines on the
LAN to the Internet), you cannot use videoconferencing.
• If you are using Windows XP and you tick the “Protect my computer and network by
limiting or preventing access to this computer from the Internet” checkbox in the
Internet connection firewall settings, videoconferencing cannot be used. See
“Troubleshooting” (/ P.100) for information on setting up firewalls.
• When you reinstall or remove FinePixViewer, the Internet menu and your user ID and
password for the FinePix Internet Service are deleted from your computer. Click the
[Register now] button, enter your registered user ID and password and download the
menu again.
NOTE
Pre-installation Checklist
1 2
Page 8
14 15
2
3
From FinePixViewer installation to restart
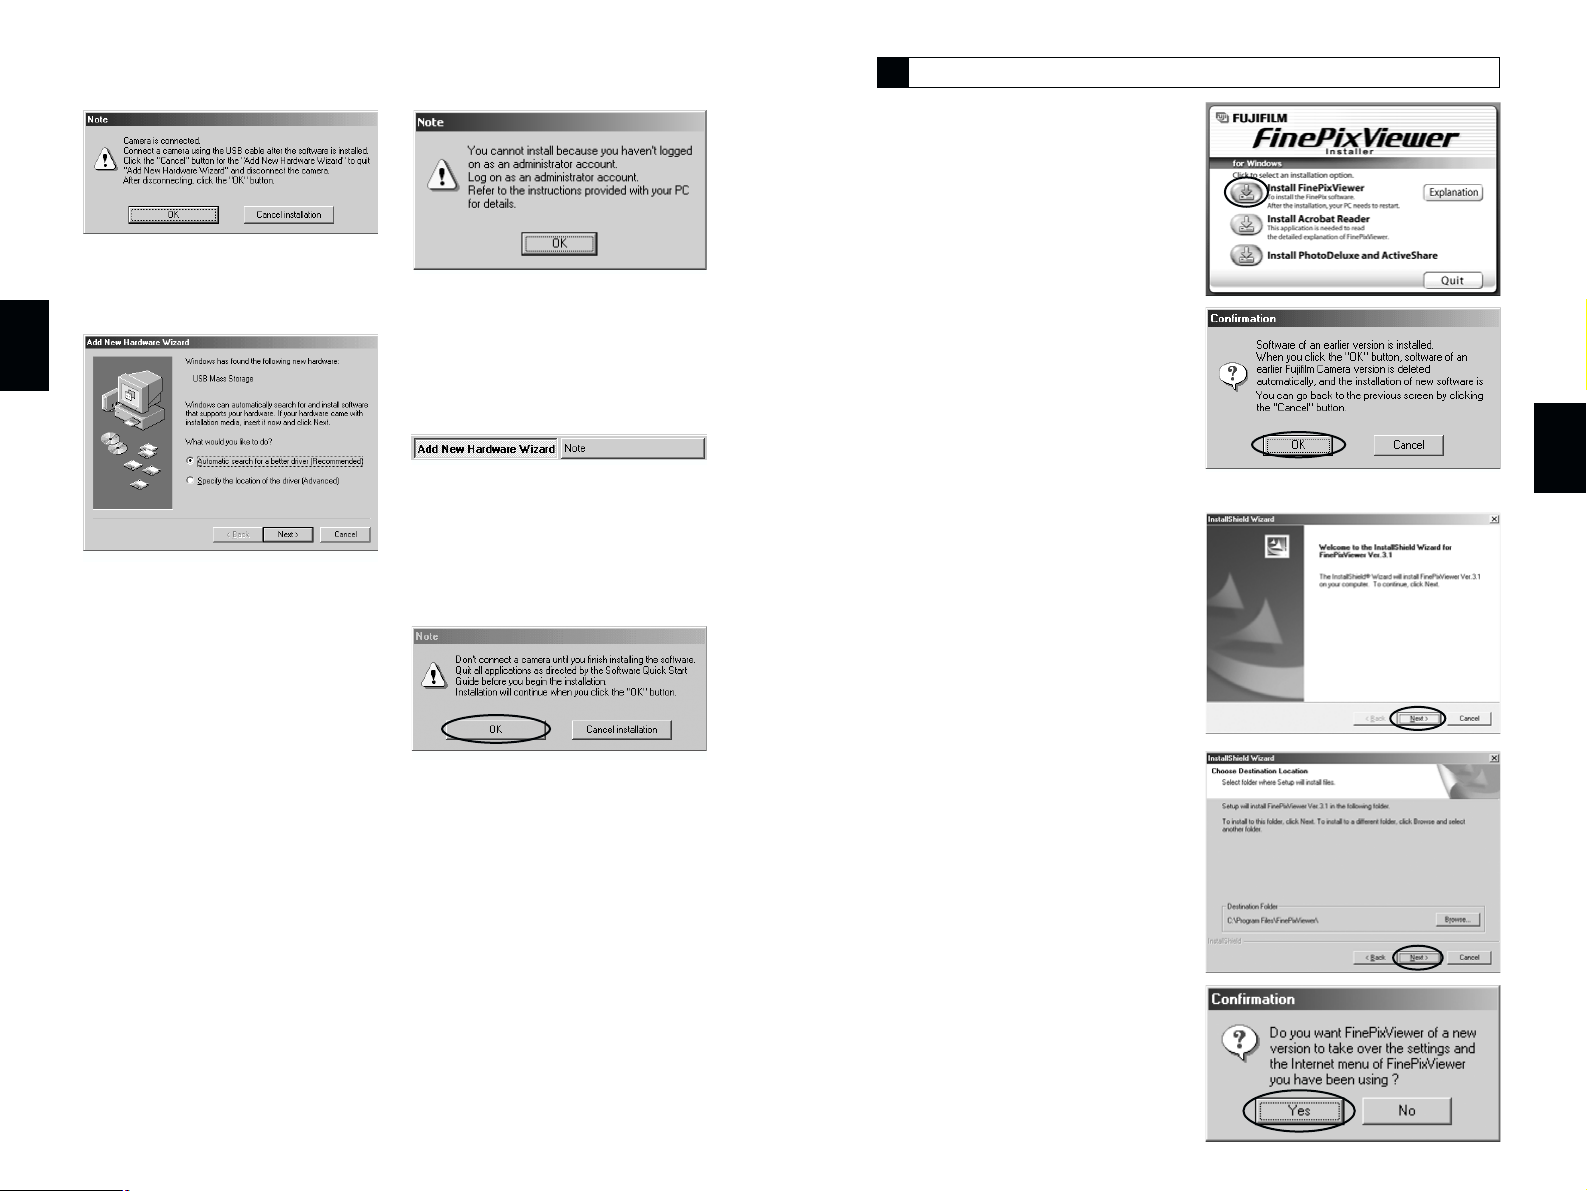
4. Pre-installation checking begins. If any warning messages
appear, follow the instructions given on the screen.
✽
The “Add New Hardware Wizard” may be hidden behind the “Note” message.
Check the taskbar, move the message window and then click the [Cancel] button.
5. A confirmation message appears asking whether you want to
continue with the installation. Click the [OK] button.
3
1. The Setup screen appears.
Click the [Install
FinePixViewer] button.
✽ For more information on what is
installed, click the [Explanation]
button.
2. The software version is
checked. If the window
shown at right appears, click
the [OK] button to uninstall
the software.
3. The USB drivers are installed.
4. Install FinePixViewer.
1 FinePixViewer installation begins
and notes and warnings are
displayed. When you have
confirmed these, click the [Next >]
button.
2 Check the installation destination
folder and then click the [Next >]
button.
3 The screen shown at right may
appear. To continue with the
settings, click the [Yes] button.
Page 9
17
4
Actually connect the camera in DSC mode and check that USB Mass Storage
Driver was installed correctly.
It is strongly recommended that you use the AC power adapter. Loss of power during
data communications will prevent successful data transfer.
1. Load a SmartMedia containing
photographed images into the camera.
• Do not format the SmartMedia on a PC as this may make the card unusable for taking
pictures.
• Use only SmartMedia containing shots taken on a FUJIFILM digital camera.
2. Select “DSC” as the USB mode setting on the camera and
then switch the camera off.
3. Use the special USB cable to connect the camera to your PC.
4. Switch the camera back on.
• Always use the correct procedure when disconnecting the camera from your PC or
switching the camera off.
• Do not perform any of the following when the camera is connected to a PC as this
could damage the SmartMedia or corrupt the data on the SmartMedia:
Disconnect the USB cable or AC power adapter / Touch the camera controls (power
switch, control buttons, lens cover or slot cover)
NOTE
NOTE
TIP
q
q
q
See “Connection” in
the camera Owner’s
Manual.
The Windows CD-ROM may also be required in some cases. Have the CD-ROM
ready beforehand. If no Windows CD-ROM was supplied with your PC, consult the
Owner’s Manual for your PC or contact your PC’s manufacturer.
16
3
In this window, tick the “I have read the
Privacy Statement” checkbox and then
click the [Next >] button.
When you click the [Finish] button, your
PC is restarted.
If the “Connection speed” window
appears, set the correct speed for your
environment of connection and then click
the [Next] button.
✽
If you do not know your connection
speed, simply click the [Next] button.
Click [Agree] button in the “Software
License Agreement” window.
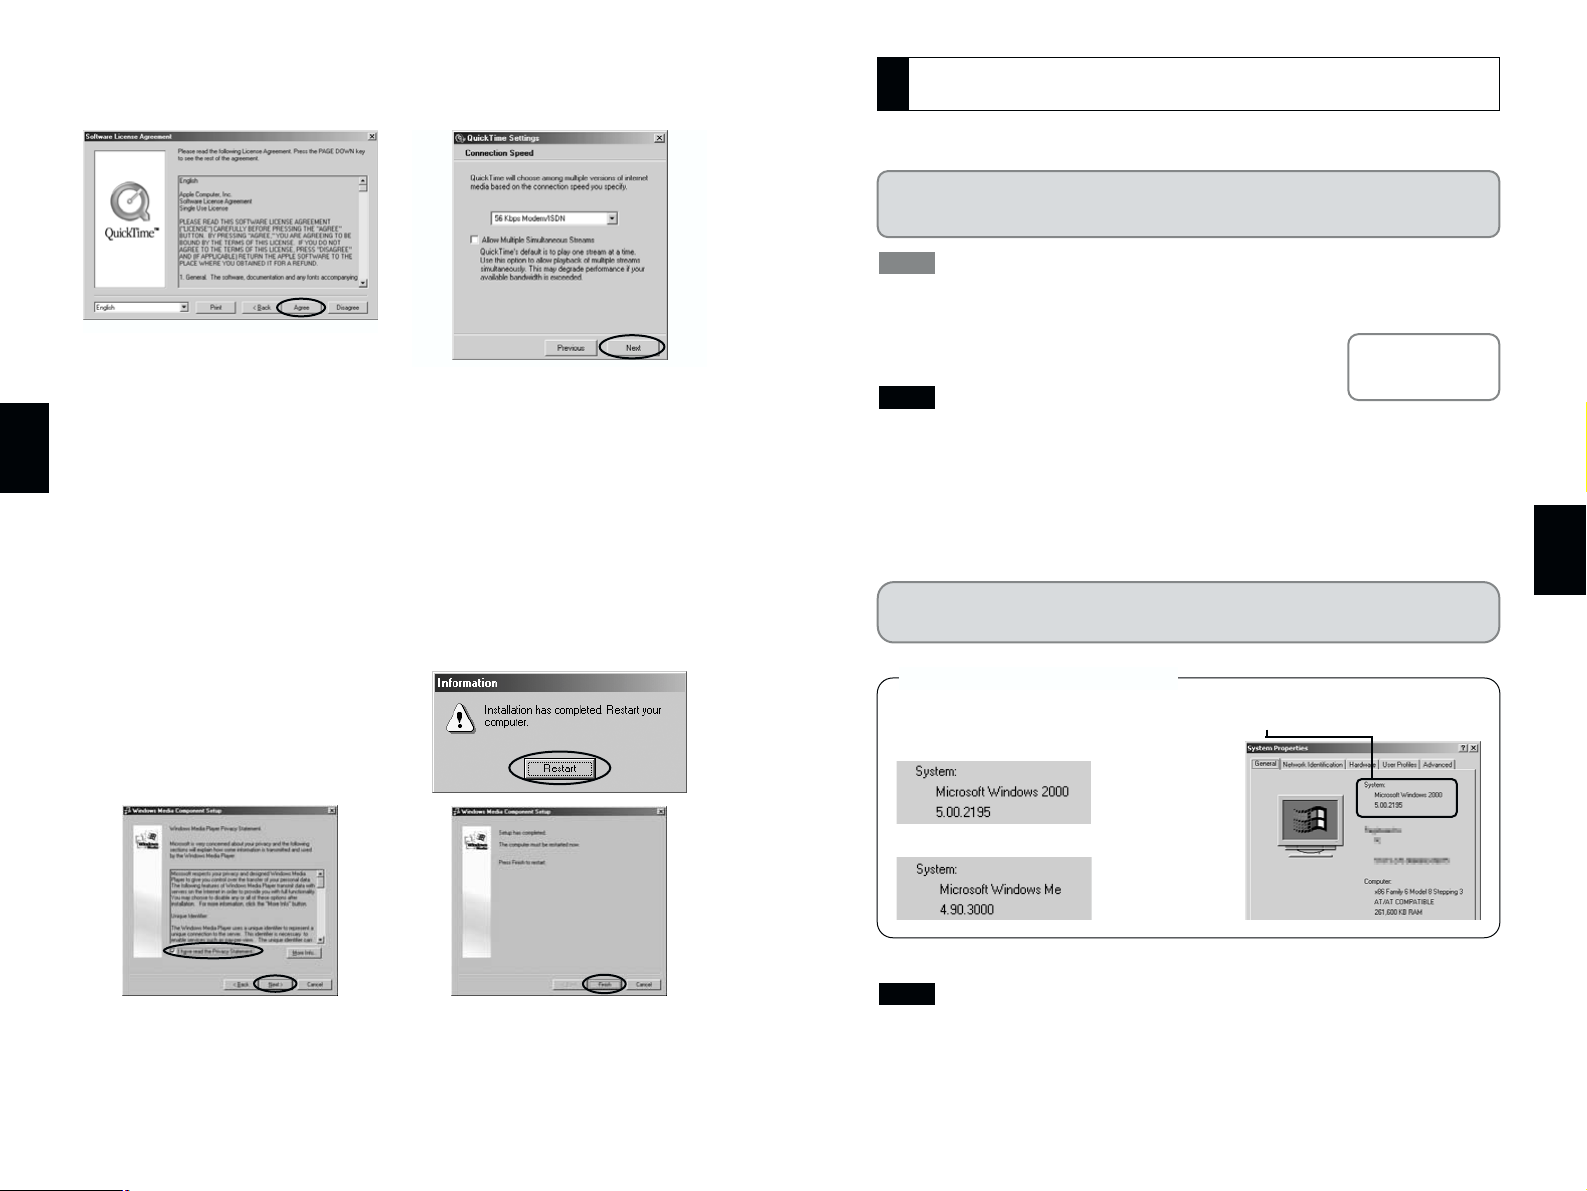
5. Install QuickTime as directed by the on-screen instructions.
✽
If you have already installed QuickTime version 5.0.2 or later, this installation is
not performed.
6. Install NetMeeting as directed by the on-screen instructions.
✽
If NetMeeting 3.01 or later is already installed on your PC, this installation is not
performed.
7. Install VideoImpression as directed by the on-screen instructions.
8. Install Windows Media Player as directed by the on-screen
instructions and then restart your PC.
✽
If the latest version of the software is
already installed on your PC, this
installation is not performed. When
next screen appears, click the
[Restart] button.
9. After you restart your PC, the “FinePixViewer Help” page
appears in the web browser window. Check the details before
closing the window and proceeding with the installation.
Use this procedure the first time you connect the
camera to your PC (DSC connection)
4
From this point onwards the procedure differs depending
on your operating system.
1 Right-click “My Computer” and then click “Properties”.
2 Your operating system type is shown in the “System” box.
To check your type of PC...
<Example: Windows 2000 Professional>
<Example: Windows Me>
Page 10
19
4
18
4
Proceed to “Disconnecting the Camera (DSC Connection)”
on page 20.
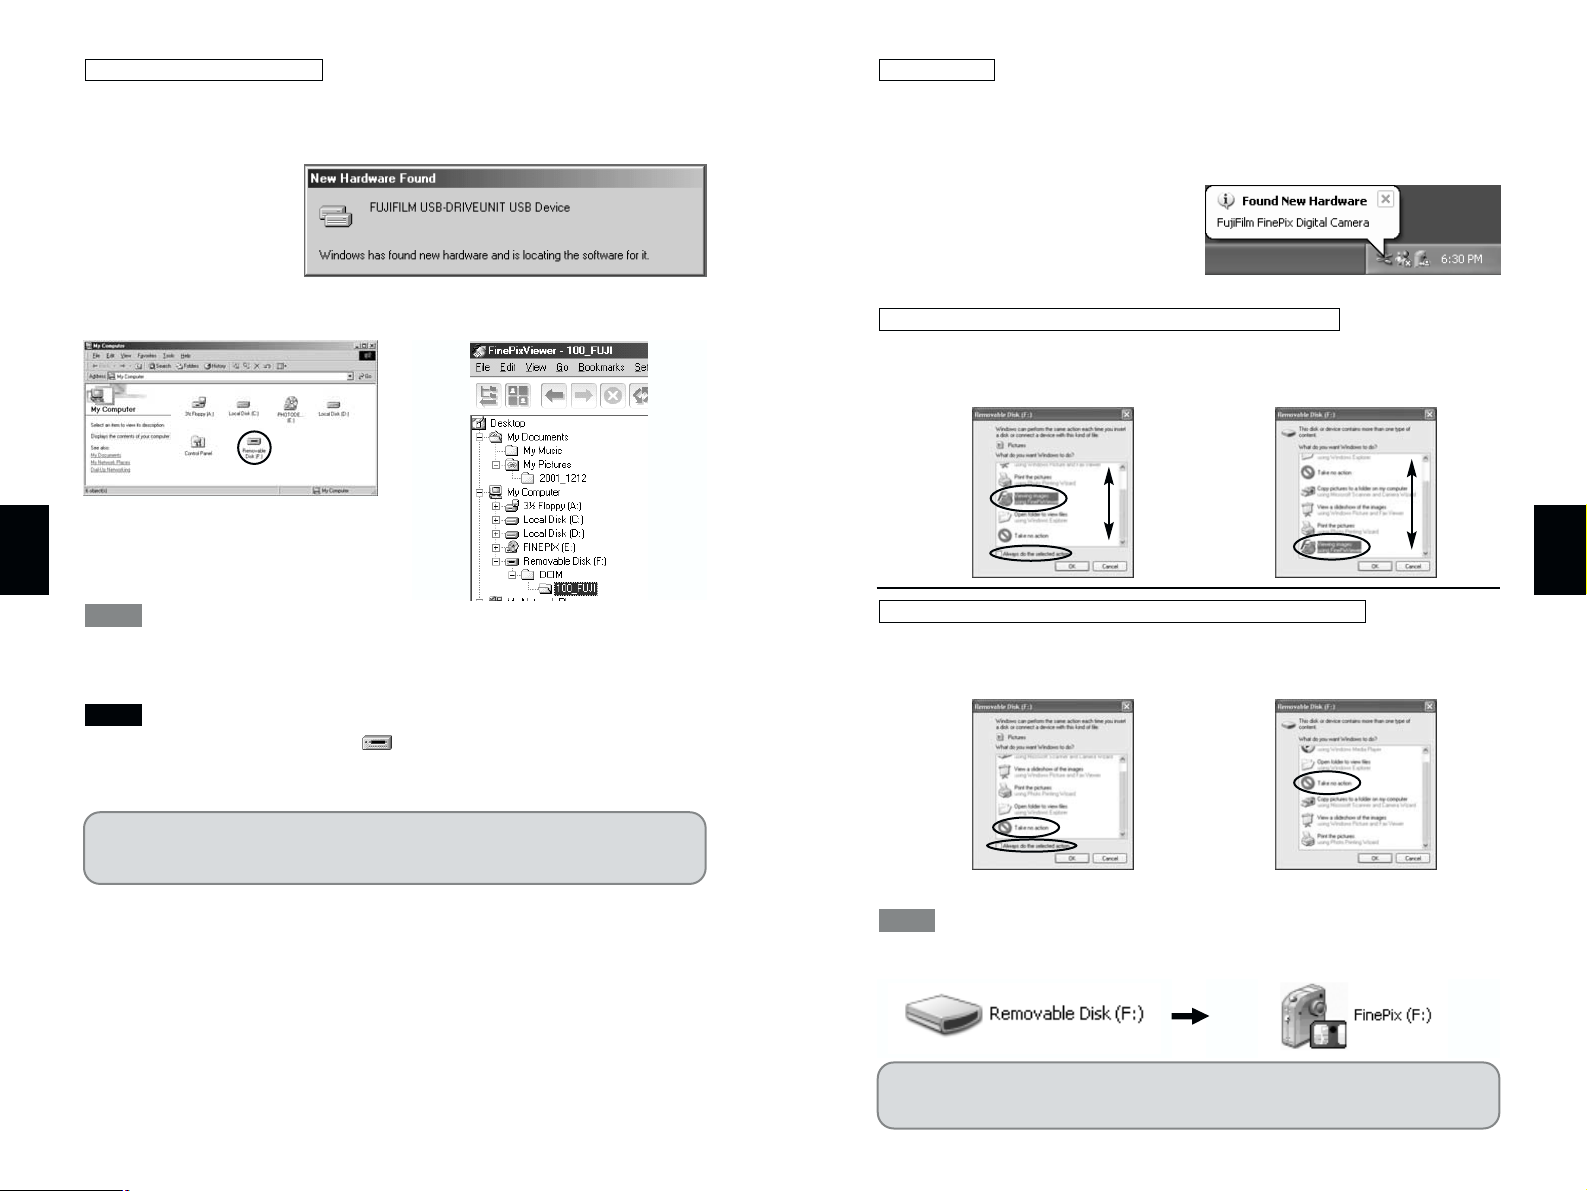
1 The “Found New Hardware” help message appears in the bottom-right corner of your
screen. This message will close when the settings are completed. No action is
required.
✽
This step is not required for subsequent connections.
2 Specify the settings shown below in the “AutoPlay” dialog box.
Select “Viewing images using FinePixViewer” and then select the “Always do the
selected action” checkbox. (This checkbox may not be shown in some cases.)
Click the [OK] button to launch FinePixViewer.
Select “Take no action” and then select the “Always do the selected action” checkbox.
(This checkbox may not be shown in some cases.)
Click the [OK] button and launch FinePixViewer manually.
3 A new removable disk icon appears in the “My Computer” window.
As of the next time you connect the camera, the removable disk drive icon and name
change to the “FinePix” icon and name.
TIP
When FinePixViewer is not included in the list of actions to perform
When FinePixViewer is included in the list of actions to perform
Windows XP
Proceed to “Disconnecting the Camera (DSC Connection)”
on page 20.
1 The “New Hardware Found” wizard appears. The wizard will close when the settings
are completed. No action is required.
✽ This step is not required for subsequent connections.
2 FinePixViewer automatically starts up and the images on the SmartMedia are
displayed. A new removable disk icon also appears in the “My Computer” window.
The Exif Launcher installed with the FinePixViewer automatically launches
FinePixViewer when you connect the camera to your PC. However, FinePixViewer does
not start up if there are no still images on the SmartMedia.
If FinePixViewer does not start up and does not appear, the software was not
installed correctly. Disconnect the camera, restart your PC and re-install the software.
If this does not resolve the problem, refer to the Troubleshooting section.
NOTE
TIP
Windows 98/98 SE/Me/2000
Page 11
21
5
20
5
q
2 Click the Eject icon in the taskbar. When the “Safe To Remove Hardware” dialog box
appears, click the [OK] button.
Click the Eject icon in the taskbar. When the “Safe To Remove Hardware”
dialog box appears, click the [OK] button.
Click the eject icon in the taskbar and click the Close button in the “Safe To
Remove Hardware” help message.
4. Switch the camera off.
5. Unplug the special USB cable from the
camera.
• Always close all the files in the camera (removable disk) folder and confirm that the
camera and PC are no longer communicating.
• In Windows 2000 Professional, Windows XP or Windows Me, your PC may malfunction
if you disconnect the USB cable without first using the “Eject hardware” procedure.
• When the “Copying” message disappears from your PC screen, wait a few moments
before disconnecting the USB cable or removing the SmartMedia.
If a large amount of data is being copied, camera access continues for a short time
after the message displayed on the PC has gone off.
NOTE
Windows XP
Windows 2000
1. Exit any applications that are using the camera (FinePixViewer,
etc.).
Failure to carry out this step could cause your computer to
malfunction.
2. Check that the camera and PC are not
communicating. If communication is in
progress, wait until it ends.
3. Prepare to switch the camera off. The procedure for this
differs depending on the operating system you are using.
No PC operations are required.
1 In the “My Computer” window, right-click
the “Removable disk” icon and then click
“Eject”.
Windows Me
Windows 98/98 SE
NOTE
q
See “Connection” in
the camera Owner’s
Manual.
Disconnecting the Camera (DSC Connection)
5
See “Connection” in
the camera Owner’s
Manual.
Page 12
23
6
22
6
The USB PC Camera Driver is installed automatically. When the following
screen appears, click the [Continue] button.
5. FinePixViewer starts up automatically and the live image is
displayed.
If the live image does not appear, refer to “Troubleshooting” (/P.94)
The Exif Launcher installed with the FinePixViewer automatically launches FinePixViewer
when you connect the camera to your PC.
TIP
NOTE
Windows XP
Actually connect the camera in PC Camera mode and check that USB PC
Camera Driver was installed correctly.
It is strongly recommended that you use the AC power adapter. Loss of power during
data communications will prevent successful data transfer.
1. Select “PC CAM” as the USB mode
setting on the camera and then switch
the camera off.
2. Use the special USB cable to connect the camera to your PC.
3. Switch the camera back on.
• Always use the correct procedure when disconnecting the camera from your PC or
switching the camera off.
• Do not perform any of the following when the camera is connected to a PC :
Disconnect the USB cable or AC power adapter / Touch the camera controls (power
switch, control buttons, lens cover or slot cover)
4. Check PC operation. The installation procedure differs
depending on the operating system running on your PC.
✽
This step is not required for subsequent connections.
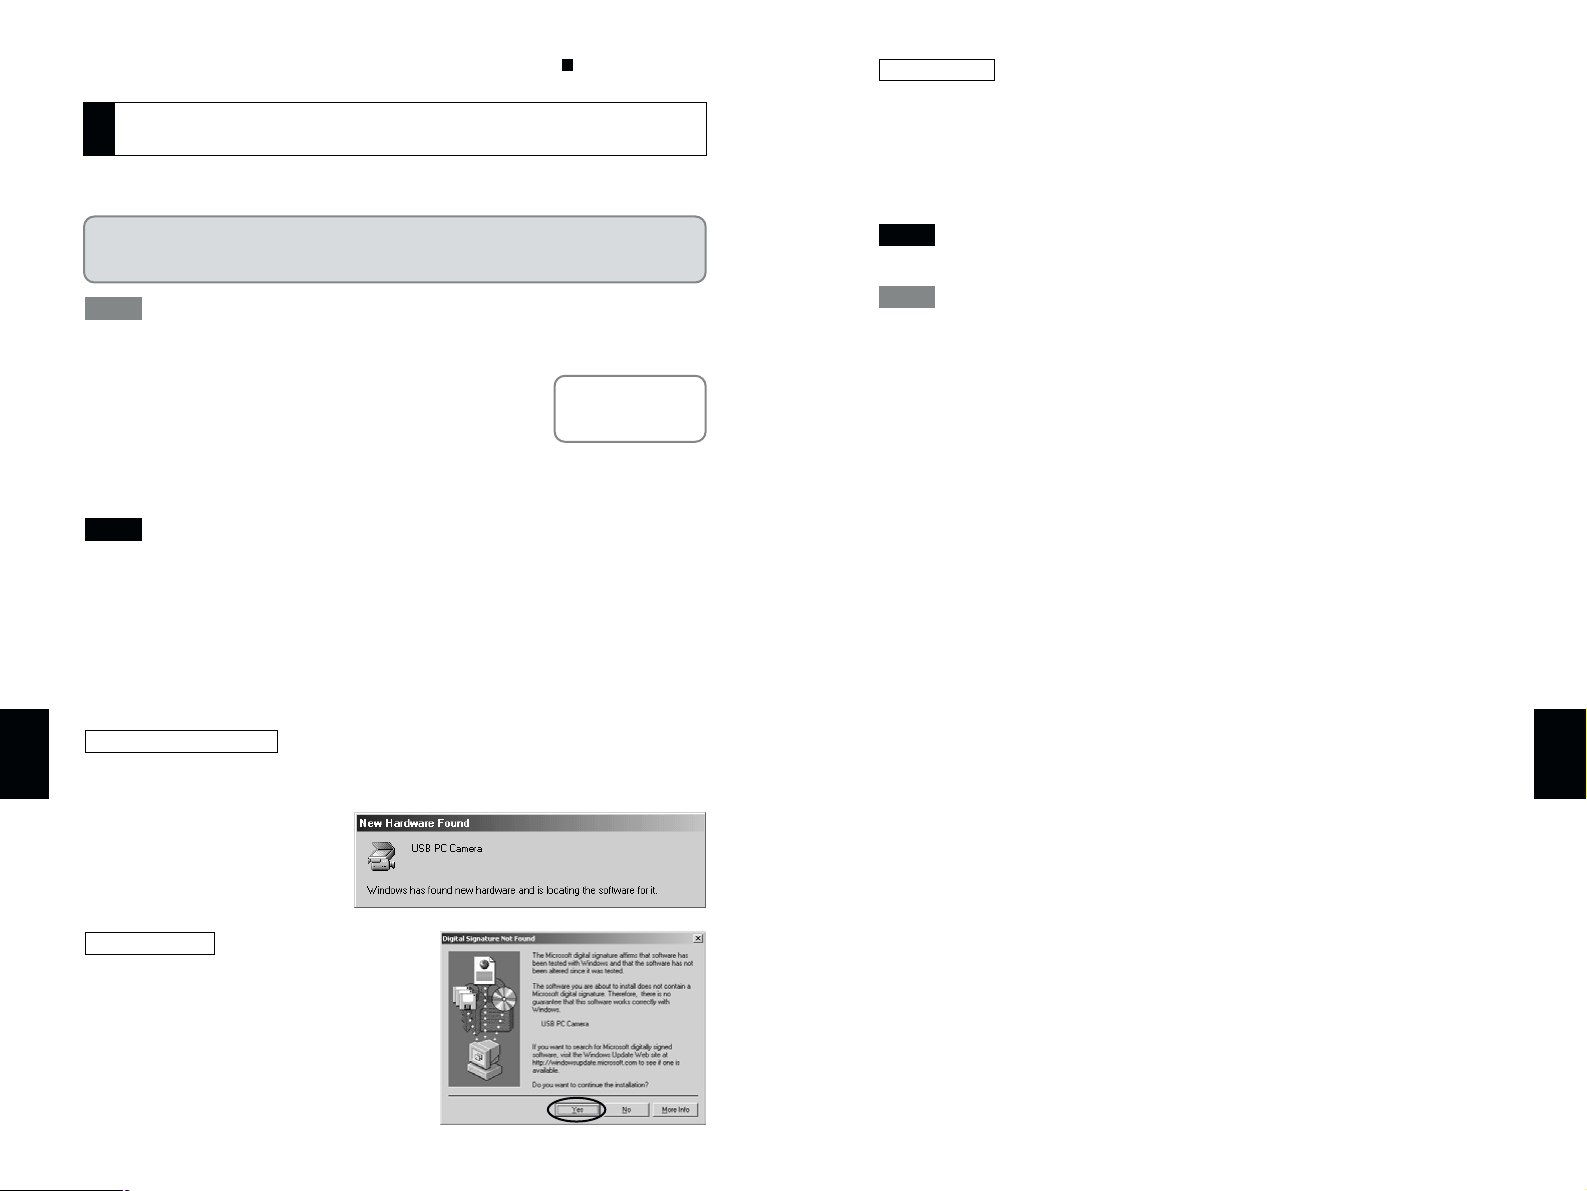
The “New Hardware Found” wizard appears. The wizard will close when the
settings are completed. No action is required.
If the “Digital Signature Not Found”
dialog box appears, click the [Yes]
button.
Windows 2000
Windows 98/98 SE/Me
NOTE
TIP
q
q
The Windows CD-ROM may also be required in some cases. Have the CD-ROM
ready beforehand. If no Windows CD-ROM was supplied with your PC, consult the
Owner’s Manual for your PC or contact your PC’s manufacturer.
See “Connection” in
the camera Owner’s
Manual.
Use this procedure the first time you connect the
camera to your PC (PC Camera connection)
6
✽ If your camera does not have a PC Camera function, proceed to “ Acrobat Reader,
PhotoDeluxe and ActiveShare installation” (/ P.25).
8
Page 13

25
8
24
7
q
q
1. Exit any applications that are using the camera (FinePixViewer,
etc.).
Failure to carry out this step could cause your computer to
malfunction.
2. Check that the camera and PC are not
communicating. If communication is in
progress, wait until it ends.
3. Switch the camera off.
4. Unplug the special USB cable from the camera.
NOTE
Disconnecting the Camera (PC Camera Connection)
7
You must install Adobe Systems’ Acrobat Reader software to read the
FinePixViewer User’s Guide (PDF).
If you already have the latest version installed, this step is not required.
1. Open the “My Computer”
window, right-click the CDROM icon and select “Open”
to view the contents of the
CD-ROM.
2. Double-click “SETUP” or “SETUP.exe”.
3. In the installer window, click
the [Install Acrobat Reader]
button.
4. Proceed with the installation as directed by the on-screen
instructions.
5. Use the same procedure to
install “PhotoDeluxe” and
“ActiveShare”.
✽
When you have finished installing
“PhotoDeluxe”, you may be asked to
restart your computer. In this case,
begin installing “ActiveShare”
without restarting your computer.
Acrobat Reader, PhotoDeluxe and ActiveShare installation
8
This completes the installation of all the software
components. Now proceed to “Using FinePixViewer” on
page 41.
See “Connection” in
the camera Owner’s
Manual.
Page 14

27
1
2
3
4
5
6
1
2
3
4
5
6
Installing the Software on Mac OS 8.6 to 9.2
The CD-ROM includes software for Mac OS 8.6 to 9.2 and for Mac OS X. This
chapter describes the installation and setup procedures for Mac OS 8.6 to 9.2.
Check this before you start the installation.
Ensure that your Macintosh hardware and software meet the system
requirements for the software to be installed.
Install FinePixViewer and restart your Macintosh.
Click [Install FinePixViewer] and install the software as directed by the on-screen
instructions. Then restart your Macintosh.
Connect the camera in DSC mode.
Disconnect the camera in DSC mode.
Install Acrobat Reader.
You must install this software as you need it to read the electronic manual.
Check the system software settings.
26
When you have installed all the software...
Once you have finished installing all the software components, remove the CD-ROM.
You will need this CD-ROM if you ever have to re-install any of the software, so keep it
in a safe place away from dampness and out of direct sunlight.
Page 15

29
2
3
28
1
■ Hardware and software requirements
To run this software, you must have the hardware and software described
below. Check your system before you begin the installation.
Pre-installation Checklist
■ Enable File Exchange
Check whether File Exchange is active.
To use a SmartMedia that is supported by the camera, the File Exchange
utility supplied with Mac OS must be running.
1. Switch on your Macintosh and start up Mac OS 8.6 to 9.2.
Do not connect the camera to your Macintosh until the software installation is
completed.
2. Select the Extensions Manager in the Control Panels and
check that the File Exchange check box is ticked. If not, click
in the box so that an appears and then restart your
Macintosh.
NOTE
Check the system software settings
From FinePixViewer installation to restart
1. When you load the enclosed CD-ROM into the CD-ROM drive,
the “FinePix” window automatically opens.
If the “FinePix” window does not open
automatically, double-click the CD-ROM icon.
NOTE
1 2
3
2. Double-click “Installer for MacOS8.6-9.x” to launch the
Installer.
Compatible Mac Power Macintosh G3✽1, PowerBook G3
✽1
,
Power Macintosh G4, iMac, iBook,
Power Macintosh G4 Cube or PowerBook G4
Operating System Mac OS 8.6 to 9.2
✽2
RAM 64 MB minimum
✽3
Hard disk space Amount required for installation: 110 MB minimum
Amount required for operation: 300 MB minimum
(When FinePix CD Album Maker is used: 2 GB or better)
Display 800 × 600 pixels or better, 16-bit color or better
Internet connection
✽4
• To use the FinePix Internet Service or mail attachment
function
An Internet connection and e-mail transmission software
• Connection speed: 56k or better recommended
Sound functions
✽5
Speakers and microphone
✽1
Models with a USB port as a standard feature
✽2
This software does not run correctly in the Mac OS X Classic environment.
✽3
Turn virtual memory on if necessary.
✽4
Required to use the FinePix Internet Service. The software can still be installed even
if you do not have an Internet connection.
✽5
Sound functions are required for audio input/output in VideoImpression.
• Connect the camera directly to the Macintosh using the special USB cable. The
software may not operate correctly if you use an extension cable or connect the
camera via a USB hub.
• Push the USB connector fully into the socket to ensure that it is securely connected.
The software may not operate correctly if the connection is faulty.
• Additional USB interface board is not guaranteed.
NOTE
Page 16
31
3
30
3
Click [Agree] button in the “License”
window.
6. Install VideoImpression as directed by the on-screen
instructions.
7. Install QuickTime as directed by the on-screen instructions
and then restart your Macintosh.
✽
If you have already installed QuickTime version 5.0.2 or later, this installation is
not performed.
8. After you restart your Macintosh, the “Guidance of
FinePixViewer” alias is created on the desktop. Use your
browser software to check the details and then proceed with
the installation.
If the “Connection Speed” window appears
after your restart your Macintosh, set the
correct speed for your environment of
connection and then click the [Next] button.
✽
If you do not know your connection
speed, simply click the [Next] button.
3. A confirmation message appears asking whether you want to
continue with the installation. Click the [OK] button.
4. The Installer setup screen appears.
Click the [Install FinePixViewer] button.
✽
For more information on what is
installed, click the [Explanation]
button.
5. Select the installation destination for FinePixViewer.
1 Click the [Open] button to open the
installation destination folder.
2 Click the [Save] button.
Page 17
33
5
1. Exit any applications that are using the camera (FinePixViewer,
etc.).
2. Check that the camera and Macintosh are
not communicating.
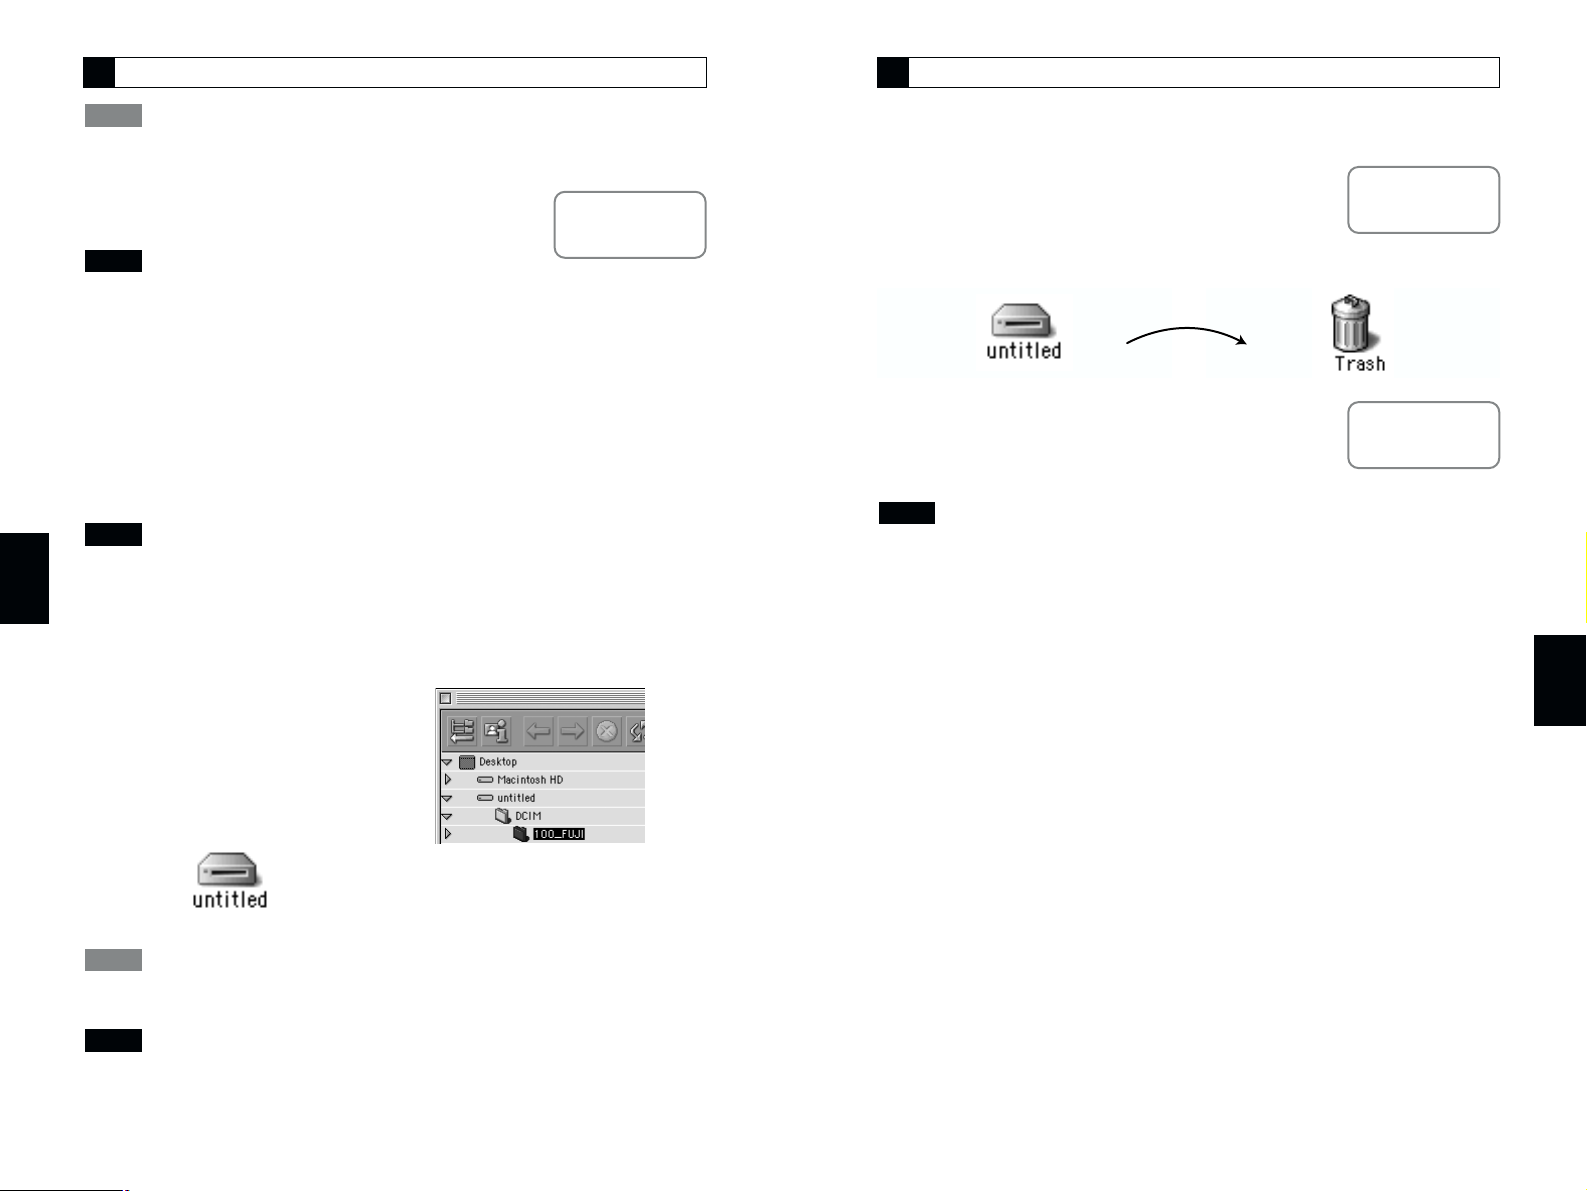
3. Drag the removable disk icon to the Trash.
4. Switch the camera off.
5. Unplug the special USB cable from the
camera.
• Always close all the files in the camera (removable disk) folder and confirm that the
camera and Macintosh are no longer communicating.
• Disconnecting the camera or the USB cable without first dragging the removable disk
icon to the Trash could cause your Macintosh to malfunction.
• When the “Copying” message disappears from your Macintosh screen, wait a few
moments before disconnecting the USB cable or removing the SmartMedia.
If a large amount of data is being copied, camera access continues for a short time
after the message displayed on the Macintosh has gone off.
NOTE
q
See “Connection” in
the camera Owner’s
Manual.
See “Connection” in
the camera Owner’s
Manual.
Disconnecting the Camera
q
32
4
It is strongly recommended that you use the AC power adapter. Loss of power during
data communications will prevent successful data transfer.
1. Load a SmartMedia containing
photographed images into the camera.
• Do not format the SmartMedia from your camera on a Macintosh as this may make
the card unusable for taking pictures.
• Use only SmartMedia containing shots taken on a FUJIFILM digital camera.
2. Select “DSC” as the USB setting on the camera and then
switch the camera off.
3. Use the special USB cable to connect the camera to your
Macintosh.
4. Switch the camera back on.
• Always use the correct procedure when disconnecting the camera from your
Macintosh or switching the camera off.
• Do not perform any of the following when the camera is connected to a Macintosh as
this could damage the SmartMedia or corrupt the data on the SmartMedia:
Disconnect the USB cable or AC power adapter / Touch the camera controls (power
switch, control buttons, lens cover or slot cover)
5. FinePixViewer starts up
automatically and the
images on the SmartMedia
are displayed. A new
removable disk icon also
appears on the desktop.
The Exif Launcher installed with the FinePixViewer automatically launches
FinePixViewer when you connect the camera to your Macintosh.
If FinePixViewer does not start up and the removable disk icon does not appear, the
software was not installed correctly. Disconnect the camera, restart your Macintosh and
re-install the software. If this does not resolve the problem, refer to the Troubleshooting
section.
NOTE
TIP
NOTE
NOTE
TIP
See “Connection” in
the camera Owner’s
Manual.
q
q
q
Connecting the Camera as a Card Reader
4 5
Page 18

35
1
2
3
4
34
6
Acrobat Reader installation
6
2
3
4
Check this before you start the installation.
Ensure that your Macintosh hardware and software meet the system
requirements for the software to be installed.
Install FinePixViewer and restart your Macintosh.
Connect the camera in DSC mode.
Disconnect the camera in DSC mode.
Installing the Software on Mac OS X
The CD-ROM includes software for Mac OS 8.6 to 9.2 and for Mac OS X. This
chapter describes the installation and setup procedures for Mac OS X.
You must install Adobe Systems’ Acrobat Reader software to read the
FinePixViewer User’s Guide (PDF).
If you already have the latest version installed, this step is not required.
1. Double-click the “Installer for MacOS8.6–9.x” icon to launch
the installer.
2. A confirmation message appears asking whether you want to
continue with the installation. Click the [OK] button.
3. The installer setup window appears.
Click the [Install Acrobat Reader] button.
4. Install Acrobat Reader as directed by the on-screen
instructions.
This completes the installation of all the software
components. Now proceed to “Using FinePixViewer” on
page 41.
When you have installed all the software...
Once you have finished installing all the software components, remove the CD-ROM.
You will need this CD-ROM if you ever have to re-install any of the software, so keep it
in a safe place away from dampness and out of direct sunlight.
1
Page 19

Only FinePixViewer is installed on Mac OS X.
AVI movies cannot be played back on version 10.0.4.
1. Switch your Macintosh on and start up Mac OS X. Do not
launch any other applications.
2. Load the enclosed CD-ROM into the CD-ROM drive. The
“FinePix” window opens.
If the “FinePix” window does not open
automatically, double-click the CD-ROM icon.
3. Double-click “Installer for MacOS X”.
4. Click the “” icon.
5. Enter the administrator name
and password. Then click
the [OK] button.
NOTE
NOTE
37
2
36
1
From FinePixViewer installation to restart
■ Hardware and software requirements
To run this software, you must have the hardware and software described
below. Check your system before you begin the installation.
Pre-installation Checklist
1 2
AVI movie playback
Function
Batch format conversion
Create data for CD writing
Online updating
Online help
Not supported in version 10.0.4
Comment
Only supported for still images.
Not supported.
Information on updates can be obtained using [Support]
in the Internet menu.
Online help can be viewed by opening “English.pdf” in
the installation folder.
✽1
Models with a USB port as a standard feature
✽2
AVI movies cannot be played back on version 10.0.4.
✽3
Required to use the FinePix Internet Service. The software can still be installed even
if you do not have an Internet connection.
• Connect the camera directly to the Macintosh using the special USB cable. The
software may not operate correctly if you use an extension cable or connect the
camera via a USB hub.
• Push the USB connector fully into the socket to ensure that it is securely connected.
The software may not operate correctly if the connection is faulty.
• Additional USB interface board is not guaranteed.
■ Functions not supported in FinePixViewer for Mac OS X
■ Using the FinePix Internet Service
The user registration procedure for the FinePix Internet Service and the
service upload method are different from those used in Mac OS 8.6 to 9.2.
For more information on using the FinePix Internet Service, see P.72.
■ VideoImpression
This is not supported by Mac OS X. Note that live images cannot be captured
in the Classic environment.
NOTE
Compatible Mac Power Macintosh G3
✽1
, PowerBook G3
✽1
,
Power Macintosh G4, iMac, iBook,
Power Macintosh G4 Cube, or PowerBook G4
Operating System Mac OS X (compatible with version 10.0.4, 10.1.3✽2)
RAM 192 MB minimum
Hard disk space Amount required for installation: 110 MB minimum
Amount required for operation: 300 MB minimum
Display 800 × 600 pixels or better, at least 32,000 colors
Internet connection
✽3
• To use the FinePix Internet Service or mail attachment
function
An Internet connection and e-mail transmission software
• Connection speed: 56k or better recommended
Page 20

39
3
38
2
q
q
q
It is strongly recommended that you use the AC power adapter. Loss of power during
data communications will prevent successful data transfer.
1. Load a SmartMedia containing
photographed images into the camera.
• Do not format the SmartMedia from your camera on a Macintosh as this may make
the card unusable for taking pictures.
• Use only SmartMedia containing shots taken on a FUJIFILM digital camera.
2. Select “DSC” as the USB setting on the camera and then
switch the camera off.
3. Use the special USB cable to connect the camera to your
Macintosh.
4. Switch the camera back on.
• Always use the correct procedure when disconnecting the camera from your
Macintosh or switching the camera off.
• Do not perform any of the following when the camera is connected to a Macintosh as
this could damage the SmartMedia or corrupt the data on the SmartMedia:
Disconnect the USB cable or AC power adapter / Touch the camera controls (power
switch, control buttons, lens cover or slot cover)
5. ImageCapture starts up and a removable disk icon appears
on the desktop.
✽ If ImageCapture does not start up, double-click the “ImageCapture” icon in the
“Application” folder.
6. Change the ImageCapture settings as shown below and then
click the Close button.
With these settings, ImageCapture will no longer start up as of the next time you
connect the camera to your Macintosh.
TIP
NOTE
NOTE
TIP
6. Click the [Continue] button.
7. Quit out of any other programs that are running and then
click the [Continue] button.
8. Select the Mac OS X startup disk as the installation destination
and click the [Continue] button.
9. Click the [Install (upgrade)] button.
10. When you have completed
the installation, click the
[Restart] button.
Connecting the Camera as a Card Reader
3
1 Hot-Plug Actions: None
2 Automatic Task: None
See “Connection” in
the camera Owner’s
Manual.
Page 21

1. Exit any applications that are using the camera (FinePixViewer,
etc.).
2. Check that the camera and Macintosh are
not communicating.
3. Drag the removable disk icon to the Trash.
4. Switch the camera off.
5. Unplug the special USB cable from the
camera.
• Always close all the files in the camera (removable disk) folder and confirm that the
camera and Macintosh are no longer communicating.
• Disconnecting the camera or the USB cable without first dragging the removable disk
icon to the Trash could cause your Macintosh to malfunction.
• When the “Copying” message disappears from your Macintosh screen, wait a few
moments before disconnecting the USB cable or removing the SmartMedia.
If a large amount of data is being copied, camera access continues for a short time
after the message displayed on the Macintosh has gone off.
NOTE
41
This section gives a brief overview of how to use FinePixViewer. Refer to
these instructions while you are using FinePixViewer.
1. Connect the camera to your computer in
DSC mode.
2. When you open the folders shown below in order, the images
in the camera are displayed in the thumbnail display area.
On Windows XP, the removable disk
appears as “FinePix” (for the second
and subsequent connections).
3. Click the [Automatic Taking] button.
NOTE
Mac OS X
Mac OS 8.6–9.2Windows
Saving Images on Your Computer
40
4
q
See “Connection” in
the camera Owner’s
Manual.
Now, you can connect and disconnect the camera in DSC
mode.
Next, proceed to “Using FinePixViewer” on page 41.
See “Connection” in
the camera Owner’s
Manual.
q
Disconnecting the Camera
4
Using FinePixViewer
1
2
3
4
q
See “Connection” in
the camera Owner’s
Manual.
1
2
3
1
2
3
Page 22

42 43
1 indicates the folder in which
FinePixViewer is installed.
1
2
3
6. You can use functions such as “Rotate” and “Type Tool” to
modify your image. For details, see “Mastering
FinePixViewer” on page 82.
7. Click the [Save As...] button.
8. Enter a file name and click the [Save] button.
If you repeatedly save an image in the Exif-JPEG format the image quality deteriorates.
We recommend that you save the original file using the following procedure:
• First make a copy of the original file.
• Save the file under a different name or in a different location.
• Save the file in a format that does not lower the image quality (Exif-TIFF, BMP or PICT).
9. Close the image window.
NOTE
4. Check that the files are downloaded from the camera to your
computer and that a folder with the photography date is
created.
Open the folder as shown below.
To open a folder, click on the plus “ ” symbol (Windows) or arrow “ ” (Macintosh) to
the left of the folder.
OR
5. Double-click a still-image thumbnail to open an image window.
+
TIP
2
3
1
1
2
Page 23

4544
Deleting Images
1. Select the images to be deleted.
2. Click “Delete” in the File menu.
3. Click the [OK] button in the confirmation window to delete the
selected images.
1. Double-click a still-image thumbnail to open an image window.
2. Click the [Print] button.
3. Tick the checkboxes for the required print option settings.
4. Click the [Preview] button to check how the image will be
printed. When you are happy with the image, click the Close
button.
5. Click the [OK] button (Windows) or [Print] button (Macintosh)
to print the image.
Printing
<Print settings window>
Tick this checkbox to
print the image in the
center of the page.
Tick this checkbox to
print the photography
date.
Ensures that the
image is not cropped
during printing.
Prints with the minimum margins.
✽ To set details such as the paper size and printing orientation, select “Page Setup”
in the “File” menu. For more information, refer to your printer’s operation manual.
<Print settings window>
Tick this checkbox
to print the image
in the center of the
page.
Tick this checkbox
to print the
photography date.
Select
“FinePixViewer”.
Ensures that the
image is not
cropped during
printing.
Prints with the minimum margins.
✽
r
t
✽
r
t
✽
To set details such as the paper size and printing orientation, select “Page
Setup” in the “File” menu.
Page 24

4746
The figure below gives a general overview of the procedure.
Using the FinePixViewer Advanced Features
1 Launch FinePixViewer
2 Select a folder or thumbnail
3 Operations
• Double-clicking
• Drag & drop
• Clicking buttons
• Using menus
• Using the Internet menu
Select a folder Select a thumbnail
This manual describes steps 1 and 2 and part of step 3. For information on
the other functions, see “How to Use FinePixViewer” in the Help menu.
Page 25

4948
In the “Start” menu, click “Programs” /“FinePixViewer” /“FinePixViewer”.
Double-click “FinePixViewer” in the installation folder.
■ Changing the Automatic Launch Settings
Macintosh
Windows
Launching FinePixViewer
Launch automatically
Do not launch automatically
Windows 98/98 SE/Me/2000
You can use either of the methods below to prevent FinePixViewer launching
automatically.
• Change the Exif Launcher settings
1 Right click the Exif Launcher icon in the taskbar and select “Settings” from the
pop-up menu.
2 Clear the “Start automatically when connected” checkbox.
✽ To restore the original setting, use the same procedure and place a tick in the
automatic launch checkbox.
• Remove Exif Launcher
1 Right click the Exif Launcher icon in the taskbar and select “Exit” from the pop-
up menu.
2 Click the [Start] button and select “Programs”
/
“Startup”. Right-click “Exif
Launcher” and select “Remove” from the pop-up menu.
✽ To restore the original setting, create a shortcut to Exif Launcher in the
“Startup” folder.
Launch automatically Do not launch automatically
Windows XP
In Windows XP, you can select different automatic launch settings for each
connection mode.
• DSC connection mode
1 Open “My Computer” from the Start
menu.
2 Click the “FinePix” icon and then click
“Properties”.
3 Click the “AutoPlay” tab.
4 Select “Pictures”.
5 Select “Select an action to perform”.
6 Select “Take no action” to disable
automatic launching.
7 Click the [OK] button.
Mac OS 8.6 to 9.2
You can use either of the methods below to prevent FinePixViewer launching
automatically.
• Change the Exif Launcher settings
1 Select “Exif Launcher settings” in the Settings menu in FinePixViewer and
click “Do not run Exif Launcher at restart”.
2 Restart your Macintosh.
✽ To restore the original setting, use the same procedure and select the “Run
Exif Launcher at restart” checkbox. Then restart your Macintosh.
• Remove Exif Launcher.
1 Select “Exif Launcher Settings” in the Settings menu in FinePixViewer and
select the “Quit Exif Launcher immediately” checkbox.
2 Open “System Folder”
/
“Startup Items” and drag “Exif Launcher” to the
Trash.
3 Select “Empty Trash...” in the “Special” menu.
✽ To restore the original setting, reinstall the software.
• PC Camera connection mode
Follow the procedure used in other versions of Windows.
Page 26

5150
Switching between Windows
■ Showing or hiding the Playback pane or folder tree.
■ Selecting the thumbnail display mode
■ Resizing areas
You can list the photography dates and times and
the image sizes by selecting “Details”.
You can resize an area by dragging its frame.
FinePixViewer Components
Å Folder tree display area
ı Thumbnail display area
Ç Playback pane
Î Internet Service display
area
´ Playback application
display area
Shows the folders on the camera and computer.
Shows reduced versions of the images in the selected
folder.The reduced images are referred to as thumbnails.
Shows a larger version of the image along with a range
of information about the image.
Shows the FinePix Internet Service menu.
Allows you to register and switch between the
application programs used to play back images.
Name Function
The images in the folder selected in the folder tree display
area are displayed in the thumbnail display area .
BA
A
B
E
C
D
Page 27

5352
Selecting Folders
When you select a folder, the folder name is highlighted and the images in
that folder are displayed in the thumbnail display area.
If there are subfolders inside the
folder, a plus or minus symbol
appears to the left of the folder.
Clicking on the plus or minus symbol
opens or closes the folder.
–+
To open or close a folder, click the
arrow “ ” to the left of the folder.
Unselected
Select / The images in this
folder are displayed.
Open/close folder
If no or is displayed, the
folder contains no subfolders.
–+
Open/close folder
Click
To open or close a folder, click the
arrow “ ” to the left of the folder.
■ Finding the camera (SmartMedia) on your computer
Open the folders in the sequence shown below to display the images on the
camera in the thumbnail display area.
Mac OS X
Mac OS 8.6–9.2
Windows
1
2
3
4
1
2
3
1
2
3
Windows
Mac OS X
On Windows XP, the removable disk
appears as “FinePix” (for the second
and subsequent connections).
NOTE
Mac OS 8.6–9.2
Page 28

55
1. Click (to select 1 image only).
2. Click while holding down the [Ctrl] key (Windows) or [shift]
key (Macintosh) (to select another image).
3. Click in the background (to deselect all the selected
images).
4. Click “Select All” in the “Edit” menu (to select all the
images).
Before
After
54
Select a Thumbnail
The thumbnail display area shows a list of reduced versions of the images in a
folder. The reduced images are referred to as thumbnails.
The type of thumbnail shown differs depending on the file format.
Still image Sound
A damaged file or a
format not supported by
FinePixViewer.
When a thumbnail is
selected, a pink frame
appears around the
image.
Still image
with sound
Movie
This section describes how FinePixViewer operates when you select a
thumbnail. Refer to the operation examples provided here.
• When you click a thumbnail, only that thumbnail is selected.
• To select multiple images, drag the mouse so that the images are enclosed.
• To select additional thumbnails, hold down the [Ctrl] key (Windows) or [shift] key
(Macintosh) as you click the images.
• Click in the background to deselect all the selected images.
Copy
Å Drag and drop the folder or image in
the folder tree display area while
holding down the [Ctrl] key (Windows)
or [option] key (Macintosh).
Stop a copy
When you drop the folder or image (release the mouse button) the operation ends.
ı Drop the folder or image in the
thumbnail display area.
Aim Operation
Mouse pointer during the
operation (Windows)
Copying Images
You can use drag and drop to copy folders and images.
A
B
Operation Examples
Page 29

Deletes the file in the save destination and saves the data as a new file.
Cancels batch processing.
Leaves the file in the save destination and proceeds to the next step.
Allows you to rename the file.
5756
If you tick this checkbox, a folder is created in which all the images are saved.
If there is already a folder with that name, the images are saved in that folder.
■ Naming folders
If you tick this checkbox and there is already a file with the same name, that
file is overwritten without any warning being displayed.
You are advised to leave this checkbox blank unless you have a particular
reason.
■ Instructions that can be selected in the overwrite warning screen
If you tick this checkbox, all the original files are deleted. You are advised to
leave this checkbox blank unless you have a reason.
Click the [Browse] button to
change the save destination.
Date
The Same Name
Arbitrary
The file’s date is used as the folder name.
The name of the folder containing the original file is used as the
folder name.
Enter the name yourself.
Example where “Overwrite” applies only to file A and the other files are
skipped.
Save to
File A
File B
File C
File A
File B
File C
Save to
File A
File B
File C
■ Way of Saving
Specify the save destination for the converted files.
Once you specify the destination and click the [OK] button, the file format is
converted. The same settings are used for subsequent file format conversions.
This function allows you to convert the formats of multiple files at once. You
can use this, for example, when you want to make the file sizes smaller.
Select the thumbnails with the formats you want to convert and specify the
settings.
■ Format Conversion
Select the file type you want to convert.
Exif-JPEG Smaller file sizes/ On the Internet
Lowered during
saving
Exif-TIFF
Saved with its Exif data /To retain image
quality and information
Not lowered
during saving
BMP
(Windows only)
Standard Windows image file format/For
viewing on other Windows PCs
PICT
(Macintosh only)
Standard Macintosh image file format/For
viewing on other Macintoshes
Still Image File Type
Features/Typical Uses Quality
Batch Format Conversion
Only AVI (Motion JPEG) movies shot on a FUJIFILM camera can be converted and saved.
NOTE
FeaturesMovie File Types
FeaturesMovie File Types
Macintosh
Windows
Windows Media video (Normal)
Saves files in a standard Windows file format.
Has lower image quality and smaller file sizes.
Windows Media video (for E-mail)
QuickTime movie (Normal)
QuickTime movie (for E-mail)
Saves files in a standard Macintosh file format.
Has lower image quality and smaller file sizes.
Overwrite
Cancel
Skip
Rename
Page 30

5958
3. The “FinePix CD Album Maker” window opens and the folders
selected in step 2 are registered.
• A warning message appears if the amount of registered data exceeds 650 MB.
• You cannot register thumbnails displayed in FinePixViewer. Move the thumbnails to a
new folder and then register the new folder.
4. Because CDs written using this function cannot be rewritten,
check that all the data you intended to register is in fact
registered.
5. When you have registered all your images, click the [Create
data for CD writing] button.
TIP
FinePix CD Album Maker is a tool that helps you to process images and
record them on CD-R disks. This function is useful when you want to back up
your images or show them to a friend who does not have FinePixViewer.
To write a CD-R disk, you need a CD-R drive and CD writing software. If you
use the Windows XP or Mac OS CD writing functions, your disks may be
unreadable when you give them to other people.
Still images in formats other than JPEG (such as TIFF files) cannot be viewed
in the Internet browser. You should use batch format conversion to save your
images in JPEG format before creating a FinePix CD Album.
■ CD writing software for which operation has been verified
1. Launch FinePixViewer.
2. Click the folder containing the images you want to write to
the CD and then click the [Create data for CD writing] button.
Register
Setup
Write
CD-R
• Back up
• Give to friends
CD-writing
software
Create
Images are displayed showing the folder
contents.
Current data size.
Drag and drop to add
further images.
When you select a folder and click “Remove Registration” in the “File” menu,
that folder is deregistered.
[Create data for CD wtiting] button
Windows Macintosh
roxio Easy CD Creator 5 roxio Toast 5
Making a FinePix CD Album
Page 31

6160
8. Use the formats below to record images onto the CD.
Recording mode: DiscAtOnce
Format: ISO 9660 level 1
About DiscAtOnce
• DiscAtOnce is a method for writing data to a CD-R disk in which all the data is written
in a single operation. This method does not allow further data to be written to the disk,
but it provides good compatibility and disks recorded using this method can be read
even on older CD-ROM drives.
• DiscAtOnce is sometimes abbreviated as DAO.
TIP
If “Write now” is selected
If “Write afterwards” is selected
6. When you have completed the settings, click the [Create]
button.
This type of display is created.
A
B
C
D
7. Wait a few moments until data creation is completed.
Times vary depending on your computer’s
performance, but writing takes about 15
minutes for around 600 MB of data (approx.
600 files).
TIP
Do not drag and drop the CD icon to a location outside the CD writing software.
NOTE
✽ Actual screen may differ.
✽ Actual screen may differ.
Å
Specify the folder used for creating the CD writing data (up to 15 alphanumeric
characters (including quotation marks)).
ı
Sets the title and comment for the created HTML file (web page data).
Ç
Select the order in which files are arranged on the CD.
Î
Decide the styles used in the created HTML file (web page data).
Page 32

6362
1. Click “Control Panels” /
“Internet” and then click the
“E-mail” tab.
2. Check that “Outlook
Express” is shown in
“Default E-mail Application”.
1. Click “System Preferences...” in the Apple menu.
2. Click “Internet” and then click “Mail”.
3. Check that “Mail” is selected as the “Default e-mail software”.
Mac OS X
Mac OS 8.6–9.2
Follow the procedure below to set up Outlook Express to attach images to e-mail
messages in FinePixViewer✽. To check the Outlook Express version, click “About
Microsoft Outlook Express” in the Outlook Express “Help” menu.
✽This feature can be used only when Outlook Express is selected as your default
e-mail application.
1 Quit any e-mail applications other than Outlook Express that are currently
running.
2 Click “Options” in the “Tools” menu to open the “Options” window.
3 Click the “General” tab and click the “Make Outlook Express my default e-mail
program” checkbox so that it is ticked.
4 Click the “Make Outlook Express my default Simple MAPI client” checkbox so
that it is ticked. When the confirmation message for the changed settings
appears, click the [Yes] button.
5 Click the [OK] button to close the “Options” window and click the [OK] button
again when the following message appears:
“The Simple MAPI client has been changed. You may need to restart your
machine for this change to take effect.”
6 Exit Outlook Express and restart your computer.
When Using Outlook Express 4 on Windows 98
Attaching Images to E-mail Messages in FinePixViewer
FinePixViewer provides a simple procedure for attaching images to an e-mail
message.
■ Supported E-mail Software
The e-mail software programs listed below can only be used if they are selected
as your default e-mail software.
Outlook Express, Outlook 2000 or Outlook 2002
Outlook Express
Mail
Contact your ISP (Internet Service Provider) for information on setting up your e-mail
software.
■ Check the following:
Check that your e-mail software is registered correctly.
1 In the “Start” menu, click
“Settings” / “Control Panel”
/ “Internet Properties” and
then click the “Programs”
tab.
2. Check that Outlook Express
or Outlook is shown in the
“E-mail” field.
Windows
NOTE
Mac OS X
Mac OS 8.6–9.2
Windows
Page 33

6564
5. The Outlook Express or Outlook
mail transmission window opens
and the images are automatically
attached to your e-mail message.
Type in the address, title and your
message and then send the
message in the usual way.
Do not exit FinePixViewer until mail transmission is complete, as this will prevent the email with the images attached from being sent.
■ Setting the file size for attached images
When FinePixViewer attaches an image file to an e-mail message, it adjusts
the size of the image file in accordance with the “Mail Transmission Settings”.
✽
When an image is resized, the original image is not affected.
1. Click “Mail Transmission Settings” in the “Settings” menu.
2. Place a tick in the “Resize” checkbox and specify the number
of pixels (height and width) for resized images.
If you do not want to resize the image, deselect the “Resize” checkbox.
TIP
NOTE
■ Attaching Images
1. Launch FinePixViewer.
In the “Start” menu, select “Programs” / “FinePixViewer” /
“FinePixViewer”.
2. Click the folder containing the images you want to attach.
3. Click the thumbnails for the images to select them.
✽
Up to 10 images can be sent with one e-mail message.
4. With the images selected, click “Mail Sending” in the “File”
menu.
✽
You can send a total of up to 1 MB of image data at one time.
If the total exceeds 1 MB, a warning message appears when you click “Mail
Sending”. If this occurs, reduce the number or size of the images until the
message no longer appears.
Use the Batch Format Conversion function ( / P.56) to convert the file format for
movies.
TIP
Page 34

To use the FinePix Internet services, users must first register.
✽
Follow the steps below to register. Users can be registered for free.
1. Launch FinePixViewer.
2. Click the [Register Now] button.
3. The “User’s Registration for Internet Services” dialog box
opens. As shown below, select [Register Here], then select
the country or region where you are living and click the [OK]
button.
☞ If you are not already connected to the Internet, connect now.
(A dial-up dialog box may be displayed.)
✽ If you have completed the user registration, select “Already Registered” (E.g.
When you want to re-install FinePixViewer after completing user registration).
✽ If the country or area where you are living does not appear in the pull-down list,
select “OTHERS”.
6766
User Registration
Using the FinePix Internet Service
Mac OS X users should refer to P.72.
Using FinePixViewer also allows you to access the FinePix Internet Service
via the Internet.
✽ A working Internet connection is required.
✽ A FinePix Internet Service fees do not include your Internet service provider (ISP)
connection fees or any phone charges incurred in dialing your ISP’s access point.
The figure below gives a general overview of the procedure.
NOTE
1
User Registration
First-time users
To the user registration window
Registered users
The Internet menu is updated.
2
Using the Services
Obtain the latest service information.
You can use videoconferencing.
You can also use the “Videoconferencing” (Windows only) and “Online Update”
services.
Your user ID and password are very important. Make sure you do not forget them.
NOTE
Page 35

1. Click the [Update menu] button in FinePixViewer.
2. The “Input of User ID” dialog box
appears. Enter the user ID and
password set during user
registration and then click the [OK]
button to update the Internet
menu.
☞ If you are not already connected to the
Internet, the software automatically attempts
to connect (for dial-up connections).
• If you tick the “Click here to save your password” checkbox, you will not need to enter
your password next time.You may need your user ID and password. Make sure you
do not forget them.
• As well as the Internet menu being updated, related information pages may also be
opened. Because these pages may contain good news or useful information, you
should update the Internet menu frequently.
3. Click the menu button for the service you want to use.
☞ If you are not already connected to the Internet, the software automatically
attempts to connect (for dial-up connections).
☞ Operation after you click the menu button differs depending on the button you
click. For instance, you may jump to your service provider’s web site or an
upload dialog box may open.
✽
The actual Internet menu may differ slightly in appearance from the sample
shown here.
Move the mouse cursor over an Internet menu button to view information about the
service.
4. When you have finished using the Internet services,
disconnect from the Internet (for dial-up connections).
The connection speed will vary significantly depending on the quality of your phone line
and the amount of traffic on the server to which you are connected.
NOTE
TIP
TIP
6968
Using the Services
4. When the browser starts up, proceed as directed by the
on-screen instructions.
5. Enter the required information in the user registration page.
1 Enter the name of your choice (nickname, etc.).
2 Enter a password of your choice using letters and/or numbers. Then enter the
password again for confirmation.
3 Enter your name.
4 Enter your e-mail address.
5 Enter the remaining required information.
✽
After you register, a confirmation e-mail message is sent to you. Be sure to enter
a valid e-mail address at which you can receive the message.
✽
The actual user registration page may differ slightly in appearance from the
sample shown here.
6. When you have entered all the required information, click the
[Registration] button at the bottom of the page.
Once you complete the registration, a confirmation e-mail is sent.
Wait a few moments until the message is sent.
●
1
●
2
●
3
●
4
Page 36

7170
6. After your computer restarts, download the Internet menu
again. Launch FinePixViewer and click the [Register Now]
button.
7. Select “Already Registered” and then click the [OK] button.
8. Enter your user ID and password.
The update is completed when the Internet menu appears.
Obtaining the Latest Version of FinePixViewer
By registering as a FinePix Internet Service user, you can download the latest
version of FinePixViewer and install it on your computer.
When you update your software, your user ID and password for the FinePix
Internet Service are deleted from your computer. Ensure that you do not
forget your registered user ID and password.
1. When you click “Software Update” in the “Help” menu,
FinePixViewer connects to the Internet and looks for a new
version of FinePixViewer.
2. If a new version is found, the dialog box shown below
appears.
3. Click the [Now] button and then wait until downloading is
completed.
4. Updating begins automatically.
5. Restart your computer.
Page 37

7372
User Registration
Using the FinePix Internet Service (Mac OS X)
If you use the FinePixViewer, you can also access the FinePix Internet
Service via the Internet. When you register, you will be able to use the various
services provided in the country where you are registered.
• The services provided vary depending on the country.
• The services are frequently updated, so we recommend that you access
them regularly.
• In order to access the service you need to have an internet connection,
provided by an ISP (Internet Service Provider.)
✽
You must have the hardware and software required environment for connecting to the
Internet.
✽
The FinePix Internet Service does not include any connection fees charged by your
service provider or the normal telephone charges for dialing your service provider’s
access number.
To use the FinePix Internet services, users must first register.
✽
Follow the steps below to register. Users can be registered for free.
1. Double-click the “FinePixViewer” icon in the installed folder.
2. Click the [User’s
Registration] button. The
“Operation Selection” dialog
box appears.
<User’s Registration button>
3. Select “User’s registration” and click the [OK] button.
☞ If you are not already connected to
the Internet, connect now.
(A dial-up dialog box may be
displayed.)
✽
Only select menu acquisition if you
have already completed the user
registration process and you have
re-installed “FinePixViewer”, etc.
●
1
●
2
●
3
●
4
4. The User’s Registration dialog box
opens.
Select the country or area where
you are living and click the [OK]
button.
✽
The actual user registration page may differ slightly in appearance from the
sample shown here.
✽
If the country or area where you are living does not appear in the pull-down list,
select “OTHERS”.
5. When the browser starts up, proceed as directed by the
on-screen instructions.
6. Enter the required information in the user registration page.
1 Enter the name of your choice (nickname, etc.).
2 Enter a password of your choice using letters and/or numbers. Then enter the
password again for confirmation.
3 Enter your name.
4 Enter your e-mail address.
5 Enter the remaining required information.
✽
After you register, a confirmation e-mail message is sent to you. Be sure to enter
a valid e-mail address at which you can receive the message.
✽
The actual user registration page may differ slightly in appearance from the
sample shown here.
7. When you have entered all the required information, click the
[Register] button at the bottom of the page.
Once you complete the registration, a confirmation e-mail is sent.
Wait a few moments until the message is sent.
Page 38

7574
Videoconferencing with PictureHello
■ What is videoconferencing?
Videoconferencing is a form of communication in which you can see a live
image of the person you are calling as you converse in realtime. This
explanation describes the use of the FinePixViewer PictureHello software, in
which specific PCs communicate with each other (one-to-one communication)
via the Internet.
The main steps in the procedure are as follows:
1
2
3
4
5
6
7
Check your computer’s hardware and software.
Ensure that your computer hardware and software meet the system
requirements.
Set the camera to “PC CAMERA” mode and connect it to
your computer.
Refer to the Owner’s Manual for your camera for information on selecting “PC
Camera” mode.
Log in.
Begin the videoconferencing session.
To end the call, click the [End call] button.
To end the videoconferencing session, log out.
Register your e-mail address.
Using the Services
Once user registration is completed, you can use the FinePix Internet
services.
■ Selecting services
1. Click the menu button for the service you want to use.
☞ If you are not already connected to the Internet, the software automatically
attempts to connect (for dial-up connections).
☞ Operation after you click the menu button differs depending on the button you
click. For instance, you may jump to your service provider’s web site or an
upload dialog box may open.
✽
The actual Internet menu may differ slightly in appearance from the sample
shown here.
Move the mouse cursor over an Internet menu button to view information about the
service.
2. When you have finished using the Internet services,
disconnect from the Internet (for dial-up connections).
The connection speed will vary significantly depending on the quality of your phone line
and the amount of traffic on the server to which you are connected.
■ Updating the Menu
1. Select “Menu Update” from the “View” menu.
2. The “Enter Network Password” dialog box appears.
Enter the user ID and password set during user registration
and then click the [OK] button to update the Internet menu.
☞ If you are not already connected to the Internet, the software automatically
attempts to connect (for dial-up connections).
As well as the Internet menu being updated, related information pages may also be
opened. Because these pages may contain good news or useful information, you
should update the Internet menu frequently.
TIP
NOTE
TIP
Page 39

7776
■ Picture Descriptions
Other party’s image
Pop-up menu
Your image
9
✽
Portrait images are inset composite images.
Name Explanation
q Connection icon Indicates whether you are logged in to the server.
w Login button Logs in to the server.
e Logout button Logs out from the server.
r Start Call button Notifies the other party that the call has begun.
t End Call button Ends a call.
y Close button Exits PictureHello.
u Address Book button Opens the address book.
i Address input field Used for specifying the party to be called. You can use this
field to directly type in the other party’s e-mail address.
o Capture button Pauses the video image of the other party and saves the
paused frame as a still image.
!0 Remote party information Reflects the information in the address book.
!1 Own information E-mail address used at user registration.
!2 Message to other party Message entered during login.
!3 Answer automatically Tick this checkbox to begin videoconferencing
checkbox automatically.
!4 Bandwidth
(network speed)
Select the network connection speed used for calls from
this list. If you change the bandwidth, you must then restart
FinePixViewer.
!5 “Pause” If you uncheck this item, the live image on your screen
begins to move. When you want to check whether the live
image is displayed correctly, uncheck this item. (“Pause” is
unchecked automatically during calls.)
!6 Items other than PictureHello automatically selects the optimum setting.
“Pause” and “Copy” Ordinarily, these settings can be ignored.
!7 Properties To rotate the input screen, click the following in order:
[Properties] / (Optional screen display) [Video] tab /
[Source] button / (USB PC Camera display screen)
[Camera Controls]. Then specify the rotation angle in [Roll].
✽
Menu displayed when
you click the right
mouse button on your
image.
■ Hardware and software required for videoconferencing
● A FUJIFILM camera equipped with the “PC Camera” function
● A PC with an Internet connection
✩ 56kbps modem connection or better or an ISDN connection
✩ An established service contract with an Internet service provider (ISP)
✽
Depending on your type of Internet connection and/or your modem connection
speed, video quality may deteriorate and some frames may be lost.
✩ A sound card installed and speakers and a microphone connected to your PC
✽
PCs that do not have a sound card installed and speakers and a microphone
connected can only be used to transmit images.
✽
For the best results, use headphones with an attached microphone.
✩ If your Internet connection is via a router or via a LAN (connecting machines on
the LAN to the Internet), you cannot use videoconferencing.
✩ If you are using Windows XP and you tick the “Protect my computer and network
by limiting or preventing access to this computer from the Internet” checkbox in
the Internet connection firewall settings, videoconferencing cannot be used. See
“Troubleshooting” (/P.100) for information on setting up firewalls.
✩ If your PC and the other party’s PC are connected to the same LAN and you are
connected to the Internet via a router, PictureHello can be used between the 2
PCs. However, if there is a firewall between the LAN and external lines, the
status of parties in the Address Book may be “Unknown” depending on the
firewall settings, making calls to those parties impossible.
● FinePixViewer and NetMeeting 3.01 installed
● A completed FinePix Internet Service user registration
✽
When the [ ] (Register Now) button is displayed on the right side of the
FinePixViewer window, you must complete the user registration procedure
(/P.66).
Take care when using your own e-mail address. Disclosing your e-mail address to
people other than those you wish to call could result in unintentional and
unnecessary videoconferencing calls from third parties.
Important Notes on E-mail Addresses for Videoconferencing
Page 40

7978
■ Starting the call
1. Click the [Address Book]
button to open the Address
Book.
2. Click the [Update Status] button in the Address Book to
check the status of the party you are calling.
Click the information column for the other party to select him
or her and then click the [Start Call] button.
☞ The call begins when the other party replies.
1 Stay logged on and wait a few minutes.
2 Click the [Update Status] button in the Address Book to
check the status of the other party.
3 Repeat steps 1 and 2 until the other party becomes
available. If you decide not to call, see “Ending the
Videoconference” on P.80.
■ When a call comes in
A confirmation dialog box appears. Click the [Yes] button to
begin the call.
☞ If you click the [No] button, the call does
not begin. The caller sees a message
stating, “The other party cannot receive
calls.”
If you tick the “Automatically accept incoming calls” checkbox, no confirmation message
is displayed and the call begins automatically.
■ Saving a Caller’s Image
1. When you click the [Capture] button during a call, the
“Remote party information” image is updated.
TIP
If the other party is unavailable
If the other party is available
q
■
Preparations for videoconferencing (to be followed by both parties)
1. Obtain the e-mail addresses of both parties. (These must be
the e-mail addresses given during FinePix Internet Service
user registration.)
2. Switch the camera on and select “PC CAM”
as the USB setting.
3. Use the special USB cable to connect the
camera to your PC.
4. Check that FinePixViewer has started up and the PictureHello
window has opened automatically.
☞ To open the PictureHello window manually, click “Videoconferencing” in the
FinePixViewer “Tools” menu.
✽
You cannot use PictureHello and NetMeeting at the same time. Do not attempt
to launch NetMeeting when you are using PictureHello.
• Do not switch off the camera or disconnect the USB cable during live image display
as this may cause your PC to hang.
• If the “PictureHello” window does not open, refer to “Troubleshooting” (/ P.94).
• If no live image is displayed, right-click in the live image display area and uncheck
“Pause” in the menu (/ P.77).
5. Open the “Address book” and store the e-mail address of the
other party. (/ P.81)
6. Log in.
Click the [Login] button.
Connect to the Internet and then click the [Login] button.
7. A message input dialog box opens. Type in a message to the
other party and click the [OK] button.
☞ When you are successfully logged in,
the connection icon changes to
indicate a call in progress.
✽
If your network setup is checked and
there is a possibility that you cannot
use videoconferencing, the
“Information” dialog box opens. If you
clear the checkbox, the “Information”
dialog box does not appear.
• Messages are sent without being encoded. Take care not to send important
information such as telephone or credit card numbers.
• To change the message, you must log out and then log in again.
NOTE
If your system is set up for manual connection to the Internet
If your system is set up to automatically connect to the Internet
NOTE
See “Connection”
in the camera
Owner’s Manual.
Page 41

8180
You can use the address book to check the status of other parties and to store
addresses. To view the address book, click the [Address Book] button.
■ Checking the status
Click the [Update Status] button to check the latest status details.
[Update Status] button
Click the [Capture] button to
store or update.
1 Other party’s name
2 Other party’s e-mail address
3 Comment (not seen by the other party)
4 Message written when the other party
logged in
Status
1
2
3
4
Icon Can be called? Status of other party
No Not logged in.
Yes Logged in.
No Logged in but busy with another call.
Unclear Unclear. Click the [Update Status] button.
■ Registering E-mail Addresses
To add a new address or edit an existing address, click the [New] or [Edit]
button. Enter or modify each item and then click the [OK] button.
1 Other party’s name
2 Other party’s e-mail address
3 Comment (not seen by the other party)
1
2
3
Using the Address Book
2. A dialog box to confirm the save destination appears. When
you select “Paste to address book” and click the [OK] button,
the image in the address book is updated.
✽
If you accept a call, you can only
select “Copy to Clipboard” during the
call.
■ Ending a Call
Click the [End Call] button.
If you call someone who is not already listed in the Address Book, a dialog box appears
when the call ends asking you whether you would like to store the other party’s details
in the Address Book. Click the [Yes] button to store the information in the Address Book.
■ Ending the Videoconference
1. When you click the [Logout] button, the connection to the
server is ended.
2. To exit PictureHello, click the [Close] button.
If you are using a dial-up connection, logging out does not disconnect you from the
Internet. If you have finished using the Internet, disconnect manually.
NOTE
TIP
Page 42

Mastering FinePixViewer
8382
You can use VideoImpression to make your own movies.
For more information on VideoImpression, refer to the contact information
provided on the back cover of this manual.
● Allows you to create and save movies that include both still and moving
images and sound.
● Allows you to edit your movies so you can cut unwanted scenes or add
captions.
● Provides effective ways of switching from one scene to another (transitions)
● Connects in PC Camera mode to download live images.
✽
More information on these functions and how to use them is available as follows:
• Open the “English.pdf” file on the enclosed CD-ROM.
Windows: Open “English.pdf” in the “Manual” folder inside “Vimpress” on the CD-ROM.
Macintosh: Go to “FinePix for Mac OS 8.6-9.x” → “VideoImpression” → “MANUAL”
on the CD-ROM and read the “English.pdf” file.
• Check on the Internet by clicking the link in the bottom right corner of the screen.
• Use the contact details printed on the back cover.
The main steps in the procedure are as follows:
Main Functions
Lights, Camera, Action! Using VideoImpression
Launch VideoImpression.
Add a storyboard.
Edit the movie.
Play back and check the edited movie.
Save the edited movie.
Store your movie in an album.
For more information on FinePixViewer functions not fully explained in this
manual, refer to “How to Use FinePixViewer” in the Help menu.
■ To read “How to Use FinePixViewer”...
You must install Adobe Systems’ Acrobat Reader. See P.25 (Windows) or
P.34 (Macintosh) for information on installing Acrobat Reader.
■ What is explained in “How to Use FinePixViewer”...
“How to Use FinePixViewer” covers a range of topics, including batch
processing and ordering prints.
■ Example: Looking up slide shows
1. Click “How to Use FinePixViewer” in the FinePixViewer Help
menu.
2. Search for relevant articles by clicking the corresponding
items in the Help “Bookmarks” or “Contents”. Here, click
“Viewing Slide Shows”.
3. The “Viewing Slide Shows” information is displayed. Press
the “←” key to view the previous page or the “→” key to view
the next page.
✽
For more information on using Acrobat Reader, refer to the Acrobat Reader “Help” menu.
– Using Online Help –
4
5
1
2
3
6
Bookmarks
Contents
Page 43

8584
■ Add text
1. Click the [edit movie] button to
switch to the editing window.
2. Click the [text] button and enter the text.
☞ You can use the drag handle to adjust the position.
3. Use the buttons below the image to specify settings such as
the typeface and the time for which the text appears.
■ Play back and save the movie
1. Click the [play movie] button to
switch to the playback window.
2. Click the [Play] button and check
the movie.
3. When you click the [save] button, the Save dialog box
appears. Specify the save location, file name, etc. and save
the movie file.
• If you leave the mouse pointer positioned over a button or image for a few seconds,
information about that button or image is displayed.
• In any window, you can access the online help by clicking “?”.
• In addition to “MPEG”, you can choose from a wide range of formats for saved files.
TIP
The procedure for capturing live images differs
depending on the operating system you are using.
Windows / P.86
Mac OS 8.6 to 9.2/P.88
Drop images into here.
Drop sounds into here.
Making Your Own Movies
<FinePixViewer>
■ Store the movie in an album
To work with still images, video and sound, you first have to import them into
the album window.
1. Launch VideoImpression.
Windows
In the “Start” menu, click “Programs” / “ArcSoft
VideoImpression” / “ArcSoft VideoImpression 1.6FP”.
Mac OS 8.6 to 9.2
Double-click the “VideoImpression 1.6FP” icon in the folder
where the software was installed.
2. Click the [new] button to open an album window.
3. Drag the thumbnails from FinePixViewer and drop them into
the album window.
■ Add a storyboard
In the storyboard, you select the files to be used in the movie and set the
order in which the files are played.
1. Add files to the movie by dragging
them from the album window and
dropping them onto the
storyboard.
2. If necessary, you can drag items
around in the storyboard to
change the playback sequence.
Page 44

8786
6. Display switches to the capture window and the live image is
displayed. If the live image does not appear, click the [Live]
button 1.
✽
Recording has not yet started.
7. Use the [Drives] button 2 to select “USB PC Camera”.
To rotate a live image, click the “Source” button and specify a rotation angle in the “Roll”
setting in the “Camera Controls” tab sheet.
8. Click the [Record] button 3 to start recording.
9. Click the [Record] button 3 again to end recording.
✽
The recorded images are not saved to a file.
■ To check the images
Click the [Play] button 4.
■ To save the images to a file and return to the Album window
1. When you click the [album] button, the Save dialog box
opens. Specify the save destination and click the [OK] button.
2. When the album storage confirmation dialog box appears,
click the [OK] button.
TIP
1 3 4
2
Capturing Live Images (Windows)
q
See “Connection” in
the camera Owner’s
Manual.
If your camera has a PC Camera function, you can download live images to
your PC.
1. Connect the camera to your PC in “PC
Camera” mode.
• Always use the correct procedure when disconnecting the camera from your PC or
switching the camera off.
• Do not perform any of the following when the camera is connected to a PC as this
may cause the PC to hang:
Disconnect the USB cable or AC power adapter / Touch the camera controls (power
switch, control buttons, lens cover or slot cover)
2. If FinePixViewer starts up, quit FinePixViewer.
3. In the “Start” menu, select “Programs” / “ArcSoft
VideoImpression” / “ArcSoft VideoImpression 1.6FP”.
4. When the startup screen appears,
click the [new] button.
5. When the album window opens,
click the [capture] button.
NOTE
Page 45

If your camera has a PC Camera function, you can download live images to
your Macintosh.
1. Switch the camera on and select “PC CAM”
as the USB setting.
2. Connect the camera to your Macintosh.
• Always use the correct procedure when disconnecting the camera from your Macintosh
or switching the camera off.
• Do not perform any of the following when the camera is connected to a Macintosh as
this may cause the Macintosh to freeze:
Disconnect the USB cable or AC power adapter / Touch the camera controls (power
switch, control buttons, lens cover or slot cover)
3. Double-click the “VideoImpression 1.6FP” icon in the
installation folder.
4. When the startup screen appears,
click the [new] button.
5. When the album window opens,
click the [capture] button.
NOTE
8988
6. The Capture window appears and
the live image is displayed.
✽
Recording has not yet started.
To rotate a live image, click the “Source”
button and specify a rotation angle in the
“Roll” setting in the “Camera Controls” tab
sheet.
7. Click the [Capture Video] button to begin recording the
movie.
☞ The name of the button changes to [Stop Capture]. During recording, only the
[Stop Capture] button can be pressed.
8. Click the [Stop Capture] button to stop recording. The movie
data will be automatically saved to a file and imported to the
Album.
9. Click the [Done] button to
return to the Album window.
• You must have a sound card installed and speakers and a microphone connected to
your Macintosh to input and output sound.
• The time required for playing and saving images varies depending on the
performance of your Macintosh.
• Do not perform any of the following while live camera images are being displayed as
this could cause your Macintosh to freeze:
Switch off the camera/Touch any of the control buttons on the camera/ Disconnect
the USB cable/Remove the SmartMedia/Open the SmartMedia cover/ Remove the
camera battery/Put your Macintosh to sleep.
■ Disconnecting the Camera from your Macintosh
1. Exit “VideoImpression”. If you are using any other applications
that display live images, exit those applications also.
2. Switch the camera off.
NOTE
TIP
<Standby> <Movie recording in progress>
q
See “Connection” in
the camera Owner’s
Manual.
Capturing Live Images (Mac OS 8.6 to 9.2)
q
q
See “Connection” in
the camera Owner’s
Manual.
Page 46

91
Uninstalling the Software
q
<To remove the driver software>
Only perform this operation when you no longer require the installed software.
1. Switch on your PC.
2. Disconnect the camera.
3. Quit all currently running applications.
4. Close all files.
5. Open the “My Computer” window and
double-click “Add/Remove Programs” in
the Control Panel.
6. The “Add/Remove Programs
Properties” window appears.
Select the software to be
uninstalled (FinePixViewer
or the driver) and then click
the [Add/Remove] button.
7. When the confirmation message appears, click the [OK]
button. Check your selection carefully since the process
cannot be cancelled once you click [OK].
8. Automatic uninstallation begins.
When uninstallation ends, click the [OK] button.
Windows
90
<To remove FinePixViewer>
See “Connection” in
the camera Owner’s
Manual.
Page 47

9392
When you have a problem
My computer doesn’t recognize the camera.
• I can’t see the files on the SmartMedia.
• I can’t see the removable disk icon.
• I can’t shoot live images.
Was installation completed normally?
Is the camera switched on?
Are the batteries dead?
Are the cables connected securely?
Is there a SmartMedia loaded in the camera?
When I disconnect the camera from the computer...
• A warning appears on the computer.
• My computer doesn’t operate normally.
Did you follow the correct procedures before disconnecting the
camera?
Have you resolved the problem?
If not, go to “Troubleshooting”.
Windows ......................................................................................P.94
Macintosh ..................................................................................P.103
Reinstall the software.
Windows........................................P.11
Mac OS 8.6 to 9.2 .........................P.27
Mac OS X ......................................P.35
Read the Owner’s Manual for the
camera and load the SmartMedia
correctly.
Carry out the correct procedures
for the operating system running
on your computer before
disconnecting the camera.
Windows........................................P.20
Mac OS 8.6 to 9.2 .........................P.33
Mac OS X ......................................P.40
Only perform this operation when you no longer require the installed software or when
the software was not installed correctly.
Mac OS 8.6–9.2
NOTE
Macintosh
Uninstalling Mass Storage Driver and PC Camera Driver
1. Check that the camera is not connected to your Macintosh.
2. Drag all the files that begin with “USB04CB...” to the Trash.
3. Restart your Macintosh.
4. Select “Empty Trash” in the “Special” menu.
1. After you have quit Exif Launcher in “Exif Launcher Settings”
in the FinePixViewer “Settings” menu, move the Exif
Launcher file from the “Startup Items” folder in the System
folder to the Trash. Then select “Empty Trash” in the
“Special” menu.
2. After you have exited FinePixViewer and DP Editor and then
drag the installed FinePixViewer folder to the Trash. Then
click “Empty Trash” in the “Special” menu.
Mac OS X
Uninstalling Exif Launcher, FinePixViewer and DP Editor
Quit FinePixViewer and DP Editor. Then drag the installed
FinePixViewer folder to the Trash and select “Empty Trash” from
the “Special” menu.
Uninstalling FinePixViewer
Page 48

9594
OS Type Name of Folder ✽ When using CD-ROM Drive D
Windows 98 D:\win98
Windows Me D:\win9x
Windows 2000 Professional D:\i386
Windows XP D:\i386
If no Windows CD-ROM was supplied with your PC, contact your PC manufacturer.
NOTE
■ I was asked for the disk labeled “Windows” the first time I connected
the camera to my PC.
Solution
1 Load the Windows CD-ROM into the CD-ROM drive.
2 Click the [Browse] button in the “Copy files” dialog box.
3 In the dialog box that then appears, select the CD-ROM icon in the drive display
area, refer to the information in the table below and specify the appropriate folder
and then click the [OK] button.
4 In the “Copy files” dialog box, click the [OK] button to install the driver. Then click
the [Finish] button.
Possible cause Solution
■ When I connect the camera to my PC, the “Add New Hardware Wizard”
appears.
Is FinePixViewer installed? Use the enclosed CD-ROM to install
FinePixViewer (/P.11).
Possible cause Solution
■ When I double-click the removable disk icon, “The device is not
ready” error message appears.
Is the SmartMedia loaded in the
camera?
Load a SmartMedia into the camera.
For more information, refer to the Owner’s
Manual for your camera.
■ A warning message appeared when I disconnected the camera from
my PC.
Possible cause Solution
Did you disconnect the camera while
the camera and PC were
communicating?
Disconnecting the camera while it is still
mounted can corrupt the data on the
SmartMedia or damage the SmartMedia
itself. Always check that all the files on the
camera (on the removable disk) are
closed and that the camera and PC are
no longer communicating before you
disconnect the camera.
Connection
95
96
If the software does not operate correctly but the problem does not match any
of those listed below, check that you are using the correct hardware and
software (/P.12).
If the problem persists even though you are using the correct hardware and
software, refer to the table below and then see the reference page listed for
your problem.
Page
Videoconferencing
Problem
with
98
99
100
101
102
97
Other
Problem
I was asked for the disk labeled “Windows” the first time I connected the
camera to my PC.
When I connect the camera to my PC, the “Add New Hardware Wizard”
appears.
When I double-click the removable disk icon, “The device is not ready” error
message appears.
A warning message appeared when I disconnected the camera from my PC.
My PC doesn’t recognize the camera (I can’t use the camera from my PC).
A “Device eject warning” appeared.
FinePixViewer automatic startup is slow.
When I disconnect the special USB cable and double-click the removable disk
icon, a message appears and the window does not open.
The PC hangs when I access the SmartMedia.
The PictureHello (videoconferencing) window does not open.
PictureHello (videoconferencing) does not show video of me.
The live image of the other party in videoconferencing is very jerky.
I clicked the [Login] button in PictureHello (videoconferencing), but I can’t log in.
There is no live image of the other party during videoconferencing.
Videoconferencing call notifications are not displayed.
I can’t hear the other party in the videoconference/The other party can’t hear me.
I can make calls but I cannot use videoconferencing.
I want to disable the Internet connection firewall so that I can use
videoconferencing (Windows XP).
Live images do not appear in the VideoImpression Capture window.
I can’t log in to the “FinePix Internet Service”.
I can’t sign on as a “FinePix Internet Service” user.
My PC does not shut down correctly.
My camera will no longer play back image files.
I can’t play AVI files on Windows Media Player.
I can’t update the Internet menu properly. (The buttons do not line up correctly.)
Troubleshooting (Windows)
Troubleshooting Connection Problems
Page 49

9796
Possible cause Solution
■
When I disconnect the special USB cable and double-click the removable
disk icon, a message appears and the window does not open.
Is another USB removable drive
connected?
Some USB removable drives do not
operate correctly if other USB removable
drives are being used at the same time.
Disconnect all the connected USB
removable drives and then connect the
camera.
However, with some USB storage devices,
computer operation may become unstable
when the Exit Launcher is resident. See
“Changing the Automatic Launch Settings”
(/P.48, 49) and try removing the Exit
Launcher.
Possible cause Solution
■ The PC hangs when I access the SmartMedia.
When opening the “Device Manager”,
there is a yellow “!” mark next to the
driver in “Universal Serial Bus
controllers”.
When opening the “Device Manager”,
there is a yellow “!” mark next to “USB
Mass Storage”.
You are using a driver or camera that
prevents the driver for the Universal Serial
Bus controllers from operating. Refer to
the User’s Manual for your PC and check
your hardware and software setup.
You are using a driver or camera that
prevents the Mass Storage Driver from
operating. Re-install FinePixViewer from
the CD-ROM provided.
Possible cause Solution
■ FinePixViewer automatic startup is slow.
Are you running too many background
applications?
Click the [Start] button and select
“Programs” / “Startup” from the Start
menu. Click the right mouse button on any
shortcuts for infrequently used
applications from the “Startup” window.
Click “Delete” from the pop-up menu and
then restart your PC.
Possible cause Solution
■
My PC doesn’t recognize the camera (I can’t use the camera from my PC).
Is the camera switched on?
Is the special USB cable connected to
the camera and to the computer?
Did you select the correct connection
mode for what you want to do?
Are you using a compatible operating
system?
Are “PC Camera Driver” and “Mass
Storage Driver” not listed under “Other
Devices” in the Device Manager?
Are the USB functions active?
Double-click “System” in the Control
Panel, select “Device Manager” and
check “Universal Serial Bus
controllers”.
Switch the camera on. See “Connection”
in the camera’s Owner’s Manual for
details.
Check that one end of the special USB
cable is connected to the camera and the
other end is connected to the computer.
• To check the images on the SmartMedia,
use “DSC” connection mode.
• For videoconferencing or to download
live images, use “PC Camera”
connection mode.
Run the software on Windows 98, 98 SE,
Me, 2000 Professional or XP.
The drivers are not installed correctly.
Uninstall (/P.91) and then re-install
drivers.
• If “Universal Serial Bus controllers” is not
displayed, the USB functions is disabled.
Refer to the User’s Manuals supplied
with your PC for details of how to enable
the USB functions.
• USB functions are disabled when the
item is marked with a yellow exclamation
mark “!” or red cross “x”. Refer to the
User’s Manuals supplied with your PC
for details of how to enable the USB
functions.
Possible cause Solution
■ A “Device eject warning” appeared.
Are you using Windows 2000
Professional, Windows XP or Windows
Me?
1 Click the “Unplug or Eject Hardware”
icon in the taskbar and eject “USB
Mass Storage” or “USB Disk”.
2 Switch the camera off and then
disconnect it.
Did you right-click the removable disk
icon and then click “Eject”?
On Windows 2000 Professional,windows XP
or Windows Me, use the following procedure
when removing the camera:
1 Click the “Unplug or Eject Hardware”
icon in the taskbar and eject “USB
Mass Storage” or “USB Disk”.
2 Switch the camera off and then
disconnect it.
Page 50

9998
Possible cause Solution
■ I clicked the [Login] button in PictureHello (videoconferencing), but I
can’t log in.
Are you able to connect to the
Internet?
Is the FinePix Internet Service
undergoing maintenance?
Have you completed the user
registration process?
Check your PC hardware and software
setup.
Log in after the maintenance is
completed.
Click the FinePixViewer [Register Now]
button and sign on as a “FinePix Internet
Service” user (/P.66).
Possible cause Solution
■ There is no live image of the other party during videoconferencing.
Are you or the other party trying to call
outside from an in-house LAN?
Are you or the other party trying to call
outside from a home-office LAN?
Calls cannot be made in either direction
between a LAN and an external line. Use
a dial-up connection.
Calls cannot be made in either direction
between a LAN and an external line. Use
a dial-up connection.
Possible cause Solution
■ Videoconferencing call notifications are not displayed.
Is the “Automatically accept incoming
calls” checkbox ticked?
Are you logged in to the server?
Uncheck the “Automatically accept
incoming calls” checkbox.
Log in to the server.
Possible cause Solution
■ I can’t hear the other party in the videoconference/The other party
can’t hear me.
Are the speakers set to playback
mode?
Is the microphone operating normally?
You and the other party should use the
following procedure to check the speaker
setup:
1 Check that the speakers are connected
correctly to your PC.
2 In the “Start” menu, select “Programs”
/ “Accessories” / “Entertainment”
and click “Volume Control”. Then adjust
the volume.
You and the other party should use the
following procedure to check the
microphone setup:
1 Check that the microphone is
connected correctly to your PC.
2 In the “Start” menu, select “Programs”
/ “Accessories” / “Entertainment”
and click “Sound Recorder”. Then
adjust the microphone input level.
Solution
■ The live image of the other party in videoconferencing is very jerky.
Use a high-speed line with a connection speed of 56 kbps or better.
Possible cause Solution
■ The PictureHello (videoconferencing) window does not open.
Is FinePixViewer installed?
Is FinePixViewer running?
Is the camera switched on?
Is “PC CAM” selected as the USB
setting on the camera?
Is the special USB cable connected to
the camera and to the computer?
Are you using a compatible operating
system?
Is the PC Camera Driver running?
Install FinePixViewer and NetMeeting 3.01
from the enclosed CD-ROM (/P.11).
In the “Start” menu, select “Programs” /
“FinePixViewer” and click “FinePixViewer”.
Switch the camera on. For more information
on “Connection”, refer to the camera’s
Owner’s Manual.
Disconnect the camera briefly and change
the USB setting to “PC CAM”. For more
information on
“
Connection”, refer to the
camera’s Owner’s Manual.
Check that one end of the special USB
cable is connected to the camera and the
other end is connected to the computer.
Use Windows 98, Windows 98 SE,
Windows Me, Windows 2000 Professional
or Windows XP.
Double-click “System” in the Control
Panel, select the Device Manager and
check “USB PC Camera” in “Imaging” or
“Other Devices”. If “USB PC Camera” is
marked with a yellow exclamation mark “!”
or a red cross “x”, it is not running.
Re-install FinePixViewer from the CD-ROM
provided.
Possible cause Solution
■ PictureHello (videoconferencing) does not show video of me.
Is another video input device
connected to your PC?
Is another application displaying the
live images from the camera?
Did you disconnect the special USB
cable or switch off the camera during
live image display?
Disconnect all other video input devices.
Quit any other application that is
displaying live images.
1 Exit PictureHello and restart your PC.
2 Select “PC CAM” as the USB setting
on the camera.
3 Connect the camera to your PC correctly
using the special USB cable.
Troubleshooting Videoconferencing Problems
Page 51

101100
Possible cause Solution
■ Live images do not appear in the VideoImpression Capture window.
Do you have Windows Media Player
installed?
Is “PC CAM” selected as the USB
setting on the camera?
Is the special USB cable connected to
the camera and your PC?
Are you using a compatible operating
system?
Is the PC Camera Driver running?
Is another video input device selected?
Is another application displaying the
live images?
Did you disconnect the special USB
cable or switch off the camera during
live image display?
Install Windows Media Player from the
enclosed CD-ROM (/P.11).
Disconnect the camera briefly and change
the USB setting to “PC CAM”. For more
information on “Connection”, refer to the
camera’s Owner’s Manual.
Check that one end of the special USB
cable is connected to the camera and the
other end is connected to your PC.
Use Windows 98, Windows 98 SE,
Windows Me, Windows 2000 Professional
or Windows XP.
Double-click “System” in the Control
Panel, select the Device Manager and
check “USB PC Camera” in “Imaging” or
“Other Devices”. If “USB PC Camera” is
marked with a yellow exclamation mark “!”
or a red cross “x”, it is not running.
Re-install FinePixViewer from the CD-ROM
provided.
Select “USB PC Camera”. Refer to the
VideoImpression User’s Guide for
information on how to select the video
input device.
Quit any other application that is
displaying live images.
1 Exit VideoImpression and restart your
PC.
2 Select “PC CAM” as the USB setting
on the camera.
3 Connect the camera to your PC
correctly using the special USB cable.
Possible cause Solution
■ I can make calls but I cannot use videoconferencing.
Is the other party able to make or
accept calls?
Are you or the other party trying to call
outside from an in-house LAN?
Are you or the other party trying to call
outside from a home-office LAN?
Open the address book and click the
[Update Status] button. If the other party
cannot accept calls, try again later (
/
P.81).
Calls cannot be made in either direction
between a LAN and an external line. Use
a dial-up connection.
Calls cannot be made in either direction
between a LAN and an external line. Use
a dial-up connection.
■ I want to disable the Internet connection firewall so that I can use
videoconferencing (Windows XP).
Solution
1 Click [Start] button /“Control Panel” /“Network & Internet Connections”
/
“Network Connections”.
✽ The details shown on the screen differ depending on your PC settings. In the
example shown below, the default values are used for all settings.
2 Right-click the desired connection and then click “Properties”.
3 Clear the “Protect my computer and network by limiting or preventing access to
this computer from the Internet” checkbox in the “Advanced” tab and then click the
[OK] button.
✽ Once you clear this checkbox, the
computer and network are no longer
protected against external access.
When you are not using
videoconferencing, you should
restore the original setting.
Troubleshooting Other Problems
Page 52

103102
■ When I connected the camera to my Macintosh, the “Required
software not found” message or “Required driver cannot be used”
message appears.
Possible cause Solution
Is the software installed? Install the software on your Macintosh.
Other
If the software does not operate correctly but the problem does not match any
of those listed below, check that you are using the correct hardware and
software (/P.28, 36).
If the problem persists even though you are using the correct hardware and
software, refer to the table below and then see the reference page listed for
your problem.
Page
Connection
•
Image Viewing
Internet
Problem
with
Problem
When I connected the camera to my Macintosh, the “Required software not
found” message or “Required driver cannot be used” message appears.
When I connected the USB cable, Mac OS displayed the “Initialize disk?”
message.
The Macintosh hangs when I access the SmartMedia.
The camera and Macintosh are connected but no removable disk icon is
displayed.
A warning message appears when I disconnect the USB cable from the
camera.
I can’t log in to the “FinePix Internet Service”.
I can’t sign on as a “FinePix Internet Service” user.
I can’t update the Internet menu properly. (The buttons do not line up
correctly.)
The “The tool could not be executed” message appears.
Thumbnails are not displayed in CD Album (they appear as “?”).
Live images do not appear in the VideoImpression Capture window.
My camera will no longer play back image files.
I want to stop the FinePixViewer from launching automatically.
103
104
105
106
107
Possible cause Solution
■ I can’t sign on as a “FinePix Internet Service” user.
Have you already signed on under the
same e-mail address?
You cannot sign on twice with the same
user ID or e-mail address.
Possible cause Solution
■ My camera will no longer play back image files.
Did you rename any files or folders
inside the “DCIM” folder?
Did you replace an image file inside the
“DCIM” folder?
Change the file or folder names in the
“DCIM” folder back to the original names.
Do not replace image files in the “DCIM”
folder.
Solution
■ My PC does not shut down correctly.
Disconnect the PC and the camera using the correct procedure and then exit
Windows.
Solution
■ I can’t play AVI files on Windows Media Player.
If you want to use Windows Media Player, you must install DirectX 8.0. Refer to the
Microsoft homepage or industry-related magazines for details of how to acquire
DirectX 8.0.
Solution
■ I can’t update the Internet menu properly. (The buttons do not line up
correctly.)
The menu data is corrupted. Use the procedure below to update the menu:
1 Quit FinePixViewer.
2 From the “Start” menu, select “FinePixViewer” in “Programs”. Then right-click on
the “FinePixViewer” icon and select “Properties”.
3 Click the [Find link destination] button to display the folder in which FinePixViewer
was installed.
4 Delete the “FinePixInternetFiles” folder in the FinePixViewer installation folder.
5 Launch FinePixViewer and click “Menu Update” in the “View” menu.
☞ Some types of PC may not shut down correctly while the camera is still connected.
Possible cause Solution
■ I can’t log in to the “FinePix Internet Service”.
Are you able to connect to the
Internet?
Is the FinePix Internet Service
undergoing maintenance?
Have you completed the user
registration process?
Check your PC hardware and software
setup.
Log in after the maintenance is
completed.
Click the FinePixViewer [Register Now]
button and sign on as a “FinePix Internet
Service” user (/P.66).
Troubleshooting (Macintosh)
Troubleshooting Connection and Image Viewing Problems
Page 53

105104
Possible cause Solution
■ I can’t sign on as a “FinePix Internet Service” user.
Have you already signed on under the
same e-mail address?
You cannot sign on twice with the same
user ID or e-mail address.
Possible cause Solution
■ I can’t log in to the “FinePix Internet Service”.
Are you able to connect to the
Internet?
Is the FinePix Internet Service
undergoing maintenance?
Have you completed the user
registration process?
Check your Macintosh hardware and
software setup.
Log in after the maintenance is
completed.
Click the FinePixViewer [Register Now]
(Mac OS 8.6–9.2) / [user’s registration]
(Mac OS X) button and sign on as a
“FinePix Internet Service” user (/P.66,
72).
Solution
■ I can’t update the Internet menu properly. (The buttons do not line up
correctly.)
The menu data is corrupted. Use the procedure below to update the menu:
1 Quit FinePixViewer.
2 Delete the menu data in the following locations:
The “FinePixInternetFiles” folder inside “Preferences” in the
System Folder.
“FinePixInternetFile” folder in “Users” /“(user name)” /“Library”
/
“Preferences”.
3 Launch FinePixViewer and click “Menu Update” in the “View” menu.
Mac OS X
Mac OS 8.6–9.2
Possible cause Solution
■ The Macintosh hangs when I access the SmartMedia.
Is the software installed? Install the software on your Macintosh.
■ When I connected the USB cable, Mac OS displayed the “Initialize
disk?” message.
Possible cause Solution
Is the SmartMedia formatted?
Disconnect the USB cable from the camera,
insert the SmartMedia into the camera and
format the SmartMedia. For more information ,
refer to the Owner’s Manual for your camera.
Is File Exchange enabled?
Mac OS 8.6–9.2
only
Enable File Exchange (/P.29).
Possible cause Solution
■ The camera and Macintosh are connected but no removable disk icon
is displayed.
Is the camera switched on?
Is the SmartMedia loaded in the
camera?
Is “DSC” selected as the USB setting
on the camera?
Is the special USB cable connected to
the camera and to the computer?
Are you using a compatible operating
system?
Is the Mass Storage Driver active?
Mac OS 8.6–9.2
only
Switch the camera on. For more
information on “Connection”, refer to the
camera’s Owner’s Manual.
Load a SmartMedia into the camera. For
more information, refer to the Owner’s
Manual for your camera.
Disconnect the camera briefly and change
the USB setting to “DSC”. For more
information on “Connection”, refer to the
camera’s Owner’s Manual.
Check that one end of the special USB
cable is connected to the camera and the
other end is connected to the Macintosh.
Use Mac OS 8.6 to 9.2 or Mac OS X
(version 10.1.3). Note that the driver
software does not run correctly in the Mac
OS X Classic environment.
Enable all the files that begin with
“USB04CB” in the Extensions Manager
and then restart your Macintosh.
Possible cause Solution
■ A warning message appears when I disconnect the USB cable from
the camera.
Did you remove the camera while the
camera was still mounted as a disk
drive?
Disconnecting the camera while it is still
mounted can corrupt the data on the
SmartMedia or damage the SmartMedia
itself. Drag the drive icon to the Trash
before you disconnected the camera.
Troubleshooting Internet Problems
Page 54

107106
Solution
■ I want to stop the FinePixViewer from launching automatically.
You can use either of the two methods below to prevent FinePixViewer from launching
automatically.
• Change the Exif Launcher settings
1 Select “Exif Launcher Settings” in the FinePixViewer “Settings” menu and click
“Do not run Exif Launcher at restart.”
2 Restart your computer.
✽ To restore the original setting, use the same procedure and tick the “Run Exif
Launcher at restart.” option.
• Remove Exif Launcher
1 Select “Exif Launcher Settings” in the FinePixViewer “Settings” menu and tick
“Quit Exif Launcher immediately”.
2 Move “Exif Launcher” from the “Startup Items” folder in the System folder to the
Trash.
3 Select “Empty Trash” in the “Special” menu.
✽ To restore Exif Launcher, re-install the software.
Possible cause Solution
■ Live images do not appear in the VideoImpression Capture window.
Is the camera switched on?
Is “PC CAM” selected as the USB
setting on the camera?
Is the special USB cable connected to
the camera and your Macintosh?
Are you using a compatible operating
system?
Is PC Camera Driver enabled?
Switch the camera on. See “Connection” in
the camera’s Owner’s Manual for details.
Disconnect the camera briefly and change
the USB setting to “PC CAM”. See
“Connection” in the camera’s Owner’s
Manual for details.
Check that one end of the special USB
cable is connected to the camera and the
other end is connected to your Macintosh.
The USB Driver should be used with Mac
OS 8.6 to 9.2. (It is not compatible with
Mac OS X.)
Enable “USB04CB_VcShim” and
“USB04CB_VcDriver” in the Extensions
Manager and restart your Macintosh.
Possible cause Solution
■ My camera will no longer play back image files.
Did you rename any files or folders
inside the “DCIM” folder?
Did you replace an image file inside the
“DCIM” folder?
Change the file or folder names in the
“DCIM” folder back to the original names.
Do not replace image files in the “DCIM”
folder.
Troubleshooting Other Problems
Possible cause Solution
■ The “The tool could not be executed” message appears.
Mac OS 8.6–9.2
Do you have enough system memory
installed?
1 Quit any other applications that are
running.
2 Open the [Control Panels] / [Memory]
and increase the amount of virtual
memory allocated. Then restart your
Macintosh.
Solution
■ Thumbnails are not displayed in CD Album (they appear as “?”).
Mac OS 8.6–9.2
1 Click images without thumbnails from FinePixViewer.
2 Check the number of pixels in the information display at the bottom of the window.
3 Double-click “HELPERS” in “EXTENSIONS” in the FinePixViewer installation folder
to open the “HELPERS” folder and then select the “FPVCDBK” file.
4 Click “Get Info” in the “File” menu to view the “FPVCDBK Info”.
5 Select “Memory” in the “Show” pop-up menu.
6 In “Minimum Size:” in “Memory Requirements”, allocate the memory size shown in
the table below for the number of pixels shown in step 2.
Possible cause Solution
Is another video input device selected?
Is another application displaying the
live images from the camera?
Did you disconnect the special USB
cable or switch off the camera during
live image display?
Select “USB PC Camera”. Refer to the
VideoImpression User’s Guide for information
on how to select the video input device.
Quit any other application that is
displaying live images.
1 Exit VideoImpression and restart your
Macintosh.
2 Select “PC CAM” as the USB setting
on the camera.
3 Connect the camera to your Macintosh
correctly using the special USB cable.
No. of image pixels
3040 × 2016 pixels or less
4256 × 2848 pixels or less
Required minimum memory
20480
40960
Page 55

Printed in Japan FGS-204104-FG
Printed on recycled paper.
Technical Support Information
The following is a list of ArcSoft regional offices around the world. If you have any questions regarding
our products, or need technical support, please contact the office that is closest to you.
[Area]
North America and others
46601 Fremont Blvd.
Fremont, CA 94538
Tel: 1-510-440-9901
Fax: 1-510-440-1270
Web: www.arcsoft.com
E-Mail: support@arcsoft.com
Europe
Unit 14, Shannon Industrial Estate
Shannon, Co. Clare, Ireland
Tel: +353 (0) 61-702087
Fax: +353 (0) 61-702001
E-Mail: europe@arcsoft.com
China
ArcSoft Beijing Representative Office
No 6 South Capital Gym Rd.
Beijing New Century Hotel, #1910
Beijing 100044, P.R. China
Tel: +86-10-6849-1368
Fax: +86-10-6849-1367
E-Mail: China@arcsoft.com
Taiwan
ArcSoft Taiwan Representative Office
# 1, 5th Floor
164 North Fu Shin Road
Taipei, Taiwan
Tel: 886-2-2719-0225
Fax: 886-2-2719-0256
Australia
Marketing Results Prop Ltd.
P.O. Box 6246 BHBC
Baulkham Hills,
New South Wales 2153
Australia
Tel: +61 (2) 9899-5888
Fax: +61 (2) 9899-5728
E-Mail: david@mresults.ba.aust.com
Web site: www.marketingresults.com.au
For inquiries regarding VideoImpression™
26-30, Nishiazabu 2-chome, Minato-ku, Tokyo 106-8620, Japan
 Loading...