


IMPORTANT SAFETY INSTRUCTIONS
Contents
IMPORTANT SAFETY INSTRUCTIONS...........................................................................1
Preparation Before Use..........................................................................................................5
Name and Functions of Components...................................................................................10
Before Starting Massage ......................................................................................................12
How to Adjust the Chair....................................................................................................... 13
How to Use the AUTO-COURSE........................................................................................16
How to Use the Quick Mode................................................................................................ 21
Adjustment during massaging with AUTO-COURSE or in QUICK MODE...................... 24
Registration in the Memory ................................................................................................. 29
Basic Movements of Massage.............................................................................................. 32
Using the WAIST/HIP massage functions ........................................................................... 33
Using the Mecha. (knead balls) massage functions .............................................................35
Adjustment during the movement of Mecha. (knead balls) massage functions................... 38
Using the Air-massage functions..........................................................................................41
Adjustment during the movement of LEG stretch function................................................. 42
Using the Shoulders/Arms Air-massage functions............................................................... 43
Adjustment during the movement of Air-massage functions............................................... 45
Combination massage of Mecha. (knead balls) and Air....................................................... 47
When changing the massage on the way..............................................................................51
Other functions.....................................................................................................................55
Care and storing...................................................................................................................57
Q & A................................................................................................................................... 58
When trouble is suspected.................................................................................................... 59
(Effect and Efficacy) Substitution of professional masseur
Recovery from fatigue
Promotion of blood circulation
Removal of muscular fatigue
Relief of muscular stiffness
Alleviation of neuralgia or muscular pain
Thank you for your purchasing of Massage Chair EC-3000.
Read this manual carefully beforehand to use the product properly.
After reading through, keep this manual at a safe place where you can consult whenever it is
necessary.

IMPORTANT SAFETY INSTRUCTIONS
When using an electrical appliance, basic precautions should always be followed, including the following:
Read all instructions before using this appliance.
DANGER To reduce the risk of electric shock:
1. Always unplug this appliance from electrical outlet immediately after using and before cleaning.
2. Improper connection of the equipment-grounding conductor can result in a risk of electric shock.
Check with a qualified electrician or serviceman if you are in doubt as to whether the product is properly
grounded. Do not modify the plug provided with the product - if it will not fit outlet, have a proper outlet
installed by a qualified electrician.
WARNING To reduce the risk of burns, fire, electric shock, or injury to persons:
1. An appliance should never be left unattended plugged in.
Unplug from outlet when not in use, and before off parts.
2. Do not operate under blanket or pillow.
Excessive heating can occur and cause fire, electric shock, or injury to persons.
3. Close supervision is necessary when this appliance is used by, on, or near children, invalids, or
disabled persons.
4. Use this appliance only for its intended use as described in this manual.
Do not use attachments not recommended by the manufacturer.
5 Never operate this appliance if it has a damaged cord or plug, if it is not working properly, if it has
been dropped or damaged, or dropped into water.
Return the appliance to a service center for examination and repair.
6. Do not carry this appliance by supply cord or use cord as a handle.
7. Keep the cord away from heated surfaces.
8. Never operate the appliance with the air openings blocked.
Keep the air openings free of lint, hair, and the like.
9. Never drop or insert any objects into any opening.
10. Do not use outdoors.
11. Do not operate where aerosol (spray) products are being used or where oxygen is being
administered.
12. To disconnect, turn all controls to the off position, then remove plug from outlet.
1

IMPORTANT SAFETY INSTRUCTIONS
WARNING
13. Grounding Instructions
This product must be grounded. If it should malfunction or breakdown, grounding provides a path of least
resistance for electric current to reduce the risk of electric shock. This product is equipped with a cord
having an equipment-grounding conductor and a grounding plug. The plug must be plugged into an
appropriate outlet that is properly installed and grounded in accordance with all local codes and
ordinances.
This product is for use on a nominal 120-volt circuit, and has a grounding plug that look like the plug
illustrated in sketch A. A temporary adapter that looks like the adapter illustrated B and C may be used to
connect the plug to a 2-pole receptacle as shown in sketch B if a properly grounded outlet is not available.
The temporary adapter should be used only until a properly grounded outlet (sketch A) can be installed by
a qualified electrician. The green colored rigid ear, lug, or the like extending from the adapter must be
connected to a permanent ground such as a properly grounded outlet box cover.
Whenever the adapter is used, it must be held in place by a metal screw.
Grounding
pin
14. Massager is intended for Household Use Only.
15. Be sure to check that there is not anybody (children in particular), pet or obstacle behind prior to
inclining the Back Rest.
Otherwise, it may result in a cause of injury or trouble.
16. Be sure to check that there is not anybody (children in particular), pet or obstacle behind prior to
lowering the Foot Rest.
Otherwise, it may result in a cause of injury.
- Sketch A -
Grounded
outlet
GROUNDING METHODS
- Sketch B - - Sketch C -
Grounded
outlet box
Save these instructions
Adapter
Metal
screw
Tab for
grounding screw
17. Be careful not to operate the Back Rest with the cord wound on the main unit, or with the cord
hooked to the other obstacle.
Otherwise, the unreasonable force may be applied to the cord, probably resulting in a cause of fire or
electric shock.
18. Be careful not to put the hand into the clearance at the underside of Back Rest or to the clearance
between the Back Rest and Arm Rest.
Otherwise, it may result in a cause of injury.
2

IMPORTANT SAFETY INSTRUCTIONS
WARNING
19. Do not attempt to stand on the Arm Rest, Foot Rest or Back Rest.
Otherwise, the massager may fall down, resulting in injury.
20. Do not use the massager on the head, arm, knee or abdomen. As well as, do not put your hand or
leg between knead ball.
Otherwise, the user may feel sick or an injury may occur.
21. Do not attempt to plug/unplug the power plug with wet hands.
Otherwise, it may result in injury or electric shock.
22. When the cover cloth is broken (when the built-in mechanism is exposed), do not use such
massager, but send it for repair.
Otherwise, it may result in a cause of accident, or injury.
23. Never attempt to disassemble the massager. Do not allow any personnel other than repair engineer
to disassemble or repair the massager.
Otherwise, it may result in a cause of fire, electric shock or injury.
24. The following persons are requested to consult a doctor prior to use.
Otherwise, the user may feel sick or an injury may occur.
Those who are under the medical treatment or particularly those who complain of indisposition
Those who have malign tumors
Those who suffer from heart trouble
Those who are in menstrual period or pregnant
Those who require complete rest
Those whose backbone is abnormal or bent
Those who desire to use the massager on a part of the body that is diseased or receiving medical
treatment
Those who are feverish (38C or over)
Those who have weak bones (osteoporosis etc.)
25. If sickness or pain is felt during use, stop using the massager and consult a doctor immediately.
Otherwise, it may result in injury.
26. Attempt to use the massager up to 15 minutes for each use. Limit the use of massager at one point,
up to 5 minutes.
Otherwise, the use of massager at one point for a long time continuously may result in adverse effect.
27. Check the knead ball position for the sake of safety before leaning on the massager slowly. Do not
twist the body, but lean on the massager straight, so that the backbone is located at center of
knead ball.
Otherwise, leaning on the massager abruptly may injure the backbone or result in injury.
28. Do not pull the cord, but the plug, when unplugging the massager.
Otherwise, the electric shock or short-circuit may occur, resulting in fire.
29. Do not use the massager with bare skin.
Otherwise, it may result in a cause of injury.
30. Do not move the massager with a person on it.
Otherwise, the massager may fall down.
3

IMPORTANT SAFETY INSTRUCTIONS
WARNING
31. After use, be sure to set the POWER switch to [OFF] position.
Otherwise, it may result in accident or injury due to child's mischief.
32. Do not attempt to pull the Back Pad forcibly or hang from the Back Pad.
Otherwise, the Back Pad may come off, probably resulting in injury or broken massager.
33. Do not attempt to damage, bend, pull, twist, or bundle the cord forcibly.
Otherwise, the cord may break, resulting fire or electric shock.
34. Do not use the massager on other than the designated voltage.
Otherwise, it may result in a cause of fire or electric shock.
35. Do not use the massager in the bathroom, or places where humidity is high.
Otherwise, it may result in electric shock or damage.
36. When the massager becomes inoperative, disconnect the power plug immediately for prevention of
accident, and ask the sales agent for inspection/repair information.
Otherwise, it may result in fire due to electric shock, leaking current, short circuit, etc.
37. Switch the power [OFF] instantly at the time of power failure, as well as pull the power plug out
from the socket.
Otherwise, it would become dangerous at the time of power comeback.
38. Be careful not to fall asleep during massage.
Otherwise, it may result in a cause of accident or injury.
39. Do not use the massager with other medical instruments (excluding foot type massager).
Otherwise, it may result in an accident or injury.
40. Place the massager main unit at a level floor surface.
Otherwise, if it is placed at an unstable place, it may fall down, probably resulting in a cause of injury.
41. The maximum permissible weight of the massager is 100 kilograms.
Do not use the massager with those who weigh more than 100 kilograms.
Otherwise, an accident may happen or damage to the machine may result.
4

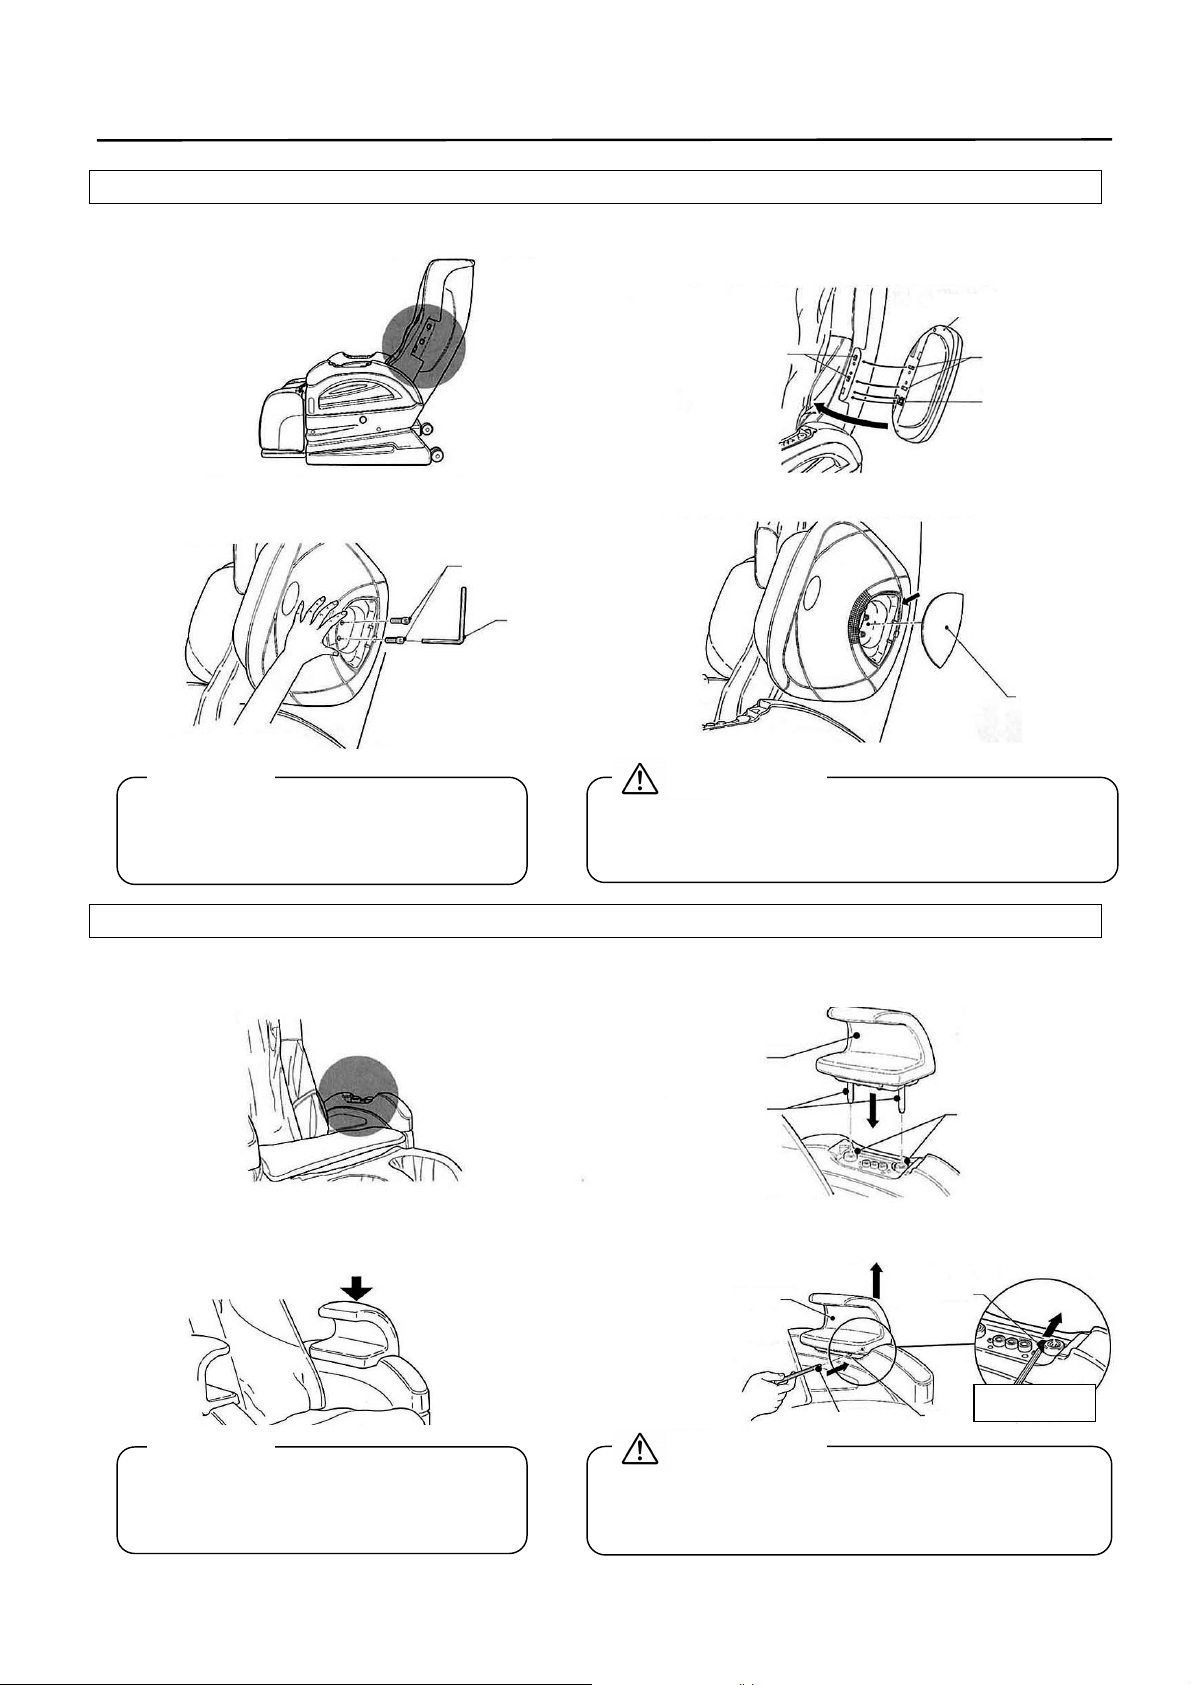
Preparation Before Use
Hexagonal wrench for
the s
houlder unit
can be identified with the
Shoulder cap
(2 pcs.)
Mounting screw (4 pcs.)
Lock
Hexagonal wrench for the
remote controller stand
Quick Operation
Guide
Do not use any accessories other than
Take out the MAIN BODY and ACCESSORIES from the box.
[MAIN BODY] [ACCESSORIES]
Arm unit
Front
Shoulder unit
Left
Rear
Rear
Right
Pillow
Front
Cap for the arm unit (open)
Cap for the arm unit (closed)
User Manual Grounding Cable
Request
those packaged.
Assembling and Folding the Back-Rest.
Raise the back-rest to the arrow direction,
and make sure that the stopper (encircled)
is locked, when a click sound can be heard.
CAUTION
Be careful not to get hand or fingers
caught between the arm-rest and the
back-rest.
Stopper
Back pad
Mounting screw (2 pcs.)
Rear
Which shoulder unit
should be in right or left,
air joint on the rear side.
Front
Air joint
Remote Controller Stand
Press down the stopper (encircled) to the
arrow direction, and fold the back-rest slowly
forward.
* Be careful not to turn the back-rest quickly.
* The back-rest cannot be turned when it is equipped
with the shoulder unit and the arm unit.
CAUTION
Release
Stopper
Do not touch any sections other than
indicated with the circle when
operating the stopper.
5
Preparation Before Use
Locking mechanism
the back
-
rest.
Installation of the Shoulder Unit.
1. Install the Shoulder Unit with the
back-rest at the upright
position.
3. Fix securely at two places with a pair
of mounting screws.
Mounting screw
* In tightening the mounting screw, use fingers
Request
Install in the same way also at the opposite side.
When disassembling, proceed referring to the
installation method.
first until it reaches the innermost. When you
find it difficult to tighten it, try to press the
Shoulder Unit with hand. With the screw at
the innermost, fix it with the hexagonal wrench.
Hexagonal
wrench
Installation of the Arm Unit.
1. Install the Arm Unit with the back-rest
at the upright position.
3. Press down the Arm
Unit a click sound
can be heard.
Request
Install in the same way also at the opposite side.
When disassembling, proceed referring to the
installation method.
4. When removing the Arm Unit, insert the hexagonal
wrench in the hole.
Pull it upward while
pressing the button.
* The hole of the Arm Unit
at the opposite side is on
2. Insert the Shoulder Unit convex and
the air joint in the hole on the
back-rest.
Holes
4. It is complete once the cap has been
installed.
CAUTION
Make sure to install the Shoulder Unit securely. Otherwise,
it could cause air leakage or injury or mechanical trouble if
the unit has dropped off accidentally.
2. Insert the Arm Unit convex into the
hole of arm-rest.
Arm Unit
* Arm Units are
CAUTION
Make sure to install the Arm Unit securely. Otherwise, it
could cause air leakage or injury or mechanical trouble if
the unit has dropped off accidentally.
Convex
identical at
right and left.
Arm
Unit
Back-rest side
Hexagonal wrench
Shoulder Unit
Convex
Air joint
Holes
Button
Hole*
Cap
enlarged
6
Preparation Before Use
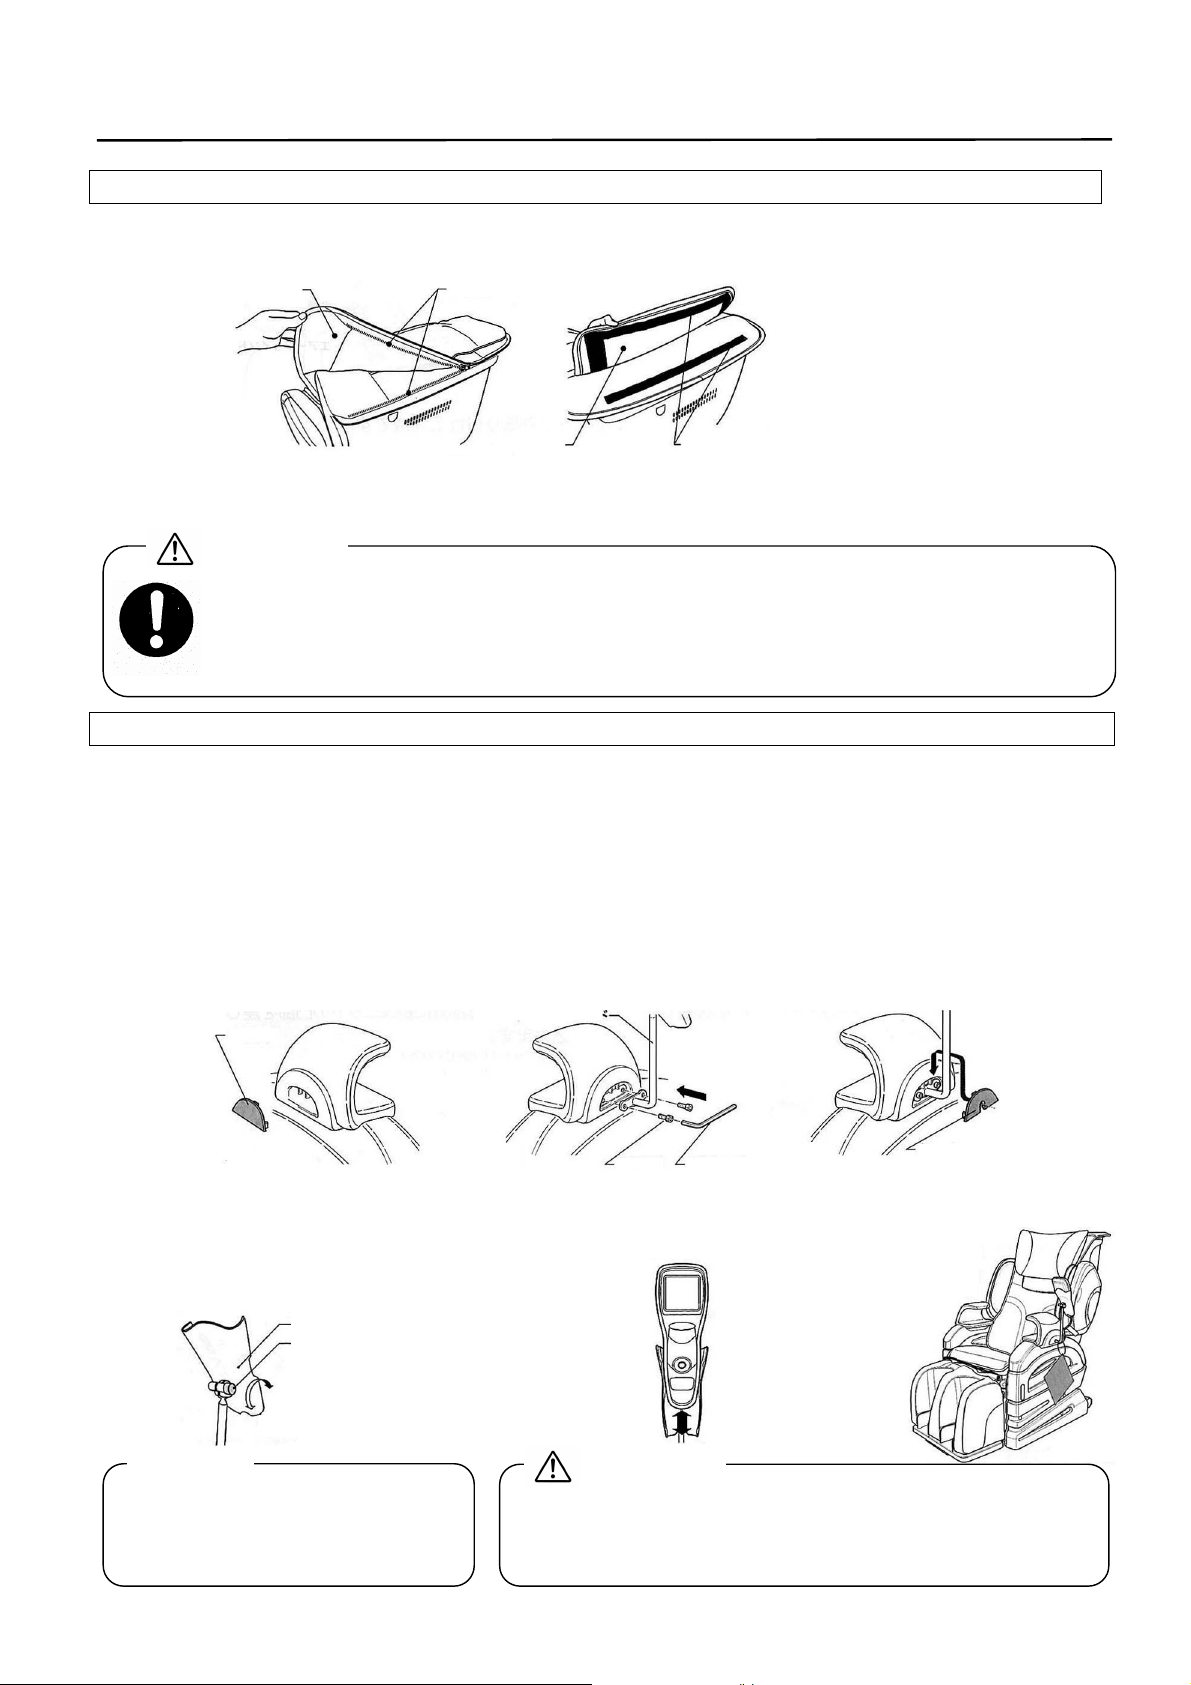
How to install the Back Pad and the Pillow.
Install the Back Pad on the zipper of the back-rest. Install the Pillow on the Velco tape of the Back Pad.
1. Install the Back Pad.
Back Pad
Zipper
When massaging, place the pillow behind.
If you feel massaging strength strong, use the pillow.
When not massaging, use the chair as the recliner with the back pad and the pillow installed.
WARNING
Pillow
Before use, tuck up the back pad to make sure that there is no tear on the cover cloth of the
back-rest and on the other parts. (Should there be any tear, no matter how small it is,
discontinue using the chair immediately, disconnect the power cord plug, and ask for repair.)
Continued use with the cloth torn may cause electric shock or any hazard on the body.
Installation of the Remote Controller Stand.
* The Remote Controller Stand is designed to be installed at the left side. Should it need to be
installed at the right side, take the procedure as detailed in the next page.
1. Put the cap on the arm
unit on the right-side
arm-rest.
* The Remote Controller Stand
can be installed either at the
right side or at the left side.
Cap
Right side
[How to adjust the Remote
Controller Holder]
Loosen the fixing screw to a
desired position, and fix it
tightly.
Remote Controller
Holder
Fixing screw
Tightening
Request
Loosening
To remove the Remote Controller
stand, reverse the order of
installation.
2. Fix the Remote
Controller Stand on
the arm unit on the
left-side arm-rest with
the mounting screws
at 2 places.
Remote Controller Stand
Left side
[How to install or remove
the Remote Controller]
Installation:
Push it down
from upward.
Removal:
Pull it up
upward.
Make sure to install the Remote Controller Stand securely.
Otherwise, it could cause injury or mechanical trouble if
the stand has dropped off accidentally.
2. Install the Pillow.
Mounting
screw
CAUTION
Velco tape
Hexagonal
wrench
3. Finish up the work by
installing the cap
(open).
Left side
Cap (open)
[View of the finished work]
Get a piece of
string through
the Remote
Controller
Stand to hang
down the
Quick
Operation
Manual.
7
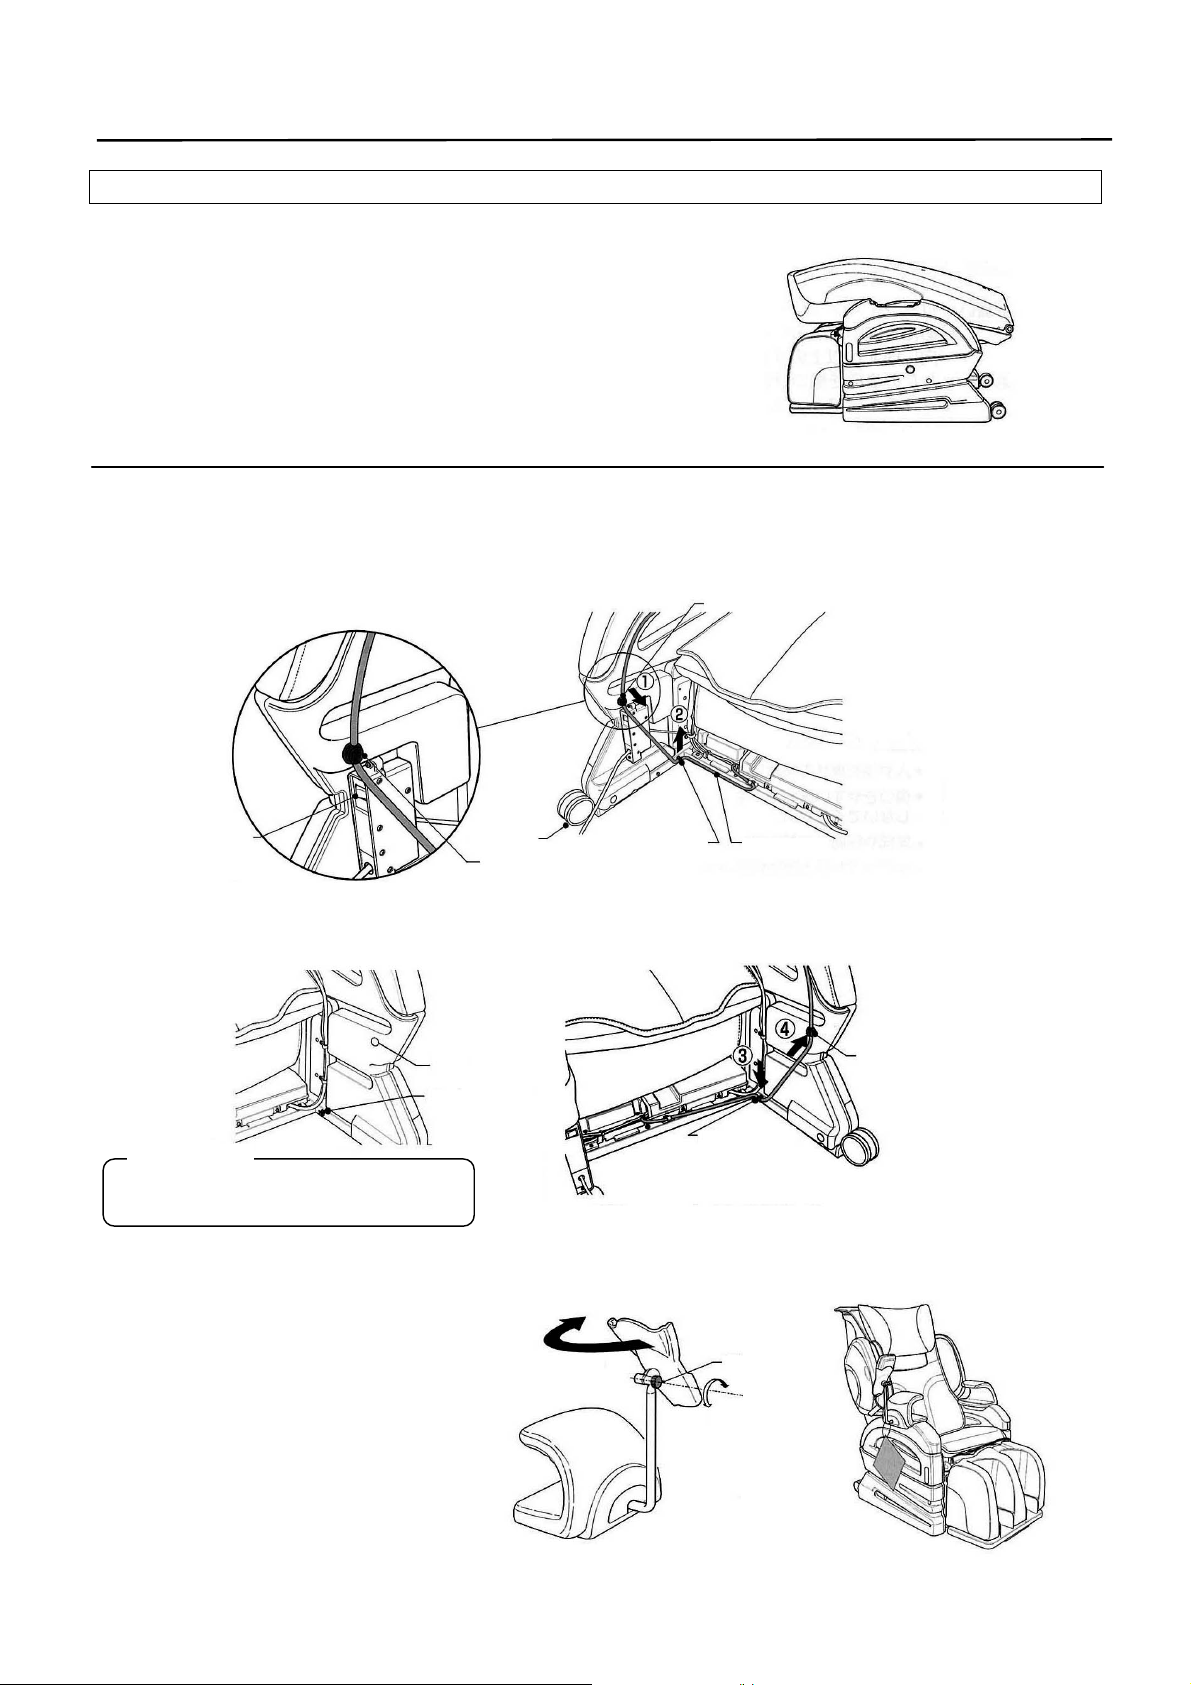
Preparation Before Use
together with its grip.
Cord
[View of the finished work]
How to replace the Remote Controller Stand.
<In case the Remote Controller Stand, after being installed,
needs to be replaced from left to right side.>
First, take the following procedures:
Remove the pillow and the back pad (see Page 7).
Remove the Remote Controller from its stand.
Then, remove the shoulder unit and the arm unit,
and turn the back-rest forward (see Page 5, 6 and 7).
* The Remote Controller Stand does not have to be removed from the arm unit.
<In case the Remote Controller Stand is installed at the right side from the first, take
the following procedures starting 1.>
1. Remove the rubber cord grip behind the arm-rest ①.
2. Remove the Remote Controller cord from its cord grip ②.
Power switch
Caster
Remove the rubber cord
3. Hang the Remote Controller cord on the cord grip at the opposite side ③.
4. Adjust the position of the rubber cord grip so that the cord may not loosen, and
insert the grip into the hole of the arm-rest ④.
Hole
Cord grip
Request
The cord may snap if it loosens.
5. Raise the back-rest, and install the arm unit equipped with the Remote Controller
Stand at the opposite side (see Page 7).
6. Adjust an angle of the Remote
Controller holder.
7. Install the pillow and the
Rotate the stand at 180.
back pad (see Page 7).
Rubber cord grip
grip
Cord grip
Fixing screw
Tighten
Loosen
Remote
Controller cord
Rubber cord grip
8

Preparation Before Use
Lift up the front
Where to place the chair.
Place the chair on a level surface with enough space
around.
■ Request: With the back-rest reclined backward, the foot-rest
comes up. Keep space of 70cm or more ahead and
60cm or more behind.
■ Request: The chair may damage the floor. Spread a mattress
for protection.
■ Request: Avoid placing the chair at the place exposed to the
direct ray of the sunshine for long hours every day
or at the place of high temperature, e.g. close to a
heater. The cover cloth may discolor or change in
quality.
How to move the chair.
Lift up the front side of the chair, and push it forward.
CAUTION
Do not move the chair with a person or any object
seated on it to avoid the possible upset.
Do not move the chair with its casters, or do not drag
it on the floor so as not to damage the floor surface.
Do not hold the seat, the foot-rest or the shoulder
unit to move the chair.
Be careful when lifting up the front side of the
chair; it is very heavy.
CAUTION
Be sure to make grounding connection.
Without grounding connection,
leakage may cause electric shock.
For inquiry on grounding
connection, contact your dealer.
Do not make grounding connection
at the following places:
Gas pipe so as not to cause the hazard
of explosion or not to catch fire.
Telephone cord or lightening rod not so
as to cause the hazard by thunderbolt.
Water pipe with plastics used partly,
since it does not function as
grounding connection.
side of the chair
Grounding connection.
The receptacle in your place is already
equipped with the grounding terminal.
Connect the grounding cable
(packaged) with the
grounding terminal of the
receptacle of the grounding
terminal screw of the chair.
* (Grounding terminals are provided on the models for
Thailand, Sweden, France and Russia.)
The receptacle in your place is not
equipped with the grounding terminal.
Contact your dealer or any electrical worker
for grounding connection.
70cm or more
Grounding cable
60 cm or more
Caster
9

Relax and lay the bac
k on
here.
Air-massage
hip
Air-massage legs and
In addition to the entire back, the
Turn
OFF
after
Cord
massaging area
*
Install the grounding cable.
Back Pad
Name and Functions of Components
Main Body
Pillow
Put it behind when massaging.
Back-Rest
Shoulder
Air-massage on the shoulder.
Arm
Air-massage on the arm.
Arm-Rest
Seat Pad
Seat
and thighs.
Foot-Rest
feet.
Power Switch
use.
air-massage is applied also to the
back and the waist.
Caution Seal
Remote Controller Stand
Caution Tag
Quick Operation Guide
Massaging Position
Mecha. (knead balls)
Shoulder
Power Cord Plug
Power
Grounding Terminal*
(Grounding terminals are provided
on the models for Thailand,
Sweden, France and Russia.)
Back
Arm
Waist
Air Bag
Thigh
Calf
Ankle
Sole
Caster
10

Name and Functions of Components
Various functions are
Start or stop massage, and store
11 AUTO
-
COURSE
options
4
air-massage options are
Repeatedly continue the current
Discontinue the current option
Turn
“
ON/OFF”
air-massage of
Select any option in various
Turn
“
ON/OFF”
massage of
Adjust an angle of the “foot
-
rest.”
Select any
AUTO
-
COURSE
option
Discontinue any in
-
progress
you have to discontinue massage at
Select any one out of 22 massaging
Finely adjust the shoulder position while in
Select any option out of “
ARM
KNEAD
/
Store the back
-
rest and the foot
-
rest.
Adjust the
foot-rest
length.
START
ADJUSTMENT
Adjust an angle each of the back
-
rest
Remote Controller
LCD display
“QUICK” button
available.
“START/RESET” button
the knead balls.
“AUTO-COURSE” button
are available in combination of
massaging positions and
massage types.
“AIR” button
available.
“REPEAT” button
option selected from the
AUTO-COURSE options.
“SKIP” button
and change into another
AUTO-COURSE option.
“SHOULDER” button
shoulders and changes the massaging
strength in one of the 5 steps.
“MENU” button
Adjust the current option.
“CROSS KEY”
functions.
“WAIST/HIP” button
WAIST/HIP
“ENTER” button
Determine any option.
STOP
/RESET
AUTO FUNCTION
AIR
REPEAT
SKIP
SHDR
W/H
FOOTREST RECLINER
FORWARD BACK
HEIGHT
MENU
ARM
ENTER
RESET
LEG
preprogrammed for each of the
standard body shapes.
“STOP” button
movement. (Press this button when
once.)
“FUNCTION” button
options.
“HEIGHT ADJUSTMENT” button
massage of any AUTO-COURSE option or
when fixing the shoulder position in the
process of selecting any function.
* The knead balls can be repositioned in the process of
selecting any function.
* When the knead balls are positioned around shoulders
or back in any AUTO-COURSE option, a display for
finely adjusting the “SHOULDER” position comes
out. When they are around WAIST, a display for
finely adjusting the “WAIST” position comes out.
Fine adjustment function of the “WAIST” position is
available only for “EXTREME KNEAD WAIST” and
“EXTREME TAPPING WAIST.”
“ARM” button
ARM GRASP / STOP” functions.
Or, adjust the massaging strength at one
of the 3 steps.
“LEG” stretch button
Select stretching or not.
RECLINER “UP”, “DOWN” button
and the foot-rest. The foot-rest moves
in link with the back-rest.
* While in reclining, the movements of
“AIR”, “TAPPING” and “WAVELET” do
not function.
“UP” or “DOWN” button
* “Air” does not function while the
foot-rest goes up or down.
“FOWARD” or “BACK”
button
* “AIR” does not function while forward
or backward the foot-rest.
11
“RESET” button
* The back-rest does not go up completely.

Before Starting Massage
STO R E
Power ON.
1. Connect the power cord plug with the
receptacle.
2. Power ON.
The power switch is behind the left arm-rest.
After power ON, the LCD in the initial stage
displays the screens as shown on the right side
alternately.
WARNING
Do not use the massager on other than the
designated voltage.
Do not use the chair when the power cord or its plug
is damaged, or when the receptacle is loosened.
It could electric shock, short circuit or fire.
Check items.
1. Check around the chair.
① Check to make sure that there is nobody, no pet and nothing ahead and
behind the chair and under the foot-rest.
<Standby position>
Press the “START/RESET” button to start massage. Then, the foot-rest
automatically comes up at about 55.
* Be sure to check that there is nothing around.
2. Check the main body itself.
① Hold up the back pad, and check to make sure
that the cover cloth of the back-rest is not torn
and that there is no tear in any other parts.
* Should there by any tear, no matter how
small it is, discontinue using the chair
immediately. Disconnect the power cord
plug, and contact your dealer for repair.
② Check to make sure that none of the power cord,
the Remote Controller cord or any other materials
is pinched in the main body.
③ Check to make sure that there is no damage in
the power cord, Remote Controller cord and
the power cord plug and that nothing of dust
(e.g. pins) is attached to the plug.
Pillow pad
Back pad
④ Before seated on the chair, make sure where
there are the knead balls.
The knead balls are
usually located at
the stored position
(in the innermost at
the lower part of
the back-rest)
When the knead balls are not located at the stored
position, press the “START/RESET” button.
They move down to the lowest position. Press it
again, and then, they go back to the stored position.
⑤ Before seated on the chair, make sure where
there is the foot-rest.
Do not be seated forcibly with the foot-rest at
the upright position. Such attempt may result
in injury. Press the foot-rest [▼] button or the
“RESET” button to lower the foot-rest.
* Press the “RESET” button. Then, the
back-rest is also stored.
Stored
position
FOOTREST RECLINER
12
RESET
FORW AR D BA CK

How to Adjust the Chair
START
ADJUSTMENT
How to use the RECLINER.
1. To turn down the back-rest, press the RECLINER []
button.
Continue to press the RECLINER [▼] button.
The back-rest turns down backward, and the foot-rest
comes up.
The deeper it turns down, the stronger the knead balls’
movement becomes.
2. Release your finger from the RECLINER [] button at
a desired angle.
Foot-rest angle will change depending on the reclining
angle of back-rest.
STOP
/RESET
AUTO FUNCTION
AIR
REPEAT
SKIP
SHDR
HEIGHT
MENU
ARM
3. To raise the back-rest, press the RECLINER [] button.
Holding down the RECLINER [] button raises the
back-rest while the foot-rest is lowered.
Upright position Backward position
ENTER
W/H
FOOTREST RECLINER
LEG
RESET
FORWARD BACK
WARNING
Before reclining the back-rest, before raising or
lowering the foot-rest, or before stretching or
shortening the leg length, check to make sure that
there is nobody, no pet or nothing ahead and
behind the chair and under the foot-rest.
Negligence may result in accident, hazard on the
body or damage in furniture.
CAUTION
Do not allow anybody to ride on the
back-rest, the arm-rest, the foot-rest or the
shoulder unit.
The chair may overturn, and
the user may fall down and
hurt himself/herself.
■ Request: When using the reclining during the massage, turn down the back-rest gradually observing
the change in the intensity of massage.
13

How to Adjust the Chair
START
ADJUSTMENT
How to use the FOOT-REST.
1. To raise the FOOT-REST, press the FOOT-REST [▲]
button.
Continue to press the FOOT-REST [▲] button.
The FOOT-REST comes up.
2. Release your finger from the FOOT-REST [▲ ]
button at a desired angle.
3. To lower the foot-rest, press the FOOT-REST [▼] button.
Continue to press the FOOT-REST [▼] button.
The FOOT-REST goes down.
STOP
/RESET
Downward position
AUTO FUNCTION
AIR
REPEAT
SKIP
SHDR
HEIGHT
MENU
ARM
W/H
FOOTREST
ENTER
LEG
RECLINER
WARNING
RESET
Before lowering the foot-rest, be careful not to have your
foot or hand pinched in it. Check to make sure that
FORWARD BACK
there is nobody, no pet or nothing under the foot-rest.
Negligence may result in hazard on the body.
Upward position
14

How to Adjust the Chair
START
HEIGHT
ADJUSTMENT
How to FORWARD or BACK the FOOT-REST.
1. To raise the foot-rest at a desired angle, continue to
press the foot-rest button [▲]
The function of FORWARD or BACK is not available when
the foot-rest is positioned at 30 or less.
In a range of 30 - 55, the FORWARD length varies.
The FORWARD length becomes longest at an angle of 55 or more.
2. To FORWARD the foot-rest at a desired length,
continue to press the foot-rest [] button.
Continue to press the [] button.
The foot-rest is forwarded.
3. To BACK the foot-rest, press the foot-rest [] button.
Continue to press the [] button.
The foot-rest is backwarded.
STOP
/RESET
AUTO
REPEAT
SKIP
SHDR
W/H
FOOTREST
FORWARD
FUNCTION
AIR
MENU
ARM
ENTER
LEG
RECLINER
RESET
BACK
Downward position
Upward position FORWARD position
Request
Do not strain yourself on your feet
while FORWARD or BACKWARD
the foot-rest. Given the force, the
foot-rest may be damaged, or a
squeaking sound may be caused.
CAUTION
When the foot-rest is
backwarded, do not put your
hand or foot between the seat
and the foot-rest.
You may get hurt.
How to use the [RESET] button.
FOOTREST RECLINER
RESET
FORWARD
BACK
1. To store the back-rest and the foot-rest, press the
[RESET] button.
The back-rest is raised by about 12, and the foot-rest is
shortened and lowered down to the lowest position.
* The [RESET] function is available only when the LCD is in
an initial stage.
* The back-rest does not move up completely, stopping
halfway. To raise it up completely, press the RECLINER
[▲] button.
15

How to Use the AUTO-COURSE
START
ADJUSTMENT
Introduction
After turning the power ON, the LCD in the
initial stage displays the screens as shown
on the right side alternately.
When changing from an AUTO-COURSE to
another AUTO-COURSE, or when changing
non-AUTO-COURSE massage to any
AUTO-COURSE option (see Page 51).
1. Press the [START/RESET] button.
Foot-rest goes up automatically to the standby position.
(To interrupt on the way, press the [STOP] button.)
The standby screen comes out.
Be deeply seated on the chair, and
recline yourself slowly with your
head on the back-rest.
STOP
/RESET
AUTO FUNCTION
AIR
REPEAT
SKIP
SHDR
W/H
FOOTREST RECLINER
FORWARD BACK
HEIGHT
MENU
ENTER
RESET
ARM
LEG
2. Press the [AUTO] button. Or, select “AUTO” with
the button, and press the [ENTER] button.
All of the AUTO-COURSE options
are displayed.
* The [ENTER] button remains not
to be pressed. Even so, all the
options are displayed 5 seconds
later. (The same holds good of this
procedure.)
3. Select a desired course with the button or
the [AUTO] button, and press the [ENTER] button.
Select one out of the 4 courses of “WHOLE BODY”,
“SHOULDER”, “WAIST” and “7MIN”.
There are 4 sub-courses in the “WHOLE BODY” course,
and 3 sub-courses in the “SHOULDER” and, “WAIST”
course each.
16

START
ADJUSTMENT
/RESET
AUTO
REPEAT
SKIP
MENU
SHDR
W/H
FOOTREST RECLINER
AIR
ENTER
RESET
How to Use the AUTO-COURSE
4. The course name selected is displayed. When the
AUTO-COURSE starts, a process of detecting your
body shape also starts.
When the “7MIN” course is selected,
the process of detecting your body
shape is not taken.
5. In the process of detection, the detection points are
lighted up, and the detection levels each of the points
are indicated with the detection indicator.
* When nobody is seated on the chair, or when nothing can be
detected, a message “CAN NOT DETECT BODY SHAPE”
STOP
FUNCTION
HEIGHT
ARM
LEG
comes out on the LCD. In this case, press the [AUTO]
button again, and try to detect the body shape again.
6. With the body shape detection completed, the knead
balls move to the shoulder position as determined.
7. Should you feel the shoulder position not in good
fitness, finely adjust its position as desired. While a
FORWARD BACK
beep sound is caused, press the button for
adjustment, and press the [ENTER] button.
At this time, the knead balls can be moved to back-and-forth
with the button for adjustment.
The massage is applied at the positions adjusted during the
movements of “NECK RELAX”, “EXTREME KNEAD”
and “EXTREME TAPPING” in the AUTO COURSE. (This
is effective only with the “REJUVENATE” course for the
“WHOLE BODY” and “SHOULDER”.)
One scale: about 12mm
17
One scale: about 2mm

How to Use the AUTO-COURSE
START
HEIGHT
ADJUSTMENT
Present massage
Next massage
Air-massage strength
Air-massage strength
Air-massage
Mecha
. (knead balls)
Present position of
massage
Air-massage
Shoulder position may also be adjusted finely using the
HEIGHT ADJUSTMENT [] and [] buttons.
When the body shape was detected with the
[START/RESET] button, the body shape is remembered till
the massage is completed. When changing the body shape
in memory, press the [START/RESET] button to complete
the process and then start again.
8. When the time allowed for the fine adjustment of
shoulder position is counted up, a message “POINT
NAVI FINISHED” is displayed.
STOP
/RESET
AUTO FUNCTION
AIR
REPEAT
SKIP
MENU
SHDR
ENTER
W/H
FOOTREST RECLINER
RESET
FORWARD BACK
ARM
LEG
9. Contour of your back line is displayed.
10. The AUTO-COURCE presently in progress of
massaging is displayed on the LCD screen.
mode
mode
of shoulders
of arms
options
position
massage strength
Air-massage strength
Mecha. (knead balls)
Name of AUTO-COURSE
Remaining time
18

How to Use the AUTO-COURSE
START
HEIGHT
ADJUSTMENT
11. As the AUTO-COURSE is completed, the knead balls
return automatically to the stored position.
12. After using the chair, turn the power switch “OFF”.
This prevents the chair from starting when the Remote
STOP
/RESET
AUTO FUNCTION
AIR
REPEAT
SKIP
MENU
SHDR
ARM
Controller has been operated inadvertently.
CAUTION
ENTER
W/H
FOOTREST RECLINER
LEG
When stopping the massage immediately.
Press the [STOP] button.
Knead balls stop retaining the
RESET
present position.
Standby screen is displayed.
FORWARD BACK
Turn the power switch OFF
after using the chair.
There is risk of accident if a
child has played with the
chair out of mischief.
When terminating the massage on the way.
Press the [START/RESET] button.
Knead balls move to the stored position.
After the knead balls have been stored, the initial screen is
displayed.
19

How to Use the AUTO-COURSE
Extreme
Extreme
Knead Down
Neck Relax
Knead Up
Stretch Knead Up
Extreme Tapping
Extreme
Stretch Wavelet
Knead Down
Stretch
Stretch
Shiatsu
For your information:
What is POINT NAVI?
POINT NAVI is the function to measure the body shape and posture before massaging only when
the AUTO-COURSE is used.
With your contour back line in memory, effective massage can be given.
Contents of the AUTO-COURSE
Sections to massage and types of massage can be selected from 11 combinations in the
AUTO-COURSE.
<Rejuvenation>
All round
(WHOLE BODY) course
<Approx. 15 min>
Effective to massage the entire
back of body
● ● ● ●
(SHOULDER) course
<Approx. 15 min>
Effective to massage intensively
on the neck and shoulder
● ● ●
(WAIST) course
<Approx. 15 min>
Effective to massage intensively
on the waist
● ● ●
(7 MIN) course
Course that reduces the duration of WHOLE BODY course to approx. 7 minutes
* 7 MIN course does not have the body shape detection.
Following illustration shows only the outline for quick reference. Also, the air massage and the
lower body are abbreviated.
WHOLE BODY
REJUVENATION
COURSE
Point Navi
Knead Down
Knead Up
Waist/Hip
Rolling
Knead
Knead Up
Knead Down
Extreme
Tapping
Extreme
Tapping Waist
Knead Down
Neck Relax
Wavelet
Knead Up
Waist/ Hip
<Refresh>
Comfortable
Knead Up
Knead Down
Stretch
Wavelet
<Relax>
Gentle
Knead
Neck Relax
Wavelet
Knead Up
Knead Down
Extreme
Knead Waist
<Air>
Air only
Regularizing
SHOULDER
REJUVENATION
COURSE
WAIST
REJUVENATION
COURSE
7 MIN COURSE
Point Navi
Knead Down
Knead Up
Point Navi
Knead Down
Tapping
Rolling
Knead Up
Extreme
Knead
Waist/ Hip
Rolling
Neck Relax
Knead Up
Extreme
Tapping
Rolling
Waist/Hip
Knead Up
Knead Down
Extreme Knead
Waist
Knead Up
Knead Up
Knead Down
Extreme
Tapping
Wavelet
Knead Up
Extreme
Knead
Rolling
Extreme
Tapping
Wavelet
Waist
Knead Up
Extreme Knead
Waist
Rolling
Stretch Wavelet
Tapping
Rolling
Knead Up
Knead Down
Wavelet
Tapping
Extreme
Tapping Waist
20
Knead Up
Knead Down
Extreme
Tapping
Stretch
Knead Up
Tapping Waist
Knead Up
Knead Down
Waist/ Hip
Rolling
Tapping
Extreme
Knead
Knead Up
Wavelet
Stretch
Knead Down
Neck Relax
Knead Down
Shiatsu
Stretch
Wavelet
Knead Down
Rolling
Extreme
Tapping Waist
Tapping
Knead Up
Regularizing
Regularizing
Regularizing

How to use the Quick Mode
START
START
ADJUSTMENT
What is Quick Mode?
You can select the preprogrammed AUTO-COURSEs, which are adjusted to the categories of
body height for standard body shape.
Since the POINT NAVI is skipped, this mode is recommended when you like to start the massage
immediately.
/RESET
STOP
Introduction
After turning the power ON, the screens
shown at right are displayed alternately on
the LCD display in the initial state.
When changing from a course of Quick Mode
to another or from the massage other than
Quick Mode to a massage of Quick Mode
(See P52.)
1. Press [START/RESET] button.
Foot-rest goes up automatically to the standby position.
STOP
/RESET
AUTO
REPEAT
SKIP
SHDR
FUNCTION
AIR
HEIGHT
MENU
ARM
(To interrupt on the way, press the [STOP] button.)
Standby screen is displayed.
2. Press either one of , , or .
Or select either one of , , or using
List of AUTO-COURSEs is displayed.
For the height of about 155 cm (5’1”)
For the height of about 165 cm (5’5”)
For the height of about 175 cm (5’9”)
Some original courses may be enjoyed by changing and registering
the contents of preprogrammed AUTO-COURSEs. (See P29)
Initial condition is set for a person in the height of 168 cm (5’6”).
button and press the [ENTER] button.
ENTER
W/H
FOOTREST RECLINER
LEG
RESET
FORWARD BACK
21

How to use the Quick Mode
START
ADJUSTMENT
Present massage
Next massage
Air-massage strength
Air-massage strength
Air-massage
Mecha
.
(knead balls)
Present position of
massage
Air-massage
3. Select a desired course with the button and
press the [ENTER] button.
Select one of [WHOLE BODY], [SHOULDER], [WAIST]
/RESET
AUTO FUNCTION
AIR
REPEAT
SKIP
MENU
SHDR
ENTER
W/H
FOOTREST RECLINER
RESET
FORWARD BACK
STOP
HEIGHT
ARM
LEG
mode
mode
of shoulders
of arms
options
position
or [7MIN] course.
[WHOLE BODY] course has 4 sub-courses while
[SHOULDER] [WAIST] has 3 sub-courses.
4. Name of selected course is displayed and the
specified AUTO-COURSE starts.
5. Name of the QUICK MODE course presently
selected is displayed on the LCD screen.
massage strength
Air-massage strength
Mecha. (knead balls)
Name of AUTO-COURSE
Remaining time
22

How to use the Quick Mode
START
ADJUSTMEN
T
6. As the course of QUICK MODE is terminated, the
knead balls return automatically to the stored
position.
7. After using the chair, turn the power switch “OFF”.
This prevents the inadvertent start of movement when the
STOP
/RESET
AUTO FUNCTION
AIR
REPEAT
SKIP
SHDR
HEIGHT
MENU
ARM
Remote Controller has been operated accidentally.
CAUTION
ENTER
W/H
FOOTREST RECLINER
LEG
When stopping the massage immediately.
Press the [STOP] button.
RESET
Knead balls stop retaining the
present position.
FORWARD BACK
Standby screen is displayed.
Turn the power switch OFF
after use.
There is risk of accident out
of mischief by children.
When terminating the massage on the way.
Press the [START/RESET] button.
Knead balls move to the stored position.
After the knead balls have been stored, the initial screen is
displayed.
23

START
ADJUSTMENT
Around shoulders or back
Adjustment during massaging with AUTO-COURSE or in QUICK MODE
1. To adjust the strength of Mecha. (knead balls)
massaging.
Adjust by pressing the button and then press
the [ENTER] button.
Strength of Mecha. (knead balls) massaging can be adjusted
at 7 steps.
This is set initially at the
strength step 4.
STOP
/RESET
AUTO FUNCTION
AIR
REPEAT
SKIP
SHDR
HEIGHT
MENU
ARM
2. To adjust the strength of air massage.
Adjust by pressing the button and then press
the [ENTER] button.
Air-massage strength can be adjusted at 5 steps.
This is set initially at the strength step 3.
For adjustment of
air-massage strength on the
shoulder/arm, refer to P28.
ENTER
W/H
FOOTREST RECLINER
RESET
LEG
3. To adjust the shoulder position/knead ball position.
When the knead balls are positioned around
shoulders or back, press the [▲] or [▼] buttons
FORWARD BACK
for HEIGHT ADJUSTMENT, and press the [ENTER]
button.
The shoulder position is adjustable with the [▲] or [▼]
buttons pressed once and then with the button
pressed. At this time, the knead balls can be moved
back-and-forth with the button for adjustment.
Massage is applied at the position adjusted during the
movements of the “NECK RELAX”, “EXTREME KNEAD”
and “EXTREME TAPPING” in the AUTO-COURSE. (This is
effective only for the “REJUVENATION” course of
“WHOLE BODY” and “SHOULDER”.)
One scale:
about 12mm
One scale:
about 2mm
24

START
ADJUSTMENT
Around waist
Adjustment during massaging with AUTO-COURSE or in QUICK MODE
4. To adjust the “EXTREME KNEAD WAIST” or
“EXTREME TAPPING WAIST” positions.
When the knead balls are positioned around waist,
press the [▲] or [▼] buttons for HEIGHT
ADJUSTMENT, and press the [ENTER] button.
The waist position is adjustable with the [▲] or [▼] buttons
pressed once and then with the button pressed.
Massage is made with the knead balls at the position
adjusted for “EXTREME KNEAD WAIST” or
“EXTREME TAPPING WAIST” in the AUTO-COURSE
position. (This position is available only for the courses of
“WHOLE BODY”, “WAIST” and “REJUVENATE”.)
/RESET
STOP
One scale: about 12mm
AUTO FUNCTION
AIR
REPEAT
SKIP
SHDR
HEIGHT
MENU
ENTER
ARM
5. To turn ON/OFF the [PULSE].
W/H
LEG
Press the [MENU] button. Adjust at the “PULSE”
FOOTREST RECLINER
with the button and select “ON/OFF” with the
RESET
button. Press finally the [ENTER] button.
Turn [PULSE] ON. Air-massage starts in quick pulsation
FORWARD BACK
at a high frequency.
Example: Air-massage of waist and back at the strength 3
Regular mode 1 pulsation in 7 seconds
Pulse mode 7 pulsation in 12 seconds
It is set at “ON” initially.
The function selected is reversed.
* The [PULSE] function is not
available in the air-massage of arm.
6. To turn ON/OFF the “COMBO FOOT REST”.
Press the [MENU] button. Adjust at the “COMBO FOOT REST” with the
button and select “ON/OFF” with the button. Press finally the [ENTER] button.
Both “COMBO FOOT REST” and
“STRETCH/FOOT STRETCH/DOUBLE
STRETCH” functions do not work at the
same time.
It is set at “OFF” initially.
If the COMBO FOOT REST is turned “ON”
when the FOOT AIR is “OFF”, the FOOT
AIR is also turned “ON”
25

START
ADJUSTMENT
Adjustment during massaging with AUTO-COURSE or in QUICK MODE
7. To turn ON/OFF the FOOT STRETCH.
Press the [MENU] button. Adjust at the “FOOT
STRETCH” with the button and select
/RESET
AUTO FUNCTION
AIR
REPEAT
SKIP
MENU
SHDR
ENTER
W/H
FOOTREST RECLINER
RESET
FORWARD BACK
STOP
HEIGHT
ARM
LEG
“ON/OFF” with the button. Press finally the
[ENTER] button.
FORWARD the foot-rest. If the angle of the foot-rest is still low,
wait for a while until it comes up. Then, the massage starts.
The FOOT STRETCH and COMBO FOOT REST cannot
be used simultaneously.
It is set at “ON” initially
If the FOOT STRETCH is turned “ON” when the FOOT
AIR is “OFF”, the FOOT AIR is also turned “ON”
FOOT
STRE TCH
8. To do “LEG” stretch air-massage.
Press the “LEG” stretch button once, and then
press it again repeatedly. With “LEG” stretch
selected, press the [ENTER] button.
The [ENTER] button remains not to be pressed. Even so, this
function starts 5 seconds later. (The same holds good of this
procedure.)
Massaging strength can be adjusted to 5 steps.
This is set initially at the strength step 3.
Massaging strength can be adjusted with the button.
The stretching function is not available with the foot-rest
position at less than 30.
In an angle range of 30-40, the stretching length of the
foot-rest varies.
FORWARD the foot-rest. If the angle of the foot-rest is still low,
wait for a while until it comes up. Then, the massage starts.
26

START
ADJUSTMENT
Adjustment during massaging with AUTO-COURSE or in QUICK MODE
9 To turn ON/OFF the “FOOT AIR”.
Press the [MENU] button. Adjust at the “FOOT AIR”
with the button and select “ON/OFF” with the
button. Press finally the [ENTER] button.
It is set at “ON” initially.
With both “FOOT AIR” and “COMBO FOOT REST” ON,
turn “FOOT AIR” OFF. Then, “COMBO FOOT REST” is
also turned “OFF”.
With both “FOOT AIR” and “FOOT STRETCH” ON, turn
“FOOT AIR” OFF. Then, “FOOT STRETCH” is also
turned “OFF”.
STOP
/RESET
AUTO FUNCTION
AIR
REPEAT
SKIP
SHDR
HEIGHT
MENU
ARM
PULSE
FOOT AIR
10. To repeat the currently conducted massage once
ENTER
more.
Press the [REPEAT] button.
W/H
FOOTREST RECLINER
LEG
You can use the currently conducted massage once more for
about 30 seconds.
* AIR MASSAGE cannot be
RESET
repeated.
* If you press the REPEAT button
FORWARD BACK
once more during the repeat
massage, you can extend the
massage for more about 30
seconds.
* If you press the [SKIP] button
on the way of repeat massage,
the REPEAT is reset.
11. To proceed from the currently conducted massage
to the next.
Press the [SKIP] button.
Massage being conducted
currently is interrupted and it
moves to the next massage
position.
* AIR MASSAGE cannot be
skipped.
27

START
ADJUSTMENT
Adjustment during massaging with AUTO-COURSE or in QUICK MODE
12. To adjust or turn OFF the shoulder air-massage.
To adjust, press the [SHDR] once and then press
the [SHDR] repeatedly. Finalize the adjustment by
pressing the [ENTER] button.
Massaging strength can be adjusted to 5 steps.
This is set initially at the strength step 3.
Massaging strength can be adjusted by pressing the [SHDR]
once and then using the button.
* During the shoulder air-massaging, the back air bag is also
inflated.
* During the shoulder air-massage, the strength of massage by
the knead balls may become stronger.
/RESET
STOP
* When using the shoulder air-massage, do not wear clothes,
which expose the shoulders.
AUTO FUNCTION
AIR
REPEAT
SKIP
SHDR
HEIGHT
MENU
ARM
ENTER
W/H
FOOTREST RECLINER
LEG
13. To select the arm air-massage functions (ARM
KNEAD/ARM GRASP).
Press the [ARM] button, and select “ARM KNEAD/ARM
GRASP” with the button and the [ENTER] button.
FORWARD BACK
It is set at “ARM KNEAD” initially.
The function selected is reversed.
14. To adjust or turn OFF the arm air-massage.
To adjust, press the [ARM] once and then press the [ARM] repeatedly. Finalize the
adjustment by pressing the [ENTER] button.
Massaging strength can be adjusted to 3 steps.
It is set at “MODERATE” initially.
Even after the [ARM] button is
pressed once, massaging strength
can be adjusted.
* When using the arm air-massage,
do not wear something hard such
as a watch, accessory, etc.
28

Registration in the Memory
START
ADJUSTMENT
Regarding the memory.
You can enjoy your original courses by changing the contents of preprogrammed
AUTO-COURSEs and registering such in the memory.
What can be registered in the memory?
Body shape information (POINT NAVI, shoulder and waist position) Positions when using the SKIP/REPEAT functions
Selected AUTO-COURSE
Air option (ON/OFF of PULSE, COMBO FOOT REST, STRETCH/FOOT STRETCH/DOUBLE STRETCH,
ARM KNEAD/ARM GRASP, SHOULDER and LEG)
(Caution)
* Strength of Mecha. (knead balls) massage, air-massage and shoulder/arm massage strength are not registered. Adjust
them at each occasion.
* Air options are registered in the memory as the state at the end of course.
Introduction
After turning the power ON, the screens
shown at right are displayed alternately
on the LCD display in the initial state.
1. Press the [START/RESET] button.
Foot-rest goes up automatically to the standby position.
(To stop on the way, press the [STOP] button.)
/RESET
AUTO FUNCTION
REPEAT
SKIP
MENU
SHDR
W/H
FOOTREST RECLINER
STOP
AIR
HEIGHT
ARM
ENTER
LEG
Standby screen is displayed.
2. Hold down the button for 2 seconds.
Guidance of memory registration and AUTO-COURSE list
are displayed.
RESET
FORWARD BACK
29

③
④
START
ADJUSTMENT
REG IST
-
ERING
/RESET
AUTO FUNCTION
AIR
REPEAT
SKIP
MENU
SHDR
ENTER
W/H
FOOTREST RECLINER
RESET
FORWARD BACK
STOP
HEIGHT
Registration in the Memory
3. Select a desired AUTO-COURSE to enjoy the massaging
according to your preference.
Some examples of use are shown below.
These describe points only of each feature for a quick
overview.
Select desirable massages by referring to the sections: Use
of the AUTO-COURSE (P16 - P20) and Adjustment during
massaging with AUTO-COURSE or in QUICK MODE
(P24 - P28).
Example of use.
① To select the “REFRESH” course of
the “SHOULDER”
② As the POINT NAVI is completed,
ARM
③
LEG
“REGISTERING” is displayed on the
LCD screen.
③ Adjust the massage.
PULSE “ON” → “OFF”
FOOT STRETCH “ON” → “OFF”
SHOULDER air-massage strength
“3” → “STOP”
④ “3D TAPPING” programmed at 5 minutes after the start of
massage is skipped. “WAVELET” programmed at 9 minutes
after the start is repeated.
This shows the memory
registration is going on.
FOOT
STRE TCH
30

START
ADJUSTMENT
/RESET
AUTO FUNCTION
REPEAT
SKIP
MENU
SHDR
AIR
STOP
HEIGHT
Registration in the Memory
4. As the AUTO-COURSE terminates, the memory
registration confirmation screen is displayed.
Select “Yes/No” with the
button and press the
[ENTER] button.
5. Select “Yes”. Registration starts. With the
message “Finished” on the LCD, the process of
registration is completed.
* Do not turn the power OFF when the memory registration is
going on. Otherwise, the memory registration will be disabled.
ARM
ENTER
W/H
FOOTREST RECLINER
FORWARD BACK
LEG
One Point!
You can select other
AUTO-COURSEs based on
the registered body shape
information and air-massage
option information.
If you start the massage by pressing the QUICK MODE
button (See P21) after the completion of registration, the
chair operates according to the registered program.
In case of the example of use.
Following movements will start based on the
information of your body shape.
“REFLESH” course of “SHOULDER”
Mechanical strength “4”
Air strength “3”
Shoulder massage strength “STOP”
Arm knead massage strength
“MODERATE”
Foot Stretch “OFF”
Pulse “OFF”
Skips “3D TAPPIN” at 5 minutes after the massage start.
Repeats the “WAVELET” at 9 minutes after the massage start.
* Mecha. (knead balls) massage strength and air strength are
not registered in the memory.
* On the air options, registration can be made of the final
stage of the course in the memory.
6. As the memory registration is over, the knead balls
return to the stored position automatically.
To change the content of registered memory (overwrite),
start from the beginning on P29.
To erase the registered memory, refer to another function
(When erasing the registered memory) (P55).
31
 Loading...