

Page 1

Getting Started With
1
the QuickTake 200 Camera
The QuickTake 200 is an easy-to-use digital camera that produces highquality images you can quickly transfer to your Macintosh Operating System
(Mac OS)–based computer. Using your computer you can manipulate and
modify the images to suit your purposes. The QuickTake 200 is a valuable
tool for graphic ar tists, publishing professionals, and anyone who wants to use
images to communicate.
IMPORTANT
instructions.
This chapter contains information about system requirements; installing the
QuickTake software, the storage card, and the batteries; and setting the date
and time.
Save this manual. It contains important safety and operating
1
Page 2
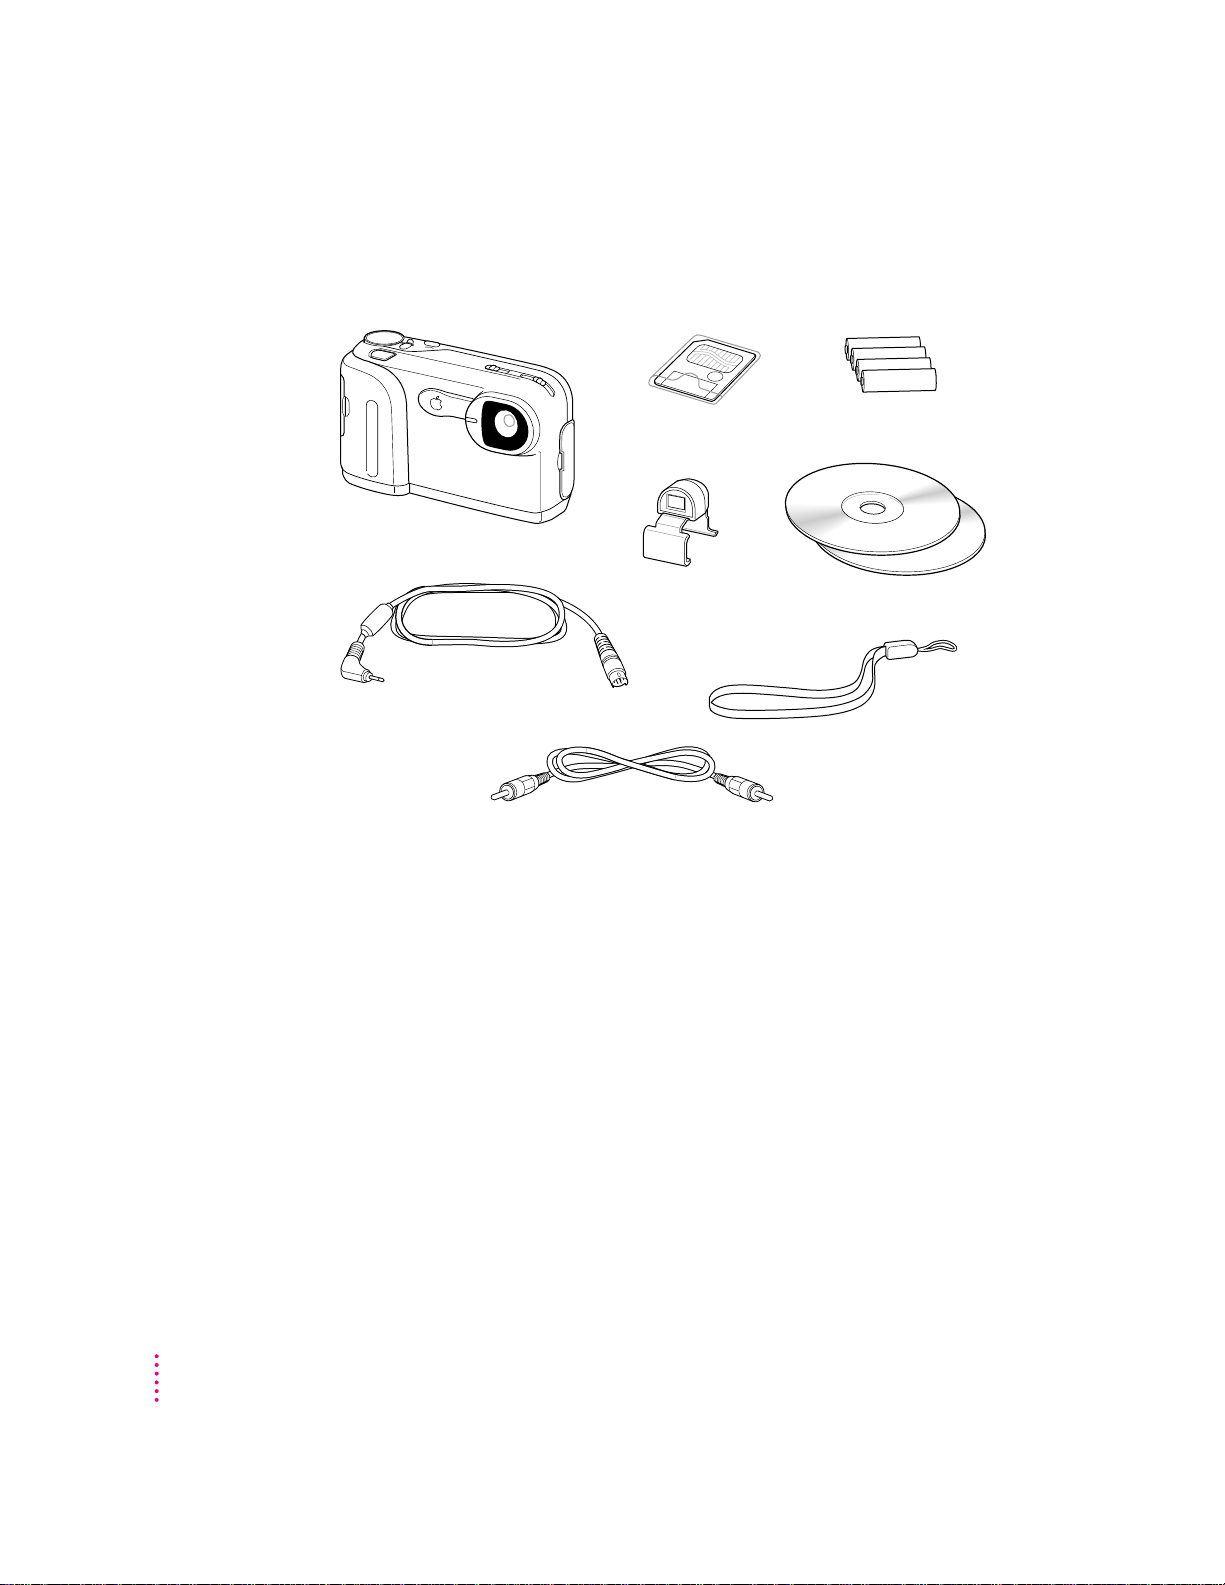
Do you have what you need?
QuickTake 200 camera
Storage card AA batteries
Mac OS–based
computer cable
QuickTake CD-ROM discs
Optical viewfinder
Carrying strap
TV video cable
Be sure you have all the items shown here:
System requirements
2
Chapter 1
To use the QuickTake 200 camera with your computer, you need
m a Mac OS–based 68040 computer or a Power Macintosh computer
m Mac OS version 7.5 or later
m QuickTime version 2.0 or later
m Apple recommends that you have at least 16 megabytes (MB) of random-
access memory (RAM) with at least an 8-MB RAM partition available
m a hard drive with at least 10 MB available
m a CD-ROM drive
Page 3
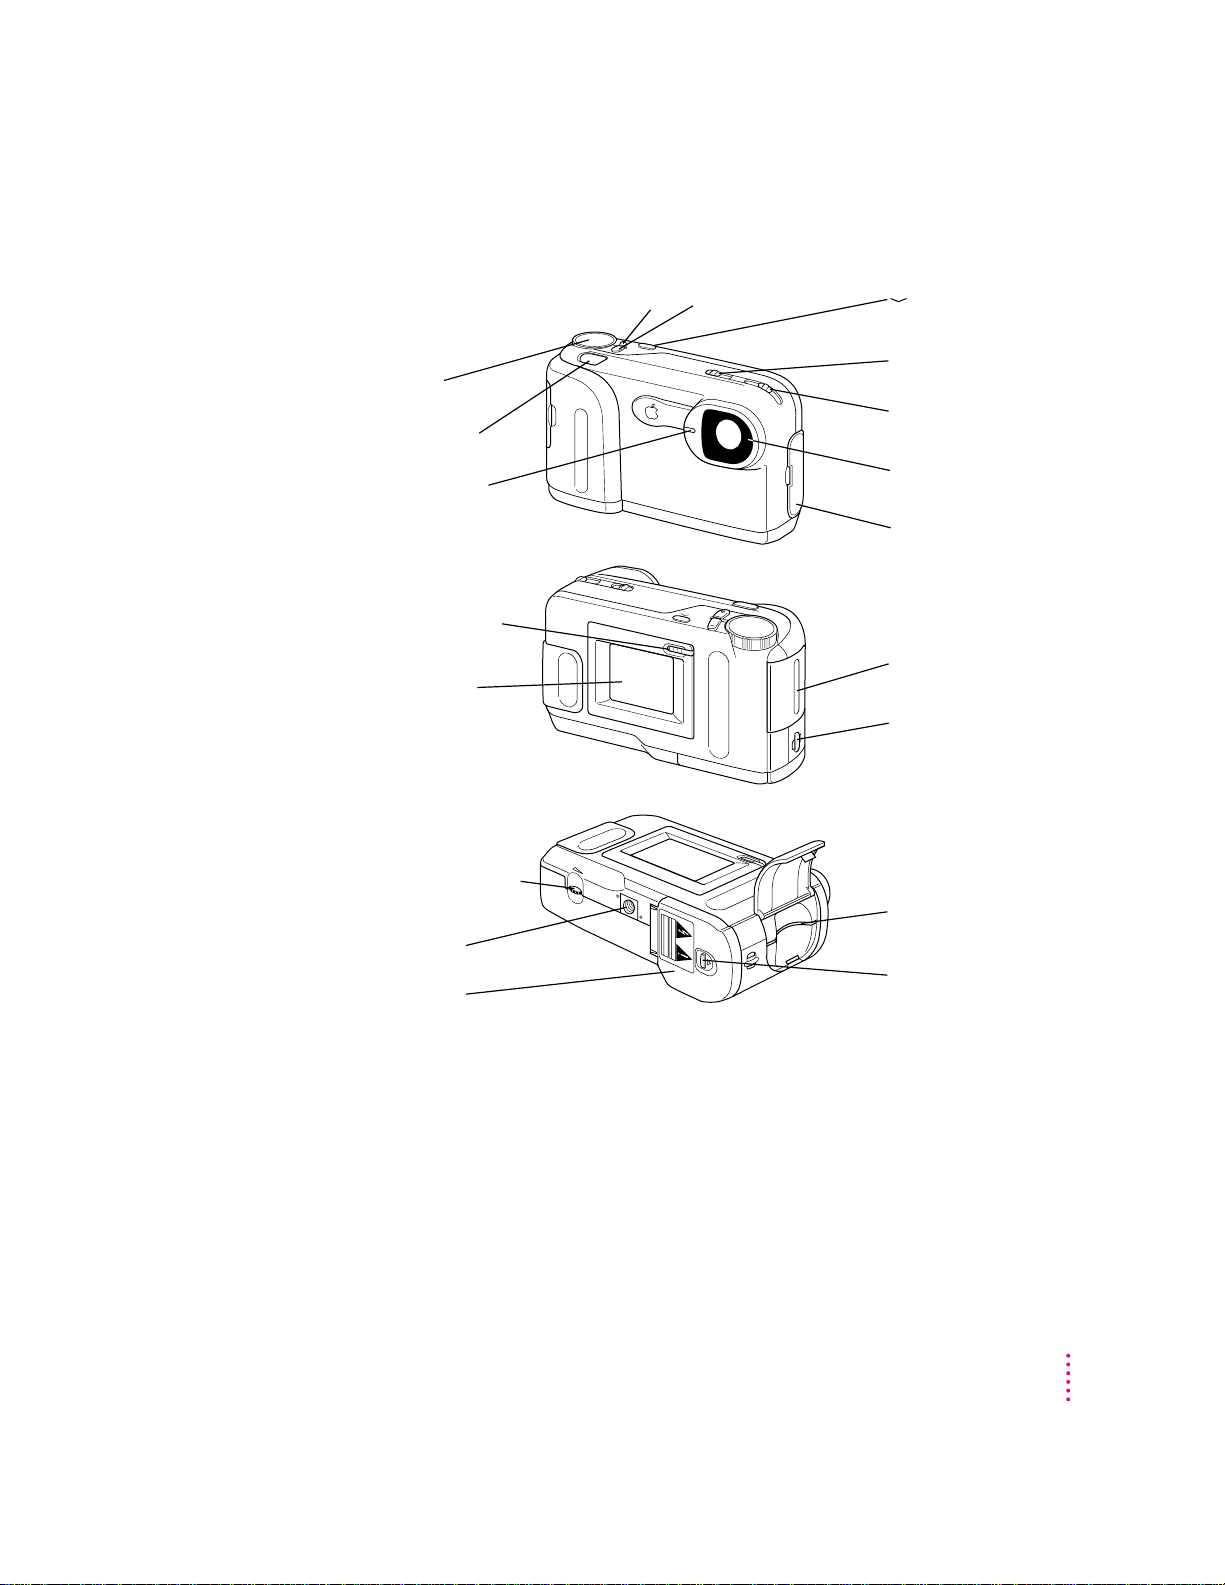
Your camera at a glance
+ (Date) button Action button– (Time) button
Camera lens
Aperture selector
Focus selector
Terminal door
Carrying strap mount
Storage card door
Iø Power switch
Front view
Back view
Shutter release
Timer/sleep light
Mode dial
LCD screen
(liquid-crystal
display)
Bottom view
Storage card slot
Battery door
release button
¤
LCD brightness
dial
Tripod mount
Battery door
I
ø
CAUTION
ATTENTION
¤
Getting Started With the QuickTake 200 Camera
3
Page 4

The camera mode dial
Mode dial
Use the camera mode dial to select modes; for example, turn to Computer
mode to use the camera with your computer. This section describes the modes
ava ilab le. See Chapter 2 for information on how to use each mode.
Icon Mode Description
Computer mode Use this mode, along with the included Mac–OS based computer
`
~
1
!
Self-Timer mode Use this mode to set the camera to take a picture after 10 seconds.
Record mode Use this mode to take good-quality pictures.
Record-Fine mode Use this mode when you want the highest picture quality. You can
cable, to transfer images from the camera to your computer.
PC-Mode
(
also change the date and time in this mode.
appears on your LCD screen.)
4
Chapter 1
2
@
3
#
Play mode Use this mode to view single or multiple camera images on the
LCD screen.
Auto-Playback mode Use this mode to automatically play back consecutive frames
on the LCD screen. You also use this mode to view images on
your television.
Protect mode Use this mode to prevent images from being erased.
Erase mode Use this mode to erase a single image, erase all images on the
storage card, or to format the storage card.
Page 5

Installing the QuickTake software
Before you can transfer images from your camera to your computer, you need
to install the QuickTake software on your computer.
1 Insert the
computer.
Apple QuickTake 200 Software
CD-ROM disc into the CD-ROM drive of your
Note: For information about the second CD that contains other applications,
see Chapter 3.
2Double-click the folder called QuickTake 200 Software to open it.
3Double-click the Installer icon to begin the installation process.
IMPORTANT
Do not install the QuickTake software by dragging its icons to
your hard disk. You must use the Installer to install the software on your
computer correctly.
4 In the Welcome dialog box that appears, click Continue.
5 In the Installer dialog box, click Install.
Easy Install is already selected to ensure that all the necessary software is
installed. Make sure that you install the software on your startup disk.
A software license agreement appears.
6 Read the agreement.
7If you agree with the terms of the license, click Agree to continue with installation.
You may also print the license agreement or save it to your hard disk. If you
click Disagree, the software will not be installed.
8When you see a message reporting that the installation was successful, click Restart.
The Installer restarts your computer, and a new folder called QuickTake 200
appears on your hard disk. This folder contains the Camera Access software.
Getting Started With the QuickTake 200 Camera
5
Page 6
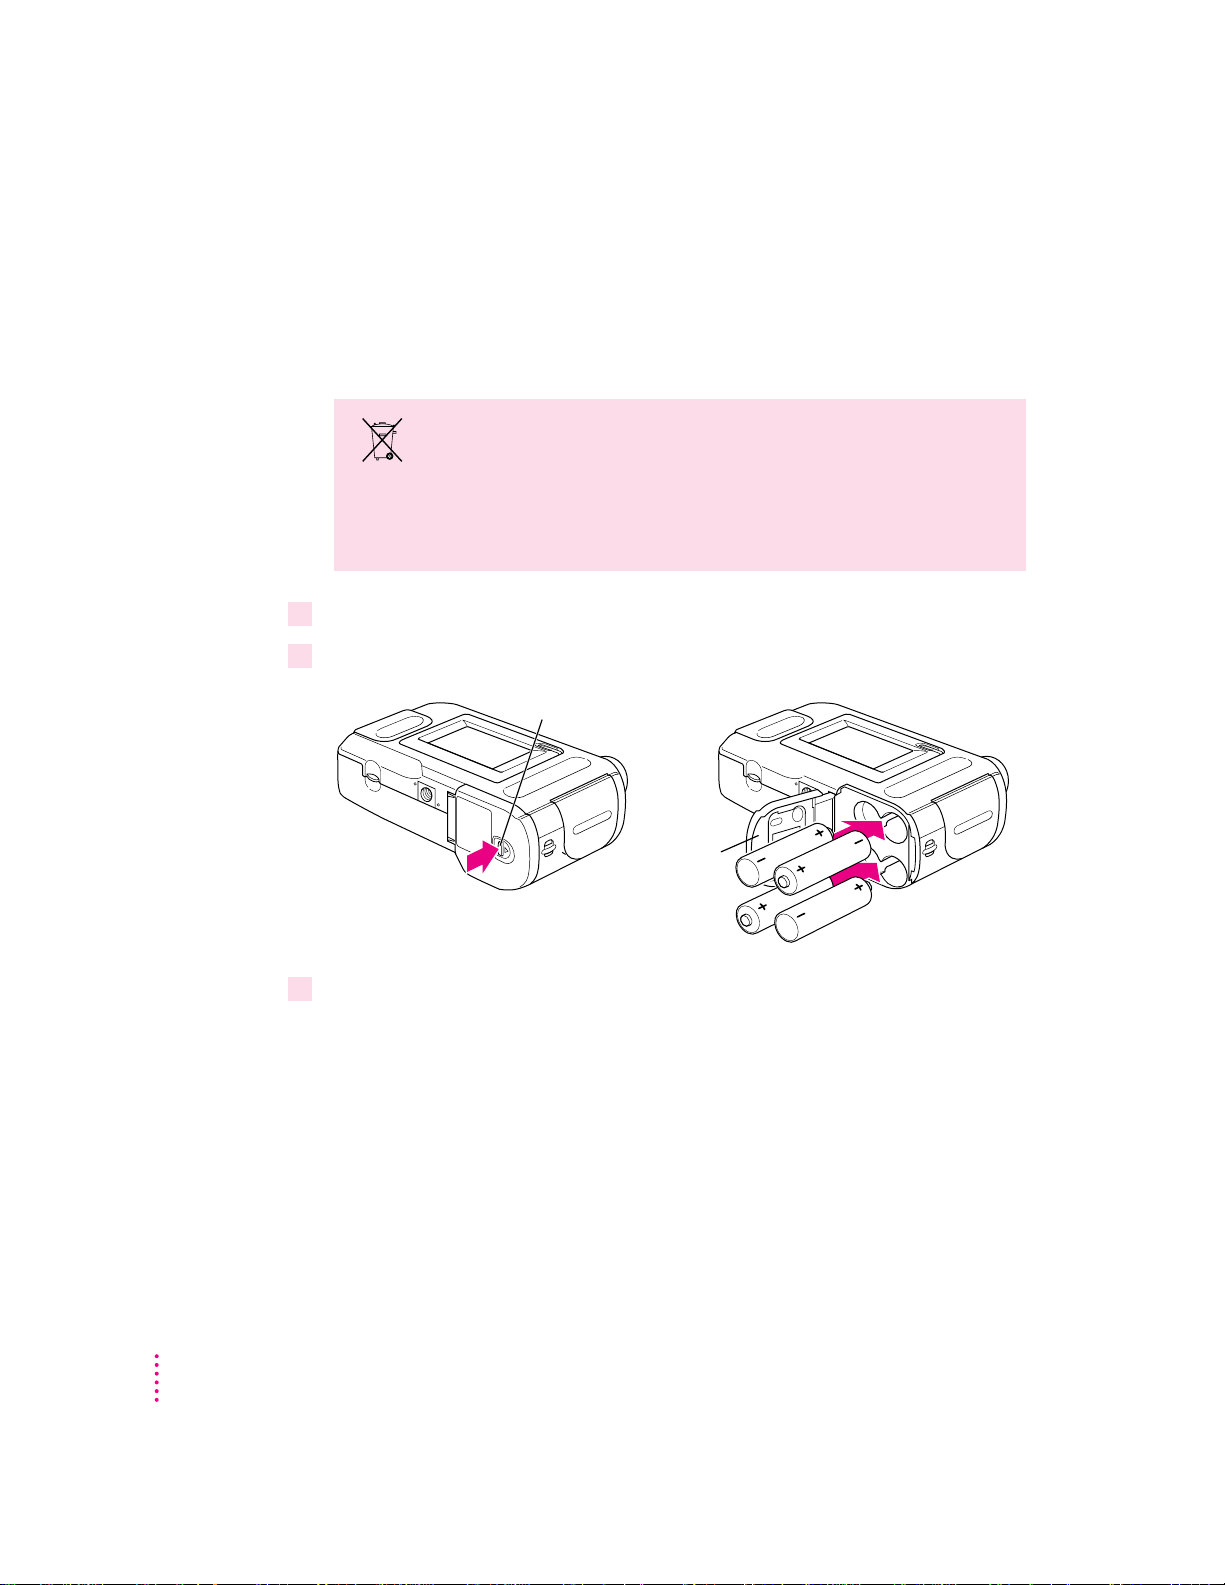
Installing the bat te ries
Push button
Battery door
Lithium
(Li)
Before you begin using your camera, you need to install the batteries. Use
the four lithium batteries (AA size) that came with your camera. To obtain
maximum use from your batteries, turn off the camera whenever you are not
using it.
WARNING
Installing the batteries incorrectly may cause an
explosion. Follow the instructions in this manual to replace the
batteries. Use only the same type of batteries or an equivalent
batteries recommended by the manufacturer of the original
batteries. Do not mix different types of batteries in the camera.
1Press down on the Push button and slide and open the battery door.
2Insert the batteries into the camera as shown.
3Close the battery door by sliding it into place.
6
See also: Appendix B, “Battery Information.”
Chapter 1
Page 7

Replacing the batteries
Lithium
(Li)
When the batteries are low, the battery warning flashes on the liquid-crystal
display (LCD) screen to remind you to replace the batteries. The camera turns
itself off when the batteries get too low to use.
IMPORTANT
types together.
IMPORTANT
the environment. Please dispose of used batteries according to your local
environmental guidelines.
Installing the storage card
Before you can use your QuickTake 200 camera, you must install the storage
card th at you received with the camera. After you install the card, you need to
format it using the Erase mode Format function. (You format the card the first
time th a t you use it in the camera.)
WARNING
your camera may result in damage to your camera.
If the card is not in the camera, a
the LCD screen when you turn on the camera. You cannot take pictures
without a card.
Do not use old and new batteries together or batteries of different
Batteries contain chemicals, some of which may be harmful to
The use of storage cards other than that specified for use with
NO CARD message flashes on
Getting Started With the QuickTake 200 Camera
7
Page 8
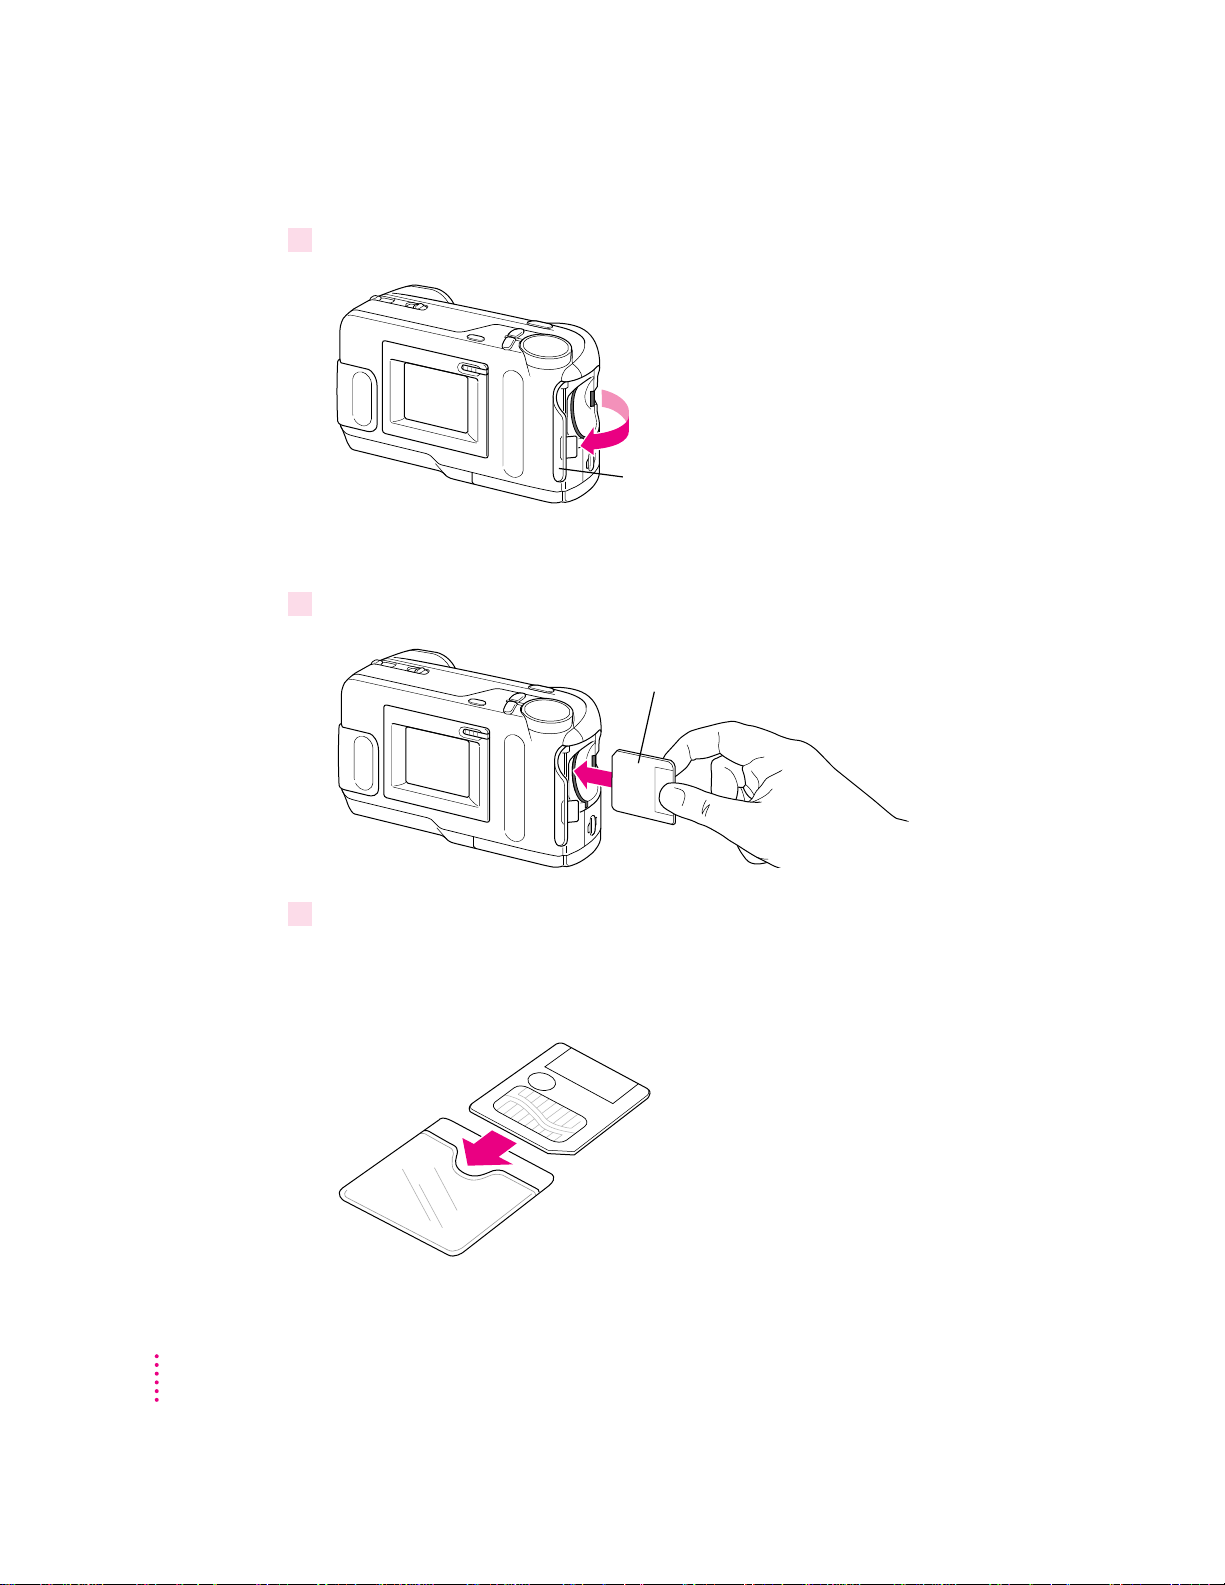
1 Open the storage card door.
Storage card
Storage card door
IMPORTANT
Opening the storage card door always turns off the camera.
2Hold the card as shown, and gently push it all the way into the card slot.
3Close the card door.
IMPORTANT
When storing the camera, you should remove the card and store it
in its plastic case.
8
Chapter 1
Page 9

Formatting the storage card
1 Turn on the camera by sliding the power switch (
direction indicated by the arrow and then releasing it.
2 To format the storage card, turn the mode dial to Erase (
3 Use the plus (+) and minus (–) buttons (next to the mode dial) to select
the screen.
4Press the action button (next to the + and – buttons).
OK? appears blinking on your screen.
5Press the action button again to format the card.
WARNING
When you format a card, all the data on the card is removed,
‰
) (above the LCD screen) in the
#
) mode.
FORMAT
on
including any protected images.
Write-protecting the storage c ard
To prevent erasing important data from your storage card, place a write-
protect seal over the write-protect circle on the card. You receive 4 seals with
every card you buy. (You cannot reuse seals.)
This seal makes it impossible to record data to or erase data from the card.
To again use the card to record or erase data, remove the seal.
IMPORTANT
Write-protection might not function if the seal becomes dirty. Use
a dry, lint-free cloth to wipe the seal clean.
Getting Started With the QuickTake 200 Camera
9
Page 10
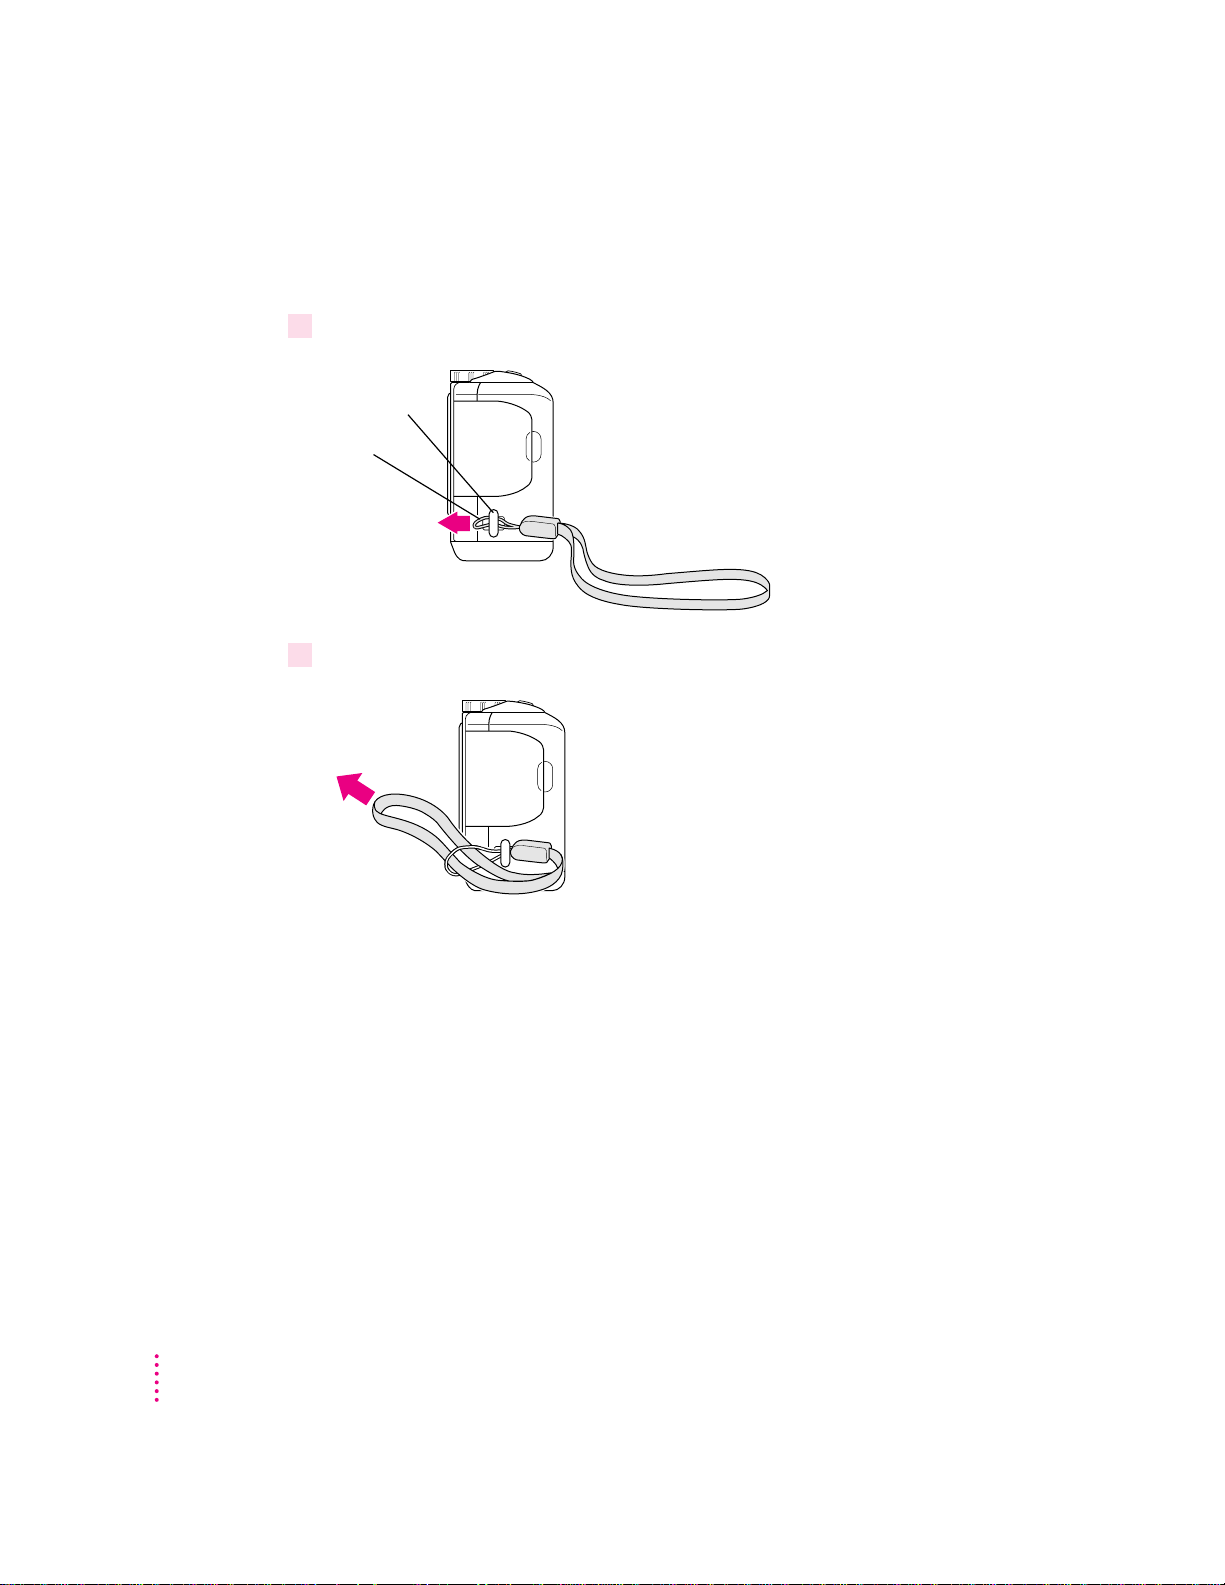
Attaching the carrying strap
Strap
Strap mount
Always use the car rying strap to avoid dropping the camera.
1Pass the end of the strap through the strap mount on the camera.
2Pull the strap through the strap fastener.
10
Loop the carrying strap over your wrist before grasping the camera.
Chapter 1
Page 11

Setting the date and time in the camera
You can set the date and time to date-stamp your images. The date and
time a re automatically recorded and appear on the LCD screen or the
television monitor.
1 Turn the mode dial to Record-Fine (!) mode.
2Hold down the plus (+) and minus (–) buttons at the same time for 3 or more seconds.
The date appears with the year flashing.
3Press the + button to change the year.
IMPORTANT
If you advance beyond the number that you want to set, continue
pressing the + button. When the highest number is reached, the display
goe s bac k to the lowest number. For example, when you set the month, the
display goes from 12 back to 1.
4Press the – button to set the year and advance to the month.
The month appears flashing.
IMPORTANT
Press the – button only when you want to set your choice. You cannot
use the – button t o go backw ard if you pass the number that you wanted.
5 Repeat steps 3 and 4 to change and set the month, day, and time.
Press the + button to advance the number flashing. Press the – button
to set t he flashing number and move to the next setting. The time appears
after you set the day.
IMPORTANT
To set AM and PM, you must advance the hours using the + button.
Getting Started With the QuickTake 200 Camera
11
Page 12

6After you set the number for minutes, press the – button again.
The date and time are now set.
Displaying and hidin g the date and time
You can display and hide the date and time on your LCD screen when you are
using ei t her Record-Fine or Record mode.
Press the + button to display the date and press again to hide it.
Press the – button to display the time and press again to hide it.
IMPORTANT
cha nge the bat tery. You must reset the date and time after 5 minutes have
elapsed without batteries in the camera.
The date and time remain set for up to 5 minutes while you
What if you upgrade your system software?
If you decide to replace or upgrade your system software after you’ve installed
the QuickTake software, you might not be able to connect to the camera. You
must reinstall the Apple QuickTake 200 software. See “Installing the
QuickTake Software,” earlier in this chapter.
What’s next?
Read Chapter 2 for instructions about how to take pictures with your
QuickTake 200 camera.
12
Chapter 1
Page 13
2
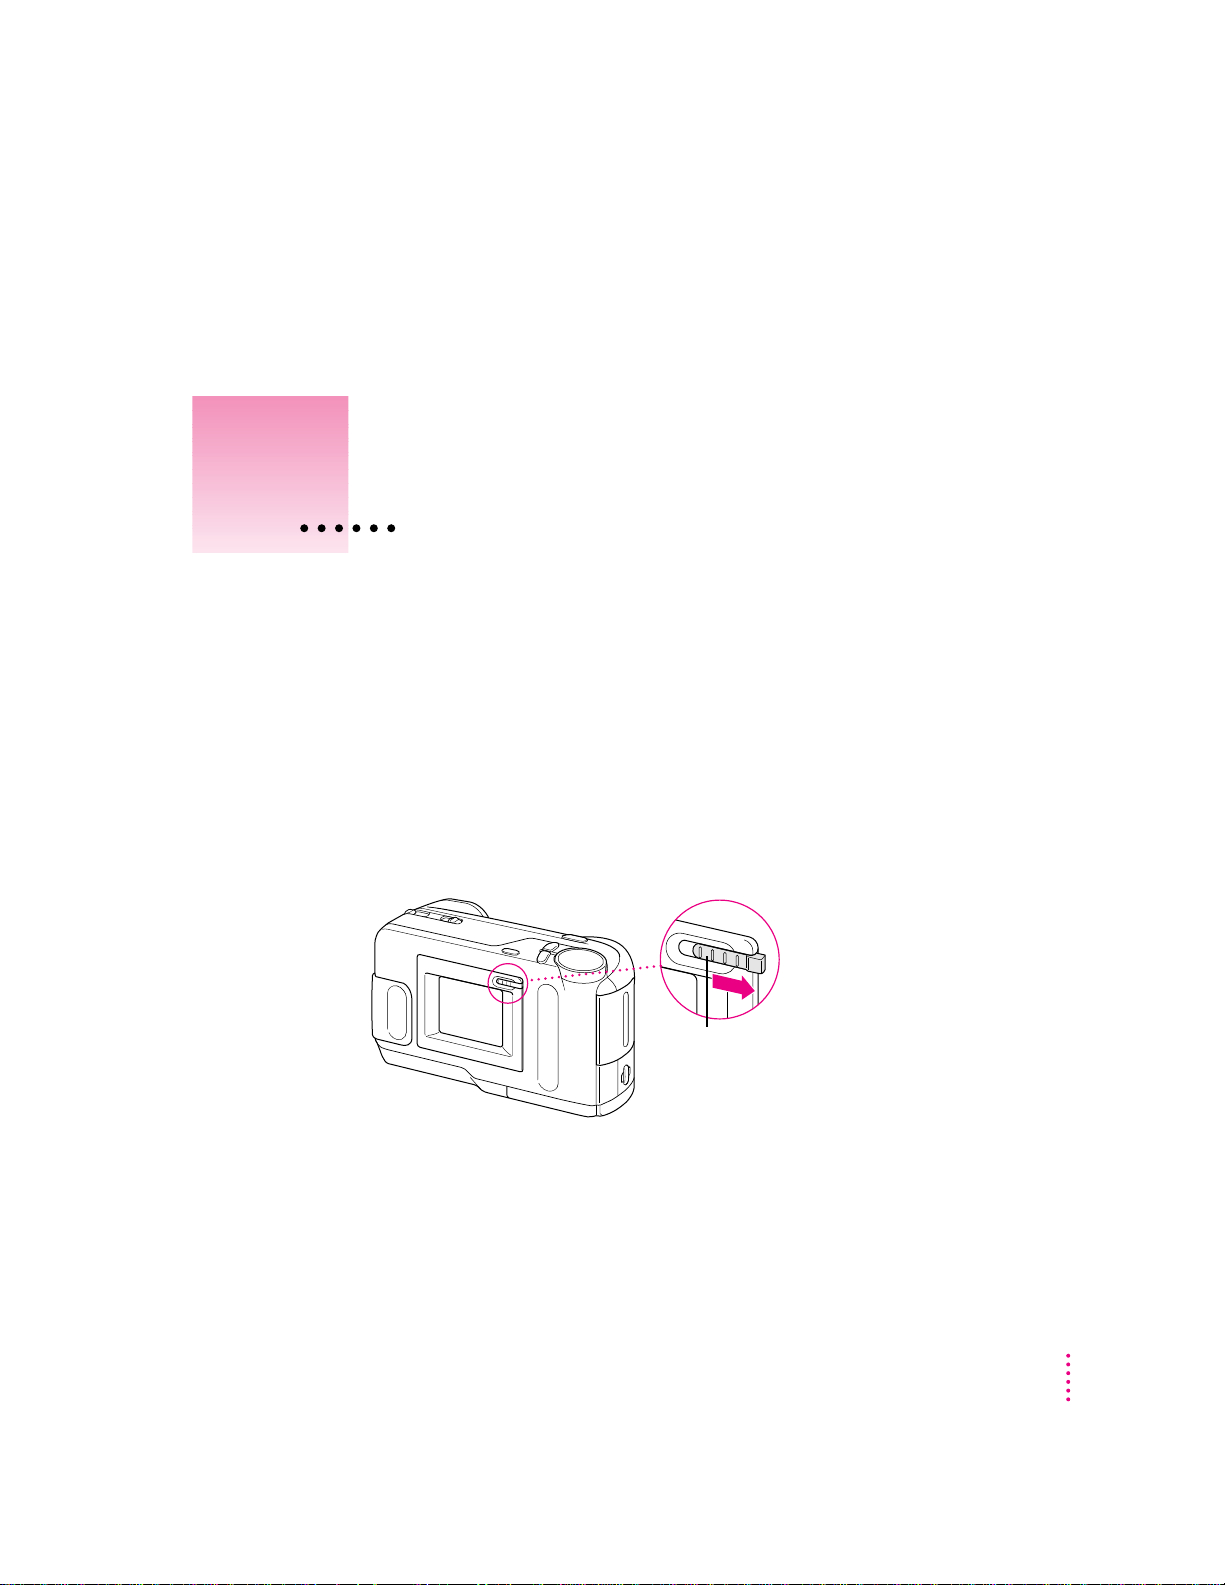
I
ø
Iø Power switch
Using the Camera to Take Pictures
This chapter provides information about turning on the camera and taking
pictures; using the optical viewfinder; using the camera mode dial; the
auto-power-off function; and using the camera with the optional AC
power adapter.
Turning on th e camera
To tur n on the camera, slide the power switch (‰) (above the LCD screen)
in the direction indicated by the arrow and then release it.
13
Page 14

When the camera is on, the LCD screen displays live, video images. If the
camera do es not tur n on, check to make sure that you’ve installed the
storage card and the batteries correctly (see Chapter 1). Also make sure that
the card door is closed and that the mode dial is correctly positioned.
m Tur n the mode dial to the Record-Fine (!) mode when you want high-
quality images, and you want to preserve the details of the image.
m Tur n the mode dial to the Record (1) mode when you want good-quality
images, but you don’t need to show as much detail.
To tur n off the camera, again slide the power switch (‰) in the direction
indicated by the ar row and then release it.
Taking pictures
1 Turn the mode dial to Record-Fine (
2Take time to frame the subject that you want to photograph using the LCD screen.
IMPORTANT
When not using your camera for long periods or when you store
the camera , remove the storage card and keep it in its plastic case.
!
) or Record (1).
The LCD screen displays live, video images.
14
Chapter 2
Page 15
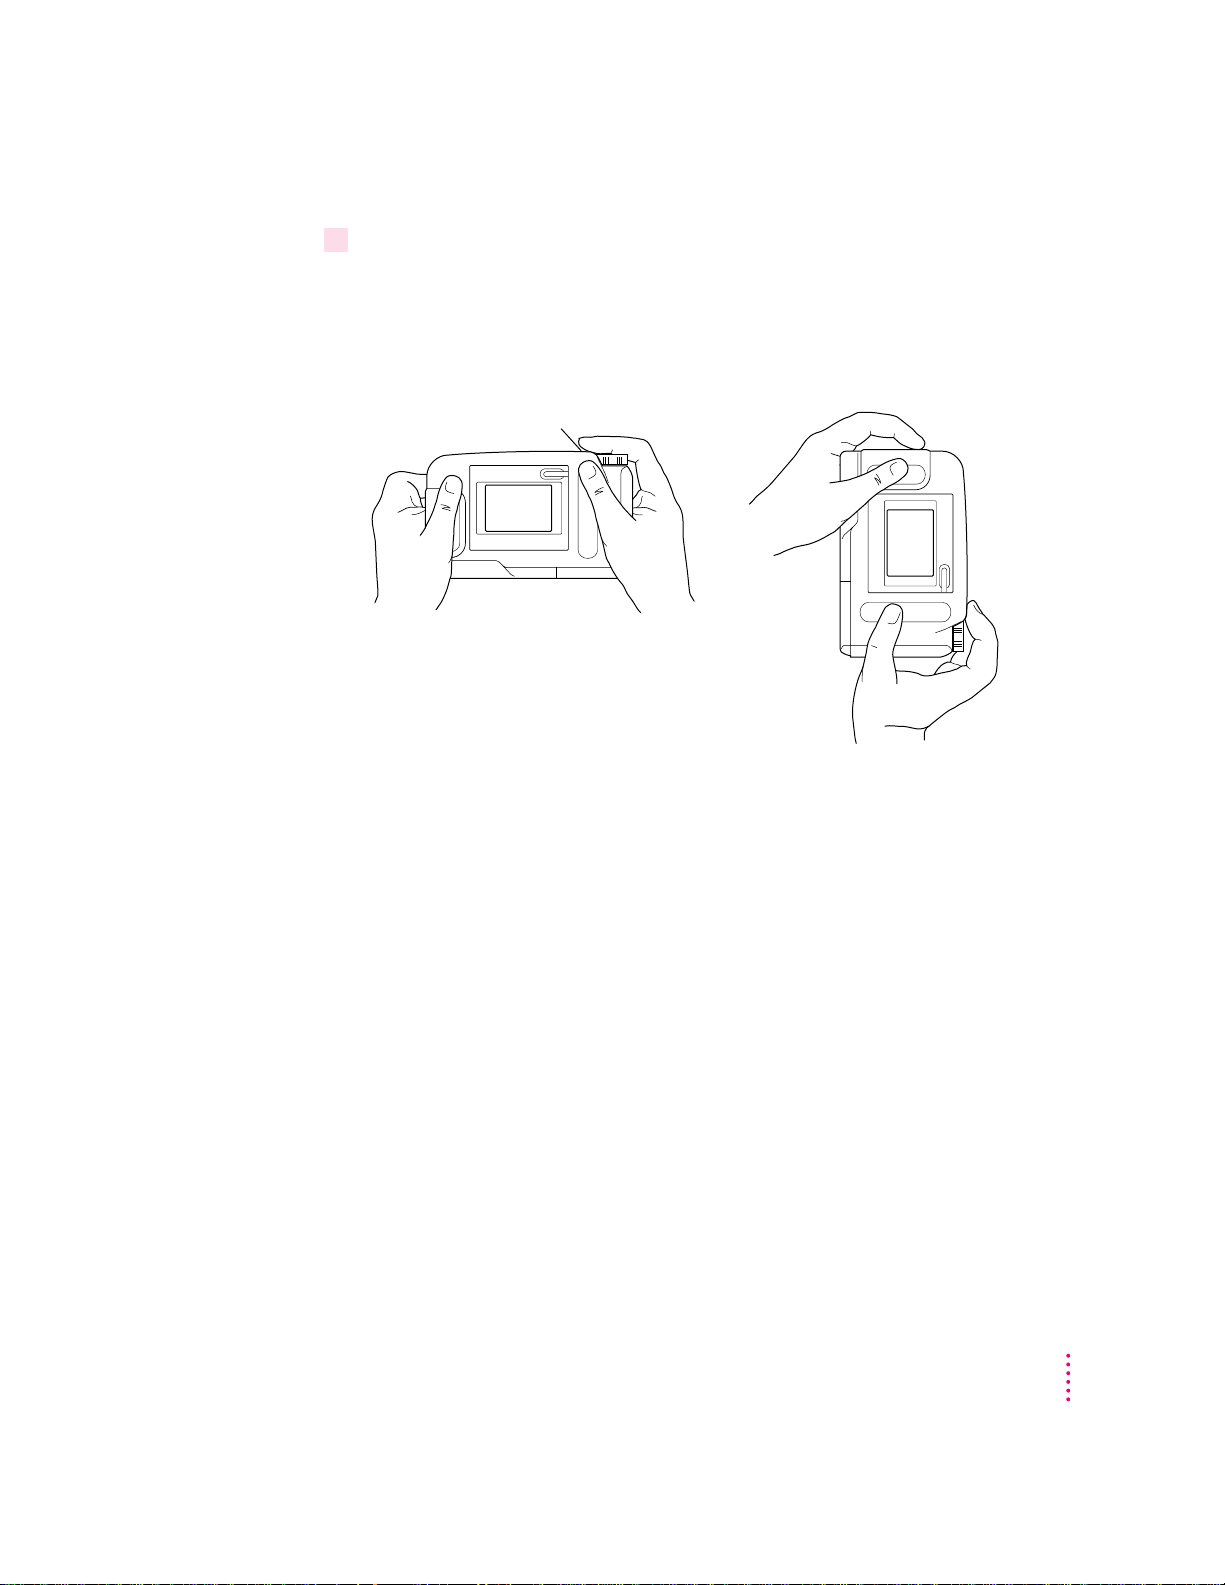
3Hold the camera steady, and press the shutter release.
Shutter release
You can hold the camera horizontally or vertically.
The screen displays a still image (the picture that you just took) for about 5 to
8 seconds with
REC or REC-FINE flashing in the upper-left corner of the
screen. When the camera is ready for you to take the next picture,
REC-FINE stops flashing and the live, video images resume.
Frame numbers
REC or
A frame number is automatically assigned to each photograph that you take.
It appears in the top-right corner of the LCD screen during Play, Auto-Play,
Erase, and Protect modes when you have screen information displayed. (To
hide or show LCD screen information, press the action button.)
Frame numbers are assigned a 5-digit number from 00001 to 30000. If you
take pictures without erasing all previous images, the frame numbers continue
from the last image that you captured.
Using the Camera to Take Pictures
15
Page 16

Setting the focus
Focus selector
Use the focus selector to set the distance from the lens to the subject.
1Estimate the focal distance from the front surface of the LCD screen to the object
being photographed.
2Set the focus for the correct distance:
Icon Name Description
4
$
5
Close-up 3.5 to 5.1 inches (9 to 13 cm)
Portrait 17.7 to 35.4 inches (45 to 90 cm)
Far 35.4 inches and farther (90 cm and farther)
For close-up images, you can set the focus between close-up and portrait.
IMPORTANT
Do not use the close-up focus when you use the viewfinder. It is
not accurate.
16
Chapter 2
Page 17
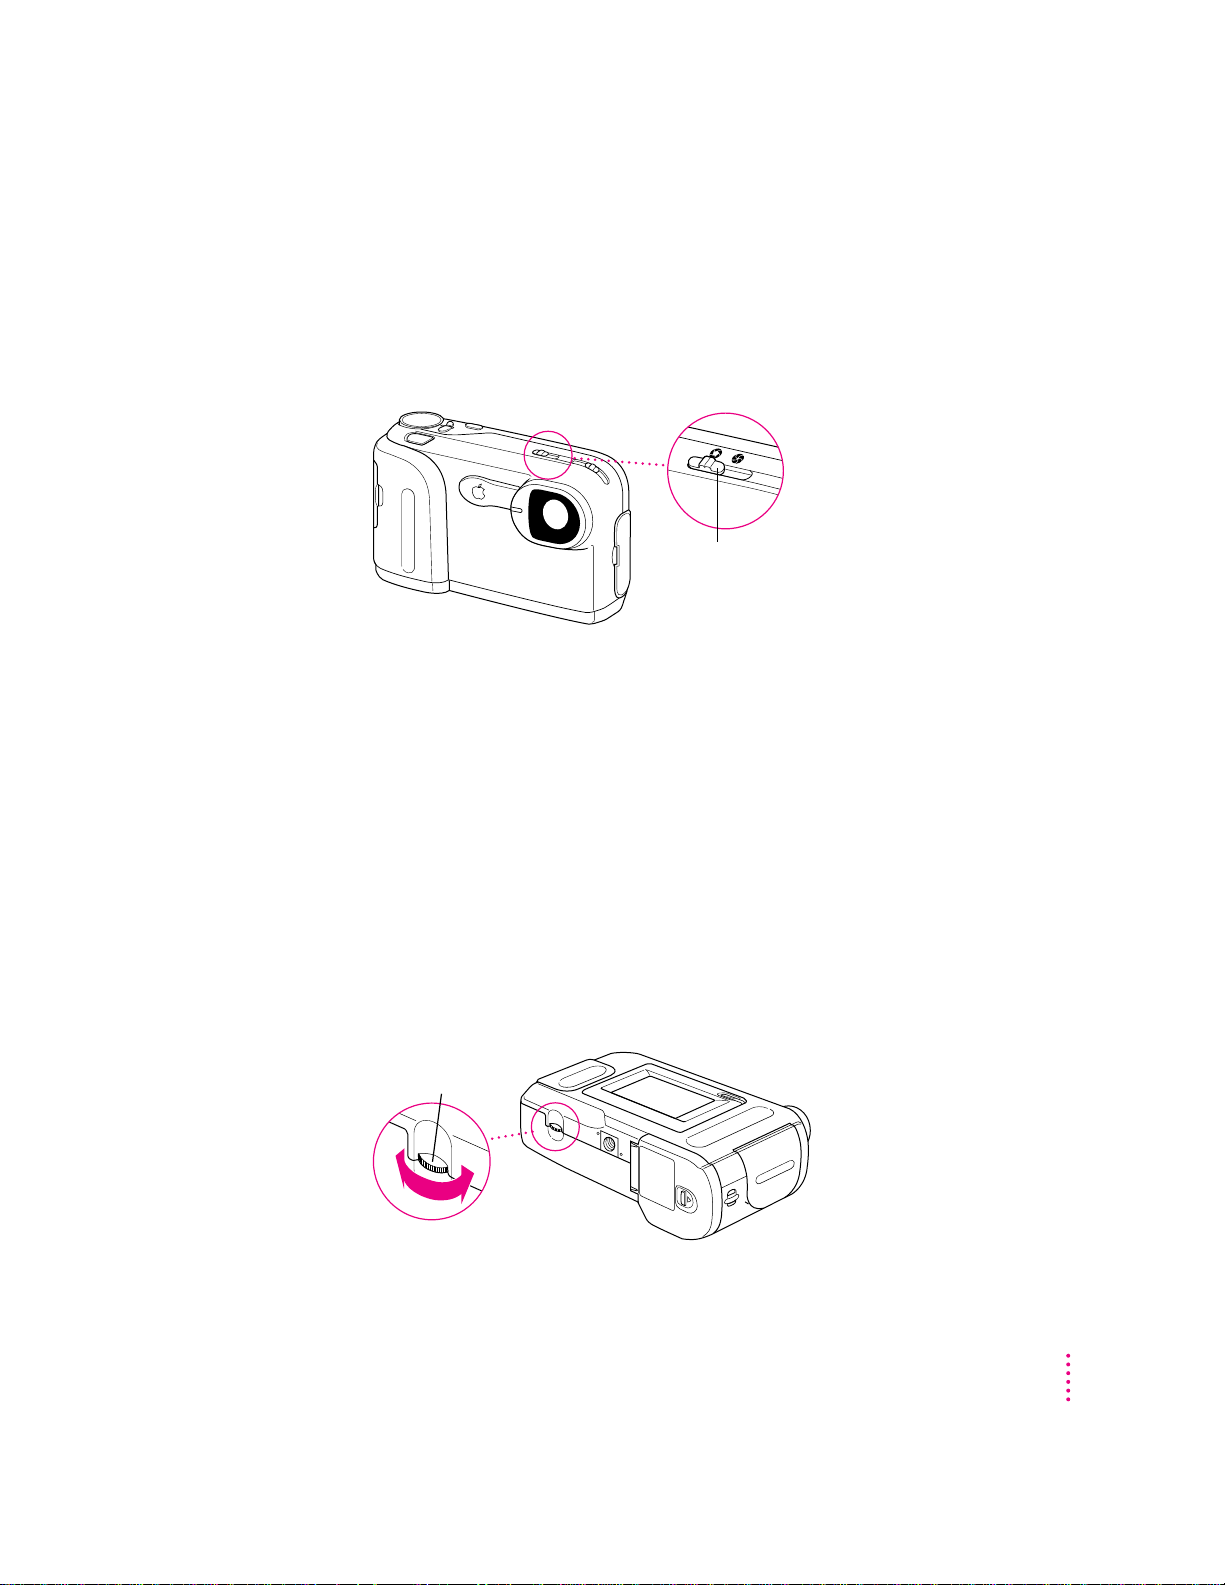
Selecting the aperture
Brightness dial
Aperture selector
Selecting the aperture (the light setting) for your camera is a simple process.
(The aperture is the opening in the lens that lets in light.) You can switch the
aperture b etween ƒ2.2 and ƒ8.0. Use the X (ƒ2.2) setting when you have low
light, and use the ◊ setting (ƒ8.0) when you have bright light.
If the overexposure (%) warning is flashing on the LCD screen, indicating
too much light, change the setting to ◊ (ƒ8.0).
If the underexposure (⁄) warni ng is flashing on the LCD screen, indicating
too little light, change the setting to X (ƒ2.2).
Adjusting the LCD screen brightness
Use the brightness dial on the bottom of the camera to set the LCD screen to
a visible brightness.
image might be affected by the flicker of fluorescent lighting.
IMPORTANT
The brightness dial does not adjust the brightness of images that
you have already taken; it only adjusts the brightness of the LCD screen.
Note: While taking pictures indoors, the brightness of an
Using the Camera to Take Pictures
17
Page 18
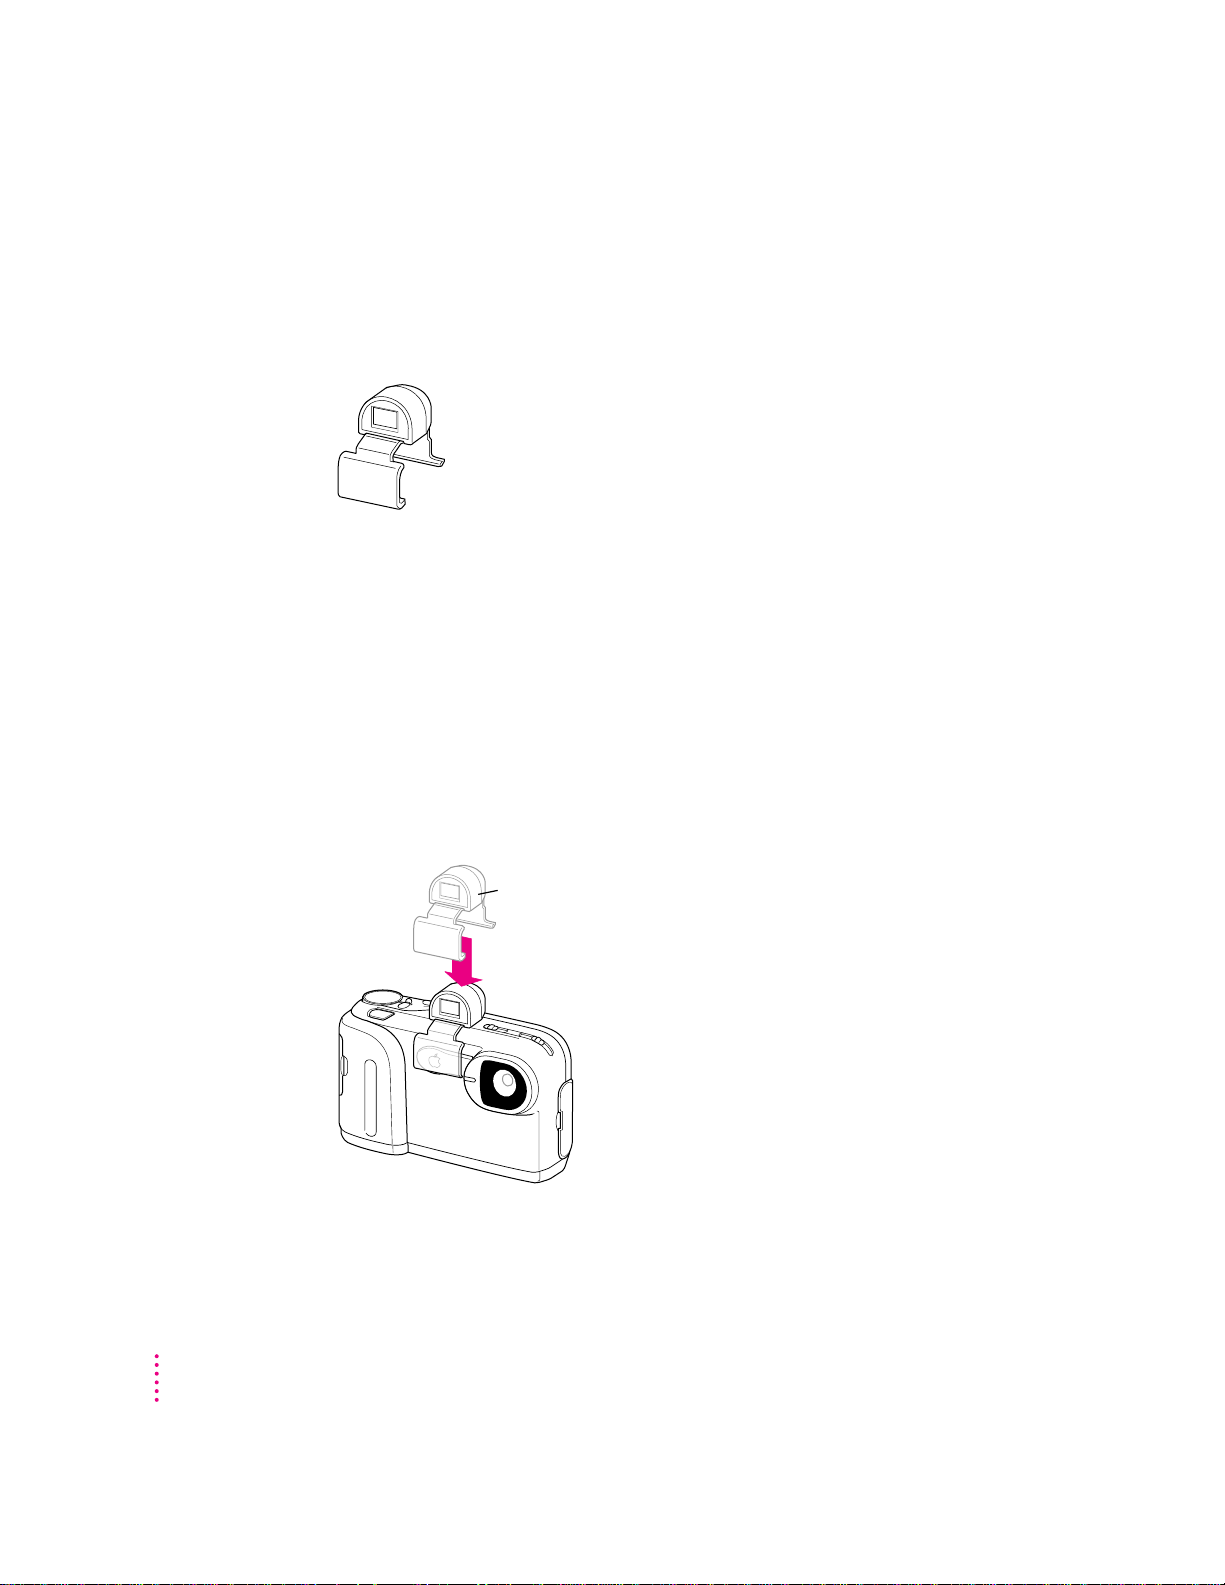
Using the optical viewfinder
Optical viewfinder
Attach the optical viewfinder to your camera to use when you are taking a
series of pictures, when you want to conserve the batteries, or when you are
outdoors and sunlight is distorting the LCD screen view.
Note that when you use the viewfinder, you will not be able to tell whether
the aperture setting is correct before you take the picture, because the LCD
screen is asleep. However, the overexposure or underexposure warning will
appear flashing on the screen after you take the picture if the condition exists.
IMPORTANT
Do not use the close-up focus with the viewfinder; it is not
accurate, because the parallex correction is off.
To install the optical viewfinder, hook the viewfinder to the front of the
camera first, then hook it to the back of the camera. Remove it in the same
way; don’t pull the viewfinder off the camera.
18
Chapter 2
Page 19

Press the action button twice when the camera is in Record-Fine or Record
Record-Fine mode Record mode
mode. The LCD screen turns off and the red sleep light on the front of the
camera goes on. When you press the shutter, the LCD screen turns on and
lets you review the image. Then the LCD screen turns itself off again. To
reactivate the LCD screen, press the action button twice again.
While you are framing your picture, use the viewfinder’s clear, center circle as
a reference point for the center of the picture.
For more information about using the viewfinder, see “Battery-Saving Mode,”
later in this ch apter.
Using the camera mode dial
The mode dial on the right side of the top of the camera provides eight
settings (represented by icons) that let you choose how you want your camera
to work.
Record-Fine and Record modes for taking pictures
You take pictures by turning the mode dial to either Record-Fine (!) for
highest-quality images or Record (1) for good-quality images.
m In Record-Fine (!) mode, high-quality images have 640 x 480 pixels
resolution and you can take up to 20 high-quality pictures. Use RecordFine mode to print or display the image when you want to preserve the
details of the image.
Using the Camera to Take Pictures
19
Page 20

m In Record (1) mode, good-quality images have 640 x 480 pixels resolution,
and you can take up to 30 standard-quality pictures. Use Record mode
whe n you don’t need to show as much detail.
You can mix high-quality and standard-quality images on the camera—all in
24-bit color. The camera holds a maximum of 30 images.
1Set the mode dial to either Record-Fine (
!
) or Record (1).
Live, video images appear on the LCD screen.
2Frame your picture using the LCD screen as your guide.
3Adjust the brightness of the LCD screen using the brightness dial and select the correct
focus using the focus selector.
4Press the shutter release.
The photographed image is displayed for about 5 to 8 seconds. REC or REC-
FINE (to indicate that the camera is recording) appears flashing in the upper-
left corner of the LCD screen.
WARNING
Never open the storage card door while the camera is
recording an image. This can damage the card or corr upt data on the
card.You might have to reformat the card, which means that all the
images on the card will be erased.
Images available
When the LCD display is on, the number in the upper-right corn er of the
LCD screen shows how many more pictures you can take. The number
decreases as you take pictures, and indicates the number of pictures you can
take at the current image quality before the card is full.
20
Chapter 2
Page 21

Self-Timer mode
You can take delayed photographs by turning to the Self-Timer (~) mode on
the mode dial. This setting uses the Record-Fine mode.
1Set the mode dial to Self-Timer (~).
2Press the shutter release.
The LCD screen displays the countdown—from 10 to 1. The shutter opens
after 10 seconds and the camera captures the image. (
REC flashes in the
upper-left corner of the LCD screen while the image is being recorded.)
On the front of the camera, the red self-timer light stays on for 5 seconds and
then flashes for 5 seconds.
3 To stop the timer, turn the mode dial to another setting.
Play mode for the camera and the television
Use the Play (2) mode to view the images in the camera on your LCD screen
or on a television screen.
To view one ima ge o n the LCD screen
1Plug the optional AC power adapter into your camera to conserve the batteries.
See “Using the Camera With the Optional AC Power Adapter,” later in
this chapter.
2Set the mode dial to Play (2).
The last image that you captured is played back.
3 Use the + and – buttons to scroll forward and backward one frame at a time through
your pictures.
4Press the action button to show the Play mode, the frame number, and the date and the
time on the LCD screen.
Press the action button again to hide this information.
Using the Camera to Take Pictures
21
Page 22

Viewing nine images on the LCD screen
Video Out port
Video cable
1Plug the optional AC power adapter into your camera to conserve the batteries.
2Set the mode dial to Play (2).
3Press the + and – buttons at the same time.
Nine images appear on your LCD screen.
4Press the + and – buttons to select and view the frames.
5 To revert to single-frame playback, press the + and the – buttons at the same time again.
A single image appears on your LCD screen.
Viewing images on a color television
IMPORTANT
Your television must meet NTSC (National Television System
Committee) color television telecasting specifications (adopted mainly in the
United States, Canada, and Japan).
1Make sure the camera and television are turned off.
2Plug the optional power adapter into your camera to conserve the batteries.
See “Using the Camera With the Optional AC Power Adapter,” later in
this chapter.
3Set the mode dial to Play (2).
4Connect the video cable to the Video Out port on the camera.
22
5Connect the other end of the video cable to the video input port on the television.
6 Turn on the camera.
Chapter 2
Page 23

7 Use the + and – buttons to scroll forward and backward one frame at a time through
your pictures.
8Press the + and – buttons at the same time to view multiple images on your television screen.
Auto-Play mode
Use the Auto-Play (@) mode to have the camera automatically play back
consecutive frames of images.
1Set the mode dial to Auto-Play (@).
The Auto-Play settings appear on the LCD screen.
2Press the + or – button to select3,5,or10seconds between each frame.
3Press the action button to begin viewing the images.
Using Auto -Play mode with your television
You can also use the Auto-Play (@) mode to play back consecutive frames of
images on your television.
1 Follow the steps in Play mode to connect the camera to the television.
2 Follow the steps in Auto-Play mode to view images on your television.
Computer mode
In Computer (`) mode, you can connect your camera to your computer to
transfer pictures and perform other camera functions using the Camera
Access software (see Chapter 3 for more information about Camera Access).
1 Turn off the camera.
2Set the mode dial to Computer (
3Connect the computer cable to the Digital port on the camera.
4Connect the other end of the computer cable to the modem or printer port.
Apple re c ommends that you connect to the modem port.
5 Turn on the camera.
PC-MODE appears on the LCD screen.
6 To open the Camera Access application, double-click the icon on your computer.
`
).
Using the Camera to Take Pictures
23
Page 24

See Chapter 3 for more information about using the Camera Access software
with your computer.
Eras e m ode
When the camera is in Erase (#) mode, you can erase a single frame, erase all
the frames on the storage card, or format the card before you use it.
Remember, you cannot erase protected images.
IMPORTANT
1 Turn the mode dial to Erase (#).
You cannot use Erase mode with write-protected cards.
The ERASE-MODE selections appear on the LCD screen.
2 Use the plus + and minus – buttons to select the function that you want.
m FRAME: Erase one image.
m
ALL: Erase all images.
m
FORMAT: Format a storage card.
IMPORTANT
3Press the action button.
See Chapter 1 for information about formatting a card.
The function you selected appears in the upper-left corner of the LCD screen:
ERASE FRAME or ERASE ALL.
4Press the action button again.
OK? flashes on your screen, giving you a chance to verify that you want to
erase the image.
5Press the action button a third time to erase the image.
24
If you selected ERASE FRAME, the next image appears on the screen. You
can continue to erase frame-by-frame or skip a frame by moving forward or
backward using the + and - buttons.
6 Turn the mode dial to leave Erase mode.
Chapter 2
Page 25

Viewing nine images in Erase mode
1Set the mode dial to Erase (#).
2Press the action button to select
3Press the + and – buttons at the same time.
ERASE FRAME
.
Nine images appear on your LCD screen.
4Press the + and – buttons to select a frame.
5Press the action button again to erase the frame.
OK? flashes on your screen, giving you a chance to verify that you want to
erase the image.
6Press the action button a third time to erase the image.
7 To revert to single-frame playback, press the + and – buttons at the same time again.
A single image appears on your LCD screen.
Protect mo de
Use Protect (3) mode to assign read-only, protected status to an image to
prevent it from being erased.
IMPORTANT
card is formatted. (See Chapter 1 for more information about formatting
the card.)
Even protected, read-only images are erased when the storage
1Set the mode dial to Protect (3).
2Press the plus + or minus – button to select the frame that you want to protect.
3Press the action button.
The image is now protected and cannot be erased. The protection icon
appears next to the image number on your LCD screen when you view
this image.
Using the Camera to Take Pictures
25
Page 26

Note: After you transfer your images to the computer, you can erase all the
images from your camera. However, the images that you have protected are
not erased.
To remove protection
While the camera is in Protect mode, select the protected frame, and press the
action button again. The protection icon disappears and the image is no
longer protected.
Battery-saving mode
To conserve your batteries, you can turn off your LCD screen and still take
pictures using the optical viewfinder.
1Attach the optical viewfinder to your camera.
2 Turn on the camera using the power switch (‰).
3In either Record or Record-Fine mode to take pictures, press the action button twice to
put the LCD screen to sleep.
The red sleep light on the front of the camera goes on. You cannot see live,
video images on the LCD screen when you put the screen to sleep.
26
Chapter 2
4 Use the viewfinder to focus on the image that you want to capture.
5Press the shutter release to take a picture.
The LCD screen turns on and captures the image. The image appears on the
screen for about 5 to 8 seconds allowing you to review the picture that you
just captured, and then the screen goes to sleep—ready for you to take
another picture.
6Press the shutter release again to take another picture.
IMPORTANT
Press the action button once to again turn on the LCD screen.
Page 27

Auto-power-off function
Your camera automatically switches itself off when you do not use it for
more than 2 minutes as a way to conserve batteries and to save power
whe n you use the optional AC power adapter.
IMPORTANT
The auto-power-off function does not operate in Computer mode.
To disable the auto-power-off function in all modes, hold down the action
button while turning on the camera. The camera will continue to use battery
power even if you do not use it for several minutes. When you turn off the
camera and then turn it back on, auto-power-off is again enabled.
It is especially good to disable auto-power-off when you are using a television
to view images or when you are recording a video; you do not want the
camera to turn off during those operations.
IMPORTANT
You should always use the optional power adapter when you
disable the auto-power-off function.
Using the Camera to Take Pictures
27
Page 28

Using the camera with the optional AC power adapter
DC IN 6V socket
To conserve battery power when you use the camera indoors, use the optional
AC power adapter plugged into an available power outlet.
WARNING
Use only the QuickTake 20 0 AC Adapter with the QuickTake
200 camera. The use of other power sources might cause a fire.
With the camer a turned off, connect the adapter to the camera DC IN 6V
socket, plug the adapter into an outlet, and then turn on the camera.
Use the optional AC power adapter when you play back and erase images,
for power while the camera is connected to your computer or television, and
when you disable the auto-power-off function.
28
Chapter 2
Note: The power adapter does not recharge batteries in the camera. If you
have rechargeable batteries, use a charger designed for them.
WARNING
Never alter the plug on the power adapter. If it will not fit an
electrical outlet, have a proper outlet installed by a qualified electrician.
Improper connection may result in electrical shock. Use of a power
adapter not recommended or sold by Apple Computer, Inc., may result
in a risk of fire, electrical shock, injury, or damage to the camera.
Page 29

What’s next?
Now you’re ready to transfer the pictures that you’ve taken from the camera
to your computer. Read Chapter 3 for instructions about connecting the
camera to your computer and transferring images—and about using the
Camera Access software.
Using the Camera to Take Pictures
29
Page 30

Page 31

Using the Camera With Your
3
Mac OS–Based Computer
When you finish taking pictures (or when the storage card is full), you can
connect the QuickTake 20 0 camera to your Mac OS–based computer and then
transfer the images to the computer. This chapter provides information about
connecting the camera to your computer; transferring images to your
computer; opening, editing, and printing images on the computer; creating
movies; a nd using the Dispatcher with third-party applications.
Connecting the camera to your computer
To connect the camera to your Mac OS–based computer, use the serial cable
that came with your camera.
IMPORTANT
AC Adapter whenever your QuickTake camera is connected to the computer.
1 Turn off the camera by sliding the power switch (
2Connect one end of the serial cable to the modem or printer port on your computer.
Apple recommends that you use the optional QuickTake 200
‰
).
Apple Computer recommends that you use the modem port, but either port
will work.
IMPORTANT
whe n th e port is used by AppleTalk. To use the printer port, you can turn off
AppleTalk or you can select another form, such as Ethernet or Remote-only.
You cannot use the printer port (or the combined serial port)
31
Page 32

If both ports are in use, free the one that’s most convenient and connect
Digital port
Macintosh serial cable
These icons identify the printer and
modem ports on your computer.
Connect the camera to either port.
Some Mac OS–based computers have
a combined serial port with two icons.
the came ra, but Apple recommends that you always try to use the modem port.
IMPORTANT
It is not necessary to turn off your computer before you connect
and disconnect the serial cable. However, if you want to connect or
disconnect other devices, in many cases you must turn off the computer
before you connect or disconnect a cable.
3Connect the other end of the cable to the Digital port on the camera.
32
Chapter 3
Page 33

4 Turn the mode dial to Computer (`).
5 Turn on the camera by sliding the power switch (
‰
).
When the camera is connected and turned on, PC-MODE appears on the
LCD screen.
Using QuickTake Camera Access to work with your camera and images
QuickTake 200 Camera Access software lets you perform the following tasks:
m connect to the QuickTake 200 camera
m look at images in the camera
m transfer images from the camera to your computer
m delete images from your camera
m open and edit your images
m place images in other application programs
m create and run movies
m print images
Connecting to the QuickTake 200 camera
The Camera Access application appears as a camera icon on the desktop for
convenient access to images in the QuickTake 200 camera.
1Make sure the camera is connected to your computer.
2 Turn the mode dial to Computer (`).
3 Turn on the camera by sliding the power switch (
4Double-click the Camera Access icon on your computer to open it.
Using the Camera With Your Mac OS–Based Computer
‰
).
33
Page 34

The Camera Access Welcome message appears briefly, then the QuickTake 200
panel appears.
Number of images in
the camera
Click to view
camera contents.
Click to move an image from
the computer to the camera.
The QuickTake 200 panel contains two buttons: the Viewer button to view
your camera’s contents and the Upload button to move images from your
computer to your camera. You can also tell at a glance how many images
are stored in your camera.
IMPORTANT
When your camera is not connected to the computer or not
turned on, the QuickTake 200 pan el is disabled.
Number of images in the
camera does not appear.
34
You cannot work with your camera’s contents, but by using the panel menus
you can open a nd edit Camera Access images that have already been
transferred to your computer.
Chapter 3
Page 35

Looking at images in the camera
You can view the images in your camera by connecting the camera to your
computer and viewing them on the computer screen.
IMPORTANT
To conserve battery power, transfer images to your computer’s hard
disk before you view or work with them, or use the optional QuickTake 200
AC Adapter while the camera is connected to the computer. After the images
have been transferred, turn off the camera and open the images from your
computer’s hard disk using Camera Access.
1Connect the camera to your computer.
For instructions, see “Connecting the Camera to Your Computer,” earlier in
this chapter.
2 Turn the mode dial to Computer (`).
3 Turn on the camera by sliding the power switch (
4Double-click the Camera Access icon in the QuickTake 200 folder to open it.
‰
).
If Camera Access is already running when you turn on your camera, the
QuickTake 200 panel becomes active.
5 In the QuickTake 200 panel that appears, click Viewer.
The images appear in a Camera Contents window on your computer screen.
Click to view
image information.
The Camera Contents window represents all the images in your camera that
have not yet been downloaded to your computer.
Using the Camera With Your Mac OS–Based Computer
35
Page 36

For information about what you can do with the images, see “Working With
Your Images,” later in this chapter.
Getting information about an image
1In the Camera Contents window, click an image to select it.
2Choose Get Info from the File menu or click the “i” in the upper-right corner of the
image frame.
An information box appears.
Opening an image to its full size
36
To see an image full-size, double-click the thumbnail image in the Camera
Contents window (or in a Viewer folder; see the following sections). A progress
bar appears, followed by the full-size image.
To open more than one image, click one image, then Shift-click and doubleclick th e next image.
Chapter 3
Page 37

Click to view the
Scale pop-up menu.
To see a portion of the image enlarged, choose the Zoom In command from
the Image menu. To reduce the image, choose the Zoom Out command.
You can also reduce and enlarge the image using the Scale pop-up menu
locat ed i n the lower-left corn er of the screen.
Using the Camera With Your Mac OS–Based Computer
37
Page 38

Transferring images to your computer
Connect the camera to your computer to transfer images. For instructions, see
“Connecting the Camera to Your Computer,” earlier in this chapter.
IMPORTANT
Apple recommends that you transfer all your images from the
camera to the computer before you work with them. This will result in better
performance a nd will conserve batteries.
1 Turn the mode dial to Computer (`).
2 Turn on the camera by sliding the power switch (
‰
).
When the camera is turned on and the serial connector is plugged in,
PC-MODE appears on the LCD screen.
3 On your computer, double-click the Camera Access icon.
The QuickTake 200 panel appears. If Camera Access is already running, the
panel becomes active after you attach your camera and turn the mode dial to
Computer mode (`).
4Click the Viewer button.
A Camera Contents window appears showing all the images in your camera.
5From the Viewer menu, choose “Copy All Images to Disk.”
38
6 To transfer only selected images, select one or more images (using Shift-click) and then
choose “Copy Selected Images to Disk.”
7In the dialog box that appears, create a new folder for your images.
8In the Image File Name Prefix box, type a prefix name that will be assigned to this group
of images.
The images are saved on your hard drive in the folder you created, each
showing the prefix you assigned.
Chapter 3
Page 39

Naming images
After you transfer images to your computer, you can rename each file. You
can change t he name of the file using the Finder. When you use Save As, you
can rename an image or you can change the name on your desktop.
When you move images to your computer, you also have the option to assign a
new prefix to all the images that you copy. When you choose “Copy All
Images to Disk” or “Copy Selected Images to Disk,” a dialog box appears in
which you can select a folder to save your images and type an Image File
Name Prefix to assign to all the images that you are saving to your computer.
For example, each image has the prefix “Image.” You can change that to
“Book” to indicate images that you are going to use to put together a book.
Uploading: transferring images from your computer to the camera
You can transfer images quickly from your computer to the camera using
the Uplo ad button on the QuickTake 200 panel. You can upload any image
as long as you have enough memory to convert the file to a type compatible
with your camera.
1With the camera attached to your computer, turn the mode dial to Computer (
2 Turn on the camera and the computer.
3Click the Upload button in the QuickTake 200 panel.
`
) mode.
You can also choose the Upload Image command from the QuickTake 200 menu.
4Choose a folder, and click the name of the image that you want to move to your camera.
Using the Camera With Your Mac OS–Based Computer
39
Page 40

You can always upload images created with Camera Access; but otherwise,
with images created by other applications, you can upload only PICT and
JPEG files to the camera.
5Click Open to upload the image.
The image is now part of your camera contents. It appears in the Camera
Contents viewer with an image number assigned to it. Any image name is
replaced with an image number.
40
Chapter 3
Page 41

Moving images between Camera Contents and a Viewer folder
Another easy way to transfer images is to open the Camera Contents window
and a Viewer folder and then simply drag and drop images between the
folders. That’s it! Th e image you drag is moved to the Viewer folder or
uploaded to the camera.
Viewing images on your computer
After you transfer images to your computer, you can view thumbnails of all
the images in a folder. You can also open a viewer of other folders that
contain PICT or JPEG images created in other applications.
1 Open the Camera Access application.
Your camera does not need to be connected to the computer.
Using the Camera With Your Mac OS–Based Computer
41
Page 42

2From the File menu, choose Open Folder Viewer.
3 Locate the folder that contains the images that you want to view and click Select
Click the Select
button to open a
folder of images.
The “Select a Folder” dialog box appears.
<folder name>.
You are not selecting a file; you are selecting a folder of images.
42
The Folder window appears.
Chapter 3
Page 43

4Choose “View by Name” or “View by Date” from the Viewer menu to change how you
view the contents of the folder.
The images appear in the order that you want.
Deleting images from the camera
After you transfer your images to your computer, you can use the Viewer
menu to delete them from the camera to make room for new images.
IMPORTANT
1Select the images that you want to delete.
You cannot delete images that have been protected.
To select m ore than one image, Shift-click.
2From the Viewer menu, choose “Delete Selected Images from Camera.”
To delete all images, choose “Delete All Images from Camera.” All the
images in your camera (except protected images) are deleted.
Using the Camera With Your Mac OS–Based Computer
43
Page 44

Worki ng with your images
Whether your images are in the camera or have been moved to your
computer, you can use the QuickTake software to look at them, make changes,
and save the images in a variety of formats.
Opening and editing images on your computer
You can double-click an image in the Camera Contents viewer or open it
from your computer. You can then edit your images using Camera Access or
your favorite application. (See “Using the Camera Access Dispatcher to Start
Other Applications,” later in this chapter.)
Adjusting the brightness and contrast of an image
If you capture an image that seems too light or too dark, you can adjust its
brightness using Camera Access.
1 Open the image that you want to work with.
2From the Image menu, choose “Brightness and Contrast.”
44
Chapter 3
Page 45

3 Drag the sliders to adjust the brightness and contrast of your image.
4Click OK to accept changes.
Adjusting the lightness and sharpness of an image
1 Open the image that you want to adjust.
2From the Image menu, choose Adjust to see the selections.
2Choose either Darken or Lighten.
The image is lightened or darkened accordingly. If you’re not satisfied, choose
Undo from the Edit menu. You can use Lighten and Darken until the image
has the appearance that you want.
3Choose either Sharpen or Soften.
The image is sharpened or softened accordingly. If you’re not satisfied,
choose Undo from the Edit menu. You can use Sharpen and Soften until the
image has the appearance that you want.
Using the Camera With Your Mac OS–Based Computer
45
Page 46

Cropping an image
You can use the Crop command to select part of an image and delete the rest.
1 Open the image that you want to crop.
2Click and drag the crosshair cursor to define the part of the image that you want to keep.
46
3From the Image menu, choose Crop.
After you select part of an image, the Crop command is enabled and appears
in the menu.
Chapter 3
Page 47

Only the part of the image defined by the marquee remains. Choose Undo
from the Edit menu if you are not satisfied with the cropping.
4Save your image.
Flipping an ima ge
You can flip an image horizontally or vertically.
1 Open the image that you want to flip.
2From the Image menu, choose Flip and select either Horizontal or Vertical.
Your image is flipped the way you selected.
Using the Camera With Your Mac OS–Based Computer
47
Page 48

Rotatin g an image
You can rotate an image to the left or to the right.
1 Open the image that you want rotate.
2From the Image menu, choose Rotate and select either Left or Right.
Your image is rotated in the selected direction.
Making videos and movies
Using the Camera Access software you can create your own movies using still
images stored on your computer, and you can make your own videos using
the camera .
48
Chapter 3
IMPORTANT
Apple reco mmends that you use the optional AC adapter
whenever your camera is connected to your computer.
Creating a movie with images stored on your computer
You can create a movie by dragging and dropping images onto the QuickTime
Screen. You can then run your movie on your computer.
1 Open the Camera Access application.
Page 49

2Choose New Movie from the File menu.
3 In the Save dialog box that appears, type the name for your movie in the “New file name”
box and click Save.
The QuickTime IC movie panel appears.
Using the Camera With Your Mac OS–Based Computer
49
Page 50

4Choose Open Folder Viewer.
5 Drag and drop the images from the folder window to the QuickTime IC movie panel in the
Click the arrow to
review your images.
6Click the scroll arrow in the lower-left corner of the QuickTime IC movie panel to preview
You can arrange the images in one folder before you start for convenience, or
you can open several folders to get the images that you want.
order that you want them to appear.
You are limited in the number of images you use only by memory.
your images.
50
7Choose Present Movie from the Movie menu.
A checkmark appears next to Present Movie and the QuickTime IC panel
appears first.
Chapter 3
Page 51

8Click the Run Movie arrow in the lower-left corner of the movie panel.
Click to run
your movie.
Each of your images appears in the order you placed them in a movie slide
show. When all the images have appeared, the movie stops. The arrow
changes to a double bar while the movie is playing.
The arrow changes
to a double bar.
9Choose Present Movie from the Movie menu to return to the desktop.
Your movie file still remains for you to run and edit it. After you close the
movie file, you can also double-click the movie icon from within the Finder
and run the movie.
Using the Camera With Your Mac OS–Based Computer
51
Page 52

The Movie Menu
m
Loop
Choose Loop to continuously run your movie from beginning to end.
m
Loop Back and Forth
Choose “Loop Back and Forth” to run your movie
continuously starting with the first image to the last and then going
backwards by running the movie from the last image to the first.
Size
m
m
Choose one of the sizes to change the size of your movie panel.
Present Movie
Choose Present Movie to run your movie; a checkmark
appears. Choose Present Movie again to stop playing; the checkmark
disappears.
52
Chapter 3
Recompress Movie
m
For information about recompressing your movie, see
your Apple Video Player documentation.
Note that you can also use the Edit menu to cut, copy, and paste images and to
undo your commands.
Page 53

Creating a QuickTime movie
You can create a QuickTime movie using your camera and Camera Access
software. You view and record the live, video images appearing on your
LCD screen.
Disable the auto-power-off function when you are recording a video; you
do not want the camera to turn off during the operations. To disable
auto-power-off, hold down the action button while turning on the camera.
Always use the optional power adapter when you disable the auto-power-off
function.
IMPORTANT
To use the “Video-in” function, your computer must be
AV-compatible; otherwise, you will not have a digitizer.
1Attach the QuickTake 200 camera to your computer with the video cable.
See Chapter 2 for instructions.
2 Turn on the camera and turn the mode dial to Record-Fine (
3Choose “Hide Video-in” from the Window menu to display “Show Video-in.”
!
) or Record (1).
The “Video-in” window appears showing live, video images—exactly what
appears on the camera LCD screen.
Using the Camera With Your Mac OS–Based Computer
53
Page 54

4Choose Record from the “Video-in” menu to begin recording.
5In the Save dialog box that appears, type the name for your movie in the “New file name”
box and click Save.
A screen appears showing what you are recording.
Note: From the Video-in menu, choose Video Playthru Off During Record, so
that the action stops on your computer screen and you view the recording
movie on your LCD screen.
6 To stop recording, press the mouse button.
A new screen showing your movie appears.
7Choose Present Movie from the Movie menu.
54
A checkmark appears next to Present Movie.
8Click the Run Movie arrow in the lower-left corner of the movie.
9Choose Present Movie from the Movie menu to stop the movie and return to the desktop.
For information about video settings, see your Apple Video Player
documentation.
After you save your movie to your hard drive, it appears as a movie icon.
Double-click the icon to play your movie using Movie Player.
Chapter 3
Page 55

Using the Cam era Access Dispatcher to start other applications
On your Apple QuickTake 200 Software CD, you received the PictureWorks
NetCard software. You also received a second CD-ROM disc, Adobe Software,
containing Adobe PageMill and Adobe PhotoDeluxe. You can use these
products with Camera Access and with Camera Access images.
Camera Access provides a Dispatcher pan el that lets you load the NetCard
and Adobe PhotoDeluxe software as well as any other compatible software.
You can then drag a Camera Access image over the software icon to start
the application.
IMPORTANT
To us e images with Adobe PageMill, first open a PageMill
document and then drag a Camera Access image onto the page. The image
appears immediately.
1 Install PictureWorks NetCard and Adobe software from the CD-ROM discs that you
received with your camera.
2Make sure that your camera is connected to the computer, and open the Camera
Access software.
3From your computer, open a folder of images.
Using the Camera With Your Mac OS–Based Computer
55
Page 56

4From the Window menu, choose Show Dispatcher.
The Dispatcher panel appears showing no software assigned to it.
Note: You can display the Dispatcher horizontally or vertically by choosing
Horizontal or Vertical from the Dispatcher menu.
56
Chapter 3
Page 57

5Click one of the Unassigned icons to display the Open dialog box.
Click one of the Unassigned icons
to select it.
The Open dialog box appears. Click Open.
6 Find and choose Adobe PhotoDeluxe and click Open.
The Dispatcher panel appears with the Adobe PhotoDeluxe icon in place.
7 Repeat Steps 5 and 6 for the NetCard application.
You can also assign other graphics-editing applications.
Using the Camera With Your Mac OS–Based Computer
57
Page 58

8 Drag an image over the NetCard icon.
The “Save temp file as?” box appears for you to save the file in PICT format,
which i s compatible with NetCard and other graphics applications.
9 Find the folder where you want to save the image and type a name for the image.
10 Click Save.
The NetCard application opens with your image in the center of a card.
IMPORTANT
Only image file formats that are compatible will be opened by the
destination application. For example, NetCard will open PICT and JPEG file
images and QuickTime movies.
58
Chapter 3
Page 59

Saving an image
To preserve the changes that you make to an image, you must save the
modified image. The Save and Save As commands behave as they do in
other Mac OS–based computer applications. While you are working with an
image, save your work frequently.
When you choose the Save As command, you can rename the image and save
it in the file format you want. Click Save to save your image.
Printing your images
You can use Camera Access to print your image—while it is on the camera
or after you transfer it to your computer. You can also print a collection
of thumbnails.
Printing a single image
1 Open the image that you want to print to full-size.
This can be an image in the camera or on your computer.
2From the File menu, choose Print.
3 In the dialog box that appears, select the settings that you want.
Be sure to select Color/Grayscale to print images.
4Click Print to send your image to the printer.
Using the Camera With Your Mac OS–Based Computer
59
Page 60

Printing a collection of images
1 Open the Camera Contents window or a folder containing thumbnail images that you
want to print.
You cannot select one thumbnail to print.
2From the File menu, choose Print.
3In the dialog box that appears, select the settings that you want.
Be sure to select Color/Grayscale to print images.
4Click Print to send your images to the printer.
Quitting th e QuickTake 200 software
Choose the Quit command in the File menu to end a session with the
QuickTake 200 software. If you have made changes to an image but have not
yet saved them, a message appears asking whether you want to save the image
before quitting the program.
What’s next?
60
See Chapter 4 for important maintenance and troubleshooting information.
Chapter 3
Page 61

4
Maintenance and Troubleshooting
This chapter offers suggestions to help you care for your camera and
solve problems.
WARNING
nothing presented in this chapter solves it, consult the service and
support information that came with you Apple product for instructions
about how to contact an Apple-authorized service provider or Apple for
assistance. If you attempt to repair the QuickTake 200 yourself, any
damage you may cause to the camera will not be covered by the limited
warranty on your camera. Contact an Apple-authorized dealer or
service provider for additional information about this or any other
warranty question.
If you have a problem with your QuickTake 200 camera and
Caring for your camera and lens
These suggestions will help you maintain the QuickTake 200 camera:
m Protect the camera from moisture, steam, and excessive heat.
m Do not use the camera in very humid, dir ty, or dusty areas.
m Do not use the camera in smoky areas.
61
Page 62

WARNING
Don’t expose the camera to sand; this can cause irreparable
damage.
m Don’t use harsh or abrasive cleaners on the camera. Wipe off dust with a
clean, dry cloth.
m To clean the camera lens, Apple recommends that you purchase a camera
lens cleaning kit from your local photographic supply store. When cleaning,
don’t press hard, or you might scratch the lens. Never wipe a dry lens.
m Don’t scrape the LCD surface or wipe it with an abrasive cloth or
substance; the surface scratches easily.
WARNING
designed for cleaning camera lenses. Don’t use chemically treated tissues
intended for eyeglasses.
m If you store the camera for an extended period, remove the batteries and
the storage card (see the next section). When you replace the batteries,
remember to reset the date and time. (For instructions, see “Setting the
Date and Time in the Camera” in Chapter 1.)
Note: You must reset the date and time whenever the batteries are out of the
camera for more than 5 minutes.
m If the camera is taken from a very cold to a very warm area, water drops
(condensation) might form on the inside of the camera or on the lens. If
this happens, switch off the camera and wait an hour before using it again.
Handling the storage card
Use only the storage card designed for your camera. These suggestions should
help you maintain the card:
m When you are not using your camera or are storing it for long periods,
remove the card and store it in the plastic sleeve.
Don’t use solvents or solutions unless they are specifically
62
m While you are using the camera, never open the storage card door or
remove the card; this will turn off the camera and could cause damage to it.
Chapter 4
Page 63

m Never remove the card while the camera is recording.
m If condensation forms on the card, remove the card and wait an hour before
using i t again.
m Do not bend, drop, or bang the card.
m Do not use or store the card in very hot, humid, or corrosive environments.
m Do not touch the card’s gold surfaces or allow the surfaces to become
soiled. Use a dry, lint-free cloth to wipe away any soil.
m Storage cards can be damaged by static electricity during transpor tation or
while in storage. Use the static-free case provided or keep the card in a
storage case, if available.
Solving probl ems
WARNING
When you format the storage card, all data is erased,
including protected images.
This section describes some of the problems that you might encounter and
offers solutions that you can try.
The camera LCD screen won’t go on when you slide the power switch (
‰
)
m The storage card is not loaded.
m The storage card is write-protected or is not formatted.
m The storage card is old and must be replaced.
m The batteries are not installed correctly. (See “I nstalli ng the Batteries”
in Chapter 1.)
m The batteries need to be replaced.
m You need to reconnect the optional AC power adapter to the camera or
make sure it is plugged in.
m The mode dial is not set to Record-Fine (!) or Record (1) mode to
take pictures.
m The mode dial is not set to one of the mode icons. Turn the dial until it
clicks into place.
Maintenance and Troubleshooting
63
Page 64

m The camera’s memory does not have room for another image. Tra nsfer the
images from the camera to your computer, then delete the images. (See
“Deleting Images From the Camera” in Chapter 3.)
Power goes out during operation
m You have not used your camera for 2 minutes and auto-power-off turned off
the camera to save power. Use the power switch to turn on the camera.
m The batteries need to be replaced.
m The camera is overheated, and the safety shutoff operated to turn it off.
Wait a few minutes until the camera has cooled and then switch it on. This
is a safety device, not a fault.
The computer doesn’t recognize the camera
Different devices and programs may compete with the camera for the use
of a serial port on your Mac OS–based computer. If there’s a problem,
a message tells you that the camera is not responding. Make sure the serial
cable is connected properly, the camera is turned on, and the batteries have
enough power.
m If you upgraded your system software after you installed your QuickTake
camera software, you may need to reinstall the camera software. See “What
If You Upgrade Your System Software?” in Chapter 1.
64
m If you are sharing a serial port that you use for another device and
AppleTalk is turned on, turn off AppleTalk. Apple recommends that you
always use the modem port.
m If you tried to install the QuickTake camera software by dragging it to
your hard disk, it will not work correctly. Reinstall the software using the
Installer provided on the Apple QuickTake 200 Software CD-ROM disc.
Not enough memory
m To make more memory available while running the Apple QuickTake 200
software, try quitting open programs that you’re not using.
Chapter 4
Page 65

Images are fuzzy, blurry, or blotchy
m The lens is dirty. Clean the lens. (See “Caring for Your Camera and Lens,”
earlier in this chapter.)
m The subject or the camera moved. Hold the camera steady.
m The subject is out of focal range. Check the focus.
m The image quality setting is not appropriate for the subject. Change to
Record-Fine (!) to preserve details. (See Chapter 2.)
m The camera is pointed directly at a bright light. Try a different angle.
Maintenance and Troubleshooting
65
Page 66

Page 67

Appendix A
Technical Specifications
Physical
m Depth 1.9 in. (47 mm)
m Width 5.1 in. (129 mm)
m Height 3.0 in. (77 mm)
m Weight 8.5 oz. (240 g)
Technical
m Type Digital Camera
m Image size 640 x 480 pixels
m Interface RS-232C
m Bit depth 24-bit (16 million colors)
m Memory 2 MB storage card
67
Page 68

Camera
m Lens field of view 8 mm (equivalent to 48-mm lens on a
35-mm film camera)
m Liquid crystal display 1.8 inches color LCD
m ISO equivalent to approximately ISO 100
m Focus range Close-up – 3.5 to 5.1 inches (9 to 13 cm)
Portrait – 17.7 to 35.4 inches (45 to 90 cm)
Far – 35.4 inches and farther (90 cm
and farther)
m Aperture ƒ2.2 to ƒ8
m Shutter speed 1/4 second to 1/500 0 second
m Input/output ports Digital (RS-232C) port
Video Out port (NTIS required)
Temperature
m Operating 0° to 40° C (32° to 104° F)
m Storage (6 months) –20° to 60° C (–4° to 140° F)
Power requirements
68
m Standby < 500 mW
m Operating < 4.5 W
Operating environment
m Temp erature 0° to 40° C (32° to 104° F)
m Humidity 10 to 85 percent, noncondensing
Electrical requirements
m Internal power 4 AA batteries (3.6 V DC to 5.4 V DC)
m External power 4.5 V DC/1.75 A to 8.0 V DC/1.0 A
Accessories
m QuickTake 4 MB Storage Card
m QuickTake 200 AC Adapter
Appendix A
Page 69

Appendix B
Battery Information
The QuickTake 200 camera comes with four lithium batteries. In place of the
lithium batteries, the camera can also use high-energy alkaline batteries and
NiCad rechargeable batteries. This appendix contains important information
about the batteries you can use in the QuickTake 200 camera.
Caring for batteries
Here are some general suggestions for good battery care.
m Do not mix different types of batteries.
m Always handle batteries carefully.
m When inser ting batteries, check the polarity markings on the battery
(+ and –) to ensure that you insert them correctly. Incorrect battery polarity
may cause batteries to split or leak, which could result in a fire, injury, or
damage to the camera.
m Do not attempt to charge lithium or alkaline batteries. Doing so may cause
the batteries to split or leak.
m Do not shor t-circuit battery terminals (that is, do not touch both terminals
with a metal object). Do not carry loose batteries in a pocket or purse
where they may mix with coins, keys, or other metal objects. Doing so may
cause an explosion or a fire.
m Do not drop, puncture, disassemble, mutilate, immerse in water, or
incinerate the batteries.
m Intense heat can shorten battery life. Do not leave batteries in hot locations
(such as the trunk of a car) for more than a day or two.
69
Page 70

m Remove the batteries when the camera will not be used for an extended
Lithium
(Li)
period of time. If the batteries leak, clean and wipe the battery
compartment carefully. Wash your hands carefully if you touch the
battery fluid.
m Store unused batteries in a dry place at normal room temperature.
IMPORTANT
Batteries contain chemicals, some of which may be harmful to
the environment. Please dispose of used batteries according to your local
environmental guidelines.
Ways to impro ve battery performance
Here are some tips that may help you get the most from your batteries.
m For longest battery life, use lithium batteries.
m When you replace used batteries, replace all the old ones with new ones.
Mixing new and used batteries weakens the performance of the new ones.
m Batteries work best when the contact surfaces are clean. If necessary,
clean thes e surfaces by gently rubbing with a clean pencil eraser or a cloth.
WARNING
feature operates that switches off the camera as a protective
measure. Wait until the camera cools down and then switch it on.
When you use the camera in hot conditions, a safety
70
Appendix B
Page 71

Appendix C
About ColorSync
Mac OS–based computers use ColorSync to help make sure that the colors
you see on your monitor closely match the colors you get on your printers,
scanners, and other devices. Because ColorSync works behind the scenes,
you don’t have to know anything about it. All you need to do is initially set it
up. This appendix describes how ColorSync works and how to configure your
monitor and computer to take advantage of it.
The problem that C olo rSync solves
Providing consistent color with desktop computers is a technical challenge
because different color devices use different methods for representing color,
and they produce different ranges of colors. For example, the colored light on
your monitor is very different from the colored inks your printer uses.
Different color devices also create color using different methods. Monitors
(and most scanners) produce colors by mixing red, green, and blue light—
RGB color. Most pri nters produce colors by mixing cyan (a shade of
called
blue), magenta (a bright pink), yellow, and black ink. This color system is
called CMYK. Since monitors, printers, and scanners each have different color
capabilities, they cannot reproduce each other’s colors exactly.
71
Page 72

Further compounding the problem is that no two monitors or printers produce
exactly the same colors. (For example, you can see differences in color ability
among monitors in the TV department of a consumer electronics store.)
ColorSync is a system extension that provides color-conversion capabilities and
improves color consistency. ColorSync “translates” the colors used on one
device so that they more closely match the colors displayed or printed on
another device.
ColorSync color conversion is a central part of Mac OS–based computing,
ensuring that applications, monitors, printers, scanners, and digital cameras can
use th e same scheme for color conversion. This means you can scan an image,
display it on your monitor, and print it—with visually matching colors every
step of the way.
How ColorSync works
When you create a TIFF or PICT file using a program that supports ColorSync,
a “profile” describing the color capabilities of your equipment is saved with the
image. For example, when you scan a photograph, a profile describing the
scanner is saved inside the image file. If you later print the image, even using a
different computer, ColorSync looks at the profile to learn about the
capabilities of the scanner you used, and automatically picks closely matching
colors that your printer can reproduce.
72
The profile contains information ColorSync needs to perform color matching,
such as the li ghtest and darkest possible tones (white point and black point)
that the device can produce, and the maximum supported densities for red,
green, blue, cyan, magenta, and yellow. Together, these characteristics describe
the color gamut (or range) that a device is capable of capturing, displaying, or
reproducing. To take advantage of ColorSync, each of the imaging devices you
use n eeds to have its own ColorSync profile. When you create images using
these devices, information from the profile will automatically become part of
the image file—ensuring that colors are consistent throughout the entire
creative process.
Appendix C
Page 73

Because ColorSync information becomes part of your output files, you don’t
Monitor Printers
Digital cameras Scanners
ColorSync profile
ColorSync
have to worry about losing the profile or using the wrong profile with the
wrong image. Additionally, ColorSync profiles are in the standard
International Color Consortium (ICC) format recognized by Microsoft
Windows, Mac OS, and other systems.
When you work with an image that has an embedded ColorSync or ICC
profile, ColorSync identifies the colors that your monitor or printer can
reproduce by examining their ColorSync profile. It compares their capabilities
with those of the system used to create the image (as described in the
embedded profile), and then picks appropriate, matching colors. For example,
your monitor may be able to display a vivid red, but your printer inks may not
be able to produce that color. ColorSync determin es the “next best” color for
your printer to use.
independent color standard. ColorSync uses the CIE color standard, which
describes colors in terms of how they are perceived by the human eye under
specific lighting conditions. (CIE stands for the Commission International de
ColorSync performs color matching by comparing each profile to an
l’Eclairage, the Inter national Commission on Illumination, which created the
standard in 1931.)
About ColorSync
73
Page 74

Setting up ColorSync
To take a dva ntage of ColorSync, you need to obtain profiles for each of your
imaging devices, such as your monitor, scanner, and color printer. ColorSync
profiles are usually automatically installed when you install the software for a
ColorSync-supported device. Profiles are stored in the ColorSync Profiles
folder, inside Preferences in the System Folder. If you need to obtain a
ColorSync profile, contact the manufacturer of your device. Ask for either a
ColorSync or ICC profile for the specific model of monitor, printer, or
scanner you’re using.
You also need to make sure the ColorSync extension is installed and active.
ColorSync is automatically installed in the Extensions folder of your System
Folder during AppleVision software installation. Unless you’ve removed or
disabled it, it’s already installed.
Finally , you need to set a ColorSync System Profile for the Mac OS. The
ColorSync System Profile is used by ColorSync to determine the color range
of your monitor. ColorSync compares this information with the profiles of
your other devices to make sure that colors are consistent with what you see
on your monitor.
Additionally, the System Profile is used as a default profile if a document you
are working on doesn’t have any ColorSync information saved within it. This
can o ccur if the do cument was created without ColorSync installed. By using
the System Profile as a default, ColorSync ensures that colors are consistent
with what you currently see on your monitor.
74
Appendix C
Page 75

Setting the ColorSync System Profile
To set the System Profile, follow these steps:
1Make sure the profile you want to use is located in the ColorSync Profiles folder.
This folder is located in the Preferences folder in your System Folder.
2Choose Control Panels from the Apple (
control panel.
K
) menu and open the ColorSync System Profile
The ColorSync System Profile control panel appears.
3Click Set Profile.
A dialog box appears with a list of ColorSync profiles installed on
your computer.
4Click the profile you want to use or create your own custom profile.
Select the profile for your monitor. (If you don’t have a profile, contact the
monitor manufacturer.)
About ColorSync
75
Page 76

5Click Select.
ColorSync automatically references the profile you selected and uses it to
define the color capabilities of your monitor.
6Close the ColorSync System Profile control panel.
Setting other ColorSync profiles
Some programs and printer software might require that you do something
special, such as turning on an option, in order to take advantage of ColorSync.
For example, to use ColorSync with the Apple Color OneScanner, select the
Use ColorSync option in the ColorSync Preferences dialog box of the
OneScanner Dispatcher software. This tells the scanning software to embed
information about the Color OneScanner in scanned images.
Refer to the instructions that came with your application or device to
determine if it supports similar options. If there’s an option to specify a
profile or to activate ColorSync, be sure to use it.
Tips for be st results
After you’ve made sure ColorSync is installed, set the System Profile, and set
any necessary ColorSync options for your applications, you’re ready to begin
taking advantage of ColorSync! Just scan, create, and print your images or
documents as you normally would. ColorSync works behind the scenes to
ensure consistent color matching.
76
The following settings and strategies will help you get the best color results
from your system. Not all of these tips will apply to the software and devices
you may be using, but be sure to take advantage of those tips that do.
m Set the gamma curve for your monitor to “1.8:Standard” to have the
monitor more closely match printed results.
m When printing in color, check to see if the printing options include a
setting for ColorSync. For example, for the Apple LaserWriter 12/600 PS,
turn on ColorSync by clicking the Options button and selecting ColorSync
Color Matching.
Appendix C
Page 77

m If your scanning program has a ColorSync option, use it. This embeds a
ColorSync profile within the scanned image file, and ColorSync will be
better able to reproduce the original colors on your monitor and printer.
m Don’t try to use two color-matching systems at once on your computer.
Some ap pl ications install other color-matching systems. These should
either be re moved or disabled if you want to use ColorSync.
For mor e information
To learn more about ColorSync, or color matching and color technology in
general, refer to these publications and resources.
Publications
Advanced Color Imaging on the Mac OS, Apple Computer, Inc.,
Addison-Wesley Developers Press, ISBN 0-201-48949-X
ColorSync 2.0 White Paper at gopher://info.apple.com
Internet resources
Apple I maging Web Site at http://imaging.apple.com
Apple Technical Information Library at http://til.info.apple.com
International Color Consortium at http://www.color.org
ColorSync plug-ins for use with Adobe Photoshop (Macintosh Utilities
section of the Apple Software Updates page on the Apple Support and
Information Web at http://www.info.apple.com)
About ColorSync
77
Page 78

Page 79

Appendix D Transferring DOS Images
to Mac OS–Based Portable Computers
If you use a Mac OS–based portable computer with a PCMCIA slot and have
an optional PC card adapter, you can transfer DOS images from your storage
card to your portable computer using Macintosh PC Exchange. You assign
Camera Access to the DOS
compatible with your Mac OS–based computer. You can store images on your
computer, and you can work with the image files using the Camera Access
software.
.JPG suffix so that DOS files with that suffix are
IMPORTANT
them. Do not work with images that remain on the storage card. After you
edit an image file on your hard drive, you can move it back to your camera
using the Upload function.
1 Open the PC Exchange control panel on your Mac OS–based portable computer.
2 In the PC Exchange dialog box that appears, click Add.
3 In the DOS Suffix box, type
4 In the scrollable list, select Camera Access as the specified application program.
5Select JPEG from the Document Type pop-up menu.
Always transfer all images to your computer before working with
.JPG
.
79
Page 80

6Click OK.
The first PC Exchange dialog box reappears with the JPEG file type assigned
to Camera Access. This maps DOS files with the
.JPG suffix to the JPEG
file type of the Camera Access application.
You can open and view DOS
.JPG files in Camera Access, and you can save
files in other formats (EXIF, PICT, and TIF F).
7Place your storage card in the PC card adapter.
8Insert the PC card adapter into one of the PCMCIA card slots on your portable computer.
You can now open and work with the storage card images from your camera.
80
Appendix D
Page 81

Index
A
accessories 68
AC power adapter. See power adapter
action button
Auto Play mode and 23
auto-power-off function and 27
battery-saving mode and 26
Erase mode and 24, 25
location of 3
Protect mode and 25
Record mode and 19
Self-Timer mode and 21
Adobe PageMill software 55
Adobe PhotoDeluxe software 55
alkaline batteries 69
aperture 17, 68
aperture selector 3, 17
Apple menu 75
Apple QuickTake 200 folder 5
Apple QuickTake 200 Software CD-ROM
disc 5
AppleTalk 31, 64
applications
Adobe PageMill 55
Adobe PhotoDeluxe 55
PictureWorks Netcard 55
QuickTake Camera Access 5, 33–34,
48–54
scanning applications 77
starting applications with Camera
Access Dispatcher 55–58
Auto-Play mode 4, 15, 23
auto-power-off 27, 53, 64
B
batteries
alkaline 69
caring for 69–70
cleaning contact surfaces of 70
conserving 22, 26, 28, 35, 38
disposing of 7, 70
improving performance of 70
installing 6–7, 69
leaking 70
life of 70
lithium 69, 70
polarity of 69
rechargeable 28
replacing 7, 70
storing 70
troubleshooting 63
81
Page 82

battery door
location of 3
opening 6
battery door release button 3
battery-saving mode 26
bit depth 67
blotchy images 64–65
blurry images 64–65
brightness
of images 44–45
of LCD screen 17
brightness dial 17
C
cables
serial cable 31, 32
turn off computer before
connecting 32
video cable 22
Camera Access application 33–60
commands in. See commands
connecting to the camera with 33–34
getting information about images
with 36
making videos and movies with
48–54
menus in. See menus
moving images between Camera
Contents and Viewer folder with
41–43
naming images with 39
opening images to full size with
36–37
tasks performed by 33
transferring images to computer
with 38
uploading images from computer to
camera with 39–40
using to work with images 44–48
viewing images with 35, 41–43
Camera Access Dispatcher, starting other
applications with 55–58
Camera Access icon 33, 38
Camera Contents window
moving images between Camera
Contents and Viewer folder
41–43
purpose of 35
selecting images in 36
camera mode dial 4, 19–26.
See also modes
caring for the camera and lens 61–62
carrying strap, attaching 10
carrying strap mount, location of 3
CIE color standard 73
cleaning
battery contact surfaces 70
camera and lens 62
seal on storage card 9
storage card 62
close-up focal setting 16, 18
CMYK color 71
color matching. See ColorSync
color printing 76
color range 72–73
ColorSync 71–77
how ColorSync works 72–73
obtaining further information
about 77
problems solved by 71
resources for 77
tips for best results with 76–77
ColorSync extension 74
ColorSync System Profile 72–76
ColorSync System Profile control panel
(Apple menu) 75
commands
Copy All Images to Disk (Viewer
menu) 38
Copy Selected Images to Disk
(Viewer menu) 38
Get Info (File menu) 36
Hide Video-in (Window menu) 53
Horizontal (Dispatcher menu) 56
Loop (Movie menu) 52
82
Index
Page 83

Loop Back and Forth (Movie
menu) 52
Open Folder Viewer (File menu) 42, 50
Present Movie (Movie menu) 50, 51,
52, 54
Print (File menu) 60
Quit (File menu) 60
Recompress Movie (Movie menu) 52
Record (Video-In menu) 54
Size (Movie menu) 52
Undo (Edit menu) 47
Upload Image (QuickTake 200
menu) 39
Vertical (Dispatcher menu) 56
Video Playthru Off During Record
(Video-in menu) 54
Zoom In and Zoom Out (Image
menu) 37
communications regulation
information vi
Computer mode 4, 23–24
condensation
on camera or lens 62
on storage card 63
connecting
cables, safety precaution for 32
camera to computer 31–32
to camera with Camera Access
application 33–34
conserving power 35, 38
contrast of images 44–45
control panels
ColorSync System Profile control
panel 75
PC Exchange control panel on Mac
OS-based portable computer 79
Copy All Images to Disk command
(Viewer menu) 38
Copy Selected Images to Disk command
(Viewer menu) 38
cropping images 46
crosshair cursor 46
D
date and time
displaying and hiding 12
resetting 62
setting 11–12
DC IN 6V socket 28
delayed photographs 20
deleting images
with Erase mode 24–25
with Viewer menu commands 43
depth specifications 67
Digital port on camera 32
Dispatcher menu, Horizontal or Vertical
command 56
Dispatcher panel 55–57
displaying and hiding date and time 12
disposing of batteries 70
DOS images, transferring to Mac
OS–based portable computers
79–80
dragging and dropping images between
folders 41
E
editing images on your computer 44–48
Edit menu, Undo command 47
electrical requirements 68
electrical shock, avoiding 28
enlarging images 37
Erase mode
formatting storage card with 9
frame numbers displayed in 15
purpose of 4
working with 24–25
erasing images
with Erase mode 24–25
with Viewer menu commands 43
erasure, guarding against 25–26
exposure warning 17, 18
external power specifications 68
Index
83
Page 84

F
G
Far focal setting 16
FCC statement vi
file formats
JPEG 40, 58, 79, 80
PICT 40, 58, 72
TIFF 72
File menu
Get Info command 36
Open Folder Viewer command 42, 50
Print command 60
Quit command 60
files
JPEG files 40, 79, 80
PICT files 40, 72
renaming 39
saving 39
TIFF files 72
Finder, renaming files with 39
flipping images 47
fluorescent lighting 17
focal distance, estimating 16
focal range specifications 68
focus
close-up focus 18
setting 16
focus selector 3, 16
folders
Apple QuickTake 200 folder 5
dragging and dropping images
between 41
selecting 42
Viewer folder 41–43
viewing thumbnails of images in 41
formats. See file formats
formatting the storage card 4, 9, 24–25
frame numbers 15
frames
playing back 23
scrolling through 21
selecting seconds between 23
framing the subject 14
fuzzy images 64–65
gamma curve for monitor, setting 76
Get Info command (File menu) 36
H
heat, problems caused by 64, 70
height specifications 67
Hide Video-in command (Window
menu) 53
hiding and displaying date and time 12
Horizontal command (Dispatcher
menu) 56
humidity 68
I
ICC profile 74
icons
Camera Access icon 38
movie icon 51, 54
protection icon 25
Unassigned icons 57
Image menu, Zoom In and Zoom Out
commands 37
images. See also movies or specific topic
blotchy 64–65
blurry 64–65
brightness of 44–45
close-up 16
contrast of 44–45
cropping 46
deleting from camera 43
DOS 79–78
dragging and dropping between
folders 41
editing on computer 44–48
enlarging 37
erasing from storage card 4
flipping 47
fuzzy 64–65
getting information about 36
84
Index
Page 85

indoor pictures 17
lightness of 45–48
moving between Camera Contents and
Viewer folder 41–43
naming 39
number of images in camera 34
opening more than one 36
opening on computer 44–48
opening to full size 36–37
picture quality, setting modes for 4
printing 59–60
printing thumbnails of 59
QuickTime movies 53–54
reducing 37
renaming 39
rotating 48
saving 59
sharpness of 45–48
taking pictures 13–29
transferring DOS images to Mac
OS–based portables 79–80
transferring from camera to computer
4, 23–24, 38
transferring from computer to camera
34, 39–40
viewing by date 43
viewing by name 43
viewing in camera 21–23, 35
viewing multiple images 23
viewing on computer 41–43
viewing on LCD screen 21–23
viewing on television 21–23
viewing thumbnails of 41–43
working with 44–48
write-protecting 25–26
image size specifications 67
indoor pictures 17
Industry Canada statement vii
input/output ports on camera 68
installing
batteries 6–7
optical viewfinder 18–19
QuickTake camera software 5, 64
storage card 7–9
interface specifications 67
interference on radio and television vi
internal power specifications 68
Internet resources for ColorSync 77
ISO specifications 68
J, K
JPEG file format 40, 58, 79, 80
L
LCD brightness dial, location of 3
LCD screen
brightness of 3, 17
location of 3
putting to sleep 26
turning off 19
turning on 19, 26
viewing images on 21–23, 35
viewing movies on 54
LCD specifications 68
lens
caring for 61–62
field of view 68
location of 3
moisture on 62
light
adjusting 45–48
red sleep light 19
lighting, fluorescent 17
lightness of images 45–48
light setting 17
lithium batteries 69, 70
looking at images. See viewing images
Loop Back and Forth command (Movie
menu) 52
Loop command (Movie menu) 52
Index
85
Page 86

M
Macintosh PC Exchange 79
Mac OS–based computers, using the
camera with 31–60
Mac OS–based portable computers,
transferring DOS images to
79–80
maintenance 61–63
memory, insufficient amount of 64
menus
Apple menu 75
Dispatcher menu 56
Edit menu 47
File menu 36, 60
Movie menu 50, 51, 54
QuickTake 200 menu 39
Video-in menu 54
Viewer menu 43
mode dial
location of 3
troubleshooting 63
modem port on computer 23, 31, 32, 64
modes
Auto-Play mode 4, 15, 23
battery-saving mode 26
Computer mode 4, 23–24
Erase mode 4, 9, 15, 24–25
Play mode 4, 15, 21–23
Protect mode 4, 15, 25–26
Record-Fine mode 4, 11, 14, 19–20
Record mode 4, 14, 19–20
selecting 4
Self-Timer mode 4, 21
moisture
on camera or lens 62
on storage card 63
monitor
ColorSync profile for 75
gamma curve 76
movie icon 51, 54
Movie menu
Loop Back and Forth command 52
Loop command 52
Size command 52
Present Movie command 50, 52, 54
Recompress Movie command 52
Movie Player 54
movies. See also images
looping 52
naming 49
playing 54
QuickTime movies 53–54
recompressing 52
recording 48–54
running 52
stopping action of 54
viewing on LCD screen 54
moving images
between Camera Contents window
and Viewer folder 41–43
from computer to camera 34
N
naming
images 39
movies 49
number of images in the camera 34
O
Open Folder Viewer command (File
menu) 42, 50
opening
battery door 6
images on your computer 44–48
images to full size 36
more than one image 36
storage card door 8
operating environment 68
operating power 68
operating temperature 68
optical viewfinder. See viewfinder
overexposure warning 17, 18
overheated camera 64, 70
86
Index
Page 87

P
PC card adapter 79
PC Exchange control panel on Mac
OS–based portable computer 79
PCMCIA slot on Mac OS–based
portable 79
photographs. See images or specific topic
physical specifications 67
PICT file format 40, 58, 72
picture quality, setting modes for 4
pictures. See images; movies; taking
pictures or specific topic
PictureWorks NetCard software 55
pixels 19, 20
playing back consecutive frames 4
playing movies 54
Play mode 4, 15, 21–23
portable computers
PCMCIA slot on 79
transferring DOS images to Mac
OS–based portables 79–80
Portrait focal setting 16
ports
Digital port on camera 32
input/output ports on camera 68
modem port on computer 23, 31,
32, 64
printer port on computer 31, 32
serial port on computer 32, 64
video input port on television 22
Video Out port on camera 22
power
conserving 22, 26, 28, 35, 38
improving battery performance 70
troubleshooting 64
power adapter 27, 28, 31,35
power-off function 27
power requirements 68
power specifications 68
power switch 3, 13
Present Movie command (Movie menu)
50, 51, 52, 54
Print command (File menu) 60
printer port on computer 23, 31, 32
printing
images 59–60
in color 76
thumbnails of images 59
problems. See troubleshooting
protection icon 25. See also
write protection
Protect mode 4, 15, 25–26
Q
QuickTake 200 AC Power Adapter. See
power adapter
QuickTake 200 Camera Access
application. See Camera
Access application
QuickTake 200 panel 34, 35
QuickTake 200 software
installing 5
quitting 60
QuickTime IC movie panel 50
QuickTime movies, creating 53–54
Quit command (File menu) 60
quitting, QuickTake 200 software 60
R
radio and television interference vi
rechargeable batteries 28
Recompress movie command (Movie
menu) 52
Record command (Video-in menu) 54
Record-Fine mode 4, 11, 14, 19–20
recording movies and videos 48–54
Record mode 4, 14, 19–20
red sleep light 19
reducing images 37
renaming images 39
repair 61
replacing batteries 7, 70
resetting date and time 62
resolution 19, 20
RGB color 71
rotating images 48
Run Movie arrow 51, 54
Index
87
Page 88

S
safety precautions
batteries 6, 69–70
caring for the camera and lens 61–62
disposing of batteries 7
handling the storage card 62–63
Important Safety Instructions vii–viii
power adapter 28
saving
files in PICT format 58
images 59
Scale pop-up menu 37
scanning programs, ColorSync option
in 77
screen
brightness of 17
changing size of 52
scrolling through frames 21
selecting a folder 42
Self-Timer mode 4, 21
serial cable 31, 32
serial port on computer 32, 64
service 61
setting date and time 11–12
sharpness, adjusting 45–48
shutter 19
shutter release 3, 15, 26
shutter speed 68
Size command (Movie menu) 52
sleep 26
sleep light 19, 26
slide shows. See movies
software. See applications; Camera
Access application;
system software
software license agreement 5
specifications 67–68
standby power 68
starting other applications with Camera
Access Dispatcher 55–58
static electricity, storage card and 63
storage card
cleaning 63
cleaning seal on 9
erasing frames on 24–25
erasing images from 4
formatting 4, 9, 24–25
handling 62–63
installing 7–9
moisture on 63
removing before storing camera 8
static electricity and 63
storing 63
transferring DOS images from storage
card to portable computer 79
troubleshooting 63
write-protecting 9
storage card door 3, 8, 20, 62
storage card slot 3
storage temperature 68
storing
batteries 70
camera 8, 62
storage card 63
strap, attaching 10
strap mount, location of 3
sunlight, distortion from 18
support 61
system requirements 2
system software, upgrading 12, 64
T
taking pictures 13–29. See also images
or specific topic
framing the subject 14
setting aperture 17
setting focus 16
steps for 14–15
turning on the camera 13–14
using AC power adapter 27–28
using auto-power-off function 27
using battery-saving mode 26
using camera mode dial 19–26
using optical viewfinder 18–19
88
Index
Page 89

technical specifications 67–68
television
interference on vi
playing back consecutive frames
on 23
video input port on 22
viewing images on 21–23
thumbnail images
printing 59
viewing on your computer 41–43
TIFF file format 72
time
displaying and hiding 12
resetting 62
setting 11–12
timer 20–21
timer/sleep light, location of 3
transferring
DOS images to Mac OS–based
portables 79–80
images between Camera Contents
window and Viewer folder
41–43
images from camera to computer
4, 23–24, 38
images from computer to camera
39–40
transit temperature 68
tripod mount, location of 3
troubleshooting 63–65
batteries 63
computer does not recognize
camera 64
images are fuzzy, blurry, or blotchy
64–65
LCD screen won’t go on when you
slide the power switch 63
leaking batteries 70
memory 64
mode dial 63
overheated camera 64, 70
power goes out during operation 64
storage card 63
turning off the camera 14
safety shutoff when camera overheats
64, 70
turning on the camera 13–14
turning on the LCD screen 26
U
Unassigned icons 57
underexposure warning 17, 18
Undo command (Edit menu) 47
upgrading system software 12, 64
Upload button (QuickTake 200 panel)
34, 35
Upload Image command (QuickTake 200
menu) 39
uploading images from computer to
camera 39–40
V
VCCI Class 2 statement vii
Vertical command (Dispatcher menu) 56
video cable 22
Video-in function 3, 53
Video-in menu
Record command 54
Video Playthru Off During Record
command 54
Video Out port on camera 22
Video Playthru Off During Record
command (Video-in menu) 54
videos, recording 48–54
creating a movie with images stored
on your computer 48–52
creating a QuickTime movie 53–54
Viewer button, (QuickTake 200 panel)
34, 35
Viewer folder, moving images between
Camera Contents window and
41–43
Index
89
Page 90

Viewer menu
Copy All Images to Disk
command 38
Copy Selected Images to Disk
command 38
viewfinder 16, 18–19, 26
viewing
images by date 43
images by name 43
images in camera 35
images on LCD screen 21–23
movies on LCD screen 54
multiple images 4, 23
single images 4
thumbnails images on computer
41–43
W, X, Y
weight specifications 67
width specifications 67
write-protection
of images 25–26
of storage card 9
90
Z
Zoom In and Zoom Out commands
(Image menu) 37
Index
Page 91

Apple
QuickTake 200
For Mac OS users
Page 92

K Apple Computer, Inc.
© 1997 Apple Computer, Inc. All rights reserved.
Under the copyright laws, this manual may not be copied, in whole or in part, without the
written consent of Apple. Your rights to the software are governed by the accompanying
software license agreement.
The Apple logo is a trademark of Apple Computer, Inc., registered in the U.S. and other
countries. Use of the “keyboard” Apple logo (Option-Shift-K) for commercial purposes without
the prior written consent of Apple may constitute trademark infringement and unfair
competition in violation of federal and state laws.
Every effort has been made to ensure that the information in this manual is accurate. Apple is
not responsible for printing or clerical errors.
Apple Computer, Inc.
1 Infinite Loop
Cupertino, CA 95014-2084
408-996-1010
http://www.apple.com
Apple, the Apple logo, AppleTalk, AppleVision, ColorSync, the ColorSync logo, LaserWriter,
Mac, Macintosh, Performa, Power Macintosh, QuickTake, and QuickTime are trademarks of
Apple Computer, Inc., registered in the U.S. and other countries.
Finder, Macintosh PC Exchange, and OneScanner are trademarks of Apple Computer, Inc.
Adobe, Adobe Illustrator, Adobe PageMill, Adobe PhotoDeluxe, Photoshop, and PostScript are
trademarks of Adobe Systems Incorporated or its subsidiaries and may be registered in certain
jurisdictions.
Helvetica and Times are registered trademarks of Linotype-Hell AG and/or its subsidiaries.
PictureWorks NetCard is a trademark of PictureWorks Technology, Inc.
Other company and product names mentioned herein may be trademarks of their respective
companies. Mention of third-party products is for informational purposes only and constitutes
neither an endorsement nor a recommendation. Apple assumes no responsibility with regard to
the performance or use of these products.
Simultaneously published in the United States and Canada.
Notes on copyright
Images recorded using your digital camera cannot be used in ways that infringe copyright laws
without the consent of the owner, unless intended only for personal use. Note also that some
restrictions apply to the photographing of stage performances, entertainments, and exhibits,
even when intended purely for personal use. Users are also asked to note that the transfer of
memory cards containing images or data protected under copyright laws is only permissible
within the restrictions imposed by those copyright laws.
Page 93

Cont ents
Communications regulation information vi
Important safety instructions vii
1Getting Started With the QuickTake 200 Camera 1
Do you have what you need? 2
System requirements 2
Your camera at a glance 3
The camera mode dial 4
Installing the QuickTake software 5
Installing the batteries 6
Replac ing the batteries 7
Installing the storage card 7
Formatt ing the storage card 9
Write-protecting the storage card 9
Attaching the carryi ng strap 10
Setti ng the date and time in the camera 11
Displaying and hiding the date and time 12
What if you upgrade your system software? 12
What’s next? 12
iii
Page 94

2Using the Camera to Take Pictures 13
Tur ning on the camera 13
Taki ng pictures 14
Frame numbers 15
Setting the focus 16
Selecting the aperture 17
Adjusting the LCD screen brightness 17
Usi ng t he optical viewfinder 18
Usi ng t he camera mode dial 19
Record-Fine a nd Record modes for taking pictures 19
Self-Timer mode 21
Play mode for the camera and the television 21
Auto-Play mode 23
Computer mode 23
Erase mode 24
Protect mode 25
Battery-saving mode 26
Auto-power-off function 27
Usi ng t he camera with the optional AC power adapter 28
What’s next? 29
3Using the Camera With Your Mac OS–Based Computer 31
Connecting the camera to your computer 31
Using QuickTake Camera Access to work with your camera and images 33
Connecting to the QuickTake 20 0 camera 33
Looking at images in the camera 35
Getting information about an image 36
Opening an image to its full size 36
Transferring images to your computer 38
Naming images 39
iv
Contents
Page 95

Uploading: transferring images from your computer to the camera 39
Moving images between Camera Contents and a Viewer folder 41
Viewing images on your computer 41
Deleting images from the camera 43
Working with your images 44
Opening and editing images on your computer 44
Making videos and movies 48
Creating a movie with images stored on your computer 48
Creating a QuickTime movie 53
Usi ng t he Camera Access Dispatcher to start other applications 55
Saving an image 59
Printing your images 59
Printing a single image 59
Printing a collection of images 60
Quitting the QuickTake 200 software 60
What’s next? 60
4Maintenance an d Troubles h ooting 61
Caring for your camera and lens 61
Handling the storage card 62
Solv ing problems 63
Appendix A Technical Specifications 67
Appendix B Battery Information 69
Appendix C About ColorSync 71
Appendix D Transferring DOS Images to Mac OS–Based Portable Computers 79
Index 81
Contents
v
Page 96

Communications regulation information
FCC statement
This equipment has been tested and found to comply with the limits for a Class B digital device
in accordance with the specifications in Part 15 of FCC rules. See instructions if interference to
radio or television reception is suspected.
Radio and television interference
The equipment described in this manual generates, uses, and can radiate radio-frequency
energy. If it is not installed and used properly—that is, in strict accordance with Apple’s
instructions—it may cause interference with radio and television reception.
This equipment has been tested and found to comply with the limits for a Class B digital device
in accordance with the specifications in Part 15 of FCC rules. These specifications are designed
to provide reasonable protection against such interference in a residential installation. However,
there is no guarantee that interference will not occur in a particular installation.
You can determine whether your computer system is causing interference by turning it off. If
the interference stops, it was probably caused by the computer or one of the peripheral devices.
If your computer system does cause interference to radio or television reception, try to correct
the interference by using one or more of the following measures:
m Turn the television or radio antenna until the interference stops.
m Move the computer to one side or the other of the television or radio.
m Move the computer farther away from the television or radio.
m Plug the computer into an outlet that is on a different circuit from the television or radio.
(That is, make certain the computer and the television or radio are on circuits controlled by
different circuit breakers or fuses.)
If necessary, consult an Apple-authorized service provider or Apple. See the service and support
information that came with your Apple product. Or, consult an experienced radio/television
technician for additional suggestions.
IMPORTANT
could void the FCC Certification and negate your authority to operate the product.
This product was tested for FCC compliance under conditions that included the use of Apple
peripheral devices and Apple shielded cables and connectors between system components. It is
important that you use Apple peripheral devices and shielded cables and connectors between
system components to reduce the possibility of causing interference to radios, television sets,
and other electronic devices. You can obtain Apple peripheral devices and the proper shielded
cables and connectors through an Apple-authorized dealer. For non-Apple peripheral devices,
contact the manufacturer or dealer for assistance.
Changes or modifications to this product not authorized by Apple Computer, Inc.,
vi
Communications Regulation Information
Page 97

Industry Canada statement
ATTENTION
CAUTION
RISK OF ELECTRIC SHOCK DO NOT OPEN
RISQUE DE CHOC ELECTRIQUE NE PAS OUVRIR
This Class B device meets all requirements of the Canadian interference-causing equipment
regulations.
Cet appareil numérique de la Class B respecte toutes les exigences du Règlement sur le matériel
brouilleur du Canada.
VCCI Class 2 statement
Important Safety Instructions
You’re almost ready to get started using your QuickTake 200 camera, but first read these
important safety instructions.
≠ This symbol is intended to alert the user to the presence of uninsulated “dangerous voltage”
within the product’s enclosure that may be of sufficient magnitude to constitute a risk of electric
shock to persons.
± This symbol is intended to alert the user to the presence of important operating and
maintenance (servicing) instructions in the literature accompanying the appliance.
WARNING
system of the region in which you purchased it. I t works with only one frequency of electricity,
either 50 or 60 hertz (Hz). The label on the adapter indicates the frequency required.
The label on the adapter also indicates the voltage required. If you are using the camera in a
region with a different voltage but the same frequency as that listed on the adapter, you must use
a voltage converter to provide the voltage indicated on the adapter label.
Serious damage to the equipment will result from using the QuickTake 200 AC Adapter with an
improper electrical frequency or improper voltage converter. Damage resulting from such
misuse of the equipment is not covered under warranty.
The QuickTake 200 AC Adapter (sold separately) is designed to work with the electrical
Important Safety Instructions
vii
Page 98

For your own safety and that of your equipment, always take the following precautions.
Disconnect the power adapter (by pulling the plug, not the cord) if any of the following
conditions exist:
m you spill something into the case or other foreign objects have entered
the equipment
m your equipment is exposed to rain or any other excess moisture
m your equipment has been dropped or the case has been otherwise damaged
m your equipment is emitting smoke, is unusually hot to the touch, is emitting any unusual
odor or noise, or is in any other abnormal state
m you suspect your equipment needs service or repair
m you want to clean the case (use only the recommended procedure described in Chapter 4)
IMPORTANT
The only way to disconnect power completely is to unplug the power adapter. Make
sure the power adapter is within easy reach so that you can unplug it when you need to.
Be sure to follow these instructions:
m Keep your equipment away from sources of liquids, such as washbasins, bathtubs, shower
stalls, and so on.
m Protect your equipment from dust and dampness or wet weather, such as rain, snow, and
so on.
m Protect your equipment from high temperatures. For example, do not leave the camera in a
sealed vehicle or direct sunlight.
m Always use the camera, the AC adapter, and its accessories in well-ventilated locations.
m Handle and transport the equipment carefully. Do not place the equipment on unstable
surfaces.
m Do not insert foreign objects into the card slot.
m Do not modify or disassemble this equipment. Doing so may cause a fire or electric shock.
m If you are using the AC power adapter, do not touch the power plug during a thunderstorm.
Doing so may cause an electric shock.
m Never use the camera while you are operating a vehicle.
m Do not place the equipment near cooking areas or humidifiers, where it can be affected by
oil fumes or steam. Doing so may cause a fire or
electric shock.
m Read all the installation instructions carefully before you plug the adapter into a wall socket.
m Keep these instructions handy for reference by you and others.
m Follow all instructions and warnings dealing with your system.
WARNING
Electrical equipment may be hazardous if misused. Operation of this product, or
similar products, must always be supervised by an adult. Do not allow children access to the
interior of any electrical product and do not permit them to handle any cables.
viii
Important Safety Instructions
 Loading...