


CONTENTS
Part 1, Fundamentals
Names and Functions of Parts.
Special Features
1.Basic Steps.
2.Battery Insertion . . .
3.Film Loading .
4.Setting the Film Speed. .
5.Setting the Shutter Speed .
6 Focus the Lens and Frame Your Picture
7 Correct Exposure .
8 Holding the Camera and Releasing the Shutter .... ....
9 Rewinding Film and Unloading Film
Part 2, Advanced Techniques
1 Changing the Lens .. ....
2.Exposure Correction : . . .
3.Utilizing the Lens Depth of Field
4.Using the Self Timer. ...
5.Infrared Photography
6.Taking flash pictures
7.Accessories for the FUJICA STX-1n
8.Care and Storage of your FUJICA STX-1n
9.Specifications
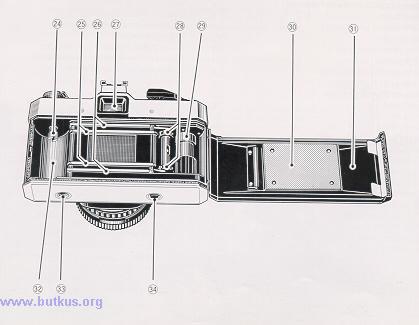
Names and functions of the parts
1.Film Advance Lever
2.Shutter Speed Selector Dial/ASA film speed selector
3.Film ASA Speed Window
4.Shutter Release Button provided with socket for
5.Frame Counter (Additive type automatically resets)
6.Shutter Speed Mark (red dot)

7.Shutter Release. Lock
8.Neck strap Eyelet
9.Self-timer Start Button.
10.Self-timer Set Lever (The shutter is activated in 8 - 10seconds)
11.Depth of Field Preview Button
12.Taking Lens
13.Accessory (hot) Shoe
14.Hot Shoe for X Contact
15.Combination Rewind Crank/Camera Back Lock
16.Battery Chamber / Insert two alkaline-manganese batteries (LR44) for powering the camera's electric Metering system (mercury batteries (HR44) or silver-oxide batteries (SR44) can also be used)
17.Lens Mount
18.Aperture Selector Ring
19.Aperture / Distance Mark
20.Depth of Field Indicator
21.Distance Scale
22.Focusing Ring
23.Lens Safety Lock
24.Film Rewind Spindle
25.Film Rail
26.Guide Rail (the film is passed over the film rail and the edges go between the Guide Rail)
27.Viewfinder Eyepiece designed for attaching the Eye Cup. etc.
28.Battery Chamber / Insert two alkaline-manganese batteries (LR44) for powering the camera s electric
Metering system (mercury batteries (HR44) or silver-oxide batteries (SR44) can also be used).
29.Sprocket Wheel ( The film perforations are engaged with the sprocket teeth to advance the film. )
30.Take-up Spool
31.Pressure Plate
32.Camera Back
33.Film Chamber
34.Tripod Socket
35.Film Rewind Button
SPECIAL FEATURES
1. Improved Through-The-Lens Exposure Meter
The exposure meter of the FUJICA STX-1n consists of 2 Silicon photocell light receptors located on either side of the viewfinder eyepiece. which are connected to an FET (Field Effect Transistor) circuit and are coupled with the shutter and diaphragm. It measures the average light intensity which falls on the entire surface of the focusing glass In other words, it measures the light that has passed through the lens and will actually reach the film.4.butkus.org
Special features of this camera are: the new Fujica X bayonet mount which permits quick interchanging of the lenses, a full aperture metering system. and three-way focusing with split image, microprism and ground glass It is also provided with a shutter speed indicator scale in the viewfinder to enable you to set the shutter speed while looking through the viewfinder
2. World Renowned X-FUJINON Lens
The interchangeable lenses of the FUJICA STX-1n are widely known for their superb color definition and perfect corner-to-corner picture sharpness and clarity.
3. A Complete Camera System in Itself
A wide range of interchangeable lenses, accessories. and its Improved TTL full-aperture exposure meter make the FUJICA STX-1n
a complete camera system in itself capable of handling any picture-taking situation and subject.
BASIC STEPS
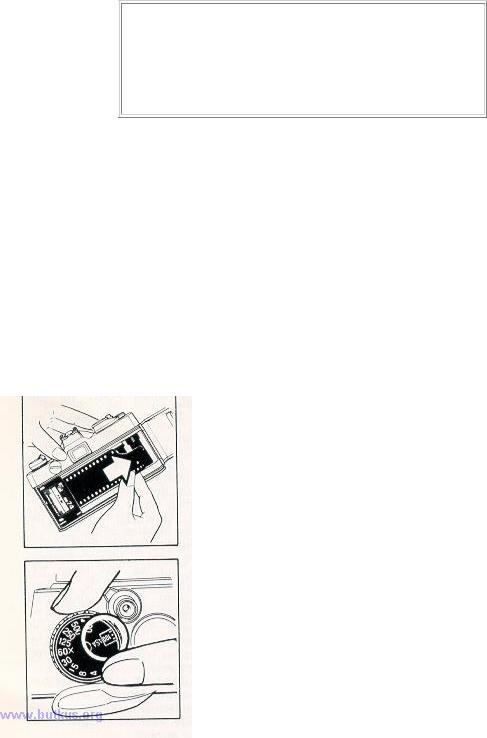
1. Load the Film
Pull the Combination Film Rewind Crank/Back Cover Lock fully until the Camera Back automatically snaps open Next, load the 35mm film cartridge into the Film Chamber and insert the film into the slot of the Take-up Spool.
2. Set the Film Speed
To set the camera for the speed of the film you are using, pull up the top of the Shutter Speed Selector Dial and turn it until the number you want appears in the center of the ASA Film Speed Indicator Window
3. Set the Frame Counter to 1 (the first white dot before the number 2)

The odd numbers of the frame counter are represented by white dots. Wind the Film Advance Lever and press the Shutter Release Button Do this twice. and on the 3rd winding. the first white dot on the film counter (frame No 1 ) will move opposite the triangular mark.
4. Set the Shutter Speed Selector Dial
Turn the Shutter Speed Selector Dial to the speed desired If you are shooting outdoors. the shutter speed will be either 1/125 sec or 1/250 see If you are shooting indoors it will be 1/30 sec or 1/60 sec The shutter speed can also be set with the shutter speed scale and green indicator needle in the viewfinder (left side edge) The needle is set by turning the Shutter Speed Selector
5. Focus the Lens and Frame Your Picture
(1) Look through the Viewfinder Eyepiece and turn the Focusing Ring to focus and frame your picture
(2) To focus turn the focusing ring to make the upper and lower segments of the split image in the microprism center spot converge and form a perfect fit4.butkus.org
6. Set the exposure
 Loading...