


Fujica ST605N
This camera manual library is for reference and historical purposes, all rights reserved.
This page is copyright by  , M. Butkus, NJ.
This page may not be sold or distributed without the expressed permission of the producer On-line camera manual library
This is the full text and images from the manual. This may take 3 full minutes for all images to appear.
If they do not all appear. Try clicking the browser "refresh" or "reload button" or right click on the image, choose "view image" then go back. It should now appear. To print, try printing only 3 or 4 pages at a time.
If you find this manual useful, how about a donation of $3 to: M. Butkus, 29 Lake Ave., High Bridge, NJ 08829 This will allow me to continue to buy new manuals and pay their shipping costs.
It'll make you feel better, won't it?
If you use Pay Pal, use the link below. Use the above address for a check, M.O. or cash.
Back to my main Chinon information page
If you need more specific information on Fujica cameras.... try this U.K. site
1.Film Advance Lever
2.Shutter Speed Selector Dial
3.Film ASA Speed Window
4.Frame Counter / Additive type automatically resets

5.Shutter Release Button / Provided with socket for cable release
6.Shutter Speed Mark (red dot)
7.Neck strap Eyelet
8.Self-timer Start Button (hi) Self-timer Set Lever / The shutter is activated in 8 - 10seconds
9.Combination Exposure Meter Switch-Aperture
10.Selector Button
11.Taking Lens
12.Accessory (hot) Shoe
13.Hot Shoe for X Contact
14.Combination Rewind Crank-Camera Back Lock
15.Film Plane Mark4.butkus.org
16.Lens Mounting Screw / Praktica screw mount
17.Aperture Selector Ring
18.Aperture / Distance Mark
19.Depth of Field Indicator
20.Distance Scale
21.Focusing Ring
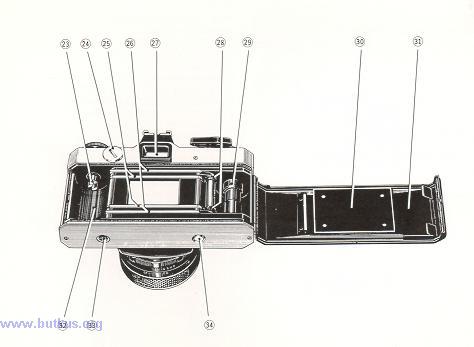
22.X Contact Socket
23.Film Rewind Spindle
24.Battery Chamber / Insert two nickel-zinc batteries for powering the camera Electric Eye System.
25.Film Rail.
26.Guide Rail / The film is passed over the Film Rail and the edges go between the Guide Rail
27.Viewfinder Eyepiece / Designed for attaching the Eye Cup. etc.
28.Sprocket Wheel / The film perforations are engaged with the sprocket teeth to advance the film
29.Take-up Spool
30.Pressure Plate
31.Camera Back
32.Film Chamber
33.Tripod Socket
34.Film Rewind Button
SPECIAL FEATURES
1. Improved Through-The-Lens Exposure Meter
The exposure meter of the FUJICA ST605N consists of 2 Silicon photocell light receptors located on either side of the viewfinder eyepiece, which are connected to an FET (Field Effect Transistor) circuit and are coupled with the shutter and diaphragm It measures the average light intensity which falls on the entire

surface of the focusing glass In other words. it measures the light that has passed through the lens and will actually reach the film4.butkus.org
Its special features are: high sensitivity, complete accuracy, instantaneous response, and a spectral sensitivity close to that of color film. Other merits are its compatibility with any lens that can be mounted on the camera, and elimination of the necessity of making exposure corrections in taking close-ups and in shooting with a filter on the lens because the light that has passed through the selected aperture is the light that is measured
2. World Renowned FUJINON Lens
The interchangeable lenses of the FUJICA ST605N are widely known for their superb color definition and perfect corner-to-corner picture sharpness and clarity.
3. A Complete Camera System in Itself
A wide range of interchangeable lenses, accessories, and its improved through-the-lens exposure meter make the FUJICA ST605N a complete camera system in itself capable of handling any picture-taking situation and subject
BASIC STEPS
1. Load the Film
Pull the Combination Film Rewind Crank Back Cover Lock fully until the Camera Back automatically snaps open. Next. load the 35mm film cartridge into the Film Chamber and insert the film into the slot of the Take-up Spool.
2. Set the Film Speed
If you are using a FUJICOLOR Fell or FUJICHROME R100 (ASA 100) film, pull up the top of the Shutter Speed Selector Dial and turn it until the number 100 appears in the center of the ASA Film Speed Indicator
Window.4.butkus.org
3. Set the Frame Counter to 1 (the first white dot before the number 2)
The odd numbers of the frame counter are represented by white dots Wind the Film Advance Lever and press the Shutter Release Button Do this twice, and on the 3rd winding, the first white dot on the film counter (frame No 1 ) will move opposite the triangular mark

4. Set the Shutter Speed Selector Dial
Turn the Shutter Speed Selector Dial to the speed desired. If you are shooting out of doors, the shutter speed will be either 1/125 sec. or 1/250 sec If you are shooting indoors, it will be 1/30 sec or 1/60 sec The shutter speed can also be set with the shutter speed scale and green indicator needle in the viewfinder (left side edge) The needle is set by turning the S h utter S peed Selector.
5. Focus the Lens and Frame Your Picture
(1)Look through the Viewfinder Eyepiece and turn the Focusing Ring to focus and frame your picture
(2)To focus, turn the focusing ring to make the upper and lower segments of the split image in the microprism center spot converge and form a perfect fit.
6. Set the Exposure
Press the Combination Exposure Meter Switch - Aperture Selector Button with the finger to activate the exposure meter needle in the viewfinder and turn the Aperture Selector Ring until the needle moves into the center of the indentation You can also set the aperture first then adjust the needle by turning the Shutter Speed Selector Dial. The aperture will return to wide open again as you release the switch.
7. Press the Shutter Release Button
Hold camera steady to prevent shake and gently press the Shutter Release
Button.

8. Rewind the Film
After you have exposed the entire roll of film, press the Film Rewind Button, erect the Film Rewind Crank, and turn it in the direction pointed by the arrow and wind the film back into the cartridge, until you feel tension released Next, lift the Back Cover Lock fully up until the camera back snaps open Now, remove the cartridge
BATTERY INSERTION
1. Open the Cover
Insert a coin into the slot of the Battery Chamber Cover ~ located on the upper back side of the body and turn it counter-clockwise.
2. Load the Batteries
Insert two nickel-zinc batteries, one on top of the other, into the battery chamber with the plus sides (+) facing outward and close the cover.
· If you are buying new batteries, be sure to specify 1.5V silver oxide batteries (Eveready S-76E, Mallory MS-76H or UCAR S-76E)

3. Check the batteries
(1 ) Set the ASA Speed Selector (a) to 100 the Aperture Selector (2) to F2.2 and the Shutter Speed Selector (2) to 60.
(2) While pressing down the Exposure Meter Switch (10) look through the viewfinder and point the camera toward bright light (fluorescent light etc.).
(3)If the meter needle in the viewfinder moves from the plus side down to the minus side when the camera is faced toward dim light (you can block out the light with your hand). the batteries are loaded correctly.
(4)If the needle remains stationary on the plus side or minus side when the camera is faced from bright to dim light the batteries are either exhausted or improperly loaded and have to be changed or reloaded properly.4.butkus.org
·The nickel-zinc batteries and silver oxide batteries will normally last for 1 year
·If you are not using the camera for a long while remove the batteries and keep them where it is dry
·Be sure to wipe both ends of the batteries clean with a piece of cloth before loading. Poor contact may result if
the ends are unclean.
 Loading...