


PLRS267ZAB8
Frigidaire PLRS267ZAB8, PLHS268ZCB1, PLHS237ZAB6, GS26HSZBW2, GS26HSZBQ2 Owner’s Manual
...
Controls .......
Looking Inside .......... 9
2
Automatic Ice and Water
Dispenser ................ 12
Food Storage
& Energy Saving Tips ....... 17
Normal Operating Sounds.. 18
Care & Cleaning ......... 19
Warranty ...................... 21
Espahol ........... 26
READ AND SAVE THESE INSTRUCTIONS P/N240389310(0212)
Before You Call
Solutions to
Common Problems.............. 22 - 25
Congratulations on your purchase of a new refrigerator! We
here at Electrolux Home Products are very proud of our
product and we are completely committed to providing you
with the best service possible. Your satisfaction is our #1
priority.
Questions?
1-800-944-9044
(United States)
Please read this Use &Care Manual very carefully. Itcontains
valuable information on how to properly maintain your new
refrigerator.
We know you'll enjoy your new refrigerator and Thank You
for choosing our product. We hope you consider us for future
purchases.
PLEASE READ AND SAVE THESE INSTRUCTIONS
This Use & Care Manual provides specific operating
instructions for your model. Use your refrigerator only as
instructed in this manual. These instructions are not meant
to cover every possible condition and situation that may
occur. Common sense and caution must be practiced when
installing, operating and maintaining any appliance.
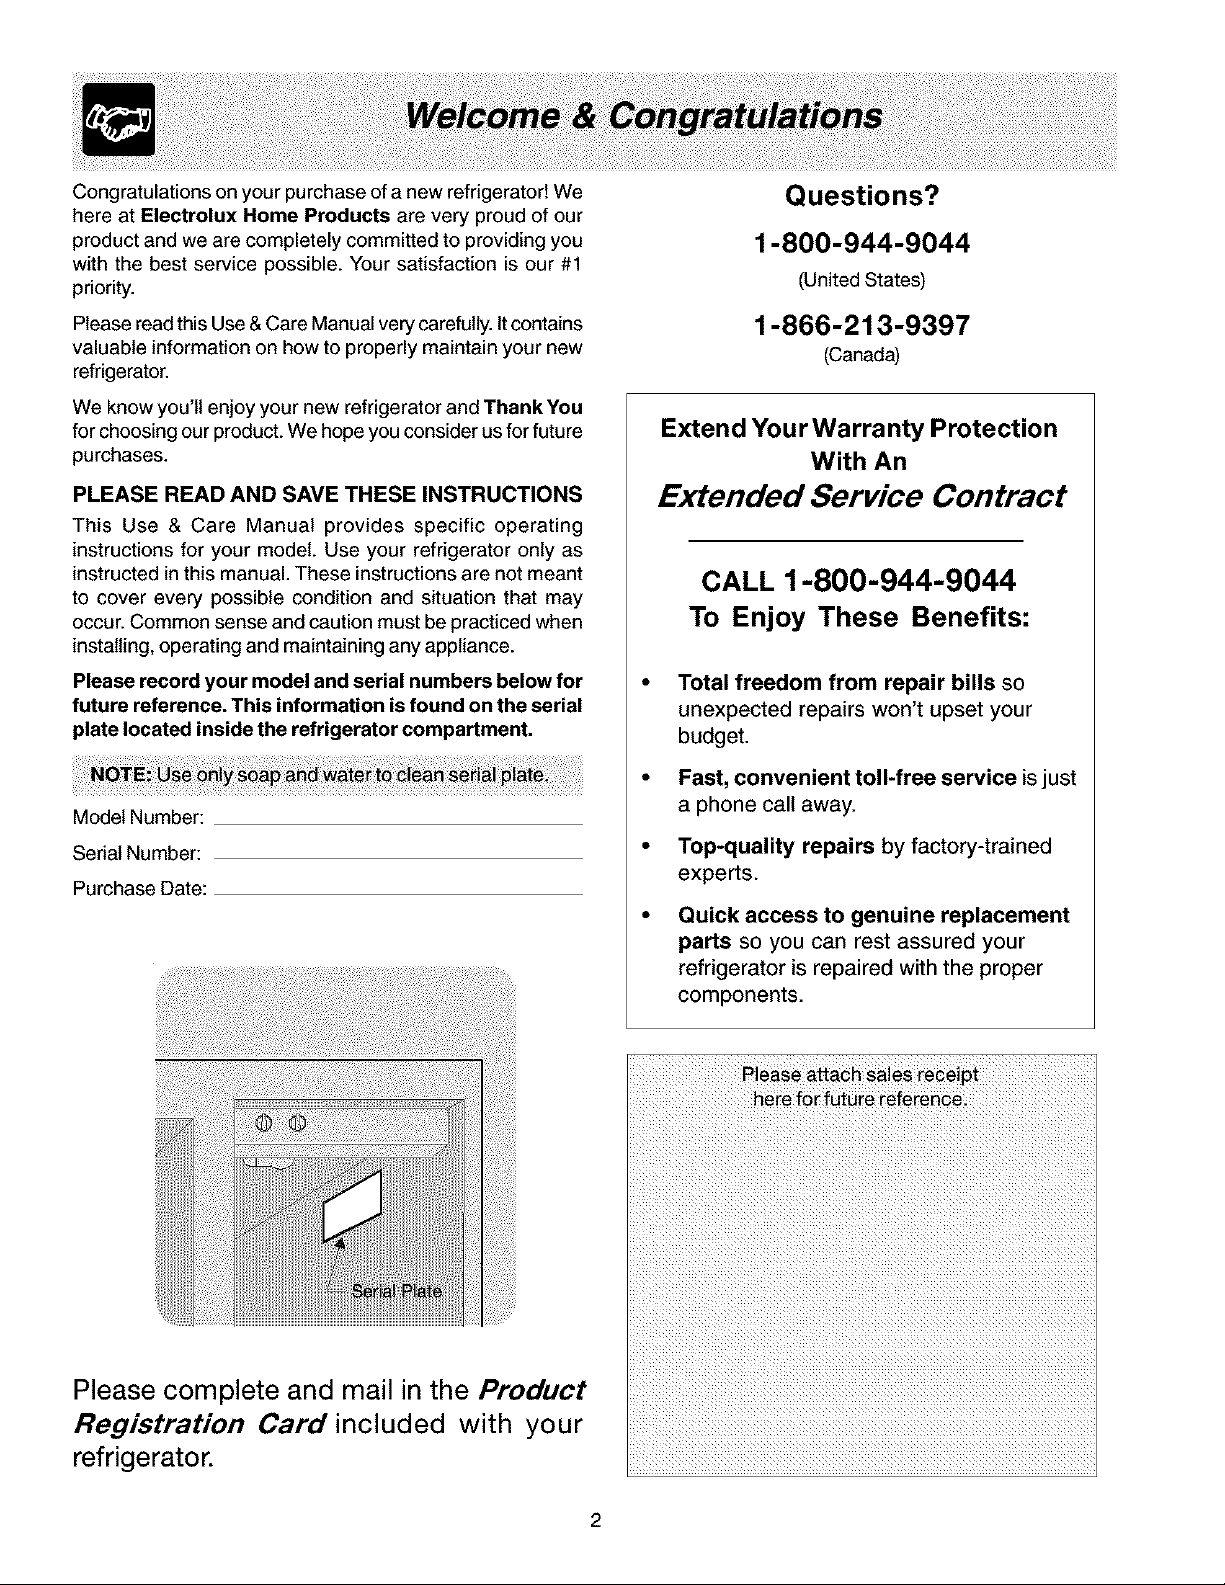
Please record your model and serial numbers below for
future reference. This information is found on the serial
plate located inside the refrigerator compartment.
Model Number:
Serial Number:
Purchase Date:
1-866-213-9397
(Canada)
Extend Your Warranty Protection
With An
Extended Service Contract
CALL 1-800-944-9044
To Enjoy These Benefits:
Total freedom from repair bills so
unexpected repairs won't upset your
budget.
Fast, convenient toll-free service is just
a phone call away.
Top-quality repairs by factory-trained
experts.
Quick access to genuine replacement
parts so you can rest assured your
refrigerator is repaired with the proper
components.
Please complete and mail in the Product
Registration Card included with your
refrigerator.
Please attach sales receipt
here for future reference.
2
FORYOURSAFETY
• Donotstoreorusegasoline,orotherflammableliquids
inthevicinityofthisoranyotherappliance.Read
productlabelsforwarningsregardingflammabilityand
otherhazards.
• Donotoperatetherefrigeratorinthepresenceof
explosivefumes.
• Avoidcontactwithanymovingpartsofautomaticice
maker.
• Removeallstaplesfromthecarton.Staplescancause
severecuts,andalsodestroyfinishesiftheycomein
contactwithotherappliancesorfurniture.
CHILDSAFETY
Destroyorrecyclethecarton,plasticbags,andanyexterior
wrappingmaterialimmediatelyafterthe refrigeratoris
unpacked.ChildrenshouldNEVERusetheseitemstoplay.
Cartonscoveredwithrugs,bedspreads,plasticsheetsor
stretchwrapmaybecomeairtightchambers,andcanquickly
causesuffocation.
PROPER DISPOSAL OF YOUR REFRIGERATOR
OR FREEZER
Risk of child entrapment
Child entrapment and suffocation
are not problems of the past.
Junked orabandonedrefrigerators
or freezers are still dangerous -
even if they willsit for "just a few
days." If you are getting rid of your
oldrefrigerator orfreezer, please
follow the instructions below to
help prevent accidents.
Before you throw away your old refrigerator/freezer:
• Remove doors.
• Leave shelves in place so children may noteasily climb
inside.
• Have refrigerant removed by a qualified service
technician.
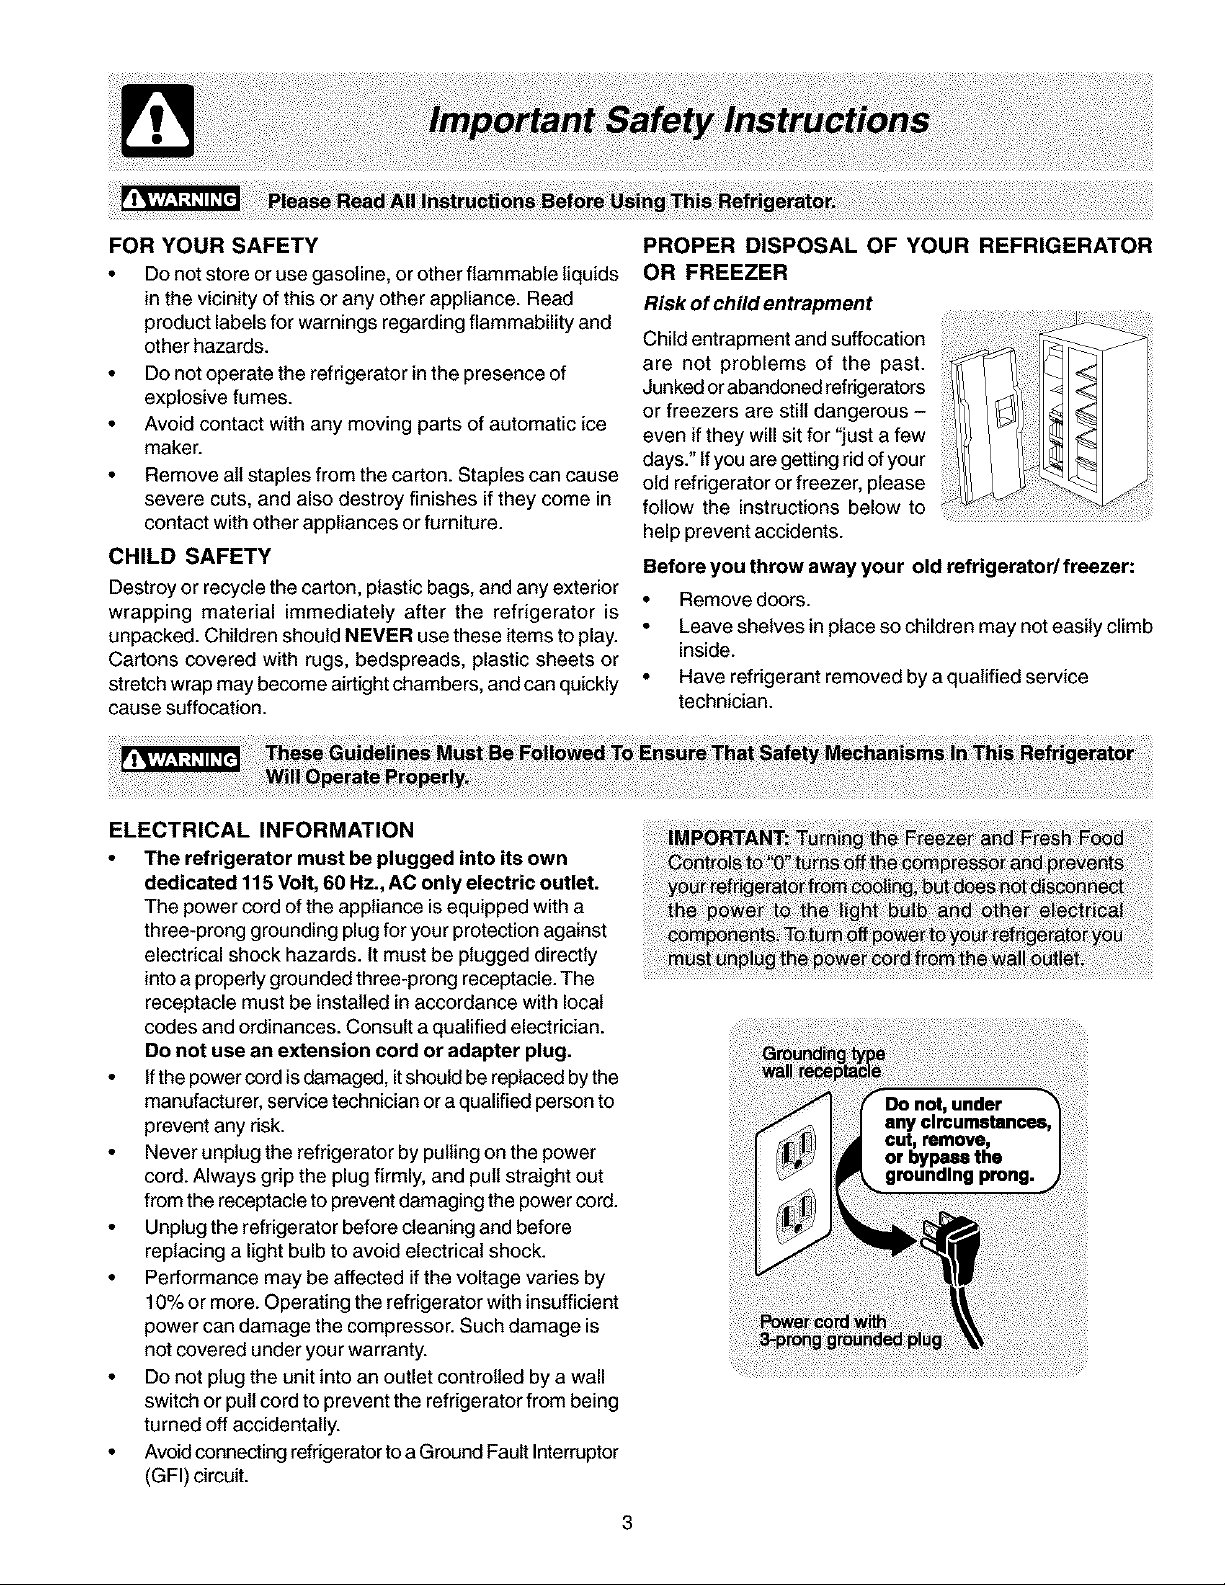
ELECTRICAL INFORMATION
• The refrigerator must be plugged into its own
dedicated 115 Volt, 60 Hz., AC only electric outlet.
The power cord of the appliance isequipped with a
three-prong grounding plug for your protection against
electrical shock hazards. It must be plugged directly
into a properly grounded three-prong receptacle. The
receptacle must be installed in accordance with local
codes and ordinances. Consult a qualified electrician.
Do not use an extension cord or adapter plug.
• If the power cord is damaged, itshould be replaced bythe
manufacturer, service technician or a qualified person to
prevent any risk.
• Never unplug the refrigerator by pulling on the power
cord. Always grip the plug firmly, and pull straight out
from the receptacle to prevent damaging the power cord.
• Unplug the refrigerator before cleaning and before
replacing a light bulb to avoid electrical shock.
• Performance may be affected if the voltage varies by
10% or more. Operating the refrigerator with insufficient
power can damage the compressor. Such damage is
not covered under your warranty.
• Do not plug the unit into an outlet controlled by a wall
switch or pullcord to prevent the refrigerator from being
turned off accidentally.
• Avoid connecting refrigerator to a Ground Fault Interruptor
(GFI) circuit.
3
This Owner's Guide provides specific operating instructions
for your model. Use the refrigerator only as instructed in this
Use & Care Manual. Before starting the refrigerator, follow
these important first steps.
LOCATION
• Choose a place that isnear a grounded electrical outlet.
Do Not use an extension cord or an adapter plug.
• If possible, place the refrigerator out of direct sunlight
and away from the range, dishwasher or other heat
sources.
• The refrigerator must be installed on a floor that is level
and strong enough to support a fully loaded refrigerator.
• Consider water supply availability for models equipped
with an automatic ice maker.
INSTALLATION
Installation Clearances
• Allow the following clearances for ease of installation,
proper air circulation, and plumbing and electrical
connections:
Sides & Top 3/8"
Back 1"
DOOR OPENING
Your refrigerator should be positioned to allow easy access to
a counter when removing food. For best use of drawers and
freezer baskets, the refrigerator should be in a position where
both the refrigerator and freezer doors can be fully opened.
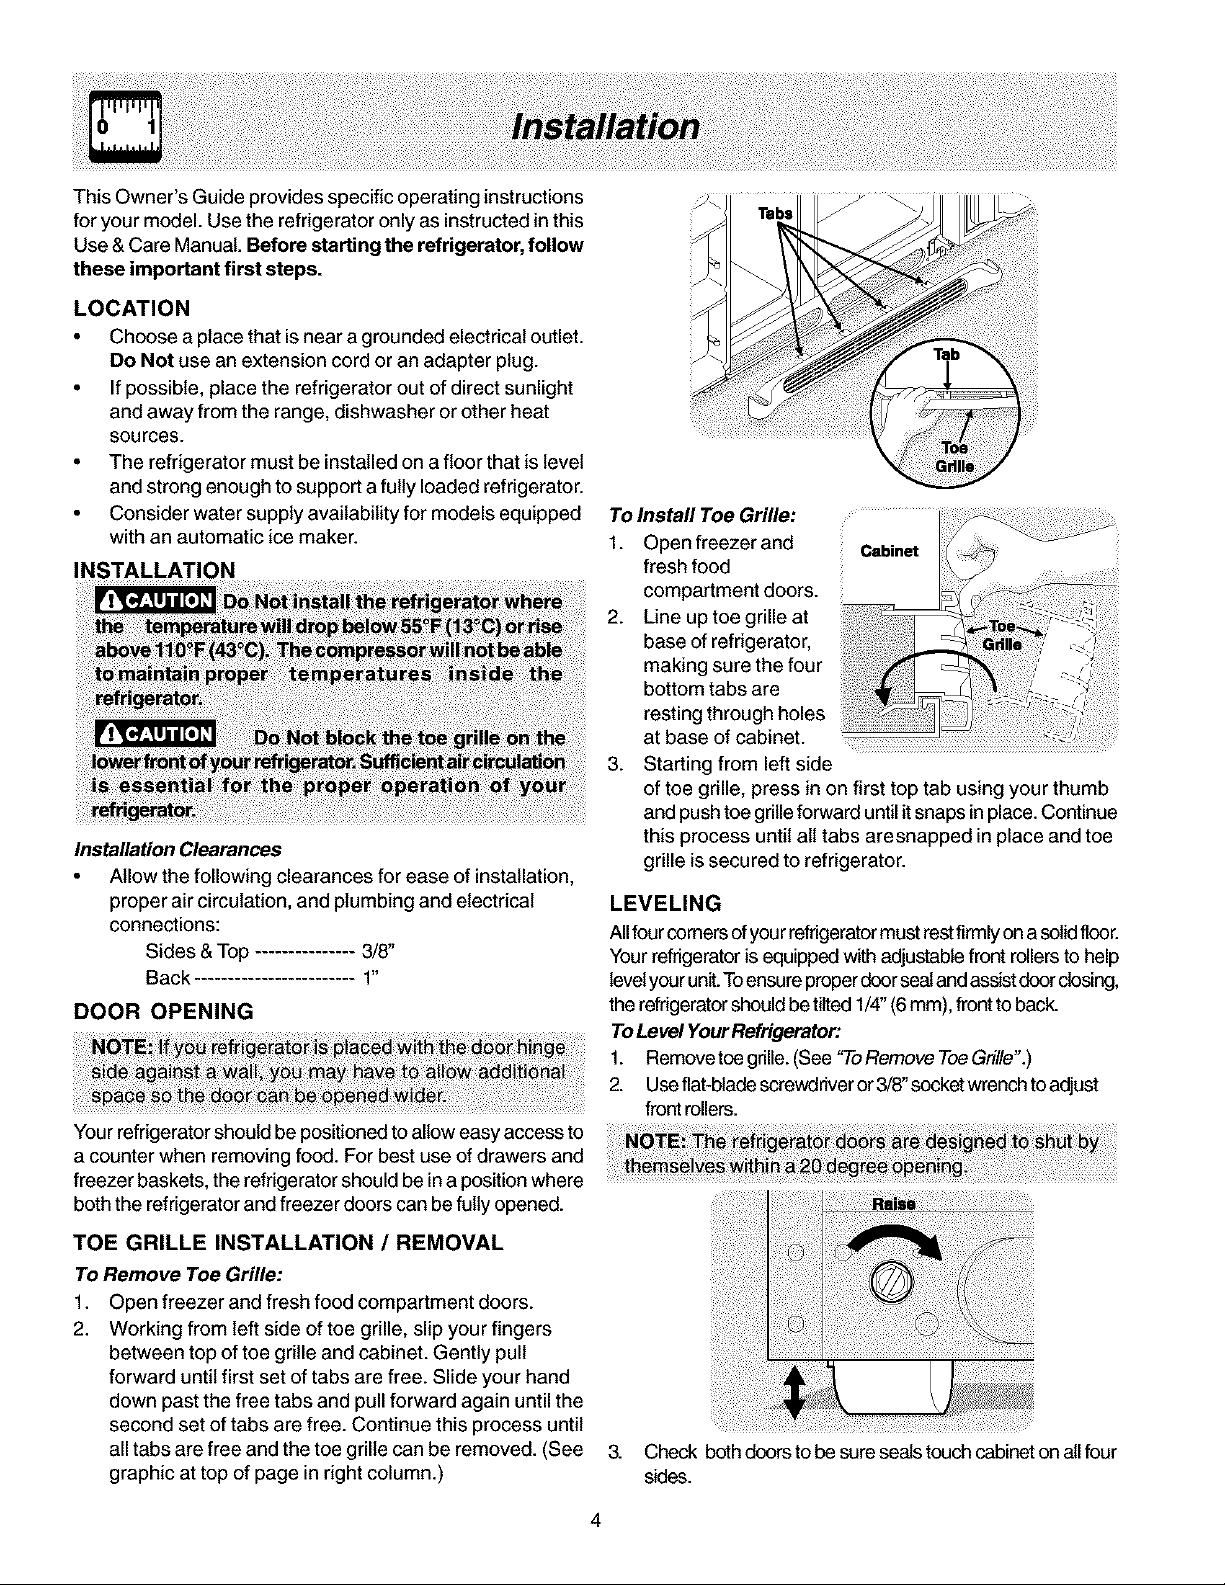
To Install Toe Grille:
1. Open freezer and
fresh food
compartment doors.
2. Line up toe grille at
base of refrigerator,
making sure the four
bottom tabs are
resting through holes
at base of cabinet.
3. Starting from left side
of toe grille, press in on first top tab using your thumb
and push toe grille forward until it snaps in place. Continue
this process until all tabs aresnapped inplace and toe
grille is secured to refrigerator.
LEVELING
Allfour comers ofyour refrigeratormust restfirmly on asolidfloor.
Your refrigerator is equipped with adjustable front rollersto help
levelyourunit.Toensure properdoor sealand assist doorclosing,
the refrigerator should be tilted 1/4"(6 mm), front to back.
ToLevel Your Refrigerator:
1. Removetoegrille.(See "ToRemove ToeGrille".)
2. Use flat-blade screwdriver or3/8" socket wrench to edjust
front rollers.
TOE GRILLE INSTALLATION / REMOVAL
To Remove Toe Grille:
1. Open freezer and fresh food compartment doors.
2. Working from left side of toe grille, slip your fingers
between top of toe grille and cabinet. Gently pull
forward until first set of tabs are free. Slide your hand
down past the free tabs and pull forward again until the
second set of tabs are free. Continue this process until
all tabs are free and the toe grille can be removed. (See
graphic at top of page in right column.)
3. Check both doors to be sure seals touch cabinet on allfour
sides.
4
Before Installing The Water Supply Line, You Will Need
• Basic Tools: adjustable wrench, flat-blade screwdriver, and Phillips TM screwdriver
• Access to a household cold water line with water pressure between 20 and 100 psi.
• A water supply line made of 1Ainch (6.4 mm) OD, copper tubing. To determine the length of copper tubing needed,
you will need to measure the distance from the ice maker inlet valve at the back of the refrigerator to your cold water
pipe. Then add approximately 7 feet (2.1 meters), so the refrigerator can be moved out for cleaning (as shown).
• A shutoff valve to connect the water supply line to your household water system. DO NOT use a self-piercing type
shutoff valve.
• A compression nut and ferrule (sleeve) for connecting the water supply line to the ice maker inlet valve.
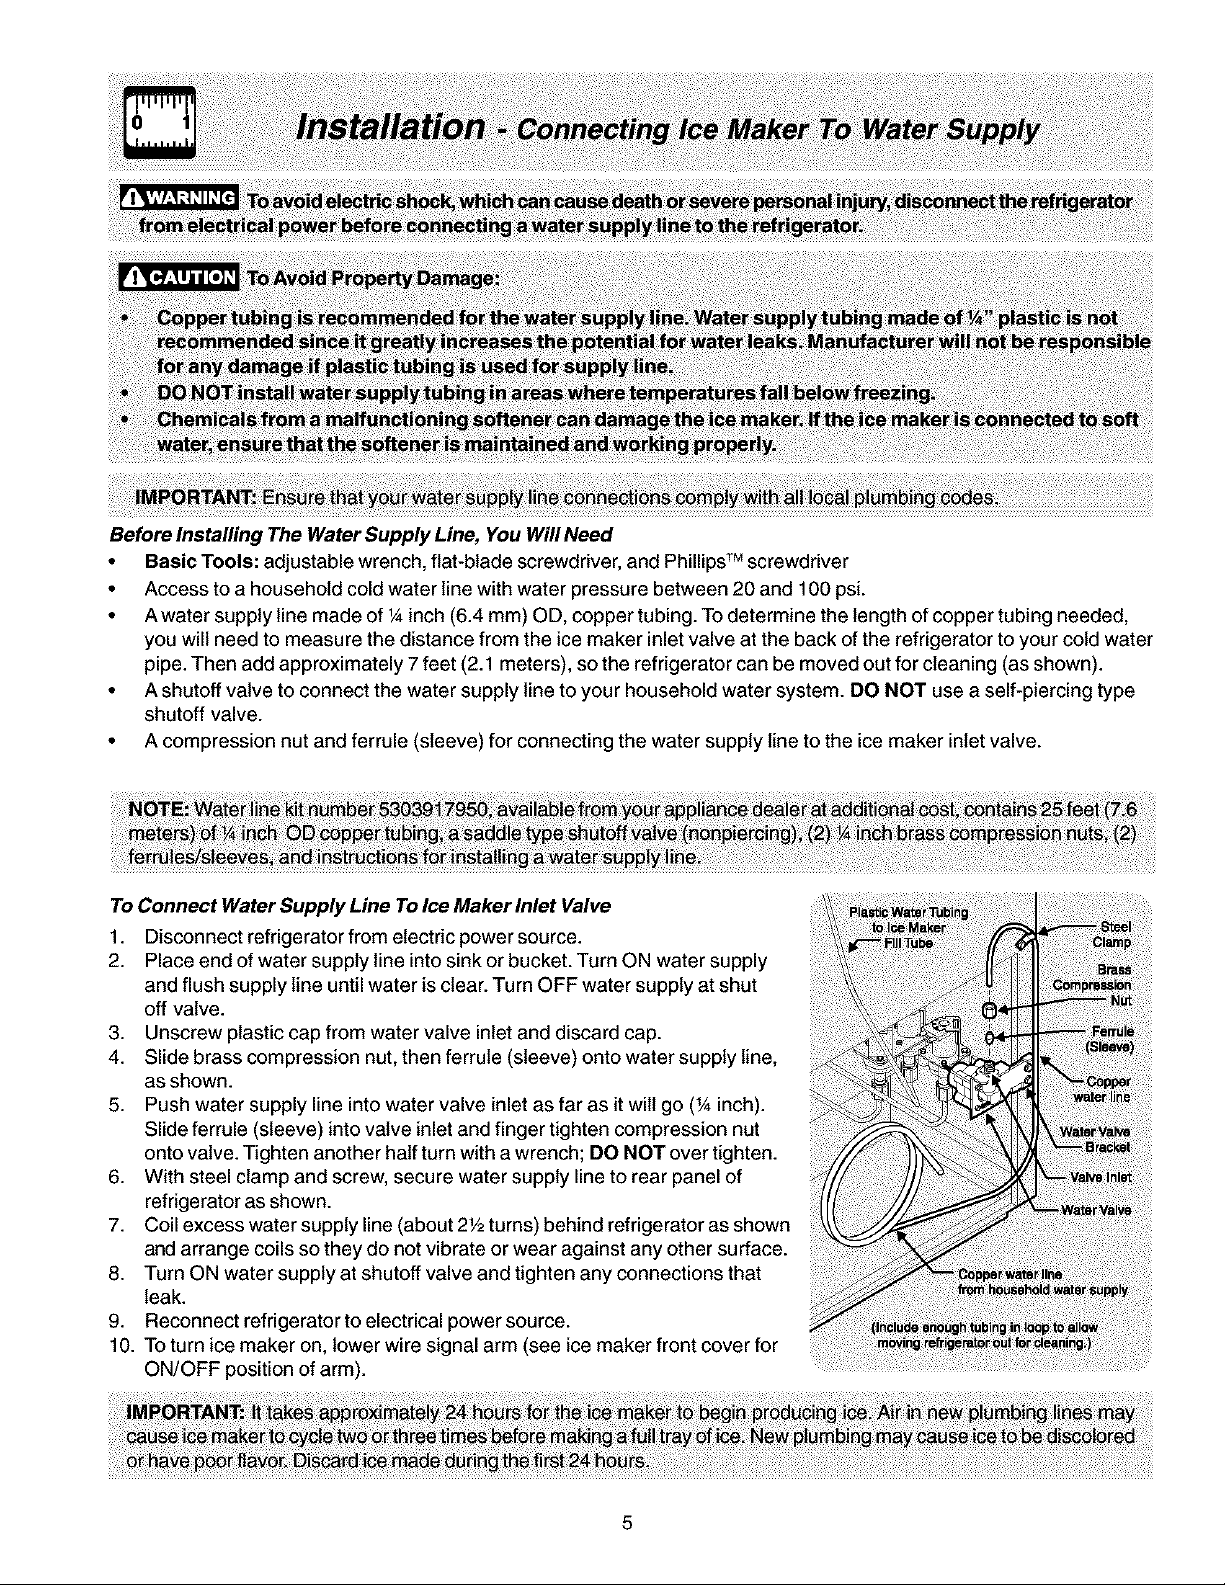
To Connect Water Supply Line To Ice Maker inlet Valve
1. Disconnect refrigerator from electric power source.
2. Place end of water supply line intosink or bucket. Turn ON water supply
and flush supply line untilwater is clear.Turn OFF water supply at shut
off valve.
3. Unscrew plastic cap from water valve inlet and discard cap.
4. Slide brass compression nut, then ferrule (sleeve) onto water supply line,
as shown.
5. Push water supply line into water valve inlet as far as it wilt go (_Ainch).
Slide ferrule (sleeve) into valve inlet and finger tighten compression nut
onto valve. Tighten another half turn with a wrench; DO NOT over tighten.
6. With steel clamp and screw, secure water supply line to rear panel of
refrigerator as shown.
7. Coil excess water supply line (about 2Y2turns) behind refrigerator as shown
and arrange coils so they do not vibrate or wear against any other surface.
8. Turn ON water supply at shutoff valve and tighten any connections that
leak.
9. Reconnect refrigerator to electrical power source.
10. To turn ice maker on, lower wire signal arm (see ice maker front cover for
ON/OFF position of arm).
5
Tools Necesson/:
3/8"
F_ed
Wrench
Phlllps"head
Socket
W_nch Sel
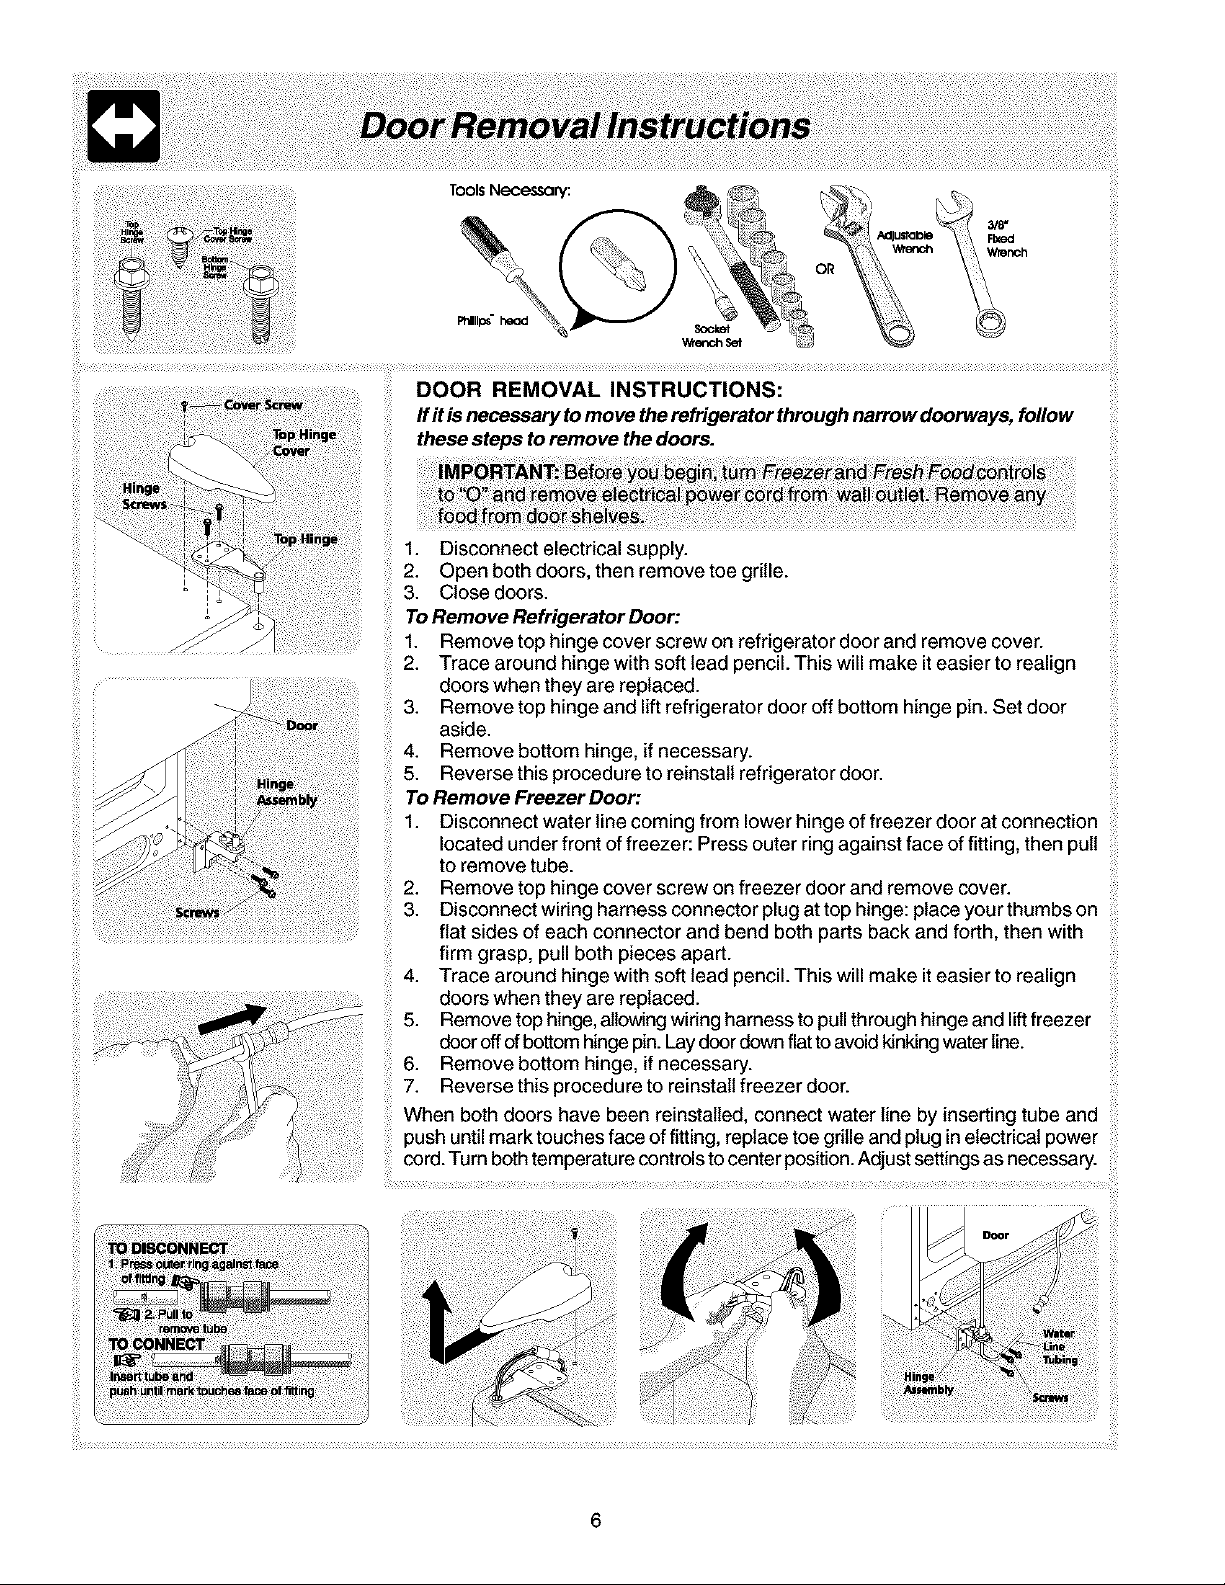
DOOR REMOVAL INSTRUCTIONS:
ffit is necessary tomove the refrigerator through narrow doorways, follow
these steps to remove the doors.
1. Disconnect electrical supply.
2. Open both doors, then remove toe grille.
3. Close doors.
To Remove Refrigerator Door:
1. Remove top hinge cover screw on refrigerator door and remove cover.
2. Trace around hinge with soft lead pencil. This will make it easier to realign
doors when they are replaced.
3. Remove top hinge and lift refrigerator door off bottom hinge pin. Set door
aside.
4. Remove bottom hinge, if necessary.
5. Reverse this procedure to reinstall refrigerator door.
To Remove Freezer Door:
1. Disconnect water line coming from lower hinge of freezer door at connection
located under front of freezer: Press outer ring against face of fitting, then pull
to remove tube.
2. Remove top hinge cover screw on freezer door and remove cover.
3. Disconnect wiring harness connector plug at top hinge: place your thumbs on
flat sides of each connector and bend both parts back and forth, then with
firm grasp, pull both pieces apart.
4. Trace around hinge with soft lead pencil. This will make it easier to realign
doors when they are replaced.
5. Remove top hinge,allowing wiring harness to pull through hinge and liftfreezer
door off of bottom hinge pin.Lay door down flat toavoid kinkingwater line.
6. Remove bottom hinge, if necessary.
7. Reverse this procedure to reinstall freezer door.
When both doors have been reinstalled, connect water line by insertingtube and
push until mark touches face of fitting, replace toe grille and plug in electrical power
cord. Turn both temperature controls to center position. Adjust settings as necessary.
6
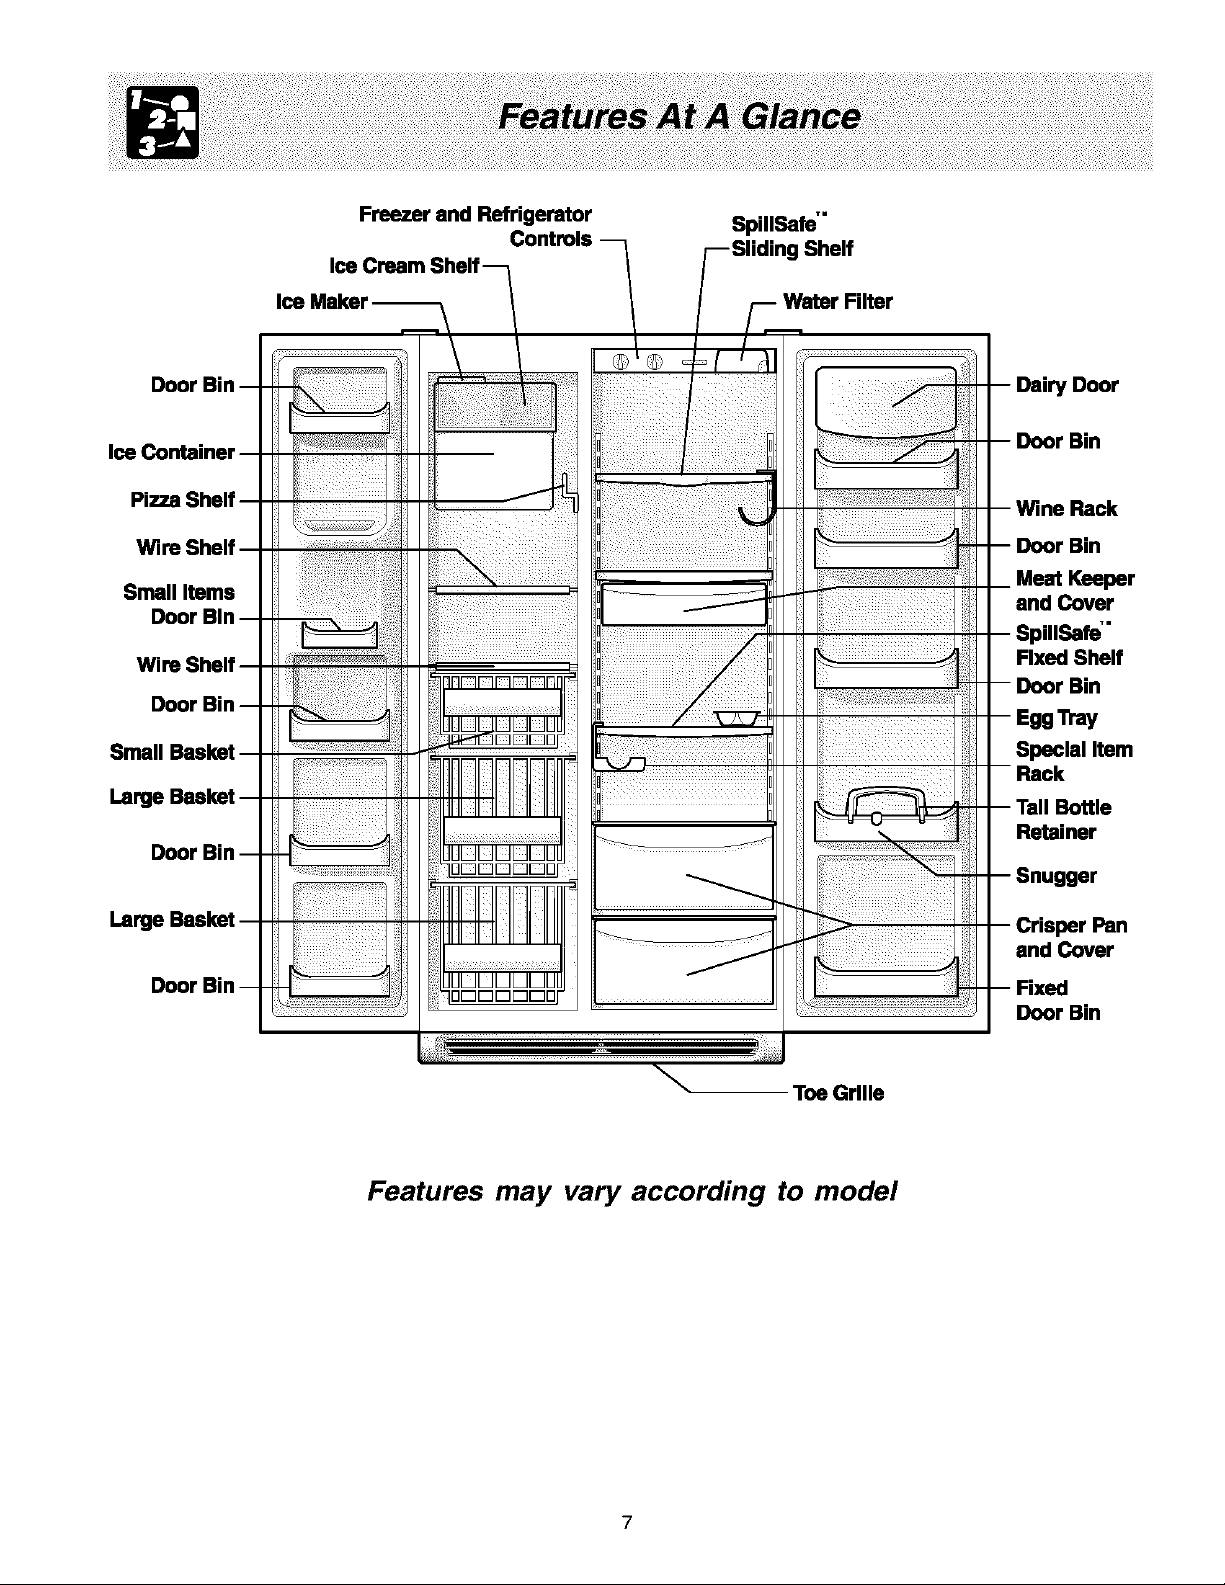
Freezer end Refrigerator
Controls
SpillSafe'"
Shelf
Door
Small Items
Wirl
Larg_
Largq
Meat Keeper
and Cover
Fixed Shelf
Special Item
Bottle
Retainer
and Cover
Door Bin
Toe Grille
Features may vary according to model
7
COOLDOWN PERIOD
Toensure safe food storage, allow the refrigerator to operate with the doors closed for at least 8to 12 hours before loading
it with food.
REFRIGERATOR & FREEZER CONTROLS
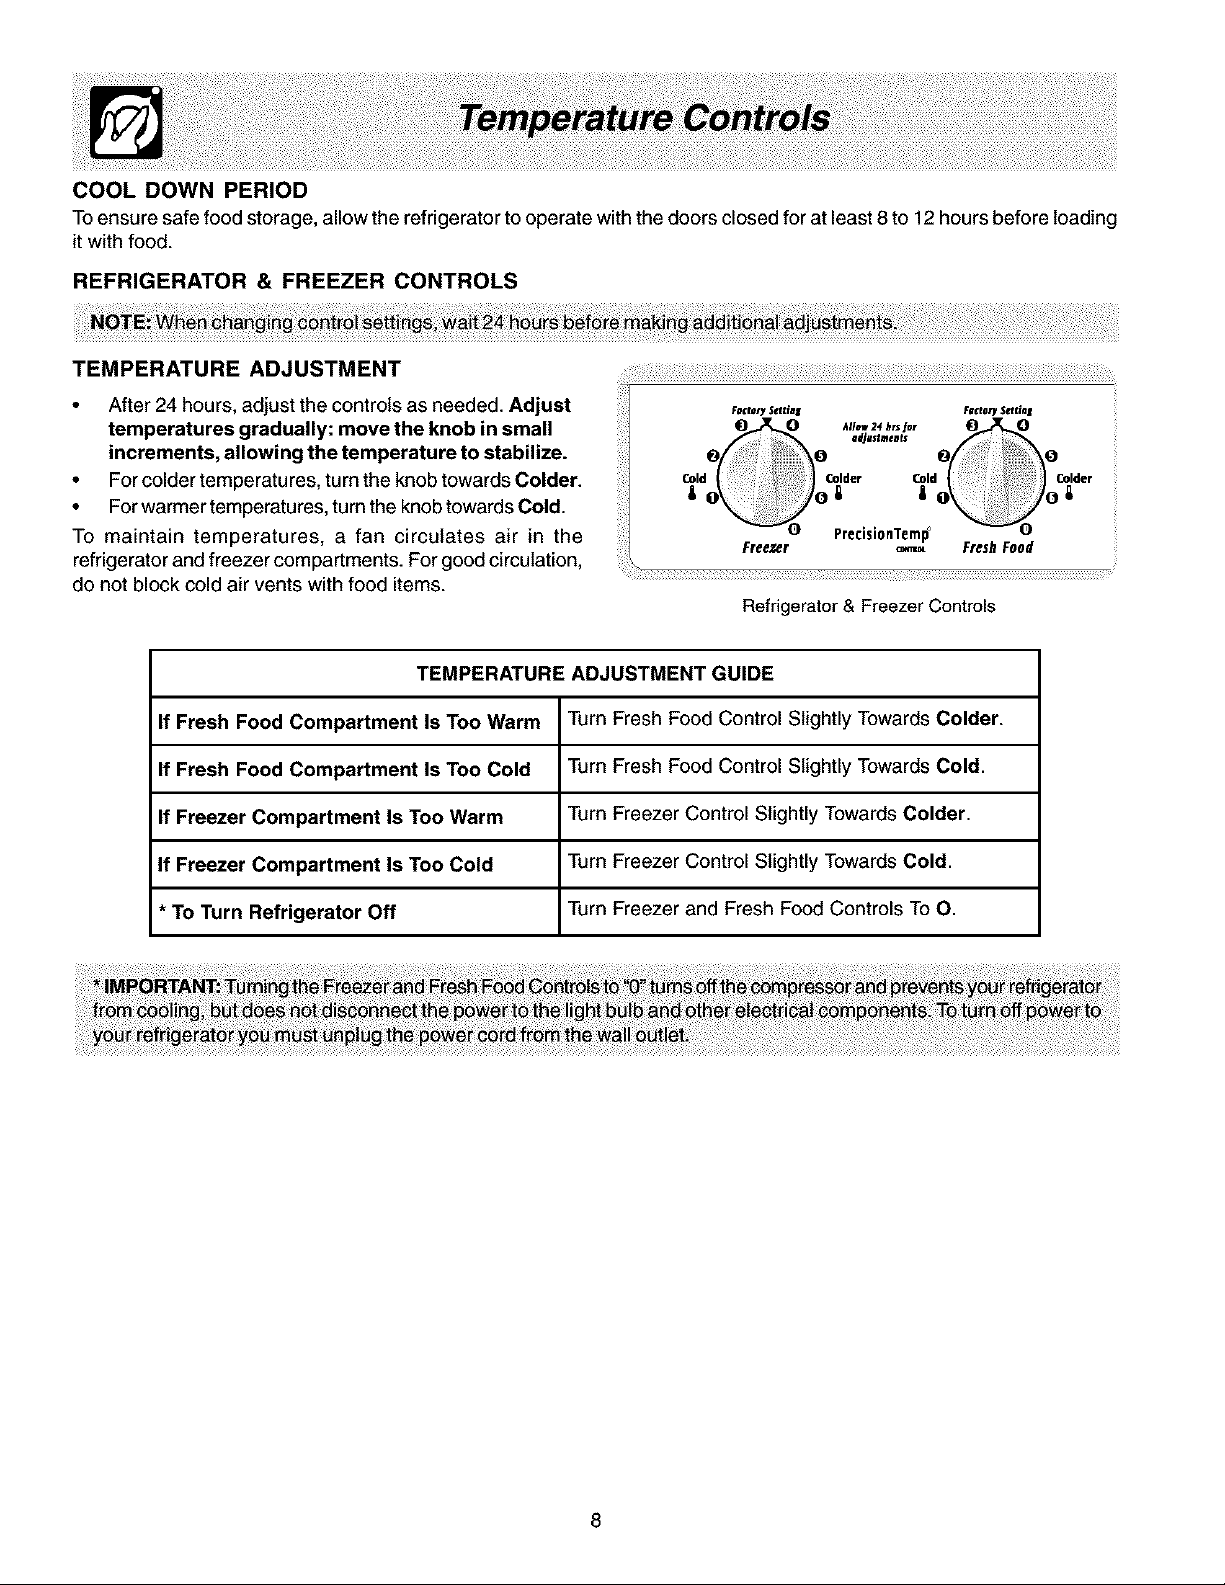
TEMPERATURE ADJUSTMENT
• After 24 hours, adjust the controls as needed. Adjust
temperatures gradually: move the knob in small
increments, allowing the temperature to stabilize.
• For colder temperatures, turn the knob towards Colder.
• For warmer temperatures, turn the knob towards Cold.
To maintain temperatures, a fan circulates air in the
refrigerator and freezer compartments. For good circulation,
do not block cold air vents with food items.
TEMPERATURE ADJUSTMENT GUIDE
If Fresh Food Compartment Is Too Warm Turn Fresh Food Control Slightly Towards Colder.
If Fresh Food Compartment Is Too Cold Turn Fresh Food Control Slightly Towards Cold.
If Freezer Compartment Is Too Warm Turn Freezer Control Slightly Towards Colder.
If Freezer Compartment Is Too Cold Turn Freezer Control Slightly Towards Cold.
* To Turn Refrigerator Off Turn Freezer and Fresh Food Controls To O.
Factety$¢ttil| Factety $_.ttln t
Freezer _ FreshFood
Refrigerator & Freezer Controls
8
 Loading...