


Frigidaire GLEB27Z7HBB Manual
1
Clean
Broil
Bake
Clock
Clear
/Of f
Bake
time
Start
time
Oven
light
Timer
On/Of f
Door Locked
Oven
Preheat
Speed
clean
Speed
bake
Keep
warm
Speed Bake Oven
ELECTRONIC OVEN CONTROL
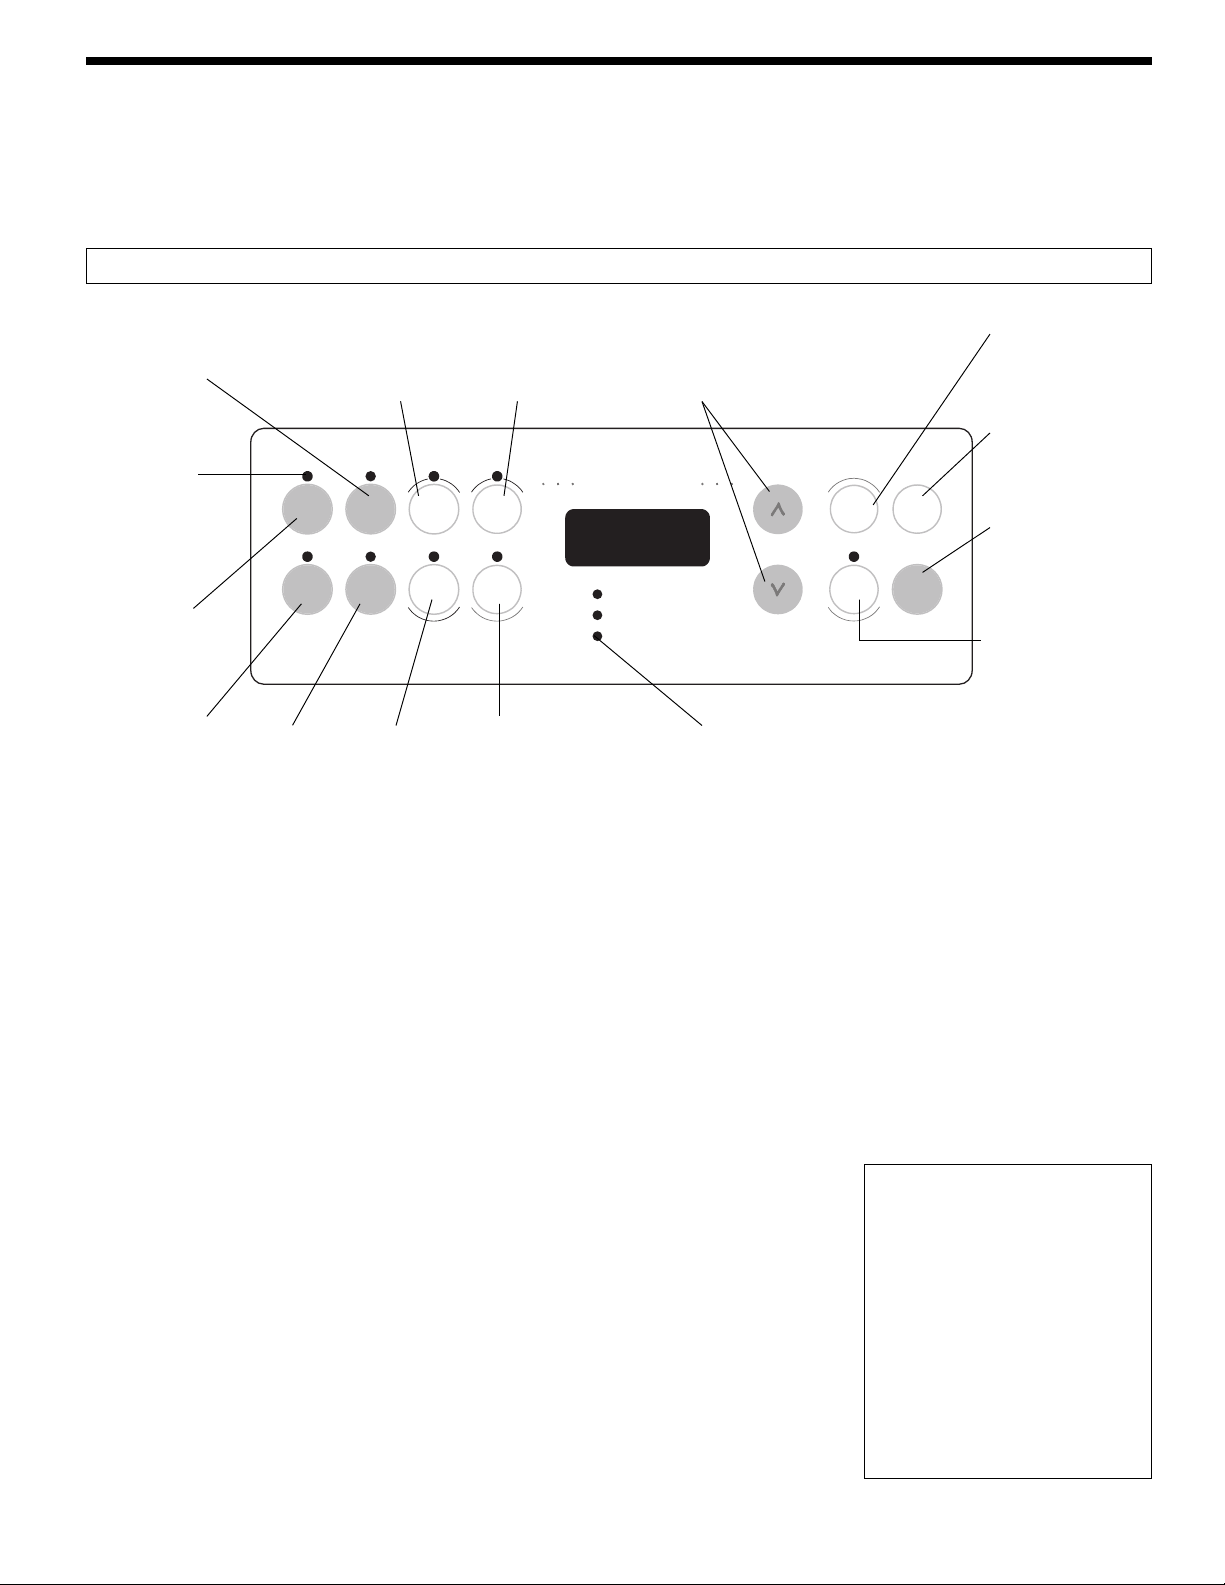
Control Pad Functions
Read the instructions carefully before using the oven. For satisfactory use of your oven, become familiar with the
various functions of the oven as described below. Note: The graphics on your timer may not look exactly like the one
shown. This doesn't change the way it operates.
Note: The oven function will not work if the time of day clock is not set.
318204143 (0802) Rev. A
The oven can be programmed to:
Bake normally, Speed Bake, Keep warm, Time Bake, Delay Start (delayed bake), Broil, Clean and Speed Clean.
Note: Push buttons or pads may be shaped differently.
For a silent control panel:
When choosing a function, a beep will be heard each time a pad is pushed. If desired, the controls can be programmed for silent
operation.
To tell if your oven is set for normal or silent operation push and hold START TIME pad for 7 seconds. "- -" or "SP" appears in
the display. Within 5 seconds, press the UP or DOWN ARROW pad to switch between normal sound operation and silent
operation mode. The display will show either "- -" or "SP". Wait 5 seconds to return to normal operating mode.
Note: If "SP" appears, the control will operate with normal sounds and beeps. If "- -"
appears, the control is in the silent operation mode.
Temperature Conversion (Fahrenheit / Celsius)
The electronic oven control is set to operate in °F (Fahrenheit) when shipped from the
factory. The oven can be programmed for any temperature from 170°F to 550°F (77°C to
288°C).
To change the temperature to °C (Celsius) or from °C to °F (control should not be
in a Bake or Clean mode):
1. Press and hold BROIL pad for 7 seconds until °F or °C appears in the display.
2. Press the UP or DOWN ARROW pad to change °F to °C or °C to °F.
3. Wait 5 seconds to accept the changes or press CLEAR/OFF pad to accept the changes.
Bake Pad
Used to enter
the normal
baking mode
temperature.
Broil Pad- Used
to select the
variable broil
function.
Clean Pad
Used to
select the
self-
cleaning
cycle.
Clear Pad- Used to
clear any function
previously entered
except the time of day
and minute timer.
Push Clear pad to
stop cooking.
Up and Down arrow pads- Used along
with the function pads to select oven
temperature, cooking time, start time (when
programming an automatic start time), time
of day, clean time and minute timer.
Clock Pad- Used to
set the time of day.
Feature indicator
lights- These light
show which
feature is in use.
Bake Time
Pad- Used to
enter the length
of the baking
time.
Start Time Pad- Used
to set the desired start
time for baking. Can be
used with BAKE TIME
to program a delayed
bake cycle.
Timer Pad- Used to
set or cancel the
minute timer. The
minute timer does not
start or stop cooking.
Oven, Preheat & Lock lights- The "oven" light indicates
that the oven is functioning. The "Preheat" light will glow
when the oven is first set to operate, or if the desired
temperature is reset higher than the actual oven temperature.
The "Door Locked" light will flash until the door locks when
the self-clean cycle is in use. It glows constantly after the
door locks (some models).
Oven Interior Light
Pad- Used to turn
oven interior light ON
and OFF.
Keep Warm
Pad- Used to
set the Keep
Warm feature.
Speed Bake Pad- Used
to enter the speed bake
mode temperature (some
models).
Speed Clean
Pad- Used to
select the speed
clean cycle
(some models).
Versión en español
Si desea obtener una copia en
español de este Manual del
Usuario, sírvase escribir a la
dirección que se incluye a
continuación. Solicite la P/N
318204143E.
Spanish Owner's Guides
Frigidaire Company
P. O. Box 9061
Dublin, Ohio 43017-0961
2
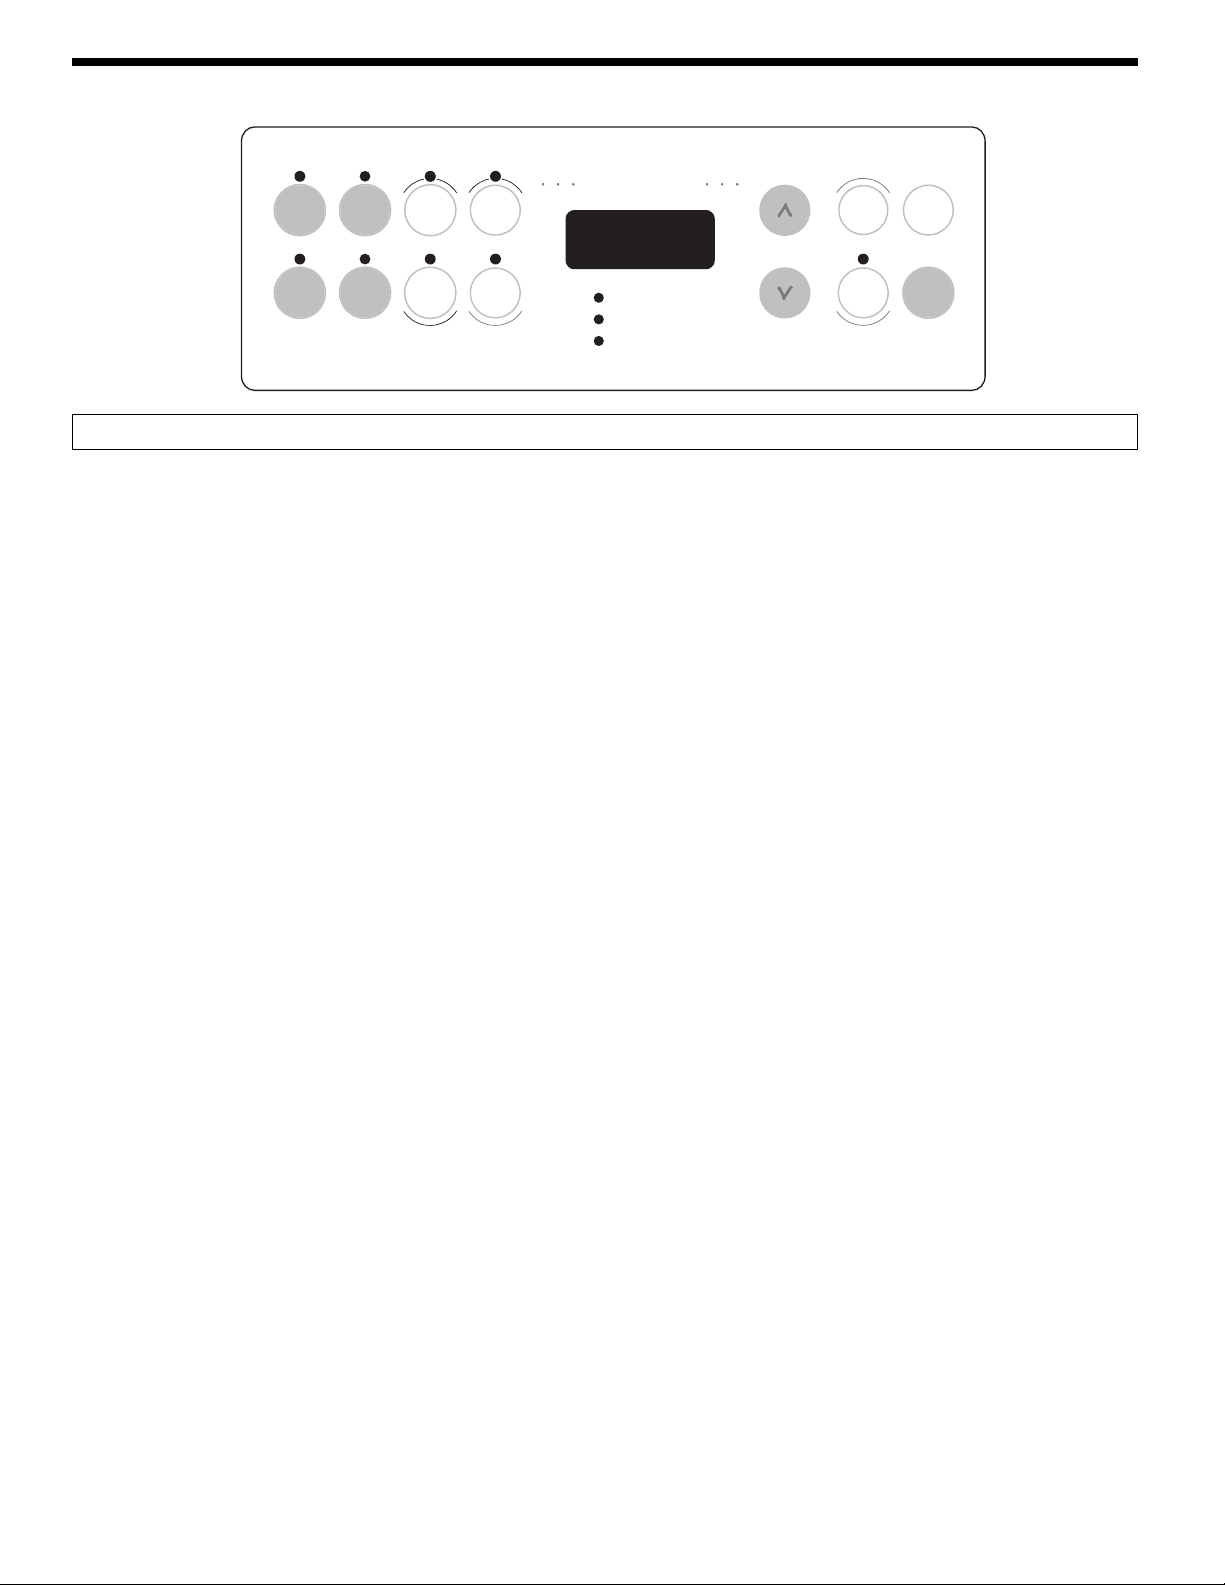
Note: The time of day must first be set in order to operate the oven.
To set the Clock
When the range is first plugged in, or when the power supply to the appliance has been interrupted, the display will flash
"12:00".
1. Press the CLOCK pad once (do not hold pad down).
2. Within 5 seconds, push and hold the UP or DOWN ARROW pad until the correct time of day appears in the display.
3. Press the CLOCK pad to accept the new time of day. If the CLOCK pad is not pressed, the timer will return automatically
to the new time of day after 7 seconds.
Note: The clock cannot be changed during any bake, timed bake, delayed time bake, clean cycle, speed clean or delayed
clean cycle.
Changing between 12 or 24 Hour Time of Day Display
1. Press and hold the CLOCK pad for 7 seconds. After 7 seconds, "12Hr" or "24Hr" will appear in the display and the control
will beep once.
2. Press the UP or DOWN ARROW pad to switch between the 12 and 24 hour time of day display. The display will show either
"12Hr" or "24Hr".
3. Wait 5 seconds or press the CLEAR/OFF pad to return to the time of day display.
4. Reset the correct time as described in To set the Clock above. Please note that if the 24 hour time of day mode was chosen,
the clock will now display time from 0:00 through 23:59 hours.
To Set the Minute Timer
1. Press the TIMER ON/OFF pad.
2. Press the UP ARROW pad to increase or DOWN ARROW pad to decrease the time in one minute increments. The timer
can be set for any amount of time from 1 minute to 11 hours and 59 minutes.
3. The display shows the timer count down in minutes if more than 1 hour remains. When less than 1 hour remains, the display
will count down in seconds.
4. When the set time has run out, the timer will beep 3 times. It will continue to beep 3 times every 8 seconds until the TIMER
ON/OFF pad is pressed.
Note: The indicator light located above the TIMER ON/OFF pad will glow while the minute timer is active.
Note: The minute timer does not start or stop cooking. It serves as an extra timer in the kitchen that will beep when the set time
has run out. The minute timer can be used alone or during any of the other oven functions. When the minute timer is in use with
any other mode, the minute timer will be shown in the display. To view other functions, press the function pad for that mode.
To Cancel the Minute Timer before the set time has run out: Press the TIMER ON/OFF pad.
Setting the Clock and Minute Timer
Clean
Broil
Bake
Clock
Clear
/Of f
Bake
time
Start
time
Oven
light
Timer
On/Of f
Door Locked
Oven
Preheat
Speed
clean
Speed
bake
Keep
warm
Speed Bake Oven

3
Note: The time of day must first be set in order to operate the oven.
To Set or Change the Temperature for Normal or Speed Baking
The oven can be programmed to bake at any temperature from 170°F to 550°F (77°C to 288°C).
To Set the Controls for Normal or Speed Baking:
1. Press the BAKE or SPEED BAKE pad."— — —°" appears in the display.
2. Within 5 seconds, Press the UP or DOWN ARROW pad. The display will show "350°F (177°C)." By holding the UP or DOWN
ARROW pad, the temperature can then be adjusted in 5°F (1°C if control is set to display Celsius) increments.
3. 8 seconds after the UP or DOWN ARROW pad is released, the oven will begin heating to the selected temperature. When
the displayed temperature reaches the desired baking temperature, the preheat indicator light will turn OFF.
4. To cancel the baking function, press the CLEAR/OFF pad.
To Change the Oven Temperature after Baking has Started:
Press the UP or DOWN ARROW pad to increase or decrease the set temperature.
Speed Bake
TM
Cooking System (some models)
Speed Bake
TM
Cooking System uses a fan to circulate the oven’s heat uniformly and
continuously around the oven. This improved heat distribution allows for fast, even cooking and
browning results. It also gives better baking results when using two racks at the same time.
Heated air flows around the food from all sides, sealing in juices and flavors. Meats cooked with
Speed Bake
TM
Cooking System are juicer. Poultry is crisp on the outside while staying tender
and moist on the inside. Breads and pastry brown more evenly. Speed Bake
TM
Cooking System
cooks most foods faster and more evenly than conventional baking.
Benefits of Speed Bake
TM
Cooking System:
- Foods can cook up to 30% faster, saving time and energy.
- Two racks can be used with more even cooking and browning.
- No special pans or bakeware needed; but for most bakery pan without sides have better
results.
General Cooking Instructions:
1. To convert baking times from normal recipes to Speed Bake times, start with a 30% reduction in time and increase the
time until desired doneness is obtained. Time reductions will vary depending on the amount and type of food.
2. Preheating is not necessary when cooking with Speed Bake, except with items such as cakes, cookies, biscuits, breads, etc.
3. When using two racks at the same time, place them in positions 1 and 3 for the best results.
4. When baking pastries with Speed Bake, set temperature 25°F (13°C) degrees lower than the recommended setting for
best results.
To Set Control for Continuous Bake or 12 Hour Energy Saving:
The oven control has a built-in 12 Hour Energy Saving feature that will shut off the oven if the control is left on for more than
11 hours and 59 minutes. The oven can be programmed to override this feature for continuous baking.
To set control for continuous baking:
1. Press and hold the TIMER ON/OFF pad for 7 seconds until a tone is heard.
2. Within 5 seconds, press the UP or DOWN ARROW pad to switch between Continuous Bake and 12 Hour Energy Saving
mode. The display will show either "— — hr" or "12hr". If "- - hr" appears, the oven will be set to continuous baking. If
"12hr " appears, the oven is set to 12 hour energy saving mode.
3. Wait 5 seconds or press the CLEAR/OFF pad to accept the changes.
Setting Oven Controls
 Loading...