

Page 1

USS1G27BB
TR2250
OPERATION MANUAL
MANUAL DE OPERACIÓN
Page 2
Thank you for purchasing the TR2250.
Please read this operation manual carefully before using the product.
The TR2250 features the following functions; Translation, Inflections,
Phrase display, EZ-Learn, Word games, Data bank, Expense manager,
Converters, Calculator, and Time and calendar.
Removing the battery deletes all data stored in the Data Bank mode, the
Expense Manager mode and the EZ-Learn mode.
Remember to keep written copies of the important data.
EC DECLARATION OF CONFORMITY
This is to certify that this equipment fully conforms to the protection requirements of the following EC Council Directives on the approximation
of the laws of the member states relating to:-
Directives Title
89/336/EEC Electromagnetic Compatibility
Applicable Standards
EN55022: 1998 Electromagnetic Compatibility - Emissions (Radiated)
EN55024: 1998 Electromagnetic Compatibility - Immunity (Radiated Susceptibility, ESD)
SEIKO UK Limited SC House, Vanwall Road, Maidenhead, Berks. SL6 4UW U.K.
This equipment has been tested and found to comply with the limits for a Class B digital device, pursuant to Part 15 of the
FCC Rules. These limits are designed to provide reasonable protection against harmful interference in a residential
installation. This equipment generates, uses and can radiate radio frequency energy and, if not installed and used in
accordance with the instructions, may cause harmful interference to radio communications. However, there is no guarantee
that interference will not occur in a particular installation. If this equipment does cause harmful interference to radio or
television reception, which can be determined by turning the equipment off and on, the user is encouraged to try to correct the
interference by one or more of the following measures:
- Reorient or relocate the receiving antenna.
- Increase the separation between the equipment and receiver.
- Connect the equipment into an outlet on a circuit different from that to which the
receiver is connected.
- Consult the dealer or an experienced radio/TV technician for help.
Page 3

CONTENTS English
Functions and Features .........................2
The Keys and their Functions.................6
Preparation for using the Unit ................8
1.Resetting .........................................8
2.Contrast Adjustment........................9
3.Demo Function ................................9
Translator .............................................10
Basic Procedure ...............................10
Pick Function ....................................14
Inflection Function ................................15
Phrase Display Function ......................23
Keyword Search................................23
EZ-Learn Function ...............................25
Word Games ........................................28
Hangman ..........................................29
User Hangman..................................31
Against the Clock..............................32
Memory .............................................32
Translation.........................................33
Data Bank ............................................34
Expense Manager ................................39
Converters............................................45
Currency Conversion ........................46
Metric Conversion .............................46
Clothing Size Chart ...........................47
Calculator .............................................48
Time and Calendar...............................49
Setting Function ...................................52
Help function ........................................56
Proper Use / Specification....................57
Changing Battery .................................58
Resetting ..............................................59
ONE YEAR LIMITED WARRANTY ......... 60
1
Page 4

Functions and Features
1. T ranslator
* The unit provides over 800,000 words.
* The unit will check whether the entered word is the English word or the Spanish word.
*You may scroll the headwords through the dictionary's word list in alphabetical order.
* The translation word can be picked and you can confirm the meaning of the translation
word in your language.
2. Inflection Function
* The personal pronoun, the verb in the corresponding inflected form and the
corresponding translation can be seen at one glance.
* The unit also provides the inflection forms of an adjective and a noun.
3. Phrase Display Function
* The unit provides over 5,500 phrases.
* Simple phrases and conversational exchanges can be found and their translations will be
displayed.
* Phrases and conversational exchanges incorporating a particular keyword can be
examined in sequence.
2
4. “EZ-Learn” T eaching Function
* This function takes words from a list you build and presents them to you for translation.
*You can keep up to 100 words.
5.Word Games
*You can take on the challenge of 5 different word games set to any one of three levels of
difficulty.
6.Data Bank
*You can store any type of personal information up to 100 entries.
*You can keep multiple names, phone/fax numbers, addresses, e-mail addresses and
memos.
7.Expense Manager
*You can store your payment information up to 100 records.
* The unit can display the total amount by date, or by category.
3
Page 5

8.Converters
* The conversion function enables you to convert foreign currencies and metric units of
length, area, volume, weight, capacity, power, and temperature.
* In foreign countries you can easily check the clothing sizes: shirts, hats and shoes etc.
for men, women and children.
9.Calculator
*You may add, subtract, multiply and divide numbers with up to 12 digits.
* Memory and percent functions are included.
10.
Time and Calendar
* The "World Time Display" tells you the time in over 100 cities throughout the world.
You may set the "Home Time" for the cities or region where you live.
11.
Help Function
An explanation of how to operate the various functions is simply explained on the
screen at each operational stage in each mode.
12.
Demo Function
A demonstration display explains the contents of the unit.
Translation data and morphology by © SYSTRAN Software Inc.
Phrases © Oxford University Press 2001
is a registered trademark of Seiko Corporation.
“EZ-Learn” Teaching System is a registered trademark of Seiko Instruments USA Inc.
is a registered trademark of Seiko Instruments Inc.
© 2002,2005 Seiko Instruments Inc.
How to set the Home Time
When using the unit for the first time, you need to set the home time.
Please see page 49 for details.
4
5
5
Page 6
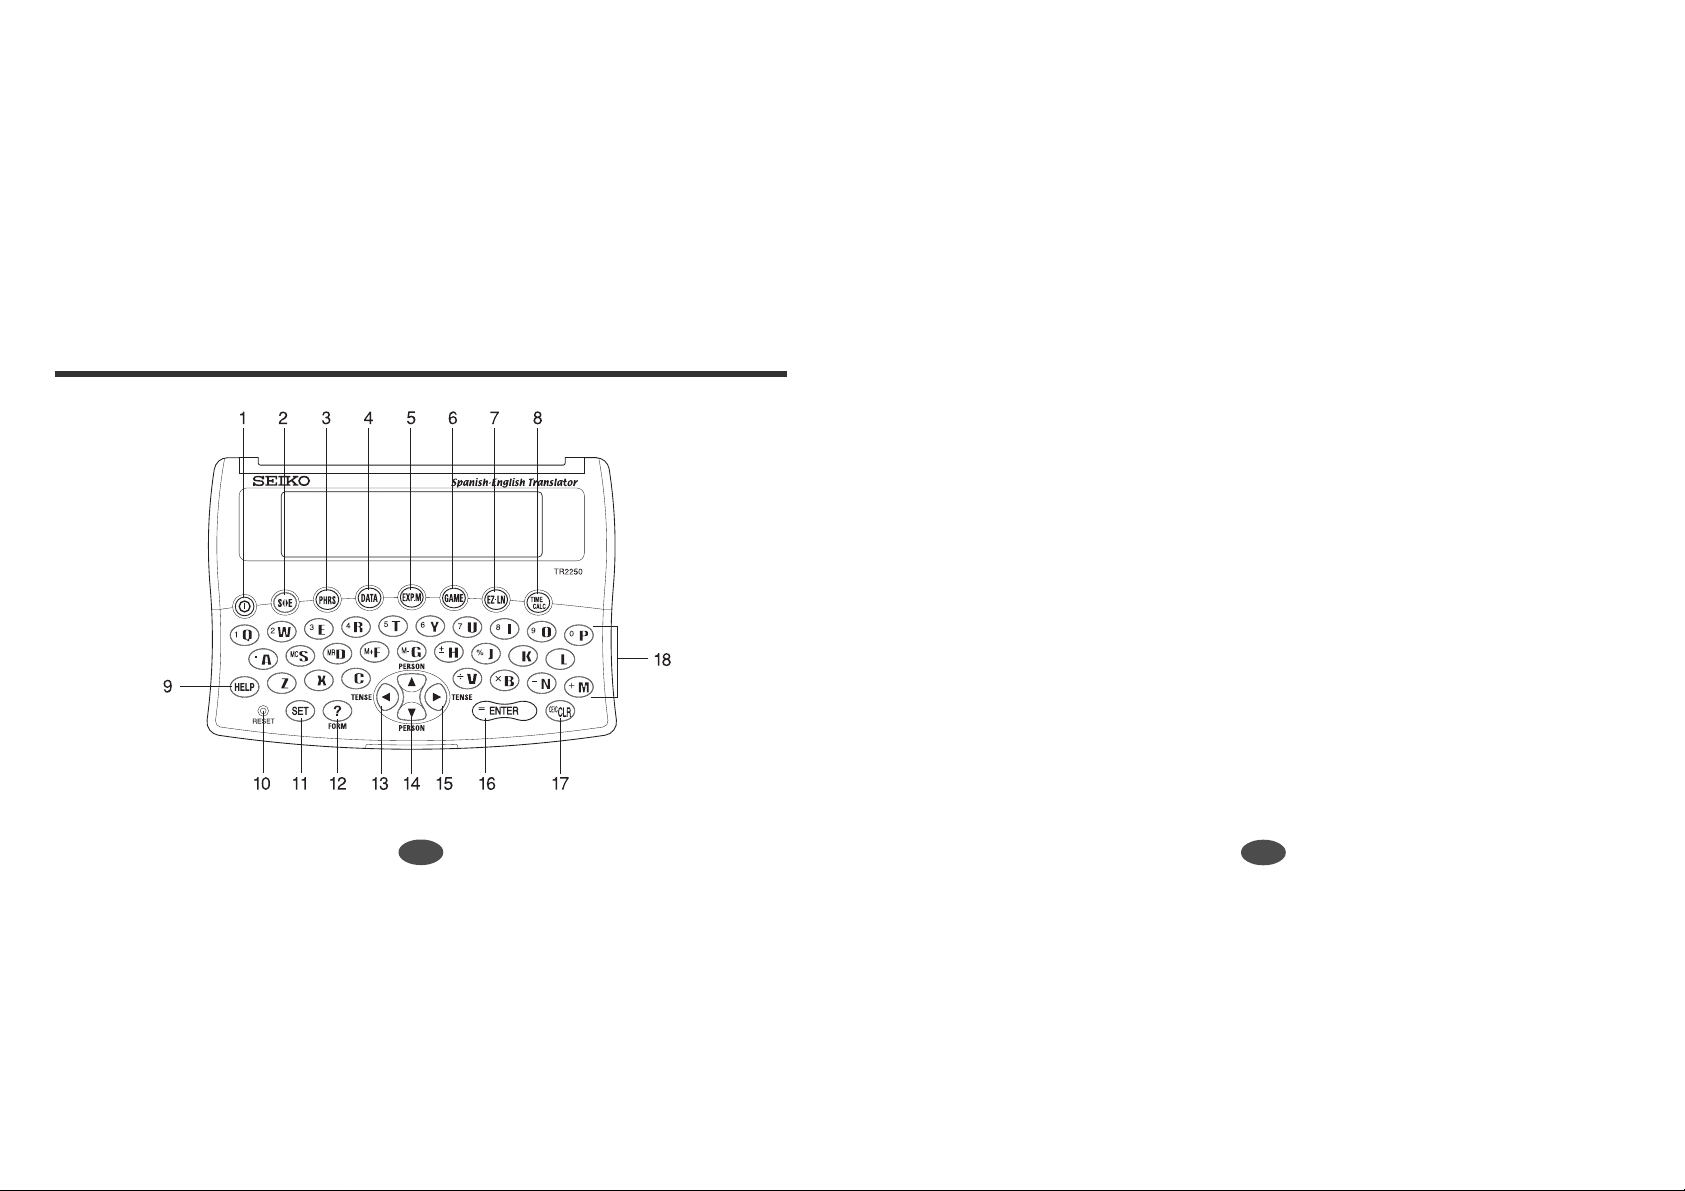
The Keys and their Functions
1 Turns power ON and OFF.
2 Selects Translator mode.
3 Selects Phrase Display mode.
4 Selects Data Bank mode.
5 Selects Expense Manager mode.
6 Selects Word Game mode.
7 Selects EZ-Learn mode.
8 Selects Time and Calculator mode.
9 Activates Help function.
10 RESET button
11 Activates Setting function.
12 Used for a hint in the word game
mode.
Change the form in the inflection
function.
• The unit will automatically
TURN OFF
6
13 Selects the item on the screen.
Backspace Erasure key
Change the tense in the inflection
function.
14 For scrolling back up or down through
the lists in the unit's memory.
Change the person in the inflection
function.
15 Selects the item on the screen.
Enters one blank space when pressed
once.
Change the tense in the inflection
function.
16 Executes the functions.
17 Clears all the input characters.
18 Letter and numeral input keys
when not used for over 3 minutes.
7
Page 7
Preparation for using the Unit
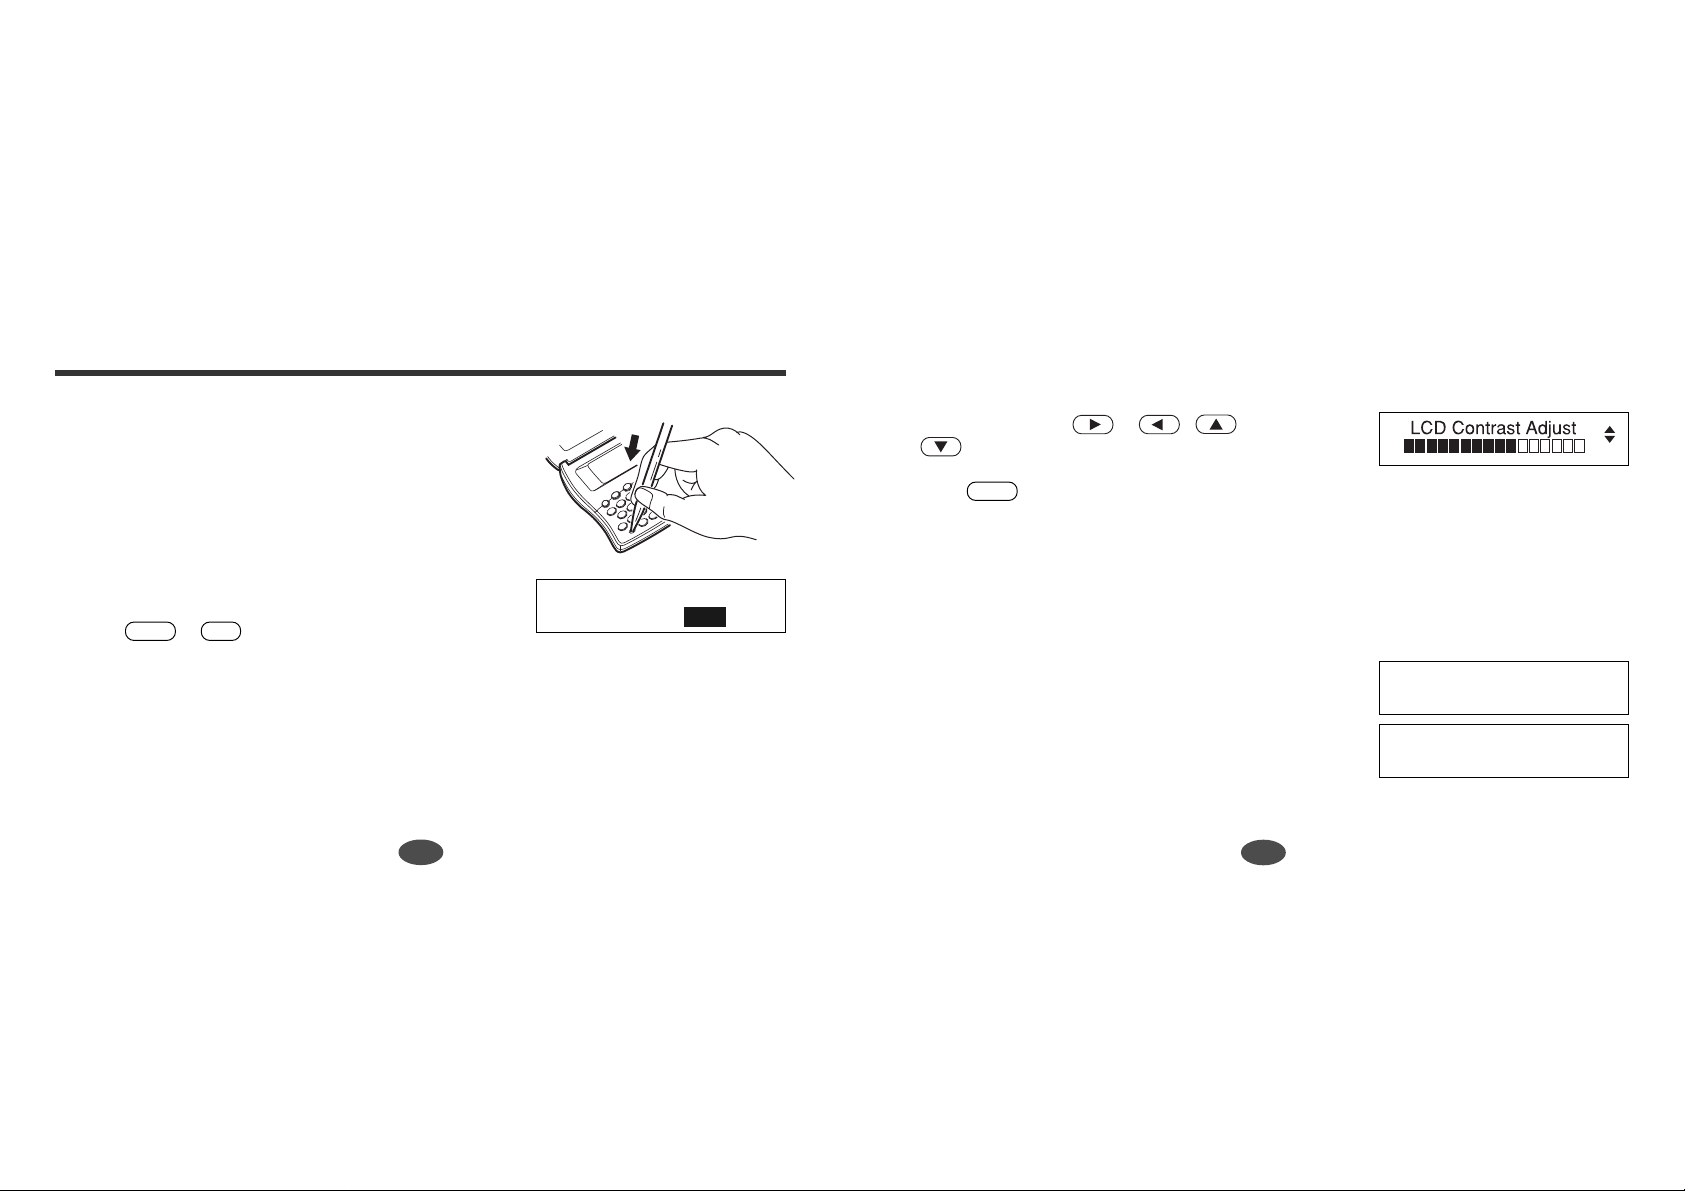
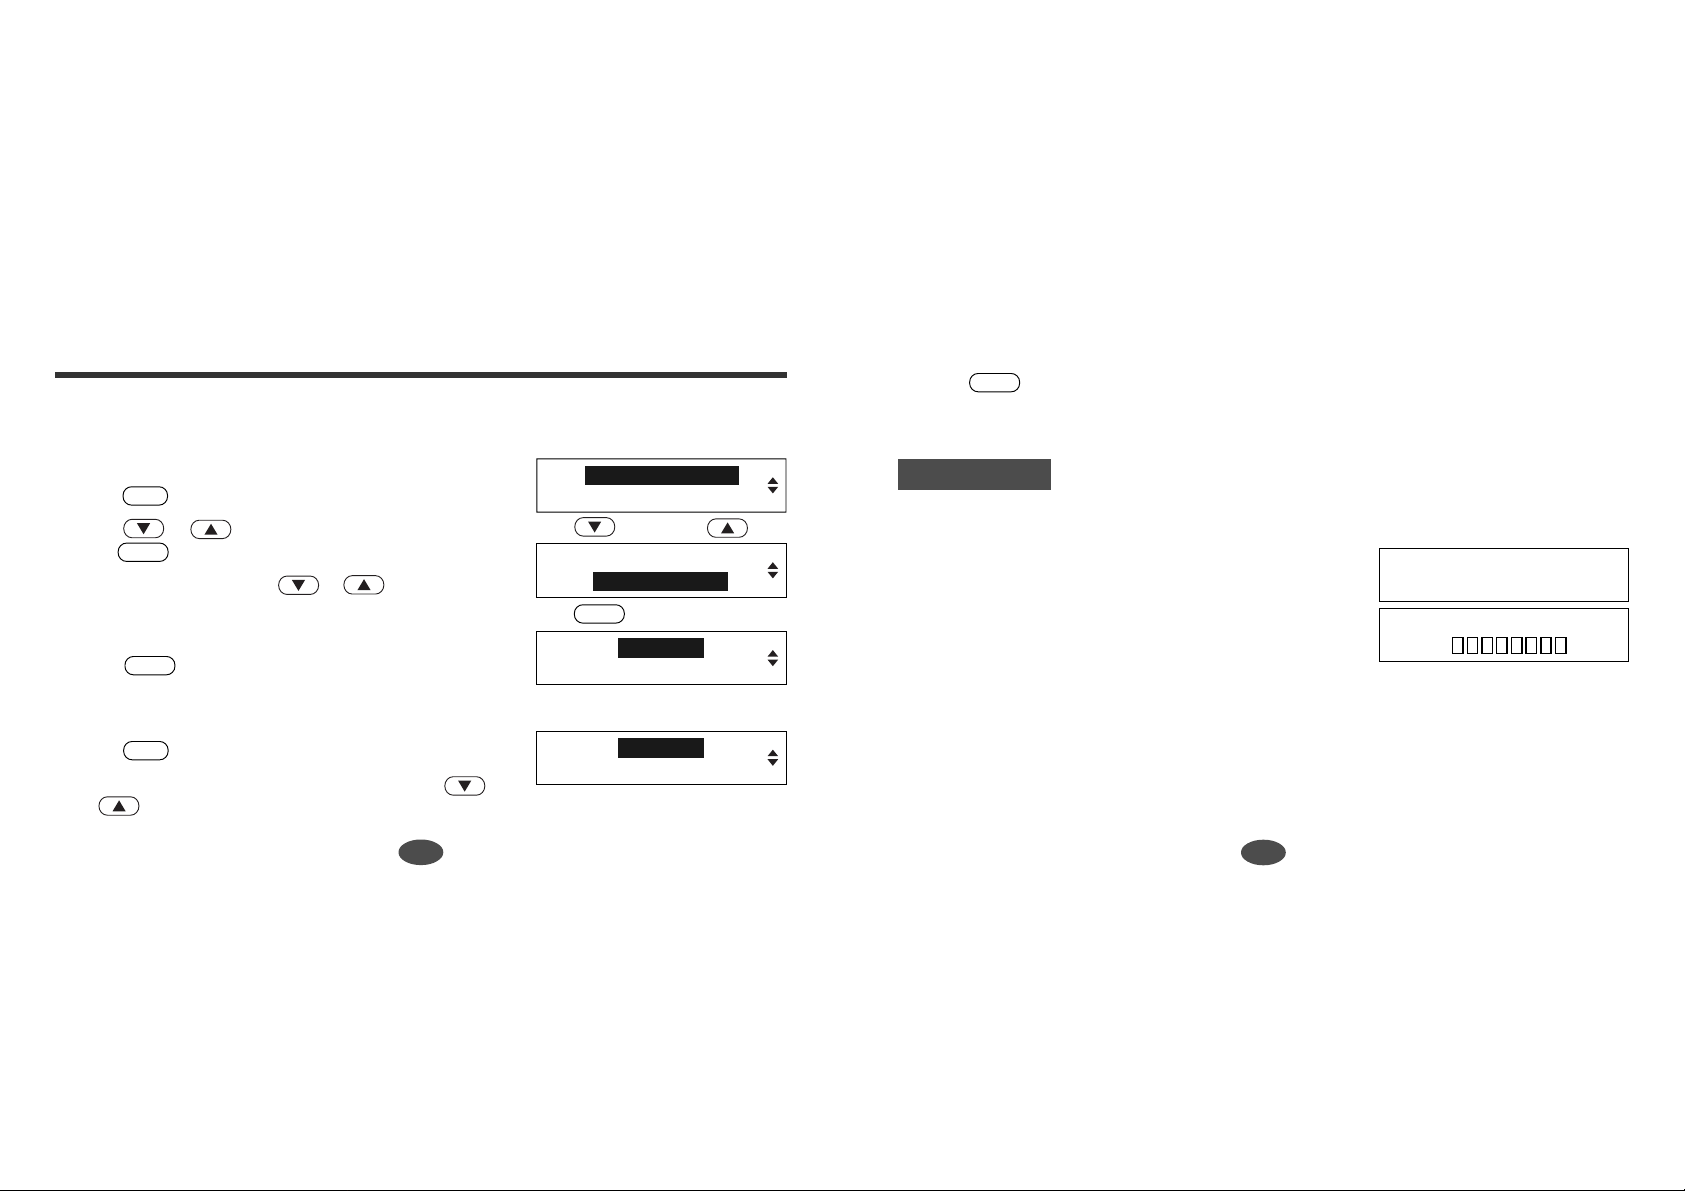
1.Resetting
1. Before using the unit, press the RESET button on the
front of the unit.
Since some pens and pencils are too thick, a paper
clip is suggested for pressing the RESET button.
2. The message “Clear Databank Memory ?” will
appear.
Press or (Yes).
ENTER
(Please see page 59 for details.)
After resetting, the contrast adjustment display will
appear.
Y
Clear Databank Memory?
No Yes
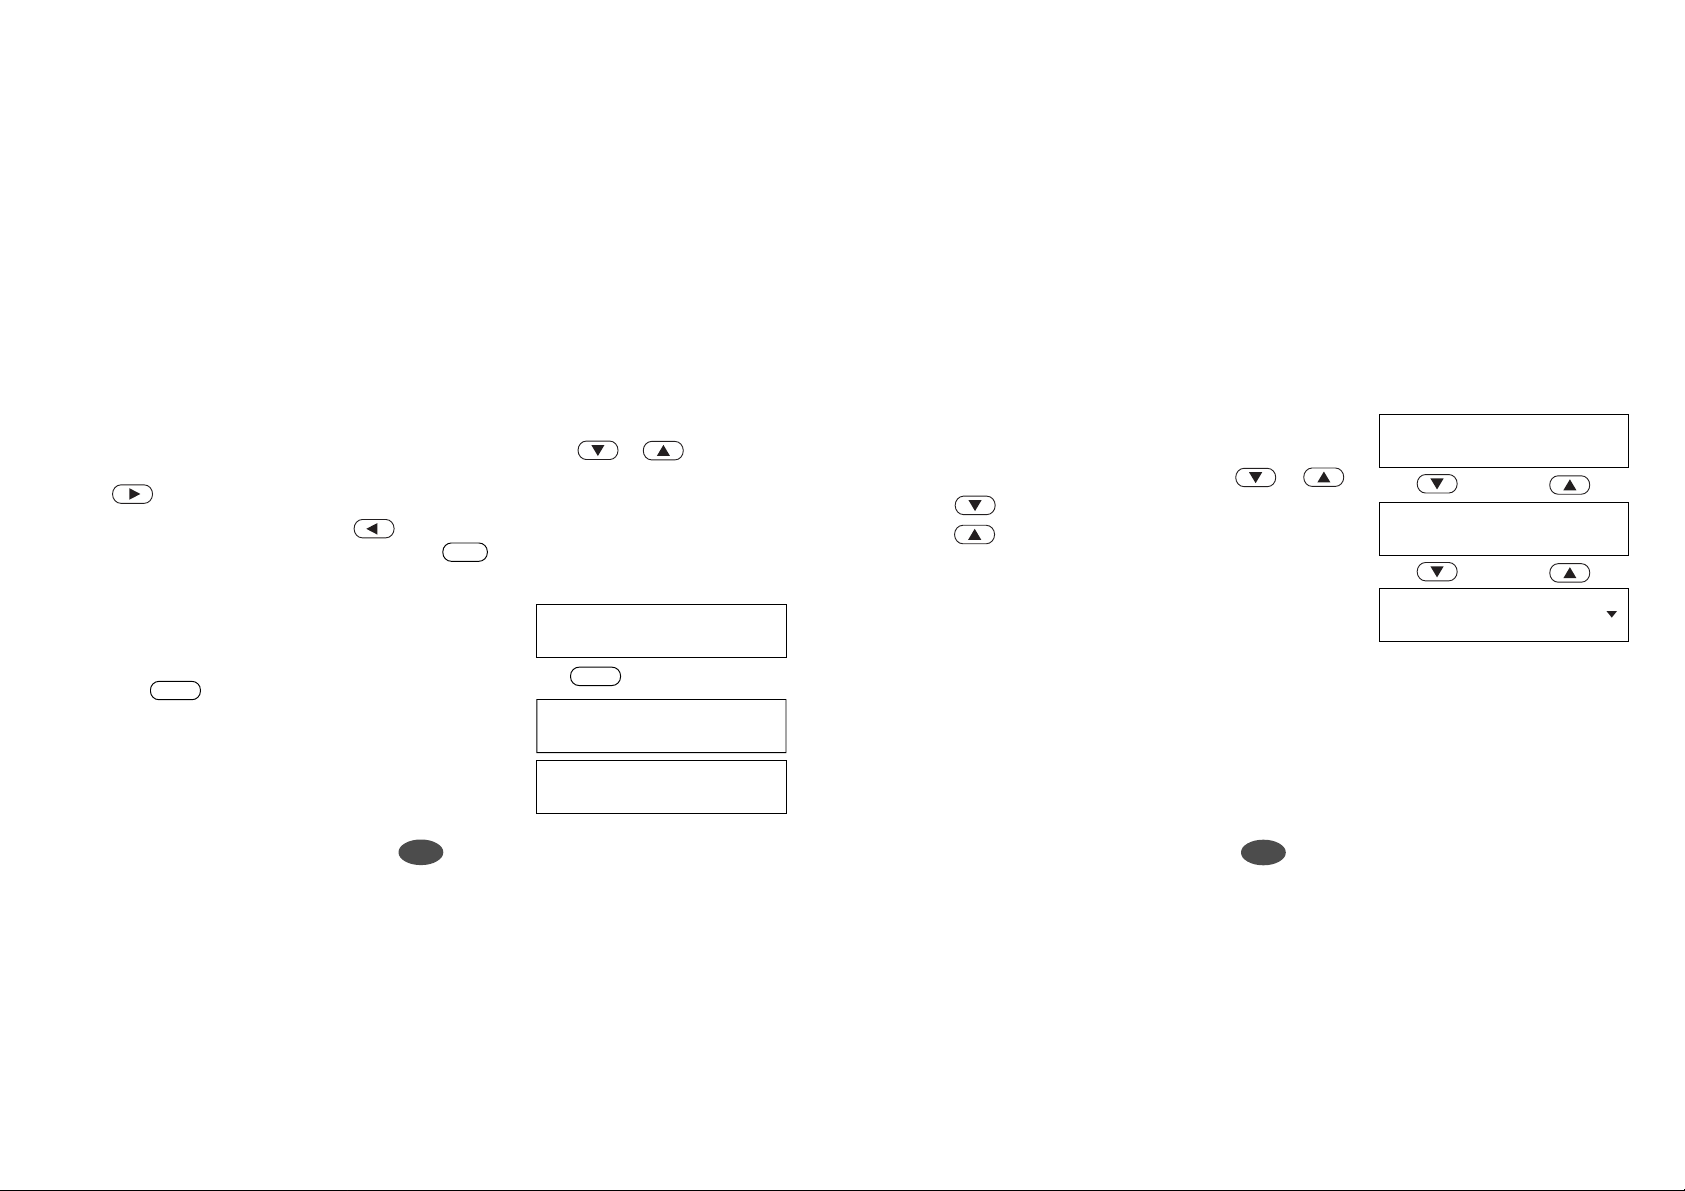
2.Contrast Adjustment
1. You can use either or ( or
) to adjust the contrast of the display.
2. Press to finish.
* If you want to adjust the contrast of the display again,
ENTER
A demonstration display will appear.
see “Setting function (page 52)”.
3.Demo Function
A demonstration display will begin to explain the
contents of the unit.
*You can stop the demonstration by pressing any of
the keys.
* If you want to disable the demo function, see
“Setting function (page 52)”.
Welcome to the
SEIKO English/Spanish
Translator.
...
8
9
Page 8
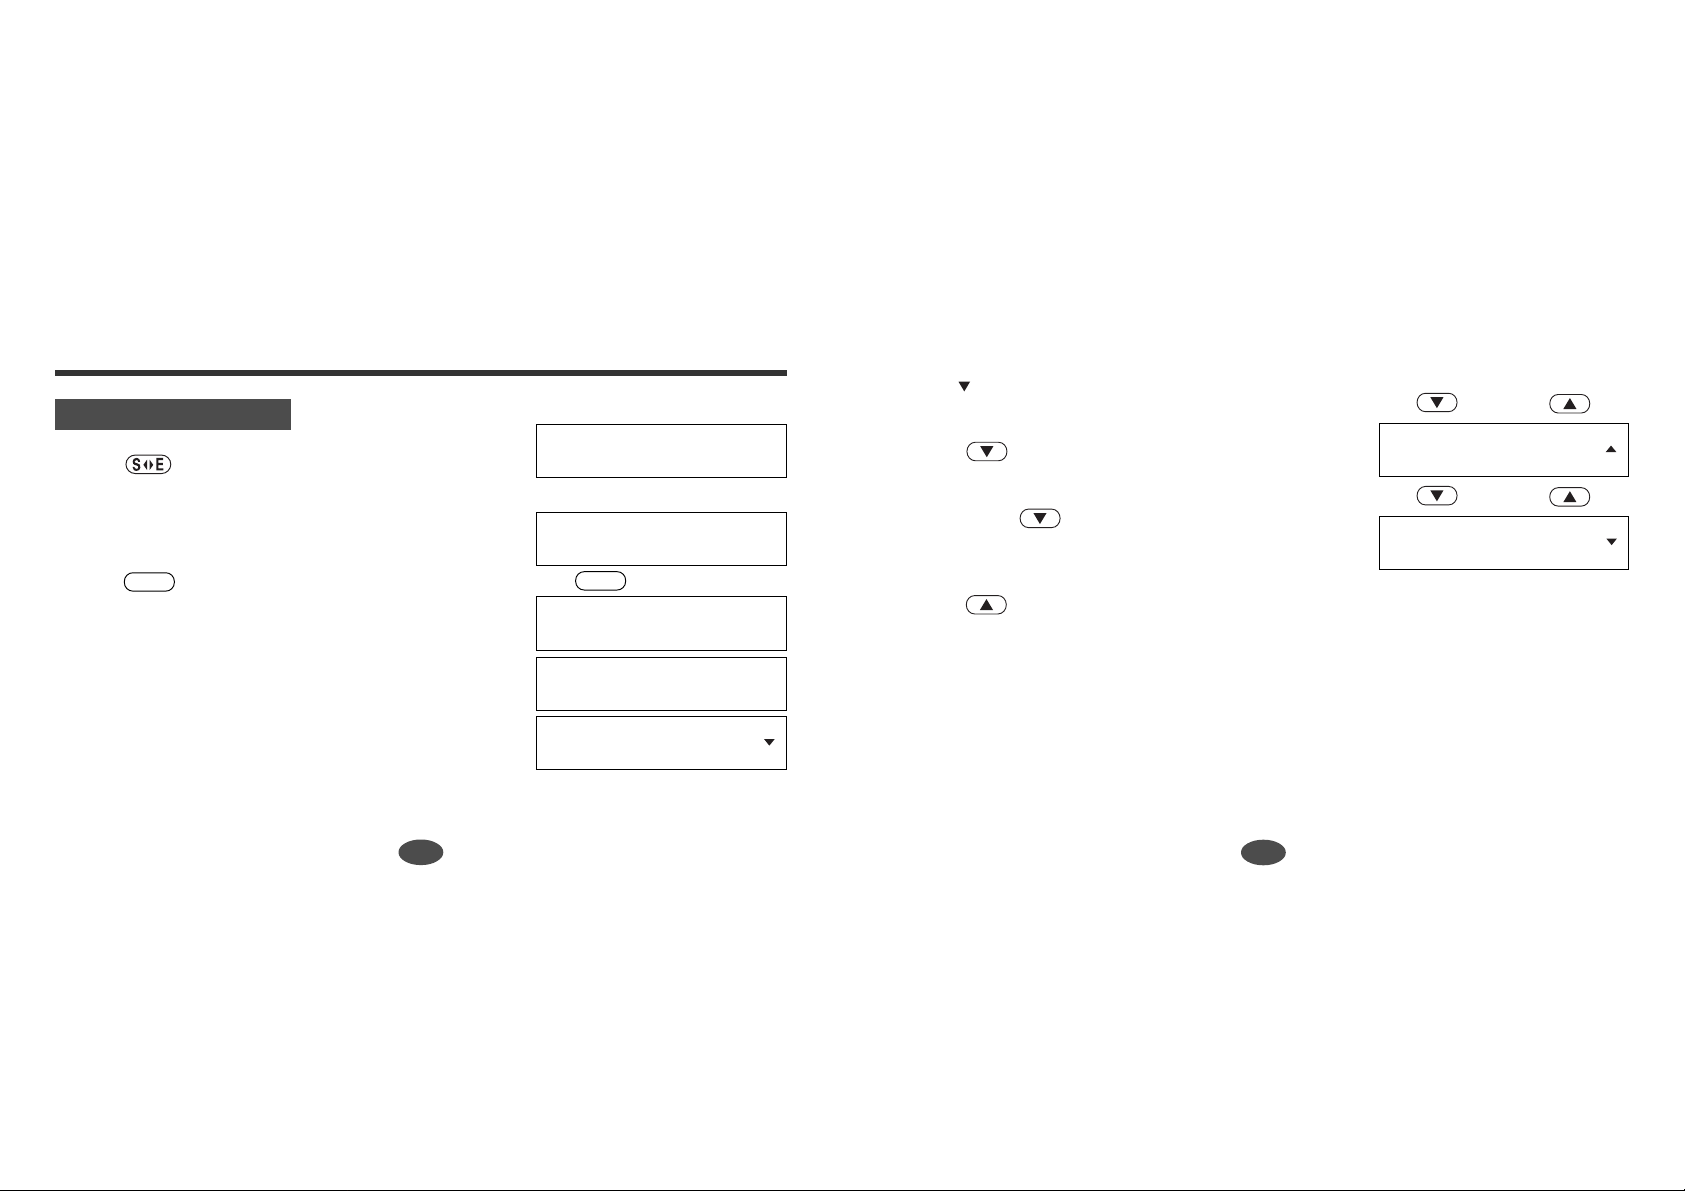
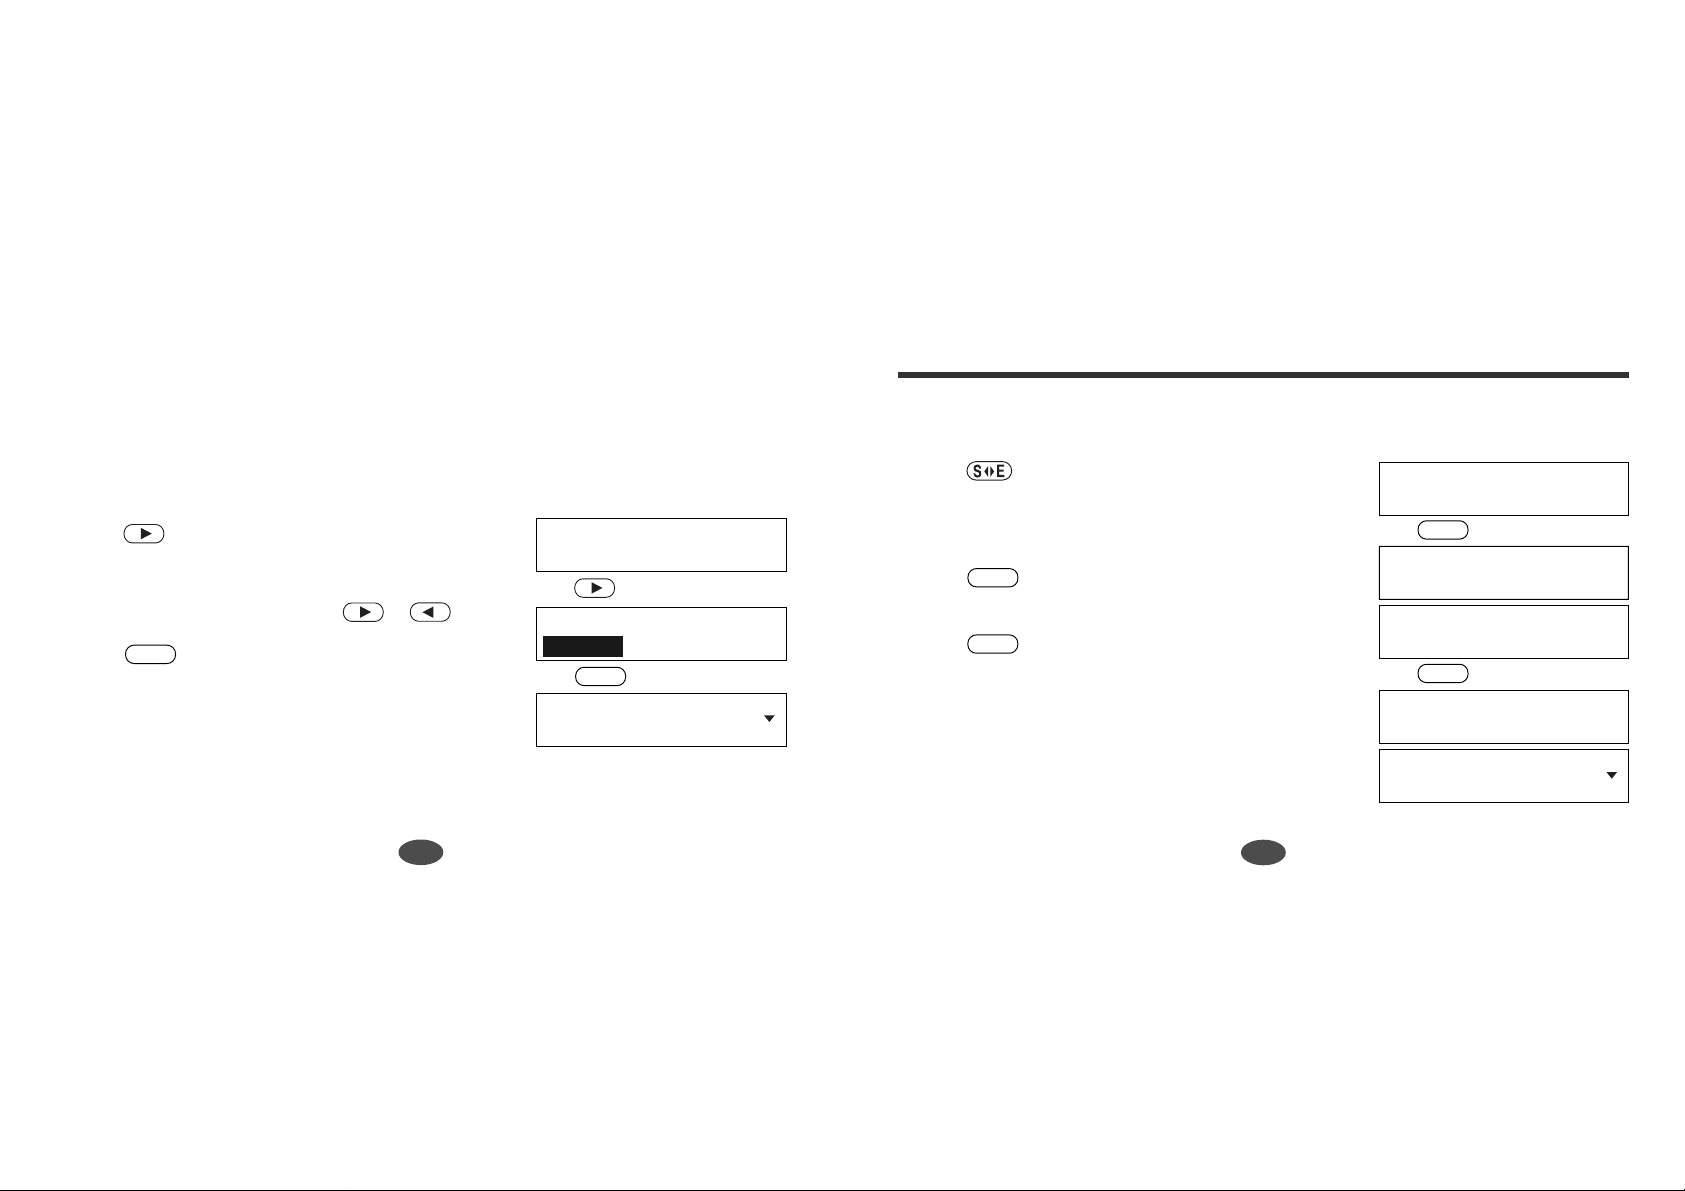
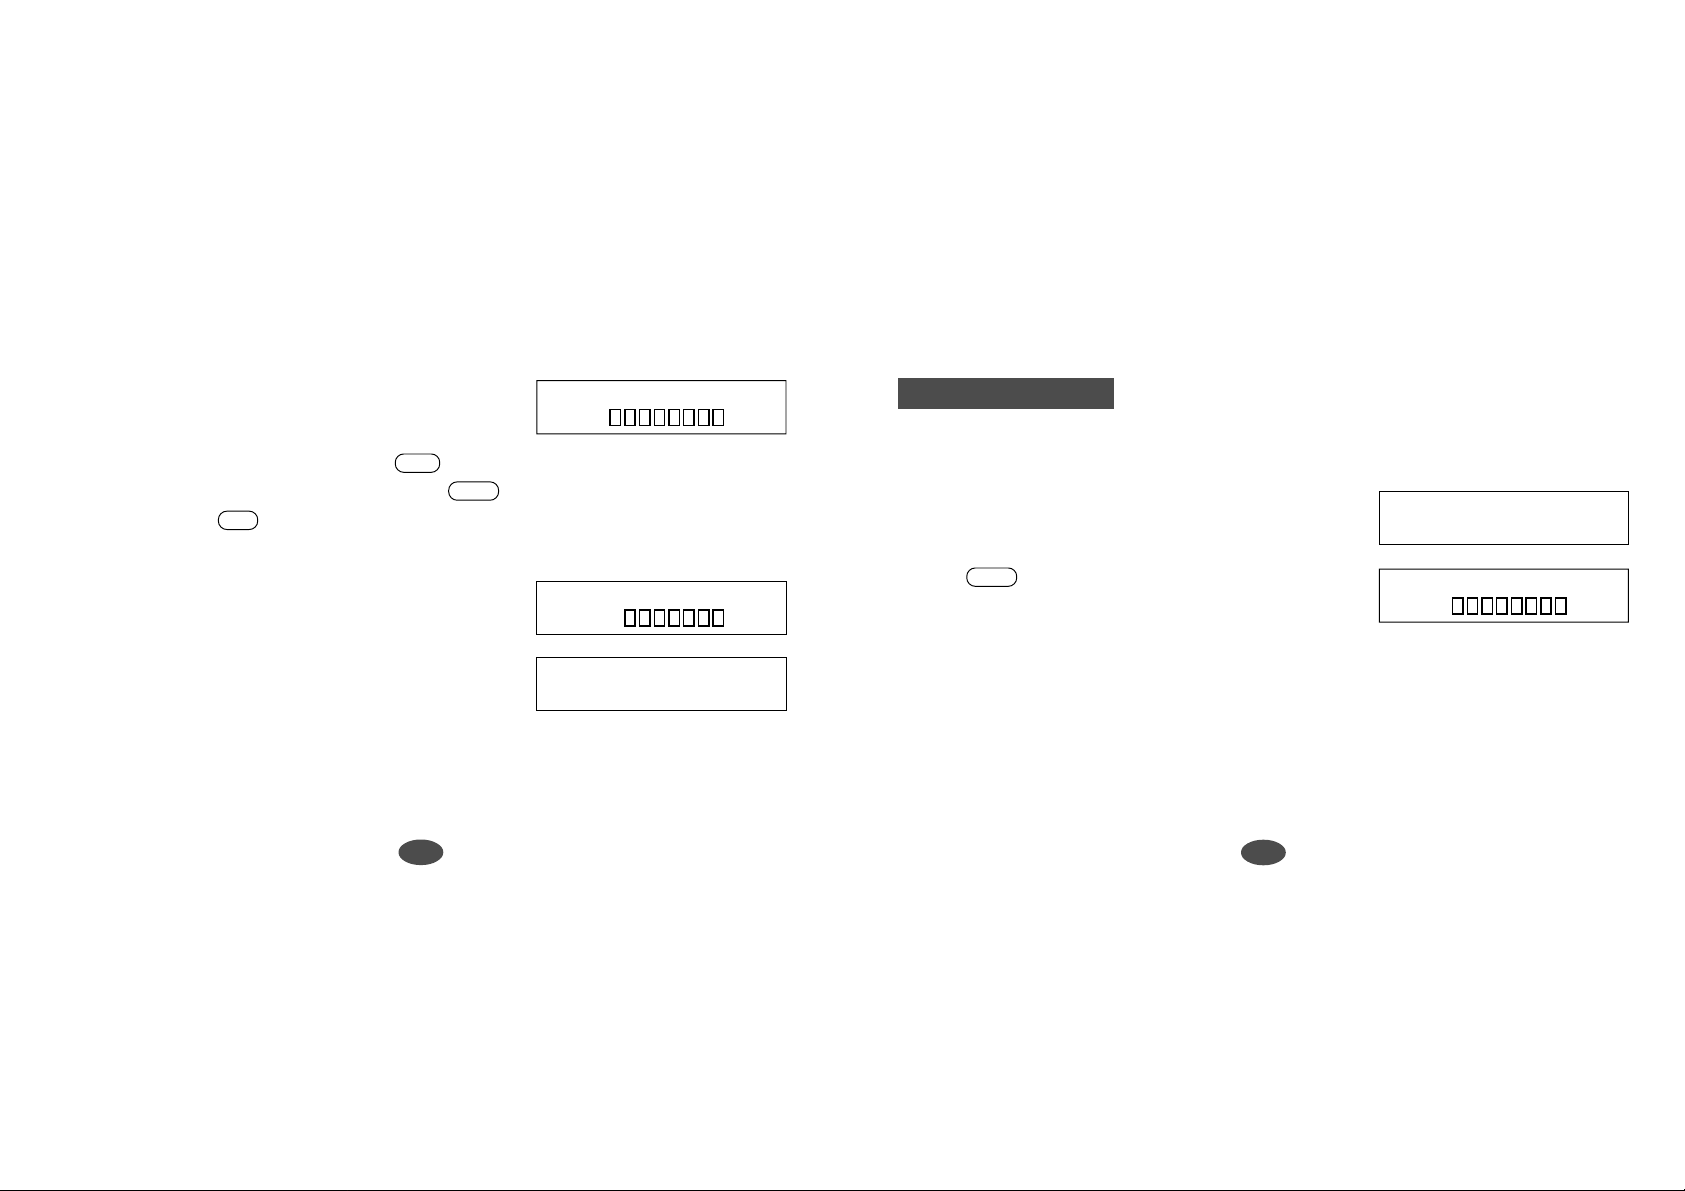
Translator
Basic Procedure
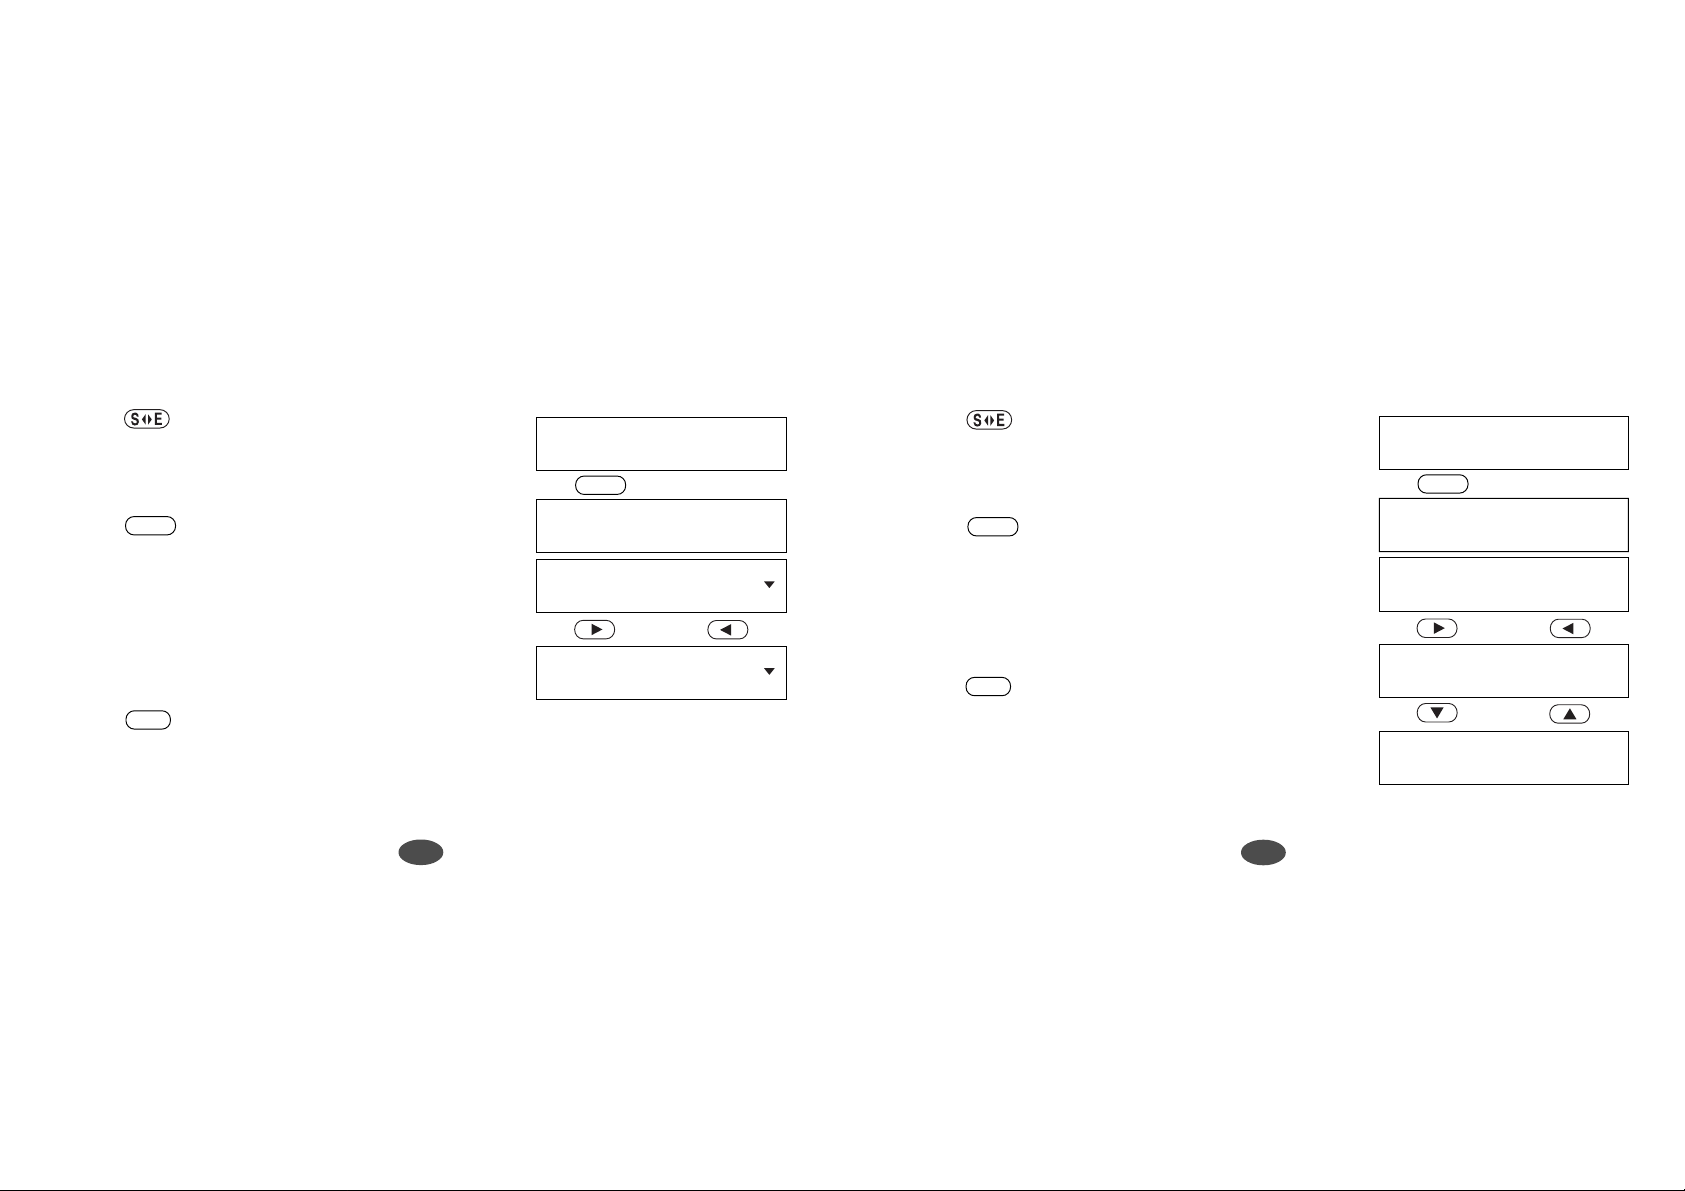
1. Press .
2. Enter a word.
Example: language
3. Press .
ENTER
The unit will check whether the entered word is the
English word or the Spanish word.
Translator
Enter a Word or Phrase:
language
↓
Enter a Word or Phrase:
language_
ENTER
↓
Base Form
The mark will appear if there is insufficient space
to display all the translations.
4. Press .
* If you press after all corresponding translations
are shown, the next headword with it’s translation
will be displayed. (See page 13.)
Press if you would like to return to the original
inputted word.
↓↑
idioma [m], lengua [f],
lenguaje [m].
↓↑
languid [adj]
lánguido.
Then the entered word along with part of speech will
be displayed on the upper line.
The corresponding translation(s) with part of speech
will be displayed on the lower line.
10
Searching ...
language [n]
idioma [m], lengua [f],
●Parts of Speech
[adj] adjective, [adv] adverb, [v] verb, [n] noun, [pron] pronoun,
[prep] preposition, [conj] conjunction, [art] article, [ijec] interjection,
[pn] propernoun, [m] masculine, [f] feminine, [m/f] masculine & feminine,
[phr] phrase, [ord] ordinal, [num] number, [av] auxiliary verb
11
Page 9
●Entering and Correcting letters
* Up to 30 letters can be entered.
* For entering capital letters or Spanish letters with accents, use or after
pressing the corresponding lower case letter.
* Use to enter a space.
* Corrections can be made by using .
* The entire display can be cleared by pressing .
●Misspelled Words or Words Not in
Memory
If the entered word is not contained in the dictionary,
pressing will result in display of the word
whose spelling comes closest (alphabetically) to that
of the entered word.
Example: tri
ENTER
CLR
Enter a Word or Phrase:
tri_
ENTER
↓
No words found.
Enter a Word or Phrase:
trial_
●Searching for Word
* The word lists for both English and Spanish are in
alphabetical order.
You can scroll through the word list by or .
manzana [f].
↓↑
The moves forward through the alphabet.
The moves backward.
Example: apple
aplicable.
↓↑
aplicación [f], solicitud
* The unit shows only the base form by scrolling search.
* Homonyms, words with the same spelling but different meanings are listed sequentially.
*Words with accents or phonetic symbols are stored in alphabetical order and come after
other words in the unit’s memory, without such symbols.
apple [n]
applicable [adj]
application [n]
12
13
Page 10
Inflection Function
●Pick Function
The translation word can be picked and you can confirm the meaning of the translation
word in your language.
Example: friend
1. Press to select the first word you can pick.
Selected word will have a flashing cursor on it.
Select the desired word by using or .
2. Press .
ENTER
The translation for “amiga” will be presented.
14
amiga [f], amigo [m].
↓
amiga [f], amigo [m].
↓
friend [n], playmate [n],
friend [n]
friend [n]
ENTER
amiga [f]
•You can see the verbal inflections after having displayed the translation screen
using the Translation Function.
1. Press .
2. Enter a word.
Example: go
3. Press .
ENTER
Enter a Word or Phrase:
go_
ENTER
↓
Base Form
Results will be displayed.
go [v]
4. Press .
ENTER
The [pronoun + verb] for the first person singular
andar, ir, marchar.
ENTER
↓
will then be displayed.
Inflections
*The position of [A-1] on the Verbal Inflection Matrix
Chart. (See page 17.)
Yo ando, Yo voy, Yo
I go
15
Page 11
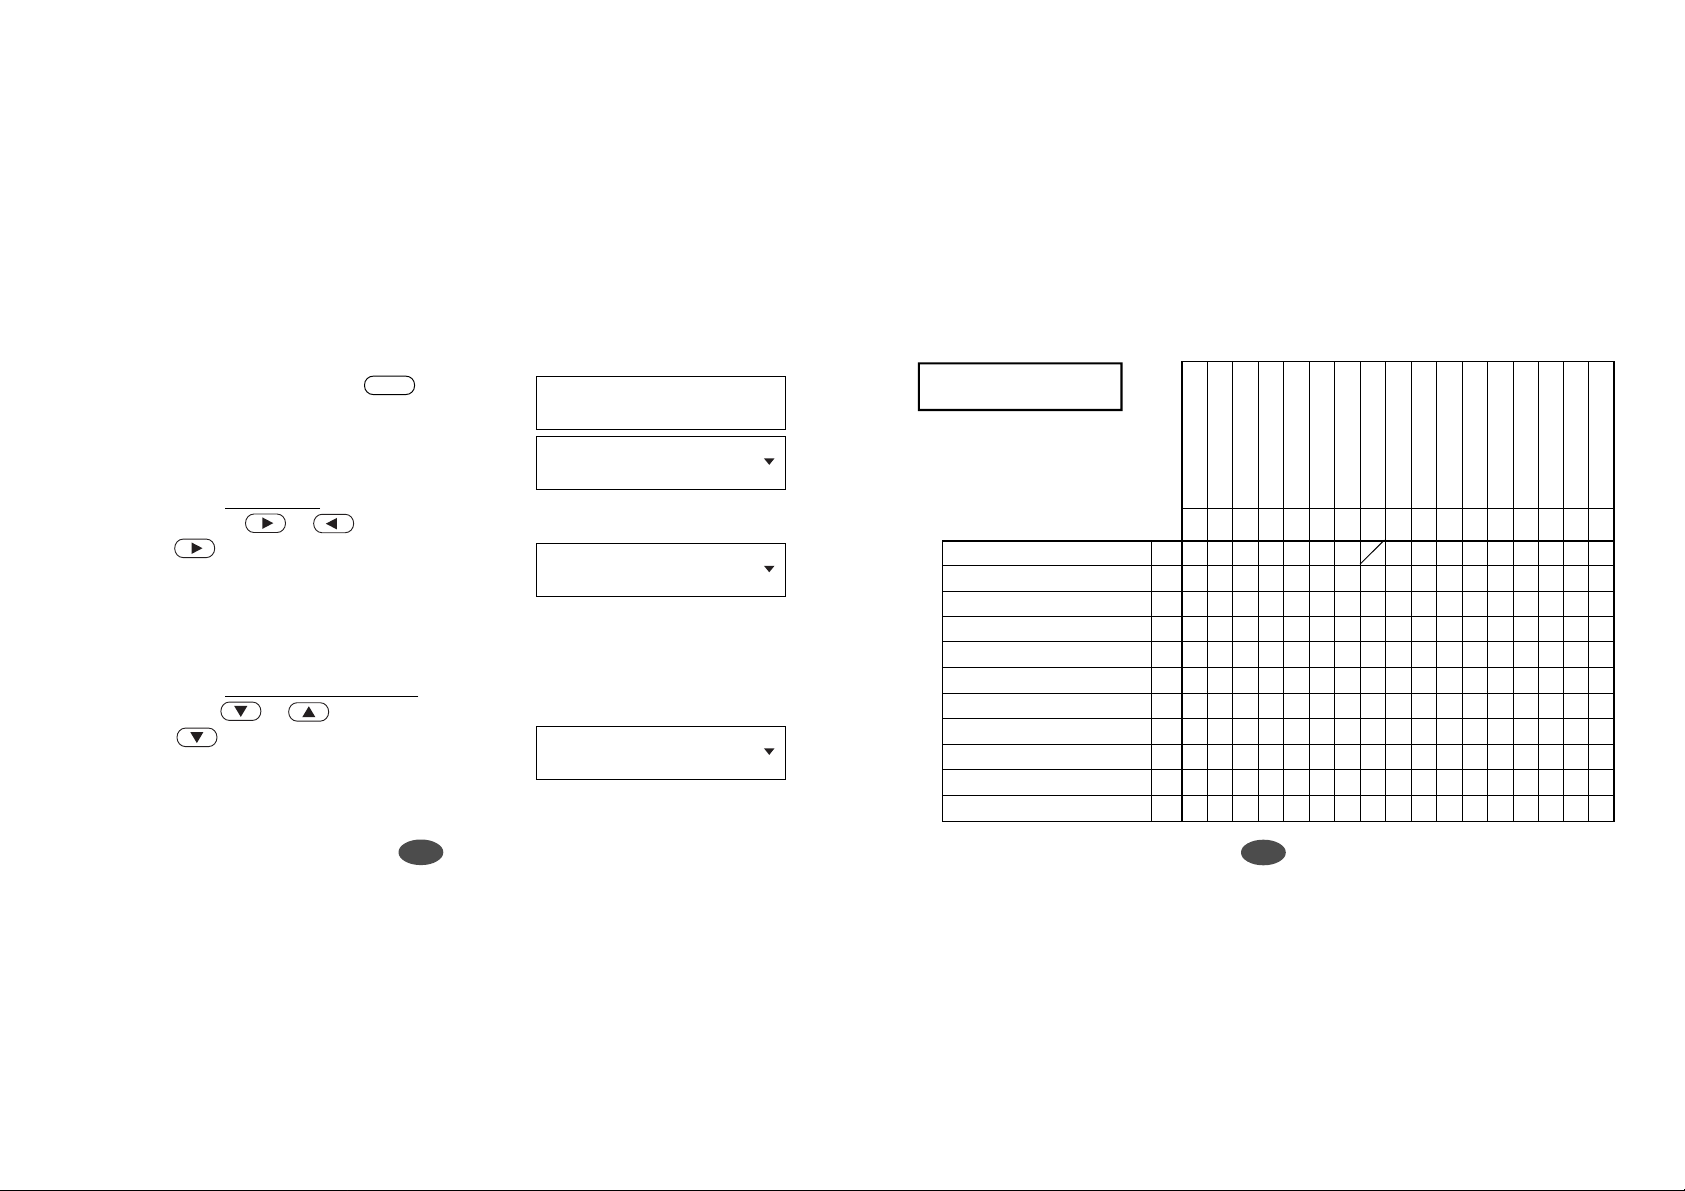
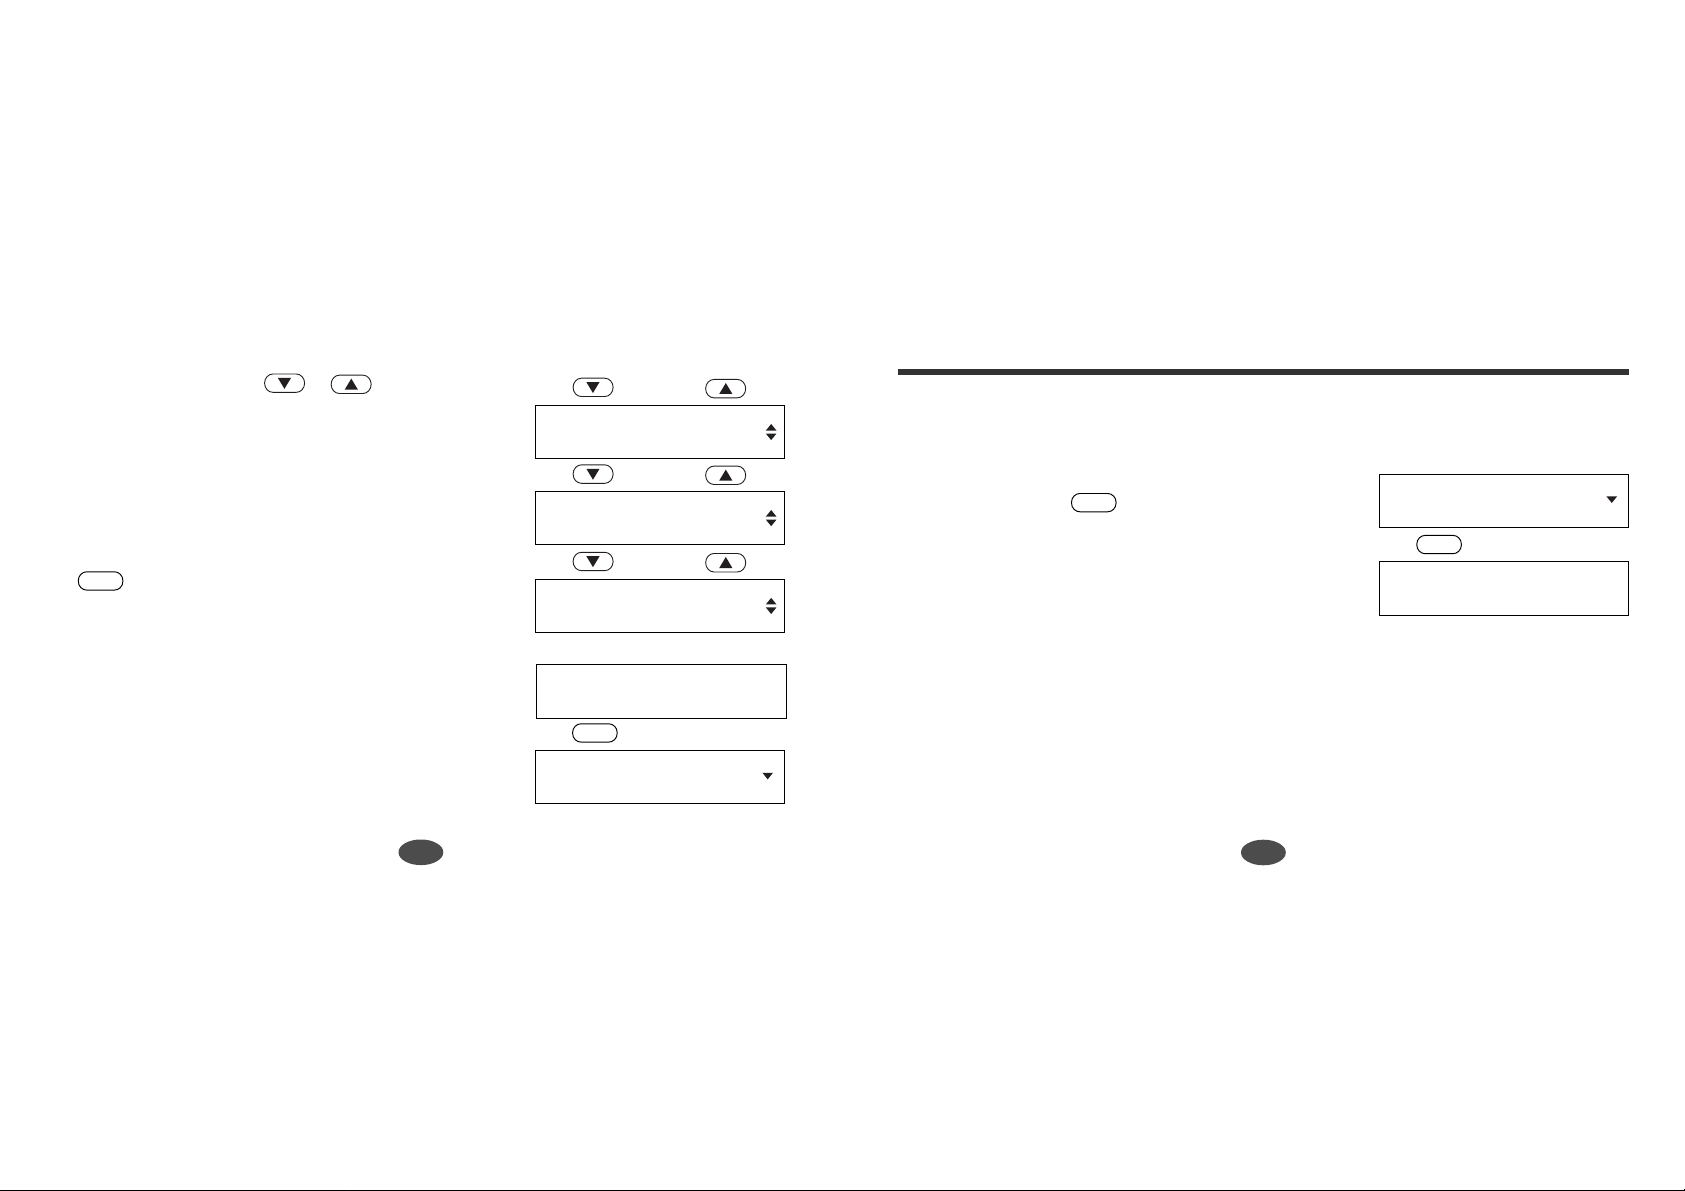
5. To view the person and tense, press again.
ENTER
The person and tense will be displayed.
Then the screen will return to the previous state.
•Tense may be changed.
If you wish to see other tenses, the tense may be
changed by pressing or .
6. If you press three times, the display will move
to the position of [A-4] on the chart. (See page 17.)
The amount of Inflections available depends on
inflections for that particular word.
• Person may be changed.
If you wish to see other personal pronouns, you can
do so by pressing or .
7. If you press four times, the display will move to
the position of [C-4] on the chart.
The amount of Inflections available depends on
inflections for that particular word.
Present Indicative
1st Singular
I go
Yo ando, Yo voy, Yo
I will go
Yo andaré, Yo iré, Yo
You will go
Usted andará, Usted irá,
Verbal Inflection
Matrix Chart
Sing.=Singular
Plur.=Plural
Masc.or M=Masculine
Fem.or F=Feminine
1st Sing. Masc/Fem IA
2nd Sing. Fam. M&F you B
2nd Sing. For. M&F you C
3rd Sing. Masc. he D
3rd Sing. Fem. she E
3rd Sing. M&F it F
1st Plur. Masc./Fem. we G
2nd Plur. Fam. M&F you H
2nd Plur.For M&F you I
3rd Plur. Masc. they J
3rd Plur. Fem. they K
Fam.=Familiar
For.=Formal
Ind.=Indicative
Subj.=Subjunctive
Present Indicative
Preterit
Imperfect indicative
Future
Present Progressive
Past Progressive
Conditional
Imperative
Present Perfect Ind.
Past Perfect Ind.
Past Anterior
Future Perfect
Conditional Perfect
Present Subjunctive
Past Subjunctive
Present Perfect Subj.
1234567891011121314151617
A-1
A-4
C-4
D-3
Past Perfect Subj.
16
17
Page 12
* If you press from tense [17], the display will move to tense [1].
Conversely, if you press from tense [1], the display will move to tense [17].
* If you press from person [K], the display will move to person [A].
Conversely, if you press from person [A], the display will move to person [K].
*There is no person or tense for [A-8], for this particular word.
9. You can return to the base form you have entered by
pressing .
CLR
CLR
↓↑
Base Form
go [v]
andar, ir, marchar.
ENTER
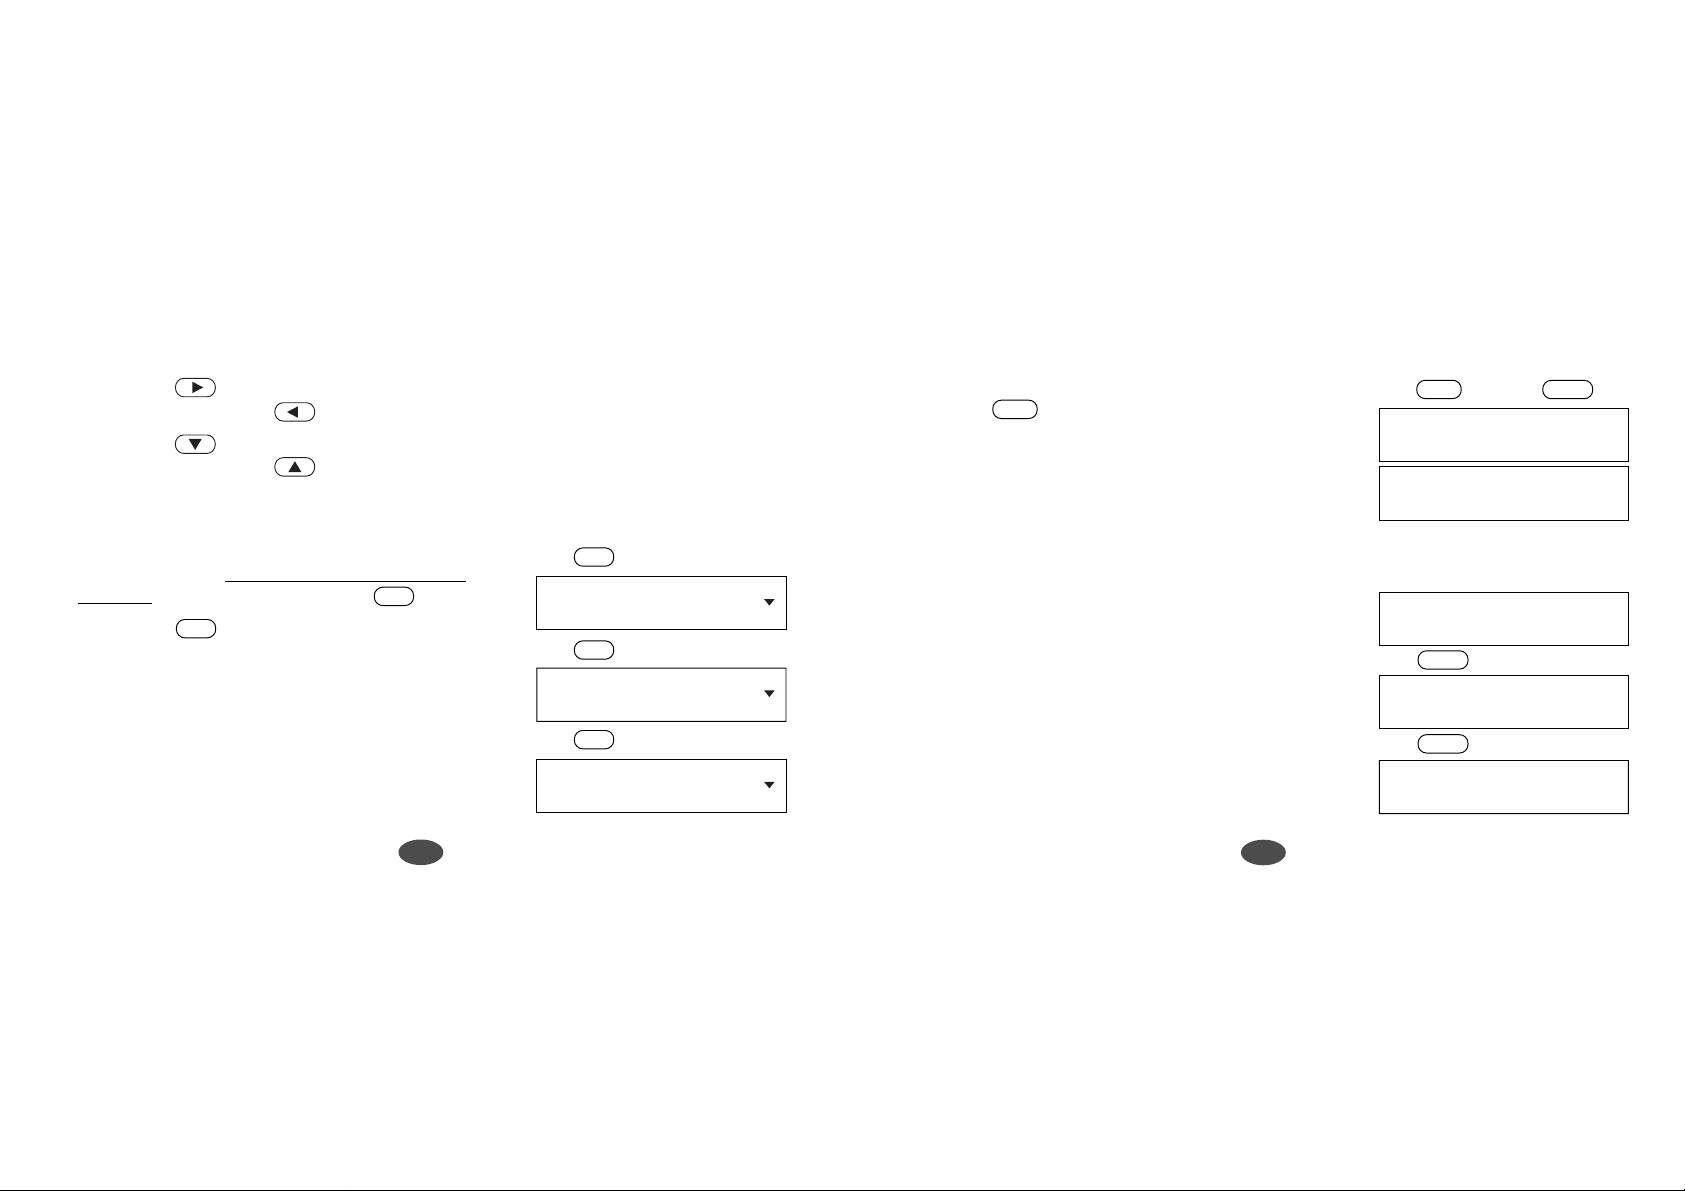
•Form may be changed.
8. If you wish to see other forms (interrogative and
negative), you can do so by pressing .
* If you press from the negative form, the display
?
?
will return to the normal form.
18
?
↓
¿
↓
Usted no andará, Usted
↓
Usted andará, Usted irá,
Will you go?
Andará usted?, ¿Irá
?
You will not go
?
You will go
* If you enter a verb and search the inflections,
movement of tense, person and form by means of key
operation, they will occur from the original (A-1)
position.
Example: eat
19
eat
↓
Enter a Word or Phrase:
eat_
ENTER
↓
eat [v]
comer.
ENTER
↓
I eat
Yo como.
Page 13
•You can enter the inflected forms of a verb together with the personal pronoun.
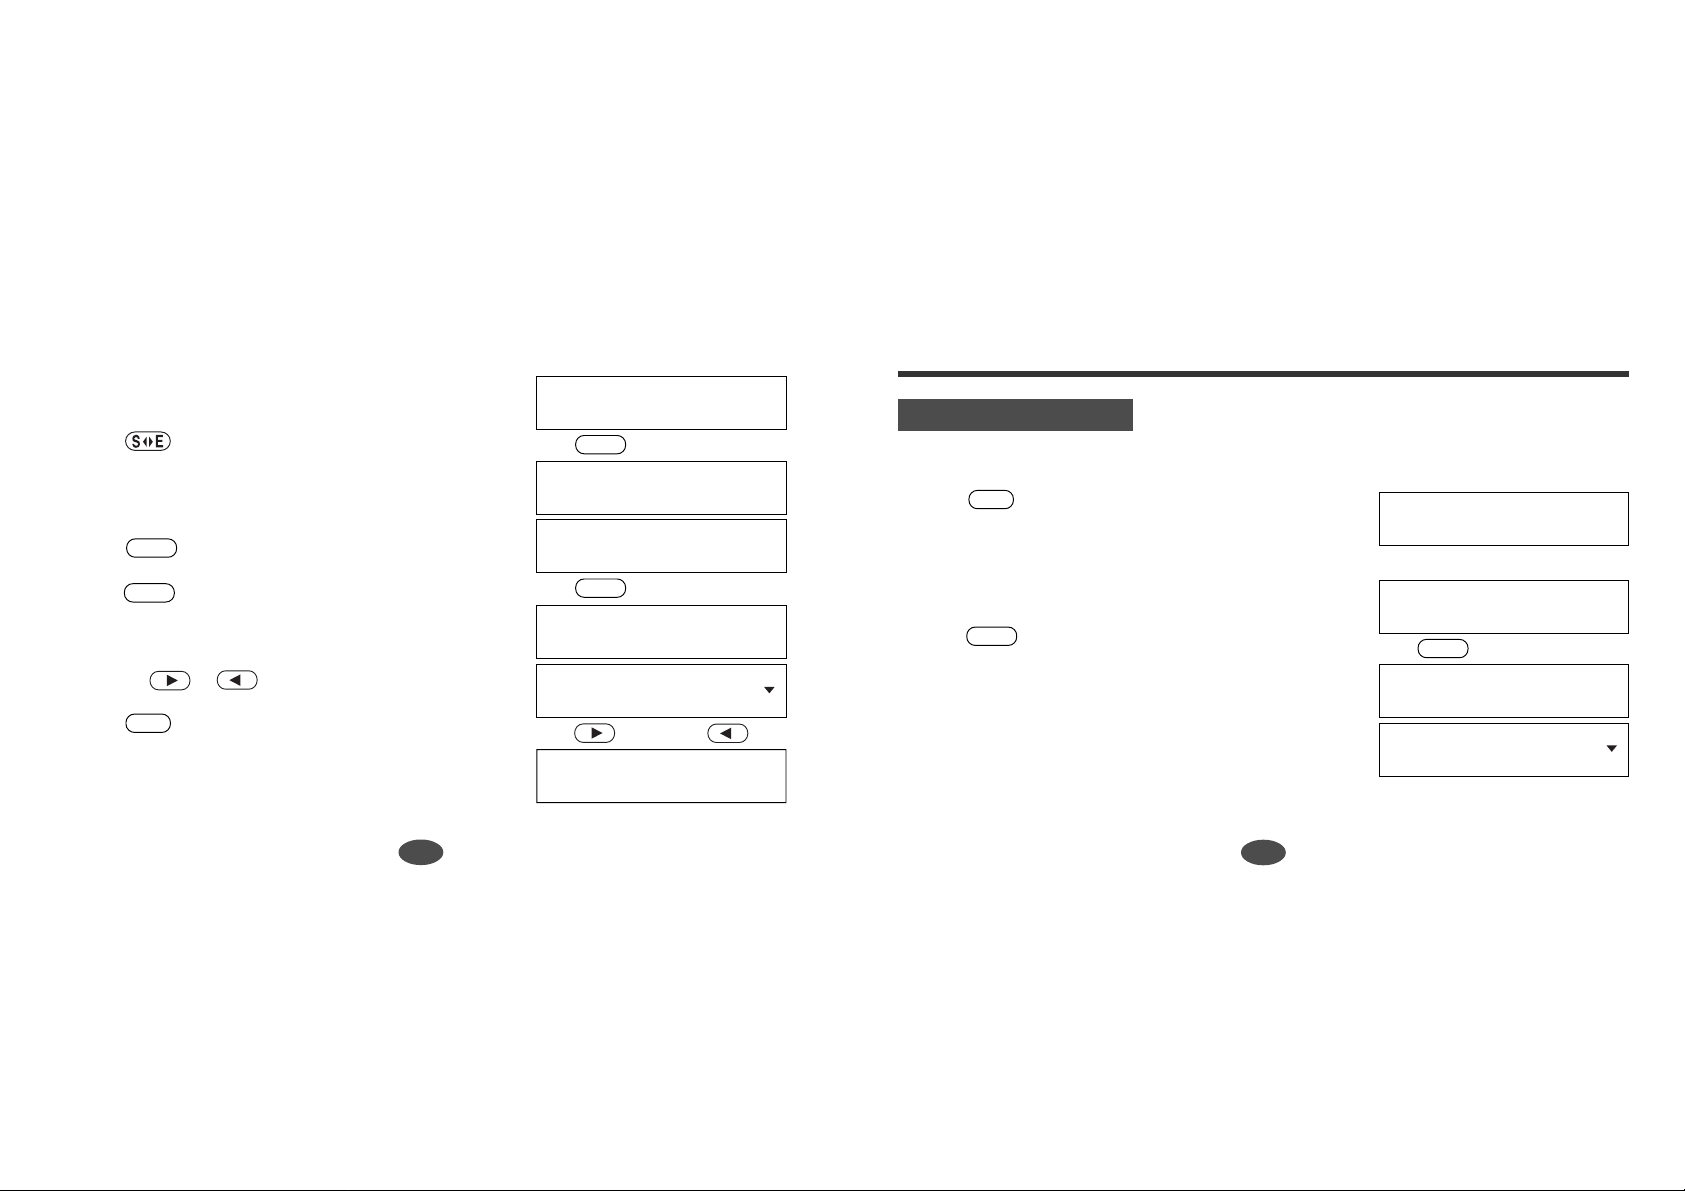
1. Press .
2. Enter words.
Example: he was going
Enter a Word or Phrase:
he was going_
ENTER
↓
•You can enter the base form or the inflected forms of an adjective.
1. Press .
2. Enter a word.
Example: best
Enter a Word or Phrase:
best_
ENTER
↓
3. Press .
ENTER
The translated inflection appears, which falls into the
position of [D-3] on the chart (see page 17.)
* In this case, movement of tense and person by means
of key operation will occur from this position.
* Press to see the base form of the entered
CLR
inflection.
20
Inflections
3. Press .
The translated inflection appears.
He was going
Él andaba, Él iba, Él
↓↑
He will go
Él andará, Él irá, Él
* In this case, movement of inflection by means of key
operation will occur from this position.
* Press to see the base form of the entered
inflection.
ENTER
CLR
Inflections
best
el más bueno.
↓↑
good
bueno.
↓↑
good
buena.
21
Page 14
•You can enter the singular form or the plural form
of a noun.
1. Press .
2. Enter a word.
Example: tree
3. Press .
3. Press .
ENTER
ENTER
You can switch the singular form or the plural form
by using or .
* Press to see the base form of the entered
CLR
inflection.
Phrase Display Function
Enter a Word or Phrase:
tree_
ENTER
↓
Base Form
tree [n]
árbol [m].
ENTER
↓
Inflections
tree
árbol.
↓↑
trees
árboles.
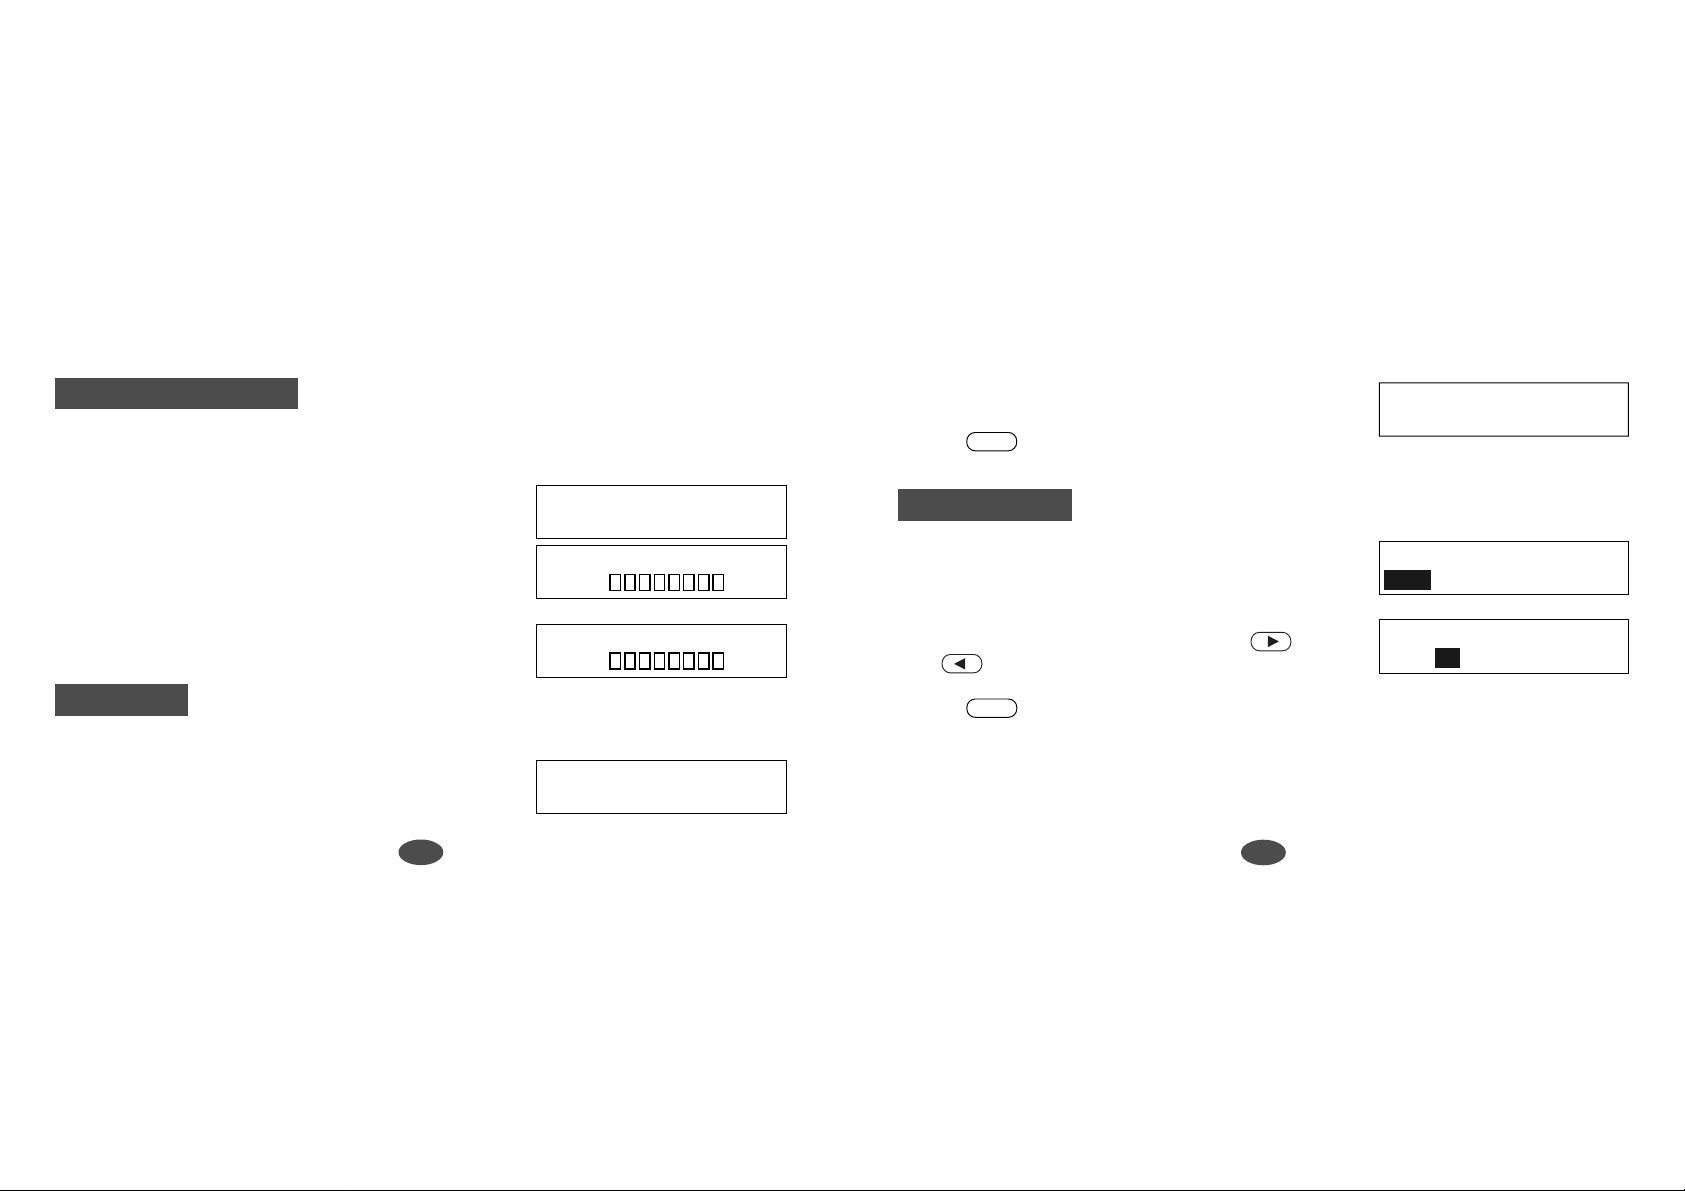
Keyword Search
The keywords of phrases can be used to look up phrases containing that word.
1. Press .
2. Enter the keyword.
Example: taxi
3. Press .
The first phrase containing the entered keywords is
displayed.
PHRS
ENTER
Translator
Enter Phrase or a Word:
taxi
↓
Enter Phrase or a Word:
taxi_
ENTER
↓
Phrases
Is there a taxi
stand nearby?
22
23
Page 15
4. Select the phrase using or .
If no more phrases using the keyword exist, the
message “End of Phrase List” will be displayed.
* Once a word is entered in the translator, you can
search the phrases from the translation mode. Press
PHRS
once the translated results are displayed.
* Some phrases need more specific entries. For
example, typing in the word “rent” will give you up
to 14 results containing the word “rent”. Let’s say
you want to rent a tennis racket, but the translated
phrase is not included in the 14 listed entries. In this
case you would have to be more specific and type in
the words “rent tennis racket”. If you are specific
with your entry, and there are still no results, there
are no phrases available.
EZ-Learn Function
↓↑
stand nearby?
¿Hay una parada de taxis
↓↑
¿Hay una parada de taxis
cerca?
↓↑
Please order a taxi
for me.
taxi [n]
taxi [m].
PHRS
↓
Is there a taxi
stand nearby?
●Building word list:
The EZ-Learn function creates the user's word list from the Translator.
When a headword or the translation you wish to add
is displayed, press .
The message “Word has been added to the EZ-Learn
list.” will appear.
The headword and the corresponding translations
will be added to your list.
* The unit can store the word with from 3 to 14 letters.
* The unit's memory can store up to 100 words. If you try to add more, the message
“Sorry, EZ-Learn memory is full” will appear.
* If the word to be added is already contained in memory, the message “Word is already
in the EZ-Learn list” will appear.
EZ-LN
language [n]
idioma [m], lengua [f],
EZ-LN
↓
Word has been added
to the EZ-Learn list.
24
25
Page 16
●Finding a word
1. Press .
2. Press to select “Bookmarks”.
3. Press or to select a word.
4. Press .
EZ-LN
A blinking cursor on Bookmarks indicates that is
your selection.
ENTER
ENTER
The translation display of the selected word will be
displayed.
EZ-LN
EZ-Learn
Bookmarks Delete Erase
ENTER
↓
apple [n]
language [n]
↓↑
●Deleting a word
1. Press .
2. Press or to select “Delete” then .
3. Press or to select the word you wish to
delete.
4. Press .
5. Press or to select “Yes”.
The selected word will be deleted from the word list.
↓
apple [n]
language [n]
ENTER
* If you decide not to delete the word, press to
select “No”.
●Deleting all words
language [n]
idioma [m], lengua [f],
1. Press or to select “Erase” then .
2. Press or to select “Yes”.
* If you decide not to delete all the words, press
to select “No”.
EZ-LN
ENTER
ENTER
ENTER
EZ-Learn
ENTER
Y
N
ENTER
Y
N
Boolmarks Delete Erase
ENTER
↓
apple [n]
language [n]
ENTER
↓
Are you sure?
Yes No
EZ-Learn
Boolmarks Delete Erase
ENTER
↓
Are you sure?
Yes No
26
27
Page 17
Word Games
You can take on the challenge of 5 different word games set to any one of three levels of
difficulty.
3. Press to enter the selected game.
ENTER
*You can press the first letter of any title of the game in order to select the game.
●Setting the level of the game
1. Press .
2. Press or to select “Games Level ...”
3. Set the level by pressing or .
4. Press to finish.
SET
then .
ENTER
You can choose from “Beginner”, “Intermediate” and
“Advanced”.
ENTER
●Selecting the game
1. Press .
2. Select the game you wish to play by pressing
GAME
or .
28
Demo Message...
LCD Contrast...
↓↑
ENTER
↓
x 2
LCD Contrast...
Games Level...
Beginner
Intermediate
Hangman
This is a game in which you have to find a mystery word with a limited number of tries.
1. Select “Hangman”.
The language of the mystery word will be changed
alternately.
The number of letters in the mystery word is
indicated by question marks.
* The first number in the left hand corner indicates the
number of correct letters entered. ( 0/8 )
Hangman
User Hangman
*Your limited number of tries, is indicated by the
second number in the right hand corner. ( 0/8 )
Guess this English Word.
???? 0/8
29
Page 18
2. When you enter one of the letters used in the mystery
word, the question mark will be replaced by the
?p?? 1/8
letter.
*To skip the displayed question, press .
*To give up and see the mystery word, press . This will be counted as a loss.
* For a hint press .
?
CLR
ENTER
This can be used up until the last letter, yet it will be
deducted from your limited number of tries.
* The number of tries you are allowed will decrease
progressively every time you enter an incorrect letter.
?p?? 1/7
u
3. If you successfully enter all the letters in the mystery
word before you use up your limited number of tries,
a congratulatory message will be displayed and a
Won:1 Lost:0
open
point will be counted in the “Won” column. The next
mystery word will be displayed.
4. If you fail to find the mystery word before you use up your limited number of tries,
“Sorry, you lost” will appear and a point will be counted in the “Lost” column.
User Hangman
This is a Hangman Game using a word that one player can enter, while a second player
tries to guess what it is.
1. Select “User Hangman”.
2. Enter a word.
3. Press .
ENTER
* The ensuing procedure is the same as that used in the Hangman Game.
[Tip for Parents]
This game is a fun way for you to help your children to learn new words from a list or
as part of their homework. Select a suitable level, secretly enter your chosen word and
then work with them to correctly spell the mystery word.
Enter a Word or Phrase:
beat_
???? 0/8
30
31
Page 19
Against the Clock
The letters of a mystery word are displayed one at a time at regular intervals.
Enter the mystery word before they are all displayed.
1. Select “Against the Clock”.
The language of the mystery word will be changed
alternately.
2. When you enter a letter, the game will start.
The hidden letters will be displayed one by one.
* The ensuing procedure is the same as that used in the
Hangman Game.
Guess this Spanish Word.
???? 0/8
???? 0/8
2. Re-enter the word which has just disappeared from
the screen.
3. Press .
ENTER
Translation
1. Select “Translation”.
The unit will provide the game word on the upper
line, and the translations on the lower line.
2. Select the correct translation by pressing
or to place the cursor on your selection.
Enter your guess
azul_
todo [adv]
keen, all, hunt, taper, wit.
todo [adv]
keen, all, hunt, taper, wit.
Memory
Correctly re-enter the words that are momentarily displayed.
1. Select “Memory”. The words will be displayed for
about one second.
32
azul
3. Press .
ENTER
33
Page 20
Data Bank
You can store any type of personal information up to 100 entries.
Since your Data will be lost with a battery change, it is strongly suggested that you
keep any information entered into the TR2250 written down on a sheet of paper.
●Selecting the function
1. Press .
2. Select the function by pressing or .
3. Press to enter the selected function.
*You can press the first letter of any name of the
DATA
ENTER
function in order to select the function.
●Entering a New Listing
1. Select “New”.
The first field “Name” will be displayed.
Enter a name.
2. Press .
ENTER
The second field “Tel.1” will be displayed.
Enter a telephone number.
View New Search Edit
↓↑
View New Search Edit
Delete All-Clear
Name: Brown
Tel.(1): 123-4567
Data Bank
_
_
3. You can also enter the data in the fields; Tel.(2), Fax,
Address, e-mail and Memo.
* If you have no need to enter the data in the particular
field, press . The next field will appear.
ENTER
*You can return to the previous field by pressing
CLR
.
*You can return to the menu of the Data Bank by
pressing .
4. Press .
DATA
ENTER
The new entries will be stored.
View New Search Edit
Saving ...
Data Bank
●Entering and Correcting Characters
* Use or to move cursor.
* Use to enter a space.
* Corrections can be made by using .
* For entering capital letters or Spanish letters with accents, use or after
pressing the corresponding lower case letter.
* For entering period ( . ), press twice after pressing .
* For entering hyphen ( - ), press twice after pressing .
* For entering symbols ( ? ’ ! , _ @ = $ : ( ) [ ] ), use or after pressing .
A
N
34
35
Page 21

●Finding an Entry
1. Select “View”.
The [Name] of the entries will be displayed in
alphabetical order.
2. Select the entry by pressing or .
* If you press the first letter of the name you wish to
review, the unit automatically select the first listing
that begins with that letter.
3. Press to find the entry.
4. Press or to change the field.
*You can return to the menu of the Data Bank by
ENTER
pressing .
CLR
●Editing an Entry
Brown
Clark
↓↑
Brown
Clark
ENTER
↓
Name: Clark
↓↑
Tel.(1): 987-654-3210
1. Select “Edit”.
The [Name] of the entries will be displayed in
alphabetical order.
2. Select the entry by pressing or .
3. Press to select the entry you wish to edit.
4. Edit the entry and press .
* If you have no need to edit the data in the particular
field, press . The next field will appear.
5. After editing the last field (Memo), the confirmation
screen will appear.
6. Press and then or simply press to
select “Yes”.
* If you decide not to edit the entry, press or
to select “No”.
N
ENTER
ENTER
ENTER
ENTER
Edit OK?
No Yes
Y
ENTER
36
37
Page 22

Expense Manager
●Deleting an Entry
1. Select “Delete”.
2. Select the entry by pressing or .
3. Press to select the entry you wish to delete.
4. Press and then or simply press to
ENTER
The confirmation screen will appear.
ENTER
Delete OK?
No Yes
select “Yes”.
* If you decide not to delete the entry, press or to select “No”.
ENTERYN
●Deleting all Entries
1. Select “All clear”.
The confirmation screen will appear.
2. Press and then or simply press to
ENTER
Y
select “Yes”.
* If you decide not to delete all the entry, press or to select “No”.
ENTER
N
38
All Clear OK?
No Yes
You can store your payment information up to 100 records.
●Selecting the function
1. Press .
2. Select the function by pressing or .
3. Press to enter the selected function.
*You can press the first letter of any name of the
EXP.M
ENTER
function in order to select the function.
●Entering a New Record
1. Select “New”.
First category name and today’s date will be
displayed.
* The date must be correctly SET for “today’s date” to
be displayed.
2. Select a category, day or month by pressing or
.
39
Expense Manager
View Total New Edit
↓↑
View Total New Edit
Search Delete All-Clear
category
Airfare Th, 03 Oct
0.
amount of money
day
month
Page 23

2. Change a category name, day or month by pressing
or .
[Categories] Airfare, Breakfast, Bus, Car Rental,
Dinner, Fax, Gas, Gifts, Hotel, Laundry, Lunch,
Parking, Postage, Taxi, Tolls, T r ain
3. Enter the amount of money.
4. Press .
ENTER
The new record will be stored.
*You can clear inputted amount of money by pressing
CLR
.
*You can return to the menu of Expense Manager by
pressing .
EXP.M
●Finding a Record
1. Select “View”.
The dates of records will be displayed in order.
2. Select the date by pressing or .
40
Lunch Th, 03 Oct
0.
3. Press once the cursor is placed on your selection.
4. If you have several entries within different categories
on the same date, you can press or to
Lunch Th, 03 Oct
7.30
scroll through them.
* Pressing again will show you the Total for all
entries within all categories, for that particular date.
* Pressing with the Total showing will take you
Saving ...
back to the dates of records display.
*You can return to the menu of the Expense Manager
Expense Manager
View Total New Edit
by pressing .
●Finding a Total Record
1. Select “Total”.
Th, 03 Oct, 2002
Tu, 01 Oct, 2002
↓↑
Th, 03 Oct, 2002
Tu, 01 Oct, 2002
2. Select “Date” or “Category” by pressing or
and then press .
3. Select the date or category by pressing or
and then press .
The total amount will be displayed.
*You can return to the previous display by pressing
CLR
.
ENTER
ENTER
ENTER
CLR
ENTER
ENTER
Train Tu, 01 Oct
2.30
↓↑
Lunch Tu, 01 Oct
6.
Expense T otal
Date Category
Air fare
Breakfast
Total Dinner
126.30
41
Page 24

●Searching a Record
1. Select “Search”.
2. Select the year or month by pressing or
.
3. Change the year or month by pressing or
and then press .
4. Select the date by pressing or .
5. Press once the cursor is placed on your selection.
ENTER
6. If you have several entries within different categories
on the same date, you can press or to
scroll through them.
* Pressing again will show you the Total for all
ENTER
entries within all categories, for that particular date.
* Pressing with the Total showing will take you
ENTER
back to the dates of records display.
*You can return to the menu of the Expense Manager
by pressing .
CLR
ENTER
Expense Search
2002 Oct
Expense Search
2002 Sep
Mon, 30 Sep, 2002
Sun, 29 Sep, 2002
Bus Mon, 30 Sep
1.25
●Editing a Record
1. Select “Edit”.
The dates of records will be displayed in order.
2. Select the date by pressing or .
3. Press and then press or to select the
4. Press and then press or to select the
5. After editing, press . The confirmation screen
6. Press and then or simply press to
* If you decide not to edit the entry, press or
ENTER
record you wish to edit.
ENTER
item you wish to edit.
ENTER
will appear.
select “Yes”.
N
to select “No”.
ENTER
Y
ENTER
Edit OK?
No Yes
42
43
Page 25

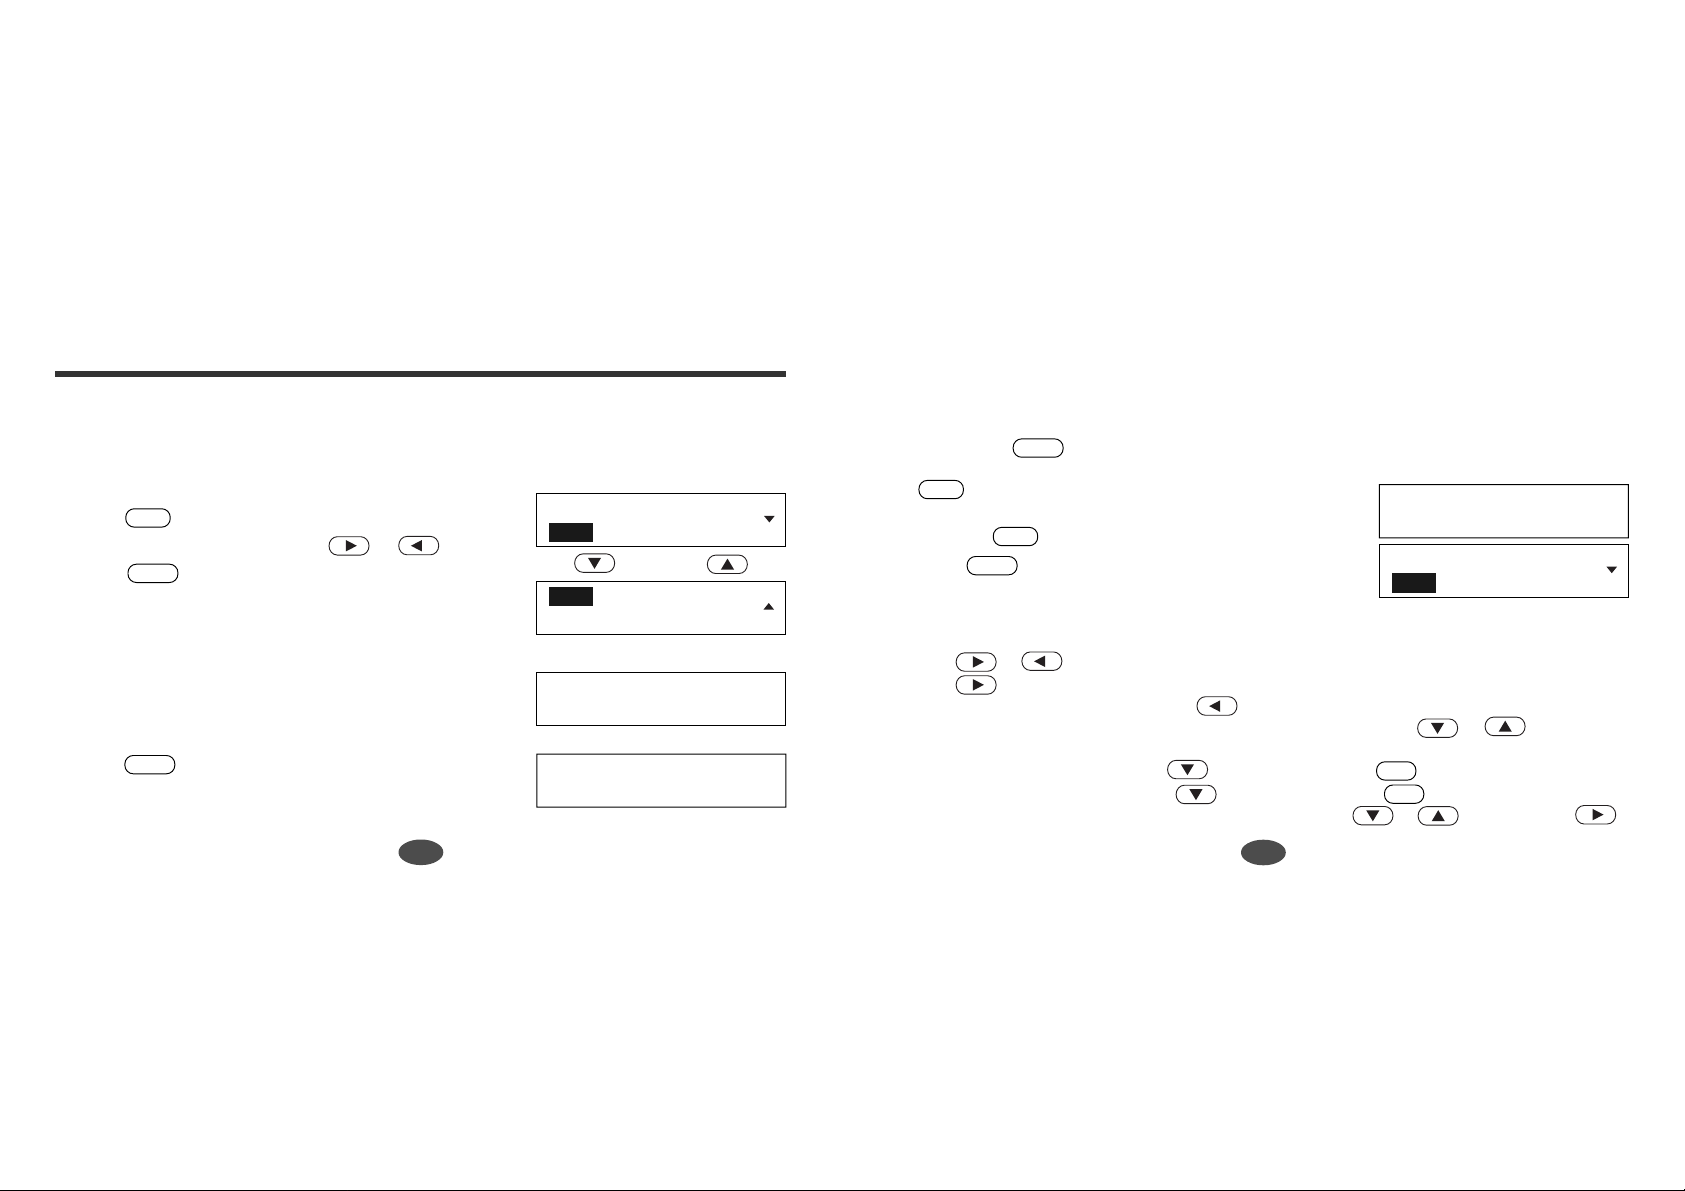
Converters
●Deleting an Entry
1. Select “Delete”.
2. Select the date and the record.
3. Press to select the record you wish to delete.
4. Press and then or simply press to
ENTER
The confirmation screen will appear.
ENTER
Delete OK?
No Yes
Y
select “Yes”.
* If you decide not to delete the entry, press or to select “No”.
ENTER
N
●Deleting all Entries
1. Select “All clear”.
The confirmation screen will appear.
2. Press and then or simply press to
ENTER
Y
select “Yes”.
* If you decide not to delete all the entry, press or to select “No”.
ENTER
N
44
All Clear OK?
No Yes
●Entering or Changing a Conversion Rate
1. You can switch between the calculator/conversion
display and the time display by pressing .
For example, the unit was inputted “130” already on
calculator.
2. Press or to display the conversion menu.
3. Press or to select the conversion menu.
4. Select “Money” and then press .
5. Select “Set” and then press .
ENTER
ENTER
6. Whatever number is entered in place of the zero will
be the equivalent of one American dollar. Once the
number is entered, press or to return to the
main menu.
7. The set rate will not need to be set again unless that
particular currency rate changes, or you want a
different form of currency altogether.
TIME CALC
45
130.
↓↑
Select a Converter
Money Metric Clothing
Currency Converter
$ Other Other $ Set
Exchange Rate
$1 = 130.
CLR
Page 26

●Currency Conversion
Example: Japanese Yen to US Dollar ( $1 = 130
Japanese Yen )
Input value (5,200) on calculator and press .
1. Select “Money”, press . Select “Other $”
(other currency to American dollar) and press .
ENTER
ENTER
2. Enter the number you wish to convert, (ex. 5,200).
Press or .
3. Select “Money”, press . Select “Other $”,
press . You will see that 5,200 Yen is
ENTER
ENTER
converted into $40.
●Metric Conversion
Example: Kilometers to Miles
Input value (5) on calculator and press .
1. Select “Metric” and then press .
2. Select “Length” and then press .
3. Select “kilometer” and then press .
4. Select “Mile” and then press .
ENTER
ENTER
ENTER
ENTER
46
Currency Converter
$ Other Other $ Set
OC $
OC 5,200.
OC 5,200. =
$40.
Select a Converter
Money Metric Clothing
Temperature Length
Area volume Weight
Centimeter Inch Feet
Yard Meter Kilometer
Yard Meter Kilometer
Mile
5. Enter the number you wish to convert.
6. Press .
ENTER
(5 Kilometers = 3.10685596119 miles.)
5. km
5. km =
3.10685596119 mi.
km mi
●Clothing Size Chart
In foreign countries you can easily check the clothing
sizes: shirts, shoes, hats etc. for men, women and
children.
1. Select “Clothing” and then press .
ENTER
2. Select a category from Men, Women or Children and
then press .
3. Select a sub- category and then press .
ENTER
ENTER
4. Use to see more sizes.
[ Categories of the Clothing Size Chart ]
Men: (Suits, Trousers, Overcoats, Pullovers) (Socks) (Shoes) (Shirts) (Hats)
Women: (Blouses, Pullovers) (Dresses, Coats, Suits, Skirts, Trousers) (Shoes) (Stockings)
Children: (Dresses, Coats, Suits, Skirts, Trousers - Girls and Boys) (Shoes - Girls and Boys) (Most
Clothing - Girls and Boys)
47
Select a Converter
Money Metric Clothing
Clothing Sizes
Men Women Children
Blouses Pullovers
Dresses Coats Suits
Amer. Brit. EU
8 30 36
Page 27

Calculator
Time and Calendar
You can switch between the calculator/conversion display and the time display by
pressing .
TIME CALC
●Keys and their Functions
CLR
(CE/C)– Clears last entry with one press, clears all with two presses.
1 ~ 0 – Number input keys. +, –, x, ÷ – Mathematical function keys.
MC
– Clears memory .
M -
– Subtract number from memory . +/– – Changes sign of number. % – Percentage key.
* The number stored in the memory is held when the calculation is changed, the mode is
switched or the power is turned off.
MR – Recalls number from memory.
M+ – Enters number into memory.
●Correcting and Clearing Entries
If you enter an incorrect number, press (CE/C) to clear the entire displayed
number, then re-enter the correct number. If you press an incorrect mathematical
function key, simply press the correct function key afterwards.
If “ E ” appears in display:
The answer to a calculation is more than 12 digits. / The memory is full.
0 has been used as a divisor.
Press (CE/C) to remove the “ E ” and continue.
CLR
CLR
48
●Setting the Home Time
.
ENTER
SET
1. Press .
2. Press or to select “Home Time...” then
❍Setting the Time and Calendar
1. Select “Time and Date...” and then press .
* Press to return.
2. You can use either or to move to the
3. Use and to adjust the setting. The setting
4. Press to finish.
*To reset the second “0”, move cursor to the sector
CLR
sector to be set.
changes continuously if the key is held in.
TIME CALC
and press .
ENTER
ENTER
49
Home time ...
World Time ...
Time and Date ...
Format ...
2002
Th, Aug 1
2002
Th, Aug 1
12
6:18
14
6:18
Page 28

❍Setting the Format of the calendar display
1. Select “Format...” and then press .
2. Press or to change the format of the
calendar display.
Day of week – Month, Date – 12hr.
Day of week – Month, Date – 24hr.
Day of week – Date, Month – 12hr.
Day of week – Date, Month – 24hr.
ENTER
2002
Th, Aug 1
6:18
❍Setting the daylight saving time
1. Select “DST...” and then press .
2. Press or to select ON or OFF.
• Daylight savings time (DST) is for use exclusively with the City set for your Home
Time and/or World Time. If you are going to use the clock to see the time in different
parts of the world besides the Home Time and World Time City, it is suggested to
manually set the time/hour for the Home Time/World Time instead of using the DST
function.
ENTER
Home Time DST
OFF ON
20
AM
❍Setting the city of the home time
1. Select “City...” and then press .
2. Press or to select a city.
* If you enter the first letter of a city name, the first
city that begins with that letter will appear.
ENTER
●Setting the World Time
1. Press .
2. Press or to select “World Time...” then
SET
ENTER
.
You can set the city and the daylight saving time.
●Displaying the Time
1. Press to display the Home Time.
2. Press or to display the time of the
* If you enter the first letter of a city name, the time of
TIME CALC
selected city of the world time.
the first city that begins with that letter will appear.
New York
Norfolk Isl.
World Time...
Password...
World Time DST
OFF ON
Frankfurt
Geneva
2002
Th, Aug 1
Frankfurt
Th, Aug 1
7:23
1:23
30
AM
30
AM
50
51
Page 29

Setting Function
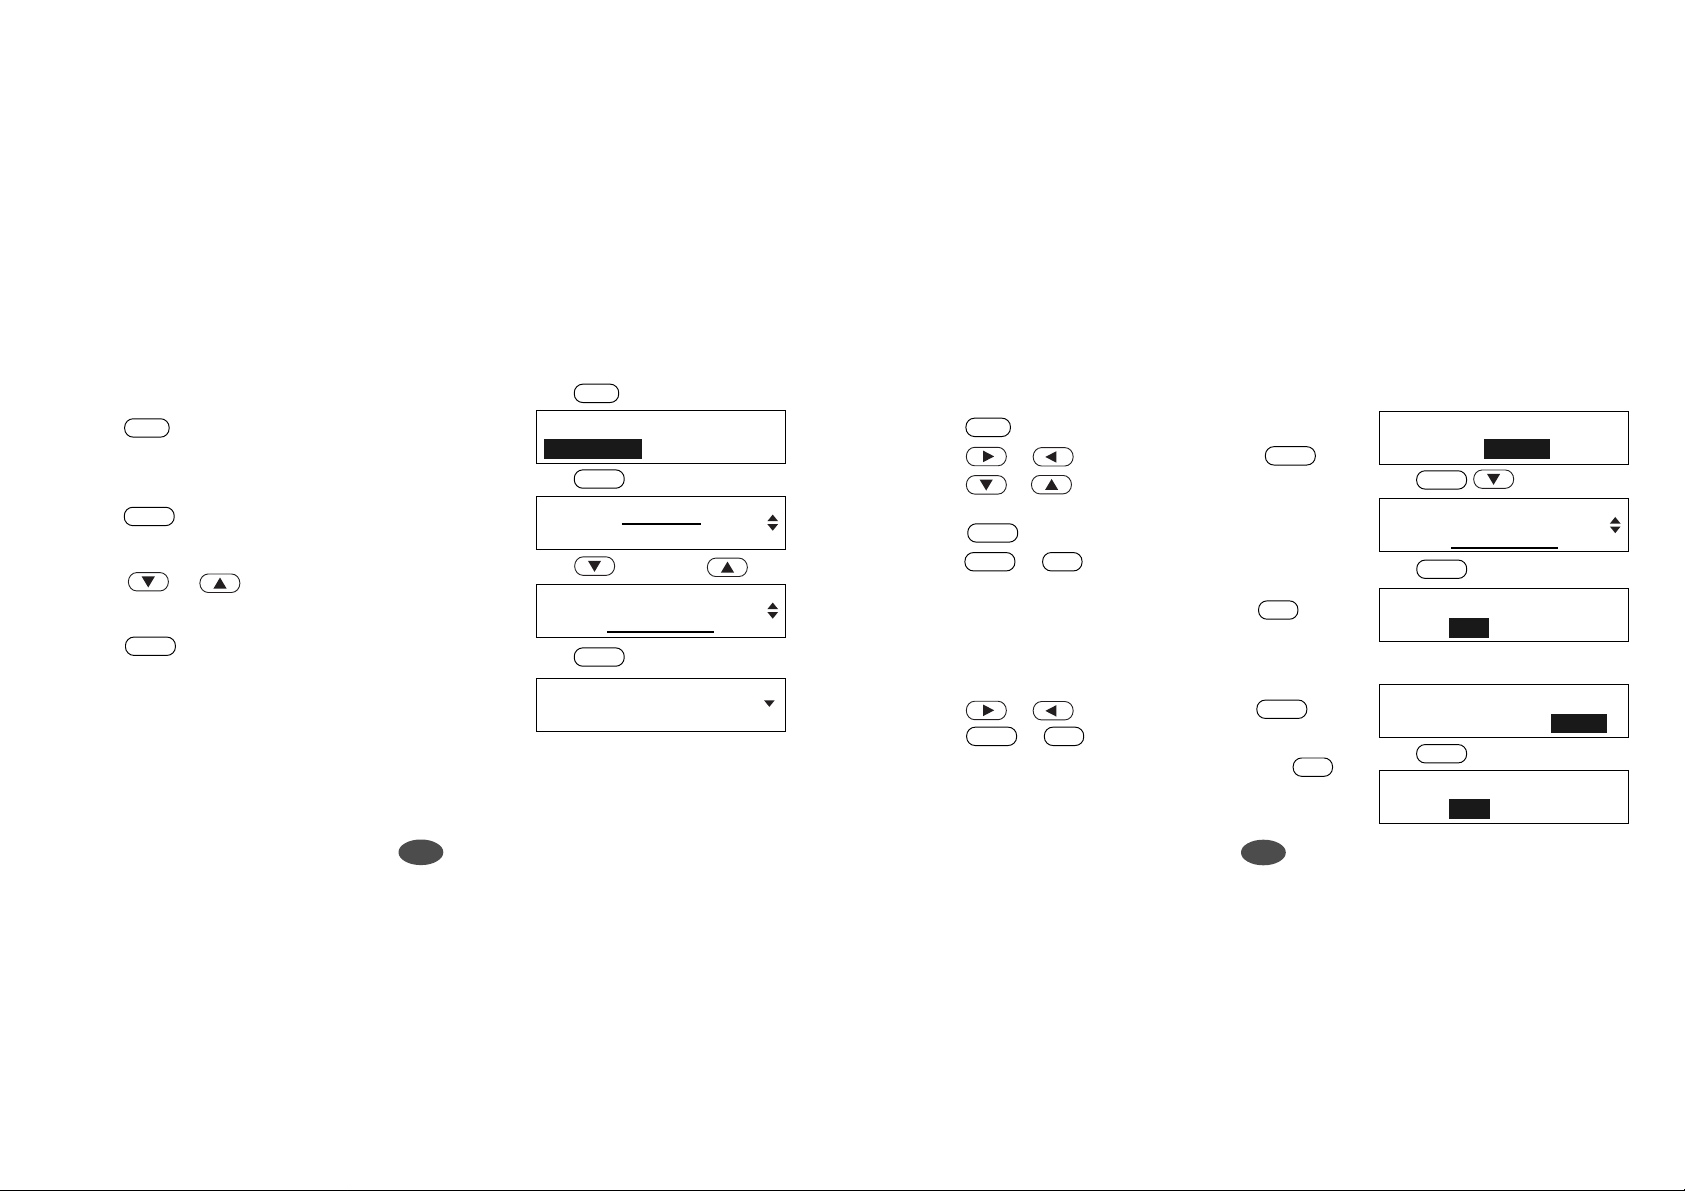
1. Press .
2. Press or to select the menu.
●Demo Message
1. Select “Demo Message...” and then press .
2. Press or to select Disable or Enable.
3. Press .
●LCD Contrast
1. Select “LCD Contrast...” and then press .
2. You can use either or ( or
3. Press .
SET
ENTER
ENTER
ENTER
) to adjust the contrast of the display.
ENTER
Demo Message...
LCD Contrast...
Demo Message
Disable Enable
Demo Message...
LCD Contrast...
●User Word List
If you have compiled a list within the EZ-Learn function (user’s word list), you can
choose the frequency level for the words in this list to appear in the Games.
ENTER
.
SET
User Word List...
Home Time...
1. Press . Select “User Word List...” and then press
2. Press or to select the frequency level.
3. Press .
ENTER
Use V ery Often
Use V ery Seldom
●Password
You can limit access to the entry of the Data Bank or the data of the Expense Manager.
❍Entering a Password
1. Select “Password...” and then press .
2. Select “Set” and then press .
ENTER
ENTER
Password...
Demo Message...
Password
Set Clear
52
53
Page 30

3. Enter a password of up to four characters and then
ENTER
press .
4. Enter the password again and then press .
ENTER
• Once you set the password, the unit will ask the
password in the Data Bank mode or the Expense
Manager mode.
• Be sure to write down your Password. Without it,
there is NO way to review the confidential data.
Enter New Password.
* * * *
Confirm Password.
* * * *
Password Enabled.
❍Deleting a Password
1. Select “Password...” and then press .
2. Select “Clear” and then press .
3. Enter the old password and then press .
ENTER
ENTER
ENTER
●Games Level
See page 28.
Password Disabled.
❍Changing a Password
1. Select “Password...” and then press .
2. Select “Set” and then press .
ENTER
3. Enter the old password and then press .
4. Enter a new password of up to four characters and
then press .
ENTER
5. Enter the password again and then press .
ENTER
ENTER
ENTER
54
Enter Old Password.
* * * *
●Home Time
See page 49.
●World Time
See page 51.
55
Page 31

Help function
An explanation of how to operate the various functions is simply explained on the
screen at each operational stage in each mode.
Example:
1. Press .
2. Press .
*The can be pressed at all sections of the
*You can stop display of the explanation by pressing
HELP
HELP
TR2250.
any of the keys.
type it and press ENTER.
Translator
Enter a Word or Phrase:
To translate a word,
56
Proper Use
To ensure a long and useful life from this precision electronic instrument, do not expose
the unit to extreme heat or cold, water or other liquids (including spray cleaners) or
extreme pressure (such as carrying in a back pocket).
Doing any or all of these things may render the unit inoperable and invalidate the warranty .
Specification
Display: LCD 16 x 112 dot matrix
Temperature range: 32°F to 104° F (0° C to +40° C)
Battery: Lithium CR2032 x 1 pc.
Battery life: approx. 800 hours (continuous use)
Automatic power off: approx. 3 minutes
Size: 106 (W) x 76 (H) x 14.6 (D) mm
Weight: approx. 68g (including battery)
* Specifications may change without notice due to our policy of continual product
improvement.
* The life of the battery will vary depending on how the unit is used.
57
Page 32

Changing Battery
The battery needs to be changed as soon as display becomes dim.
Make sure that power is switched off before replacing the battery.
• Removing the battery deletes all data stored in the
Data Bank mode, the Expense Manager mode and
the EZ-Learn mode.
• Remember to keep written copies of the important
data.
1. Turn the unit over.
2. Remove the screw and the battery cover.
3. Remove old battery.
4. Insert one new CR2032 battery with “+” side facing
you.
5. Replace the battery cover and the screw.
6. Press the "RESET" button.
58
CAUTION
• The battery may pose a choking hazard to small children.
•Keep the battery and product away from small children.
• Do not expose the battery to open flame or intense heat.
●Resetting
If the unit does not operate properly after the battery has been replaced, or if at any
time the unit fails to operate properly;
1. Press the “RESET” button on the front of the unit.
(This will reset the time display.)
2. The message “Clear Databank Memory ?” will
appear.
Press (No).
If you press (Yes), all data stored in memory
will be deleted.
The contrast adjustment display will appear. (See page 9.)
N
Y
59
Clear Databank Memory?
No Yes
Page 33

ONE YEAR LIMITED WARRANTY
1. This product is warranted to be free from defects in material or workmanship for one
year from date of purchase.
2. Repair (or at our discretion, replacement) will be made on any unit which proves to be
defective during this period. Carefully pack the unit along with proof of purchase and a
completed copy of the Warranty Record which you will find in this manual. Postage,
insurance and shipping costs incurred in returning the product for warranty service are
your responsibility.
3. This warranty does not extend to units which have been subjected to misuse, abuse,
neglect, accidents or to units that have been used in violation of the operation
instructions. If in our judgement, the unit shows evidence of having been altered,
modified or serviced without our authorisation, it will be ineligible for service under this
warranty.
4. Battery replacement and broken Liquid Crystal Displays are not covered under
this warranty.
Seiko Instruments Inc. shall not be liable for any direct, consequential or incidental
damages arising out of use of this product. Seiko Instruments Inc. shall not be
responsible for damages to this unit as a result of a natural or unnatural disaster, except
to the extent prohibited by applicable law. Any implied warranty of merchantability or
fitness for a particular purpose on this product is limited in duration to the duration of
the warranty.
This warranty gives you specific legal rights, and you may also have other rights which
vary from state to state.
60
61
Page 34

INDICE Español
Muchas gracias por comprar el TR2250. Tenga a bien leer estas
instrucciones detenidamente antes de empezar a utilizar el aparato.
El TR2250 ofrece las siguientes funciones: traductor, inflexiones,
visualización de frases, EZ-Learn, juegos de palabras, banco de datos,
gestor de gastos, conversión, calculadora, hora y calendario.
Al extraer la pila se perderán todos los datos almacenados en el modo de
Banco de datos, de Gestor de gastos y de EZ-Learn.
Tenga a bien mantener un registro escrito de los datos importantes.
62
Funciones y características..................64
Teclas y sus Funciones ........................68
Preparativos para el uso de la unidad..70
1.Reposición .....................................70
2.Cómo ajustar el contraste.............71
3.Función de demostración ..............71
Traductor ..............................................72
Procedimiento básico .......................72
Función de selección ........................76
Función de inflexión .............................77
Función de visualización de frases ......85
Búsqueda por palabra clave .............85
Función de aprendizaje “EZ-Learn” .....87
Juegos de palabras..............................90
Hangman (Juego del Ahorcado).......91
User Hangman (Hangman de usuario) ..
93
Against the Clock (Contra el reloj) ....94
Memory (Memoria) ...........................94
Translation (Traducción)....................95
Banco de datos ....................................96
Gestor de gastos................................101
Conversión .........................................107
Conversión monetaria.....................108
Conversión de unidades de medida
Cuadro de tamaños de las prendas
Calculadora ........................................110
Hora y calendario ...............................111
Cómo configurar las funciones...........114
Función de ayuda...............................118
Uso Correcto / Especificaciones ........119
Cambio de la pila ...............................120
Reposicion .........................................121
GARANTIA LIMITADA DE UN AÑO.............122
63
...108
...109
Page 35

Funciones y características
1. T raductor
* La unidad proporciona más de 800.000 palabras.
* La unidad comprobará si la palabra introducida es una palabra inglesa o una palabra
española.
*Visualización secuencial y por orden alfabético de los vocablos contenidos en el
diccionario.
* Seleccione la palabra a traducir para poder confirmar su significado en su idioma.
2. Función de inflexión
*Visualización simultánea del pronombre personal, el verbo en su forma alterada
correspondiente y su traducción.
*La unidad también provee formas de inflexión de adjetivos y sustantivos.
3. Función de visualización de frases
* La unidad provee más de 5.500 frases.
* Se podrán buscar frases y diálogos simples y visualizar sus correspondientes
traducciones.
* Búsqueda por palabra clave que permite localizar frases y diálogos por las palabras que
contienen.
64
4. Función de aprendizaje EZ-Learn
*Esta función toma palabras de la lista creada por usted y las presenta para que sean
traducidas.
* Es posible guardar hasta 100 palabras.
5.Juegos de palabras
* Puede probar hasta 5 juegos de palabras diferentes en cualquiera de los tres niveles de
dificultad.
6.Banco de datos
* Puede almacenar cualquier tipo de información personal, hasta 100 entradas.
* Puede guardar múltiples nombres, números de teléfono/fax, direcciones, direcciones de
correo electrónico y apuntes.
7.Gestor de gastos
* Puede guardar información sobre sus gastos, hasta100 registros.
* La unidad puede visualizar el importe total por fecha, o por categoría.
65
Page 36

8.Conversión
* La función de conversión le permite convertir divisas y unidades métricas de longitud,
superficie, volumen, peso, capacidad, potencia, y temperatura.
* En los países extranjeros podrá verificar fácilmente los tamaños de las prendas: camisas,
guantes, zapatos, etc. para caballeros, damas y niños.
9.Calculadora
* Le permite sumar, restar, multiplicar y dividir números de hasta 12 dígitos.
*Se incluyen las funciones de memoria y de porcentaje.
10.
Hora y calendario
*El "hora mundial" le permite saber la hora de más de 100 ciudades del mundo. Puede
ajustar "hora local" de su ciudad o región.
11.
Función de ayuda
Aparecerá en pantalla una breve descripción sobre cómo operar las diversas funciones
en cada una de las etapas operacionales de los diversos modos.
12.
Función de demostración
En el display demostrativo se explican los detalles de la unidad.
Translation data and morphology by © SYSTRAN Software Inc.
Phrases © Oxford University Press 2001
is a registered trademark of Seiko Corporation.
“EZ-Learn” Teaching System is a registered trademarks of Seiko Instruments USA Inc.
is a registered trademark of Seiko Instruments Inc.
© 2002,2005 Seiko Instruments Inc.
Cómo ajustar la hora local
Cuando utiliza la unidad por primera vez, deberá ajustar la hora local.
Para los detalles, consulte la página 111.
66
67
Page 37

Teclas y sus Funciones
1 Conexión y desconexión
2 Selección del modo Traductor
3 Selección del modo de Visualización
de frases.
4 Selecciona el modo de Banco de datos.
5 Selecciona el modo de Gestor de gastos.
6 Selecciona el modo Juegos de palabras.
7 Selecciona el modo EZ-Learn.
8 Selecciona el modo de hora y
calculadora.
9 Activa la función de ayuda.
10 Botón de reposición
11 Activa la Cómo configurar las
funciones
12 Se utiliza como sugerencia en el modo
de juego de palabras.
Cambie la forma en la función de
inflexión.
• La unidad se desconectará automáticamente cuando se la deje sin usar durante unos 3
minutos.
13 Selecciona el artículo sobre la pantalla.
Tecla de borrado en retroceso
Cambie el tiempo en la función de
inflexión.
14 Para el desplazamiento secuencial
ascendente o descendente a lo largo de
las listas contenidas en la memoria de
la unidad
Cambie la persona en la función de
inflexión.
15 Selecciona el artículo sobre la pantalla.
Se introduce un espacio en blanco por
cada pulsación.
Cambie el tiempo en la función de
inflexión.
16 Ejecuta las funciones.
17 Borra la última entrada.
18 Teclas de entrada de letras y números
68
69
Page 38

Preparativos para el uso de la unidad
1.Reposición
1. Antes de usar la unidad, pulse el botón de reposición
en la parte delantera de la unidad.
Para pulsar el botón RESET, utilice un clip de papel,
dado que algunas lapiceras y lápices son
excesivamente gruesos.
2. Aparecerá el mensaje “Clear Databank Memory ?”
Pulse o (Yes).
ENTER
(Para los detalles, consulte la página 121.)
Después de reinicializar, aparecerá el display de
ajuste del contraste.
Y
Clear Databank Memory?
No Yes
2.Cómo ajustar el contraste
1. Podrá ajustar el contraste utilizando o
( o ).
2. Pulse para terminar.
* Si desea volver a ajustar el contraste del display,
ENTER
Aparece un display demostrativo.
consulte “Cómo configurar las funciones”. (Véase
página 114)
3.Función de demostración
El display demostrativo empezará a explicar los
detalles de la unidad.
*Si desea interrumpir la demostración, pulse cualquier
tecla.
* Si desea desactivar la función de demostración,
consulte “Cómo configurar las funciones”. (Véase
página 114)
Welcome to the
SEIKO English/Spanish
Translator.
...
70
71
Page 39

Traductor
Procedimiento básico
1. Pulse .
2. Introduzca la palabra.
Ejemplo: language
3. Pulse .
ENTER
La unidad comprobará si la palabra introducida es
una palabra inglesa o una palabra española.
Translator
Enter a Word or Phrase:
language
↓
Enter a Word or Phrase:
language_
ENTER
↓
Base Form
Aparecerá la marca cuando no haya espacio
suficiente para visualizar todas las traducciones.
4. Pulse .
* Si pulsa después que se muestren todas las
traducciones correspondientes, se visualizará la
siguiente palabra de encabezamiento junto con su
traducción. (Véase página 75.)
Pulse si desea volver a la palabra introducida
originalmente.
↓↑
idioma [m], lengua [f],
lenguaje [m].
↓↑
languid [adj]
lánguido.
Entonces, en la línea superior se visualizará la
palabra ingresada, junto con una parte de la oración.
La(s) traducción(es) correspondiente(s), junto con
una parte de la oración, será visualizada en la línea
inferior.
72
Searching ...
language [n]
idioma [m], lengua [f],
●Partes de la oración
[adj] adjetivo, [adv] adverbio, [v] verbo, [n] sustantívo, [pron] pronombre,
[prep] preposición, [conj] conjuncíón, [art] artículo, [ijec] interjección,
[pn] nombre propio, [m] masculino, [f] femenino, [m/f] masculino y femenino,
[phr] frase, [ord] ordinal, [num] número, [av] verbo auxiliar
73
Page 40

●Introducción y corrección de letras
* Se pueden introducir hasta 30 letras.
* Para introducir letras mayúsculas o letras en español con acento, utilice o
después de pulsar la letra minúscula correspondiente.
* Para introducir espacios, utilice .
* Para corregir, utilice .
* La pantalla puede borrar se íntegramente pulsando .
●Palabras mal deletreadas o que no
están en memoria
Si la palabra introducida no se encuentra en el
diccionario, la pulsación de hace que se
visualice aquella palabra cuya grafía más se asemeje
al vocablo introducido.
Ejemplo: tri
ENTER
CLR
Enter a Word or Phrase:
tri_
ENTER
↓
No words found.
Enter a Word or Phrase:
trial_
●Búsqueda de palabras
*Tanto en inglés como en español, las listas de
vocablos están por orden alfabético.
Podrá desplazarse a través de la lista de palabras
mediante o .
Pulse para avanzar.
Pulse para retroceder.
manzana [f].
↓↑
aplicable.
↓↑
Ejemplo: apple
aplicación [f], solicitud
* La unidad muestra solamente la forma básica mediante búsqueda por desplazamiento.
* Los homónimos de ortografía idéntica se visualizan uno a continuación del otro.
* Las palabras con vocales acentuadas u otros símbolos fonéticos se memorizan por orden
alfabético sin dichos símbolos y quedan a continuación de las demás palabras.
apple [n]
applicable [adj]
application [n]
74
75
Page 41

Función de inflexión
●Función de selección
La palabra de la traducción puede ser seleccionada para que usted pueda confirmar su
significado en su idioma.
Ejemplo: friend
1. Pulse para seleccionar la primera palabra que
desea escoger.
Un cursor parpadeante aparecerá encima de la
palabra seleccionada.
Seleccione la palabra deseada utilizando o .
2. Pulse .
ENTER
Aparecerá la traducción de “amiga”.
76
amiga [f], amigo [m].
↓
amiga [f], amigo [m].
↓
friend [n], playmate [n],
friend [n]
friend [n]
ENTER
amiga [f]
•Presentación de inflexiones verbales después de visualizada la traducción
utilizando la función de traducción
1. Pulse .
2. Introduzca la palabra.
Ejemplo: go
3. Pulse .
ENTER
Enter a Word or Phrase:
go_
ENTER
↓
Base Form
Se visualizarán los resultados.
go [v]
4. Pulse .
ENTER
Se visualiza el [pronombre + verbo] de la primera
andar, ir, marchar.
ENTER
↓
persona del singular.
Inflections
* Posición [A-1] del Cuadro de matrices de inflexiones
verbales (Véase página 79.)
Yo ando, Yo voy, Yo
I go
77
Page 42

5. Para ver la persona y el tiempo, pulse de nuevo
ENTER
.
Se visualiza la persona y el tiempo.
Entonces la pantalla volverá al estado anterior.
• Es posible cambiar el tiempo.
Para cambiar el tiempo, utilice y .
6. Si pulsa tres veces, la visualización se moverá a
la posición de [A-4] en el cuadro. (Véase página 79.)
La cantidad de inflexiones disponibles depende de las
inflexiones existentes para una determinada palabra.
• Es posible cambiar la persona.
Para cambiar el pronombre personal, utilice y
.
7. Si pulsa cuatro veces, la visualización se
moverá a la posición de [C-4] en el cuadro.
La cantidad de inflexiones disponibles depende de las
inflexiones existentes para una determinada palabra.
Present Indicative
1st Singular
I go
Yo ando, Yo voy, Yo
I will go
Yo andaré, Yo iré, Yo
You will go
Usted andará, Usted irá,
Cuadro de matrices de
inflexiones verbales
Sing. = Singular
Plur. = Plural
Masc. o M = Masculino
Fem. o F = Femenino
Fam. = Familiar
Primera Sing. M&F yo
Segunda Sing. Fam M&F tú
Segunda Sing. For M&F usted
Tercera Sing. Masc. él
Tercera Sing. Fem. ella
Tercera Sing. M&F él / ella
Primera Plur. M&F
Segunda Plur. Fam. M&F
Segunda Plur. For M&F
Tercera Plur. Masc. ellos
Tercera Plur. Fem. ellas
For. = Formal
Perf.=Perfecto
Ind. = Indicativo
Subj. = Subjuntivo
A
B
C
D
E
F
nosotros
vosotros
ustedes
G
H
J
K
Indicativo Presente
Pretérito
Indicativo Imperfecto
Futuro
Presente Progresivo
Pretérito Progresivo
Potencial Simple
Imperativo
Ind. Presente Perf.
Ind. Pretérito Perf.
Pretérito Anterior
Futuro Perfecto
Potencial Compuesto
Subjuntivo Presente
Subjuntivo Pretérito
1234567891011121314151617
A-1
I
A-4
C-4
D-3
Subj. Presente Perf.
Subj. Pretérito Perf.
78
79
Page 43

* Si pulsa desde los tiempos [17], la pantalla muestra el tiempo [1]. Del mismo
modo, si desde el tiempo [1] pulsa , la pantalla muestra el tiempo [17].
* Si pulsa desde la persona [K], la pantalla muestra la persona [A]. Del mismo
modo, si desde la persona [A] pulsa , la pantalla muestra la persona [K].
* Para esta palabra, no hay ni persona ni tiempo para [A-8].
9. Podrá volver a la forma básica introducida pulsando
CLR
.
CLR
↓↑
Base Form
go [v]
andar, ir, marchar.
ENTER
• Es posible cambiar la forma.
8. Si desea ver otras formas (interrogativa y negativa),
podrá hacerlo pulsando .
* Si pulsa desde la forma negativa, la pantalla
?
?
volverá a la forma normal.
80
?
↓
¿
Usted no andará, Usted
Usted andará, Usted irá,
Will you go?
Andará usted?, ¿Irá
?
↓
You will not go
?
↓
You will go
*Si ingresa un verbo y busca inflexiones, cambio del
tiempo, de la persona y de la forma por medio de una
operación de tecla, esto se realizará desde la posición
original (A-1).
Ejemplo: eat
81
eat
↓
Enter a Word or Phrase:
eat_
ENTER
↓
eat [v]
comer.
ENTER
↓
I eat
Yo como.
Page 44

•Presentación de inflexiones de verbos introducidos desde el teclado, junto con el
pronombre personal
1. Pulse .
2. Introduzca la palabra.
Ejemplo: he was going
3. Pulse .
ENTER
Posición [D-3] del Cuadro de matrices de inflexiones
verbales (Véase página 79.)
Enter a Word or Phrase:
he was going_
ENTER
↓
Inflections
He was going
Él andaba, Él iba, Él
↓↑
*En este caso, el cambio del tiempo y de la persona
mediante una operación de tecla será realizado desde
Él andará, Él irá, Él
He will go
esta posición.
* Pulse para ver la forma básica de la inflexión
CLR
introducida.
• Usted puede ingresar la forma básica o bien la forma declinada de un adjetivo.
1. Pulse .
2. Introduzca la palabra.
Ejemplo: best
3. Pulse .
ENTER
Enter a Word or Phrase:
best_
ENTER
↓
Inflections
Aparecerá la inflexión traducida.
best
el más bueno.
* En este caso, el cambio de la inflexión por medio de
una operación de tecla tendrá lugar desde esta
posición.
* Pulse para ver la forma básica de la inflexión
CLR
introducida.
↓↑
good
bueno.
↓↑
good
buena.
82
83
Page 45

• Es posible introducir la forma singular o plural de
un sustantivo.
1. Pulse .
2. Introduzca la palabra.
Ejemplo: tree
3. Pulse .
3. Pulse .
ENTER
ENTER
Puede cambiar la forma singular o la forma plural
utilizando o .
* Pulse para ver la forma básica de la inflexión
CLR
introducida.
Función de visualización de frases
Enter a Word or Phrase:
tree_
ENTER
↓
Base Form
tree [n]
árbol [m].
ENTER
↓
Inflections
tree
árbol.
↓↑
trees
árboles.
Búsqueda por palabra clave
Consiste en la localización de frases por las palabras que contienen.
1. Pulse .
2. Introduzca la palabra clave desde el teclado.
Ejemplo: taxi
3. Pulse .
Se visualiza la primera frase que contiene la palabra
clave.
PHRS
ENTER
Translator
Enter Phrase or a Word:
taxi
↓
Enter Phrase or a Word:
taxi_
ENTER
↓
Phrases
Is there a taxi
stand nearby?
84
85
Page 46

4. Seleccione la frase utilizando y .
Cuando no se encuentran más frases con la palabra
clave, se visualiza el mensaje “End of Phrase List”.
* Una vez que se introduzca la palabra en el traductor,
podrá buscar las frases desde el modo de traducción.
Pulse una vez para que se visualicen los
PHRS
resultados traducidos.
*Algunas frases requieren más entradas específicas.
Por ejemplo, si teclea la palabra “rent” (alquilar),
podrá obtener hasta 14 resultados conteniendo la
palabra “rent”. Supongamos que desea alquilar una
raqueta de tenis, pero la frase traducida no está
incluida en las 14 entradas listadas. En este caso
deberá ser más específico y teclear las palabras “rent
tennis racket” (alquilar una raqueta de tenis). Si ha
sido más específico con su entrada pero sigue sin
obtener resultados, significa que no hay frases
disponibles.
Función de aprendizaje “EZ-Learn”
↓↑
stand nearby?
¿Hay una parada de taxis
↓↑
¿Hay una parada de taxis
cerca?
↓↑
Please order a taxi
for me.
taxi [n]
taxi [m].
PHRS
↓
Is there a taxi
stand nearby?
●Creación de listas de palabras
Para poder utilizar EZ-LEARN, primero tendrá que crear una lista de palabras
utilizando la función de traducción.
Cuando se visualice la palabra ingresada o la
traducción que se desea añadir, pulse .
Aparecerá el mensaje “Word has been added to the
EZ-Learn list.” y la palabra será añadida en su lista.
* La unidad puede almacenar palabras compuestas por 3 a 14 letras.
*La memoria de la unidad puede almacenar hasta 100 palabras. Cuando intente añadir
más, aparecerá "Sorry, EZ-Learn memory is full".
* Si la alabra a añadir ya está contenida en la memoria, aparecerá el mensaje “Word is
already in the EZ-Learn list”,
EZ-LN
language [n]
idioma [m], lengua [f],
EZ-LN
↓
Word has been added
to the EZ-Learn list.
86
87
Page 47

●Cómo encontrar una palabra
1. Pulse .
2. Pulse para seleccionar “Bookmarks”.
3. Pulse o para seleccionar la palabra.
4. Pulse .
EZ-LN
Un cursor parpadeante en Favoritos indica que esa es
su selección.
ENTER
ENTER
Se visualizará la traducción de la palabra
seleccionada.
88
EZ-LN
EZ-Learn
Bookmarks Delete Erase
ENTER
↓
apple [n]
language [n]
↓↑
apple [n]
language [n]
●Borrar una palabra
1. Pulse .
2. Pulse o para seleccionar “Delete” y luego
pulse .
3. Pulse o para seleccionar la palabra que
desea borrar.
4. Pulse .
5. Pulse o para seleccionar “Yes”. La
palabra seleccionada será borrada de la lista de
palabras.
* Si decide no borrar la palabra, pulse para
ENTER
↓
language [n]
idioma [m], lengua [f],
seleccionar “No”.
●Borrar todas las palabras
1. Pulse o para seleccionar “Erase” y luego
pulse .
2. Pulse o para seleccionar “Yes”.
* Si decide no borrar todas las palabras, pulse
para seleccionar “No”.
EZ-LN
ENTER
ENTER
ENTER
ENTER
ENTER
EZ-Learn
Boolmarks Delete Erase
ENTER
↓
apple [n]
language [n]
ENTER
Y
N
Y
N
↓
Are you sure?
Yes No
EZ-Learn
Boolmarks Delete Erase
ENTER
↓
Are you sure?
Yes No
89
Page 48

Juegos de palabras
Puede probar hasta 5 juegos de palabras diferentes en cualquiera de los tres niveles de
dificultad.
3. Pulse para acceder al juego seleccionado.
ENTER
*Para seleccionar un juego, puede presionar la primera letra de cualquier título del juego.
●Cómo ajustar el nivel del juego
1. Pulse .
2. Pulse o para seleccionar “
3. Defina el nivel pulsando o .
4. Pulse para terminar.
SET
Games Level ...
y luego pulse .
ENTER
Puede seleccionar entre “Beginner” (principiante),
“Intermediate” (intermedio) y “Advanced”
(avanzado).
ENTER
●Cómo seleccionar un juego
1. Pulse .
2. Seleccione el juego deseado pulsando o .
GAME
90
Demo Message...
LCD Contrast...
↓↑
”
ENTER
↓
x 2
LCD Contrast...
Games Level...
Beginner
Intermediate
Hangman
User Hangman
Hangman (Juego del Ahorcado)
Este es un juego que consiste en acertar una palabra misteriosa cuya ortografía
desconoce mediante un número limitado de intentos.
1. Seleccione “Hangman”.
El idioma de la palabra misteriosa será cambiada
alternativamente.
El número de letras de la palabra misteriosa se indica
mediante signos de interrogación.
* El primer número de la esquina izquierda indica el
número de letras correctas introducidas. ( 0/8 )
* Los intentos a su favor se indican mediante el
segundo número de la esquina derecha. ( 0/8 )
91
Guess this English Word.
???? 0/8
Page 49

2. Cuando se introduzca una de las letras de la palabra
misteriosa, el signo de interrogación será
?p?? 1/8
reemplazada por la letra acertada.
* Para omitir la pregunta visualizada, pulse .
* Si pulsa , se visualizarán todas las letras. Esto será contado como una
ENTER
CLR
pérdida.
*Cada vez que pulsa , se visualizará una letra como sugerencia.
?
*El número de intentos a su favor disminuirá
progresivamente cada vez que introduzca una letra
incorrecta.
?p?? 1/7
u
3. Si se introducen todas las letras de la palabra antes de
utilizar el número de intentos a su favor, aparecerá un
mensaje felicitándole por haber ganado, y será
Won:1 Lost:0
open
contado en la columna “Won”. Luego se visualizará
la siguiente palabra misteriosa.
4. Si no adivina la palabra antes de usar todos los intentos a su favor o si utiliza para
sugerencia o a mitad del juego, se visualizará “Sorry, you lost” y será contado en
ENTER
?
la columna “Lost”.
92
User Hangman (Hangman de usuario)
Es un juego de ahorcado que consiste en utilizar las palabras seleccionadas por usted.
1. Seleccione “User Hangman”.
2. Escriba la palabra.
3. Pulse .
ENTER
* El procedimiento es el mismo que el empleado en Hangman Game.
[Consejo para los padres]
Esta es una manera divertida de ayudar a sus hijos a aprender palabras nuevas de una
lista o a realizar sus tareas. Seleccione el nivel apropiado, introduzca secretamente una
palabra, y luego ayúdeles a escribir correctamente la palabra misteriosa.
93
Enter a Word or Phrase:
beat_
???? 0/8
Page 50

Against the Clock (Contra el reloj)
Las letras de la palabra misteriosa se visualizan una tras otra, a intervalos regulares.
Introduzca la palabra misteriosa antes que sea visualizada completamente.
1. Seleccione “Against the Clock”.
El idioma de la palabra misteriosa será cambiada
alternativamente.
2. El juego se inicia en cuanto usted introduce una letra.
Las letras ocultas se irán visualizando una por una.
* El procedimiento es el mismo que el empleado en
Hangman Game.
Guess this Spanish Word.
???? 0/8
???? 0/8
2. Introduzca correctamente las letras de la palabra que
acaba de desaparecer de la pantalla.
3. Pulse .
ENTER
Translation (Traducción)
1. Seleccione “Translation”.
La unidad mostrará la palabra del juego en la línea
superior, y las traducciones en la línea inferior.
2. Seleccione la traducción correcta pulsando o
para posicionar el cursor sobre su selección.
Enter your guess
azul_
todo [adv]
keen, all, hunt, taper, wit.
todo [adv]
keen, all, hunt, taper, wit.
Memory (Memoria)
Escriba correctamente las palabras visualizadas momentáneamente.
1. Seleccione “Memory”. Las palabras serán
visualizadas durante aproximadamente un segundo.
94
azul
3. Pulse .
ENTER
95
Page 51

Banco de datos
Puede almacenar cualquier tipo de información personal, hasta 100 entradas.
Puesto que los datos se pierden al cambiar la pila, se recomienda mantener un
registro escrito de cualquier información ingresada al TR2250.
●Selección de la función
1. Pulse .
2. Seleccione la función pulsando o .
3. Pulse para acceder a la función seleccionada.
* Para seleccionar la función, podrá pulsar la primer
DATA
ENTER
letra del nombre de cualquier función.
●Introducción de datos
1. Seleccione “New” (Nuevo).
Se visualizará el primer campo, “Name” (Nombre).
Ingrese un nombre.
2. Pulse .
ENTER
Se visualizará el segundo campo, “Tel.1”.
Ingrese un número de teléfono.
View New Search Edit
↓↑
View New Search Edit
Delete All-Clear
Name: Brown
Tel.(1): 123-4567
Data Bank
_
3. También podrá ingresar datos en los campos de;
Tel.(2), Fax, Address, E-mail y Memo.
* Si no hay necesidad de ingresar de un determinado
campo, pulse . Aparecerá el segundo campo.
* Puede volver al campo anterior pulsando .
ENTER
CLR
* Puede volver al menú del Banco de datos pulsando
DATA
.
4. Pulse .
ENTER
Se almacenarán las entradas nuevas.
View New Search Edit
Saving ...
Data Bank
●Introducción y corrección de letras
*Utilice o para desplazar el cursor.
* Para introducir espacios, utilice .
* Para corregir, utilice .
* Para introducir letras mayúsculas o letras en español con acento, utilice o
después de pulsar la letra minúscula correspondiente.
* Para ingresar un punto ( . ), pulse dos veces después de pulsar .
_
* Para ingresar un guión ( - ), pulse dos veces después de pulsar .
* Para ingresar símbolos ( ? ’ ! , _ @ = $ : ( ) [ ] ), utilice o después de
pulsar .
A
N
96
97
Page 52

●Encontrando una entrada
1. Seleccione “View” (Ver).
Se visualizará el nombre [Name] de las entradas en
orden alfabético.
2. Seleccione la entrada pulsando o .
*Si pulsa la primera letra del nombre que desea
examinar, la unidad seleccionará automáticamente el
primer listado que empieza con tal letra.
3. Pulse para encontrar la entrada.
4. Pulse o para cambiar el campo.
* Puede volver al menú del Banco de datos pulsando
CLR
.
ENTER
●Edición de una entrada
Brown
Clark
↓↑
Brown
Clark
ENTER
↓
Name: Clark
↓↑
Tel.(1): 987-654-3210
1. Seleccione “Edit” (Editar).
Se visualizará el nombre [Name] de las entradas en
orden alfabético.
2. Seleccione la entrada pulsando o .
3. Pulse para seleccionar la entrada que desea
editar.
4. Edite la entrada y pulse .
*Si no hay necesidad de editar de un determinado
campo, pulse . Aparecerá el segundo campo.
5. Después de editar el último campo (Memo),
aparecerá la pantalla de confirmación.
6. Pulse y luego o pulse simplemente
para seleccionar “Yes”.
* Si decide no editar la entrada, pulse o
para seleccionar “No”.
ENTER
ENTER
ENTER
Edit OK?
No Yes
ENTER
ENTERYN
98
99
Page 53

Gestor de gastos
●Borrando una entrada
1. Seleccione “Delete” (Borrar).
2. Seleccione la entrada pulsando o .
3. Pulse para seleccionar la entrada que desea
borrar.
ENTER
Delete OK?
No Yes
Aparecerá la pantalla de confirmación.
4. Pulse y luego o pulse simplemente
ENTER
para seleccionar “Yes”.
* Si decide no borrar la entrada, pulse o para seleccionar “No”.
ENTERYN
●Borrando todas las entradas
1. Seleccione “All clear” (Borrado Total).
Aparecerá la pantalla de confirmación.
2. Pulse y luego o pulse simplemente
ENTER
Y
para seleccionar “Yes”.
* Si decide no borrar todas las entradas, pulse o para seleccionar “No”.
ENTER
N
100
All Clear OK?
No Yes
Puede guardar información sobre sus gastos, hasta100 registros.
●Selección de la función
1. Pulse .
2. Seleccione la función pulsando o .
3. Pulse para acceder a la función seleccionada.
* Para seleccionar la función, podrá pulsar la primer
EXP.M
ENTER
letra del nombre de cualquier función.
●Ingresando un registro nuevo.
1. Seleccione “New” (Nuevo).
Se visualizará el primer nombre de la categoría y la
fecha de hoy.
* Se deberá ajustar correctamente la fecha para que se
visualice la "fecha de hoy".
2. Seleccione una categoría, día o mes pulsando o
.
101
Expense Manager
View Total New Edit
↓↑
View Total New Edit
Search Delete All-Clear
categoría
Airfare Th, 03 Oct
0.
día
mes
importe
Page 54

2. Cambie el nombre de la categoría, el día o el mes
pulsando o .
[Categorías]
Airfare (Billete de avión), Breakfast
(Desayuno), Bus (Autobús), Car Rental (Alquiler
coches), Dinner (Cena), Fax (Facsímil), Gas (Gasolina),
Gifts (Regalos), Hotel, Laundry (Lavandería), Lunch
(Almuerzo), Parking (Estacionamiento), Postage
(Correos), T axi, Tolls (Peajes), Train (Trenes)
3. Ingrese el importe.
4. Pulse .
ENTER
Se almacenará el registro nuevo.
* El importe ingresado se puede borrar pulsando .
CLR
* Puede volver al menú de Gestor de gastos pulsando
EXP.M
.
●Buscando un registro
1. Seleccione “View” (Ver).
Se visualizarán las fechas de los registros, en orden.
2. Seleccione la fecha pulsando o .
Lunch Th, 03 Oct
0.
3. Pulse con el cursor posicionado en su selección.
4. Si tiene varias entradas de diferentes categorías con
una misma fecha, podrá pulsar o para
desplazarse a través de las mismas.
Lunch Th, 03 Oct
7.30
* Pulsando otra vez se mostrará el Total de todas
las entradas existentes para esa determinada fecha.
* Pulsando con el Total visualizado podrá
Saving ...
retroceder a través de las fechas de la pantalla de
registros.
* Puede volver al menú de Gestor de gastos pulsando
Expense Manager
View Total New Edit
CLR
.
●Buscando un registro de total
Th, 03 Oct, 2002
Tu, 01 Oct, 2002
↓↑
Th, 03 Oct, 2002
Tu, 01 Oct, 2002
1. Seleccione “Total”.
2. Seleccione “Date” o “Category” pulsando o
y luego pulse .
3. Seleccione la fecha o la categoría pulsando o
y luego pulse .
Se visualizará el importe total.
*Podrá volver a la pantalla anterior pulsando .
ENTER
ENTER
ENTER
ENTER
ENTER
Train Tu, 01 Oct
2.30
↓↑
Lunch Tu, 01 Oct
6.
Expense T otal
Date Category
Air fare
Breakfast
Total Dinner
126.30
CLR
102
103
Page 55

●Encontrando un registro
1. Seleccione “Search” (Búsqueda).
2. Seleccione el año o el mes pulsando o
.
3. Cambie el año o el mes pulsando o y
luego pulse .
4. Seleccione la fecha pulsando o .
5. Pulse con el cursor posicionado en su selección.
6. Si tiene varias entradas de diferentes categorías con
una misma fecha, podrá pulsar o para
desplazarse a través de las mismas.
* Pulsando otra vez se mostrará el Total de todas
las entradas existentes para esa determinada fecha.
* Pulsando con el Total visualizado podrá
retroceder a través de las fechas de la pantalla de
registros.
* Puede volver al menú de Gestor de gastos pulsando .
ENTER
ENTER
ENTER
ENTER
CLR
Expense Search
2002 Oct
Expense Search
2002 Sep
Mon, 30 Sep, 2002
Sun, 29 Sep, 2002
Bus Mon, 30 Sep
1.25
●Editando un registro
1. Seleccione “Edit” (Editar).
Se visualizarán las fechas de los registros, en orden.
2. Seleccione la fecha pulsando o .
3. Pulse y luego pulse o para
4. Pulse y luego pulse o para
5. Después de editar, pulse .
6. Pulse y luego o pulse simplemente
* Si decide no editar la entrada, pulse o
ENTER
seleccionar el registro que desea editar.
ENTER
seleccionar el entrada que desea editar.
ENTER
Aparecerá la pantalla de confirmación.
ENTER
para seleccionar “Yes”.
ENTER
para seleccionar “No”.
Edit OK?
No Yes
Y
N
104
105
Page 56

Conversión
●Borrando una entrada
1. Seleccione “Delete” (Borrar).
2. Seleccione la fecha y registro.
3. Pulse para seleccionar la entrada que desea
borrar.
ENTER
Delete OK?
No Yes
Aparecerá la pantalla de confirmación.
4. Pulse y luego o pulse simplemente
ENTER
Y
para seleccionar “Yes”.
* Si decide no editar la entrada, pulse o para seleccionar “No”.
ENTER
N
●Borrando todas las entradas
1. Seleccione “All clear” (Borrado Total).
Aparecerá la pantalla de confirmación.
2. Pulse y luego o pulse simplemente
ENTER
Y
para seleccionar “Yes”.
* Si decide no editar la entrada, pulse o para seleccionar “No”.
ENTER
N
106
All Clear OK?
No Yes
●Registro o modificación de la tasa de conversión
1. Podrá cambiar entre la pantalla de calculadora/
conversión y la pantalla de hora pulsando .
Por ejemplo, ya se ha introducido “130” en la
calculadora.
2. Pulse o para visualizar el menú de
conversión.
3. Pulse o para seleccionar el menú de
conversión.
4. Seleccione “Money” y luego pulse .
5. Seleccione “Set” y luego pulse .
ENTER
6. Cualquier número introducido en el lugar del cero
será equivalente a un dólar americano. Una vez
ingresado el número, pulse o para volver
al menú principal.
7. No será necesario volver a modificar el tipo de
cambio ajustado a menos que varíe el mismo, o que
desee ingresar otro tipo de divisa.
TIME CALC
130.
↓↑
Select a Converter
Money Metric Clothing
ENTER
Currency Converter
$ Other Other $ Set
Exchange Rate
107
CLR
$1 = 130.
Page 57

●Conversión monetaria
Ejemplo: Yen japonés a dólares ($1 = 130 Yen
japonés)
Ingrese un valor (5.200) en la calculadora y pulse .
1. Seleccione “Money” y luego pulse .
ENTER
Seleccione “Other $” (Otra divisa a dólar
americano) y luego pulse .
ENTER
2. Ingrese el número que desea convertir, (por ej.
5.200). Pulse o .
3. Seleccione “Money” y luego pulse .
Seleccione “Other $” y luego pulse .
ENTER
ENTER
Verá que 5.200 Yen se convierte a $40.
●Conversión de unidades de medida
Ejemplo: Kilómetros a millas
Ingrese un valor (5) en la calculadora y pulse .
1. Seleccione “Metric” y luego pulse .
2. Seleccione “Length” y luego pulse .
3. Seleccione “kilometer” y luego pulse .
4. Seleccione “Mile” y luego pulse .
ENTER
ENTER
ENTER
ENTER
108
Currency Converter
$ Other Other $ Set
OC $
OC 5,200.
OC 5,200. =
$40.
Select a Converter
Money Metric Clothing
Temperature Length
Area volume Weight
Centimeter Inch Feet
Yard Meter Kilometer
Yard Meter Kilometer
Mile
5. Introduzca el número que desea convertir.
6. Pulse .
ENTER
(5 Kilómetros = 3.10685596119 Millas.)
5. km
5. km =
3.10685596119 mi.
km mi
●Cuadro de tamaños de las prendas
En los países extranjeros podrá verificar fácilmente
los tamaños de las prendas: camisas, guantes,
zapatos, etc. para caballeros, damas y niños.
1. Seleccione “Clothing” y luego pulse .
ENTER
2. Seleccione una categoría entre Men, Women y
Children. Pulse .
3. Seleccione una categoría y luego pulse .
ENTER
ENTER
4. Utilice para ver otros tamaños.
[ Categorías del cuadro de tamaños de las prendas ]
Men: (Suits, Trousers, Overcoats, Pullovers) (Socks) (Shoes) (Shirts) (Hats)
Women: (Blouses, Pullovers) (Dresses, Coats, Suits, Skirts, Trousers) (Shoes) (Stockings)
Children: (Dresses, Coats, Suits, Skirts, Trousers - Girls and Boys) (Shoes - Girls and Boys) (Most
Clothing - Girls and Boys)
109
Select a Converter
Money Metric Clothing
Clothing Sizes
Men Women Children
Blouses Pullovers
Dresses Coats Suits
Amer. Brit. EU
8 30 36
Page 58

Calculadora
Hora y calendario
Podrá cambiar entre la pantalla de calculadora/conversión y la pantalla de hora pulsando
TIME CALC
.
●Teclas y sus funciones
CLR
(CE/C)– Borra la última entrada si se pulse una vez.
1 ~ 0 – Las teclas de números. +, –, x, ÷ – Teclas de funciones matemáticas.
MC
– Limpia la memoria.
número en la memoria.
signo del número. % – Tecla de porcentaje.
* El número almacenado en la memoria será retenido cuando se realice otro cálculo,
cuando se cambie de modo de operación o cuando se apague la unidad.
MR – Recupera un número en la memoria.
M -
– Substrae un número en la memoria. +/– – Cambia el
M+ – Escribe un
●Corrección de errores de introducción
Si introduce un número equivocado, pulse (CE/C) para borrar toda la pantalla y
vuelva a introducir el número correcto. Si pulsa la tecla de operación matemática
equivocada, simplemente proceda a pulsar la tecla correcta.
Si aparece el signo de error “E” en pantalla:
La respuesta tiene más de 12 dígitos. / La memoria está llena.
Se ha intentado dividir por cero.
Para cancelar el signo de error “E” y continuar, pulse (CE/C).
CLR
CLR
110
●Cómo ajustar la hora local
1. Pulse .
2. Pulse o para seleccionar “Home Time...”
SET
y luego pulse .
ENTER
❍Cómo ajustar la hora y el calendario
1. Seleccione “Time and Date...” y luego pulse .
* Pulse para volver.
2. Puede utilizar o para ir al sector que
3. Utilice y para corregir el ajuste. El ajuste
4. Pulse para terminar.
* Para reinicializar el segundo “0”, mueva el cursor
CLR
desea ajustar.
cambia continuamente mientras mantiene pulsada la
tecla.
TIME CALC
hasta el sector y pulse .
ENTER
ENTER
111
Home time ...
World Time ...
Time and Date ...
Format ...
2002
Th, Aug 1
2002
Th, Aug 1
12
6:18
14
6:18
Page 59

❍Cómo ajustar el formato de visualización del calendario
1. Seleccione “Format...” y luego pulse .
2. Pulse o para cambiar el formato de
visualización del calendario.
Día de semana – Mes, fecha – 12hr.
Día de semana – Mes, fecha – 24hr.
Día de semana – fecha, Mes – 12hr.
Día de semana – fecha, Mes – 24hr.
ENTER
2002
Th, Aug 1
6:18
❍Cómo ajustar la hora de verano
1. Seleccione “DST...” y luego pulse .
2. Pulse o para seleccionar ON u OFF.
•La hora de verano (DST) se utiliza exclusivamente con la ciudad ajustada para la hora
local y/o hora mundial. Si va a utilizar el reloj para saber la hora en diferentes partes
del mundo, aparte de la ciudad de hora local y de hora mundial, se recomienda ajustar
manualmente el tiempo/hora para la hora local/hora mundial en lugar de utilizar la
función DST.
ENTER
Home Time DST
OFF ON
20
AM
❍Cómo ajustar la ciudad de la hora local
1. Seleccione “City...” y luego pulse .
2. Pulse o para seleccionar una ciudad.
* Si introduce la primera letra para el nombre de una
ciudad, aparecerá la primera ciudad que empieza con
esa letra.
ENTER
●Cómo ajustar la hora mundial
1. Pulse .
2. Pulse o para seleccionar “World Time...”
SET
y luego pulse .
Cómo ajustar la ciudad y la hora de verano.
ENTER
●Cómo visualizar la hora
1. Pulse para visualizar la hora local.
2. Pulse o para visualizar la hora de la
* Si introduce la primera letra para el nombre de una
TIME CALC
ciudad seleccionada de la hora mundial.
ciudad, aparecerá la primera ciudad que empieza con
esa letra.
New York
Norfolk Isl.
World Time...
Password...
World Time DST
OFF ON
Frankfurt
Geneva
2002
Th, Aug 1
Frankfurt
Th, Aug 1
7:23
1:23
30
AM
30
AM
112
113
Page 60

Cómo configurar las funciones
1. Pulse .
SET
2. Pulse o para seleccionar el menú.
●Mensaje de demostración
1. Seleccione “Demo Message...” y luego pulse .
2. Pulse o para seleccionar Desactivar o
Activar.
3. Pulse .
ENTER
ENTER
●Contraste LCD
1. Seleccione “LCD Contrast...” y luego pulse .
2. Podrá ajustar el contraste utilizando o
( o ).
3. Pulse .
ENTER
ENTER
114
Demo Message...
LCD Contrast...
Demo Message
Disable Enable
Demo Message...
LCD Contrast...
●Lista de palabras de usuario
Si ha creado una lista dentro de la función EZ-Learn (lista de palabras de usuario),
podrá escoger el nivel de frecuencia de las palabras de esta lista para que aparezca en
los Juegos.
1. Pulse . Seleccione “User Word List...” y luego
SET
pulse .
ENTER
User Word List...
Home Time...
2. Pulse o para seleccionar el nivel de
frecuencia
3. Pulse .
ENTER
Use V ery Often
Use V ery Seldom
●Contraseña
Podrá limitar el acceso a los datos del Banco de Datos o del Gestor de gastos.
❍Introducción de la contraseña
1. Seleccione “Password...” y luego pulse .
2. Seleccione “Set” y luego pulse .
ENTER
ENTER
115
Password...
Demo Message...
Password
Set Clear
Page 61

3. Ingrese una contraseña de hasta cuatro caracteres y
luego pulse .
4. Ingrese la contraseña otra vez y luego pulse .
ENTER
ENTER
• Una vez definida la contraseña, la misma le será
solicitada por la unidad para acceder al modo de
Banco de datos o al modo de Gestor de gastos.
•Asegúrese de anotar su contraseña. Sin ella, NO
hay manera de visualizar los datos confidenciales.
Enter New Password.
* * * *
Confirm Password.
* * * *
Password Enabled.
❍Borrado de la contraseña
1. Seleccione “Password...” y luego pulse .
2. Seleccione “Clear” y luego pulse .
3. Ingrese la contraseña anterior y luego pulse .
ENTER
ENTER
ENTER
●Nivel de juegos
Véase página 90.
Password Disabled.
❍Cambio de la contraseña
1. Seleccione “Password...” y luego pulse .
2. Seleccione “Set” y luego pulse .
ENTER
3. Ingrese la contraseña anterior y luego pulse .
4. Ingrese una contraseña nuevo de hasta cuatro
caracteres y luego pulse .
ENTER
5. Ingrese la contraseña otra vez y luego pulse .
ENTER
ENTER
ENTER
116
Enter Old Password.
* * * *
●Hora local
Véase página 111.
●Hora mundial
Véase página 113.
117
Page 62

Función de ayuda
Aparecerá en pantalla una breve descripción sobre cómo operar las diversas funciones
en cada una de las etapas operacionales de los diversos modos.
Ejemplo:
1. Pulse .
Translator
Enter a Word or Phrase:
Uso Correcto
Para asegurar que este instrumento electrónico de precisión tenga una vida de servicio
larga y útil, no exponga la unidad a lo siguiente:
• Calor o frío excesivos • Agua u otros líquidos, incluso limpiadores con pulverizador
• Presión extrema (como llevarlo en el bolsillo trasero del pantalón o en una billetera)
Si no cumple con estas pautas:
• El aparato puede dañarse y dejar de funcionar. • La garantía puede invalidarse.
2. Pulse .
* Podrá pulsar en todas las secciones del
*La descripción desaparece al pulsar cualquiera de las
HELP
HELP
TR2250.
teclas.
118
To translate a word,
type it and press ENTER.
Especificaciones
Pantalla: Matris de puntos de 16 x 112
Margen de temperatura
de operación: 32°F a 104° F (0° C a +40° C)
Pila: Litio CR2032 x 1
Duración de la pila: aprox. 800 horas (uso continuo)
Apagado automático: aprox. 3 minutos
Tamaño: 106 (ancho) x 76 (altura) x 14.6 (profundidad) mm
Peso: aprox. 68g (con la pila)
* Las especificaciones podrían cambiar sin previo aviso para mejorar el producto.
* La vida de la pila variará según cómo se use la unidad.
119
Page 63

Cambio de la pila
La pila necesita ser cambiada tan pronto como la pantalla se vuelva tenue.
Asegúrese de desconectar la alimentación antes de cambiar la pila.
• Al extraer la pila se perderán todos los datos
almacenados en el modo de Banco de datos, de
Gestor de gastos y de EZ-Learn.
•Tenga a bien mantener un registro escrito de los
datos importantes.
1. Doble la cubierta de la unidad.
2. Quite el tornillo y la tapa.
3. Retire la pila vieja.
4. Inserte la pila ( CR2032 ) nueva con el polo (+)
orientado hacia arriba.
5. Ponga la tapa y el tornillo como estaban.
6. Pulse el botón de reposición.
120
PRECAUCION
• Las pilas de este producto pueden ser peligrosas en manos de niños pequeños.
•Guarde tanto el aparato como las pilas fuera del alcance de los niños.
• No ponga la pila al fuego ni la caliente en exceso.
●Reposicion
Si después de cambiadas las pilas o en algún momento determinado el aparato deja de
funcionar correctamente;
1. Pulse el botón de reposición.
(Esto hará que se reposicione la visualización del
tiempo.)
2. Aparecerá el mensaje “Clear Databank Memory ?”.
Pulse (No).
Si pulsa (Yes), se borrarán todos los datos
almacenados en la memoria.
Aparecerá la pantalla de ajuste del contraste. (Véase página 71.)
N
Y
121
Clear Databank Memory?
No Yes
Page 64

GARANTIA LIMITADA DE UN AÑO
1. Se garantiza que este producto estará libre de defectos de material o fabricación por el
plazo de un año a partir de la fecha de compra.
2. Se harán las reparaciones (o reemplazo, a opción nuestra) de cualquier unidad que se
halle defectuosa durante este plazo. Embale la unidad cuidadosamente junto con el
comprobante de compra y una copia llenada del Registro de Garantía que hallará en el
manual en inglés. Los costos de correo, seguros y envío incurridos al devolver el
producto para servicio de garantía correrán por cuenta suya.
3. Esta garantía no cubrirá unidades que han sufrido uso indebido, abuso, descuido,
accidentes ni unidades que se han usado en contravención de las instrucciones de
operación. Si a nuestro juicio la unidad muestra pruebas de haber sido alterada,
modificada o haber recibido servicio sin autorización nuestra, no podrá recibir servicio
bajo la presente garantía.
4. El cambio de la pila y la pantalla de cristal líquido no está incluido bajo esta
garantía.
SEIKO INSTRUMENTS INC. NO SERÁ RESPONSABLE DE NINGUN DAÑO DIRECTO,
CONSECUENTE O INCIDENTAL RESULTANTE DEL USO DE ESTE PRODUCTO. SEIKO
INSTRUMENTS INC. NO SERÁ RESPONSABLE DE NINGÚN DAÑO A ESTA UNIDAD RESULTANTE
DE DESASTRES PROVOCADOS POR FUERZAS DE LA NATURALEZA O DEL HOMBRE, EXCEPTO
EN LA MEDIDA DISPUESTA POR LAS LEYES APLICABLES. LA DURACIÓN DE TODA GARANTÍA
IMPLÍCITA DE COMERCIABILIDAD O IDONEIDAD PARA ALGÚN PROPÓSITO PARTICULAR
SOBRE ESTE PRODUCTO SE LIMITARÁ A LA DURACIÓN DE LA GARANTÍA.
La presente garantía le otorga derechos legales específicos, y es posible que tenga otros
derechos que varían de un estado al otro.
122
123
 Loading...