

Franke FMXO 86 M, MAM 82 M Instructions For Use And Installation
Istruzioni per l'uso e l'installazione
Forni elettrici d'incasso 2
Instructions for use and installation
Built-in electric ovens 15
Mode d'emploi et installation
Fours électriques encastrables 28
Instrucciones para el uso y la instalación
Hornos eléctricos empotrables 41
Kullanım ve montaj talimatları
Elektrikli ankastre firinlar 54
Οδηγίες χρήσης και εγκατάστασης
Ηλεκτρικοί εντοιχιζόμενοι φούρνοι 67
FMXO 86 M
MAM 82 M

INDICE
Istruzioni per l'Installazione: pagina
INSERIMENTO FORNO DA INCASSO NEL MOBILE 3
CARATTERISTICHE DEL MOBILE 3
COLLEGAMENTO ELETTRICO DEL FORNO 3
PULIZIA FORNO 4
PORTA FORNO 4
SOSTITUZIONE DELLA LAMPADA FORNO 4
ASSISTENZA E PARTI DI RICAMBIO ORIGINALI 4
AVVERTENZE PER LA SICUREZZA 5
DATI TECNICI DEL FORNO 6
GUIDA ALL'USO DEL FORNO:
SPIE INDICATORI 6
PROGRAMMATORE ELETTRONICO 7
PROGRAMMATORE MANUALE 9
FUNZIONE SICUREZZA BAMBINI 9
TERMOSTATO TEMPERATURA FORNO 9
MANOPOLA PROGRAMMATORE FUNZIONI 10
UTILIZZO DEL GIRARROSTO 10
UTILIZZO DEL GRILL 10
POSIZIONI GRIGLIE INTERNE 11
INFORMAZIONE AGLI UTENTI 11
FUNZIONI FORNO (FONTE E CIRCOLO DEL CALORE) 12
FIGURE, SULL'UTILIZZO E MANUTENZIONE 13 – 14
2

ISTRUZIONI PER USO E PULIZIA
ATTENZIONE: PER UNA CORRETTA INSTALLAZIONE ED UTILIZZO, CI SI DEVE
RIFERIRE AI DATI TECNICI DEL PROPRIO PRODOTTO. PER CORTESIA,
CONTROLLARE ETICHETTA MATRICOLA PER RILEVARE I DATI DEL VS.
PRODOTTO
ISTRUZIONE PER L'INSTALLAZIONE
INSERIMENTO FORNO DA INCASSO NEL MOBILE:
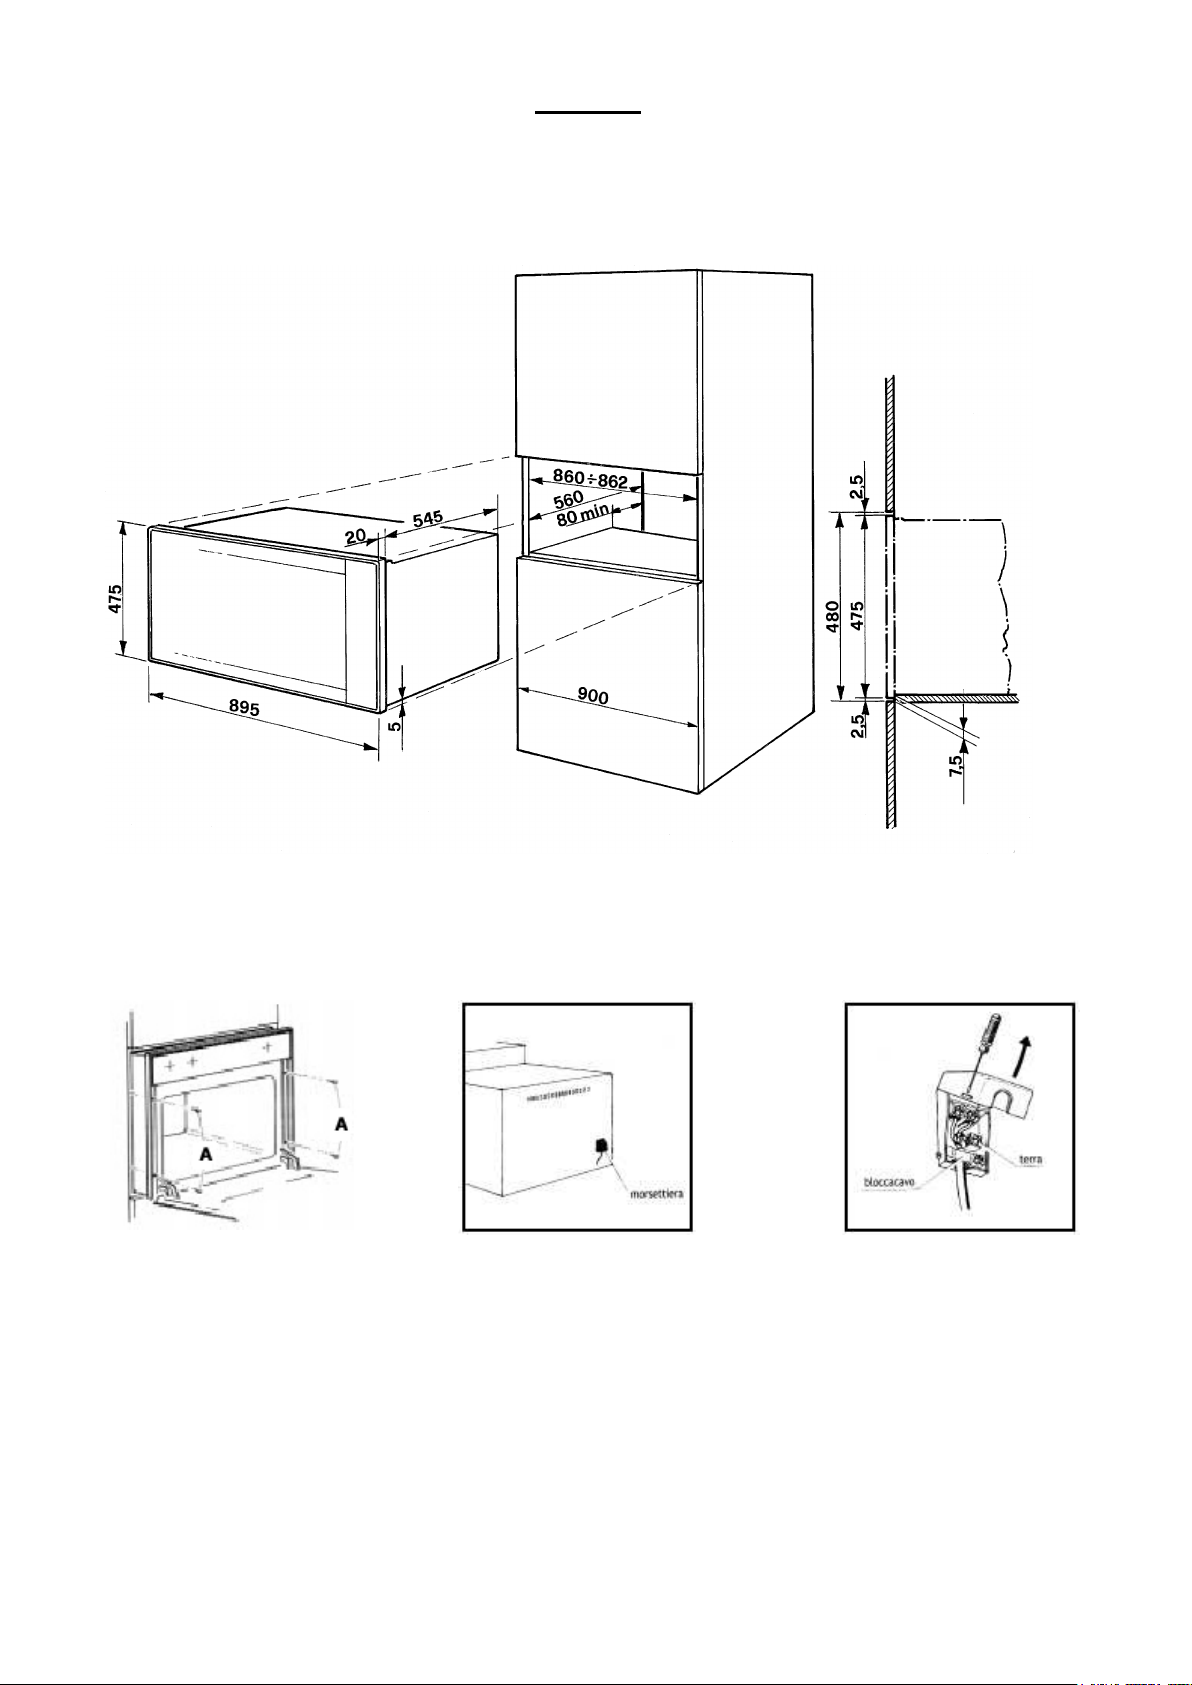
Il forno può essere installato sia a colonna sia sotto il piano di lavoro di un mobile da cucina.
Le dimensioni dell'apertura da effettuare sul mobile per l'incasso del forno sono indicate nella fig. 1.
Assicurarsi che il mobile nel quale sarà installato il forno sia in grado di sopportare il peso di 45 kg. per DPM
86 M e MAM 82 M. Seguire le rispettive dimensioni del tipo di forno per l'apertura nel mobile, indicate in fig. 1
per FI 90 (90x48).
Nel fondo del mobile o nel ripiano di supporto del forno bisogna fare un'apertura, nella zona posteriore,
vedere fig. 1, per permettere l'entrata d'aria e quindi il riciclo d'aria per il raffreddamento del forno stesso
durante il funzionamento.
Assicurarsi che il forno sia installato in maniera sicura nel mobile. Utilizzare le viti “A”, fig. 2, per il fissaggio
del forno.
CARATTERISTICHE DEL MOBILE: I requisiti tecnici del mobile sono i seguenti;
- Il mobile ed i suoi componenti devono essere in grado di resistere ad una temperatura di 150 °C senza
presentare deformazioni e/o difetti alla superficie.
- Il mobile deve consentire il libero passaggio dei collegamenti elettrici.
COLLEGAMENTO ELETTRICO DEL FORNO
IMPORTANTE.
- Il forno deve essere allacciato soltanto da un elettricista specializzato e/o autorizzato.
- L'allacciamento deve essere eseguito secondo le norme europee vigenti.
- Il collegamento elettrico è del tipo monofase 220 – 230 – 240 V ~ 50/60 Hz. Verificare Etichetta Prodotto
per corretto voltaggio e frequenza di potenza elettrica.
È OBBLIGATORIO IL COLLEGAMENTO A TERRA.
- Se il collegamento alla rete si effettua direttamente, si deve interporre un interruttore bipolare dimensionato
alla potenza del forno con un'apertura dei contatti di almeno 3 mm, secondo quanto richiesto dalle
normative vigenti.
- IL CAVO DI TERRA NON DEVE ESSERE INTERROTTO IN NESSUN CASO DALL'INTERRUTTORE.
IL FORNO DEVE ESSERE SEMPRE SCOLLEGATO DALLA CORRENTE ELETTRICA PRIMA DI
PROCEDERE ALLA MANUTENZIONE E/O REGOLAZIONI VARIE.
Il forno potrebbe essere fornito con cavo elettrico senza spina. In caso d'applicazione della spina, questa
deve essere dimensionata alla potenza massima del forno. Prestare attenzione al corretto collegamento del
filo di terra (giallo/verde) al corrispettivo puntale nella spina.
In caso d'applicazione o sostituzione del cavo elettrico bisogna procedere nel modo seguente:
- Scollegare o togliere la corrente elettrica.
- Aprire il coperchio della morsettiera (fig. 3 and 4).
- Collegare i puntali del cavo elettrico come indicato in figura 4, facendo attenzione che il filo giallo/verde è la
terra. In caso d'utilizzo di una spina da 13A omologata BS. 1363, applicare fusibile da 13 amps.
- Il cavo elettrico deve essere fissato dal blocca - cavo (fig. 4) sulla morsettiera in modo tale che non possa
girarsi e/o staccarsi. In nessun punto deve essere a contatto con temperature superiori al 75 °C.
- La spina per il collegamento elettrico deve essere idonea alla potenza del forno. Inoltre, la spina elettrica
deve essere sistemata per un facile accesso dopo l'installazione del forno. In caso di collegamento diretto
alla rete elettrica, bisogna applicare un interruttore bipolare con apertura per ogni contatto di almeno 3 mm.
ATTENZIONE: utilizzare cavo elettrico flessibile con tre puntali, tipo H05RR-FH 3 x 1.5.
3

PULIZIA FORNO
SICUREZZA PER LA PULIZIA
Spegnere il forno ed aspettare che tutti gli elementi riscaldanti siano freddi prima di toccarli o pulirli. Pulire
l'elettrodomestico con cura.
PULIZIA DELLA SUPERFICIE
Utilizzare un panno umido con detersivo non abrasivo, poi utilizzare un soffice panno asciutto. Su parti in
acciaio inossidabile con incrostazioni di sporco, usare solo spatole di plastica o una spugna con aceto e
acqua tiepida.
Attenzione: Non usare pulitori a vapore per la pulizia di qualsiasi parte del forno.
PORTA FORNO: Per rimuovere e reinserire la Porta del Forno, seguire le istruzioni qui di seguito
riportate.
RIMUOVERE LA PORTA FORNO:
Aprire completamente la porta forno.
- Alzare il gancio cerniera ed inserirlo nel supporto di bloccaggio su entrambe le cerniere, vedere figura 5.
Questo evita la chiusura improvvisa della cerniera durante la rimozione della porta.
- Afferrare la porta dai lati verso il basso.
- Sollevare la porta per alcuni centimetri (ci sarà una certa resistenza della molla causata dal bloccaggio
della cerniera).
- Quando la porta è sufficientemente sollevata, sarà possibile sollevare le cerniere fuori dalla sede.
- Tirare fuori le cerniere dalle aperture della cornice del forno.
REINSERIRE LA PORTA FORNO:
Afferrare la porta dai lati verso il basso ed inserire le cerniere nelle aperture della cornice frontale del forno,
vedere figura 5. Con la porta forno completamente aperta, disinnescare i ganci di bloccaggio. Sollevare la
porta forno ed assicurarsi che sia stata inserita correttamente ed allineata con i bordi laterali.
ATTENZIONE. Non togliere i ganci blocca porta dalla loro sede quando la porta è tolta. Non chiudere le
cerniere senza il peso della porta, altrimenti le potenti molle faranno chiudere violentemente le cerniere.
AVVISO: Non appoggiare eccessivo peso o mettersi in piedi sulla porta. Questo può rompere la porta o
ferire l'utente. Inoltre, non usare il forno fino a che la porta non sia stata rimontata correttamente.
SOSTITUZIONE DELLA LAMPADA FORNO
ATTENZIONE: Per prevenire scosse elettriche e/o danni alla persona, leggere ed attenersi alla seguente
procedura:
Prima di sostituire la lampada forno, assicurarsi che la corrente elettrica sia stata tolta aprendo l'interruttore
generale.
Assicurarsi che il forno e la lampada siano freddi. Puoi, rimuovere la calotta lampada “A” svitandola.
Figura 6.
Non toccare la lampadina calda con un panno umido, può causare la rottura della lampadina stessa.
Sostituire la lampadina con altra appropriata per elettrodomestici di 25 W per 220 - 230 V a.c. Figura 6.
Nel caso in cui la calotta lampada sia danneggiata o rotta, non usare il forno finché la calotta non sia stata
sostituita o reinserita in modo corretto e sicuro.
ASSISTENZA E PARTI DI RICAMBIO ORIGINALI
Per l'assistenza dell'elettrodomestico possono essere utilizzati solo componenti autorizzati. Non riparare o
sostituire alcun componente del forno che non sia stato raccomandato da questo manuale. Tutti gli altri
interventi e riparazioni devono essere effettuati da personale tecnico autorizzato.
Per richiedere un componente di ricambio, bisogna indicare i seguenti dati:
1) Sigla del modello di forno e numero di produzione, che si trovano sull'etichetta prodotto posizionata sulla
parte inferiore frontale della camera di cottura del forno.
2) Descrizione e numero del componente di ricambio, informazione tecnica a disposizione solo del servizio
di assistenza autorizzato.
3) E per ultimo, indicare i dati del distributore che ha venduto il forno, e i dati del centro di assistenza più
vicino a Voi.
4

AVVERTENZE PER LA SICUREZZA
Rivolgersi assolutamente a personale qualificato nei seguenti casi:
Per garantire l'efficienza e la sicurezza di questo elettrodomestico:
- rivolgetevi esclusivamente a centri di assistenza tecnica autorizzati
- richiedete sempre l'utilizzo di parti di ricambio originali
- l'apparecchio è concepito per uso non professionale in abitazioni; non modificatene le caratteristiche
- sulla targa matricola figurano i simboli dei paesi di destinazione per cui le istruzioni sono valide
- soltanto quando l'apparecchio è correttamente collegato ad un efficiente impianto di messa a terra,
come previsto dalle norme vigenti, viene garantita la sicurezza elettrica.
- Fare attenzione a non toccare gli elementi riscaldanti e alcune parti della porta forno durante l'uso,
in quanto diventano molto calde, ed in particolar modo tenere i bambini a distanza.
Evitate che i bambini abbiano contatti con:
- i comandi e l'apparecchio in genere;
- i componenti dell'imballo (sacchetti, polistirolo, punti metallici, ecc.);
- l'apparecchio, durante e subito dopo il funzionamento del forno, visto il surriscaldamento;
- l'apparecchio inutilizzato (in tal caso vanno rese inoffensive le parti che potrebbero risultare
pericolose).
Evitate le seguenti operazioni:
- toccare l'apparecchio con parti del corpo umide;
- usare l'apparecchio quando si è a piedi nudi;
- tirare l'apparecchio o il cavo di alimentazione per staccarli dalla presa di corrente;
- operazioni improprie e pericolose;
- ostruire le aperture di ventilazione o smaltimento calore;
- lasciare il cavo di alimentazione di altri elettrodomestici su parti calde dell'apparecchio;
- l'esposizione ad agenti atmosferici (pioggia, sole);
- l'utilizzo del forno come ripostiglio di oggetti vari;
- l'utilizzo di liquidi infiammabili in prossimità dell'apparecchio;
- l'impiego di adattatori, prese multiple e/o prolunghe;
- installazione o riparazione senza l'intervento di personale qualificato.
Rivolgersi assolutamente a personale qualificato nei seguenti casi:
- installazione (secondo le istruzioni del costruttore);
- nel caso di dubbi sul funzionamento;
- sostituzione della presa in caso di incompatibilità con la spina dell'apparecchio.
5

DATI TECNICI DEL FORNO.
Voltaggio 220 – 230 – 240 V ~ 50/60 Hz
Potenza Totale: kW
2,6
Resistenza Cielo: kW
0,8
Resistenza Grill: kW
1,8
Resistenza Suola: kW
1,2
Resistenza Circolare: kW
2,5
Lampada Forno: W
25 x 2
Ventilatore Forno: W
25
Ventilatore Tangenziale Forno: W
25
Dimensioni utili della Camera di Cottura
Altezza mm
305
Larghezza mm
580
Profondità mm
410
Volume Utile dm³
73
Superficie di Grigliata cm²
700
Consumo Energetico
per raggiungere 200 °C kW/h
0,60
per mantenere 200 °C kW/h
0,81
Potenza Consumo Totale kW/h
1,41
Dotazione Forno
n. 1 Leccarda
n. 1 Griglia cromata
n. 1 Girarrosto
GUIDA ALL' USO DEL FORNO
IMPORTANTE:
Prima di utilizzare il forno per la prima volta, farlo funzionare a vuoto selezionando il programma Cottura
intensa aria calda per circa 1 ora. Ventilare bene il locale, possibilmente aprendo le finestre della cucina.
Questo permetterà l'evacuazione dei fumi di combustione di residui di produzione quali grassi, oli e resina da
lavorazione.
ON e OFF SPIA INDICATORE DI POTENZA
Qualora sia accesa, indica che il forno è sotto tensione e quindi alimentato elettricamente. Vedere figura 7.
SPIA INDICATORE TERMOSTATO
Indica l'accensione e spegnimento delle resistenze per mantenere la temperatura di cottura prescelta.
Vedere figura 8.
6
ISTRUZIONI PROGRAMMATORE per Mod. FMXO 86 M
SIMBOLOGIA
TIMER (CONTAMINUTI)
FORNO ATTIVO
DECREMENTO NUMERAZIONE
INCREMENTO NUMERAZIONE
A AUTOMATICO
QUESTO PROGRAMMATORE FUNZIONA CON SISTEMA TUOCH, AGIRE SUI COMANDI SFIORANDO O ESERCITANDO UNA LEGGERA
PRESSIONE NELLA ZONA INDICATA DAI SIMBOLI
ATTIVAZIONE E REGOLAZIONE DELL’ORA
Una volta allacciata la corrente, sul display appaiono il simbolo A e le cifre lampeggianti, per la regolazione
dell’ora procedere come segue:
Agire contemporaneamente sui simboli per alcuni secondi fino a quando le cifre smettono di
lampeggiare. Agendo sempre sugli stessi simboli regolare l’ora, a impulso singolo o mantenendo la
pressione costante, le cifre scorrono così più velocemente . Passati alcuni secondi l’orario viene fissato.
L’eventuale regolazione dell’ora mentre un programma automatico è attivo, provoca la cancellazione del
programma.
SELEZIONE/ANNULLAMENTO DEI PROGRAMMI
La selezione dei programmi avviene tramite una leggera pressione o sfioramento sul simbolo MODE,
precedentemente attivato tenendolo premuto per alcuni secondi fino a sentire un bip e al lampeggiare del
simbolo . D’ora in avanti l’indicazione “agire sul simbolo MODE” considererà implicita la sua attivazione nel
modo appena descritto.
Il simbolo illuminato, indica che il forno è pronto per l’utilizzo in manuale o sta eseguendo un programma.
Esso si spegnereà ogniqualvolta un programma termina la sua funzione (eccetto la funzione contaminuti) e
si riaccenderà ad ogni azzeramento.
Per visualizzare lo stato di un programma o modificarne i dati impostati agire su MODE e scorrere il menù
verificando i dati impostati ed eventualmente procedere alla loro modifica.
Per annullare una programmazione agire contemporaneamente sui simboli per alcuni secondi.
7
FUNZIONAMENTO MANUALE
Per il funzionamento manuale non si deve intervenire sul programmatore (il simbolo deve comunque
essere illuminato) ma agire tramite le manopole delle funzioni e delle temperature.
Il forno è pronto per una normale cottura senza programmazione. Può essere comunque utilizzata la
funzione CONTAMINUTI.
FUNZIONAMENTO SEMI-AUTOMATICO (CON IMPOSTAZIONE DEL TEMPO DI COTTURA)
Sfiorare il simbolo MODE fino alla comparsa delle cifre 0:00, il simbolo comincia a lampeggiare.
Impostare la durata di cottura desiderata agendo sui simboli . Dopo alcuni secondi il simbolo rimane
fisso e ricompare l’ora corrente.
Ruotare le manopole del selettore funzioni e delle temperature sui valori desiderati.
Al termine del tempo impostato il segnale acustico segnala la fine della cottura, il simbolo comincia a
lampeggiare e il forno si spegne.
Ruotare le manopole nella posizione di spento. Per interrompere il segnalatore acustico sfiorare uno
qualsiasi dei simboli, per annullare la programmazione agire contemporaneamente sui tasti per alcuni
secondi.
FUNZIONAMENTO SEMI-AUTOMATICO (CON IMPOSTAZIONE DEL TEMPO DI FINE COTTURA)
Agire sul simbolo MODE fino alla comparsa della scritta END alternata all’ora attuale, entrambi lampeggianti
(il simbolo A comincia anch’esso a lampeggiare). Sfiorando il simbolo impostare l’ora di termine cottura.
Dopo alcuni secondi ricompare l’ora dell’orologio e la lettera A rimane fissa. Ruotare ora le due manopole
sulla temperatura e sul tipo di cottura desiderate.
Al raggiungimento dell’ora impostata l’indicatore acustico segnala la fine della cottura, la lettera A comincia a
lampeggiare e il forno si spegne.
Ruotare le manopole nella posizione di spento. Per interrompere il segnalatore acustico sfiorare uno
qualsiasi dei simboli, per annullare la programmazione agire contemporaneamente sui simboli per
alcuni secondi.
FUNZIONAMENTO AUTOMATICO (CON IMPOSTAZIONE DIFFERITA DI INIZIO COTTURA)
Sfiorare il simbolo MODE fino alla comparsa della scritta DUR (durata) alternata all’ora attuale, entrambi
lampeggianti (il simbolo A comincia anch’esso a lampeggiare). Agendo sul simbolo impostare il tempo
previsto di durata della cottura. Con MODE passare alla funzione END (fine) che lampeggia alternativamente
all’ora di fine cottura calcolata dal programmatore in base ai dati di durata inseriti. Impostare l’ora di fine
cottura desiderata sempre agendo sul simbolo . Dopo alcuni secondi ricompare l’ora dell’orologio e la
lettera A rimane fissa. Il forno rimarrà spento e si attiverà automaticamente (si illumina il simbolo ) come
da voi impostato.
Al raggiungimento dell’ora impostata l’indicatore acustico segnala la fine della cottura, la lettera A comincia a
lampeggiare e il forno si spegne.
Ruotare le manopole nella posizione di spento. Per interrompere il segnalatore acustico sfiorare uno qualsiasi
dei simboli, per annullare la programmazione agire contemporaneamente sui simboli per alcuni secondi.
Esempio: sono le ore 11:30, il tempo di cottura necessario è di 30 minuti e si desidera che la cottura termini
alle ore 13:00 impostandolo nel programma. Il forno si accenderà alle 12:30 e si spegnerà alle 13:00.
FUNZIONE CONTAMINUTI
Agire sul simbolo MODE fino al comparire del simbolo lampeggiante e delle cifre 0:00.
Con il simbolo impostare il tempo desiderato. Dopo alcuni secondi il simbolo smette di lampeggiare e
ritorna l’ora dell’orologio. Al raggiungimento del tempo impostato il simbolo comincia nuovamente a
lampeggiare ed entra in funzione il segnalatore acustico. Sfiorare indifferentemente uno qualsiasi dei simboli
per fermare il segnale acustico.
Dopo alcuni secondi ricomparirà l’ora dell’orologio. Per annullare questa funzione premere il simbolo MODE.
Questa funzione può essere utilizzata per una cottura manuale.
SEGNALE ACUSTICO
Il segnale acustico continua a suonare per circa 6 minuti, per interromperlo agire indifferentemente su uno
qualsiasi dei tre simboli.
È possibile regolare l’intensità del segnale su tre diversi livelli sonori nel seguente modo: agire
contemporaneamente sui simboli agire sul simbolo MODE fino al comparire della sigla ton sfiorare
poi il simbolo per scegliere il livello desiderato.
8

CANCELLAZIONE DEL PROGRAMMA
Per cancellare un programma impostato basta agire contemporaneamente sui simboli .
Il programmatore ritornerà nell’impostazione manuale pronto per un nuovo utilizzo.
SICUREZZA BAMBINI O CONTRO CONTATTI ACCIDENTALI
Si tratta di una funzione aggiuntiva che consente di bloccare l'accesso alla funzionalità dei tasti del
programmatore elettronico sia quando il forno è in funzione, sia in via preventiva quando il forno è spento.
Quando attivata, questa funzione evita che i bambini o altre persone sfiorando inavvertitamente i simboli del
programmatore, modifichino il programma precedentemente in essere, oppure che mettano in funzione il
forno spento.
Ogni segnalazione del programmatore che intervenga durante il funzionamento del forno quando è in
funzione questo blocco di sicurezza, può essere eliminata sfiorando uno qualsiasi dei tasti. Il blocco di
sicurezza rimarrà attivato.
Il blocco di sicurezza, si attiva automaticamente se per un tempo di circa 8 secondi non viene premuto
nessun simbolo e viene disattivato con la pressione per più di 2 secondi sul simbolo MODE o agendo
contemporaneamente sui simboli .
NOTE: - Per la visualizzazione del tempo di cottura rimanente è necessario disattivare il blocco.
PROGRAMMATORE MANUALE: PUSH-PULL per Mod. MAM 82 M
FUNZIONAMENTO MANUALE: Premere la manopola per sollevarla. Girare la manopola in senso antiorario
sul simbolo di manuale “Mano”. Vedere figura 10.
ATTENZIONE: se la manopola è lasciata in funzione Manuale, ed è selezionato un programma di cottura,
il forno resta acceso di continuo.
FUNZIONAMENTO PROGRAMMATO DI COTTURA: Girare la manopola in senso orario e selezionare il
tempo di cottura desiderato. Alla fine del tempo di cottura, il forno si spegne automaticamente ed un segnale
acustico a suono di campana sarà udito.
FUNZIONE SICUREZZA (BLOCCO) BAMBINI – dove previsto
Si tratta di una funzione aggiuntiva che consente di bloccare l'accesso alla funzionalità dei tasti del
programmatore elettronico sia quando il forno è in funzione, sia in via preventiva quando il forno è spento.
Essa è evidenziata dall'apposito simbolo (chiave)
Quando attivata, questa funzione evita che i bambini od altre persone, premendo sui tasti del programmatore,
modifichino il programma precedentemente in essere oppure che mettano in funzione il forno precedentemente
spento.
Ogni segnalazione del programmatore che intervenga durante il funzionamento del forno quando è in
funzione questo blocco di sicurezza, può essere eliminata premendo uno qualsiasi dei tasti. Il blocco di
sicurezza rimarrà attivato
Per attivare o disattivare questa funzione di sicurezza (blocco) bambini procedere come segue:
1) Per attivare: premere il tasto + e tenere premuto per almeno 3 secondi fino a quando appare sullo
schermo del programmatore il simbolo (chiave) che evidenza questa funzione.
2) Per disattivare: premere il tasto + e tenerlo premuto fino a quando il simbolo (chiave) non scompare
dallo schermo del programmatore.
NOTA: Per la visualizzazione del tempo di cottura rimanente è necessario disattivare il blocco.
TERMOSTATO TEMPERATURA FORNO: Vedere figura 11.
Il termostato forno controlla la temperatura desiderata per la cottura, su tutte le selezioni di funzionamento
forno.
Gli elementi riscaldanti s'accendono e spengono per mantenere la temperatura impostata.
Per Mod. MAM 82 M; per attivare la manopola Push-Pull, premere la manopola per sollevarla.
9
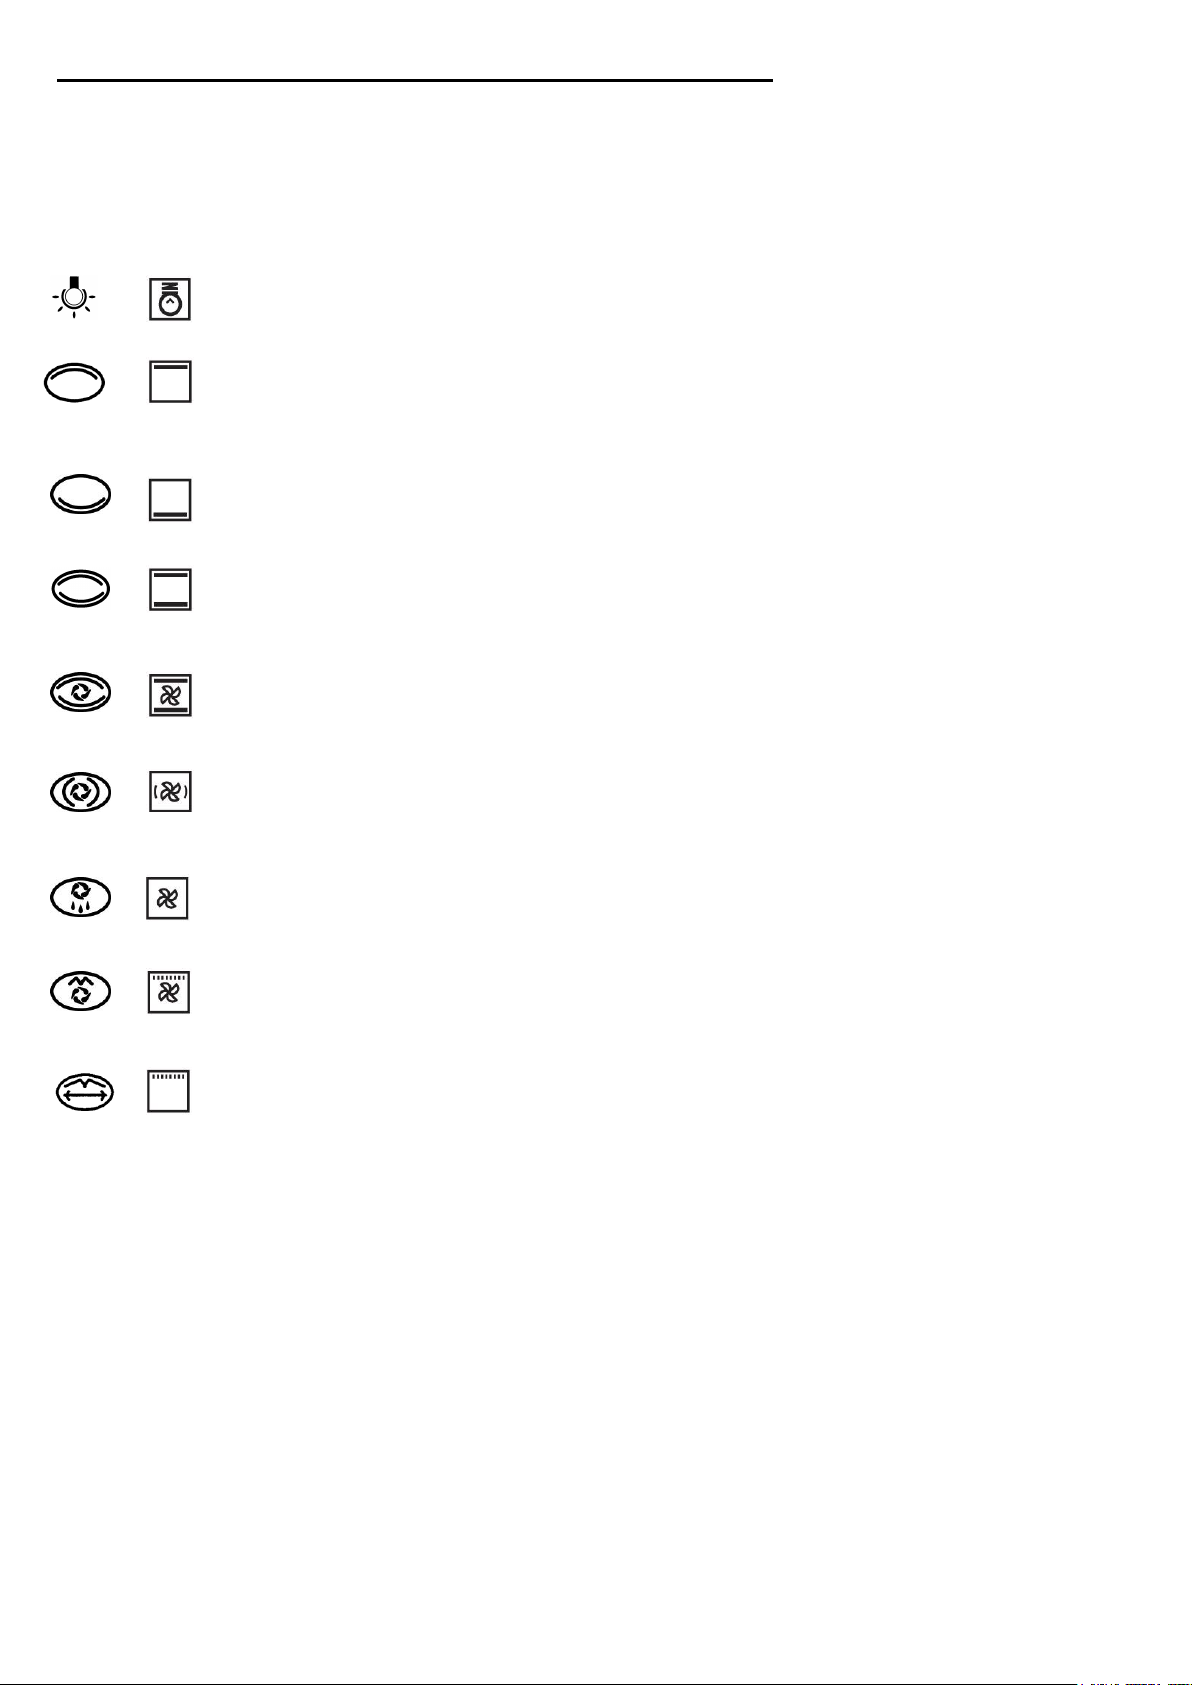
MANOPOLA PER LA SELEZIONE DI UN PROGRAMMA DI COTTURA: Vedere figura 12.
Questo commutatore attiva il tipo di funzione desiderata per la cottura. La seguente illustrazione mostra la
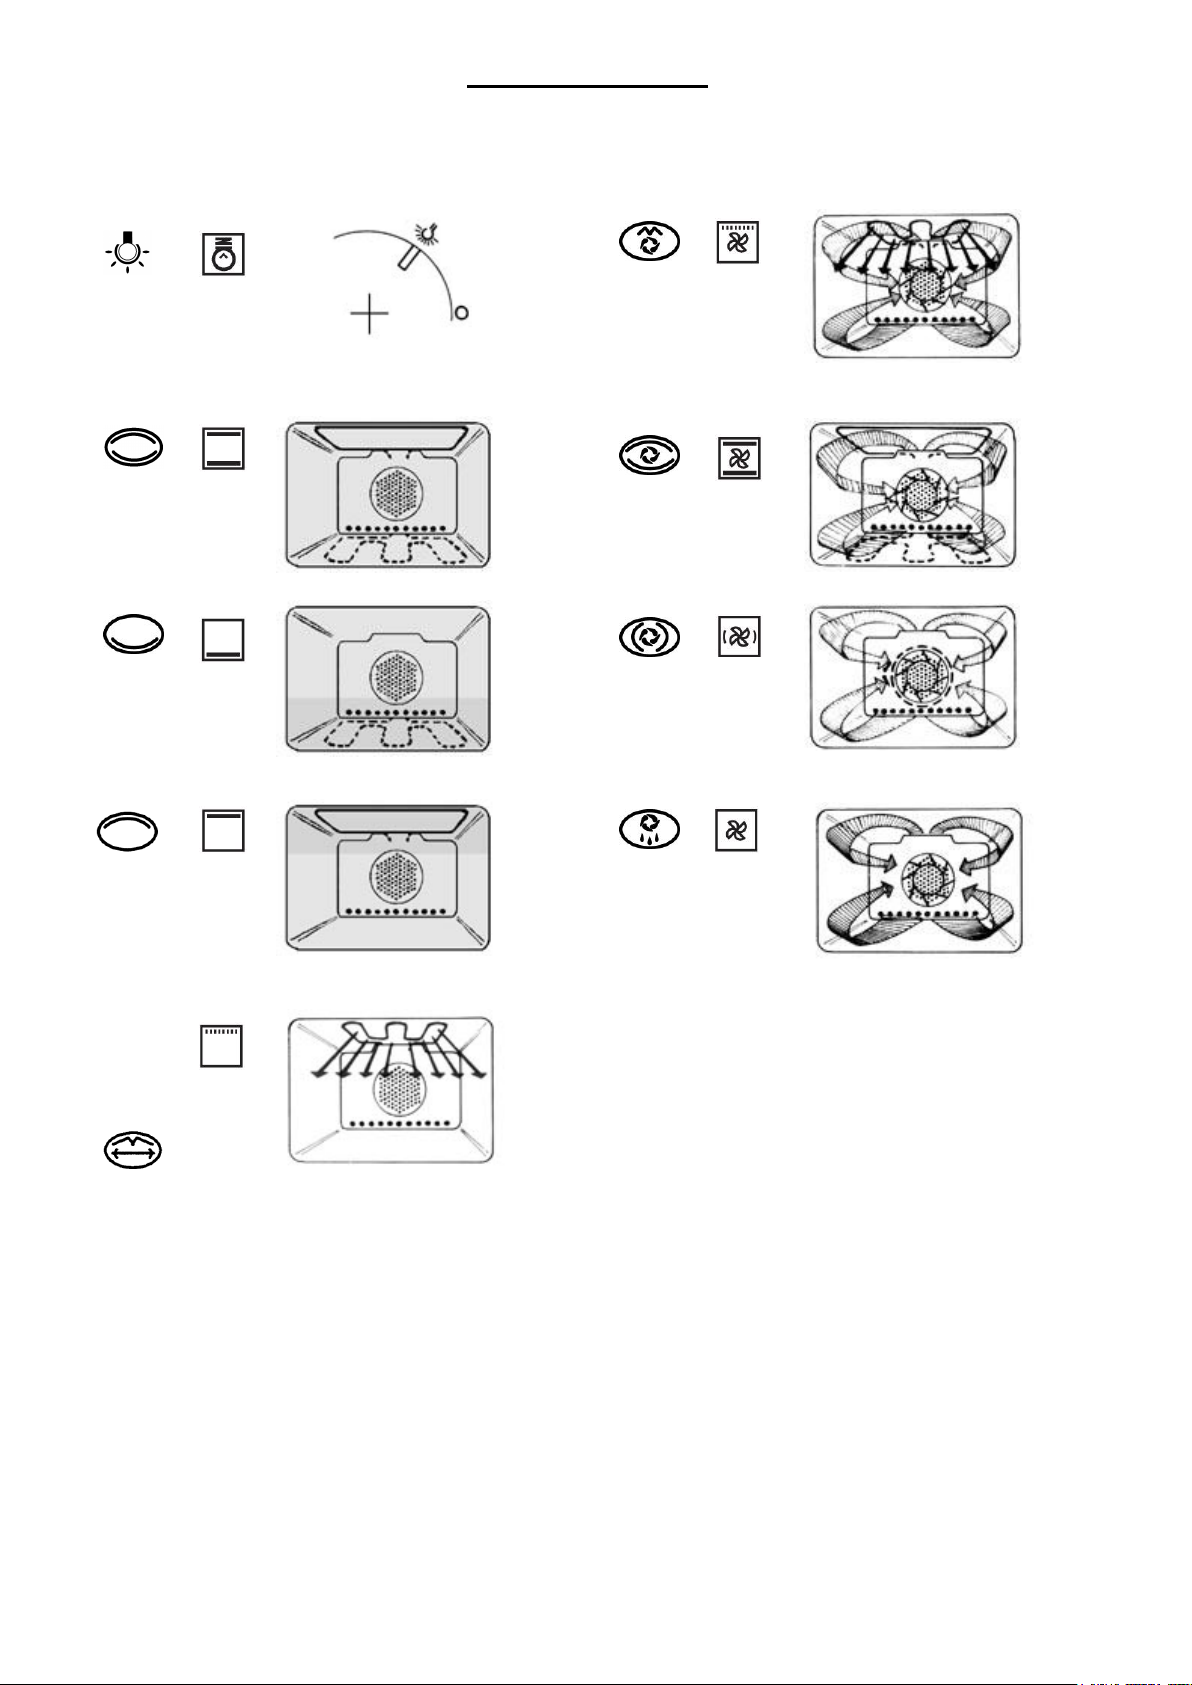
fonte e distribuzione del calore per ogni selezione di funzionamento. La resistenza Suola e Circolare sono
interne rispettivamente alla struttura inferiore e posteriore della muffola. Le resistenze si accenderanno e
spegneranno automaticamente per mantenere la temperatura di cottura desiderata.
Per Mod. MAM 82 M; per attivare la manopola Push-Pull, premere la manopola per sollevarla.
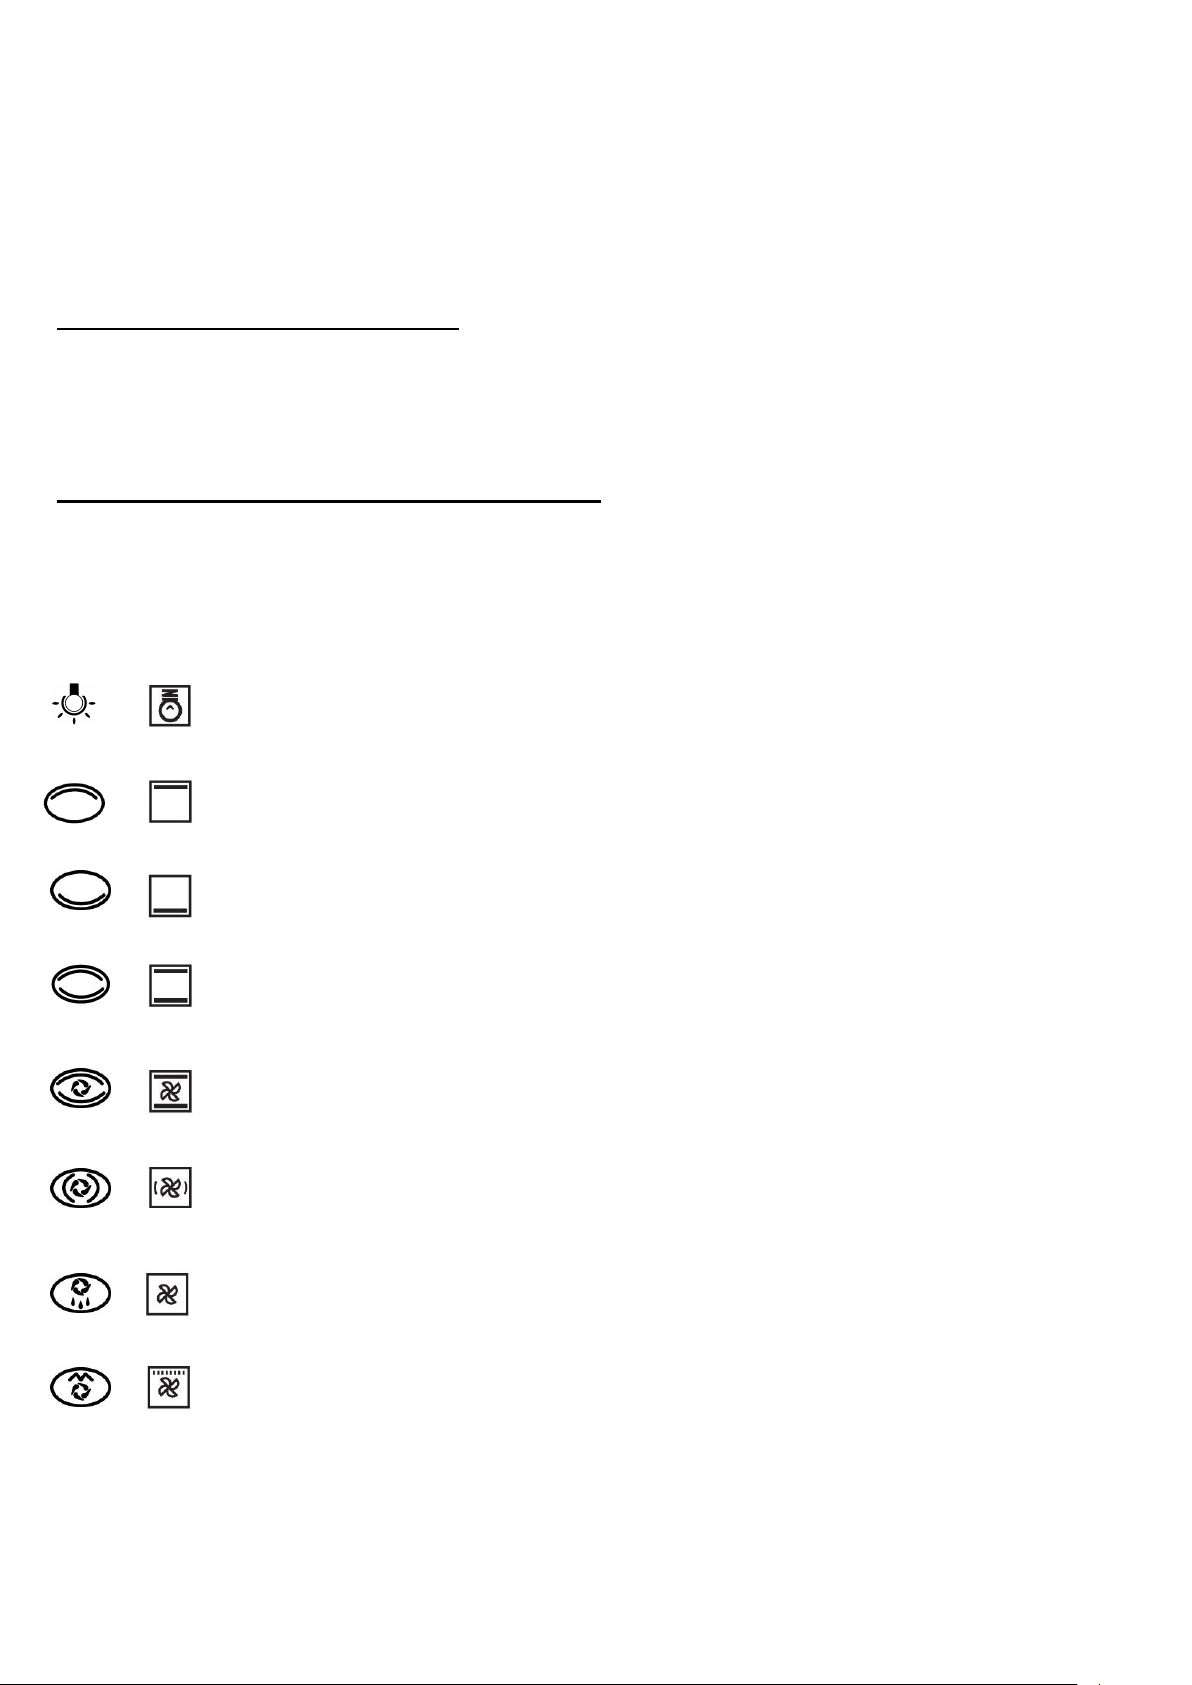
LAMPADA FORNO
Utilizzare questa funzione per accendere la lampada forno. La lampada rimane accesa
anche con le altre funzioni.
COTTURA SUPERIORE
Usare questa funzione per arrostire dall'alto. Questo calore intenso è ottimale per cuocere
e dorare.
COTTURA INFERIORE
Usare questa funzione per arrostire dal basso. Questo calore intenso è ottimale per
arrostire carni non particolarmente tenere.
COTTURA NORMALE STATICA
Usare questa funzione per una cottura normale e per arrostire. La resistenza superiore ed
inferiore riscaldano l'aria.
COTTURA INTENSIVA CON ARIA CALDA
Usare questa funzione per arrostire e cuocere con l'ausilio d'aria calda. Cottura superiore
ed inferiore con aria calda per una croccante finitura del cibo.
COTTURA INTENSA AD ARIA CALDA
Usare questa funzione per una cottura uniforme. Cottura ideale per la preparazione di
torte, pane ed altre pietanze di larga dimensione.
SCONGELARE ED ASCIUGARE
Usare questa funzione per accelerare il processo di scongelare e/o asciugare il cibo da
cuocere, con l'utilizzo di aria forzata.
GRILL VENTILATO;
Usare questa funzione per grigliare più aria calda. Cottura intensiva alla griglia con aria
calda. Porta forno chiusa.
GRILL
Usare questa funzione per grigliare. Cottura con il Grill. Leggere capitolo Utilizzo del Grill
per ulteriore informazione. Porta forno aperta.
GRILL CON GIRARROSTO
Usare questa funzione per grigliare con l'ausilio del Girarrosto. Per usare questa funzione
si raccomanda di pre-riscaldare il forno utilizzando il Grill.
UTILIZZO DEL GIRARROSTO
Inserire l'asta girarrosto, con la pietanza, nell'apposito mozzo per poi appoggiarlo sul supporto asta.
Installare la leccarda raccogli sughi sotto la pietanza. Ricordarsi di togliere l'impugnatura dell'asta prima di
iniziare la cottura. Per ulteriori informazioni, leggere il capitolo seguente, Utilizzo del Grill.
UTILIZZO DEL GRILL
Selezionare la funzione Grill nel commutatore e posizionare il termostato a temperatura massima.
Permettere un periodo di preriscaldamento della camera di cottura prima di introdurre la pietanza. Utilizzare il
Grill per un tempo massimo di 15 minuti e sempre con la Porta Forno aperta.
ATTENZIONE: durante l'utilizzo del Grill, le parti accessibili possono surriscaldarsi. Pertanto è
opportuno mantenere i bambini a debita distanza.
10
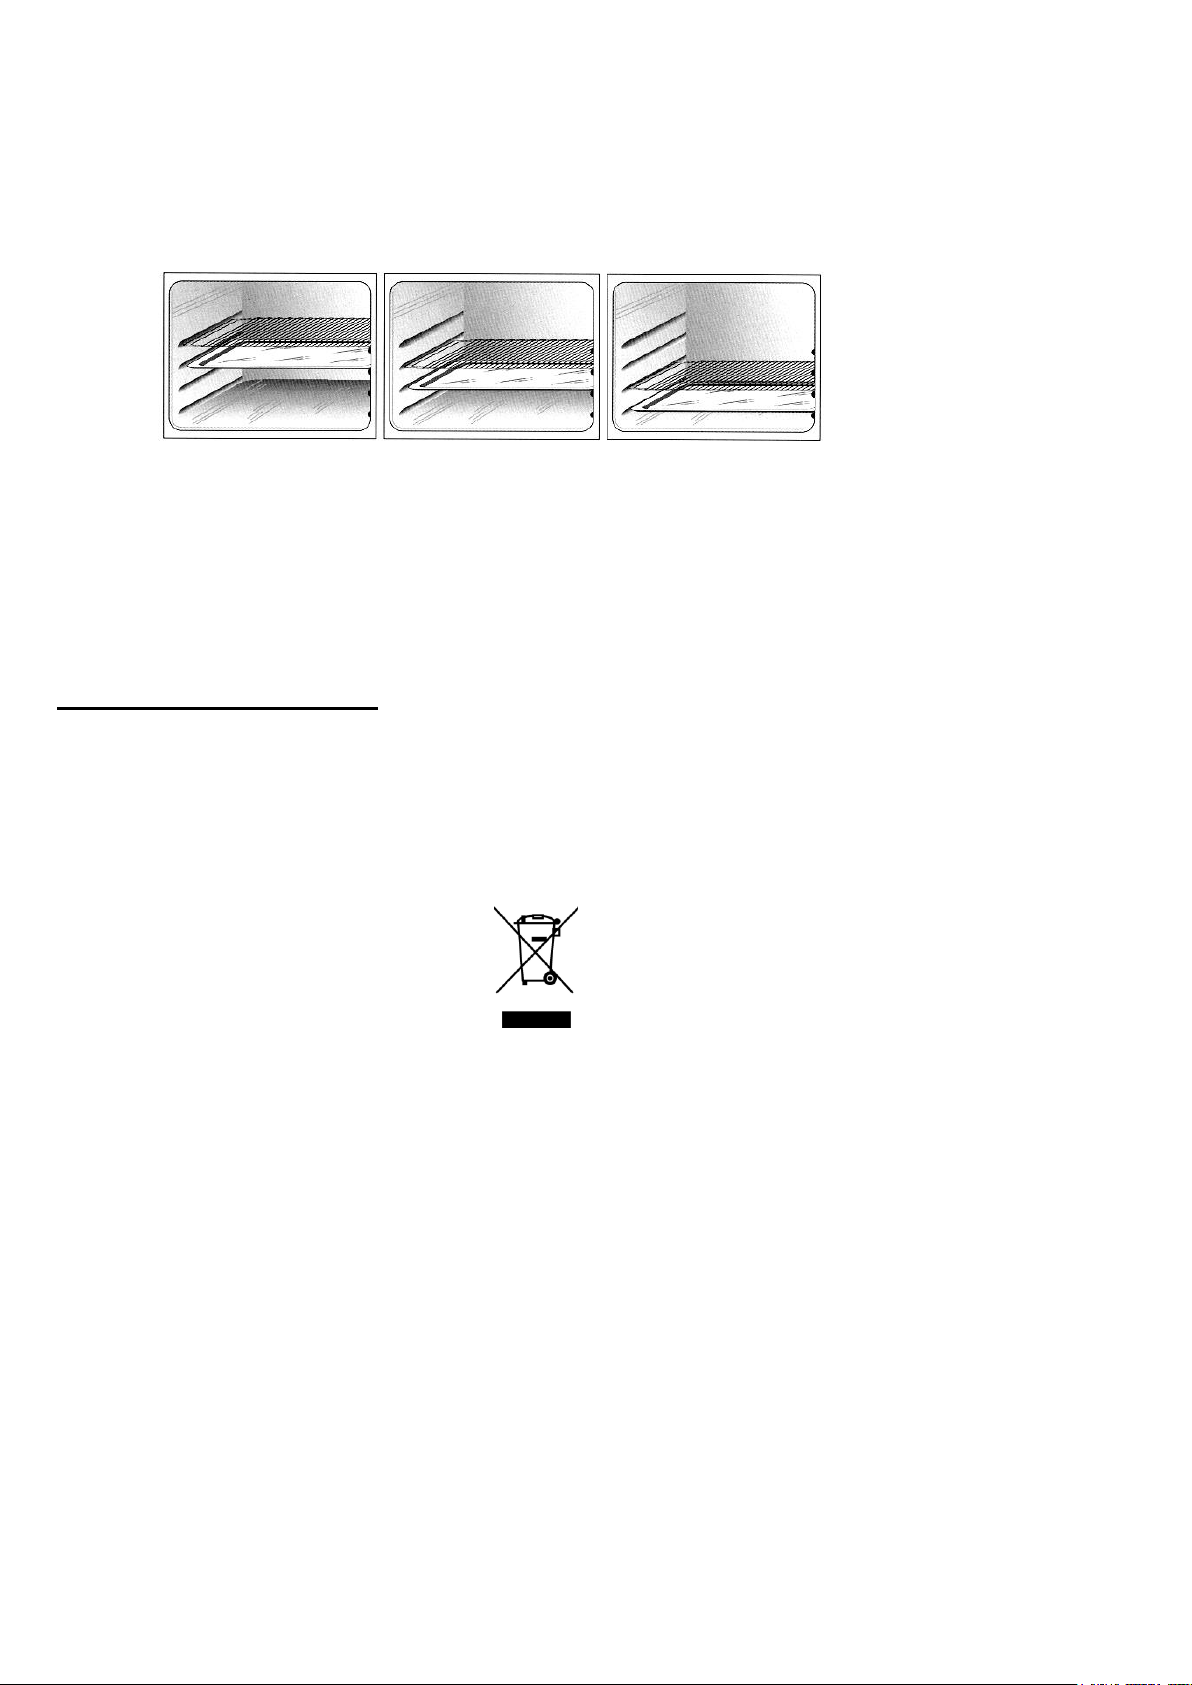
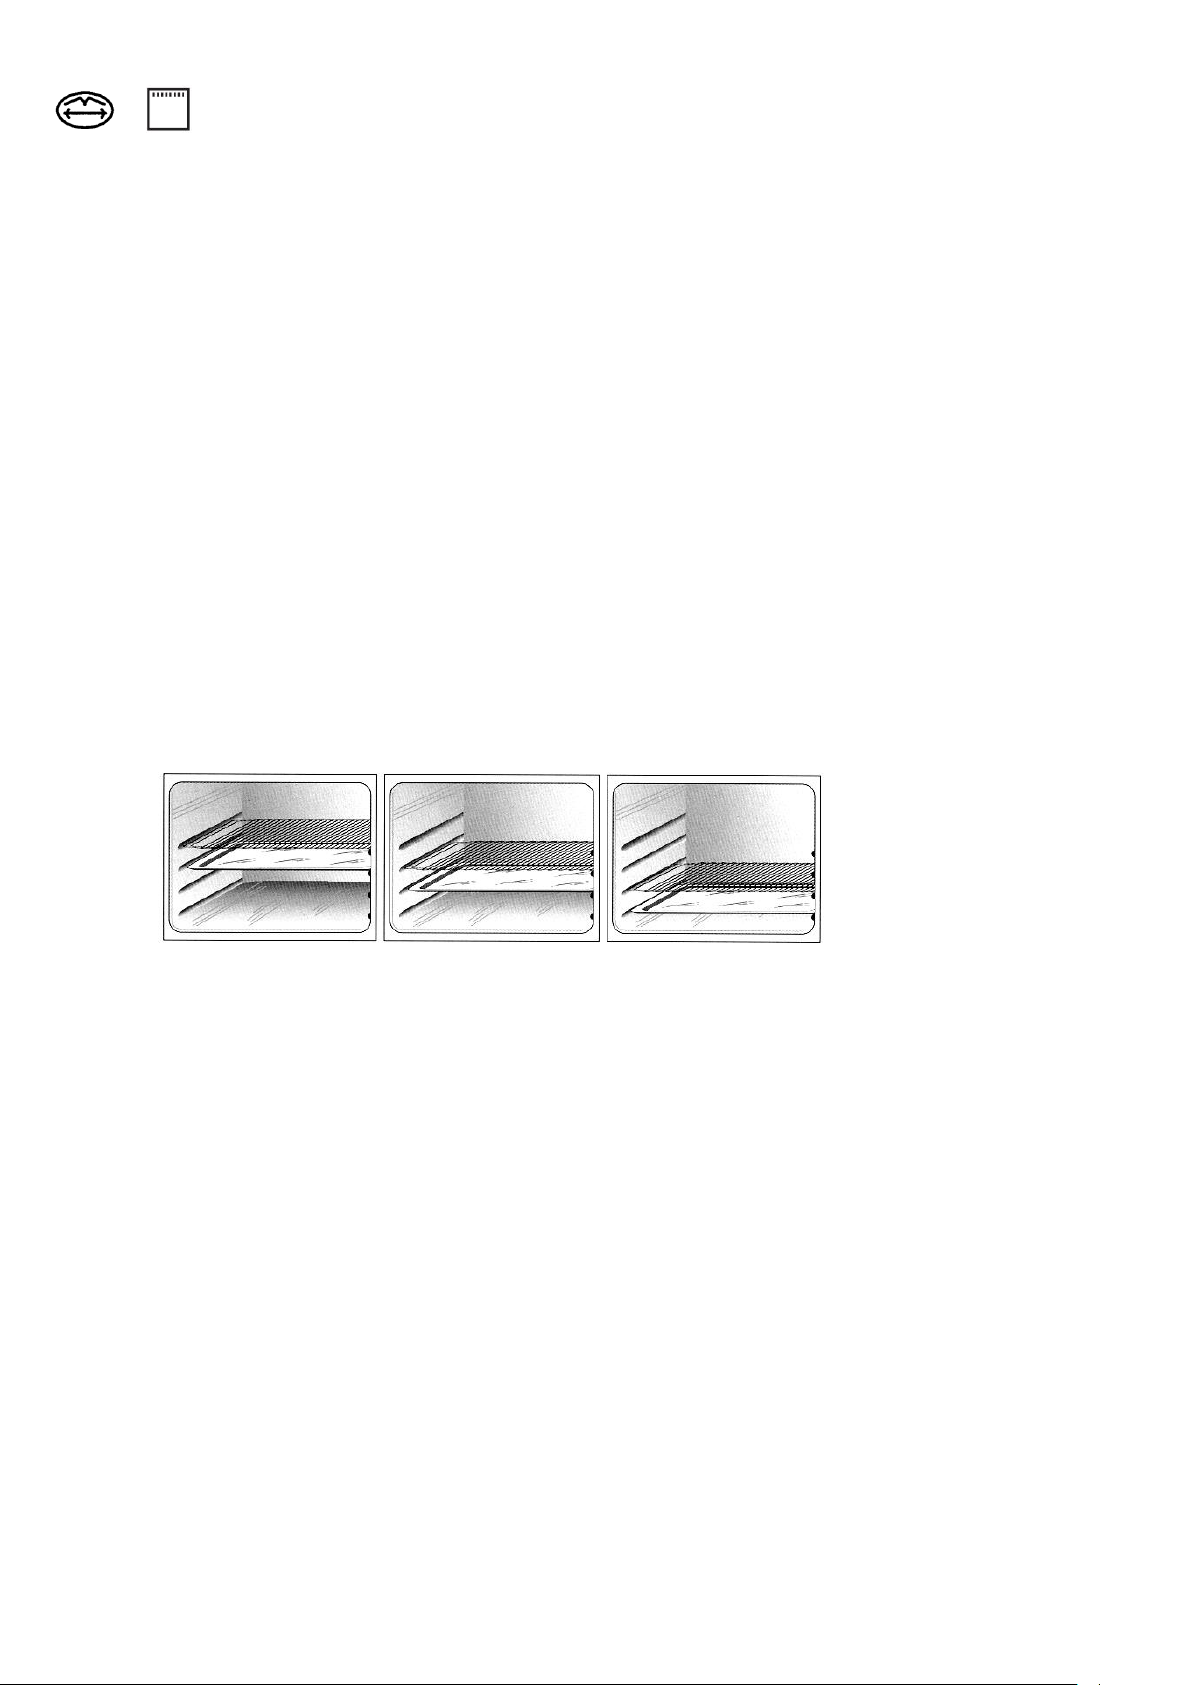
POSIZIONE GRIGLIE FORNO PER SPECIFICHE COTTURE:
1) Torte surgelate, Arrosti lunghi, Tacchino, Torte, Bistecca Carne ben cotta; posizione n° 1 e 2 dal basso.
2) Torte, Pan carrè, Toast, Casseruola, Pane integrale, Carne; posizione n° 2 dal basso.
3) Biscotti, Carne a taglio fino; posizione n° 2 e 3 dal basso.
Per Dorare col Grill, adoperare la posizione n° 3 dal basso.
ATTENZIONE: Durante l'utilizzo il forno può raggiungere temperature elevate. Prestare attenzione a
non toccare gli elementi riscaldanti o bruciatori dentro il forno.
INFORMAZIONE AGLI UTENTI:
Questo prodotto è conforme alla Direttiva EU 2002/96/EEC.
Il simbolo del cestino barrato riportato sull'apparecchio indica che il prodotto, alla fine della propria vita utile,
dovendo essere trattato separatamente dai rifiuti domestici, deve essere conferito in un centro di raccolta
differenziata per apparecchiature elettriche ed elettroniche oppure riconsegnato al rivenditore al momento
dell'acquisto di una nuova apparecchiatura equivalente.
L'utente è responsabile del conferimento dell'apparecchio a fine vita alle appropriate strutture di raccolta,
pena le sanzioni previste dalla vigente legislazione sui rifiuti.
L'adeguata raccolta differenziata per l'avvio successivo dell'apparecchio dismesso al riciclaggio, al
trattamento e allo smaltimento compatibile con l'ambiente contribuisce ad evitare possibili effetti negativi
sull'ambiente e sulla salute e favorisce il riciclo dei materiali di cui è composto il prodotto.
Per informazioni più dettagliate inerenti i sistemi di raccolta disponibili, rivolgersi al servizio locale di
smaltimento rifiuti, o al negozio in cui è stato effettuato l'acquisto.
IL PRODUTTORE DECLINA OGNI RESPONSABILITÀ CIVILE E PENALE SE L'ALLACCIAMENTO NON
VIENE ESEGUITO SECONDO LE NORME VIGENTI E QUANTO INDICATO DA QUESTO MANUALE
D'ISTRUZIONI.
Questo forno è conforme alle prescrizioni delle direttive comunitarie CEE 87/308; 73/23; 93/68 e 89/336.
11
FUNZIONI FORNO
12
FIGURE
Fig. 1 FORNO INCASSO
Fig. 2 Fig. 3 Fig. 4
13
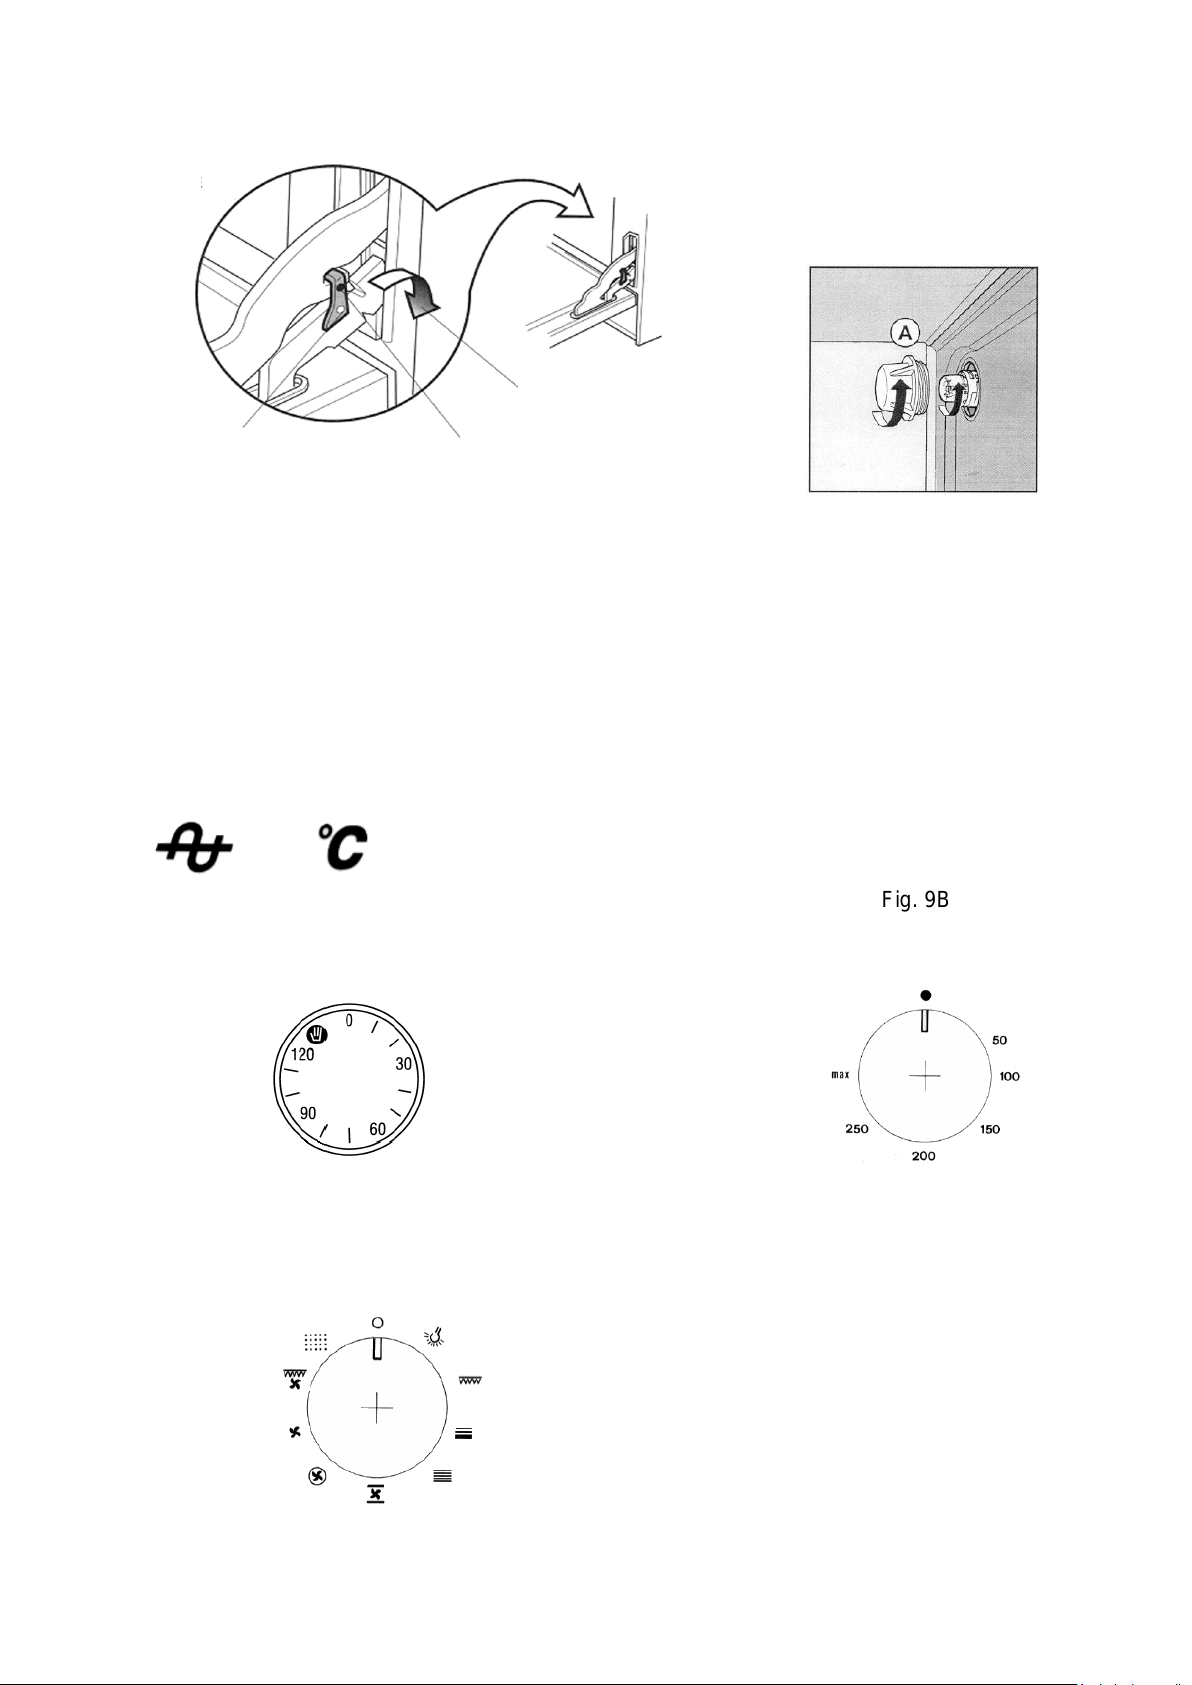
Fig. 9
CERNIERA PORTA
Abbassare gancio
cerniera dopo
inserimento porta.
Alzare gancio cerniera fino Gancio cerniera
“Sede Bloccaggio” per
rimuovere porta forno.
Fig. 5 Fig. 6
Fig. 7 Fig. 8 Fig. 9B
Fig. 10 Fig. 11
Fig. 12
14

CONTENTS
Installation instructions: page
FITTING THE BUILT-IN OVEN IN CABINET 16
CABINET REQUIREMENTS 16
OVEN ELECTRICAL CONNECTION 16
OVEN CLEANING 17
OVEN DOOR 17
REPLACING THE OVEN LAMP 17
ASSISTANCE AND ORIGINAL REPLACEMENT PARTS 17
SAFETY INSTRUCTIONS 18
OVEN TECHNICAL DATA 19
GUIDE TO USING THE OVEN:
INDICATOR LAMPS 19
ELECTRONIC PROGRAMMER 20
MANUAL PROGRAMMER 21
CHILD SAFETY FUNCTION 21
OVEN TEMPERATURE THERMOSTAT 22
FUNCTIONS PROGRAMMER KNOB 22
USING THE ROTISSERIE 23
USING THE GRILL 23
POSITIONS OF INSIDE RACKS 23
INFORMATION FOR USERS 24
OVEN FUNCTIONS (HEAT SOURCE AND CIRCULATION) 25
FIGURES, ON USE AND MAINTENANCE 26 – 27
15

INSTRUCTIONS FOR USE AND CLEANING
IMPORTANT: FOR CORRECT INSTALLATION AND USE, REFER TO THE
TECHNICAL DATA OF YOUR PRODUCT. PLEASE CHECK THE SERIAL
NUMBER LABEL FOR THE DATA RELEVANT TO YOUR PRODUCT
INSTALLATION INSTRUCTIONS
FITTING THE BUILT-IN OVEN IN CABINET:
The oven can be installed in a column unit or under the worktop of a kitchen unit.
The dimensions of the opening to be made in the cabinet for fitting the oven are given in fig. 1. Make sure the
cabinet in which the oven is to be installed can take the weight of 45 kg for DPM 86 M and MAM 82 M.
The respective dimensions of the type of oven for the opening in the cabinet are given in Fig. 1 for FI 90 (90x48).
Make an opening at the bottom of the cabinet or in the oven support shelf, at the back, see fig. 1, to allow air
to enter and therefore the recirculation of air for cooling the oven during use.
Make sure the oven is securely fitted in the cabinet. Use the screws “A”, fig. 2, to fix the oven.
CABINET REQUIREMENTS The cabinet technical requirements are as follows;
- The cabinet and its components must be able to withstand a temperature of 150 °C without any
deformation and/or surface defects.
- The cabinet must allow sufficient room for the electrical connections.
OVEN ELECTRICAL CONNECTION
IMPORTANT.
- The oven must be connected by a specialised and/or authorised electrician.
- Connection must be carried out in compliance with the current European regulations.
- The electrical connection is single-phase 220 – 230 – 240 V ~ 50/60 Hz. Check the Product Label for the
correct electrical power voltage and frequency.
THE EARTH CONNECTION IS COMPULSORY.
- In case of direct connection to the mains, a double-pole switch suitable for the oven power, with contact
opening of at least 3 mm, must be installed in accordance with the current regulations.
- THE EARTH WIRE MUST NOT BE INTERRUPTED BY THE SWITCH.
THE OVEN MUST ALWAYS BE DISCONNECTED FROM THE POWER SUPPLY BEFORE
CARRYING OUT ANY MAINTENANCE AND/OR ADJUSTMENTS.
The oven may come with an electrical cable without a plug. If fitting the plug, it must adequate for the max. oven
power. Ensure correct connection of the earth wire (yellow/green) to the corresponding terminal in the plug.
If fitting or replacing the electrical cable, proceed as follows:
- Switch off or disconnect the power supply.
- Open the terminal block cover (fig. 3 and 4).
- Connect the electrical cable terminals as shown in figure 4, remembering that the yellow/green wire is the
earth. If using a 13A BS. 1363 approved plug, fit a 13 amp fuse.
- The electrical cable must be secured by the cable clamp (fig. 4) on the terminal block so that it cannot turn
and/or become detached. No part must be in contact with temperatures above 75 °C.
- The plug for the electrical connection must be suitable for the power of the oven. Also, the electrical plug
must be arranged for easy access after oven installation. In case of direct connection to the mains, install a
double-pole switch with opening of at least 3 mm for each contact.
IMPORTANT: Use type H05RR-FH 3 x 1.5 flexible electrical cable with three terminals.
16

OVEN CLEANING
CLEANING SAFETY
Switch the oven off and wait until all the heating elements are cold before touching or cleaning them.
Carefully clean the electrical appliance.
CLEANING THE SURFACE
Use a moist cloth with non-abrasive detergent, then dry with a soft rag. Only use plastic spatulas or a sponge
with vinegar and lukewarm water to remove grime from stainless steel parts.
Important: Do not use steam cleaners on any part of the oven.
OVEN DOOR: To remove or refit the Oven Door, carry out the following instructions;
REMOVE THE OVEN DOOR:
Open the oven door completely.
- Lift the hinge hook and insert it in the locking support on both hinges, see figure 5. This will prevent sudden
closing of the hinge during door removal.
- Grip the sides of the door towards the bottom.
- Lift the door a few inches (the spring will offer a certain amount of resistance due to locking of the hinge).
- When the door is raised enough, the hinges can be lifted out of their grooves.
- Pull the hinges out through the openings in the oven trim.
REFIT THE OVEN DOOR:
Grip the sides of the door towards the bottom and insert the hinges in the openings in the front trim of the
oven, see figure 5. With the oven door completely open, release the locking hooks. Lift the oven door and
make sure it was properly fitted and aligned with the side edges.
IMPORTANT. Do not remove the door locking hooks from their grooves when the door is removed. Do not
close the hinges without the weight of the door, otherwise the strong springs will violently close the hinges.
CAUTION: Do not apply excessive weight or stand on the door. This could break the door or injure the user.
Do not use the oven until the door has been properly refitted.
REPLACING THE OVEN LAMP
IMPORTANT: To prevent electric shocks and/or injury, read and carry out the following procedure:
Before replacing the oven lamp, make sure the power is disconnected by turning off the main switch.
Make sure the oven and lamp are cold. Then remove the lamp cover “A” by unscrewing it. Figure 6.
Do not touch the hot lamp with a damp cloth, as it may break.
Replace the lamp with another one suitable for electrical appliances of 25 W for 220 - 230 Vac. Figure 6.
If the lamp cover is damaged or broken, do not use the oven until the cover has been replaced or properly
refitted.
ASSISTANCE AND ORIGINAL REPLACEMENT PARTS
Only authorised components can be used on the electrical appliance. Do not repair or replace any oven
component not recommended in this manual. All other operations or repairs must be carried out by
authorised technical personnel.
When ordering a replacement part, specify the following data:
1) Oven model abbreviation and production number, given on the product label at the bottom front of the
oven cooking compartment.
2) Description and number of replacement part, technical information only available to the authorised after-
sales service.
3) Specify the details of the distributor that sold the oven, and the details of your nearest service centre.
17

SAFETY INSTRUCTIONS
Always contact qualified personnel in the following cases:
To ensure safe and efficient operation of this electrical appliance:
- only contact authorised technical service centres;
- always demand the use of original replacement parts;
- the appliance is designed for non-professional domestic use; do not modify its characteristics;
- the dataplate gives the symbols of the countries for which the instructions apply;
- appliance electrical safety is guaranteed only when it is connected to an earthing system in
compliance with the current regulations.
- Do not touch the heating elements or any parts of the oven door during use, as they become very hot,
and in particular keep children away.
Do not allow children to touch:
- the controls and the appliance in general;
- the packing elements (bags, polystyrene, staples, etc.);
- the appliance during and immediately after oven use, since it becomes very hot;
- the appliance when not used (make any potentially hazardous parts safe).
Do not:
- touch the appliance with wet parts of the body;
- use the appliance when barefoot;
- pull the appliance or power cable to unplug it from the socket;
- carry out improper or hazardous operations;
- obstruct the ventilation and cooling openings;
- leave the power cables of other electrical appliances on hot parts of the oven;
- expose the oven to atmospheric agents (rain, sun);
- use the oven to store various objects;
- use flammable liquids near the appliance;
- use adapters, multi-sockets and/or extension leads;
- allow anyone except qualified personnel to install or repair the appliance.
Always contact qualified personnel in the following cases:
- installation (according to the manufacturer's instructions);
- doubts regarding appliance operation;
- replacing the socket if incompatible with the appliance plug.
18
OVEN TECHNICAL DATA
Voltage 220 – 230 – 240 V ~ 50/60 Hz
Total Power: kW
2.6
Roof Heating Element: kW
0.8
Grill Heating Element: kW
1.8
Floor Heating Element: kW
1.2
Circular Heating Element: kW
2.5
Oven Lamp: W
25 x 2
Oven Fan: W
25
Oven Tangential Fan: W
25
Useful dimensions of Cooking Compartment
Height mm
305
Width mm
580
Depth mm
410
Useful Volume dm³
73
Grill Area cm²
700
Energy Consumption
to reach 200 °C kW/h
0.60
to maintain 200 °C kW/h
0.81
Power Total Consumption kW/h
1.41
Oven equipment
1 Drip-tray
1 Chromed grill
1 Rotisserie
GUIDE TO USING THE OVEN
IMPORTANT:
Before using the oven for the first time, operate it empty, selecting the hot air intense Cooking programme for
approx. 1 hour. Air the room, if possible opening the kitchen windows. This will allow removal of the combustion
fumes of manufacturing residuals such as greases, oils and resins.
POWER ON and OFF INDICATOR
When lit up, it indicates that the oven is on and therefore powered. See figure 7.
THERMOSTAT INDICATOR LAMP
Indicates switching on and off of the heating elements to maintain the selected cooking temperature.
See figure 8.
19
PROGRAMMER INSTRUCTIONS for Model FMXO 86 M
SYMBOLS
TIMER
KILN ACTIVE
NUMBER DECREASE
NUMBER INCREASE
A AUTOMATIC
THIS PROGRAMMER FUNCTIONS WITH A TOUCH SYSTEM. ACT ON THE CONTROLS BY PRESSING THEM SLIGHTLY IN THE AREA
INDICATED BY THE SYMBOLS
ACTIVATION AND REGULATION OF THE TIME
Once the current s connected, the A symbol appears on the display along with the flashing numbers.
Proceed as follows to regulate the time:
Act on the symbols simultaneously for a few seconds until the numbers stop flashing. Always act on the
same symbols to regulate the time with a single impulse. Maintaining the pressure constant the numbers run
quicker. After a few seconds the time is fixed.
Any regulation of the time while an automatic program is active will cause the same to be deleted.
PROGRAMS SELECTION/ANNULMENT
The programs are set by lightly pressing or touching the previously-activated MODE symbol, holding it down
for a few seconds until a beep is heard and the symbol flashes. Herein the “at on the MODE symbol”
indication will consider its activation implicit in the way just described.
The illuminated symbol indicates that the kiln is ready for use in manual mode or is performing a program.
This will switch off every time a program ends, (except timer function) and will switch back on at every reset.
To display the sate of a program or modify the data set, act on MODE and scroll the menu verifying the data
set and modify it, if necessary.
To annul programming, act on the symbols simultaneously for a few seconds.
MANUAL FUNCTIONING
For manual functioning, do not intervene on the programmer (the symbol be illuminated) but act using the
temperature function knobs.
The kiln is ready for normal firing without programming. The TIMER function can however be used
SEMI-AUTOMATIC FUNCTIONING (WITH FIRING TIME SET)
Touch the MODE symbol until 0:00 appears, the symbol starts to flash. Set the desired firing time by
acting on the symbols. After a few seconds the symbol remains fixed and the current time re-appears.
Turn the functions and temperatures selector knob onto the desired values.
At the end of the set time, the acoustic signal indicates the end of firing, the symbols starts to flash and the
kiln switches off.
Turn the knobs to the off position. Touch any of the symbols to interrupt the acoustic signal and act on the
keys for a few seconds to annul programming.
SEMI-AUTOMATIC FUNCTIONING (WITH FIRING TIME END SET)
Act on the MODE symbol until END appears alternating with the current time, both flashing (the A symbol also
starts to flash). Touch the symbol to set the firing end time. After a few seconds the time re-appears and
the letter A remains fixed. Now turn the two knobs onto the desires temperature and firing time.
When the set time is reached, the acoustic signal indicates the end of firing, the letter A starts to flash and
the kiln switches off.
20
Turn the knobs to the off position. Touch any of the symbols to interrupt the acoustic signal and act on the
symbols for a few seconds to annul programming.
AUTOMATIC FUNCTIONING (WITH DEFERRED FIRING START SETTING)
Act on the MODE symbol until DUR (duration) appears alternating with the current time, both flashing (the A
symbol also starts to flash). Act on the symbol to set the envisioned firing time duration. With MODE pass to
the END function, which flashes alternately with the firing end time calculated by the programmer on the basis
of the duration data inserted. Set the desired firing end time, by acting on the symbol. After a few seconds
the time re-appears and the letter A remains fixed. The kiln remains off and will re-activate automatically
(the symbol lights up), as set.
When the set time is reached, the acoustic signal indicates the end of firing, the letter A starts to flash and
the kiln switches off.
Turn the knobs to the off position. Touch any of the symbols to interrupt the acoustic signal and act on the
symbols for a few seconds to annul programming.
Example: it is 11:30, the firing time necessary is 30 minutes and firing must end at 13:00 by setting it in the
program. The kiln will switch on at 12:30 and switch off at 13:00.
TIMER FUNCTION
Act on the MODE symbol until the flashing symbol and 0:00 appears.
Set the desired time, using the symbol. After a few seconds the symbol stops flashing and the clock
returns. When the set time is reached, the symbol starts to flash again and the acoustic signal starts.
Touch any of the symbols indifferently to stop the acoustic signal.
After a few seconds, the clock will re-appear. Press the MODE symbol to annul this function.
This function can be used for manual firing.
ACOUSTIC SIGNAL
The acoustic signal starts to ring for 6 minutes, to interrupt it, act indifferently on one of the three symbols.
The intensity of the signal can be regulated on three different sound levels in the following way: act
simultaneously on the symbols, act on the MODE symbol until ton appears, touch the symbol to
select the desired level.
DELETING THE PROGRAM
To delete a program set, act on the symbols to delete a program set, just act on the symbols
simultaneously. The programmer will return to the manual setting ready for new use.
SAFETY FOR CHILDREN OR AGAINST ACCIDENTAL CONTACTS
It is an additional function that allows to block access to the functionality of the electronic programmer keys
both when the kiln is running and as prevention with the kiln is off.
When activated, this function prevent children or other persons touching the programmer symbols
accidentally, thus modifying the previous program or from starting the kiln.
Every programmer signal that intervenes firing kiln functioning when the safety lock is activated can be
eliminated by acting on any of the keys. The safety lock will remain active.
The safety lock is activated automatically if, no symbol is pressed for about 8 seconds and is deactivated by
pressing the MODE symbol for more than 2 seconds or acting on the symbols simultaneously.
NOTES: - The lock must be deactivated to display the remaining firing time.
MANUAL PROGRAMMER: PUSH-PULL for Model MAM 82 M
MANUAL OPERATION: Press the knob to raise it. Turn the knob anticlockwise to the “Hand” manual
symbol. See figure 10.
IMPORTANT: If the knob is left on Manual mode and a cooking programme is selected, the oven stays on
continuously.
COOKING PROGRAMME OPERATION: Turn the knob clockwise and select the required cooking time.
At the end of the cooking time the oven switches off automatically and a ringer sounds.
CHILD SAFETY FUNCTION (LOCK) – when provided for
This additional function is used to lock the electronic programmer buttons, when the oven is operating and as
a preventive measure when it is off. It is shown by the special symbol (key).
When activated, this function prevents children or others from modifying the previously set programme or
switching on the oven, if off, by pressing the programmer buttons.
21
When this safety lock is activated, any signalling by the programmer during oven operation can be eliminated
by pressing any of the buttons. The safety lock will remain activated.
To activate or deactivate this child safety function (lock), proceed as follows:
1) To activate: press the + button and hold it down for at least 3 seconds until the symbol (key) showing
this function appears on the programmer screen.
2) To deactivate: press the + button and hold it down until the symbol (key) disappears from the
programmer screen.
NOTE: To display the remaining cooking time it is necessary to deactivate the lock.
OVEN TEMPERATURE THERMOSTAT: See figure 11.
The oven thermostat controls the required cooking temperature, with all oven operation selections.
The heating elements switch on and off to maintain the set temperature.
For Model MAM 82 M; to activate the Push-Pull knob, press the knob to raise it.
KNOB FOR SELECTING A COOKING PROGRAMME: See figure 12.
This switch activates the type of function required for cooking. The following illustration shows the source and
distribution of heat for each operation selection. The Floor and Circular heating elements are respectively
inside the lower and rear structure of the muffle. The heating elements will switch on and off automatically to
maintain the required cooking temperature.
For Model MAM 82 M; to activate the Push-Pull knob, press the knob to raise it.
OVEN LAMP;
Use this function to switch on the oven lamp. The lamp remains on even with the other
functions.
TOP COOKING;
Use this function to roast from above. This intense heat is ideal for cooking and browning.
BOTTOM COOKING;
Use this function to roast from below. This intense heat is ideal for roasting not particularly
tender meat.
CONVENTIONAL NORMAL COOKING;
Use this function for normal cooking and for roasting. The top and bottom heating
elements heat the air.
INTENSIVE COOKING WITH HOT AIR;
Use this function for roasting and cooking with the aid of hot air. Top and bottom cooking
with hot air for crisp finish of food.
INTENSE HOT AIR COOKING;
Use this function for uniform cooking. Ideal for preparing cakes, bread and other largesize dishes.
DEFROST AND DRY;
Use this function to speed up defrosting and/or drying food to be cooked, with the use of
forced air.
TURBOGRILL;
Use this function for grilling plus hot air. Intensive grilling with hot air. Oven door closed
22
GRILL;
Use this function for grilling. Cooking with the Grill. Read the section Use of Grill for
further information. Oven door open.
GRILL WITH ROTISSERIE;
Use this function to grill with the aid of the Rotisserie. To use this function, make sure to
preheat the oven using the Grill.
USING THE ROTISSERIE
Insert the rotisserie rod, with the food, in the special hub then place it on the rod support. Install the drip-tray
under the food. Remember to remove the rod grip before starting cooking. For further information, read the
following section, Using the Grill.
USING THE GRILL
Select the Grill function on the switch and set the thermostat to max. temperature. Allow a cooking compartment
preheat period before putting the food in the oven. Use the Grill for not more than 15 minutes and always with
the Oven Door open.
CAUTION: During Grill use, the accessible parts can become very hot. Therefore keep children away.
POSITION OF OVEN RACKS FOR SPECIFIC COOKING:
1) Frozen cakes, long Roasts, Turkey, Cakes, well-done Steak and Meat; position 1 and 2 from the bottom.
2) Cakes, Loaf, Toast, Casserole, Wholemeal bread, Meat; position 2 from the bottom.
3) Biscuits, thin Meat cuts; position 2 and 3 from the bottom.
To Brown with the Grill, use position 3 from the bottom.
CAUTION: During use, the oven can reached high temperatures. Make sure not to touch the heating
elements or burners inside the oven.
23

INFORMATION FOR USERS:
This product complies with European Directive 2002/96/EEC.
The barred dustbin symbol on the appliance indicates that at the end of its useful life the product must be
collected separately from domestic waste and taken to a special centre for differentiated collection of
electrical and electronic equipment or returned to the dealer when purchasing an equivalent new appliance.
The user is responsible for taking the appliance to a suitable collection centre at the end of its service life,
otherwise the penalties provided for by the current law on waste disposal shall apply.
Adequate differentiated collection of the scrapped appliance for recycling, treatment and environmentallyfriendly disposal will help prevent possible negative effects for the environment and the health of people and
favours recycling the materials of which the product is made.
For more detailed information on the available collection systems, contact the local waste disposal service or
the shop where the product was purchased.
THE MANUFACTURER DECLINES ANY CIVIL AND PENAL LIABILITY IF THE CONNECTION IS NOT
CARRIED OUT IN ACCORDANCE WITH THE CURRENT REGULATIONS AND THAT INDICATED IN THIS
INSTRUCTION MANUAL.
This oven complies with the requirements of European Directives EEC 87/308; 73/23; 93/68 and 89/336.
24
 Loading...