

Page 1
SKYWELL
User Manual
Atmospheric Water Cooler
Model: 5T1.5
Spec:
Serial Number:
Admin PIN:
Date of Purchase:
Please register this unit
at Skywell.com to
activate warranty and
get the latest product
updates.
SAVE THIS MANUAL FOR FUTURE USE
When using electrical appliances, basic
safety precautions should be followed in
order to reduce the risk of fire, electric
shock and injury to persons or property.
This manual contains important information describing how to safely set up, use
RECYCLED
PAPER
and maintain your Skywell water cooler.
© 2014 Skywell, LLC
1
Page 2
WARNING
entire manual before assembling, installing & operating the dispenser. Failure to
execute the instructions in this manual could cause personal injury or property
damage.
To reduce risk of injury and property damage, please read this
QUICK SETUP AND INSTALLATION
WARNING
more people to move and install the water cooler.
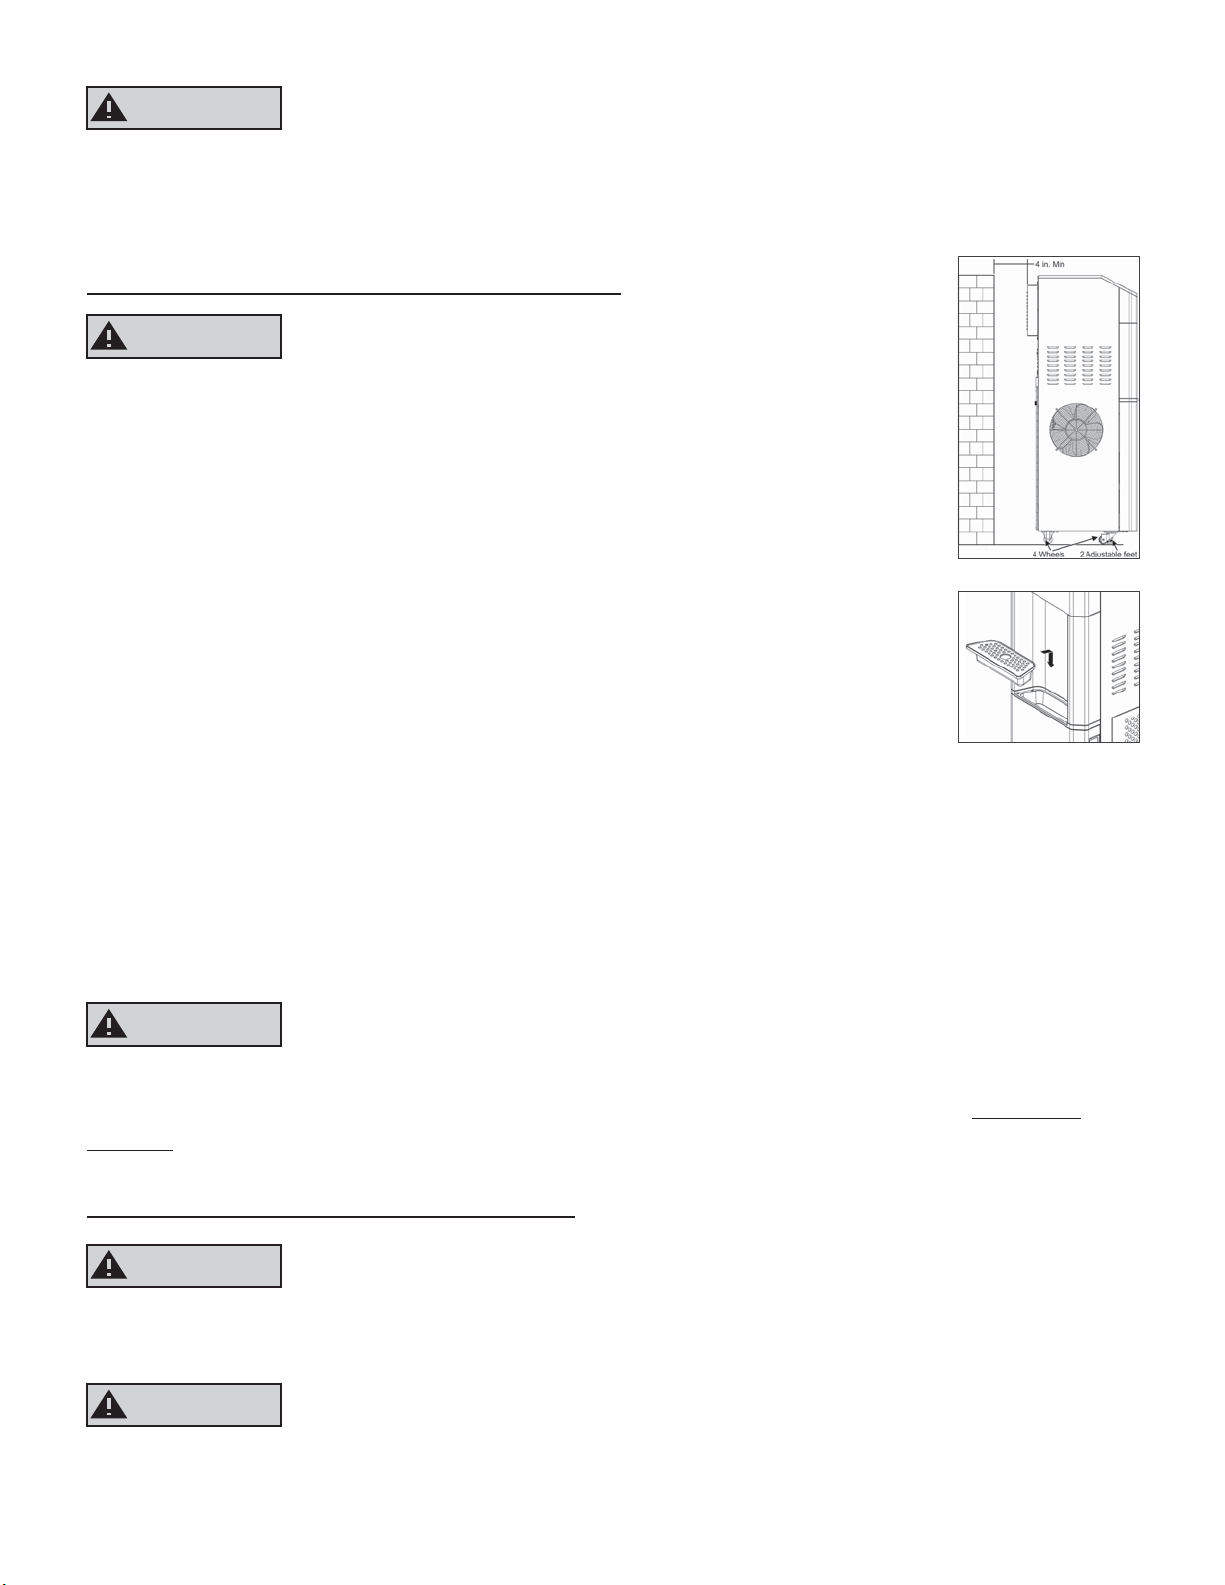
① Find the perfect spot for your Skywell on a hard level surface. It should
have 4 inches of space in each direction to ensure proper air flow and
operation.
② Remove the Skywell from the box and recycle the box. Both we and
the environment appreciate it! Skywell takes recycling and conservation
efforts to heart.We have instituted the “Skywell Cares” initiative is a
program Skywell has instituted for when it is time to retire your 5T1.5 unit.
A Skywell Cares technician will retrieve your unit, at no cost, and recycle
a significant portion of the materials to minimize waste and
environmental impact.
③ The drip tray may be removed and installed without opening the front
door.The drip tray cover may be removed to clean the drip tray. When
re-installing the driptray, insert it downward securing it into its docking point below the dispense
point.
④ (OPTIONAL) If your Skywell was not installed by a Skywell technician, you may want to
flush the filters to avoid a chalky taste in your first few gallons of generated water. See page 6
for instructions.
Excessive Weight Hazard. Use two or
⑤ Plug the Skywell into a standard means of a ground-fault circuit interrupter and let it begin making
water.
WARNING
in shortly after the unit has been on another side can damage the compressor.
NOTE: WHEN YOUR UNIT IS PLUGGED IN FOR THE FIRST TIME, IT MAY TAKE UP TO 6
HOURS FOR COLD WATER TO REACH ITS COLDEST POINT.
The unit should be upright for 4 hours prior to plugging in. Plugging
KEY SAFETY CONSIDERATIONS
WARNING
3-prong grounded AC 120V, 60Hz outlet ONLY. The Skywell must be properly ground
ed. Consult with an electrician if necessary.
WARNING
Use caution when dispensing hot water and do not allow children to dispense hot
water without supervision.
Plug the Skywell 3-prong grounded plug into a standard
The Skywell dispenses water as hot as 207°Farenheit (97°Celsius).
2
Page 3

WELCOME TO YOUR SKYWELL
Congratulations on your selection of an advanced state-of-the-art Atmospheric Water Generator,
water cooler, and multi-purpose dehumidification unit.
Your Skywell 5T1.5 uses a fan to draw moist air into the machine, where it passes through a chilled
evaporator coil that cools the air to below the dew point. The resulting condensation is collected
in a tank at the bottom of the machine, and purified for your use using a proprietary filtration
system, UV light treatment, and ozone protection.
THE SKYWELL MISSION
The company started with a simple goal: To change how the world thinks about drinking water.
Clearly, our planet needs a better way to create and dispense drinking water—a new approach
that’s convenient for consumers, yet respectful of our environment. No plastic bottles, no delivery
trucks, no added chemicals or unnecessary water waste. And a cost that’s comparable to
traditional methods, including bottled water delivery and single-use bottles. This new approach
had to be self-contained—no plumbing required—with super-efficient filtering, very low
maintenance, and very high purity.
The solution: revolutionary technology that literally creates water from the air. Skywell takes our
planet’s most plentiful resource—the air around us—condenses and filters it, and creates one of
our most precious resources: pure, clean drinking water. We call it air water. To produce it, all you
need is a Skywell and a standard electrical outlet.
Skywell is committed to making a positive impact on our world’s water crisis. We’re empowering
people to control their own water supply—and in the process, to act in a socially responsible
manner regarding the Earth’s waning supply of clean drinking water.
The time is right for Skywell. It’s here, now. And for us, it’s not just a product; it’s a mission.
CONTENTS OF THIS MANUAL
Quick Install Guide
Welcome to Your Skywell
Safety Precautions
Product Features
Parts & Features Specifications
Cleaning Prior to Initial Use
Operation
Using the touchscreen
Proper Care & Cleaning
How to Install Filters
Troubleshooting
Limited Warranty
Quick Reference Guide
FCC Statement
IC Statement
.......................................................................................................................................................6
.........................................................................................................................................2
................................................................................................................................3
.........................................................................................................................................4
...........................................................................................................................................5
....................................................................................................................5
...........................................................................................................................6
..................................................................................................................................7
...............................................................................................................................8
......................................................................................................................................10
.............................................................................................................................................11
...........................................................................................................................................12
.............................................................................................................................13
............................................................................................................................................14
................................................................................................................................................15
3
Page 4

SAFETY PRECAUTIONS
WARNING
Ensure you read this entire manual before operating the machine
for the first time.
WARNING
This product dispenses water at very high temperatures. Failure to
use properly can cause personal injury.
When operating this dispenser, always exercise basic safety precautions, including
the following:
1. Prior to use, this dispenser must be properly assembled and installed in accordance with this manual.
2. This dispenser is intended for water dispensing only. Do NOT use other liquids. Do NOT use for other
purposes.Warranty is void if used to directly dispense any other liquids.
3. For indoor use only. Keep water dispenser in a dry place away from direct sunlight. Do NOT use outdoors.
4. Install and use only on a hard, flat and level surface.
5. Do NOT place dispenser in an enclosed space or cabinet.
6. Do NOT operate dispenser in the presence of explosive fumes.
7. Position the back of the dispenser no closer than 4 inches from a wall and permit free airflow between
wall and the dispenser. There must be at least 4 inches of clearance on the sides of the dispenser to
permit airflow.
8. Use only properly grounded outlets. Do not use an extension cord with your water dispenser.
9. Always grasp the plug and pull straight out from the outlet. Never unplug by pulling on the cord.
10. Do NOT use this dispenser if the cord becomes frayed or otherwise damaged.
11. To protect against electric shock, do NOT immerse the cord, plug, or any other part of the cooler in water
or other liquids.
12. Ensure the dispenser is unplugged prior to cleaning or changing filters.
13. Never allow children to dispense hot water without proper and direct supervision.
14. Service should be performed only by a certified technician. Please contact us at 1-844-SKYWELL (759-935
5) for assistance.
WARNING
Do not attempt to adjust the ozonator. Ozone is released in
very small quantities that have been verified as safe. Attempting to adjust the
ozonator may release more ozone than prescribed.
WARNING
1. Plug your Skywell into a grounded 3-prong outlet only.
2. Do not remove ground prong from Skywell power cable.
3. Do not use an adapter or extension cord.
4. Failure to follow these instructions can result in death, fire, or electrical shock.
A 120 volt, 60 Hz, AC only, 15- amp, fused electrical supply is required. A time-delay fuse or circuit
breaker is recommended. Do not overload the circuit, and provide a separate circuit, if required,
to serve only this appliance. The Skywell must be plugged into a mating, 3 prong, grounding-type
outlet, grounded in accordance with local codes and ordinances. In the event of a malfunction
or breakdown, grounding will reduce the risk of electrical shock by providing a path of least
resistance for electric current. If a mating outlet is not available, it is the personal responsibility and
obligation of the customer to have the properly grounded outlet installed by a qualified
electrician. Do not ground to a gas pipe. Do not have a fuse in the neutral or ground circuit.
4
If you have a question or problem, please contact 1-844-SKY-WELL(759-9355) for assistance.
Electrical Shock Hazard
IMPORTANT: Do NOT Return Dispenser To Store.
Page 5
PRODUCT SPECIFICATIONS
Power rating
Refrigerant Types
Cold Water Power
Cold water capacity / Hour
Hot Water Power
Hot water capacity / Hour
Dispense Temp. Range
Collection tank capacity
Cold tank capacity
Hot tank capacity
Dimensions
Net Weight
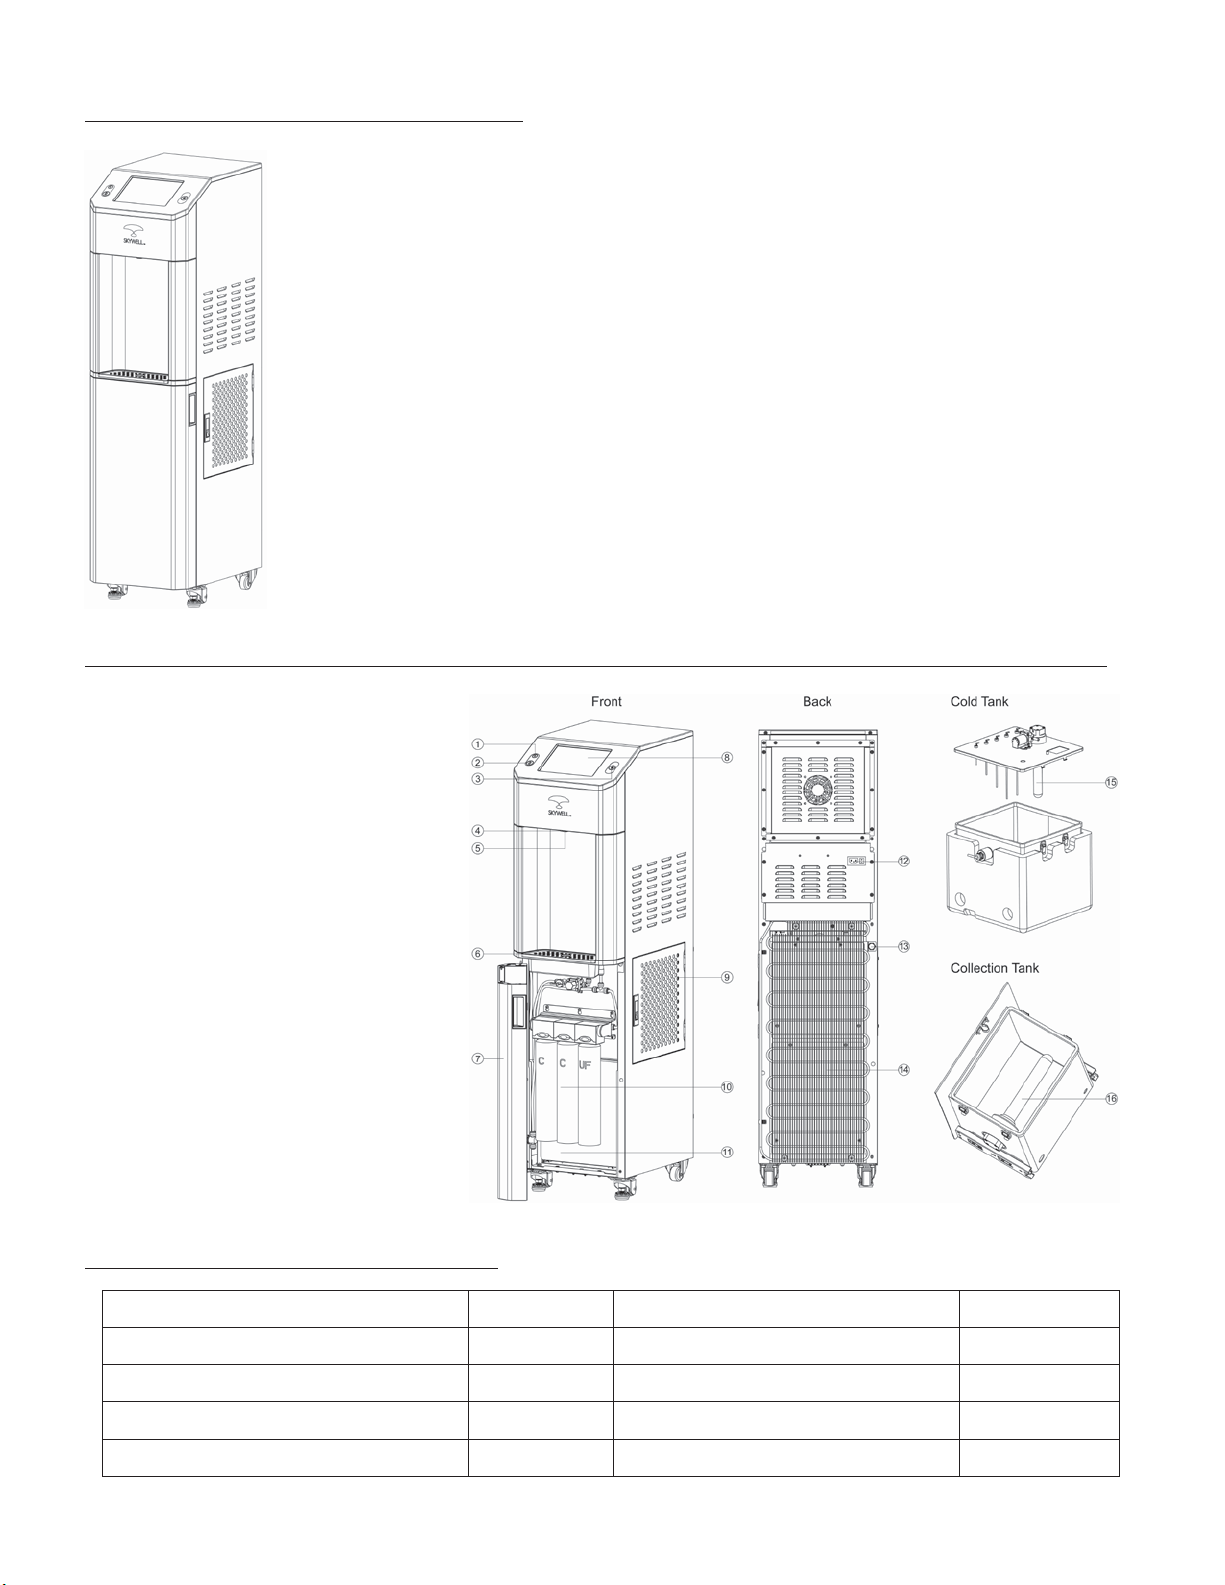
PARTS & FEATURES
Child Safety Lock ①
Tap button: Hot Water ②
Tap button: Cold Water ③
Water Dispensing Point ④
LED Night Lights ⑤
Drip Tray ⑥
Water Filter Door ⑦
Interactive Touchscreen ⑧
Vent door ⑨
Water Filter ⑩
Water Collection Tank ⑪
Power Cord ⑫
Drain Plug ⑬
Condenser ⑭
UV light ⑮
UV light ⑯
AC120V / 60Hz / 12A
R-134a & R-410a
70W
0.8L / 0.21Gallons
850W
7.2L / 1.9Gallons
39°F - 203°F
6 L / 1.6 Gallons
10 L / 2.5 Gallons
0.8 L / 0.21 Gallons
123.6 H × 32 W × 50.2 D (cm)
48.7 H × 12.6 W × 19.8 D (inch)
139 Ibs / 63 Kg
REPLACEMENT PARTS LIST
Complete Filter Kit FW555 Air Filter FA006
Sediment Filter FW011 Touch Screen Device TZ121
Pre-Carbon Filter FW021 UV Light FW101
UF Membrane Filter FW031 Hot Water Button AB051
Alkaline Filter(special order) FW041 Cold Water Button AB061
5
Page 6

OPERATING AND USING YOUR SKYWELL
WATER FILTER BREAK-IN PRIOR TO USE (OPTIONAL)
While the very first drops of Skywell water will be clean, fresh water, the first few gallons may have a less than optimal taste while the filters break in. In order to avoid
this Skywell recommends that the first 10 gallons produced not be consumed. (Feel
free to water plants or otherwise use the water as you see fit.) After the first ten gallons, or the cold tank filling twice and being completely dispensed, the filters will
have had ample water passed through them for a complete break-in. Your Skywell
water will now not only be clean and fresh, but taste pure, without the potential
chalkiness associated with brand new water filters.
Dispensing Cold Water
Note: After setup, it will take up to 6 hours to get the water to its maximum cold
temperature. During this time, the compressor may run continuously. Cold water
availability for dispense will bealigned with overall water production, which is driven
by the ambient conditions.
1. Position your bottle, glass, pitcher or cooking pot securely below
the dispensing point indicated by the Skywell Mark at the front
of the machine.
• To avoid splashes, hold the cup as close to the tap as possible.
2. Press and hold the cold water control downward to start
dispensing water.
3. Release the control once the desired fill level is achieved.
Dispensing Hot Water
Note: After setup, the Skywell is able to heat generated water to
hot water (up to 207degrees Fahrenheit) within 15-20 minutes. Hot
water availability for dispense will be aligned with overall water
production, which is driven by the ambient conditions.
1. Position your bottle, glass, pitcher or cooking pot securely below
the dispensing point indicated by the Skywell Mark at the front
of the machine.
2. Press the red unlock button to unlock hot water dispensing (you
should hear a beep)
3. Press and hold the hot water button to start dispensing water.
4. Release the control once the desired fill level is achieved.
IMPORTANT: Do NOT Return Dispenser To Store.
If you have a question or problem, please contact 1-844-SKY-WELL(759-9355) for assistance.
6
Page 7

THE SKYWELL HYDRATION APP
Current Water Temperatures Current Water Level
Button: Expand Menu
Button: Go to Home
Screen
Button: User profiles
Button: Cause Info
Button: Settings Menu
Button: Help Screen
Button: Quiet Mode
Total .5L plastic bottles
saved to date from use
of the machine
Water Facts
Skywell Cause Video
Westbrook
Custom Logo
IMPORTANT: Do NOT Return Dispenser To Store.
If you have a question or problem, please contact 1-844-SKY-WELL(759-9355) for assistance.
7
Page 8

SETTING PRODUCTION SCHEDULE
To set up a custom schedule for producing water, first go to the Settings Menu. In
the lower-right-hand corner there are two options:
Schedule Daily Generation – use to set regular production
schedule.You can set up to 4 different time periods and
have each produce water at different rates. “MAX” will
produce the most water but also have the most
“fan noise.”
Change Today’s Schedule – similar to setting Daily
Generation but only applies to the calendar day for
which it is set.
CREATING A USER PROFILE
To engage a new user, have them dispense water into a glass. After dispensing has
finished, the screen will announce how much water has been dispensed and there
will be a button in the lower-right-hand corner offering to “Create A New Hydration
Profile”. Pressing this button will prompt the user to create a user name and PIN
number. After this point, any water dispensed can be added to this profile.
ADDING WATER DISTRIBUTION TO A USER PROFILE
After dispensing has finished, the screen will announce how much water has been
dispensed and there will be a button in the lower-right-hand corner offering to “Add
to My Hydration Profile”. Press this button, select the desired user profile, and enter
the PIN to complete.
ADDING CUSTOM LOGOS
A Skywell representative can help load your custom logos or brand messaging to
the touchscreen display.
CLEANING AND CARE
Disinfecting the dispensing point
Time Required: 5 minutes
Recommended Frequency: Once per month
The Skywell machine is self-cleaning internally,but the dispensing point for the
water interacts with the outside environment.Regular use of the hot water will
generally disinfect the dispensing point,but extra care at the dispensing point
can ensure you always have the cleanest water possible.
1) Use non-toxic cleaning agent to clean the nozzle
8
Page 9

2) Dispense cold water and then hot water for at least 3 seconds each. Captu re this water for non-potable use
Cleaning the collection tank
Time Required: 15 minutes
Recommended Frequency: Once per month
Because the collection tank by necessity interacts with the environment in order to
collect water, it can over time develop buildup. While the Skywell’s filtration and
water quality systems will ensure your water remains clean and safe to drink regardless, such build up can shorten the life of the water filters and reduce the efficiency
of the system. Therefore regular cleaning is important to ensure optimal
performance.
1) Unplug your Skywell
2) Open the front cabinet door, and swivel the water filters in an upward motion
until they are parallel to the floor.
3) Use the handle on the collection tank to pull it forward to help, but be careful to
not put stress on the wires connected to the lid. Carefully remove the lid of the
collection tank by lifting straight up.
4) Empty contents of tank. This is unfiltered water, but it can still be used for non potable purposes, such as watering plants.
5) Use a non-toxic cleaning agent to wipe down all of the internal surface area of
the collection tank.
6) Rinse the collection tank to remove any traces of cleaning agent.
7) Return collection tank into the Skywell, carefully reattach lid (NOTE: Ensure lid is
properly lined up. If lid is reattached out of place, the machine may leak
collected water over time).
8) Lower water filters to vertical position, plug Skywell back in.
Cleaning the air filter
Time Required: 5 minutes
Recommended Frequency: Once per month
1) Open the fan door by pressing the release latch
2) Remove the air filter
3) Rinse the air filter until water passing through it comes out clear
4) Return the air filter to its compartment and latch the door shut.
Note: The Air Filter comes with a lifetime warranty. If your air filter breaks due to
manufacturing error, Skywell will replace it for free. If your air filter breaks for misuse
or accidental damage, a replacement can be ordered by calling the Skywell
Service Department at 844-SKY-WELL
9
Page 10

Replacing water filters
Time Required: 15 minutes
Recommended Frequency: Quarterly
NOTE:
perform all replacements of filters for your machine.
1) Unplug your Skywell and wait for any noises to cease.
2) Open the front cabinet door to expose the filter
manifold.
3) Place a bowl or other device below the filters to catch
any water that may drip out as a result of releasing filters.
4) From left to right, replace the filters one at a time:
If you purchased a service plan through Skywell, a certified technician will
1. Swivel existing filter up until it is para llel to the ground.
2. Pull out the filter element
3. Insert new filter and until it locks into
place.
4. Gently lower the new filter to its ver tical position.
The filter manifold
5) Once all the filters have been replaced, you may wish to flush them to provide
any taste inconsistency while they are being broken in. See instructions for filter
flushing on Page 6.
6) Close cabinet door and plug Skywell back in.
Replacing the UV System
Time Required: 20 minutes
Recommended Frequency: Every 8-9 months
UV Specification: model BS-ZSZ5-8W-WHF, input voltage 24VDC, input current 260
mA, power consumption 8W. It is recommended that a Skywell technician perform
this maintenance function,including UV light proper handling,changment and
disposal. (Before perform this maintenance, disconnect the electrical source of supply
to the UV radiation before opening cover). Please contact Skywell for support.
10
Page 11

TROUBLESHOOTING TIPS
PROBLEM POSSIBLE CAUSES HOW TO SOLVE
1. Ensure that the power outlet has power by
testing another safe device.
2. Allow machine to generate additional water,
or you can expedite by adding clean water
to the collection tank.
3. Add water to collection tank and wait for 30
minutes while machine is plugged in. If there is
still no water being dispensed from hot tank,
call for service.
1. Ensure that the power outlet has power by
testing another safe device.
2. Allow machine to generate additional water,
or you can expedite by adding clean water
to the collection tank.
3. Allow additional time for cooling, which can
take multiple hours if machine has just been
plugged in or is empty.
4. Check to see if the condenser coils (black
tubing at the back) are radiating heat or not.
If the area is not hot, call for service.
No hot
water
No cold
water
1. There is no power to the
outlet, machine is not
plugged in, or power
switch is off
2. Water levels are too low
3. Pump is not working
1. There is no power to the
outlet, machine is not
plugged in, or power
switch is off
2. Water levels are too low
3. Water has had insuffici ent time to cool.
4. Potential compressor
cooling system problem
if there is no cold water
and unit doesn’t cool
water after one hour of
running continuously.
5. Pump is not working
Water does
not taste
good
Water leaking
from unit
1. Water filters have not
been replaced
recently enough
2. Water filters are new
and still being broken
in.
3. Air filter is dirty
4. Collection tank needs
to be cleaned
1. Collection tank lid is
not aligned correctly.
2. Filters not seated
correctly in filter
manifold.
3. Water line cracked.
4. Level sensors are out of
the tank.
1. Replace water filters (see page 10)
2. Flush the filters (see page 6)
3. Clean the air filter (see page 9)
4. Clean the collection tank (see page 9)
1. Ensure that the lid to the collection tank is
perfectly covering it and is firmly in place.
2. Remove water filters and put back in place,
ensuring tight fit (see page 10)
3. Open cabinet door at front of unit and see if
you can find a drip. Replace line if possible or
call for service.
11
Page 12

LIMITED WARRANTY
Skywell, LLC (“Vendor”) warrants to the original purchaser of this dispenser, and to no other
person, that if this dispenser is assembled and operated in accordance with the printed
instructions accompanying it, then for a period of one (1) year from the date of purchase, all
parts in such dispenser shall be free from defects in material and workmanship, and upon the
primary compressor for five (5) years. Vendor may require reasonable proof of your date of
purchase from an authorized retailer or distributor. Therefore, you should retain your sales slip or
invoice. The Limited Warranty shall be limited to repair or replacement of parts, which prove
defective under normal use and service and which Vendor shall determine in its reasonable
discretion upon examination to be defective. Before returning any parts, you should contact
Vendor’s Customer Service Department using the contact information listed below. If Vendor
confirms, after examination, a defect covered by this Limited Warranty in any returned part,
and if Vendor approves claim, Vendor will replace such defective part without charge. If you
return defective parts, transportation charges must be prepaid by you. Vendor will return
replacement parts to original purchaser, freight or postage prepaid.
The Limited Warranty does not cover any failures or operating difficulties due to accident,
abuse, misuse, alteration, misapplication, improper installation or improper maintenance or
service by you or any third party, or failure to perform normal and routine maintenance on the
dispenser, as set out in the User’s Manual. In addition, the Limited Warranty does not cover
damages to the finish, such as scratches, dents, discoloration or rust after purchase.
The Limited Warranty is in lieu of all other express warranties. Vendor disclaims all warranties for
products that are purchased from seller other than authorized retailers or distributors. AFTER
THE PERIOD OF THE ONE (1) YEAR EXPRESS WARRANTY (OR FIVE YEARS FOR PRIMARY
COMPRESSOR), VENDOR DISCLAIMS ANY AND ALL IMPLIED WARRANTIES, INCLUDING WITHOUT
LIMITATION THE IMPLIED WARRANTIES OF MERCHANTABILITY AND FITNESS FOR A PARTICULAR
PURPOSE. FURTHER, VENDOR SHALL HAVE NO LIABILITY WHATSOEVER TO PURCHASER OR ANY
THIRD PARTY FOR ANY SPECIAL, INDIRECT, PUNITIVE, INCIDENTAL, OR CONSEQUENTAL
DAMAGES. Vendor assumes no responsibility for any defects caused by third parties. This
Limited Warranty gives the purchaser specific legal rights; a purchaser may have other rights
depending upon where he or she lives. Some jurisdictions do not allow exclusion or limitation of
special, incidental or consequential damages, or limitations on how long a warranty lasts, so
the above exclusion and limitations may not apply to you.
Warranty is void if the electrical outlet is improperly wired to incorrectly sized circuit breaker or
fuse, if not grounded properly, or wires do not have correct polarity. Use of this cooler confirms
Purchasers agreement with the conditions of this warranty.
To activate this warranty, you must register your purchase at Skywell.com.
Skywell, LLC
2856 Colorado Ave
Santa Monica, CA 90404
www.skywell.com
1-844-SKY-WELL
12
Page 13

QUICK REFERENCE GUIDE
1 2 3
1) Open the air filter door
2) Remove the air filter
3) Rinse until clean
4) Return air filter and close filter door
NOTE: Use only Skywell water filters. Other filters may damage the unit
and will void the warranty.
1) Unplug your Skywell and open the front cabinet door
2) Place a bowl or drip tray below filters
3) From left to right, replace the filters one at a time:
1. Swivel existing filter up until it is parallel to the
ground.
2. Pull out the filter element
3. Insert new filter and until it locks into place.
4. Gently lower the new filter to its vertical position
4) Once all the filters have been replaced, you may wish to flush them to
provide any taste inconsistency while they are being broken in. See instr uctions for filter flushing on Page 6.
5) Close cabinet door and plug Skywell back in.
Your Skywell’s Service History
Delivered On:
Second Service:
First Service:
Third Service:
Fourth Service:
Sixth Service:
Eighth Service:
Fifth Service:
Seventh Service:
Ninth Service:
13
Page 14

FCC STATEMENT
This equipment has been tested and found to comply with the limits for a Class B
digital device, pursuant to part 15 of the FCC Rules. These limits are designed to
provide reasonable protection against harmful interference in a residential installation. This equipment generates uses and can radiate radio frequency energy and, if
not installed and used in accordance with the instructions, may cause harmful
interference to radio communications. However, there is no guarantee that
interference will not occur in a particular installation. If this equipment does cause
harmful interference to radioor television reception, which can be determined by
turning the equipment off and on, the user is encouraged to try to correct the
interference by one or more of the following measures:
—Increase the separation between the equipment and receiver.
—Connect the equipment into an outlet on a circuit different from that to
which the receiver is connected.
—Consult the dealer or an experienced radio/TV technician for help.
FCC Radiation Exposure Statement
This device complies with FCC radiation exposure limits set forth for an uncontrolled
environment and it also complies with Part 15 of the FCC RF Rules. This equipment
must not be co-located or operating in conjunction with any other antenna or transmitter.This equipment should be installed and operated with a minimum distance
of 5 millimeters between the radiator and your body.This device complies with Part
15 of the FCC Rules. Operation is subject to the following two conditions: (1) this
device may not cause harmful interference, and (2) this device must accept any
interference received, including interference that may cause undesired operation.
Caution!
Any changes or modifications not expressly approved by the party responsible for
compliance could void the user's authority to operate the equipment.
14
IMPORTANT: Do NOT Return Dispenser To Store.
If you have a question or problem, please contact 1-844-SKY-WELL(759-9355) for assistance.
Page 15

IC STATEMENT
This device complies with Industry Canada licence-exempt RSS standard(s). Operation is subject to the following two conditions: (1) this device may not cause
interference, and (2) this device must accept any interference, including interference that may cause undesired operation of the device.
Le présent appareil est conforme aux CNR d'Industrie Canada applicables aux
appareils radio exempts de licence. L'exploitation est autorisée aux deux conditions
suivantes : (1) l'appareil ne doit pas produire de brouillage, et (2) l'utilisateur de
l'appareil doit accepter tout brouillage radioélectrique subi, même si le brouillage
est susceptible d'en compromettre le fonctionnement.
This digital apparatus does not exceed the Class B limits for radio noise emissions
from digital apparatus as set out in the interference-causing equipment standard
entitled “Digital Apparatus,” ICES-003 of Industry Canada.
Cet appareil numérique respecte les limites de bruits radioélectriques applicables
aux appareils numériques de Classe B prescrites dans la norme sur le matérial
brouilleur: “Appareils Numériques,” NMB-003 édictée par l’Industrie.
Operation is subject to the following two conditions: (1) this device may not cause
interference, and (2) this device must accept any interference, including interference that may cause undesired operation of the device.
L'opération est soumise aux deux conditions suivantes: (1) cet appareil ne peut
causer d'interférences, et (2) cet appareil doit accepter toute interférence, y
compris celles susceptibles de provoquer fonctionnement du dispositif.
To reduce potential radio interference to other users, the antenna type and its gain
should be so chosen that the equivalent isotropically radiated power (e.i.r.p.) is not
more than that permitted for successful communication.
Afin de réduire les interférences radio potentielles pour les autres utilisateurs, le type
d'antenne et son gain doivent être choisie que la puissance isotrope rayonnée
équivalente (PIRE) est pas plus que celle premise pour une communication réussie.
RF exposure warning: The equipment complies with RF exposure limits set forth for an
uncontrolled environment. The antenna(s) used for this transmitter must not be
co-located or operating in conjunction with any other antenna or transmitter.
Avertissement d'exposition RF: L'équipement est conforme aux limites d'exposition
aux RF établies pour un incontrôlés environnement. L'antenne (s) utilisée pour ce
transmetteur ne doit pas être co-localisés ou fonctionner en conjonction avec toute
autre antenne ou transmetteur.
15
Page 16

3A2241100-000-G
 Loading...