

Page 1

Page 2

2
SXRC Remote Control
Introduction
Attention:
Please record your purchase information in the area
provided below. We recommend attaching the original
sales receipt or a copy of it to this manual for future
reference.
If you require service on this remote control during the
warranty period, you will need to provide this
information and a copy of the receipt to Kicker
to validate your warranty.
ALWAYS KEEP YOUR RECEIPT!
Congratulations!
You have just purchase the latest in microprocessor
powered amplifier control technology to carry the famous
KICKER name. Your KICKER SXRC is designed and
built to give you years of unmatched control, flexibility
and trouble-free performance in the judging lanes
and on the street.
Please read this installation manual, it contains valuable
information to help you get the most out of your new
SXRC Remote Control.
This is your “Fuel for Livin’ Loud ™“!
SX Series
SXRC Remote Control
Owner’s Manual
SX Series Amplifier Remote Control:
SXRC
Dealer Where Purchased:
Purchase Date:
Model Number:
SXRC
Page 3

3
SXRC Remote Control
Features
Features
A Brief Plug For The SXRC SX Amplifier Remote
Control And Our Support Materials At
www.KICKER.com
The SXRC is a component we envisioned from the start to
compliment your KICKER SX Series amplifier. That is why all SX
Series amplifiers have been built from day one with the ability to
be controlled remotely...and now you have the tool to do so, the
SXRC. The SXRC incorporates the latest in microprocessor
technology which allows you to not only update the software in
your SX Series amplifier (so you are always on the cutting edge)
but also group, diagnose and control them in a way never before
possible in the car audio world. This technological marvel is
loaded with diagnostic and control features that literally put the
SX Series amplifier controls at your fingertips from the driver’s
seat...plus a whole lot more! PLEASE read this manual so you
have a thorough understanding of the capabilities, installation and
operation of your SXRC. Also, sometimes things change, we find
things we overlooked or a customer points out a mistake we
made when writing this manual. When in doubt, always check out
the SUPPORT section at www.KICKER.com for the latest
information. If we change anything in this manual, or add to it,
you will always find the latest version available for download
there. Last but not least...grab a cold beverage, kick back and
read about this latest creation from the Livin’ Loud Labs. Enjoy!
Full Control Of SX Amplifiers The SXRC gives you
complete access to all settings and diagnostic tools for up to 16
KICKER SX Series amplifiers.
Very Important Note!!!
Ok...we know you are chomping at the bit to get this new toy
plugged in and working but there are some initial steps you will
have to take before you can use your SXRC with your SX Series
amplifiers.
After you follow the instructions for mounting and wiring your
SXRC into your system you will have to perform these steps
before you can use your SXRC.
1.) SET EACH OF YOUR SX AMPLIFIERS TO A UNIQUE
COMMUNICATION ADDRESS.
In order for the SXRC to properly communicate with all
your SX Series amplifiers, each amplifier must have its
own unique Communication Address.
2.) PERFORM A SOFTWARE UPGRADE TO ALL OF YOUR
SX SERIES AMPLIFIERS!
The SXRC has new software (Version 3.00) loaded into it for
all SX Series amplifiers. By using a one-at-a-time process,
each of your amplifiers will need to be updated to Version
3.00 so that all SXRC functions work properly.
So get your initial mounting and wiring done but keep in mind
that BOTH of the steps outlined above MUST be performed
before your SXRC will work properly with your SX Series
amplifiers.
PLEASE read the entire manual so you are aware of ALL the
steps required for this procedure.
Page 4

4
SXRC Remote Control
Features
Amplifier Adjustment Allows you to individually select and
adjust any setting on any amplifier controlled by the SXRC.
Amplifier Grouping & Group Adjustment Allows you to
build groups of amplifiers which can then share similar settings
and be adjusted all at once. Great for multiple sub amps, front
stage, rear stage, etc!
SickBay ™ Allows you to view operation history and use
diagnostic tools on any amplifier connected to the SXRC.
SXRC Setup Allows you to setup and adjust many options for
the SXRC like ISIS display brightness, lock codes, amp names,
memory names, etc. See details further in the manual.
Security Mode Allows you to ‘Lock’ and ‘Unlock’ your SXRC
and connected SX amplifiers to prevent un-authorized
adjustments.
Global Memory Presets Allows you to store and recall up to 4
memory settings for all amplifiers connected to the SXRC.
DIN Sized Control Head The controller for the SXRC is very
thin and includes hardware to be mounted in a standard DIN
sized opening.
ISIS Display Indicate Status & Input Settings ISIS is a VFD
(Vacuum Fluorescent Display), 5-way soft-touch keypad and 4
memory presets that allows you to view any current settings and
make changes to your SXRC and the connected amplifiers.
SXRC Name The name of the SXRC is displayed in the default
screen scrolling menu. Name is ‘SXRC’ by default but can be
changed by you to any name using up to 10 characters.
Digital Remote Volume Control (DRVC) Allows instant
control of the output level of selected amplifiers. The current
setting of the digital remote volume control is displayed in the
default screen scrolling menu.
Number Of Units Under SXRC Control The number of
amplifiers currently being controlled by the SXRC is displayed in
the default screen scrolling menu.
Real Time Calendar & Clock The SXRC is capable of
displaying the current date and time and is user adjustable.
Amplifier Temperature Display Selected amplifier’s
current temperature is displayed in the default screen scrolling
menu. All amplifiers can be viewed through SickBay™.
Amplifier Voltage Display Selected amplifier’s current
voltage is displayed in the default screen scrolling menu. All
amplifiers can be viewed through the SickBay™.
Page 5
5
SXRC Remote Control
Features
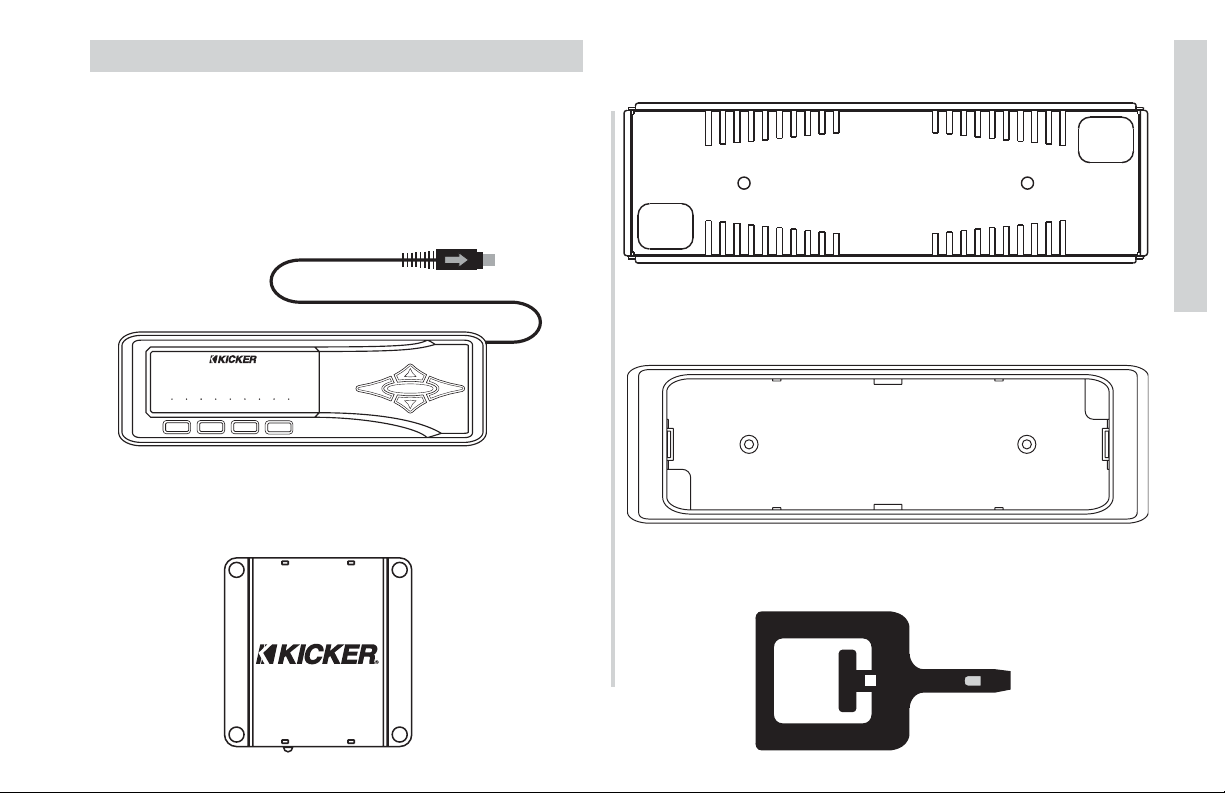
Metal DIN Mounting Cage This cage is designed to mount
into a standard DIN sized opening and provide a solid mounting
for your SXRC.
Plastic Cosmetic Trim Ring This ring trims out the DIN
Mounting Cage and provides a professional finished look to your
install.
R-Tool Tool used to assist in removing the SXRC Control Head
from the Plastic Cosmetic Trim Ring.
X 2
Parts List
Here is a breakdown of the components and accessories
included with your SXRC Remote Control kit.
SXRC Control Head This is the DIN sized unit used to control
the SXRC and your SX amplifiers. It includes an attached 1 meter
long 6-pin DIN cable. This cable is also referred to as a PS2
cable and you can use an extension (Male to Female) cable to
lengthen the cable if required (not included).
SXRC Interface Box This small enclosure provides the power
connections for the SXRC as well as being the communication
bridge between the Control Head and your SX Series amplifiers.
SYS
M3
PHASE
M4
AMP2
MUTE
HOME
ESC
ENT
AMP1
LEFT RIGHT
LOCK
GAIN EQ LPF HPF KOMP
** kicker
MEM-1
MEM-2 MEM-3 MEM-4
M1
M2
TO SXRC
FROM AMP
+ 12V
REM
GND
Page 6
6
SXRC Remote Control
Features
ISIS
The ISIS (Indicate Status & Input Settings) system consists of
the VFD (Vacuum Fluorescent Display) and nine soft touch
buttons that make up the Keypad. The ISIS allows you to view
and adjust the settings of your SXRC and all of the SX Series
amplifiers connected to it.
VFD DISPLAY
Here is a brief description of the indicators found on the VFD.
AMP1 - Indicates amplifier 1 is selected for adjustment. Only
available with four channel amplifiers.
AMP2 - Indicates amplifier 2 is selected for adjustment. Only
available with four channel amplifiers.
LOCK - Indicates the SXRC and/or SX Series amplifier controls
are locked out and not usable.
LEFT - Indicates an action or adjustment of the left channel.
SYS - Indicates you are in the System Menu.
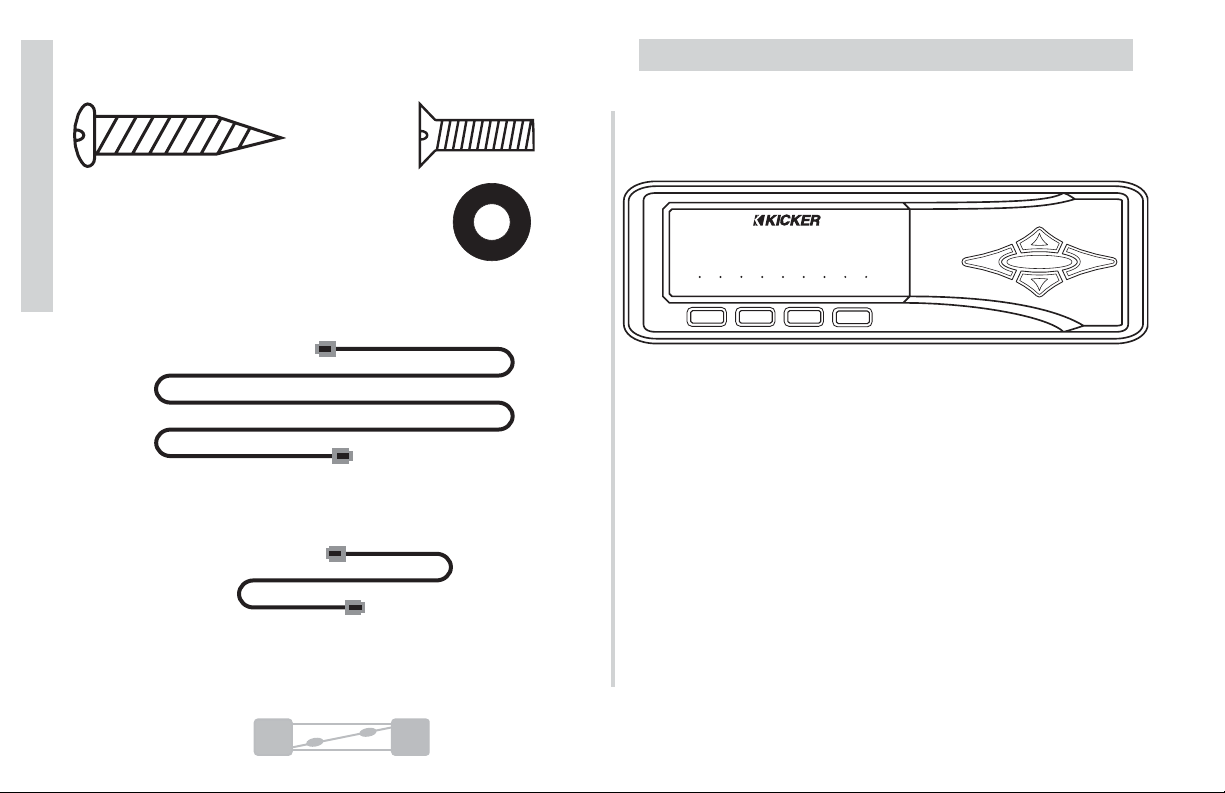
Mounting Hardware Includes four (4) sheet metal screws for
mounting the Interface Box and two (2) M3 flathead screws to
mount the Cosmetic Trim Ring to the DIN Mounting Cage.
Rubber Mounting Washers Includes four
(4) rubber mounting washers to protect the
mounting flange on the Interface Box.
One 5-Meter Network Cable This cable is used to create your
SXRC Communications Network and connects your Interface Box
to your first SX amplifier. This cable is known as a StraightThrough Ethernet Cable.
Two 1-Meter Network Cables These cables are used to
connect additional SX Series amplifiers to the SXRC
Communications Network. These cables are known as a StraightThrough Ethernet Cable.
3 Amp Mini Glass Fuse Extra replacement fuse for use in
SXRC Interface Box. See the Service section of this manual for
replacement instructions
X 4
X 2
X 2
X 4
AMP1
LOCK
GAIN EQ LPF HPF KOMP
** kicker
MEM-1
M1
SYS
LEFT RIGHT
MEM-2 MEM-3 MEM-4
M2
PHASE
M3
M4
AMP2
MUTE
ESC
HOME
ENT
3A
250V
Page 7

7
SXRC Remote Control
Features
KEYPAD
Here is a brief description of the soft touch buttons.
M1 - Used to select memory preset 1 or to store current
settings into memory preset 1.
M2 - Used to select memory preset 2 or to store current
settings into memory preset 2.
M3 - Used to select memory preset 3 or to store current
settings into memory preset 3.
M4 - Used to select memory preset 4 or to store current
settings into memory preset 4.
ESC - Used to exit the current menu.
ENT - Used to enter the selected menu.
HOME - Used to return to the Main Menu and other
functions explained later in this manual.
UP - Used to advance up through menu selections
and/or adjust SXRC and amplifier controls.
DOWN - Used to advance down through menu selec-
tions and/or adjust SXRC and amplifier controls.
These controls and their usage will be explained later with
more detail in each menu usage section.
RIGHT - Indicates an action or adjustment of the right
channel.
MUTE - Indicates you are in the mute menu or the mute
function is active.
GAIN - Indicates you are in the gain menu.
EQ - Indicates you are in the equalizer menu.
LPF - Indicates you are in the low pass filter menu.
HPF - Indicates you are in the high pass filter menu.
PHASE - Indicates you are in the phase menu.
KOMP - Indicates you are in the Kompressor™ menu.
MEM-1 - Memory preset 1 activated or stored.
MEM-2 - Memory preset 2 activated or stored.
MEM-3 - Memory preset 3 activated or stored.
MEM-4 - Memory preset 4 activated or stored.
M1
M2
M3
M4
ESC
ENT
HOME
Page 8
8
SXRC Remote Control
Installation
Mounting
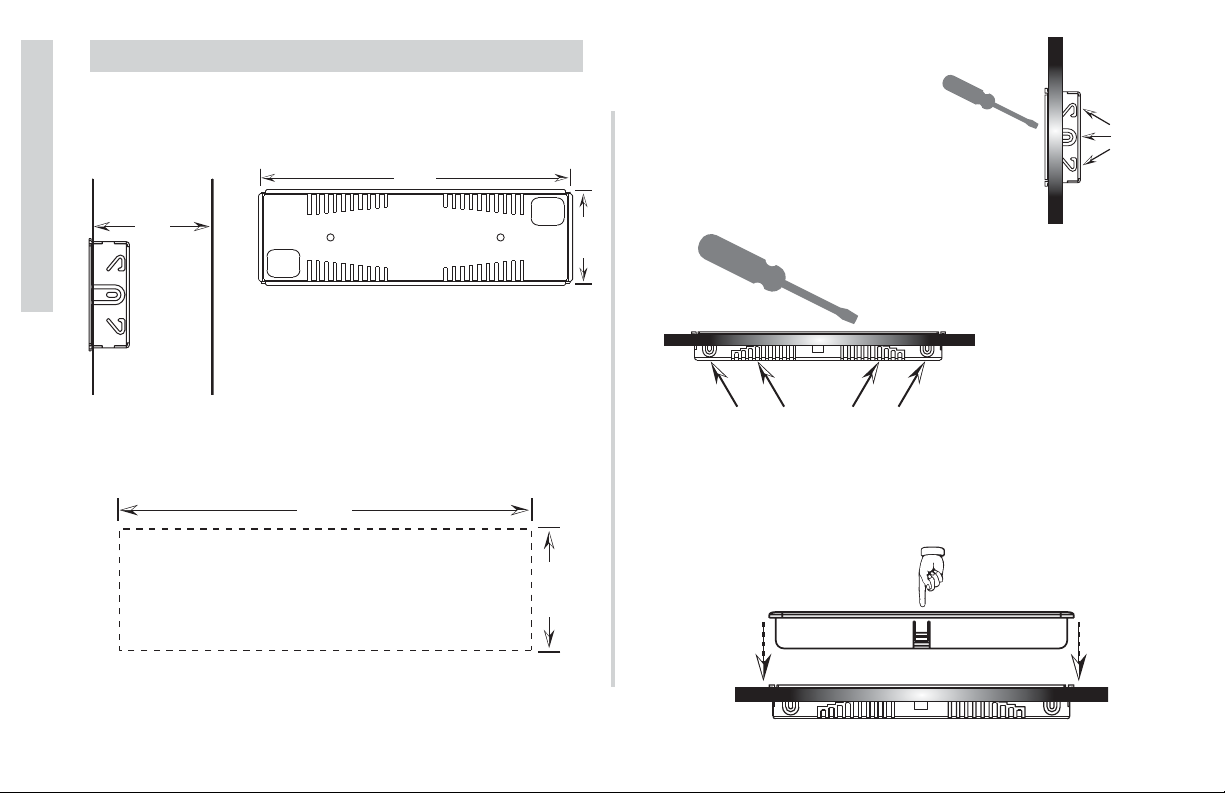
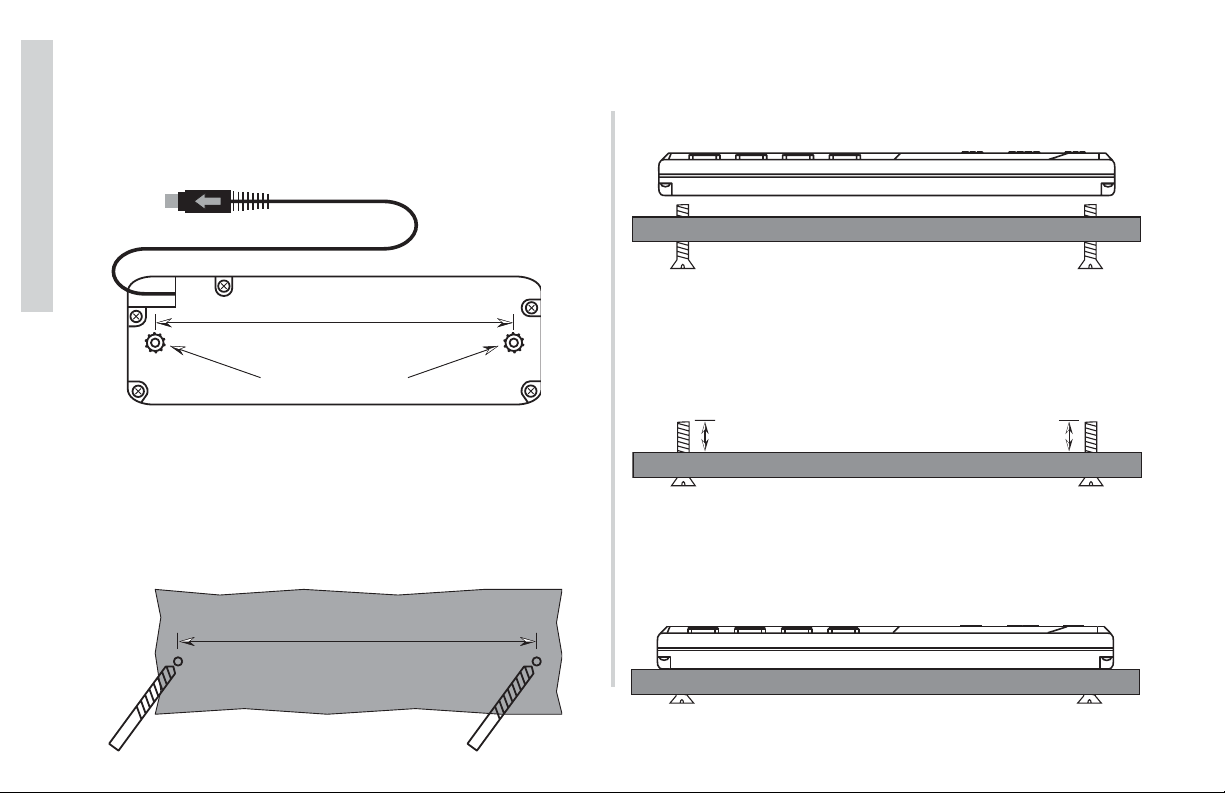
DIN Mounting
Using the supplied hardware you can mount the SXRC into a
standard DIN sized opening.
Be sure you will have a minimum of 2”
(51 mm) clearance depth behind your mounting
surface panel to mount the SXRC.
If not using an existing DIN opening, you will first need to cut
an opening that is 7-3/16” (182 mm) by 2-1/8” (53 mm) into your
mounting surface panel.
It is VERY important that you DO NOT make the hole any
larger than the specified dimensions. If you make the opening too
large then the mounting cage will not work properly.
Using the existing DIN opening or
the one you just created, slide the
Metal DIN Mounting Cage into the
opening. Secure the Cage by bending
the Mounting Tabs on the sides, top
and bottom of the Cage using a small
flat-blade screwdriver. Use only the
tabs that when bent will secure the
Cage to the Mounting Surface.
Next, place the Plastic Cosmetic Trim Ring into the Metal DIN
Mounting cage. There are two plastic retainers in the Trim Ring
(one on top and one on bottom) that will snap into place.
Side View
Top and Bottom View
Mounting
Surface
2"
51 mm
Other
Surfaces
7-3/16"
182 mm
7-3/16"
182 mm
2-1/8"
53 mm
SMAC-ON TOOLZ
2-1/8"
53 mm
Mounting
Surface
SMAC-ON TOOLZ
Mounting
Tabs
Mounting
Surface
Mounting
Tabs
Plastic Cosmetic Trim Ring
Mounting
Surface
Metal DIN Mounting Cage
Page 9
9
SXRC Remote Control
Installation
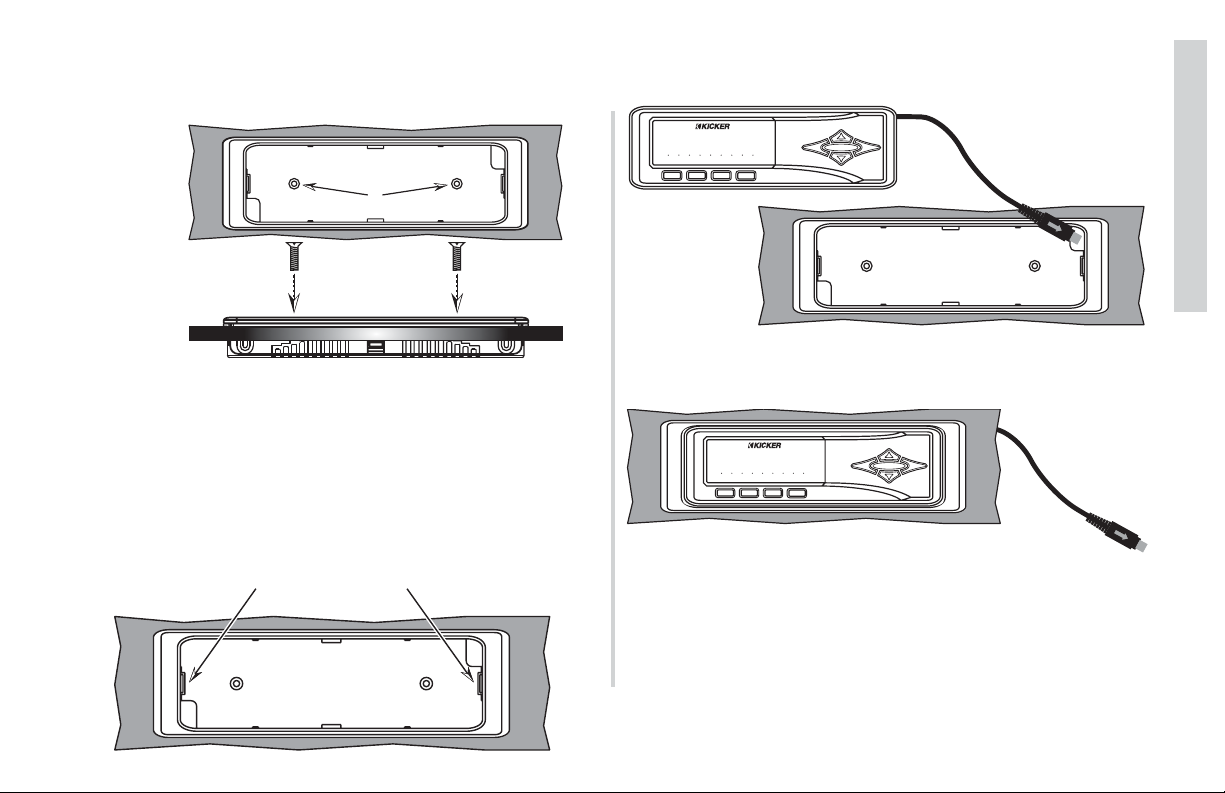
Once in place use the 2 supplied M3 flathead screws to secure
the Trim Ring to the Metal Cage.
The SXRC Control Head is held in place by two clips (one on
each side) of the Plastic Trim Ring.
Route the SXRC Control Head cable through one of the
openings in the Trim Ring/Metal Cage assembly to your SXRC
Interface Box location.
Press the SXRC control head in to the assembly until it locks
into place.
Your SXRC Control Head is now mounted and you can move
on to the wiring section of this manual
Trim Ring & Metal Cage Assembly
Front View
Mounting
Surface
Screws Here
Mounting
Surface
Trim Ring & Metal Cage Assembly
Side View
AMP1
LOCK
LEFT RIGHT
GAIN EQ LPF HPF KOMP
** kicker
MEM-1
M1
AMP2
SYS
MUTE
PHASE
MEM-2 MEM-3 MEM-4
M3
M2
M4
HOME
ESC
ENT
SXRC Control Head
Mounting Clips
AMP1
LEFT RIGHT
LOCK
GAIN EQ LPF HPF KOMP
** kicker
MEM-1
M1
AMP2
SYS
MUTE
PHASE
MEM-2 MEM-3 MEM-4
M3
M2
M4
HOME
ESC
ENT
Page 10
10
SXRC Remote Control
Installation
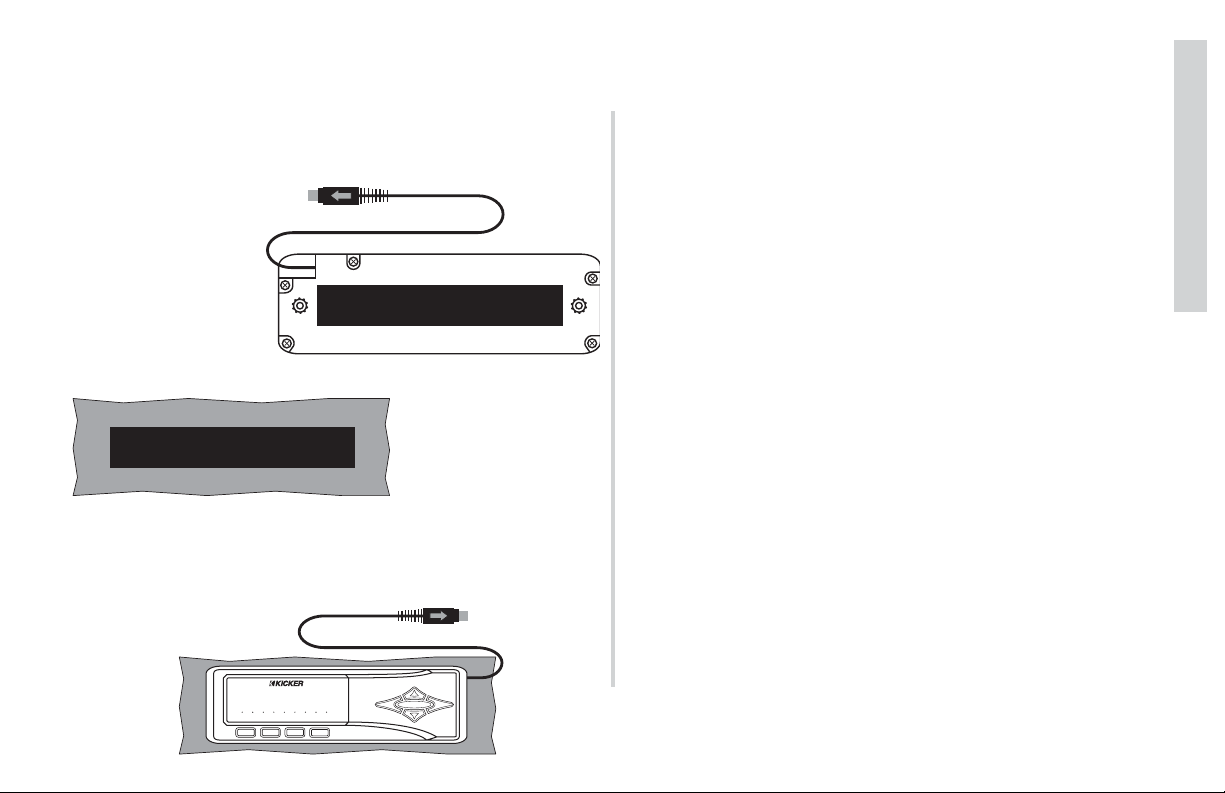
Surface Mounting With Screws
The SXRC Control Head can also be surface mounted if you
do not have a spare DIN opening in your dash or do not want to
cut one into an existing panel.
The back of the SXRC Control Head has two metal inserts
designed to work with M3 screws.
Find a suitable location and drill two 1/8 inch (3 mm) holes to
secure the SXRC Control Head.The holes should be 5-17/32”
(140 mm) apart from center to center.
NOTE: You will need to have access to the area behind this
location to install the mounting screws.
Once your holes are drilled you can use the two supplied M3
screws to secure the SXRC Control Head to your mounting
surface. If the supplied screws are not long enough to reach the
SXRC Control Head you can supply your own M3 screws of the
required length to secure the SXRC.
NOTE!!! Whether using the supplied M3 screws from the SXRC
kit or your own, the screws can not enter into the SXRC more
than 5/16” (4 mm). If you attempt to insert the screw any deeper
than this into the SXRC Control Head you will run the risk of
damaging the unit.
Route the SXRC Control Head cable to your SXRC Interface
Box location.Your SXRC Control Head is now mounted and you
can move on to the wiring section of this manual.
Mounting Surface
Center to Center
5-17/32" (140mm)
Inserts for M3 Screws
Mounting Surface
Center to Center
5-17/32" (140mm)
NO MORE THAN 5/16" (4 mm)
Mounting Surface
Mounting Surface
Page 11
11
SXRC Remote Control
Installation
Surface Mounting With Velcro
If you do not want to cut any openings or drill any holes you
can use a material such as Velcro™ to secure your SXRC
Control Head to your dashboard or other mounting surface.
Velcro™ is not supplied with your SXRC but can be obtained
from any local fabric or retail store.
Velcro™ is a two
piece product, one half
is soft and fuzzy(loop)
while the other is stiff
and prickly (hook).
Place a 5” (127 mm)
strip of the loop half on
the SXRC.
Place the 5” (127 mm)
strip of the hook half on
the mounting surface.
The SXRC Control Head will now be able to stick to the dash
or other mounting surface. Route the SXRC Control Head cable
to your SXRC Interface Box location.Your SXRC Control Head is
now mounted and you can move on to the wiring section of this
manual.
Got No Time For Mounting
If this is the case there are many options...ranging from ‘Ok’ to
‘What are you thinking?’...and we do not recommend any of
them. But we know some of you may use these...or a variation of
them...so we included these for your entertainment. Got your own
idea? E-mail them to questions@kicker.com, Attn: Hank.
In the center console. This one makes some sense as it
keeps the SXRC in an ‘easy to access’ location while protecting it
from your gym bag that gets tossed in the ride everyday for ball
practice.
In the glove box. Another excellent choice for protection. Just
be sure you run the SXRC Control Head cable through the back
of the glove box...not out the front with the door pinching the wire.
Lay it in the seat. This allows quick and easy access to your
SXRC...just be sure that your girl or best friend Larry does not sit
on it when sharing your ride. Being ‘sat on and squashed’ is not
covered under warranty.
Lay it in the catch-all pocket in your center console. This
also allows quick and easy access to your SXRC...plus it adds
another item to rattle along with all those nickels, dimes and
quarters sitting there. Could be very harmonious.
Stand vertically in your cup holder. This is an excellent
location that puts your SXRC within reach. Just be sure to tell
your guests riding in the car that one cup holder is for you and
the other is for your remote...they will just have to hold their
128 oz. Super Ultra Chug drink.
Under your seat. This location is not ideal but is usable. When
you need to adjust your SXRC simply ‘tap’ the brakes which will
slide the unit forward onto your floor mat for easy access.
Mounting Surface
Loop Side Of Velcro™ Strip
Hook Side Of Velcro™ Strip
Mounting Surface
AMP1
LEFT RIGHT
LOCK
GAIN EQ LPF HPF KOMP
** kicker
MEM-1
M1
AMP2
SYS
MUTE
PHASE
MEM-2 MEM-3 MEM-4
M3
M2
M4
Stiff Side Of Velcro™ Strip
HOME
ESC
ENT
Page 12
12
SXRC Remote Control
Installation
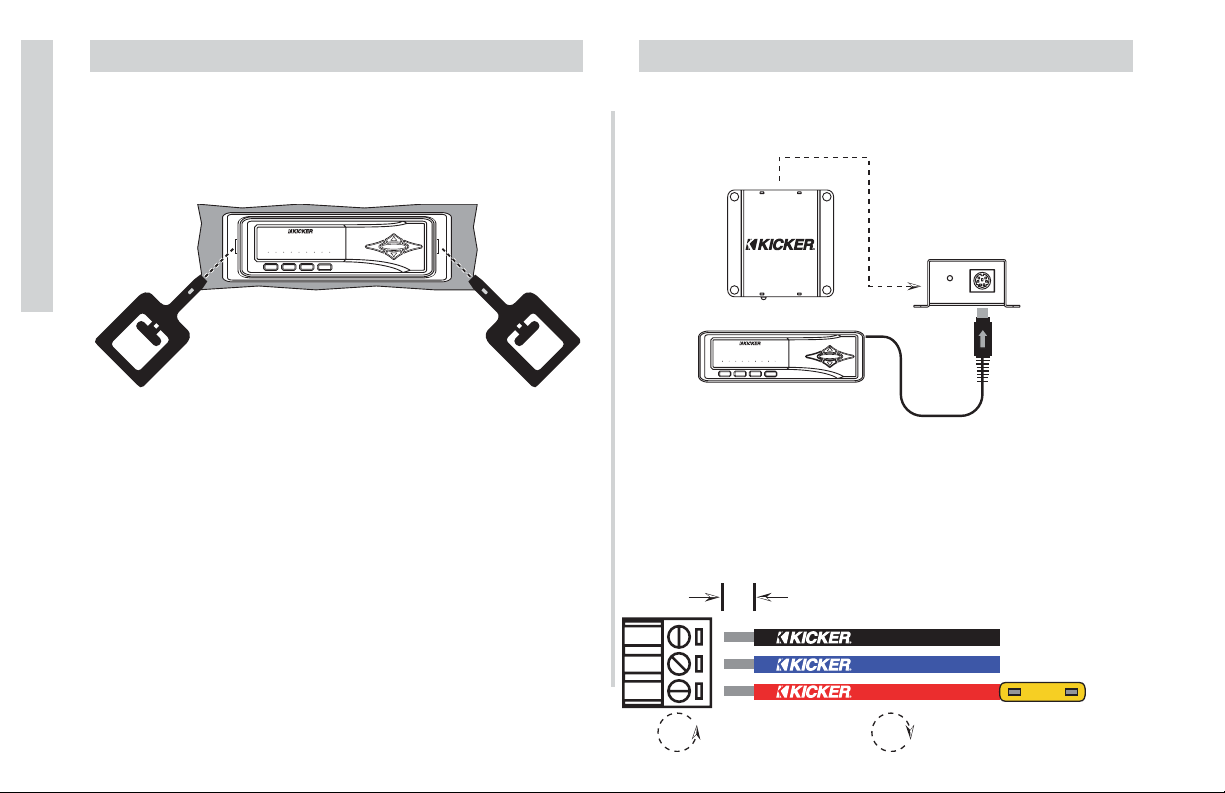
Using the R-Tool
The included R-Tools are used to remove the SXRC Control
Head from the Trim Ring/Metal Cage assembly. The R-Tools
simply slide into the notched area on both sides of the Plastic
Cosmetic Trim Ring and will release the clips holding the SXRC
Control Head.
Wiring
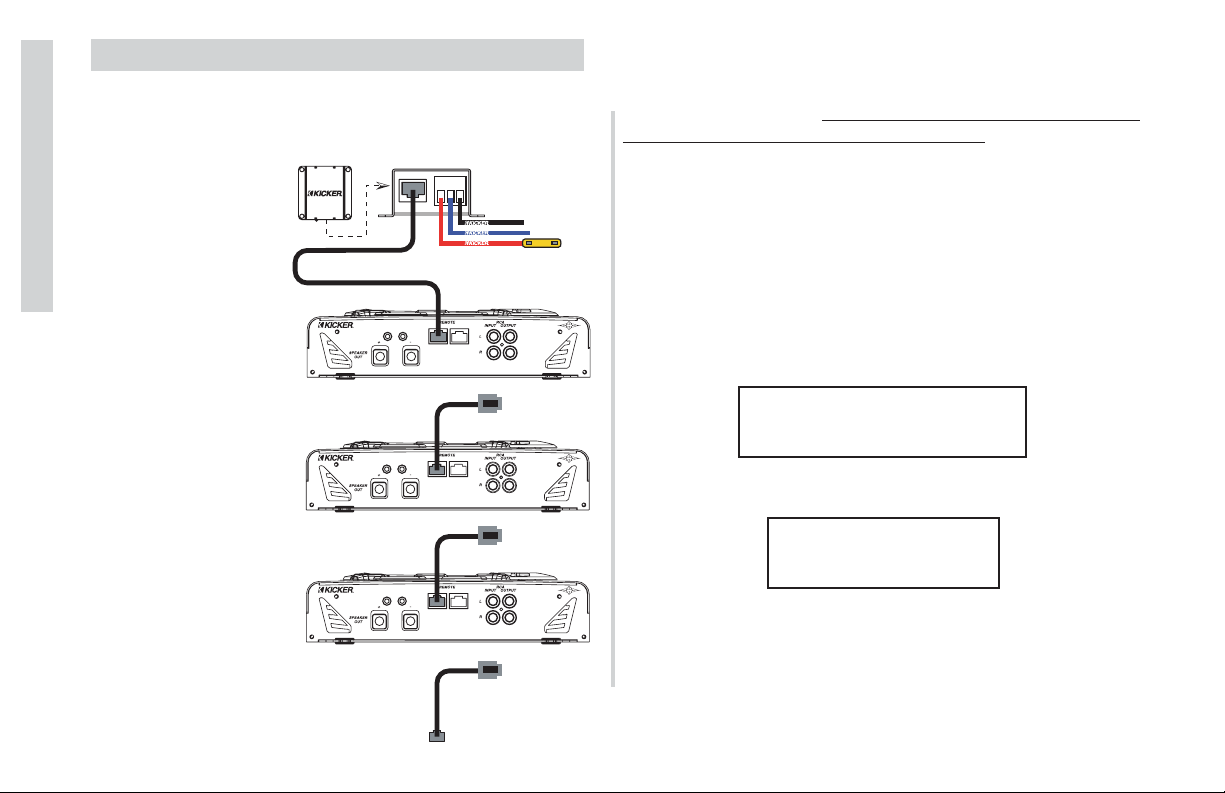
Now that you have mounted your SXRC Control Head it is time
to do some wiring. The first step is to plug your SXRC Control
Head into the SXRC Interface Box.
Next, run a fused (5 amp) constant 12 volt, ground and remote
turn on to the SXRC Interface Box. Connect the wiring to the
removable power plug by loosening the set screws, inserting the
stripped wire and then tightening the set screw.
t
AMP1
LOCK
GAIN EQ LPF HPF KOMP
** kicker
MEM-1
R-Tool R-Tool
SYS
LEFT RIGHT
MEM-2 MEM-3 MEM-4
M1
M2
AMP2
MUTE
PHASE
M3
M4
HOME
ESC
ENT
TO SXRC
Power On
LED
FROM AMP
GND
REM
+ 12V
PS2 - SXRC
Connector
Interface Box
AMP1
AMP2
SYS
LOCK
MUTE
LEFT RIGHT
GAIN EQ LPF HPF KOMP
PHASE
** kicker
MEM-1
MEM-2 MEM-3 MEM-4
M1
M2
M3 M4
HOME
ESC
ENT
Control Head
Strip Back Wire
1/4" (6 mm)
HyperFlex
HyperFlex
HyperFlex
Tighten Set ScrewLoosen Set Screw
Ground
Remote
5
Fuse
+ 12 Vol
Page 13
13
SXRC Remote Control
Installation
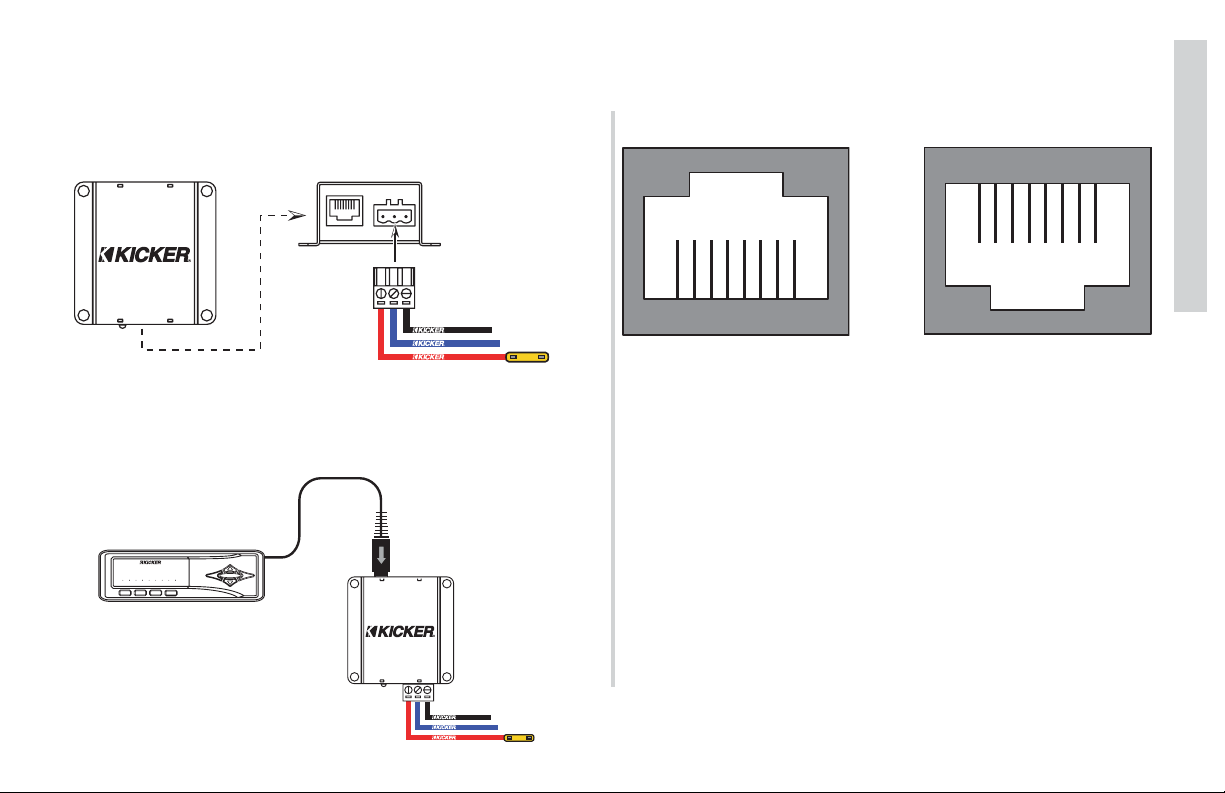
Now insert the removable power plug into the SXRC Interface
Box.
You should have something resembling this picture at this
point. The Control Head plugged in and the power plug wired
correctly and plugged in.
t
NOTE!!!
There are 8 pins in each RJ45 jack used on the SXRC
Interface Box and on SX Series amplifiers. We only use 3 of
these pins for the Digital Communications Network: Pins #2, #7
and #8.
If pins #2, #7 or #8 are bent or damaged, you will not be able
to establish reliable communications on the SXRC Digital
Communications Network.
A common issue is if your SX Series amplifier has been used
with the Remote Bass Level Controller prior to being used with
the SXRC. Some cables that came with the SX Series amplifiers
for use with the Remote Bass level Controller will bend pins #1
and #8 down too far causing poor contact with the SXRC
Communications Network Cable. To fix this simply take a small
screwdriver or paper-clip and pull these pins back up into place.
Check all the RJ45 jacks on your amplifiers to insure the pins
are up and in place before plugging in any of your SXRC
Communications Network Cables.
SX Amplifiers
SXRC
RJ45 Communication
Interface Box
TO SXRC
Network Jack
Power, Ground
Remote Jack
12345678
+ 12V
GND
REM
HyperFlex
HyperFlex
HyperFlex
Ground
Remote
5
Fuse
+12 Vol
FROM AMP
AMP2
AMP1
SYS
LEFT RIGHT
LOCK
MUTE
GAIN EQ LPF HPF KOMP
PHASE
** kicker
MEM-1
MEM-2 MEM-3 MEM-4
M1
M2
M3
Control Head
HOME
ESC
M4
ENT
Interface Box
FROM AMP
TO SXRC
GND
REM
+ 12V
HyperFlex
Ground
HyperFlex
Remote
HyperFlex
5
+12 Volt
Fuse
12345678
Page 14
14
SXRC Remote Control
Installation
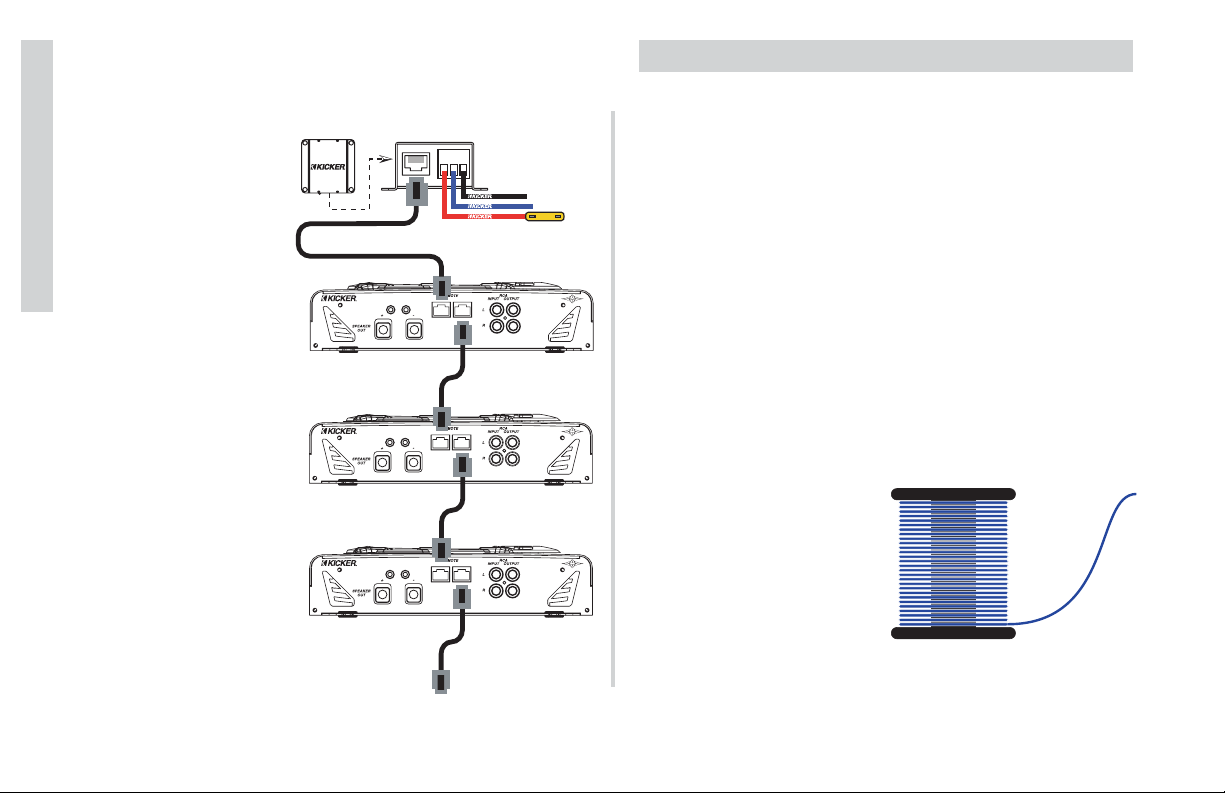
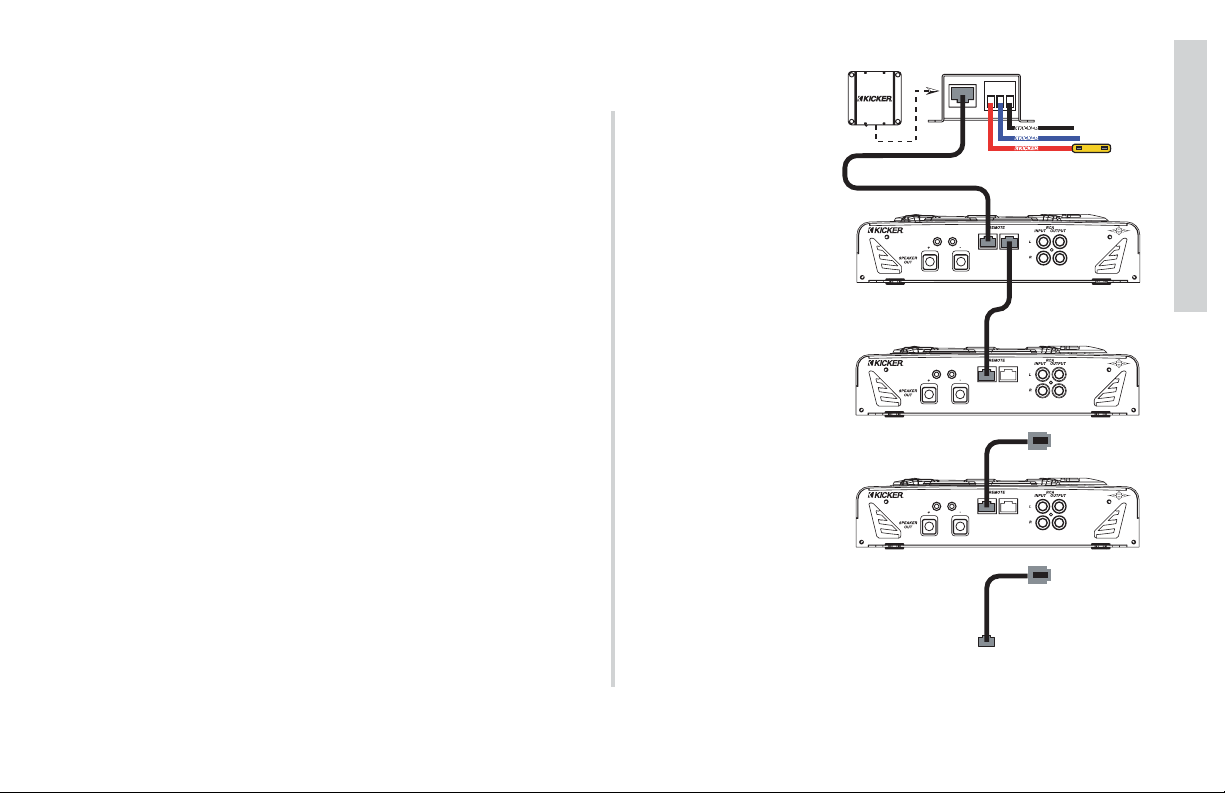
Now we can run the Network Cables from the SXRC Interface
Box to your SX Series amplifiers to create the SXRC
Communications Network.
Run the supplied
5-meter Network Cable
from the Interface Box to
the REMOTE IN jack of
your first SX Series
amplifier.
Run the first supplied
1-meter Network Cable
from the first SX Series
amplifier’s REMOTE OUT
jack to the REMOTE IN
jack of the second
amplifier.
Run the second supplied
1-meter Network Cable
from the second SX Series
amplifier’s REMOTE OUT
jack to the REMOTE IN
jack of the third amplifier.
You can continue adding
amplifiers (16 total) by
following this setup and
supplying your own
Network Cables.
t
SXRC Network Cables
The SXRC is supplied with 3 Network Cables, one 5-meter and
two 1-meter. This is enough to connect 3 SX Series amplifiers to
the SXRC Interface Box. You can connect up to 16 SX Series
amplifiers to the SXRC by supplying additional cables.
If you need additional cables or need to use custom lengths,
you can purchase pre-made cables at any computer or
electronics store. You want to purchase a Straight-Through,
Ethernet Network Cable.
If you want to make your own custom length cables you will
need:
•Bulk Cat3, Cat5, Cat5e or Cat6 network cable.
•Crimp on RJ45 plugs.
•Cable cutters.
•Electrician's scissors.
•RJ45 crimp tool.
•A UTP/Network Cable stripping tool.
Step 1.) Cut a piece of net-
work cable the required length
from the bulk cable roll using
your Cable Cutters.
Communication
Interface Box
FROM AMP
TO SXRC
D
V
M
N
E
G
12
R
+
Network Jack (RJ45)
5-Meter Network Cable
AMP STRAPPING
IN OUT
IN OUT
1-Meter Network Cable
AMP STRAPPING
IN OUT
IN OUT
1-Meter Network Cable
AMP STRAPPING
IN OUT
IN OUT
Power, Ground
Remote Jack
HyperFlex
Ground
HyperFlex
Remote
HyperFlex
Fuse
5
+12 Vol
Additional Network Cable
(Supplied By You)
To Next Amplifier
Page 15
15
SXRC Remote Control
Installation
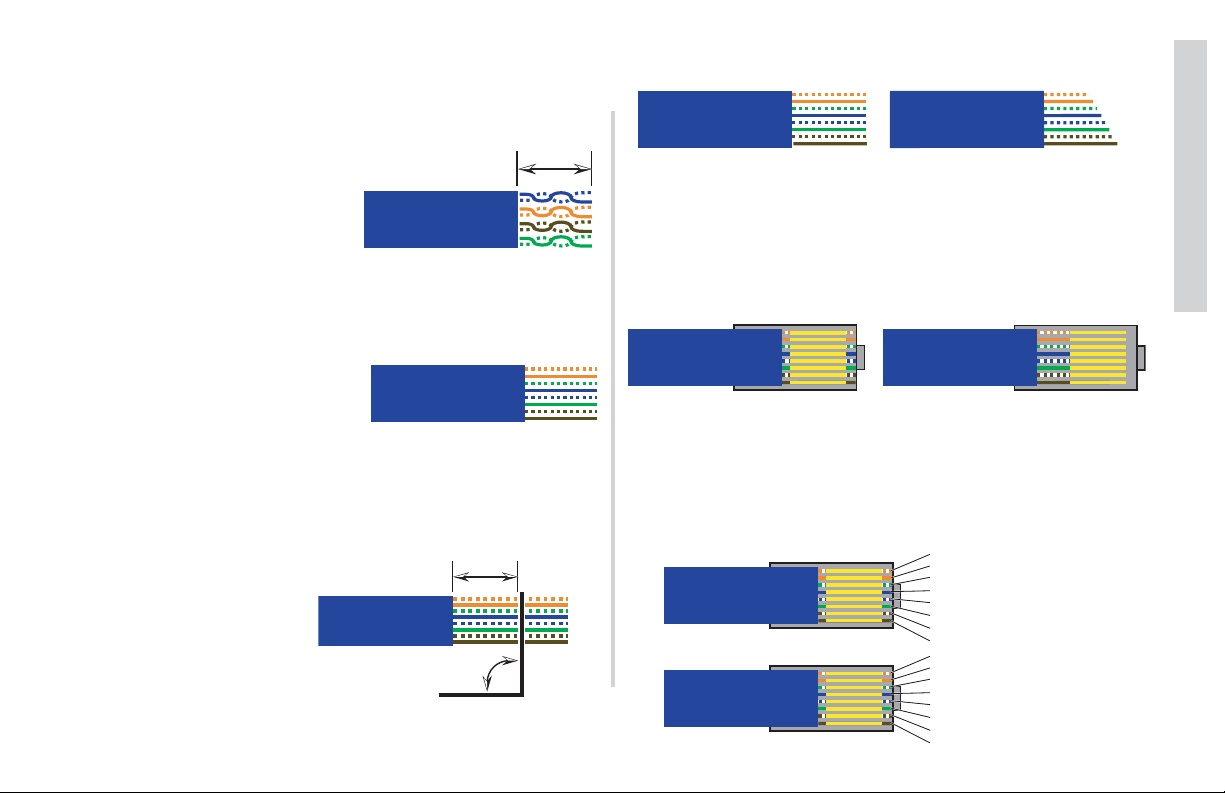
Step 2.) Using the UTP/Network Cable stripping tool, remove
1 inch (25 mm) of the outer insulating jacket from each end of the
cable exposing the 8 wires (4 twisted pairs).
Step 3.) Untwist the 4 wire pairs on each end back to the
outer insulating jacket and lay them in this order.
•Orange-White
•Orange
•Green-White
•Blue
•Blue-White
•Green
•Brown-White
•Brown
Step 4.) Hold the now
grouped and sorted wires
together tightly and using the
Electrician's Scissors cut
them all 1/2 inch (13 mm) in
length at a 90 degree angle.
NOTE: The wires must be cut at a 90 degree angle to insure
proper fit in the RJ45 plug.
Step 5.) Slide an RJ45 plug (clip side down) onto the cable
and seat it fully onto the cable. The 8 wires should butt up against
the end of the plug tightly. Crimp the plug onto the wire securely
using the RJ45 Crimp Tool. Repeat the process for the other end
of the cable.
Step 6.) Lay the cable ends side by side (clip down) and verify
the wire colors are in the correct order. The ends should be
identical. If they are not, cut off the incorrect end and return to
step 2 to put on a new RJ45 plug.
1 inch
(25 mm)
Network
Cable
•Blue-White
•Blue
•Green-White
•Green
Pair 1
Pair 2
Pair 3 Pair 4
•Orange-White
•Orange
•Brown-White
•Brown
1/2 inch
(13 mm)
90°
Network
Cable
Network
Cable
Yes !
No !
Network
Cable
Yes !
No !
Network
Cable
Network
Cable
Network
Cable
1
1-Orange-White
2
3
Network
Cable
Network
Cable
2-Orange
4
5
3-Green-White
6
7
4-Blue
8
1
5-Blue-White
2
3
6-Green
4
5
7-Brown-White
6
7
8
8-Brown
Page 16
16
SXRC Remote Control
Installation
Software Updates
Now that you have the SXRC mounted and wired properly it is
time to update the software in all of your SX Series amplifiers.
This process has to be completed for EACH amplifier and does
require you to disconnect
and reconnect cables
between each step.
Please read the
instructions and follow
them exactly as
described.
You only have to do this
setup and programming
process one time for each
amplifier.
Step 1.) Un-plug the
Communications Network
Cables from the REMOTE
OUT jacks on ALL the SX
Series amplifiers. Leave
the Communications
Network Cables
connected to the
REMOTE IN jacks. The
SXRC Interface Box
should only be connected
to the first SX Series
amplifier as the diagram
to the right is showing.
NOTE!!!
Each SX Series amplifier must be assigned its own unique
address from the amplifier’s keypad before it can be updated and
controlled by the SXRC. This has to be done at each amplifier
’s
keypad and can not be done from the SXRC. Think of the
amplifiers like houses...no two houses can share the same street
address...the mailman would throw a complete fit! Well, the
SXRC feels the same way about two amps sharing the same
Remote Communication Address.
Each series of SX amplifiers (.2-Stereo, .1-Mono Block, .4-Four
Channel) has a unique address range that is not shared between
the others. So it is impossible to accidentally share addresses
from one series with another. All you need to do is assign a
unique (different) address to each amplifier in you system. The
possible choices for each series are:
All SX Series amplifiers are shipped from the factory with their
Remote Address set to the lowest setting.
For example, lets say you have 4 SX.2, 4 SX.4 and 4 SX.1
amplifiers in your system for a grand total of 16 amplifiers. Set the
Remote Addresses as such:
t
SX.2 # 1 - 10
SX.2 # 2 - 11
SX.2 # 3 - 12
SX.2 # 4 - 13
SX.2 Series - Addresses 10-59
SX.1 Series - Addresses 60-109
SX.4 Series - Addresses 110-119
SX.1 # 1 - 60
SX.1 # 2 - 61
SX.1 # 3 - 62
SX.1 # 4 - 63
SX.4 # 1 - 110
SX.4 # 2 - 111
SX.4 # 3 - 112
SX.4 # 4 - 113
SX.2 Series - Address 10
SX.1 Series - Address 60
SX.4 Series - Address 110
Interface Box
TO SXRC
V
FROM AMP
12
+
Network Jack (RJ45)
D
M
N
E
G
R
Communication
Power, Ground
Remote Jack
5-Meter Network Cable
AMP STRAPPING
IN OUT
IN OUT
1-Meter Network Cable
1-Meter Network Cable
Additional Network Cable
AMP STRAPPING
IN OUT
AMP STRAPPING
IN OUT
(Supplied By You)
To Next Amplifier
IN OUT
IN OUT
HyperFlex
HyperFlex
HyperFlex
Ground
Remote
5
Fuse
+12 Vol
Page 17
1717
SXRC Remote Control
Installation
The important thing is that no matter what combination of
amplifiers you are running, each amplifier must have its own
unique Remote Address.
It is also a good idea to write down which amplifier has been
assigned which address. This will help you later in identifying the
amplifier and assigning it a name based on its function. For
example:
BASS AMP 1, BASS AMP 2, FRONTSTAGE, MIDBASS,
etc. A fill-in-the-blank form is provided in the back of this manual
to assist you.
Step 2.) Power up your system so you can access the settings
and controls of your SX Series amplifiers. When the amplifiers
power up you will see
* KICKER *. You are now in the amplifiers
Default Screen.
Step 3.) Press the ENT key to enter the Main
Menu of the amplifier.
Step 4.) Press the UP or DOWN key until the
display reads
SYSTEM. Press the ENT key to enter
the System Menu.
Step 5.) Press the UP or DOWN key until the
display reads
Remote adr. Press the ENT key to
enter the Remote Address Selection Menu.
Step 6.) Press the UP or DOWN key to select
the Remote Address you want to assign to this
amplifier. Press the
ESC key three times to save
your setting and return to the Default Screen.
Step 7.) Repeat steps 3 through 6 for each amplifier.
Step 8.) Power cycle your system by turning it off, waiting 3
seconds, then turning it back on.
NOTE:
At this point each SX Series amplifier has been assigned a
unique Remote Address. Be sure you have properly done this to
each amplifier before proceeding! If multiple amplifiers share the
same address, they all will be detected and you will corrupt the
software that is loaded into each of the amplifiers. If this
happens the SXRC display will flash
FAILED and then show
Manual SW Update Required . You will then need to perform a
Manual Software Update (
SW UPDATES Menu) as described on
page 73 in this manual for each amplifier.
If you need assistance please visit your local KICKER dealer or
contact KICKER Technical Services.
Step 9.) The SXRC will display
STARTING * while the amp(s) and remote
are booting. When completed booting it will
switch to
* KICKER * . You are now in the
Default Menu.
Step 10.) Press the ENT key one time to enter
the SXRC Main Menu. The first Main Menu item will
be displayed which is
AMP ADJ.
Step 11.) Press the UP or DOWN key until
the display reads
SXRC SETUP . Press the ENT
key to enter the SXRC SETUP Menu.
Step 12.) Press the UP or DOWN key until
the display reads
AUTOSearch . Press the ENT
key to activate the AUTOSEARCH function.
ESC
ENT
HOME
ESC
ENT
HOME
HOME
ESC
ENT
HOME
ESC
ENT
AMP1
LEFT RIGHT
LOCK
GAIN EQ LPF HPF KOMP
ss**taarrttiinngg
MEM-2 MEM-3 MEM-4
MEM-1
AMP1
LEFT RIGHT
LOCK
GAIN EQ LPF HPF KOMP
**** kkiicckkeerr
MEM-2 MEM-3 MEM-4
MEM-1
SYS
SYS
ESC
ESC
ESC
PHASE
PHASE
HOME
HOME
HOME
AMP2
MUTE
AMP2
MUTE
ENT
ENT
ENT
Page 18

EXTREMELY IMPORTANT NOTE:
DO NOT power down your system or amplifiers during this
process (Step 13, A-P). Doing so will
corrupt the software and force you to
perform a Manual Software Update!
18
SXRC Remote Control
Installation
Step 13.) The SXRC is now:
A.) Searching for the first amplifier
connected to the Communications
Network.
B.) Detecting the amplifier’s
software boot loader.
C.) Erasing the old software.
D.) Loading the new software into
the amplifier.
E.) Checking the software in the
amplifier to insure it has been
loaded correctly.
F.) Confirming the software update
is successful.
G.) Loading the amplifier into the
SXRC.
H.) Displaying how many amplifiers
have been detected (1 at this
point), successfully updated and
brought into the SXRC
Communications Network.
A
B
C
D
E
F
G
H
The SXRC will now ask you if you
want to save the current settings of your
amplifier into a memory preset. Use the
UP or DOWN keys to select:
I.) SAVE - YES
J.) SAVE - NO
and press the ENT key to select.
If you select
SAVE - NO then the
amplifier’s current settings are not stored
into the SXRC.
If you select
SAVE - YES then you
choose which Global Memory Location to
store the amplifier’s settings in by using
the
UP or DOWN key to scroll through
the options (
K, L, M, N). When the
memory you want to use is selected
press the
ENT key to store. The SXRC
will respond by blinking
STORED (O) to
confirm the memory storing has
completed successfully.
The display will then read
AUTOSEARCH
(P) which indicates the software update
process has completed and the SXRC is
ready to find and update another SX
Series amplifier.
All of the above steps happen
automatically once you initiate the
AUTOSEARCH function.
ssssavvee -- yyee
SYS
MEM-1
GAIN EQ LPF HPF KOMP
AMP1
LOCK
MEM-2 MEM-3 MEM-4
PHASE
MUTE
AMP2
LEFT RIGHT
ss avvee -- nnoo
SYS
MEM-1
GAIN EQ LPF HPF KOMP
AMP1
LOCK
MEM-2 MEM-3 MEM-4
PHASE
MUTE
AMP2
LEFT RIGHT
meemmoorryy--11
SYS
MEM-1
GAIN EQ LPF HPF KOMP
AMP1
LOCK
MEM-2 MEM-3 MEM-4
PHASE
MUTE
AMP2
LEFT RIGHT
meemmoorryy--22
SYS
MEM-1
GAIN EQ LPF HPF KOMP
AMP1
LOCK
MEM-2 MEM-3 MEM-4
PHASE
MUTE
AMP2
LEFT RIGHT
meemmoorryy--33
SYS
MEM-1
GAIN EQ LPF HPF KOMP
AMP1
LOCK
MEM-2 MEM-3 MEM-4
PHASE
MUTE
AMP2
LEFT RIGHT
meemmoorryy--44
SYS
MEM-1
GAIN EQ LPF HPF KOMP
AMP1
LOCK
MEM-2 MEM-3 MEM-4
PHASE
MUTE
AMP2
LEFT RIGHT
ssttoorreedd
SYS
MEM-1
GAIN EQ LPF HPF KOMP
AMP1
LOCK
MEM-2 MEM-3 MEM-4
PHASE
MUTE
AMP2
LEFT RIGHT
aahhuttoosseeaarrcc
SYS
MEM-1
GAIN EQ LPF HPF KOMP
AMP1
LOCK
MEM-2 MEM-3 MEM-4
PHASE
MUTE
AMP2
LEFT RIGHT
I
J
K
L
M
N
O
P
AMP1
LEFT RIGHT
LOCK
GAIN EQ LPF HPF KOMP
ss eaarrcchh **
MEM-1
AMP1
LOCK
GAIN EQ LPF HPF KOMP
ddrretteecctt lldd
MEM-1
AMP1
LOCK
GAIN EQ LPF HPF KOMP
ee raassiinngg **
MEM-1
AMP1
LOCK
GAIN EQ LPF HPF KOMP
pp00rooggrraamm==00
MEM-1
AMP1
LOCK
GAIN EQ LPF HPF KOMP
vv00erriiffyy ==00
MEM-1
AMP1
LOCK
GAIN EQ LPF HPF KOMP
vv erriiffyy ookk
MEM-1
AMP1
LOCK
GAIN EQ LPF HPF KOMP
**looaaddiinngg
MEM-1
AMP1
LOCK
GAIN EQ LPF HPF KOMP
1 uunniittss
MEM-1
SYS
MEM-2 MEM-3 MEM-4
LEFT RIGHT
SYS
MEM-2 MEM-3 MEM-4
LEFT RIGHT
SYS
MEM-2 MEM-3 MEM-4
LEFT RIGHT
SYS
MEM-2 MEM-3 MEM-4
LEFT RIGHT
SYS
MEM-2 MEM-3 MEM-4
LEFT RIGHT
SYS
MEM-2 MEM-3 MEM-4
LEFT RIGHT
SYS
MEM-2 MEM-3 MEM-4
LEFT RIGHT
SYS
MEM-2 MEM-3 MEM-4
PHASE
PHASE
PHASE
PHASE
PHASE
PHASE
PHASE
PHASE
AMP2
MUTE
AMP2
MUTE
AMP2
MUTE
AMP2
MUTE
AMP2
MUTE
AMP2
MUTE
AMP2
MUTE
AMP2
MUTE
Page 19
19
SXRC Remote Control
Installation
NOTE:
If steps 8-13 worked correctly, you have taken the first step to
remote control bliss, skip to step 14. If not, then read on.
If the display came back blinking
0 Units after doing the
AUTOSEARCH then there is a problem with the Communications
Network.
• Go back and double check your Communications Network
cable and make sure it is inserted properly and ‘snapped’ into
place.
• If you have purchased different cables, double check that they
are Straight-Through Ethernet Network cables.
• If you have made your own cables double check them for
secure and proper termination.
• Did you check the pins (#1 and #8) in the SX Series
amplifiers to make sure they are not bent or damaged?
You have to get the Communications Network working with the
first amplifier and update its software before we can proceed with
the rest of the amplifiers so double check everything. Try a
different cable if necessary. Repeat steps 8-13 after double
checking your cable and jacks. Once the first amp is successfully
updated and in the SXRC Communications Network you can
move on to step 14.
If you can not get the amplifier to accept a software update
then visit your local KICKER dealer or call KICKER Technical
Services for more troubleshooting advice.
Step 14.) If you are
only controlling one SX
Series amplifier with the
SXRC (yeah...right...we
bet you have at least two!)
you can skip to the next
section in the manual
titled Operation (look for
the gray box tabs on the
side of the pages...in case
you missed that up to
now). If you have more
than one SX Series
amplifier to control then
continue with Step 15.
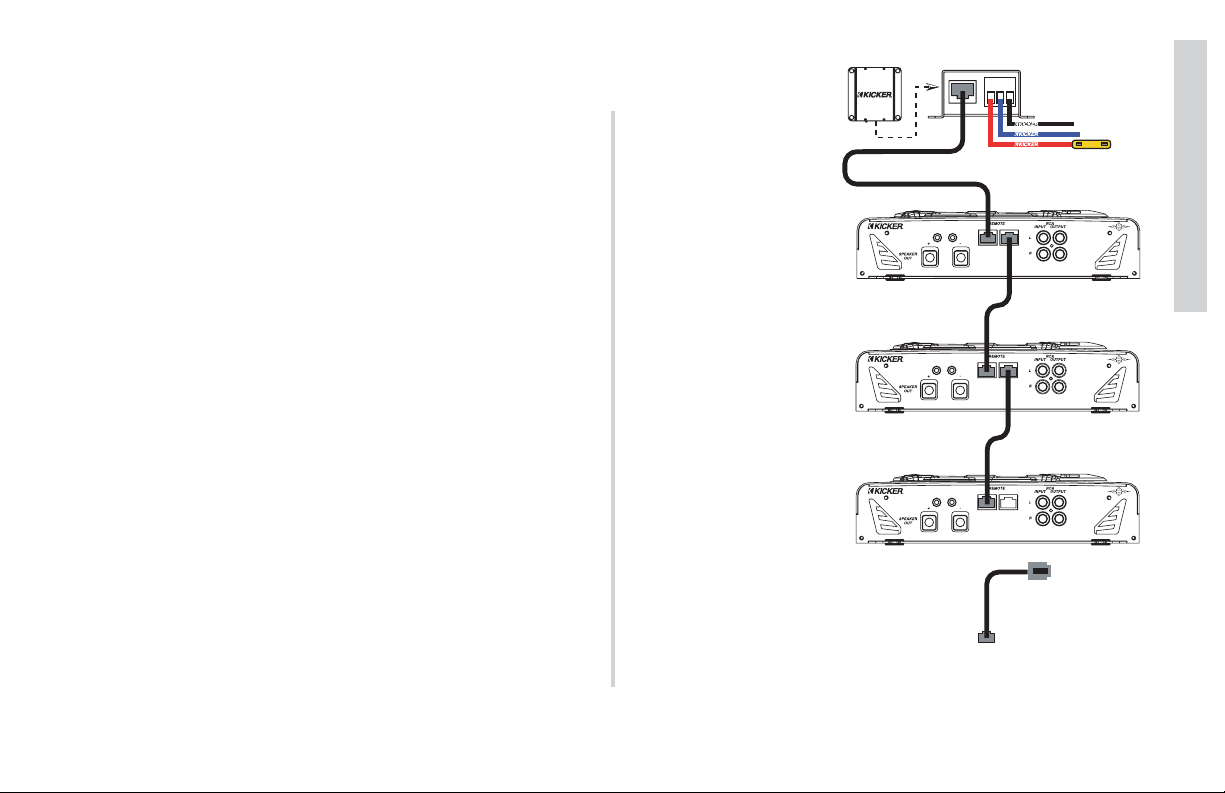
Step 15.) Plug the
Communications Network
Cable from the REMOTE
IN jack on the second
amplifier into the
REMOTE OUT jack of the
first amplifier in the chain.
Even if you have more
than two amps, at this
point only the first and
second one should be
connected as the diagram
on the right shows.
t
Communication
Interface Box
FROM AMP
5-Meter Network Cable
1-Meter Network Cable
1-Meter Network Cable
Additional Network Cable
Network Jack (RJ45)
TO SXRC
D
V
M
N
E
G
12
R
+
AMP STRAPPING
IN OUT
AMP STRAPPING
IN OUT
AMP STRAPPING
IN OUT
(Supplied By You)
IN OUT
IN OUT
IN OUT
To Next Amplifier
Power, Ground
Remote Jack
HyperFlex
Ground
HyperFlex
Remote
HyperFlex
Fuse
5
+12 Vol
Page 20

20
SXRC Remote Control
Installation
NOTE: If you take longer than three minutes to plug the
Network Cable in from the second amplifier (Step 15) the SXRC
will time out and return to the scrolling Default Menu. If this
happens you will then need to skip Step 16 and return to the
Autosearch Menu by following Steps 17-19.
Step 16.) If the ISIS Display is showing
AUTOSEARCH press the ENT key to detect, update
and load the second amplifier. Skip to Step 20.
Step 17.) Press the ENT key one time to enter
the SXRC Main Menu. The first Main Menu item will
be displayed which is
AMP ADJ.
Step 18.) Press the UP or DOWN key until
the display reads
SXRC SETUP . Press the ENT
key to enter the SXRC SETUP Menu.
Step 19.) Press the UP or DOWN key until
the display reads
AUTOSearch . Press the ENT
key to activate the AUTOSEARCH function.
Step 20.) The SXRC is now searching
for the second amplifier connected to the
Communications Network. It will do the
exact same sequence (A-P) as in step 13.
Once it detects the amplifier it will load the
new software into the amplifier and verify
the software upload has been successful.
The remote will then display how many
amplifiers have been detected (2 at this
point), successfully updated and brought
into the SXRC Communications Network.
Like before, the SXRC will ask if you want to
save the current settings of your second amplifier
into a memory preset. Use the
UP or DOWN
keys to select SAVE - YES or SAVE - NO and
press the
ENT key to select.
If you select
SAVE - NO then the amplifier’s current settings
are not stored into the SXRC.
NOTE:
The memory settings in the SXRC are a global memory
system. What this means is that each memory preset (1-4) stores
the settings of all (up to 16) the amplifiers connected to it. This
allows you to have unique settings for each amplifier stored and
ready for instant recall. If you chose
Memory-1 before, you can
choose it again. All amplifiers will have their individual settings
stored here in memory location 1 for instant recall later.
If you select
SAVE - YES then you choose which Global
Memory Location to store the amplifier’s settings in by using the
UP or DOWN key to scroll through the options
(
Memory-1 through Memory-4). When the memory
you want to use is selected press the
ENT key to
store. The SXRC will respond by blinking
STORED to
confirm the memory storing has completed successfully.
The display will then read
AUTOSEARCH which indicates the
software update process has completed.
HOME
ESC
ENT
HOME
ESC
ENT
HOME
ESC
ESC
ESC
AMP1
LEFT RIGHT
LOCK
GAIN EQ LPF HPF KOMP
ss eaarrcchh **
MEM-1
AMP1
LOCK
GAIN EQ LPF HPF KOMP
pp00rooggrraamm==00
MEM-1
AMP1
LOCK
GAIN EQ LPF HPF KOMP
vv00erriiffyy ==00
MEM-1
AMP1
LOCK
GAIN EQ LPF HPF KOMP
2 uunniittss
MEM-1
SYS
MEM-2 MEM-3 MEM-4
LEFT RIGHT
SYS
MEM-2 MEM-3 MEM-4
LEFT RIGHT
SYS
MEM-2 MEM-3 MEM-4
LEFT RIGHT
SYS
MEM-2 MEM-3 MEM-4
HOME
HOME
PHASE
PHASE
PHASE
PHASE
ENT
ENT
ENT
AMP2
MUTE
AMP2
MUTE
AMP2
MUTE
AMP2
MUTE
HOME
ESC
ENT
Page 21
21
SXRC Remote Control
Installation
NOTE:
If steps 15-20 worked correctly, you should now have two SX
Series amplifiers updated and brought into the SXRC
Communications Network, skip to step 21. If not, then read on.
If the display came back blinking
1 Units after doing the
AUTOSEARCH then there is a problem with the Communications
Network.
• Go back and double check your Communications Network
cable between the first and second amplifier and make sure it is
inserted properly and ‘snapped’ into place.
• If you have purchased different cables, double check that they
are Straight-Through Ethernet Network cables.
• If you have made your own cables double check them for
secure and proper termination.
• Did you check the pins (#1 and #8) in the SX Series
amplifiers to make sure they are not bent or damaged?
You have to get the Communications Network working with the
second amplifier and update its software before we can proceed
with the rest of the amplifiers so double check everything. Try a
different cable if necessary. Repeat steps 15-20 after double
checking your cables and jacks. Once the second amp is
successfully updated and in the Communications Network you
can move on to step 21.
Step 21.) If you are
only controlling only two
SX Series amplifiers with
the SXRC (sure ...sure ...
we know you have them
stacked up!) you can skip
to the next section in the
manual titled Operation.
If you have more than
two SX Series amplifiers
to control then continue
with Step 23.
Step 22.) Plug the
Communications Network
Cable from the REMOTE
IN jack on the third amplifier into the REMOTE
OUT jack of the second
amplifier in the chain.
Even if you have more
than three amps, at this
point only the first, second
and third ones should be
connected as the diagram
on the right shows.
t
Communication
Interface Box
FROM AMP
5-Meter Network Cable
1-Meter Network Cable
1-Meter Network Cable
Additional Network Cable
Network Jack (RJ45)
TO SXRC
D
V
M
N
E
G
12
R
+
AMP STRAPPING
IN OUT
AMP STRAPPING
IN OUT
AMP STRAPPING
IN OUT
(Supplied By You)
IN OUT
IN OUT
IN OUT
To Next Amplifier
Power, Ground
Remote Jack
HyperFlex
Ground
HyperFlex
Remote
HyperFlex
Fuse
5
+12 Vol
Page 22

22
SXRC Remote Control
Installation
Like before, the SXRC will ask if you want to
save the current settings of your third amplifier into
a memory preset. Use the
UP or DOWN keys to
select
SAVE - YES or SAVE - NO and press the
ENT key to select.
If you select
SAVE - NO then the amplifier’s current settings
are not stored into the SXRC.
NOTE:
Remember, the memory settings in the SXRC are a global
memory system. What this means is that each memory preset
(1-4) stores the settings of all (up to 16) the amplifiers connected
to it. This allows you to have unique settings for each amplifier
stored and ready for instant recall. If you chose
Memory-1 before,
you can choose it again. All amplifiers will have their
individual settings stored here in memory location 1 for instant
recall later.
If you select
SAVE - YES then you choose which Global
Memory Location to store the amplifier’s settings in
by using the
UP or DOWN key to scroll through
the options (
Memory-1 through Memory-4). When
the memory you want to use is selected press the
ENT key to store. The SXRC will respond by blinking STORED to
confirm the memory storing has completed successfully.
The display will then read
AUTOSEARCH which indicates the
software update process has completed.
NOTE: If you take longer than three minutes to plug the
Network Cable in from the third amplifier (Step 22) the SXRC will
time out and return to the scrolling Default Menu. If this
happens you will then need to skip Step 23 and return to the
Autosearch Menu by following Steps 24-26.
Step 23.) If the ISIS Display is showing
AUTOSEARCH press the ENT key to detect, update
and load the second amplifier. Skip to Step 27.
Step 24.) Press the ENT key one time to enter
the SXRC Main Menu. The first Main Menu item will
be displayed which is
AMP ADJ.
Step 25.) Press the UP or DOWN key until
the display reads
SXRC SETUP . Press the ENT
key to enter the SXRC SETUP Menu.
Step 26.) Press the UP or DOWN key until
the display reads
AUTOSearch . Press the ENT
key to activate the AUTOSEARCH function.
Step 27.) The SXRC is now searching
for the third amplifier connected to the
Communications Network. It will do the
exact same sequence (A-P) as in step 13.
Once it detects the amplifier it will load the
new software into the amplifier and verify
the software upload has been successful.
The remote will then display how many
amplifiers have been detected (3 at this
point), successfully updated and brought
into the SXRC Communications Network.
HOME
ESC
ENT
ss eaarrcchh **
pp00rooggrraamm==00
vv00erriiffyy ==00
3 uunniittss
HOME
ESC
ENT
HOME
ESC
ESC
ESC
AMP1
LEFT RIGHT
LOCK
GAIN EQ LPF HPF KOMP
MEM-1
AMP1
LOCK
GAIN EQ LPF HPF KOMP
MEM-1
AMP1
LOCK
GAIN EQ LPF HPF KOMP
MEM-1
AMP1
LOCK
GAIN EQ LPF HPF KOMP
MEM-1
SYS
MEM-2 MEM-3 MEM-4
LEFT RIGHT
SYS
MEM-2 MEM-3 MEM-4
LEFT RIGHT
SYS
MEM-2 MEM-3 MEM-4
LEFT RIGHT
SYS
MEM-2 MEM-3 MEM-4
HOME
HOME
PHASE
PHASE
PHASE
PHASE
ENT
ENT
ENT
AMP2
MUTE
AMP2
MUTE
AMP2
MUTE
AMP2
MUTE
ESC
HOME
ENT
Page 23
Step 28.) If you are
only controlling only three
SX Series amplifiers with
the SXRC (Only 3? You
probably have three just
on bass duty!) you can
skip to the next section in
the manual titled
Operation. If you have
more than three SX Series
amplifiers to control then
continue with Step 29.
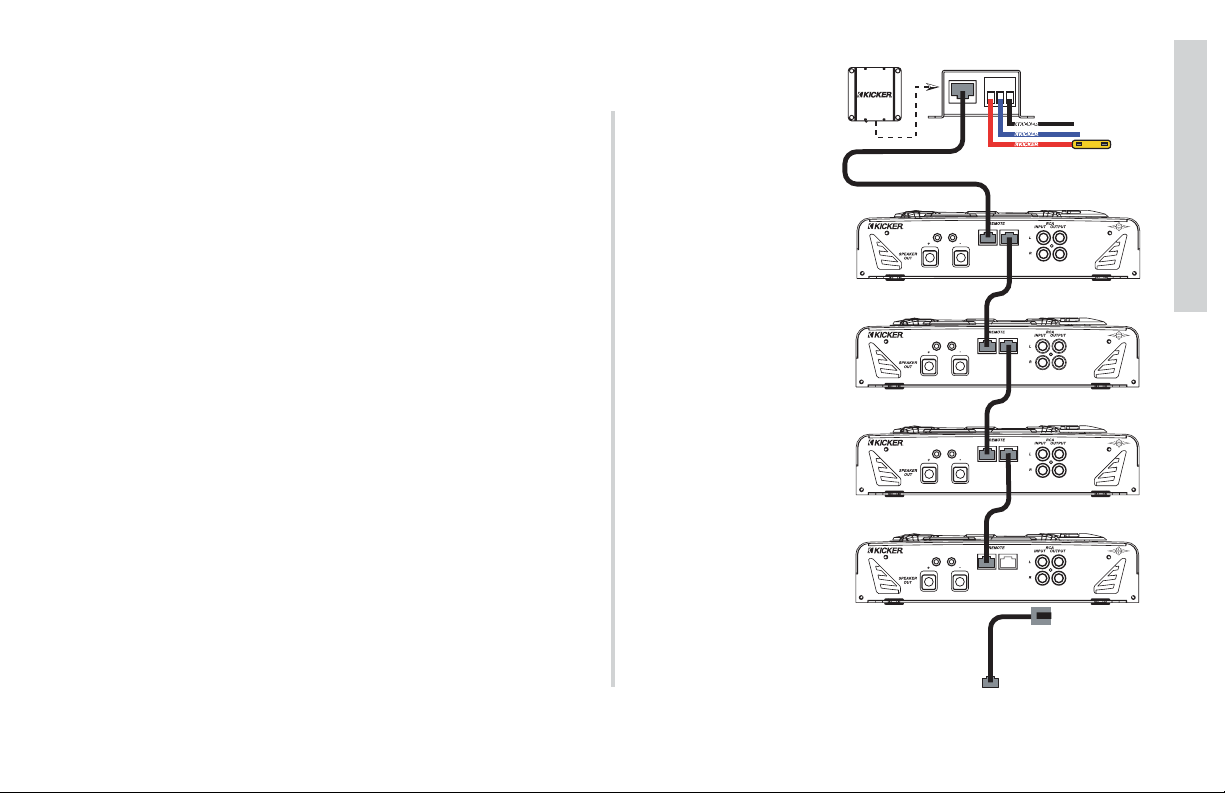
Step 29.) Plug the
Communications Network
Cable from the REMOTE
IN jack on the fourth
amplifier into the
REMOTE OUT jack of the
third amplifier in the chain.
Even if you have more
than four amps, at this
point only the first,
second, third and fourth
ones should be connected
as the diagram on the
right shows.
23
SXRC Remote Control
Installation
NOTE:
If steps 21-27 worked correctly, you should now have three SX
Series amplifiers updated and brought into the SXRC
Communications Network, skip to step 30. If not, then read on.
If the display came back blinking
2 Units after doing the
AUTOSEARCH then there is a problem with the Communications
Network.
• Go back and double check your Communication Network
cable between the second and third amplifier and make sure it is
inserted properly and ‘snapped’ into place.
• If you have purchased different cables, double check that they
are Straight-Through Ethernet Network cables.
• If you have made your own cables double check them for
secure and proper termination.
• Did you check the pins (#1 and #8) in the SX Series
amplifiers to make sure they are not bent or damaged?
You have to get the Communications Network working with the
third amplifier and update its software before we can proceed with
the rest of the amplifiers so double check everything. Try a
different cable if necessary. Repeat steps 21-27 after double
checking your cables and jacks. Once the third amp is
successfully updated and in the Communications Network you
can move on to step 28.
t
Communication
Interface Box
FROM AMP
5-Meter Network Cable
1-Meter Network Cable
1-Meter Network Cable
Additional Network Cable
Additional Network Cable
Network Jack (RJ45)
TO SXRC
D
V
M
N
E
G
12
R
+
AMP STRAPPING
IN OUT
AMP STRAPPING
IN OUT
AMP STRAPPING
IN OUT
(Supplied By You)
AMP STRAPPING
IN OUT
(Supplied By You)
To Fifith Amplifier
IN OUT
IN OUT
IN OUT
IN OUT
Power, Ground
Remote Jack
HyperFlex
Ground
HyperFlex
Remote
HyperFlex
Fuse
5
+12 Vol
Page 24

24
SXRC Remote Control
Installation
NOTE:
If steps 28-34 worked correctly, you should now have four SX
Series amplifiers updated and brought into the SXRC
Communications Network, skip to step 35. If not, then read on.
If the display came back blinking
3 Units after doing the
AUTOSEARCH then there is a problem with the Communications
Network.
• Go back and double check your Communication Network
cable between the third and fourth amplifier and make sure it is
inserted properly and ‘snapped’ into place.
• If you have purchased different cables, double check that they
are Straight-Through Ethernet Network cables.
• If you have made your own cables double check them for
secure and proper termination.
• Did you check the pins (#1 and #8) in the SX Series
amplifiers to make sure they are not bent or damaged?
You have to get the Communications Network working with the
fourth amplifier and update its software before we can proceed
with any additional amplifiers so double check everything. Try a
different cable if necessary. Repeat steps 28-34 after double
checking your cables and jacks. Once the fourth amp is
successfully updated and in the Communications Network you
can move on to step 35.
NOTE: If you take longer than three minutes to plug the
Network Cable in from the fourth amplifier (Step 29) the SXRC
will time out and return to the scrolling Default Menu. If this
happens you will then need to skip Step 30 and return to the
Autosearch Menu by following Steps 31-33.
Step 30.) If the ISIS Display is showing
AUTOSEARCH press the ENT key to detect, update
and load the second amplifier. Skip to Step 34.
Step 31.) Press the ENT key one time to enter
the SXRC Main Menu. The first Main Menu item will
be displayed which is
AMP ADJ.
Step 32.) Press the UP or DOWN key until
the display reads
SXRC SETUP . Press the ENT
key to enter the SXRC SETUP Menu.
Step 33.) Press the UP or DOWN key until
the display reads
AUTOSearch . Press the ENT
key to activate the AUTOSEARCH function.
Step 34.) The SXRC is now searching
for the fourth amplifier connected to the
Communications Network. It will do the
exact same sequence (A-P) as in step 13.
Once it detects the amplifier it will load the
new software into the amplifier and verify
the software upload has been successful.
The remote will then display how many
amplifiers have been detected (4 at this
point), successfully updated and brought
into the SXRC Communications Network.
AMP1
LOCK
GAIN EQ LPF HPF KOMP
ss eaarrcchh **
MEM-1
AMP1
LOCK
GAIN EQ LPF HPF KOMP
pp00rooggrraamm==00
MEM-1
AMP1
LOCK
GAIN EQ LPF HPF KOMP
vv00erriiffyy ==00
MEM-1
AMP1
LOCK
GAIN EQ LPF HPF KOMP
4 uunniittss
MEM-1
LEFT RIGHT
MEM-2 MEM-3 MEM-4
LEFT RIGHT
MEM-2 MEM-3 MEM-4
LEFT RIGHT
MEM-2 MEM-3 MEM-4
LEFT RIGHT
MEM-2 MEM-3 MEM-4
ESC
ESC
ESC
ESC
SYS
SYS
SYS
SYS
HOME
HOME
HOME
HOME
PHASE
PHASE
PHASE
PHASE
ENT
ENT
ENT
ENT
AMP2
MUTE
AMP2
MUTE
AMP2
MUTE
AMP2
MUTE
Page 25
25
SXRC Remote Control
Installation
Step 35.) If you are controlling just four SX Series
amplifiers with the SXRC (A nice start...you can always add
more...up to a total of 16) you can skip to the next section in the
manual titled Operation. If you have more than four SX Series
amplifiers to control then continue with Step 36.
Step 36.) At this point the manual has walked you through
the process, step-by-step, on how to install, update and
troubleshoot the connection of four SX Series amplifiers to the
SXRC. If you are controlling more than four SX Series amplifiers
(which we hope you are!) simply follow the same steps above
(29-34) for each additional amplifier. The process is exactly the
same. Just remember that you cannot add another amplifier until
you get the current one recognized, updated and brought into the
SXRC Communications Network.
The entire process is very easy, even though there seems to
be quite a few steps. Once the SXRC detects a new amplifier on
the SXRC Communications Network through the
Autosearch
function it takes approximately 90 seconds to load and verify the
new software. So if you have 16 amplifiers, the entire process will
take approximately 25-30 minutes. Remember, this only has to be
done once.
If you need any further assistance with these steps please visit
your local KICKER dealer or contact KICKER Technical Services
for more guidance.
After you have connected all of your SX Series amplifiers and
updated the software, you can move on to the Operation section
of this manual to learn all the features, functions and operation of
your SXRC Remote Control.
AMP STRAPPING
OUT
OUT
AMP STRAPPING
OUT
OUT
AMP STRAPPING
OUT
OUT
AMP STRAPPING
OUT
OUT
AMP STRAPPING
OUT
OUT
AMP STRAPPING
OUT
OUT
AMP STRAPPING
OUT
OUT
AMP STRAPPING
OUT
OUT
AMP STRAPPING
OUT
OUT
AMP STRAPPING
OUT
OUT
AMP STRAPPING
OUT
OUT
AMP STRAPPING
OUT
OUT
AMP STRAPPING
OUT
OUT
AMP STRAPPING
OUT
OUT
AMP STRAPPING
OUT
OUT
AMP STRAPPING
OUT
OUT
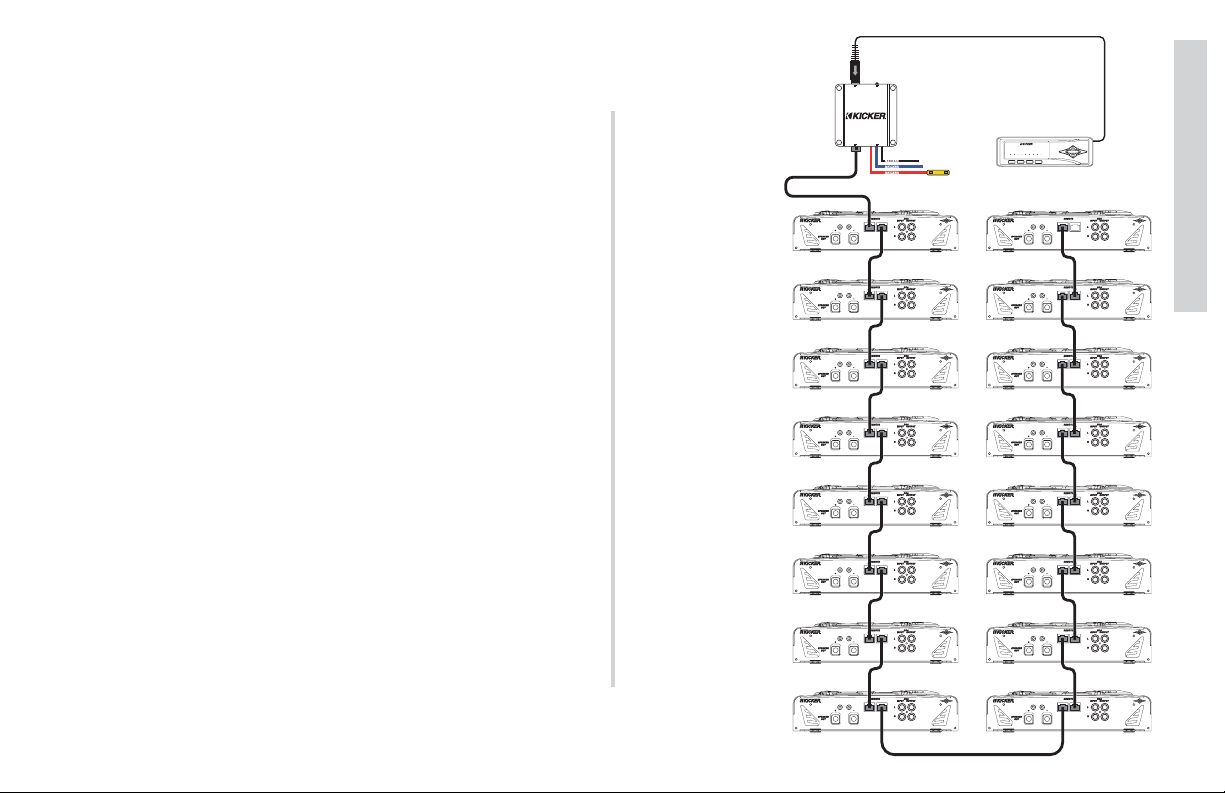
Here is a block diagram showing 16 SX Series amplifiers connected
to the SXRC. Looks good doesn’t it? Go get a napkin...we can see
the drool on your chin from here in Stillwater
, Oklahoma.
TO SXRC
Interface Box
GND
FROM AMP
REM
+ 12V
HyperFlex
Ground
HyperFlex
Remote
HyperFlex
5
+12 Volt
5-Meter Network Cable
AMP STRAPPING
ININOUT
ININOUT
Fuse
1-Meter Network Cable
AMP STRAPPING
ININOUT
ININOUT
1-Meter Network Cable
AMP STRAPPING
ININOUT
ININOUT
Additional Network Cable
(Supplied By You)
AMP STRAPPING
ININOUT
ININOUT
Additional Network Cable
(Supplied By You)
AMP STRAPPING
ININOUT
ININOUT
Additional Network Cable
(Supplied By You)
AMP STRAPPING
ININOUT
ININOUT
Additional Network Cable
(Supplied By You)
AMP STRAPPING
ININOUT
ININOUT
Additional Network Cable
(Supplied By You)
AMP STRAPPING
ININOUT
ININOUT
Additional Network Cable
(Supplied By You)
Control Head
AMP1
AMP2
SYS
LOCK
MUTE
LEFT RIGHT
GAIN EQ LPFHPF KOMP
PHASE
** kicker
MEM-1
MEM-2 MEM-3 MEM-4
M1
M2 M3
M4
AMP STRAPPING
ININOUT
Additional Network Cable
(Supplied By You)
AMP STRAPPING
ININOUT
Additional Network Cable
(Supplied By You)
AMP STRAPPING
ININOUT
Additional Network Cable
(Supplied By You)
AMP STRAPPING
ININOUT
Additional Network Cable
(Supplied By You)
AMP STRAPPING
ININOUT
Additional Network Cable
(Supplied By You)
AMP STRAPPING
ININOUT
Additional Network Cable
(Supplied By You)
AMP STRAPPING
ININOUT
Additional Network Cable
(Supplied By You)
AMP STRAPPING
ININOUT
ESC
ININOUT
ININOUT
ININOUT
ININOUT
ININOUT
ININOUT
ININOUT
ININOUT
HOME
ENT
Page 26

26
SXRC Remote Control
Operation
Navigation
Your KICKER SXRC uses the latest in microprocessor
technology control to provide you with operational information
about your amplifiers, full control over amplifier settings, real-time
diagnostics, global memory presets and amplifier group control
capability. All of this from the driver’s seat of your car using a very
simple multi-level menu-driven operating system.
The menu system is designed in layers. There is a starting
point and you simply keep drilling down until you get to the menu
item you want to view or change. This menu tree gives you an
example of how the SXRC menu structure is set up.
NOTE: Not all menus and menu items shown.
As you can see there can be an infinite number of menu levels
and each of these menu levels can have an infinite number of its
own items.
Navigating the menu structure is very
easy using the 5-way keypad.
You use the
UP and DOWN keys to scroll
through the available menu items. The
ENT key is used to
select that menu item. The
ESC key backs you up one
menu level from where you are, and the
HOME key can
return you all the way to MAIN MENU by pressing and holding it
for 1.5 seconds.
For example let’s begin at the DEFAULT SCREEN; our goal is
to get to the RELEASE menu item. Pressing the
ENT key would get us to MAIN MENU. Now
use the
UP or DOWN keys to scroll to SXRC
SETUP
, and then press the ENT key. Now you
are in the SXRC SETUP MENU. Using the
UP
or DOWN keys again you scroll to GROUP AMPS and press the
ENT key. You are now in the GROUP AMPS
MENU. Use the
UP or DOWN keys again to
scroll to
RELEASE and then press the ENT key.
That’s it! You are there.
This is how you view information and change settings in your
SXRC Remote Control.
∝
ESC
HOME
ENT
ESC
ENT
HOME
DEFAULT SCREEN
MAIN MENU
AMP ADJ
GROUP ADJ
SICK BAY
SXRC SETUP
SECURITY
•
•
•
∝
SXRC SETUP MENU
DISPLAY
AUTOSEARCH
GROUP AMPS
SXRC NAME
MEM NAME
ESC
HOME
ENT
HOME
ESC
GROUP AMPS MENU
•
•
•
∝
GROUPS
GROUP NAME
ASSIGN
RELEASE
LINK
•
•
•
∝
ENT
Page 27

27
SXRC Remote Control
Operation
Continuing our example, we are now in the RELEASE item in
the GROUP AMPS MENU. If we press the
ESC key we would go back up to the GROUP
AMPS MENU. If we press the
ESC key again
we would go to the SXRC SETUP MENU. One
more press of the
ESC key and we are in the
MAIN MENU.
Let’s start at the RELEASE item in the GROUP AMPS MENU
again but instead press and hold the
HOME key for 1.5
seconds. Doing this will take us all the way back to the MAIN
MENU in one key press. Pressing and holding the
HOME key
will return you all the way back to the MENU
ITEM you started with in the MAIN MENU, no
matter how deep in the menu level structure you
are. Pretty cool!
This is a very quick way to return to the MAIN MENU after
drilling down several menu layers to view or change an item.
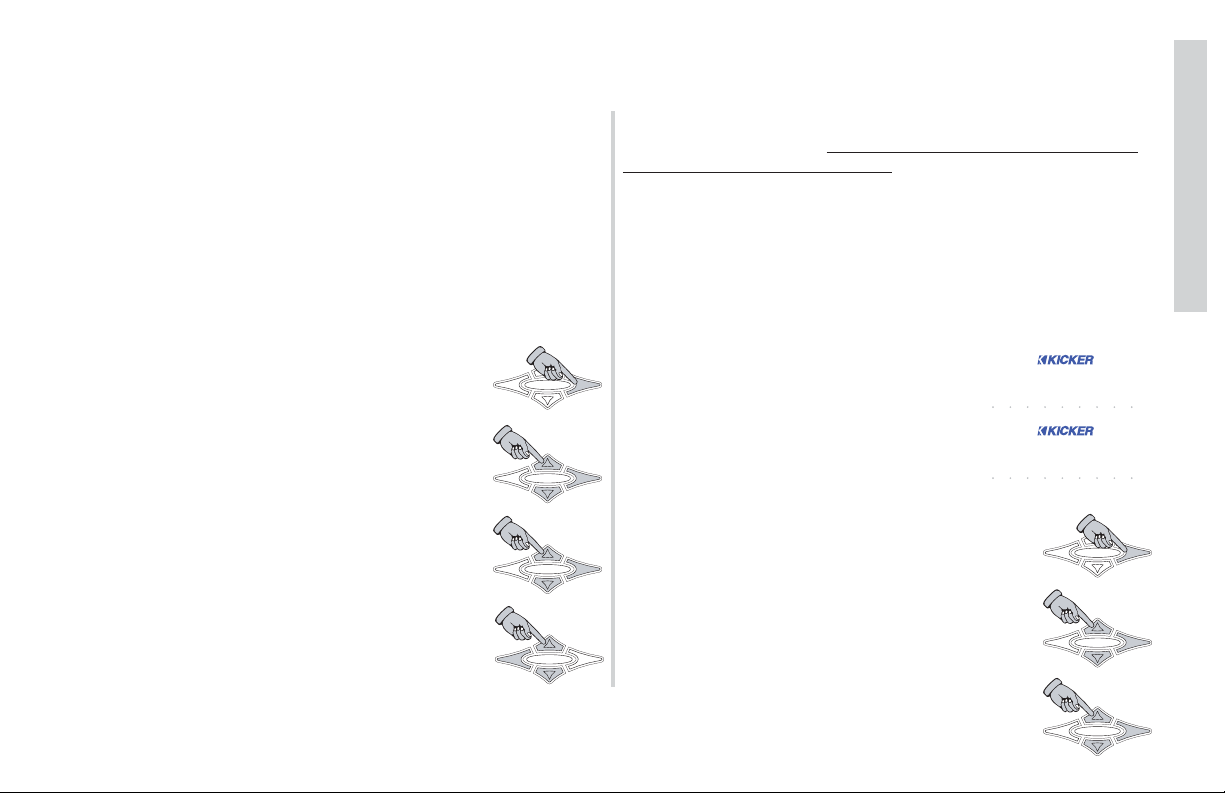
When adjusting any SXRC control the
UP and DOWN arrow
keys have 2 speeds, normal and accelerated.
Pressing and releasing the key repeatedly
will scroll through the menu items at normal
speed.
Pressing the key and holding it in for longer
than 1.5 seconds will activate the accelerated
scrolling mode and scroll through the menu
items at a much faster rate. Releasing the key
will return it to normal speed mode.
PRESS &
HOLD
PRESS &
RELEASE
PRESS &
HOLD
Menu System
Here are the descriptions of each menu item, its function and
how to operate it.
DEFAULT - This menu is displayed when your SXRC is first
powered up and operating. If you are in another menu making
adjustments, the SXRC will time-out and return to the DEFAULT
menu automatically after 3 minutes of no key press activity.
The following information is scrolled through the ISIS display
one after the other and repeats.
»
* KICKER * - Your friend wants to know who makes that
wicked sick remote sitting in your dash...we put it right here for
you! Plus...it is quicker than a Google™ search!
»
-SXRC- - The name of the remote control. You can change
this name to whatever you like. See the SXRC SETUP section
of the manual.
»
xx.x volts - Displays the current voltage at the selected
amplifier’s (
INFO AMP ) + 12 volt battery terminal. Selecting
the INFO
AMP is described in the SXRC SETUP section of the
manual.
»
xx.x DEG f or xx.x deg c - Displays the current
temperature of the selected amplifier (
INFO AMP ) in
fahrenheit or celsius. Selecting the
iNFO AMP is described in
the SXRC SETUP section of the manual.
ESC
HOME
ENT
HOME
ESC
ENT
HOME
ESC
HOME
ESC
ENT
ENT
Page 28

28
SXRC Remote Control
Operation
» memory name - The name of the current Global Memory
Preset in use, if any are currently selected.
»
vol= 00.0 db - The current setting of the Digital Remote
Volume Control. You can select which amplifiers are controlled
by this function. See the SXRC SETUP section of the manual.
»
XX units - How many SX Series amplifiers are currently
connected to the SXRC. If you have 4 but it only says 3...time
to troubleshoot...or go fishing. Your choice.
»
date display - Displays the current date in month-day-year
format. Requires initial setup by you and then is kept up-to-date
with internal backup battery. Described later in the SXRC
SETUP section of the manual.
»
time display - Displays the current time in 12 hour am/pm
format. Requires initial setup by you and then is kept up-to-date
with internal backup battery. Described later in the SXRC
SETUP section of the manual.
You can freeze the scrolling display on any
item in the DEFAULT menu by simply pressing
the
HOME key.
Once you freeze the scrolling display you can
manually select any item to view by pressing the
ESC key. Each press brings up the next item in
the DEFAULT menu.
If you want the display to start scrolling again,
simply press the
HOME key.
You can change the Digital Remote Volume
Control (DRVC) at any time when you are in the
DEFAULT menu. Simply press the
UP key to
increase the volume level or press the
DOWN
key to decrease the volume level.
When you press either the
UP or
DOWN key to change the DRVC level,
the display will instantly show the current
Remote Volume Level.
The Digital Remote Volume Control has
an operating range of 0.0 dB to -30.0 dB.
Each press of the
UP key will increase the
DRVC level .5 dB and each press of the
DOWN key decreases the DRVC level .5 dB.
Pressing and holding either the
UP or
DOWN key will cause the DRVC level to
change rapidly.
The SXRC will pause on the DRVC level for 2 seconds after
you have made your adjustment and then return to the previous
DEFAULT menu item that was being displayed before you
adjusted the DRVC.
PRESS &
HOLD
ESC
HOME
ENT
AMP1
LEFT RIGHT
LOCK
GAIN EQ LPF HPF KOMP
vvbboll== 0000dd
MEM-1
SYS
MEM-2 MEM-3 MEM-4
PHASE
AMP2
MUTE
ESC
HOME
ESC
ENT
ESC
HOME
HOME
AMP1
LOCK
GAIN EQ LPF HPF KOMP
vvbboll==--330000dd
MEM-1
HOME
ESC
ENT
ENT
ENT
LEFT RIGHT
SYS
MEM-2 MEM-3 MEM-4
PHASE
AMP2
MUTE
Page 29

Once you select the AMP ADJ menu a list of all the amplifiers
connected to the SXRC will be available. The list will show the
current name of the SX Series amplifier.
This will either be the default name from
the factory (example
SX-500/2) or any
name you may have assigned to the amp.
Use the
UP and DOWN keys to scroll
through the list of available amplifiers. If you
have several of the same model of amplifier
installed and did not change the name prior to
installing the SXRC then you will see the same
name when you press the
UP or DOWN keys on the SXRC. In
other words it appears like nothing changed. It did...just read on.
To help you identify which amp you are
currently viewing simply press and hold the
ENT key and the Remote Address of the
amplifier will be displayed. This will aid you in
determining which amp you are currently
viewing when you have multiple amps of
the same make.
Changing the amplifiers name (coming up later in the manual)
will help you here. Remember when we said to keep track of
which amp had what unique Remote Address? It all makes sense
now.
Once you have found the amplifier you wish to
adjust simply press the
ENT key to select it.
29
SXRC Remote Control
Operation
MAIN
This is the first menu you access from the DEFAULT menu and
is the gateway to all the settings and information
display on your SXRC.
To enter the MAIN menu simply press the
ENT key while in the DEFAULT menu.
The available selections in the MAIN menu are:
» AMP ADJ
» GROUP ADJ
» SICK BAY
» SXRC SETUP
» SECURITY
Use the UP and DOWN arrow keys to
scroll through the available selections in the
MAIN menu.
When you have the menu item selected that
you want to view or adjust simply press the
ENT key to select it.
AMP ADJ
AMP ADJ MENU - This menu item lets
you select each individual amplifier
connected to the SXRC and view or adjust
any of its settings.
PRESS &
HOLD
aa00dddrr == 11
SYS
MEM-1
GAIN EQ LPF HPF KOMP
AMP1
LOCK
MEM-2 MEM-3 MEM-4
PHASE
MUTE
AMP2
LEFT RIGHT
MAIN
AMP ADJ
HOME
ESC
ENT
AMP1
LEFT RIGHT
LOCK
GAIN EQ LPF HPF KOMP
aa mpp aaddjj
MEM-1
HOME
ESC
ESC
SYS
MEM-2 MEM-3 MEM-4
HOME
PHASE
ENT
ENT
AMP2
MUTE
AMP1
LEFT RIGHT
LOCK
GAIN EQ LPF HPF KOMP
sxx--550000//22
MEM-1
SYS
MEM-2 MEM-3 MEM-4
PHASE
AMP2
MUTE
HOME
ESC
ENT
HOME
ENT
ESC
HOME
ESC
ENT
Page 30

30
SXRC Remote Control
Operation
Once the amplifier you want to adjust is selected you will be
able to choose from the following items. Some of these functions
may not be available depending on if the amplifier is assigned to
a Group and what LINK property the group has set. This is
described in more detail in the SXRC SETUP menu.
Use the
UP and DOWN keys to scroll
through the selections above and press the
ENT key to select.
GAIN MENU - Here is where you adjust the selected amplifier’s
gain controls. The SX Series amplifiers’ UltraMatch™ gain
structure features both a digital input gain attenuator with five
selectable Gain Ranges AND 12dB of “tweakable” Gain
adjustment in each range! This super wide adjustment range
allows SX amplifiers to operate flawlessly with any source unit,
pre-amplifier, or line driver.
In “Gear-Head” terms, the Gain Range and Gain adjustments
can be compared to the gear box and gas pedal of a race car.
The Gain Range represents what gear you’re in and the Gain
represents stepping on the gas. In this menu, you are adjusting
the gas pedal! The gear box comes up later.
Use the
UP and DOWN keys to scroll
through
LEFT CHN , RIGHT CHN or
BOTH CHNS and then press the ENT key to
select. SX.1 Series do not have Lef
t or
Right channel options since it is a Mono-Block
design. Skip this step and move to next paragraph.
Now use the UP and DOWN keys to
increase or decrease the gain of the selected
channel(s) in .5 dB increments from 0 dB to
+12 dB. (
0.0 to 12.0)
Press the ESC key to save your adjustment
and return to the
LEFT CHN, RIGHT CHN,
BOTH CHNS options menu. You can now
select another channel to adjust on this
amplifier if desired. Does not apply to SX.1
Series. Pressing the ESC key at this point on a SX.1 Series
amplifier exits the GAIN menu.
When you are done adjusting the gain on this
amplifier press the
ESC key while in the
LEFT CHN, RIGHT CHN, BOTH CHNS options
menu to return to the AMP ADJ menu and
choose another function to adjust.
NOTE:
While you are in the GAIN menu the
GAIN indicator on the ISIS VFD display is
lit. This indicates you are making
adjustments in the GAIN menu.
The
LEFT and RIGHt indicators will light
up as well to indicate which amplifier
channel(s) you are currently adjusting.
» GAIN
» EQ
» LO-PASS
» HI-PASS
» PHASE
» MUTE
» KOMPRESSOR
» KOMP. ADJ.
» GAIN RANGE
» BYPASS DSP
» PINK NOISE
» REMOTE VOL
ESC
HOME
ENT
AMP1
LEFT RIGHT
LOCK
GAIN EQ LPF HPF KOMP
bb otthh cchhnnss
MEM-1
AMP1
LEFT RIGHT
LOCK
GAIN EQ LPF HPF KOMP
5510055 1100
MEM-1
HOME
ESC
ESC
ESC
ESC
SYS
MEM-2 MEM-3 MEM-4
SYS
MEM-2 MEM-3 MEM-4
HOME
HOME
HOME
PHASE
PHASE
ENT
ENT
ENT
ENT
AMP2
MUTE
AMP2
MUTE
Page 31

31
SXRC Remote Control
Operation
EQ MENU - Here is where you adjust the selected amplifier’s
single band parametric equalizer.
Use the
UP and DOWN keys to scroll
through
frequency, boost/cut and
bandwidth and then press the ENT key to
select.
FREQUENCY selects the center frequency of the equalizer and
can be set at any 1/12th octave spaced frequency from 20 Hz 20 kHz. (
20 Hz to 20325 Hz) SX.1 Series is 10 Hz to 200 Hz
in 1 Hz Steps.
Use the UP and DOWN keys to select your
frequency. Press the
ESC key to save your
setting and return to the
frequency,
boost/cut, bandwidth options menu. You
can now select another equalizer option to
adjust on this amplifier if desired.
bandwidth (better known as Q) can be set from .5 to 10 in .5
increments. In simple terms, lower Q effects more frequencies
around the center frequency while higher Q effects fewer
frequencies around the center frequency.
As an example, if our center frequency is 100 HZ, a Q of .5
(area in gray) effects many more frequencies around 100 Hz
than a Q of 10 (area in black)
There is no right or wrong Q,
you use whatever fits the
needs of the system or
personal taste. KICKER uses
a default Q of 3.
Use the
UP and DOWN keys to select your
bandwidth (Q) value and press the
ESC to
save your setting and return to the
frequency, boost/cut, bandwidth
options menu. You can now select another
equalizer option to adjust on this amplifier if desired.
Boost/Cut is where you boost or cut the equalizer and has a
range of 36 dB;
-18 dB to +18 db in .5 dB steps. Keep in
mind that for every 3 dB of boost you are requiring the amplifier
to use twice as much power in that equalized area. The default
setting from KICKER is
FLAT (No boost or cut).
Use the
UP and DOWN keys to adjust your
boost or cut and press the
ESC key to
save your setting and return to the
frequency,boost/cut,bandwidth options
menu. You can now select another equalizer
option to adjust on this amplifier if desired.
When you are done adjusting the equalizer on
this amplifier press the
ESC key while in the
frequency, boost/cut, bandwidth
options menu to return to the AMP ADJ menu
and choose another function to adjust.
NOTE:
While you are in the EQ menu the EQ
indicator on the ISIS display is lit. This
indicates you are making adjustments in
the EQ menu.
ESC
HOME
ENT
ESC
HOME
ENT
ESC
HOME
ENT
100 HZ
Q=.5
Q=10
HOME
ESC
ESC
AMP1
LEFTLEFT RIGHTRIGHT
LOCK
GAINGAIN EQ LPF HPF KOMP
ffreeqquueennccyy
MEM-1
SYS
MEM-2 MEM-3 MEM-4
HOME
PHASE
ENT
ENT
AMP2
MUTE
Page 32

32
SXRC Remote Control
Operation
When you are done adjusting the low pass
crossover on this amplifier press the
ESC key while in the frequency and
slope options menu to return to the AMP ADJ
menu and choose another function to adjust.
NOTE:
While you are in the LO-PASS menu the
LPF indicator on the ISIS display is lit. This
indicates you are making adjustments in
the LO-PASS menu.
The KICKER SXRC monitors and prevents any low pass
crossover point from being set any closer than 1/3 octave from
the high pass crossover point. If you cannot set the low pass
crossover where you want then check the ISIS display and see if
the
LPF is lit and the HPF indicator is
flashing. If it is then you need to go to the
HI-PASS menu and lower the high pass
crossover point.
This is done as a safety precaution to prevent a notch filter
condition.
lo-pass MENU - Here is where you adjust the selected
amplifier’s low pass crossover.
Use the
UP and DOWN keys to scroll
through
frequency and slope and then
press the
ENT key to select.
FREQUENCY selects the crossover point and can be set at any
1/12th octave spaced frequency from 30 Hz to 20 kHz.
(
30 Hz to 20325 Hz) SX.1 Series is 30 Hz to 200 Hz in 1 Hz
steps.
Use the UP and DOWN keys to select your
frequency. Press the
ESC key to save your
setting and return to the
frequency and
slope options menu. You can now select
another low pass crossover option to adjust
on this amplifier if desired.
SLOPE selects the roll-off of the crossover and can be set
from
oFF to 36 dB/OCT in 6 dB steps. SX.1 Series is OFF to
48 dB in 6 dB Steps.
Use the UP and DOWN keys to select your
low pass crossover slope. Press the
ESC
key to save your setting and return to the
frequency and slope options menu. You
can now select another low pass crossover
option to adjust on this amplifier if desired.
ESC
HOME
ENT
HOME
ESC
AMP1
LEFTLEFT RIGHTRIGHT
LOCK
GAINGAIN EQ LPF HPF KOMP
sslooppee
MEM-1
SYS
MEM-2 MEM-3 MEM-4
PHASE
ENT
AMP2
MUTE
ESC
ESC
HOME
HOME
ENT
AMP1
LEFTLEFT RIGHTRIGHT
LOCK
GAINGAIN EQ LPF HPF KOMP
110066 hhzz
MEM-1
ENT
AMP2
PHASE
MUTE
SYS
MEM-2 MEM-3 MEM-4
Page 33

33
SXRC Remote Control
Operation
hi-pass MENU - Here is where you adjust the selected
amplifier’s high pass crossover.
Use the
UP and DOWN keys to scroll
through
frequency and slope and then
press the
ENT key to select.
FREQUENCY selects the crossover point and can be set at any
1/12th octave spaced frequency from 10 Hz to 16 kHz.
(
10 Hz to 16132 Hz) SX.1 Series is 10 Hz to 159 Hz in 1 Hz
steps.
Use the UP and DOWN keys to select your
frequency. Press the
ESC key to save your
setting and return to the
frequency and
slope options menu. You can now select
another high pass crossover option to adjust
on this amplifier if desired.
SLOPE selects the roll-off of the crossover and can be set
from
oFF to 36 dB/OCT in 6 dB steps. SX.1 Series is OFF to
24 dB in 6 dB Steps.
Use the UP and DOWN keys to select your
high pass crossover slope. Press the
ESC
key to save your setting and return to the
frequency and slope options menu. You
can now select another high pass crossover
option to adjust on this amplifier if desired.
When you are done adjusting the high pass
crossover on this amplifier press the
ESC key while in the frequency and
slope options menu to return to the AMP ADJ
menu and choose another function to adjust.
NOTE:
While you are in the HI-PASS menu the
HPF indicator on the ISIS display is lit. This
indicates you are making adjustments in
the HI-PASS menu.
The KICKER SXRC monitors and prevents any high pass
crossover point from being set any closer than 1/3 octave from
the low pass crossover point. If you cannot set the high pass
crossover where you want then check the ISIS display and see if
the
HPF is lit and the LPF indicator is
flashing. If it is then you need to go to the
LO-PASS menu and raise the low pass
crossover point.
This is done as a safety precaution to prevent a notch filter
condition.
ESC
HOME
ENT
HOME
ESC
AMP1
LEFTLEFT RIGHTRIGHT
LOCK
GAINGAIN EQ LPF HPF KOMP
sslooppee
MEM-1
SYS
MEM-2 MEM-3 MEM-4
PHASE
ENT
AMP2
MUTE
ESC
HOME
HOME
ESC
ENT
AMP1
LEFTLEFT RIGHTRIGHT
LOCK
GAINGAIN EQ LPF HPF KOMP
111199 hhzz
MEM-1
ENT
AMP2
PHASE
MUTE
SYS
MEM-2 MEM-3 MEM-4
Page 34

34
SXRC Remote Control
Operation
phase MENU - Here is where you can switch the polarity of
each channel(s) output between 0 or 180 degrees.
Use the
UP and DOWN keys to scroll
through
both chns, left chn and right
chn
then press the ENT key to select. SX.1
Series does not offer Left or Right Channel
option...Only 0 Degree or 180 Degree for the entire amplifier
since it is a Mono-Block design. Skip this step and move to
next paragraph.
Use the UP or DOWN keys to select from
0 degree or180 degree. Press the ESC
key to save your setting and return to the
both chns, left chn and right chn
options menu. You can now select another
phase option to adjust on this amplifier if desired.
Does not apply to SX.1 Series. Pressing the ESC key at this
point on a SX.1 Series amplifier exits the PHASE menu.
When you are done adjusting the phase on
this amplifier press the
ESC key while in the
Both chns, left chn and right chn
options menu to return to the AMP ADJ menu
and choose another function to adjust.
NOTE:
While you are in the PHASE menu the
PHASE indicator on the ISIS display is lit.
This indicates you are making adjustments
in the PHASE menu.
There is also a LEFT and RIGHT indicator
in the ISIS display that will light up
indicating which channel(s) (Left and/or
Right) are currently being adjusted.
By default, all channels in all amplifiers ares set to 0 Degree.
ESC
ESC
ESC
HOME
HOME
HOME
ENT
ENT
ENT
AMP1
LEFTLEFT RIGHTRIGHT
LOCK
GAINGAIN EQ LPF HPF KOMP
ee 00 ddeeggrree
MEM-1
SYS
MEM-2 MEM-3 MEM-4
PHASE
AMP2
MUTE
AMP1
LEFTLEFT RIGHTRIGHT
LOCK
GAINGAIN EQ LPF HPF KOMP
bbotthh cchhnnss
MEM-1
SYS
MEM-2 MEM-3 MEM-4
PHASE
AMP2
MUTE
Page 35

35
SXRC Remote Control
Operation
There is also a LEFT and RIGHT indicator
in the ISIS display that will light up
indicating which channel(s) (Left and/or
Right) are currently being adjusted.
If you exit the MUTE menu with any
channel(s) muted (
Mute On), the MUTE
indicator in the ISIS VFD will begin flashing
to indicate this.
The
MUTE indicator will stop flashing once you un-mute the
channel(s) currently muted.
mute MENU - Here is where you can mute each channel(s)
output on the amplifier for setup or testing purposes.
Use the
UP and DOWN keys to scroll
through
both chns, left chn and right
chn
then press the ENT key to select. SX.1
Series does not offer Left or Right Channel
option...Only Mute On or Mute Off for the entire amplifier
since it is a Mono-Block design. Skip this step and move to
next paragraph.
Use the UP or DOWN keys to select from
mute on or mute off. Press the ESC
key to save your setting and return to the
both chns, left chn and right chn
options menu. You can now select another
mute option to adjust on this amplifier if desired.
Does not apply to SX.1 Series. Pressing the ESC key at this
point on a SX.1 Series amplifier exits the MUTE menu.
When you are done adjusting the mute on
this amplifier press the
ESC key while in the
Both chns, left chn and right chn
options menu to return to the AMP ADJ menu
and choose another function to adjust.
NOTE:
While you are in the MUTE menu the
MUTE indicator on the ISIS display is lit.
This indicates you are making
adjustments in the MUTE menu.
ESC
HOME
ESC
HOME
ESC
HOME
ENT
ENT
ENT
AMP1
LEFTLEFT RIGHTRIGHT
LOCK
GAINGAIN EQ LPF HPF KOMP
mmuttee ooffff
MEM-1
AMP1
LOCK
GAINGAIN EQ LPF HPF KOMP
mmuttee
MEM-1
SYS
MEM-2 MEM-3 MEM-4
LEFTLEFT RIGHTRIGHT
SYS
MEM-2 MEM-3 MEM-4
PHASE
PHASE
AMP2
MUTE
AMP2
MUTE
AMP1
LEFTLEFT RIGHTRIGHT
LOCK
GAINGAIN EQ LPF HPF KOMP
bbotthh cchhnnss
MEM-1
SYS
MEM-2 MEM-3 MEM-4
PHASE
AMP2
MUTE
Page 36

36
SXRC Remote Control
Operation
Kompressor MENU - Here you select from any of the four
settings for the SX Series amplifiers Digital Compressor Circuit.
Use the
UP and DOWN keys to scroll
through
off, red-line, contour or
attack.
Press the
ESC key to save your setting and
return to the AMP ADJ menu.You can now
choose another function to adjust.
NOTE:
While you are in the KOMPRESSOR™
menu the
KOMP indicator on the ISIS
display is lit. This indicates you are making
adjustments in the KOMPRESSOR™
menu.
See the specifications pages later in this manual for a brief
description of each Kompressor™ setting and some general
guidelines for their use.
komp. adj. MENU - Here you can adjust the operation
threshold for the SX Series amplifiers Digital Compressor Circuit
(Kompressor™).
The KOMP. ADJ. menu allows you to adjust the activation
threshold (in simple terms...the volume level at which it turns
on/off) through a 48 dB window, +24 dB to -24 dB. The unit
comes preset from KICKER at a default level of 0.0 dB. By
adjusting the threshold up or down from this point you can
change when the Kompressor™ ‘kicks in’ in relationship to the
volume level to allow for different sized speakers, acoustics or
listener tastes.
Use the
UP and DOWN keys to scroll
through from
24.0 db to -24.0 dB
Remember that 0.0 dB is the default setting.
Press the
ESC key to save your setting and
return to the AMP ADJ menu.You can now
choose another function to adjust.
NOTE:
While you are in the KOMP. ADJ. menu
the
KOMP indicator on the ISIS display is lit.
This indicates you are making adjustments
in the KOMP. ADJ. menu.
There is no right or wrong setting here, you can simply adjust
when the Kompressor™ activates in relationship to volume level.
Experiment around and find what works for you.
ESC
ESC
AMP1
LEFTLEFT RIGHTRIGHT
LOCK
GAINGAIN EQ LPF HPF KOMP
rredd--lliinnee
MEM-2 MEM-3 MEM-4
MEM-1
SYS
HOME
HOME
PHASE
ENT
ENT
AMP2
MUTE
AMP1
LOCK
GAINGAIN EQ LPF HPF KOMP
rredd--lliinnee
MEM-1
HOME
ESC
ESC
LEFTLEFT RIGHTRIGHT
SYS
MEM-2 MEM-3 MEM-4
HOME
PHASE
ENT
ENT
AMP2
MUTE
Page 37

37
SXRC Remote Control
Operation
BYPASS DSP MENU - Here you can bypass all the DSP
processing for the selected SX Series amplifier and send the
RCA input signal directly to the amplifier.
Use the
UP or DOWN keys to select from
BYPASS OFF or BYPASS ON.
Press the
ESC key to save your setting and
return to the AMP ADJ menu to select another
function to adjust.
NOTE:
While you are in the BYPASS DSP menu
the
SYS indicator on the ISIS display is lit.
This indicates you are making adjustments
in the BYPASS DSP menu.
The BYPASS DSP function is a SYSTEM menu function and
that is why the
SYS indicator is lit while adjusting the BYPASS
DSP function.
GAIN RANGE MENU - Here you can select the SX Series
amplifiers’ UltraMatch™ digital input gain range. The
UltraMatch™ gain structure features five selectable Gain Ranges
(1 volt, 2 volt, 4 volt, 8 volt and 16 volt).
In “Gear-Head” terms, the Gain Range and Gain adjustments
can be compared to the gear box and gas pedal of a race car.
The Gain Range represents what gear you’re in and the Gain
represents stepping on the gas. In this menu you are adjusting
the gear box. THE GAIN RANGE OF YOUR AMPLIFIER NEEDS
TO BE CORRECTLY ADJUSTED TO PROVIDE MAXIMUM
PERFORMANCE!
Use the
UP and DOWN keys to scroll
through
1v range, 2v range, 4v range,
8V Range or 16v range.
Press the
ESC key to save your setting and
return to the AMP ADJ menu to select another
function to adjust.
NOTE:
While you are in the GAIN RANGE menu
the
SYS and GAIN indicators on the ISIS
display are lit. This indicates you are
making adjustments in the GAIN RANGE
menu.
The GAIN RANGE function is a SYSTEM menu function and
that is why the
SYS indicator and the GAIN are lit while adjusting
the GAIN RANGE function
ESC
ESC
HOME
HOME
ENT
ENT
AMP1
LEFTLEFT RIGHTRIGHT
LOCK
GAINGAIN EQ LPF HPF KOMP
1vv rraannggee
MEM-1
SYS
MEM-2 MEM-3 MEM-4
PHASE
AMP2
MUTE
ESC
ESC
HOME
HOME
AMP1
LEFTLEFT RIGHTRIGHT
LOCK
GAINGAIN EQ LPF HPF KOMP
bbyppaassss ooffff
MEM-1
SYS
MEM-2 MEM-3 MEM-4
PHASE
ENT
ENT
AMP2
MUTE
Page 38

38
SXRC Remote Control
Operation
pink noise MENU - Here you can activate the integrated pink
noise generator of the selected SX Series amplifier and is very
useful for testing and troubleshooting your system.
Pink noise is a sound made up of equal energy at all 1/3
octaves from 20 Hz to 20 kHz and sounds like the static between
radio stations.
When activated, pink noise is generated by the SX amplifier’s
DSP and fed into both the left and right channels.
Use the
UP or DOWN keys to scroll
through
noise off and noise on.
Press the ESC key to save your setting and
return to the AMP ADJ menu to select another
function to adjust.
NOTE:
When the pink noise is activated (NOISE ON) the LEFT and
RIGHT indicators on the ISIS display will
begin blinking. This indicates that the PINK
NOISE generator is active.
If you exit the PINK NOISE menu with the generator on
(
NOISE ON) the left and RIGHT indicators in the ISIS VFD will
stay flashing to indicate this.
The
LEFT and RIGHT indicators will stop
flashing once you turn off (
NOISE OFF) the
pink noise generator.
REMOTE VOL MENU - Here you can choose to have the
selected SX Series amplifier’s output level controlled by the
Digital Remote Volume Control (DRVC).
If you wish to use the DRVC as a master volume control,
raising and lowering the output level of all the amplifiers, leave all
amplifiers set to
REMOTE ON. By default, all amplifiers are set to
REMOTE ON.
If you wish to use the DRVC as a bass level controller, raising
and lowering the output level on subwoofer amplifiers only, set
the REMOTE VOL to
REMOTE OFF on your non-subwoofer
amplifiers.
These are the two most common uses. You can configure
whatever combination works for your particular installation.
Use the
UP or DOWN keys to scroll
through
REMOTE ON and REMOTE OFF.
Press the ESC key to save your setting and
return to the AMP ADJ menu to select another
function to adjust.
NOTE:
While you are in the REMOTE VOL
menu the
SYS indicator on the ISIS display
is lit. This indicates you are making
adjustments in the REMOTE VOL menu.
ESC
HOME
ENT
ESC
HOME
ENT
AMP1
LEFTLEFT RIGHTRIGHT
LOCK
GAINGAIN EQ LPF HPF KOMP
nnoiissee oonn
MEM-1
SYS
MEM-2 MEM-3 MEM-4
AMP1
LEFTLEFT RIGHTRIGHT
LOCK
GAINGAIN EQ LPF HPF KOMP
nnoiissee ooffff
MEM-1
SYS
MEM-2 MEM-3 MEM-4
PHASE
PHASE
AMP2
MUTE
AMP2
MUTE
HOME
ESC
HOME
ESC
AMP1
LEFTLEFT RIGHTRIGHT
LOCK
GAINGAIN EQ LPF HPF KOMP
rremmoottee oonn
MEM-1
SYS
MEM-2 MEM-3 MEM-4
PHASE
ENT
ENT
AMP2
MUTE
Page 39

39
SXRC Remote Control
Operation
GROUP ADJ
GROUP ADJ MENU - This menu item lets
you select each amplifier group (up to 10
can be created in the SXRC SETUP menu)
connected to the SXRC and view or adjust any of its settings.
This section describes how to adjust the settings in each group.
See the SXRC SETUP section later in the manual for a complete
description on amplifier group setup.
When a group is created from the SXRC SETUP menu it can
be set as a LINK ON or a LINK OFF group. All of the GROUP
ADJ functions are described in this section but what you can
adjust for the group will vary based on this setting.
ggroouupp aaddjj
SYS
MEM-1
GAINGAIN EQ LPF HPF KOMP
AMP1
LOCK
MEM-2 MEM-3 MEM-4
PHASE
MUTE
AMP2
LEFTLEFT RIGHTRIGHT
»GAIN
»EQ
»LO-PASS
»HI-PASS
»PHASE
»MUTE
»KOMPRESSOR
»KOMP. ADJ.
»GAIN RANGE
»PINK NOISE
A LINK ON group allows you
to adjust each of the following
settings and they are shared
for each amplifier in the group:
A LINK OFF group allows you
to adjust each of the following
settings and they are shared for
each amplifier in the group:
»
GAIN
»MUTE
»KOMPRESSOR
»PINK NOISE
Look for more details and explanations on grouping amplifiers
and setting them up in the SXRC SETUP menu of this manual.
Once you select the
group ADJ menu a list of all the groups
created by the SXRC will be available. The list will show the
current name of the selected group. This
will either be the default name from
KICKER (
group-01 through GROUP-10) or
any name you may have assigned to the
group.
Use the
UP and DOWN keys to scroll
through the list of available groups..
Once you have found the group you wish to
adjust simply press the
ENT key to select it.
NOTE:
If the ISIS display reads N/A when you
enter the GROUP ADJ menu, this signifies
that no amplifier groups have been
created.
GROUP ADJ
AMP1
LEFTLEFT RIGHTRIGHT
LOCK
GAINGAIN EQ LPF HPF KOMP
ggroouupp--0011
MEM-1
SYS
PHASE
MEM-2 MEM-3 MEM-4
ESC
HOME
ENT
HOME
ESC
AMP1
LEFTLEFT RIGHTRIGHT
LOCK
GAINGAIN EQ LPF HPF KOMP
nn/aa
MEM-1
SYS
PHASE
MEM-2 MEM-3 MEM-4
AMP2
MUTE
ENT
AMP2
MUTE
Page 40

40
SXRC Remote Control
Operation
Once the group you want to adjust is selected you will be able
to choose from the following items (depending on LINK setting).
»
GAIN
»EQ
»LO-PASS
»HI-PASS
»PHASE
»MUTE
»KOMPRESSOR
»KOMP. ADJ.
»GAIN RANGE
»PINK NOISE
Use the UP and DOWN keys to scroll
through the selections above and press the
ENT key to select.
GAIN MENU - Here is where you adjust the selected group’s
gain controls. All amplifiers in the group will be adjusted up or
down when you adjust the gain control.
If each amplifier has different gain settings, the SXRC will
display the gain level of the highest amplifier in the group . It also
monitors and maintains any differences between channels or
individual amplifiers that you may have set separately.
If you can not adjust a group up or down, then it means the
channel differences are being maintained and there is no where
to go. You will need to adjust each amplifier individually or set
each amplifier’s gain to a similar setting.
Here are four of the many possible examples.
Example 1
Group-01 has two amplifiers in it, amp 1
has both channels gain set at
12.0 while
amp 2 is at
0.0. When you select this
group to adjust the gain you will see
12.0 in the display,the highest gain
setting of the group.
When you try to increase or decrease the
gain setting of this group, nothing will
happen. Since the gain range is 12 dB
(0.0 dB to 12.0 dB) there is no way to
increase or decrease the gain and
maintain 12 dB of difference between the amplifiers. The SXRC
is maintaining the differences you set between the amplifiers.
Example 2
Group-02 has two amplifiers in it, amp 1
has channel gains set at
3.0 (Left) and
9.0 (Right) while amp 2 is at 6.0 (Left)
and
3.0 (Right). When you select this
group to adjust the gain you will see
6.0
(Left) and 9.0 (Right) in the display, the
highest gain settings of the group.
Since the gain range is 12 dB
(0.0 dB to 12.0 dB) for both channels,
when you try to increase or decrease the
gain setting of this group you will only
have 3 dB of movement in either direction. (3.0 dB to 0.0 dB in
the Left channel) and (9.0 dB to 12.0 dB in the Right channel)
This will maintain all the channel and amplifier gain differences
while allowing you to adjust the gain of all the amplifiers.
0012200 1122
SYS
MEM-1
GAIN EQ LPF HPF KOMP
AMP1
LOCK
MEM-2 MEM-3 MEM-4
PHASE
MUTE
AMP2
LEFT RIGHT
Amp 1
Amp 2
0012200 1122
SYS
MEM-1
GAIN EQ LPF HPF KOMP
AMP1
LOCK
MEM-2 MEM-3 MEM-4
PHASE
MUTE
AMP2
LEFT RIGHT
You See
00 6600 33
SYS
MEM-1
GAIN EQ LPF HPF KOMP
AMP1
LOCK
MEM-2 MEM-3 MEM-4
PHASE
MUTE
AMP2
LEFT RIGHT
Amp 1
Amp 2
You See
HOME
ESC
ENT
AMP1
LEFT RIGHT
LOCK
GAIN EQ LPF HPF KOMP
00 0000 00
MEM-1
SYS
MEM-2 MEM-3 MEM-4
PHASE
AMP2
AMP1
LEFT RIGHT
LOCK
GAIN EQ LPF HPF KOMP
00 3300 99
MEM-1
SYS
MEM-2 MEM-3 MEM-4
PHASE
AMP2
MUTE
AMP1
LEFT RIGHT
LOCK
GAIN EQ LPF HPF KOMP
00 6600 99
MEM-1
SYS
MEM-2 MEM-3 MEM-4
PHASE
AMP2
MUTE
MUTE
Page 41

41
SXRC Remote Control
Operation
Use the UP and DOWN keys to scroll
through
LEFT CHN, RIGHT CHN or BOTH CHNS
and then press the ENT key to select. SX.1
Series do not have Left or Right channel
options since it is a Mono-Block design. Skip
this step and move to next paragraph.
Now use the UP and DOWN keys to
increase or decrease the gain of the selected
group’s channel(s) in .5 dB increments from 0
dB to +12 dB. (
0.0 to 12.0)
Press the ESC key to save your adjustment
and return to the
LEFT, RIGHT, BOTH options
menu. You can now select another channel to
adjust in this group if desired. Does not
apply to SX.1 Series. Pressing the ESC key at this point on a
SX.1 Series amplifier exits the GAIN menu.
When you are done adjusting the gain in this
group press the ESC key while in the
LEFT
CHN
, RIGHT CHN, BOTH CHNS options menu
to return to the GROUP ADJ menu and
choose another function to adjust.
NOTE:
While you are in the GAIN menu the
GAIN indicator on the ISIS VFD display is
lit. This indicates you are making
adjustments in the GAIN menu.
The
LEFT and RIGHt indicators will light
up as well to indicate which amplifier’s
channel(s) you are currently adjusting.
Example 3
Group-07 has two amplifiers in it, amp 1
has both channels gain set at
0.0 while
amp 2 is at
0.0. When you select this
group to adjust the gain you will see
0.0 in the display, the highest gain
setting of the group.
Since the gain range is 12 dB (0.0 dB to
12.0 dB) and both amplifier’s channels
are set at 0.0 dB, the SXRC will let you
adjust through the full gain range. When
you try to increase or decrease the gain
setting of this group, you will have a full 12 dB swing up and
down on both channels.
Example 4
Group-09 has two amplifiers in it, amp 1
has channel gains set at
0.0 (Left) and
12.0 (Right) while amp 2 is at 0.0
(Left) and 12.0 (Right). When you
select this group to adjust the gain you
will see
0.0 (Left) and 12.0 (Right) in
the display, the highest gain settings of
the group.
Since the gain range is 12 dB
(0.0 dB to 12.0 dB) for both channels,
and each channel on each amplifier is
separated by 12 dB, you can only adjust the gain if you do
each channel separately. Choosing
BOTH CHNS will not work
but choosing just the
LEFT CHN or RIGHT CHN will allow full
adjustment of 12 dB on that channel.
Amp 1
Amp 2
You See
Amp 1
Amp 2
You See
AMP1
LEFT RIGHT
LOCK
GAIN EQ LPF HPF KOMP
00 0000 00
MEM-1
AMP1
LOCK
GAIN EQ LPF HPF KOMP
00 0000 00
MEM-1
AMP1
LOCK
GAIN EQ LPF HPF KOMP
00 0000 00
MEM-1
SYS
MEM-2 MEM-3 MEM-4
LEFT RIGHT
SYS
MEM-2 MEM-3 MEM-4
LEFT RIGHT
SYS
MEM-2 MEM-3 MEM-4
AMP1
LEFT RIGHT
LOCK
GAIN EQ LPF HPF KOMP
00 0000 1122
MEM-1
AMP1
LOCK
GAIN EQ LPF HPF KOMP
00 0000 1122
MEM-1
AMP1
LOCK
GAIN EQ LPF HPF KOMP
00 0000 1122
MEM-1
SYS
MEM-2 MEM-3 MEM-4
LEFT RIGHT
SYS
MEM-2 MEM-3 MEM-4
LEFT RIGHT
SYS
MEM-2 MEM-3 MEM-4
PHASE
PHASE
PHASE
PHASE
PHASE
PHASE
AMP2
MUTE
AMP2
MUTE
AMP2
MUTE
AMP2
MUTE
AMP2
MUTE
AMP2
MUTE
ESC
ESC
ESC
ESC
AMP1
LEFT RIGHT
LOCK
GAIN EQ LPF HPF KOMP
bb otthh cchhnnss
MEM-1
AMP1
LOCK
GAIN EQ LPF HPF KOMP
5510055 1100
MEM-1
SYS
MEM-2 MEM-3 MEM-4
LEFT RIGHT
SYS
MEM-2 MEM-3 MEM-4
HOME
HOME
HOME
HOME
PHASE
PHASE
ENT
ENT
ENT
ENT
AMP2
MUTE
AMP2
MUTE
Page 42

42
SXRC Remote Control
Operation
EQ MENU - Here is where you adjust the selected group’s EQ
controls. All amplifiers in the group will be adjusted.
Use the
UP and DOWN keys to scroll
through
frequency, boost/cut and
bandwidth and then press the ENT key to
select.
FREQUENCY selects the center frequency of the equalizer and
can be set at any 1/12th octave spaced frequency from 20 Hz 20 kHz. (
20 Hz to 20325 Hz) SX.1 Series is 10 Hz to 200 Hz
in 1 Hz Steps.
Use the UP and DOWN keys to select your
frequency. Press the
ESC key to save your
setting and return to the
frequency,
boost/cut, bandwidth options menu. You
can now select another equalizer option to
adjust on this group if desired.
bandwidth (better known as Q) can be set from .5 to 10 in .5
increments. In simple terms, lower Q effects more frequencies
around the center frequency while higher Q effects fewer
frequencies around the center frequency.
As an example, if our center frequency is 100 HZ, a Q of .5
(area in gray) effects many more frequencies around 100 Hz than
a Q of 10(area in black) There
is no right or wrong Q, you use
whatever fits the needs of the
system or personal taste.
KICKER uses a default Q of 3.
Use the
UP and DOWN keys to select your
bandwidth (Q) value and press the
ESC to
save your setting and return to the
frequency, boost/cut, bandwidth
options menu. You can now select another
equalizer option to adjust in this group if desired.
Boost/Cut is where you boost or cut the equalizer and has a
range of 36 dB;
-18 dB to +18 db in .5 dB steps. Keep in
mind that for every 3 dB of boost you are requiring the amplifier to use twice as much power in that equalized area. The
default setting from KICKER is
FLAT (No boost or cut).
Use the
UP and DOWN keys to adjust your
boost or cut and press the
ESC key to
save your setting and return to the
frequency,boost/cut,bandwidth options
menu. You can now select another equalizer
option to adjust in this group if desired.
When you are done adjusting the equalizer in
this group press the
ESC key while in the
frequency, boost/cut, bandwidth
options menu to return to the GROUP ADJ
menu and choose another function to adjust.
NOTE:
While you are in the EQ menu the EQ
indicator on the ISIS display is lit. This
indicates you are making adjustments in
the EQ menu.
ESC
ESC
100 HZ
HOME
HOME
ENT
ENT
Q=.5
Q=10
AMP1
LOCK
GAINGAIN EQ LPF HPF KOMP
ffreeqquueennccyy
MEM-1
HOME
ESC
ESC
ESC
LEFTLEFT RIGHTRIGHT
SYS
MEM-2 MEM-3 MEM-4
HOME
HOME
PHASE
ENT
ENT
ENT
AMP2
MUTE
Page 43

43
SXRC Remote Control
Operation
When you are done adjusting the low pass
crossover in this group press the
ESC key
while in the
frequency and slope options
menu to return to the GROUP ADJ menu and
choose another function to adjust.
NOTE:
While you are in the LO-PASS menu the
LPF indicator on the ISIS display is lit. This
indicates you are making adjustments in
the LO-PASS menu.
The KICKER SXRC monitors and prevents any low pass
crossover point from being set any closer than 1/3 octave from
the high pass crossover point. If you cannot set the low pass
crossover where you want then check the ISIS display and see if
the
LPF is lit and the HPF indicator is
flashing. If it is then you need to go to the
GROUP ADJ. HI-PASS menu and lower the
high pass crossover point.
This is done as a safety precaution to prevent a notch filter
condition.
lo-pass MENU - Here is where you adjust the selected
group’s low pass crossover controls. All amplifiers in the group
will be adjusted.
Use the
UP and DOWN keys to scroll
through
frequency and slope and then
press the
ENT key to select.
FREQUENCY selects the crossover point and can be set at any
1/12th octave spaced frequency from 30 Hz to 20 kHz.
(
30 Hz to 20325 Hz) SX.1 Series is 30 Hz to 200 Hz in 1 Hz
steps.
Use the UP and DOWN keys to select your
frequency. Press the
ESC key to save your
setting and return to the
frequency and
slope options menu. You can now select
another low pass crossover option to adjust
in this group if desired.
SLOPE selects the roll-off of the crossover and can be set
from
oFF to 36 dB/OCT in 6 dB steps. SX.1 Series is OFF to
48 dB in 6 dB Steps.
Use the UP and DOWN keys to select your
low pass crossover slope. Press the
ESC
key to save your setting and return to the
frequency and slope options menu. You
can now select another low pass crossover
option to adjust in this group if desired.
ESC
HOME
ESC
HOME
ESC
HOME
ENT
AMP1
LEFTLEFT RIGHTRIGHT
LOCK
GAINGAIN EQ LPF HPF KOMP
sslooppee
MEM-1
ENT
AMP1
LEFTLEFT RIGHTRIGHT
LOCK
GAINGAIN EQ LPF HPF KOMP
110066 hhzz
MEM-1
ENT
HOME
ESC
SYS
MEM-2 MEM-3 MEM-4
SYS
MEM-2 MEM-3 MEM-4
PHASE
PHASE
ENT
AMP2
MUTE
AMP2
MUTE
Page 44

44
SXRC Remote Control
Operation
hi-pass MENU - Here is where you adjust the selected
group’s high pass crossover controls. All amplifiers in the group
will be adjusted.
Use the
UP and DOWN keys to scroll
through
frequency and slope and then
press the
ENT key to select.
FREQUENCY selects the crossover point and can be set at any
1/12th octave spaced frequency from 10 Hz to 16 kHz.
(
10 Hz to 16132 Hz) SX.1 Series is 10 Hz to 159 Hz in 1 Hz
steps.
Use the UP and DOWN keys to select your
frequency. Press the
ESC key to save your
setting and return to the
frequency and
slope options menu. You can now select
another high pass crossover option to adjust
in this group if desired.
SLOPE selects the roll-off of the crossover and can be set
from
oFF to 36 dB/OCT in 6 dB steps. SX.1 Series is OFF to
24 dB in 6 dB Steps.
Use the UP and DOWN keys to select your
high pass crossover slope. Press the
ESC
key to save your setting and return to the
frequency and slope options menu. You
can now select another high pass crossover
option to adjust in this group if desired.
When you are done adjusting the high pass
crossover in this group press the
ESC key
while in the
frequency and slope options
menu to return to the GROUP ADJ menu and
choose another function to adjust.
NOTE:
While you are in the HI-PASS menu the
HPF indicator on the ISIS display is lit. This
indicates you are making adjustments in
the HI-PASS menu.
The KICKER SXRC monitors and prevents any high pass
crossover point from being set any closer than 1/3 octave from
the low pass crossover point. If you cannot set the high pass
crossover where you want then check the ISIS display and see if
the
HPF is lit and the LPF indicator is
flashing. If it is then you need to go to the
LO-PASS menu and raise the low pass
crossover point.
This is done as a safety precaution to prevent a notch filter
condition.
ESC
ESC
HOME
HOME
ENT
AMP1
LEFTLEFT RIGHTRIGHT
LOCK
GAINGAIN EQ LPF HPF KOMP
sslooppee
MEM-1
ENT
AMP1
LEFTLEFT RIGHTRIGHT
LOCK
GAINGAIN EQ LPF HPF KOMP
111199 hhzz
MEM-1
HOME
ESC
SYS
MEM-2 MEM-3 MEM-4
SYS
MEM-2 MEM-3 MEM-4
PHASE
PHASE
ENT
AMP2
MUTE
AMP2
MUTE
ESC
HOME
ENT
Page 45

45
SXRC Remote Control
Operation
phase MENU - Here is where you can adjust the selected
group’s polarity output on each channel(s) between 0 or 180
degrees. All amplifiers in the group will be adjusted.
Use the
UP and DOWN keys to scroll
through
both chns, left chn and right
chn
then press the ENT key to select. SX.1
Series does not offer Left or Right Channel
option...Only 0 Degree or 180 Degree for the entire amplifier
since it is a Mono-Block design. Skip this step and move to
next paragraph.
Use the UP or DOWN keys to select from
0 degree or180 degree. Press the ESC
key to save your setting and return to the both
chns,left chn and right chn options
menu. You can now select another phase
option to adjust in this group if desired.
Does not apply to SX.1 Series. Pressing the ESC key at this
point on a SX.1 Series amplifier exits the PHASE menu.
When you are done adjusting the phase in
this group press the
ESC key while in the
Both chns,left chn and right chn
options menu to return to the GROUP ADJ
menu and choose another function to adjust.
NOTE:
While you are in the PHASE menu the
PHASE indicator on the ISIS VFD display is
lit. This indicates you are making adjustments in the PHASE menu.
There is also a LEFT and RIGHT indicator
in the ISIS display that will light up
indicating which channel(s) (Left and/or
Right) are currently being adjusted.
By default, all channels in all amplifiers ares set to 0 Degree.
ee 00 ddeeggrree
SYS
MEM-1
GAINGAIN EQ LPF HPF KOMP
AMP1
LOCK
MEM-2 MEM-3 MEM-4
PHASE
MUTE
AMP2
LEFTLEFT RIGHTRIGHT
ESC
HOME
ESC
ESC
HOME
HOME
ENT
ENT
ENT
AMP1
LEFTLEFT RIGHTRIGHT
LOCK
GAINGAIN EQ LPF HPF KOMP
bbotthh cchhnnss
MEM-1
SYS
MEM-2 MEM-3 MEM-4
PHASE
AMP2
MUTE
Page 46

46
SXRC Remote Control
Operation
There is also a LEFT and RIGHT indicator
in the ISIS display that will light up
indicating which channel(s) (Left and/or
Right) are currently being adjusted.
If you exit the MUTE menu with any
group channel(s) muted (
Mute On), the
MUTE indicator in the ISIS display will begin
flashing to indicate this.
The
MUTE indicator will stop flashing once you un-mute the
group channel(s) currently muted.
mute MENU - Here is where you can mute each channel(s)
output in the selected group for setup or testing purposes.
Use the
UP and DOWN keys to scroll
through
both chns, left chn and right
chn
then press the ENT key to select. SX.1
Series does not offer Left or Right Channel
option...Only Mute On or Mute Off for the entire amplifier
since it is a Mono-Block design. Skip this step and move to
next paragraph.
Use the UP or DOWN keys to select from
mute on or mute off. Press the ESC
key to save your setting and return to the both
chns, left chn and right chn options
menu. You can now select another mute
option to adjust in this group if desired.
Does not apply to SX.1 Series. Pressing the ESC key at this
point on a SX.1 Series amplifier exits the MUTE menu.
When you are done adjusting the mute in
this group press the
ESC key while in the
Both chns,left chn and right chn
options menu to return to the GROUP ADJ
menu and choose another function to adjust.
NOTE:
While you are in the MUTE menu the
MUTE indicator on the ISIS display is lit.
This indicates you are making
adjustments in the MUTE menu.
ESC
ESC
ESC
HOME
HOME
HOME
ENT
ENT
ENT
AMP1
LEFTLEFT RIGHTRIGHT
LOCK
GAINGAIN EQ LPF HPF KOMP
mmuttee ooffff
MEM-1
AMP1
LOCK
GAINGAIN EQ LPF HPF KOMP
mmuttee
MEM-1
SYS
MEM-2 MEM-3 MEM-4
LEFTLEFT RIGHTRIGHT
SYS
MEM-2 MEM-3 MEM-4
PHASE
PHASE
AMP2
MUTE
AMP2
MUTE
AMP1
LEFTLEFT RIGHTRIGHT
LOCK
GAINGAIN EQ LPF HPF KOMP
bbotthh cchhnnss
MEM-1
SYS
MEM-2 MEM-3 MEM-4
PHASE
AMP2
MUTE
Page 47

Example
You have selected a group to adjust which contains
four amplifiers and the group has the LINK property set to OFF.
The Kompressor™ settings on each amp are as follows:
Amp 1 - Off
Amp 2 - Attack
Amp 3 - Contour
Amp 4 - Red-Line
NOTE:
While you are in the KOMPRESSOR™
menu the
KOMP indicator on the ISIS
display is lit. This indicates you are making
adjustments in the KOMPRESSOR™ menu.
See the specifications pages later in this manual for a brief
description of each Kompressor™ setting and some general
guidelines for their use.
47
SXRC Remote Control
Operation
Kompressor MENU - Here you can adjust the selected group’s
Kompressor™ settings. The function will vary depending on if this
is a LINK ON or LINK OFF group. Both functions are described
below.
LINK ON
In a LINK ON group, each amplifier in the group shares the
exact same Kompressor™ setting.
Use the
UP or DOWN keys to scroll
through
off, red-line, contour or
attack.
Press the
ESC key to save your setting and
return to the GROUP ADJ menu and choose
another function to adjust.
LINK OFF
In a LINK OFF group, each amplifier in the group has its own
unique Kompressor setting that has been selected from the AMP
ADJ menu. Here you can, as a group, turn the Kompressor™
OFF or ON, ON being the individual setting you selected from the
AMP ADJ menu.
Use the
UP or DOWN keys to scroll
through
off and ON.
Press the
ESC key to save your setting and
return to the GROUP ADJ menu and choose
another function to adjust.
If you select the Kompressor™
and turn it
OFF for this group
the amplifier’s Kompressor™
will be set as:
Amp 1 - Off
Amp 2 - Off
Amp 3 - Off
Amp 4 - Off
Amp 1 - Off
Amp 2 - Attack
Amp 3 - Contour
Amp 4 - Red-Line
If you select the Kompressor™
and turn it
ON for this group the
amplifier’s Kompressor™ will
be set as:
ESC
HOME
ENT
HOME
ESC
ESC
ESC
HOME
HOME
ENT
ENT
ENT
AMP1
LEFTLEFT RIGHTRIGHT
LOCK
GAINGAIN EQ LPF HPF KOMP
rredd--lliinnee
MEM-1
SYS
PHASE
MEM-2 MEM-3 MEM-4
AMP2
MUTE
Page 48

48
SXRC Remote Control
Operation
komp. adj. MENU - Here you can adjust the selected group’s
operation threshold for each SX Series amplifiers Kompressor™.
The KOMP. ADJ. menu allows you to adjust the activation
threshold (in simple terms...the volume level at which it turns
on/off) through a 48 dB window, +24 dB to -24 dB. The unit
comes preset from KICKER at a default level of 0.0 dB. By
adjusting the threshold up or down from this point you can
change when the Kompressor™ ‘kicks in’ in relationship to the
volume level to allow for different sized speakers, acoustics or
listener tastes.
Use the
UP and DOWN keys to scroll
through from
24.0 db to-24.0 dB
Remember that 0.0 dB is the default setting.
Press the
ESC key to save your setting and
return to the GROUP ADJ menu and choose
another function to adjust.
NOTE:
While you are in the KOMP. ADJ. menu
the
KOMP indicator on the ISIS display is lit.
This indicates you are making adjustments
in the KOMP. ADJ. menu.
There is no right or wrong setting here, you can simply adjust
when the Kompressor™ activates in relationship to volume level.
Experiment around and find what works for you.
GAIN RANGE MENU - Here you can adjust the selected group’s
UltraMatch™ digital input gain range. The UltraMatch™ gain
structure features five selectable Gain Ranges (1 volt, 2 volt,
4 volt, 8 volt and 16 volt).
In “Gear-Head” terms, the Gain Range represents what gear
you’re in and the Gain adjustment represents stepping on the
gas. In this menu you are adjusting the gear box. This group
adjustment sets the Gain Range of all the amplifiers in the group
to the same setting. THE GAIN RANGE OF YOUR AMPLIFIER
NEEDS TO BE CORRECTLY ADJUSTED TO PROVIDE
MAXIMUM PERFORMANCE! See you SX Series
Amplifier Quick
Start Guide for det
ails on Gain Range if required.
Use the UP and DOWN keys to scroll
through
1v range, 2v range, 4v range,
8V Range or 16v range.
Press the
ESC key to save your setting and
return to the GROUP ADJ menu to select
another group function to adjust.
NOTE:
While you are in the GAIN RANGE menu
the
SYS and GAIN indicators on the ISIS
display are lit. This indicates you are
making adjustments in the GAIN RANGE
menu.
The GAIN RANGE function is a SYSTEM menu function and
that is why the
SYS and the GAIN indicators are lit while adjusting
the GAIN RANGE function.
ESC
ESC
AMP1
LEFTLEFT RIGHTRIGHT
LOCK
GAINGAIN EQ LPF HPF KOMP
rredd--lliinnee
MEM-2 MEM-3 MEM-4
MEM-1
SYS
HOME
HOME
PHASE
ENT
ENT
AMP2
MUTE
AMP1
LOCK
GAINGAIN EQ LPF HPF KOMP
1vv rraannggee
MEM-1
HOME
ESC
ESC
LEFTLEFT RIGHTRIGHT
SYS
MEM-2 MEM-3 MEM-4
HOME
PHASE
ENT
ENT
AMP2
MUTE
Page 49

49
SXRC Remote Control
Operation
pink noise MENU - Here you can activate the selected
group’s integrated pink noise generator for testing and
troubleshooting your system.
Pink noise is a sound made up of equal energy at all 1/3
octaves from 20 Hz to 20 kHz and sounds like the static between
radio stations.
When activated, pink noise is generated by all the SX Series
amplifier’s in this selected group.
Use the
UP or DOWN keys to scroll
through
noise off and noise on.
Press the ESC key to save your setting and
return to the GROUP ADJ menu and choose
another function to adjust.
NOTE:
When the pink noise is activated (NOISE ON) the LEFT and
RIGHT indicators on the ISIS display will
begin blinking. This indicates that the PINK
NOISE generator is active.
If you exit the PINK NOISE menu with the generator on
(
NOISE ON) the left and RIGHT indicators in the ISIS display will
stay flashing to indicate this.
The
LEFT and RIGHT indicators will stop
flashing once you turn off (
NOISE OFF) the
pink noise generator.
SICK BAY™
SICK BAY MENU - This menu item lets
you view each amplifier’s built in troubleshooting and diagnostic tools.
The available tools in the Sick Bay™ menu are:
Use the
UP and DOWN keys to scroll
through the selections above.
When you have the SICK BAY menu item
selected that you want to view simply press the
ENT key to select it.
»volt now
»volt min
»volt max
»temp now
»temp max
»run time
»history
»pink noise
»no. of amps
SICK BAY™
HOME
ESC
ESC
AMP1
LEFTLEFT RIGHTRIGHT
LOCK
GAINGAIN EQ LPF HPF KOMP
nnoiissee oonn
MEM-1
SYS
MEM-2 MEM-3 MEM-4
HOME
PHASE
ENT
ENT
AMP2
MUTE
AMP1
LOCK
GAIN EQ LPF HPF KOMP
ss icckk bbaayy
MEM-1
LEFT RIGHT
SYS
MEM-2 MEM-3 MEM-4
ESC
ESC
PHASE
HOME
HOME
AMP2
ENT
ENT
MUTE
AMP1
LEFTLEFT RIGHTRIGHT
LOCK
GAINGAIN EQ LPF HPF KOMP
nnoiissee ooffff
MEM-1
SYS
MEM-2 MEM-3 MEM-4
PHASE
AMP2
MUTE
Page 50

NOTE:
The following ‘Helpful Hint’ applies to any menu item in the
Sick Bay™ which has a scrolling list of amplifiers to choose from.
Use the
UP or DOWN keys to scroll
through the list of available amplifiers. If you
have several of the same model of amplifier
installed and did not change the name prior to
installing the SXRC then you will see the same
name when you press the
UP or DOWN keys on the SXRC. In
otherwords it appears like nothing changed. It did...just read on.
To help you identify which amp you are
currently viewing simply press and hold the
ENT key and the Remote Address of the
amplifier will be displayed. This will aid you in
determining which amp you are currently
viewing when you have multiple amps of
the same make or name.
VOLT NOW MENU - Here you can view the current voltage
reading at each amplifier’s +12 volt terminal.
Once you select the
VOLT NOW menu, a
list of all the amplifiers connected to the
SXRC will be displayed in a scrolling list.
Use the
UP or DOWN keys to scroll
through the list of available amplifiers.
50
SXRC Remote Control
Operation
When you have the amplifier selected you
wish to view simply press the
ENT key to
select it.
The selected amplifier’s current +12 volt
terminal voltage reading will be displayed
in real time.
When done viewing the current amplifier’s
voltage, press the
ESC key to return to the
list of available amplifiers.
You can now select another amplifier by using
the
UP or DOWN keys and view its current
+12 volt terminal voltage by pressing the
ENT key
OR
Press the ESC key to return to the SICK
BAY menu and select another function.
PRESS &
HOLD
ESC
HOME
ENT
HOME
ESC
HOME
ENT
ESC
AMP1
LEFT RIGHT
LOCK
GAIN EQ LPF HPF KOMP
aa00dddrr == 11
MEM-1
SYS
PHASE
MEM-2 MEM-3 MEM-4
AMP1
LEFT RIGHT
LOCK
GAIN EQ LPF HPF KOMP
sxx--550000//22
MEM-1
SYS
PHASE
MEM-2 MEM-3 MEM-4
HOME
ESC
ENT
AMP2
MUTE
AMP2
MUTE
ENT
AMP1
LOCK
GAIN EQ LPF HPF KOMP
11 388 vvoollttss
MEM-1
LEFT RIGHT
SYS
MEM-2 MEM-3 MEM-4
ESC
ESC
ESC
PHASE
HOME
HOME
HOME
AMP2
ENT
ENT
ENT
MUTE
Page 51

51
SXRC Remote Control
Operation
VOLT MIN MENU - Here you can view the lowest voltage
seen at each amplifier’s +12 volt terminal since being installed.
Once you select the
VOLT MIN menu, a
list of all the amplifiers connected to the
SXRC will be displayed in a scrolling list.
Use the
UP or DOWN keys to scroll
through the list of available amplifiers.
When you have the amplifier selected you
wish to view simply press the
ENT key to
select it.
The selected amplifier’s minimum +12
volt terminal reading will be displayed.
When done viewing the current amplifier’s
minimum voltage, press the
ESC key to
return to the list of available amplifiers.
You can now select another amplifier by using
the
UP or DOWN keys and view its
minimum voltage by pressing the
ENT key
OR
Press the ESC key to return to the SICK
BAY menu and select another function.
VOLT MAX MENU - Here you can view the highest voltage
seen at each amplifier’s +12 volt terminal since being installed.
Once you select the
VOLT MAX menu, a
list of all the amplifiers connected to the
SXRC will be displayed in a scrolling list.
Use the
UP or DOWN keys to scroll
through the list of available amplifiers.
When you have the amplifier selected you
wish to view simply press the
ENT key to
select it.
The selected amplifier’s maximum +12
volt terminal reading will be displayed.
When done viewing the current amplifier’s
maximum voltage, press the
ESC key to
return to the list of available amplifiers.
You can now select another amplifier by using
the
UP or DOWN keys and view its
maximum voltage by pressing the
ENT key
OR
Press the ESC key to return to the SICK
BAY menu and select another function.
AMP1
LEFT RIGHT
LOCK
GAIN EQ LPF HPF KOMP
sxx--550000//22
MEM-1
SYS
PHASE
MEM-2 MEM-3 MEM-4
AMP2
MUTE
AMP1
LOCK
GAIN EQ LPF HPF KOMP
sxx--550000//22
MEM-1
LEFT RIGHT
SYS
PHASE
MEM-2 MEM-3 MEM-4
AMP2
MUTE
AMP1
LOCK
GAIN EQ LPF HPF KOMP
11 055 vvoollttss
MEM-1
ESC
HOME
ENT
HOME
ESC
LEFT RIGHT
SYS
MEM-2 MEM-3 MEM-4
PHASE
ENT
AMP2
MUTE
ESC
HOME
ENT
ESC
HOME
ENT
HOME
ESC
ENT
HOME
ESC
ESC
AMP1
LEFT RIGHT
LOCK
GAIN EQ LPF HPF KOMP
11 488 vvoollttss
MEM-1
SYS
MEM-2 MEM-3 MEM-4
ESC
ESC
ESC
HOME
PHASE
HOME
HOME
HOME
ENT
ENT
AMP2
MUTE
ENT
ENT
ENT
Page 52

52
SXRC Remote Control
Operation
TEMP NOW MENU - Here you can view the current operating
temperature of the selected amplifier.
Once you select the
TEMP NOW menu, a
list of all the amplifiers connected to the
SXRC will be displayed in a scrolling list.
Use the
UP or DOWN keys to scroll
through the list of available amplifiers.
When you have the amplifier selected you
wish to view simply press the
ENT key to
select it.
The selected amplifier’s current operating
temperature reading will be displayed.
When done viewing the current amplifier’s
temperature, press the
ESC key to
return to the list of available amplifiers.
You can now select another amplifier by using
the
UP or DOWN keys and view its
temperature by pressing the
ENT key.
OR
Press the ESC key to return to the SICK
BAY menu and select another function.
TEMP MAX MENU - Here you can view the highest operating
temperature of the selected amplifier since its installation.
Once you select the
TEMP MAX menu, a
list of all the amplifiers connected to the
SXRC will be displayed in a scrolling list.
Use the
UP or DOWN keys to scroll
through the list of available amplifiers.
When you have the amplifier selected you
wish to view simply press the
ENT key to
select it.
The selected amplifier’s maximum
operating temperature reading will be
displayed.
When done viewing the current amplifier’s
maximum temperature, press the
ESC key
to return to the list of available amplifiers.
You can now select another amplifier by using
the
UP or DOWN keys and view its
maximum temperature by pressing the
ENT
key
OR
Press the ESC key to return to the SICK
BAY menu and select another function.
AMP1
LOCK
GAIN EQ LPF HPF KOMP
sxx--550000//22
MEM-1
LEFT RIGHT
SYS
PHASE
MEM-2 MEM-3 MEM-4
AMP2
MUTE
AMP1
LEFT RIGHT
LOCK
GAIN EQ LPF HPF KOMP
sxx--550000//22
MEM-1
SYS
MEM-2 MEM-3 MEM-4
PHASE
AMP2
MUTE
HOME
ESC
ENT
HOME
ESC
AMP1
LEFT RIGHT
LOCK
GAIN EQ LPF HPF KOMP
866 ddeegg ff
MEM-1
SYS
MEM-2 MEM-3 MEM-4
ESC
PHASE
HOME
ENT
AMP2
MUTE
ENT
ESC
HOME
ENT
HOME
ESC
ENT
HOME
ESC
HOME
ESC
AMP1
LEFT RIGHT
LOCK
GAIN EQ LPF HPF KOMP
11 288 ddeegg ff
MEM-1
SYS
PHASE
MEM-2 MEM-3 MEM-4
HOME
ESC
HOME
ESC
HOME
ESC
ENT
ENT
AMP2
MUTE
ENT
ENT
ENT
Page 53

53
SXRC Remote Control
Operation
RUN TIME MENU - Here you can view the total time that the
selected amplifier has been powered up since installation in
1/10th of an hour increments.
Once you select the
RUN TIME menu, a
list of all the amplifiers connected to the
SXRC will be displayed in a scrolling list.
Use the
UP or DOWN keys to scroll
through the list of available amplifiers.
When you have the amplifier selected you
wish to view simply press the
ENT key to
select it.
The selected amplifier’s total run time
reading will be displayed.
When done viewing the current amplifier’s
run time, press the
ESC key to return to the
list of available amplifiers.
You can now select another amplifier by using
the
UP or DOWN keys and view its
run time by pressing the
ENT key.
OR
Press the ESC key to return to the SICK
BAY menu and select another function.
HISTORY MENU - Here you can view the last 5 fault codes and
how long ago they happened versus the run time clock for the
selected amplifier. The following conditions are logged:
THERMAL - Thermal cutoff protection engaged.
OVERLOAD - Short circuit protection engaged.
LO-VOLT - Low voltage protection engaged.
HI-VOLT - High voltage protection engaged.
SERVICE - Amp requires service by KICKER.
Once you select the
HISTORY menu, a
list of all the amplifiers connected to the
SXRC will be displayed in a scrolling list.
Use the
UP or DOWN keys to scroll
through the list of available amplifiers.
When you have the amplifier selected you
wish to view simply press the
ENT key to
select it.
If there have not been any fault codes
triggered on the selected amplifier, the
display will read
NO HISTORY.
If there are fault codes listed they are
numbered in order from 1 (the newest) to
5 (the oldest). When a new fault code is
triggered the fault code stack rolls and
the oldest of the 5 is discarded.
AMP1
LEFT RIGHT
LOCK
GAIN EQ LPF HPF KOMP
sxx--550000//22
MEM-1
AMP1
LOCK
GAIN EQ LPF HPF KOMP
ss75544 hhoouurr
MEM-1
SYS
PHASE
MEM-2 MEM-3 MEM-4
HOME
ESC
HOME
ESC
LEFT RIGHT
SYS
PHASE
MEM-2 MEM-3 MEM-4
HOME
ESC
HOME
ESC
HOME
ESC
AMP2
MUTE
ENT
ENT
AMP2
MUTE
ENT
ENT
ENT
AMP1
LOCK
GAIN EQ LPF HPF KOMP
sxx--550000//22
MEM-1
AMP1
LOCK
GAIN EQ LPF HPF KOMP
nnyyo hhiissttoorr
MEM-1
AMP1
LOCK
GAIN EQ LPF HPF KOMP
11 =lloo--vvoolltt
MEM-1
LEFT RIGHT
SYS
PHASE
MEM-2 MEM-3 MEM-4
HOME
ESC
HOME
ESC
LEFT RIGHT
SYS
PHASE
MEM-2 MEM-3 MEM-4
LEFT RIGHT
SYS
PHASE
MEM-2 MEM-3 MEM-4
AMP2
MUTE
ENT
ENT
AMP2
MUTE
AMP2
MUTE
Page 54

54
SXRC Remote Control
Operation
Use the UP or DOWN keys to scroll
through the list of fault codes stored for
this selected amplifier.
To see how long ago a fault code was
triggered, press the
ENT key.
The display will now show you how long
ago this fault code was triggered in
relation to the built in Run Time clock. So
a display showing
T- 4.5 HR is telling
you this fault code was triggered 4.5
hours ago from the current Run Time clock.
Press the
ESC key to return to the history
list for the selected amplifier.
When done viewing the current amplifier’s
history, press the
ESC key to return to the
list of available amplifiers.
You can now select another amplifier by using
the
UP or DOWN keys and view its
history by pressing the
ENT key.
OR
Press the ESC key to return to the
SICK BAY menu and select another function.
pink noise MENU - Here you can activate the integrated pink
noise generator of the SX Series amplifiers. This is very useful for
testing and troubleshooting your system. See the Help section of
this manual for more details on pink noise use.
Pink noise is a sound made up of equal energy at all 1/3
octaves from 20 Hz to 20 kHz and sounds like the static between
radio stations.
When activated, pink noise is generated by the SX amplifier’s
DSP and fed into both the left and right channels.
Use the
UP or DOWN keys to scroll
through
SELECT AMP or ALL AMPS and
press the
ENT key to select.
ALL AMPS allows you to turn the pink
noise generator on and off for all SX
Series amplifiers connected to the SXRC
at the same time.
SELECT AMP allows you to select each
amp individually and turn on or off its
pink noise generator.
If you chose
ALL AMPS then use the UP or
DOWN keys to select NOISE ON or
NOISE OFF
When done adjusting all the amplifier’s
pink noise generator, press the
ESC key to
return to the
ALL AMPS, SELECT AMP menu.
HOME
ESC
ESC
AMP1
LEFT RIGHT
LOCK
GAIN EQ LPF HPF KOMP
tt - 4455 hhrr
MEM-1
SYS
MEM-2 MEM-3 MEM-4
ESC
ESC
ESC
HOME
PHASE
HOME
HOME
HOME
ENT
ENT
AMP2
MUTE
ENT
ENT
ENT
HOME
ESC
AMP1
LEFT RIGHT
LOCK
GAIN EQ LPF HPF KOMP
aa lll aammppss
MEM-1
AMP1
LOCK
GAIN EQ LPF HPF KOMP
ssppelleecctt aamm
MEM-1
SYS
MEM-2 MEM-3 MEM-4
LEFT RIGHT
SYS
MEM-2 MEM-3 MEM-4
ESC
PHASE
PHASE
HOME
ENT
AMP2
MUTE
AMP2
MUTE
ENT
HOME
ESC
ENT
ESC
HOME
ENT
Page 55

If you chose SELECT AMP then use the UP or
DOWN keys to scroll through the list of
available amplifiers and press
ENT to select.
You can then use the
UP or DOWN keys to
select
NOISE ON or NOISE OFF for the
selected amplifier.
When done adjusting the current amplifier’s
pink noise generator, press the
ESC key to
return to the list of available amplifiers.
You can now select another amplifier by using
the
UP or DOWN keys and adjust its
pink noise generator by pressing the
ENT
key.
OR
Press the ESC key to return to the
ALL AMPS, SELECT AMP menu.
Pressing the
ESC key again while in the
ALL AMPS, SELECT AMP menu will return you
to the SICK BAY menu to select another
menu item.
55
SXRC Remote Control
Operation
NOTE:
When the pink noise is activated (NOISE ON) the LEFT and
RIGHT indicators on the ISIS display will
begin blinking. This indicates that the PINK
NOISE generator is active.
If you exit the PINK NOISE menu with the generator on
(
NOISE ON) the left and RIGHT indicators in the ISIS display will
stay flashing to indicate this.
The
LEFT and RIGHT indicators will stop flashing once you
turn off (
NOISE OFF) the pink noise generator.
nnoiissee oonn
SYS
MEM-1
GAINGAIN EQ LPF HPF KOMP
AMP1
LOCK
MEM-2 MEM-3 MEM-4
PHASE
MUTE
AMP2
LEFTLEFT RIGHTRIGHT
ESC
ESC
HOME
HOME
ENT
ENT
ENT
ENT
ENT
ENT
HOME
ESC
HOME
ESC
HOME
ESC
HOME
ESC
Page 56

56
SXRC Remote Control
Operation
NO. OF AMPS MENU - Here you can see how many SX Series
amplifiers are currently connected to the SXRC.
Once you select the
NO. OF AMPS
menu, the SXRC will display how many
amplifiers are currently connected to it.
(from 1 to 16 units)
When done viewing the number of amplifiers
connected to the SXRC, press the
ESC key
to return to the SICK BAY menu.
GROUP ADJ
SXRC SETUP MENU - This menu item
lets you select and adjust many operating
parameters for your SXRC, create amplifier
groups, change names, change lock codes and update your SX
Series amplifier software. A lot of very powerful tools and
functions are built into your SXRC.
Here is a list of the menu items contained in the SXRC SETUP
menu.
Use the
UP and DOWN arrow keys to
scroll through the available selections in the
SXRC SETUP menu.
When you have the menu item selected that
you want to view or adjust simply press the
ENT key to select it.
»display
»autosearch
»group amps
»sxrc name
»mem name
»amp name
SXRC SETUP
»save all
»lock code
»reset sxrc
»sw updates
»about
AMP1
LEFT RIGHT
LOCK
GAIN EQ LPF HPF KOMP
100 uunniittss
MEM-1
AMP2
HOME
PHASE
MUTE
ENT
SYS
MEM-2 MEM-3 MEM-4
ESC
AMP1
LEFT RIGHT
LOCK
GAIN EQ LPF HPF KOMP
ssppxrrcc sseettuu
MEM-1
SYS
PHASE
MEM-2 MEM-3 MEM-4
AMP2
MUTE
HOME
ESC
ENT
HOME
ESC
ENT
Page 57

57
SXRC Remote Control
Operation
DISPLAY MENU - Here you can adjust the items displayed in
the DEFAULT menu as well as customize the display to fit your
use.
Here is a list of the menu items contained in the DISPLAY
menu.
Use the
UP and DOWN arrow keys to
scroll through the available selections in the
DISPLAY menu.
When you have the menu item selected that
you want to view or adjust simply press the
ENT key to select it.
brightness MENU - Here you can adjust the intensity level of
the ISIS display from 1 of 5 different levels.
Use the
UP and DOWN arrow keys to
scroll through the available settings:
maximum,
high, medium, low, minimum.
Press the
ESC key to save your setting and
return to the DISPLAY menu to select
another display function to adjust.
temp. c/f MENU - Here you can select in which format,
Celsius or Fahrenheit, the temperature readings are displayed.
Use the
UP or DOWN arrow keys to
scroll through the available settings:
fahrenheit and celsius.
Press the
ESC key to save your setting and
return to the DISPLAY menu to select
another display function to adjust.
hold time MENU - Here you can select how long each item
in the DEFAULT menu pauses (1 to 11 seconds) before scrolling
continues. The default setting for this 2 seconds.
Use the
UP and DOWN arrow keys to
scroll through the available settings:
1 sec. to 11 sec. in 1 second increments.
Press the
ESC key to save your setting and
return to the DISPLAY menu to select
another display function to adjust.
»
brightness
»temp. c/f
»hold time
»scrnsaver
»set date
»set time
»info amp
»led on lvl
»led dimlvl
»led time
ESC
HOME
ESC
HOME
ENT
ENT
ESC
ESC
ESC
ESC
HOME
HOME
HOME
HOME
ENT
ENT
ENT
ENT
HOME
ESC
ESC
HOME
ENT
ENT
Page 58

The year will begin blinking, use the UP and
DOWN arrow keys to scroll through and set
the year.Press the
ENT key to save the year
setting and return to the month.
When you have set the month, day and year
correctly then press and hold the HOME key
for 1.5 seconds to save your settings and
return to the DISPLAY menu.
When saved the display will return to the DISPLAY menu.
NOTE:
After 3 minutes without any key press activity, the SXRC will
save the current date settings and return to the scrolling
DEFAULT menu.
58
SXRC Remote Control
Operation
scrnsaver MENU - Here you can turn on (AUTO) or off (OFF)
the built in screensaver function for the ISIS display. If turned on,
the display will power down and go blank after 90 seconds with
no key press activity. Pressing any key on the SXRC will wake up
the screen.
Use the
UP or DOWN arrow keys to
scroll through the available settings:
off and auto.
Press the
ESC key to save your setting and
return to the DISPLAY menu to select
another display function to adjust.
set date MENU - Here is where you can set
the proper date (Month, Day, Year) that is displayed in the
scrolling DEFAULT menu. The SXRC
contains a backup battery good for 5 years
to maintain this setting even if power is
removed from the unit.
The month will begin blinking when you
enter the menu. Use the
UP and DOWN
arrow keys to scroll through and set the
month. Press the
ENT key to save the
month setting and advance to the day.
The day will begin blinking, use the
UP and
DOWN arrow keys to scroll through and set
the day.Press the
ENT key to save the day
setting and advance to the year.
PRESS &
HOLD
ESC
HOME
ENT
ESC
ESC
HOME
HOME
ENT
ENT
ESC
AMP1
LEFT RIGHT
LOCK
GAIN EQ LPF HPF KOMP
jj ann--2222--0044
MEM-1
MEM-2 MEM-3 MEM-4
ESC
ESC
SYS
HOME
HOME
HOME
PHASE
ENT
AMP2
MUTE
ENT
ENT
Page 59

59
SXRC Remote Control
Operation
set time MENU - Here is where you can set the proper time
in am/pm format that is displayed in the
scrolling DEFAULT menu. It is also
protected by the backup battery.
The hour will begin blinking when you
enter the menu. Use the
UP and DOWN
arrow keys to scroll through and set the
hour. Press the
ENT key to save the
hour setting and advance to the minutes.
The minutes will begin blinking, use the
UP
and DOWN arrow keys to scroll through and
set the minutes. Press the
ENT key to save
the minutes setting and advance to the am/pm
selection.
The am/pm indicator will begin blinking, use
the
UP and DOWN arrow keys to select
AM or PM . Press the ENT key to save
the am/pm setting and advance to the hour.
When you have set the time correctly then
press and hold the HOME key for 1.5
seconds to save your settings and
return to the DISPLAY menu.
NOTE:
After 3 minutes without any key press activity, the SXRC will
save the current time settings and return to the scrolling
DEFAULT menu.
PRESS &
HOLD
info amp MENU - Here is where you select which of the
amplifiers connected to the SXRC has its
voltage and temperature scrolled through
the DEFAULT menu.
Once you select the
info amp menu, a
list of all the amplifiers connected to the
SXRC will be displayed in a scrolling list..
Use the
UP or DOWN keys to scroll
through the list of available amplifiers.
To help you identify which amp you are currently viewing simply
press and hold the
ENT key and the Remote Address of the
amplifier will bedisplayed. This will aid you in
determining which amp you are currently
viewing when you have multiple amps of the
same make or name.
When you have the amplifier selected you
wish to use simply press the
ESC key to
select it and return to the DISPLAY menu.
NOTE:
All of the amplifier’s voltage and temperature can be viewed
from the Sick Bay, this simply selects which amplifier gets the
privilege of being up front on the DEFAULT menu all the time.
You can always change this to any other amplifier connected to
the SXRC if jealousy breaks out among the ranks.
sxx--550000//22
SYS
MEM-1
GAIN EQ LPF HPF KOMP
AMP1
LOCK
MEM-2 MEM-3 MEM-4
PHASE
MUTE
AMP2
LEFT RIGHT
PRESS &
HOLD
AMP1
LEFT RIGHT
LOCK
GAIN EQ LPF HPF KOMP
122--0000 aamm
MEM-1
SYS
PHASE
MEM-2 MEM-3 MEM-4
AMP2
MUTE
ESC
HOME
ENT
ESC
HOME
ENT
HOME
ESC
ENT
ESC
HOME
ENT
ESC
ESC
ESC
HOME
HOME
HOME
ENT
ENT
ENT
Page 60

60
SXRC Remote Control
Operation
led on lvl MENU - The backlit keys on the SXRC have two
intensity modes, On and Dim. When the
keys are pressed and in use they will
brighten to the level set in this menu. The
default setting from KICKER is 11.
Use the
UP and DOWN arrow keys to
scroll through the available settings:
11 (Brightest) to 0 (Off)
Press the
ESC key to save the setting and
return to the DISPLAY menu.
NOTE:
As you lower the brightness level of the LED ON LVL you may
not be able to reach the 0 setting. This is because the On level
can not be set any lower than the current Dim level. So...if the
Dim level (discussed next) is set to 3, you would only be able to
lower the On level to 3. If you want to use a lower value for the
On level you will need to lower the value of the Dim level.
led dimlvl MENU - The backlit keys on the SXRC have two
intensity modes, On and Dim. When the
keys are not being used they will dim to the
level set in this menu. The default setting
from KICKER is 3.
Use the
UP and DOWN arrow keys to
scroll through the available settings:
11 (Brightest) to 0 (Off)
Press the
ESC key to save the setting and
return to the DISPLAY menu.
NOTE:
As you raise the brightness level of the LED DIM LVL you may
not be able to reach the 11 setting. This is because the Dim level
can not be set any higher than the current On level. So...if the On
level (discussed previously) is set to 7, you would only be able to
raise the Dim level to 7. If you want to use a higher value for the
Dim level you will need to raise the value of the On level.
AMP1
LOCK
GAIN EQ LPF HPF KOMP
ll evveell==1111
MEM-1
LEFT RIGHT
SYS
MEM-2 MEM-3 MEM-4
PHASE
AMP2
MUTE
AMP1
LEFT RIGHT
LOCK
GAIN EQ LPF HPF KOMP
ll evveell== 33
MEM-1
SYS
MEM-2 MEM-3 MEM-4
PHASE
AMP2
MUTE
ESC
ESC
HOME
HOME
ENT
ENT
ESC
ESC
HOME
HOME
ENT
ENT
Page 61

61
SXRC Remote Control
Operation
led time MENU - The backlit keys on the SXRC have two
intensity modes, On and Dim. This menu lets you select how long
the SXRC waits when there is no button
press activity before switching from the On
level to the Dim level. The default is 90
seconds.
Use the
UP and DOWN arrow keys to
scroll through the available settings:
1 sec.(shortest delay) to 240 sec.
(longest delay)
Press the
ESC key to save the setting and
return to the DISPLAY menu.
NOTE:
This menu item works hand-in-hand with the LED ON LVL and
LED DIM LVL menu items. Use this menu setting to determine
how long your ISIS keys stay brightly lit after making your SXRC
adjustments.
At this point you have explored all the settings
in the DISPLAY menu. Press the
ESC key to
return to the SXRC SETUP menu.
autosearch MENU - You should be familiar with this menu
from the software updates we did earlier in
the manual. The AUTOSEARCH function
seeks out any amplifier connected to the
SXRC Communications Network, updates
the amplifier’s software if required and loads it in to the SXRC.
If for any reason you lose an amplifier from the SXRC due to
being un-plugged from the Communications Network, bad cable,
etc. OR if you are adding a new amplifier to the SXRC you use
this function.
Press the
ENT key to activate the
Autosearch function.
The SXRC will perform all of its steps (highly detailed on page
18...attempting to save a forest here...go back and check it out
there.) and return to the SXRC SETUP menu.
AMP1
LEFT RIGHT
LOCK
GAIN EQ LPF HPF KOMP
9900 sseecc
MEM-1
SYS
MEM-2 MEM-3 MEM-4
PHASE
AMP2
MUTE
AMP1
LEFT RIGHT
LOCK
GAIN EQ LPF HPF KOMP
aahhuttoosseeaarrcc
MEM-1
SYS
PHASE
MEM-2 MEM-3 MEM-4
AMP2
MUTE
ESC
ENT
HOME
ESC
HOME
ENT
HOME
ESC
ENT
ESC
HOME
ENT
Page 62

62
SXRC Remote Control
Operation
group amps MENU - Here you can create and customize
amplifier groups in the SXRC. This is one of the most powerful
and fun functions of the SXRC. Once you assign an amplifier to a
group, it and all the other amplifiers in its’ group can be adjusted
in unison from the GROUP ADJ menu. All amplifiers in a group
still maintain the ability to be adjusted individually in the AMP ADJ
menu even when they are grouped...just what functions are
accessible will vary based on the group setup.
The complete list of what functions can be controlled together
(
Group Adj) or separately (Amp Adj) are described in the LINK
menu a little bit later in the manual.
The SXRC has 10 groups (
Group-01 through Group-10) for
you to use. Each of these groups is capable of having up to 16
amplifiers assigned to it. No more than 16 amps total can be
controlled by the SXRC. So if you have 16 amplifiers connected
to the SXRC and you assign all 16 to Group-01, you can not
create any more groups.
Some examples of why you would want to use grouping are:
Example 1
You have multiple amplifiers driving your subwoofer(s) and
want to control all of them at the same time. Change a setting
and have it changed in all of the amplifiers simultaneously.
Example 2
You have multiple amplifiers driving the front stage of your
system (Midbass, Midrange and Tweeter) and you want to control
them as a group.
Example 3
You have a 5.1 channel setup using multiple amplifiers to drive
your front, center, rear and subwoofer setup. You want to create
amplifier groups to control each section. Two amplifiers on front,
two on center, two on rear and 4 on subwoofer.
Example 4
Our manual writer just experienced a combination of brain
freeze and writer’s block. Use your imagination and insert your
own wild and crazy setup here for Example 4.
These are just a few of the many examples possible.
Here is a list of the menu items contained in the
GROUP AMPS menu.
Use the
UP and DOWN arrow keys to
scroll through the available selections in the
GROUP AMPS menu.
When you have the menu item selected that
you want to view or adjust simply press the
ENT key to select it.
»groups
»group name
»assign
»release
»link
»remote vol
ESC
ESC
HOME
HOME
ENT
ENT
Page 63

63
SXRC Remote Control
Operation
GROUPS MENU - Here you can view the groups you have
created and see which SX Series amplifiers have been assigned
to each group.
If the display shows
N/A, this means you
do not have any groups created.
If you do have groups created then you will be
able to scroll through the available groups
using the
UP and DOWN keys.
When you have the group selected that you
want to view simply press the
ENT key to
select it.
You can now use the
UP and DOWN keys
to view each amplifier assigned to this group.
If you have multiple amps of the same make
or name you can check its’ Remote Address
to help you identify which amp you are
currently viewing. Simply press and hold the
ENT key and the Remote Address of
the amplifier will be displayed.
Press the
ESC key to return to the list of
available groups.
PRESS &
HOLD
aa00dddrr == 1111
SYS
MEM-1
GAIN EQ LPF HPF KOMP
AMP1
LOCK
MEM-2 MEM-3 MEM-4
PHASE
MUTE
AMP2
LEFT RIGHT
GROUP NAME MENU - Here you can change the default name
of the 10 groups (
Group-01 to Group-10) to any 10 character
name you want. Very useful for identifying a group of amps by
their function or location.
Use the
UP or DOWN keys to scroll
through the available groups (
Group 1
through Group 10)
When you have the group selected that you
want to name simply press the
ENT key to
select it.
You can now use the
ESC and ENT keys
to move the blinking cursor left or right to
select which character you want to change.
Use the
UP and DOWN keys to change the
selected character. (
A B C ...1 2 3 ...etc.)
When you are finished press and hold the
HOME key for 1.5 seconds to save your
new group name.
You can now select another Group Name to
change or press the
ESC key to return to the
SXRC SETUP menu.
PRESS &
HOLD
AMP1
LEFTLEFT RIGHTRIGHT
LOCK
GAINGAIN EQ LPF HPF KOMP
nn/aa
MEM-1
SYS
MEM-2 MEM-3 MEM-4
ESC
ESC
PHASE
HOME
HOME
AMP2
MUTE
ENT
ENT
AMP1
LEFT RIGHT
LOCK
GAIN EQ LPF HPF KOMP
gg roouupp 11
MEM-1
SYS
MEM-2 MEM-3 MEM-4
PHASE
AMP2
MUTE
ESC
ESC
HOME
HOME
ENT
ENT
ESC
ESC
HOME
HOME
ENT
ENT
HOME
ESC
ENT
ESC
ESC
ESC
ESC
HOME
HOME
HOME
HOME
ENT
ENT
ENT
ENT
Page 64

The display will flash ASSIGNED to confirm the amplifier has
been added. Once an amplifier is added
to a group it is removed from the list of
available amplifiers.
Continue assigning the amplifiers you want
associated with this group by using the
UP or
DOWN keys to select the amp and the
ENT key to select it.
When you are done assigning amplifiers to
this group, press the
ESC key to return to
the ASSIGN menu’s group selection screen.
You can then select another group and assign
amplifiers to it.
NOTE:
While selecting amplifiers to assign to a group, If you use up all
the available amplifiers the display will
read
N/A letting you know there are no
more amplifiers available to assign.
64
SXRC Remote Control
Operation
ASSIGN MENU - Here you can select any of the 10 groups and
select which amplifiers belong to that group.
An amplifier can only belong to ONE group at any time...so
once you assign it to a group it can not be assigned to another
group unless you remove it from the group it is currently assigned
to. To remove an amplifier from a group you use the RELEASE
menu function.
Use the
UP or DOWN keys to select
which group you want to assign amplifiers to
and press the
ENT key to select it.
If the display shows
N/A then all amplifiers are currently
assigned to a group. You have to use the
RELEASE menu to free up the
amplifier(s) you are wanting to use.
If there are amps available to assign then use
the
UP or DOWN keys to scroll through the
list of available amplifiers.
If you have multiple amps of the same make
or name you can check its’ Remote Address
to help you identify which amp you are
currently viewing. Simply press and hold the
ENT key and the Remote Address of
the amplifier will be displayed.
Press
ENT to add the selected amplifier to
the current selected group.
PRESS &
HOLD
AMP1
LOCK
GAINGAIN EQ LPF HPF KOMP
nn/aa
MEM-1
ESC
LEFTLEFT RIGHTRIGHT
SYS
MEM-2 MEM-3 MEM-4
ESC
HOME
PHASE
HOME
ENT
AMP2
MUTE
ENT
AMP1
LEFT RIGHT
LOCK
GAIN EQ LPF HPF KOMP
assssiiggnneedd
MEM-1
SYS
PHASE
MEM-2 MEM-3 MEM-4
ESC
HOME
ESC
HOME
AMP1
LEFTLEFT RIGHTRIGHT
LOCK
GAINGAIN EQ LPF HPF KOMP
nn/aa
MEM-1
SYS
PHASE
MEM-2 MEM-3 MEM-4
AMP2
MUTE
ENT
ENT
AMP2
MUTE
HOME
ESC
ESC
HOME
ENT
ENT
Page 65

65
SXRC Remote Control
Operation
Press ENT to remove the selected amplifier
from the current selected group.
The display will flash RELEASED to confirm the amplifier has
been removed. Once an amplifier is
removed from a group it is added back to
the list of available amplifiers in the
ASSIGN menu.
Continue releasing the amplifiers you want
removed from this group by using the
UP or
DOWN keys to select the amp and the
ENT key to select it.
When you are done releasing amplifiers from
this group, press the
ESC key to return to
the RELEASE menu’s group selection screen.
You can then select another group to release amplifiers from.
NOTE:
While selecting amplifiers to remove from a group, If you
remove all the amplifiers the display will
read
N/A letting you know there are no
more amplifiers assigned to this group.
RELEASE MENU - Here you can remove any amplifier(s) from
a group it is currently assigned to.
An amplifier can only belong to ONE group at any time...so if
you wish to use an amplifier in a different group than the one it is
currently assigned to, you have to release it from the current
group. Here is where you can perform that precise surgical
removal process. Don’t touch the sides as you reach for the funny
bone. BZZZ!
Use the
UP or DOWN keys to select
which group you want to release an
amplifier(s) from and press the
ENT key to
select it.
If the display shows
N/A then there are
no amplifiers currently assigned to that
group.
If there are amps assigned to the group then
use the
UP or DOWN keys to scroll
through the list of amplifiers.
If you have multiple amps of the same make
or name you can check its’ Remote Address
to help you identify which amp you are
currently viewing. Simply press and hold the
ENT key and the Remote Address of
the amplifier will be displayed.
PRESS &
HOLD
ESC
HOME
ENT
AMP1
LEFT RIGHT
LOCK
GAIN EQ LPF HPF KOMP
reelleeaasseedd
MEM-1
SYS
MEM-2 MEM-3 MEM-4
PHASE
AMP2
MUTE
AMP1
LOCK
GAINGAIN EQ LPF HPF KOMP
nn/aa
MEM-1
HOME
ESC
ENT
LEFTLEFT RIGHTRIGHT
SYS
PHASE
MEM-2 MEM-3 MEM-4
AMP2
MUTE
HOME
ESC
HOME
ESC
ENT
ENT
HOME
ESC
ESC
AMP1
LEFTLEFT RIGHTRIGHT
LOCK
GAINGAIN EQ LPF HPF KOMP
nn/aa
MEM-1
SYS
MEM-2 MEM-3 MEM-4
HOME
PHASE
ENT
ENT
AMP2
MUTE
Page 66

66
SXRC Remote Control
Operation
LINK MENU - Here you can set the Link property of the
selected group to Link On or Link Off. By default all groups have
the Link property set to Link Off.
The Link property sets a group to have certain characteristics
depending on the setting (Link On or Link Off). By adjusting this
one setting you completely change what settings and adjustments
are shared between amplifiers in the group, what settings you
can select to adjust in the AMP ADJ and GROUP ADJ menus and
how certain settings act once they are selected. You have all
ready seen an example of this in the GROUP ADJ menu when
adjusting the Kompressor™.
Link Off - AMP ADJ
If you set the group’s Link property to Link Off each amplifier in
the group can have these items adjusted from the AMP ADJ
menu.
Link Off - GROUP ADJ
If you set the group’s Link property to Link Off each amplifier in
the group can have these items adjusted from the GROUP ADJ
menu.
»
GAIN
» EQ
» LO-PASS
» HI-PASS
» PHASE
» MUTE
» KOMPRESSOR
» KOMP. ADJ.
» GAIN RANGE
» BYPASS DSP
» PINK NOISE
»GAIN
»MUTE
»KOMPRESSOR
»PINK NOISE
Link On - AMP ADJ
If you set the group’s Link property to Link On each amplifier in
the group can have these items adjusted from the AMP ADJ
menu.
Link On - GROUP ADJ
If you set the group’s Link property to Link On each amplifier in
the group can have these items adjusted from the GROUP ADJ
menu.
Wow...things do change up quite a bit. But why? Glad you
asked! The following two examples show why this happens and
why the Link function exists...but we know there are many more.
Example 1
You have four SX.1 Series amplifiers driving four Solobaric L7
12 inchers. First off...you got game baby! Deep smooth bass for
days...you could share some with the boys lounging around down
at Local 317 and still have plenty! Ok...enough of that...here is
one of the many reasons the Link function exists.
You would want to control all of these amplifiers together and
share many settings between them the same since they are all on
bass duty.
»
GAIN
» MUTE
»GAIN
»EQ
»LO-PASS
»HI-PASS
»PHASE
»MUTE
»KOMPRESSOR
»KOMP. ADJ.
»GAIN RANGE
»PINK NOISE
Page 67

67
SXRC Remote Control
Operation
You would want to control some of the functions of these
amplifiers together but many you do not. Each amplifier needs its
own unique crossover point to handle its required duties so Link
On would not work.
You would select a group and assign each of your SX.2 Series
amplifiers to this group. For our example we will assume this
group has been named FRONTSTAGE.
Next select the FRONTSTAGE group from the LINK menu and
set its Link Property to Link Off.
Now you would use the AMP ADJ menu to adjust each
amplifier’s gain range, gain, equalizer, low pass crossover, high
pass crossover, Kompressor™, Kompressor™ Adjustment, etc. to
fit its unique needs.
So why group them then? Because now you can use the
GROUP ADJ menu to select FRONTSTAGE and be able to:
»Adjust the overall output gain of all three amps together.
»Turn their Kompressors™ on and off in unison.
»Mute the entire front stage for setup and testing.
»Use the pink noise generator on the entire front stage for
setup and testing.
These are just two real world examples of how powerful
grouping amplifiers can be and the flexibility it gives you when
used in conjunction with the Link property. Use your imagination
to come up with what works for you.
You would select a group and assign each of your four SX.1
Series amplifiers to this group. For this example we will assume
you also changed the name of the group to BIG BASS.
Next select the BIG BASS group from the LINK menu and set
its Link Property to Link On.
Now you would be able to set the gain range, gain, equalizer,
low pass crossover, high pass crossover, Kompressor™,
Kompressor™ Adjustment, etc. for all four amplifiers at the same
time using the BIG BASS group you created. Each amplifier
would share these important settings and you don’t have to adjust
four amplifiers, just adjust the BIG BASS group from the GROUP
ADJ menu and that’s it.
The only options you would be able to adjust from the AMP
ADJ menu would be each amplifiers individual gain setting and
mute function.
The gain setting allows you to level match each amplifier in the
group independently in case one channel or amp needs to be
tweaked to match the rest.
The mute function is for muting individual channels or entire
amplifiers for setup and testing purposes.
Example 2
You have three SX.2 Series amplifiers driving the front stage of
your audio system. One on tweeter duty, another on midrange
and the last one on midbass.
Page 68

68
SXRC Remote Control
Operation
Once you select the LINK menu, a list of
all 10 groups controlled by the SXRC
will be displayed in a scrolling list. The
list will either display the names you
have created or the default names if you
have not re-named them.
Use the
UP or DOWN keys to scroll
through the list of groups and press the
ENT
key to select.
Use the
UP or DOWN keys to select
LINK ON or LINK OFF for the group.
When done selecting the current group’s
Link property, press the
ESC key to save the
setting and return to the list of groups.
You can now select another group to view or
adjust by using the
UP or DOWN keys
and select it by pushing the
ENT key.
OR
Press the ESC key to return to the GROUP
AMPS menu and select another function.
REMOTE VOL MENU - Here you can choose to have the
selected group’s output level controlled by the Digital Remote
Volume Control (DRVC).
If you wish to use the DRVC as a master volume control,
raising and lowering the output level of all the amplifiers, select all
the groups and set to them
REMOTE ON. By default, all groups are
set to
REMOTE OFF.
If you wish to use the DRVC as a bass level controller, raising
and lowering the output level on subwoofer amplifiers only, set
the REMOTE VOL to
REMOTE ON for the group(s) controlling your
subwoofer amplifiers and leave all other non-subwoofer groups
set to
REMOTE OFF.
These are the two most common uses. You can configure
whatever combination works for your particular installation.
Use the
UP or DOWN keys to scroll
through the list of groups and press the
ENT
key to select.
Use the
UP or DOWN keys to scroll
through
REMOTE ON and REMOTE OFF.
When done selecting the current group’s
Remote Vol setting, press the
ESC key to
save the setting and return to the list of
groups.
AMP1
LEFT RIGHT
LOCK
GAIN EQ LPF HPF KOMP
bb igg bbaassss
MEM-1
AMP1
LOCK
GAIN EQ LPF HPF KOMP
gg roouupp--0044
MEM-1
SYS
PHASE
MEM-2 MEM-3 MEM-4
LEFT RIGHT
SYS
PHASE
MEM-2 MEM-3 MEM-4
HOME
ESC
HOME
ESC
HOME
ESC
HOME
ESC
HOME
ESC
AMP2
MUTE
AMP2
MUTE
ENT
ENT
ENT
ENT
ENT
ESC
ESC
ESC
HOME
HOME
HOME
ENT
ENT
ENT
Page 69

69
SXRC Remote Control
Operation
You can now select another group to view or
adjust by using the
UP or DOWN keys
and select it by pushing the
ENT key.
OR
Press the ESC key to return to the GROUP
AMPS menu and select another function.
SXRC NAME MENU - Here you can change the default name of
the SXRC controller (
-SXRC-) to any 10 character name you
want. This is the name that scrolls in the DEFAULT menu.
Use the
ESC and ENT keys tomove the
blinking cursor left or right to select
which character you want to change.
Use the
UP and DOWN keys to change the
selected character. (
A B C ...1 2 3 ...etc.)
When you are finished press and hold the
HOME key for 1.5 seconds to save your
new SXRC name.
You are now back in the SXRC SETUP menu.
--ssxxrrcc--
SYS
MEM-1
GAIN EQ LPF HPF KOMP
AMP1
LOCK
MEM-2 MEM-3 MEM-4
PHASE
MUTE
AMP2
LEFT RIGHT
PRESS &
HOLD
ESC
HOME
ENT
HOME
ESC
ENT
ESC
ESC
ESC
HOME
HOME
HOME
ENT
ENT
ENT
Page 70

70
SXRC Remote Control
Operation
MEM NAME MENU - Here you can change the default name of
each of the four global memories (
memory-1 to memory-4) to any
10 character name you want. Very useful for identifying a preset
by its purpose (
SPL, SOUND Q, ROCK, RAP, etc).
Use the
UP or DOWN keys to scroll
through the available memories (
memory-1
through memory-4)
When you have the memory selected that you
want to name simply press the
ENT key to
select it.
You can now use the
ESC and ENT keys
to move the blinking cursor left or right to
select which character you want to change.
Use the
UP and DOWN keys to change the
selected character. (
A B C ...1 2 3 ...etc.)
When you are finished press and hold the
HOME key for 1.5 seconds to save your
new group name.
You can now select another Memory Name to
re-name or press the
ESC key to return to
the SXRC SETUP menu.
PRESS &
HOLD
AMP NAME MENU - Here you can change the default name of
each SX Series amplifier (
SX-500/2) to any 10 character name
you want. Very useful for identifying an amplifier by its purpose
(
bass, center, front, rear, etc).
Use the
UP or DOWN keys to scroll
through the amplifiers connected to the SXRC.
When you have the amplifier selected that
you want to re-name simply press the
ENT
key to select it.
You can now use the
ESC and ENT keys
to move the blinking cursor left or right to
select which character you want to change.
Use the
UP and DOWN keys to change the
selected character. (
A B C ...1 2 3 ...etc.)
When you are finished press and hold the
HOME key for 1.5 seconds to save your
new amplifier name.
You can now select another amplifier to
re-name or press the
ESC key to return to
the SXRC SETUP menu.
PRESS &
HOLD
AMP1
LEFT RIGHT
LOCK
GAIN EQ LPF HPF KOMP
mm emmoorryy--33
MEM-1
SYS
MEM-2 MEM-3 MEM-4
PHASE
AMP2
MUTE
ESC
ESC
ESC
ESC
ESC
ESC
HOME
HOME
HOME
HOME
HOME
HOME
ENT
ENT
ENT
ENT
ENT
ENT
AMP1
LEFT RIGHT
LOCK
GAIN EQ LPF HPF KOMP
sxx--550000//22
MEM-1
SYS
MEM-2 MEM-3 MEM-4
PHASE
AMP2
MUTE
ESC
ESC
ESC
ESC
ESC
ESC
HOME
HOME
HOME
HOME
HOME
HOME
ENT
ENT
ENT
ENT
ENT
ENT
Page 71

71
SXRC Remote Control
Operation
SAVE ALL MENU - Here you can download the current SXRC
settings for each amplifier into any one of the four SX Series
amplifiers on-board memories. (
Mem-1 through Mem-4)
This is useful for several purposes.
1.) You could have a preferred setup programmed into the
SXRC and then simply plug it into the system and download all
the settings into the amplifiers. Then un-plug the SXRC and the
settings are now loaded into one of the amplifier’s memory
presets for use. Talk about a one-touch programming tool!
2.) You may want to disconnect your SXRC from the system
and take it with you. By saving all the current settings in the
SXRC to the amplifiers the system will operate without the SXRC
but with the exact settings you were using.
3.) The 3-step-plan to sanity: Save, Save and Save. By
saving your current settings from the SXRC into your amplifiers
you have a backup of all your programming. If something should
ever happen to your SXRC (Beverage spill, Sat on and crushed,
girlfriend throws out the window at 60 MPH) you will have all your
hard-earned system programming backed-up in your
amplifiers. You could then follow the 3-step-plan to happiness:
Remember, Remember, Remember. Simply plug in a new (or
repaired) SXRC, perform an Autosearch, save the settings back
into a global SXRC memory and your back in business.
Ain’t technology just swell!
Once you are in the SAVE ALL menu you
need to decide if you want to download
the current settings in the SXRC or any
one of the four SXRC global memories.
If you want to download the current settings in use, skip the
steps marked with a
*
* Press any one of the four SXRC global
memory presets to load it into the SXRC.
* The display will show LOADING while
the global memory preset loads and then
the display will show which preset is
loaded and active.
Press the
ENT key to enter the SAVE ALL
memory location selection menu.
Use the
UP or DOWN keys to scroll
through the available memories (
mem-1
through mem-4). This will be the memory
preset the SXRC uses on each amplifier to
store your settings.
When you have the memory selected that
you want to use simply press the
ENT key
to select it.
The settings will be saved to the SX
Series amplifiers and the display will
return to
SAVE ALL. You are now back in
the SXRC SETUP menu.
AMP1
LEFT RIGHT
LOCK
GAIN EQ LPF HPF KOMP
ss avvee aallll
MEM-1
SYS
PHASE
MEM-2 MEM-3 MEM-4
M1
M2 M3
AMP1
LEFT RIGHT
LOCK
GAIN EQ LPF HPF KOMP
ll oaaddiinngg
MEM-1
AMP1
LOCK
GAIN EQ LPF HPF KOMP
ss avvee aallll
MEM-1
SYS
PHASE
MEM-2 MEM-3 MEM-4
HOME
ESC
HOME
ESC
HOME
ESC
LEFT RIGHT
SYS
PHASE
MEM-2 MEM-3 MEM-4
AMP2
MUTE
M4
AMP2
MUTE
ENT
ENT
ENT
AMP2
MUTE
Page 72

72
SXRC Remote Control
Operation
LOCK CODE MENU - Here you can change the default security
lock code used for the SXRC Security function. This code is used
to unlock the SXRC after it has been locked to prevent
un-authorized use. The default lock code is
123.
Use the
ESC and ENT keys tomove the
blinking cursor left or right to select which
character you want to change.
Use the
UP and DOWN keys to change the
selected character. (
A B C ...1 2 3 ...etc.)
When you are finished press and hold the
HOME key for 1.5 seconds to save your
new security lock code.
You are now back in the SXRC SETUP menu.
NOTE:
Please write down your lock code and keep it in a safe place. If
you lock the SXRC you will need this code to un-lock the unit.
Without this code you will be very, very unhappy when at 1:00 am
Friday night hanging out at BK Lounge you can’t unlock your
SXRC to show it off to your friends.
If you have lost your lock code you will have to chill until
Monday morning, 8:00 am Central time, to ask a KICKER tech
what magic he may be able to work for you. Be nice to him...it’s
Monday...It’s early...he enjoys weekends too!
PRESS &
HOLD
RESET SXRC MENU - Sometimes things just go wacky and the
only way to fix things is to start fresh. Or perhaps you just want to
start with a clean new slate. Either way, Ctrl-Alt-Delete works for
Microsoft™...RESET SXRC works for us.
The SXRC is designed to handle the automotive electrical
system and all its wonderful peculiarities but extreme low voltage
conditions in your car, jump starting, voltage spikes, etc. could
cause glitches or errors in your SXRC settings. If this ever
happens here is where you can fix it.
Use the
UP or DOWN arrow keys to
select
SKIP RESEt or DO RESET and press
the
ENT key to select.
The SXRC will perform a complete reset
back to factory defaults...
Then will search for all the amplifiers
connected to it...
And will load all the amplifier settings
back into the SXRC.
The SXRC will now ask you if you want
to save the amplifier settings into a global
memory preset in the SXRC. Use the
UP or DOWN keys to select
SAVE - YES or SAVE - NO
and press the ENT key to select.
ESC
HOME
ENT
ESC
ESC
HOME
HOME
ENT
ENT
HOME
ESC
AMP1
LEFT RIGHT
LOCK
GAIN EQ LPF HPF KOMP
ww aiitt
MEM-1
AMP1
LOCK
GAIN EQ LPF HPF KOMP
ss eaarrcchh **
MEM-1
AMP1
LOCK
GAIN EQ LPF HPF KOMP
**looaaddiinngg
MEM-1
AMP1
LOCK
GAIN EQ LPF HPF KOMP
ssssavvee -- yyee
MEM-1
AMP1
LOCK
GAIN EQ LPF HPF KOMP
ss avvee -- nnoo
MEM-1
SYS
MEM-2 MEM-3 MEM-4
LEFT RIGHT
SYS
MEM-2 MEM-3 MEM-4
LEFT RIGHT
SYS
MEM-2 MEM-3 MEM-4
LEFT RIGHT
SYS
MEM-2 MEM-3 MEM-4
LEFT RIGHT
SYS
MEM-2 MEM-3 MEM-4
PHASE
PHASE
PHASE
PHASE
PHASE
ENT
AMP2
MUTE
AMP2
MUTE
AMP2
MUTE
AMP2
MUTE
AMP2
MUTE
Page 73

73
SXRC Remote Control
Operation
If you select SAVE - NO then the all of the connected
amplifier’s current settings are not stored into the SXRC. We
recommend that you choose
SAVE - YES and save them.
If you select
SAVE - YES then you will
choose which global memory location to
store all of the connected amplifier’s settings
in by using the
UP or DOWN key to scroll
through the four memory locations.
(
MEMORY-1 through MEMORY-4)
When the memory you want to use is selected
press the
ENT key to store.
The SXRC will respond by blinking
STORED in the display to confirm the
memory storing has completed
successfully.
You are now back in the SXRC SETUP menu.
SW UPDATES MENU - This menu allows you to manually reload
an SX Series amplifier with its operating software which is stored
in the SXRC. The only time you would use this manual
programming option is if:
1.) The operating software on an amplifier has been damaged or
lost during normal operation.
2.) During the software update portion of the AUTOSEARCH
function you experience a catastrophic failure. (Examples - More
than one amp sharing the same Remote Address, Powering down
an amplifier during software update, Communications Network
failure)
You will know this has happened if:
¾The ISIS display on the SX Series amplifier refuses to come
back on.
¾The ISIS display on the SX Series amplifier is filled with
garbage characters.
¾The SXRC ISIS display blinks
FAILED and then scrolls
MANUAL SW UPDATE REQUIRED.
NOTE:
This reload has to be performed with ONLY the amp you need
to program plugged into the SXRC Interface Box. It is so
important we will say it again...The ONLY amplifier plugged into
the SXRC Interface Box is the one needing programmed. Please
READ and FOLLOW the directions on how to perform this reload.
You will need to change some wiring on the Interface Box to
perform this manual software upload.
The SXRC will have to be wired so it is on all the time. You do
this by removing the remote turn-on wire from the Interface Box
and using a short piece of wire to temporarily jumper the Remote
Turn-On to the constant
+12 volt.
The SX Series amplifier
should have Power,
Ground and Remote
connected to it but be off
at this point, no power on
the Remote line. (System
Off)
t
ESC
HOME
AMP1
LOCK
GAIN EQ LPF HPF KOMP
ssttoorreedd
MEM-1
HOME
ESC
LEFT RIGHT
SYS
PHASE
MEM-2 MEM-3 MEM-4
ENT
ENT
AMP2
MUTE
Interface Box
TO SXRC
FROM AMP
12
+
Network Cable
Network Jack (RJ45)
D
V
M
N
E
G
R
Communication
Remote Turn-On
Jumpered to
+12 Volt
HyperFlex
Ground
HyperFlex
Remote
HyperFlex
5
Fuse
+12 Vol
AMP STRAPPING
IN OUT
IN OUT
Page 74

74
SXRC Remote Control
Operation
1.) Use the UP or DOWN arrow keys to
select the model of amplifier you are
loading software into. You MUST select the
correct one for the software load to work.
MONO SW (SX.1 Series)
QUADRO SW (SX.4 Series)
STEREO SW (SX.2 Series)
2.) Press the
ENT key to start the loading
process.
The display will say
DETECT LDR. You
now have 10 seconds to power up the
amplifier.
If you do not power up the amplifier
within 10 seconds of activating the
software loading process it will time out
and display
FAILED in the display.
If it
FAILED then turn off your SX Series
amplifier and press the ENT key to
return to Step 1 and try again.
When done correctly the SXRC will
recognize the amplifier and begin the
software loading process.
»A.) Erase old software...
»B.) Load new software...
»C.) Verify software is good...
A
B
C
The SXRC will display UPDATED OK to
verify the software loading process
has completed successfully.
3.) Press the
ENT or ESC key to return to
the SW UPDATE menu.
You can load another amplifier with software by following the
process outlined above.
If you are done manually loading software into SX Series
amplifiers you can remove the jumper wire from the SXRC
Interface Box and re-connect the Remote Turn-On wire.
NOTE:
Just a reminder that the SX Series amplifier must be off
BEFORE you start the software loading process. You turn on the
amplifier only after the SXRC ISIS display shows
DETECT LDR.
uukkpddaatteedd oo
SYS
MEM-1
GAIN EQ LPF HPF KOMP
AMP1
LOCK
MEM-2 MEM-3 MEM-4
PHASE
MUTE
AMP2
LEFT RIGHT
t
ESC
HOME
ENT
ESC
HOME
ENT
HOME
ESC
AMP1
LEFT RIGHT
LOCK
GAIN EQ LPF HPF KOMP
ddrretteecctt lldd
MEM-1
AMP1
LOCK
GAIN EQ LPF HPF KOMP
ff aiilleedd
MEM-1
AMP1
LOCK
GAIN EQ LPF HPF KOMP
ee raassiinngg **
MEM-1
AMP1
LOCK
GAIN EQ LPF HPF KOMP
pp00rooggrraamm==00
MEM-1
AMP1
LOCK
GAIN EQ LPF HPF KOMP
vv00erriiffyy ==00
MEM-1
SYS
PHASE
MEM-2 MEM-3 MEM-4
LEFT RIGHT
SYS
PHASE
MEM-2 MEM-3 MEM-4
HOME
ESC
LEFT RIGHT
SYS
PHASE
MEM-2 MEM-3 MEM-4
LEFT RIGHT
SYS
PHASE
MEM-2 MEM-3 MEM-4
LEFT RIGHT
SYS
PHASE
MEM-2 MEM-3 MEM-4
ENT
AMP2
MUTE
AMP2
MUTE
ENT
AMP2
MUTE
AMP2
MUTE
AMP2
MUTE
Interface Box
TO SXRC
D
M
N
2V
E
G
FROM AMP
1
R
+
Network Cable
Communication
Network Jack (RJ45)
AMP STRAPPING
IN OUT
IN OUT
Power, Ground
Remote Jack
HyperFlex
Ground
HyperFlex
Remote
HyperFlex
Fuse
5
+12 Vol
Page 75

ABOUT MENU - The ABOUT menu displays information about
the DAP (Digital Audio Processor) in your SXRC.
Use the
UP or DOWN keys to
view the model name, software version and
software build date.
Press the
ESC key to return to the SXRC
SETUP menu.
75
SXRC Remote Control
Operation
DON’T LOCK does just that. It skips the entire locking function
and returns to the MAIN menu.
LOCK SXRC locks out all the SXRC controls.
LOCK AMPS locks out the controls on all SX Series amplifiers
connected to the SXRC. This prevents tampering at the amp
directly unless you know the code.
LOCK ALL locks out all the SXRC controls and all SX Series
amplifiers connected to the SXRC.
UNLOCK unlocks the controls on all SX Series amplifiers
connected to the SXRC.
If you select any of the Lock functions,
the SXRC will flash LOCKED in the
display to verify the lock has completed
successfully.
Once the SXRC is locked it will return to
the DEFAULT menu and the
LOCK
indicator will be lit in the ISIS display.
From the DEFAULT menu press the
ENT
key to unlock the SXRC.
The display will show
UNLOCK. Press the
ENT key again to enter the UNLOCK
menu and enter your code.
SECURITY MENU - Want to keep your friends from adjusting
your system to their tastes instead of yours? The SXRC lets you
do it! Here you get to lock out the controls and prevent tampering
with your system settings.
When the SXRC is locked down you will still see all of the
DEFAULT menu items scrolling through the display, you can
freeze and un-freeze the scrolling and you can adjust the Digital
Remote Volume Control. These are the only controls accessible
when the SXRC is locked.
Use the
UP or DOWN arrow keys to
scroll through the selections and press
the
ENT key to select.
SECURITY
HOME
ESC
AMP1
LEFT RIGHT
LOCK
GAIN EQ LPF HPF KOMP
ss00w vveerr 3300
MEM-1
SYS
MEM-2 MEM-3 MEM-4
ESC
HOME
PHASE
ENT
AMP2
MUTE
ENT
ESC
HOME
ENT
AMP1
LEFT RIGHT
LOCK
GAIN EQ LPF HPF KOMP
lloocckkeedd
MEM-2 MEM-3 MEM-4
MEM-1
AMP1
LEFT RIGHT
LOCK
GAIN EQ LPF HPF KOMP
**** kkiicckkeerr
MEM-2 MEM-3 MEM-4
MEM-1
ESC
AMP1
LEFT RIGHT
LOCK
GAIN EQ LPF HPF KOMP
uu nlloocckk
MEM-2 MEM-3 MEM-4
MEM-1
SYS
SYS
SYS
PHASE
PHASE
HOME
PHASE
AMP2
MUTE
AMP2
MUTE
ENT
AMP2
MUTE
Page 76

76
SXRC Remote Control
Operation
Use the ESC and ENT keys tomove the
blinking cursor left or right to select which
character you want to change.
Use the
UP and DOWN keys to change the
selected character. (
A B C ...1 2 3 ...etc.)
When you are finished press and hold the
HOME key for 1.5 seconds to enter your
unlock code.
If the code is correct the SXRC will unlock and return to the
MAIN menu. If this did not happen, then read on...
If you enter the wrong code the display will flash the message
BAD CODE and return you to the UNLOCK menu.
Press the
ENT key to enter your lock code
again.
Enter your code again making sure to place the correct
character in the correct position in the display. Blank spaces
count as part of the code so be sure you are entering your
code correctly.
If you have tried entering your code several times with no
success (several is defined as more than 3...less than 10) then
you probably have forgotten your lock code.
You will need to call KICKER directly at (405) 624-8583 and
speak to a tech to handle this situation. You will need to have
your amplifier’s serial number AND your receipt by the phone as
the guys and gals answering the phone will need this information
from you to be of assistance.
Take the time right now to fill out the first page in this manual
and staple your receipt to it. That way if you ever need service
(like forgetting your lock code) you will have all the information
you need right here with the manual.
NOTE:
The local ISIS keypads on all SX Series amplifiers are
disabled once connected to the SXRC, their display will scroll
SXRC CTRL to indicate this. If you disconnect the SXRC Control
Head and power up the system, the local keypad at each
amplifier will become active again. The LOCK AMPS menu
item on the SXRC prevents the use of the amplifier’s local keypad
when the SXRC Control Head is disconnected ... unless you
know the lock code.
If
LOCK AMPS is activated, the LOCK indicator on all
connected SX Series amplifiers will be turned on. If you use
UNLOCK, the indicators will be turned off.
PRESS &
HOLD
PHASE
PHASE
AMP2
MUTE
AMP2
MUTE
AMP1
LEFT RIGHT
LOCK
GAIN EQ LPF HPF KOMP
baadd ccooddee
MEM-1
AMP1
LOCK
GAIN EQ LPF HPF KOMP
uu nlloocckk
MEM-1
SYS
MEM-2 MEM-3 MEM-4
LEFT RIGHT
SYS
MEM-2 MEM-3 MEM-4
ESC
ESC
ESC
ESC
HOME
HOME
HOME
HOME
ENT
ENT
ENT
ENT
Page 77

RECALLING A PRESET
To recall a memory preset simply press and
release the desired memory key. The matching
indicator in the ISIS display will light up and
the SXRC will display
LOADING while it
loads all the settings stored in that preset
into each SX Series amplifier.
There are four global memory presets built into the SXRC,
each with its own indicator in the ISIS display and a dedicated
memory key to activate it.
Each memory preset stores all the values
shown at the right for each amplifier connected
to the SXRC.
This gives you the ability to dial in four
completely different system settings and store
them in the memory presets for instant recall at
any time.
STORING A PRESET
To store the current amplifier or group
settings in the SXRC into a memory preset
simply press and hold the desired memory
key until the ISIS display flashes
STORED and
then release the memory key.
77
SXRC Remote Control
Operation
Memory Presets
»
GAIN
» EQ
» LO-PASS
» HI-PASS
» PHASE
» MUTE
» KOMPRESSOR
» KOMP. ADJ.
» REMOTE VOL
M1
M2
M3
M4
PRESS &
HOLD
AMP1AMP1
LOCKLOCK
GAINGAIN EQEQ LPFLPF HPFHPF KOMPKOMP
** ** kk ii cckkeerr
MEM-1MEM-1
M1
SYSSYS
LEFTLE FT RIGHTRIGHT
MEM-2MEM-2 MEM-3MEM-3 MEM-4MEM-4
M2
PHASEPHASE
M3
AMP2AMP2
MUTEMUTE
M4
ESC
HOME
ENT
AMP1
LOCK
GAIN EQ LPF HPF KOMP
LL OAADDIINNGG
MEM-1
M1
M2 M3
LEFT RIGHT
SYS
PHASE
MEM-2 MEM-3 MEM-4
M4
AMP2
MUTE
M1
M2 M3
AMP1
LEFT RIGHT
LOCK
GAIN EQ LPF HPF KOMP
ssttoorreedd
MEM-1
SYS
MEM-2 MEM-3 MEM-4
PHASE
M4
AMP2
MUTE
Page 78

78
SXRC Remote Control
Specifications
Kompressor™
Powered by the on-board SX DAP (Digital Audio Processor),
the Kompressor™ included in all SX Series amplifiers (and
controlled by the SXRC) is a complete digital compressor solution
used to compress or expand the audio signal in different ways
based on the setting selected.
Using ‘real world’ testing in the automotive environment,
KICKER engineers developed three compression/expansion
settings for use in your SX Series amplifiers. Each setting
controls 6 Kompressor™ parameters:
Compression Above Threshold - Controls how much expansion
or compression is applied to the audio signal when its level is
higher than the threshold.
Compression Below Threshold - Controls how much expansion
or compression is applied to the audio signal when its level is
lower than the threshold.
Threshold - This is the signal strength reference point that the
Kompressor™ uses to determine when to compress or expand
the signal.
Integration Time - Controls the energy detection part of the
Kompressor™ circuitry and determines whether to look for peak
output, averaged output or anything in between the two extremes.
Attack Time - Controls how quickly the Kompressor™ reacts to
any signal above or below the threshold.
Release Time - Controls how quickly the Kompressor™ effect is
released when any signal above or below the threshold is
detected.
When you select one of the Kompressor™ presets (Contour,
Red-Line or Attack) each of these 6 parameters is adjusted to
provide the desired effect on the audio Signal.
Contour - This preset applies expansion below the threshold
point to provide a fuller sound at lower volume levels. Effect
decreases at higher volume levels. Nice effect for someone
wanting a fuller sound at low to moderate listening levels.
ATTACK - This preset applies expansion above the threshold
point to provide a nice quick punch or attack to the music.
Effect increases with higher volume levels. Like music with a
quick and punchy sound? Sub-bass need a little more snap to
it? Give this one a try.
Red-line - Provides a quick clamp to dynamic peaks while
still allowing a full sound to come through. Effect increases
at higher volume levels. Like to play it loud but want to
protect your speakers? Want low level details to come
through over road noise? Want a more even volume level to
your music? All can be achieved with this preset.
OFF - Pretty much says it all. This turns the Kompressor™
off. This is the factory default setting.
After selecting your Kompressor™ setting you can adjust the
Threshold level through a 48 dB window (+24 dB to -24 dB from
the default setting) by accessing the Kompressor™ Adjustment
(KOMP ADJ.) setting located in the System menu. There you can
change the threshold point to customize the Kompressor™ effect
to fit your speakers, car or personal tastes.
Page 79

Operating Voltage:
Remote Turn-On Voltage:
Internal Fusing in SXRC
Interface Box:
Maximum Amplifiers:
Maximum Groups:
DRVC Range:
Power, Ground, Remote
Terminals:
Mounting Hardware:
9-16 volts DC
9-16 volts DC
Mini Glass Fast Blow 3 amp
16 units
10 groups
30 dB
Removable plug will accept
up to 12 gauge wire.
Standard DIN 7-3/16 x 2-1/8
182mm x 53mm
79
SXRC Remote Control
Specifications
A few words on the Kompressor™. The effect is most
noticeable in the bass area of your music (Bass/Midbass). You
can use the Kompressor™ in any amplifier configuration
(Low Pass, High Pass, Band Pass or Full Range) but we feel the
most dramatic results are obtained when the amp is in a Low
Pass (subwoofer) or Band Pass (midbass) situation.
A few exceptions to this statement are:
The
red-line setting is good for use in any configuration
as it helps control dynamic peaks and limit distortion at
higher output levels. VERY effective at controlling speaker
damaging distortion caused by over-driving or clipping the
amplifier.
The
contour setting is also another good all around use
setting and when used in Full Range or High Pass
configurations tends to enhance the vocal and top end of
the music. Great for helping to cover up interior noise.
The
ATTACK setting is really geared for bass and midbass
duty but can be used in any setup.
Remember, these are just suggestions, play around with each
Kompressor™ preset and the Threshold (KOMP ADJ) to find
what works for you.
The possibilities are almost endless! Tweak away!
SXRC Specifications
HOME
ENT
ESC
M1
M3
M4
AMP1AMP1
SYSSYS
LOCKLOCK
LEFTLEFT RIGHTRIGHT
GAINGAIN EQEQ LPFLPF HPFHPF KOMPKOMP
** ** kk ii cc kkee rr
MEM-1MEM-1
M1
PHASEPHASE
MEM-2MEM-2 MEM-3MEM-3 MEM-4MEM-4
M2M2M3
AMP2AMP2
MUTEMUTE
HOME
ESC
M4
ENT
Page 80

80
SXRC Remote Control
Service
With the screws removed, carefully
lift the top cover off the SX Interface
Box.
With the top removed you can now
see the 3 amp fuse held in place by
two fuse clips.
Examine the fuse visually and see if
it is blown and needs replaced.
If blown, then gently pry the fuse up
and away from the fuse clips using a
small screwdriver.
Press in the new fuse until it locks fully
into place.
You can now re-assemble the Interface
Box following the above instructions in
reverse.
NOTE:
Just a reminder that you should be very careful with the top
cover removed from the Interface Box as to not damage any of
the components inside. NEVER use a fuse with a higher rating
than 3 amps. DO NOT connect the power harness to the
Interface Box until it is fully assembled.
Interface Box Fuse
The SXRC is protected by a fuse which is internally mounted in
the Interface Box. If you ever need to replace this fuse an extra
one has been supplied with your SXRC kit. If you lose this fuse or
ever need another one, please replace with the the same size
and style of fuse.
To replace the fuse, first
disconnect the power harness
from the SX Interface Box.
Next, remove the
four screws holding
the Interface Box to
its mounting surface.
Now, remove the
two screws on the
side of the Interface
Box which secure the
top cover/mounting
base to the bottom.
t
Fuse Good
Fuse Blown
TO SXRC
SMAC-ON TOOLZ
SMAC-ON TOOLZ
Interface Box
Remove Screws
Remove Screws
GND
FROM AMP
REM
+ 12V
HyperFlex
Ground
HyperFlex
Remote
HyperFlex
5
+12 Vol
Fuse
250V
Interface Box
TO SXRC
FROM AMP
GND
REM
+ 12V
Interface Box
TO SXRC
FROM AMP
GND
REM
+ 12V
3A
3A
250V
3A
INTERFACE BOX
SXRC
250V
Page 81

81
SXRC Remote Control
Help
Troubleshooting
If your SXRC does not appear to be working, check obvious
things first such as blown fuses, poor or incorrect wiring
connections, cables and connectors not fully seated, etc.
There is a blue LED located on one end of the SXRC Interface
Box. This LED indicates the SXRC is receiving power and is
turned on.
Blue LED off:
¬Verify the external fuse to the Interface Box is good.
¬Verify the power plug is fully seated in the Interface Box.
¬Verify the wiring is correct at the power plug.
¬With a Volt Ohm Meter’s (VOM) negative probe
attached to chassis ground check:
;+12 volt power terminal (should read +12V to +16V)
;Remote turn-on terminal (should read +12V to +16V)
;Ground terminal (should read 0V)
¬Verify the internal fuse in the Interface Box is good.
Blue LED on, no display on SXRC Control Head:
¬Verify the cable from the Control Head is plugged securely
into the Interface Box.
¬If using an extension cable between the Interface Box and
the Control Head, Verify the connectors are plugged in securely
on both ends.
¬If using an extension cable between the Interface Box and
the Control Head, Verify the cable is a 6 conductor PS2 type
cable.
¬If using an extension cable between the Interface Box and
the Control Head, the cable or connectors on it may be bad, try
bypassing the extension cable and plugging the Control Head
directly into the Interface Box. If this works, then try a new
cable.
Blue LED on, garbage characters in display:
¬Power cycle your system (turn off, wait 3 seconds, turn on).
¬Reset the SXRC form the SXRC SETUP menu.
¬Verify all cables are securely plugged into the Interface Box.
¬Verify all Network Cables are securely plugged in at the
Interface Box and SX Series amplifiers.
¬Verify all Network cables are good. If you made these cables
check that they are properly wired and terminated.
Blue LED on,
STARTING * displayed for a long time,
amplifiers not responding:
¬Does SX Series amplifier(s) scroll
SXRC CTL in display?
9If not, then that amplifier is not connected or
communicating to the SXRC.
¬Go back and double check your Communications Network
cables and make sure they are inserted properly and ‘snapped’
into place.
¬If you have purchased different cables, double check that
they are Straight-Through Ethernet Network cables.
¬If you have made your own cables double check them for
secure and proper termination.
¬Check the pins (#1 and #8) in the SX Series
amplifiers to make sure they are not bent or damaged.
¬Power cycle your system (turn off, wait 3 seconds, turn on).
¬Reset the SXRC form the SXRC SETUP menu.
Blue LED on, SXRC display ok, SX Series amplifiers on,
garbage characters in SX Series amplifier display, blank SX
Series amplifier display:
¬Power cycle your system (turn off, wait 3 seconds, turn on).
¬Perform a Manual Software Update for each amplifier
exhibiting problem.
¬Reset the SXRC form the SXRC SETUP menu.
Page 82

82
SXRC Remote Control
Help
SXRC displays FAILED and MANUAL SW UPDATES
REQUIRED:
¬Autosearch function has failed due to a catastrophic failure,
loss of communication network, loss of power during software
update.
9Go back and double check your Communications Network
cables and make sure they are inserted properly and
‘snapped’ into place.
9If you have purchased different cables, double check that
they are Straight-Through Ethernet Network cables.
9If you have made your own cables double check them for
secure and proper termination.
9Check the pins (#1 and #8) in the SX Series
amplifiers to make sure they are not bent or damaged.
¬Perform a Manual Software Update for each amplifier
exhibiting problem.
Everything powers up and looks great, just no sound:
¬Is the
MUTE indicator blinking in the SXRC display?. Turn off
mute for all amplifiers.
¬Use the Pink Noise function to test system for audio output.
The pink noise function injects its signal directly into the
amplifier after the DSP processor. This helps to determine if the
problem is before the DSP and amplifier or after.
9If you have pink noise from all your speakers then check
your :
Gain Range settings.
Gain settings.
Crossover settings.
RCA cables and connections.
Head unit fader, balance and volume controls.
9If you don’t have pink noise from all your speakers then
check your :
Speakers.
Speaker cables and connections.
Amplifier power and speaker connections.
All of my amplifier’s volumes vary when I use the DRVC
(Remote Volume Control). I just want to control my bass!:
¬By default, all amplifiers connected to the SXRC are
controlled by the DRVC. Turn the
REMOTE VOL function off for
all amplifiers not connected to your subwoofers.
Select appropriate amp through
Amp Adj menu.
OR
Select appropriate group through
GROUP Adj menu.
THEN
Select
Remote Vol.
Select
Off.
Other problem, I am lost, I don’t know, Help!:
¬Contact your local Authorized KICKER Dealer where you
purchased your unit for assistance.
¬Contact KICKER Technical Services for assistance.
¬Ctrl+Alt+Del.
CAUTION: When jump starting the vehicle, be sure that
connections made with the jumper cables are correct.
Improper connections (+ to - & - to +) will result in blown
fuses as well as failure to other systems in the vehicle.
If you have questions about the installation and operation of
your new KICKER SXRC Remote Control, see the Authorized
KICKER Dealer in your area or contact KICKER Technical
Services directly at (405)624-8583.
Page 83

83
SXRC Remote Control
Help
Remote Address Chart
Spair
Use this fill-in-the-blank chart to keep track of your SX Series
amplifier’s remote address and name. This is very helpful for
setting up your SXRC.
Amplifier 1
Amplifier 2
Amplifier 3
Amplifier 4
Amplifier 5
Amplifier 6
Amplifier 7
Amplifier 8
Amplifier 9
Amplifier 10
Amplifier 11
Amplifier 12
Amplifier 13
Amplifier 14
Amplifier 15
Amplifier 16
Amplifier Remote Address Name
It is going to happen, you will change your mind or change your
system. Here is a backup chart. Photocopy this page and you can
have all the charts you need.
Amplifier 1
Amplifier 2
Amplifier 3
Amplifier 4
Amplifier 5
Amplifier 6
Amplifier 7
Amplifier 8
Amplifier 9
Amplifier 10
Amplifier 11
Amplifier 12
Amplifier 13
Amplifier 14
Amplifier 15
Amplifier 16
Amplifier Remote Address Name
Page 84

84
SXRC Remote Control
Warranty
ELECTRONICS LIMITED WARRANTY
WHAT IS NOT COVERED?
Kicker warrants this product to be free from defects in material and workmanship
under normal use for a period of
TTHHRREEEE ((33)) MMOONNTTHHSS
from date of original
purchase with receipt. When purchased from a Authorized KICKER Dealer it is
warranted for
TTWWOO ((22)) YYEEAARRSS
from date of original purchase with receipt. In all
cases you must have the original receipt! Should service be necessary under this
warranty for any reason due to manufacturing defect or malfunction during the
warranty period, Kicker will repair or replace (at its discretion) the defective
merchandise with equivalent merchandise at no charge. Warranty replacements may
have cosmetic scratches and blemishes. Discontinued products may be replaced
with more current equivalent products.
This warranty is valid only for the
oorriiggiinnaall ppuurrcchhaasseerr
and is not extended to owners of the product subsequent to the original purchaser. Any applicable implied warranties are limited in duration to a period of the express warranty as provided herein
beginning with the date of the original purchase at retail, and no warranties, whether
express or implied, shall apply to this product thereafter. Some states do not allow
limitations on implied warranties, therefore these exclusions may not apply to you.
This warranty gives you specific legal rights; however you may have other rights
that vary from state to state.
WWHHAATT TTOO DDOO IIFF YYOOUU NNEEEEDD WWAARRRRAANNTTYY OORR SSEERRVVIICCEE
Defective merchandise should be returned to your local Authorized Stillwater
Designs (Kicker) Dealer for warranty. Assistance in locating an Authorized Dealer
can be found at www.kicker.com or by contacting Stillwater Designs directly. You can
confirm that a dealer is authorized by asking to see a current authorized dealer
window decal.
If it becomes necessary for you to return defective merchandise directly to
Stillwater Designs (Kicker), call the Kicker Customer Service Department at
(405)624-8510 for a Return Authorization (RMA) number. Package all defective
items in the original container or in a package that will prevent shipping damage,
and return to
Stillwater Designs,5021 North Perkins Road,Stillwater,OK 74075
The RMA number must be clearly marked on the outside of the package. Return
only defective components. Return of entire cabinets, system packs, pairs, etc.
increases your return freight charges. Non-defective items received will be returned
freight collect.
Include a “proof-of-purchase” statement! This would be a copy of the original
receipt with the Purchase date clearly visible
, Customer’s name, Dealer’s name,
Invoice number and Product purchased. Warranty expiration on items without a
proper proof-of-purchase will be determined from type of sale and the manufacturing date code. Freight must be prepaid; items received freight collect will be refused.
Failure to follow these steps may void your warranty. Any questions can be
directed to the Kicker Customer Service Department at (405)624-8510.
This warranty is valid only if the product is used for the purpose for which it was
designed.
It does not cover:
Kicker strives to maintain a goal of 72-hour service for all electronics (amps,
crossovers, eq, etc.) returns. Delays may be incurred if lack of replacement
inventory or parts is encountered.
Contact your International Kicker dealer or distributor concerning specific
procedures for your country’s warranty policies.
• Damage due to improper installation.
• Subsequent damage to other components.
• Damage caused by exposure to moisture
, excessive heat, chemical cleaners,
and/or UV radiation.
• Damage through negligence
, misuse, accident or abuse. Repeated returns for
the same damage may be considered abuse.
• Any cost or expense related to the removal or reinstallation of product.
• Speakers damaged due to amplifier clipping or distortion.
• Items previously repaired or modified by any unauthorized repair facility.
• Return shipping on non-defective items.
• Products with tampered or missing barcode labels.
• Products returned without a Return Authorization (RMA) number.
• Freight Damage.
• The cost of shipping product to Kicker.
• Service performed by anyone other than Kicker.
HOW LONG WILL IT TAKE?
INTERNATIONAL WARRANTY
P.O. Box 459 • Stillwater, Oklahoma 74076 • U.S.A. • 405 624-8510
KICKER drivers are capable of producing sound levels
that can permanently damage your hearing! Turning up a
system to a level that has audible distortion is more
damaging to your ears than listening to an undistorted
system at the same volume level. The threshold of pain
is always an indicator that the sound level is too loud and
may permanently damage your hearing.
Please use common sense when controlling volume!
WARNING:
10272004+05SXRC
Page 85

85
SXRC Remote Control
Notes
Today’s System Diagram
Tomorrow’s System Diagram
Page 86

86
SXRC Remote Control
Notes
My Future ‘Drool’ System
Cash Money Plan
Page 87

87
SXRC Remote Control
Notes
Pizza Delivery
Earl’s Thoughts
Page 88

 Loading...