

Page 1
FortiAP 224E
QuickStart Guide
Page 2
06/19/2018
Copyright© 2018 Fortinet, Inc. All ri ghts reserved. Fortinet®, FortiGate®,
FortiCare® and FortiGuard®, and certain other marks are r egistered trademarks of Fortinet,
Inc.,in the U .S. and other jurisdictions, andother Fortinet names herein may also be
registered and/or common law trademarks of Fortinet. All other product or company names
may betrademarks of their respective owners. Performance andother m etrics contained
herein were attained in internal lab tests under ideal conditions, and actual performance and
other results may vary. Network variables, different network environments andother
conditions may affect performanceresults. Nothingherein represents any binding
commitment by Fortinet, and Fortinet disclaims all warranties, whether express or im plied,
except to theextent Fortinet enters a bindingw ritten contract, signed by Fortinet’s General
Counsel, with a purchaser that expressly w arrants that the identified product will perform
according to certain expressly-identified performance metrics and, in suchevent, only the
specific performance m etrics expressly identified in such bindingw ritten contractshall be
binding on Fortinet. For absolute clarity, any such warr anty will be lim ited to performancei n
thesame ideal conditions as in Fortinet’s internal lab tests. In no event does Fortinet make
any commitment r elated to future deliverables, features, or development, and circumstances
may changesuch that any forward-looking statements herein are not accurate. Fortinet
disclaims in full any covenants, representations,and guarantees pursuant hereto, whether
express or implied. Fortinet reserves the r ight to change, m odify, transfer, or otherwise
revise this publication withoutnotice, and the most current version of thepublication shall be
applicable.
Page 3
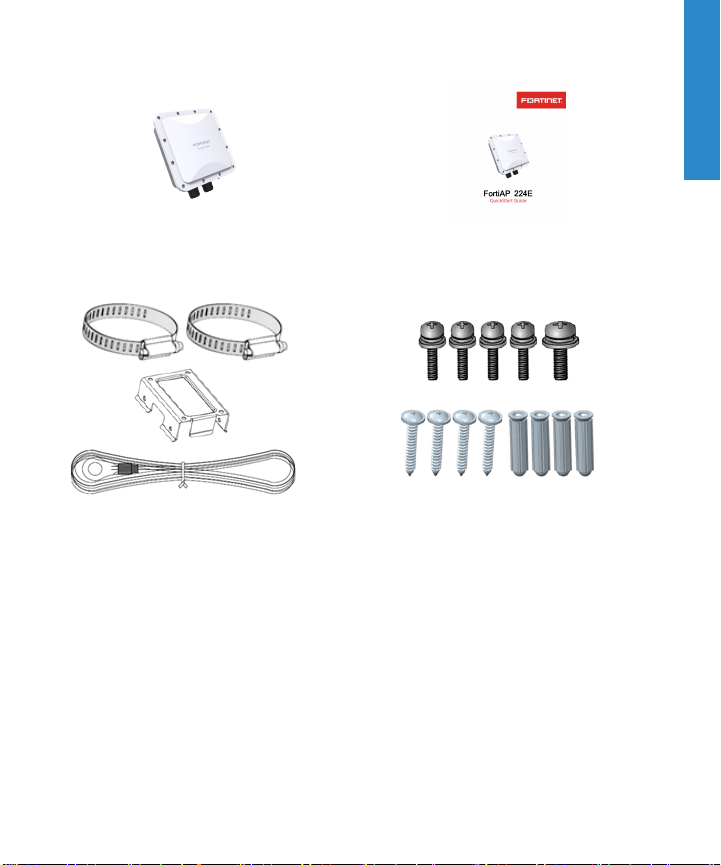
Box Includes
FortiAP device QuickStart Guide
Pole Mount Straps (X2), Wall Mount
Bracket, and Grounding Cable 6M
Pole and Wall Mounting Kits:
Machine Pan M4x10L screws (X4), Machine
pan M5x10L screw, Self-Tapping Steel Pan
P3x20L(X4), and Plastic Conicalwall
anchors (X4)
3
Page 4
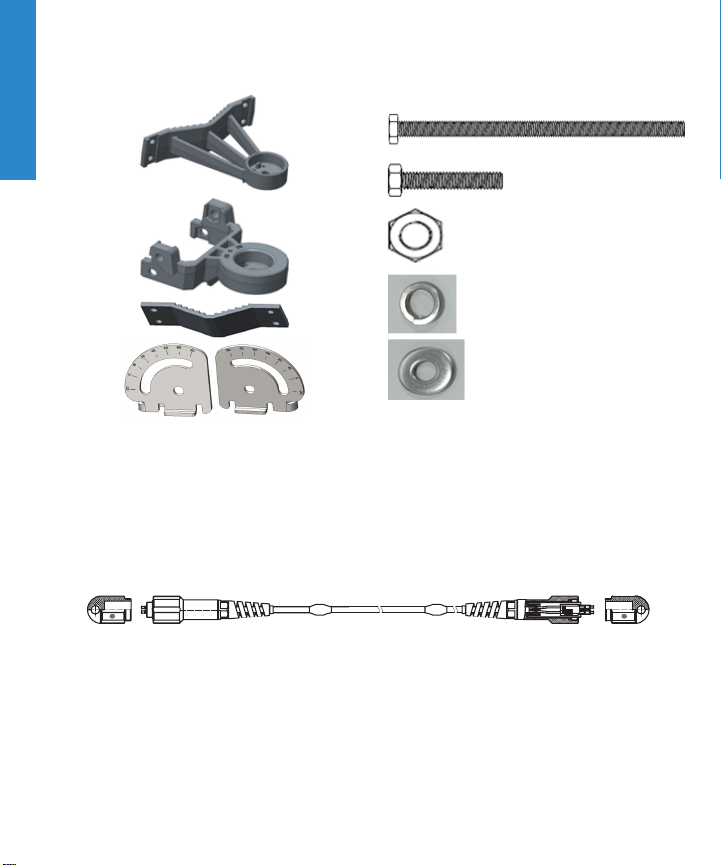
Optional parts
Rotating Mounting Kit (FAP-224E-MNT):
Pole Bracket, Hold Bracket, Wall Bracket,
Bracket Sheets (X2)
Weatherproof OpticalFiber Cable (FAP-224E-F BR)
4
l M8x160LHexagon screw bolts ( X4)
l M8x32LHexagon screw bolts ( X5)
l M8 Hexagon screw bolts (X18)
l Spring-washers (X9)
l Flater-washers (X9)
Page 5
Before YouBegin
Write down details typically provided by your network administrator or ISP.
Static IPaddress
IPaddress ___________________
Subnet Mask ___________________
Default Gateway ___________________
Primary/Secondary DNS ___________________
DHCP
It is normal to not require a hostname, but your ISP might require it.
Hostname ___________________
QuickStart Guide Video
https://video.fortinet.com/video/177/
fortigate-and-fortiap
5
Page 6

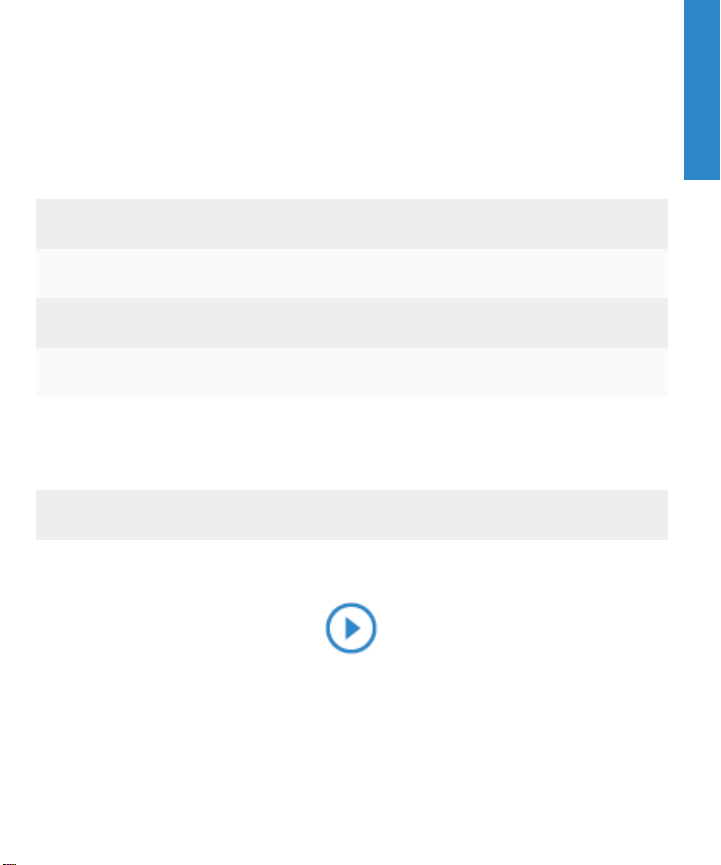
FortiAP 224E - Device Front
6
Page 7
FortiAP 224E - Device Rear
LAN1/PoELAN2 SFP
7
Page 8
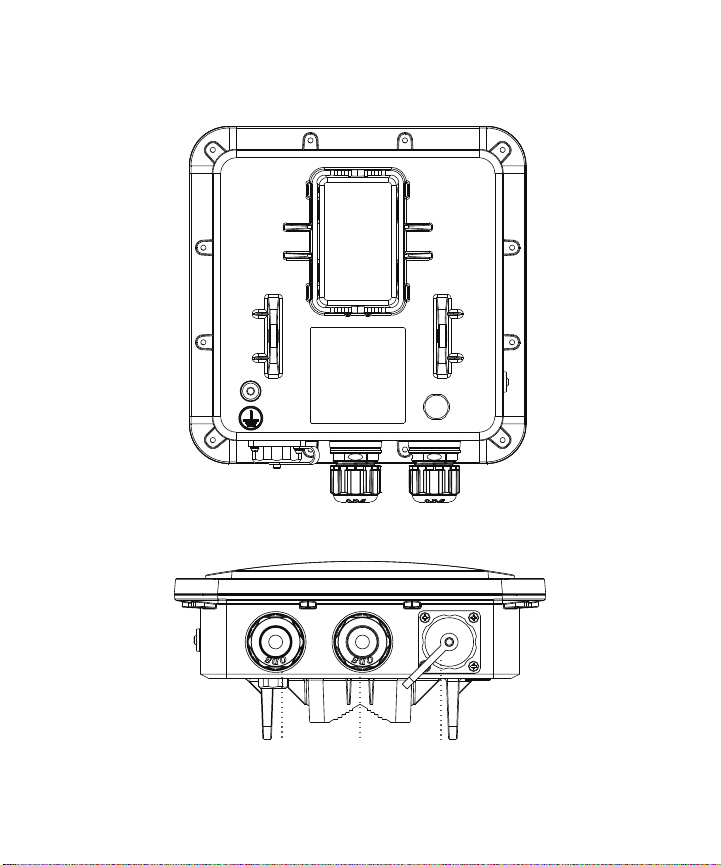
FortiAP 224E - Device Side (LEDs)
Green: System is ready
O: Power o
Amber: System is booting up
1: Power
2: SFP
3: 2.4GHz WLAN
4: 5GHz WLAN
5: LAN2
6: LAN1 (PoE)
Green: Connect to optical port
Blinking: Optical activity present
O: No activity or power o
Amber: Reserved
Green: Connect to WLAN port
Blinking: WLAN activity present
O: No activity or power o
Amber: Reserved
Amber: Device connected to
LAN port at 10/100/1000Mbps
Blinking: LAN activity present
O: Not connected
Green: Connect to WLAN port
Blinking: WLAN activity present
O: No activity or power o
Amber: Reserved
Amber: Device connected to
LAN port at 10/100/1000Mbps
Blinking: LAN activity present
O: Not connected
1
4
3
2
5
6
8
Page 9
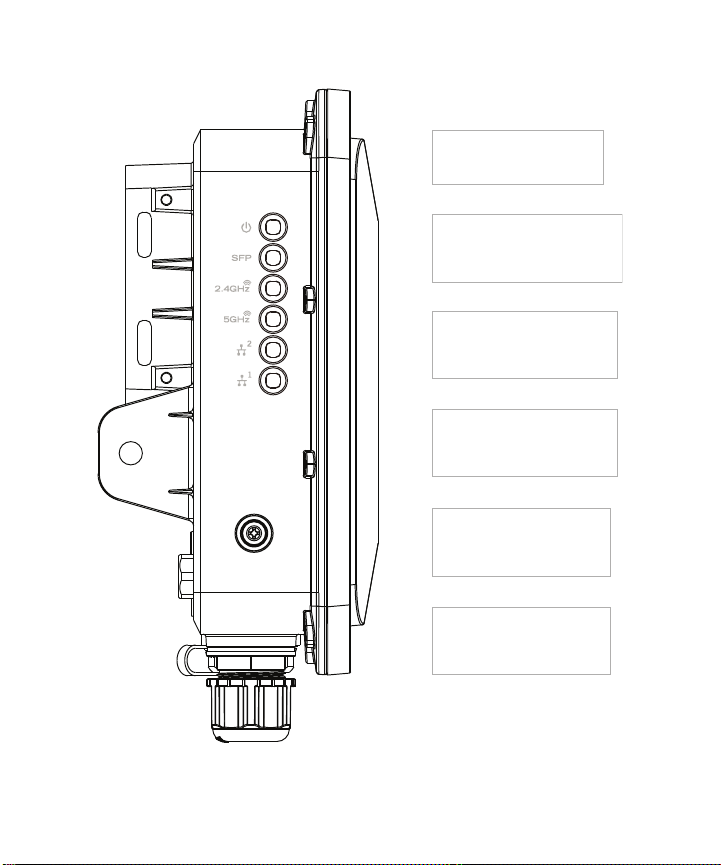
Installation
A
Mounting
Mount on Wall
9
Page 10

Mount on Pole
10
Page 11
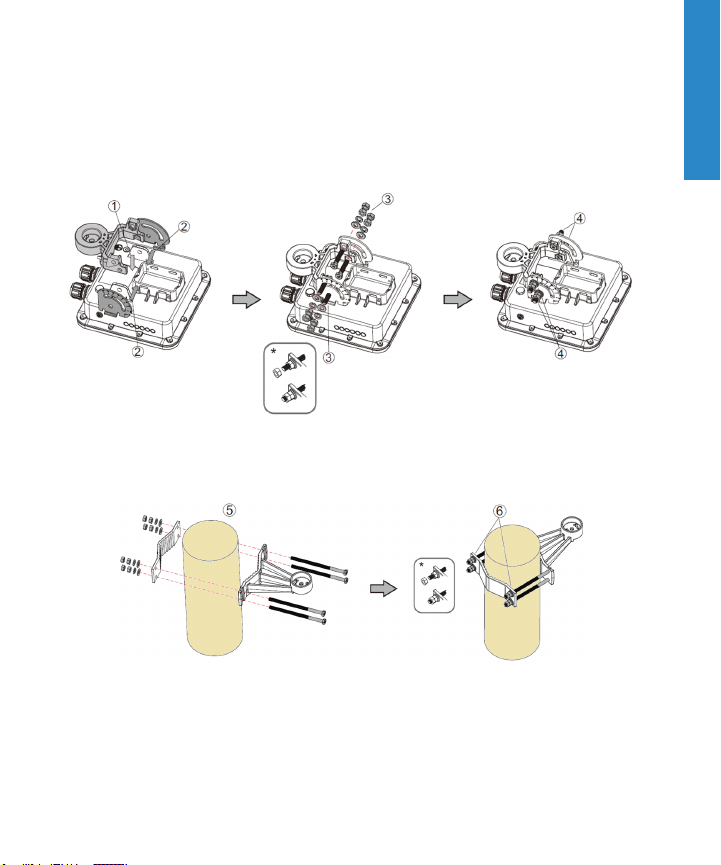
Rotating Mount
Please note that the rotating mount is an optional accessory and should be
ordered separately.
Fasten the Hold Bracket (1) and the Bracket Sheets (2) to the base using the
M8x32L Hexagon screw bolts and washers:
Fasten the Pole Bracket & Wall Bracket to the pole using supplied M8x160L
Hexagon screw bolts (5 and 6):
11
Page 12

Fasten the Pole Bracket to the Wall Bracket by securing the supplied M8x32L
Hexagon screw bolts (7, 8, and 9):
To adjust the unit to tilt up and down:
12
Page 13
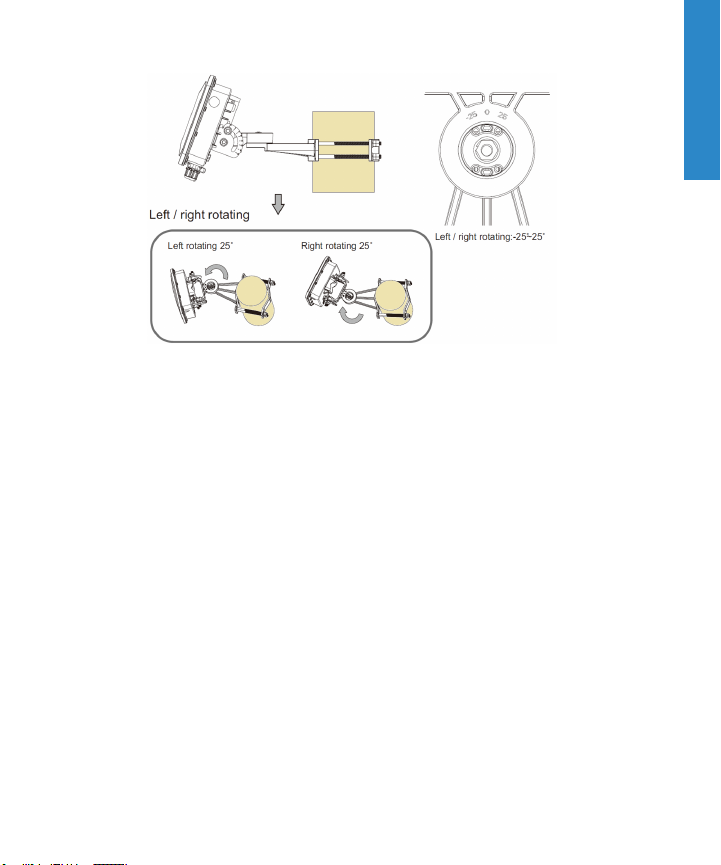
To adjust the unit to tilt left and right:
13
Page 14

B
Cabling
Weatherproof Connector
The unit requires 48VDC power, which is delivered by the PoE injector over a
straight-through Ethernet cable.
To install the weatherproof connector
1. Unscrew the coupling ring from the waterproof connector, remove the
sealing gland, and thread the RJ-45 plug through the connector
components.
2. Insert the RJ-45 plug into the PoE port on the unit and install the
weatherproof panel connector onto the threaded coupling at the port.
3. Slide the sealing gland along the cable into the panel connector.
4. Thread the coupling ring into the panel connector and tighten it until the
sealing gland is compressed, making a watertight seal on the cable.
14
Page 15

Weatherproof Optical Fiber Cable
Please note that the weatherproof optical fiber cable is an optional accessory
and should be ordered separately.
To install the optical fiber cable
Open the SFP cap, and pull out the plug connector.
Connect with the LC-Duplex Transceiver and plug-in.
Tighten the cable until the yellow line is visible.
15
Page 16

Basic Connection
WAN/POE
Network Core/FortiGate
Connect the FortiAP device to a FortiGate controller or an Internet connection.
Ensure that the Power over Ethernet (PoE) cable is connected to an
applicable port on your FortiGate device or PoE injector.
Caution: Adequate grounding must be provided to the FortiAP unit and
the PoE injector, in compliance with your local electrical code or
regulations.
Warning: This device complies with IEEE 802.3af PoE specification. Do
not use any PoE injectors that are not IEEE 802.3af compliant as they
may damage your device.
16
Page 17

FortiAPSetup
FortiAPSetup Video
https://video.fortinet.com/video/92/basic-fortiap-setup
17
Page 18

A
FortiCloud
1.
Visit http://www.forticloud.com to sign in or create a new account.
2. Click the Add Device link, enter the unique FortiCloud key located on
your FortiAP device, then click Submit.
3. Deploy the FortiAP to an existing APNetwork or create a new AP
network, then click Submit.
4. Follow the prompts to associated the FortiAP device to an SSID.
5. Connect your FortiAP to an Internet connection. This can be a modem or
another source of Internet connectivity. The FortiAP will self-configure.
18
Page 19

B
Deployment through a FortiGate
Ensure that you are running the Fortinet recommended version of
software. Please check support.fortinet.com for more information.
If FortiGate is on the same network as the FortiAP:
1. Use FortiGate to preauthorize the FortiAP device.
2. Refer to the “Access Point Deployment” section of the FortiWiFiand
FortiAP Configuration Guide found at http://forti.net/ap-docs.
3. Plug the FortiAP into your local Ethernet connection. The FortiAP will selfconfigure.
Or
1. Instead of preauthorizing, you can use the FortiGate to authorize the
FortiAP device after you have connected the FortiAP to the network.
2. Within two minutes of connecting the FortiAP to the FortiGate, the device
appears on the Managed FortiAP page in the Web-based Manager:
authorize and assign a profile to the device.
19
Page 20

If FortiGate is not on the same network as the FortiAP:
1. Log into FortiAP directly (IP address: 192.168.1.2) with username admin
and no password, and specify the IP address of the controlling FortiGate.
2. Connect to FortiAP via the CLI using the instructions in the “Connecting to
FortiAP CLI” section of the FortiWiFi and FortiAPConfiguration guide.
3. Specify the IP address of the controlling FortiGate:
cfg -a AC_IPADDR_1=0.0.0.0
cfg -c
where 0.0.0.0 is the address of the FortiGate.
4. The FortiAP device connects to FortiGate, and then you can authorize the
FortiAP.
20
Page 21

Cautions and Warnings
Environmental specifications
Ambient operating temperature: -30C to 60C
Refer to specific Product Model Data Sheet for EnvironmentalSpecifications (Operating Temperature,
Storage Temperature, Humidity, and Altitude)
Référez à la Fiche Techniquede ce produit pour les caractéristiques environnementales (Température
de fonctionnement, température de stockage, humidité et l'altitude).
Safety
Warning: Equipment intendedfor installation in Restricted Access Location.
Avertissement: Le matériel est conçu pour être installé dans un endroit où l’accès est restreint.
Caution: This equipment is to be used in a Network Environment 0 per IECTR 62101. This product is
connected only to PoE networks without routing to the outside plant.
Attention: Ce matérieldoit être utilisé dans un Environnement Réseau 0 par IECTR 62101. Ce produit
est uniquement connecté aux réseaux PoE sans installation externe de routage.
This product is intended to be supplied48-57 Vdc from PoE source.
Le produit doit être alimenté par à de 48-57 Vdc (PoE).
Grounding — To prevent damageto your equipment, connections that enter from outside the building
should pass througha lightning/ surge protector, and be properly grounded. Use an electrostatic
discharge workstation (ESD) and/or wear an anti-static wrist strap while you work. In addition to the
grounding terminal of the plug, on the back panel, there is another, separate terminal for earthing.
Mise à la terre — Pour éviter d’endommager votre matériel, assurez-vous que les branchements qui
entrent à partir de l’extérieur du bâtiment passent par un parafoudre / parasurtenseur et sont
correctement mis à la terre. Utilisez un poste de travail de décharge électrostatique (ESD) et / ou portez
un bracelet anti-statique lorsque vous travaillez. Ce produit possède une bornede mise à la terre qui est
prévu à l’arrièredu produit, à ceci s’ajoute la mise à la terre de la prise.
This product has a separate protective earthing terminal provided on the back of the product in addition
to the grounding terminal of the attachment plug. This separate protective earthingterminal must be
21
Page 22

permanently connected to earth with a green with yellow stripe conductor minimum size # 14 AWG and
the connection is to be installed by a qualified service personnel.
Ce produit a une borne de mise à la terre séparé sur le dos de l'appareil, en plus de la borne de mise à la
terre de la fiche de raccordement. Cette bornede mise à la terre séparée doit être connecté en
permanence à la terre avec un conducteur vert avec la taille bande jaune de minimum # 14 AWG et la
connexion doit être installé par un personnelqualifié.
The connecting cable between the outdoor equipment and the indoor ITE devices should comply with
Class 3 wiring methods as listed in NEC, Table 725.154(G) for Class 3 Cable Substitutions.
Le câble connectant l’équipement extérieur et ceux d’intérieur de type ITE doit être conforme avec les
méthodes de câblagede classe 3 tel que listé dans le standardNEC, Table 725.154(G) pour les câbles
de substitutions de classe 3.
PoE input cable type should be CL3, CL3P, CL3R, CL3X, marked "SUNLIGHT RESISTANT", "SUN.
RES.", or "SR." and "water resistant" or "W".
Le type de câble PoE d'entrée doit être CL3, CL3P, CL3R, CL3X marqué"SUNLIGHT RESISTANT".
"SUN RES.» Ou «SR». et "waterproof" ou "W".
If further assistance is needed with purchasing a power source and POE input cable, please contact
Fortinet, Inc.
Si vous avez besoin de plus d'aide à l'achat de l'alimentation et le fil d'entrée PoE, s'il vous plaît
communiquer avec Fortinet, Inc.
The Console port is not intended to be connected to the computer after the outdoor installation is
completed.
La porte Console n’est pas destinée à être raccordée à l’ordinateur après l’installation extérieure faite.
This equipment is to be connected only to PoEnetworks (LPS)and maybe installed outdoors except the
SurgeProtector, the PoEInjector and its externalLPS Power Supply which are intended for indoor
installation only.
Ce produit doit être connecté uniquement aux réseaux POE et peut être installé à l'extérieur sauf le
protecteur de surtension, l'injecteur PoE et son alimentation LPS externe qui sont destinés à une
installation intérieure seulement.
22
Page 23

Regulatory Notices
Federal Communication Commission (FCC) – USA
This device complies with Part 15 of FCC Rules. Operationis subject to the following two conditions:
(1) this device may not cause harmful interference, and
(2) this device must accept any interference received; including interference that may cause undesired
operation.
This equipment has been tested and found to comply with the limits for a Class B digital device,
pursuant to Part 15 of the FCC Rules. These limits are designedto provide reasonable protection
against harmful interference in residential installation. This equipment generates, uses, and can radiate
radiofrequency energy, and if it is not installed and used in accordance with the instruction manual, it
may cause harmful interference to radio communications. However, there is no guarantee that
interference will not occur in a particular installation.
If this equipment does cause harmful interference to radioor television reception, which can be
determinedby turning the equipment off and on, the user is encouraged to try to correct the interference
by one or more of the following measures:
Reorient or relocate the receiving antenna.
Increase the separation between the equipment and receiver.
Connect the equipment into an outlet on a circuit different from that to which the receiver is connected.
Consult the dealeror an experienced radio/TV technician for help.
WARNING: Any changes or modifications to this unit not expressly approved by the party responsible
for compliance could void the user’s authority to operate the equipment
This equipment complies with FCC radiation exposure limits set forth for an uncontrolled environment.
This equipment shouldbe installed and operated with minimum distance 32 cm between the radiator and
your body. This transmitter must not be co-located or operating in conjunction with any other antenna or
transmitter.
This device meets all the other requirements specified in Part 15E, Section 15.407 of the FCC Rules.
Industry Canada Equipment Standard for Digital Equipment (ICES)
– Canada
This Class B digital apparatus complies with Canadian ICES-003.
Cet appareilnumériquede la classe B est conforme à la norme NMB-003du Canada.
23
Page 24

Innovation, Science and Economic Development (ISED) – Canada
This device complies with Industry Canada’s license-exempt RSSs. Operation is subject to the
following two conditions:
(1) This device may not cause interference; and
(2) This device must accept any interference, includinginterference that may cause undesired operation
of the device.
Le présent appareilest conforme aux CNR d'Industrie Canadaapplicables aux appareils radio exempts
de licence. L'exploitation est autorisée aux deux conditions suivantes:
(1) l'appareil ne doit pas produire de brouillage, et
(2) l'utilisateur de l'appareildoit accepter tout brouillageradioélectrique subi, même si le brouillage est
susceptible d'en compromettre le fonctionnement.
For product availablein the USA/Canada market, only channel 1~11 can be operated. Selection of other
channels is not possible.
Pour les produits disponibles aux États-Unis / Canada du marché, seul le canal 1 à 11 peuvent être
exploités. Sélection d'autres canaux n'est pas possible.
This equipment complies with ISED radiation exposure limits set forth for an uncontrolledenvironment.
This equipment shouldbe installed and operated with minimum distance 32 cm between the radiator &
your body.
Cet équipement est conforme aux limites d'exposition aux rayonnements ISED établies pour un
environnement non contrôlé. Cet équipement doit être installé et utilisé avec un minimum de 32 cm de
distance entre la source de rayonnement et votre corps.
Caution: The device for the band5150-5250 MHz is only for indoor usage to reduce potential for harmful
interference to co-channel mobile satellite systems. High-power radars are allocated as primary users
(i.e. priority users) of the bands 5250-5350 MHz and 5650-5850MHz and that these radars could cause
interference and/or damage to LE-LAN devices.
Attention: Le dispositif de la bande 5150-5250 MHz est réservé à un usage intérieur afin de réduire
l'interférence nuisible potentielle aux systèmes mobiles par satellite co-canal. Les radars à haute
puissance sont désignés comme utilisateurs principaux (à savoir les utilisateurs prioritaires) des bandes
5250-5350 MHz et 5650-5850MHz et que ces radars pourraient causer des interférences et / ou
endommagerles périphériques LE-LAN
24
Page 25

This device has beendesigned to operate with an antenna having a maximum gain of 5.9 dBifor 2.4GHz
and 6.5 dBi for 5GHz. Antenna having a higher gain is strictly prohibited per regulations of ISED. The
required antennaimpedance is 50 ohms.
Under ISED regulations, this radio transmitter may only operate using an antenna of a type and
maximum (or lesser) gainapproved for the transmitter by ISED. To reduce potential radio interference to
other users, the antenna type and its gain shouldbe so chosen that the equivalent isotopically radiated
power (e.i.r.p.) is not more than that necessary for successful communication.
Ce dispositif a été conçu pour fonctionner avec une antenne ayant un gain maximal de 5.9 dBi pour2,4
GHz et 6.5 dBi pour5GHz. Une antenne ayant un gain supérieursont strictement interdites par la
réglementation d'ISED. L'impédance d'antenne requise est de 50 ohms.
Conformément à la réglementation d'ISED, cet émetteur radio peut fonctionnerseulement avec une
antenned’un type et d'un gainmaximal (ou inférieur) approuvé pour l'émetteur par ISED. Dans le but de
réduire les risques de brouillage radioélectrique aux autres utilisateurs, il faut choisir le type d'antenne et
son gainde sorte que la puissance isotrope rayonnée équivalente (p.i.r.e.) ne dépasse pas l'intensité
nécessaire à l'établissement d'une communication réussie.
This radio transmitter (IC: 7280B-2517Q021) has beenapproved by ISED to operate with the antenna
types listed below with the maximum permissible gainand required antenna impedance for each
antennatype indicated. Antenna types not included in this list, having a gaingreater than the maximum
gain indicated for that type, are strictly prohibited for use with this device.
Le présent émetteur radio (IC: 7280B-2517Q021) a été approuvé par ISED pour fonctionner avec les
types d'antenne énumérés ci-dessous et ayant un gain admissible maximal et l'impédance requise pour
chaque type d'antenne. Les types d'antenne non inclus dans cette liste, ou dont le gain est supérieur au
gain maximal indiqué, sont strictement interdits pour l'exploitation de l'émetteur.
This device and it's antennas(s) must not be co-located or operating in conjunction with any other
antennaor transmitter except in accordance with IC multi-transmitter product procedures.
Cet appareilet son antenne (s) ne doit pas être co-localisés ou fonctionnement en association avec une
autre antenne ou transmetteur.
25
Page 26

Qty MPN
Antenna
Type
Antenna
Conn ector
2.4GHz
5GHz
Band
1
Gain (dBi )
5GHz
Band
2
5GHz
Band
3
5GHz
Band
4
RFMTA400809MMLB901
1
RFMTA400811MMLB901
1
RFMTA400814MM5B901
1
RFMTA400816MM5B901
1
RFPCA381017MMAB702
1
Metal
Antenna
Metal
Antenna
Metal
Antenna
Metal
Antenna
PCB
Antenna
MMCX 5.9 - - - -
MMCX 5.9 - - - -
MMCX - 6.2 6.5 6.5 6.4
MMCX - 6.2 6.5 6.5 6.4
MMCX 8.6 - - - -
Professional Installation Instruction
1. Installation personnel
This product is designedfor specific application and needs to be installedby qualified personnel who has
RF and relatedrule knowledge. The general user shall not attempt to install or change the settings.
2. Installation location
The product shall be installed at a location where the radiating antennacan be kept 32 cm from nearby
person in normal operation condition to meet Regulatory RF exposure requirement. The installation
applies to both indoor and outdoorlocation.
26
Page 27

3. Antenna(s)
Use only the antenna(s) that have been approvedby the manufacturer. The non-approvedantenna(s)
may produce unwanted spurious or excessive RF transmitting power that may lead to the violation of
FCC/ISED limit and is prohibited.
4. Warning
Please carefully select the installation position and ensure that the final output power does not exceed
the limit set forth in relevant rules. The violation of the rule could lead to serious federalpenalty.
Instructions d'installation professionnelle
1. Installation
Ce produit est conçu pour un usage spécifique et doit être installé par un personnel qualifié maîtrisant les
radiofréquences et règle similaires. L'utilisateur ne doit pas tenter d'installer ou de modifier les
paramètres.
2. Emplacement d'installation
En usage normal, afin de respecter les exigences réglementaires concernant l'exposition aux
radiofréquences, ce produit doit être installe de façon à respecter une distance de 32 cm entre l'antenne
émettrice et. L'installation s'appliqueaux emplacements intérieur et extérieur.
3. Antenne(s)
Utiliser uniquement l'antenne (s) approuvées par le fabricant. L'utilisation d'autres antennes peut
conduireà un niveau de rayonnement essentiel ou nonessentiel dépassant les niveaux limites définis
par FCC/ISED, ce quiest interdit.
4. Avertissement
Choisir avec soin la position d'installation et s'assurer que la puissance de sortie ne dépasse pas les
limites en vigueur. La violation de cette règle peut conduire à de sérieuses pénalités fédérales.
27
Page 28

European Conformity (CE) - EU
This is a Class B product. In a domestic environment, this product may cause radiointerference, in
which case the user may be required to take adequate measures.
The product transmits within the frequency ranges and less than or equal to the power listed below:
2412-2472MHz less than 20dBm
5180-5240MHz less than 23dBm
5260-5320MHz less than 23dBm *
5500-5700MHz less than 30dBm *
Note: * Only with DFS bands certification.
This equipment shouldbe installed and operated with minimum distance 32cm between the radiator &
your body.
The device is restricted to indoor use only when operating in the 5150to 5350 MHz frequency range in
the following countries:
AT BE BG HR CY CZ DK
EE FI FR DE EL HU IE
IT LV LT LU MT NL PL
PT R O SK SI ES SE UK
Simplified EU Declaration of Conformity
This declaration is only valid for Fortinet products (including, combinations of software, firmware and
hardware) provided by Fortinet or Fortinet’s authorized partners to the end customer directly for use
within the EU or countries that have implemented the EU Directives and/or spectrum regulation. Any
Fortinet products not obtained directly from Fortinet or Fortinet’s authorized partners may not comply
with EU Directives and Fortinet makes no assurances for such products.
Български
Този продукт е в съответствие с Директива 2014/53/ЕС.
28
Page 29

Česky
Tento produkt je v souladuse směrnicí 2014/53/EU.
Dansk
Dette produkt er i overensstemmelse med direktiv 2014/53/EU.
Deutsch
Dieses Produkt entspricht der Richtlinie 2014/53/EU.
Eesti
See toodevastab direktiivile 2014/53/EL.
English
This product is in compliance with Directive 2014/53/EU.
Español
Este producto cumple con la Directiva 2014/53/UE.
Ελληνική
Το προϊόν αυτό συμμορφώνεται με την Οδηγία2014/53/ΕΕ.
Français
Ce produit est conforme à la Directive 2014/53/UE.
Hrvatski
Ovaj proizvod je u skladu s Direktivom 2014/53/EU.
Italiano
Questo prodotto è conforme allaDirettiva 2014/53/EU.
Latviski
Questo prodotto è conforme allaDirettiva 2014/53/EU.
Lietuvių
Šis gaminys atitinka direktyvą 2014/53/ES.
Malti
Dan il-prodott huwa konformi mad-Direttiva 2014/53/UE.
Magyar
Ez a termék megfelel a 2014/53/EU irányelvnek.
29
Page 30

Nederlands
Dit product is in overeenstemming met Richtlijn 2014/53/EU.
Norsk
Dette produktet er i samsvar med direktiv 2014/53/EU.
Polski
Ten produkt jest zgodny z dyrektywą 2014/53/UE.
Português
Este produto está em conformidade com a Diretiva 2014/53/UE.
Rumunski
Acest produs este în conformitate cu Directiva 2014/53/UE.
Slovensky
Tento produkt je v súlade so smernicou 2014/53/EÚ.
Slovensko
Ta izdelek je v skladu z Direktivo 2014/53/EU.
Suomi
Tämä tuote on direktiivin 2014/53/EU mukainen.
Svenska
Denna produkt överensstämmer med direktiv 2014/53/EU.
Note: The full declaration of conformity for this product is available at the link below:
https://site.fortinet.com/ProductRegulatory/EU
30
Page 31

Fortinet Product License Agreement / EULA and Warranty Terms
Trademarks and Copyright Statement
Fortin et®, Forti Gate®, and FortiGua rd® are regi stered tradem arks o f Fortin et, In c., and o the r Fo rtinet names ma y a lso be trade marks,
registe red or oth erwise, o f Forti net. All oth er produ ct or company name s may be trad em arks of thei r respective ow ners. Copyrig ht ©
2016 Fortin et, In c., All Ri ght s reserved. Cont ents an d terms a re subje ct to chang e by Fortinet wi tho ut pri or not ice. No part of this
publ ication may be reprodu ced in any form o r by any mea ns or used to m ake an y d erivati ve such as transla tio n, transformati on , or
adap tati on with out p ermi ssion from Fortin et, Inc., as stipulat ed by the Uni ted Stat es Copyrigh t Act o f 197 6.
Prod uct Licen se Agre eme nt
The pa rties to this agreeme nt are you , the e nd custom er, an d ei the r (i ) where you h ave pu rchased your Product wit hin the Ame ricas,
Fortin et, In c., or (ii) whe re you ha ve purchased you r Produ ct outsid e of th e Ameri cas, Fortine t Singa pore Private L im ite d (each referred
to he rein a s "Fortinet"). CAREFULLY READ THE FOLLOWING LEGAL AGREEMENT (THE OR THIS “AGREEMENT” OR “EULA”). USE OR
INSTALLATION OF FORTINET PRODUCT(S) AND ANY UPDATES THERETO, INC LUDIN G HARDWARE APPLIANCE PRODUCTS,
SOFTWARE AND FIRM WARE INCL UDED THEREIN BY FORTINET, AND STAND-ALONE SOFTWARE PRODUCTS SOLD BY FORTINET
(TOGETHER, THE "PRODUCTS") CONSTITUTES ACCEPTANCE BY YOU OF THE TERMS IN THIS AGREEMENT, AS AMENDED OR
UPDATED FROM TIM E TO TIM E IN FORTINET’SD ISCRETION BY FORTINET PUBLISHING AN AMENDED OR UPDATED VERSION.
FORTINET SHALL NOT BE BOUND BY ANY ADDITIONAL AND/OR CONFLICTING PROVISIONS IN ANY ORD ER, RELEASE,
ACCEPTANCE OR OTHER WRITTEN CORRESPONDENCE OR OTHER WRITTEN OR VERBAL C OMMU NICATION UNLESS EXPRESSLY
AGREED TO I N A WRITING SIGNED BY THE GENERAL COUNSEL OF FORTINET. I F YOU DO NOT AGREE TO ALL OF TH E TERMS OF
THIS AGREEMENT, DO N OT START THE I NSTALLATION PROCESS OR USE THE PRODUCTS. I F YOU DO NOT AGREE TO THE TERMS
OF TH IS AGREEMENT, YOU SHOULD IM MEDIATELY, AND IN NO EVENT L ATER THAN FIVE (5) CALENDAR DAYSAFTER YOUR
RECEIPT OF THE PRODUCT IM MEDIATELY NOTIFY THE FORTIN ET L EGAL TEAM IN WRITING AT L EGAL@FORTINET.COM OF
REQUESTED C HANGES TO TH IS AGREEMENT.
1. Li cense Grant.
This is a l icense, n ot a sal es agree me nt, be twee n you and Forti net . The te rm "Software", as used th rough out t his Agreem ent, includes
all Fortin et and third pa rty f irmw are and software provide d to you w ith , or in corporated in to, Forti net appl iances and a ny stand-alon e
software p rovided to you b y Fo rtine t, wi th th e excepti on o f any open source softwa re contai ne d in Fortin et’s Produ cts wh ich i s d iscussed
in d etai l i n sectio n 15 b el ow, a nd th e term “Softw are” incl ude s a ny accompa nying docum enta tio n, an y upda tes and enha ncem ents of
the software or fi rmware p rovide d to you b y Fortine t, at i ts opti on. Fortin et gran ts to you a no n-transfe rable (except as provide d i n
section 5 ("Transfer") and section 1 5 ("Open Source Software") bel ow), n on-exclusi ve, revocable (in th e event o f your fai lu re to comply
with these te rms or in th e even t Fortin et i s n ot properly pa id f or the a ppl icable Product) li cense to use the Soft ware sol ely for your
int ernal busin ess purposes (provide d, i f a substan tia l po rtion of your bu siness is to p rovide man age d service provide r services to you r
end-custom ers, you ma y u se the Softw are em bed ded in Fo rtiGate a nd sup porti ng h ardware a ppl ia nces to provi de th ose services,
subje ct to the o the r restrictions in thi s Agree ment), in accordance wi th th e term s set f orth i n thi s Agreemen t and subje ct to any further
restriction s i n Forti ne t docum enta tion, and solely on t he Forti net appli ance, o r, in th e case of bl ad es, CPUs o r datab ases, on th e sing le
bla de, C PU o r data base on whi ch Fortin et in stall ed t he Softw are or, for sta nd-al one Software, sol el y on a sin gle compu ter runn ing a
validly li censed cop y o f the operatin g system for whi ch the Soft ware wa s d esigned u nless a nd except set f orth i n the publi shed
docum enta tio n oth erwi se, or, in t he case of b la des, CPUs or datab ases, on a singl e bl ad e, CPU or dat aba se. For clarity,
notw ith standi ng a nythi ng to the con trary, all li censes of Software t o be i nstal le d on b la des, CPUs or databases are li censed o n a per
singl e bl ad e, sole ly for on e bl ade and n ot fo r m ul tiple bla des tha t ma y b e in stall ed i n a cha ssis, p er sing le CPU o r per single d atab ase
basis, as ap pli cabl e. The Software i s "in use" on an y Fo rtine t app li ances whe n it is loaded into tem porary m emo ry (i .e. RAM). You
agree t hat, except for the li mi ted, specifi c l i cense righ ts granted in t his sectio n 1, you receive no l icen se right s t o the Software.
2. Li mi tati on o n Use.
You may no t atte mpt to, an d, i f you are a corpo ration, you a re responsi ble to preven t your emp lo yees and con tractors f rom at tem pti ng
to, (a) mo dif y, translat e, reverse eng ine er, decompi le , disassemble , create derivati ve works b ased on , subl icense, o r distrib ute t he
31
Page 32

Software; (b) rent or lea se any righ ts in th e Softwa re in a ny form to any thi rd party or ma ke the Software avai lab le or accessible to thi rd
parti es in a ny other m an ner; (c) e xcept as provide d in section 5, transfe r assign or subl icense ri ght to any oth er person o r enti ty, (d)
remove a ny proprie tary noti ce, la bel s, or marks on the Software, Produ cts, a nd con tai ners, or (e) use the Softw are for th ird-pa rty traini ng ,
comme rcial t im e-sharin g or service burea u use or use th e Software to provid e services to thi rd parti es except as expressly set forth i n
thi s Agree men t.
3. P roprie tary Righ ts.
All rig hts, tit le, int erest, and all copyrigh ts to the Software a nd an y copy m ade thereof by you an d to a ny Product remai n wi th Forti net .
You acknowl edge that no ti tle to th e in tel le ctual p roperty in the Software or other Products is transferred to you and you will n ot acqu ire
any righ ts to the Soft ware or ot her Products except for the specifi c licen se as expressly set fo rth in section 1 (“License Grant ”) a bove. You
expressly a gree a nd a cknowle dge t hat Fortine t owns a nd shal l ret ain al l intel le ctual prope rty ri ghts in and to, an d you ha ve no
int ell ectua l prop erty rights i n a nd to , the Produ cts and th e Software o the r than th e Li cense Grant. You a gree t o keep con fid enti al all
Fortin et confi denti al i nfo rmati on a nd o nly to u se such info rmati on f or the p urposes for wh ich Forti net d isclosed i t.
4. Term a nd Term ination.
Except fo r evalu ati on an d be ta l icenses or oth er li censes, such as subscription li censes, where t he te rm of th e li cense i s l im it ed pe r the
evalu ati on/b eta o r othe r agreem ent , in t he ordering docum ents o r otherwi se, the term o f the l icen se is for the d urati on o f Fortinet's
copyright i n th e Softwa re. Fortin et m ay termi nat e thi s Agreemen t, an d the l icenses and ot her rig hts herei n, i mm edi ate ly wit hou t noti ce
if you b reach or fai l to compl y with any of th e term s a nd con dit ion s of thi s Agree ment or for ot her reasons a s sta ted i n Forti net’s oth er
docum enta tio n. You agree th at, up on such te rmin ati on, you wil l cea se using t he Software and any Product and eit her de stroy a ll copie s
of the Fortin et do cumen tati on o r return al l m ate rial s t o Forti net.
5. Transfer.
If you are a Fo rtinet contracte d and auth orized re sell er or distrib uto r of Products, you may transfe r (not rent o r l ea se unl ess spe cifically
agree d to i n writ ing by Fortinet) the Soft ware to o ne e nd user on a permane nt ba sis, provide d tha t: (i) you ensure tha t your customer
and t he en d user receives a copy of t his Agreem ent, is bou nd by it s t erms and condi tio ns, and , by sell ing the Produ ct or Software, you
hereb y a gree to enfo rce the te rms in th is Agreeme nt ag ai nst such end u ser, (ii) you at a ll tim es comp ly with al l ap pli cabl e United
States export control la ws and reg ul ati ons, an d (ii i) you ag ree to ref und a ny fees pa id to you by an e nd u ser w ho pu rchased Product(s)
from you b ut do es not a gree to the te rms contai ned in t his Agreem ent a nd th erefo re wishe s t o return t he Product(s) a s provided for in
thi s Agree men t. Furthe r, if you a re a non-auth orized resell er of Products, you are no t authori zed to sel l Product(s) o r Software, b ut,
regardl ess, by selli ng Produ ct(s) or Software , you hereby agree you are bou nd b y t he restricti ons and obl ig ati ons herein a nd are b oun d
to: (i) en sure that your customer an d the end u ser receive a copy of th is Agreeme nt an d are b oun d in ful l by al l restricti ons and
obl igati ons herei n (ii ) enfo rce the restricti ons and obl ig ati ons in this Agree men t aga in st such custom er and/or en d user, (ii i) comp ly
with all appli cabl e Uni ted States export control l aws and re gul ati ons an d al l other app li cabl e la ws, and (i v) ref und a ny fees pa id to you
by a customer a nd/ or end u ser who pu rchased Product(s) fro m you bu t doe s not ag ree to t he restricti ons and obl ig ati ons conta ine d in
thi s Agree men t and therefore wi shes to return t he Product(s) as p rovide d for in thi s Agreemen t. Notwith standi ng anythi ng to the
contrary, distrib uto rs, resel le rs a nd ot her Forti net p artners (a) are no t age nts of Forti ne t and (b ) a re not auth orized t o bi nd Forti net in
any way.
6. Li mi ted Warran ty.
Fortin et provid es thi s l imited wa rranty for its prod uct onl y to the singl e en d-user person o r enti ty that o rigi nal ly purchased the Produ ct
from Forti net or its aut horized resell er or di stributo r and p aid for such Product. The wa rranty is onl y valid for Products which a re prope rly
registe red on Fo rtine t’s Supp ort Website , https://supp ort.forti ne t.com, o r such o the r w ebsit e as provid ed by Forti net, or for whi ch the
warranty oth erwise starts a ccording to Fortin et’s p ol icie s. The warrant y p erio ds discussed bel ow w il l start accordin g to Fo rtine t’s poli cies
posted at htt p://w ww.fo rtine t.com/ abo utus/l ega l.h tml or such othe r website as provide d by Fortinet. I t is the Fo rtine t di stribut or’s and
resell er’s respon sibi li ty to ma ke clear to th e en d user the date the p roduct was o rigi nal ly ship ped from Forti ne t, and it i s the en d user’s
responsib il ity to u nde rstand the orig inal shi p da te from the p arty from wh ich the end user purchased th e prod uct. All w arranty clai ms
must be submi tted in w riti ng to Fortin et be fore th e expi ratio n of th e warranty term or such clai ms are wa ived i n fu ll . Fortin et provides
no wa rranty for any bet a, do nati on o r evalu ati on Products, for an y spa re parts not purchased d irectl y f rom Forti net b y the en d-user, for
any accessories, or for any stand -alone softw are. Forti net w arrants tha t the h ardwa re porti on o f the Produ cts, i nclu ding spare p arts
unl ess n ote d oth erwise ("Hardwa re") w il l be free from mat eria l de fects in wo rkmanshi p as comp ared to the fu nctio nal specifi cations for
the p eriod set forth a s f oll ows a nd appl icabl e to the Produ ct type ("Hardware Warranty Period "): a three h und red sixty-five (365 ) day
li mi ted wa rranty for the Hardwa re excludi ng spa re parts, po wer suppl ie s, and a ccessorie s (provided, solel y with respect to Forti AP an d
32
Page 33

Meru AP indo or Wi-Fi access p oi nt Hard ware ap pl ian ce produ cts and Forti Switch Hardware ap pl ian ce produ cts o ther than th e
FortiSwit ch-5000 series (for both excludi ng spa re parts, power suppl ie s, and accessorie s), the wa rranty herei n shal l l ast from th e start of
the wa rranty peri od as di scussed a bove u nti l fi ve (5) years fo ll owi ng th e prod uct ann oun ced end -of-li fe date), an d, fo r spare parts,
powe r suppli es, an d accessories, solel y a ni nety (90) da ys l im ite d warran ty. Fortine t's sol e ob li gat ion shall be t o repair or offe r
repla cement Hardware for th e defective Ha rdware a t no charge to th e origin al o wne r. This obl ig ati on i s exclusive of tran sport fee s,
lab or, de-i nstal la tio n, in stall ati on , reconfi gurat ion , or return shi pm ent a nd handl ing fees and costs, and Fortin et shal l have no
obl igati on rel ated there to. Such repa ir or repl aceme nt wi ll be ren dered by Fortine t at a n aut hori zed Fortin et service facili ty as
dete rmin ed b y Fo rtine t. The repla cemen t Hardw are ne ed no t be n ew or of a n i dentical make, m odel, o r part; Forti net m ay, in its
discretio n, replace th e de fective Ha rdware (or an y part the reof) wit h any recon ditioned Produ ct that Forti net reasona bly de termi nes i s
substanti al ly equ ival ent (o r superior) in all ma teria l respects to the defecti ve Hardwa re. The Ha rdware Warranty Peri od fo r the repa ired
or repla cement Hardware shal l b e for the greater of the remai ni ng H ardware Warran ty Period or ni net y d ays from the del ivery of the
repai red or repl acem ent H ardwa re. If Forti net d eterm in es in i ts reasonab le d iscretio n tha t a ma teri al d efect i s i ncap abl e of correctio n or
that i t is n ot practi cal to repai r or repla ce defe ctive Hardw are, th e price p aid by the origi nal purchaser for th e def ective Ha rdware wi ll be
refund ed b y Fo rtine t upo n retu rn to Forti net o f the d efe ctive Hardw are. All H ardwa re (or part the reof) tha t is repl aced by Fo rtine t, or for
whi ch the pu rchase price i s re fund ed, sha ll becom e the prope rty o f Fortin et up on rep la cemen t or refun d. Forti net w arrants tha t the
software a s i ni tiall y shipped wi th th e Hardw are Products wil l substanti all y conform t o Forti net's then current fun ction al spe cificat ion s f or
the Softw are, as set forth in the ap pl icabl e do cumen tati on f or a period o f ni nety (90) da ys ("Software Warranty Period "), i f the Software
is prope rly instal le d on appro ved Hardw are and ope rated a s contem pla ted i n i ts docume nta tio n. Forti net's sole o bl iga tio n shal l be to
repai r or offer repl acem ent Soft ware fo r the no n-conform in g Software w ith software th at substa nti all y conforms to Fortin et's functi onal
specifi catio ns. This ob li gati on i s exclusive of t ransport fe es, lab or, de-instal la tio n, install ati on , reconfi gurat ion , or return shi pm ent a nd
hand li ng f ees and costs, a nd Forti net shall have n o obl igati on rel ate d the reto. Except as oth erwise a greed by Fortine t in writi ng, t he
warranty repl acem ent Softw are is provi ded o nl y t o the origi na l licensee , and is subje ct to the terms and condi tio ns of the li cense
grante d by Fortinet fo r the Softwa re. The Soft ware Warranty Period shall exten d for an a ddi ti ona l ni nety (9 0) days after an y w arranty
repla cement softwa re is del ivered . If Forti net dete rmin es in i ts reasona ble discretio n tha t a m ateri al n on-conf orman ce is incapabl e of
correction or t hat i t is no t practical to rep air or repl ace th e non-conform ing Software, t he price pai d by the origina l l icensee for the n onconform ing Software wi ll be refund ed by Fo rtine t; provid ed th at th e non-conform ing Software (an d al l copi es the reof) is fi rst ret urned to
Fortin et. The li cense grant ed respecting a ny Software fo r which a refund is given auto ma tical ly termina tes im media tel y u pon refund.
For purpose o f the a bove h ardware and soft ware wa rranties, the te rm “functi ona l speci ficati on s” m ean s sol el y t hose speci ficati ons
auth orized a nd p ubl ishe d by Fortin et that expressly state i n such specifi catio ns that they are th e fun ction al spe cificat ion s referred to i n
thi s secti on 6 o f thi s Agreemen t, an d, in the e vent no such specifi cations are provid ed to you with the Soft ware or Ha rdware, t here shal l
be no warranty on such Software.
7. Di sclaim er of Othe r Warrantie s a nd Re strictions.
EXCEPT FOR THE LIM ITED WARRANTY SPECIFIED I N SECTION 6 ABOVE, THE PRODUCT AND SOFTWARE ARE PROVIDED "AS-IS"
WITHOUT ANY WARRANTY OF ANY KIND INCL UDING, WITHOUT LI MITATION, ANY IM PLIED WARRANTY, IMPLIED OR EXPRESS
WARRANTYOF M ERCHANTABILITY, OR WARRANTY FOR FITNESSFOR A PARTICULAR PURPOSE AND NON-INFRINGEMENT. IF ANY
IMPLIED WARRANTY CANNOT BE DISCLAIMED IN ANY TERRITORY WHERE A PRODUCT IS SOLD, TH E DU RATION OF SUCH
IMPLIED WARRANTY SHALL BE LIM ITED TO N INETY (90) DAYS FROM THE DATE OF ORIGINAL SHIPMENT FROM FORTINET. EXCEPT
AS EXPRESSLY COVERED UNDER THE LIMITED WARRANTY PROVIDED HEREIN, TH E ENTIRE RISK AS TO THE QUALITY, SELECTION
AND PERFORMANCE OF THE PRODUCT IS WITH THE PURCHASER OF THE PRODUCT. NOTWITHSTANDING ANYTHING TO THE
CONTRARY, TH E HARDWARE WARRANTY PERIOD DISCUSSED ABOVE DOESNOT APPLY TO CERTAIN FORTINET PRODUCTS,
INCLU DING FORTITOKEN WHICH H AS A 365 DAY WARRANTY FROM THE D ATE OF SHIPMENT FROM FORTIN ET’S FACILITIES, AND
THE SOFTWARE WARRANTY DOES NOT APPLY TO CERTAIN FORTINET PRODUCTS, IN CLUD ING FORTIGATE-ONE AND VDOM
SOFTWARE. YOU HEREBYACKNOWLEDGE AND AGREETHAT NO VENDOR CAN ASSURE COM PLETE SECURITY AND NOTHING
HEREIN OR ELSEWHERE SHALL BE DEEMED TO IMPLY A SECURI TY GUARANTEE OR ASSURANCE.
The warranty in Sectio n 6 ab ove does not ap pl y i f the Software, Product or any othe r equi pm ent u pon whi ch the Softw are is au thori zed
to be u sed (a) has be en al tered , except by Forti net o r its auth orized representa tive, (b ) has not be en i nstal le d, op erate d, repa ired ,
upda ted to the lat est version, or m ai nta ine d in accordance wi th i nstructio ns suppl ied by Fortin et, (c) h as bee n subj ected to abn ormal
physical o r electri cal stress, m isuse, n egl ig ence, o r accident ; (d) is li censed for b eta , evalu ati on, d ona tio n, te sting o r dem onstrati on
purpo ses o r for which Fortine t doe s not charge a purchase p rice or li cense fee . In th e case of be ta, te sting , eval uati on , don ati on or free
Software or Produ ct, the e nd user acknowled ges and agree s that such Softwa re or Product may conta in b ugs or errors and could cause
33
Page 34

system fai lures, d ata loss and o ther i ssues, and t he en d user ag rees that such Softw are or Product is provid ed “as-is” without any
warranty wha tsoever, an d Fortinet d isclai ms any warran ty or lia bili ty whatsoever. An e nd user’suse of eval uation or beta Software o r
Product is li mi ted to thi rty (30) days from ori gin al shi pm ent u nl ess o therwi se agreed i n writi ng by Fortine t.
8. Governi ng La w.
Any di spute s arising out o f thi s Agreemen t or Fortin et’s l im ited wa rranty shall be g overned by the l aws of th e state o f Cal ifo rnia , wit hou t
regard to the con fli ct of la ws princi ple s. In the event of any di sputes arising out of th is Agreem ent o r Fortine t’s l im ite d warrant y, the
parti es submi t to th e ju risdi ction o f the fede ral an d state cou rts l ocate d in Santa Clara Count y, Cali forni a, a s appl icable.
9. Li mi tati on o f Li abi li ty.
TO TH E M AXIMUM EXTENT PERMITTED BY LAW AND NOTWITHSTANDING ANYTHING TO THE C ONTRARY, FORTIN ET IS NOT LIABLE
UNDER ANY CONTRACT, N EGLIGENCE, TORT, STRICT LIABILITY, INFRINGEMENT OR OTHER LEGAL OR EQUITABLE THEORY FOR
ANY LOSS OF USE OF THE PRODUCT OR SERVICE OR ANY DAMAGESOF ANY KIND WHATSOEVER, WHETHER DIRECT, SPECIAL,
INCIDENTAL OR CONSEQUENTIAL (INCLUDING, BUT NOT LIMITED TO, DAMAGES FOR LOSSOF GOODWILL, LOSS OF PROFIT,
LOSS OF OPPORTUNITY, LOSS OR DAMAGE RELATED TO USE OF THE PRODUCT OR SERVICE IN CONNECTION WITH HIGH RISK
ACTIVITIES, DE-INSTALLATION AND INSTALLATION FEES AND COSTS, DAMAGE TO PERSONAL OR REAL PROPERTY, WORK
STOPPAGE, COMPUTER FAILUR E OR M ALFUNCTION, COMPUTER SECURITY BREACH, COMPUTER VIRUS INFECTION, LOSS OF
INFORMATION OR DATA CONTAINED IN, STORED ON, OR INTEGRATED WITH ANY PRODUCT INCL UDING ANY PRODUC T
RETURNED TO FORTIN ET FOR WARRANTY SERVICE)RESULTING FROM THE U SE OF THE PRODUCT, R ELATING TO WARRANTY
SERVICE, OR ARISING OUT OF ANY BREACH OF THE LIM ITED WARRANTY IN SECTION 6 ABOVE, EVEN IF FORTINET H AS BEEN
ADVISED OF THE POSSIBILITY OF SUCH DAMAGES. THE SOLE REMEDY FOR A BREACH OF THE LIMITED WARRANTY IS REPAIR,
REPLACEMENT OR REFUND OF THE DEFECTIVE OR NON-CONFORMI NG PRODUCT AS SPECIFICALLY STATED IN SECTION 6
ABOVE.
10. Im port / Export Re qui reme nts; FCP A Co mpl iance.
You are ad vised tha t the Produ cts m ay be subj ect to t he Un ite d States Export Admin istrati on Regul ation s a nd o ther i mpo rt and e xport
law s; diversion contrary to Uni ted Stat es law a nd reg ul ati on i s p rohi bited. You a gree t o comp ly with al l ap pli cabl e i nterna tio nal and
nati ona l l aws tha t app ly to th e Products as well as end u ser, end-use, and d estin ati on restricti ons issued by U.S. and o ther
governm ents. For ad di tio nal inf ormation on U. S. export control s see www.b is.doc.gov. Fortin et assume s no responsibili ty or l i abi li ty for
your fail ure to obta in any necessary i mp ort an d export a pproval s, and Fo rtine t reserves th e rig ht to termi nate or suspend shi pm ents,
services an d supp ort in the event Forti net h as a reasona ble basi s to suspect any im port or export viol ati on. You represent th at neither
the Un ite d States Bureau o f Ind ustry a nd Security no r any othe r governme nta l ag ency has issued san ctions a gai nst you or oth erwi se
suspende d, revoked o r deni ed you r export privil eg es. You agree not to use or transfe r t he Products for an y u se relat ing to nu clear,
chemi cal or b io log ical weap ons, or m issile techno lo gy, unl ess autho rized by the Uni ted Stat es Governmen t by regul ati on or specifi c
writte n li cense. Addi ti ona ll y, you agree n ot to directl y or indi rectly export, import or transmit th e Products contrary to the l aws o r
regul ati ons of a ny othe r governme nta l en tity th at has jurisdi ctio n over such export, i mport, transmission o r use. Furthermore, you
represent that you u nde rstand, a nd you h ereby agree to com ply with, all requ irem ents of t he U.S. Forei gn C orrupt Practices Act an d al l
othe r appl icab le l aws. For be ta, te sting , evaluati on, dona tio n or free Produ cts a nd/o r related services, you hereb y agree, represent a nd
warrant to Fortin et th at (a) receip t of the Products and/o r services comply wi th al l p oli cies an d you ha ve obta ine d al l n ecessary
appro vals for such Products a nd/or services, (b) the Products and/o r services are n ot provi ded in e xchange fo r Fortinet ma intai nin g
current business or for new busine ss op portu nit ies, an d (c) the Products and /or services a re not b ei ng recei ved for the ben efi t of, a nd
are not bei ng tran sferred to, any governm ent enti ty, representati ve or affi li ate .
11. U. S. Governm en t En d Users.
The Softwa re and accompa nying docum enta tio n are d eem ed to be "comm ercial compu ter softwa re" and "comm ercial compu ter
software d ocume ntation," respectivel y, pursuant t o DFAR Section 2 27.7 202 and FAR Section 12.2 12, as appl icab le. Any use,
mod ifi cation, rep roducti on, rel ea se, perform ance, d ispl ay or disclosure of the Software and accomp anyi ng do cumentati on by the
Uni ted State s Governmen t shall be g overned solel y by the terms of thi s Agreemen t and shall be p rohibited except t o the e xtent
expressly p ermi tte d by the terms of thi s Agreeme nt an d its successors.
12. Tax Li abil ity.
You agree to be re sponsib le for payme nt of a ny sales or use ta xes i mp osed at any tim e on thi s t ransactio n.
34
Page 35

13. Gen eral Provisio ns.
Except a s spe cifi call y p ermi tted and re qui red i n section 5 (“Transfer”) a bove, you a gree n ot to a ssign th is Agreeme nt or tran sfer any of
the rights or obli gati ons u nde r this Agreement wi tho ut th e prio r writte n consent o f Fortinet. Th is Agreeme nt shal l b e bi ndi ng u pon , and
inu re to th e ben efi t of, t he successors and permitte d assign s o f the parti es. The Un ite d Nat ion s Convent ion on Co ntracts for the
Internati ona l Sale s o f Good s i s expressly e xcluded . Thi s Agree men t and oth er Fortin et ag reeme nts ma y b e am end ed o r sup pl eme nted
onl y b y a writi ng th at refe rs e xpli citly to t he ag reem ent signed on behal f of b oth parti es, or, for thi s Agreement, as oth erwise expressly
provide d in the l ea d-in a bove Sectio n 1 ab ove, provided , notw ith standi ng anythi ng to the con trary a nd e xcept for thi s Agreemen t whi ch
may be a me nded or upd ated as expressly p rovide d in the l ead-in a bove Sectio n 1 ab ove, fo r a ny ame ndm en t or othe r agreem en t to be
bin ding on Fortin et, such am end me nt or oth er agree me nt mu st be sign ed b y Fo rtine t’s Gen eral C oun sel. No wai ver will be i mpli ed
from cond uct or fai lu re to en force righ ts nor effe ctive unl ess in a w riti ng sig ned on be hal f of th e pa rty a gai nst who m th e wai ver is
asserted. If a ny part of this Agreem ent i s foun d une nforceable , tha t part wi ll be e nforced t o the m axim um extent p ermi tted and the
remai nd er shall conti nue in fu ll force and effe ct. You acknowl edge that you have rea d thi s Agreement, un derstand it, and a gree to be
boun d by it s t erms and condi tio ns.
14. P rivacy.
Fortin et’s col le ction , use, prot ection and transfer of you r personal informa tio n is governed by the Fortin et pri vacy po li cy on the Fo rtine t
web sit e (http ://www .forti net .com/a bou tus/privacy.html).
15. Ope n Source So ftwa re.
Fortin et’s p roducts may i nclud e softwa re mod ul es that a re li censed (or subl icensed) to the user unde r the GNU Gen eral Publi c License,
Version 2, o f June 19 91 (“GPL”) or GNU L esser General Publi c License, Version 2.1 , of Feb ruary 1999 (“LGPL”) or other open source
software l icen ses w hich, a mo ng ot her rights, perm it th e user tou se, copy, mod ify an d redi stribute mo dul es, or portion s t hereo f, and may
also req uire a ttrib uti on d isclosures and access to t he source code ("Open Source Software"). The GPL requi res that fo r any Open Source
Software covered u nde r the GPL, whi ch is di stribute d to som eone i n an e xecutabl e bi na ry fo rmat, t hat th e source code a lso be mad e
avail abl e to those u sers. For a ny Open Source Softwa re covered un der the GPL, the source code i s mad e avai lab le on th is CD or
down load pa ckage. If a ny Open Source Softwa re li censes requi re that Fo rtine t provid e rig hts to use, cop y o r modify a Open Source
Software program t hat a re broad er than the ri ghts gran ted i n th is agree ment, th en such rights shall take preced ence o ver t he rig hts and
restriction s h erei n. Forti net w il l pro vide, f or a charge ref lecti ng o ur standa rd di stributi on costs, the compl ete machi ne -readab le cop y o f
the m odi fi ed softw are mo dul es. To ob tai n a com ple te m achin e-readabl e copy, pl ease send your writte n requ est, al ong with a check in
the a mou nt of U S $ 25.0 0, to General Publi c Licen se Source Code R equest, Fortin et, In c., 899 Kifer Rd, Sunn yvale, CA 94086 U SA. In
order to recei ve the m od ifi ed soft ware m odu les, you m ust al so inclu de the fo ll owi ng i nform ati on: (a) N ame , (b) Address, (c) Tele pho ne
num ber, (d) E-mail Address, (e) Produ ct purchased (i f app li cable ), (f) Produ ct Serial Nu mb er (if appli cabl e). All o pen sou rce software
mod ule s are li censed free of charge . There i s no warran ty for these m odu les, to t he extent pe rmit ted b y a ppl icab le l aw. The copyrig ht
hol ders provide these software m odu les “AS-IS” w ith out w arranty of an y kind, e ith er expressed or im plied . In no event w il l the copyrigh t
hol der for th e open source softwa re be l ia ble to you fo r dam ages, i ncludin g any spe cial , inciden tal or conseque nti al d am ages a rising
out o f the u se or ina bili ty to use the software m odu le s, even if such h old er has been ad vised of t he po ssibil it y o f such dam age s. A fu ll
copy of thi s licen se, incl udi ng a ddi tional open source softwa re li cense di sclosures and th ird p arty licen se disclosures a ppl icab le t o
certain Fo rtine t prod ucts, may obt ain ed b y con tactin g Forti net’s Leg al D epa rtmen t at l ega l@f ortin et.com .
GNU GENERAL PUBLIC LICENSE GNU GENERAL PUBLIC LICENSE
Copyrig ht (C) 198 9, 19 91 Free Soft ware Fou nda tio n, Inc.
59 Tem pl e Place, Sui te 33 0, Boston, M A 0211 1-130 7 USA
This Li cense app li es to an y program o r othe r w ork which cont ain s a noti ce pl aced by the copyright hol der saying it m ay be di stribu ted
unde r the te rms of thi s General Publi c License. The "Program", bel ow, refers to any such progra m or work, an d a "work based o n the
Program" mea ns either the Program or any d erivati ve work under copyright l aw: that i s to say, a work contai ni ng th e Program o r a
porti on of it, e ith er verbati m or wi th m odi ficat ion s and/o r translat ed i nto a nother la ngu age . (Hereinafte r, transla tio n is in clud ed wi tho ut
li mi tati on i n the term "mo di ficati on ".) Each licensee is addressed as "you".
TERMS AND COND ITIONS FOR C OPYING, DISTRIBUTION AND MODIFIC ATION
Version 2, June 199 1
35
Page 36

Activitie s o ther th an copyi ng, d istrib uti on an d mo di ficati on a re not covered by thi s L icense; t hey are ou tside its scope. The act of
runni ng th e Program i s not restricted , and the o utp ut from the Program is covered on ly if i ts conten ts constitute a work based on th e
Program (indepe nde nt of havin g bee n made b y ru nni ng th e Program). Whe ther th at is true depe nds on w hat t he Program d oes.
1. You ma y copy a nd d istribute verba tim copie s of the Program 's sou rce code as you receive i t, i n any me di um, p rovide d tha t you
conspicuo usly and a pprop riat ely pu bli sh on e ach copy an approp riate copyright n oti ce and d isclai me r of warrant y; keep in tact al l th e
noti ces that refe r to thi s License and to the a bsence of any warranty; a nd g ive an y o the r recipie nts of th e Program a cop y of thi s L icen se
alo ng wi th the Program . You may charge a fee for the p hysical act o f transfe rring a cop y, and you m ay at your op tio n off er warranty
protecti on i n exchan ge fo r a fee.
2. You ma y modi fy your copy or copie s o f the Program or any po rtion of it, thu s f ormi ng a w ork b ased o n the Program, an d copy and
distrib ute such m odi fi catio ns or work under t he te rms of Section 1 abo ve, provid ed th at you also me et al l o f the se condi tio ns:
a) You must cause th e mo di fie d files to carry promi nen t not ices statin g tha t you chan ged t he fi le s a nd th e da te of a ny chang e.
b) You must cause a ny work that you d istrib ute o r publ ish, th at i n who le o r in p art contai ns or is derived from the Program or any part
thereo f, to b e li censed a s a whol e at n o charge to al l th ird p artie s u nde r the te rms of thi s License.
c) If the m odi fie d prog ram no rmal ly read s com ma nds in teracti vely when run, you m ust cause it , when started run ni ng fo r such
int eractive use i n the mo st ordinary w ay, to pri nt or di spla y a n an nou nceme nt i nclud ing an a pprop riate copyright n oti ce and a not ice
that t here i s no warrant y (o r e lse, sayin g tha t you provi de a w arranty) and t hat u sers m ay redistrib ute t he program u nde r these
condi tio ns, and telli ng th e user how to view a copy of thi s Licen se. (Excepti on: i f th e Program i tself i s inte ractive bu t doe s not no rmal ly
print such an announ ceme nt, your wo rk ba sed on t he Program is not req ui red to p rint a n ann oun cemen t.)
These requ irem ent s a ppl y to the m od ifi ed w ork a s a whol e. If ide nti fia ble section s o f tha t work are not derived from th e Program, and
can be rea sonab ly conside red indep end ent a nd sep arate w orks i n the msel ves, then th is Li cense, an d its terms, do n ot ap ply to those
sections when you d istribu te th em a s separate works. But wh en you d istrib ute th e same section s a s part of a w hol e whi ch is a wo rk
based o n the Program, th e di stribut ion of the who le m ust be o n the terms of th is Li cense, whose perm issions fo r othe r licen sees extend
to the enti re who le , and thus to e ach and every p art rega rdle ss of w ho wrot e it.. Thus, i t is not t he i nten t of th is section to clai m ri ghts
or contest your rights to work writt en en tire ly by you; rathe r, the i nte nt is to e xercise the rig ht to control the distribu tio n of d erivati ve or
collective wo rks based on th e Program. In add iti on , mere a ggreg ati on o f ano ther wo rk not ba sed on th e Program w ith the Program (or
with a work based on the Program) on a volum e of a storage or distrib uti on m edi um doe s n ot bri ng th e oth er work unde r the scope o f
thi s L icense.
3. You ma y copy a nd d istribute th e Program (or a work b ased on it, unde r Section 2) i n object code or executab le fo rm un der the terms
of Section s 1 and 2 above provide d tha t you al so do on e of t he fo ll owi ng:
a) Accomp any it with the com pl ete correspon ding machin e-reada bl e source code, w hich m ust be d istrib uted under the te rms of
Sections1 and 2 a bove on a me dium custom aril y used for softw are in terchan ge; o r,
b) Accomp any it with a writt en of fer, vali d fo r at le ast three yea rs, t o gi ve any thi rd party, for a cha rge no m ore th an you r cost of
physicall y perform ing source distrib uti on, a compl ete machine -readab le cop y of the correspon di ng source code , to be distri bute d un der
the te rms of Section s 1 and 2 above on a m edi um customari ly used fo r software i nterchange; or,
c) Accompan y i t wi th th e in forma tio n you recei ved as to th e offer to di stribut e correspond ing source code. (Thi s alte rnati ve is all owe d
onl y f or non comm ercial distrib uti on a nd on ly if you received the prog ram i n ob ject code or executab le f orm wi th such an offer, i n accord
with Subsection b abo ve.)
Source code for a wo rk m ean s the pref erred form of the work for maki ng m odi ficat ion s to it. Fo r an executa ble work, compl ete source
code means al l th e source code f or all mo dul es it cont ains, plu s a ny associate d in terface definition fil es, pl us the scripts used to control
compi la tio n and in stall ati on o f the e xecutabl e. However, as a special e xceptio n, th e source code di stribu ted n eed not i nclu de an ythin g
that i s norma ll y distributed (in ei the r source o r bin ary form) wit h the m aj or comp onents (compi ler, kerne l, and so on ) o f the operatin g
system on wh ich the executab le runs, unl ess that com pon ent i tself a ccompanie s t he executabl e. If d istrib uti on of executab le o r obje ct
code i s m ade by offering a ccess to copy from a desi gnated place, t hen o fferi ng e qui valent access to copy the source code from th e
same place coun ts as distrib uti on of the sou rce cod e, even thou gh th ird p artie s a re not com pell ed to cop y the source al ong with the
obj ect code.
4. You ma y not copy, modi fy, subli cense, or di stribu te th e Program except as expressly p rovided und er thi s L icen se. Any a ttem pt
othe rwise to cop y, modi fy, subl icense o r distrib ute th e Program i s void, a nd wi ll aut oma tical ly term in ate your ri ght s u nde r this Li cense.
Howe ver, partie s who ha ve received cop ies, or rig hts, from you und er thi s L icen se wil l no t have th ei r licen ses t ermi nate d so lo ng as
such partie s remai n in ful l compli an ce.
5. You are n ot requ ired to accept th is Li cense, since you h ave no t signe d it. Howe ver, noth in g el se grants you pe rmissio n to m odi fy or
distrib ute t he Program or its deri vative wo rks. The se action s are prohi bi ted b y law i f you do not a ccept thi s L icense. Therefo re, by
36
Page 37

mod ifying or di stribu tin g the Program (or any work based o n the Program), you i ndi cate your a cceptance o f thi s License to do so, and
all its terms and cond iti on s f or copying , distributi ng o r mod ifyin g the Program or wo rks based on i t.
6. Each tim e you red istrib ute th e Program (or an y work b ased on the Program ), the recipient autom ati call y receives a li cense from t he
origi na l l icensor to cop y, distrib ute o r modi fy the Program subject to the se terms and condi ti ons. You ma y not impo se any furthe r
restriction s o n the recipi ent s' exercise of the rights gran ted h erein. You are n ot respon sibl e for en forcing compl ia nce by thi rd parti es to
thi s L icense.
7. If, a s a consequ ence of a court ju dgm ent o r all ega tio n of p aten t in fring em ent o r for any othe r reason (not l im ited to pate nt i ssues),
condi tio ns are im posed on you (wh ethe r by court order, ag reeme nt or ot herwi se) that contradi ct the cond iti ons of t his Li cense, th ey do
not e xcuse you f rom th e condi ti ons of th is Li cense. If you can not d istribute so as to sati sfy simul tan eou sly your o bl iga tio ns und er thi s
Licen se and a ny othe r pertin ent o bl iga tio ns, the n as a consequ ence you m ay not distrib ute t he Program at al l. Fo r exampl e, i f a pa tent
li cense wou ld n ot pe rmit ro yalty-free redi stribu tio n of th e Program b y all those wh o receive copies di rectly or in dire ctly throug h you,
then the o nly way you coul d sati sfy b oth it an d thi s Licen se woul d be to refrai n en tirel y from di stribu tio n of the Program .
If any po rtion of thi s section i s hel d in vali d or une nfo rceable und er any parti cula r circumstance, th e balan ce of the section i s intende d
to ap ply an d the section a s a whole i s inte nde d to a ppl y in oth er circumstan ces.
It is not the p urpose of this secti on to ind uce you to i nfri nge any pat ents or oth er prope rty ri ght cl aim s or to conte st valid ity of a ny such
claims; thi s section ha s the sole purpo se of protecting the i nte grity o f the f ree softwa re distributi on system, w hich i s imp le men ted b y
publ ic l icen se practices. Ma ny people have m ade g ene rous contrib uti ons to th e wi de ran ge of software d istrib uted throug h tha t system
in rel ia nce on con sistent a ppl ication of tha t system; it i s up to t he au tho r/dono r to deci de i f he o r she is wil li ng to di stribute software
throug h an y o ther system a nd a l icen see canno t im pose th at choi ce.
This section is in tend ed to make th oroug hl y cl ear wha t is beli eved to b e a conseq uen ce of the rest of thi s License.
8. If th e di stribut ion and /or use of the Program i s restricted in certain countri es eit her by pat ents or by copyrigh ted i nte rfaces, the
origi na l copyrig ht ho lde r who pl aces the Program under thi s License m ay add an expl ici t geo graph ical distrib uti on l im itation exclud in g
those coun trie s, so t hat d istribution i s p ermi tted onl y in or am ong countries not thus exclude d. In such case, this Li cense in corporate s
the l im ita tio n as if w ritte n in the b ody of th is Li cense.
9. The Free Software Founda tion may publ ish revised and /or new versio ns of the General Publ ic Licen se from ti me to ti me. Such new
versions wil l b e simi la r in spi rit to t he pre sent version, b ut m ay dif fer in d eta il to ad dress n ew proble ms or concerns. Each version is
given a di sting uishi ng versio n num be r. If the Program specifi es a version n umb er of th is Li cense whi ch app li es to it a nd "an y l ate r
version", you ha ve the op tio n of f oll owi ng t he te rms and con dit ion s eith er of that version o r of any la ter version p ubl ishe d by the Free
Software Fou nda tio n. If the Program d oes no t specify a version n um ber of th is Li cense, you m ay choose an y versio n ever pub li shed b y
the Free Soft ware Fou nda tio n.
10. If you wish to incorpo rate p arts of the Program in to ot her free p rogram s w hose di stribu tio n conditi ons are diffe rent, write to the
auth or to ask for perm ission. For software which i s copyrighte d by the Free Software Founda tio n, wri te to t he Free Soft ware Fou nda tio n;
we some tim es ma ke exceptio ns for thi s. Our d ecisio n wi ll be gu id ed by the two g oal s of preserving the free status of a ll derivat ives of
our free soft ware an d of p romo tin g the sharing and reuse of softw are general ly.
11. BECAUSETH E PROGRAM IS LICENSED FREE OF CHARGE, THERE IS NO WARRANTY FOR THE PROGRAM, TO THE EXTENT
PERMITTED BY APPLICABLE LAW. EXCEPT WHEN OTHERWISE STATED IN WRITING THE C OPYRIGHT HOLDERS AND/OR OTHER
PARTIES PROVIDE TH E PROGRAM "AS IS" WITHOUT WARRANTY OF ANY KIND, EITHER EXPRESSED OR IM PLIED, INCLU DING, BUT
NOT LIMITED TO, THE IMPLIED WARRANTIES OF M ERCHANTABILITY AND FITNESS FOR A PARTICULAR PURPOSE. THE ENTIRE
RISK AS TO THE QUALITY AND PERFORMANCE OF THE PROGRAM IS WITH YOU. SHOULD THE PROGRAM PROVED EFECTIVE, YOU
ASSUME THE COST OF ALL NECESSARY SERVICING, R EPAIR OR CORRECTION.
12. IN NO EVENT UNLESS REQUIRED BY APPLICABLE L AW OR AGREED TO IN WRITING WILL ANY COPYRIGHT HOLDER, OR ANY
OTHER PARTY WHO MAY MODIFY AND/OR REDISTRIBUTETH E PROGRAM AS PERMITTED ABOVE, BE LI ABLE TO YOU FOR
DAMAGES, INCLU DING ANY GENERAL, SPECIAL, INCIDENTAL OR CONSEQUENTIAL DAMAGES ARISING OUT OF THE USE OR
INABILITY TO USE THE PROGRAM (INCLUDIN G BUT NOT LIMITED TO LOSS OF DATA OR DATA BEING RENDERED INACCU RATE OR
LOSSES SUSTAINED BY YOU OR THIRD PARTIES OR A FAILU RE OF THE PROGRAM TO OPERATE WITH ANY OTHER PROGRAMS),
EVEN IF SUCH HOLDER OR OTHER PARTY HAS BEEN ADVISED OF THE POSSIBILITY OF SUCH DAMAGES.
NO WARRA NTY
37
Page 38

GNU LESSER GENERAL PUBLIC LICENSE
Copyrig ht (C) 199 1, 19 99 Free Soft ware Fou nda tio n, Inc.
59 Tem pl e Place, Sui te 33 0, Boston, M A 0211 1-130 7 USA
This Li cense Agreem ent a ppl ie s to any softwa re li brary or othe r program w hich con tai ns a notice pl aced b y the copyrig ht ho lde r or othe r
auth orized p arty saying i t ma y b e di stributed under th e term s o f thi s Lesser General Publi c L icen se (also call ed "th is Licen se"). Each
li censee i s a ddressed as "you".
A "li brary" m ea ns a coll ectio n of software function s and/o r data p repared so as to be con veni entl y lin ked wi th ap plicati on p rograms
(which use some of t hose fu nctio ns and d ata) to f orm executa bl es.
The "Lib rary", belo w, refers to a ny such software l ib rary o r work which h as been distribute d und er the se terms. A "work ba sed on t he
Lib rary" me ans ei the r t he Library or any de rivative w ork u nde r copyright l aw: t hat i s to say, a work contai ni ng th e Li brary or a porti on of
it, e ith er verbati m or wi th m odi ficat ion s and/o r translat ed strai ghtforwardl y into a not her la ngu age . (Herei naft er, transla tio n is i nclud ed
with out l im itati on i n the term "mo di ficati on".)
"Source code " for a work mea ns the preferred fo rm of th e work for ma king m odi fi catio ns to it . For a li brary, compl ete source code m eans
all the source code for al l m odu le s i t conta in s, plus an y a ssociated interface de fin iti on fi l es, plu s the scripts used to con trol com pi latio n
and i nstal la tio n of the l ibrary.
Activitie s o ther th an copyi ng, d istrib uti on an d mo di ficati on a re not covered by thi s L icense; t hey are ou tside its scope. The act of
runni ng a program using the L ib rary i s not restricted , and outp ut from such a program is covered on ly if i ts conten ts constitu te a wo rk
based o n the Lib rary (i nde pen den t of the use of th e Li brary in a tool for writing it). Whet her tha t is true d epe nds on wh at th e Li brary
does an d wha t the program that uses the Li brary doe s.
1. You ma y copy a nd d istribute verba tim copie s of the L ib rary's compl ete source code as you receive it, i n any m edi um , provid ed th at
you conspicuo usly and app ropria tel y p ubl ish on each copy a n appropriate copyrig ht no tice a nd di sclai mer of warranty; keep intact all
the n oti ces th at refe r to thi s License and to the a bsence of a ny warranty; a nd d istrib ute a copy of thi s License a lon g wi th th e Li brary.
You may charge a fee f or the p hysical act of transferrin g a copy, an d you m ay at your opt ion offe r w arranty prote ction in e xchange f or a
fee.
2. You ma y modi fy your copy or copie s o f the L ib rary o r any portion of i t, th us formi ng a work based o n the L ib rary, a nd cop y a nd
distrib ute such m odi fi catio ns or work under t he te rms of Section 1 abo ve, provid ed th at you also me et al l o f the se condi tio ns:
a) The mo di fie d work must i tself b e a software library.
b) You must cause th e fi les modi fie d to carry promi nen t not ices statin g tha t you chan ged t he fi le s a nd th e da te of a ny chang e.
c) You m ust cause the whol e of t he wo rk to be l icensed at no charge to all thi rd parti es und er the t erms of th is Licen se.
d) If a faci li ty in th e mo dified Li brary refers t o a function or a tab le o f dat a to b e suppl ie d by an a ppl ication program that uses the
facil ity, ot her tha n as an a rgument p assed when the f acil ity is in voked, th en you m ust ma ke a goo d fai th e ffort to e nsure that, i n the
event an app li catio n do es not supp ly such functi on o r tabl e, the facil ity sti ll ope rates, and perfo rms whate ver part of i ts purpose
remai ns me ani ngf ul.
These requ irem ent s a ppl y to the m od ifi ed w ork a s a whol e. If ide nti fia ble section s o f tha t work are not derived from th e Li brary, and
can be rea sonab ly conside red indep end ent a nd sep arate w orks i n the msel ves, then th is Li cense, an d its terms, do n ot ap ply to those
sections when you d istribu te th em a s separate works. But wh en you d istrib ute th e same section s a s part of a w hol e whi ch is a wo rk
based o n the Lib rary, the di stribu tio n of th e who le m ust be on th e terms o f thi s License, w hose pe rmissions for othe r licen sees extend
to the enti re who le , and thus to e ach and every p art rega rdle ss of w ho wrot e it. Thus, it i s not th e in ten t of th is section t o clai m rights or
contest your rig hts to work writt en en tire ly by you; rathe r, the i nte nt is to e xercise the rig ht to control the distribu tio n of d erivati ve or
collective wo rks based on th e Li brary. In ad dit ion , me re aggregati on o f anothe r work n ot ba sed on t he Li brary wit h the Lib rary (or wi th a
work based on the L ib rary) on a volume o f a storage or distributi on m edi um doe s n ot bri ng th e other work und er the scope o f thi s
Licen se.
3. You ma y opt to a ppl y the te rms of the ordin ary GNU General Publi c Licen se instea d of t his Li cense to a given copy of the L ib rary. To
do th is, you mu st alter all the n oti ces that refe r to thi s License, so that th ey refer to th e ordi nary GNU Gene ral Publ ic Li cense, version 2
instea d of t o thi s License. (If a new er version tha n version 2 of the ordi nary GNU Genera l Publ ic Li cense has appeare d, the n you can
specify that version in stead i f you wi sh.) Do no t ma ke any oth er change in t hese no tices.
Once this cha nge i s mad e in a gi ven copy, it i s irreversibl e for tha t copy, so the o rdin ary GNU General Publi c License a ppl ie s t o al l
subseque nt copi es and derivative wo rks ma de from that copy. This option is usefu l when you wi sh to copy p art of th e code o f the
Lib rary i nto a progra m tha t is no t a li brary.
TERMS AND COND ITIONS FOR C OPYING, DISTRIBUTION AND MODIFIC ATION
Version 2.1 , Februa ry 1 999
38
Page 39

4. You ma y copy a nd d istribute th e Li brary (or a porti on o r derivati ve of i t, un der Section 2) in o bje ct code or executa ble form u nde r the
terms of Sectio ns 1 and 2 abo ve provid ed th at you accom pany i t with the com pl ete correspondi ng m achin e-read abl e source code,
whi ch must be d istrib ute d und er the t erms of Sectio ns 1 and 2 abo ve on a m edi um customa rily used f or software i nte rchange .
If di stribution of ob ject code is mad e by off ering access to cop y f rom a d esign ate d pl ace, the n offerin g equ ival ent a ccess to copy th e
source code from the sam e pl ace sati sfies the re qui reme nt to d istrib ute th e source code, even th oug h thi rd parti es are no t compe ll ed t o
copy the source al ong with the o bj ect code.
5. A program that con tai ns no de rivati ve of an y p ortio n of the Li brary, but is desig ned to work wit h the Lib rary b y b ei ng com pil ed or
li nked wi th i t, is called a "work t hat u ses t he Li brary". Such a work, in i sola tio n, i s n ot a d erivati ve work of the Library, and th erefo re fal ls
outsid e the scope of th is Li cense.
Howe ver, lin king a "work th at uses th e Li brary" w ith the Library creates an e xecutabl e th at is a derivat ive of t he Li brary (because i t
contai ns porti ons of th e Li brary), rather th an a "work tha t uses the l ibrary". The e xecutabl e i s therefo re covered by thi s L icen se. Section 6
states terms for di stribu tio n of such executabl es.
When a "work tha t uses the Li brary" uses m ate rial from a head er fil e th at i s p art of th e Li brary, the o bj ect code fo r the work m ay be a
derivat ive work of th e Li brary even tho ugh the sou rce cod e is no t.
Whethe r this is true i s especia ll y si gni fican t if the wo rk can b e li nked w ith out th e Li brary, or if the wo rk i s i tsel f a li brary. The th reshol d
for thi s to be true is not p recisely de fin ed by l aw.
If such an ob je ct fil e uses onl y nume rical p aram eters, dat a structure la youts and accessors, and smal l macros a nd sma ll inl in e function s
(ten line s o r less in l eng th), then th e use of the ob je ct file is unrestri cted, rega rdle ss of whether it i s leg all y a deri vative wo rk.
(Executable s con tai ni ng th is obj ect code p lus p ortio ns of the Library w il l stil l f all und er Section 6 .) Otherwi se, if the wo rk i s a deri vative
of the Lib rary, you may di stribut e the obj ect code fo r the wo rk un der th e terms o f Section 6 . Any e xecutables conta ini ng that w ork a lso
fal l un der Section 6, whethe r or not the y are li nked directly wi th th e Li brary itself.
6. As a n excepti on to the Sections abo ve, you ma y a lso com bin e or link a "work that u ses the Li brary" w ith t he Library to produce a wo rk
contai ni ng portio ns of the Lib rary, and di stribu te th at work und er terms of you r choice, provided that t he te rms permi t mo dificati on o f
the wo rk fo r your own use a nd reverse engin eeri ng fo r debu ggi ng such m odi fication s. You must gi ve prom ine nt no tice wi th e ach copy
of the work that th e Li brary is used i n it a nd that th e Li brary and i ts use are covered b y t his Li cense. You m ust suppl y a copy of thi s
Licen se. If the work durin g executi on d ispl ays cop yright n oti ces, you must includ e the copyright n oti ce for the Lib rary a mon g the m, a s
wel l as a refe rence di recting the u ser to the cop y of thi s L icen se. Also, you mu st do on e of th ese thi ngs:
a) Accomp any the work with the com plete correspon din g ma chin e-reada ble source code fo r the Li brary incl udi ng wh ate ver cha nge s
were used in th e work (whi ch mu st be di stributed un der Section s 1 and 2 abo ve); and, i f the work is an execut abl e li nked w ith the
Lib rary, w ith the com pl ete m achi ne-read abl e "work that u ses t he Li brary", as obje ct code an d/or source code , so that t he user can
mod ify the Lib rary a nd th en rel in k to produ ce a mo dif ied executab le con tai ning th e mo dif ied Lib rary. (It is unde rstood th at the user
who cha nges th e conte nts of definition s f il es in th e Li brary wil l n ot ne cessarily be ab le t o recomp il e the app li catio n to use the
mod ifi ed d efi ni tio ns.)
b) Use a suita bl e shared l ib rary m echanism for li nking with the L ibrary. A suita bl e me chani sm is one that (1) uses a t run ti me a copy of
the l ib rary a lread y present on the u ser's comp uter system, rath er than copying li brary functio ns int o the executab le, a nd (2) wi ll ope rate
prope rly with a modified version of t he l ibra ry, i f the user instal ls o ne, a s l on g as the m od ifi ed version is in terface-comp ati bl e wi th the
version tha t the work was made wit h.
c) Accompan y t he wo rk wi th a writte n off er, vali d for at lea st three years, to g ive the same u ser the materi als specif ied in Subsection 6 a,
above, for a charge n o mo re tha n the cost o f perfo rmin g this distributi on.
d) If di stribution of the work is mad e by offe ring access to copy from a design ated pla ce, offe r equi vale nt access t o copy the a bove
specifi ed m ateri al s f rom the same p la ce.
e) Verify that th e user has a lrea dy received a cop y o f the se material s or that you have al read y sen t thi s user a copy.
For an executa bl e, the requi red fo rm of th e "work that u ses th e Li brary" m ust in clud e any da ta an d uti li ty program s need ed fo r
reprodu cing the executa bl e from i t. Ho wever, as a speci al e xceptio n, the mat erials to be distrib ute d nee d no t include anythi ng that i s
norma ll y distrib uted (in ei the r source or bina ry fo rm) wit h the maj or comp one nts (compi ler, kerne l, and so on ) of the o perat ing system
on wh ich the executab le runs, unl ess t hat com pon ent i tsel f accompa ni es the executabl e. It m ay hap pen t hat this requ irem ent
contradi cts t he l icense restrictions o f other proprie tary li brarie s t hat d o not norma ll y accompan y t he operati ng system. Such a
contradi ctio n me ans you cannot use bo th th em a nd th e Li brary toge ther in an e xecutabl e th at you di stribu te.
7. You ma y place lib rary faciliti es that a re a work ba sed on t he Li brary side-by-side in a singl e l ib rary to geth er with oth er li brary
facil iti es not covered by thi s L icense, a nd d istrib ute such a com bi ned l ibrary, provide d tha t the sep arate d istrib uti on o f the w ork b ased
on th e Li brary and of the o ther l ibrary fa cili tie s is otherwise permitt ed, a nd pro vided that you do th ese two t hin gs:
39
Page 40

a) Accomp any the combi ned li brary with a copy of the same w ork b ased o n the Lib rary, uncomb ine d wi th an y other l ibra ry fa cili tie s.
This mu st be di stribut ed un der th e term s o f the Secti ons abo ve.
b) Give prom ine nt no tice with t he com bin ed l ib rary o f the f act that p art of i t is a wo rk b ased on the L ib rary, a nd explai ni ng wh ere to
fin d the a ccompanying uncom bin ed fo rm of th e same work.
8. You ma y not copy, modi fy, subli cense, l ink w ith , or distribute the L ibrary except as expressly provided un der thi s Licen se. Any a ttem pt
othe rwise to cop y, modi fy, subl icense, link with , or distribute the L ibra ry i s voi d, a nd wi ll aut oma tical ly term in ate your ri ght s u nde r this
Licen se. Howe ver, parti es who have received cop ie s, or ri ght s, from you un der this Licen se wil l n ot ha ve thei r licen ses terminate d so
lon g as such parti es remai n i n ful l com pl ian ce.
9. You are n ot requ ired to accept th is Li cense, since you h ave no t signe d it. Howe ver, noth in g el se grants you pe rmissio n to m odi fy or
distrib ute t he Library or its de rivative works. These actio ns are prohibi ted by law i f you do not a ccept thi s License. Th erefo re, by
mod ifying or di stribu tin g the Lib rary (or an y work b ased on the L ib rary), you i ndi cate you r acceptance of this L icense to do so, a nd al l i ts
terms and condi tio ns for copyin g, di stribut ing or mod ifyi ng th e Li brary or works ba sed on it.
10. Each ti me you redistribute the L ibrary (or any work based o n the Lib rary), th e recip ien t aut oma tical ly receives a l i cense from th e
origi na l l icensor to cop y, distrib ute, l ink with o r mod ify the Lib rary sub ject to these te rms and con dit ion s. You may not im pose an y
furthe r restrictions on t he recip ie nts' exercise of the ri ght s g rante d herei n. You a re not re sponsib le for enfo rcing com pli an ce by third
parti es with thi s L icense.
11. If , as a consequ ence of a court ju dgm ent o r all ega tio n of p ate nt in fringem ent o r for any othe r reason (not li mi ted to pate nt i ssues),
condi tio ns are im posed on you (wh ethe r by court order, ag reeme nt or ot herwi se) that contradi ct the cond iti ons of t his Li cense, th ey do
not e xcuse you f rom th e condi ti ons of th is Li cense. If you can not d istribute so as to sati sfy simul tan eou sly your o bl iga tio ns und er thi s
Licen se and a ny othe r pertin ent o bl iga tio ns, the n as a consequ ence you m ay not distrib ute t he Li brary at al l. For example, i f a p aten t
li cense wou ld n ot pe rmit ro yalty-free redi stribu tio n of th e Li brary by all those who recei ve copie s d irectl y o r ind irectl y throug h you, th en
the o nly way you coul d sati sfy b oth i t an d thi s Licen se woul d be to refrai n en tirel y from di stribu tio n of the Li brary.
If any po rtion of thi s section i s hel d in vali d or une nfo rceable und er any parti cula r circumstance, th e balan ce of the section i s intende d
to ap ply, an d the section a s a whol e i s inte nded to ap pl y i n ot her circumstan ces.
It is not the p urpose of this secti on to ind uce you to i nfri nge any pat ents or oth er prope rty ri ght cl aim s or to conte st valid ity of a ny such
claims; thi s section ha s the sole purpo se of protecting the i nte grity o f the f ree softwa re distributi on system wh ich i s i mp le men ted b y
publ ic l icen se practices. Ma ny people have m ade g ene rous contrib uti ons to th e wi de ran ge of software d istrib uted throug h tha t system
in rel ia nce on con sistent a ppl ication of tha t system; it i s up to t he au tho r/dono r to deci de i f he o r she is wil li ng to di stribute software
throug h an y o ther system a nd a l icen see canno t im pose th at choi ce. Thi s section i s i nte nde d to m ake thoroug hly clea r what i s believed
to be a consequ ence of t he rest of this Li cense.
12. If t he distribu tio n an d/or use o f the L ib rary i s restricted in certain cou ntrie s eith er by pate nts or by copyrighted i nterfa ces, the
origi na l copyrig ht ho lde r who pl aces the Lib rary u nde r t his L icense m ay add a n expl icit geo graph ical d istrib uti on l im ita tio n exclud in g
those coun trie s, so t hat d istribution i s p ermi tted onl y in or am ong countries not thus exclude d. In such case, this Li cense in corporate s
the l im ita tio n as if w ritte n in the b ody of th is Li cense.
13. The Free Softwa re Found ati on m ay pub li sh revised an d/or ne w versions of th e Le sser Gen eral Pub li c L icense from ti me t o time.
Such n ew version s wil l be simi lar i n spi rit to t he present version, b ut m ay differ in d eta il t o address n ew proble ms or concerns. Each
version is gi ven a d istin gui shin g version n umb er. If th e Li brary specifi es a version nu mbe r of thi s License which a ppl ie s t o it a nd "any
lat er version", you have the op tio n of f oll owi ng t he te rms and con dit ion s eith er of tha t version o r of any la ter version p ubl ishe d by the
Free Software Fo und ati on. If the L ibra ry do es not spe cify a li cense version n umb er, you may choose any version e ver publ ishe d by the
Free Software Fo und ati on.
14. If you wish to incorpo rate p arts of the L ib rary i nto othe r free progra ms whose d istributi on cond iti ons a re incom pa tib le wi th t hese,
write t o the auth or to ask for perm ission. For software wh ich i s copyrighte d by the Free Software Fou nda tio n, wri te to t he Free Software
Found ati on; w e some tim es make e xceptio ns for thi s. Our d ecisio n wi ll be gu ided by the two goal s o f preserving the f ree status of a ll
derivat ives of ou r free softwa re and o f prom oti ng th e sharing an d reuse of software g ene rall y.
15. The warrant y d isclai me r contai ned i n Sectio ns 11 an d 12 o f the precedi ng GPL Li cense is in corporate d here in.
40
Page 41

Fortinet Customer Service & Support
Create a support account, register and manage your products,
download updates, firmware images and release notes, and create
technical support tickets.
https://support.fortinet.com
Fortinet Document Library
Up-to-date versions of Fortinet publications for the entire family of
Fortinet products.
http://docs.fortinet.com
Training Services
Course descriptions, availability, schedules, and location of
training programs in your area.
http://www.fortinet.com/training
Technical Discussion Forums
Communicate with other customers and Fortinet partners about
Fortinet products, services, and configuration issues.
https://support.fortinet.com/forum
FortiGuard Threat Research and Response
Up-to-date information on vulnerabilities and threats, includes a
virus scanner, IP signature look-up, and web filtering tools.
http://www.fortiguard.com
Fortinet.com
 Loading...