

Page 1
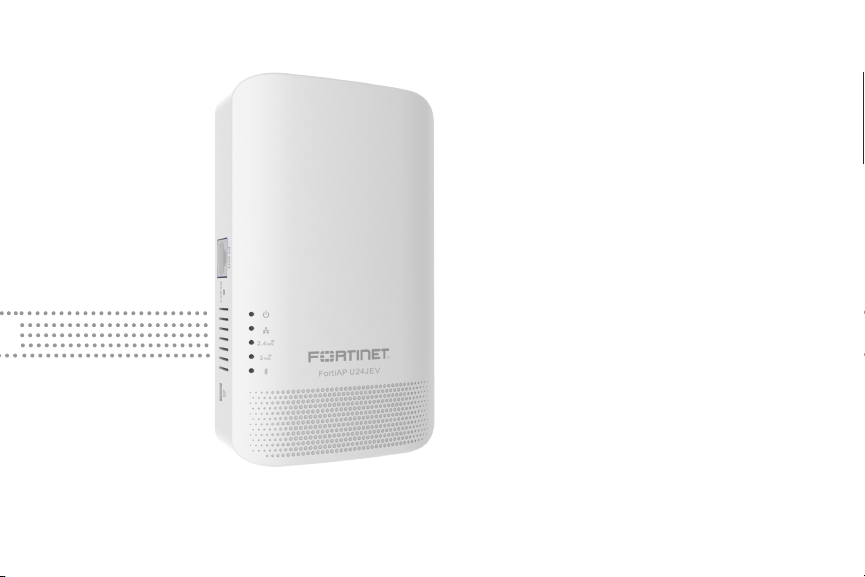
FortiAP
FAP-U24JEV
FORTIAP-U24JEV
Quick Start Guide
Page 2
FAP-U24JEV Box Includes
FortiAP U24JEV
Screws (3)
QuickStart Guide
1
Mounting Plate (1)
Page 3
Installation
IMPORTANT: Supported only from FortiWLC Release 8.4.0 or later and FortiGate with FortiOS Release 5.6.3 and later.
The unit can be mounted on a wall using the provided wall mounting bracket or optionally be placed
on a table using the table top stand.
Attach the wall mount bracket/table top stand by sliding it into the bottom cover of the FortiAP unit.
2
Page 4
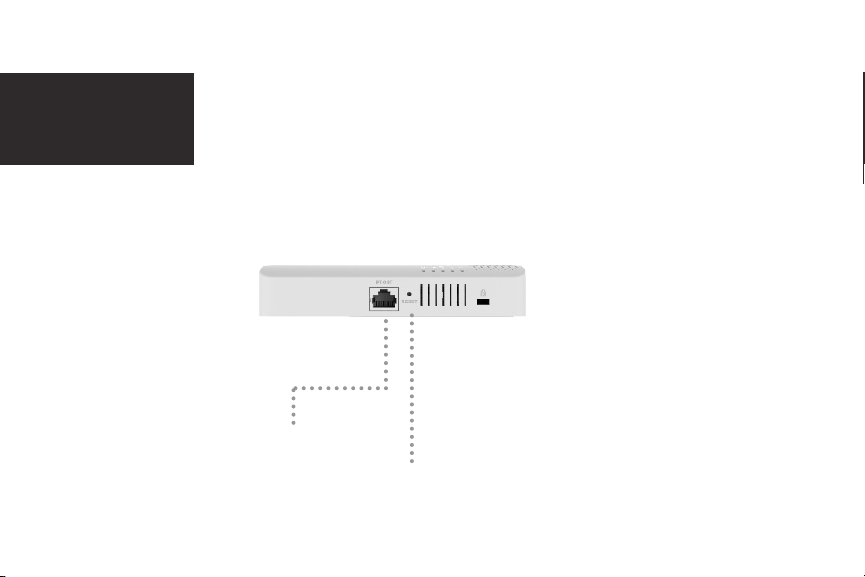
Ports
WAN/POE PD
RJ-45 Passthrough
3
Page 5

Ports
LAN 2LAN 3
LAN 1 PSE delivers 802.3af only when:
- Power adapter is used.
OR
- 802.3at power is supplied to the FAP unit.
4
Power
48V DC/0.5A
Page 6
Ports
RJ45
Passthrough OUT
RESET
5
Page 7
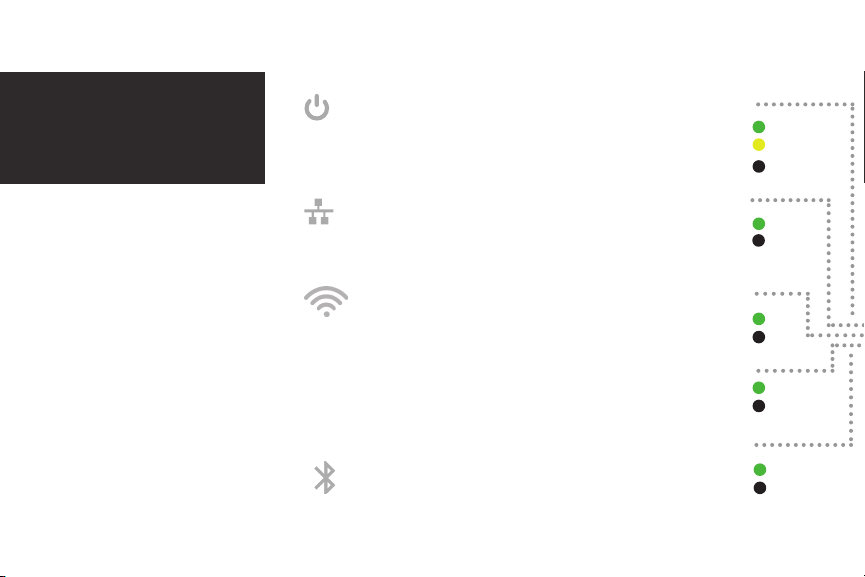
LED Status
Green: FAP powered on.
Power
Yellow: FAP is rebooting or upgrading rmware
O: FAP is powered o.
Steady Green: Link is up
Steady Green: 2.4G link is up
Steady Green: 5G link is up
Steady Green: Bluetooth or BLE activity
6
WAN
O: Link is down
WiFi 1
O: Link down
WiFi 2
O: Link down
BLE
O: No activity
Page 8
7
Page 9

Connecting
Using the provided mounting hardware, attach the FortiAP unit to the
wall.
Adequate grounding must be provided to the FortiAP unit in
compliance with the local electrical code.
This device complies with the IEEE 802.af and 802.3at PoE specications.
Both PoE specications support 1x1 MIMO and a default TX power of
20dBm for both 5GHz and 2.4GHz bands.
Caution: Do not use any PoE injectors that are not IEEE 802.3af or
802.3at compliant, as they may damage your device.
To connect the FortiAP unit:
1. Insert an Ethernet cable into the WAN port of the FortiAP unit.
2. Insert the other end of the Ethernet cable into your switch.
3. If you are not using PoE, connect the DC plug of the optional power
adapter into the DC power jack on the FortiAP unit and then insert
the other end into an appropriate power outlet.
4. The power LED will light up.
8
Page 10

The FortiAP boots up with the default FortiWLC AP image
Controller Discovery
• If FortiWLC controller is discovered, the unit continues booting up with the default FortiWLC
image.
• If the FortiGate or the FortiCloud controller is discovered, the unit reboots with the FortiAP
image.
For the FortiAP to discover the FortiCloud controller, you need to add the unique FortiCloud key
labelled on the device to the FortiCloud. See section
For the FortiAP to complete the FortiGate discovery, you need to authorize the FortiAP on the
FortiGate. See section
To bring the FortiAP back to factory default setting, insert a pin into the reset point on the power
adapter and hold on for 10 seconds. Release the pin.
On the FortiAP image, run the
FortiGate Deployment
reload default factory
and tries to discover the FortiWLC, FortiGate, and FortiCloud
controllers simultaneously.
The FortiAP connects to the controller that is rst
discovered.
FortiCloud Deployment
.
command to reset the FortiAP to factory default.
9
.
Page 11

Follow these steps to complete the FortiCloud discovery.
FortiCloud Deployment
2. Click Inventory > Import AP Key and enter the unique FortiCloud key located on your FortiAP
device, then click Submit.
3. Deploy the FortiAP to an existing AP network, or create a new AP network, then click Submit.
1. Visit http://www.forticloud.com and sign in or create a
new account.
10
Page 12

4. Follow the prompts to associate the FortiAP device to an SSID.
5. Connect your FortiAP to an Internet connection. This can be a modem or another source of
Internet connectivity.
Congure the discovered FortiAP.
11
Page 13

FortiGate Deployment
To complete the FortiGate controller discovery process, you
need to authorize the FortiAP on the FortGate.
12
Page 14

Zero
Conguration
The FortiAP unit is designed to require no conguration in most
networks. Zero conguration mode works if the unit is on the same
layer-2 network and subnet as the FortiWLC, or if the unit is on the
same layer-3 network and subnet as the FortiGate or FortiCloud
controller.
If the FortiAP wireless controller’s IP address cannot be determined
using Zero Conguration mode, or if the network uses static IP
addresses, it can be congured to use a static IP address.
13
Page 15

Zero
Conguration
To enable the FortiAP using Zero Conguration:
1. After connecting the FortiAP unit as described in the previous
chapter, the unit goes through its boot procedure and requests
an IP address from the DHCP server.
2. If the IP address is retrieved successfully, the FortiAP enters
discovery mode to locate a Controller.
The discovery modes for the FortWLC controller are:
• DHCP option 43
• DHCP option 138
• DNS
• Mesh PNP
• Static Controller IP address
The discovery modes for FortiGate controller are:
• DHCP option 138
• DNS
• Multicast
• Broadcast
• Static Controller IP address
14
Page 16

Zero
Conguration
The discovery mode for FortiCloud controller is:
• FortiCloud Protocol
3. Verify that the FortiAP has successfully connected to the
controller in the FortiWLC/FortiCloud/FortiGate WebUI.
15
Page 17

Manual IP
Conguration
& Controller
Discovery
To enable the FortiAP with a static IP address:
1. Connect the FortiAP device to a seperate private switch or hub.
2. Access the AP console.
3. To congure FortiAP’s own IP address, type ip cong net static
address <ip-address> netmask <netmask ip-address> gateway
<gateway ip-address>.
4. [FortiWLC only] To discover the controller, type ip cong l2l3
<l2only | l2preferred | l3only | l3preferred>.
5. To congure a designated wireless controller’s IP address, type ip
cong controller name <controller ip-address>.
6. Save the conguration by typing ip cong save.
7. Move the FortiAP to the intended deployment location and
connect the Ethernet cable.
16
Page 18

Cautions and Warnings
Environmental specifications
Ambient operating temperature: 0C to 40C
Refer to specific Product Model Data Sheet for Environmental
Specifications (Operating Temperature, Storage Temperature,
Humidity, and Altitude)
Référez à la Fiche Technique de ce produit pour les caractéristiques
environnementales (Température de fonctionnement, température
de stockage, humidité et l’altitude).
Caution: This equipment is to be used in a Network Environment 0
per IECTR 62101. This product is connected only to PoE networks
without routing to the outside plant.
Attention: Ce matériel doit être utilisé dans un Environnement
Réseau 0 par IECTR 62101. Ce produit est uniquement connecté aux
réseaux PoE sans installation externe de routage.
This product is intended to be supplied by a Listed Direct Plug-In
Power Unit marked LPS or Class 2 and rated 12 Vdc, 2A or by 54 Vdc
from PoE source.
Le produit doit être alimenté par un bloc d’alimentation à courant
continu homologué UL de 12 Vdc, 2A nominal marqué LPS ou Class
2 ou par une source d’alimentation par Ethernet de 54 Vdc (PoE).
Regulatory Notices
Federal Communication Commission (FCC) – USA
This device complies with Part 15 of FCC Rules. Operation is subject
to the following two conditions:
(1) this device may not cause harmful interference, and
(2) this device must accept any interference received; including
interference that may cause undesired operation.
This equipment has been tested and found to comply with the
limits for a Class B digital device, pursuant to Part 15 of the FCC
Rules. These limits are designed to provide reasonable protection
against harmful interference in residential installation. This
equipment generates, uses, and can radiate radio frequency energy,
and if it is not installed and used in accordance with the instruction
manual, it may cause harmful interference to radio communications.
However, there is no guarantee that interference will not occur in a
particular installation.
If this equipment does cause harmful interference to radio or television reception, which can be determined by turning the equipment
off and on, the user is encouraged to try to correct the interference
by one or more of the following measures:
• Reorient or relocate the receiving antenna.
• Increase the separation between the equipment and receiver.
• Connect the equipment into an outlet on a circuit dierent from
that to which the receiver is connected.
• Consult the dealer or an experienced radio/TV technician for help.
WARNING: Any changes or modifications to this unit not expressly
approved by the party responsible for compliance could void the
user’s authority to operate the equipment.
This equipment complies with FCC radiation exposure limits set
forth for an uncontrolled environment. This equipment should be
installed and operated with minimum distance 20cm between the
radiator and your body. This transmitter must not be co-located or
operating in conjunction with any other antenna or transmitter.
Caution: Operation of this device is restricted to indoor use only.
For operation within 5.15 ~ 5.25GHz frequency range, it is restricted
to indoor environment.
This device meets all the other requirements specified in Part 15E,
Section 15.407 of the FCC Rules.
Industry Canada Equipment Standard for Digital Equipment
(ICES) – Canada
This Class B digital apparatus complies with Canadian ICES-003.
Cet appareil numérique de la classe B est conforme à la norme
NMB-003 du Canada.
Innovation, Science and Economic Development (ISED)
– Canada
This device complies with Industry Canada’s License-exempt RSSs.
Operation is subject to the following two conditions: (1) this device
may not cause interference, and (2) this device must accept any
interference, including interference that may cause undesired
operation of the device.
Le présent appareil est conforme aux CNR d’ ISED applicables aux
appareils radio exempts de licence. L’exploitation est autorisée aux
deux conditions suivantes : (1) l’appareil ne doit pas produire de
brouillage, et (2) l’utilisateur de l’appareil doit accepter tout brouillage radioélectrique subi, même si le brouillage est susceptible d’en
compromettre le fonctionnement.
For product available in the USA/Canada market, only channel 1~11
can be operated. Selection of other channels is not possible.
Pour les produits disponibles aux États-Unis / Canada du marché,
seul le canal 1 à 11 peuvent être exploités. Sélection d’autres canaux
n’est pas possible.
Page 19

This equipment complies with ISED radiation exposure limits set
forth for an uncontrolled environment. This equipment should be
installed and operated with minimum distance 20cm between the
radiator & your body.
Cet équipement est conforme aux limites d’exposition aux rayonnements ISED établies pour un environnement non contrôlé. Cet
équipement doit être installé et utilisé avec un minimum de 20cm
de distance entre la source de rayonnement et votre corps.
Caution: The device for the band 5150-5250 MHz is only for indoor
usage to reduce potential for harmful interference to co-channel
mobile satellite systems.
The maximum antenna gain permitted for devices in the band
5725-5850 MHz shall be such that the equipment still complies with
the e.i.r.p. limits specified for point-to-point and non-point-to-point
operation as appropriate.
Users should also be advised that high-power radars are allocated
as primary users (i.e. priority users) of the bands 5650-5850 MHz
and that these radars could cause interference and/or damage to
LE-LAN devices.
Attention: Le dispositif de la bande 5150-5250 MHz est réservé à un
usage intérieur afin de réduire l’interférence nuisible potentielle aux
systèmes mobiles par satellite co-canal.
Le gain maximal d’antenne permis (pour les dispositifs utilisant la
bande 5725-5850 MHz)
doit se conformer à la limite de p.i.r.e. spécifiée pour l’exploitation
point à point et non point à point, selon le cas.
De plus, les utilisateurs devraient aussi être avisés que les
utilisateurs de radars de haute puissance sont désignés utilisateurs
principaux (c.-à-d., qu’ils ont la priorité) pour les bandes 5650-5850
MHz et que ces radars pourraient causer du brouillage et/ou des
dommages aux dispositifs LAN-EL.
This device has been designed to operate with an antenna having
a maximum gain of 4 dBi for 2.4GHz and 5GHz. Antenna having
a higher gain is strictly prohibited per regulations of ISED. The
required antenna impedance is 50 ohms.
Under ISED regulations, this radio transmitter may only operate
using an antenna of a type and maximum (or lesser) gain approved
for the transmitter by ISED. To reduce potential radio interference to
other users, the antenna type and its gain should be so chosen that
the equivalent isotopically radiated power (e.i.r.p.) is not more than
that necessary for successful communication.
Ce dispositif a été conçu pour fonctionner avec une antenne ayant
un gain maximal de 4 dBi pour 2,4 GHz et 5GHz. Une antenne ayant
un gain supérieur sont strictement interdites par la réglementation
d’ISED. L’impédance d’antenne requise est de 50 ohms.
Conformément à la réglementation d’ISED, cet émetteur radio peut
fonctionner seulement avec une antenne d’un type et d’un gain
maximal (ou inférieur) approuvé pour l’émetteur par ISED. Dans le
but de réduire les risques de brouillage radioélectrique aux autres
utilisateurs, il faut choisir le type d’antenne et son gain de sorte
que la puissance isotrope rayonnée équivalente (p.i.r.e.) ne dépasse
pas l’intensité nécessaire à l’établissement d’une communication
réussie.
This radio transmitter (IC: 7280B-121C01) has been approved by
ISED to operate with the antenna types listed below with the
maximum permissible gain and required antenna impedance for
each antenna type indicated. Antenna types not included in this
list, having a gain greater than the maximum gain indicated for that
type, are strictly prohibited for use with this device.
Le présent émetteur radio (IC: 7280B-121C01) a été approuvé par
ISED pour fonctionner avec les types d’antenne énumérés ci-dessous et ayant un gain admissible maximal et l’impédance requise
pour chaque type d’antenne. Les types d’antenne non inclus dans
cette liste, ou dont le gain est supérieur au gain maximal indiqué,
sont strictement interdits pour l’exploitation de l’émetteur.
This device and it’s antennas(s) must not be co-located or operating
in conjunction with any other antenna or transmitter except in
accordance with IC multi-transmitter product procedures.
Cet appareil et son antenne (s) ne doit pas être co-localisés
ou fonctionnement en association avec une autre antenne ou
transmetteur.
Internal antenna Model:
Antenna Qty Antenna
Wi-Fi
1 PIFA IPEX 4 -
2.4GHz
Antenna
Wi-Fi 5GHz
1 PIFA IPEX - 4
Antenna
BT
1 PIFA IPEX 3.2 -
Antenna
European Conformity (CE) - EU
This is a Class B product. In a domestic environment, this product
may cause radio interference, in which case the user may be
required to take adequate measures.
Type
FAP-U24JEV
Connector
Gain (dBi)
2.4GHz 5GHz
Page 20

The product transmits within the frequency ranges and less
than or equal to the power listed below:
2412-2472MHz less than +24dBm
5180-5240MHz less than 23dBm
5260-5320MHz less than 23dBm *
5500-5700MHz less than 30dBm *
Note: * Only with DFS bands certification.
Page 21

Fortinet Product License Agreement / EULA
and Warranty Terms
Trademarks and Copyright Statement
Fortinet®, FortiGate®, and FortiGuard® are registered trademarks of
Fortinet, Inc., and other Fortinet names may also be trademarks,
registered or otherwise, of Fortinet. All other product or company
names may be trademarks of their respective owners. Copyright
© 2016 Fortinet, Inc., All Rights reserved. Contents and terms are
subject to change by Fortinet without prior notice. No part of this
publication may be reproduced in any form or by any means or
used to make any derivative such as translation, transformation, or
adaptation without permission from Fortinet, Inc., as stipulated by
the United States Copyright Act of 1976.
Product License Agreement
The parties to this agreement are you, the end customer, and either
(i) where you have purchased your Product within the Americas,
Fortinet, Inc., or (ii) where you have purchased your Product
outside of the Americas, Fortinet Singapore Private Limited (each
referred to herein as “Fortinet”). CAREFULLY READ THE FOLLOWING
LEGAL AGREEMENT (THE OR THIS “AGREEMENT” OR “EULA”). USE
OR INSTALLATION OF FORTINET PRODUC T(S) AND ANY UPDATES
THERETO, INCLUDING HARDWARE APPLIANCE PRODUCTS,
SOFTWARE AND FIRMWARE INCLUDED THEREIN BY FORTINET,
AND STAND-ALONE SOFTWARE PRODUCTS SOLD BY FORTINET
(TOGETHER, THE “PRODUCTS”) CONSTITUTES ACCEPTANCE BY YOU
OF THE TERMS IN THIS AGREEMENT, AS AMENDED OR UPDATED
FROM TIME TO TIME IN FORTINET’S DISCRETION BY FORTINET
PUBLISHING AN AMENDED OR UPDATED VERSION. FORTINET
SHALL NOT BE BOUND BY ANY ADDITIONAL AND/OR CONFLICTING
PROVISIONS IN ANY ORDER, RELEASE, ACCEPTANCE OR OTHER
WRITTEN CORRESPONDENCE OR OTHER WRITTEN OR VERBAL
COMMUNICATION UNLESS EXPRESSLY AGREED TO IN A WRITING
SIGNED BY THE GENERAL COUNSEL OF FORTINET. IF YOU DO NOT
AGREE TO ALL OF THE TERMS OF THIS AGREEMENT, DO NOT START
THE INSTALLATION PROCESS OR USE THE PRODUCTS. IF YOU DO
NOT AGREE TO THE TERMS OF THIS AGREEMENT, YOU SHOULD
IMMEDIATELY, AND IN NO EVENT LATER THAN FIVE (5) CALENDAR
DAYS AFTER YOUR RECEIPT OF THE PRODUCT IMMEDIATELY NOTIFY
THE FORTINET LEGAL TEAM IN WRITING AT LEGAL@FORTINET.COM
OF REQUESTED CHANGES TO THIS AGREEMENT.
1. License Grant.
This is a license, not a sales agreement, between you and Fortinet.
The term “Software”, as used throughout this Agreement, includes
all Fortinet and third party rmware and software provided to you
with, or incorporated into, Fortinet appliances and any stand-alone
software provided to you by Fortinet, with the exception of any
open source software contained in Fortinet’s Products which is
discussed in detail in section 15 below, and the term “Software”
includes any accompanying documentation, any updates and
enhancements of the software or rmware provided to you by
Fortinet, at its option. Fortinet grants to you a non-transferable
(except as provided in section 5 (“Transfer”) and section 15 (“Open
Source Software”) below), non-exclusive, revocable (in the event
of your failure to comply with these terms or in the event Fortinet
is not properly paid for the applicable Product) license to use the
Software solely for your internal business purposes (provided, if a
substantial portion of your business is to provide managed service
provider services to your end-customers, you may use the Software
embedded in FortiGate and supporting hardware appliances
to provide those services, subject to the other restrictions in
this Agreement), in accordance with the terms set forth in this
Agreement and subject to any further restrictions in Fortinet
documentation, and solely on the Fortinet appliance, or, in the case
of blades, CPUs or databases, on the single blade, CPU or database
on which Fortinet installed the Software or, for stand-alone
Software, solely on a single computer running a validly licensed
copy of the operating system for which the Software was designed
unless and except set forth in the published documentation
otherwise, or, in the case of blades, CPUs or databases, on a single
blade, CPU or database. For clarity, notwithstanding anything to
the contrary, all licenses of Software to be installed on blades,
CPUs or databases are licensed on a per single blade, solely for
one blade and not for multiple blades that may be installed in a
chassis, per single CPU or per single database basis, as applicable.
The Software is “in use” on any Fortinet appliances when it is loaded
into temporary memory (i.e. RAM). You agree that, except for the
limited, specic license rights granted in this section 1, you receive
no license rights to the Software.
2. Limitation on Use.
You may not attempt to, and, if you are a corporation, you are
responsible to prevent your employees and contractors from
attempting to, (a) modify, translate, reverse engineer, decompile,
disassemble, create derivative works based on, sublicense, or
distribute the Software; (b) rent or lease any rights in the Software
in any form to any third party or make the Software available
or accessible to third parties in any other manner; (c) except as
provided in section 5, transfer assign or sublicense right to any
other person or entity, (d) remove any proprietary notice, labels,
or marks on the Software, Products, and containers, or (e) use
the Software for third-party training, commercial time-sharing or
service bureau use or use the Software to provide services to third
parties except as expressly set forth in this Agreement.
3. Proprietary Rights.
All rights, title, interest, and all copyrights to the Software and
any copy made thereof by you and to any Product remain with
Fortinet. You acknowledge that no title to the intellectual property
in the Software or other Products is transferred to you and you will
not acquire any rights to the Software or other Products except
for the specic license as expressly set forth in section 1 (“License
Grant”) above. You expressly agree and acknowledge that Fortinet
owns and shall retain all intellectual property rights in and to, and
you have no intellectual property rights in and to, the Products
and the Software other than the License Grant. You agree to keep
condential all Fortinet condential information and only to use
such information for the purposes for which Fortinet disclosed it.
4. Term and Termination.
Except for evaluation and beta licenses or other licenses, such
as subscription licenses, where the term of the license is limited
per the evaluation/beta or other agreement, in the ordering
documents or otherwise, the term of the license is for the duration
of Fortinet’s copyright in the Software. Fortinet may terminate this
Agreement, and the licenses and other rights herein, immediately
without notice if you breach or fail to comply with any of the terms
and conditions of this Agreement or for other reasons as stated
in Fortinet’s other documentation. You agree that, upon such
termination, you will cease using the Software and any Product and
either destroy all copies of the Fortinet documentation or return all
materials to Fortinet.
5. Transfer.
If you are a Fortinet contracted and authorized reseller or
distributor of Products, you may transfer (not rent or lease unless
specically agreed to in writing by Fortinet) the Software to one
end user on a permanent basis, provided that: (i) you ensure that
your customer and the end user receives a copy of this Agreement,
is bound by its terms and conditions, and, by selling the Product or
Software, you hereby agree to
Page 22

enforce the terms in this Agreement against such end user, (ii) you
at all times comply with all applicable United States export control
laws and regulations, and (iii) you agree to refund any fees paid to
you by an end user who purchased Product(s) from you but does
not agree to the terms contained in this Agreement and therefore
wishes to return the Product(s) as provided for in this Agreement.
Further, if you are a non-authorized reseller of Products, you are not
authorized to sell Product(s) or Software, but, regardless, by selling
Product(s) or Software, you hereby agree you are bound by the
restrictions and obligations herein and are bound to: (i) ensure that
your customer and the end user receive a copy of this Agreement
and are bound in full by all restrictions and obligations herein
(ii) enforce the restrictions and obligations in this Agreement
against such customer and/or end user, (iii) comply with all
applicable United States export control laws and regulations and
all other applicable laws, and (iv) refund any fees paid to you by
a customer and/or end user who purchased Product(s) from you
but does not agree to the restrictions and obligations contained
in this Agreement and therefore wishes to return the Product(s)
as provided for in this Agreement. Notwithstanding anything to
the contrary, distributors, resellers and other Fortinet partners
(a) are not agents of Fortinet and (b) are not authorized to bind
Fortinet in any way.
6. Limited Warranty.
Fortinet provides this limited warranty for its product only to
the single end-user person or entity that originally purchased
the Product from Fortinet or its authorized reseller or distributor
and paid for such Product. The warranty is only valid for Products
which are properly registered on Fortinet’s Support Website,
https://support.fortinet.com, or such other website as provided by
Fortinet, or for which the warranty otherwise starts according to
Fortinet’s policies. The warranty periods discussed below will start
according to Fortinet’s policies posted at http://www.fortinet.com/
aboutus/legal.html or such other website as provided by Fortinet.
It is the Fortinet distributor’s and reseller’s responsibility to make
clear to the end user the date the product was originally shipped
from Fortinet, and it is the end user’s responsibility to understand
the original ship date from the party from which the end user
purchased the product. All warranty claims must be submitted
in writing to Fortinet before the expiration of the warranty term
or such claims are waived in full. Fortinet provides no warranty
for any beta, donation or evaluation Products, for any spare parts
not purchased directly from Fortinet by the end-user, for any
accessories, or for any stand-alone software. Fortinet warrants that
the hardware portion of the Products, including spare parts unless
noted otherwise (“Hardware”) will be free from material defects
in workmanship as compared to the functional specications for
the period set forth as follows and applicable to the Product type
(“Hardware Warranty Period”): a three hundred sixty-ve (365)
day limited warranty for the Hardware excluding spare parts,
power supplies, and accessories (provided, solely with respect to
FortiAP and Meru AP indoor Wi-Fi access point Hardware appliance
products and FortiSwitch Hardware appliance products other
than the FortiSwitch-5000 series (for both excluding spare parts,
power supplies, and accessories), the warranty herein shall last
from the start of the warranty period as discussed above until ve
(5) years following the product announced end-of-life date), and,
for spare parts, power supplies, and accessories, solely a ninety
(90) days limited warranty. Fortinet’s sole obligation shall be to
repair or oer replacement Hardware for the defective Hardware
at no charge to the original owner. This obligation is exclusive of
transport fees, labor, de-installation, installation, reconguration,
or return shipment and handling fees and costs, and Fortinet shall
have no obligation related thereto. Such repair or replacement
will be rendered by Fortinet at an authorized Fortinet service
facility as determined by Fortinet. The replacement Hardware
need not be new or of an identical make, model, or part; Fortinet
may, in its discretion, replace the defective Hardware (or any part
thereof) with any reconditioned Product that Fortinet reasonably
determines is substantially equivalent (or superior) in all material
respects to the defective Hardware. The Hardware Warranty Period
for the repaired or replacement Hardware shall be for the greater
of the remaining Hardware Warranty Period or ninety days from
the delivery of the repaired or replacement Hardware. If Fortinet
determines in its reasonable discretion that a material defect is
incapable of correction or that it is not practical to repair or replace
defective Hardware, the price paid by the original purchaser for
the defective Hardware will be refunded by Fortinet upon return to
Fortinet of the defective Hardware. All Hardware (or part thereof)
that is replaced by Fortinet, or for which the purchase price is
refunded, shall become the property of Fortinet upon replacement
or refund. Fortinet warrants that the software as initially shipped
with the Hardware Products will substantially conform to Fortinet’s
then current functional specications for the Software, as set
forth in the applicable documentation for a period of ninety (90)
days (“Software Warranty Period”), if the Software is properly
installed on approved Hardware and operated as contemplated
in its documentation. Fortinet’s sole obligation shall be to repair
or oer replacement Software for the non-conforming Software
with software that substantially conforms to Fortinet’s functional
specications. This obligation is exclusive of transport fees, labor,
de-installation, installation, reconguration, or return shipment
and handling fees and costs, and Fortinet shall have no obligation
related thereto. Except as otherwise agreed by Fortinet in writing,
the warranty replacement Software is provided only to the original
licensee, and is subject to the terms and conditions of the license
granted by Fortinet for the Software. The Software Warranty Period
shall extend for an additional ninety (90) days after any warranty
replacement software is delivered. If Fortinet determines in its
reasonable discretion that a material non-conformance is incapable
of correction or that it is not practical to repair or replace the nonconforming Software, the price paid by the original licensee for the
non-conforming Software will be refunded by Fortinet; provided
that the non-conforming Software (and all copies thereof) is rst
returned to Fortinet. The license granted respecting any Software
for which a refund is given automatically terminates immediately
upon refund. For purpose of the above hardware and software
warranties, the term “functional specications” means solely
those specications authorized and published by Fortinet that
expressly state in such specications that they are the functional
specications referred to in this section 6 of this Agreement, and,
in the event no such specications are provided to you with the
Software or Hardware, there shall be no warranty on such Software.
7. Disclaimer of Other Warranties and Restrictions.
EXCEPT FOR THE LIMITED WARRANTY SPECIFIED IN SECTION 6
ABOVE, THE PRODUCT AND SOFTWARE ARE PROVIDED “AS-IS”
WITHOUT ANY WARRANTY OF ANY KIND INCLUDING, WITHOUT
LIMITATION, ANY IMPLIED WARRANTY, IMPLIED OR EXPRESS
WARRANTY OF MERCHANTABILITY, OR WARRANTY FOR FITNESS
FOR A PARTICULAR PURPOSE AND NON-INFRINGEMENT. IF ANY
IMPLIED WARRANTY CANNOT BE DISCLAIMED IN ANY TERRITORY
WHERE A PRODUCT IS SOLD, THE DURATION OF SUCH IMPLIED
WARRANTY SHALL BE LIMITED TO NINETY (90) DAYS FROM THE
DATE OF ORIGINAL SHIPMENT FROM FORTINET. EXCEPT AS
EXPRESSLY COVERED UNDER THE LIMITED WARRANTY PROVIDED
HEREIN, THE ENTIRE RISK AS TO THE QUALITY, SELECTION AND
PERFORMANCE OF THE PRODUCT IS WITH THE PURCHASER OF THE
PRODUCT. NOTWITHSTANDING
Page 23

ANYTHING TO THE CONTRARY, THE HARDWARE WARRANTY PERIOD
DISCUSSED ABOVE DOES NOT APPLY TO CERTAIN FORTINET
PRODUCTS, INCLUDING FORTITOKEN WHICH HAS A 365 DAY
WARRANTY FROM THE DATE OF SHIPMENT FROM FORTINET’S
FACILITIES, AND THE SOFTWARE WARRANTY DOES NOT APPLY TO
CERTAIN FORTINET PRODUCTS, INCLUDING FORTIGATE-ONE AND
VDOM SOFTWARE. YOU HEREBY ACKNOWLEDGE AND AGREE THAT
NO VENDOR CAN ASSURE COMPLETE SECURITY AND NOTHING
HEREIN OR ELSEWHERE SHALL BE DEEMED TO IMPLY A SECURITY
GUARANTEE OR ASSURANCE.
The warranty in Section 6 above does not apply if the Software,
Product or any other equipment upon which the Software is
authorized to be used (a) has been altered, except by Fortinet
or its authorized representative, (b) has not been installed,
operated, repaired, updated to the latest version, or maintained
in accordance with instructions supplied by Fortinet, (c) has
been subjected to abnormal physical or electrical stress, misuse,
negligence, or accident; (d) is licensed for beta, evaluation,
donation, testing or demonstration purposes or for which Fortinet
does not charge a purchase price or license fee. In the case of beta,
testing, evaluation, donation or free Software or Product, the end
user acknowledges and agrees that such Software or Product may
contain bugs or errors and could cause system failures, data loss
and other issues, and the end user agrees that such Software or
Product is provided “as-is” without any warranty whatsoever, and
Fortinet disclaims any warranty or liability whatsoever. An end
user’s use of evaluation or beta Software or Product is limited to
thirty (30) days from original shipment unless otherwise agreed in
writing by Fortinet.
8. Governing Law.
Any disputes arising out of this Agreement or Fortinet’s limited
warranty shall be governed by the laws of the state of California,
without regard to the conict of laws principles. In the event of
any disputes arising out of this Agreement or Fortinet’s limited
warranty, the parties submit to the jurisdiction of the federal and
state courts located in Santa Clara County, California, as applicable.
9. Limitation of Liability.
TO THE MAXIMUM EXTENT PERMITTED BY LAW AND
NOTWITHSTANDING ANYTHING TO THE CONTRARY, FORTINET IS
NOT LIABLE UNDER ANY CONTRACT, NEGLIGENCE, TORT, STRICT
LIABILITY, INFRINGEMENT OR OTHER LEGAL OR EQUITABLE THEORY
FOR ANY LOSS OF USE OF THE PRODUCT OR SERVICE OR ANY
DAMAGES OF ANY KIND WHATSOEVER, WHETHER DIRECT, SPECIAL,
INCIDENTAL OR CONSEQUENTIAL (INCLUDING, BUT NOT LIMITED
TO, DAMAGES FOR LOSS OF GOODWILL, LOSS OF PROFIT, LOSS
OF OPPORTUNITY, LOSS OR DAMAGE RELATED TO USE OF THE
PRODUCT OR SERVICE IN CONNECTION WITH HIGH RISK ACTIVITIES,
DE-INSTALLATION AND INSTALLATION FEES AND COSTS,
DAMAGE TO PERSONAL OR REAL PROPERTY, WORK STOPPAGE,
COMPUTER FAILURE OR MALFUNCTION, COMPUTER SECURITY
BREACH, COMPUTER VIRUS INFECTION, LOSS OF INFORMATION
OR DATA CONTAINED IN, STORED ON, OR INTEGRATED WITH ANY
PRODUCT INCLUDING ANY PRODUCT RETURNED TO FORTINET
FOR WARRANTY SERVICE) RESULTING FROM THE USE OF THE
PRODUCT, RELATING TO WARRANTY SERVICE, OR ARISING OUT OF
ANY BREACH OF THE LIMITED WARRANTY IN SEC TION 6 ABOVE,
EVEN IF FORTINET HAS BEEN ADVISED OF THE POSSIBILITY OF
SUCH DAMAGES. THE SOLE REMEDY FOR A BREACH OF THE
LIMITED WARRANTY IS REPAIR, REPLACEMENT OR REFUND OF THE
DEFECTIVE OR NON-CONFORMING PRODUCT AS SPECIFICALLY
STATED IN SECTION 6 ABOVE.
10. Import / Export Requirements; FCPA Compliance.
You are advised that the Products may be subject to the United
States Export Administration Regulations and other import
and export laws; diversion contrary to United States law and
regulation is prohibited. You agree to comply with all applicable
international and national laws that apply to the Products as
well as end user, end-use, and destination restrictions issued
by U.S. and other governments. For additional information on
U.S. export controls see www.bis.doc.gov. Fortinet assumes no
responsibility or liability for your failure to obtain any necessary
import and export approvals, and Fortinet reserves the right to
terminate or suspend shipments, services and support in the event
Fortinet has a reasonable basis to suspect any import or export
violation. You represent that neither the United States Bureau of
Industry and Security nor any other governmental agency has
issued sanctions against you or otherwise suspended, revoked
or denied your export privileges. You agree not to use or transfer
the Products for any use relating to nuclear, chemical or biological
weapons, or missile technology, unless authorized by the United
States Government by regulation or specic written license.
Additionally, you agree not to directly or indirectly export, import
or transmit the Products contrary to the laws or regulations of any
other governmental entity that has jurisdiction over such export,
import, transmission or use. Furthermore, you represent that you
understand, and you hereby agree to comply with, all requirements
of the U.S. Foreign Corrupt Practices Act and all other applicable
laws. For beta, testing, evaluation, donation or free Products and/
or related services, you hereby agree, represent and warrant to
Fortinet that (a) receipt of the Products and/or services comply
with all policies and you have obtained all necessary approvals for
such Products and/or services, (b) the Products and/or services are
not provided in exchange for Fortinet maintaining current business
or for new business opportunities, and (c) the Products and/or
services are not being received for the benet of, and are not being
transferred to, any government entity, representative or aliate.
11. U.S. Government End Users.
The Software and accompanying documentation are deemed to
be “commercial computer software” and “commercial computer
software documentation,” respectively, pursuant to DFAR
Section 227.7202 and FAR Section 12.212, as applicable. Any
use, modication, reproduction, release, performance, display or
disclosure of the Software and accompanying documentation by
the United States Government shall be governed solely by the
terms of this Agreement and shall be prohibited except to the
extent expressly permitted by the terms of this Agreement and
its successors.
12. Tax Liability.
You agree to be responsible for payment of any sales or use taxes
imposed at any time on this transaction.
13. General Provisions.
Except as specically permitted and required in section 5
(“Transfer”) above, you agree not to assign this Agreement or
transfer any of the rights or obligations under this Agreement
without the prior written consent of Fortinet. This Agreement shall
be binding upon, and inure to the benet of, the successors and
permitted assigns of the parties. The United Nations Convention on
Contracts for the International Sales of Goods is expressly excluded.
This Agreement and other Fortinet agreements may be amended
or supplemented only by a writing that refers explicitly to the
agreement signed on behalf of both parties, or, for this Agreement,
as otherwise expressly provided in the lead-in above Section 1
above, provided, notwithstanding anything to the contrary and
except for this Agreement which may be amended or updated as
Page 24

expressly provided in the lead-in above Section 1 above, for any
amendment or other agreement to be binding on Fortinet, such
amendment or other agreement must be signed by Fortinet’s
General Counsel. No waiver will be implied from conduct or failure
to enforce rights nor eective unless in a writing signed on behalf
of the party against whom the waiver is asserted. If any part of this
Agreement is found unenforceable, that part will be enforced to
the maximum extent permitted and the remainder shall continue
in full force and eect. You acknowledge that you have read this
Agreement, understand it, and agree to be bound by its terms
and conditions.
14. Privacy.
Fortinet’s collection, use, protection and transfer of your personal
information is governed by the Fortinet privacy policy on the
Fortinet web site (http://www.fortinet.com/aboutus/privacy.html).
15. Open Source Software.
Fortinet’s products may include software modules that are licensed
(or sublicensed) to the user under the GNU General Public License,
Version 2, of June 1991 (“GPL”) or GNU Lesser General Public
License, Version 2.1, of February 1999 (“LGPL”) or other open
source software licenses which, among other rights, permit the
user touse, copy, modify and redistribute modules, or portions
thereof, and may also require attribution disclosures and access to
the source code (“Open Source Software”). The GPL requires that
for any Open Source Software covered under the GPL, which is
distributed to someone in an executable binary format, that the
source code also be made available to those users. For any Open
Source Software covered under the GPL, the source code is made
available on this CD or download package. If any Open Source
Software licenses require that Fortinet provide rights to use, copy
or modify a Open Source Software program that are broader than
the rights granted in this agreement, then such rights shall take
precedence over the rights and restrictions herein. Fortinet will
provide, for a charge reecting our standard distribution costs,
the complete machine-readable copy of the modied software
modules. To obtain a complete machine-readable copy, please
send your written request, along with a check in the amount of US
$25.00, to General Public License Source Code Request, Fortinet,
Inc., 899 Kifer Rd, Sunnyvale, CA 94086 USA. In order to receive the
modied software modules, you must also include the following
information: (a) Name, (b) Address, (c) Telephone number, (d)
E-mail Address, (e) Product purchased (if applicable), (f) Product
Serial Number (if applicable). All open source software modules
are licensed free of charge. There is no warranty for these modules,
to the extent permitted by applicable law. The copyright holders
provide these software modules “AS-IS” without warranty of any
kind, either expressed or implied. In no event will the copyright
holder for the open source software be liable to you for damages,
including any special, incidental or consequential damages arising
out of the use or inability to use the software modules, even if such
holder has been advised of the possibility of such damages. A full
copy of this license, including additional open source software
license disclosures and third party license disclosures applicable to
certain Fortinet products, may obtained by contacting Fortinet’s
Legal Department at legal@fortinet.com.
GNU GENERAL PUBLIC LICENSE GNU GENERAL PUBLIC LICENSE
Copyright (C) 1989, 1991 Free Software Foundation, Inc.
59 Temple Place, Suite 330, Boston, MA 02111-1307 USA
TERMS AND CONDITIONS FOR COPYING, DISTRIBUTION AND
This License applies to any program or other work which contains a
notice placed by the copyright holder saying it may be distributed
under the terms of this General Public License. The “Program”,
below, refers to any such program or work, and a “work based
on the Program” means either the Program or any derivative
work under copyright law: that is to say, a work containing the
Program or a portion of it, either verbatim or with modications
and/or translated into another language. (Hereinafter, translation
is included without limitation in the term “modication”.) Each
licensee is addressed as “you”.
Activities other than copying, distribution and modication are
not covered by this License; they are outside its scope. The act of
running the Program is not restricted, and the output from the
Program is covered only if its contents constitute a work based on
the Program (independent of having been made by running the
Program). Whether that is true depends on what the Program does.
1. You may copy and distribute verbatim copies of the Program’s
source code as you receive it, in any medium, provided that
you conspicuously and appropriately publish on each copy an
appropriate copyright notice and disclaimer of warranty; keep
intact all the notices that refer to this License and to the absence of
any warranty; and give any other recipients of the Program a copy
of this License along with the Program. You may charge a fee for
the physical act of transferring a copy, and you may at your option
oer warranty protection in exchange for a fee.
2. You may modify your copy or copies of the Program or any
portion of it, thus forming a work based on the Program, and
copy and distribute such modications or work under the terms
of Section 1 above, provided that you also meet all of these
conditions:
a) You must cause the modied les to carry prominent notices
Version 2, June 1991
MODIFICATION
stating that you changed the les and the date of any change.
b) You must cause any work that you distribute or publish, that in
whole or in part contains or is derived from the Program or any part
thereof, to be licensed as a whole at no charge to all third parties
under the terms of this License.
c) If the modied program normally reads commands interactively
when run, you must cause it, when started running for such
interactive use in the most ordinary way, to print or display an
announcement including an appropriate copyright notice and a
notice that there is no warranty (or else, saying that you provide a
warranty) and that users may redistribute the program under these
conditions, and telling the user how to view a copy of this License.
(Exception: if the Program itself is interactive but does not normally
print such an announcement, your work based on the Program is
not required to print an announcement.)
These requirements apply to the modied work as a whole. If
identiable sections of that work are not derived from the Program,
and can be reasonably considered independent and separate
works in themselves, then this License, and its terms, do not apply
to those sections when you distribute them as separate works. But
when you distribute the same sections as part of a whole which is a
work based on the Program, the distribution of the whole must be
on the terms of this License, whose permissions for other licensees
extend to the entire whole, and thus to each and every part
regardless of who wrote it.. Thus, it is not the intent of this section
to claim rights or contest your rights to work written entirely
by you; rather, the intent is to exercise the right to control the
distribution of derivative or collective works based on the Program.
In addition, mere aggregation of another work not based on the
Program with the Program (or with a work based on the Program)
on a volume of a storage or distribution medium does not bring
the other work under the scope of this License.
3. You may copy and distribute the Program (or a work based on it,
under Section 2) in object code or executable form under the terms
of Sections 1 and 2 above provided that you also do
Page 25

one of the following:
a) Accompany it with the complete corresponding machinereadable source code, which must be distributed under the terms
of Sections1 and 2 above on a medium customarily used for
software interchange; or,
b) Accompany it with a written oer, valid for at least three years,
to give any third party, for a charge no more than your cost of
physically performing source distribution, a complete machinereadable copy of the corresponding source code, to be distributed
under the terms of Sections 1 and 2 above on a medium
customarily used for software interchange; or,
c) Accompany it with the information you received as to the
oer to distribute corresponding source code. (This alternative
is allowed only for noncommercial distribution and only if you
received the program in object code or executable form with such
an oer, in accord with Subsection b above.)
Source code for a work means the preferred form of the work for
making modications to it. For an executable work, complete
source code means all the source code for all modules it contains,
plus any associated interface denition les, plus the scripts used
to control compilation and installation of the executable. However,
as a special exception, the source code distributed need not
include anything that is normally distributed (in either source or
binary form) with the major components (compiler, kernel, and so
on) of the operating system on which the executable runs, unless
that component itself accompanies the executable. If distribution
of executable or object code is made by oering access to copy
from a designated place, then oering equivalent access to copy
the source code from the same place counts as distribution of the
source code, even though third parties are not compelled to copy
the source along with the object code.
4. You may not copy, modify, sublicense, or distribute the Program
except as expressly provided under this License. Any attempt
otherwise to copy, modify, sublicense or distribute the Program
is void, and will automatically terminate your rights under this
License. However, parties who have received copies, or rights, from
you under this License will not have their licenses terminated so
long as such parties remain in full compliance.
5. You are not required to accept this License, since you have not
signed it. However, nothing else grants you permission to modify
or distribute the Program or its derivative works. These actions
are prohibited by law if you do not accept this License. Therefore,
by modifying or distributing the Program (or any work based on
the Program), you indicate your acceptance of this License to do
so, and all its terms and conditions for copying, distributing or
modifying the Program or works based on it.
6. Each time you redistribute the Program (or any work based on
the Program), the recipient automatically receives a license from
the original licensor to copy, distribute or modify the Program
subject to these terms and conditions. You may not impose any
further restrictions on the recipients’ exercise of the rights granted
herein. You are not responsible for enforcing compliance by third
parties to this License.
7. If, as a consequence of a court judgment or allegation of patent
infringement or for any other reason (not limited to patent issues),
conditions are imposed on you (whether by court order, agreement
or otherwise) that contradict the conditions of this License, they
do not excuse you from the conditions of this License. If you
cannot distribute so as to satisfy simultaneously your obligations
under this License and any other pertinent obligations, then
as a consequence you may not distribute the Program at all.
For example, if a patent license would not permit royalty-free
redistribution of the Program by all those who receive copies
directly or indirectly through you, then the only way you could
satisfy both it and this License would be to refrain entirely from
distribution of the Program.
If any portion of this section is held invalid or unenforceable under
any particular circumstance, the balance of the section is intended
to apply and the section as a whole is intended to apply in other
circumstances.
It is not the purpose of this section to induce you to infringe any
patents or other property right claims or to contest validity of
any such claims; this section has the sole purpose of protecting
the integrity of the free software distribution system, which is
implemented by public license practices. Many people have made
generous contributions to the wide range of software distributed
through that system in reliance on consistent application of that
system; it is up to the author/donor to decide if he or she is willing
to distribute software through any other system and a licensee
cannot impose that choice.
This section is intended to make thoroughly clear what is believed
to be a consequence of the rest of this License.
8. If the distribution and/or use of the Program is restricted in
certain countries either by patents or by copyrighted interfaces,
the original copyright holder who places the Program under this
License may add an explicit geographical distribution limitation
excluding those countries, so that distribution is permitted only in
or among countries not thus excluded. In such case, this License
incorporates the limitation as if written in the body of this License.
9. The Free Software Foundation may publish revised and/or new
versions of the General Public License from time to time. Such new
versions will be similar in spirit to the present version, but may
dier in detail to address new problems or concerns. Each version
is given a distinguishing version number. If the Program species
a version number of this License which applies to it and “any later
version”, you have the option of following the terms and conditions
either of that version or of any later version published by the Free
Software Foundation. If the Program does not specify a version
number of this License, you may choose any version ever published
by the Free Software Foundation.
10. If you wish to incorporate parts of the Program into other free
programs whose distribution conditions are dierent, write to the
author to ask for permission. For software which is copyrighted
by the Free Software Foundation, write to the Free Software
Foundation; we sometimes make exceptions for this. Our decision
will be guided by the two goals of preserving the free status of all
derivatives of our free software and of promoting the sharing and
reuse of software generally.
11. BECAUSE THE PROGRAM IS LICENSED FREE OF CHARGE, THERE
IS NO WARRANTY FOR THE PROGRAM, TO THE EXTENT PERMITTED
BY APPLICABLE LAW. EXCEPT WHEN OTHERWISE STATED IN
WRITING THE COPYRIGHT HOLDERS AND/OR OTHER PARTIES
PROVIDE THE PROGRAM “AS IS” WITHOUT WARRANTY OF ANY KIND,
EITHER EXPRESSED OR IMPLIED, INCLUDING, BUT NOT LIMITED TO,
THE IMPLIED WARRANTIES OF MERCHANTABILITY AND FITNESS
FOR A PARTICULAR PURPOSE. THE ENTIRE RISK AS TO THE QUALITY
AND PERFORMANCE OF THE PROGRAM IS WITH YOU. SHOULD
THE PROGRAM PROVE DEFECTIVE, YOU ASSUME THE COST OF ALL
NECESSARY SERVICING, REPAIR OR CORRECTION.
12. IN NO EVENT UNLESS REQUIRED BY APPLICABLE LAW OR
AGREED TO IN WRITING WILL ANY COPYRIGHT HOLDER, OR
ANY OTHER PARTY WHO MAY MODIFY AND/OR REDISTRIBUTE
THE PROGRAM AS PERMITTED ABOVE, BE LIABLE TO YOU FOR
DAMAGES, INCLUDING ANY GENERAL, SPECIAL, INCIDENTAL
OR CONSEQUENTIAL DAMAGES ARISING OUT OF THE USE OR
INABILITY TO USE THE PROGRAM (INCLUDING BUT NOT LIMITED TO
LOSS OF DATA OR DATA BEING RENDERED INACCURATE OR LOSSES
SUSTAINED BY YOU OR THIRD PARTIES OR
NO WARRANTY
Page 26

A FAILURE OF THE PROGRAM TO OPERATE WITH ANY OTHER
PROGRAMS), EVEN IF SUCH HOLDER OR OTHER PARTY HAS BEEN
ADVISED OF THE POSSIBILITY OF SUCH DAMAGES.
GNU LESSER GENERAL PUBLIC LICENSE
Version 2.1, February 1999
Copyright (C) 1991, 1999 Free Software Foundation, Inc.
59 Temple Place, Suite 330, Boston, MA 02111-1307 USA
TERMS AND CONDITIONS FOR COPYING, DISTRIBUTION AND
0. This License Agreement applies to any software library or other
program which contains a notice placed by the copyright holder
or other authorized party saying it may be distributed under
the terms of this Lesser General Public License (also called “this
License”). Each licensee is addressed as “you”.
A “library” means a collection of software functions and/or data
prepared so as to be conveniently linked with application programs
(which use some of those functions and data) to form executables.
The “Library”, below, refers to any such software library or work
which has been distributed under these terms. A “work based
on the Library” means either the Library or any derivative
work under copyright law: that is to say, a work containing the
Library or a portion of it, either verbatim or with modications
and/or translated straightforwardly into another language.
(Hereinafter, translation is included without limitation in the term
“modication”.)
“Source code” for a work means the preferred form of the work for
making modications to it. For a library, complete source code
means all the source code for all modules it contains, plus any
associated interface denition les, plus the scripts used to control
compilation and installation of the library.
Activities other than copying, distribution and modication are
not covered by this License; they are outside its scope. The act of
running a program using the Library is not restricted, and output
from such a program is covered only if its contents constitute a
work based on the Library (independent of the use of the Library
in a tool for writing it). Whether that is true depends on what the
Library does and what the program that uses the Library does.
1. You may copy and distribute verbatim copies of the Library’s
complete source code as you receive it, in any medium, provided
that you conspicuously and appropriately publish on each copy
an appropriate copyright notice and disclaimer of warranty; keep
intact all the notices that refer to this License and to the absence
of any warranty; and distribute a copy of this License along with
the Library. You may charge a fee for the physical act of transferring
a copy, and you may at your option oer warranty protection in
exchange for a fee.
2. You may modify your copy or copies of the Library or any portion
MODIFICATION
of it, thus forming a work based on the Library, and copy and
distribute such modications or work under the terms of Section 1
above, provided that you also meet all of these conditions:
a) The modied work must itself be a software library.
b) You must cause the les modied to carry prominent notices
stating that you changed the les and the date of any change.
c) You must cause the whole of the work to be licensed at no
charge to all third parties under the terms of this License.
d) If a facility in the modied Library refers to a function or a table
of data to be supplied by an application program that uses the
facility, other than as an argument passed when the facility is
invoked, then you must make a good faith eort to ensure that, in
the event an application does not supply such function or table,
the facility still operates, and performs whatever part of its purpose
remains meaningful.
These requirements apply to the modied work as a whole. If
identiable sections of that work are not derived from the Library,
and can be reasonably considered independent and separate
works in themselves, then this License, and its terms, do not apply
to those sections when you distribute them as separate works. But
when you distribute the same sections as part of a whole which is
a work based on the Library, the distribution of the whole must be
on the terms of this License, whose permissions for other licensees
extend to the entire whole, and thus to each and every part
regardless of who wrote it. Thus, it is not the intent of this section to
claim rights or contest your rights to work written entirely by you;
rather, the intent is to exercise the right to control the distribution
of derivative or collective works based on the Library. In addition,
mere aggregation of another work not based on the Library with
the Library (or with a work based on the Library) on a volume of
a storage or distribution medium does not bring the other work
under the scope of this License.
3. You may opt to apply the terms of the ordinary GNU General
Public License instead of this License to a given copy of the Library.
To do this, you must alter all the notices that refer to this License, so
that they refer to the ordinary GNU General Public License, version
2 instead of to this License. (If a newer version than version 2 of the
ordinary GNU General Public License has appeared, then you can
specify that version instead if you wish.) Do not make any other
change in these notices.
Once this change is made in a given copy, it is irreversible for that
copy, so the ordinary GNU General Public License applies to all
subsequent copies and derivative works made from that copy.
This option is useful when you wish to copy part of the code of the
Library into a program that is not a library.
4. You may copy and distribute the Library (or a portion or
derivative of it, under Section 2) in object code or executable
form under the terms of Sections 1 and 2 above provided that you
accompany it with the complete corresponding machine-readable
source code, which must be distributed under the terms of
Sections 1 and 2 above on a medium customarily used for software
interchange.
If distribution of object code is made by oering access to copy
from a designated place, then oering equivalent access to copy
the source code from the same place satises the requirement
to distribute the source code, even though third parties are not
compelled to copy the source along with the object code.
5. A program that contains no derivative of any portion of the
Library, but is designed to work with the Library by being compiled
or linked with it, is called a “work that uses the Library”. Such
a work, in isolation, is not a derivative work of the Library, and
therefore falls outside the scope of this License.
However, linking a “work that uses the Library” with the Library
creates an executable that is a derivative of the Library (because
it contains portions of the Library), rather than a “work that uses
the library”. The executable is therefore covered by this License.
Section 6 states terms for distribution of such executables.
When a “work that uses the Library” uses material from a header
le that is part of the Library, the object code for the work may be a
derivative work of the Library even though the source code is not.
Whether this is true is especially signicant if the work can be
linked without the Library, or if the work is itself a library. The
threshold for this to be true is not precisely dened by law.
If such an object le uses only numerical parameters, data
structure layouts and accessors, and small macros and small inline
functions (ten lines or less in length), then the use of the object
le is unrestricted, regardless of whether it is legally a derivative
work. (Executables containing this object code plus portions of
the Library will still fall under Section 6.) Otherwise, if the work is a
derivative of the Library, you may distribute the object code for the
work under the terms of Section 6. Any
Page 27

executables containing that work also fall under Section 6, whether
or not they are linked directly with the Library itself.
6. As an exception to the Sections above, you may also combine
or link a “work that uses the Library” with the Library to produce
a work containing portions of the Library, and distribute that
work under terms of your choice, provided that the terms permit
modication of the work for your own use and reverse engineering
for debugging such modications. You must give prominent
notice with each copy of the work that the Library is used in it and
that the Library and its use are covered by this License. You must
supply a copy of this License. If the work during execution displays
copyright notices, you must include the copyright notice for the
Library among them, as well as a reference directing the user to the
copy of this License. Also, you must do one of these things:
a) Accompany the work with the complete corresponding
machine-readable source code for the Library including whatever
changes were used in the work (which must be distributed under
Sections 1 and 2 above); and, if the work is an executable linked
with the Library, with the complete machine-readable “work that
uses the Library”, as object code and/or source code, so that the
user can modify the Library and then relink to produce a modied
executable containing the modied Library. (It is understood that
the user who changes the contents of denitions les in the Library
will not necessarily be able to recompile the application to use the
modied denitions.)
b) Use a suitable shared library mechanism for linking with the
Library. A suitable mechanism is one that (1) uses at run time a
copy of the library already present on the user’s computer system,
rather than copying library functions into the executable, and
(2) will operate properly with a modied version of the library, if
the user installs one, as long as the modied version is interfacecompatible with the version that the work was made with.
c) Accompany the work with a written oer, valid for at least three
years, to give the same user the materials specied in Subsection
6a, above, for a charge no more than the cost of performing this
distribution.
d) If distribution of the work is made by oering access to copy
from a designated place, oer equivalent access to copy the above
specied materials from the same place.
e) Verify that the user has already received a copy of these materials
or that you have already sent this user a copy.
For an executable, the required form of the “work that uses the
Library” must include any data and utility programs needed
for reproducing the executable from it. However, as a special
exception, the materials to be distributed need not include
anything that is normally distributed (in either source or binary
form) with the major components (compiler, kernel, and so on) of
the operating system on which the executable runs, unless that
component itself accompanies the executable. It may happen
that this requirement contradicts the license restrictions of other
proprietary libraries that do not normally accompany the operating
system. Such a contradiction means you cannot use both them
and the Library together in an executable that you distribute.
7. You may place library facilities that are a work based on the
Library side-by-side in a single library together with other
library facilities not covered by this License, and distribute such
a combined library, provided that the separate distribution of
the work based on the Library and of the other library facilities is
otherwise permitted, and provided that you do these two things:
a) Accompany the combined library with a copy of the same work
based on the Library, uncombined with any other library facilities.
This must be distributed under the terms of the Sections above.
b) Give prominent notice with the combined library of the fact that
part of it is a work based on the Library, and explaining where to
nd the accompanying uncombined form of the same work.
8. You may not copy, modify, sublicense, link with, or distribute
the Library except as expressly provided under this License.
Any attempt otherwise to copy, modify, sublicense, link with, or
distribute the Library is void, and will automatically terminate
your rights under this License. However, parties who have
received copies, or rights, from you under this License will not
have their licenses terminated so long as such parties remain in
full compliance.
9. You are not required to accept this License, since you have not
signed it. However, nothing else grants you permission to modify
or distribute the Library or its derivative works. These actions are
prohibited by law if you do not accept this License. Therefore, by
modifying or distributing the Library (or any work based on the
Library), you indicate your acceptance of this License to do so, and
all its terms and conditions for copying, distributing or modifying
the Library or works based on it.
10. Each time you redistribute the Library (or any work based on
the Library), the recipient automatically receives a license from the
original licensor to copy, distribute, link with or modify the Library
subject to these terms and conditions. You may not impose any
further restrictions on the recipients’ exercise of the rights granted
herein. You are not responsible for enforcing compliance by third
parties with this License.
11. If, as a consequence of a court judgment or allegation of
patent infringement or for any other reason (not limited to patent
issues), conditions are imposed on you (whether by court order,
agreement or otherwise) that contradict the conditions of this
License, they do not excuse you from the conditions of this License.
If you cannot distribute so as to satisfy simultaneously your
obligations under this License and any other pertinent obligations,
then as a consequence you may not distribute the Library at all.
For example, if a patent license would not permit royalty-free
redistribution of the Library by all those who receive copies directly
or indirectly through you, then the only way you could satisfy both
it and this License would be to refrain entirely from distribution
of the Library.
If any portion of this section is held invalid or unenforceable under
any particular circumstance, the balance of the section is intended
to apply, and the section as a whole is intended to apply in other
circumstances.
It is not the purpose of this section to induce you to infringe any
patents or other property right claims or to contest validity of
any such claims; this section has the sole purpose of protecting
the integrity of the free software distribution system which is
implemented by public license practices. Many people have made
generous contributions to the wide range of software distributed
through that system in reliance on consistent application of that
system; it is up to the author/donor to decide if he or she is willing
to distribute software through any other system and a licensee
cannot impose that choice. This section is intended to make
thoroughly clear what is believed to be a consequence of the rest
of this License.
12. If the distribution and/or use of the Library is restricted in
certain countries either by patents or by copyrighted interfaces, the
original copyright holder who places the Library under this License
may add an explicit geographical distribution limitation excluding
those countries, so that distribution is permitted only in or among
countries not thus excluded. In such case, this License incorporates
the limitation as if written in the body of this License.
13. The Free Software Foundation may publish revised and/or new
versions of the Lesser General Public License from time to time.
Such new versions will be similar in spirit to the present version,
but may dier in detail to address new problems or concerns. Each
version is given a distinguishing version number. If the Library
species a version number of this License which applies to it and
“any later version”, you have the option of following the terms and
conditions either
Page 28

of that version or of any later version published by the Free
Software Foundation. If the Library does not specify a license
version number, you may choose any version ever published by the
Free Software Foundation.
14. If you wish to incorporate parts of the Library into other free
programs whose distribution conditions are incompatible with
these, write to the author to ask for permission. For software which
is copyrighted by the Free Software Foundation, write to the Free
Software Foundation; we sometimes make exceptions for this. Our
decision will be guided by the two goals of preserving the free
status of all derivatives of our free software and of promoting the
sharing and reuse of software generally.
15. The warranty disclaimer contained in Sections 11 and 12 of the
preceding GPL License is incorporated herein..
Page 29

Fortinet Customer Service & Support
Create a support account, register and manage your products, download updates, rmware images
and release notes, and create technical support tickets.
https://support.fortinet.com
Fortinet Document Library
Up-to-date versions of Fortinet publications for the entire family of Fortinet products.
http://docs.fortinet.com
Training Services
Course descriptions, availability, schedules, and location of training programs in your area.
http://www.fortinet.com/training
Technical Discussion Forums
Communicate with other customers and Fortinet partners about Fortinet products, services, and
conguration issues.
https://support.fortinet.com/forum
Fortinet.com
 Loading...