

Foredom MAFH25 User Manual [en, de, es, fr]
Deutsch
Français
Español
English
Anwender Bedienungsanleitung
Anleitung zur Verwendung und
dem technischen Unterhalt für
Absaugeinheit
MAFH25
Le manuel du propriétaire
Manuel d'entretien technique
et d’utilisation, pour
Augette Filtrante
MAFH25
Manual de Instrucciones
Aspirador
de Polvo con Filtro
MAFH25
Owner’s Manual
Assembly, Operation and Service Manual
Filter Hood
MAFH25
Zur Ihrer Sicherheit
• Vor der Inbetriebnahme
der Absaugeinheit bitte diese
Bedienungsanleitung
aufmerksam durchlesen.
• Tragen Sie stets Schutzbrillen
während der Verwendung
von Werkzeugmaschinen
FOREDOM
www.foredom.net
Para su seguridad:
• Lea este manual
atentamente antes de
Pour votre propre sécurité
• Veuillez lire ce manuel avant la mise en
route de votre Augette Filtrante Foredom.
• Portez toujours des lunettes de protections
lors de l’utilisation de machines-outils.
®
The Foredom Electric Company
16 Stony Hill Road, Bethel, CT 06801 USA
el.: (203) 792-8622 • Fax: (203) 796-7861
T
Email: customerservice@blackstoneind.com
utilizar la unidad.
• Use siempre gafas protectoras
para proteger los ojos.
®
FOREDOM
www.foredom.net
For Your Own Safety
• Please read this Manual before operating
your Foredom Filter Hood.
• Always wear eye protection while using
power tools.
The Foredom Electric Company
16 Stony Hill Road, Bethel, CT 06801
Tel.: (203) 792-8622 • Fax: (203) 796-7861
Email: customerservice@blackstoneind.com

Safety Instructions
Before using your Foredom®power tool, please
read safety instructions.
protection and should always be followed to
reduce the risk of personal injury or damage
to the tool.
• Always wear proper eye and face protection.
Wear safety glasses or face shields whenever
you operate a Foredom or any power tool to
prevent serious eye or face injuries.
• Do not wear loose fitting clothing or jewelry.
Loose clothing or jewelry can become entan
gled in the rotating accessory. Do not wear
items such as neckties, necklaces, or bracelets
when operating power tools. Be sure to
back or secure long hair.
• Never operate any accessory at speeds above
it’s maximum rated speed.
all of Foredom's accessories can be operated
at the speed ratings listed in the Foredom
Accessory Catalog or specified on kits and
packages.
speed rating before using accessories other
than those from Foredom.
•
Always disconnect the power cord before
servicing the unit.
•
Never operate your unit during a perceptible
power decrease. Turn the machine off and do
not use it until power is fully restored.
Always
They are for your
tie
When properly used,
find out the manufacturer's
•
U
se proper grounding procedures.This tool
should be grounded while in use to protect
the operator from electric shock. The tool is
equipped with an approved 3-conductor cord
and a 3-prong grounding type plug to fit the
proper grounding receptacle. The green (or
green and yellow) conductor in the cord is the
grounding wire. Never connect the green (or
green and yellow) wire to a live terminal. If your
unit is for use on less than 150 volts, it has a
plug that looks like sketch A below. An adapter
(sketches B and C) can be used for connecting
plugs as shown in sketch A to 2-prong receptacles. The green colored rigid ear, lug, etc.,
extending from the adapter must be connected to
a permanent ground such as a properly grounded
outlet box.
Canada, prohibit the use of 3 to 2 prong
adapters. Where prohibited, they should not be
used.
3-prong grounding type plugs and 3-pole type
plugs and 3-pole receptacles that accept the tool’s
plug. Always disconnect the power cord before
servicing the tool. Never use in an area where
flammable vapors are present.
Store your Foredom power tools in a DRY,
clean, dust-free area, and out of the reach
of children.
Some jurisdictions, including
Use only 3-wire extension cords that have
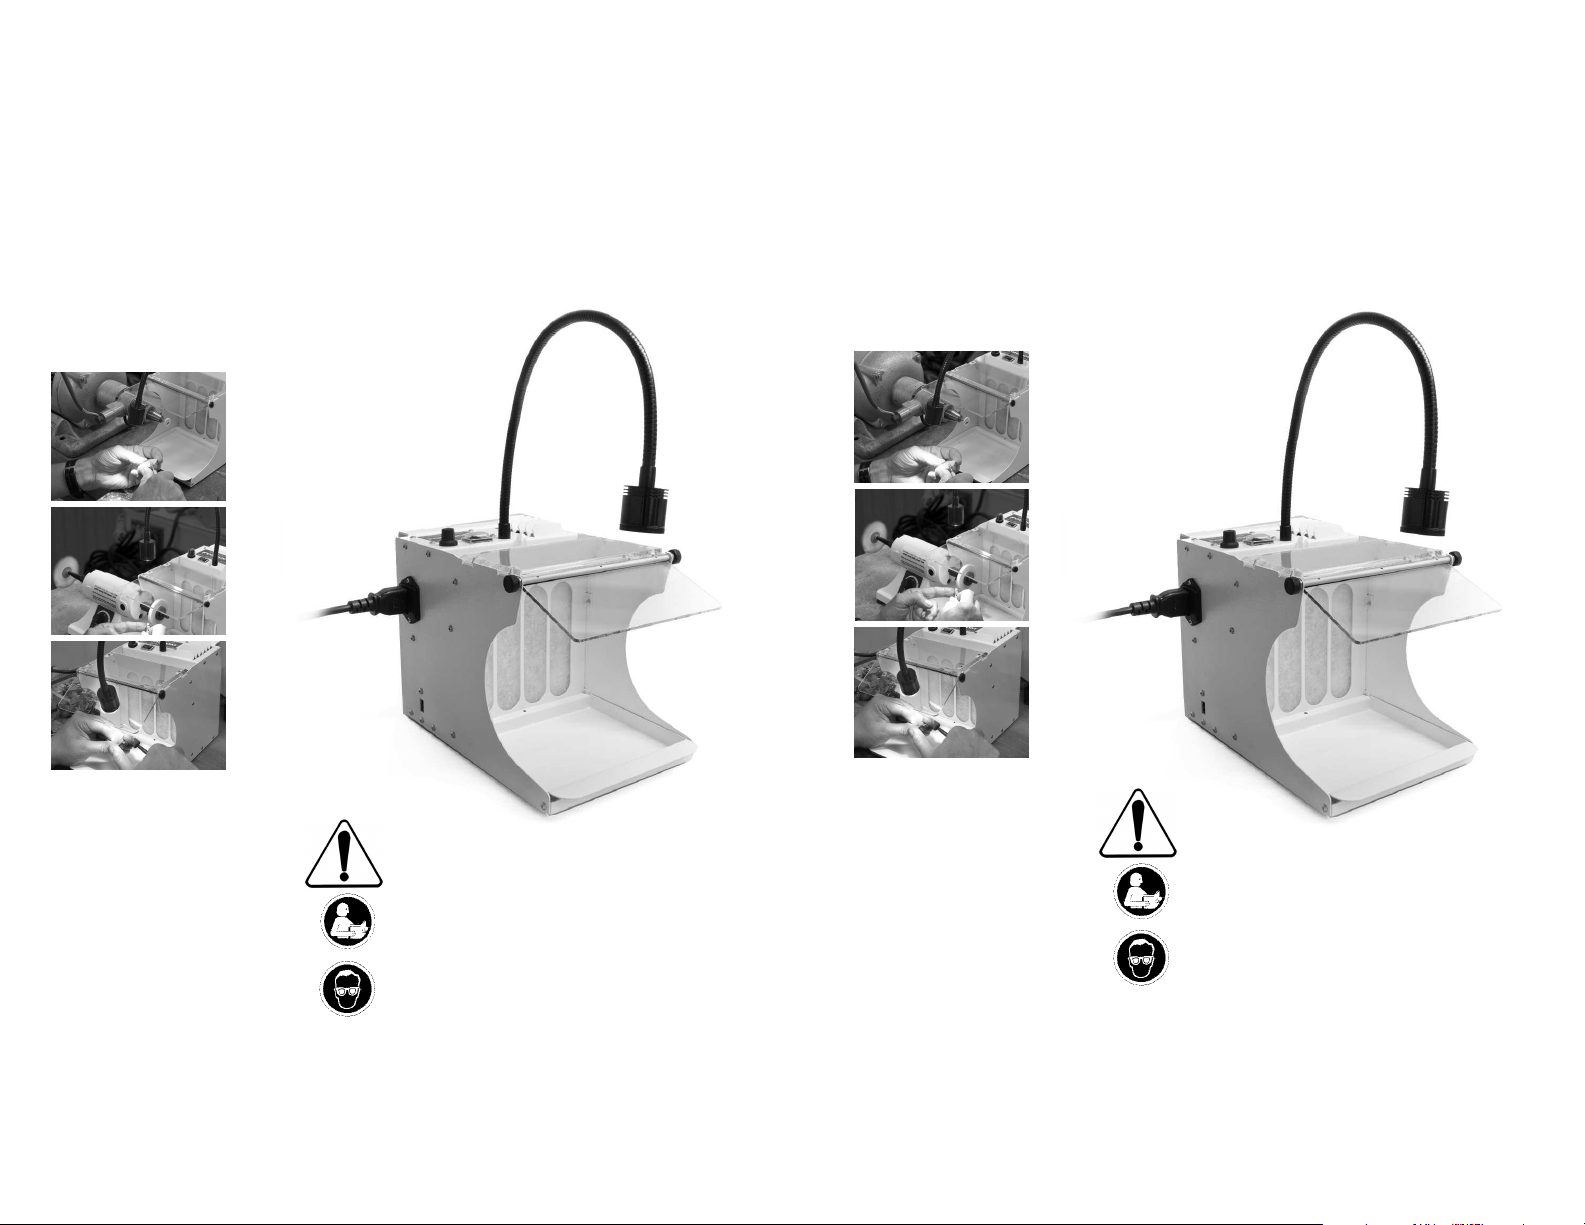
Packing List:
Filter Hood with light
and view shield
Removable Splash Tray
Cord Set
2 Polyester Filters and
one Charcoal Filter
power cord outlet
fuse compartment
voltage selector
fan
speed
dial
splash
tray
main
power
switch
Assembly and Operation
1. Remove the filter hood and
cord set from the box.
2. Remove the filters from the
work area of the filter hood.
3. Make sure that a filter
is inserted all the way down in
the filter slot on top of the filter
hood. When using a charcoal
filter install it with the white side
facing the splash tray and black
side toward the inside of
the machine.
4. Check the splash tray to be
sure that it is seated properly
in the filter hood work area.
5. Make sure that the voltage selector switch is
indicating the proper voltage desired. To change the
voltage selection use a small flat blade screwdriver
to move the switch down for 110 Volt or up for 220
Volt operation. The proper voltage will be displayed.
6. Plug female plug end of cord set into the filter
hood and then the male plug end into a power outlet as shown in drawing on opposite page.
7. Press power switch located on top of unit to on
position. Select desired fan speed by turning speed
knob clockwise to increase or counterclockwise to
reduce speed. Adjust gooseneck lamp to illuminate
work area.
8. To move filter hood to a different location, use
the handle on back of unit.
lamp neck.
hh
h
h
Use handle on back
Filters are easy
to remove
h
h
hh
Insert filter all the
way down
Do NOT lift by the
Do NOT do this!
Maintenance
1. Periodically check filter condition. If it
becomes clogged with debris you can remove it
by pulling upward on its ribbon handle. You can
either tap it on its side in a trash can to gently
remove large particles and then insert it back
into the filter slot or, if it is heavily clogged,
replace the filter with a new one.
sure that the filter is inserted all the way to the
bottom of the filter compartment slot.
can be saved and sent to a refiner to recover
precious metals.
2. Clean and wipe the polycarbonate shield with
a soft cloth or paper towel. A non-ammoniated
cleaner (such as soap and water) will remove
greasy polishing compound dust.
3. The Filter Hood comes with an extra 5 Amp
fuse located in the fuse compartment near the
power cord receptacle on the side of the unit.
Unscrew brush caps
on back of unit
Please make
Filters
Remove motor brush
Replacement of Motor Brushes
Motor brushes should be checked for wear
periodically. When new they are approximately
″ (10mm) long. Replace them when they have
3/8
worn to 1/8″ (3mm). To remove brushes, disconnect motor power cord and unscrew the brush
caps. Remove the worn motor brushes, replace
with new motor brushes, and screw motor brush
caps back on. Replace BOTH motor brushes even
if one of them is less worn than the other.
New Motor Brush Motor Brush that
needs replacement
Replacement Parts and Supplies
Part No. Description
MAFH101
MAFH105 Splash Tray
MAFH107-5 Polyester Filters 5-pk
MAFH108-5 Charcoal Filters 5-pk
MP251P Pair of Replacement Motor Brushes
MAFH119 LED Light Assembly
MAFH110 5 Amp Fuse
CP10831 Cord Set 6′
Polycarbonate Window and Shield
 Loading...