

oredom Wax Carver Parts
arranty
This unit has a one year warranty from the date of
delivery, valid only if the unit has not been misused
or tampered with. ALL IMPLIED WARRANTIES,
INCLUDING BUT NOT LIMITED TO WARRANTIES OF
FITNESS AND MERCHANTABILITY, ARE HEREBY
LIMITED IN DURATION TO A PERIOD ENDING ONE
YEAR FROM DATE OF PURCHASE,AND WE WILL
NOT BE LIABLE OR RESPONSIBLE FOR ANY
SPECIAL OR CONSEQUENTIAL DAMAGES.
Repair or replacement will be made at our option
if the product is returned post-paid to:
The Foredom Electric Company
16 Stony Hill Road, Bethel, CT 06801
All warranty repairs must be done at the factory at
the above address. We will not pay any shipping or
transportation charges. This warranty only covers
the original purchaser of the product. Some states
do not allow limitations on how long an implied
warranty lasts or the exclusion or limitation of incidental or consequential damages so the above
limitations may not apply to you.
gives you specific legal rights, and you may also
have other rights which vary from state to state.
FOREDOM
oredom Electric Company,Bethel, CT 06801
The F
W
This warranty
®
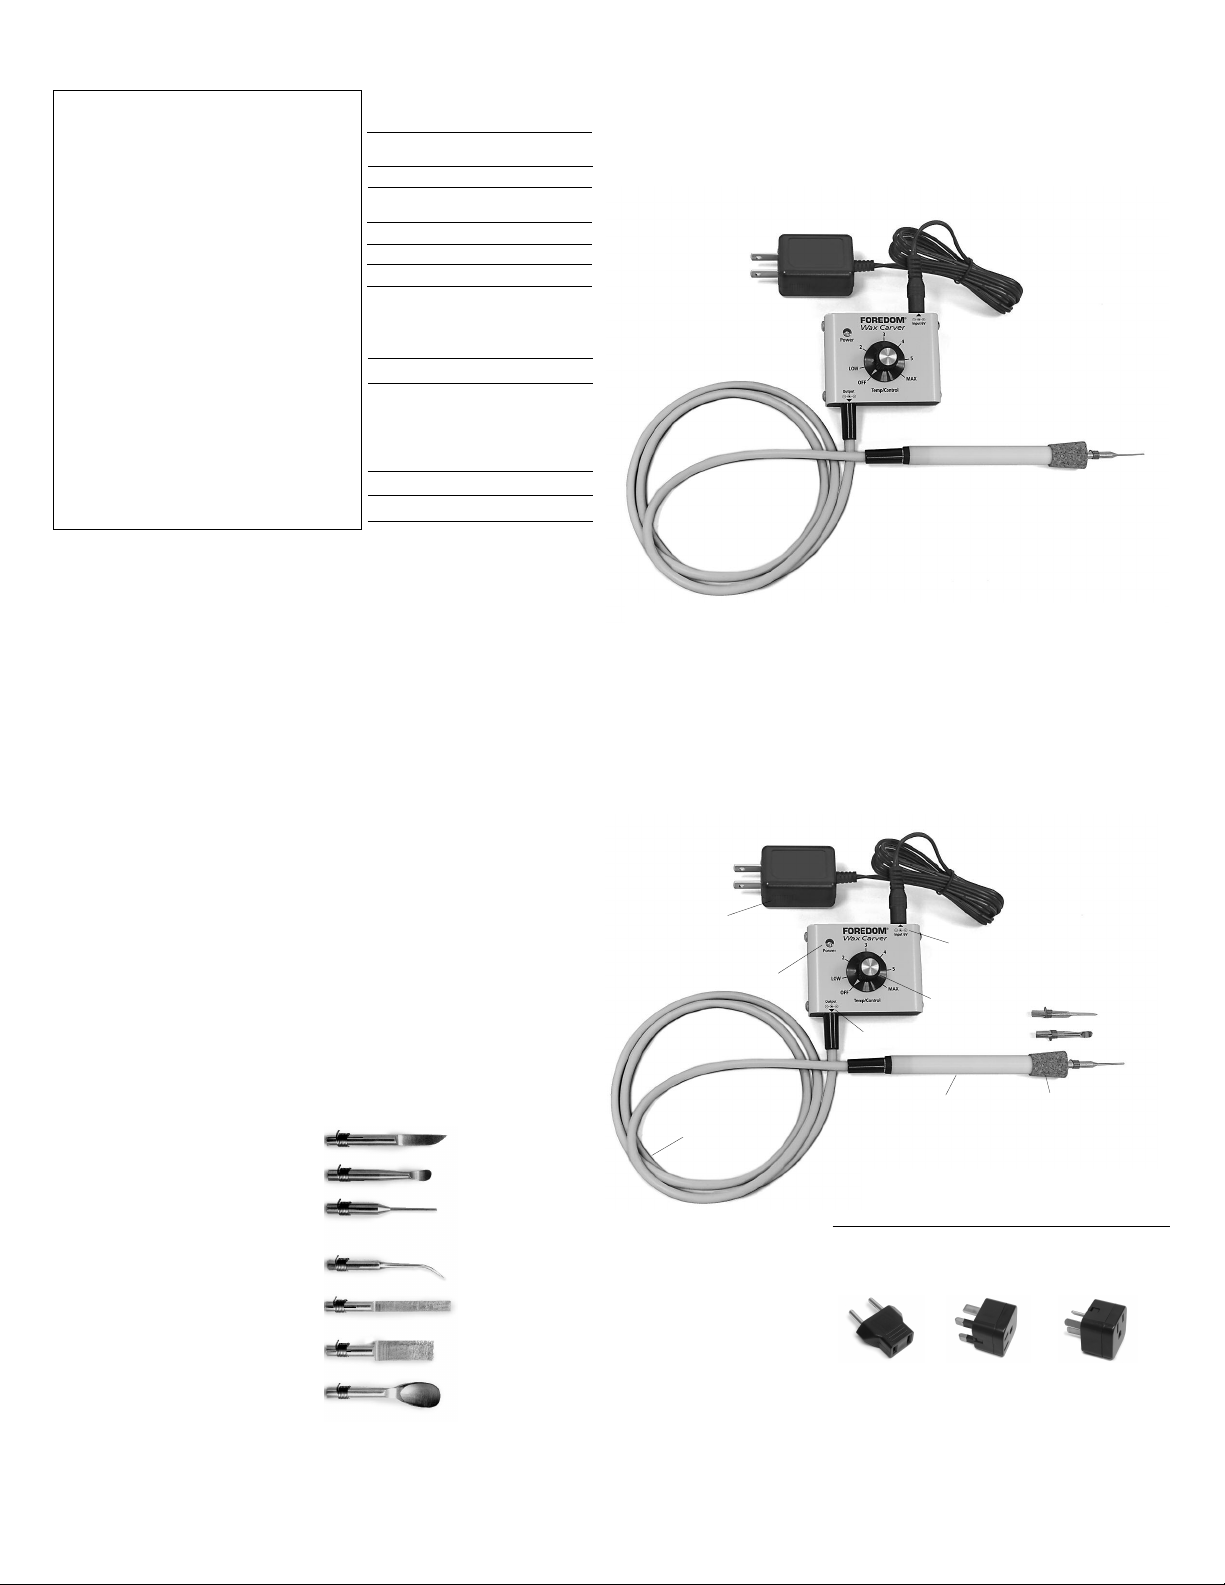
F
Handpiece A.WT-82
Handpiece Cap with cork cover
Handpiece Cord A.WT-86
On/Off and Temperature Control
Transformer 115–220V A.WT-85
European Plug Adapter HPL4-508
UK Plug Adapter HPL4-506
Australian Plug Adapter HPL4-507
K.WC-1 & K.WC-2 includes 3 tips
Straight Taper A.WT-2
Knife A.WT-3
Small Spoon A.WT-4
K.WC-3 & K.WC-4 includes all 7 Tips
Small Flat A.WT-1
Curved Taper A.WT-5
Large Flat A.WT-6
Large Spoon A.WT-7
.foredom.com
www
A.WT-84
A.WT-87
For More Information on Foredom machines, handpieces or accessories,
contact: The Foredom Electric Company, 16 Stony Hill Road, Bethel, CT 06801,
Tel: 203-792-8622, Fax: 203-796-7861, Email: cus tomerservice@ blackstoneind.com.
orm 1263 n 3/10 Printed in U.S.A.
F
®
FOREDOM
Wax Carver
110V. kits:
K.WC-1 and K.WC-3
220V. kits:
K.WC-2* and K.WC-4*
*with specific plug adapters
for use in Europe, UK,
or Australia
For Your Own Safety Read This Owner’s Manual
Before Operating Your Foredom Tool
Important Safety Instructions
• Warning: Tip becomes hot
during operation.
• Always turn off the unit when it is
not in use.
• Never bend the handpiece cord
sharply behind connector.
• Use only the 6 Volt DC transformer
supplied with your Wax Carver.
• Keep out of reach of children.
Assembly and Operation
• Use either end of the handpiece cord
to connect the output receptacle and
back end of the handpiece. Connect
the transformer cord to the input
receptacle as shown at right.
• Plug the transformer into an
electrical outlet.
• Insert a tip. The brass tips can be
sharpened or reshaped with a file or
bent with pliers. Follow instructions
at right to remove or change a tip.
• Turn the Temperature Control Dial to
desired temperature.
• The blue LED light will flash constantly
when the unit is turned on and with
greater frequency as the
temperature increases.
Changing Tips
• Always change tips while power is on
and handpiece is hot. Use a leather cloth,
leather gloves, or pliers to gently turn the
tip to make sure it can be loosened and
safely removed.
• Never remove a tip from a handpiece
that is cold.
may act as an adhesive and damage your
handpiece as you try to remove the tip.
• Each tip has a coil spring that helps it grip
the handpiece heating rod. For a tighter
grip, slide the coil toward the handpiece.
Cooled and hardened wax
Knife
A.WT-3
*
Small Spoon
-4
A.WT
*
Straight Taper
A.WT-2
*
Curved Taper
A.
WT-5
Small Flat
-1
A.
WT
Large Flat
A.
WT-6
Large Spoon
-7
A.
WT
Transformer
Blue LED
Light
Handpiece
Cord
All 7 Brass Tips shown at left
come in K.WC-3 and K.WC-4.
ips included in K.WC-1
3 T
*
and K.WC-2.
Tips and Plug Adapters may
also be purchased separately
6 Volt Input
Receptacle
On/Off and
Temperature
Output
Receptacle
oximate
Appr
Low
º
F
95º
ºC
35º 93º 171º 218º 274º 294º
Adapters
Plug
HPL4-508
European Plug
.
Adapter
Option-22
Control
Handpiece
Tip Temperatures at Dial Settings
3 4 5 Max.
2
425º
340º
200º
for K.WC-2 and K.WC-4 kits
HPL4-506
United Kingdom
Plug Adapter
Option-21
Cap with
cork cover
525º 560º
HPL4-507
Australian Plug
Adapter
Option-26
 Loading...