


®
FOREDOM
Operation and Maintenance Manual for
K.1030 or K.103018 Portable Micromotor Kit
HP8-306
Charger/Adapter
HP4-310
Control
Unit
HP4-933
Handpiece Cradle
Optional Components
H.MH-130 or H.MH-13018
Handpiece
For Your Safety:
Read this Manual before
operating your Foredom
Micromotor Power Tool.
Always wear eye protection
while using the Foredom
Micromotor Handpiece.
Contact Information
For more information on Foredom machines, handpieces or accessories, contact
your local dealer. When no local dealer is available, write, call, fax, or email:
Foredom Electric Company
16 Stony Hill Road, Bethel, CT 06801
Tel: 203-792-8622 Fax: 203-796-7861 Email customerservice@blackstoneind.com
Visit our website: www.foredom.net
F-1231 n 2/14 Printed in U.S.A.
On/Off
Foot Pedal
HP4-927
Carrying
Case
AP1130
Tool Belt
with Pouch
A-KC300
Safety Instructions
A Micromotor Handpiece is a high speed
rotary power tool which can be dangerous and cause serious injury if it is not
used properly. NEVER operate it without
wearing eye protection.
• ALWAYS wear proper eye and
face protection.
• ONLY use accessories rated for speeds
of 30,000 rpm or higher when operating
this micromotor.
• ALWAYS observe the manufacturer’s maxi-
mum speed rating when using any accessory.
• NEVER use or continue to use any acces-
sory which appears to be damaged, loose,
vibrating, bent, or out of balance. Inspect
each accessory for cracks or aws before use.
• ALWAYS insert the shank or arbor of an
accessory or mandrel into the collet or chuck
of the handpiece as far as possible in order to
provide proper support and close the collet or
chuck securely. DO NOT use accessories with
shanks that are less than 1″ (25mm) long.
• NEVER use excessive side pressures which
may tend to bend or break the shank or arbor
of an accessory. Let the speed of the accessory do the work.
• DO NOT stall the motor by jamming or us-
ing excessive pressure on the mounted point,
buff, wheel or accessory. This can result in
damage to the motor.
• WEAR a dust protector to prevent the inha-
lation of harmful dust or debris from grinding,
carving or other operations performed with
this power tool.
• DO NOT cover the ventilation slots or
handpiece motor with cloth or tape. Air must
pass freely through the intake and exhaust
ventilation slots to properly cool the motor.
If the power cord or plug to the handpiece is
damaged, repair or replace immediately.
• NEVER use a damaged power cord or
adapter. ONLY use the power adapter that
came with the K.1030 Kit.
• USE a dust collector or lter hood to pull
sawdust, grinding dust, or other debris away
from the work area and the micromotor
intake vents.
• NEVER wear open shoes or sandals. Use
foot-wear that is tough enough to protect
your feet from falling tools.
• ALWAYS keep both hands and ngers
away from the cutting edge.
• NEVER cut or exert pressure, toward your
hand or any other part of your body.
• DO NOT wear loose tting clothing or
jewelry. Loose clothing or jewelry can become entangled in the tool. Do not wear
items such as neckties, necklaces, or
bracelets when operating power tools.
Secure or tie back long hair.
• NEVER turn on or start the Handpiece
while the collet is in open (unlocked) position. This can damage the handpiece.
• ALWAYS operate and store it with a bur
or other accessory in the collet and with the
collet in the closed position.
• NEVER plug the Handpiece into the On/
Off Foot Control Connection Port on the side
of the Control Unit. ONLY plug the Hand-
piece into the Handpiece Connection Port on
the Top of the Control Unit.
• DO NOT operate the handpiece in the
presence of any ammable liquid or gas.
• NEVER drop the Control Unit or Micromo-
tor Handpiece.
• NEVER plug or unplug the power cord
with wet hands.
• NEVER allow water or liquids to spill onto
any parts of the K.1030 Micromotor Kit.
• DO NOT operate or store the unit in a
high heat environment such as direct sun,
a parked car in hot weather, near a ame
or stove. Minimum and maximum working
environment temperatures are 32°F – 104°F
(0°C – 40°C).
• The K.1030 Micromotor has a Lithium
Ion battery that should NEVER be
thrown in the trash. Recycle Lithium Ion
batteries in accordance with local laws.
www.call2recycle.org is a good source of
recycling locations in the US and Canada.
NEVER throw the battery into a re as
it could explode. Should the electrolytic
chemicals spill and get in your eyes wash
immediately with water. Remove and wash
any clothing or article that has spilled battery
chemicals with water.
On/Off
Button
2-digit
Power
Adapter
Outlet
RPM
Indicator
LED
Display
Overload
Battery
Charge
Assembly
Before attaching the handpiece or adapter
with power cord to the control box turn the
Speed Selection Knob down to MIN. Make
sure that the power is off by conrming
that the Speed Indicator LED Light is off by
pushing in the On/Off button located on the
upper left side of the control box for at least
2 seconds.
Attaching the
Micromotor Handpiece
Be sure that the handpiece collet is secure
with an accessory in it. Attach the micromotor handpiece by plugging in the handpiece
cord into the Motor connection port on the
top of the Control Box.
Connecting AC Power Adapter
First, make sure the power to the handpiece
is turned off by pushing in the On/Off button
on the upper left side of the control unit for
at least 2 seconds. Then, plug the adapter
plug into the DC IN port located on the
lower left side of the control box. Next, plug
the power cord receptacle into the 3-prong
power cord port in the adapter. Finally,
plug the power cord into an electrical
outlet to charge the battery or to use
the micromotor without battery drain.
Power Cord Plugs
into electrical outlet
Micromotor
Handpiece
plugs into
Control
AC Power
Adapter
and
Battery
Charger
Unit
Power
Adapter plugs
into control
unit
Forward/
Reverse
Button
Optional
Foot Pedal
Button
Optional
On/Off Foot
Pedal
Outlet
Fwd/
Rev
Battery
Level
Display
Foot
Pedal
Micromotor
Handpiece
Outlet
Operating Instructions
for the HP4-310 Control Unit
1. Charging the Battery: Once the power
cord and adapter are connecting the control
unit to the electrical outlet, the Battery
Charge LED light will blink on and off. When
the battery is fully charged the light will
stay on. The rst time the battery is charged
it will take about 3 hours. After that, it will
take about 2 hours to fully charge a low
battery. When fully charged the micromotor
will run for 3 to 5 hours depending on the
workload. Charging should be done in a
cool dry place 32°F – 104°F (0°C – 40°C).
The motor will shut down on its own when
the battery charge is too low.
2. The Power On/Off Button located on
the upper left side of the control box must
be pushed in at least 2 seconds to either
turn on or off the micromotor. When it is on
the red LED two digit speed indicator light
will light up as well as the battery indicator/
charge light. 00 rpm is not the same as
OFF. Use the Power On/Off Button to
turn the unit off.
The unit will power off automatically
after 3 minutes if it is not in use.
3.
Each time the unit is turned on
the speed control dial must be
reset to MIN for the micromotor
handpiece to work.
Control Dial varies the speed from
Speed
Control
Dial
MIN (minimum) to MAX (maxi-
mum). The Speed Indicator LED
light shows the speed in two
digits 00 = zero rpm and
Optional
On/Off
Foot
Pedal plugs into
control unit
The Speed
30 = 30,000 rpm.
Optional
On/Off Foot
Pedal
4. The Forward/Reverse Button located
on the upper right side of the control box is
Close
for operating the micromotor handpiece in
reverse rotation. Rotation direction
always resets to Forward when power
is stopped and restarted. The Fwd/Rev
LED on top of the control unit will light up
when reverse rotation is selected. The light
goes off when Forward rotation is engaged.
Forward is the most commonly used setting.
Right-handed people will get the most control
in forward rotation. Forward motor rotation
means that the motor is turning an accessory
(bur, bit, drill, cutter, etc.) counterclockwise
when holding the handpiece upright in your
hand and you are looking down on to the
front of the accessory. When the handpiece/
collet
knurled locking ring
shanks less than 1″ (25mm) long. To tighten
the new bur twist the knurled locking ring
counterclockwise toward the S (Secure) until
it stops and locks the collet closed.
Never turn the power on to the handpiece when the collet is open or in the R
(Release) position.
If the power is on when the collet is open, it
will damage the motor because the spindle is
locked and it will not turn. Always keep a
bur in the collet when it is not in use.
accessory is applied to the workpiece, your
viewpoint changes to the back end of the
handpiece and accessory and the forward
rotation direction can be described as
clockwise.
5. The Optional On/Off Foot Pedal will not
vary the speed and only turns the micromotor
on or off. It plugs into the port marked FOOT
on the lower right side of the control box. To
select the on/off foot pedal you must press
the foot control button located just below the
Forward/Reverse Button on the right side of
the control box. With the on/off foot pedal
you can select and keep a specic speed
setting and return to it without turning the
speed control dial. This is useful when accessories require an optimal speed or a lower
maximum speed (<30,000rpm) than the full
speed range of the micromotor.
6. To Change an Accessory or bur, rst open
the collet. To open the collet, rst turn off the
unit by holding down the on/off button for
Maintenance
The handpiece has permanently lubricated
ball bearings, which require no lubrication.
Putting even a small amount of oil or grease
in the handpiece will damage it and void
the warranty.
Replacement & Optional Parts
2.35mm (3/32″) Collet HP4-117
3.18mm (1/8″) Collet HP4-117B
3mm Collet HP4-117C
Lithium Ion Battery HP8-B1800
Motor Brushes (2) HP8-163
Set of 2 Wrenches HP4-993
Charger/ Adapter HP8-306
Optional Parts
On/Off Foot Pedal
Carrying Case
Tool Belt with Pouch
(shown at left) HP4-927
(shown on front) AP1130
(shown on front) A-KC300
Part No.
at least 2 seconds– until the indicator light
is off. The collet snaps open when the
knurled locking ring on the handpiece is
turned clockwise toward the R (Remove or
Release). You can now remove an accessory
or bur and insert another. Insert the new bur
shank fully into the collet for maximum
support. Do not use accessories with
Open
R
I
Knurled
Locking Ring
Collet
S
Collet Adapters are used to ‘step down’ a
collet size without actually having to change
the collet. It is a faster and easier way to use
smaller diameter shank accessories without
the effort of changing a collet.
Collet Accessory
Adapter Size Shank Size Part No.
3/32″ (2.35mm)– 1/16″ 1/16″ HPL4-3233
1/8″ to 1/16″ 1/16″ HPL4-3234
3mm – 3/32″ (2.35mm) 3/32″ (2.35mm) HPL4-3235
1/8″ – 3/32″ (2.35mm) 3/32″ (2.35mm) HPL4-3236
3mm to 1.6mm 1.6mm HPL4-3237

Maintenance continued
Micromotor Supplies
K.1030 Micromotor Kit comes with a chuck
wrench and chuck joint wrench for changing
collets (Wrench Set p/n HP4-993), and spare
pair of motor brushes (p/n HP8-163) as
shown at right.
Checking and
Changing Carbon Brushes
A spare set of carbon brushes is supplied
with each handpiece. They come packed in
the handpiece box. Depending on how long
the handpiece is used each day, the brushes
should be checked for wear about every 200
hours of use and replaced when the brush is
less than 1mm (1/16″) long.
1. With handpiece power cord disconnected
from control box, unscrew protective cap
from rear of motor by turning counterclockwise while gripping the handpiece body. (It
has a standard right hand thread.)
motor brush
installed
spare
motor brush
crosspoint
screwdriver
2. With small crosspoint screwdriver remove
screws and brush assemblies one at a time.
Check length of carbon brush from spring to
end of brush.
New motor brush
Brushes should be replaced if they are less
than 1mm long. Replace both motor
brushes with new ones even if only one
of them looks worn.
protective
cap
Worn
motor brush
REPLACE!
Set of 2 wrenches HP4-993 and spare
motor brushes come packed in handpiece box.
chuck
joint
wrench
triangular
holes
motor brushes HP8-163
chuck
wrench
Installing/Changing Collets
Important Note: Always keep a test
bur or accessory in both collets when
changing collets.
1. The Handpiece has either a 2.35mm
(3/32″) or 1/8″collet installed. 2.35mm
(3/32″), 1/8″ and 3mm collets are available
separately. They can be installed with the
collet changing wrenches, described below.
Caution: Finger tightening is not enough.
A wrench MUST be used to tighten the
collet fully several turns beyond the
point of initial resistance. If collet is too
loose or absent, the spindle will not turn
and it will damage the motor.
Close
collet
A bur or test bur MUST be in the
collet when changing collets!
2. With a test bur in the collet, turn the
Locking Ring toward the secure “S” (closed)
position. Do NOT remove the locking
ring or spring!
3. Place the Chuck Wrench hook into the
notch on the H.MH-130 handpiece nose
cone and unscrew it counterclockwise (see
photo above).
Do NOT remove
the locking ring or spring.
R
I
S
knurled locking ring
hook
notch
nose cone
chuck
joint
wrench
spindle assembly
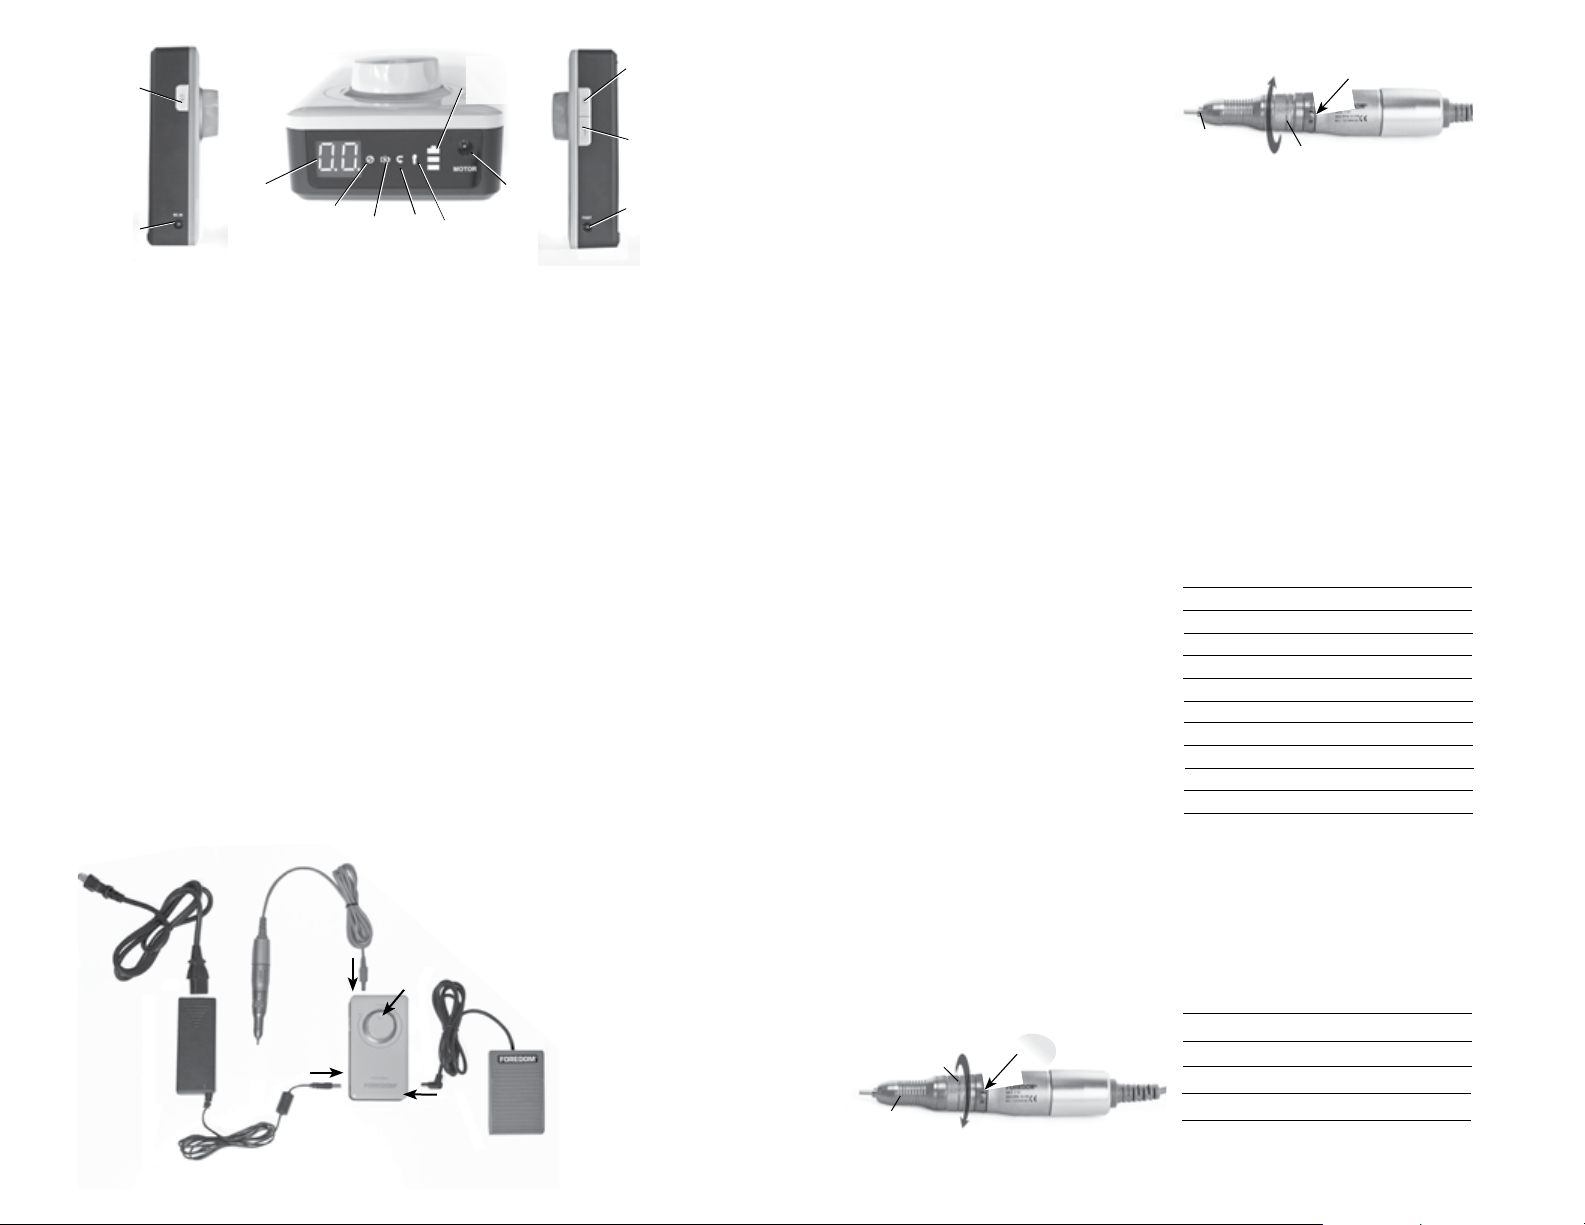
4. Carefully remove the spindle assembly
from the nose cone. Be sure to place the
nose cone
washer
collet with bur
chuck joint
wrench
spindle
assembly
collet
bur
thin washer back on the collet end of
the spindle assembly before reassembling the handpiece. Don’t misplace it!
spindle
assembly
chuck
wrench
chuck joint
wrench
6. Remove collet and insert new size collet,
with a test bur inserted. Use the triangular
hole in chuck wrench to re-tighten collet by
turning clockwise. Be sure to securely
tighten collet! Rotate the collet to align
the cross-shaped end of the spindle assembly with the cross-shaped motor drive inside
collet
with bur
5. Insert the chuck joint wrench into the cross
section of the back end of the spindle assem-
the handpiece. Carefully review steps 4, 3,
2, and 1 to reassemble the handpiece with
the changed collet. Re-attach and tighten
nose cone.
bly. Insert the collet head into the collet size
triangle hole on the chuck wrench and turn
the chuck wrench counterclockwise to loosen
the collet while holding the chuck joint wrench
Please retain your proof of purchase
for warranty repairs.
with your other hand.
Limited Warranty
Foredom warrants all parts of this product (except the
has a one year warranty)
after purchase. Blackstone Industries, LLC d/b/a The Foredom Electric Company warrants, to the original
purchaser only, that its products will be free from defects in material or workmanship for the applicable
period of time indicated above following the purchase date. During the warranty period, the defective
product will be repaired or replaced without charge or, at our sole option, the purchase price will be refunded. This warranty does not cover damage caused in transit or by accident, misuse or ordinary wear
ALL IMPLIED WARRANTIES INCLUDING, WITHOUT LIMITATION, IMPLIED WARRANTIES OF FITNESS FOR
A PARTICULAR PURPOSE AND MERCHANTABILITY, ARE LIMITED IN DURATION TO THE APPLICABLE
WARRANTY PERIOD. IN NO EVENT WILL WE BE LIABLE FOR ANY INCIDENTAL OR CONSEQUENTIAL
DAMAGES. Some states do not allow limitations on how long an implied warranty lasts or the exclusion
or limitation of incidental or consequential damages, so the above limitations or exclusion may not
apply to you.
At our sole option, repair, replacement or refund will be made if the product is returned postage
prepaid to:
All warranty repairs must be done at the factory at the address above. We will not pay any shipping
or transportation charges. This warranty only covers the original purchaser of the product. Proof of
purchase may be requested. Some states do not allow limitations on how long an implied warranty
lasts, so the above imitation may not apply to you. This warranty gives you specic legal rights, and you
may also have other rights which vary from state to state.
Foredom Electric Company, 16 Stony Hill Road, Bethel, CT 06801
to be free of defects in material or workmanship for a period of two years
Repair Services
Authorized repair service is available at the
Foredom factory in Bethel, CT. Send items
for repair to the factory marked “Attention:
Repair Department”. Enclose the item(s), a
packing list and description of the problem
or repairs required plus your daytime phone
number and email address. Estimates of
Lithium Ion Battery p/n HP8-B1800 which
repair cost will be made upon request. It
is our policy not to proceed with a repair
without your approval if the cost (labor plus
parts) is more than fty percent of the cost
for a new replacement. You will be notied
and advised of the cost to repair and to
purchase a new replacement.
 Loading...