

FOREDOM Handpiece H.20, Handpiece H.20D Important Instructions Manual

IMPORTANT INSTRUCTIONS
For Handpiece H.20 and H.20D
Before attaching this Handpiece
please read these instructions.
• Keep a 2.35mm (3/32″) shank in the handpiece at all times,
during operation and storage.
• Never turn collet release lever while flexible shaft is rotating.
The release lever is not intended for use as a brake.
For More Information
For more information on Foredom machines, handpieces, or
accessories, contact your local dealer. When no local dealer is available,
write: The Foredom Electric Company, 16 Stony Hill Road, Bethel, CT
06801, call (203) 792-8622, or visit our website at www.foredom.com.
Always wear proper
eye protection while using
this handpiece.
Form 1264 n 11/06 Printed in U.S.A.
Operation This Quick Change handpiece has a unique lever action
collet release mechanism for rapid accessory changes. Wait for the
motor, flexible shaft and accessory to come to a complete stop
before turning the lever to open collet and remove or insert a bur.
Never turn collet release lever while flexible shaft is rotating!
This can cause damage and extensive wear to the handpiece!
Turn lever 90˚ to left or right to Center lever to close collet to
open collet and release bur. secure bur.
Maintenance and Lubrication Bearings in handpieces H.20 &
H.H.20D do not require any lubrication. Putting oil or grease into
the front or back of these handpieces will damage their prelubricated ball bearings. The H.20D handpiece duplex connection
should be lubricated approximately every 20 hours of use. Apply 2
drops of oil (p/n MS10005) in oil hole on rear of duplex connection.
Flexible Shaft Cleaning and Lubrication should be performed every
50 hours of use: Unscrew motor connector (left hand thread) and
remove drive shaft. The flexible shaft should be thoroughly cleaned
with a solvent. Apply a light film of Foredom grease (p/n MS10006)
to entire length of inner shaft. Reconnect shaft (see shaft and
sheath adjustment instructions on reverse) and sheath and run
motor for a ten minutes before reconnecting handpiece. T
, wipe off excess grease from tip of drive shaft and reconnect
motor
to handpiece per instructions.
urn off
Shaft and Sheath Adjustment for Handpiece H.20 and H.20D
Note:
This illustration
does not apply to
slip joint connections.
It is important to check the sheath and shaft tip and properly adjust
them before you attach this handpiece to your Foredom flexible
shaft tool. The tip of the flexible shaft should extend 3/4
″ beyond
the end of the sheath and no more than 7/8″ or less than 5/8″
(see above).
On Foredom machines with standard shaft and sheath, this
adjustment is made by loosening the set screw in the motor
connector and moving the sheath in or out while the motor and
shaft/sheath assembly are fully extended and straight while hanging
or on a flat surface. When the adjustment is correct, tighten the set
screw in the motor connector.
Attaching the Handpiece to the Flexible Shaft
Attach the handpiece by pushing it on the grooved QD (quick
disconnect) fitting on the sheath. Be sure that the keyed tip of the
flexible shaft is properly lined up with the slot in the handpiece
shaft connector by looking into the rear of the handpiece before
pushing it on. If it is not in line, turn the handpiece to the
correct position.
Replacement Collet
Instructions for replacing and adjusting the collet are on the reverse
side. If a collet is damaged or needs replacement, order Collet
HP3-1008 which includes special size hex key for installation.
ARRANTY
LIMITED W
Foredom®warrants its product to be free of defects in material or workmanship
for a period of 90 days after purchase. During the warranty period, the defective
product will be repaired or replaced without charge or, at our option, the
purchase price will be refunded. This warranty does not cover damage caused in
transit or by accident, misuse, or ordinary wear.
ALL IMPLIED WARRANTIES, INCLUDING BUT NOT LIMITED TO WARRANTIES
OF FITNESS AND MERCHANTABILITY, ARE HEREBY LIMITED IN DURATION TO
A PERIOD ENDING 90 DA
BE LIABLE OR RESPONSIBLE FOR ANY SPECIAL OR CONSEQUENTIAL
DAMAGES. Repair or replacement will be made at our option if the product is
returned post-paid to:
All warranty repairs must be done at the factory at the address above. We will
not pay any shipping or transportation charges. This warranty covers the
original pur
how long an implied warranty lasts, so the above limitation may not apply to
you. This warranty gives you specific legal rights, and you may also have other
rights which vary from state to state.
chaser of the product only. Some states do not allow limitations on
YS FROM DA
The Foredom Electric Company
16 Stony Hill Road, Bethel CT 06801
TE OF PURCHASE, AND WE WILL NOT
Repair Service
Factory repairs are done promptly and at reasonable cost. If you wish,
you can send your equipment directly to the factory marked: “Attention:
Service Department”. Be sure to give your street address, daytime
phone number and /or email address. Include a brief note describing
the problem with the equipment. Estimates will be made upon request.
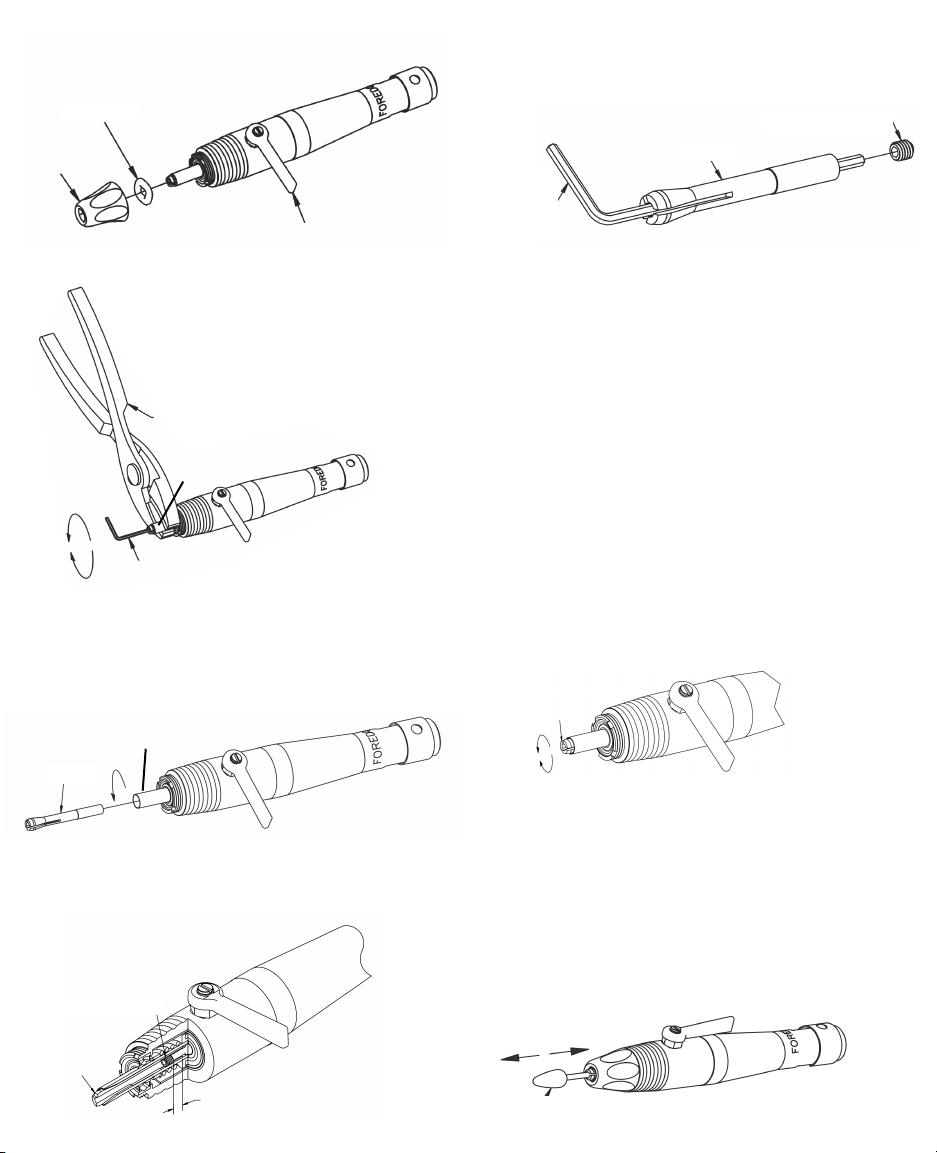
H.20 Handpiece Collet
(
P/N HP3-1008
)
Replacement and Adjustment
Felt Washer
Nose-Cone
1. Un-screw and remove nose-cone and felt washer - Fig 1.
2.Open the collet completely, with lever
perpendicular (at a 90° angle) to
the handpiece - Fig. 1.
Soft Jaw Pliers
Spindle
Loosen
1.5mm Allen Wrench
Tighten
3. Insert a 1.5mm Allen wrench (supplied with new handpiece
collet) into the collet lock screw, and grip the exposed spindle
using soft-jaw pliers. Turn the Allen wrench counter-clockwise
1/4 turn to loosen the collet lock screw - Fig. 2.
Spindle
Collet
Fig. 1
Lever
Fig. 2
Fig. 3
4. For collet adjustment procedure, proceed to Step 7. To
replace the collet, or to remove it for cleaning, un-thread
the collet completely by turning it counter-clockwise - Fig. 3.
Collet Lock Screw
Collet
1.5mm
Allen
Wrench
5. When re-installing a collet or installing a new collet, the
collet lock screw must be in the collet before you screw the
collet into the spindle - Fig. 5. The collet lock screw must be
threaded into the collet to a depth of approximately 5mm,
(3/16″) from the back-end of the collet - Fig. 4.
6. Check to insure that the collet release lever is in the fully
opened position - Fig. 1. Screw the collet into the spindle
while gripping the exposed spindle with your fingers. Do not
screw the collet in too far. (Do not close the three slots in
the collet.)
7. Collet Adjustment Procedure:
Insert a bur with a 2.35mm shank into the collet. If the bur
does not enter the collet, un-screw the collet counter-clock
wise until the bur fits in freely, and re-insert the bur. The
collet tension is adjusted by rotating the collet clockwise to
tighten, and counter-clock-wise to loosen - Fig. 6. The collet
is adjusted properly when a SLIGHT resistance is felt when
moving the bur in and out with the collet release lever in
the fully opened position. Next, grip the spindle with the
soft-jaw pliers, and tighten the collet lock screw securely
with the Allen Wrench - Fig. 2.
Collet
Loosen
Tighten
8. Insert a 2.35mm shank bur into the collet, and close the
collet release lever. Using a cloth to protect your fingers, try
to pull the bur out to test the collet’s holding strength - Fig. 7.
If you can remove the bur by hand, the collet is too loose. If
the collet is too loose, loosen the collet lock screw, refer to
Collet Adjustment Procedure above and re-adjust the collet
until the bur cannot be removed with the collet closed.
9. Re-install the felt washer, and the nose-cone.
Fig. 5
Fig. 6
Collet Lock Screw
Collet
Fig. 4
5mm (3/16″) distance from
end of Collet to Lock Screw
NO Slip
Bur
Fig. 7
 Loading...