

Page 1
United States
Ford Customer Relationship Center
1-800-392-3673 (FORD)
(TDD for the hearing impaired:
1-800-232-5952)
owner.ford.com
@FordService
Canada
Ford Customer Relationship Centre
1-800-565-3673 (FORD)
ford.ca
@FordServiceCA
GM5J 19G217 HA
August 2015
First Printing
Quick Reference Guide
C-MAX Energi
Litho in U.S.A.
This Quick Reference Guide is not intended
to replace your vehicle Owner’s Manual
which contains more detailed information
concerning the features of your vehicle, as
well as important safety warnings designed
to help reduce the risk of injury to you and your
passengers. Please read your entire Owner’s
Manual carefully as you begin learning about
your new vehicle and refer to the appropriate
chapters when questions arise. All information
contained in this Quick Reference Guide was
accurate at the time of duplication. We reserve
the right to change features, operation and/
or functionality of any vehicle specification at
any time. Your Ford dealer is the best source
for the most current information. For detailed
operating and safety information, please
consult your Owner’s Manual.
learn more about
your vehicle
To put QR tags to work for you, use your mobile
phone’s browser or app store link to download
a QR tag reader. Scan the QR tag and see
your vehicle’s features come to life through
animation and video.
WARNING
Driving while distracted can result in loss of
vehicle control, crash and injury. We strongly
recommend that you use extreme caution
when using any device that may take your
OWNER.FORD.COM
FORD.CA
focus o the road. Your primary responsibility
is the safe operation of your vehicle. We
recommend against the use of any hand-held
device while driving and encourage the use of
voice-operated systems when possible. Make
sure you are aware of all applicable local laws
that may aect the use of electronic devices
while driving.
REFERENCE
PLUG-IN HYBRID
QUICK
GUIDE
2016
Page 2
energy saving tips
HELP MAXIMIZE YOUR FUEL ECONOMY BY UTILIZING THESE FEW TIPS
1. Use smooth acceleration and braking.
According to the United States
Department of Energy, aggressive driving
can lower your gas mileage by up to
33 percent at highway speeds and
5 percent in the city.
2. Carry the bare essentials.
The Department of Energy estimates
that an extra 100 pounds (45 kilograms)
in your vehicle could reduce your fuel
economy by up to 2 percent.
3. Seasonal fuel makes a dierence.
Winter fuel contains slightly less energy
than summer fuel, so the fuel blend you
fill up with can impact your eciency.
4. Idling burns fuel, too.
You can burn up to half a gallon (1.9 liters)
of fuel per hour while idling. Minimize your
morning warm-up and parking lot waits
to get the most out of filling your tank.
5. Avoid extreme temperatures.
Find a shady or sheltered spot to help
keep your lithium-ion battery operating
eciently, and minimize the amount of
energy required to heat or cool your cabin.
6. Use accessories wisely.
Heat and air conditioning reduce
your vehicle’s electric range and can
prompt the gasoline engine to operate.
Use energy from your home outlet or
charging station by taking advantage of
the preconditioning feature and setting
your GO Times in advance. When you
precondition your vehicle, you can reduce
the amount of heating or air conditioning
you need at the start of your drive. See
page 3 for more SmartGauge details.
7. Check your tires.
Proper tire inflation can help you
improve your fuel economy by up to
3.3 percent, according to the Department
of Energy, while under-inflation could
lower your fuel economy by 0.3 percent
for every 1 psi drop in pressure of all four
tires. Check your vehicle’s door sticker for
recommended cold tire inflation pressure.
C-MAX Energi smart start
SMARTGAUGE® WITH ECOGUIDE
Use your 5-way steering wheel controls to scroll through your menu
choices. Select the following screens from the Display/Trip and
Fuel Economy menus to help improve your fuel eciency:
Engage: Provides separate gauges for gas and electric power,
plus and instantaneous fuel economy gauge.
Empower: Provides a power demand gauge with an engine on and
o threshold, plus instantaneous fuel economy gauge.
MyView: Lets you choose your preferred information to create
your own custom display.
Energy Use: A green bar indicates a positive eect on your EV range
per full charge estimate. An amber bar indicates a
negative eect. The climate power gauge shows you
how much power the climate control uses.
Eciency Shows your short-term fuel economy. The more leaves
Leaves: you have, the more eciently you are driving!
Fuel Tracks your fuel economy over time and helps you try to
History: improve your average.
Coach: Rates the eciency of your recent acceleration
eciency, braking and cruising behavior. The more blue
you see, the better you are driving!
energy saving tips 2
C-MAX Energi smart start 3–4
unique C-MAX Energi features 5
instrument panel 6–7
SYNC 3 8–12
parking aids 13
convenience 14
C-MAX Energi
power management 15
comfort 16
function 17
essential information 18–19
32
Page 3
C-MAX Energi smart start (continued)
PLUG-IN POWER
» C-MAX Energi comes equipped with a 120-volt convenience
charge cord, located in the floor compartment behind the
driver’s seat. This cord allows you to charge the battery using a
standard, 120-volt, grounded, three-pronged household outlet.
See your Owner’s Manual for more details.
» For faster charge times, the available 240-volt charging
option provides a full charge in approximately 2.5 hours.
See your Dealer for more information.
CHARGE PORT DOOR AND LIGHT RING
The charge port is between the front
le-hand side door and wheel well.
To open, use your thumb to press in and
release the indentation on the charge port
door. To close, use your thumb to press and
hold the indentation until the door rotates
and closes.
TO CHARGE C-MAX ENERGI
1. Put your vehicle in park (P) and switch o the vehicle.
2. Open the charge port door.
3. Plug the charging coupler into the vehicle’s charge port. Make
sure the button clicks, confirming you have completely engaged
the coupler. Lock the charging coupler into place by inserting
the straight end of the padlock* through the hole in the black
button on the coupler. Lock the padlock.
*customer-supplied equipment only
4. The charge port light ring flashes twice, and then pulses
slowly when charging.
5. When charging is complete, the light ring turns o.
Unlock the padlock* and remove it. Then press the coupler
button and remove the coupler from the charge port.
CHOOSE YOUR C-MAX ENERGI MODE
Your vehicle contains selectable Electric Vehicle
(EV) modes controlled through the EV button
on the center of the instrument panel, below the
climate controls.
Choose to drive in electric-only mode for city driving, saving
your plug-in power for later or let the system adjust your power
mode to suit the current driving conditions.
» Auto EV: automatically selects high-voltage battery power
during the drive, staying in electric mode when possible
and running the engine when needed. Aer the plug-in
power depletes, this mode is the only one available.
» EV Now: puts your vehicle into an all-electric power
experience, aer you charge your vehicle using
plug-in power.
» EV Later: provides gasoline-hybrid driving power,
and saves most of the high-voltage battery
plug-in power for future use when the driver
is ready to switch to Auto EV or EV Now modes.
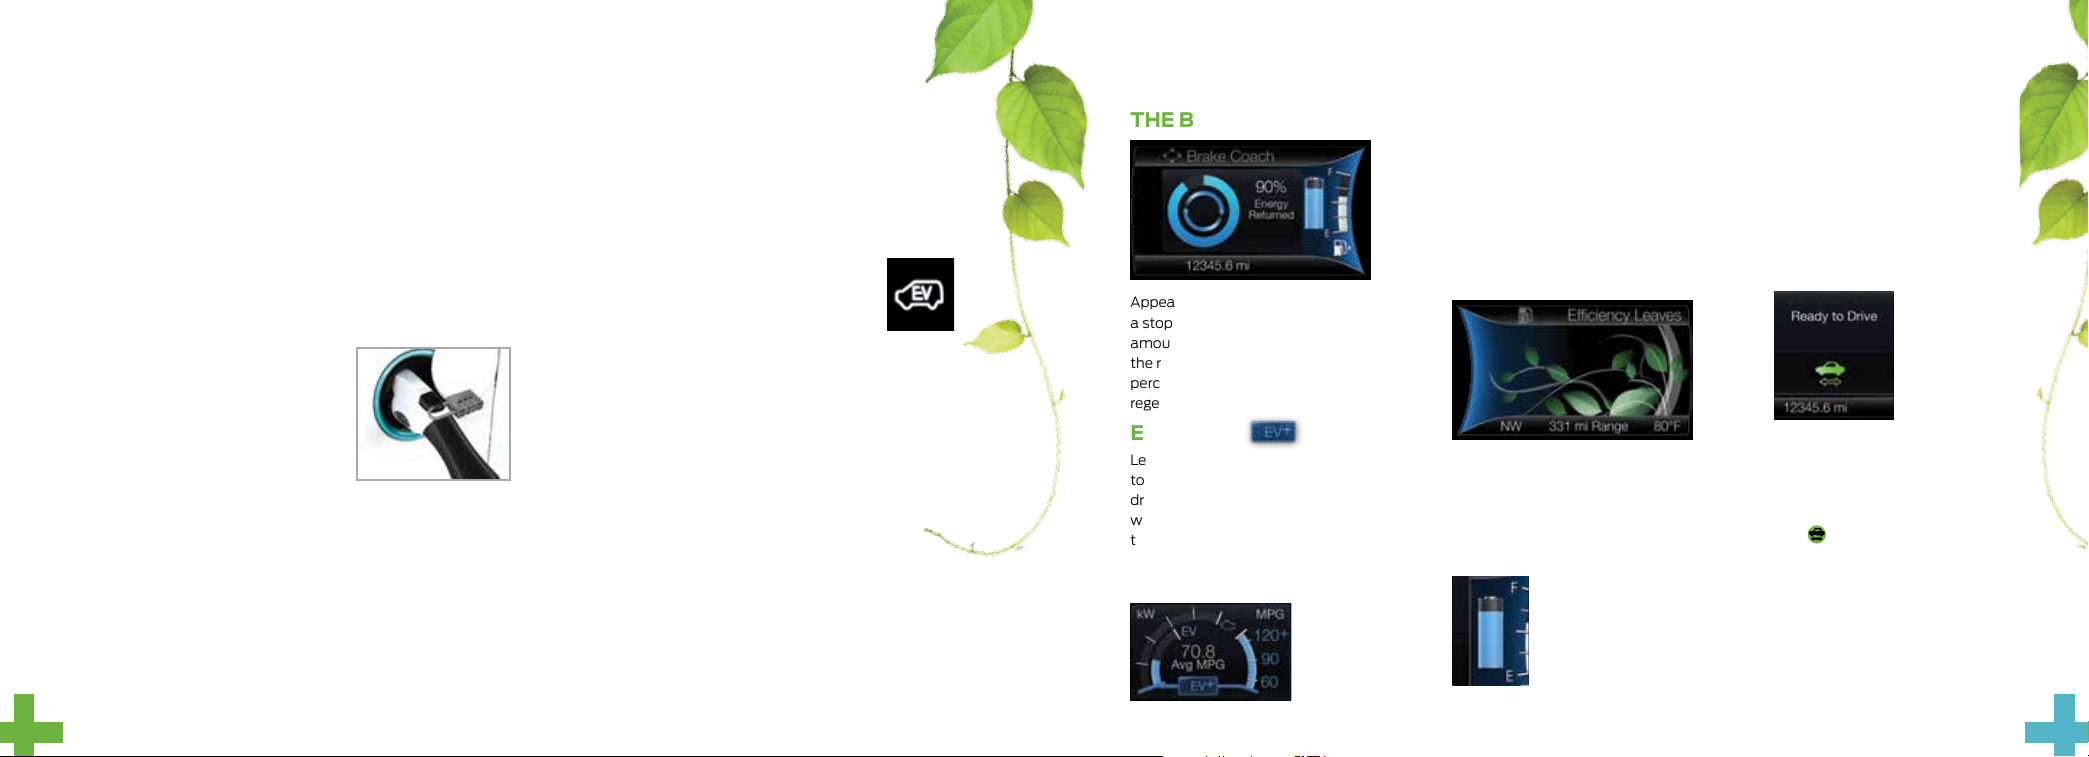
unique C-MAX Energi features
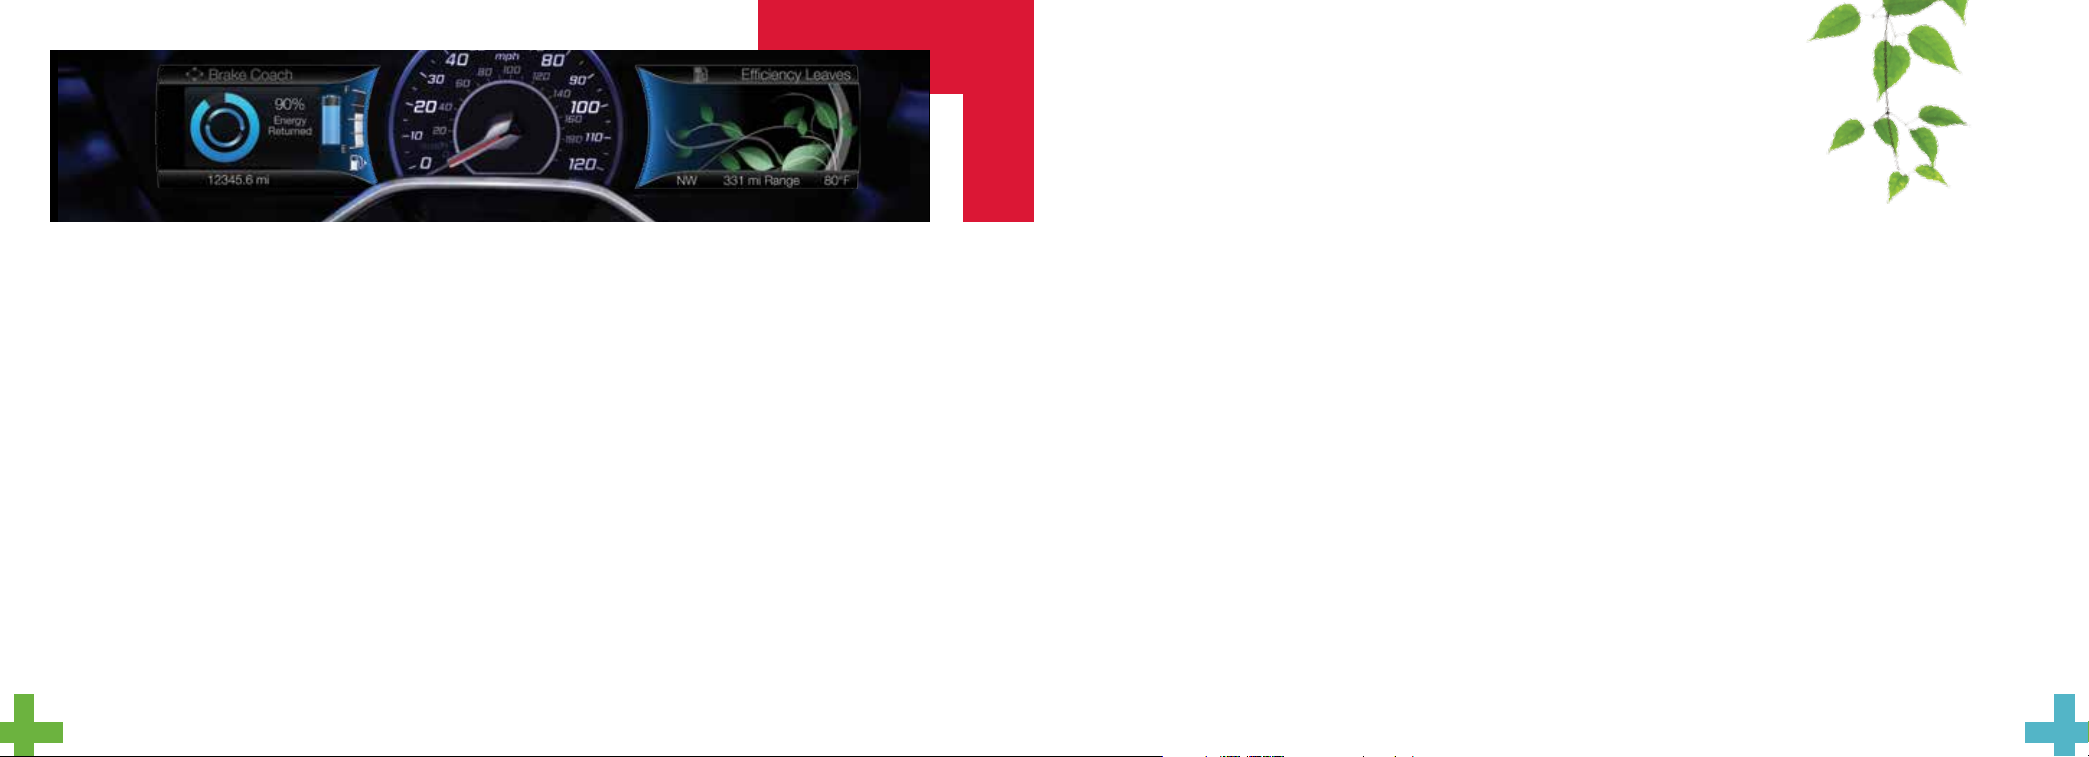
THE BRAKE COACH
Appears aer the vehicle has come to
a stop. It coaches you to maximize the
amount of energy returned through
the regenerative braking system. The
percentage displayed indicates the
regenerative braking eciency.
EV+ MODE
Learns your frequent destinations aer two
to four weeks of use, allowing for more EV
driving as you approach them. For example,
when nearing your home, it should be easier
to stay in electric mode.
See the Unique Driving Characteristics
chapter of your Owner’s Manual for details.
ECO CRUISE CONTROL
Saves vehicle energy by relaxing
acceleration compared to standard cruise
control. Your vehicle may temporarily lose
speed when going uphill. You can switch
this feature on and o in the Driver Assist
section of the Settings menu.
EFFICIENCY LEAVES
The right vehicle information display
provides a visual representation of your
driving behavior. The leaves grow as driving
habits and eciency improve.
THE BATTERY GAUGE
During Plug-in Power Mode,
a full battery fill represents
the total amount of energy
you can get from an external
charge (plugging your
vehicle in).
It is normal for your electric range
estimate to vary from charge to
charge due to changes in average
energy usage. Driving style, drive
route, extreme temperatures and
use of heat and air conditioning
aect your energy usage.
SILENT KEY START
silent key start. This fuel-saving
feature allows your vehicle to be
ready to drive without requiring
your gas engine to be running. Look
for the ‘ready to drive’ indicator
in your instrument display.
light
When the light displays, you
successfully started your vehicle
and it is ready to drive.
When starting
your vehicle,
your gas engine
may not start
because your
hybrid-electric
vehicle includes
54
Page 4

instrument
panel
1 CRUISE CONTROL
To Set a Cruise Control Speed
A. Press the ON button and release.
B. Drive to the desired speed.
C. Press the SET+ and release, then
take your foot o the accelerator.
Aer setting your speed, you can press
SET+ or SET– to adjust cruise speed. To
disable, press the OFF button, tap the brake
pedal or pull the CAN control toward you.
2 LEFT VEHICLE INFO DISPLAY
Provides specific information about various systems
on your vehicle. Use the le-hand, 5-way controls
to use SmartGauge
and confirm settings and messages. Refer to the
Information Displays chapter of your Owner’s Manual
for more information.
3 TILT AND TELESCOPE
STEERING COLUMN
Unlock the steering wheel by pulling the lever down.
Adjust the steering wheel to your desired position.
Push the lever up to lock the steering wheel in place.
®
, customize views, and choose
4 RIGHT VEHICLE
INFO DISPLAY
Access information about
2
4
2
7
4
1
5
6
3
9
8
Entertainment, Phone, Navigation*
or the animated EcoGuide and
eciency leaves by using the righthand, 5-way controls. Scroll through
the menu, highlight selections and
make adjustments. Press OK to
confirm your choices. Refer to
your SYNC Supplement for
more information.
5 STEERING WHEEL
MEDIA CONTROLS
Volume: Press + to increase or
– to decrease volume levels.
Press
previous radio station, CD track or
preset satellite radio channel*.
Pull
Press
answer a call.
Press
to access the next or
to access voice recognition.
to access phone mode or to
to end a phone call.
6 PUSH-BUTTON SWITCH
While transmitters remain in your
pocket, purse or back pack, you can
still start your vehicle. With your
vehicle in park (P) and you pressing
the brake pedal, press the START
STOP button. Press the button
again to switch o the vehicle.
NOTE Your intelligent access
transmitter must be inside the
vehicle for the ignition to start.
7 DOOR LOCK
INDICATOR LIGHT
Lights aer you lock all of the doors,
and does not light when a door
remains open or unlocked. The
central door locks are on both driver
and front-passenger doors, and on
your keyless remote.
8 FUEL BUTTON
Press to open the fuel door. It may
take up to 15 seconds to open.
9 EV MODE BUTTON
*if equipped
76
Page 5

SYNC® 3
A REVOLUTIONARY WAY TO CONNECT WITH YOUR VEHICLE.
Before You Get Started
Pair your phone with SYNC 3 (see the Pairing Your Cell Phone
with SYNC section in this guide for instructions on how to
do this).
Apps > EV Info
Press the Apps icon and then the Electric Vehicle “road and leaf”
icon to access your Power Flow Status and Charge Settings.
» The Power Flow Status displays how your vehicle uses its
power at any moment.
» The Charge Settings screen lets you schedule charging, GO
times and cabin conditioning times, as well as view charge
status and more:
- My GO Time summary
- Charge status and actual times
GETTING STARTED WITH SYNC 3
Use the touchscreen to explore and interact with your vehicle.
The screen works the same way as traditional controls, knobs
and buttons do. Press the various icons on your touchscreen to
personalize the many features and settings of your vehicle. The
system provides easy interaction with your cellular phone, multimedia
entertainment, climate controls, navigation system* and apps.
*if equipped
- Charge profile and mode
- Estimated charge time limits
CREATE YOUR ACCOUNT
1. Set up your owner account at
owner.ford.com (U.S.) or SyncMyRide.ca (Canada).
Register by following the on-screen instructions. Aer
registering, you can see which services may be available
to you.
2. SYNC uses a wireless connection called
communicate with your phone. Switch on Bluetooth mode in
your phone’s menu options. This lets your phone find SYNC.
If you need more details on setting up your phone with SYNC,
call the toll-free number, visit the website or your phone
manufacturer’s website.
Bluetooth® to
WHY DO YOU NEED A SYNC
OWNER ACCOUNT?
A SYNC owner account allows you to receive the latest soware
updates, and when you have questions, free customer support.
Some services may not be available in your area. Create your
account by visiting the website or calling the toll-free number for
more information:
For U.S. Customers
Visit owner.ford.com or call 1-800-392-3673
(select Option 1 or 2 for language, then Option 3).
For Canadian Customers
Visit SyncMyRide.ca or call 1-800-565-3673
(select Option 1 or 2 for language, then Option 3).
PAIRING YOUR CELL PHONE
WITH SYNC
In order to use many of the features of SYNC, you must first pair
and connect your phone with SYNC. Make sure your vehicle is in
park (P), switch on your ignition and radio, and then make sure that
your phone’s Bluetooth is set to ON.
1. Touch Add Phone on your touchscreen. An audible prompt
tells you to search for SYNC on your device.
2. Select SYNC on your device.
3. Confirm that the six-digit PIN appearing on your phone
matches the six-digit PIN that displays on
the touchscreen.
4. Once you confirm the PIN, the display indicates when the
pairing is successful.
TIPS
» SYNC 3 may prompt you to choose your settings for
certain features.
» Your cell phone may also prompt you to give SYNC 3
permission to access information. For more information on
your cell phone’s capability, see your cell phone’s manual
and visit the website.
98
Page 6

SYNC® 3
GET IN TOUCH USING YOUR TOUCHSCREEN
Use the feature bar at the bottom of the touchscreen to access the many features of SYNC 3.
PHONE
Aer pairing your phone, you can access
more phone-dependent features:
» Recent call lists.
» Contacts: Sort alphabetically and
choose a specific letter to begin
viewing your entries.
» Phone settings: Pair another phone,
and set ring tones and alerts.
» Text messages.
» Do not disturb: Send all calls to your
voicemail, and all ring tones and alerts
set to silent mode.
NOTE Use the voice commands to make
calls. Say “Call James at home” or “Dial
555-1212”. You can use the touchscreen
to place calls as well. Refer to your SYNC
Supplement for complete details.
USING YOUR CELL PHONE
WITH SYNC
NOTE Enter your phone book contacts
with both first and last names to increase
the ability of SYNC to select the correct
contact. Remember to say the contact
name exactly as you listed it in your
phone book.
Making a Phone Call
Use SYNC to make a phone call to anyone
in your phone book by pulling the voice
control
voice command.
For example, you could say “Call Jake Smith
at home”. SYNC repeats the command
back to you and dials the number.
NOTE You can make phone calls by
pulling the voice control
prompted, give the voice command “Dial”
again to initiate the call.
and when prompted, give a
and when
Answering Incoming Calls
Whenever you have an incoming call, the
name and number of the person calling
appears in the display. Press the
to answer an incoming call. You can hang
up at any time by pressing and holding the
button.
Do Not Disturb Mode
This feature blocks incoming calls and text
messages, and saves them for later. You
still have access to outgoing calls when this
feature is active. Say the voice command
“Do not disturb on” to enable and “Do not
disturb o” to disable.
button
NAVIGATION
Press the navigation icon and then select
one of two ways to find your destination:
» Destination mode lets you key in a
specific address or use a variety of
search methods to locate where you
want to go.
» Map mode shows advanced viewing of
2-D city maps, 3-D landmarks and 3-D
city models (when available).
Set a Destination
Press Destination on your touchscreen and
then press Search.
Enter a street address, intersection, city or a
point of interest (POI).
You can also use voice commands. Say
“Find a point of interest” and then select a
category, such as hotels, gas stations, ATMs
or restaurants.
*
Aer you choose your destination, press
Start Route. The system uses a variety of
screens and visible prompts to guide you to
your destination.
The navigation map shows your estimated
time of arrival, remaining travel time and
the distance to your destination.
Navigation Menu
While you are on your route, you can change
your touchscreen view: Touch Menu on
the bottom of the screen, and then select
Screen View to choose from any of
the following:
» Full Map.
» Highway Exit Info displays on the right
side of the touchscreen. View POI
icons (restaurants, ATMs, etc.) as they
pertain to each exit. You can select a
POI as a waypoint, if you wish.
» Turn List shows all of the available
turns on your current route.
» Trac List displays SiriusXM Trac
and Travel Link* information. If trac
conditions change to cause a major
delay on the originally selected route,
then SYNC 3 provides an automatic
re-route.
NOTE Minor trac changes do not
prompt a re-route.
CLIMATE
Access climate control features, including
the temperature, airflow direction, fan
speed and other climate features for you
and your front passenger.
Set Your Temperature
» Touch the Climate icon on
the touchscreen.
» Use voice commands to change your
settings, like “Climate set temperature
to 72 degrees” and SYNC 3 makes
that adjustment.
» You can also use the
the touchscreen.
or buttons on
*if equipped
1110
Page 7

SYNC® 3
(continued)
AUDIO
No matter how you store your music, SYNC
makes it yours to enjoy when you are behind
the wheel. Just press the Audio icon on the
touchscreen. From here, you can easily go
between AM, FM, SiriusXM and other
media sources.
Set Your Radio Presets
» Tune to the station and then press
and hold one of the memory preset
buttons. The audio mutes briefly while
the system saves the station, and then
the audio returns.
» Two preset banks are available for
AM and three banks for FM. To access
additional presets, tap the preset
button. The indicator on the preset
button shows which bank of presets
you are currently viewing.
Bring in Your Own Music
Gain access to any audio source by voice
and even control how each operates, like
changing radio stations, CD tracks or music
on one of the following devices:
» USB
®
» Bluetooth
streaming
APPS
Stream Apps
The system supports the use of
certain apps such as Pandora
iHeartRadio
Bluetooth-enabled devices.
Each app gives you dierent onscreen
options depending on the app’s content.
Refer to your SYNC Supplement, visit
the website or call the toll-free number
for more information. See the Why Do
You Need a SYNC Owner Account? page
in this guide for phone number details.
®
through a USB or
®
or
parking aids
FRONT* AND REAR*
SENSING SYSTEMS
Sound an audible warning tone if there is an obstacle
near the vehicle’s front or rear bumpers. As the vehicle
moves closer to the obstacle, the rate of the warning
tone increases in frequency.
NOTE The driver is always responsible for controlling
the vehicle, supervising the system and intervening if
required. Visibility aids do not replace the need to watch
where the vehicle is moving. Refer to your Owner’s
Manual for safety information, more details
and limitations.
REAR VIEW CAMERA
Provides a visual display of the area behind the vehicle. The
display automatically appears in the touchscreen when the
vehicle is in reverse (R) and uses colored guides to alert you
of your proximity to objects.
ACTIVE PARK ASSIST
Can detect an available parallel parking space
and automatically steer the vehicle into that space
(hands-free). The system instructs the driver
with visual and audible instructions with regard to
braking, accelerating and shiing gears in order to
safely park the vehicle.
» To start active park assist, press the button located in the
instrument panel below the audio system.
» To stop the parking procedure, grab the steering wheel or
press the control again. For complete information, refer to the
Parking Aids chapter of your Owner’s Manual.
*
*if equipped
1312
Page 8

C-MAX Energi
convenience
INTELLIGENT ACCESS
NOTE Your intelligent access transmitter
must be within 3 feet (1 meter) of the vehicle
for intelligent access to function properly.
Pull a front exterior door handle to unlock
and open the door. Press and hold the raised
sensor on the door handle to lock your
vehicle. The intelligent access transmitter
also contains a mechanical key blade that
you can use to unlock the driver door, if
necessary. To unlock and open the ligate,
press the button on the top of the ligate
pull-cup handle.
*
MYKEY
MyKey allows you to program certain driving restrictions in order to
promote good driving habits. You can program speed restrictions,
limit audio volume levels and force safety belt reminder chimes to
remain on. For complete information, refer to the MyKey chapter in
your Owner’s Manual.
110-VOLT AC POWER POINT
REMOTE START
To remote start your vehicle, press the buttons within three
seconds of each other:
1. Press the lock button to lock all the doors.
2. Press the remote start button twice. The exterior lamps
flash twice.
NOTE When remote starting with an integrated keyhead
transmitter, switch the ignition on before driving. When remote
starting with an intelligent access transmitter, press the START
STOP button while applying the brake pedal before driving. See
the Keys and Remote Control chapter in your Owner’s Manual for
more details.
14 15
*if equipped
120-VOLT CONVENIENCE CHARGE CORD
AND CARGO STORAGE
Your vehicle includes two under-floor
storage compartments that are behind the
front seats. The compartment behind the
driver seat contains the plug-in convenience
charge cord. Use the compartment behind
the front passenger seat to store items
discreetly, and secure the lids so items
stay in place.
®
*
The power point is on the rear of the center
console. You can use it to power smaller
electrical devices that require up to 150 watts.
This feature is available to use when you switch
on your ignition and the battery voltage is above
11 volts. When the indicator light is on, the power
point is working and ready to use.
power management
SMART POWER-SPLIT
ARCHITECTURE
City Driving: In stop and go driving and at low speeds,
the electric motor provides the necessary power. The gas
engine kicks in only to recharge the battery or when you
need more power.
Accelerating: Step on the accelerator pedal and get all the
responsiveness of a traditional gasoline engine.
Cruising or Highway Driving: With greater power demands
at highway speeds, your vehicle uses the gasoline engine
more frequently than while driving at city trac speeds.
This is normal.
Braking: For added eciency, the energy normally created
during braking recycles to the battery.
Stopped: To save energy, the gasoline engine shuts o
and the electric motor stops drawing current.
MYFORD®
MOBILE APP FOR
SMARTPHONES
The downloadable MyFord
Mobile app lets you know the
status of your charge and upcoming charge
schedules at any time, from anywhere.
Use the App to
» See your charge status.
» Set charging schedules when utility
» Set your cabin temperature when setting a GO Time
NOTE Extreme outside temperatures or using a standard
outlet with 120V charging may reduce cabin conditioning
eectiveness. For maximum eciency, use a 240V outlet.
Register your smartphone: visit MyFordmobile.com
to download your free app.
rates are low with the Value Charging feature.
either remotely or through your touchscreen to
precondition your cabin when the vehicle remains
plugged in.
15
Page 9

comfort
HEATED SEATS
*
DUAL ZONE
TEMPERATURE CONTROL
With the dual climate controls, you have
the flexibility to operate the temperature
with one control, called single zone, or two,
where both driver and front passenger can
select independent temperatures.
To operate the dual zone temperature
control: Use the rotary control on
the passenger side. The single zone
temperature control automatically
turns o.
To return back to single zone: Press and
hold the AUTO button. The passenger side
temperature switches to the driver side
temperature setting.
16
*if equipped *if equipped
The front heated seat controls are on the
center console near the gearshi lever.
Rotate the dial to select your preferred
heat mode.
1
2
TO FOLD THE
REAR SEATBACK
1. Fold the outboard head
restraints and lower the center
head restraint.
2. Pull the lever up to fold the
seatback forward.
To unfold the seatback, simply pull
up on the seatback to raise it to the
upright position.
function
MANUAL LIFTGATE
To open the ligate manually from outside of your vehicle, press
the button on top of the ligate pull-cup handle to unlatch the
ligate, and then pull on the outside handle.
You can also use the transmitter to unlock your ligate.
Press
Use the molded handle inside the ligate to help with closing.
POWER LIFTGATE
You can open the power ligate from the instrument panel
by pressing
twice within three seconds. If the vehicle is running, the ligate
operates only with the transmission in park (P). One warning
tone sounds as the ligate begins to power close. Three short
tones indicate a problem with the open or close request,
caused when:
» The ignition is on and the transmission is not in park (P).
» The battery voltage is below the minimum operation voltage.
» The vehicle speed is at or above 3 mph (5 km/h).
twice within three seconds.
*
, or with your transmitter by pressing
HANDS-FREE POWER LIFTGATE
To open your ligate hands-free while you are at the
ligate: Move your foot under and away from the rear
bumper, using a single kicking motion. Do not move your
foot sideways or the sensors may not detect the motion.
The ligate power opens or closes.
NOTE Your intelligent access transmitter must
be within 3 feet (1 meter) behind the ligate for the
feature to work. The ligate may not power
open or close under specific conditions.
Refer to the Locks chapter in your
Owner’s Manual for more information.
*
17
Page 10

essential
information
FUEL TANK CAPACITY
AND FUEL INFO
C-MAX Energi has a 14.0 gallon (53L)
fuel tank capacity, in addition to its
high-voltage battery system.
Use only “Regular” UNLEADED fuel
with an octane rating of 87 or higher,
with no more than 15% ethanol.
Do not use ethanol
diesel, fuel-methanol, leaded fuel or
any other fuel because it could
damage or impair the emission
control system.
18
E20 - E85
(E85),
REFUELING
Your vehicle features a locking
fuel door and an auto-sealing
feature that locks the fuel tank
refueling valve.
1. Put your vehicle into park (P) and switch
o the ignition.
2. Press the button
console. Pressing this button unlocks the
fuel tank refueling valve, allowing the fuel
filler door to open so you can insert the
fuel filler nozzle into the fuel inlet.
3. Wait up to 15 seconds
before opening the fuel
filler door. During this
time, a Fuel Door Opening
message appears in
the Information display.
4. The Fuel Door Open
message in the information display
indicates that the vehicle is ready for
refuelling. The vehicle remains ready to
refuel for approximately 20 minutes. If
you need more than 20 minutes, you
need to press the refueling button again.
You may experience the fuel pump
shutting o if the refuel button is not
pressed again.
5. Open the fuel filler door.
6. Slowly insert the fuel filler nozzle fully
into the fuel system, and leave the nozzle
fully inserted until you are done pumping.
located on the center
Hold the handle higher during insertion
for easier access.
7. Aer you are done pumping fuel, slowly
remove the fuel filler nozzle. Allow
approximately 5–10 seconds aer
pumping fuel before removing the fuel
filler nozzle. This allows residual fuel to
drain back into the fuel tank and not spill
onto the vehicle.
NOTE When refilling with a portable
container, use only the funnel that comes
with your vehicle. Do not use aermarket
funnels as they do not work with the
Easy Fuel
You can purchase extra funnels from your
authorized dealer.
®
system and may cause damage.
FUEL FRESHNESS MODE
This feature helps keep the fuel system
functional and the fuel fresh.
If you operate your vehicle mainly in plug-in
power mode using electricity from plugging
in without refueling, the gasoline in your
tank eventually becomes stale. Stale fuel
can damage the engine and fuel system.
To prevent the fuel from becoming stale,
your vehicle automatically enters fuel
freshness mode. In fuel freshness mode,
your vehicle operates in hybrid mode,
causing the gasoline engine to run in order
to consume the fuel in the fuel tank.
NOTE If you do not add new fuel during
an 18-month period, fuel freshness mode
consumes fuel until 1.2 gallons (4.5 liters)
remain in the tank.
During Fuel Freshness Mode
» The information display screen
indicates that fuel freshness mode
is active.
» The vehicle runs only in hybrid mode.
EV Now is not available.
» Most of the plug-in power stores until
fuel freshness mode is complete.
NOTE EV Now can resume if less than
1 gallon (3.8 liters) of fuel is le in the tank.
NOTE In most cases, when the fuel level
is below 1/4 tank, refueling the vehicle ends
fuel freshness mode and EV Now becomes
available. Refueling aer consuming a full
tank in fuel freshness mode also ends
the mode.
NOTE We recommend that you use
a fuel stabilizer if your vehicle consumes
less than a full tank of fuel during an
18-month period.
LOW ENGINE USE MODE
The feature automatically keeps the engine
oil quality in good condition when you
drive the vehicle with limited engine use.
When you start the vehicle in Low Engine
Use mode, a message appears in the
information display.
When the vehicle is in Low Engine Use
mode, the vehicle runs the engine as
necessary. Selecting EV Now mode when
your vehicle is in the Low Engine Use mode
suspends the Low Engine Use mode for as
long as you continue driving your vehicle.
The Low Engine Use mode resumes the
next time you start your vehicle. Changing
the engine oil and resetting the oil life
monitoring system suspends the Low
Engine Use mode.
TIRE PRESSURE
MONITORING SYSTEM
Your vehicle shows a low tire pressure
warning light
display when one or more of your tires
are significantly under-inflated. If this
happens, stop and check your tires as soon
as possible. Inflate them to the proper
pressure. Refer to the Wheels and Tires
chapter of your Owner’s Manual for
more information.
in your information
TEMPORARY MOBILITY KIT
The kit is under the front passenger seat. It
consists of an air compressor to reinflate
the tire and a sealing compound in a
canister that seals most punctures caused
by nails or similar objects. Refer to the
Wheels and Tires chapter of your Owner’s
Manual for more details.
AUTOMATIC SHUTDOWN
In vehicles with intelligent access, this
feature automatically shuts down
the vehicle if has been idling for an
extended period. Before this happens,
a message appears in the information
display, allowing you time to override
the shutdown feature. Refer to Starting
and Stopping the Engine in your Owner’s
Manual for details.
ROADSIDE ASSISTANCE
Your new Ford vehicle comes with
the assurance and support of 24-hour
emergency roadside assistance.
To receive roadside assistance in the
United States, call 1-800-241-3673.
In Canada, call 1-800-665-2006.
TOWING YOUR VEHICLE
Towing your vehicle behind an RV
or any other vehicle may be limited.
Refer to Towing the Vehicle on Four
Wheels in the Towing chapter of
your Owner’s Manual.
*if equipped
*
19
 Loading...