

Ford 7S7J-19A285-DA Owner's Handbook Manual

Feel the difference
Owner's handbook
Navigation system

The information contained in this publication was correct at the time of going to print. In the
interest of development the right is reserved to change specifications, design or equipment
at any time without notice and without incurring any obligations. This publication, or part
thereof, may not be reproduced nor translated without our approval. Errors and omissions
excepted.
© Ford Motor Company 2007
All rights reserved.
Part number: 7S7J-19A285-DA (CG3537en) 12/2006 20070207104045

Navigation
introduction
General information..........................3
Road Safety........................................4
Navigation Quick start
Navigation unit
overview
Using the touchscreen...................10
Loading the navigation disc............11
System settings
Navigation system
security
Security code..................................20
Lost security code..........................20
Entering a security code................20
Incorrect security code..................20
Disabling a security code...............20
Audio operation
Radio operation...............................21
CD operation...................................22
Navigation system
Navigation system controls...........25
Menu structure................................26
Route options menu.......................27
Entering a destination....................28
Route displays.................................28
Traffic Message
Channel
Principle of operation......................31
Using TMC........................................31
Map updates
Navigation telephone
control
General information........................33
Telephone setup.............................33
Using the telephone.......................33
Navigation voice
control
Principle of operation.....................36
Using voice control.........................37
Audio unit commands....................39
Telephone commands...................43
Navigation system
commands...................................45
Climate control commands..........50
Navigation climate
control
Automatic climate control..............51
1
Table of contents

2

GENERAL INFORMATION
The system has many features
including a full range of audio and
climate control functions. To access
these functions, press the relevant
button on the unit bezel. This will take
you into the selected mode.
One hour mode
To conserve battery power, the
system can be operated in one hour
mode. If the ignition is off, press the
ON/OFF button to switch on the
system. The system will automatically
switch off again after one hour if not
switched off by the user.
System notes
The Ford Navigation System is
recommended for use when the
ignition key is turned to the accessory
position, or when the engine is
running. If the system is used
extensively when the engine is not
running, care needs to be taken to
avoid draining the battery.
To clean the navigation system,
please use a soft cloth that is moist,
but not wet. Do not use any liquid or
aerosol cleaning agents.
WARNING
The front glass on the liquid
crystal display may break when
hit with a hard surface. If the glass
breaks, do not touch the liquid
crystalline material. In case of contact
with skin, wash immediately with
soap and water.
The Ford Navigation System is a
highgrade laser product which uses
a visible laser beam. If this is handled
incorrectly it can emit dangerous
rays. Do not attempt to look through
any openings in the equipment into
the interior.
3
Navigation introduction

CAUTION
Do not clean the system with
solvents or aerosol cleaning
agents. Use only a damp cloth.
Do not apply excessive force to the
screen.
Do not insert foreign objects into any
of the system disc drives or media
card slots.
Do not insert more than one disc into
the navigation system disc drive.
Use only 12 cm discs, or 8 cm discs
with a suitable adaptor.
Do not attempt to open up the
device itself – your Ford Dealer will be
happy to assist you if the equipment
should develop any faults.
Improper use of other settings and
connections than those presented
here can cause damage to the
equipment.
Do not turn the ignition key or start
the engine while the software is
updating.
ROAD SAFETY
WARNING
The Ford Navigation System
provides you with information
designed to help you reach your
destination quickly and safely. For
reasons of safety, the driver should
only program the system when the
vehicle is stationary.
The Ford Navigation System provides
no assistance with respect to stop
signs, traffic lights, areas under
construction or other important
safety information. This always
remains the personal responsibility
of the driver.
Do not use the system until you have
familiarised yourself with its operation.
While driving under route guidance,
only follow an instruction when it is
safe to do so, as the system cannot
be aware of changing conditions, for
example turn restrictions, roadworks
or diversions. Use voice guidance as
much as possible, and only view the
display when driving conditions
permit.
The road safety caution is displayed
each time the ignition is switched on,
and the navigation system is
selected. To use the system, read
the caution and touch ‘Ok’.
4
Navigation introduction

Functions available whilst
driving
For safety reasons, not all functions
may be available whilst the vehicle is
on the move.
The driver must not attempt to
operate any detailed operation of the
navigation system while the vehicle
is in motion. Give full attention to
driving and to the road. Pull off the
road and park in a safe place before
performing detailed operations.
Safety information
Please read and follow all stated
safety precautions. Failure to do so
may increase your risk of collision and
personal injury. Ford Motor Company
shall not be liable for any damages
of any type arising from failure to
follow these guidelines.
The navigation system is not a
substitute for your personal
judgement.
Route suggestions should not
supersede local traffic regulations or
safe driving practices.
Do not follow route suggestions if
they direct you to perform an unsafe
or illegal manoeuver, would place you
in an unsafe situation, or would route
you into an area that you consider
unsafe.
Let the voice guide you. If detailed
viewing is necessary, pull off the road
to a safe location.
Do not use the navigation system to
locate emergency services.
The map database does not reflect
road detours, closures or
construction, road characteristics
such as rough road surface, slope or
grade, weight or height restrictions,
traffic congestion, weather or similar
conditions.
To use the system as effectively and
safely as possible, obtain updates to
the map database whenever they
become available.
5
Navigation introduction
The Ford Navigation System has a
large range of features, yet is easy
and intuitive to use. Route guidance
can be given by voice prompts and
is also shown on the display screen.
The screen provides full information
for operating the system through the
use of menus, text screens and map
displays. Screen selections are made
by touching the required button on
the screen.
Basic touchscreen
operation
There are some common basic
methods of entering data and making
option selections. These are briefly
described below.
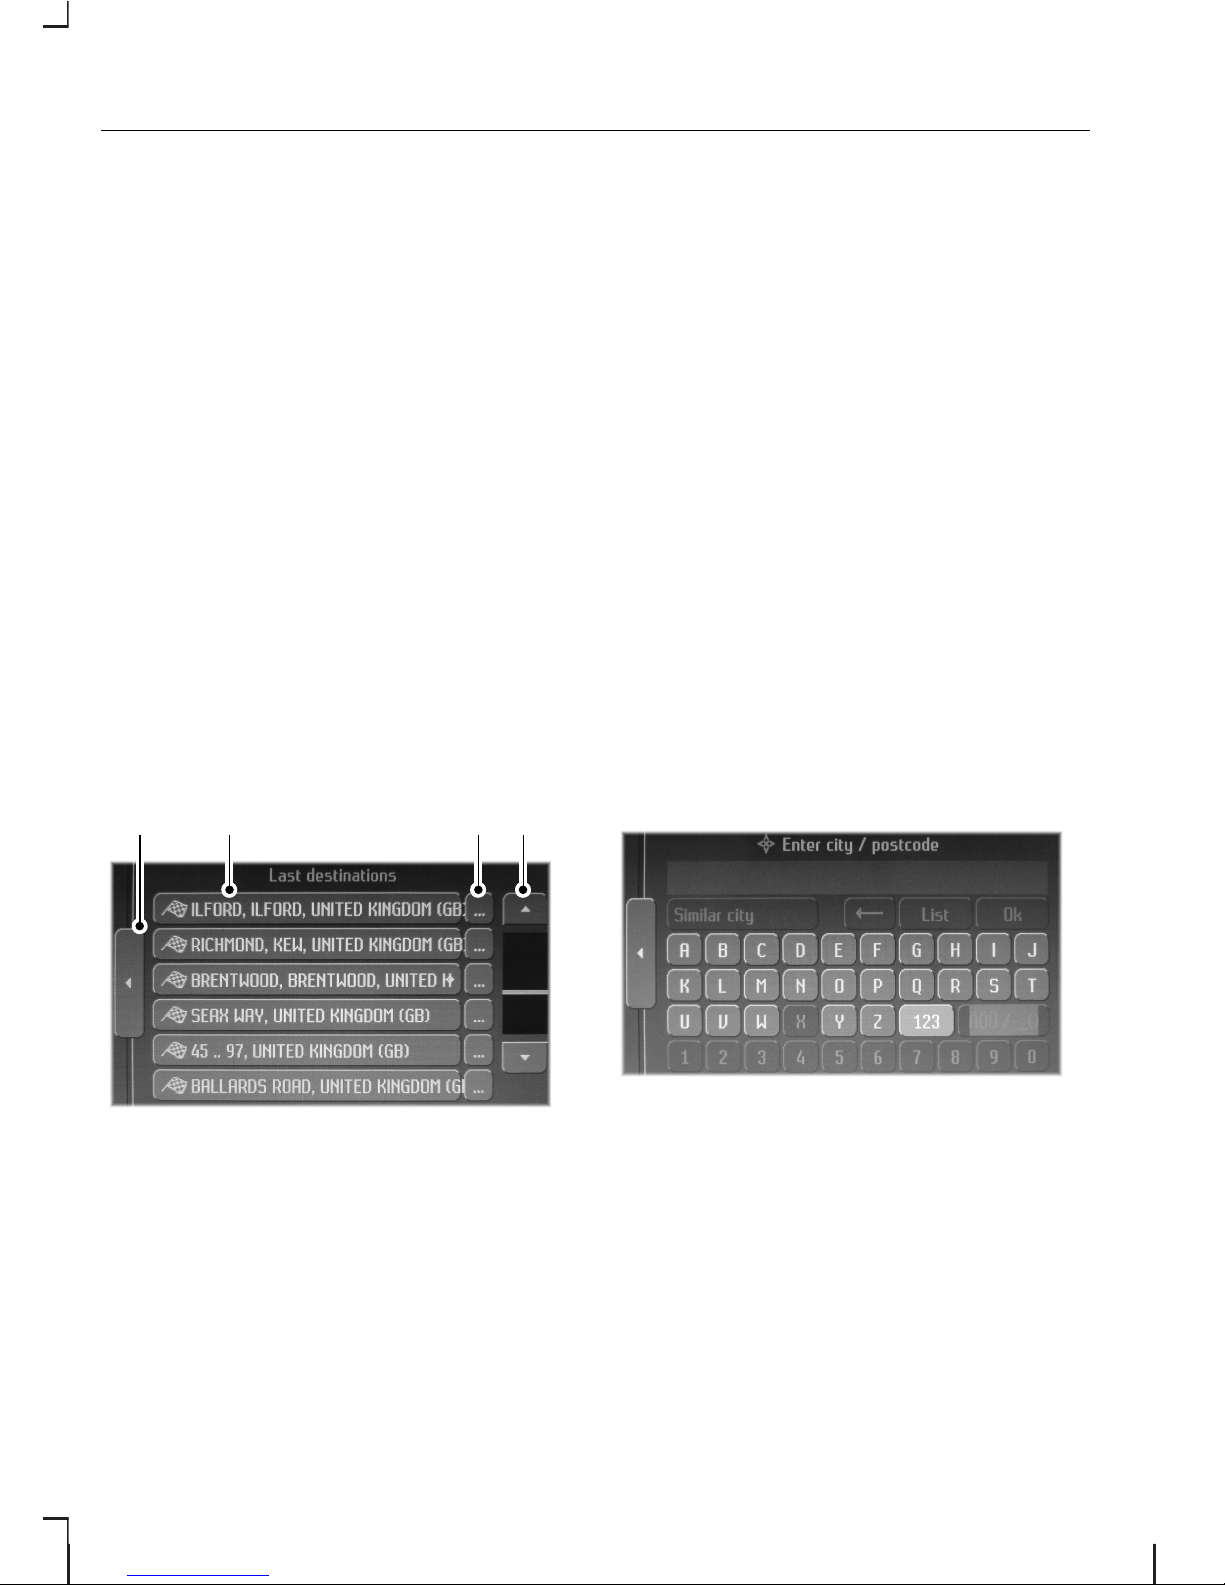
Selection lists
B DCA
E88721
Back/return buttonA
Selection list buttonsB
Further informationC
Scroll bar movement arrow
buttons.
D
Various screens are presented which
offer a selection list of available
options. Press the option which you
require, or if it is not shown on the
screen you may need to scroll the
selection using the up/down arrow
buttons to the right of the display.
Press the back button to return to
the last screen.
Note:
You can press and hold the
up/down arrow button for continuous
scrolling if required.
Some options within a list have text
that does not fit completely on the
button. In these cases a separate
button is shown next to the main
button. This button has three dots
and when selected provides more
details.
Alphanumeric keypad entry
E88722
When it is necessary to enter an
address, a keypad will appear
prompting you to enter a postcode,
city, or street. Press the letter and
number digits to spell your entry. The
system will limit your entries to only
those characters which spell a valid
entry. It will automatically predict your
entry if possible so it will not always
be necessary to enter the full details.
6
Navigation Quick start
As you spell the entry the results will
appear in the top line. Once the
desired entry is shown press OK. If
only part of the name appears
highlighted you can press LIST and
this will show a selection list screen
showing all available entries which
match. Select your required entry
from this list.
If there is more than one entry with
the exact same name a selection list
will appear showing the various
different options.
Note:
You may also press the MAP
button to display each option
represented on a map.
Select the correct option.
Return to previous screen
display
Touch the back button to return to
the previously displayed screen. This
is a useful button if you need to only
go back one step. The back button
may appear on many different
screens and will always be on the left
side of the screen display.
Route setting example
This is a simple example explaining
how to use the basic features of the
system to set a route. For information
relating to the other features of the
system, see the relevant section in
this guide.
Please follow this step by step
procedure to familiarise yourself with
the system.
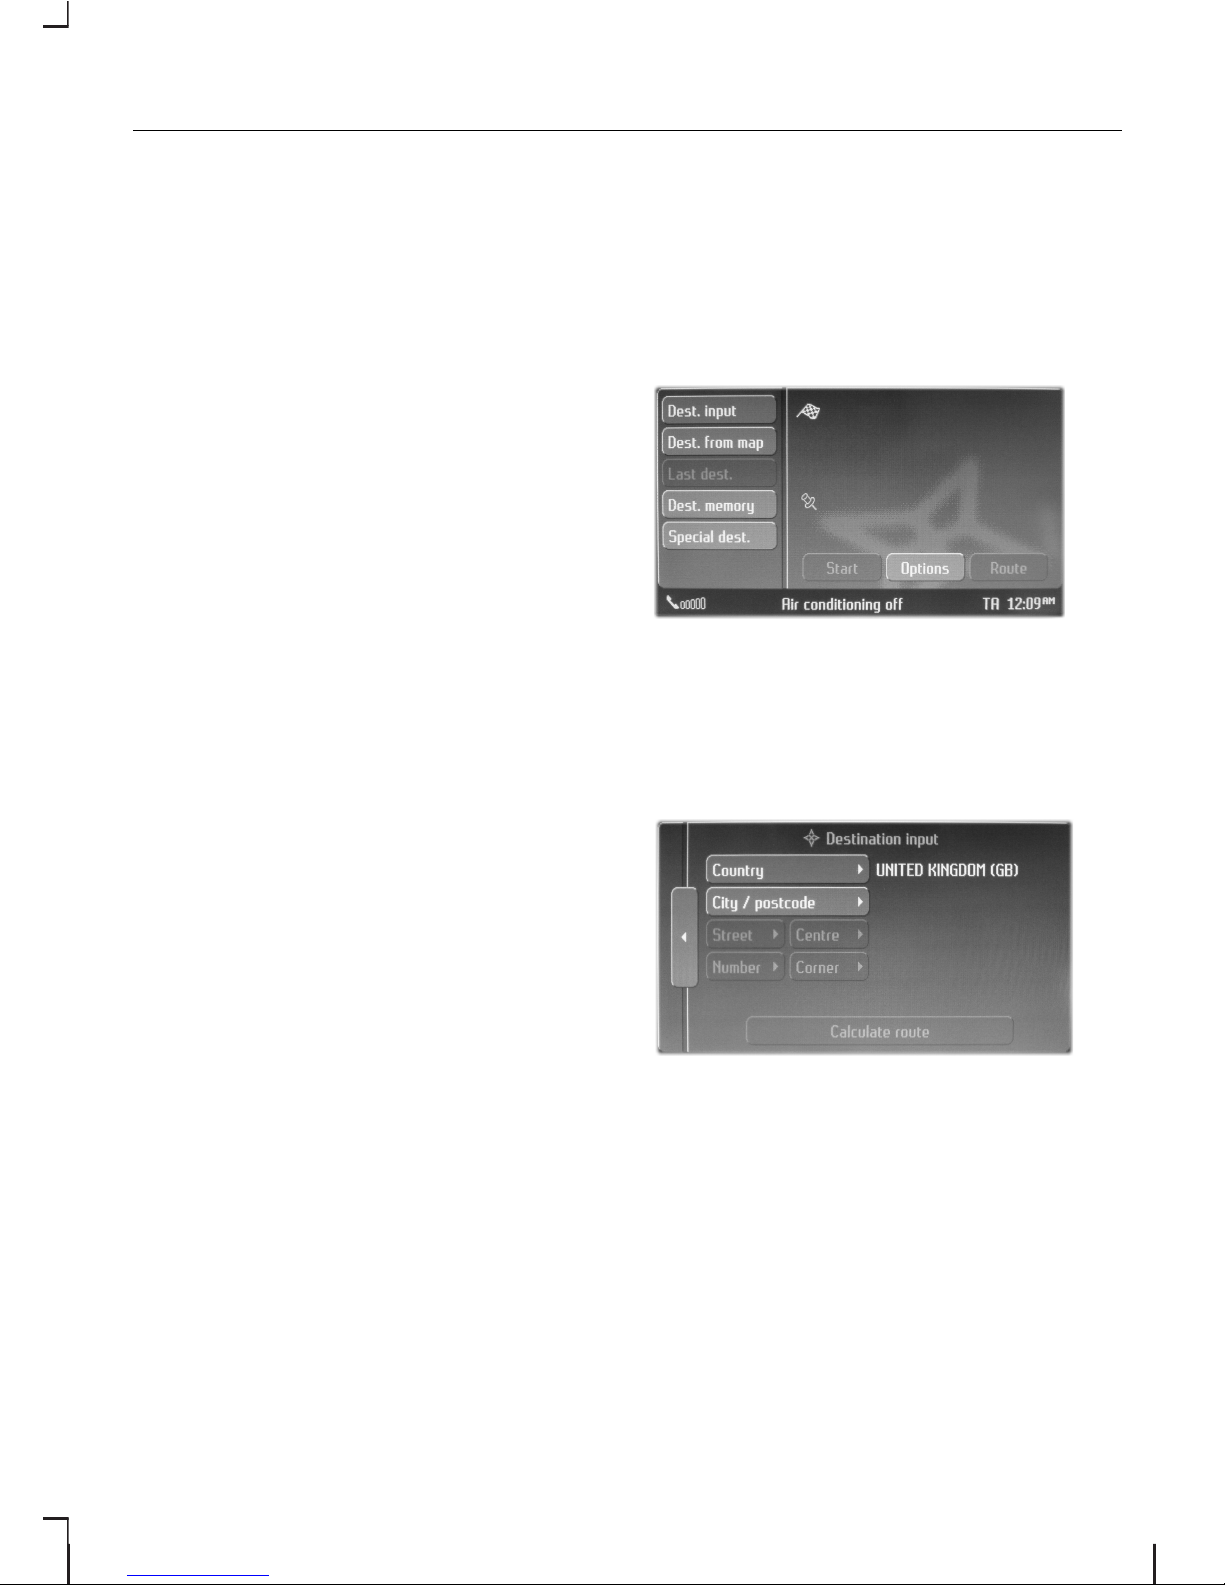
Navigation main screen
To select the navigation system, push
the NAV button adjacent to the touch
screen panel. The road safety caution
will be displayed. To use the system,
read the caution and touch OK.
E89800
Destination input screen
Touch the destination input button to
enter the destination you wish to
navigate to.
E89799
The destination input screen is now
displayed. Starting from the top
button first, select the country
followed by either postcode if
available or city and street name. Use
the alphanumeric keypad and
selection lists to select your address
details.
7
Navigation Quick start

Once enough information has been
entered touch the CALCULATE
button to proceed.
Note:
If you only need to navigate
to a city centre for example, full
address details are not required.
Touch the CALCULATE button
once it becomes available.
The route is now calculated and the
screen returns to the main navigation
screen with instructions on how to
proceed. Follow the screen and
audio prompts to reach your
destination.
8
Navigation Quick start
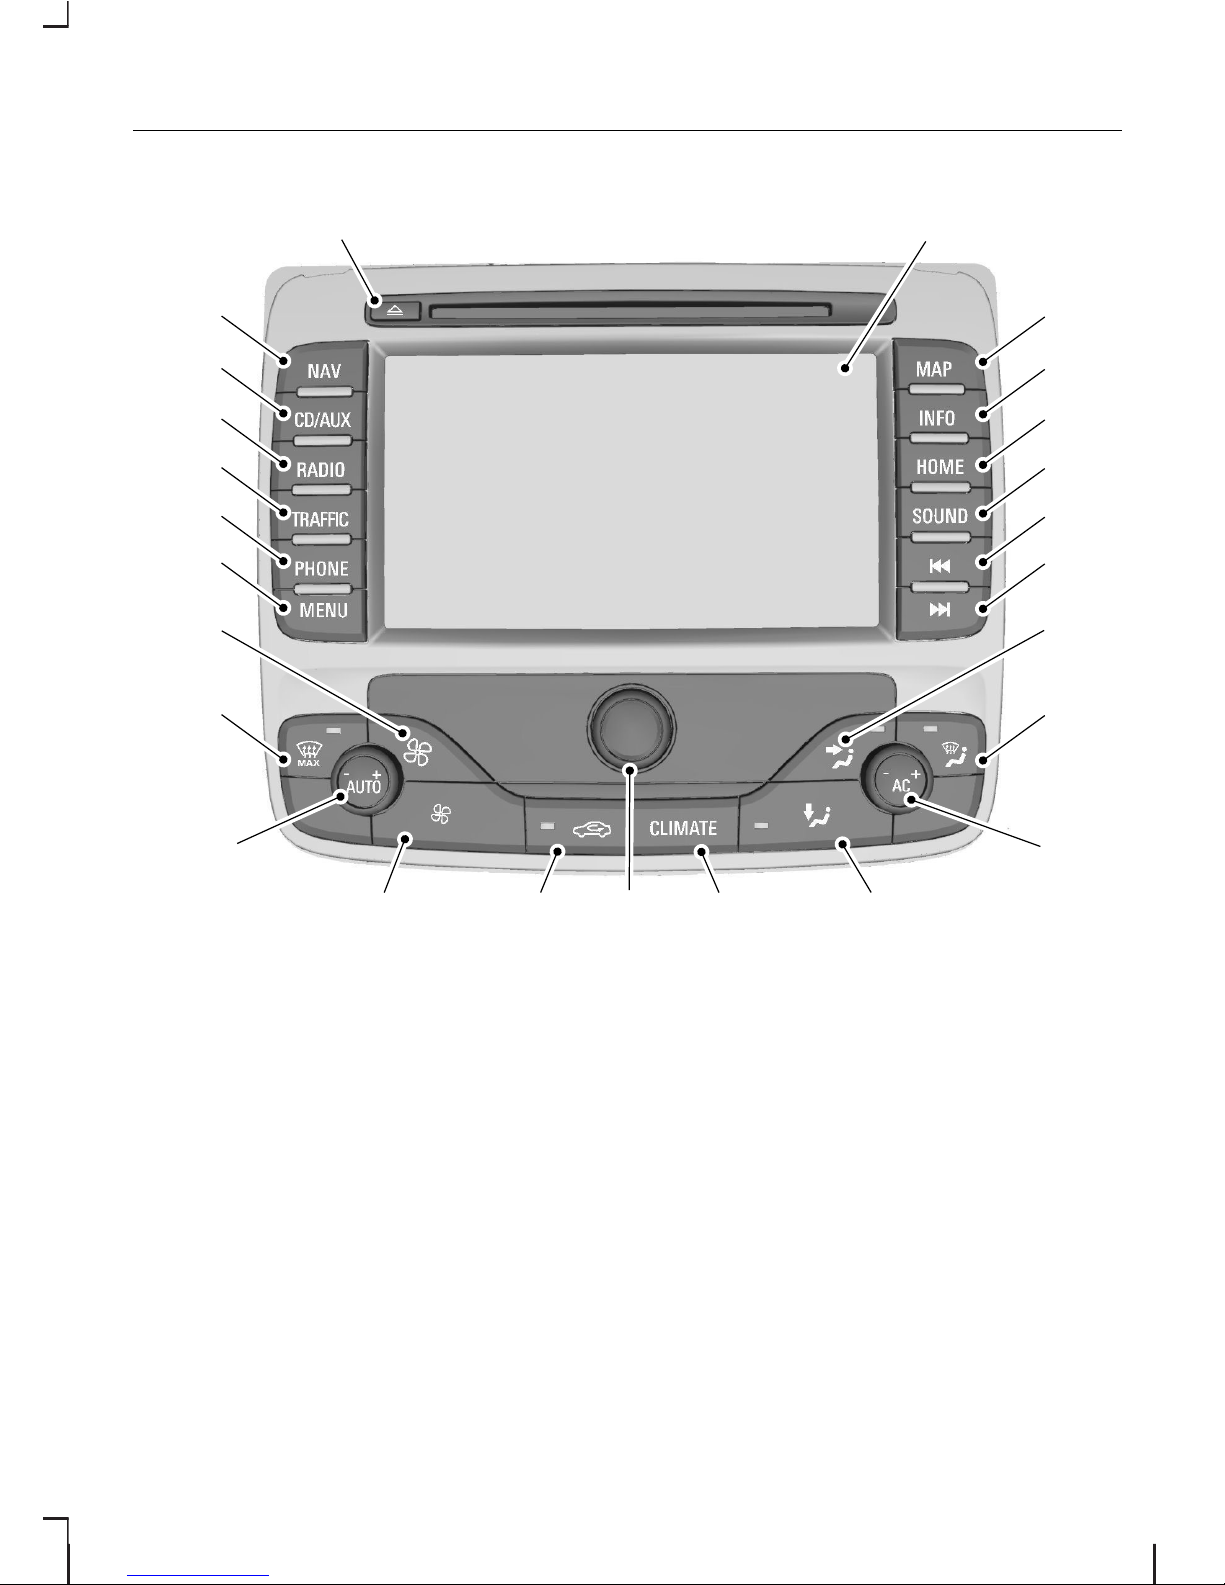
A B
C
D
E
F
G
H
J
KQ
LMNOP
I
Y
X
W
V
U
T
R
S
E88272
CD eject/apertureA
Touchscreen displayB
Map displayC
Navigation position information/repeat last navigation voice promptD
Home menu selectE
Sound settings/Equalizer settings select. See Audio operation
(page 21).
F
Seek downG
Seek upH
Face level ventilation controlI
9
Navigation unit overview

Front screen ventilation controlJ
Air conditioning/right hand temperature controlK
Footwell ventilation controlL
Climate control menuM
On/off and volume control. See Audio operation (page 21).
N
Recirculate airO
Blower decrease speedP
Climate control/left hand temperature controlQ
Screen maximum defrostR
Blower increase speedS
Menu select. See System settings (page 12).
T
Phone menu selectU
Traffic/TMC menu select. See Traffic Message Channel (page
31).
V
Radio source select/waveband change. See Audio operation
(page 21).
W
CD/CD-MP3/CD Changer/AUX source select. See Audio
operation (page 21).
X
Navigation main screen. See Navigation system (page 25).
Y
USING THE
TOUCHSCREEN
Your navigation unit is equipped with
a high quality touch sensitive screen.
Where instructed, touch the various
buttons shown on the screen. These
buttons can be text or icon based
and will be enclosed within a box. The
button will appear to move when
touched to indicate it has been
pressed correctly.
Note:
In some cases the button will
change colour after a successful
button press. This is normally to
indicate a feature has been activated.
Note:
Buttons will normally appear
highlighted and will stand out on the
display. If the button option is not
available then it will not be highlighted.
You cannot select the button in these
cases and touching it will have no
effect.
10
Navigation unit overview

Note:
Scroll bars may not be
dragged or selected. Use the arrow
buttons to move the bar as
necessary. An arrow button may be
pressed and held for continuous
movement.
LOADING THE
NAVIGATION DISC
Under normal operating conditions
access to the navigation disc will not
be necessary. This is a dealer/service
only operation.
For map updates and system
upgrades please refer to your dealer.
11
Navigation unit overview

Most of the important settings for
your navigation unit can be accessed
via the MENU button. The following
section describes the various options
and how to use them.
Press the MENU button to display the
settings screen. The following
diagram shows an overview of the
menu structure within the settings
screen:
12
System settings

View 2D / 3D
Orientation
Lane
Nav arrows
Map view
Map content
Position
Destination
Overview
A
E88792
Auto / North up / Head up
On / Off
On / Off
On / Off
On / Off
On / Off
Off / Temp. / Always
Off / Temp. / Always
Selection list
Day / Night / Auto
Display mode
View
Brightness
Calibrate touch screen
Colour 1 / Colour 2
Time
Set speed profile
Nav arrows
Nav demo
Start manual calibration
Enter position manually
Alternative freq.
Rest / Arrival
Off / One / Loop
Manual set screen
News
Regional
Via GPS
Nav voice output
Nav mix
Sys Min
AVC
Map
Navigation
AM/FM
Display off
Clock/date
Display
Volume settings
13
System settings
Languages
Voice control
Factory settings
E88793
Anti-theft protection
Enable anti-theft protection
Reset radio settings to default
Reset CD/AUX settings to default
Reset NAV/MAP settings to default
Reset system settings to default
Reset destination memory
Preferred country
Language
Selection list
Selection list
Selection list
Enter VIN
A
Touch the button required as shown
in the first column of the menu tree.
A description of the various functions
and options available are given here:
Map button
This accesses features to customise
the map display.
View
The view option changes the map
display from 2D to 3D view.
•
Select 2D for a plan view (this is
closest to a paper map).
•
Select 3D for a forward facing
view (simulated view through
vehicle windscreen).
Orientation
This changes the way in which the
2D map is displayed.
•
Select NORTH UP to display the
map with north always at the top
of the screen.
•
Select HEAD UP to display the
map with the direction of the
vehicle always at the top of the
screen. The display will rotate as
your vehicle changes direction.
•
Select AUTO to select a
combination of the above two
options. For lower map scales, the
system will use a HEAD UP
display, and for higher scales it will
switch to a NORTH UP display.
14
System settings

Note:
You can also select these
functions via a shortcut button on the
map screen. See Route displays
(page 28).
Navigation arrows
This feature enables a graphic inset
on the map display screen which
shows the next turn or direction to
travel in.
•
Select OFF to disable.
•
Select TEMP. to activate. This
option will only display the inset
graphic when there is a direction
change/turn approaching.
•
Select ALWAYS to turn this on
constantly. A graphic inset will
always be shown even if there is
no direction change or turn
approaching.
Map view
•
Select POSITION to show the map
with the current location of the
vehicle in the centre.
•
Select DESTINATION to show the
map centred on the entered
destination address.
•
Select OVERVIEW to show the
map automatically scaled to
display the entire route.
Map content
This feature enables various
categories of information to be
included on the map display. You
may select and de-select the
different categories by scrolling
through the options.
Note:
Multiple categories can be
selected.
Navigation button
Time
This feature changes the way in
which the journey time is shown in
navigation mode.
•
Select REST to display the
remaining estimated driving time
to reach the destination.
•
Select ARRIVAL to display the
estimated time of arrival.
Set speed profile
This feature allows personal
adjustment of average speeds
assumed for a given category of
road. This allows you to customise
the system to your individual driving
style. This should make the estimated
travel time calculations more realistic.
Navigation arrows
This feature enables a graphic inset
on the audio and phone displays
which shows basic navigation
information. The graphic will be an
arrow showing the next turn or
direction to travel in and the distance
to that turn.
15
System settings

•
Select OFF to disable.
•
Select TEMP. to activate. This
option will only display the inset
graphic when there is a direction
change/turn approaching.
•
Select ALWAYS to leave this on
constantly. A graphic inset will
always be shown even if there is
no direction change or turn
approaching.
Navigation demo
This feature allows you to set any
vehicle start position, and to begin a
demonstration route guidance
scenario if required. Your GPS
position is ignored when activating
this feature and your vehicle does not
need to be moving to begin a route.
•
Select OFF to deactivate. The
system will operate normally using
the GPS sensor and display the
true vehicle position.
•
Select ONCE to enable and run
through a simulated route
guidance plan one time only.
•
Select LOOP to enable a
continuous demonstration mode.
The simulated route will keep
repeating by returning to the start
point once the destination has
been reached.
To enter a simulated vehicle position,
select the manual position button.
This will allow entry of an address in
the usual manner.
Manual calibration
It may be necessary to periodically
calibrate the navigation system, in
order to maintain position accuracy.
Touch this button to re-calibrate the
navigation system. Follow the on
screen instructions.
AM/FM button
News
This feature will interrupt normal
reception to broadcast news bulletins
from stations on the FM waveband,
in the same way as traffic information
is provided. News interrupts are
broadcast at the same preset volume
level as traffic announcements. You
can turn this on and off.
16
System settings
 Loading...