

Page 1
Owner's handbook
Audio system
100% Ford. 100% Entertainment.
Page 2

The information contained in this publication was correct at the time of going to print. In the
interest of development the right is reserved to change specifications, design or equipment
at any time without notice and without incurring any obligations. This publication, or part
thereof, may not be reproduced nor translated without our approval. Errors and omissions
excepted.
© Ford Motor Company 2006
All rights reserved.
Order Code: 6S5J-19C104-DA (CG3508en) 01/2006 20060120121755
Page 3

Audio introduction........3
Important audio information............3
Radio reception.................................4
Audio unit overview......5
Audio system
security......................7
Removable front panel.....................7
Security code.....................................7
Lost security code.............................7
Entering a security code..................7
Incorrect security code....................8
Vehicle identification (VID)................8
Audio unit clock and
date displays............10
Setting the clock and date on the
audio unit.......................................10
Audio unit operation...12
On/off control...................................12
Volume control.................................12
Bass/treble control..........................12
Balance/fade control.......................12
Phone mute control........................13
Audio menu control.........................13
Station preset buttons....................15
Audio control....................................15
Waveband button............................16
Sound button...................................16
Autostore control.............................16
Stereo indicator control..................17
Traffic information (TA) control.......17
Station tuning control......................19
Loudness control............................20
Audio unit menus........21
Automatic volume control
(AVC)..............................................21
Audio distortion reduction
(CLIP)..............................................21
Digital signal processing (DSP)......21
Rear seat controls (RICP)...............21
Preset scan tuning..........................22
Alternative frequencies..................22
Music/speech..................................23
Radio data system (RDS)..............23
Enhanced other network
(RDS-EON)...................................23
News broadcasts...........................23
Priority programme type (PTY).....24
Cassette tape
player.......................27
Cassette tape playback.................27
Fast forward.....................................27
Fast rewind.......................................27
Auto reverse....................................28
Ending playback..............................28
Cassette tape pause......................28
Cassette tape side selection........29
Automatic music search
(AMS).............................................29
Ejecting a cassette tape................29
Compact disc
player.......................30
Loading compact discs.................30
Loading the compact disc
changer.........................................31
1
Table of Contents
Page 4

Track selection.................................31
Compact disc playback.................32
Compact disc selection.................33
Fast forward/reverse.....................34
Shuffle/random...............................34
Compact disc track
compression................................35
Compact disc track scanning.......35
Ejecting compact discs..................36
Unloading the compact disc
changer.........................................37
MP3 file playback............................37
MP3 display options........................41
Repeat compact disc tracks.........42
Ending compact disc
playback........................................43
Ejecting multiple compact discs
........................................................43
Auxiliary input (AUX IN)
socket......................45
Rear passenger
controls...................46
Rear seat controls..........................46
Control panel buttons....................46
Control mode...................................47
One hour mode...............................48
Headphones....................................48
Headphone sockets.......................48
Rear passenger control display
screen...........................................49
Audio system care.....50
Audio unit.........................................50
Audio
troubleshooting........51
2
Table of Contents
Page 5
IMPORTANT AUDIO
INFORMATION
WARNINGS
Copyright laws vary from
country to country; please
check the laws in your country if you
want to record from copyright source
material.
Due to technical incompatibility,
recordable (CD-R) and
rewritable (CD-RW) discs may not
function correctly.
These CD radio units will play
compact discs that conform to
the International Red Book standard
audio specification. Copy protected
CDs from some manufacturers do
not conform to this standard and
playback cannot be guaranteed.
Dual format, dual sided discs
(DVD Plus, CD-DVD format),
now being adopted by the music
industry, are thicker than normal CDs
and consequently playback cannot
be guaranteed in Ford and Sony CD
audio units, and jamming could
occur.
Warranty claims, where this type
of disc is found to be inside an
audio unit returned for repair, will not
be accepted.
Apart from the 6000MP3
model, CD units are designed
to play commercially pressed 12 cm
audio compact discs only.
The Sony CD unit (but not the
6CD) will play 8 cm discs with a
Sony approved adaptor fitted
(CSA-8).
Irregular shaped CDs and CDs
with a scratch protection film or
self adhesive labels attached should
not be used.
The audio unit may be damaged
if unsuitable items like credit
cards or coins are pushed inside the
CD aperture.
Please contact your Dealer for
further information.
Sony CD/6CD
E66256
This label is located on the top of the
Sony CD/6CD chassis.
E66257
This label is located on the Sony
CD/6CD drive unit's internal chassis.
These units are designed to play
discs that conform to the Compact
Disc (CD) standard.
Recently, some record companies
have marketed various music discs
encoded with copyright protection.
Please be aware that among those
discs, there are some that do not
conform to the CD standard and may
not be playable by this product.
3
Audio introduction
Page 6
• You cannot play a CD-R/CD-RW
that is not finalised. (This process
is necessary for a recorded
CD-R/CD-RW disc to be played
on the audio CD player.)
• With the Sony CD unit, you can
play MP3 files recorded on
CDROMs, CD-Rs, and CDRWs.
• A CD-R/CD-RW to which a
session can be added can be
played.
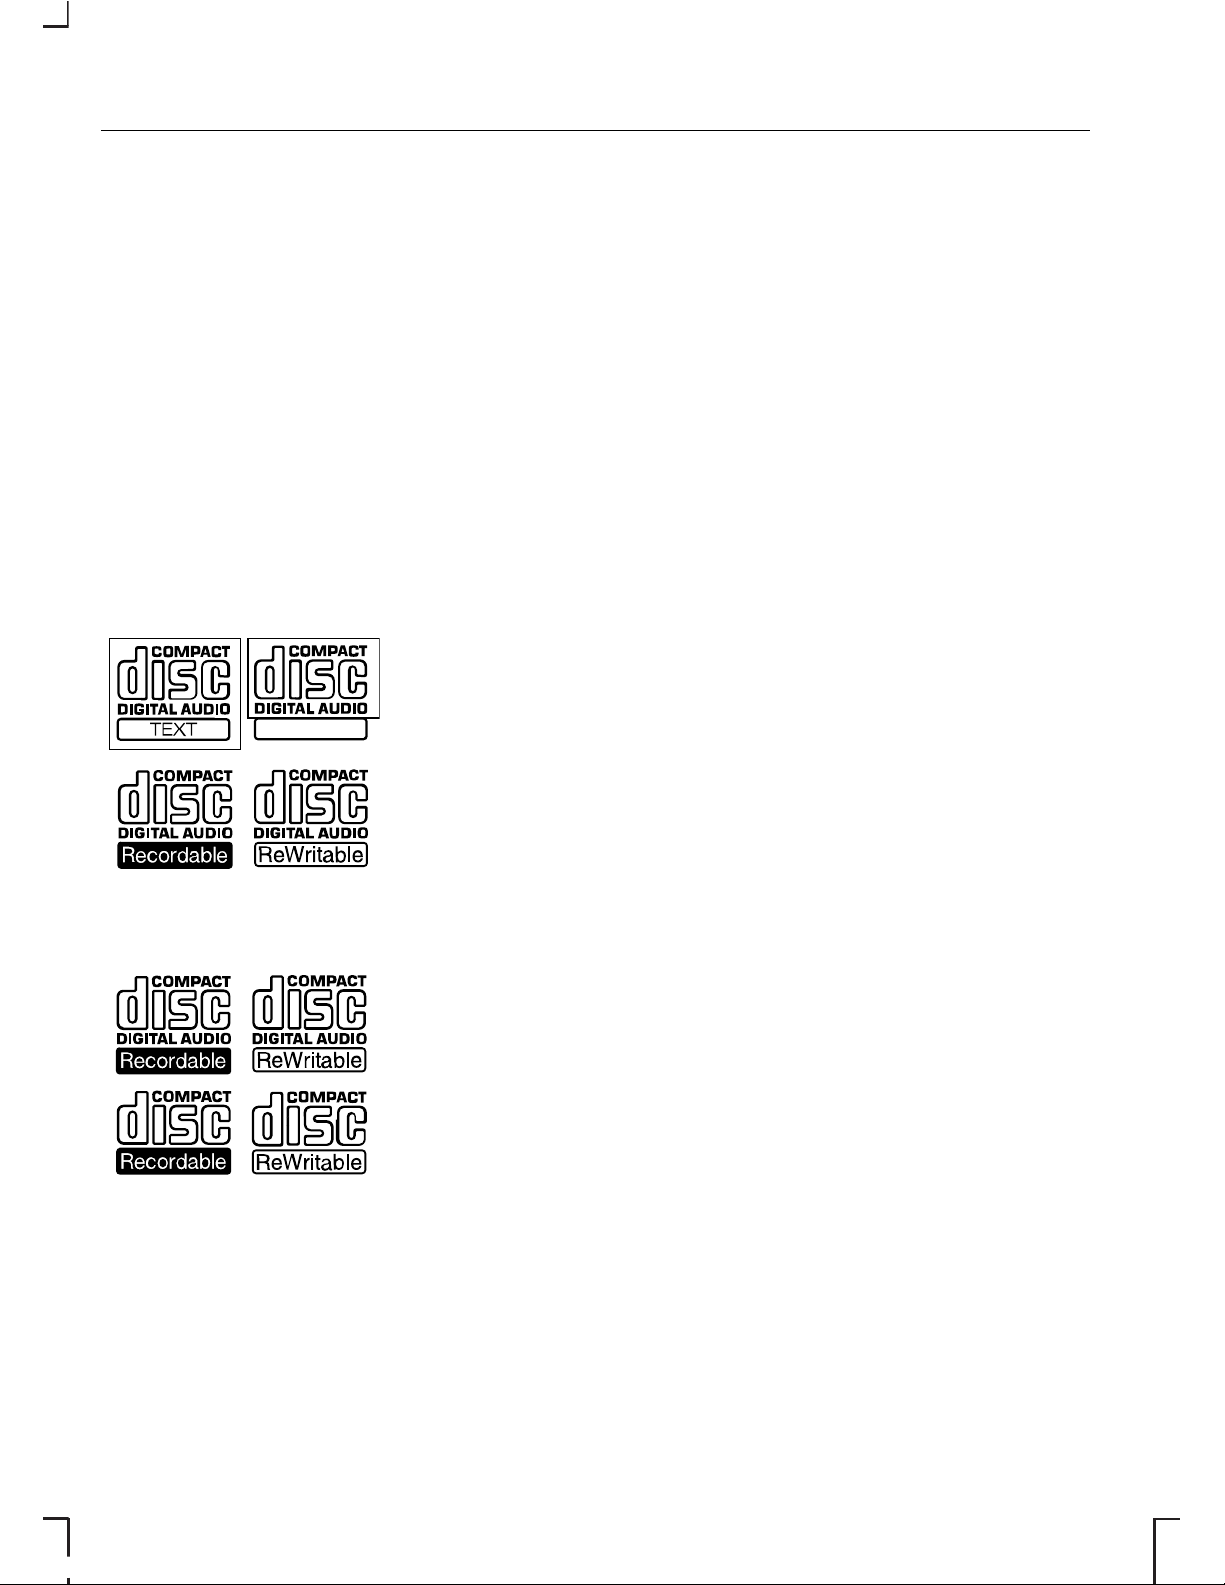
Disc labels
Audio CD
E66254
MP3
E66255
RADIO RECEPTION
Advanced digital filter
adjustment (ADFA)
Sony CD/6CD
Note: Consult your dealer before
switching off the filter.
Under certain exceptional
conditions, radio reception may be
adversely affected by very strong
competing signals. This function
allows you to switch off the digital
filter to overcome this condition.
4
Audio introduction
Page 7
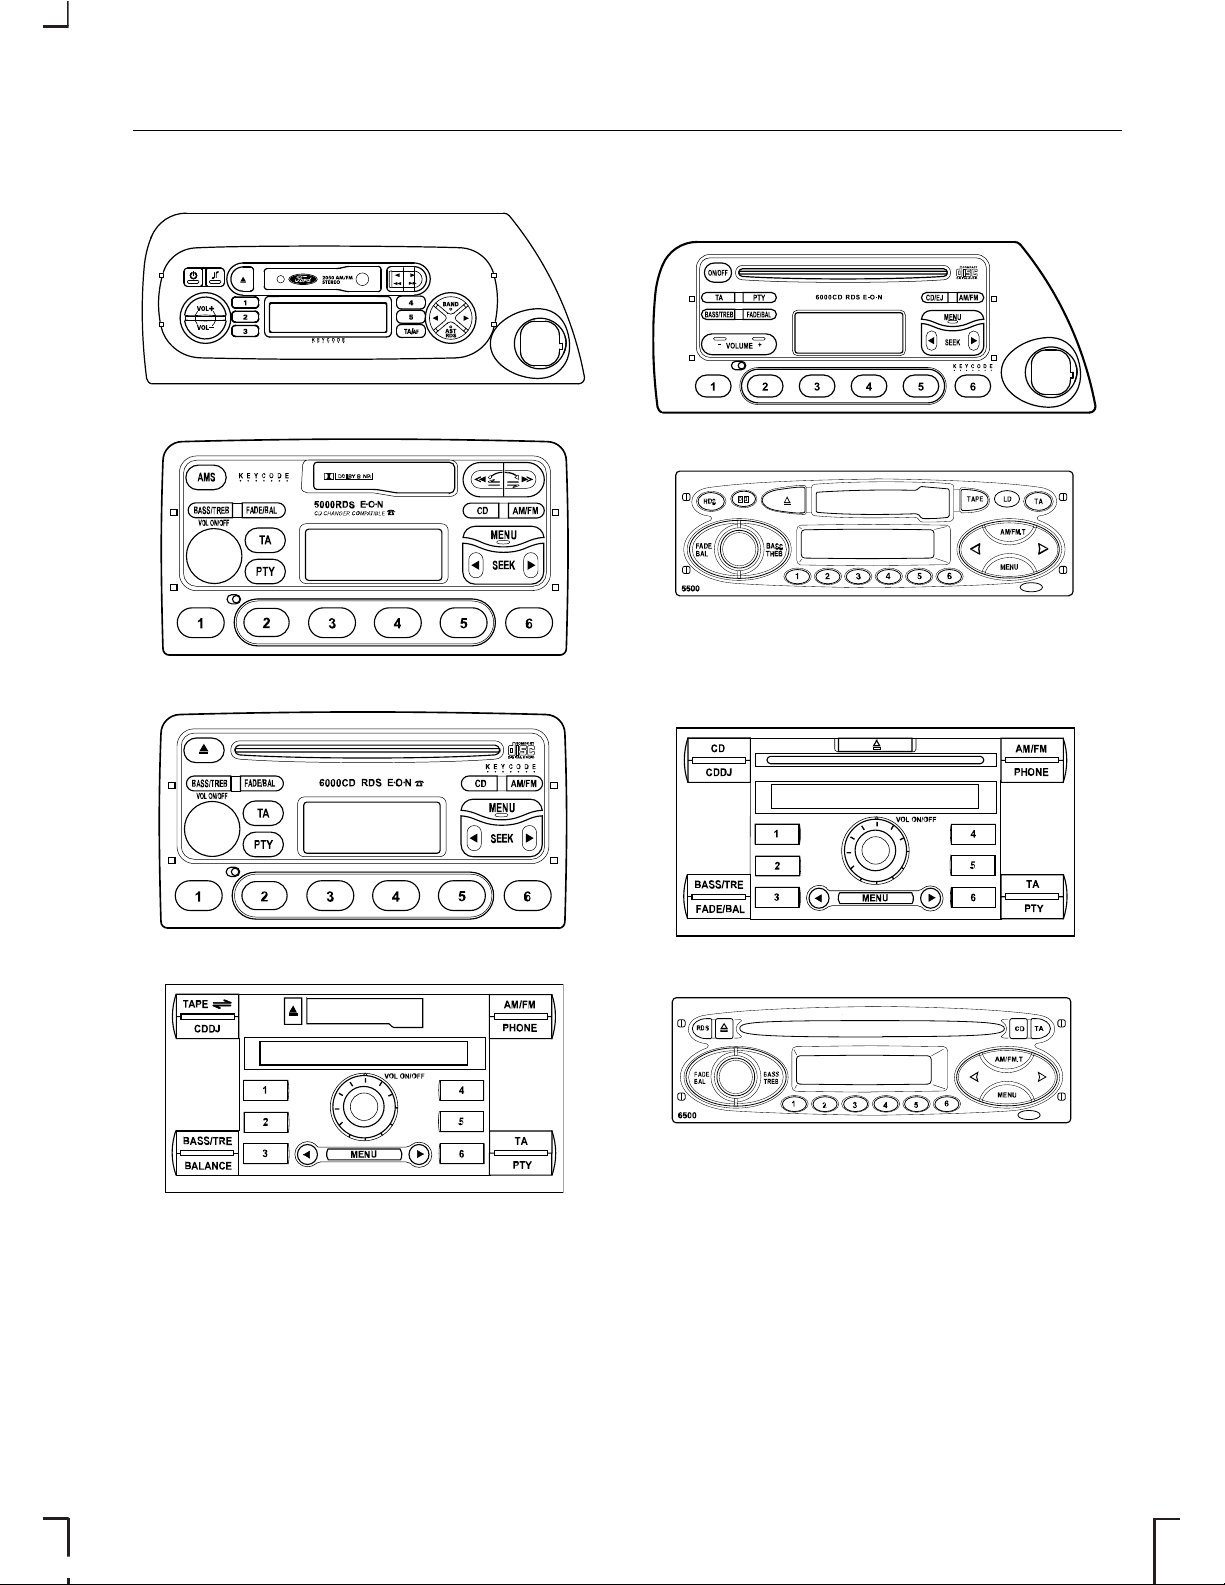
2050
4050 and 5000
E66125
6000 CD Series
E66127
5000C
E66129
6000CD Series (with rocker
volume control)
E66130
5500
E66138
6000CD (with centrally
located On/off and volume
control)
E66131
6500
E66133
5
Audio unit overview
Page 8
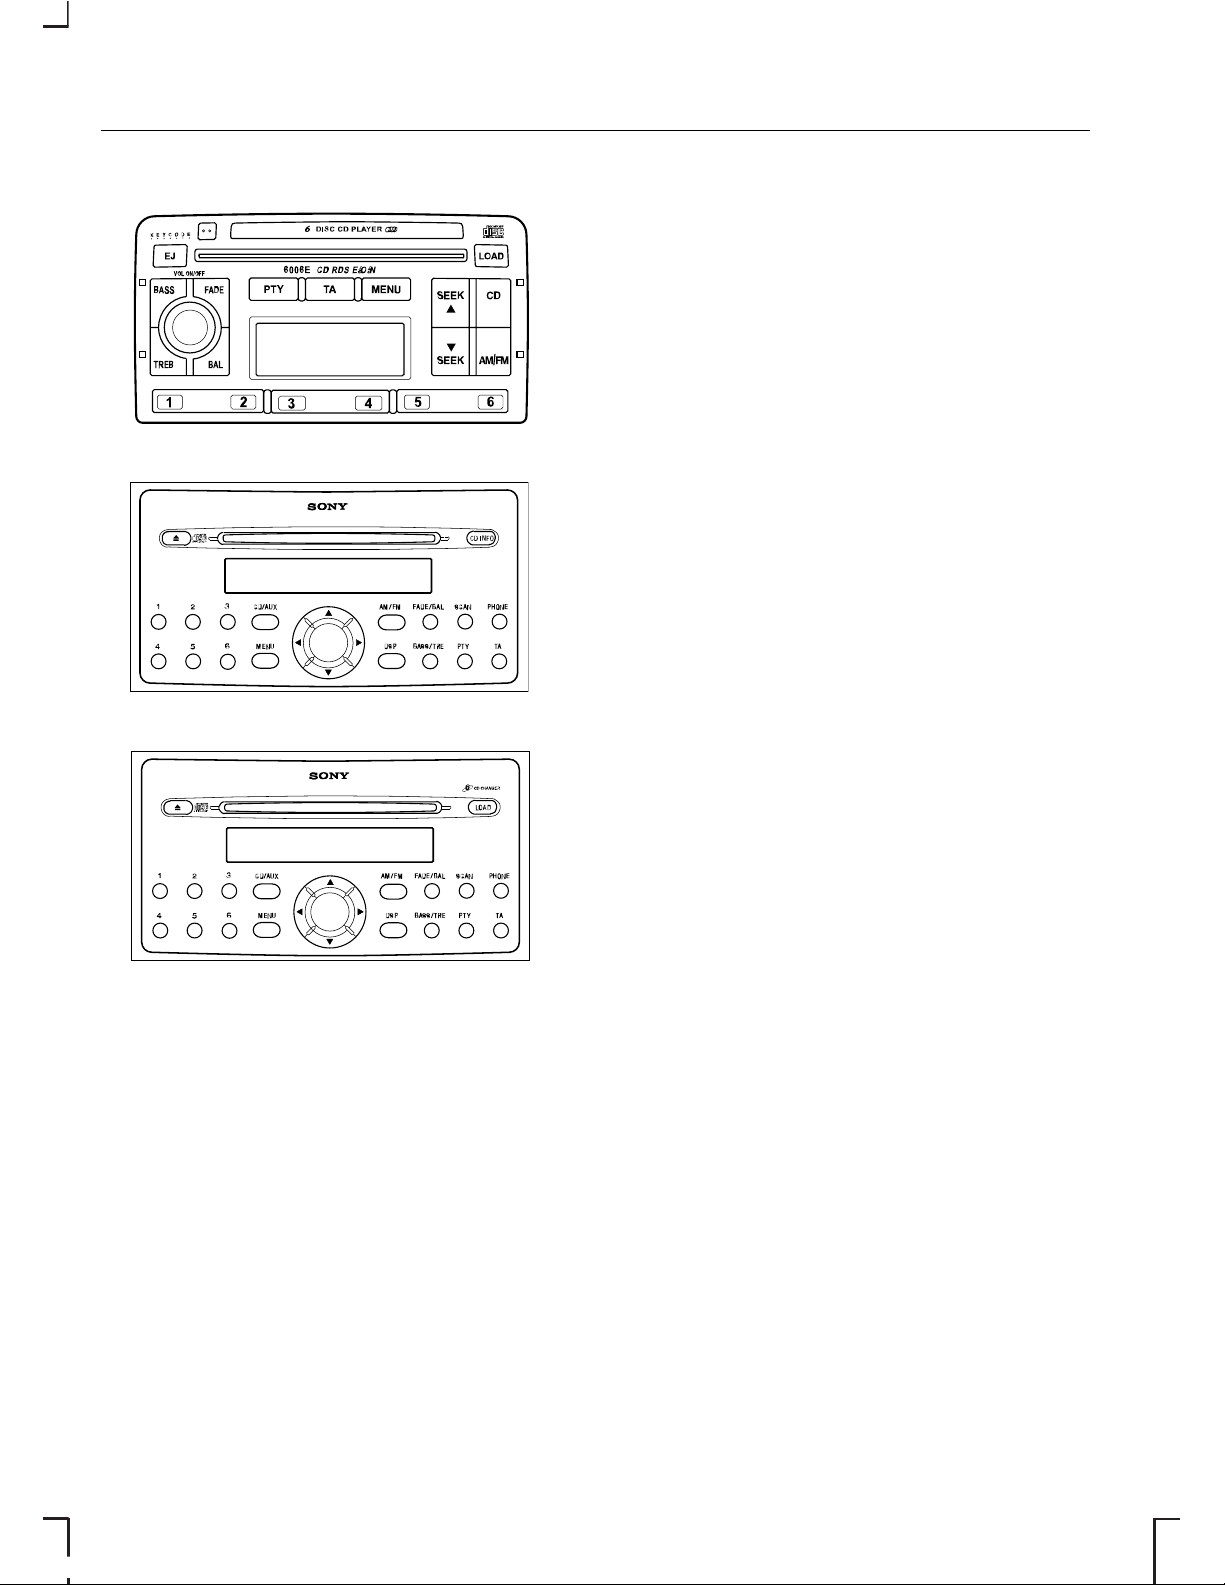
6006E
E66134
Sony CD
E66135
Sony 6CD
E66137
6
Audio unit overview
Page 9

REMOVABLE FRONT
PANEL
Note: During removal, avoid
touching the contacts on the back of
the panel and do not use excessive
force to refit it.
• Where available slide the panel
release button to the left (on
6006E units press the panel
release button) and remove the
panel.
• To replace the panel, insert the
right-hand edge first, and then
push home the left-hand side until
the retaining latch is engaged.
SECURITY CODE
Most units incorporate a unique
Keycode security number that must
be entered before the unit will
operate. Normally, the Ford Dealer
does this during the predelivery
inspection.
If the battery is disconnected for any
reason, or the audio unit is removed
from the vehicle, the Keycode must
be re-entered before the unit will
work again.
LOST SECURITY CODE
If you lose the Keycode, contact your
dealer and supply details of your
audio unit along with some proof of
identity. Your Dealer will then obtain
the correct code from Ford Motor
Company.
ENTERING A SECURITY
CODE
If ‘CODE - - - -’ or ‘CODE 0000’
appears in the display for more than
5 seconds when you switch on the
audio unit, you must enter the
Keycode.
On all units except 2050
1. Press button 1 repeatedly until the
first digit of your Keycode is
shown in the display.
2. Press preset buttons 2, 3 and 4
in the same way for remaining
three digits.
3. Ensure the complete Keycode is
correct before pressing preset
button 5 to confirm it.
2050
1. Press button 1, use the arrow left
or right arrow buttons until the first
digit of your Keycode is shown in
the display.
2. Repeat step 1 for the remaining 3
digits.
3. Ensure the complete Keycode is
correct before pressing button 1
to confirm.
If the correct code was entered, the
radio will beep and then will function
normally.
7
Audio system security
Page 10

INCORRECT SECURITY
CODE
On all units except 2050
Up to TEN Keycode entry attempts
are allowed with various
consequences if you get it wrong.
The number of attempts is shown in
the display.
• If the display reverts to ‘CODE’
another entry attempt may be
made immediately.
• If the display shows ‘WAIT 30’, the
unit will be locked for 30 minutes.
Wait until the timer counts down
to zero. When ‘CODE’ is
displayed, enter the Keycode
again.
• After ten incorrect attempts the
unit will be permanently
inoperative and ‘LOCK 10’ or
‘LOCKED’ will be displayed.
Contact your local Ford Dealer for
help.
2050
If an incorrect code was entered, the
radio beeps and "WAIT" appears in
the display. This indicates that a
waiting period has started.
Note: Do not switch off the radio
when the display shows "WAIT".
Turning off the radio will cause the
waiting period to start all over again.
• You must wait until the display
changes to "CODE" this indicates
that the waiting period has
finished and the correct code can
be entered.
• The waiting period doubles each
time an incorrect code is entered.
(1 minute, 2 minutes, 4 minutes,
etc)
VEHICLE IDENTIFICATION
(VID)
Note: For the location of the vehicle
identification number on your vehicle,
please refer to your Owner’s
handbook.
On all units except 2050
1. Press and hold the MENU button,
then press it repeatedly to select
a VID display. On Sony units, press
and hold the MENU button.
2. The current vehicle identification
number will be displayed or, if a
number has yet to be entered,
‘NO VID’, ‘VID 00000’ or ‘CODE
----’ appears.
3. Enter your Keycode.
4. The audio unit will mute and the
display will show either a
previously entered vehicle
identification number or a flashing
cursor or a display of zeros.
8
Audio system security
Page 11

5. Use the left/right arrow buttons to
move across the display, and use
the volume control or the
up/down arrow buttons on Sony
CD/6CD, to select or change the
individual characters. A total of 15
or 16 characters can be stored.
6. When all the characters have
been selected, press MENU to
store the number. The unit then
returns to normal operation.
On some units, the number appears
in the display whenever power is
restored. To check the vehicle
identification number, repeat steps 1
and 2 then press the MENU button.
9
Audio system security
Page 12

SETTING THE CLOCK
AND DATE ON THE
AUDIO UNIT
All units, except the 2050, the
5000C, the 6000CD with centrally
located on/off and volume control,
and Sony CD/6CD, have a built in
facility that will receive RDS data for
a current time and date display.
When first switched on, a series of
bars may be displayed until the signal
is received.
In all cases, the time derived from the
signal is exact and in most units it
cannot be altered. Some units,
however, do allow you to set the time
manually.
On certain models, where possible,
adjustments are made as follows:
• Press and hold the MENU button
for approximately two seconds
until the display changes.
• Press the MENU button
repeatedly until a ‘CLK-MAN’ or
‘RDS TIME OFF’ display appears.
• Use the SEEK buttons to select
‘CLK-AUTO’ or ‘RDS TIME ON’.
Note: With ‘CLK-AUTO’ or ‘RDS
TIME ON’ selected, the time will be
set automatically via the RDS function
if an RDS signal is available. In this
case you will not find a time display
to set the time manually.
If you observe after setting ‘RDS
TIME’ to ‘ON’, that the clock is not set
properly, then the radio station
selected does not support RDS clock
setting.
In this case, either select another
radio station which transmits a time
signal or set the clock manually.
Note: If any of these features are
not available in your unit, the relevant
menu options will not be displayed.
2050
The clock is located on the
instrument panel please refer to your
Owner's handbook for instructions.
5000C and 6000CD with
centrally located on/off and
volume control
Changing the date and time
• Press the CLOCK button to
display the date and time.
Note: If you do not press another
button within 30 seconds of pressing
the CLOCK button, the display will
return to its previous setting.
• Use the SEEK buttons to select
the date or time value that you
wish to change. The selected
value will flash in the display.
• Turn the volume control to
change the selected date or time
value.
• Use the SEEK buttons to select
additional date or time values that
you wish to change.
• Turn the volume control to
change the selected date or time
value.
• Press the CLOCK button to exit
and save the new date and time.
10
Audio unit clock and date displays
Page 13

Note: If you do not press the CLOCK
button within 30 seconds of changing
a date or time value, the display will
exit and save the new values
automatically.
Tip: Press and hold the CLOCK
button for more than two seconds
to automatically select the hour value
for winter or summer time
adjustment.
12/24 hour format
• Press the MENU button
repeatedly until a 12/24 hour clock
display appears.
• Use the SEEK button to select the
setting required.
• Press the MENU button again to
confirm the selection.
Sony CD/6CD
Changing the date
• Press the MENU button and use
the up/down arrow buttons until
a date setting display appears.
• Use the left/right arrow buttons to
select days which flash in the
display.
• Use the up/down arrow buttons
to make an adjustment, then
press the left/right arrow buttons
to select months/years and adjust
accordingly.
• Press the MENU button to confirm
the date.
Changing the time
• Press the MENU button and use
the up/down arrow buttons until
a clock display appears.
• Use the left/right arrow buttons to
select hours which will flash in the
display.
• Use the up/down arrows to make
an adjustment, then press the
left/right arrow buttons to select
minutes and adjust accordingly.
• Press the MENU button to confirm
the time.
12/24 hour format
• Press the MENU button and use
the up/down arrow buttons until
a 12/24 hour clock display
appears.
• Use the left/right arrow buttons to
select the setting required.
• Press the MENU button to confirm
your selection.
11
Audio unit clock and date displays
Page 14

ON/OFF CONTROL
• Press the on/off control to turn
your unit on or off. This will also
operate the unit for up to one
hour with the ignition turned off.
The radio will switch off
automatically after one hour.
2050
Note: CODE will briefly flash in the
display when the unit is turned on.
This is a normal system function the
security code is not required to be
entered.
VOLUME CONTROL
Use this control to raise or lower the
volume of the current audio source
at any time. When you make an
adjustment, the display indicates the
selected volume level.
On some audio units, the volume
control is also used in conjunction
with certain menu functions to make
other adjustments.
BASS/TREBLE CONTROL
All units, except the 2050, to adjust
the amount of bass or treble
response from any audio source. On
2050 See Sound button (page 16).
• Where the adjustment is featured
on a single button, press the
button once for bass or twice for
treble.
• Where there are separate
buttons, press the required button
once.
• Use the volume control or, on
Sony CD/6CD, the up/down
arrow buttons to make the
necessary adjustment.
The display indicates the level
selected.
Default audio settings
On 5500/6500 units, press and hold
BASS/TREB until the default audio
display appears. With the function
switched on, all the audio setting
return to the manufacturer’s original
preset levels.
BALANCE/FADE
CONTROL
All units, except the 2050, the
BALANCE control is used to adjust
the sound coming from the left and
right speakers. On 2050 See Sound
button (page 16).
All units, except the 2050, the FADE
control is used to adjust the sound
distribution from front to rear in
vehicles equipped with rear
speakers. When 6006E is fitted in
vehicles without rear speakers, ‘No
Rear’ is displayed if the FADE button
is pressed.
12
Audio unit operation
Page 15

• Where the adjustment is featured
on a single button, press the
button once for fade or twice for
balance.
• Where there are separate
buttons, press the required button
once.
• Use the volume control to make
the necessary adjustment.
• Or, on Sony CD/6CD, use the
up/down arrow buttons for fade
adjustment, and left/right arrow
for balance adjustment.
The display indicates the level
selected.
PHONE MUTE CONTROL
• Where available, press the
PHONE button to mute your audio
unit.
• Press PHONE again to unmute.
AUDIO MENU CONTROL
Where available use the MENU
button to access features that
cannot be selected directly via one
of the button controls. Press the
MENU button for ‘first level’ features,
or press and hold the MENU button
for different ‘second level’ functions.
Features that are not available do not
appear in the display.
13
Audio unit operation
Page 16

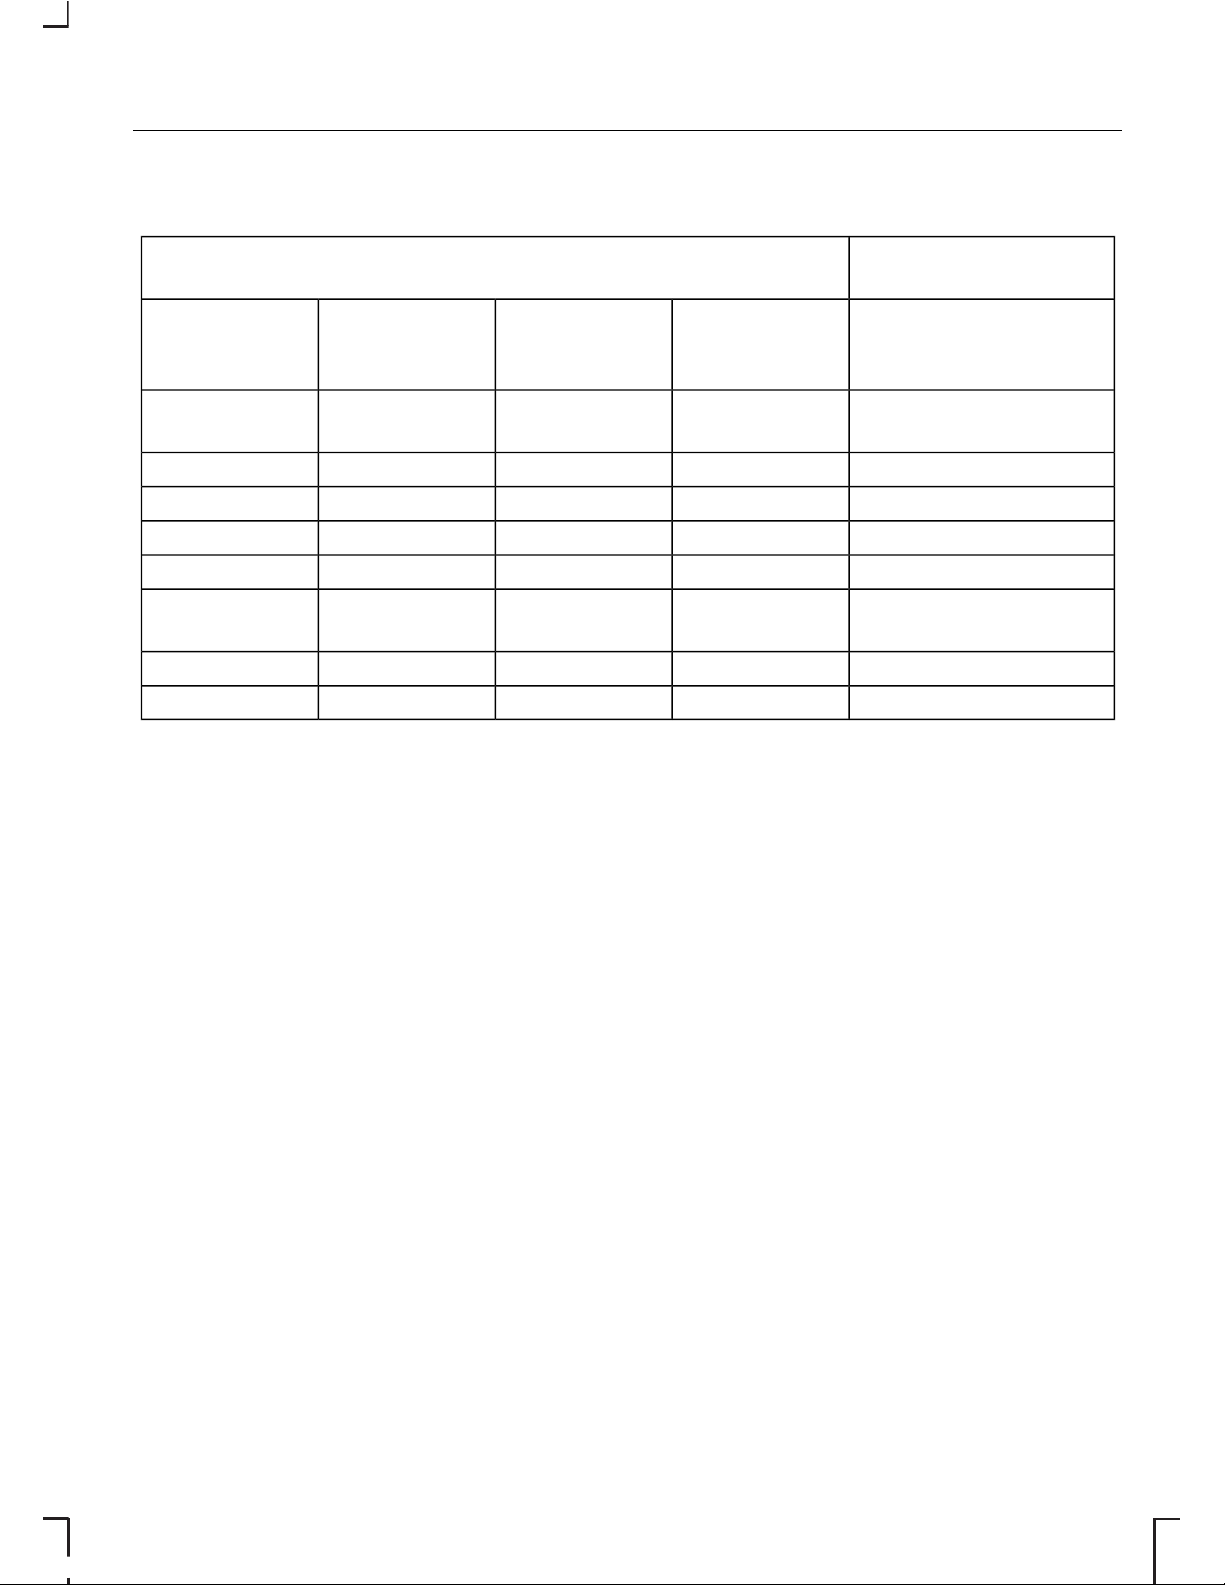
Sony CD/6CD
Second level func-
tions
Menu features - First level features
During all functionsDuring CD
changer
playback
During CD
playback
During tape
playback
During radio
reception
VIDRSE*RSE*RSE*
CLIP ON/OFFClockClockClock
Aux ON/OFFDateDateDate
News ON/OFF12/24 hour12/24 hour12/24 hour
Bluetooth enable/
disable
AVCScrollAVC
ADFA ON/OFFRepeatAVCTraffic local or
distant
CompRepeatAF
ShuffleComp
Shuffle
Note: The sequence in which features appear may vary for different audio
units and vehicles.
* Only when fitted.
14
Audio unit operation
Page 17
5000C/6000CD
Second level func-
tions
Menu features - First level features
During all functionsDuring CD
changer
playback
During CD
playback
During tape
playback
During radio
reception
Traffic local or distantScanScanTrack
number
Manual
tuning
AFShuffleShuffleClockScan tuning
VIDRepeatRepeatDateClock
CLIPCompComp12/24 hourDate
NewsClockClockAVC12/24 hour
Bluetooth enable/
disable
DateDateAVC
12/24 hour12/24 hour
AVCAVC
Note: The sequence in which features appear may vary for different audio
units and vehicles.
* Only when fitted.
STATION PRESET
BUTTONS
This feature allows you to store your
favourite stations so that they can be
recalled by selecting the appropriate
waveband and pressing one of the
preset buttons.
• Select a waveband.
• Tune to the station required.
• Press and hold one of the preset
buttons. The audio unit will mute.
When sound returns or, on certain
units, a bleep sounds, the station
has been stored.
This can be repeated on each
waveband and for each preset
button.
Note: When you drive to another
part of the country, FM stations that
broadcast on alternate frequencies,
and are stored on preset buttons,
may be updated with the correct
frequency for that area.
AUDIO CONTROL
Where available, this control
combines all the sound adjustment
features – bass, treble, balance and
fade – in one button.
15
Audio unit operation
Page 18
• Press AUDIO repeatedly to select
the required item.
• Use the volume control to make
the necessary adjustment. The
display indicates the level
selected.
WAVEBAND BUTTON
This control allows you to switch
between the LW, MW and AM
waveband, where available and the
FM waveband.
If you press the button repeatedly
during radio reception, you can select
from the wavebands available. The
display indicates the selection made.
On some units the selector can also
be used to return to radio reception
when you have been listening to a
tape cassette or CD.
SOUND BUTTON
2050 only
Note: The sound button can be
identified by the two music note
symbols.
Sound style
• Press sound once to reach music
settings, to scroll through the
settings use the volume up/down
buttons.
Sound styleSetting
Original.FLAT
Jazz music.JAZZ
Speech.VOCAL
Pop music.POP
Classical music.CLASSIC
Rock music.ROCK
Bass/treble/balance and
loudness
• Press SOUND twice to select bass
adjust the settings with the
volume up/down buttons.
• Press SOUND three times to
select treble adjust the settings
with the volume up/down buttons.
• Press SOUND four times to select
balance adjust the settings with
the volume up/down buttons.
• Press SOUND five times to select
loudness adjust the settings with
the volume up/down buttons.
After 5 seconds the display goes
back to the last mode of operation.
AUTOSTORE CONTROL
Where available, AutoStore can be
used to store the up to six stations
on some units, with the strongest
signals receivable, either from the FM
waveband or from LW, MW, AM and
FM (where available).
16
Audio unit operation
Page 19

• Press and hold the waveband
button. On 2050 short press the
AST button.
• The sound mutes and on some
units a beep is heard and an ‘AST’
or ‘AUTOSTORE’ display appears
while the unit searches through
the frequencies.
• When the search is complete,
sound is restored and the
strongest signals are stored on
the AutoStore presets.
Each time AutoStore is activated, the
unit will store station frequencies from
the waveband last selected and
replace stations previously stored.
Note: The AutoStore feature can
also be used to store stations
manually in the same way as other
wavebands.
STEREO INDICATOR
CONTROL
On all units except 2050
Where available this shows whenever
a stereo signal is being received on
the FM waveband. On some units it
may be displayed as ‘ST’; on others
it will be the accredited stereo
symbol.
In poor signal conditions, the indicator
may flicker, or it may disappear
completely if the stereo signal is lost
altogether.
2050
The 2050 unit selects stero or mono
mode automatically according to
signal strength.
TRAFFIC INFORMATION
(TA) CONTROL
Many stations broadcast on the FM
waveband have a TP code to signify
that they carry traffic programme
information this may appear in your
radio display.
Activating traffic
announcements
Before you can receive traffic
announcements, you must press the
TA button. A ‘TA’ display will appear
to show the feature is switched on.
Note: On 2050 units a short press
to reach the TA feature.
If you are already tuned to a station
that broadcasts traffic information,
‘TA’ or ‘TP’ will also be displayed.
Otherwise the unit will search for a
traffic programme and display ‘TA
SRCH’ or ‘TP SEEK’ while doing so.
If it cannot locate such a station, ‘Not
Found’ or ‘NO TA’ will be displayed.
On some units ‘TP’ appears within a
box when you are tuned to a station
providing traffic from a linked
RDS-EON station.
When traffic information is broadcast,
it will automatically interrupt normal
radio, tape or CD playback and
‘TRAFFIC’ will appear in the display.
17
Audio unit operation
Page 20

If the traffic signal weakens, ‘TP’ or
‘TP LOST’ will flash in the display and
on some units a beep will be heard.
Press the SEEK button or, the
left/right arrow buttons to find
another station. Some units will
automatically retune to another traffic
station.
If a non-traffic station is selected or
recalled using a preset button, the
audio unit will remain on that station
unless:
• TA is turned off, then on again.
• On certain models, the volume
control is set to zero for four
minutes after which the audio unit
will retune to another traffic
station.
Local or distant traffic
The number of RDS (EON-) traffic
announcements may become
excessive in some areas so there is
an option on some units to select
between local traffic information and
all available information.
Sony CD/6CD
• Press the MENU button and use
the up/down arrow buttons to
select a TA display.
• Use the left/right arrow buttons to
select the setting required.
• Press the MENU button to confirm
your selection.
All other units except Sony
CD/6CD and 2050
• Press and hold the MENU button
until the display changes.
• Press the MENU button
repeatedly until a TA display
appears.
• Use the SEEK or left/right arrow
buttons to select either local
(‘TA-LOCAL’) or distant (‘TADIST’)
traffic announcements.
• ‘TA-L or ‘TA-D’ appear in the
display to show which has been
selected.
2050
On 2050 units the radio is permantely
set on distant traffic annoucments.
Traffic announcement
volume
Traffic announcements interrupt
normal broadcasts at a preset
minimum level that is usually louder
than normal listening volumes.
To adjust the preset volume on all
units except 2050:
• Press and hold the TA button.
• Use the volume control or, on
Sony units, the up/down arrow
buttons to make the necessary
adjustment. The display will show
the level selected.
To adjust the volume on 2050:
• When the traffic announcment is
broadcasting adjust the volume
using the volume up/down
buttons.
18
Audio unit operation
Page 21

Ending traffic
announcements
The audio unit will return to normal
operation at the end of each traffic
announcement. To end the
announcement prematurely, press
TA during the announcement.
Note: If you press TA at any other
time it will switch all announcements
off.
STATION TUNING
CONTROL
Seek tuning
Select a waveband and briefly press
one of the SEEK or arrow buttons.
The unit will stop at the first station it
finds in the direction you have
chosen.
Manual tuning
Sony CD/6CD
• Press the up/down arrow buttons.
The display shows the frequency
selected.
All units except 2050
• Press the MENU button
repeatedly until a MAN display
appears.
• Then press one of the SEEK
arrows to tune down or up the
waveband in small increments,
until you find a station you want to
listen to.
2050
• Long press one of the left or right
arrow buttons for more than 2
seconds to reach manual tuning.
• Press one of the left or right arrow
buttons to tune down or up the
waveband in small increments,
until you find a station you want to
listen to.
• Press and hold to tune up or
down quickly.
Note: When the keys are released,
a time-out will start to count. After 5
seconds a time-out, display ‘Auto’
will appear and a beep beep will be
heard and then returns to automatic
search.
Scan tuning
Note: This feature is not available on
certain units and may not appear as
a menu option.
Sony CD/6CD
• Press the SCAN button. ‘SCAN’
flashes in the display and each
station is played for a few
seconds.
• Press SCAN again to continue
listening to a station.
19
Audio unit operation
Page 22

All units except 2050
• Press the MENU button
repeatedly until a SCAN display
appears.
• Use the SEEK button to scan up
or down the selected waveband.
‘Scn’ or ‘SCAN’ flash in the display
and each station is played for a
few seconds.
• Depending on the audio unit,
press SEEK or MENU again to
continue listening to a station.
LOUDNESS CONTROL
6500
• Press the MENU button
repeatedly until a loudness display
appears.
• Then use the left/right arrow
buttons to switch this function on
or off.
• With this function activated, the
unit automatically detects low
volume audio output and raises
the level of bass frequencies.
20
Audio unit operation
Page 23

AUTOMATIC VOLUME
CONTROL (AVC)
AVC automatically adjusts the volume
level to compensate for engine noise
and road speed noise. When
available:
• Press the MENU button
repeatedly until an AVC display
appears.
• Use the SEEK button, or the
left/right arrow buttons, to adjust
the AVC setting.
• Or, on Sony CD/6CD, press the
MENU button briefly and use the
up/down arrow buttons to select
an AVC display.
• Press the MENU button to confirm
your selection.
AUDIO DISTORTION
REDUCTION (CLIP)
CLIP automatically detects sound
distortion and reduces the unit’s
volume level until the distortion has
been eliminated. This means that
whilst the display might change
numerically when you raise the
volume manually with the control,
there may be no actual increase in
sound. When available:
• Press and hold the MENU button
until the display changes. Then
press MENU repeatedly until a
CLIP display appears.
• Use the SEEK button, or the
left/right arrow buttons, to turn the
function on or off.
• Or, on Sony CD/6CD, press and
hold the MENU button until the
display changes, and use the
up/down arrow buttons to select
a CLIP display.
• Press the MENU button to confirm
your selection.
DIGITAL SIGNAL
PROCESSING (DSP)
Where available, DSP provides a
choice of preset acoustic
environments, which may include
settings like ‘JAZZ’, ‘CONCERT’,
‘CHURCH’, ‘STADIUM’, ‘POP’,
‘CLASSICAL’ or ‘ROCK’.
• Press the DSP button repeatedly
until a DSP display appears.
• Use the volume control or, on
Sony units, the up/down arrow
buttons, to select the setting
required and the display confirms
your selection.
Where available, these settings may
be further customised to suit the
current occupants of the vehicle.
For example, ‘OPTIMISED ALL’ gives
a conventional stereo environment,
‘OPTIMISED RIGHT’ and ‘OPTIMISED
LEFT’ alter the left/right sound
balance and ‘REAR’ gives rear seat
passengers a reduced level of bass
response for improved comfort.
REAR SEAT CONTROLS
(RICP)
Where this feature is available:
21
Audio unit menus
Page 24

• Press and hold the MENU button
until the display changes.
• Press the MENU button
repeatedly until an RICP display
appears.
• Use the SEEK button to select
either ‘RICP ON’ or ‘RICP-OFF’.
PRESET SCAN TUNING
• Where available, press the MENU
button repeatedly until a ‘P-SCAN’
display appears.
• Use the SEEK button to scan up
or down the frequencies stored
on the presets. ‘Scn’ flashes in the
display and each station is played
for a few seconds.
• Press any preset or MENU again
to continue listening to a station.
ALTERNATIVE
FREQUENCIES
Many programmes broadcast on the
FM waveband have a programme
identification (PI) code, which can be
recognised by audio units.
If your radio has AF tuning switched
on and you move from one
transmission area to another, this
facility will search for and switch to a
stronger station signal, if one can be
found.
Under certain conditions, however,
alternative frequency tuning may
temporarily disrupt normal reception.
With ‘AF-ON’ or ‘AF-AUTO’ selected,
the unit continually evaluates signal
strength and, if a better signal
becomes available, the unit will switch
to that alternative. It mutes while it
checks a list of alternative
frequencies and, if necessary, it will
search once across the selected
waveband for a genuine alternative
frequency.
It will restore radio reception when it
finds one or, if one is not found, the
unit will return to the original stored
frequency. On certain units, ‘Not
Found’ will be displayed.
On some units with ‘AF-MAN’
selected, the unit operates in a similar
way to ‘AFAUTO’ or ‘AF-ON’, but only
searches for an alternative frequency
when prompted by pressing a preset
button.
With ‘AF-OFF’ selected, the original
stored frequency remains selected.
In this mode, ‘AF-OFF’ will be
displayed every time the unit is turned
on.
Sony CD/6CD
• Press the MENU button and use
the up/down arrow buttons to
select an ‘AF’ display.
• Use the left/right arrow buttons to
select the setting required.
• Press the MENU button to confirm
your selection.
22
Audio unit menus
Page 25

All other units except 2050
• Press and hold the MENU button
until the display changes.
• Press the MENU button
repeatedly until an ‘AF’ display
appears.
• Use the SEEK or left/right arrow
buttons to select the setting
required.
2050
• Short press the AF button to turn
AF-ON.
• Repeat the step above to turn
AF-OFF.
MUSIC/SPEECH
5500/6500
• Press and hold the MENU button
until the display changes.
• Press the MENU button
repeatedly until a music/speech
display appears.
• Then use the left/right arrow
buttons to make a selection.
RADIO DATA SYSTEM
(RDS)
Most radio stations on the FM
waveband transmit additional code
in their broadcast signal that allows
receivers equipped with the
necessary decoder to present more
information to the listener. This is
known as the Radio Data System
(RDS).
When this information is available, the
additional features may include the
station name, the station’s
programme identification number,
alternative broadcasting frequencies
and traffic information.
ENHANCED OTHER
NETWORK (RDS-EON)
There is also a feature-enhanced
version known as Radio Data System
– Enhanced Other Networks
(RDS-EON) that provides even more
information such as radio text and
programme type coding.
Note: Certain features may not be
available from all radio stations.
NEWS BROADCASTS
Where available apart from selecting
NEWS as a PTY selection, some
audio units interrupt normal reception
to broadcast news bulletins from
stations on the FM waveband or
RDS-EON linked stations, in the same
way as traffic information is provided.
23
Audio unit menus
Page 26

During news broadcasts, the display
alternates between the station name
and ‘NEWS’. News interrupts are
broadcast at the same preset volume
level as traffic announcements.
Sony CD/6CD
• Press and hold the MENU button
until the display changes.
• Use the up/down arrow buttons
to select a ‘NEWS’ display.
• Use the left/right arrow buttons to
select the setting required.
All other units except Sony
CD/6CD and 2050
• Press the MENU button
repeatedly or, where available,
press and hold the PTY button,
until a ‘NEWS’ display appears.
• Use the SEEK button to turn the
function on or off.
PRIORITY PROGRAMME
TYPE (PTY)
Many programmes in the FM
waveband are categorised by the
type of material they broadcast. This
classification takes the form of an
identification number coded into the
broadcast signal.
On designated units, searches can
be based on one of these
classifications so that you can
choose to listen to a particular type
of programme.
24
Audio unit menus
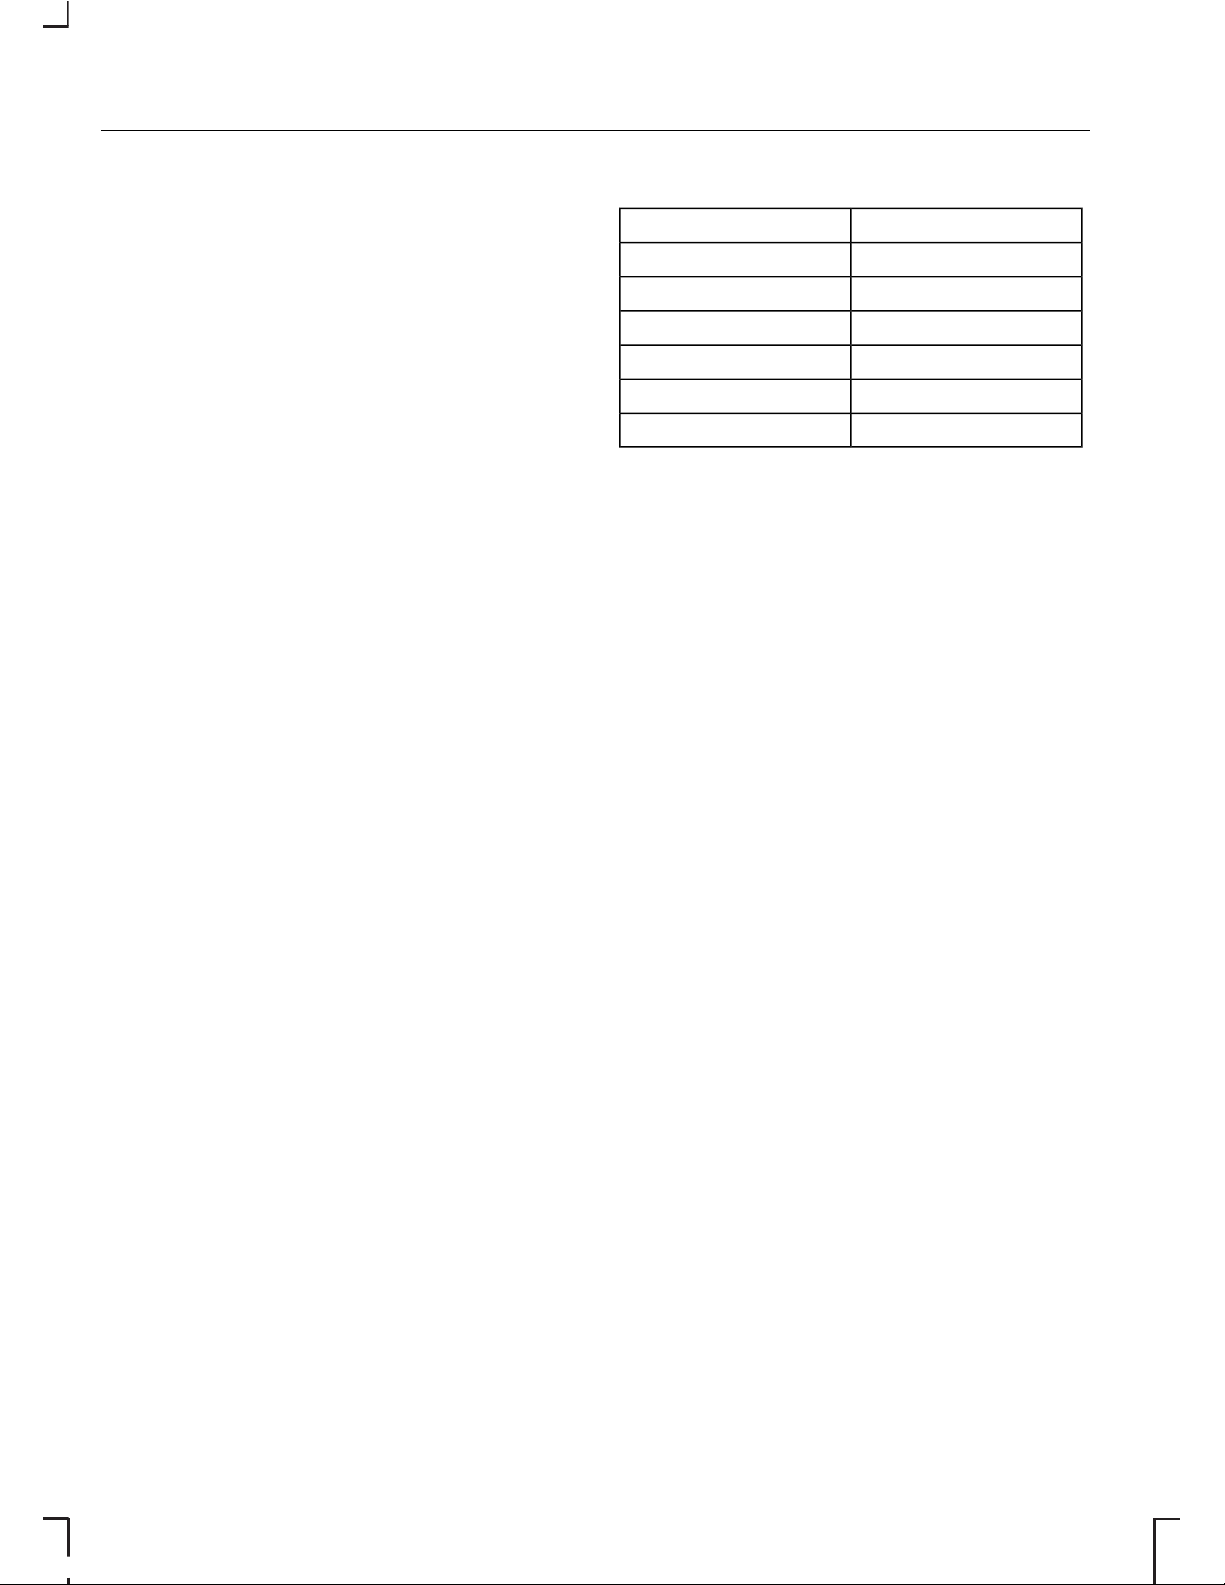
Page 27

DescriptionClassification
Current affairsAFFAIRS
See note belowALARM
Children’s programmesCHILDREN
Classical musicCLASSICS
Country musicCOUNTRY
CULTURE
Documentary contentDOCUMENT
DRAMA
Easy listening musicEASY
Educational contentEDUCATE
FINANCE
Folk musicFOLK M
InformationINFO
JAZZ
LEISURE
Light musicLIGHT M
Middle of the road musicM.O.R.M
National musicNATION M
NEWS
Not categorisedNONE
Old time musicOLDIES
Music not covered elsewhereOTHER M
PHONE IN
Pop musicPOP M
RELIGION
Rock musicROCK M
Scientific contentSCIENCE
SOCIAL
SPORT
TRAVEL
Mixed programme contentVARIED
WEATHER
25
Audio unit menus
Page 28

Note: Some radio stations can also
transmit emergency information
under the undocumented category
of ALARM but this programme type
cannot be selected manually.
Selecting PTY
• Press the PTY button or the
MENU button repeatedly until a
PTY display appears.
Selecting stations with the
same programme type
Activate PTY and while PTY is
displayed:
• Use the SEEK button or the
left/right arrow buttons to locate
other stations broadcasting
programmes of the type selected.
Selecting stations with
different programme types
Activate PTY and while PTY is
displayed:
• Use the volume control or, on
Sony units, the up/down arrow
buttons to select another
programme type.
• Then use SEEK or the left/right
arrow buttons to locate a station
broadcasting the selected
programme type.
Using PTY
While the audio unit is searching for
another PTY station, a PTY search
display appears. When a programme
is found, the new station name
flashes in the display and radio
reception is restored from the station
selected.
If the new station is not required,
while its name is still flashing, press
SEEK again or the left/right arrow
buttons to find another station
broadcasting the same programme
type.
Note: If a station transmitting the
same type of programme cannot be
found, ‘Not Found’ is displayed and
the radio returns to the original
station.
PTY selection during tape
or CD playback
• Select PTY and use the controls
as described above. CD playback
continues, but radio reception is
restored when the search is
completed.
• If a station is not found, press the
PTY or MENU buttons or the
waveband selector, depending
on the audio unit, to cancel the
search.
26
Audio unit menus
Page 29

CASSETTE TAPE
PLAYBACK
Note: Always remove cassettes
from the unit when your not using
them.
All units automatically switch to tape
operation as soon as a cassette is
inserted. On some units during radio
reception when a tape is already
inserted, press the TAPE control
buttons to start tape playback. On
2050 units the tape must be ejected
to return to radio reception.
On 2050 the direction of playback is
shown by a left or right arrow in the
display.
FAST FORWARD
Radio reception is automatically
restored when you fast forward while
the tape is playing. Press the left/right
arrow buttons or, on certain models,
press the TAPE button to revert to
tape playback.
5500
• Press the right arrow button
twice.
• Press the left arrow button to end
fast forward and restart the tape.
All other units except 2050
• Press the right arrow button fully
in.
• Press and release the left arrow
button to end fast forward and
restart the tape.
2050
The direction of fast winding depends
on the direction of play indicated by
the left or right arrow in the display.
• If the play display shows a right
arrow, press the double right
arrow button to fast forward.
• If the play display shows a left
arrow, press the double left arrow
button to fast forward.
If you continue fast winding until the
end of the tape, playback restarts
automatically.
To stop fast winding before the end
of the tape press the key which is not
pressed the left double arrows or the
rights double arrows. Playback is
then resumed.
FAST REWIND
Radio reception is automatically
restored when you fast rewind while
the tape is playing. Press the left/right
arrow buttons or, on certain models,
press the TAPE button to revert to
tape playback.
When the beginning of the tape is
reached, press the left/right arrow
buttons part way in to restart
playback. If rewind is engaged while
you are listening to the radio, tape
playback will restart automatically
when the beginning or, on certain
models, the end of the tape is
reached.
27
Cassette tape player
Page 30

5500
• Press the left arrow button twice.
• Press the right arrow button to
end fast rewind and restart the
tape.
All other units except 2050
• Press the left arrow button fully in.
• Press and release the right arrow
button to end rewind and restart
the tape.
2050
The direction of fast rewinding
depends on the direction of play
indicated by the left or right arrow in
the display.
• If the play display shows a right
arrow, press the double left arrow
button to fast rewind.
• If the play display shows a left
arrow, press the double right
arrow button to fast rewind.
If you continue to fast winding until
the end of the tape, playback restarts
automatically.
To stop fast winding before the end
of the tape press the key which is not
pressed the left double arrows or the
rights double arrows. Playback is
then resumed.
AUTO REVERSE
On certain units, when the end of the
tape is reached, the tape auto
reverses and playback resumes at
the beginning of the other side.
On other units you may have to eject
the cassette and turn it over.
ENDING PLAYBACK
On all units except 2050
• Press AM/FM to restore radio
reception, or the CD button to
restore CD playback when a
changer is fitted.
2050
To restore radio reception or end
tape playback the tape must be
ejected.
CASSETTE TAPE PAUSE
2050
• Using the volume control adjust
the volume to 0 the tape playback
will then pause.
• Using the volume control adjust
the volume up to resume tape
playback.
4000
• Press the left/right arrow buttons
partially in. This will restore radio
reception.
28
Cassette tape player
Page 31

4050, 5000 and 5000C
• Press AM/FM to restore radio
reception, or the CD button to
restore CD playback when a
changer is fitted.
• Press the left/right arrow buttons
partially in to restart tape
playback.
CASSETTE TAPE SIDE
SELECTION
The 2050, 4050, 5000 and 5500
units are able to play both sides of
the tape without removing the
cassette from the unit.
During tape playback, you can make
the unit play the other side of the
tape by pressing the TAPE button or
press both the left and right arrow
buttons partially in.
AUTOMATIC MUSIC
SEARCH (AMS)
This feature allows you to move
directly to the next or previous track
by using the direction buttons.
4050/5000 with a rotary
volume control
• Press the AMS button to turn the
feature on or off.
5000 with a rocker volume
control
• Press the MENU button
repeatedly until an ‘AMS’ display
appears.
• Use the SEEK button to turn this
function on or off.
When this feature is on:
• Press the left/right arrow buttons
to select the start of the previous
or next track.
5500
• Press the left/right arrow buttons
to select the start of the previous
or the next track.
• Press the opposite direction
button to end the search.
EJECTING A CASSETTE
TAPE
This will eject the tape and restore
radio reception.
2050, 5000C and 5500
• Press the eject button.
All other units except
5000C and 5500
• Press both the left/right arrow
buttons fully in.
29
Cassette tape player
Page 32

LOADING COMPACT
DISCS
6500 and 6000CD
Insert a CD in the slot.
6006
To load a single CD:
• Press and release the LOAD
button. ‘WAIT’ will appear in the
display.
• When the message changes to
‘INSERT’, and lights flash in the CD
entry slot, insert a CD into the
audio unit.
To load more than one CD:
• Press and hold the LOAD button
until ‘WAIT’ appears in the display.
• When this message changes to
‘INSERT’, and lights flash in the CD
entry slot, insert a single CD, label
side up, into the audio unit.
• One of the disc icons will flash in
the display and the word ‘LOAD’
will appear. When the disc is
loaded, a number in one of the
disc icons will indicate its location.
• The display will change to ‘WAIT’
and then the word ‘INSERT’ will
appear again. At this point, you
can load another CD.
• Repeat the last step to load more
CDs.
Note: You can only load six CDs. If
LOAD is pressed again, the display
will show ‘FULL’.
Do not try to insert a CD into the unit
when ‘WAIT’ is displayed. Do not
insert two CDs in a figure of eight
fashion with edges overlapping.
WARNING
If the power to 6006 units has
been disconnected, then
reconnected, the unit will
automatically check for the presence
of discs in the magazine. This will take
approximately 45 seconds. During
this time all functions except
Keycode entry will be locked out.
Sony CD
• Insert a CD, label side up, into the
slot.
• ‘LOADING’, ‘READING CD’ and
‘AUDIO CD’ or ‘MP3 CD’ appears
in the display and playback starts
automatically.
Sony 6CD
To load a single CD:
• Press and release the LOAD
button. ‘PLEASE WAIT’ appears
in the display.
• When this changes to ‘PLEASE
LOAD’, insert a CD, label side up,
into the audio unit.
• A numbered disc icon flashes in
the display and ‘LOADING’ and
‘READING CD’ will appear as the
disc is loaded into the first
available space.
• The disc icon revolves to confirm
the disc is loaded, and playback
starts automatically.
30
Compact disc player
Page 33

To load more than one CD:
• Press and hold the LOAD button.
‘INSERT ALL’ and then ‘PLEASE
WAIT’ appear in the display.
• When this changes to ‘PLEASE
LOAD’, insert a CD, label side up,
into the audio unit.
• ‘LOADING’ appears with a disc
location icon, followed by ‘PLEASE
LOAD’ again, and this repeats until
a maximum of six discs have been
loaded.
• Playback starts from the last disc
inserted.
• If the LOAD button is pressed
after six discs have already been
loaded, ‘ALL CDs FULL’ will
appear in the display.
LOADING THE COMPACT
DISC CHANGER
E66144
• Slide open the door on the CD
changer unit.
• Press the eject button.
• Remove the magazine.
• Insert one disc into each slot with
the label facing upwards. There
will be a click when the disc is in
the correct position.
• Reinsert the magazine in the
direction indicated by the arrow
on the magazine. The magazine
will click into position ready for
use.
• Close the changer door.
Do not insert more than one disc into
a single slot and always keep the disc
changer door closed while the
magazine is inserted.
Note: For the location of the CD
changer, please refer to your
Owner's Handbook.
TRACK SELECTION
Sony CD/6CD
The left/right arrow buttons are used
to navigate from track to track on the
current disc.
• Press the right arrow button to
move to the next track.
• Press the right arrow button
repeatedly to access later tracks.
• Press the left arrow button to
replay the current track. If pressed
within a few seconds of the start
of a track, the previous track will
be selected.
• Press the left arrow button
repeatedly to select previous
tracks.
31
Compact disc player
Page 34

Except Sony CD/6CD
• Press the right or up arrow
buttons once to move to the next
track or press it repeatedly to
access later tracks.
• Press the left or down arrow
buttons once to replay the current
track. If pressed within three
seconds of the start of a track, the
previous track will be selected.
• Press the left or down arrow
buttons repeatedly to select
previous tracks.
COMPACT DISC
PLAYBACK
Sony CD/6CD
During radio reception, press the
CD/AUX button once to start CD
playback.
Radio reception is automatically cut
off when you play a CD, but CD
playback may be interrupted from
time to time, if the traffic
announcement or news broadcast
features are switched on.
In these audio units, when one
conventional CD has been loaded,
playback will start immediately the
disc is loaded.
Except Sony CD/6CD
• Press the CD or CD/EJ button
once to start CD playback.
Radio reception is automatically cut
off when you play a CD but, on
certain models, CD playback may be
interrupted from time to time if the
traffic announcement or news
broadcast features are switched on.
In single or multiple disc players
where only one conventional CD has
been loaded, playback will start
immediately the disc is loaded.
In multiple disc players, if two or more
CDs are loaded one after the other,
playback will start with the last CD
loaded.
CD changer playback
On a cassette tape unit attached to
a CD changer, or on the 6000CD unit
when there is no CD in the internal
player:
• Press the CD, CDDJ or CD/EJ
button once to operate the CD
changer.
On 6000CD audio units with an AUX
button:
• Press the CD button twice for CD
changer playback.
If there is already a disc in the internal
player of the 6000CD unit, but you
want to play a disc in the CD
changer:
• Press the CD or CD/EJ button
twice, if the unit has a rotary
volume control.
• Press the CD button three times,
if it has a rocker volume control.
• Press the CDDJ button.
32
Compact disc player
Page 35

Note: On the 6000MP3 unit, you
should press the CD button three
times to activate the CD changer.
If the CD button is pressed when no
discs are loaded, the display will show
‘NO DISCS’.
Note: During playback, the display
indicates the time that has elapsed
since the start of the track.
On certain models, the display
continues up to 99:99 before
resetting to zero. On other models,
if the display exceeds the maximum
allowed, the first digit will flash and
the displays resets to zero.
COMPACT DISC
SELECTION
Sony 6CD
On Sony 6CD audio units, when the
CD button is pressed, playback will
recommence from wherever it was
last stopped.
If that disc is no longer available,
playback will start from the next disc
and then continue in ascending
order, i.e. disc three follows disc two.
When the disc in the highest loading
position has been played, playback
will continue with the disc in the
lowest loading position and go
through the same cycle.
You can, however, switch to a disc
of your choice by pressing the preset
button, which has the number
corresponding to the disc you want
to play. ‘CHANGING CD’ is displayed
and an icon shows the disc selected.
You can also press the up/down
arrow selection buttons to select the
previous disc or the next disc
available. ‘CHANGING CD’ appears
in the display and playback restarts
automatically.
The audio unit remembers which
discs are available so it will not select
a disc that it knows to be missing. If
you select a missing disc using the
preset buttons, ‘NO CD’ will be
displayed and playback will continue
from the current disc.
6006CDC
On multiple CD units, including CD
changers, discs are normally played
sequentially in ascending order.
You can, however, switch to a disc
of your choice by pressing the radio
preset button with the number that
corresponds to the disc you want to
play. The display will show which disc
is selected.
The audio unit remembers which
discs are available so it will not select
a disc that it knows to be missing. If
you select a missing disc, the display
will show ‘NO CD’ and playback will
continue from the current disc.
33
Compact disc player
Page 36

If a selected disc is damaged or
upside down, the warning ‘CD
ERROR’ flashes and the disc number
is displayed. The unit then selects the
next available disc.
If a changer is fitted, but the
magazine is missing or incorrectly
inserted, ‘NO MAGAZINE’ will appear
in the display when the changer is
selected and radio reception will be
resumed.
FAST
FORWARD/REVERSE
• Press and hold the left/right arrow
buttons to search backwards or
forwards within the tracks on the
disc.
SHUFFLE/RANDOM
Random track playback, also known
as shuffle, plays all tracks on the CD
in random order.
Sony CD
• Press the MENU button and use
the up/down arrow buttons to
select a ‘SHUFFLE’ display.
• Use the left/right arrow buttons to
select ‘SHUFFLE CD’ or ‘SHUFFLE
OFF’.
• When an MP3 CD is playing,
options include ‘SHUFFLE CD’,
‘SHUFF FOLDER’ to play all the
tracks in a folder in random order,
and ‘SHUFFLE OFF’.
Sony 6CD
• Press the MENU button and use
the up/down arrow buttons to
select a ‘SHUFFLE’ display.
• Use the left/right arrow buttons to
select ‘SHUFFLE CD’, ‘SHUFFLE
ALL’ to play all the tracks on all the
loaded discs in random order, or
‘SHUFFLE OFF’.
Except Sony CD/6CD
• Press the MENU button
repeatedly until a ‘SHUF’ display
appears.
• Use the SEEK button to turn the
function on or off.
With the function on, ‘SHUF’ or
‘SHUFFLE’ appears in the display as
each new track is selected and the
elapsed time indicator is replaced by
‘SHUF’ as each new track is selected.
If an optional CD changer is fitted, the
audio unit plays all the tracks on the
current disc then moves onto the
next disc in the CD magazine and
plays the tracks on that in random
sequence.
On certain models, where available,
use the MENU and SEEK buttons for
shuffle playback across all the discs
in a CD changer.
When an MP3 CD is playing, menu
modes include ‘SHUFFLE’ and
‘REPEAT’.
34
Compact disc player
Page 37

• ‘SHUFFLE’ options are ‘OFF’,
‘FOL’ which shuffles tracks in the
current folder, and ‘ALL’ which
plays all tracks on the disc in
random order.
• ‘REPEAT’ options are ‘ALL’ which
plays the entire disc and ‘FOL’
which plays all the tracks in
current folder, then repeats tracks
from the same folder.
• ‘REPEAT’ and ‘SHUFFLE’
functions are cancelled when a
disc is ejected.
COMPACT DISC TRACK
COMPRESSION
With this feature on, quieter music is
boosted and louder music lowered
to minimise repeated volume
adjustments.
Sony CD/6CD
• Press the MENU button and use
the up/down arrow buttons to
select a ‘COMP’ display.
• Use the left/right arrow buttons to
select ‘COMP ON’ or ‘COMP
OFF’.
• Press the MENU button to confirm
your selection.
• Compression remains selected,
unless it is switched off.
Except Sony CD/6CD
• Press MENU repeatedly until a
‘COMP’ display appears.
• Use the SEEK button to turn the
function on or off.
COMPACT DISC TRACK
SCANNING
The SCAN function allows you to
preview each track for a few
seconds.
Sony CD
When selected, the track being
played flashes in the display. Scan
playback continues until the SCAN
button is pressed again.
• Press the SCAN button to scan
each track on an Audio or MP3
CD.
• Press the SCAN button twice to
scan the first track of each folder
on an MP3 CD.
Sony 6CD
When selected, the track being
played flashes in the display. Scan
playback continues until the SCAN
button is pressed again.
• Press the SCAN button to scan
each track on an Audio CD.
• Press the SCAN button twice to
scan each track on all Audio CDs
loaded in the CD mechanism.
Except Sony CD/6CD
When selected, ‘Scn’ or ‘SCAN’ flash
in the display.
35
Compact disc player
Page 38

• Press the MENU button
repeatedly until a ‘SCAN’ display
appears.
• Use the SEEK button to scan up
or down the tracks selected.
• Press SEEK again to continue
listening to a track.
EJECTING COMPACT
DISCS
Sony CD
• Press the eject button at any time
and remove the disc.
• ‘EJECTING’ and ‘PLEASE
REMOVE’ appear in the display.
• Radio reception is restored
automatically when the eject
button is pressed.
• If no CD is loaded when the eject
button is pressed, ‘NO CD’
appears in the display.
When ejected, discs are held in the
audio unit ready for removal. If they
are not removed, the disc will be
reloaded automatically.
Sony 6CD
• Press the eject button briefly, to
eject the disc.
• ‘PLEASE WAIT’, ‘EJECTING’ and
‘PLEASE REMOVE’ appear in the
display while a disc is being
ejected.
• Playback resumes from the next
available disc or, if no discs are
inserted, ‘NO CD’ is displayed, and
radio reception is restored as the
eject button is pressed.
When ejected, discs are held in the
audio unit ready for removal. If they
are not removed, the disc will be
reloaded automatically.
Except Sony CD/6CD
Single disc players
Press the eject button at any time
and remove the disc.
6000 units with rocker volume
control and 6000MP3 players
Press the CD/EJ button once during
CD playback or twice during radio
playback. Then remove the disc.
Multiple disc players
• During CD playback, press EJ to
eject the disc being played or
• Use the preset button to select
the disc you want to remove and
then press EJ.
Note: If EJ is pressed in error, press
the button again to cancel.
36
Compact disc player
Page 39

‘EJECT’ and ‘REMOVE’ appear in the
display and the disc is held ready for
removal. If it is not removed, the disc
will be pulled back into the audio unit
and CD playback will restart.
After removal, ‘INSERT’ will be
displayed briefly to allow a new disc
to be inserted if required.
• To eject a disc during radio
reception, press EJ.
• While ‘SELECT’ or ‘SELECT CD’ is
displayed, press the preset button
that corresponds to the disc to be
ejected. ‘REMOVE’ appears in the
display and the disc is held ready
for removal.
UNLOADING THE
COMPACT DISC
CHANGER
• Slide open the door on the CD
changer unit.
• Press the eject button and
remove the magazine.
• Pull the tray out using the lever on
the side.
• Remove the CD and close the
tray.
• Repeat the last two steps to
remove other CDs.
MP3 FILE PLAYBACK
6000MP3
When a compact disc is loaded into
the 6000MP3 unit, the display will
show ‘READING’ while the unit scans
the disc. The time this takes will
depend entirely on the number of
tracks, files, folders and sessions on
the disc. ‘AUDIO CD’, ‘MP3 CD’ or
‘MIXED CD’ will then be displayed to
indicate the type of CD the unit
detected.
If the disc is a mixed CD, the unit will
automatically start playing the audio
sections but you can switch to MP3
sessions by pressing and holding
either of the folder navigation
buttons.
To return to the audio tracks again,
press and hold either of the folder
navigation buttons.
MP3 navigation
MP3 tracks may be recorded on the
CD in several ways. They can all be
placed in the root directory like a
conventional audio CD, or they can
be placed in folders that may
represent, for example, an album, an
artist, or a genre. Folders may even
be nested within other folders.
To cater for the latter requirement,
the 6000MP3 unit has two additional
buttons. Each has the folder legend
(as in the Windows PC environment)
and a direction arrow engraved on
the face of it.
37
Compact disc player
Page 40

When one of these buttons is
pressed and released, the first track
in the next or previous folder will be
selected and played. The SEEK
button (described above) can be
used to move between tracks in the
folder.
The normal playing sequence on CDs
with multiple folders is to play the
tracks in the first folder, then the
tracks in any folder nested inside the
first folder, then the second folder,
and so forth.
Note: The unit will always play MP3
tracks in alphabetical order. If you
record your own MP3 discs, and
want to dictate a specific order of
play, you must ensure that each track
filename starts with a number, e.g.
001-sunshine-ladyb.mp3, 002augustsong-robert.mp3, etc. The unit
will still play in alphabetic sequence
but the number will ensure that 001
is played before 002, and so forth.
Fast Trak selection
On the 6000MP3 unit, preset button
1 has an additional function when
MP3 discs are being played. This
allows you to step rapidly through the
folders and tracks on the disc.
• Press button 1. ‘FASTTRAK’
appears in the display.
• Use the volume control to step
through the tracks and folders by
number until you find the song
you want.
• Cancel the operation by pressing
button 1 again or allow the
operation to time out normally.
Note: When you use this method,
only the folder and track numbers are
displayed, i.e. F1 T4 followed by F1
T5, etc. To locate the track you want,
you will need to know what folder it
is in, and what track number it has.
Sony CD
MP3 (MPEG 1 Audio Layer-3) is a
standard technology and format for
compressing audio data. This allows
a more efficient use of the media.
You can play MP3 files recorded on
CD-ROMs, CD-Rs, and CD-RWs. The
disc must be in the ISO 9660 level 1
or level 2 format, or Joliet or Romeo
in the expansion format. You can also
use a disc recorded in Multi Session.
ISO 9660 format
This is the most common
international standard for the logical
format of files and folders on a
CD-ROM.
There are several specification levels.
In Level 1, file names must be in the
8.3 format (no more than 8
characters in the name, no more
than 3 characters in the extension
“.MP3”) and in capital letters.
Folder names can be no longer than
8 characters. There can be no more
than 8 folder levels (trees). Level 2
specifications allow file names up to
31 characters long.
Each folder can have up to 8 trees.
38
Compact disc player
Page 41

For Joliet or Romeo in the expansion
format, please consider these
restrictions when configuring your
CD writing software.
Multi session
This is a recording method that
enables adding of data using the
Track-At-Once method.
Conventional CDs begin at a CD
control area called the Lead-in and
end at an area called Lead-out. A
Multi Session CD is a CD having
multiple sessions, with each segment
from Lead-in to Lead-out regarded
as a single session.
• CD-Extra: The format that records
audio (audio CD data) as tracks
on session 1, and records data as
tracks on session 2.
• Mixed CD: In this format, data is
recorded as track 1, and audio
(audio CD data) is recorded as
track 2.
File formats
• With formats other than ISO 9660
level 1 and level 2, folder names
or file names may not be
displayed correctly.
• When naming, be sure to add the
file extension “.MP3” to the file
name.
• If you put the extension “.MP3” to
a file other than MP3, the unit
cannot recognize the file properly
and will generate random noise
that could damage your speakers.
• The following discs take a longer
time to start playback.
• a disc recorded with
complicated tree structure.
• a disc recorded in Multi
Session.
• a non-finalised disc to which
data can be added.
Playing a multi session disc
When the first track of the first
session is audio CD data
Only audio CD data of the first
session is played back. Non-audio
CD data/MP3 file information (track
number, time, etc.) is displayed with
no sound.
When the first track of the first
session is not audio CD data
• If an MP3 file is in the disc, only
MP3 file(s) play back and other
data is skipped. (Audio CD data is
not recognised.)
• If no MP3 file is in the disc, nothing
is played back. (Audio CD data is
not recognised.)
MP3 files playback order
The playback order of the folders and
files is as shown.
Note: A folder that does not include
an MP3 file is skipped.
39
Compact disc player
Page 42

Playback tip: To specify a desired
playback order, before the folder or
file name, input the order by number
(e.g., “01,” “02”), then record
contents onto a disc. (The order
differs depending on the writing
software.)
E66143
ID3 Tag Version 2
The following occurs when an MP3
file containing ID3 tag ver.2 is played:
• When skipping a portion of ID3 tag
ver.2 (at the beginning of the
track), sound is not output. Skip
time changes depending ID3 tag
ver.2 capacity. Example: At 64
kbytes, it is about 2 seconds (with
RealJukebox).
• The displayed elapsed playing
time when skipping a portion of
ID3 tag ver.2 is inaccurate. For
MP3 files of a bit rate other than
128 kbps, time is not displayed
accurately during playback.
• When an MP3 file is created with
MP3 conversion software (e.g.
RealJukebox - a registered
trademark of RealNetworks Inc),
ID3 ver.2 will automatically be
written.
MP3 navigation
MP3 tracks may be recorded on the
CD in several ways. They can all be
placed in the root directory like a
conventional audio CD, or they can
be placed in folders that may
represent, for example, an album, an
artist, or a genre.
The normal playing sequence on CDs
with multiple folders is to play the
tracks in the first folder, then the
tracks in any folder(s) nested inside
the first folder, then move onto the
second folder, and so forth. For
example, if folder 1 has folders 1a and
1b within it, and folder 2 contains
folder 2a, the playing sequence will
be folder 1, 1a, 1b, 2, 2a.
40
Compact disc player
Page 43

• Press the up/down arrow buttons
to select another folder.
• Press the left/right arrow buttons
to select another track (file) within
the folder.
MP3 DISPLAY OPTIONS
6000MP3
When an MP3 disc is playing, certain
information encoded in each track
can be displayed on the unit. Such
information will normally include:
• The file name
• The folder name
• The song title
• The artist’s name
• The name of the album from
which the song was taken, if
applicable
• The bit rate and sampling rate
used for the recording
The unit will normally show the file
name of the track that is playing. To
select one of the other items of
information, or to show the folder and
track numbers:
• Press the INFO button repeatedly
until the correct item is shown.
• After 2 seconds, the display will
continue to show the selected
information about the current
song, or ‘NO TEXT’ if the info is
unavailable. The display will scroll
if necessary, and then revert to
the standard filename (or other
default) display.
MP3 default displays
You can also change the default
display (normally file name) to
another option of your choice:
• Press and hold the INFO button
until ‘DEFAULT INFO’ is displayed.
• Use the volume control to scroll
to the item of information you
want to display as the default.
Options are file name, song title,
artist, album, or folder and track
number.
• If the information you require is not
encoded into a particular track,
‘NO TEXT’ will be displayed, and
then the display will revert to the
Folder and Track number display.
Scrolling MP3 displays
Normally the display will scroll once
and then show only the first eight
characters of whatever information
you have chosen. However, it is
possible to control how the display
shows the information.
• Press and hold the MENU button
for two seconds to access the
Set-up menu.
• Press the MENU button
repeatedly until ‘SCROLL’ appears
in the display.
• Use the SEEK keys to select the
option you require. Options are
‘Off’, ‘Once’ (1 – default setting),
‘Twice’ (2), and ‘On’. ‘On’ will
make the display scroll
continuously.
41
Compact disc player
Page 44

Sony CD unit
When an MP3 disc is playing, certain
information encoded in each track
can be displayed. Such information
will normally include:
• The file name
• The folder name
• ID3 information which might be
the album or artist’s name
The unit will normally show the file
name that is playing. To select one
of the other items of information:
• Press the CD INFO button
repeatedly until the display
required is shown.
• If the ID3 information selected is
unavailable, ‘NO MP3 TAG’
appears in the display.
Scrolling MP3 displays
Display information will scroll once
across the display as each track
starts, so the full line can be read. The
display will then return to a static
display showing the first few
characters of whatever information
you have chosen.
• Press the MENU button and use
the up/down arrow buttons to
select a ‘SCROLL’ display.
• Use the left/right arrow buttons to
select ‘SCROLL ON’ or ‘SCROLL
OFF’. ‘SCROLL ON’ is the default
setting and remains selected,
unless it is switched off.
• Press the MENU button to confirm
your selection.
• Press and hold the CD INFO
button, to scroll the display
independently of the scroll setting
selected.
CD text display options
When an audio disc with CD text is
playing, limited information encoded
in each track can be displayed. Such
information will normally include:
• The disc name
• The artist name
• The track name
These display options are selected
in the same way as MP3 displays.
‘NO DISC NAME’ or ‘NO TRACK
NAME’ appears if no information has
been encoded.
REPEAT COMPACT DISC
TRACKS
6500
• Press and hold the CD button to
switch this function on or off.
42
Compact disc player
Page 45

Sony CD
• Press the MENU button and use
the up/down arrow buttons to
select a ‘REPEAT’ display.
• Use the left/right arrow buttons to
select ‘REPEAT TRACK’ or
‘REPEAT OFF’.
• When an MP3 CD is playing,
playback options are ‘REPEAT
TRACK’, ‘REP FOLDER’ and
‘REPEAT OFF’.
Press the MENU button to confirm
your selection.
Sony 6CD
• Press the MENU button and use
the up/down arrow buttons to
select a ‘REPEAT’ display.
• Use the left/right arrow buttons to
select ‘REPEAT TRACK’, ‘REPEAT
CD’ or ‘REPEAT OFF’.
• Repeat playback remains
selected, unless it is switched off.
Press the MENU button to confirm
your selection.
ENDING COMPACT DISC
PLAYBACK
Sony CD/6CD
To restore radio reception on all units:
• Press the AM/FM button.
Note: This will not eject the CD; the
disc will merely pause at the point
where radio reception was restored.
CD playback can be resumed by
pressing the CD/AUX button again.
Except Sony CD/6CD
• Press the waveband button to
restore radio reception.
• Push the tape control buttons
partially in to restore tape
playback.
On units fitted with an AMS button,
this can also be used to restore tape
operation.
Note: Neither of these actions will
eject the CD; the disc will merely
pause at the point where radio or
tape reception was restored.
To resume CD playback, press the
CD button again.
EJECTING MULTIPLE
COMPACT DISCS
Sony 6CD
• Press and hold the eject button
to eject all the discs that are
loaded.
• ‘EJECT ALL’ followed by
‘EJECTING’ and ‘PLEASE
REMOVE’ appear in the display,
as each disc is ejected.
• When all discs have been ejected
and removed, ‘ALL CDs EMPTY’
is displayed briefly and radio
reception is restored.
43
Compact disc player
Page 46

Except Sony 6CD
• To eject all discs, press and hold
EJ until ‘EJECT’ or ‘EJECT ALL’ is
displayed.
• The display will alternate between
‘EJECT’ and ‘REMOVE’.
• When ‘REMOVE’ is displayed, take
the disc out of the unit. This
routine repeats until all discs have
been removed.
44
Compact disc player
Page 47

Where available, this socket is
located in the vehicle glove box and
permits an auxiliary device, like a
portable MiniDisc or MP3 player, to
be linked into the vehicle audio
system, so that output can be played
through the vehicle speakers.
To listen to an auxiliary device, plug
it into the glove box socket using a
3.5 mm conventional ‘headphone
type’ electrical connector.
Select the auxiliary input via the
‘CD/AUX’ button and playback will be
heard through the vehicle speakers
from that source, rather than from
the vehicle audio unit. ‘AUX’ will
appear in the vehicle audio unit
display.
To disconnect the auxiliary device,
pull out the plug-in electrical
connector and use the vehicle audio
unit buttons, ‘CD/AUX’, or ‘FM/AM’,
to restore playback from the vehicle
audio unit.
The vehicle audio unit buttons can
also be used to restore playback
from the vehicle audio unit, while the
auxiliary device remains connected.
E66141
45
Auxiliary input (AUX IN) socket
Page 48

REAR SEAT CONTROLS
E66142
Where available, the way the Rear
Seat Audio System control panel
operates will depend on which RSE
menu option is selected.
• Press the MENU button and use
the up/down arrow buttons to
select an RSE display.
• Use the left/right arrow buttons to
select from ‘RSE On, RSE Off, RSE
Ctrl On or RSE Ctrl Off’.
• Press the MENU button to confirm
your selection.
CONTROL PANEL
BUTTONS
On/Off button
With ‘RSE On/Rear Audio On’
selected at the main audio unit
• Press the ON/OFF button on the
Rear Seat Audio control panel to
switch the system on or off and
all the rear seat audio functions
may then be controlled from the
rear control panel.
With ‘RSE Off/Rear Audio Off’
selected at the main audio unit
• Pressing the ON/OFF button on
the rear control panel will not
affect the system. ‘DISABLED’
appears briefly in the display and
the rear control panel will not
operate.
Waveband selector
• Press this button repeatedly to
select from FM1, FM2, FM AST,
AM or AM AST. The display
indicates the selection made.
Note: If the main audio unit and the
rear control panel are tuned to radio
reception when this button is
pressed, ‘SHARED’ appears in the
display to show that a shared radio
source is being controlled through
the main audio unit.
CD/AUX button
• Press this button repeatedly to
select CD playback or playback
from an auxiliary source like a mini
disc player.
Note: If rear seat passengers select
the same source as front seat
passengers, ‘SHARED’ appears in
the display to show that a shared CD
source is being controlled through
the main audio unit.
46
Rear passenger controls
Page 49

Station preset/CD/MP3
folder selector
• Press this button repeatedly to
select radio stations stored on the
preset buttons, MP3 folders or
discs from the magazine of a CD
changer, when fitted.
• If the rear control panel is tuned
to radio reception, press the
up/down arrow buttons
repeatedly to search through and
select stations stored on the
preset buttons for the waveband
selected. The display shows
which preset is selected and the
waveband, e.g. 1FM1, 2FM1,
3FM1, etc.
• If CD playback from a CD changer
is selected at the rear control
panel, press the up/down arrow
buttons repeatedly to search
through and select discs in the
magazine. The display indicates
the selection.
• During playback from an MP3 CD,
press the up/down arrow buttons
repeatedly to search through and
select from the file directories
stored on the MP3 disc.
Seek button
If the rear control panel is tuned to
radio reception:
• Press the left/right arrow buttons
briefly for manual tuning, in small
increments, down or up the
waveband selected.
• Or press and hold the left/right
arrow buttons for automatic
tuning. The unit will stop at the first
station it finds in the direction you
have chosen.
If CD playback is selected at the rear
control panel:
• Press the left/right arrow buttons
briefly to select other tracks on
the disc selected.
• Or press and hold the left/right
arrow buttons to fast forward or
fast reverse across the disc
selected.
Note: If the main audio unit and rear
control panel are used to select the
same source when either the Station
preset or Seek button is pressed,
‘SHARED’ appears in the display to
show that a shared audio source is
being controlled through the main
audio unit.
CONTROL MODE
‘RSE Ctrl On/Control Mode
On’
Selecting ‘RSE CTRL ON/CONTROL
MODE ON’ at the main audio unit will
enable a front passenger to use the
main audio unit to assist rear
passengers to select a particular
audio source, e.g. a radio station or
a certain CD track.
47
Rear passenger controls
Page 50

• Press the MENU button and use
the up/down arrow buttons until
an RSE display appears.
• Press the left/right arrow buttons
to select from ‘ RSE Ctrl On’.
• Press the MENU button to confirm
your selection.
Note: In this mode, all functions are
controlled through the main audio
unit and, if any rear control panel
button is pressed, ‘FRONT’ appears
in the rear panel display.
If ‘RSE Ctrl On/Control Mode On’ is
selected, the main audio unit will
provide playback from the audio
source last selected in the rear
compartment. ‘RS’ or ‘RSE’ are
displayed on your audio unit display
screen.
‘RSE Ctrl Off/Control Mode
Off’
Select ‘RSE Ctrl Off/Control Mode
Off’ in a similar way to ‘RSE Ctrl
On/Control Mode On’.
With ‘RSE Ctrl Off/Control Mode Off’
selected, the main audio unit leaves
RSE control mode and returns to the
audio source being played before
‘RSE Ctrl On/Control Mode On’ was
selected.
The rear audio system plays the
source that was selected last in the
RSE control mode.
ONE HOUR MODE
If the ignition is turned off or in the
ACC position when the radio is
turned off, pressing the ON/OFF
button will switch on the system, but
it switches off automatically, after one
hour.
During this time, sound output will
play through the vehicle’s speaker
system, if headphones are not
plugged in, and this output is fully
controlled through the Rear Seat
Audio System control panel.
HEADPHONES
Volume control
Right headphone
• Press the right hand side + or –
buttons repeatedly to increase or
decrease sound output through
headphones plugged into the
right side socket.
Left headphone
• Press the left hand side + or –
buttons repeatedly to increase or
decrease sound output through
headphones plugged into the left
side socket.
HEADPHONE SOCKETS
If either or both headphone sockets
are used, audio output mutes from
the rear compartment audio system
speakers, and is channeled, instead,
through the fitted headphones.
48
Rear passenger controls
Page 51

However, if the headphone sockets
are used, audio output remains
unaffected through the front
compartment speakers and, in this
way, front and rear seat passengers
can listen to two different audio
sources.
For example, with ‘RSE On’ selected,
front seat passengers can insert a
CD into the audio unit, and then press
the AM/FM button to listen to radio
reception through the front
compartment audio system
speakers.
At the same time, rear seat
passengers using the rear seat audio
system control panel, can press the
CD/AUX button and listen to CD
playback through their headphones.
At any time, front seat passengers
can select the CD playback or rear
seat passengers can switch to radio
reception, without affecting audio
output to the other part of the
vehicle.
REAR PASSENGER
CONTROL DISPLAY
SCREEN
When the Rear Seat Audio System is
switched on, the rear control panel
display shows which audio source is
selected for rear seat passengers.
• During radio reception, the preset
button number, waveband and
station frequency or station name
are displayed.
• During CD playback, the CD track
number and elapsed time appear.
• During playback from an MP3
disc, MP3, the CD track number
and elapsed time appear.
• During playback from a CD
changer, if fitted, the disc number,
CD track number and elapsed
time appear.
• The display also confirms volume
adjustments made using the + or
– control buttons.
If rear panel control functions are not
available, information displays include:
• SHARED – This indicates the rear
compartment audio source is
shared with the main audio unit.
• FRONT – This shows that audio
control is through the main audio
unit.
• DISABLED – This shows that the
rear seat audio system is not
operating and cannot be switched
on.
49
Rear passenger controls
Page 52

AUDIO UNIT
Cassette care
The tape head in the cassette player
needs to be cleaned regularly with a
recommended ‘wet’ cleaning tape
to maintain the best sound quality.
Use high quality cassettes to improve
sound performance and take good
care of them. Avoid those that:
• are old, worn out, or spliced.
• are damaged or have a peeling
label.
• have a total playback time
exceeding 100 minutes. These
use thinner tape that increases
the chance of tangling.
CD care
For best possible sound quality, use
CDs that are clean and in good
condition.
50
Audio system care
Page 53

RectificationAudio unit display
Internal fault, see your Ford Dealer.E2E, E2D, E3, E5, E7, E11,
E15, CD ERROR
Clean the disc and try again.E12, E23, E24, E25, E26,
E27, E28, E29, E2B, E2C,
BAD CD
Disc upside down or dirty. Clean the disc and try
again.
E4
Ambient temperature too hot – unit will not work
until it has cooled down.
CD HOT, HIGH TEMP, E2,
E14
Eject fault, see your Ford Dealer.E16, E81, E84, E85
Disc loading or playback fault. Eject the disc,
check it is clean and undamaged, and inserted
correctly.
CHECK CD
Internal mechanical fault. CD playback will cease
and the audio unit will revert to radio reception.
See your Ford Dealer.
ERROR
CD ROM/MP3 disc inserted.NON AUDIO CD
Information field not filled in.NO TEXT
Check cassette tape for faults.TAPE ERR
MP3 button pressed (e.g. folder up/down) when
in non-MP3 mode.
NOT MP3
Radio is still waiting for information (e.g. when
scanning an MP3 disc).
WAIT
RectificationCD changer display
Internal fault. See your Ford Dealer.CD/CDDJ ERROR, E5 CD
DISC ERROR
Clean the disc and try again.E2 or E3
Ambient temperature too hot – unit will not work
until it has cooled down.
E4, CDDJ OVERHEAT
CD ROM/MP3 disc inserted.NON AUDIO CD
See your Ford Dealer.VIN ERROR
51
Audio troubleshooting
52
Page 54

Page 55

A
Alternative frequencies..................22
2050......................................................23
All other units except 2050................23
Sony CD/6CD.......................................22
Audio control....................................15
Audio distortion reduction
(CLIP)...............................................21
Audio introduction.............................3
Audio menu control.........................13
Audio system care..........................50
Audio system security......................7
Audio troubleshooting....................51
Audio unit clock and date
displays...........................................10
Audio unit menus.............................21
Audio unit operation........................12
Audio unit overview...........................5
Audio unit.........................................50
Cassette care.......................................50
CD care.................................................50
Auto reverse....................................28
Automatic music search
(AMS)..............................................29
4050/5000 with a rotary volume
control................................................29
5000 with a rocker volume
control................................................29
5500......................................................29
Automatic volume control
(AVC)...............................................21
Autostore control.............................16
Auxiliary input (AUX IN) socket......45
B
Balance/fade control.......................12
Bass/treble control..........................12
Default audio settings..........................12
C
Cassette tape pause......................28
2050......................................................28
4000......................................................28
4050, 5000 and 5000C.....................29
Cassette tape playback.................27
Cassette tape player......................27
Cassette tape side selection........29
Compact disc playback.................32
Except Sony CD/6CD.........................32
Sony CD/6CD.......................................32
Compact disc player......................30
Compact disc selection.................33
6006CDC..............................................33
Sony 6CD..............................................33
Compact disc track
compression.................................35
Except Sony CD/6CD.........................35
Sony CD/6CD.......................................35
Compact disc track scanning.......35
Except Sony CD/6CD.........................35
Sony 6CD..............................................35
Sony CD................................................35
Control mode...................................47
‘RSE Ctrl Off/Control Mode Off’........48
‘RSE Ctrl On/Control Mode On’........47
Control panel buttons....................46
CD/AUX button....................................46
On/Off button.......................................46
Seek button..........................................47
Station preset/CD/MP3 folder
selector..............................................47
Waveband selector.............................46
D
Digital signal processing (DSP)......21
53
Index
Page 56

E
Ejecting a cassette tape................29
2050, 5000C and 5500.....................29
All other units except 5000C and
5500...................................................29
Ejecting compact discs..................36
Except Sony CD/6CD.........................36
Sony 6CD..............................................36
Sony CD................................................36
Ejecting multiple compact discs
.........................................................43
Except Sony 6CD................................44
Sony 6CD..............................................43
Ending compact disc
playback.........................................43
Except Sony CD/6CD.........................43
Sony CD/6CD.......................................43
Ending playback..............................28
2050......................................................28
On all units except 2050....................28
Enhanced other network
(RDS-EON).....................................23
Entering a security code..................7
2050.........................................................7
On all units except 2050.......................7
F
Fast forward/reverse.....................34
Fast forward.....................................27
2050.......................................................27
5500.......................................................27
All other units except 2050................27
Fast rewind.......................................27
2050......................................................28
5500......................................................28
All other units except 2050................28
H
Headphone sockets.......................48
Headphones....................................48
Volume control.....................................48
I
Important audio information............3
Disc labels...............................................4
Sony CD/6CD.........................................3
Incorrect security code....................8
2050.........................................................8
On all units except 2050.......................8
L
Loading compact discs.................30
6006......................................................30
6500 and 6000CD..............................30
Sony 6CD..............................................30
Sony CD................................................30
Loading the compact disc
changer...........................................31
Lost security code.............................7
Loudness control............................20
6500......................................................20
M
MP3 display options........................41
6000MP3...............................................41
Sony CD unit.........................................42
MP3 file playback............................37
6000MP3..............................................37
Sony CD................................................38
Music/speech..................................23
5500/6500...........................................23
N
News broadcasts...........................23
All other units except Sony CD/6CD
and 2050...........................................24
Sony CD/6CD.......................................24
54
Index
Page 57

O
On/off control...................................12
2050.......................................................12
One hour mode...............................48
P
Phone mute control........................13
Preset scan tuning..........................22
Priority programme type
(PTY)...............................................24
PTY selection during tape or CD
playback............................................26
Selecting PTY.......................................26
Selecting stations with different
programme types............................26
Selecting stations with the same
programme type..............................26
Using PTY..............................................26
R
Radio data system (RDS)..............23
Radio reception.................................4
Advanced digital filter adjustment
(ADFA)..................................................4
Rear passenger control display
screen.............................................49
Rear passenger controls...............46
Rear seat controls (RICP)...............21
Rear seat controls..........................46
Removable front panel.....................7
...................................................................7
Repeat compact disc tracks.........42
6500......................................................42
Sony 6CD..............................................43
Sony CD................................................43
S
Security code.....................................7
Setting the clock and date on the
audio unit........................................10
2050.......................................................10
5000C and 6000CD with centrally
located on/off and volume
control................................................10
Sony CD/6CD........................................11
Shuffle/random...............................34
Except Sony CD/6CD.........................34
Sony 6CD..............................................34
Sony CD................................................34
Sound button...................................16
2050 only...............................................16
Bass/treble/balance and
loudness.............................................16
Sound style............................................16
Station preset buttons....................15
Station tuning control......................19
Manual tuning.......................................19
Scan tuning............................................19
Seek tuning...........................................19
Stereo indicator control..................17
2050.......................................................17
On all units except 2050.....................17
T
Track selection.................................31
Except Sony CD/6CD.........................32
Sony CD/6CD.......................................31
Traffic information (TA) control.......17
Activating traffic announcements......17
Ending traffic announcements...........19
Local or distant traffic..........................18
Traffic announcement volume...........18
U
Unloading the compact disc
changer..........................................37
55
Index
Page 58

V
Vehicle identification (VID)................8
On all units except 2050.......................8
Volume control.................................12
W
Waveband button............................16
56
Index
Page 59

Page 60

6S5J-19C104-DA (CG3508en)
 Loading...