

Page 1

User’s Guide
User’s Guide
version 6.00
version 6.00
Portions Copyright 1984-2000
Faircom Corporation
All Rights Reserved
Page 2

2 04/04
Copyright 1998 - 2004
by Follett Software Company
1391 Corporate Drive
McHenry, Illinois 60050
(800) 323-3397 or (815) 344-8700
Email: info@fsc.follett.com (Customer Service)
techsupport@fsc.follett.com (Technical Support)
All rights reserved. This book and application, or parts thereof, may not be reproduced in
any form without permission.
This software application and the information contained in this manual are subject to
change without notice.
Circulation Plus, Catalog Plus, WebCollection Plus, Union Catalog Plus, Alliance Plus,
Find-a-Book, Find-It-All, One Search, Knowledge Links, and TitlePeek are trademarks of
Follett Software Company.
TextLink is a registered trademark of Follett Educational Services and Follett Software
Company.
TITLEWAVE Copyright 2000 Follett Library Resources.
All other trademarks are the property of their respective third-party owners.
Page 3

FOLLETT SOFTWARE COMPANY
PRODUCT LICENSING TERMS
***IMPORTANT***
This legal document (the Agreement") is an agreement between you and Follett Software
Company governing the use of Follett Software Company's library management products
listed on Follett's Web sites, including at www.fsc.follett.com, and any revisions and
updates (the Product"). The Product may include software, data, and/or other
instructional materials. By installing, accessing, or using all or any portion of the Product,
you agree to be bound by the terms of this Agreement. If you do not agree to the terms of
this Agreement, do not install, access, or use the Product and promptly return any
Product to Follett Software Company.
The Product is owned by Follett Software Company and/or its third party licensors.
Please see www.fsc.follett.com/destiny for a complete list of the third party open source
contributors to the Product and their license terms. The Product is protected by U.S. and
international copyright law, and Follett Software Company and its licensors retain all title
to and ownership of the Product, with the exception of the following limited use license:
1. Windows and MacOS-Based Products. If you have obtained a single-user license for
a MacOS or Windows-based Product, you may install and use one copy of the
Product on one computer not attached to your network at your site for the purpose of
managing your site's library collection. If you have obtained a multiple-user license
for a MacOS or Windows-based Product, you may install and use one copy of the
Product on one system or one network at your site for the purpose of managing your
site's library collection.
2. Web-Enabled Products. If you have obtained a single site license for a Web-enabled
Product, you may install and use one copy of the Product on a central server located
within and under the control of your site for the purpose of managing your site's
library collection. If you have acquired a district license to use the Product, you may
install a copy of the Product on a central server or servers located within and under
the control of your district for the purpose of managing the library collections of the
sites within your district and for whom you have paid a license fee.
3. Subscription ID and Password. Follett will provide you with a subscriber
identification number and user password enabling you to access and allow access to
any Follett-hosted subscription Product you have licensed, which may be accessed
through your library management system or Follett's Internet sites, depending on the
license you have paid for. You are responsible for maintaining the security of your
password and agree not to post it on any Web site accessible to the public. You agree
to assume responsibility for the results of any misuse of your password and to report
any misuse of the password immediately to Follett.
4. Prohibited Use. You may not copy the Product or any accompanying written
materials without Follett's permission, except as necessary to use the Product in its
intended manner. You may not use the Product or allow any third party to use the
Product for any commercial purpose or in any manner not set forth in this
Agreement. You may not loan, sublicense, rent, lease, transfer, or assign the Product
or any portion thereof to any third party, with the following exception: You may
download and post MARC records solely for the purpose of importing them into and
managing them from your duly licensed Follett library automation management
system. You may not reverse engineer, decompile, disassemble, or in any way
modify the Product or any portion thereof without prior written consent of Follett
Software Company. Any modifications you make to the Product will remain the
property of Follett Software Company and/or its licensor(s).
304/04
Page 4

4 04/04
5. New Versions. When you install a new version of the Product accompanied by a new
license, provided your license fee entitles you to the new version, your use of the new
version constitutes your acceptance of the new license and the termination of your
license to use any previous version of the Product.
6. Termination for Breach. If you breach any material terms of this Agreement or fail to
pay license fees as they become due, Follett Software Company may immediately
terminate your license to use the Product, including by disabling any online access, in
addition to taking any other legal remedies available to it. Upon termination of your
license, you must either return any copies of the Product and any data taken from the
Product, including any MARC records, to Follett Software Company or destroy the
copies and data and certify in writing that you have done so.
7. Third Party Web Sites. The Product may provide you and your patrons with links to
third party Web sites. You acknowledge that Follett Software Company does not
endorse or maintain control over and will not be liable for the content, advertising, or
other materials contained on such third party sites. Your use and your patrons' use
of the content, goods, or services on any third party site will be governed by the
terms on that site, if any. You will be responsible for understanding and complying
with third party sites' terms of use and instructing your patrons and employees on
the same.
8. Third Party Subscription Databases. The Product may enable you and your patrons
to search all of your sites' third party subscription databases simultaneously. Because
access to many of these databases is strictly regulated under the terms of the license
agreements between you and the third party database owners, you agree that it is
your obligation to ensure against the unauthorized access of such third party-owned
subscription databases. If the Product provides access to password protected
content, you agree to password protect such access at your library's server level to
ensure that only your patrons can use the Product, and to protect against the
unauthorized use of third party-owned content, such as subscription databases.
9. Student Privacy. As part of your subscription, you may be able to allow your patrons
to set up their own individual login accounts. If you do so, you agree that you are
solely responsible for complying with all applicable state and federal laws regarding
student privacy, including the federal Family Education and Privacy Act (FERPA).
Follett warrants that it will not use any information you provide from students'
accounts for any purpose other than servicing your subscription, and that it will not
disclose such information to any third party unless required by law. FOLLETT
SOFTWARE COMPANY DOES NOT KNOWINGLY COLLECT ANY PERSONALLY
IDENTIFYING INFORMATION ABOUT CHILDREN UNDER THE AGE OF 13
THROUGH THE PRODUCTS. However, Follett cannot make that claim on behalf of
third party sites found through the Product. You therefore agree to inform and
educate patrons under the age of 13 that they should not provide any personally
identifying information on any third party sites without the involvement and
verifiable consent of their parents.
10. Limited Warranty. Follett Software Company warrants that for a period of 1 year
from its delivery to your site or access, in the case of online subscriptions, the Product
will perform in substantial compliance with its specifications and be free of material
defects. As your sole and exclusive remedy for this warranty, Follett Software
Company will either repair the Product or refund your prorated license fee, provided
you report to Follett Software Company in writing the material defect or
noncompliance within the 1 year warranty period. This limited warranty does not
cover any material defect resulting from any accident, abuse, or misapplication of the
Product caused by you, your employees, end users, agents, or contractors, or any
modification you, your employees, end users, agents, or contractors make to the
Page 5

Product, whether or not such modification is authorized by Follett Software
Company.
11. DISCLAIMER OF WARRANTY. FOLLETT SOFTWARE COMPANY DISCLAIMS
ALL OTHER WARRANTIES, EITHER EXPRESS OR IMPLIED, INCLUDING BUT
NOT LIMITED TO IMPLIED WARRANTY OF MERCHANTABILITY, FITNESS FOR
A PARTICULAR PURPOSE, WARRANTY OF TITLE, OR WARRANTY OF
NON-INFRINGEMENT. FOLLETT SOFTWARE COMPANY AND ITS LICENSORS
ARE NOT RESPONSIBLE FOR AND MAKE NO REPRESENTATIONS OR
WARRANTIES WITH REGARD TO THIRD PARTY NETWORK OPERATING
SYSTEMS, COMPUTER HARDWARE, SOFTWARE, OR PERIPHERALS THAT YOU
USE IN CONJUNCTION WITH THE PRODUCT, OR THAT ANY
NETWORK-ACCESSIBLE FEATURES OF THE PRODUCT WILL BE
CONTINUALLY ACCESSIBLE OR ACCESSIBLE AT ANY TIME.
THE THIRD PARTY SOURCE CODE USED IN THE PRODUCT AND LISTED, WITH
ITS LICENSING TERMS, AT WWW.FSC.FOLLETT.COM/DESTINY IS PROVIDED
BY THIRD PARTY LICENSORS AS IS," WHO DISCLAIM ANY EXPRESSED OR
IMPLIED WARRANTIES, INCLUDING, BUT NOT LIMITED TO, IMPLIED
WARRANTIES OF MERCHANTABILITY AND FITNESS FOR A PARTICULAR
PURPOSE. IN NO EVENT SHALL ANY SUCH THIRD PARTY LICENSOR OR ITS
CONTRIBUTORS OR FOLLETT SOFTWARE COMPANY BE LIABLE FOR ANY
DIRECT, INDIRECT, INCIDENTAL, SPECIAL, EXEMPLARY, OR
CONSEQUENTIAL DAMAGES (INCLUDING, BUT LIMITED TO LOSS OF USE OR
DATA), HOWEVER CAUSED AND ON ANY THEORY OF LIABILITY, WHETHER
IN CONTRACT, STRICT LIABILITY, OR TORT (INCLUDING NEGLIGENCE OR
OTHERWISE) ARISING OUT OF THE USE OF THE PRODUCT, SOFTWARE, OR
SOURCE CODE, EVEN IF ADVISED OF THE POSSIBILITY OF SUCH DAMAGE.
IN NO EVENT WILL FOLLETT SOFTWARE COMPANY OR ITS LICENSORS BE
LIABLE TO YOU IN ANY AMOUNT EXCEEDING THE TOTAL FEES YOU HAVE
PAID TO FOLLETT SOFTWARE COMPANY DURING THE TWELVE MONTHS
PRECEDING YOUR CLAIM.
504/04
FOLLETT SOFTWARE COMPANY IS NOT RESPONSIBLE FOR AND MAKES NO
REPRESENTATIONS OR WARRANTIES THAT THIRD PARTY PRODUCTS,
SERVICES, OR WEB SITES WILL WORK WITH THE PRODUCT, OR THAT ACCESS
TO THE PRODUCT OR THIRD PARTY SITES FOUND THROUGH THE PRODUCT
WILL BE UNINTERRUPTED OR ERROR-FREE. FOLLETT MAKES NO
WARRANTY THAT THE INFORMATION OBTAINED FROM THE PRODUCT IS
ACCURATE OR RELIABLE OR THAT ANY GOODS OR SERVICES MADE
AVAILABLE THROUGH THE PRODUCT WILL MEET YOUR EXPECTATIONS.
YOU AGREE THAT ANY MATERIAL OR DATA DOWNLOADED OR OTHERWISE
OBTAINED FROM USE OF THE COLLECTION IS DONE OR ALLOWED AT YOUR
SOLE RISK AND THAT YOU WILL BE SOLELY RESPONSIBLE FOR ANY
DAMAGE THAT RESULTS FROM THE DOWNLOADING OF SUCH MATERIAL
OR DATA.
12. Indemnification. To the extent you are permitted under applicable law, you agree to
defend, indemnify, and hold harmless Follett Software Company, its parent
corporation, subsidiaries, affiliates, and their respective officers, directors, employees,
attorneys, and agents from and against any and all third party claims, liability, and
expenses, including attorneys' fees and legal costs, that arise out of the use of the
Products by you or your patrons in violation of this Agreement. This provision will
not apply if you are a public school or public library.
Page 6

6 04/04
13. Arbitration. You agree to submit any dispute, controversy, or claim you may have
arising out of or relating to this Agreement solely to binding arbitration to be
conducted pursuant to the Commercial Rules of the American Arbitration then in
effect.
14. Right to Audit Compliance. Follett will have the right to conduct or direct an
independent accounting firm to conduct, during normal business hours and no more
than twice during any calendar year, an audit of your relevant records to verify your
compliance with the terms of this Agreement. This provision does not limit Follett's
right to monitor its server logs for accesses made by you, or using any access code
issued to you, to any online features, or to investigate any conduct Follett believes
either may be a breach of the licensing terms or otherwise threatening to the integrity
of its products or services.
15. Entire Agreement. This Agreement constitutes the entire agreement of the parties
with respect to the use of the Product. The failure by Follett to enforce any of its
rights hereunder will not constitute a waiver of such rights. If any portion of this
Agreement is found by a court of competent jurisdiction to be invalid, the other
provisions will remain in full force and effect.
16. Intellectual Property. Follett Software Company is the owner or licensee of copyright,
trademark, and other intellectual property and proprietary rights in the Product. All
trademarks appearing in the Product are the property of Follett or their respective
third party owners. Follett disclaims any affiliation or endorsement of such third
parties' goods or services, and does not intend to imply any such endorsement or
affiliation by using such marks. Likewise, such use is not meant to imply any third
party's endorsement of Follett's goods or services. Please be aware and inform your
patrons that copyright, trademark, and other intellectual property rights may protect
content on third party Web sites and databases accessed through the Product.
Nothing in this Agreement affects such rights or implies that you, your patrons, or
Follett has any rights in this content. Use of third party content may be governed by
a separate agreement with the third party owner and you agree not to use the content
in any way that violates this Agreement or the intellectual property rights of the third
party owner. You also agree to take reasonable measures to make your patrons aware
of all provisions in this section.
17. Exporting Products. This Agreement will not be governed by the United Nations
Convention on Contracts for the International Sale of Goods, the application of which
is expressly excluded. You agree not to ship, transfer, or export the Product or any
data obtained from the Product into any country or use the Product or data obtained
from the Product in any manner prohibited by the United States Export
Administration Act or any other export laws or regulations.
U.S. GOVERNMENT RESTRICTIONS
1. If the Product is acquired by or on behalf of a unit or agency of the United States
Government, this provision applies. The Product: (a) was developed at private
expense, and no part of it was developed with government funds; (b) contains trade
secret information of Follett Software Company for all purposes of the Freedom of
Information Act; (c) is commercial computer software" subject to limited utilization
as provided in the contract between Follett Software Company and the governmental
entity; and (d) in all respects contains proprietary data belonging solely to Follett
Software Company.
2. For units of the Department of Defense (DOD), this Product is sold only with
Restricted Rights" as that term is defined in the DOD Supplement to the Federal
Acquisition Regulations (DFARS") 52.227-7013(c) (1) (ii) and use, duplication, or
Page 7

disclosure is subject to restrictions as set forth in subparagraph (c) (1) (ii) of the Rights
in Technical Data and Computer Product clause at DFARS 52.227-7013.
Manufacturer: Follett Software Company, 1391 Corporate Drive, McHenry, IL
60050-7041.
3. If the Product is acquired under a GSA Schedule, the U.S. Government has agreed: (a)
to refrain from changing or removing any insignia or lettering from the Product that
is provided or from producing copies of manuals or disks (except one copy for
backup purposes); (b) title to and ownership of the Product and any reproduction
thereof shall remain with Follett Software Company; (c) use of the Product and
documentation shall be limited to the facility for which it is acquired; and (d) if use of
the Product is discontinued at the installation specified in the purchase/delivery
order and the Government desires to use it at another location, it may do so by giving
prior written notice to Follett Software Company, specifying the type of computer
and new location site.
4. U.S. Government personnel using the Product, other than under a DOD contract or
GSA Schedule, are hereby on notice that use of the Product is subject to restrictions
which are the same as, or similar to, those specified above.
Follett Software Company
1391 Corporate Drive
McHenry, Illinois 60050-7041
(800)323-3397
Email: info@fsc.follett.com or techsupport@fsc.follett.com
www.fsc.follett.com
704/04
Copyright 2003 - 2004, Follett Software Company. All rights reserved.
Page 8

8 04/04
Notes
Page 9

Contents
Welcome 27
9
Getting started 28
Viewing the online User's Guide 28
Getting help 29
About our customized training 29
Contacting Follett Software Company 29
Follett's tollfree number 29
Visit our Web site 30
Contacting Technical Support 30
What's folletttalk? 30
Enhancement requests 30
System Setup 31
Chapter 1 System Setup basics 31
About the setup chapters 31
What you'll need 32
Getting around in System Setup 33
Chapter 2 Setting up your site 35
Identifying your library 35
Identifying your country and first month of statistical year 36
Setting up your barcode symbologies 37
Protecting your Follett applications with passwords 40
Transferring the PHD application to a PHD 42
Obtaining a MARC Organization Code 36
Selecting a barcode symbology 38
Can symbologies be mixed? 38
How to select and define barcode symbologies 39
How to change an application password 41
Page 10

10 04/04
How to change the PHD settings 43
Maintaining events for Catalog Plus 43
After setting up your site 44
Chapter 3 Preparing to catalog your collection 45
Grouping your collection according to lending period 45
How to add or edit circulation types 47
Identifying call number locations in your MARC records 47
Setting up your call number prefixes 48
How to add or edit call number prefixes 50
Sorting your call numbers 51
Increasing access to your collection with categories 52
How to add or edit categories 53
How to delete categories 54
Defining the tag range for your brief MARC records 54
Setting up miscellaneous Cataloging options 55
After preparing for cataloging 59
Chapter 4 Setting up Acquisitions 61
Adding vendors 61
Contact tab 63
Notes tab 63
Purchases tab 63
Adding funding sources 64
Amount tab 65
Notes tab 66
Setting the default information 66
Chapter 5 Preparing to circulate your collection 69
Grouping your patrons by type 69
How to add or edit a patron type 71
Making it easier to create new patrons 72
Empowering your patrons 74
Circulation policies: who can have what and for how long 76
How to set circulation limits for patron types 77
How to limit loan periods 78
Setting time limits for items on hold 78
Expiring holds 79
Deleting holds 79
Page 11

Setting up reserves 79
Entering the time limits 80
Activating automatic fine calculation and refunds 81
Customizing your overdue, bill, and ready hold notices 82
How to change the wording on a notice 83
Setting your library's hours 85
Setting up your library's current calendar 85
Setting up alert sounds (and more) for your circulation desk 88
After preparing for circulation 90
Chapter 6 Building your union 91
Who should read this? 91
Where do we begin? 91
What is data exchange? 92
Participation levels 93
Filtering rules 94
How are the best" records created? 95
Setting up your union 95
Entering union catalog site information 96
Entering union cataloging information 98
Setting up your members 101
Defining your nonDX members 102
Defining your DX members 106
Deleting a member 112
What's next? 112
Considerations for nonDX members and unions 113
1104/04
Circulation Desk 115
Chapter 7 Circulation Desk basics 115
What is Circulation Desk? 115
Starting Circulation Desk 115
Circulation Desk security 118
Limiting and restoring access to Circulation Desk 118
Receipt Printer (Transaction Tracker) setup and printing 120
Showing and hiding patron pictures 122
Transactions 101 122
Typing or scanning barcodes 123
Page 12

12 04/04
Finding patrons or copies 123
Important messages for patrons 126
Sounds 126
Handling block conditions during a transaction 127
Adding or editing a patron record 129
Viewing and printing patron information 130
Viewing the current status of a copy 134
Sending items to the bindery or on interlibrary loan 135
Troubleshooting 136
Chapter 8 Checking out items 137
How to check out a copy 138
Adding or editing a patron 139
Adding a title during a checkout 139
Handling noncirculating copies 141
Showing due dates 142
Special due dates for checkouts and renewals 143
Troubleshooting 144
Chapter 9 Renewing items 147
Renewing all (or some) of a patron's checkouts 147
How to renew a single copy or stack of copies 149
Troubleshooting 150
Chapter 10 Checking in items 151
How to check in a copy 151
Handling items on hold or reserve 152
Reshelving items 152
Troubleshooting 152
Chapter 11 Dealing with fines and lost copies 155
Crime and punishment: the types of fines 155
Tracking fine payments 156
Recording payment against the fine balance 157
Recording payment for a single fine 158
Creating fines 158
Editing fines 160
Giving refunds 161
Page 13

Marking a patron's checkout lost 161
Charging a fine for the lost copy 163
Troubleshooting 164
Chapter 12 Managing holds 165
A brief introduction to holds 165
A brief introduction to reserves 166
Readying reserves 166
Circulating reserves 166
Getting around the Holds/Reserves window 167
Placing a hold or reserve for a patron 168
Managing holds 169
Extending the life of a hold 169
Changing the priority of a hold 170
Interpreting the Daily Holds Processing exception report 171
Troubleshooting 174
1304/04
Chapter 13 Circulating items with a PHD 175
Patrons 183
Chapter 14 Patron Maintenance basics 183
Why use a PHD to circulate your collection 175
Before recording transactions with a PHD 176
Recording transactions with a PHD 176
Processing remote circulation transactions 176
Interpreting the Remote Circulation Processing exception report 179
Troubleshooting 182
About Patron Maintenance 183
Using Patron Maintenance 183
Searching for patron records 184
How to search for a patron record 185
What happens if the patron isn't found 186
Chapter 15 Maintaining individual patron records 187
About maintaining individual patron records 187
Page 14

14 04/04
How to add or edit a patron record 187
How to add, edit, and delete addresses 188
How to add or edit an important message or a note 189
How to add, replace, or remove a patron picture 189
How to delete individual patron records 190
Chapter 16 Maintaining patron records in batches 191
About global maintenance 191
Globally updating batches of patrons 191
Updating information for a few individual patrons 192
Updating patron records using a PHD 193
Globally deleting patrons 195
Deleting patrons with a PHD 196
Interpreting the exception report 198
Chapter 17 Importing patron information 199
Chapter 18 Exporting patron records 207
Inventory 209
Chapter 19 Inventory basics 209
About importing patron records 199
Formatting information for the librarian's technical personnel 199
Follett's patron import data file formats 199
Importing patron records 202
Interpreting the exception report 203
Importing patron pictures 204
Interpreting the exception report 206
About exporting patron records 207
How to export patron records 208
Overview of an inventory 209
Preparing for inventory 210
How will Inventory affect circulation? 210
After inventory 212
Inventory Checklist 213
Page 15

Starting and getting around in Inventory 215
Chapter 20 Taking inventory of your collection 217
Beginning an inventory 217
Entering copies into Inventory 218
Entering copies directly into the Inventory main window 219
Using a PHD to inventory your collection 221
Using a portable computer to inventory your collection 223
Interpreting the Remote Inventory exception report 228
Finalizing an inventory 230
Printing reports of your Missing items 231
Resetting Missing copies 231
Marking items Missing outside an inventory 232
Deleting Missing items 232
1504/04
Cataloging 233
Chapter 21 Cataloging basics 233
Cataloging 101 233
Using MARC bibliographic and authority record formats 233
Permanent or temporary? 234
Starting Cataloging 235
Customizing the toolbar 236
Cataloging Security 238
Finding MARC records in your collection 240
Using Limiters on your local database 241
Accelerated Reader search 242
Lexile search 243
Reading Counts search 244
Find-It-All Collection 245
Searching Alliance Plus Online or Alliance Plus CDs 245
Scanning an ISBN 247
Searching your DX union catalog 247
Using your search results 248
TitlePeek 250
Adding, saving, copying, and editing MARC records 251
Deleting a MARC record 252
Printing MARC records 253
Page 16

16 04/04
Chapter 22 Using the Easy Editor 255
When to use the Easy Editor 255
Working with bibliographic records 255
Brief MARC Record tab 256
Added Description tab 257
Providing access through subjects 259
Providing additional entries 260
Using the Find Headings feature 261
What's next? 262
Chapter 23 Using the MARC Editor 263
Working with bibliographic records 263
Adding new bibliographic records 264
The MARC Editor: an overview 265
What is a good" bibliographic record? 265
Tags: the backbone of a MARC record 266
Bibliographic fixed-length tags 268
Variable-length tags 273
What's next? 277
Working with authority records 278
Creating crossreferences 278
Getting started 278
Adding new authority records 279
How are authority records different? 280
What's next? 284
Chapter 24 Working with copies 285
Adding and editing copies 285
Deleting a copy 288
Chapter 25 Importing MARC records 289
Importing bibliographic records 289
Importing MARC 21/852 Holdings data 291
Importing MARC 21/852 Holdings Format Data by Barcode 295
Importing MARC 21/852 Holdings Format by Control Number 296
For Winnebago records: Reconstructing your barcodes and more 297
Importing authority records 307
Interpreting the exception report 308
Page 17

Chapter 26 Exporting MARC records 311
Getting ready to export 311
Exporting bibliographic records 312
Exporting authority records 318
Splitting a collection 318
Using a PHD 318
Using categories 319
Interpreting the exception report 321
Chapter 27 Maintaining your collection 323
Using reports to analyze your collection 323
Updating bibliographic headings globally 324
Updating copy information globally 326
Adding funding sources or vendors to their tables 327
Updating individual copies 330
Deleting lost or missing copies globally 330
Deleting subject headings by source globally 332
DX-enabled union catalogs and members 333
Deleting tags globally 334
Deleting titles without copies globally 335
Using a scanner to delete copies 337
Using your PHD for mass updates 338
Updating categories, circulation types, or copy status with a PHD 338
Removing categories from copies with a PHD 340
Deleting copies with a PHD 342
Viewing the Weeding log 344
Updating keywords 345
Rebuilding crossreferences 346
Enhancing your records with the Book Cart 346
Adding titles to the Book Cart 346
Reconning titles in the Book Cart 347
Editing titles from the Book Cart 348
Transferring your records to and from MARC Magician 348
Printing the contents of the Book Cart 349
Merging copies onto one title record 351
1704/04
Chapter 28 Cataloging tips 353
Audiovisual equipment 353
Vertical file material 353
Page 18

18 04/04
Videorecordings 354
Electronic resources 355
Tag 856Electronic Location and Access 355
System notes and considerations 357
Related materials 358
eBooks 360
Websites 366
Computer files 367
For further information 369
Chapter 29 Acquisitions 371
The lifecycle of an order 371
Adding or editing an order 372
Filling out an order 372
Finding an order 375
Editing vendor information 376
Editing funding source information 377
Updating address information 378
Printing your order form 379
Alliance Plus 381
Chapter 30 Alliance Plus basics 381
About Alliance Plus 381
Starting Alliance Plus 381
Choosing Alliance Plus Online or an Alliance Plus CD 382
Using Alliance Plus 383
Chapter 31 Autorecon and Reading Program Recon 385
About the Autorecon process 385
Bibliographic record modifications 386
Preparing for an Autorecon 387
Running an Autorecon 387
About the Reading Program Recon process 390
Preparing for a Reading Program Recon 391
Running a Reading Program Recon 391
Chapter 32 Process Misses 395
About Process Misses 395
Page 19

Running Process Misses 396
Search Stations 403
Chapter 33 Setting up your search stations 403
Accessing Setup 403
General Setup tab 404
Choosing the OPAC interface 405
Controlling user access 406
Providing access to other applications 408
Setting up passwords 409
What's next? 409
Text OPAC Setup tab 410
Choosing search options 410
Modifying the record display 412
Selecting limiter options 412
What's next? 414
Visual OPAC Setup tab 415
Choosing display options 415
Selecting Bookbag options 416
Saving your settings 416
Importing the default buttons 416
Default button sets 416
What's next? 418
Adding and editing action buttons 418
Identifying the button 420
Associating an image with the button 421
Choosing the Action of the button 422
Saving buttons 427
Deleting buttons 427
Putting it all together 428
After saving your setup 429
Setting up multiple search stations 429
1904/04
Chapter 34 Setting up WebCollection Plus 431
Running WebCollection Plus 431
Shutting down a connection to the FairCom Server 431
Accessing WebCollection Plus 432
Page 20

20 04/04
Constructing the URL for the main page 432
Constructing the URL for the Setup Information page 432
Changing the setup password 432
A note about browser settings 433
The Setup Information page 434
Customizing the appearance of the pages 436
Changing the text on the main page 436
Changing the graphics 437
Providing tools and services for your patrons 438
Configuring the toolbar 438
Enabling the Bookbag 439
Setting up hold and interlibrary loan request options 440
Setting up WebCollection Plus for State Standards 443
Setting up WebCollection Plus for Keyword/Power and Browse searches 444
Checking a copy's status from WebCollection Plus for Union 445
Enabling Patron Empowerment 445
Setting up Visual WebCollection Plus 447
Providing more information access for your patrons 448
Accessing TitlePeek 448
Setting up QuickLinks 448
Modifying the record display 449
Viewing Follett eBooks 449
Enabling optional tabs 450
Customizing your pages 450
Information page 450
Web Links page 451
Testing your setup 452
WebCollection Plus for English/French or English/Spanish 454
Troubleshooting 456
Chapter 35 Using your OPAC 457
Choosing the interface 457
Searching your library in the text interface 458
What is a Power search? 459
Accelerated Reader search 461
Lexile search 461
Reading Counts! search 462
Find-It-All Collection searches 463
Using the search results 463
Electronic Location and Accessthe 856 tag in action 466
Page 21

eBooks 467
TitlePeek button 469
Printing search results 470
Searching tools 470
Customizing the limiters 470
Repeating a search 472
Patron Empowerment 472
Accessing other applications 474
Using the Bookbag 475
Viewing events 476
Resetting the search station 476
Clearing the current search 476
Searching your library in the visual interface 477
Getting around in Visual OPAC 477
Tracing your steps 479
Using the Type In Search 480
Using the search results 481
Viewing the record 482
Using the Bookbag 484
Clearing the search station 484
2104/04
Reports 485
Chapter 36 Reports basics 485
Chapter 37 Cataloging reports 499
About Reports 485
Creating custom reports 486
Starting Reports 487
Generating a report 489
Selecting a report 489
Setting the report options 489
Changing the date used to run reports 494
Printing the report 495
Cataloging reports overview 499
Generating a Bibliography Report 502
Generating a Brief Records Report 503
Generating a Code Table List 504
Page 22

22 04/04
Generating a Copies Added Report 506
Generating a Copies by Funding Source or Vendor Report 507
Generating a Copies With Different Call Numbers Report 511
Generating a Copies With Other Call Numbers Report 512
Generating a Copies Without Call Numbers Report 513
Printing Copy Barcode Labels 514
Generating a Copy List by Circulation Type 516
Generating a Headings Without Authorities Report 517
Generating a Lexile Report 520
Generating a Shelf List 521
Generating Spine/Pocket Labels 522
Generating a Title List 525
Generating a Titles Added/Updated Report 529
Generating a Titles by Category Report 530
Generating a Titles With Duplicate Standard Numbers Report 531
Generating a Titles Without Copies Report 533
Generating a Titles Without Standard Numbers Report 534
Generating a Used or Unused Copy Barcodes Report 535
Chapter 38 Circulation reports 537
Circulation reports overview 537
Generating a Category Statistics Report 539
Generating a Checkouts/Fines Transactions Report 540
Generating a Circulation Statistics Report 542
Generating a Collection Age by Call Number Report 545
Generating a Collection Age by Subject Report 547
Generating a Collection Statistics Report 548
Generating a Collection Value Report 550
Generating a Copy List by Status 551
Generating Date Slips 552
Generating Hold Notices 553
Generating a Hold Statistics Report 556
Generating a Hold Transaction List 557
Generating an Inventory List by Call Number 558
Generating an Inventory List by Title 559
Generating Overdue/Bill Notices 561
Generating an Overdue List 566
Printing Patron Barcode Labels 567
Generating a Patron Barcode List 570
Generating Patron Cards 572
Page 23

Generating a Patron Name List 575
Generating a Patron Statistics Report 577
Generating a Used or Unused Patron Barcodes Report 579
Chapter 39 System reports 581
Generating your system circulation statistics 582
Generating a System Information Report 582
More information for union catalogs and members 584
Chapter 40 Extracting data 585
About extracting data 585
How to extract data 585
Using extracted data 586
2304/04
Utilities 591
Chapter 41 Database maintenance utilities 591
About Utilities 591
When should I run a utility? 591
What if a utility is interrupted? 592
Backing up your library database 592
Starting Utilities 592
About the Maintenance utilities 593
Check Database Integrity 594
Rebuild Keywords 595
Rebuild MARC Headings 596
Rebuild File Indexes 597
About the Advanced utilities 598
Rebuild Database 599
Reload File 600
Remove Patron History 601
Empty Database 602
Enable/Disable Data Exchange 602
Viewing your registered products 603
Interpreting the Utilities exception report 603
Chapter 42 Backing up your database 605
Develop a backup strategy 605
Page 24

24 04/04
How do I back up my database? 605
Media rotation 606
Backup tips 606
Using Follett Software's Backup and Restore 607
Backing up your database 608
Restoring your database 609
Using another vendor's backup software 610
Singleuser sites 610
Multiuser sites 611
Restoring from backup 612
Appendices 613
Appendix A Glossary 613
Appendix B Bibliographic and authority tags 627
Bibliographic tags 627
Tags in the Easy Editor 632
Reading and interest levels and the 521 tag 634
Reading programs and the 526 tag 635
Searchable tags 637
Tags displayed in online public access catalogs 638
Authority tags 639
Appendix C Bibliographic and authority templates 643
Selecting a template 643
Editing the leader, 007, and 008 tags 645
Editing an existing tag in a template 645
Inserting a tag into a template 646
Appendix D Barcode symbologies 647
What does a barcode contain? 647
Barcode terminology 648
What are your barcode options? 649
Defining the barcode symbology 650
Assigning barcodes 652
Page 25

Appendix E Using a PHD+, PHD+ II, or PHD Laser+ 653
PHD+, PHD+ II, and PHD Laser+: the Telxon models 653
Supported barcodes 654
Connecting a PHD to your computer 655
Downloading the application 655
Using a Telxon PHD 656
The Telxon PHD main menu 657
Keys used most often 658
How to change key functions 658
PHD features 659
PHD task commands 659
Mastering barcode scanning 660
PHD scanning sounds 661
Recording remote circulations 661
Starting circulation mode and setting the date 662
Checking out and renewing items 662
Checking in items 663
Collecting inventory, copy, or patron data 663
Erasing data from a PHD 664
Troubleshooting 664
Rebooting your Telxon PHD 667
Maintenance information 668
Storing your PHD 668
Cleaning your PHD 668
Charging and recharging batteries 668
Backup power 669
Disposing of old batteries 670
2504/04
Appendix F Using a PHD Dolphin+ 671
Getting started 671
Loading the PHD application for the first time 671
PHD Dolphin+ basics 672
Navigating the PHD Dolphin+ 672
Entering alpha and special characters 672
Supported barcodes 673
Scan and battery capacity 673
Collecting circulation information 674
Checking in items 674
Checking out and renewing items 675
Collecting inventory scans 676
Page 26

26 04/04
Collecting patron barcodes 676
Collecting copy barcodes 677
Examining barcode scans 678
Reviewing or deleting individual scans 678
Viewing scan counts 678
Erasing scans 679
Troubleshooting 679
PHD Dolphin+ Quick Reference Guide 682
Important Keys 682
PHD Dolphin+ Main Menu 683
Procedures 683
Appendix G The Bar Tender 693
Setting up The Bar Tender 693
Specifying the label stock layout 693
Editing the barcode label contents 693
Printing sequential barcode labels 695
Saving sequential barcode setup 695
Printing patron barcode labels 695
Barcodes in The Bar Tender 696
Appendix H Configuring scanners 699
Uses 699
Selecting a scanner 699
ScanTeam 3400 CCD 700
Getting ready 700
Programming codes for ScanTeam 3400 CCD scanner 701
ScanTeam 5400 Laser 701
Getting ready 701
Programming codes for ScanTeam 5400 Laser scanner 702
Page 27

Welcome
27
Welcome to Follett Software Company's suite of library automation solutions.
This guide includes information about many of our integrated products, even
though you may not have purchased all of them.
Circulation Plus is a complete library collection and patron management system.
It circulates your collection and tracks circulation and patron statistics, fines,
holds, reserves, and your library schedule. Once you set up your policies, you
can use Circulation Plus to add patron, MARC, and copy records to your
database; circulate materials; print reports; and take an inventory. Circulation
Plus includes the basic shared modules (System Setup, Reports, Cataloging,
Utilities, and Backup and Restore) and the circulation modules (Circulation Desk,
Inventory, and Patron Maintenance).
Catalog Plus offers flexible searching capabilities to help you and your patrons
easily locate the materials you want. Once you've set up your site and built your
database, you can search your entire collection. Catalog Plus includes the basic
shared modules (System Setup, Reports, Cataloging, Utilities, and Backup and
Restore) plus an OPAC (Online Public Access Catalog) for your patrons. An
OPAC for your crossplatform search stations is also available.
Union Catalog Plus allows you to create a districtwide database from all the
MARC records of the member sites. Follett Data Exchange Server instantly
updates the union and the member databases with cataloging changes made at
any of the sites. These changes are shared, or not, according to the participation
preferences of each member. The search results in the OPAC show all copies of a
title and their locations.
Alliance Plus lets you add or enhance library bibliographic records with
information from an online database with over 5 million titles and a suite of
CDROMs. This User's Guide includes information for integrating Alliance Plus
into your collection maintenance tasks. Alliance Plus is also available for unions.
WebCollection Plus and the Z39.50 Server expand access to your collection.
WebCollection Plus gives your patrons access to your collection over the Internet.
Z39.50 Server makes your library database accessible to Z39.50 clients
worldwide. Follett Software Company also offers BookWhere? 2000, a Z39.50
client that lets users search multiple Z39.50 databases at the same time.
WebCollection Plus and Z39.50 Server are also available for unions.
Find-It-All Collection provides one-stop searching of multiple online resources
with Find-It-All One Search, and access to over 160,000 safe, high-quality K-12
Web sites aligned to state and national standards with Find-It-All Knowledge
Links. Students can access Find-It-All Collection from Follett's OPAC,
WebCollection Plus, or their Internet browser. Find-It-All Collection gives your
students access to the best information in the least amount of time.
Page 28

28
04/04
A PHD (Portable Handheld Device) is a portable scanner that collects, stores, and
transmits data. A PHD lets you expedite your circulation, cataloging, inventory,
and reporting activities. Circulation Plus and Catalog Plus currently support four
PHD models: PHD+, PHD+ II, PHD Laser+, and the PHD Dolphin+.
If you are interested in learning more about any of the Follett Software products
and services mentioned here or elsewhere in this guide, please refer to
Contacting Follett Software Company" on page 29.
Getting started
We know you're eager to get started. This User's Guide is designed to help you get
the information you need when you need it. The first section covers the setup
tasks you need to complete. The remainder of the guide provides information on
a modulebymodule basis. Be sure to take a look at the end of the guide for the
Glossary and information on MARC tags, the PHDs, and The Bar Tender.
Many of Follett Software Company's applications have been developed for both
the Windows and Macintosh operating systems. This guide provides instructions
for using the applications on either platform. All differences between platforms
are noted in the text.
This guide assumes you have a basic understanding of your operating system. If
you need help with OSspecific tasks, such as changing your screen resolution,
associating a program with a particular file type, assigning sounds to events, or
creating shortcuts/aliases, please see your operating system's help.
Throughout this guide, when instructing you to select several menu commands
in sequence, this guide uses a vertical line to indicate a division between menus
and submenus (for example: Edit | Global Update | Headings).
You'll notice blocks of information in this guide that are preceded by a boldface
word. The boldfaced word indicates the information's importance:
Note:
Important:
See also:
Warning:
Provides additional information
Indicates information crucial for optimal performance
Directs you to another source of information for a given topic
Warns that a particular function may change or delete data
Viewing the online User's Guide
By default, this guide is installed in an electronic format wherever you installed
Circulation Plus, Catalog Plus, or Union Catalog Plus. This lets you access the
guide wherever and whenever you need it. With the online guide, you can
quickly search for a specific word or phrase and print pages of the guide.
Note: To use the online User's Guide, you'll need Adobe
or higher. The current version of Adobe Acrobat Reader can be installed
from the Adobe Acrobat Web site.
Acrobat Reader v5.x
Page 29

04/04 Welcome 29
To open the online guide, from the computer desktop, open the Follett
Applications folder and doubleclick the User's Guide icon. You can also access
the Follett Applications menu from the Windows Start | Programs menu or from
the Mac OS Apple menu.
Getting help
In addition to the information contained in this guide, all the Follett applications
come with extensive help topics. These help topics are designed to provide you
with quick access to important information about the module you're using.
To get help with a specific window or dialog, simply click the Help button. You
can also select Help from the menu bar at the top of the module's window. From
the Help menu, you can access the help topic for the current window, a
description of the menus displayed in the current module, product information,
and counts for the current number of patrons, titles, and copies in the system.
About our customized training
Follett Software Company offers several options for interactive training with a
Follett representative. Visit our Web site at www.fsc.follett.com or call
1-800-323-3397 for details.
Contacting Follett Software Company
For information about our products, or if you need assistance, please contact us
using any of the following methods:
Follett's tollfree number
Use the following number and enter the extension or number key to contact the
departments listed below:
(800) 323-3397
7:00 A.M. to 7:00 P. M . central time
Customer Service
(order placement and status, returns,
training and workshop information)
To order product literature Press 2
Upcoming events Press 3
FSC's mailing address, additional numbers Press *
Accounts Receivable Ext. 7201 or 7415
Customer Service Fax 1-800-807-3623
Press 1
Page 30

30
04/04
Visit our Web site
Follett Software Company's home page is located at http://www.fsc.follett.com.
From our home page, you'll discover:
What's new at Follett Software Company
How to integrate information literacy solutions with technology
How to solve some of the technology challenges your district is facing
Information on automating Englishspeaking libraries worldwide
How to make your library more efficient and your resources more accessible
Contacting Technical Support
If you need technical support for one of our products and have a support
agreement for that product, you may call, fax, or email your questions to us free
of charge. Be sure to include your customer number and as much detail as
possible (e.g., the contents of critical error messages, what you were doing when
an error occurred, etc.).
Phone:(800) 722-74247:00 A.M. to 6:00 P.M. central time
Fax:(815) 578-5196
Email:techsupport@fsc.follett.com
Support Web pagehttp://www.fsc.follett.com/support/
Important: If your support agreement has expired and you need service, call
Customer Service at (800) 323-3397.
What's folletttalk?
As a Follett Software customer, you are entitled to subscribe to folletttalk, an
Internet mailing list. This electronic discussion group lets you share your
experiences with our software products and services, ask questions, and receive
responses from other Follett Software customers. Anything related to Follett
Software is welcome on this mailing list.
To join folletttalk, fill out the subscription form on our Web site or send an email
message to: imailsrv@fsc.follett.com. In the body (not the subject line) of your
message, include: subscribe follett-talk firstname lastname (e.g. subscribe
folletttalk John Smith).
Enhancement requests
We welcome your ideas and comments. If you have ideas for enhancing our
products, guides, or services, please copy the form at the back of this guide, fill it
out, and mail it to us; or you can submit your suggestion online at
http://www.fsc.follett.com/contact/suggest_feature.cfm.
Page 31

System Setup
Chapter 1 System Setup basics
Once you've completed installation, you're ready to set up the Circulation
Plus/Catalog Plus applications. Check the details in the following sections before
you start.
Note: If you're setting up Union Catalog Plus, please see Chapter 6, Building
your union."
About the setup chapters
The tasks in the setup chapters are presented in sequential order. You should
complete all of the setup tasks in a chapter before proceeding to the next chapter.
31
If you did not purchase both Circulation Plus and Catalog Plus, the following
table explains which setup chapters you are required to complete before using
the software:
If you purchased only Circulation Plus, complete
the tasks in these chapters:
Chapter 2, Setting up your site" Chapter 2, Setting up your site"
Chapter 3, Preparing to catalog your collection" Chapter 3, Preparing to catalog your collection"
Chapter 4, Setting up Acquisitions Chapter 4, Setting up Acquisitions
Chapter 5, Preparing to circulate your collection" Chapter 33, Setting up your search stations"
In addition to the setup tasks described in the chapters above, you might also
want to customize your MARC bibliographic and authority templates. This
procedure is described in Appendix C, Bibliographic and authority templates."
This function is not available on Mac OS.
If you purchased only Catalog Plus, complete
the tasks in these chapters:
Note: The instructions in the setup chapters assume that you've already
barcoded your collection and your patron library cards. If you haven't
done this, you'll need to do so before you can circulate your collection
using Circulation Desk or before using OPAC. If Follett Software has
converted your patron and library material data for you, complete the
setup chapters first, and then import your data.
Page 32

What you'll need
To aid you in setting up Circulation Plus/Catalog Plus quickly and accurately, we
recommend that you gather the following information before you start:
The official name of your site as you would like it to appear on reports, and
your MARC Organization Code (formerly known as holdings code), if
applicable.
Information about your barcode symbologies. If you purchased your
barcodes from Follett, this information appears on the packing slip that
arrived with your barcodes. If you're using another vendor, or aren't sure
what kind of barcodes you're using, please read Appendix D, Barcode
symbologies," before beginning to set up your software.
A list of the call number prefixes you use in your library, if any.
A list of circulation descriptions based on the types of books you have in
your collection. For example: 2week checkout" (fiction, biographies, etc.),
1hour checkout" (encyclopedias, dictionaries, maps), and Overnight
checkout" (general reference books).
04/0432 System Setup
If you want to use the Acquisitions feature, pertinent vendor and funding
source information.
In addition, if you purchased Circulation Plus, you'll want to gather together the
following:
A list of your patron groupings. For example: elementary school, middle
school, high school, parents or volunteers, staff, etc.
A copy of your library policy handbook, or a list of your circulation policies.
A copy of your school's or site's calendar that lists all of the closed days and
holidays for the current and upcoming year.
Page 33

04/04 Chapter 1 System Setup basics 33
Getting around in System Setup
To begin setting up your software, from the computer desktop, open the Follett
Applications folder and doubleclick the System Setup icon. You can also access
the Follett Applications menu from the Windows Start | Programs menu or from
the Mac OS Apple menu.
Important: When you launch System Setup for the first time, it creates files that
are used by all the other Follett applications. This process may take
several minutes.
The Site Setup password dialog appears:
Enter the default password, MAKEITSO, or your own previously defined one,
and click OK. The Site tabs appear with the Identification tab open:
Menu bar
To open a group of setup tabs
To customize your MARC
bibliographic and authority
templates (not available on
Mac OS)
The menu bar in the System Setup module contains the following menus:
File menuContains the Exit/Quit command used to close System Setup.
Setup menuContains the options for accessing the various setup tabs. For
example, to access the Site tabs, choose Site from the Setup menu. The setup
tasks associated with the items on this menu are described in Chapters 2
through 5.
Templates menu(Not available on Mac OS) Contains options for modifying
the MARC bibliographic or authority templates. The tasks associated with
Page 34

04/0434 System Setup
these options are described in Appendix C, Bibliographic and authority
templates."
Help menuContains options for finding help pertaining to System Setup.
From the About dialog you can see product information for the application,
the current number of patrons, titles, and copies in the system, and run the
System Circulation Statistics and System Information Reports (see Chapter
39, System reports").
You should begin setting up Circulation Plus/Catalog Plus by entering your site
information in the System Setup - Site tabs. Proceed to Chapter 2, Setting up
your site," for the instructions.
Page 35

Chapter 2 Setting up your site
In this chapter, you'll do the following setup tasks: identify your library; identify
your country and the first month in your statistical year; set up your barcode
symbologies; protect your Follett applications with passwords; transfer the PHD
application to your PHD, if you have one; and maintain events for OPAC.
Identifying your library
System Setup allows you to store the most relevant information about your site,
such as your site's name and MARC Organization Code, in a place that's
accessible to all Follett applications.
Note: For nonUS sites, complete the tasks in the next section, Identifying your
country and first month of statistical year," before identifying your library.
35
To obtain a MARC
Organization Code,
see page 36.
The person to whom library
mailings are directed
Voice phone number for the
library's contact person
(e.g., the head librarian)
This numberassigned to
you when you purchased
this softwareis required
by Follett's online services
(e.g., Alliance Plus Online,
WebPath Express, and
Find-It-All Collection).
Your site's federal or state tax
exemption number
1. After launching System Setup, a password dialog for Site Setup appears. The
default password for Site Setup is MAKEITSO. Type the password and
choose OK. The Site tabs appear with the Identification tab open:
Your site's name
(appears on reports
and notices)
To cancel changes
before saving
Your site's mailing
address appears as
the return address on
Hold, Overdue, and
Bill Notices.
Note: Field names
vary based on your
address format (e.g.,
State vs. Province).
If you purchased
netLibrary eBooks,
this number is
required to allow
checkouts.
2. In the text boxes, enter your official site information. When you're finished,
choose Save. The only information that is required here is your site's name
and your Follett customer number, unless you are a member of a union.
Page 36

04/0436 System Setup
For Union Catalog Plus members: If you are a member of a union catalog,
you must also enter a short site name and a MARC Organization Code. The
short site name is limited to 10 characters and should be a meaningful
abbreviation of the full site name. In Union Catalog Plus, the short site name
appears with the copy information in Cataloging, OPAC, and WebCollection
Plus for Union. If you do not have a MARC Organization Code, see the
instructions below.
Obtaining a MARC Organization Code
To obtain a MARC Organization Code, fill out the online request form at
http://lcweb.loc.gov/marc/organizations/ or contact the Library of Congress
directly (fax or email requests are preferred and can speed up processing):
Library of Congress
Network Development and MARC Standards Office
101 Independence Ave, SE
Washington, DC 20540-4402 Fax: (202) 707-0115
Canadian organizations should contact the National Library of Canada at
illser@knoll-bnc.ca to obtain a library symbol.
Your MARC Organization Code must be unique among the sites with whom you
may share records.
Identifying your country and first month of statistical year
System Setup allows you to choose from three address formats: US, Canadian,
and Other Countries. Changing your address format changes the address format
of the Identification tab and modifies the template you use to add patrons. To
ensure accurate statistical reports, System Setup requires that you define the first
month in your statistical year.
Page 37

04/04 Chapter 2 Setting up your site 37
1. From the Site tabs, select the Information tab:
Country where your site is
located. This determines
the address format.
The first month in your site's
statistical year. The Follett
applications use this month
when generating circulation
statistics and reports.
To cancel changes
before saving
Note: The Follett applications track circulation statistics automatically. If you
are familiar with our earlier products, this means that you no longer
need to reset counters.
2. Select your address format and the first month in your statistical year from
the list. When you're finished, click Save.
See also: For information about running statistical reports on your
collection's circulations, see the Collection Statistics (page 548), Patron
Statistics (page 577), and System Circulation Statistics (page 582) reports.
Setting up your barcode symbologies
Before you can start scanning barcodes for library items or patrons or before you
start importing copies, you must inform Circulation Plus/Catalog Plus which
symbology you are using, or plan to use. There are three preparative steps:
Select the barcode symbology you are using for patrons and library items.
Define the barcode symbologies if other than Follett Classic.
Test the barcode symbologies.
You don't need to define Follett Classic as your symbology. Follett Classic is
always recognized, and any barcode with seven digits or fewer is recognized as
Follett Classic. A barcode symbology with eight or more digits must be defined.
Note: Circulation Plus/Catalog Plus let you automatically assign the next highest
available barcode number to an item or a patron. For more information, see
Assigning barcodes" on page 652.
Page 38

Selecting a barcode symbology
Circulation Plus and Catalog Plus can recognize the following barcode
symbologies:
04/0438 System Setup
Follett Classic symbologies
Generic Codabar
Codabar Mod 10
Generic Code 39
Code 39 Mod 10
Code 39 Mod 11
Code 39 Mod 43
Generic Interleaved 2 of 5
Interleaved 2 of 5 A
Generic LabelCode 5
Follett Software applications recognize the industrystandard 14character
barcode symbologies and the Follett Classic barcode symbologies.
See also: For more information about using the above barcode symbologies,
refer to Appendix D, Barcode symbologies."
PHD supported barcodes
You can use a PHD to simplify certain circulation, cataloging, inventory, patron
maintenance, and reporting activities. Currently Follett Software supports four
PHD models. For information about the barcodes supported by the PHD+, PHD+
II, or PHD Laser+, see page 654. If you're using a PHD Dolphin+, see page 673.
Important: To use a PHD, your barcodes must include a Type Identifier
regardless of the symbology you choose. Follett Classic symbologies
assume a P" for patron barcodes and a T" for library materials.
Can symbologies be mixed?
Circulation Plus/Catalog Plus allow you to use the same symbology for both
your patron and your library item barcodes, or you can use different
symbologies. For each type of barcode (patron and library item), you can use a
Follett Classic symbology and an additional 8to14 digit symbology.
If you are already using a Follett Classic barcode symbology for your patrons or
library items, you can still continue to use these barcodes. Even if you choose
another symbology, say, Code 39 Mod 10 for your new patron barcodes,
Circulation Plus will always recognize and accept those barcodes that are of a
Follett Classic symbology.
If you choose to use a symbology other than Follett Classic, you can only use one
additional 8- to 14-digit symbology for each type of barcode (patron or library
item). For example, you could use Code 39 Mod 10 for patron barcodes and Code
39 Mod 43 for library items. However, you cannot use both Code 39 Mod 10 and
Code 39 Mod 43 symbologies for patron barcodes because these symbologies use
a different check digit algorithm.
Page 39

04/04 Chapter 2 Setting up your site 39
How to select and define barcode symbologies
1. From the Site tabs in System Setup, select the Barcodes tab:
To cancel changes
before saving
Note: If your site only uses Follett Classic symbologies for patrons and
library materials, you're finished. Go on to the next section, How to
test a barcode."
2. From the Symbology dropdown lists, select the name of the symbology you
are using for your patron and library item barcodes. If you are changing from
one symbology to another, a message appears, warning you that some of
your barcodes may become invalid, which might require you to rebarcode
part of your collection. Choose Yes. Another message appears, explaining in
detail the consequences of changing your symbology. Choose Yes.
If you use Follett Classic and a nonFollett Classic symbology, you only need
to specify the nonFollett Classic symbology. Circulation Plus/Catalog Plus
always recognize and accept the Follett Classic symbologies.
If you ordered your barcodes from Follett Software, all of the information
required to fill in the Barcodes tab is listed on the packing slip you received
with your barcodes. If you didn't purchase your barcodes from Follett
Software, and you're not sure how your barcode symbology is configured,
contact your vendor.
If either of the following conditions apply to you, you may also want to refer
to Appendix D, Barcode symbologies," for more detailed information about
filling out the Barcodes tab:
You are converting from another software package that uses its own
barcode symbology.
You have printed, or are thinking about printing, your own barcodes. For
more information, see Appendix G, The Bar Tender."
Page 40

04/0440 System Setup
3. Fill in the text boxes as appropriate for your symbology, and then test your
barcodes using the instructions in the next section. When you're finished,
click Save.
Important: You must fill in all fields that are enabled. If you don't know the
information, contact your barcode vendor.
How to test a barcode
1. In the Barcodes tab, choose Test. The Test Barcode dialog appears:
2. In the Barcode text box, scan the barcode or type it, and then choose Test.
When the validation process is finished, a message appears notifying you if
the barcode passed or failed. If the test failed, contact your barcode vendor or
Follett Software's Technical Support to ensure your symbology is set up
properly in the Barcodes tab.
Protecting your Follett applications with passwords
For security purposes, Circulation Plus/Catalog Plus allow you to change the
passwords you use to access the Circulation Plus/Catalog Plus applications such
as Cataloging and Circulation Desk. This ensures that only those users who know
the passwords can access the applications.
The Cataloging and Patron Maintenance tabs in System Setup are protected using
the password for the corresponding application. For example, to access the
Cataloging tabs in System Setup, you must enter the password for the Cataloging
application. The Circulation tabs and the Site tabs have their own passwords,
called the Circulation Setup and Site Setup passwords.
In addition to these passwords, you can also specify a password for overriding
block conditions that occur during transactions in Circulation Desk. A block
condition occurs when a patron violates a circulation policy, such as exceeding
the maximum number of checkouts. In order to proceed with the transaction, you
must enter the Circulation Desk Override password.
To use the security options in Circulation Desk, you must define a password for
Circulation Desk. To use the security options in Cataloging, you need only define
one on the Limit Cataloging Access dialog; you do not need to define a
Cataloging password.
Note: If you don't want to use passwords, you may delete any or all of them.
Page 41

04/04 Chapter 2 Setting up your site 41
How to change an application password
1. From the Site tabs, select the Passwords tab:
To cancel changes
before saving
Tip: To remove password protection from your Follett applications, select the
hidden text (*s), and then press DELETE.
2. In the Password column text boxes, type a password composed of up to ten
alphanumeric characters. (See the following table for a list of the default
passwords.) In the Verification column text boxes, type the same password
again, and then choose Save.
Module Password
Alliance Plus Same as the password for Cataloging
Backup and Restore Same as the password for Utilities
Cataloging MODTITLE
Circulation Desk CHECKITOUT
Circulation Desk Override LETITGO
Circulation Setup SOBEIT
Inventory Same as the password for Circulation Desk
Patron Maintenance MODPATRON
Reports PRINTIT
Site Setup MAKEITSO
Utilities FIXDATA
Page 42

Transferring the PHD application to a PHD
Follett Software's PHD application allows your PHD to recognize your library's
barcode symbologies and to work with Circulation Plus/Catalog Plus. Use the
following steps to load the current version of the PHD application onto each
PHD your library uses before you use it.
Once the application is loaded, you'll only need to repeat the process if:
The PHD screen displays the message, Ready to Update?"
You upgrade to a new version of Circulation Plus/Catalog Plus.
Your barcode symbologies change.
You share your PHD with other libraries that use different symbologies.
You're using a PHD+, PHD+ II, or PHD Laser+, and you've replaced the
PHD's memory or batteries.
1. Make certain your PHD is connected to your computer. To protect your
equipment, turn off the PHD and computer before connecting or
disconnecting your PHD.
04/0442 System Setup
Select the PHD model
you're using.
These instructions
change based on the
PHD you choose.
2. From the Site tabs in System Setup, select the PHD tab:
If the default port and speed
aren't correct, click Edit and
make the desired changes.
For instructions, see How to
change the PHD settings"
(page 43).
3. Once you've selected the correct PHD model and adjusted the PHD settings
as desired, simply follow the instructions displayed on the screen.
Note: If you're loading the PHD application to a PHD Dolphin+ for the first
time, see the instructions on page 671.
A progress dialog appears while the application is transferred to your PHD.
When the process is complete, click Close to return to Site Setup.
Page 43

04/04 Chapter 2 Setting up your site 43
How to change the PHD settings
If the default port and speed aren't correct for your PHD, from the PHD tab,
choose Edit under PHD Settings. The PHD Settings dialog appears:
Select the port you use to attach your
PHD to your computer, and then...
...select the highest speed available for
that port. The PHD Dolphin+ only com
municates at a speed of 9600 baud.
After selecting the port and speed for your PHD, click Save.
Note: The port and speed settings are saved as the defaults for this workstation
only. You can change a workstation's default settings through any of the
PHD features in the Circulation Plus/Circulation Plus applications.
Maintaining events for Catalog Plus
If you want events
deleted after they have
expired, check this box.
Note: This option isn't
available if you have not
installed Circulation Plus.
Entering event notes for specific days throughout the year is like keeping an
event log or notebook of upcoming activities for the library, school, or
community. If you have Catalog Plus, your library patrons can view the events
you maintain in OPAC (see page 410) and with WebCollection Plus (see page
450). However, even if Catalog Plus is not installed, you can still maintain a list of
events for yourself in System Setup.
1. From the Site tabs in System Setup, select Events.
To delete an event,
select the event
and click Delete. At
the message, click
Yes to proceed.
The number of days an expired
event remains in the system
before being deleted
Page 44

04/0444 System Setup
2. To add an event, click New. To edit an event, select the event under Event
List, and click Edit. The dialog appears:
To erase the note
for this event
3. Add or make changes under Event Information. Type the time and date that
the event you are scheduling begins and ends.
Example: If the event is scheduled to begin at noon, type 12 p. If the event
starts at 9:30 in the morning, type 09:30 a.
Type a brief description of the event. Adding a note for each event is
optional. If you want to add or edit a note for a scheduled activity, put the
cursor in the Event Note text box and type the note. When finished making
changes under Event Information and Event Note, click Save. The Events List
window reappears, displaying all events in chronological order.
After setting up your site
Whether you purchased Circulation Plus, Catalog Plus, or both, you're now
ready to prepare to catalog your collection. Proceed to Chapter 3, Preparing to
catalog your collection."
Page 45

Chapter 3 Preparing to catalog your collection
The Cataloging setup tasks you'll need to perform include the following:
grouping your collection according to lending period; identifying probable call
number locations in your MARC records; setting up your call number prefixes;
increasing access to your collection with categories you define; defining the tag
range for your brief MARC records; and making it easier to add copies to your
collection.
Throughout this chapter there are references to MARC 21 (formerly known as
USMARC), MARC records, and the MARC 21 standard. If you are not familiar
with MARC, please find an appropriate reference guide before beginning, such as
the MARC Bibliographic Format Guide, published by the Follett Software Company,
or MARC 21 Format for Bibliographic Data, published by the Library of Congress.
45
See also: For more information about MARC, visit the Library of Congress Web
site at http://lcweb.loc.gov/marc.
Grouping your collection according to lending period
As you already know, when a patron checks out a book, the circulation period
(length of time he/she is allowed to keep the book) is based on the patron type
(age or classification of the patron) and the circulation type (type of book). For
example, libraries may only allow students to check out new books for half of the
normal checkout period. To help you maintain the various lending periods based
on the type of book, Circulation Plus/Catalog Plus allow you to create and assign
circulation types to the copies in your collection.
Example: Let's suppose you want to limit the loan period of a new book to one
week. You would create a circulation type such as 1week checkout," or New
books," depending on how you want to group your collection, and then establish
a corresponding loan period for this circulation type for each of your patron
types in your circulation policies.
You assign a circulation type to a copy when you add a new copy to a title in
Cataloging. You can change the circulation type of a copy by editing the copy.
Circulation types are, however, only descriptions of the loan periods for items in
your collection. You establish the actual loan periods when you create your
circulation policies for your patrons.
See also: For more information about how circulation types relate to loan
periods, see Circulation policies: who can have what and for how long" on
page 76.
Page 46

Circulation Plus/Catalog Plus have three default circulation types:
Suggested use for default circulation types
Circulation type Suggested use
04/0446 System Setup
Regular
R
Noncirculating eBook
*NC
Temporary
TEM
Use the Regular circulation type for library materials that can be checked
out for the standard loan period set by your library.
Use the *NC circulation type for electronic library materials, such as
eBooks, that are not checked out through Circulation Desk. Copies with
this circulation type cannot be circulated or have a hold or fine placed on
them. Any block condition generated when trying to do so cannot be
overridden. The inventory status is always Marked. NetLibrary eBook
copies" have this circulation type.
Use the Temporary circulation type for library materials that are not a
part of your permanent collection and that can be checked out only on a
temporary basis. This is typically used for magazines and newspapers.
You can only assign the Temporary circulation type when you add a title
during a checkout. Temporary titles are automatically deleted when the
item is checked in.
See also: For more information about temporary items, see Adding a
title during a checkout" on page 139.
You can also use circulation types as a limiter when you generate the following
reports: Overdue/Bill Notices and Checkouts/Fines Transaction Reports.
To access your circulation types, select Cataloging from the Setup menu in
System Setup. If you have defined a password for Cataloging, a password dialog
appears. The default password for Cataloging is MODTITLE. Type the password
and choose OK. The Cataloging tabs appear with the Circ Types tab open:
The number of copies
attributed to each circulation
type increments as copies
are added in Cataloging
and Circulation Desk.
To delete the
highlighted
circulation type
To define the
highlighted
circulation
type as the
default for all
new copies
From this tab you can add, edit, or delete circulation types. You cannot, however,
delete or edit the Regular (R), Noncirculating eBook (*NC), or Temporary (TEM)
Page 47

04/04 Chapter 3 Preparing to catalog your collection 47
circulation types. Circulation Desk automatically assigns the Temporary
circulation type to temporary copies created during a checkout. You can also
define any one of the Circ Types as the default. Cataloging then automatically
assigns the default circulation type when adding or importing new copies to the
collection that do not have a circulation type defined in the import file.
Note: You cannot delete a circulation type if it has copies assigned to it. To do
this, you must first change the circulation type of the affected copies. If you
have a PHD, you can do this by using Update Copies via PHD. For
information about updating copies with a PHD, see Using your PHD for
mass updates," page 338.
How to add or edit circulation types
1. To add a circulation type, choose New in the Circ Types tab. To edit a
circulation type, select one from the list, and then choose Edit. The desired
dialog appears:
Note: Once a circulation type is saved, you cannot edit its code.
2. Type a code and description that easily identifies the circulation type. When
you finish adding or editing a circulation type, choose Save.
Identifying call number locations in your MARC records
When you create a copy record, unless you replicate an existing copy, Cataloging
automatically retrieves the call number from the 900 tag in the copy's MARC
bibliographic record. This saves you time because you don't need to retype the
call number each time you create a new copy record.
System Setup allows you to customize Cataloging so that it looks for call
numbers in up to three tags and in up to five different subfields for each tag. You
will want to add other locations for the call numbers if the vendor of your MARC
records puts the call number in a tag other than the 900, or if you are doing your
own original cataloging and choose to put call numbers in another tag.
Page 48

To set up the default call number locations, follow these steps:
1. From the Cataloging tabs in System Setup, select the Call Numbers tab:
To cancel changes before saving
Default value is 900a.
One of the five subfields must
be filled in. The subfield must
be valid for the tag based on
current MARC 21 standards.
04/0448 System Setup
2. In the Tag and Subfields text boxes, type the most probable locations for the
call number in your MARC bibliographic records, and then choose Save.
Important: Enter the tag and subfield values in order of probability that a call
number will be located in those locations.
Setting up your call number prefixes
Call number prefixes are meaningful abbreviations typically used to help identify
the location of a book in the library according to general content. Examples of
common call number prefixes are BIO (Biography), E or EZ (Easy Reading), REF
(Reference), and FIC (Fiction).
Circulation Plus/Catalog Plus use call numbers to collect circulation statistics
and sort copy lists during searches and in reports (Bibliography Report,
Inventory List by Call Number, and Shelf List). By creating specific call number
prefixes in System Setup, you control how the library automation system collects
statistics and sorts copy lists. For records with call number prefixes not defined in
System Setup, Circulation Plus/Catalog Plus place the statistics under the OTH
(Other) call number prefix. The system automatically tracks statistics for items
using standard Dewey call numbers without prefixes.
You can also use the call number prefixes to sort copies. Using the custom sorting
option (see Sorting your call numbers" on page 51), you can adjust your sort
order to match the bookshelves or to control reports of copies listed by call
numbers. The default sort order is numbers followed by symbols and alphabetic
characters.
Page 49

04/04 Chapter 3 Preparing to catalog your collection 49
If you want to use your call number prefixes to organize your collection by
subject matter, we recommend you run the Copies With Other Call Numbers
Report (see page 512) and address any copies in the report (change the prefixes
used by the copies or add them to the prefix list maintained in System Setup).
To access your call number prefixes, select the Call Num Prefixes tab from the
Cataloging tabs:
List of currently specified
call number prefixes
Deletes the selected call number prefix. If you delete a call number prefix, System Setup compares the
deleted item to the remaining prefixes. If it finds a prefix consisting exclusively of the first, or first and
second characters of the deleted prefix, it moves the circulation statistics to that prefix. Otherwise,
System Setup moves the circulation statistics relating to the deleted prefix to the OTH (Other) prefix.
Important: Prefixes included in the Custom sorting list (see page 51) can't be deleted.
System Setup assigns the following default prefix codes automatically:
OTH(Other) used to track circulation statistics for copies that have a call
number prefix that is not defined in the Call Num Prefixes tab.
TEM(Temporary) used to track circulation statistics for temporary copies
that are created during checkout.
Note: You can neither edit nor delete the OTH and TEM call number
prefixes. You can only edit the description of a call number prefix you
have created.
Page 50

How to add or edit call number prefixes
1. To add a call number prefix, choose New. The Add Call Number Prefix
dialog appears. To edit the description of an existing call number prefix,
select one from the list, and then choose Edit. The Edit Call Number Prefix
dialog appears:
Note: Once a call number prefix is saved, you can edit the description, but
you cannot edit the prefix. If a prefix is incorrect, delete the call
number prefix and create a new one.
04/0450 System Setup
2. If you are adding a call number prefix, type up to three characters in the
Prefix text box. A prefix can consist of any three characters with the exception
of Dewey numbers (000-999), periods, and leading or embedded blank
spaces. Whether you are creating or editing a call number prefix, type a
description in the Description text box, and then choose Save.
Note: As you add each call number prefix, System Setup checks for any
copies using the new prefix and moves any circulation statistics
associated with those copies to the new prefix.
Important: In the interest of accurate statistics and reporting, you may want
to define all the nonDewey prefixes used in your collection. If
you're a DXenabled union member, your defined call number
prefixes can also impact what data is exchanged.
If you define a prefix that consists exclusively of the first or first
and second characters of undefined prefixes in your collection,
the copies with the undefined prefixes will be grouped with the
defined prefix. For example, defined prefix B" would include
undefined prefixes BI" and BIO."
See also: If you notice that some copies in your collection are using
variations of your defined call number prefixes (e.g., [Fic] vs. FIC), you can
easily change them. See Updating copy information globally" on page 326
for instructions.
If you're using the custom sorting option to organize your call numbers by
prefix, any new call number prefixes are added to the Statistics only list. To
place the new prefix in the desired sorting order, continue with Sorting your
call numbers" below.
Page 51

04/04 Chapter 3 Preparing to catalog your collection 51
Sorting your call numbers
1. To change your call number sorting order, from the Call Num Prefixes tab,
click Sorting. The Sort Call Numbers dialog appears.
Note: If a partial inventory is in progress, System Setup will not allow you to
change your call number sort order.
The order defined in the Custom sorting group box represents the order
used to organize copy lists by call number in searches and reports.
Any call number prefixes displayed in the Statistics only list are limited to collecting circulation statistics. They have no impact on
sorting order. Circulation Plus/Catalog Plus incorporate copies using these prefixes into the sort order by comparing them to the
prefixes in the Custom sorting list. If it finds a prefix consisting exclusively of the first or first and second characters used by the
prefix in the Statistics only list, Circulation Plus/Catalog Plus sort those copies with that prefix. Otherwise, the copies are sorted
with the OTH (Other) prefix titles.
2. If you want to use a customized call number sort order, the Enable custom
sorting of call numbers check box must be selected. Highlight the desired call
number prefix, and then use the Add, Remove, Move Up, and Move Down
buttons to modify the sorting order.
Important: You'll need exclusive access to the library database if you want to
save changes to the sort order. This means that no other Follett
applications or services may be open on any workstation or
search station. Rebuilding the call number headings may take a
long time and cannot be interrupted.
3. When you have finished rearranging the call number prefix order, click OK.
If you have modified the call number prefix sorting order, a message appears,
informing you that System Setup must rebuild the call number index to use
the updated sorting order.
4. Click Yes to proceed. The Rebuilding Call Number Headings progress dialog
appears while the index is updated. When the process is finished, click Close.
Page 52

Increasing access to your collection with categories
Circulation Plus/Catalog Plus let you create categories for your collection. You
assign your categories to copies in your collection in Cataloging. Categories are
most commonly used for report generation and curriculum support.
As an example of a reportbased category, let's imagine that you wanted to see a
list of books you purchased using money from an Olin Foundation grant. You
would create a category, Olin Foundation grant," and then assign that category
to those copies as you purchased them. You would then generate a Titles by
Category Report.
For an example of a curriculumbased category, let's look at a teacher 's reading
list. If you create a category for the books on Mr. Smith's biology class reading
list, the Titles by Category Report you generate can then be distributed to Mr.
Smith's students. Since copy call numbers are listed on the Titles by Category
Report, students can go to the shelves to find the books on their reading list.
Another example of a curriculumbased category might be Books about
presidents." You can selectively assign this category to books that contain
presidential biographies. When students are searching for report topics, your
Titles by Category Report will save them time when finding the books they need.
04/0452 System Setup
The following is a list of additional reports, other than the Titles by Category
Report, that you can generate according to category or limit by category:
Bibliography, Inventory List by Title, and Circulation Statistics.
See also: For more information about the reports listed above, please see
Chapter 37, Cataloging reports," and Chapter 38, Circulation reports."
In addition to reports, you can use categories for collection maintenance tasks. In
Cataloging, you can specify a category or a range of categories when exporting
MARC records or when adding them to the Book Cart for further processing.
If you have OPAC installed, you can quicken the search process by selecting
Category as one of the search options available at a search station. For
information about enabling category searches in OPAC, see Choosing search
options," page 410.
Except for selfgenerated categories created by Cataloging during MARC 21
import and the Temporary category, there are no default or builtin categories. If
you import a MARC 21 record into Cataloging that contains a category code that
doesn't already exists in System Setup, Cataloging creates a category with the
description <Code> <Added by Import>," where the code would be the
category code number from the imported record. After the MARC records are
imported, you can change this description to something meaningful to your
collection. The Temporary category is automatically assigned to temporary items
that are created in Circulation Desk during a checkout.
Page 53

04/04 Chapter 3 Preparing to catalog your collection 53
To access your categories, select Categories from the Cataloging tabs:
You can have up to 2,000
categories.
From this window you can add, edit, or delete a category. You cannot, however,
delete or edit the Temporary category.
How to add or edit categories
1. To add a new category, choose New in the Categories tab. To edit a category,
The category code can be a
number ranging from 2 to 2000.
Once a category is saved,
you cannot edit its code.
2. When you finish creating or editing a category, choose Save. The code and
select one from the list, and then choose Edit. The desired dialog appears:
description appear in the Categories tab.
Page 54

How to delete categories
1. On the Categories tab, select the desired category, and then choose Delete. A
warning message appears, asking if you are sure you want to delete the
category. Choose Yes. You will be asked if you want to continue. Choose Yes
again. The Deleting Categories progress dialog appears.
When a category is deleted, the category is first removed from all of the
copies to which it has been assigned. After the category is removed from all
of its copies, the category itself is deleted. If you interrupt the deletion
process by choosing Cancel in the progress dialog, System Setup does not go
back and reassign that category to the copies from which it has already been
removed. You will have to reassign the category to its copies based on your
Titles by Category Report.
2. When processing is complete, choose Close in the Deleting Categories
progress dialog.
Defining the tag range for your brief MARC records
System Setup allows you to set starting and ending tag numbers to determine if a
record is brief or full. A brief record contains no information in the tags within
the specified range. A full record does contain information in one or more tags in
the specified range.
04/0454 System Setup
If you purchase Alliance Plus, changing the brief record range affects which titles
are updated during an Autorecon. For more information about the Autorecon
process using Alliance Plus, see Chapter 31, Autorecon and Reading Program
Recon."
You can also generate a Brief Records Report that lists brief records in your
collection according to title. For more information about the Brief Records Report,
see Generating a Brief Records Report" on page 503.
Important: When redefining your brief record tag range, you must have exclusive
access to the database. This means that no other Follett applications
may be open at any workstation except for search modules, such as
OPAC or WebCollection Plus. Redefining your brief record tag range
may also take a long time. Once started, this process cannot be
interrupted.
Page 55

04/04 Chapter 3 Preparing to catalog your collection 55
To change the tag range for a brief record, follow these steps:
1. From the Cataloging tabs, select the Brief Records tab:
To reset the brief record range to
the defaults: 305 through 899
To cancel changes
before saving
The current values for the starting and ending tag numbers appear in the two
text boxes.
2. In the first text box, type the first tag number for the range of tags to exclude
from a brief record. In the second text box, type the last tag number for the
range to exclude from brief records.
3. When you're finished, choose Save. An alert box appears, warning you that
redefining your brief record tag range may take a long time. Choose Yes. The
Brief Record Definition progress dialog appears.
4. When System Setup finishes processing, choose Close in the progress dialog.
Setting up miscellaneous Cataloging options
The options on the last Cataloging tab let you control a number of timesaving
and searchenhancing features. You can choose the following:
Have keywords and crossreferences created automatically.
Include the series information cataloged in 490 tags in an index.
Enable WebPath Express (formerly 856Express) entries or your own virtual"
856 tags.
Delete a MARC record automatically when its last copy is deleted.
Enable the TitlePeek button in Cataloging and OPAC.
Sort categories by either title or call number.
Choose the MARC Editor or the Easy Editor as the default when adding or
editing records.
Page 56

04/0456 System Setup
Choose either authority or bibliographic headings as the default for the Find
Headings list.
Determine how the applications handle leading articles (for example, A, An,
The) during searches.
Enter your proxy server information for Alliance Plus Online and TitlePeek.
You can set up all of these options on the Misc tab.
To set up any, or all, of these options, follow these steps:
1. From the Cataloging tabs, select the Misc tab. Select the options that meet
your library's needs. For a description and important information for each
option, see the following table.
To cancel changes
before saving
Option Description
Create Cross
References...
Create Keyword
Entries...
Index 490 tags Lets you find information in the 490 tag during series searches.
Lets you build crossreferences as you save or import authority records.
If you don't choose this option, you can always use the Rebuild
CrossReferences feature in Cataloging (see page 346).
Lets you update your keywords as you save or import bibliographic records.
If you don't choose this option, you'll need to update the keyword index
before new records can be found by a keyword search (see page 345).
Note: If you change this option, you must rebuild the Series MARC headings
through Utilities before the change will appear (see page 596).
Page 57

04/04 Chapter 3 Preparing to catalog your collection 57
Option Description
Show Authority
856 tags...
Delete Title
When Last Copy
is Deleted
Lets you display virtual" Elec. Access hyperlinks in the OPACs,
WebCollection Plus, and Cataloging (OPAC Display only). These virtual
hyperlinks are created from information in the 856 tags of related authority
records.
If you subscribe to WebPath Express (formerly 856Express), you must select
this option to make the WebPath Express hyperlinks appear. For information
about adding 856 tags to your own authority records, see Using `virtual'
856 tags" on page 358.
Important: If you have WebCollection Plus, you must stop and restart the
WebCollection Plus service after selecting this option.
Note: Whenever you click Save after turning off this option, you have the
opportunity to delete any WebPath Express bibliographic records that may
be in your database. Follett Software provides these records to WebPath
Express subscribers to ensure at least one access point for each WebPath
Express subject. They have little value without the virtual hyperlinks and
can be easily reimported if needed. If you choose not to delete these records
(or cancel during processing) and later change your mind, simply enable this
feature, click Save, and then disable it again.
Automatically deletes a MARC record when the last copy attached to it is
deleted. This occurs whether the copy is deleted manually or by a
Cataloging feature such as Delete Copies via PHD. To globally delete
existing titles without copies, see page 335.
Note: In the MARC View window, before the actual deletion occurs, a
confirmation message appears. This prevents unintentional deletions while
you are cataloging.
For Union Catalog Plus: Selecting this feature at the union has no effect on
member databases; selecting it at the member has no effect on the union.
Enable
TitlePeek
Sort Category
Index...
Default Editor Lets you determine which editor appears when you click the +Title or Edit
Find Headings Lets you determine the default list for the Find Headings feature.
If you subscribe to TitlePeek, selecting this checkbox enables the TitlePeek
button in Cataloging, the OPACs, and WebCollection Plus.
For more information about accessing TitlePeek information, see page 250
for Cataloging and page 469 for the OPACs.
Note: If you select Disable access to other applications" on the General
Setup tab in OPAC, the TitlePeek button does not appear in the OPACs.
Lets you determine how category search results and the Titles by Category
Report are sorted.
Note: If you change this option, System Setup must reindex your categories.
This means that no other Follett applications may be open except for search
modules such as OPAC or WebCollection Plus. This process may take a long
time and cannot be interrupted.
buttons in Cataloging.
No matter which editor you choose as the default, both are available from
Cataloging's File menu. For more information about each, see Chapter 23,
Using the MARC Editor," and Chapter 22, Using the Easy Editor."
Set it to Bibliographic or Authority.
2. By default, the Follett Software applications recognize the English articles
(e.g., a, an, the) and ignore them if they are at the beginning of search terms.
If you want to change how your applications handle articles, click the
Page 58

Select the language(s) whose
articles you wish to recognize.
Note: If you change the language
selection, System Setup must
rebuild your keywords, which may
take a long time.
Select this to ignore all
recognized leading articles
when searching for a title.
3. After making your changes to your Articles setup, click Save. If you changed
4. If you cannot access Alliance Plus Online or TitlePeek even though you have
04/0458 System Setup
Articles button on the Misc tab. Select the language options that meet your
library's needs.
For a list of each
language's articles,
select Help.
Important: If the Remove leading articles option is selected, you must set the
indicator for any nonfiling leading characters when you catalog
titles (see Editing indicators" on page 274). If you don't, you will
have difficulty finding titles with leading articles.
your language selection, System Setup will ask if you want to rebuild your
keywords. To start the process, click Yes. When the process is complete, close
the Update Keywords progress dialog.
a subscription to one or both services, you may need to enter your proxy
configuration here. This information redirects the Alliance Plus Online or
TitlePeek requests from your Windows workstations to your proxy server.
Please consult your technical coordinator before making this configuration.
Make sure, also, that you have write" access to the system folder. For more
information about connection requirements, see Chapter 6, Setting up online
services," in the Installation Guide.
Click the Proxies button on the Misc tab.
Enter the address of your proxy
server and its port number for
these services.
Under TitlePeek, enter the IP address of your proxy server and either accept
the default TCP port number of 80 or enter your custom port number. If your
patrons also need access to TitlePeek, you need to enter this information in
OPAC Setup (see page 405) at each Windows search station.
Note: On Macintosh computers, Cataloging and OPAC use the proxy settings
in the Macintosh Internet Control Panel or in the Web browser when
accessing TitlePeek. If the workstation or search station has access to
the Internet, no additional configuration is necessary for TitlePeek.
Page 59

04/04 Chapter 3 Preparing to catalog your collection 59
Under Alliance Plus, enter the IP address of your proxy server again and
accept the default TCP port number of 5151. If you have multiple cataloging
workstations, at each one, you'll need to open System Setup and enter this
information.
Important: If you can currently access Alliance Plus Online and TitlePeek,
you do not need to change this proxy configuration.
Click Save to close the dialog box.
5. To save any changes you made to the Misc tab, click Save. If you made
changes that require additional processing (see the previous table for details),
System Setup prompts you to complete the processing. Once a process is
complete, close the progress dialog.
Note: If you changed the Sort Category Index option, remember that the
reindex process requires you to close all other Follett applications
(with the exception of search modules, such as OPAC ).
After preparing for cataloging
After completing the tasks in this chapter, you are ready to start creating (see
page 263) or importing (see page 289) MARC records.
Note: If you are importing MARC authority as well as bibliographic records, and
you've chosen to generate crossreferences automatically, you should
import your bibliographic records first.
Before creating new MARC records, you should consider the following tasks:
Customize your MARC bibliographic and authority templates (not available
for Mac OS). For more information about customizing your templates, see
Appendix C, Bibliographic and authority templates."
Provide a copy of the Code Table List (see page 504) to the individuals doing
the actual cataloging. This report shows a listing of all the codes and
descriptions for the circulation types, categories, and call number prefixes
you defined in this chapter.
If you purchased Circulation Plus, you still need to complete the tasks in Chapter
5, Preparing to circulate your collection."
If you purchased Catalog Plus, you also need to complete the tasks in Chapter 4,
Setting up Acquisitions," and Chapter 33, Setting up your search stations."
Page 60

Notes
04/0460 System Setup
Page 61

Chapter 4 Setting up Acquisitions
The Acquisitions setup tasks you need to perform are relatively easy. Because the
Acquisitions feature allows you to create book orders and track orders and
funding sources, it is helpful if you have all information pertinent to particular
vendors and funding sources. This information includes names, addresses, phone
numbers, Tax ID numbers, and allocated funding source amounts.
Setting up a list of vendors and funding sources in Acquisitions allows you to
create new orders, accurately track existing orders, and maintain all pertinent
acquisitions information in one place. Once set up, Acquisitions is available from
the menu of your Cataloging module.
61
Adding vendors
The first tab in Acquisitions setup is the Vendors tab. Here you establish and
maintain a list of vendors. By default, your Circulation Plus/Catalog Plus
modules come with Follett Library Resources listed as a vendor.
Note: If you are upgrading, existing vendors defined in your copy records are
not automatically added.
1. To add a vendor to the list, click New.
Page 62

2. Enter a vendor description.
3. Enter a onetothree character alphanumeric code.
4. Federal Tax ID information is available from the vendor.
04/0462 System Setup
Note: Currently, there is no capability to delete vendors. Use the Status switch to
make a vendor you no longer use Inactive.
5. Account Number is a previouslyestablished account number that you have
with a specific vendor. This is not your Follett Customer Number.
6. Clicking Address opens a new window where you enter the vendor's
address.
7. After entering vendor address information, click OK.
8. Click Save on the Add Vendor dialog.
Note: We recommend that you click Save at each stage (tab) when adding a
vendor. If you decide to cancel an addition at any point, NONE of the
changes are saved.
Page 63

04/04 Chapter 4 Setting up Acquisitions 63
Contact tab
There are three extra informational tabs available for Add/Edit Vendors: Contact,
Notes, and Purchases. The Contact tab is where you enter information for the
person with whom you communicate.
Notes tab
Clicking on the Notes tab on your Vendor window opens a freeform text entry
box where you can type in any notes you want to store about that vendor.
Purchases tab
Clicking on the Purchases tab displays monetary amounts associated with orders
with that vendor. These amount fields are read-only and display the following
information:
Open Ordersa total amount of all orders with a status of Open
Issued Ordersa total amount of all orders with a status of Issued
Page 64

Closed Ordersa total of all orders with a status of Closed
Total Issued or Closedthe combined total of all Issued and all Closed
orders for that vendor
Click Save to save your changes.
Note: We recommend that you click Save at each stage when adding a vendor. If
you cancel an addition at any point, none of the changes are saved.
Clicking the Recompute button updates the figures in the previouslymentioned
fields to display any changes. These new recalculated figures are read-only and
are not saved by the system.
Adding funding sources
Clicking the Funding Sources tab opens a window for adding funding sources to
a list. Funding source information on this window includes the source
description and associated code, the status, and total funding allotment.
Note: If you use yeartoyear funding source data, you may want to describe
your funding source as funding source 2002," for example, to distinguish
fiscal year changes in this information.
04/0464 System Setup
Page 65

04/04 Chapter 4 Setting up Acquisitions 65
To add funding source information, click New from the Funding Sources tab.
1. Add your funding source description (name).
2. Enter a code specific to that funding source (13 alphanumeric characters).
3. If you have a funding source that you are no longer using, set the Status to
Inactive. (Currently, there is no capability to delete funding sources.)
Amount tab
The Amount tab allows you to add or update funding source monies. The
add/edit amount fields are defined as follows:
Allocated: The total amount allocated to this source (may be set to zero).
Committed: The total of the orders for this funding source with a status of
Open, Issued, or both. Represented in both dollars and percentage. Resets to
zero each time you click Edit in the Funding Source window.
Spent: The total amount of orders for this funding source with a status of
Closed. Represented in both dollars and percentage.
Remaining: The total amount allocated minus the committed amount.
Note: We recommend that you click Save at each stage of an addition. If you
decide to cancel an addition at any point, none of the changes are saved.
Page 66

Notes tab
Use the Funding Source Notes tab to capture any notes you want to store for a
particular funding source. This is a freeform text entry field.
Note: We recommend that you click Save at each stage of a funding source add. If
you decide to cancel an add at any point, none of the changes are saved.
Setting the default information
04/0466 System Setup
The Acquisitions Defaults tab is where you enter any shipto/billto information
you want to use for ordering. This information includes the information a vendor
would need to contact your school or library. By default, contact person name
and school address established in Site Setup populate this tab, but this
information is editable.
1. Enter the name of the person at your school or library who the vendor would
contact concerning an order.
2. Enter the contact person's telephone number.
3. Enter the contact's Fax number.
4. Enter the contact's email address.
5. Click Bill To to enter address information in a freeform text box.
Page 67

04/04 Chapter 4 Setting up Acquisitions 67
6. If the billto address is the same as the shipto address, check the Same As
Bill To Address check box. If not, click Ship To and enter the shipto address.
7. Click Save.
Note: We recommend that you click Save at each stage of a Defaults add. If you
decide to cancel an update at any point, none of the changes are saved.
Once you have established vendor and funding information in System Setup, that
information is available from Cataloging to help you create book orders. You can
update this information from Cataloging as well. Changing default information
will only affect new orders.
Page 68

Notes
04/0468 System Setup
Page 69

Chapter 5 Preparing to circulate your collection
The setup features discussed in this chapter include ways to do the following:
group your patrons for circulation purposes; make it easier to create new patrons;
set up your circulation policies; set time limits for items on hold and on reserve;
activate automatic fine calculation and refunds; customize your overdue, bill, and
hold notices; set up your library's hours and current calendar; and set up alert
sounds for your circulation desk.
Important: You must set up the alert sounds at the workstation where you will be
using Circulation Desk.
69
Grouping your patrons by type
As you already know, the checkout period for a book or other library item is
partially determined by who is trying to check out the item. Circulation Plus lets
you create as many groups of patrons as you need to describe the various types
of patrons who use your library. These groups are called patron types.
See also: For more information about how patron types relate to checkout
periods, see Circulation policies: who can have what and for how long" on
page 76.
The patron types you create are also important for statistical reasons. The
Checkouts/Fines Transactions Report, Patron Cards, and the Overdue/Bill and
Hold Notices can all be limited according to patron type. You can also limit the
Patron Name List according to patron type.
You assign a patron type to a patron when you add a patron record. You can then
use patron types for global editing and updating of patron records. For more
information about globally editing patron records, see Chapter 16, Maintaining
patron records in batches."
Page 70

04/0470 System Setup
To access your patron types, select Patron Maintenance from the Setup menu in
the System Setup module. If you have defined a password for Patron
Maintenance, a password dialog appears. The default password for Patron
Maintenance is MODPA TRON. Type the password in the text box, and then
choose OK. The Patron Maintenance tabs appear with the Patron Types tab open:
To delete the
highlighted
patron type
From this window you can add, edit, or delete a patron type. You cannot delete
the Student (S) or Faculty (F) patron types or the patron type that has been
defined as the default on the Patron Defaults tab. However, you can change the
description of the Student (S) or Faculty (F) patron types. When you add or edit a
patron type, you can also create or edit the salutation that appears on all notices
you send to patrons of this type.
You cannot delete a patron type if there are patrons assigned to it. To do this, you
must first assign the patrons to a different patron type using global editing in
Patron Maintenance.
Page 71

04/04 Chapter 5 Preparing to circulate your collection 71
How to add or edit a patron type
1. To create a patron type, choose New in the Patron Types tab. To edit a patron
type, select the patron type from the list, and then choose Edit. The desired
dialog appears:
This text appears at the top of all notices
before the patron name. If this text box is
empty, only the patron name appears at
the top of the notice. According to this
example, Dear Jane Doe:" appears on
the notice. If no salutation is defined, only
Jane Doe:" appears.
Note: Once a new patron type is saved, you cannot edit its code.
2. When you finish creating or editing a patron type, choose Save.
Page 72

Making it easier to create new patrons
These prompts apply to
all patron types and
appear in the Edit
Patron and Patron
Information dialogs.
Location 1 appears in
the patron information
box of the Circulation
Desk windows.
Select the check box to
give your patrons access
to the login features in
OPAC.
Choose the password
they must enter along
with the barcode or ID
required above.
Select to allow your patrons
to view their own information
and/or place holds in OPAC.
Select the patron type
representing your most
frequent library visitors.
04/0472 System Setup
There are a few options in System Setup that enable you to create new patrons
faster and make it easier to find patrons when searching for them.
To set up these options, follow these steps:
1. From the Patron Maintenance tabs, select the Patron Defaults tab:
To cancel changes
before saving
Select the unique
identifier for your
patrons. When you
create or import new
patrons, either the
barcode, the ID, or both
are required before you
can save the patron
record.
2. In the UserDefined Patron Field Names box, position the cursor in a text box
and type a prompt that is appropriate for all your patrons. These appear in
Circulation Desk, Patron Maintenance, OPAC, and on some reports.
The UserDefined Patron Field Names are indexed in your patron database
so that you can use them to search for patrons in Circulation Desk. You can
generate the following circulation reports sorted by the UserDefined Patron
Field Names: Checkouts/Fines Transactions, Hold Notices, Overdue/Bill
Notices, Patron Barcode List, Patron Cards, and Patron Name List.
Page 73

04/04 Chapter 5 Preparing to circulate your collection 73
The Location and User Field prompts you enter in the Patron Defaults tab
appear in the Edit Patron dialog in Patron Maintenance:
Location prompts
User Field prompts
When you retrieve a patron in Circulation Desk, the Location 1 prompt
appears in the patron information box:
Patron information box
Location 1 prompt, here
defined as Homeroom
3. In the Required Patron Field(s) box, select the way you want to identify your
patrons: barcode, ID, or both. Your selection here determines what
information is required in order to save a patron record and could impact the
way you retrieve patrons in Circulation Desk. It also determines one of the
fields that the patron must enter when logging on at a search station.
Regardless of which field you require when saving a patron record, you can
retrieve a patron in Circulation Desk by either his barcode or ID. However, in
order to retrieve a patron by his ID, you must precede the ID by a forward
slash, /". If you print your patron IDs as barcodes so that you can scan
them, you must precede the ID by a forward slash. This could impact the
symbology you choose. For more information about retrieving patrons in
Circulation Desk, see Transactions 101" on page 122.
Page 74

4. From the Default Patron Type list, select your most common patron type.
Whenever you add a patron, Patron Maintenance automatically assigns this
type to the new patron record. When you import patron records that don't
have patron types, this patron type is assigned to those records.
Empowering your patrons
You can allow your patrons to log on at the search stations. You can choose to
allow them to view their checkouts, fines, and holds, and to place actual holds
and reserves. Just choose the applications where logging on is allowed, set up the
password field, and choose the allowable activities.
To set up this option, follow these steps:
1. In the Patron Empowerment box, choose whether to allow your patrons to
log on to the OPAC or to WebCollection Plus or both.
2. Choose the Password field. To log on, the patron must enter the barcode or
ID that you specified in the Required Patron Field(s) box, above, (if your
Required Patron Fields are Barcode and ID, you can choose either), plus the
password field you select from the dropdown list: Last Name, First Name,
Location 1 or 2, User Field 1 or 2, or Birth Date.
04/0474 System Setup
3. Select one or both check boxes to allow patrons to view their own
informationcheckouts, fines, holds, and reservesor to place actual holds
and reserves.
When you choose to allow patrons to view their information, patrons have
access to the Patron Information dialog after logging on. They can view,
however, only three of the seven tabs on that dialog: Checkouts, Fines, and
Page 75

04/04 Chapter 5 Preparing to circulate your collection 75
Holds. They cannot view any other tab or any fine notes you have created. In
WebCollection Plus, the tabs appear as one page.
If you choose to allow patrons to place holds and reserves, Hold/Reserve
buttons appear on the OPAC's selection list and on the record display
window. In WebCollection Plus, a Place Hold/Reserve button appears on the
Title Information page. Clicking a button brings up the New Hold/Reserve
dialog.
Please note that patrons can place actual holds and reserves, not requests for
holds and reserves. For more information on using Patron Empowerment,
see page 472.
Enabling Patron Empowerment here automatically adds the My Info and Log
Out toolbar buttons in the OPACs and in WebCollection Plus, and options in
the OPAC's Tools menu.
Please note that this feature does not affect the Hold and ILL request options
in WebCollection Plus.
When you are finished selecting your Patron Defaults, choose Save.
Page 76

Circulation policies: who can have what and for how long
Now that you've completed setting up your circulation types and your patron
types, you're ready to take your existing circulation policies and define them in
System Setup. The circulation policies you establish in System Setup are used by
Circulation Desk to automatically monitor and control checkouts, renewals, fine
calculations, refunds, holds, and reserves.
To give you an overview, you determine a set of circulation policies based on the
patron types you created at the beginning of this chapter. For each patron type,
you assign maximum numbers for checkouts, overdues, holds/reserves, and
unpaid fines.
When a patron reaches one of the limits for his type, a block condition occurs
during the next transaction. Circulation Desk alerts you with a message. You
must address the block condition or override it with the Circulation Desk
Override password before continuing with the transaction. For more information,
see Handling block conditions during a transaction" on page 127.
You will also be creating loan periods for each patron type based on the type of
item the patron is checking out. If you did not create your circulation types in
Chapter 3, do so before establishing your circulation policies.
04/0476 System Setup
The following table shows an example of how patron types and circulation types
work together when you create your circulation policies:
Loan policy creationexample
Patron type Circulation type Your loan periods
Faculty Regular Fixedthe last day of the current semester or school year
New Books 40 days
Reference 12 hours
Student Regular 20 days
New Books 10 days
Reference 2 hours
Page 77

04/04 Chapter 5 Preparing to circulate your collection 77
To access your circulation policies, from System Setup, select Setup | Circulation.
If you defined a password for Circulation Setup, a password dialog appears. The
default password for Circulation Setup is SOBEIT. Type the password in the text
box, and then choose OK. The Circulation tabs appear with the Policies tab open:
To view the policies for
a patron type, select
the patron type from
this dropdown list.
You cannot edit the loan period
for noncirculating eBooks.
To set up the
circulation limits
for the selected
patron type
To set up the loan
periods for the
selected patron
type/circulation
type combination
The maximum number of overdue
items for this patron type
To use a specific date for check
outs of items belonging to a
circulation type, enter that date
here. Then set the loan period of
that circulation type to Fixed in the
Edit Loan Period dialog (see the
next section).
Make sure to change this date
each year. Circulation Desk does
not do so automatically.
From this tab you create or edit your circulation limits and your circulation
periods for your patron types.
How to set circulation limits for patron types
1. From the Policies tab, select the patron type for which you want to establish
limits from the Patron Type list. In the Limits box, choose Edit. The Edit
Patron Limits dialog appears:
The maximum number of checkouts
for this patron type
The ceiling date overrides the due date calculated by the system if this date is earlier
than the calculated due date. A commonly used ceiling date is the last day of school
so that all items are due the last day of school, no matter what their calculated due
date would be. Make sure to change this date each year. Circulation Desk increments
the year if needed, but the date may not be correct for your school year.
2. In the text boxes, type the circulation limits that you want applied to patrons
of this type, and then choose Save to return to the Policies tab.
3. Go back to step 1 and repeat this process for the remaining patron types.
The maximum amount of unpaid fines
that a patron of this type can accumulate
The maximum number
of items that patrons of
this type can have on
hold or on reserve
The default priority for holds
placed by patrons of this
type. The lower the priority
value, the higher the hold is
in the queue. Enter a
number between 1 and 99.
Page 78

The length of checkout (days,
hours, or fixed). If you choose fixed,
all items of this circulation type will
be due on the fixed due date you
established in the patron type limits
for this patron type.
Maximum number of renewals
for this circulation type
for this patron type
The amount charged per day, or
hour, for overdues
04/0478 System Setup
How to limit loan periods
1. In the Policies tab, select the patron type you want to establish loan periods
for from the Patron Type list. All of the circulation types appear in the Loan
Periods box. Select the circulation type for which you want to define loan
periods, and then choose Edit in the Loan Periods box. The Edit Loan Period
dialog appears:
The number of days, or hours, a patron
has to return an overdue without
incurring a fine
The maximum fine amount a patron of
this type can be charged for a single
item of this circulation type
Maximum number of checkouts for this circulation type. The number
cannot exceed the maximum checkout limit for this patron type.
Note: The amount you type in the Fine Increment text box should not exceed
the amount you type in the Fine Limit text box.
2. When you finish establishing the loan period limits for this circulation type
for the selected patron type, choose Save. The Policies tab appears showing
the modified information.
3. To set up another circulation type for this patron type, select the circulation
type from the Loan Periods box and repeat filling out the Edit Loan Period
dialog. Repeat this process until you have established loan periods for all
circulation types for each patron type.
Note: You cannot set up loan periods for the Noncirculating eBook (*NC)
circulation type. *NC is intended for eBooks, or other electronic resources,
that are noncirculating, noninventoried, and nonholdable.
Setting time limits for items on hold
When a patron places a hold or reserve on an item, it is entered in the
holds/reserves queue.
A hold is ready if the item is available. If it is not, the hold is pending.
A reserve is inactive until the prereserve processing date. When that date
arrives, the reserve is ready if the item is available, pending if it is not.
A pending hold or reserve becomes ready when the item becomes available.
A hold expires according to the time limits you set on this tab.
A reserve automatically expires the day after the end of the reserve period.
Page 79

04/04 Chapter 5 Preparing to circulate your collection 79
To keep the hold queue from building up with holds that are not retrieved or
fulfilled, System Setup allows you to set time limits on them.
Expiring holds
After the assigned number of days, Circulation Desk expires a hold. By expiring a
ready hold that has not been picked up by the patron, Circulation Desk can make
the next pending hold ready, giving the next patron in the queue the opportunity
to check the item out. By expiring a pending hold, Circulation Desk assumes that,
since a lengthy time has elapsed, the patron no longer wants the item.
You can revive expired holds - that is, make them pending again; Circulation
Desk has not yet deleted them. If you do so, Circulation Desk makes them ready
if and when the item becomes available. You cannot, however, revive reserves.
Deleting holds
To keep expired holds from building up in the queues, System Setup allows you
to assign a time frame for automatically deleting expired holds.
Expired holds are deleted from the system when Circulation Desk is started at
the beginning of each day. Any holds that are deleted are listed on an exception
report. For information about the Daily Holds Processing exception report, see
Interpreting the Daily Holds Processing exception report" on page 171.
Please note:
You can revive expired holds; you cannot revive deleted holds.
You can edit the expiration date of a hold, either before or after it expires.
You can edit the priority of a hold.
Setting up reserves
A reserve is slightly different from a hold. A patron places a hold when he would
like to have the item as soon as possible. For a reserve, a patron specifies a future
date when he would like to have the copy.
The copy's status is unaffected by the reserve until the prereserve processing
date arrives. On that date, when processing reserves, the Daily Holds Processing
initially changes the reserve status to pending. When processing holds, it changes
the reserve status to ready and the copy status to On Hold, if the item is available.
If the item is unavailable, the reserve status remains pending until it is available.
System Setup allows you to set the number of prereserve processing days. This
allows you time to locate the reserved copies, place them on the hold shelf, and
remind the patron to retrieve them.
Example: If you enter 2, the Daily Holds Processing exception report alerts you
to an upcoming reserve 2 days before the reserve date. Because the copy status of
an available item becomes On Hold that day, any attempted transaction on the
reserved item causes Circulation Desk to display an alert message.
Page 80

The number of days a hold
remains pending before expiring
The number of days a hold
remains ready before expiring
The number of processing days
you need to prepare a reserve
04/0480 System Setup
A reserve has a reserve period equal to its loan period. For example, if a patron
reserves an item for March 18th, and the loan period is 10 days (2 weeks) for that
circulation type, the reserve period is March 18-April 1. A reserve automatically
expires a day after the end of the reserve period. For more information about
reserves, see A brief introduction to reserves" on page 166.
Entering the time limits
To set up the time limits for items on hold and the number of processing days
needed for preparing reserves, follow these steps:
1. From the Circulation tabs in System Setup, select the Holds tab:
To cancel
changes before
saving
To activate automatic deletion
of expired holds and reserves
The number of days the
expired holds and reserves
remain in the queue before
being deleted
2. In the Holds tab, set up your time limits for pending and ready holds, and
decide if and when you want Circulation Desk to delete expired holds and
reserves automatically.
3. Select the number of prereserve processing days that you need to make a
reserve ready for retrieval by the patron. On that day, the Daily Holds
Processing changes the copy status to On Hold and the exception report lists
the upcoming reserve.
4. When you're finished, choose Save.
See also: For more information about deleting holds manually, extending hold
expiration dates, and processing reserves, see Chapter 12, Managing holds."
Page 81

04/04 Chapter 5 Preparing to circulate your collection 81
Activating automatic fine calculation and refunds
System Setup lets you decide whether you want to charge fines, and if so, how
they're calculated. Depending on library policy, you may not want all fine
options active.
You can create additional fine types as needed. Unlike the default fine types of
Damaged, Lost, Overdue, and Refund, userdefined fine types are not associated
with copy information.
To set up the fines options, follow these steps:
1. From the Circulation tabs in System Setup, select the Fines tab:
To activate automatic
calculation of overdue fines
To increment overdue fines,
even on grace days
To increment overdue
fines, even if the library is
closed
To generate a refund
whenever a partially paid
fine (overdue, damaged,
lost, or useddefined) is
deleted in Circulation Desk
To add a new fine type to the
list, click New. Highlight an ex
isting fine type and click Edit to
change the fine type description
(no duplicates). You cannot edit
default fine types or codes for
userdefined fine types. To edit
a userdefined code, delete the
fine type and create a new fine
type and code.
To cancel changes
before saving
To use the Fine
Limit, specified in
the Edit Loan
Period dialog, as
the replacement
cost for lost
copies that do not
have a price
recorded in their
copy records
2. Select the fine options that correspond to your current policies, and then click
Save. For more information about fine options, see the following table.
Page 82

Option Selected Cleared
04/0482 System Setup
Include grace
days in fine
calculation
Include closed
days in fine
calculation
Use fine limit if
the copy price
has not been
entered
Example: A copy is due on Monday,
but not returned until Thursday.
There is a twoday grace period and
a $0.10 fine increment for this
patron type. The patron is charged
$0.30 for the overdue copy.
Example: You are closed for the
weekend. A copy is due on Friday,
but not returned until Monday. If
there are zero grace days for this
transaction situation, then the
patron is charged $0.30. If there is a
oneday grace period in effect, and
grace days are not included in fines,
the patron is charged $0.20.
The fine limit is the most money a
patron can be charged for a single
copy. If this is selected, and you
choose to show the copy price on
Notices, then the fine limit also
appears on Notices if no copy price
is specified.
In addition, if this is selected, the
fine limit is used when you create a
lost copy fine if there is no price.
Example: A copy is due on Monday,
but not returned until Thursday.
There is a twoday grace period and a
$0.10 fine increment for this patron
type. The patron is charged $0.10 for
the overdue copy.
Example: You are closed for the
weekend. A copy is due on Friday,
but not returned until Monday. If
there are zero grace days for this
transaction situation, then the
patron is charged $0.10. If there is a
oneday grace period in effect, and
grace days are not included in fines,
there is no charge.
No predetermined fine is charged for
a lost copy. You type the amount you
want charged at the time the lost copy
fine is created.
Note: Currency format changes are defined in Windows from the Control Panel |
Regional Settings Properties | Currency tab. On Mac OS, you change the
currency format through the Numbers Control Panel.
Customizing your overdue, bill, and ready hold notices
When you print out a notice, the message at the top of the notice states the reason
you are sending the notice and the urgency with which the recipient should treat
it. Circulation Plus allows you to customize the message. For example, you might
want your overdue notices to include a special message before the summer break
to make sure that all of your overdue items are returned before the break begins.
When Reports creates a notice, it takes the wording that appears at the top of the
notice from a notice template. Circulation Plus comes with three standard
templates. To create your own notice templates and to edit those templates when
needed, use the following instructions.
Page 83

04/04 Chapter 5 Preparing to circulate your collection 83
To access your templates, select the Notices tab from Circulation in System Setup:
To delete the
highlighted
This text appears at the top of a
notice when the highlighted
template is assigned to a notice.
This box shows you which
template is used as the default
when generating a notice. You
can always select a different
template when generating
a notice.
template
The following table lists the wording of each of the standard notice templates:
Template Wording
Standard Bill Notice The following items are long overdue and assumed to be lost.
Standard Overdue Notice The following items are overdue. Please return them as soon as
Standard Ready Hold Notice The items you requested are now available in the library. Please
Please pay the amount listed below as soon as possible.
possible.
bring this notice to the library as soon as possible.
You cannot delete or edit any of the standard notice templates. If you want to edit
a standard template, choose Duplicate, and then create a new template based on
the existing wording.
How to change the wording on a notice
1. Decide how you want to go about changing the wording on a notice:
If you want to change the Default Template assignment, skip to step 3.
If you want to change the wording of a listed template, other than the
standard templates, highlight the template, and then choose Edit. The
Edit Template dialog appears.
If you want to create a new template based on the wording of a listed
template, such as one of the standard templates, highlight the template,
and then choose Duplicate. The Add Template dialog appears.
Page 84

04/0484 System Setup
If you want to create a new template with completely new wording,
choose New. The Add Template dialog appears.
There is room for approximately
285 words (2000 characters) at
the top of a notice.
2. After you type in the new wording and name the template, choose Save.
3. From the list under Template, highlight the name of the template that you
want to assign as the default, and then choose Set Default. The Set Default
Template dialog appears:
4. In the Set Default Template dialog, select the notice you want to assign your
template to, and then choose Save.
Page 85

04/04 Chapter 5 Preparing to circulate your collection 85
Setting your library's hours
Setting up your library hours in System Setup is important because Circulation
Desk uses this information when calculating due dates and fines for hourly
checkouts. Be sure to define opening and closing times for each day of the week
you are open, even if you are only open once a month on that day.
To set up the opening and closing times for your library, follow these steps:
1. From Circulation in System Setup, select the Hours tab.
To cancel changes
before saving
2. In the Sunday through Saturday text boxes, enter the default opening and
closing times for your library. Remember to add am or pm. When you're
finished, click Save.
Setting up your library's current calendar
You record your library's closed days in the calendar in System Setup.
Circulation Desk uses this calendar to determine due dates, calculate overdues,
and monitor grace periods.
Important: Any changes you make to your calendar take effect when you reopen
Circulation Desk. These changes, however, are not applied
retroactively to checkout due dates. For example, if you close a day
that lies less than two weeks in the futureassuming your maximum
circulation period is two weekscopies already checked out that
come due on that day are still due on that day. If a copy is checked in
late because the library was closed on the due date, a fine is still
calculated and assessed based on the settings in the Fines tab.
Make sure that you have hours of operation defined in the Hours tab for each
day you are open. Circulation Desk treats days without defined hours of
operation as if they were closed.
System Setup uses the default annual calendar as a template when you create a
calendar for the new year. You are not required to change any of the settings in
the default annual calendar.
Page 86

04/0486 System Setup
Circulation Desk also uses the default annual calendar to automatically create a
new calendar year for you when the due date for a checkout extends into the
coming year for which no calendar has been created.
To set up or change your current calendar, follow these steps:
1. From the Circulation tabs, select the Calendar tab. If a calendar exists for the
current year, the Calendar tab appears. Skip to step 4. If a message appears
informing you that the system was not able to locate the current calendar,
you must set up your default annual calendar. In the warning message,
choose Yes. The Edit New Annual Calendar Defaults dialog appears:
To add a closed day
Weekday check boxes
To remove a closed day
from the default annual
calendar
Closed day selection
list
Note: If you already created a calendar for the current year and then change
the default annual calendar, these changes won't take effect until you
create a calendar for the next year.
2. Select the weekday check boxes for the days you want to close for the entire
year. Make sure that you do not leave any days open for which you have not
defined Open and Close times in the Hours tab. Circulation Desk treats days
without defined hours of operation as if they were closed.
If there are certain dates on which you know the library will always be
closedsuch as January 1 or December 25you can mark them as closed on
the default calendar by closing the individual day. If you want to close an
individual day, choose New. The New Closed Day dialog appears:
3. From the Closed On dropdown lists, select the month and the day of the
month. Choose OK to add that date to the list of closed days and return to the
Edit New Annual Calendar Defaults dialog. To add another closed day, click
New in the Edit New Annual Calendar Default dialog, and repeat this step.
Page 87
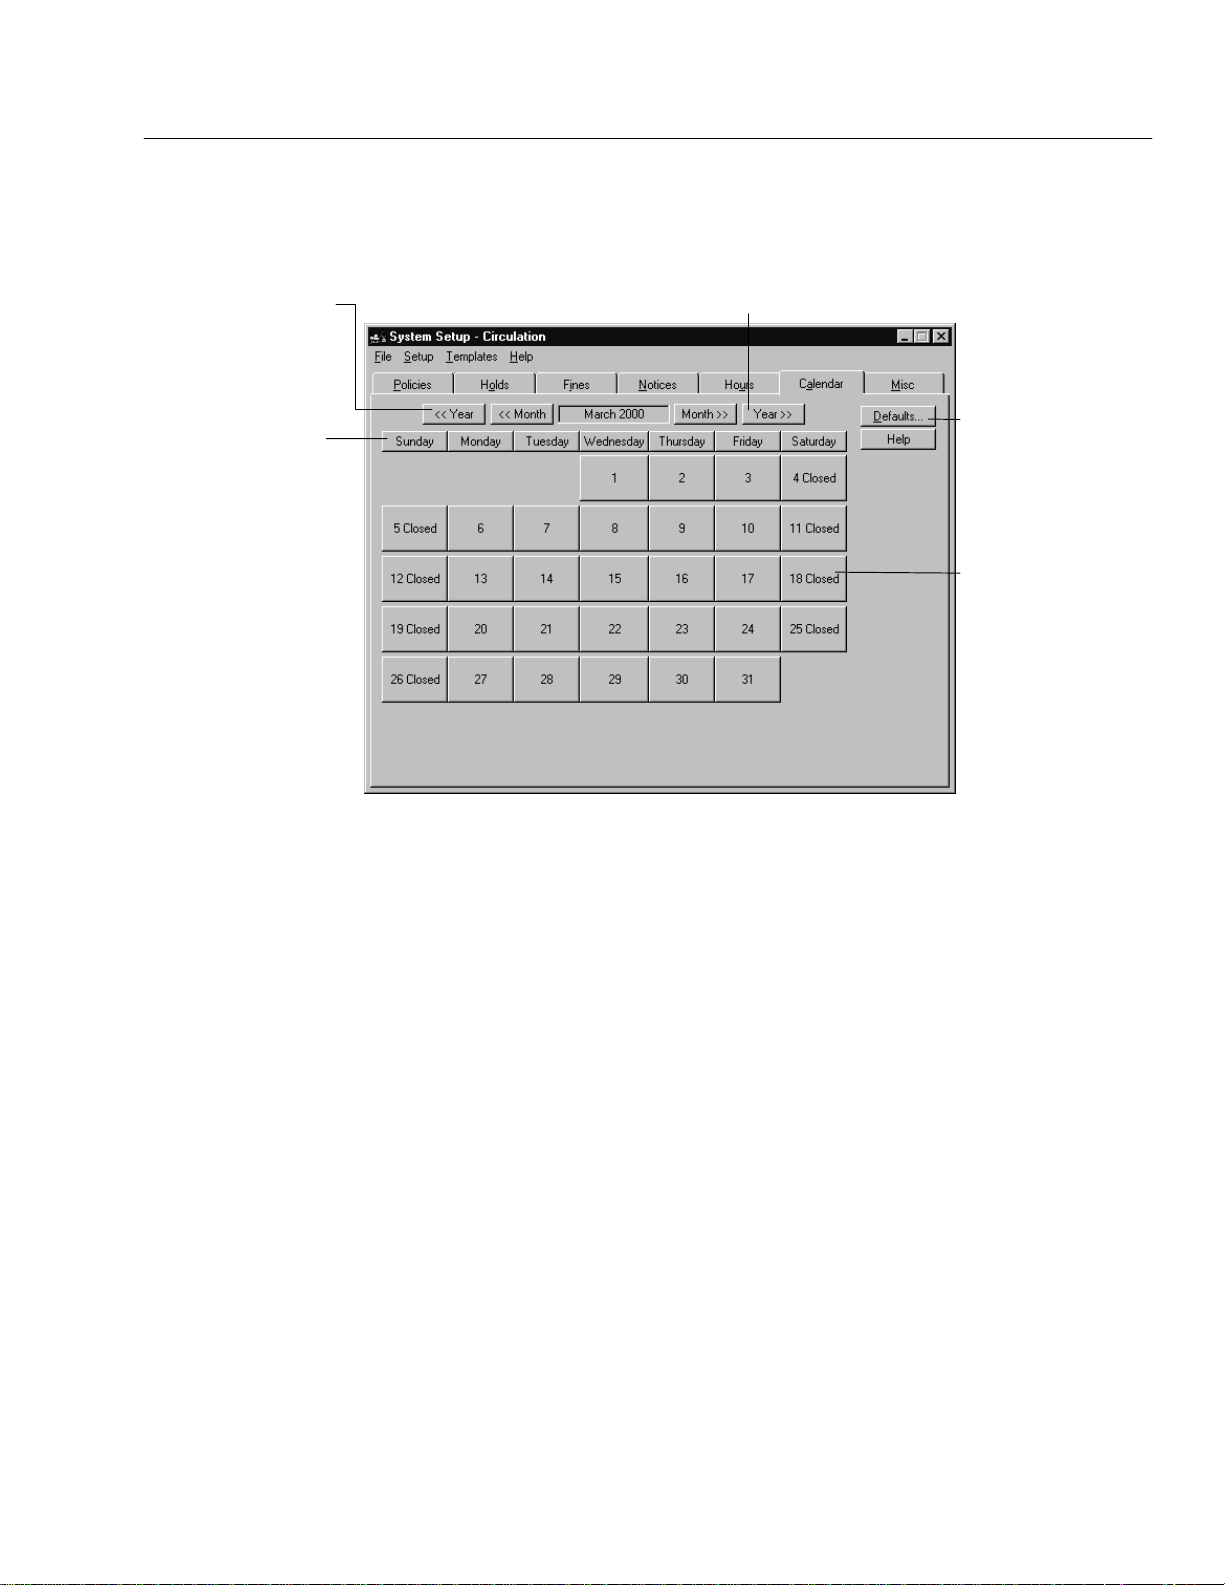
04/04 Chapter 5 Preparing to circulate your collection 87
When you're finished, choose Save on the Edit New Annual Calendar
Defaults dialog. The Calendar tab appears:
Use the scrolling buttons to move from month
to month or from year to year.
To open or close a day of the
week for every week of the year,
click on the weekday button.
System Setup uses the first day of
the month as its reference.
For example, if you choose the
Tuesday button, and the first
Tuesday in the month you're
viewing is closed, then all of the
Tuesdays for the entire year are
opened, regardless of the
previous open/closed status.
Warning: You cannot undo your mistakes in the Calendar tab. For example, if
Use the Year forward scroll button to create a calendar for
the coming year based on the default annual calendar.
To edit the default
annual calendar,
choose Defaults
and go back to
step 2.
To open or close a
single day, click on
the date. If the day
was marked closed,
it will now be
cleared, meaning
that it's open.
you open the first Saturday of every month, and then accidentally
click the Saturday weekday button, all the Saturdays for the entire
year are closed. You must now reopen those first Saturdays
individually for each month of the year.
4. Open and close the days in the current month to match your calendar. If you
try to open a day for which no library hours are defined, a message appears.
Use the scroll buttons to move from month to month or year to year.
If you scroll past December and there is no calendar defined for the coming
year, a message appears informing you that the system was not able to locate
the current calendar. You have two options:
If you want to use the current default calendar to set up next year's
calendar, choose Yes in the warning message. Next year's calendar is
created based on the current default calendar.
If you want to edit your default calendar, choose No in the warning
message, and then choose Defaults on the Calendar tab. The Edit New
Annual Calendar Defaults dialog appears. Go back to step 2 to edit your
calendar defaults.
When you're finished, go on to the next setup task, Setting up alert sounds (and
more) for your circulation desk."
Page 88

Setting up alert sounds (and more) for your circulation desk
System Setup lets you set up sounds for certain Circulation Desk events
(including block conditions). From the Misc tab, you also set your default
circulation type and, if you want, set an inactivity timeout period for Circulation
Desk. If necessary, you can also adjust your system date from the Misc tab.
Important: The sounds, today's date, and inactivity timeout options are specific
to the current workstation. You must set up these options at each
workstation where you will be using Circulation Desk.
To set up these options, select the Misc tab from the Circulation tabs in System
Setup. Please note that while the options on the Misc tab are identical on Mac OS
and Windows workstations, the way you set up certain options varies:
04/0488 System Setup
Page 89

04/04 Chapter 5 Preparing to circulate your collection 89
The sounds you choose will play whenever the
associated event occurs.
Select your most common circulation type.
To clear all the Circulation Desk fields automatically
after a period of inactivity, select this option.
On Mac OS, to select a sound, click the popup button.
To test a sound, click Play.
On Windows, to select a sound, click Edit. From the
Windows Sounds Properties dialog, locate the
Circulation Desk event you want to change, and then
locate and select the sound you want to use.
To include patron information when extracting data, check
this box. For more information, see Extracting Data" on
page 585.
When this check box is checked, patrons will be associated to
transactions recorded in the statistics records. When this check
box is not checked, there will not be a link between statistic
records and patrons.
If today's date isn't correct, click Change. On Windows, the Date/Time Properties dialog appears automatically. On Mac OS, a message appears telling you to go to the Date &
Time Control Panel. After making your changes, click OK to return to the Misc tab.
Important: Changing the date/time changes the operating system date/time, not just the date/time used by the Follett applications.
When you're finished setting up the rest of the options, choose Save.
Important: Windows workstations need a sound card for you to set up sounds for
Circulation Desk. If your workstation doesn't have a sound card,
Circulation Desk plays a beep through the computer speaker each
time one of the specific events occurs.
Important: Changing the Collect Patron Transaction Histories check box will only
affect future statistics records. Statistics currently in the database will
remain the same until you perform Remove Patron History in
Utilities.
Page 90

Additional sounds are available on your Follett Software Installation CD. To use
them at your workstation, insert the CD into the CD drive. From the CD, locate
the EXTRAS\SOUNDS folder, and open the folder that matches your
workstation's operating system:
On Windows, drag the sounds you want from the CD to your
FOLLETT\CC40\WMEDIA folder (by default located in C:\PROGRAM
FILES). To set up the new sounds, follow the instructions on page 88.
On Mac OS, locate but don't open your hard drive's System Folder. Drag the
sounds you want from the CD to the System Folder and click OK on the
message that appears. The next time you start System Setup, the new sounds
will be available from the popup buttons (see page 88).
See also: For more information about the Sound Properties, Date/Time
Properties dialogs, or Date & Time Control Panel, please refer to your operating
system's help or documentation. For more information about block conditions,
see Handling block conditions during a transaction" on page 127.
After preparing for circulation
04/0490 System Setup
After completing all of the setup tasks in this chapter, you are ready to add
patrons to your database. For instructions, see Chapter 15, Maintaining
individual patron records," and Chapter 17, Importing patron information."
If you purchased Catalog Plus, you also need to complete Chapter 33, Setting up
your search stations."
Page 91

Chapter 6 Building your union
A union catalog can mean something very different from one district to the next.
While one district might process and distribute all records from a central location,
the next may rely on catalogers at each member site. No matter what your
situation, this version of Follett's Union Catalog Pluswith or without Follett
Data Exchange Serveris the most flexible district solution ever. The instructions
in this chapter assume that you have already decided on the type of union
catalog your district needs.
Who should read this?
Building a union catalog is a cooperative effort. No matter what type of union
catalog you're setting up, you'll need to be familiar with the members in your
district. For sites that won't be using Data Exchange (DX, for short), you'll need a
general idea of the quality of each member's MARC records so you can import
the highest quality records first. Setting up DX members not only requires
knowledge of your members' cataloging practices you'll also need to know
their participation preferences. DX members also require some additional, rather
technical, setup tasks, which are explained in the Follett Data Exchange Guide
(fscdx.pdf).
Important: We strongly recommend that you enlist the aid of your technology
coordinator or arrange to have Follett Software Company help you set
up the Follett Data Exchange Server.
91
Where do we begin?
To help you build your union catalog, we have included the following checklist
to guide you through the process:
Steps for building your union catalog
1. Before you begin, make sure you have all the information you'll need:
If you'll be doing original cataloging at the union catalog, you'll want a list of the
nonDewey call number prefixes used in your district.
If you'll be setting up any nonDX members, make sure you have the current setup
information for each, including the barcode symbology they use for library materials
and any circulation types or categories they use. If you haven't already, this would
also be a good time to request that they export their collections (MARC 21/852 hold
ings format) and send you the files for import. See page 112 for more information.
If you'll be setting up any DX members, make certain each has installed and set up
Circulation Plus/Catalog Plus. The Union Catalog Plus, Follett Data Exchange Server,
and member applications must all be the same version for a new union/DX
installation (currently, v5.0). Determine each member's level of participation (see page
93), and any material types, categories, call number prefixes, or circulation types the
member wants to exclude from the union catalog database (see page 94).
Important: It is critical that all sites (member and union catalog, DX or not) have a full and
short version of their site name and a unique MARC Organization Code.
Page 92

Steps for building your union catalog
2. Enter your union catalog's site and cataloging information through the union catalog's
System Setup. For instructions, see page 95.
3. If your union catalog will be using data exchange, the union catalog database and DX
member databases must be linked to a Follett Data Exchange Server before you can add
the DX members to the union catalog. For more information and instructions, see the
Follett Data Exchange Guide (fscdx.pdf). After completing all the steps outlined in the
checklist, continue with the following steps.
4. Enter the site and cataloging information for your nonDX members through the union
catalog's System Setup. For instructions, see page 101.
5. Configure your DX members through the union catalog's System Setup. Instructions be
gin on page 101, with DX member-specific information starting on page 106. Also see the
Follett Data Exchange Guide (fscdx.pdf).
6. To finish building your union catalog, see What's next?" on page 112.
What is data exchange?
04/0492 System Setup
The Follett Data Exchange Server lets you make the most of the union catalog's
best cataloging practices. Data Exchange (DX for short) is a behindthescenes
way to transfer collection data between members and the union catalog. Follett
Data Exchange Server's setup options let you customize the flow of data.
By setting participation levels and filtering rules, the union catalog can control
how and what data is exchanged with its member sites. Once these rules are set,
the Follett Data Exchange Server updates district and member data automatically.
Selected Database Sources in Cataloging lets DX members search the union
catalog database for MARC records, even if they choose not to share their data
with the union catalog.
Rather than the union catalog and all members sharing the same static records,
Follett Data Exchange Server lets each member send and receive MARC records
appropriate to its own quality needs automatically. For example, a member site
with an expert cataloger would not have to receive records from other members,
or even the union catalog. With seven levels of participation, union catalogs and
members can share at the level appropriate for each site.
Behindthescenes rules for merge, match, survival, and bounceback determine
which record will be added to a database. Typically, the record with the most
complete information is the one that is saved to the union catalog database and
then transmitted to members. For example, a brief MARC record is sent to the
union catalog, where it encounters a better record. A merged record is created
and that better record of merged" data is bounced back to the sending member
site.
Note: Data exchange transfers bibliographic and copy records. However, within
these records certain tags are not exchanged: 59x (local notes) tags, 9xx tags
(except for the 940 tags), and any WebPath Express bibliographic tags you
may have in your collection.
Page 93

04/04 Chapter 6 Building your union 93
Participation levels
Follett Data Exchange Server's seven levels of participation let you explicitly
define the relationship between the union catalog and each member. The
participation levels determine how information moves between the union catalog
and the member. Before setting this option, you need to know how much
partnering of records each member wants to have. Each level is described below.
Level 1 - In this scenario, no data is shared between the union catalog and the
member. This option is intended for sites that want to manually maintain a
central repository of MARC data, but do not want to have that data automatically
transferred between a site and the union catalog. This option requires that data
either be manually entered or imported at the union catalog. It is not
recommended that data for a specific member be exported from the union catalog
and imported into the member since the member will usually have the most
recent record. Importing data does not ensure that the most robust MARC record
survives.
Level 2 - In this scenario, the member sends all of its data to the union catalog,
but the union catalog sends no data to this member. This option ensures that this
member's data is never replaced by MARC or copy updates or additions at the
union catalog. Level 2 might be applied across an entire union catalog in those
situations where the union catalog database acts solely as a resource for union
catalog OPAC search stations. The downside to this option is that more robust
MARC records at the union catalog never find their way down to the member.
For example, if your district were sharing electronic hyperlinks (856 tags) or
curriculum objectives, these tags would not be transferred to the members.
Level 3 - In this scenario, the member sends no data to the union catalog, but the
union catalog sends all of its data to this member. This option would be ideal for
districts that do all cataloging and distribution at the union catalog. This
environment is commonly referred to as central processing. Items are cataloged
and barcoded at the district level and distributed to member sites.
Level 4 - In this scenario, the member sends added MARC records and all copies
to the union catalog. The union catalog, in turn, sends all data to this member.
The union catalog is protected from having MARC data replaced by updated
records from this member. This option is for member sites who have bad data or
who rely on a parttime or volunteer cataloger. It would be appropriate for sites
that do little or no original cataloging but are in charge of managing their own
acquisitions. Level 4 allows the site to create a MARC record and, if a better
record reaches the union catalog later, that record will be sent back down to the
member due to its holdings.
Level 5 - In this scenario, the member sends all data to the union catalog. The
union catalog sends added MARC and copy records to this member. This
member is protected from having its data replaced with records from the union
catalog. It accepts no changes from the district cataloger. This option could be
used in environments where very little original cataloging takes place at the
union catalog, but the member and the union catalog share acquisition
responsibilities. In this situation, the member would be responsible for original
cataloging (if any) and would be charged with managing its own acquisitions.
This option protects the member from any MARC changes from the union
Page 94

04/0494 System Setup
catalog, but it also prevents better" records from another level 5 member
replacing its own records. For example, if your district were sharing electronic
hyperlinks (856 tags) or curriculum objectives, these tags would not be
transferred to the Level 5 members.
Level 6 - In this scenario, the member sends all data to the union catalog. The
union catalog only sends changes made by the district cataloger. This could be a
member with an expert cataloger who wants to send records to the union catalog
where there is another expert cataloger for the district. This member does not
want to get records from other member sites, however. If a member participates
at Level 6, it receives all of the benefits of Level 7, but does not receive MARC
changes that originate at any other point in the district other than at the union
catalog database. This option might either be appropriate in a district where most
cataloging is done at the union catalog or at a Level 6 member.
Level 7 - In this scenario, all data is shared equally between the union catalog
and this member. This option is recommended for sites that share cataloging and
acquisition responsibilities with the union cataloger. This option is ideal for
districts that want to share all of their MARC information, including data such as
electronic hyperlinks and curriculum objectives.
Levels 3, 4, 6, and 7 assume that there is a professional cataloger at the union
catalog who performs some central processing. Certain types of MARC changes
should be performed at the union catalog if any members participate at these
levels. If, say, an 856 tag changed on a record already in the union catalog
database and a Level 7 member removed that tag and sent the new record to the
union catalog, because the tag wasn't removed at the union catalog, it would be
put back when the record merged with the existing data. Basically, members
participating at these levels agree to accept changes from the union catalog.
Note: Regardless of the participation level chosen, every DX member running
Catalog Plus on Windows has access to the union catalog database through
the Selected Database Sources (on-demand data sharing) feature (see page
247). This feature is not available on Mac OS.
Filtering rules
You also have control over which part of each member collection is shared with
the union catalog. This is done through filtering rules set for each member site.
These filters apply only for membertounion catalog data and are configured on
a memberbymember basis. These filters are MARCspecific: Material Types; and
copyspecific: Categories, Circulation Types, and Call Number Prefixes. The
copyspecific filters for Categories, Circulation Types, and Call Number Prefixes
filter out information a member would not want to share with the union catalog.
If you catalog a record or copy at the union catalog, however, no filters are
applied; all records will go to the member sites if the participation level allows it.
Sharing MARC records depends on MARCspecific and copyspecific filters. A
MARC record is sent to the union catalog if it passes the MARC filters and there
is at least one qualifying (nonfiltered) copy record attached. A record need only
fulfill one filter criterion before it is stopped from being transferred to the union
Page 95

04/04 Chapter 6 Building your union 95
catalog. For example, the MARCspecific filter for Material Types could keep a
member's cataloged AV equipment from being transferred to the union catalog.
A copy record is sent if it passes the copyspecific filters and if its associated
MARC record passes the MARCspecific filters. Copy records at the union
catalog are only sent to the member who owns the copy. A scenario for
copyspecific filtering might be a private source of funding cataloged locally as a
Category if the private funding specified that the funds were to purchase
materials to be used only at the site. By filtering this category, the records for
these items could be excluded from the union catalog. Likewise, you may not
want items with a circulation type of Temporary to go up to the union catalog.
How are the best" records created?
Once a record is transferred to the union catalog, some nonconfigurable filters
are used to create the best possible record.
Matching rules determine whether a remote site already contains a record. If no
match is found, the record is added to the destination database. If a match is
found, the rules are applied and a replacement attempt is made. Further rules
determine if replacing the existing record or merging the two records would
produce the best results. This helps ensure that the best record is in the database.
Bounceback rules help the better union catalog record go back to the member. If
the incoming record loses, the winning record is sent back to the sending
database (if allowed by participation and filter rules). If the incoming record
wins, the record is redistributed to other members based on holdings information
and participation rules.
Setting up your union
The first step in building your union catalog is entering your union catalog's site
and cataloging information in System Setup. To help set up your union catalog
quickly and accurately, we recommend that you gather the following information
before starting:
The official name of your union catalog as you would like it to appear on
reports and your union catalog's MARC Organization Code.
A list of the nonDewey call number prefixes you need when cataloging at
the union catalog.
To start System Setup, open the Follett Applications folder on the computer
desktop, and doubleclick the Union System Setup icon. The System Setup
window appears (see page 33).
Note: You can also access the Follett Applications menu from the Windows
Start | Programs menu or from the Mac OS Apple menu.
Important: The first time you launch System Setup, it creates files that are used by
all the other Follett applications. This process may take a few minutes.
Page 96

These three fields are required.
If you need to obtain a MARC
Organization Code, see page 36
for instructions.
The person to whom all union
catalog mailings are directed
Voice phone number for your
contact person (district librarian,
for example)
The number assigned to
you when you purchased
your software
Your union catalog's federal or
state tax exemption number
04/0496 System Setup
Entering union catalog site information
1. To enter your union catalog's site information, from the union catalog's
System Setup menu bar, select Setup. If Union is checked, select Site; if it
isn't, select Union, and then select Setup | Site.
If you're using a Site Setup password, a password dialog appears. Enter the
Site Setup password (by default, MAKEITSO) and click OK. The Site tabs
appear with the Identification tab open. Only the tabs you need are enabled:
Your union
catalog's name
To cancel changes
before saving
Your union catalog's
mailing address.
Some field names
depend on your ad
dress format (e.g.,
State/Province).
If your union
catalog owns
netLibrary
eBooks, enter
the account
number to
enable previews
and checkouts.
Important: For nonUS union catalogs, see step 2 before entering your
information.
Enter your information: the Full and Short Union Names and MARC
Organization Code are required. When you're finished, click Save.
Page 97

04/04 Chapter 6 Building your union 97
2. By default, the Identification tab uses the address format for the United
States. To choose a different address format, select the Information tab:
Country where your union
catalog is located. This will
determine the address format
on the Identification tab for
the union catalog and all
members.
To cancel changes
before saving
After selecting your address format, click Save.
3. For security purposes, Union Catalog Plus lets you change the passwords
you use to access the applications. To change the application passwords,
select the Passwords tab:
The System Setup Cataloging
tabs use the Cataloging password.
See also: For a list of the default
application passwords, see
page 41.
To cancel changes
before saving
You can change any passwords you like. If you don't want to use passwords,
you may delete any or all of them. After making your changes, click Save.
Page 98

04/0498 System Setup
4. Through the union catalog's System Setup, you can enter events for patrons
to view in the union catalog OPAC (see page 410) or with WebCollection Plus
for Union (see page 450). To add or maintain events for the district, select the
Events tab:
To add or edit an event,
see the instructions on
page 44.
To delete an event, select
the event and click Delete.
At the message, click Yes
to proceed.
Events entered at the
union catalog cannot be
deleted automatically.
The events you enter here are not shared (exchanged) with members. After
making your changes, click Save.
Entering union cataloging information
1. To enter your union catalog's cataloging information, from the union
catalog's System Setup menu bar, select Setup. If Union is checked, select
Cataloging; if it isn't, select Union, and then select Setup | Cataloging.
If you are using the Cataloging password option, a password dialog appears.
Enter the Cataloging password (by default MODTITLE) and click OK. The
Page 99

04/04 Chapter 6 Building your union 99
Cataloging tabs appear with the Call Numbers tab open. Only the tabs you
need are enabled:
To cancel changes before saving
To save you time when you add
a new copy record, Cataloging
looks in the locations you define
here for a default call number for
the copy record.
This information is also used by
several reports. For more
information, see page 47.
Currently defined
call number prefixes
In the Tag and Subfields text boxes, type the most probable locations for the
call number in your MARC bibliographic records, and then choose Save.
2. To define the call number prefixes for the union catalog, select Call Num
Prefixes:
To add or edit a call number
prefix, see the instructions
on page 50.
By default, numeric call
numbers are followed by
symbols and alphabetic
prefixes. To control how call
numbers are sorted, see
page 51.
Deletes the selected call
number prefix. Prefixes that
are included in the Custom
sorting list (see page 51)
can't be deleted.
A prefix can contain any three characters except for Dewey numbers
(000-999), periods, and leading or embedded blank spaces. For additional
information on call number prefixes, see page 50.
Page 100

A brief record has no information
in the specified tag range. For
more information, see page 54.
Resets the brief record range to
the defaults: 305 through 899
04/04100 System Setup
3. System Setup lets you set starting and ending tag numbers to determine if a
record is brief or full from the Brief Records tab:
To cancel changes
before saving
After making any desired modifications, click Save.
4. A number of settings are controlled from the Misc tab. For information about
these options, see the table of miscellaneous Cataloging options on page 56:
To cancel changes
before saving
To ignore leading
articles in selected
languages, see
page 57.
To arrange your
member databases
in groups
Make certain to save the changes you made to the Misc tab.
 Loading...