

Page 1
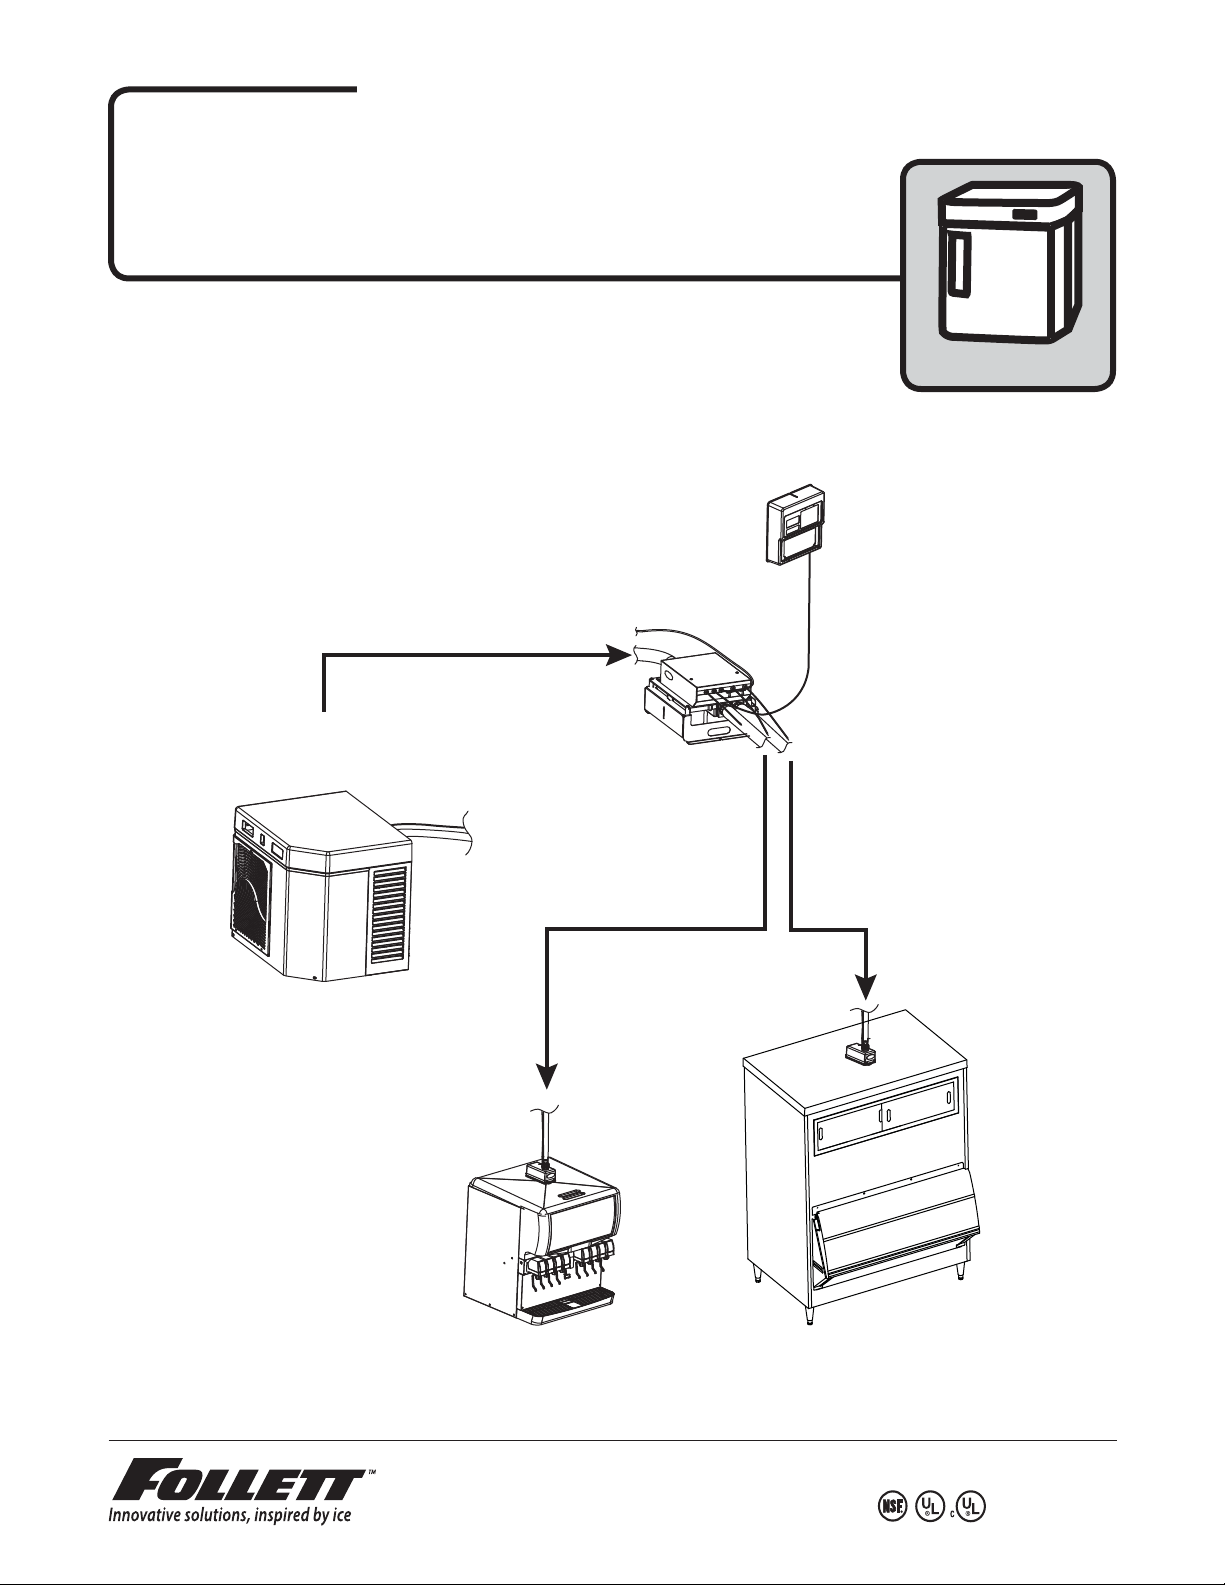
Horizon™ Ice Machine Models with RIDE™ Technology
Installation Instructions for Ice Manager™ Diverter Valve
HCD/HCF1000RMS, HCD/HCF1400RMS, HCD/HCF1650RMS,
HCD1000NMS, HCD1400NMS, HCD1650NMS
(See model number con gurator on page 2 for details.)
Order parts online
www.follettice.com
remote condensing
Ice Manager
Control Panel
Ice Manager
Diverter Valve
(1) Horizon
Chewblet® Ice Machine
(purchased separately)
™
(2) ice storage units
(purchased separately)
Any combination of bins or dispensers
Lane 2
Lane 1
801 Church Lane • Easton, PA 18040, USA
Toll free (877) 612-5086 • +1 (610) 252-7301
www.follettice.com
00172536R06
Page 2
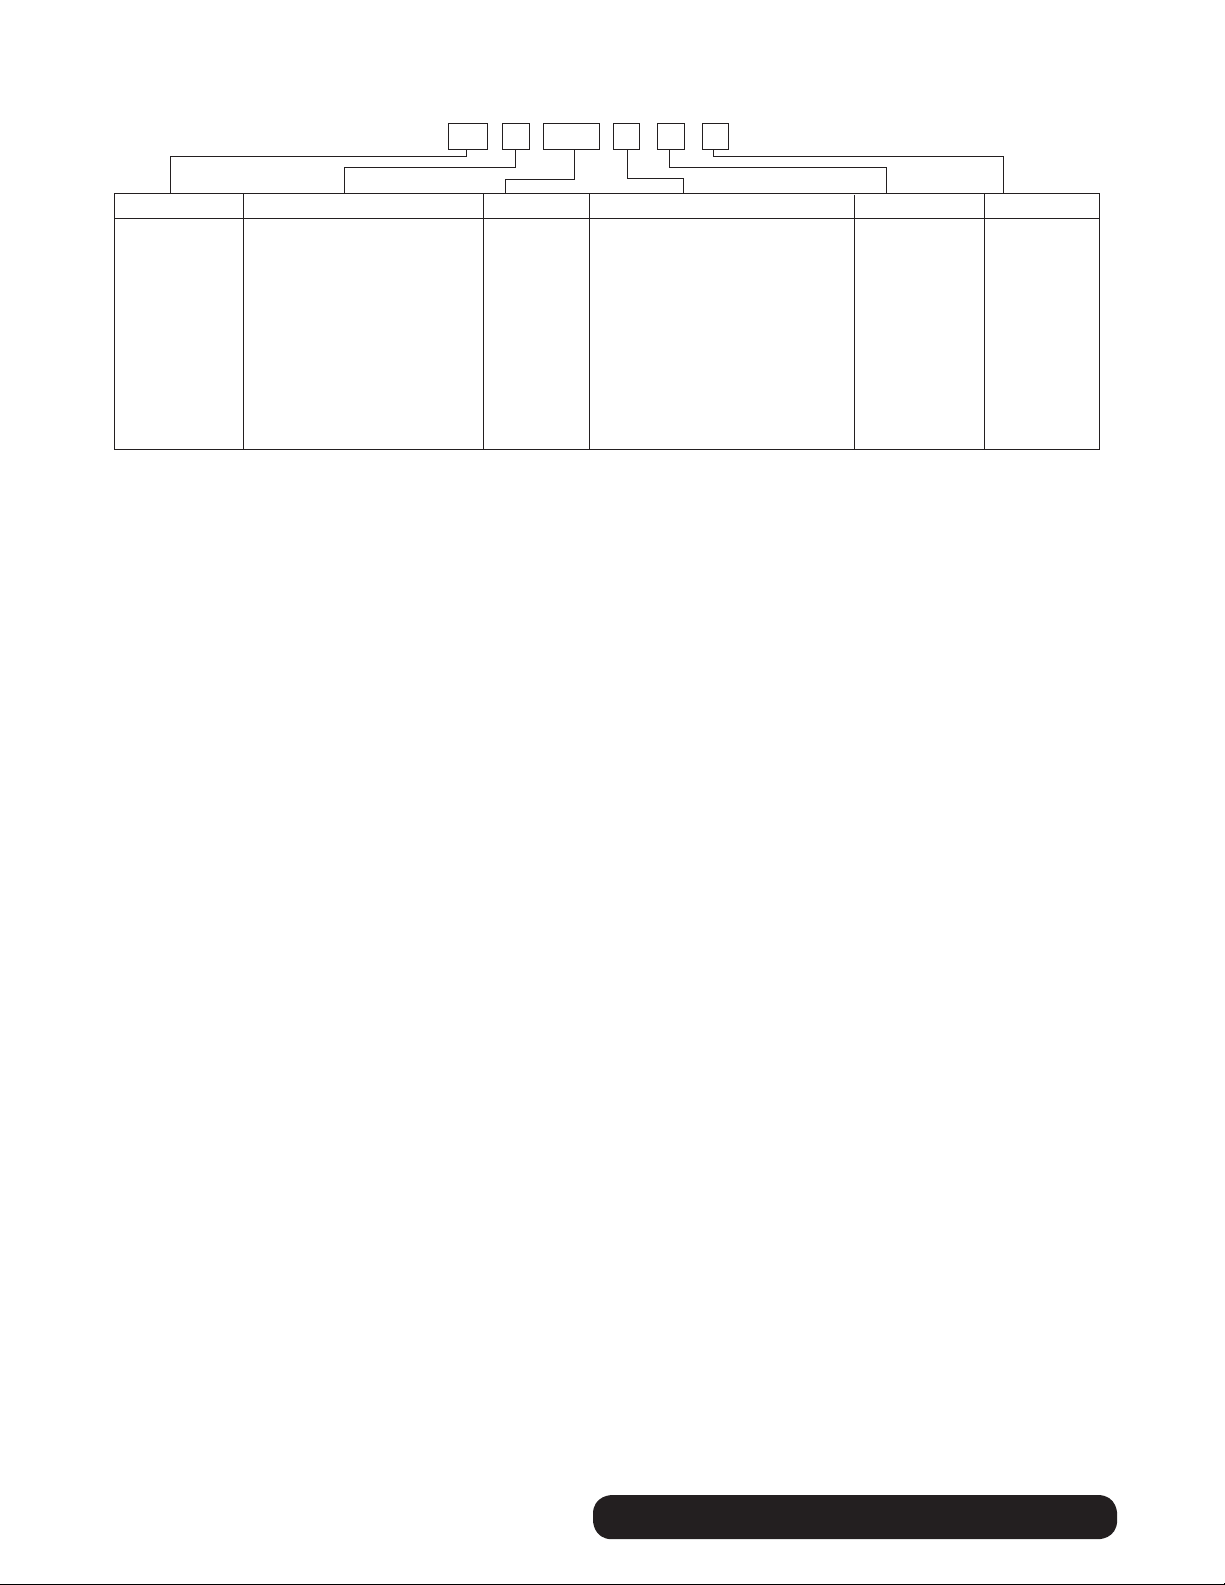
Chewblet® Ice Machine Model Number Configurations
HC 1400CSVA
MC Maestro™
Chewblet
(400 Series)
HC Horizon
Chewblet
(1000, 1400,
1650 Series)
HM Horizon
Micro Chewblet
C 208-230/60/1 (icemaking head)
®
Self-contained only.
D 115/60/1 (icemaking head)
Self-contained and remote. If remote
unit, high side is 208-230/60/1.
E 230/50/1 (icemaking head)
Self-contained only.
F 115/60/1 (icemaking head)
Remote only. High side is
208-230/60/3.
400 up to
454 lbs
(206kg)
1000 up to
1036 lbs
(471kg)
1400 up to
1450 lbs
(658kg)
1650 up to
1580 lbs
(717kg)
CondenserSeriesVoltageIcemaker
A Air-cooled, self-contained
W Water-cooled, self-contained
R Air-cooled, remote condensing unit
N Air-cooled, no condensing unit for
connection to parallel rack system
V Vision™
H Harmony™
B Ice storage bin
J Drop-in
M Ice Manager
diverter valve
system
ConfigurationApplication
S RIDE™
(RIDE remote
ice delivery
equipment)
T Top-mount
2
remote condensing ICE MANAGER
Page 3
Horizon ice machine for use with Ice Manager diverter valve system
The Ice Manager diverter valve system delivers ice to two ice storage units enabling a single Follett
Horizon ice machine to meet demand for ice at two locations. The system’s sensors monitor ice levels
in each storage unit and automatically switch ice delivery to the appropriate location.
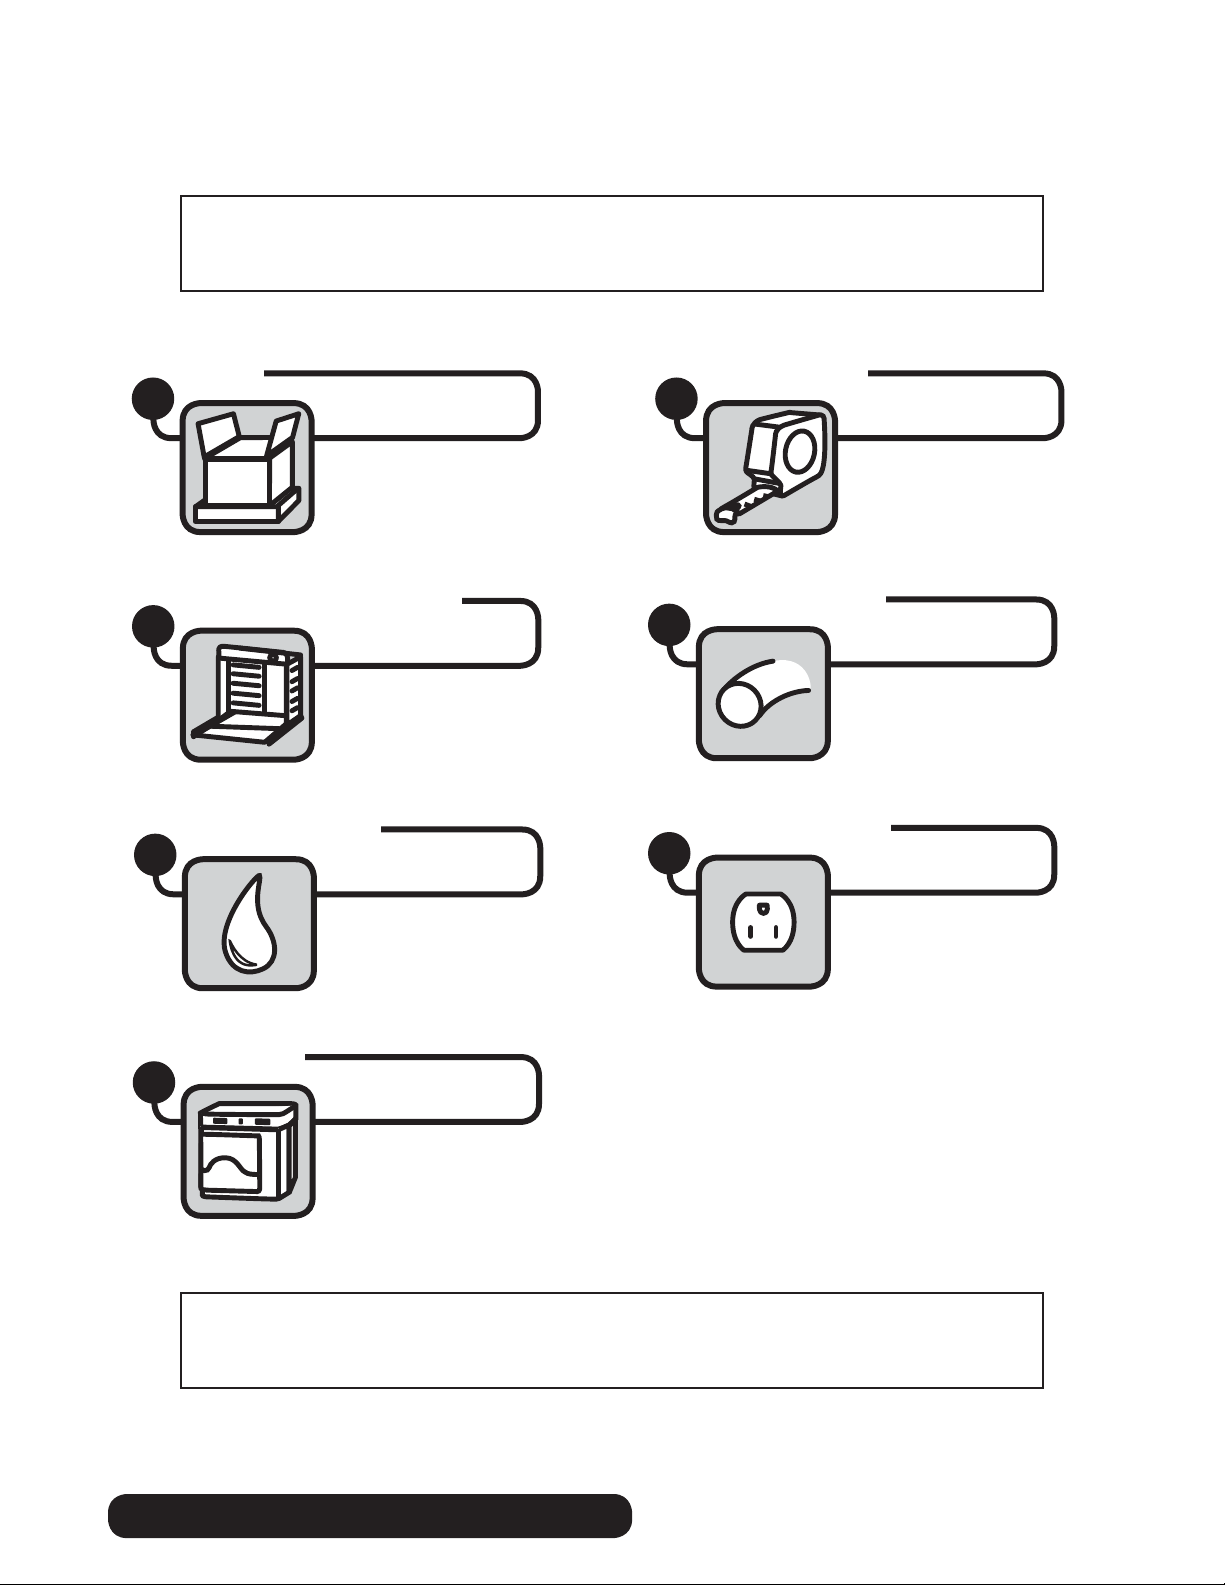
After thorough review of Ice Manager site survey, read and complete
Horizon ice machine installation sections 1 through 6.
Unpack
1
Louvered docking assembly
3
External connection
5
Site preparation
2
Ice transport tube
4
Internal connection
6
Front cover
7
For connection to Ice Manager diverter valve system
refer to Ice Manager installation guide.
ICE MANAGER remote condensing
3
Page 4
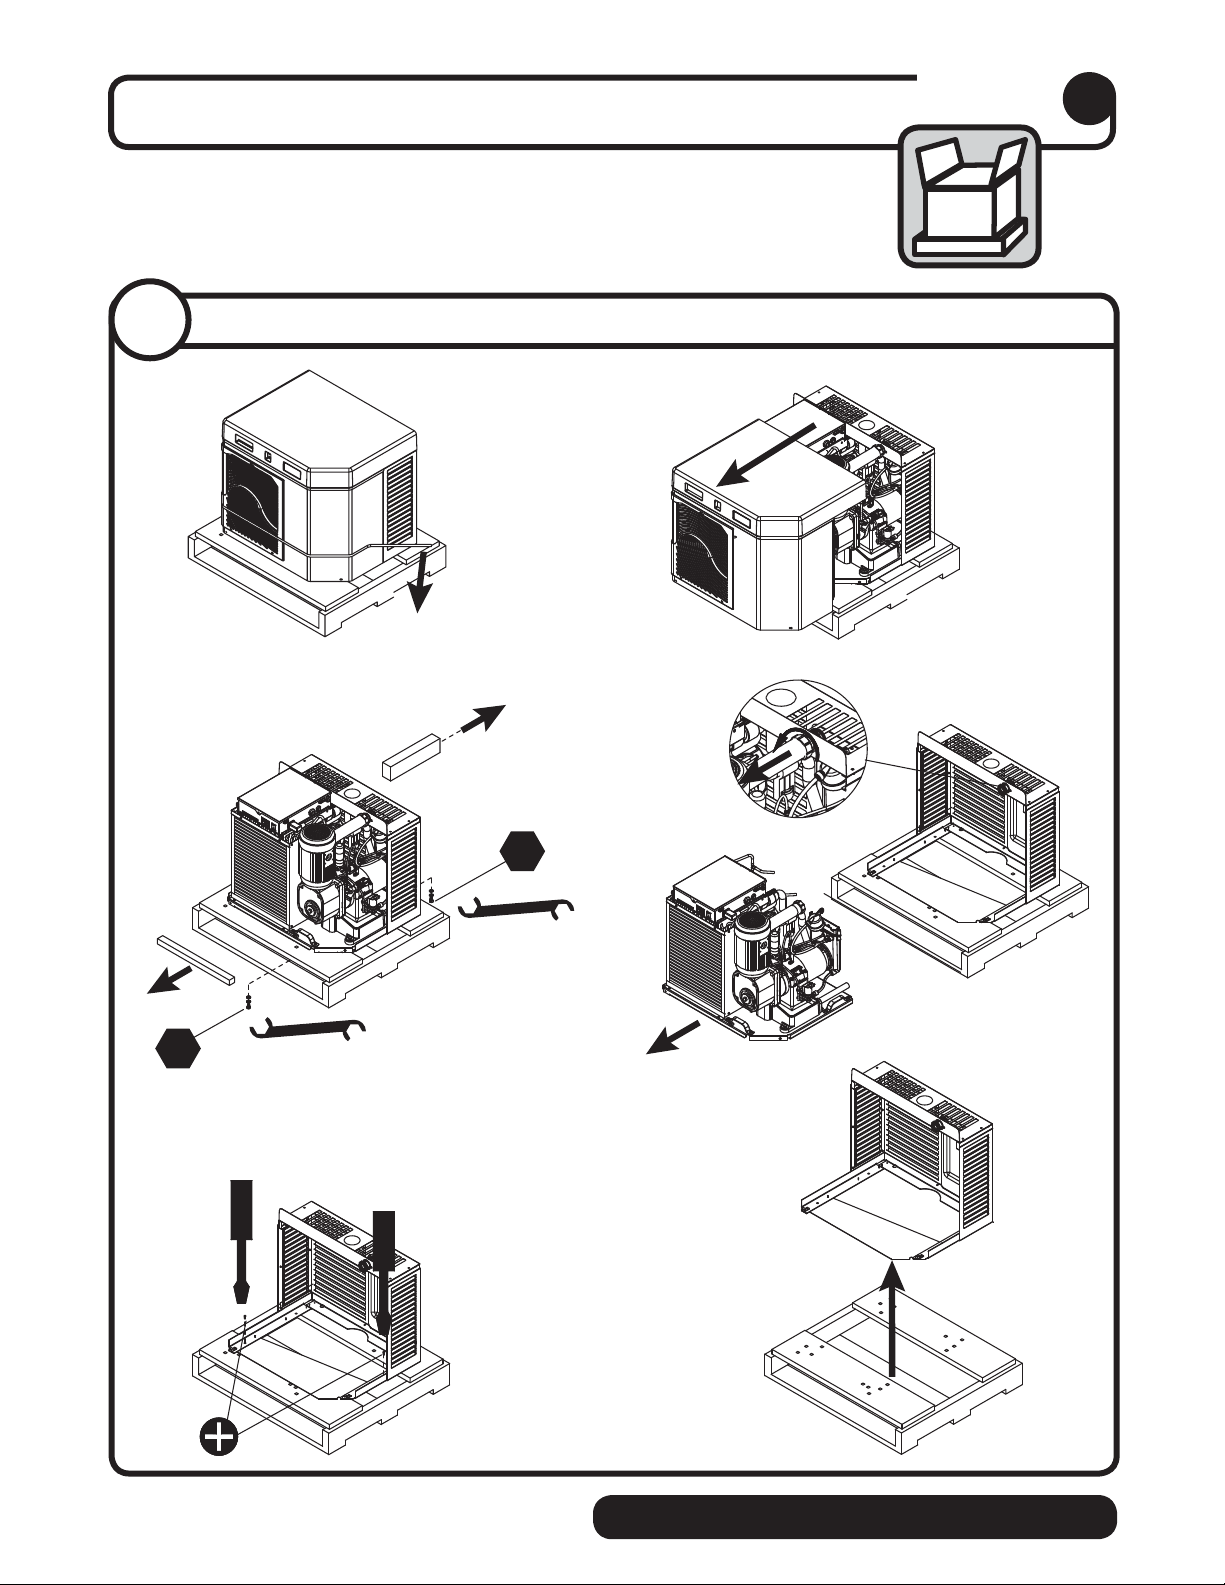
Carefully unpack and inspect the contents of your Follett ice machine.
1/2"
1/2"
➊➋
➌➍
➎➏
Unpack
1
1. 1
Unpack ice machine
4
remote condensing ICE MANAGER
Page 5
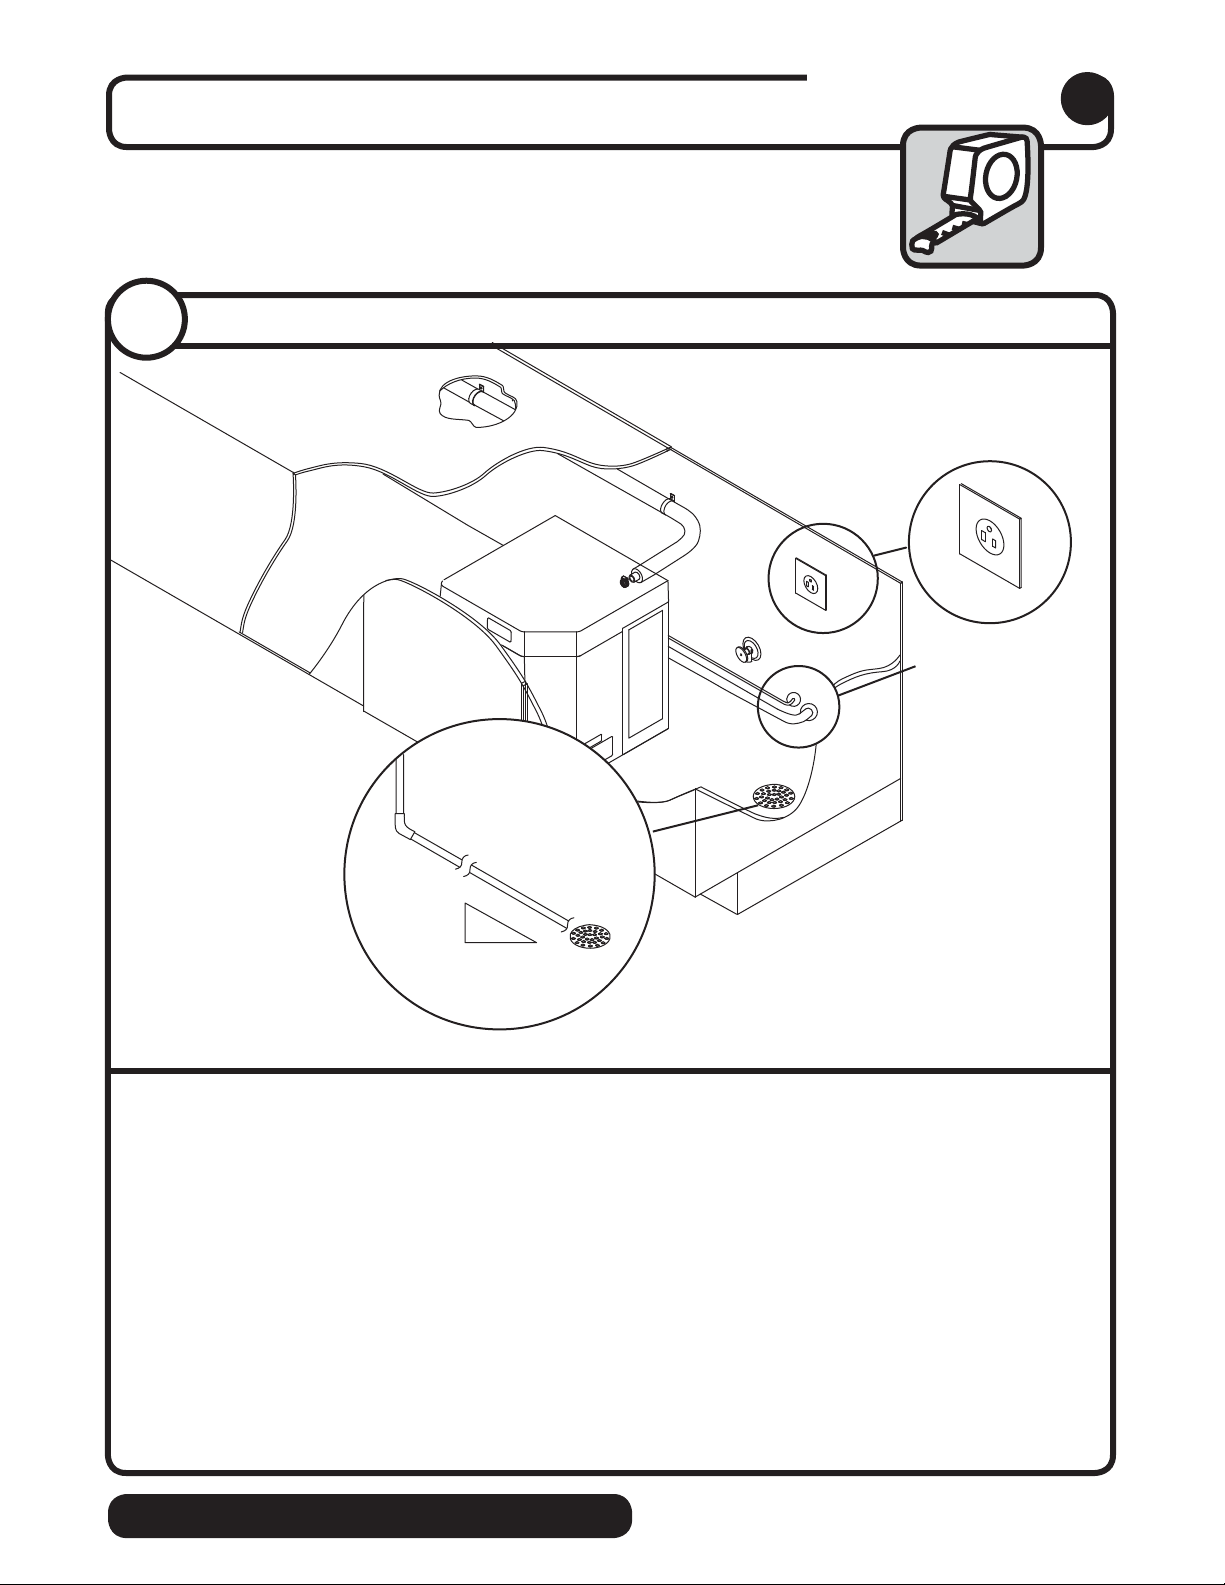
Site preparation
Prepare the installation site.
Provide drainage, water supply and electrical power to within 6 feet (2m) of ice
machine in accordance with local and national codes. Outdoor installation is
not recommended and will void warranty.
2
2.1
2.1
Installation site requirements
➌
➍
➊
NEMA
5-15
3/8" ∅ (9,5mm)
➎
➍
1/4"
1'
Electrical
• 120/60/1-6 amps
Potable water supply
• 10-70 psi (69-483kpa)
• 45-90 F (7-32 C)
• Follett recommends the use of an in-line water ltration system (item# 00130286)
Drain
• The drain line from the ice machine must have at least 1/4" per foot pitch (6,4mm/0,3m)
Refrigeration lines
• 1000, 1400: 5/8” (15,8mm) diameter suction (insulated)
• 1650: 7/8” (22,2mm) diameter suction (insulated)
• 3/8" (9,5mm) liquid
➌
➊
➍
➋
➎
➍
➍
➍
ICE MANAGER remote condensing
5
Page 6
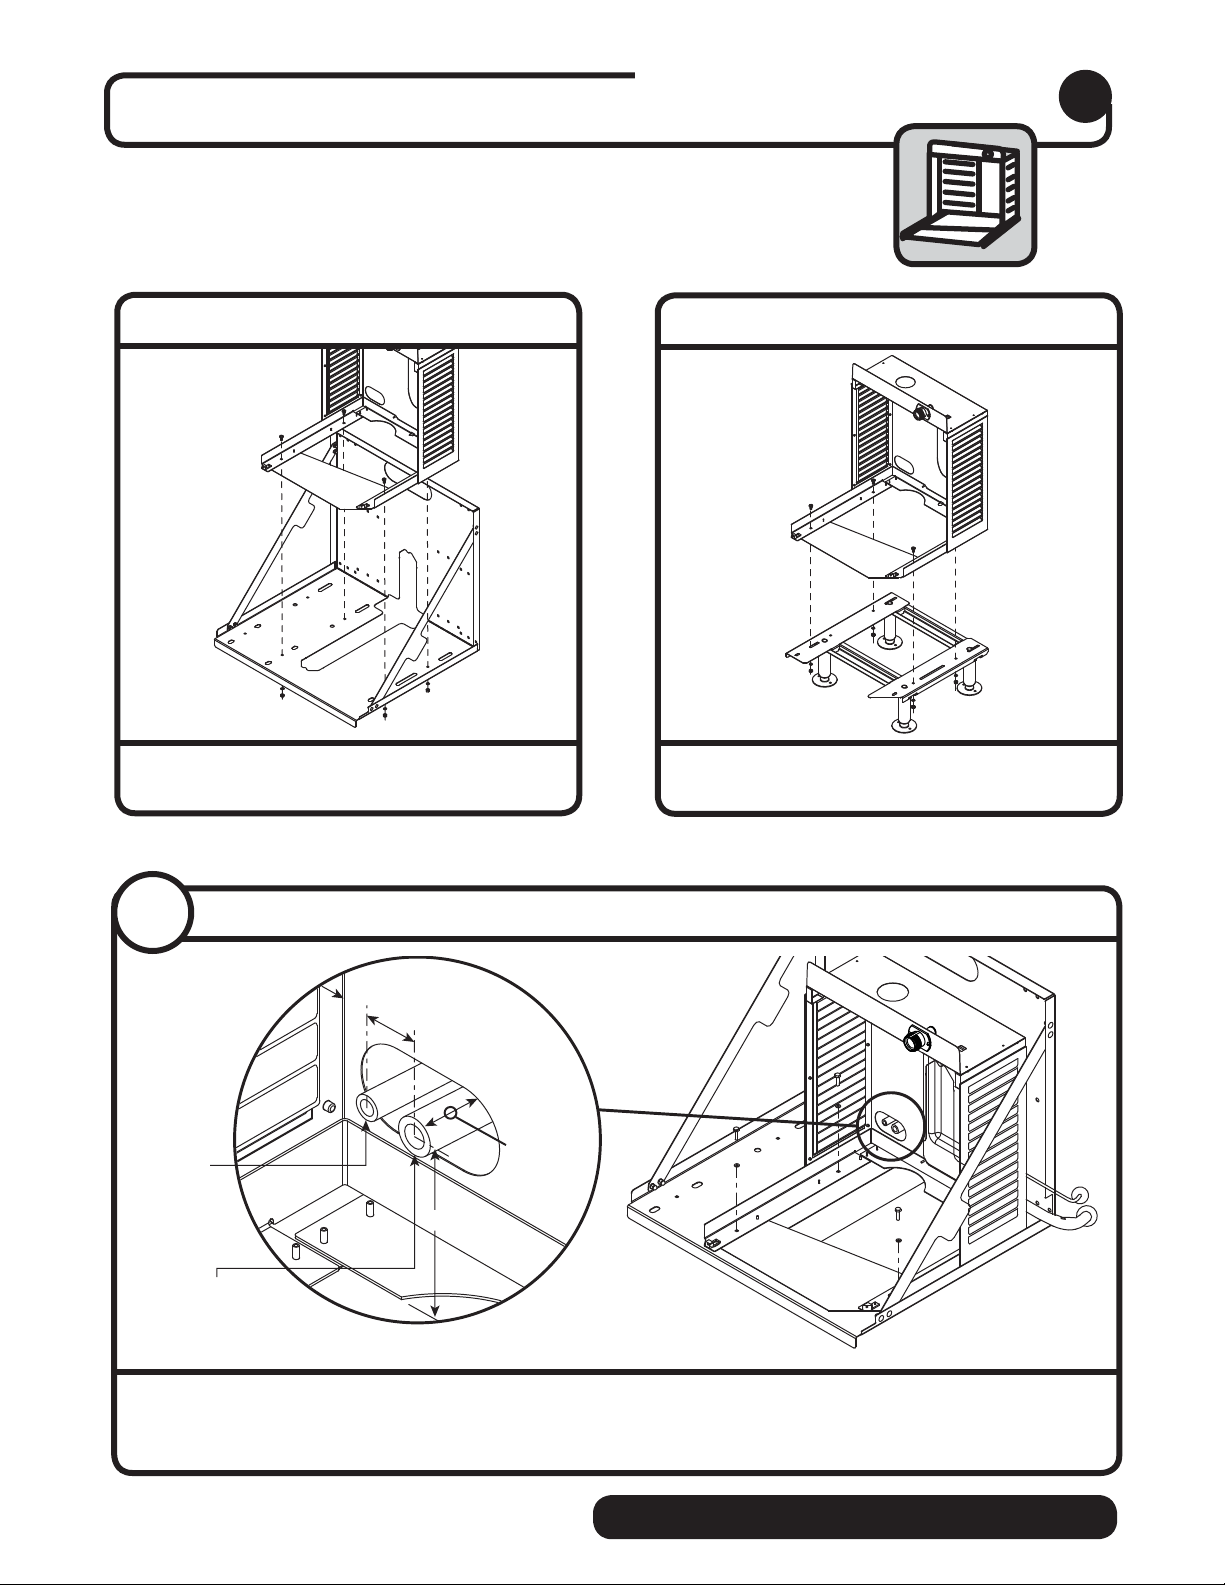
Install the louvered docking assembly.
Louvered docking assembly
3
Wall bracket accessory
• Mount louvered docking assembly to wall
bracket accessory
Machine stand accessory
• Mount louvered docking assembly to
machine stand accessory
2.1
3.1
high pressure
1000, 1400:
5/8" ∅ low pressure line
1650:
7/8" ∅ low pressure line
Louvered docking assembly
1-3/4" (44,5mm)
3" (76mm)
3/8˝ ∅
line
3" (76mm)
• Mount louvered docking assembly
• “Rough-in” the refrigerant piping
➋
1" (25,4mm)
Stub Typ
➊
➋
➊
➊
6
remote condensing ICE MANAGER
Page 7
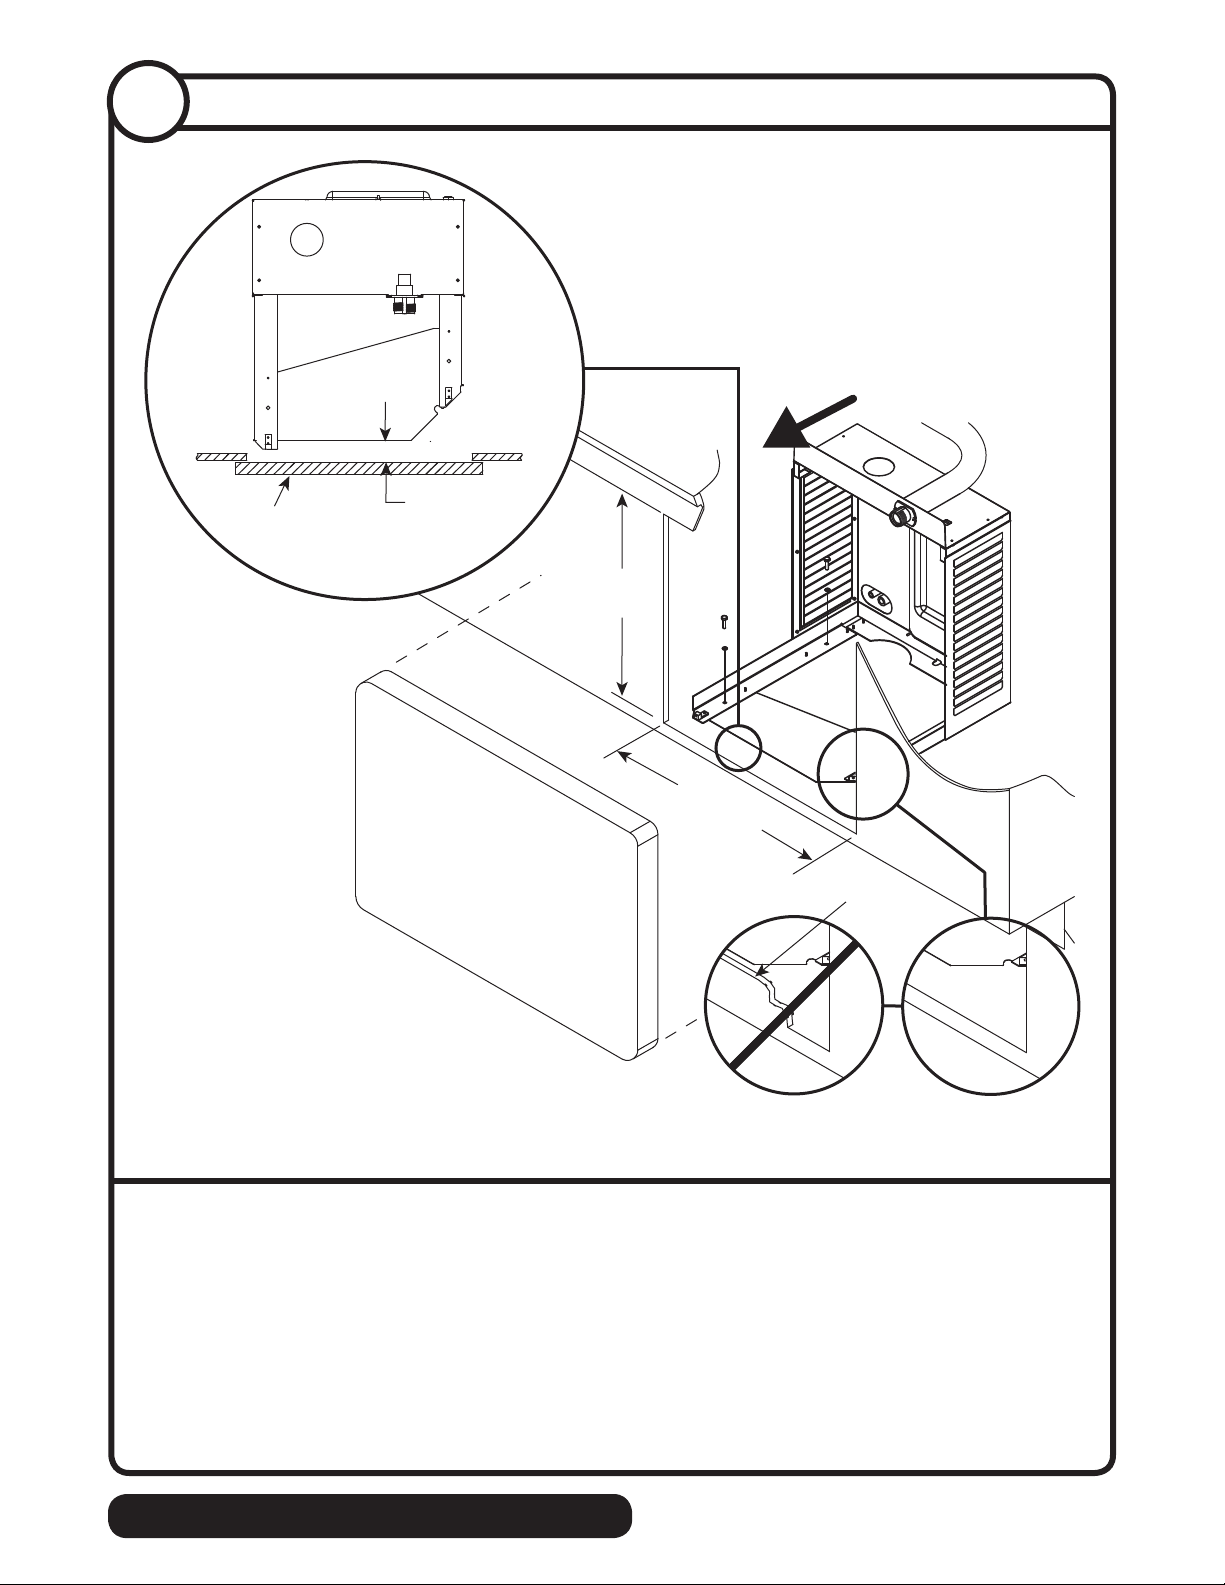
3.2
Undercounter installation requirements
Top View
CROSSBRACE
Access panel/
door on counter
➊
➌
1.75" (45mm) min.
24.5" min.
(623mm)
21" min.
(534mm
No Lip
➋
DOCKING STATION
• Position and screw louvered docking assembly to the bottom of counter inside of access panel/
door min. of 1.75" (45mm) from the front edge of the cross brace
• The mounting surface for the louvered docking assembly must be solid.
Do not mount directly onto runners or channels.
• There must be no lip or edge that would hinder the ice machine from sliding in or out of the
louvered docking station
• Ice machine must be installed facing forward as shown for service accessibility
➋
➊
➌
ICE MANAGER remote condensing
7
Page 8
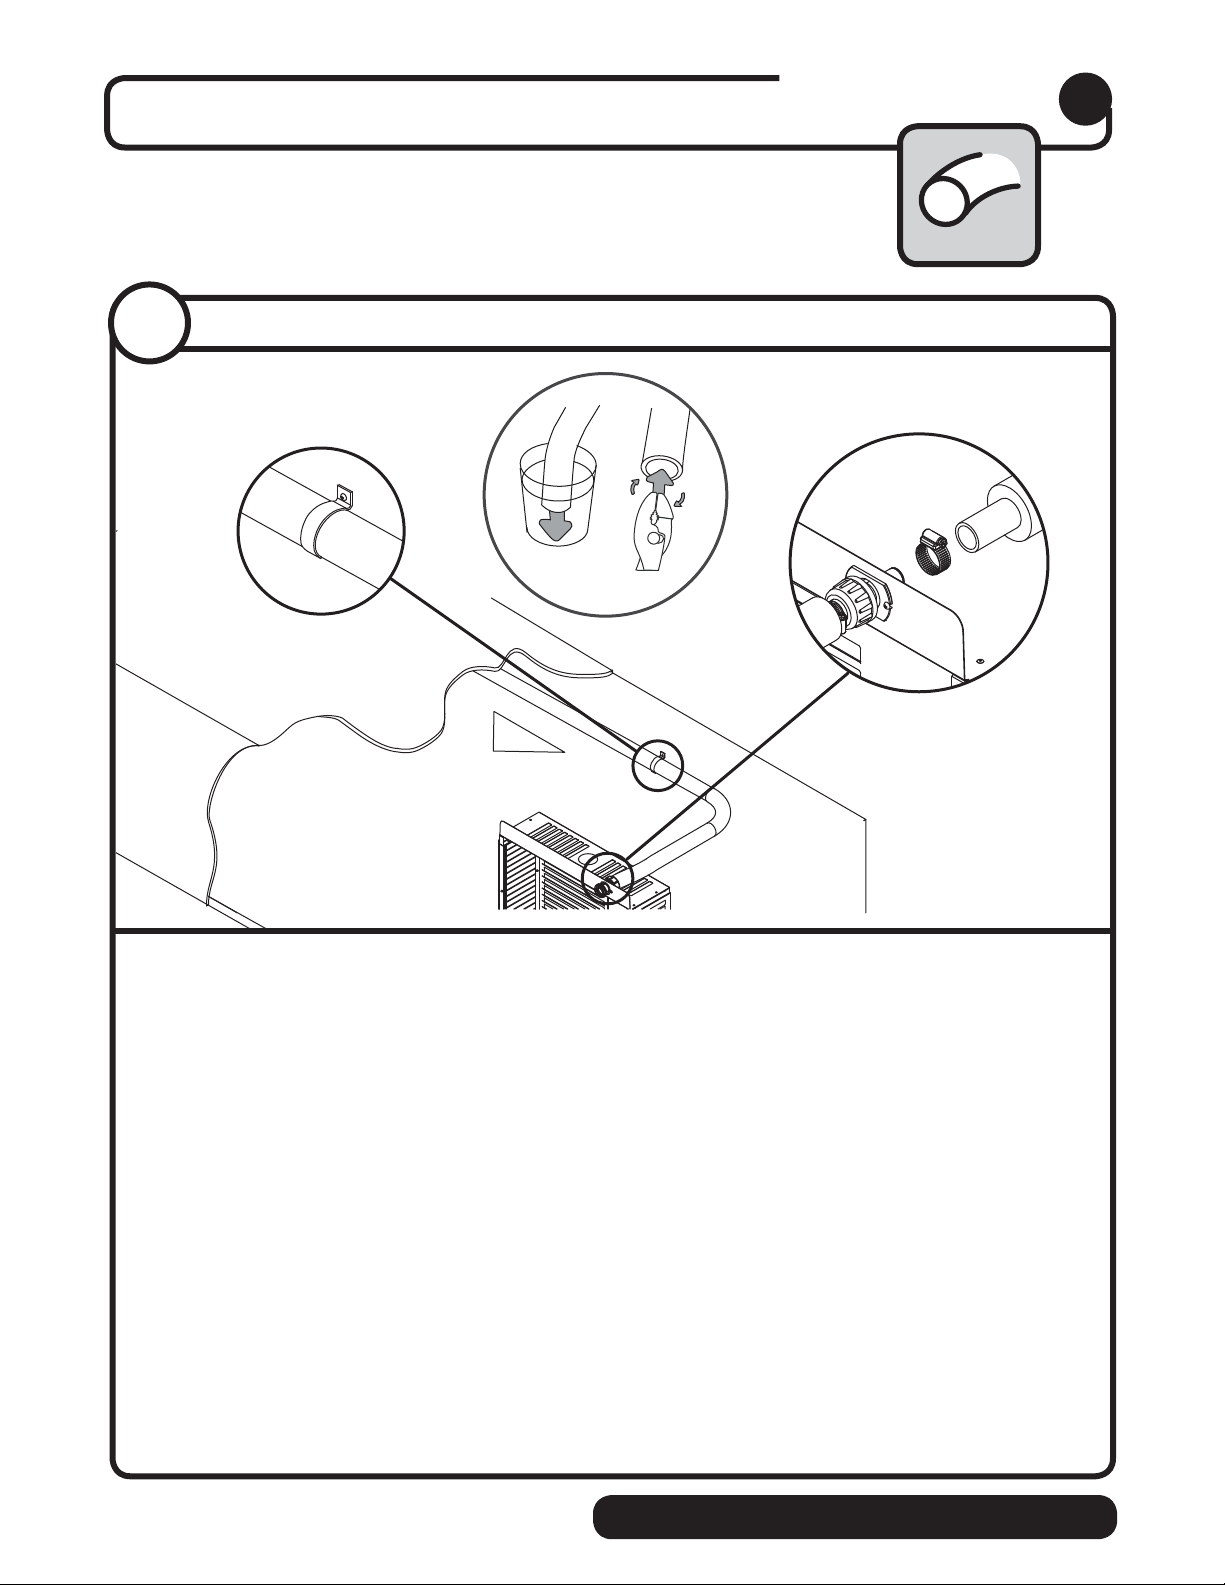
Install the ice transport tube.
Ice transport tube
4
4.1
Ice transport tube installation.
➋
1/4"
➌
Hot Water
160 F (71 C)
1'
➍
➏
➐
➎
➊
Ice transport tube tips
• Insulate entire length of ice transport tube
• Secure ice transport tube ➋ as needed to prevent dips and traps from forming.
For long tube runs see guide on page 13.
• Pitch tube at least 1/4" per foot (6,4mm/.3m)
• Ice transport tube must drain towards ice machine
Ice transport tube to Ice machine
• Be sure tube ends are square
• Heat end of transport tube in cup of 160F (71 C) hot water to soften and spread with pliers
before making connection to ease assembly
• Push ice transport tube onto ice machine nipple
• Install hose clamp
Ice transport tube to diverter valve
• See Ice Manager diverter valve instructions
8
➐
➍
➊
➌
➏
remote condensing ICE MANAGER
➎
Page 9
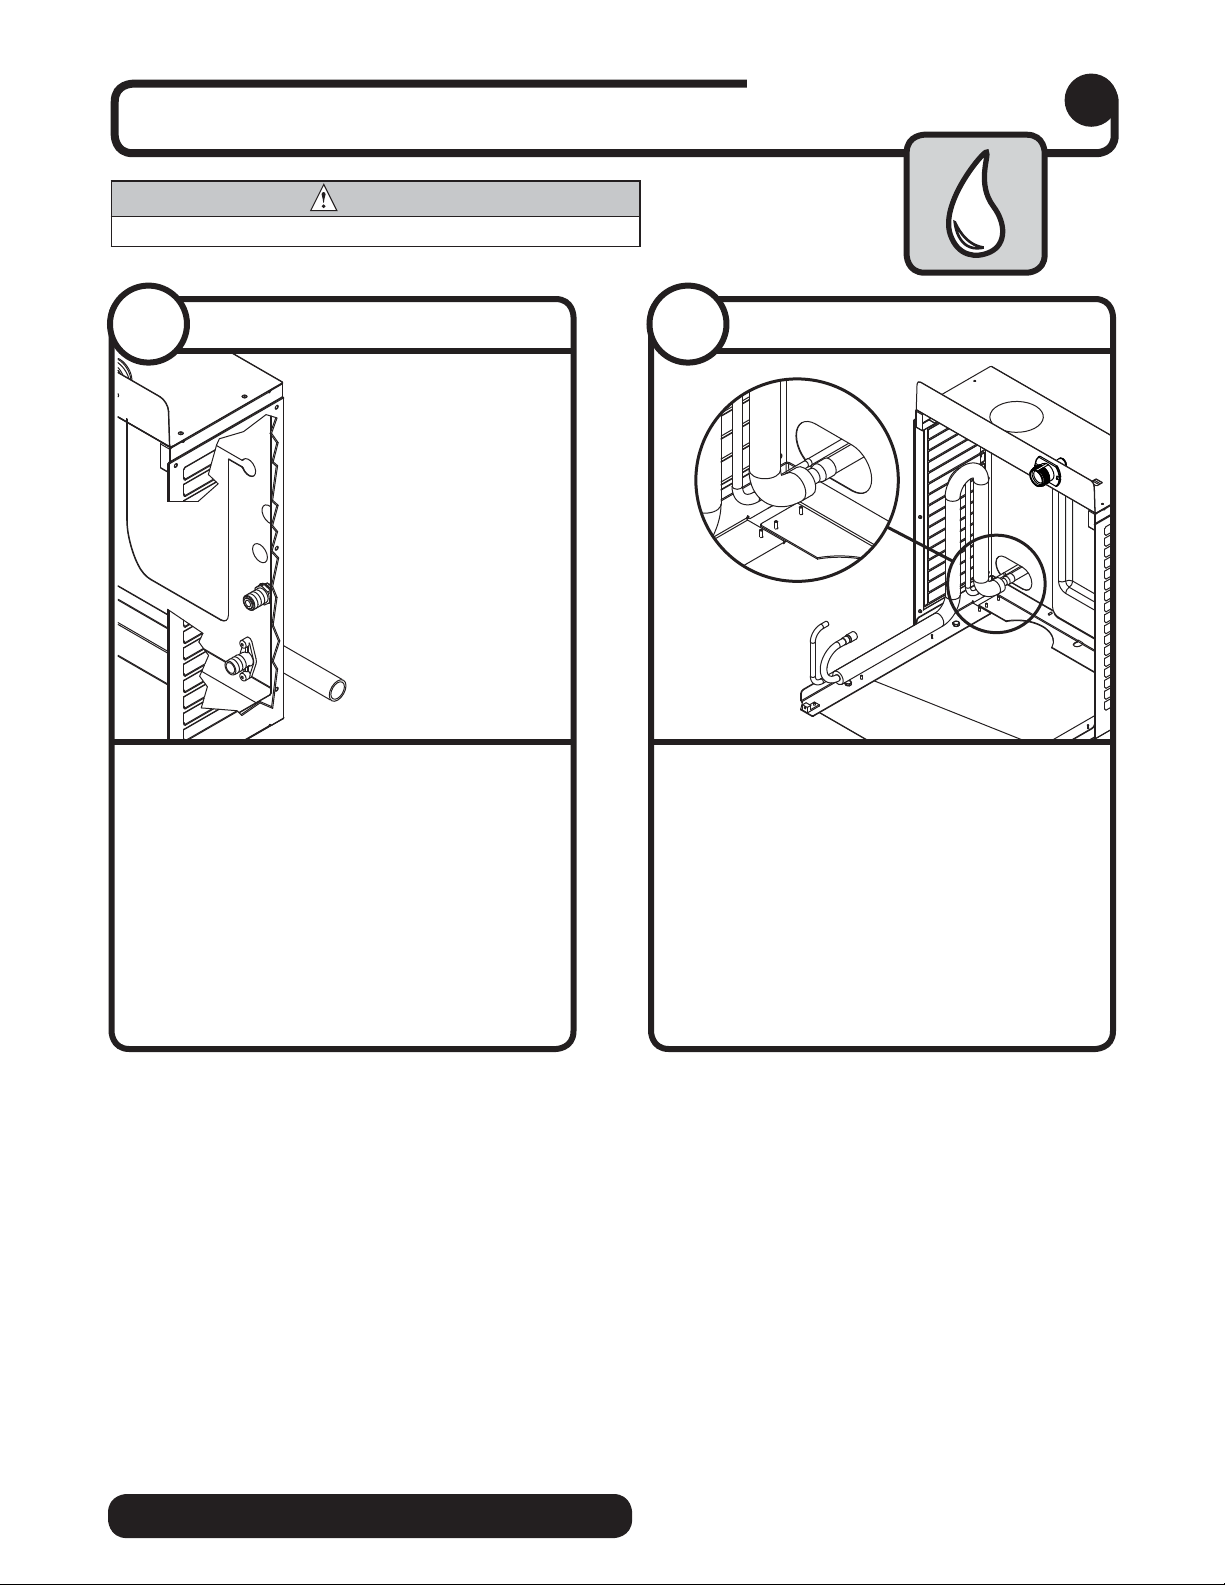
Connect utilities to louvered docking assembly.
CAUTION
• Plug must be accessible after nal installation.
External connections
5
5.1
Water and drain
➋
➊
• Remove access panel if necessary.
• Install drain line
The rigid drain line from the ice machine
must have at least 1/4" per foot pitch
(6,4mm/0,3m).
• Install ice machine potable water
supply
• Replace access panel
➋
➊
.
5.2
Refrigerant
➊
• Braze supplied expandable refrigerant
lines in place
➊
ICE MANAGER remote condensing
9
Page 10
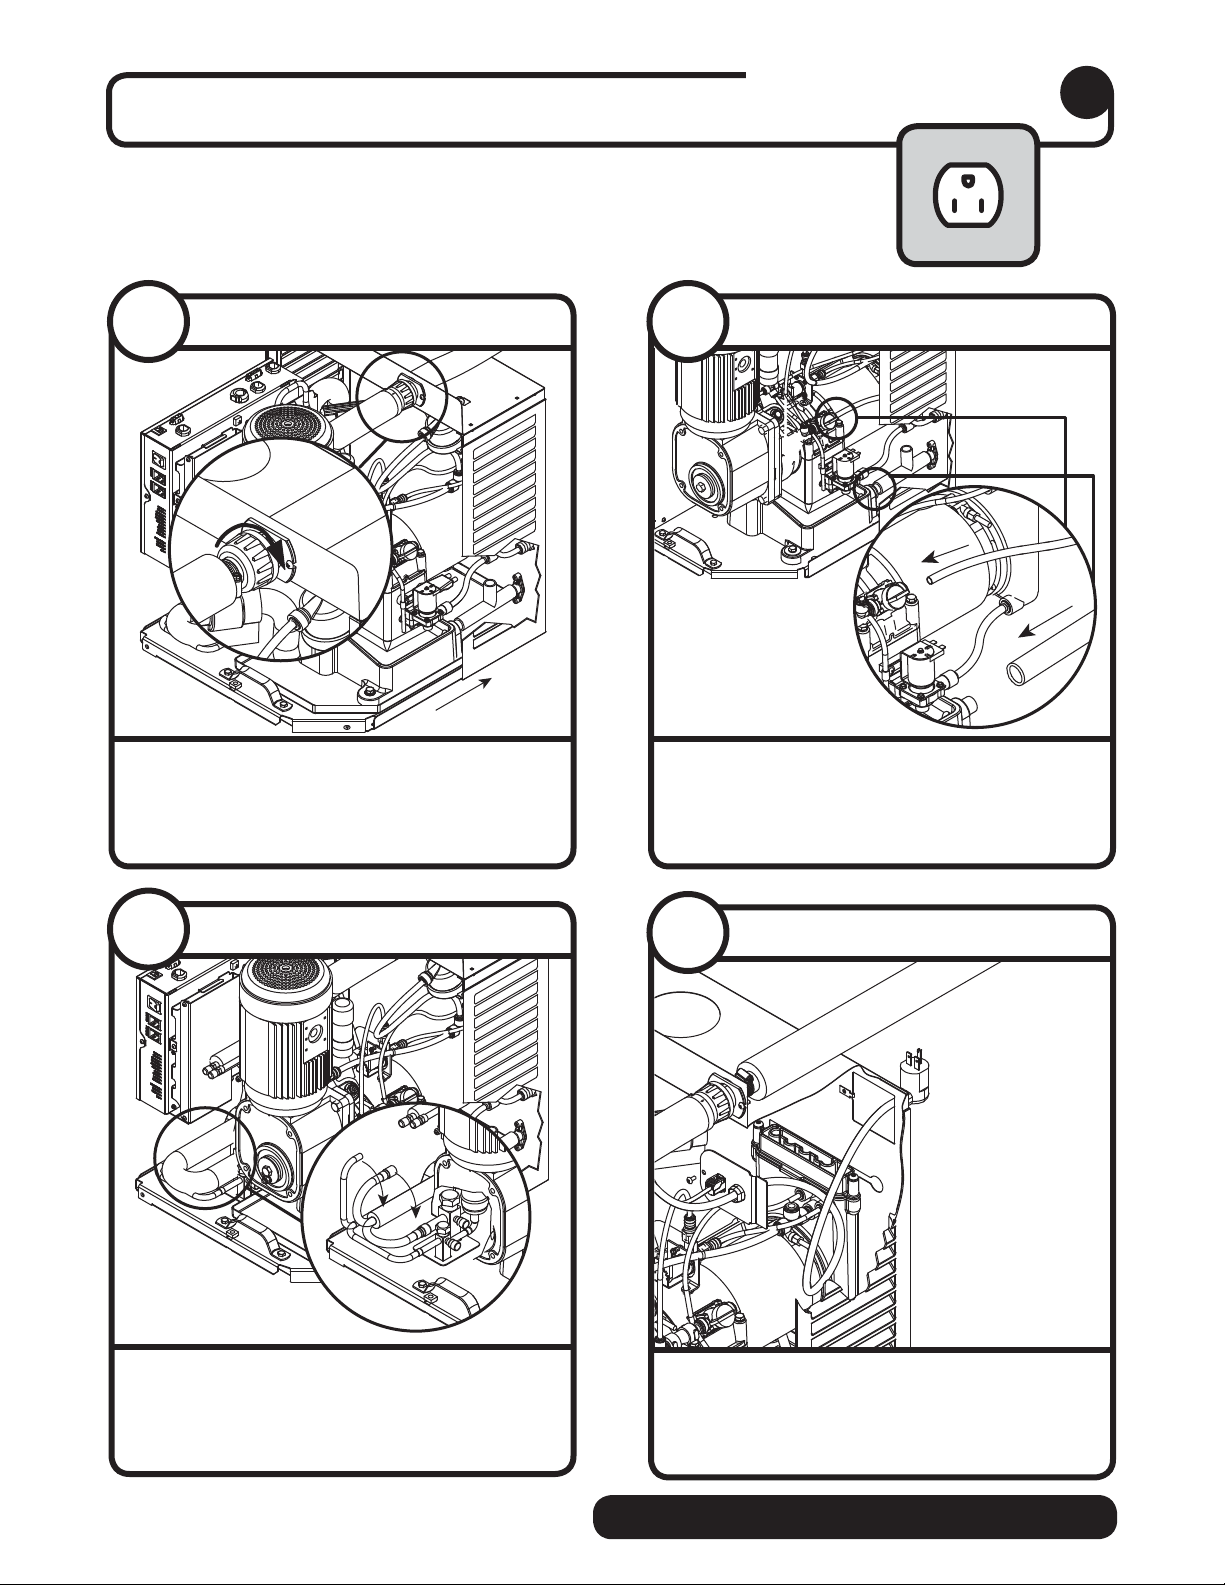
Connect louvered docking assembly to ice machine.
Internal connections
6
6.1
Ice transport tube installation
➋
➊
• Slide ice machine into louvered docking
assembly
• Insert ice transport tube all the way into
coupling and tighten nut rmly
➊
➋
6.2
Water and drain lines
➊
• Insert potable water line into valve
• Push drain line over hose barb on
back of evaporator mount
➋
➊
➋
➋
➊
6.3
Refrigeration lines
➊
• Rotate and braze refrigerant lines
➊
6.4
• Remove twist tie
• Carefully pass plug thru opening and plug
Power cord
into wall outlet
10
remote condensing ICE MANAGER
Page 11
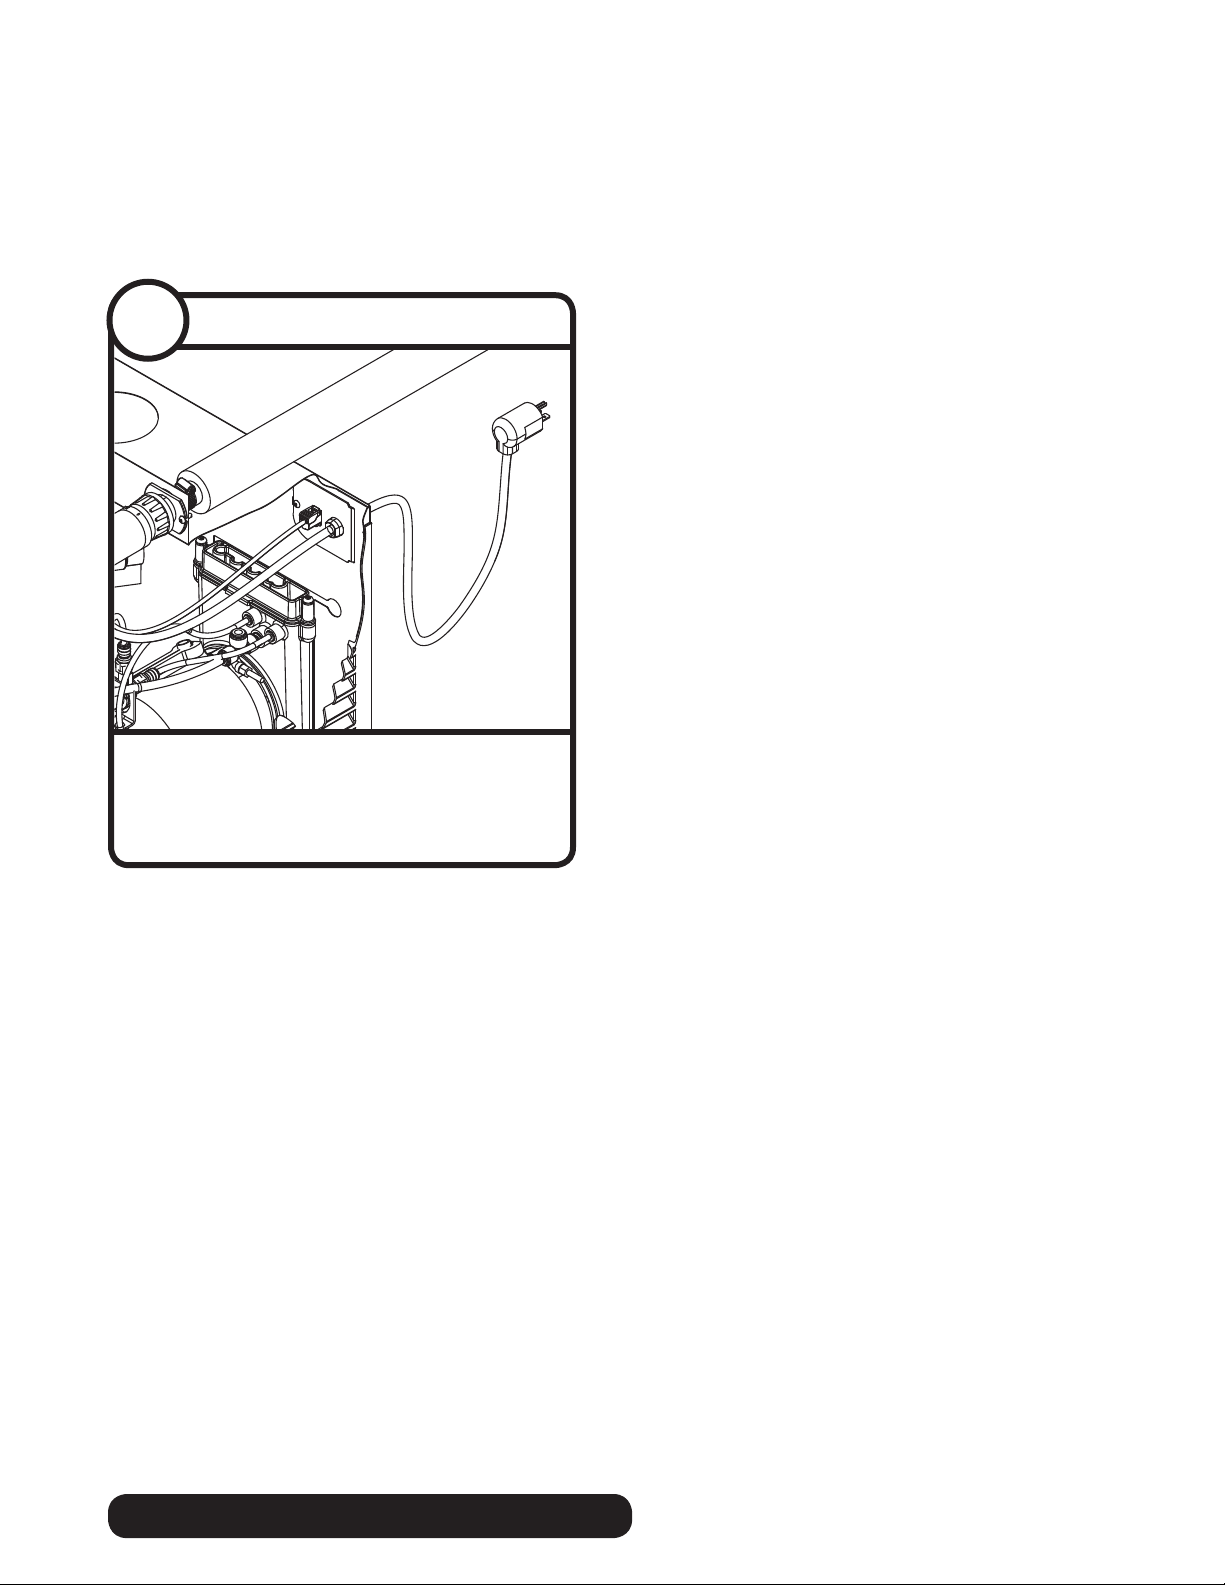
6.5
• Position plate into opening and secure
Power cord
with supplied screw
ICE MANAGER remote condensing
11
Page 12
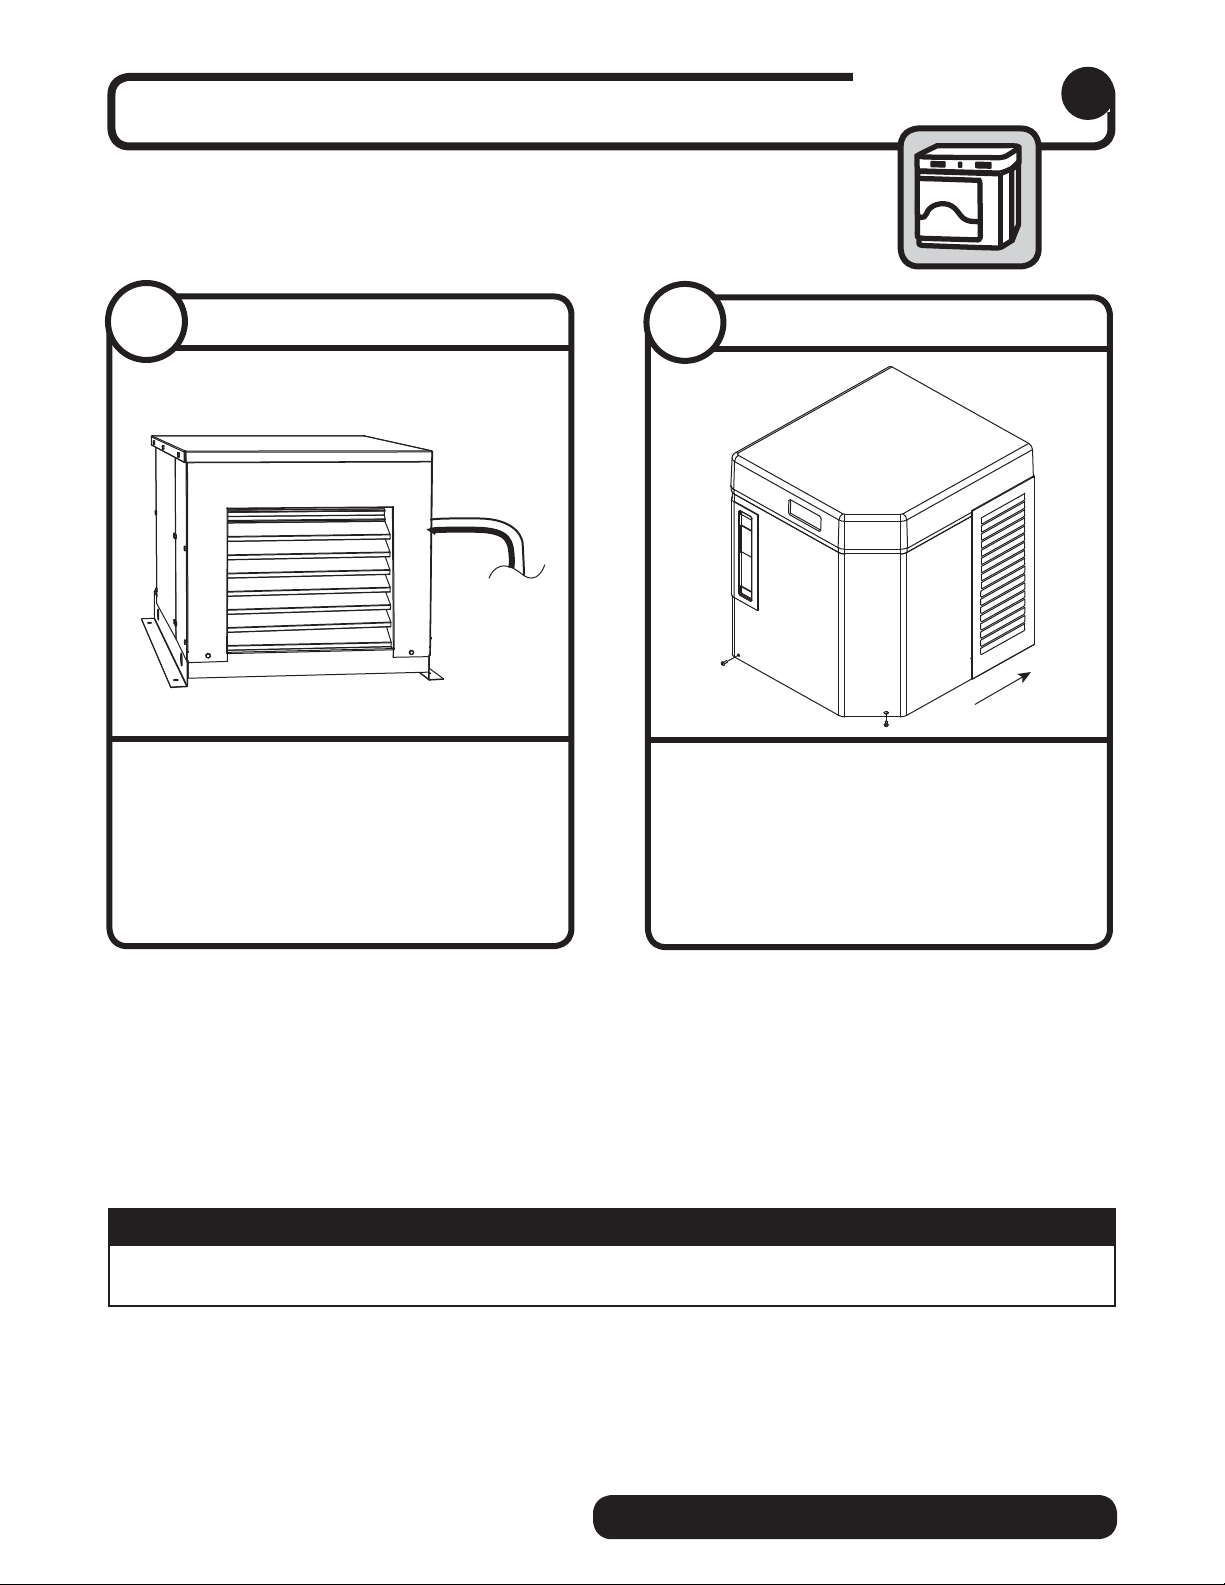
Install front cover to ice machine.
Front cover
7
7. 1
• Complete installation of condensing unit
Install condensing unit
or connection to rack system.
7. 2
• Slide ice machine cover over machine
• Insert and tighten two screws through
Install ice machine front cover
➋
ensuring that tabs on back of cover
slip under louvers on back of louvered
docking assembly
cover and into louvered docking assembly
➊
➊
➋
12
NOTICE
Ice machine MUST be sanitized prior to operation!
Consult Operation and Service Manual provided with ice machine for sanitizing instructions.
remote condensing ICE MANAGER
Page 13
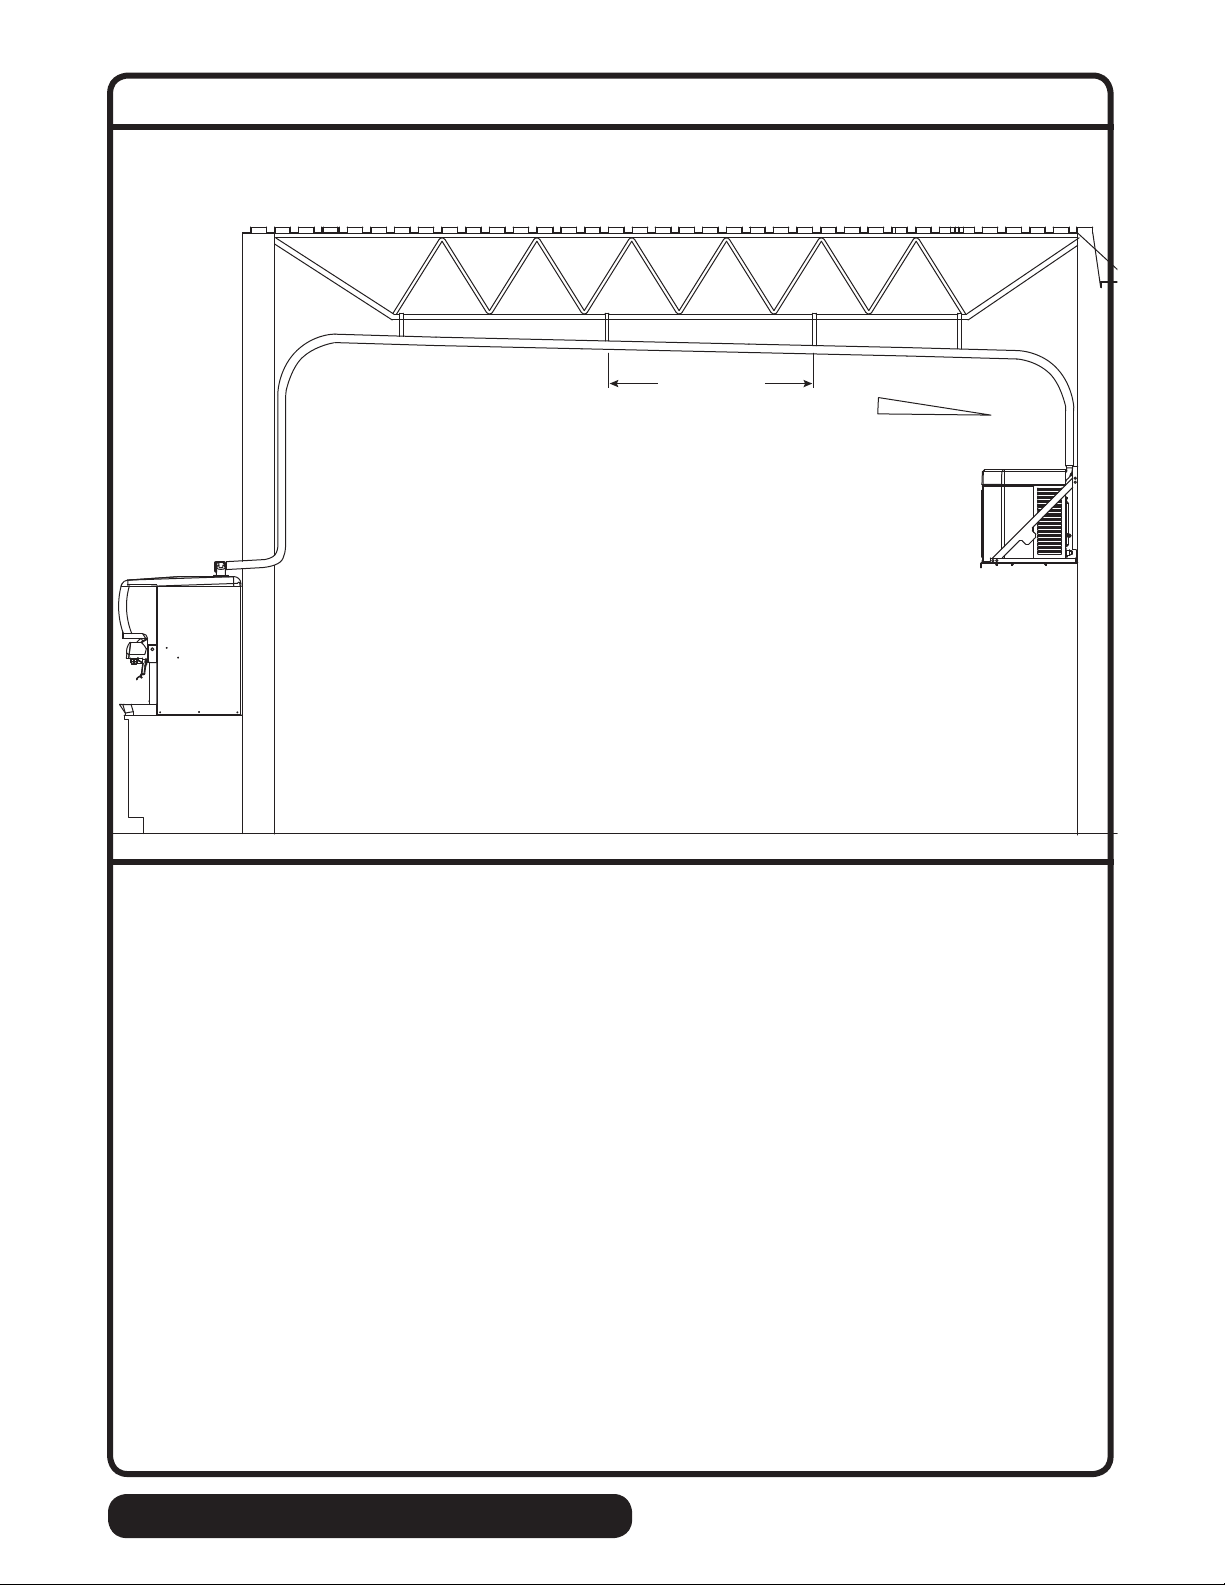
Long tube run recommendations
max. 2 ft (.6m)
➋
• Pitch ice transport tube to allow melt water to drain towards ice machine
• Secure insulated ice transport tube at least every 2 ft (.6m) to prevent dips or traps
1/4"
➊
➊
1'
➋
ICE MANAGER remote condensing
13
Page 14

14
remote condensing ICE MANAGER
Page 15

ICE MANAGER remote condensing
15
Page 16

Horizon, Maestro, Harmony, Ice Manager, SafeCLEAN, Sani-Sponge, RIDE and Vision are trademarks of Follett Corporation.
Chewblet is a registered trademark of Follett Corporation, registered in the US.
801 Church Lane • Easton, PA 18040, USA
Toll free (877) 612-5086 • +1 (610) 252-7301
www.follettice.com
00172536R06
3/12
 Loading...