


Flytec AG, Ebenaustrasse 8a, CH-6048 Horw
Electronic flight instruments made in Switzerland
Flytec 4030 GPS
Operating Instructions
Operating Instructions FLYTEC 4030 |
1 |
|
|
|
|
Introduction |
3 |
Instrument overview |
4 |
Keyboard |
5 |
Operating philosophy |
5 |
Run mode (normal operating mode) |
5 |
Setting mode (for adjustments) |
5 |
Option mode |
6 |
Commissioning |
6 |
The altimeter |
7 |
General remarks |
7 |
How does an altimeter work? |
7 |
Altimeter 1 (ALT1) |
8 |
Setting mode |
8 |
Option mode |
9 |
Altimeter 2 (ALT 2) |
9 |
Setting mode |
10 |
Option mode |
10 |
Vario and Polar |
11 |
Vario sound levels |
11 |
Analog vario bar display |
11 |
Digital vario display (Integrator) |
11 |
Setting mode |
12 |
Option mode |
12 |
Descent tone/Descent alarm and Polar |
13 |
Setting mode |
13 |
Option-Mode |
13 |
Speedometer |
14 |
General remarks |
14 |
Display |
14 |
Correction |
14 |
Setting mode |
14 |
Option mode |
15 |
Time measurement and temperature display |
16 |
Clock time (real-time clock), Stopwatch (CHRONO), Flying time |
16 |
Temperature display |
16 |
Setting mode |
17 |
Option mode |
17 |
GPS-supported functions |
18 |
Introduction |
18 |
Connection to a GPS navigation receiver |
18 |
 Flytec
Operating Instructions FLYTEC 4030 |
2 |
|
|
|
|
Normal flight according to McCready |
19 |
Theory |
19 |
Introduction |
19 |
Abbreviations |
19 |
The polar and its interpretation |
19 |
Working out the polars |
20 |
Polars for the best glide in still and agitated air |
21 |
Optimum crusing speed |
21 |
MacCready nominal flight display |
22 |
Descent phase |
22 |
MacCready nominal flight instrument setting |
22 |
Weighting of the wind commponent compensation |
23 |
Final approach |
23 |
Theory |
23 |
Introduction |
23 |
Final approach computer display |
23 |
Ascent phase |
23 |
Descent phase |
24 |
Final approach computer: instrument settings |
25 |
With or without head wind component |
25 |
Logbook |
26 |
General remarks |
26 |
Printout |
26 |
Barograph |
27 |
Recording |
27 |
Time marker |
27 |
Printout |
27 |
Transmission to a PC |
28 |
Barograph setting mode |
28 |
Barograph option mode |
28 |
APPENDIX |
29 |
Scope of supply |
29 |
Procedure for Official FAI Observers |
30 |
Water damage |
30 |
ASCII table |
31 |
PC and printer interface |
31 |
Function overview |
32 |
 Flytec
Operating Instructions FLYTEC 4030 |
3 |
|
|
|
|
Introduction
Flytec’s 4030 is a completely new development. The new instrument is now more compact, lighter and more economical thanks to the use of the very latest technology.
The 4030 is an instrument which you can adjust to suit your requirements. For this reason, all important data can be altered quickly and easily. You’re flying in the United States? No problem: Altimeter 1 displays the altitude in feet and Altimeter 2 displays the meters to which you are accustomed! This is just one example of what the 4030 has to offer.
With this new instrument, we have remained loyal to Flytec’s operating philosophy - and also improved it with the new option mode. Flytec’s new 4030 is an instrument that will give you immense enjoyment.
Your Flytec team
 Flytec
Operating Instructions FLYTEC 4030 |
4 |
|
|
|
|
 3
3
6
2
5
4
 1
1
 8
8
10
 7
7
9 
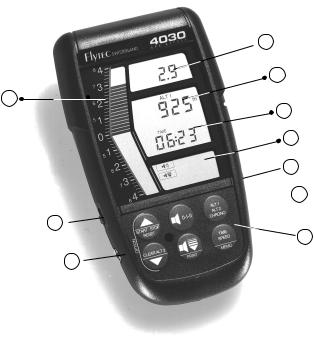
Instrument overview
1.On/Off switch
2.Analog vario bar display
3.Digital vario display, Glide ratio display
4.INDICATOR display
5.TIME / SPEED / MEMO display
6.Altimeter & stopwatch display
7.Key
8.Speed sensor Socket
9.PC, printer and GPS interface
10.REC switch
 Flytec

Operating Instructions FLYTEC 4030 |
5 |
|
|
|
|
Keyboard
1 |
2 |
3 |
|
|
|
0-I-II |
ALT 1 |
|
STARTSTOP |
|
ALT 2 |
|
OPTION |
|
|
CHRONO |
|
RESET |
|
|
||
|
|
|
||
|
CLEARALT 2 |
|
|
TIME |
|
|
|
SPEED |
|
|
|
|
|
MEMO |
4 |
5 |
6 |
1START-STOP-RESET
2VARIO
3ALT1-ALT2-CHRONO
4CLEAR ALT 2
5SINK (PRINT)
6TIME / SPEED / MEMO
Operating philosophy
The philosophy behind all Flytec instruments is to keep everything as simple as possible. This is why each key has only one function, i.e. a function can be displayed and switched on or off with each key. In order to alter a function, you press and hold down the relevant function key for approximately 3 seconds. The setting to be changed will then flash and can be altered by pressing  and
and  .
.
The instrument has three operating modes: normal operating mode, setting mode and configuration mode.
Run mode (normal operating mode)
The instrument is in run mode when used in normal operation. In run mode, the instrument will display your altitude, ascent and the time continuously.
Setting mode (for adjustments)
In setting mode, the most important value can be changed for each display. For example, the altitude can be set by using the setting mode for altimeter 1.
 Flytec

Operating Instructions FLYTEC 4030 |
6 |
|
|
|
|
Enter setting mode for a particular display (e.g. for altimeter 1), by pressing the relevant function key (e.g.  ) and holding it down for about 4 seconds. As soon as you are in setting mode, the SET indicator will appear in the INDICATOR display. The value to be changed begins to flash.
In order to return to run mode, press the relevant function key briefly (e.g. ALT 1 )
ALT 2
CHRONO
If no change is made in setting mode for 15 seconds, the instrument returns to run mode.
Option mode (configuration mode)
Option mode allows you to configure the instrument to your requirements and preferences. In option mode, you can set the parameters for the relevant display or function at various levels. For example, these can be units or special functions. A precise description of the various settings in option mode is given in the descriptions of the individual functions.
You can enter option mode (in the setting mode of a function) by simultaneously pressing the two keys marked “Option” in yellow (Fig. 1). If the instrument is in option mode, this is confirmed by the OPTION indicator in the INDICATOR display.
In OPTION mode you can change several parameters. By briefly pressing the relevant function key (e.g. ) you skip from one level to the next. In each level you can change one parameter of the relevant function. The level number will appear each time in the digital vario display.
If no change is made for 15 seconds in option mode, the instrument returns to run mode.
In order to return to run mode manually, press the two option keys simultaneously again (Fig. 1).
Using FlyChart 4.0 software on a PC, all settings in setting and option modes as well as additional configurations can be conveniently set and transmitted to the instrument via the PC interface.
OPTION |
STARTSTOP |
|
RESET |
||
|
||
|
CLEARALT 2 |
Figure 1
Commissioning
Switch on the instrument with the On/Off switch. On being switched on, the instrument goes through a self-test routine and then enters run mode.
 Flytec
Operating Instructions FLYTEC 4030 |
7 |
|
|
|
|
When switched on, the instrument settings correspond to those valid when the instrument was last switched off.
When first switched on, the instrument displays the approximate charging status of the batteries in the vario bar display. If the display shows approximately 50% of the maximum display in the green sector, the batteries are still half full. If the display is in the red sector, the batteries must be changed. If the batteries are low on charge during a flight, PO will light up briefly in the digital vario display and, at the same time, the charging status of the batteries is shown in the bar display.
The battery life of the instrument using alkaline batteries is 160 hours. Rechargeable batteries can also be used. However, operating time is substantially shorter with these (total operating time is approximately 40 - 50 hours).
Alkaline batteries can also be recharged several times using the appropriate charging unit (no fast chargers!).
The altimeter
General remarks
How does an altimeter work?
An altimeter is really a barometer because it does not measure altitude directly but pressure. The altitude is then calculated from the pressure. For the purpose of calculating absolute altitude (according to the international formula for altitude), the pressure at sea-level is assumed as being zero-point pressure.
Why does pressure change with altitude? The air pressure at a point on Earth is produced by the weight of the atmospheric air above it. This is why air pressure decreases with altitude - there is less air above your head! At 500 meters above sea-level, a pressure change of 1 mbar corresponds to a difference in altitude of about 8 meters.
In practice, however, it is not quite that simple as other factors also have an influence on air pressure. Pressure also depends on temperature and, of course, weather. On a stable day, there can be air pressure fluctuations of 1 mbar caused by temperatures and this corresponds to a difference in altitude of ± 10 meters. Depending on the weather, air pressure at sea-level (QNH) can be between 950 mbar and 1050 mbar. In order to eliminate this weather effect, an altimeter needs continual recalibration. This means that the altimeter must be set at a known altitude to display that same altitude.
 Flytec

Operating Instructions FLYTEC 4030 |
8 |
|
|
|
|
When the weather changes fast (e.g. cold fronts), air pressure can change in the course of a day by up to 5 mbar. This represents a change in altitude of 40 meters!
Another method of calibrating an altimeter is by entering the current QNH. What is the QNH? In flying circles, a general zero point is needed to enable all aircraft at the same altitude to also have the same altitude on their altimeters. This joint basis is called the QNH. The QNH is the current air pressure in hPa (1 hPa = 1 mbar) calculated at sea-level. It is redetermined several times daily and can be obtained in the flying weather report or from airfields by radio.
Altimeter 1 (ALT 1)
Altimeter 1 displays absolute altitude, i.e. the altitude above sea-level.
Function key  is used to change from the displays for altimeter 1, altimeter 2 and the stopwatch. Pressing and holding down this key will make the instrument go into setting mode.
Attention: While a flight is being recorded (REC activated) the setting mode is blocked for Altitude 1. This altitude can only be readjusted after the REC has been switched off. This is an FAI requirement.
Altimeter 1 setting mode
As mentioned above, the absolute altitude can be set in setting mode. The altitude and the QNH flash on 2 lines. Using the setting keys  and
and  , you can set the altitude and the QNH simultaneously. If you do not know what altitude you are currently at, you can set the altitude using the QNH but this method is not as precise as direct altitude setting. The QNH has a resolution of 1 mbar which corresponds to an altitude resolution of approximately 8 meters. The altitude, however, can be set directly to an accuracy of 1 meter.
Pressing the setting keys  and
and  simultaneously will take you from setting mode to option mode.
ALT 1
 ALT1 4 Sec.
ALT1 SET-MODE
ALT 1/QNH
OPTION |
|
OPTION-MODE |
|
ALT1 Unit |
|
m - ft |
|
QNH Unit |
|
hPa - inHg |
|
Sensor |
|
Correction |
|
OPTION |
|
 Flytec

Operating Instructions FLYTEC 4030 |
9 |
|
|
|
|
Altimeter 1 option mode
In option mode, you can set the unit for ALT 1 (meters or feet) at the first level and, at the second level, you can set the unit for the QNH (hPa or inHg). The indicator for the relevant unit set flashes in the display.
The pressure sensor can be corrected at the third level (± 50 hPa).
If you find that the QNH value displayed at a known altitude deviates seriously from the QNH value of a weather station in your area, you can correct this deviation by entering the deviation (with a different prefix). I.e. if the QNH displayed by your instrument is 20 hPa too high, enter -20 to correct this deviation.
This deviation is caused by the aging of the pressure sensor and stabilizes after 2 - 3 years.
N. B.: Incorrect manipulation of the correction value of the pressure sensor will result in false altitude readings! Never alter the basic settings of the altimeter unless you have good reason to do so (in your own interest)!
In option mode, the indicators OPTION and ALT 1 appear and the relevant number of the module is shown at the top of the display. The unit to be adjusted will flash.
Altimeter 2 and target altitude (ALT 2)
Altimeter 2 can either be used as an absolute altimeter or as a relative altimeter.
When used as an absolute altimeter, it functions in precisely the same way as altimeter 1. Altimeter 2 can now, for example, display the altitude in feet and altimeter 1 the altitude in meters.
The relative altimeter displays the current altitude with reference to a point. This reference point can be set at zero in run mode at any time by using the  key or set at any altitude in setting mode. The relative altimeter can thus be used to measure the higher altitude of the takeoff area. Pressing the
  key at the take-off area will zero ALT 2 for this purpose.
ALT 2
 ALT 2 4 Sec.
ALT2 SET-MODE
ALT 2/QNH
OPTION |
|
OPTION-MODE |
|
Target altitude |
|
GPS |
|
on / off |
|
ALT2 Unit |
|
m - ft |
|
Mode |
|
• relative altitude |
|
• absolute altitude |
|
|
|
OPTION |
|
 Flytec
Operating Instructions FLYTEC 4030 |
10 |
|
|
Altimeter 2 setting mode
The altitude can be set in setting mode in precisely the same way as with altimeter 1.
If altimeter 2 is selected as the absolute altimeter, it is coupled to altimeter 1. Any change in the display for altimeter 1 is reflected by a corresponding change in the display for altimeter 2 and vice-versa.
Altimeter 2 option mode
In OPTION mode, you can enter the target altitude at the first level using the  key and
the |
CLEARALT 2 |
|
key. |
|
|
||||
Use the |
TIME |
key to enter the second level of OPTION mode. There, the GPS-supported func- |
||
SPEED |
||||
|
||||
MEMO |
||||
tions of the instrument can be switched on or off.
The unit of the ALT 2 display (meters or feet) is determined at the third level. The currently
selected unit flashes in the display. Use the |
|
or the |
CLEARALT 2 |
key to toggle between the units. |
||
STARTSTOP |
|
|||||
RESET |
|
|||||
Press key |
TIME |
to enter the fourth level of option mode. At this level, you select the operating |
||||
SPEED |
||||||
|
||||||
MEMO |
||||||
mode of altimeter 2. If this is set at absolute altimete, the two indicators ALT 1 and ALT 2 will flash in the display. If set at relative altimeter, only the indicator ALT 2 will flash.
You return from option mode to run mode by waiting 15 seconds or again pressing the two keys marked “OPTION” simultaneously.
 Flytec
 Loading...