

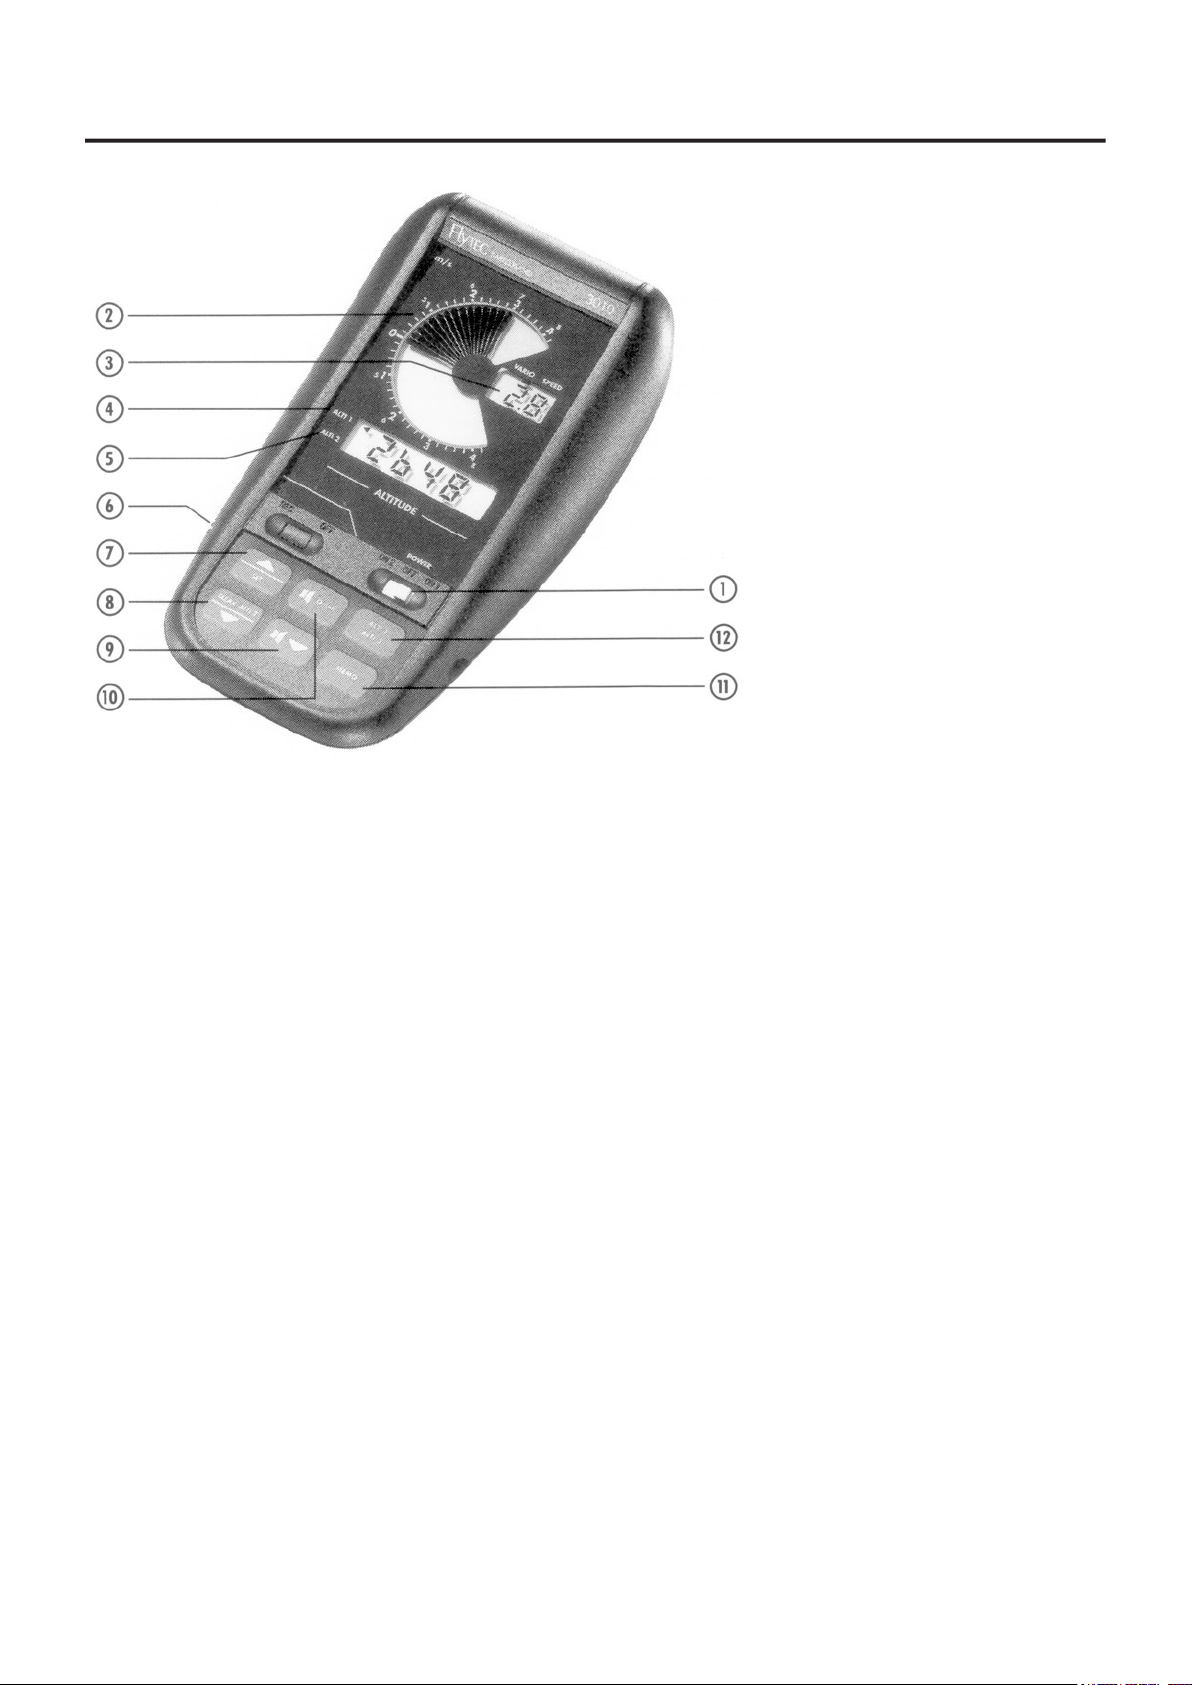
Analog vario display
3.
4.
Altitude 1: Absolute altitude
5.
Altitude 2: Relative altitude
6.
Vane wheel sensor socket / rechargeable
8.
9.
Starting:
On1 or On2 (1). Two independent batteries (rechargeable). The switch should be set to OFF when the unit has switched off automatically.
Power voltage is indicated on the analog vario display (2) for approximately 10 seconds and «Po» for power on the digital vario
display. When all the segments in the ascent sector (green) light up, this indicates that the battery which has been switched on has an energy reserve
of 100%.
descent sector (red) and «Po». If this occurs, the unit does not shift into operating mode.
Automatic power down:
Power is automatically cut off approx. 15 mins after the unit is last used. The on/off switch must rst be set at OFF before
the unit can be used again.
Setting mode:
1. Changeover into adjustment mode is effected by pressing a key (9, 10 or 12) for several (approx. 4) seconds. The corresponding
display will then ash intermittently and can be reset.
2. Use the reset key «Up» (7) or «Down» (8) to set the required value. When entering altitude gures, the number display can be speeded up by
continuous pressing.
3. Finish by pressing the corresponding original key. When setting the altitude there is automatic acknowledgement after approx. 10 sec.
Altimeter:
Altitude 1: Absolute altitude. Can be set within weather-de pendent tolerances.
Altitude 2:
Relative altitude. Can be set whenever required over the whole measurement range and zeroed at any time by pressing the key «CLEAR
ALTI 2» (8). lt can also be cleared while ALTI 1 is shown on the display. Operating the changeover key ALTI 1-ALTI 2 (12) indicates the desired altitude
and marks it with an arrow. Pressing the changeover key (12) for several (approx, 4) seconds will cause the unit to change to the adjustment mode of
the altitude currently displayed (see Setting mode).
Altitude gain / loss:
Altimeter 2 (ALTI 2) can be used to indicate a gain or loss in altitude, as it can be zeroed at any time using the key «CLEAR ALTI
2» (8), even while ALTI 1 is displayed.
Analog vario:
Fully automatic segment display over the entire range. Individual segments remain displayed until the end of the rst scale sector is
Display over the entire range.
Changeover into the vario attenuation settin mode is effected by pressing the volume key (10) for several (approx. 3
seconds (c.f. Setting mode). Four selectable average value computations are possible for the digital vario display:
d0 = average value for the last second (4 measurements per second)
d1 = average value for the last 3 seconds
d2 = average value for the last 10 seconds
d3 = average value for the last 30 seconds
The analog vario display is not attenuated.

Seite 2 von 2
Vario sound:
Sound can either be switched off entirely or 2 volume levels can be set by repeatedly pressing the volume key (8). The volume level currently
set will sound when the key is pressed.
When the unit is switched on, the volume is automatically set at level 1.
Ascent tone:
A sound interval with a rising tone frequency dependent on ascent frequency and a timbre dependent on scale (ASI: Acoustic Scale
a specialist).
A continuous falling tone frequency de pendent on descent with a timbre dependent on scale (ASI: Acoustic Scale
descent sector of the vario display to indicate the current response point. When the descent tone/alarm is switched off, pressing the key will not produce
a display. The descent tone/alarm will only sound when the vario acoustic facility is switched on.
When the descent tone key (9) is pressed for approx. 3 seconds, the unit moves into the adjustment mode for descent tone/alarm (see Setting mo de). The
Wind speed display:
The vane wheel sensor is connected to the socket (6) on the left-hand side of the unit. The display replaces the digital vario display
Pressing the MEMO key (11) will display the peak values (max. absolute altitude 2 and maximum ascent) of the current ight (F0).
a clear difference in altitude).
Unscrew the unit and open up the back. Use a 9 V battery.
Order the FLYTEC AKKU SET from your local dealer (2 rechargeable batteries and 1 charging unit) .
N.B. Only use rechargeable batteries ! The charging unit must never be connected when non-rechargeable batteries are being used.
Water damage:
Open the unit immediately. lf salt water has entered the unit, rinse it thoroughly (the printed circuit board, in particular) with hand-hot fresh
water. Allow the unit to dry as well as possible, preferably in the sun. lf this is not possible, the unit must be placed on a piece of wood in an oven. Allow the
N.B. Never put the unit in a microwove oven !
Attachment:
Clip or special attachment for hang-glider ( t to the rear of the unit). The clip can be unscrewed, rotated 90º and re tted.
Adjusting the security cord:
Open the unit, cut the cord to the required length and knot it well. Tighten the cord from the outside and screw the unit
together again.
Servicing, repairs:
Return the unit to your nearest FLYTEC service agent.
Telefon: 041 / 340 34 24,
Telefax: 041 / 340 54 24
 Loading...