

Page 1

RUSKA 7350
High Pressure Gas Controller/Calibrator
PN 3952249
November 2010
© 2010 Fluke Corporation. All rights reserved. Printed in USA. Specifications are subject to change without notice.
All product names are trademarks of their respective companies.
Users Manual
Page 2

LIMITED WARRANTY AND LIMITATION OF LIABILITY
Each Fluke product is warranted to be free from defects in material and workmanship under normal use and
service. The warranty period is one year and begins on the date of shipment. Parts, product repairs, and
services are warranted for 90 days. This warranty extends only to the original buyer or end-user customer of
a Fluke authorized reseller, and does not apply to fuses, disposable batteries, or to any product which, in
Fluke's opinion, has been misused, altered, neglected, contaminated, or damaged by accident or abnormal
conditions of operation or handling. Fluke warrants that software will operate substantially in accordance
with its functional specifications for 90 days and that it has been properly recorded on non-defective media.
Fluke does not warrant that software will be error free or operate without interruption.
Fluke authorized resellers shall extend this warranty on new and unused products to end-user customers
only but have no authority to extend a greater or different warranty on behalf of Fluke. Warranty support is
available only if product is purchased through a Fluke authorized sales outlet or Buyer has paid the
applicable international price. Fluke reserves the right to invoice Buyer for importation costs of
repair/replacement parts when product purchased in one country is submitted for repair in another country.
Fluke's warranty obligation is limited, at Fluke's option, to refund of the purchase price, free of charge repair,
or replacement of a defective product which is returned to a Fluke authorized service center within the
warranty period.
To obtain warranty service, contact your nearest Fluke authorized service center to obtain return
authorization information, then send the product to that service center, with a description of the difficulty,
postage and insurance prepaid (FOB Destination). Fluke assumes no risk for damage in transit. Following
warranty repair, the product will be returned to Buyer, transportation prepaid (FOB Destination). If Fluke
determines that failure was caused by neglect, misuse, contamination, alteration, accident, or abnormal
condition of operation or handling, including overvoltage failures caused by use outside the product’s
specified rating, or normal wear and tear of mechanical components, Fluke will provide an estimate of repair
costs and obtain authorization before commencing the work. Following repair, the product will be returned to
the Buyer transportation prepaid and the Buyer will be billed for the repair and return transportation charges
(FOB Shipping Point).
THIS WARRANTY IS BUYER'S SOLE AND EXCLUSIVE REMEDY AND IS IN LIEU OF ALL OTHER
WARRANTIES, EXPRESS OR IMPLIED, INCLUDING BUT NOT LIMITED TO ANY IMPLIED WARRANTY
OF MERCHANTABILITY OR FITNESS FOR A PARTICULAR PURPOSE. FLUKE SHALL NOT BE LIABLE
FOR ANY SPECIAL, INDIRECT, INCIDENTAL, OR CONSEQUENTIAL DAMAGES OR LOSSES,
INCLUDING LOSS OF DATA, ARISING FROM ANY CAUSE OR THEORY.
Since some countries or states do not allow limitation of the term of an implied warranty, or exclusion or
limitation of incidental or consequential damages, the limitations and exclusions of this warranty may not
apply to every buyer. If any provision of this Warranty is held invalid or unenforceable by a court or other
decision-maker of competent jurisdiction, such holding will not affect the validity or enforceability of any other
provision.
Fluke Corporation
P.O. Box 9090
Everett, WA 98206-9090
U.S.A.
Fluke Europe B.V.
P.O. Box 1186
5602 BD Eindhoven
The Netherlands
11/99
To register your product online, visit register.fluke.com
Page 3

Table of Contents
Chapter Title Page
1 General Information ............................................................................ 1-1
Introduction........................................................................................................ 1-1
General Information........................................................................................... 1-1
How to Contact Fluke ........................................................................................ 1-1
Safety Information ............................................................................................. 1-2
Safety Summary ............................................................................................ 1-2
Keep Away from Live Circuits ..................................................................... 1-2
Do Not Service or Adjust Alone.................................................................... 1-2
Resuscitation.................................................................................................. 1-2
Electrostatic Discharge Sensitive Parts ......................................................... 1-2
Compressed Air ............................................................................................. 1-2
Personal Protective Equipment...................................................................... 1-2
Inert Gases..................................................................................................... 1-2
AC Main Plug, Switch, and Power Cord....................................................... 1-2
Symbols Used in this Manual ............................................................................ 1-3
Features.............................................................................................................. 1-3
Mercury-Free................................................................................................. 1-3
NIST Traceability.......................................................................................... 1-3
Power Supply................................................................................................. 1-3
Measure While Control ................................................................................. 1-3
Friendly Display ............................................................................................ 1-3
Adjustable Pressure Display.......................................................................... 1-3
Ease of Operation .......................................................................................... 1-4
Easily Programmable..................................................................................... 1-4
Attractive Desktop Packaging ....................................................................... 1-4
Power-On Self Test ....................................................................................... 1-4
Ease of Calibration ........................................................................................ 1-4
Automatic Zero Adjust .................................................................................. 1-4
Automatic Head Correction........................................................................... 1-4
Choice of Medium......................................................................................... 1-4
Choice of Display Units ................................................................................ 1-4
Communications Interface............................................................................. 1-4
Standard Equipment & Options......................................................................... 1-5
i
Page 4

RUSKA 7350
Users Manual
2 Theory of Operation ............................................................................ 2-1
Introduction........................................................................................................ 2-1
Power Supply..................................................................................................... 2-1
Electronics Section ............................................................................................ 2-1
Back Plane Board .......................................................................................... 2-1
Microprocessor Board ................................................................................... 2-1
IEEE-488 Interface........................................................................................ 2-3
Front Panel..................................................................................................... 2-3
Motor Controller............................................................................................ 2-3
76xx Interface Board ..................................................................................... 2-4
Pneumatic Module ............................................................................................. 2-4
Pneumatic Pump............................................................................................ 2-4
Gearmotor...................................................................................................... 2-4
System Valve................................................................................................. 2-4
Electronics Regulator .................................................................................... 2-5
Dome Regulator............................................................................................. 2-5
System Transducer ........................................................................................ 2-5
Test Port ........................................................................................................ 2-5
Drive Air-Supply Port ................................................................................... 2-5
Gas Supply Port............................................................................................. 2-5
3 Installation ........................................................................................... 3-1
Introduction........................................................................................................ 3-1
Unpacking the RUSKA 7350............................................................................. 3-1
Cautions ............................................................................................................. 3-2
Powering Up the RUSKA 7350......................................................................... 3-2
Pneumatic Connections...................................................................................... 3-2
Drive Air Supply Port.................................................................................... 3-2
Test Port ........................................................................................................ 3-2
Gas Supply Port............................................................................................. 3-2
4 Local Operation ................................................................................... 4-1
Local Operation ................................................................................................. 4-1
Numeric Keypad............................................................................................ 4-1
Function Keys................................................................................................ 4-1
Rotary Knob .................................................................................................. 4-1
Cancel, Previous............................................................................................ 4-2
Tutorial .............................................................................................................. 4-3
Selecting Language ....................................................................................... 4-5
Selecting Mode of Operation......................................................................... 4-5
Tare Mode ................................................................................................. 4-5
Triple Range (Optional) ............................................................................ 4-6
Main Menu......................................................................................................... 4-6
Controlling Pressure .......................................................................................... 4-6
Setting the Pressure Set-Point ....................................................................... 4-6
Entering/Exiting Control Mode..................................................................... 4-7
Vent.................................................................................................................... 4-7
Step/Jog.............................................................................................................. 4-7
Stepping......................................................................................................... 4-7
Setting Step Size............................................................................................ 4-7
Jogging .......................................................................................................... 4-7
Menu .................................................................................................................. 4-8
Menu | Setup.................................................................................................. 4-8
Menu | Setup — Limits ............................................................................. 4-9
ii
Page 5

Contents (continued)
Menu | Setup — User ................................................................................ 4-11
Menu | Setup — Units............................................................................... 4-13
Menu | Setup — Remote ........................................................................... 4-15
Menu | Setup — System............................................................................ 4-15
Menu | Calibrate ............................................................................................ 4-16
Calibration Password ................................................................................ 4-16
Menu | Program — Storing A Sequence in Memory..................................... 4-17
Preparing to Program ................................................................................ 4-17
Entering a New Program........................................................................... 4-18
Automatically Generating a Program........................................................ 4-20
Changing the Name of a Program............................................................. 4-21
Changing an Existing Program ................................................................. 4-21
Changing the Configuration Stored with a Program................................. 4-22
Running a Program ................................................................................... 4-23
Menu | Test .................................................................................................... 4-24
Menu | Test — Sweep Test ....................................................................... 4-24
Menu | Test — Self Test ........................................................................... 4-25
Menu | Test — Remote Test ..................................................................... 4-25
Menu | Test — Shop1................................................................................ 4-26
Menu | Display............................................................................................... 4-27
Menu | Display — Blank ............................................................................... 4-27
5 Remote Operation ............................................................................... 5-1
Remote Operation .............................................................................................. 5-1
Capabilities ........................................................................................................ 5-1
IEEE-488 ....................................................................................................... 5-1
RS-232........................................................................................................... 5-2
Remote/Local Operation.................................................................................... 5-2
Configuration ..................................................................................................... 5-3
Device Messages................................................................................................ 5-3
SCPI Command Format ................................................................................ 5-3
SCPI Response Format.................................................................................. 5-3
ANSI/IEEE 488.2-1987 Command Summary............................................... 5-4
SCPI Command Summary ............................................................................ 5-4
Example SCPI Commands ............................................................................ 5-6
SCPI Status Registers .................................................................................... 5-7
6005 Interface Panel Emulation......................................................................... 5-8
Serial Operation ................................................................................................. 5-9
6 Maintenance......................................................................................... 6-1
Introduction........................................................................................................ 6-1
Observing the RUSKA 7350’s Full Scale Rating.............................................. 6-1
Observing the Software Version Number.......................................................... 6-1
Preventive Maintenance..................................................................................... 6-1
Initiating the RUSKA 7350’s Self Test......................................................... 6-1
Removing the RUSKA 7350’s Cover ........................................................... 6-1
Processor Battery ............................................................................................... 6-2
Calibration ......................................................................................................... 6-2
Calibration Instructions — Single Sensor ..................................................... 6-3
Preparation..................................................................................................... 6-3
Storing the Coefficients................................................................................. 6-4
Editing the Calibration Coefficients .............................................................. 6-5
Zeroing .......................................................................................................... 6-5
RUSKA 7350 Pump Lubrication....................................................................... 6-6
iii
Page 6

RUSKA 7350
Users Manual
Approved Lubrications.................................................................................. 6-6
Frequency of Lubrication .............................................................................. 6-6
Lubrication Procedure ................................................................................... 6-6
Fuse.................................................................................................................... 6-6
Cleaning............................................................................................................. 6-6
7 Preparation for Storage and Shipment.............................................. 7-1
Disconnection Instructions................................................................................. 7-1
Packing Instructions........................................................................................... 7-1
Shipping Instructions ......................................................................................... 7-3
Appendices
A Summary of Specifications ......................................................................... A-1
B Summary of Error Messages ....................................................................... B-1
iv
Page 7

List of Tables
Table Title Page
1-1. Symbols.................................................................................................................. 1-3
1-2. RUSKA 7350 - Options List .................................................................................. 1-5
2-1. Conversion Factors................................................................................................. 2-3
3-1. General Specification and Parameters.................................................................... 3-1
v
Page 8

RUSKA 7350
Users Manual
vi
Page 9

List of Figures
Figure Title Page
2-1. RUSKA 7350 Block Diagram................................................................................ 2-2
2-2. Pneumatic Diagram................................................................................................ 2-4
4-1. RUSKA 7350 Front Panel...................................................................................... 4-1
4-2. Menu Tree .............................................................................................................. 4-2
4-3. Main Menu ............................................................................................................. 4-3
4-4. Units - Menu .......................................................................................................... 4-3
4-5. Main Menu - Entering Pressure ............................................................................. 4-4
4-6. Main Menu - Control Mode ................................................................................... 4-5
4-7. Main Menu ............................................................................................................. 4-6
4-8. Menu ...................................................................................................................... 4-8
4-9. Menu | Setup | Menu .............................................................................................. 4-8
4-10. Menu | Setup | Limits - Menu................................................................................. 4-9
4-11. Menu | Setup | User - Menu.................................................................................... 4-11
4-12. Menu | Setup | Units - Menu .................................................................................. 4-13
4-14. Menu | Setup | Remote - Menu............................................................................... 4-15
4-15. Menu | Setup | System - Menu ............................................................................... 4-15
4-16. Menu | Program - Menu ......................................................................................... 4-18
4-17. Menu | Program | Edit - Menu................................................................................ 4-19
4-18. Menu | Program | Edit | Auto - Menu ..................................................................... 4-20
4-19. Menu | Program | Edit | Name - Menu.................................................................... 4-21
4-20. Menu | Program | Edit - Menu................................................................................ 4-22
4-21. Menu | Program | Config - Menu ........................................................................... 4-23
4-22. Menu | Program | Run - Menu................................................................................ 4-23
4-23. Menu | Test - Menu ................................................................................................ 4-24
4-24. Menu | Test | Sweep - Menu................................................................................... 4-25
4-25. Menu | Test | Remote - GPIB Menu....................................................................... 4-26
4-25. Menu | Test | Remote | Serial 1 - Menu.................................................................. 4-26
4-26. Menu | Test | Shop1 - Menu ................................................................................... 4-26
4-27. Menu | Display - Menu........................................................................................... 4-27
7-1. Packing the Calibrator............................................................................................ 7-3
vii
Page 10

RUSKA 7350
Users Manual
viii 1-1
Page 11

Introduction
This manual contains operation and routine and preventive maintenance instructions for
the RUSKA 7350 High Pressure Gas Controller/Calibrator manufactured by Fluke. This
portion of the manual provides general information about the RUSKA 7350 and presents
its features and options.
General Information
The RUSKA 7350 uses transducers to provide the precise measurement of pressure.
During normal operation, the RUSKA 7350 performs in either measure mode or
control mode.
Chapter 1
General Information
In control mode, the RUSKA 7350 simultaneously measures and controls pressure.
Control mode is commonly used in the calibration and testing of pressure gauges,
transducers, pressure switches, and production pressure instruments.
In Measure mode the RUSKA 7350 measures pressure. Typically, measure mode finds
applications in research laboratories, testing of gauges and transducers.
How to Contact Fluke
To order accessories, receive operating assistance, or get the location of the nearest Fluke
distributor or Service Center, call:
• Technical Support USA: 1-800-99-FLUKE (1-800-993-5853)
• Calibration/Repair USA: 1-888-99-FLUKE (1-888-993-5853)
• Canada: 1-800-36-FLUKE (1-800-363-5853)
• Europe: +31-402-675-200
• China: +86-400-810-3435
• Japan: +81-3-3434-0181
• Singapore: +65-738-5655
• Anywhere in the world: +1-425-446-5500
Or, visit Fluke's website at www.fluke.com
To register your product, visit http://register.fluke.com
To view, print, or download the latest manual supplement, visit
http://us.fluke.com/usen/support/manuals
.
.
.
Page 12

RUSKA 7350
Users Manual
Safety Information
Safety Summary
Keep Away from Live Circuits
Do Not Service or Adjust Alone
Resuscitation
The following are general safety precautions that are not related to any specific
procedures and do not appear elsewhere in this publication. These are recommended
precautions that personnel must understand and apply during equipment operation and
maintenance to ensure safety and health and protection of property.
Operating personnel must at all times observe safety regulations. Do not replace
components or make adjustments inside the equipment with the voltage supply connected.
Under certain conditions, dangerous potentials may exist when the power control is in the
off position due to charges retained by capacitors. To avoid injuries, always remove
power from, discharge, and ground a circuit before touching it.
Do not attempt internal service or adjustment unless another person capable of rendering
aid and resuscitation is present.
Personnel working with or near dangerous voltages shall be familiar with modern
methods of resuscitation. Such information may be obtained from your local American
Medical Association.
Electrostatic Discharge Sensitive Parts
W Caution
Electrostatic discharge sensitive (ESDS) is applied to low
power, solid-state parts which could be damaged or destroyed
when exposed to discharges of static electricity. Maintenance
personnel are often not aware that an ESDS part has been
damaged or destroyed because electrostatic discharges at
levels less than 4,000 volts cannot be seen, felt or heard.
Compressed Air
Use of compressed air can create an environment of propelled foreign matter. Pressure
system safety precautions apply to all ranges of pressure. Care must be taken during
testing to ensure that all pneumatic connections are properly and tightly made prior to
applying pressure. Personnel must wear eye protection to prevent injury.
Personal Protective Equipment
Wear eye protection approved for the materials and tools being used.
Inert Gases
Operation of pressure equipment may be accompanied by the discharge of inert gases to
the atmosphere. The result is a reduction of oxygen concentration. Therefore, it is
mandatory that all exhaust gases be vented outside the work area.
W Warning
If the equipment is used in a manner not specified by the
manufacturer, the protection provided by the equipment may be
impaired.
1-2
AC Main Plug, Switch, and Power Cord
The AC main plug, switch and power cord shall remain readily accessible for operation.
Page 13

General Information
Symbols Used in this Manual 1
Symbols Used in this Manual
In this manual, a Warning identifies conditions and actions that pose a hazard to the user.
A Caution identifies conditions and actions that may damage High Pressure Gas
Controller/Calibrator.
Symbols used on the High Pressure Gas Controller/Calibrator and in this manual are
explained in Table 1-1.
Table 1-1. Symbols
Symbol Description
B AC (Alternating Current)
J Earth Ground
W Important Information: refer to manual
X Shock Hazard
Do not dispose of this product as unsorted
~
municipal waste. Go to Fluke’s website for
recycling information.
Features
The following features are available on all RUSKA 7350s.
Mercury-Free
All components in the RUSKA 7350 are mercury-free.
NIST Traceability
All RUSKA 7350s are calibrated per ANSI/NCSL Z-540-1-1994 using RUSKA
deadweight gauges that are directly traceable to the National Institute of Standards and
Technology (NIST). All instruments are provided with a NVLAP accredited calibration
certificate.
Power Supply
The RUSKA 7350s are either 100 – 120VAC, 1PH, 50/60 HZ or 220 – 240VAC, 1PH,
50/60 HZ.
Measure While Control
The RUSKA 7350 simultaneously digitally displays the commanded pressure, the actual
pressure, and the difference between the two. A bar graph indicates how close the actual
pressure is to the commanded pressure, as well as how close the commanded pressure is
to the RUSKA 7350’s full scale pressure.
P
This equipment meets the requirements of all
relevant European safety directives. The
equipment carries the CE mark
Friendly Display
The RUSKA 7350’s color active matrix TFT display combines a bright, low-glare
readout with a wide viewing angle. During normal operation, the measured pressure is
easily visible from a distance of 10 feet (3 meters).
Adjustable Pressure Display
The pressure display may be adjusted to show one decimal greater than or less than the
default resolution.
1-3
Page 14

RUSKA 7350
Users Manual
Ease of Operation
Easily Programmable
Attractive Desktop Packaging
Power-On Self Test
Ease of Calibration
An intuitive, menu-driven interface makes the RUSKA 7350 easy to use. Frequently
used selections, such as the units of measure, are stored in memory each time the
RUSKA 7350 powers up.
The RUSKA 7350’s powerful microprocessor provides the basis for smart electronics.
With a few simple keystrokes, the user set limits on the system pressure, create unique
units of measure, program a test sequence, and more.
A sturdy aluminum case houses all of the RUSKA 7350’s pneumatics, electronics, and
user controls. With the optional rack mount kit, this standard 19" EIA chassis fits easily
into a rack mount system.
Upon power-up, the RUSKA 7350 quickly tests its hardware and software. After the
RUSKA 7350 completes this test, the user can select more extensive self-tests for the
pneumatics and electronics.
A four-point calibration can be performed either remotely or entirely from the front panel.
No disassembly is required, and there are no potentiometers to tune.
Automatic Zero Adjust
At the user’s request, the RUSKA 7350’s software automatically performs the zero
adjustment, with no potentiometers to tune.
Automatic Head Correction
The RUSKA 7350 automatically corrects for head pressure between the RUSKA 7350
and the device under test (DUT), taking into account the density of the test gas.
Choice of Medium
The Pneumatic RUSKA 7350 can be used with any dry, clean nitrogen as the pressure
medium.
Choice of Display Units
Standard units include inches of mercury at 0 °C and 60 °C, kiloPascals, bars, pounds per
square inch, inches of water at 4 °C, 20 °C, and 25 °C, kilograms per square centimeter,
millimeters of mercury, centimeters of mercury at 0 °C, and centimeters of water at 4 °C.
Altitude and airspeed units include feet, meters, knots, and kilometers/hour. In addition to
these predefined units, four user-defined units are programmable.
Communications Interface
The RUSKA 7350 includes standard RS-232 serial and IEEE-488 interfaces. The user’s
computer communicates with the RUSKA 7350 through the Standard Commands for
Programmable Instruments (SCPI) protocol. The RUSKA 7350 can also be configured to
accept existing software written for the RUSKA Series 6000 DPG.
1-4
Page 15

General Information
Standard Equipment & Options 1
Standard Equipment & Options
A standard pneumatic RUSKA 7350 comes with this manual, a power cord, a grease gun
and grease. The standard pneumatic RUSKA 7350 is fully functional, but the following
options are also available.
IEEE-488 Interface: All models of the RUSKA 7350 have an IEEE-488 (GPIB) card. The
user’s computer communicates with the RUSKA 7350 through the Standard Commands
for Programmable Instruments (SCPI) protocol. In addition, software written for the
Series 7000 CALIBRATOR and Series 6000 DPG is fully compatible with the
RUSKA 7350.
Additional Power Cords: Additional power cords are available for most countries of the
world.
Table 1-2. RUSKA 7350 - Options List
Option Part Number
Communication Software Contact Fluke
User’s Manual 3952249
Power Cord, USA and Canada 284174
Power Cord, Central Europe 769422
Power Cord, India 782771
Power Cord, Japan 3898323
Power Cord, Australia/New Zealand 658641
Battery 2135249
1-5
Page 16

RUSKA 7350
Users Manual
1-6
Page 17

Introduction
The RUSKA 7350’s power supply, electronics, pneumatics, and sensor combine to form
a complete, stand-alone, measure and control instrument. This portion of the manual
breaks the RUSKA 7350 down into its component modules (Figure 2-1) and provides a
general discussion of each.
Power Supply
The RUSKA 7350 is set up as either a 120 – 130 VAC, 50/60 Hz or 220 – 240 VAC,
50/60 Hz single phase as required by customer. Check label next to power supply inlet.
Chapter 2
Theory of Operation
Electronics Section
The RUSKA 7350’s electronics section consists of the Back Plane Board, the
Microprocessor Board, the 76XX Interface Board, the Option Board, the IEEE interface,
and the Front Panel consisting of display and key pad.
Back Plane Board
The Microprocessor Board, the 76XX Interface Board, the Option Board, and the IEEE
Board plugs into the Back Plane Board.
The four voltages produced by the Power Supply are distributed to the Back Plane Board,
where they are conditioned to produce four additional voltages of +5 VDC, -5 VDC,
+12 VDC, and -12 VDC for analog use. The resulting seven DC voltages are then used
either directly or indirectly throughout the entire RUSKA 7350.
Microprocessor Board
All of the RUSKA 7350’s software resides in nonvolatile, programmable, read-only
memory (Flash EPROM) on the Microprocessor Board, which plugs directly into the
Control Board. This software contains all of the instructions that operate the
RUSKA 7350, as well as the conversion factors that the RUSKA 7350 uses to translate
the detected pressure into the units selected by the user. These factors are given in
Table 2-1.
Data that is subject to change after the RUSKA 7350 leaves the factory is held in
electrically erasable, programmable, read-only memory (EEPROM) on this Board.
This includes the current units of measure, the coefficients from the zeroing process,
the current pressure medium, and the conversion factors for the four user-defined units
of measure.
When the RUSKA 7350 powers up, its software is loaded into random access memory
(RAM), which is also on the Microprocessor Board. At the same time, the values stored
in EEPROM on the Board are restored to memory.
2-1
Page 18

RUSKA 7350
Users Manual
Another important component on the Microprocessor Board is the lithium battery, which
continuously updates the RUSKA 7350’s date and time, even when the unit is powered
down.
The Sensors, Front Panel, the pump expansion and compression limit switches
communicate with this board through cables. The Processor Board also supports the
RS-232 serial interface, which allows the user’s computer to communicate with the
RUSKA 7350.
AIRTEST PORT
Pneumatic Section
MOTOR
CONTROLLER
GEAR MOTOR
76XX INTERFACE
DC POWER
SUPPLY
AC POWER
PUMP
BOARD
AIR REGULATOR
MICROPROCESSOR
BOARD
BACK PLANE
BOARD
OPTION
BOARD
SENSORS
Electronic Section
DISPLAY/
KEY PAD
PANEL
IEEE CARD
2-2
POWER SUPPLY
Figure 2-1. RUSKA 7350 Block Diagram
gld01.eps
Page 19

Theory of Operation
Electronics Section 2
Table 2-1. Conversion Factors
Symbol Description Conversion Factor
inHg inches of mercury (0 °C) = kPa x 0.2952998
inHg inches of mercury (60 °C) = kPa x 0.296134
kPa kiloPascals = kPa x 1.0
bar bars = kPa x 0.01
psi pounds per inch2 = kPa x 0.1450377
cmH2O centimeters of water (4 °C) = kPa x 10.19744
inH2O inches of water (4 °C) = kPa x 4.014742
inH2O inches of water (20 °C) = kPa x 4.021898
inH2O inches of water (25 °C) = kPa x 4.024108
kg/cm2 kilograms per cm2 = kPa x 0.0101972
mmHg millimeters of mercury (0 °C) = kPa x 7.500605
cmHg centimeters of mercury (0 °C) = kPa x 0.7500605
knots airspeed knots per NASA TN D-822
km/hr kilometers per hour = knots x 1.852
feet feet of altitude per MIL-STD-859A
meters meters of altitude per MIL-STD-859A
user1 user defined = kPa x User defined
user2 user defined = kPa x User defined
Pa user defined (Pascals) = kPa x 1000.0
%FS user defined (percent of full scale)
IEEE-488 Interface
The RUSKA 7350’s IEEE-488 (GPIB) Interface Card, which plugs directly into the
Back Plane Board, provides the RUSKA 7350 with an IEEE-488 Interface. This interface
allows the user to automate the measurement and control processes.
Front Panel
The Microprocessor Board interprets all input from the Front Panel. The Front Panel
contains the active matrix TFT color display, rotary knob and rubberized keys used to
operate the RUSKA 7350.
Motor Controller
This motor controller controls the speed of the motor driving the pump in the pneumatic
section of the 7350. The motor controller receives its analog signal (+/-10VDC) from the
76XX Interface Board and in turn runs the motor at variable speed. The controller can be
configured with jumpers for either 115 VAC or 230 VAC power supply.
2-3
Page 20
RUSKA 7350
Users Manual
76xx Interface Board
Pneumatic Module
This board interfaces and conditions the pump position signal. The board interfaces
these signals between the electronic and pneumatic module. This board also provides
a 0 – 10 VDC signal to 0 – 100 psi electronic pneumatic regulators and the motor
controller.
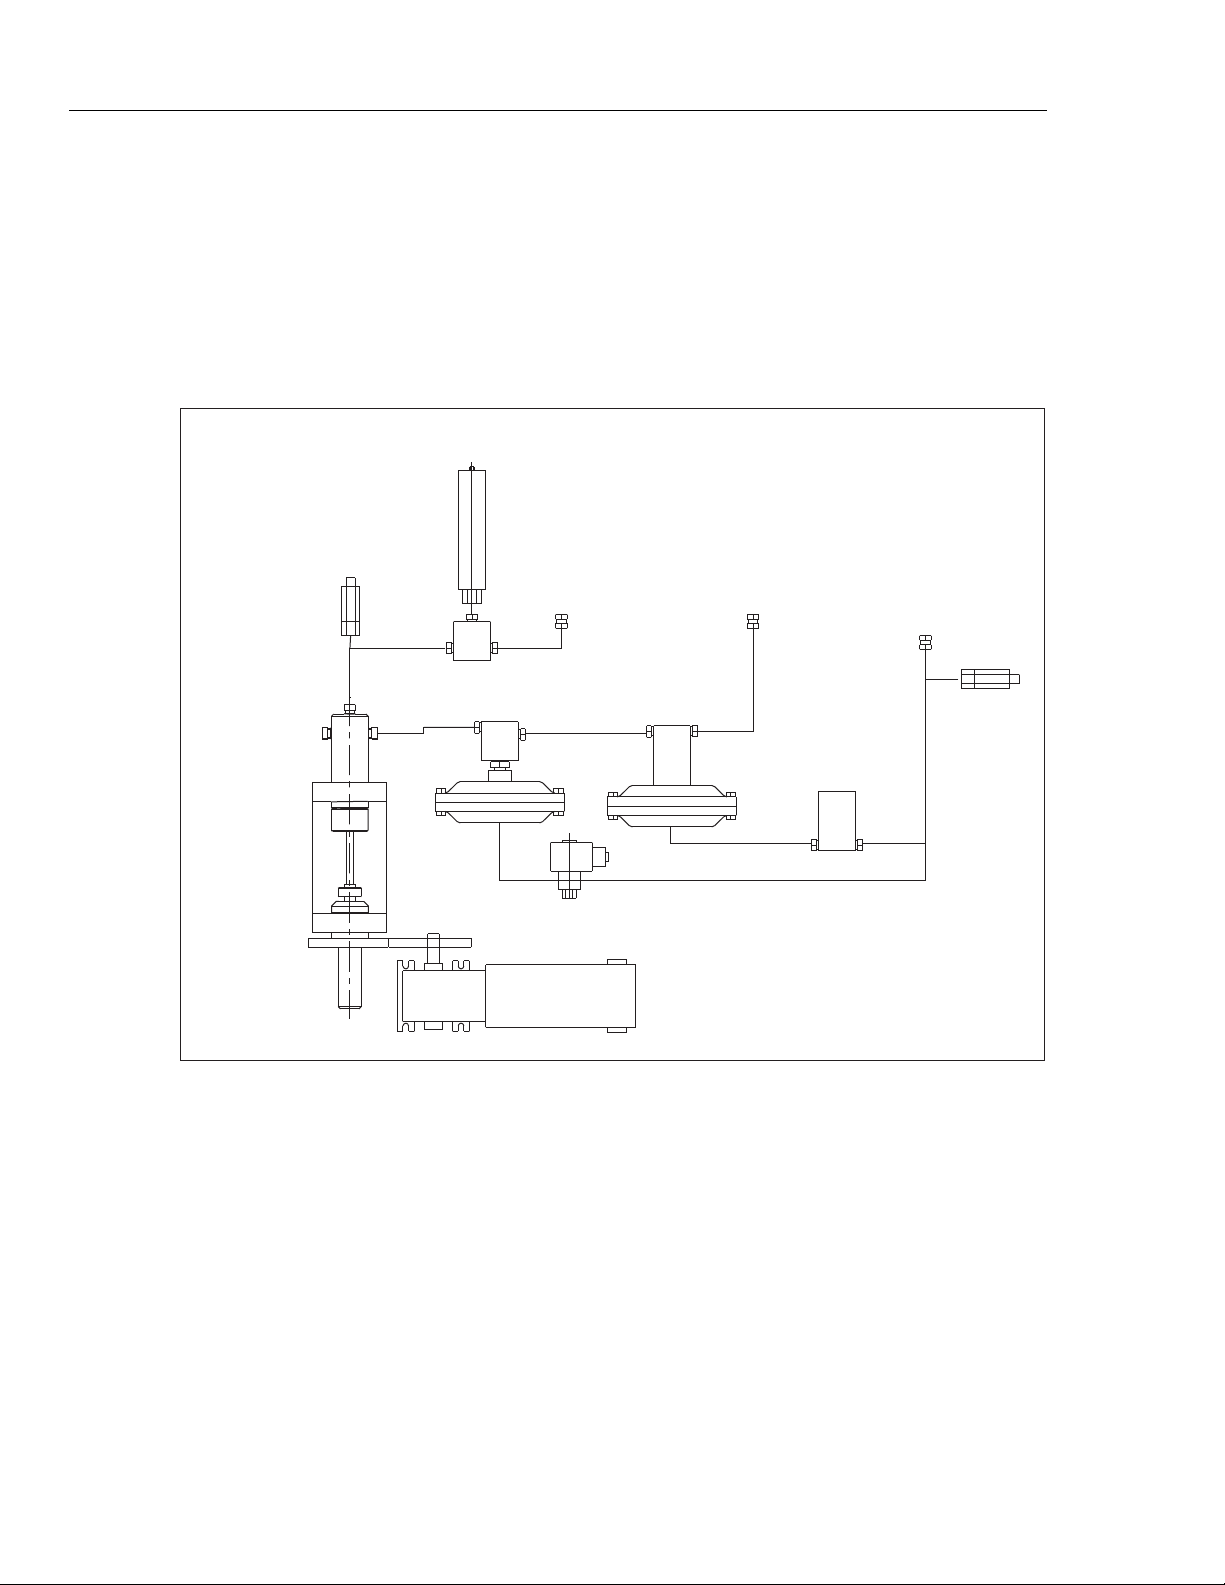
The pneumatic section shown in Figure 2-2 houses components that control and
accurately measure pneumatic pressure.
TRANSDUCER
RELIEF
VALVE
TEST
PORT
SUPPLY
PORT
AIR SUPPLY
110 PSI
PNEUMATIC
PUMP
Pneumatic Pump
The pneumatic pump is a positive displacement pump that precisely varies the system
pressure by compressing and expanding system gas. The pump is driven by a variable
speed gear-motor. The pump has a position sensor that tracks the position of the pump
plunger. It has two travel limit switches at each end of its stroke.
AIR-OPERATED
VALVE
SOLENOID
VALVE
Figure 2-2. Pneumatic Diagram
VARIABLE
SPEED
GEARMOTOR
ELECTRONIC
REGULATOR
RELIEF
VALVE
gld02.eps
2-4
Gearmotor
The variable-speed gear motor drives the pneumatic pump. The gear box on the motor
reduces the motor speed.
System Valve
The system valve isolates the pump and system from the gas supply regulators. It is a
high pressure air-operated valve. This valve has a diaphragm operator that requires a
minimum of 60 psi of air pressure to close the valve. The air is supplied to this valve
through a three-way normally-open solenoid valve.
Page 21

Theory of Operation
Pneumatic Module 2
Electronics Regulator
The electronics regulator supplies a 0 – 100 psi air signal for the dome regulator.
The electronics regulator is driven by a 0 – 10 VDC signal from the interface board.
Dome Regulator
The dome regulators, which are self-relieving, “rough” in the commanded pressure.
The precise pressure is then achieved by the pump after closing the system valve.
System Transducer
The system transducer accurately measures (accuracy is specified as purchased,
0.01% minimum) the controlled pressure. This transducer should be calibrated at
a regular interval to maintain its stated accuracy.
Test Port
The device under test is connected to this port. This port is a 1/8 NPT female.
Drive Air-Supply Port
The supply air is connected to the drive-air supply port. The supply air should be
100 – 110 psi (7 – 7.5 bar). The pneumatic side is protected by a relief valve set at
120 psi. (8.3 bar). This port is a 1/4 NPT female connection.
Gas Supply Port
The clean, dry gas supply is connected to this port. The gas pressure should be 10%
above the full scale pressure of the controller. This port is a 1/8 NPT female connection.
2-5
Page 22

RUSKA 7350
Users Manual
2-6
Page 23

Introduction
This portion of the manual discusses initial installation for the RUSKA 7350. Installing
the RUSKA 7350 is a relatively simple process of unpacking the RUSKA 7350,
powering it up, and then using the front panel to configure the system.
Unpacking the RUSKA 7350
Carefully unpack all components, checking for obvious signs of damage. In addition to
any nonstandard items ordered with the RUSKA 7350, the shipment should contain at
least the following items:
Chapter 3
Installation
• RUSKA 7350
• power cord, and this user’s manual
• grease gun and grease
If necessary, report any shipping damage to the freight agency. Remove masking tape,
strings, and packing materials from all components. If possible, save the packing
materials for future use.
Finally, install the Calibrator in a location that meets the requirements listed in Table 3-1.
Note
The RUSKA 7350 should not be subjected to mechanical shocks during
installation or use. It should be mounted on a rigid bench or in a sturdy
19 inch rack. Although the zeroing process will compensate for a slightly
unlevel mounting; the RUSKA 7350 should be mounted to within 5º of level.
Table 3-1. General Specification and Parameters
Parameter Value Model
Operating Humidity Range 5% to 95% RH all
Operating Temperature Range 5 °C to 50 °C all
Storage Humidity Range None1 all
Storage Temperature -20 °C to 70°C all
Power Requirements 100 – 120 VAC or 220 – 240 VAC all
Warm Up Period 30 minutes all
3-1
Page 24

RUSKA 7350
Users Manual
Cautions
Powering Up the RUSKA 7350
W Caution
If there is any condensation, the RUSKA 7350 must be
thoroughly dried before power is applied.
The following cautions should be heeded at all times to insure safe operation of the
RUSKA 7350.
WX Warning
Never operate the unit with the cover removed. The power
supply has internal voltages near 400 volts.
Never apply more than 110% of the unit’s full scale pressure range to the test port. Never
try to control while a pressure source is connected to the test port.
Avoid thermal and mechanical shock to the instrument. This will affect performance and
require re-zeroing.
1. First, plug the power cord supplied with the RUSKA 7350 into the power connector
on the RUSKA 7350’s back panel.
Grounding for the RUSKA 7350 is provided through the power cord.
2. Next, plug the power cord into a receptacle rated for either 100 – 120 VAC
or 220 – 240 VAC (check name plate). If a different power cord is necessary for your
receptacle, consult Table 1-1 for available power cords.
3. Finally, turn on the RUSKA 7350 by flipping the POWER switch on the back panel.
The MEASURE screen will appear on the color display, and the front panel will be
fully operational.
Pneumatic Connections
Pneumatic connection to the RUSKA 7350 is straightforward. The following sections
discuss each port.
Drive Air Supply Port
The air supply port must be connected to a well regulated source of dry shop air.
Air supply should be 100 – 110 psi (7 – 7.5 bar). Supply port is a 1/4 NPT female
connection.
Test Port
The test port is designed to control a wide range of volumes. Any leaks on the test port
will cause measurement errors. For best results, a volume of approximately 3 in
is recommended. The test port is 1/8 NPT female.
Gas Supply Port
The gas supply port should be connected to a clean, dry gas supply with a pressure of
110% of full scale pressure. The port is 1/8 NPT female.
Note
3
(50 cc)
3-2
Page 25

Local Operation
This section of the manual describes operation of the Calibrator using the front panel.
The local interface (front panel) consists of a color TFT display, a rotary knob and a set
of keys. The display shows the system status and menu options. The keys are grouped
according to function.
Chapter 4
Local Operation
Numeric Keypad
This includes the number keys, the decimal point [.], and the change sign key [-]. The
UNITS key changes between units of measure, MODE changes between modes of
operation such as gauge and absolute, MEASURE is used to place the unit into measure
mode. CLEAR key will clear the numeric entry field. The ENTER key accepts the
entered number or confirms a command.
Function Keys
These are the six keys that run vertically beside the display. The label shown in the
display beside each key identifies their function. These functions will change based on
which screen you are operating. For ease of communication, throughout the manual we
refer to these keys as [F1] through [F6]. We consider the top key to be F1 and the
bottom F6.
Rotary Knob
The rotary knob selects a field for editing and is used for small pressure changes
(pressure jog) at the main menu.
Figure 4-1. RUSKA 7350 Front Panel
gld03.bmp
4-1
Page 26

RUSKA 7350
Users Manual
Cancel, Previous
These keys are used to stop, undo, or exit the current operation. The CANCEL key
returns all edited fields on the current entry screen to their original values. It also stops
the current program sequence or calibration process. The PREVIOUS key exits the
current menu and returns to the previous menu.
Figure 4-2 is a menu tree showing the relationship between all the menus in the system.
Refer to it for selections available under the menu. To move to a lower menu, press the
function key with the correct label. To move towards the Main Menu, press the
PREVIOUS key. In the Main Menu screen, the [F2] key places the unit in Control mode,
ENTER must be pressed to actually enter the Control mode. The [F3] key places the unit
in Vent mode. This opens the test port to atmosphere and rapidly reduces the pressure,
ENTER is required to confirm the operation. The [F5] key places the unit either the step
or the jog mode and the rotary knob is then used to set the control set-point by the correct
step or jog amount. To go to one of the menus, press the [F6] key.
4-2
Figure 4-2. Menu Tree
gld32.eps
Page 27

Local Operation
Tutorial 4
Tutorial
To begin the tutorial, first verify that the Calibrator is powered-up and that the pneumatic
connections have been completed. The Calibrator should display a screen similar to the
one shown below. (The right hand side of the display should show the options). At power
up, there may be errors relating to the default settings. If an error message is displayed in
red at the bottom of the screen, press [F6], then press PREVIOUS. If multiple errors exist,
you will need to press the [F6] key multiple times to clear all of the errors.
Figure 4-3. Main Menu
gld04.bmp
Figure 4-3 shows the Main Menu. It is at the top level of the menu tree (see Figure 4-2)
and all descriptions in this manual start from this point. The double sized numbers in the
top center of the display shows the current measured pressure (0.00 psi diff). The upper
left corner shows the current mode of the Calibrator (MEASURE, CONTROL or VENT).
The right side of the screen shows a bar graph displaying the current pressure relative to a
user-configurable full-scale value. Below the pressure is the pressure control set-point;
below this is the difference between the set-point and the actual value. Below this is a
numeric scratchpad for entering a new set-point value. The highlighted label on the right
hand side of the screen displays the current assignments of the function keys [F1] through
[F6] that are located beside the display.
1. Change the pressure units. The units are changed by selecting the UNITS key on
the keypad.
Figure 4-4. Units - Menu
gld05.bmp & gld06.bmp
4-3
Page 28

RUSKA 7350
Users Manual
2. Use the rotary knob located to the right of the display to move the highlight bar to the
desired unit.
Note
The highlighted curser initially shows the current unit of measure. When
the rotary knob is moved, the current unit remains highlighted in a gray
color, and the new unit is highlighted in a light blue color.
3. When the unit desired is highlighted, press the ENTER key on the far right side of
the front panel, under the numeric keypad. The display will return to the Main screen
with the current units.
The second part of this tutorial uses the Calibrator to generate pressure. The pressure
supply must be connected and the test port must be connected to a closed volume, in
accordance with Chapter 3, Pneumatic Connections section.
4. From the Main Menu, use the numeric keypad to enter the starting pressure. The
pressure is entered in the units set in the previous exercise. As the pressure is entered,
each digit will be displayed in the numeric scratchpad (the highlighted box in the
lower section of the display). If a mistake is made, press the CLEAR key (found in
the numeric keypad), and the numeric scratchpad will be cleared.
4-4
Figure 4-5. Main Menu - Entering Pressure
gld07.bmp
5. When the entry is correct, press the ENTER key. The scratchpad will be cleared and
the value will appear as the new set-point.
6. Now that the starting pressure is entered, enter Control mode. Press Control [F2].
The CONTROL label will be highlight, and the message “Press Enter to Confirm”
will appear below the scratch pad. Notice that the upper left corner still shows
MEASURE. The Calibrator stays in Measure mode until the change is confirmed.
Page 29

Local Operation
Tutorial 4
7. Press ENTER to confirm the mode change. The upper left corner will change to
CONTROL, and the pressure will start moving towards the set-point.
8. After the pressure is stabilized, assure that the word Step is highlighted in the
Step/Jog [F5]. The Step/Jog [F5] key toggles between Step and Jog, to switch
between these modes, press the function key 5 [F5]. In addition to using the keypad
to enter a pressure set-point, you can also use the step function. Using the rotary knob,
rotate the knob clock-wise to increase the set-point, or counter clock-wise to decrease
the controller set-point. The scratchpad will be updated with a new set-point. The
step size defaults to 10% of full scale. This step size is user defined and can be
changed in the Menu | Setup | User menu.
9. Press ENTER to accept the new set-point. The Calibrator will move to the new
set-point.
10. Press Measure key which is located in the key-pad. The Calibrator will change to
Measure mode. No confirmation is necessary to leave Control mode.
Selecting Language
The RUSKA 7350 Calibrator can operate in a variety of different languages. To select a
different language, press the Mode key two times MODE, MODE. The current language
will be highlighted. Use the rotary knob to highlight a new language and hit the ENTER
key to select that language.
Figure 4-6. Main Menu - Control Mode
gld08.bmp
Selecting Mode of Operation
The RUSKA 7350 Calibrator normally operates in Absolute mode but also supports Tare
mode for calibration of Gauge mode sensors. As an option for increasing accuracy by
limiting range, the RUSKA 7350 Calibrator may be ordered with Triple Ranging.
Tare Mode
Press the Mode key then press Tare [F3] to turn on Tare mode. The current pressure
reading will be stored as the tare offset and the pressure reading will be zeroed. Press
Tare [F3] again to turn off Tare mode.
4-5
Page 30

RUSKA 7350
Users Manual
Triple Range (Optional)
Main Menu
When Triple Ranging is enabled the currently selected range will be displayed below the
current pressure. To change to a different range make sure the pressure is below 100 psi
(700 kPa). Then press the Mode key and then press Range [F5] until the correct range
is displayed. If the current pressure range is exceeded the range will automatically change
to the highest range until manually changed.
The Main Menu displays the measured pressure in double-sized numbers. Below the
pressure reading is the current unit of measure and mode (Tare or Absolute). The Main
Menu can always be reached by repeatedly pressing PREVIOUS. The RUSKA 7350 is
designed such that all of the commonly used functions are accessible by a direct key on
the key pad or from a top level function key. Less commonly used set-up type functions
are accessible through the menu function key.
4-6
Controlling Pressure
The Control [F2] function key is used to place the Calibrator into the Control Mode. A
pressure set-point should be entered into the Calibrator prior to placing the unit into the
control mode. This is to assure that the operator is aware of the set-point valve prior to
entering into the control mode.
Setting the Pressure Set-Point
The pressure set-point is the destination of the pressure control algorithm. It should be set
before entering Control mode. The pressure set-point is set to zero at power-up or
whenever a pressure error occurs.
1. The pressure set-point is set from the Main Menu. (Press PREVIOUS until the Main
Menu appears.)
2. Use the numeric keypad to enter the new pressure set-point in the current pressure
units.
3. Press ENTER to accept the entry or press CLEAR to clear the numeric scratchpad.
Figure 4-7. Main Menu
gld09.bmp
Page 31

Local Operation
Vent 4
Note
The set-point can also be changed using either the Step or the Jog function.
Please see Chapter 4, Step/Jog.
Entering/Exiting Control Mode
1. The Control mode is set from the Main Menu. (Press PREVIOUS until the Main
Menu appears.)
2. Press CONTROL [F2] to enter Control mode. ENTER must be pressed to confirm
entry into Control mode.
3. Press MEASURE key found in the keypad to exit Control mode. No confirmation is
necessary.
Vent
The Vent [F3] function is used to rapidly vent the pressure in the system to atmosphere.
Step/Jog
In addition to entering the pressure set-point through the key-pad, the pressure set-point
can be changed using either the step or the jog functions. The Step function is used
primarily when the operator is taking pressure steps in equal pressure increments. The
size of the pressure step is user defined. The Jog function is most often used when
calibrating mechanical gauges such as a dial gauge and the operator wishes to change the
pressure until the mechanical gauge indicates a cardinal point. The operator can then read
the higher resolution Calibrator to determine the actual pressure value when the
mechanical gauge is indicating a cardinal point. The Step/Jog [F5] key toggles between
Step and Jog, to switch between these modes, press the function key 5 [F5].
Stepping
Assure that the word Step is highlighted in the Step/Jog [F5]. Using the rotary knob,
rotate the knob clock-wise to increase the set-point, or counter clock-wise to decrease the
controller set-point. The scratchpad will be updated to a new set-point. The step size
defaults to 10% of full scale. Press ENTER to accept the new set-point.
Setting Step Size
From the Main Menu, press Menu [F6] ⎢Setup [F2 ⎢User [F2]. Using the rotary knob,
move the cursor to highlight Step Size. Enter the desired step size in the current pressure
units and press ENTER.
Jogging
Assure that the word Jog is highlighted in the Step/Jog [F5]. From the Main Menu, the
pressure set-point can be modified by rotating the rotary knob clockwise to increase
pressure and counterclockwise to decrease pressure. Each increment or decrement will
change the pressure in the least significant digit. Continually rotating the rotary knob, the
pressure will continue to change until the rotation is stopped.
4-7
Page 32

RUSKA 7350
Users Manual
Menu
The menu key is used to access the less commonly accessed configuration type functions.
This accesses the Setup, Calibration, Program, Test and Display functions.
Menu | Setup
Setup is used to configure the system. It includes setting all of the limits, user parameters,
user-defined units of measure, remote interface and system setup.
Figure 4-8. Menu
gld10.bmp
4-8
Figure 4-9. Menu | Setup | Menu
gld11.bmp
Page 33

Local Operation
Menu 4
Menu | Setup — Limits
The Menu | Setup | Limits menu is used to setup all of the limits in the system. The
pressure limits can be used to protect the device-under-test (DUT) from overpressure.
High Limit
High limit is the user-defined Maximum pressure limit. This is often set just over the
full-scale pressure of the device under test (DUT) in order to protect the DUT. The
Calibrator will then prevent the pressure from exceeding the high limit. If the user enters
a value greater than the user defined limit, the unit will not accept the value and it will
generate an error code informing the user that they have entered a set-point that is greater
than the high pressure limit. In control mode, if for any reason the pressure exceeds the
user defined limit, it will change into the measure mode and again display an error
message to the operator informing them of the error that occurred.
This value can be edited using the rotary knob to highlight the High Limit. Then enter the
new value using the keypad. This will show up in the scratch pad on the lower portion of
the screen. Press the Enter key and the value for the high limit will be updated to the
value that was typed into the scratchpad.
Low Limit
User defined Minimum pressure limit. This is the same as the high limit except it is to
protect the DUT from low pressure limits.
Auto Vent
User defined maximum pressure that the Calibrator can reach prior to venting the test
port to atmosphere.
Figure 4-10. Menu | Setup | Limits - Menu
gld12.bmp
4-9
Page 34

RUSKA 7350
Users Manual
Control Band
There are two common pressure control approaches that are available with the
RUSKA 7350 Calibrator. One of the most common control styles is an Active controller
where the controller remains operative and holds the pressure at a commanded set-point.
This allows the system to hold the pressure at a set-point within the control stability
specification (See Appendix A). In addition to possible leaks in a system, following a
pressure step, the pressure in the system changes due to temperature effects. When
operating an Active control system, the controller continuously monitors any pressure
variances in the system and compensates for these effects to hold the pressure at the
set-point. The benefit of the Active control is that it can maintain the pressure at the
commanded set-point even when there are slight leaks in the system or the system is not
thermally stable.
The second approach is to control the pressure in the system to a set-point and then to
shut-off the Active controller. We describe this as a Passive control mode. Following a
pressure step and the controller becomes passive, the pressure will continue to change in
the system due to thermal effects. However these thermal effects will stabilize over time.
Once the system has thermally stabilized, pressure measurements can be made in the
system without any “pressure noise” injected into the system as a result of having an
Active controller in the system. The result would be that the controller would not add any
additional uncertainty to the pressure measurement since it would be inactive during the
measurement process. For this method, pressure will not be at a cardinal set-point.
When the Control Off Band and Control On Band are set to zero, the Calibrator operates
in the Active control mode. Setting a Control On and Off Band, places the Calibrator in
the Passive control mode.
The Control On and Off Band provides a tolerance around the pressure set-point in the
current unit of measurement. The Controller will control the pressure to the commanded
set-point. Once the actual pressure is within the user defined +/- Control Off Band
tolerance, the controller will shut off. The pressure will remain at this level, only
changing by the thermal influences or leaks in the system. The controller will remain off
until it reaches the +/- Control On Band limit. The controller will then re-activate and
control the pressure back to the Control Off Band tolerance. This mode of operation
removes any added uncertainty in the measurement system due to the controller since the
controller is Passive during the high accuracy pressure measurements.
As an example, if a 100 psi (690 kPa) full scale Calibrator was set-up with the Control
Off Band at 0.001 psi (0.007 kPa) and the Control On Band set to 0.005 psi (0.035 kPa).
This would place the Calibrator in a Passive control mode. If the Calibrator was placed
into the control mode with a pressure set-point of 10 psi (69 kPa), it would control up to
the 10 psi (69 kPa) value. Once it reached a pressure of 9.999 psi (68.993 kPa) the active
control would turn off. Due to the thermal effects caused by pressurizing the system, the
pressure will start reducing in the system. Once the pressure reaches 9.995 psi
(68.965 kPa) the active controller would automatically turn on and control the pressure
back to 9.999 psi (68.993 kPa) and then turn off. After a few cycles, the system will
thermally stabilize and the pressure will hold between the Control On and Control Off
Bands.
4-10
Page 35

Local Operation
Menu 4
Slew Rate
User defined maximum pressure rate of change. The Calibrator is designed to control
with minimum overshoot into a wide variety of external volumes at its highest slew rate.
Therefore, in most applications it is recommended that the slew rate be set at its
maximum rate value. This provides the highest speed control without jeopardizing
overshoot or control stability properties. The only application where the operator may
wish to slow down the slew rate (control speed) is in applications where the device under
test could be damaged by high rate of pressure change. The Calibrator control algorithm
tries to limit the rate of pressure change to the slew rate. On Calibrator’s will full scale
pressures ranges less than 10 psi (70 kPa), it is common to reduce the slew rate to less
than 25% of full scale to improve on control overshoot characteristics.
Slew Limit
The slew limit is used by the system to assure that the slew rate is not exceeded. If the
slew rate is exceeded, the Calibrator will change from the control mode to the measure
mode and it will generate an error message to the operator.
Access
The test access password allows the user to protect access to Calibrator configuration and
programs. If the test access password is set to any number other than zero (factory
default), it is required before the user is allowed to change the limits, control parameters
or programs.
It is recommended that the access password be recorded and filed in a
secure location.
Menu | Setup — User
The Menu | Setup | User menu is used to setup all of the user specific configurations.
This includes setting the control step size, range of bar-graph, pressure gas head, display
pressure filter, display resolution digits, and audible key click.
Note
Figure 4-11. Menu | Setup | User - Menu
gld13.bmp
4-11
Page 36

RUSKA 7350
Users Manual
Step Size
Bar Graph Maximum
Ready Tolerance
Gas Head Pressure Correction
In addition to entering the pressure set-point by the key-pad, the pressure set-point can be
changed using the step function. The step function is used primarily when the operator is
taking pressure steps in equal pressure increments. The size of the pressure step is user
defined. From the Main Menu, press Menu [F6], Setup [F2], and then User [F2]. Using
the rotary knob, move the cursor to highlight Step Size. Enter the desired step size in the
current pressure units and press ENTER.
The bar graph on the Main Menu screen can be scaled to match the device under test by
setting the full scale value of the bar graph.
A Ready indication is generated when in control mode and the measured pressure is
reading within this ready tolerance value. When running an internal program, the ready
indicator is shown when the measured pressure is within the tolerance stored in the
program.
The term “head height” refers to the vertical distance between the sensing element in the
device under test and the Calibrator’s pressure reference plane. Once the user inputs the
head height and selects air or nitrogen, the Calibrator automatically corrects for head
pressure.
1. The Pressure Reference Line on the Calibrator is defined as the bottom
display where the display and the front panel join. This provides the reference plane
against which the device under test (DUT) pressure is measured.
2. Determine the vertical distance between the Calibrator Pressure Reference Line and
the reference plane of the device under test.
3. Press the Unit key found in the keypad and press in/mm [F1] to select either inches
(in) or millimeters (mm) for the head height entry.
4. The head height is set from the Menu | Setup | User. From the Main Menu (press
PREVIOUS until the Main Menu appears), press Menu [F6 ⎢Setup [F2] ⎢User [F2].
5. Press Medium [F3] to select either “Air” or “Nitrogen”. The selected units will be
highlighted.
6. Press Position [F4] to select if the position of the Device Under Test is either
“Above” or “Below” the 7350. The selected units will be highlighted and appear in
the Gas Head description.
7. Use the rotary knob to highlight the label “Gas Head”.
8. Use the numeric keypad to enter the height in the selected unit.
9. Press ENTER to accept the entry.
Atmosphere
The nominal barometric pressure value for the location that the Calibrator is utilized
should be entered for atmosphere. On tare mode instruments, this number is used to
calculate the density of the test port pressure medium and to correct for head pressure
variances between the reference port of the Calibrator and the DUT.
of the color
4-12
Page 37

Local Operation
Menu 4
Pressure Filter
The Pressure Filter is used to adjust the degree to which the front display pressure value
is filtered. A value of four (4), is the default value. As the value increases, the filtering
level increases, however, the display update rate reduces. Typical filter values would
range between 1 to 10.
Changing the Number of Decimals
Each unit has a default number of decimal places used for pressure display. This may be
adjusted up or down by one decimal place.
1. The decimal digits are set from the Menu | Setup | User. From the Main Menu (press
PREVIOUS until the Main Menu appears), Menu [F6 ⎢Setup [F2] ⎢User [F2].
2. Turn the rotary knob until the label “Display digits” is highlighted.
3. Turn the rotary knob further until the desired number of digits from the default
resolution is highlighted (-1, 0, +1), and then press the ENTER key to select.
Key Click
The Calibrator can be configured to emit a “clicking” sound each time a key is pressed.
1. The key “click” is set from the Menu | Setup | User. From the Main Menu (press
PREVIOUS until the Main Menu appears), press Menu [F6 ⎢Setup [F2] ⎢User [F2].
2. Turn the rotary knob to highlight “Key click” and then highlight either On or Off.
3. Press the ENTER key to select.
Menu | Setup — Units
In addition to the standard units of measure provided by the Calibrator, four user-defined
units are available. To create a user-defined unit, the user enters a name that is one to ten
characters long and a conversion factor that is a multiple of kiloPascals (kPa).
For example, using the information from Table 2-1, the conversion factor for millitorr or
one micron of mercury at 0 °C is calculated as follows.
1000 °
=
thus the conversion factor simplifies to
xkPamTorr
1
mTorr
Torr
1
x
Torr
x
01
°
CmmHg
0193377.0
01
CmmHg
psi
6180.7500xkPamTorr =
1450377.0
x
1
psi
kPa
Figure 4-12. Menu | Setup | Units - Menu
gld14.bmp
4-13
Page 38

RUSKA 7350
Users Manual
1. The pressure units are defined from the Menu | Units | Define. From the Main Menu
(press PREVIOUS until the Main Menu appears) press Menu [F6 ⎢Setup [F2]
⎢Units [F3].
2. Use the rotary knob to highlight the desired user-defined unit, and then select the Edit
Name [F1] function key.
3. The following sequence is used to change the name of the selected unit.
a. Use the < [F4] or > [F5] key to highlight the desired character in the matrix.
b. Use the rotary knob to change the character.
c. Repeat steps a and b until the desired name is entered. Press the Clear key to
start over.
d. Press the Done [F6] key when the name change is completed.
Figure 4-13. Menu | Setup | Units | Edit Name - Menu
gld15.bmp
4. Use the rotary knob to highlight the desired user-defined unit that has just been
renamed.
5. Use the numeric keypad to enter the conversion factor and press ENTER to accept.
6. Press PREVIOUS three times to return to the Main Menu. The new unit definition
may now be selected using the Units key.
4-14
Page 39

Local Operation
Menu 4
Menu | Setup — Remote
The Menu | Setup | Remote screen is where the remote communication interface
is set-up.
GPIB Address
Sets the IEEE-488 interface address.
Protocol
The Protocol defines which protocol should be used by the remote interface. The options
are Standard Communication for Programmable Instruments (SCPI) which is the standard
interface, 6000 to emulate the Series 6000 pressure controller, and 510 to emulate the
Model 510 pressure controller. When using the SCPI interface, the RUSKA 7350 will
emulate the 7010 and 7215 series controllers.
Serial Interface Set-Up
The operator can set-up the Baud Rate, Data Bits, Parity, and Stop Bits for the Serial
Interface.
Menu | Setup — System
The System Menu identifies the Software release version that is being operated in the
Calibrator. It also stores and allows the operator to edit the Date and Time.
Figure 4-14. Menu | Setup | Remote - Menu
gld16.bmp
Figure 4-15. Menu | Setup | System - Menu
gld17.bmp
4-15
Page 40

RUSKA 7350
Users Manual
Date/Time
Reset
Menu | Calibrate
The Calibrator’s system clock is continuously updated. If the date or time requires editing,
the following applies;
1. The date and time are set from the Setup | System | Menu. From the Main Menu
(press PREVIOUS until the Main Menu appears), press Menu [F6] | Setup [F2] |
System [F5].
2. To set the system date, turn the rotary knob until Date is highlighted. Use the numeric
keypad to enter the current four-digit year, month, and day (yyyymmdd). All digits
must be entered. Press ENTER to accept.
3. To set the system time, turn the rotary knob until Time is highlighted. Use the
numeric keypad to enter the current hour, minute, and second (hhmmss). All digits
must be entered. Press ENTER to accept.
The Reset [F1] command is used to re-boot the Calibrator.
To reset the system, from the Main Menu (press PREVIOUS until the Main Menu
appears), press Menu [F6] | Setup [F2] | System [F5] | Reset [F1].
The Menu | Calibrate command is used to perform the calibrations on all of the sensors
utilized by the Calibrator. The RUSKA 7350 can be completely calibrated using the front
panel interface. It does not require any external computer or software in order to perform
a successful calibration. It also has the capability of being calibrated remotely through
either the RS232 or IEEE-488 interface. The RUSKA 7350 will guide the operator
through a menu driven calibration procedure identifying the pressures that should be
supplied by a standard. Following the calibration procedure, the RUSKA 7350 calculates
and saves its own coefficients. The calibration coefficients are date stamped so the user
can easily identify the last time the instrument went through a full calibration, when the
coefficients were last edited or when the Calibrator was re-zeroed.
4-16
The calibration section in the RUSKA 7350 can be password protected to prevent any
unauthorized entry into the calibration section of the system. Please refer to Chapter 6,
Maintenance, of the manual for more detailed information regarding the calibration of the
RUSKA 7350.
Calibration Password
The calibration password allows the user to protect access to Calibrator calibration
constants and the calibration procedure. If the calibration password is set to any number
other than zero, it is required before the user is allowed to calibrate the Calibrator or
manually change the calibration constants.
Note
It is recommended that the access password be recorded and filed in a
secure location.
1. The calibration password is set from the Calibration Menu. From the Main Menu
(press PREVIOUS until the Main Menu appears), press Menu [F6] | Calibrate [F3] |
Menu | Calibrate | Edit.
2. Press the Access [F4] key. If there is a password in the system other than 0, then you
must enter the current valid password into the RUSKA 7350 before it will allow you
to modify the password.
Page 41

Local Operation
Menu 4
3. Use the numeric keypad to enter the new calibration password. Setting the calibration
password to zero allows free access to Calibrator calibration and constants. Press
ENTER.
4. Press Yes [F4] to acknowledge changing the calibration password. Press No [F5] to
reject changing the calibration password.
Menu | Program — Storing A Sequence in Memory
Consider an exercise that requires the Calibrator to start at 30 psi, increase to 50 psi, then
decrease to 20 psi. Test sequences like this may be stored in the Calibrator’s memory as a
program.
One benefit of storing a sequence in memory is that the user does not have to command
each pressure separately every time a multipoint test or calibration routine is performed.
Another benefit is that the user can specify a tolerance for each set-point pressure. Once
a tolerance is set, the dwell timer will start counting down instead of waiting until the
pressure is at the exact set-point to start the dwell timer. This gives the user a time
advantage compared to manual mode operation and provides a degree of automation
without the use of an external computer.
Note
The Calibrator can store up to 1,000 program steps that may be divided
among a maximum of 20 named programs.
Preparing to Program
Before entering a test sequence, consider the items discussed below.
Program Name
Valid program names range from one to eight characters in length and can include
numbers, upper case letters, and the /, %, and # symbols. For example, Exer#14 and %FS
test are both valid names.
Configuration
Since a program will depend on the current setup of the Calibrator (the current
configuration is stored with the program) the user should set the units, limits, control
parameters, etc., to the desired values before creating a program.
Number of Set-points
Before entering the sequence, the user should determine the number of upscale and
downscale set-points required to complete the exercise.
Set-point Pressure and Tolerance
Each set-point in the program requires both a pressure and a tolerance, in the current units
of measure. For example, one set-point might require a tolerance as low as 0.05 psi
(0.35 kPa), whereas another set-point in the same program could be satisfied with a
tolerance as high as 5 psi (0.35 kPa).
Dwell Time
Once the pressure is within the specified tolerance, the Calibrator starts a timer that runs
for a user-defined number of seconds. This is referred to as dwell time. As long as this
timer is running, the Calibrator will remain at the designated set-point unless the max
time (see below) elapses. When the dwell time expires, the Calibrator will proceed to the
next step. Typically the dwell time should be set to a value less than the max time.
Usually dwell time has a value of a few seconds, but a value of 0 can be used to create a
pause in the program. When the dwell time is set to zero, the Calibrator switches to
manual control once it is within the tolerance value of the set-point pressure. The user
must then press a key on the front panel to continue the program.
4-17
Page 42

RUSKA 7350
Users Manual
MaxTime
Mode of Entry
Entering a New Program
The max time is the maximum time in seconds including the dwell time that the
Calibrator can spend on one step of the program. After the max time elapses, the
Calibrator will automatically proceed to the next set-point in the program, even if the
current set-point has not been achieved. Thus, the max time selection limits the amount of
time that the Calibrator can spend on any one set-point. Typically the max time should be
set to a value greater than the dwell time. If the max time is set to zero, the Calibrator will
attempt to achieve the set-point indefinitely (i.e. the max time function is disabled).
If the upscale portion of the desired pressure step sequence and the downscale portion of
the sequence both have the same highest and lowest set-points and consist of evenly
spaced steps, the <Auto> option can be used to automatically generate the program.
However, if any part of the sequence includes unevenly spaced steps, or the starting and
ending set-points are not the same, each step must be programmed individually. In the
example given at the beginning of the section Menu | Program – Storing a Sequence in
Memory, each step must be programmed individually since the starting set-point is 30 psi
and the ending set-point is 20 psi.
Detailed instructions for entering these items are given in the sections that follow.
To program the Calibrator, use the keys on the front panel to change values on the
Calibrator’s program editing screen. Instructions for entering each step of a new program
are included below.
1. Ensure that the units, limits, and control parameters have been set to the desired
values.
2. The program is entered from the Program Menu. From the Main Menu (press
PREVIOUS until the Main Menu appears), press Menu [F6] | Program [F4].
4-18
Figure 4-16. Menu | Program - Menu
gld18.bmp
Page 43

Local Operation
Menu 4
3. Use the rotary knob to highlight “new”.
4. Press Edit [F4]. Since “new” was highlighted, the Calibrator will create a new
program and give a default name of NAMEnn, where nn is a two digit number. The
Program editing screen will appear, displaying the first step.
Figure 4-17. Menu | Program | Edit - Menu
gld19.bmp
5. Using the numeric keypad, enter the values for Pressure, Tolerance, Dwell time, and
Max time, pressing ENTER after each value. The rotary knob may be used to skip
fields.
6. At the 0 step, enter the next pressure and the Calibrator will automatically insert a
new pressure step.
7. Repeat steps 5 and 6 until the test sequence is complete. The Tolerance, Dwell time
and Max time will default to the value programmed in the first program step, and
only need to be changed if a different value is desired for a particular step.
8. It is often suggested that the last point in a calibration program is to vent the pressure
to atmosphere. This can be achieved by selecting the VENT function key as the
pressure set point.
Note
You can use the vent as a set-point at any point in the program. The dwell
and max time function with vent just as they would at a controlled set-point.
9. When all steps have been entered, press PREVIOUS to return to the Named
programs screen. See section, Chapter 4, Changing the Name of a Program, section
for creating a user-defined program name.
4-19
Page 44

RUSKA 7350
Users Manual
Automatically Generating a Program
For the Calibrator to automatically generate a program, the user must input the first
set-point pressure, the last set-point pressure, and the number of steps in between, as well
as the dwell time, max time and tolerance common to all set-points.
1. Ensure that the units, limits, and control parameters are set to their desired values.
2. The program is entered from the Program Menu. From the Main Menu (press
PREVIOUS until the Main Menu appears), press Menu [F6] | Program [F4].
3. Use the rotary knob to highlight “new”. If these steps are used on an existing
program, all program steps will be deleted and replaced with the automatically
generated program.
4. Press Edit [F4]. Since “new” was highlighted, the Calibrator will create a new
program and give a default name of NAMEnn where nn is a two digit number. The
Program editing screen will appear, displaying the first step.
5. Press Auto [F3].
4-20
Figure 4-18. Menu | Program | Edit | Auto - Menu
gld20.bmp
6. Using the numeric keypad, enter the values for Start, Stop, Tolerance, Dwell time,
Max time, number of pressure Points up, and number of pressure Points down,
pressing ENTER after each value. The rotary knob may be used to skip fields.
7. Press Program [F1]. The program will be generated and the display will show the
first step.
8. Press the Name [F6] key to edit the name of the program. See next section, Chapter 4,
Changing the Name of a Program, for creating a user-defined program name.
Page 45

Local Operation
Menu 4
Changing the Name of a Program
1. The name of an existing program is changed from the Program Menu. From the Main
Menu (press PREVIOUS until the Main Menu appears), press Menu [F6] |
Program [F4]. In addition to changing the name of an existing program, a new
program may be initiated by selecting new and performing the same steps as outlined
to change the name of a program.
2. Use the rotary knob to highlight the current name. (For a new program name,
select “new”.)
3. Press Edit [F4]. The program editing screen will appear, displaying the first step.
4. Press Name [F6].
Figure 4-19. Menu | Program | Edit | Name - Menu
5. Use the < [F4] and > [F5] keys to highlight a character.
6. Turn the rotary knob to select the character from the character set.
7. To correct a mistake, press Clear [F4] and return to step 5.
8. Repeat steps 5 and 6 until the name is complete.
9. Press Done [F6] to store the contents of the scratchpad as the new name of the
program.
Changing an Existing Program
Instructions for changing an existing sequence are given below. Both manually and
automatically generated programs may be edited.
1. Programs are changed from the Program Menu. From the Main Menu (press
PREVIOUS until the Main Menu appears), press Menu [F6] | Program [F4].
gld21.bmp
4-21
Page 46

RUSKA 7350
Users Manual
2. Use the rotary knob to highlight the name of the program.
3. Press Edit [F4]. The program editing screen will appear as a table showing all of the
steps.
Figure 4-20. Menu | Program | Edit - Menu
4. The rotary knob can be used to move through the program and highlight the value
you wish to edit. Use the keyboard to enter a new value. This value will show up in
the scratch pad located at the bottom of the window. Press Enter to accept the
edited value.
5. To add a step to the program, first move to the step after the new step. For example,
to insert a step between steps 3 and 4, move to step 4. Press Insert [F4].
6. To delete a step in the program, first move to the step to be deleted, then press
Delete [F5].
7. When all changes have been made, press PREVIOUS to return to the Named
Programs screen. The Calibrator automatically saves the changes that were made in
the program.
Changing the Configuration Stored with a Program
1. Programs are configured from the Program Menu. From the Main Menu (press
PREVIOUS until the Main Menu appears), press Menu [F6] | Program [F4].
2. Use the rotary knob to highlight the name of the program.
3. Press Config [F3]. The configuration screen will appear.
4. Press Recall [F2]. The Calibrator will be set to the configuration stored with the
program.
gld22.bmp
4-22
Page 47

Local Operation
Menu 4
5. Press PREVIOUS until the Main Menu appears.
6. Press Setup [F2] | Limits [F1]. Change the desired parameters using the normal
procedures.
7. Return to the Main Menu by pressing PREVIOUS three times.
8. Press Menu [F6] | Program [F4].
9. Use the rotary knob to highlight the name of the program.
10. Press Config [F3] | Save [F1]. The configuration of the Calibrator will be changed to
the current settings and stored in the program’s configuration.
Running a Program
1. Programs are run from the Program Menu. From the Main Menu (press PREVIOUS
until the Main Menu appears), press Menu [F6] | Program [F4].
2. Use the rotary knob to highlight the name of the program.
3. Press Run [F1]. The program run screen will appear. “Stop” will be highlighted,
showing that the program is not currently running.
Figure 4-21. Menu | Program | Config - Menu
gld23.bmp
Figure 4-22. Menu | Program | Run - Menu
gld24.bmp
4-23
Page 48

RUSKA 7350
Users Manual
Menu | Test
4. Press Run [F2]. The configuration of the Calibrator stored with the program is
restored, the pressure set-point is set to the pressure value in the first step, and the
Calibrator is placed in Control mode. “Run” will now be highlighted and the program
will proceed through its steps.
5. To pause the program, press Pause [F3]. “Pause” will now be highlighted and the
Calibrator will continue controlling to the current set-point. The Calibrator will
maintain control of the current set-point until further instructions from the operator.
Press Continue [F4] to resume the program.
6. To stop the program, press Stop [F5]. The program will stop running but the
Calibrator will continue controlling to the current set-point.
The Menu | Test section of the system is used to perform a number of the diagnostic and
tuning functions that are available with the RUSKA 7350.
4-24
Menu | Test — Sweep Test
The sweep function can be used to automatically exercise the elastic sensing element of
the device under test prior to performing a calibration. For the Calibrator to perform the
sweep test, input the high and low set-point pressures, the pressure control tolerance, the
dwell time at set-point, and the number of cycles to perform.
1. Ensure that the units, limits, and control parameters are set to their desired values.
2. The sweep test is entered from the Sweep Test Menu. From the Main Menu, (press
PREVIOUS until the Main Menu appears), press Menu [F6], then Test [F5], and then
Sweep [F2].
3. Enter the high and low pressure points, the control tolerance, dwell time, and the
number of cycles.
Figure 4-23. Menu | Test - Menu
gld25.bmp
Page 49

Local Operation
Menu 4
Figure 4-24. Menu | Test | Sweep - Menu
4. Press Run [F2] to initiate the test.
5. To pause the program, press Pause [F3]. Pause will now be highlighted and the
Calibrator will continue controlling to the current set-point. The Calibrator will
maintain control of the current set-point until further instructions from the user. Press
Continue [F4] to resume the program.
6. To stop the program, press Stop [F5]. The program will stop running but the
Calibrator will continue controlling to the current set-point.
Menu | Test — Self Test
The Calibrator can perform electrical and pneumatic self test to assist in trouble shooting
potential problems. Please refer to Chapter 6, Maintenance, for more details.
In order to perform a pneumatic self test, the supply port must be connected
to a properly set supply pressure and the test port not open to atmosphere.
For absolute units, a vacuum supply must also be connected to the
exhaust port.
Menu | Test — Remote Test
The Menu | Test | Remote section of the system is used to perform a number of the
diagnostic functions on the remote interface. It can be used to display the transmitted and
received messages that are sent across the interface. This can be a powerful tool to assist
in identifying the source of communication problems.
Note
gld26.bmp
The Menu | Test | Remote menu displays information from the IEEE-488 interface.
Pressing the Serial 1 [F2] or Serial 2 [F3] keys will display information from the
serial ports.
4-25
Page 50

RUSKA 7350
Users Manual
Menu | Test — Shop1
gld27.bmp & gld28.bmp
Figure 4-25. Menu | Test | Remote - GPIB Menu & Menu | Test | Remote | Serial 1 - Menu
The Menu | Test | Shop1 menu of the system is used to display the current status of the
various valve positions in the system. This menu is primarily used for diagnostics and
will be discussed further in Chapter 6, Maintenance.
4-26
Figure 4-26. Menu | Test | Shop1 - Menu
gld29.bmp
Page 51

Local Operation
Menu 4
Menu | Display
The Menu | Display is used to conveniently monitor most of the sensor output parameters.
It is primarily used for troubleshooting.
Menu | Display — Blank
This is used as a screen saver in the RUSKA 7350.
Figure 4-27. Menu | Display - Menu
gld30.bmp
4-27
Page 52

RUSKA 7350
Users Manual
4-28
Page 53

Remote Operation
The RUSKA 7350 can be operated remotely by a computer. Three interfaces are
supported; IEEE-488, RS-232, and RS-485. All three interfaces support Standard
Commands for Programmable Instruments (SCPI).
The IEEE-488 interface additionally supports emulation of a Single Channel Interface
Panel (Models 6005-701 and 6005-761). The IEEE-488 interface conforms to the
following standards.
ANSI/IEEE Std 488.1-1987 IEEE Standard Digital Interface for Programmable
Chapter 5
Remote Operation
Instrumentation
ANSI/IEEE Std 488.2-1987 IEEE Standard Codes, Formats, Protocols, and Common
SCPI 1991.0 Standard Commands for Programmable Instruments
Capabilities
IEEE-488
The following identification codes define the interface capabilities of the RUSKA 7350.
Their meaning is described in the IEEE-488 standard.
SH1 Source Handshake, Complete Capability
AH1 Acceptor Handshake, Complete Capability
T5 Talker
L3 Listener
SR1 Service Request, Complete Capability
RL1 Remote-Local, Complete Capability
PP0 Parallel Poll, No Capability
DC1 Device Clear, Complete Capability
DT0 Device Trigger, No Capability
C0 Controller, No Capability
Commands
The optional IEEE-488 interface is installed next to the processor board. The interface is
identified by the IEEE-488 standard connector on the back panel of the unit.
5-1
Page 54

RUSKA 7350
Users Manual
RS-232
Note
Do not change any jumpers or switch settings on the IEEE-488 interface
board. The IEEE-488 address is set by the Menu
The RS-232 interface supports standard serial operation from a computer to a single
RUSKA 7350. RS-232 supports the IEEE-488.2 and SCPI commands. The RUSKA 7350
allows the following port setups.
Baud Rate: 1200, 2400, 9600, or 19200
Data Bits: 7 or 8
Parity: Even, Odd, or None
Stop Bits 1 or 2
Handshaking XON/XOFF
The RS-232 connection is a DB-9P connector found on the back panel of the RUSKA
7350. It is located on the processor board directly above the DB-25S connector. The
following pins are used; all other pins are reserved.
Pin # Direction Signal
⎢
Setup ⎢ Remote screen.
2 In RXD Receive Data
3 Out TXD Transmit Data
5 —— GND Ground
7 Out RTS Request to Send
Remote/Local Operation
In local mode, the RUSKA 7350 is operated manually through the front panel. Chapter 4,
Local Operation, covers local operation. The RUSKA 7350 always powers up in the local
mode. In remote mode, the RUSKA 7350 is operated by a computer connected to an
interface. Most functions that can be performed in local mode can also be performed
remotely.
Remote mode does not automatically disable local operation. The remote interface may
be active while local operations are being done. In cases where full remote control is
required the following methods may be used.
1. Issue a Local Lockout (LLO) interface message via the IEEE-488 interface.
The RUSKA 7350 will disable the local keyboard until the Go To Local (GTL)
interface message is received or the REN (Remote Enable) line is unasserted. This
method cannot be used on the serial interfaces.
2. Issue the SCPI command “SYSTEM:KLOCK O” to lock the local keyboard.
The RUSKA 7350 will disable the local keyboard until the command
“SYSTEM:KLOCK OFF” is received.
5-2
3. Issue the SCPI command “DISPLAY:ENABLE OFF” or “DISPLAY:TEXT
<string>”. These commands will disable the local display in addition to locking the
keyboard. The command “DISPLAY:ENABLE ON” will restore the local display
and keyboard operation.
Local operation may also be restored by powering the RUSKA 7350 off and back on.
Page 55

Remote Operation
Configuration 5
Configuration
The remote interface is configured using the local interface before the remote is
connected. The parameters needed varies with the interface used.
IEEE-488 Address, Protocol
RS-232 Baud Rate, Data Bits, Parity, Stop Bits
RS-485 Address, Baud Rate, Data Bits, Parity, Stop Bits
To configure the remote interface follow these steps:
1. The remote interface is configured from the Setup Remote Menu. From the Main
Menu (press Prev. until the Main Menu appears) press Menu [F6] ⎢Setup [F2]
⎢Remote [F4].
2. Use the knob to highlight the desired parameter.
3. Use the numeric keypad to enter the address. The ENTER key must be pressed to
change any parameter.
4. Repeat steps 2 and 3 to set all parameters needed.
Device Messages
SCPI Command Format
SCPI mnemonics have two forms: long and short. The short form is all in capital letters.
The long form is the entire mnemonic. Commands may use either the short form or the
entire long form. No other forms are accepted. SCPI ignores case: uppercase and
lowercase are equivalent.
A SCPI command is made by following the command tree as presented in the command
summary. Each level adds a mnemonic to the command separated by colons. Mnemonics
enclosed in square brackets are optional and may be omitted.
Some mnemonics are followed by an optional numeric suffix. If omitted, the suffix
defaults to 1.
Multiple commands may be placed in a single message separated by semicolons. Each
command starts at the same level of tree where the last command stopped unless the
command starts with a colon. The first command in a message and any commands
starting with a colon start of the root of the command tree. IEEE 488.2 commands may
occur between SCPI commands without affecting the tree level.
Command parameters are separated from the command name by one or more spaces.
Multiple parameters are separated by commas. SCPI accepts numeric parameters with
optional sign, decimal point, and exponent. OFF is equivalent to zero and ON is
equivalent to one. Floating point numbers are rounded to the nearest integer for
commands accepting integer values only.
A message is terminated by a Line Feed (hexadecimal 0A). Carriage Returns, Tabs, and
other control characters are ignored.
SCPI Response Format
Only commands ending in a question mark have responses. Multiple values from a single
command are separated by commas. Responses from different commands in the same
message are separated by semi-colons. The response message is terminated by a Line
Feed (hexadecimal 0A).
Integer responses are returned as one or more digits. Boolean values (ON and OFF values)
are always returned as numbers with zero for OFF and one for ON. Floating point values
are returned in the format “+d.ddddddddE+dd”.
5-3
Page 56

RUSKA 7350
Users Manual
ANSI/IEEE 488.2-1987 Command Summary
SCPI Command Summary
*CLS Clear Status
*ESE? Event Status Enable Query
*ESE <number> Event Status Enable
*ESR? Event Status Register
*IDN? Identification
*OPC? Operation Complete Query (Returns 1)
*OPC Operation Complete
*RST Reset
*SRE? Service Request Enable Query
*SRE <number> Service Request Enable
*STB? Status Byte Query
*TST? Self-Test Query
*WAI Wait (No operation)
The current value associated with a SCPI command may be read by appending a question
mark to the command. For example CALC:LIM:UPP? will return the current upper
pressure limit.
MEASure
[:PRESsure]? returns current pressure reading
:POSITION? returns pump position (%)
CALCulate
:LIMit
:LOWer <number> get/set low pressure limit
:SLEW <number> get/set slew rate limit
:UPPer <number> get/set high pressure limit
:VENT <number> get/set auto-vent limit
:TARE
:VALue <number> get/set tare value
:STATe ON/OFF set tare using current pressure
CALibration
[:PRESsure]
:Data
:POINts ? number of calibration constants
:VALue<n>? returns cal constants label, value
:VALue<n> <number> set calibration constant
:CALibration
:POINts? number of calibration points
:VALue? Nominal calibration point
:VALue<n> <number> perform calibration point
:ZERO performs zero calibration
:VALUE <number> sets zero value
:INITiate enter zero calibration mode
:INITiate? returns status for cal, press, temp, ref
:RUN start zero calibration
:STOP abort zero calibration
:POSition
:DATA <number>, <number> sets C0, C1 position
:DATA? reads C0, C1
:VALue <number> sets first calibration point
:VALue 2 <number> sets second calibration point
5-4
Page 57

Remote Operation
Device Messages 5
:MODE? calibration edit enabled?
:MODE ON¦OFF¦1¦0 enable calibration edit
(Cal. button required)
DISP
:ENABle ON¦OFF¦1¦0 turns front panel display on/off
:TEXT <string> displays message on front panel
:BGRaph <number> sets bar graph maximum
OUTPut
:STATe ON¦OFF¦1¦0 off=MEASure, on=CONTrol
:STATe? returns 0=Measure or 1=Control
:MODE MEASure¦CONTrol¦VENT sets mode
:MODE? returns mode string
PROGram
:CATalog? returns list of defined programs
[SELected]
:DEFine <program block> Define program
press1, toler1, dwell1, max1, press2,
toler2, ..
:DEFine? read program definition
:DELete
[:SELected] deletes current program
:ALL deletes all programs
:NAME <program name> select current program
:STATe RUN|PAUSe|STOP|CONTinue set program state
:STATe? ` read program state
:CONFigure
:RECall restore saved configuration
:SAVE save current configuration
SENSE
[:PRESSure]
[:RESolution] <number> set pressure display resolution
:AUTO <boolean>|ONCE return to default resolution
:MODE? returns ABSOLUTE or TARE
:RANGE
[:UPPer] returns RUSKA 7350 full scale value in
units
:LOWer returns 0
:REFerence
[:HEIGht] <number> set head height
:SGRavity <numbers> set specific gravity
[SOURCE]
[:PRESsure]
[:LEVel]
[:IMMediate]
[:AMPLitude] <number> sets pressure setpoint
[:AMPLitude]? read pressure setpoint
:MODE FIXed|LIST set source parameter set
:TOLerance <number> specifies output tolerance
:SLEW <number> set slew rate
:CONTrol <number> set control band
5-5
Page 58

RUSKA 7350
Users Manual
:LIST
:PRESsure <number> [,<number>] set list of pressure values
:POINts? returns number of points defined
:DWELl <number> [,<number>] specifies dwell times
:POINts? returns number of dwell times
:TOLerance <number> [,<number>] specifies tolerances
:POINts? returns number of tolerances
:DIRection UP|DOWN direction to go through list
:COUNt <number> number of times to go through list
STATus
:OPERation
[:EVENT]? read/clear operation event register
:CONDition? read operation condition register
:ENABle <number> set operation enable mask
:QUEStionable
[:EVENT]? read/clear questionable event register
:CONDition? read questionable condition register
:ENABle <number> set questionable enable mask
:PRESet reset condition flags
SYSTem
:DATE <year>,<month>,<day> set system date
:ERRor? returns <error#,”descr;info”>
or 0,”No Error”
:KLOCk ON|OFF|1|0 lock keyboard
:TIME <hour>,<minute>,<second> set system time
:VERSion? returns 1991.0
:LANGuage “6000”|”SCPI” set interface protocol to 6000 or SCPI
:PRESet reset system
TEST
:ELECtronic? perform electronic self-test
UNIT
:DEFine<n> <name>,<number> define a unit
:LENGth MM|IN set length units for head height
[:PRESsure] <unit name> set pressure units
5-6
Example SCPI Commands
To request the current pressure reading, all of the following commands are equivalent:
:MEASURE:PRESSURE?
:measure:pressure?
:MeAsUrE:pReSsUrE?
:meas:pres?
:measure?
:meas?
MEAS?
To set the control pressure setpoint to 50, all of the following commands are equivalent:
SOURCE:PRESSURE:LEVEL:IMMEDIATE:AMPLITUDE 50
SOUR:PRES:LEV:IMM:AMPL 50.0
PRESSURE +50
PRES 50
Page 59

Remote Operation
Device Messages 5
SCPI Status Registers
Status Byte Register (STB), Service Request Enable Register (SRE)
Bit 7 Operation Status Summary. Set when an event enabled in OPER:ENABLE
occurs.
Bit 5 EBS - Event status bit. Set when an event enabled in ESE occurs.
Bit 4 MAV - Message Available. Set when a response is ready to be sent.
Bit 3 Questionable Status Summary. Set when an event enabled in
QUES:ENABLE occurs.
Bit 2 Error/Event Queue Not Empty.
Bit 1 Always 0.
Bit 0 Always 0.
Standard Event Status Register (ESR), Standard Event Status Enable Register (ESE)
Bit 7 Power-on. set at power-up.
Bit 6 User request. Always 0.
Bit 5 Command Error. Error in command syntax.
Bit 4 Execution Error. Error in command execution.
Bit 3 Device Dependent Error. Device error independent of commands.
Bit 2 Query Error. Output queue empty when request received.
Bit 1 Request Control. Always 0.
Bit 0 Operation Complete. Set for *OPC command.
Operation Status (OPER:EVENT, OPER:CONDITION, OPER:ENABLE)
Bit 0 Calibrating. Currently performing a calibration.
Bit 1 Settling. Waiting for control to stabilize.
Bit 2 Ranging. Always 0.
Bit 3 Sweeping. Always 0.
Bit 4 Measuring. The instument is actively measuring. Always 1.
Bit 5 Waiting for Trigger. Always 0.
Bit 7 Correcting. Currently performing a correction. Always 0.
Bit 8 Self-test in progress.
Bit 9 Always 0.
Bit 10 Always 0.
Bit 11 Always 0.
Bit 12 Always 0.
Bit 13 Instrument Summary bit. Always 0.
Bit 14 Program Running.
Bit 15 0.
5-7
Page 60

RUSKA 7350
Users Manual
Questionable Status (QUES:EVENT, QUES:CONDITION, QUES:ENABLE)
Bit 0 Voltage is questionable. Set when supply voltages are not within 5%.
Bit 1 Current is questionable. Always 0.
Bit 2 Time is questionable. Set when the clock has not been set.
Bit 3. Temperature is questionable. Set when the oven temperature is not within range.
Bit 5. Phase is questionable. Always 0.
Bit 6 Modulation is questionable. Always 0.
Bit 7 Calibration is questionable. Set when the unit has not been calibrated.
Bit 8 Pressure is questionable. Set when the pressure is overranged.
Bit 9 Always 0.
Bit 10 Always 0.
Bit 11 Always 0.
Bit 12 Always 0.
Bit 13 Instument Summary bit. Always 0.
Bit 14 Command Warning. Set whenever a command ignores a parameter.
Bit 15. 0.
6005 Interface Panel Emulation
The RUSKA 7350 may be configured to emulate the IEEE-488 command set of the
RUSKA Single Channel Interface Panel (Models 6005-701 and 6005-761). See the
Interface Panel manual for a description of the protocol. The RUSKA 7350 emulation has
the following differences:
1. The RUSKA 7350 is always in remote mode (Byte 0, Bit 2)
2. All TI strip outputs read as OFF (zero) and must be written as OFF.
3. No special functions are implemented.
4. Any message written to the RUSKA 7350 which starts with a colon as the first
character is interpreted as a SCPI command.
To change from SCPI to Interface Panel Emulation via the remote interface, send the
following message:
:SYSTem:LANGuage “6000”
To change from Interface Panel Emulation to SCPI via the remote interface, send the
following message:
:SYSTem:LANGuage “SCPI”
5-8
Page 61

Remote Operation
Serial Operation 5
Serial Operation
The RS-232 and RS-485 ports accept the same SCPI commands as the IEEE-488 port.
The commands can be terminated by a carriage return (hexadecimal 0D) or a line feed
(hexadecimal 0A). The responses are always terminated by a carriage return followed by
a line feed.
The serial ports also support XON/XOFF. When the XOFF (hexadecimal 13) command
is received, the RUSKA 7350 will stop transmitting. Transmission is restarted when the
XON (hexadecimal 11) command is received.
When only one unit is attached, the Control-C (hexadecimal 03) command will clear the
transmit and receive buffers and disable addressing. When addressing is disabled, the unit
will respond to commands without being addressed.
When more than one unit is attached via the RS-485 multi-drop interface, an address
sequence must be sent. The Data Link Escape (hexadecimal 10) command is sent
followed by the address byte (hexadecimal 20 + unit address). This sequence will enable
the address unit and disable all others. The Clear (hexadecimal 14) command may be
used to clear the transmit and receive buffers without disabling addressing.
5-9
Page 62

RUSKA 7350
Users Manual
5-10
Page 63

Maintenance
Introduction
Very little maintenance is normally required for the RUSKA 7350. The following
sections discuss some of the suggested procedures.
Observing the RUSKA 7350’s Full Scale Rating
Instructions for observing the RUSKA 7350’s full scale rating are given below.
1. If necessary, press PREV. several times to return the display to the main screen.
2. Select Menu/Cal. The RUSKA 7350’s full scale pressure rating (FS:) will appear on
the screen, in the current units of measure.
Chapter 6
3. Press PREV. to return to the previous screen.
Observing the Software Version Number
Follow the steps below to observe the RUSKA 7350’s software version number.
1. If necessary, press PREV. several times to return the display to the Main Menu.
2. Select Menu ⎢Setup ⎢System. The software version number will appear on the screen.
3. Press PREV. to return to the previous screen.
Preventive Maintenance
Although the RUSKA 7350 is designed to be nearly maintenance free, occasional
preventive maintenance is required to keep the RUSKA 7350’s performance optimal.
Initiating the RUSKA 7350’s Self Test
To test the RUSKA 7350’s hardware, software, and pneumatics, follow the steps below.
1. If necessary, press PREV. several times to return the display to the Main Menu.
2. Select Menu ⎢Test ⎢Self ⎢Electrical. The electronics self test will run and display the
results.
Removing the RUSKA 7350’s Cover
The RUSKA 7350 should be kept clean and completely assembled at all times. Operating
the RUSKA 7350 without its cover affects the RUSKA 7350’s thermal gradients and
therefore reduces accuracy. If it becomes necessary to remove the RUSKA 7350’s cover,
follow the instructions below.
6-1
Page 64

RUSKA 7350
Users Manual
Processor Battery
WX Warning
The RUSKA 7350 should only be opened by qualified
electrical/mechanical service technicians. Lethal voltages are
present and exposed in the power supply and display.
1. Turn off the RUSKA 7350 and disconnect the power cord from the power supply.
2. Locate the 14 screws on back and side and two screws on top of cover that secure the
cover to the chassis.
3. Unscrew these screws.
4. Remove the cover.
5. Replace the cover before resuming operation.
The processor board uses a lithium battery to maintain time and date information. This
battery has a varying life. If the instrument is left on 24 hours a day, it will last 5-10 years.
If the instrument is stored, it will last one year. It is recommended to replace it every year.
To do this, follow the instructions below:
1. Remove cover, see Chapter 6, Removing the RUSKA 7350’s Cover section.
2. Remove the cover of electronic chassis located at the front right corner.
3. Remove processor card by removing one screw and rocking upward.
4. Remove battery, a round silver object, by carefully pulling on battery while
holding card.
5. Plug in new battery (part no. 4-725).
6. Reassemble in reverse order.
7. The time and date may have to be re-entered. See subsection Chapter 4, Date/ Time
section.
Calibration
To keep the RUSKA 7350 operating within its specified accuracy (Appendix A), the
calibration procedure described below must be performed every year. Use appropriate
DWG, such as Model 2475.
The calibration procedure automatically generates coefficients which are
stored in memory on the RUSKA 7350’s Control Board (Chapter 2). If
these constants are “lost” for any reason, the calibration procedure must
be performed, regardless of the last calibration date. If the calibration
coefficients are known, they may be restored to the RUSKA 7350 at any
time by “editing the coefficients” (See Chapter 6, Editing the Coefficients
section.)
Note
6-2
Page 65

Maintenance
Calibration 6
Calibration Instructions — Single Sensor
To calibrate the RUSKA 7350, the user simply connects a calibration standard to the
Calibrator’s Test port then follows the 4-step calibration procedure on the Callibrator’s
display. The calibration procedures is a menu driven procedure that steps the user through
the pressures that are required to calibrate each pressure range that is included in the
Calibrator. The user generates the defined pressures utilizing an adequate standard to
calibration the RUSKA 7350. The pressure steps will vary based on the pressure range
and number of sub ranges that are included with the RUSKA 7350. Typically, for a single
range instrument, the operator would be prompted to generate Atmosphere, 50%, 100%,
and 50% of the Calibrator’s full scale operating range of a sensor (See Chapter 6,
Observing the RUSKA 7350’s Full scale Rating). No disassembly is required and there
are no potentiometers to tune.
Note
The uncertainty of the final calibration must include the uncertainty of the
standard being used.
Preparation
• Verify that the calibration standard is connected to the TEST PORT.
• Verify that the RUSKA 7350 has been at stable operating temperature for at
least two hours
• Verify that the RUSKA 7350 is in Measure mode (See Chapter 4, Local
Operation).
• Verify and set the head pressure to zero in Menu ⎢Setup ⎢User.
• (Triple range only) Verify the range to be calibrated is selected. To change press
the Mode ⎢Range [F5].
• If desired, change the RUSKA 7350’s units of measure (See Chapter 4) to match
those of the calibration standard.
• To go to the Calibration screen, select MENU/CAL.
Step 1
Step 2
To begin the calibration process, press MENU ⎢CALIBRATE ⎢CALIBRATE. If the
calibration access code is enables, enter it at the prompt. The Calibration, Step 1, screen
will appear.
Note
To exit the calibration procedure before the calibration coefficients have
been changed, press CANCEL any time during the procedure.
1. To begin Step 1 of the calibration process, select Step 1. Enter the actual pressure
applied and press ok.
2. Wait until the zero procedure completes. When the 7350 completes Step 1, the
Calibration, Step 2, screen will appear.
1. To begin Step 2, use the calibration standard to Apply the mid-point pressure
requested by the RUSKA 7350. As pressure is to be applied into the Test Port, the
Measured pressure on the RUSKA 7350’s screen will change accordingly.
2. When the Measured pressure stabilizes, use the RUSKA 7350’s numeric keypad and
OK to enter the actual pressure applied by the calibration standard. Do not enter the
Measured pressure reported by the RUSKA 7350. If necessary, use the CLEAR key
to correct a mistake in the edit field. If the actual pressure applied is acceptable, the
Calibration, Step 3, screen will appear.
6-3
Page 66

RUSKA 7350
Users Manual
Step 3
Note
If the actual pressure is outside of the tolerance for the requested mid-point
pressure, Error –222 Data out of range will occur. Acknowledge this error
by selecting OK, then re-enter the actual pressure, repeating Step 2,
number 1, if necessary.
1. To begin Step 3, use the calibration standard to Apply the high-point pressure
requested by the 7350. The Measured pressure on the RUSKA 7350’s screen will
change accordingly.
2. When the Measured pressure stabilizes, use the RUSKA 7350’s numeric keypad and
OK to enter the actual pressure reported by the calibration standard. Do not enter the
Measured pressure reported by the RUSKA 7350. If necessary, use the CLEAR key
to correct a mistake in the edit field. If the actual pressure applied is acceptable, the
Calibration, Step 4, screen will appear.
Note
If the actual pressure applied is outside of the tolerance for the requested
high-point pressure, Error –222 Data out of range will occur.
Acknowledge this error by selecting OK, then re-enter the actual pressure,
repeating Step 3, number1, if necessary.
Step 4
1. To begin Step 4, use the calibration standard to Apply the mid-point pressure
requested by the RUSKA 7350. As pressure is to be applied into the Test Port, the
Measured pressure on the RUSKA 7350’s screen will change accordingly.
2. When the Measured pressure stabilizes, use the RUSKA 7350’s numeric keypad and
OK to enter the actual pressure applied by the calibration standard. Do not enter the
Measured pressure reported by the RUSKA 7350. If necessary, use the CLEAR key to
correct a mistake in the edit field. If the actual pressure applied is acceptable, the
Calibration complete screen will appear.
Storing the Coefficients
In addition to saving the calibration coefficients to the RUSKA 7350’s
memory, the user is advised to separately record the calibration coefficients
and store this “backup” in a safe place.
Step 5
Calibration is complete. To exit the calibration procedure without storing the calibration
coefficients in memory, press CANCEL. To store the calibration coefficients in memory,
select DONE.
Step 6
Press PREV. to return to the main screen.
Note
6-4
Once the calibration procedure is complete, the user is advised to record several pressure
readings. If there are any significant errors at these points, then an error was probably
made in generating one of the calibration pressures, and the calibration procedure should
be repeated.
Page 67

Maintenance
Calibration 6
Editing the Calibration Coefficients
If the RUSKA 7350’s memory is erased but the calibration coefficients are known, the
user can restore the coefficients to the RUSKA 7350 by following the directions below.
W Caution
Never randomly adjust the calibration coefficients. Only
qualified personnel with valid backup data should be allowed to
edit the coefficients. If the backup coefficients are questionable,
perform the calibration procedure in its entirety.
1. Verify that the RUSKA 7350 is in Measure mode (Chapter 4, Local Operation).
2. To go to the Calibration screen, select MENU ⎢CALIBRATE.
3. To edit the calibration coefficients, press the EDIT KEY. If the calibration access
code is enabled, enter it at the prompt.
Note
To exit the calibration procedure before the calibration coefficients have
been changed, press CANCEL any time during the procedure.
4. Use the arrow keys to highlight the coefficient.
Zeroing
5. Use the numeric keypad and ENTER key to enter a new value. To correct a mistake
in the edit field, use the CLEAR key.
6. Repeat steps 4 and 5 until all four coefficients are correct.
Note
In addition to saving the calibration coefficients to the RUSKA 7350’s
memory, the user is advised to separately record the calibration coefficients
and store this “backup” in a safe place.
7. To exit the editing procedure without storing the calibration coefficients in memory,
press CANCEL. To store the calibration coefficients in memory, select OK.
8. Press PREV. to return to the main screen.
Once the calibration coefficients are input, the user is advised to record several pressure
readings. If there are any significant errors at these points, then the calibration procedure
should be performed.
The zero procedure may be performed by itself without requiring a full calibration.
• Verify ABS Mode.
• Verify that the RUSKA 7350’s test port is open to atmosphere.
• Verify that the RUSKA 7350 has been at stable operating temperature for
at least 30 minutes.
• Verify that the RUSKA 7350 is in Measure mode.
1. Enter the calibration screen by selecting MENU ⎢CALIBRATE.
2. Select ZERO. The CAL button should not be pressed. If the CAL button is pressed,
a full calibration will be selected.
3. Use the numeric keypad to enter the atmospheric pressure at the test port. Press OK
when the measured pressure is stable.
4. Wait until the zero procedure completes. When the RUSKA 7350 completes the
procedure, it will return to the CAL screen.
6-5
Page 68

RUSKA 7350
Users Manual
RUSKA 7350 Pump Lubrication
Approved Lubrications
Frequency of Lubrication
W Caution
The threaded portion of the RUSKA 7350 pump spindle requires
periodic lubrication. Failure to lubricate the pump spindle can
cause premature failure of the pump spindle and nut resulting
in permanent pump damage.
Jet Lube AP-5 Grease (part number 45-342)
Jet Lube MP-50 Moly-paste
The frequency of lubrication is dependant upon the frequency of instrument use. On a
highly utilized system, the pump must be lubricated every other week. Also the pump
should be lubricated any time that the pump shows signs of loss of lubrication along the
face of the pump threads.
If a pump position error occurs, along with checking the condition of the pump and pump
over-travel limit switches, please check the pump lubrication. An inadequately lubricated
pump can sometimes be the cause of pump-position error detection by the system
software.
Lubrication Procedure
The threaded portion of the pump plunger requires periodic lubrication. The pump may
be lubricated by either injecting the lubricant through the grease fitting located on the left
side of the instrument or by applying the grease directly to the threads of the pump
plunger. Either way, the power to the system should be removed when applying the
lubrication to the pump.
When applying grease directly to the pump, extend the pump plunger such that the
majority of the threads are exposed. Using the lubrication provided with the system, or
one of the lubrications noted in the approved lubrication list, disperse a generous amount
of lubrication all along the threaded portion of the pump plunger.
Only the lubrication defined on the approved lubrication list
above can be used. Substituting this lubrication can cause
permanent damage to the pumping mechanism.
Fuse
The main fuse is a 6 AMP, 250V type 3AB-Slow blow (part number 3926870).
Cleaning
When necessary, clean externally using a damp lint-free cloth and mild liquid detergent.
W Caution
6-6
Page 69

Preparation for Storage and Shipment
Disconnection Instructions
W Caution
The procedures given in this Chapter must be strictly adhered
to in order to prevent damage to the instrument. Failure to
follow these procedures will likely result in damage to the
RUSKA 7350 during shipment. This damage is not covered by
the carrier’s insurance.
Chapter 7
1. Relieve all pneumatic pressure from the RUSKA 7350.
2. Turn the RUSKA 7350 power switch to the off position.
3. Disconnect the power cable from the RUSKA 7350 power receptacle.
4. Disconnect all pneumatic lines and fittings from the RUSKA 7350’s back panel.
5. Plug all ports.
Packing Instructions
The instructions below must be strictly followed in order to prevent damage to the
instrument.
The main principle behind a successful shipment is that of minimizing shocks. This is
accomplished by cradling the device within two boxes such that the RUSKA 7350 is
restrained but still has resilience. The two most successful materials for this purpose are
rubber foam and flexible polyurethane foams.
Styrofoam, poured “foam in place” mixtures, and other rigid
foams are not suitable.
Even polyfoam or rubber foam should be cut into strips so that it will not present a large
rigid surface to the RUSKA 7350.
Fluke has found that corrugated cardboard boxes provide the best packing. The boxes
sometimes arrive damaged, but the contents are usually intact. A minimum of 3 inches of
foam with at least an N95 impact rating should separate the inner surface of the inner box
and any portion of the RUSKA 7350. The same is true for the inner and outer box.
W Caution
W Caution
Wood or metal boxes do not absorb shock when dropped and;
therefore, are not recommended.
7-1
Page 70

7350
Users Manual
If the original packing and shipping materials were retained, use them for packing the
RUSKA 7350. If the RUSKA 7350 is being packed for long-term storage (more than 30
days), place a desiccant bag inside the unit. In general, prepare the RUSKA 7350 for
shipment as follows.
1. Fluke has an RMA procedure in place. Please contact the Customer Service Center to
obtain an RMA number prior to returning any equipment to Fluke. Have the
following information available when contacting Fluke:
• the part number,
• the serial number,
• the purchase order number,
• the billing and ship to address, and
• the buyer’s name and telephone number.
This information plus the RMA number must be attached to the unit when it is shipped to
Fluke Calibration. There will be a minimal charge for inspection and/or evaluation of
returned goods.
2. Enclose the RUSKA 7350 in plastic or any good water barrier material. Anti-static
material is advisable.
3. Interior Carton (size 30 x 30 x 30 inches): Cover bottom and sides with no less than
3 inches of polyfoam. Use four strips 4" to 6" wide and 50" to 60" long. Arrange
strips to cross each other inside carton. Cover sides and top, completely filling entire
carton. Tape carton closed.
4. The Exterior Carton must be a double wall of corrugated or fiberboard box. Use four
3 x 3 x 84 inch strips of polyfoam crossing each other inside the carton. Place interior
carton inside, making sure exterior carton is completely filled. Do not close the
carton yet.
5. Inside the exterior carton, include the following:
a. Statement of the problem or service needed. Be specific. Include the name and
telephone number of a knowledgeable technician for consultation.
b. The part number, serial number, return address, and purchase order number.
6. Seal the carton, using gummed tape.
7. Address the carton to:
FLUKE CALIBRATION
10311 WESTPARK DRIVE
HOUSTON, TX 77042
USA
8. Label the carton with the following labels: THIS SIDE UP, HANDLE WITH
CARE, DO NOT DROP, and FRAGILE.
7-2
Page 71

Preparation for Storage and Shipment
Shipping Instructions 7
Figure 7-1. Packing the Calibrator
Shipping Instructions
Fluke recommends using air freight for transportation. Surface transportation subjects the
shipment to more frequent handling and much more intense shock.
Again, it is essential that the procedures mentioned in the packing instructions are strictly
adhered to in order to prevent any shipping and handling damage to the instrument.
gld31.bmp
7-3
Page 72

7350
Users Manual
7-4
Page 73

Accuracy
Specifications of pressure transducer instrumentation can be divided into three categories:
Input Specifications, General Specifications, and Performance Specifications. Each of
these categories in turn consists of parameters which are usually specified by minimum
and/or maximum numeric limits. Almost all of these parameters can have an effect on
what is generally referred to as the instrument’s “accuracy.” Therefore, the accuracy of
pressure instrumentation can be varied either beneficially or detrimentally by controlling
the Input Specifications, operating within the General Specifications, or knowing the
actual Performance Specifications.
Appendix A
Summary of Specifications
For example, if Input Specifications have not been met for the line voltage, the unit may
not have a catastrophic failure, but errors may be present in the transducer measurement.
As another example, if the requirement for the Pressure Source Flow Capacity has not
been met, the RUSKA 7350 may not be able to achieve a final steady state controlled
pressure within the settling time specification. Finally, if the RUSKA 7350 is
commanded to a pressure outside of the Applicable Control Pressure Range, the
nonlinearity in the pressure output may be greater than that specified.
Performance Specifications give the user the most flexibility and control over his
“accuracy claims.” The term accuracy is defined by ISA-S37.1 as either the ratio of the
error to the full-scale output (%FS) or the ratio of the error to the reading (%RDG). Note
that the definition of accuracy is not the summation of some or even all of the possible
error source maximum limits.
The true accuracy of an instrument is relative to the actual error introduced by the
calibration transfer standard plus the actual error not eliminated from the instrument’s
indicated output. Therefore, an instrument’s accuracy can be manipulated by introducing
more or less actual error through the choice of a calibration standard; or its accuracy can
be varied by the elimination of actual errors inherent in the instrument. For example, if an
instrument has a known error due to being used in an attitude, or tilt, the %FS zero shift
error can be eliminated by re-zeroing the instrument in the tilted position. Even %RDG
sensitivity shifts can be eliminated mathematically or by controlling the attitude of the
instrument during its calibration.
A-1
Page 74

RUSKA 7350
Users Manual
The key to eliminating an error is knowing its source and type along with its polarity and
magnitude. Generally, the source is simple to detect and is represented by the specific
parameter. The type is usually a function of the instrument’s design and manufacturing
process. Within a given instrument, an error can be either random or systematic, as well
as random or systematic within the instrument’s population. The user is free to consult
Fluke for recommended methods of minimizing error source contributions.
In summation, total error can and should be managed by the control of the three general
error sources: Input Specifications, which includes the user’s chosen calibration standards;
General Specifications, which includes the user’s chosen processes; and Performance
Specifications, which includes the user’s chosen applications for the instrumentation. The
parameters and value limits listed in the following specifications indicate the product
line’s general acceptance limits and are not a report of any unit’s specific error
contribution. Any parameter exceeding the specified limits should be considered in need
of maintenance.
Specifications
Pressure Ranges 0-6000, 0-10,000 psia
Accuracy 0.01% FS
Resolution 0.001% FS or better
Control Stability Typically 0.0075% FS
Control Response 20 – 90 seconds controlling into a 15 cu. in. volume
depending on full scale range and increment step size
Control Range 300 – 3000, 600 – 6000, 1000 – 10,000 psia
Control Volume 3 in
Overshoot 0.01% of Full Scale
Overpressure Protection Relief valve set at 110% FS
Connections Supply Pressure port: 1/8 NPT
Display Color active matrix TFT display
Pressure Medium
(test and control gas)
Gas Consumption Zero at commanded pressure with a leak tight system
Pressure Supply 110 to 120 psi gas pressure for controller circuit. Test gas
3
(50cc) to 35 in3 (570cc) all ranges
Test port: 1/8 NPT
Drive Air Supply: 1/4 NPT
Clean, dry, non-corrosive gas with a dew point of -40 °C
and a particulate size <100 microns.
supply to be 110% higher than full scale pressure (may
require an external booster system).
A-2
Recommended
Recalibration Interval
Communications Standard: RS-232 and IEEE-488
Dimensions 19" W x 24" D x 17" H
Weight 120 lbs
1 year
(49 x 61 x 43 cm)
Page 75

Summary of Specifications
Accuracy A
Electrical Power 100 – 120 VAC or 22 – 240 VAC, 50/60 HZ, single
phase, 600 VA MAX (Separate part numbers for 115VAC
and 230 VAC) Fuse 6AT-250V
Humidity 5 to 95% noncondensing
Temperature Operating: 5 °C to 50 °C (40 °F to 122 °F)
Storage: -20 °C to 70 °C (-4 °F to 158 °F)
Ingress Protection IP 20, Indoor use, Altitude <2000m
EMC EN 61326
Electrical Safety EN 61010
Pressure Safety Pressure equipment directive — class:
Sound Engineering Practice (SEP)
A-3
Page 76

RUSKA 7350
Users Manual
A-4
Page 77

Summary of Error Messages
Summary of Error Messages
Negative error numbers are from the Standard Commands for Programmable Instruments
(Version 1991.0).
Table B-1. Summary of Error Messages
Value Description and Corrective Action
0 No Error.
-103 Invalid Separator. Check punctuation in the SCPI command.
Appendix B
-104 Data Type. The type of parameter data is incorrect. Check for numeric versus string
data.
-109 Missing Parameter. No valid parameter was found for the SCPI command.
-110 Command Header. The command name is not valid.
-113 Command Unknown. The command specified does not exist.
-114 Header Suffix. The numeric suffix for the command name is out of range.
-201 Remote Required. Remote command conflicted with local interface. Return local
interface to main Menu.
-221 Settings Conflict. The command could not be executed due to the current state of
the Calibrator. Some commands cannot be executed while a program, self-test, or
calibration is in progress.
-222 Out of Range. The value is not within the valid range. For pressures, check your
high and low limits.
-281 Cannot create program. Program memory is full.
-282 Illegal Program Name. The name specified is not valid or does not exist.
-284 Program Currently Running. The command cannot be executed while a program is
running.
-285 Program Syntax Error. The syntax of the program definition is not correct.
B-1
Page 78

RUSKA 7350
Users Manual
Value Description and Corrective Action
-286 Program Runtime Error. An error occurred while running the program. Usually the
setpoint is out of range.
-313 Calibration Data Lost. The calibration data has been lost and the unit must be
recalibrated.
-315 Configuration Data Lost. The configuration data has been lost. Check all parameters
to be sure that they are correct.
-330 Self Test failed. See display for more information.
-350 Queue Overflow. The error queue was full and messages were lost.
-400 Query Error. A read request was received when there was nothing to read.
500 Controller Malfunction. Internal control failure.
501 High Limit Exceeded. The pressure was greater than the high limit.
502 Low Limit Exceeded. The pressure was less than the low limit.
503 Slew Limit Exceeded. The pressure changed faster than the slew limit allowed.
521 Pressure Overrange. The pressure reading is outside the range of the RUSKA 7350.
538 Auto vent. The Vent Limit was exceeded and the instrument entered Vent Mode.
543 Supply Pressure. The instrument is attempting to increase pressure and the
pressure is not responding. Check main pressure supply, shop air supply, and for
leaks.
600 Factory Data Lost. Internal factory constants have been lost. Contact Fluke for more
information.
602 Model Changed. Firmware has been downloaded that is not correct. Download the
correct firmware.
706 Pump position failure. The position sensor is not detecting movement in the pump
after the pump has been commanded to move.
707 Range Switch. The current range can only be changed when the pressure reading is
below 100 psi (700 kPa).
B-2
 Loading...