

Page 1

27
®
Multimeter
Service Manual
For IEC 61010 CAT III Meters Only
PN 690206
November 1998
© 1998 Fluke Corporation, All rights reserved. Printed in U.S.A.
All product names are trademarks of their respective companies.
Page 2

Page 3

Table of Contents
Chapter Title Page
1 Introduction and Specifications........................................................... 1-1
1-1. Using the Meter Safely .......................................................................... 1-3
1-2. Operating Instructions ............................................................................ 1-4
1-3. Specifications ......................................................................................... 1-5
2 Theory of Operation .............................................................................. 2-1
2-1. Introduction ........................................................................................... 2-3
2-2. Functional Description ........................................................................... 2-3
2-3. Block Diagram Description ................................................................... 2-4
2-4. Input Overload Protection ................................................................. 2-4
2-5. Function Switching Circuits .............................................................. 2-4
2-6. Signal Conditioning Circuits ............................................................. 2-4
2-7. Custom Analog IC (U1) .................................................................... 2-4
2-8. Peripherals to U1 ............................................................................... 2-6
2-9. Microcomputer Control ..................................................................... 2-6
2-10. Display .............................................................................................. 2-7
3 Maintenance........................................................................................... 3-1
3-1. Introduction ........................................................................................... 3-3
3-2. Service Information ............................................................................... 3-4
3-3. Operator Maintenance ............................................................................ 3-4
3-4. Battery Replacement ......................................................................... 3-5
3-5. Fuse Test ........................................................................................... 3-6
3-6. Fuse Replacement .............................................................................. 3-6
3-7. General Maintenance Information ......................................................... 3-7
3-8. Handling Precautions for Static-Sensitive Devices ........................... 3-7
3-9. Disassembly ....................................................................................... 3-7
3-10. Reassembly ........................................................................................ 3-10
3-11. Cleaning ............................................................................................ 3-12
3-12. Performance Tests ................................................................................. 3-12
3-13. Display Test ....................................................................................... 3-12
3-14. Voltage Functions Performance Verification .................................... 3-13
3-15. AC and DC Current Performance Verification .................................. 3-13
3-16. Ohms Function Performance Verification ......................................... 3-14
i
Page 4

27
Service Manual
3-17. Diode Test Performance Verification ................................................ 3-15
3-18. Calibration Adjustment .......................................................................... 3-15
3-19. Calibration Preparation ...................................................................... 3-15
3-20. DC Voltage Connection .................................................................... 3-16
3-21. AC Voltage Calibration ..................................................................... 3-16
3-22. Troubleshooting ..................................................................................... 3-17
3-23. Power-Up Self Test ........................................................................... 3-17
3-24. Overall System Check ....................................................................... 3-17
3-25. DC Voltage Signal Tracing ............................................................... 3-18
3-26. Fault Diagnosis Guide ....................................................................... 3-19
4 List of Replaceable Parts...................................................................... 4-1
4-1. Introduction ........................................................................................... 4-3
4-2. How to Obtain Parts ............................................................................... 4-3
4-3. Manual Status Information .................................................................... 4-3
4-4. Newer Instruments ................................................................................. 4-4
4-5. Service Centers ...................................................................................... 4-4
4-6. Parts Lists .............................................................................................. 4-5
5 Schematic Diagrams ............................................................................. 5-1
ii
Page 5

List of Tables
Table Title Page
1-1. Specifications.......................................................................................................... 1-5
3-1. Recommended Test Equipment .............................................................................. 3-3
3-2. Replacement Fuses.................................................................................................. 3-6
3-3. Ohm Function Performance Test ............................................................................ 3-15
3-4. Fault Diagnosis Guide............................................................................................. 3-19
4-1. Final Assembly ....................................................................................................... 4-6
4-2. A1 Main PCA ......................................................................................................... 4-8
4-3. A2 Digital PCA....................................................................................................... 4-11
iii
Page 6

27
Service Manual
iv
Page 7

List of Figures
Figure Title Page
3-1. Battery and Fuse Replacement................................................................................ 3-5
3-2. Disassembly............................................................................................................ 3-8
3-3. Calibration Adjustment Locations .......................................................................... 3-16
4-1. Final Assembly ....................................................................................................... 4-7
4-2. A1 Main PCA ......................................................................................................... 4-10
4-3. A2 Digital PCA....................................................................................................... 4-11
5-1. A1 Main PCA and A2 Digital PCA........................................................................ 5-3
v
Page 8

27
Service Manual
vi
Page 9

Chapter 1
Introduction and Specifications
Title Page
1-1. Using the Meter Safely........................................................................ 1-3
1-2. Operating Instructions.......................................................................... 1-4
1-3. Specifications....................................................................................... 1-5
1-1
Page 10

27
Service Manual
1-2
Page 11

1-1. Using the Meter Safely
Use the meter as described in this manual. Otherwise the safety features provided by the
meter might be impaired. A Warning identifies conditions and actions that pose hazards
to the user; a Caution identifies conditions and actions that might damage the meter.
Read First: Safety Information.
Read First: Safety Information
This meter complies with EN 61010-1:1993, ANSI/ISA S82.011994 and CAN/CSA C22.2 No. 1010.1-92 Overvoltage Category
III. Use the meter only as specified in the Users Manual,
otherwise the protection provided by the meter may be
impaired.
Warning
To avoid possible electric shock or personal injury:
• Do not use the meter if it is damaged. Before use, inspect the
case for cracks or missing plastic. Pay particular attention to the
insulation surrounding the connectors.
Introduction and Specifications
Using the Meter Safely
1
• Inspect the test leads for damaged insulation or exposed metal.
Check test lead continuity. Replace damaged leads.
• Do not use the meter if it operates abnormally. Protection may be
impaired. When in doubt, have the meter serviced.
• Do not operate the meter around explosive gas, vapor or dust.
• Do not apply more than the rated voltage, as marked on the meter,
between terminals or between any terminal and earth ground.
• Before each use, verify the meter’s operation by measuring a
known voltage.
• When servicing the meter, use only specified replacement parts.
• Use caution when working above 30 V ac rms, 42 V ac peak, or 60
V dc. Such voltages pose a shock hazard.
• Keep your fingers behind the finger guards on the probe when
making measurements.
• Connect the common test lead before connecting the live test
lead. Disconnect the live test lead first.
• Remove test leads from the meter before opening the battery
door.
• Make sure the battery door is closed and latched before operating
the meter.
• Use only a single 9 V battery, properly installed in the meter case,
to power the meter.
• Follow all equipment safety procedures.
1-3
Page 12

27
Service Manual
• Before measuring current, check the meter’s fuses (see “How to
Test the Fuse”).
• Never touch the probe to a voltage source when the test leads are
plugged into the 10 A or 40 mA input jacks.
• To avoid false readings, which could lead to possible electric
shock or personal injury, replace the meter’s battery as soon as
the low battery indicator (
• Avoid working alone.
To avoid possible damage to the meter or to equipment under
test:
• Disconnect the power to the circuit under test and
discharge all high voltage capacitors before testing
resistance, continuity or diodes.
• Use the proper function and range for your measurement
applications.
) appears.
Caution
• When measuring current, turn off circuit power before
connecting the meter in the circuit. Remember to place the
meter in series with the current.
This manual presents service information for the Fluke 27 Multimeters. Included are a
theory of operation, general maintenance procedures, performance tests, calibration
procedures, troubleshooting information, a list of replaceable parts, and a schematic
diagram.
1-2. Operating Instructions
For operating instructions, refer to the Users Manual provided with the instrument at time
of purchase.
1-4
Page 13
Introduction and Specifications
1-3. Specifications
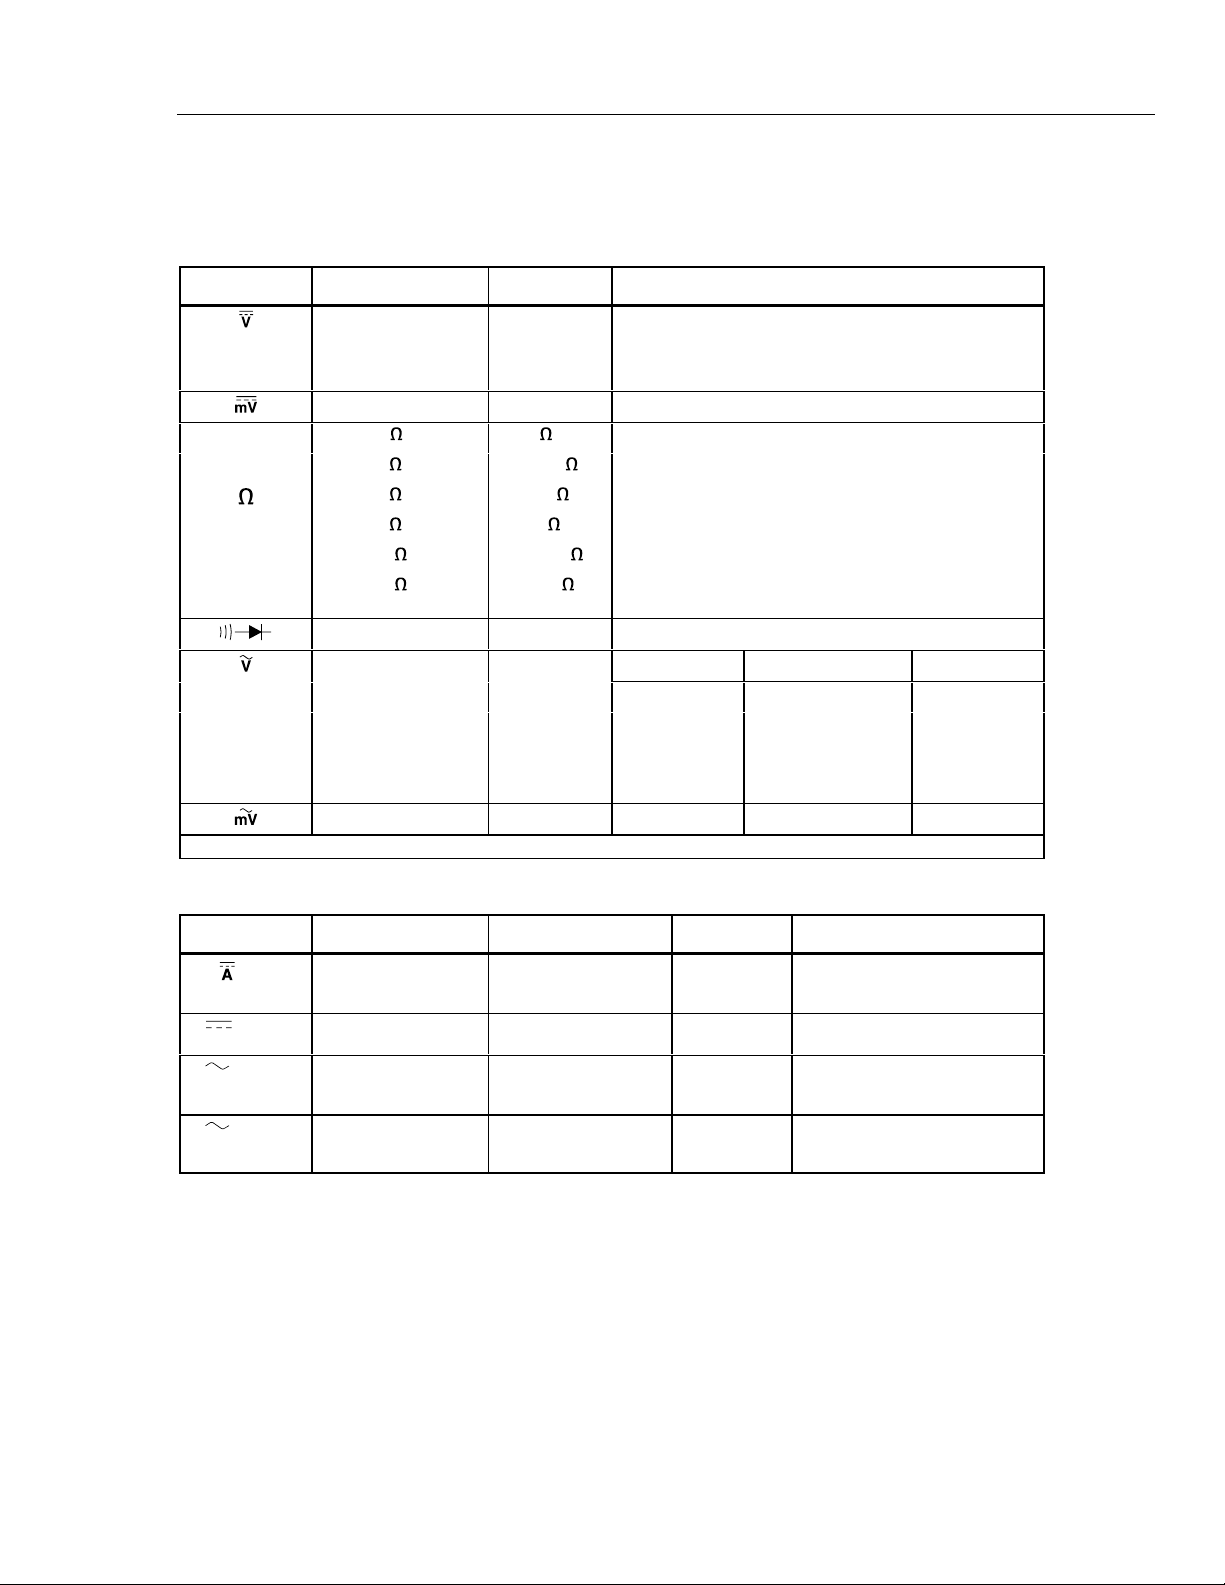
Instrument specifications are presented in Table 1-1.
Table 1-1. Specifications
Function Range Resolution Accuracy
3.200 V
32.00 V
320.0 V
1000 V
320.0 mV 0.1 mV ±(0.1%+1)
320.00 0.1 ±(0.3%+3)*
3.200 k 0.001 k ±(0.2%+1)
32.00 k 0.01 k ±(0.2%+1)
(nS)
* When using the REL ∆ function to compensate for offsets.
320.0 k 0.1 k ±(0.2%+1)
3.200 M 0.001 M ±(0.2%+1)
32.00 M
32.00 nS
2.080 V 0.001 V ±(1%+1) typical
3.200 V 0.001 V ±(0.5%+3) ±(2%+3) ±(4%+ 10)
32.00 V 0.01 V ±(0.5%+3) ±(2%+3) ±(4%+ 10)
320.0 V 0.1 V ±(0.5%+3) ±(2%+3) ±(4%+ 10)
1000 V 1 V ±(1%+3) ±(3%+3) Not Specified
320.0 mV 0.1 mV ±(0.5% +3) ±(2%+3) ±(4%+10)
0.001 V
0.01 V
0.1 V
1 V
0.01 M
0.01 nS
40 Hz-2 kHz 2 kHz -10 kHz 10 kHz -30 kHz
±(0.1%+1)
±(0.1%+1)
±(0.1%+1)
±(0.1%+1)
±(1%+1)
±(0.2%+10)
Specifications
1
Function Range Resolution Accuracy Typical Burden Voltage
m /A
µA
mA/A
40-1000 Hz
µA
40-1000 Hz
32.00 mA
320.0 mA
10.00 A
320.0 µA
3200 µA
32.00 mA
320.0 mA
10.00 A
320.0 µA
3200 µA
0.01 mA
0.1 mA
0.01 A
0.1 µA
1 µA
0.01 mA
0.1 mA
0.01 A
0.1 µA
1 µA
±(0.75%+2)
±(0.75%+2)
±(0.75%+2)
±(0.75%+2)
±(0.75%+2)
±(1.5%+2)
±(1.5%+2)
±(1.5%+2)
±(1.5%+2)
±(1.5%+2)
5.6 mV/mA
5.6 mV/mA
50 mV/A
0.5 mV/µA
0.5 mV/µA
5.6 mV/mA
5.6 mV/mA
50 mV/A
0.5 mV/µA
0.5 mV/µA
1-5
Page 14
27
Service Manual
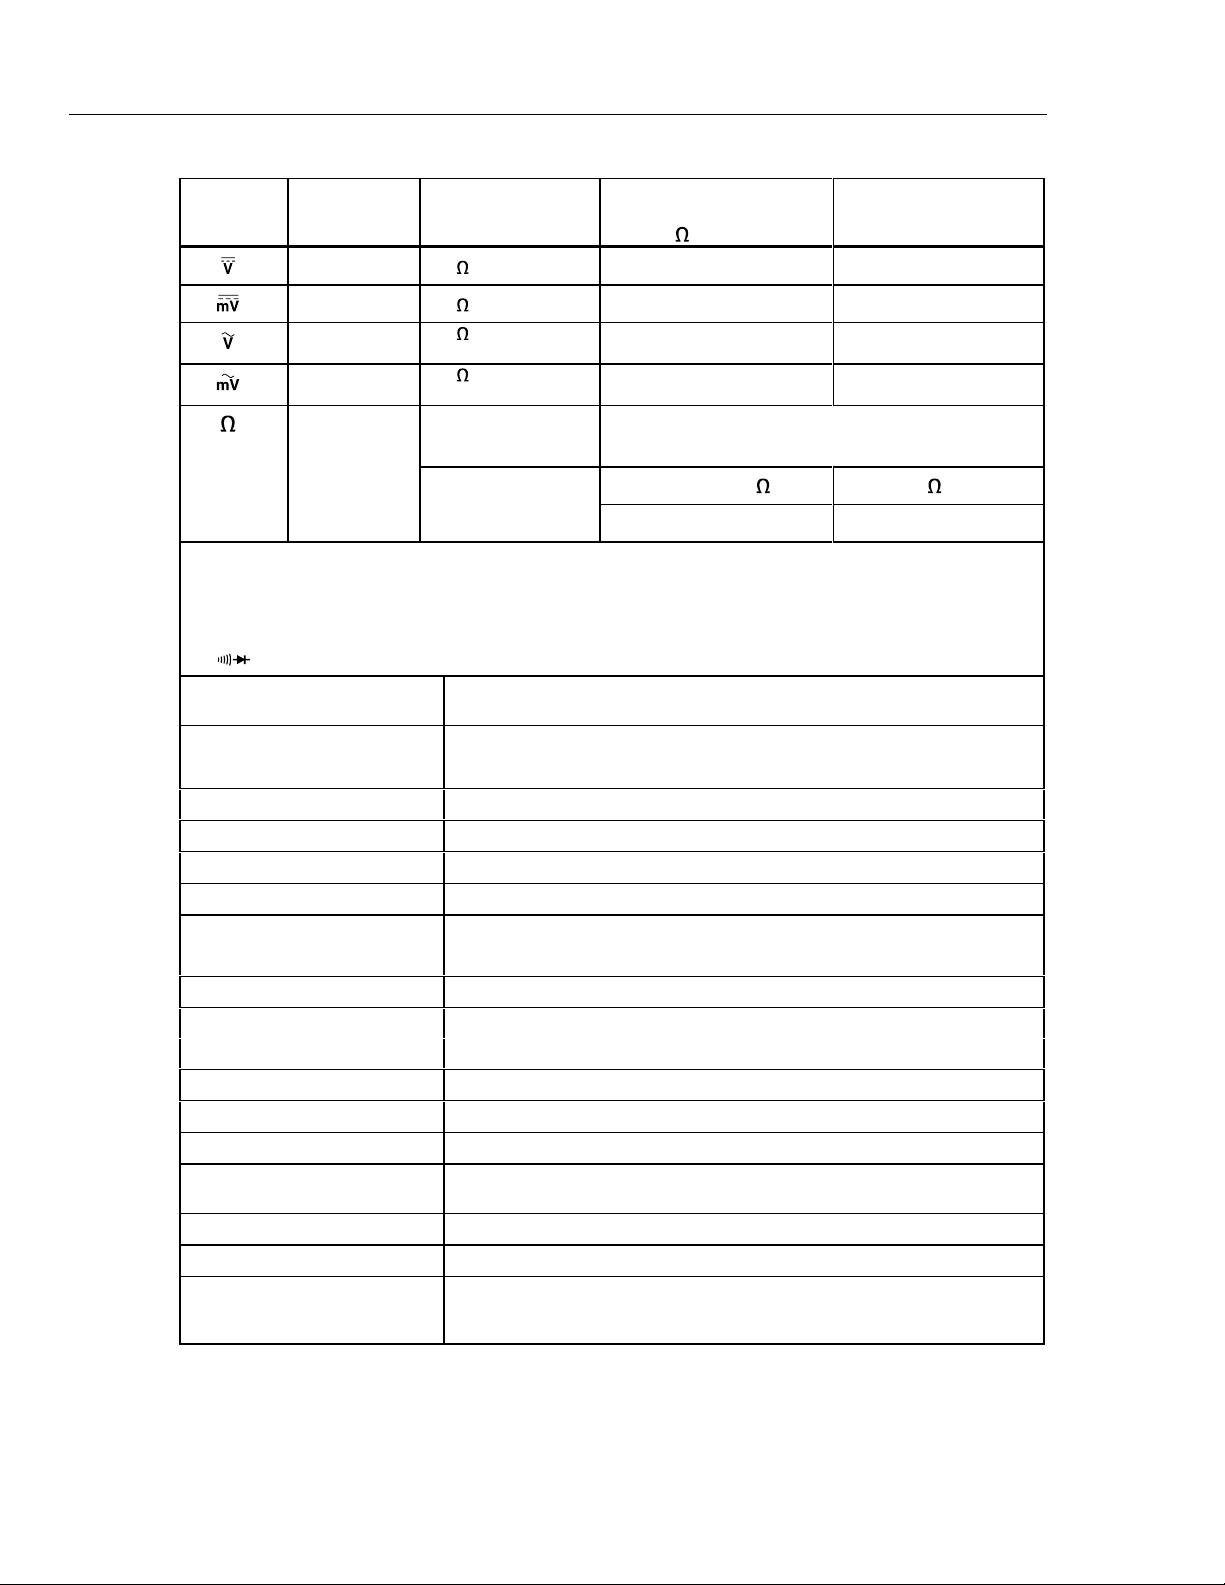
Table 1-1. Specifications (cont)
Function Overload
Protection**
1000 V rms 10 M in // with <100pF >120 dB at dc, 50 Hz, or 60 Hz >60 dB at 50 Hz or 60 Hz
1000 V rms 10 M in // with <100pF >120 dB at dc, 50 Hz, or 60 Hz >60 dB at 50 Hz or 60 Hz
1000 V rms
1000 V rms
1000 V rms Open Circuit Test
Input Impedance
(nominal)
10 M
in // with <100pF
(ac coupled)
10 M
in // with <100pF
(ac coupled)
Common Mode Rejection
Ratio
unbalance)
(1 k
>60 dB, dc to 60 Hz
>60 dB, dc to 60 Hz
Full Scale Voltage
Normal Mode
Rejection
Voltage
Up to 3.2 M 32 M or nS
<2.8 V dc <420 mV dc <1.3 V dc
** 107 V Hz Max
Basic electrical accuracy is specified from 18°C to 28°C with relative humidity up to 95%, for a period of one year after
calibration. All ac conversions are ac coupled, average responding, and calibrated to read the true rms value of a sine wave
input. Accuracy is specified as ±([% of reading] + [number of least significant digits]).
Ranging is either automatic or manual in all functions with more than one range. Test resistance below approximately 270 J in
function produces a continuous audible tone.
the
Maximum voltage between any
terminal and earth ground
Fuse protection
mA or µA
A
Digital Display 3200 counts, updates 2/sec
Analog Display 31 segments, updates 25/sec
Operating Temperature -150°C to 55°C, to -40°C for 20 minutes when taken from 20°C
Storage Temperature -55°C to 85°C without battery, to 60°C with battery
Electromagnetic Compatibility
Temperature Coefficient 0.1 x (specified accuracy)/°C (18°C or >28°C)
Relative Humidity 0% to 95% (0°C to 35°C)
Altitude 2000 meters
Battery Type 9 V, NEDA 1604 or 6F22 or 006P
Battery Life 1000 hrs typical
Shock, Vibration and Water
Resistance
Size (HxWxL) 2.2 in x 3.75 in x 8 in (5.6 cm x 9.5 cm x 20.3 cm)
Weight 1.6 pounds (0.75 kg)
Safety Complies with ANSI/ISA S82.01-1994, CAN/CSA 22.2 NO. 1010.1:1992 to
1000 V
44/100 A 1000 V Fast
11 A 1000 V Fast
In an RF field of 2 V/m on all ranges and functions (except mVac),
total accuracy = specified accuracy + 1.0% or range. For mVac,
total accuracy = specified accuracy + 1.5% or range. EN 61326-1:1997.
0% to 70% (35°C to 55°C)
Per MIL-T-28800 for a Style A, Class 2 Instrument
1000 V Overvoltage Category III. UL License pending to UL3111-1. TUV
License pending to EN61010-1.
1-6
Page 15

Chapter 2
Theory of Operation
Title Page
2-1. Introduction ......................................................................................... 2-3
2-2. Functional Description......................................................................... 2-3
2-3. Block Diagram Description ................................................................. 2-4
2-4. Input Overload Protection ............................................................... 2-4
2-5. Function Switching Circuits ............................................................ 2-4
2-6. Signal Conditioning Circuits ........................................................... 2-4
2-7. Custom Analog IC (U1) .................................................................. 2-4
2-8. Peripherals to U1............................................................................. 2-6
2-9. Microcomputer Control................................................................... 2-6
2-10. Display ............................................................................................ 2-7
2-1
Page 16

27
Service Manual
2-2
Page 17
2-1. Introduction
This chapter describes how the Fluke 27 works. First, a functional description presents an
overview of operation. This is followed by a block diagram description, which describes
the major circuit functions in more detail. For reference, a detailed schematic diagram is
included in Chapter 5.
2-2. Functional Description
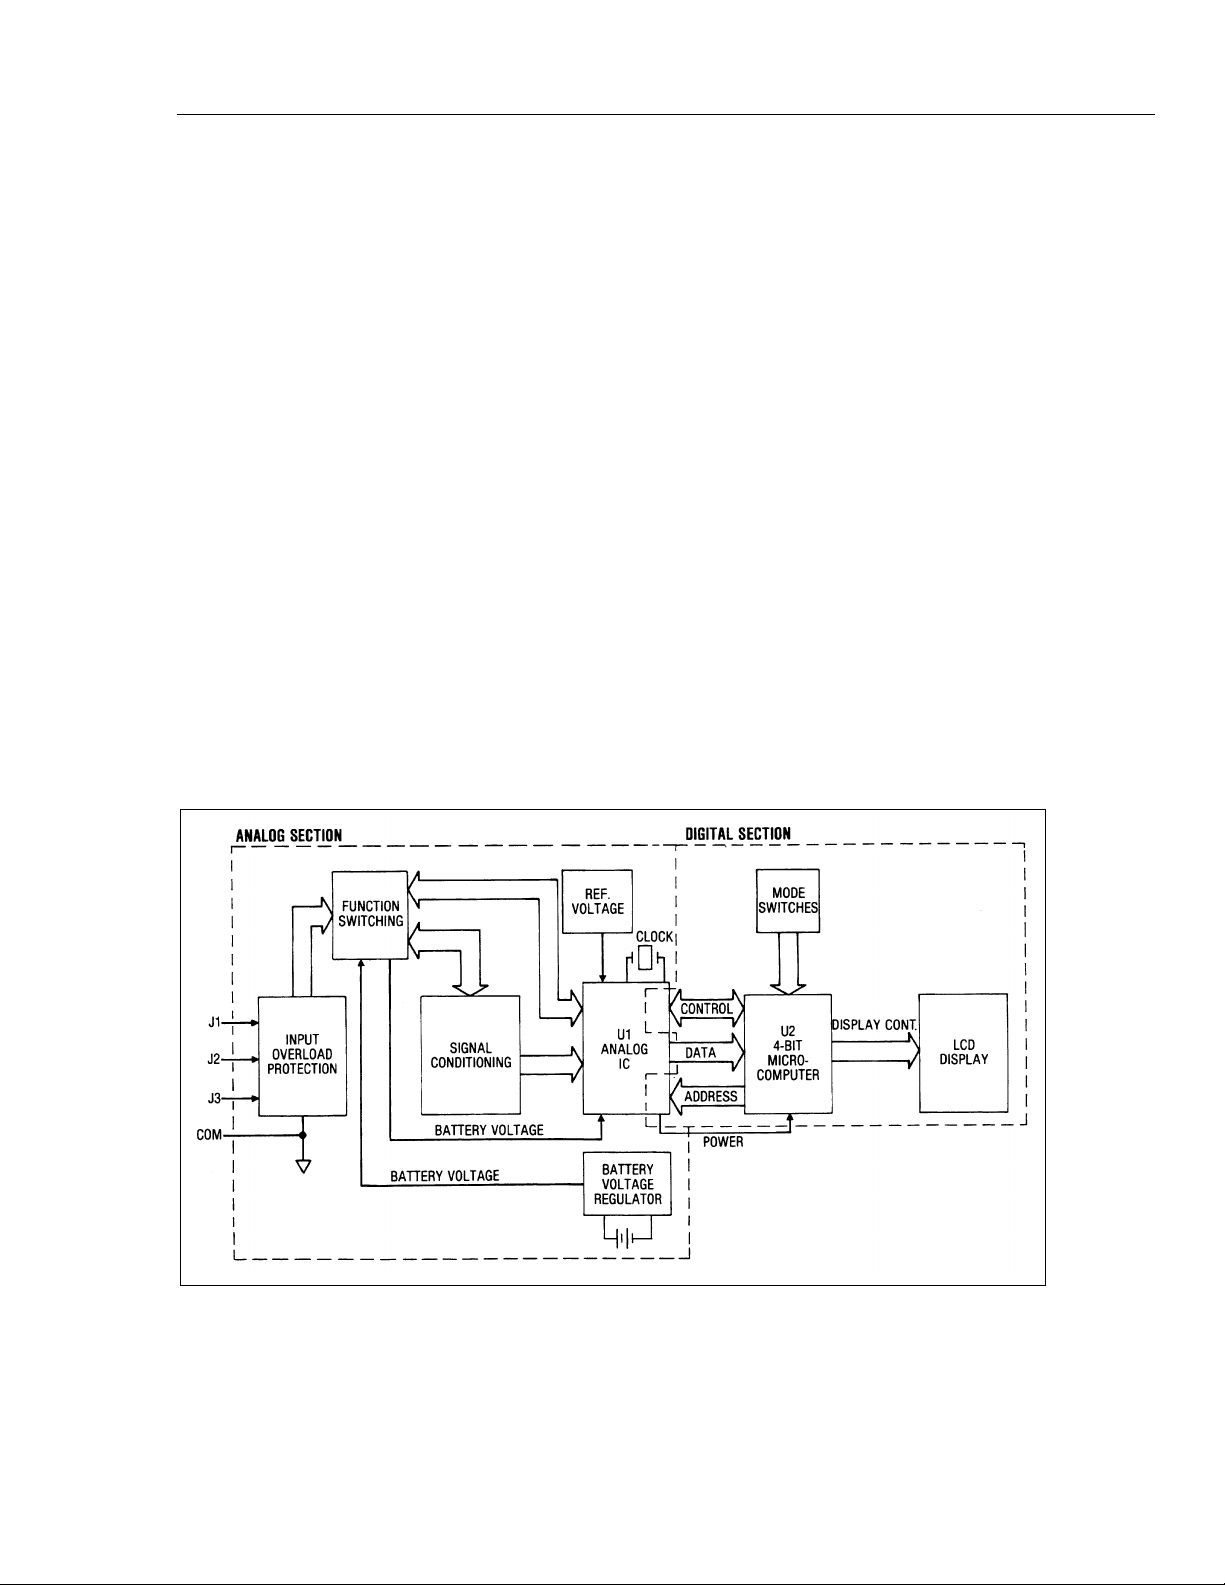
A block diagram of the Fluke 27 circuitry is shown in Figure 2-1. As this figure shows,
the instrument is composed of two major functional sections: the analog section and the
digital section. Each section contains one major active component and one or more
peripheral circuits. Most analog functions are performed by a custom analog IC (U 1) and
analog peripherals to U1. Digital functions are performed by a CMOS, 4-bit
microcomputer, U2.
The custom analog IC contains the A/D converter, signal conditioning circuits, and the
digital control circuitry required for communication with the microcomputer. Although
the custom IC is primarily analog, digital circuits provide state machine control for the
A/D converter, a read counter for A/D samples, decoding ROMs for analog switch drive,
and bus control for communication with the microcomputer.
Theory of Operation
Introduction
2
The microcomputer controls the A/D converter, initiates the range and function
switching, formats data for display, and drives the display. The mode push buttons supply
input to the microcomputer to initiate various modes. Output from the microcomputer is
displayed on the liquid crystal display (LCD).
Figure 2-1. Overall Functional Block Diagram
aac01s.tif
2-3
Page 18

27
Service Manual
2-3. Block Diagram Description
2-4. Input Overload Protection
Each of the blocks in the Figure 2-1 is discussed in the following paragraphs. In many
cases, circuit sections are described in greater detail than is shown in the Figure 2-1;
therefore, it may be helpful to refer to the schematic located near the back of this manual.
Overload protection for the volts/ohms/diode-test input (J1) is provided by a network of
five metal-oxide varistors (RV1 through RV5) a current-limiting resistor (R2) and a
thermistor (RT1).
A 44/100A, 1000 V fuse provides protection for the mA/µA input (J2) current shunts. An
11 A, 1000 V fuse provides protection for the 10 A input (J3) current shunt. In addition,
for the µA and mA ranges, a bridge rectifier (U7) and four diodes (CR1, CR2, CR3, CR4)
ensure that the fuses (instead of the shunts) open in very high current overload
conditions.
Transistors Q1, Q2, and Q1 provide additional overload protection for the millivolt and
ohms functions. If sufficient overload voltage is present, the transistors turn on and
connect that input to common through limiting resistors R2 and RT1, thereby protecting
the circuitry in U1. A clamp circuit (CR6 and Q15) connected to the volt/ohms/diode-test
input through Z1 and C3 provides similar protection for the volts/ohms/diode-test input.
2-5. Function Switching Circuits
Input signals are routed from the overload protection circuits to the function switch. The
function switch is a rotary switch with two double-sided wafers which provide the
necessary switching to select each of the various functions. In addition, battery voltage is
routed through the function switch from the battery voltage regulator to U1, and from U1
to U2.
2-6. Signal Conditioning Circuits
Each input signal is routed through signal conditioning circuitry before reaching U1.
Input signals received through the volts/ohms/diode-test input (J1) are routed through Z1,
a precision resistor network. The resistor network provides precise input scaling for the
various voltage ranges, and it provides precision reference resistors for the ohms
function. The capacitors in parallel with the various resistors in Z1 are used in the ac
voltage functions; the variable capacitors provide calibration adjustment for the high
frequency ac ranges.
Current inputs received through the mA/ µA input (J2) and the A input (J3) develop a
voltage across shunt resistors R14, R20, and R23 (320 µA, 32 mA, and 10 A
respectively). Resistors R9 and R10 comprise a 10:1 divider for the 3200-µA and 320mA current ranges.
2-7. Custom Analog IC (U1)
The analog-to-digital converter, autorange switching, and most of the remaining active
analog circuitry (including additional signal conditioning) are contained in U1, a custom
LSI package. Peripherals to U1 include the system clock, the reference voltage regulator
for the A/D converter, and some filtering and amplifier stabilization components. U1 also
contains digital circuitry for state machine control over the A/D decoding ROMs for
analog switch drive and read counter preset, and registers to store control outputs from
the microcomputer.
2-4
Page 19

Theory of Operation
Block Diagram Description
Analog-to-digital conversion is accomplished within U1 using a modified dual-slope A/D
converter circuit, as shown in Figure 2-2. The conversion method in the Fluke 27 can be
described as a charge-coupled, multiple-slope technique. A series of 10 minor
conversions occur every 40 ms (each at 1/10th the desired resolution) without taking time
for an autozero phase between the conversions. These minor conversions (or samples, as
they are called in the following discussion) occur at a rate of 25 per second, and are used
to provided the fast response bar-graph display and fast autoranging.
New samples are taken every 40 ms. Ten samples are summed to produce a fullresolution digital display, with full scale greater than 3200 counts. A 100 ms autozero
phase occurs every 10-sample sequence.
Basic A/D conversion elements and waveforms are illustrated in Figure 2-2. As this
figure shows, a residual charge is retained by the integrator capacitor due to the overshoot
past the true-zero base line. In the absence of an autozero phase, the residual charge
would normally produce a significant error in the sample next taken. However, a digital
algorithm eliminates the error and accounts for the residue as it propagates through all 10
samples.
2
Figure 2-2. A/D Conversion Elements and Waveform
aac02s.tif
2-5
Page 20

27
Service Manual
2-8. Peripherals to U1
Digital circuitry in U1 provides state machine control for the A/D converter, a read
counter for A/D samples, decoding ROMs for analog switch drive and for read counter
preset, and bi-directional bus control for storing control outputs from the microcomputer
and for transferring data to the microcomputer.
Basic timing for the A/D converter is defined as a series of 10 integrate/read cycles
(samples), followed by a 100 ms autozero phase. However, the diode test and continuity
function, the 32 M
autoranging, and the Touch-Hold
range, the battery test, the power-up self test, overload recovery,
®
mode all required variations from the basic timing.
The state machine, in combination with the ROM and preset read counter, plus an
autozero flag under computer control, establishes the timing variances necessary for the
various functions.
Circuitry peripheral to U1 provides regulated battery voltage to power U1, a regulated
reference voltage for the A/D converter, a system clock, signal conditioning, and
amplifier stabilization. The battery voltage regulator consists of AR1, Q12, and
associated components; the regulator circuit supplies consistent operating power to U1
and, through a second regulator circuit in U1, to the microcomputer (U2). Voltage
regulator VR1 (and associated components) supplies a regulated 1.000 V reference
voltage for the A/D converter. Potentiometer R19 provides for calibration adjustment of
the reference voltage.
Additional circuits are necessary for the active filter, integrator, and buffer in U1. the
active filter response is determined by R13, R16, C18, and C19. Integrator and buffer
signal characteristics are determined by C20, C21, and two resistors in Z1. Several
components external to U1 provide for ac-to-dc conversion; they are C41, C42, C43,
R35, R7, C16, R30, R31, and R32.
The system clock, with a frequency of 32.768 kHz, controls all timing synchronization
for the instrument. Y1 is a quartz crystal which determines the frequency of the clock
oscillator circuit.
2-9. Microcomputer Control
A CMOS, 4-bit microcomputer (U2) controls the various instrument functions and drives
the LCD display. The microcomputer reads and processes data samples from the A/D
converter, sends a code to U1 which represents the operator-selected function, performs
the Touch-Hold algorithm, selects the correct A/D mode for the function in used, controls
range, sets the autozero flag, and disables the analog filter during autoranging.
In reading and processing A/D samples, the computer accepts raw sample data, applies
necessary corrections as described in the preceding discussion of U1, and accumulates 10
samples which then become the full resolution conversion for digital display. Each minor
conversion is also processed for the bar-graph display. For the diode test and continuity
function, the microcomputer evaluates the data and determines whether or not the beeper
should be switched on.
Touch-Hold operation requires the microcomputer to perform a different algorithm. The
microcomputer does not allow a full-resolution conversion to be completed unless the
input signal is stable. When a stable reading occurs, the conversion is completed and the
microcomputer generates the corresponding display and freezes it. the microcomputer
then waits for a change in the signal to exceed a certain threshold, and then begins
watching for a stable reading again. There are two exceptions to this simple algorithm:
First, open test lead indication does not allow a full-resolution conversion to be
completed either; the microcomputer continues to wait for a stable signal which is outside
the open test lead region. (Open test leads in voltage or current function result in low
2-6
Page 21

readings; open test leads in resistance or diode test functions result in off-scale readings)
Second, if the Touch-Hold button is momentarily pressed at any time, then the fullresolution conversion is forced to complete in spite of input or test lead conditions.
The microcomputer also sets the required A/D converter mode. A single mode is used in
all voltage and current conversions, but there are three ohms function A/D converter
modes, a diode test mode, and two power-up test modes (battery test and self test). The
microcomputer sends the proper code to U1 to select the required A/D converter mode.
Following each group of 10 samples, in normal operation, the microcomputer sets the
autozero flag.
Both manual and autoranging are controlled by the microcomputer. The microcomputer
loads a range register in U1 in conjunction with a mode-dependent map. In autorange, the
analog filter is disabled to increase the autoranging speed.
Peripheral components Q13 and C12 force the microcomputer to reset when the function
switch is moved to OFF. A voltage-divider network (R3, R4, and C13) supplies a midlevel voltage to drive the multiplexed display.
2-10. Display
The liquid crystal display (LCD) operates under direct control of the microcomputer.
Characters are generated by the computer and displayed on the LCD. Both digital
readings and an analog bar-graph display are presented, in conjunction with annunciators
and decimal points. Refer to the Fluke 27 Users Manual for a more detailed description
of the display.
Theory of Operation
Block Diagram Description
2
2-7
Page 22

27
Service Manual
2-8
Page 23

Chapter 3
Maintenance
Title Page
3-1. Introduction ......................................................................................... 3-3
3-2. Service Information............................................................................. 3-4
3-3. Operator Maintenance.......................................................................... 3-4
3-4. Battery Replacement ....................................................................... 3-5
3-5. Fuse Test ......................................................................................... 3-6
3-6. Fuse Replacement............................................................................ 3-6
3-7. General Maintenance Information....................................................... 3-7
3-8. Handling Precautions for Static-Sensitive Devices ......................... 3-7
3-9. Disassembly..................................................................................... 3-7
3-10. Reassembly...................................................................................... 3-10
3-11. Cleaning .......................................................................................... 3-12
3-12. Performance Tests ............................................................................... 3-12
3-13. Display Test..................................................................................... 3-12
3-14. Voltage Functions Performance Verification .................................. 3-13
3-15. AC and DC Current Performance Verification................................ 3-13
3-16. Ohms Function Performance Verification....................................... 3-14
3-17. Diode Test Performance Verification.............................................. 3-15
3-18. Calibration Adjustment........................................................................ 3-15
3-19. Calibration Preparation.................................................................... 3-15
3-20. DC Voltage Connection .................................................................. 3-16
3-21. AC Voltage Calibration................................................................... 3-16
3-22. Troubleshooting................................................................................... 3-17
3-23. Power-Up Self Test ......................................................................... 3-17
3-24. Overall System Check..................................................................... 3-17
3-25. DC Voltage Signal Tracing ............................................................. 3-18
3-26. Fault Diagnosis Guide..................................................................... 3-19
3-1
Page 24

27
Service Manual
3-2
Page 25

Warning
To avoid electric shock or personal injury:
• Do not perform any servicing other than operator
maintenance unless you are qualified to do so. These
service instructions are for used by qualified personnel
only.
• Do not allow water to get inside case.
• Remove any input signals prior to removing test leads and
opening case.
• When servicing the meter, use only specified replacement
parts.
• Make sure the battery door is closed and latched before you
operate the meter.
• To prevent arc blast and resulting injury, install only
specified replacement fuses with the speed, amperage,
interrupt rating and voltage rating listed in Fuse
Replacement Maintenance section.
Maintenance
Introduction
3
3-1. Introduction
This chapter presents instructions for disassembly, performance tests, calibration
adjustment, and troubleshooting. The performance tests may be used as an acceptance
test when the instrument is first received, and can be used later as a preventive
maintenance tool.
A l-year calibration cycle is recommended to maintain the instrument’s specifications. In
addition, the seals should be replaced during servicing to maintain the environmental
specifications stated in that manual. A seal kit is available from the factory. The seal kit
(Model 8025A-740 1, part number 738112) contains a complete set of seals and four
replacement screws and washers for the bottom case.
The test equipment required for the performance tests and calibration adjustments is
listed in Table 3-1. Test equipment with equivalent specifications may be used if the
recommended models are unavailable.
Table 3-1. Recommended Test Equipment
Instrument Type Required Characteristics Recommended Model
Voltage Range: 0-1000 V ac, ±.05%
Frequency Range: 40 - 10,000 Hz, ±1%
DMM Calibrator Voltage Range: 0-1000 V dc
Accuracy: ±.05%
Current Range: 2 mA - 5 A
Accuracy: ±.2%
Fluke Model 5500A
Values: 100 ohm, 1 kilohm, 10 kilohm, 100
kilohm, 1 megohm, 10 megohm
Accuracy±.06%
3-3
Page 26

27
Service Manual
3-2. Service Information
The Fluke 27 has a lifetime warranty upon shipment of the instrument to the original
purchaser. Conditions of the warranty are described on the registration card.
Malfunctions that occur within the limits the warranty will be corrected at no cost to the
purchaser. For in-warranty service, ship the instrument post-paid to the Fluke Service
Center nearest you. A list of service centers is included at the back of this manual.
Fluke Service Centers are also available for calibration or repair. Upon request, a cost
estimate will be provided before work is performed on instruments.
If reshipment is necessary, please use the original shipping container. If the original
container is not available, be sure that adequate protection is provided to prevent damage
during shipment. It is recommended that the instrument be surrounded by at least 3
inches of shock absorbing material in the shipping container.
To contact Fluke, call one of the following telephone numbers:
USA and Canada: 1-888-99-FLUKE (1-888-993-5853)
Europe: +31 402-678-200
Japan: +81-3-3434-0181
Singapore: +65-738-5655
Anywhere in the world: +1-425-356-5500
Or, visit Fluke’s Web site at www.fluke.com.
3-3. Operator Maintenance
The Fluke 27 Multimeter has been designed to meet the requirements of the
United States Department of Labor Mine Safety and Health Administration
for use in mines. If your instrument has MSHA approval, a decal stating so
will be present on the bottom of your instrument. The following Warning
applies only if the decal is present.
The Fluke 27 multimeter is approved (permissible) by the United
States Department of Labor Mine Safety and Health
Administration (MSHA) for use in mines (approval 2G-3665-0).
To maintain MSHA permissibility, repairs to these instruments
must be made using parts exactly like those furnished by Fluke
Corporation. Any changes in the intrinsically safe circuitry or
components may result in an unsafe condition.
The Fluke 27 multimeter was tested by the MSHA for intrinsic
safety in methane air mixtures only. The Fluke 27 multimeter is
approved with a 9 V NEDA 1604 (carbon zinc) battery only. Do
not use to check electrical blasting circuits. Do not connect to
an electrically energized circuit in a hazardous area.
Note
Warning
3-4
Page 27

3-4. Battery Replacement
To avoid false readings, which could lead to possible electric
shock or personal injury, replace the battery as soon as the
battery indicator (
The Fluke 27 is powered by a single 9 V battery (NEDA 1604, 6F22, or 006P). Referring
to Figure 3-1, use the following procedure to replace the battery:
1. Turn the rotary switch to OFF, and remove the test leads.
Warning
) appears.
Maintenance
Operator Maintenance
3
2. Lift the instrument stand on the back of the instrument, then remove the four #6 X
32, Pozidriv
screws from the battery cover.
3. Pull the battery cover straight out from the back of the instrument. (A coin-slot in the
side of the battery cover facilitates removal.)
Warning
To avoid electrical shock or personal injury, remove the test
leads and any input signals before replacing the battery or
fuses. Make sure the battery door is closed and latched before
you operate the meter.
4. Disconnect and remove the battery.
5. Snap the battery connector to the terminals on the new battery, then slide the battery
into the battery compartment.
6. Insert the battery spacer/cover into the instrument, then start the four screws removed
in step 2. Press firmly on the battery cover while tightening the screws in a diagonal
pattern.
Battery cover
Fuse cover
Battery
connector
Battery
F2
F1
ye1f.eps
Figure 3-1. Battery and Fuse Replacement
3-5
Page 28

27
Service Manual
3-5. Fuse Test
Warning
To avoid electrical shock or personal injury, remove the test
leads and any input signals before replacing the battery or
fuses. Make sure the battery door is closed and latched before
you operate the meter.
To prevent equipment damage or injury, install ONLY specified
replacement fuses with the amperage, voltage, interrupt, and
speed ratings listed in the Fuse Replacement Maintenance
section.
1. Turn the function selector switch to the
2. Connect a test lead from the volts/ohms/diode-test input terminal to the A input
terminal.
3. The display should indicate between 0.1
fast).
4. Move one end of the test lead from the A input terminal to the mA/µA input terminal.
5. The display should indicate between 5.3
(44/100 A, 1000 V) .
6. If either of the above display indications is OL (overload), replace the appropriate
fuse.
3-6. Fuse Replacement
Referring to Figure 3-1, use the following procedure to check or replace the Fluke 27
fuses:
1. Perform steps 1 through 4 of the battery replacement procedure.
2. Pull the fuse cover down, then out of the meter.
3. Remove the defective fuse (or check continuity) through the suspected fuse), and if
necessary install a new fuse of the same size and rating.
4. Snap the fuse cover back into place.
position.
and 0.3 . This tests F2 (11 A, 1000 V
and 6.0 . This tests F1
3-6
5. Reinstall the battery/cover as instructed in step 6 of the battery spacer replacement
procedure.
Table 3-2. Replacement Fuses
Item Description Fluke Part Number Quantity
F1 Fuse, F44/100 A, 1000 VAC/DC 943121 1
F2 Fuse, 11 A, 1000 VAC/DC 943118 1
To ensure safety, use exact replacement only
Page 29

3-7. General Maintenance Information
3-8. Handling Precautions for Static-Sensitive Devices
Caution
This unit contains CMOS components which can be damaged
by static discharge. Static-sensitive components include U1
(the custom analog IC), U2 (the microcomputer), and op amp
AR1. To prevent static discharge damage, take the following
precautions when servicing the instrument.
• Perform all work at a static-free work station.
• Do not handle components or pca (printed circuit assembly) by their connectors.
• Wear static ground straps.
• Use conductive foam to store components.
• Remove all plastic, vinyl, and Styrofoam from the work area.
• Use a grounded, temperature-regulated soldering iron.
Maintenance
General Maintenance Information
3
3-9. Disassembly
To avoid the possibility of electric shock, remove the test leads
prior to disassembly.
Opening the instrument case in damp, humid environments
followed by moving the instrument to a cooler environment
could cause condensation inside the case. Instrument
performance may be adversely affected by condensation.
To avoid contaminating the pcas with oil from the hands (or Oring lubricant), handle the pcas by the edges or wear gloves. If
a pca does become contaminated, refer to the cleaning
instructions given later in this chapter. Do not allow the LCD to
come in contact with moisture.
Disassembly requires a number 2 Pozidriv
screws and a number 1 Phillips-head screwdriver for all interior screws.
Reassembly requires silicone lubricant (Parker Super O-Lube is
recommended) and new seals. A Fluke seal kit (Model 8025 A-7401, Fluke
Part Number 738112) provides a complete set of seals and four
replacement screws and washers for the bottom case. A 2 oz tube of Parker
Super O-Lube can be obtained from the Fluke Corporation by ordering p/n
812230.
Warning
Caution
Caution
Note
®
screwdriver for all exterior
3-7
Page 30

27
Service Manual
MP2
MP19
U3
MP2 (2PL)
MP18
H2 (2PL)
Top Case/Digital
PCB Subsection
MP13
MP10
MP12
MP11
MP21
H1
MP4
MP7
MP1
MP5
MP6
S3
A2
H5 (4PL)
MP9
MP8
MP3
H4 (3PL)
Button-Up
Subsection
A1
Main Board
Subsection
MP17
H8 (2PL)
H9 (2PL)
F1
F2
H3 (4PL)
F1
F2
MP61
MP15
BT1
H7 (4PL)
MP16
MP14
H6
aac04f.eps
Figure 3-2. Disassembly
Most maintenance procedures require at least partial instrument disassembly. The
following procedure (illustrated in Figure 3-2) provides complete step-by-step
disassembly instructions to gain access to any assembly. Complete disassembly is not
required to gain access to most assemblies; the following procedure contains notes that
explain which maintenance procedures are possible at various levels of disassembly.
1. Turn the function switch to the upper OFF position.
2. Lift the tilt bail up about 1 inch up from the back of the instrument, then gently pull
out the ends of the tilt bail and remove it.
3. Remove the four Pozidriv
®
machine screws (H6) that hold the battery cover (MP14)
to the bottom case, then lift the battery cover and battery spacer out of the instrument.
4. Disconnect and remove the battery.
5. Unsnap the battery spacer from the battery cover.
3-8
Page 31

Maintenance
General Maintenance Information
6. Remove the old O-ring (MP15). Clean the O-ring surfaces of the battery cover and
the instrument case. Install the battery holder on the battery cover, then install the
new O-ring.
7. Remove the four Pozidriv
®
screws (H7) and rubber washers from the bottom case.
8. Lift the bottom case off the instrument, and remove the O-ring (MP13) between the
top and bottom cases. (Always install a new O-ring prior to reassembly.)
9. At this point, all calibration adjustments are accessible through the openings in the
side of the pca shield. Refer to the calibration adjustment procedure later in this
chapter to calibrate the instrument.
10. Remove the four Phillips-head screws (H3) at the bottom of the pca that connect the
pca to the input terminals molded into the top case.
11. Carefully lift the upper end of the main pca and shield assembly to disconnect the
assembly from the digital pca, then lift the main pca and shield assembly clear of the
case.
3
Figure 3-3. Switch Extension Shaft Installation
aac05s.tif
12. Note the position of the rotary switch extension shaft (MP17). With the rotary switch
in the OFF position, the single small pointer on the base of the extension shaft is
pointed toward the top of the instrument. Refer to Figure 3-3.
13. Lift the rotary switch extension shaft (MP17) off the rotary switch shaft (the shaft on
MP2).
14. Remove the E-ring retainer (MP6) and the detent spring (MP5) from the rotary
switch shaft.
15. Pull the rotary switch knob (MP2) out from the front of the top case (MP1). Take
care not to loose the Teflon bearing washer (H1) under the knob.
16. To replace the O-ring (MP4) on the rotary switch shaft, cut off the existing O-ring
without scratching the metal shaft. Clean the shaft thoroughly, and slide a new O-ring
over the shaft into the groove on the shaft.
3-9
Page 32

27
Service Manual
17. Remove the four lower Phillips-head screws (H5) that secure the digital pca to the
top case using a diagonal pattern (i.e., remove the upper-right screw, then the lowerleft, then the upper-left, and last the lower-right). Then remove the two Phillips-head
screws (H2) at the top of the digital pca, above the connector.
18. Carefully lift the digital pca straight up from the top case and remove it.
Caution
Do not touch the elastomeric LCD contact strips (MP20) or
contacts of the momentary switch (S3-S6) with bare hands.
Wear gloves or remove the contact strips using clean pliers or
tweezers. Avoid contaminating the contact strips.
19. Lift the momentary switch (S3-S6) from the top case. Remove the elastomeric LCD
contact strips (MP20) and LCD interconnect support (MP18), located on the back of
the LCD.
20. Remove the LCD (U3) and the LCD mask (MP19) from the case.
21. To disassemble the main pca/shield assembly, first remove the two Philllips-head
screws (H8) from the top shield (MP9). Take care not to lose the flat washers under
the screw heads.
22. Turn the assembly over and remove the three thread-forming, Phillips-head screws
(H4) that secure the bottom shield (MP3).
23. Lay the bottom shield aside, and separate the top shield from the pca.
24. At this point, all main pca components are accessible.
3-10. Reassembly
Reassembly requires a number 2 Pozidriv
screws, a number 1 Phillips-head screwdriver for all internal screws,
silicone lubricant (Parker Super-O-Lube is recommended), and new seals.
A Fluke seal kit (Model 8025A-7401, Fluke Part Number 738112) provides
a complete set of seals and four replacement screw and washers for the
bottom case. A 2-oz tub of Parker Super-O-Lube can be obtained from the
Fluke Corporation by ordering p/n 812230.
Reassembling the instrument is primarily a reversal of the disassembly procedure.
However, some precautions are necessary to ensure proper sealing and to maintain watertight integrity. Use the following procedure to reassemble the instrument:
Do not touch the elastomeric LCD contact strips (MP20) or
contacts of the momentary switch (S3-S6) with bare hands.
Wear gloves or remove the contact strips using clean pliers or
tweezers. Avoid contaminating the contact strips.
Note
Caution
®
screwdriver for all external
3-10
1. Position the LCD mask (MP19) in the top case (MP1), then place the LCD (U3) in
the LCD mask with the Fluke part number toward the top of the instrument, pressing
the LCD lightly to engage the spring action of the LCD mask. Place the LCD
interconnect support (MP18) over the LCD, then place the elastomeric connector
strips (MP20) at the top and bottom of the LCD interconnect support with the black
connection strip against the LCD.
Page 33

Maintenance
General Maintenance Information
2. Note the small bump at the center of tone edge of the momentary switch (S3-S6).
Place the momentary switch in the case with the bump toward the LCD display.
3. Place the digital pca in the top case with the connector toward the back of the
instrument and at the top of the case.
4. Install the four lower Phillips-head screws (H5) that secure the digital pca over the
momentary switch. Note that the momentary switch provides a seal between the case
and the digital pca. Install the screws using a diagonal sequence (i.e., upper-right,
then lower-left, then upper-left, then lower-right).
5. Install the two thread-forming, Phillips-head screws (H2) above the connector that
hold the top of the digital pca.
6. Install a new O-ring (MP4) on the rotary switch shaft (if not previously installed),
then place the Teflon washer (H1) on the rotary switch shaft, then install the rotary
switch knob in the front of the top case.
7. Lubricate the outer edges of the detent spring (MP5) with a very thin layer of silicon
lubricant, then install the detent spring over the rotary switch shaft. Detent spring
orientation is not critical.
8. Install the E-ring retainer (MP6) on the rotary switch shaft.
3
9. Rotate the rotary switch to the upper OFF position.
10. Place the rotary switch extension shaft (MP17) on the rotary switch shaft. Note the
small pointer on the base of the extension shaft. Place the pointer toward the center of
the display while the rotary switch knob is in the upper OFF position.
11. To reassemble the main pca/shield assembly, fit the top shield (MP9) over the
component side of the pca, taking care not to bend the connector pins. Make sure the
shield posts fit through the holes in the pca, and verify that the rotary switch is in the
upper OFF position.
12. Position the bottom shield (MP3) on the back of the pca with the stand-offs fitted
through the pca, then position the top shield on the top of the pca with the molded
stand-offs fitted through the pca.
13. Install the two Phillips-head machine screws (H8) and flat washers through the top
shield into the bottom shield. Install the three thread-forming Phillips-head screws
(H4) through the bottom shield into the top shield.
14. Carefully fit the main pca/shield assembly into the top case, taking care to ensure that
the connector pins on the main pca are lined up properly with the connector on the
digital pca, and the switch shaft extension aligns with the two rotary switch wafers in
the OFF position (do not use force). Engage the connector by pressing lightly on the
bottom shield at the case screw holes.
15. Install the four Phillips-head machine screws (H3) with lock washers that secure the
main pca/shield assembly to the back of the input terminals, again using a diagonal
pattern.
16. Install a new O-ring (MP13) on the bottom case (MP10), if it was not replaced during
disassembly, and position it at the beginning of the tapered area.
17. Place the bottom case on the top case, then start four new thread-forming screws
(H7) with rubber washers. (The new screws and washers are provided in the seal kit.)
Press the case halves firmly together, and using a number 2 Pozidriv
tighten the screws in a diagonal pattern (lower-right, upper-left, upper-right, lower
left), to ensure a proper seal.
®
screwdriver,
3-11
Page 34

27
Service Manual
18. If the battery compartment O-ring (MP15) was not replaced during disassembly, it
should be replaced before reassembly. Use the procedure given in step 5 of the
disassembly procedure.
19. Connect the battery to the battery terminal connector, then slide the battery into the
battery compartment.
20. Slide the battery spacer/cover assembly into the back of the instrument.
21. Start the four screws (H6) that secure the battery cover. Press firmly on the battery
cover while tightening the screws in a diagonal pattern using a number 2 Pozidriv
screwdriver.
22. Move the rotary switch knob from OFF to any function. All segments of the LCD
should illuminate briefly if the instrument has been properly assembled.
3-11. Cleaning
Do not use aromatic hydrocarbons or chlorinated solvents for
cleaning. These solutions will react with the plastic materials
used in the instrument.
Do not allow the LCD to come in contact with moisture.
Clean the exterior plastic parts using a mild solution of detergent and water on a soft
cloth. Clean dust from the pcas using clean, dry air at low pressure (less than 20 psi).
Clean contaminates from the pcas using isopropyl alcohol and a soft brush, followed by
demineralized water and a soft brush (remove the LCD before washing). Dry the pca at
50 to 60 degrees Celsius for 24 hours after washing (and before reassembly ) to assure
that no moisture is sealed in the instrument.
®
Caution
Caution
3-12
3-12. Performance Tests
The following procedures allow you to check the performance of the Fluke 27 against the
specifications given in the Fluke 27 Users Manual. The procedures are recommended for
incoming inspections, periodic calibration verification, and as an aid in troubleshooting.
If the instrument fails any test, calibration adjustment or repair is needed.
Prior to performing any of the sting procedures, allow the instrument to stabilize to room
temperature (18 to 28 degrees Celsius). Also, check the fuses and if the battery
annunciator is displayed, change the battery.
Note
In the following procedures, the Fluke 27 is referred to as the unit under
test, or UUT.
3-13. Display Test
When the function switch is moved from the OFF position to any other position, the
instrument performs a power-up self test. All LCD segments in the display are switched
on while the test is in progress, then the instrument commences normal operation. This
automatic self test verifies that the instrument is functional and that all LCD segments are
functioning.
Page 35

3-14. Voltage Functions Performance Verification
The following procedure may be used to verify proper operation and calibration of the ac
and dc voltage measurement functions. Required test equipment is listed in Table 3-1.
Caution
Connect the common terminal of the Digital Multimeter
Calibrator to the COM terminal on the UUT.
1. Verify that both the Digital Multimeter Calibrator (hereafter referred to as the DMM
Calibrator) and the UUT are off.
2. Connect the UUT, using the volts/ohms/diode-test input terminal, to the ac output
connections of the DMM Calibrator.
Maintenance
Performance Tests
3
3. Turn the function switch on the UUT to the ac voltage position (
4. Switch on power to the DMM Calibrator, and program it for an output of 2.7 V ac, at
100 Hz.
5. Verify that the UUT indicates between 2.684 and 2.716 V ac.
6. Program the DMM Calibrator for an output of 27 V ac, at 10 kHz.
7. Verify that the UUT indicates between 26.43 and 27.57 V ac.
8. Program the DMM Calibrator output for 250 V ac, at 10 kHz.
9. Verify that the UUT indicates between 244.7 and 255.3 V ac.
10. Program the DMM Calibrator for an output of 1000 V ac, at 10 kHz.
11. Verify that the UUT indicates between 967 and 1033 V ac.
12. Program the DMM Calibrator for an output of zero volts.
13. Turn the UUT function switch to the dc voltage position (
14. Program the DMM Calibrator output for 2.7 V dc.
15. Verify that the UUT indicates between 2.696 and 2.704 V dc.
16. Program the DMM Calibrator for an output of 27 V dc.
17. Verify that the UUT indicates between 26.96 and 27.04 V dc.
18. Program the DMM Calibrator output to 250 V dc.
19. Verify that the UUT indicates between 249.6 and 250.4 V dc.
).
).
20. Program the DMM Calibrator for an output of 1000 V dc.
21. Verify that the UUT indicates between 998 and 1002 V dc.
22. Switch off the DMM Calibrator. Disconnect the Calibrator from the UUT.
3-15. AC and DC Current Performance Verification
The following procedure may be used to test the ac and dc current functions, and to
verify current measurement accuracy.
1. Turn the UUT function switch to the ac mA/A position (m
2. Connect the DMM Calibrator output to the UUT mA/µA input terminal.
3. Switch on power to the DMM Calibrator and program the DMM Calibrator output
for 27 mA at 50 Hz.
4. Verify that the UUT indicates between 26.58 and 27.42 mA.
5. Program the DMM Calibrator output for 200 mA at 50 Hz.
/A).
3-13
Page 36

27
Service Manual
6. Verify that the UUT indicates between 196.8 and 203.2 mA.
7. Program the DMM Calibrator output for zero amps.
8. Switch the UUT to the ac µ
output for 2000 µ
at 500 Hz.
function (µ ), then program the DMM Calibrator
9. Verify that the UUT indicates between 1968 and 2032 µA.
10. Program the DMM Calibrator to standby.
11. Connect the DMM Calibrator output to the UUT amp (A) and common (COM) input
terminals.
12. Switch the UUT to the AC mA/A function, then program the DMM Calibrator output
for 5 A at 1 kHz.
13. Verify that the UUT indicates between 4.91 and 5.09 A. Program the DMM
Calibrator to standby.
14. Set the UUT to the dc m
/A function(m /A).
15. Program the DMM Calibrator output for an output of 5.0 A dc.
16. Verify that the UUT indicates between 4.94 and 5.06 A.
17. Program the DMM Calibrator to standby.
18. Turn the function switch on the UUT to the dc m
/A position (m /A).
19. Connect the DMM Calibrator output to the UUT mA/µA input terminal, then
program the DMM Calibrator for an output of 27 mA dc.
20. Verify that the UUT indicates between 26.78 and 27.22 mA.
21. Program the DMM Calibrator output for 2700 µ
function (µ ).
22. Program the DMM Calibrator for 2.7 mA.
23. Verify that the UUT indicates between 2678 and 2722 µA.
3-16. Ohms Function Performance Verification
The following test may be used to verify correct ohms function operation and to verify
UUT accuracy in the various ohms ranges.
1. Connect the DMM Calibrator to the UUT using the volts/ohms/diode-test input
terminal and common.
2. Turn the function switch to the
position.
3. Switch on power to the DMM Calibrator. Program the DMM Calibrator to the
resistance values indicated in Table 3-2, and verify that the UUT indication is within
the tolerances given for each input value.
dc. Set the UUT to the dc µ
3-14
Page 37

Table 3-3. Ohm Function Performance Test
Step Resistance Indication
1 100 99.5 to 100.5
2 1.000 k .997 to 1.003 k
3 10.00 k 9.97 to 10.03 k
4 100.0 k 99.7 to 100.3 k
51 M .997 to 1.003 M
6 10 M 9.89 to 10.11 M
*7 open circuit -00.10 to .0010 nS
*Note: Conductance (nS) range must be entered using manual range selection.
3-17. Diode Test Performance Verification
The following procedure may be used to verify proper operation of the diode test
function. (This test can not be performed unless the source can sink 0.6 mA at 0.9 V.)
1. Turn the UUT function selection switch to the diode test function.
2. The UUT should display OL.
Maintenance
Calibration Adjustment
3
3. Connect the DMM Calibrator to the UUT volt/ ohms/ diode-test input terminal and
common, and switch on Calibrator power.
4. Program the DMM Calibrator output for 1.00 V, then push the Range Lock button on
the Calibrator to place the Calibrator in the 3.3V range.
5. Program the DMM Calibrator output for 0.090 V and verify that the UUT indicates
approximately 0.090 V and the beeper is sounding continuous tone.
6. Increase the DMM Calibrator output to 0.11 V. The beeper should turn off.
7. Increase the Calibrator output to 1.0V, then slowly decrease the Calibrator output to
0.6 V. Note that the UUT beeper produces a short beep as the voltage descends
through 0.7 V (typical silicon diode threshold).
8. Push the DMM Calibrator Range Lock button to return to Autorange operation.
3-18. Calibration Adjustment
Under normal operating conditions, the Fluke 27 should maintain its specifications for a
period of one year after calibration. If the instrument has been repaired, or if it has failed
any of the performance tests, the following calibration adjustment procedures must be
performed. Use a non-conductive tool for adjustments.
In the following procedures, the Fluke 27 is referred to as the unit under
test, or UUT.
Note
3-19. Calibration Preparation
Allow the UUT to stabilize at an ambient temperature of 21 to 25 degrees Celsius (70 to
77 degrees Fahrenheit) and at a relative humidity of less than 80% with the power off for
at least 30 minutes before beginning calibration. Calibration adjustments require removal
of the bottom cover. Complete steps 1 through 7 of the disassembly procedure given
earlier in this chapter, and then reconnect the battery to the UUT’s battery connector.
3-15
Page 38

27
Service Manual
3-20. DC Voltage Connection
The dc voltage function must be calibrated before calibrating the other functions. Use the
following procedure to calibrate the dc voltage function.
1. Connect the DMM Calibrator to the UUT volts/ohms/diode-test input terminal and
common. Refer to Figure 3-4 for calibration component locations.
2. Select the dc voltage function (
) on the UUT.
3. Switch on power to the DMM Calibrator, and program the Calibrator output for
2.700 V dc.
4. Adjust potentiometer R19 on the UUT for a display indication of 2.700 V on the 3 V
range.
5. Program the DMM Calibrator for zero output, and disconnect the Calibrator from the
UUT.
3-16
C4 (320 V AC Range)
C10 (1000 V AC Range)
Figure 3-3. Calibration Adjustment Locations
3-21. AC Voltage Calibration
There is a single ac-to-dc converter adjustment for basic ac voltage accuracy. However,
each ac voltage range must be calibrated independently for high frequency accuracy.
Variable capacitors provide these high frequency adjustments. There should be no
interaction between the various ranges when adjustments are made in the specified order.
Use the following procedure to calibrate the ac voltage ranges.
C6 (3.2 V AC Range at 10 kHz)
R19
R7
(3.2 V AC Range)
C8
(32 V AC Range)
(DC V olts)
aac06f.eps
Page 39

Warning
The following procedure requires that high voltages be
supplied to the UUT for calibration. Read the safety precautions
in the Fluke 27 Users Manual before performing the following
procedure.
Maintenance
Troubleshooting
3
1. Select the ac voltage function (
2. Connect the DMM Calibrator to the volts/ohms/diode-test input terminal on the
UUT.
3. Program the DMM Calibrator output for 2.7 V ac at 100 Hz.
4. Adjust R7 to obtain a display of 2.700 V ac ±0.001 V ac.
5. Program the DMM Calibrator output for 270 V ac at 10 kHz.
6. Adjust C4 to obtain a display of 270.0V ac ±0.1 V ac.
7. Program the DMM Calibrator output for 1000 V ac at 10 kHz.
8. Adjust C10 to obtain a display of 1000 V ac ±1 V ac.
9. Program the DMM Calibrator output for 27.00 V ac at 10 kHz.
10. Adjust C8 to obtain a display of 27.00 V±0.01 V ac.
11. Program the DMM Calibrator output for 2.700 V ac at 10 kHz.
12. Adjust C6 to obtain a display of 2.700 V ac ±0.001 V ac.
13. Program the DMM Calibrator output for 2.700 ac at 100 Hz.
14. Verify that the UUT display indicates 2.700 V ac ±0.017 V ac.
15. Switch off both the DMM Calibrator and the UUT. Disconnect the DMM Calibrator
from the UUT.
) on the UUT.
16. Refer to the instructions in paragraph 30-10 to reassemble the UUT after calibration.
3-22. Troubleshooting
Static discharge can damage CMOS components U1 and U2.
Follow the handling precautions for static sensitive
components given previously. Never remove or install
components without first disconnecting all inputs to the
instrument and turning the function selector switch to OFF.
Refer to Table 3-4 and to the schematics in Chapter 5 of this manual as necessary during
the following troubleshooting procedures.
3-23. Power-Up Self Test
When the function switch is moved to any position from the OFF position, the instrument
performs a power-on self test. All LCD segments are switched on while the test is being
performed (about 1 second), then the unit commences normal operation.
3-24. Overall System Check
If the LCD display segments do not light, or if other malfunction indications occur during
power-up or operation, perform the following overall system check.. All measurements
are taken with respect to common. The overall system check is helpful in isolating a
Caution
3-17
Page 40

27
Service Manual
malfunction to the component area, and Table 3-4 provides further fault isolation within
the component area. Refer to the disassembly and reassembly procedures as necessary
(paragraphs 3-9 and 3-10).
1. Set up the instrument as follows:
a. Perform steps 1 through 10 of the disassembly procedure to remove the battery
cover, bottom case, and main pca/shield assembly from the instrument.
b. Perform steps 21 through 23 of the disassembly procedure to remove the top and
bottom shields from the main pca.
c. Perform step 14 of the reassembly procedure to install the main pca in the top
case.
d. Perform step 15 of the reassembly procedure to secure the main pca to the input
terminals.
2. Select the dc voltage function (
3. Use a Digital Voltmeter (DVM) to check the battery voltage at the battery connector
(battery voltage must be above 6.3 V). If battery voltage is less than 7.5 V, battery
replacement is advised. Normal current drain is less than 600 µA.
4. Connect either an oscilloscope or frequency counter, using a low-capacitance probe,
to pin 54 of U1 or to the junction of C17 and Y1 (the crystal). A 32.768 kHz sine
wave with an amplitude of approximately 600 mV peak-to-peak should be present at
the junction of C17 and Y1 (3 V peak-to-peak at U1 pin 54). Note that U2 and the
display will not operate if the clock signal is not present. If the clock signal is not
present, the most likely causes are U1, Y1 or C17.
5. Use a DVM to check for a reference voltage of 1.00V dc (adjustable through R l 9) at
pin 13 of U1 or at the junction of R15 and R18. If the reference voltage is not
present, the most likely causes are VR1, R12, R15, R18, R19, R37, or U1.
6. Use a DVM to check for Vm (voltage middle) at pin 55 of U2, pin 16 of J8, or at the
junction of R3 and R4. Vm should be 1.6 V dc ±0.1 V. If Vm is not present, the most
likely causes are R3, R4, or C13.
3-25. DC Voltage Signal Tracing
The following procedure is a step-by-step method of tracing a dc voltage input through the
instrument’s circuits to the output of the active filter. Faulty components in the input signal
path can be identified using this procedure. All measurements are taken with respect to
common.
).
3-18
1. Select the dc voltage function (
volts/ohms/diode-test input terminal.
2. Using a DVM, measure the 2 V input at the input terminal (Jl).
3. Check pin l of the input divider (Z l ) for 2 V dc. If 2 V dc is not present, R2, Sl, RV1,
RV2, RV3, RV4, or RV5 may be defective.
), then apply a 2 V dc input through the
4. Check pin 3 of Z1 for approximately 200 mV dc. If 200 mV is not present, either Z1
or U1 may be defective. (Measurement may be approximately 10% low if a
10 M
input impedance DVM is being used for signal tracing.)
5. Check the active filter input (pin 28 of U1) for approximately 200 mV dc. If 200 mV
is not present, U1 may be defective. (Measurement may be affected by loading.)
Page 41

Maintenance
Troubleshooting
6. Check the active filter output (pin 29 of U1) for approximately 200 mV dc. If 200
mV is not present, R13, R16, C18, or C19 may be defective. (Measurement may be
affected by loading.)
3-26. Fault Diagnosis Guide
Table 3-3 presents a fault diagnosis guide for the Fluke 27. The left column lists various
malfunction. The left column lists various malfunction symptoms. The center column
recommends actions to determine the exact problem. The right column lists the
components most likely to be defective.
Table 3-4. Fault Diagnosis Guide
Symptom Recommended Action Possible Component
Blank display Do system check given in paragraph 3-24. BT1, U1,U2,Y1,C13
Display reads zero in volt dc Do do signal tracing in paragraph 3-25. RT1,Z1,U1,S1
Display hangs up in self-test mode Do system check given in paragraph 3-24. R15, R18, R19, R12, R37, VR1, Z1,
Display reads OL or 0 in 320 mA
range
Display reads 0 in 320 mA or 10A
ranges
AC volts is inaccurate Check calibration R31, R32, R29, R30
320 mV range reads OL Q11, U1
AC volts measurement noisy at
50-60 Hz
Wrong annunciator displayed S1R, U1
Volts inaccurate Check calibration RV2-RV5
Ohms inaccurate Z1, U1
Intermittent display Clean connectors and connector strips on
LCD and pca
Display reads constant offset in
volts
Ohms reads low or will not read OL Q1,Q2 shorted or leaky
Ohms reads random or alternates
between
U1, C20, C21
R9, R10, U1
F1, F2, R9, R20, R14
R13, R16, C18,C19
Display Assembly
C18, C19, C20 shorted
R2, RT1
3
3-19
Page 42

27
Service Manual
3-20
Page 43

Chapter 4
List of Replaceable Parts
Title Page
4-1. Introduction ......................................................................................... 4-3
4-2. How to Obtain Parts............................................................................. 4-3
4-3. Manual Status Information .................................................................. 4-3
4-4. Newer Instruments ............................................................................... 4-4
4-5. Service Centers.................................................................................... 4-4
4-6. Parts Lists ............................................................................................ 4-5
4-1
Page 44

27
Service Manual
4-2
Page 45

4-1. Introduction
This chapter contains an illustrated list of replaceable parts for the Fluke 27 Multimeters.
Parts are listed by assembly; alphabetized by reference designator. Each assembly is accompanied by an illustration showing the location of each part and its reference
designator. The parts lists give the following information:
• Reference designator
• An indication if the part is subject to damage by static.
• Description
• Fluke stock number
• Total quantity
• Any special notes (i.e., factory-selected part)
A * symbol indicates a device that may be damaged by static
discharge.
Caution
List of Replaceable Parts
Introduction
4
4-2. How to Obtain Parts
Electrical components may be ordered directly from the manufacturer by using the
manufacturers part number, or from the Fluke Corporation and its authorized
representatives by using the part number under the heading FLUKE STOCK NO. In the
U.S., order directly from the Fluke Parts Dept. by calling 1-800-526-4731. Parts price
information is available from the Fluke Corporation or its representatives. Prices are also
available in a Fluke Replacement Parts Catalog which is available on request.
In the event that the part ordered has been replaced by a new or improved part, the
replacement will be accompanied by an explanatory note and installation instructions, if
necessary.
To ensure prompt delivery of the correct part, include the following information when
you place an order:
• Instrument model and serial number
• Part number and revision level of the pca containing the part.
• Reference designator
• Fluke stock number
• Description (as given under the DESCRIPTION heading)
• Quantity
4-3. Manual Status Information
The Manual Status Information table that precedes the parts list defines the assembly
revision levels that are documented in the manual. Revision levels are printed on the
component side of each pca.
4-3
Page 46

27
Service Manual
4-4. Newer Instruments
4-5. Service Centers
Changes and improvements made to the instrument are identified by incrementing the
revision letter marked on the affected pca. These changes are documented on a manual
supplement which, when applicable, is included with the manual.
To contact Fluke, call one of the following telephone numbers:
USA and Canada: 1-888-99-FLUKE (1-888-993-5853)
Europe: +31 402-678-200
Japan: +81-3-3434-0181
Singapore: +65-738-5655
Anywhere in the world: +1-425-356-5500
Or, visit Fluke’s Web site at www.fluke.com.
Note
The Fluke 27 Multimeter has been designed to meet the requirements of the
United States Department of Labor Mine Safety and Health Administration
for use in mines. If your instrument has MSHA approval, a decal stating so
will be present on the bottom of your instrument. The following Warning
applies only if the decal is present:
Warning
The Fluke 27 multimeters are approved (permissible) by the
United States Department of Labor Mine Safety and Health
Administration (MSHA) for use in mines (approval 2G-3665-0).
To maintain MSHA permissibility, repairs to this instrument
must be made using parts exactly like those furnished by the
Fluke Corporation. Any changes in the intrinsically safe
circuitry or components may result in an unsafe condition. The
Fluke 27 multimeter was tested by MSHA for intrinsic safety in
methane air mixtures only. The Fluke 27 multimeter is MSHA
approved with a 9 V NEDA 1604 (carbonzinc) battery only. Do
not use to check electrical blasting circuits. Do not connect to
an electrically energized circuit in a hazardous area.
Warning
When servicing, use only specified parts.
Warning
To ensure safety, use exact replacement parts where specified.
4-4
Page 47

List of Replaceable Parts
4-6. Parts Lists
The following tables list the replaceable parts for the 45 Multimeter. Parts are listed by
assembly; alphabetized by reference designator. Each assembly is accompanied by an
illustration showing the location of each part and its reference designator. The parts lists
give the following information:
• Reference designator
• An indication if the part is subject to damage by static discharge
• Description
• Fluke stock number
• Total quantity
• Any special notes (i.e., factory-selected part)
Caution
A * symbol indicates a device that may be damaged by static
discharge.
Manual Status Information
Ref or Option Number Assembly Name Fluke Part No. Revision Level
Parts Lists
4
A1 Main PCA 665007 A
A2 Digital PCA 665067 E
4-5
Page 48

27
Service Manual
Table 4-1. Final Assembly
Reference
Designator
A 1 MAIN PCA 665007 1
A 2 DIGITAL PCA 665067 1
BT 1 BATTERY,9 V,0-15 MA 696534 1
F 1 FUSE, F44/100A, 1000 VAC/DC 943121 1
F 2 FUSE, 11 A, 1000 VAC/DC 943118 1
H 1 WASHER,FLAT,TEFLON,0.295 ID,0.020 THK 696591 1
H 2 SCREW,FIH,P,THD FORM,STL,4-20,3.000 682310 2
H 3 SCREW,PH,P,SEMS,STL,4-40,.312 721670 4
H 4 SCREW,PH,P,THD FORM,STL,4-14,.375 448456 3
H 5 SCREW,PH,P,STL,4-40,.250 129890 4
H 6 SCREW,PH,PO,STL,6-32,.375 682070 4
H 7 SCREW,PH,PO,STL,6-20,1.256 733394 4
H 8 SCREW,PH,P,LOCK,STL,4-40,1.000 157008 2
H 9 WASHER,FLAT,STL,.125,.312,.030 739912 2
MP 1 CASE TOP, FLUKE 27 YEL 744508 1
MP 2 KNOB SWITCH, YEL 744466 1
MP 3 BOTTOM SHIELD ASSEMBLY 654079 1
MP 4 O-RING,SYN RUBBER,.114 ID,.070 WIDE 705947 1
MP 5 SPRING,DETENT 654046 1
MP 6 RING,RET,EXT,FLAT,STL,.188 DIA 697078 1
MP 7 DECAL, TOP CASE, FLUKE 27 YEL 744565 1
MP 8 SUPPORT, TOP SHIELD 654038 1
MP 9 SHIELD,TOP 654384 1
MP 10 CASE BOTTOM, YEL 203091 1
NP 11 FOOT, CASE 654335 1
MP 12 BAIL, TILT, YEL 744474 1
MP 13 O-RING,SYN RUBBER,6.710,.080 654392 1
MP 14 COVER,BATTERY, YEL 830166 1
MP 15 O-RING,SYN RUBBER,1.612 ID,.103 WIDE 697185 1
MP 16 RETAINER, BATTERY, YEL 744615 1
MP 17 SHAFT, SWITCH 655894 1
MP 18 SUPPORT, LCD INTERCONNECT 683664 1
MP l9 MASK,LCD, FLUKE 27 661025 1
MP 20 CONN,ELASTOMERIC, LCD TO PWB,1.970 L 682500 2
MP 21 DECAL, MSHA APPROVAL, FLUKE 27 809871 1
MP 23 TEST LEADS 855742 1
MP 24 DECAL YEL, WARNING 744607 1
MP25 ALLIGATOR CLIP BLACK 738047 1
MP26 ALLIGATOR CLIP RED 738120 1
MP 61 COVER, FUSE 665031 1
S3 SWITCH, MOMENTARY 659847 1
TM 1
TM 2
U 3 LCD,3.75 DIGIT,BAR GRAPH,MULTIPLEXED 654293 1
27 USERS MANUAL
27 SERVICE MANUAL
Description Fluke Stock
Number
738088
690206
Total
Qty
1
1
4-6
Page 49

Top Case/Digital
PCA Subsection
List of Replaceable Parts
Parts Lists
4
MP2
MP19
U3
MP2 (2PL)
MP18
H2 (2PL)
MP13
Button-Up
Subsection
H1
MP4
MP7
MP1
MP5
MP6
S3
A2
H5 (4PL)
MP9
MP8
A1
MP3
H4 (3PL)
Main Board
Subsection
MP17
H8 (2PL)
H9 (2PL)
F1
F2
H3 (4PL)
MP10
MP12
MP11
MP21
H7 (4PL
F1
F2
MP61
MP15
BT1
)
MP16
MP14
H6
FLUKE 27 T&B
aac07f.eps
Figure 4-1. Final Assembly
4-7
Page 50

27
Service Manual
Table 4-2. A1 Main PCA
Reference
Designator
A 3 * FUSE PCA 665015 1
AR 1 * IC, OP AMP, LOW POWER 721928 1
C 3 CAP,POLYES,0.022 UF,+-10%,1000 V 448183 1
C 4, 10 CAP,VAR,0.25-1.5 PF,1700 V,TEFLON 721480 2
C 5 CAP,CER,2.7 PF,+-0.25 PF,5OV,COG 773044 1
C 6 CAP,VAR,2-7 PF,100 V,CER 714600 1
C 7 CAP,CER,430 PF,+-5%,50 V,COG 732644 1
C 8 CAP,VAR,6-50PF,50 V,CER 714618 1
C 9 CAP,CER,5100 PF,+-2%,50 V,COG 732651 1
C 11 CAP,POLYCA,0.027 UF,+-5%,63 V 733444 1
C14 CAP 714550 1
C15 CAP 740654 1
C 16 CAP,TA,lOUF,+-20%,10 V 714766 1
C 17, 50 CAP,CER,33 PF,+-5%,50 V,COG 714543 2
C 18, 19 CAP,POLYCA,0.027 UF,+-10%,63 V 720979 2
C 20 CAP,POLYES,0.47 UF,+-10%,50 V 697409 1
C 21 CAP,POLYPR,0.033 UF,+-10%,63 V 721050 1
C 22, 36 CAP,POLYES,0.01 UF,+-10%,50 V 715037 2
C 23, 37 CAP,TA,22 UF,+-20%,10 V 658971 2
C 30 CAP,CER,4.0 PF,+-0.25 PF,1500 V,COJ 714535 1
C 31- 33,40 CAP,CER,0.22 UF,+80-20%,50V,Z5U 733386 4
C 34 CAP,POLYES,1000 PF,+-20%,630 V 740126 1
C 35 CAP,POLYCA,1000 PF,+-20%,100 V 721472 1
C 38, 39 CAP,POLYES,O.l UF,+-10%,50 V 649913 2
C 41, 42 CAP,CER,10 PF,+-20%,50V,COG 721589 2
C 43 CAP,CER,220 PF,+-20%,50 V,COG 740654 1
C 48 CAP,POLYCA,0.033 UF,+-5%,63 V 733451 1
C 49 CAP,CER,0.022 UF,+80-20%,500 V,Z5U 740340 1
C 51 CAP,CER,0.01 UF,+-10%,100 V,X7R 557587 1
CR 1-5 DIODE,SI,1 K PIV,1.0 AMP 453399 5
CR 6 * DIODE,SI,BV=35 V, LOW LEAKAGE 723817 1
CR 7 * DIODE,SI,BV= 75.0 V,RADIAL INSERTED 659516 l
L 1 RF COIL ASSEMBLY 857792 1
MP 1 SHIELD, FENCE 722280 1
MP 8 SUPPORT,PCA 656108 1
P 1 CONNECTOR,18 PIN 707646 1
Q 1, 2, 11 * TRANSISTOR,SI,NPN,SELECTED IEBO,TO-92 685404 3
Q 12 * TRANSISTOR,SI,N-JFET,TO-92,RAD T&R 721936 1
Q 13 * TRANSISTOR,SI,N-JFET,TO-92 723734 1
Q 15 * TRANSISTOR,SI,PNP,T092 698233 1
R 1 RES,CC,220 K,+-10%,1 W 714485 1
R 2 RES,MF,1 K,+-1%,100 PPM,FLMPRF,FUSIBLE 650085 1
R 3 RES,MF,301 K,+-1%,0.125 W, 100 PPM 655274 1
R 4 RES,MF,332 K,+-1%,0.125 W,100 PPM 655217 1
R 6, 25, 33, 41 RES,CF,100 K,+-5%,0.25 W 658963 4
R 7 RES,VAR,CERM,1K,+-20%,0.3 W 706655 1
R 9 RES,MF,402 K,+-0.1%,0.125 W,100 PPM 714329 1
R 10 RES,MF,44.8 K,+-0.1%,0.125 W,100 PPM 714311 1
R 12 RES,MF,14.3 K,+-1%,0.125 W, 100 PPM 721803 1
R 13 RES,CF,1.5 M,+-5%,0.25 W 649962 1
R 14 RES,MF,500,+-0.25%,0.25 W,100 PPM 697557 1
R 15 RES,MF,107 K,+-1%,0.125 W,50 PPM 714295 1
An * indicates a static-sensitive part.
Description Fluke Stock
Number
Total
Qty
4-8
Page 51

Table 4-2. A1 Main PCA (cont)
List of Replaceable Parts
Parts Lists
4
Reference
Designator
R 16, 28, 29 RES,CF,1 M,+-5%,0.25 W 649970 3
R 18 RES,MF,412 K,+-1%,0.125 W,50 PPM 714287 1
R 19 RES,VAR,CERM,100 K,+-20%,0.3 W 658989 1
R 20 RES,WW,4.995,+-.25%,4 W 658948 1
R 23 RES,WW,.005,+-.5%,.5 W 655423 1
R 26 RES,MF,499 K,+-1%,0.125 W,100 PPM 714980 1
R 27 RES,MF,l.5 M,+-1%,0.125 W,100 PPM 714998 1
R 30 RES,MF,20 K,+-0.25%,0.125 W,50 PPM 715029 1
R 31, 32 RES,MF,22.6 K,+-0.25%,0.125 W,50PPM 715011 2
R 35 RES,CF,4.7 K,+-5%,0.25 W 721571 1
R 36 RES,CF,47 K,+-5%,0.25 W 721787 1
R 37 RES,MF,5.49 K,+-1%,0.125 W,100 PPM 721795 1
R 38 RES,CF,1.5,+-5%,0.25 W 732800 1
R 39 RES,CF,300 K,+-5%,0.25 W 732818 1
R 40 RES,CF,200 K,+-5%,0.25 W 681841 1
R 42 RES,CC,15 M,+-5%,.125 W 875112 1
RV 1-5 VARISTOR,430 V,+-10%,1 MA 706&38 5
RT 1, 2 THERMISTOR,RECT.,POS.,1 K,+-40%,25 C 602995 2
S 1 SWITCH, ROTARY (UPPER) 654301 1
S 2 SWITCH, ROTARY (LOWER) 654319 1
U 1 8025 AP25 CHIP ASSEMBLY TESTED 665059 1
U 7 DIODE,SI,RECT,BRIDGE,BV=50 V,10 =1A 418582 1
VR 1 * IC,1.23 V,60 PPM TC,BAND-GAP REFERENCE 654707 1
W 3 WIRE, MILLIAMP JUMPER 722967 1
XF 1 CONTACT,600 V,FUSE 659524 2
XF 2 HLDR,FUSE,5 MM X 20 MM 697086 2
XF 3 600 VOLT FUSE CONTACT 707190 2
XBT 1 CONTACT ASSY TERMINATION 651653 1
Y 1 CRYSTAL,32.768 KHZ,+-1%,3 X 8 MM 643031 1
Z 1 * OHMS/INPUT RES NET ASSY TESTED JF25 616938 1
An * indicates a static-sensitive part.
Description Fluke Stock
Number
Total
Qty
4-9
Page 52

27
Service Manual
4-10
XF5
XF3
XF6
XF4
J5-3J5-2J5-1
Figure 4-2. A1 Main PCA
MP8
J5-4
Fluke 27-4001
aac08f.eps
Page 53

Table 4-3. A2 Digital PCA
List of Replaceable Parts
Parts Lists
4
Reference
Designator
C 12, 13, 44-47 CAP,CER,0.22 UF,+80-20%,50 V,Z5U 733386 6
J 8 SOCKET,1 ROW,PWB,0.100 CTR,18 POS 707026 1
LS 1 AF TRANSD,PIEZO,24 MM 602490 1
U 2 * IC,CMOS,4 BIT MICROCOMPUTER 685628 1
An * in ’S’ column indicates a static-sensitive part.
Description Fluke Stock Number Total
Qty
Figure 4-3. A2 Digital PCA
Fluke 27-4002
aac09f.eps
4-11
Page 54

27
Service Manual
4-12
Page 55

Chapter 5
Schematic Diagrams
5-1
Page 56

27
Service Manual
5-2
Page 57

Schematic Diagrams
5
MP8
XF5
XF3
XF6
XF4
J5-3J5-2J5-1
J5-4
Figure 5-1. A1 Main PCA and A2 Digital PCA
Fluke 27-4001
aac08f.eps
5-3
Page 58

27
Service Manual
300K
R39
VDD
CR6
10KHZ
270VAC
10KHZ
1000VAC
WP2
2MM
C3
10%
.022
2MM
20%1.1K
t
+
RT1
1000V
4MM
5W
R2
WW
3.5K
5%
R1
1.0M
S2
8.5MM
DIODE TEST
VOLTS/OHMS/
J1
JPAD5
S1
M
1000V
2MM
CERM
Q15
R40
1
1F
12F
2N3906
C4
1
200K
C10
1
3F
FRONT
0.25-1.5PF
TEFLON
1700V
2
4.0PF
C30
1500V
C
9.995M
2
Z1
0.25-1.5PF
TEFLON
1700V
2
3F
FRONT
11F
10F
RV5
430V
430V
RV1
1.5MM
9F
1.5
R38
4F
RV2
6F
8F
10KHZ
27VAC 2.7VAC
10KHZ
A
5F
430V
1MM
2MM
R14
2
1
2.7PFC5
1.111M
7
Z1
50V C
1
C50V5%
22PFC14
C50V
430PFC7
7
Z1
220PFC15
50V C
5100PFC9
7
Z1
PC63V
.033C48
PC63V
.027C11
7
Z1
20%
.001
C35
6F
7F
50V
10%
C49
.022
430V
RV3
0.5MM
A
500
0.25%
C 100V
C6 2-7PF
C 50V
3
2
C8 6-50PF
5%
101.01K
2%
10.01K
5%
5%
1.0001K
PC
100V
M
RV4
S2
4
20% 50V C
5
6
430V
R36
C34
SEL
SEL
SEL
.001
20%
M
1000V
R20
4.995
47K
R9 402K
4W
WW
0.25%
0.5W
0.1%
S2F S2R
ROTARY SWITCH CONNECTIONS
POSITION S1RS1F
3
4
J5
J5
FUSE
BOARD
J5
J5
1
2
8.5MM
J3
AMPS
MILLIAMPS/
MICROAMPS
4-8
-
2-6-8
5-7
OFF(UP)
WP5
WP4
8.5MM
J2
4-8-9
-
3-6-8
4-5
6-7
VAC
U7
R23
.01
C51
4-8
4-9
6-9
6-8
3-4-6-8
2-3-8-9
7-10-11
3-5
6-7
11-12
MAAC/AAC
MVAC
R41
100K
1N4007
CR4
CR3
1N4007
CR2
1N4007
1N4007
CR1
.005
WW
0.5%
C
10%
100V
L1
J4
COMMON
4-9
6-8
3-8-9
4-5
11-12
UAAC
M1
4-8-9
8-9
4-8
3-6
3-6
-
-
2-3-8
3-4-6-8-9
3-12
6-7
11-12
5-7
1-10-11-12
OHMS
OFF(DOWN)
DT
A
4-8-9
4-8
4-9
6-8
6-9
6-8
3-4-8
2-3-4-8-9
2-3-6-8-9
-
10-11
11-12
1-4-5
3-5-6-7
10-11-12
MVDC
MADC/ADC
UADC
MTG
WP3WP1
1
3
2
SH1
STDOFF
A
FLUKE 27-1001
4-9
-3-4-8-9
4-5-7
11-12
VDC
R25
100K
4
5
5
Q11
Q2
Q1
4R
REAR
9R
8R
5-4
Figure 5-1. A1 Main PCA and A2 Digital PCA (cont)
aac10f.eps
Page 59

Schematic Diagrams
5
DIGITAL
BOARD
P1P1P1
1
3
4
2
9
10
CR7
1N4448
VDD
3256
33PF
C17
C
50V
5%5%
32.768KHZ
C
50V
C32
0.22
6R
7R
22
BT1
9V
C37
6
8
7
1
2
3
.01
C36
499K
1%
C50V
C50
33PF
C40
C31
20%
ICL7611
AR1
4
5
50V
10%
1%
1.50M
R27
0.22
0.22
10V
M
50V
T
C
C50V
GUARD
Y1
VDD
S1
VDD
C
50V
C33
0.22
2R3R4R
REAR
9R
8R
CR5
1N4007
Q12
SEL
R26
CLK
BPR1
BPR2
XTAL1
52
XTAL2
54
B3
4
B0
7
B1
6
B2
5
VDD
23
VDD
38
VDD
53
VDD
8
VSS
46
41
34
32
22
20
NETWORK
INPUT
V2
V1
V0
353133
VSS
10
NWR
V3
36
9
NRD
V4
37
57
NDAV
RRS
15
R6
121314
51
D0D1D2
U1
AM1
DCS
19
24
R10
100K
AP25
TEST
55
44.8K
0.1%
A
15
48
D3
P1
567
15049
A3
OHS
25
P1
60
A2
INTEGRATOR
FILTER
ACTIVE BUFFER/
AC
CONVERTER
AM0
LO
21
27
P1
P1
P1
P1
P1
P1
P1
P1
P1
P1
8
17
59
58
VDD
A1
A0
K1
42
K0
43
INT
45
AZ
44
FAO
40
FA-
39
AFO
29
AFI
28
ACLO
30
ACN
16
ACP
17
ACS
18
ACB
26
PAZ
47
ACFLG
11
BIAS
12
COM
14
EC
13
VDD
R12
14.3K
Q13
9
C21
C20
R13
C16
1%
P1
18
SEL1
301K
R3
Z1
.033
63V
10% 10%
.47
50V
1.5M
50V M
0.1C39
10
10V T
20%
R28
R33
R37
1%
225.91K
110.0K
PP
M
C18
1.0M
R16
1.0M
R29
1.0M
100K
5.49K
VSS
8
C19
10%
.027
10%
R7
1%
P1
16
10
.027
63V
1K
P1
11
332K
R4
1%
PC
63V
10%
PC
20%
C41
0.25%
C42
CW
C38
107K
R15
A
C
50V
C43
20%
220PF
R35
4.7K
20%
10PF
50V
0.25%
22.6K
R31
22.6K
R32
10PF
50V
CC
20%
100HZ
2.7VAC
R30
20.0K
0.25%
M
0.1
50V
10%
GUARD
.01
C22
M
50V
10%
1%
1%
VR1
1.23V
R18
412K
VDD
C23
R19
100K
20%
CW
2. VDC
22
T
10V
20%
Figure 5-1. A1 Main PCA and A2 Digital PCA (cont)
FLUKE 27-1001
aac11f.eps
5-5
Page 60

27
Service Manual
REFERENCE DESIGNATON
LAST
USED
NOT USED
C47 C1-11,14-43
J1-7
J8
LS1
S6 S1,2
U3
U1
FLUKE 27-4002
VDD
S3
RANGE
3
J8
LS1
4KHZ
4
J8
10
J8
1
J8
2
J8
9
J8
12
J8
13
J8
14
J8
15
J8
5
J8
6
J8
7
J8
8
J8
18
J8
17
J8
16
J8
11
J8
VDD
C44
0.22
50V C
C12
0.22
50V
C
S4
C45
0.22
C13
0.22
50V
C
C46
0.22
S5 S6
HOLDMIN/MAXREL
C47
0.22
50V C50V C50V C
10
13
12
58
57
41
40
36
35
16
38
55
56
U2
SM4A
11
K4
K3
9
K2
5
K1
6
ALPHA
OSCOUT
OSCIN
R2
R1
7
BETA
4
DIO1
3
DIO2
2
DIO3
1
DIO4
O26
O16
O25
O15
ACL
8
GND
GND
VM
VD
T1
T2
BA
OS2
OS1
O11
O21
O31
O41
O12
O22
O32
O42
O13
O23
O33
O43
O14
O24
O34
O44
O15
O25
O35
O45
O16
O26
O36
O46
O17
O27
O37
O47
O18
O28
O38
O48
H2
17
18
19
20
21
22
23
24
25
26
27
28
29
30
31
32
33
34
35
36
37
39
40
41
42
43
44
45
46
47
48
49
50
51
59
R3
60
R4
54
H1
53
NS
M
4C
4A
4F
4D
3C
3A
3F
3D
2C
2A
2F
2D
1B
1AGD
H
BGBG1
BG3
BG5
BG7
BG9
BG11
BG13
BG15
BG17
BG19
BG21
BG23
BG25
BG27
BG29
MAX
MIN
U3
27LCD
DP300
DP30
DP3
BG0
BG2
BF4
BG6
BG8
BG10
BG12
BG14
BG16
BG18
BG20
BG22
BG24
BG26
BG28
BG30
H2H1
K
4B
4G
4E
3B
3G
3E
2B
2G
2E
1C
1E
521514
5-6
FLUKE 27-1002
aac12f.eps
Figure 5-1. A1 Main PCA and A2 Digital PCA (cont)
 Loading...