

Page 1

FLT93 Installation, Operation and
Troubleshooting Guide
Pre-Installation
A. To get the best results from the instrument, the instrument should be mounted 20 pipe diameters downstream from any valve,
pipe elbow, or other flow disturbance and 10 pipe diameters upstream from any disturbances.
The instrument tag shows the model number, tag number (if noted on the customer’s order), serial number along with other
important safety information. Compare this information with the appropriate pipe installation drawings to verify the instrument
is the correct configuration.
Tag Location - Between Conduit Ports
On Integral or Local Enclosure
Note:
The recommended tag number on the local enclosure will have an FE in the tag number. The recommended tag number on the
remote enclosure will have an FT in the tag number. (Tags are specified by the customer, “FE/FT” is a recommended naming
convention.)
B. Verify the serial numbers on the enclosure(s), flow element and electronics match. The instrument may not work if the
serial numbers do not match. (The remote option has a remote transmitter enclosure (FT) and a local flow element enclosure (FE). The integral option has one enclosure.)
If the instrument is a remote configuration, the serial number on the enclosure tags must match.
Flow Element Serial Number
Also Showing Flow Arrow.
(Located near the FE enclosure.
It is also on the enclosure tag.)
Electronics Serial Number
(It is also on the transmitter’s (FT) enclosure tag.)
Tag Location - Top Side of
Remote Enclosure Option
C. Recommended installation/troubleshooting tools are an open-ended wrench to fit the NPT connection, an open-ended wrench
to fit the flanged fitting nuts and bolts, a small flat blade screw driver for manipulating potentiometers, both a medium flat
blade screwdriver and a medium phillips head screwdriver for tightening connections, 3 mm allen wrench for CENELEC
approved instruments, a measuring tape for proper flow element placement, and a DVM for Ohm/Voltage measurements.
This page is subject to proprietary rights statement on last page
Page 2
FLUID COMPONENTS INTERNATIONAL LLC FLT93 Flow Switch Series
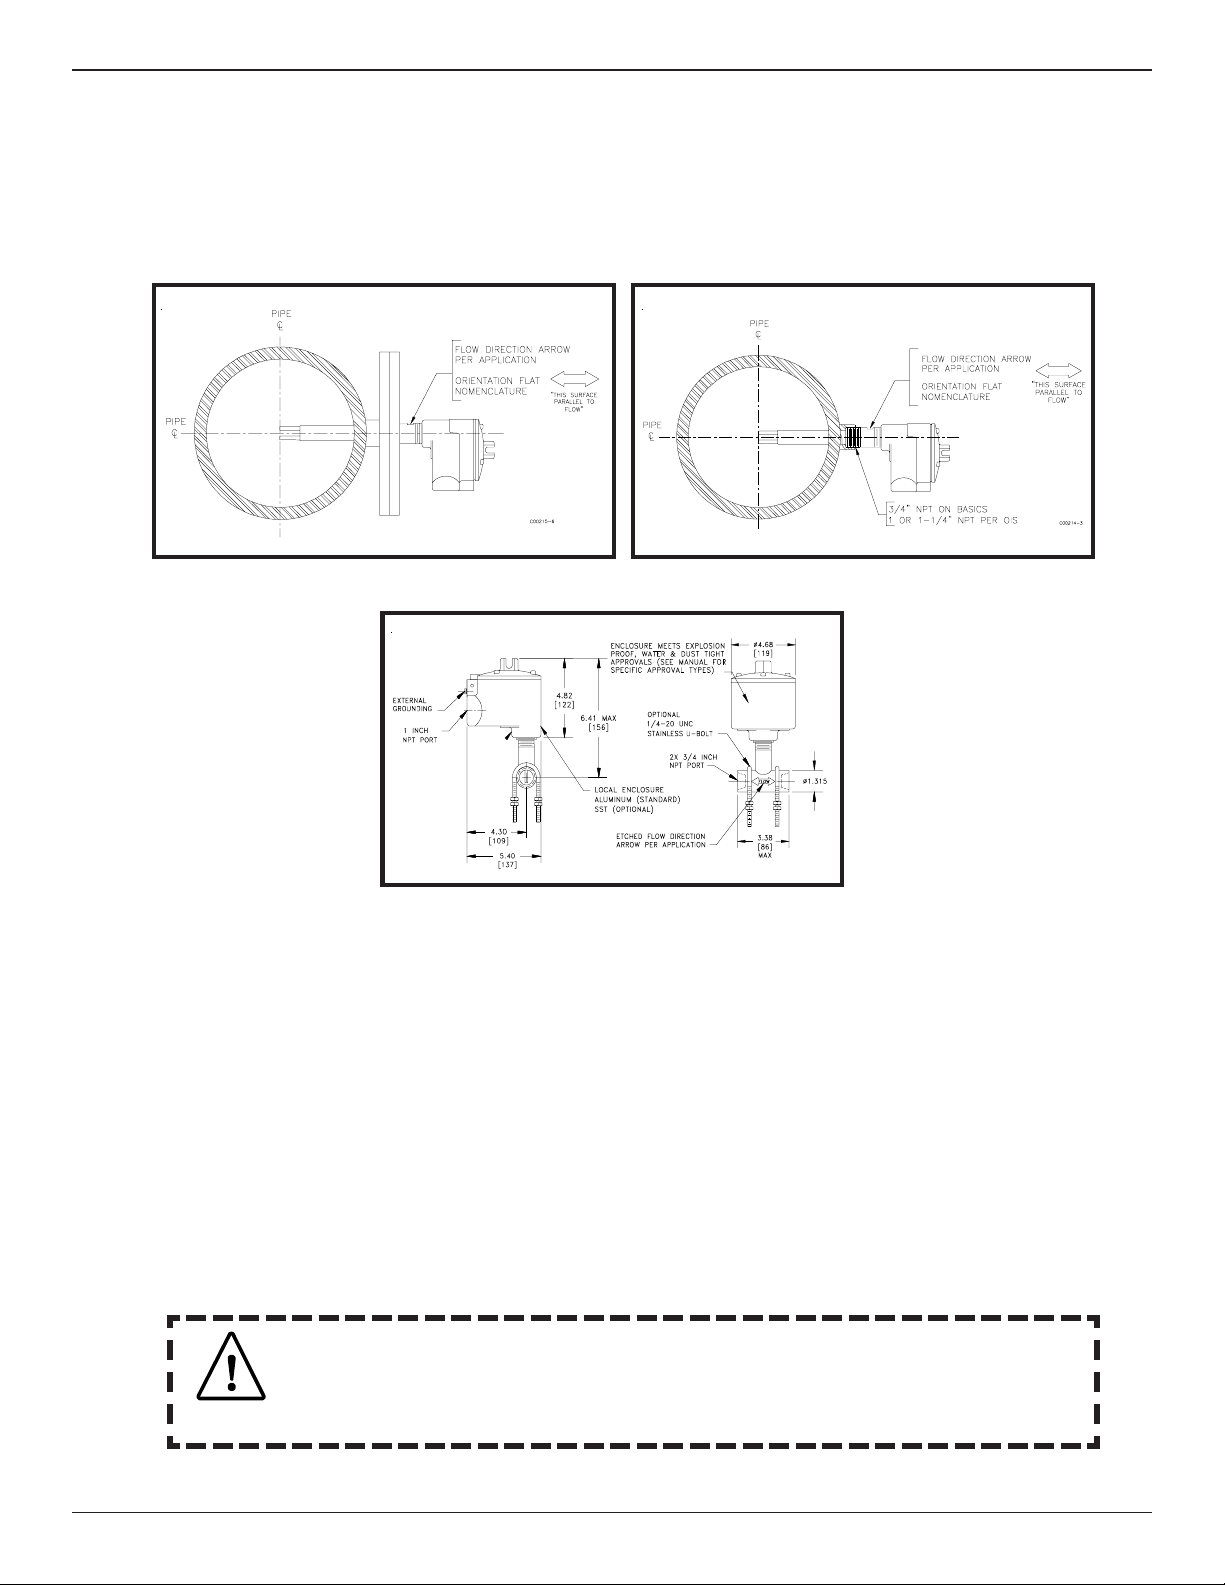
Flow Element Installation
Install the flow element, with the flow arrow (shown on Page 1) in the direction of media flow. The element should be in the
center line of the process pipe or rectangular duct. The flow arrow flat area is to be parallel ±2° with the media flow. If the
remote control circuit option is used, the serial number of the flow element must match the serial number of the electronic
enclosure. Below are the most common instrument mounting options.
Flanged Integral Instrument Shown in a Customer Process
Wiring Preparation
Before the instrument is opened to install the wiring, FCI recommends that the following ESD precautions be observed:
Use a wrist band or heel strap with a 1 megohm resistor connected to ground. If the instrument is in a shop setting there should
be static conductive mats on the work table and floor with a 1 megohm resistor connected to ground. Connect the instrument to
ground. Apply antistatic agents such as Static Free made by Chemtronics (or equivalent) to hand tools to be used on the
instrument. Keep high static producing items away from the instrument such as non-ESD approved plastic, tape and packing
foam.
The above precautions are minimum requirements to be used. The complete use of ESD precautions can be found in
the U.S. Department of Defense Handbook 263.
Unscrew the instrument’s lid. Remove the control circuit by prying up on the metal transformer tabs (under the serial
number label) while rocking the transformer back and forth. This exposes the wiring block shown on the next page.
NPT Integral Instrument Shown in a Customer Process
FLT93L Local Inline Mount
Be sure the instrument is configured correctly for the applied input power. If Factory Mutual
specifications were ordered, the input power should be 115 VAC and the instrument jumpers should be set
for 115 VAC as shown on Page 4. Otherwise, the power input has been set for 220 VAC unless otherwise
Caution
This page is subject to proprietary rights statement on last page
specified.
2 Doc. No. 06EN003312 Rev. D
Page 3
FLT93 Flow Switch Series FLUID COMPONENTS INTERNATIONAL LLC
Wiring the Instrument
Caution
Only qualified personnel are to wire or test this
instrument. The operator assumes all
responsibilities for safe practices while wiring
or troubleshooting.
Alert
The instrument contains electrostatic discharge
(ESD) sensitive devices. Use standard ESD
precautions when handling the control circuit.
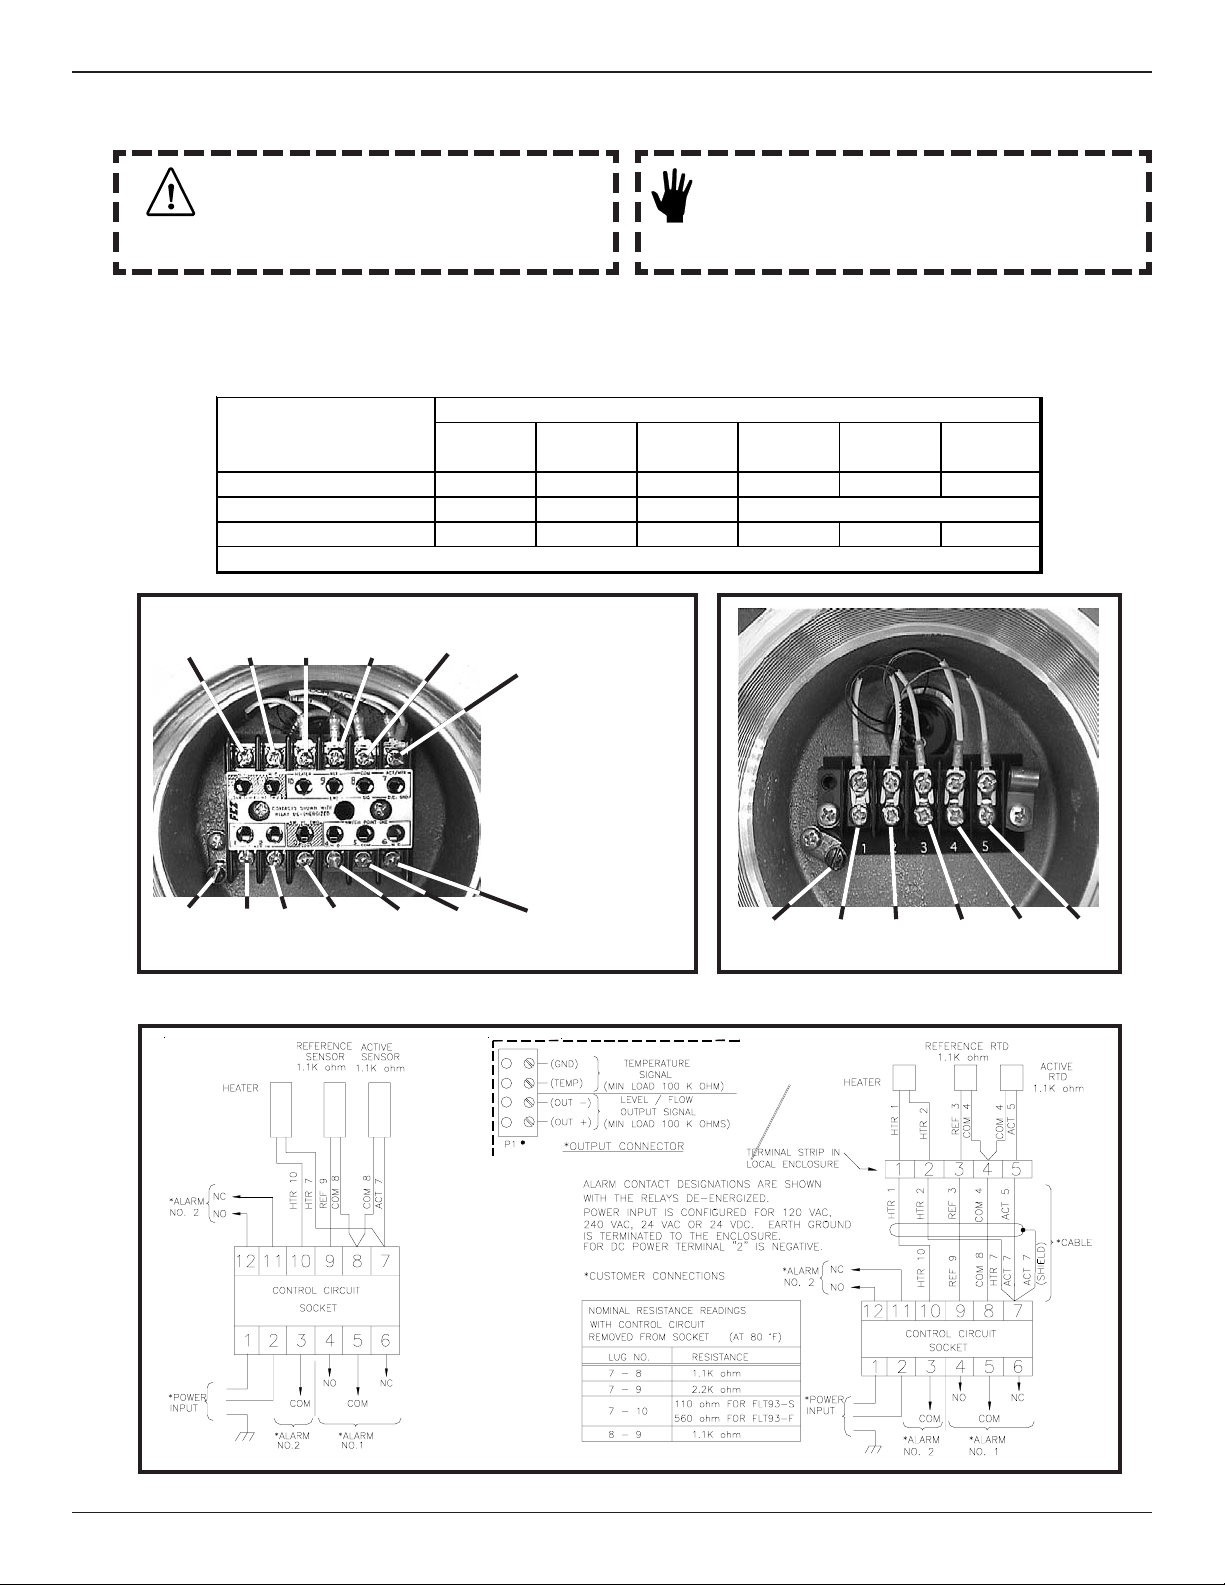
Wiring the Instrument into the Customer Application:
This section describes proper wiring to the transmitter inputs, outputs and interconnection cabling for the optional remote
configuration. See the following table to determine the size of wiring to be used versus the length of the wire.
Maximum Dis tanc e for AW G
Connection 10 ft. 50 ft. 100 ft. 250 ft. 500 ft. 1000 ft.
(3m) (15m) (31m) (76m) (152m) (305m)
AC Power 222222201816
Relay (6A) 22 16 12 Not Recommended
Flow Element W ires* 22 20 20 18 18 18
*Requires a shielded cable with the shield wire connected to the control socket only.
N/O
ALARM
# 2
N/C
ALARM
# 2
COM 8*REF 9*HTR 10*
HTR 7*
ACT 7*
(SHIELD-REMOTE ONLY)*
SAFETY
GND
* Connected at Factory,
unless the instrument is
a remote configuration.
PWR PWR
AC or DC
(+) (-)
COM
ALARM
# 2
N/O
ALARM
# 1
COM
ALARM
# 1
FLT93 Integral (Remote) Wiring Pictorial
N/C
ALARM
# 1
SAFETY
GND
HTR 2 REF 3 COM 4 ACT5 HTR 1
FLT93 Local Wiring Pictorial
FLT93 Integral Wiring Diagram
Doc. No. 06EN003312 Rev. D 3
FLT93 Remote Wiring Diagram
This page is subject to proprietary rights statement on last page
Page 4
FLUID COMPONENTS INTERNATIONAL LLC FLT93 Flow Switch Series
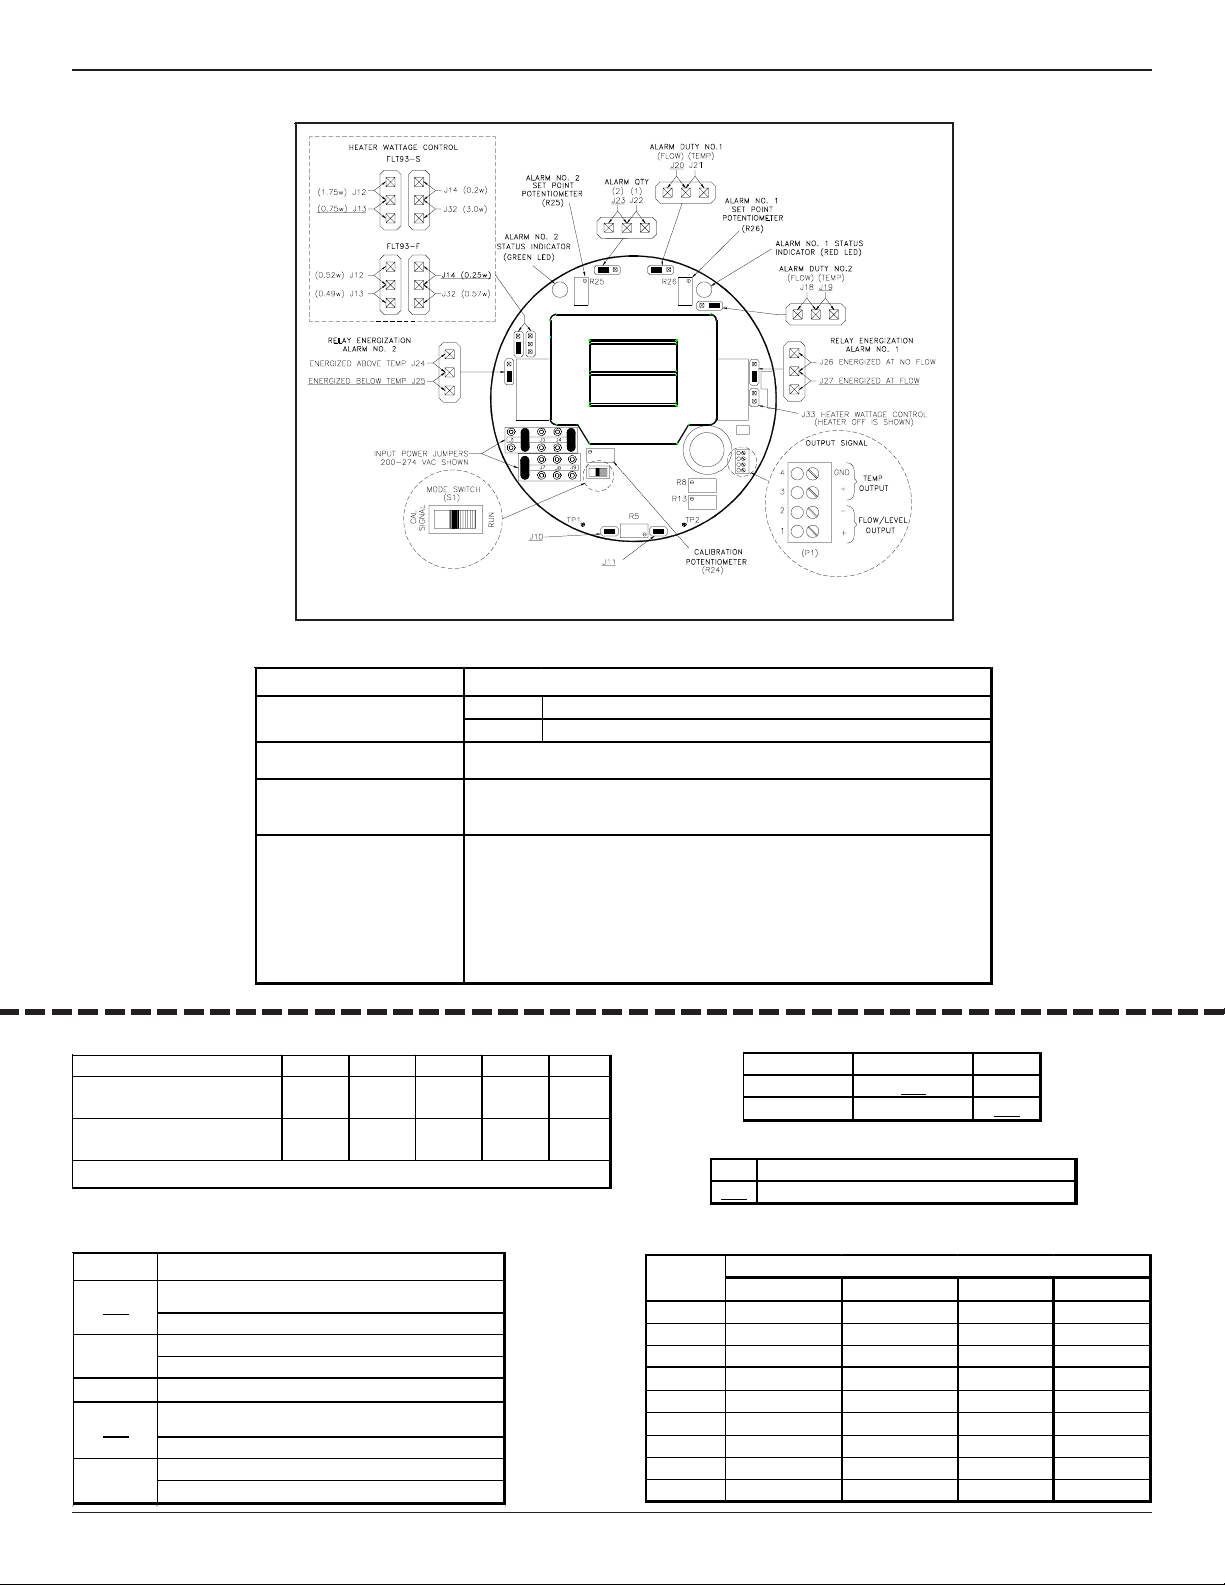
Jumper Placement
Jumper Locations (Underlined Jumpers are default)
Standard Default Jumper Configuration
INPUT POW ER
HEA TER PO W ER
NUMB ER OF A LA RMS
ALARM NO. 1 RED LED
SET POINT POT R26
ALARM NO. 2 GREEN LED
SET POINT POT R25
230 VA C (J2, J5 AND J6), OR FM APPROV AL 120 VAC (J1, J3, J5)
FLT9 3- S 0.75 WA TTS FOR AIR OR LIQUID A PPLICATIONS ( J13)
FLT93- F 0. 25 WA TTS FOR AIR OR LIQUID APPL ICATIONS (J14)
TWO ( J23) . EA CH A LA RM HA S ONE SET OF SPDT CONTA CTS.
SET TO MONITOR FLOW OR LEVEL SIGNALS (J20).
RELAY ENERGIZED A T FLOW OR WET (J27)
SET TO MONITOR FLOW OR LEVEL SIGNALS (J20).
RELAY ENERGIZED BELOW TEMPERATURE (J25)
SET POINT AT A PPROXIMATELY:
250°F (121°C) FOR STANDARD TEMPERATURE,
500°F (260°C) FOR MEDIUM TEMPERATURE,
850°F (454°C) FOR HIGH TEMPERATURE (FLT93-S ONLY).
Selectable Heater Wattage Control
JUMPER J32 J12 J13* J14* J33
FL T93- S EL EMENT
WATTA GE (110 OHM HTR)
FLT93- F ELEMENT
WATTA GE (560 OHM HTR)
*J13 IS STA NDA RD FOR FLT-S A ND J1 4 IS STA NDA RD FOR FLT93- F.
3
WA TTS
0.57
WA TTS
1.75
WA TTS
0.52
WA TTS
0.75
WA TTS
0.49
WA TTS
0.21
WATTS
0.25
WATTS
OFF
OFF
Alarm Application
FLOW / LEV EL TEMP
ALARM NO. 1 J20
ALARM NO.2 J18 J19
J21
Relay Contact Configuration
J22 SINGLE SPDT (DISABLES ALARM NO. 2)
DUA L DPDT (O NE RELA Y PER A LA RM)
J23
Relay Energization
JUM PER ALARM NO. 1
RELA Y DE-ENERGIZED WITH LOW FL OW,
J27
LOW LEVEL (DRY ) OR HIGH TEMPERATURE.
RELA Y DE-ENERGIZ ED WITH HIGH FLOW,
J26
HIG H L EV EL ( W ET) O R L O W TEMPERA T URE.
ALARM NO. 2
RELA Y DE-ENERGIZED WITH LOW FL OW,
J25
LOW LEVEL (DRY ) OR HIGH TEMPERATURE.
RELA Y DE-ENERGIZ ED WITH HIGH FLOW,
J24
HIG H L EV EL ( W ET) O R L O W TEMPERA T URE.
This page is subject to proprietary rights statement on last page
Input Power
JUMPER
4 Doc. No. 06EN003312 Rev. D
100-130 VA C 200-260 VAC 21-30 VDC 18-26 VAC
J1 IN OUT OUT OUT
J2 OUT IN OUT OUT
J3 IN OUT OUT OUT
J4 OUT OUT OUT IN
J5 IN IN OUT OUT
J6 OUT IN IN IN
J7 OUT OUT IN OUT
J8 OUT OUT IN OUT
J9 OUT OUT OUT IN
POWER SELECT
Page 5

FLT93 Flow Switch Series FLUID COMPONENTS INTERNATIONAL LLC
Alarm Adjustment Procedure
Control Circuit Adjustment Locations
(Not necessary if the instrument has been factory calibrated.)
Flow Application Signal Output
Adjustment by Observation (Option 1)
Note:
The control circuit has two mutually exclusive alarms; they are identified as Alarm No. 1 and Alarm No. 2 and
each has a set point adjustment potentiometer and LED indicator. Each alarm can be setup for one of three
applications: flow, level/interface, or temperature. The following application specific adjustment procedures
are generic and can be used for setting either or both alarms. The mode switch must be in the RUN position.
Use the top figure on this page to help locate the adjustment potentiometers and LEDs.
Flow Applications
1. Ensure that the instrument has been properly installed in the pipeline. Fill the pipeline so the sensing element is
surrounded by the process media.
2. Apply power to the instrument and allow fifteen minutes for the sensing element to become active and stabilize.
3. Flow the pipeline at the normal or expected rate. Remove the enclosure cover to allow access to the control circuit
to make adjustments.
Doc. No. 06EN003312 Rev. D 5
Level Application Signal Output
This page is subject to proprietary rights statement on last page
Page 6

FLUID COMPONENTS INTERNATIONAL LLC FLT93 Flow Switch Series
Detecting Decreasing Flow (low flow alarm)
If the status LED is off, turn the set point adjustment potentiometer clockwise until the LED turns on. With the LED
on, slowly turn the potentiometer counterclockwise one turn past the point at which the LED just turns off. The
potentiometer may have up to one-quarter turn of hysteresis, therefore, if the mark is overshot, the procedure should
be repeated.
Detecting Increasing Flow (high flow alarm)
If the status LED is on, turn the set point adjustment potentiometer counterclockwise until the LED turns off. With
the LED off, slowly turn the potentiometer clockwise one-half turn past the point at which the LED just turns on.
The potentiometer may have up to one-quarter turn of hysteresis, therefore, if the mark is overshot, the procedure
should be repeated.
Signal Output for Flow Applications
The output signal at connector P1 is a non-linear voltage representation of the flow rate. The output signal level is
also relative to the type of process media, see flow application signal output figure on the previous page.
Level Applications
1. Ensure that the instrument has been properly installed in the vessel.
2. Apply power to the instrument and allow fifteen minutes for the sensing element to become active and stabilize.
3. Remove the enclosure cover to allow access to the control circuit to make adjustments.
Detecting Dry Condition (adjustment with sensing element wet)
Verify that the sensing element is wet. If the status LED is off, turn the set point adjustment potentiometer clockwise
until the LED turns on. With the LED on, slowly turn the potentiometer counterclockwise one turn past the point at
which the LED just turns off. The potentiometer may have up to one-quarter turn of hystereses, therefore, if the mark
is overshot, the procedure should be repeated.
Detecting Wet Condition (adjustment with sensing element dry)
Alert:
Give consideration to the fact that air or gas flowing over the sensing element may decrease the
output signal resulting in a false alarm. If the sensing element is exposed to air or gas flow in the
dry condition, or where the process media is highly viscous, make set point adjustments in the wet
condition only.
Field adjustments made in the dry condition should be performed in the actual service environment or within a
condition that approximates that environment. Provision should be made for the worst case condition of air or gas
flow on the sensing element. If the status LED is on, turn the set point adjustment potentiometer counterclockwise
until the LED turns off. (If the LED cannot be turned off, the instrument must be set in the wet condition.)
With the LED off, slowly turn the potentiometer clockwise 1 turn past the point where the LED just lights. The
potentiometer may have up to one-quarter turn of hysteresis, therefore, if the mark is overshot, the procedure should
be repeated.
Signal Output for Level Applications
The output signal at P1 is low in liquid and high in gas. See the level application signal output figure on the
previous page.
Temperature Applications
Note: It is recommended not to use the instrument for a dual flow and temperature application in air or gas
unless the flow rate is greater than 5.0 SFPS. (The instrument may be used for a dual flow and
temperature application in liquids at any flow rate.)
This page is subject to proprietary rights statement on last page
6 Doc. No. 06EN003312 Rev. D
Page 7

FLT93 Flow Switch Series FLUID COMPONENTS INTERNATIONAL LLC
When using the instrument for both level and temperature applications, the temperature signal can be as
much as 50°F (28°C) high when the sensing element is in still air.
Turn the heater off for temperature only applications. To turn off the heater remove the heater control
jumper from the heater wattage control. The jumper may be stored on the control circuit by plugging it
across J12 and J14. Placing the jumper here will not turn on the heater.
Ensure that the instrument has been properly installed. Apply power to the instrument and allow fifteen minutes for the
sensing element to become active and stabilize.
Establish the normal or expected temperature. Remove the enclosure cover to allow access to the control circuit.
Perform either the detecting increasing temperature or detecting decreasing temperature procedure shown below.
Detecting Increasing Temperature (high temperature alarm)
If the status LED is off, turn the alarm adjustment potentiometer clockwise until the LED turns on. With the LED on,
slowly turn the potentiometer counterclockwise one half turn past the point at which the LED just turns off. The
potentiometer may have up to one-quarter turn of hysteresis, therefore, if the mark is overshot, the procedure should be
repeated.
Detecting Decreasing Temperature (low temperature alarm)
If the status LED is on, turn the set point adjustment potentiometer counterclockwise until the LED turns off. With the
LED off, slowly turn the potentiometer clockwise one-half turn past the point at which the LED just turns on. The
potentiometer may have up to one-quarter turn of hysteresis, therefore, if the mark is overshot, the procedure should be
repeated.
Adjustment by Measurement (Option 2)
Air/Gas Flow Applications
1. Remove the instrument's enclosure cover.
2. Ensure the configuration jumpers on the control circuit are correct for this application. See tables on page 4.
3. Check to make sure the input power jumpers match the power to be applied to the instrument. See the power input
table on page 4.
4. Apply power to the instrument. Verify the yellow LED is on and allow the instrument fifteen minutes to
warm-up.
5. Verify the mode switch is in the RUN position.
6. Attach a DC voltmeter to the P1 terminal block with the positive (+) lead to position one and the negative (-) lead to
position two.
Note:
7. Establish the normal process flow condition and allow the signal to stabilize.
Note:
8. Record the normal flow signal value.
The terminal block can be unplugged from the control circuit to facilitate easy connections. The terminal
block is used in late production instruments. Early production instruments used a mating cable and
connector. If a cable and connector are required use FCI part number 015664-01 to order.
The output signal at connector P1 will vary inversely with changes in the process flow rate. The output
signal level is relative to the type of process media being measured and the heater wattage setting. See flow
application figure on page 5.
Normal Flow Signal = ________ volts DC
9. Follow either the Detecting Decreasing Flow or the Detecting Increasing Flow procedure for each flow application
alarm.
Doc. No. 06EN003312 Rev. D 7
This page is subject to proprietary rights statement on last page
Page 8

FLUID COMPONENTS INTERNATIONAL LLC FLT93 Flow Switch Series
Detecting Decreasing Flow (low flow alarm)
1. Stop the process flow and allow the signal to stabilize.
2. Record the no-flow signal. (The no-flow signal should be greater than the normal flow signal.)
No-Flow Signal = ________ volts DC
3. Determine the set point by calculating the average of the normal and no-flow output signals. (i.e.; If the normal
signal is 2.000 volts and the no-flow signal is 5.000 volts, then the calculated set point would be 3.500 volts.)
4. Record this value.
Calculated Set Point = ________ volts DC
Note:
The calculated set point must be at least 0.020 volts greater than the normal signal to ensure that the alarm
will reset.
5. Slide the mode switch to the CALIBRATE position.
6. Adjust the calibrate potentiometer (R24) until the voltmeter equals the calculated set point.
7. For the appropriate alarm, determine whether the status LED is on or off (red for No. 1 or green for No. 2).
If the LED is off, turn the set point adjustment potentiometer (R26 for alarm No. 1 or R25 for alarm No.2) slowly
clockwise just until the LED turns on .
OR
If the LED is on, turn the set point adjustment potentiometer (R26 for alarm No. 1 or R25 for alarm No. 2)
counterclockwise until the LED turns off and then slowly clockwise just until the LED turns on.
8. If this is the only flow application alarm to be setup, then skip to the Continue With the Air/Gas Flow Procedure.
Detecting Increasing Flow (high flow alarm)
1. Establish the excessive process flow condition and allow the signal to stabilize.
2. Record the high flow signal. (The high flow signal should be less than the normal flow signal.)
High Flow Signal = ________ volts DC
3. Determine the set point by calculating the average of the normal and high flow output signals. (i.e., If the normal
signal is 2.000 volts and the high flow signal is 1.000 volts, then the calculated set point would be 1.500 volts.)
4. Record this value.
Calculated Set Point = ________ volts DC
Note:
The calculated set point must be at least 0.020 volts less than the normal signal to ensure that the alarm will
reset.
5. Slide the mode switch to the CALIBRATE position.
6. Adjust the calibrate potentiometer (R24) until the voltmeter equals the calculated set point.
7. For the appropriate alarm, determine whether the status LED is on or off (red for No. 1 or green for No. 2).
If the LED is on, turn the set point adjustment potentiometer ( R26 for alarm No. 1 or R25 for alarm No. 2) slowly
counterclockwise just until the LED turns off.
OR
If the LED is off, turn the set point adjustment potentiometer ( R26 for alarm No. 1 or R25 for alarm No. 2)
clockwise until the LED turns on and then slowly counterclockwise just until the LED turns off.
This page is subject to proprietary rights statement on last page
8 Doc. No. 06EN003312 Rev. D
Page 9

FLT93 Flow Switch Series FLUID COMPONENTS INTERNATIONAL LLC
Continue With the Air/Gas Flow Procedure
1. Slide the mode switch to the RUN position.
2. Establish the normal process flow condition. For low-flow alarm setups, the status LED should be off. For high flow
alarm setups, the status LED should be on.
3. Establish the process alarm condition and monitor the voltmeter display.
4. When the output signal passes through the calculated set point value, the status LED should turn on for low-flow
alarms, off for high flow alarms, and the relay contacts should change state.
5. Reestablish the normal process flow condition. Both the LED and the relay contacts should reset.
6. Disconnect the voltmeter from P1.
7. Replace the enclosure cover.
Note:
The alarm can be set for a specific flow rate. Follow the Air/Gas Flow Application procedure up to step 7
except establish the specific flow rate rather than the normal flow. The output signal will be the set point
value. Determine whether the alarm should actuate with decreasing or increasing flow and skip to the
appropriate step 4 in Detecting Decreasing Flow or Detecting Increasing Flow, respectfully. Enter the
specific flow rate value as the set point. Then follow the Continue With the Air /Gas Flow Procedure steps.
The relay logic default configuration is set for the relay coil to be de-energized when the flow signal voltage
is greater than the set point value. (i.e., Assume that the normal process flow condition has been
established. In this state, the relay coil will be energized if the alarm has been set for low-flow detection
and de-energized if the alarm has been set for high flow detection.) A recommendation is to have the relay
coils energized when the process condition is normal. This will enable the alarm to close or open the
contacts in case of a power failure.
Wet/Dry Liquid Level Applications
1. Remove the instrument's enclosure cover.
2. Ensure the configuration jumpers on the control circuit are correct for this application. See the tables on page 4.
3. Check to make sure the input power jumpers match the power to be applied to the instrument. See the power input
table on page 4.
4. Apply power to the instrument. Verify the yellow LED is on and allow the instrument fifteen minutes to
warm-up.
5. Verify the mode switch is in the RUN position.
6. Attach a DC voltmeter to P1 with the positive (+) lead to position one and the negative (-) lead to position two.
Note:
The terminal block can be unplugged from the control circuit to facilitate easy connections. The terminal
block is used in late production instruments. Early production instruments used a mating cable and
connector. If a cable and connector are required use FCI part number 015664-01 to order.
7. Raise the process fluid level so the sensing element is wet.
8. Allow the output signal to stabilize and record the wet condition value.
Wet Condition Signal = ________ volts DC
Note:
The output signal at P1 is relative to the type of process media detected. See the figure on page 4.
9. Lower the process fluid level so the sensing element is dry.
10. Allow the output signal to stabilize and record the dry condition value. (The dry signal should be greater than the
wet signal.)
Dry Condition Signal = ________ volts DC
Doc. No. 06EN003312 Rev. D 9
This page is subject to proprietary rights statement on last page
Page 10

FLUID COMPONENTS INTERNATIONAL LLC FLT93 Flow Switch Series
11. Determine the set point by calculating the average of the wet and dry output signals. (i.e., If the wet signal is 0.200
volts and the dry signal is 4.000 volts, then the calculated set point would be 2.100 volts.)
12. Record this value.
Calculated Set Point = ________ volts DC
Note:
The calculated set point must be at least 0.015 volts greater than the wet signal and 0.020 volts less than the
dry signal to ensure that the alarm will reset.
13. Slide the mode switch to the CALIBRATE position.
14. Adjust the calibrate potentiometer (R24) until the voltmeter equals the calculated set point.
15. For the appropriate alarm, determine whether the status LED is on or off (red for No. 1 or green for No. 2).
16. Follow either the Detecting Dry Condition or the Detecting Wet Condition for each level application alarm.
Detecting Dry Condition (low level alarm)
If the status LED is off, turn the set point adjustment potentiometer (R26 for alarm No. 1 or R25 for alarm
No. 2) slowly clockwise just until the LED turns on.
OR
If the status LED is on, turn the set point adjustment potentiometer (R26 for alarm No. 1 or R25 for alarm No. 2)
counterclockwise until the LED turns off and then slowly clockwise just until the LED turns on.
Detecting Wet Condition (high level alarm)
If the status LED is on, turn the set point adjustment potentiometer (R26 for alarm No. 1 or R25 for alarm No. 2)
slowly counterclockwise just until the LED turns off.
OR
If the status LED is off, turn the set point adjustment potentiometer (R26 for alarm No. 1 or R25 for alarm
No. 2) clockwise until the LED turns on and then slowly counterclockwise just until the LED turns off.
17. Slide the mode switch to the RUN position. The status LED should be on if the sensing element is dry and off if the
sensing element is wet.
18. Monitor the voltmeter display while raising or lowering the process fluid level. When the output signal passes
through the set point, the status LED should change states and the relay contacts should change state.
19. Reestablish the normal level condition. Both the LED and relay contacts should reset.
20. Disconnect the voltmeter from P1.
21. Replace the enclosure cover.
Note:
The relay logic default configuration is set for the relay coil to be de-energized when the level signal is
greater than the set point value. (i.e., The relay coil will be de-energized when the sensing element is dry.)
A recommendation is to have the relay coils energized when the process condition is normal. This will
enable the alarm to close or open the contacts in case of a power failure.
Temperature Applications
If the adjustment by observation is not accurate enough for the application, adjustment with a voltmeter can be
accomplished using manual 06EN003246. See the Operation Section of the manual for complete instructions.
This page is subject to proprietary rights statement on last page
10 Doc. No. 06EN003312 Rev. D
Page 11

FLT93 Flow Switch Series FLUID COMPONENTS INTERNATIONAL LLC
Troubleshooting
If you continue to experience problems with the instrument, see the Troubleshooting Section in the FLT93 Manual, document
number 06EN003246. To acquire a manual, call your local FCI Sales Representative.
1. Is the Yellow LED
on,off, blinking, or
dim?
2. Mode Switch
LED ON
Although the LED is on, it may appear dim. This is usually caused by the instrument being supplied
with 115 Vac and the Input Power Jumper Configuration set to 220 Vac.
Input power and jumper configuration:
OK: See item 2, Mode Switch.
NOT OK: Remove the control circuit and set the jumpers correctly. Reinstall the control circuit and
restart the system.
LED OFF
Check the Input Power Jumper Configuration setting and verify the input power.
OK: See item 4, Power Supply Check.
NOT OK: Remove the control circuit, set the jumpers correctly and verify the input power. Reinstall
the control circuit, restart the system and check for proper operation. If LED is still off go to Wiring the
Instrument, page 3.
LED BLINKING
For Liquid Flow Applications: Sensor is DRY. Make sure the pipe is full.
For Gas Flow Applications: Heater power set too high. Set to lower value by moving heater jumper.
For Liquid level Applications: Heater power set too high. Set to lower value by moving heater jumper.
For Liquid Interface Applications: Set the heater power to the maximum value to achieve the maximum
signal difference between the two liquids. For liquid applications, it is normal for the LED to blink if
the element goes dry. Go to item 2, Mode Switch.
Make sure the mode switch is in the “RUN” position.
OK: See item 3, Signal Voltage Observation.
3. Signal Voltage
Observation
4. Power Supply
Check
5. Sensor Element
Check for
Integral Installation
6. Sensor Element
Check for Remote
Installation
Remove the Heater Wattage Control jumper. Measure the signal voltage at P1, Terminals 1 and 2.
a) The voltage is 0 volts +/- 25 mV:
OK: Reinstall the jumper and wait 5 minutes. Go to c) or d) which ever is applicable.
b) The voltage is out of tolerance:
NOT OK: The serial numbers on the control board and the sensing element must match. If the
serial numbers are OK then contact FCI Field Service.
c) The Voltage is between 1 and 6 volts and changes with flow or level changes:
OK: See item 7, Alarm Switch Point Settings.
d) The voltage is still about 0 volts: or the voltage is over + 7 volts: or the voltage is negative,
between -1 and -6 volts and changes with flow or level changes:
Not OK: Sensing element not wired correctly or defective. Incorrect wiring on remote instruments
is not uncommon upon initial installation. For integral installations, see item 5 in this section or for
remote installations, see item 6 in this section.
Measure the voltage at P1 terminals 2 to 4.
Voltage is 0 volts: NOT OK; Contact FCI Technical Service. Replace with spare control board.
Turn off the power and remove the control circuit. Check sensing element connections.
Sensor Failure: Call the Factory
Sensors are OK: See item 7, Alarm Switch Point Settings.
Turn off the power and remove the control circuit. Check the flow element connections versus the
wiring diagram.
Remote cable incorrectly wired or damaged: Repair and restart the system.
Sensor Failure: Call the Factory
Sensors are OK: See item 7, Alarm Switch Point Settings.
7. Alarm Switch Point
Settings
Make sure that the jumpers are set correctly. The related settings are the "Alarm Duty", "Alarm
Quantity" and the "Energization". Refer to the previous tables or the bottom side of the control circuit
for more information.
Using the Mode Switch set to Cal, check and record the alarm settings. Compare these setting to the
signals generated by the process and make adjustments if necessary.
Doc. No. 06EN003312 Rev. D 11
This page is subject to proprietary rights statement on last page
Page 12

FLT93 Flow Switch Series FLUID COMPONENTS INTERNATIONAL LLC
FCI’s Complete Customer Commitment. Worldwide
ISO 9001:2000 and AS9100 Certified
Notice of Proprietary Rights
This document contains confidential technical data, including trade secrets and proprietary information which is the property of Fluid Components
International LLC (FCI). Disclosure of this data to you is expressly conditioned upon your assent that its use is limited to use within your company only
(and does not include manufacture or processing uses). Any other use is strictly prohibited without the prior written consent of FCI.
Visit FCI on the Worldwide Web: www.fluidcomponents.com
1755 La Costa Meadows Drive, San Marcos, California 92078 USA - 760-744-6950 - 800-854-1993 - Fax 760-736-6250
Doc. No. 06EN003312 Rev. DFluid Components International LLC (FCI) All Rights Reserved
 Loading...