

Page 1

INSTALLATION, OPERATION AND
MAINTENANCE MANUAL
FLT
ÔÔ
Ô
ÔÔ
Series FlexSwitch
ÔÔ
Ô
ÔÔ
Flow, Level, Temperature
Switch/Monitor
Doc. No. 06EN003246 Rev. B
Notice of Proprietary Rights
This document contains confidential technical data, including trade
secrets and proprietary information which are the property of Fluid
Components Intl (FCI).
Disclosure of this data to you is expressly conditioned upon your assent
that its use is limited to use within your company only (and does not
include manufacture or processing uses). Any other use is strictly
prohibited without the prior written consent of FCI.
FLTÔ uses FCI's Proprietary FLEXSWITCHÔ Technology.
Patent 4,967,593
© Copyright 1996 Fluid Components Intl
a limited liability company
All Rights Reserved
9/29/94
Page 2

CUSTOMER COMMITMENT PLEDGE
We will work closely with our customers to provide the best products and service
• at a competitive value
• on time
• with unquestioned support
in full compliance with our COMPLETE CUSTOMER COMMITMENT.
COMMITMENT TO QUALITY
In keeping with the overall commitment of management and employees of Fluid Components Intl to Total Quality
Management, the publications department expresses its pledge and mission to you, our customer:
“To support the creation and publication of world-class technical material which is technically accurate and
practical, concise and user-friendly, attractive and professional in appearance, and consistent in form, format,
content, and style.”
QUALITY IMPROVEMENT
FLUID COMPONENTS INTL
We appreciate your comments and suggestions which support our effort to constantly improve our product and
services. Please address comments and suggestions to your nearest field representative or in-house technical
support representative. Thank you.
FCI Technical Publications Department
Doc. No. 06EN003246 Rev. B iii FLTÔ Series FlexSwitchÔ
Page 3

FLUID COMPONENTS INTL
CUSTOMER SERVICE/TECHNICAL SUPPORT
FCI provides full in-house technical support for our products 7 a.m. to 5 p.m. PST, Monday through Friday
(excepting holidays and an annual plant closure between Christmas and New Year's day). Also, additional
technical representation is provided by FCI field representatives. Before contacting one of our field or in-house
representatives, please ensure that you have performed the troubleshooting techniques outlined in this document.
By Mail
Fluid Components Intl
1755 La Costa Meadows Dr.
San Marcos, CA 92069
Attn: Customer Service Department
By Phone
Contact the FCI regional representative in your area. If your are unable to contact the field representative
or are unable to satisfactorily resolve the situation, contact the FCI Customer Service Department at
1 (800) 854-1993, toll free.
By Fax
To describe your problems in a more graphic or pictorial manner, send your fax including your phone or
fax number to your regional representative. Again FCI is available through facsimile if you have
exhausted your possibilities with the authorized factory representative. Our fax number is
(760) 736-6250; it is available 7 days a week, 24 hours a day.
International Support
For product information or product support outside the contiguous United States, Alaska, or Hawaii,
contact your country’s FCI International Representative or the one nearest to you. See the list on
following pages.
Appendix C contains a detailed explanation of the FCI customer service policy on returns, adjustments, in-field or
factory repair, in- or out-of-warranty.
FLTÔ Series FlexSwitchÔ
iv Doc. No. 06EN003246 Rev. B
Page 4

FLUID COMPONENTS INTL
REVISIONS
REV. DESCRIPTION DATE AUTHOR
A
Added Revision Page. Revised Table of Contents.
Chapter 1 Theory of Operation: Changed wording; signal conditioner to control
circuit.
Chapter 1 Specifications: Revised Specification information .
Chapter 3 Page 3-1, Heater Cut-Off: Revised description.
Chapter 3 Table 3-1: Corrected typographical error. Deleted an incorrect statement.
Chapter 3 Figure 3-1: Added potentiometer call out R5 to the figure.
Chapter 3 Table 3-3A: Changed asterisk information.
Chapter 3 Tables 3-3A, 3-3B: Changed wattage values.
Appendix A Figure A-1, A-7 and A-8: Updated drawings.
Appendix A Figures A-1, A-4, A-5, A-7 and A-9: Changed the figure captions to
correctly identify the figures.
Appendix A Added Figures A-13, A-14 and A-15.
Appendix C Pages C-1, C-3, C-4 and C-5: Changed wording; Attachment to
Document. Added paragraph to clarify that documents are indeed added
to the appendix.
1/24/95
R. Sanders
Appendix D Page D-2, Step 5. Corrected jumper number and added a reference to
Figure 3-1.
Appendix D Table D-1: Changed wattage and a voltage values.
B Added Appendix E CE Mark information. Added information on FLT93-C 2-25-96 R. Sanders
and FLT93-L. Added remote relay wiring information. Change bars have also
been added to draw attention to new information.
Doc. No. 06EN003246 Rev. B vii FLTÔ Series FlexSwitchÔ
Page 5

FLUID COMPONENTS INTL
Contents
1. General Information
2. Installation
Description ........................................................................................................................... 1 - 1
Theory of Operation ............................................................................................................. 1 - 1
Sensing Element .................................................................................................................. 1 - 1
Control Circuit ..................................................................................................................... 1 - 1
Technical Specifications ...................................................................................................... 1 - 2
Receiving/Inspection ............................................................................................................ 2 - 1
Packing/Shipping/Returns ................................................................................................... 2 - 1
Factory Calibration Note ...................................................................................................... 2 - 1
Pre-Installation Procedure ................................................................................................... 2 - 1
Use Standard ESD Precautions .................................................................................... 2 - 1
Prepare or Verify Sensing Element Location ............................................................... 2 - 2
Verify Dimensions ........................................................................................................ 2 - 2
Verify Sensing Element Flow Direction and Placement Orientation (Flow) ............. 2 - 2
Verify Sensing Element Flow Direction and Placement Orientation (Level) ............ 2 - 2
Install the Sensing Element ................................................................................................. 2 - 2
Male NPT Mounting ..................................................................................................... 2 - 2
Flange Mounting ........................................................................................................... 2 - 3
Packing Gland Assembly .............................................................................................. 2 - 3
In-Line NPT Assembly ................................................................................................. 2 - 3
Sanitary Assembly ........................................................................................................ 2 - 4
Install and Wire the Enclosure ............................................................................................ 2 - 4
Minimum Wire Size ..................................................................................................... 2 - 4
Wiring the Local Enclosure .......................................................................................... 2 - 5
Wiring at the Remote Enclosure .................................................................................. 2 - 6
Locate the Remote Hardware Location ........................................................................ 2 - 6
Wiring Remote Enclosure with Auxiliary Relay.......................................................... 2 - 7
Wiring a Remote Control Circuit To A Auxiliary Relay Board .................................. 2 - 8
Wiring Output Signal Terminals ......................................................................................... 2 - 8
3. Operation
Factory Default Jumper Configuration ................................................................................ 3 - 1
Configuration Jumpers ......................................................................................................... 3 - 1
Heater Cut-Off ...................................................................................................................... 3 - 1
Alarm Set Point Adjustment ................................................................................................ 3 - 2
Numerical Adjustment Versus Adjustment by Observation ........................................ 3 - 2
Numerical Set Point Adjustment ......................................................................................... 3 - 3
Air/Gas Flow Applications ........................................................................................... 3 - 4
Wet/Dry Liquid Level Applications ............................................................................. 3 - 7
Temperature Applications ............................................................................................ 3 - 8
Liquid Flow Applications ............................................................................................. 3 - 10
Adjustment by Observation .................................................................................................. 3 - 12
Flow Applications ......................................................................................................... 3 - 12
Level Applications ........................................................................................................ 3 - 12
Temperature Applications ............................................................................................ 3 - 13
Converting Temp Out Voltage to Temp in Degrees F ................................................. 3 - 19
Fail Safe Alarm Setting ....................................................................................................... 3 - 20
Low Flow Alarm Setting .............................................................................................. 3 - 20
High Flow Alarm Setting ............................................................................................. 2 - 20
Low Level Alarm Setting ............................................................................................. 3 - 20
High Level Alarm Setting............................................................................................. 2 - 20
4. Maintenance
Maintenance ......................................................................................................................... 4 - 1
Calibration .................................................................................................................... 4 - 1
Electrical Connections .................................................................................................. 4 - 1
FLTÔ Series FlexSwitchÔ
viii Doc. No. 06EN003246 Rev. B
Page 6

Remote Enclosure ......................................................................................................... 4 - 1
Electrical Wiring .......................................................................................................... 4 - 1
Sensing Element Connections ...................................................................................... 4 - 1
Sensing Element Assembly .......................................................................................... 4 - 1
5. Troubleshooting
Tools Needed ........................................................................................................................ 5 - 1
Quick Check ......................................................................................................................... 5 - 1
Non-maintenance Observations ........................................................................................... 5 - 1
Check Serial Numbers .................................................................................................. 5 - 1
Check Input Power ........................................................................................................ 5 - 1
Check the Instrument Installation ................................................................................ 5 - 1
Check for Moisture ....................................................................................................... 5 - 1
Check Application Design Requirements .................................................................... 5 - 2
Troubleshooting the Flow Element ..................................................................................... 5 - 2
Troubleshooting the Flow Transmitter ................................................................................ 5 - 2
Spares ................................................................................................................................... 5 - 4
Defective Parts ..................................................................................................................... 5 - 4
Customer Service ................................................................................................................. 5 - 4
Appendix A. Drawings
Outline Drawings ................................................................................................................. A - 1
Appendix B. Glossary
Abbreviations and Explanation of Terms ............................................................................ B - 1
FLUID COMPONENTS INTL
Figures
Appendix C. Customer Service
Policy and Procedures .......................................................................................................... C - 1
Appendix D. Temperature Compensation
Temperature Compensation Procedure................................................................................ D - 1
Appendix E. CE Conformance
CE Conformance Information ............................................................................................. E - 1
Figure 1-1. View of the Sensing Element ............................................................................................. 1 - 1
Figure 2-1. NPT Pipe Thread Mount .................................................................................................... 2 - 2
Figure 2-2. Flange Mount ......................................................................................................................2 - 3
Figure 2-3. FLT93-L In-line Flow Element ..........................................................................................2 - 4
Figure 2-4. FLT93-C Sanitary Flow Elements ......................................................................................2 - 4
Figure 2-5. Local Wiring Diagram ........................................................................................................ 2 - 5
Figure 2-6. Remote Wiring Diagram ....................................................................................................2 - 6
Figure 2-7. Auxiliary Relay Board Wiring Diagram ............................................................................2 - 7
Figure 3-1. 5294 Control Circuit Jumper Locations .............................................................................3 - 2
Figure 3-2. 5294 Control Circuit Component Locations ......................................................................3 - 4
Figure 3-3. Flow Application Signal Output ......................................................................................... 3 - 5
Figure 3-4. Level Application Signal Output ........................................................................................3 - 7
Figure 3-5. Low Flow Fail Safe Alarm.................................................................................................. 3 - 20
Figure 3-6. High Flow Fail Safe Alarm ................................................................................................. 3 - 20
Figure 3-7. Low Level Fail Safe Alarm ................................................................................................. 3 - 21
Figure 3-8. High Level Fail Safe Alarm ................................................................................................3 - 21
Figure 5-1. Troubleshooting Chart ........................................................................................................5 - 3
Figure A-1. Local Enclosure, NEMA Type 4X and Hazardous Location ............................................A - 1
Doc. No. 06EN003246 Rev. B ix FLTÔ Series FlexSwitchÔ
Page 7

FLUID COMPONENTS INTL
Figure A-2. Local Enclosure NEMA Type 4X ...................................................................................... A - 1
Figure A-3. Remote Enclosure NEMA Type 4X .................................................................................. A - 1
Figure A-4. Remote Enclosure NEMA Type 4 and Hazardous Location ............................................. A - 2
Figure A-5. Remote Enclosure, Killark, NEMA Type 4 and Hazardous Location ..............................A - 2
Figure A-6. 1/4, 3/4 or 1 Inch NPT Process Connection ......................................................................A - 2
Figure A-7. Flanged Process Connection ..............................................................................................A - 3
Figure A-8. Low Pressure Packing Gland .............................................................................................A - 3
Figure A-9. Flanged Low Pressure Packing Gland Process Connection ...............................................A - 3
Figure A-10. 1-1/4 Inch Medium Pressure Packing Gland Connection ................................................ A - 4
Figure A-11. Flanged Medium Pressure Packing Gland Process Connection ...................................... A - 4
Figure A-12. 1/4 Inch Process Connection ............................................................................................A - 4
Figure A-13. Wire Pigtail Process Connection ...................................................................................... A - 5
Figure A-14. Injection Tube with Tee Fitting ....................................................................................... A - 5
Figure A-15. 3/4 Inch Female NPT FLT93-L With U-Bolt Bracket Kit ..............................................A - 5
Figure A-16. 1 Inch NPT FLT93-L .......................................................................................................A - 6
Figure A-17. 1 Inch RF Flanged FLT93-L............................................................................................ A - 6
Figure A-18. FLT93-C Sanitary Removable Clamp Instrument .......................................................... A - 6
Figure A-19. FLT93-C Sanitary Clean-In-Place Instrument ................................................................A - 7
Figure A-20. FLT93 Auxiliary Relay ....................................................................................................A - 7
Figure A-21. FLT93 PWB Module ........................................................................................................ A - 8
Figure D-1. Sensing Element Calibration Connections ........................................................................ D - 3
Tables
Table 2-1. Maximum AWG Number ....................................................................................................2 - 5
Table 3-1. Standard Jumper Default Configuration .............................................................................. 3 - 1
Table 3-2. Input Power .......................................................................................................................... 3 - 3
Table 3-3A. Selectable Heater Wattage Control ....................................................................................3 - 3
Table 3-3B. Fixed Heater Wattage Control ............................................................................................3 - 3
Table 3-4. Application ...........................................................................................................................3 - 3
Table 3-5. Relay Energization ...............................................................................................................3 - 3
Table 3-6. Relay Contact Configuration ................................................................................................ 3 - 3
Table 3-7. Temperature Versus Voltage Output .................................................................................... 3 - 14
Table 5-1. Resistance at Control Circuit Terminal Block Socket ......................................................... 5 - 2
Table 5-2. Resistance at Flow Element Enclosure Terminal Block ..................................................... 5 - 2
Table D-1. Heater Voltage Settings .......................................................................................................D - 3
Table D-2. Temp Comp Factor Table .................................................................................................... D - 5
FLTÔ Series FlexSwitchÔ
x Doc. No. 06EN003246 Rev. B
Page 8

Symbols
The following symbols are used throughout the manual to draw attention to items or procedures that require
special notice or care.
FLUID COMPONENTS INTL
Warning:
Caution:
Note:
Warns of possible personal danger to those handling the equipment.
Cautions against possible equipment damage.
Contains important information.
Doc. No. 06EN003246 Rev. B xi FLTÔ Series FlexSwitchÔ
Page 9

CHAPTER 1 - GENERAL INFORMATION FLUID COMPONENTS, INTL
1. General Information
Description
The FLT Series models are multipurpose measurement instruments. The FLT Series models that are included in
this manual are FLT93-C, FLT93-F, FLT93-L and FLT93-S. Each model is a single instrument that is capable of
detecting air flow, fluid flow and temperature. It is also able to detect liquid level or fluid media interfaces. The
instrument has two field adjustable alarm set points, two buffered voltage outputs, as well as a built-in calibration
circuit. The output of the alarm set points are 6 amp relay contacts that can be used to control customer process
applications. One buffered voltage output is available for flow or level monitoring and the second buffered voltage
output is available for temperature monitoring.
Theory of Operation
The flow switch is a fixed position, single-point flow, level, interface and temperature switch. The operation of the
sensing element is based upon the thermal dispersion principle: A low-powered heater is used to produce a
temperature differential between two Resistance Temperature Detectors (RTDs). The RTD temperature differential
varies as a function of forced convection for flow measurement and as a function of fluid thermal conductivity for
level and interface measurement. The measurement of the fluid's temperature is obtained from the non-heated
RTD.
Sensing Element
The sensing element consists of two thermowells (hollow tubes) that when inserted into the flow process allows an
unimpeded flow inside the process line. The top thermowell has a self-heated RTD inserted into it. The bottom
thermowell has a reference RTD inserted into it. In order to correctly orient the sensing element a flow arrow has
been etched onto the threaded portion of the sensing element. See Figure 1-1 for a view of the sensing element.
Control Circuit
The control circuit converts the sensing element's RTD temperature differential into an analog DC voltage signal.
Dual comparators monitor the sensing element signal and activates the relay alarm circuits if the signal exceeds an
adjustable set point.
The control circuit contains all the removable jumpers that configure the instrument to perform as needed by the
customer.
Doc. No. 06EN003246 Rev. B
Figure 1-1 View of the Sensing Element
1 - 1
FLTÔ Series FlexSwitchÔ
Page 10

FLUID COMPONENTS, INTL CHAPTER 1 - GENERAL INFORMATION
Technical Specifications
• Process Connection
3/4 inch male NPT standard. 1 inch BSP, 1 inch
male NPT, 1/4 inch male NPT (FLT93-F only),
flanged mounting, spool piece with 3/4 inch NPT tee
or retractable sensing element available.
• Insertion Length
Beginning as low as 0.9 inches (23 mm). Standard as
well as custom lengths are available.
• Sensing Element Material
All wetted surfaces are 316 Stainless steel, with allwelded construction. Hastelloy C-276, Monel 400
and electro-polished stainless steel surface preparation
optionally available. Titanium is optionally available
on the FLT93-S configuration only.
• Operating Temperature
Control circuit:
Ambient: -40 to 140°F (-40 to 60°C).
Sensing element:
Standard temperature configuration:
-40 to 350°F (-40 to 177°C).
Medium temperature configuration:
-100 to 500°F (-73 to 260°C).
High temperature configuration:
-100 to 850°F (-73 to 454°C).
• Operating Pressure
Hydrostatically proof pressure tested to 3500 psi
(241.3 bar) at 70°F (21.1°C). De-rated with
temperature, the maximum recommended operation
service is 2350 psi (162 bar) at 500°F (260°C).
Higher ratings available with special construction and
test certification.
• Flow Range
From 0.01 to 5 fps (0.006 to 0.15mps) with fluid or
0.25 to 120 fps (0.076 to 38.1 mps) with gas,
depending upon model.
• Signal Output
Buffered voltage output available as a standard for
temperature and either flow or level/interface. The
minimum load impedance is 100 K ohms.
• Accuracy
Switch point accuracy:
Up to ± 2% of the switch point
velocity.
Monitoring accuracy:
±5 % reading (or ±0.04 fps, 0.012 mps,
which ever is larger for liquid applications
and ±2 fps, 0.061 mps, which ever is larger
for gas applications).
Level accuracy:
Down to ±0.1 inch (±0.25 cm)
Temperature accuracy:
Up to ±2 °F, (±1.1°C) depending upon
application. Higher accuracy is available
with factory calibration.
• Repeatability
±0.5% of monitor reading.
Up to ±0.05 inch (±0.13 cm) of level depending on
model.
±1.0°F, (±0.56°C) of temperature.
• Response Time
Alarm set point may be set as low as 0.5 seconds.
Alarm reset may be as low as 2.5 seconds.
• Input Power
Field or factory selectable for 115 Vac ±15V, 13VA
100 mA maximum; 230 Vac ±30V 14 VA 50mA
maximum; 24 Vac +2 to -6V 12.5 VA 485 mA
maximum; or 24 Vdc +6, to -3V, 7 watts, 230 mA
maximum. 100 Vac ±10 V is optionally available.
All AC Power is 50 to 60 Hz. Power applied is
indicated by an LED.
• Heater Power
Field or factory selectable for specific fluid service
requirements.
• Relay Rating
Dual alarm SPDT or single alarm DPDT field
configurable 6 amp resistive at 240 Vac, 115 Vac or
24 Vdc. Options available on auxiliary relay board
are 2 amp or 10 amp DPDT, plastic sealed, 0.5 amp
DPDT hermetically sealed.
• Enclosure
FLTÔ Series FlexSwitchÔ
Hazardous Location Class I, II, Div. 1, 2 Groups B, C,
D, E, F, and G. NEMA type 4X optionally available.
• Electronics
Part Number: 5294- _ _ _ FlexSwitch™
• Agency Approvals
Factory Mutual and CSA system approved.
CENELEC (hazardous location only) system
approved. Approved CE marking.
1 - 2
Doc. No. 06EN003246 Rev. B
Page 11

CHAPTER 2 - INSTALLATION FLUID COMPONENTS, INTL
2. Installation
Receiving/Inspection
• Unpack carefully.
• Verify that all items in the packing list are received and are correct.
• Inspect all instruments for damage or contaminants prior to installation.
If the above three items are satisfactory, proceed with the installation. If not, then stop and contact a customer
service representative.
Packing/Shipping/Returns
These issues are addressed in Appendix C - Customer Service.
Factory Calibration Note
The instrument is factory calibrated to the applications as specified at the time of order. There is no need to perform
any verification or calibration steps prior to installing and placing the instrument in service unless the application has
been varied.
Pre-Installation Procedure
Warning: Only qualified personnel should install this instrument. Install and follow safety procedures in
accordance with the current National Electrical Code. Ensure that power is off during installation.
Any instances where power is applied to the instrument will be noted in this manual. Where the
instructions call for the use of electrical current, the operator assumes all responsibility for
conformance to safety standards and practices.
Caution:
Use Standard ESD Precautions
Use standard ESD precautions when opening an instrument enclosure or handling the control circuit. FCI
recommends the use of the following precautions: Use a wrist band or heel strap with a 1 megohm resistor connected
to ground. If the instrument is in a shop setting there should be static conductive mats on the work table and floor
with a 1 megohm resistor connected to ground. Connect the instrument to ground. Apply antistatic agents to hand
tools to be used on the instrument. Keep high static producing items away from the instrument such as non-ESD
approved plastic, tape and packing foam.
The instrument contains electrostatic discharge (ESD) sensitive devices. Use standard ESD precautions
when handling the control circuit. See below, for ESD details.
The instrument is not designed for weld-in-place applications. Never weld to a process connection or a
structural support.
Damage resulting from moisture penetration of the control circuit or flow element enclosure is not
covered by product warranty.
The above precautions are minimum requirements to be used. The complete use of ESD precautions can be found in
the U.S. Department Of Defense Handbook 263.
Doc. No. 06EN003246 Rev. B 2 - 1 FLTÔ Series FlexSwitchÔ
Page 12
FLUID COMPONENTS, INTL CHAPTER 2 - INSTALLATION
Prepare or Verify Sensing Element Location
Prepare the process pipe for installation, or inspect the already prepared location to ensure that the instrument will fit
into the system.
Review the requirement for the supply power and alarm circuit connections.
Verify Dimensions
Verify the instrument's dimensions versus the process location to be sure of a correct fit. Also see Appendix A for
dimensions.
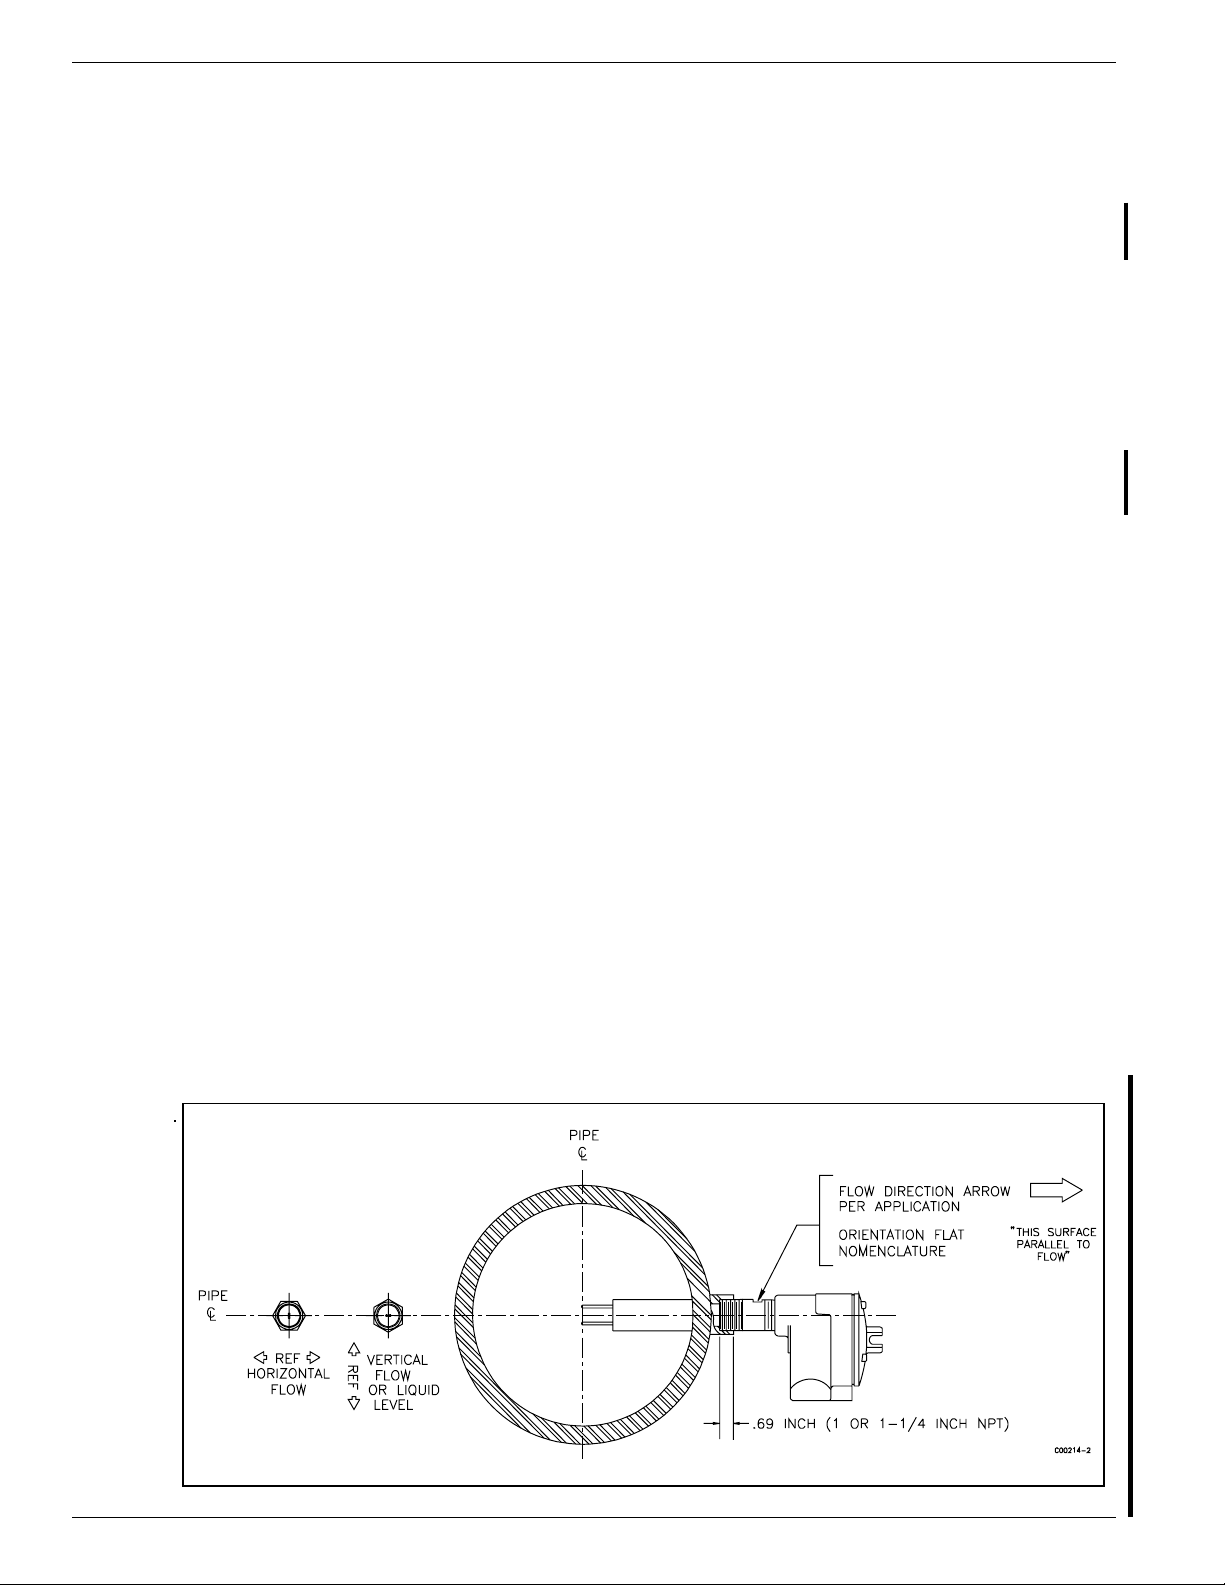
Verify Sensing Element Flow Direction and Placement Orientation (Flow Application)
For flow detection, the sensing element surface marked with direction arrows should be oriented parallel to the
process flow. The flow can be from either direction. See the appropriate figure in Appendix A for the flow arrow
marking.
Mount the sensing element at least 20 diameters downstream and 10 diameters upstream from any bends or
interference in the process pipe or duct to achieve the greatest accuracy.
For liquid flow service, the sensing element should be located in the process pipe so that the thermowells are always
completely wet.
When mounted in a tee or section of pipe larger than the normal process pipe, position in a vertical run of pipe with
flow upward. This will prevent air or gas bubbles from becoming trapped at the sensor assembly.
Vertical positioning with flow downward is only recommended for higher flow rate applications (consult FCI).
Verify Sensing Element Flow Direction and Placement Orientation (Level Application)
If the sensing element is side-mounted on the process vessel, then the surface marked with direction arrows should be
vertically oriented.
If the sensing element is top- or bottom-mounted on the process vessel, the orientation of the surface marked with
direction arrows does not matter.
Install the Sensing Element
Male NPT Mounting
When mounting the sensing element to the process pipe, it is important that a lubricant/sealant be applied to the male
threads of all connections. Be sure to use a lubricant/sealant compatible with the process environment. All
connections should be tightened firmly. To avoid leaks, do not overtighten or cross-thread connections. See
Figure 2-1 and the appropriate figure in Appendix A for proper mounting.
Figure 2-1. NPT Pipe Thread Mount
FLTÔ Series FlexSwitchÔ 2 - 2 Doc. No. 06EN003246 Rev. B
Page 13
CHAPTER 2 - INSTALLATION FLUID COMPONENTS, INTL
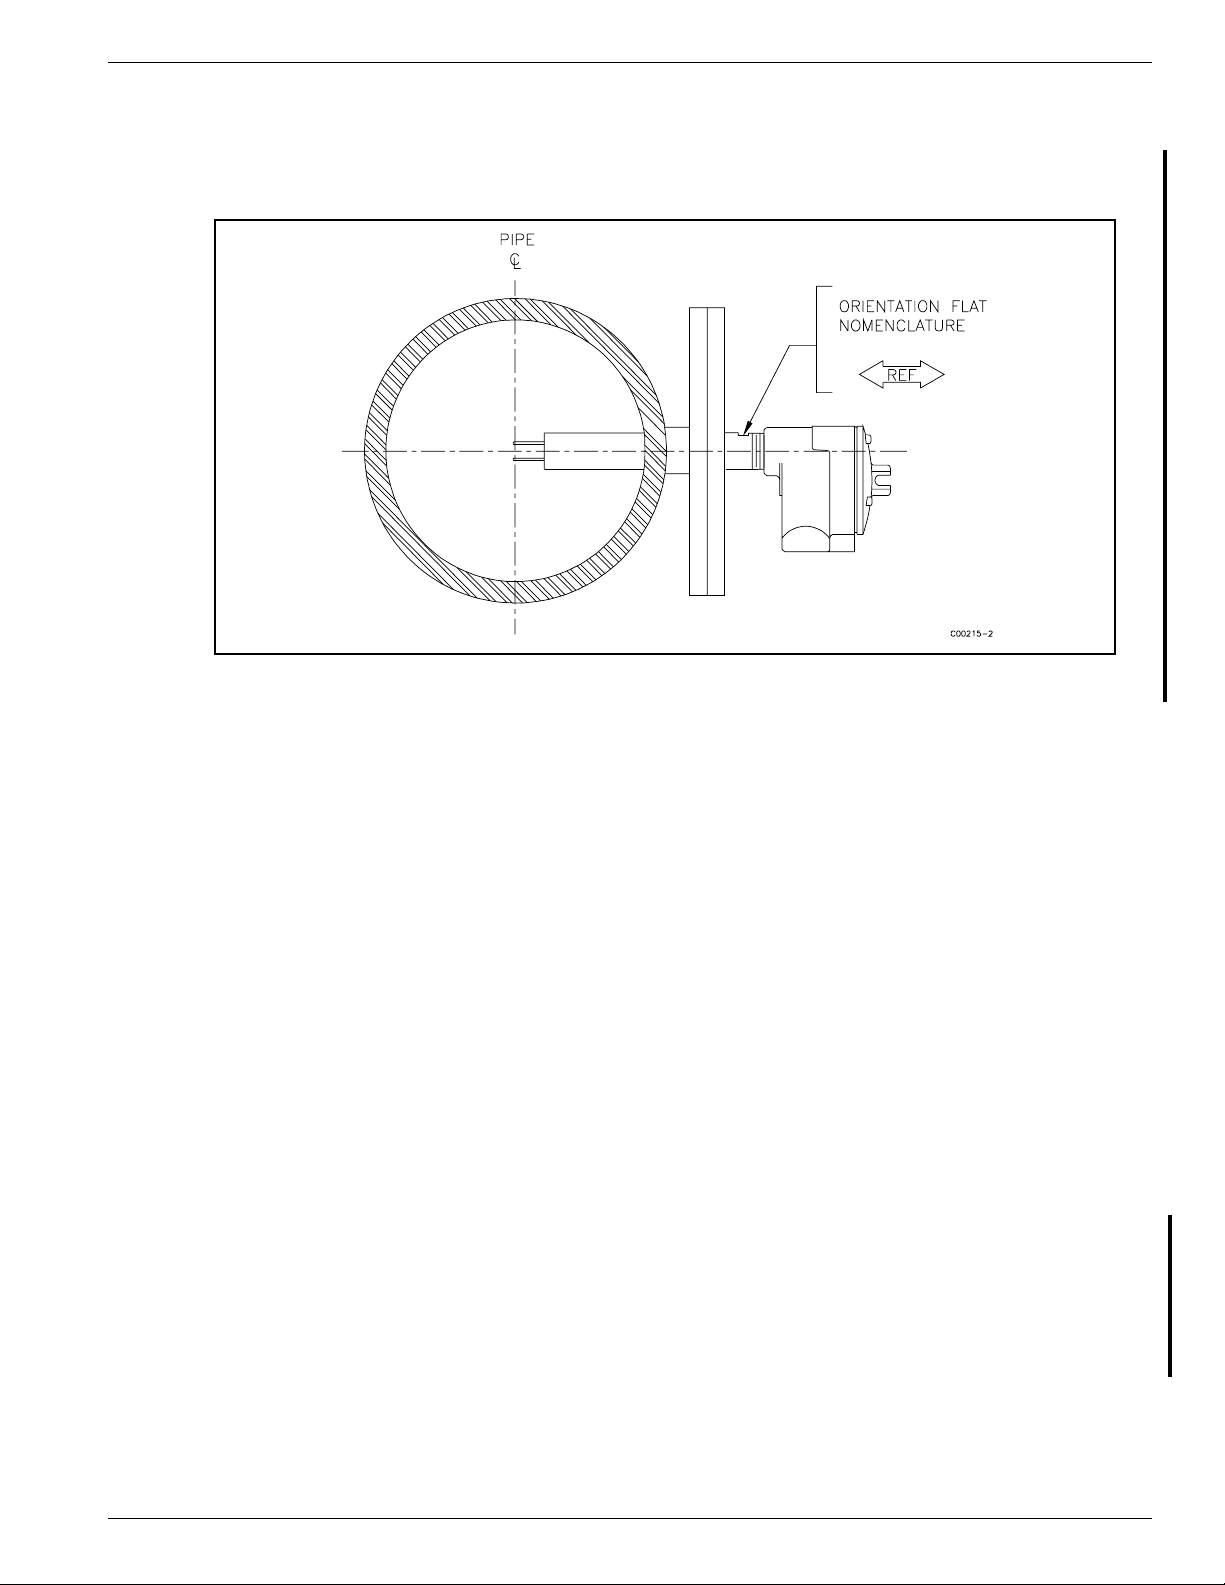
Flange Mounting
For flange mounted sensing elements, attach the process mating flange with care. The correct orientation of the
sensing element must be maintained to ensure optimum performance or calibration. See Figure 2-2 and the
appropriate drawings in Appendix A.
Figure 2-2. Flange Mount
Packing Gland Assembly
Applications involving the use of a packing gland (low or medium pressure) should refer to the drawings in
Appendix A for additional detail.
1. Threaded or flanged packing gland mounts are available. The valve assembly with appropriate connections are
customer supplied. Follow the male NPT mounting procedure above to attach the pipe thread portion or flange
mounting portion as applicable.
2. Tighten the packing nut until the internal packing is tight enough so that the friction fit on the shaft is adequate
to prevent leakage but not prevent the shaft from sliding. Position the etched flow arrow parallel with the flow
(±1° of level) and position the flow arrow so it is pointing in the direction of the flow.
3. Proceed to insert the probe into the process media line. Use the adjusting nuts on the all-thread to pull the
sensing element into proper predetermined depth position.
4. Tighten the opposing lock nuts on the all-threads. Tighten the packing nut another half to full turn until tight
(approximately 65 to 85 ft-lbs [88 to 115 N-m] torque).
5. Rotate the split ring locking collar to line up with the connecting strap welded to the packing nut. Tighten the
two 1/4-28 hex socket cap screws on the split ring locking collar.
Reverse these steps for removal.
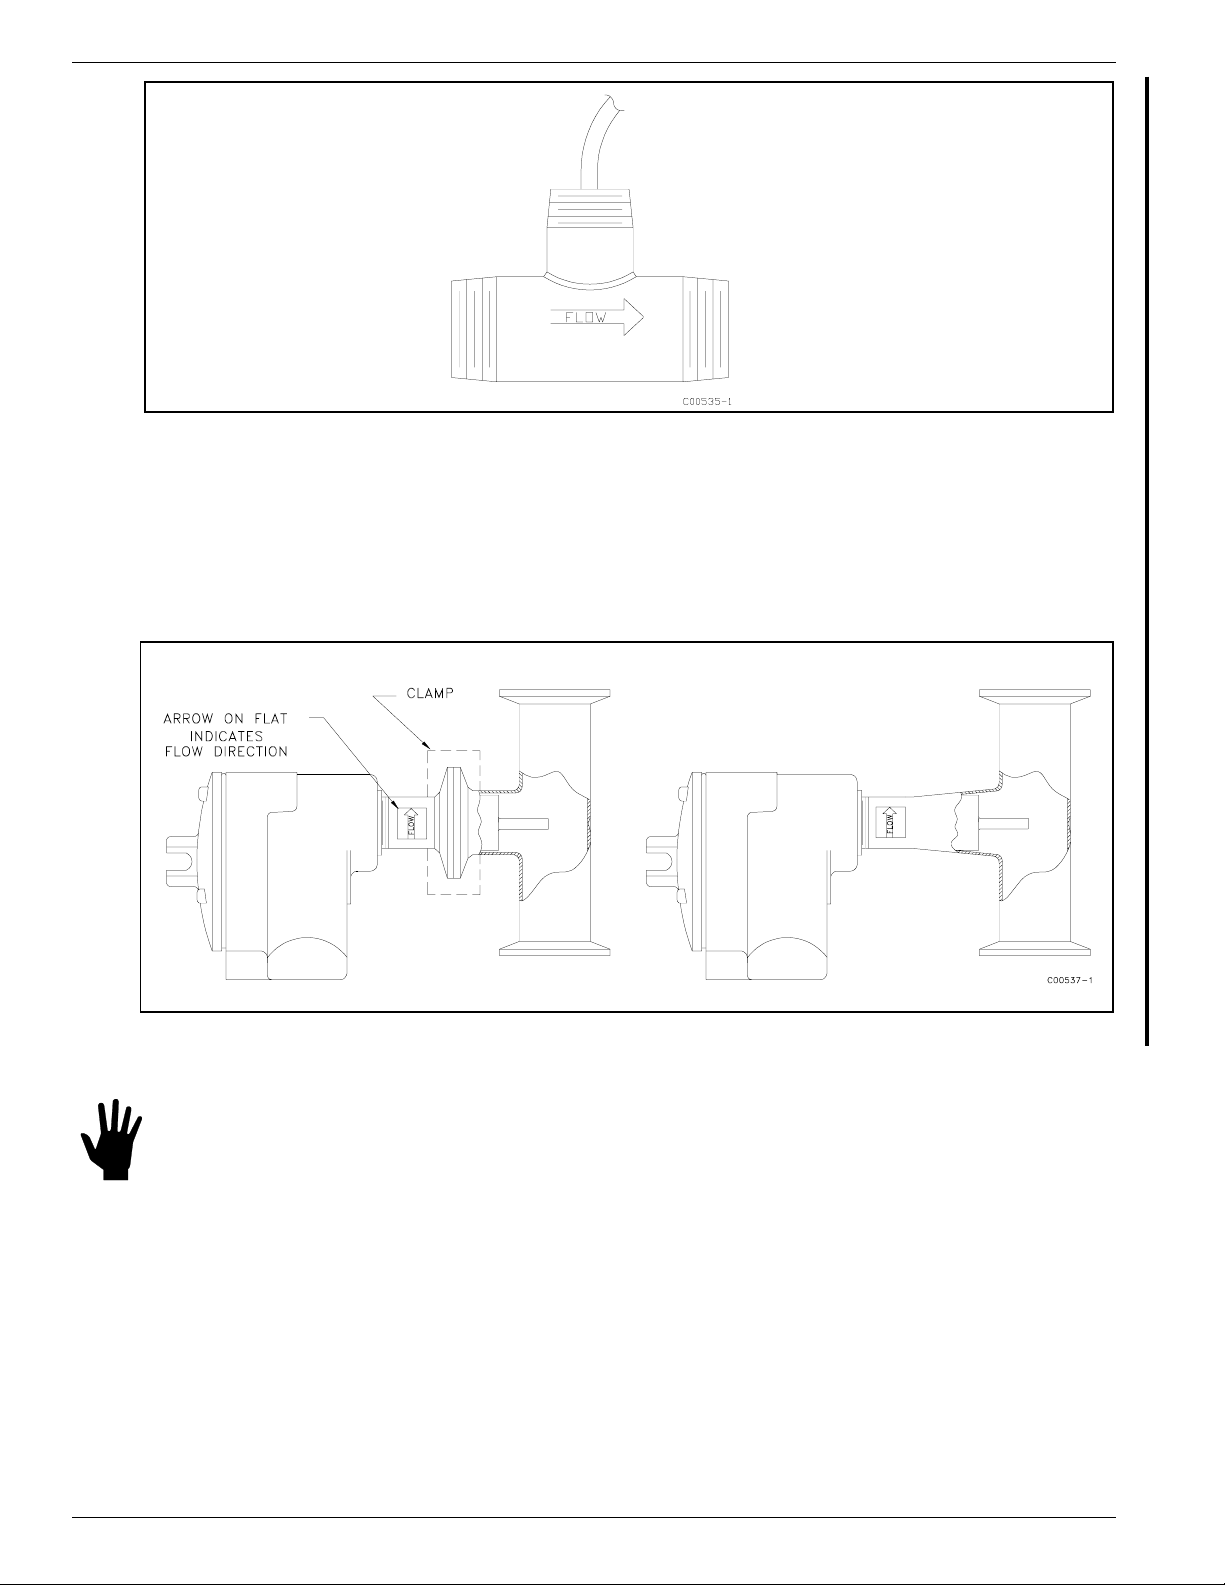
In-line NPT Assembly (FLT93-L)
The body length of the in-line assembly should be verified to be sure the assembly will fit into the process line. See
the appropriate figure in Appendix A to determine the assemblies length. The direction of flow is important for
proper operation. There is a flow direction arrow on the in-line pipe that is to point in the direction of flow. See
Figure 2-3 for the correct orientation.
Doc. No. 06EN003246 Rev. B 2 - 3 FLTÔ Series FlexSwitchÔ
Page 14
FLUID COMPONENTS, INTL CHAPTER 2 - INSTALLATION
Figure 2-3. FLT93-L In-line Flow Element
Sanitary Assembly (FLT93-C)
The instrument is inserted into the process connection with a removable clamp fittings. The Removable Clamp (RC)
sanitary assembly contains a removable clamp connection to the flow element. The Clean-In-Place (CIP) sanitary
assembly has the flow element directly welded into the process stand pipe. Otherwise these instruments function
exactly the same as an FLT93-F or FLT93-S. See Appendix A for an outline dimensions of the instruments.
Figure 2-4 also shows the sanitary assemblies.
Figure 2-4. FLT93-C Sanitary Flow Elements (RC and CIP Respectively)
Install and Wire the Enclosure(s)
Caution:
In applications where the sensing element is located in an explosive environment, isolate the conduit
before it leaves the environment. A potting Y may be used to provide the isolation.
Pulling wires can cause damage to the control circuit. Therefore, remove the control circuit from the
enclosure and use extreme care when pulling wires into the enclosure.
Mount and wire the control circuit either locally or remotely (option) by following the local or remote enclosure
procedure below.
Minimum Wire Size
Table 2-1 shows the smallest (maximum AWG number) copper wire that is used in the electrical cables. Use a lower
gauge of wire for less of a voltage drop. Contact FCI concerning greater distances than those listed in the table. The
sensing element cable must be shielded. If the cable is spliced the shield wire must be continued through the splice.
If a terminal block is used, the shield must have its own terminal.
FLTÔ Series FlexSwitchÔ 2 - 4 Doc. No. 06EN003246 Rev. B
Page 15
CHAPTER 2 - INSTALLATION FLUID COMPONENTS, INTL
Table 2-1. Maximum AWG Number
GWArofecnatsiDmumixaM
noitcennoC
.tf01
)m3(
.tf05
)m51(
.tf001
)m13(
.tf052
)m67(
.tf005
)m251
.tf0001
)m503(
rewoPCA222222028161
)A2(yaleR822202612101
*seriWtnemelEwolF220202818181
.ylnotekcoslortnocehtotdetcennoceriwdleihsehthtiwelbacdedleihsaseriuqeR*
Wiring the Local Enclosure
This procedure is for instruments with the control circuit located in the sensing element enclosure.
1. Remove the control circuit from its socket. Do not remove the control circuit socket. Removal of the control
circuit socket may cause damage to the instrument.
2. Install conduit between the local enclosure and the power source and monitoring circuit. Provide watertight
hardware and apply thread sealant to all connections to prevent water damage.
Warning:
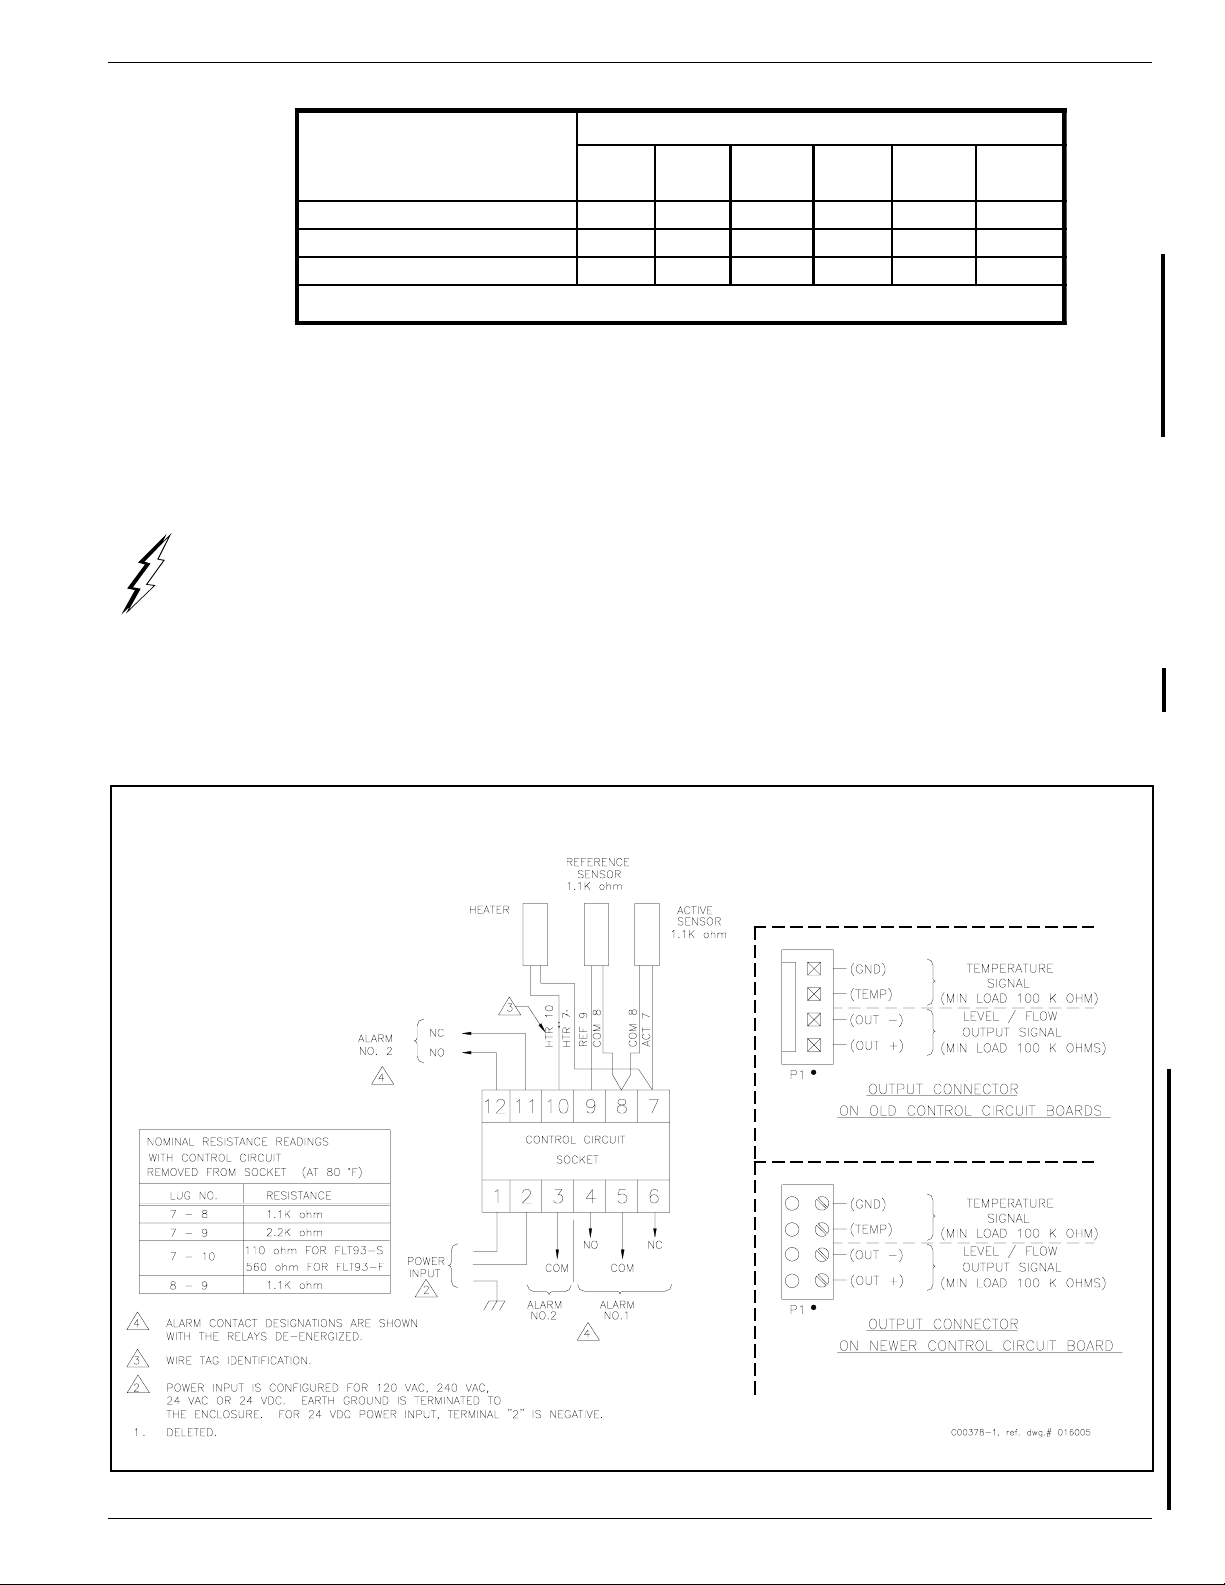
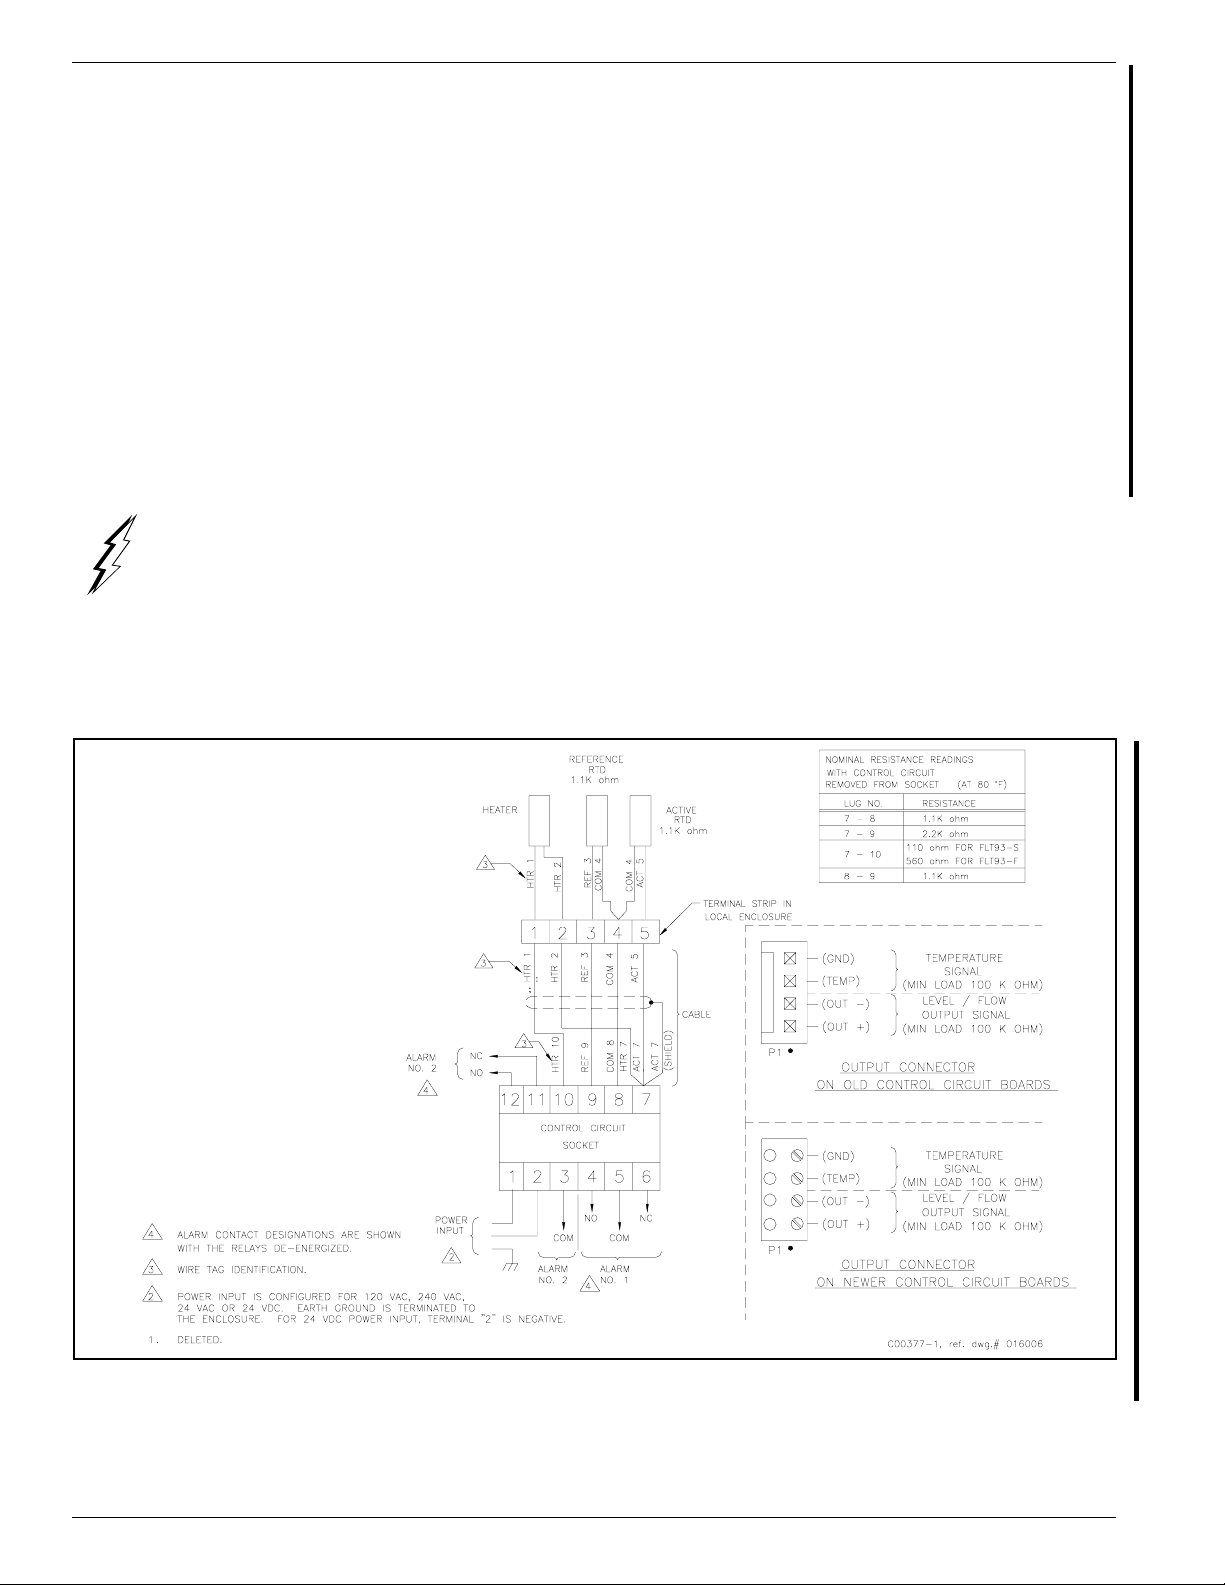
3. When connecting the relay wiring, do so with complete understanding of what the process requires of the
instrument. The instrument has dual SPDT or single DPDT relay output contacts dependent on the jumper
configuration for each alarm switch point. For the relay logic, refer to Figure 2-5. Also refer to Table 3-5 and
Table 3-6 in Chapter 3 - Operation. Relay contacts are shown with the relays de-energized. Wire in accordance
with the system requirements.
Ensure that all power is off before wiring any circuit.
Figure 2-5. Local Wiring Diagram
Doc. No. 06EN003246 Rev. B 2 - 5 FLTÔ Series FlexSwitchÔ
Page 16
FLUID COMPONENTS, INTL CHAPTER 2 - INSTALLATION
Wiring The Remote Enclosure
This procedure is for instruments with the control circuit located remotely from the sensing element.
Locate the Remote Hardware Location
Appendix A shows the remote enclosure along with the physical dimensions to properly mount it. Select a location
for the remote enclosure within a 1000 feet (305 m) of the sensing element. Pigtail sensing elements can not be
located more than 10 feet (3 m) from the enclosure unless the pigtail is extended with the proper size cable listed in
Table 2-1. If the cable is extended the cable connections should be located in a junction box with a 6 position
terminal block. All 5 conductors and the shield must have its own termination. The remote enclosure should be
easily accessible with enough room to open the enclosure cabinet cover at any time. Secure the remote enclosure
solidly to a vertical surface capable of providing support. Use appropriate hardware to secure the enclosure.
1. Remove the control circuit from the remote enclosure.
2. Run a five-conductor, shielded cable from the local enclosure to the remote enclosure. Use Table 2-1 to
determine which wire gauge to use.
3. Wire between the local and remote enclosures according to Figure 2-6.
Warning:
Ensure that all power is off before wiring any circuit.
4. When connecting the relay wiring, do so with complete understanding of what the process requires of the
instrument. The instrument has dual SPDT or single DPDT relay output contacts dependent on the jumper
configuration for each alarm switch point. For the relay logic, refer to Figure 2-6. Also refer to Table 3-5 and
Table 3-6 in Chapter 3 - Operation. Relay contacts are shown with the relays de-energized. Wire in accordance
with the system requirements.
Figure 2-6. Remote Wiring Diagram
FLTÔ Series FlexSwitchÔ 2 - 6 Doc. No. 06EN003246 Rev. B
Page 17
CHAPTER 2 - INSTALLATION FLUID COMPONENTS, INTL
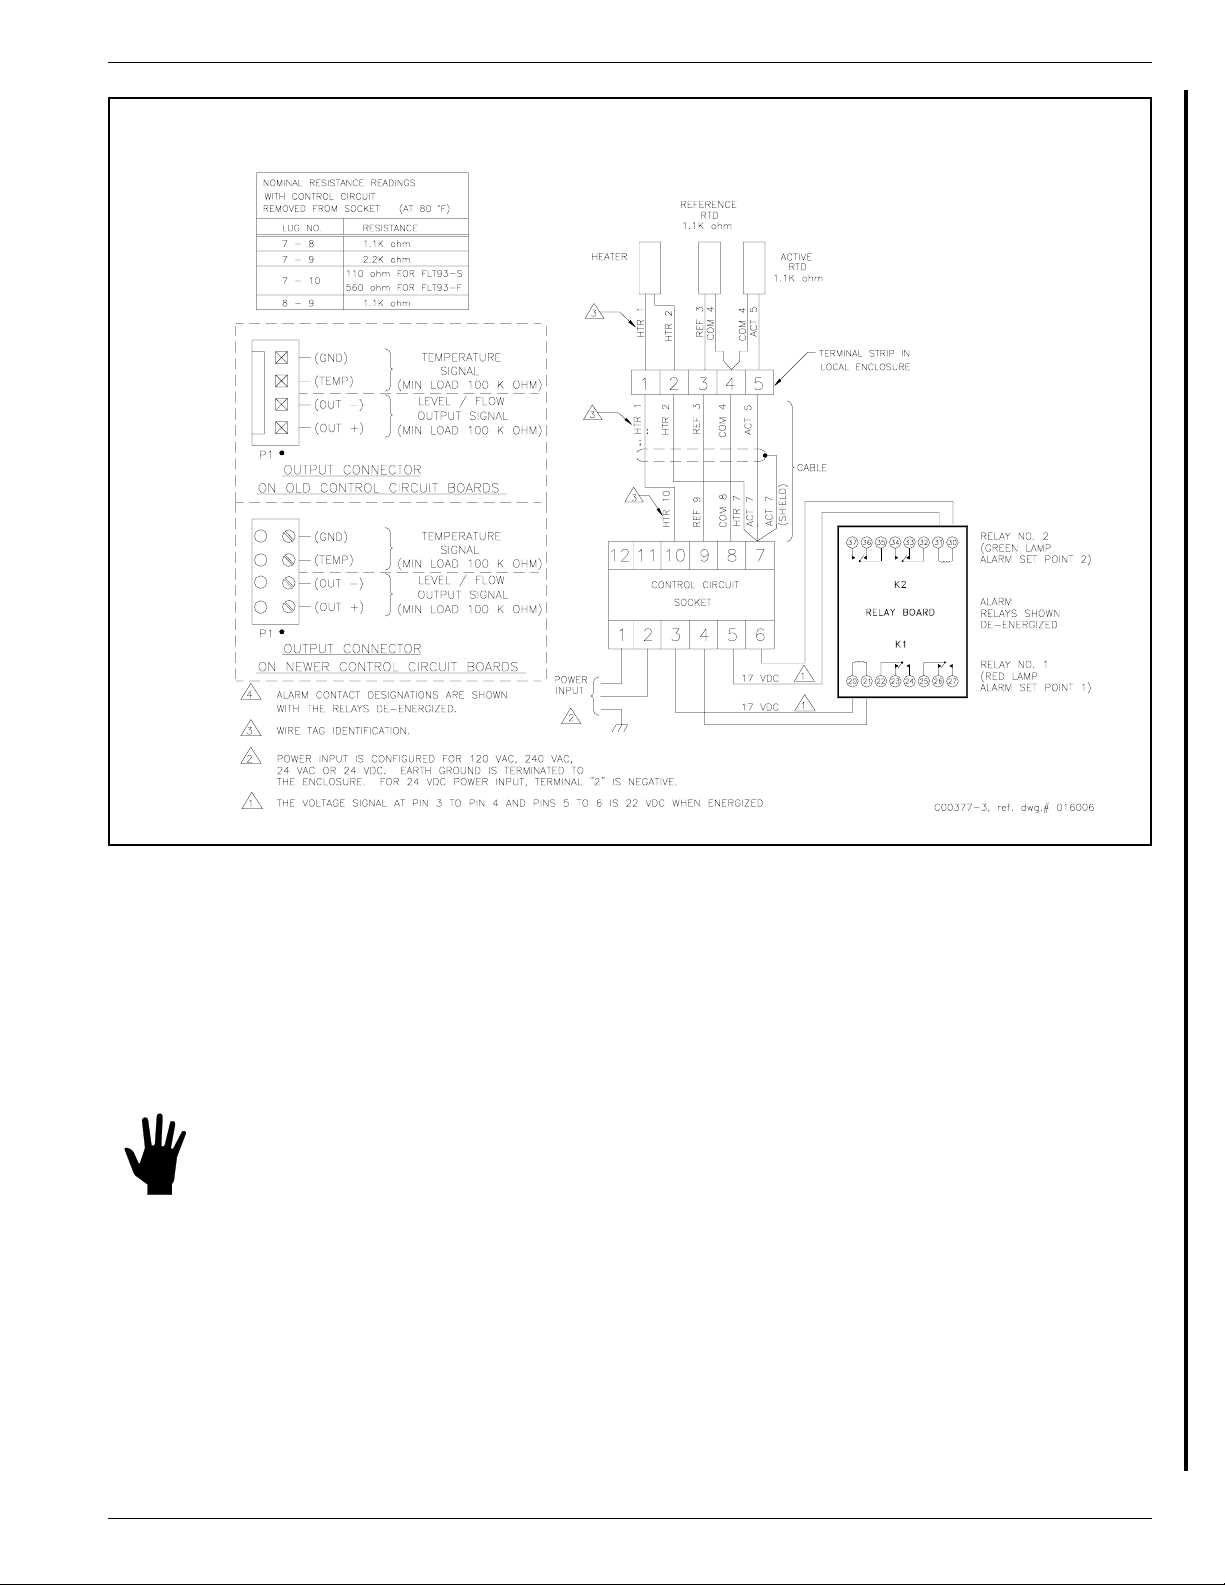
Figure 2-7. Auxiliary Relay Board Wiring Diagram
Wiring Remote Enclosure with Auxiliary Relay
Refer to the "Wiring the Remote Enclosure" section to run the cable between the local and remote enclosures. In
most cases the auxiliary relay board is in the same enclosure as the control circuit. Both boards are mounted on the
same panel and have been wired together at the factory. This configuration can be ordered without an enclosure
which can be supplied by the customer.
The alarm connections are made at the auxiliary relay board where each alarm is driving a DPDT relay.
Caution:
This configuration uses a control circuit that provides a switching voltage signal instead of relay contacts. The
switch voltage is wired from the control circuit socket to the auxiliary relay board actuating the relays.
The auxiliary relay board has several relay options that can be ordered. The options are as follows:
Do not connect any loads to the control circuit socket. Damage will occur to the control circuit if the
alarm circuit is energized.
Be sure the correct relay board has been ordered for the correct output. See the following paragraph.
• Dry to 2 amps at 115 Vac or 28Vdc, Dry to 1 amp at 230 Vac (relay is enclosed in a plastic sealed cover).
• 100mA to 10mA at 115 Vac or 28Vdc, 50mA to 3 amps at 230 Vac (relay is enclosed in a plastic sealed cover).
• Dry to 0.5 amps at 115 Vac, hermetically sealed relay.
Doc. No. 06EN003246 Rev. B 2 - 7 FLTÔ Series FlexSwitchÔ
Page 18

FLUID COMPONENTS, INTL CHAPTER 2 - INSTALLATION
Make sure that the proper relays have been selected for the intended load. See Appendix A for the auxiliary relay
board configuration drawing.
When connecting the relay wiring, do so with complete understanding of what the process requires of the instrument.
The instrument has dual DPDT or single 4PDT relay output contacts dependent on the jumper configuration for each
alarm switch point. For the relay logic, refer to Figure 2-5. Also refer to Table 3-5 and Table 3-6 in
Chapter 3 - Operation. Relay contacts are shown with the relays de-energized. Wire in accordance with the system
requirements.
The control circuit can be ordered with switching voltage outputs without ordering a relay board. This can be used
with customer supplied relays or any other device that has a differential input. The output voltage is 17 Vdc and will
drive a load as low as 1500 ohms. Refer to Figure 2-7 for the output terminals.
Wiring A Remote Control Circuit To An Auxiliary Relay Board
1. Run a four-conductor cable from the control circuit to the auxiliary relay board if the board was not factory
installed. Use the wiring diagram in Figure 2-7 to wire the boards together.
2. Attach the customer wiring as desired using Figure 2-7 as a wiring guide.
Wiring for this configuration is the same as the sensing element wiring to the control circuit on a remote instrument.
Wiring Output Signal Terminals
Two output signals are provided on the control circuit at P1. The signal voltage at positions 1 and 2 represents the
process change. The signal voltage at positions 3 and 4 is proportional to the temperature at the sensing element.
See Figures 2-5 through 2-7. See also Chapter 3 for the physical layout of the control circuit.
Caution:
Do not ground terminal 2 of P1. (Terminal 2 is the negative lead of the process signal.) This terminal
is 9 volts above the control circuit ground. The peripheral using this signal must have a differential
input.
These voltages can be used by other peripherals with a minimum load of 100K ohms. The terminal block can be
wired with between gauge 26 and 18 wire (22 gauge wire is normally used). The maximum recommended length of
wire is 1000 feet. Shielding is required on any length of cable. The shield must be terminated at position 4 on P1.
Early versions of the FLT93 require a connecting harness that was supplied with each instrument. The harness can
be ordered if it is missing. The FCI part number is 015664-01. Newer versions of the FLT93 require a supplied
terminal plug.
FLTÔ Series FlexSwitchÔ 2 - 8 Doc. No. 06EN003246 Rev. B
Page 19

CHAPTER 3 - OPERATION FLUID COMPONENTS INTL
3. Operation
Caution: The control circuit contains electrostatic discharge (ESD) sensitive devices. Use standard ESD precautions
when handling the control circuit. See Chapter 2, Operation, for ESD details.
Factory Default Jumper Configuration
Unless a custom factory setup or calibration is specified, the instrument is delivered in a standard factory
configuration. The standard default jumper configuration is shown in Table 3-1.
Table 3-1. Standard Jumper Default Configuration
rewoPtupnI.)6Jdna5J,2J(caV032
S-39TLF
rewoPretaeH
F-39TLF
smralAforebmuN.stcatnocTDPSfotesenosahmralahcaE.)32J(owT
DELdeR1.oNmralA
62R.toPtnioPteS
neerG2.oNmralA
.toPtnioPteSDEL
52R
)31J(
)41J(
.)72J(tewrowolf
.)52J(erutarepmetwoleb
:yletamixorppatatniopteS
,erutarepmetdradnatsrof)C121(F052
,erutarepmetmuidemrof)C062(F005
.snoitacilppaleveldiuqilroriarofsttaw57.0
.snoitacilppaleveldiuqilroriarofsttaw52.0
tadezigreneyaleR.)02J(slangislevelrowolfrotinomotteS
dezigreneyaleR.)91J(slangiserutarepmetrotinomotteS
.)ylnOS-39TLF(erutarepmethgihrof)C454(F058
If the order included custom factory setup and calibration, leave all settings alone. The instrument is ready for
service without changes.
If custom factory setup or calibration was not ordered, configure the control circuit using the jumper tables
(Tables 3-2 to 3-6) and then follow the set point adjustment section that is appropriate for the application.
Configuration Jumpers
If the order did not specify for the control circuit to be factory configured, the standard configuration can be changed
using Figure 3-1 and Table 3-2 though Table 3-6. The factory default configuration is shown as being underlined.
Heater Cut-Off
The 5294 control circuit has a heater cutoff switch that limits the skin temperature of the sensing element to a
temperature differential of approximately 150°F (66°C) above the process temperature. In the case where the
instrument is used as a gas flow switch, and the heater wattage is set too high, the temperature differential (DT)
between the RTDs may exceed the usable input range of the control circuit. The usable input range can also be
exceeded in the case where the instrument is used in liquid flow applications where the heater wattage is set at the
highest value, and when the sensing elements go dry. When the temperature differential is less than 150°F (66°C)
the heater automatically turns back on. The yellow power indicator LED (DS3) turns on and off with the heater for a
visual indication of the heater state. The LED will alternate between on and off until the condition iss corrected.
Doc. No. 06EN003246 Rev. B 3 - 1 FLTÔ Series FlexSwitchÔ
Page 20

FLUID COMPONENTS INTL CHAPTER 3 - OPERATION
Figure 3-1. 5294 Control Circuit Jumper Locations
The reason for operation in the above extreme conditions is that the input signal range is at the widest point making
the alarm set point adjustment easier to perform. If the heater does cycle the operator may need to use the next lower
wattage setting.
In some applications it is desirable to set the heater wattage high, even though the sensing element goes into the
heater cutoff mode. An example is when the instrument is used to detect the interface of two liquids. These liquids
may have viscosities that will have signals very close to each other. In order to have the maximum signal difference
between the signals the heater wattage is set to its maximum. If the sensing element detects a dry condition the
control circuit will indicate a heater cutoff condition. The sensing element will not be dammaged if it is left dry with
the maximum heater wattage. The alarms can be set so one alarm will switch at the interface and one alarm can
detect when the element goes dry.
Alarm Set Point Adjustments
Numerical Adjustment Versus Adjustment by Observation
An alarm set point is established using either numerical adjustment or adjustment by observation. The adjustment by
observation requires the customer to establish normal process operation and adjust the alarm set point relative to this
condition. The numerical approach requires measuring normal and alarm process conditions with a voltmeter and
setting up the instrument in the calibrate mode based on these values. The adjustment by observation requires less
time to establish the alarm set point. The numerical adjustment requires control of the process as well as additional
time to establish the alarm set point. Use the adjustment procedure that is the most appropriate for the application
requirement.
FLTÔ Series FlexSwitchÔ 3 - 2 Doc. No. 06EN003246 Rev. B
Page 21

CHAPTER 3 - OPERATION FLUID COMPONENTS INTL
Table 3-2. Input Power
Table 3-4. Application
REPMUJ
1JNITUOTUOTUO
2J
3JNITUOTUOTUO
4JTUOTUONITUO
5J
6J
7JTUOTUOTUONI
8JTUOTUOTUONI
9JTUOTUONITUO
CAV031-001CAV062-002CAV62-81CDV03-12
TUONITUOTUO
NINITUOTUO
TUONININI
TCELESREWOP
Table 3-3A. Selectable Heater Wattage Control
REPMUJ23J21J*31J*41J33J
TNEMELEF-39TLF
EGATTAW
)RTHMHO065(
TNEMELES-39TLF
EGATTAW
)RTHMHO011(
75.0
STTAW
3
STTAW
25.0
STTAW
57.1
STTAW
94.0
STTAW
57.0
STTAW
LEVEL/WOLF.PMET
1.ONMRALA02J
12J
2.ONMRALA81J91J
Table 3-5. Relay Energization
REPMUJ
1.ONMRALA
72J
62J
2.ONMRALA
52J
02.0
72.0
FFO
STTAW
FFO
STTAW
42J
Table 3-6. Relay Contact Configuration
WOL,WOLFWOLHTIWDEZIGRENE-EDYALER
.ERUTAREPMETHGIHRO)YRD(LEVEL
HGIH,WOLFHGIHHTIWDEZIGRENE-EDYALER
ERUTAREPMETWOLRO)TEW(LEVEL
WOL,WOLFWOLHTIWDEZIGRENE-EDYALER
.ERUTAREPMETHGIHRO)YRD(LEVEL
HGIH,WOLFHGIHHTIWDEZIGRENE-EDYALER
.ERUTAREPMETWOLRO)TEW(LEVEL
*J13 is standard for FLT93-S and
J14 is standard for FLT93-F.
Table 3-3B. Fixed Heater Wattage Control
REPMUJ31J41J33J
TNEMELEF-39TLF
EGATTAW
)RTHMHO065(
TNEMELES-39TLF
EGATTAW
)RTHMHO011(
.A.N
57.0
STTAW
02.0
STTAW
.A.NFFO
Numerical Alarm Set Point Adjustment
The control circuit has two mutually exclusive alarms; they are identified as Alarm No. 1 and Alarm No. 2. Each has
an alarm set point adjustment potentiometer and LED indicator. Both alarms can be setup for one of three
applications; flow, level/interface, or temperature. The following application specific adjustment procedures are
generic and can be used for setting either or both alarms. Use Figure 3-2 to help locate the important setup
components (potentiometers, LEDs, etc.).
32J )MRALAREPYALERENO(TDPSLAUD
22J)2.ONMRALASELBASID(TDPDELGNIS
FFO
Doc. No. 06EN003246 Rev. B 3 - 3 FLTÔ Series FlexSwitchÔ
Page 22

FLUID COMPONENTS INTL CHAPTER 3 - OPERATION
Air/Gas Flow Applications
Figure 3-2. 5294 Control Circuit Component Locations
1. Remove the instrument's enclosure cover.
2. Ensure the configuration jumpers on the control circuit are correct for this application. See Tables 3-3
through 3-6.
3. Check to make sure the input power jumpers match the power to be applied to the instrument. See Table 3-2.
4. Apply power to the instrument. Verify the yellow LED is on and allow the instrument fifteen minutes to
warm-up.
5. Verify the mode switch is in the RUN position.
6. Attach a DC voltmeter to the P1 terminal block with the positive (+) lead to position one and the negative (-)
lead to position two.
Note:
The terminal block can be unplugged from the control circuit to facilitate easy connections. The terminal
block is used in late production instruments. Early production instruments used a mating cable and
connector. If a cable and connector are required use FCI part number 015664-01 to order.
7. Establish the normal process flow condition and allow the signal to stabilize.
Note:
The output signal at connector P1 will vary inversely with changes in the process flow rate. The output
signal level is relative to the type of process media being measured and the heater wattage setting. See
Figure 3-3.
FLTÔ Series FlexSwitchÔ 3 - 4 Doc. No. 06EN003246 Rev. B
Page 23

CHAPTER 3 - OPERATION FLUID COMPONENTS INTL
Figure 3-3. Flow Application Signal Output
8. Record the normal flow signal value.
Normal Flow Signal = ________ volts DC
9. Follow either the Detecting Decreasing Flow or the Detecting Increasing Flow procedure for each flow
application alarm.
Detecting Decreasing Flow (low flow alarm)
1. Stop the process flow and allow the signal to stabilize.
2. Record the no-flow signal. (The no-flow signal should be greater than the normal flow signal.)
No-Flow Signal = ________ volts DC
3. Determine the set point by calculating the average of the normal and no-flow output signals. (i.e.; If the normal
signal is 2.000 volts and the no-flow signal is 5.000 volts, then the calculated set point would be 3.500 volts.)
4. Record this value.
Calculated Set Point = ________ volts DC
Note:
The calculated set point must be at least 0.020 volts greater than the normal signal to ensure that the alarm
will reset.
5. Slide the mode switch to the CALIBRATE position.
6. Adjust the calibrate potentiometer (R24) until the voltmeter equals the calculated set point.
7. For the appropriate alarm, determine whether the status LED is on or off (red for No. 1 or green for No. 2).
If the LED is off, turn the set point adjustment potentiometer (R26 for alarm No. 1 or R25 for alarm No.2)
slowly clockwise just until the LED turns on .
OR
If the LED is on, turn the set point adjustment potentiometer (R26 for alarm No. 1 or R25 for alarm No. 2)
counterclockwise until the LED turns off and then slowly clockwise just until the LED turns on.
8. If this is the only flow application alarm to be setup, then skip to the Continue With the Air/Gas Flow
Procedure.
Doc. No. 06EN003246 Rev. B 3 - 5 FLTÔ Series FlexSwitchÔ
Page 24

FLUID COMPONENTS INTL CHAPTER 3 - OPERATION
Detecting Increasing Flow (high flow alarm)
1. Establish the excessive process flow condition and allow the signal to stabilize.
2. Record the high flow signal. (The high flow signal should be less than the normal flow signal.)
High Flow Signal = ________ volts DC
3. Determine the set point by calculating the average of the normal and high flow output signals. (i.e., If the
normal signal is 2.000 volts and the high flow signal is 1.000 volts, then the calculated set point would be 1.500
volts.)
4. Record this value.
Calculated Set Point = ________ volts DC
Note:
The calculated set point must be at least 0.020 volts less than the normal signal to ensure that the alarm will
reset.
5. Slide the mode switch to the CALIBRATE position.
6. Adjust the calibrate potentiometer (R24) until the voltmeter equals the calculated set point.
7. For the appropriate alarm, determine whether the status LED is on or off (red for No. 1 or green for No. 2).
If the LED is on, turn the set point adjustment potentiometer ( R26 for alarm No. 1 or R25 for alarm No. 2)
slowly counterclockwise just until the LED turns off.
OR
If the LED is off, turn the set point adjustment potentiometer ( R26 for alarm No. 1 or R25 for alarm No. 2)
clockwise until the LED turns on and then slowly counterclockwise just until the LED turns off.
Continue With the Air/Gas Flow Procedure
1. Slide the mode switch to the RUN position.
2. Establish the normal process flow condition. For low-flow alarm setups, the status LED should be off. For high
flow alarm setups, the status LED should be on.
3. Establish the process alarm condition and monitor the voltmeter display.
4. When the output signal passes through the calculated set point value, the status LED should turn on for low-flow
alarms, off for high flow alarms, and the relay contacts should change state.
5. Reestablish the normal process flow condition. Both the LED and the relay contacts should reset.
6. Disconnect the voltmeter from P1.
7. Replace the enclosure cover.
Note:
The alarm can be set for a specific flow rate. Follow the Air/Gas Flow Application procedure up to step 7
except establish the specific flow rate rather than the normal flow. The output signal will be the set point
value. Determine whether the alarm should actuate with decreasing or increasing flow and skip to the
appropriate step 4 in Detecting Decreasing Flow or Detecting Increasing Flow, respectfully. Enter the
specific flow rate value as the set point. Then follow the Continue With the Air /Gas Flow Procedure steps.
The relay logic default configuration is set for the relay coil to be de-energized when the flow signal voltage
is greater than the set point value. (i.e., Assume that the normal process flow condition has been
established. In this state, the relay coil will be energized if the alarm has been set for low-flow detection
and de-energized if the alarm has been set for high flow detection.) A recommendation is to have the relay
coils energized when the process condition is normal. This will enable the alarm to close or open the
contacts in case of a power failure.
FLTÔ Series FlexSwitchÔ 3 - 6 Doc. No. 06EN003246 Rev. B
Page 25

CHAPTER 3 - OPERATION FLUID COMPONENTS INTL
Wet/Dry Liquid Level Applications
1. Remove the instrument's enclosure cover.
2. Ensure the configuration jumpers on the control circuit are correct for this application. See Tables 3-3
through 3-6.
3. Check to make sure the input power jumpers match the power to be applied to the instrument. See Table 3-2.
4. Apply power to the instrument. Verify the yellow LED is on and allow the instrument fifteen minutes to
warm-up.
5. Verify the mode switch is in the RUN position.
6. Attach a DC voltmeter to P1 with the positive (+) lead to position one and the negative (-) lead to position two.
Note:
The terminal block can be unplugged from the control circuit to facilitate easy connections. The terminal
block is used in late production instruments. Early production instruments used a mating cable and
connector. If a cable and connector are required use FCI part number 015664-01 to order.
7. Raise the process fluid level so the sensing element is wet.
8. Allow the output signal to stabilize and record the wet condition value.
Wet Condition Signal = ________ volts DC
Note:
The output signal at P1 is relative to the type of process media detected. See Figure 3-4.
9. Lower the process fluid level so the sensing element is dry.
10. Allow the output signal to stabilize and record the dry condition value. (The dry signal should be greater than
the wet signal.)
Dry Condition Signal = ________ volts DC
11. Determine the set point by calculating the average of the wet and dry output signals. (i.e., If the wet signal is
0.200 volts and the dry signal is 4.000 volts, then the calculated set point would be 2.100 volts.)
12. Record this value.
Calculated Set Point = ________ volts DC
Note:
The calculated set point must be at least 0.015 volts greater than the wet signal and 0.020 volts less than the
dry signal to ensure that the alarm will reset.
Figure 3-4. Level Application Signal Output
Doc. No. 06EN003246 Rev. B 3 - 7 FLTÔ Series FlexSwitchÔ
Page 26

FLUID COMPONENTS INTL CHAPTER 3 - OPERATION
13. Slide the mode switch to the CALIBRATE position.
14. Adjust the calibrate potentiometer (R24) until the voltmeter equals the calculated set point.
15. For the appropriate alarm, determine whether the status LED is on or off (red for No. 1 or green for No. 2).
16. Follow either the Detecting Dry Condition or the Detecting Wet Condition for each level application alarm.
Detecting Dry Condition (low level alarm)
If the status LED is off, turn the set point adjustment potentiometer (R26 for alarm No. 1 or R25 for alarm
No. 2) slowly clockwise just until the LED turns on.
OR
If the status LED is on, turn the set point adjustment potentiometer (R26 for alarm No. 1 or R25 for alarm No. 2)
counterclockwise until the LED turns off and then slowly clockwise just until the LED turns on.
Detecting Wet Condition (high level alarm)
If the status LED is on, turn the set point adjustment potentiometer (R26 for alarm No. 1 or R25 for alarm No. 2)
slowly counterclockwise just until the LED turns off.
OR
If the status LED is off, turn the set point adjustment potentiometer (R26 for alarm No. 1 or R25 for alarm
No. 2) clockwise until the LED turns on and then slowly counterclockwise just until the LED turns off.
17. Slide the mode switch to the RUN position. The status LED should be on if the sensing element is dry and off if
the sensing element is wet.
18. Monitor the voltmeter display while raising or lowering the process fluid level. When the output signal passes
through the set point, the status LED should change states and the relay contacts should change state.
19. Reestablish the normal level condition. Both the LED and relay contacts should reset.
20. Disconnect the voltmeter from P1.
21. Replace the enclosure cover.
Note:
The relay logic default configuration is set for the relay coil to be de-energized when the level signal is
greater than the set point value. (i.e., The relay coil will be de-energized when the sensing element is dry.)
A recommendation is to have the relay coils energized when the process condition is normal. This will
enable the alarm to close or open the contacts in case of a power failure.
Temperature Applications
For temperature versus voltage values, see Table 3-7 located at the rear of this chapter. These values have an
accuracy of ±5°F (2.78°C). There is also a conversion formula later in this chapter to convert the temperature output
voltage to degrees fahrenheit. If a factory calibration chart was ordered look for it in the plastic page protector at the
back of this manual. Make sure the serial number of the chart matches the instrument to be adjusted.
1. Remove the instrument's enclosure cover.
2. Ensure the configuration jumpers on the control circuit are correct for this application. See Tables 3-3
through 3-6.
Caution:
If both alarms are to be used for temperature, then remove the heater control jumper from the heater, control
header. The jumper may be stored on the control circuit by plugging it across J12 and J14. Placing the
jumper here will not turn on the heater. If one alarm is for temperature and the other is for flow or level,
then set the heater power according to the application. Use alarm No. 2 for the temperature alarm. See
Table 3-3.
FLTÔ Series FlexSwitchÔ 3 - 8 Doc. No. 06EN003246 Rev. B
Page 27

CHAPTER 3 - OPERATION FLUID COMPONENTS INTL
3. Check to make sure the input power jumpers match the power to be applied to the instrument. See Table 3-2.
4. Apply power to the instrument. Verify the yellow LED is on. Allow the instrument fifteen minutes to warm-up.
5. Verify the mode switch is in the RUN position.
6. Attach a DC voltmeter to P1 with the positive (+) lead to position 3 and the negative (-) lead to position 4.
Note:
The terminal block can be unplugged from the control circuit to facilitate easy connections. The terminal
block is used in late production instruments. Early production instruments used a mating cable and
connector. If a cable and connector are required use FCI part number 015664-01 to order.
7. Establish the normal process temperature condition and allow the signal to stabilize.
8. Record the normal temperature signal value.
Normal Temperature Signal = ________ volts DC
Note:
The output signal at connector P1 will vary proportionally with the process temperature.
9. Follow either the Detecting Increasing Temperature or the Detecting Decreasing Temperature procedure for
each temperature application alarm.
Detecting Increasing Temperature (high temperature alarm)
1. Slide the mode switch to the CALIBRATE position.
2. Adjust the calibrate potentiometer (R24) until the voltmeter equals the desired temperature signal in Table 3-7.
3. For the appropriate alarm, determine whether the status LED is on or off (red for No. 1 or green for No. 2).
If the LED is off, turn the set point adjustment potentiometer (R26 for alarm No. 1 or R25 for alarm No. 2)
slowly clockwise just until the LED turns on.
OR
If the LED is on, turn the set point adjustment potentiometer (R26 for alarm No. 1 or R25 for alarm No. 2)
counterclockwise until the LED turns off and then slowly clockwise just until the LED turns on.
If this is the only temperature application alarm to be setup, then skip to the Continue With the Temperature
Application procedure.
Detecting Decreasing Temperature (low temperature alarm)
1. Slide the mode switch to the CALIBRATE position.
2. Adjust the calibrate potentiometer (R24) until the voltmeter equals the normal temperature signal.
3. For the appropriate alarm, determine whether the status LED is on or off (red for No. 1 or green for No. 2).
If the LED is on, turn the set point adjustment potentiometer (R26 for alarm No. 1 or R25 for alarm No. 2)
slowly counterclockwise just until the LED turns off.
OR
If the LED is off, turn the set point adjustment potentiometer (R26 for alarm No. 1 or R25 for alarm No. 2)
clockwise until the LED turns on and then slowly counterclockwise just until the LED turns off.
Continue With the Temperature Applications
1. Slide the mode switch to the RUN position.
2. Establish the normal process temperature condition. For the high temperature alarm setups, the status LED
should be off at normal temperatures. For the low temperature alarm setups, the status LED should be on at
normal temperatures.
Doc. No. 06EN003246 Rev. B 3 - 9 FLTÔ Series FlexSwitchÔ
Page 28

FLUID COMPONENTS INTL CHAPTER 3 - OPERATION
3. Establish the process alarm condition and monitor the voltmeter display.
4. When the output signal passes through the set point value, the status LED should turn on for high temperature
alarms, off for low temperature alarms, and the relay contacts should change state.
5. Reestablish the normal process temperature condition. The LED and relay contacts should reset.
6. Disconnect the voltmeter from P1.
7. Replace the enclosure cover.
Note:
The relay default configuration is for the relay coil to be de-energized when the temperature signal is greater
than the set point value. (i.e., Assume that the normal process temperature condition has been established.
In this state, the relay coil will be energized.)
Liquid Flow Applications
1. Remove the instrument's enclosure cover.
2. Check to make sure the input power jumpers match the power to be applied to the instrument. See Table 3-2.
3. As necessary, set the following control circuit configuration jumpers. See Tables 3-3 through 3-6.
Application: J20 or J18 (Flow/Level) for alarm No. 1 or No. 2, respectively.
Heater Power: J32 (3 watts for FLT93-S or 0.57 watts for FLT93-F).
4. Apply power to the instrument. Verify the yellow LED is on. Allow the instrument fifteen minutes to warm-up.
5. Verify the mode switch is in the RUN position.
6. Attach a DC voltmeter to P1 connector with the positive (+) lead to position one and the negative (-) lead to
position two.
Note:
The terminal block can be unplugged from the control circuit to facilitate easy connections. The terminal
block is used in late production instruments. Early production instruments used a mating cable and
connector. If a cable and connector are required use FCI part number 015664-01 to order.
The output signal at connector P1 will vary inversely with changes in the process flow rate. The output
signal level is also relative to the type of process media being measured. See Figure 3-3.
7. Establish the normal process flow condition and allow the signal to stabilize.
8. Record the normal flow signal value.
Normal Flow Signal = ________ volts DC
9. Follow either the Detecting Decreasing Flow or Detecting Increasing Flow procedure for each Liquid flow
application alarm.
Detecting Decreasing Flow (low flow alarm)
1. Stop the process flow and allow the signal to stabilize.
2. Record the no-flow signal. (The no-flow signal should be greater than the normal flow signal.)
No-Flow Signal = ________ volts DC
3. Determine the set point by calculating the average of the normal and no-flow output signals. (i.e.; If the normal
signal is 0.080 volts and the no-flow signal is 0.300 volts, then the calculated set point would be 0.190 volts.)
4. Record this value.
Calculated Set Point = ________ volts DC
FLTÔ Series FlexSwitchÔ 3 - 10 Doc. No. 06EN003246 Rev. B
Page 29

CHAPTER 3 - OPERATION FLUID COMPONENTS INTL
Note:
The calculated set point must be at least 0.020 volts greater than the normal signal to ensure that the alarm
will reset.
5. Slide the mode switch to the CALIBRATE position.
6. Adjust the calibrate potentiometer (R24) until the voltmeter equals the calculated set point.
7. For the appropriate alarm, determine whether the status LED is on or off (red for No. 1 or green for No. 2).
If the LED is off, turn the set point adjustment potentiometer (R26 for alarm No. 1 or R25 for alarm No. 2)
slowly clockwise just until the LED turns on.
OR
If the LED is on, turn the set point adjustment potentiometer (R26 for alarm No. 1 or R25 for alarm No. 2)
counterclockwise until the LED turns off and then slowly clockwise just until the LED turns on.
8. If this is the only flow application alarm to be setup, then skip to Continue With the Liquid Flow Applications
procedure.
Detecting Increasing Flow Rate (high flow alarm)
1. Establish the excessive flow condition and allow the signal to stabilize.
2. Record the high flow signal. (The high flow signal should be less than the normal flow signal.)
High Flow Signal = ________ volts DC
3. Determine the set point by calculating the average of the normal and high flow output signals. (i.e.; If the
normal signal is 0.080 volts and the high flow signal is 0.030 volts, then the calculated set point would be 0.055
volts.)
4. Record this value.
Calculated Set Point = ________ volts DC
Note:
The calculated set point must be at least 0.020 volts less than the normal signal to ensure that the alarm will
reset.
5. Slide the mode switch to the CALIBRATE position.
6. Adjust the calibrate potentiometer (R24) until the voltmeter equals the calculated set point.
7. For the appropriate alarm, determine whether the status LED is on or off (red for No. 1 or green for No. 2).
If the LED is on, turn the set point adjustment potentiometer (R26 for alarm No. 1 or R25 for alarm No. 2)
slowly counterclockwise just until the LED turns off.
OR
If the LED is off, turn the set point adjustment potentiometer (R26 for alarm No. 1 or R25 for alarm No. 2)
clockwise until the LED turns on and then slowly counterclockwise just until the LED turns off.
Continue With the Liquid Flow Applications
1. Slide the mode switch to the RUN position.
2. Establish the normal process flow condition. For low-flow alarm setups, the status LED should be off. For high
flow alarm setups, the status LED should be on.
3. Establish the process alarm condition and monitor the voltmeter display.
4. When the output signal passes through the calculated set point value, the status LED should turn on for low-flow
alarms, off for high flow alarms, and the relay contacts should change state.
5. Reestablish the normal process flow condition. Both the LED and the relay contacts should reset.
Doc. No. 06EN003246 Rev. B 3 - 11 FLTÔ Series FlexSwitchÔ
Page 30

FLUID COMPONENTS INTL CHAPTER 3 - OPERATION
6. Disconnect the voltmeter from P1.
7. Replace the enclosure cover.
Note:
The alarm can be set for a specific flow rate. Follow the Liquid Flow Application Procedure above to
establish the specific flow rate rather than the normal flow. The output signal will be the set point value.
Determine whether the alarm should actuate with decreasing or increasing flow and skip to the appropriate
step, 4 of either Decreasing Flow Rate or Increasing flow rate. Enter the specific flow rate value as the set
point and then follow the Continue With the Liquid Flow Application procedure steps.
The relay logic default configuration is set for the relay coil to be de-energized when the flow signal is
greater than the set point value. (i.e., Assume that the normal process flow condition has been established.
In this state, the relay coil will be energized if the alarm has been set for low-flow detection and deenergized if the alarm has been set for high flow detection.)
Adjustment by Observation
Note:
Flow Applications
The control circuit has two mutually exclusive alarms; they are identified as Alarm No. 1 and Alarm No. 2
and each has a set point adjustment potentiometer and LED indicator. Each alarm can be setup for one of
three applications: flow, level/interface, or temperature. The following application specific adjustment
procedures are generic and can be used for setting either or both alarms. The mode switch must be in the
RUN position. Use Figure 3-2 to help locate the adjustment potentiometers and LEDs.
1. Ensure that the instrument has been properly installed in the pipeline. Fill the pipeline so the sensing element is
surrounded by the process medium.
2. Apply power to the instrument and allow fifteen minutes for the sensing element to become active and stabilize.
3. Flow the pipeline at the normal or expected rate. Remove the enclosure cover to allow access to the control
circuit to make adjustments.
Detecting Decreasing Flow (low flow alarm)
If the status LED is off, turn the set point adjustment potentiometer clockwise until the LED turns on. With the LED
on, slowly turn the potentiometer counterclockwise one turn past the point at which the LED just turns off. The
potentiometer may have up to one-quarter turn of hysteresis, therefore, if the mark is overshot, the procedure should
be repeated.
Detecting Increasing Flow (high flow alarm)
If the status LED is on, turn the set point adjustment potentiometer counterclockwise until the LED turns off. With
the LED off, slowly turn the potentiometer clockwise one-half turn past the point at which the LED just turns on.
The potentiometer may have up to one-quarter turn of hysteresis, therefore, if the mark is overshot, the procedure
should be repeated.
Signal Output for Flow Applications
The output signal at connector P1 varies inversely with flow rate. The output signal level is also relative to the type
of process media, see Figure 3-3.
Level Applications
1. Ensure that the instrument has been properly installed in the vessel.
2. Apply power to the instrument and allow fifteen minutes for the sensing element to become active and stabilize.
3. Remove the enclosure cover to allow access to the control circuit to make adjustments.
FLTÔ Series FlexSwitchÔ 3 - 12 Doc. No. 06EN003246 Rev. B
Page 31

CHAPTER 3 - OPERATION FLUID COMPONENTS INTL
Detecting Dry Condition (adjustment with sensing element wet)
Verify that the sensing element is wet. If the status LED is off, turn the set point adjustment potentiometer clockwise
until the LED turns on. With the LED on, slowly turn the potentiometer counterclockwise one turn past the point at
which the LED just turns off. The potentiometer may have up to one-quarter turn of hystereses, therefore, if the mark
is overshot, the procedure should be repeated.
Detecting Wet Condition (adjustment with sensing element dry)
Caution:
Give consideration to the fact that air or gas flowing over the sensing element may decrease the output
signal resulting in a false alarm. If the sensing element is exposed to air or gas flow in the dry condition, or
where the process media is highly viscous, make set point adjustments in the wet condition only.
Field adjustments made in the dry condition should be performed in the actual service environment or within a
condition that approximates that environment. Provision should be made for the worst case condition of air or gas
flow on the sensing element. If the status LED is on, turn the set point adjustment potentiometer counterclockwise
until the LED turns off. (If the LED cannot be turned off, the instrument must be set in the wet condition.)
With the LED off, slowly turn the potentiometer clockwise 1 turn past the point at which the LED just goes on. The
potentiometer may have up to one-quarter turn of hysteresis, therefore, if the mark is overshot, the procedure should
be repeated.
Signal Output for Level Applications
The output signal at P1 is lowest in water and highest in air. See Figure 3-4.
Temperature Applications
Note: It is reccommended not to use the instrument for a dual flow and temperature application in air or gas unless
the flow rate is greater than 1.0 SFPS. (The instrument may be used for a dual flow and temperature
application in liquids at any flow rate.)
When using the instrument for dual level and temperature applications, the temperature signal can be as
much as 50°F (28°C) high when the sensing element is in still air.
Turn the heater off for temperature only applications. To turn off the heater remove the heater control
jumper from the heater, control headder. The jumper may be stored on the control circuit by plugging it
across J12 and J14. Placing the jumper here will not turn on the heater.
1. Ensure that the instrument has been properly installed. Apply power the instrument and allow fifteen minutes
for the sensing element to become active and stabilize.
3. Establish the normal or expected temperature. Remove the enclosure cover to allow access to the control circuit.
Perform either the detecting increasing temperature or detecting decreasing temperature procedure shown below.
Detecting Increasing Temperature (high temperature alarm)
If the status LED is off, turn the alarm adjustment potentiometer clockwise until the LED turns on. With the LED
on, slowly turn the potentiometer counterclockwise one half turn past the point at which the LED just turns off. The
potentiometer may have up to one-quarter turn of hysteresis, therefore, if the mark is overshot, the procedure should
be repeated.
Detecting Decreasing Temperature (low temperature alarm)
If the status LED is on, turn the set point adjustment potentiometer counterclockwise until the LED turns off. With
the LED off, slowly turn the potentiometer clockwise one-half turn past the point at which the LED just turns on.
The potentiometer may have up to one-quarter turn of hysteresis, therefore, if the mark is overshot, the procedure
should be repeated.
Doc. No. 06EN003246 Rev. B 3 - 13 FLTÔ Series FlexSwitchÔ
Page 32

FLUID COMPONENTS INTL CHAPTER 3 - OPERATION
Table 3-7. Temperature Versus Voltage Output (sheet 1 of 5)
0.00375 OHMS/OHMS/ C 1000 OHMS PLATINUM
°
TEMPERATURE VERSUS VOLTAGE OUTPUT, FLT93
T(°F) V OUT T(°F) V OUT T(°F) V OUT T(°F) V OUT
-100 1.434 -57 1.620 -14 1.804 29 1.987
-99 1.439 -56 1.625 -13 1.809 30 1.992
-98 1.443 -55 1.629 -12 1.813 31 1.996
-97 1.447 -54 1.633 -11 1.817 32 2.000
-96 1.452 -53 1.637 -10 1.822 33 2.004
-95 1.456 -52 1.642 -9 1.826 34 2.008
-94 1.460 -51 1.646 -8 1.830 35 2.013
-93 1.465 -50 1.650 -7 1.834 36 2.017
-92 1.469 -49 1.655 -6 1.839 37 2.021
-91 1.473 -48 1.659 -5 1.843 38 2.025
-90 1.478 -47 1.663 -4 1.847 39 2.030
-89 1.482 -46 1.667 -3 1.851 40 2.034
-88 1.486 -45 1.672 -2 1.856 41 2.038
-87 1.491 -44 1.676 -1 1.860 42 2.042
-86 1.495 -43 1.680 0 1.864 43 2.047
-85 1.499 -42 1.685 1 1.868 44 2.051
-84 1.504 -41 1.689 2 1.873 45 2.055
-83 1.508 -40 1.693 3 1.877 46 2.059
-82 1.512 -39 1.698 4 1.881 47 2.063
-81 1.517 -38 1.702 5 1.885 48 2.068
-80 1.521 -37 1.706 6 1.890 49 2.072
-79 1.525 -36 1.710 7 1.894 50 2.076
-78 1.530 -35 1.715 8 1.898 51 2.080
-77 1.534 -34 1.719 9 1.902 52 2.085
-76 1.538 -33 1.723 10 1.907 53 2.089
-75 1.543 -32 1.728 11 1.911 54 2.093
-74 1.547 -31 1.732 12 1.915 55 2.097
-73 1.551 -30 1.736 13 1.919 56 2.101
-72 1.556 -29 1.740 14 1.924 57 2.106
-71 1.560 -28 1.745 15 1.928 58 2.110
-70 1.564 -27 1.749 16 1.932 59 2.114
-69 1.569 -26 1.753 17 1.936 60 2.118
-68 1.573 -25 1.757 18 1.941 61 2.122
-67 1.577 -24 1.762 19 1.945 62 2.127
-66 1.581 -23 1.766 20 1.949 63 2.131
-65 1.586 -22 1.770 21 1.953 64 2.135
-64 1.590 -21 1.775 22 1.958 65 2.139
-63 1.594 -20 1.779 23 1.962 66 2.144
-62 1.599 -19 1.783 24 1.966 67 2.148
-61 1.603 -18 1.787 25 1.970 68 2.152
-60 1.607 -17 1.792 26 1.975 69 2.156
-59 1.612 -16 1.796 27 1.979 70 2.160
-58 1.616 -15 1.800 28 1.983 71 2.165
FLTÔ Series FlexSwitchÔ 3 - 14 Doc. No. 06EN003246 Rev. B
Page 33

CHAPTER 3 - OPERATION FLUID COMPONENTS INTL
Table 3-7. Temperature Versus Voltage Output (sheet 2 of 5)
0.00375 OHMS/OHMS/ C 1000 OHMS PLATINUM
°
TEMPERATURE VERSUS VOLTAGE OUTPUT, FLT93
T(°F) V OUT T(°F) V OUT T(°F) V OUT T(°F) V OUT
72 2.169 121 2.374 170 2.577 219 2.779
73 2.173 122 2.378 171 2.581 220 2.783
74 2.177 123 2.382 172 2.585 221 2.787
75 2.181 124 2.386 173 2.590 222 2.791
76 2.186 125 2.391 174 2.594 223 2.795
77 2.190 126 2.395 175 2.598 224 2.799
78 2.194 127 2.399 176 2.602 225 2.803
79 2.198 128 2.403 177 2.606 226 2.807
80 2.202 129 2.407 178 2.610 227 2.811
81 2.207 130 2.411 179 2.614 228 2.816
82 2.211 131 2.415 180 2.618 229 2.820
83 2.215 132 2.420 181 2.623 230 2.824
84 2.219 133 2.424 182 2.627 231 2.828
85 2.223 134 2.428 183 2.631 232 2.832
86 2.228 135 2.432 184 2.635 233 2.836
87 2.232 136 2.436 185 2.639 234 2.840
88 2.236 137 2.440 186 2.643 235 2.844
89 2.240 138 2.445 187 2.647 236 2.848
90 2.244 139 2.449 188 2.651 237 2.852
91 2.248 140 2.453 189 2.656 238 2.856
92 2.253 141 2.457 190 2.660 239 2.860
93 2.257 142 2.461 191 2.664 240 2.865
94 2.261 143 2.465 192 2.668 241 2.869
95 2.265 144 2.469 193 2.672 242 2.873
96 2.269 145 2.474 194 2.676 243 2.877
97 2.274 146 2.478 195 2.680 244 2.881
98 2.278 147 2.482 196 2.684 245 2.885
99 2.282 148 2.486 197 2.688 246 2.889
100 2.286 149 2.490 198 2.693 247 2.893
101 2.290 150 2.494 199 2.697 248 2.897
102 2.295 151 2.499 200 2.701 249 2.901
103 2.299 152 2.503 201 2.705 250 2.905
104 2.303 153 2.507 202 2.709 251 2.909
105 2.307 154 2.511 203 2.713 252 2.913
106 2.311 155 2.515 204 2.717 253 2.917
107 2.315 156 2.519 205 2.721 254 2.922
108 2.320 157 2.523 206 2.725 255 2.926
109 2.324 158 2.528 207 2.729 256 2.930
110 2.328 159 2.532 208 2.734 257 2.934
111 2.332 160 2.536 209 2.738 258 2.938
112 2.336 161 2.540 210 2.742 259 2.942
113 2.340 162 2.544 211 2.746 260 2.946
114 2.345 163 2.548 212 2.750 261 2.950
115 2.349 164 2.552 213 2.754 262 2.954
116 2.353 165 2.556 214 2.758 263 2.958
117 2.357 166 2.561 215 2.762 264 2.962
118 2.361 167 2.565 216 2.766 265 2.966
119 2.366 168 2.569 217 2.770 266 2.970
120 2.370 169 2.573 218 2.775 267 2.974
Doc. No. 06EN003246 Rev. B 3 - 15 FLTÔ Series FlexSwitchÔ
Page 34

FLUID COMPONENTS INTL CHAPTER 3 - OPERATION
Table 3-7. Temperature Versus Voltage Output (sheet 3 of 5)
0.00375 OHMS/OHMS/ C 1000 OHMS PLATINUM
°
TEMPERATURE VERSUS VOLTAGE OUTPUT, FLT93
T(°F) V OUT T(°F) V OUT T(°F) V OUT T(°F) V OUT
268 2.978 317 3.176 366 3.373 415 3.567
269 2.982 318 3.180 367 3.377 416 3.571
270 2.987 319 3.184 368 3.381 417 3.575
271 2.991 320 3.188 369 3.385 418 3.579
272 2.995 321 3.192 370 3.388 419 3.583
273 2.999 322 3.196 371 3.392 420 3.587
274 3.003 323 3.200 372 3.396 421 3.591
275 3.007 324 3.205 373 3.400 422 3.595
276 3.011 325 3.209 374 3.404 423 3.599
277 3.015 326 3.213 375 3.408 424 3.602
278 3.019 327 3.217 376 3.412 425 3.606
279 3.023 328 3.221 377 3.416 426 3.610
280 3.027 329 3.225 378 3.420 427 3.614
281 3.031 330 3.229 379 3.424 428 3.618
282 3.035 331 3.233 380 3.428 429 3.622
283 3.039 332 3.237 381 3.432 430 3.626
284 3.043 333 3.241 382 3.436 431 3.630
285 3.047 334 3.245 383 3.440 432 3.634
286 3.051 335 3.249 384 3.444 433 3.638
287 3.055 336 3.253 385 3.448 434 3.642
288 3.059 337 3.257 386 3.452 435 3.646
289 3.063 338 3.261 387 3.456 436 3.650
290 3.068 339 3.265 388 3.460 437 3.654
291 3.072 340 3.269 389 3.464 438 3.658
292 3.076 341 3.273 390 3.468 439 3.662
293 3.080 342 3.277 391 3.472 440 3.665
294 3.084 343 3.281 392 3.476 441 3.669
295 3.088 344 3.285 393 3.480 442 3.673
296 3.092 345 3.289 394 3.484 443 3.677
297 3.096 346 3.293 395 3.488 444 3.681
298 3.100 347 3.297 396 3.492 445 3.685
299 3.104 348 3.301 397 3.496 446 3.689
300 3.108 349 3.305 398 3.500 447 3.693
301 3.112 350 3.309 399 3.504 448 3.697
302 3.116 351 3.313 400 3.508 449 3.701
303 3.120 352 3.317 401 3.512 450 3.705
304 3.124 353 3.321 402 3.516 451 3.709
305 3.128 354 3.325 403 3.520 452 3.713
306 3.132 355 3.329 404 3.523 453 3.716
307 3.136 356 3.333 405 3.527 454 3.720
308 3.140 357 3.337 406 3.531 455 3.724
309 3.144 358 3.341 407 3.535 456 3.728
310 3.148 359 3.345 408 3.539 457 3.732
311 3.152 360 3.349 409 3.543 458 3.736
312 3.156 361 3.353 410 3.547 459 3.740
313 3.160 362 3.357 411 3.551 460 3.744
314 3.164 363 3.361 412 3.555 461 3.748
315 3.168 364 3.365 413 3.559 462 3.752
316 3.172 365 3.369 414 3.563 463 3.756
FLTÔ Series FlexSwitchÔ 3 - 16 Doc. No. 06EN003246 Rev. B
Page 35

CHAPTER 3 - OPERATION FLUID COMPONENTS INTL
Table 3-7. Temperature Versus Voltage Output (sheet 4 of 5)
0.00375 OHMS/OHMS/ C 1000 OHMS PLATINUM
°
TEMPERATURE VERSUS VOLTAGE OUTPUT, FLT93
T(°F) V OUT T(°F) V OUT T(°F) V OUT T(°F) V OUT
464 3.760 513 3.950 562 4.139 611 4.327
465 3.763 514 3.954 563 4.143 612 4.330
466 3.767 515 3.958 564 4.147 613 4.334
467 3.771 516 3.962 565 4.151 614 4.338
468 3.775 517 3.966 566 4.155 615 4.342
469 3.779 518 3.970 567 4.159 616 4.346
470 3.783 519 3.974 568 4.162 617 4.349
471 3.787 520 3.977 569 4.166 618 4.353
472 3.791 521 3.981 570 4.170 619 4.357
473 3.795 522 3.985 571 4.174 620 4.361
474 3.799 523 3.989 572 4.178 621 4.365
475 3.803 524 3.993 573 4.182 622 4.368
476 3.806 525 3.997 574 4.185 623 4.372
477 3.810 526 4.001 575 4.189 624 4.376
478 3.814 527 4.005 576 4.193 625 4.380
479 3.818 528 4.008 577 4.197 626 4.384
480 3.822 529 4.012 578 4.201 627 4.387
481 3.826 530 4.016 579 4.205 628 4.391
482 3.830 531 4.020 580 4.208 629 4.395
483 3.834 532 4.024 581 4.212 630 4.399
484 3.838 533 4.028 582 4.216 631 4.403
485 3.842 534 4.032 583 4.220 632 4.406
486 3.845 535 4.035 584 4.224 633 4.410
487 3.849 536 4.039 585 4.228 634 4.414
488 3.853 537 4.043 586 4.231 635 4.418
489 3.857 538 4.047 587 4.235 636 4.422
490 3.861 539 4.051 588 4.239 637 4.425
491 3.865 540 4.055 589 4.243 638 4.429
492 3.869 541 4.059 590 4.247 639 4.433
493 3.873 542 4.062 591 4.250 640 4.437
494 3.877 543 4.066 592 4.254 641 4.440
495 3.880 544 4.070 593 4.258 642 4.444
496 3.884 545 4.074 594 4.262 643 4.448
497 3.888 546 4.078 595 4.266 644 4.452
498 3.892 547 4.082 596 4.270 645 4.456
499 3.896 548 4.086 597 4.273 646 4.459
500 3.900 549 4.089 598 4.277 647 4.463
501 3.904 550 4.093 599 4.281 648 4.467
502 3.908 551 4.097 600 4.285 649 4.471
503 3.912 552 4.101 601 4.289 650 4.474
504 3.915 553 4.105 602 4.292 651 4.478
505 3.919 554 4.109 603 4.296 652 4.482
506 3.923 555 4.113 604 4.300 653 4.486
507 3.927 556 4.116 605 4.304 654 4.490
508 3.931 557 4.120 606 4.308 655 4.493
509 3.935 558 4.124 607 4.311 656 4.497
510 3.939 559 4.128 608 4.315 657 4.501
511 3.943 560 4.132 609 4.319 658 4.505
512 3.947 561 4.136 610 4.323 659 4.508
Doc. No. 06EN003246 Rev. B 3 - 17 FLTÔ Series FlexSwitchÔ
Page 36

FLUID COMPONENTS INTL CHAPTER 3 - OPERATION
Table 3-7. Temperature Versus Voltage Output (sheet 5 of 5)
0.00375 OHMS/OHMS/ C 1000 OHMS PLATINUM
°
TEMPERATURE VERSUS VOLTAGE OUTPUT, FLT93
T(°F) V OUT T(°F) V OUT T(°F) V OUT T(°F) V OUT
660 4.512 709 4.696 758 4.878 807 5.058
661 4.516 710 4.700 759 4.881 808 5.062
662 4.520 711 4.703 760 4.885 809 5.065
663 4.523 712 4.707 761 4.889 810 5.069
664 4.527 713 4.711 762 4.892 811 5.072
665 4.531 714 4.714 763 4.896 812 5.076
666 4.535 715 4.718 764 4.900 813 5.080
667 4.538 716 4.722 765 4.904 814 5.083
668 4.542 717 4.726 766 4.907 815 5.087
669 4.546 718 4.729 767 4.911 816 5.091
670 4.550 719 4.733 768 4.915 817 5.094
671 4.554 720 4.737 769 4.918 818 5.098
672 4.557 721 4.741 770 4.922 819 5.102
673 4.561 722 4.744 771 4.926 820 5.105
674 4.565 723 4.748 772 4.929 821 5.109
675 4.569 724 4.752 773 4.933 822 5.113
676 4.572 725 4.755 774 4.937 823 5.116
677 4.576 726 4.759 775 4.940 824 5.120
678 4.580 727 4.763 776 4.944 825 5.124
679 4.584 728 4.767 777 4.948 826 5.127
680 4.587 729 4.770 778 4.951 827 5.131
681 4.591 730 4.774 779 4.955 828 5.134
682 4.595 731 4.778 780 4.959 829 5.138
683 4.599 732 4.781 781 4.962 830 5.142
684 4.602 733 4.785 782 4.966 831 5.145
685 4.606 734 4.789 783 4.970 832 5.149
686 4.610 735 4.793 784 4.974 833 5.153
687 4.614 736 4.796 785 4.977 834 5.156
688 4.617 737 4.800 786 4.981 835 5.160
689 4.621 738 4.804 787 4.985 836 5.164
690 4.625 739 4.807 788 4.988 837 5.167
691 4.629 740 4.811 789 4.992 838 5.171
692 4.632 741 4.815 790 4.996 839 5.175
693 4.636 742 4.819 791 4.999 840 5.178
694 4.640 743 4.822 792 5.003 841 5.182
695 4.644 744 4.826 793 5.007 842 5.185
696 4.647 745 4.830 794 5.010 843 5.189
697 4.651 746 4.833 795 5.014 844 5.193
698 4.655 747 4.837 796 5.018 845 5.196
699 4.658 748 4.841 797 5.021 846 5.200
700 4.662 749 4.844 798 5.025 847 5.204
701 4.666 750 4.848 799 5.029 848 5.207
702 4.670 751 4.852 800 5.032 849 5.211
703 4.673 752 4.856 801 5.036 850 5.214
704 4.677 753 4.859 802 5.040 851 5.218
705 4.681 754 4.863 803 5.043 852 5.222
706 4.685 755 4.867 804 5.047 853 5.225
707 4.688 756 4.870 805 5.051 854 5.229
708 4.692 757 4.874 806 5.054 855 5.233
FLTÔ Series FlexSwitchÔ 3 - 18 Doc. No. 06EN003246 Rev. B
Page 37

CHAPTER 3 - OPERATION FLUID COMPONENTS INTL
Converting Temp Out Voltage to Temp in Degrees F
This formula is useful when monitoring the temperature output voltage with a data acquisition system where the
formula can be used in the program.
Use the following formula to determine what the temperature is in degrees Fahrenheit, if the FLT temperature output
voltage is known.
y = a + bx + c/x + dx2 + e/x2 + fx3 + g/x
3
Where: y = Temperature in Degrees F
x = FLT Temperature Output Voltage
a = -533.998303
b = 251.-092242
c = 218.4101830
d = -1.25664666
e = -225.492653
f = 0.522817769
g = 95.41271936
Doc. No. 06EN003246 Rev. B 3 - 19 FLTÔ Series FlexSwitchÔ
Page 38

FLUID COMPONENTS INTL CHAPTER 3 - OPERATION
Fail Safe Alarm Setting
These procedures set the second relay to detect component failure (fail-safe).
Low Flow Alarm Settings
For the low flow fail safe setup the following jumpers are to be installed: J18, J20, J23, J24, J27.
WHEN ALARM 1 DETECTS LOW
5.0
DE-ENERGIZED
ALARM 1 SET POINT
ENERGIZED
SIGNAL
OUTPUT
4.5
4.0
3.5
3.0
2.5
2.0
1.5
ENERGIZED
ALARM 2 SET POINT
DE-ENERGIZED
1.0
0.5
0
Figure 3-5. Low Flow Fail Safe Alarm
The following information is assumed:
02010 30 5040 60
FLOW THERE IS A POSSIBLE OPEN
ACTIVE RTD OR SHORTED
REFERENCE RTD
WHEN ALARM 2 DETECTS OVER
RANGE FLOW, THERE IS A POSSIBLE
HEATER FAILURE,
SHORTED ACTIVE RTD OR
OPEN REFERENCE RTD
A POWER FAILURE IS DETECTED IF
BOTH RELAYS ARE DE-ENERGIZED
AIR FLOW RATE
C00534-1
Relay is de-energized in the ALARM condition.
Alarm 1 set point is adjusted for desired low flow alarm velocity or signal.
Alarm 2 set point is adjusted slightly below minimum signal output (over range flow).
High Flow Alarm Settings
For the high flow fail safe setup the following jumpers are to be installed: J18, J20, J23, J25, J26.
DE-ENERGIZED
ALARM 2 SET POINT
ENERGIZED
5.0
4.5
SIGNAL
OUTPUT
ENERGIZED
ALARM 1 SET POINT
DE-ENERGIZED
4.0
3.5
3.0
2.5
2.0
1.5
1.0
0.5
Figure 3-6. High Flow Fail Safe Alarm
0
02010 30 5040 60
WHEN ALARM 1 DETECTS HIGH
FLOW, THERE IS A POSSIBLE
HEATER FAILURE,
SHORTED ACTIVE RTD OR
OPEN REFERENCE RTD
WHEN ALARM 2 DETECTS AN
UNDER RANGE FLOW, THERE IS A
POSSIBLE OPEN ACTIVE RTD OR
SHORTED REFERENCE RTD
A POWER FAILURE IS DETECTED IF
BOTH RELAYS ARE DE-ENERGIZED
AIR FLOW RATE
C00535-1
The following information is assumed:
Relay is de-energized in the ALARM condition.
Alarm 1 set point is adjusted for desired high flow alarm velocity or signal.
Alarm 2 set point is adjusted above maximum signal output (under range flow not to exceed 7.0 volts).
FLTÔ Series FlexSwitchÔ 3 - 20 Doc. No. 06EN003246 Rev. B
Page 39

CHAPTER 3 - OPERATION FLUID COMPONENTS INTL
Low Level Alarm Settings (Sensing Element Normally Wet)
For the low level fail safe setup the following jumpers are to be installed: J18, J20, J23, J24, J27.
WHEN ALARM 1 DETECTS LOW
LEVEL, THERE IS A POSSIBLE
OPEN ACTIVE RTD OR
SHORTED REFERENCE RTD
ALARM 2 DETECTS A
POSSIBLE HEATER FAILURE,
SHORTED ACTIVE RTD OR
OPEN REFERENCE RTD
A POWER FAILURE IS DETECTED IF
BOTH RELAYS ARE DE-ENERGIZED
LIQUID
MEDIA
C00534-2
DE-ENERGIZED
ALARM 1
SET POINT
ENERGIZED
SIGNAL
OUTPUT
ENERGIZED
ALARM 2
SET POINT
DE-ENERGIZED
5.0
4.5
4.0
3.5
3.0
2.5
2.0
1.5
1.0
0.5
0
AIR
Figure 3-7. Low Level Fail Safe Alarm
The following information is assumed:
Relay is de-energized in the ALARM condition.
Alarm 1 set point is adjusted for the mean value between the air and liquid signals.
Alarm 2 set point is adjusted to approximately half of the liquid signal. (A lower setting might be needed if the
liquid is moving.)
High Level Alarm Settings (Sensing Element Normally Dry)
For the high level fail safe setup the following jumpers are to be installed: J18, J20, J23, J25, J26.
DE-ENERGIZED
ALARM 2
SET POINT
ENERGIZED
SIGNAL
OUTPUT
ENERGIZED
ALARM 1
SET POINT
DE-ENERGIZED
5.0
4.5
4.0
3.5
3.0
2.5
2.0
1.5
1.0
0.5
0
AIR
WHEN ALARM 1 DETECTS HIGH
LEVEL, THERE IS A POSSIBLE
HEATER FAILURE,
SHORTED ACTIVE RTD OR
OPEN REFERENCE RTD
ALARM 2 DETECTS A POSSIBLE
OPEN ACTIVE RTD OR SHORTED
REFERENCE RTD
A POWER FAILURE IS DETECTED IF
BOTH RELAYS ARE DE-ENERGIZED
LIQUID
MEDIA
C00535-2
Figure 3-8. High Flow Fail Safe Alarm
The following information is assumed:
Relay is de-energized in the ALARM condition.
Alarm 1 set point is adjusted for the mean value between the air and liquid signals.
Alarm 2 set point is adjusted above maximum signal output for air (not to exceed 7.0 volts).
Doc. No. 06EN003246 Rev. B 3 - 21 FLTÔ Series FlexSwitchÔ
Page 40

CHAPTER 4 - MAINTENANCE FLUID COMPONENTS INTL
4. Maintenance
The FCI instrument requires very little maintenance. There are no moving parts or mechanical parts subject to wear
in the instrument. The sensor assembly which is exposed to the process media is all stainless steel construction and
is only susceptible to chemical attack based on the corrosion relationship of the RTD thermowell material with the
process media.
Maintenance
Without detailed knowledge of the environmental parameters of the application surroundings and process media, FCI
cannot make specific recommendations for periodic inspection, cleaning, or testing procedures. However, some
suggested general guidelines for maintenance steps are offered below. Use operating experience to establish the
frequency of each type of maintenance.
Calibration
Periodically verify the calibration of the output and re-calibrate if necessary. See Chapter 3 for instructions.
Warning:
Caution: The insturment contains electrostatic discharge (ESD) sensitive devices. Use standard ESD
To avoid hazards to personnel, ensure that all environmental isolation seals are properly
maintained.
precautions when handling the control circuit. See Chapter 2, Operation, for ESD details.
Electrical Connections
Periodically inspect cable connections on terminal strips and terminal blocks. Verify that terminal connections are
tight and in good condition with no sign of corrosion.
Remote Enclosure
Verify that the moisture barriers and seals protecting the electronics in the local and remote enclosures are adequate
and that no moisture is entering those enclosures.
Electrical Wiring
FCI recommends occasional inspection of the system’s interconnecting cable, power wiring and sensing element
wiring on a common sense basis related to the application environment. Periodically the conductors should be
inspected for corrosion and the cable insulation checked for signs of deterioration.
Sensing Element Connections
Verify that all seals are performing properly and that there is no leakage of the process media. Check for
deterioration of the gaskets and environmental seals used.
Sensing Element Assembly
Periodically remove the sensing element for inspection based on historical evidence of debris, foreign matter, or
scale buildup during appropriate plant shutdown schedules and procedures. Check for corrosion, stress cracking,
and/or buildup of oxides, salts, or other substances. The thermowells must be free of excessive contaminants and be
physically intact. Any debris or residue buildup could cause inaccurate switching. Clean the sensing element with a
soft brush and available solvents that are compatible with the instruments wetted metal.
Doc. No. 06EN003246 Rev. B 4 - 1 FLTÔ Series FlexSwitchÔ
Page 41

CHAPTER 5 - TROUBLESHOOTING FLUID COMPONENTS INTL
5. Troubleshooting
Tools Needed
Digital Multimeter (DMM)
Quick Check
Verify that the control circuit is seated firmly.
LED DS3 should be lit when power is applied and in most cases it should not be blinking.
Ensure that the jumpers are in the correct position. See Chapter 3 for the correct positions.
Ensure that the CALIBRATE - RUN switch is in the RUN position (switch S1 positioned toward the heat sink).
If LED DS3 flashes the heater power is set to high for most applications.
Check any customer supplied fuses.
See the troubleshooting chart in Figure 5-1 at the end of this chapter.
Warning:
Caution: The control circuit contains electrostatic discharge (ESD) sensitive devices. Use standard ESD
(The power is factory preset for 220 Vac, the customer may need to reset jumpers for other power input.)
Only qualified personnel should attempt to test this instrument. The operator assumes all
responsibilities for safe practices while troubleshooting.
precautions when handling the control circuit. See Chapter 2, Operation, for ESD details.
Non-maintenance Observations
At this point, observe the system setup to verify operation. No disassembly or testing is required at this time.
Check Serial Numbers
Verify that the serial number of the sensing element and the control circuit are the same number. The sensing
element and the control circuit are a matched set and cannot be operated independently of each other. The
exception to this is if a removal and replacement have been done for repair purposes. All calibrations and jumpers
must have been done and set.
Check Input Power
Verify that the correct power source is turned on and connected. Verify that the power jumpers are correct for the
application. See Chapter 3 for the correct positions.
Check the Instrument Installation
Review the information on instrument installation in Chapter 2 to verify correct mechanical and electrical
installation.
Check for Moisture
Check for moisture on the control circuit. Moisture on the control circuit may cause intermittent operation.
For normally dry conditions check for moisture on the sensing element. If a component of the process media is
near its saturation temperature it may condense on the sensing element. Place the sensing element where the
process media is well above the saturation temperature of any of the process gases.
Doc. No. 06EN003247 Rev. B 5 - 1 FLTÔ Series FlexSwitchÔ
Page 42

FLUID COMPONENTS INTL CHAPTER 5 - TROUBLESHOOTING
Check Application Design Requirements
Application design problems may occur with first time application instruments, although the design should also be
checked on instruments that have been in operation for some time. If the application design does not match field
conditions, errors occur.
1. Review the application design with plant operation personnel and plant engineers.
2. Ensure that plant equipment such as pressure and temperature instruments conform to the actual conditions.
3. Verify operating temperature, operating pressure, line size, and process medium.
If conditions and specifications are satisfactory, then refer to the troubleshooting chart in the back of this chapter
for troubleshooting suggestions.
Troubleshooting the Flow Element
Use Tables 5-1 and 5-2 to determine if the flow element is wired correctly or has failed. Turn off the input power
to the instrument. Unplug the control circuit from its socket and measure the resistances below from the terminal
block socket.
If the instrument is set up in remote configuration (flow element enclosure seperate from the control circuit
enclosure), and the ohm readings are incorrect disconnect the flow element cable at the local (flow element)
enclosure. Measure the resistance as shown in Table 5-2. If the resistance is correct then the cable between the
enclosures is probably bad or not connected properly (loose, corroded, or connected to the wrong terminal).
Table 5-1. Resistances at Control Circuit Terminal Block Socket
ECNATSISERTIUCRICLORTNOCLANIMON
GUL
REBMUN
ECNATSISER
8OT7MHOK1.1
9OT7MHOK2.2
01OT7
S-39TLFROFMHO011
F-39TLFROFMHO065
9OT8MHOK1.1
Table 5-2. Resistance at Flow Element Enclosure Terminal Block (Remote Applications Only)
KCOLBLANIMRETERUSOLCNELACOLTAECNATSISERLANIMON
.ONLANIMRETECNATSISER
2OT1
4OT3MHOK1.1
5OT3MHOK2.2
5OT4MHOK1.1
S-39TLFROFMHO011
F-39TLFROFMHO065
ON.YLNOTEKCOSTIUCRICLORTNOCOTDETCENNOCDLEIHS
.KCOLBLANIMRETSTIROERUSOLCNELACOLOTNOITCENNOC
Troubleshooting the Flow Transmitter
With power applied measure 9 volts DC ±2% (8 to 10 volts) from Plug P1 Pin 1 to Pin 4. See Figure 3-2 for the
location of P1.
FLTÔ Series FlexSwitchÔ 5 - 2 Doc. No. 06EN003247 Rev. B
Page 43

CHAPTER 5 - TROUBLESHOOTING FLUID COMPONENTS INTL
1. Is the Yellow LED ON,
OFF or BLINKING
LED ON
Although the LED is on, it may appear dim. This is caused by the unit being supplied
with 115 Vac and the Input Power Jumper Configuration set to the default setting of
230 Vac.
Input power and the jumper configuration:
OK: See Step 2.
NOT OK: Pull out the control circuit and set the jumpers correctly. Reinstall the
control circuit and restart the system.
LED OFF
Check the Input Power Jumper Configuration setting and verify the input power.
OK: See Step 4
NOT OK: Pull out the control circuit and set the jumpers correctly and verify the input
power. Reinstall the control circuit and restart the system and check for proper
operation. If LED is still off go to Step 4.
LED BLINKING
For Liquid Flow Applications: Line is DRY. Make sure the line is packed.
For Gas Flow Applications: Heater power set too high. Set to lower value.
For Liquid level Applications: Heater power set too high. Set to lower value.
For Liquid Interface Applications: In some cases it is necessary to set the heater power to
the maximum value to achieve the maximum signal difference between the two liquids.
For this application it is normal for the LED to blink if the element goes dry. Go to
Step 2.
2. Mode Switch
3. Signal Voltage
Observation
4. Power Supply Check
Make sure the mode switch is in the “RUN” position.
OK: See Step 3.
Remove the Heater Wattage Control jumper. With a voltmeter measure the signal
voltage at P1 Terminals 1 and 2.
a) The voltage is 0 volts +/- 25 mV: OK,
Reinstall the jumper and wait 5 minutes. Go to c) or d) which ever is applicable.
b) The voltage is out of tolerance: NOT OK,
Make sure that the serial numbers on the control board and the sensing element match.
If the serial numbers are OK then go to the “Restoring Temp Comp Adjustments”
procedure in Appendix D then go to c) or d) which ever is applicable.
c) The Voltage is between 1 and 6 volts and changes with flow or level changes: OK.
See Step 9.
d) The voltage is still about 0 volts: or the voltage is over +/- 7 volts: or the voltage
is negative, between -1 and -6 volts and changes with flow or level
changes: Not OK,
Sensing element may be miswired or is defective. Miswiring is more common on remote
installations at the initial installation. See Step 6 for integral installation, Step 7 for
remote installations.
Measure the voltage at P1 terminals 3 to 4.
Voltage is 0 volts: NOT OK. See Step 5.
Voltage is 9 volts: OK. See Step 6 for integral installation, Step 7 for remote
installations.
Figure 5-1. Troubleshooting Chart
Doc. No. 06EN003247 Rev. B 5 - 3 FLTÔ Series FlexSwitchÔ
Page 44

FLUID COMPONENTS INTL CHAPTER 5 - TROUBLESHOOTING
5. Fuse Check
6. Sensor Element
Check for
Integral
Installation
7. Sensor Element Check
for Remote Installation
8. Sensor Balance and
Temp Comp Settings
Check
Turn off the power to the FLT and remove the control circuit. With an ohmmeter, measure
the continuity of the fuse F1.
Fuse has no continuity: NOT OK Replace the fuse and restart the system.
Check for proper operation. Call the factory if the fuse fails again.
Fuse has continuity: OK Control circuit is defective. Replace it with a control circuit that
has the temp comp adjusted for the particular sensing element. Follow the "Restoring
temperature compensation settings" procedure in Appendix D and restart the system.
Turn off the power and remove the control circuit. Follow the “Troubleshooting the Flow
Element” procedure in this chapter.
Sensor Failure: Call the Factory
Sensors are OK: See Step 8.
Turn off the power and remove the control circuit. Follow the “Troubleshooting the Flow
Element” procedure in this chapter.
Remote cable miswired or damaged: Repair and restart the system.
Sensor Failure: Call the Factory
Sensors are OK: See Step 8.
Turn off the power and remove the control circuit. Follow the procedure to check the temp
comp settings and balance adjustment.
Temp Comp Settings are Wrong: Perform the “Restore Temp Comp” Procedure. Then
perform the sensor Balancing procedure.
Temp Comp Settings are OK: Perform the Balancing procedure. Restart the system for
proper operation. See Step 9.
9. Alarm Switch Point
Settings
Spares
FCI recommends an extra control circuit to be kept as a spare. The control circuit part number is 5294-XXX. The
dash number can be found on the control circuit, the enclosure and on the ordering paper work.
Defective Parts
Before returning any equipment to FCI, please obtain an RA number for authorization, tracking, and repair/
replacement instructions. If a return is required, remove defective instrument, replace with spare, calibrate, then
return defective instrument to FCI freight prepaid for disposition.
Customer Service
Make sure that the jumpers are set correctly. The related settings are the "Alarm Duty",
"Alarm Quantity" and the "Energization". Refer to the charts in chapter 3 or the bottom of
the control circuit.
Using the Mode Switch set to Cal, check and record the alarm settings. Compare these
setting to the signals generated by the process and make adjustment if necessary. Refer to
the Operation chapter for guidelines on setting a switch point in your particular application.
Figure 5-1. Troubleshooting Chart
1. In the event of problems or inquiries regarding the instrument, contact the Regional or Country Authorized
FCI Field Agent. There is an extensive list of these representatives at the front of this manual.
2. Before contacting the FCI representative, please be sure that all the applicable information is near so that a
more effective, efficient and timely response may be provided.
3. Refer to Appendix C for specific Customer Service policy provisions.
FLTÔ Series FlexSwitchÔ 5 - 4 Doc. No. 06EN003247 Rev. B
Page 45

APPENDIX A - DRAWINGS FLUID COMPONENTS INTL
Appendix A. Drawings
Inch [mm]
Figure A-1. Local Enclosure, NEMA Type 4X and Hazardous Location (Aluminum Enclosure Shown)
Doc. No. 06EN003246 Rev. B
Figure A-2. Local Enclosure NEMA Type 4X (Fiberglass Shown)
Figure A-3. Remote Enclosure NEMA Type 4X
A - 1 FLT Ô Series FlexSwitchÔ
Page 46

FLUID COMPONENTS INTL APPENDIX A - DRAWINGS
1.25 INCH NPT TYPICAL
Figure A-4. Remote Enclosure, Feralloy, NEMA Type 4 and Hazardous Location
Figure A-5. Remote Enclosure, Killark, NEMA Type 4 and Hazardous Location
Figure A-6. 1/4 (FLT-F Only), 3/4 or 1 Inch NPT Process Connection
FLTÔ Series FlexSwitchÔ A - 2 Doc. No. 06EN003246 Rev. B
Page 47

APPENDIX A - DRAWINGS FLUID COMPONENTS INTL
Figure A-7. Flanged Process Connection
Figure A-9. Flanged Low Pressure Packing Gland Process Connection
Doc. No. 06EN003246 Rev. B
Figure A-8. Low Pressure Packing Gland
A - 3 FLT Ô Series FlexSwitchÔ
Page 48

FLUID COMPONENTS INTL APPENDIX A - DRAWINGS
Figure A-10. 1-1/4 Inch Medium Pressure Packing Gland Connection
Figure A-11. Flanged Medium Pressure Packing Gland Process Connection
Figure A-12. 1/4 Inch Process Connection
FLTÔ Series FlexSwitchÔ A - 4 Doc. No. 06EN003246 Rev. B
Page 49
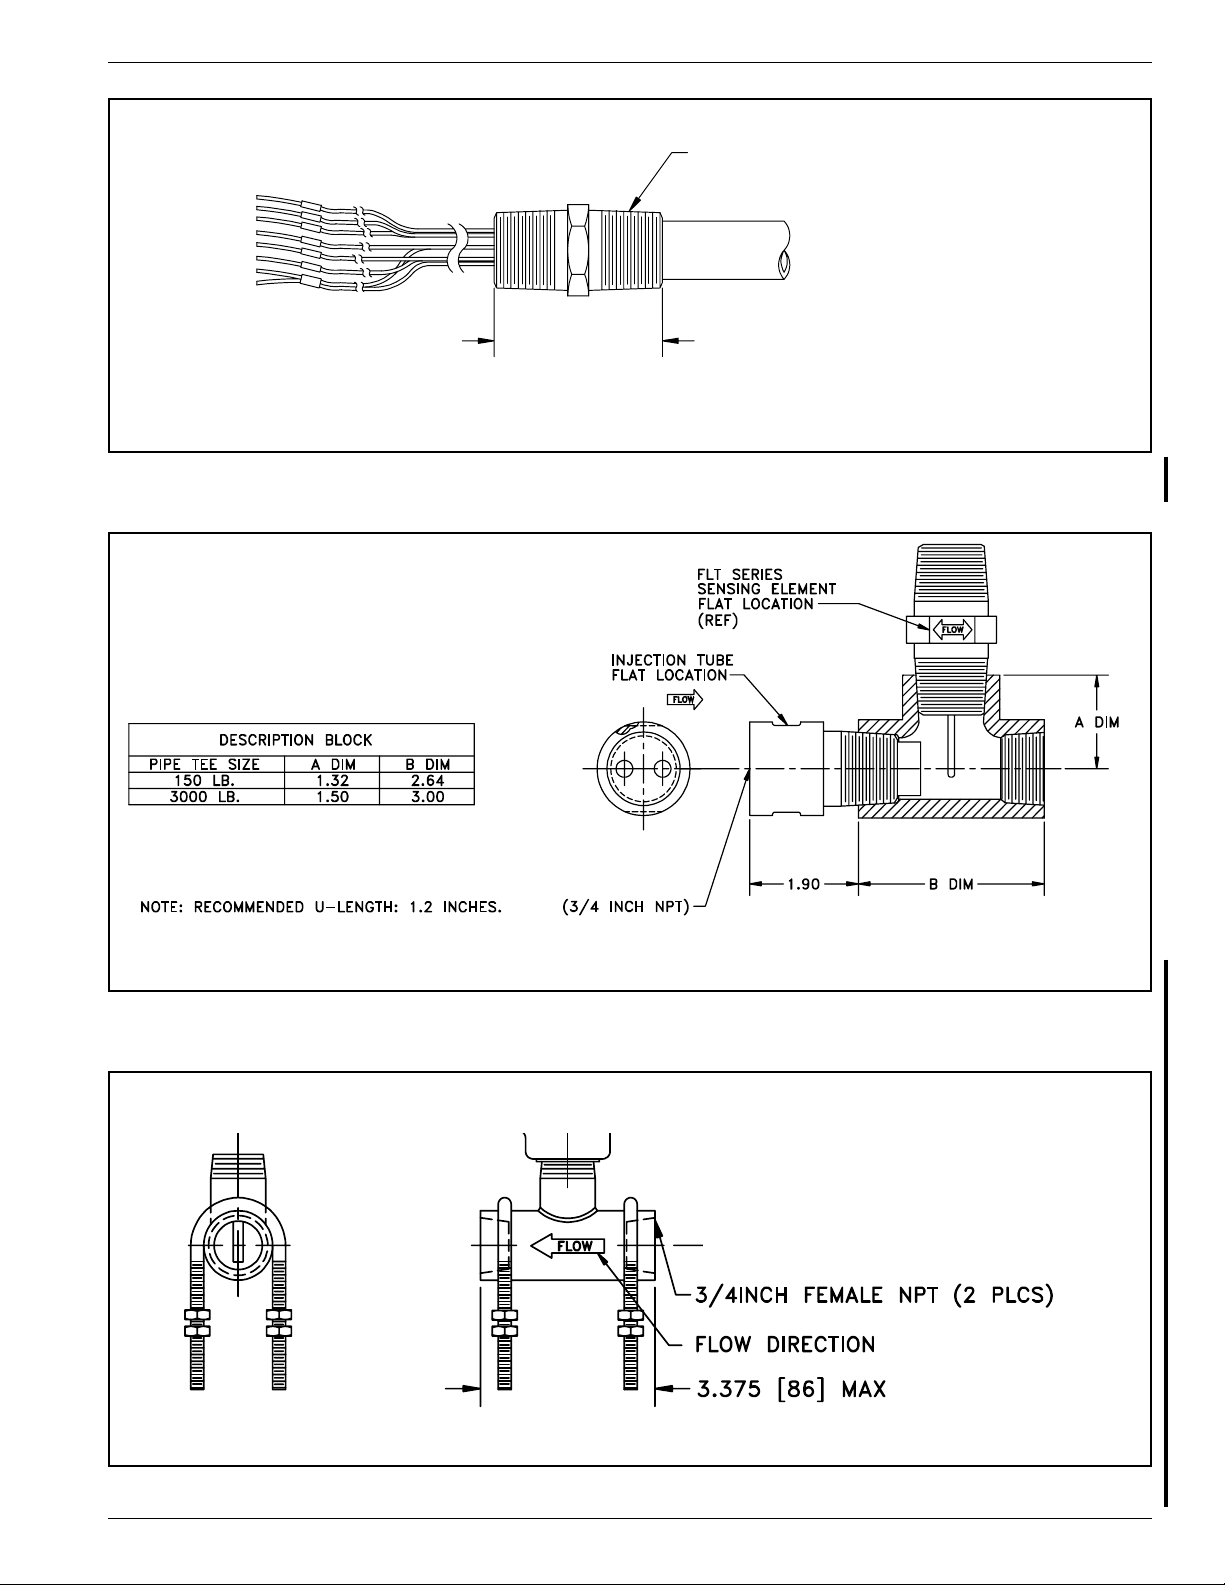
APPENDIX A - DRAWINGS FLUID COMPONENTS INTL
3/4, 1 INCH NPT OR BSP
PROCESS CONNECTION
2.0 [51]*
*1 INCH NPT PROCESS CONNECTION HAS A
3 INCH [76] LONG THREADED LENGTH
Figure A-13. Wire Pigtail Process Connection
C00421-1
C00423-1
Figure A-15. 3/4 Inch Female NPT FLT93-L With U-Bolt Bracket Kit
Doc. No. 06EN003246 Rev. B
Figure A-14. Injection Tube with Tee Fitting
A - 5 FLT Ô Series FlexSwitchÔ
Page 50

FLUID COMPONENTS INTL APPENDIX A - DRAWINGS
Figure A-16. 1 Inch NPT FLT93-L
Figure A-17. 1 Inch RF Flanged FLT93-L
Figure A-18. FLT93-C Sanitary Removable Clamp (RC) Instrument
FLTÔ Series FlexSwitchÔ A - 6 Doc. No. 06EN003246 Rev. B
Page 51

APPENDIX A - DRAWINGS FLUID COMPONENTS INTL
Figure A-19. FLT93-C Sanitary Clean-In-Place (CIP) Instrument
Doc. No. 06EN003246 Rev. B
Figure A-20. FLT93 Auxiliary Relay
A - 7 FLT Ô Series FlexSwitchÔ
Page 52

FLUID COMPONENTS INTL APPENDIX A - DRAWINGS
Figure A-21. FLT93 PWB Module
FLTÔ Series FlexSwitchÔ A - 8 Doc. No. 06EN003246 Rev. B
Page 53

APPENDIX B - GLOSSARY FLUID COMPONENTS INTL
Appendix B. Glossary
ABBREVIATIONS
Delta-R (
Delta-T
DMM Digital Multimeter
DPDT Double Pole Double Throw
FCI Fluid Components Intl
HTR Heater
LED Light Emitting Diode
POT Potentiometer
RA Return Authorization
RTD Resistance Temperature Detector
SFPS Standard Feet Per Second
SPDT Single Pole Double Throw
DEFINITIONS
DD
DR) Differential Resistance
DD
(D(D
(DT) Differential Temperature
(D(D
Active RTD The of the sensing element that is heated by the heater. The active RTD
is cooled due to increases in the process fluid flow rate or density (level sensing).
Differential resistance
Delta-R (
Differential temperature
Delta-T (
Heater (HTR) The part of the sensing element that heats the active RTD.
Local enclosure The enclosure attached to the sensing element. (Usually contains the
Reference RTD The part of the sensing element that senses the process media temperature.
Remote enclosure An optional protective enclosure for the control circuit. Used when the
Resistance Temperature
Detector (RTD) A sensor whose resistance changes proportionally to temperature changes.
Sensing element The transducer portion of the instrument. The sensing element produces
DD
DR) The difference in resistance between the active and reference RTDs.
DD
DD
DT) The difference in temperature between the active and reference RTDs.
DD
control circuit and mounting socket.)
control circuit must be located away from the sensing element.
an electrical signal that is related to the flow rate, density (level sensing), and
temperature of the process media.
Doc. No. 06EN003286 Rev. - B - 1 FLTÔ Series FlexSwitchÔ
Page 54

FLUID COMPONENTS INTL APPENDIX B - GLOSSARY
Thermowell The part of the sensing element that protects the heater and RTDs
from the process fluid.
Turndown The ratio of the upper to lower flow rate values.
FLTÔ Series FlexSwitchÔ B - 2 Doc. No. 06EN003286 Rev. -
Page 55

APPENDIX C - CUSTOMER SERVICE FLUID COMPONENTS INTL
Appendix C. Customer Service
Point of Contact
Your point of contact for service, or return of equipment to FCI is your authorized FCI service representative (see
list in the front matter of this manual).
Reference Documents
Return Authorization Request/Certificate of Non-Contamination (Document 1)
Warranties (Document 2)
Documents 1 and 2 are included in this appendix.
Hardware Return Procedure
1. Complete a Return Authorization (RA) Request/Certificate of Non-Contamination form (Document 1). Mail
or fax it to the FCI customer service department. After FCI issues you an RA number, do the following steps.
2. Thoroughly clean the hardware.
3. Package each instrument with protective packing material similar to the original FCI shipment cartons
indicated below. All damage occurring in transit is the customer’s responsibility.
a. Instruments weighing less than 25 pounds each are to be covered with protective wrap, i.e. bubble
wrap or surrounded with "popcorn". Instruments weighing greater than 60 pounds or extending more
than four feet should be secured in wooden crates by bolting the sensing element assembly in place.
b. Protect the sensing element with a cardboard tube or other sturdy wrapping.
c. Do not pack more than four small instruments in each carton.
d. Packages weighing in excess of 70 pounds or with a combined length and girth of more than 138
inches cannot be shipped by United Parcel Service. Larger packages or crates should be shipped by
carriers who specialize in the transport of industrialized instrumentation.
e. The RA number should be noted on the packing list and marked clearly on the outside of the box.
4. Prepay freight to the FCI receiving door.
Shipping/Handling Charges
All Shipping (Warranty and Nonwarranty Repairs or Returns)
The customer prepays all shipping, freight, duty/entry and handling charges from the customer site to the FCI
door. If the customer does not prepay, FCI will invoice the customer for the charges that appear on the freight bill.
Address the return equipment to :
FLUID COMPONENTS INTL
1755 LA COSTA MEADOWS DRIVE
SAN MARCOS, CA. 92069
ATTN: REPAIR DEPT.
RA NUMBER:
Doc. No. 06EN003286 Rev. - C - 1 FLTÔ Series FlexSwitchÔ
Page 56

FLUID COMPONENTS INTL APPENDIX C - CUSTOMER SERVICE
Warranty Repairs or Returns
FCI prepays ground transportation charges for return of freight to the customer’s door. FCI reserves the right to
return equipment by the carrier of our choice.
International freight, handling charges, duty/entry fees for return of equipment are paid by the customer.
Nonwarranty Repairs or Returns
FCI returns repaired equipment to the customer either collect or prepaid and adds freight charges to the customer
invoice.
Return to Stock Equipment
The customer is responsible for all shipping and freight charges for equipment that is returned to FCI stock from
the customer site. These items will not be credited to customer’s account until either all freight charges are cleared
or until the customer agrees to have any freight costs incurred by FCI deducted, along with applicable return to
stock charges, from the credit invoice. (Exceptions are made for duplicate shipments made by FCI.)
If any repair or return equipment is received at FCI, freight collect, without prior factory consent, FCI bills the
sender for these charges.
Field Service Procedures
Field Service Requests
Contact your FCI field representative to request field service.
A field service technician is dispatched to the site from either the FCI factory or one of the FCI representative
offices. After the work is complete, the technician completes a preliminary field service report at the customer site
and leaves a copy with the customer.
Following the service call, the technician completes a formal, detailed service report. The formal report is mailed
to the customer within five days of the technician’s return to the factory or office.
Rates
All field service calls are billed at the prevailing rates as listed in the FCI Price Book unless specifically excepted
by the FCI Customer Service Manager. FCI reserves the right to bill for travel times at our discretion.
Customers are charged for shipping costs related to the transfer of equipment to and from the job site. They are
also invoiced for field service work and travel expenses by FCI’s Accounting Department.
FLTÔ Series FlexSwitchÔ C - 2 Doc. No. 06EN003286 Rev. -
Page 57

APPENDIX C - CUSTOMER SERVICE FLUID COMPONENTS INTL
Document 1.
FCI RETURN AUTHORIZATION REQUEST
Customer Information
Name of Company Returning Hardware
Contact Name: Phone # Fax #
Customer Bill to Address: Ship to:
Purchase Agent Contact: Phone # Fax #
Product Information
Model Number(s) Serial Number(s)
Sending: Electronics only Sensor only Complete unit Number of units
Failure Symptoms
Troubleshooting done in the field by FCI representative or by Customer :
Action to be taken by FCI
(Note: Re-calibration/Re-certification requires the completion of a new Application Data Sheet)
Process Flow Media:
Who is your FCI factory technical contact:
Note: FCI will charge a $100 minimum handling fee on all non-warranty evaluations.
Have you contacted your local FCI representative for assistance? yes no
Decontamination Information
Exposure to hazardous materials is regulated by Federal, state (California), County and City laws and regulations. These
laws provide FCI's employees with the right to know the hazardous materials with which they come in contact while handling
our products. Consequently, our employees must have access to data regarding the hazardous materials which the equipment
has been exposed to in your process(es). Accordingly, prior to returning your instrument for repair, please sign the certification below and
thoroughly comply with the instructions, if applicable.
I certify that the item(s) has (have) been thoroughly and completely cleaned and if the item(s) has (have) been exposed to or
contacted by a hazardous material, hazardous substance or toxic materials or substances that the undersigned can assure the returned item(s) has
(have) been thoroughly and completely decontaminated and neutralized of such substances and contamination. I have also attached a
Material Safety Data Sheet (MSDS) which covers all hazardous material, hazardous substance or toxic materials or substances
exposed to or contacted by the instrument. Furthermore, I understand that this Certificate, or providing a MSDS, shall not waive our
responsibility to provide a neutralized, decontaminated, and clean product for repair to FCI.
Authorized Signature Date
Cleanliness of a returned item or the acceptability of the MSDS shall be at the sole discretion of FCI.
Any returned item which does not comply with these instructions shall be returned to you at your expense.
Doc. No. 06EN003286 Rev. - C - 3 FLTÔ Series FlexSwitchÔ
Page 58

FLUID COMPONENTS INTL APPENDIX C - CUSTOMER SERVICE
Document 2. Warranties
Warranties
Goods furnished by the Seller are to be within the limits and of the sizes published by the Seller and subject to the
Seller’s standard tolerances for variations. All items made by the Seller are inspected before shipment, and should
any of said items prove defective due to faults in manufacture or performance under Seller approved applications, or
fail to meet the written specifications accepted by the Seller, they will be replaced or repaired by Seller at no charge
to Buyer provided return or notice of rejection of such material is made within a reasonable period but in no event
longer than three (3) years for non-calibration defects and one (1) year for calibration defects from date of shipment
to Buyer, and provided further, that an examination by Seller discloses to Seller’s reasonable satisfaction that the
defect is covered by this warranty and that the Buyer has not returned the equipment in a damaged condition due to
Buyer’s or Buyer’s employees’, agents’, or representatives’ negligence and Buyer has not tampered, modified,
redesigned, misapplied, abused, or misused the goods as to cause the goods to fail. In addition, this warranty shall
not cover damage caused by Buyer’s exposure of the goods to corrosive or abrasive environments. Moreover, Seller
shall in no event be responsible for (1) the cost or repair of any work done by Buyer on material furnished hereunder
(unless specifically authorized in writing in each instance by Seller), (2) the cost or repair of any modifications added
by a Distributor or a third party, (3) any consequential or incidental damages, losses, or expenses in connection with
or by reason of the use of or inability to use goods purchased for any purpose, and Seller’s liability shall be
specifically limited to free replacement, or refund of the purchase price, at Seller’s option, provided return or
rejection of the goods is made consistent with this paragraph, and the Seller shall in no event be liable for
transportation, installation, adjustment, loss of good will or profits, or other expenses which may arise in connection
with such returned goods, or (4) the design of products or their suitability for the purpose for which they are intended
or used. Should the Buyer receive defective goods as defined by this paragraph, the Buyer shall notify the Seller
immediately, stating full particulars in support of his claim, and should the Seller agree to a return of the goods, the
Buyer shall follow Seller’s packaging and transportation directions explicitly. In no case are the goods to be
returned without first obtaining a return authorization from the Seller. Any repair or replacement shall be at Seller’s
factory, unless otherwise directed, and shall be returned to Seller transportation prepaid by Buyer. If the returned
goods shall prove defective under this clause they will be replaced or repaired by Seller at no charge to Buyer
provided the return or rejection of such material is made within a reasonable period, but in no event longer than (1)
year from the date of shipment of the returned goods or the unexpired terms of the original warranty period
whichever is later. If the goods prove to be defective under this paragraph, the Buyer shall remove the goods
immediately from the process and prepare the goods for shipment to Seller. Continued use or operation of defective
goods is not warranted by Seller and damage occurring due to continued use or operation shall be for Buyer’s
account. Any description of the goods contained in this offer is for the sole purpose of identifying them, and any
such description is not part of the basis of the bargain, and does not constitute a warranty that the goods will conform
to that description. The use of any sample or model in connection with this offer is for illustrative purposes only, is
not part of the basis of the bargain, and is not to be construed as a warranty that the goods will conform to the sample
or model. No affirmation of that fact or promise made by the Seller, whether or not in this offer, will constitute a
warranty that the goods will conform to the affirmation or promise. THIS WARRANTY IS EXPRESSLY IN LIEU
OF ANY AND ALL OTHER EXPRESS OR IMPLIED WARRANTIES WITH RESPECT TO THE GOODS OR
THEIR INSTALLATION, USE, OPERATION, REPLACEMENT OR REPAIR, INCLUDING ANY IMPLIED
WARRANTY OF MERCHANTABILITY OR FITNESS OF PURPOSE; AND THE GOODS ARE BEING
PURCHASED BY BUYER “AS IS”. SELLER WILL NOT BE LIABLE BY VIRTUE OF THIS WARRANTY OR
OTHERWISE FOR ANY SPECIAL, INCIDENTAL OR CONSEQUENTIAL LOSS OR DAMAGE RESULTING
FROM THE USE OR LOSS OF USE OF THE GOODS.
FLTÔ Series FlexSwitchÔ C - 4 Doc. No. 06EN003286 Rev. -
Page 59

APPENDIX D - TEMP COMP FLUID COMPONENTS INTL
Appendix D. Temperature Compensation
Introduction
Temperature compensation (Temp Comp) is an essential part of the FLT FlexSwitch circuitry. When the Temp
Comp is set correctly, the instrument stays accurate over a process temperature range of 100°F. The instrument is
a thermal dispersion device. It relies on the temperature differential between the reference RTD, which is at the
process media temperature, and the active RTD, which is heated to produce a temperature differential (DT). For
example; with constant temperature, flow rate, process media and heater power, the DT is reduced and reaches a
stable value. If the process media temperature goes up and all other conditions stay the same, the DT is reduced.
Without Temp Comp the circuitry would process the signal as an increased flow rate.
To understand Temp Comp the output signal needs to be understood first. This temperature output signal is the
absolute voltage drop across the reference RTD, and proportional to temperature. The instrument uses this voltage
for two purposes. The voltage drop across the reference RTD is subtracted from the voltage drop across the Active
RTD to produce a voltage differential. The voltage differential is used to set flow or liquid level alarms. Also, the
voltage drop across the reference RTD adds to, or subtracts from, the output signal as a function of DT.
Note:
In order to adjust the Temp Comp correctly certain parameters must be measured and calculated. All
temperature measurements should converted to degrees Fahrenheit before a temperature differential is
found. These parameters and measurements will be discussed later in this appendix.
Factory Temperature Compensation Settings
A Temp Comp adjustment procedure is performed on the instrument before it is shipped. Under normal conditions
this setting will not have to be done by the customer. However, if there have been changes in environment since
the instrument was ordered then the following instructions may need to be done by the customer.
Restoring Temp Comp Adjustments
When the control circuit is replaced or if the Temp Comp potentiometers are accidently moved the adjustments
must be restored. There are three adjustments that need to be made on the control circuit in order to set the Temp
Comp. Two of the adjustments are done with no power applied to the instrument and a third adjustment is done
with power applied. Calibration values for each instrument are on the Temp Comp calibration sheet that is found
in the plastic page protector at the back of this manual. The calibration values are listed by the serial number of
the instrument.
Equipment Required
5-1/2 digit digital multimeter (DMM). (Small clip leads are desirable.)
Adapter cable FCI part number 015664-01 for older version of the control circuit.
Flat screw driver, capable of adjusting control circuit potentiometers.
Temp Comp calibration values from the page protector in the back of this manual.
Insulating varnish or equivalent to reseal the potentiometers.
Alert:
Doc. No. 06EN003286 Rev. - D - 1 FLTÔ Series FlexSwitchÔ
The instrument contains electrostatic discharge (ESD) sensitive devices. Use standard ESD
precautions when handling the control circuit. See Chapter 2, Installation, for ESD details.
Page 60

FLUID COMPONENTS INTL APPENDIX D - TEMP COMP
Procedure
1. Turn off the instrument power. Remove the control circuit form the socket.
2. Write down where the heater wattage control jumper is located in the area of the upper left hand side of the
control circuit. Remove the heater wattage control jumper and set it aside. Refer to Figure 3-1 for the jumper
location.
3. Remove jumpers J10 and J11 at the lower side of the control circuit and set them aside.
4. Connect the DMM from TP1 (by J10), to the left jumper post of J10. Set the DMM to ohms. See Figure 3-2
for component placement.
5. Adjust potentiometer R5 (bottom center of the control circuit) until the DMM reads the ohm value for R5 as
shown on the Temp Comp calibration sheet that is in the plastic page protector in the back of this manual.
6. Remove the DMM, and reconnect it between TP2 (by J11), and the right jumper post of J11. Figure 3-1 shows
jumper post location.
7. Adjust pot R8 (below the yellow LED) until the ohm value for R8 is as shown on the Temp Comp Cal sheet.
8. Remove the DMM and reinstall jumpers J10 and J11. (Leave the heater jumper removed.)
Note: Steps 10 through 13 are the flow element balance procedure required to complete the Temp Comp
restoration.
9. Connect the DMM to P1 (the adapter cable on older control circuits) with the positive lead connected to
position 2 (red wire on older control circuits) and the negative lead connected to position 2 (blue wire on older
control circuits). Re-install the control circuit on the socket. Set the DMM to volts DC.
10. Turn on the instrument power and wait fifteen minutes for the instrument to stabilize. During this time make
sure that the process media is flowing or the sensing elements are submerged. Do not make the following
adjustment in still gas.
11. Adjust potentiometer R13 (next to R8) until the DMM reads 0 volts ±5mV.
12. Turn off the instrument power and remove the DMM. Re-install the heater jumper in its original position.
The Temp Comp adjustments are now restored. Turn on the power and make sure the instrument is functioning
properly. Make adjustments to the alarm set points if needed.
Field Temp Comp Calibration
If the application of the instrument changes the Temp Comp may need to be re-calibrated. An example of when
the Temp Comp needs to be re-calibrated is as follows: The process media is gas, the factory set Temp Comp is 40
to 140 °F. The instrument is then placed in an application that varies in temperature from 300 to 400 °F. In this
case the instrument's accuracy would be greater with a new Temp Comp calibration performed.
Another example of where the accuracy will be affected and a Temp Comp calibration would need to be done is
when the process media is changed, i.e. from water to heavy oil.
Temp Comp calibration is possible to do in the field if the test conditions are met and the data is measured
correctly. However, in many applications it is difficult to achieve these parameters and it is easier to have the
switch factory calibrated. To do the procedure the following parameters are required:
• The maximum temperature range does not exceed 100 °F.
• The maximum temperature does not exceed the instruments rated maximum temperature.
• The velocity at which the switch will alarm needs to be known.
FLTÔ Series FlexSwitchÔ D - 2 Doc. No. 06EN003286 Rev. -
Page 61

APPENDIX D - TEMP COMP FLUID COMPONENTS INTL
Equipment Required
1 each DC Power Supply, 0 to 20 Vdc minimum, at 0.5 Amps.
2 each 5-1/2 Digit DMM with 4 wire clip leads.
1 each #1 Philips screw driver.
1 each #1 Flat blade screw driver.
1 each Flat screw driver, capable of adjusting control circuit potentiometers.
Insulating varnish or equivalent to reseal the potentiometers.
Procedure
1. Turn off the instrument power.
2. Install the instrument into the pipe or a test stand where it can be calibrated. Start the process media flowing
at a normal rate. Cool the process media to the lowest temperature in the expected operating range.
3. Remove the control circuit. Disconnect the wires on terminals 6 through 10. Removal of the socket from the
enclosure may be necessary for access to the wires.
4. Connect the DMM's and the power supply to the sensing element as shown in Figure D-1.
5. Set the power supply voltage to the proper voltage as shown in Table D-1. Turn on the power supply and
check the voltage setting.
Figure D-1. Sensing Element Calibration Connections
Table D-1. Heater Voltage Settings
SGNITTESYLPPUSREWOP
S-39TLF
F-39TLF
Doc. No. 06EN003286 Rev. - D - 3 FLTÔ Series FlexSwitchÔ
sttaW3sttaW57.1sttaW57.0sttaW12.0
cdV0.81roFteScdV8.31roFteScdV0.9roFteScdV9.4roFteS
sttaW75.0sttaW25.0sttaW04.0sttaW52.0
cdV0.81roFteScdV0.71roFteScdV0.51roFteScdV8.11roFteS
Page 62

FLUID COMPONENTS INTL APPENDIX D - TEMP COMP
6. Stop the process media flow and make sure that the media is at no flow and then let the instrument stabilize
for fifteen minutes.
7. Record the resistance values of the sensing elements and calculate the resistance differential (DR). If DR does
not exceed the maximum DR of 280 ohms then proceed with the calibration. If the DR is above 280 ohms use
the next lower heater wattage setting and let the instrument stabilize. Recheck the DR
8. Start the process media flowing at the desired switch point velocity and at the low temperature, let the
instrument stabilize for fifteen minutes.
9. Record the resistance values of the active and reference RTD's at the low temperature.
10. Raise the temperature of the process media to the maximum expected temperature. With the instrument power
on, let the instrument stabilize for fifteen minutes. The difference between the low and the high temperature
should not exceed 100°F.
11. Record the resistance values of the active and reference RTD's for the high temperature.
12. Calculate the Temp Comp factor with the formula shown below.
TEMP
COMP =
DR Low Temperature - DR High Temperature .
FACTOR (R Reference High Temperature) - (R Reference Low Temperature)
The Temp Comp factor is not to exceed ±0.041.
13. If the Temp Comp factor is within tolerance, turn off the power to the instrument and stop the process media if
needed. Disconnect the DMM's and the power supply from the instrument. Reconnect the sensing element
wires to the control circuit socket and reinstall the socket in the enclosure if it was previously removed. Do
not pinch the wires between the socket and the enclosure.
14. Look up the resistance values to adjust potentiometers R5 and R8 in the Temp Comp Factor table (Table D-2).
Follow the procedure in the Restoring Temp Comp adjustment section using the values found in the table
below.
15. If the calculated Temp Comp factor exceeds the allowable tolerance by a small amount (±0.01), using the
maximum Temp Comp factor may make the instrument perform satisfactorily. However, if the factor is out of
tolerance by more than ±0.01 then it will be necessary to repeat the calibration to verify the result. Continue
with the adjustment procedure if the second result is within tolerance.
FLTÔ Series FlexSwitchÔ D - 4 Doc. No. 06EN003286 Rev. -
Page 63

APPENDIX D - TEMP COMP FLUID COMPONENTS INTL
Table D-2. Temp Comp Factor Table
TEMP TEMP TEMP
COMP R5 R8 COMP R5 R8 COMP R5 R8
FACTOR K OHMS K OHMS FACTOR K OHMS K OHMS FACTOR K OHMS K OHMS
0.042 119.75 263.16 0.013 123.38 149.25 -0.016 127.00 104.17
0.041 119.88 256.41 0.012 123.50 147.06 -0.017 127.13 103.09
0.040 120.00 250.00 0.011 123.63 144.93 -0.018 127.25 102.04
0.039 120.13 243.90 0.010 123.75 142.86 -0.019 127.38 101.01
0.038 120.25 238.10 0.009 123.88 140.85 -0.020 127.50 100.00
0.037 120.38 232.56 0.008 124.00 138.89 -0.021 127.63 99.01
0.036 120.50 227.27 0.007 124.13 136.99 -0.022 127.75 98.04
0.035 120.63 222.22 0.006 124.25 135.14 -0.023 127.88 97.09
0.034 120.75 217.39 0.005 124.38 133.33 -0.024 128.00 96.15
0.033 120.88 212.77 0.004 124.50 131.58 -0.025 128.13 95.24
0.032 121.00 208.33 0.003 124.63 129.87 -0.026 128.25 94.34
0.031 121.13 204.08 0.002 124.75 128.21 -0.027 128.38 93.46
0.030 121.25 200.00 0.001 124.88 126.58 -0.028 128.50 92.59
0.029 121.38 196.08 0.000 125.00 125.00 -0.029 128.63 91.74
0.028 121.50 192.31 -0.001 125.13 123.46 -0.030 128.75 90.91
0.027 121.63 188.68 -0.002 125.25 121.95 -0.031 128.88 90.09
0.026 121.75 185.19 -0.003 125.38 120.48 -0.032 129.00 89.29
0.025 121.88 181.82 -0.004 125.50 119.05 -0.033 129.13 88.50
0.024 122.00 178.57 -0.005 125.63 117.65 -0.034 129.25 87.72
0.023 122.13 175.44 -0.006 125.75 116.28 -0.035 129.38 86.96
0.022 122.25 172.41 -0.007 125.88 114.94 -0.036 129.50 86.21
0.021 122.38 169.49 -0.008 126.00 113.64 -0.037 129.63 85.47
0.020 122.50 166.67 -0.009 126.13 112.36 -0.038 129.75 84.75
0.019 122.63 163.93 -0.010 126.25 111.11 -0.039 129.88 84.03
0.018 122.75 161.29 -0.011 126.38 109.89 -0.040 130.00 83.33
0.017 122.88 158.73 -0.012 126.50 108.70 -0.041 130.13 82.64
0.016 123.00 156.25 -0.013 126.63 107.53 -0.042 130.25 81.97
0.015 123.13 153.85 -0.014 126.75 106.38
0.014 123.25 151.52 -0.015 126.88 105.26
Doc. No. 06EN003286 Rev. - D - 5 FLTÔ Series FlexSwitchÔ
Page 64

APPENDIX E FLUID COMPONENTS INTL
Appendix E. CE Conformance
Approved CE marking FLT Series FlexSwitch Configurations
Approved Options
1) all process temperature ranges
2) all metallic sensor elements
3) all process connections and flanges
4) all insertion U-lengths
5) aluminum and 300 series stainless steel NEMA 4X local and remote enclosures
6) all specified application combinations
7) all cable jackets and lengths
8) 115/230 VAC power input.
Approved Part Numbers
General Sensing Element
FLT93-S
or
FLT93-F
1 2 3 4 5 6 7
3
All options conform to CE marking
Requirements.
All other configurations must be approved for CE marking conformity by FCI's Engineering Department.
8
C D E
X Y X or Y options only conform to CE
9 10 11 12
1 or 2
Conditionally Approved CE marking FLT Series FlexSwitch
Configurations
24 VAC and 24 VDC Field/Factory Selectable Options
Input power of 24 VAC and 24 VDC may be optionally selected. Since the manufacturer does not supply the power
source or transformer for these connections, the responsibility for the conditioning of these sources and associated
compliance to the EMC Directive shall be the responsibility of the User.
Control Circuit
13 14 15
0 A B
C D F
Panel Mounted Control Circuit Options
The models included in this family may be supplied with panel mounted (code F block 13 as derived from the above
diagram) control circuit boards. Since the manufacturer does not supply an EMC enclosure for these configurations,
the associated compliance to the EMC Directive shall be the responsibility of the User.
Doc. No. 06EN003246 Rev. B E - 1 FLTÔ Series FlexSwitchÔ
Page 65

FLUID COMPONENTS INTL APPENDIX E
INSTALLATION CONFORMITY CRITERIA
Grounding
All enclosures must be grounded to earth ground through a path of less than 1 ohm.
Interconnecting Cables
All interconnecting cables between the FlexSwitch local enclosure, remote enclosure, power source and monitoring
device shall be enclosed in metal conduit. AC power input cabling shall be enclosed separately in conduit for
entrance into the FlexSwitch and is not to be combined with switch or monitor output cabling.
Standard ESD Precautions
Use standard ESD precautions when opening an instrument enclosure or handling the FlexSwitch. FCI recommends
the use of the following precautions: Use a wrist band or heel strap with a 1 megohm resistor connected to ground.
If the instrument is in a shop setting there should be static conductive mats on the work table and floor with a 1
megohm resistor connected to ground. Connect the instrument to ground. Apply antistatic agents to hand tools to
be used on the instrument. Keep high static producing items away from the instrument such as non-ESD approved
plastic, tape and packing foam.
The above precautions are minimum requirements to be used. The complete use of ESD precautions can be found in
the U.S. Department Of Defense Handbook 263.
Location of CE mark documentation (European Location)
The technical documentation file part A resides at Fluid Components Intl, European Service Center, Persephonestraat
3-01 5047 TTTilburg - The Netherlands - Phone 31-13-5159989 - Fax 31-13-5799036
Location of CE mark documentation (Manufacturer Location)
The technical documentation file part B resides at the Configuration Management department of Fluid Components
Intl, 1755 La Costa Meadows Dr. San Marcos, Ca 92069 USA.
FLTÔ Series FlexSwitchÔ E - 2 Doc. No. 06EN003246 Rev. B
 Loading...