

Page 1
User Manual
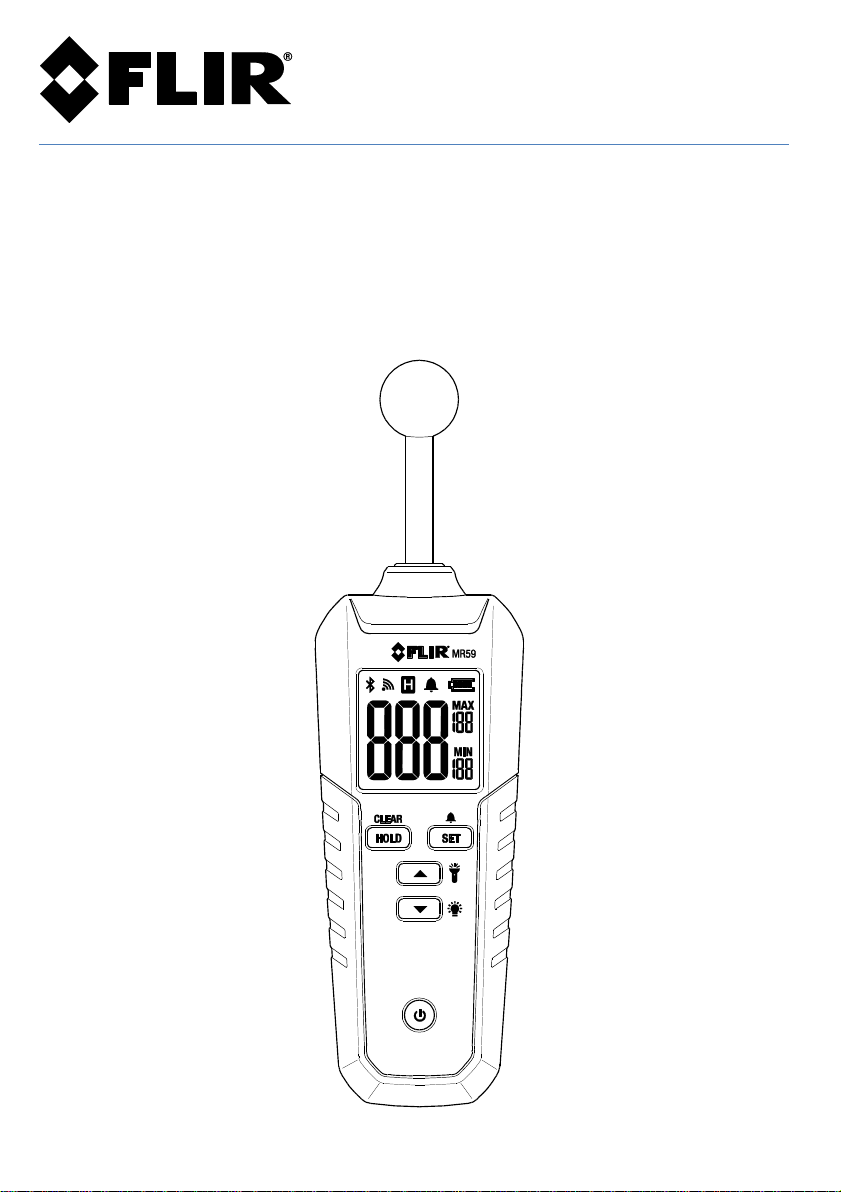
Ball Probe Moisture Meter
With Bluetooth®
Model MR59
Page 2

FLIR MR59 USER MANUAL Document Identifier: MR59-en-US_AB
2
Table of Contents
1. Advisories ................................................................................................................... 3
1.1 Copyright ...................................................................................................................................... 3
1.2 Quality Assurance .......................................................................................................................... 3
1.3 Documentation ............................................................................................................................. 3
1.4 Disposal of Electronic Waste ........................................................................................................... 3
2. Introduction .............................................................................................................. 4
2.1 Key Features ................................................................................................................................. 4
3. Description ................................................................................................................ 4
3.1 Meter Description ......................................................................................................................... 4
3.2 Display Description ........................................................................................................................ 5
3.3 Button Description......................................................................................................................... 5
4. Operation .................................................................................................................. 6
4.1 Meter Power, APO, and Zero Calibration .......................................................................................... 6
4.2 Moisture Measurements ................................................................................................................ 6
4.3 Maximum and Minimum Readings .................................................................................................. 6
4.4 Data Hold ..................................................................................................................................... 6
4.5 Display Backlight ........................................................................................................................... 6
4.6 Worklight ..................................................................................................................................... 6
4.7 High Moisture Audible Alarm .......................................................................................................... 7
4.8 Bluetooth® Transmission Basics ....................................................................................................... 7
5. Bluetooth® Technical Details ..................................................................................... 7
6. Field Firmware Upgrades via USB Interface ............................................................... 8
6.1 System Firmware Upgrade .............................................................................................................. 8
6.2 Bluetooth® Firmware Upgrade ........................................................................................................ 9
7. Maintenance ............................................................................................................. 9
7.1 Cleaning ....................................................................................................................................... 9
7.2 Battery Installation and Replacement .............................................................................................. 9
8. Safety ...................................................................................................................... 10
8.1 FCC Compliance ........................................................................................................................... 10
9. Specifications .......................................................................................................... 10
10. Technical Support .................................................................................................... 11
11. Three-Year Limited Warranty .................................................................................. 11
Page 3

FLIR MR59 USER MANUAL Document Identifier: MR59-en-US_AB
3
1. Advisories
1.1 Copyright
© 2018, FLIR Systems, Inc. All rights reserved worldwide. No parts of the software including
source code may be reproduced, transmitted, transcribed or translated into any language or
computer language in any form or by any means, electronic, magnetic, optical, manual or
otherwise, without the prior written permission of FLIR Systems.
The documentation must not, in whole or part, be copied, photocopied, reproduced, translated or
transmitted to any electronic medium or machine readable form without prior consent, in writing,
from FLIR Systems.
Names and marks appearing on the products herein are either registered trademarks or
trademarks of FLIR Systems and/or its subsidiaries. All other trademarks, trade names or company
names referenced herein are used for identification only and are the property of their respective
owners.
1.2 Quality Assurance
The Quality Management System under which these products are developed and manufactured
has been certified in accordance with the ISO 9001 standard.
FLIR Systems is committed to a policy of continuous development; therefore, we reserve the right
to make changes and improvements on any of the products without prior notice.
1.3 Documentation
To access the latest manuals and notifications, go to the ‘Downloads’ tab at:
http://support.flir.com. It only takes a few minutes to register online. In the download area you
will also find the latest releases of manuals for our other products, as well as manuals for our
historical and obsolete products.
1.4 Disposal of Electronic Waste
As with most electronic products, this equipment must be disposed of in an
environmentally friendly way, and in accordance with existing regulations for
electronic waste.
Please contact your FLIR Systems representative for more details.
Page 4
FLIR MR59 USER MANUAL Document Identifier: MR59-en-US_AB
4
2. Introduction
Thank you for selecting the FLIR MR59 Ball Probe Moisture Meter with Bluetooth®. This
instrument detects moisture in wood and other building materials and transmits readings
to a remotely paired smart device. This device is shipped fully tested and calibrated and,
with proper use, will provide years of reliable service.
2.1 Key Features
Non-invasive pinless moisture measurements for wood and other building materials
including plywood, drywall, oriented strand board (OSB), brick, cement screed,
concrete, cement mortar, anhydrite screed, lime mortar, and plaster
Bluetooth® data transmission
Firmware upgrades via micro USB port located in battery compartment
Maximum/Minimum readings
High moisture Alarm audible alert
LED Worklight
Backlit LCD
Data Hold
Battery powered (1 x 9V battery)
Automatic Power OFF after 30 minutes
3. Description
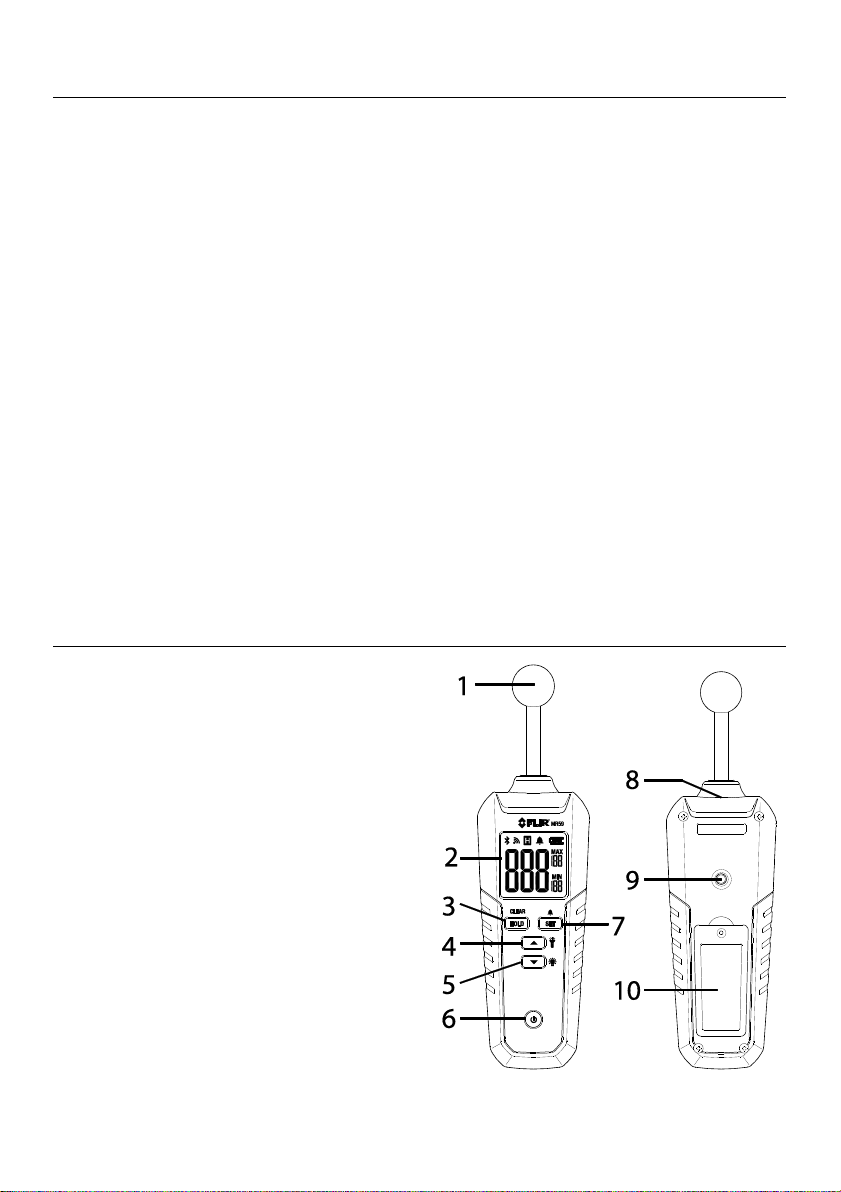
3.1 Meter Description
1. Moisture sensor (capacitance type)
2. Backlit LCD
3. Data Hold / MIN-MAX clear button
4. Worklight ON/OFF and up arrow
button
5. Backlight ON/OFF and down arrow
button
6. Power button
7. Alarm enable/Alarm threshold button
8. Worklight
9. Tripod mount
10. Battery/USB port compartment
Page 5

FLIR MR59 USER MANUAL Document Identifier: MR59-en-US_AB
5
3.2 Display Description
1. Bluetooth® (BLE) icon (when paired)
2. Transmission icon (flashes when paired)
3. Data Hold icon
4. Alarm enabled icon
5. Battery status icon
6. Maximum reading
7. Minimum reading
8. Moisture reading
3.3 Button Description
Long press to power the meter ON/OFF
CLEAR
HOLD
Long press to clear the MIN/MAX reading memories
Short press to enable/disable Data Hold mode
SET
Long press to enable/disable the audible Alarm
Short press to access the alarm threshold (limit) screen
In the Alarm limit mode, increase the moisture alarm threshold
In the Alarm limit mode, decrease the moisture alarm threshold
Long press to switch Worklight ON/OFF
Long press to the switch display backlight ON/OFF
Page 6

FLIR MR59 USER MANUAL Document Identifier: MR59-en-US_AB
6
4. Operation
4.1 Meter Power, APO, and Zero Calibration
1. One (1) 9V battery (rear compartment) powers the meter.
2. Long press the power button to switch the meter ON/OFF. If the meter display
does not switch ON, please check the battery.
3. The meter beeps and flashes CAL while it performs a self-test (zero calibration).
Keep hands and objects away from the sensor while the meter powers up for
optimum calibration accuracy.
4. The meter’s APO feature automatically switches the meter OFF after 30 minutes of
inactivity.
4.2 Moisture Measurements
1. Power the meter, keeping hands and objects away from the ball sensor.
2. Place the sensor against the surface of the material under test. The sensitivity of
the sensor is uniform across its entire surface, so you can easily move the sensor in
a variety of orientations to make it easier for you to reach and position during tests.
3. View the moisture reading on the LCD. Take a number of readings in a variety of
locations for the best representation of the moisture present. Compare readings
between a known dry area and an area where you suspect to find moisture.
4. The measurement range is 0 to 100 (relative readings).
4.3 Maximum and Minimum Readings
In addition to the real-time moisture reading display, the meter shows the highest
(MAX) and lowest (MIN) readings for a measurement session. Long press the CLEAR
button to reset the MIN/MAX reading memories.
4.4 Data Hold
Short press the HOLD button to freeze/unfreeze the displayed reading. The ‘H’ icon
appears when the data hold mode is active.
4.5 Display Backlight
Long press the backlight button to switch the LCD backlight ON/OFF. Over use of
the backlight will shorten battery life considerably.
4.6 Worklight
Long press the Worklight button to switch the light ON/OFF. To conserve battery life
use the light only as needed.
Page 7

FLIR MR59 USER MANUAL Document Identifier: MR59-en-US_AB
7
4.7 High Moisture Audible Alarm
The MR59 beeps when the moisture reading exceeds the high alarm limit. To set the
alarm limit, short press the SET button and use the arrow buttons to set the value.
To exit the alarm programming screen, short press the SET button again. To
enable/disable the audible alarm, long press the SET button. When the alarm is
enabled (default), the alarm bell icon appears. The alarm limit is set to ‘20’ by default.
4.8 Bluetooth® Transmission Basics
To connect to a remote device running FLIR Tools™, turn on the remote device and start
the FLIR Tools™ application. Open Instruments, and search for the MR59 (the MR59
must be ON). Tap to connect to the MR59.
When connected to a remote device, the MR59 displays the Bluetooth® and the
transmission icons and automatically transmits moisture data.
When you switch the meter ON, the Bluetooth® and transmission icons will be OFF.
They appear only when you pair the MR59 with a remote device.
5. Bluetooth® Technical Details
When connected to a device running the FLIR Tools™ mobile app, the MR59 (using the
METERLiNK® protocol) continually sends readings for live display on the remote device.
When connected to a compatible FLIR camera that supports BLE (Bluetooth® Low
Energy), the MR59 continually sends meter readings for live display on the camera
screen. Download the FLIR Tools™ mobile app from the Google Play™ store, the Apple
App store, or here: https://www.flir.com/products/flir-tools-app/
1. When successful communication between the meter and a remote device or FLIR
camera is established, the Bluetooth® icon and the transmission icon appear
on the meter display.
2. Refer to the FLIR Tools™ help utility (in the mobile app) for detailed information and
tutorials regarding the FLIR Tools™ application.
3. Refer to Section 4.8 Bluetooth® Transmission Basics for using the meter to transmit
data via Bluetooth®.
Page 8

FLIR MR59 USER MANUAL Document Identifier: MR59-en-US_AB
8
6. Field Firmware Upgrades via USB Interface
The MR59 includes a micro USB port, located inside the battery compartment. The USB
port allows the user to upgrade the System firmware or the Bluetooth® firmware by first
downloading an upgrade file from the FLIR website and then connecting the meter to a
PC to transfer the file to the meter. Firmware upgrades are available at the
http://support.flir.com website.
To update the firmware, you will need:
Access to the website where the upgrade file(s) are located:
http://support.flir.com
The MR59 to be updated
The update file(s). Refer to the steps in the next sections:
6.1 System Firmware Upgrade
1. Visit support.flir.com to obtain a firmware upgrade file.
2. Select the ‘Downloads’ tab and then select ‘Instrument Firmware’ (Test and
Measurement) from the drop down menu.
3. Select MR59 from the second drop down menu.
4. Select and download the firmware upgrade file to the PC.
5. With the meter OFF, open the battery compartment and completely disconnect
the battery. Failure to disconnect the battery could cause damage to the PC.
6. Connect the meter to the PC via the micro USB jack located in the battery
compartment. When connected, the meter will show the screen below:
7. Copy the firmware upgrade file to the MR59 drive.
8. Disconnect the USB cable from the PC USB port and from the meter’s USB port in
the battery compartment.
9. Connect the battery to the meter and secure the battery compartment.
10. Turn the meter ON.
11. If the battery power is sufficient, the upgrade will begin automatically and the
meter will display the screen shown below:
12. If the battery power is too low, the meter will display the ‘LO’ message shown
below. You must replace the battery before you can upgrade the meter firmware.
Page 9

FLIR MR59 USER MANUAL Document Identifier: MR59-en-US_AB
9
13. When the upgrade is complete, the meter will return to the normal operating
mode.
6.2 Bluetooth® Firmware Upgrade
To execute a Bluetooth® Firmware Upgrade please perform the same steps as listed in
Section 6.1, System Firmware Upgrade, above. If there is an error,
the ‘Err’ icon will flash and the meter will return to the normal
operation mode. If this error occurs, please repeat the upgrade
procedure. If the problem persists, contact FLIR technical support.
7. Maintenance
7.1 Cleaning
Wipe meter and sensor with a water-dampened cloth as needed. Do not use
solvents or abrasives.
Always keep the instrument dry.
Prevent dirt from accumulating on the sensor.
7.2 Battery Installation and Replacement
If the instrument does not switch ON or if the battery status icon indicates a low
battery voltage, please replace the battery:
1. Remove the Phillips head screw at the rear of the instrument and remove the
battery compartment cover.
2. Install or replace the 9V battery observing correct polarity.
3. Secure the battery compartment before operating the meter.
Page 10

FLIR MR59 USER MANUAL Document Identifier: MR59-en-US_AB
10
8. Safety
Handle the meter carefully and do not subject the sensor to shock or excessive
vibration.
Keep the instrument dry.
Pack the battery separately when the meter is to be stored for periods longer than 60
days.
Do not use this device for purposes other than those described in this manual.
8.1 FCC Compliance
This device complies with part 15 of the FCC Rules. Operation is subject to the following two conditions:
1. This device may not cause harmful interference.
2. This device must accept any interference received, including interference that may cause undesired
operation.
This equipment has been tested and found to comply with the limits for a Class B digital device, pursuant to
part 15 of the FCC Rules. These limits are designed to provide reasonable protection against harmful
interference in a residential installation. This equipment generates, uses, and can radiate radio frequency
energy and, if not installed and used in accordance with the instructions, may cause harmful interference to
radio communications. However, there is no guarantee that interference will not occur in a particular
installation. If this equipment does cause harmful interference to radio or television reception, which can be
determined by turning the equipment off and on, the user is encouraged to try to correct the interference by
one or more of the following measures:
1. Reorient or relocate the receiving antenna.
2. Increase the separation between the equipment and receiver.
3. Connect the equipment into an outlet on a circuit different from that to which the receiver is connected.
4. Consult the dealer or an experienced radio/TV technician for help.
WARNING
Changes or modifications not expressly approved by the party responsible for compliance could void the
user’s authority to operate the equipment.
9. Specifications
Measurement range Moisture, 0 to 100
Measurement accuracy Relative measurements only
Measurement type Capacitance ball sensor (non-invasive)
Measurement detection depth Sensing depth for most common building materials
up to 4.0” (100mm), this may vary depending upon
material under test.
Response time 0.5 seconds
Display Backlit, multifunction LCD
Worklight High intensity white LED
Auto Power OFF (APO) After 30 minutes
Power supply 9V battery (rear compartment)
Page 11

FLIR MR59 USER MANUAL Document Identifier: MR59-en-US_AB
11
Low battery indicator
(100% to empty)
Operating RH/Temperature 90%, 32~86°F (0~30°C)
75%, 86~104°F (30~40°C)
45%, 104~122°F (40~50°C)
Housing material Impact resistant plastic
Drop-proof 6.6 ft. (2m)
IP rating IP40
Safety Compliance CE, RCM
Dimensions 9.5 x 2.6 x 1.5 in. (240.5 x 67 x 38mm)
Weight 86 oz. (245g)
10. Technical Support
Main Website
http://www.flir.com/test
Technical Support Website
http://support.flir.com
Technical support Email
TMSupport@flir.com
Service/Repair Support Email
Repair@flir.com
Support Telephone number
+1 855-499-3662 option 3 (toll-free)
11. Three-Year Limited Warranty
This product is protected by FLIR’s 3-Year Limited Warranty. Visit www.flir.com/testwarranty to
read the 3-Year Limited Warranty document. Register your product at the website to receive a
free 1-year warranty extension.
Page 12

FLIR MR59 USER MANUAL Document Identifier: MR59-en-US_AB
12
Corporate Headquarters
FLIR Systems, Inc.
2770 SW Parkway Avenue
Wilsonville, OR 97070
USA
Telephone: +1 503-498-3547
Customer Support
Technical Support Website http://support.flir.com
Technical Support Email TMSupport@flir.com
Service and Repair Email Repair@flir.com
Customer Support Telephone +1 855-499-3662 option 3 (toll free)
Publication Identification No.: MR59-en-US
Release Version: AB
Release Date: August 2018
Language: en-US
 Loading...