

Page 1
User Manual
Pin Moisture Meter
with Bluetooth®
Model MR55
Page 2

FLIR MR55 USER MANUAL Document Identifier: MR55-en-US_AB
2
Table of Contents
1. Advisories ................................................................................................................... 3
1.1 Copyright ...................................................................................................................................... 3
1.2 Quality Assurance .......................................................................................................................... 3
1.3 Documentation ............................................................................................................................. 3
1.4 Disposal of Electronic Waste ........................................................................................................... 3
2. Introduction .............................................................................................................. 4
2.1 Key Features ................................................................................................................................. 4
3. Description ................................................................................................................ 5
3.1 Meter Description ......................................................................................................................... 5
3.2 Display Description ........................................................................................................................ 6
3.3 Button Description......................................................................................................................... 6
4. Operation .................................................................................................................. 7
4.1 Meter Power and APO.................................................................................................................... 7
4.2 Measuring Temperature and Relative Humidity ................................................................................ 7
4.3 Moisture Measurements ................................................................................................................ 7
4.4 Bluetooth® Transmission Basics ....................................................................................................... 8
4.5 Display Backlight ........................................................................................................................... 8
4.6 Worklight ..................................................................................................................................... 8
4.7 Data Hold ..................................................................................................................................... 8
4.8 Material Group Selection ................................................................................................................ 8
4.9 Temperature (oC, oF) and Relative Humidity Display Selection ............................................................ 8
4.10 Calibration Verification Test ................................ ................................................................ .......... 9
5. Bluetooth® Technical Details ..................................................................................... 9
6. Field Firmware Upgrades via USB Interface ............................................................. 10
6.1 System Firmware Upgrade ............................................................................................................ 10
6.2 Bluetooth® Firmware Upgrade ...................................................................................................... 11
7. Maintenance ........................................................................................................... 12
7.1 Cleaning ..................................................................................................................................... 12
7.2 Battery Installation and Replacement ............................................................................................ 12
7.3 Electrode Pin Replacement ........................................................................................................... 12
8. Safety ...................................................................................................................... 13
8.1 FCC Compliance ........................................................................................................................... 13
9. Specifications .......................................................................................................... 14
10. Material Group Reference ....................................................................................... 15
10.1 Common Names of Timbers (BS888/589:1973) with group nos. ...................................................... 15
10.2 Botanical names of timbers with MR55 group numbers .................................................................. 17
10.3 %WME Table (% Wood Moisture Equivalent) ................................................................................ 19
11. Technical Support ................................................................................................... 20
12. Three-Year Limited Warranty .................................................................................. 20
Page 3

FLIR MR55 USER MANUAL Document Identifier: MR55-en-US_AB
3
1. Advisories
1.1 Copyright
© 2018, FLIR Systems, Inc. All rights reserved worldwide. No parts of the software including
source code may be reproduced, transmitted, transcribed or translated into any language or
computer language in any form or by any means, electronic, magnetic, optical, manual or
otherwise, without the prior written permission of FLIR Systems.
The documentation must not, in whole or part, be copied, photocopied, reproduced, translated or
transmitted to any electronic medium or machine readable form without prior consent, in writing,
from FLIR Systems.
Names and marks appearing on the products herein are either registered trademarks or
trademarks of FLIR Systems and/or its subsidiaries. All other trademarks, trade names or company
names referenced herein are used for identification only and are the property of their respective
owners.
1.2 Quality Assurance
The Quality Management System under which these products are developed and manufactured
has been certified in accordance with the ISO 9001 standard.
FLIR Systems is committed to a policy of continuous development; therefore, we reserve the right
to make changes and improvements on any of the products without prior notice.
1.3 Documentation
To access the latest manuals and notifications, go to the ‘Downloads’ tab at:
http://support.flir.com. It only takes a few minutes to register online. In the download area you
will also find the latest releases of manuals for our other products, as well as manuals for our
historical and obsolete products.
1.4 Disposal of Electronic Waste
As with most electronic products, this equipment must be disposed of in an
environmentally friendly way, and in accordance with existing regulations for
electronic waste.
Please contact your FLIR Systems representative for more details.
Page 4

FLIR MR55 USER MANUAL Document Identifier: MR55-en-US_AB
4
2. Introduction
Thank you for selecting the FLIR MR55 Pin Moisture Meter with Bluetooth®
connectivity. This instrument detects moisture in wood and other building materials.
The MR55 also measures Relative Humidity (RH) and ambient Temperature. This device
is shipped fully tested and calibrated and, with proper use, will provide years of reliable
service.
2.1 Key Features
Resistance-based pin moisture measurements for wood and other building materials
including plywood, drywall, oriented strand board (OSB), brick, cement screed,
concrete, cement mortar, anhydrite screed, lime mortar, and plaster
Ambient Temperature and Relative Humidity measurements
Test material group selectivity
Bluetooth® data transmission
Firmware upgrades via micro USB port located in battery compartment
Work light
Backlit LCD
Self-test calibration verification (test points in protective cap)
Replaceable electrode pins
Data Hold
Battery powered (2 x 1.5V ‘AA’ cells)
Automatic Power OFF after 20 minutes
Page 5
FLIR MR55 USER MANUAL Document Identifier: MR55-en-US_AB
5
3. Description
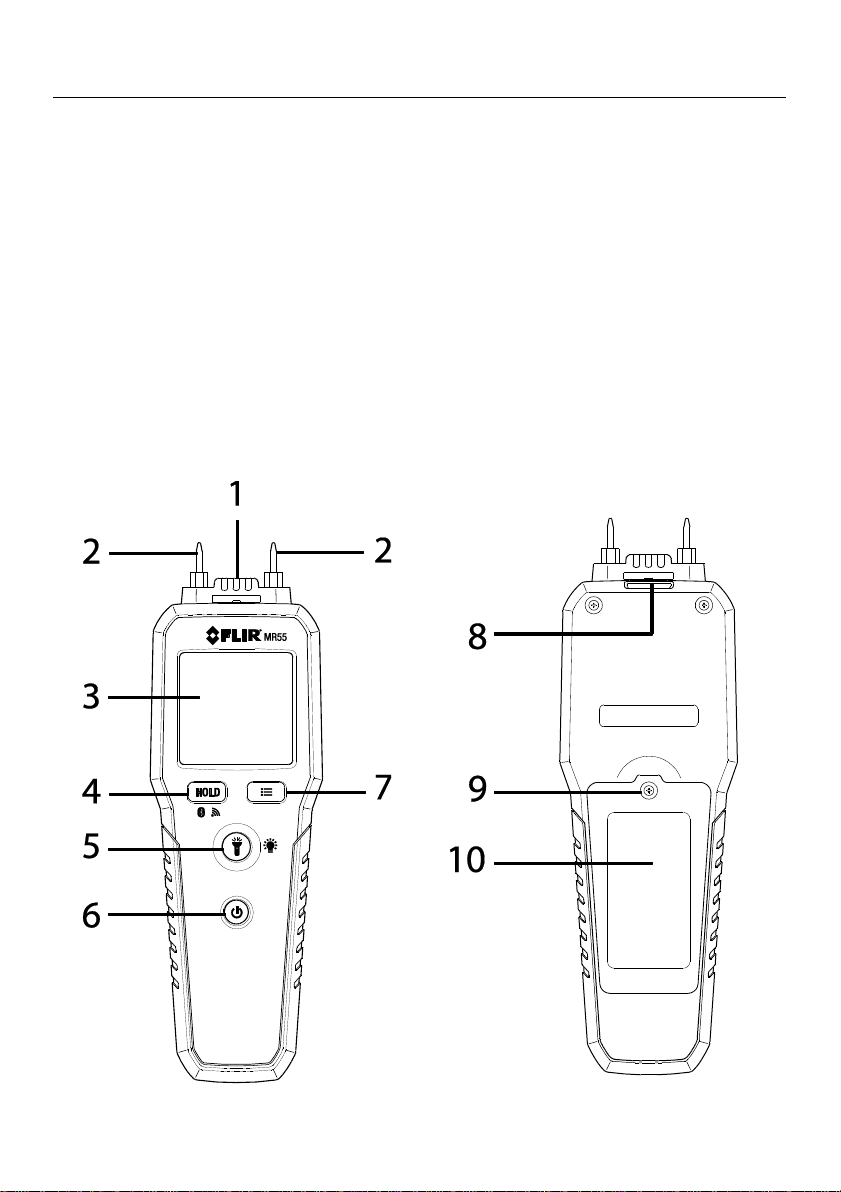
3.1 Meter Description
1. Temperature and Relative Humidity sensors
2. Measurement electrode pins
3. Display (backlit LCD)
4. Data Hold (short press) / Bluetooth® transmit (long press)
5. Worklight ON/OFF (short press) and backlight ON/OFF (long press)
6. Power button (long press ON/OFF)
7. Material Group number (short press) and
o
C, oF, RH% selection (long press)
8. Work light
9. Battery/USB port compartment lock
10. Battery/USB port compartment cover
Note: Protective cap not pictured
Page 6
FLIR MR55 USER MANUAL Document Identifier: MR55-en-US_AB
6
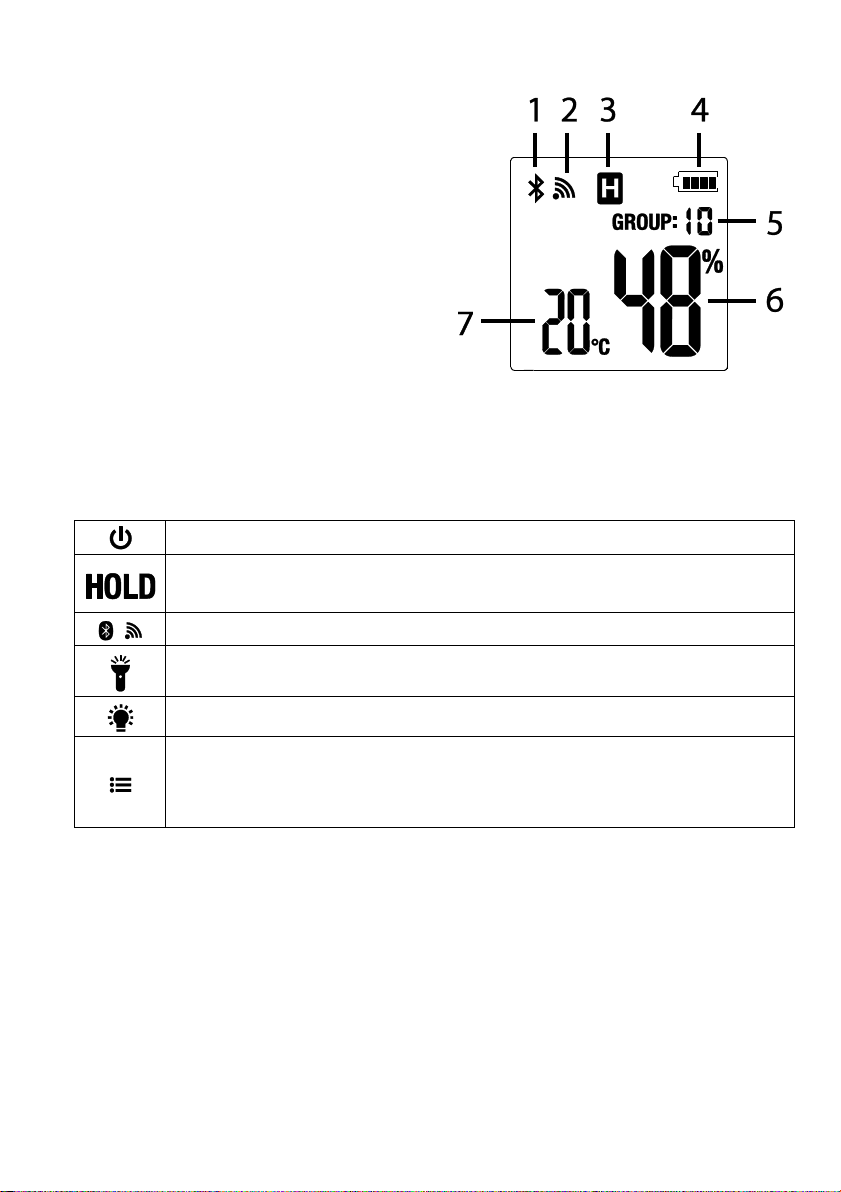
3.2 Display Description
1. Bluetooth® (BLE) icon (when paired)
2. Transmission icon (appears for 3 seconds
at the start of transmission)
3. Data Hold
4. Battery status
5. Material group number
6. Moisture measurement
7. Ambient temperature (
o
C, oF) and RH%
display area
3.3 Button Description
Long press to power the meter ON/OFF
Short press to freeze/unfreeze displayed readings. Readings must first be
held before they can be transmitted via Bluetooth®
Long press to transmit held reading to remotely paired device
Short press to switch work light ON/OFF
Long press to switch display backlight ON/OFF
Short press to select a material group number (1~11)
Long press to step through ambient temperature (oC, oF) and relative
humidity readings (shown on lower left display digits)
Page 7

FLIR MR55 USER MANUAL Document Identifier: MR55-en-US_AB
7
4. Operation
4.1 Meter Power and APO
1. Two (2) 1.5V ‘AA’ batteries (rear compartment) power the meter.
2. Long press the power button to switch the meter ON/OFF. When ON, the
meter display will appear as shown in the meter description section above. If
the meter display does not switch ON, please check the batteries.
3. The meter’s APO feature automatically switches the meter OFF after 20 minutes
of inactivity.
4.2 Measuring Temperature and Relative Humidity
The ambient temperature and relative humidity sensors are located at the top of the
meter (item 1 in the Meter Description section).
Moisture measurements are automatically temperature compensated. The meter
calculates the compensation using the ambient temperature measurements.
1. The temperature or humidity reading appears on the bottom left of the LCD.
2. Long press the button to step through
o
F, oC, and Relative Humidity readings.
3. Remove the protective cap when taking ambient measurements.
4. Replace the cap when finished.
4.3 Moisture Measurements
1. Power the meter and select the appropriate material group using the button
(short presses). See the Material Group Reference sections for details.
2. The meter detects moisture through the electrode pins positioned at the top of
the meter. Carefully remove the protective cap and push the pins firmly into the
material under test. For wood applications, insert the pins perpendicular to the
wood’s fiber structure.
3. View the readings on the LCD. Take a number of readings in a variety of
locations for the best representation of the moisture present.
4. The measurement range for wood is 7 to 99%. The measurement range for
other building materials is 1 to 99% (Group 10) and 1 to 35% (Group 11).
Readings are automatically temperature compensated.
5. Replace the protective cap after each use.
CAUTION: The electrode measurement pins are sharp; Use care when handling. Cover the
pins with the protective cap when the instrument is not in use.
Page 8

FLIR MR55 USER MANUAL Document Identifier: MR55-en-US_AB
8
4.4 Bluetooth® Transmission Basics
When connected with a remote device, the MR55 shows the Bluetooth® icon .
To transmit a displayed reading to a remotely paired device, first short press the
HOLD button to freeze the reading.
Long press the button to send the data. The transmission symbol will
appear for 3 seconds during transmission. The information transmitted consists of
the moisture reading, material group number, and the temperature or humidity
reading (depending on which you select to display on the meter). See the
dedicated Bluetooth® section for technical details.
Note that when you switch the meter ON, the Bluetooth® icon will be OFF. It only
appears when you connect the MR55 with a remote device. Further, you cannot
transmit data unless the display is showing the Bluetooth® icon.
4.5 Display Backlight
Long press the backlight button to switch the LCD backlight ON/OFF. Over use of
the backlight will shorten battery life considerably.
4.6 Worklight
Short press the work light button to switch the beam ON/OFF. To conserve
battery life use the light only as needed.
4.7 Data Hold
Short press the HOLD button to freeze/unfreeze the displayed reading. The ‘H’ icon
appears when the data hold mode is active. You must freeze a reading first, before
transmitting the reading data via Bluetooth®.
4.8 Material Group Selection
Short press the button to step through the material group numbers (1 ~ 11). See
the Material Group Reference section for details.
4.9 Temperature (
o
C, oF) and Relative Humidity Display Selection
Long press the button to step through oF, oC, and Relative Humidity readings.
These readings appear on the lower left LCD area.
Page 9

FLIR MR55 USER MANUAL Document Identifier: MR55-en-US_AB
9
4.10 Calibration Verification Test
With the meter ON and set to Group 1, touch the measurement pins to the test
points labeled ‘T’ on the protective cap (test points ‘1’ in accompanying diagram).
The display will read 18% (±2) if the test passes. Next, touch the measurement pins
to the test points labeled ‘B’ on the protective cap (test points ‘2’ in the
accompanying diagram). The display will read 26% (±2) if the test passes. Please
return the MR55 for service if either self-test consistently fails.
5. Bluetooth®
Technical Details
When connected with a remote device running the FLIR Tools™ mobile app, the MR55
(using the METERLiNK® protocol) can send readings for display on the remote device.
When connected to a compatible FLIR camera that supports BLE (Bluetooth® Low
Energy), the MR55 can send meter readings for display on the camera screen.
Download the FLIR Tools™ mobile app from the Google Play™ Store, the Apple App
store, or from here: https://www.flir.com/products/flir-tools-app/
1. When successful communication between the meter and a remote device or FLIR
camera is established, the Bluetooth® icon appears on the meter display.
2. Refer to the FLIR Tools™ help utility (in the mobile app) for detailed information
and tutorials regarding the FLIR Tools™ application.
3. Refer to Section 4.4 Bluetooth® Transmission Basics for using the meter to
transmit data via Bluetooth®.
Page 10

FLIR MR55 USER MANUAL Document Identifier: MR55-en-US_AB
10
6. Field Firmware Upgrades via USB Interface
The MR55 includes a micro USB port, located inside the battery compartment. The USB
port allows the user to upgrade the System firmware or the Bluetooth® firmware by
first downloading an upgrade file from the FLIR website and then connecting the meter
to a PC to transfer the file to the meter. Firmware upgrades are available at the
http://support.flir.com website.
To update the firmware, you will need:
Access to the website where the upgrade file(s) are located:
http://support.flir.com
The MR55 to be updated
The update file(s). Refer to the steps in the next section
6.1 System Firmware Upgrade
1. Visit support.flir.com to obtain a firmware upgrade file.
2. Select the ‘Downloads’ tab and then select ‘Instrument Firmware’ (Test and
Measurement) from the drop down menu.
3. Select MR55 from the second drop down menu.
4. Select and download the firmware upgrade file to the PC.
5. Turn the meter on, and connect it to the PC via the micro USB jack located in the
battery compartment. When connected, the meter displays this alert:
6. Copy the firmware upgrade file to the MR55 drive.
7. Disconnect the meter from the USB port.
8. Turn the meter OFF and then back ON again.
9. If the battery power is sufficient, the upgrade will begin and the meter will
display the screen shown below:
Page 11

FLIR MR55 USER MANUAL Document Identifier: MR55-en-US_AB
11
10. If the battery power is too low, the meter will display the ‘LO’ message shown
below. You must replace the batteries before you can upgrade the meter
firmware.
11. When the upgrade is complete, the meter will automatically power ON.
6.2 Bluetooth® Firmware Upgrade
To execute a Bluetooth® Firmware Upgrade please perform the same steps as listed in
Section 6.1, System Firmware Upgrade, above.
If there is an error, the screens shown below will alternately display. If this error
occurs, please repeat the upgrade procedure. If the problem persists, contact FLIR
technical support.
Page 12

FLIR MR55 USER MANUAL Document Identifier: MR55-en-US_AB
12
7. Maintenance
7.1 Cleaning
Wipe the meter housing and pins with a soft, damp cloth. Use a mild detergent if
necessary. Do not use solvents or abrasives.
Always keep the instrument dry.
Prevent dirt from accumulating at the electrode pins.
7.2 Battery Installation and Replacement
If the instrument does not switch ON or if the battery status icon indicates a low
battery voltage, please replace the batteries:
1. Remove the Phillips head screw at the rear of the instrument and remove the
battery compartment cover.
2. Install or replace the two (2) x 1.5V ‘AA’ batteries observing correct polarity.
3. Secure the battery compartment before operating the meter.
7.3 Electrode Pin Replacement
To replace the two electrode pins:
1. Remove the protective cap
2. Unscrew and remove the electrode pins
3. Install the new pins
4. Replace the protective cap
Page 13

FLIR MR55 USER MANUAL Document Identifier: MR55-en-US_AB
13
8. Safety
The electrode pins are sharp; please use caution when handling the meter. Keep
the protective cover in place when not in use.
Keep the instrument dry.
Do not strike the meter in an effort to push the pins further into the material
under test. Always hold the meter by its side grips when firmly pressing the pins
into the tested material.
Store the batteries separately when the meter is to be stored for periods longer
than 60 days.
8.1 FCC Compliance
This device complies with part 15 of the FCC Rules. Operation is subject to the following two
conditions:
1. This device may not cause harmful interference.
2. This device must accept any interference received, including interference that may cause
undesired operation.
This equipment has been tested and found to comply with the limits for a Class B digital device,
pursuant to part 15 of the FCC Rules. These limits are designed to provide reasonable protection
against harmful interference in a residential installation. This equipment generates, uses, and can
radiate radio frequency energy and, if not installed and used in accordance with the instructions,
may cause harmful interference to radio communications. However, there is no guarantee that
interference will not occur in a particular installation. If this equipment does cause harmful
interference to radio or television reception, which can be determined by turning the equipment
off and on, the user is encouraged to try to correct the interference by one or more of the
following measures:
1. Reorient or relocate the receiving antenna.
2. Increase the separation between the equipment and receiver.
3. Connect the equipment into an outlet on a circuit different from that to which the receiver is
connected.
4. Consult the dealer or an experienced radio/TV technician for help.
WARNING
Changes or modifications not expressly approved by the party responsible for compliance could void
the user's authority to operate the equipment.
Page 14

FLIR MR55 USER MANUAL Document Identifier: MR55-en-US_AB
14
9. Specifications
Measurements Moisture, relative humidity and ambient temperature
Moisture measurement type Electrical resistance
Display Backlit, multifunction LCD
Electrode length 0.4” (10mm)
Electrode pins Integrated, replaceable
Work light White LED
Auto Power OFF (APO) After 20 minutes
Power supply Two (2) 1.5V ‘AA’ batteries (rear compartment)
Low battery indicator
(100% to empty)
Operating Temperature 32 ~ 122°F (0 ~ 50°C)
Operating Humidity 85% Relative Humidity maximum
Housing material Impact resistant plastic
Drop-proof 6.6 ft. (2m)
IP rating IP40
Safety Compliance CE, RCM
Dimensions 7.4 x 2.3 x 1.3” (188 x 58 x 33mm)
Weight 5.6 oz. (160g) battery excluded
Measurements
Function
Range
Accuracy
Moisture in wood
Group 1~9
7 ~ 29%
± 2% MC*
30 ~ 99%
Reference Only
Moisture in building materials
Group 10 and 11
1~99% (Group 10)
1 ~ 35% (Group 11)
Reference Only
Ambient Temperature
32 ~ 122°F (0 ~ -50°C)
± 2°F (± 1°C)
Ambient Relative Humidity
0 ~ 10%
± 4%
10 ~ 85%
± 2%
* Maximum specified range is dependent on the fiber saturation point for specific species. Beyond this point,
the reading can only be used as a relative reference value. For more information on fiber saturation please
refer to ASTM D7438. Accuracy specification is based on the analysis in J. Fernández‐Golfín et al. Actual
real‐world accuracy depends on a variety of factors; For more information, refer to ASTM D4444, section 6.
Relative Humidity Sensor Note
The meter should be stored in an environment with a relative humidity similar to the area to be tested. If the
storage humidity differs by more than 50% RH from the area under test, an acclimation period of up to 24
hours may be required to meet the specified RH accuracy.
Page 15

FLIR MR55 USER MANUAL Document Identifier: MR55-en-US_AB
15
10. Material Group Reference
10.1 Common Names of Timbers (BS888/589:1973) with group nos.
Group 1 ~ 8 for timbers
Group 9 for plywood, drywall, and oriented strand board (OSB)
Group 10 for brick, cement screed, and concrete
Group 11 for cement mortar, anhydrite screed, lime mortar, and plaster
Group 10 and 11 are not specified for accuracy and should be used for reference only
Abura 4 Gurjun
1
Pine, American Long Leaf
3
Afara 1 Hemlock, Western
3
Pine, American Pitch
3
Aformosa
6
Hiba 8 Pine, Bunya
2
Afzelia
4
Hickory
5
Pine, Caribbean Pitch
3
Agba 8 Hyedunani
2
Pine, Corsican
3
Amboyna
6
Iroko 5 Pine, Hoop
3
Ash, American
2
Ironbank
2
Pine, Huon
2
Ash, European
1
Jarrah 3 Pine, Japanese Black
2
Ash, Japanese
1
Jelutong
3
Pine, Kauri
4
Ayan 3 Kapur 1 Pine, Lodgepole
1
Baguacu, Brazilian
5
Karri 1 Pine, Maritime
2
Balsa 1 Kauri, New Zealand
4
Pine, New Zealand White
2
Banga Wanga
1
Kauri, Queensland
8
Pine, Nicaraguan Pitch
3
Basswood
6
Keruing
5
Pine, Parana
2
Beech, European
3
Kuroka
1
Pine, Ponderosa
3
Berlina
2
Larch, European
3
Pine, Radiata
3
Binvang
4
Larch, Japanese
3
Pine, Red
2
Birch, European
8
Larch, Western
5
Pine, Scots
1
Birch, Yellow
1
Lime 4 Pine, Sugar
3
Bisselon
4
Loliondo
3
Pine, Yellow
1
Bitterwood
5
Mahogany, African
8
Poplar, Black
1
Blackbutt
3
Mahogany, West Indian
2
Pterygota, African
1
Bosquiea
1
Makore
2
Pyinkado
4
Boxwood, Maracaibo
1
Mansonia
2
Queensland Kauri
8
Camphorwood, E African
3
Maple, Pacific
1
Queensland Walnut
3
Canarium, African
2
Maple, Queensland
2
Ramin 6 Cedar, Japanese
2
Maple, Rock
1
Redwood, Baltic (European)
1
Cedar, West Indian
8
Maple, Sugar
1
Redwood, Californian
2
Cedar, Western Red
3
Matai 4 Rosewood, Indian
1
Page 16

FLIR MR55 USER MANUAL Document Identifier: MR55-en-US_AB
16
Cherry, European
8
Meranti, Red (dark/light)
2
Rubberwood
7
Chestnut
3
Meranti, White
2
Santa Maria
7
Coachwood
6
Merbau
2
Sapele
3
Cordia, American Light
5
Missanda
3
Sen 1 Cypress, E African
1
Muhuhi
8
Seraya, Red
3
Cypress, Japanese (18-28%mc)
3
Muninga
6
Silky Oak, African
3
Cypress, Japanese (8-18%mc)
8
Musine
8
Silky Oak, Australian
3
Dahoma
1
Musizi 8 Spruce, Japanese (18-28%mc)
3
Danta 3 Myrtle, Tasmanian
1
Spruce, Japanese (8-18%mc)
8
Douglas Fir
2
Naingon
3
Spruce, Norway (European)
3
Elm, English
4
Oak, American Red
1
Spruce, Sitka
3
Elm, Japanese Grey Bark
2
Oak, American White
1
Sterculia, Brown
1
Elm, Rock
4
Oak, European
1
Stringybark, Messmate
3
Elm, White
4
Oak, Japanese
1
Stringybark, Yellow
3
Empress Tree
8
Oak, Tasmanian
3
Sycamore
5
Erimado
5
Oak, Turkey
4
Tallowwood
1
Fir, Douglas
2
Obeche
6
Teak
5
Fir, Grand
1
Odoko
4
Totara
4
Fir, Noble
8
Okwen
2
Turpentine
3
Gegu, Nohor
7
Olive, E African
2
Utile 8 Greenheart
3
Olivillo
6
Walnut, African
8
Guarea, Black
8
Opepe
7
Walnut, American
1
Guarea, White
7
Padang
1
Walnut, European
3
Gum, American Red
1
Padauk, African
5
Walnut, New Guinea
2
Gum, Saligna
2
Panga Panga
1
Walnut, Queensland
3
Gum, Southern
2
Persimmon
6
Wandoo
8
Gum, Spotted
1
Pillarwood
5
Wawa
6 Whitewood
3
Yew
3
Page 17

FLIR MR55 USER MANUAL Document Identifier: MR55-en-US_AB
17
10.2 Botanical names of timbers with MR55 group numbers
Abies alba
1
Eucalyptus acmenicides
3
Picea jezoensis (818%mc)
8
Abies grandis
1
Eucalyptus crebra
2
Picea sitchensis
3
Abies procera
8
Eucalyptus diversicolor
1
Pinus caribaea
3
Acanthopanex ricinifolius
1
Eucalyptus globulus
2
Pinus contorta
1
Acer macrophyllum
1
Eucalyptus maculate
1
Pinus lampertiana
3
Acer pseudoplatanus
5
Eucalyptus marginata
3
Pinus nigra
3
Acer saccharum
1
Eucalyptus microcorys
1
Pinus palustris
3
Aetoxicon punctatum
6
Eucalyptus obliqua
3
Pinus pinaster
2
Aformosia elata
6
Eucalyptus pilularis
3
Pinus ponderosa
3
Afzelia spp
4
Eucalyptus saligna
2
Pinus radiate
3
Agathis australis
4
Eucalyptus wandoo
8
Pinus spp
2
Agathis palmerstoni
8
Fagus sylvatica
3
Pinus strobus
1
Agathis robusta
8
Flindersia brayleyana
2
Pinus sylvestris
1
Amblygonocarpus andogensis
1
Fraxinus Americana
2
Pinus thunbergii
2
Amblygonocarpus obtusungulis
1
Fraxinus excelsior
1
Pipadeniastrum
africanum
1
Araucaria angustifolia
2
Fraxinus japonicus
1
Piptadenia africana
1
Araucaria bidwilli
2
Fraxinus mardshurica
1
Podocarpus dacrydiodes
2
Araucaria cunninghamii
3
Gonystylus macrophyllum
6
Podocarpus spicatus
3
Berlinia grandiflora
2
Gossweilodendron balsamiferum
8
Podocarpus totara
4
Berlinia spp
2
Gossypiospermum proerox
1
Populus spp
1
Betula alba
8
Grevillea robusta
3
Prunus avium
8
Betula alleghaniensis
8
Guarea cedrata
7
Pseudotsuga menzesii
2
Betula pendula
8
Guarea thomsonii
8
Pterocarpus angolensis
6
Betula spp
8
Guibortia ehie
2
Pterocarpus indicus
6
Bosquiera phoberos
1
Hevea brasilensis
7
Pterocarpus soyauxii
5
Brachylaena hutchinsii
8
Intsia bijuga
2
Pterygota bequaertii
1
Brachystegia spp
2
Juglans nigra
1
Quercus cerris
4
Calophyllum brasiliense
7
Juglans regia
3
Quercus delegatensis
3
Canarium schweinfurthii
2
Khaya ivorensis
8
Quercus gigantean
3
Cardwellia sublimes
3
Khaya senegalensis
4
Quercus robur
1
Carya glabra
5
Larix decidua
3
Quercus spp
1
Cassipourea elliotii
5
Larix kaempferi
3
Ricinodendron heudelotti
5
Cassipourea melanosana
5
Larix leptolepis
3
Sarcocephalus diderrichii
7
Castanea sutiva
3
Larix occidentalis
5
Scottellia coriacea
4
Page 18

FLIR MR55 USER MANUAL Document Identifier: MR55-en-US_AB
18
Cedrela odorata
8
Liquidamper styraciflua
1
Sequoia sempervirens
2
Ceratopetalum apetala
6
Lovoa klaineana
8
Shorea spp
2
Chamaecyparis spp (18-28%mc)
3
Lovoa trichiloides
8
Sterculia rhinopetala
1
Chamaecyparis spp (8-18%mc)
8
Maesopsis eminii
8
Swietenia candollei
1
Chlorophora excelsa
5
Mansonia altissima
2
Swietenia mahogani
2
Cordia alliodora
5
Millettia stuhimannii
1
Syncarpia glomulifera
3
Croton megalocarpus
8
Mimusops heckelii
2
Syncarpia laurifolia
3
Cryptomelia japonica
2
Mitragyna ciliata
4
Tarrietia utilis
3
Cupressus spp
1
Nauclea diderrichii
7
Taxus baccata
3
Dacryium franklinii
2
Nesogordonia papaverifera
3
Tectona grandis
5
Dalbergia latifolia
1
Nothofagus cunninghamii
1
Terminalia superba
1
Diospyros virginiana
6
Ochroma pyramidalis
1
Thuja plicata
3
Dipterocarpus (Keruing)
5
Ocotea rodiaei
3
Thujopsis dolabrat
8
Dipterocarpus zeylanicus
1
Ocotea usambarensis
3
Tieghamella heckelii
2
Distemonanthus benthamianus
3
Octomeles sumatrana
4
Tilia americana
6
Dracontomelium mangiferum
2
Olea hochstetteri
2
Tilia vulgaris
4
Dryobanalops spp
1
Olea welwitschii
3
Triploehiton scleroxylon
6
Dyera costulata
3
Palaquium spp
1
Tsuga heterophylia
3
Endiandra palmerstoni
3
Paulownia tomentosa
8
Ulmus americana
4
Entandrophragma angolense
7
Pericopsis elata
6
Ulmus procera
4
Entandrophragma cylindricum
3
Picaenia excelsa
3
Ulmus thomasii
4
Entandrophragma utile
8
Picea abies
3
Xylia dolabriformis
4
Erythrophleum spp
3
Picea jezoensis (18-28%mc)
3
Zelkova serrata
2
Page 19

FLIR MR55 USER MANUAL Document Identifier: MR55-en-US_AB
19
10.3 %WME Table (% Wood Moisture Equivalent)
Standard
Scale
Wood Species Group
Chipboard
1
2 3 4 5 6 7 8
9
%WME
7
8 9 8 7 7
11
11 7 8
10
11 9 8 7 12
11 8 9
11
11
10 8 8
12
12
9
10
12
12
10 9 9
13
12
9
11
13
13
11
10
10
13
13
11
12
14
14
12
11
11
14
14
12
13
15
15
13
11
11
15
15
13
14
15
16
13
12
12
15
16
14
15
16
17
14
13
13
16
17
14
16
17
18
15
13
13
16
18
15
17
18
19
16
14
14
17
19
15
18
18
20
16
15
15
17
19
16
19
19
21
17
16
15
18
20
17
20
20
23
18
17
16
18
21
17
21
21
24
19
18
17
19
22
18
22
22
25
19
18
17
20
23
19
23
23
26
20
20
19
21
25
20
24
24
27
21
20
19
22
26
21
25
24
28
21
21
19
23
26
23
26
25
29
22
22
20
24
27
26
27
27
29
23
23
21
25
28
27
28
28
29
24
25
22
26
28
28
29
29
30
26
26
23
27
29
29
Page 20

FLIR MR55 USER MANUAL Document Identifier: MR55-en-US_AB
20
11. Technical Support
Main Website
http://www.flir.com/test
Technical Support Website
http://support.flir.com
Technical support Email
TMSupport@flir.com
Service/Repair Support Email
Repair@flir.com
Support Telephone number
+1 855-499-3662 option 3 (toll-free)
12. Three-Year Limited Warranty
This product is protected by FLIR’s 3-Year Limited Warranty. Visit www.flir.com/testwarranty to
read the 3-Year Limited Warranty document. Register your product at the website to receive a
free 1-year warranty extension.
Page 21

FLIR MR55 USER MANUAL Document Identifier: MR55-en-US_AB
21
Corporate Headquarters
FLIR Systems, Inc.
2770 SW Parkway Avenue
Wilsonville, OR 97070
USA
Telephone: +1 503-498-3547
Customer Support
Technical Support Website http://support.flir.com
Technical Support Email TMSupport@flir.com
Service and Repair Email Repair@flir.com
Customer Support Telephone +1 855-499-3662 option 3 (toll free)
Publication Identification No.: MR55-en-US
Release Version: AB
Release Date: August 2018
Language: en-US
 Loading...