

FLIR BLACKFLY S USB Vision, BLACKFLY S GiGE Vision Installation Manual

INSTALLATIONGUIDE
FLIR
BLACKFLY®S
Copyright © 2015-2017 FLIR Integrated Imaging Solutions Inc.
Allrights reserved.
Version 4.0
Revised 5/4/2017

FCC Compliance
This device complies with Part 15 of the FCC rules. Operation is subject to the following two conditions: (1) This
device may not cause harmful interference, and (2) this device must accept any interference received, including
interference that may cause undesirable operation.
Korean EMCCertification
The KCC symbol indicates that this product complies with Korea’s Electrical Communication Basic Law regarding
EMC testing for electromagnetic interference (EMI) and susceptibility (EMS).
Hardware Warranty
The warranty for the BlackflyS camera is 3 years. For detailed information on how to repair or replace your
camera, please see the terms and conditions on our website.
Export Control
The ECCN for this product is EAR099.
WEEE
The symbol indicates that this product may not be treated as household waste. Please ensure this
product is properly disposed as inappropriate waste handling of this product may cause potential
hazards to the environment and human health. For more detailed information about recycling of this
product, please contact us.
Trademarks
Names and marks appearing on the products herein are either registered trademarks or trademarks of FLIR
Systems, Inc. and/or its subsidiaries.
Licensing
To view the licenses of open source packages used in this product please see What open source packages does
firmware use?
Copyright © 2015-2017 FLIR Integrated Imaging Solutions Inc.
Allrights reserved.

Table of Contents
1 Blackfly S Installation Guide 1
2 Handling Precautions and Camera Care 2
3 BlackflyS Installation 3
3.1 Preparing for Installation 3
3.2 Installing Your Interface Card and Software 4
3.3 Installing Your BlackflyS 6
3.4 Powering Your BlackflyS 7
4 Tools to Control the BlackflyS 8
4.1 Using the Spinnaker® Software Development Kit 8
4.1.1 SpinView Camera Evaluation Application 8
4.1.2 Custom Applications Built with the Spinnaker API 8
4.2 Using GenICam Applications 9
5 Configuring BlackflyS Setup 11
5.1 Configuring Camera Drivers 11
5.2 Configuring the IP Address—GigEonly 11
5.3 Allocating Bandwidth—GigEonly 12
5.3.1 Determining Bandwidth Requirements 12
5.4 Configuring Other Ethernet Settings—GigEonly 13
5.4.1 Stream Channel Destination Address 13
5.4.2 Heartbeat 13
5.5 Camera Firmware 15
5.5.1 Determining Firmware Version 15
5.5.2 Upgrading Camera Firmware 15
6 BlackflyS Physical Interface 16
6.1 BlackflyS Physical Description 16
6.2 BlackflyS Dimensions 17
6.3 Interface Connector 19
6.3.1 Ethernet Connector 19
6.3.2 USB3.1 Connector 19
6.4 Interface Cables 20
6.5 Interface Card 20
6.6 General Purpose Input/Output (GPIO) 21
5/4/2017
©2015-2017 FLIR
Integrated Imaging
Solutions Inc.
Allrights reserved.
FLIRBlackfly®S Installation Guide i

6.7 Mounting with the Case or Mounting Bracket 23
6.8 Case Temperature and Heat Dissipation 24
6.9 Lens Mounting 25
6.9.1 Back Flange Distance 25
6.10 Non-Volatile Flash Memory 26
6.11 Dust Protection 26
6.12 Infrared Cut-Off Filters 27
7 Input/Output Control 28
7.1 General Purpose Input/Output (GPIO) 28
7.2 GPIO Electrical Characteristics 30
8 Troubleshooting 32
8.1 Support 32
8.2 Status Indicator LED 33
Contacting Us 34
Revision History 34
5/4/2017
©2015-2017 FLIR
Integrated Imaging
Solutions Inc.
Allrights reserved.
FLIRBlackfly®S Installation Guide ii

1 Blackfly S Installation Guide
Welcome to the BlackflyS camera. We offer a number of resources to assist you with the BlackflyS.
n Release Notes—information about the current firmware release including feature additions or changes,
bug fixes, and known issues.
n Specifications—information about the camera model as it performs with the current firmware.
n Getting Started—quick start guide for installing the camera and software.
n Installation Guide—information about installing the camera and SDK, the physical interface and
mechanical properties, troubleshooting and how to get help. This document is available as a PDF for
download or as a webpage included in the firmware release package.
n Technical Reference—information about the features supported by the camera model with the current
firmware, including: image format control, acquisition control, sequencing, binning/decimation, and others.
This document is available as a PDF for download or as a webpage included in the firmware release
package.
1 Blackfly S Installation Guide
n Firmware—programming inserted into the programmable ROM of the camera that can be updated in-field.
New firmware packages are available for download and include both the firmware file and documentation.
n Spinnaker SDK—software development kit that provides GenICam-compliant controls to create
applications for the camera. Spinnaker is available for download. Each installation includes API
documentation for C, C++, and C#.
Our website provides additional information in our Knowledge Base and Technical Application Note library. As
well, the Downloads site is the portal to access documentation and firmware updates.
5/4/2017
©2015-2017 FLIR
Integrated Imaging
Solutions Inc.
Allrights reserved.
FLIRBlackfly®S Installation Guide 1

2 Handling Precautions and Camera Care
2 Handling Precautions and Camera Care
Warning! Do not open the camera housing. Doing so voids the
Hardware Warranty described in the Terms and Conditions on
our website.
Your FLIR digital camera is a precisely manufactured device and should be handled with care. Here are some tips
on how to care for the device.
n Avoid electrostatic charging.
n When handling the camera unit, avoid touching the lenses. Fingerprints will affect the quality of the image
produced by the device.
n To clean the lenses, use a standard camera lens cleaning kit or a clean dry cotton cloth. Do not apply
excessive force.
n Extended exposure to bright sunlight, rain, dusty environments, etc. may cause problems with the
electronics and the optics of the system.
n Avoid excessive shaking, dropping or any kind of mishandling of the device.
Related Knowledge Base Articles
Title Article
Cleaning the imaging surface of your
camera
Knowledge Base Article
10243
5/4/2017
©2015-2017 FLIR
Integrated Imaging
Solutions Inc.
Allrights reserved.
FLIRBlackfly®S Installation Guide 2

3 BlackflyS Installation
3.1 Preparing for Installation
What system configuration is recommended?
3 BlackflyS Installation
Recommended
System
Configuration
Operating
System
Windows7,
Windows8, or
Windows10
(32- or 64-bit)
CPU RAM Ports
Intel i5 4 GB
Intel USB3
host controller
Software to run and
compile example code
Microsoft Visual Studio 2010,
Visual Studio 2013, or
Visual Studio 2015
Note: Refer to Technical Application Note 10359 for important
information on recommended USB 3.0 system components.
Do you have all the parts you need?
To install your camera you will need the following components:
n For GigEcameras—Ethernet cable (see Interface Cables) and Powered Ethernet switch or Ethernet power
injector (if using PoE)
n For USB3 cameras—USB 3.0 cable (see Interface Cables)
n 6-pin GPIOcable (see General Purpose Input/Output (GPIO))
n C-mount Lens (see Lens Mounting )
n Tripod adapter (optional) (see Mounting with the Case or Mounting Bracket)
n Interface card (see Interface Card)
FLIR sells a number of the additional parts required for installation. To purchase, visit the Accessories page.
Do you have a downloads account?
The downloads page has many resources to help you operate your camera effectively, including:
n Spinnaker
n Firmware updates and release notes
n Dimensional drawings and CADmodels
n Documentation
To access the software and firmware downloads you must have a downloads account.
5/4/2017
©2015-2017 FLIR
Integrated Imaging
Solutions Inc.
Allrights reserved.
®
SDKsoftware, including drivers (required for installation)
FLIRBlackfly®S Installation Guide 3

1. Go to our website: www.ptgrey.com.
2. In the upper right corner, click Register.
3. Complete the form, then click Register.
After you submit your registration, you will receive an email with instructions on how to activate your account.
3.2 Installing Your Interface Card and Software
1. Install your Interface Card
Ensure the card is installed per the manufacturer's instructions.
Connect the internal IDE or SATApower connector on the card to the computer power
supply.
Alternatively, use your PC's built-in host controller, if equipped.
3 BlackflyS Installation
Open the Windows Device Manager. Ensure the card is properly installed. Ethernet cards appear under Network
Adapters. USB3 cards appear under Universal Serial Bus Controllers. An exclamation point (!) next to the
card indicates the driver has not yet been installed.
2. Install the Spinnaker® Software
Note: For existing users who already have Spinnaker installed,
we recommend ensuring you have the latest version for optimal
performance of your camera. If you do not need to install
Spinnaker, use SpinView to install and enable drivers for your
card.
a. Login to the Downloads page.
b. Select your Product Family, Camera Model and Operating System from the drop-down lists.
c. Click on the Software search results to expand the list.
d. Click the appropriate link to begin the download and installation.
After the download is complete, the Spinnaker setup wizard begins. If the wizard does not start automatically,
double-click the .exe file to open it. Follow the steps in each setup dialog.
3. For Ethernet cards: Enable jumbo frames
a. In Start->All Programs-> Point Grey Spinnaker SDK->SpinView, right click on the Network Adapter
and select Adapter Configuration, then select IP Configuration.
b. Click Open Network Connections.
5/4/2017
©2015-2017 FLIR
Integrated Imaging
Solutions Inc.
Allrights reserved.
FLIRBlackfly®S Installation Guide 4

c. Click Change Settings.
d. Click on the Advanced tab and from the Settings list select Jumbo Packet.
e. Set the Value to 9014 Bytes and click OK.
3 BlackflyS Installation
5/4/2017
©2015-2017 FLIR
Integrated Imaging
Solutions Inc.
Allrights reserved.
FLIRBlackfly®S Installation Guide 5
3.3 Installing Your BlackflyS
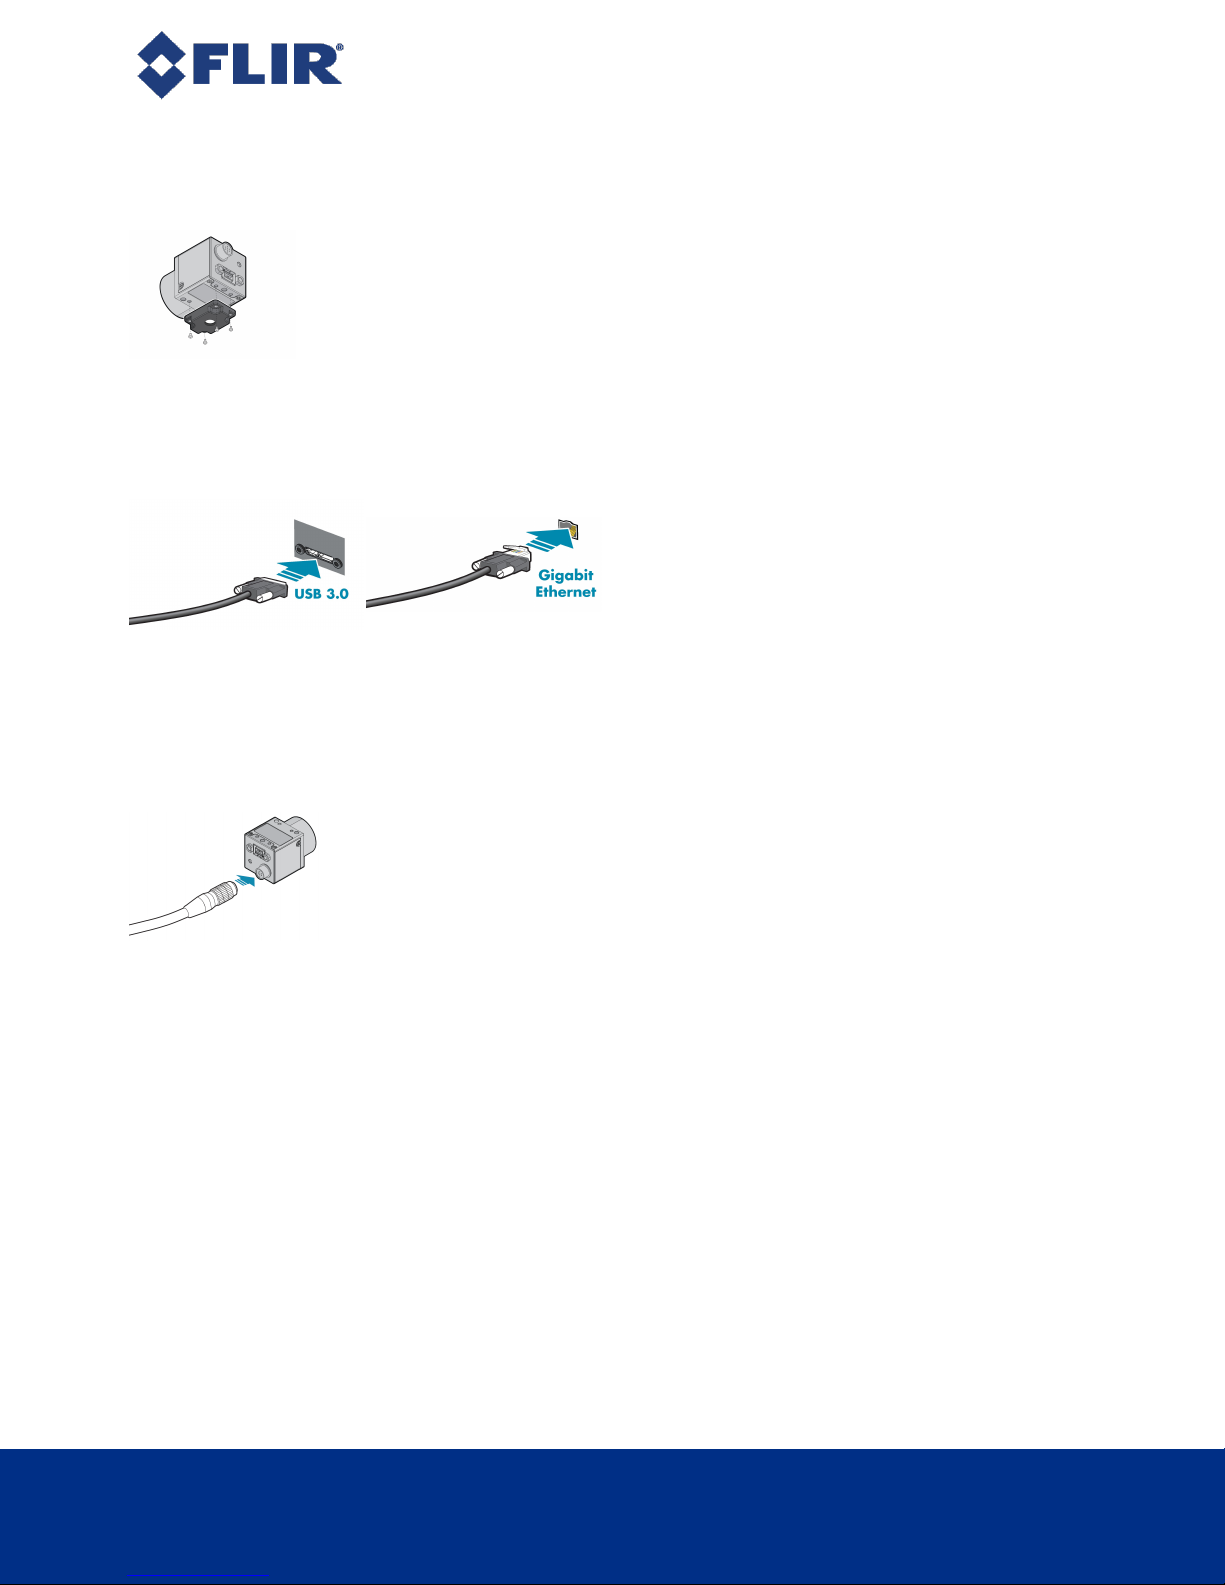
1. Install the Tripod Mounting Bracket (optional)
The ASA and ISO-compliant tripod mounting bracket attaches to the camera using the
included screws.
2. Attach a Lens
Unscrew the dust cap from the lens holder to install a lens.
3. Connect the interface Card and Cable to the Camera
3 BlackflyS Installation
Plug the interface cable into the host controller card and
the camera. The cable jack screws can be used for a
secure connection.
When the camera is first connected, the operating system automatically installs the camera driver. Camera
drivers are available with the Spinnaker SDK installation.
a. If using PoE, connect a powered Ethernet switch or Ethernet power injector in between the card and the
camera.
4. Plug in the GPIO connector if required
GPIOcan be used for power, trigger, and strobe.
5. Confirm Successful Installation
Run the SpinView application: Start->All Programs-> Point Grey Spinnaker->SpinView
The SpinView application can be used to test the camera's image acquisition capabilities.
Changes to your camera's installation configuration can be made using the SpinView application.
5/4/2017
©2015-2017 FLIR
Integrated Imaging
Solutions Inc.
Allrights reserved.
FLIRBlackfly®S Installation Guide 6

3.4 Powering Your BlackflyS
For GigE cameras—Power can be provided over the Ethernet interface (PoE). To use PoE, you must also have a
powered Ethernet card, a powered Ethernet switch, or an Ethernet power injector.
For USB3 cameras—The USB 3.0 Micro-B connector provides a power connection between the camera and the
host computer. The ideal input voltage is nominal 5 V DC. For the USB 3.0 connector to provide power, the host
controller must be connected to the computer's power supply.
Power can also be provided externally through the GPIO interface: 12 V nominal (8 - 24 V). Power consumption is
3W maximum.
If both power sources are connected the camera always uses external power over the GPIO connector.
Note: Some systems, especially those with laptop computers or
longer cable lengths, may not provide adequate power through
the USB 3.0 cable which could result in intermittent operation.
The use of external power through the GPIOis required for
these systems.
3 BlackflyS Installation
Related Knowledge Base Articles
Title Article
How can I power my USB 3.0 camera?
The camera does not transmit images for the first 100 ms after power-up. The auto-exposure and auto-white
balance algorithms do not run while the camera is powered down. It may therefore take several images to get a
satisfactory image.
When the camera is power cycled (power disengaged then re-engaged), the camera reverts to its default factory
settings, or if applicable, a saved user set.
Knowledge Base Article 10240
5/4/2017
©2015-2017 FLIR
Integrated Imaging
Solutions Inc.
Allrights reserved.
FLIRBlackfly®S Installation Guide 7

4 Tools to Control the BlackflyS
4 Tools to Control the BlackflyS
The BlackflyS's features can be accessed using various controls, including:
n Spinnaker SDK including API examples
n SpinView camera evaluation application, included in the Spinnaker SDK installation
n Third-party GenICam applications
4.1 Using the Spinnaker®Software Development Kit
You can monitor or control features of the camera through Spinnaker API examples provided in the Spinnaker SDK,
or through the SpinView camera evaluation application. A Programmer's Guide and API Reference is included in
the installation.
4.1.1 SpinView Camera Evaluation Application
The SpinView application is a generic, easy-to-use streaming image viewer included with the Spinnaker SDK that
can be used to test many of the capabilities of your camera. It allows you to view a live video stream from the
camera, save individual images, adjust the various attributes, frame rates, features and settings of the camera. It
includes tools for updating firmware, managing drivers, IP addressing, and activity logging.
4.1.2 Custom Applications Built with the Spinnaker API
The Spinnaker SDK includes a full Application Programming Interface that allows you to create custom
applications to control your camera. Included with the SDK are a number of source code examples to help you get
started.
Spinnaker API examples are provided for C, C++, C#, and VB.NET languages. These examples are precompiled
for your convenience.
5/4/2017
©2015-2017 FLIR
Integrated Imaging
Solutions Inc.
Allrights reserved.
FLIRBlackfly®S Installation Guide 8
 Loading...