

Page 1

User Guide
User Guide
Outboard Acoustic Preamps
Includes Instructions for
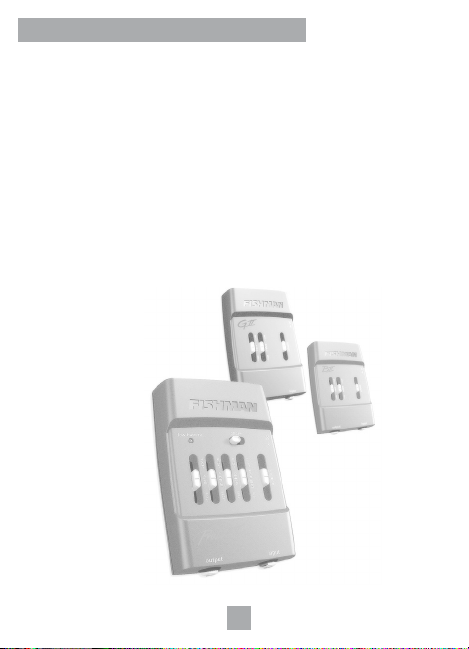
Model GII
General Purpose Preamp
Model BII
Acoustic Bass Preamp
Pro EQ II
Acoustic Instrument Preamp / EQ
Page 2
Outboard Acoustic Preamps
Outboard Acoustic Preamps
Thank you for choosing a Fishman Outboard Acoustic Preamp. Our goal is to provide
you with the finest products for amplifying your acoustic instrument - systems that
simply let you sound your best. With our long-standing commitment to quality, you can
feel confident that your Fishman gear will produce great sound and trouble-free
performance for years to come.
Please take a few minutes to read this guide and familiarize yourself with the preamp's
controls. Your satisfaction is very important to us. If you have any questions, please
contact us at
tteecchh@@ffiisshhmmaann..ccoomm
; or by telephone at
997788--998888--99666655
.
2
2
Page 3

User Guide
User Guide
Model GII & Model BII
Model GII & Model BII
The GII and BII are upgraded and updated versions of our classic Model G & B
preamps. Well suited for all acoustic instrument pickups, these new preamps are
enclosed in a tough injection molded case. Both models feature advanced new
electronics, which are quieter, cleaner and offer longer battery life than their
predecessors.
•
The GII is designed specifically for acoustic instruments including guitar, violin,
viola, 'cello and mandolin.
•
The BII offers the same basic features as the GII, but with the tone controls voiced
at slightly lower frequencies for upright acoustic bass and acoustic/electric bass
guitar.
3
3
Page 4

Outboard Acoustic Preamps
Outboard Acoustic Preamps
GII & BII FEATURES
Power
You can power your BII/GII two ways:
1 - 9 Volt Battery
Remove the battery compartment lid by sliding it up towards the top of the unit.
Place a fresh 9 Volt alkaline battery in the compartment and replace the lid.
NOTE: Make sure the battery is installed with the correct polarity.
You can expect 1,400 hours of continuous use. To conserve the battery, unplug
the input when you are not using the preamp. When you start to hear distortion
from the preamp, it is time to change the battery.
2 - 9-Volt AC Adapter Input
Use only a Fishman 910-R or Boss PSA series regulated AC adapter. If a 9 Volt
battery is in the preamp, no battery drain will occur when you use the AC adapter.
Input
The input accepts all piezo and magnetic pickups (passive or active). When you plug
in here, the 9 Volt battery switches on. To conserve battery life, remember to unplug
the input jack when you are not using the preamp. It is a good idea to turn down your
amp or mixer before you plug into the input of the preamp. Doing so will protect your
speakers (and your ears) from loud pops.
Output
Plug a standard instrument cable from the output to a stage amp, a DI or an
unbalanced microphone input on a Mixer.
Input Gain
You'll find this miniature rotary control recessed in the back of the preamp.
Like a trim control on a mixer, the input gain accommodates a variety of signal levels.
Use a slot head jeweler's screwdriver to raise or lower the input level.
4
4
Page 5
User Guide
User Guide
If the signal coming from your pickup is very weak, you may wish to turn the input
trim clockwise, which will raise the overall level and reduce system noise (hiss). If
you hear distortion when you play (with a new battery), lower the input trim until it
goes away.
Volume
For the cleanest signal, set this as high as possible without distorting your amp or
mixer .
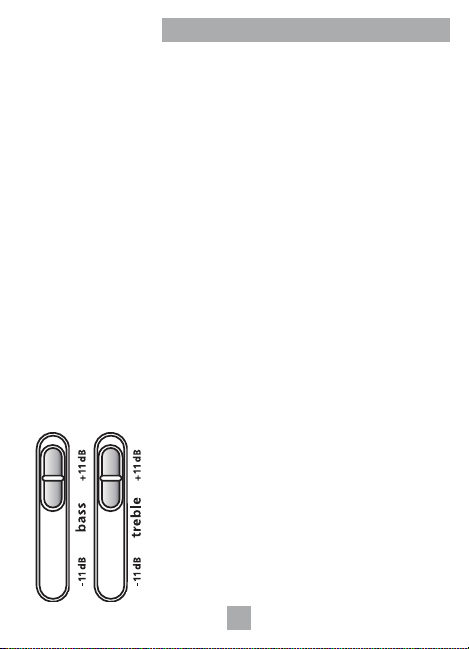
Tone Controls
The Tone controls are boost/cut shelving style, which means they affect bass and
treble in a way that is both musical and pleasing to your ears. With the sliders at
their center detent positions, the EQ is flat and tone controls are out of the circuit.
Above center is boost and below is cut.
Bass
A Boost here will add depth and weight to the sound of an instrument with light
bass response. Lower the bass to tighten up the big boomy tone of a
dreadnought or jumbo guitar.
Treble
A Boost here will help to "cut through the mix" Conversely, lowering the Treble
will mellow and subdue your amplified tone.
Implied Midrange Cut
You can cut mids by boosting equal parts of bass and
treble.
5
5
Page 6

Outboard Acoustic Preamps
Outboard Acoustic Preamps
Optional Belt Clip
Attaches to the back of the GII or BII with two screws.
MODEL GII SPECIFICATIONS
Measured with all tone controls at center detent and volume at max.
Nominal Input Level: -20 dBV
Input Overload (20 Hz to 20 kHz): +8 dBV
Input Impedance: 10 MOhm
Output Impedance: Less than 3.5 kOhm
Output Level: -20 dBV with input gain
THD: .01% at 1 kHz, -10dBV input, -4 dBV output
Signal to Noise Ratio: 91 dB (A weighted, -10 dBV input,
Bass Control Range: ± 11dB at 60 Hz
Treble Control Range: ± 11dB at 10 kHz
Current Drain: Less than .4 mA
Power Supply: 9V alkaline battery (estimated 1400 hours
All specifications subject to change without notice.
control at minimum position
-8 dBV with input gain
control at maximum position
-4 dBV output)
± 3 dB at 350 Hz
± 3 dB at 2.4 kHz
continuous use) Regulated 9V AC Adapter
Tip = negative 9 V
6
6
Page 7

User Guide
User Guide
MODEL BII SPECIFICATIONS
Measured with all tone controls at center detent and volume at max.
Nominal Input Level: -20 dBV
Input Overload (20 Hz to 20 kHz): +8 dBV
Input Impedance: 10 MOhm
Output Impedance: Less than 3.5 kOhm
Output Level: -20 dBV with minimum input gain position
THD: .01% at 1 kHz, -10dBV input, -4 dBV output
Signal to Noise Ratio: 91 dB (A weighted, -10 dBV input,
Bass Control Range: ± 11 dB at 60 Hz
Treble Control Range: ± 11 dB at 10 kHz
Current Drain: Less than .4 mA
Power Supply: 9V alkaline battery (estimated 1400 hours
All specifications subject to change without notice.
-8 dBV with maximum input gain position
-4 dBV output)
± 3 dB at 350 Hz
± 3 dB at 1.2 kHz
continuous use) Regulated 9V AC Adapter
Tip = negative 9 V
7
7
Page 8

Outboard Acoustic Preamps
Outboard Acoustic Preamps
Pro EQ II
Pro EQ II
The Pro EQ II is an upgraded and updated version of our classic preamp/equalizer.
It is well suited for all acoustic instrument pickups. Enclosed in a tough injection
molded case, the Pro EQ II features advanced new electronics which are quieter,
cleaner and offer longer battery life than our original Pro EQ preamp.
8
8
Page 9

User Guide
User Guide
PRO EQII FEATURES
Power
You can power your Pro EQII two ways:
1 - 9 Volt Battery
Remove the battery compartment lid by sliding it up towards the top of the unit.
Place a fresh 9 Volt alkaline battery in the compartment and replace the lid.
NOTE: Make sure the battery is installed with the correct polarity.
You can expect 220 hours of continuous use. To conserve the battery, unplug the
input when you are not using the preamp. When you start to hear distortion from
the preamp, it is time to change the battery.
2 - Nine-Volt AC Adapter Input
Use only a Fishman 910-R or Boss PSA series regulated AC adapter. If a 9 Volt
battery is in the preamp, no battery drain will occur when you use the AC adapter.
Output
Plug a standard instrument cable from the output to a stage amp, DI or an
unbalanced microphone input on a Mixer.
Input
The input accepts all piezo and magnetic pickups (passive or active).
When you plug in here, the 9 Volt battery switches on. To conserve battery life,
remember to unplug the input jack when you are not using the preamp. It is a good
idea to turn down your amp or mixer's input before you plug into the input. Doing so
will protect your speakers (and your ears) from loud pops.
Input Gain
You'll find this control located on the back of the preamp, to the left of the sub bass
control. Like a trim control on a mixer, the input gain accommodates a variety of
signal levels. Use a slot head jeweler's screwdriver to raise or lower the input level.
9
9
Page 10

Outboard Acoustic Preamps
Outboard Acoustic Preamps
Input Gain Continued
If the signal coming from your pickup is very weak, turn the input gain clockwise to
reduce the overall system noise (hiss). If you hear distortion when you play (with a
fresh battery), lower the input trim until it goes away.
Sub Bass
You'll find this control located on the back of the preamp, to the right of the input gain
control. Use a slot head jeweler's screwdriver to raise or lower the sub bass level.
For instruments with lots of natural deep bass, typically dreadnought and jumbo style
guitars, leave the sub bass at its factory set full counterclockwise position.
For instruments that don't naturally produce a lot of deep bass, such as small bodied
electro-acoustic guitars, adjust this control clockwise to add bass resonance.
Low Battery Light
This light has two distinct functions:
1. Power Up Indicator
The low battery LED will flash briefly when the unit turns on. Some people ask
us, "Why doesn't this light stay on, like a conventional pilot light?" We believe that
a steadily lit LED devours too many precious hours of battery life. So, by briefly
flashing the Pro EQ II's light when the unit turns on, we conserve power and
extend the useful life of the battery.
2. Low Battery Warning
When the Low Battery LED lights steadily, it is time to change the battery.
Phase
This control works to suppress acoustic feedback and can drastically affect your
amplified tone. Flip the Phase switch back and forth until you find a position that
sounds good and subdues feedback.
10
10
Page 11

User Guide
User Guide
Volume
For the cleanest signal, set this as high as possible without distorting your amp or
mixer
Optional Belt Clip
Attaches to the back of the Pro EQ II with two screws.
PRO-EQ II TONE CONTROLS
Bass
A Boost here will add depth and weight to the sound of an instrument with light bass
response. Lower the bass a few dB to tighten up the big boomy tone of a
dreadnought or jumbo guitar.
Middle
More than any other control, the middle slider can affect the character of your
instrument's tone. Typically, a slight mid cut just below the center detent will help
bring out roundness in the bass and will unmask the treble. A deep midrange cut
produces a "scooped out" tone that works well at high volume levels and can help to
reduce feedback. Boost the mids for an "in your face" nasal quality, similar to electric
guitar tone.
Treble
A Boost here will help to "cut through the mix". Conversely, cutting the Treble will
mellow and subdue your amplified tone.
Brilliance
This slider can add shimmer and sparkle to your sound. It zeros in on "extra crispy"
high frequency tones, the realm of harmonics and acoustic string sound. Lowering
the Brilliance slider can help to reduce finger noise and fret buzz.
11
11
Page 12

Outboard Acoustic Preamps
Outboard Acoustic Preamps
SAMPLE EQ SETTINGS
Here are a few suggested settings for the Pro EQ II:
Finger Style
This setting will add fullness to the bass and definition to the treble.
12
12
Page 13

User Guide
User Guide
"Scooped" Mid
This is the popular "smiley eq " tone that emphasizes extreme bass and treble.
Strummer
This is a good overall setting if you mainly strum the instrument.
13
13
Page 14

Outboard Acoustic Preamps
Outboard Acoustic Preamps
Sample Settings Continued
Cut through the mix
This setting is helpful when you need to be heard through a loud band.
14
14
Page 15

User Guide
User Guide
PRO-EQ II SPECIFICATIONS
Measured with all tone controls at center detent and volume at max.
Nominal Input Level: -20 dBV
Input Overload (20 Hz to 20 kHz) +8 dBV
Input Impedance: 10 MOhm
Output Impedance: Less than 3.5 kOhm
Nominal Output Level: -20 dBV with input gain control
THD: .015% at 1 kHz, -10 dBV input,
Signal to Noise Ratio: 93 dB (A weighted, -10 dBV input,
Sub-Bass Control: 0 to +10 dB at 80 Hz
Bass Control Range: ± 11dB at 60 Hz
Middle Control Range: ± 8 dB at 1.25 kHz
Treble Control Range: ± 11dB at 10 kHz
Brilliance Control Range: ± 9 dB at 9 kHz
Current Drain: Less than 2.6 mA
Power Supply: 9V alkaline battery
All specifications subject to change without notice.
at minimum position
-8 dBV with input gain control
at maximum position
-4 dBV output
-4 dBV output)
± 3 dB at 350 Hz
± 3 dB bandwidth:1.5 kHz
± 3 dB at 2.4 kHz
± 3 dB bandwidth: 7 kHz
(estimated 220 hours continuous use)
Regulated 9V AC Adapter
tip = negative 9V
15
15
Page 16

Limited Warranty
Limited Warranty
FISHMAN Model GII BII and Pro-EQ II Preamps are warranted to function for a
period of One (1) Year from the date of purchase. If the unit fails to function
properly within the warranty period, free repair and the option of replacement or
refund in the event that FISHMAN is unable to make repair are FISHMAN’s only
obligations. This warranty does not cover any consequential damages or damage to
the unit due to misuse, accident, or neglect. FISHMAN retains the right to make
such determination on the basis of factory inspection. Products returned to
FISHMAN for repair or replacement must be shipped in accordance with the Return
Policy, as follows. This warranty remains valid only if repairs are performed by
FISHMAN. This warranty gives you specific legal rights and you may also have
other rights which may vary from state to state.
Return Policy
To return products to FISHMAN TRANSDUCERS, you must follow these steps...
1. Call FISHMAN TRANSDUCERS at 978-988-9199 for a Return Authorization
Number (“RAN”).
2. Enclose a copy of the original Bill of Sale as evidence of the date of purchase,
with the product in its original packaging and a protective carton or mailer.
3. FISHMAN TRANSDUCERS’ technicians will determine whether the item is
covered by warranty or if it instead has been damaged by improper customer
installation or other causes not related to defects in material or workmanship.
4. Warranty repairs or replacements will be sent automatically free of charge.
5. If FISHMAN TRANSDUCERS determines the item is not covered by warranty, we
will notify you of the repair or replacement cost and wait for your authorization to
proceed.
340-D Fordham Road Wilmington MA 01887 USA
FISHMAN TRANSDUCERS
Phone 978-988-9199 • Fax 978-988-0770
www.fishman.com
2-02 • 009-062-004 • Rev 2
 Loading...