

Fisher & Paykel WL8060P1 User Manual for WL8060P1

CLEANSMART™ CLOTHES WASHER
WL8O60P model
INSTALLATION GUIDE / USER GUIDE
NZ AU


CONTENTS
Safety and warnings 4
Installation instructions 6
Before your first wash 12
Safety features 13
Control panel 14
Wash cycles 17
The unique cleansmart™ wash 19
Wash preparation 20
Getting started quickly 23
Wash options 25
Customising Wash options 29
Changing pre-set options 31
Caring for your washer 37
Before you call for service 40
Fault codes 42
Troubleshooting 43
Manufacturer’s warranty 48
Customer care 50
Registration
To register your product visit our website: fisherpaykel.com/register
3

SAFETY AND WARNINGS
!
WARNING!
Electrical Shock Hazard
Failure to follow this advice may result in
electrical shock or death.
• If you are using an extension cord or a portable
electrical outlet device (eg multi-socket outlet
box), ensure that it is positioned so that it does
not come into contact with water or moisture.
READ AND SAVE THIS GUIDE
When using your clothes washer, follow basic precautions, including thefollowing:
General
z
This product has been designed for personal, family or household use. This product is
not designed for any commercial use. Any commercial use will terminate this products
manufacturer’s warranty.
z
A damaged power cord must be replaced by a Fisher&Paykel trained and supported
service technician or similarly qualified person in order to avoid a hazard. Do not use
the appliance until it has been repaired to avoid a risk of electric shock.
z
Do not operate this machine if it has been damaged during transport. Contact your
Fisher&Paykel dealer or Fisher&Paykel trained and supported service technician.
z
This clothes washer is not intended for use by persons (including children)
with reduced physical, sensory or mental capabilities, or lack of experience and
knowledge,unless they are supervised or given instructions on how to use the
washerby someone responsible for their safety.
z
Keep children away from the washer while it is in operation.
z
Supervise children to ensure they do not play with the washer or climb inside thedrum.
z
The washer should only be used for washing and rinsing of textiles where this
isindicated on the care label.
z
Do not add petrol, dry-cleaning solvents, or other flammable or explosive substances to
the wash water. These substances give off vapours that could ignite or explode.
z
Do not wash articles that have been previously cleaned in, washed in, soaked in,
or spotted with gasoline, dry-cleaning solvents, or other flammable or explosive
substances as they give off vapours that could ignite or explode.
z
The lid will be locked for some parts of the wash cycle for safety reasons. It is possible
to open the lid during the cycle under certain conditions. Never force the lid open.
z
Do not touch or operate the machine with wet hands or with bare-feet.
z
Ensure the installation provides accessibility to the plug or incorporate a switch in the
fixed wiring in accordance with the wiring rules to allow disconnection of the appliance
from the supply after installation.
z
Read and follow the detergent manufacturers’ instructions carefully. Instructions on
how to use the detergent will be clearly indicated on the pack. Remember to store your
detergents out of the reach of children.
4

SAFETY AND WARNINGS
MODEL CODE MAX CAPACITY* (KG)
WL8060P 8
*Capacity refers to the maximum dry weight of items the washer can wash at any one
time.
z
Do not overload your washing machine beyond its rated capacity.
z
Do not wash an electric blanket in your washer unless the care label specifically states
it is safe to do so.
z
Do not wash curtains in this washer, as sunlight makes them brittle and they may
disintegrate during washing.
z
The only user-removable parts of the washer are the inlet hose(s) and the dispenser
funnels (tops). No other parts are designed to be removed by anyone other than a
Fisher&Paykel trained and supported service technician.
Installation
z
For guidance on how to install your product, please refer to installation instructions
contained in this document.
Water supply requirements:
z
Inlet water pressure: Max. 1MPa (145psi), Min. 34kPa (5psi)
z
Inlet water flow rate: Min. 8litres/minute
z
A pressure-reducing valve must be installed if pressure is higher than 1MPa.
z
For optimum wash performance check the supply pressure is within the
recommendedrange.
z
New hose sets provided with the washer should be used to connect the washer to the
water mains. Old hose sets should not be re-used.
z
We recommend the inlet hose(s) are changed every 5 years. WARNING: Failure to do so
may result in a flood and damage to property.
z
The hot water temperature should not exceed 65°C and the cold water temperature
not exceed35°C. Temperatures above these may cause the machine to fault or cause
damage to the machine.
z
Install the machine on a solid and level floor surface ensuring it has at least 20mm
clearance on each side. The washer must not be installed on any textured floor
coverings (eg carpet, rugs).
Disposal
z
When disposing of the washer, it is recommended that the lid is removed to
avoidchildren getting trapped inside, and that the electrical cable is cut off
close to thewasher.
5

INSTALLATION INSTRUCTIONS
INSTALLATION INSTRUCTIONS
Accessories
Check if you received the following accessories with your Fisher&Paykel washer. Youwill
find them inside the drum or attached to the packaging.
z
2 x inlet hose(s)
z
1 x hose guide
Unpacking
To ensure the best performance from your new washer please follow the instructionsbelow.
Removing the packaging
1 Remove the outer packaging.
2 Tilt the washer backwards and walk it off the base
packer one foot at a time (ensure the lid is still
taped down).
3 Remove the base packer from under the washer by
tilting the washer backwards and pulling the packer
out the front.
4 Remove the tape, lift the lid and remove the bowl
packer from the bowl.
5 Remove the hoses and accessories.
6 Keep the base packer and bowl packer in case they
are required for future transit.
Please ensure that the base packer has been removed before operating your machine.
6

INSTALLATION INSTRUCTIONS
Product and minimum clearance dimensions
H I
AAD
E
B C
F G
PROFILE VIEWFRONT VIEW
PRODUCT DIMENSIONS MM
A Overall height of product* (to highest point on console) 1045 – 1075
B Overall width of product 600
C Overall depth of product 600
D Height of product to top of lid closed* 950 – 980
E Height of product to top of lid open* 1350 – 1385
Standpipe height 850 - 1200
MINIMUM CLEARANCES MM
F Minimum cavity width 640
G Minimum depth clearance
660
(including inlet hoses, drain hose and bowed front)
H Minimum clearance to side wall or adjacent product
#
(dryer) 20
I Minimum clearance at the rear of the product 50
*The exact height of your washer is dependent on how far the feet are extended from the base of
the washer.
#
Applies either side.
7

INSTALLATION INSTRUCTIONS
Levelling instructions
It is IMPORTANT to level the washer to ensure good spin performance.
A level is provided with your washer. The washer is level when the bubble sits in the centre,
within the two lines.
Your washer is equipped with self-locking feet at the front to ensure they do not move once
you have levelled your washer. Move the washer using the top corners, do not push the
centre front of the washer.
After levelling, the corners of the washer should be clear of the floor and the washer must
not rock in any direction.
Move the washer to its final position allowing
for required clearances.
1
2
Level
100mm
Wall
Level the washer side to side:
z
Open the lid and place level at the centre
front of the top deck (forward of the lid
lock slot). Wind the front feet up or down.
Release the rear feet:
z
Close the lid and tilt washer forward away
from the wall. Gently lower washer down.
8
3
4
Level
Level the washer front to back:
z
Open the lid and place the level on
one side of the top deck. Wind both
front feet equally.
z
To release back feet, tilt the
washer forward.
Re-check the washer is level:
z
Place the level at the centre front of the
topdeck (forward of the lid lock slot)
z
Ensure washer does not rock
in any direction.
z
If washer is not level repeat the above steps.
If moving or transporting your washer in the
future, ensure you tape the lid down.

INSTALLATION INSTRUCTIONS
Water supply
Inlet hoses
Failure to adhere to the following instructions may result in a flood and
damage to property:
1 Connect the straight ends of the inlet hoses to the taps
(thereare washers fitted in both ends). Connect the red
connector hose to Hot, and the white connector hose
toCold.
2 Connect the elbow ends of the inlet hoses to the
corresponding washer inlet valves. Inlet valves are
marked on the back of the washer. Ensure the Hot
Straight
(tap) end
Inlet hose ends
Elbow
(machine) end
Only use the new hose set provided with your washer.
Water supply requirements:
z
If you have an uncontrolled water heating source (eg a wet back or solar heating
system) you should fit a tempering valve. This will ensure the hot water temperature
remains within safe limits. Contact your registered plumber to select and install the
tempering valve.
z
Your cold water should not exceed 35°C and your hot water should not exceed
65°C. Temperatures above these may cause the machine to fault or cause damage
to the machine.
z
Inlet water static pressure: Max.1MPa(145psi) Min.34KPa (5psi).
z
Inlet water flow rate at tap: Min.8litres/min.
valve is connected to the hot tap and the Cold valve is
connected to the cold tap.
H = Hot C = Cold
This clothes washer should be plumbed into both a hot and cold water supply otherwise
some cycles may not function correctly. Your washer does not have an internal heater to
heat water.
9

Draining
INSTALLATION INSTRUCTIONS
Placing the drain hose in a standpipe or tub:
Pull hose
through
guide
(20 mm)
maximum
1 Carefully pull the drain hose out from the
back of the washer by pulling the exposed
part of the hose downward and outward.
2 To guide the drain hose over the tub or
standpipe the hose guide MUST be fitted to
the drain hose.
3 Place the drain hose in the tub or standpipe.
Do not fit the hose to a drain spigot.
Drainage must not be airtight in order to
Flex hose
guide apart
Standpipe 850 - 1200 mm
prevent siphoning.
Fitting the drain hose guide
To prevent siphoning the drain hose should not extend more than 20mm from the end
of the guide. The height of the standpipe or tub should be between 850 - 1200 mm. The
drain hose can be trimmed to length.
z
Regularly check that your standpipe or tub is free from lint or other obstructions, which
may affect how your washer works or may cause flooding.
z
In multi-storey apartments or any upper floor, the washer should be installed on a floor
equipped with a drain.
z
Draining must comply with local by-laws.
Electrical connection
z
This appliance must be supplied with a 220 – 240V, 50Hz, sinusoidal,
10Aelectrical supply.
z
Check the power cord for damage, making sure it is not squashed or twisted.
z
A damaged power cord must be replaced by a Fisher & Paykel trained and supported
service technician or qualified person, in order to avoid a hazard. The appliance must not
be operated until it is repaired, as there is a risk of electric shock.
SPARE PARTS* PART NO.
Hose inlet long (2m) 422680P
Hose inlet large bore 426123P
Drain hose extension (not suitable for attaching to a spigot) 425627P
*Available from your Fisher&Paykel dealer or a Fisher&Paykel trained and supported
service technician.
10

INSTALLATION INSTRUCTIONS
Completing the installation
z
Turn on the water and check all hose connections for leaks. Make sure there are no kinks
in the hoses. Check the hose connections for leaks again after 24hours.
z
Uncoil power cord, remove and discard the plastic pin cover, and plug into wall socket.
z
Connect the appliance to an earthed outlet protected by a fuse of suitable capacity.
Installation test cycle
Your washer must be correctly installed before use. Check the installation and operation of
the washer using the following procedure:
1
2
3
Touch to activate your washer.
+
Touch and OPTIONS together for 3 seconds.
Touch to start the installation test cycle.
The display will show .
The washer will beep to signal the end of
the installation test cycle. Any faults will be
displayed on the screen, refer ‘Fault codes’.
If you need further assistance, please contact
a Fisher&Paykel trained and supported
service technician or our Customer Care
Centre. Refer to ‘Customer care’ section for
contact details.
If there are any problems, you must address these before proceeding with normal use. The
washer will automatically turn off at the end of the cycle if there are no problems.
11

BEFORE YOUR FIRST WASH
Check you have done everything you need to before you start your first wash:
Has the base space packer been removed?
Is the drain hose threaded through the hose guide ‘Ubend’ (with no more than
20mm extended) and hooked into your standpipe or tub, or attached toa spigot?
Is the hot hose connected to the Hot valve marked ‘H’?
Is the cold hose connected to the Cold valve marked ‘C’?
Have the taps been turnedon?
Is the washer correctly levelled, feet are extended and cabinet corners are clear of
the floor?
Has the power cord been connected to an appropriate power supply andthepower
turned on?
Have you performed the installation test cycle?
CleanSmart™ washer capacity
CleanSmart™ washer offers a generous 8kg capacity. The list below outlines what is
included in a 8kg wash load (in accordance with AS/NZS2040.1:2005).
WASH LOAD - 8 KG QUANTITY
Sheets (double) 3
Bath towels 4
Tablecloths 3
Shirts 5
T-Shirts 5
Pillowcases 5
Shorts 5
Washcloths 8
Handkerchiefs 6
The above load composition is indicative only. We recommend for everyday use that you
separate out your sheets and towels and wash them on the cycles specifically designed for
them.
12
SAFETY FEATURES
Lid lock
The lid of your CleanSmart™ washer is locked for some parts of the wash cycle, ensuring
safety for you and your family while it is operating.
The
LID LOCKED light (above the button) is illuminated when the lid lock is activated,
letting you know at a glance if you can open the lid or not.
To unlock the lid at any time during the cycle touch
The lid will be locked from the beginning of the
.
BOWL CLEAN cycle, through to the end,
unless is touched.
If the lid is left open, your CleanSmart™ washer will be unable
to lock the lid, and the cycle will be halted. The washer will
beep to alert you and display a warning message on the
screen. If this occurs, ensure that the lid is closed and touch
Do not put anything down the lid lock slot in the top deck of
your washer.
Do not try to disable the lid lock.
Auto drain
z
Unsupervised clothes washers filled with water can present a drowning hazard to small
children. In order to minimise any risk of this type of accident, your CleanSmart™ washer
has been pre-programmed to know when this potential hazard is created and drains the
wash water to a safe level.
z
If you pause your CleanSmart™ washer at any time during the wash cycle when there
is water in the bowl, the washer will activate the auto drain function after 3 minutes.
This will drain the water in the wash bowl to an acceptable level, minimising any
potential hazard.
z
A warning message will be displayed on the digital display while auto drain is in
operation. The cycle can be restarted at anytime by touching .
.
13
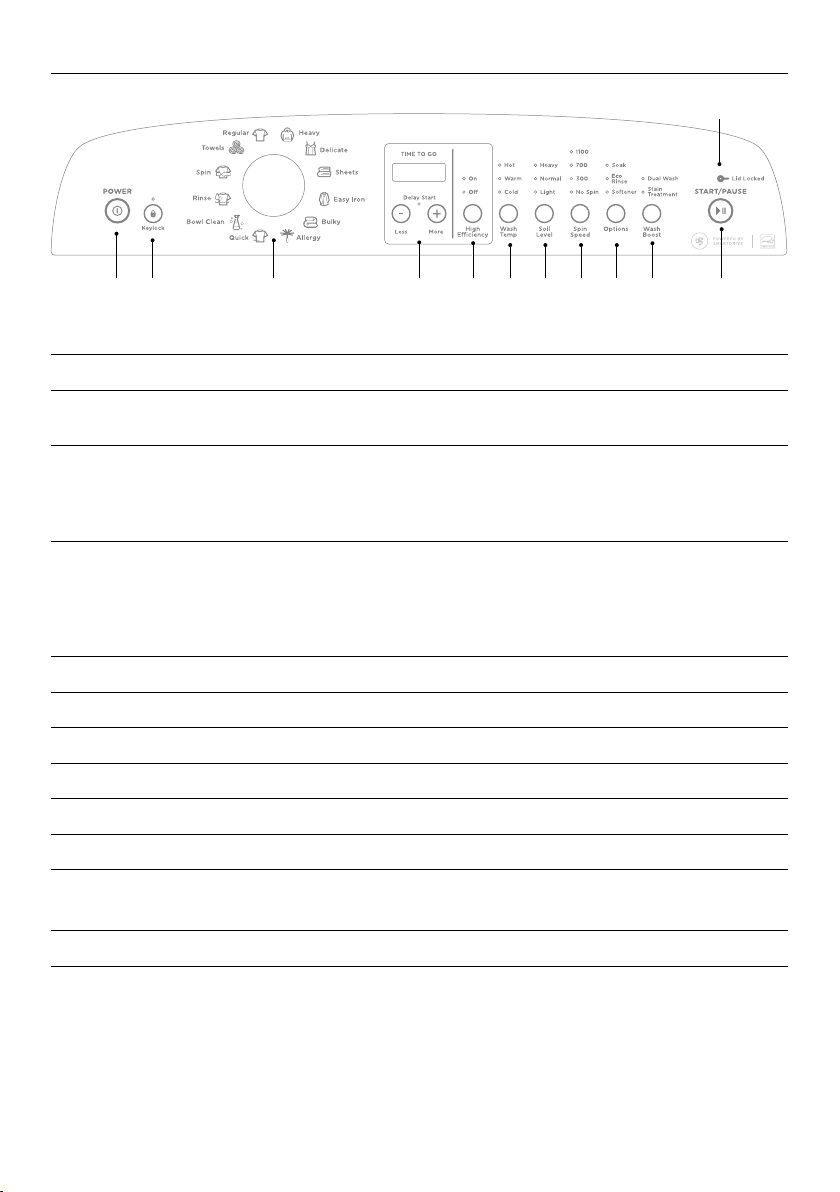
CONTROL PANEL
!1
1 2 3 6 7 8 9
5
4 !2
!0
1 POWER Touch to turn the washer ON/OFF.
2 Keylock Touch to disable all buttons on the display panel, except
POWER button. This prevents accidental button presses.
3 Wash cycle Select your desired wash cycle by turning the SmartTouch™
Control Dial. The wash cycle icons will illuminate as you
turn the dial showing which cycle is selected (refer to the
‘Wash cycles’ section).
4 Digital display
screen
Shows the following:
z
‘Time to go’ – the remaining time in the cycle that is
currently running.
z
Delayed start time of wash cycle.
z
Notifications if an error is detected or a warning is necessary.
5 High Efficiency Touch to turn High Efficiency On or Off.
6 Wash Temp Touch to select the water temperature.
7 Soil Level Touch to select the level of soil in your load.
8 Spin Speed Touch to select the washer spin speed
9 Options Touch to select Softener, Eco Rinse and Soak.
!0 Wash Boost Touch to select Stain Treatment or Dual Wash.
!1 Lid Lock Illuminates to indicate the lid of the washer is locked.
To open the washer pause the cycle.
!2 START/PAUSE Touch to start or pause the selected wash cycle.
14

CONTROL PANEL
Time to go
Your CleanSmart™ washer displays approximately how many minutes the cycle has
remaining, so that you can tell at a glance when your washing will be finished. Once you
have selected your wash cycle and options, the time the cycle will take to complete will be
displayed. Please be aware that a number of factors influence the overall cycle time, eg the
water flow rate, load size and cycle selection, therefore times will vary.
Keylock
Keylock can be used to lock the buttons on your CleanSmart™ washer when not in use. This
will avoid accidental button pushes from items left on the lid of the washer (eg washing
baskets) and also from any little fingers.
To turn
Keylock ON or OFF:
1
If
Keylock is ON:
1
Touch for 2 seconds.
When activated, the light above the
is illuminated.
To turn your washer on, touch for 2
seconds. This will activate the display panel.
KEYLOCK will remain activated but let you
select your wash cycle options and start the
cycle.
button
2
To pause your washer at any time during the
cycle, touch
twice in quick succession.
for 2seconds, or touch
15

3
CONTROL PANEL
To stop your washer or power off at any time,
touch for 2seconds or touch twice in
quick succession.
16
 Loading...