

Page 1
Operating Manual
Page 2

Page 3
SECTION
English .................................................................... A
(Chinese Simplified) ................................ B
Dansk ...................................................................... C
Deutsch ................................................................... D
Español .................................................................... E
Français ................................................................... F
Greek ...................................................................... G
Italiano .................................................................... H
(Japanese) ..................................................... I
(Korean) .......................................................... J
Nederlands ............................................................... K
Norsk ...................................................................... L
Português ................................................................. M
Suomi ...................................................................... N
Svenska ................................................................... O
(Chinese Traditional) ................................ P
Türkçe ..................................................................... Q
This product is covered by one or more of the following patents or patent applications in the corresponding countries listed below.
HC604 USA: US6598604, US6398197, US7111624, US6953354, US7086399, US7616871, Australia: AU761713, AU756477, AU2003204474,
AU2003265025, AU2004266551, AU2009201906, Japan: JP4436758, Europe: EP1369141, EP1542757, EP1656173 , EP1055431 (GB, IT),
Hong Kong: HK1074178
HC608 USA: US6598604, US6398197, US7111624, US6953354, US7086399, US7616871, Australia: AU761713, AU756477, AU2003204474,
AU2003265025, AU2004266551, AU2009201906, Japan, JP4436758, Europe: EP1369141, EP1542757, EP1656173, EP1055431 (GB, IT),
Hong Kong: HK1074178
Page 4

Page 5

A - 1
English
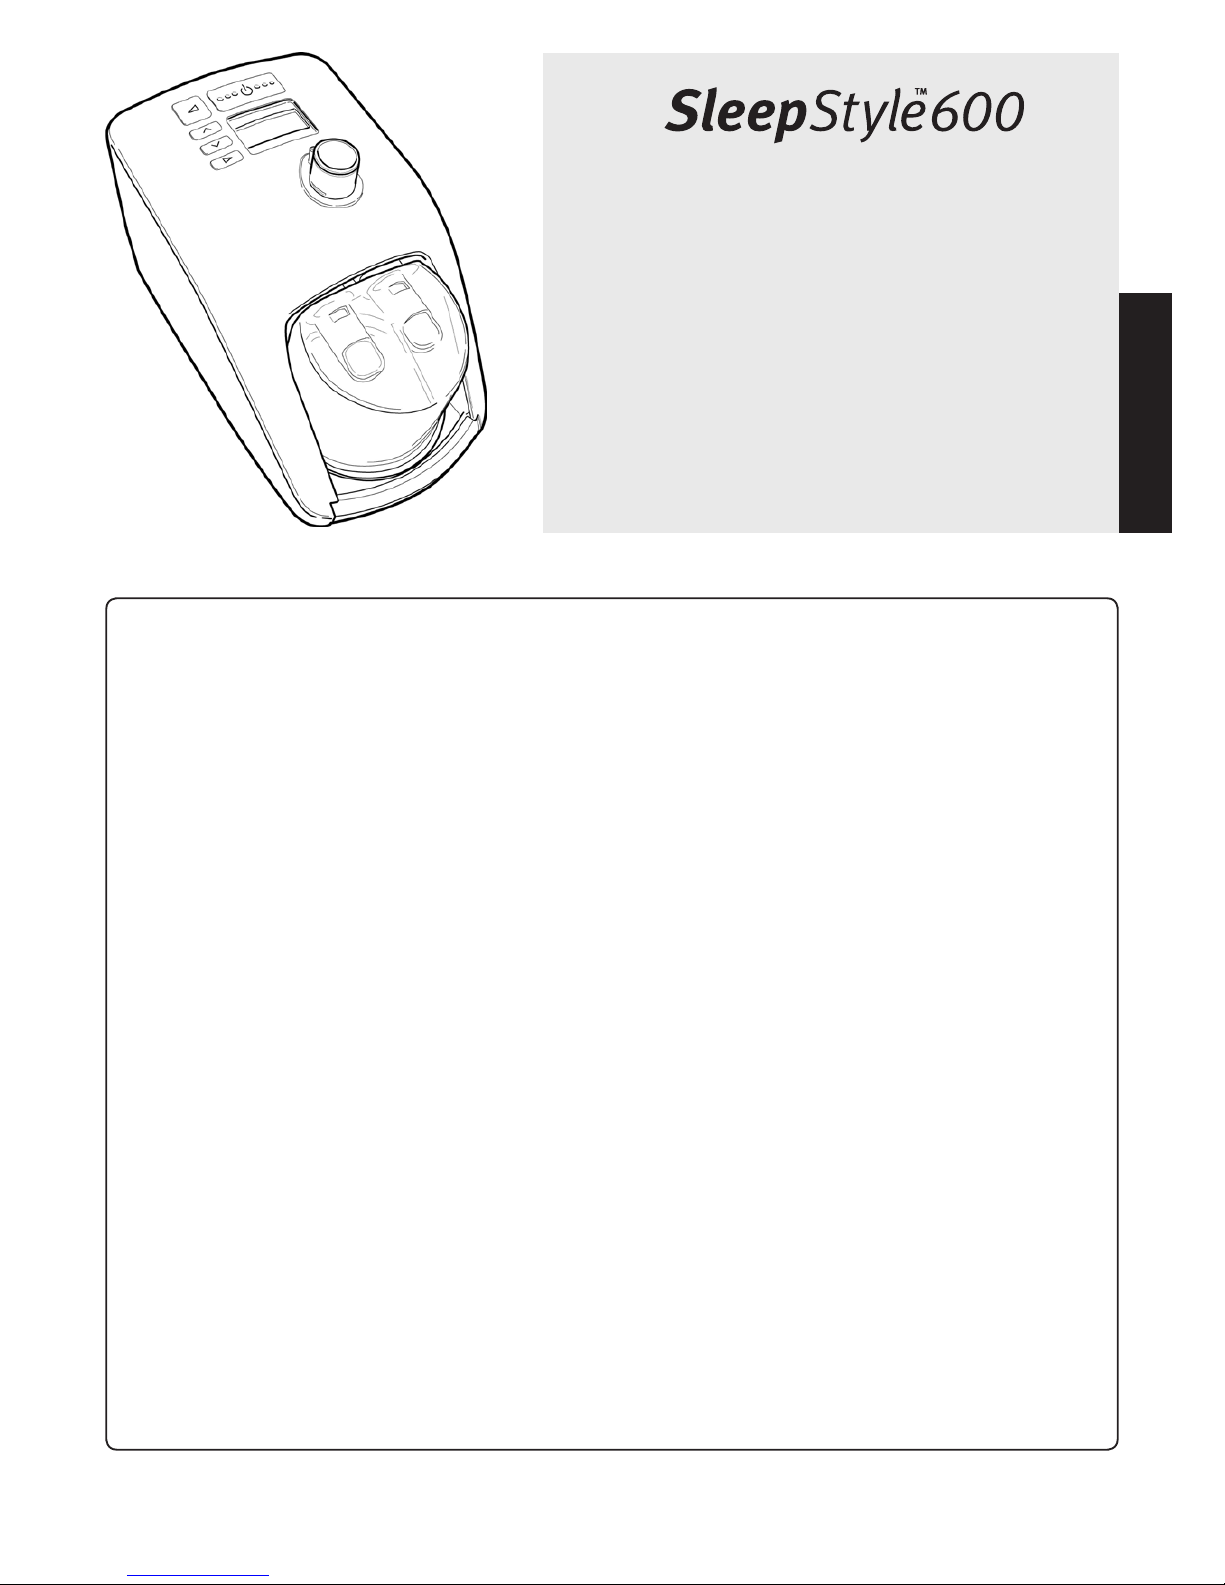
The SleepStyle™ 600 CPAP Series has integrated
heated humidification and a heated breathing
tube. It is designed for use in the home or sleep
laboratory, for the treatment of Obstructive Sleep
Apnea.
For further assistance, please contact your local
Fisher & Paykel Healthcare office – see back cover
for details.
Please keep this manual for future reference.
Table of ConTenTs
1. Symbol Definitions ............................................................................................................................................................................... A - 2
2. Warnings, Cautions and Contraindications ....................................................................................................................................... A - 2
3. Description of the Device .................................................................................................................................................................... A - 3
3.1 Package Contents .......................................................................................................................................................................... A - 3
3.2 Important Parts of the Device ....................................................................................................................................................... A - 3
3.3 Accessories ...................................................................................................................................................................................... A - 3
3.4 ThermoSmart™ Technology .......................................................................................................................................................... A - 4
4. Intended Use ......................................................................................................................................................................................... A - 4
5. Oxygen Use Warnings ......................................................................................................................................................................... A - 4
6. Cleaning and Maintenance ................................................................................................................................................................. A - 5
7. Setup Instructions ................................................................................................................................................................................. A - 5
8. Controls and Display ............................................................................................................................................................................ A - 6
8.1 Display Description and Functions .............................................................................................................................................. A - 6
8.2 Patient Menu Summary ................................................................................................................................................................. A - 7
8.3 Patient Menu - Additional Settings Summary ............................................................................................................................ A - 7
9. Frequently Asked Questions ............................................................................................................................................................... A - 8
10. Operating Conditions .......................................................................................................................................................................... A - 8
11. Storage and Transport Conditions ..................................................................................................................................................... A - 8
12. Troubleshooting .................................................................................................................................................................................... A - 8
13. Warranty ................................................................................................................................................................................................. A - 8
14. Device and Consumables Disposal Instructions ..................................................................................................................... A - 8
15. Product Specifications ......................................................................................................................................................................... A - 9
16. Appendix ............................................................................................................................................................................................... A - 9
PLEASE READ ALL INSTRUCTIONS BEFORE INITIAL USE
Caution: USA Federal Law restricts this device for sale by or on the order of a physician.
Page 6

A - 2
1. symbol DefiniTions
Type BF
Applied Part
Alternating Current
Drip Proof
93/42/EEC
Class IIb
Class II
Double Insulated
Power
On/Off
2. Warnings, Cautions and ContraindiCations
NOTES
• This manual refers to the SleepStyle™ 600 CPAP Series unit as
“the device”.
• If required to use CPAP by a referring physician, you should
use your device every time you sleep. Should your device
stop working for any reason, contact your healthcare provider
immediately.
• The user of this system shall have sole responsibility and
liability for any injury to persons or damage to property
resulting from operation of the device which is not in
accordance with the operating instructions supplied.
• The device should only be used with ISO 17510-2 compliant
masks, connectors and delivery tubes recommended by
Fisher & Paykel Healthcare, or your healthcare provider.
• Do not use the device when the room temperature exceeds
95 °F (35 °C) as this may lead to an elevated airflow
temperature which may give rise to an irritation of the airways.
• Refer all repairs and maintenance to Fisher & Paykel Healthcare.
WARNINGS
To avoid electric shock from your device, do not:
• Operate the device if the power cord or plug is damaged.
• Operate the device if it has been dropped in water.
• Plug the device into the power socket if it is wet.
• Clean the device while connected to the power socket.
• Store or use the device where it can tilt, fall or be pulled
into water. If water has entered the unit enclosure, disconnect
the power cord and discontinue use. Seek advice from
Fisher & Paykel Healthcare.
To avoid choking or inhalation of a foreign body:
• Never place any object into any opening of the tube.
• Ensure the air filter is fitted during device use.
To ensure optimal therapy, do not:
• Operate the device if dropped or damaged.
• Operate the device if it is not working properly.
• Adjust the pressure. Pressure must only be adjusted by a
healthcare professional.
• Operate the device if the breathing tube has been damaged
with holes, tears or kinks.
• Block the exhaust flow on the mask.
• Use the mask if the unit is turned off or not operating properly.
• Use an insulating sleeve or any similar accessories which are
not approved by Fisher & Paykel Healthcare. These may affect
the humidification performance.
• Try to remove the heated breathing tube without pushing the
sleeve up first. This will avoid damage to the connection port.
To avoid burns, do not:
• Fill the chamber with boiling water.
• Touch the exposed heater plate or chamber base.
• Position the breathing tube in such a way that it can come into
prolonged contact with skin.
To avoid the risk of fire while using oxygen, do not:
• Turn oxygen flow on when the device is not operating; this can
lead to accumulation of oxygen within the device.
• Locate the device in a position where ventilation around the
device is restricted.
• Use oxygen while smoking or in the presence of an open
flame.
• Use any materials which will burn in air or ignite easily at high
oxygen concentration.
• Keep any source of ignition near the product. To avoid ignition,
it is preferable to keep all sources of ignition out of the room
where supplemental oxygen is being used.
• Keep oxygen regulators, cylinder valves, tubing, connections
and all other oxygen equipment near oil, grease or greasy
substances. Spontaneous and violent ignition may occur
if these substances come into contact with oxygen under
pressure.
• Operate the device without the cover over the serial port
adaptor.
Other:
• Place the device on a level surface lower than head height
to prevent water entering the tubing. If water does enter the
tubing, drain excess condensate. Water in the tubing may
result in aspiration.
• The device is intended to be used with CPAP masks and
connectors that have exhaust flow holes to allow continuous
flow of air out of the mask. When the device is turned on and
operating properly new air flushes exhaled air out of the mask
through the exhaust flow holes. At low CPAP pressures and
in the event of power failure or machine malfunction, remove
the mask immediately, as flow through the mask may be
insufficient to clear all exhaled gas and CO2 re-breathing may
occur which can be hazardous.
• Failure to select the correct altitude level (for any given
location) will have an adverse effect on delivered pressure.
• This device is not intended for life support.
• Avoid unnecessary removal of the power cord from the rear of
the device. If removal is necessary then hold the connector and
remove. Avoid pulling on the power cord (refer to Section 3.2).
CAUTIONS
To prevent water damage to your device:
• Remove the humidification chamber from the device before
filling.
• Empty water from the chamber before transporting the device.
If the device is required to be handled with water in the
chamber, avoid tilting the device to prevent water entering its
enclosure.
Other:
• To prevent damage to your PC, only operate the device if
it is connected to a PC via an isolated serial port adapter
(900HC236).
• To prevent airway irritation, do not use the device when room
temperature exceeds 95 °F (35 °C).
CONTRAINDICATIONS
• Research indicates the following pre-existing conditions may
contraindicate the use of positive pressure for some patients:
pneumothorax, bullous lung disease, pneumocephalus,
cerebrospinal fluid leak, recent cranial surgery or trauma,
abnormalities of the cribriform plate, pathologically low blood
pressure or in patients whose upper airways are bypassed.
PRECAUTIONS
• The safety and effectiveness of positive pressure has not been
established in patients with respiratory failure or COPD.
ADVERSE EFFECTS
• Nosebleeds, ear and sinus discomfort may occur from the use
of positive pressure therapy.
Please contact your physician if you have any questions
concerning your therapy.
ATTENTION
Consult
accompanying
documents
Page 7
A - 3
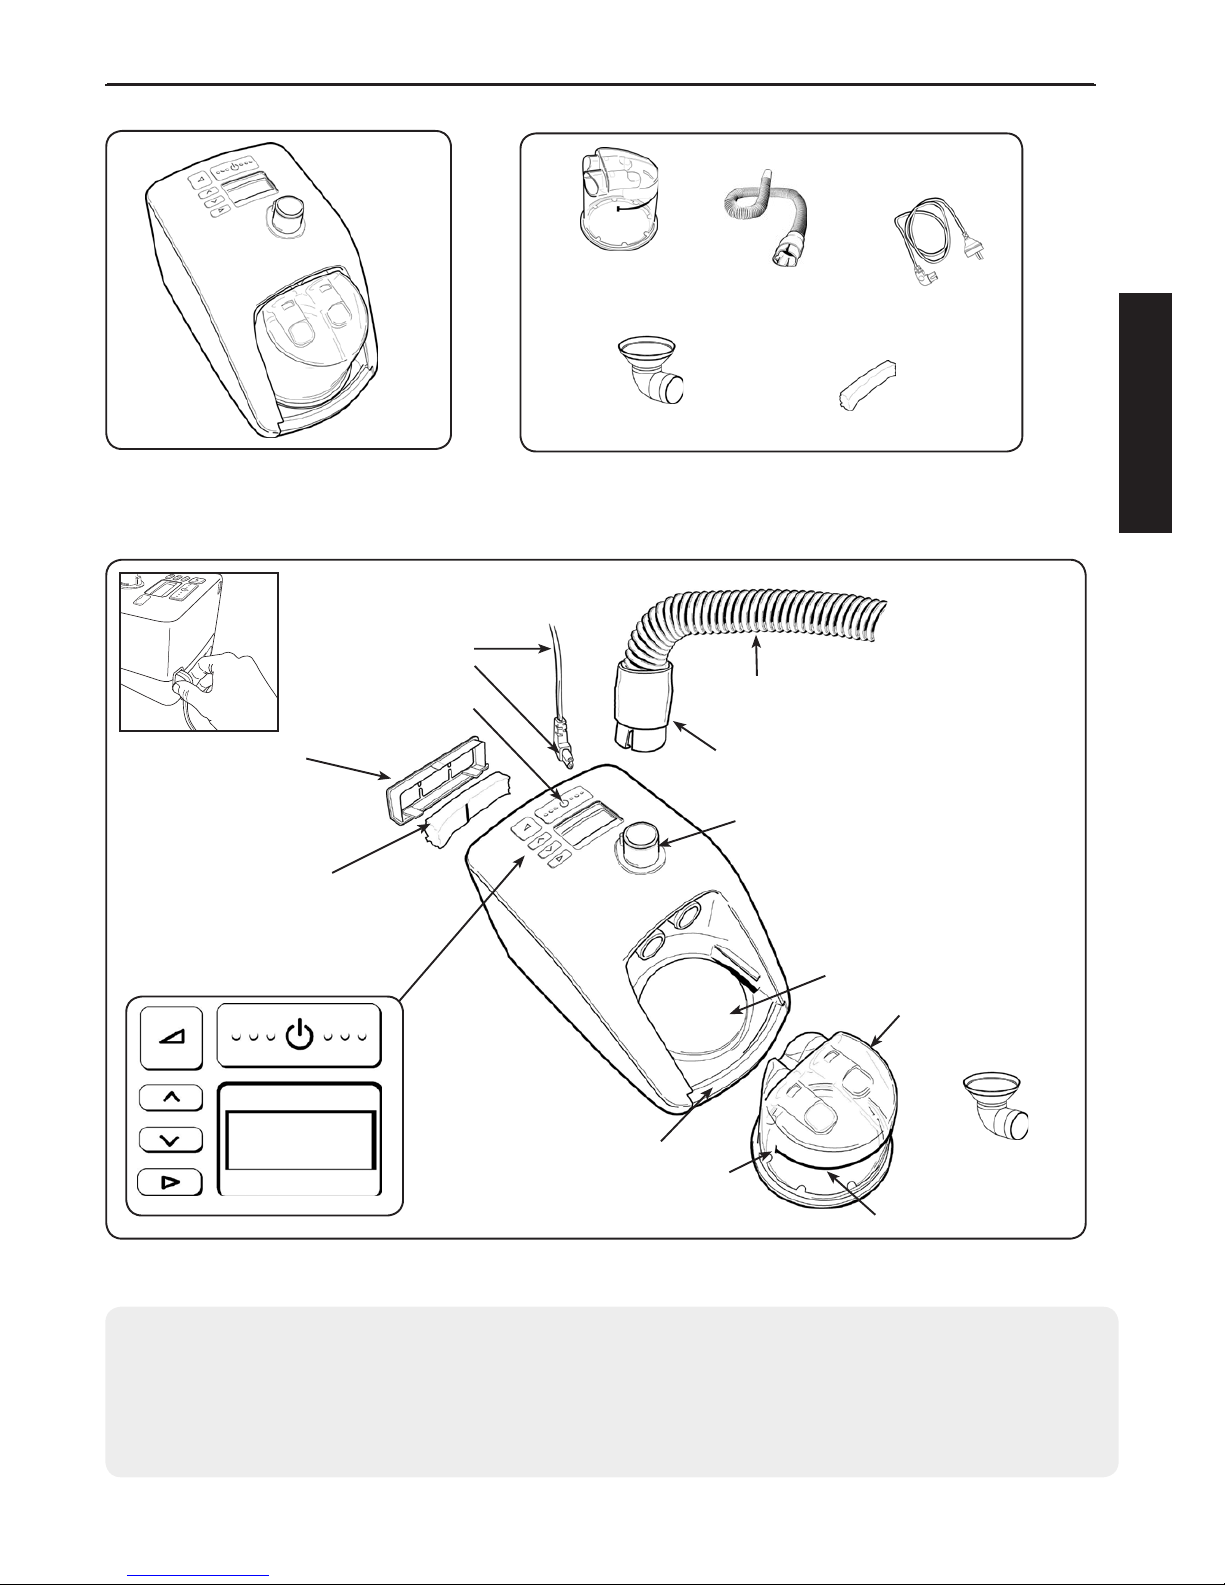
3. DesCripTion of The DeviCe
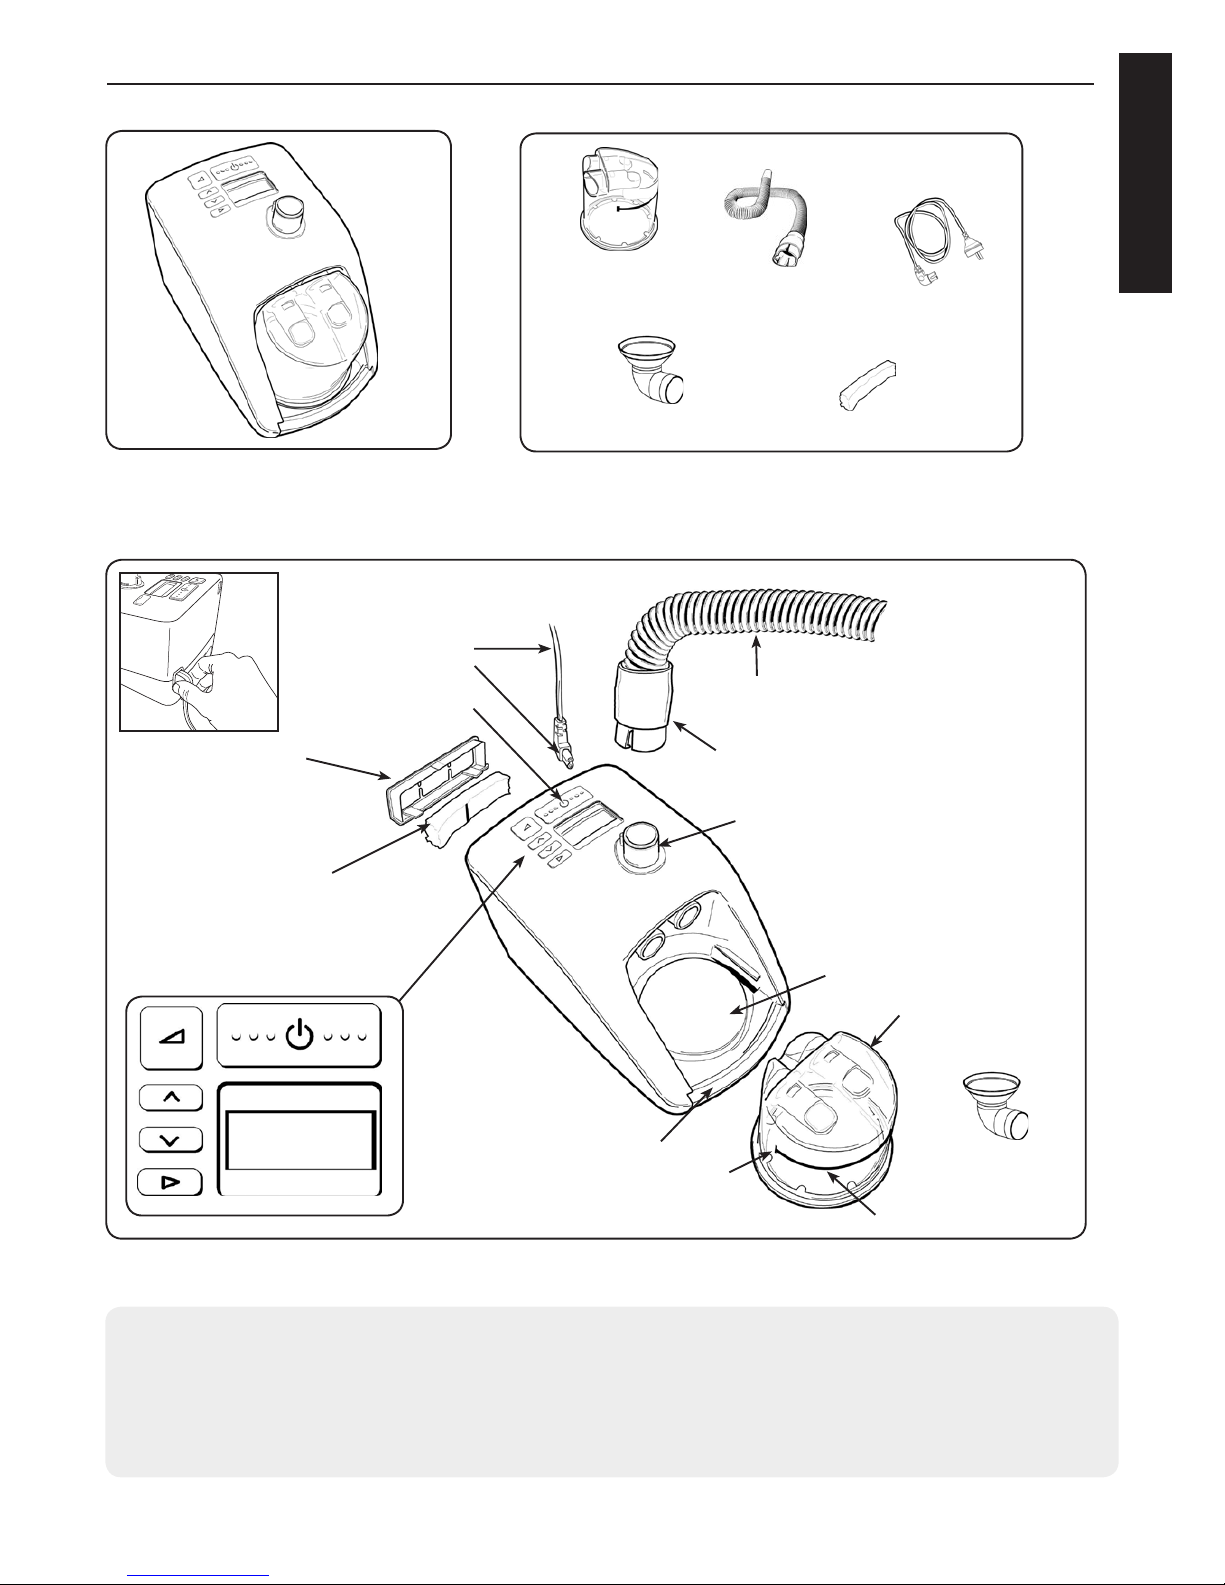
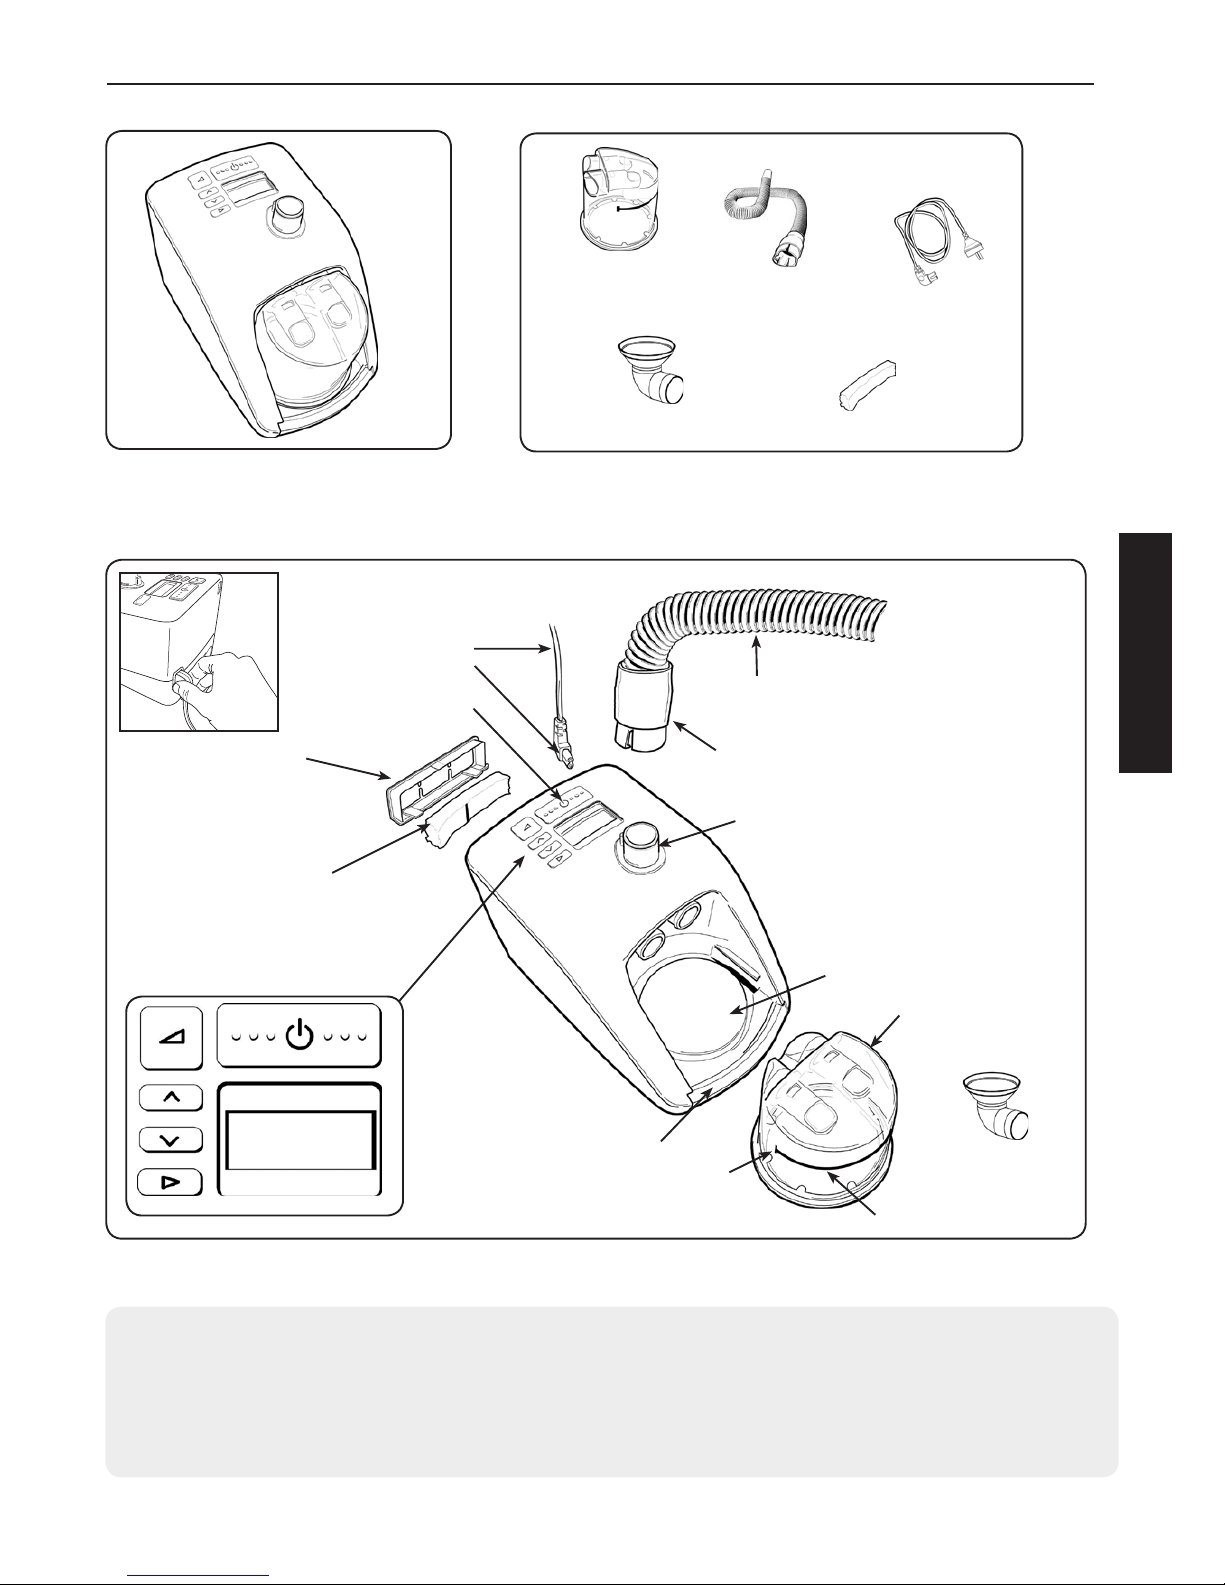
3.1 Package Contents
3.2 Important Parts of the Device
Accessories
1 x SleepStyle™ 600 CPAP Series
POWER CORD
and CONNECTOR
THERMOSMART™ HEATED BREATHING TUBE
CONNECTOR
with
SLEEVE
THERMOSMART™ HEATED BREATHING TUBE
CONNECTION PORT
WATER CHAMBER
WATER FILL LINE (vertical)
FINGER GUARD
HEATERPLATE
WATER LEVEL LINE
FILTER HOLDER
DISPLAY
AIR FILTER
ON/OFF BUTTON
3.3 Accessories
HC365 Standard Humidification Chamber
HC360* Extended Life Humidification Chamber
900HC522 ThermoSmart™ Heated Breathing Tube
to fit 22 mm (.86") conical connector
*Not available in all countries
900HC240 Filter (2-Pack)
900HC604 Outlet Cleaning Kit HC600
900HC627 Elbow Funnel (10-Pack)
English
1 x Spare Air Filter
1 x Power Cord
2 x Water Chamber
1 x Funnel
1 x ThermoSmart™
Heated
Breathing Tube
FUNNEL
Page 8

A - 4
3.4 ThermoSmart™ Technology
This device has been designed for optimal patient comfort and offers the unique heated breathing tube technology ThermoSmart™.
ThermoSmart™ Technology allows for the delivery of optimal (higher and customized) levels of humidity to the patient, independent of
ambient temperature.
This device can be adjusted on two levels to achieve optimal comfort:
ThermoSmart™ Humidity setting: this setting regulates the temperature of the heater plate, adjusting the humidity levels for the
comfort of the patient. Adjustment can be made from 1 to 4 with increments of 0.5. The device is preset to 2.5 which is suitable for
most patients.
• If you experience dryness or find the air too cool: increase the setting.
• If you find there is too much moisture in the tube or the air feels too hot: decrease the setting.
• If you do not achieve optimal comfort with this setting further adjustments can be made by altering your ThermoSmart™ Climate
setting.
ThermoSmart™ Climate setting: this setting provides further adjustment options by optimizing the delivered humidity. Adjustment
can be made from 1 to 3 with increments of 1. The device is preset to 2 which is suitable for most patients. Note, if the climate setting
is adjusted, the humidity setting will revert back to the default setting.
• ThermoSmart™ Climate setting 3 is recommended for oral CPAP delivery.
• If you feel the range of settings offered by the ThermoSmart™ Humidity Setting are too dry or too cool: Increase the
ThermoSmart™ Climate setting.
• If you feel the range of settings offered by the ThermoSmart™ Humidity Setting are too warm or too humid: Reduce the
ThermoSmart™ Climate setting.
It is recommended to keep the (heated breathing) tube on top of bedding for the best humidity performance. To operate ThermoSmart™
Humidity and Climate settings, refer to section 8 “Controls and Display” of this manual.
4. inTenDeD Use
The device is used to assist with patient breathing while sleeping for the purpose of treating Obstructive Sleep Apnea (OSA). This is done
by the delivery of Continuous Positive Airway Pressure (CPAP) in order to prevent airway obstruction. The addition of heated respiratory
humidification to the device relieves the drying and irritating effects on the patient airways which usually arises from use of a CPAP system.
The device is for use on adult patients at home or in the sleep lab. Please refer to the SleepStyle™ 600 Series product range listed in the
appendix section of this manual.
5. oxygen Use Warnings
If oxygen is required, it is recommended that supplemental oxygen be administered at the mask. Please see instructions specific to
your mask type.
NOTE:
• At a fixed flow rate of supplemental oxygen, the inhaled oxygen concentration will vary, depending on the pressure settings,
patient’s breathing pattern, mask selection and leak rate.
Before using oxygen with the device please see oxygen warnings in Section 2.
Page 9
A - 5
English
6. Cleaning anD mainTenanCe
PLEASE NOTE: The device should be cleaned as required.
1. Switch off the device and unplug from the power socket. Wait for the water to cool, then remove chamber.
2. Wipe the exterior of the device with a clean, damp (not wet) cloth and mild dishwashing detergent. Do not use harsh abrasives or
solvents, as these may damage the device.
3. DAILY
Clean the chamber, heated breathing tube and heated breathing tube connection port.
• Remove the heated breathing tube from the device by pulling the sleeve upwards to unlock the connector. Then remove the
connector.
• Wash the heated breathing tube with soapy water, rinse and then hang-up the heated breathing
tube with its ends pointing to the floor to dry.
• Remove the chamber by pushing down the finger guard and pulling out the chamber.
• Pour out and discard the remaining water.
• For standard (HC365) chambers, clean and wash with soapy water, then rinse and dry.
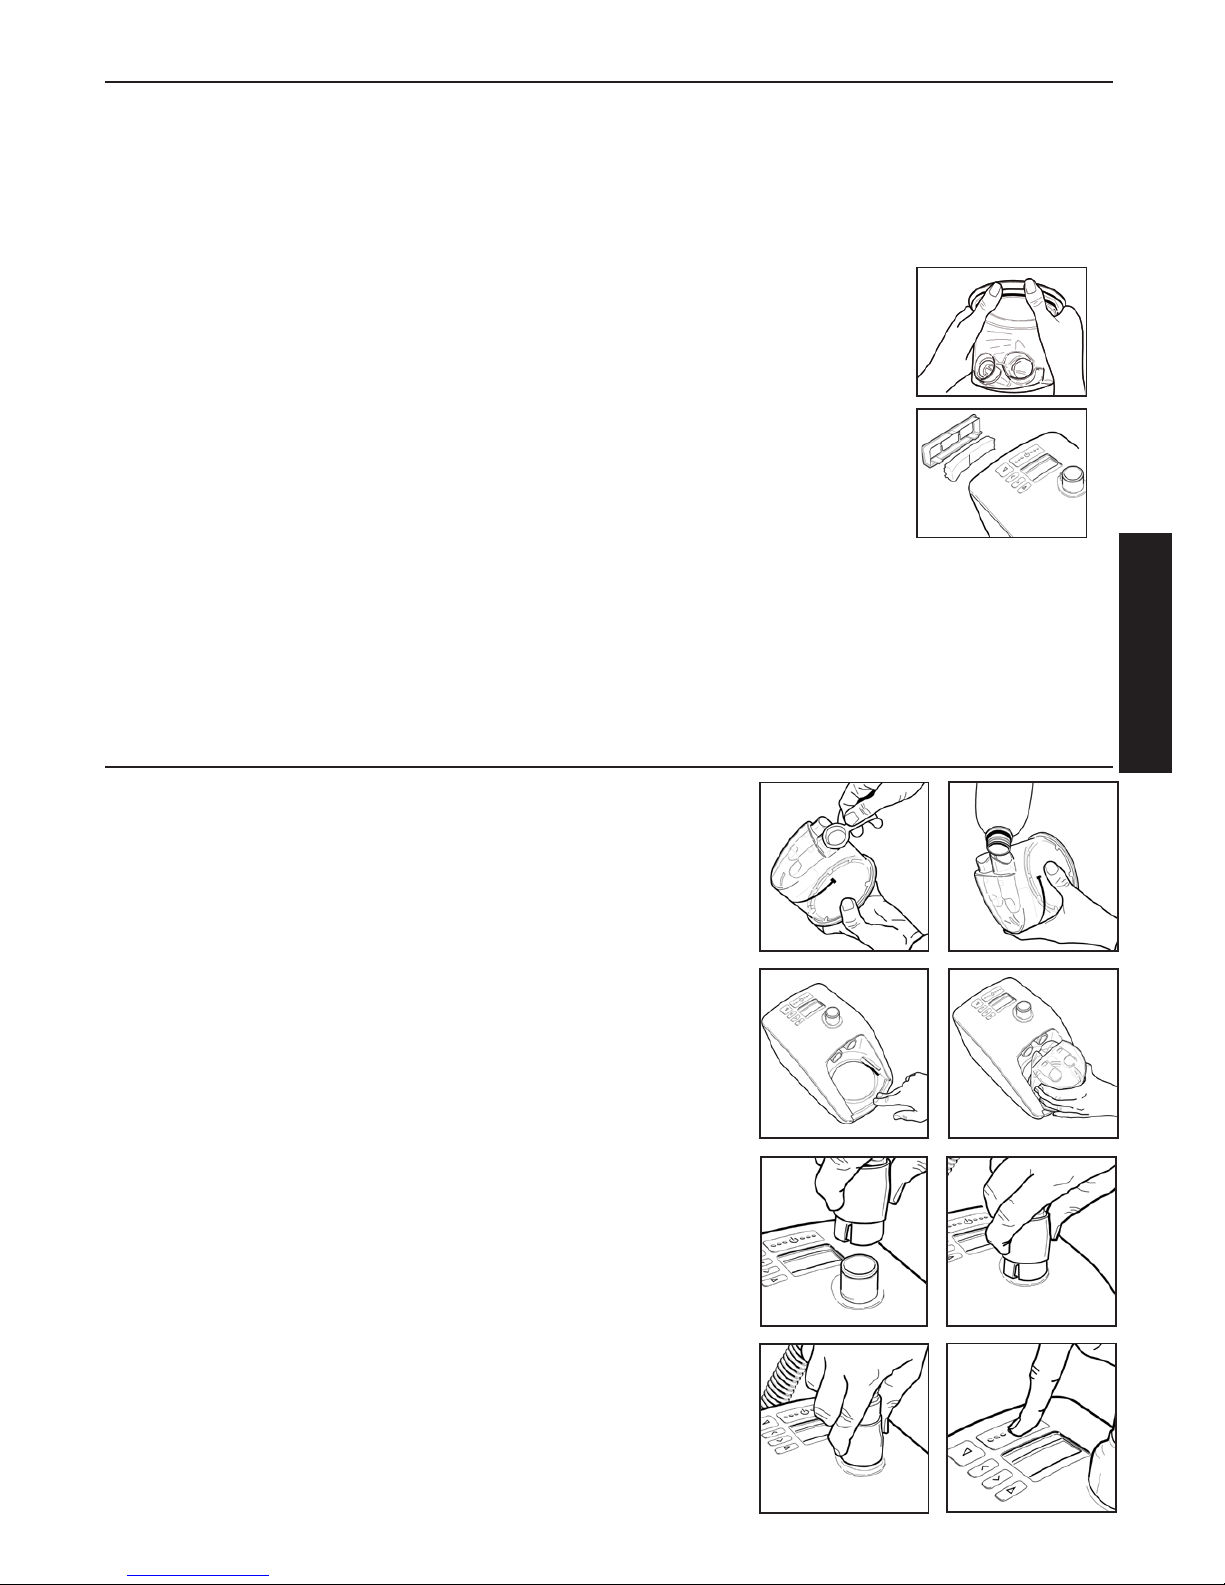
• The extended life (HC360) chamber requires disassembly before cleaning. Push the base off the
chamber top as shown in Fig. 1. Ensure the round seal at the base is not loose or damaged.
Wash the chamber top and base in a mild dishwashing detergent. Rinse thoroughly and dry. This
chamber may also be cleaned in a domestic dishwashing machine.
• Thoroughly wipe the inside of the heated breathing tube connection port with a clean damp, low
lint cloth.
4. WEEKLY
Thoroughly clean the chamber.
• Soak the inside of the chamber for 10 minutes in a solution of one part white vinegar to two parts water and rinse well with
distilled water.
5. MAINTENANCE
• Replace the air filter when it becomes significantly discoloured, at least once every three months or after 1000 hours machine run
time. To do this, remove the filter holder from the back of the device as shown in Fig. 2. Ensure the vertical black line of the new
filter is facing towards the device, and fit both back to the device.
• Replace the chamber if it is cracked, discoloured or scratched.
• Replace the heated breathing tube after 4000 hours usage or once per year. A damaged tube needs to be replaced immediately.
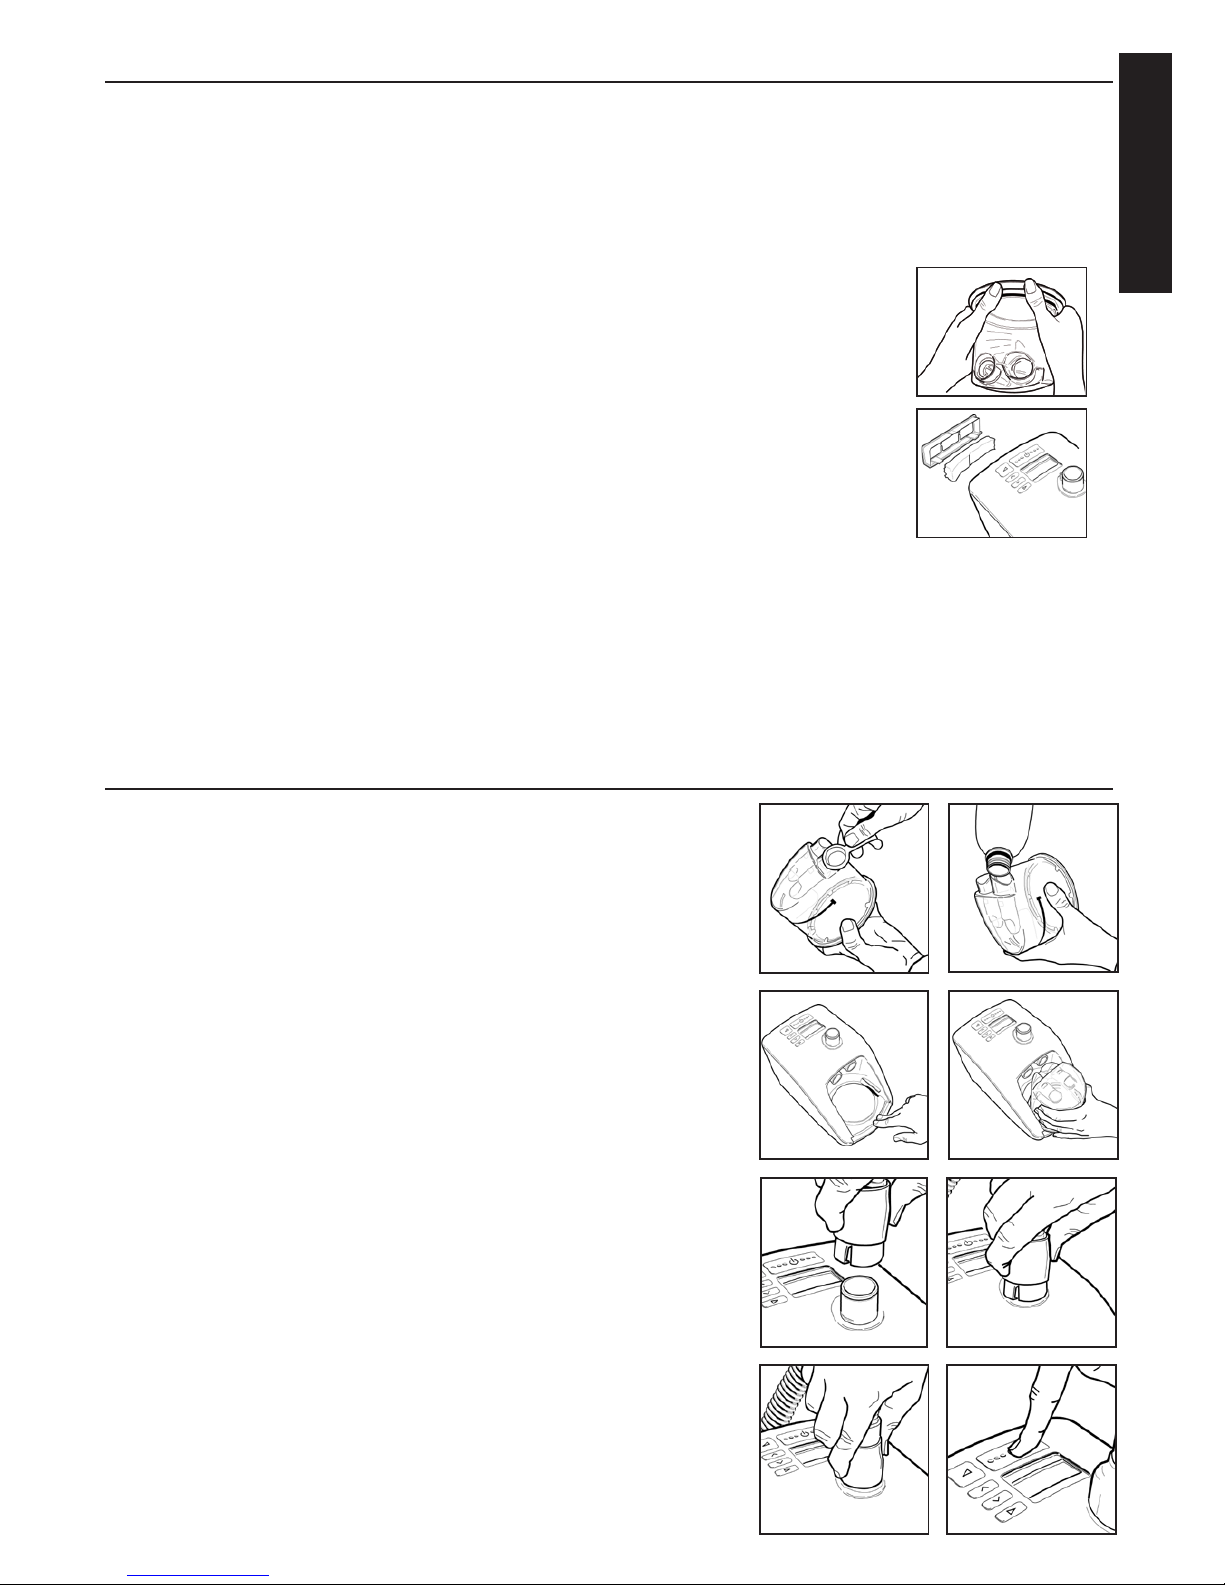
7. seTUp insTrUCTions
When the chamber is fitted and filled, the device must remain upright, so that water
cannot enter the enclosure.
1. Remove your device from its packaging.
2. Place the device on a low shelf or on the floor beside your bed, the unit needs
to be placed below head height.
3. Remove water chamber from the packaging.
4. Remove the blue caps and discard them (Fig. 1).
5. Fill the chamber up to the water filling line with distilled water only (Fig. 2).
Never fill the chamber through the heated breathing tube connector port.
When moving your device, ensure that the water chamber is empty.
Machine failure due to water damage is not covered by warranty.
6. To attach the water chamber to the device, press down the finger guard and
slide the chamber on (Figs. 3 and 4).
7. When the chamber is fitted correctly, the finger guard will click into place.
8. One end of the heated breathing tube has a grey plastic connector. Lift the
sleeve and slide connector on to the device. Push the sleeve down to lock
(Figs. 5, 6 and 7).
9. Connect the other end of the heated breathing tube to the mask.
10. Plug the device power cord into your household power socket.
11. Switch on the device by pressing the on/off button (Fig. 8). The current
ThermoSmart™ Humidity setting is displayed.
12. For changing the setting refer to section 8 “Controls and Display”.
Your device is now ready for use.
Fig. 2
Fig. 3
Fig. 4
Fig. 5
Fig. 6
Fig. 7
Fig. 8
Fig. 1
Fig. 1
Fig. 2
Page 10

A - 6
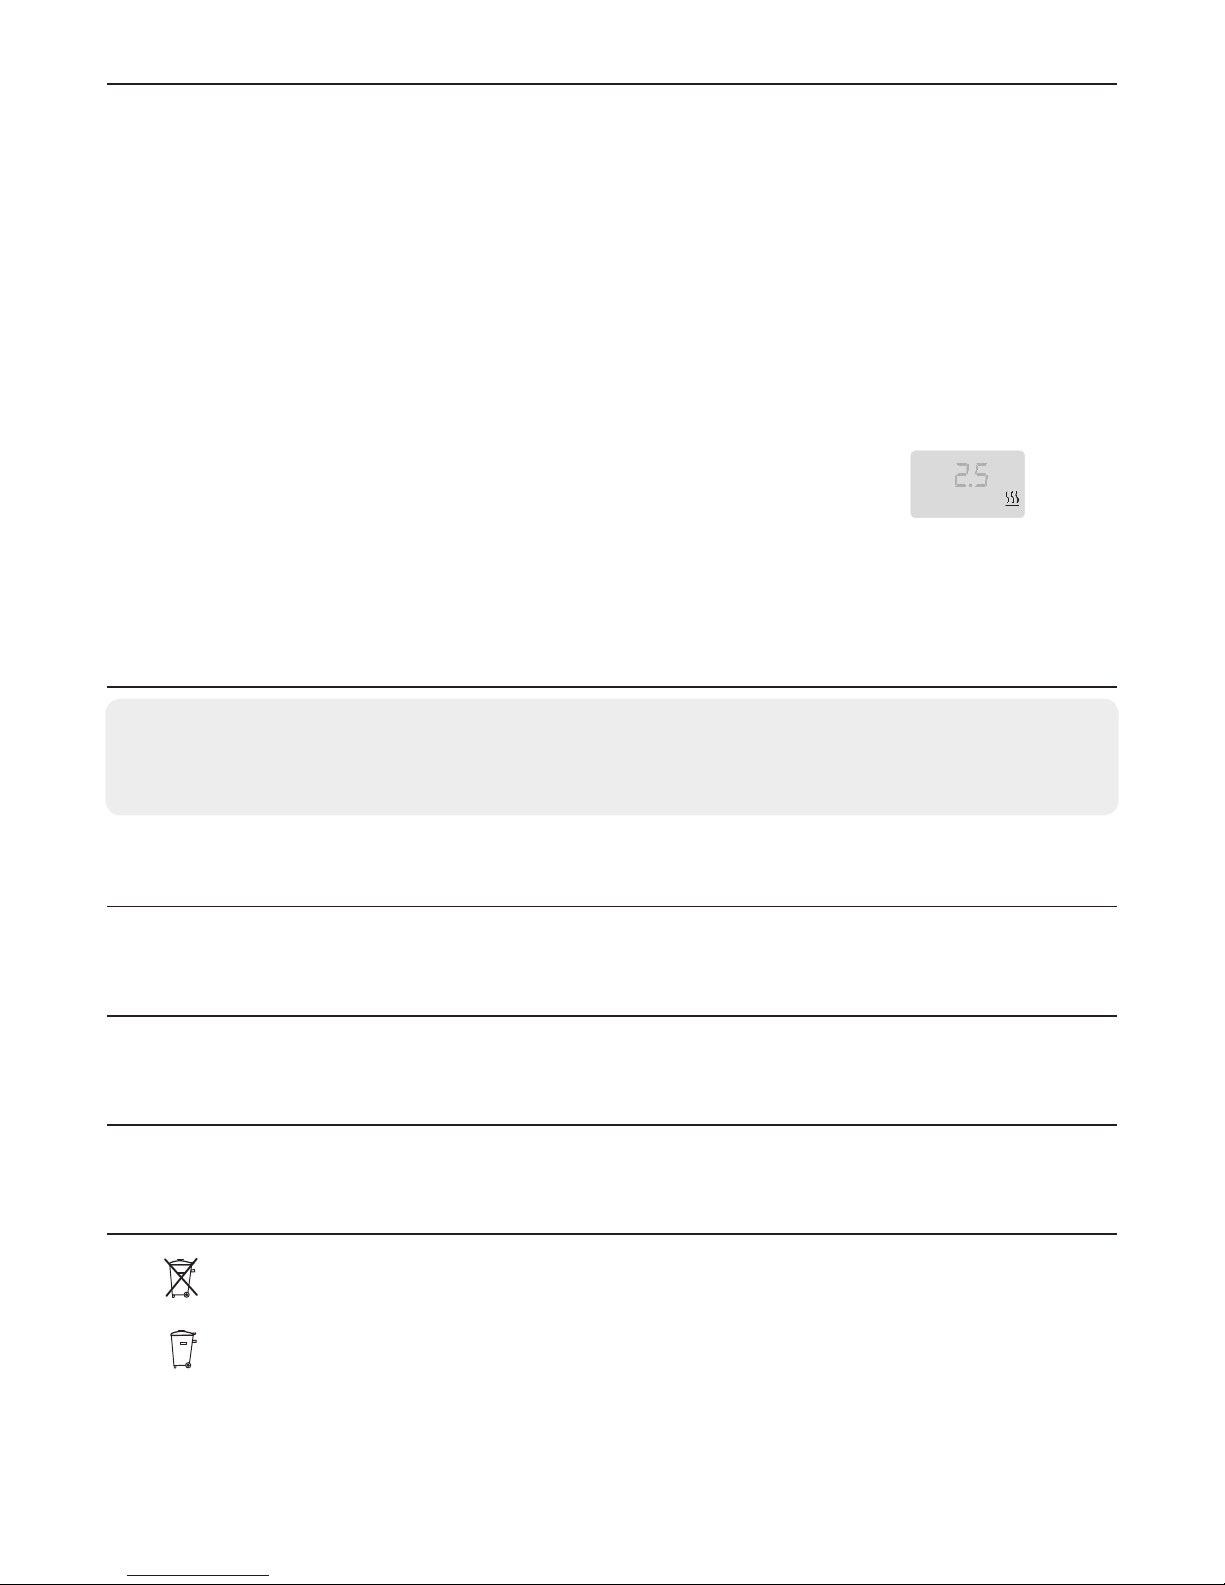
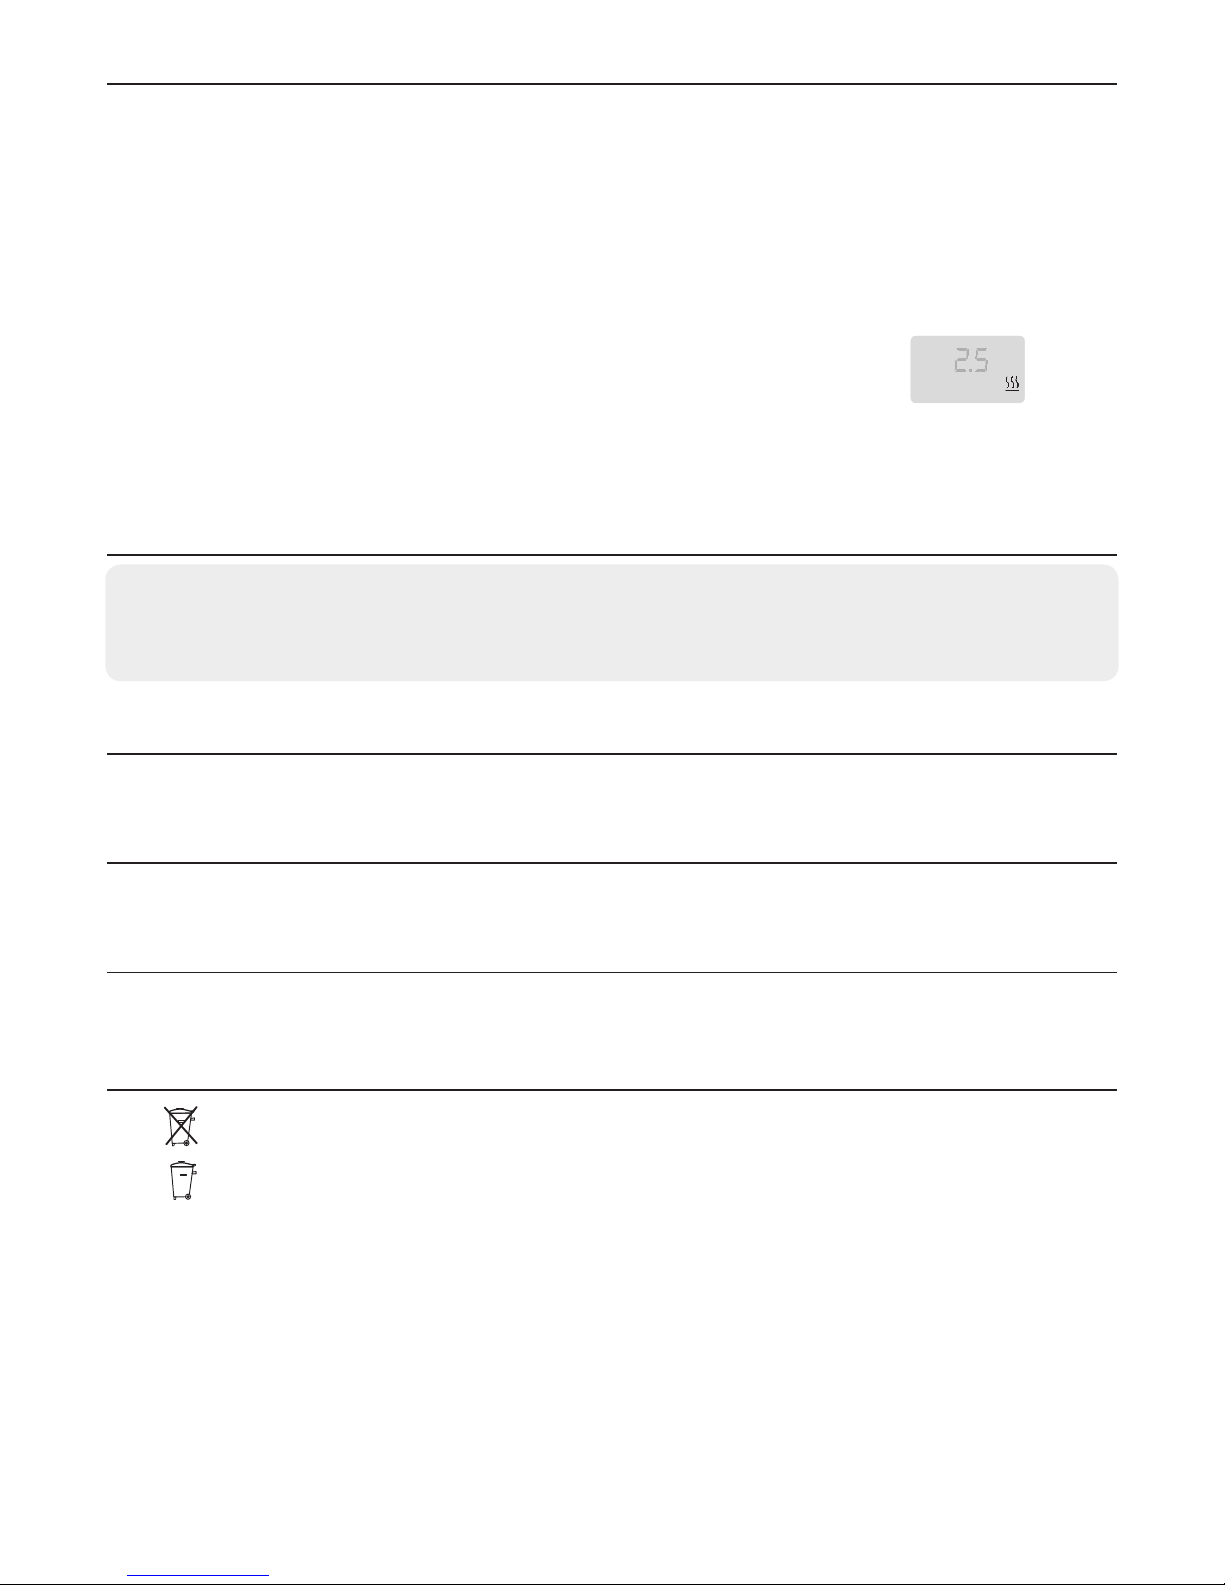
ThermoSmart™ Climate setting*
To change the delivered temperature: Press for warmer more humid air
delivery. Press for cooler and drier air delivery.* Refer to Section 3.4
Altitude
Select “m” for metres or “ft” for feet using and keys
Altitude setting
- Set the altitude level by pressing and keys
- Press to exit menu
Actual Pressure (Displays actual pressure)
- Display reverts to default if the menu is not exited. Press button in order to
exit menu (only available in HC608)
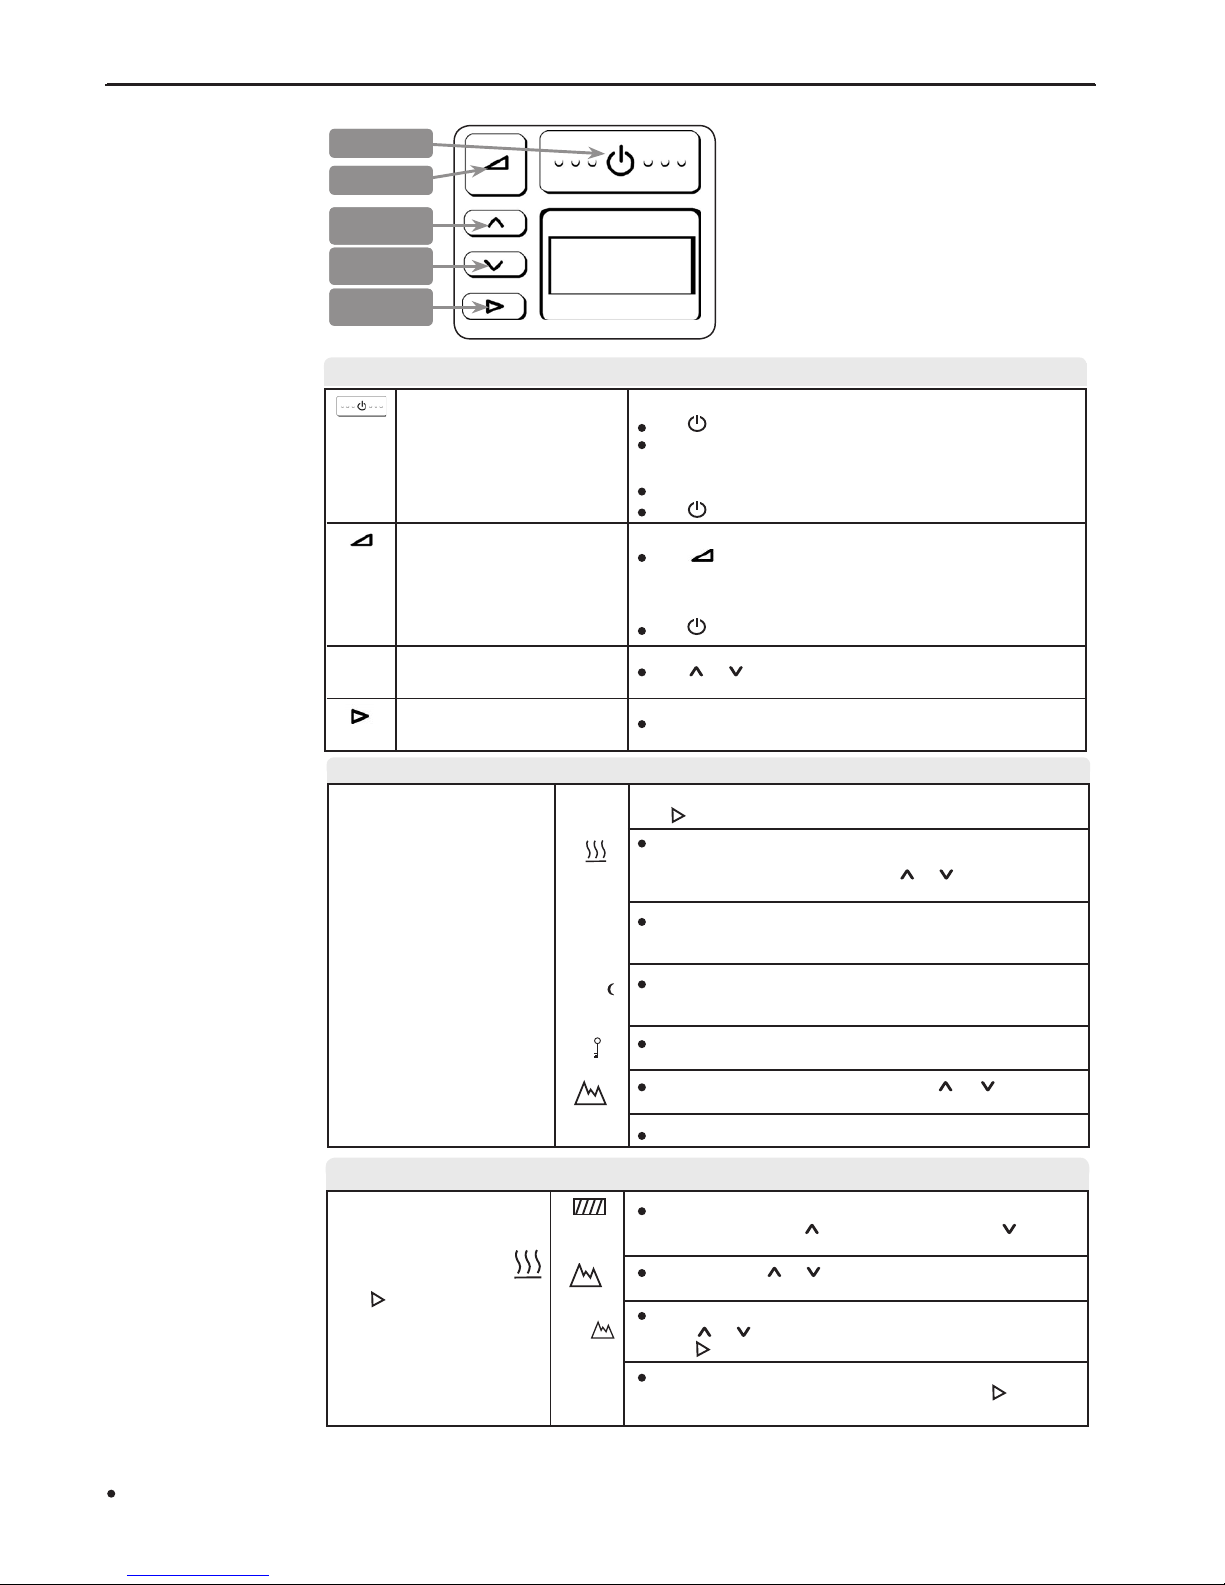
8. ConTrols anD Display
Mode button
Step through the options
Down button
Decrease Setting
Up button
Increase Setting
Ramp button
On/Off button
8.1 Display Description and Functions
KEY FUNCTION & DESCRIPTION OPERATION
TO SWITCH “ON”
Press button down briefly
The device will default to display the ThermoSmart™ Humidity setting
TO SWITCH “OFF”
Remove your mask
Press button briefly
TO SWITCH “ON”
Press
(NB: to reset ramp during a cycle the device must be switched off first)
TO SWITCH “OFF”
Press
Press and button to raise or lower settings
Press sequentially to step through and view options available
<
<
PATIENT MENU DISPLAY OPERATION
For viewing CPAP settings, humidity,
compliance data, altitude and pressure
settings
TO VIEW ITEMS
Press key to sequentially view:
ThermoSmart™ Humidity setting (default display)
For adjusting ThermoSmart™ Humidity setting levels to minimize upper airway
side effects from CPAP use
Press and button to raise or lower settings
Total run hours: displays the total number of hours the device has been
switched on (includes hours without mask use)
Average compliance hours per night: displays average number of hours
the device has been used at night with the mask on
Check sum: displays information for the medical practitioner or the dealer to
check compliance
Altitude setting: displays altitude setting. Press or to change altitude
Pressure setting: displays pressure setting
cmH2O
hr
hr/
ON/OFF
Switches the device ON and OFF
RAMP
Reduces pressure to a lower level
to help you fall asleep. The pressure
will gradually return to full operating
pressure over 20 minutes
INCREASE/DECREASE
Adjusts settings up or down
MODE
To step through options
PATIENT MENU - Additional Settings DISPLAY OPERATION
To access additional settings:
From the Default setting
“THERMOSMART™
HUMIDITY”
Press the key for 3 seconds
3000
cmH2O
Warning: Failure to select correct altitude setting (for any given location) will have an adverse effect on delivered pressure.
* When the ThermoSmart™ Climate setting is altered the Humidity Setting will revert back to default setting 2.5
Page 11
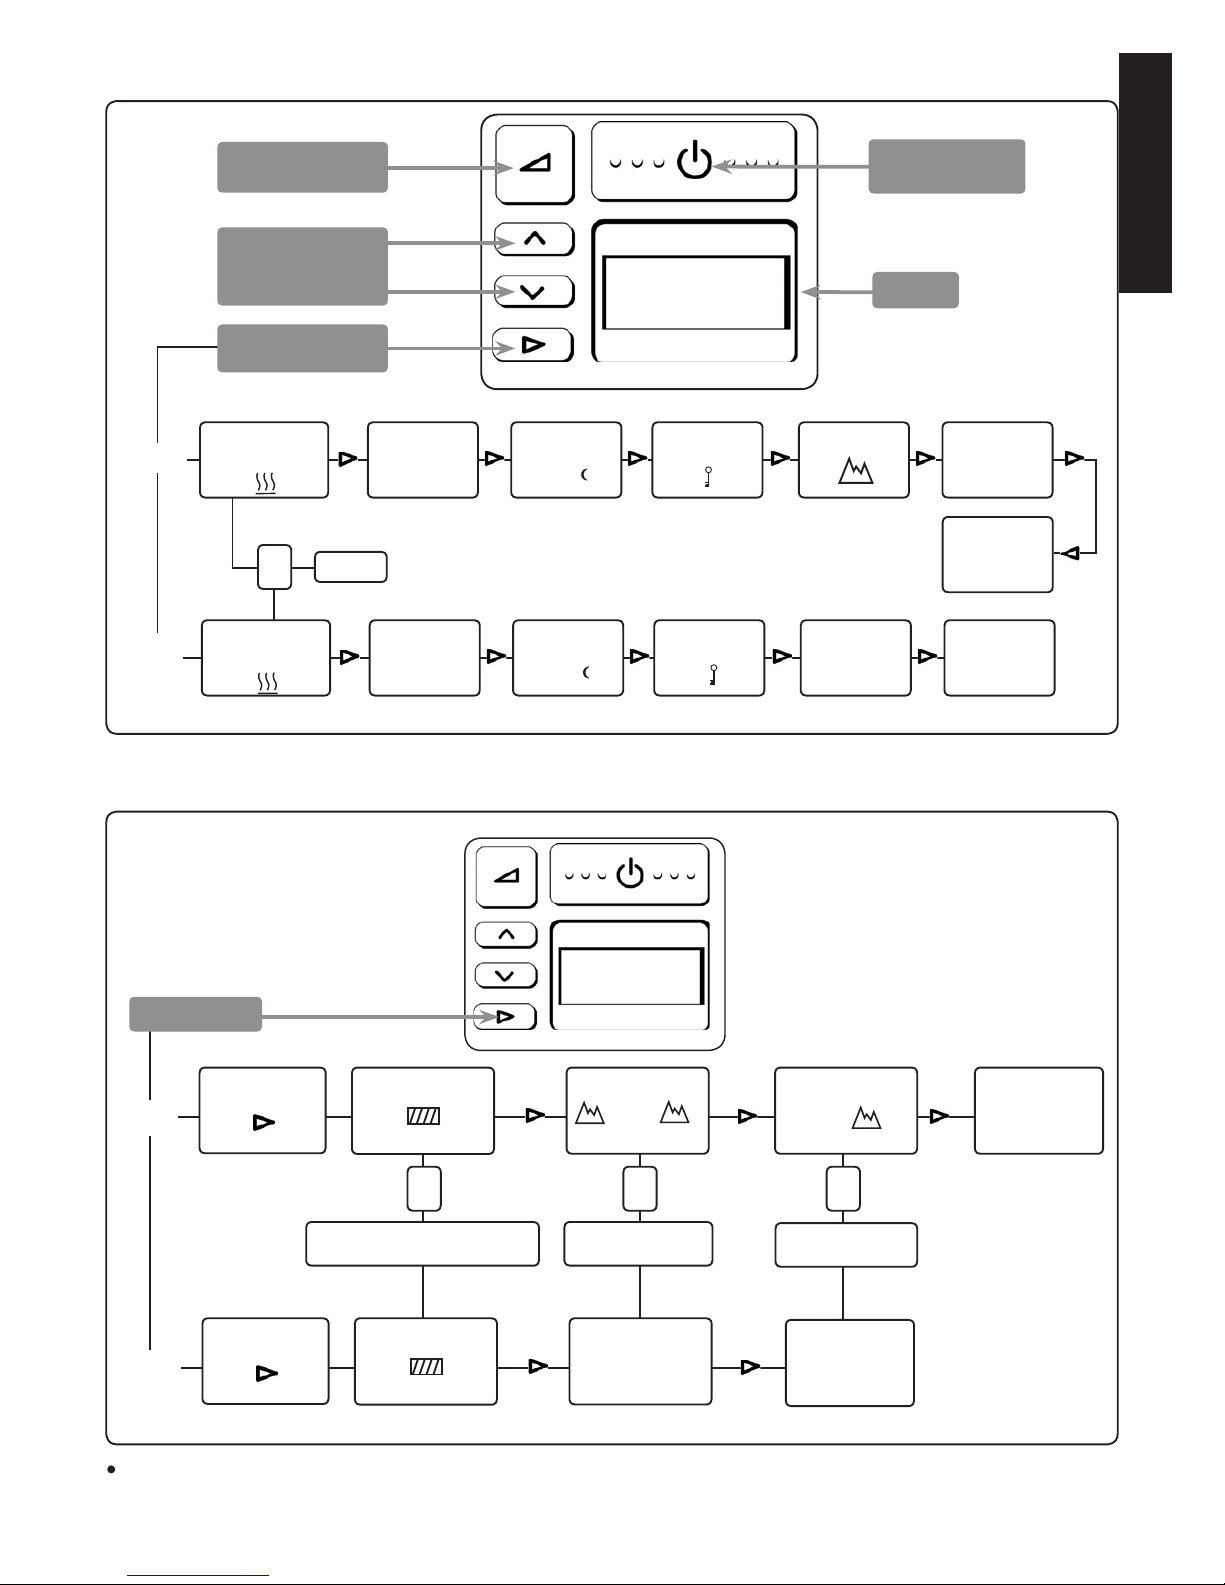
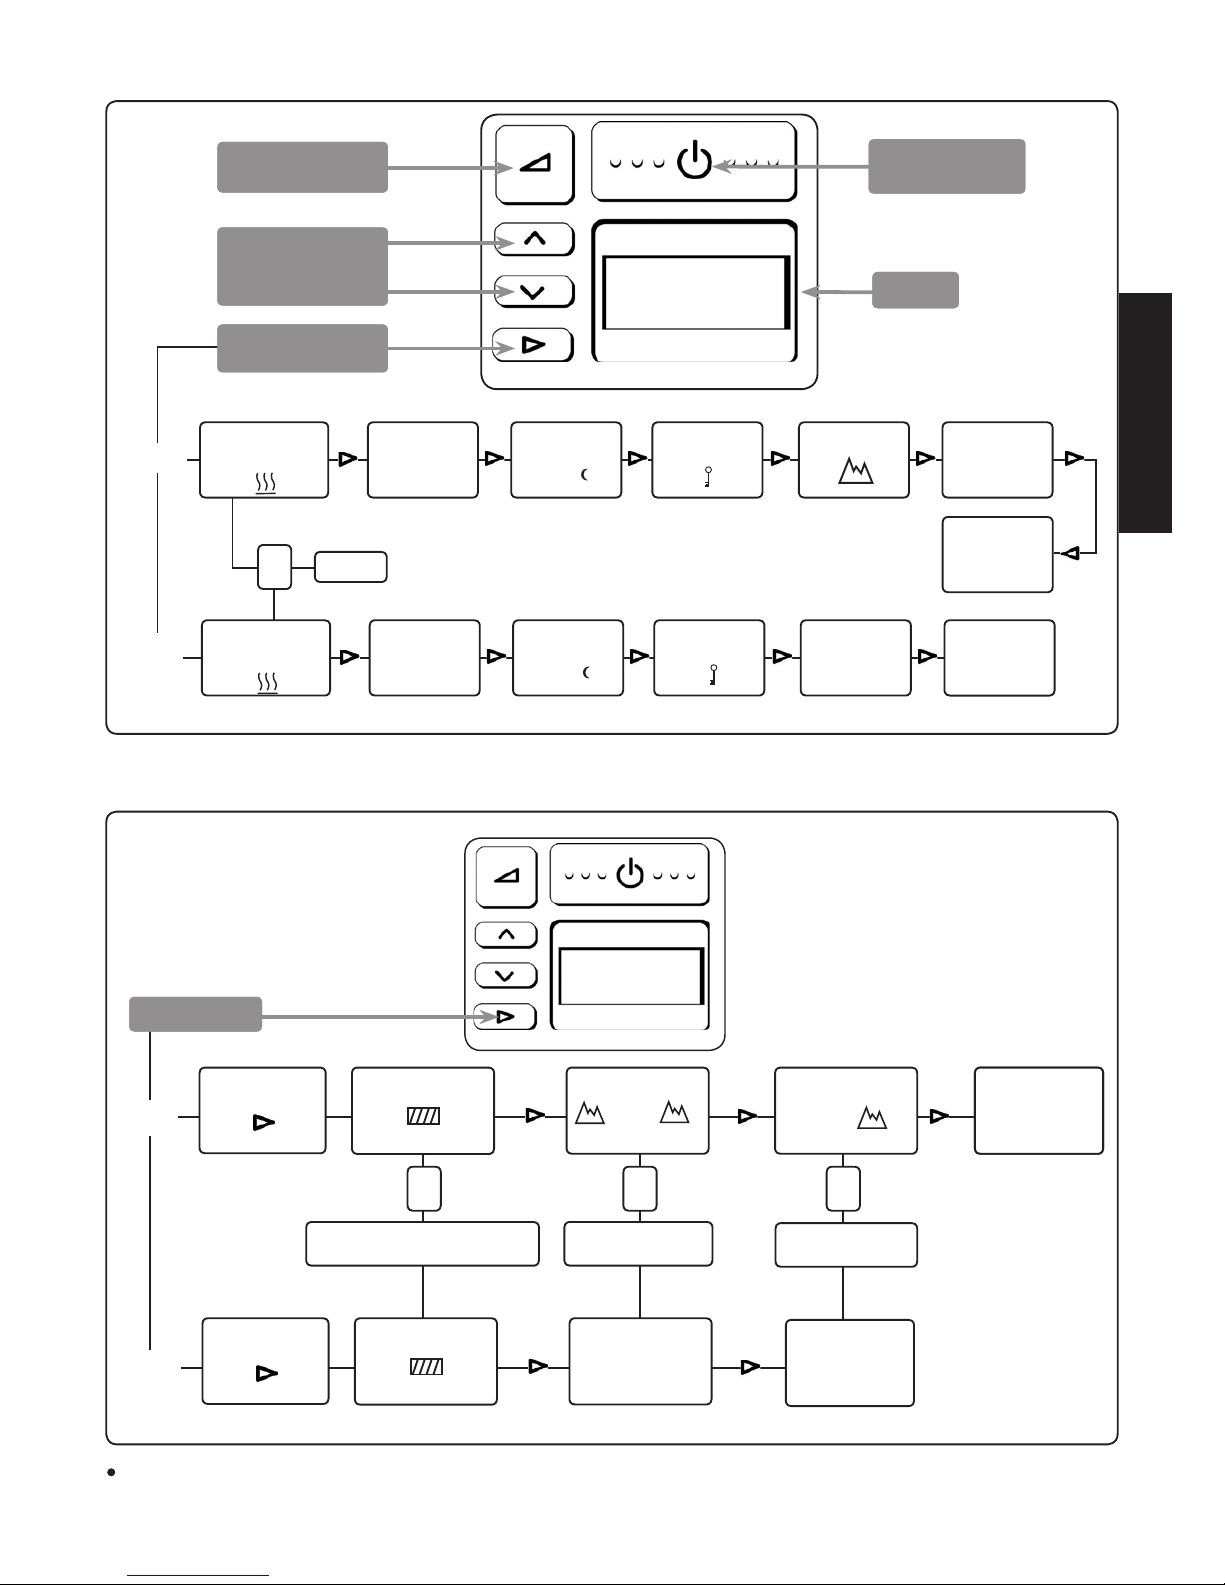
8.2 Patient Menu Summary
Increase
Decrease
Press to activate
Ramp
Press once to switch
device on/off
Display
Mode
ThermoSmart™
Humidity Setting
(default)
Altitude Setting
Pressure
Setting
cmH2O
0,1,2,3,4
<
<
or
Check sumTotal Run Time
hr
Average Hours
per night*
hr/
Return to
Default
ThermoSmart™
Humidity Setting
(default)
Pressure
Setting
cmH2O
Check sumTotal Run Time
hr
Average Hours
per night*
hr/
Return to
Default
Model
HC604
Model
HC608
Model
HC604
Model
HC608
Return to Default
or
m
Increase/Decrease
Altitude Level
Hold for 3 seconds
ft
<
<
or
<
<
or
Select Units
for Altitude
3000
<
<
or
Increase/Decrease
ThermoSmart™ Climate Setting
Return to Default
Hold for 3 seconds
Actual
Pressure
cmH2O
Advanced
Patient Menu
Advanced
Patient Menu
Mode
Warning: Failure to select correct altitude setting (for any given location) will have an adverse effect on delivered pressure.
A - 7
8.3 Patient Menu - Additional Settings Summary
English
±
0.5 Increment
Page 12
A - 8
9.
freqUenTly askeD qUesTions
Do I have to use distilled water with my device?
The use of distilled water will maximize the life of the water chamber. Water from the faucet will often contain minerals which can
damage the chamber, causing pitting in the base, even if the water is passed through a filter.
Can I use my device in other countries?
Yes. Simply use the appropriate electrical socket adaptor and the device will automatically adapt to any voltage supply.
Note: When moving your device, ensure that the water chamber is empty. Machine failure due to water damage is not covered by
warranty.
Can I use supplemental oxygen with my device?
Yes, oxygen can be administered at the mask. Turn the device on before turning on the oxygen. Ensure that the oxygen source is
turned off before turning off the device to avoid oxygen accumulating in the machine.
When do I replace my water chamber?
Replace the chamber if the plastic walls of the chamber become cracked or cloudy or the chamber base becomes pitted.
(Note: If the chamber leaks at all, it should be replaced immediately).
Can I use my device without a heated breathing tube?
Yes you can, but you will not gain the optimum humidity performance the device offers.
The device will then not display the heated breathing tube symbol and show the following display:
What happens to my device during power failure?
Remove the mask immediately. Upon restoration of the power supply, the device will restart in the same operation mode with the
same settings as before the power failure. Refer to Section 2 for additional information.
10. operaTing ConDiTions
AMBIENT TEMPERATURE: 41 - 95 ºF (5 - 35 ºC)
HUMIDITY: 10 - 95% Relative Humidity (RH)
ALTITUDE: 0 - 9000 ft (0 - 3000 m)
Above 1500 m (4500 ft) the maximum operating pressure will be reduced.
11. sTorage anD TransporT ConDiTions
The device should be stored and transported in environmental conditions of: 14 to 140 °F (-10 to 60 °C).
12. TroUbleshooTing
If you feel that your device is not operating correctly, consult your healthcare provider. Do not attempt to repair the device yourself.
13. WarranTy
Please contact your Fisher & Paykel Healthcare Provider regarding warranty.
14. DeviCe anD ConsUmables Disposal insTrUCTions
• Unit Disposal Instructions
This unit contains electronics. Please do not discard as regular rubbish. Dispose according to local guidelines for
disposing of electronics.
• Consumable Disposal Instructions
Place the mask, breathing tube and water chamber in a rubbish bag at the end of use and discard with normal
rubbish.
Page 13
A - 9
English
16. appenDix
The following table lists the main difference in features across the SleepStyle™ 600 Product Range.
MODEL
HC604
HC608
NOTE:
●
All models are fully integrated with ThermoSmart
™
Technology.
●
Some models are not available for sale in all countries.
Patient Compliance
Monitoring (LCD & Download)
✓
✓
Auto Altitude Adjustment/
Leak Compensation
-
✓
Fully Integrated CPAP with
Heated Humidification
✓
✓
DIMENSIONS: 10.7” x 6.7” x 6.9”
(273 mm x 170 mm x 175 mm)
WEIGHT: 4.6 lbs (2.1 kg) unit only
7.5 lbs (3.4 kg) packaged in bag incl.
accessories
ELECTRICAL RATINGS
Supply Frequency: 50 - 60 Hz
Supply Voltage and Current: 100 - 115 V (1.5 A, max 1.7 A),
220 - 240 V (1.0 A, max 2.0 A)
Note: These values represent average
current.
DC to AC Inverter
requirements: 115 V - 200 W/300 W surge
230 V - 300 W/500 W surge
Heater Plate: max. 85 W
Heater Plate Temperature: max. 149 °F (65 °C)
Heated breathing tube
Power Setting: max. 30 W
PERFORMANCE
Pressure Range: 4 to 20 cmH2O
Altitude Range: 0 to 9000 ft, or 0 to 3000 m
STANDARDS COMPLIANCE:
Designed to conform to the
requirements of: IEC 60601-1
UL60601-1
CSA C22.2/No. 601.1
AS3200.1.0
EN60601-1
ISO 17510-1
The device complies with the electromagnetic compatibility
requirements of IEC 60601-1-2. In certain circumstances, the device
may affect or be affected by nearby equipment due to the effects of
electromagnetic interference. If this should happen, try moving your
unit or the location of the device causing interference, or alternatively
consult your healthcare provider.
15.
proDUCT speCifiCaTions
Warm-up time: 30 min
Humidity delivered: 30 mg/L*
Gas Temperature: max. 98.87 ºF (37.15 ºC)
*measured at 22 ºC ambient temperature: 10 cmH2O at bias flow.
Maximum Flow Rates
CPAP Pressure
Setting (cmH2O) 4 8 12 16 20
Measured pressure at
the patient connection 3 7 11 15 19
port (cmH2O)
Maximum flow rate
(L/Min) at mask 60 78 80 81 83
connection port
Static Pressure Stability (long term)
-0.05 to 0.18 cmH2O pressure difference, measured at the mask
connection port, at the pressure setting of 10 cmH2O
Dynamic Pressure Stability (short term)
CPAP Pressure
Setting (cmH2O) 4 8 12 16 20
Pressure Difference
(cmH2O) at mask .73 .74 .74 .81 .79
connection port
Page 14

Page 15
B - 1
SleepStyleTM 600 持续正压气道通气(CPAP)系统是结合了加
温湿化和加热呼吸管路的CPAP机系列产品。可用于睡眠室
和家庭护理,用于治疗阻塞性睡眠呼吸暂停症。
如需更多信息请联系当地的费雪派克医疗保健 (Fisher &
Paykel Healthcare) 公司代表处 - 联系方式详见封底。
请保管好本手册以备今后查阅。
目录
1. 符号定义 ................................................................................................................................................................................................ B - 2
2. 警告、注意和禁忌症 ............................................................................................................................................................................ B - 2
3. 治疗仪说明 ............................................................................................................................................................................................ B - 3
3.1 包装内容 .......................................................................................................................................................................................... B - 3
3.2 治疗仪的重要组件 .......................................................................................................................................................................... B - 3
3.3 附件 .................................................................................................................................................................................................. B - 3
3.4 智能加热ThermoSmart™ 技术 .......................................................................................................................................................... B - 4
4. 用途 ........................................................................................................................................................................................................ B - 4
5. 氧气使用警告 ........................................................................................................................................................................................ B - 4
6. 清洁保养 ................................................................................................................................................................................................ B - 5
7. 设置说明 ................................................................................................................................................................................................ B - 5
8. 控制和显示 ............................................................................................................................................................................................ B - 6
8.1 显示说明和功能 .............................................................................................................................................................................. B - 6
8.2 患者菜单摘要 .................................................................................................................................................................................. B - 7
8.3 患者菜单 - 附加设定摘要 .............................................................................................................................................................. B - 7
9. 常见问题解答 ........................................................................................................................................................................................ B - 8
10. 工作条件 ................................................................................................................................................................................................ B - 8
11. 存储及运输条件 .................................................................................................................................................................................... B - 8
12. 故障排除 ................................................................................................................................................................................................ B - 8
13. 保修期 .................................................................................................................................................................................................... B - 8
14. 治疗仪和消耗品处置说明 .................................................................................................................................................................... B - 8
15. 产品规格 ................................................................................................................................................................................................ B - 9
16. 附录 ........................................................................................................................................................................................................ B - 9
使用前请详细阅读手册所有内容。
注意: 美国联邦法律规定本治疗仪为医生处方产品。
持续正压气道通气(CPAP)系统
简体中文
Page 16

B - 2
1.
符号定义
BF类
应用部件
交流电
防漏水
93/42/EEC
LLB类
第二类产品
双重绝缘
电源
开/关
2. 警告、注意和禁忌症
注
• 本手册中将 SleepStyle™ 600 系列湿化持续正压气道通气
(CPAP)治疗仪称为“治疗仪”。
• 如果医生觉得您需要使用 CPAP治疗仪,您应在每次睡觉时使用
治疗仪。如果治疗仪由于某种原因停止工作,请立即联系医护人
员或供应商。
• 对于因未依照所提供操作说明而使用治疗仪所导致的任何人身伤
害或财产损坏,用户应承担全部责任。
• 治疗仪只能与由 费雪派克医疗保健公司Fisher & Paykel Healthcare,
医护人员或供应商推荐的符合 ISO 17510-2 标准的面罩、接头和
呼吸管路搭配使用。
• 不要在室温超过35°C(95°F)的环境下使用治疗仪,因为这会
导致气流温度升高,有可能对气道造成损伤。
• 有关维修和保养的所有事宜请咨询费雪派克医疗保健公司
Fisher& Paykel Healthcare。
警告
为避免治疗仪漏电,请注意以下几点:
• 如果电源线或插头有损坏,请勿使用治疗仪。
• 如果治疗仪曾掉进水里,请勿使用。
• 若治疗仪已弄湿,请勿将其插入电源插座。
• 若治疗仪已连接到电源插座,请勿对其进行清洁。
• 请勿在容易倾斜、坠入、或拖入水中的地方放置或使用治疗仪。
如果主机外壳已进水,请拔掉电源线并停止使用,并咨询 费雪
派克医疗保健公司Fisher & Paykel Healthcare。
为避免堵塞或吸入异物,请注意以下几点:
• 切勿将任何物体塞入管路的任何开口。
• 确保在治疗仪使用时已安装空气过滤片。
为确保实施最佳治疗,请注意以下几点:
• 如果治疗仪曾摔落或有损坏,请勿使用。
• 如果治疗仪不能正常工作,请勿使用。
• 请勿自行调节压力。只能由专业医护人员或供应商来调节压力。
• 如果呼吸管出现裂孔、裂缝或扭结,请勿使用治疗仪。
• 请勿堵塞面罩上的排气孔。
• 如果治疗仪已关闭或不能正常运行,请勿使用面罩。
• 请勿使用任何未经费雪派克医疗保健公司 Fisher & Paykel Healthcare
认可的绝缘护套或同类附件。否则可能会影响湿化性能。
• 只有先将护套向上推,然后才能尝试拔下加热呼吸管。以防止损
坏连接端口。
为避免发生灼伤,请注意以下几点:
• 请勿向水罐内注入沸水。
• 请勿触摸暴露的加热板或水罐底部。
• 将呼吸管妥善放置在合适的位置,请勿让它长时间接触皮肤。
使用氧气时为避免引起火灾,请注意以下几点:
• 请勿在治疗仪不开机时打开氧气源;否则会导致氧气在治疗仪内
积聚。
• 治疗仪应放置通风条件不受阻碍的地方。
• 氧气不应在吸烟或有明火的场合下使用。
• 请勿使用任何能在空气中燃烧或在高浓度氧气条件下燃烧的
材料。
• 请勿将治疗仪置于任何易燃源附近。为避免起火,最好不要在正
使用氧气的房间内放置任何易燃源。
• 保持氧减压阀、氧气瓶阀、供氧管路、接头和其它所有氧气设备
远离油、油脂或油脂状物质。如果这些物质与加压氧气接触,可
能会自燃和大火。
• 串行接口转换器未加盖前,请勿使用治疗仪。
其他事项:
• 治疗仪放置的高度比睡觉时头部的位置要低,以防止水倒流入管
路。万一有水进入管路,应排掉多余的冷凝水。否则管路中积聚
的水可能会被患者吸入。
• 治疗仪要求与 带有排气孔的CPAP 面罩或接头搭配使用,让气流
能够不断地从面罩中排出。在治疗仪开机并正常运行时,新鲜空
气会将呼出气体通过面罩排气孔清除。在低 CPAP 压力条件下,
万一发生停电或机器故障,应立即摘下面罩,因为通过面罩的气
流可能不足以把呼出气体全部清除,从而可能导致二氧化碳再吸
入的危险。
• 如果未能选择正确的海拔高度(对任何已知的位置),会影响压
力输出。
• 本治疗仪不用于生命支持。
• 避免在没必要的情况下拔下治疗仪背面的电源线。如需要拔下,
请在拔出时握住接头,避免拖拽电源线。(请参阅第 3.2 节)。
注意
为防止治疗仪因进水而受损,请注意以下几点:
• 注水前,请从治疗仪上取下湿化水罐。
• 移动治疗仪前,请倒空水罐中的水。如果在水罐中有水的情形下
需要移动治疗仪,应防止治疗仪倾斜以免进水。
其他事项:
• 只有通过绝缘串行电缆 (900HC236) 将治疗仪连接到电脑后,才
能使用,以免损伤你的电脑。
• 不要在室温超过35°C(95°F)的环境下使用治疗仪,因为这会
导致气流温度升高,有可能对气道造成损伤。
禁忌症
• 研究表明,某些出现下列情况的患者可能不适宜使用正压通气治
疗:出现气胸、肺大泡疾病、气颅、脑脊液渗漏,近期有过颅脑
手术或创伤、筛板异常、病理性低血压,或者已接受气管插管或
气管切开。
注意事项
• 正压通气治疗对呼吸衰竭或慢性肺阻塞(COPD) 患者的安全性和
有效性还有待证实。
副作用
• 正压通气治疗有可能引起鼻出血、耳和鼻窦不适。
如果您对接受的治疗有任何疑问,请联系您的医生。
注意
请查阅随机
文件
Page 17
B - 3
3.
治疗仪说明
3.1 包装内容
3.2 治疗仪的重要组件
附件
1 x
SleepStyle™ 600
持续正压
气道通气 (
CPAP
) 系统
电源线和接头
ThermoSmart™ 加热呼吸管
带锁套的连接头
ThermoSmart™ 加热呼吸管连接口
水罐
水位控制线(垂直)
手指护板
加热板
水位线
空气过滤片支架
显示屏
空气过滤片
电源开关
3.3 附件
HC365 标准湿化水罐
HC360* 耐用湿化水罐
900HC522 智能加热 ThermoSmart™ 加热呼吸管,
接到 22 mm (0.86") 圆锥形接头
*部分地区不适用
900HC240 过滤片(2 包)
900HC604 出气口清洁工具 HC600
900HC627 弯头漏斗10 个
1 x 备用空气过滤片
1 x 电源线
2 x 水罐
1 x 漏斗
1 x ThermoSmart™ 加
热呼吸管
漏斗
简体中文
Page 18

B - 4
3.4 智能加热ThermoSmart™ 技术
本装置通过采用独特的管道智能加热 ThermoSmart™ 技术使患者有最佳的舒适度。智能加热 ThermoSmart™ 技术使输送到患者的湿度水平达到
最佳(更高和个性化),而且不受环境温度的影响。
本治疗机可在两种设置上调整以达到最佳舒适度:
智能加热 ThermoSmart™ 湿度设 定模式:该设定调节加热盘的温度以调整湿度从而满足患者对舒适度的要求。调节范围为1到 4, 调整
步幅为 0.5。治疗机在出厂时已预先设定在2.5, 这是适合大多数患者的设定值。
• 如您感觉干燥或空气太凉, 请调高设定。
• 如您觉得管子里湿气太大或感到空气太热, 请调低设定。
• 如您在这一设置上不能获得最佳的舒适度, 您还可进一步调整智能加热ThermoSmart™ Climate气候设定。
智能加热 ThermoSmart™ 气候设定模式:该模式可以提供进一步调节选择来提供最佳湿化输送。调节范围为1到3, 调整步幅为1。治疗
机在出厂时已预先设定在 2, 这是适合大多数患者的设定值。注意: 如对气候设定模式做过调整, 湿度设定模式会回到默认值。
• 对使用口式 CPAP 供气的患者, 建议将ThermoSmart™ Climate气候设定调到3。
• 如您觉得智能加热 ThermoSmart™ Humidity 湿度设定的一系列设定太干或太凉, 请调高气候设定。
• 如您觉得智能加热 ThermoSmart™ Humidity 湿度设定的一系列设定太热或太湿, 请调低气候设定。
建议把(加热呼吸)管放在被褥的上方以获得最好的湿化效果。请参照本手册的第8节“控制与显示”来操作智能加热 ThermoSmart™ Humidity
湿度设定和智能加热 ThermoSmart™ Climate 气候设定。
4.
用途
本治疗仪用于支持患者睡眠时的呼吸, 目的是治疗阻碍性睡眠呼吸暂停症(OSA)。通过提供持续气道正压(CPAP)来 避 免 气 道 阻 塞 。增 加 了 对
吸入气体进行加热湿化功能, 避免由于使用普通 CPAP 装置而造成的呼吸道干燥不适。本治疗仪仅适用于成人在家或睡眠实验室使用。请查阅
本手册附录中列出的 SleepStyle
TM
600 持续正压气道通气(CPA P)系统产品范围。
5. 氧气使用警告
如需使用氧气,建议通过面罩给予供氧。请参阅您面罩类型的使用说明。
注:
• 在辅助用氧流量固定的情况下,吸入的氧气浓度会根据设定压力、患者呼吸模式、面罩选择和漏气量的不同而变化。
氧气辅助治疗仪器使用前,请参阅第二节所述的氧气使用警告。
Page 19

B - 5
6.
清洁保养
请注意: 要按要求来清洁本治疗仪。
1. 关 闭 治 疗 仪 ,并 从 电 源 插 座 上 拔 下 插 头 。等 到 水 冷 却 后 ,取 下 水 罐 。
2. 用干净、微湿(不是湿透)的软布和中性的洗洁精擦拭治疗仪的表面。不要使用粗糙的去污粉或溶剂,这些东西可能会导致治疗仪损坏。
3. 每天清洁
清洁水罐, 加热呼吸管和加热呼吸管的连接头。
• 向上拔起锁套, 松开连接头, 把加热呼吸管从治疗仪上取下, 然后取下连接头。
• 用肥皂水清洗加热呼吸管, 用水冲洗干净, 然后将加热呼吸管子两端朝下悬挂晾干。
• 按下手指护板, 将水罐向外拔, 取下水罐。
• 倒干净水罐里面剩下的水。
• 如使用标准水罐 (HC365), 请用肥皂水清洗后, 用水冲洗, 晾干。
• 如是耐用型水罐 (HC360), 要先拆卸后再清洁。如图1所示将水罐上部和底座分开。确保在底座上的圆形
密封没有松动或损坏。用洗洁精清洗水罐和底座后, 用水冲洗干净, 晾干。这个水罐也可以放在家用洗
碗机里清洗。
• 用清洁潮湿低棉绒布彻底擦 拭加热呼吸管连接端口内表面。
4. 每周清洁
彻底清洗水罐
• 用一份白醋两份水混合的溶液浸泡水罐内部 10 分钟。然后用蒸馏水冲洗晾干。
5. 保养
• 当空气过滤片出现明显变色时, 更换空气过滤片, 至少每 3 个月或机器运行时间超过 1000 小时要更
换一次。更换时, 如图 2 所示从仪器的背面拆下过滤片支架。确保新过滤片上黑色垂直线的一面朝里,
将换好的过滤片和支架装回治疗仪。
• 如水罐有开裂, 变色, 或划痕, 更换水罐。
• 使用时间每达到 4000 小时或一年要更换加热呼吸管。如管子损坏要立即更换。
7.
设置说明
一旦水罐加满水并装回仪器, 治疗仪一定要保持竖立, 以防水流进仪器内部。
1. 从包装盒中取出治疗仪。
2. 将治疗仪放在你床边的低架子或地板上, 确保放置后治疗仪低于睡觉时头高度。
3. 从包装盒中取出水罐。
4. 取 下 蓝 色 盖 子 并 将 其 弃 置( 图 1 )。
5. 给水罐加入蒸馏水到黑色水位控制线(图 2)。
不能通过加热呼吸管连接端口加水。当搬动治疗仪时,确保水罐是空的。治疗仪进
水而造成的损坏是不在保修范围内的。
6. 压下手指护板然后将水罐滑入治疗仪(图 3, 图 4)。
7. 水罐安放正确时, 手指护板会弹回原位。
8. 加热呼吸管路一端有一个灰白色的塑料连接头。拔高锁套然后将连接头接入治疗仪,
向下按压锁套以固定连接(图 5,图 6,图 7)。
9. 将加热呼吸管的另一端和面罩相连接。
10. 把治疗仪电源插头插入家里电源插座上。
11. 按电源开关键开启治疗仪(图 8)。治疗仪显示现有智能加热 Th ermoSma rt™ Humidity
湿度设 定。
12. 如需改变设定值, 请参阅第8节“控制和显示”。
您的治疗仪已经做好使用准备了。
图 2
图 3
图 4
图 5
图 6
图 7
图 8
图 1
图 1
图 2
简体中文
Page 20
B - 6
智能加热 ThermoSmart™ Climate 气候设定 *
要改变所要的温度 : 按 键获得更暖 更湿的空气。按 键获得
较冷较干的空气 *。参照 3.4 节。
海拔高度 : 使用 和 键 选择海拔高度单位。用米制选择“m”,
用英制选择“f t”。
海拔高度设定
- 按压 和 键设定海拔高度
- 按压 键退出菜单
实际压力 ( 显示实际压力 )
- 如不退出菜单 , 显示回到默认值。要退出菜单 , 按压 键 ( 仅适
用 HC608 型号 )。
8.
控制和显示
8.1 显示描述和功能
图例 功能和描述 操作
启动
按压 按键。
治疗仪显示默认的智能加热 ThermoSmart ™ Humidity 湿度设定。
关闭
取下您的面罩。
按压 按键。
启动
按压
注意 : 如要再次启动延时升压功能 , 请先关闭治疗仪后重新开机。
关闭
按压 .
按压 和 增加或 减少设 定值。
按压以逐个切换并显示可用选项。
<
<
患者菜单 显示 操作
显示 CPAP 设定,湿度设定,顺
应性数据,海拔和压力设定。
显示项目
按压 逐个观看。
智能加热 ThermoSmart™ Humidity 湿度设定 (显示默认值)
调整智能加热 ThermoSma rt ™ Humidity 湿度设定水平以减少使用
CPAP 治疗对上气道带来的副作用。按 和 按键来提高或降 低
设定值。
总运行时间 : 显示治疗仪启动后的总运行时间 ( 包括没有佩
带面罩的时间 )。
每晚平均使用小时数 : 显示佩带面罩后每晚使用治疗仪的平
均小时数。
核查系数 :给临床医师或服务商显示顺应性检查所需信息。
海拔高度设定 : 显示海拔高度设定。按 或 改变海拔
高度。
压力设定 : 显示压力设定。
cmH2O
hr
hr/
开/关
治疗仪开关
延时升压
降低 压力至较低水平以帮助您 顺
利入睡。在启动后 20 分钟内压
力将逐 渐升高到您需要的治疗压
力。
增加 / 减少
往上或往下调节设定值。
模式
逐个切换选项。
患者菜单簿 - 附加设定 显示 操作
进入附加设定 :
从默认
智能加热
THERMOSMART™
HUMIDITY
湿度设定
按压 键 3 秒钟。
3000
cmH2O
警告 : ( 在任何给定区域 ) 选择错 误的海拔高度可能对输出压力造成不利影响。
* 改变 ThermoSmart™ Climate 气候设定会使 ThermoSmart™ Humidity 湿度设定回到默认设定值 2.5。
模式按键
逐个切换选项
向下按键
减少设定
向上按键
增加设定
延时升压按键
开 / 关按键
Page 21
8.2 患者菜单摘要
cmH2O
0,1,2,3,4
<
<
或
cmH2O
或
m
增加/减少
海拔高度
按压3秒钟
ft
<
<
或
<
<
或
选择海拔
高度单位
3000
<
<
或
增加/减少智能加热
ThermoSmart™ Climate 气候设定
返回默认值
按压3秒钟
实际压力
cmH2O
高级患者菜单
高级患者菜单
警告: (在任何给定区域)选择错误的海拔高度可能对输出压力造成不利影响。
B - 7
8.3 患者菜单- 附加设定摘要
调整步幅
±
0.5
模式
型号
HC604
型号
HC608
返回默认值
智能加热
ThermoSmart™ Humidity
湿度设定(默认值)
海拔高度设定
压力设定
核查系数
仪器总运行时间
hr
每晚平均
使用时间*
hr/
返回默认值
智能加热
ThermoSmart™ Humidity
湿度设定(默认值)
压力设定
核查系数
仪器总运行时间
hr
每晚平均
使用时间*
hr/
返回默认值
型号
HC604
型号
HC608
增加
减少
按压激活延
时升压
按一次治疗仪
启动/关闭
显示
模式
简体中文
Page 22
B - 8
9.
常见问题解答
我的治疗仪是否必须使用蒸馏水?
使用蒸馏水可以最大限度地延长水罐的使用寿命。水龙头出来的水带有可损坏水罐的矿物质,即使采用过滤器过滤,也会造成底部腐蚀。
我可以在其它国家使用我的治疗仪吗?
可以。只要使用合适的电源转换插座。治疗仪会根据不同的供电电压自动调整。
注意:在移动您的治疗仪时请确保水罐是空的。治疗仪进水造成的损坏不在保修范围之内。
我的 治疗仪可以同氧气一起使用 吗?
可以。氧气可以通过 面罩 输送。在接通氧气前请先启动 治疗仪,并 确 保在 治疗仪关 机前先 关闭 氧气输送 以避免氧气在 治疗仪内积 聚。
什么时候 更换我的水罐?
如发现水罐的塑料壁有裂痕或变成雾状和不透明或水罐底部凹陷(如果水罐漏水则需立即更换。)
我的治疗仪可以不使用加热呼吸管路吗?
可以。但是您就不会获得由治疗仪提供的最佳湿化功能了。
在这种情况下,治疗仪不会显示加热呼吸管路符号而是显示以下信息:
如果发生停电,我的治疗仪会出现什么情况?
应立即摘下面罩。在恢复供电后,治疗仪会重新启动并进入停电前所用操作模式和设置。有关更多信息,请参阅第 2 节。
10.
工作条件
环境温度: 5 - 35 °C (41 - 95 °F)
湿度: 10 至 95% 相对湿度 (RH)
海拔高度: 0 - 3000米(0 - 9000 英尺)
高于1500米(4500英尺)时最大工作压力将下降。
11.
存储及运输条件
治疗仪存储和运输环境条件: -10 - 60 °C (14 -140 °F)。
12.
故障排除
如果您认为治疗仪运行不正常,请咨询医护人员或供应商。切勿自行尝试维修治疗仪。
13.
保修期
有关保修期的问题,请和您所在地费雪派克医疗保健公司 (Fisher & Paykel Healthcare) 产品供应商联系。
14. 治疗仪和消耗品处置说明
• 主机处置说明
本治疗仪主机含有电子元器件。请勿将主机作为普通垃圾丢弃。应依据当地有关处置电子设备的规定进行处理。
• 消耗品处置说明
请将不能继续使用的面罩、呼吸管和水罐置于垃圾袋中,并作为普通垃圾丢弃。
Page 23
16.
附录
以下表格列出了 SleepStyle™ 600 系列各款功能的主要差别。
型号
HC604
HC608
注意:
●
所有型号都带有智能加热 ThermoSmart™ 技术。
●
某些型号不是在所有国家都有销售。
患者顺应性监测
(液晶显示和下载)
✓
✓
自动海拔高度调节/
漏气补偿
-
✓
B - 9
加温湿化一体化
持续正压通气 CPAP 治疗仪
✓
✓
尺寸: 10.7” x 6.7” x 6.9”
(273 mm x 170 mm x 175 mm)
重量: 4.6 lbs (2.1 kg) 仅主机
7.5 lbs (3.4 kg) 含包装及附件
电气额定值:
电源频率: 50 至 60 Hz
电源电压和电流: 100 - 115 V (1.5 A, 最大 1.7 A),
220 - 240 V (1.0 A, 最大 2.0 A)
注:这些值均代表平均电流。
直流转交流变换器要求: 115 V - 200 W/300 W (电涌)
230 V - 300 W/500 W (电涌)
加热板: 最大 85 W
加热板温度: 最大 149°F (65°C)
加热呼吸管功率设定: 最大 30 W
性能
压力范围: 4 至 20 cmH2O
高度范围: 0 至 9000 ft 或 0 至 3000 m
标准合规性:
旨在符合以下标准的要求: IEC 60601-1
UL60601-1
CSA C22.2/No. 601.1
AS3200.1.0
EN60601-1
ISO 17510-1
本治疗仪符合电磁兼容性标准IEC 60601-1-2。在某些情况下,由于电磁
干扰的作用,治疗仪可能本身受到影响或影响附近的便携式移动射频
通信设备。如果出现这种情况,可尝试移动您的治疗仪或移开干扰设
备的位置,也可咨询您的医护人员或供应商。
15.
产品规格
预热时间: 30 分钟
输送的湿度: 30 mg/L*
气体温度: 最大值 = 98.87 ºF (37.15 ºC)
*22 °C 环境温度下测得:持续气流下 10 cmH2O。
最大流量
CPAP 压力设置
(cmH2O) 4 8 12 16 20
患者侧连接端
口处测得的 3 7 11 15 19
压力 (cmH2O)
面罩连接端
口处最大流量 60 78 80 81 83
(L/Min)
静态压力稳定性(长期)
10 cmH2O 压力设置下 -0.05 至 0.18 cmH2O 压力差(面罩连接端口处测
得)
动态压力稳定性(短期)
CPAP 压力设置
(cmH2O) 4 8 12 16 20
面罩连接端口处
压力差 (cmH2O) 0.73 0.74 0.74 0.81 0.79
简体中文
Page 24

Page 25
C - 1
SleepStyle™ 600 CPAP Serien har kombineret
opvarmet fugtning med en opvarmet patientslange.
Den er udviklet til brug i hjemmet eller på
søvnlaboratoriet til behandling af Obstruktiv
Søvn Apnea.
Yderligere assistance fås ved henvendelse til Deres
lokale Fisher & Paykel Healthcare repræsentant – se
bagsiden for adresser.
Gem venligst denne brugsanvisning til senere
reference.
inDholDsforTegnelse
1. Symbolforklaring ................................................................................................................................................................................... C - 2
2. Advarsler, forsigtighedsregler og kontraindikationer ...................................................................................................................... C - 2
3. Beskrivelse af apparatet ....................................................................................................................................................................... C - 3
3.1 Pakningens indhold ........................................................................................................................................................................ C - 3
3.2 Vigtige dele på apparatet ............................................................................................................................................................. C - 3
3.3 Tilbehør ........................................................................................................................................................................................... C - 3
3.4 ThermoSmart™ Teknologi ............................................................................................................................................................. C - 4
4. Tilsigtet brug ......................................................................................................................................................................................... C - 4
5. Advarsler ved brug af ilt ...................................................................................................................................................................... C - 4
6. Rengøring og Vedligeholdelse ........................................................................................................................................................... C - 5
7. Installationsvejledning .......................................................................................................................................................................... C - 5
8. Styring og display ................................................................................................................................................................................. C - 6
8.1 Beskrivelse af displayet og funktionerne .................................................................................................................................... C - 6
8.2 Patient-menu oversigt ................................................................................................................................................................... C - 7
8.3 Patient-menu – yderligere indstillinger oversigt ......................................................................................................................... C - 7
9. Ofte stillede spørgsmål ....................................................................................................................................................................... C - 8
10. Driftsbetingelser ................................................................................................................................................................................... C - 8
11. Betingelser under opbevaring og transport ..................................................................................................................................... C - 8
12. Problemløser ......................................................................................................................................................................................... C - 8
13. Garanti ................................................................................................................................................................................................... C - 8
14. Bortskaffelse af apparat og forbrugsvarer ......................................................................................................................................... C - 8
15. Produktspecifikationer ......................................................................................................................................................................... C - 9
16. Bilag ........................................................................................................................................................................................................ C - 9
LÆS VENLIGST ALLE INSTRUKTIONER INDEN DE BRUGER APPARATET FØRSTE GANG
Dansk
Page 26

C - 2
1. symbolforklaring
Type BF
Anvendt del
Vekselstrøm
Dryp tæt
93/42/EEC
Klasse IIb
Klasse II
dobbelt isoleret
Tænd/sluk
BEMÆRK
Se de medfølgende
dokumenter
2. advarsler, forsigtighedsregler og kontraindikationer
HENVISNINGER
• Denne brugsanvisning henviser til SleepStyle™ 600 CPAP
seriens enhed som ”apparatet”.
• Hvis en henvisende læge foreskriver brugen af CPAP, skal De
bruge apparatet, hver gang De sover. Kontakt Deres læge med
det samme, hvis Deres apparat af en eller anden grund holder
op med at fungere.
• Brugeren af dette system er ene og alene ansvarlig for
personskader eller materielle skader som følge af anvendelse
af apparatet, som ikke er i overensstemmelse med den
vedlagte brugsanvisning.
• Apparatet må kun anvendes med masker, stik og
tilførselsslanger, der opfylder ISO 17510-2, og som er anbefalet
af Fisher & Paykel Healthcare eller Deres læge.
• Brug ikke apparatet, hvis rumtemperaturen overstiger 95 °F
(35 °C), da det kan medføre en forhøjet lufttilførselstemperatur,
hvilket kan forårsage irritation af luftvejene.
• Al reparation og vedligeholdelse skal henvises til Fisher &Paykel
Healthcare.
ADVARSLER
For at undgå elektrisk stød fra Deres apparat må
Deikke:
• Betjene apparatet, hvis netledningen eller -stikket er
beskadiget.
• Betjene apparatet, hvis det har været tabt i vand.
• Tilslutte apparatet til stikkontakten, hvis det er vådt.
• Rengøre apparatet, mens det er tilsluttet til stikkontakten.
• Opbevare eller bruge apparatet, hvis det kan vælte, falde eller
trækkes ned i vand. Hvis der er trængt vand ind i enhedens
indre, skal netledningen afbrydes og brugen standses. Kontakt
Fisher & Paykel Healthcare.
For at undgå kvælning eller inhalering af et
fremmedlegeme:
• Placér aldrig en genstand i nogen af slangens åbninger.
• Sørg for, at luftfilteret er påsat under brug af apparatet.
For at sikre optimal behandling må De ikke:
• Betjene apparatet, hvis det er tabt eller beskadiget.
• Betjene apparatet, hvis det ikke fungerer korrekt.
• Justere trykket. Tryk må kun justeres af sundhedspersonale.
• Betjene apparatet, hvis luftslangen er blevet beskadiget med
huller, revner eller knæk.
• Blokere udåndingsstrømmen på masken.
• Bruge masken, hvis enheden er slukket eller ikke fungerer
korrekt.
• Bruge en isoleringsmuffe eller lignende tilbehør, som ikke
er godkendt af Fisher & Paykel Healthcare. De kan påvirke
befugtningsfunktionen.
• Prøve at fjerne den opvarmede luftslange uden at skubbe
muffen op først. Dermed undgås det at beskadige
forbindelsesporten.
For at undgå forbrændinger må De ikke:
• Fylde kammeret med kogende vand.
• Berøre den blotlagte varmeplade eller kammerets bund.
• Placere luftslangen, så den kan komme i kontakt med huden
ilængere tid.
For at undgå brandfare under brug af ilt må De ikke:
• Åbne ilttilførslen, når apparatet ikke er i drift. Det kan medføre
ophobning af ilt inde i apparatet.
• Placere apparatet på et sted, hvor ventilationen omkring
apparatet er begrænset.
• Bruge ilt, mens De ryger eller er i nærheden af åben ild.
• Bruge materialer, som brænder i luft eller som er let
antændelige ved høje iltkoncentrationer.
• Holde nogen antændingskilde i nærheden af produktet. For at
undgå antænding anbefales det at holde alle antændingskilder
ud af rummet, hvor supplerende ilt anvendes.
• Opbevare iltregulatorer, cylinderventiler, slanger, mellemstykker
og alt andet iltrelateret udstyr i nærheden af olie, fedt eller
fedtholdige stoffer. Spontan og voldsom antænding kan
forekomme, hvis disse stoffer kommer i kontakt med ilt
undertryk.
• Betjene apparatet uden dækslet over den serielle portadapter.
Andet:
• Placér apparatet på en jævn overflade, der er lavere end
hovedhøjden, for at forhindre, at der kommer vand ind i
slangen. Aftap overskydende kondens, hvis der kommer vand
ind i slangen. Vand i slangen kan medføre aspiration.
• Apparatet er bestemt til at blive brugt med CPAP-masker
og -stik, der har udåndingshuller for at tillade en konstant
luftstrøm ud af masken. Når apparatet er tændt og fungerer
korrekt, skyller frisk luft udåndingsluften ud gennem maskens
udåndingshuller. Ved lave CPAP-tryk og ved strømsvigt eller
fejl ved apparatet skal masken straks fjernes, da luftstrømmen
gennem masken kan være utilstrækkelig til at fjerne al den
udåndede luft. Det kan medføre, at der genindåndes CO2,
hvilket kan være sundhedsfarligt.
• Hvis der ikke vælges det rigtige højdeniveau (for enhver
placering), vil det have en negativ virkning på det tilførte tryk.
• Dette apparat er ikke beregnet til kunstigt åndedræt.
• Undgå unødvendig fjernelse af netledningen på bagsiden
af apparatet. Hold i stikket, og træk det ud, hvis det er
nødvendigt at fjerne netledningen. Undgå at trække i
netledningen (se afsnit 3.2).
FORSIGTIGHEDSREGLER
For at undgå vandskade på Deres apparat:
• Fjern befugtningskammeret fra apparatet, inden det fyldes
med vand.
• Hæld vand ud af kammeret, før apparatet transporteres. Hvis
det er nødvendigt at håndtere apparatet, mens der er vand
i kammeret, må apparatet ikke vippes for at forhindre, at der
kommer vand ind i det.
Andet:
• For at undgå at beskadige Deres pc må De kun betjene
apparatet, hvis det er tilsluttet til en pc med en isoleret seriel
portadapter (900HC236).
• For at undgå luftvejsirritation må apparatet ikke bruges, når
rumtemperaturen overstiger 95 °F (35 °C).
KONTRAINDIKATIONER
• Videnskabelig forskning viser, at behandling med positivt
tryk er kontraindiceret for visse patienter ved følgende
præeksisterende tilstande: Pneumothorax, bulløs
lungesygdom, pneumocephalus, cerebrospinalvæskelækage,
nylig kraniekirurgi eller -traume, abnormiteter af den
cribriforme plade, patologisk lavt blodtryk, eller hos patienter
med bypass i de øvre luftveje.
ADVARSLER
• Sikkerheden og effektiviteten af positivt tryk er ikke påvist
for patienter med åndedrætssvigt eller kronisk, obstruktiv
lungesygdom (KOL).
KONTRAINDIKATIONER
• Næseblod og ubehag i ører og bihuler kan forekomme ved
behandling med positivt tryk.
Kontakt Deres læge, hvis De har spørgsmål vedrørende Deres
behandling.
Page 27
C - 3
3. beskrivelse af apparaTeT
3.1 Indpakningens indehold
3.2 Udstyrets vigtigste dele
Tilbehør
1 x SleepStyle™ 600 CPAP Serien
NETLEDNING
og STIK
THERMOSMART™ OPVARMET
PATIENTSLANGE
PORT MED MUFFE
THERMOSMART™ OPVARMET
PATIENTSLANGE PORT
VANDKAMMER
VANDOPFYLDNINGSNIVEAU
(vertikal)
FINGERBESKYTTLESE
VARMEPLADE
VANDOPFYLDNIGSNIVEAU
FILTERHOLDER
DISPLAY
LUFTFILTER
TÆND/SLUK KNAP
3.3 Tilbehør
HC365 Standard Fugterkammer
HC360* Extended Life Fugterkammer
900HC522 ThermoSmart™ opvarmet luftslange, der passer til
den koniske konnektor på 22 mm (0,86")
*Ikke tilgængelig i alle lande
900HC240 Filter (2-pakke)
900HC604 Rengøringskit HC600
900HC627 Bøjet Tragt 10 pakke
1 x Reserve Luftfilter
1 x Strømledning
2 x Vandkammer
1 x Tragt
1 x ThermoSmart™
Opvarmet
Patientslange
TRAGT
Dansk
Page 28

C - 4
3.4 ThermoSmart™ Teknologi
Dette apparat er designet for optimal komfort og det byder på ThermoSmart™, den unikke teknologi i den opvarmede patientslange.
Takket være ThermoSmart™ teknologien, leveres optimale (højere og brugervenlige) fugtighedsniveauer til patienten, uafhængig af den
omgivende temperatur.
Dette apparat kan justeres på to niveauer for at opnå optimal komfort:
ThermoSmart™ Fugtighedsindstilling: Denne indstilling regulerer temperaturen på varmepladen, og derigennem justeres
fugtighedsniveauet til patientens komfort. Der kan justeres mellem 1 og 4 med 0,5 spring. Apparatet er forindstillet på 2,5, som
passer de fleste patienter.
• Hvis De oplever tørhed eller synes at luften er for kold: øges indstillingen.
• Hvis De synes at der er for meget fugt i luftslangen eller hvis luften føles for varm: mindskes indstillingen.
• Hvis De ikke opnår optimal komfort med denne indstilling, kan videre justeringer foretages ved at ændre på ThermoSmart™
Klimaindstillingen.
ThermoSmart™ Klimaindstilling: Denne indstilling giver flere justeringsmuligheder ved at optimere den tilførte fugtighed. Der kan
justeres mellem 1 og 3 med 1 spring. Apparatet er forindstillet på 2, som passer de fleste patienter. Bemærk, hvis klimaindstillingen
justeres, tilbagestilles fugtighedsindstillingen til default indstillingen.
• ThermoSmart™ Klimaindstilling 3 anbefales ved oral tilførsel.
• Hvis De synes, at indstillingsområdet i ThermoSmart™ indstillingen for fugtigheden er for tørt eller for koldt: Forøg
ThermoSmart™ klimaindstillingen.
• Hvis De synes, at indstillingsområdet i ThermoSmart™ indstillingen for fugtigheden er for varmt eller for fugtigt: Reducér
ThermoSmart™ klimaindstillingen.
Det anbefales at holde luftslangen over dynen for at opnå den bedste befugtning. For at betjene ThermoSmart™ Komfort og
ThermoSmart™ Klimaindstillingerne, henvises til afsnit 8 “Styring og Display”.
4. TilsigTeT formål
Apparatet anvendes til at hjælpe patienten med at trække vejret under søvn, med det formål at behandle Obstruktiv Søvn Apnea (OSA).
Det gøres ved at levere Continuous Positive Airway Pressure (CPAP) (kontinuerligt positivt tryk på luftvejene) for at undgå spærring af
luftvejene. Tilføjelsen af opvarmet fugtning til apparatet afhjælper udtørringen og irritationen på patientens luftveje, som almindeligvis
opstår ved brug af et CPAP-system. Apparatet er tænkt til brug af voksne patienter i hjemmet eller i søvnlaboratoriet.
5. aDvarsler veD brUg af ilT
Hvis ilt er nødvendig, anbefales det, at supplerende ilt gives gennem masken. Se anvisninger, der er gældende for Deres masketype.
BEMÆRK:
• Ved et konstant flow af supplerende ilt vil den inhalerede koncentration af ilt variere, afhængigt af trykindstillingen, patientens
åndedrætsmønster, valget af maske og udsivningshastigheden.
Læs iltadvarslerne i afsnit 2, før der bruges ilt med apparatet.
Page 29
C - 5
6. rengøring & veDligeholDelse
BEMÆRK VENLIGST: Apparatet bør gøres rent som angivet.
1. Sluk apparatet, og træk stikket ud af stikkontakten. Afvent, at vandet køler af, fjern derefter kammeret.
2. Tør apparatet af udenpå med en ren, fugtig (ikke våd) klud og et mildt opvaskemiddel. Skrappe skuremidler eller opløsningsmidler
må ikke bruges, da disse kan skade apparatet.
3. DAGLIGT
Rengør kammeret, den opvarmede patientslange og porten til den opvarmede patientslange.
• Tag den opvarmede patientslange af apparatet ved at trække muffen op for at løsne forbindelsesstykket. Derefter kan det tages af.
• Vask den opvarmede patientslange i sæbevand, skyl den og hæng den til tørre med enderne ned
til gulvet.
• Fjern kammeret ved at trykke fingerværnet ned og trække kamret ud.
• Hæld det resterende vand ud.
• Standard (HC365) kamre renses og vaskes i sæbevand og skylles og tørres.
• Extended life (HC360) kamre skilles ad, inden de rengøres. Tryk basen fra kamrets top som vist
på Fig. 1. Sørg for, at den runde tætning ikke sidder løs eller er beskadiget. Kamrets top samt
base vaskes med et mildt opvaskemiddel. De skylles grundigt og tørres. Dette kammer kan også
rengøres i en opvaskemaskine til husholdninger.
• Tør grundigt indersiden af porten på den opvarmede patientslange med en ren, fugtig, støvfri klud.
4. UGENTLIGT
Gør kammeret grundigt rent.
• Sæt indersiden af kamret i blød i 10 minutter i en opløsning af en del hvid eddike til fem dele vand,
og skyl det grundigt i destilleret vand.
5. VEDLIGEHOLDELSE
• Udskift luftfiltret når det er betydeligt affarvet, mindst hver tredje måned eller efter 1000 timers drift. Det gøres ved at fjerne
filteret fra apparatets bagside som vist i Fig. 2. Sørg for at den lodrette sorte linje på det nye filter peger mod apparatet og
begge placeres tilbage på apparatet.
• Kamret erstattes, hvis det er revnet, affarvet eller kradset.
• Den opvarmede patientslange erstattes efter 4000 times brug eller en gang årligt. Når slangen er beskadiget, skal den erstattes
omgående.
7. insTallaTionsvejleDning
Når kammeret er installeret og fyldt med vand, er det vigtigt, at apparatet hele tiden
står opret, så at der ikke trænger vand ind i apparatets indre.
1. Fjern apparatet fra indpakningen.
2. Sæt apparatet på en lav hylde eller på gulvet ved siden af Deres seng. Enheden
skal stå et sted under hovedhøjde.
3. Vandkammeret tages ud af dets emballage.
4. De blå kapsler tages af og kasseres (Fig. 1).
5. Fyld vandkammeret med vand til vandopfyldningsniveauet (Fig. 2).
Kammeret må aldrig fyldes gennem porten til den opvarmede
patientslange. Når De flytter apparatet, sørg for at vandkammeret er tomt.
Maskinsvigt på grund af vandskade dækkes ikke af garantien.
6. For at fastgøre vandkammeret på apparatet, tryk fingerværnet ned og glid
kamret på (Fig. 3 og 4).
7. Når Kammeret er anbragt rigtigt, klikker fingerværnet på plads igen.
8. Den ene ende af den opvarmede patientslange har et plast forbindelsesstykke.
Løft muffen og glid forbindelsesstykket på apparatet. Træk muffen ned for at
lukke (Fig. 5, 6 og 7).
9. Forbind den anden ende af den opvarmede patientslange med masken.
10. Sæt stikket i stikkontakten.
11. Tænd for apparatet ved at trykke på Tænd/sluk knappen (Fig. 8). Den aktuelle
ThermoSmart™ fugtighedsindstilling vises.
12. For at ændre indstillingen henvises til afsnittet 8 “Styring og Display”.
Nu er Deres apparat klar til brug.
Fig. 2
Fig. 3
Fig. 4
Fig. 5
Fig. 6
Fig. 7
Fig. 8
Fig. 1
Fig. 1
Fig. 2
Dansk
Page 30

C - 6
Opvarmet patientslange*
For at ændre temperaturen: Tryk på for levering af varmere og fugtigere luft.
Tryk på for levering af køligere og mere tør luft.* Der henvises til afsnit 3.4
Højde
Vælg ”m” for meter eller ”ft” for fod ved brug af og tasterne
Højdeniveau indstilling
- Indstil højdeniveauet ved at trykke på og tangenterne
- Tryk for at forlade menuen
Aktuelt tryk (Viser aktuelt tryk)
- Hvis man ikke forlader menuen, tilbagestilles displayet til standardindstillingen
Tryk på knappen for at forlade menuen (findes kun i HC608)
8. sTyring og Display
Mode knappen
Gå mulighederne igennem
Ned knappen
Formindske indstillingen
Op knappen
Forøge indstillingen
Trappe knappen
Tænd/sluk
knappen
8.1 Beskrivelse Af Displayet Og Funftioner
KNAP FUNKTION & BESKRIVELSE DRIFT
FOR AT TÆNDE
Tryk kort på knappen
Som standard viser apparatet ThermoSmart™ fugtighedsindstillingen
FOR AT SLUKKE
Tag masken af
Tryk kort på knappen
FOR AT TÆNDE
Tryk på
(BEMÆRK: For at genindstille TRAPPE i en cyklus, skal apparatet først slukkes)
FOR AT SLUKKE
Tryk på
Tryk på og knapperne for at øge eller mindske indstillingerne
Tryk fortløbende for at gennemgå og se de forhåndenværende muligheder
<
<
PATIENT MENU DISPLAY DRIFT
For at se CPAP-indstillingerne, og
hvordan fugtigheden, kontroldata,
højden og trykket er indstillet
FOR AT SE PUNKTERNE
Tryk på tasten for at se respektive:
ThermoSmart™ Fugtighedsindstillingen (default display)
For at justere ThermoSmart™ Fugtighedsniveauet, hvilket reducerer bivirkningerne
til et minimum på de øvre luftveje, på grund af anvendelsen af CPAP.
Tryk på og knapperne for at øge eller mindske indstillingen
Totalt antal timer i drift: viser det totale antal timer som apparatet har
været tændt (timerne uden at masken blev brugt er indregnet)
Gennemsnitsantallet af kontroltimer per nat: viser gennemsnitstiden
apparatet har været i brug om natten med masken på
Kontrolsum: viser information til søvntekninker eller forhandleren til at
kontrollere compliance
Højdeindstilling: viser højdeindstillingen. Tryk eller for at ændre højde
Trykindstilling: viser trykindstillingen
cmH2O
hr
hr/
TÆND/SLUK
Tænder og slukker for apparatet
TRAPPE
Reducerer trykket til et lavere niveau
for at hjælpe Dem med at falde i søvn.
Trykket kommer gradvist op på det
fulde arbejdstryk i løbet af 20 minutter
FORØGE/FORMINDSKE
Juster indstillingerne op eller nedad
FUNKTION
For at gå mulighederne igennem
PATIENT MENU - Yderligere Indstillinger DISPLAY DRIFT
For at få adgang til yderligere
indstillinger:
Fra Default indstillingen
”THERMOSMART™
FUGTIGHED”
Tryk på tasten i 3 sekunder
3000
cmH2O
Advarsel: Hvis man undlader at vælge det rigtige højdeniveau (for hvilket som helst sted), har det en ugunstig effekt på trykleveringen.
* Når der ændres på Thermosmart™ Klimaindstillingen, stilles Fugtighedsindstillingen automatisk tilbage til default indstillingen 2.5.
Page 31

8.2 Patient Menu Oversigt
Forøge
Formindske
Tryk for at aktivere
Rampen
Tryk en gang for at
tænde/slukke apparatet
Display
FUNKTION
ThermoSmart
™
Fugtighedsindstilling
(standard indstilling)
Højde indstilling
Tryk
Indstilling
cmH2O
0,1,2,3,4
<
<
eller
KontrolsumTotal Løbetid
hr
Antal timer i
gen-nemsnit
per nat*
hr/
Gå tilbage
til standard
ThermoSmart™
Fugtighedsindstilling
(standardindstilling)
Tryk
Indstilling
cmH2O
KontrolsumTotal Løbetid
hr
Antal timer i
gen-nemsnit
per nat*
hr/
Gå tilbage
til standard
Model
HC604
Model
HC608
Model
HC604
Model
HC608
Gå tilbage
til standard
m
Forøge/Formindske
Højdeniveauet
Hold i 3 sekunder
ft eller
<
<
eller
<
<
eller
Vælg enheder
for højden
3000
<
<
eller
Forøge/Formindske
ThermoSmart™ Temperaturen
Gå tilbage
til standard
Hold i 3 sekunder
Aktuelt
tryk
cmH2O
Patient menu
yderligere indstillinger
Patient menu
yderligere indstillinger
Funktion
Advarsel: Hvis man undlader at vælge korrekt højdeindstilling (for det pågældende område) vil det have en ugunstig effekt på det leverede tryk.
C - 7
8.3 Patient Menu - Yderligere Indstillinger Oversigt
±
0,5 Increment
Dansk
Page 32

C - 8
9.
ofTe sTilleDe spørgsmål
Skal jeg bruge destilleret vand til apparatet?
Brug af destilleret vand forlænger levetiden af vandkammeret optimalt. Vand fra hanen indeholder tit mineraler der kan beskadige
kammeret, idet det forårsager huller i basen, selvom vandet filtreres.
Kan jeg anvende apparatet i andre lande?
Ja. De skal bare bruge det passende adapterstik og apparatet tilpasser sig automatisk til enhver strømforsyning.
Bemærk: Når De flytter på apparatet, sørg for at vandkammeret er tomt. Maskinsvigt på grund af vandskade dækkes ikke af
garantien.
Kan jeg bruge supplerende ilt med mit apparat?
Ja, ilt kan gives ved masken. Tænd for apparatet inden De tænder for ilten. Sørg for at der er slukket for iltkilden, inden De slukker
apparatet for at undgå at ilt ophober sig i maskinen.
Hvornår skal jeg udskifte vandkammeret?
Udskift vandkammeret når plastvæggene på kammeret har rifter eller affarvninger, eller hvis kammerbunden er hullet.
(Bemærk: Hvis kammeret er utæt, skal det udskiftes med det samme).
Kan jeg anvende mit apparat uden den opvarmede patientslange?
Ja, det er muligt, men De kommer ikke til at få den optimale fugtningsydelse, som apparatet byder på. I det
tilfælde viser apparatet ikke symbolet af den opvarmede patientslange, men i stedet vises følgende på displayet:
Hvad sker der med mit apparat under strømsvigt?
Fjern masken straks. Når strømforsyningen genetableres, genstarter apparatet i den samme driftstilstand med de samme indstillinger
som inden strømsvigtet. Se afsnit 2 for mere information.
10. DrifTsvilkår
OMGIVELSESTEMPERATUR: 5 - 35 ºC
FUGTIGHED: 10 - 95 % relativ fugtighed
HØJDE: 0 - 3000 m (0 - 9000 ft)
Over 1500 m (4500 ft) bliver det maximale betjeningstryk reduceret.
11. opbevarings- og TransporTbeTingelser
Apparatet opbevares og transporteres ved en omgivelsestemperatur af: -10 til 60 °C.
12. fejlfinDer
Kontakt Deres læge, hvis De mener, at Deres apparat ikke fungerer korrekt. Forsøg ikke selv at reparere apparatet.
13. garanTi
De bedes venligst kontakte Deres Fisher & Paykel-leverandør vedrørende garanti.
14. borTskaffelse af apparaT og forbrUgsvarer
• Anvisninger for bortskaffelse af apparatet
Dette apparat indeholder elektronik. Det må ikke bortskaffes som almindeligt affald. Bortskaf det ifølge de lokale
bestemmelser for bortskaffelse af elektronisk udstyr.
• Anvisninger for bortskaffelse af forbrugsvarer
Masken, luftslangen og vandkammeret kommes i en skraldepose ved afslutningen af brugsperioden og smides ud
sammen med almindeligt affald.
Page 33

16. appenDix
Denne tabel viser de største forskelle mellem de enkelte apparater inden for SleepStyle™ 600 produktudbuddet.
MODEL
HC604
HC608
BEMÆRK:
●
Alle modeller er helt integreret med ThermoSmart
™
Teknologi.
●
Nogle modeller er ikke til salg i alle lande.
Monitorering af patientens
kompliance (LCD & Download)
✓
✓
Automatisk højdejustering /
lækage kompensation
-
✓
C - 9
Helt integreret CPAP med
opvarmet befugtning
✓
✓
Dansk
15.
proDUkT speCifikaTioner
DIMENSIONER: 273 mm x 170 mm x 175 mm
VÆGT: 2,1 kg, kun enhed
3,4 kg, indpakket i pose inkl. tilbehør
ELEKTRISKE DATA
Frekvens for strømforsyning: 50 - 60 Hz
Forsyningsspænding og -strøm: 100 - 115 V (1,5 A, maks. 1,7 A),
220 - 240 V (1,0 A, maks. 2,0 A)
Bemærk: Disse værdier repræsenterer
gennemsnitlig strøm.
Krav til DC til AC inverter: 115 V - 200 W/300 W strømstød
230 V - 300 W/500 W strømstød
Varmeplade: Maks. 85 W
Varmepladens temperatur: Maks. 65 °C
Opvarmet luftslange,
effektindstilling: Maks. 30 W
YDELSE
Trykområde: 4 til 20 cmH2O
Højdeområde: 0 til 3000 m
OVERENSSTEMMELSE MED STANDARDER:
Beregnet til at opfylde
kravene i: IEC 60601-1
UL60601-1
CSA C22.2/No. 601.1
AS3200.1.0
EN60601-1
ISO 17510-1
Apparatet er i overensstemmelse med IEC 60601-1-2-kravene til
elektromagnetisk kompatibilitet. Apparatet kan under visse forhold
påvirke eller være påvirket af nærtliggende udstyr pga. virkningen
af elektromagnetisk interferens. Skulle dette ske, skal De forsøge at
flytte enheden eller det udstyr, der forårsager interferens. Alternativt
kan der søges læge.
Opvarmningstid: 30 min
Tilført fugtighed: 30 mg/L*
Lufttemperatur: Maks. 37,15 ºC
*Målt ved 22 ºC omgivende temperatur: 10 cmH2O ved skrå strømning.
Maksimale flowhastigheder
CPAP-trykindstilling
(cmH2O) 4 8 12 16 20
Målt tryk ved
patientens forbindelses- 3 7 11 15 19
port (cmH2O)
Maksimal flowhastighed
(L/min) ved maskens 60 78 80 81 83
forbindelsesport
Statisk trykstabilitet (langsigtet)
-0,05 til 0,18 cmH2O trykforskel, målt ved maskens forbindelsesport,
ved en trykindstilling på 10 cmH2O
Dynamisk trykstabilitet (kortsigtet)
CPAP-trykindstilling
(cmH2O) 4 8 12 16 20
Trykforskel
(cmH2O) ved maskens ,73 ,74 ,74 ,81 ,79
forbindelsesport
Page 34

Page 35

D - 1
Die SleepStyle™ 600 CPAP-Serie verfügt über
eine Warmluftbefeuchtung und einen beheizten
Beatmungsschlauch. Sie ist für die Benutzung
zuhause oder im Schlaflabor zur Behandlung der
obstruktiven Schlafapnoe vorgesehen.
Wenn Sie Fragen haben, wenden Sie sich bitte an
Ihren Fisher & Paykel Healthcare-Händler vor Ort
(Angaben siehe Rückseite).
Bewahren Sie diese Bedienungsanleitung bitte
gutauf.
inhalTsverzeiChnis
1. Symbolerklärungen .............................................................................................................................................................................. D - 2
2. Warnhinweise, Vorsichtshinweise und Kontraindikationen ............................................................................................................. D - 2
3. Beschreibung des Geräts .................................................................................................................................................................... D - 3
3.1 Inhalt der Verpackung .................................................................................................................................................................... D - 3
3.2 Wichtige Teile Ihres Geräts ........................................................................................................................................................... D - 3
3.3 Zubehör ........................................................................................................................................................................................... D - 3
3.4 ThermoSmart™ Technologie ........................................................................................................................................................ D - 4
4. Verwendungszweck .............................................................................................................................................................................. D - 4
5. Warnhinweise bei Verwendung von Sauerstoff ................................................................................................................................ D - 4
6. Reinigung und Wartung ...................................................................................................................................................................... D - 5
7. Aufbauanweisungen ............................................................................................................................................................................. D - 5
8. Bedienungstasten und Anzeige ......................................................................................................................................................... D - 6
8.1 Anzeige: Beschreibung und Funktion ......................................................................................................................................... D - 6
8.2 Patientenmenü – Zusammenfassung .......................................................................................................................................... D - 7
8.3 Patientenmenü – Zusätzliche Einstellungen ............................................................................................................................... D - 7
9. Häufig gestellte Fragen ....................................................................................................................................................................... D - 8
10. Betriebsbedingungen .......................................................................................................................................................................... D - 8
11. Lagerungs- und Transporttemperaturen ........................................................................................................................................... D - 8
12. Fehlersuche ........................................................................................................................................................................................... D - 8
13. Garantie ................................................................................................................................................................................................. D - 8
14. Entsorgung von Gerät und Zubehör ............................................................................................................................................... D - 8
15. Technische Daten ................................................................................................................................................................................. D - 9
16. Anhang ................................................................................................................................................................................................... D - 9
LESEN SIE BITTE VOR DEM ERSTMALIGEN GEBRAUCH ALLE ANWEISUNGEN
Hinweis: Nach US-Bundesrecht darf dieses Gerät nur von Ärzten oder auf ärztliche Verordnung verkauft werden.
Deutsch
Page 36

D - 2
1. symbolerklärUngen
Anwendungsteil
vom Typ BF
Wechselstrom
Spritzwassergeschützt
93/42/EWG
Klasse IIb
Klasse ll
Doppelt isoliert
Strom
Hauptschalter
ACHTUNG:
Bitte lesen Sie
die beiliegenden
Unterlagen
2. WarnhinWeise, vorsiChtshinWeise und kontraindikationen
ANMERKUNGEN
• In dieser Gebrauchsanleitung wird die CPAP-Modellserie
SleepStyle™ 600 als „das Gerät“ bezeichnet.
• Wenn ein Arzt die CPAP-Verwendung verordnet, sollten Sie das Gerät
stets während des Schlafs einsetzen. Sollte Ihr Gerät aus irgendeinem
Grund nicht mehr funktionieren, informieren Sie sofort Ihren Arzt
oder Fachhändler.
• Der Verwender dieses Systems allein ist für jede Schädigung von
Personen oder Schäden an Eigentum verantwortlich und haftbar,
die sich aus einem Betrieb des Geräts ergeben, der nicht der
mitgelieferten Betriebsanleitung entspricht.
• Das Gerät sollte nur mit Masken, Anschlüssen und Zufuhrschläuchen
gemäß ISO 17510-2 eingesetzt werden, die von Fisher & Paykel
Healthcare bzw. dem Arzt oder Fachhändler empfohlen werden.
• Das Gerät nicht benutzen, wenn die Raumtemperatur über
35 °C (95°F) liegt, da dies zu einer erhöhten Temperatur des
Luftstroms führen kann, wodurch u.U. eine Reizung der Atemwege
verursachtwird.
• Wenden Sie sich bitte für alle Reparatur- und Wartungsarbeiten an
Fisher & Paykel Healthcare.
WARNHINWEISE
Zur Vermeidung eines elektrischen Stromschlags durch Ihr
Gerät vermeiden Sie Folgendes:
• Betrieb des Geräts, wenn Netzkabel oder Stecker beschädigtsind;
• Betrieb des Geräts, wenn es in Wasser gefallen ist;
• Einstecken eines feuchten Netzsteckers in die Steckdose;
• Reinigen des Geräts, während es mit dem Stromnetz verbunden ist;
• Aufbewahren oder Benutzen des Geräts dort, wo es kippen,
fallen oder in Wasser gezogen werden kann. Wenn Wasser in das
geschlossene Gehäuse eingedrungen ist, nehmen Sie das Gerät
vom Netz und beenden Sie den Betrieb. Wenden Sie sich um Rat an
Fisher & Paykel Healthcare.
Um der Gefahr des Erstickens oder Inhalierens eines
Fremdkörpers vorzubeugen:
• Niemals ein Objekt in eine Schlauchöffnung geben;
• Dafür sorgen, dass beim Gebrauch des Geräts der Luftfilter richtig
eingepasst ist.
Um die optimale Therapie sicherzustellen, Folgendes
unterlassen:
• Betrieb des Geräts, wenn es heruntergefallen oder beschädigtist;
• Betrieb des Geräts, wenn es nicht ordnungsgemäß funktioniert;
• Einstellen des Drucks; der Druck darf nur von einem Arzt oder vom
Fachhändler eingestellt werden;
• Betrieb des Geräts, wenn der Schlauch beschädigt ist, d.h. Löcher,
Risse oder Knicke aufweist;
• Blockieren des Maskenausstroms;
• Verwendung der Maske, wenn das Gerät ausgeschaltet ist oder nicht
ordnungsgemäß funktioniert;
• Verwendung von Isolierhülsen oder ähnlichem Zubehör, das nicht
von Fisher & Paykel Healthcare zugelassen ist; dadurch kann die
Luftbefeuchtungsleistung beeinträchtigt werden;
• Versuch, den beheizten Beatmungsschlauch zu entfernen, ohne
zunächst die Hülse hochzuschieben; dadurch wird nämlich eine
Beschädigung der Anschlusses vermieden.
Um Verbrennungen/Verbrühungen zu vermeiden, nicht:
• Die Kammer mit kochendem Wasser füllen;
• Die frei liegende Heizplatte oder Kammerbasis berühren;
• Platzieren des Beatmungsschlauchs auf eine Weise, dass er längere
Zeit die Haut berührt.
Um ein Brandrisiko bei der Verwendung von Sauerstoff zu
vermeiden, sollten Sie Folgendes keinesfalls tun:
• Die Sauerstoffzufuhr starten, wenn das Gerät nicht in Betrieb ist; dies
kann zu einer Sauerstoffansammlung im Gerät führen;
• Das Gerät an einem Ort aufstellen, an dem die Luftzirkulation um das
Gerät behindert ist;
• Sauerstoff verwenden, während geraucht wird, oder bei offener
Flamme;
• Ein Material verwenden, das bei hoher Sauerstoffkonzentration an
der Luft leicht brennt bzw. leicht entzündlich ist;
• Nahe am Gerät eine Zündquelle haben. Um eine Zündung zu
vermeiden, ist unbedingt dafür zu sorgen, alle Zündquellen
außerhalb des Raums zu halten, in dem zusätzlicher Sauerstoff
verwendet wird;
• Sauerstoffregler, Zylinderventile, Schläuche, Adapter und sonstiges
Sauerstoffzubehör in der Nähe von Öl, Schmierstoffen oder fettigen
Substanzen aufbewahren; diese könnten sich spontan entzünden,
wenn sie mit unter Druck stehendem Sauerstoff in Berührung
kommen;
• Das Gerät ohne die Abdeckung über dem Adapter am seriellen Port
zu verwenden.
Sonstiges:
• Stellen Sie das Gerät auf einer Höhe unterhalb der Kopfhöhe auf,
um das Eindringen von Wasser in die Schläuche zu vermeiden.
Wenn Wasser in die Schläuche eindringt, lassen Sie überschüssiges
Kondenswasser abfließen. Wasser in den Schläuchen kann zur
Aspiration führen;
• Das Gerät ist für die Verwendung mit CPAP-Masken und -anschlüssen
vorgesehen, die Öffnungen für den Ausatmungsfluss besitzen, damit
ein kontinuierlicher Luftstrom aus der Maske heraus gewährleistet
ist. Wenn das Gerät eingeschaltet wird und ordnungsgemäß
funktioniert, spült neue Luft die ausgeatmete Luft durch diese
Ausatmungsöffnungen aus der Maske heraus. Bei niedrigen CPAPDrücken und im Falle eines Stromausfalls oder einer Gerätstörung
nehmen Sie sofort die Maske ab, da der Fluss durch die Maske
ungenügend sein kann, das ausgeatmete Gas ungenügend
hinausbefördert wird und es ggf. zur gefährlichen CO2-Rückatmung
kommen kann;
• Wenn nicht die korrekte Höhenlage (für ein bestimmtes
geografisches Gebiet) gewählt wird, hat dies einen nachteiligen
Effekt auf den zugeführten Druck.;;
• Das Gerät ist nicht als Lebenserhaltungssystem vorgesehen;
• Vermeiden Sie unnötiges Entfernen des Netzkabels von der
Geräterückseite. Falls eine Entfernung notwendig ist, halten Sie den
Anschlussstecker fest und entfernen Sie das Kabel. Vermeiden Sie es,
am Netzkabel zu ziehen (siehe Abschnitt3.2).
VORSICHT
Um Wasserschäden am Gerät zu vermeiden:
• Nehmen Sie die Befeuchterkammer vor dem Auffüllen aus dem
Gerät heraus;
• Gießen Sie das Wasser vor dem Transport des Geräts aus der
Kammer aus; falls Sie mit dem Gerät umgehen müssen, während
sich Wasser in der Kammer befindet, vermeiden Sie ein Kippen des
Geräts, um das Eindringen von Wasser in das geschlossene Gehäuse
zu vermeiden.
Sonstiges:
• Um Schaden an Ihrem PC zu vermeiden, betreiben Sie das Gerät
nur, wenn es über einen isolierten seriellen Adapter (900HC236) mit
einem PC verbunden ist;
• Um Atemwegsreizungen zu vermeiden, verwenden Sie das Gerät
nicht, wenn die Raumtemperatur 35 °C (95 °F) übersteigt.
KONTRAINDIKATIONEN
• Forschungsergebnissen zufolge stellen die folgenden
vorbestehenden Erkrankungen bei einigen Patienten möglicherweise
Kontraindikationen für den Einsatz des positiven Atemwegsdrucks
dar: Pneumothorax, bullöse Lungenerkrankung, Pneumozephalus,
Liquorverlust, kürzlich erfolgte Schädeloperation oder erfolgtes
Schädeltrauma, Anomalien der Siebbeinplatte sowie pathologisch
niedriger Blutdruck. Gleiches gilt für Patienten, deren obere
Atemwege umgangen werden.
VORSICHTSHINWEISE
• Sicherheit und Wirksamkeit einer Positivdrucktherapie bei Patienten
mit respiratorischer Insuffizienz oder COPD wurden bisher nicht
nachgewiesen.
UNERWÜNSCHTE WIRKUNGEN
• Bei der Positivdrucktherapie können Nasenbluten, Ohren- und
Nasenbeschwerden auftreten.
Sollten Sie Fragen zu Ihrer Therapie haben, setzen Sie sich bitte mit
Ihrem Arzt in Verbindung.
Page 37

D - 3
3. besChreibUng Des geräTs
3.1 Inhalt der Verpackung
3.2 Wichtige Teile Ihres Geräts
Zubehör
1 Gerät der SleepStyle™ 600 CPAP-Serie
THERMOSMART™ BEHEIZTER BEATMUNGSSCHLAUCH
VERBINDUNGSSTÜCK MIT HÜLLE
ANSCHLUSS FÜR THERMOSMART™
BEHEIZTEN BEATMUNGSSCHLAUCH
WASSERKAMMER
ABFÜLLMARKIERUNG (vertikal)
KAMMERSICHERUNG
HEIZPLATTE
WASSERSTANDMARKIERUNG
FILTERHALTER
ANZEIGE
LUFTFILTER
HAUPTSCHALTER
3.3 Zubehör
HC365 Standard-Befeuchterkammer
HC360* Dauer-Befeuchterkammer
900HC522 ThermoSmart™ beheizter Beatmungsschlauch
passend für konischen Anschluss 22 mm (0,86")
*nicht in allen Ländern erhältlich
900HC240 Filter (2 Stück)
900HC604 Auslassreinigungskit HC600
900HC627 Winkeltrichter, 10er-Packung
1 Ersatzluftfilter
1 Netzkabel
2 Wasserkammern
1 Wassertrichter
1 ThermoSmart™
Beheizter
Beatmungsschlauch
WASSERTRICHTER
Deutsch
NETZKABEL und
ANSCHLUSSSTECKER
Page 38

D - 4
3.4 ThermoSmart™ Technologie
Dieses CPAP-Gerät wurde für optimalen Komfort entwickelt und bietet ThermoSmart™, die einzigartige Technologie mit beheiztem
Beatmungsschlauch. ThermoSmart™ ermöglicht optimale (höhere und individuell angepasste) Atemluftbefeuchtung für Patienten,
unabhängig von der Raumtemperatur.
Das Gerät kann auf zwei Ebenen eingestellt werden, um optimalen Komfort zu erzielen:
ThermoSmart™ Feuchtigkeitseinstellung: Mit dieser Einstellung wird die Temperatur der Heizplatte reguliert, um die
Feuchtigkeitsmenge auf eine dem Patienten angenehme Menge einzustellen. Die Einstellung erfolgt in Schritten von 0,5 von 1 bis 4.
Das Gerät ist auf 2,5 voreingestellt, was für die meisten Patienten geeignet ist.
• Wenn Ihre Schleimhäute austrocknen oder Sie die Luft als zu kühl empfinden, erhöhen Sie die Einstellung.
• Wenn zu viel Feuchtigkeit im Schlauch ist oder wenn Sie die Luft als zu heiß empfinden, verringern Sie die Einstellung.
• Wenn Sie mit diesen Einstellungen keinen optimalen Komfort erzielen, ermöglicht die ThermoSmart™ Klimaeinstellung weitere
Anpassungen.
ThermoSmart™ Klimaeinstellung: Diese Einstellung bietet weiterer Anpassungsmöglichkeiten, mit denen sich die
Feuchtigkeitszufuhr optimieren lässt. Die Anpassung ist auf ganze Stufen von 1 bis 3 möglich. Das Gerät ist auf Stufe 2 voreingestellt,
was für die meisten Patienten geeignet ist. Es ist zu beachten, dass die Feuchtigkeitseinstellung nach Anpassung der Klimaeinstellung
auf die Standardeinstellung zurückgesetzt wird.
• Für die CPAP-Abgabe über eine Mundmaske wird die ThermoSmart™ Klimaeinstellung 3 empfohlen.
• Wenn Sie den Bereich der ThermoSmart™ Feuchtigkeitseinstellung als zu trocken oder zu kühl empfinden, erhöhen Sie die
ThermoSmart™ Klimaeinstellung.
• Wenn Sie den Bereich der ThermoSmart™ Feuchtigkeitseinstellung als zu warm oder zu feucht empfinden, verringern Sie die
ThermoSmart™ Klimaeinstellung.
Es wird empfohlen, den beheizten Beatmungsschlauch auf der Bettdecke zu belassen, um die beste Feuchtigkeitsleistung zu
gewährleisten. Die Regulierung der ThermoSmart™ Feuchtigkeits- bzw. Klimaeinstellung entnehmen Sie bitte Abschnitt 8: Bedienung
undDisplay.
4. verWenDUngszWeCk
Das Gerät wird bei der Behandlung von obstruktiver Schlafapnoe (OSA) zur Unterstützung der Patientenatmung im Schlaf eingesetzt.
Dabei wird kontinuierlich positiver Atemwegsdruck (CPAP) zugeführt, der eine Obstruktion der oberen Atemwege verhindern soll. Die
zusätzliche Warmluftbefeuchtung mildert die üblichen Nebenwirkungen der Behandlung mit einem CPAP-System, wie Trockenheit und
Reizungen der Atemwege des Patienten. Das Gerät ist für die Behandlung von erwachsenen Patienten zu Hause oder in der Schlafklinik
bestimmt. Bitte entnehmen Sie die Palette der HC600-Serie Geräte aus dem Anhang.
5. WarnhinWeise bei verWenDUng von saUersToff
Falls Sauerstoff benötigt wird, ist die ergänzende Zufuhr von Sauerstoff über die Maske zu empfehlen (siehe spezielle Anweisungen zu
Ihrem Maskentyp).
ANMERKUNG:
• Bei einer festen Flussrate von zusätzlichem Sauerstoff wird die inhalierte Sauerstoffmenge abhängig vom eingestellten Druck,
Atemmuster des Patienten, Maskenwahl und Leckagerate variieren.
Vor der Zufuhr von Sauerstoff mit dem Gerät lesen Sie bitte die Sauerstoffwarnhinweise in Abschnitt 2.
Page 39

D - 5
6. reinigUng UnD WarTUng
BITTE BEACHTEN: Das Gerät sollte nach Bedarf gereinigt werden.
1. Gerät ausschalten und Stecker von der Steckdose abziehen. Wasser abkühlen lassen, dann die Kammer entfernen.
2. Das Äußere des Geräts mit einem sauberen, feuchten (nicht nassen) Tuch und mildem Spülmittel reinigen. Benutzen Sie keine
scharfen Scheuer- oder Lösungsmittel, da diese das Gerät beschädigen können.
3. TÄGLICH
Reinigen Sie Kammer, Schlauch sowie Anschlussstück des beheizten Beatmungsschlauches.
• Nehmen Sie den Beatmungsschlauch vom Gerät ab, indem Sie die Hülle nach oben ziehen, um das Anschlussstück zu trennen.
Entfernen Sie dann das Anschlussstück.
• Spülen Sie den Schlauch mit Seifenlauge und anschließend mit klarem Wasser aus. Hängen Sie den
Schlauch mit den Schlauchenden nach unten zum Trocknen auf.
• Entfernen Sie die Kammer, indem Sie die Kammersicherung herunterdrücken und die Kammer
herausziehen.
• Gießen Sie etwaige Wasserrückstände aus.
• Waschen Sie die Standardkammer (HC365) mit Seifenwasser aus, spülen und trocknen Sie sie ab.
• Die Dauerbefeuchterkammer (HC360) muss vor der Reinigung auseinander genommen werden.
Schieben Sie die Basis von der Kammerhaube ab, wie in Abb. 1 dargestellt. Achten Sie darauf, dass
der Dichtungsring an der Basis nicht locker oder beschädigt ist. Waschen Sie Kammerhaube und –
boden mit mildem Spülmittel, spülen Sie gründlich nach und trocknen Sie sie ab. Diese Kammer ist
auch spülmaschinenfest.
• Wischen Sie den Anschluss des beheizten Beatmungsschlauches innen gründlich mit einem
feuchten, fusselfreien Tuch ab.
4. WÖCHENTLICH
Reinigen Sie die Wasserkammer gründlich.
• Desinfizieren Sie die Innenseite der Kammer 10 Minuten lang mit einer Lösung aus einem Teil klarem Essig und zwei Teilen
Wasser und spülen Sie gründlich mit destilliertem Wasser nach.
5. WARTUNG
• Wechseln Sie den Luftfilter aus, wenn er deutliche Verfärbungen aufweist, mindestens jedoch alle drei Monate oder nach
1000 Betriebsstunden. Dazu entfernen Sie den Filterhalter an der Rückseite des Geräts (Abb. 2). Achten Sie darauf, dass die
senkrechte schwarze Linie des neuen Filters zum Gerät zeigt und setzen Sie den Halter mit dem neuen Filter wieder am Gerät ein.
• Wechseln Sie die Kammer aus, wenn sie Risse, Verfärbungen oder Kratzer aufweist.
• Wechseln Sie den beheizten Beatmungsschlauch nach 4000 Betriebsstunden oder einmal im Jahr aus. Ein beschädigter Schlauch
ist unverzüglich zu ersetzen.
7. aUfbaUanWeisUngen
Wenn die Kammer eingesetzt und gefüllt ist, muss das Gerät stets aufrecht stehen,
damit kein Wasser in das Innere eindringen kann.
1. Packen Sie das Gerät aus.
2. Stellen Sie das Gerät auf einem niedrigen Regal oder auf dem Fußboden neben
Ihrem Bett auf. Das Gerät muss sich unterhalb Ihres Kopfes befinden.
3. Nehmen Sie die Wasserkammer aus der Verpackung.
4. Nehmen Sie die blauen Kappen ab und entsorgen Sie diese (Abb. 1).
5. Befüllen Sie die Kammer bis zur Markierungslinie mit destilliertem Wasser. (Abb. 2).
Füllen Sie die Kammer niemals durch den Anschlusseingang für den
beheizten Schlauch auf. Vor dem Umstellen Ihres Geräts leeren Sie die
Wasserkammer. Ein Geräteausfall aufgrund von Wasserschaden ist von der
Garantie ausgeschlossen.
6. Um die Wasserkammer am Gerät anzubringen, drücken Sie die
Kammersicherung herunter und schieben Sie die Kammer auf das Gerät
(Abb. 3 und 4).
7. Sitzt die Kammer richtig, rastet die Kammersicherung ein.
8. Das eine Ende des Schlauches hat einen grauen Kunststoffanschluss. Heben Sie
die Hülle an und schieben Sie das Anschlussstück auf das Gerät. Drücken Sie die
Hülle herunter, bis sie einrastet (Abb. 5, 6 und 7).
9. Schließen Sie das andere Ende des Schlauches an die Maske an.
10. Stecken Sie den Netzstecker des Geräts in eine Haushaltssteckdose.
11. Schalten Sie das Gerät ein, indem Sie den Hauptschalter drücken und halten
(Abb. 8). Die aktuelle ThermoSmart™ Feuchtigkeitseinstellung wird angezeigt.
12. Wenn Sie die Einstellung ändern möchten, lesen Sie bitte den Abschnitt 8
„Bedienungstasten und Anzeige”.
Das Gerät ist nun einsatzbereit.
Abb.2
Abb.3
Abb.4
Abb.5
Abb.6
Abb.7
Abb. 8
Abb.1
Abb.1
Abb.2
Deutsch
Page 40

D - 6
ThermoSmart™ Klimaeinstellung*
Drücken Sie auf für die Abgabe von wärmerer, feuchterer Luft oder auf
für die Abgabe von kühlerer, trockenerer Luft.* Siehe Abschnitt 3.4
Höheneinheit
Mit den Tasten oder „m“ für Meter oder „ft“ für Fuß wählen
Höheneinstellung
- Ändern Sie die Höheneinstellung durch Drücken von Taste und
- Drücken Sie Taste um das Menü zu beenden
Tatsächlicher Druckwert (zeigt den tatsächlichen Druckwert an)
- Das Display kehrt zur Standardanzeige zurück, wenn das Menü nicht beendet
wird. Drücken Sie auf Taste um das Menü zu beenden (nur bei HC608)
8. beDienUngsTasTen UnD anzeige
Modustaste
Führt durch die Menüoptionen
Abtaste
Verringern der Einstellung
Auftaste
Erhöhen der Einstellung
Rampenknopf
Hauptschalter
8.1 Anzeige: Beschreibung und Funktion
TASTE BESCHREIBUNG UND FUNKTION BETRIEB
ZUM EINSCHALTEN
Taste kurz niederhalten
Das Gerät zeigt die ThermoSmart™ Feuchtigkeitseinstellung (Standardeinstellung) an
ZUM AUSSCHALTEN
Nehmen Sie die Maske ab
Drücken Sie kurz auf Taste
ZUM EINSCHALTEN
Taste
(Anmerkung: Zur Rückstellung der Rampe während eines Zyklus ist das Gerät
zunächst auszuschalten)
ZUM AUSSCHALTEN
AN/AUS Taste
Um die Einstellung zu erhöhen bzw. zu verringern, die Tasten und bedienen
Bei wiederholtem Drücken erscheinen nacheinander die verfügbaren Optionen
<
<
PATIENTENMENÜ: ANZEIGE BETRIEB
Zur Ansicht der CPAP-Einstellungen
(Feuchtigkeit, Compliance-Daten, Höhe
und Druck)
ZUR ANSICHT
Taste drücken, um nacheinander folgende Werte abzurufen:
ThermoSmart™ Feuchtigkeitseinstellung (Standardeinstellung)
Zur ThermoSmart™ Feuchtigkeitseinstellung der Befeuchtung, so dass
Nebeneffekte der CPAP Therapie auf die oberen Atemwege minimiert werden.
Drücken Sie die Tasten und um die Einstellung zu verändern
Betriebszeit insgesamt: Zeigt die Gesamtanzahl der Stunden an, die das
Gerät eingeschaltet war (einschl. Stunden ohne Maskenbenutzung)
Durchschnittliche Anzahl der Compliance-Stunden pro Nacht:
Zeigt die durchschnittliche Anzahl der Stunden an, die das Gerät mit Maske
benutzt wurde
Prüfsumme: Zeigt Informationen für Arzt oder Fachhändler zum Prüfen der
Compliance-Daten an
Höheneinstellung: Zeigt die Höheneinstellung an. Drücken Sie Taste or
um das Höhenniveau zu ändern
Druckeinstellung: Zeigt die Druckeinstellung an
cmH2O
hr
hr/
AN / AUS
Ein- und Ausschalten des Geräts
RAMPE
Verringert den Druck auf eine
niedrigere Stufe, um das Einschlafen zu
erleichtern. Der Druck steigt im Laufe
von 20 Minuten allmählich wieder auf
den vollen Betriebswert an
AUF- / ABTASTE
Reguliert die Einstellung nach oben
oder unten
MODUS
Führt durch die verschiedenen
Parameter
PATIENTENMENÜ: Zusätzliche Einstellungen ANZEIGE BETRIEB
Für Zugriff auf zusätzliche Einstellungen:
Von der Standardeinstellung
„THERMOSMART™
FEUCHTIGKEITSEINSTELLUNG“
Taste 3 Sekunden drücken
3000
cmH2O
Warnhinweis: Wenn der richtige Höhenwert (für den jeweiligen Standort) nicht eingestellt wird, kann die Druckleistung beeinträchtigt werden
* Wenn die ThermoSmart™ Klimaeinstellung geändert wird, stellt sich die ThermoSmart™ Feuchtigkeitseinstellung wieder auf die werkseitige Einstellung von 2,5 zurück
Page 41

8.2 Patientenmenü – Zusammenfassung
Auf- /
Abtaste
Zum Aktivieren der
Rampe
Anzeige
Modus
Einmal drücken, um
das Gerät ein- oder
auszuschalten
ThermoSmart
™
Feuchtigkeitseinstellung
(Standardeinstellung)
Höheneinstellung
Druckeinstellung
cmH2O
0,1,2,3,4
<
<
oder
Prüfsumme
Betriebszeit
insgesamt
hr
Durchschnittliche
Anzahl der
Compliance-
Stunden pro
Nacht*
Zurück zur
Standardeinstellung
ThermoSmart
™
Feuchtigkeitseinstellung
(Standardeinstellung)
Druckeinstellung
cmH2O
Prüfsumme
Betriebszeit
insgesamt
hr
Durchschnittliche
Anzahl der
Compliance-
Stunden pro
Nacht*
Zurück zur
Standardeinstellung
Gerätetyp
HC604
Gerätetyp
HC608
Gerätetyp
HC604
Gerätetyp
HC608
Zurück zur
Standardeinstellung
oder
m
Erhöhen – Verringern
der Höheneinstellung
3 Sekunden drücken
ft
<
<
oder
<
<
oder
Höheneinheiten
auswählen
3000
<
<
oder
Erhöhen – Verringern
ThermoSmart™ Klimaeinstellung
Zurück zur
Standardeinstellung
3 Sekunden drücken
Anzeige des
tatsächlichen
Drucks
cmH2O
Erweitertes
Patientenmenü
Erweitertes
Patientenmenü
Mode
Warnhinweis: Wenn der richtige Höhenwert (für den jeweiligen Standort) nicht eingestellt wird, kann die Druckleistung beeinträchtigt werden.
D - 7
8.3 Patientenmenü – Zusätzliche Einstellungen
±
0,5 Erhöhung
Deutsch
Page 42

D - 8
9.
häUfig gesTellTe fragen
Muss ich bei meinem Gerät destilliertes Wasser verwenden?
Die Verwendung von destilliertem Wasser verlängert die Lebensdauer der Wasserkammer. Leitungswasser enthält oft Mineralien, die
Wasserkammer beschädigen können, so dass es zu Unebenheiten des Kammerbodens kommt, selbst wenn das Wasser gefiltert wird.
Kann ich mein Gerät in anderen Ländern verwenden?
Ja. – Verwenden Sie einfach einen Steckdosenadapter, und das Gerät passt sich automatisch jeder Netzspannung an.
Hinweis: Vor dem Umstellen des Geräts leeren Sie die Wasserkammer. Geräteausfall aufgrund eines Wasserschadens ist von der Garantie
ausgeschlossen.
Kann ich zusätzlichen Sauerstoff mit meinem Gerät verwenden?
Ja, Sauerstoff kann an der Maske zugeführt werden. Schalten Sie das Gerät vor der Sauerstoffzufuhr ein. Stellen Sie sicher, dass die
Sauerstoffzufuhr unterbrochen wird, bevor Sie das Gerät abschalten. So verhindern Sie ein Ansammeln von Sauerstoff im Gerät.
Wann muss ich die Wasserkammer auswechseln?
Wechseln Sie die Kammer aus, wenn die Kunststoffwände der Kammer Risse aufweisen oder sich verfärben bzw. wenn die Kammerbasis tiefe
Kratzer aufweist.
Hinweis: Wenn die Kammer undicht ist, muss sie umgehend ausgewechselt werden.
Kann ich das Gerät ohne beheizten Beatmungsschlauch verwenden?
Ja, aber in diesem Fall steht Ihnen die optimale Feuchtigkeitsleistung des Geräts nicht zur
Verfügung. Das Gerät zeigt in diesem Fall nicht das Symbol für den beheizten Schlauch an und sieht
folgendermaßen aus:
Was geschieht mit dem Gerät bei Stromausfall?
Sofort die Maske abnehmen. Bei Wiederherstellung der Stromversorgung startet das Gerät im selben Betriebsmodus mit denselben
Einstellungen wie vor dem Stromausfall. Zusätzliche Informationen finden Sie in Abschnitt 2.
10. beTriebsbeDingUngen
RAUMTEMPERATUR: 5 bis 35 ºC
LUFTFEUCHTIGKEIT: 10 - 95% relative Luftfeuchtigkeit (RH)
HÖHE: 0 bis 3000 m (0 - 9000 ft)
Bei einer Höhe von über 1500 m (4500 ft) wird der maximale Betriebsdruck reduziert.
11. lagerUngs- UnD TransporTTemperaTUren
Das Gerät muss bei Temperaturen von -10 bis 60 °C gelagert und transportiert werden.
12. fehlersUChe
Falls Sie den Eindruck haben, dass das Gerät nicht ordnungsgemäß funktioniert, wenden Sie sich an Ihren Arzt oder den Fachhändler.
Versuchen Sie nicht, das Gerät selbst zu reparieren.
13. garanTie
Bezüglich der Garantie wenden Sie sich bitte an den Fisher & Paykel Healthcare Fachhändler.
14. entsorgung von gerät und Zubehör
• Entsorgung des Geräts
Das Gerät enthält Elektronik. Bitte entsorgen Sie es nicht mit dem normalen Haushaltsmüll. Entsorgen Sie es gemäß
den geltenden Richtlinien für die Entsorgung von Elektronikgeräten.
• Entsorgung des Zubehörs
Packen Sie die Maske, den Schlauch und die Wasserkammer zur Entsorgung in eine Mülltüte und entsorgen Sie diese
mit dem Haushaltsmüll.
Page 43

16. anhang
Die folgende Tabelle führt die Hauptunterschiede der Produkte der SleepStyle™ 600-Serie auf.
GERÄTETYP
HC604
HC608
ANMERKUNG:
●
Alle Modelle enthalten vollintegrierte ThermoSmart
™
-Technologie.
●
Einige Modelle sind nicht in allen Ländern erhältlich.
Überwachung der Patienten-
Compliance (LCD & Download)
✓
✓
Automatische
Höheneinstellung/
Leckagenkompensation
-
✓
D - 9
Integriertes CPAP mit
beheizter Atemluftbefeuchtung
✓
✓
Deutsch
ABMESSUNGEN: 273 mm x 170 mm x 175 mm
(10,7” x 6,7” x 6,9”)
GEWICHT: 2,1 kg (4,6 lbs) nur Gerät
3,4 kg (7,5 lbs) komplett in der Tasche
inkl. Zubehör
STROMVERSORGUNG
Stromfrequenz: 50 - 60 Hz
Versorgungsspannung
und -strom: 100 - 115 V (1,5 A, max. 1,7 A),
220 - 240 V (1,0 A, max. 2,0 A)
Anmerkung: Diese Werte stellen den
Durchschnittsstrom dar.
Anforderungen an
DC-AC-Wechselrichter: 115 V - 200 W/300 W Überspannung
230 V - 300 W/500 W Überspannung
Heizplatte: max. 85 W
Heizplattentemperatur: max. 65 °C (149 °F)
Eingestellte Spannung für den
beheizten Beatmungsschlauch: max. 30 W
LEISTUNG
Druckbereich: 4 cmH2O bis 20 cmH2O
Bereich der Höhenlage-
Einstellungen: 0 m bis 3000 m oder 0 ft bis 9000 ft
EINGEHALTENE NORMEN:
Entwickelt zur Erfüllung der
Anforderungen dieser Normen: IEC 60601-1
UL60601-1
CSA C22.2/No. 601.1
AS3200.1.0
EN60601-1
ISO 17510-1
Das Gerät erfüllt die elektromagnetischen
Verträglichkeitsanforderungen der Norm IEC 60601-1-2. Unter
Umständen kann das Gerät aufgrund von elektromagnetischer
Beeinflussung Geräte in der näheren Umgebung stören oder
Störungen davon empfangen. In diesem Fall sollte das Gerät an
einen anderen Platz gestellt werden oder der Fachhändler um Rat
gefragt werden.
15.
TeChnisChe DaTen
Aufwärmzeit: 30 min
Zugeführte Feuchtigkeit: 30 mg/L*
Gastemperatur: max. 37,15 °C (98,97 °F)
* gemessen bei 22 °C Umgebungstemperatur: 10 cmH2O bei Bias-Flow.
Max. Flussraten
CPAP-Druck-
einstellung (cmH2O) 4 8 12 16 20
Gemessener Druck am
Patientenanschluss- 3 7 11 15 19
port (cmH2O)
Max. Flussrate
(L/min) am Masken- 60 78 80 81 83
anschlussport
Statische Druckstabilität (langfristig)
-0,05 cmH2O bis 0,18 cmH2O Druckunterschied, gemessen am
Maskenanschluss mit einer Druckeinstellung von 10 cmH2O
Dynamische Druckstabilität (kurzfristig)
CPAP-Druckeinstellung (cmH2O) 4 8 12 16 20
Druckdifferenz
(cmH2O) am Masken- 0,73 0,74 0,74 0,81 0,79
anschluss
Page 44

Page 45

E - 1
La serie SleepStyle™ 600 es una línea de CPAP
cuenta con humidificación calentada y un tubo
respiratorio calentado integrados. Ha sido diseñada
para ser utilizada en el laboratorio del sueño y en el
hogar, para el tratamiento de la Apnea Obstructiva
del Sueño.
Para más ayuda, póngase en contacto con la oficina
local de Fisher & Paykel Healthcare: las direcciones
se encuentran en la cubierta posterior.
Sírvase guardar este manual para futuras consultas.
ÍnDiCe De maTerias
1. Significado de los símbolos ................................................................................................................................................................. E - 2
2. Advertencias, precauciones y contraindicaciones ........................................................................................................................... E - 2
3. Descripción del aparato ....................................................................................................................................................................... E - 3
3.1 Contenido del paquete ................................................................................................................................................................. E - 3
3.2 Piezas importantes de su equipo ................................................................................................................................................. E - 3
3.3 Accesorios ........................................................................................................................................................................................ E - 3
3.4 Tecnología ThermoSmart™ ........................................................................................................................................................... E - 4
4. Uso para el que ha sido diseñado ..................................................................................................................................................... E - 4
5. Advertencias sobre el uso de oxígeno .............................................................................................................................................. E - 4
6. Limpieza y mantenimiento ................................................................................................................................................................... E - 5
7. Instrucciones de Operación ................................................................................................................................................................ E - 5
8. Controles y Pantalla .............................................................................................................................................................................. E - 6
8.1 Pantalla: descripción y funciones .................................................................................................................................................. E - 6
8.2 Resumen Menú Paciente .............................................................................................................................................................. E - 7
8.3 Resumen Menú Paciente: Ajustes adicionales ........................................................................................................................... E - 7
9. Preguntas más frecuentes ................................................................................................................................................................... E - 8
10. Condiciones de operación .................................................................................................................................................................. E - 8
11. Condiciones de almacenamiento y transporte ................................................................................................................................ E - 8
12. Solución de problemas ........................................................................................................................................................................ E - 8
13. Garantía ................................................................................................................................................................................................. E - 8
14. Instrucciones sobre como eliminar el dispositivo y los consumibles ........................................................................................ E - 8
15. Especificaciones del producto ............................................................................................................................................................ E - 9
16. Apéndice ............................................................................................................................................................................................... E - 9
POR FAVOR LEA TODAS LAS INSTRUCCIONES ANTES DE USAR POR PRIMERA VEZ
Español
Page 46

E - 2
1. DefiniCión De los sÍmbolos
Tipo BF
Pieza aplicada
Corriente alterna
A prueba de
salpicaduras
93/42/EEC
Clase IIb
Clase II Doble
aislamiento
Interruptor Encendido/
Apagado
ATENCION:
Consulte la
documentación
adjunta
2. advertenCias, preCauCiones y ContraindiCaCiones
NOTAS
• Este manual se refiere al modelo CPAP de la serie
SleepStyle™600 como “el dispositivo”.
• Si el médico de cabecera le prescribe el uso de un equipo
CPAP, debe usar el dispositivo siempre que duerma. En caso
de que el dispositivo deje de funcionar por cualquier razón,
póngase en contacto de inmediato con su proveedor de
cuidados de la salud.
• El usuario de este sistema será el único responsable de las
lesiones a personas o daños a la propiedad que se puedan
derivar de un uso del dispositivo que no se ajuste a las
instrucciones de operación que se proporcionan.
• El dispositivo sólo debe utilizarse con mascarillas, conectores
y tubos de suministro conformes con la norma ISO 17510-2
y recomendados por Fisher & Paykel Healthcare o por su
proveedor de cuidados de la salud.
• No utilice el dispositivo si la temperatura ambiente sobrepasa
los 35 °C, ya que, en tal caso, la temperatura del flujo de
aire podría ser excesiva y dar lugar a una irritación de las vías
respiratorias.
• Informe de todas las reparaciones y mantenimiento a
Fisher&Paykel Healthcare.
ADVERTENCIAS
Para prevenir descargas eléctricas causadas por el
dispositivo, evite:
• Utilizar el dispositivo si el cable eléctrico o el enchufe
estándañados.
• Utilizar el dispositivo si se ha caído al agua.
• Enchufar el dispositivo a la toma de corriente si está húmeda.
• Limpiar el dispositivo mientras esté conectado a la toma de
corriente.
• Guardar o utilizar el dispositivo donde se pueda volcar, tirar o
caer al agua. Si ha entrado agua en el interior del dispositivo,
desconecte el cable eléctrico y deje de utilizarlo. Consulte con
Fisher & Paykel Healthcare.
Para evitar atragantarse o inhalar un cuerpo extraño:
• No coloque objetos en ninguna apertura del tubo.
• Asegúrese de que el filtro de aire esté colocado en el
dispositivo cuando lo esté utilizando.
Para asegurar una terapia óptima, evite:
• Utilizar el dispositivo si se ha caído o está dañado.
• Utilizar el dispositivo si no funciona correctamente.
• Ajustar la presión: sólo puede ajustarla el personal sanitario.
• Utilizar el dispositivo si el tubo de respiración está dañado y
tiene orificios, desgarros o está retorcido.
• Bloquear el flujo de escape de la mascarilla.
• Usar la mascarilla si la unidad está apagada o no funciona
correctamente.
• Utiliza una manga aislante o cualquier accesorio similar
que no esté autorizado por Fisher & Paykel Healthcare.
Tales accesorios pueden afectar al funcionamiento de la
humidificación.
• Intentar retirar el tubo de respiración calentado sin presionar
antes la manga hacia arriba para evitar que se dañe el puerto
de conexión.
Para prevenir quemaduras, evite:
• Llenar la cámara con agua hirviendo.
• Tocar el plato calentador expuesto o la base de la cámara.
• Colocar el tubo de respiración de tal forma que entre en
contacto de forma prolongada con la piel.
Para prevenir el riesgo de incendio al utilizar oxígeno,
evite:
• Activar el flujo de oxígeno cuando el dispositivo no esté
funcionando: el oxígeno puede acumularse en el interior
deldispositivo.
• Situar el dispositivo en un lugar donde tenga poca ventilación.
• Utilizar el oxígeno si está fumando o cerca del fuego.
• Utilizar cualquier material que se inflame o encienda
fácilmente en concentraciones elevadas de oxígeno.
• Mantener cerca del producto cualquier fuente de ignición.
Para evitar la ignición, se recomienda mantener cualquier
fuente de ignición fuera de la habitación donde se utilice
oxígeno adicional.
• Utilizar el dispositivo sin la cubierta del adaptador de puerto
serial.
• Mantener los reguladores de oxígeno, válvulas de cilindro,
tubos, conexiones y cualquier otro equipamiento de oxígeno
cerca de aceites, grasa o substancias grasas. Si estas sustancias
entran en contacto con oxígeno bajo presión, pueden
ocasionar una ignición espontánea y violenta.
Otras:
• Coloque el dispositivo en una superficie que esté a un nivel
por debajo de la altura de la cabeza para evitar que el agua
entre en el tubo. Si el agua llega a entrar en el tubo, drene
el exceso de líquido. El agua presente en el tubo podría ser
aspirada.
• El dispositivo está diseñado para utilizarse con mascarillas y
conectores CPAP que tengan orificios de flujo de escape para
permitir el flujo continuo de aire fuera de la mascarilla. Cuando
el dispositivo está encendido y funcionando correctamente,
el aire nuevo elimina hacia fuera el aire exhalado a través de
los orificios del flujo de escape de la mascarilla. A presiones
CPAP bajas y en caso de fallos en el suministro eléctrico o mal
funcionamiento del equipo, retire la mascarilla de inmediato,
ya que el flujo de la mascarilla puede ser insuficiente para
eliminar todo el gas exhalado y la reinhalación del CO2 puede
llegar a ser peligrosa.
• Si no se selecciona el nivel de altitud correcto (en una
ubicación determinada) se producirá un efecto negativo en el
suministro de presión.
• Este dispositivo no está diseñado para el soporte vital.
• Evite retirar innecesariamente el cable eléctrico de la parte
posterior del dispositivo. Si fuera necesario retirarlo, sujete el
conector y retírelo. Evite tirar del cable eléctrico (consulte la
Sección 3.2).
PRECAUCIONES
Para evitar que el agua dañe el dispositivo:
• Extraiga la cámara de humidificación del dispositivo antes de
llenarla.
• Vacíe el agua de la cámara antes de transportar el dispositivo.
Si fuera necesario manipular el dispositivo con agua en la
cámara, evite inclinarlo, para que no entre agua en su interior.
Otras:
• Para evitar que se dañe su ordenador, utilice el dispositivo sólo
si está conectado al ordenador a través de un adaptador de
puerto serial aislado (900HC236).
• Para evitar la irritación de las vías respiratorias, no utilice el
dispositivo si la temperatura ambiente sobrepasa los 35 °C.
CONTRAINDICACIONES
• La investigación indica que las siguientes condiciones
preexistentes pueden contraindicar el uso de presión positiva
en algunos pacientes: neumotórax, enfermedad bulosa
pulmonar, neumoencéfalo, pérdida de líquido cerebroespinal,
cirugía o traumatismo craneal recientes, anormalidades de la
placa cribriforme, presión sanguínea patológicamente baja o
pacientes con desvío de las vías respiratorias superiores.
PRECAUCIONES
• No se ha establecido que la presión positiva sea segura y
eficaz para los pacientes con insuficiencia respiratoria o EPOC.
EFECTOS NEGATIVOS
• Debido al uso de la terapia de presión positiva, puede
aparecer hemorragia nasal, molestias en el oído y en el seno.
Póngase en contacto con su médico si tiene cualquier pregunta
sobre la terapia.
Page 47

E - 3
3. DesCripCión Del aparaTo
3.1 Contenido del paquete
3.2 Piezas importantes del equipo
Accesorios
1 x CPAP Serie SleepStyle™ 600
TUBO DE RESPIRACION CALENTADO
THERMOSMART
™
CONECTOR CON MANGA
PUERTO CONECTOR DE TUBO DE
RESPIRACION CALENTADO THERMOSMART
™
CÁMARA DE AGUA
NIVEL DE LLENADO DE
AGUA (vertical)
PROTECTOR DE LOS DEDOS
PLATO CALENTADOR
MARCA DEL NIVEL DE AGUA
PORTAFILTRO
PANTALLA
FILTRO DE AIRE
BOTÓN DE ENCENDIDO/
APAGADO
3.3 Accessorios
HC365 Cámara de humidificación estándar
HC360* Cámara de humidificación larga vida
900HC522 Tubo de respiración calentado ThermoSmart™
para conector cónico de 22 mm
*No disponible en todos los países
900HC240 Filtro (paquete de 2)
900HC604 Kit de limpieza de la salida HC600
900HC627 Paquete de 10 embudos de codo
1 x filtro de aire de repuesto
1 x cable eléctrico
2 x cámaras de agua
1 x embudo
1 x Tubo de
respiración
calentado
ThermoSmart
™
EMBUDO
Español
CABLE ELÉCTRICO
y CONECTOR
Page 48

E - 4
3.4 Tecnología ThermoSmart
™
Este equipo se ha diseñado para lograr mejor confort y ofrece la tecnología única ThermoSmart™ de tubo de respiración calentado.
La tecnología ThermoSmart™ permite el suministro de mejores niveles (más elevados y personalizados) de humedad para el paciente,
independientemente de la temperatura ambiente.
En este mecanismo se pueden ajustar dos niveles para lograr mejor confort:
Parámetro de humedad ThermoSmart™: este parámetro regula la temperatura del plato calentador, ajustando los niveles de
humedad para el confort del paciente. El ajuste se puede realizar de 1 a 4 con incrementos de 0,5 por vez. El dispositivo ha sido
configurado por defecto a 2,5 que es adecuado para la mayoría de los pacientes.
• Si siente sequedad o encuentra el aire muy frío: aumente el intervalo de posición.
• Si siente que hay mucha humedad en el tubo o el aire parece muy caliente: disminuya el intervalo de posición.
• Si no logra el confort óptimo con este parámetro, puede realizar más ajustes alterando el parámetro climático ThermoSmart™.
Parámetro climático ThermoSmart™: este parámetro proporciona más opciones de ajuste mediante la optimización de la
humedad suministrada. El ajuste se puede realizar de 1 a 3 con incrementos de 1. El dispositivo ha sido configurado por defecto en
2, que es adecuado para la mayoría de los pacientes. Tenga en cuenta que si ajusta el parámetro climático el parámetro de humedad
volverá al parámetro por defecto.
• Para suministro oral de CPAP le recomendamos que fije el nivel climático ThermoSmart™ en 3.
• Si siente que el intervalo de parámetros que ofrece el parámetro de humedad ThermoSmart™ es muy seco o muy frio: aumente
el intervalo de posición del parámetro de humedad ThermoSmart
™.
• Si siente que el intervalo de parámetros que ofrece el parámetro de humedad ThermoSmart™ es muy caliente o muy húmedo:
reduzca el intervalo de posición del parámetro de humedad ThermoSmart™.
Se recomienda mantener el tubo (de respiración calentada) por encima de la ropa de cama para mantener unas condiciones óptimas
de humidificación. Para operar los parámetros de humedad y climáticos ThermoSmart™ vea la sección 8 “Controles y Pantalla” de
estemanual.
4. Uso para el qUe ha siDo DiseñaDo
El equipo se utiliza para ayudar a respirar al paciente mientras duerme, para el tratamiento de la Apnea Obstructiva del Sueño (AOS).
Esto se consigue mediante el suministro de Presión Positiva y Continua a las Vías Respiratorias (CPAP) para evitar la obstrucción de las vías
respiratorias. El añadir humidificación respiratoria calentada al aparato alivia los efectos de sequedad e irritación de las vías respiratorias
del paciente que suelen derivarse del uso del sistema CPAP. El equipo es para ser utilizado por pacientes adultos en su domicilio o en el
laboratorio del sueño. Por favor vea la lista de Productos de la Serie SleepStyle™ 600, que se encuentra en el Apéndice de este manual.
5. aDverTenCias aCerCa Del Uso Con oxÍgeno
Si se requiere oxígeno, se recomienda administrar el oxígeno adicional por la mascarilla. Consulte las instrucciones específicas para
cada tipo de mascarilla.
NOTA:
• A una tasa fija de flujo de oxígeno adicional, la concentración de oxígeno inhalado variará, dependiendo de los parámetros de
presión fijados, el patrón respiratorio del paciente, la mascarilla seleccionada y la tasa de fugas.
Antes de utilizar oxígeno con el dispositivo, vea las advertencias relacionadas con el oxígeno en la Sección 2.
Page 49

E - 5
6. limpieza y manTenimienTo
ATENCION: hay que limpiar el equipo según sea necesario.
1. Apague el dispositivo y desenchúfelo de la toma de corriente. Espere hasta que el agua se haya enfriado y, a continuación, extraiga
la cámara.
2. Limpie la parte exterior del dispositivo con un trapo limpio húmedo (no mojado) y detergente suave. No use limpiadores abrasivos
odisolventes, ya que pueden dañar el dispositivo.
3. DIARIAMENTE
Limpie la cámara, el tubo calentado y el puerto de conexión del tubo calentado.
• Retire el tubo de respiración calentado del aparato tirando de la vaina protectora hacia arriba para desbloquear el conector.
Luego retire el conector.
• Enjuague el tubo de respiración calentado con agua y jabón y luego cuélguelo con sus extremos
apuntando hacia el suelo para secar.
• Retire la cámara presionando la protección de los dedos y sacando la cámara hacia arriba.
• Vierta y deseche el agua restante.
• Para cámaras estándar (HC365), lave con agua jabonosa, luego enjuague y seque.
• La cámara larga vida (HC360) requiere que se desmonte antes de lavarla. Empuje hacia afuera la
base de la parte superior de la cámara como se muestra en el Gráfico 1. Asegúrese de que el sello
redondo en la base no esté suelto o dañado. Lave la parte superior y la base de la cámara en un
detergente para lavar platos suave. Enjuague a fondo y deje secar. Esta cámara se puede limpiar
también en un lavavajillas doméstico.
• Limpie cuidadosamente el interior del puerto de conexión del tubo calentado con un trapo
húmedo limpio que deje poca pelusa.
4. SEMANALMENTE
Limpie a fondo la cámara de agua.
• Deje remojar durante 10 minutos el interior de la cámara en una solución de 1 parte de vinagre blanco en dos partes de agua y
enjuague bien con agua destilada.
5. MANTENIMIENTO
• Cambie el filtro de aire cuando haya perdido su color de forma considerable, al menos una vez cada 3 meses o tras 1000 de
horas de funcionamiento del aparato. Para hacer esto, extraiga el portafiltro de la parte posterior del equipo como se muestra
en el Gráfico 2. Asegúrese de que la línea negra vertical del nuevo filtro esté colocada mirando hacia el equipo, y vuelva a ajustar
ambos al equipo.
• Cambie la cámara si ésta está agrietada, ha perdido el color o se ha rayado.
• Cambie el tubo de respiración calentado después de 4000 horas de uso o una vez por año. Si el tubo está dañado hay que
cambiarlo inmediatamente.
7. insTrUCCiones De operaCión
Cuando la cámara esté instalada y llena, el equipo debe mantenerse en posición
vertical para que el agua no entre en su interior.
1. Retire el equipo de su embalaje.
2. Coloque del equipo sobre un estante bajo o en el suelo junto a la cama.
Launidad debe colocarse a un nivel inferior a la altura de su cabeza.
3. Retire la cámara de agua de su embalaje.
4. Retire los tapones azules y deséchelos (Gráfico 1).
5. Llenar la cámara hasta la línea de agua únicamente con agua destilada. (Gráfico 2).
No llene nunca la cámara a través del puerto conector del tubo calentado.
Cuando mueva su equipo, asegúrese de que la cámara de agua se encuentre
vacía. Los fallos de la máquina debidos a daños provocados por agua no
están cubiertos por la garantía.
6. Para fijar la cámara de agua al aparato, presione la protección de los dedos y
deslice la cámara (Gráficos 3 y 4).
7. Cuando la cámara esté correctamente colocada la protección para los dedos
volverá a su posición con un clic.
8. Uno de los extremos del tubo calentado tiene un conector plástico gris. Levante
la vaina y deslice el conector sobre el aparato. Empuje la vaina hacia abajo para
bloquear (Gráficos 5, 6 y 7).
9. Conecte el otro extremo del tubo calentado a la mascarilla.
10. Enchufe el cable eléctrico del equipo en un tomacorriente doméstico normal.
11. Encienda el equipo pulsando y manteniendo presionado el botón de
encendido/apagado (Gráfico 8). La pantalla indica el parámetro de humedad
ThermoSmart™.
12. Para cambiar el parámetro consulte la sección 8 “Controles y Pantalla”.
El equipo se encuentra ahora listo para el uso.
Gráfico 2
Gráfico 3
Gráfico 4
Gráfico 5
Gráfico 6
Gráfico 7
Gráfico 8
Gráfico 1
Gráfico 1
Gráfico 2
Español
Page 50

E - 6
Parámetro climático ThermoSmart™*
Para modificar la temperatura suministrada: presione para calentar más el suministro de
aire. Presione para hacer más frío y seco el suministro de aire.* Véase la sección 3.4
Unidad de altitud
Seleccione “m” de metros o “p” de pies utilizando las teclas y
Ajuste de altitud
- Ajustar el nivel de altitud presionando las teclas y
- Presione para salir del menú
Presión actual (Presenta la presión actual)
- La pantalla vuelve al parámetro por defecto si no se sale del menú. Presione
el botón para salir del menú (sólo disponible en HC608).
8. ConTroles y panTalla
Botón de modo
Avance las opciones
Botón de bajada
Disminuir ajuste
Botón de subida
Aumentar ajuste
Botón de
rampa
Botón de
Encendido/Apagado
8.1 Pantalla: descripción y funciones
BOTON DESCRIPCIÓN Y FUNCIÓN OPERACIÓN
PARA “ENCENDER”
Presionar el botón brevemente
El aparato presentará el parámetro de humedad ThermoSmart
™
PARA “APAGAR”
Retire la máscara
Presione brevemente el botón
PARA “ENCENDER”
Presionar el botón
(Nota: para reajustar el modo progresivo durante el ciclo, es necesario primero
apagar el equipo)
PARA “APAGAR”
Presione el botón
Utilizar el botón y para aumentar o bajar los ajustes
Pulse en secuencia para avanzar y ver las opciones disponibles
<
<
MENÚ PACIENTE PANTALLA OPERACIÓN
Para visualizar los parámetros de
CPAP, la humedad, los datos sobre el
cumplimiento, parámetros de altitud
y presión
PARA VISUALIZAR PUNTOS
Presionar la tecla para visualizar en secuencia:
Parámetro de humedad ThermoSmart™ (ajuste estándar)
Para cambiar los niveles de humedad ThermoSmart™ para minimizar los
efectos colaterales a las vías respiratorias superiores debido al uso de CPAP.
Presione los botones y para subir o bajar los parámetros
Tiempo total de funcionamiento: presenta el número total de horas que
el equipo estuvo encendido (incluso el número de horas en que la máscara no
ha sido utilizada)
Promedio de horas de uso por noche: presenta el número promedio de
horas en que el equipo ha sido utilizado con la máscara durante la noche
El total de control: presenta la información referente a la conformidad para
uso médico o para el distribuidor
Ajuste de altitud: presenta el ajuste de altitud. Presione o para
cambiar el nivel de altitud
Ajuste de la presión: presenta el ajuste de presión
cmH2O
hr
hr/
ENCENDIDO / APAGADO
Encendido y apagado del equipo
RAMPA
Reduce la presión a un nivel inferior
para ayudar al paciente a dormir.
La presión volverá gradualmente
a la presión de operación total en
20minutos
AUMENTAR / DISMINUIR
Para ajustar los niveles hacia arriba o
hacia abajo
MODO
Avance las opciones
MENÚ PACIENTE: Ajustes Adicionales PANTALLA OPERACIÓN
Para acceder a ajustes adicionales:
Desde el ajuste por defecto
“HUMEDAD
THERMOSMART™”
Presione la tecla durante
3segundos
3000
cmH2O
Atención: No eligir la altitud correcta (para una ubicación en particular) tendrá un efecto adverso en el suministro de presión.
* Cuando el parámetro climático ThermoSmart™ se modifica, el parámetro de humedad ThermoSmart™ volverá al parámetro por defecto 2,5.
Page 51

8.2 Resumen Menú Paciente
Aumentar
Disminuir
Presionar el botón para
activar rampa
Pantalla
Modo
Pulsar y mantener
presionado para encender/
apagar el aparato
Parámetro de humedad
ThermoSmart™
(por defecto)
Ajuste de
altitud
Ajuste de la
Presión
cmH2O
0,1,2,3,4
<
<
o
Total de
control*
Tiempo total de
funcionamiento
hr
Promedio de
horas de uso
por noche*
hr/
Volver a ajuste
por defecto
Parámetro de humedad
ThermoSmart™
(por defecto)
Ajuste de la
Presión
cmH2O
Total de
control*
Tiempo total de
funcionamiento
hr
Promedio de
horas de uso
por noche*
hr/
Volver a ajuste
por defecto
Modelo
HC604
Modelo
HC608
Modelo
HC604
Modelo
HC608
Volver a ajuste
por defecto
m
Fije la altitud
Presione durante 3 segundos
pies o
<
<
o
<
<
o
Seleccione
unidades de altitud
3000
<
<
o
Aumentar / disminuir parámetro
Climate ThermoSmart
™
Volver a ajuste
por defecto
Presione durante 3 segundos
Presión
actual
cmH2O
Menú paciente
avanzado
Menú paciente
avanzado
Modo
Atención: no eligir la altitud correcta (para una ubicación en particular) tendrá un efecto adverso en el suministro de presión.
E - 7
8.3 Resumen Menú Paciente: Ajustes adicionales
INCREMENTO ± 0,5
Español
Page 52

E - 8
9.
pregUnTas más freCUenTes
¿Es necesario usar agua destilada con el aparato?
El uso de agua destilada prolongará la vida útil de la cámara de agua. El agua del grifo a menudo contiene minerales que pueden
dañar la cámara picando la base, incluso cuando se filtre el agua.
¿Se puede utilizar el equipo en otros países?
Sí. Simplemente utilice el adaptador de enchufe eléctrico apropiado y el equipo se adaptará automáticamente a cualquier suministro
de voltaje.
Nota: Cuando mueva su equipo, asegúrese de que la cámara de agua se encuentre vacía. Las averías de la máquina debidas a daños
provocados por agua no están cubiertas por la garantía.
¿Se puede utilizar oxígeno complementario con el equipo?
Sí, se puede administrar oxígeno directamente a través de la mascarilla. Encienda el equipo antes de abrir el paso del oxígeno.
Asegúrese de que la fuente de oxígeno esté cerrada antes de apagar el equipo para evitar la acumulación de oxígeno en la
máquina.
¿Cuándo se debe cambiar la cámara de agua?
Cambie la cámara si las paredes de plástico de la cámara se agrietaran o perdieran color o si la base de la cámara se picara.
Nota: Si se advirtiera la más mínima fuga, la cámara deberá cambiarse inmediatamente.
¿Puedo utilizar mi equipo sin un tubo de respiración calentado?
Sí, si puede. No podrá obtener el rendimiento óptimo de humedad que el equipo ofrece.
El aparato no presentará entonces el símbolo de tubo de respiración calentado y no mostrará lo
siguiente en la pantalla:
¿Qué ocurre con el dispositivo si se produce un fallo en el suministro eléctrico?
Retire la mascarilla de inmediato. Al restablecerse el suministro eléctrico, el dispositivo se reiniciará en el mismo modo de
funcionamiento y con los mismos parámetros que antes del fallo de suministro eléctrico. Consulte la Sección 2 para obtener
información adicional.
10. ConDiCiones De operaCión
TEMPERATURA AMBIENTE: 5 °C a 35 °C (41 °F a 95 °F)
HUMEDAD: 10 a 95% de humedad relativa (HR)
ALTITUD: 0 - 3000 m (0 - 9000 pies)
A más de 1500 m (4500 pies) se reducirá el máximo de presión de funcionamiento.
11. ConDiCiones De almaCenamienTo y TransporTe
El equipo deberá almacenarse y transportarse en las siguientes condiciones ambientales: 14 a 140 °F (-10 a 60 °C).
12. solUCión De problemas
Si nota que el dispositivo no funciona correctamente, consulte a su proveedor de cuidados de la salud. No intente reparar el
dispositivo usted mismo.
13. garanTÍa
Por favor contacte a su proveedor de productos Fisher & Paykel Healthcare con relación a la garantía.
14. insTrUCCiones sobre Como eliminar el DisposiTivo y los ConsUmibles
• Instrucciones sobre cómo desechar la unidad
Esta unidad contiene componentes electrónicos. No desechar como basura común. Deseche el dispositivo de
acuerdo a las directivas locales para el desecho de componentes electrónicos.
• Instrucciones sobre cómo desechar los consumibles
Coloque la mascarilla, el tubo de respiración y la cámara de agua en una bolsa de basura al final de su vida útil
ytírelos con la basura normal.
Page 53

16. apénDiCe
El cuadro a continuación indica las principales diferencias en características entre los productos de la serie SleepStyle™ 600
MODELO
HC604
HC608
NOTE:
●
Todos los modelos están totalmente integrados con la Tecnología ThermoSmart
™
●
Algunos modelos no están disponibles en todos los países
Control de Cumplimiento
(Pantalla y descarga)
✓
✓
Ajuste Automático de la
Altitud/Compensación de Fuga
-
✓
E - 9
CPAP Totalmente Integrado
Con Humidificación Calentada
✓
✓
Español
DIMENSIONES: 10,7” x 6,7” x 6,9”
(273 mm x 170 mm x 175 mm)
PESO: 4,6 lbs (2,1 kg) sólo unidad
7,5 lbs (3,4 kg) empaquetados en una
bolsa que incluye los accesorios
ESPECIFICACIONES ELÉCTRICAS
Frecuencia de alimentación: 50-60 Hz
Voltaje y corriente
de alimentación: 100 - 115 V (1,5 A, máx. 1,7 A),
220 - 240 V (1,0 A, máx. 2,0 A)
Nota: estos valores representan
lacorriente media.
Requisitos del convertidor
de corriente continua
a corriente alterna: 115 V - 200 W/300 W de potencia máxima
230 V - 300 W/500 W de potencia máxima
Plato calentador: max. 85 W
Temperatura del plato
calentador: máx. 149 °F (65 °C)
Tubo de respiración calentado
Parámetro de suministro
eléctrico: máx. 30 W
FUNCIONAMIENTO
Rango de presión: 4 a 20 cmH2O
Rango de altitud: 0 a 9000 pies, o 0 a 3000 m
CUMPLIMIENTO DE LOS ESTÁNDARES:
Diseñado conforme a
los siguientes requisitos: IEC 60601-1
UL60601-1
CSA C22.2/No. 601.1
AS3200.1.0
EN60601-1
ISO 17510-1
El dispositivo cumple con los requisitos de compatibilidad
electromagnética de la norma IEC 60601-1-2. En ciertas
circunstancias, el dispositivo puede influir o puede recibir la influencia
de equipos cercanos, debido a los efectos de las interferencias
electromagnéticas. En este caso, mueva el dispositivo o la ubicación
del equipo que causa las interferencias o póngase en contacto con
su proveedor de cuidados de la salud.
15.
espeCifiCaCiones Del proDUCTo
Tiempo de calentamiento: 30 min
Humedad suministrada: 30 mg/L*
Temperatura del gas: Máx = 98,97 ºF (37,15 ºC)
*medida a 22 ºC de temperatura ambiente: 10 cmH2O a flujo
continuocontrolado.
Nivel máximo de flujo
Parámetro de
presión CPAP (cmH2O) 4 8 12 16 20
Presión medida en el
puerto de conexión 3 7 11 15 19
del paciente (cmH2O)
Nivel máximo de flujo
(L/min) en el puerto de 60 78 80 81 83
conexión de la mascarilla
Estabilidad de la presión estática (a largo plazo)
Diferencia de presión -0,05 a 0,18 cmH2O, medida en el puerto de
conexión de la mascarilla en el parámetro de presión de 10 cmH2O
Estabilidad de presión dinámica (a corto plazo)
Parámetro de
presión CPAP (cmH2O) 4 8 12 16 20
Diferencia de presión
(cmH2O) en el puerto de ,73 ,74 ,74 ,81 ,79
conexión de la mascarilla
Page 54

Page 55

F - 1
Les PPC SleepStyle™ 600 Series comportent un
humidificateur chauffant intégré muni d’un circuit
chauffant convenant aussi bien à une utilisation à
domicile que dans les laboratoires du sommeil,
pour le traitement du Syndrome d’Apnée du
Sommeil.
Pour plus d’informations, veuillez contacter votre
Bureau local F&P – voir coordonnées au verso.
Conserver ce manuel pour futures références.
Table Des maTières
1. Définitions des symboles ..................................................................................................................................................................... F - 2
2. Avertissements, précautions et contre-indications .......................................................................................................................... F - 2
3. Description de l’appareil ..................................................................................................................................................................... F - 3
3.1 Contenu de l’emballage ............................................................................................................................................................... F - 3
3.2 Eléments importants de l’appareil ............................................................................................................................................... F - 3
3.3 Accessoires ...................................................................................................................................................................................... F - 3
3.4 Technologie ThermoSmart™ ........................................................................................................................................................ F - 4
4. Utilisation recommandée .................................................................................................................................................................... F - 4
5. Précautions lors de l’utilisation d’oxygène ....................................................................................................................................... F - 4
6. Nettoyage et Entretien ........................................................................................................................................................................ F - 5
7. Instructions pour l’installation ............................................................................................................................................................. F - 5
8. Contrôles et Affichages ....................................................................................................................................................................... F - 6
8.1 Affichage de la Description et des Fonctions ............................................................................................................................ F - 6
8.2 Sommaire Menu Patient ................................................................................................................................................................ F - 7
8.3 Sommaire Menu Patient: Réglages Supplémentaires ............................................................................................................... F - 7
9. Questions fréquemment posées ........................................................................................................................................................ F - 8
10. Conditions de fonctionnement .......................................................................................................................................................... F - 8
11. Entreposage et transport .................................................................................................................................................................... F - 8
12. Dépannage ............................................................................................................................................................................................ F - 8
13. Garantie ................................................................................................................................................................................................. F - 8
14. Instructions pour la mise au rebut l’appareil et des consommables ........................................................................................ F - 8
15. Caractéristiques techniques ................................................................................................................................................................ F - 9
16. Appendice ............................................................................................................................................................................................. F - 9
VEUILLEZ LIRE LES INSTRUCTIONS DANS LEUR TOTALITE AVANT D’UTILISER VOTRE APPAREIL POUR LA PREMIERE FOIS
Français
Page 56

F - 2
1. DéfiniTion Des symboles
Type BF
Pièce utilisée
Courant alternatif
Anti-écoulement
93/42/EEC
Classe IIb
Class II
Double isolation
Alimentation électrique
On/Off
2. avertissements, préCautions et Contre-indiCations
REMARQUES
• Ce manuel concerne l’appareil SleepStyle™ série PPC 600,
désigné par « l’appareil ».
• Si un médecin vous a prescrit un traitement en PPC, vous
devez utiliser l’appareil chaque nuit. S’il s’arrête de fonctionner
pour une raison quelconque, contactez le prestataire de soins
immédiatement.
• L’utilisateur de cet appareil est seul responsable des lésions
corporelles ou dommages matériels résultant d’une utilisation du
dispositif non conforme aux instructions d’utilisation fournies.
• L’appareil doit être utilisé uniquement avec les masques
conformes à la norme ISO 17510-2, les tuyaux et les tubulures
recommandés par Fisher & Paykel Healthcare, ou par le prestataire
de soins.
• Ne pas utiliser l’appareil lorsque la température ambiante dépasse
les 35 °C (95 °F), cela pourrait augmenter la température de l’air et
entrainer une irritation des voies respiratoires.
• Pour les réparations et l’entretien, consulter Fisher & Paykel
Healthcare.
AVERTISSEMENTS
Pour éviter un choc électrique provenant de l’appareil, ne pas :
• Faire fonctionner l’appareil si la prise ou le cordon d’alimentation
est endommagé.
• Faire fonctionner l’appareil s’il a été mis dans de l’eau.
• Brancher l’appareil sur la prise d’alimentation s’il est mouillé.
• Nettoyer l’appareil lorsqu’il est branché à la prise d’alimentation.
• Stocker ou utiliser l’appareil dans un endroit où il peut basculer,
tomber ou tomber dans l’eau. Si de l’eau a pénétré dans
l’appareil, débrancher le cordon d’alimentation et arrêter de
l’utiliser. Demander conseil à Fisher & Paykel Healthcare.
Pour éviter de suffoquer ou d’inhaler un corps étranger :
• Ne jamais placer d’objet dans les orifices du tube.
• S’assurer que le filtre à air est en place lors de l’utilisation
l’appareil.
Pour assurer un traitement optimal, ne pas :
• Faire fonctionner le dispositif s’il est tombé ou s’il est
endommagé.
• Utiliser le dispositif s’il ne fonctionne pas correctement.
• Ajuster la pression. La pression doit être ajustée uniquement par
un prestataire de soins.
• Faire fonctionner l’appareil si le circuit respiratoire a été
endommagé, et comporte des trous, des déchirures ou s’il a
étéplié.
• Bloquer le débit de fuite du masque.
• Utiliser le masque si l’appareil est éteint ou ne fonctionne pas
correctement.
• Utiliser un manchon isolant ou tout autre accessoire similaire qui
ne sont pas approuvés par Fisher & Paykel Healthcare. Ils peuvent
affecter les performances d’humidification.
• Essayer d’enlever le circuit respiratoire chauffé sans tirer vers le
haut le manchon d’abord. Cela permettra d’éviter d’endommager
le raccord.
Pour éviter les brûlures, ne pas :
• Remplir la chambre avec de l’eau bouillante.
• Toucher la plaque chauffante ou la base de la chambre.
• Placer le circuit respiratoire de telle manière qu’il puisse entrer en
contact prolongé avec la peau.
Pour éviter les risques d’incendie lors de l’utilisation d’oxygène,
ne pas :
• Ouvrir l’alimentation d’oxygène lorsque l’appareil n’est pas en
fonctionnement; cela peut conduire à une accumulation d’oxygène
dans l’appareil.
• Mettre l’appareil à un endroit où la circulation d’air autour de
l’appareil est limitée.
• Utiliser l’oxygène lorsqu’une personne fume ou en présence d’une
flamme nue.
• Utiliser des matériaux qui brûlent dans l’air ou qui s’enflamment
facilement en présence d’une forte concentration d’oxygène.
• Mettre l’appareil à côté d’une source d’embrasement. Pour éviter
l’embrasement, il est préférable d’éloigner toutes les sources
d’embrasement de la pièce où l’alimentation d’oxygène est
utilisée.
• Entreposer des détendeurs, robinets, circuits, raccords et autre
équipement d’alimentation en oxygène près d’huile, de graisse
ou d’autres substances graisseuses. Un embrasement violent et
spontané peut se produire si ces substances entrent en contact
avec de l’oxygène sous pression.
• Faire fonctionner l’appareil sans le couvercle sur l’adaptateur de
port série.
Autre :
• Placer l’appareil sur une surface plane en dessous du niveau de
la tête, pour prévenir toute pénétration d’eau dans le tube. Si de
l’eau a pénétré dans le tube, enlever l’excès de condensation. De
l’eau dans le tube peut provoquer une aspiration.
• L’appareil est destiné à être utilisé avec des masques PPC et des
raccords qui ont des orifices de fuite pour permettre l’évacuation
continue de l’air hors du masque. Lorsque l’appareil est en marche
et fonctionne correctement, le débit d’air frais évacue l’air expiré
du masque par les orifices de fuite. À pression PPC faible et en
cas de panne de courant ou de dysfonctionnement de l’appareil,
retirer immédiatement le masque, puisque la circulation dans le
masque peut s’avérer insuffisante pour évacuer les gaz expirés, et
réinhaler du CO2 peut être dangereux.
• Un mauvais réglage du niveau d’altitude (quel que soit l’endroit)
aura un effet néfaste sur la pression délivrée.
• Cet appareil n’est pas destiné à la réanimation.
• Éviter de débrancher inutilement le cordon d’alimentation situé
à l’arrière de l’appareil. Si c’est nécessaire, tenir la prise pour
débrancher. Éviter de tirer sur le cordon d’alimentation (se reporter
au paragraphe 3.2).
PRÉCAUTIONS
Pour éviter que l’appareil ne soit endommagé par de l’eau :
• Retirer la chambre d’humification du dispositif avant remplissage.
• Vider l’eau de la chambre avant de transporter l’appareil. Si
l’appareil doit être manipulé avec de l’eau dans la chambre,
ne pas incliner l’appareil pour éviter que de l’eau ne pénètre à
l’intérieur.
Autre :
• Pour éviter d’endommager votre PC, ne faire fonctionner l’appareil
que s’il est connecté au PC avec un adaptateur de port série isolé
(900HC236).
• Pour éviter toute irritation des voies respiratoires, ne pas utiliser
l’appareil si la température ambiante dépasse 35° C (95 °F).
CONTRE-INDICATIONS
• Les recherches indiquent que l’utilisation de la pression positive
peut être déconseillée chez certains patients qui présentent
les conditions suivantes : pneumothorax, troubles pulmonaires
bulleux, pneumocéphalie, fuites de liquide céphalo-rachidien,
chirurgie ou traumatisme crâniens récents, anomalies de la lame
criblée, hypotension pathologique, ou patients dont les voies
respiratoires supérieures sont shuntées.
PRÉCAUTIONS
• L’innocuité et l’efficacité de la pression positive n’ont pas été
déterminées pour les patients présentant une insuffisance
respiratoire ou une BPCO.
EFFETS INDÉSIRABLES
• Des saignements de nez ou un inconfort des sinus ou des oreilles
peuvent survenir avec l’utilisation de la PPC.
En cas de questions sur le traitement, contacter le médecin.
ATTENTION
Consulter les
documents joints
Page 57

F - 3
3. DesCripTion De l’appareil
3.1 Contenu de l’emballage
3.2 Eléments importants de l’appareil
Accessoires
1 x SleepStyle™ 600 CPAP Series
THERMOSMART™ CIRCUIT CHAUFFANT
CONNECTEUR À MANCHON
PRISE DE CONNECTION DE THERMOSMART™
CIRCUIT CHAUFFANT
CHAMBRE
D’HUMIDIFCATION
NIVEAU DE REMPLISSAGE D’EAU (vertical)
DISPOSITIF PROTECTEUR
PLAQUE CHAUFFANTE
NIVEAU D’EAU
SUPPORT DE FILTRE
AFFICHAGE
FILTRE A AIR
INTERRUPTEUR
3.3 Accessoires
HC365 Chambre d’humidification standard
HC360* Chambre d’humidification à durée de vie prolongée
900HC522 Le circuit respiratoire chauffé ThermoSmart™
s’adapte à un raccord conique de 22 mm (0,86").
*Non disponible dans certains pays
900HC240 Filtre (x2)
900HC604 Kit de nettoyage de la prise de connexion
900HC627 Coude d’entonnoir (x10)
1 x Filtre à air de rechange
1 x Cordon
d’alimentation
2 x Chambre
d’humidification
1 x Entonnoir
1 x ThermoSmart™
Circuit Chauffant
ENTONNOIR
Français
CORDON D’ALIMENTATION
et RACCORD
Page 58

F - 4
3.4 Technologie ThermoSmart
™
Cet appareil comporte la technologie du circuit chauffant ThermoSmart™ conçu pour un confort patient optimal et une distribution
d’humidité optimale (plus élevée et personnalisée) indépendamment de la température ambiante.
Cet appareil peut être réglé à deux niveaux pour un confort optimal:
Paramètres d’Humidité ThermoSmart™ : ces paramètres contrôlent la température de la plaque chauffante en ajustant le degré
d’humidité pour le confort du patient. Il est possible d’ajuster la valeur de 1 à 4 par incréments de 0,5. L’appareil est programmé
à2,5ce qui est acceptable pour la plupart des patients.
• En cas de sensation de sècheresse ou de froideur, augmenter le réglage.
• À l’inverse diminuer si l’humidité est trop importante ou si l’air est trop chaud.
• Si le confort n’est pas optimal après avoir modifié ces paramètres, il est possible de modifier les valeurs de Conditions ambiantes
du ThermoSmart™.
Réglages climat ThermoSmart™ : ce réglage permet des possibilités d’adaptation supplémentaires en optimisant l’humidité
délivrée. Il est possible d’ajuster la valeur de 1 à 3 par incréments de 1. L’appareil est programmé à 2 ce qui est acceptable pour la
plupart des patients. Remarque : si les paramètres de conditions ambiantes sont modifiés, les paramètres d’humidité retournent
automatiquement à leur valeur par défaut.
• Il est recommandé de régler la valeur des Conditions ambiantes ThermoSmart™ à 3 pour les patients avec une interface buccale.
• Si vous trouvez que les variations offertes par le réglage d’humidité ThermoSmart™ produisent un air trop sec ou trop froid,
augmentez la valeur du réglage de condition ambiante.
• Si vous trouvez que les variations offertes par le réglage d’humidité ThermoSmart™ produisent un air trop chaud ou trop humide,
diminuez la valeur du réglage de condition ambiante.
Il est recommandé de placer le circuit chauffant au niveau de la tête de lit pour de meilleures performances d’humidification. Pour régler
l’Humidité et Conditions ambiantes ThermoSmart™, consulter la rubrique 8 «Contrôles et Affichage» de ce mode d’emploi.
4. Usage reCommanDé
L’appareil a pour objectif le traitement du syndrome des apnées du sommeil (SAS) et est particulièrement recommandé comme aide
respiratoire de patients endormis. La méthode consiste à délivrer une Pression Positive Continue (PPC) afin de prévenir l’obstruction des
voies respiratoires. L’adjonction d’un humidificateur respiratoire chauffant prévient les effets desséchants et irritants des voies respiratoires
couramment observés lors de l’utilisation d’appareils PPC. L’appareil est destiné aux adultes pour une utilisation à domicile ainsi qu’une
utilisation professionnelle dans les laboratoires du sommeil. Se référer à la liste des différents produits de la gamme du SleepStyle™ série
dans la section Appendice de ce manuel.
5. préCaUTions lors De l’UTilisaTion D’oxygène
Si de l’oxygène est nécessaire, il est recommandé que l’alimentation d’oxygène soit délivrée au masque. Consulter les instructions
spécifiques sur le genre de masque utilisé.
REMARQUE :
• Pour un débit d’oxygène fixe, la concentration d’oxygène inhalée varie en fonction des réglages de pression, du profil de
respiration du patient, du masque utilisé et du taux de fuite.
Avant d’utiliser l’oxygène avec l’appareil, se reporter aux avertissements du chapitre 2.
Page 59

F - 5
6. neTToyage & enTreTien
NOTER : l’appareil doit être nettoyé de la manière suivante.
1. Éteindre l’appareil et le débrancher de la prise de courant. Attendre que l’eau refroidisse, puis retirer la chambre.
2. Essuyer l’extérieur de l’appareil avec un linge propre et humide (sans être mouillé) et un détergent doux. N’utilisez pas de produits
abrasifs ou de solvants risquant d’endommager l’appareil.
3. JOURNALIER
Nettoyer la chambre, le circuit chauffant et le connecteur du circuit chauffant.
• Détacher le circuit de l’appareil en soulevant le manchon vers le haut pour débloquer le connecteur. Retirer ensuite le connecteur.
• Nettoyer le circuit chauffant à l’eau savonneuse. Rincer et suspendre le circuit en l’air en s’assurant
que ses extrémités pointent vers le bas afin qu’il sèche complètement.
• Retirer la chambre en poussant la protection vers le bas et faire sortir la chambre.
• Vider et jeter l’eau usagée.
• Nettoyer les chambres standard (HC365) à l’eau savonneuse, rincer et sécher.
• Les chambres à durée de vie prolongée (HC365) doivent être désassemblées avant nettoyage.
Pousser la base de la chambre comme indiqué sur la Figure 1. S’assurer que la jupe à la base n’est
pas lâche ou endommagée. Nettoyer le dessus et la base de la chambre avec un détergent doux.
Rincer soigneusement et sécher. Vous pouvez également nettoyer cette chambre dans un lave-
vaisselle domestique.
• Essuyer l’intérieur du connecteur du circuit chauffé à l’aide d’un chiffon légèrement humide, propre
et sans peluche.
4. HEBDOMADAIRE
Nettoyer la chambre.
• Nettoyer soigneusement la chambre en la faisant tremper 10 minutes dans une solution de vinaigre
blanc et d’eau (1 dose de vinaigre blanc pour 2 doses d’eau) et rincer soigneusement à l’eau distillée.
5. ENTRETIEN
• Replacer le filtre à air lorsqu’il se décolore de manière significative, au moins une fois tous les 3 mois ou après 1000 heures de
fonctionnement. Retirer tout d’abord le support de filtre à l’arrière de l’appareil comme indiqué sur la Figure 2. S’assurer que la
ligne noire verticale du nouveau filtre fait face à l’appareil et placer les deux dans l’appareil.
• Remplacer la chambre si elle est fissurée, décolorée ou rayée.
• Remplacer le circuit chauffant après 4000 heures d’utilisation ou une fois par an. Remplacer tout circuit endommagé
immédiatement.
7. insTrUCTions D’insTallaTion
Lorsque la chambre est mise en place et remplie, l’appareil doit rester à la verticale
pour éviter la pénétration d’eau.
1. Retirer l’appareil de son emballage.
2. Placer l’appareil sur une étagère basse ou par terre à côté de votre lit. Placer
l’appareil à une hauteur inférieure à celle de votre tête.
3. Retirer la chambre d’humidification de son emballage.
4. Retirer et jeter les capuchons bleus (Fig. 1).
5. Remplir la chambre jusqu’à la ligne de remplissage avec de l’eau distillée (Fig. 2).
Ne jamais remplir la chambre à travers la prise du connecteur du circuit
chauffant. Lors du transport de l’appareil, toujours s’assurer que la chambre
est vide. La garantie ne couvre pas les dommages occasionnés par l’eau.
6. Pour attacher la chambre d’humidification à l’appareil, appuyer sur la protection
et y glisser la chambre (Fig. 3) (Fig. 4).
7. Lorsque la chambre est placée correctement, la protection s’enclenche.
8. Une des extrémités du circuit chauffant possède un connecteur gris en plastic.
Soulever le manchon et glisser le connecteur sur l’appareil. Pousser le manchon
vers le bas pour le bloquer (Fig. 5, 6 et 7).
9. Connecter l’autre extrémité du circuit chauffant au masque.
10. Brancher l’appareil à la prise murale.
11. Allumer l’appareil à l’aide de l’interrupteur se trouvant sur le dessus de l’appareil
(Fig. 8). La valeur de ThermoSmart™ Humidité est affichée.
12. Pour modifier les paramètres, consulter le chapitre «Contrôles et Affichages».
Votre appareil est prêt à l’utilisation.
Fig. 2
Fig. 3
Fig. 4
Fig. 5
Fig. 6
Fig. 7
Fig. 8
Fig. 1
Fig. 1
Fig. 2
Français
Page 60

F - 6
ThermoSmart™ Climat*
Appuyer sur pour un air plus chaud et humide. Appuyer sur pour un air
plus froid et sec.* Se référer à la section 3.4
Altitude
Sélectionner «m» pour mètres ou «ft» pour pied à l’aide des
boutons ou .
Réglage de l’altitude
- Régler l’altitude à l’aide des boutons ou
- Appuyez sur pour sortir du menu
Pression délivrée (Affichage de la pression délivrée)
- L’affichage retourne aux paramètres par défaut si vous n’êtes pas sorti du
menu. Presser le bouton pour sortir du menu (disponible sur le HC608
seulement)
8. ConTrôles eT affiChage
Bouton mode
Naviguer entre les options
Bouton Bas
Diminue la valeur
Bouton Haut
Augmente la valeur
Bouton monté en pression progressive
Interrupteur On/Off
8.1 Affichages : Description et Fonction
BOUTON DESCRIPTION ET FONCTION FONCTIONNEMENT
METTRE EN MARCHE
Appuyer sur le bouton brièvement
L’appareil affiche la valeur de ThermoSmart™ Humidité par défaut
ETEINDRE L’APPAREIL
Retirer le masque
Appuyer sur le bouton brièvement
METTRE EN MARCHE
Appuyer sur le bouton du mode progressif
(A noter: pour réinitialiser le mode progressif lors d’un cycle, il est nécessaire
d’éteindre l’appareil préalablement)
ETEINDRE L’APPAREIL
Appuyer sur le bouton Marche/Arrêt
Utiliser le bouton et pour augmenter ou réduire le réglage
Appuyez séquentiellement pour visualiser les options disponibles
<
<
MENU PATIENT AFFICHAGE FONCTIONNEMENT
Visualisation des paramètres PPC
(humidité, données d’observance,
altitude et pression)
VISUALISER LES VALEURS
Appuyer sur le bouton pour visualiser séquentiellement:
La valeur d’humidité ThermoSmart™ (paramètres par défaut)
Pour minimiser les effets secondaires subis par les voies aériennes supérieures
provoqués par l’utilisation de PPC, ajuster l’humidité ThermoSmart™
Changer la température à l’aide des boutons et
Durée totale de fonctionnement : affiche la durée totale de
fonctionnement de l’appareil (comprenant la durée d’utilisation sans le
masque)
Durée d’observance moyenne par nuit : affiche la durée moyenne
d’utilisation avec un masque
Chiffre clé : affiche des informations de contrôle d’observance destinées au
praticien ou prestataire
Réglage d’altitude : displays altitude setting. affiche le réglage d’altitude.
Changer l’altitude à l’aide des boutons et
Réglage de la Pression: affiche le réglage de la pression
cmH2O
hr
hr/
MARCHE /ARRET
Mise en marche & arrêt
MODE PROGRESSIF
Réduction de pression pour favoriser
l’endormissement. Augmentation
progressive de la pression à la valeur
prescrite après 20 minutes
AUGMENTER / DIMINUER
Augmente ou diminue le réglage
MODE
Naviguer entre les options
Menu Patient : Réglages supplémentaires AFFICHAGE FONCTIONNEMENT
Pour accéder aux réglages
additionnels :
A partir de la valeur d’HUMIDITÉ
par défaut «THERMOSMART™»
Appuyer sur pendant
3 secondes
3000
cmH2O
Avertissement : si l’altitude n’est pas sélectionnée correctement (quel que soit le lieu) la pression délivrée pourra en être affectée.
* Lorsque que l’on modifie le réglage de conditions ambiantes ThermoSmart™, le réglage d’humidité ThermoSmart™ retourne à 2,5 par défaut.
Page 61

8.2 Sommaire Menu Patient
Augmenter
diminuer
Appuyer pour activer
le mode Rampe
Appuyer une fois
pour allumer/arrêter
l’appareil
Affichage
Mode
Humidité
ThermoSmart
™
(Réglage par défaut)
Ajuster
l’altitude
Pression
cmH2O
0,1,2,3,4
<
<
ou
Chiffre clé
Durée totale de
fonctionnement
hr
Durée moyenne
par nuit*
hr/
Retourner aux
valeurs par
défaut
Humidité
ThermoSmart
™
(Réglage par défaut)
Pression
cmH2O
Chiffre clé
Durée totale de
fonctionnement
hr
Durée moyenne
par nuit*
hr/
Retourner aux
valeurs par
défaut
*
Modèle
HC604
Modèle
HC608
Modèle
HC604
Modèle
HC608
Retourner aux
valeurs par
défaut
ou
m
Augmenter / diminuer
le niveau de l’altitude
appuyer pendant 3 secondes
ft
<
<
ou
<
<
ou
Sélectionner l’unité
d’altitude
3000
<
<
ou
Augmenter / diminuer Conditions
ambiantes ThermoSmart
™
Retourner aux
valeurs par
défaut
appuyer pendant 3 secondes
Pression
délivrée
cmH2O
Menu Patient
avancé
Menu Patient
avancé
Mode
Attention : Effectuer un mauvais réglage de l’altitude (quelque soit le lieu) peut engendrer des effets délétères sur la pression délivrée.
F - 7
8.3 Menu patient - Sommaire de paramètres Supplémentaires
±
0,5 Augmentation
Français
Page 62

9.
qUesTions fréqUemmenT posées
Dois-je utiliser de l’eau distillée avec mon appareil ?
L’utilisation d’eau distillée maximisera la durée de vie de la chambre d’humidification. L’eau du robinet, même filtrée, contient des minéraux pouvant
endommager la chambre d’humidification, formant un creux à la base de celle-ci.
Puis-je utiliser mon appareil dans d’autres pays ?
Oui. Utiliser simplement l’adaptateur électrique adéquat et l’appareil s’adaptera à n’importe quelle tension.
Remarque : Lorsque vous transportez l’appareil, assurez-vous que la chambre est vide. La garantie ne couvre pas les dommages occasionnés par l’eau.
Puis-je utiliser un supplément d’oxygène avec mon appareil ?
Oui, il est possible d’administrer de l’oxygène via le masque. Mettez l’appareil sous tension avant d’ouvrir l’oxygène. Vérifiez que la source d’oxygène
est fermée avant de mettre l’appareil hors tension afin d’éviter l’accumulation d’oxygène dans l’appareil.
A quel moment dois-je remplacer la chambre d’humidification ?
Remplacer la chambre si les parties en plastique se décolorent ou présentent des fissures, ou si la base de la chambre est abîmée.
Remarque : si la chambre fuit, remplacez-la immédiatement.
Puis-je utiliser mon appareil sans circuit chauffant ?
Oui c’est possible, mais vous ne bénéficierez pas des performances d’humidité optimales qu’offre l’appareil
L’appareil n’affichera pas le symbole du circuit chauffant mais affichera :
Que se passe t-il avec l’appareil en cas de panne de courant ?
Retirer le masque immédiatement. Après le retour du courant, l’appareil redémarrera avec le même mode de fonctionnement et avec les mêmes
réglages qu’avant la panne. Se reporter au chapitre 2 pour des informations supplémentaires.
10. ConDiTions De fonCTionnemenT
TEMPÉRATURE AMBIANTE : 5 à 35 ºC (41 à 95 ºF)
HUMIDITÉ : 10 à 95 % d’humidité relative (HR)
ALTITUDE : 0 à 3000 m (0 - 9000 pieds)
Au-dessus de 1500 m (4500 pieds) la pression maximale sera réduite.
11. ConDiTions De sToCkage eT De TransporT
L’appareil doit être entreposé et transporté à une température ambiante allant de -10 à 60 °C.
12. Dépannage
En cas de doute sur le fonctionnement de l’appareil, contacter votre prestataire de soins. Ne tentez pas de réparer vous-même
l’appareil.
13. garanTie
Veuillez contacter votre Prestataire de service Fisher & Paykel Healthcare.
14. insTrUCTions poUr la mise aU rebUT DU DisposiTif eT Des Consommables
• Instructions pour l’élimination du dispositif.
Ce dispositif contient des pièces électroniques. Ne pas le jeter avec les ordures ménagères. L’éliminer conformément
aux directives locales concernant l’élimination des déchets électroniques.
• Instructions pour l’élimination des consommables
Placer le masque, le circuit respiratoire et la chambre d’humidification dans un sac poubelle à la fin de l’utilisation,
etles jeter avec les ordures ménagères.
F - 8
Page 63

16. appenDiCe
Le tableau suivant énumère les principales différences de fonctionnalités des produits de la gamme SleepStyle™ 600.
MODÈLE
HC604
HC608
REMARQUES :
●
Tous les modèles sont équipés de la Technologie ThermoSmart
™.
●
Certains modèles ne sont pas en vente dans tous les pays.
Surveillance de l’Observance du Patient
(Affichage LCD & Téléchargement)
✓
✓
Ajustement Automatique de l’altitude.
Compensation Automatique des Fuites
-
✓
F - 9
PPC Avec Humidificateur
Intégré
✓
✓
Français
DIMENSIONS : 273 mm x 170 mm x 175 mm
(10,7” x 6,7” x 6,9”)
POIDS : 2,1 kg (4,6 lbs) appareil seul
3,4 kg (7,5 lbs) emballé dans un sac,
accessoires compris
CARACTÉRISTIQUES ÉLECTRIQUES :
Fréquence d’alimentation : de 50 à 60 Hz
Tension d’alimentation
et intensité : de 1,5 à 1,7 A ~ (100 à 115 V max),
de 1,0 à 2,0 A ~ (220 à 240 V max)
REMARQUE : ces valeurs représentent
l’intensité moyenne.
Critères de l’onduleur
CC en CA : Surtension 115 V - 200 W/300 W
Surtension 230 V - 300 W/500 W
Plaque chauffante : max. 85 W
Température de la plaque
chauffante : max. 65 °C (149 °F)
Réglage d’alimentation du
circuit respiratoire chauffé : max. 30 W
FONCTIONNEMENT
Plage de pression : 4 à 20 cmH2O
Plage d’altitude : De 0 à 3000 m (0 à 9000 pieds)
Débits maximum
Réglage de pression
de PPC (cmH2O) 4 8 12 16 20
Pression mesurée au
niveau du raccord 3 7 11 15 19
port (cmH2O)
Débit maximum
au raccord du masque 60 78 80 81 83
(L/min)
Stabilité de la pression statique (long terme)
Variation de pression de -0,05 à 0,18 cmH2O mesurée au raccord
dumasque, à un réglage de pression de 10 cmH2O
Stabilité de la pression dynamique (court terme)
Réglage de pression
de PPC (cmH2O) 4 8 12 16 20
Différence de pression
au raccord 0,73 0,74 0,74 0,81 0,79
du masque (cmH2O)
Délai de préchauffage : 30 min
Humidité délivrée : 30 mg/L*
Température du gaz : Max = 37,15 ºC (98,87 ºF)
*mesurée à une température ambiante de 22 °C : 10 cmH2O
à un débit continu.
CONFORMITÉ AUX NORMES :
Conçu pour être conforme aux
exigences des normes : IEC 60601-1
UL60601-1
CSA C22.2/No. 601.1
AS3200.1.0
EN60601-1
ISO 17510-1
L’appareil est conforme aux exigences de compatibilité
électromagnétique CEI 60601-1-2. Dans certains cas, l’appareil
peut affecter ou être affecté par d’autres équipements en raison
des interférences électromagnétiques. Si cela se produit, déplacer
l’appareil ou l’équipement causant l’interférence, ou bien consulter
votre prestataire de soins.
15.
CaraCTérisTiqUes TeChniqUes
Page 64

Page 65

G - 1
H Σειρά SleepStyle™ 600 Συνεχούς Θετικής Πίεσης
Αεραγωγών (CPAP) έχει ολοκληρωμένη θερμαινόμενη
ύγρανση και θερμαινόμενο αναπνευστικό αγωγό. Είναι
σχεδιασμένη για χρήση στο σπίτι ή σε εργαστήριο ύπνου,
για τη θεραπευτική αγωγή Αποφρακτικής Υπνικής Άπνοιας.
Για περαιτέρω βοήθεια, παρακαλείστε να επικοινωνείτε
με το τοπικό σας γραφείο Fisher and Paykel Healthcare –
δείτε το οπισθόφυλλο για λεπτομέρειες.
Παρακαλείστε να φυλάξετε αυτό το Εγχειρίδιο για
μελλοντική αναφορά.
Πίνακας Περιεχομένων
1. Ορισμοί Συμβόλων .................................................................................................................................................................................. G - 2
2. Προειδοποιήσεις, Συστάσεις και Αντενδείξεις ........................................................................................................................................... G - 2
3. Περιγραφή της Συσκευής ......................................................................................................................................................................... G - 3
3.1 Περιεχόμενα Πακέτου ........................................................................................................................................................................ G - 3
3.2 Σημαντικά Εξαρτήματα της Συσκευής ............................................................................................................................................... G - 3
3.3 Αξεσουάρ .......................................................................................................................................................................................... G - 3
3.4 Τεχνολογία ThermoSmart™ ................................................................................................................................................................ G - 4
4. Προοριζόμενη Χρήση .............................................................................................................................................................................. G - 4
5. Προειδοποιήσεις Χρήσης Οξυγόνου ........................................................................................................................................................ G - 4
6. Καθαρισμός και Συντήρηση ..................................................................................................................................................................... G - 5
7. Οδηγίες Συναρμολόγησης ....................................................................................................................................................................... G - 5
8. Σύστημα Ελέγχου και Οθόνη Ενδείξεων ................................................................................................................................................... G - 6
8.1 Χαρακτηριστικά και Λειτουργίες Οθόνης Ενδείξεων .......................................................................................................................... G - 6
8.2 Περίληψη Μενού Ασθενή .................................................................................................................................................................. G - 7
8.3 Μενού Ασθενή - Περίληψη Επιπρόσθετων Ρυθμίσεων ...................................................................................................................... G - 7
9. Απαντήσεις στις Συχνότερες Ερωτήσεις ................................................................................................................................................... G - 8
10. Συνθήκες λειτουργίας .............................................................................................................................................................................. G - 8
11. Συνθήκες Αποθήκευσης και Μεταφοράς ................................................................................................................................................. G - 8
12. Επίλυση Προβλημάτων ............................................................................................................................................................................ G - 8
13. Εγγύηση Κατασκευαστή ........................................................................................................................................................................... G - 8
14. Οδηγίες απόρριψης συσκευής και αναλώσιμων υλικών ........................................................................................................................... G - 8
15. Προδιαγραφές Προϊόντος ........................................................................................................................................................................ G - 9
16. Προσάρτημα ............................................................................................................................................................................................ G - 9
ΠΑΡΑΚΑΛΕΙΣΤΕ ΝΑ ΔΙΑΒΑΣΕΤΕ ΟΛΕΣ ΤΙΣ ΟΔΗΓΙΕΣ ΠΡΙΝ ΤΗΝ ΑΡΧΙΚΗ ΧΡΗΣΗ
Σύσταση: Ομοσπονδιακός Νόμος των ΗΠΑ περιορίζει αυτή τη συσκευή για πώληση από ιατρό ή με εντολή ιατρού.
ΣΕΙΡΑ
ΣΥΝΕΧΟΥΣ ΘΕΤΙΚΗΣ ΠΙΕΣΗΣ ΑΕΡΑΓΩΓΩΝ (CPAP)
Ελληνικά
Page 66

G - 2
1. Ορισμοί Συμβόλων
Εφαρμοσμένο
τμήμα τύπου BF
Εναλλασσόμενο
Ρεύμα
Προστασία από
Σταγόνες Νερού
93/42/EEC
Class IIb
Κατηγορία ll
Διπλή Μόνωση
Εκκίνηση/Διακοπή
2.
ΠροειδοΠοιήσεισ, συστάσεισ κάι άντενδειξεισ
ΣΗΜΕΙΩΣΕΙΣ
• Στο παρόν εγχειρίδιο, η μονάδα της σειράς συνεχούς θετικής πίεσης
αεραγωγών (CPAP) SleepStyle™ 600 αναφέρεται ως «η συσκευή».
• Εάν κατόπιν εντολής του ιατρού σας πρέπει να ακολουθήσετε θεραπεία
CPAP, τότε πρέπει να χρησιμοποιείτε τη συσκευή σας κάθε φορά που
κοιμάστε. Σε περίπτωση που η συσκευή σας σταματήσει να λειτουργεί για
οποιοδήποτε λόγο, επικοινωνήστε αμέσως με τον τοπικό αντιπρόσωπο.
• Ο χρήστης του συστήματος φέρει την αποκλειστική ευθύνη για
οποιοδήποτε τραυματισμό ατόμων ή φθορά ιδιοκτησίας που προκύπτει
από λειτουργία της συσκευής που δεν ακολουθεί τις οδηγίες λειτουργίας
που συνοδεύουν τη συσκευή.
• Η συσκευή πρέπει να χρησιμοποιείται μόνο με μάσκες, συνδέσμους
και σωλήνες παροχής αέρα που συμμορφώνονται με ISO 17510-2 και
συνιστώνται από τη Fisher & Paykel Healthcare ή τον πάροχο περίθαλψης
της υγείας.
• Μη χρησιμοποιείτε τη συσκευή όταν η θερμοκρασία δωματίου υπερβαίνει
τους 35 °C καθώς η θερμοκρασία της ροής του αέρα ενδέχεται να αυξηθεί,
γεγονός που μπορεί να προκαλέσει ερεθισμό των αεραγωγών.
• Αναφέρετε κάθε εργασία επισκευής και συντήρησης στη Fisher & Paykel
Healthcare.
ΠΡΟΕΙΔΟΠΟΙΗΣΕΙΣ
Για αποφυγή ηλεκτροπληξίας από τη χρήση της συσκευής:
• Μη χρησιμοποιείτε τη συσκευή εάν το καλώδιο τροφοδοσίας ή το βύσμα
έχουν φθαρεί.
• Μη χρησιμοποιείτε τη συσκευή εάν έχει πέσει σε νερό.
• Μην τοποθετείτε τη συσκευή στην πρίζα εάν είναι υγρή.
• Μην καθαρίζετε τη συσκευή ενώ είναι στην πρίζα.
• Μην αποθηκεύετε ή τοποθετείτε τη συσκευή σε σημείο όπου μπορεί
να γείρει, να πέσει σε νερό ή να τραβηχτεί και να πέσει σε νερό. Εάν
εισχωρήσει νερό εντός του περιβλήματος της μονάδας, αποσυνδέστε το
καλώδιο τροφοδοσίας και διακόψτε τη λειτουργία. Συμβουλευτείτε τη
Fisher & Paykel Healthcare.
Για αποφυγή πνιγμού ή εισπνοής ξένου σώματος:
• Μην τοποθετείτε ποτέ οποιοδήποτε αντικείμενο μέσα σε οποιοδήποτε
άνοιγμα του σωλήνα.
• Βεβαιωθείτε ότι το φίλτρο αέρα είναι καλά τοποθετημένο κατά τη χρήση
της συσκευής.
Για εξασφάλιση βέλτιστης θεραπείας:
• Μη χρησιμοποιείτε τη συσκευή σε περίπτωση που πέσει ή παρουσιάσει
φθορά.
• Μη χρησιμοποιείτε τη συσκευή εάν δεν λειτουργεί σωστά.
• Μη ρυθμίζετε την πίεση. Η πίεση πρέπει να ρυθμίζεται μόνο από
επαγγελματία περίθαλψης της υγείας.
• Μη χρησιμοποιείτε τη συσκευή εάν ο αναπνευστικός σωλήνας έχει φθαρεί,
τρυπήσει, σκιστεί ή στρεβλωθεί.
• Μη φράζετε τις οπές εξαγωγής της μάσκας.
• Μη χρησιμοποιείτε τη μάσκα εάν η μονάδα είναι απενεργοποιημένη ή δεν
λειτουργεί σωστά.
• Μη χρησιμοποιείτε μονωτικό περίβλημα ή οποιοδήποτε άλλο εξάρτημα
που δεν είναι εγκεκριμένο από τη Fisher & Paykel Healthcare. Κάτι τέτοιο
ενδέχεται να επηρεάσει την απόδοση της ύγρανσης.
• Μην προσπαθήσετε να αφαιρέσετε το θερμαινόμενο αναπνευστικό
σωλήνα χωρίς να σηκώσετε πρώτα το περίβλημα. Με αυτόν τον τρόπο θα
αποφευχθεί οποιαδήποτε φθορά στη θύρα σύνδεσης.
Για αποφυγή εγκαυμάτων:
• Μη γεμίζετε το θάλαμο με καυτό νερό.
• Μην αγγίζετε την εκτεθειμένη πλάκα του θερμαντήρα ή τη βάση του
θαλάμου.
• Τοποθετείτε τον αναπνευστικό σωλήνα κατά τέτοιο τρόπο, ώστε να μην
μπορεί να έρθει σε επαφή με το δέρμα για παρατεταμένο διάστημα.
Για αποφυγή του κινδύνου εκδήλωσης φωτιάς κατά τη χρήση
του οξυγόνου:
• Μην ενεργοποιείτε τη ροή του οξυγόνου όταν η συσκευή δεν λειτουργεί.
Κάτι τέτοιο μπορεί να προκαλέσει συσσώρευση οξυγόνου εντός της
συσκευής.
• Μην τοποθετείτε τη συσκευή σε θέση με περιορισμένο εξαερισμό γύρω
από τη συσκευή.
• Μη χρησιμοποιείτε οξυγόνο ενώ καπνίζετε ή με παρουσία ελεύθερης
φλόγας.
• Μη χρησιμοποιείτε οποιαδήποτε υλικά που καίγονται στον αέρα ή
αναφλέγονται εύκολα σε υψηλή συγκέντρωση οξυγόνου.
• Απομακρύνετε οποιαδήποτε πηγή ανάφλεξης που βρίσκεται κοντά στο
προϊόν. Για να αποφύγετε την ανάφλεξη, είναι προτιμότερο να διατηρείτε
όλες τις πηγές ανάφλεξης έξω από το δωμάτιο όπου χρησιμοποιείται
συμπληρωματικό οξυγόνο.
• Διατηρείτε ρυθμιστές οξυγόνου, βαλβίδες κυλίνδρων, σωληνώσεις,
συνδέσεις και όλο τον υπόλοιπο εξοπλισμό οξυγόνου μακριά από λάδι,
λιπαντική ουσία ή λιπαρές ουσίες. Αυτογενής και βίαιη ανάφλεξη ενδέχεται
να προκύψει εάν οι εν λόγω ουσίες έλθουν σε επαφή με οξυγόνο υπό
πίεση.
• Μη χειρίζεστε τη συσκευή χωρίς το κάλυμμα πάνω από τον προσαρμογέα
σειριακής θύρας.
Επιπλέον πληροφορίες:
• Τοποθετήστε την συσκευή σε μια επίπεδη επιφάνεια χαμηλότερα από το
ύψος του κεφαλιού για να αποφευχθεί η είσοδος νερού στον σωλήνα. Εάν
οποιαδήποτε ποσότητα νερού εισχωρήσει στο σωλήνα, αποστραγγίξτε
την πλεονάζουσα υγρασία. Το εναπομένον νερό στο σωλήνα ενδέχεται να
εισπνευστεί ακούσια.
• Η συσκευή προορίζεται για χρήση με μάσκες CPAP και συνδέσμους που
έχουν οπές εξαγωγής ώστε να επιτρέπουν τη συνεχόμενη εκροή αέρα
από τη μάσκα. Όταν η συσκευή ενεργοποιηθεί και λειτουργεί κανονικά,
ο νέος αέρας ωθεί τον εκπνεόμενο αέρα εκτός μάσκας μέσω των οπών
εξαγωγής. Σε χαμηλές πιέσεις CPAP και σε περίπτωση διακοπής ρεύματος
ή δυσλειτουργίας της μηχανής, αφαιρέστε τη μάσκα αμέσως, καθώς η ροή
μέσα στη μάσκα ενδέχεται να είναι ανεπαρκής για να ελευθερώσει όλα
τα εκπνεόμενα αέρια, γεγονός που δημιουργεί ενδεχόμενο επανεισπνοής
CO2, η οποία είναι επικίνδυνη.
• Η αποτυχία επιλογής του σωστού επιπέδου υψομέτρου (για οποιαδήποτε
δεδομένη τοποθεσία) θα έχει δυσμενή επίδραση στην παρεχόμενη πίεση.
• Η συσκευή δεν προορίζεται για υποστήριξη ζωτικών λειτουργιών.
• Μην αφαιρείτε ασκόπως το καλώδιο τροφοδοσίας από το πίσω μέρος
της συσκευής. Εάν, ωστόσο, είναι απαραίτητο να αφαιρέσετε το καλώδιο,
τότε κρατήστε το σύνδεσμο και αφαιρέστε. Μην τραβάτε το καλώδιο
τροφοδοσίας (ανατρέξτε στην Ενότητα 3.2).
ΣΥΣΤΑΣΕΙΣ
Για πρόληψη βλάβης της συσκευής από νερό:
• Αφαιρέστε το θάλαμο ύγρανσης από τη συσκευή πριν τον γεμίσετε.
• Αδειάστε το νερό από το θάλαμο πριν μεταφέρετε τη συσκευή. Εάν η
συσκευή πρέπει να μεταφερθεί με νερό εντός του θαλάμου, προσπαθήστε
να μη γέρνετε τη συσκευή έτσι ώστε το νερό να μην εισχωρήσει στο
περίβλημα.
Επιπλέον πληροφορίες:
• Για αποφυγή βλάβης στον Η/Υ σας, χρησιμοποιήστε τη συσκευή μόνο εάν
είναι συνδεδεμένη στον Η/Υ μέσω μονωμένου προσαρμογέα σειριακής
θύρας (900HC236).
• Για αποφυγή ερεθισμού των αεραγωγών, μη χρησιμοποιείτε τη συσκευή
όταν η θερμοκρασία δωματίου υπερβαίνει τους 35 °C.
ΑΝΤΕΝΔΕΙΞΕΙΣ
• Η έρευνα υποδεικνύει ότι οι ακόλουθες προϋπάρχουσες παθήσεις
ενδέχεται να αποτελούν αντενδείξεις για τη χρήση θετικής πίεσης
σε ορισμένους ασθενείς: πνευμονοθώρακας, πομφολυγώδης
πνευμονοπάθεια, πνευμοκέφαλος, διαρροή εγκεφαλονωτιαίου υγρού,
πρόσφατη κρανιακή χειρουργική επέμβαση ή τραύμα, ανωμαλίες του
τετρημένου πετάλου του ηθμοειδούς, παθολογικά χαμηλή πίεση αίματος,
ή σε ασθενείς όπου οι άνω αεραγωγοί έχουν παρακαμφθεί.
ΠΡΟΛΗΠΤΙΚΑ ΜΕΤΡΑ
• Η ασφάλεια και αποτελεσματικότητα της θετικής πίεσης δεν έχει
επαληθευτεί σε ασθενείς με αναπνευστική ανεπάρκεια ή χρόνια
αποφρακτική πνευμονοπάθεια.
ΑΝΕΠΙΘΥΜΗΤΕΣ ΕΝΕΡΓΕΙΕΣ
• Ενδέχεται να προκύψουν ρινικές αιμορραγίες και δυσφορία αυτιών και
ρινικού κόλπου από τη χρήση θεραπείας θετικής πίεσης.
Σε περίπτωση που έχετε οποιαδήποτε απορία σχετικά με τη θεραπεία σας,
επικοινωνήστε με το θεράποντα ιατρό σας.
ΠΡΟΣΟΧΗ
Συμβουλευθείτε
συνοδευτικά
έγγραφα
Page 67

G - 3
3. Περιγραφή της Συσκευής
3.1 Περιεχόμενα Πακέτου
3.2 Σημαντικά Εξαρτήματα της Συσκευής
Aξεσουάρ
1 x Σειρά SleepStyle™ 600 Συνεχούς Θετικής
Πίεσης Αεραγωγών (CPAP)
ΚΑΛΩΔΙΟ ΤΡΟΦΟΔΟΣΙΑΣ και
ΣΥΝΔΕΣΜΟΣ
ΘΕΡΜΑΙΝΟΜΕΝΟΣ ΑΝΑΠΝΕΥΣΤΙΚΟΣ ΑΓΩΓΟΣ
THERMOSMART™
ΕΞΑΡΤΗΜΑ ΣΥΝΔΕΣΗΣ ΜΕ ΧΙΤΩΝΙΟ
ΘΥΡΑ ΣΥΝΔΕΣΗΣ ΘΕΡΜΑΙΝΟΜΕΝΟΥ
ΑΝΑΠΝΕΥΣΤΙΚΟΥ ΑΓΩΓΟΥ THERMOSMART™
ΘΑΛΑΜΟΣ ΝΕΡΟΥ
ΓΡΑΜΜΗ ΠΛΗΡΩΣΗΣ ΝΕΡΟΥ (κάθετη)
ΠΡΟΦΥΛΑΚΤΗΡΑΣ ΔΑΚΤΥΛΩΝ
ΘΕΡΜΑΙΝΟΜΕΝΗ ΠΛΑΚΑ
ΓΡΑΜΜΗ ΣΤΑΘΜΗΣ ΝΕΡΟΥ
ΥΠΟΔΟΧΗ ΦΙΛΤΡΟΥ
ΟΘΟΝΗ ΕΝΔΕΙΞΕΩΝ
ΦΙΛΤΡΟ ΑΕΡΑ
ΚΟΥΜΠΙ ΕΚΚΙΝΗΣΗΣ/ΔΙΑΚΟΠΗΣ
(ΟΝ/OFF)
3.3 Aξεσουάρ
HC365 Τυποποιημένος Θάλαμος Ύγρανσης
HC360* Θάλαμος Ύγρανσης Παρατεταμένης Διάρκειας Ζωής
900HC522 Θερμαινόμενος αναπνευστικός σωλήνας ThermoSmart™
που ταιριάζει σε κωνικό εξάρτημα σύνδεσης 22 mm.
*Δεν διατίθεται σε όλες τις χώρες
900HC240 Φίλτρο (Πακέτο-2)
900HC604 Πακέτο Καθαρισμού Στομίου HC600
900HC627 Χοάνη κεκαμμένου σωλήνα πακέτο 10
1 x Ανταλλακτικό Φίλτρο Αέρα
1 x
Ηλεκτρικό Καλώδιο
2 x Θάλαμος Νερού
1 x Xοάνη
1 x Θερμαινόμενος
Αναπνευστικός Αγωγός
ThermoSmart™
ΧΟΑΝΗ
Ελληνικά
Page 68

G - 4
3.4 Τεχνολογία ThermoSmart
™
Αυτή η συσκευή έχει σχεδιαστεί για βέλτιστη άνεση και προσφέρει τη μοναδική τεχνολογία θερμαινόμενου αναπνευστικού αγωγού ThermoSmart™.
Η τεχνολογία ThermoSmart™ επιτρέπει την παροχή βέλτιστων (υψηλότερων και εξατομικευμένων) επιπέδων υγρασίας στον ασθενή, ανεξαρτήτως
θερμοκρασίας περιβάλλοντος.
Αυτή η συσκευή μπορεί να προσαρμόζεται σε δύο επίπεδα για να επιτυγχάνεται βέλτιστη άνεση:
Ρύθμιση Υγρασίας ThermoSmart™: αυτή η ρύθμιση ελέγχει τη θερμοκρασία της θερμαινόμενης πλάκας, προσαρμόζοντας τα επίπεδα υγρασίας
για την άνεση του ασθενή. Προσαρμογή μπορεί να γίνεται από 1 έως 4 με αυξήσεις ανά 0,5. Η συσκευή είναι ρυθμισμένη εκ των προτέρων στο
2,5που είναι κατάλληλο για τους περισσότερους ασθενείς.
• Αν αισθάνεστε ξηρότητα ή θεωρείτε τον αέρα πολύ ψυχρό: αυξήστε τη ρύθμιση.
• Αν θεωρείτε ότι υπάρχει πάρα πολλή υγρασία μέσα στον αγωγό ή αν αισθάνεστε τον αέρα πολύ ζεστό: μειώστε τη ρύθμιση.
• Αν δεν επιτύχετε βέλτιστη άνεση με αυτή τη ρύθμιση μπορούν να γίνουν περαιτέρω προσαρμογές με μεταβολή της ρύθμισης Κλίματος
ThermoSmart™ σας.
Ρύθμιση Κλίματος ThermoSmart™: αυτή η ρύθμιση προσφέρει επιπλέον επιλογές προσαρμογής βελτιστοποιώντας την παρεχόμενη υγρασία.
Ηπροσαρμογή μπορεί να γίνεται από 1 έως 3 με αυξήσεις ανά 1. Η συσκευή είναι ρυθμισμένη εκ των προτέρων στο 2 που είναι κατάλληλο για τους
περισσότερους ασθενείς. Σημειώστε, αν προσαρμοστεί η ρύθμιση κλίματος, η ρύθμιση υγρασίας θα επανέλθει στην προεπιλεγμένη ρύθμιση.
• Ενδείκνυται η ρύθμιση 3 του Κλίματος ThermoSmart™ για στοματική παροχή Συνεχούς Θετικής Πίεσης Αεραγωγών (CPAP).
• Αν αισθάνεστε ότι η κλίμακα ρυθμίσεων που προσφέρονται από τη ρύθμιση Υγρασίας ThermoSmart™ είναι πολύ ξηρή ή πολύ ψυχρή. Αυξήστε τη
ρύθμιση Κλίματος ThermoSmart™.
• Αν αισθάνεστε ότι η κλίμακα ρυθμίσεων που προσφέρονται από τη ρύθμιση Υγρασίας ThermoSmart™ είναι πολύ θερμή ή πολύ υγρή. Μειώστε τη
ρύθμιση Κλίματος ThermoSmart™.
Ενδείκνυται να διατηρείτε τον (θερμαινόμενο αναπνευστικό) αγωγό πάνω από την κλινοστρωμνή για την καλύτερη απόδοση υγρασίας. Για λειτουργία της
ρύθμισης Υγρασίας ThermoSmart™ και Κλίματος ThermoSmart™, ανατρέξτε στο τμήμα 8 «Σύστημα Ελέγχου και Οθόνη Ενδείξεων» αυτού του εγχειριδίου.
4. Προοριζόμενη Χρήση
Η συσκευή χρησιμοποιείται για να βοηθά με την αναπνοή του ασθενή κατά τη διάρκεια του ύπνου για το σκοπό της θεραπευτικής αγωγής Αποφρακτικής
Υπνικής Άπνοιας. Αυτό γίνεται με την παροχή Συνεχούς Θετικής Πίεσης Αεραγωγών (CPAP) για να προλαμβάνεται η απόφραξη των αεραγωγών. Η
προσθήκη θερμαινόμενης αναπνευστικής ύγρανσης στη συσκευή ανακουφίζει τις επιδράσεις ξηρότητας και ερεθισμού στους αεραγωγούς του ασθενή
που συνήθως προκύπτουν από τη χρήση του συστήματος Συνεχούς Θετικής Πίεσης Αεραγωγών (CPAP). Η συσκευή είναι για χρήση σε περιπτώσεις
ενήλικων ασθενών στο σπίτι ή σε εργαστήριο ύπνου. Παρακαλείστε να ανατρέξετε στη γκάμα προϊόντων της Σειράς SleepStyle™ 600 που αναγράφονται
στο τμήμα προσαρτήματος αυτού του εγχειριδίου.
5. Προειδοποιήσεις Χρήσης Οξυγόνου
Εάν πρέπει να χρησιμοποιήσετε οξυγόνο, συνιστάται η χορήγηση επιπλέον οξυγόνου στη μάσκα. Ανατρέξτε στις συγκεκριμένες οδηγίες που αφορούν
στον τύπο της μάσκας που χρησιμοποιείτε.
ΣΗΜΕΙΩΣΗ:
• Με σταθερό ρυθμό ροής συμπληρωματικού οξυγόνου, η συγκέντρωση του εισπνεόμενου οξυγόνου θα ποικίλλει, ανάλογα με τις ρυθμίσεις
πίεσης, το πρότυπο αναπνοής του ασθενή, την επιλογή μάσκας και το ρυθμό διαρροής.
Πριν τη χρήση οξυγόνου με τη συσκευή, ανατρέξτε στις προειδοποιήσεις περί οξυγόνου στην Ενότητα 2.
Page 69

G - 5
6. Καθαρισμός και Συντήρηση
ΠΑΡΑΚΑΛΕΙΣΤΕ ΝΑ ΣΗΜΕΙΩΣΕΤΕ: Η συσκευή θα πρέπει να καθαρίζεται όπως απαιτείται
1. Απενεργοποιήστε τη συσκευή και αποσυνδέστε την από την πρίζα. Περιμένετε έως ότου το νερό κρυώσει και στη συνέχεια αφαιρέστε το θάλαμο.
2. Σκουπίστε το εξωτερικό της συσκευής με ένα καθαρό, νοτισμένο (όχι υγρό) ύφασμα και ένα ήπιο απορρυπαντικό πιάτων. Μη χρησιμοποιείτε
σκληράστιλβωτικά ή διαλυτικά, καθώς ενδέχεται να προκαλέσουν βλάβη στη συσκευή.
3. ΚΑΘΗΜΕΡΙΝΑ
Καθαρίζετε το θάλαμο, το θερμαινόμενο αναπνευστικό αγωγό και τη θύρα σύνδεσης του θερμαινόμενου αναπνευστικού αγωγού.
• Αφαιρείτε το θερμαινόμενο αναπνευστικό αγωγό από τη συσκευή τραβώντας το χιτώνιο προς τα πάνω για ν’ απασφαλίζετε το εξάρτημα
σύνδεσης. Μετά αφαιρείτε το εξάρτημα σύνδεσης.
• Πλένετε το θερμαινόμενο αναπνευστικό αγωγό με σαπουνόνερο, ξεπλένετε και μετά κρεμάζετε το
θερμαινόμενο αναπνευστικό αγωγό με τις άκρες του να βλέπουν προς το πάτωμα για να στεγνώνει.
• Αφαιρείτε το θάλαμο σπρώχνοντας προς τα κάτω τον προφυλακτήρα δακτύλων και τραβώντας έξω τον θάλαμο.
• Αδειάζετε και απορρίπτετε το υπόλοιπο νερό.
• Για τυποποιημένους θαλάμους (HC365), καθαρίζετε και πλένετε με σαπουνόνερο, μετά ξεπλένετε και στεγνώνετε.
• Ο θάλαμος παρατεταμένης διάρκειας ζωής (HC360) απαιτεί αποσυναρμολόγηση πριν τον καθαρισμό. Πιέζετε
τη βάση για να αφαιρείται από το πάνω μέρος του θαλάμου όπως φαίνεται στο Σχ. 1. Σιγουρευτείτε ότι το
στρογγυλό παρέμβυσμα στη βάση δεν είναι χαλαρό ή φθαρμένο. Πλένετε το πάνω μέρος και τη βάση του
θαλάμου σε ελαφρύ απορρυπαντικό πιάτων. Ξεπλένετε επιμελώς και στεγνώνετε. Αυτός ο θάλαμος μπορεί
επίσης να καθαρίζεται σε οικιακό πλυντήριο πιάτων.
• Σκουπίζετε επιμελώς το εσωτερικό της θύρας σύνδεσης του θερμαινόμενου αναπνευστικού αγωγού με καθαρό
υγρό πανί με χαμηλό χνούδι.
4. ΕΒΔΟΜΑΔΙΑΙΑ
Καθαρίζετε επιμελώς το θάλαμο.
• Μουσκεύετε το εσωτερικό του θαλάμου για 10 λεπτά σε διάλυμα ενός μέρους λευκού ξυδιού σε δύο μέρη νερού και ξεπλένετε καλά με
απεσταγμένο νερό.
5. ΣΥΝΤΗΡΗΣΗ
• Αντικαθιστάτε το φίλτρο αέρα όταν αποχρωματιστεί σημαντικά, τουλάχιστον μια φορά κάθε τρεις μήνες ή μετά από 1000 ώρες χρόνου
λειτουργίας της μηχανής. Για να το κάνετε αυτό αφαιρέστε την υποδοχή φίλτρου από το πίσω μέρος της συσκευής όπως φαίνεται στο Σχ. 2.
Διασφαλίστε ότι η κάθετη μαύρη γραμμή του νέου φίλτρου βλέπει προς τη συσκευή, και συναρμολογήστε και τα δύο πίσω πάνω στη συσκευή.
• Αντικαθιστάτε το θάλαμο αν είναι ραγισμένος, αποχρωματισμένος ή γδαρμένος.
• Αντικαθιστάτε το θερμαινόμενο αναπνευστικό αγωγό ύστερα από 4000 ώρες χρήσης ή μία φορά το χρόνο. Ένας φθαρμένος αγωγός χρειάζεται
αντικατάσταση αμέσως.
7. Οδηγίες Συναρμολόγησης
Όταν ο θάλαμος συναρμολογηθεί και γεμιστεί, η συσκευή πρέπει να παραμένει σε όρθια θέση,
ούτως ώστε το νερό να μη μπορεί να εισέλθει στο εσωτερικό.
1. Αφαιρέστε τη συσκευή από τη συσκευασία της.
2. Τοποθετήστε τη συσκευή σε χαμηλό ράφι ή στο πάτωμα δίπλα στο κρεβάτι σας, η μονάδα
χρειάζεται να τοποθετηθεί κάτω από το ύψος της κεφαλής.
3. Αφαιρέστε το θάλαμο νερού από τη συσκευασία.
4. Αφαιρέστε τα μπλε καλύμματα και απορρίψτε τα (Σχ. 1).
5. Γεμίστε το θάλαμο μέχρι τη γραμμή πλήρωσης νερού με απεσταγμένο νερό μόνο (Σχ. 2).
Ποτέ μη γεμίζετε το θάλαμο μέσω της θύρας εξαρτήματος σύνδεσης του
θερμαινόμενου αναπνευστικού αγωγού. Όταν μετακινείτε τη συσκευή σας,
βεβαιώνεστε ότι ο θάλαμος νερού είναι κενός. Η μη λειτουργία της μηχανής λόγω
βλάβης από νερό δεν καλύπτεται από την εγγύηση κατασκευαστή.
6. Για να προσαρτήσετε το θάλαμο νερού στη συσκευή, πιέστε προς τα κάτω τον
προφυλακτήρα δακτύλων και περάστε το θάλαμο γλιστρώντας τον στη θέση του (Σχ. 3 και 4).
7. Όταν ο θάλαμος εγκατασταθεί σωστά, ο προφυλακτήρας δακτύλων θα πάει στη θέση του
κάνοντας κλικ.
8. Το ένα άκρο του θερμαινόμενου αναπνευστικού αγωγού έχει ένα γκρίζο πλαστικό εξάρτημα
σύνδεσης. Ανασηκώστε το χιτώνιο και σπρώξτε ελαφρά το εξάρτημα σύνδεσης για να
τοποθετηθεί πάνω στη συσκευή. Σπρώξτε το χιτώνιο κάτω για να ασφαλιστεί (Σχ. 5, 6 και 7).
9. Συνδέστε το άλλο άκρο του θερμαινόμενου αναπνευστικού αγωγού στη μάσκα.
10. Συνδέστε το ηλεκτρικό καλώδιο της συσκευής στον οικιακό ρευματοδότη σας..
11. Βάλτε σε λειτουργία τη συσκευή πιέζοντας το μπουτόν εκκίνησης/διακοπής (Σχ. 8).
Προβάλλεται η ένδειξη της τρέχουσας ρύθμισης Υγρασίας ThermoSmart™.
12. Για αλλαγή της ρύθμισης ανατρέξτε στο τμήμα 8: «Σύστημα Ελέγχου και Οθόνη Ενδείξεων».
Η συσκευή σας είναι τώρα έτοιμη για χρήση.
Σχ. 2
Σχ. 3
Σχ. 4
Σχ. 5
Σχ. 6
Σχ. 7
Σχ. 8
Σχ. 1
Σχ. 1
Σχ. 2
Ελληνικά
Page 70

G - 6
Ρύθμιση Κλίματος ThermoSmart™ *
Για αλλαγή της παρεχόμενης θερμοκρασίας: Πιέστε για παροχή θερμότερου πιο υγρού αέρα.
Πιέστε για παροχή ψυχρότερου και ξηρότερου αέρα.* Ανατρέξτε στο τμήμα 3.4
Υψόμετρο
Επιλέξτε «m» για μέτρα ή «ft» για πόδια χρησιμοποιώντας τα πλήκτρα και
Ρύθμιση Υψομέτρου
- Ρυθμίστε το επίπεδο υψομέτρου πιέζοντας τα πλήκτρα και
- Πιέστε για έξοδο από το μενού
Πραγματική Πίεση (Προβάλλει την ένδειξη πραγματικής πίεσης)
- Η έ νδειξη επανέρχεται στην προεπιλεγμένη θέση αν δεν γίνει έξοδος από το μενού. Πιέστε το
κουμπί για έξοδο από το μενού (διατίθεται μόνο στο HC602)
8. Σύστημα Ελέγχου και Οθόνη Ενδείξεων
8.1 Χαρακτηριστικά και Λειτουργίες Οθόνης Ενδείξεων
ΠΛΗΚΤΡΟ ΛΕΙΤΟΥΡΓΙΑ & ΠΕΡΙΓΡΑΦΗ ΛΕΙΤΟΥΡΓΙΑ
ΓΙΑ «ΕΚΚΙΝΗΣΗ»
Πιέστε κάτω το Κουμπί για λίγο
Η συσκευή θα πάει στην προεπιλεγμένη θέση για προβολή της ένδειξης ρύθμισης Υγρασίας
ThermoSmart™
ΓΙΑ «ΔΙΑΚΟΠΗ»
Αφαιρέστε τη μάσκα σας
Πιέστε το Κουμπί για λίγο.
ΓΙΑ «ΕΚΚΙΝΗΣΗ»
Πιέστε
(Σημείωση: για να επαναρρυθμίσετε την κλίμακα κατά τη διάρκεια ενός κύκλου πρέπει πρώτα να
διακοπεί η λειτουργία της συσκευής)
ΓΙΑ «ΔΙΑΚΟΠΗ»
Πιέστε
Πιέστε το Κουμπί και για να υψώσετε ή να χαμηλώσετε τις ρυθμίσεις
Πιέστε αλληλοδιαδόχως για βαθμηδόν μετάβαση και επισκόπηση των διαθέσιμων επιλογών
<
<
ΜΕΝΟΥ ΑΣΘΕΝΗ ΟΘΟΝΗ ΕΝΔΕΙΞΕΩΝ ΛΕΙΤΟΥΡΓΙΑ
Για επισκόπηση ρυθμίσεων Συνεχούς Θετικής
Πίεσης Αεραγωγών (CPAP), υγρασίας, δεδομένων
προσαρμογής, ρυθμίσεων υψομέτρου και πίεσης
ΓΙΑ ΠΑΡΑΚΟΛΟΥΘΗΣΗ ΣΤΟΙΧΕΙΩΝ
Πιέστε το κουμπί για να παρακολουθήσετε στην σειρά
Ρύθμιση Υγρασίας ThermoSmart™ (προεπιλεγμένη ένδειξη)
Για προσαρμογή των επιπέδων ρύθμισης Υγρασίας ThermoSmart™ για ελαχιστοποίηση των
παρενεργειών των άνω αεραγωγών από χρήση Συνεχούς Θετικής Πίεσης Αεραγωγών CPAP. Πιέστε το
κουμπί και για να υψώσετε ή να χαμηλώσετε τις ρυθμίσεις
Σύνολο ωρών λειτουργίας: προβάλλει ένδειξη του συνολικού αριθμού ωρών κατά τις
οποίες είναι σε λειτουργία η συσκευή (συμπεριλαμβάνει ώρες χωρίς χρήση μάσκας)
Μέσος όρος ωρών συμμόρφωσης ανά νύχτα: προβάλλει ένδειξη του μέσου
αριθμού ωρών χρήσης της συσκευής τη νύχτα με τη μάσκα
Έλεγχος άθροισης: προβάλλει ένδειξη πληροφοριών για χρήση από ιατρό ή εμπορικό
αντιπρόσωπο προς έλεγχο της προσαρμογής
Ρύθμιση υψομέτρου: προβάλλει ένδειξη της ρύθμισης υψομέτρου. Πιέστε ή για
αλλαγή υψομέτρου
Ρύθμιση πίεσης: προβάλλει ένδειξη της ρύθμισης πίεσης
cmH2O
hr
hr/
ΕΚΚΙΝΗΣΗ/ΔΙΑΚΟΠΗ
Κάνει ΕΚΚΙΝΗΣΗ και ΔΙΑΚΟΠΗ της συσκευής.
ΚΛΙΜΑΚΑ (RAMP)
Μειώνει την πίεση σε χαμηλότερο επίπεδο για να
σας βοηθά να αποκοιμάστε. Η πίεση θα επανέλθει
σταδιακά σε πλήρη πίεση λειτουργίας μέσα σε
20 λεπτά.
ΑΥΞΗΣΗ/ΜΕΙΩΣΗ
Προσαρμόζει ρυθμίσεις πάνω ή κάτω.
ΤΥΠΟΣ ΛΕΙΤΟΥΡΓΙΑΣ
Για βαθμηδόν μετάβαση μέσω επιλογών.
ΜΕΝΟΥ ΑΣΘΕΝΗ- Επιπρόσθετες Ρυθμίσεις ΟΘΟΝΗ ΕΝΔΕΙΞΕΩΝ ΛΕΙΤΟΥΡΓΙΑ
Για πρόσβαση σε επιπρόσθετες ρυθμίσεις:
Από την Προεπιλεγμένη ρύθμιση
«ΥΓΡΑΣΙΑΣ
THERMOSMART™»
Πιέστε το πλήκτρο για 3 δευτερόλεπτα
3000
cmH2O
Προειδοποίηση: Παράλειψη να επιλέξετε τη σωστή ρύθμιση υψομέτρου (για οποιαδήποτε δεδομένη τοποθεσία) θα έχει δυσμενή επίδραση σ την παρεχόμενη πίεση.
* Όταν μεταβάλλεται η ρύθμιση Κλίματος ThermoSmart™ η ρύθμιση Υγρασίας θα επανέρχεται πίσω στην προεπιλεγμένη ρύθμιση 2,5
Κουμπί Τύπου Λειτουργίας
Βαθμηδόν μετάβαση
μέσω των επιλογών
Κουμπί Κάτω
Μείωση Ρύθμισης
Κουμπί Πάνω
Αύξηση Ρύθμισης
Κουμπί Κλίμακας
(Ramp)
Κουμπί Εκκίνησης/
Διακοπής (Οn/Off)
Page 71

8.2 Περίληψη Μενού Ασθενή
cmH2O
0,1,2,3,4
<
<
ή
cmH2O
ή
m
Αύξηση/Μείωση
Επιπέδου Υψομέτρου
Κρατήστε πιεσμένο για 3 δευτερόλεπτα
ft
<
<
ή
<
<
ή
Επιλογή Μονάδων
για Υψόμετρο
3000
<
<
ή
Αύξηση/Μείωση
Ρύθμισης Κλίματος ThermoSmart™
Επιστροφή
στην Προεπιλεγμένη
Ρύθμιση
Κρατήστε πιεσμένο για 3 δευτερόλεπτα
Πραγματική
Πίεση
cmH2O
Προχωρημένο Μενού
Ασθενή
Προχωρημένο Μενού
Ασθενή
Προειδοποίηση: Παράλειψη να επιλέξετε τη σωστή ρύθμιση υψομέτρου (για οποιαδήποτε δεδομένη τοποθεσία) θα έχει δυσμενή επίδραση στην παρεχόμενη πίεση.
G - 7
8.3 Μενού Ασθενή - Περίληψη Επιπρόσθετων Ρυθμίσεων
±
0,5 ΑΥΞΗΣΗ
Τυπος λειτουργιας
Μοντέλο
HC604
Μοντέλο
HC608
Επιστροφή
στην Προεπιλεγμένη
Ρύθμιση
Ρύθμιση Υγρασίας
ThermoSmart™
(προεπιλεγμένη)
Ρύθμιση
Υψομέτρου
Ρύθμιση
Πίεσης
Έλεγχος άθροισης
Συνολικός Χρόνος
Λειτουργίας
hr
Μέσος Όρος Ωρών
ανά νύχτα*
hr/
Επιστροφη στην
προεπιλεγμενη
ρυθμιση
Ρύθμιση Υγρασίας
ThermoSmart™
(προεπιλεγμένη)
Ρύθμιση
Πίεσης
Έλεγχος άθροισης
Συνολικός Χρόνος
Λειτουργίας
hr
Μέσος Όρος Ωρών
ανά νύχτα *
hr/
Επιστροφη στην
προεπιλεγμενη
ρυθμιση
Μοντέλο
HC604
Μοντέλο
HC608
Αύξηση
Μείωση
Πιέστε για να ενεργοποιήσετε
την Κλίμακα (Ramp)
Πιέστε μία φορά για εκκίνηση/
διακοπή της συσκευής
Οθόνη Ενδείξεων
Τυπος λειτουργιας
Ελληνικά
Page 72

G - 8
9. Απαντήσεις στις Συχνότερες Ερωτήσεις
Πρέπει να χρησιμοποιώ απεσταγμένο νερό με τη συσκευή μου;
Η χρήση απεσταγμένου νερού θα μεγιστοποιήσει τη διάρκεια ζωής του θαλάμου νερού. Το νερό από τη βρύση συχνά θα περιέχει μέταλλα που μπορούν να προκαλέσουν
βλάβη στο θάλαμο προκαλώντας σημειακή διάβρωση στη βάση, ακόμα και αν το νερό περνά μέσω φίλτρου.
Μπορώ να χρησιμοποιώ τη συσκευή μου σε άλλες χώρες;
Ναι. Απλώς χρησιμοποιείτε τον κατάλληλο προσαρμογέα ηλεκτρικού ρευματοδότη και η συσκευή θα προσαρμόζεται αυτομάτως σε ηλεκτροδότηση οποιασδήποτε τάσης.
Σημείωση: Όταν μετακινείτε τη συσκευή σας, διασφαλίζετε ότι ο θάλαμος νερού είναι κενός. Η μη λειτουργία της μηχανής λόγω βλάβης από νερό δεν καλύπτεται από την
εγγύηση κατασκευαστή.
Μπορώ να χρησιμοποιώ συμπληρωματικό οξυγόνο με τη συσκευή μου;
Ναι, μπορεί να παρέχεται οξυγόνο στη μάσκα. Να θέτετε σε λειτουργία τη συσκευή πριν κάνετε εκκίνηση του οξυγόνου. Διασφαλίζετε ότι η πηγή οξυγόνου είναι κλειστή
πριν διακόπτετε τη λειτουργία της συσκευής για να αποφεύγετε τη συγκέντρωση οξυγόνου στη μηχανή.
Πότε να αντικαθιστώ το θάλαμο νερού μου;
Αντικαθιστάτε το θάλαμο αν τα πλαστικά τοιχώματα του θαλάμου αποκτήσουν ραγίσματα ή θολώσουν ή αν η βάση του θαλάμου υποστεί σημειακή διάβρωση. (Σημείωση:
Αν ο θάλαμος διαρρέει, θα πρέπει να αντικαθίσταται αμέσως).
Μπορώ να χρησιμοποιώ τη συσκευή μου χωρίς θερμαινόμενο αναπνευστικό αγωγό;
Ναι, μπορείτε, αλλά δεν θα εξασφαλίζετε τη μέγιστη απόδοση υγρασίας που προσφέρει η συσκευή.
Η συσκευή τότε δεν θα προβάλλει την ένδειξη του συμβόλου θερμαινόμενου αναπνευστικού αγωγού και θα δείχνει την ακόλουθη ένδειξη:
Τι πρέπει να κάνω σε περίπτωση διακοπής ρεύματος;
Αφαιρέστε αμέσως τη μάσκα. Μετά από την αποκατάσταση της τροφοδοσίας ρεύματος, η συσκευή θα ενεργοποιηθεί ξανά στον ίδιο τρόπο
λειτουργίας, διατηρώντας τις ίδιες ρυθμίσεις που είχε πριν από τη διακοπή ρεύματος. Ανατρέξτε στην Ενότητα 2 για επιπλέον πληροφορίες.
10. Συνθήκες Λειτουργίας
ΘΕΡΜΟΚΡΑΣΙΑ ΠΕΡΙΒΑΛΛΟΝΤΟΣ: 5 - 35 °C
ΥΓΡΑΣΙΑ: 10 - 95% Σχετική Υγρασία (RH)
ΥΨΟΜΕΤΡΟ 0 - 3000 m (0 - 9000 πόδια)
Άνω των 1500 m (4500 ποδιών) η μέγιστη πίεση λειτουργίας θα μειώνεται.
11. Συνθήκες Αποθήκευσης και Μεταφοράς
Η συσκευή θα πρέπει να αποθηκεύεται και να μεταφέρεται σε περιβαλλοντικές συνθήκες: 14 έως 140 °F (-10 έως 60 °C).
12. Επίλυση Προβλημάτων
Εάν πιστεύετε ότι η συσκευή σας δεν λειτουργεί σωστά, συμβουλευτείτε τον πάροχο περίθαλψης της υγείας. Μην επιχειρήσετε να επισκευάσετε τη
συσκευή μόνοι σας.
13. Εγγύηση Κατασκευαστή
Παρακαλείστε να επικοινωνείτε με τον αντιπρόσωπο Fisher & Paykel Healthcare που σας εξυπηρετεί σχετικά με την εγγύηση
κατασκευαστή.αντιπρόσωπο.
14. Οδηγίες απόρριψης συσκευής και αναλώσιμων υλικών
• Οδηγίες απόρριψης μονάδας
Αυτή η μονάδα περιέχει ηλεκτρονικά μέρη. Παρακαλείστε να μην την απορρίπτετε μαζί με τα συνηθισμένα απορρίμματα.
Νααπορρίπτεται σύμφωνα με τις τοπικές κατευθυντήριες οδηγίες για απόρριψη ηλεκτρονικών.
• Οδηγίες απόρριψης αναλώσιμων υλικών
Τοποθετήστε τη μάσκα, τον αναπνευστικό σωλήνα και το θάλαμο νερού σε μια σακούλα απορριμμάτων στο τέλος της χρήσης και
απορρίψτε τα με τα συνηθισμένα απορρίμματα.
Page 73

16. Προσάρτημα
Ο ακόλουθος πίνακας καταγράφει την κύρια διαφορά σε χαρακτηριστικά στοιχεία σε όλη τη Γκάμα Προϊόντων SleepStyle™ 600.
ΜΟΝΤΕΛΟ
HC604
HC608
ΣΗΜΕΙΩΣΗ:
●
Όλα τα μοντέλα είναι πλήρως ολοκληρωμένα με Τεχνολογία ThermoSmart™.
●
Μερικά μοντέλα δεν διατίθενται για πώληση σε όλες τις χώρες.
Παρακολούθηση Συμμόρφωσης Ασθενή
[Οθόνη Υγρών Κρυστάλλων (LCD) & Download
✓
✓
Αυτόματη Προσαρμογή Υψομέτρου/
Αντιστάθμιση διαρροής
-
✓
G - 9
Πλήρως Ολοκληρωμένη Συνεχής Θετική Πίεση
Αεραγωγών (CPAP) με Θερμαινόμενη Ύγρανση
✓
✓
ΔΙΑΣΤΑΣΕΙΣ: 273 mm x 170 mm x 175 mm
ΒΑΡΟΣ: 2,1 kg μόνο η μονάδα
3,4 kg μαζί με τη συσκευασία και τα
αξεσουάρ
ΗΛΕΚΤΡΙΚΑ ΧΑΡΑΚΤΗΡΙΣΤΙΚΑ
Συχνότητα παροχής: 50 - 60 Hz
Τάση και ρεύμα παροχής: 100 - 115 V (1,5 A, μέγ. 1,7 A),
220 - 240 V (1,0 A, μέγ. 2,0 A),
Σημειωση: Αυτές οι τιμές αντιπροσωπεύουν
ένα μέσο όρο ρεύματος.
Απαιτήσεις μετατροπέα
DC σε AC: 115 V - 200 W/300 W αιχμή τάσης
230 V - 300 W/500 W αιχμή τάσης
Πλάκα θερμαντήρα: Μέγ. 85 W
Θερμοκρασία πλάκας
θερμαντήρα: Μέγ. 65 °C
Ρύθμιση ισχύος θερμαινόμενου
αναπνευστικού σωλήνα: Μέγ. 30 W
ΑΠΟΔΟΣΗ
Εύρος πίεσης: 4 έως 20 cmH2O
Εύρος υψομέτρου: 0 έως .000 m (0 έως 9000 πόδια)
ΣΥΜΜΟΡΦΩΣΗ ΜΕ ΠΡΟΤΥΠΑ:
Σχεδιασμένη για συμμόρφωση
με τις απαιτήσεις των: IEC 60601-1
UL60601-1
CSA C22.2/No. 601.1
AS3200.1.0
EN60601-1
ISO 17510-1
Η συσκευή συμμορφώνεται με τις απαιτήσεις ηλεκτρομαγνητικής
συμβατότητας IEC 60601-1-2. Σε ορισμένες συνθήκες, η συσκευή μπορεί
να επηρεάζει ή να επηρεάζεται από παρακείμενο εξοπλισμό λόγω των
επιδράσεων ηλεκτρομαγνητικής παρεμβολής. Σε περίπτωση που θα
συμβεί αυτό, δοκιμάστε να μετακινήσετε τη συσκευή σας ή να αλλάξετε
την τοποθεσία της συσκευής που προκαλεί την παρεμβολή, ή, εναλλακτικά,
συμβουλευθείτε τον πάροχο περίθαλψης της υγείας.
15. Προδιαγραφές Προϊόντος
Χρόνος προθέρμανσης: 30 λεπτά
Παρεχόμενη υγρασία: 30 mg/L*
Θερμοκρασίες αερίων: μέγ. 37,15 °C
*σύμφωνα με μέτρηση σε θερμοκρασία περιβάλλοντος 22 °C: 10 cmH2O σε
παράπλευρη ροή.
Τιμές μέγιστης ροής
Ρύθμιση πίεσης
CPAP (cmH2O) 4 8 12 16 20
Μετρούμενη πίεση
στη θύρα σύνδεσης 3 7 11 15 19
ασθενή (cmH2O)
Τιμή μέγιστης ροής
(l/min) στη θύρα 60 78 80 81 83
σύνδεσης μάσκας
Σταθερότητα στατικής πίεσης (μακροχρόνια χρήση)
-0,05 έως 0,18 cmH2O διαφορά πίεσης, μετρούμενη στη θύρα σύνδεσης
μάσκας, στη ρύθμιση πίεσης 10 cmH2O
Σταθερότητα δυναμικής πίεσης (βραχυχρόνια χρήση)
Ρύθμιση πίεσης
CPAP (cmH2O) 4 8 12 16 20
Διαφορά πίεσης
(cmH2O) στη θύρα 0,73 0,74 0,74 0,81 0,79
σύνδεσης μάσκας
Ελληνικά
Page 74

Page 75

H - 1
Le CPAP della serie SleepStyle™ 600 sono
provviste di umidificatore a caldo integrato e di
circuito paziente termoregolato. Sono studiate per
essere utilizzate a domicilio o nei laboratori del
sonno, per il trattamento delle apnee ostruttive
delsonno.
Per ulteriori informazioni, contattare la sede
Fisher & Paykel Healthcare più vicina – vedere
l’elenco degli indirizzi sul retro di tale manuale.
Si consiglia di conservare questo manuale onde
poterlo consultare in futuro.
inDiCe
1. Definizione dei simboli ........................................................................................................................................................................ H - 2
2. Avvertenze, precauzioni e controindicazioni .................................................................................................................................... H - 2
3. Descrizione dell’apparecchio .............................................................................................................................................................. H - 3
3.1 Contenuto della confezione ......................................................................................................................................................... H - 3
3.2 Componenti importanti dell’apparecchio .................................................................................................................................. H - 3
3.3 Accessori .......................................................................................................................................................................................... H - 3
3.4 Tecnologia ThermoSmart™ ........................................................................................................................................................... H - 4
4. Indicazioni per l’uso .............................................................................................................................................................................. H - 4
5. Avvertenze sull’uso dell’ossigeno ....................................................................................................................................................... H - 4
6. Pulizia e manutenzione ........................................................................................................................................................................ H - 5
7. Istruzioni per l’installazione ................................................................................................................................................................. H - 5
8. Comandi e schermo a cristalli liquidi ................................................................................................................................................. H - 6
8.1 Schermo: descrizione e funzione ................................................................................................................................................. H - 6
8.2 Riassunto del menù paziente ........................................................................................................................................................ H - 7
8.3 Riassunto del menù paziente: funzioni addizionali .................................................................................................................... H - 7
9. Domande poste più frequentemente ............................................................................................................................................... H - 8
10. Condizioni di funzionamento .............................................................................................................................................................. H - 8
11. Condizioni di conservazione e trasporto ........................................................................................................................................... H - 8
12. Risoluzione dei problemi ..................................................................................................................................................................... H - 8
13. Garanzia ................................................................................................................................................................................................. H - 8
14. Istruzioni per lo smaltimento dell’apparecchio e dei materiali di consumo ................................................................................ H - 8
15. Specifiche del prodotto ....................................................................................................................................................................... H - 9
16. Appendice ............................................................................................................................................................................................. H - 9
LEGGERE PER INTERO LE ISTRUZIONI PRIMA DELL’USO
Italiano
Page 76

H - 2
1. Definizione Dei simboli
Tipo BF
Parte applicata
Corrente alternata
A prova di
gocciolamento
93/42/CEE
Classe IIb
Classe II
Doppio isolamento
Stato dell’apparecchio
Acceso/Spento
ATTENZIONE:
Consultare la
documentazione
allegata
2. avvertenZe, preCauZioni e ControindiCaZioni
NOTE
• Il presente manuale si riferisce all’unità della serie CPAP
SleepStyle™ 600 come “l’apparecchio”.
• Se un medico richiede l’utilizzo della CPAP, l’apparecchio
dovrebbe essere utilizzato ogni qual volta si dorma. Qualora
l’apparecchio cessasse di funzionare per qualsiasi motivo,
contattare immediatamente il proprio fornitore di assistenza.
• La responsabilità civile e penale scaturente da qualsiasi danno
a persone o cose in seguito ad un utilizzo dell’apparecchio non
conforme alle istruzioni fornite ricade sull’utente di questo sistema.
• L’apparecchio dovrebbe essere utilizzato solamente con maschere,
connettori e tubi di somministrazione conformi alla normativa
ISO 17510-2 e raccomandati da Fisher & Paykel Healthcare o dal
proprio fornitore di assistenza.
• Non utilizzare l’apparecchio se la temperatura ambiente supera i
35 °C, poiché ciò può portare ad un’elevata temperatura del flusso
d’aria, che potrebbe determinare un’irritazione delle vie aeree.
• Per tutte le riparazioni e per la manutenzione fare riferimento a
Fisher & Paykel Healthcare.
AVVERTENZE
Onde evitare scosse elettriche dal proprio apparecchio:
• Non attivare l’apparecchio se il collegamento del cavo o la spina
sono danneggiati.
• Non attivare l’apparecchio se è stato gettato in acqua.
• Non collegare l’apparecchio alla presa di corrente se bagnato.
• Non pulire l’apparecchio mentre esso è collegato alla presa di
corrente.
• Non conservare o utilizzare l’apparecchio dove si può capovolgere,
può cadere per terra o in acqua. Se l’acqua è entrata all’interno
dell’unità, scollegare il collegamento del cavo e sospendere
l’utilizzo. Consultare Fisher & Paykel Healthcare.
Per evitare soffocamento o inalazione di corpi estranei:
• Non posizionare mai alcun oggetto in qualsiasi apertura del tubo.
• Assicurarsi che il filtro dell’aria sia montato durante l’utilizzo
dell’apparecchio.
Onde garantire una terapia ottimale:
• Non attivare l’apparecchio se è caduto o danneggiato.
• Non attivare l’apparecchio se si riscontra un malfunzionamento
dello stesso.
• Non regolare la pressione. La pressione deve essere regolata solo
da un professionista in ambito sanitario.
• Non attivare l’apparecchio se il tubo di respirazione è stato
danneggiato e riporta fori, spaccature o è attorcigliato.
• Non bloccare il flusso in uscita sulla maschera.
• Non utilizzare la maschera se l’unità è spenta o se il funzionamento
non risulta ottimale.
• Non utilizzare un manicotto isolante o accessori affini non
approvati da Fisher & Paykel Healthcare. Essi potrebbero avere
effetti sulle prestazioni di umidificazione.
• Non provare a rimuovere il tubo riscaldato senza aver prima spinto
verso l’alto il manicotto. Ciò eviterà danni alla connessione.
Onde evitare bruciature:
• Non riempire la camera con acqua bollente.
• Non toccare la parte esposta della piastra di riscaldamento o la
base della camera.
• Non posizionare il tubo di respirazione in modo che esso possa
venire a contatto prolungato con la pelle.
Onde evitare il rischio di incendio durante l’utilizzo di
ossigeno:
• Non attivare il flusso di ossigeno quando l’apparecchio non è
in funzione; ciò può portare all’accumulo di ossigeno all’interno
dell’apparecchio stesso.
• Non posizionare l’apparecchio in una posizione in cui la
ventilazione attorno allo stesso è scarsa.
• Non utilizzare l’ossigeno mentre si fuma o in presenza di fiamme
libere.
• Non utilizzare materiali nel caso dei quali il contatto con l’aria
potrebbe facilmente provocare incendi in presenza di un’elevata
concentrazione di ossigeno.
• Non tenere fonti di combustione in prossimità del prodotto. Al
fine di evitare la combustione è preferibile tenere tutte le fonti
di ignizione fuori dal locale in cui si sia utilizzando l’ossigeno
supplementare.
• Non tenere i regolatori di ossigeno, le valvole dei cilindri, itubi,
le connessioni e tutti gli altri strumenti d’ossigeno in prossimità
di olio, grasso o sostanze grasse. Si può avere autocombustione
violenta se queste sostanze entrano in contatto con ossigeno sotto
pressione.
• Non attivare l’apparecchio senza porre la protezione
sull’adattatore della porta seriale.
Altro:
• Posizionare l’apparecchio su una superficie piatta più in basso
dell’altezza della testa, onde prevenire che l’acqua entri nel tubo.
Qualora l’acqua entri all’interno del tubo, l’eccesso del drenaggio
condenserà. L’acqua all’interno del tubo potrebbe provocare
aspirazione.
• L’apparecchio deve essere utilizzato con maschere e connettori
per CPAP provvisti di fori di esalazione, che consentano un
flusso continuo di aria dalla maschera. Quando l’apparecchio
è acceso e funziona correttamente, la nuova aria elimina l’aria
esalata dalla maschera attraverso fori di esalazione. In presenza
di bassa pressione CPAP in caso di interruzione di corrente o
un malfunzionamento dell’apparecchio, rimuovere la maschera
immediatamente in quanto il flusso d’aria attraverso la maschera
può essere insufficiente per eliminare tutti i gas esalati e di
conseguenza si può verificare una ri-respirazione di CO2 che può
essere pericolosa.
• La mancata selezione del corretto livello di altitudine (per qualsiasi
località) avrà un effetto indesiderato sulla pressione fornita.
• Il presente apparecchio non è considerato un apparecchio
salvavita.
• Evitare un’inutile rimozione del collegamento del cavo dalla parte
posteriore dell’apparecchio. Se è necessario rimuoverlo, tenere
saldo il connettore e procedere alla rimozione. Evitare di tirare il
collegamento del cavo (fare riferimento alla Sezione3.2).
PRECAUZIONI
Per prevenire danni causati dall’acqua all’apparecchio:
• Rimuovere la camera di umidificazione dall’apparecchio prima di
provvedere al relativo riempimento.
• Prima di trasportare l’apparecchio, svuotare la camera dall’acqua.
Se l’apparecchio deve essere manipolato con acqua all’interno
della camera, evitare di capovolgere l’apparecchio stesso, onde
prevenire che l’acqua penetri all’interno.
Altro:
• Onde prevenire danni al proprio PC, attivare l’apparecchio
solamente se esso è collegato ad una PC tramite un adattatore di
porta seriale isolato (900HC236).
• Onde prevenire un’irritazione alle vie respiratorie, non utilizzare
l’apparecchio se la temperatura ambiente supera i 35 °C.
CONTROINDICAZIONI
• Le ricerche indicano che per alcuni pazienti l’utilizzo di pressione
positiva può essere controindicato nelle seguenti condizioni
pre-esistenti: pneumotorace, malattia bollosa polmonare,
pneumocefalo, perdita di liquido cerebrospinale, recente
operazione chirurgica o trauma al cranio, anomalie della lamina
cribrosa, pressione bassa patologica o in pazienti le cui vie aeree
superiori sonobypassate.
PRECAUZIONI
• Le sicurezza e l’efficacia della pressione positiva non sono state
testate in pazienti con difficoltà respiratorie o broncopneumopatia
cronica ostruttiva.
EFFETTI COLLATERALI
• La terapia a pressione positiva può generare epistassi, otalgia
erinalgia.
Contattare il proprio medico in caso ci fossero domande relative alla
propria terapia.
Page 77

H - 3
3. DesCrizione Dell’appareCChio
3.1 Contenuto della confezione
3.2 Componenti importanti dell’HC600 Series
Accessori
SleepStyle™ 600 CPAP Series (x1)
THERMOSMART™ TUBO RISCALDATO
CONNETTORE CON MANICOTTO
PORTA DI CONNESSIONE DI
THERMOSMART™ TUBO RISCALDATO
CAMERA DELL’ACQUA
SEGNO (verticale) DEL LIVELLO DELL’ACQUA
PROTEZIONE PER LE DITA
PIASTRA DI RISCALDAMENTO
SEGNO DEL LIVELLO
DELL’ACQUA
ALLOGGIAMENTO DEL FILTRO
SCHERMO
FILTRO DELL’ARIA
Pulsante di accensione e
spegnimento (ON/OFF)
3.3 Accessori
HC365 Camera di umidificazione standard
HC360* Camera di umidificazione a lunga durata
900HC522 Tubo riscaldato ThermoSmart™ per il collegamento
con il connettore conico da 22 mm (0,86")
*Non disponibile in tutte le nazioni
900HC240 Filtro (*2)
900HC604 Kit pulizia porta di connessione HC600
900HC627 Imbuto a gomito pacco da 10
Filtro dell’aria di riserva (x1)
Cavo di
alimentazione
(x1)
Camera
dell’acqua (x2)
1 x Imbuto
ThermoSmart™
Tubo Riscaldato (x1)
IMBUTO
Italiano
COLLEGAMENTO DEL
CAVO e CONNETTORE
Page 78

H - 4
3.4 Tecnologia ThermoSmart
™
Questo apparecchio è stato progettato per garantire il massimo comfort. Si avvale della tecnologia ThermoSmart™, unica nel suo genere.
La tecnologia ThermoSmart™ permette di fornire al paziente livelli di umidità ottimali (più alti e personalizzati), indipendentemente dalla
temperatura ambiente.
Questo apparecchio può essere regolato a due livelli per ottenere il massimo comfort:
Impostazione Umidità ThermoSmart™: questa impostazione controlla la temperatura della piastra riscaldante, regolando i livelli
diumidità per il comfort del paziente. La regolazione può essere fatta da 1 a 4 con incrementi di 0,5. L’apparecchio è preimpostato
a2,5, un valore adatto alla maggioranza dei pazienti.
• Se si prova secchezza o se l’aria è troppo fredda: aumentare l’impostazione.
• Se c’è troppa umidità nel tubo o se l’aria è troppo calda: diminuire l’impostazione.
• Se non si raggiunge un comfort ottimale con questa impostazione, si possono effettuare ulteriori regolazioni, cambiando
l’impostazione Ambiente ThermoSmart™.
Impostazione Ambiente ThermoSmart™: questa impostazione offre ulteriori opzioni di regolazione, consentendo di ottimizzare
l’umidità erogata. La regolazione può essere fatta da 1 a 3 con incrementi di 1. L’apparecchio è preimpostato a 2, un valore adatto
alla maggioranza dei pazienti. Nota: se viene regolata l’impostazione Ambiente, l’impostazione Umidità ritornerà all’impostazione
dibase.
• Durante la somministrazione orale è raccomandata l’impostazione ambiente ThermoSmart™ al livello 3.
• Se i livelli offerti dalla regolazione dell’impostazione Umidità ThermoSmart™ sono troppo secchi o troppo freddi: aumentare
l’impostazione Ambiente ThermoSmart
™.
• Se i livelli offerti dalla regolazione dell’impostazione Umidità ThermoSmart™ sono troppo caldi o troppo umidi: diminuire
l’impostazione Ambiente ThermoSmart™.
Si raccomanda di mantenere il circuito respiratorio riscaldato sopra le coperte per garantire ottime prestazioni di umidificazione.
Pervariare l’impostazione Umidità ThermoSmart™ e l’impostazione Ambiente ThermoSmart™, fare riferimento alla sezione 8 “Controlli
eSchermo”.
4. inDiCazioni per l’Uso
L’apparecchio va utilizzato per assistere la respirazione del paziente durante il sonno ai fini del trattamento dell’apnea ostruttiva del sonno
(OSA). Ciò si ottiene tramite la somministrazione di pressione positiva continua alle vie aeree (CPAP), in modo da prevenire l’ostruzione
delle vie stesse. L’aggiunta all’apparecchio dell’umidificazione riscaldata allevia l’irritazione e la deumidificazione a carico delle vie
respiratorie del paziente, effetti causati di solito dall’uso dei sistemi CPAP. L’apparecchio CPAP è indicato per l’uso da parte di pazienti
adulti a casa propria o presso un laboratorio del sonno. Fare riferimento all’elenco dei prodotti della serie HC600 in appendice a questo
manuale.
5. avverTenze sUll’UTilizzo Di ossigeno
Se è necessario l’uso dell’ossigeno, si raccomanda che l’ossigeno supplementare venga somministrato in corrispondenza della
maschera. Si prega di consultare le istruzioni specifiche del proprio tipo di maschera.
NOTA:
• ad un flusso costante di ossigeno supplementare, la concentrazione dell’ossigeno inalato varia a seconda dell’impostazione della
pressione, del pattern di respirazione del paziente, della scelta della maschera e della quantità delle perdite.
Prima di utilizzare l’ossigeno con l’apparecchio, si prega di prendere visione
delle avvertenze relative all’ossigeno all’interno della Sezione 2.
Page 79

H - 5
6. pUlizia e manUTenzione
NOTA: l’apparecchio dovrebbe essere pulito come richiesto.
1. Spegnere l’apparecchio e scollegarlo dalla presa di corrente. Attendere il raffreddamento dell’acqua e rimuovere la camera.
2. Strofinare la parte esterna dell’apparecchio con un panno pulito e umido (non bagnato) e un detergente per piatti non troppo forte.
Non utilizzare abrasivi potenti o solventi poiché potrebbero danneggiare l’apparecchio.
3. OPERAZIONI QUOTIDIANE
Pulire la camera e il tubo riscaldato.
• Estrarre il tubo riscaldato di respirazione dall’apparecchio tirando il manicotto verso l’alto in modo da sbloccare il connettore.
Rimuovere quindi il connettore.
• Sciacquare il tubo riscaldato con acqua insaponata. Stendere ad asciugare il tubo con entrambe le
estremità rivolte verso il pavimento.
• Estrarre la camera premendo il fermo e tirandola verso l’esterno.
• Svuotare e smaltire l’acqua rimanente.
• Per camere standard (HC365), pulire e lavare con acqua saponata, poi risciacquare ed asciugare.
• La camera a lunga durata (HC360) va smontata prima di pulirla. Spingere la base della camera
come mostrato in Fig. 1. Assicurarsi che la guarnizioen circolare della base non sia troppo allentata
o danneggiata. Lavare la parte superiore della camera e la base con un detergente neutro.
Sciacquare accuratamente ed asciugare. Questa camera può anche essere lavata in lavastoviglie.
• Strofinare accuratamente l’interno della presa di connessione del tubo di respirazione riscaldato
con una garza umida e pulita.
4. OPERAZIONI SETTIMANALI
Pulire a fondo la camera dell’acqua.
• Immergere l’interno della camera per 10 minuti in una soluzione composta da una parte di aceto
bianco e dieci parti d’acqua e risciacquare bene con acqua distillata.
5. MANUTENZIONE
• Sostituire il filtro dell’aria quando ha cambiato molto il suo colore, e in ogni caso almeno una volta ogni tre mesi o dopo 1000ore
di uso della macchina . Per far questo, rimuovere il supporto del filtro dal retro dell’apparecchio come mostrato in Fig.2.
Assicurarsi che la linea nera verticale del nuovo filtro sia rivolta verso l’apparecchio e montarlo insieme al supporto sul retro
dell’apparecchio.
• Sostituire la camera se questa è spaccata, scolorita o danneggiata.
• Sostituire il tubo di respirazione riscaldato dopo 4000 ore di utilizzo o una volta all’anno. Un tubo danneggiato deve eseere
sostituito immediatamente.
7. isTrUzioni per l’insTallazione
Quando la camera è montata e riempita, lapparecchio deve rimanere diritto, in modo
che l’acqua non entri al suo interno.
1. Tirar fuori l’apparecchio dalla sua confezione.
2. Collocare l’apparecchio su uno scaffale basso o sul pavimento accanto al letto.
Esso deve trovarsi più in basso rispetto alla vostra testa.
3. Togliere la camera di umidificazione dall’imballaggio.
4. Togliere i coperchi blu ed eliminarli (Fig. 1).
5. Riempire la camera d’acqua fino al livello contrassegnato dall’apposita linea
(Fig. 2).
Non riempire mai la camera attraverso la porta di connessione del tubo
riscaldato. Assicurarsi che la camera dell’acqua sia vuota prima di spostare
l’apparecchio. Eventuali danni all’apparecchio causati dall’acqua non sono
coperti dalla garanzia.
6. Per fissare la camera dell’acqua all’apparecchio, premere il fermo e far scorrere
la camera in posizione (Fig. 3 e Fig. 4).
7. Quando la camera è nella giusta posizione il fermo scatta automaticamente.
8. Una delle estremità del tubo con circuito riscaldato è dotata di un connettore
di plastica grigio. Sollevare il manicotto e far scorrere il connettore
nell’apparecchio. Tirar giù il manicotto per bloccarlo in posizione (Fig. 5, 6 e 7).
9. Collegare l’altra estremità del tubo con circuito riscaldato alla maschera.
10. Inserire la spina del cavo di alimentazione dell’apparecchio nella presa di
corrente.
11. Accendere l’apparecchio tenendo premuto il pulsante di accensione (Fig. 8).
Verrà visualizzata l’impostazione corrente dell’umidità ThermoSmart™.
12. Per modificare l’impostazione, fare riferimento alla sezione 8, “Comandi e
schermo a cristalli liquidi”.
L’apparecchio è ora pronto per l’uso.
Fig. 2
Fig. 3
Fig. 4
Fig. 5
Fig. 6
Fig. 7
Fig. 8
Fig. 1
Fig. 1
Fig. 2
Italiano
Page 80

H - 6
lmpostazione Ambiente ThermoSmart™*
Premere per ottenere aria più calda e più umida. Premere per ottenere
aria più fredda e più secca.* Fare riferimento alla sezione 3.4
Unità di misura di altitudine
Selezionare “m” per metri o “ft” per piedi usando i tasti o
Valori di altitudine
- Definire il livello di altitudine premendo i pulsanti o
- Premere per uscire dal menù
Pressione reale (Mostra la pressione reale)
- Lo schermo ritorna all’impostazione di base se non si esce dal menù. Premere
il tasto il tasto per uscire dal menù (disponibile solo nel HC608)
8. ComanDi e sChermo a CrisTalli liqUiDi
Pulsante di modalità
Passa in rassegna le varie opzioni
Pulsante giù
Diminuisce l’impostazione
Pulsante su
Incrementa l’impostazione
Pulsante di rampa
Pulsante di accensione
e spegnimento (On/Off)
8.1 Schermo: descrizione e funzione
PULSANTE FUNZIONI E DESCRIZIONE OPERAZIONE
PER ACCENDERE
Premere l’interruttore brevemente
L’apparecchio di default visualizza l’impostazione Umidità ThermoSmart
™
PER SPEGNERE
Rimuovere la maschera
Premere brevemente l’interruttore
PER ACCENDERE
Premere l’interruttore
(NB: Per resettare la rampa durante un ciclo, bisogna prima spegnere
l’apparecchio)
PER SPEGNERE
Premere l’interruttore
Usare i pulsanti e per aumentare o diminuire i valori
Premere il tasto per vedere in sequenza le varie opzioni
<
<
MENU’ PAZIENTE SCHERMO OPERAZIONE
Per controllare i valori di umidità; di
tempo totale di funzionamento di ore
medie di uso per notte, di valori di
altitudine e di valori di pressione
PER CONTROLLARE I VALORI
Premere il tasto per controllare in sequenza:
l’impostazione Umidità ThermoSmart™ (funzioni di base)
Regolazione dei livelli di umidità per limitare gli effetti collaterali dell’uso
del CPAP
Premere gli interruttori e per aumentare o diminuire i valori
Tempo totale di funzionamento: Mostra il numero totale di ore da
quando l’apparecchio è stato acceso (incluse le ore senza l’uso della
maschera)
Ore medie di uso per notte: Mostra il numero medio di ore di utilizzo
dello strumento con la maschera
Somma di controllo: Mostra le informazioni, utilizzate dal personale medico
o dal rivenditore, per controllare i dati di funzionamento
Valori di altitudine: Mostra i valori di altitudine . Premere o per
cambiare l’altitudine
Valori di pressione: Mostra i valori di pressione
cmH2O
hr
hr/
ACCESO / SPENTO
Accendere e spegnere l’Apparecchio
RAMPA
Riduce la pressione ad un livello più
basso in modo che sia più facile
addormentarsi. La pressione ritorna al
livello operativo normale in 20 minuti
INCREMENTARE / DIMINUIRE
Incrementare / diminuire l’impostazione
MODALITÀ
Passa in rassegna le varie opzioni
MENU’ PAZIENTE - Funzioni addizionali SCHERMO OPERAZIONE
Per accedere alle impostazioni
addizionali:
Dall’impostazione di base
“UMIDITA’
THERMOSMART™”
Premere il tasto per 3 secondi
3000
cmH2O
Nota: L’aggiustamento manuale dell’altitudine non è disponibile sulle unità che dispongono della Regolazione Automatica dell’Altitudine/Compensazione delle Perdite.
* Quando l’impostazione Ambiente ThermoSmart™ viene modificata l’impostazione dell’umidità ritorna all’impostazione di base 2,5.
Page 81

8.2 Riassunto del menù paziente
Incrementare /
diminuire
Premere per attivare
la rampa
Schermo
Modalità
Premere per
accendere e spegnere
l’apparecchio
Impostazione Umidità
ThermoSmart
™
(valori di base)
Impostazione
dell’altitudine
Impostazione
della pressione
cmH2O
0,1,2,3,4
<
<
o
Somma totale
Tempo totale di
funzionamento
hr
Ore medie di
uso per notte*
hr/
Ritorna alle
impostazioni
di base
Impostazione Umidità
ThermoSmart
™
(valori di base)
Impostazione
della pressione
cmH2O
Somma totale
Tempo totale di
funzionamento
hr
Ore medie di
uso per notte*
hr/
Ritorna alle
impostazioni
di base
Modello
HC604
Modello
HC608
Modello
HC604
Modello
HC608
Ritornare alla
funzione di base
o
m
Incrementare /
diminuire il valore
di altitudine
Premere per 3 secondi
ft
<
<
o
<
<
o
Selezionare l’unità
di misura di
altitudine
3000
<
<
o
Incrementare / diminuire
l’impostazione Ambiente
ThermoSmart
™
Ritorna alle
impostazioni
di base
Premere per 3 secondi
Pressione Reale
cmH2O
Menù paziente:
funzioni addizionali
Menù paziente:
funzioni addizionali
Modalita’
Avvertenza: Se non si seleziona la giusta altitudine (per ogni specifica località) la pressione somministrata non corrisponde a quella impostata.
H - 7
8.3 Menù paziente: funzioni addizionali
±
0,5 Incremento
Italiano
Page 82

9.
DomanDe posTe più freqUenTemenTe
Devo utilizzare acqua distillata con il mio l’apparecchio?
L’uso di acqua distillata prolunga la durata della camera dell’acqua. L’acqua del rubinetto contiene minerali e può danneggiare la
camera, bucandone la base, anche se l’acqua è passata attraverso un filtro.
Posso utilizzare l’apparecchio in altri paesi?
Sì. Basta utilizzare un adattatore conforme alle prese di corrente locali, in quanto l’apparecchio è in grado di selezionare
automaticamente il voltaggio richiesto.
Nota: Assicurarsi che la camera dell’acqua sia vuota prima di spostare l’apparecchio. Eventuali danni all’apparecchio causati
dall’acqua non sono coperti dalla garanzia.
È possibile utilizzare l’apparecchio insieme ad ossigeno supplementare?
Sì, l’ossigeno può essere somministrato in maschera. Accendere l’apparecchio prima di accendere l’ossigeno. Assicurarsi che la fonte
di ossigeno sia spenta prima di spegnere l’apparecchio per evitare l’accumulo di ossigeno nell’apparecchio.
Quando occorre sostituire la camera dell’acqua?
Sostituire la camera se le sue pareti di plastica si crepano o perdono colore, o se la base della camera risulta danneggiata.
Nota: in caso di perdite anche piccole la camera va sostituita immediatamente.
È possibile utilizzare l’apparecchio senza il tubo riscaldato?
Sì, è possibile, ma ciò farà sì che non possiate godere delle prestazioni ottimali in termini di umidità che
l’apparecchio offre. In questo caso non comparirà il simbolo del tubo riscaldato, come mostrato:
Cosa accade al mio apparecchio durante un’interruzione di corrente?
Rimuovere immediatamente la maschera. Successivamente al ripristino della corrente, l’apparecchio si avvierà nuovamente nello
stesso modo operativo e con le stesse impostazioni che presentava prima dell’interruzione di corrente. Fare riferimento alla Sezione 2
per ulteriori informazioni.
H - 8
10. ConDizioni Di fUnzionamenTo
TEMPERATURA AMBIENTE: tra 5 e 35 ºC
UMIDITÀ: Umidità relativa (UR) dal 10 al 95%
ALTITUDINE: 0 - 3000 m (0 - 9000 piedi)
Al di sopra dei 1500 m (4500 piedi) la pressione massima di esercizio risulta inferiore.
11. ConDizioni Di Conservazione e TrasporTo
L’apparecchio va conservato e trasportato nelle condizioni ambientali seguenti: tra -10 e 60 °C.
12. risolUzione Dei problemi
Se si ha la sensazione che il proprio apparecchio presenti malfunzionamenti, consultare il proprio fornitore di assistenza. Non tentare
di riparare l’apparecchio autonomamente.
13. garanzia
Per la garanzia si prega di contattare il proprio rappresentante Fisher & Paykel Healthcare.
14.
isTrUzioni per lo smalTimenTo Dell’appareCChio e Dei maTeriali Di ConsUmo
• Istruzioni per lo smaltimento dell’apparecchio
Questo apparecchio contiene materiale elettronico. Si prega di non gettarlo nella spazzatura normale. Smaltirlo
secondo le norme locali per lo smaltimento dei materiali elettronici.
• Istruzioni per lo smaltimento degli accessori consumabili
Mettere la maschera, il tubo di respirazione e la camera in una busta della spazzatura alla fine del suo utilizzo
esmaltirli nella normale spazzatura.
Page 83

16. appenDiCe
La tabella seguente elenca le principali differenze nelle caratteristiche della gamma di prodotti SleepStyle™ 600.
MODELLO
HC604
HC608
NOTA:
●
Tutti i modelli sono provvisti di umidificatore a caldo integrato e di tecnologia ThermoSmart
™.
●
Alcuni modelli non sono disponibili per la vendita in tutte le nazioni.
Monitoraggio dei dati di compliance (su
schermo LCD e scaricabili con software)
✓
✓
Autoregolazione dell’altitudine/
Compensazione delle perdite
-
✓
H - 9
CPAP completamente integrato
con umidificazione riscaldata
✓
✓
Italiano
15.
speCifiChe Del proDoTTo
DIMENSIONI: 10,7” x 6,7” x 6,9”
(273 mm x 170 mm x 175 mm)
PESO: 4,6 libbre (2,1 kilogrammi) solo unità
7,5 libbre (3,4 kilogrammi) imballato
all’interno della borsa inclusi accessori
COEFFICIENTI ELETTRICI
Frequenza di alimentazione: 50 - 60 Hz
Alimentazione elettrica
e corrente assorbita: 100 - 115 V (1,5 A, max 1,7 A),
220 - 240 V (1,0 A, max 2,0 A)
Nota: I presenti valori rappresentano
lamedia della corrente assorbita.
Requisiti del convertitore
da CC a CA: picco 115 V - 200 W/300 W
picco 230 V - 300 W/500 W
Placca del dispositivo
di riscaldamento: max. 85 W
Temperatura della placca del
dispositivo di riscaldamento: max. 149 °F (65 °C)
Impostazione di
alimentazione tubo di
respirazione termoregolato: max. 30 W
PRESTAZIONI
Pressione somministrata: da 4 a 20 cmH2O
Gamma delle altitudini: da 0 a 9000 piedi o da 0 a 3000 metri
CONFORMITÀ AGLI STANDARD:
Progettato per adempiere
ai requisiti di: IEC 60601-1
UL60601-1
CSA C22.2/No. 601.1
AS3200.1.0
EN60601-1
ISO 17510-1
L’apparecchio è conforme ai requisiti di compatibilità
elettromagnetica IEC 60601-1-2. In determinate circostanze,
l’apparecchio può disturbare o essere disturbato da dispositivi
posti nelle vicinanze, a causa degli effetti dell’interferenza
elettromagnetica. Qualora ciò dovesse accadere, provare a spostare
l’unità o l’apparecchio che crea l’interferenza o, in alternativa,
consultare il proprio fornitore di assistenza a domicilio.
Tempo di riscaldamento: 30 minuti
Umidità fornita: 30 mg/L*
Temperatura del gas: Max = 37,15 ºC (98,87 ºF)
*misurata ad una temperatura ambiente di 22°C: 10 cmH2O a
flussocontinuo.
Portate massime
Pressione CPAP
impostata (cmH2O) 4 8 12 16 20
Pressione misurata
alla connessione della 3 7 11 15 19
maschera del paziente
(cmH2O)
Flusso massimo
(L/Min) alla connessione 60 78 80 81 83
della maschera
Stabilità della pressione statica (lungo termine)
differenza di pressione da -0,05 a 0,18 cmH2O, pressione misurata
alla connessione della maschera alla pressione impostata di
10cmH2O
Stabilità della pressione dinamica (breve termine)
Pressione CPAP
impostata (cmH2O) 4 8 12 16 20
Differenza di pressione
(cmH2O) alla connessione 0,73 0,74 0,74 0,81 0,79
della maschera
Page 84

Page 85

I - 1
SleepStyle™ 600 CPAP シリーズは、加温加湿および熱
線入り回路が統合された製品です。本製品は、家庭あるいは
スリープラボにおいて、閉塞型睡眠時無呼吸症候群の治療の
ために使用することができます。
さらに詳しい情報をお求めの場合は、裏表紙の一覧をご覧
に な り 、最 寄 り の F&P 事業所までご連絡ください。
この説明書はご使 用の際にいつでも見られるように大切に
保 管してくだ さい 。
目次
1. 表示記号の定義 ...................................................................................................................................................................................... I - 2
2. 警告事項、注意事項、および禁忌事項 ................................................................................................................................................. I - 2
3. 本装置の説明 .......................................................................................................................................................................................... I - 3
3.1 本製品に含まれる物 ........................................................................................................................................................................ I - 3
3.2 本装置の重要部品 ............................................................................................................................................................................ I - 3
3.3 アクセサリー ................................................................................................................................................................................... I - 3
3.4 ThermoSmart™ テクノロジー ....................................................................................................................................................... I - 4
4. 使用目的 ............................................................................................................................................................................................................. I - 4
5. 酸素使用上の注意 .................................................................................................................................................................................. I - 4
6. 洗浄およびメンテナンス ....................................................................................................................................................................... I - 5
7. セットアップの手順 .............................................................................................................................................................................. I - 5
8. 操作と表示 ............................................................................................................................................................................................. I - 6
8.1 表示の説明、および機能 ................................................................................................................................................................ I - 6
8.2 患者用メニューの概要 .................................................................................................................................................................... I - 7
8.3 患者用メニュー – 追加設定の概要 ................................................................................................................................................. I - 7
9. よくある質問 .......................................................................................................................................................................................... I - 8
10. 動作環境 ................................................................................................................................................................................................. I - 8
11. 保管および輸送環境 .............................................................................................................................................................................. I - 8
12. トラブルシューティング ....................................................................................................................................................................... I - 8
13. 製品保証 ................................................................................................................................................................................................. I - 8
14. 装置と消耗品廃棄に関する指示 ........................................................................................................................................................... I - 8
15. 製品仕様 ................................................................................................................................................................................................. I - 9
16. 付録 ......................................................................................................................................................................................................... I - 9
はじめてご使用になる前に必ず説明書を全てお読みください。
注意: 合衆国連邦法により、この装置は医師による販売、または医師の発注による販売のみに制限されています。
加湿
CPAP
システム
Page 86

I - 2
1. 表示記号の定義
Type BF
適合箇所
交流
防滴
93/42/EEC
Class IIb
Class II
二重絶縁
電源
オン / オフ
2. 警告事項、注意事項、および禁忌事項
備考
• この取扱説明書では、「本装置」は SleepStyle™ 600 CPAP シリー
ズの装置のことを指します。
• CPAP(持続的気道陽圧)の使用を医師によって処方された場合
は、睡眠の際には毎回本装置を使用する必要があります。 本装置
が何らかの理由で機能を停止した場合は、直ちに医療サービス提
供者にお問い合わせください。
• 同梱の取扱指示に適合しない本装置の使用によって発生した人
身に対するケガまたは所有物に対する損傷については、本システ
ムの使用者が責任および責務を持つものとします。
• 本装置は、Fisher & Paykel Healthcare または医療サービス提供
者によって推奨された ISO 17510-2 に適合するマスク、コネクタお
よび呼吸チューブのみと一緒に使用してください。
• 室温が 95°F (35°C) を超えた場合、空気フロー温度が高くなり過
ぎ、気道を刺激することがあるため、本装置を使用しないでくださ
い。
• 修理および保守に関する事柄は全てFisher & Paykel Healthcare
にお問い合わせください。
警告
本装置からの感電を防ぐために:
• 電源コードまたはプラグに損傷がある場合は、本装置を使用しな
いでください。
• 水中に本装置を落とした場合は、使用しないでください。
• 本装置が濡れている場合は、電源ソケットに接続しないでくださ
い。
• 電源ソケットに接続している時に本装置を清掃しないでください。
• 傾いて水中に落下したり、引き込まれる可能性のある場所では、本
装置を保管したり使用したりしないでください。 装置のハウジング
に水が浸入した場合は、電源コードを外し、使用を中断してくださ
い。 Fisher & Paykel Healthcareにお問い合わせください。
窒息や異物吸入を防ぐために:
• チューブの開口部に物を一切入れないでください。
• 本装置の使用時に空気フィルターが装着されていることを確認し
てください。
治療を最適に行うためには:
• 本装置を落としたり損傷した場合は使用しないでください。
• 本装置が正しく機能しない場合は使用しないでください。
• 圧力を調整する場合、 医療専門家以外は圧力調整を行わないで
ください。
• 呼吸チューブに穴、亀裂、またはよじれなどの損傷がある場合、本
装置を使用しないでください。
• マスクの排気フローを遮断しないでください。
• 本装置がスイッチが切られていたり正しく機能していない時にマ
スクを使用しな いでください。
• 絶縁スリーブまたは類似するFisher & Paykel Healthcareによって
認証されていないアクセサリを使用しないでください。 それらは、
加湿機能を妨げる恐れがあります。
• 加温呼吸チューブを、スリーブを最初に押し上げないで取り外した
りしないようにしてください。 それは接続ポートに損傷を与えるこ
とを避けるためです。
やけどを防ぐために:
• チャンバーに沸騰した湯を充填しないでください。
• 露出したヒータープレートまたはチャンバーベースを直接手で触
らないでください。
• 呼吸チューブを皮膚と長時間接触する位置に置かないでくださ
い。
火災の危険を防ぐために、酸素使用の際は:
• 装置が使用されていない時は酸素フローのスイッチを入れない
でください。装置内に酸素が蓄積する可能性があります。
• 通気が悪いところに本装置を設置しないでください。
• 喫煙の際または炎があるところでは酸素を使用しないでく
ださい。
• 空気中で燃焼したり、酸素濃度が高いところで発火しやすいもの
は一切使用しないでください。
• 発火源となるものは一切本製品の近くに置かないでください。 発
火を防ぐために、発火源となるものは全て、追加酸素使用の部屋
から取り除くことをお勧 めします。
• 酸素レギュレータ、シリンダーバルブ、チューブ、接続部、その他す
べての酸素関連装置を、オイル、グリース、油性物質に近づけない
でください。 これらの物質が圧力下にある酸素と接触した場合、激
しく自然発火する可能性があります。
• シリアルポート・アダプタのカバー無しで本装置を使用しないでく
ださい。
そ の 他:
• チューブに水が浸入しないように、本装置を水平な面で頭の位置
よりも低い高さに設置してください。 チューブに水が浸入した場
合は、過剰な結露を排出してください。 チューブ内の水分は誤嚥
の恐れがあります。
• 本装置は、排気フロー穴を伴うCPAPマスクおよびコネクタと一緒
に使用するために設計され、マスクから絶えず空気を排出するこ
とを可能にします。 本装置のスイッチを入れ、装置が正しく機能し
ていると、吐いた息は新鮮な空気によってマスクの排気フロー穴
から排出されます。 CPAP 圧力が弱い場合、および停電または機
器の誤動作が発生した場合は、吐きだした息を排出するためのマ
スクを通して流れる空気の流量が不十分な可能性があるため、直
ちにマスクを 取り外してください。 そうしないと吐 き出した息 およ
び二酸化炭素の再呼吸が起きることがあり、危険な場合がありあ
ます。
• (一定の場所の)標高位置設定の失敗は、出力された圧力に対し
て悪影響を及ぼすことがあります。
• 本装置は生命維持を目的とするものではありません。
• 電源コードを必要ない時に本装置のリアパネルから取り外さない
でください。 取り外しが必要な場合は、コネクタを持って取り外し
てください。 電源コードを持って引張らないでください(3.2章参
照 )。
注意
本装置の水による損傷を防ぐために:
• 注水を行う前に、加湿チャンバーを本装置から取り外してくださ
い。
• 本装置を持ち運ぶ前にチャンバーの水を空にしてください。 チャ
ンバーに水を入れて本装置を取り扱うことが必要な場合は、水分
が本装置のハウジングに浸入することを防ぐために、装置を傾け
ないようにしてください。
そ の 他:
• パソコンの損傷を防ぐために、本製品とパソコンが隔絶されたシ
リアルポート・アダプタ(900HC236)を通して接続されている場合
のみ使用してください。
• 気道の刺激を避けるために、室温が 95 °F (35 °C) を超えた場合、
本装置を使用しないでください。
禁忌
• 研究によると、次のような既往症がみられる場合、一部の患者へは
陽圧の使用が禁忌とされることがあります。 気胸、水疱性の肺疾
患、気脳、脳脊髄液漏出、頭蓋手術や頭部外傷の直後、篩板異常、
病理学的低血圧、または上気道のバイパス手術歴など。
使用上の注意
• 呼吸障害または慢性閉塞性肺疾患の患者に対し、陽圧の安全か
つ効果的な使用は保証されていません。
副作用
• 陽圧治療を行う際、鼻血や耳または副鼻孔への不快感を生じるこ
とが あります。
治療に関して何らかの質問が生じた場合は、かかりつけの医師にお
問い合わせください。
注意
付属書類を
参照して
ください。
Page 87

I - 3
3. 本装置の説明
3.1 製品に含まれるもの
3.2 本装置の重要部品
アクセサリー
SleepStyle™ 600 CPAP シリーズ x 1
電源コードとコネクタ
THERMOSMART™ 熱線入り回路
スリーブ付きコネクター
THERMOSMART™ 熱線入り回路接続ポート
水チャンバー
水位線 (垂直)
フィンガーガード
ヒータープレート
水位線
フィルター ホルダー
DISPLAY
エアーフィルター
オン / オフ ボタン
3.3 アクセサリー
HC365 加湿チャンバー – 標準r
HC360* 加湿チャンバー – 長期使用可能
900HC522 ThermoSmart™ 呼吸チューブは
22 mm (.86") 円錐コネクタにフィットします。
*国によって販売されていないモデルがあります。
900HC240 エアーフィルター (2 パック)
900HC604 アウトレ ット ク リー ニ ング キ ット HC600
900HC627 じ ょ う ご( エ ル ボ ) 10 パッ
予備エアーフィルター x 1
電源コード x 1
水チャンバー x 2
じょうご x 1
ThermoSmart
™
熱線入り回路 x 1
じょうご
Page 88

I - 4
3.4 ThermoSmart™ テ クノロ ジ ー
本装置は最適な快適性を実現するように設計されており、独自の熱線入り回路技術、ThermoSmart™ を提 供し ます。ThermoSmart™ テクノロジー
により、環境温度に左右されずに、最適なレベルの湿度(高め、またはカスタムの設定 )を患者に提 供することができます。
最適な快適性を実現するために、本装置を 2 つのレベルで 調整することができます。
ThermoSmart
™
加湿設定: この設 定により、ヒータープレートの温 度を 制 御し、患 者 が 快 適な加湿レベルに調節します。設定値は1〜 4で、0 .5
単 位 での 調節が 可能 で す。本 装置は 、ほと んど の 患者に 対応 するよう 2 . 5 に プリセットされて いま す。
• 乾燥感を覚えたり、空気 が冷たすぎると感じる場 合: 設定を上げる。
• チューブ内に過度の湿気がある、または空気が熱く感られる場合: 設定を下げる。
• この設定で最適な快適性が得られない場合には、ThermoSmart™ 温度設定でさらに高度な調整が可能です。
ThermoSmart™ 温度設定: この設定で、出力される湿度を最適化することにより、さらに調節オプションが得られます。設定値は1〜3で、1.0単
位 で の調 節が 可能 です。本 装 置 は、ほと ん どの患 者に 対応 する よう 2 にプ リセットされて いま す。
• 経口 CPAP デリバリー に は 、ThermoSmart™ 温度設定 "3" が推奨されています。
• ThermoSmart™ 快 適設定で得られる設定範 囲で、乾燥しすぎていたり、冷たすぎると感じる場合: クライメート設定を上げてくだ
さい。
• ThermoSmart™ 快適設定で得られる設 定範囲で、暖 かすぎたり、湿 度が高すぎると感じる場 合: クライメート設定を下げてください。
最適な湿度を維持するために呼吸回路を寝具の上に保持する事を推奨します。
ThermoSmart
™
快適設 定、および ThermoSmart™ クライメート設定に関する詳細は、第 8 項「操作と表示」を参照してください。
4. 使用目的
本装置は閉塞型睡眠時無呼吸症候群(OSA)の治療において、患者への睡眠時の呼吸補助を目的として使用されます。持続的気道陽圧(CPAP)
をかけ、気道の障害を防ぐことによって行われます。本 装置は 加温加湿器と併用することにより、CPAPシステム使用の際によく見られる、患者の気
道乾燥および炎症等の症状を緩和します。本装置は在宅またはスリープラボにて成人患者用に使用してください。この取扱説明書の付録に記載の
SleepStyle™ 600 シ リーズ 製 品 一覧 を参 照してくだ さい 。
5. 酸素使用上の注意
酸素が必 要な場 合、追加酸 素をマスクのところで施 すことを奨励しま す。 あなたのマスクタイプに即した取扱い 指 示を参 照してください。
備 考:
• 追加酸素の流量が固定されている場合、圧力設定や患者の呼吸パターン、使用されるマスクまたはリーク量に応じ、吸入される酸素の濃
度が変 動することがあります。
本装置と一緒に酸素を使用する場合は、2項の酸素使用に関する警告事項を参照してください。
Page 89

I - 5
6. 洗浄およびメンテナンス
注意: 必要に応じて、本装置の洗浄を随時行ってください。
1. 本装置の電源を切り、電源ソケットからプラグを抜いてください。 湯が冷めるのを待ち、チャンバーを取り外してください。
2. 本装置の外部を湿らせた清潔な(完全に濡れていない)布とマイルドな食器用洗剤でふき取ってください。 強力な研磨剤や溶剤は本装
置に損傷を加える可能性があるので使用しないでください。
3. 毎日の 手入れ
チャンバー、熱 線入り回 路 、および 熱 線入り回 路接 続 ポートを洗浄します。
• スリーブを引き上げてコネクターを外し、熱線入り回路 を本装置から取り外します。コネクターを取り外します。
• 石 鹸 水で 熱線 入り回路を洗浄し 、よくすすいだ 後、チューブの両端を床に向 けてつるし 乾燥 させます。
• 指ガードを押し下げ、チャンバーを引き出すように取り外します。
• 残 っ た 水 を 空 け 、捨 て ま す 。
• 標 準 の 加湿 チャンバー (HC365) は、石鹸水で洗浄し、すすいだ後に乾燥させます。
• 長期使用可能な加湿チャンバー (HC360) は、洗浄の前に分解する必要があります。図1のように、チャンバー
上部から底 部を 押して取り 外します。この 際 、底 部 の円 形シール が緩くなっていたり、破 損して い な いことを
確認してください。チャンバー上部および底部を食器洗浄用の中性洗剤で洗います。そして、すすいだ後に乾
燥 させ ま す。チャンバ ーを家 庭 用皿 洗 い 機で 洗浄 すること も 可 能で す。
• 糸くずの出にくい清 潔な湿らせた布を使用して熱線入り回路接続ポートの内部をよく拭きます。
4. 毎 週の手入れ
チャンバーを十分に洗 浄します。
• 酢1水5の割合の溶液でチャンバー内部を満たし10分間浸け、その後、蒸留水で良くすすぎます。
5. メンテナンス
• エアーフィル ターが 著しく変 色している 場合 や、少なくとも 3ヶ月に一 度 または 装置 を10 0 0 時間 運 転させる 毎
にエアーフィルターを交換をします。これには、図2のように、装置の 後ろからフィルター フォルダーを取り外します。交換した新しいフィルタ
ーの縦線(黒)が装置の方向を向いていることを確認し、両方を装置に取り付けます。
• チャンバーにひび割れ、変色、キズがある場合は、チャンバーを交換します。
• 熱線入り回路は、使用時間4000時間以上または年に一回交換します。破損したチューブは即交換が必要となります。
7. セットアップの手順
チャンバ ーの 取り 付 け が 完 了し 、注 水 した ら、水 がユ ニット内 部 に入ら ない よう 、装 置を 傾 け
たりし ない ようにしてくだ さい 。
1. 本 装 置を 梱包 か ら取り出 し ま す。
2. 本装置をベッド脇の低い棚または床の上に置きます。装置は頭部よりも低い場所に置い
てくだ さ い 。
3. 水チャンバーを梱包から取り出します。
4. 青いキャップを外し、捨てます。(図 1)
5. チャンバーに水位線まで注水します。(図 2)
熱線入り回路のコネクターポートからチャンバーへの注水は絶対に行わないでくださ
い。本装置を輸 送する場 合は、水チャンバーが空であることを必ず確認します。水によ
る装置の故障は保証対象外となります。
6. 水チャンバーを本装置に取り付けるには、指ガードを押し下げ、チャンバーをスライドさ
せます。(図 3) (図 4)
7. チ ャンバ ー が正しく取り付 けられ ると、「 カチッ」と音 がして フィンガーガードが 正しくは
まります。
8. 熱 線 入り回路 の一方の 先端 には 灰 色のプラスチック 製コネクターが備 わっています。ス
リーブを持ち上げ、コネクターを本装置にスライドさせて取り付けます。スリーブを押し下
げてロックします。(図 5) (図 6) (図 7)
9. 熱線入り回路の他方の先端をマスクに接続します。
10. 本装置の電源コードをコンセントに差し込みます。
11. オン/オフ ボタンを押して本装置の電源をオンにします。( 図 8)
現在のThermoSmart™ 湿度設定が表示されます。
12. 設定変更に関する詳細は第 8 項「操作と表示」を参照してください。
システムを使用する準備ができました。
図2
図3
図4
図5
図6
図7
図8
図1
図1
図2
Page 90

I - 6
ThermoSmart™ 気温設定*
供給ガス温度を変更するには:より暖かく加温されたガス供給には を押
します。低温で乾燥したガス供給には を押します。*セク ション3.4を参照。
高度
または を押して、メートル単位の場合は“m”を、フィート単位の場合は“ft”を選択します。
高度設定
- ボタンまたは ボタン を押して高度レ ベルを設 定します。
- を押してメニューを終了します。
実圧力 (実圧力を表示します)
- メニューが利用できない場合は、表示が自動的に前の状態に戻ります。
ボタンを押してメニューを終了します(HC608のみ利用可能)。
8. 操作と表示
8.1 表 示 の 説 明 、お よ び 機 能
キー 機能と説明 操作
「オン」にするには
ボタンを短く押します。
ThermoSmart™ 湿度設定が自動的に表示されます。
「 オ フ 」に す る に は
マスクを外しま す。
ボタンを短く押し下げます。
「オン」にするには
を押します。
(注意: 途中でランプをリセットする場合は、必ず本装置の電源をオフにしてくだ
さ い 。)
「 オ フ 」に す る に は
を 押します。
と ボタンを押して設定の上げ下げを行います。
ボタンを押すたびに選択可能なオプションが切り替わり確認できます。
<
<
患者用メニュー 表示 操作
CPAP設定、湿度、コンプライア
ンス データ、高度、および圧力
設定が確認できます。
項目を 表示するには
キーを押すと項目を切り替えて表示します。
ThermoSmart™ 湿度設定(初期表示)
CPAP 使用による上部気道への副作用を抑制するためのThermoSmart
™
湿 度設 定調 節に 使用し ます。
と ボタンを押して設定の上げ下げを行います。
総動作時間: 本装置が電源オンになっている総時間を表示します(マス
クが使用されていない時間も含まれます)。
夜間平均コンプライアンス時間: 夜間にマスクを使用して本装置が
使 用さ れた平均 時間 を 表 示しま す。
チェック サム: 医師 や業 者がコンプライアンスをチェック するための情
報を表示します。
高度設定: 高 度 設定を 表示し ます。 または を 押して高度 を 変更
します。
圧力設定: 圧 力 設定を 表示 しま す。
cmH2O
hr
hr/
オン / オフ
本装置のオンおよびオフを切り替
えます。
ランプ
圧力レベルを下げ、睡眠をとりやす
くし ま す。
圧力は20分間にわたり徐々に通常
稼働圧力まで戻ります。
上げる / 下げる
設定の上げ下げを調整します。
モード
オプションを 1つ ずつ切り替えま す。
患者用メニュー – 追加設定 表示 操作
追加設定にアクセスするには:
初期設定から
"THERMOSMART™
HUMIDITY"
キーを 3 秒間押します。
3000
cmH2O
警 告:誤った高度設 定(いかなる場 所においても)を行うと圧力供給に悪影響を及ぼします。
* ThermoSmart
™
気温設定が変更されると湿度設定は初期設定値の2.5に戻 ります。
モード ボタン
オプションを1つずつ
切り替えます
ダウン ボタン
設定値を下げます
アップ ボタン
設定値を上げます
ランプ ボタン
オン/ オフ ボタン
Page 91

8.2 患 者用メニュー の 概要
cmH2O
0,1,2,3,4
<
<
または
cmH2O
または
m
上昇/下降
高度レベル
3 秒間押し続ける
ft
<
<
または
<
<
または
高度の単位を
選択します。
3000
<
<
または
上昇/下降
ThermoSmart™ 気温設定
初期状態に戻る
3 秒間押し続ける
実圧力
cmH2O
患者用
詳細メニュー
患者用
詳細メニュー
警 告:誤った高度設定(いかなる場所においても)を行うと圧力供給に悪影響を及ぼします。
I - 7
8.3 患者用メニュー – 追加設定の概要
±
0.5 上昇
モード
モデル
HC604
モデル
HC608
初期状態に戻る
ThermoSmart™
湿度設定
(初期設定)
高度設定
圧力設定
チェックサム総動作時間
hr
夜間
平均時間
*
hr/
初期状態に
戻る
ThermoSmart™
湿度設定
(初期設定)
圧力設定
チェックサム
総動作時間
hr
夜間
平均時間
*
hr/
初期状態に
戻る
モデル
HC604
モデル
HC608
上昇
下降
押してランプを
作動させる
一度だけ押して装置の
電源をオン/オフにする
表示
モード
Page 92

I - 8
9. よくある質問
蒸留水を使用しなければなりませんか。
蒸留水を 使 用することにより、水チャンバーの寿命を延ばすことがで きます。水道水はフィルターされた 水であってもミネラルが含まれている事が 多い
ため、底にへこみができるなどチャンバー破損の原因となります。
この装置を外 国で使用することは出来ますか。
使用できます。本装置は自動的に異なる電圧に適応するため、適切な電源プラグアダプターを用いるだけで使用が可能です。
注意:本装置を輸送する場合は、水チャンバーが空であることを必ず確認してください。水による装置の故障は保証対象外となります。
追加酸素の使用は出来ますか。
使用出来ます。酸素はマスクにより供給されます。酸素の供給を開始する前に本装置の電源をオンにし、装置の電源をオフにする前に酸素供給源が
閉じていることを確認し、装置内に酸素が溜まらないようにします。
水チャンバーはいつ交換すれば良いですか。
チャンバ ーのプ ラスチ ックの 壁 に亀 裂 や曇り が 見ら れ る 、ま たは チャンバ ーの 底にへ こみ が 出 来 る などし た場 合 に は、チ ャンバ ーを 交 換しま す。
(注意:もしチャンバーから水漏れが発生した場合は早急に交換してください。)
熱線入り回路なしで本装置を使用できますか。
使用できますが、本装置の提供する最適な湿度パフォーマンスを得ることができません。
装置は、熱線入り回路の記号を表示せず、次の表示を行います。
停電時には、本装置に何が起きるのでしょうか?
直ちにマスクを取り外してください。 電源が復活した後は、本装置は停電前と同じ使用モードと設定で再起動します。 詳細は2項を参照して
ください。
10. 動作環境
環境温度: 5 - 35 ºC
湿度: 10 - 95% 相対湿度 (RH)
高度: 0 - 3000 m (0 - 9000 ft)
1500 m (4500 ft) より高い高度では、最大動作圧力が減少します。
11. 保管および輸送環境
本装置の保管および輸送環境基準: -10 to 60 °C
12. トラブルシューティング
装置が正確に作動していないと思われる場合は、医療サービス提供者にお問い合わせください。 自分で装置を修理することは試みないでく
ださい。
13. 製品保証
製品保証に関しては、お近くのFisher & Paykel医療サービス提供者にご連絡ください。
14. 装置と消耗品廃棄に関する指示
• 製品の廃棄に関する指示
本装置は電子部品を含有しています。 そのため、普通ごみとして廃棄しないでください。 電子機器の処分に関する現地の
規定に従って廃 棄してください。
• 消耗品の廃棄に関する指示
使用後、マスク、呼吸チューブ、ウォーターチャンバーをごみ袋に入れて普通ごみと一緒に捨ててください。
Page 93

16. 付録
SleepStyle™ 600 製品群における主な仕様の違いは、以下の表にまとめてあります。
モデル
HC604
HC608
注意:
●
全モデルがThermoSmart
™
テクノロジーと完全統合されています。
●
国によって販売されていないモデルがあります。
患者コンプライアンス モニター
(LCD お よびダウン ロード )
✓
✓
自動高度/
漏れ補償機能
-
✓
I - 9
加温加湿と
完全統合された CPAP
✓
✓
寸法: 10.7” x 6.7” x 6.9”
(273 mm x 170 mm x 175 mm)
重量: 4.6 lbs (2.1 kg) ユニットのみ
7.5 lbs (3.4 kg) バッグに梱包。アクセサリ
を含む
電気的定格仕様
電源周波数: 50 - 60 Hz
電源電圧および電流: 100 - 115 V (1.5 A, 最大 1.7 A),
220 - 240 V (1.0 A, 最大 2.0 A)
備考 : これらの値は、平均電流値を表す。
直流から交流への変換条件: 115 V - 200 W/300 W サージ
230 V - 300 W/500 W サージ
ヒータープレート:: 最大 85 W
ヒータープレート温度: 最大 149 °F (65 °C)
加熱呼吸チューブ電源設定: 最大 30 W
性能
圧力範囲: 4 から 20 cmH2O
標高範囲: 0 から 9000 ft または 0 から 3000 m
適合基準:
下記の規定に適合するように設計: IEC 60601-1
UL60601-1
CSA C22.2/No. 601.1
AS3200.1.0
EN60601-1
ISO 17510-1
本製品は電磁波障害規定 IEC 60601-1-2 に適合しています。 ただし一定
の状況下においては、電磁波障害の効果によって付近の装置に対して本
製品が影響を与える、またはその装置によって本製品が影響を受けるこ
とがあります。 もしそのようなことが起きたら、本製品の場所を移すか、
障害を起こす装置の位置を変えるか、または医療サービス提供者に問
い合わせてください。
15. 製品仕様
ウォーミングアップ 時間 : 30 分
供給湿度: 30 mg/L*
気体温度: 最大 = 105.8 °F (41 °C)
*周囲温度 22 ºC で測定 バイアスフロー時10 cmH2O 。
最大流量
CPAP 圧力設定
(cmH2O) 4 8 12 16 20
患者の接続ポート
における測定圧力 3 7 11 15 19
(cmH2O)
マスク接続ポート
における最大流量 60 78 80 81 83
(L/min)
静圧安定性(長期)
圧力設定 10 cmH2Oの際、マスク接続ポートにおいて
-0.05 〜 0.18 cmH2O の圧力差
動圧安定性(短期)
CPAP 圧力設定
(cmH2O) 4 8 12 16 20
マスク接続ポート
における圧力差 .73 .74 .74 .81 .79
(cmH2O)
Page 94

Page 95

J - 1
SleepStyle™ 600 시리즈는 가온가습기와 가온
호흡튜브가 통합된 CPAP 시스템입니다.
이 장치는 폐쇄성 수면 무호흡(OSA) 치료를 위하여
가정 및 수면 검사실에서 사용할 수 있도록 디자인
되었습니다.
자세한 사항은 뒷면의 Fisher & Paykel Healthcare 지역
담당자에게 문의하십시오.
이 설명서를 잘 보관하여 필요 시 참조하십시오.
차례
1. 제품 기호 ................................................................................................................................................................................................ J - 2
2. 경고, 주의 및 금기 ............................................................................................................................................................................. J - 2
3. 제품 설명 ................................................................................................................................................................................................ J - 3
3.1 포장된 내용물 .................................................................................................................................................................................. J - 3
3.2 제품의 중요 부품 ............................................................................................................................................................................ J - 3
3.3 부속품 ............................................................................................................................................................................................... J - 3
3.4 ThermoSmart™ 가습공학 .............................................................................................................................................................. J - 4
4. 사용 목적 ............................................................................................................................................................................................... J - 4
5. 사용 시 주의 사항 ................................................................................................................................................................................. J - 4
6. 세척 및 관리 .......................................................................................................................................................................................... J - 5
7. 설치 안내 ................................................................................................................................................................................................ J - 5
8. 조정 및 화면 표시 ................................................................................................................................................................................. J - 6
8.1 화면 표시 설명 및 기능 .................................................................................................................................................................. J - 6
8.2 환자 메뉴 요약 ................................................................................................................................................................................ J - 7
8.3 환자 메뉴 – 추가 설정 요약 ......................................................................................................................................................... J - 7
9. 제품 FAQ ............................................................................................................................................................................................... J - 8
10. 사용 환경 ............................................................................................................................................................................................... J - 8
11. 보관 및 운반 .......................................................................................................................................................................................... J - 8
12. 문제 해결 ................................................................................................................................................................................................ J - 8
13. 보증 ......................................................................................................................................................................................................... J - 8
14. 제품 및 소모품 처리 방법 .................................................................................................................................................................... J - 8
15. 제품 규격 ................................................................................................................................................................................................ J - 9
16. 부록 ......................................................................................................................................................................................................... J - 9
사용 전 설명서를 숙지하십시오.
주의: 미 연방법은 이 제품을 의사 혹은 의사의 주문에 의해서만 판매하도록 제한하고 있습니다.
가습 CPAP 시스템
Page 96

J - 2
1. 제품 기호
Type BF
적용부품
교류 전류
누수방지
93/42/EEC
Class IIb
Class II
이중차단
전원
켜기/끄기
2. 경고, 주의 및 금기
참고
• 이 설명서에서는 SleepStyle™ 600 CPAP 시리즈 제품을 "장치"
로 지칭합니다.
• 주치의로부터 CPAP 사용을 처방 받은 경우 잠을 잘 때마다
장치를 사용해야 합니다. 어떤 이유에서든 장치의 작동이
중지되는 경우 즉시 의료진에게 문의하십시오.
• 이 시스템을 사용할 때 제공된 작동 지침을 준수하지 않아서
발생하는 상해나 장치 손상에 대한 일체의 책임은 사용자에게
있습니다.
• 장치는 Fisher & Paykel Healthcare 또는 담당 의료진이
추천하는 ISO 17510-2 준수 마스크, 연결기 및 공급 튜브만
함께 사용할 수 있습니다.
• 실내 온도가 35 °C (95 °F)를 넘을 경우 공기 흐름 온도가
상승하여 기도에 자극이 발생할 수 있으므로 장치를 사용하면
안 됩니다.
• 모든 복구 및 유지 보수 작업은 Fisher & Paykel Healthcare 에
문의하십시오.
경고
장치 사용 시 전기 충격을 피하려면 다음 사항을
주의하시기 바랍니다.
• 전선이나 플러그가 손상되어 있을 경우 장치를 사용하지
않습니다.
• 장치가 물에 젖은 경우 사용하면 안 됩니다.
• 장치가 물에 젖은 경우 전원 소켓 연결을 금지합니다.
• 전원 소켓에 연결되어 있을 경우 장치 청소를 금지합니다.
• 경사진 곳이나 모서리 또는 물기가 있는 곳에서 장치를
사용하거나 보관하지 않습니다. 장치 내부에 물이
들어간 경우 전원을 차단하고 사용을 중지해야 합니다.
도움이 필요한 경우 Fisher & Paykel Healthcare 의 자문을
구하십시오.
이상 물질 흡입이나 질식 등의 문제를 방지하려면 다음
사항을 주의하시기 바랍니다.
• 튜브 입구에 어떤 물질도 넣지 않습니다.
• 장치 사용 중에 공기 필터가 잘 끼워져 있는지 확인합니다.
최적의 치료 효과를 얻으려면 다음 사항을 주의하시기
바랍니다.
• 떨어뜨렸거나 손상된 경우 장치를 사용하지 않습니다.
• 제대로 작동하지 않는 경우 장치를 사용하지 않습니다.
• 압력 조절을 금지합니다. 압력 조절은 전문 의료진만
수행해야 합니다.
• 호흡 튜브에 구멍이나 찢어진 곳 또는 비틀어진 부분이 있을
경우 장치를 사용하지 않습니다.
• 마스크의 배출구를 막으면 안 됩니다.
• 장치의 전원이 꺼져 있거나 작동하지 않는 상태에서 마스크를
사용하지 않습니다.
• Fisher & Paykel Healthcare 의 승인을 받지 않은 절연 슬리브
또는 유사 부속품을 사용하면 안 됩니다. 이들은 가습 성능에
영향을 줄 수 있습니다.
• 슬리브를 먼저 밀어 올리지 않은 상태에서 가온 호흡
튜브를 제거하면 안 됩니다. 이렇게 할 경우 연결 포트가
손상됩니다.
화상을 예방하려면 다음 사항을 주의하시기 바랍니다.
• 뜨거운 물로 물통을 채우지 않습니다.
• 노출된 열판 또는 물통 바닥을 만지지 않습니다.
• 호흡 튜브를 놓을 때 피부와 장시간 접촉되지 않도록 놓아야
합니다.
산소 사용 중 화재 위험을 예방하려면 다음 사항을
주의하시기 바랍니다.
• 장치가 작동하지 않을 경우 산소 흐름을 차단해야 합니다.
이렇게 하지 않으면 장치 내에 산소가 축적될 수 있습니다.
• 환기가 잘 되지 않는 곳에 장치를 놓지 않습니다.
• 담배 연기나 화염이 있는 곳에서 산소를 사용하지 않습니다.
• 고농도 산소에서 쉽게 타거나 점화되는 물질을 사용하지
않습니다.
• 제품 근처에 점화될 수 있는 물질을 두면 안 됩니다. 불이
붙는 것을 막으려면 보충 산소가 사용되는 공간에서 점화
가능한 물질을 모두 치워야 합니다.
• 기름이나 기름이 묻은 물질이 고압의 산소와 접촉하면
급작스러운 발화를 유발할 수 있습니다. 이러한 물질은
산소 조절기, 실린더 밸브, 튜브, 연결기, 그 외 모든 산소
장비로부터 멀리 떨어져 있어야 합니다.
• 시리얼 포트 어댑터 위에 커버 없이 장치를 작동하면 안
됩니다.
기타.
• 물이 튜브에 유입되지 않도록 하기 위해 장치를 머리
높이보다 낮은 평평한 표면에 둡니다. 튜브에 물이 유입되면
응축액이 빠져나갑니다. 튜브에 물이 들어가면 흡입될 수
있습니다.
• 장치는 환자가 내뱉은 공기가 계속 배출되는 배출구가 있는
CPAP 마스크 및 연결기와 함께 사용되어야 합니다. 장치의
전원이 켜져 있고 제대로 작동될 때는 배출구를 통해 신선한
공기가 들어오고 내뱉은 공기는 밖으로 나갑니다. CPAP
압력이 낮고 전원 장애가 발생했거나, 기계가 오작동할
경우에는 마스크를 통한 공기 흐름이 불충분해서 배출된
공기를 모두 제거할 수 없고 이로 인해 해로울 수 있는
CO2 재호흡이 발생할 수 있으므로 마스크를 즉시 제거해야
합니다.
• 주어진 위치에 대해 고도 수준을 제대로 선택하지 못할 경우
전달되는 압력에 부작용이 생길 수 있습니다.
• 이 장치는 생명 유지 장치로 고안되지 않았습니다.
• 장치 후면에서 불필요하게 전원 코드를 뽑지 않습니다. 전원
코드를 뽑아야 하는 상황이면 연결기를 고정한 상태에서
뽑아야 합니다. 전원 코드를 잡아 당기면 안 됩니다. 관련
내용은 3장 2절을 참조하십시오.
주의
물로 인한 장치 손상을 예방하려면 다음 사항을
주의하시기 바랍니다.
• 물을 채우기 전에 장치에서 물통을 제거합니다.
• 장치를 운반하려면 먼저 물통의 물을 비웁니다. 물통에 물이
든 상태에서 장치를 사용해야 할 경우 장치가 기울어져서
물이 내부로 들어가지 않도록 주의해야 합니다.
기타.
• PC 손상을 예방하려면 장치가 절연 시리얼 포트 어댑터를
통해 PC 에 연결되어 있을 경우에만 작동해야 합니다.
• 기도 자극을 예방하려면 실내 온도가 35 °C (95 °F)를 넘을
경우 장치를 사용하면 안 됩니다.
금기
• 연구 결과 기흉, 폐기종, 기뇌증, 뇌척수액 누출, 최근
뇌수술이나 손상 시, 사판기형, 병리적 저혈압 또는 상기도가
우회된 환자의 경우 등과 같이 일부 환자들에게 양압기
사용이 금기가 될 수 있습니다.
주의
• 호흡기 장애 또는 만성 폐쇄성 폐 질환 환자의 경우에는
양압의 안전과 효과가 검증되지 않았습니다.
부작용
• 양압기 사용 시 비출혈, 귀와 비강의 불편증이 생길 수
있습니다.
현재 치료와 관련하여 질문이 있는 경우 담당 의사에게
문의하십시오.
주의
첨부문서
참조
Page 97

J - 3
3. 제품 설명
3.1 포장된 내용물
3.2 제품의 중요 부품
부속품
SleepStyle™ 600 CPAP 시리즈 x 1
전원 코드 및 연결기
THERMOSMART™ 가온 호흡 튜브
슬리브를 포함한 연결기
THERMOSMART™ 가온 호흡 튜브 연결 포트
물통
물 보충선
물통 보호대
가열판
수위 눈금
필터 고정기
화면표시부
공기 필터
전원 버튼
3.3 부속품
HC365 표준형 물통
HC360* 긴수명 물통
900HC522 ThermoSmart™ 가온 호흡 튜브 -
22 mm(.86") 원추형 연결기에 고정
*일부 국가에서는 판매가 제한될 수 있습니다.
900HC240 필터(2 팩)
900HC604 배출구 청소 키트 HC600
900HC627 엘보우 깔때기 10팩
공기 필터 여분 x 1
전원 코드 x 1
물통 x 2
깔때기 x 1
ThermoSmart™
가온 호흡 튜브 x 1
깔때기
Page 98

J - 4
3.4 ThermoSmart™ 가습공학
최적의 편안함을 위해 설계된 SleepStyle™ 600 시리즈는 독특한 가온가습 기술인 ThermoSmart™를 제공합니다. ThermoSmart™
가습공학은 개개인에게 맞춘 최적의 습도를 주위 온도 변화에 상관 없이 환자에게 제공합니다.
이 장치는 최적의 편안함을 제공하기 위하여 두 단계로 조정될 수 있습니다.
ThermoSmart™ 습도 설정: 이 설정은 가열판의 온도를 조절하여 환자에게 편안함을 줄 수 있는 습도로 조절합니다. 1에서 4까지
0.5씩 조정되며 대부분의 환자에게 알맞도록 2.5로 초기 설정되어 있습니다.
• 만일 건조함을 느끼거나 공기가 차가워지는 것을 느낀다면 설정을 높이십시오.
• 만일 너무 습하거나 뜨겁게 느껴지면 설정을 낮추십시오.
• 만일 위의 조정으로 최적의 편안함을 얻지 못한다면 ThermoSmart
™
온도 설정을 조정합니다.
ThermoSmart™ 온도 설정: 전달되는 습도를 최적화할 수 있는 추가 조절 옵션이 제공됩니다. 조정은 1~3까지 1씩 조정되며 대부분의
환자에게 알맞은 2로 초기 설정되어 있습니다.
주의: 만약 온도 설정이 조정이 되면 습도 설정은 기본값으로 돌아가게 됩니다.
• 구강 인터페이스
를 사용하는 환자는 ThermoSmart™ 온도 설정을 3으로 해야 합니다.
• 만일 ThermoSmart
™
습도 설정에 의한 공기가 너무 건조하거나 차다면 ThermoSmart™ 온도 설정을 증가시킵니다.
• 만일 ThermoSmart
™
습도 설정에 의한 공기가 너무 덥거나 습하게 느껴지면 ThermoSmart™ 온도 설정을 감소시킵니다.
최대의 가습효과를 위해 가온 호흡 튜브를 침대 머리 끝에 놓으십시오. ThermoSmart™ 습도 설정 및 ThermoSmart™ 온도 설정은
“ 8. 조정 및 화면 표시”를 참조하십시오.
4. 사용 목적
이 장치는 폐쇄성 수면 무호흡증(OSA) 치료를 목적으로 환자들의 수면 중 호흡을 돕기 위하여 사용됩니다. 기도가 막히는 것을 방지하기
위해 지속적인 기도 압력을 제공합니다. 이 장치에 가열된 습도를 추가하여 CPAP 시스템 사용시 흔히 일어나는 환자의 기도 건조증이나
불편한 증상을 막을 수 있습니다. 이 장치는 성인 환자가 가정 혹은 수면 실험실에서 사용할 수 있도록 설계되었습니다. 이 설명서 부록의
SleepStyle™ 600 시리즈 제품 목록을 참조하십시오.
5. 산소 사용 시 주의 사항
산소가 필요할 경우 보충 산소를 마스크로 공급하는 것이 좋습니다. 마스크 유형별 지침을 확인하시기 바랍니다.
참조:
• 보충 산소는 고정 흐름 속도로 공급되나 흡입되는 산소의 농도는 압력값, 환자의 호흡 패턴, 마스크 종류, 공기 누출 정도에
따라 달라집니다.
장치에서 산소를 사용하려면 먼저 2장의 산소 관련 경고 사항을 확인하십시오.
Page 99

J - 5
6. 세척 및 관리
이 장치는 반드시 다음의 방법으로 세척해야 합니다.
1. 장치의 전원을 끄고 전원 소켓에서 플러그를 뽑습니다. 물이 냉각된 다음 물통을 제거합니다.
2. 장치 외부는 깨끗하고 축축한 수건과 순한 식기용 세제를 이용하여 닦습니다. 거친 연마제 혹은 용매는 제품에 손상을 줄 수
있으므로 사용하지 않습니다.
3. 매일
물통, 가온 호흡 튜브, 가온 호흡 튜브 연결 포트를 청소합니다.
• 가온 호흡 튜브를 장치로부터 슬리브를 위로 잡아당겨서 연결기를 풀어 떼어 냅니다. 그리고 연결기를 분리합니다.
• 가온 호흡 튜브를 비눗물로 씻고 헹군 뒤 가온 호흡 튜브의 끝이 바닥으로 향하도록 공중에 걸어서
말립니다.
• 물통의 지지대를 아래로 눌러 물통을 잡아 당겨 분리합니다.
• 남은 물을 부어 버립니다.
• 표준형 물통(HC365)을 비눗물로 씻고 헹군 뒤 말립니다.
• 긴수명 물통(HC360)은 청소하기 전에 분해합니다. 그림 1과 같이 아래면을 밀어서 물통의
윗면으로부터 분리합니다. 아래면의 봉합부분이 헐거워지거나 손상을 입지 않도록 주의합니다.
물통의 윗면과 아래면을 순한 식기 세척제로 씻어 잘 헹구고 말립니다. 이 물통은 가정용 식기
세척기를 사용할 수도 있습니다.
• 가온 호흡 튜브 연결 포트를 깨끗하고 축축한 수건으로 잘 닦습니다.
4. 매주
물통을 잘 닦습니다.
• 식초와 물을 1:2로 섞은 용액에 물통을 10분간 담가 둡니다.
5. 관리
• 공기 필터가 심하게 변색되면 최소한 3개월 혹은 1000시간 사용 후 교체합니다. 그림2와 같이 제품 뒷 부분의 필터 고정기를
분리시키고 필터를 빼냅니다. 새 필터의 수직의 검은 선이 반드시 제품을 향하도록 하고 필터와 고정기를 다시 장치에 부착합니다.
• 물통이 금이 가거나 변색되거나 긁히면 교체합니다.
• 4000시간 사용 후 혹은 1년에 1회 가온 호흡 튜브를 교체합니다. 손상된 튜브는 즉시 교체해야 합니다.
7. 설치 안내
물통이 부착되고 물을 채우면 장치는 반드시 똑바로 세워 두어 물이 내부로 들어가지
않도록 합니다.
1. 포장을 벗깁니다.
2. 장치를 낮은 선반이나 침대 옆 바닥에 놓습니다. 머리 높이보다 낮아야 합니다.
3. 물통을 포장지에서 빼냅니다.
4. 파란 캡을 제거하여 버립니다(그림 1).
5. 증류수로 눈금까지 물을 채웁니다(그림 2).
가온 호흡 튜브를 통해 물통을 채워서는 안됩니다. 장치를 옮길 때에는 물통을
반드시 비우십시오. 물에 의한 제품 손상은 제품 보증 범위에 포함되지 않습니다.
6. 물통을 장치에 결합합니다. 물통 보호대를 아래로 누르면서 물통을 밀어서
부착시킵니다(그림 3, 4).
7. 물통이 잘 부착되면 물통 보호대는 제자리로 돌아갑니다.
8. 가온 호흡 튜브의 한쪽 끝에 회색 플라스틱 연결기가 있습니다. 슬리브를
들어올리고 연결기를 장치에 밀어서 부착시킵니다. 슬리브를 아래로 밀어서
잠급니다(그림 5, 6, 7).
9. 가온 호흡 튜브의 다른 쪽 끝을 마스크에 연결합니다.
10. 장치의 전원코드를 가정용 전원 소켓에 꽂습니다.
11. 전원 버튼을 눌러 장치를 켭니다(그림 8). ThermoSmart
™
습도 설정값이
표시됩니다.
12. 설정을 바꾸려면“8. 조정 및 화면 표시”를 참조하십시오.
이제 제품을 사용할 준비가 다 되었습니다.
그림2
그림3
그림4
그림5
그림6
그림7
그림8
그림1
그림1
그림2
Page 100

J - 6
ThermoSmart™ 온도 설정*
제공되는 온도를 변경하려면 및 버튼을 눌러서 설정을
조정합니다. 3장 4절을 참조하십시오.
고도
와 키를 이용하여 미터는“m”, 피트는“ft”을 선택합니다.
고도 설정
- 와 키를 눌러서 고도를 설정합니다.
- 키를 눌러서 메뉴에서 빠져 나갑니다.
실제압력 (실제압력을 표시합니다.)
-
화면은 메뉴에서 빠져나가지 않으면 기본값으로 돌아갑니다. 메뉴에서 빠져나가려면
를 누릅니다. (주의: 자동고도조정, 누출보정기능을 가진 제품에만 해당됩니다.)
8. 조정 및 화면 표시
8.1 화면 표시 설명 및 기능
버튼 기능 및 설명 작동
전원 켜기
전원 버튼을 짧게 눌러 켭니다.
장치는 초기화된 ThermoSmart
™
습도 설정값을 표시합니다.
전원 끄기
마스크를 먼저 벗습니다.
전원 버튼을 짧게 눌러 끕니다.
수면 기능 켜기
수면 버튼을 눌러 켭니다.
주의: 수면 기능이 작동되는 동안 수면 기능을 다시 시작하려면
전원을 먼저 꺼야 합니다.
수면 기능 끄기
전원 버튼을 눌러 끕니다.
및 버튼을 눌러 설정을 조정합니다.
선택 가능한 옵션을 보기 위해 순차적으로 버튼을 누릅니다.
<
<
환자 메뉴 표시 작동
CPAP 설정값, 습도, 사용 및
적응 기록, 고도 및 처방
압력값을 보기 위한 것입니다.
아이템 보기
키를 눌러서 차례로 봅니다.
ThermoSmart™ 습도 설정값(초기화면)
CPAP 사용에 따른 상기도의 부작용을 최소화 하기 위해
ThermoSmart
™
습도 설정값을 조정하려면
및 버튼을 눌러 증감합니다.
총 사용시간: 전원이 켜져 있던 총 사용시간을 표시합니다.
(마스크 없이 사용한 시간을 포함합니다.)
하루밤 동안 평균 사용 시간: 마스크를 착용하고 장치가
사용된 평균 시간을 표시합니다.
점검 항목: 사용 내용을 검증하기 위해 필요한 의료진이나
판매자용 정보를 표시합니다.
고도설정: 설정된 고도값을 표시합니다. 와 키를 눌러
변경합니다.
설정압력: 설정된 압력값을 표시합니다.
cmH2O
hr
hr/
켜기/끄기
제품의 전원을 켜거나 끕니다.
수면 기능(램프)
잠이 쉽게 들도록 압력을 낮게
시작하여 20분 동안 점차 처방
압력으로 증가합니다.
증가/감소
설정값을 올리거나 내립니다.
모드
옵션 간을 이동합니다.
환자 메뉴 – 추가 설정 표시 작동
추가 설정을 하려면:
“THERMOSMART™ 습도”
초기화면에서
키를 3초간 누릅니다.
3000
cmH2O
주의: 장소에 따른 올바른 고도 설정을 하지 않으면 환자에게 전달되는 압력이 영향을 받습니다.
* ThermoSmart
™
온도 설정값이 조정될 때 ThermoSmart™ 습도 설정값은 자동으로 초기값인 2.5로 돌아갑니다.
모드 버튼
옵션 간을 이동합니다.
감소 버튼
설정값을 감소시킵니다.
증가 버튼
설정값을 증가시킵니다.
수면 버튼(램프)
전원 버튼
 Loading...