

@LB
Installationinstrwctions
and User guide
RX2 56E models

Introduction
Safety and warnings
Installation instructions
Before use
Temperature (:ontrols (RX255E"[2B1/RX255E"[2W1 )
Temperature (:ontrols (RX256E'T2B2/RX255E'T2W2)
Fresh food features
Freezer features
Ice and water
Water filter
Food storage tips
Care and <:leaning
Operating sounds
Warranty and service
Filter specification data
2
3
5
11
12
13
14
16
17
21
23
26
31
32
37
40
SAVE INSTRUCTIONS
7/_ modds h(>wr_ir_thi //s<,rCuid_, m_y y_(>tb__c;v_i/c;b/_,in U/mc;rk_t_ _d _r#-,
sut_j_cttoch_r;g__;__r;y /me.h)rcurren/d¢l_;i/s_;bo,/tmodd_r;d5p_ci/_Jc_/k>y_
c;v_;i/_bi/ily lr_y<x/rcoui'_/ry, p/ec;s_vis£our/oct;/_/ebsi/e/isledon thebe;ok<:over
or<:ont._;csy,our/oct;/%orsdeo/e_

Thank you for buying a Elbaside by side refrigerator with chilled water and ice dispensing
through the door.
This refrigerator combines size and storage space with ice and water dispensing, Many hours
have been spent researching how you, our customer, use your refrigerator and what we can
do to make life easier for you,
Asyour life changes, so can your refrigerator. This book will help you get the most out of
your refrigerator.
We hope you enjoy your new refrigerator!
iiii_
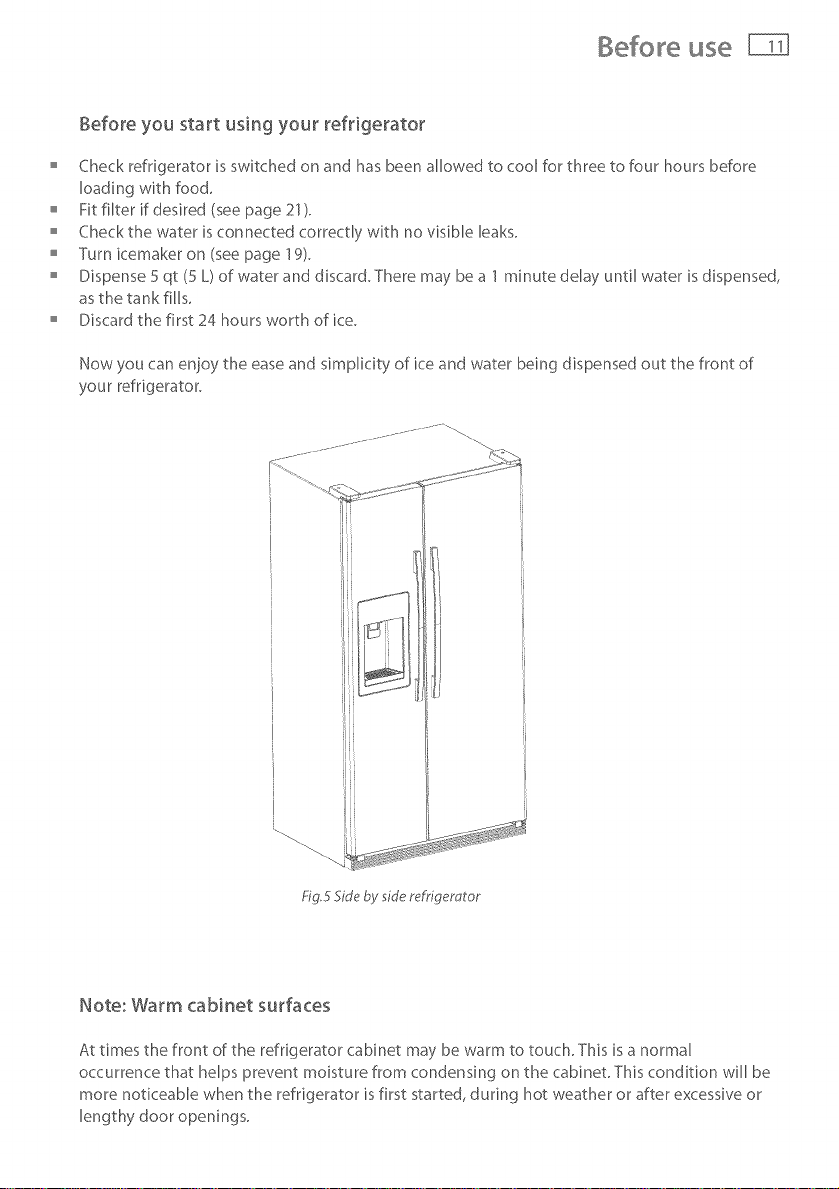
Fig,15ide by side refrigerator
It Lsimportant that this User GuMe shouM be retained with your Ice & Water refr@erator for
future reference° Should the appliance be sold or transferred to another owner, please ensure
that the User GuMe Lsleft wfth the applfanceo This wiff ensure that the new owner can familiarize
themselves with the information and warnings contained within the Guide.
Safety and warnings
Electric Shock Hazard
Read and follow the SAFETYAND WARNINGSoutlined in this UserGuide
before operating this app_ianceo
Failure to do so can result in death, e_ectric shock, fire or injury to persons°
Use this appliance only for its intended purpose as described in this User Guide.
Important sa@ty precautions
When using this appliance Mways exercise basic safety precautions including the following:
This appliance is not intended for use by @iMren or infirmed persons without supervision, This is
especially important when using the freezer compartment. Young children should be supervised
to ensure they do not play with the app#ance.
Risk of @rid entrapment, Before you throw away your old refrigerator:
- Take off the doors
- Leave the shelves in place so that chiMren can not easiJy climb insMe,
The plastic packaging, off your new refrigerator, may be a choking or suffocation hazard to
chiMren, Ensure aN plastic is disposed of property.
Extreme care must be taken when disposing of your oM appliance to avoid hazards, The
refrigerant gas must be safely removed and for the sat_ty of young chiMren, remove doors,
Your Fisher & Paykel Appliances Authorized Service Center wiff be able to give advice on
environmentally friendfy methods of disposing of your oM refrigerator.
Electrical
This new appliance must be properly instMled in accordance with the instMlation instructions
before it is used.
Never unplug your refrigerator by puNing on the power cord.
, Always gr@ the plug firmly and puHstraoht out from the outlet socket.
Do not plug in any other appliance at the same power point ouffet socket your refrigerator is
using. Do not use extension cords or doubte adapters with these products.

Repair or replace immediate!y aH electric service cords that have become frayed or otherwise
damaged, Do not use a cord that shows cracks or abrasion along its length or at either the plug
or appliance end.
If the power supply cord is damaged, it must oMy be replaced by your Fisher & Paykel Appliances
Authorized Service Center because special purpose tools are required.
When moving your appliance back against the wall, be careful not to ton over or damage the
power cord.
Unplug your refrigerator before cleaning it or replacing the interior Ioht bulb.
Storing food and drinks
Never store volatile or flammable materials in your refrigerator as they may explode.
Never freeze Iiquid.s in glass containers. Liquid expands during freezing, which may cause the
container to explode.
Never freeze carbonated drinks. They may explode.
Do not consume food ff it is too cold. Food removed from the freezer compartment may be cold
enough to cause damage when brought into contact with bare skin, eg frozen ice cubes.
Power failure - food safety
Do not refreeze frozen foods that have thawed completely. Follow the recommendations below if
you discover food in your #eezer has thawed:
1) Ice crystals still visible - food may be refrozen but should be stored for a shorter period than
recommended.
2) Thawed but refrigerator cold - retTeezing generally not recommended. Fruits and some cooked
food can be refrozen but use as soon as possible. Meat, fish, poultry - use immediatdy or cook
and retTeeze. Vegetables - discard as they usually go limp and soggy.
3) Thawed and warmer than 41 °F (5 °G - discard all foods.
Do not tefreeze frozen foods that have thawed completely. The food may be dangerous to eat.
Many commercially available cleaning products contain solvents which may attack pMsdc
components of your refrigerator and cause them to crack. Please refer to the Care and cleaning
section of this booklet for further advice.

_nsta_ation instructions
Electric Shock Hazard
Read and follow the SAFETYAND WARNINGSoutlined in this UserGuide
before operating this appliance, pages 3- 4o
Failure to do so can result in death, e_ectric shock fire or injury to persons,
Location
Do not install refrigerator near an oven, radiator or other heat source. If not possible, shield
refrigerator with cabinet material.
Do not install where temperature falls below 5_7 F (13° C) or dses above 110° F (43° C).
Malfunction may occur at these temperatures.
o The refrigerator is designed for indoor household application only.
Measuring the opening
When installing your refrigerator, allow V/' (13 ram) space at the top and V_"(13 ram) space
behind machine compartment cover (located in the rear) for proper air circulation. If the
refrigerator is placed with the door hinges against a wall, you may want to allow additional space
so the door can be opened wider.
o Subfloor_ngorfloorcoverings/_ecarpet,tUe,woodfloors,rugs/maymakeyouropeningsmaUer
than anticipated.
o Some clearance may be gained by using the leveling procedure under Leveling, page 8. :{[
/mpo i,
ffrefrigero_oris_obei_s_o_edi_toorecesswhere_he_opof_herefrigero_or_ comple_e_
covered, use dimensions from floor to top of hinge c_p to verify proper clearance.
Tra_spo_rti_g you_" _'efl'igerato_"
NEVERtransport refrigerator on its side. If an upright position is not possible, lay refrigerator !)
onitsback.AUowrefrigeratortosituprightforapproximately30minotesbeforepluggingitin.
ThiswUlensureoUreturnstothecompressor.Nuggingrefrigeratorinimmediatelymaycause
damage to internal parts.
Use an appliance dolly/trolley when moving refrigerator. ALWAYS truck refrigerator from its side
or back - NEVERfrom its front.
o Protecttheoutsidef_n_shoftherefrigeratorduringtranspor_b;,wrappingthecabinet_n
bhnkets or inserting padding between the refrigerator and dolly.
Secure refrigerator to dolb/firmly with straps or bur_gee cords. Thread straps through handles
where and when possible. Do not over-tighten. Over-tightening restraints may dent or damage
the outside finish.

nsta ation instructions
Door and hinge removal
Some installations require door removal to get the refrigerator to its final location.
Too_sneeded:
Phillips screwdnver
%" (9.5 ram) hex head driver
E_ectdcShock Hazard
Disconnect power to refrigerator before removing doors, Connect power
only after rep_acin9 doors,
Green ground wire must be attached to top hinge while performing door
remova_ and rep_acemento
Failure to do so may result in death, electric shock, fire, or injury to persons,
Toavoid property damag6 observe the following:
Protect vinyt or other flooring with cardboard, rugs or other protective material prior to moving
the refrigerator.
, Tapedecorativepanels(selectmodeLs)securdyinplacebeforeremovingdoorhandles.
Do not adjust the refrigerator to be any shorter than 68_,_" (1740 ram) taft (minus hinge and cap).
Doing so may damage underside componen%°
'I
Unplug power cord from power source.
2
Remove toe grille (see page 8).
Open both doors 180", or as wide as possible.
Note: for refrigerators in operation, shut off water before removing water line from the door.
To disconnect the water line:
Push in white collar ( a ) and hold.
Pull the door--side tube from the connector ( b ).
To reconnect the water line:
Firmly push tube $46"(8 ram) into the connector.
Use lines on the tube as a guide for full insertion.
If tube end is damaged, cut off $%" (8 ram) before
reconnecting.
If leaking occurs, cut and reconnect the line.
Step 2
J
_a
b
iiilI!i!,!,!!!!!' I'liiilii;i,ill¸IIII IIIiiiiliill_i, iliiii_illiiillIIIlilil_ill,i!,lilii_ii!iI,lii!IIIi:liii!_iiiiiiiiill,i,lliilii¸__
Installation instructions
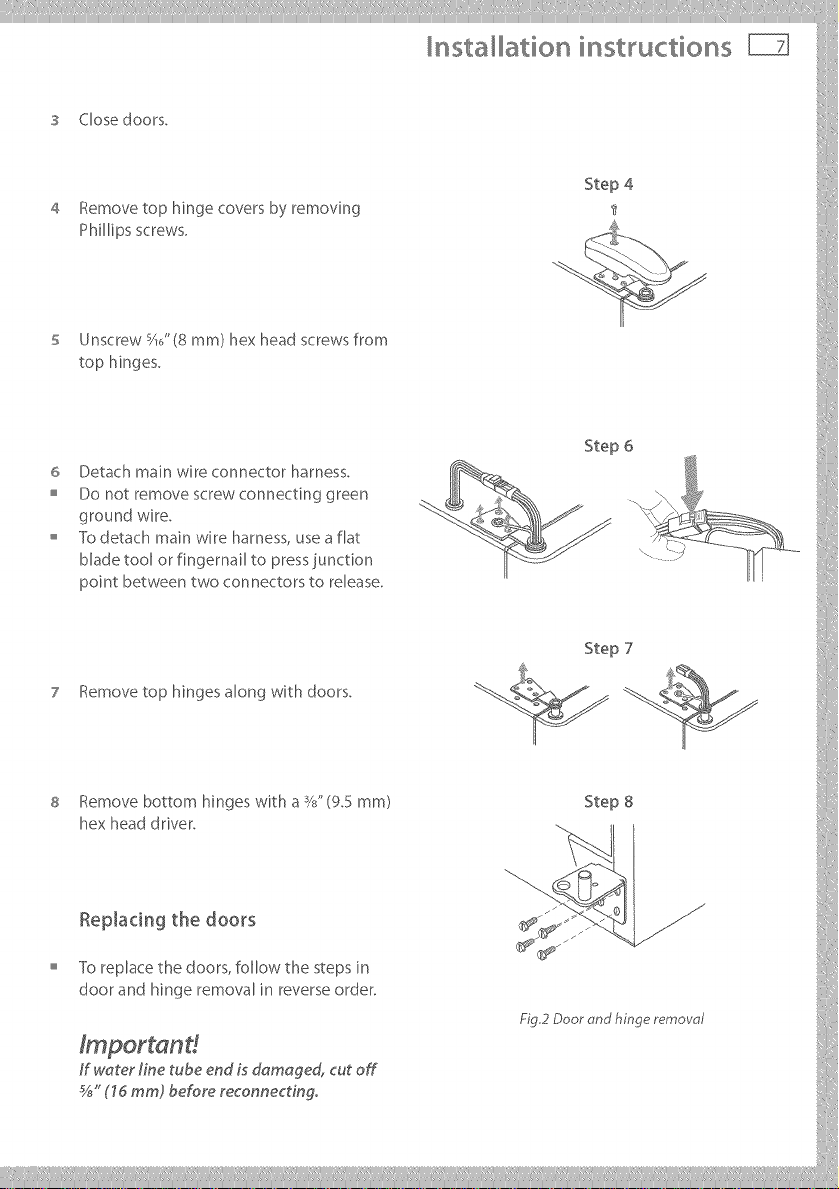
3 Closedoors.
Step 4
4 Removetop hinge covers by removing
Phillips screws.
s Unscrew s_6"(8ram) hex head screwsfrom
top hinges.
6 Detach main wire connector harness,
Do not remove screw connecting green
ground wire.
= Yb detach main wire harness, use a flat
blade tool or fingernail to press junction
point between two connectors to release.
'/
Step 6
iiiiiiiiiiii
7 Removetop hingesalongwith doors. _.
l _:r_hV:db_:ilo_ hinges ,Nith a :_,'?'Ig.Smml Step8
flepJacing the doors _
To replace the doors, follow the steps in
doorandh_ngeremoval_nreverseorder.
/ pono t:
ffwo_e__i_e_bee_di._domoge4_t off
___________
Step7
nsta ation instructions
Toprotect personal property and refrigerator from damage, observe the following:
Protect vinyl or other flooring with cardboard, rugs, or other protective material
Do not use power tools when performing leveling procedure°
To enhance the appearance and maintain performance, the refrigerator should be level.
Note:
Complete any required door reversal, panel installation and/or a water supply connection before
leveling.
Some models only have front leveling adjustment screws (a ). Step 1
Tools needed:
%" (9.5 ram) hex head driver
Carpenter's level
'I
Removetoe grille.
Graspfirmly and pull outward to unclip.
Using hex head driver, turn front adjustment screws
( e_) clockwise to raise and counterclockwise to lower
the front of the refrigerator.
Steps 2, 3
Select models also have rear adjustment screws
( b ). Using the hex head driver, turn each of these
adjustment screws ( b )to raise or lower the rear of
the refrigerator.
Using the carpenter's level, make sure front of refrigerator
is W' (d ram) or V2bubble higher than back of refrigerator
and that the refrigerator is level from side to side.
If required, correct rocking of refrigerator by turning rear
adjustment screw clockwise to raise rocking corner.
If doors are uneven, do the following:
Determine which door needs to be raised.
Turn front roller adjustment screw ( e_) clockwise
to raise front corner of door.
If one refrigerator door has reached the limit of its
adjustment range and doors are still not level,
raise or lower the opposite door by turning roller
adjustment screw clockwise or counterclockwise.
Check with level to vedfy W' (6 ram) tilt to the back for
proper door closure.
If refrigerator is aligned and stable, replace toe grille and hinge covers.
Align the toe grille mounting dips with the lower cabinet slots.
Push the toe grille firmly until it snaps into place.
ab ba
Step S
a
Fig.3Levelingthe refrigerator

_nsta_ation i_stmctions
Connecting the water supply
Read the instructions before connection, and do not attempt if instructions are not
understood or are be_'md personal skiff level
It is recommended that an authorized plumber in your state or town Lsused to install the
water connection, to ensure dl local codes and ordinances are followed° Consult a plumber
to connect ¼" (6.35 ram) OD copper tubing to household plumbing to assure compliance with
local codes and compliance.
Instdbtion premutions/warnings
CONFIRM inlet water pressure to retToeration connection is between 35 psi and 100 psL This
applies to reverse osmosis systems, ff the pressure from your reverse osmosis system is lower
than this, consult a licensed, qualified plumber.
WAIT two to three hours before pbdng refroerator in final position to check and correct any
vmter leaks. Recheck for leaks after 24 hours. Wuter damage to an improper water connection
may cause mold," mildew growth, dean up spills or leakage immediatdyo
DO NOT use with water that is microbiotogicdty unsafe or of unknown quality without
adequate disinfection before or after the system.
DO NOT use a seff piercing or _'r6"(4.7 mm) toddle valve. Both reduce the water floyd; can
become clogged over time, and may cause leaks if repair is attempted.
DO NOT service ice maker unless specifically recommended in User Guide or published user-
repairinstructions, i
cHEcKthecoppertubingunderthe.sleeveissmoothandfreefromdefects._onotreusean
oldsleeve.
Too_s needed:
I/4"(6.35 ram)outerdiameter flexiblecopper tubing, !]
Shut-off valve (requires a _" (6.35 ram) hole to be drilled into water supply line before valve [{
attachment).
Adjustable wrench (2).
1S/'(635 ram) hex nut driver, i}
Note:
Use copper tubing only forinstallation.Plasticislessdurableand can causedamage, i
Add 8' (2440 ram)to tubing length needed 1o reach water supply for creation of service loop. i[

nsta ation instructions
Water connection
Note: ensure refrigerator is not plugged into a power supply.
Create service loop with copper tubing (minimum 2' (610 ram) diameter).
Avoid kinks in the copper tubing when bending the service loop. Do not use
plastic tubing.
2 Remove plastic cap from water valve inlet port.
s Place brass nut ( a ) and sleeve (b ) on copper tube end as illustrated.
Reminder: Do not use an old sleeve. The nut and sleeve are provided in the
Use and Care packet.
Step 1
2' (610 mm)
diameter mn
Step 2
4 Place end of copper tubing into water valve inlet port. Shape tubing slightly
- do not kink - so that tubing feeds straight into inlet port.
Step 3
Before use
Before you start using your refrigerator
Check refrigerator is switched on and has been allowed to cool for three to four hours before
loading with food.
Fit filter if desired (see page 21).
Check the water is connected correctly with no visible leaks.
Turn icemaker on (see page 19).
Dispense 5 qt (5 L) of water and discard. There may be a 1 minute delay until water is dispensed,
as the tank fills.
Discard the first 24 hours worth of ice.
Now you can enjoy the ease and simplicity of ice and water being dispensed out the front of
your refrigerator.
£g.5 Side by side ret}igemtor
Note: Warm cabinet surfaces
At times the front of the refrigerator cabinet may be warm to touch. This is a normal
occurrence that helps prevent moisture from condensing on the cabinet. This condition will be
more noticeable when the refrigerator is first started, during hot weather or after excessive or
lengthy door openings.
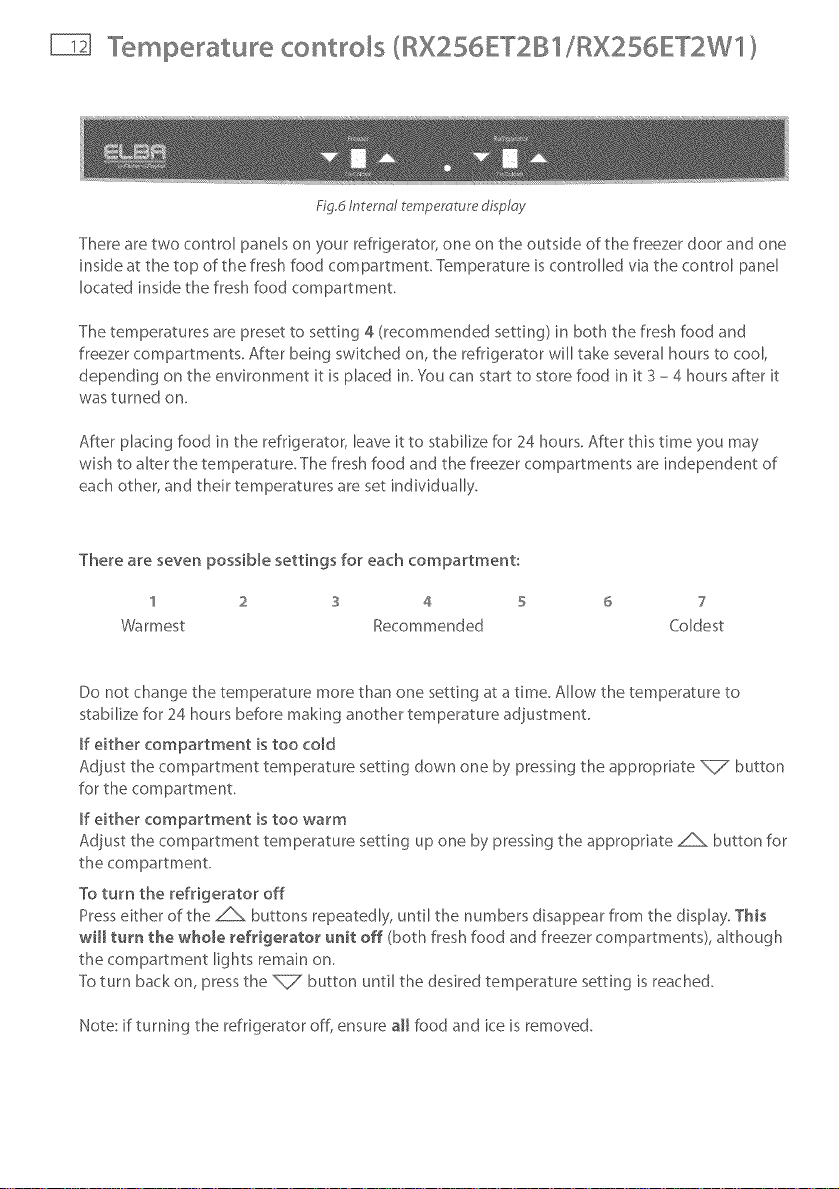
]%mperature controls (BX256ET2B1/RX256ET2W1 }
Ng.5 Interned r_mpemrure disp/c,y
There are two control panels on your refrigerator, one on the outside of the freezer door and one
inside at the top of the fresh food compartment. Temperature is controlled via the control panel
located inside the fresh food compartment.
The temperatures are preset to setting 4 (recommended setting) in both the fresh food and
freezer compartments. After being switched on, the refrigerator will take several hours to cool,
depending on the environment it is placed in. You can start to store food in it 3 - 4 hours after it
was turned on.
After placing food in the refrigerator, leave it to stabilize for 24 hours. After this time you may
wish to alter the temperature. The fresh food and the freezer compartments are independent of
each other, and their temperatures are set individually.
There are seven possible settings for each compartment:
1 2 S 4 5
Warmest Recommended
Do not change the temperature more than one setting at a time. Allow the temperature to
stabilize for 24 hours before making another temperature adiustment
If either compartment is too tom
Adjust the compartment temperature setting down one by pressing the appropriate _ button
for the compartment.
If either compartment is too warm
Adiust the compartment temperature setting up one by pressing the appropriate _ button for
the compartment.
To turn the refrigerator off
Press either of the _ buttons repeatedly, until the numbers disappear from the display. This
wH_ turn the whob _efHgerator unit off (both fresh food and freezer compartments), although
the compartment lights remain on.
7o turn back on, press the _ button until the desired temperature setting is reached.
Note: if turning the refrigerator off, ensure aimfood and ice is removed.
?
Coldest

7%mperatu e controls (BX256ET2B2/RX256ET2W2}
There are two control panels on your refrigerator, one on
the outside of the freezer door and one inside the fresh food
compartment Temperature is contrNled via the control panel
located inside the fresh food compartment.
The temperatures are preset to setting 4 (recommended setting)
in both the fresh food and freezer compartments, After being
switched on, the refrigerator will take several hours to cool,
depending on the environment it is placed in, You can start to
store food in it 3 - 4 flours after it was turned on.
0
After placing food in the refrigerator, leave it to stabilize for 24
hours. After this time you may wish to alter the temperature The
refrigerator and freezer compartments are independent of each
other, and their temperatures are set individually.
Do not change the temperature more than one setting at a time.
Allow the temperature to stabilize for 24 flours before making
another temperature adjustment
Fig.7/ntemc,/temperc, tur_ controls
If either compartment is too coM
Adjust the compartment temperature setting down one by turning the appropriate knob
anti--clockwise.
If either compartment is too warm
Adjust the compartment temperature setting up one by turning the appropriate knob clockwise.
To turn the refrigerator off
Turn the Freezer control knob to the OFF position, This wilt turn the who_e refrigerator unit off
(both fresh food and freezer compartments), akhough the compartment lights remain on.
Tb turn back on, turn the knob until the desired temperature setting is reached.
c,rd C,_det
Note: if turning the refrigerator off, ensure all food and ice is removed.

Fresh food features
The fresh food compartment is designed to keep your food as fresh, nutritious and flavorsome
as possible.
Fruit and vegetable storage
Fruit and vegetables stored in the normal refrigerator environment will lose moisture very
quickly to the cold, dry air. This decreases their storage life as they will lose moisture and
shrivel very quickly, The fruit and vegetable storage bin provides an environment in which you
control the humidity. By controlling the humidity in the bin, the air is kept moist, and fruit and
vegetables retain significantly more moisture. This increases their storage life, keeping them
fresher for longer.
Fruit and vegetables have slightly different humidity/storage requirements, so the storage
bin has an adjustable humidity slide with three settings. Fruit requires lower humidity storage
compared with vegetables.
..... Low
SuitaMe for: Vegetables Mixed fruit Fruit with
Lettuce and vegetaNes skin/peel
Spinach _ Oranges
Broccoli _ Lemons
Carrots _ Grapes
Plums
F-ig8 Humidity Control Settings
TO [_emove:
Pull drawer out to full extension.
Tilt up front of drawer and pull straight out.
To install:
Insert drawer into frame rails and push back into phce.
Fig,9 Fruit and vegetable bin

Fresh food features
Shelves
To avoid personaK injury or property @mag6 observe the foNowing:
Never attempt to adjust a sheff that isloaded with food.
Ensure sheff is secure before plating items on shd£
Handle tempered glass shelves carefully. Shelves may break suddenIy ff nicked, scratched, or
exposed to sudden temperature changes.
Your refrigerator is fitted with shelves specially designed to retain spills, making dean up easier.
To remove a shelf;
S[[ghdy tilt up the front and [fit up the rear of the shelf, then pull the sheff straight out.
To install a shelf:
Tilt the front edge up and insert the hooks into the desired frame openings and let the shelf
settle into place. Be sure the shelf is securely locked at the rear.
The top of each bin serves as the shelf above it. To remove the bin top place your hand under
the frame to push the glass up. Lift glass out. ?b install, reverse the instructions.
Dairy shelf
The dairy shelf provides convenient door storage for
spreadable items such as butter and margarine. On select
models, this compartment can be moved to several
different locations to accommodate storage needs.
To remove:
Slide dairy shelf up and pull out.
To install:
Slide assembly in and down so that the hooks are firmly seated on the door liner.
To remove dairy door:
Press in sides of dairy door and pull out.
To install dairy door:
Slide sides of dairy door inside dairy shelf until hinge points snap into place.
£g. 10 Doiry she/f c,nd door

Freezer features
Shelves
Shelves can be removed to meet individual storage needs.
To remove shelf:
Snap right side of shelf up from cabinet railing or wall
mounting clips and slide to the right.
To instal[ shelf:
Replace shelf in left side cabinet railing. Snap shelf into right
side cabinet railing (or wall mounting clips),
Baskets and drawers
Some baskets and drawers (style may vary) slide out for easy
access to items stored at the back.
To remove:
Pull out to its full extension. Lift up front of basket or drawer
and remove.
To installs
Slide basket or drawer into cabinet railings. Lift up front of
basket or drawer, and slide to the back of refrigerator.
Fig. 11 Freezer shelf
Fig 12 Freezer drawer
Ice storage bin
The ice storage bin is located below the automatic icemaker
(seepage 19for removal and installation instructions).
Door buckets (for fresh food and freezer compartments}
Some door buckets can be moved up ordown to meet
individual storage needs.
To remove:
Lift the bucket up and pull straight out.
To insta[h
Place bucket in desired door liner retainer position and push
down gently until bucket stops.
Fig, 17.Door bucket

ke and water
}'our refrigerator is equipped with an ice and water system that automatically makes and
dispenses cubed and crushed ice, and filters, chills, and dispenses water,
Once your refrigerator has been plumbed in (see page 9 and 1O)and the ice maker turned
on (see page 25) you can enjoy these great features_ The dispensing is controlled via the
external display_
Ng. 14 Ice and water cantm/panel

ke and wate
Dispenser pad
The dispenser pad is located in the back wall of the dispensing area. When the dispenser pad is
pressed, the selection chosen on the dispenser control panel will dispense.
RemovaNe tray
The removable tray at the bottom of the dispenser area is designed to collect small spills and
may be removed for cleaning and emptying purposes. It does not drain. Do not allow it to
overflow. If it does, remove tray and wipe up overflow.
Light
A light activates within the dispenser cavity when dispensing ice or water.
To avoid personal injury or property damage, observe the following:
Do not put fingers, hands or any foreon objects into dispenser opening.
Do not use sharp objects to break ice.
Do not dispense ice dffecdy into thin glass, fine china or de_icate crystal
To dispense water
Select 6 on the control panel.
Place your container against the back dispensing pad and press.
Release pressure to stop dispensing.
To dispense cubed _ or crushed _ ice
Select either _ or _< ice on the control panel.
Place your glass or container against the dispensing pad and press (for crushed ice hold your
container as close to the chute as possible).
Slowly remove your glass when you have enough ice.
Note:
The ice mode may not be changed while ice dispenser is in operation.
Once dispensing has stopped a small amount of water may be dispensed. This will be collected
by the drip tray. Large spills should be wiped dry.

ke and water
Automatic ice maker
Connect the ice maker to the water supply asinstructed on pages 9 - 10. Proper water flow
and a level refrigerator are essential for optimal ice maker performance.
Note: energy rating guides that are posted on the refrigerator at the time of purchase do not
include optional ice maker energy usage.
Operating instructions
To start ice making
Confirm ice storage bin is securely in place.
Lower the wire arm inside the ice bin gently.
Once the freezer compartment has reached O°F (d 8°C), the
ice maker will fill with water.
Approximately three to six hours after installation the first
batch of ice will be produced.
After the initial ice batch is made, a complete batch will be
made every two to three hours.
Discard ice made in the first 12 hours of operation.
The ice maker will continue to make ice until the ice level
raises the wire arm, and stops production.
To stop ice production
Lift the wire arm inside the ice bin until a click is heard.
To remove the ice bin
Stop ice production by raising the wire arm.
Lift the ice bin up slightly and pull forward.
To install the ice bin
Turn the auger driver behind the ice bin a half turn
counterclockwise.
Place the bin in the rails and slide back gently. Fig.ld Auger driver
Ice making information
The first two batches of ice may contain small or irregular cubes, due to air in the supply line.
After cubes are made, it is normal for a few cubes to be joined together. They can easily be
broken apart.
If the ice is not used frequently the cubes may become cloudy, small, stick together, and
taste stale. Empty and wash the bin in lukewarm water periodically. Dry it thoroughly before
replacing it.
The ice maker may make a few sounds during its operation. Clicking, rattling, and buzzing are
all normal.
Do not store anything in the ice bin except ice made in the ice maker,
Fig.15Icemaker (insidefreezer)

ke and water
Mechanka[ Hazard
Do not place fingers or hands on the automatk ice making mechanism
while the refrigerator is p_ugged inoThis will help protect you from possiMe
injury, _twill a_soprevent interference with moving parts of the ejector
mechanism and the heating element that re_easesthe cubes,
Under certain rare circumstances, icecubes may be discolored, usually
appearing with a green.ob_uishhue, The cause of this unusual discoloration
can be a combination of factors such ascertain characteristics of local
waters, household p_umbing and the accumulation of copper salts in
an inactive water supply line which feeds the ice makeg,Continued
consumption of such discolored ice cubes may be injurious to healtho If
such discoloration is observed, discard the icecubes and contact your
dealer to purchase and install a water _inefilter,
Water damage due to improper water connection may cause mold/mildew
Clean up ice and water spills to avoid persona_ injury and to prevent rooM/
mildew growth°
Failure to do so can res@t in death or injury to persons°

Water @ker
Water fiker removal and installation
Poisoning Hazard
Toavoid serious #[hessor death, do not use the refrigerator where water is
unsafe or of unknown quality without adequate disinfection before or after
use of fi_ter_
Failure to do so can res@t in death or injury to persons°
After instMling a new water filter, Mways dispense water for two minutes before removing the
filter for any reason. Air trapped in system may cause water and cartridge to eject. Use caution
when removing.
The bypass cap does not filter water when fitte& Be sure to have replacement cartd@e avaflabte
when filter change is require&
If water £_#ration system has been allowed to freeze, replace filter cartrMge.
If the water system has not been used for several months, or water has an unpleasant taste or
odor, flush system by dispensing water for two to three minutes, ff unpleasant taste or odor
persists, change filter cartridge.
Initial installation
The water filter is located in the upper right--hand corner of the fresh
food compartment.
1
Open filter housing by pressing the tab at the front end of the housing.
2
Remove the blue bypass cap and retain for later use.
3
Remove the sealing label from end of fiker and insert into filter head.
4
Rotate gently clockwise until filter stops. Snap filter cover closed.
5
Reduce water spurts by flushing air from system.
Run water continuously for two minutes through dispenser until water
runs steady. During initial use, allow about a 1 - 2 minute delay in
water dispensing, to allow internal water tankto fill.
Additional flushing may be required in some households where
water is of poor quality.
Fig.17Filter housing and
bypass cap
Fig. 18 Filter housing
and filter

Water fi ter
Replacing the water filter
The water filter needs to be replaced every 12 months, or after 750 gallons (2838 liters) have
been dispensed (which ever is sooner).
To purchase a replacement water filter cartridge (part number 13040210), contact your dealer or
call 1.888.9.FNRUSA (1.888.936.7872).
Air trapped in system may cause water and cartridge to eject° Use caution when removing.
1 Turn filter counterclockwise until it releases from filter head.
2 Drain water from filter into sink, and dispose in normal household trash.
3 Wipe up excess water in filter cover and continue with initial installation (page 21), steps 2
through 4.
Condition of water and amount used determines the life span of water filter cartridge° ff water
use is high, or ff water is dpoor quality, replacement may need to take ploce more often.
The dispenser feature may be used without a water filter cartridge. If you choose this option,
replace filter with blue bypass cap supplied.

Food storage tips - efdgerato
Red meat
Place fresh red meat on a plate and loosely cover with waxed paper,
plastic wrap or foil.
Store cooked and raw meat on separate plates. This will prevent any
juices lost from raw meat contaminating cooked meat.
Poultry
Fresh whole birds should be dnsed inside and out with cold running
water, dded, placed on a plate and covered.
Poultry pieces should also be stored this way. Whole poultry should
never be stuffed until lust before cooking, otherwise food poisoning
may result.
Cool and refrigerate cooked poultry quickly. Remove stuffing from
poultry and store separately.
Fish and seafood
o Whole fish and fillets, should be used on the day of purchase.
Refrigerate on a plate loosely covered until required.
If storing overnight or longer, take particular care to select very fresh
fish. Whole fish should be dnsed in cold water to remove loose scales
and dirt and then patted dry with paper towels. Place whole fish or
fillets in a sealed plastic bag.
Keep shellfish chilled at all times. Use within one to two days.
Precooked foods and leftovers
These should be stored in covered containers, so the food does not
dry out.
Keep for on ly one to two days.
Reheat leftovers only once and until steaming hot
Fruit and vegetable bins
(/\ .......
\
Although most fruit and vegetables store best at low temperatures,
take care not to store citrus fluid tropical fruit, tomatoes or cucumbers
at temperatures less than 47°F (7°C) for long periods.
Undesirable changes, such as softening of the flesh, browning,
accelerated decaying and loss of flavor will occur at low temperatures.
Do not refrigerate avocados (until they are dpe), bananas, mangoes or
pepinos.
For more information on storing fruit and vegetables refer to page 14.
iiiiiii!i7!!!!ii{!7¸¸¸ M_:="_:_

Food storage tips - freezer
Freezingfood at O°F(-18°0 reduces microbial activity, and chemical and physical reactions. This
allows food to be keptfor considerably longer than when stored in the refrigerator.
Frozen food care
For best results:
Choose only good quality foods that freeze well
Store at O°F(--ld'C) or colder. Take care to maintain this low storage /
temperature, eg try to avoid opening the freezer door unnecessarily.
If your ice cream is soft you are running your freezer too warm.
Leave space at the top of containers, glass jars and plastic bags containing liquids or semi--
solid foods. These expand as they freeze. Usually 1" (20- 50 ram) head space is recommended.
Ideally, remove all the air from the package after the food has frozem
Packages or containers of solid foods should have the air removed from them and be sealed
tightly before freezing.
Freeze immediately and as quickly as possible. Freeze only small quantities of food at any one
time. For best results we recommend that only 2.2 Ib (1 kg) of food be frozen per 0.9 cu.ft (2S L)
of freezer storage volume at any one time.
Keep a constant turnover of food. Use older items of food first. Do not exceed recommended
storage times.
Use good quality freezer proof packaging to maintain food quality.
Thaw foods preferably in a refrigerator, or using a microwave oven or mukifunction oven.
Recommended freezer storage times
Thesetimes should not be exceeded.
1 Bacon, casseroles, milk
2 Bread ice<ream, sausages pies - (meat and fruit), prepared shellfish, oily fish
3 Non oily fish, shellfish, pizza, scones and muffins
4 Ham, cakes, bisc@ts, beef and lamb chops, poultry pieces
Butter, vegetables (blanched), eggs whole and yolks, cooked crayfish,
6
minced meat (raw), pork (raw)
12 Fruit (dry or in syrup), egg whites, beef (raw), whole chicken, lamb (raw), fruit cakes

Food storage tips - freezer
Meat, poultry and game
Meat should be frozen quickly in order to maintain its texture.
Do not stuff poultry before freezing,
Always thaw poultry completdy before cooking,
Red meat can be cooked from frozen, or from partly or completdy
thawed states. Remember to allow extra cooking time if cooking from
frozen.
Fish
Fish is best frozen commercially. If however you do want to freeze fish
at home, make sure the fish is very fresh and of high quality.
Clean, scale and preferably leave whole. All fish should be wrapped in
two layers of packaging, as depending on the type offish, odors and
flavors can be readily transferred either to or from it, Seal well
For best results, cook from either the frozen or partly thawed state.
Most vegetables freeze well, although 'salad' vegetables lose their
crispness, Other vegetables, eg celery, onion and tomatoes, should
only be used in cooked dishes as they soften on freezing,
Freeze only good quality, mature, ready--to--eat vegetables,
It is necessary to blanch most raw vegetaMes prior to freezing°
o Blanching is a short cooking period during which vegetable enzymes
are destroyed, If these enzymes are not destroyed they cause
undesirable physical and chemical changes during freezer storage,
Vegetables can be blanched in boiling water, steam, or in a microwave
oven, If using boiling water, boil vegetables for 2 - 4 minutes and cool
quickly.
In general frozen vegetables are best cooked from their frozen state.
Prepared and cooked foods
Most cooked foods can be frozen, but it is not recommended to freeze
the following (as they tend to separate on thawing):
Cooked egg white, custards, cream fillings and milk puddings, gelatin
or)el[y--like dishes, mayonnaise and similar salad dressings and
meringue toppings,
Fruit
Choose good quality, mature, and ready to eat fruit, Preferably select
varieties recommended for freezing,
Avoid unripe and over--ripe fruit,
The way fruit is packed depends on how it is to be used, Fruits packed
in syrup are ideal for desserts, whereas fruits packed without sugar are
better used for cooking,

Ca e and deaning
Refrigerator cleaning chart
When cleaning your refrigerator, please pay attention to the chart below° fmproper deaning can
resu# in damage to your refr@eratoro Do not ptace buckets, shrives, or accessories in the dJshwashero
Cabinet Exterior
Important: Damage
to exterior finish due
to improper use of
cleaning products or non-
recommended products
is not covered under this
product's warranty.
Cabinet Interior
Door Gaskets
Condenser Coil Use a vacuum cleaner hose nozzle.
Remove base grille tO access' ..............................................
Condenser Fan Outlet Grille Use a vacuum cleaner hose nozzle
See back of refrigerator, with brush attachment.
Accessories
Shelves, buckets, drawers,
drip tray, etc.
Use warm, soapy water and a soft,
clean cloth or sponge.
Rinse surfaces with clean, warm
water and dry immediately to avoid
water spots.
ssUse 4 tablespoons of baking soda
dissolved in 1 qt (1 L) of warm,
soapy water. To remove odors, put
a few drops of vanilla essence or
vinegar in water solution,
Rinse surfaces with clean, warm
water and dry immediately to avoid
water spots.
Use warm, soapy water and a soft,
clean cloth or sponge.
,,Follow removal and installation
ssinstructions from appropriate
sfeature section.
ssAllow items to adjust to room
temperature_
Dilute mild detergent and use a soft,
dean cloth or sponge for cleaning,
Use a plastic bristle brush to get into
crevkes. Rinse surfaces with dean,
warm water.
Dry glass and plastic kems
immediately to avoid spots.
Abrasive or harsh cleaners.
Ammonia.
Chlorine bleach.
Concentrated detergents
or solvents.
Metal or p[astbtextured
scouring pads.
Vinegar--based products.
Citrus--based cleaners.
Abrasive or harsh cleaners.
Ammonia.
Chlorine bleach.
Concentrated detergents
or solvents.
Metal or plastic-textured
scouring pads.
Abrasive or harsh cleaners.
Metal or plastic-textured
scouring pads.
Anything other than a
vacuum cleaner.
A dishwasher.

Ca e and cleaning
Removing odors from refrigerator
E_ectdcShock Hazard
Disconnect power to refrigerator before deaningo After cleaning, reconnect
powe K
Failure to do so can res@t in death or i@ury to persons,
1 Remove all food from the refrigerator and turn the refrigerator off.
2 Disconnect power to the refrigerator.
3 £[ean the walls, floor, ceiling of cabinet interior, drawers, shelves and gaskets according to the
instructions (see page 26).
4 Dilute mild detergent and brush solution into crevices using a plastic bdst[e brush. Leave for five
minutes. Rinse surfaces with warm water. Dry surfaces with a soft, clean cloth.
5 Wash and dry aH bottles, containers and jars. Discard spoiled or expired items.
6 Wrap or store odor--causing foods eg onions, fish, meat or leftovers in tightly sealed containers to
prevent recurring odors.
7 Reconnect power to refrigerator and return food to refrigerator.
8 After 24 hours, check if odor has been eliminated.
9 If the odor is still present, liquid may have spilled down into the evaporator tray. In this instance
a service call may be required (see page 39).
Energy saving tips
There are many simple things that can be done to save energy.
During installation
Locate refrigerator in coolest part of room. Avoid areas of direct sunlight, or near heating ducts,
registers, or other heat producing appliances. If this is not possible, isolate exterior by using a
section of cabinet or an added layer of insulation.
Be sure the doors are dosing securely by leveling refrigerator.
During Use
Avoid overcrowding shelves, as this reduces airflow.
Do not use any material (such aluminium foil, wax paper, or paper toweling) as a shelf liner, this
reduces air flow.
Avoid adding too much warm food all at once, this reduces coning power.
Your refrigerator is most efficient when two thirds full.
Organize items in your refrigerator to reduce the time that the door is open.
Maintenance
Clean door gaskets every three months (see page 26).
Clean condenser coils (see page 26).

Ca e and cleaning
Rep[adng light bulbs
Electric Shock Hazard
Disconnect power to refrigerator before replacing Hght b@boAfter replacing
Hght bulb, reconnect power,
Failure to do so can result in death or injury to persons°
Toavoid personal injury or property damage, observe the following:
Before handling, allow light buKb to cool once refrigerator has been turned og(
Wear gloves when replacing light bulb°
Upper fresh food section
The upper fresh food light bulbs are located behind
the front panel. Reach behind the panel to remove
the bulbs.
Lower freezer section
1 Pinch both sides of light cover to remove.
2 Remove light bulb. Replace with appliance bulb no
greater than 40 watts.
3 Pinch both sides of the light cover to snap into place.
Ice and water dispenser
1 Locate light bulb inside top edge of dispenser frame.
Unscrew to remove.
2 Replace light bulb with a 7--watt, 120 volt bulb.
Fig. 19 Light in lower
freezer section

Ca e and cleaning
Preparing for vacatio_'_
if there iSany posibiliW that the temperature where the refrigerator is located can drop bdow
freezing, the water supp_y system (including the water tank and the water valve) must be
drained by a qual#%d servicer if going on vacation°
For short vacations or absences (three months or less):
'I Remove all perishable items from the refrigerator.
2 If no one will be using or checking the refrigerator during your absence:
Remove all frozen items.
Shut off the water supply to the ice maker at least one day ahead of time.
After the last load of ice drops, raise the wire shut off arm to the off position.
Empty the ice bin.
3 If the room temperature will drop below 55 ° F (13° C), follow the instructions for longer absences.
For long vacations, absences (more than three months) OR if the room temperature will
drop below 55 ° F (13 ° C}:
'I Remove all food from both compartments.
Shut off the water supply to the ice maker at least one day before you leave.
After the last load of ice d tops, raise the wire shut off arm to the off position.
o Emptythe ice bin.
2 Remove the water filter cartridge and install the filter bypass. Dispose of the used cartridge.
3 Unplug the refrigerator.
4 If you can not unplug your refrigerator, turn Freezer Control to off (see page 12 or 13).
5 Thoroughly dean the interior of both compartments with a baking soda solution (four
tablespoons of baking soda in 1 qt (1 L) of warm water) and a clean, soft cloth.
6 Dry thoroughly.
7 Leave the doors open to prevent the formation of mold and mildew.
8 If room temperature will drop below O°C, get a qualified servicer to drain the water supply
system (including water tank and water valve).
Preparing to move
Follow the instructions for long vacations/absences, through to step 6.
Secure all loose items such as shelves and drawers by taping them securely in place to prevent
damage
-@pe the doors shut.
Use an appliance dolly when moving the refrigerator. Always truck the refrigerator from its side
or back - never from its front (see page 5).
Be sure the refrigerator stays in an upright position during moving.

Ca e and deaning
Upon your return
After a short vacation or absence:
Reconnect the water supply and turn on supply valve (see pages 9 - 10).
Monitor water connection for 24 hours and correct leaks if necessary.
Run 10 - 15 glasses of water from the dispenser to flush out the system.
Restart the ice maker by lowering the ice maker arm.
Discard at least the first three ice harvests.
After a long vacation or absence:
Reconnect the water supply and turn on supply valve (see pages 9 - 10).
Plug the refrigerator back in and reset controUs (see page 12 or 13).
Wipe the refrigerator out with a clean damp cloth.
Monitor water connection for 24 hours and correct leaks, if necessary.
Run water through the dispenser for at least three minutes with the filter bypass in phce, then
install water filter (see page 21 ).
After installing the water filter, run water through the dispenser continuously for at least two
minutes, or until water runs steady. Initially you may notice a one to two minute delay in water
dispensing as the internal tanks fills.
Restart the ice maker by Iowedng the ice maker arm.
Discard ice produced within the first 12 hours.

Operating sounds
Improvements in refrigeration design may mean your new refrigerator produces sounds that
are different to other models. These improvements have created a refrigerator that is better at
preserving food, more energy efficient, and quieter overall Because new units are quieter, sounds
may be detected that were masked by higher sound levels in older units. Many of these sounds
are normal. Please note that the surfaces adjacent to a refrigerator, such as hard walls, floors
and cabinetry may make these sounds seem even louder. The following are some of the normal
operational sounds that may be noticed in your new refrigerator.
Normal operational sounds
Clicking
Defrost timer or electric damper control (select models) ( b ) sounds like an
electric clock and snapsin and out of defrost cycle.
Air rushing or
whirring
Gurgling or
boiling sound
Thumping
Buzzing
Vibrating noise
Humming
Freezer fan ( < ) slows to a stop as the freezer door is opened.
Evaporator ( ÷ ) and heat exchanger (f) refrigerant make this noise when
flowing.
Ice cubes from ice maker dropping into ice bucket ( g }_
Dispenser ice chute ( h )dosing.
Ice maker water valve (j) hookup buzzes when ice maker fills with water.
Compressor ( i )makes a pulsating sound while running.
Ice maker ( k ) is in the 'on' position without water connection_
Compressor ( i ) can make a high-pitched hum while operating
Other sounds
Vibrating noise
Iceauger ( I ) hums as auger agitates ice during dispensing.
: Refrigerator is not
Contents of
refrigerator rattling.
See Leveling (see page 8).
Ensure no jars or bottles
are touching.
m

ub eshooti ng
If there is a probbm with your appliance, please check the following points before contacting your
local Fisher & Paykel Appliances Authorized Service Center Dealer or Customer Care Center,
Freezer control and
lights are on, but
compressor is not
operating,
Refrigerator does
not operate,
Water droplets
form on outside of
refrigerator°
Water droplets
form on inside of
refrigerator,
Refrigerator or
ice maker makes
unfamiliar sounds
or seems too bud°
Food temperature
is too cold.
Refrigerator is in defrost
mode.
Refrigerator is not plugged Plug in refrigerator.
in
Temperature controls are See page 12 or 13 to adiust controB
set to off.
Fuse is blown, or circuit Replace any blown fuses.
breaker needs to be reset. Check circuit breaker and reset, if necessary.
Power outage has Call local power company listing to report
occurred, outage.
Refrigerator is Unplug refrigerator and transfer food to
malfunctioning, another refrigerator. If another refrigerator is
Humidity levels are high, Normal during times of high humidity
Humidity levels are high
or door has been opened
Door gaskets are not
sealing properly,
Normal operation,
Condenser coils are dirty, Clean according to the chart on page 26,
Refrigerator or freezer See page 12 or 13 to adjust controls,
controls are set too cold,
Food is too close to upper Relocate food away from upper left corner,
left air inlet.
Normal operation.
Wait 40 minutes to see if refrigerator restarts.
not available, place dry ice in freezer section to
preserve food. Warranty does not cover food
loss. Contact service agent (see page 39).
(seasonal).
Reduce time door is open, Organize food items
efficiently to assure door is open for as short a
time as possible,
Clean according to the chart on page 26,
See page 31,

T oubleshooting
Food temperature Door is not dosing properly.
is too warm.
Controls need to be adjusted. See page 12 or 13 to adjust controls.
frequently, or for long
periods of time.
added.
Refrigerator runs
too ffequendy°
Doors have been opened Reduce time door is open.
frequently or for long periods Organize food items efficiently to assure door
of time. is open for as short a time as possible.
Refrigerator is not level See page 8 for details
on how to level your refrigerator.
Check gaskets for proper seal. Clean, if
necessary, according to the chart on page 26.
Check for internal obstructions that are
keeping door from closing properly (ie
improperly closed drawers, ice buckets, etc)
Rearair grilles arelocated under the fruit and
vegetable bin.
items efficiently to ensure door isopen for as
short atime as possible.
Allow refrigerator to con after the door has
been opened.
Refrigerator is exposed to Evaluate your refrigerator's environment.
heat by environment or by Refrigerator may need to be moved to run
more efficiently.
Condenser coils are dirty. Clean according to the chart on page 26.
Controls need to be adjusted. See page 12 or 13 to adjust controls_
Door is not dosing properly. Refrigerator is not level, see page 8, Leveling.
Check for internal obstructions that are
keeping door from dosing properly (ie
........................................... !mPropedy cbsed drawers, !ce buckets, etc}:
Door gaskets are not sealing Clean according to the chart on page 26.
properly.

ub eshooti ng
Ice and water
No indicator lights
are [it on display°
Ice or water are
not dispensed
when pads are
pressed.
Ice maker is
not producing
enough ice or ice
is malformed,
Freezer door is not closed. Verify that freezer door is closed. Power is
removed from the control when freezer door
Refrigerator is not plugged in. Plug in refrigerator.
Fuse is blown, or circuit Replace any blown fuses.
breaker needs to be reset. Check circuit breakers for any tripped circuits.
Power outage has occurred. Call local power company listing to report
outage.
Freezer door is not closed. Verify that freezer door is closed. Power is
removed from the control when freezer door
is opened.
i
Water tank is filling. At initial use, there is an approximate
1- 2 minute delay in dispensing while the
Ice bin not installed properly. Reinstall ice bin (see page 19}.
Ice maker has just been Wait 24 hours for ice production to begin or
installed or a large amount of for ice maker to restock after emptied.
ice has been used.
Water pressure is too low. Water pressure must be between 35 to 1O0
.....................................................................pound s per squa[e inch to fun!tion properly.
Water filter is dogged or Change water filter (see page 21 ).
needs to be changed.
ke maker has just been Wait 24 hours for ice production to begin or
installed or a large amount of for ke maker to restock after em ptied.
ice has been used.
Water pressure is too low. Low water pressure can cause valve to leak.
Water pressure must be between 35 to 100
pounds per square inch to function properly.
Water filter is clogged or Change water filter (see page 21 ).
needs to be changed.

Ice and water
ub eshooti ng
Ice forms in inlet
tube to ice maker,
Water flow is
slower than
normal,
Refrigerator is
Jeaking water,
Water pressure is too bw, Water pressure must be between 35 to 1O0
pounds per square inch to function properly,
Saddle valve not open Open saddle valve completely,
Freezer temperature is too See temperature controls, page 12 or 13.
high. Freezer temperature should be between 0° to
2° F (,o18°to..17° C).
Water pressure is too low. Water pressure must be between 35 to 1O0
........................................................ pounds pe[ square inch to [unction properly.
Saddle valve not open Open saddle valve compReteRy.
completely.
Improper saddle valve was See connecting the water supply,
pages 9 - 10. Self-piercing and s/_6"(4.7 ram)
saddle valves cause low water pressure and
may dog the line over time. The manufacturer
is not responsible for property damage due to
improper installation or water connection.
Copper tubing has kinks. Turn off water supply and remove kinks.
If kinks cannot be removed, replace tubing.
Water filter is dogged or Change water filter (see page 21 ).
needs to be changed.
Water valve not opened Open water valve completely and check for
completely, leaks.
Plastic tubing was used to It is recommended copper tubing is used
complete water connection, for installation. Plastic is less durable and
can cause leakages. The manufacturer is not
responsible for property damage due to
installation or faulty/leaky water
connection,
Improper water valve was See connecting the water supply,
pages 9 - 10. Self--piercing and s/_6"(4,7ram)
saddle valves cause low water pressure and
may dog the line overtime.The manufacturer
is not responsible for property damage due to
improper installation or water connection.

ub eshooti n9
Ice and water
Icemaker is not
producing ice,
Dispenser water is
not cold°
Water appears
cloudy,
Particles in water
and/or icecubes,
lee maker arm is up Confirm ice maker arm is down. See
automatic ice maker, page 25.
Household water supply is See connecting the water supply,
not reaching water valve, pages g - 10.
Copper tubing has kinks. Turn off water supply and remove kinks.
if kinks cannot be removed, replace tubing.
Water pressure is too low. Water pressure must be between 35 to 1O0
pounds per square inch to function properly
Check freezer temperature. See temperature controls pages 12 or 13 to
adjust controls. Freezer must be between 0°
to 2° F (18 ° to q 7° C) to prod uce ice,
Ice bin is not installed See ice storage bin, page 19.
Improper water valve was
installed.
Refrigerator has been
recently installed.
Water supply in holding
tank has been depleted.
Air or air bubbles in water. This is normal when first using the dispenser
Carbon dust from water Initial water ejected through cartridge may
filter cartridge, contain harmless carbon dust flushed from
See connecting the water supply,
pages !)- 10, Selfopiercing and _%"(4J mm)
saddle valves cause low water pressure
and may clog the line over time, The
manufacturer is not responsible for property
damage due to improper installation or
water connection,
Allow approximately 12 hours for water in
holding tank to chill,
and will disappear with use.
cartridge. Wi[[ disappear after the first few
....................................................................uses•........................................................................................................................
Concentrations of minerals Particles are not harmful and naturally occur
in water will form particles in water supplies.
when water becomes
frozen and melts.

Limited warranty
When you purchase any new Fisher & Paykd whiteware product for personal or consumer use
you automatically receive an 18 month limited warranty covering parts and labor for servicing
within the 48 mainland United States, Hawaii, Washington D£ and Canada, In Alaska the limited
warranty is the same except that you must pay to ship the product to the service shop or the
service technkian's travel to your home, Products for use in Canada must be purchased through
the Canadian distribution channel to ensure regulatory compliance,
If the product is installed in a motor vehicle, boat or similar mobile facility, you receive the same
18 month limited warranty, but you must bring the vehkle, boat or mobile facility containing
the product to the service shop at your expense or pay the service technkian's travel to the
location of the product,
Sou receive an additional three and a half year limited warranty (for a total of five years)
covering parts and labor for sealed refrigeration system (compressor, evaporator, condenser,
filter dryer, and connecting tubing) within the 48 mainland United States, Hawaii, Washington
D,C,and Canada, In Alaska the limited warranty for the sealed refrigeration system is the same
except that you must pay to ship the product to the service shop or the service technician's
travel to your home,
Fisher & Paykel undertakes to:
Repair without cost to the owner either for material or labor any part of the product, the serial
number of whkh appears on the product, whkh is found to be defective, In Alaska, you must
pay to ship the product to the service shop or for the service technician's travel to your home,
If the product is installed in a motor vehicle, boat or similar mobile facility, you must bring it to
the service shop at your expense or pay for the service technkian's travel to the location of the
product, If we are unable to repair a defective part of the product after a reasonable number of
attempts, at our option we may replace the part or the product, or we may provide you a full
refund of the purchase price of the product (not including installation or other charges),
This warranty extends to the original purchaser and any succeeding owner of the product for
products purchased for ordinary single-family home use,
All service under this limited warranty shall be provided by Fisher & Paykd or its Authorized
Service Agent during normal business hours,
How long does this limited warranty last?
Our liability under this limited warranty expires 18 MONTHS from the date of purchase of
the product by the first consumer,
Our liaMity under any implied warranties, including the implied warranty of merchantability
(an unwritten warranty that the product is fit for ordinary use) also expires 18 MONTHS (or such
longer period as required by ap@kable law) from the date of purchase of the product by the
first consumer, Some States do not allow limitations on how long an implied warranty lasts, so
this limit on implied warranties may not apply to you,

Limited warranty
This warranty does not cover:
A Service calls that are not related to any defect in the product. The cost of a service call will be
charged if the problem is not found to be a defect of the product. For example:
1. Correcting faulty installation of the product.
2. Instructing you how to use the product.
3. Rephcing house fuses, resetting circuit breakers, correcting house wiring or plumbing, or
replacing light bulbs.
4. Correcting fault(s) caused by the user.
5. Changing the set-up of the product.
6. U nauthorized modifications of the product.
7. Noise or vibration that is considered normal, for example, drain/fan sounds, refrigeration
noises or user warning beeps.
8. Correcting damage caused by pests, for example, rats, cockroaches etc.
S Defects caused by factors other than:
1. Normal domestic use or
2. Use in accordance with the product's User Guide.
¢ Defects to the product caused by accident, neglect, misuse, fire, flood or Act of God.
D The cost of repairs carried out by non--authorized repairers or the cost of correcting such
unauthorized repairs.
E Travel fees and associated charges incurred when the product is installed in a location with
limited or restricted access. (eg airplane flights, ferry charges, isolated geographic areas).
F Normal recommended maintenance as set forth in the product's User Guide.
G Filter replacement except in the case of faulty parts or materials within the filter cartridge.
This product has been designed for use in a normal domestic environmenL It is not intended
for commercial use. Doing so may affect product warranty.
If you have an installation problem contact your dealer or installer. _ou are responsible for
providing adequate electrical, exhausting and other connection facilities.
We are not responsible for consequential or incidental damages (the cost of repairing or
replacing other property damaged if the product is defective or any of your expenses caused
if the product is defective). Some States do not allow the exclusion or limitation of incidental
or consequential damages, so the above limitation or exclusion may not apply to you.

Limited warranty
How to get service
Please read your User Guide. If you then have any questions about operating the product,
need the name of your local Fisher & Paykel Authorized Service Agent, or believe the product is
defective and wish service under this limited warranty, please contact your dealer or call us at:
USA and Canada
TOLL FREE1°888°9oFNPoUSA (1o888o936o7872)
or use the link at: wwwofisherpaykeLcomitocatoriserviceri
You may be required to provide reasonable proof of the date of purchase of the product before
the product will be serviced under this limited warranty.
No other warranties
This limited warranty is the complete and exclusive agreement between you and Fisher & Paykel
regarding any defect in the product None of our employees (or our Authorized Service Agents)
are authorized to make any addition or modification to this limited warranty.
Warrantor: Fisher & Paykel Appliances, Inc.
[f you need further help concerning this limited warranty, please call us at above number, or
write to:
Fisher & Paykel Appliances, Inc.
5900 Skylab Road
Huntington Beach
CA 92647
This limited warranty gives you specific legal rights, and you may also have other rights which
vary from state to state.
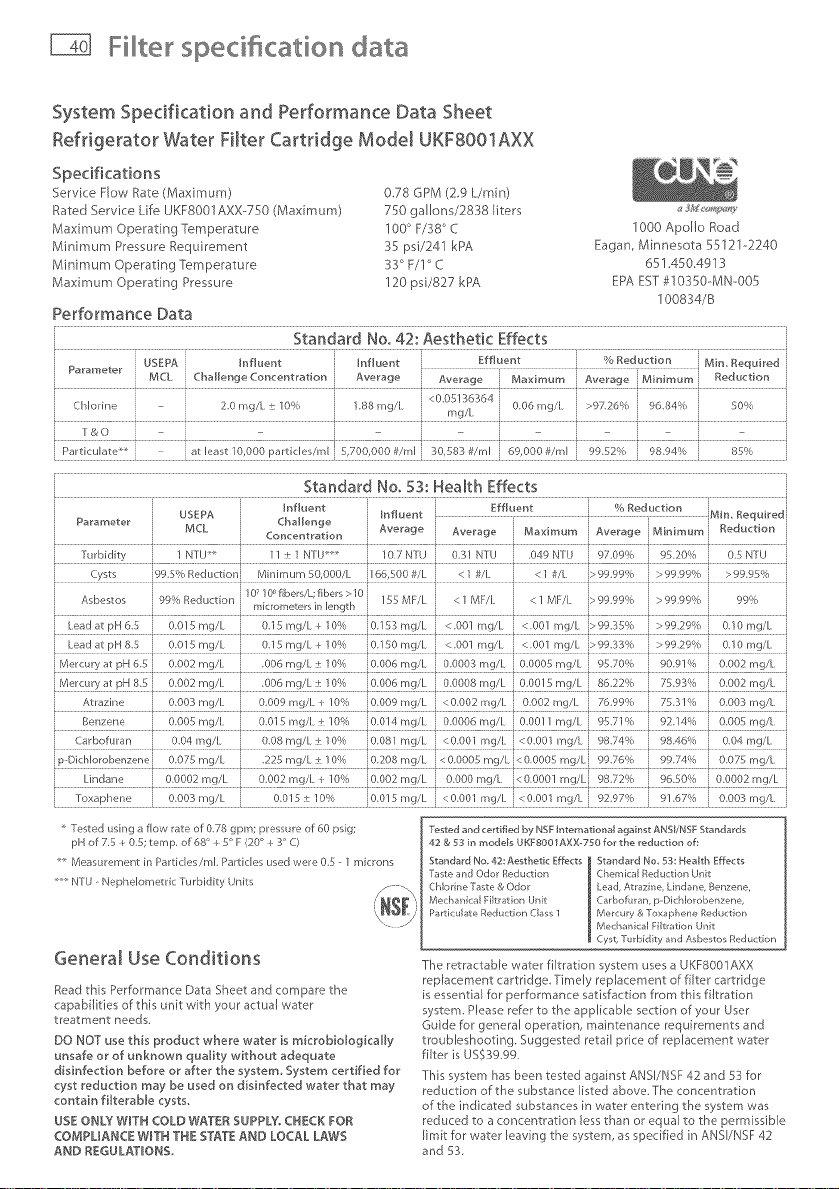
Fi ter specification data
System Specification and Performance Data Sheet
Refrigerator Water Filter Cartridge Model UKFdOO1AXX
Specifications
Serv ce How Rate (Maximum)
Rated Service Life UKF8001AXX-750 (Maximum)
Maximum Operating Temperature
Minimum Pressure Requirement
Minimum Operating Temperature
Max mum Operating Pressure
Performance Data
Parameter USEPA j Jrlf[uer_t Jnfluer_t Effluer_t ÷ % Reductior_ , Mira Required
Chlorine i i 0mg/l:e]0% lSgmg/J rng!L 006m9/I >9726% j 9684% j 50%
Particulate j at least 10,000 particles/ml 5,700,000 #/ml 30,583 #/ml 09,000 #/ml 995 % j 9894% j 85% j
T .....
MCL j Cballer_ge Cor_cer_tration Average Average Maximum Average Minimum j Reductior_
i i [
Standard Noo42: Aesthetic Effects
Standard No. 53: Health Effects
Parameter ChaHer_ge
USEPA Influer_t iMin. Requiredj
MCL Cortcerttration Average Average Maximum Average MiMmum Reductio_
Ir/fluer/t Effluer/t % Reductior/
0,78 GPM (Z9 L/min)
750 gallons/2838 liters _s44_:_,n_>_,_t_
100° F/38 ° C 1000 Apollo Road
35 psi/241 kPA Eagan M nnesota 55121-2240
33° F/1° C 651,450,4913
120 psi/837 kPA EPAEST#1035084N-005
100834/B
<005136364
i i
Asbestos i 99o Reduction micrometers irl brlgth j 155 MF/L < 1 MF/I < 1 MF/I j> 9999o > 9999% 99%
leadat pH 65 0 015 mg/L 015 rng/L + 10/o 0153 mg/L < 001 mg/L < 001 mg/L >99 B54_ >9929o 0 10 rng/L
Leadat pH 85 0015 mg/L 0 15mg/L + 10/o 0150mg/L <00] mg/L <00] mg/L 1>99334_ >9929o 010mg/L
Mercury at pH 65 0002 mg/I 006 mg/L : 10/o 0006 mg/L 0000S mg/L 00005 mg/L 9570 ,t_ 909] ,t_ 0002 mg/I
j Mercury at pH 8_ i 0002 m9/I 006 mg/L e 10% j 0006 mg/L 00008 mg/L 00015 mg/L j 8622% 7593% 0002 m9/I
t I I + ' ' '
Atrazine 0003 mg/I 0009 m9/I + 10 ,t_ 0009 mg/L <0002 m9/I 0002 mg/I 7699 t_ 7_531 o 0003 m9/I
t
Benzene 000_> mg/I 001 _>m9/I ± 10% j0014 mg/L 00006 mg/L 00011 mg/L J %71% 9214% 000_> m9/I
Carbofuran 004 rn9/I 008 mg/L ± 10% j0081 mg/L <0001 mg/I <0001 rn9/I i 9874% 9846% 004 rng/L
_ Dichlorob_mzene 0075 mg/L 225 mg/L ± 10% j 0208 mg/L < 00005 mg/L J< 00005 mg/Lj 9976% 9974% 0075 mg/I
Lindane 00002 mg/L 0002 m9/I + 10% j0002 mg/L 0000 mg/I 00001 mg/L 9872 ,t_ 96 _50% 00002 mg/L
t I t _ t '
Toxaphene 0003 mg/L 001r5 :k 10/o° ....001r5 mg/L <0001 rng/I <0001 rng/I 92,97 ,t_o 91 674_° 0003 rng/I
i
I I i , , ,
f I f I + I I
General Use Conditions
Read this Performance Data Sheet and compare the
capabilities of this unit with your actual water
treatment needs.
DO NO]" use this product where water is microbiologicaHy
unsafe or of unknown quality without adequate
disinfection before or after the system, System certified for
cyst reduction may be used on disinfected water that may
contain filterable cysts,
USE ONW WITN COLD WATER SUPPLY. CNECK FOR
COMPUANCE W_TH TNE STATE AND LOCAL LAWS
AND REGULATIONS
107 I @ fibers!L; fibers > I 0 J
0 o o
0 o o
o o o
t , , ,
< o
Testedarid certififM by NSFJrttematio_a_ against ANS_/NSFStan4ards
42 & 53 in mode_s UKFdO01AXXo750fo_the reduction of:
Standard No. 42: Aesthetic E_cts Standard No,53: _ea_th Effects
Tasteand Odor Reduction Chemical Reduction Unit
Chlorine Taste & Odor Lead,Atrazine_ Lindal_e, Benzene,
Mechanical Filtration Unit Carbo_ran, p-DichJorobenzene,
Particulate Reduction Class1 Mercury & Toxaphene Reduction
The retractable water filtration system uses a UKFd001AXX
replacement cartridge, Timely replacement of filter cartridge
is essential for performance satisfaction fron this filtration
Mechanical Filtration Unit
Cyst,TurbidiW and Asbestos Reduction
system. Please refer to the applicable section of youl User
Guide hat general operation, maintenance requirements and
troubleshooting. Suggested retail price of replacement water
filter is USS39.99.
This system has been tested again t ANSIiNSF 42 and 53 for
reduction of the substance listed above. The concentration
of the indicated substances in water entering the system was
reduced to a concentration less than or equal to the permissible
limit for water leaving the system, as specified in ANSI/NSF 42
and 53.

Fi_ter specification data
(
( o_r_ditior_s of ( {rtiffcatio_'_:
Do r_ot use wl<re 'w lie" is micr{ _i }logically ut stle ol 'wit[ wale* of tmkn{ wn qt/ali{}_ except t_llt sy reins certilie I f_r
c} _reh/ctionma} _eusedon _iinlectelwllersthltmlyc{ntai*]lilleclblec} _s.

Coovl ight O Fisher & Pavke12009, All rlgn[s reselve(
he oroauc[ soecmcauons t moo_,_e_doo_v _c
b[@ClJlt rOrO_UCIS a//(_ [J/O(]@ > (]@S(.iIJDL_(] dL L[_L _
Side by __ide retriqeratc
_.,_Eu_l _s_ 'tio]s and user ] ]ic
_x ished: 03/200 c.
Part _!o. 86] 168
 Loading...