

Fisher & Paykel RF106RDWX1, RF206RDWX1, RF306RDWX1, RF356RDWX1 Installation and Operation Guide
Page 1
INSTALLATION INSTRUCTIONS
USER GUIDE
Freestanding Wine Cabinets
RF106RDWX1, RF206RDWX1, RF306RDWX1
and RF356RDWX1 models
NZ AU GB IE EU AE IN
Page 2

Page 3

CONTENTS
Introduction 3
Safety and warnings 4
Installation instructions 8
Moving or storing your appliance 13
Operating instructions – External control panel 14
Operating instructions – Special functions 15
Interior and exterior features 16
Storing your wine 19
Loading your wine bottles 20
Cleaning care – Exterior 24
Cleaning care – Interior 25
User warnings and sounds 26
Troubleshooting 27
Manufacturer’s Warranty 29
Customer Care 31
European Directive 2012/19/EU on Waste Electrical 33
and Electronic Equipment (WEEE)
IMPORTANT!
SAVE THESE INSTRUCTIONS
The models shown in this user guide may
not be available in all markets and are
subject to change at any time. For current
details about model and specification
availability in your country, please go to
our website www.fisherpaykel.com or
contact your local Fisher & Paykel dealer.
Note: the word “cabinet”, throughout this
user guide, refers to the combination of
upper and bottom zone products.
Registration
Register your product with us so we can
provide you with the best service possible.
To register your product visit our website:
www.fisherpaykel.com
1
Page 4

Page 5
INTRODUCTION
Thank you for buying a Fisher & Paykel Wine Cabinet to store your treasured wine,
you’ve made a great choice.
Having purchased our dual-zone cabinet you can rest assured that your red and white
wines are well cared for, over short term and long term periods.
Wine generally matures at a steady temperature between 11°Cto13°C, and for ready to
drink wines they are best served at their ideal drinking temperatures (see ‘Storing your
wine’ section). Temperature control is critical for the maturation of wines, as significant
daily or weekly temperature fluctuations can denature wines. If storage temperatures are
excessively high this can reduce the wines aromatic potential and can speed up maturation.
This can cause some wines to take on a ‘spoiled fruit’ flavouring. If storage temperatures
are excessively low, this can have the opposite effect and stunt a wines natural maturation
process. This can prevent a wines flavours from developing to their full potential.
Optimum humidity levels are also important for the storage of cork enclosed wines,
especially for long term storage. Dry surroundings can lead to dried out corks
encouraging wine evaporation, as well as oxygen permeation leading to oxidised and/or
spoiled wine. As for extremely humid conditions, there is a potential of damaging wine
labels and the growth of mould on bottles.
Light is known to be damaging to wines, particularly UV light as it creates hydrogen
sulphide compounds in wine affecting the tannins and the colour of wine. Therefore our
Wine Cabinets are designed to eliminate this threat by incorporating a UV-tempered
glass door, dark interiors and dimmed LED lighting.
Other golden rules of excellent wine storage that your Wine Cabinet offers is frequent
air circulation, as well as increased air circulation when large amounts of wine bottles
are added (Air-Cool function). Condensation eliminator (Demist function*) and minimal
vibrations with the low noise compressor.
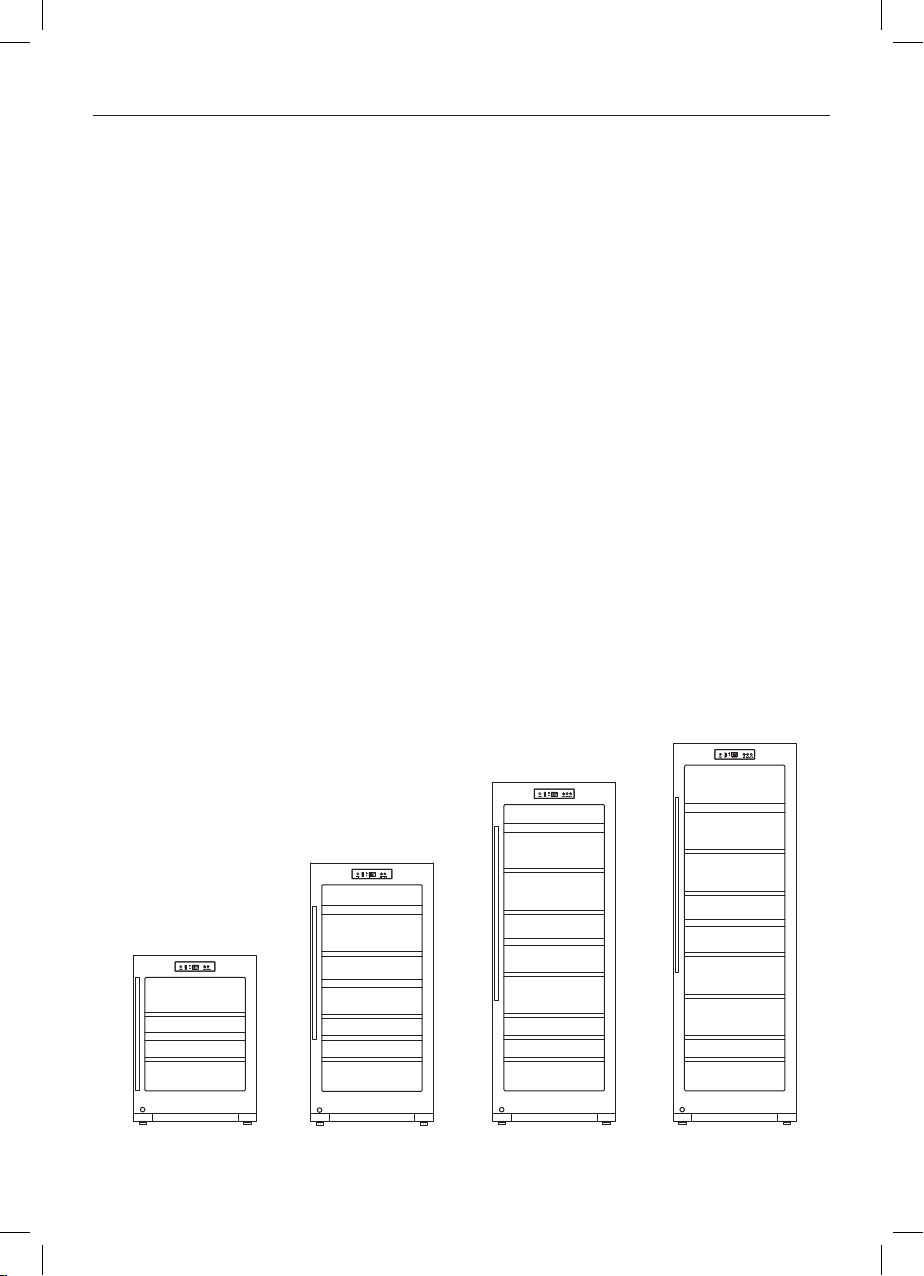
RF206RDWX1 model RF306RDWX1 model RF356RDWX1 modelRF106RDWX1 model
*For RF306RDWX1 and RF356RDWX1 models.
3
Page 6

SAFETY AND WARNINGS
!
WARNING!
Electric Shock Hazard
Read and follow the safety and warnings
outlined in this user guide before operating
this appliance.
Failure to do so can result in death, electric
shock, fire or injury to persons.
This Wine Cabinet contains flammable
refrigerant isobutane (R600a).
R600a
Use this appliance only for the intended purpose as
described in the user guide.
IMPORTANT SAFETY INSTRUCTIONS:
WARNING!
When using this appliance always exercise basic
safety precautions including the following:
• This appliance is not intended for use by persons
(including children under the age of 8 years) with
reduced physical, sensory or mental capabilities, or
lack of experience and knowledge, unless they have
been given supervision or instructions concerning
use of the appliance by a person responsible for
their safety.
• Young children should be supervised to ensure they
do not play with the appliance.
4
Page 7

SAFETY AND WARNINGS
• Cleaning and user maintenance shall not be made by
children without supervision.
• Keep ventilation openings in the appliance enclosure
clear of obstruction.
• In case of damage to the refrigerant circuit, ventilate
the area by opening all windows. Do not operate
electrical equipment or any other equipment that
may produce arcs, sparks or flames in the area.
Contact your Fisher & Paykel Authorised Repairer
immediately to arrange for the appliance to be
repaired.
Food safety
• This appliance is intended to be used exclusively for
the storage of wine.
• Do not store food and milk products in the Wine
Cabinet. The interior temperature may not be cool
enough to prevent spoilage in food, and the expiry
dates stated on the food packaging may be invalid.
Electrical safety
• This appliance must be installed in accordance with
the installation instructions before use.
• Always grip the plug firmly and pull straight out
from the outlet.
• Do not plug in any other appliance at the same
power point as your Wine Cabinet.
• Repair or replace immediately all electric service
cords that have become frayed or otherwise
damaged. Do not use a cord that shows cracks or
abrasion along its length, or at either the plug or
appliance end.
5
Page 8

SAFETY AND WARNINGS
• If the power supply cord is damaged, it must only
be replaced by your Fisher & Paykel Authorised
Repairer.
• When moving your appliance, be careful not to roll
over or damage the power cord.
• Do not use electrical appliances inside the
WineCabinet.
IMPORTANT!
Your Wine Cabinet is designed to operate without
the need for regular service checks. However, if your
Wine Cabinet is malfunctioning, have it attended to
by your Fisher & Paykel Authorised Repairer as soon
as possible.
Cleaning
• Many commercially available cleaning products
contain solvents which may attack plastic
components of your Wine Cabinet and cause them
to crack. Please refer to the ‘Cleaning care’ section
of this user guide for further advice.
Disposal and recycle
• Extreme care must be taken when disposing your old
appliance to avoid hazards:
– The flammable refrigerant gas must be safely
removed.
– The thermal insulation foam contained in this
appliance is produced by flammable blowing
gases, any exposed foam may be highly flammable
and must be carefully treated during disposal.
– The doors should be removed, if possible and
the shelves left in place so that children may not
easily climb inside.
6
Page 9

SAFETY AND WARNINGS
• Your Fisher & Paykel Authorised Repairer will be able
to give advice on environmentally friendly methods
of disposing your old Wine Cabinet.
• It is hazardous for anyone other than an authorised
repairer to service this appliance. In Queensland,
Australia the authorised service person must hold a
gas work licence or authorisation for hydrocarbon
refrigerants to carry out service or repairs which
involve removal of covers.
Storing wine
• DO NOT store explosive substances such as aerosol
cans with a flammable propellant in this appliance.
• Never store volatile or flammable materials in your
Wine Cabinet as they may explode.
Power failure
• In the event of a power interruption, the Wine
Cabinet will automatically save the current
temperature settings. When power is recovered, the
Wine Cabinet will revert to the current temperature
settings only.
• Most power failures are corrected within a short
period of time. 1–2hours loss of power will not
affect the Wine Cabinet’s temperatures.
• To avoid sudden change of temperature while the
power is off, you should avoid opening the door.
For longer periods of power failure, do take steps
toprotect your wine.
7
Page 10

INSTALLATION INSTRUCTIONS
Please follow the installation steps below to ensure your appliance operates correctly.
Power
The appliance must be installed so the plug is accessible.
To ensure that the appliance is not accidentally switched off, connect your Wine Cabinet
to its own power point. Do not plug in any other appliance at this power point.
For power requirements, please refer to the serial plate located on the rear of the
cabinet.
It is essential that the appliance is properly grounded (earthed).
Connect the appliance to the electrical supply (220V–240V50Hz) with the fitted
plug and lead.
Connections to the mains supply should be in accordance with local regulations.
Location
Your Wine Cabinet should not be located in direct sunlight or next to any heat
generating appliance such as a cooktop, oven or dishwasher.
The appliance should not be located in garages or on carpeted floors.
This appliance is intended to be used in indoor ambient temperatures between 16°C
and 25°C. Do not operate this appliance outside the specified ambient ranges as
performance may be compromised.
This appliance is intended to be used in household and similar applications such as:
– Staff kitchen areas in shops, offices, and other working environments;
– Domestic farm houses and by clients in hotels, motels and other residential type
environments;
– Domestic bed and breakfast type environments;
– Domestic catering and similar non-retail/non-commercial applications.
Ventilation and installation
To ensure adequate ventilation for your Wine Cabinet remove external protective
packaging film, and see recommended ‘Product and cabinetry dimensions’.
8
Page 11
INSTALLATION INSTRUCTIONS
Product installation
Your Wine Cabinet is fitted with rear rollers designed for moving the product in the
forwards and backwards direction.
Avoid moving the product in a sideways direction as this may damage the floor
covering/surface.
Your Wine Cabinet will arrive with the front feet raised making moving the product into
its final location a simple task.
Move the Wine Cabinet into its final position making sure there is correct clearances
between the product and surrounding cabinetry.
Aligning your Wine Cabinet with cabinetry
Align the sides of the product with the cabinetry by adjusting the hinge side front foot.
Adjust the handle side foot until it touches the floor and takes a small amount of weight.
Once the product is in place and aligned with cupboards/alcove gently push on the
front top and check if the product is rocking or stable.
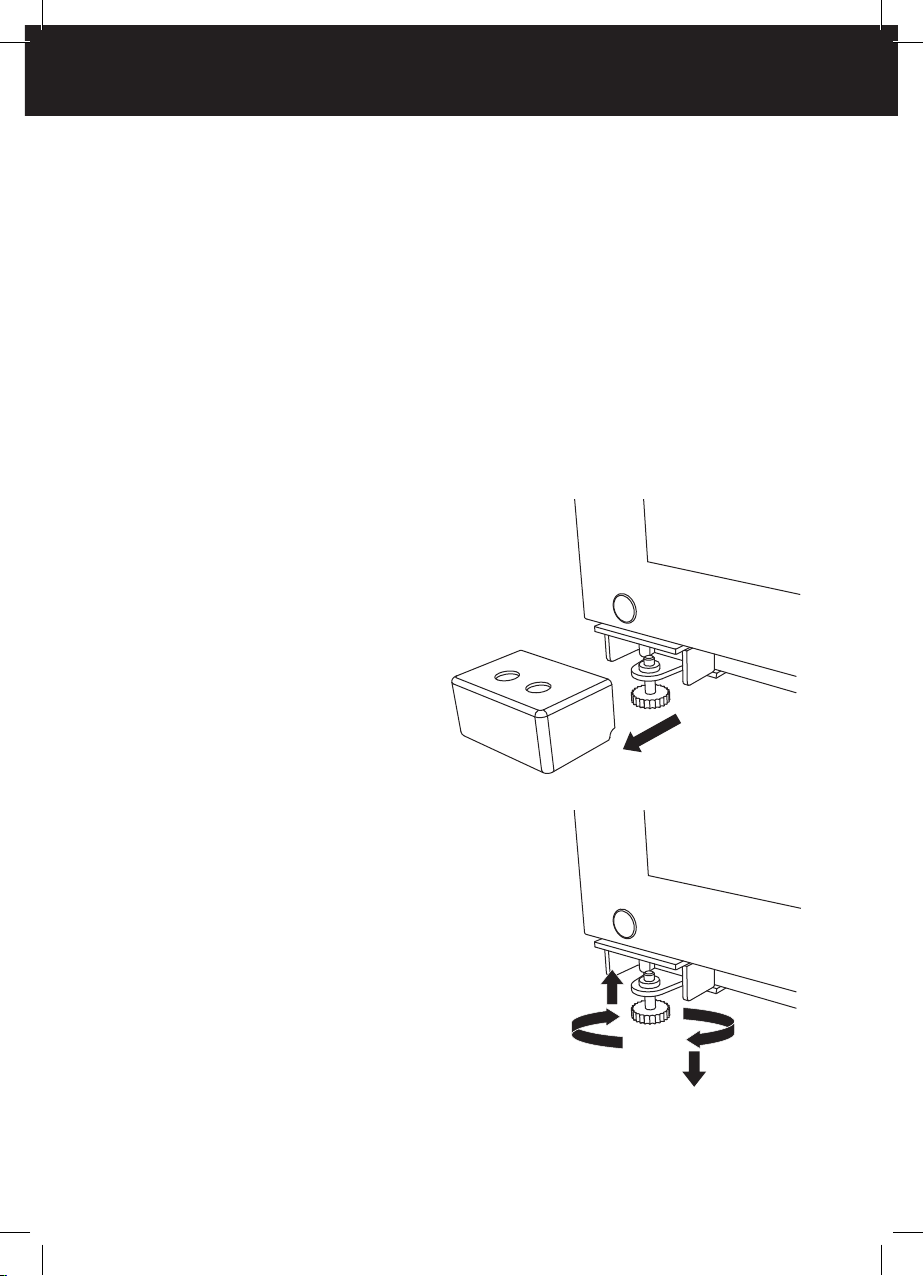
Levelling your Wine Cabinet
It is important that all four corners of
the Wine Cabinet base are supported
firmly on the floor to eliminate any
cabinet movement.
Installing the appliance on a soft or
uneven/unlevelled floor may result
in twisting of the cabinet and poor
sealing of the door.
The cabinet has adjustable feet, which
can be used to level the product.
Remove the feet cover, turn the feet
clockwise to raise the appliance
or counter-clockwise to lower the
appliance, until it is stable. This will
ensure a good door closing action.
Replace the feet cover.
The front levelling foot on the hinge
side should take majority of the
cabinet’s weight and be stable, ie the
cabinet should not rock or wobble.
To remove, pull the feet
cover towards you
Counter-clockwise
to raise feet
Clockwise to
lower feet
9
Page 12

INSTALLATION INSTRUCTIONS
C
O
Q
Q
P
A
B C
O
Q
Q
P
D
G
K M
o
H
S
I
K N
o
J
A
O
Q
Q
P
I
K N
o
J
Product and cabinetry dimensions
Q
Q
P
D
B
Flush with Wine Cabinet chassis
– full door rotation
E
K L
o
F
R
Flush with Wine Cabinet door
– 90° door rotation
I
K N
o
J
A
C
Flush with Wine Cabinet door
O
– full door rotation
G
K M
o
H
S
Power plug to
power wall socket
T
10
Page 13

INSTALLATION INSTRUCTIONS
RF106RDWX1
PRODUCT DIMENSIONS mm
Overall height of product 825 1270 1660 1855
A
Overall width of product 595 595 595 595
B
Overall depth of product
C
(excludes handle, includes back cover)
CABINETRY DIMENSIONS
(Including minimum air clearances)
Inside height of cavity 875 1320 1710 1905
D
Flush with Wine Cabinet chassis – full door rotation
Inside width 635 635 635 635
E
Inside depth 612 612 612 612
F
Flush with Wine Cabinet door – full door rotation
Inside width 635 635 635 635
G
Inside depth flush to flat door 669 669 669 669
H
Flush with Wine Cabinet door – 90° door rotation
(for full shelf access, the door needs to be open past 90°)
Inside width 715 715 715 715
I
Inside depth flush to flat door 669 669 669 669
J
MINIMUM CLEARANCES mm
Side clearance 20 20 20 20
K
Side clearance – hinge side flush
L
with chassis – full rotation
Side clearance – hinge side flush
M
with door – full rotation
Side clearance – hinge side flush
N
with door – 90°rotation
Rear clearance (includes back cover) 30 30 30 30
O
Top clearance – above Wine Cabinet 50 50 50 50
P
Vent – around top of cupboard (optional) 50 50 50 50
Q
Door clearance – hinge side flush
R
with chassis – full rotation
Door clearance – hinge side flush
S
with door – full rotation
MINIMUM POWER PLUG DIMENSIONS mm
Power plug depth 30 30 30 30
T
639 639 639 639
20 20 20 20
20 20 20 20
100 100 100 100
225 225 225 225
225 225 225 225
RF206RDWX1
RF306RDWX1
mm
RF356RDWX1
11
Page 14

INSTALLATION INSTRUCTIONS
What to do if your Wine Cabinet is unstable
Gently push the Wine Cabinet back until the
1
rear contacts the floor.
Measure the gap under the front foot, which
has come off the floor.
Obtain some solid packing material
(hardwood, plastic, etc) which fits firmly
into the gap under the foot.
IMPORTANT!
Do not use metallic materials that may
corrode, stain and/or damage floor coverings.
Wind both front feet up and ease the cabinet
2
out of position.
Place the packing material in the location
diagonally opposite the front foot that lifts
off the floor.
Make sure the packing material stays in
place when the product is pushed back
intoposition.
Ideally, the packing material is large enough
to rest against the back wall to prevent it
from moving when the cabinet is pushed
back into position.
Unlevel floor
This foot lifts off the floor when
top front is gently pushed back
Packing material goes under rear foot
diagonally opposite front foot that lifts
Wall behind Wine Cabinet
Push the Wine Cabinet back into position and
3
adjust the front feet. Check alignment and
door closing action are satisfactory.
Make small adjustments to the front feet
For example: if this foot lifts off
the floor when pushing gently on
the top front of the Wine Cabinet
where necessary, and ensure the product
is stable.
Before placing wine in your Wine Cabinet
Remove all internal packaging.
Clean the inside of the appliance to remove manufacturing and transportation dust.
Please refer to the ‘Cleaning care’ section of this user guide for further advice.
Allow the Wine Cabinet to run empty for 1–2hours, this allows the appliance to
acclimatize and remove any residual odours before making temperature adjustments.
Ensure your Wine Cabinet has adequate ventilation.
Do not cover you appliance with any material that will prevent air from flowing around
the cabinet sides.
12
Page 15

MOVING OR STORING YOUR APPLIANCE
If your Wine Cabinet is turned off for any reason, wait 10minutes before turning it back
on. This will allow the refrigeration systems pressures to equalise before restarting.
Moving your appliance
Turn off the appliance and unplug from the power point. Remove all wine bottles.
Turn the adjustable feet counter-clockwise to lower the product, making sure the feet
are wound up into the product.
Ease the appliance out of its position. Tape the power cord to the back of the Wine
Cabinet, tape the shelves in place and tape the door closed.
Always move the appliance vertically. Do not transport the product lying down, this
potentially damages the sealed cooling system.
Relocate and install the appliance. Wait 30minutes before plugging in and switching on
the cabinet.
Storing your Wine Cabinet
When storing your cleaned appliance, leave the door open. This allows air to circulate
and prevents the build-up of bacteria and moulds.
Before using again, clean well using liquid dishwashing detergent dissolved in warm
water. Rinse with clean water and dry with a lint-free cloth.
Holiday time
We recommend you leave your Wine Cabinet operating while you are on holiday.
13
Page 16

OPERATING INSTRUCTIONS – EXTERNAL CONTROL PANEL
The control panel enables you to view and modify all the features and options on your
Wine Cabinet.
Temperature control
When the Wine Cabinet is turned on for the first time, the control panel will display the
actual temperature of the cabinet.
The system will automatically cool both zones to their default temperature setting of
12°C (ideal for long term storage). This will take between 1 – 2 hours.
The temperature zones are independently controlled and do not change with the
temperature or humidity of the surrounding; whether summer or winter.
The Wine Cabinet can be set to any temperature between 5°C and 20°C in each zone to
accommodate your wine storage requirements.
If you wish to alter the temperature of either zone, this can be easily done by using the
external control panel.
External control panel
RF106RDWX1 and RF206RDWX1 models
RF306RDWX1 and RF356RDWX1 models
Adjusting the temperature of each zone
The zone last selected will automatically be illuminated.
1
Press and hold the ‘Keylock’ button for 3seconds to unlock the external control panel.
2
When unlocked the back lit LED lights intensify.
To change zones press the ‘Zone’ button once.
3
The temperature may be altered by pressing the or buttons. One press on either of
4
these buttons will increase or reduce the temperature by one °C or °F.
When the desired temperature is displayed, wait 3seconds, the blinking will stop and
the temperature will be set.
To switch between temperature units of °C and °F, press the ‘Air-Cool’ button for
5
3seconds.
14
Page 17

OPERATING INSTRUCTIONS – SPECIAL FUNCTIONS
Special functions
Keylock
The external control panel automatically locks from any key presses after 30seconds
from being enabled.
To deactivate Keylock and allow key presses. Press the ‘Keylock’ button for 3seconds,
1
when unlocked the back lit LED lights intensify.
To activate Keylock press the ‘Keylock’ button for 3seconds, when locked the back lit
2
LED lights will dim.
LED lighting
When the Wine Cabinet door is opened the light automatically illuminates both zones.
When the door is closed the light will automatically turn off. For maximum energy
savings, it is recommended to leave the light off when not viewing your collection.
To keep the light illuminated at all times (on door opening or closing):
Press the ‘Light’ button once and the icon will illuminate.
1
To deactivate the light from illuminating when not viewing your collection, press the
2
‘Light’ button once. The icon will no longer illuminate.
Air-Cool
The interior fans provide a constant and evenly distributed air flow throughout
the cabinet, ensuring the optimum environment for wine storage. This function is
recommended when large amounts of wine bottles are added at any one time.
To activate press the ‘Air-Cool’ button once and the icon will illuminate.
1
To deactivate press the ‘Air-Cool’ button once. The icon will illuminate.
2
Demist (For RF306RDWX1 and RF356RDWX1 models)
In high temperature conditions the surface of the Wine Cabinet door may show signs of
condensation. To eliminate this, the ‘Demist’ function is recommended.
To activate press the ‘Demist’ button once and the icon will illuminate.
1
To deactivate, press the ‘Demist’ button once and the icon will no longer illuminate.
2
Door alarm
A continuous alarm will sound if the cabinet door has been left open for longer than
60seconds. The alarm will stop only when the door is closed.
– For times when you require the door to be opened longer than normal eg rotating
your wine bottles or loading more wine, the door alarm can be temporarily muted.
To mute the door alarm, press any button on the external control panel once. When the
1
cabinet door is closed, alarm mute will deactivate and the door alarm will revert to normal.
IMPORTANT!
When the cabinet door is left open for long periods of time wine quality may be
compromised.
Automatic defrosting
This model has been designed to maintain the relative humidity inside the Wine Cabinet
alongside the automatic defrosting cycle.
Water captured in the reservoir tray from a defrost cycle assists in maintaining the
humidity. Humidity levels may be further assisted by adding water to the reservoir trays
and activating the ‘Air-Cool’ function.
15
Page 18

Upper zone
Standard shelf
Fixed shelf
Bottom zone
Single Tier shelf
Fixed shelf
INTERIOR AND EXTERIOR FEATURES
Door Switch
UV-tempered
glassdoor
Safety lock
RF106RDWX1 model
Upper zone
Presentation shelf
Fixed shelf
Bottom zone
Double Tier shelf
Bottom zone
Single Tier shelf
Fixed shelf
16
Door Switch
Upper zone
carbon filter
UV-tempered
glassdoor
Safety lock
RF206RDWX1 model
Page 19

INTERIOR AND EXTERIOR FEATURES
Interior features
Shelving
The oak shelves have been designed to allow for even air distribution around your wine
bottles. Depending on your model there are a range of adjustable shelves that can be
rearranged to suit your storage needs.
Standard shelf (all models)
These shelves are located in both zones and is designed to hold up to 22Bordeaux
bottles depending on the support lugs selected. The ideal loading arrangement for
these shelves is to have bottle necks interlocking.
Presentation shelf (excludes RF106RDWX1 model)
These shelves are located in the upper zone only
and is designed to hold up to 5 Bordeaux bottles
or to store opened bottles when in the tilted
state. When not using the Presentation shelf a
total of 9Bordeaux bottles can be stored in the
upright position.
To tilt the Presentation shelf:
Hold the front and back edge of the shelf
1
firmly and lift vertically to dislodge from the
support lugs.
Pull the shelf slightly forward and tilt the front
2
edge of the shelf down to the next support lugs.
Push the shelf back into the Wine Cabinet until
3
you feel it secure into the support lugs.
Double Tier shelf (excludes RF106RDWX1 model)
These shelves are located in the bottom zone only and is designed to hold up to
11Bordeaux bottles. The ideal loading arrangement for these shelves is to have bottle
necks facing the back of the Wine Cabinet.
1
2
3
Single Tier shelf (all models)
These shelves are located in the bottom support lugs of the bottom zone only and is
designed to hold 6Bordeaux bottles at any one time.
If removing this shelf please take care of the wine bottles stored underneath (when not
storing Bordeaux bottles), as bottles can be easily dislodged.
17
Page 20

INTERIOR AND EXTERIOR FEATURES
Activated carbon filters (all models)
Air quality is critical for preserving
wine, the activated carbon filters helps
to remove stale, unwanted odours and
replenishes with fresh air.
The filters are fitted to the rear wall on
the right-hand side of the upper and
bottom zone.
We recommend that you replace your
activated carbon filters once every five
years. Replacement filters are available
from your Fisher & Paykel Authorised
Repairer.
To remove the filter hold by the handle,
1
and turn counter-clockwise until fully
loosened. Pull towards you to remove.
To replace the filter hold by the handle,
2
insert and turn clockwise to fully secure.
Exterior features
Door lock (all models)
The Wine cabinet is equipped with a
door lock located at the bottom left of
the cabinet door.
1
90° counter-clockwise
to lock
2
To lock the cabinet, insert the key and
turn 90° counter-clockwise.
To unlock the cabinet, insert the key and
turn 90° clockwise
18
90° clockwise
to unlock
Page 21

STORING YOUR WINE
Short-term storage/serving
This Wine Cabinet is perfect for short-term storage such as entertaining.
Red wines are best served at warmer temperatures and white wines are best served at
cooler temperatures.
The ideal serving temperature of your wine is crucial for your taste and enjoyment.
The following are recommended serving temperatures for different wines.
SPARKLING WINES AND SWEET WHITE WINES
Non-vintage Champagne and Sparkling Wine 6°C
Vintage Champagne and Sparkling Wine, Riesling and Gewürztraminer 8°C
DRY WHITE WINES
Sauvignon Blanc, Chenin Blanc, Bordeaux Blanc 9°C
Chardonnay and White Burgundy, Rosé 10 – 12°C
LIGHT TO MEDIUM-BODIED RED WINES
Young Boredaux, Young Cabernet, Pinot Noir, Merlot 14 – 16°C
FULL-BODIED RED WINES
Cabernet Sauvignon, Red Burgundy 17°C
Shiraz, Zinfandel, Vintage Port 18°C
Long-term storage
This Wine Cabinet is also perfect for long-term storage/cellaring of wines.
The ideal temperature for long-term storage of red and white wines is between
11°Cto13°C.
Storing red and white wine
When storing a combination of red and white wines, we recommend storing same
case wines together. For example red wine in the bottom zone and white wine in the
upper zone.
Depending on the number of wine bottles and functions selected, it may take
48hours for the Wine Cabinet temperatures to stabilise.
Not all wine stored will improve/mature over time. Some wine are best consumed at
an early stage, while others have remarkable ageing capabilities. Do check with your
wine merchant for more information.
19
Page 22

LOADING YOUR WINE BOTTLES
When loading your Wine Cabinet please keep in mind our loading capacities are based
on the standard 750 ml Bordeaux bottles.
The loading arrangement outlined for the following models is recommended when using
the Presentation shelf. Maximum capacities are listed, and storage can be maximised
by removing the Presentation shelf and replacing with the additional Standard shelf
supplied (except RF106RDWX1).
DOs DON’Ts
Before loading wine into the cabinet
confirm that all shelves are secured and
stable.
Store same case bottles in a vertical
stack, this enables easy access to all
your different wines.
Arrange the wine bottles you wish
to cellar or mature at the back of the
shelves and the wines you wish to
consume in the short-term at the front.
Only interlock wine bottles of the same
size together. This ensures stacking
about the first tier is stable.
Avoid overcrowding shelves, as this
reduces airflow.
Follow the recommended loading
arrangement outlined for each shelf for
each model.
Do not load more than the
recommended number of wine bottles
on each styled shelf.
Do not remove any shelves above
another shelf to allow the shelf below
to hold more than the recommended
number of wine bottles.
Do not interlock wine bottles of
different sizes that do not fit well
together on a shelf.
20
Upper
zone
Bottom
zone
Standard shelf
19 wine bottles only
Fixed shelf
8 wine bottles only
Single Tier shelf
6 wine bottles only
Fixed shelf
17 wine bottles only
RF106RDWX1 model
Maximum capacity: 50 wine bottles
Page 23

Upper
zone
LOADING YOUR WINE BOTTLES
Presentation shelf
9 wine bottles in the
upright position only
Standard shelf
22 wine bottles only
Fixed shelf
8 wine bottles only
Bottom
zone
Double Tier shelf
11 wine bottles only
Standard shelf
8 wine bottles only
Single Tier shelf
6 wine bottles only
Fixed shelf
17 wine bottles only
RF206RDWX1 model
Maximum capacity: 83 wine bottles
21
Page 24

Upper
zone
LOADING YOUR WINE BOTTLES
Presentation shelf
9 wine bottles in the
upright position only
Standard shelf
22 wine bottles only
Fixed shelf
8 wine bottles only
22
Bottom
zone
Double Tier shelf
11 wine bottles only
Standard shelf
22 wine bottles only
Standard shelf
8 wine bottles only
Single Tier shelf
6 wine bottles only
Fixed shelf
17 wine bottles only
RF306RDWX1 model
Maximum capacity: 127 wine bottles
Page 25

Upper
zone
LOADING YOUR WINE BOTTLES
Presentation shelf
9 wine bottles in the
upright position only
Standard shelf
22 wine bottles only
Fixed shelf
8 wine bottles only
Bottom
zone
RF356RDWX1 model
Maximum capacity: 144 bottles
Double Tier shelf
6 wine bottles only
Standard shelf
22 wine bottles only
Single Tier shelf
6 wine bottles only
Fixed shelf
17 wine bottles only
23
Page 26

CLEANING CARE – EXTERIOR
Stainless steel exterior door
Use only liquid dishwashing detergent dissolved in warm water and a soft lint-free cloth
to clean the exterior door surface.
Rinse with clean water and dry with a clean, lint-free cloth.
The use of any abrasive or stainless steel cleaners and solvents will damage the door
surface.
Other exterior surfaces
Clean all other exterior surfaces with liquid dishwashing detergent dissolved in warm
water and a soft lint-free cloth.
Rinse with clean water and dry with a clean, lint-free cloth.
Door gasket
It is recommended to clean the magnetic door gasket every three months with an old
toothbrush, and liquid dishwashing detergent dissolved in warm water.
Gasket must be kept clean and pliable to assure a proper seal.
Petroleum jelly applied lightly on the hinge side of the gasket will keep the gasket
pliable and assure a good seal.
IMPORTANT!
Many commercially available cleaning products contain solvents which may attack
plastic components of your Wine Cabinet and cause them to crack.
Avoid using anti-bacterial cleaning products on the interior or exterior of the Wine
Cabinet, as they may cause rusting of metal components and cracking of plastic
components.
24
Page 27

CLEANING CARE – INTERIOR
Interior
For ease of cleaning, empty the Wine Cabinet first and remove all shelves.
Wipe interior surfaces using only liquid dishwashing detergent dissolved in warm water
and a soft lint-free cloth. Rinse with clean water and dry with a clean, lint-free cloth.
Do not use harsh chemicals, abrasives, ammonia, chlorine, bleach, concentrated
detergents, solvents or abrasive scouring pads on any part of your Wine Cabinet.
SOME of these chemicals may dissolve, damage and/or discolour the interior of your
Wine Cabinet.
Adjustable shelves
When cleaning use only a dry clean, lint-free cloth to wipe over surfaces. Do not use
warm water or any cleaners as this will damage the shelves’ oak characteristics and
cause them to warp and stain.
If the shelves are lightly stained by split wine or water allow the surface to dry, then
using 200 grade sandpaper gently sand over the stain until removed. Wipe down the
area with a dry clean, lint-free cloth to remove remaining sawdust.
If shelves are heavily stained, over time the colour of the shelf will darken and warp,
and may eventually require replacing. Replacement shelves are available from your
Fisher&Paykel Authorised Repairer.
To remove adjustable shelves
Depending on your model there are a range of adjustable shelves that can be
rearranged to suit your storage needs.
For ease of removal, empty the shelf first.
1
Hold the back of the shelf and lift vertically to dislodge from back support lugs.
2
Pull the shelf towards you to remove.
3
Repositioning adjustable shelves
Align the back edge of the shelf onto the desired support lugs.
1
Push the shelf back into the Wine Cabinet until you feel it secure into the back
2
supportlugs.
Ensure the shelf is secure before use.
3
Fixed shelves
The centre and bottom shelf of each model are permanently fixed. They cannot be
removed from the Wine Cabinet. To clean, simply wipe with a damp, lint-free cloth.
25
Page 28

USER WARNINGS AND SOUNDS
User warnings – faults
In the unlikely event of a fault occurring, a fault code will be displayed on the external
control panel and an alarm will sound.
Please take note of the fault code and contact our Customer Care Centre. Contact
details are located towards the end of the user guide.
To silence the fault alarm press any button on the external control panel. The fault code
will remain illuminated until the fault is corrected.
Normal Wine Cabinet sounds
Fisher & Paykel Wine Cabinets, can produce sounds somewhat different to your old
Wine Cabinet.
Normal operational sounds include:
Fan air flow sounds. Fisher & Paykel Wine Cabinets have fans to circulate the air within
each zone. This is quite normal.
Running/boiling water, gurgling sounds or slight vibrations. This is the liquid refrigerant
circulating in the system.
Clicking sounds. This is the thermostat control and will click when it cycles on and off.
Gasket noises. This normally occurs due to a build-up of dirt and/or grime. It is
recommended to clean the magnetic door gasket every three months to minimise these
noises occurring.
Other sounds may be heard of for the following reasons:
– Cabinet not level
– Floor uneven or weak
– Wine bottles not positioned on the shelf correctly.
26
Page 29

TROUBLESHOOTING
If there is a problem with your Wine Cabinet, please check the following points before
contacting your local Fisher & Paykel Authorised Repairer or Customer Care Centre.
Product parts and accessories can be purchased through Fisher & Paykel Customer Care
or online at www.fisherpaykel.com (this service is available to selected markets only).
PROBLEM POSSIBLE CAUSES WHAT TO DO
Appliance does
not operate.
Lights do not
illuminate
when the door
isopened.
Motor operates for
long periods.
Wine bottles
appear too warm.
Wine bottles
appear too cold.
No electricity at the
power outlet.
Cabinet is not working. Check the cabinet is turned on at the
Lights not functioning. The LED lights cannot be service by
The room temperature is
hotter than normal.
Prolonged or frequent
door openings.
Large amount of wine
bottles added.
Temperature setting is too
low.
Door not sealed properly. Check the cabinet is level and gasket
Temperature setting not
correct.
Prolonged or frequent
door openings.
Large amount of wine
bottles added.
Temperature setting not
correct.
Check the cabinet is correctly
connected and the power is
switchedon.
Check another appliance at the same
outlet.
Check the house fuse.
wall.
the user. Contact your Fisher&Paykel
Dealer or Fisher&Paykel Authorised
Repairer.
Minimise door openings to allow
temperature to stabilise.
Refer to ‘Operating instructions’
and ‘Storing your wine’ sections for
optimal temperature settings.
seals are clean.
Adjust the temperature control to a
colder setting. Refer to the ‘Operating
instructions’ sections.
Minimise door openings to allow
temperature to stabilise.
Allow time for recently added
wine bottles to reach the desired
temperature. Activate ‘Air-Cool’
function. Refer to ‘Operating
instructions – Special functions’
section.
Adjust the temperature control to a
warmer setting. Refer to ‘Operating
instructions’ sections.
27
Page 30

TROUBLESHOOTING
PROBLEM POSSIBLE CAUSES WHAT TO DO
Unfamiliar noises. The cabinet is not stable
or level.
Door alarm sounds
continuously
and a fault code
appears.
Exterior of cabinet
is warm.
Moisture build-up
on the exterior
appliance
surfaces.
Moisture build up
on the interior
glass door.
Door handle out
of alignment.
Excessive gasket
noise.
Door does not
shut properly.
This is dependent on the
displayed fault code.
This is normal.
Not unusual during
periods of high humidity.
Not unusual during
periods of high humidity.
Prolonged or frequent
door openings.
With time and usage,
movement may occur.
May be due to a build-up
of dirt and/or grime.
Cabinet not stable or level. Level the cabinet. Refer to the
The gasket is dirty. Gasket needs cleaning. Refer to the
The shelves are out of
position.
Door obstruction. Check for obstructions eg protruding
Level the cabinet. Refer to the
‘Installation instructions’ section or
refer to ‘User warnings and sounds’
section.
Please take note of the fault code and
contact the Customer Care Centre.
Wipe dry with a clean, lint-free cloth.
Wipe dry with a clean, lint-free cloth
and activate ‘Demist’ function. Refer
to ‘Operating instructions – Special
functions’ section.
Minimise door openings to allow the
temperature to stabilise. Also check
the gasket is sitting flat and sealing
tightly.
Refer to ‘Installation instructions’
sections.
Gasket needs cleaning. Refer to
‘Cleaning care – Exterior’ section.
‘Installation instructions’ section.
‘Cleaning care – Exterior’ section.
Realign shelves. Refer to the ‘Cleaning
care – Interior’ section.
wine bottles, shelves out of position.
28
Page 31

MANUFACTURER’S WARRANTY
You automatically receive a 2 year Manufacturer’s Warranty with the purchase of this
Wine Cabinet covering parts and labour for servicing within the countries New Zealand,
Australia, The Republic of Ireland and Northern Ireland. All other countries are excluded.
Fisher & Paykel undertakes to:
Repair or, at its option, replace without cost to the owner either for material or labour
any part of the product, the serial number of which appears on the product, which is
found to be defective within TWO YEARS of the date of purchase.
Note: this Manufacturer’s Warranty is an extra benefit and does not affect your
legalrights.
This Manufacturer’s Warranty DOES NOT cover
Service calls which are not related to any defect in the product. The cost of a service
A
call will be charged if the problem is not found to be a product fault. For example:
Correcting the installation of the product.
1
Instructing you how to use the product.
2
Replacing house fuses or correcting house wiring or plumbing.
3
Correcting fault(s) caused by the user.
4
Noise or vibration that is considered normal, eg drain/fan sounds, refrigeration
5
noises or user warning beeps.
Correcting damage caused by pests, eg rats, cockroaches, etc.
6
Replacement light bulbs.
7
Defects caused by factors other than:
B
Normal domestic use; or
1
Use in accordance with the product’s user guide.
2
Defects to the product caused by accident, neglect, misuse or ‘act of God’.
C
The cost of repairs carried out by non-authorised repairers or the cost of correcting
D
such unauthorised repairs.
Normal recommended maintenance as set out in the product’s user guide.
E
Repairs when the appliance has been dismantled, repaired or serviced by other than a
F
Fisher&Paykel Authorised Repairer or the selling dealer.
Pick-up and delivery.
G
Transportation or travelling costs involved in the repair when the product is installed
H
outside the Fisher&Paykel Authorised Repairer’s normal service area.
Filter replacement except in the case of faulty parts or materials within the filter
I
cartridge.
Damage (including water damage) caused by faulty installation or plumbing.
J
This product has been designed for use in a normal domestic (residential) environment.
This product is not designed for commercial use (whatsoever). Any commercial use by a
customer will affect this product’s Manufacturer’s Warranty.
29
Page 32

MANUFACTURER’S WARRANTY
Service under this Manufacturer’s Warranty must be provided by a Fisher&Paykel
Authorised Repairer (refer to the ‘Customer Care’ section at the back of this book). Such
service shall be provided during normal business hours. This Manufacturer’s Warranty
certificate should be shown when making any claim.
For Australian customers
This Manufacturer’s Warranty is an extra benefit and does not affect your legal rights.
Our goods come with guarantees that cannot be excluded under the Australian
Consumer Law. You are entitled to a replacement or refund for a major failure and
for compensation for any other reasonably foreseeable loss or damage. You are also
entitled to have the goods repaired or replaced if the goods fail to be of acceptable
quality and the failure does not amount to a major failure.
Please keep this user guide in a safe place.
30
Page 33

CUSTOMER CARE
Before you call for service or assistance...
Check the things you can do yourself. Refer to your user guide and check that:
Your product is correctly installed.
1
You are familiar with its normal operation.
2
You have read the ‘Troubleshooting’ section at the back of the book.
3
If after checking these points you still need assistance or parts, please refer to your
nearest Authorised Service Centre, Customer Care, or contact us through our website
www.fisherpaykel.com.
In New Zealand if you need assistance…*
Call your Fisher & Paykel retailer who is trained to provide information on your
appliance, or if we can be of any further help, please contact our Customer Care Centre.
Toll Free: 0800 FP CARE or 0800 372 273
Fax: (09) 273 0656
Website: www.fisherpaykel.com
Postal address: Fisher & Paykel Appliances Ltd, PO Box 58546, Botany, Auckland 2163
If you need service…*
Fisher & Paykel has a network of independent Fisher & Paykel Authorised Repairers
whose fully trained technicians can carry out any service necessary on your appliance.
Your dealer or our Customer Care Centre can recommend a Fisher & Paykel Authorised
Repairer in your area.
In Australia if you need assistance…*
Call the Fisher & Paykel Customer Care Centre and talk to one of our Customer Care
Consultants.
Toll Free: 1300 650 590
Fax: (07) 3826 9298
Website: www.fisherpaykel.com
Postal address: Fisher & Paykel Appliances Ltd, PO Box 798, Cleveland QLD 4163
If you need service...*
Fisher & Paykel has a network of qualified Fisher & Paykel Authorised Repairers
responsible for servicing only Fisher & Paykel branded appliances. Our Customer Care
Centre can recommend a qualified Fisher & Paykel Authorised Repairer in your area.
In United Kingdom if you need assistance…*
Call the Fisher & Paykel Customer Care Centre and talk to one of our Customer Care
Consultants.
Phone: 08000 886 605
Fax: 08000 886 606
Website: www.fisherpaykel.com
Postal address: Fisher & Paykel Appliances Ltd, Maidstone Road, Kingston, Milton
Keynes, Buckinghamshire, MK10 0BD
31
Page 34

CUSTOMER CARE
In Ireland if you need assistance…*
Phone: 1800 625 174 or 01-8077960
Fax: 1800 635 012
Website: www.fisherpaykel.com
Postal address: Fisher & Paykel Appliances, Unit D2, North Dublin Corporate Park,
Swords, Co. Dublin
For rest of the world…*
Call your Fisher & Paykel retailer/dealer from whom you purchased the product. They
are trained to provide information on your appliance. If we can be of any further help,
please contact use on:
Phone: +64 9 273 0660
Fax: +64 9 273 0580
Website: www.fisherpaykel.com
Postal address: Fisher & Paykel Appliances, PO Box 58732, Botany, Manukau 2163,
Auckland, New Zealand.
*If you call, write or contact our website please provide: your name and address, model
number, serial number, date of purchase and a complete description of the problem.
This information is needed in order to better respond to your request for assistance.
For product details please refer to the serial plate located on the rear of the cabinet.
Registration
Register your product with us so we can provide you with the best service possible.
To register your product visit our website: www.fisherpaykel.com
Complete and keep for safe reference:
Model
Serial No.
Purchase Date
Purchaser
Dealer
Suburb
Town
Country
32
Page 35

EUROPEAN DIRECTIVE 2012/19/EU ON
WASTE ELECTRICAL AND ELECTRONIC EQUIPMENT (WEEE)
EU This appliance is marked according to the European directive 2012/19/EU on Waste
Electrical and Electronic Equipment (WEEE). By ensuring this product is disposed of
correctly, you will help prevent potential negative consequences for the environment
and human health, which could otherwise be caused by inappropriate handling of this
product.
The symbol marked on the serial plate, or on the documents accompanying the
product, indicates that this appliance cannot be treated as household waste. It shall
be handed over to the applicable collection point for the recycling of electrical and
electronic equipment. Disposal of the appliance shall be carried out in accordance with
the local environment regulations for waste disposal and ensure the refrigerant circuit is
not damaged.
For more detailed information about treatment, recovery and recycling of this product,
please contact your local city office, your household waste disposal service or your
Fisher & Paykel retailer/dealer from whom you purchased this product.
33
Page 36

www.fisherpaykel.com
The product specifications in this booklet apply to the specific products
and models described at the date of issue. Under our policy of continuous
product improvement, these specifications may change at any time. You
should therefore check with your dealer to ensure this booklet correctly
Copyright © Fisher & Paykel 2015. All rights reserved.
describes the product currently available.
NZ AU GB IE EU AE IN
842781 A 03.15
 Loading...