

Page 1
DW820 and DW920 models
Dishwasher
Installation instructions and
User guide
NZ & AU
Page 2

Page 3

Contents
Installation instructions 2
Introduction 6
Quick operating instructions 7
Control panel 8
Loading the dishwasher 11
Detergent 13
Rinse aid 14
Wash programmes 15
Changing the preset options 16
Australian/New Zealand Standard AS2007.1 17
Care guide 18
Care and cleaning 19
Problem solving 20
Fault codes 22
Manufacturer’s warranty 23
Customer care 24
Important!
Please note, some models shown in this book are not available in all markets. It is important
that the Installation instructions/User Guide should be retained with the appliance for future
reference. Should the appliance be sold or transferred to another owner, always ensure that
the Installation instructions/User Guide is left with the appliance in order that the new owner
can familiarise themselves with the appliance and the relevant warnings.
1
Page 4

Installation instructions
Before you start
These instructions are intended as a
guide only. It is the responsibility of the
Plumber and Electrician to ensure that each
installation complies with the Government
Regulations and Local Government ByLaws.
Lifting & Removing the Dishwasher
We recommend two people should move
the dishwasher, with one person standing
INSTALLATION INSTRUCTIONS
on each side. Always lift from the step at
the lower rear of the dishwasher. Hold
the dishwasher level by placing your other
hand at the top of the door on the front.
Never Lift From the Door Handle
Do not lift from the decorative panel on the
front of the dishwasher. Always be careful
with the hoses and the power cord at the
back of the dishwasher. Careful handling
will prevent damage and malfunction from
squashing, kinking or cuts.
This dishwasher must not be connected to
an under sink high pressure “push through”
type hot water system, as damage to the
system will result. If in doubt as to the
suitability of your system, consult your
Plumber.
The dishwasher should not be connected
to a hot water system where the
temperature exceeds 75°C, or where there
is no temperature control, i.e. a wet back
system, unless the system is fitted with a
suitable tempering valve.
While installing the dishwasher, check the
drain hose is not restricted or kinked.
Do not remove the insulation blanket from
the rear of the product. This is not part of
the packaging. It provides sound and heat
insulation.
2
Plumbing
Drainage
The recommended method of installation
for a Fisher & Paykel DW920 and DW820
Dishwasher is shown in Diagrams 1, 2 & 3
on Page 5. The diagrams are designed to
eliminate problems that often occur with
combined sink-dishwasher waste systems.
The standpipe must have a minimum inside
diameter of 38mm and stand 750mm
above the floor. A drain hose support is
provided to hold the drain hose in place in
the standpipe (see Diagrams 1 and 2). It is
not recommended that the drain hose or
drain pipe be connected directly to a waste
disposal unit (see Diagram 2).
When connecting the drain hose to a sink
trap with a drain hose spigot, it is important
that the drain hose is supported to the
height of the bench (see Diagram 3). Ensure
the drain spigot has a minimum hole size of
15mm and that it has been drilled out.
Water Valve Connections
Both Fisher & Paykel Dishwasher Models
DW920 and DW820 have single valve
water connections. We recommend a cold
water connection to give the best wash
performance and energy efficiency.
Water Supply
The dishwasher inlet hose must be
connected to an accessible water tap. The
water supply to the dishwasher should be
through a 15mm minimum domestic water
pipe. The inlet hose connects to the water
supply tap using a 20mm BSP male thread.
The tap must have an adequate sealing face
for the flat washer supplied, to ensure the
hose connections
are water tight.
Hose coupling must
be tightened a further
half turn after seal
contact.
MAX Ø20mm
MIN Ø15mm
Page 5
To Change the Setup for a hot or cold
water supply
This is only required on a Fisher & Paykel
DW920 model.
1
Press the POWER button to turn the
Dishwasher off.
2
Hold the ECO button for 15 seconds and
the dishwasher will beep. On the time
Display, “H” or “C” will be displayed. “H”
represents Hot water connection and “C”
represents Cold water connection.
3
Press the START/PAUSE button to toggle
between “H” and “C”. Once the appropriate
option is chosen.
4
Press the POWER button. This will save the
option you have chosen.
The hot water supply should ideally be
at a temperature of 60-65°C at the point
of entry to the dishwasher and must not
exceed 75°C.
The water pressure to the dishwasher shall
be no less than 30kPa (4.3psi) and no more
than 960kPa (140psi).
Note: DW920 is set up for connection to
cold water when it leaves the factory.
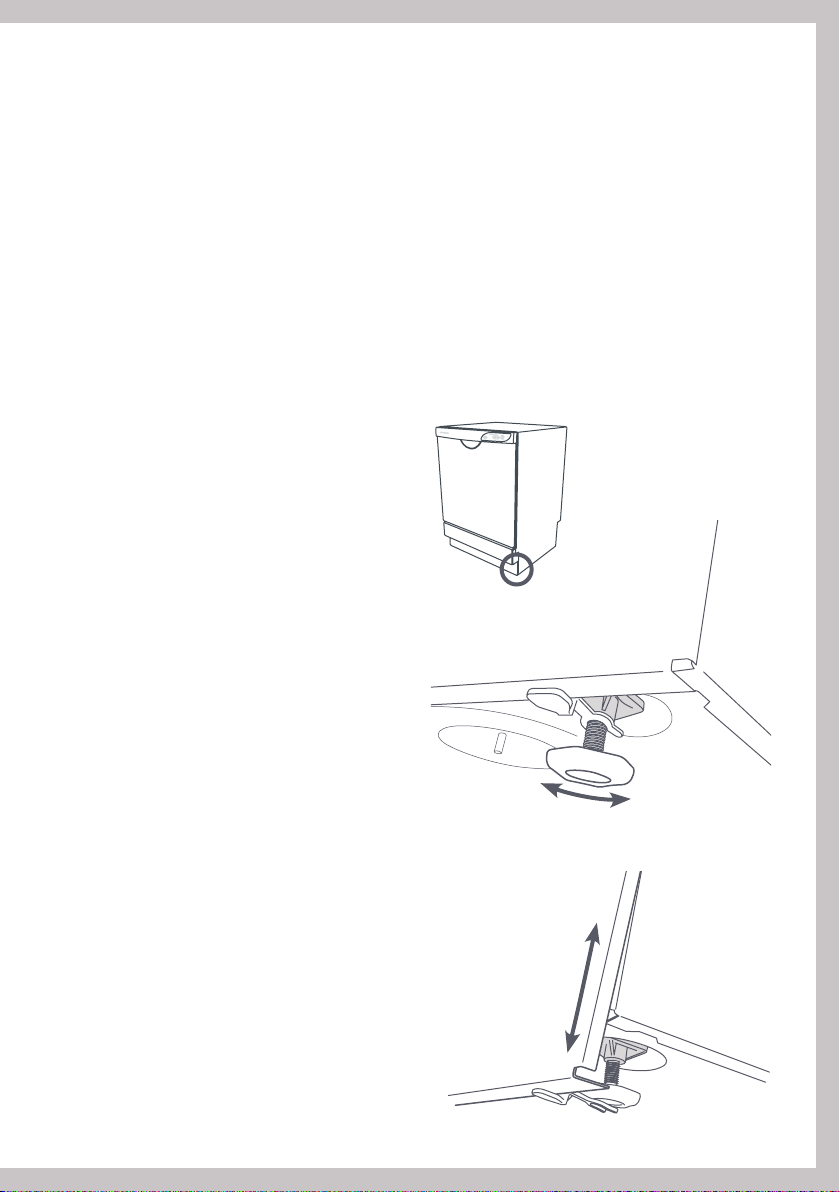
Levelling
Before sliding the dishwasher into position,
adjust the levelling feet to ensure that the
dishwasher is level at the required height.
Check that the door opens and closes
without striking the side of the cabinet. If
necessary, readjust the levelling feet slightly
(see Figure A).
IMPORTANT!
If the door strikes the side of the cabinet,
a poor door seal may result in the
product leaking.
INSTALLATION INSTRUCTIONS
Once the required height is obtained, slide
the service panel down to cover the feet
(see Figure B).
Installation
Once installed, the dishwasher’s rear
levelling feet must be anchored to the
floor to prevent the dishwasher from
tilting forward when the baskets are being
loaded with dishes. Two anchor plates,
with screws, are provided for this purpose.
A template and instructions for locating
the correct position of the anchor plates is
printed on the top cardboard spacer of the
external packaging of the product.
Built-In Installation
Where the dishwasher is installed in an
under bench situation, ensure that bare
wood surrounding the dishwasher is sealed
with an oil based paint or moisture-proof
polyurethane to prevent possible steam
damage.
Figure A: Adjusting the levelling feet
Adjust height
Figure B: Fitting the service panel
3
Page 6
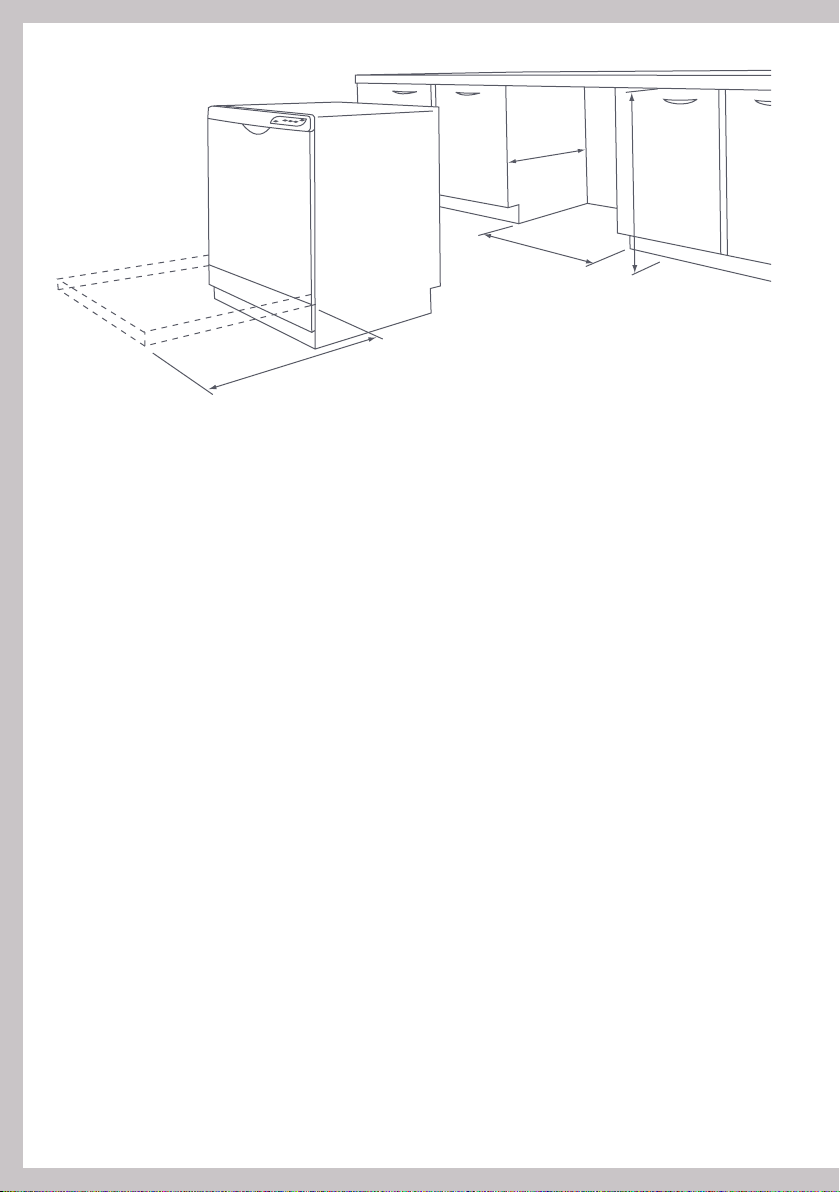
Depth (C)
560mm
Height (A)
825-875mm
Width (B)
600mm
INSTALLATION INSTRUCTIONS
Door open (D)
595mm
Electrical
A 3 Pin 10 Amp switched outlet is required. The switch must be located in a readily accessible
position with the product installed.
Joinery dimensions (DW820 & DW920)
Height A - 830mm MIN
Width B - 600mm
Depth C - 560mm
Door Open D - 595mm
Note
Ensure underside of bench is sealed with an oil based paint or moisture-proof polyurethane to
prevent possible steam damage.
Specifications
Product Size
Height 825-875mm
Width 595mm
Depth 555mm
Electrical 230-240 vAC
Drying Residual Heat / 1500 Watt Element
Water Pressure Minimum 30 kPa (4.3 psi)
Maximum 960 kPa (140 psi)
Water Temperature Cold water recommended.
Hot ideally 60-65°C (must not exceed 75°C)
Place Setting 12
4
Page 7
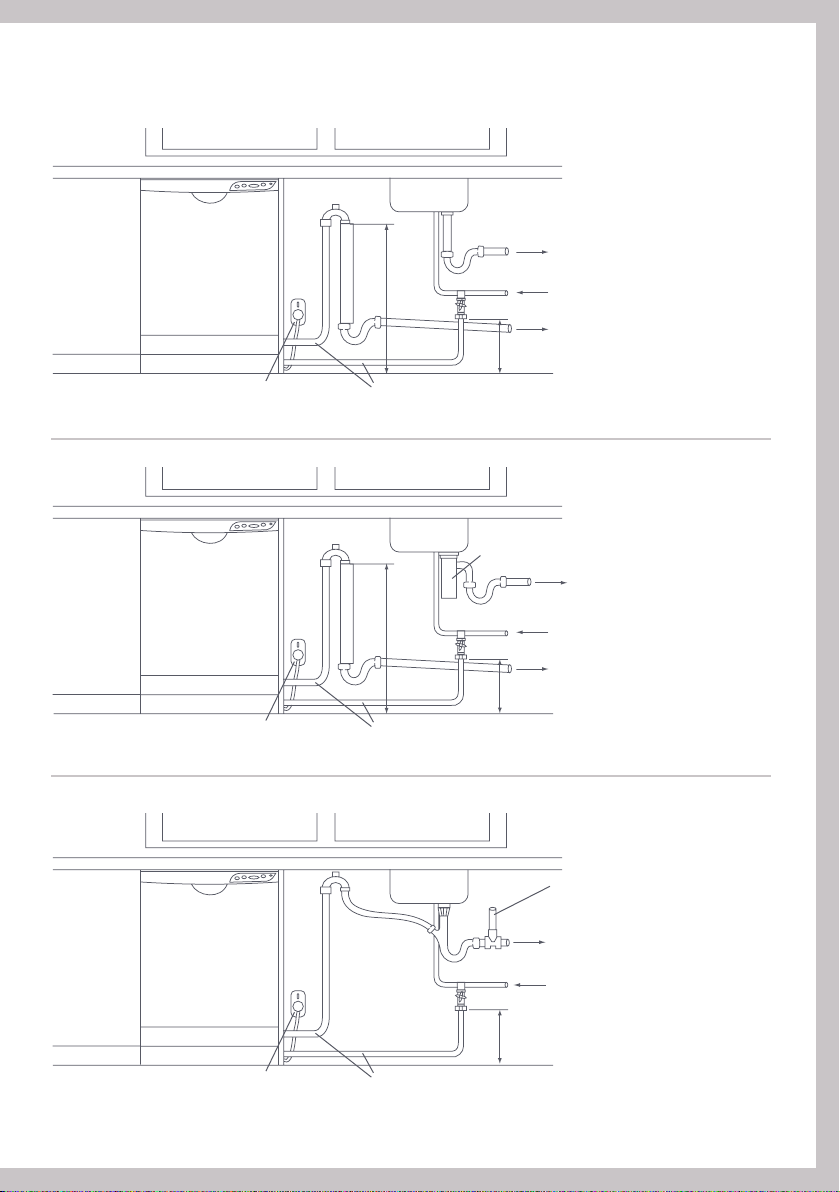
Plumbing and drainage options
Standpipe Ø38mm
*
750mm MIN above floor
Waste
*
Switched power socket
Diagram 1: Dishwasher
Hose supplied
*
Switched power socket
Diagram 2: Dishwasher & waste disposal unit
Hose supplied
200mm MIN
Waste
disposal unit
200mm MIN
Water
Waste
Standpipe Ø38mm
*
750mm MIN above floor
Waste
Water
note:
Connection of drain
Waste
hose direct to the waste
disposal unit is NOT
recommended.
INSTALLATION INSTRUCTIONS
Vent
Waste
note:
Where standard hose
is not long enough,
a service person can
fit an extra length, 3
metre, drain hose (part
no. 521287).
Switched power socket
Water
200mm MIN
Hose supplied
Diagram 3: Dishwasher using sink trap with dishwasher drain hose spigot
5
Page 8

Introduction
Fisher & Paykel strongly recommend that you read the information contained in this User
Guide before using the dishwasher.
After your Dishwasher has been installed, please check that:
1
The Dishwasher has been installed in accordance with installation instructions.
2
There are no water leaks from the hose connections which can be seen under the Dishwasher
or at the tap.
First use
Before you start, check the following:
The power cord is plugged in and the switch is on.
The inlet hose is connected and the tap is turned on.
The drain hose is installed correctly.
We recommend a cold water connection to achieve the best wash performance and lowest
overall energy consumption. A hot fill connection should be used if faster times are desired
or if an alternative hot water supply such as night rate electricity, solar heating or wetback is
desired.
Accessories
Cutlery Basket
Removable Basket Insert
Floor Mounting Kit
Safety instructions
Household appliances are not intended to be played with by children. Children or persons
with a disability that may limit their ability to use the appliance, should have a competent
person instruct them in its use. This person should be satisfied that they can then use the
appliance without danger to themselves or their surroundings.
If the supply cord is damaged, it must be replaced by a Fisher & Paykel Dealer or Authorised
Service Centre or a similarly qualified electrical tradesperson in order to avoid a hazard.
6
Page 9

Quick operating instructions
Load the dishes into the dishwasher
Remove any large scraps of food from dishes. Ensure the dishwasher is not overcrowded when
loading as this may lead to poor wash performance.
Check spray arms can rotate
Ensure there are no items blocking the spray arm path.
Fill the detergent and rinse aid dispenser
Follow the wash programme chart for recommended quantities of detergent and ensure there
is adequate rinse aid for the wash.
Select the wash programme
Close the dishwasher door. Press the WASH button to select the desired wash.
Eco function (optional)
If you would like the wash programme to use less energy and time, press the ECO button.
Start the dishwasher
Press the START/PAUSE button to start the Dishwasher. To pause in mid cycle or to restart the
Dishwasher. Press the START/PAUSE button.
End of wash programme
At the end of the wash programme, the dishwasher will automatically stop and beep five
times indicating the end of the programme.
Note:
If a power failure occurs and the Dishwasher is in the middle of a wash programme, it will
stop. Once the power is restored, the dishwasher will restart that part of the wash sub cycle
again and continue on with the wash programme. Extra detergent may be required, if the
dishwasher was disrupted in the main part of the programme.
7
Page 10

Control panel
820 Model Control Panel
920 Model Control Panel
Power Button
This turns the Dishwasher on and off.
On
After pressing the POWER button:920 Model Only - The Time Remaining Display will indicate the time remaining in minutes for
the wash programme selected.
820 Model Only - The wash programme light will be lit up.
The next time the Dishwasher is turned on, it will default to the last wash programme used.
Off
To completely stop the Dishwasher press the POWER button. Any remaining water in the
Dishwasher will be pumped out.
When the wash programme has finished, the Dishwasher will stop automatically. All the lights
will turn off and the machine will beep five times.
START/PAUSE button
The START/PAUSE button has the following functions:
1
Start the Dishwasher.
2
Interrupt the Dishwasher while it is operating.
The Dishwasher will automatically restart after five minutes if the START/PAUSE button is not
pressed again. The Dishwasher will only restart when the door is closed.
3
Restart the Dishwasher after it has been interrupted.
4
Delay Start (920 Model only).
8
Page 11

Wash button
To select a wash programme, press the WASH button. The wash button will scroll between the
normal - light - fast and rinse wash programmes. The light below the wash programme will
indicate your selection.
Eco button
The Eco feature reduces the temperatures during the wash. It saves on energy and time.
This function should be selected before you push the START/PAUSE button. When the ECO
light is on it will indicate you have selected this option.
Delay start (920 Model Only)
This feature allows you to delay the start of the wash programme between one to nine hours.
To activate the Delay start function
1
Press the START/PAUSE button for two seconds until the “1h” appears on the Time Remaining
Display.
2
Hold the START/PAUSE button down to increase the delay time in one hour increments.
This feature is useful if you want to take advantage of off peak power rates. (Check with your
local Electricity Supplier if this is available), or if you wish to start the Dishwasher at a later time.
To cancel the Delay start function
Press and hold the START/PAUSE button until the “h” no longer appears on the Time Remaining
Display or press the POWER button to turn the Dishwasher off.
Key lock (920 Model Only)
This button prevents the Dishwasher being turned on or off accidentally. It is also useful when
you are cleaning the control panel.
To activate the Key lock function
Ensure the Dishwasher door is closed, press and hold the KEYLOCK button for four seconds
during which time the keylock light will flash. After four seconds the dishwasher will give one
short beep and the KEYLOCK light will stay on.
To cancel the Key lock function
Press and hold the KEYLOCK for four seconds, the KEYLOCK light will flash during this time. The
Dishwasher will give one long beep and the KEYLOCK light will switch off to let you know that
this function has been deactivated.
9
Page 12

Time remaining display (920 Model Only)
This indicates the approximate time remaining in the wash programme. The Time Remaining
Display is based on 20°C or 60°C incoming supply, depending on whether the water
connection is cold or hot.
If your incoming water deviates from the above temperatures, the Time Remaining Display will
make the necessary adjustments to the wash time during the selected wash programme.
The wash programme time can also vary depending on your household situations. Some
examples of where the wash times could vary are ambient room temperatures and water
pressure. We do not recommend you use the Time Remaining Display as a timing device.
In the unfortunate event of a fault occurring, the Time Display will show a fault code. Refer to
the Fault code section of this User Guide to remedy the problem, if possible, otherwise you
may need to call an Authorised Fisher & Paykel Dealer.
10
Page 13

Loading the dishwasher
Scrape off large food scraps and remove bones, crusts, toothpicks and any similar items.
Load the dishes, taking care not to overload the dishwasher.
Check there are no items blocking the path of the spray arm. Check by giving the top and
bottom spray arm a turn before you close the door.
Avoid placing tall items near the detergent dispenser which may prevent it from opening.
Ensure the dishwasher is not overloaded.
Upper basket
Small, light items should be placed soiled
side down on the basket.
Small plates and saucers can be slotted into
spaces provided.
The folding cup racks allow for double
stacking of cups and glassware.
Long kitchen utensils can be laid flat.
Upper Basket
Lower basket
Plates, bowls, pots, baking dishes and other
large items should be placed in this basket.
Place plates into slots provided. Place other
items soiled side down.
The rear insert is removable to increase
flexibility, so that large bowls and pots can fit
in easily.
This insert is not designed to carry plates
safely from the Dishwasher.
With a little experimentation, you will find
the loading pattern which works best for
your household.
Lower Basket
11
Page 14

Cutlery basket
A removable cutlery basket sits in the centre
of the lower basket.
Load cutlery handles down for the best wash
performance. Take care when loading and
unloading sharp knives or prongs.
Mix spoons, knives and forks within each
section of the basket. This prevents the
spoons and forks nesting together and
ensures the water circulates freely.
There are inserts within each section of the
cutlery basket to help keep items upright.
These are removable to fit larger items.
Keep stainless steel from touching silver as
mixing these metals can stain cutlery.
We recommend sharp utensils have their
handles facing upward to reduce the risk of
cut injuries.
Cutlery Basket
12
Page 15

Detergent
15 25
Detergent usage
The detergent dispenser is located on the inside of the Dishwasher door. Check the Wash
Programme Chart for the correct amount of detergent or consult the detergent manufacturer’s
instructions.
Filling the detergent dispenser
To fill the detergent compartment:
1
Press the latch if the detergent dispenser lid is
closed.
2
Two detergent compartments are available as a
guide to detergent usage. The numbers indicate
grams.
3
After filling, close dispenser lid firmly until it
clicks shut.
4
Detergent will be automatically released during
the wash.
5
We recommend pre wash detergent be placed
on the door.
6
No detergent is required when using the rinse
programme.
Add detergent
here
Important
Only use detergent recommended for use in domestic automatic Dishwashers.
Handwashing liquids, soap, laundry detergents or disinfectant will damage the Dishwasher.
Never sprinkle or pour detergent directly onto any item in the Dishwasher.
WARNING!
Dishwasher detergents are strongly alkaline. They can be dangerous if swallowed. Avoid
contact with skin and eyes. Keep children and infirm person(s) away from the Dishwasher
when the door is open.
13
Page 16

Rinse aid
1
2
3
4
M
A
X
1
2
3
4
Rinse Aid helps give a streak-free, sparkling clean look to glass and chinaware. It speeds up
drying and helps prevent metal from tarnishing.
The Rinse Aid Dispenser is on the inside of the Dishwasher door. The dispenser holds 140ml,
enough for about 70 regular washes.
If the Rinse Aid Window is clear, the dispenser needs to be refilled.
If the Rinse Aid Window is coloured, there is enough Rinse Aid for the wash.
To fill the dispenser
1
Open the dispenser by turning the cover anti-
clockwise and remove the cover.
2
Pour the Rinse Aid into the circular region. This
area is a funnel.
3
Care should be taken not to overfill or spill Rinse
Aid on the door.
4
Wipe up any surplus rinse aid to prevent excess
foaming.
How much rinse aid?
The Rinse Aid regulator may need adjusting to
suit your conditions.
If the dishes are wet after the wash, or you live in
an area which has ‘soft’ water, slide the regulator
to a lower setting.
If the dishes have watermarks on them, or you
live in an area which has ‘hard’ water, slide the
regulator to a higher setting.
If you are unsure about the quality of your local
water supply, contact your local Water Supply
Authority or Plumber.
Rinse aid window
Removable cover
Water condition - 1 (soft) to 4 (hard)
Rinse aid
compartment
Important! - For child safety
At the end of the wash programme, the amount of Rinse Aid on the dishware is minimal
and not harmful in this quantity. Like all household cleaners, store the bottle out of
children’s reach.
Drying
To assist in drying, open the dishwasher door slightly at the end of the programme. Slide the
top basket out a little to keep the door ajar.
14
Page 17

Wash programmes
Hot
connect
(approx. minutes)
Drying Cold
Post
Post
Main
Pre
Pre
Wash descriptions Wash times
Main
Detergent
quantities
connect
rinse 2
rinse 1
wash
wash 2
wash 1
wash (g)
(g)
98 74
✓
C
o
65
✓
C
o
65
90 66
✓
C
o
65
✓
C
o
65
✓
✓✓
530
525
49 32
✓
C
o
50
✓
C
o
77
C8561
o
60
✓
C
o
60
42 26
✓
C7352
o
55
✓
C
o
44
C
o
45
✓
C
o
✓
✓
20 45
✓✓
525
525
20 40
When to use Pre wash
Wash
programme
everyday
dishes, pots &
Normal Heavily soiled
pans
particles and
Light Dried on
lightly soiled
pots & pans
soiled & heat
Fast For lightly
sensitive dishes
Rinse Prevents soil
drying onto
dishes
Normal Eco Normally
Standard programmes
soiled dshes
with optimum
energy use
Light Eco Lightly soiled
everyday dishes
Fast Eco Non-greasy
lightly soiled
dishes
Eco programmes
15
Page 18

Changing the pre-set options
End of programme beeps
The beeps at the end of each wash programme can be removed by following the steps below.
1
Press the POWER button to turn the Dishwasher off.
2
Press the ECO button and while holding down, press the START/PAUSE button and hold
together for approximately five seconds until you hear one short beep.
3
Release the two buttons and the “beeps” are now removed.
If you wish to re-instate the beeps at the end of the wash programmes, repeat the steps
above.
16
Page 19

Australian/New Zealand standards AS2007.1
Loading patterns
Fisher & Paykel Dishwashers are tested to Australian/New Zealand Dishwasher Standards for
both wash and dry performance.
The loading pattern for AS 2007.1 is shown below.
Detergent quantities
For testing to AS2007.1 we recommend the use of 5g on the door and 25g detergent in the
dispenser. We also recommend the Rinse Aid Regulator is set to “3”.
Top Basket AS2007.1 Setting
Bottom Basket AS2007.1 Setting
17
Page 20

Care guide
The combination of high temperatures and
Dishwasher detergent may cause damage
to some items if they are washed in the
Dishwasher.
Remember, if you are in doubt about any
aspect concerning items washed in the
Dishwasher, follow the instructions from the
manufacturer of the items, or wash the item
by hand.
Glassware
Most everyday glassware is Dishwasher
safe. Crystal, very fine items and antique
glassware may etch. You may prefer to wash
these items by hand.
Silverware and cutlery
All cutlery should be rinsed immediately
after use to prevent tarnishing caused by
some foods. The Rinse programme is useful
for this. Silver items should not come into
contact with stainless steel, for example
other cutlery and the inside of the machine.
Mixing these items can cause staining.
Remove silver cutlery from the Dishwasher
and hand dry it immediately after the
programme has finished. Wood, bone and
plastic handles can be sensitive to higher
water temperatures. The appearance of
these may deteriorate over time if washed in
the Dishwasher.
Woodware
Generally wooden items are sensitive
to heat and water. Regular use in the
Dishwasher may cause deterioration over
time. If in doubt, wash by hand.
Plastic
Some plastic may change shape or colour
with hot water. Check manufacturer’s
instructions about washing plastic items.
Washable plastic items are best treated
by placing them in the top basket. Weigh
them down with the cup rack otherwise
they could flip over and fill with water, or fall
onto the heating element.
Decorated Items
Most modern china patterns are Dishwasher
safe. Antique items, those with pattern
painted over the glaze, gold rims or hand
painted china may be more sensitive to
machine washing. If in doubt, wash these
items by hand.
Glued Items
Certain adhesives are softened or dissolved
in machine washing. Wash by hand.
Aluminium
Aluminium can be dulled by Dishwasher
detergent. The degree of change depends
on the quality of the product.
18
Page 21

Care and cleaning
Cleaning the strainer
The filter plate is designed to be self cleaning
but occasionally food scraps may collect. Sweep
these into the strainer before emptying.
The strainer should be regularly checked and
removed for cleaning, if necessary.
1
Unclip the strainer from the filter by squeezing
the tabs together and lifting.
2
Empty, rinse under water and replace.
Cleaning the dishwasher
Cleaning the strainer
The area around the outside of the seal and door
may need wiping down from time to time.
Use a mild soapy solution and wipe over with a
damp cloth.
Let the Dishwasher cool down before touching inside metal.
We do not recommend the use of abrasive, solvent or alkaline cleaners as they may
damage the surface finishes of the Dishwasher.
Cleaning the spray arms
1
Unload both Dishwasher baskets and slide them out. The top basket requires the two front rail
clips on the slides to be removed before the basket can be pulled out.
2
To remove the rail clips press the top plastic tabs together and slide up. Once the front two
rail clips have been removed the top basket will slide out.
3
Turn the spray arm cap in the ‘unlock’ direction (anti-clockwise) and lift off.
4
Remove the spray arm.
5
Shake out all foreign particles, rinse under water and replace the spray arm back into the
Dishwasher.
6
Ensure each spray arm has the side with most holes in it facing in the UPWARD direction. The
top spray arm is plastic and the stainless steel spray arm is the lower.
7
Replace the spray arm cap and turn in the ‘lock’ direction (clockwise).
Holiday time
If the Dishwasher is not to be used for some time, follow these steps:
1
Ensure the baskets are empty.
2
Leave the inside of the Dishwasher clean.
3
Leave the door ajar to allow air to circulate.
4
Turn off BOTH the electricity and water supply to the Dishwasher.
19
Page 22

Problem solving
If the Dishwasher does not appear to be operating properly, check this chart before you call for
service.
Problem Possible cause What to do
The dishwasher will not
start.
Dishwasher does not
drain.
Dishes do not come out
clean.
Door not closed properly. Close the door by pushing
the handle forward until it
‘clicks’,
Power supply not
connected.
Keylock on. If the keylock light is on,
Drain hose bent or kinked. Straighten drain hose so
Strainer blocked. Empty out the strainer
Loading. Avoid overloading the
Blocked spray arm holes. Remove spray arms, rinse
Not enough detergent. Use the recommended
Strainer blocked. Clean the strainer (see Care
Check that the power cord
is plugged in and the switch
is on.
Check the fuse, by seeing
if another small appliance
will not operate from that
power outlet.
press and hold the KEYLOCK
button for four seconds
until you hear a beep.
water can flow through.
and ensure the filter
plate is clear of food
particles.
dishwasher.
Ensure the spray arms can
rotate freely.
Remove food scraps from
dishes before loading.
under tap water and
replace (see Care & cleaning
section).
amount of detergent.
& Cleaning section).
20
Page 23

Problem Possible cause What to do
Water does not flow. Taps turned off. Check the taps are turned
on.
Inlet hose bent or kinked. Straighten the inlet hose so
that water can flow through.
Water spots, streaks or
film on glassware.
Foaming. Rinse aid setting too high or
Dishes not dry. Incorrect loading. Moisture can be trapped if
Detergent not dispensing. Detergent dispenser lid not
Incorrect rinse aid setting. Check that there is rinse aid
in the dispenser (see Rinse
aid section).
Dishwasher overloaded or
loaded incorrectly.
has been spilled.
Incorrect detergent. Ensure that you use a
Egg yolk. Place an extra tablespoon of
Too much detergent. Use the recommended
Rinse aid supply depleted. Refill the rinse aid dispenser
opening.
Dispenser was wet when
detergent is loaded.
Blocked spray arms. Remove spray arms, shake,
Over filling the detergent
dispenser.
Follow the instructions for
proper loading. Remember
to remove food scraps.
Turn the rinse aid dial to a
lower setting or wipe the spill.
detergent that is intended
for a domestic automatic
dishwasher.
detergent in the dishwasher
door for pre-rinsing.
quantity of detergent.
items are too closely loaded.
Ensure the dishwasher is not
overloaded.
if the indicating window is
clear.
Check that there is nothing
obstructing the opening of
the dispenser lid.
Dry the detergent dispenser
before loading to prevent
detergent caking.
and rinse under water
before replacing (see Care &
cleaning section).
Use the recommended
quantity of detergent.
21
Page 24

Fault codes
You are reminded that if you call a Fisher & Paykel Authorised Service Centre because of a User
Fault, it is not covered by the Warranty. Should you encounter any problems we recommend
that you call our Customer Care Centre.
920 model only
In the 920 Dishwasher, the Time Remaining Display informs you when there is a fault.
The fault codes are as follows and we recommend that you check the chart below and correct
if possible. If the fault code cannot be removed by pressing the POWER button, turn the
power off at the mains supply, correct the problem if possible and turn the Dishwasher on
again. If the fault code still appears, call your Fisher & Paykel Dealer or Authorised Service
Centre.
Code Description Possible cause What to do
U1 Dishwasher
attempted to fill to
correct level but
failed.
F1 Flood switch has
been activated.
F3 Temperature fault. Incoming water too hot. Decrease the incoming water
Water temperature. Faulty temperature
Overheating. Faulty element. Call your Fisher & Paykel Dealer
F4 No increase in water
temperature during
wash cycle.
Water tap not turned on. Turn the water tap on.
Too much foam. See ‘Problem solving’ section.
Wash pump faulty. Call your Fisher & Paykel Dealer
or Authorised Service Centre.
Dishwasher not draining. See ‘Problem solving’ section.
Flood has occurred. Turn the power and water
supply off to the dishwasher.
Call your Fisher & Paykel Dealer
or Authorised Service Centre.
temperature to the dishwasher.
Call your Fisher & Paykel Dealer
sensor.
Faulty element. Call your Fisher & Paykel Dealer
Electronics controller
faulty.
Faulty temperature
sensor.
or Authorised Service Centre.
or Authorised Service Centre.
or Authorised Service Centre.
Call your Fisher & Paykel Dealer
or Authorised Service Centre.
Call your Fisher & Paykel Dealer
or Authorised Service Centre.
820 model only
In the unfortunate event of a fault occurring, the Dishwasher will continuously beep every
second. If the continuous beeps cannot be removed by pressing the POWER button, turn
the Power off at the mains supply, wait 10 seconds, and turn the Dishwasher on again. If the
continuous beeps still occur, call your Fisher & Paykel Dealer or Authorised Service Centre.
22
Page 25

Manufacturer’s warranty
When you purchase any new Fisher & Paykel whiteware Product you automatically receive a
two year Manufacturer’s Warranty covering parts and labour for servicing.
Fisher & Paykel undertakes to
Repair or, at its option, replace without cost to the owner either for material or labour any
part of the Product, the serial number of which appears on the Product, which is found to be
defective within TWO YEARS of the date of purchase.
This warranty DOES NOT cover
A
Service calls which are not related to any defect in the Product. The cost of a service call will be
charged if the problem is not found to be a Product fault. For example:
1. Correct the installation of the product.
2. Instruct you how to use the product.
3. Replace house fuses or correct house wiring or plumbing.
4. Correcting fault(s) caused by the user.
B
Defects caused by factors other than:
1. Normal domestic use or
2. Use in accordance with the Product’s User Guide.
C
Defects to the Product caused by accident, neglect, misuse or Act of God.
D
The cost of repairs carried out by non-authorised repairers or the cost of correcting such
unauthorised repairs.
E
Normal recommended maintenance as set out in the Product’s User Guide.
F
Repairs when the appliance has been dismantled, repaired or serviced by other than a Fisher &
Paykel AUTHORISED SERVICE CENTRE or the selling dealer.
G
Pick up and delivery.
H
Transportation or travelling costs involved in the repair when the product is installed outside
the Fisher & Paykel AUTHORISED SERVICE CENTRE’S normal service area.
Service under this manufacturer’s warranty must be provided by an Authorised Service Agent
(refer to the Customer care section for contact details). Such service shall be provided during
normal business hours. This warranty certificate should be shown when making any claim.
Note:
This Warranty is an extra benefit and does not affect your legal rights and applies only to
product purchased in New Zealand and Australia..
Please keep this User Guide in a safe place.
Do not return to Fisher & Paykel.
23
Page 26

Customer care
Check the things you can do yourself. Refer to your
User Guide and check:
1
your appliance is correctly installed
2
you are familiar with its normal operation
If after checking these points you still need assistance please refer to the following:
In New Zealand If you need assistance...*
Call your Fisher & Paykel retailer who is trained to provide information on your appliance, or if
we can be of any further help, please contact our Customer Care Centre,
Toll Free - 0800 FP CARE or 0800 37 2273 Fax: (09) 273 0656.
Email: customer.care@fp.co.nz Postal address: P.O.Box 58732,
Greenmount, Auckland.
If you need service...*
Fisher & Paykel has a network of independent Fisher & Paykel Authorised Service Centres
whose fully trained technicians can carry out any service necessary on your appliance. Your
dealer or our Customer Care Centre can recommend an Authorised Service Centre in your area.
In Australia If you need assistance call...*
Call the Fisher & Paykel Customer Care Centre and talk to one of our Customer Care
Consultants.
Toll Free - 1300 650 590 Fax: (07) 3826 9298
Email: customer.care@fp.com.au Postal Address: PO Box 798, Cleveland QLD 4163
If you need service...*
Fisher & Paykel Australia Pty Ltd has a network of independent Fisher & Paykel Authorised
Service Centres whose fully trained technicians can carry out any service necessary on your
appliance. Our Customer Care Centre can recommend an Authorised Service Centre in your
area.
*If you call or write, please provide: name, address, model number, serial number, date of
purchase and a description of the problem. This information is needed in order to better
respond to your request for assistance.
24
Page 27

Page 28

Product details
Fisher & Paykel Ltd
Model/Serial No.
Date of Purchase
Purchaser
Dealer Suburb
Town Country
Copyright Reserved © Fisher & Paykel 2004.
The product specifications in this booklet apply to the
specific products and models described at the date
of issue. Under our policy of continuous product
improvement, these specifications may change at any
time. You should therefore check with your Dealer to
ensure this booklet correctly describes the product
currently available.
www.fisherpaykel.com
NZ AU
Dishwasher Insrallation instructions
and User Guide
Published: 5/2004
Part No. 521766 I
 Loading...