

Fisher & Paykel DISHDRAWER DD24, DISHDRAWER DD60 User Manual
Safety and warnings
Ele(:tri#:al _;onnection (6BILEonl17)
Operating instructions
Controls (modeb with no I[,,,£D}
Controls (modelb with IL,£D)
Oui_:k start
Cadng for your dinnerware
Racking and a_x;essodes
Loading suggestions
Water hardness and dishwashing
Wash programmes and detergent quantities
©etergent dispenser
Using tablets
Rinse aid dispenser
Water softener
Option adjustments
User maintenance instructions
Fault _;odes
Warranty and servi_;e
Wash programme data
Standards test USAand @nada
Standards test NewZea]andandAustmHa
Standards test -6yea_ SM_ainand We]and
2
5
6
8
10
11
12
16
18
19
20
21
22
23
26
29
32
34
37
38
40
41
42
SAVE THESE INSTRUCTIONS
7h#_modX>/sshoyvn iM,this usu guid__tony not tp_?¢_v(si/(XXein _// m_rk_ls _M,d¢_r,e
£Xgj_,(/tothong(_o/_ny/imafor (urrmt detci/sshoutmodalsadspe(if/c_tk)n
Ov#ilobili/y it7yourcountry, pl_(J _ visitourIocol w_bsit_/ist_don thebookcover
orcont#c8yourIocol fisher&I*#ykeldeole_

Safety and warnings
}'our DishDrawer _ has been carefully designed to operate safely during normal dishwashing
procedures, Please keep the following instructions in mind when you are using your
DishDrawer%
Important sa@ty instructions
WARNfN@ _ When using your dishwashe8 foNow bas£ precautions, including the foltowir_g:
Read atl instructions before usk_g the DishDrawer%
The information in this manuat must be foltowed to minh_ise the Nsk of fire or expiosion or to
prevent property damage, persona/injury or loss of bye.
, Use the DLshDrawer ®only for its intended function as described in this user guide,
ThLs apph%nce is ir_tended to be used in household and simitar apph%ations such as:
,- staff Mtchen areas ir_shops, offices and other working environments;
- farm houses/
- by clients ir_hotels, motels and other residential type environments/
- bed and breakfast type environments,
Use only detergents or rinse aid recommended for use in a domestic dishwasher and keep them
out of reach of children, Check that the detergent dispenser is empty after the completion of each
wash programme,
When ioading items to be washed, locate sharp items so that they are not likdy to damage the lid
seal and load sharp knives with the handle up to reduce the risk of cut,_type i%_juries,
Do not touch the heater plate during or immediately after use,
Do not operate your DishDrawer ®unless a[[ enclosure panels are properly ir_place,
o Do not tamper with the controls,
o Do not abuse, sit on, stand in or on the drawer or dish rack of the DishDrawer ®.
The DishDrawer shouM not be left in the open position since this couM present a tr@ping hazard,
The adjustable racks are desoned to support cups, glasses and kitchen utensils, _/hen the
adjustable racks are ir_ the DLshDrawer ®do not lean on or use them to support },our body weoht,
To reduce the risk of injury, do not altow children to play in or on the DishDrawer%
Under certain conditions, hydrogen gas may be produced in a hot water heater system that has
not been used for two weeks or more. HYDROGEN GAS IS EXPLOSIVEo If the hot water system has
not been used for such a period, before usk}g the dishwasher, turn on alt hot water taps and let
the water flow from each for severat minutes, This w,ilt release any accumulated hydrogen gas, As
the gas is flammabM do not smoke or use an open flame during this time.
Remove the door to the washing compartment when removing an old dishwasher from service
or dLscarding it.
Some dishwasher detergents are strongty a&ah%e, They can be extremely dangerous if
swallow, adoAvoid contact with the skir_ and eyes and keep chiMren away from the dishwasher
when the door Ls open, Check that the detergent receptacle is empty after completion of the wash
cycle,

Safety and warnings
Important sa@ty instructions
installation
This DishDraweP _must be instMted and located in accordance with the InstMtation instructions
before it L5used. If you did not receive InstaNation instruction sheets with your DishDrawer_ you
can order them by caning },our Authorised Repairer or dowMoad them from our IocM Fisher &
Paykel website, Hsted on the back cover°
lnstafiation and service must be performed by a quMified technician,
If the power supply cord L_damaged, it must be replaced by a deMer or Authorised Repairer or a
similar quafified trades person in order to avoid a hazard,
Ensure the DishDrawer ®is secured to adjacent cabinetry using the brackets provided, Faiture to
do so may result in an unstable product, which may cause damage or #_jury,
Do not operate this appliance ff it is damaged, maffuncdoning, partiaNy disassem bled or has
missing or broken part.£ including a damaged power soply cord or plug,
, Do not store or use petrol, or other flammable vapours and fiquids in the v£inity of the
DishDrawer ®.
Connect to a properly rated, protected and sized power supply circuit to avoid electr£M overload.
Make sure that the power supply cord L_located so that it will not be stepped on, tr@ped over or
otherwise subject to damage or stress.
Do not instalt or store the DishDrawer ®where it win be exposed to temperatures below freezing
or exposed to weather°
Do not use an extension cord or a portable electficM outlet device (e,g, multi-socket outlet box)
to connect the DishDrawer ®to the power supp/yo
This @pliance must be grounded, ln the event of a maffuncdon or breakdown, grounding w#l
reduce the risk of electr£ shock by providing a path of least resistance for electric current. This
appliance L_equipped with a cord having an equoment_grounding conductor and a grounding
plug, The plug must be plugged into an appropriate oudet that is installed and grounded
in accordance with aft IocM codes and ordinances, WARNING - improper connection of the
equipment-grounding conductor can resu# in a risk of electr£ shock. @eck with a qua#fled
e_ectr£ian or service representative if you are in doubt as to whether the apph:ance L_properly
grounded, Do not modit}_ the plug provided with the appfiance; ff it will not fit the oufle5 have a
proper outtet instMted by a quahYied technician,
lf the DishDrawer® is instalted as a permanently connected appliance:
GROUNDING iNSTRUCTiONS - This apph:ance must be connected to a grounded metat, permanent
wiling system, or an equipment-grounding conductor must be run with the circuit conductors
and connected to the equipment-grounding termina_ or lead on the appliance,

Safety and warnings
Important sa@ty instructions
Maintenance
Disconnect the appliance from the power supply before any cleaning or maintenance.
Do not repair or replace any part of the apph_ance or attempt any serv£k_g unless specifica_ly
recommended in this user guide. We recommend that you calt an Authorised Repairer.
Keep the floor around your appliance dean and dry to reduce the possibility of slipping.
Keep the area around/underneath your appliance free from the accumulation of combusdMe
materiMs, such as lint, paper, rags and chemicMs.
Under no circumstances @ould you open the drawer whilst the DishDrawer _is in operation.
Always press the H_ button to pause and wait until you hear the three additional beeps before
opening the drawer
The DishDrawer ®must be used with the motor assembly, tiger plat6 drain fi#er and spray arm in
place.
When disconnecting the appiiance puH the plug rather than the power suppiy cord or junction of
cord to avoid damage.
Take care when loading the DishDrawer ®not to load dishware items so they prevent the lid from
propeHy seah¢ng with the drawer Items should be placed so they do not protrude above andYor
forced into the drawe_ otherwise a service carl may resu#.
Household appliances are not k_tended to be played with by children. Children or persons with a
disability which Hmits their ability to use the appliance, shouM have a responsible person instruct
them in i% use, The instructor should be satisfied that they can then use the ap#iance without
danger to themselves or the# surroundings.
Close supervision is necessary ff this appliance iS used by or near children. Do not allow children
to play inside, on or with this appliance or any discarded apph_ance.
ff a dishwasher deaner L_used, we would strongty recommend a wash programme with detergent
should be run immediately afterward, to prevent any damage to the DishDrawer ®.
The DishDrawer _ is designed for wash#_g normM household utensils. #eros that are
contaminated by petrol paint, steel or iron debris, corrosive, acidic or MkM#_e chemicMs are not
to be washed in the DishDrawer ®.
ff the DL_hDrawer® L_n_t bein_ used for l_n_ peri_ds _f time, tum the eiect_dty and water supp1y
to the DishDrawer ®off.
Do not operate your app#ance by means of an extemM timer or separate remote-contro_ system,
E ectrica connection (CS on y/
1
2
3
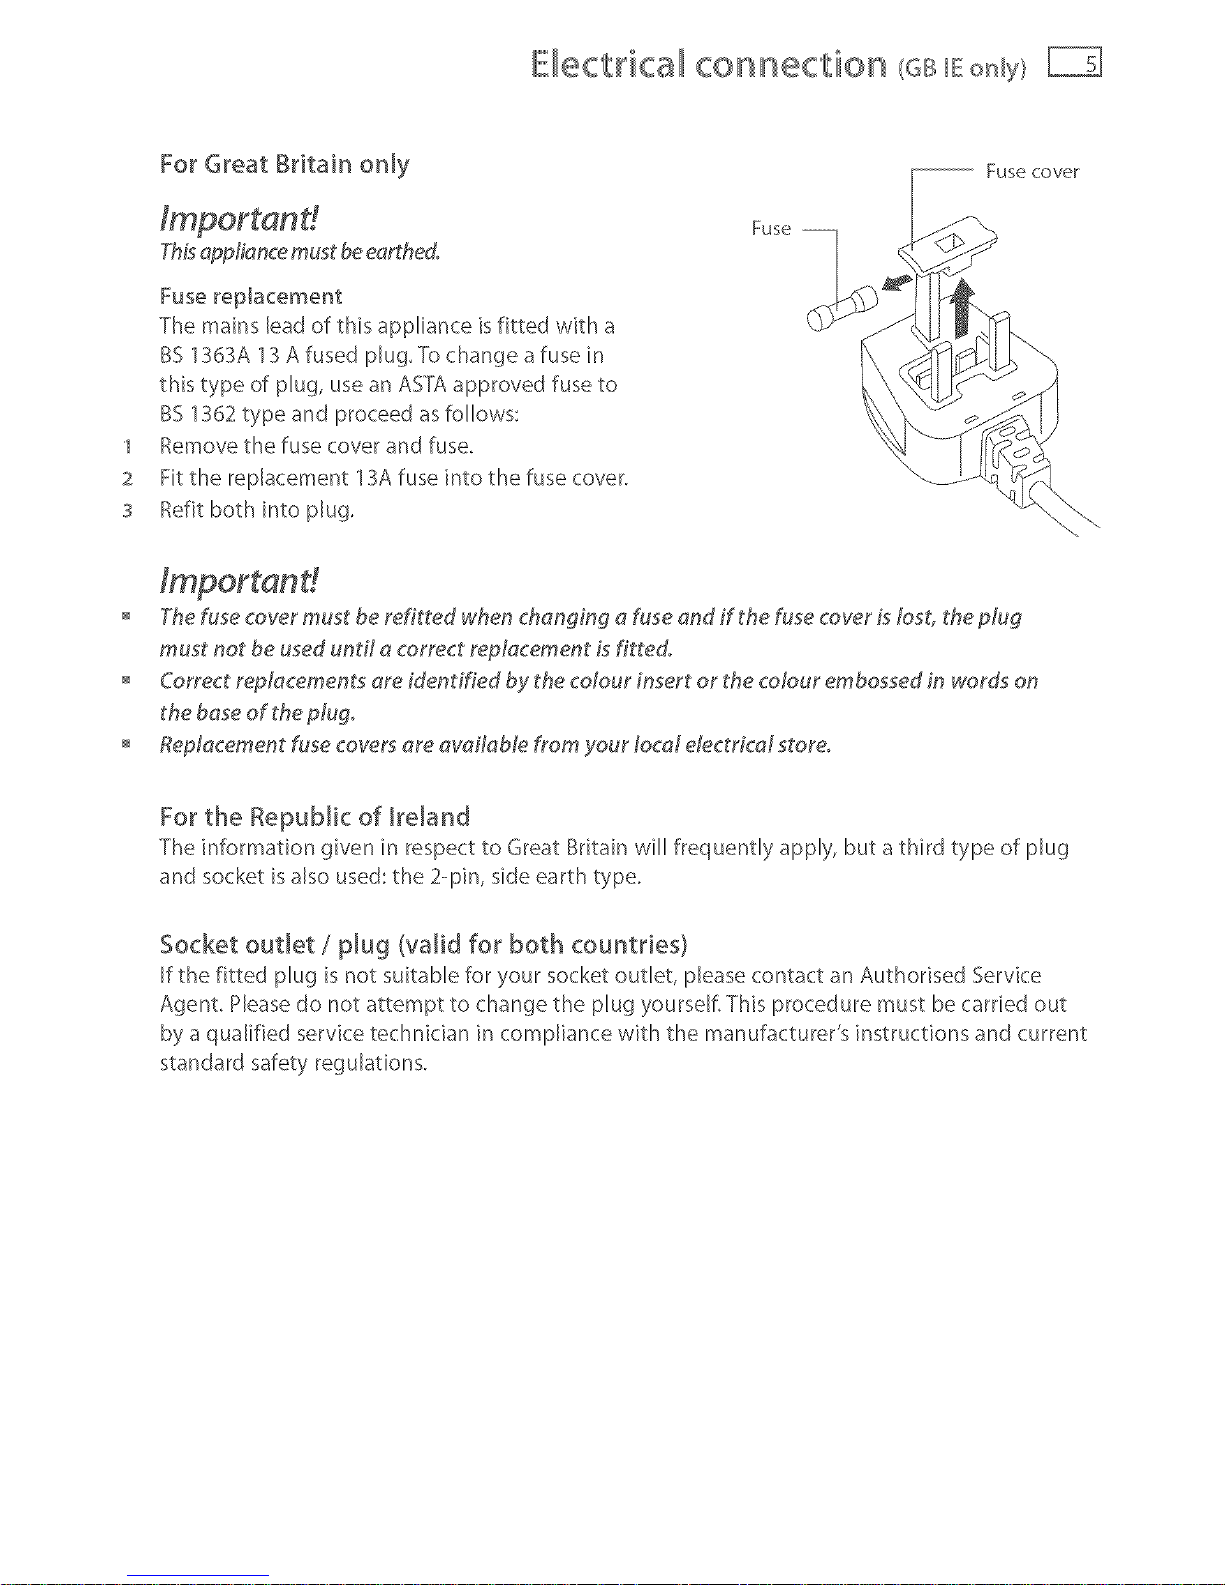
ForGreatBritainonly
Thisappliance must beearthe4
Fuse replacement
The mains bad of this appliance is fitted with a
BS 1363A 13 A fused plug. To change a fuse in
this type of plug, use an ASTA approved fuse to
BS 1362 type and proceed as follows:
Remove the fuse cover and fuse,
Fit the replacement 13A fuse into the fuse cover.
Refit both into plug.
-- Fuse cover
The fuse cover must be refitted when changing a fuse and if the fuse cover Ls tost tbe plug
must not be used until a correct replacement Lsfitte&
Correct replacements are Mentit]_ed bythe colour insert orthe colour embossed in words on
the base of the plug.
Replacement fuse covers are available from your local electrical store.
For the Republic of ireland
The information given in respect to Great Britain will frequently apply, but a third type of plug
and socket is also used: the 2-pin, side earth type.
Socket outlet / plug (valid for both countries)
If the fitted plug is not suitable for },'our socket outlet, please contact an Authorised Service
Agent, Please do not attempt to change the plug yourself, This procedure must be carried out
by a qualified service technician in compliance with the manufacturer's instructions and current
standard safety' reguhtions.
Operating instructions Controls Imodelsw thnoLCD)
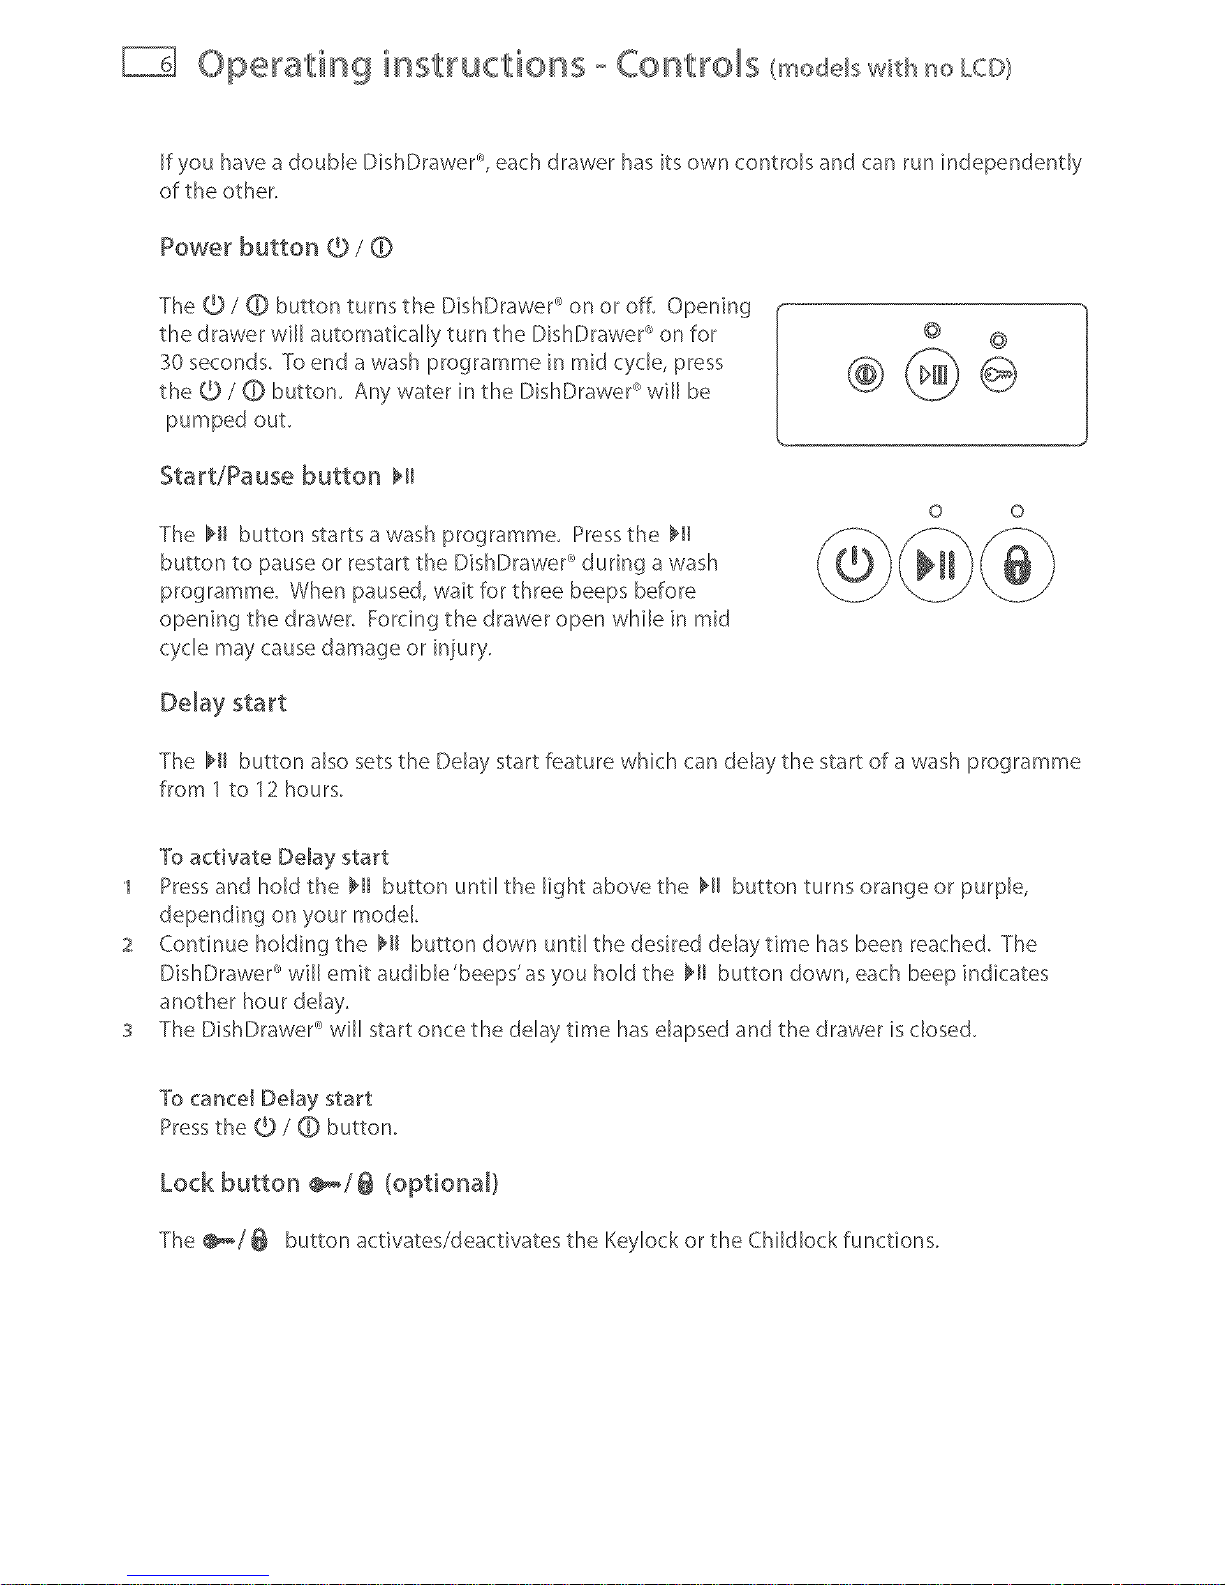
If you have a double DishDrawer% each drawer has its own controls and can run independently
of the other.
Power button @ / @
The @/O button turns the DishDraweP on or of L Opening
the drawer will automatically turn the DishDraweP on for
30 seconds, To end a wash programme in mid cycle, press
the @ / O button, Any water in the DishDraweP will be
pumped out.
© ©
Start/Pause button _H
The bl_ button starts a wash programme, Press the _H
button to pause or restart the DishDraweP during a wash
programme. When paused, wait for three beeps before
opening the drawer. Forcing the drawer open while in mid
cycle may cause damage or injury.
Delay start
The bll button also sets the Delay start feature which can delay the start of a wash programme
from 1to 12 hours.
To activate De_ay start
1 Press and hold the _H button until the light above the bll button turns orange or purple,
depending on your model,
2 Continue holding the bH button down until the desired delay time has been reached. The
DishDraweP will emit audible'beeps'as you hold the bH button down, each beep indicates
another hour delay,
s The DishDraweP will start once the delay time has elapsed and the drawer is closed.
To cancel De_ay start
Press the (D / @ button.
Lock button _/@ (optional)
The _/@ button activates/deactivates the Keylock or the Childlock functions.
Operating instructions - Controls {moddswin,,,noLCD}
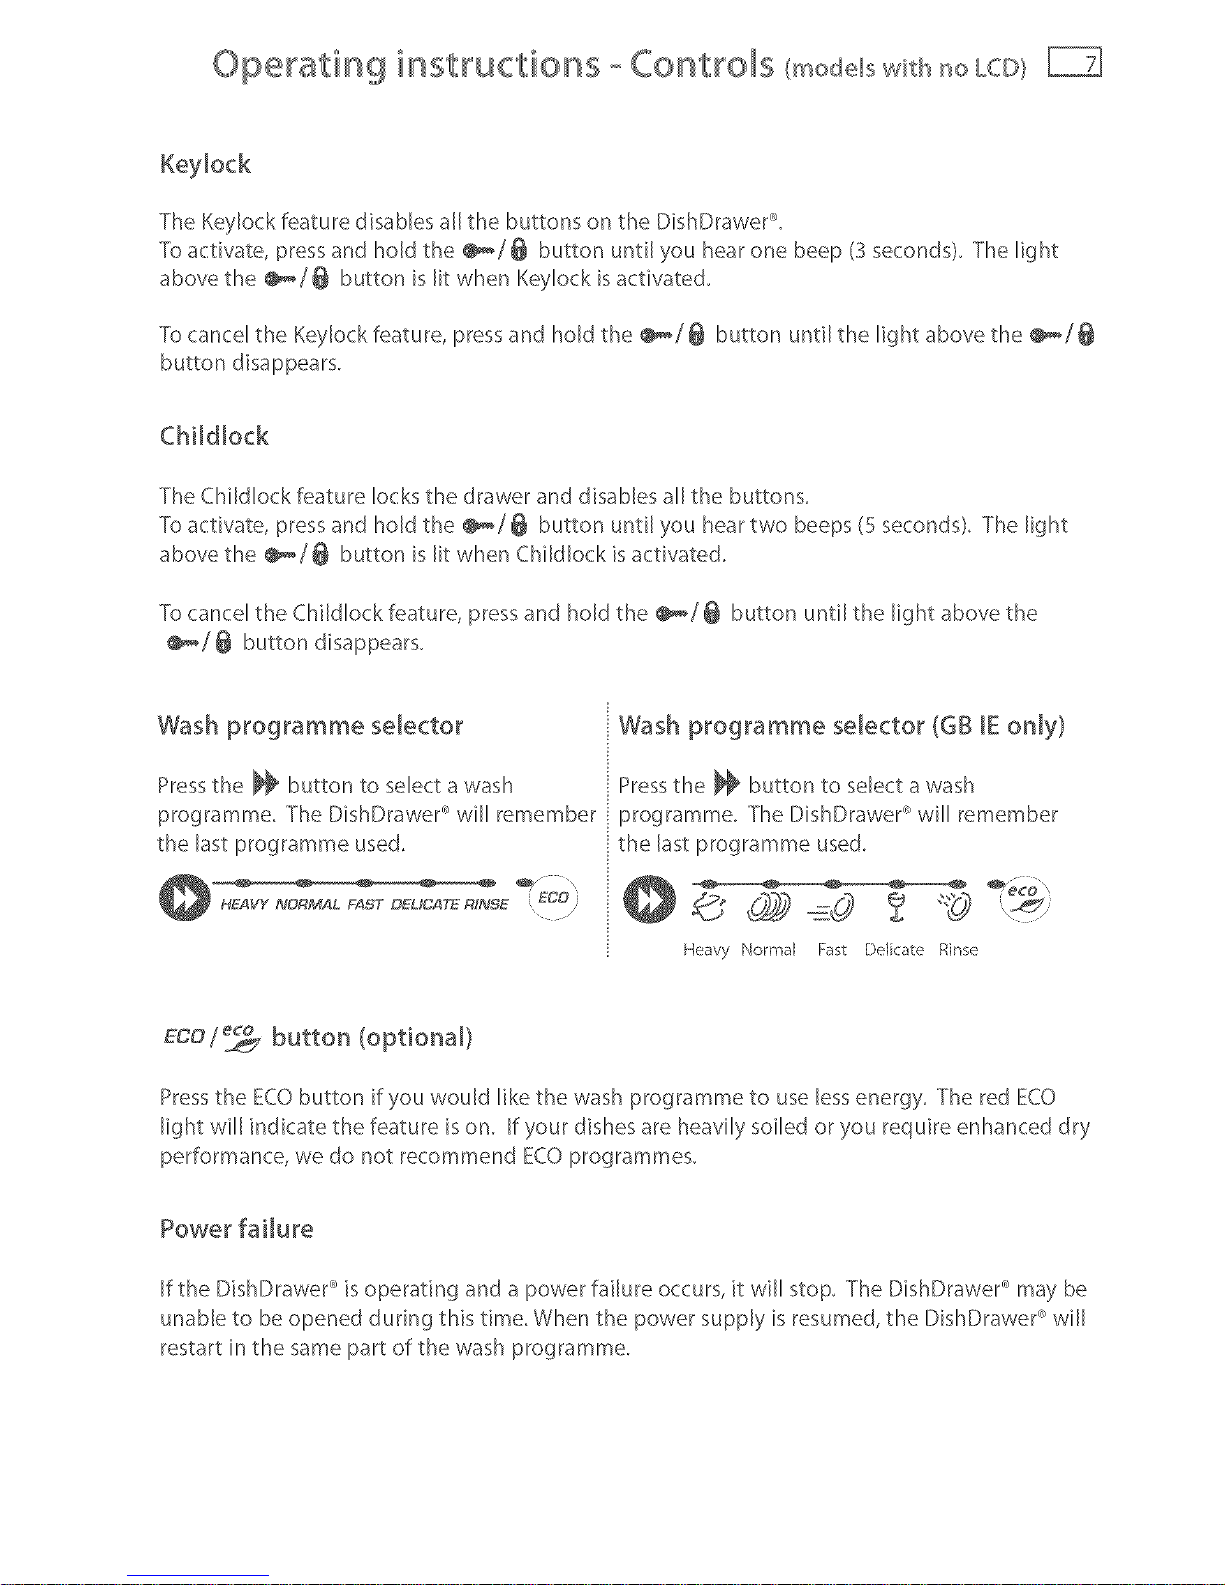
The Keylock feature disables a[[ the buttons on the DishDraweP.
To activate, press and hold the _/_ button until you hear one beep (3 seconds), The light
above the _/_ button is lit when Keylock is activated,
To cancel the Keylock feature, press and hold the _/@ button until the light above the _/@
button disappears,
Childlock
The Childlock feature locks the drawer and disables all the buttons,
To activate, press and hold the _/_ button until you hear two beeps (5 seconds), The light
above the _/_ button is lit when Childlock is activated,
To cancel the Childlock feature, press and hold the _/@ button until the light above the
_/@ button disappears,
Wash programme seJector
Press the _ button to select a wash
programme The DishDrawe¢ _will remember
the last programme used,
Wash programme seJector (6B [EonJy)
Press the _ button to select a wash
programme. The DishOrawe¢ _will remember
the last programme used,
©" 2 <6
Heavy Normal Fast Delicate Rinse
ECO/_ button (optional}
Press the ECO button if you would like the wash programme to use less energy, The red ECO
light will indicate the feature is on. If your dishes are heavily soiled or you require enhanced dry
performance, we do not recommend ECO programmes,
Power failure
If the DishDraweP _is operating and a power failure occurs, it will stop, The DishDraweP _may be
unable to be opened during this time When the power supply is resumed, the DishDraweP will
restart in the same part of the wash programme,
O_@_&ting inStruCtiOnS _ Contr©_s (modeB with LCD}
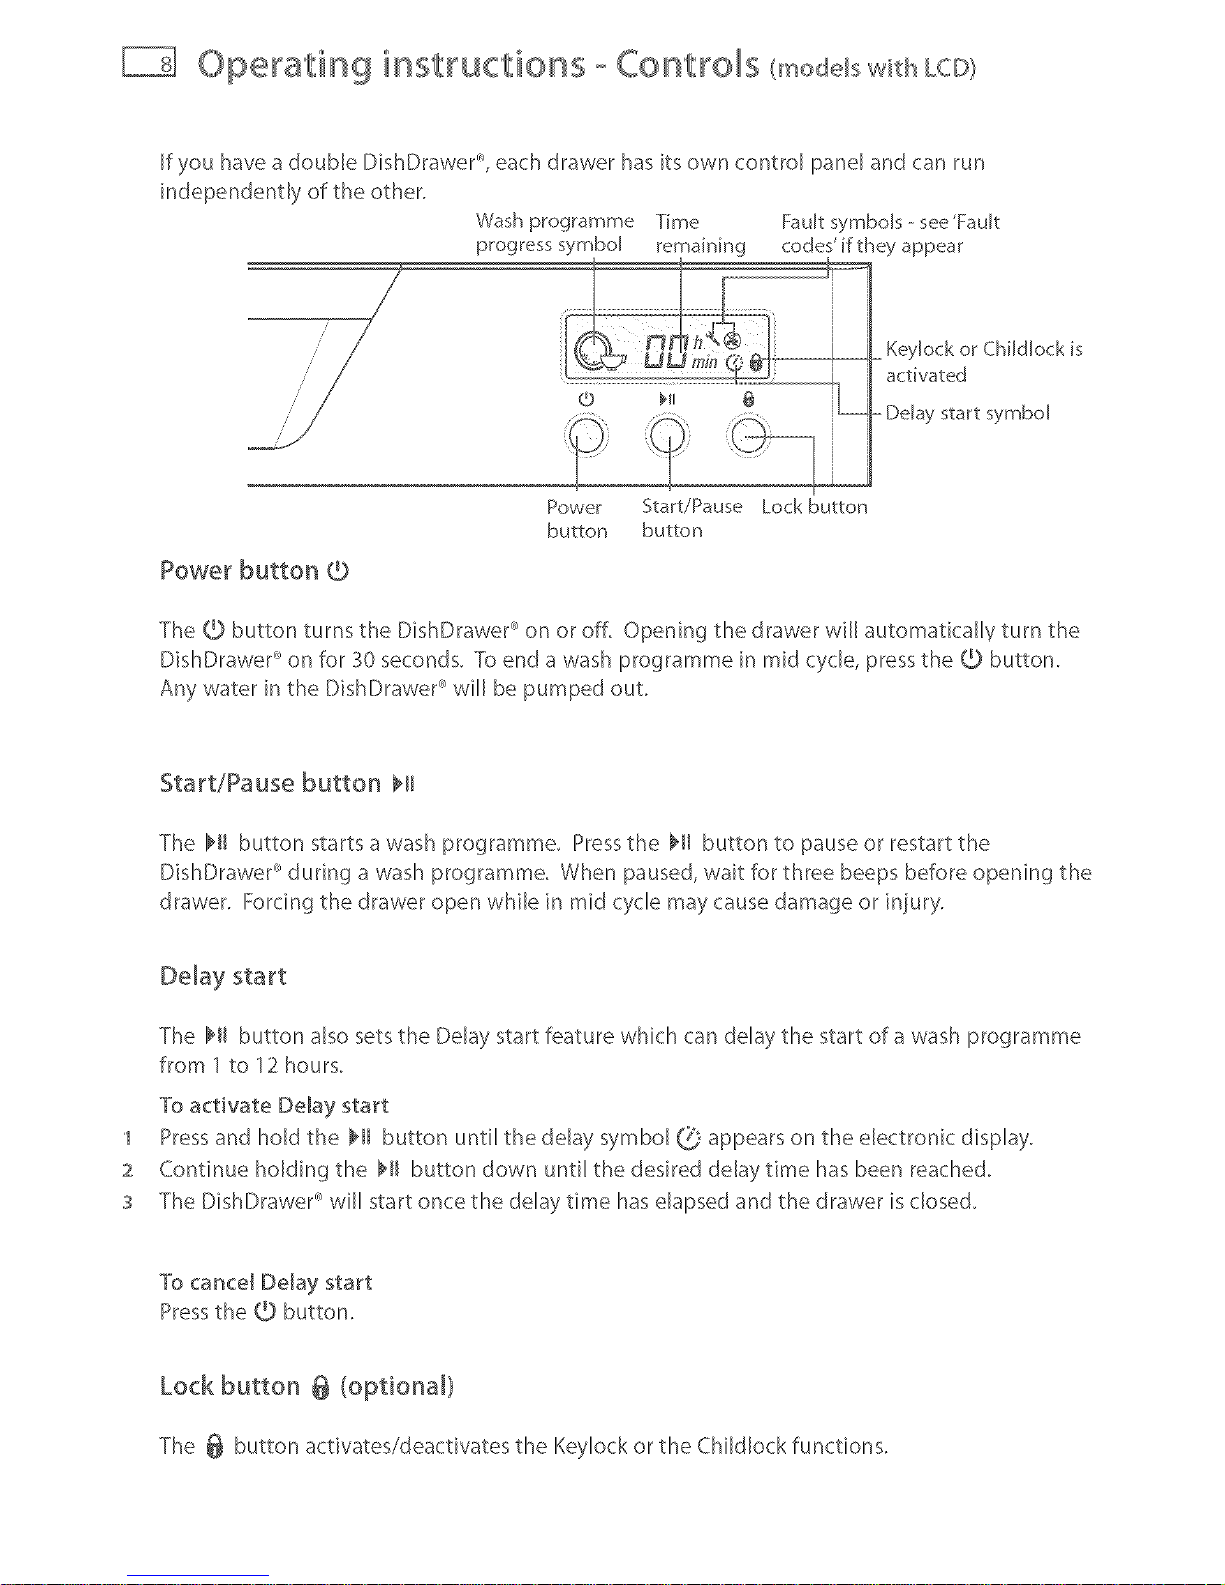
If you have a double DishDrawer% each drawer has its own control panel and can run
independently of the other.
Wash programme Time Fault symbds --see'Fault
progress symbol remaining codes' if they appear
oKeylock or Childlock is
activated
Delay start symboJ
Power button @
Power Start/Pause Lock button
button button
The tD button turns the DishDraweP on or oE Opening the drawer will automatically turn the
DishDraweP on for 30 seconds. Toend a wash programme in mid cycle, press the (D button.
Any water in the DishDraweP will be pumped out.
Start/Pause button _ll
The _tl button starts a wash programme. Press the }ql button to pause or restart the
DishDraweP during a wash programme. When paused, wait for three beeps before opening the
drawer. Forcing the drawer open while in mid cycle may cause damage or injury.
Delay start
The bit button also sets the Delay start feature which can delay the start of a wash programme
from 1to 12 hours.
To activate De_ay start
1 Press and hold the _H button until the delay symbol Q appears on the electronic display.
2 Continue holding the bll button down until the desired delay time has been reached.
s The DishDraweP will start once the delay time has elapsed and the drawer is closed.
To cance_ Delay start
Press the O button.
Lock button @ (optional}
The @ button activates/deactivates the Ke}4ock or the ChikJlock functions.
Operating instructions - Controls (mode swm LCD)
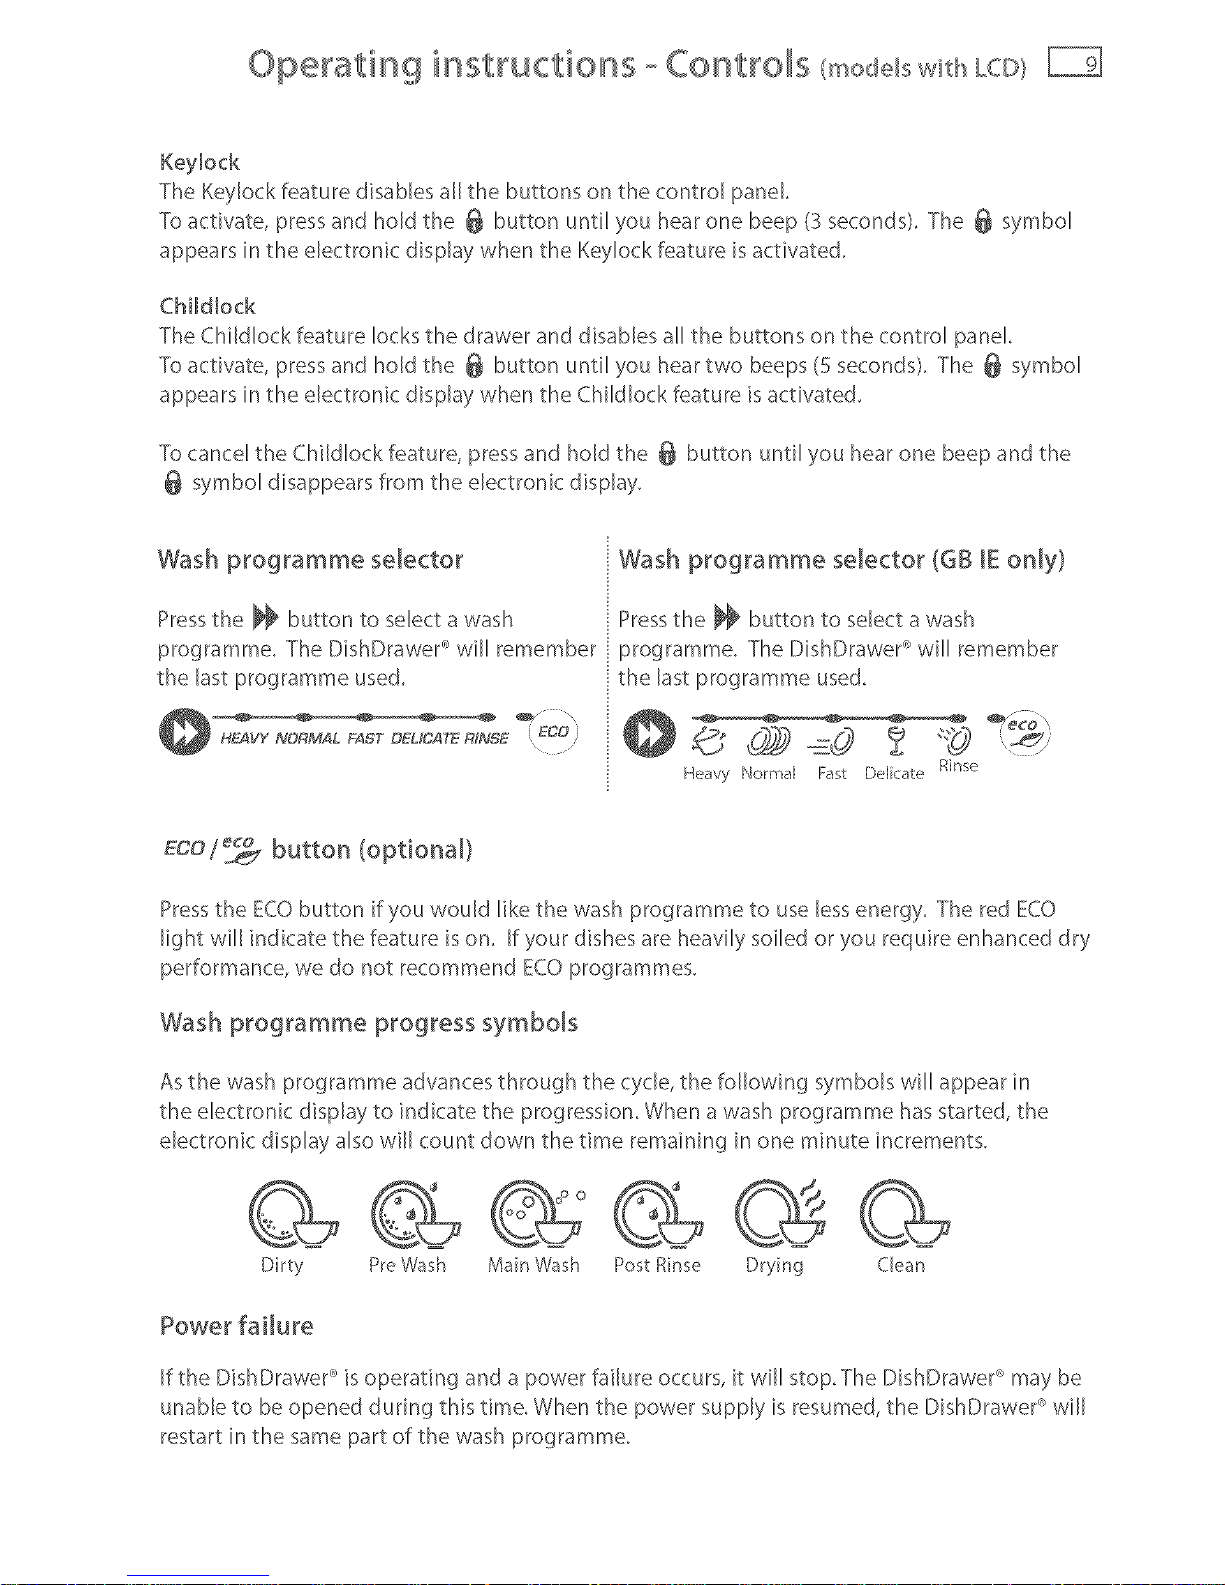
Keybck
The Keylock feature disables all the buttons on the control panel,
To activate, press and hold the @ button until you hear one beep (3 seconds). The @ symbol
appears in the electronic display when the Keylock feature is activated.
Child_ock
The Childlock feature locks the drawer and disables all the buttons on the control panel.
To activate, press and hold the @ button until you hear two beeps (5 seconds). The @ symbol
appears in the electronic display when the Childlock feature is activated.
To cancel the Childlock feature, press and hold the @ button until you hear one beep and the
@ symbol disappears from the electronic display,
Wash programme selector
Press the _ button to select a wash
programme. The DishDraweP will remember
the last programme used.
H_VY NORMAL FAST DEUCATE RINSE
Wash programme selector (Og IE only)
Press the _ button to select a wash
programme. The D[shDraweP will remember
the last programme used_
Heavy Normal Fast Del<ate Rinse
Eco/_ button (optional)
Press the ECO button if you would like the wash programme to use less energy, The red ECO
light will indicate the feature is on, If your dishes are heavily soiled or you require enhanced dry
performance, we do not recommend ECO programmes,
Wash programme progress symbols
As the wash programme advances through the cycle, the following symbols will appear in
the electronic display to indicate the progressiom When a wash programme has started, the
electronic display also will count down the time remaining in one minute increments,
Dirty PreWash Main Wash Post Rnse Drying Clean
Power failure
If the DishDraweP is operating and a power failure occurs, it will stop, The DishDraweP may be
unable to be opened during this time When the power supply is resumed, the DishDraweP will
restart in the same part of the wash programme,
Operating instructions - Quick start
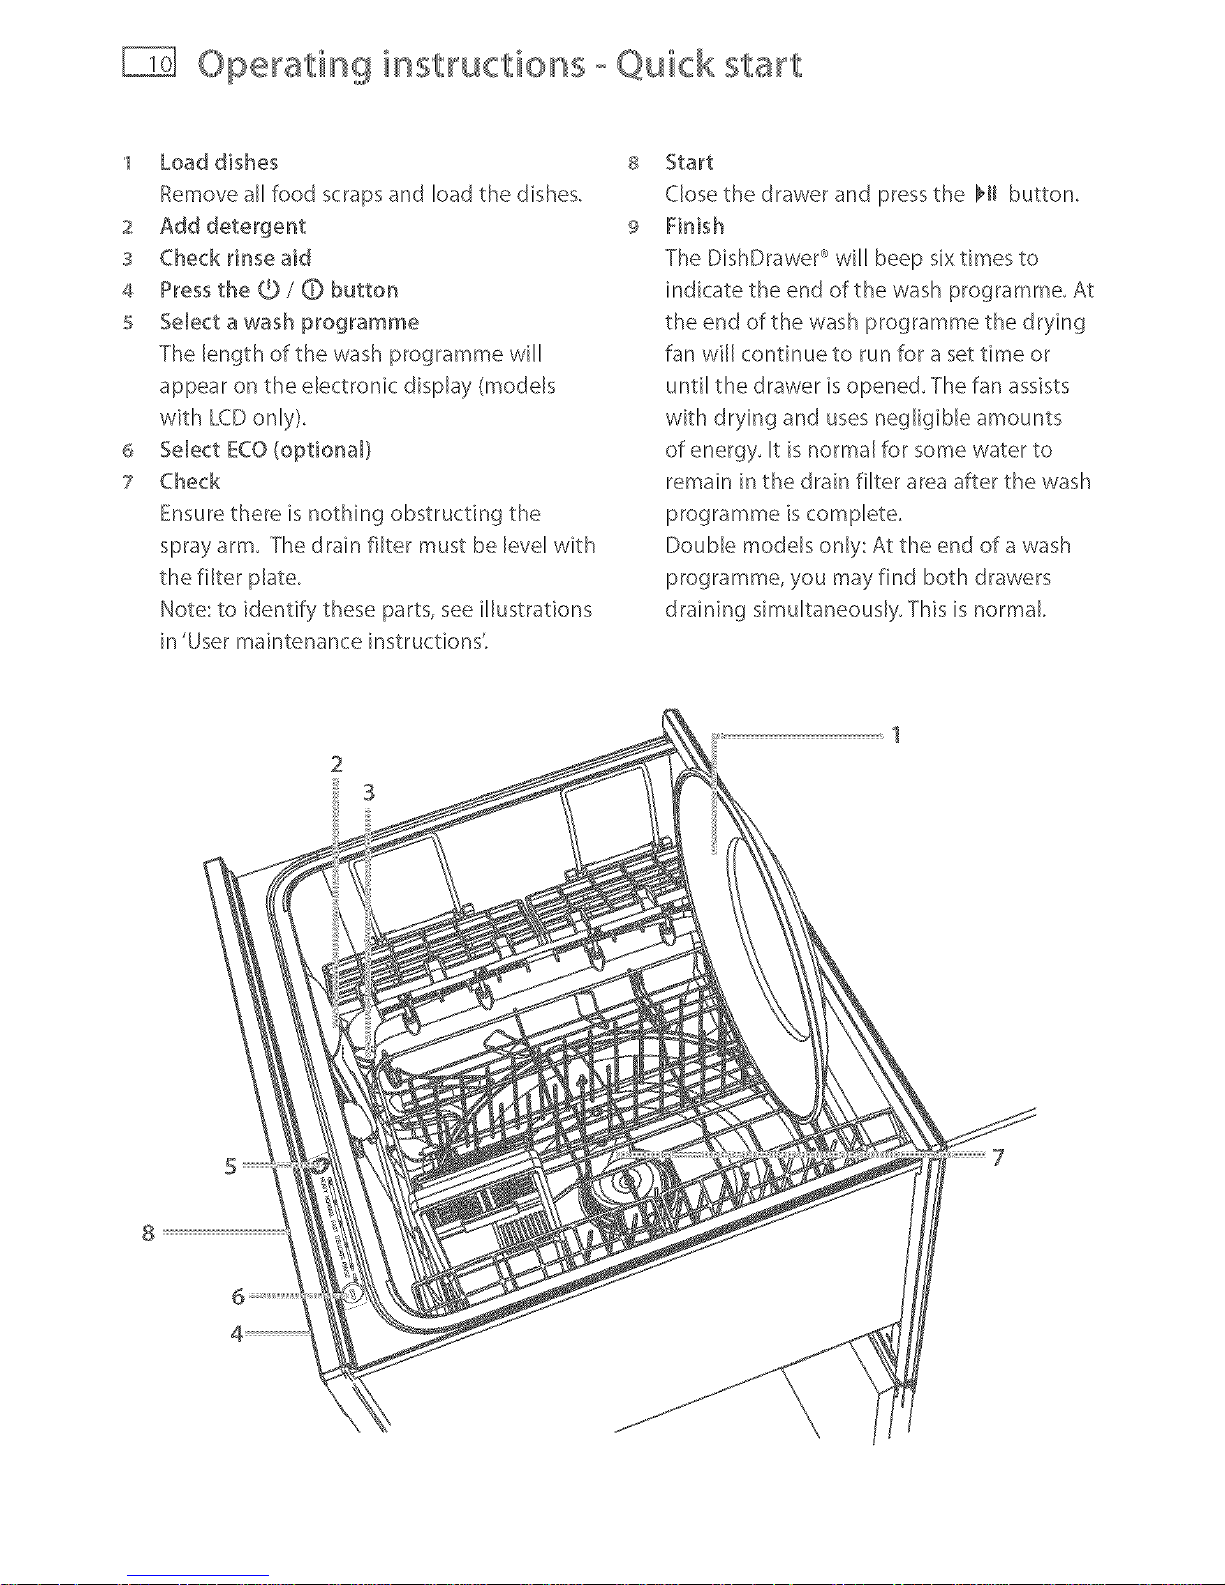
1 Load dishes
Remove all food scraps and load the dishes.
2 Add detergent
S Check rinse aid
4 Press the _/O button
5 SeJect a wash programme
The length of the wash programme wiI[
appear on the electronic display (models
with LCD only).
6 SeJect ECO (optional}
7 Check
Ensure there is nothing obstructing the
spray arm. The drain filter must be level with
the filter plate.
Note: to identify these parts, see illustrations
in 'User maintenance instructions:
8
9
Start
Close the drawer and press the HI button.
Finish
The DishDraweP _will beep six times to
indicate the end of the wash programme. At
the end of the wash programme the drying
fan will continue to run for a set time or
until the drawer is opened. The fan assists
with drying and uses negligible amounts
of energy. It is normal for some water to
remain in the drain filter area after the wash
programme is complete.
Double models only: At the end of a wash
programme, you may find both drawers
draining simultaneously. This is normal.
2
3
Caring for your dinnerware
The combination of high temperatures and dishwasher detergent may cause damage to some
items if they are washed in the DishDraweP_ Remember, if in any doubt about any aspect
concerning items washed in the DishDrawer _'_,follow the instructions from the manufacturer of
the items, or wash the item by hang
Cutlery & silverware
All cutlery and silverware should be rinsed immediately after use to prevent tarnishing caused
by some foods. The Rinse wash programme is useful for this_ Silver items should not come into
contact with stainless steel, eg other cut[ery_ Mixing these items can cause staining_ Remove
silver cutlery from the DishDrawer _'_and hand dry it immediately after the programme has
finisheG
Aluminium
Aiuminium can be dulled by dishwasher detergent. The degree of change depends on the
quality of the product
Other metals
Iron and cast iron objects can rust and stain other items. Copper, pewter and brass tend to stain.
Woodware
Wooden items are generally sensitive to heat and water. Regular use in the @shwasher may
cause deterioration over time. If in doubt, wash by hang
Glassware
Most everyday gBssware is dishwasher safe. Crystal, very fine and antique gBsware may etch
that is, become opaque. You may prefer to wash these items by hand.
Plastic
Some pBtic may change shape or co[our with hot water. Check manufacturer's instructions
about washing plastic items. Washable plastic items should be weighed down so they do not
flip over and fill with water or fall through the base rack during the wash. Use the multi-purpose
dip to hold pBtic items in place.
Decorated items
Most modem china patterns are dishwasher safe. Antique items, those with a pattern painted
over the glaze, gold rims or hand painted china may be more sensitive to machine washing. If in
doubt, wash by hand.
Glued items
Certain adhesives are softened or dissolved in machine washing. If in doubt, wash by hand.
If the DishDraweP _is not going to be used for some time, we recommend you leave the
DishDraweP _dean and empty. Leave the drawers ajar to allow air to circulate. Turn off both the
power and water supply to the DishDrawer_'L
Backing and accessories
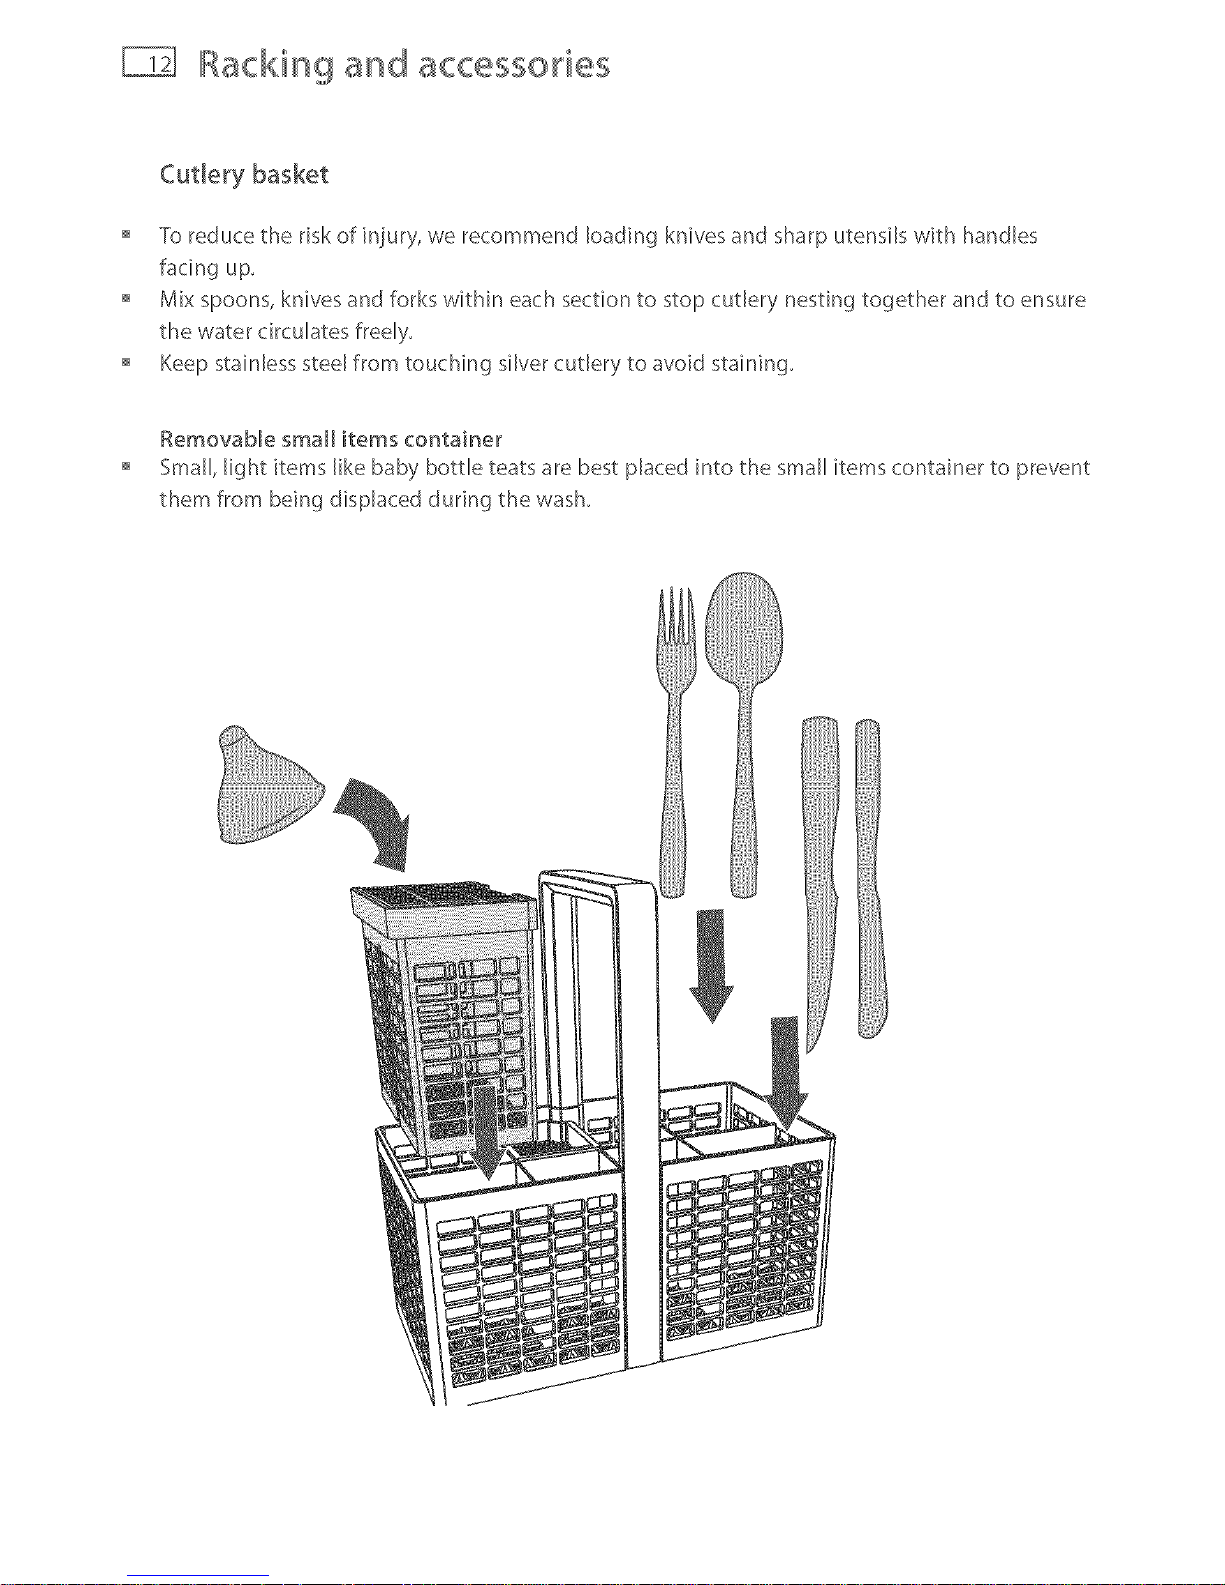
Cudery basket
To reduce the risk of injury, we recommend loading knives and sharp utensils with handles
facing up,
Mix spoons, knives and forks within each section to stop cutlery nesting together and to ensure
the water circulates freely,
Keep stainless steel from touching silver cutlery to avoid staining,
RemovaNe small items container
Small, light items like baby bottle teats are best placed into the small items container to prevent
them from being displaced dudng the wash.

Backing and accessories
Removable small items container
To optim[se the cutlery space within the basket, the small items container can be placed
elsewhere on the base rack. If laid flat, make sure the solid plastic side is facing up.
If you place a fully laden small items container under the adjustable racks, it is best to leave the
rack space directly above the container empty: there may not be enough water reaching items
that are placed there.
RemovabJe tabJet tray
If you are using dishwasher tablets, place them on the removable tablet tray, as shown.
See also 'Using tablets' for more information.
We do not recommend using tablets in USA and Canada models. The pre-wash cycle in these
models would dissolve the tablet, reducing the cleaning power left for the main wash.
/
 Loading...